MaxstAR SDK 2.0 for Unity3D Manual - olleh.com · 2015-05-14 · - 11 - Create Unity 3D Project and...
20
MaxstAR SDK 2.0 for Unity3D Manual Ver 1.2 Written as of 14 May 2015
Transcript of MaxstAR SDK 2.0 for Unity3D Manual - olleh.com · 2015-05-14 · - 11 - Create Unity 3D Project and...
MaxstAR SDK 2.0 for
Unity3D ManualVer 1.2
Written as of 14 May 2015

○ Contents
1. Requirement and Restriction …………………………………… 1
2. Creating Trackable Data …………………………………… 2
(1)Connecting Website and
Registering An Account…………………………………… 2
(2)Creating, Adding and Deleting
Tracking Data…………………………………… 4
(3)Download and Installation of
Unity 4.6.x…………………………………… 10
3. Download Maxst AR SDK Unity3D Package …………………………………… 10
4.Creating Unity3D Project and
Basic Setting…………………………………… 11
5. Augmenting Object …………………………………… 14
6. Reference …………………………………… 18

- 1 -
○ Requirement and Restriction ▷ Operated in Window / Mac OS / Android OS / iOS (as of 2015. May. 14)
▷ Unity 3D 4.6.x version or its upper versions must be installed in order
to use MAXST AR SDK
▷ Only landscape view is supported in mobile version
(as of 2015. April. 06)
▷ Watermark
Version Lite Pro
Marking O X
※ E-mail us on [email protected] for any question regarding purchase of
MAXST AR SDK v.2.0 Pro version.
※ This manual was written based on Window 7. Therefore, the process of
work might be vary in Mac OS.

- 2 -
○ Creating Trackable Data ▷ Generate trackable data by using Maxst webpage
- It is a compulsory to have a Maxst account Create an account on
https://arplatform.maxst.com/
▷ The initial page for creating an account / logging in
(see left image below)
▷ Creating an account
- Click “Join” under “LOGIN” button. (see right image below)
- Filling the blanks
• Tick on all checkboxes (Term of use and Privacy policy), and click “AGREE”
button
- 3 -
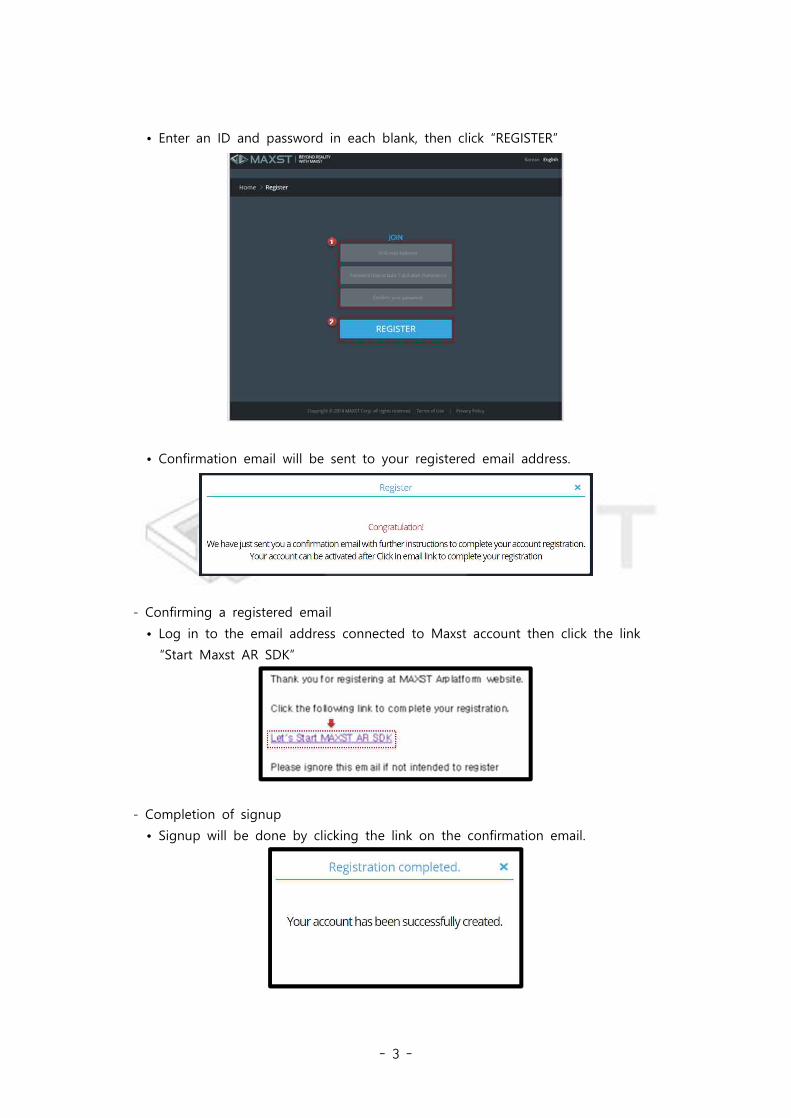
• Enter an ID and password in each blank, then click “REGISTER”
• Confirmation email will be sent to your registered email address.
- Confirming a registered email
• Log in to the email address connected to Maxst account then click the link
“Start Maxst AR SDK”
- Completion of signup
• Signup will be done by clicking the link on the confirmation email.

- 4 -
▷ Creating, Add and Deleting trackable data
- Log in webpage with a registered ID and password
- The page shown after login
- 5 -
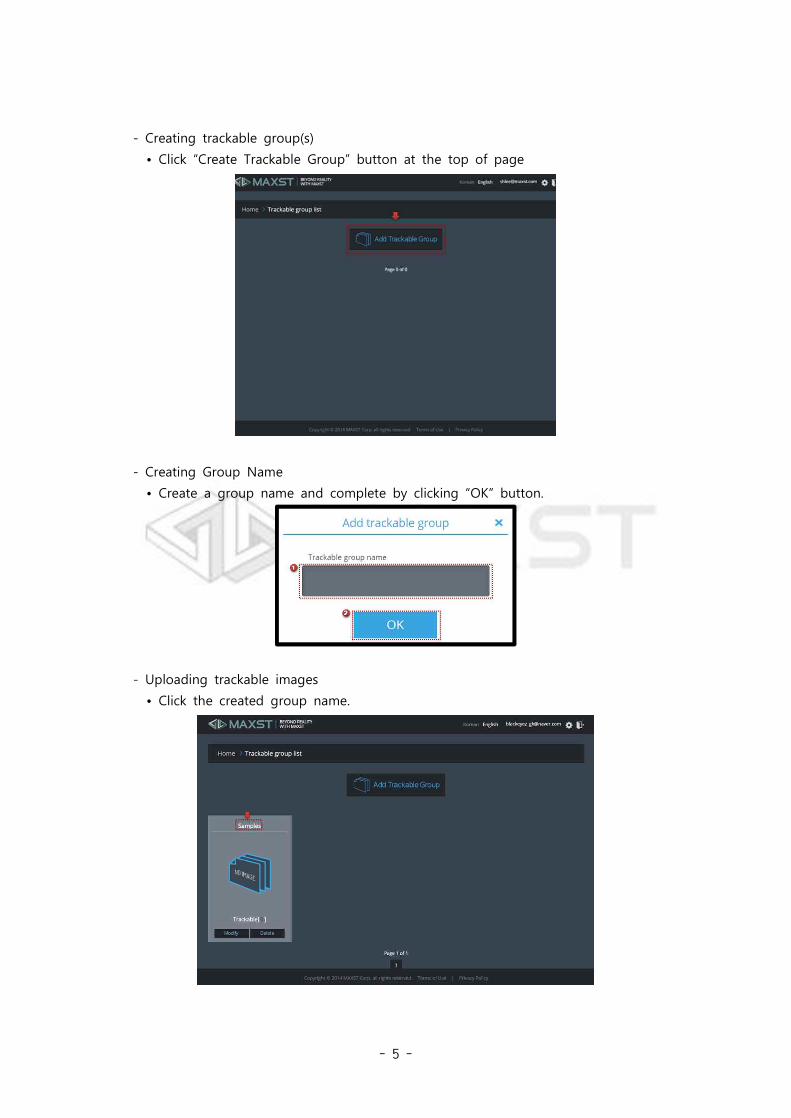
- Creating trackable group(s)
• Click “Create Trackable Group” button at the top of page
- Creating Group Name
• Create a group name and complete by clicking “OK” button.
- Uploading trackable images
• Click the created group name.
- 6 -
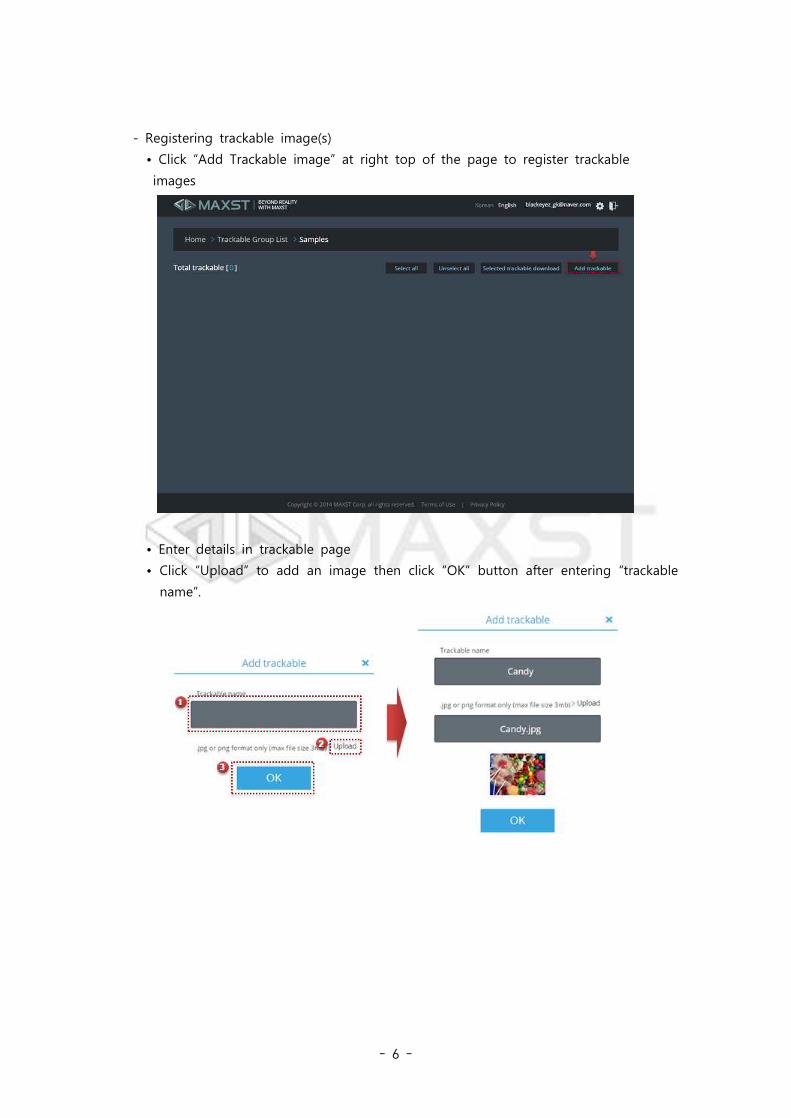
- Registering trackable image(s)
• Click “Add Trackable image” at right top of the page to register trackable
images
• Enter details in trackable page
• Click “Upload” to add an image then click “OK” button after entering “trackable
name”.

- 7 -
• When print out “Now learning”, Click “Refresh” button at bottom of imge
view
• When shown “Now learning”, click “Refresh” button.

- 8 -
※ Several trackable data can be created by repeating process above.
※ Images can be modified or deleted by using two buttons at bottom of
image(s).
- Downloading Trackable(s)
• Select trackable data by ticking a checkbox at left top of image(s)

- 9 -
• Click “Download selected Trackable” button.
• Trackable packaging is in progress.

- 10 -
○ Download and Install Unity3D 4.6.x ▷ Unity 3D download page
- http://unity3d.com/unity/download/archive
- Download and install a suitable Unity version which fits into your computer OS in
Unity3D Archive.
○ Download Maxst AR SDK Unity3D Package ▷ Maxst AR SDK Download page - http://maxst.com/products

- 11 -
○ Create Unity 3D Project and basic setting ▷ Create project
▷ Create a new project
- Click Unity3D icon to run Unity3D
- When Project Wizard is shown on the screen,
• Select Create New Project Tab
• Click “Browse” button to specify the path
• Click “Create” button to create project
- When Project Wizard is not shown
• Click “File” → “New Project” at the top of menu in Unity3D window
• Load Project Wizard window
▷ Delete Main Camera
- Select “Main Camera” under Hierarchy Tab on the main page of Unity3D.
- Delete “Main Camera” by using delete key

- 12 -
▷ Set MaxstAR SDK Package
- Click “Asset” → “Import Package“ → “Custom Package“ at the top of menu in
Unity3D main window
- Select downloaded “MaxstARSDK.unityPackage” and open
- Tick on all left check-box in Importing Package window then click “Import”.
- 13 -
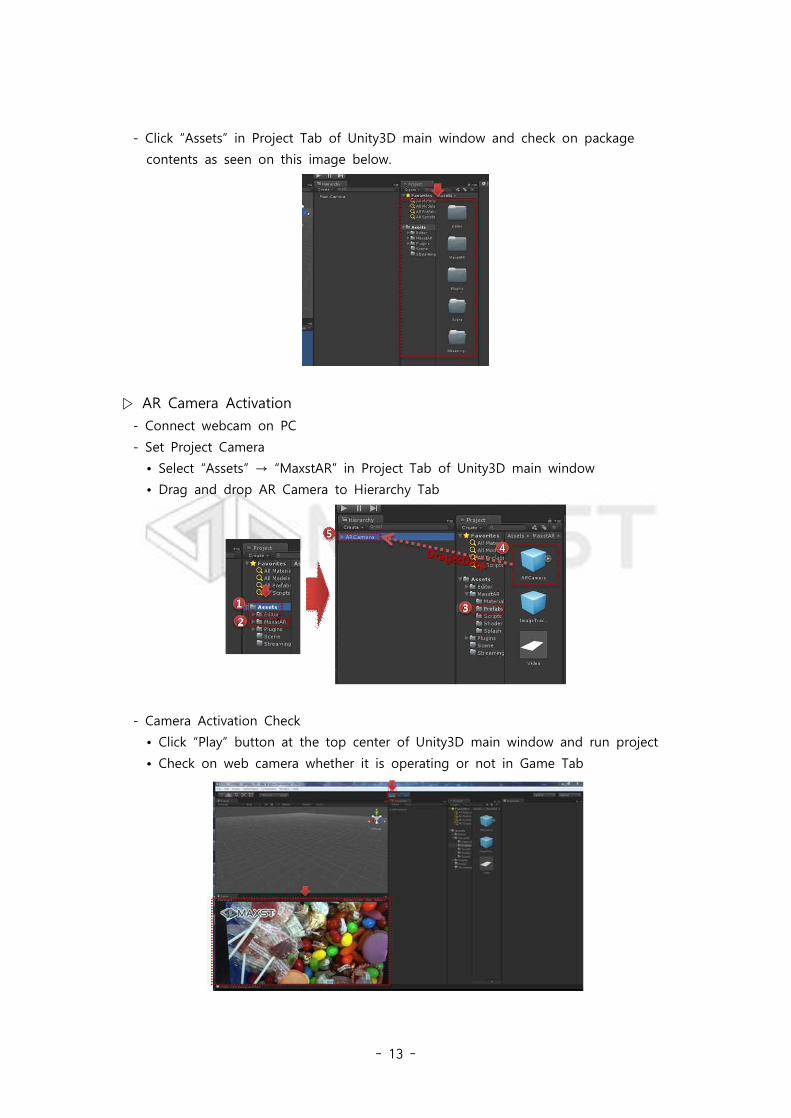
- Click “Assets” in Project Tab of Unity3D main window and check on package
contents as seen on this image below.
▷ AR Camera Activation
- Connect webcam on PC
- Set Project Camera
• Select “Assets” → “MaxstAR” in Project Tab of Unity3D main window
• Drag and drop AR Camera to Hierarchy Tab
- Camera Activation Check
• Click “Play” button at the top center of Unity3D main window and run project
• Check on web camera whether it is operating or not in Game Tab

- 14 -
▷ Augmenting Objects
- set extra Trackable Package
• Click “Asset“ → “Import Package“ → “Custom Package“ in top menu of
Unity3D main window
• Select a downloaded “Samples.unityPackage” then open
• Tick on all checkboxes of Importing Package and click “Import” button
- Create augmented objects
• Select “Assets” → “MaxstAR” in Project Tab
• Drag and drop “Trackable Target” in Prefabs to Hierarchy Tab
- 15 -
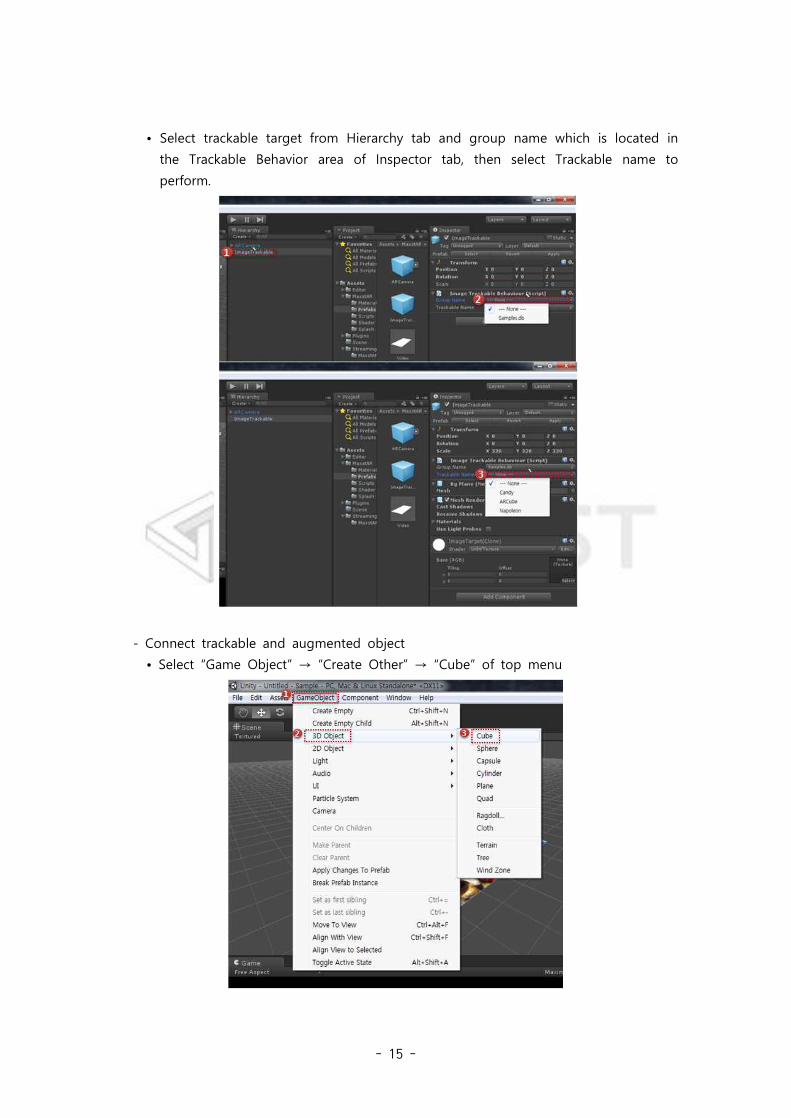
• Select trackable target from Hierarchy tab and group name which is located in
the Trackable Behavior area of Inspector tab, then select Trackable name to
perform.
- Connect trackable and augmented object
• Select “Game Object” → “Create Other” → “Cube” of top menu

- 16 -
• After clicking a created object (Cube) in Hierarchy Tab, drag and drop to
trackable target in order that Cube can be lower node of trackable target
- Set augmented object
• After selecting an object (Ex> Cube...) in Hierarchy Tab, control
Transform (Scale, Position, Rotation) value in Inspector tab to set translation,
rotation, and scale of the augmented object
• Ex> Set Transform position Y : 0.3, Scale X: 0.3, Y: 0.3, Z: 0.3

- 17 -
- Test Camera
• Click “Play” button at the center top of Unity3D main window to check camera
activation.
• Check on test result

- 18 -
○ Reference ▷ Location of Trackable Data saving
- [Unity Project Directory]/Assets/Editor/MaxstAR/Textures/[Trackable Group Name]
▷ Lighting add when the surface of an object is not recognizable in game
window
- When the color information of object is not recognizable as seen on the image
below, select “Game Object” → “Create Other” → “Directional Light” of main menu,
then contrast will be applied on the augmented object.
▷ Caution during running Unity3D 5.x or its upper version
-In the case of “Overlapping dll name” error on Android OS, x86 or x86_64 folder in
plugin must be deleted.