
Maximo Work Order Application Trainingccsd.net/resources/maintenance/17-maint-technician-wo.pdf ·...
16
S:\MNT\Apps\Documentation\17 1 Revised 01/26/09 Maximo Work Order Application Training MAINTENANCE TECHNICIAN WORK ORDER INSTRUCTIONS ACTUALS, PREMIUM PAY, MATERIALS, FAILURE REPORTING AND WORK ORDER COMPLETION LOG ON TO MAXIMO WEBSITE. WITHIN THE FACILITIES SERVICES DEPARTMENT MOST COMPUTERS WILL HAVE THE “WELCOME TO MAXIMO” ICON ON THE DESKTOP. CLICK ON MAXIMO ICON (ON DESKTOP) MAXIMO LOG ON SCREEN WILL APPEAR TYPE YOUR USER NAME IN THE USER NAME BOX User Name and Password must be typed in (LOWER CASE) Letters. TYPE YOUR PASSWORD IN THE PASSWORD BOX. CLICK ON SIGN IN TO ENTER THE PROGRAM PASSWORD MUST BE 6 CHARACTERS OR MORE WITH NUMBERS, LETTERS OR A COMBINATION OF BOTH. IF YOU ARE LOGGING ON FOR THE 1ST TIME, REPEAT YOUR USER NAME AS YOUR PASSWORD AND THEN CLICK THE SIGN ON ICON. ONCE YOU ARE IN THE APPLICATION YOU WILL BE PROMPTED TO CREATE YOUR OWN UNIQUE USER PASSWORD USING THE CRITERIA GIVEN ABOVE.) FROM THEN ON, YOU WILL USE YOUR UNIQUE PASSWORD. NOTE: DO NOT HAVE WINDOWS SAVE THE PASSWORD. COMMIT IT TO MEMORY OR LOG IT SOMEWHERE FOR REFERENCE. If you try to log on 3 times with either the wrong user name or password, you will be blocked from the system and then you will need to call the help desk at 387-0708 to get back into the program.
Transcript of Maximo Work Order Application Trainingccsd.net/resources/maintenance/17-maint-technician-wo.pdf ·...

S:\MNT\Apps\Documentation\17 1 Revised 01/26/09
Maximo Work Order Application Training
MAINTENANCE TECHNICIAN WORK ORDER INSTRUCTIONS
ACTUALS, PREMIUM PAY, MATERIALS, FAILURE REPORTING AND WORK ORDER COMPLETION
LOG ON TO MAXIMO WEBSITE. WITHIN THE FACILITIES SERVICES DEPARTMENT MOST COMPUTERS WILL HAVE THE “WELCOME TO MAXIMO” ICON ON THE DESKTOP.
CLICK ON MAXIMO ICON (ON DESKTOP)
MAXIMO LOG ON SCREEN WILL APPEAR
TYPE YOUR USER NAME IN THE USER NAME BOX
User Name and Password must be typed in (LOWER CASE) Letters.
TYPE YOUR PASSWORD IN THE PASSWORD BOX.
CLICK ON SIGN IN TO ENTER THE PROGRAM PASSWORD MUST BE 6 CHARACTERS OR MORE WITH NUMBERS, LETTERS OR A COMBINATION OF BOTH. IF YOU ARE LOGGING ON FOR THE 1ST TIME, REPEAT YOUR USER NAME AS YOUR PASSWORD AND THEN CLICK THE SIGN ON ICON. ONCE YOU ARE IN THE APPLICATION YOU WILL BE PROMPTED TO CREATE YOUR OWN UNIQUE USER PASSWORD USING THE CRITERIA GIVEN ABOVE.) FROM THEN ON, YOU WILL USE YOUR UNIQUE PASSWORD. NOTE: DO NOT HAVE WINDOWS SAVE THE PASSWORD. COMMIT IT TO MEMORY OR LOG IT SOMEWHERE FOR REFERENCE.
If you try to log on 3 times with either the wrong user name or password, you will be blocked from the system and then you will need to call the help desk at 387-0708 to get back into the program.
S:\MNT\Apps\Documentation\17 2 Revised 01/26/09
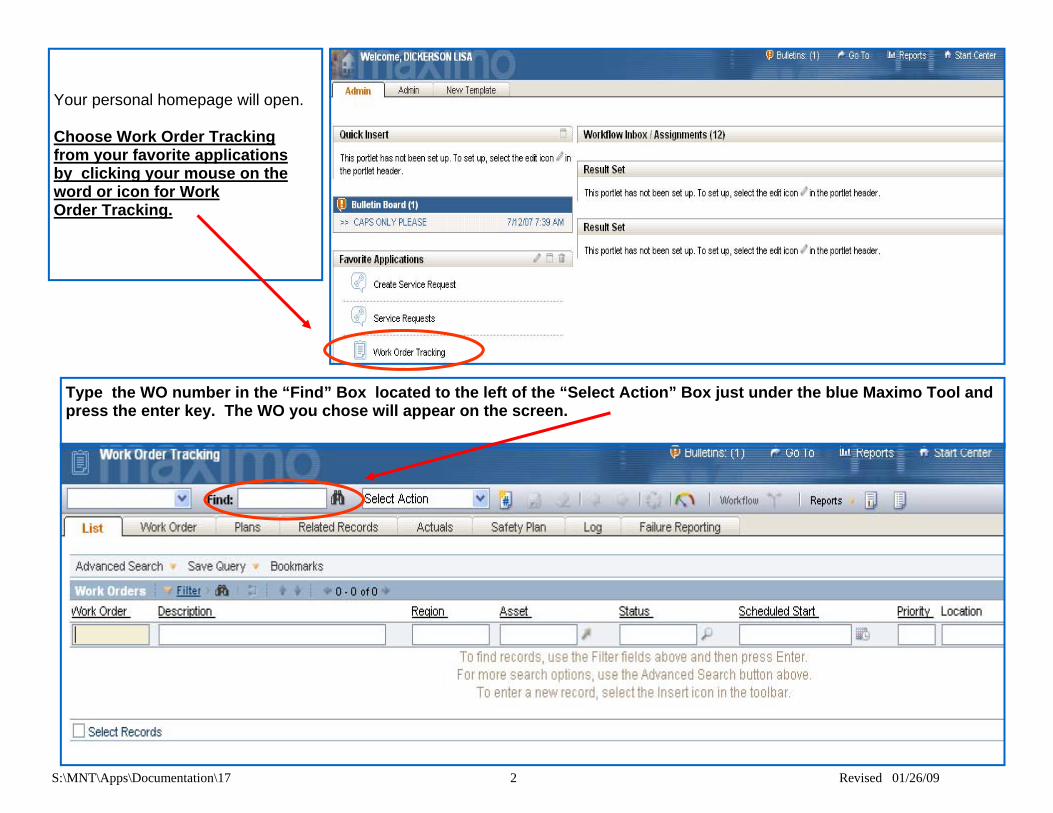
Your personal homepage will open. Choose Work Order Tracking from your favorite applications by clicking your mouse on the word or icon for Work Order Tracking.
Type the WO number in the “Find” Box located to the left of the “Select Action” Box just under the blue Maximo Tool and press the enter key. The WO you chose will appear on the screen.

S:\MNT\Apps\Documentation\17 3 Revised 01/26/09
Example of WO Screen, at this point double check your WO # and the description to make sure you are putting your time on the correct WO.
Using your mouse, place the cursor over the Actuals tab and click in order to begin the process of putting in your labor for this WO.

S:\MNT\Apps\Documentation\17 4 Revised 01/26/09
Under the Labor Tab at the lower right hand corner of the screen, you will find a “New Row” button. Click on this button to open a blank Actuals Log to be filled in with your information.
Example of Actuals Log screen that appears in order to input Labor

S:\MNT\Apps\Documentation\17 5 Revised 01/26/09
ENTERING LABOR (ACTUAL TIME WORKED) Fill in the “Labor” box with the correct Labor Code for the worker that did the work. Fill in the “Craft” box with the correct craft code, if it does not automatically populate once your labor code is entered. Fill in the “Start Date” box with the correct date or choose from the calendar by clicking on the gray calendar button to the right of the box. From the calendar, select the correct date and enter. Fill in the “End Date” using the same instructions as the “Start Date”. NOTE: Start Date and End Date will always be the same, and must be entered or selected for calendar. Fill in “Start Time” box. Example 11:00 am or 2:15 pm. The program will automatically default to AM if you are making an AM entry. If you are entering a PM time, you will need to designate PM. If you are accustomed to and like to use military time, the computer will automatically fill in the PM based on a military entry. Example: 13:00 will automatically change to 1:00 PM when you tab or enter after your entry. Actual time worked on the job. DO NOT COUNT TRAVEL TIME OR LUNCH OR BREAKS. Example: Arrived @ 8:30am, finished the job at 1:30pm. Sometime during the job took 15 minute break and a 30 minute lunch. Actual time should reflect only actual time worked. Start time 8:30am, End time 12:45pm. Total 4:15 hours actual time for this WO. Fill in the “End Time” box using the same directions as used for the “Start Time” above. Tab or Enter to see hours. Your regular hours will automatically calculate based on your other entries.
CONFIRM THIS FIELD IS FILLED
NOTE: COMPUTER WILL AUTOMATICALLY CALCULATE AND FILL THIS FIELD IF ENTRY WAS MADE CORRECTLY.

S:\MNT\Apps\Documentation\17 6 Revised 01/26/09
Example of correctly filled in Actual Row. If you put all information in correctly, the regular hours box should reflect the number of hours worked and there will be a calculated amount in the “Line Cost”. (Rate should now reflect your correct hourly rate of pay.)
Be sure to click on the save icon on the Maximo Toolbar to save the entry you just made. If you are entering Actuals for more than one worker, repeat all the steps on pages 3-6 for each. IMPORTANT: If you put time on a WO, but still need to return to finish, change the WO to “IN PROGRESS” once you enter your actuals the first time. That will advise others who view the WO that it is “In
NOTE: COMPUTER WILL AUTOMATICALLY CALCULATE AND FILL THIS FIELD IF ENTRY WAS MADE CORRECTLY.
S:\MNT\Apps\Documentation\17 7 Revised 01/26/09
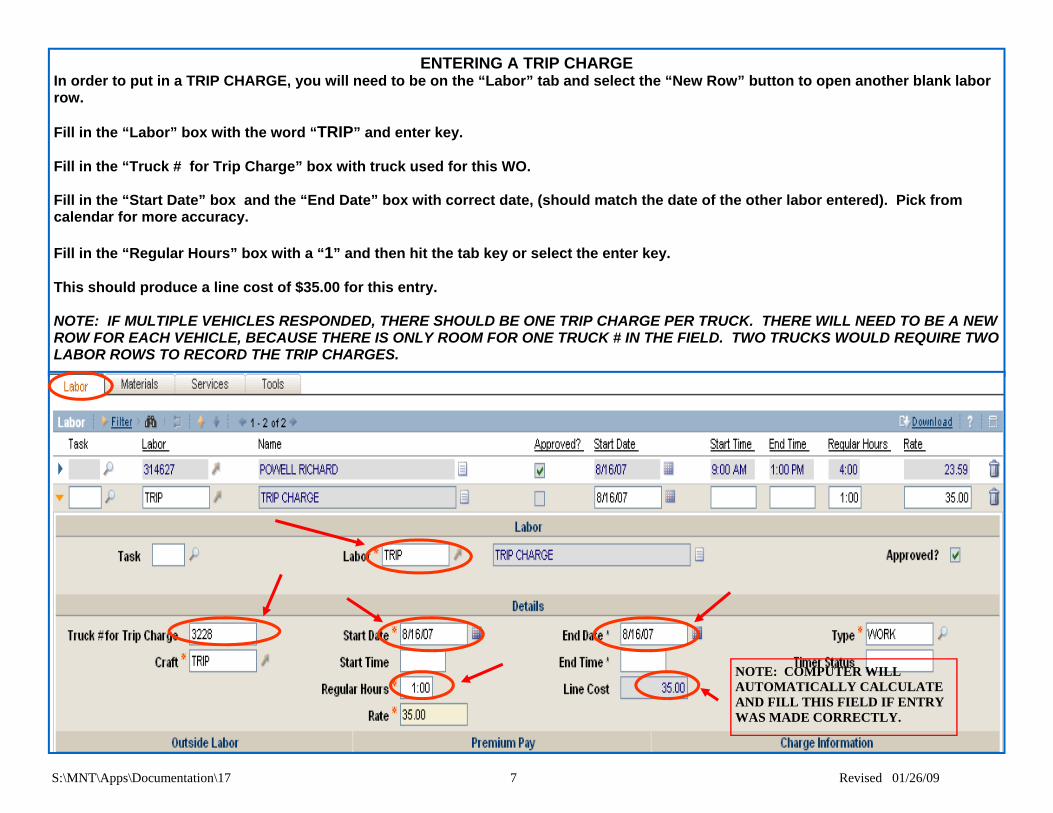
ENTERING A TRIP CHARGE In order to put in a TRIP CHARGE, you will need to be on the “Labor” tab and select the “New Row” button to open another blank labor row. Fill in the “Labor” box with the word “TRIP” and enter key. Fill in the “Truck # for Trip Charge” box with truck used for this WO. Fill in the “Start Date” box and the “End Date” box with correct date, (should match the date of the other labor entered). Pick from calendar for more accuracy. Fill in the “Regular Hours” box with a “1” and then hit the tab key or select the enter key. This should produce a line cost of $35.00 for this entry. NOTE: IF MULTIPLE VEHICLES RESPONDED, THERE SHOULD BE ONE TRIP CHARGE PER TRUCK. THERE WILL NEED TO BE A NEW ROW FOR EACH VEHICLE, BECAUSE THERE IS ONLY ROOM FOR ONE TRUCK # IN THE FIELD. TWO TRUCKS WOULD REQUIRE TWO LABOR ROWS TO RECORD THE TRIP CHARGES.
NOTE: COMPUTER WILL AUTOMATICALLY CALCULATE AND FILL THIS FIELD IF ENTRY WAS MADE CORRECTLY.

S:\MNT\Apps\Documentation\17 8 Revised 01/26/09
ENTERING OVERTIME LABOR Go to the “Labor” Tab and click on “New Row” in the lower right hand corner of the screen. Fill in the “Labor” field and then tab or enter, application will populate other boxes with the necessary labor information. ***(Confirm “Craft” field, computer will normally auto fill this field. If it does not, you will need to put in your correct craft code.) Choose a “Start Date” from the calendar or type the correct date. Choose an “End Date” from the calendar or type in the correct date. (Start and end date are always the same.) Below the Premium Pay column at the middle of the page near the bottom, fill in the “Premium Pay Code” Field. If unsure of code, choose by clicking on the magnifying glass to the right of the field and pick from the drop down menu. Go down to the very last field under Premium Pay and fill in “OT Justification” field. If unsure of code, choose justification by clicking on the magnifying glass to the right of the field. Go back up to the “Premium Pay Hours” field and enter the number of hours worked. If you need to use half and quarter hour increments, the follow-ing are examples: .25 for 15 minutes, .5 for 30 minutes, .75 for 45 minutes. Confirm that the program populated the “Line Cost” field before saving the entry. Save Entry by clicking on the Save Icon on the Maximo Toolbar.
*** Confirm
Confirm there is a line cost after your entry is complete, before your save
Must be entered in proper order : 1. Pay Code 2. OT Justification 3. Pay Hours

S:\MNT\Apps\Documentation\17 9 Revised 01/26/09
ENTERING MATERIALS To enter Materials, select the Materials Tab (next to the Labor Tab) and select the new row button in the lower right hand corner of the screen. You will get a new Materials screen that appears to enter your material information.
Fill in “Line Type” by using drop down menu (blue arrow a the right of the box) and select “Material”. Fill in “Description” box with description of part used. Refer to the “Entering Materials in Maximo Quick Steps” form for procedures for the different types of entries, i.e. Credit Card, Shop Stock, and Purchase Requisitions. If you have extra information that is important, you can enter it into the long description box to the right of the “Description” Box. Fill in “Quantity” - Numeric only..........1. 3. 10. or fractions of a whole such as .5 .25 .75 Fill in “Unit Cost”. Total cost per unit or if you know the per foot price, etc, you can just put the exact amount used. Press enter key. Maximo will calculate partial usage of a whole quantity. (Example: 5 GAL. WHITE SEMI GLOSS PAINT in description, .5 in quantity, $60.00 in unit cost will calculate material price @ $30.00.) Refer to Sample Packet for “Materials Entry” (see trainers) for correct way to enter shop stock, CC purchases and PO purchases.
NOTE: COMPUTER WILL AUTOMATICALLY CALCULATE AND FILL THIS FIELD IF ENTRY WAS MADE CORRECTLY.
Add extra info by opening “Long Description Box” if needed.

S:\MNT\Apps\Documentation\17 10 Revised 01/26/09
Be sure to click on the save icon on the Maximo Toolbar to save the entry you just made.
FAILURE CODES
NOTE: Not all crafts utilize “Failure Reporting” feature on Maximo. The “Asset” number will determine the “Failure Class” which will prompt the “Failure Code” choices for that particular as-set. There must be an asset number if “Failure Reporting” is required. To report failure codes click on the “Failure Reporting” tab to record the failure, cause and remedy codes.
NOTE: THERE MUST BE AN ASSET NUMBER ON THE W/O WHICH WILL AUTO FILL THE “FAILURE CLASS” WHICH WILL GENERATE YOUR CHOICES FOR “FAILURE REPORTING”.

S:\MNT\Apps\Documentation\17 11 Revised 01/26/09
Click on “Select Failure Code” at the lower right corner of your screen to open first selection window.
A window will open with “Failure Code Problem” choices. Click on the underlined choice from the list and click on select button (Lower Right) for next selection box to open.

S:\MNT\Apps\Documentation\17 12 Revised 01/26/09
“Failure Code Cause” Window will open. Click on underlined choice in first column and click on Select button for next screen to appear
“Failure Code Remedy” Window will open. Click on underlined choice in first column and click on Select button.
S:\MNT\Apps\Documentation\17 13 Revised 01/26/09
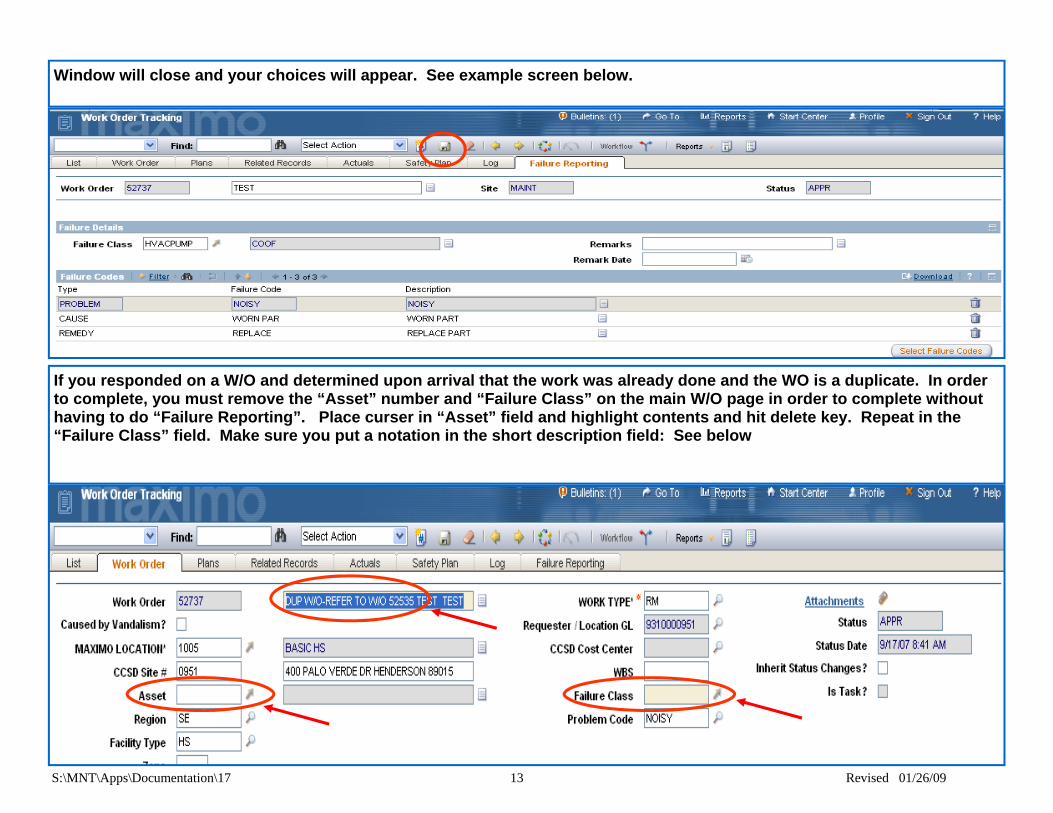
Window will close and your choices will appear. See example screen below.
If you responded on a W/O and determined upon arrival that the work was already done and the WO is a duplicate. In order to complete, you must remove the “Asset” number and “Failure Class” on the main W/O page in order to complete without having to do “Failure Reporting”. Place curser in “Asset” field and highlight contents and hit delete key. Repeat in the “Failure Class” field. Make sure you put a notation in the short description field: See below

S:\MNT\Apps\Documentation\17 14 Revised 01/26/09
STATUS CHANGES
Once you have completed all the entries outlined in this training. The status will need to be changed if the work order is ready to be completed. When determining which status you want, consider the following: If you have completed the WO and nothing further needs to be added, change the status to ‘COMPLETE’. If your supervisor is going to need to craft it and send to another craft for some reason, change to ‘IN PROGRESS’. If you are going to put more time against the WO (maybe a week long job) change the status to ‘IN PROGRESS’ after you have put your first day’s actuals on it. NOTE: If you are waiting on materials or have other status info, please put notes in the long description to be viewed by others, such as dispatch, FSR’s, etc. If you have a need to create a follow up to a different craft, please see trainers for “How to Create A Follow-Up WO”. When in doubt on a status, check with dispatch or trainers for assistance. Click on the “Status Change” icon on the Maximo Tool Bar.
S:\MNT\Apps\Documentation\17 15 Revised 01/26/09
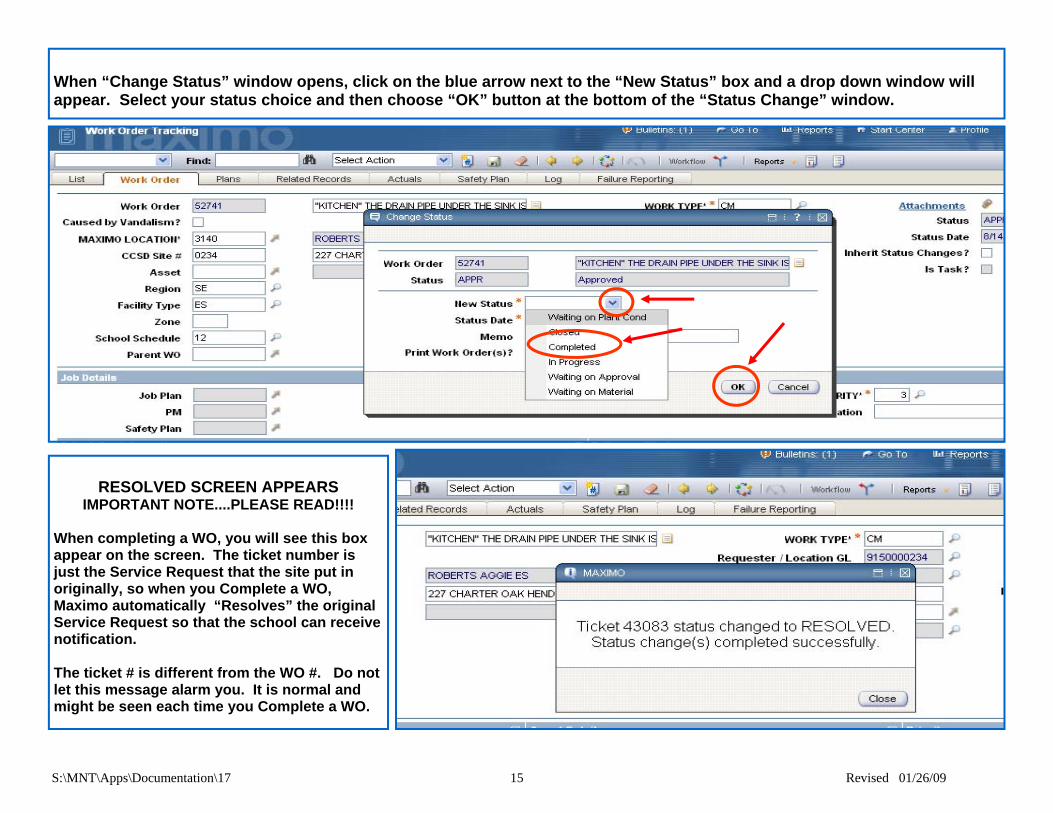
When “Change Status” window opens, click on the blue arrow next to the “New Status” box and a drop down window will appear. Select your status choice and then choose “OK” button at the bottom of the “Status Change” window.
RESOLVED SCREEN APPEARS
IMPORTANT NOTE....PLEASE READ!!!!
When completing a WO, you will see this box appear on the screen. The ticket number is just the Service Request that the site put in originally, so when you Complete a WO, Maximo automatically “Resolves” the original Service Request so that the school can receive notification. The ticket # is different from the WO #. Do not let this message alarm you. It is normal and might be seen each time you Complete a WO.

S:\MNT\Apps\Documentation\17 16 Revised 01/26/09
This training explains the basic procedure for a shop technician to complete his part of a WO. If there are still questions, contact the Help Desk at 387-0708 or make contact with the Work Management Trainers or dispatch. Be sure to properly log your Materials, refer to the training documentation for entering materials, if further information is necessary. See trainers for other documents to cover these topics. *****IMPORTANT******PLEASE NOTE******** Again, all employees should change the status of the WO to “In Progress” once any time has been added to the WO. This will enable everyone else, including maintenance dispatch to see if someone has already responded when they get inquiry phone calls. SHOP TECHNICIANS SHOULD ADD NOTATIONS TO THE LONG DESCRIPTION AS NEEDED. EXAMPLES OF SUCH ARE: NO TRIP CHARGE, NO MATERIALS NEEDED (NMU), PARTIALLY REPAIRED ON 8/7/07-WAITING ON PART TO COMPLETE. THESE NOTATIONS WILL ASSIST OTHERS SUCH AS DISPATCH, COORDINATORS, PRICING CLERKS WHEN THEY