Manual on hygiene promotion in...
72
Manual on hygiene promotion in Schools - Teachers Guidebook – Developed by Annemarieke Mooijman for Batticaloa district, Sri Lanka : CONTENTS
Transcript of Manual on hygiene promotion in...

Manual on hygiene promotion in Schools
- Teachers Guidebook –
Developed by Annemarieke Mooijman for Batticaloa district, Sri Lanka
:
CONTENTS

2
Introduction
Water, Hygiene and Sanitation in schools programmes can create an enabling learning environment that contributes children's improved health, welfare, and learning performance.
Already for several decades, almost all Srilankan school-age children attend school. However, since the early 1980s, there is an exception for those children living in areas that were not controlled by the Government because of internal conflicts. Those areas did not have formal schools or had no schools at all. The results are dramatic. While virtually all adults in Sri Lanka are literate, a recent surveyi in those areas did show that as much as 73% of the mothers in those areas are illiterate. Over the past years, the situation is slowly increasing. Informal schools are being transferred into formal schools and new schools are being opened. Meanwhile, the provision of good quality education for all Srilankan children remains a big challenge. Many children in the poor conflict affected areas suffer from malnutrition and preventable diseases such as diarrhoea, skin diseases, worm infections and respiratory diseases. Yet these conditions following from limited hygienic conditions and unhygienic behaviour can be improved. Hygiene education and particularly skills-based hygiene education has shown to make significant improvement to the development of children and adolescents. Both their physical development and the development of appropriate hygiene behaviour. This manual for teachers as part of the revised methodology for hygiene education has been developed for use in 70 schools in Batticaloa district. It is being developed by CCF-Sri Lanka in close cooperation with the Government of Sri Lanka and UNICEF. UNICEF has also provided the financial support for the programme. The manual gives some lesson plans on how to teach knowing, feeling and doing on the defined target behaviours. In addition, the manual intends to provide a framework for teachers to create their own teaching materials. If appropriately used, the manual will stimulate discussions and creative thinking on hygiene education among school teachers and their students.
3
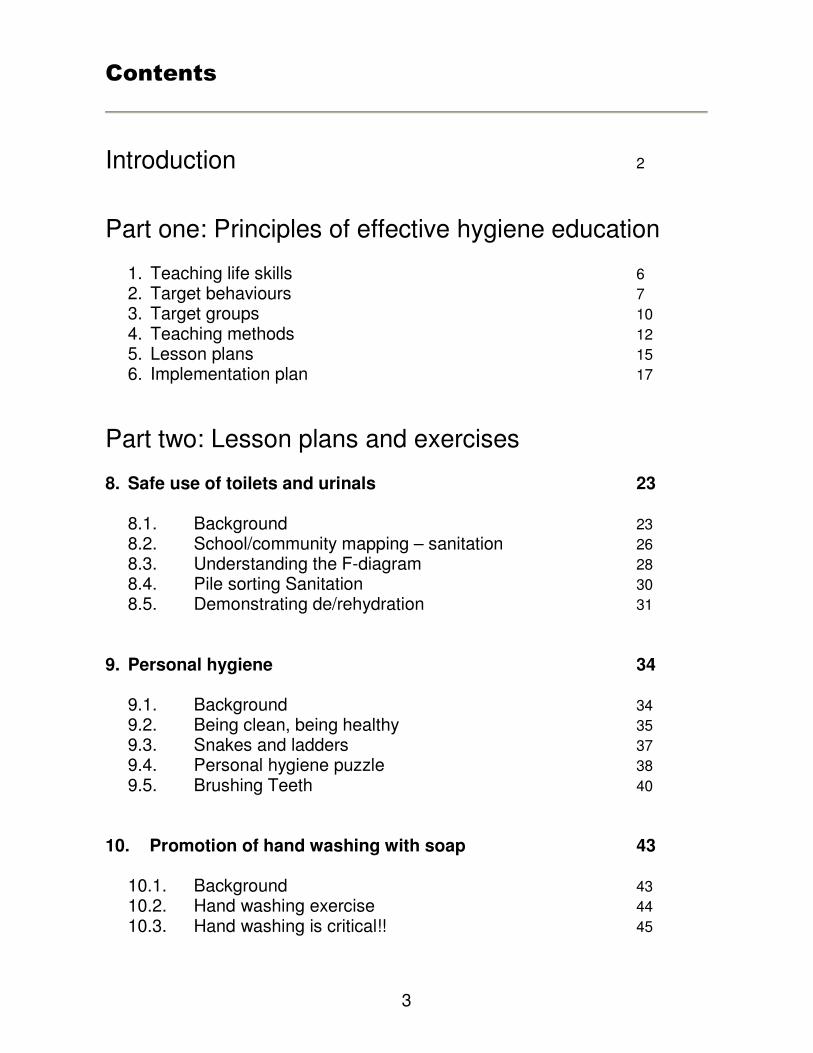
Contents
Introduction 2
Part one: Principles of effective hygiene education
1. Teaching life skills 6 2. Target behaviours 7 3. Target groups 10 4. Teaching methods 12 5. Lesson plans 15 6. Implementation plan 17
Part two: Lesson plans and exercises
8. Safe use of toilets and urinals 23
8.1. Background 23 8.2. School/community mapping – sanitation 26 8.3. Understanding the F-diagram 28 8.4. Pile sorting Sanitation 30 8.5. Demonstrating de/rehydration 31
9. Personal hygiene 34
9.1. Background 34 9.2. Being clean, being healthy 35 9.3. Snakes and ladders 37 9.4. Personal hygiene puzzle 38 9.5. Brushing Teeth 40
10. Promotion of hand washing with soap 43
10.1. Background 43 10.2. Hand washing exercise 44 10.3. Hand washing is critical!! 45
4
11. Menstrual hygiene 47
11.1. Background 47 11.2. My changing body 48
12. Waste management and water drainage 51
12.1. Background 51 12.2. School/community mapping – solid waste and water drainage
53 12.3. Sorting solid waste 55
13. Water treatment, handling and storage 56
13.1. Background 56 13.2. School/community mapping – water 57 13.3. Drinking safe water 59 13.4. Making muddy water 61 13.5. Is the water safe to drink? - H2S water quality test 62
14. Food hygiene 64
14.1. Background 64 14.2. Fried rice, fried rice 65 14.3. Flying diseases 66
15. Annual teaching schedules for grades 1-9 76

5
Part one:
Principles of
effective hygiene
education

6
1. Teaching life skills
Teaching appropriate hygiene behaviour is important because:
1. Children will be more healthy 2. Children perform better in school 3. Children can positively influence the hygiene practices in their homes among their
family members 4. Children who change their hygiene behaviour for now, will also use better hygiene
practices for the future when they will be parents, workers or even teachers themselves
5. Girls learn about menstrual hygiene stimulating them to come to school during their periods and avoiding urinal and vaginal infections.
6. Children learn about equal division of hygiene related tasks (cleaning of toilets, fetching and boiling water, taking care of sick people) etc.
7. Children are taught to observe, to listen, to communicate, to take decisions about their own hygienic conditions and about the hygiene of others. Skills which they will also be able to apply in other aspects of life
The above results will be even much stronger if also a healthy environment and facilities for hand washing, sanitation and water supply are provided and maintained.
At the same time, changing hygiene behaviour is complex. Long existing and often culturally determined habits are difficult to change. Therefore, it demands lots of efforts and should not only focus on “knowing”. Knowing does not mean that a behaviour changes. Knowledge has to be transferred into “doing” and “feeling”.
A. Knowing is receiving the information and working on the understanding thereof.
Example: all children know that many illnesses, such as diarrhoea and worm infections, result from poor hygiene practices such as not washing hands soap after visiting a toilet.
B. Doing are abilities to carry out specific behaviours to deal with the demands and
challenges of everyday life.
Example: Children keep their hands clean to avoid illness and infection. Or help to bury or burn solid waste.
C. Feeling depends on personal preferences, and own judgments that influence one to
act or respond in an appropriate way.
Example: Children want to keep themselves clean and healthy. Or feel responsible and confident to help others, particular younger children, to practise good hygiene.
Developing Knowing, Doing and Feeling (on hygiene) is called Life-Skills (on hygiene).

7
LIFE-SKILLS = KNOWING + DOING + FEELING
Life-skills focus on the personal and social skills required for people to:
(a) think and behave competently and confidently in dealing with themselves, relating to others and
(b) taking effective decisions, solve problems, (c) think critically and creatively, (d) communicate effectively, build healthy relationships, (e) empathize with others, be self-aware, (f) cope with and manage their lives in a hygienic, healthy, and productive manner.
2. Target behaviours
Teaching hygiene is most successful when it targets just a few behaviours with the biggest overall impact. Too many priorities will diffuse the attention that can be given to each subject because too little time will be available for each subject.
The basis of hygiene education lays in prevention of diseases that are transmission due to inappropriate hygiene conditions and behaviour.
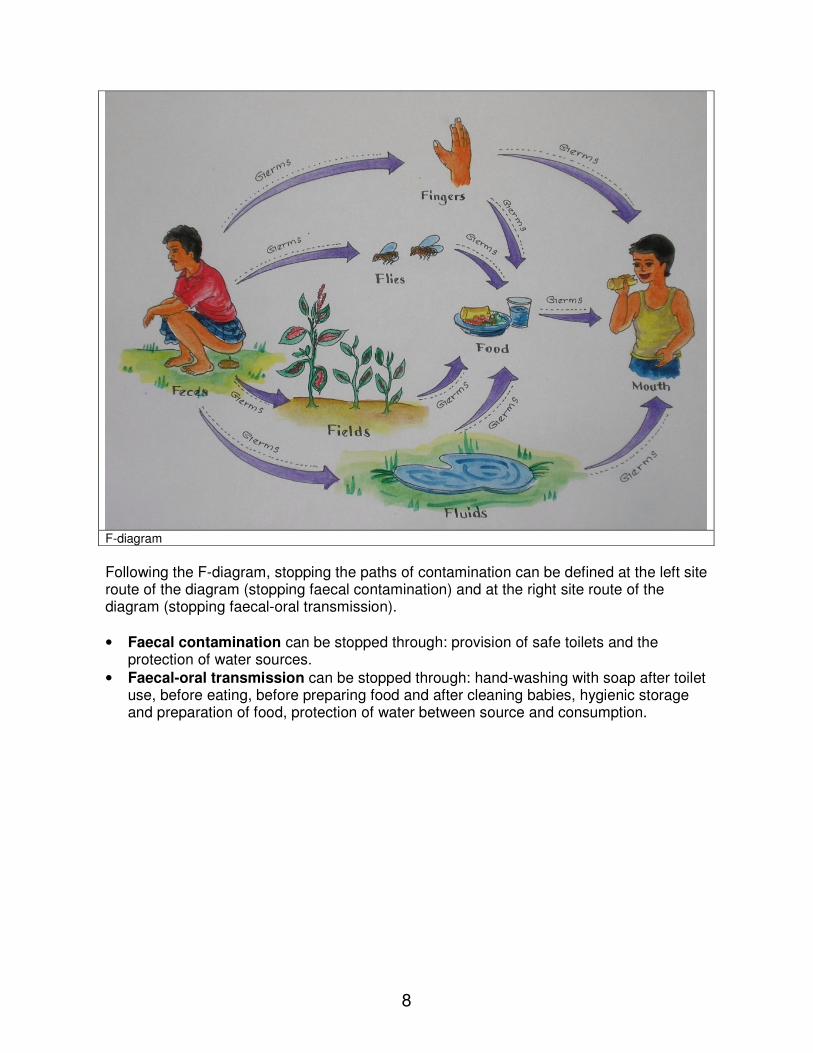
The most prevalent diseases, such as diarrhoea or worm infections are being spread by germs. Germs cause sickness. The path in which germs can spread from person to person is summarised in the, so-called, F-diagramii:
• Fingers: Human faeces stick to hands, fingers and under nails
• Flies: Flies and other insects sit on faeces and than on the food for human consumption
• Fields: (Human) faeces are being used or disposed on the fields and eaten through not fully cooked food that grew on the fields
• Fluids (water): Faeces mix with drinking water
8
F-diagram
Following the F-diagram, stopping the paths of contamination can be defined at the left site route of the diagram (stopping faecal contamination) and at the right site route of the diagram (stopping faecal-oral transmission).
• Faecal contamination can be stopped through: provision of safe toilets and the protection of water sources.
• Faecal-oral transmission can be stopped through: hand-washing with soap after toilet use, before eating, before preparing food and after cleaning babies, hygienic storage and preparation of food, protection of water between source and consumption.

9
Based on the F-diagram, the following key hygiene behaviours have been identified as having the most impact on school children: 1. Safe use of toilets and urinals
2. Personal hygiene
3. Promotion of hand washing with soap
4. Menstrual hygiene
5. Waste management and water drainage
6. Water treatment, handling and storage
7. Food hygiene

10
Background information on the why and how of each target behaviours can be found in: Part two: Lesson plans and exercises
11
3. Target groups
Because of differences in development while growing up, the teaching materials are developed for three different age-groups: Grade 1 and 2: girls and boys, as part of the environmental studies classes Grade 3, 4 and 5: girls and boys, as part of the environmental studies classes Grade 6, 7, 8 and 9: girls and boys, as part of the health education classes with some
parts specifically for girls For each age group their different stage of development should be considered to allow for the most appropriate lessons for each group. In below table the different stages, including their development stage related to knowing, feeling, doing and participation are explained.
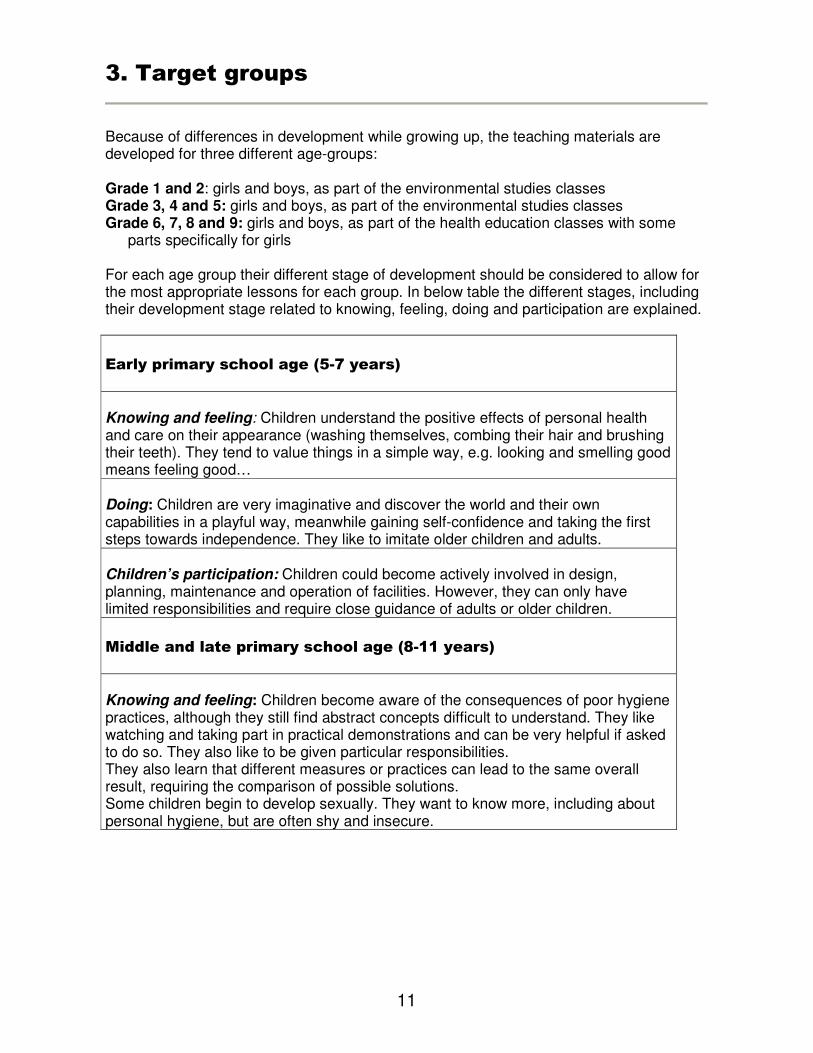
Early primary school age (5-7 years)
Knowing and feeling: Children understand the positive effects of personal health and care on their appearance (washing themselves, combing their hair and brushing their teeth). They tend to value things in a simple way, e.g. looking and smelling good means feeling good… Doing: Children are very imaginative and discover the world and their own capabilities in a playful way, meanwhile gaining self-confidence and taking the first steps towards independence. They like to imitate older children and adults. Children’s participation: Children could become actively involved in design, planning, maintenance and operation of facilities. However, they can only have limited responsibilities and require close guidance of adults or older children.
Middle and late primary school age (8-11 years)
Knowing and feeling: Children become aware of the consequences of poor hygiene practices, although they still find abstract concepts difficult to understand. They like watching and taking part in practical demonstrations and can be very helpful if asked to do so. They also like to be given particular responsibilities. They also learn that different measures or practices can lead to the same overall result, requiring the comparison of possible solutions. Some children begin to develop sexually. They want to know more, including about personal hygiene, but are often shy and insecure.
12
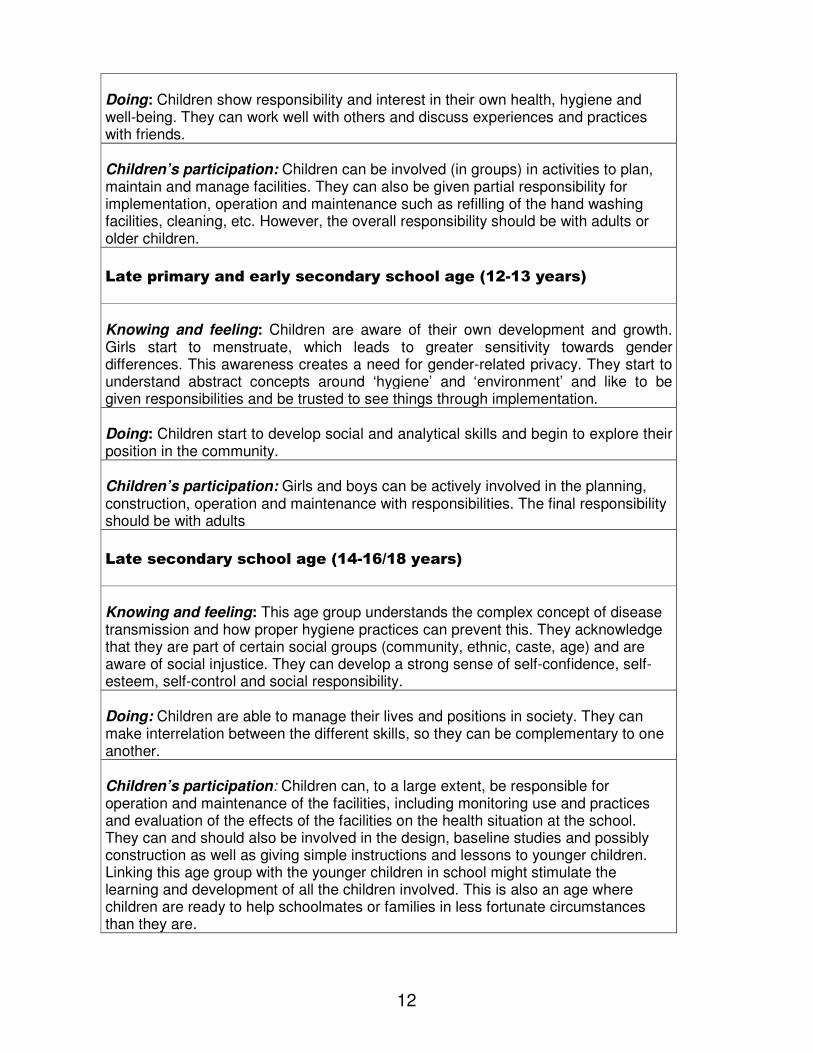
Doing: Children show responsibility and interest in their own health, hygiene and well-being. They can work well with others and discuss experiences and practices with friends. Children’s participation: Children can be involved (in groups) in activities to plan, maintain and manage facilities. They can also be given partial responsibility for implementation, operation and maintenance such as refilling of the hand washing facilities, cleaning, etc. However, the overall responsibility should be with adults or older children.
Late primary and early secondary school age (12-13 years)
Knowing and feeling: Children are aware of their own development and growth. Girls start to menstruate, which leads to greater sensitivity towards gender differences. This awareness creates a need for gender-related privacy. They start to understand abstract concepts around ‘hygiene’ and ‘environment’ and like to be given responsibilities and be trusted to see things through implementation. Doing: Children start to develop social and analytical skills and begin to explore their position in the community. Children’s participation: Girls and boys can be actively involved in the planning, construction, operation and maintenance with responsibilities. The final responsibility should be with adults
Late secondary school age (14-16/18 years)
Knowing and feeling: This age group understands the complex concept of disease transmission and how proper hygiene practices can prevent this. They acknowledge that they are part of certain social groups (community, ethnic, caste, age) and are aware of social injustice. They can develop a strong sense of self-confidence, self-esteem, self-control and social responsibility. Doing: Children are able to manage their lives and positions in society. They can make interrelation between the different skills, so they can be complementary to one another. Children’s participation: Children can, to a large extent, be responsible for operation and maintenance of the facilities, including monitoring use and practices and evaluation of the effects of the facilities on the health situation at the school. They can and should also be involved in the design, baseline studies and possibly construction as well as giving simple instructions and lessons to younger children. Linking this age group with the younger children in school might stimulate the learning and development of all the children involved. This is also an age where children are ready to help schoolmates or families in less fortunate circumstances than they are.

13
Note! Sometimes children (1) enter school when they are older than 6 or they (2) have to duplicate classes and would therefore sit in a lower grade than you would expect according to their age. For those children, who have a similar physical growth and social development as children in higher grades with the same age, it might be better to teach age-appropriate rather than grade-appropriate hygiene education. Example: a 9 year old boy in Grade 1 should rather learn from the Grade 3 instructions than the Grade 1 instructions.
4. Teaching methodsiii
Teaching life skills is best being done by using participatory methods. In this way knowledge as traditionally received through teacher instruction can be transferred into feeling and doing. Why does it work better? 1. When children actively participate in the process of learning, they will understand the
hygiene problems better. They will develop a feeling of own responsibility for their own hygiene behaviour and conditions.
2. At the same time, children will be encouraged to test/try what they learn at home and in
the wider community. In this way, they will find out why appropriate hygiene behaviours are not being applied and how changes could be achieved.
3. When children are asked to think about hygiene problems, to find out more about them
and to plan action, they are involved in the process that will ask them to use the new knowledge in a different way. It will strengthen their self-esteem and confidence to solve problems and undertake action.
What is participatory teaching and what is not?iv
IT IS:
• The teacher challenging children to think
• The teacher helping children to make their own decisions and to take hygiene action
• Interesting and funny IT IS NOT:
• The teacher deciding on behalf of the children what action to take
• The teacher deciding who will be involved
• Dull and boring Participatory education can be carried out with the whole group in a class room setting or with several small groups. Working with a whole class is best when dealing with a method in which students give each other positive feedback. Working in small groups is

14
recommended when every student has to participate more than once or if the method takes longer. Points of consideration when working in smaller groups:
• Groups should consist of no more than seven children to allow for all children to actively participate.
• All the children in the group work together. The group work helps the children to develop cooperation and teamwork skills. Cooperation is important, not competition.
• Making a sitting arrangement in a circle stresses that all children in the group are equal and have the same possibilities to speak and give their opinion.
• The teacher should supervise the process (outside) the circle and intervene if s/he sees that some of the students are dominating the process. In that case the teacher should stimulate that all children can express their opinions.
• At the end of small-group work at least a few minutes should be dedicated to work with the whole class. An elected spokesperson of each group then responds back to the class about what the group was doing and what conclusions and results they reached.

Examples of lesson plans are given in this manual. Other teaching methods that can be used for life skills1 are:
Methods suitable for the grades 1-2: children ages 6-8 years
Methods suitable for the grades 3, 4 and 5: children ages 8-11 years
Methods suitable for the grades 6, 7, 8 and 9: children ages 12-15 years
Listening to and telling stories Reciting poems and songs, and singing songs Drama/short role-plays Seeing and doing various types of puppet plays Simple sorting games Language and number games and assignments Reading and reacting to stories Walks, doing simple observations Skills demonstrations, with peer observation and
analysis Movement games, competitions Conversations and discussions Drawing, painting, colouring, claying Doing simple hygiene tasks Presentation to parents and family members
Listening to and telling stories Reading and analysing stories Doing quizzes Conversations and discussions Singing and dancing Drawing and painting Making various types of models Writing compositions and creative writing Brainstorming Excursions Drama, role-plays, pantomime, skills
demonstrations Peer observations and analysis Language and maths games such as crosswords All kinds of competitions
Listening to and telling stories Reading and analysing stories as well as writing
stories Group and class discussions Singing and dancing Drawing and painting Brainstorming Drama, role-plays, pantomime, skills
demonstrations Peer and family members observations and
analysis of behaviour School/community observation and mapping or
excursions Language and maths games, quizzes and
puzzles All kinds of competitions Doing hygiene tasks (with an educational
purpose) such as helping younger children visiting toilets and washing hands
1 Adapted from: Postma, L., R, Getkate and Van Wijk, C (2004), “Life Skills-Based Hygiene Education; A guidance document on concepts, developments and experiences with life
skills-based hygiene education in school sanitation and hygiene education programmes”, IRC International Water and Sanitation Centre, Delft, the Netherlands in cooperation with UNICEF

5. Lesson plans
For the lesson plans described in this manual, the following starting points have also been used:
• It can be introduced at school at low cost or at no cost because no expensive teaching materials are needed.
• The methodology has been adapted to the local culture and socio-economic circumstances and has a focus on gender-equity.
• The teaching materials are age-appropriate.
• The teaching topics can be independently used. And lost but not least:
• They are based on real hygiene needs and priorities of the communities in which the children live.
Developing your own Lesson Plans
Where this manual provides several lesson plans that are ready for direct implementation in the class. The teachers are being encouraged to also develop their own lesson(s) (plans) for their own class. In this way, lessons can be developed that suit in the needs, conditions and demands of the specific class, school and wider community.
1. Target Behaviour
Choose the specific Target behaviour to be addressed: (1) Safe use of toilets and urinals (2) Personal hygiene (3) Promotion of hand washing with soap (4) Menstrual hygiene (5) Waste management and water drainage (6) Water Treatment, handling and storage, or (7) Food hygiene. Stick to one of the seven above mentioned behaviours.
Always start with an introduction lesson to the target behaviour. In the “Background” section for each target behaviour, theoretic background information has been provided.
2. Target group
Define for which grade the lesson will be developed. If many of the children of this grade are older than the “official” age for this grade, adapt the contents of the lesson accordingly i.e. if many of the children in grade 4 are 12 years or older, teach also the issues of importance for the adolescence age-group
17
3. Learning goals: separated by knowing, feeling and doing
Define clearly the different goals: Knowing is receiving the information and working on the understanding thereof. Doing are abilities to carry out specific behaviours to deal with the demands and challenges of everyday life. Feeling depends on personal preferences, and own judgments that influence one to act or respond in an appropriate way.
For most Lesson Plans all three goals aspects (knowing, feeling and doing) will be address. Knowing as a sole goal, can only be applied if the emphasis on feeling and doing will be addressed in follow-up lessons.
4. Teaching methods
Choose from the age-appropriate methods as given in the table of section 4 or use other age-appropriate methods.
5. Teaching materials
Describe all materials necessary. Preferably choose for low or no cost materials that are easily available and accessible for the school and students.
6. Description of activities
Describe in detail all activities to be undertaken with the points of special attention or difficulties that can arise as well as the expected outcomes.

18
6. Implementation plan
The implementation of WASH in schools programmes includes the provision of facilities for hand washing, toilets and/or urinals, the provision of drinking water and the facilitation of solid waste collection, as well as hygiene education for all school children. Within a detailed implementation plan all steps to develop a programme should be explained. Normally the steps start with promotion of a programme, progresses through implementation planning, implementation, and operation, and ends with monitoring and evaluation. This sequence ensures that each programme will be fully supported by teachers, children, parents, the community, local and national government representatives and financing organisation.

19
Step 1. Promotion of the programme The basic message is that water, sanitation and hygiene in schools are provisions that can only be implemented when certain principles are followed. The contents of the programme will be explained in an information meeting with community members and, depending on the literacy rate of the participants, a hand-out will be distributed in which the basic approaches, rules, and procedures for the school programme. The meeting will stress: • The importance and expected impact of water, sanitation and hygiene in schools;
• Ownership, roles, and responsibility of the school, parents and the community for continuous management and support to operations and maintenance;
• Type of facilities being offered and their implications for management and costs;
• Financial implications of the programme. Step 2. Implementation planning Before starting with the programme, the school principles have to meet with parents, community members, and teacher representatives to confirm their interest in and commitment to the programme, discuss the information received from the programme-staff, and identify any assistance that might be needed. Representatives of parents, teachers, community and public health staff should form an elected committee. The committee needs to investigate whether the programme is likely to be successful over the long term. This requires sustainable school organisational arrangements and service levels that the school community can operate and maintain over time. Step 3. The existing conditions, knowledge, and practices A study on existing conditions, knowledge and practices, which should be undertaken before the programme is implemented, forms the basis for the programme’s monitoring and evaluation system. Normally the baseline will be undertaken in cooperation between the children, teachers, elected committee and professional staff in charge of the programme implementation.
The following information should be collected in the study:
Information to be collected Points to be included
What are the most risky hygiene practices among school children? For children younger than 8 years, children 9-11 years and children 12-16 years.
The most important practices must be identified based on local conditions in the schools and the community, but in any case should include:
• Toilet use or other ways of defecation (including anal cleansing);
• Hand washing with soap
• Choice of drinking water sources;
• Menstrual hygiene
• Waste management
• Food hygiene
Define the extend of the problems � How many students use the risky hygiene practices? Is there a difference between practices of girls and boys? Do they come from particular cultural or socio-economic groups?
� Who motivates or constrains them to change their hygiene behaviour?

20
Information to be collected Points to be included
Select risky hygiene practices on which the programme will focus. Determine message and channels for communication
� Which risk practices are most widespread and have the largest impact on health?
� Which risk practices are easiest to change? � What motivates those who currently use “good”
practices? � What are the most efficient ways to get
messages across?
It is also important to determine how the effectiveness of the hygiene education programme will be measured. What needs to be monitored in the short, medium, and long term? Define who is in charge of monitoring and evaluation (M&E). Step 4. Implementation and construction
The school and elected committee should be consulted and involved in all stages of construction and programme implementation. Technical assistance for construction and training on hygiene education might have to be contracted to ensure that the capacity building aspects of programme implementation will be of appropriate quality.
Based on the study in Step 3, the school teachers should be trained to learn to define their own priorities and identify the focus target behaviours and lesson plans taking into consideration age and gender differences. The lesson plans given in this manual can provide the starting points for the hygiene education activities in the school.

21
Step 5. Operation and maintenance of the facilities The most important elements to ensuring that operation and maintenance (O&M) of facilities i.e. hand wash facilities, water supply and toilets/urinals, is undertaken include: The use of an Operation and Maintenance Plan. The basic principles of an O&M plan are:
• It is developed and agreed upon before the facilities are completed.
• It is non-discriminatory and protects the best interest of children at all times.
• If possible, it is linked to other school improvement efforts such as class room construction, etc.
• If training is needed on O&M skills this should be provided on a regular basis (annual or bi-annual).
Sample of an operation and maintenance plan: Activity How often (e.g. twice
daily, daily, weekly, occasionally)
Who is responsible
Materials, parts, tools, and equipment needed (soap, brushes, spare parts, etc.)
Who finances the materials, parts, tools, and equipment
Supply of soap, filling of water reservoirs, provision of clean towels
Recommended at least daily
Cleaning of toilets, hygiene water supply facilities, school yard
Recommended at least daily
Supervision: inspection for damage and level of pit fill
Recommended at least daily
Maintenance: minor repairs, major repairs, emptying of pits
Monitoring and evaluation of use

22
Step 6. Monitoring and evaluation The information collected in the study in Step 3, provides the basis for the monitoring and evaluation system. A monitoring and evaluation system follows changes over time on indicators related to target behaviours affecting water, sanitation and hygiene in schools. It should also identify points of attention and provide recommendations for corrections or improvement. Since activities on hygiene, sanitation and water in schools will continue for ever, monitoring and evaluation will be an ongoing exercise. Short-term results can be measured by the children, teacher and elected committees through classroom or focus-group assessments. Long-term effects will become evident if reliable health statistics are available at the school and community health centres. However, impacts will only begin to show up after a critical mass of behaviour change has been achieved for a sufficient period of time. If positive results are found through monitoring of the programme this will be a catalyst for the success of the programme. It will be an enormous motivator to all involved to continue with all the effort to improve hygiene, sanitation and water in the school. If the results and impacts are less than expected, it would need some critical analysis of the outcomes in order to define joint action to improve the overall programme or the most critical parts of the programme.

Part two:
Lesson plans and
exercises
24
8. Safe use of toilets and urinals
8.1 Background
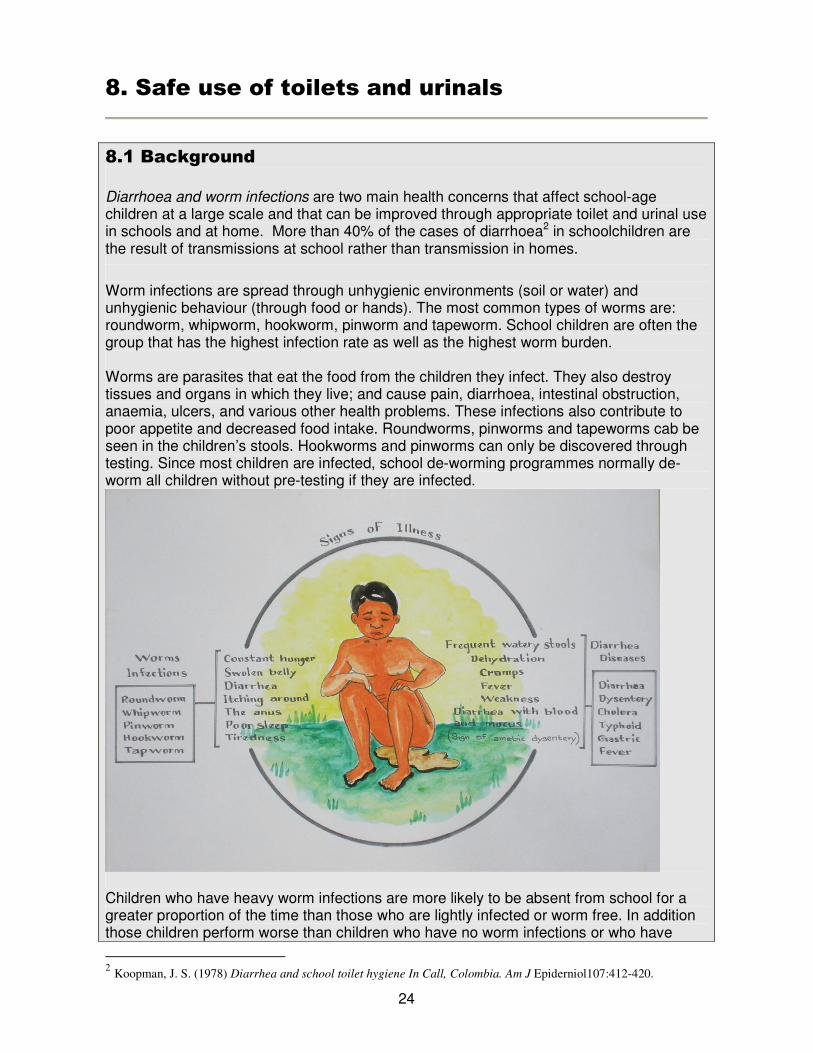
Diarrhoea and worm infections are two main health concerns that affect school-age children at a large scale and that can be improved through appropriate toilet and urinal use in schools and at home. More than 40% of the cases of diarrhoea2 in schoolchildren are the result of transmissions at school rather than transmission in homes.
Worm infections are spread through unhygienic environments (soil or water) and unhygienic behaviour (through food or hands). The most common types of worms are: roundworm, whipworm, hookworm, pinworm and tapeworm. School children are often the group that has the highest infection rate as well as the highest worm burden. Worms are parasites that eat the food from the children they infect. They also destroy tissues and organs in which they live; and cause pain, diarrhoea, intestinal obstruction, anaemia, ulcers, and various other health problems. These infections also contribute to poor appetite and decreased food intake. Roundworms, pinworms and tapeworms cab be seen in the children’s stools. Hookworms and pinworms can only be discovered through testing. Since most children are infected, school de-worming programmes normally de-worm all children without pre-testing if they are infected.
Children who have heavy worm infections are more likely to be absent from school for a greater proportion of the time than those who are lightly infected or worm free. In addition those children perform worse than children who have no worm infections or who have
2 Koopman, J. S. (1978) Diarrhea and school toilet hygiene In Call, Colombia. Am J Epiderniol107:412-420.
25
been treated against them.
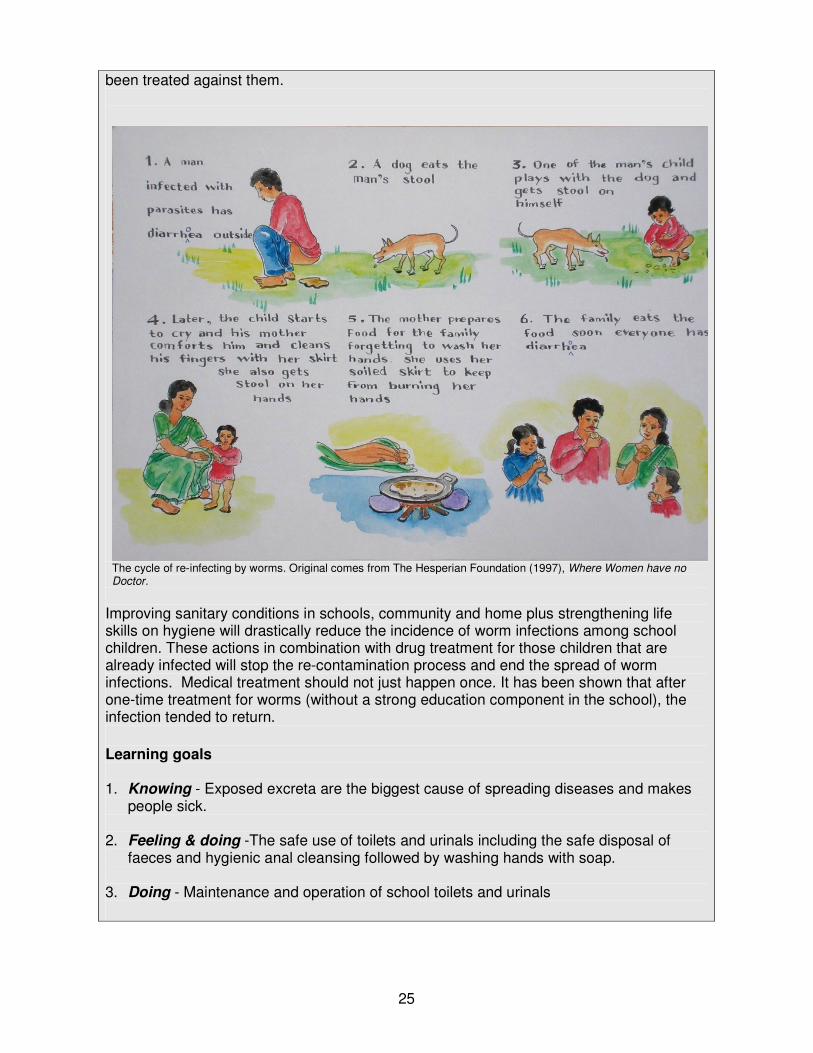
The cycle of re-infecting by worms. Original comes from The Hesperian Foundation (1997), Where Women have no Doctor.
Improving sanitary conditions in schools, community and home plus strengthening life skills on hygiene will drastically reduce the incidence of worm infections among school children. These actions in combination with drug treatment for those children that are already infected will stop the re-contamination process and end the spread of worm infections. Medical treatment should not just happen once. It has been shown that after one-time treatment for worms (without a strong education component in the school), the infection tended to return.
Learning goals 1. Knowing - Exposed excreta are the biggest cause of spreading diseases and makes
people sick. 2. Feeling & doing -The safe use of toilets and urinals including the safe disposal of
faeces and hygienic anal cleansing followed by washing hands with soap. 3. Doing - Maintenance and operation of school toilets and urinals

26
Common behaviours related to worm infections Unhygienic habits that allow worm eggs to enter the mouth from the hands include:
• Failing to wash hands before eating
• Failing to clean anus and wash hands after defecating
• Failing to wash hands after playing on the ground
• Allowing dirt to remain under the fingernails
• Sucking on fingers Behaviours that allow hookworms to penetrate the skin or enter the body include:
• Walking or working in the field without wearing shoes or sandals
• Working in the field with bare hands
• Ingesting unwashed raw vegetables Behaviours that allow eggs or young worms to be spread back into the environment include:
• Defecating on soil or in water with which others come in contact
• Using untreated or partly treated human excreta as fertiliser for crops Behaviours that allow worms and eggs to enter the body with food include:
• Eating unwashed raw vegetables may lead to worm infection
• Eating raw or undercooked fish, shellfish and meat can result in infection with flukes Behaviours that may result in continuation of infection or spread to others include:
• Not having stool samples examined
• Failing to comply with treatment Source: WHO (1997), “Strengthening Interventions to Reduce Helminth Infections; as an entry point for the development of Health-Promoting Schools”, WHO Information Series on School Health, WHO/SCHOOL/96.1, Geneva

27
Examples of Lesson Plans
8.2 School/Community mapping - sanitation3
Target group Grade 3, 4 and 5: girls and boys – school mapping and optional community mapping Grade 6, 7, 8 and 9: girls and boys - community mapping Learning goals Knowing:
• The students map those sanitation problems in their school/community that can cause diarrhoea
• Children become aware of where sanitary facilities and “informal” places for defecating and urinating are located.
• Children can identify possible impacts on health and social and economic development Feeling:
• Children are ready to take steps to protect their water resources
3 Could be undertaken in conjunction of the mapping for water and solid waste.

28
Teaching methods Modelling, presentation, role-play and discussion Teaching materials Sheets of white or brown paper, markers, paint or pencils in different colours, small items such as pebbles, twigs, cotton, buttons, small stones, beads, sand/soil, an old tin; glue and scissors (optional), small coloured stickers, cards or slips of paper. Description of activities
• Divide the class in groups of not more than 12 students.
• Ask each group to prepare a map of their school/community4. In the map at least the following points should be included:
School Community
• Building(s)
• Important features and boundaries
• Toilet and urinal buildings
• Paths
• Water points
• Garbage bins
• Houses
• Important features and boundaries
• Roads and paths
• School, mosques, health centres, shops etc.
• Fields, forest, swamp
• Water sources
• Toilet and urinal buildings
• Waste disposal sites
• After completion of the maps, the groups should present their maps to the whole class. Other groups are allowed to ask questions of give comments.
• If correction or expansion of the map is needed this could be done after all presentations are finished.
• When the map is completed, each group divides itself in twov for a role-play. One group are the Buyers, the other ones the Sellers.
o The buyers should imagine that they are visiting the school/community for the first time. The sellers take the buyers around in the school/community. It is the first time the buyers are here and they want to find out everything they can. The sellers use the school/community map to take the buyers on a guided tour. Show the buyers as much as possible, including water, sanitation and hygiene arrangements, and help them to understand what life is like by describing the activities and lives in school/community. The buyers should ask questions about what they are being shown, to make sure they know all that they should know to buy something.
• The purpose of the play is to have the children look at their school/community from a different perspective. The buyers will look for the points that need improvement while the sellers will focus on the positive points
• After the role-play the groups is asked to: o Describe sanitary arrangement they are proud of. o Describe sanitary arrangement they are not proud of. o Describe problems or difficulties that they have with sanitation o Mark those problems and difficulties on the map.
4 In bigger communities, each group could make a map of a different sector of the community

29
• Prepare a list of problems and difficulties and measures that can be taken by the children themselves as well as measures that should be taken but are beyond the control of the children.
• Make a Sanitation Plan for those measures to be taken by the school children. Indicating tasks to be done, by whom, when and possible resources needed. Demand a commitment from the children for the realisation of the plan.
• Discuss the measures that should be taken and are beyond the range of the children. Identify who is in charge of taking those measures (teachers, community groups/leaders, health centre, local authorities, etc.). If possible, approach those people with a request to take measures.
8.3 Understanding the F-diagramvi-part 1
Target group Grade 1-9 Learning goals Knowing:
• Children can give the transmission routes of diarrhoeal disease.
• Children can mention ways by which transmission of diarrhoeas can be prevented.

30
Feeling:
• Children appreciate the importance of washing hands with soap and cooking food thoroughly.
• Children are ready to practice good sanitation and hygiene and stimulate other to do the same.
Doing:
• Children can communicate to others on preventing diarrhoeas. Teaching methods Drawing, brainstorming and analysing Teaching materials Sheets of white or brown paper, markers, paint or pencils in different colours Description of activities The activities can be undertaken either in small groups or in a classroom setting. When working in small groups, there should be a plenary session to compare the results and add any missing link or risk. The diagrams do not have to be identical as long as at least the six Fs (faeces, fingers, flies, fields, fluids, food) are in.
• First ask a child to draw a picture of a child with diarrhoea and to place this at the left hand side on the blackboard or on the ground.
• Ask another child to draw a picture of a healthy child and place this on the right hand site.
• Asks the children how the diarrhoea may pass from the sick child to the healthy child.
• Discuss if the answer given is considered correct by the majority of the group, ask some children to draw a picture of each travel route or write the word concerned on a piece of paper and place them between the drawings of the children.
• Ask the other children to draw in transmission lines until the diagram is complete.
• Check the work to see that all risky practices and connections are in (either by the teacher or in a plenary class room session).
• Now ask the children to describe these transmission routes and how transmission can be prevented.
• Draw together with the children to official “F” diagram (see example above).

31
8.4 Pile sorting Sanitation
Target group Grade 1-4 Learning goals Knowing:
• Children learn about good and bad toilet use. Feeling:
• Children understand the importance of using toilets Doing:
• Children practice safe use of toilets Teaching methods Pile-sorting, discussion, seeing and doing Teaching materials Cards with drawings on different ways of sanitation with as a minimum the following drawings:
• Using the field
• Urinating against the fence of the school compound
• Boy urinating against tree
• Using latrine but littering faeces outside the hole
• Using the outside of the urinal
• Using latrine and washing hands with soap afterwards
• Using latrine and with no washing hands with soap afterwards
• Using urinal wearing barefoot
• Using urinal wearing shoes or slippers
• … additional drawings reflecting the sanitation habits in school and community Three cards with: (1) Good, (2) Bad and (2) In-between If possible make 4 sets of the above cards. Description of activities
• Divide the children in four groups (if four sets of cards are available) or do a session involving all children in the class.
• Give each group a set of cards and ask the children to sort the cards in three groups: 1. Good: those activities that are hygienic 2. Bad: those activities that are not hygienic 3. In-between: activities that are neither hygienic nor not hygienic OR activities about
which the children are not sure.

32
If undertaken with the whole class, ask individual children to answer and motivate. Go through all cards without discussion.
• After 10 minutes reunite the full class, ask each group to explain to the other groups, why they made these choices. Allow the other groups to ask questions to the group who presents.
• Discuss with the class, the differences of the outcomes of the different groups. Why are there differences? If the children do not know the answers, provide them with the answers or look jointly for the answers.
• Come to a joint agreement on which sanitation behaviours are: good, bad and in-between.
• Discuss with the children the best behaviours. At school as well as at home.
• Take the children in groups to the school toilets and urinals and show them how to use them and wash their hand afterwards. Ask some children to try and use them and practice the hand washing with all children.
• Put the drawings with the good sanitation behaviours on the wall in the class and remind the children from time to time about it
8.5 Demonstrating de/rehydrationvii
Target group Grade 6, 7, 8 and 9 Learning goals Knowing:
• Children can mention ways by which transmission of diarrhoeas can be prevented.
• Children can state the signs and symptom of a person suffering from diarrhoea.
• Children know about dehydration effects and how to prevent/treat them. Feeling:
• Children appreciate the importance of washing hands with soap and cooking food thoroughly.
• Children are ready to practice good sanitation and hygiene and stimulate other to do the same.
Doing:
• Children can make correct decisions on hand washing with soap at critical times.
• Children can communicate to others on preventing and curing diarrhoeas. Teaching methods Drawing, brainstorming and analysing

33
Teaching materials A transparent plastic bag filled with water (preferably yellow or light brown in colour), a pin or other sharp object, a small basin, a glass with clean water, some sugar and salt, a teaspoon. Description of activities
• Facilitate a discussion on diarrhoea with the whole class: o Who has recently had diarrhoea? o What happened? o Whose young brother or sister has had diarrhoea? o Do many people in the community have diarrhoea?
• Show the children a transparent bag filled with yellowish or brown water.
• Explain that the bag represents a baby or a young child who has diarrhoea.
• Tell the class that the baby/infant is about to poop and asks them to watch carefully what happens…
• Invite one of the children to come and pierce the bag with a sharp object.
• Ask the class to describe what happens (The bag empties itself and it becomes are wrinkled and limp).
• Start a discussion about what will happen to the baby/infant (Together with the excreta, the child looses all the fluids in its body and starts drying out and become limp).

34
• Ask what the mother, father, grandparents, sister or brother can do when this happens (replenish the fluids).
• Now demonstrate what kind of fluid to give to someone with diarrhoea who looses a lot of water along with the stools. Fill a bottle with one litre of clean water, put eight teaspoon of sugar and half of level teaspoon of salt in it and vigorously stir the mixture. If possible, add half a cup of fruit juice, coconut water, or mashed ripe banana to the drink. These contain potassium, a mineral which helps a sick person accept more food and drink. Ask what this mixture will do.
• Facilitate a discussion on why the water should be as pure as possible (but not fully sterile water is better than no water at all).
• Invite one or more volunteering children to come and taste the oral rehydration treatment (ORT or Jeevani) mixture and describe its taste. (They should taste both sugar and salt; the salty taste can be described as 'as salty as tears'). Explain why sugar and salt are added. Also tell that As soon as the sick child (or adult) can eat food, give frequent feedings of foods s/he likes.
• Help the class draw conclusions on ORT/Jeevani (why, when, what, how) and what they can do in case of diarrhoea at home. Explain that if the person does not cure within three days or is seriously dehydrated, a doctor should be warned.
Optional additional activities
• The children find out whether their parents know about ORT/Jeevani, explaining what they have learned in school. They report their findings and experiences in class. The teacher her knowledge on ORT/Jeevani increases over time.
• Arrange a simple home survey, during which each student finds out which of the six F’s is safe or unsafe in their homes. They use previously made checklists to identify and analyse improvements that can be taken.
• Organise a parent’s day in the children can demonstrate the F-diagram, outcomes of the home survey as well as methods for de/rehydration.

35
9. Personal hygiene
9.1 Background
There are many diseases that can be contributed to poor personal hygiene. In below table the main health risks and recommended habits for prevention are indicatedviii.
Health concerns Prevention
Body
Scabies, ring worm, yaws, lice
All these skin problems are very much related to personal hygiene and cleanliness. Bathing daily and body washing with soap as well as changing cloths daily can very much reduce the spreading.
Head
Lice Eye diseases: trachoma and conjunctivitis
Washing face and hair with water and soap as well as avoiding use of the same towel and cloths by different persons. (Chronic) eye infections spread from person-to-person by touching or flies. It develops slowly and gets worse and worse, eventually it can even cause blindness.
Mouth
Tooth decay and tooth loss
All teeth should be cleaned twice a day. Use a brush, stick or finger wrapped with a piece of rough cloth. If no toothpaste is available, salt, charcoal or just plain water will also work.
Hands
Diarrhoea, colds dysentery, various worms, cholera, typhoid, paratyphoid
Washing both hands, rubbing with plenty of water with soap/ash/mud after toilet use, before/after eating, before preparing food and after cleaning babies. (more information in section 10)

36
Nails
Dysentery, diarrhoea, various worms, cholera
Cutting nails and washing under nails with soap
Female hygiene
Vaginal, bladder and kidney infections
Cleaning of genitals and wiping from front to back after using toilet Frequent drinking and urinating Urinating after intercourse (more information in section 11)
Feet
Hook worms Some worms enter a person’s body through feet that get in touch with baby worms in moist soils. Wearing shoes or slippers can avoid this. (more information in section 9)
Learning goals 1. Knowing - Links between personal hygiene and diseases. 2. Feeling & doing - Appropriate personal hygiene: washing hands with soap (see
separate point), wearing shoes or slippers, cutting nails, brushing teeth, combing hair, regular washing of body and hair.
37
Examples of Lesson Plans
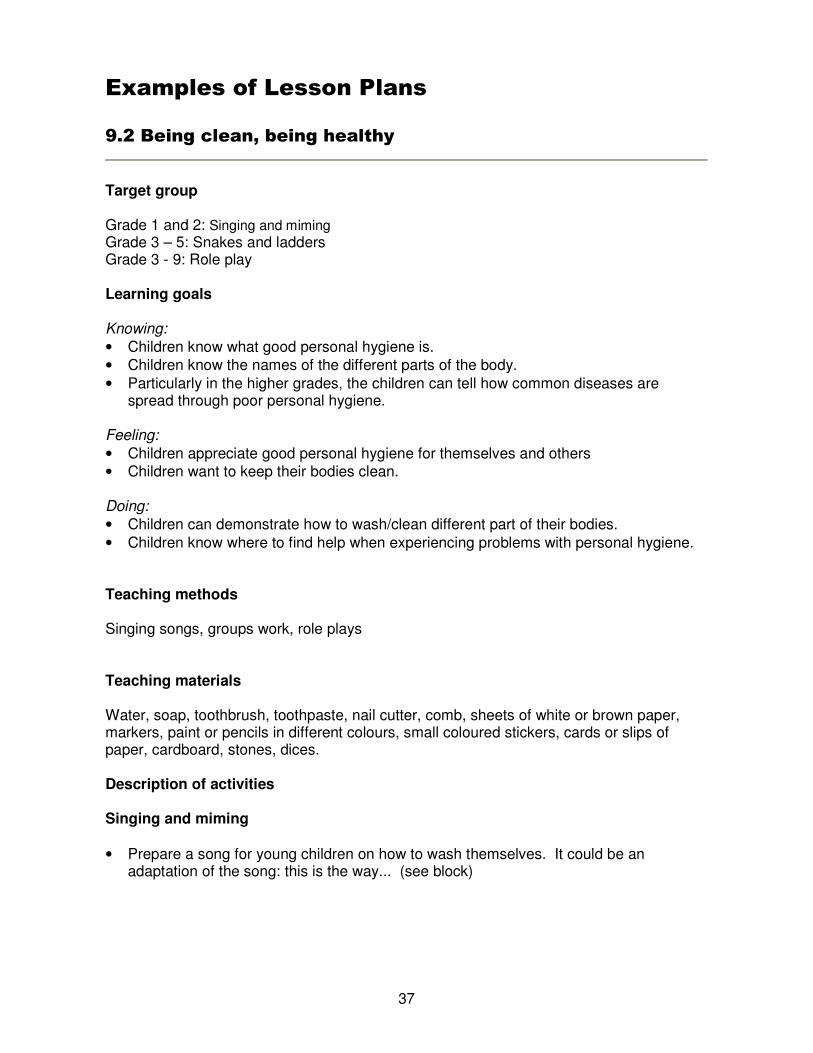
9.2 Being clean, being healthy
Target group Grade 1 and 2: Singing and miming
Grade 3 – 5: Snakes and ladders Grade 3 - 9: Role play Learning goals Knowing:
• Children know what good personal hygiene is.
• Children know the names of the different parts of the body.
• Particularly in the higher grades, the children can tell how common diseases are spread through poor personal hygiene.
Feeling:
• Children appreciate good personal hygiene for themselves and others
• Children want to keep their bodies clean. Doing:
• Children can demonstrate how to wash/clean different part of their bodies.
• Children know where to find help when experiencing problems with personal hygiene. Teaching methods Singing songs, groups work, role plays Teaching materials Water, soap, toothbrush, toothpaste, nail cutter, comb, sheets of white or brown paper, markers, paint or pencils in different colours, small coloured stickers, cards or slips of paper, cardboard, stones, dices. Description of activities Singing and miming
• Prepare a song for young children on how to wash themselves. It could be an adaptation of the song: this is the way... (see block)

38
Cleaning song
This is the way I wash my face, wash my face, wash my face. This is the way I wash my face, so early in the morning.
This is the way I brush my teeth, brush my teeth, brush my teeth. This is the way I brush my teeth, so early in the morning.
This is the way we hang up our clothes, hang up our clothes, hang up our
clothes. This is the way we hang up our clothes, so early in the morning.
This is the way I button my shirt, button my shirt, button my shirt. This is the way I button my shirt, so early in the morning.
This is the way to tie my shoe, tie my shoe, tie my shoe. This is the way to tie my shoe, so early in the morning.
This is the way to brush my hair, brush my hair, brush my hair. This is the way to brush my hair, so early in the morning.
This is the way …
• Teach the children the song.
• Ask the children to come up with other verses on other personal hygiene habits.
• Invite children one by one to sing and mime what they have done before coming to school.
• After singing, stimulate a group discussion on: o Why each practice is important o Why it helps to stay healthy
39
9.3 Snakes and ladders
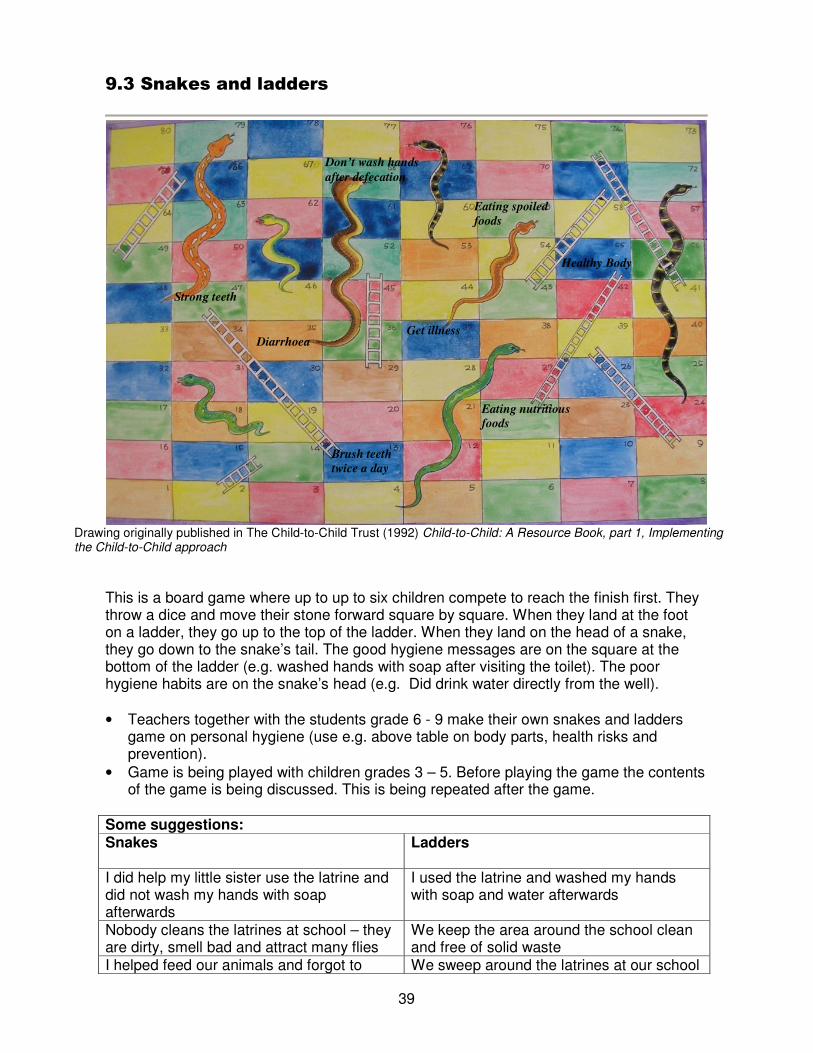
Drawing originally published in The Child-to-Child Trust (1992) Child-to-Child: A Resource Book, part 1, Implementing the Child-to-Child approach
This is a board game where up to up to six children compete to reach the finish first. They throw a dice and move their stone forward square by square. When they land at the foot on a ladder, they go up to the top of the ladder. When they land on the head of a snake, they go down to the snake’s tail. The good hygiene messages are on the square at the bottom of the ladder (e.g. washed hands with soap after visiting the toilet). The poor hygiene habits are on the snake’s head (e.g. Did drink water directly from the well).
• Teachers together with the students grade 6 - 9 make their own snakes and ladders game on personal hygiene (use e.g. above table on body parts, health risks and prevention).
• Game is being played with children grades 3 – 5. Before playing the game the contents of the game is being discussed. This is being repeated after the game.
Some suggestions: Snakes Ladders
I did help my little sister use the latrine and did not wash my hands with soap afterwards
I used the latrine and washed my hands with soap and water afterwards
Nobody cleans the latrines at school – they are dirty, smell bad and attract many flies
We keep the area around the school clean and free of solid waste
I helped feed our animals and forgot to We sweep around the latrines at our school
Strong teeth
Get illness
Eating spoiled
foods
Brush teeth
twice a day
Diarrhoea
Don’t wash hands
after defecation
Eating nutritious
foods
Healthy Body

40
wash my hands before eating and keep them covered I never cut my nails, I wait for them to break off
Whenever I wash my hands with soap I make sure that I also wash the dirt under my nails
I do not like to wear shoes I brush my teeth twice a day I never wash my face with soap – soap itches in my eyes
After using the toilet, I wipe myself with water from front to back
Role playix
• Ask some of the older children to prepare a role play incorporating of good and bad personal hygiene habits. They should give an explanation of what they show and the reasons why this is good or bad practice
• Ask the other children watching the role play to tell what were good and bad habits.
• With the older children: discuss about the specific diseases that may be passed or blocked by the demonstrated practices, the reasons why such diseases may be passed on and to whom they might be passed.
9.4 Personal hygiene puzzle
Target group Grade 6 - 9: Learning goals Knowing:
• Children learn the basics on personal hygiene (in English) Teaching methods Puzzle Teaching materials Blackboard or photocopies Description of activities
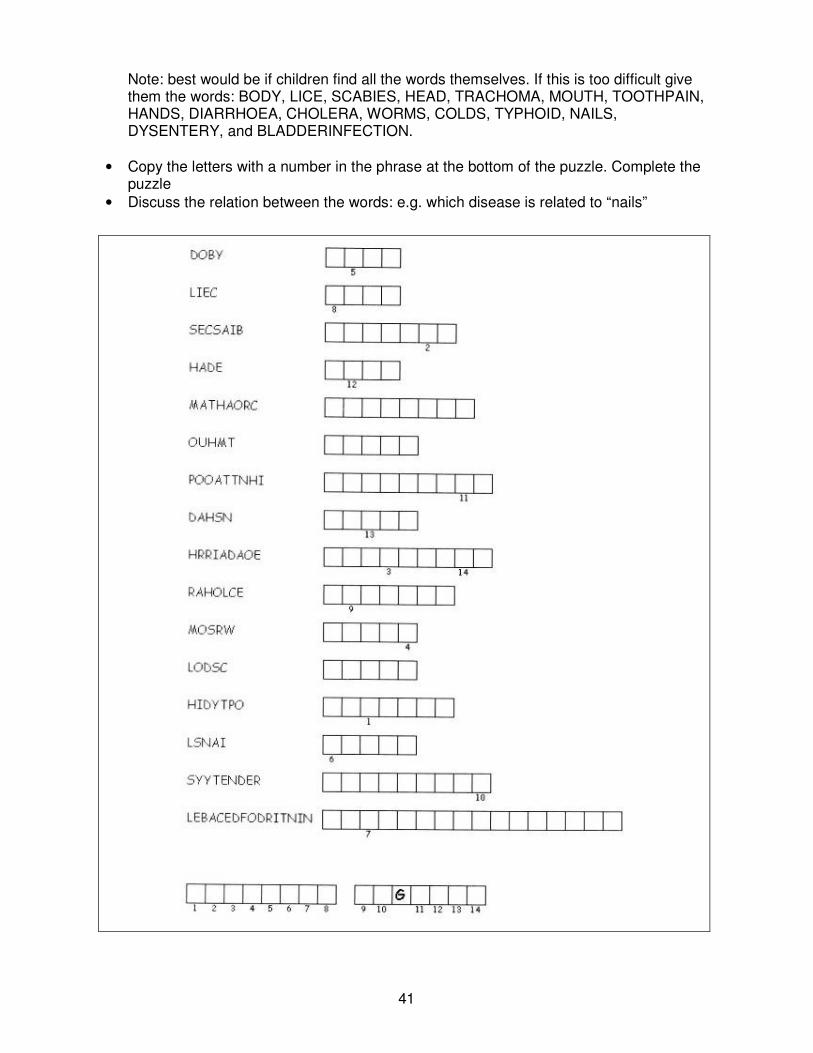
• Copy the below puzzle on blackboard or paper.
• Teach the children the names of the terminologies in English
• Tell them that all words have been scrambled and are derived from the overview table on personal hygiene (see section 9.1) and have to be put in the right sequence.
• Fill in all the words
41
Note: best would be if children find all the words themselves. If this is too difficult give them the words: BODY, LICE, SCABIES, HEAD, TRACHOMA, MOUTH, TOOTHPAIN, HANDS, DIARRHOEA, CHOLERA, WORMS, COLDS, TYPHOID, NAILS, DYSENTERY, and BLADDERINFECTION.
• Copy the letters with a number in the phrase at the bottom of the puzzle. Complete the puzzle
• Discuss the relation between the words: e.g. which disease is related to “nails”
42
9.5 Brushing teeth
Target group Grade 1-5 Learning goals Knowing:
• Children can tell about the function of each type of teeth (cutting, pointing, grinding).
Feeling:
• Children realise the importance of brushing to keep teeth healthy.
Doing:
• Children know how to keep their teeth clean and healthy.
Teaching methods Skills demonstration with peer observation and analysis, discussion, drawing and painting Teaching materials Self-made or bought tooth brushes and toothpaste (children have to take whatever they normally use from home, toothpaste is not necessary), (plastic) cups Description of activities
• Ask the children what it is that they already know about keeping their teeth (and gums) healthy.
• If it has not already come up, explain the children of the importance to keep their healthy by cleaning them at least twice a day and avoiding eating food with lots of sugar.
• Discuss why children do or do not clean their teeth.
• Do the below exercise.
• Go to a water point at the school.
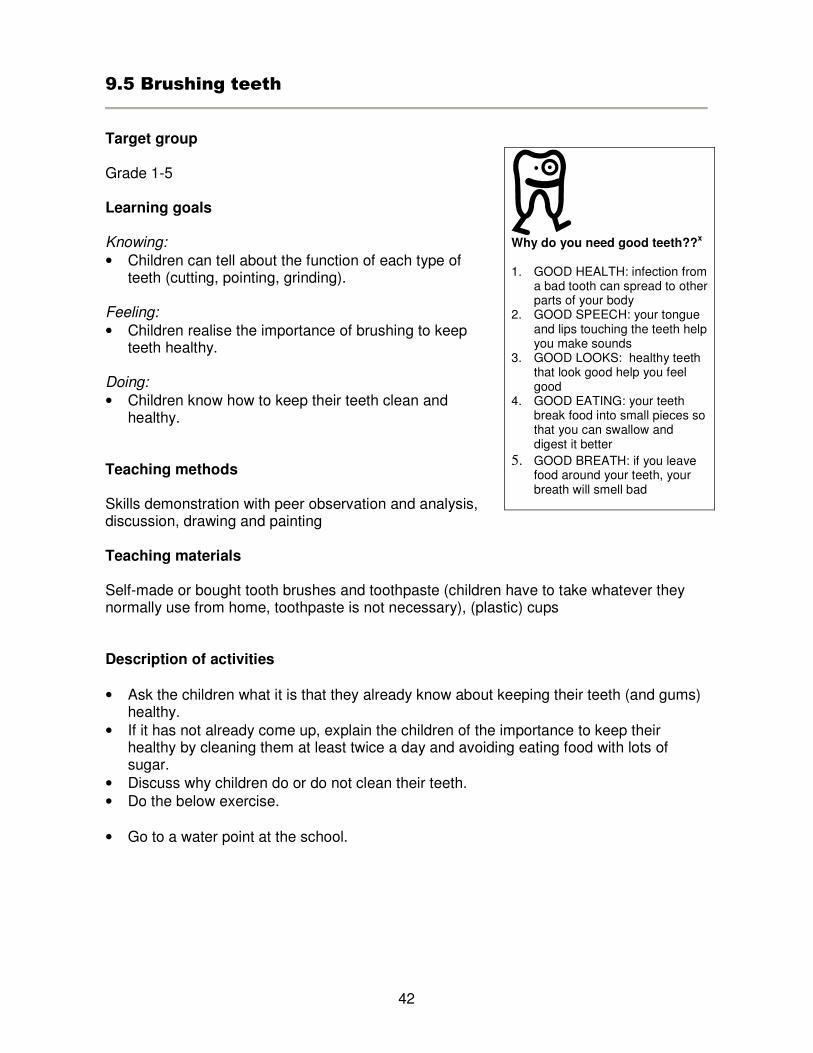
Why do you need good teeth??
x
1. GOOD HEALTH: infection from
a bad tooth can spread to other parts of your body
2. GOOD SPEECH: your tongue and lips touching the teeth help you make sounds
3. GOOD LOOKS: healthy teeth that look good help you feel good
4. GOOD EATING: your teeth break food into small pieces so that you can swallow and digest it better
5. GOOD BREATH: if you leave food around your teeth, your breath will smell bad

43
• Ask each child to undertake the following exercise. Do it in groups. Some brush teeth, others observe. Change later so the ones that first brushed, observe and the ones that observed, brush.
1. Wet the toothbrush. 2. Put on a little bit of tooth paste or clean water 3. Hold the toothbrush at an angle. 4. Brushing the top teeth. 5. Brushing the bottom teeth. 6. Brushing the front teeth. 7. Rinse out the mouth. 8. Dry the mouth. 9. Let the children look at their clean teeth in a mirror, and show them to others. Let
them smell their mouth.
• Go over again the points set out in the exercise sheet.
1. Using a circular movement, brush from the gums towards the teeth. 2. Go round all the teeth, not forgetting the tips and behind. 3. Hold the toothbrush at an angle. 4. Brush top and bottom teeth separately.
• Children will understand the importance of brushing when they realize that long, stiff bristles can get between teeth and remove food debris.
For the children in group 1-5:
• Make a schedule in which they can fill in on a daily basis if they have brushed their teeth before coming to school. Use a couple of minutes each morning to fill in the schedule. Evaluate the schedule once a week or month. Discuss why some children always brush and why some do not or sometime do not clean.
For the children in group 3-5
• Prepare posters for the school explaining why and how to clean teeth.

44
45
10. Promotion of hand washing with soap
10.1 Background
Hand washing is important for good health:
• When washing hands with soap after toilet use, before eating, before preparing food and after cleaning babies this reduces the risk of diarrhoeal diseases by 42–47%.
• Washing hands with soap also significantly reduces the cases of acute respiratory diseases among school children.
Hand washing with soap is the critical component of this behaviour and hand washing only with water provides little or no benefit reducing the amount of gems on somebody’s hands. Clean Mud or ash clean as effective as soap and can be used when soap is not available.
Learning goals 1. Knowing - Links between hand washing with soap and reduction of diseases. 2. Feeling & doing - Hand washing with soap after toilet use, before/after eating, before
preparing food and after cleaning babies
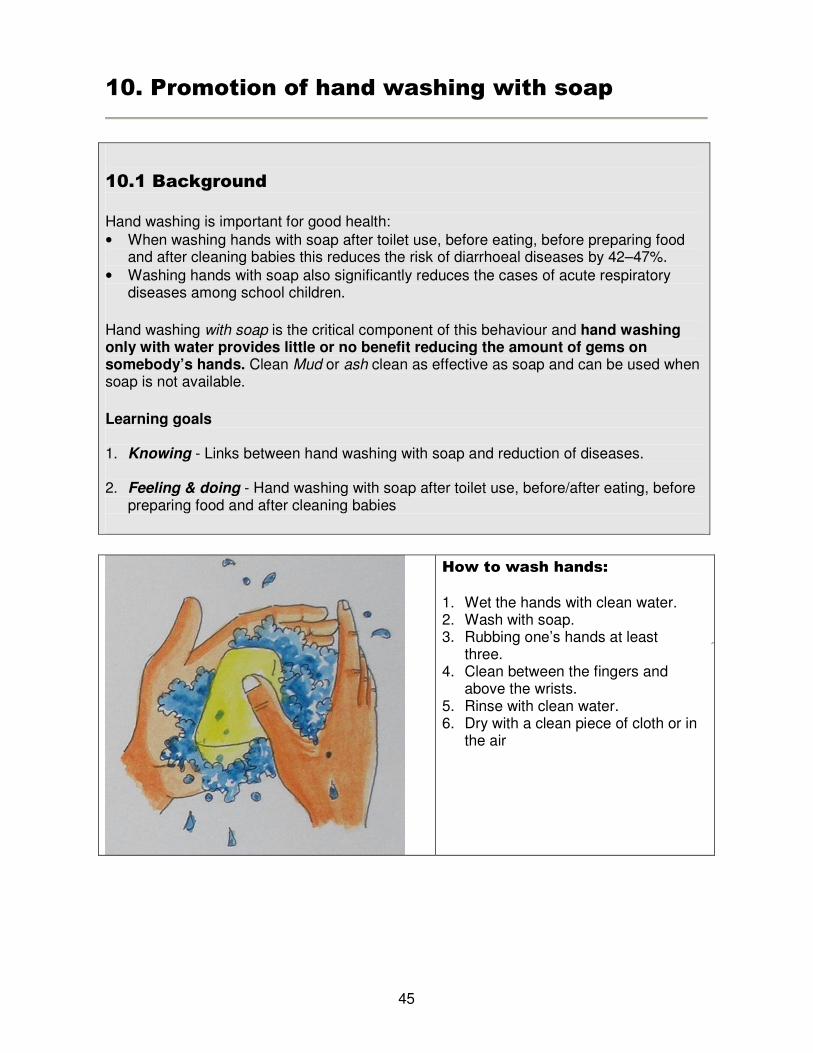
How to wash hands:
1. Wet the hands with clean water. 2. Wash with soap. 3. Rubbing one’s hands at least
three. 4. Clean between the fingers and
above the wrists. 5. Rinse with clean water. 6. Dry with a clean piece of cloth or in
the air

46
Examples of Lesson Plans
10.2 Hand washing exercise
Target group Grade 1 - 5: Learning goals Knowing:
• Children understand the importance of clean hands.
• Children know when to wash hands with soap Feeling:
• Children appreciate good personal hygiene for themselves and others
• Children want to keep their bodies clean. Doing:
• Children know how to wash their hands thoroughly with soap Teaching methods Puppet play Teaching materials Puppet, cards and drawings with personal hygiene messages, pencils in different colours, simple hand wash stand with soap. Description of activitiesxi As preparation for the puppet play, the teachers prepare posters with message related to critical times for hand washing and hand washing habits.
• Seat the children in a circle, with the facilitators sitting among the participants.
• Open the session with a greeting from the puppet “How are you today?”
• Ask the children to look at the posters with hygiene messages on the pin-board. Using the posters, name the tools that are important for washing hands (soap & water).
• Invite certain children to pick a poster and explain the “critical time for hand washing” it is trying to convey. When they are finished, tell them to take the posters back to their seats.
• When all the posters have been explained, collect them from the children and remove the others from the pin-board.
• The puppet can now announce the topic of today’s session: “Today we are dealing with hand washing. Why is it so important to wash your hands regularly and thoroughly?”

47
The children should be encouraged to mention sicknesses – e.g. diarrhoea, stomach upsets – that can result from dirty hands.
• “When should you wash your hands?” Make sure they have mentioned: after toilet use, before/after eating, before preparing food and after cleaning babies.
• “What tools do we need for hand-washing?” Make sure the children mention: a water and soap.
• Display water and soap as they are mentioned.
• A teacher divides the children into mixed-gender groups of five or six. Explain that each group will practice hand-washing in turn. Take the first group and invite them to get their hands dirty by rubbing them on the ground. Now ask them: “Do we have the necessary tools for hand-washing?” If they do not, send them back to collect them.
• Demonstrate hand washing with soap in a clear series of steps.
• Invite the children to repeat these steps.
• Assist any child who is not washing his or hands thoroughly.
• When the exercise is finished, compliment the children on their hand-washing skills before returning to collect the next group.
• The puppet should give the returning groups a poster on hand washing each, and invite them to colour them in.
• The remaining groups go one by one outside to practice washing their hands.
• When all the groups have practised their hand-washing, the session can be wrapped up by singing a popular song.
Wash, wash, wash your hands
Sung to: Row, Row Row Your Boat" Wash, wash, wash your hands Play our handy game. Rub and scrub, and scrub and rub. Germs go down the drain. HEY! Wash, wash, wash your hands Play our handy game. Rub and scrub, and scrub and rub. Dirt goes down the drain. HEY!
48
10.3 Hand washing is critical!!xii
Target group Grade 3-9 Learning goals Knowing:
• Children know the critical times, proper ways and reasons for washing hands.
• Children know which diseases are transmitted by not washing hands.
• Children become aware of the implications of wasting water.
Feeling:
• Children see washing hands as important for their and other people’s health Doing:
• Children wash hands after toilet use and before eating (at school).
• Children do not waste water Teaching methods Demonstration, practice and competition Teaching materials Two buckets with water, two scoops, soap Description of activities Part of these activities takes place outside. Pick a rain-less day.
• Invite the students to talk about a situation when they or others had diarrhoea and had to race to the toilet, but ran into a problem. Alternatively, they can draw the situation and explain or look at the drawings and guess what the drawings are about.
• Divide the class into two equally sized groups and take the two groups outside
• Place two buckets with an equal amount of water and two pieces of soap on a plate or something likewise, at one end of a long stretch of open space and at some distance from each other.
• Ask the children to choose one child in each group who will be the water distributor, or choose two children yourself.
• Explain to the distributors that they have to pour some water over the children’s hands and after they have washed with soap, have to pour water again.
• Position yourself as a referee in between the teams.
• Explain that the two groups will run to the buckets and wash their hands. The next child can start when the first one has come back.
• When the buckets are empty, explain that the group has won that had the largest number of children who had washed their hands when their bucket became empty.

49
• Back in class, facilitate a discussion asking:
o Why is washing hands important? o What may happen if you do not wash your hands? o When should you wash your hands? o What are good ways to wash hands? o Can anyone wash hands? If not, why not? What can be done? o Who does sometimes not wash hands? Why? What can be done? o Why do we want to save water? How can we do this? o Do we waste water in our school/home/community? What can we do about it? o For older children: which diseases are spread through lack of hand washing?
50
11. Menstrual hygiene
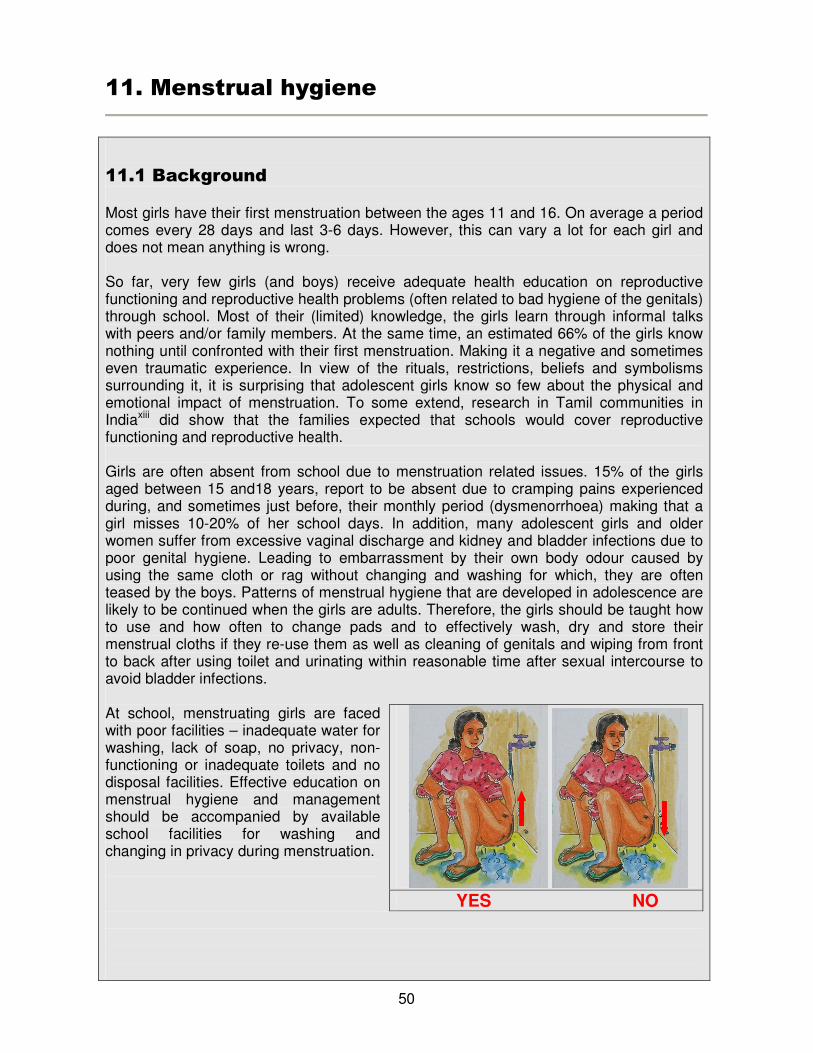
11.1 Background Most girls have their first menstruation between the ages 11 and 16. On average a period comes every 28 days and last 3-6 days. However, this can vary a lot for each girl and does not mean anything is wrong. So far, very few girls (and boys) receive adequate health education on reproductive functioning and reproductive health problems (often related to bad hygiene of the genitals) through school. Most of their (limited) knowledge, the girls learn through informal talks with peers and/or family members. At the same time, an estimated 66% of the girls know nothing until confronted with their first menstruation. Making it a negative and sometimes even traumatic experience. In view of the rituals, restrictions, beliefs and symbolisms surrounding it, it is surprising that adolescent girls know so few about the physical and emotional impact of menstruation. To some extend, research in Tamil communities in Indiaxiii did show that the families expected that schools would cover reproductive functioning and reproductive health. Girls are often absent from school due to menstruation related issues. 15% of the girls aged between 15 and18 years, report to be absent due to cramping pains experienced during, and sometimes just before, their monthly period (dysmenorrhoea) making that a girl misses 10-20% of her school days. In addition, many adolescent girls and older women suffer from excessive vaginal discharge and kidney and bladder infections due to poor genital hygiene. Leading to embarrassment by their own body odour caused by using the same cloth or rag without changing and washing for which, they are often teased by the boys. Patterns of menstrual hygiene that are developed in adolescence are likely to be continued when the girls are adults. Therefore, the girls should be taught how to use and how often to change pads and to effectively wash, dry and store their menstrual cloths if they re-use them as well as cleaning of genitals and wiping from front to back after using toilet and urinating within reasonable time after sexual intercourse to avoid bladder infections. At school, menstruating girls are faced with poor facilities – inadequate water for washing, lack of soap, no privacy, non-functioning or inadequate toilets and no disposal facilities. Effective education on menstrual hygiene and management should be accompanied by available school facilities for washing and changing in privacy during menstruation.
YES NO

51
Learning goals 1. Knowing - Menstrual blood is not dirty or unhygienic and unclean. It is simply blood
and tissue sloughed from lining of the uterus. The odour during menstruation is caused by bad hygiene of the genitals.
2. Knowing& Feeling – Recognising the symptoms of bladder and kidney infections:
frequent urinating, pain while and just after urinating, urine smells and looks cloudy and when serious infection in kidney: fever, nausea and vomiting. Knowing what remedies the infections through home cures (drinking lots of water) and doctor’s medicines.
3. Feeling & doing – Wash the genitals daily with mild soap and water particularly
during menstruation and using sterile pads as well as cleaning of genitals, wiping from front to back after defecation and urinating within reasonable time after sexual intercourse to avoid bladder infections.
Examples of Lesson Plans
11.2 My changing bodyxiv
Target group Girls and boys of grade 6, 7, 8 and 9 Learning goals Knowing � The students know the signs of adolescence in both girls and boys; � Girls and boys understand the symptoms and effects associated with maturing during
adolescence; � Girls and boys can list good personal hygiene habits related to sexual maturing; � Girls can describe how and when to clean private parts, with reasons, to a female
teacher. Boys can do the same to a male teacher. (Boy and girl adolescents should know how women and men can safely clean their private parts, girls to avoid infection of the urinary track with faecal matter, boys to reduce the risk of cancer of the cervix for their later partners).
� Girls and boys understand the menstruation cycle. Feeling: � Both sexes appreciate and respect the processes and changes that occur at
adolescence; � Children perceive positively the importance and feasibility of washing their body parts.

52
Doing: � Girls are able to safely and hygienically dispose of sanitary towels. � Facilities, e.g. water, bucket, cleansing and wrapping material, available in toilets and
used correctly for disposing sanitary towels. Timely and safely disposal of bucket contents.
� Girls and boys build on their self-esteem; � Girls and boys show solidarity with classmates in case of ‘accidents’ related to
menstruation. Teaching methods: � Case analysis � Discussion � Experiences Sharing � Observations Activities: Game 1 Problems at school: � Prepare and present an imaginative case history, e.g. "Salma has soaked her
menstrual pad. The boys in class start laughing and making remarks at her. She goes to the toilet to change, but there is no water, nowhere to throw the pad, there is no emergency towel to use in the school. In order to avoid further embarrassment, she disappears from school without telling anybody".
� Ask the class to discuss three questions:
o What does Salma feel? o What does this story tell you about the school? o What could have helped Salma cope with the situation?
� Facilitate the discussion and help the girls to share experiences Problems at home:
• Also make or invite stories that relate to conditions and problems at home.
• Ask the class to use the case study to build a problem tree. Write the central theme on a slip of paper or card and sticks this on the wall or places it on the floor: "Inappropriate housing conditions for the hygiene of adolescents in the family"
• Invite the children to write the related problems and consequences on other slips or cards, giving one message per slip/card.
• Help the children to work in groups to identify solutions for the identified problems.
• In plenary, help the groups to prepare jointly a final list of possible actions, for example on the blackboard.
53
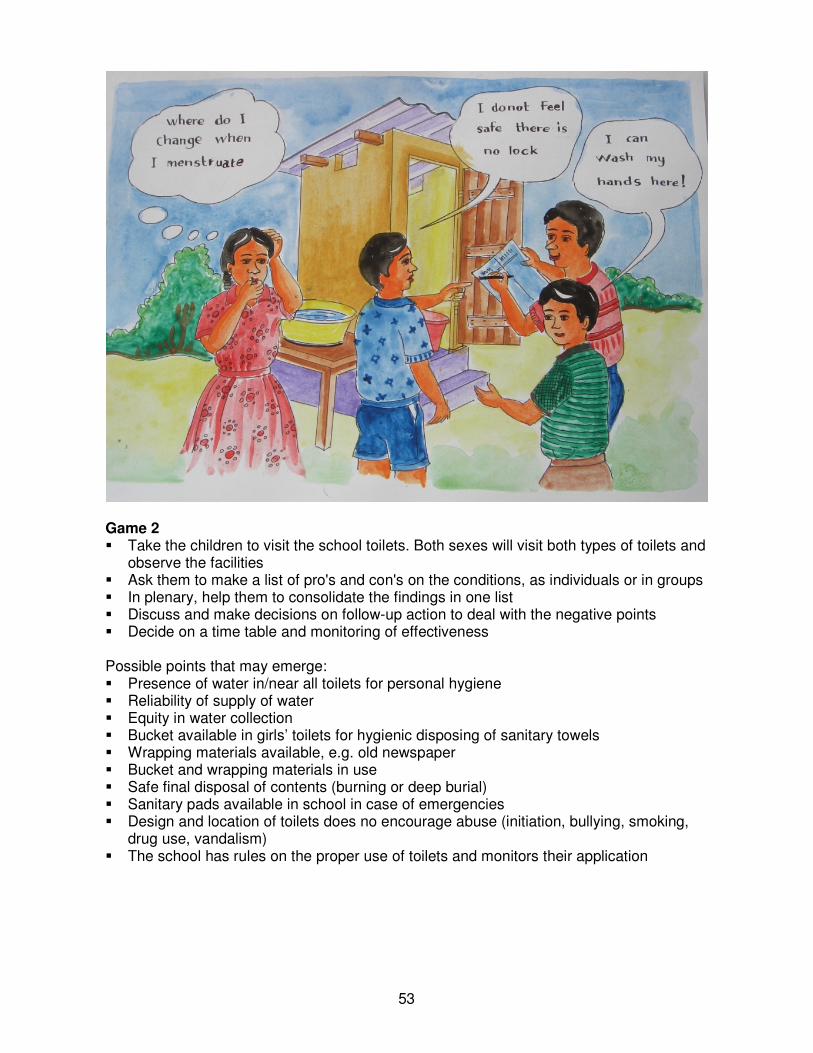
Game 2 � Take the children to visit the school toilets. Both sexes will visit both types of toilets and
observe the facilities � Ask them to make a list of pro's and con's on the conditions, as individuals or in groups � In plenary, help them to consolidate the findings in one list � Discuss and make decisions on follow-up action to deal with the negative points � Decide on a time table and monitoring of effectiveness Possible points that may emerge: � Presence of water in/near all toilets for personal hygiene � Reliability of supply of water � Equity in water collection � Bucket available in girls’ toilets for hygienic disposing of sanitary towels � Wrapping materials available, e.g. old newspaper � Bucket and wrapping materials in use � Safe final disposal of contents (burning or deep burial) � Sanitary pads available in school in case of emergencies � Design and location of toilets does no encourage abuse (initiation, bullying, smoking,
drug use, vandalism) � The school has rules on the proper use of toilets and monitors their application

54
12. Waste management and water drainage
12.1 Background Solid waste Solid waste is left-over materials that result from human activities that are no longer wanted or needed by their users. Solid waste management is the collection, transport, processing or disposal of waste materials, usually ones produced by human activity. In school compounds this is generally: paper (note books, books and wrapping material), plastic and little organic waste (fruits and other uneaten food). If the school compound is not regularly cleaned, the sold waste left behind will attract rats, flies and cockroaches, animals who can carry and spread diseases. This is also known as vector breeding. Therefore, it is important that solid waste is being collected and treated. So far, whenever solid waste is collected it is burned, buried or collected by a municipal service. In order to get most “advantage” from the waste that is left at schools, it is essential that solid waste is being separated and as much as possible reduced, re-used and recycled, as followed:
• Paper and cardboard: According to a recent studyxv in Sri Lanka, an average school produces approximately 3600 kg of paper waste per school year. If collected, the paper could be sold at 3 rps/kg or 10,800 rps/school/year!! In addition: recycling paper saves trees!! For the production of 3600 kg of paper, 36 ~ 60 trees are needed.
• Plastic bags, bottles and containers: Just like paper, plastic can be re-used and recycled. When collected at school, the plastic could be sold to a recycling company.
• Glass bottles and metals: can also be separately collected but will normally not be dumped in significant quantities at schools.
• Organic waste: Although schools generally do not produce a lot of organic waste, it could be investigated if composting organic waste in special bins would be possible or collection for feeding of pigs, chicken or other animals.
• Other waste: Some of the waste cannot be made of use. This waste, just a fraction of the original amount of solid waste, could be burned, safely buried or collected by the municipal services. For this waste, sufficient garbage bins should be placed in the school compound.

55
Wastewater
Source
xvi
Especially in the rain season, muddy paths, puddles and pools of stagnant water are common sights in school compounds. Most of water will come from rain but also significant amount of water comes from water run-off from taps, leaking pipes, pumps or even overflow from septic tanks. Standing water in the school compound will provide a breeding sit for mosquitoes. Mosquitoes can cause diseases like: malaria, dengue fever and filariasis. The water also can get contaminated with faeces and cause diarrhoeal diseases if children use this water. Further standing water will limit the available space in the school compound as well as make shoes and school uniforms dirty with mud. Following the above schedule, the wastewater problem can be solved in several ways: (1) by decreasing the amount of surface wastewater (repairing leaking taps and pipes, preparing good drainage around taps, wells and pumps, clean septic tanks, reduce the amount of rain water by collecting it for other uses) (2) by increasing the amount of water that seeps into the ground (e.g. through soak pits) (3) by increasing the drainage of wastewater out of the community (construction of drainage channels).
Learning goals 1. Knowing - Health risks of non-collection of solid waste. Health risks of standing water 2. Feeling & doing - Collection and treatment of solid waste. Avoiding of standing water.

56
Examples of Lesson Plans
12.2 School/Community mapping – solid waste and water
drainage5
Target group Grade 3, 4 and 5: girls and boys – school mapping and optional community mapping Grade 6, 7, 8 and 9: girls and boys - community mapping Learning goals Knowing:
• The students map those garbage and waste problems in their school/community that can cause health problems
• Children become aware of how different garbage sites in their school/community are used and water is being drained
• Children learn the negative impacts on the living environment
• Children can identify possible impacts on health and social and economic development Feeling:
• Children are ready to take steps to clean their school/community
Teaching methods Modelling, presentation, role play and discussion Teaching materials Sheets of white or brown paper, markers, paint or pencils in different colours, small items such as pebbles, twigs, cotton, buttons, small stones, beads, sand/soil, an old tin; glue and scissors (optional), small coloured stickers, cards or slips of paper. Description of activities
• Divide the class in groups of not more than 12 students.
• Ask each group to prepare a map of their school/communityxvii. In the map at least the following points should be included:
School Community
• Building(s)
• Important features and boundaries
• Toilet and urinal buildings
• Paths
• Water points
• Garbage bins
• Breeding points for mosquitoes/ stagnant water
• Houses
• Important features and boundaries
• Roads and paths
• School, mosques, health centres, shops etc.
• Fields, forest, swamp
• Water sources
• Toilet and urinal buildings
• Waste disposal sites
• Breeding points for mosquitoes/ stagnant water
5 Could be undertaken in conjunction of the mapping for water and sanitation.

57
• After completion of the maps, the groups should present their maps to the whole class. Other groups are allowed to ask questions of give comments.
• If correction or expansion of the map is needed this could be done after all presentations are finished.
• When the map is completed, each group divides itself in twoxviii for a role-play. One group are the Buyers, the other ones the Sellers.
o The buyers should imagine that they are visiting the school/community for the first time. The sellers take the buyers around in the school/community. It is the first time the buyers are here and they want to find out everything they can. The sellers use the school/community map to take the buyers on a guided tour. Show the buyers as much as possible, including water, sanitation and hygiene arrangements, and help them to understand what life is like by describing the activities and lives in school/community. The buyers should ask questions about what they are being shown, to make sure they know all that they should know to buy something.
• The purpose of the play is to have the children look at their school/community from a different perspective. The buyers will look for the points that need improvement while the sellers will focus on the positive points
• After the role-play the groups is asked to: o Describe garbage collection arrangements they are proud of. o Describe garbage collection arrangements they are not proud of. o Describe garbage problems or difficulties that they have in the
school/community o Describe water drainage locations they are proud of. o Describe water drainage locations they are not proud of. o Describe water drainage problems or difficulties that they have in the
school/community o Mark those problems and difficulties on the map.
• Prepare a list of problems and difficulties and measures that can be taken by the children themselves as well as measures that should be taken but are beyond the control of the children.
• Make a Solid Waste and Water Drainage Plan for those measures to be taken by the school children. Indicating tasks to be done, by whom, when and possible resources needed. Demand a commitment from the children for the realisation of the plan.
• Discuss the measures that should be taken and are beyond the range of the children. Identify who is in charge of taking those measures (teachers, community groups/leaders, health centre, local authorities, etc.). If possible, approach those people with a request to take measures.
58
12.3 Sorting solid waste
Target group Grade 1-9 Learning goals Knowing:
• Children learn to identify various types of solid waste and where they occur.
• Children can identify negative implications of careless disposal.
• Children develop the idea of waste as a resource. Feeling:
• Children develop positive feelings to a clean environment and waste as a resource. Teaching methods Doing simple hygiene tasks, discussion Teaching materials Paper, markers, solid waste (to be collected in the compound) Description of activities
• Ask the children to go out in groups and collect the different types of waste materials in the school compound, such as, old books and notebooks, banana peeling, wrappings from candies, plastic bottles and bags, a piece of broken glass. For the older children this could be expanded to the whole community.
• Go outside and ask the children to show all the materials that they have brought. Ask them to put the same materials together (cans with cans, paper with paper, etc.).
• Discussion with the children which materials can be recycled and which cannot.
• Discussion about the various risks and nuisances: e.g. bad smell, insects breeding, rats, and impact on health (e.g. when mosquitoes breed in water in empty cans, drums, etc. and spread dengue), accidents cuts, falls), general pollution and degradation of the environment.
• Discussion about reuse and recycling of waste in the homes of the children and in the community.
• Explain the possibilities and potential economic benefits of recycling.
• Develop a plan of action on reduction, re-use and recycling of solid waste for the school. Think about separated collection and selling of paper, glass, plastic etc, composting of organic waste and safe treatment of other waste. For the older children this could be expanded to the whole community.
• Discuss the plan of action with other classes, teachers, school director etc.

59
13. Water treatment, handling and storage
13.1 Background Water from unprotected sources is unsafe for human consumption because it can be contaminated by e.g. animals or human excreta.
60
Even if water is collected from a safe source it can be contaminated if not handled properly during collection, storage and use. Therefore, it is always important to collect water in a clean container, cover the container during transportation to not allow dust to enter and to keep the water covered as long as it is stored. When water is taken from the container for consumption it should be taken with a cup with handle or ladle. In addition there can be problems with the contamination of drinking water that have a chemical origin (e.g. too high level of salt, arsenic or fluoride). Regular testing should test if established levels are not exceeded. And if exceeded, human consumption should be stopped.
Learning goals 1. Knowing - Where possible collect water from a safe source and collect and store water
safely. 2. Knowing, feeling & doing - If the source is not safe always boil the water… preferably
for 5 minutes. 3. Feeling & doing - The container in which the water is collected should be clean.
During collection and storage water should be covered and protected against contamination. A cup with handle or ladle should be used to take water from container.
Examples of Lesson Plans
13.2 School/Community mapping - water6
Target group Grade 3, 4 and 5: girls and boys – school mapping and optional community mapping Grade 6, 7, 8 and 9: girls and boys - community mapping Learning goals Knowing:
• The students map those water problems in their school/community that can cause diarrhoea
• Children become aware of how different water sources in their school/community are used
• Children learn which uses negatively affect the quality and quantity of the water
• Children can identify possible impacts on health and social and economic development Feeling:
• Children are ready to take steps to protect their water resources
6 Could be undertaken in conjunction of the mapping for sanitation and solid waste.
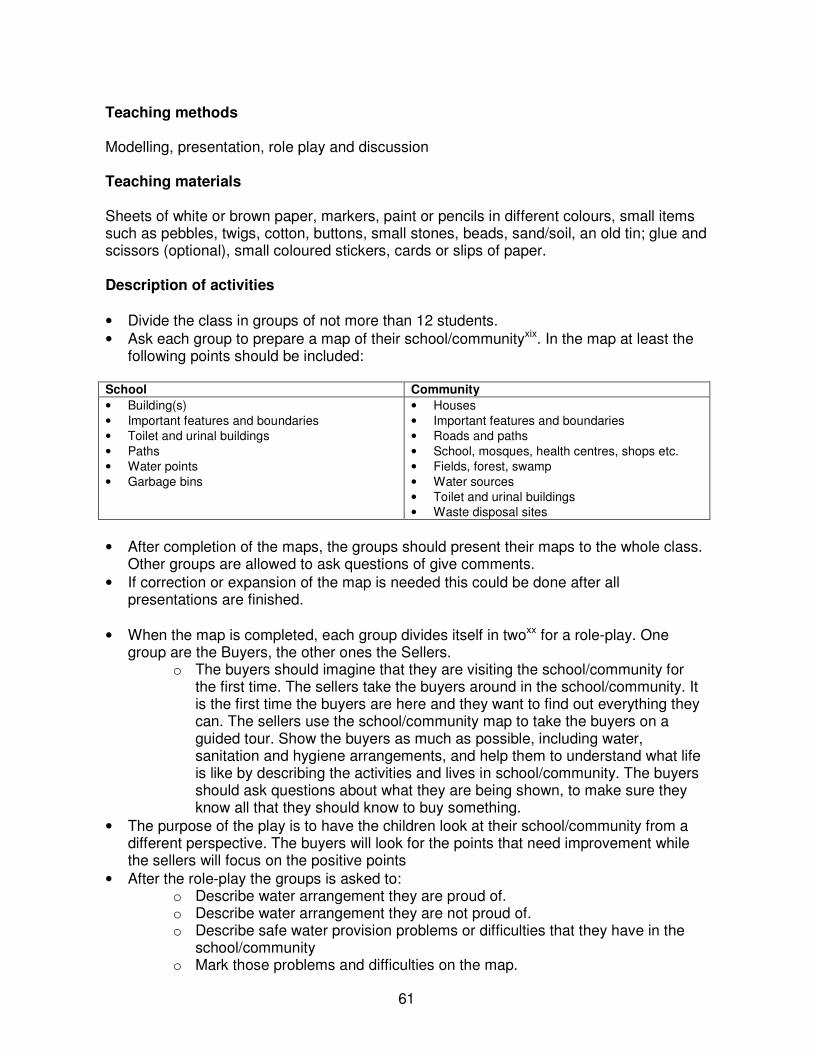
61
Teaching methods Modelling, presentation, role play and discussion Teaching materials Sheets of white or brown paper, markers, paint or pencils in different colours, small items such as pebbles, twigs, cotton, buttons, small stones, beads, sand/soil, an old tin; glue and scissors (optional), small coloured stickers, cards or slips of paper. Description of activities
• Divide the class in groups of not more than 12 students.
• Ask each group to prepare a map of their school/communityxix. In the map at least the following points should be included:
School Community
• Building(s)
• Important features and boundaries
• Toilet and urinal buildings
• Paths
• Water points
• Garbage bins
• Houses
• Important features and boundaries
• Roads and paths
• School, mosques, health centres, shops etc.
• Fields, forest, swamp
• Water sources
• Toilet and urinal buildings
• Waste disposal sites
• After completion of the maps, the groups should present their maps to the whole class. Other groups are allowed to ask questions of give comments.
• If correction or expansion of the map is needed this could be done after all presentations are finished.
• When the map is completed, each group divides itself in twoxx for a role-play. One group are the Buyers, the other ones the Sellers.
o The buyers should imagine that they are visiting the school/community for the first time. The sellers take the buyers around in the school/community. It is the first time the buyers are here and they want to find out everything they can. The sellers use the school/community map to take the buyers on a guided tour. Show the buyers as much as possible, including water, sanitation and hygiene arrangements, and help them to understand what life is like by describing the activities and lives in school/community. The buyers should ask questions about what they are being shown, to make sure they know all that they should know to buy something.
• The purpose of the play is to have the children look at their school/community from a different perspective. The buyers will look for the points that need improvement while the sellers will focus on the positive points
• After the role-play the groups is asked to: o Describe water arrangement they are proud of. o Describe water arrangement they are not proud of. o Describe safe water provision problems or difficulties that they have in the
school/community o Mark those problems and difficulties on the map.
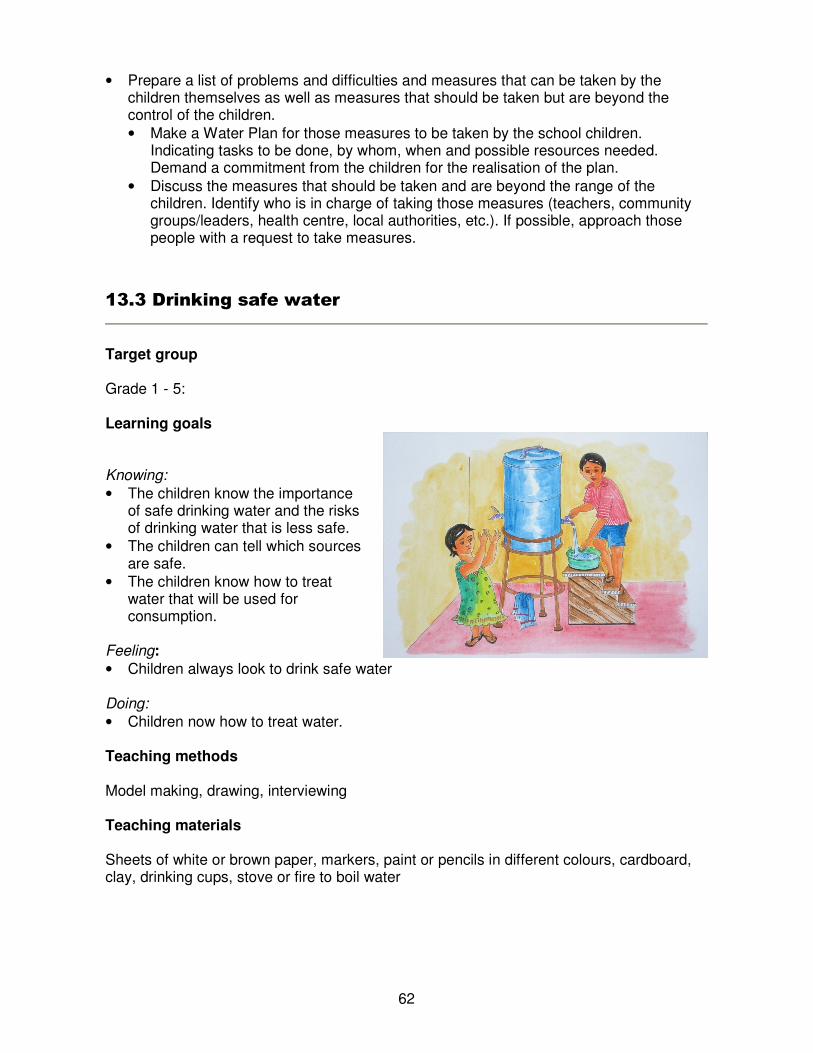
62
• Prepare a list of problems and difficulties and measures that can be taken by the children themselves as well as measures that should be taken but are beyond the control of the children.
• Make a Water Plan for those measures to be taken by the school children. Indicating tasks to be done, by whom, when and possible resources needed. Demand a commitment from the children for the realisation of the plan.
• Discuss the measures that should be taken and are beyond the range of the children. Identify who is in charge of taking those measures (teachers, community groups/leaders, health centre, local authorities, etc.). If possible, approach those people with a request to take measures.
13.3 Drinking safe water
Target group Grade 1 - 5: Learning goals Knowing:
• The children know the importance of safe drinking water and the risks of drinking water that is less safe.
• The children can tell which sources are safe.
• The children know how to treat water that will be used for consumption.
Feeling:
• Children always look to drink safe water Doing:
• Children now how to treat water. Teaching methods Model making, drawing, interviewing Teaching materials Sheets of white or brown paper, markers, paint or pencils in different colours, cardboard, clay, drinking cups, stove or fire to boil water

63
Description of activitiesxxi
• Ask the children from where they get their drinking water.
• Ask each child to draw/model/cut and paste his or her drinking water source (techniques adjusted to age).
• Let the children display their drawing or model. Subsequently group them by type of water source.
• List what children and others use these sources for, e.g. taking drinking water, washing clothes, swimming, bathe, water for animals, wash for cleaning the homes, water for cleaning cars/lorries, etc.
• Discuss with the children what this means for the cleanliness of the water and what this may mean for their stomachs if they drink this water.
• Ask older children to write the names of water-borne diseases in local and official languages.
Demonstration
• For younger children, show the preparation of safe water boiling it for 3 minutes.
• With older children, facilitate a discussion about feasibility of boiling water, asking for example:
o What may discourage people from boiling their drinking water? o What makes it hard for some children to bring safe(r) drinking water to
school? o What alternatives can they think of to solve/reduce problems? (e.g. collecting
rain water)
• Let the children make a drawing on the importance of safer drinking water. Ask them to add messages.
• Let them take the drawings home to show and, if agreed, put it on the wall at home.
• The next day/lesson, facilitate an open discussion about what they have done at home with the drawing and how their parent(s) and other family members reacted.
Monitoring sources of drinking water
• Monitor practices in class. Did all children bring safe(r) drinking water from home? If not, do not blame the child, but find out why, and follow up with the parents.
• Draw, or let the children make drawings of the different local sources of drinking water and hang them on the wall. Fix or place a paper bag or any other receptacle under each drawing. Give each child a bean, seed or slip of paper for voting. Let each child go to the wall and ask it to place the bean or slip in the receptacle under the source which their family generally uses for drinking water.
• At the end of the exercise, help the children display the contents of each bag on the floor, count the numbers and write them in a table on the blackboard.
• Facilitate a discussion on safe and unsafe sources and ways of problem solving. The reality in many schools, communities and homes is that it is still to have always access to safe drinking water. In that case, the teacher can focus on which are the safest sources of drinking water available locally, and what might be done to use these for drinking water, and how other drinking water can be made safer.

64
13.4 Making muddy waterxxii
Target group Grade 2-4 Learning goals Knowing:
• Children learn how germs can spread through water.
Feeling:
• Children understand the importance of protecting drinking water
Teaching methods Demonstration, discussion Teaching materials Jug, container, four glasses, clean water, muddy water, straw or old pen case Description of activities
• Put muddy water into four glasses of clean water in the following ways: o Two spoons into glass 1 o One spoon into glass 2 o Half a spoon into glass 3 o One drop into glass 4
• Show the children all the glasses and ask them which of the glasses contains clean water and which one looks dirty. Ask them to explain why.
• Show the children a container of water (different one from the jug with muddy water) and explain that it is full of germs.
• Put a little bit of water from the container into glasses 2, 3 and 4.
• Discuss which glass contains germs. Emphasise that: o Glass 1 looks dirty and contains mud and might taste bad because of this but
most likely DOES NOT contain germs. o Glass 4 might look clean but contains germs and muddy water.
• Discuss with the children ways how germs can get into water e.g. scooping water with a dirty ladle, putting a dirty hand in a pot to take out water, and animal drinking of water.
• Discuss ways of stopping germs entering the water.
• Discuss a plan of action for the school and/or their homes.

65
13.5 Is the water safe to drink? - H2S water quality test
Target group Grade 6 - 9: Learning goals Knowing:
• The children can tell which water sources are safe and can be used without causing diarrhoea.
Feeling:
• Children always look to drink safe water Doing:
• Children know how to test water.
• Children take measures to stop the use of unsafe sources Teaching methods Chemical testing Teaching materials H2S water quality test Description of activities
• Ask the children where they collect their drinking water while at school and while at their homes.
• Make a list of all those water collection points.
• Select the five water points that are being used most.
• Ask the children to collect TWO water samples each from those water points. Water should be collected in bottles or small containers that have been thoroughly cleaned with soap and hot water and rinsed before taking the water sample.
• Undertake the water testing for the ten samples (two for each source) as described in below instruction.
1. If both samples of the same source are “good”, the source is safe 2. If both samples of the same source are “bad”, the source is unsafe 3. If one sample is “good” and one sample is “bad”, the test should be redone because
possibly something went wrong in the collection of the samples or the testing. IF ONE OF THE WATER SOURCES IS UNSAFE:
• Discuss why the children think the source is not safe. What is the source of contamination?
• Discuss with the children which measures to take to treat the water to make it safe for consumption (e.g. boiling, chlorination, SODIS).

66
• Discuss the need for a campaign to inform the users of this source (school or community) that the water is not safe for consumption. Discuss also the possible measures to take to make the source safe (e.g. keep animals away from the source, relocate latrines etc.).

67
14. Food hygiene
14.1 Background Eating food is essential for the well-being and survival of each human being. Eating contaminated food (also know as “food poisoning”) can be an important source of diseases among school children and their family members. In general there are three sources of food poisoning that can be easily avoided with some simple measures: 1. Spreading of germs through the person who prepares the food. (1) Hands should be
washed with soap before food preparation to avoid spreading of germs through hands. (2) Avoid couching, spitting or chewing near food to avoid contact between salvia and food.
2. Special precaution when handling raw food. (1) Wash with safe water or peel all fruits and vegetables that are eaten raw. (2) Raw meat, poultry or fish should not touch other food that is eaten raw. (3) Cooking utensils that have been in touch with raw meat, poultry or fish should be cleaned thoroughly with water and soap.
3. Food storage. (1) Cooking food kills germs. All meat, poultry or fish should be cooked well. (2) Where possible, always prepare fresh food and eat immediately after preparation. (3) If food is stored, always keep it covered to avoid that flies and dust enter (4) Keep the food as cool as possible (5) Last but not least: when food smells bad, changes taste, changes colour, produced bubbles or gets slimy…. Throw it away because the food is spoiled and it can make
people and animals sick. Learning goals 1. Knowing -. Links between food hygiene and diseases 2. Knowing & Feeling – Recognising common signs of spoiled food, appropriate food
storage 3. Doing – Treatment of raw fruits and vegetables; raw meat, poultry or fish. Storage of
food.

68
Examples of Lesson Plans
14.2 Fried rice, fried rice!!xxiii
Target group Grade 1-5 Learning goals Knowing:
• Children understand the importance of hygienic food handling and protection
• Children understand that food that looks “good” can be contaminated, unsafe and even very dangerous.
Feeling:
• Children want to eat only safe food Teaching methods Story telling, discussion Teaching materials A story Description of activities The teacher tells a story about preparing food like the one below. The children are asked to listen carefully as they will get some questions at the end.
On a dusty afternoon Rajiv, a flamboyant food vendor stood under a shaded palm tree. ’fried rice, very good fried rice with chicken!’ He shouted, ‘buy very fresh and good fried rice!!’ He was an eye-catching figure wearing new cloths in fine fabrics and a large, golden bracelet. For some unknown reason he had a sheen of sweat on his brow and every once in a while this would accumulate into a droplet which he would casually brush away with his fingertips. The big bowl with fried rice stood before him on a small table. It looked good and rich with chicken and some vegetables but also had attracted the attention of numerous flies that swarmed madly and energetically around them. A family passed by with a mother, father and two little girls. ‘Buy me some fried rice, mama, said the older girl, ‘I’m so hungry’. ‘We are almost home.’ responded mother gently. ‘Wait until we reach home.’ ‘Why do you refuse her food?’ asked the father. ’ In fact I too will have one.’ Mother looked doubtfully at Rajiv, who suddenly turned around and disappeared into a toilet on the other side of the palm tree. After a while he reappeared, wiping sweat from across his brow and hastily explained that he had a problem with his

69
tummy. Take meanwhile some scoops of fried rice and stowing it with his left hand…. The family walked away happily, two of them ready to eat their fried rice.
• Ask the children to describe the choices made by …. in handling the food.
• Ask what they would have done in the same situation
• Make copies of the story, dictate it or ask the children to write down from memory.
• Ask them to write an end to the story in no more than fifteen lines, imagining what may have happened after the father and daughter ate the rice and curry.
• Invite the children to share the ending of their stories in the group.
• Discuss with the children the risk of buying food from a vendor.
• Ask the children for three ways in which the food can be contaminated. Ask them to explain what can happen and for the older children which diseases can result.
• Ask the children for three ways to avoid eating “bad” food. Use examples from school and/or home.
14.3 Flying diseasesxxiv
Target group Grade 1-3 Learning goals Knowing:
• Children learn how flies spread germs from faeces. Feeling:
• Children understand the importance of using toilets and urinals. Teaching methods Model making, drawing, discussion Teaching materials Seeds, clay, twigs for the legs, leaves for the wings, glue, string, some nails, paper, and pencils Description of activities
• Make a large model fly from the available materials as shown in below drawing.
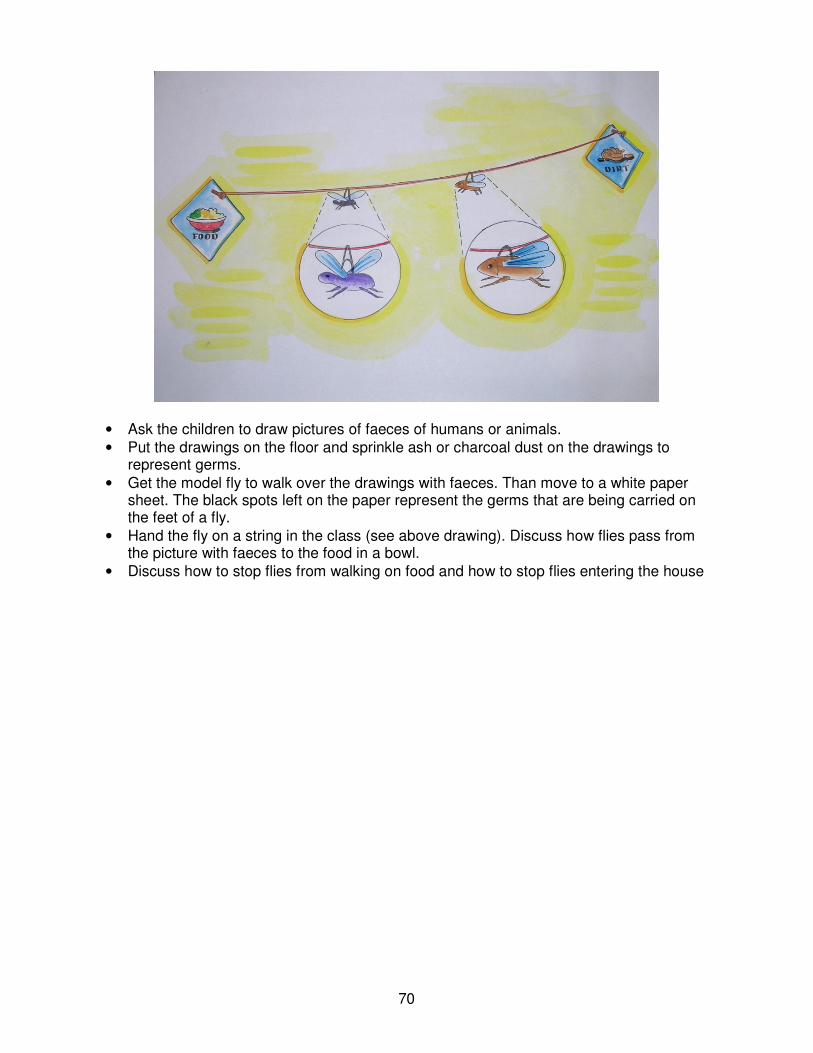
70
• Ask the children to draw pictures of faeces of humans or animals.
• Put the drawings on the floor and sprinkle ash or charcoal dust on the drawings to represent germs.
• Get the model fly to walk over the drawings with faeces. Than move to a white paper sheet. The black spots left on the paper represent the germs that are being carried on the feet of a fly.
• Hand the fly on a string in the class (see above drawing). Discuss how flies pass from the picture with faeces to the food in a bowl.
• Discuss how to stop flies from walking on food and how to stop flies entering the house
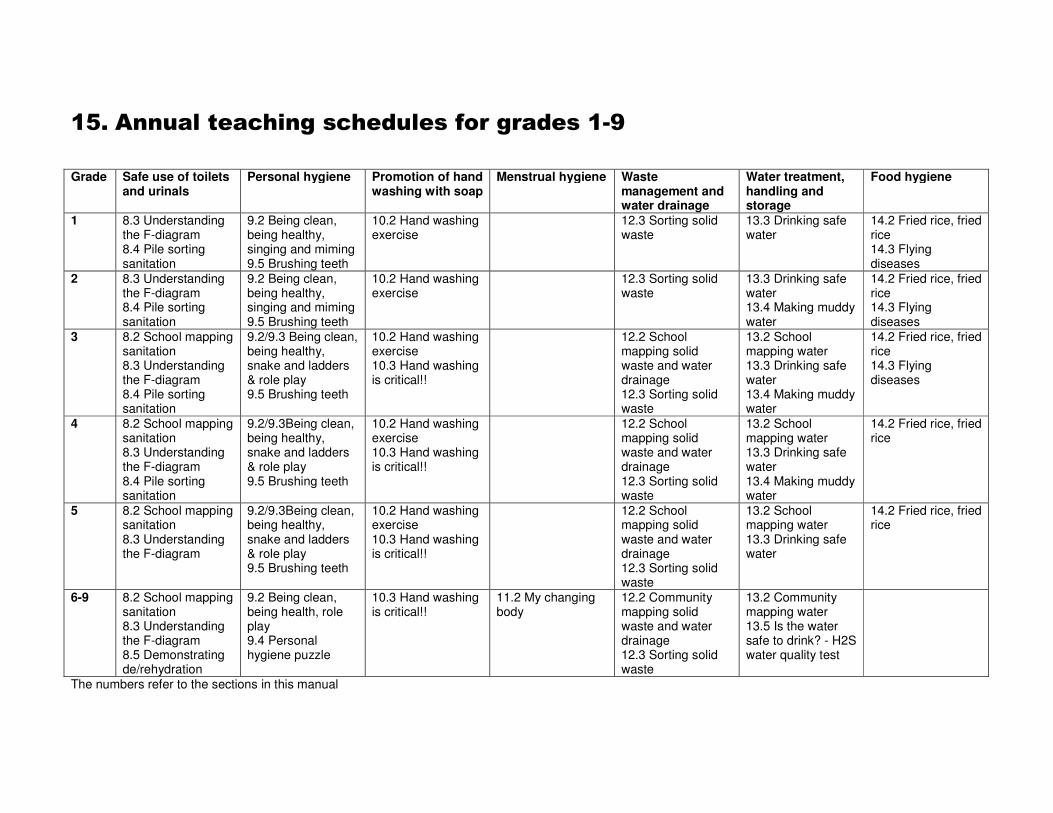
15. Annual teaching schedules for grades 1-9
Grade Safe use of toilets
and urinals Personal hygiene Promotion of hand
washing with soap Menstrual hygiene Waste
management and water drainage
Water treatment, handling and storage
Food hygiene
1 8.3 Understanding the F-diagram 8.4 Pile sorting sanitation
9.2 Being clean, being healthy, singing and miming 9.5 Brushing teeth
10.2 Hand washing exercise
12.3 Sorting solid waste
13.3 Drinking safe water
14.2 Fried rice, fried rice 14.3 Flying diseases
2 8.3 Understanding the F-diagram 8.4 Pile sorting sanitation
9.2 Being clean, being healthy, singing and miming 9.5 Brushing teeth
10.2 Hand washing exercise
12.3 Sorting solid waste
13.3 Drinking safe water 13.4 Making muddy water
14.2 Fried rice, fried rice 14.3 Flying diseases
3 8.2 School mapping sanitation 8.3 Understanding the F-diagram 8.4 Pile sorting sanitation
9.2/9.3 Being clean, being healthy, snake and ladders & role play 9.5 Brushing teeth
10.2 Hand washing exercise 10.3 Hand washing is critical!!
12.2 School mapping solid waste and water drainage 12.3 Sorting solid waste
13.2 School mapping water 13.3 Drinking safe water 13.4 Making muddy water
14.2 Fried rice, fried rice 14.3 Flying diseases
4 8.2 School mapping sanitation 8.3 Understanding the F-diagram 8.4 Pile sorting sanitation
9.2/9.3Being clean, being healthy, snake and ladders & role play 9.5 Brushing teeth
10.2 Hand washing exercise 10.3 Hand washing is critical!!
12.2 School mapping solid waste and water drainage 12.3 Sorting solid waste
13.2 School mapping water 13.3 Drinking safe water 13.4 Making muddy water
14.2 Fried rice, fried rice
5 8.2 School mapping sanitation 8.3 Understanding the F-diagram
9.2/9.3Being clean, being healthy, snake and ladders & role play 9.5 Brushing teeth
10.2 Hand washing exercise 10.3 Hand washing is critical!!
12.2 School mapping solid waste and water drainage 12.3 Sorting solid waste
13.2 School mapping water 13.3 Drinking safe water
14.2 Fried rice, fried rice
6-9 8.2 School mapping sanitation 8.3 Understanding the F-diagram 8.5 Demonstrating de/rehydration
9.2 Being clean, being health, role play 9.4 Personal hygiene puzzle
10.3 Hand washing is critical!!
11.2 My changing body
12.2 Community mapping solid waste and water drainage 12.3 Sorting solid waste
13.2 Community mapping water 13.5 Is the water safe to drink? - H2S water quality test
The numbers refer to the sections in this manual

i KAP survey by Action contre la faim, Sri Lanka ii It is called F-diagram because all paths start with F.
iii Adapted from: Postma, L., R, Getkate and Van Wijk, C (2004), “Life Skills-Based Hygiene Education; A guidance
document on concepts, developments and experiences with life skills-based hygiene education in school sanitation and hygiene education programmes”, IRC International Water and Sanitation Centre, Delft, the Netherlands in cooperation with UNICEF iv Text adapted from: Child-to-Child Trust (2005), Children for Health; Children as partners in health promotion,
Macmillan Education, Oxford, UK v Adapted from PHAST training manual
vi Inspired by lesson plan described in: Khamal, S., et al. (2005), The Joy of Learning. Participatory lessons plans on
hygiene, sanitation, water, health and the environment., IRC International Water and Sanitation Centre, Delft, the Netherlands. vii
Inspired by lesson plan described in: Khamal, S., et al. (2005), The Joy of Learning. Participatory lessons plans on hygiene, sanitation, water, health and the environment., IRC International Water and Sanitation Centre, Delft, the Netherlands. viii
Some of the recommendations have been adapted from the Hesperian Foundation publications: Where there is no
doctor and Where women have no doctor. http://www.hesperian.org/ ix From: Khamal, S., et al. (2005), The Joy of Learning. Participatory lessons plans on hygiene, sanitation, water, health
and the environment., IRC International Water and Sanitation Centre, Delft, the Netherlands. x Source: The Hesperian Foundation (2000) Where there is no dentist.
xi Adapted from puppet play of CHAST, Children’s Hygiene and Sanitation Training, Caritas, Somalia
xii Inspired by lesson plan described in: Khamal, S., et al. (2005), The Joy of Learning. Participatory lessons plans on
hygiene, sanitation, water, health and the environment., IRC International Water and Sanitation Centre, Delft, the Netherlands. xiii
Narayan K.A. et al (2001), Puberty Rituals, Reproductive Knowledge and Health of Adolescent Schoolgirls in South India, Asia-Pacific Population Journal, June 2001 xiv
A short summary of a sample lesson described in: Khamal, S., et al. (2005), The Joy of Learning. Participatory lessons plans on hygiene, sanitation, water, health and the environment., IRC International Water and Sanitation Centre, Delft, the Netherlands. xv
Study by Women’s empowerment & development forum, Batticaloa, Sri Lanka xvi
Originally published in: Booth B. et al. (2001), Urban & Development; A practical manual for use in developing
countries, MacMillan Education Ltd Oxford and London, UK. xvii
In bigger communities, each group could make a map of a different sector of the community xviii
Adapted from PHAST training manual xix
In bigger communities, each group could make a map of a different sector of the community xx
Adapted from PHAST training manual xxi
Inspired by lesson plan described in: Khamal, S., et al. (2005), The Joy of Learning. Participatory lessons plans on hygiene, sanitation, water, health and the environment., IRC International Water and Sanitation Centre, Delft, the Netherlands. xxii
Adapted from example in: Child-to-Child Trust (2005), Children for Health; Children as partners in health promotion,
Macmillan Education, Oxford, UK. Drawing copied from same publication. xxiii
Inspired by lesson plan described in: Khamal, S., et al. (2005), The Joy of Learning. Participatory lessons plans on
hygiene, sanitation, water, health and the environment., IRC International Water and Sanitation Centre, Delft, the Netherlands. xxiv
Inspired by example in: Child-to-Child Trust (2005), Children for Health; Children as partners in health promotion,
Macmillan Education, Oxford, UK