MANUAL FOR DATA CAPTURE SOFTWARE - Star …...Data capture software is the application software of...
28
STARLINK COMMUNICATION P. LTD. 1 MANUAL FOR DATA CAPTURE SOFTWARE
Transcript of MANUAL FOR DATA CAPTURE SOFTWARE - Star …...Data capture software is the application software of...

STARLINK COMMUNICATION P. LTD.
1
MANUAL
FOR
DATA CAPTURE SOFTWARE

STARLINK COMMUNICATION P. LTD.
2
INDEX
Introduction
a. System
1.1. Data Capture setting master
1.2. Card Master
1.3. Card writer
1.4. Reason card master
1.5. Set time(all machine)
1.6. Set Mail id
1.7. Set password
2. Capture
2.1. Data Capture
2.2. Multiple Data Capture
2.3. Online Data Capture
3. Biometric
3.1. Finger setup
3.2. Finger setup( with name )
3.3. Finger Writer(In card )
4. Masking
4.1. Machine Masking
4.2. Multiple Machine Masking
4.3. Online Machine Masking
5. Proximity
5.1. Proximity List send to Machine
5.2. Proximity Finger Setup
6. About us
7. Help
8. Exit

STARLINK COMMUNICATION P. LTD.
3
Introduction
Data capture software is the application software of time office software. With the help of
data capture software; you can capture punching data from starlink attendance system and
store it on a particular location of your computer and with the help of this punching data
you can generate reports.
After installing the software you run it by double click on the icon of the data capture.
A main window of data capture will appear on your computer screen as follows:
Figure 1.1: Main Data Capture
There are 8 sub menus in the data capture software which are given below:
1) System
2) Capture
3) Biometric
4) Masking
5) Proximity
6) About us
7) Help
8) Exit

STARLINK COMMUNICATION P. LTD.
4
1. System
By using this menu, you can set new machine setting, create card master, write cards
from card writer, Create reason card, set time to many machine, set mail id master and
set password.
I. Machine Setting For capturing data from Machine, first you have to create new machine setting in data
capture software.
Figure 1.2: Data capture setting master
There are 6 buttons on this machine settings window:
1. New: Press button New to create new machine setting for new machine.
2. Edit: Press button Edit to modify the existing machine setting.
3. Delete: Press button Delete to delete existing machine setting.
4. Save: Press button Save to save existing machine setting (in case you did any
change in existing Machine Setting).
5. Cancel: Press button Cancel to cancel any modification in machine setting.
6. Close: Press button to close machine setting.

STARLINK COMMUNICATION P. LTD.
5
There is some compulsory area as following below:
1.1.1. Machine name: Enter a particular name to a particular machine.
1.1.2. Connection type: You can connect Star Link attendance systems with
software through three way :
Starlink attendance systems have three type of connectivity with computer like
a. serial,
b. TCP/IP and
c. modem
a. Serial: Select Connection type as " Serial" and Mark Check on "Com1" or "Com2"
or "Com3" or "Com4"(Com port) with which system you want to connect
the machine and select transfer rate of data in bits/sec.
Figure 1.3: Machine Setting for Serial Type Connection
STARLINK COMMUNICATION P. LTD.
6
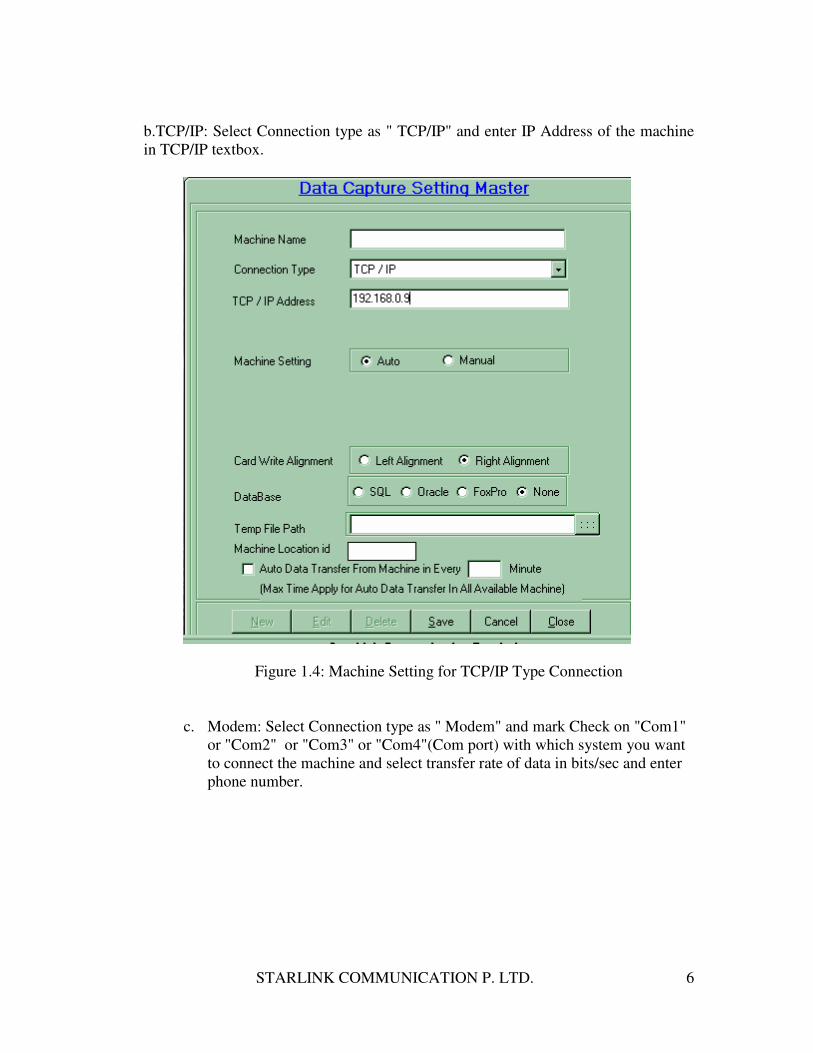
b.TCP/IP: Select Connection type as " TCP/IP" and enter IP Address of the machine
in TCP/IP textbox.
Figure 1.4: Machine Setting for TCP/IP Type Connection
c. Modem: Select Connection type as " Modem" and mark Check on "Com1"
or "Com2" or "Com3" or "Com4"(Com port) with which system you want
to connect the machine and select transfer rate of data in bits/sec and enter
phone number.

STARLINK COMMUNICATION P. LTD.
7
Figure 1.5: Machine Setting for Modem Type Connection
1.1.3. Machine Setting: You can use this option for setting in writing the card.
1. Auto: To check "Auto" for deducting setting of machine of the
card configuration automatically, that is given by machine through it's own
sense.
Manual: To check on “Manual" for deducting machine setting manually for
card By using following options:
• Five Digit Card: If you want to write your card of 5 digits number, check
on this checkbox.
• Four Digit Card: If you want to write your card of 4 digits number, check
on this checkbox.
• Eight Digit Card: If you want to write your card of 8 digits number, check
on this checkbox.

STARLINK COMMUNICATION P. LTD.
8
Note: Select the Option which is applicable to your attendance Machine and apply
here.
1.1.4. Card Write Alignment: You can write card through two type of
Alignments:
I. Left alignment is used for old machine. (Old motherboard).
II. Right alignment is used for new machine. (ARM board).
Figure 1.6: Machine Setting for Card Alignment
1.1.5. Data Base: Check on particular data base (SQL, Oracle, FoxPro, None)on
which time Office software is running.
If it is not applicable, check on box "None".
1.1.6. Temp File Path: This is a location where you want to send and store the text
file of punches data in computer. When you will capture the punching data then it will

STARLINK COMMUNICATION P. LTD.
9
automatically send "Text file" to the particular location which you saved in temp file
path.
Figure 1.7: Machine Setting for Auto or Manual
1.1.7. Machine Location Id: This option use if a company has many machines at
many locations. In that case you have to give location id for a particular location
machine which is unique.
1.1.8. Auto Transfer Data from machine in every ___minute: Check on
this checkbox to capture data automatically from the machine to temp file path after
the specified time, Which you specify in the minute box.
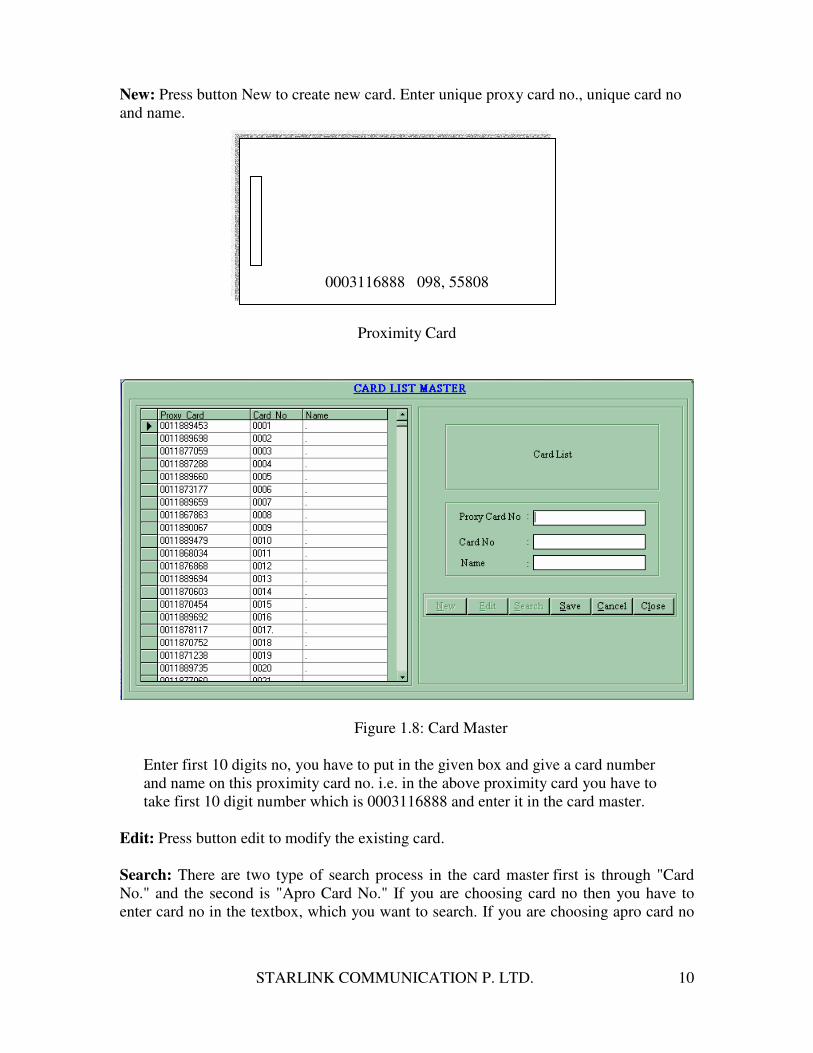
1.2. Card Master: Card master is used to create card list of proximity card or
smart card.
1. In case of proximity card, you have to enter 10 digits unique no in the proxy card no
textbox.
2. In the case of smart card, you have to enter 0 in the proxy card no textbox.
STARLINK COMMUNICATION P. LTD.
10
New: Press button New to create new card. Enter unique proxy card no., unique card no
and name.
Proximity Card
Figure 1.8: Card Master
Enter first 10 digits no, you have to put in the given box and give a card number
and name on this proximity card no. i.e. in the above proximity card you have to
take first 10 digit number which is 0003116888 and enter it in the card master.
Edit: Press button edit to modify the existing card.
Search: There are two type of search process in the card master first is through "Card
No." and the second is "Apro Card No." If you are choosing card no then you have to
enter card no in the textbox, which you want to search. If you are choosing apro card no
0003116888 098, 55808

STARLINK COMMUNICATION P. LTD.
11
then you have to enter appropriate proximity card no in the textbox which you want to
search.
Delete: Press button Delete to delete existing card.
Save: Press button Save to save new created card or modified card in data capture.
Cancel: Press button Cancel to cancel any modification in card's detail.
Close: Press button Close to close card master.
1.3. Card Writer This option is used to write the smart card which you have declared in the card
master.
Figure 1.9: Card Write
Machine Name: Select machine name from the list and IP address will automatically
come and press button Connect to connect the machine.
Enter card no in card no textbox and name of employee in name textbox and press
button Write to write the card then message will appear on the screen "done”, click
done to complete the card writing process.
Excel files Name Path: By using this opting you can write card more faster than above
process.

STARLINK COMMUNICATION P. LTD.
12
You have to make a excel file of card no and name, you simple write the path of that file
and press button show. Card and name will be show of the excel file as shown in the
below figure. Press on that card no, card no and name of employee will automatically
appears in card no textbox and name of employee in name textbox respectively. Press
button Write to write the card then message will appear on the screen "done", click done
to complete the card writing process.
1.4. Reason Card:
Like time office software, this reason card will work.
Reason Cards are used to show reason for official and unofficial out door work.
Figure 1.10: Reason Card
There are 6 buttons on this reason card master:
1. New: Press button New to add new reason in this reason card master.
2. Edit: Press button Edit to modify the existing reason card's information.
3. Delete: Press button Delete to delete existing reson card's information.
4. Save: Press button Save to save existing reason card (in case you did any change
in existing Machine Setting).
5. Cancel: Press button Cancel to cancel any modification in reason card's
information.
6. Close: Press button to close reason card master.
Reason Code: Enter reason code.
Card No: Enter card No.

STARLINK COMMUNICATION P. LTD.
13
Is group reason: In case when you check “is group reason”, if bus is late and a number
of employee want to show the same reason, first guard will show a reason card and a
number of employees will show cards and again show the reason card.
Duration for first reason card and again reason card will be 5 minute, after 5 minute you
have to do the same process again.
In the case when a single employee comes late, simply show reason card and then
attendance card.
1.5. Set Time to All Machines:
You can set time of many machines which hanged on different locations.
Press button set time to all machine and system time will be set in all machines.
Figure 1.11: Set Time to All Machines
1.6. Set Mail Id:
If you have a machine at different location and by this setting when they will capture the
data, a text report will automatically deliver to server.

STARLINK COMMUNICATION P. LTD.
14
Figure 1.12: Mail Information
Server IP: Give that server‘s IP address to which you want to send mail.
From(Mail id):Mail of that person from mail will come.
To(Mail id): Mail id of that person where mail will automatically come.
Mail Subject: Enter subject.
Mail sending option: This is the option from which you can send mail.
Mail Text: you can write mail text.
1.8 Set Password: If you want to set password in data capture, simply give a user name and password
and again the same password. When you will open the capture software, it will ask
the user name and password.

STARLINK COMMUNICATION P. LTD.
15
Figure 1.13: Set Password of Data Capture
2. Capture: By using this menu, you can capture data from single machine,
multiple machine and online punching data.
2.1. Data Capture: Through this data capture, you can transfer punching data from
machine to temp file path which you saved in machine setting.
Figure 2.1: Data Capture
1. Machine Name: Select machine name from the list and IP
address will automatically appear in IP address textbox and press button Connect to
connect the machine. When machine is connected, two options will appear:
STARLINK COMMUNICATION P. LTD.
16
I) Dates of all punching data will show on Data List textbox. Select two dates by double
click on data list and press button Transfer to transfer data from machine to specify
location which you saved in temp file path of machine setting.
II) Memory Utilized by reader is ___%( means how much percentage memory has
been used in machine) will show on respective textbox.
2.Select two dates from date list which will show in from date textbox & to date
textbox and press button Delete to delete punching data from the machine.
3.Set Time :Enter Time and press button Apply to set time in the machine.
4.Set Date: Enter Date and press button Apply to set the date in the machine.
5.Show System Date & Time: Press button Show System Date & Time and system's
date & time will show on respective textbox. Check "Set as per system Date/Time" and
press button apply to set system's date & time in the machine.
6.Disconnect:Press button Disconnect to disconnect the machine.
7.Version:Press button Version to see the version of the machine.
8.Close:Press button Close to close data capture window.
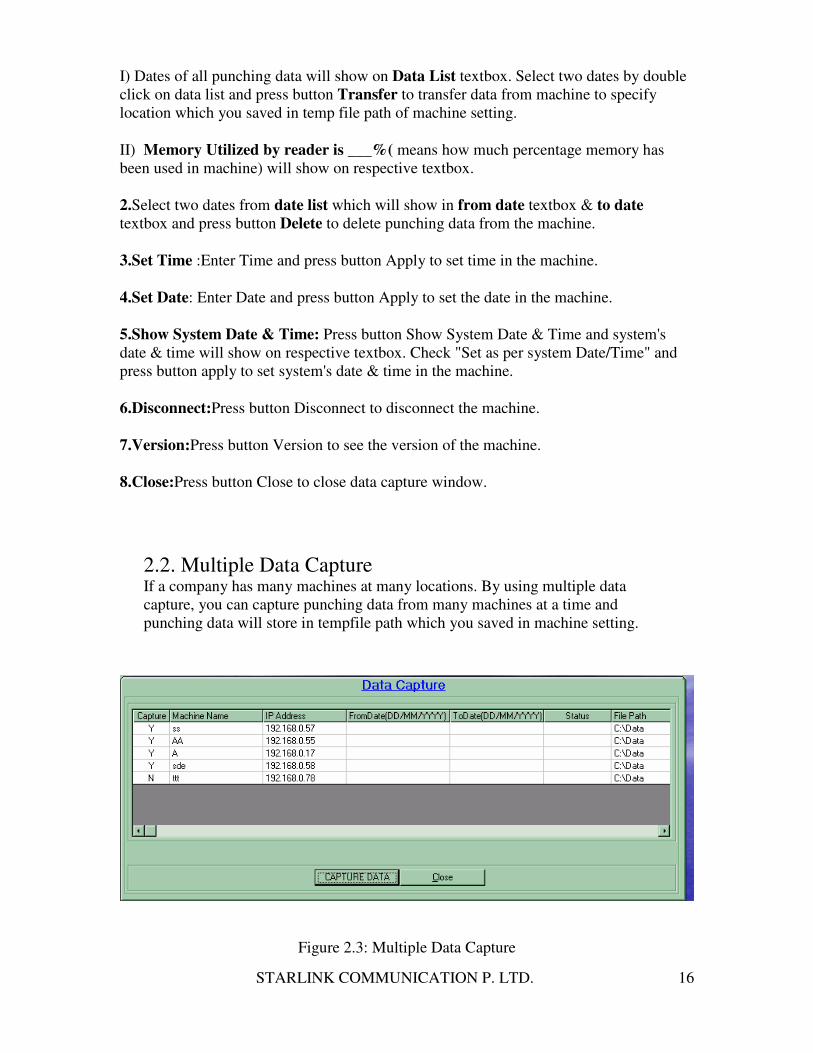
2.2. Multiple Data Capture If a company has many machines at many locations. By using multiple data
capture, you can capture punching data from many machines at a time and
punching data will store in tempfile path which you saved in machine setting.
Figure 2.3: Multiple Data Capture

STARLINK COMMUNICATION P. LTD.
17
Y states: Select state Y to activate the machine.
N states: Select state N to deactivate the machine.
From Date & To Date(dd/mm/yyyy): Enter "from date" & "to date" in textbox (proper
format) to capture punching data.
Status: After pressing button Capture Data, if punching data has been transferred from
machine, status will show "done". If process is not done, status'll show "error".
Capture Data: Press button Capture Data to capture punching data from many machine.
Close: Close multiple data capture window.
2.4. Online Data Capture
To select this option to capture punching data online but first check on auto data
transfer from the machine and enter that time duration in minutes after which
data will transfer automatically.
Figure 2.4 Online Data Transfer

STARLINK COMMUNICATION P. LTD.
18
b. Biometric
By using this menu, you can enroll finger with card, enroll only finger and card
writer(finger print).
3.1 Finger Setup
By using this finger setup, you can register new finger (with existing smart card)
from the software. All fingers data will be saved in computer. If sometimes
machine will create problem, in that case you can transfer finger data from
software to machine
Figure 3.1.a. Finger Set Up
1.Machine Name: Select machine name from the list and IP
address will automatically appear in IP Address textbox and press button
Connect to connect the machine.
STARLINK COMMUNICATION P. LTD.
19
2.Registration of new finger: There are following steps to register new
finger :
i: Check New Finger Registration and enter Card no (in textbox below
New finger register checkbox) with which you want to register finger.
ii: Register: Press button Register and message " Put Finger"
will appear on the finger setup screen, put finger on the scanner and process
will be done by the machine. That Finger data will show in "Computer data"
and then press button save>> to save that finger in computer's database.
or iii. If you don't want register finger with that card, enter card no and check
on Bypass finger, press button Register to bypass finger from that card.
3.<<Send: Check on "Select All( or check on selective finger)" from
computer side and press button <<send to send fingers data from computer
to machine.
4.>>Delete: Check on "Select All(or check on selective finger)" from
computer data side and press button Delete>> to delete finger data from the
computer.
5.<<Delete All: Press button <<Delete to delete all finger data from the
machine.
6<<Delete: Check on "Select All(or check on selective finger)" from
Machine data side and press button press button <<Delete to delete finger
data from the machine.
7.Version:Press button Version to see version of the machine.
8. Exit: Press button Exit to close finger setup window.
3.2. Finger Setup (with Name)
This setup is used in the registration of only finger. By using this finger setup
(with name), you can register new finger from the software.

STARLINK COMMUNICATION P. LTD.
20
Finger 3.2. Only Finger
1.Machine Name: Select machine name from the list and IP
address will automatically appear in IP Address textbox and press button
Connect to connect the machine.
2.Registration of new finger: There are following steps to register new
finger :
i: Check New Finger Registration and enter Card No in card no
textbox on which you want to register finger enter name in name textbox and
then press button save.
ii: Register: Press button Register and message " Put Finger" will appear
on the finger setup screen, put finger on the scanner and process will be done
by the machine. That Finger data will show in "Computer data" and then
press button save>> to save that finger in computer's database.
3.<<Send: Check on "Select All( or check on selective finger)" from
computer side and press button <<send to send fingers data from computer
to machine.

STARLINK COMMUNICATION P. LTD.
21
4.>>Delete: Check on "Select All(or check on selective finger)" from
computer data side and press button Delete>> to delete finger data from the
computer.
5.<<Delete All: Press button <<Delete to delete all finger data from the
machine.
6<<Delete: Check on "Select All(or check on selective finger)" from
Machine data side and press button press button <<Delete to delete finger
data from the machine.
7.Version:Press button Version to see version of the machine.
8. Exit: Press button Exit to close finger setup window.
3.3. Finger Writer (In Card)
Employee's data like Card number, Name and finger print in already stored in computer's
database(through finger setup). In that case you can enroll finger in card.
Figure 3.3: FP card writer
1.Machine Name: Select machine name from the list and IP address will
automatically appear in IP Address textbox and press button Connect to connect
the machine.
2.Enter Name for Search: Press button "Enter name for search" and excel file

STARLINK COMMUNICATION P. LTD.
22
of card no and name will automatically appear in the "Enter Name for Search"
textbox.
�
3.Press double click on card no & name, both card no & name will automatically
appear in Card No. textbox and Name textbox respectively and press button
Write to write the card.
c. Masking :
Masking is a function which is used to restrict area for the employee. By setting this
masking option, you can set masking for a employee for any location and that employee
can’t enter in that area.
By using this menu, you can set machine masking, multiple machine masking & online
machine masking through software.
4.1. Machine Masking
This option is used for single machine masking.
Figure 4.1: Machine Masking

STARLINK COMMUNICATION P. LTD.
23
1.Machine Name: Select machine name from the list and IP address will
automatically appear in IP address textbox and press button Connect to
connect the machine.
2.When machine will be connected, card list (made in card master) will show in
computer data side.
3. Check on Select All(or selective cards no.) checkbox and press button
<< send that card data to machine, press button Update machine to update the
machine.
4.Press button <<Delete to delete card list from the machine.
5.Exit:Press button Exit to close the machine masking window.
4.2. Multiple Machine Masking
If a company has many machines at many locations. By using multiple machine
masking option, you can set masking of card list in multiple machines at the
same time.
Figure 4.2: Multiple Machine Masking
Y states: Select state Y to activate the machine.
N states: Select state N to deactivate the machine.
Double click on "Mask" column to select Y or N to set machine activate or deactivate.

STARLINK COMMUNICATION P. LTD.
24
Transfer Data: Check on card no and press button Transfer Data to that card list to
multiple machine.
Close: Press button Close to close the Multiple machine masking window.
4.4. On Line Masking
This option is used for online masking of cards .
Figure 4.3: Online Masking
Y states: Select state Y to activate the machine.
N states: Select state N to deactivate the machine.
Double click on "Mask" column to select Y or N to set machine activate or deactivate.
Enter time of transfer : Enter time of transfer after which masking will start online and
press button Apply.
Note: Enter time of transfer will work according to computer's time. If computer time is
12:30 pm and if you want to start online masking, you have to enter time like 12:45pm in
Enter time of transfer textbox and press button Apply to start masking after 12:45pm.

STARLINK COMMUNICATION P. LTD.
25
5. Proximity
By using this menu, you can send proximity list to all machine and enroll new finger with
proximity card.
5.1. Proximity List Send To All Machine
In the card master, you created proximity card list. When you'll open sub menu
"proxi list send to machine", that proximity card list will show. Press button Send
to Machine to send that card list to all machine at the same time.
Figure 5.1: Proximity Card List send to Machine
Y states: Select state Y to activate the machine.
N states: Select state N to deactivate the machine.
Send to Machine: Press button Sent to machine to send Card list to machine.
Close: Press button Close to close Proxi list send to machine window.

STARLINK COMMUNICATION P. LTD.
26
5.2. Proximity Finger Print Transfer
By using this proximity finger setup, you can register new finger (with existing
proximity card) from the software. All fingers data will be saved in computer. If
sometimes machine will create problem, in that case you can transfer finger data
from software to machine.
Figure 5.2: Proximity Figure Print Transfer
1.Machine Name: Select machine name from the list and IP
address will automatically appear in IP Address textbox and press button
Connect to connect the machine. When machine will connect, proximity card
list will automatically appear on proximity finger setup window.
2. Registration of new finger: There are following steps to register new finger :
i. Check New Finger Registration and enter Card no (in textbox below New
finger register checkbox) with which you want to register finger.
Or Double click on existing card in proximity card list and card no will
automatically appear in textbox (below new finger register checkbox).
ii. Register: Press button Register and message “Put Finger" will appear on
the finger setup screen, put finger on the scanner and process will be done
by the machine. That Finger data will show in "Computer data" and then press
STARLINK COMMUNICATION P. LTD.
27
button save>> to save that finger in computer's database.
iii. If you don't want register finger with that card, enter card no and check on
Bypass finger, Press button Register to bypass finger from that card.
3. <<Send: Check on "Select All (or check on selective finger)" from computer
side and press button <<send to send fingers data from computer to machine.
4. >>Delete: Check on "Select All (or check on selective finger)" from computer
data side and press button Delete>> to delete finger data from the computer.
5. <<Delete All: Press button <<Delete to delete all finger data from the
machine.
6<<Delete: Check on "Select All(or check on selective finger)" from Machine
data side and press button press button <<Delete to delete finger data from
the machine.
7.Version:Press button Version to see version of the machine.
8. Exit: Press button Exit to close finger setup window.
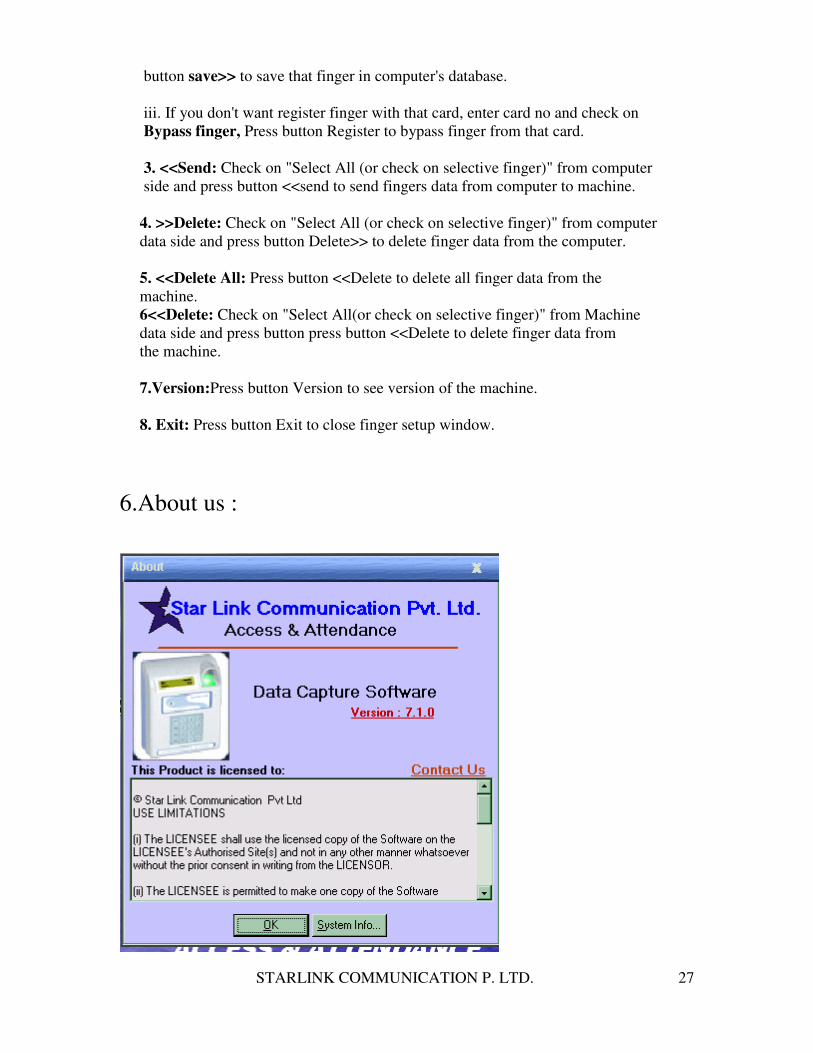
6.About us :
STARLINK COMMUNICATION P. LTD.
28
7. Help If you need some help regarding data capture software, use this option.
8. Exit It will quit you from the Software.