Manual email 19aug - Twister Trimmer · SAFETY PRECAUTION SAFETY PRECAUTION ... install the drive...
31
Version 1.0
Transcript of Manual email 19aug - Twister Trimmer · SAFETY PRECAUTION SAFETY PRECAUTION ... install the drive...

Version 1.0

CONGRATULATIONS ON YOUR PURCHASE OF THE
TWISTER T4 - the most advanced and
maintenance-free trimming system on the planet.

Table of Contents
Safety, Warnings and DisclaimersInitial SetupControlsAdjustmentOperationMaintenance and CleaningTips & TricksTroubleshootingSpecificationsWarranty Statement
25
1112141523242526

Important Safety InformationThis document refers to the Twister T4 leaf trimming machine as the T4.
Because this machine is a high speed cutting unit, special safety precautions must be observed to reduce the risk of personal injury. Careless or improper use may cause serious or even fatal injury. Please read and understand these precautions thoroughly before using the machine. Do not lend or rent your machine without the instruction manual. A first time operator should obtain practical instruction before using the machine.
SAFETY PRECAUTION
SAFETY PRECAUTION
Operating the machine without reading the instructions that accompany a “Danger” symbol may result in fatal injury.
Operating the machine without reading the instructions that accompany a “Warning” symbol may result in serious bodily injury or fatal injury.
General
Operation
Operation
Connection
Maintenance
Do not expose this machine’s electrical components to water while being plugged in.
Do not wear loose clothing or jewellery when operating the machine. Sleeves should be rolled past the elbows and long hair confined. Do not wear loose-fitting gloves. Do not operate the machine with protective covers removed. Keep body parts away from fast moving parts.
→
→
→→
Do not overload outlets or extension cords as this can result in fire or electric shock. Do not change or modify any part of the machine or accessories.
→→
Safety glasses must be worn when operating the machine. Do not operate the machine while tired or under the influence of drugs, alcohol or other medication.
→→
Do not attempt to service electrical components on this machine yourself, as opening or removing covers may expose you to dangerous voltage and possible fire or electric shock.
→
www.twistertrimmer.com2

SAFETY PRECAUTION
SAFETY PRECAUTION
General
Installation
Connection
Operation
Maintenance
General
Connection
Operation
Operating the machine without reading the instructions that accompany a “Caution” symbol may result in bodily injury or property damage.
Do not move, install, connect or inspect the machine while power is supplied to the machine. Replacement parts must be specific to this machine and supplied by the manufacturer only. Unauthorized substitutions may result in bodily injury or equipment damage. Do not allow lubricants or mineral oils to collect on the ground around the machine. This could cause a slipping hazard for the operator and others. Keep visitors a safe distance from work area. Keep children away. Do not remove safety labels from the machine. Replace safety labels if they become obscured or removed.
→→
→
→→
Refer to the machine labeling to determine correct electrical requirements. →
→→
Machine must be used with a properly grounded receptacle. Never plug in the machine with protective shrouds removed.
Do not put objects into the tumbler that cannot be processed by the machine as this may cause bodily harm or property damage. Never let the machine run unattended.
→
→
The T4 must be unplugged before any protective covers can be removed. Turn off and unplug machine before cleaning.
→→
All users should retain instructions for future reference to ensure safe use.
Damage requiring service must be referred to qualified service personnel. If the machine does not operate normally by following operating instructions, adjust only those controls that are covered in the instructions. Improper adjustment may result in damage and may require extensive work by qualified service personnel to restore the unit back to its normal operation.
→→
Do not overload outlets or extension cords as this can result in fire or electric shock. For safe use of your machine, DO NOT change or modify any part of the machine or accessories. Do not use an extension cords over 15m (50ft) in length to power the machine – longer cords increase electrical resistance, which will interfere with the T4’s efficiency.
→→→
Keep unit well ventilated to prevent overheating. →
www.twistertrimmer.comwww.twistertrimmer.com3

All users should retain instructions for future reference to ensure safe use.
Warnings and Disclaimers
The T4 is intended for use on legal aromatic herbs and hops. Please check all municipal, provincial/state, and federal laws and regulations before using the T4. Keirton® does not promote or condone the use of the T4 in any way that may be deemed illegal.
Allow only persons who understand this manual to operate the T4. Keirton® claims no liability for any damage or injury that result from the use of the T4 by persons who have not read and understood the cautions contained in this manual, or through any misuse of the T4. You are responsible for your safety while operating this machine - please keep yourself safe!
To receive maximum performance and satisfaction from the T4, it is important that you read and under-stand the safety and maintenance precautions before using the machine.
www.twistertrimmer.com4
Initial Setup
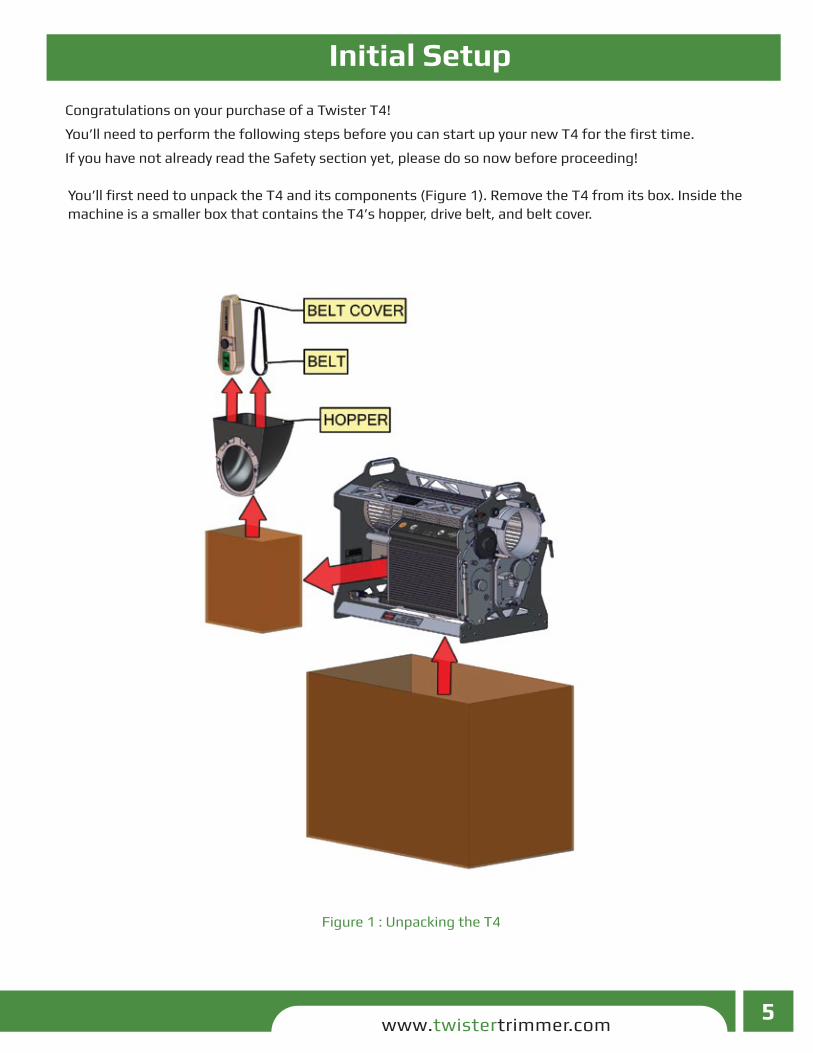
Congratulations on your purchase of a Twister T4!
You’ll need to perform the following steps before you can start up your new T4 for the first time.
If you have not already read the Safety section yet, please do so now before proceeding! You’ll first need to unpack the T4 and its components (Figure 1). Remove the T4 from its box. Inside the machine is a smaller box that contains the T4’s hopper, drive belt, and belt cover.
Figure 1 : Unpacking the T4
www.twistertrimmer.com5

The T4 is shipped with the control box pushed in to its minimum position to save space; you’ll now need to install the drive belt, and tilt the control box out to allow it to fully engage the drive belt.
1. Install the drive belt (Figure 2), aligning the belt between the two sprockets as shown. It’s normal for the belt to be loose on the sprockets at this point.
2. Loosen the lock knob to unclamp the control box (Figure 3).
3. Pull the lock pin and twist it to lock it in the open position.
4. Pressure from the piston will push the motor assembly, causing it to rotate clockwise; this will tilt the control box out from the machine.
5. Pull lightly on the control box to make sure it swings all the way out, until it’s stopped by the drive belt, and make sure the drive belt is properly seated on the control box’s sprocket. Failure to do so may damage or destroy the drive belt.
6. When the control box is correctly positioned, re-tighten the lock knob to lock it in place.
7. Install the belt cover (Figure 4), screwing in the knob until tight.
Figure 2: Installing the drive belt
Figure 3: Tilting the control box into position
Figure 4: Installing the belt cover
www.twistertrimmer.com6
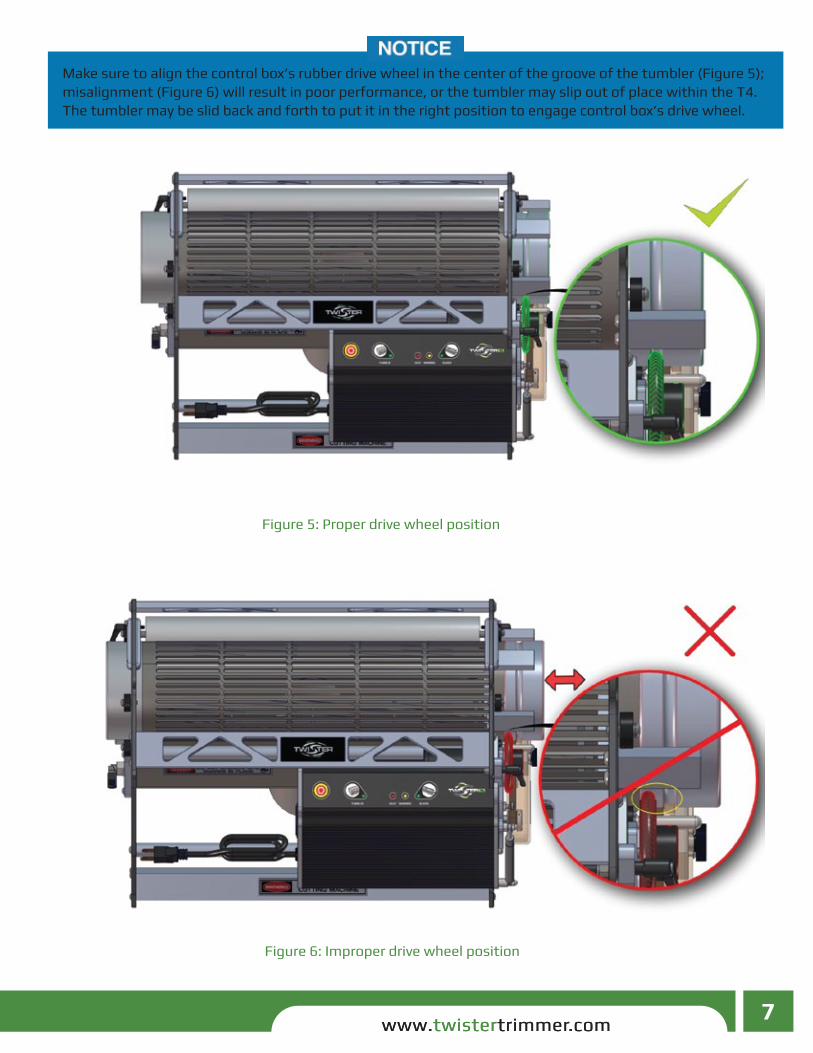
Figure 5: Proper drive wheel position
Figure 6: Improper drive wheel position
Make sure to align the control box’s rubber drive wheel in the center of the groove of the tumbler (Figure 5); misalignment (Figure 6) will result in poor performance, or the tumbler may slip out of place within the T4. The tumbler may be slid back and forth to put it in the right position to engage control box’s drive wheel.
www.twistertrimmer.comwww.twistertrimmer.com7

The T4 can operate with or without lubricant on the blades. Using the T4 with no lubricant will require more frequent cleaning. If you choose to not use lubrication, you may skip the lubrication portions of the following steps. See the lubrication section for more detailed information.
Carefully tilt the T4 on its back (Figure 7) after making sure that the two lock levers are NOT pointed outwards – if they are pointed outwards when you tilt the machine, the machine will rest on the levers and may break them. To change their angle, just pull them outwards and twist to set them in a new position.
Next, twist the shroud locking pins on the sides of the machine to retract the detent pins, so you can remove the shroud - twist the levers 180° in either direction to lock them in the open position, and then pull the shroud straight out.
Figure 7: Removing the shroud
After making sure the T4 is unplugged, apply a light coating of food-grade non-stick oil to on all internal surfacesof the shroud, bedknife and reel blade (shown in green).
Replace the shroud, and lock it back in place by twisting the shroud locking pins again, making sure that the pins have fully engaged in holding the shroud in place (Figure 8); if not, you will need to push on the shroud to press it in slightly before you push the locking pins in to hold it in place.
Now stand the T4 back on its base.
Figure 8: Replacing the shroud
www.twistertrimmer.com8

Next, install the hopper (Figure 9), aligning the bottom two divots in the hopper’s mount plate with the rounded posts on the side of the T4, and tilting the hopper up until it clicks firmly in place against the magnets.
Figure 9: Installing the hopper
You’ll next need to unpack the T4’s leaf collector system; remove the leaf collector, feet, connection cuff, and collection bag from the leaf collector’s box, and attach the feet (Figure 10).
Figure 10: Installing feet on the leaf collector
You can now connect the T4 to the leaf collector; place the leaf collector on level floor and place the T4 on top (Figure 11); make sure to orient it so that the control box (front) face of the T4 is towards the outlet of the leaf collector; putting it on the opposite way will result in the T4’s shroud outlet and the leaf collector’s inlet not meeting up properly in the middle.
Wrap the connection cuff around the connection between the top of the leaf collector’s inlet port and the bottom of the T4’s shroud port.
Install the collection bag on the bag arms, making sure to place all four of the black loops onto the bag arms. Tighten the cord around the opening of the leaf collector’s outlet.
Figure 11: Connecting the T4 to the leaf collector
www.twistertrimmer.com9
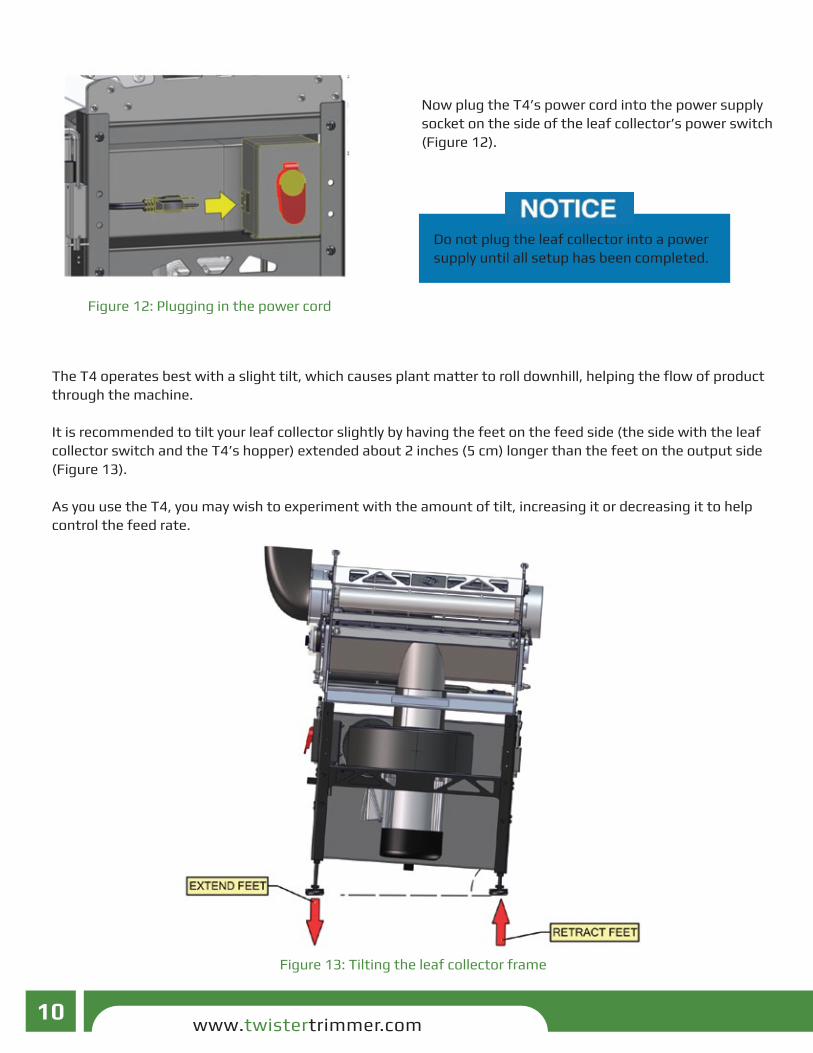
Now plug the T4’s power cord into the power supply socket on the side of the leaf collector’s power switch (Figure 12).
Do not plug the leaf collector into a power supply until all setup has been completed.
Figure 12: Plugging in the power cord
The T4 operates best with a slight tilt, which causes plant matter to roll downhill, helping the flow of product through the machine.
It is recommended to tilt your leaf collector slightly by having the feet on the feed side (the side with the leaf collector switch and the T4’s hopper) extended about 2 inches (5 cm) longer than the feet on the output side (Figure 13).
As you use the T4, you may wish to experiment with the amount of tilt, increasing it or decreasing it to help control the feed rate.
Figure 13: Tilting the leaf collector frame
www.twistertrimmer.com10

Controls
The controls for the T4 system are very straightforward and easy to use:
Figure 14: Controls for the T4 Figure 15: Leaf collector power switch
1. Emergency stop button – use this to stop all moving parts on the T4. **Note: this does not shut down the leaf collector.
2. Tumbler start/stop button.
3. Tumbler power indicator light – indicates that the tumbler motor is powered.
4. Fault light – if lit, indicates that your T4 has shut down due to a serious issue and needs to be reset – check the troubleshooting section to solve this. If lit, unplug machine to reset it.
5. Warning light – indicates that the motor is experiencing a heavy workload, usually due to either the machine requiring cleaning, or the bedknife being adjusted with too much tension – see troubleshooting section for further details.
6. Blade power indicator light – indicates that the reel blade motor is powered.
7. Blade start/stop button.
8. Leaf collector on/off switch – pull to start, push to stop. The yellow lockout tab may be removed if you wish to prevent the leaf collector from being turned on unintentionally.
9. Control box hour meter – indicates how many hours the blade motor has run over the lifetime of the T4.
Figure 16: Hour meter location
www.twistertrimmer.comwww.twistertrimmer.com11

11
AdjustmentYour new T4 has been properly adjusted during assembly; however, due to jostling during shipping, the machine may have become misaligned and need minor adjustment before use.
To run at peak efficiency, the T4’s cutting surfaces need to be aligned correctly (Figure 17); if the bedknife is too far from the reel blade (too loose), the machine will cut poorly; if it is too close (too tight) to the reel blade, there will be too much friction, causing excessive noise, increased wear on the cutting surfaces, and increased load on the motor.
Ideally, the bedknife should be just lightly touching the reel blade; when adjusted as such, there is very little friction, the bedknife and reel blade keep each other automatically sharpened and the reel blade cuts at peak effectiveness.
Figure 17: Cutaway view showing bedknife/reel blade alignment
→ Make sure that the machine is always clean before attempting to adjust it. → Never use a cord of over 15m (50ft) in length – longer cords increase electrical resistance, which will interfere with the T4’s efficiency.
www.twistertrimmer.com12

Take care not to slide your fingers along the reel blade or bedknife – both parts are sharp and can easily cut you.
Remove the tumbler, control box, and shroud. Twist the adjustment clickers counterclockwise to increase the space between the reel blade and the bedknife to allow the thick-ness of two stacked pieces of paper.
Figure 18: First adjustment step
Figure 19: Second adjustment step
Insert the doubled-up paper between the bedknife and the reel blade at the 2nd reel blade disc by slowly rotating the blade forward. Ensure the paper is parallel to the bedknife (Figure 18).
Turn the closest clicker clockwise (tighten) one click at a time. Continue until the paper is pinched slightly while rolling the reel blade. When properly adjusted, a slight drag will be felt as the doubled paper is pulled. No drag should be felt with a single piece of paper.
Repeat the same procedure at the 4th reel blade disc, using the opposite clicker (Figure 19).
Once adjustment has been completed, ensure the reel blade spins freely with no contact to the bedknife. If the blade does not spin freely, repeat the adjustment procedure and ensure the blades are clean.
Audible confirmation: To verify that the adjustment is correct, connect the T4 to the leaf collector. Turn on the blades and the leaf collector. The suction from the leaf collector will draw the blades together causing them to make contact. This will produce a slight ticking sound, which indicates proper blade adjustment. To increase or decrease this sound, turn both clickers one click at a time in the appropriate direction. Excessive blade noise will cause premature blade wear and overstrain the motor.
www.twistertrimmer.com13

Operation
As mentioned in the Initial Setup section, The T4 can operate with or without lubricant. The best non oil-based product is cold water. Using the T4 with no lubricant will require more frequent cleaning. See the lubrication section for more information.
Figure 20: Lubricating roller brush
Make certain to not spray the drive wheel with any lubricant as this will cause the wheel to not grip the tumbler, causing the tumbler to not spin. The drive wheel will need to be cleaned and dried before use if it gets sprayed.
To start processing plant matter, place a receiver bin on the output side of the machine (the side opposite of the hopper) to catch trimmed product, and start feeding plant matter into the hopper. Note that the T4 does not require plant matter to be dried before trimming – in fact, it works best with wet flowers.
Start feeding plant matter into the hopper. Try to maintain a steady flow of plant matter through the machine; you’ll need to adjust your feed rate as necessary to maintain the best flow rate. The first section of the tum-bler (Figure 21) should always be occupied by plant matter – if it keeps clearing out, increase your feed rate to always keep it occupied. If the machine starts clogging, decrease your feed rate.
It is easy to underestimate how fast the T4 can trim plant matter, so it is advisable to experiment with your feed rates, increasing or decreasing how fast you feed it in until you find the ideal pace. This will give you the maximum performance for production.
Figure 21: First section of tumbler
www.twistertrimmer.com14

Maintenance and Cleaning
Empty the collection bag periodically; waiting until it is full will result in decreased airflow, which causes less suction at the cutting point, causing decreased cutting performance. If you notice the machine has started cutting poorly, first check to see if the bag needs emptying. The guard on top of the leaf collector may occasionally get plugged with built-up plant matter, and will need to be cleaned immediately whenever this begins to impact performance, and also after every use.Make sure to clean and lubricate the T4 and leaf collector, and empty and clean the collection bag after every use – this will extend the life of the machine, keep its performance at high efficiency, and will in general make cleanup much easier, as resins and other plant by-products will build up and become extremely hard if left to dry. See the next section for details.
→
→
→
The T4 is a precision machine. It is essential that it is operated and cared for with this in mind. It has been adjusted and tested by the manufacturer. However, at initial startup and at the beginning of each day, check to ensure the blades spin freely before plugging in the unit. See below for instructions on how to access the blades.
Keep in mind that the machine will have specific operating characteristics and noise qualities. The operator should become familiar with the machine and listen for abnormal changes. Concerns should be investigated before considerable problems occur.
Be absolutely sure to unplug the T4 and leaf collector before proceeding. Never plug in machine while protective covers are not in place.
→→
Due to the different compositions of the materials being processed, lubricating and cleaning frequency will vary. Most operators will realize these needs and adjust accordingly. Ask your dealer for practical lubricating and cleaning frequency for your specific industry. The manufacturer recommends cleaning at the end of each day. Buildup is the most obvious sign that there is need for more attention in this area.
www.twistertrimmer.com15
Teardown
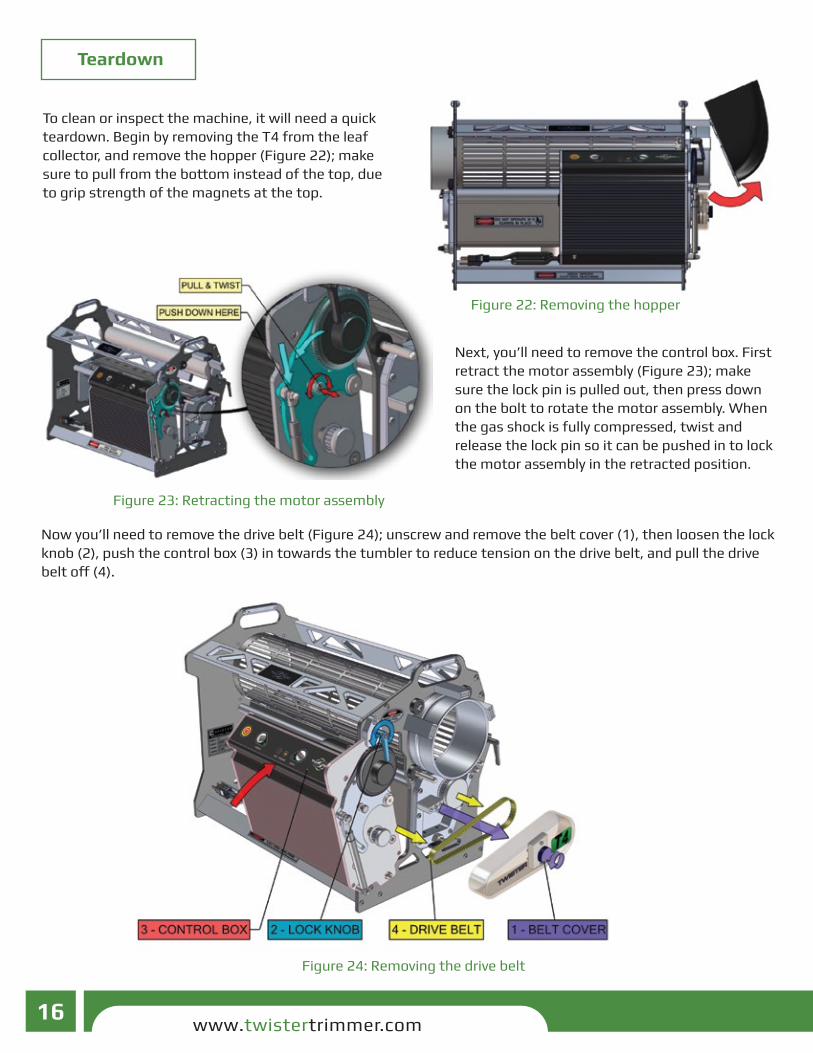
To clean or inspect the machine, it will need a quick teardown. Begin by removing the T4 from the leaf collector, and remove the hopper (Figure 22); make sure to pull from the bottom instead of the top, due to grip strength of the magnets at the top.
Figure 22: Removing the hopper
Next, you’ll need to remove the control box. First retract the motor assembly (Figure 23); make sure the lock pin is pulled out, then press down on the bolt to rotate the motor assembly. When the gas shock is fully compressed, twist and release the lock pin so it can be pushed in to lock the motor assembly in the retracted position.
Figure 23: Retracting the motor assembly
Now you’ll need to remove the drive belt (Figure 24); unscrew and remove the belt cover (1), then loosen the lock knob (2), push the control box (3) in towards the tumbler to reduce tension on the drive belt, and pull the drive belt off (4).
Figure 24: Removing the drive belt
www.twistertrimmer.com16

Now pull the top of the control box away from the tumbler to tilt it out (Figure 25), and slide it out of the side of the machine as shown to remove it (Figure 26).
Figure 25: Tilting the control box Figure 26: Removing the control box
Next, you’ll need to remove the tumbler (Figure 27). Make sure to only pull it out from the feed end as shown, not the opposite (output) end.
Be VERY CAREFUL when removing the tumbler. This is a delicate and very precise component of the machine, and if dropped or damaged the machine’s performance will be greatly reduced, or possibly completely disabled.
Figure 27: Removing the tumbler
Flip the T4 on its back. Make sure that the lock levers are not pointed outwards before tilting the machine on its back – doing so will result in the T4 leaning on the lock levers, which may break them. To change their angle, just pull them outwards and twist to set them in a new position. Now twist the shroud locking pins (Figure 28); twisting them 180° will lock them in the out position. You can now pull the shroud straight out.
Figure 28: Removing the shroud
www.twistertrimmer.com17

Next, unscrew and remove the two levers on the sides of the machine (Figure 29). This will unlock the adjuster crossbar, which will let you flip it down out of the way.
Figure 29: Unlocking the adjuster crossbar
Now you can flip up the bedknife (Figure 30), to allow access for inspection and cleaning.
Figure 30: Rotating the bedknife
www.twistertrimmer.comwww.twistertrimmer.com18

Inspection
With the T4 fully stripped down, you can now begin inspection and cleaning. Visually check the reel blade and bedknife for damage. Slowly spin the reel blades by hand to inspect all around, looking for any nicks, dents, or bends.
If there is damage to the blades that will not allow smooth operation, the unit will need to be serviced. Failure to do so may result in further damage to the T4.
Damage to the blade is very rare on a properly adjusted unit. Typically rocks, hard metallic objects or poor adjustment is the cause of blade damage. Damage will not be corrected by the self-sharpening feature. These circumstances are not covered under warranty, and replacement parts will need to be purchased and professionally installed. To avoid these repair costs, please take care to properly maintain your T4, keep it well-adjusted, and take great care to not let hard objects into the tumbler during operation.
Ensure the blades spin freely. With the bedknife lowered and the adjustment crossbar locked, light contact against the bedknife is normal on a properly adjusted unit. Due to the design and precision adjustment, the blades receive a continual self-sharpening action. Light contact is necessary to maintain a sharp cutting edge. Having no contact will cause the blades to become dull. See the Adjustment section for information on how to align the bedknife. Inspect all other exposed surfaces for signs of damage, wear, or resin buildup.
Cleaning
A thorough cleaning of the machine and leaf collector should be performed on a daily basis. Resin attracts more resin, compounding the problem. Buildup will cause decreased performance, overheating and hard start-up on future use. Future cleaning also becomes more difficult if buildup is given a chance to dry out and harden.
It is recommended the machine blades are cleaned after 4 hours of continuous use.
Spray Simple Green or other mild degreaser all over every surface on the T4 that needs cleaning (except the control box – see below), liberally soaking the roller brush and any areas with heavily coated plant matter and resin. Allow to stand for 5-10 minutes to soak in.
Figure 31: Opening the leaf collector
Use only a cloth and gentle solutions on the control box, belt and belt cover.
Remove the screws that hold the inlet on the leaf collector (Figure 31), and spray inside the cowling to loosen up any built-up plant matter. Avoid spraying the switch box and motor. The best way to clean these components is with a pressure washer, preferably one that can use hot water; cleanup is extremely easy this way.
www.twistertrimmer.com19

Cleaning with a pressure washer
High pressure water can damage the tumbler; use care and caution.
Simply place the T4 on the ground or floor and spray soiled areas with the pressure washer. Pay particular attention to the reel blade, bedknife, and roller brush. If the machine was kept adequately lubricated during operation, and has had sufficient amounts of degreaser sprayed on it during pre-soak, then all debris will come off very easily.
Any stubborn areas may require scrubbing with a stiff plastic bristled brush, or a plastic scraper (a metal scraper can be used if necessary, but is not advised due to the probability of scratching surfaces). Such areas are good indicators of the machine needing more lubricant during operation next time, or needing more degreaser sprayed on those spots during pre-soaking.
Pressure wash the leaf collector, spraying inside to remove all built-up plant matter, and make sure to also spray the underside of the inlet. Do not directly spray the motor or switch box.
It is recommended to turn the leaf collec-tor on its side for pressure washing, with the outlet pointing down (Figure 32) – this will allow water to drain more easily and reduce the probability of water pooling and seeping into the motor’s seals.
Next, spray the shroud and tumbler. Make sure the shroud and tumbler are not able to roll or slide around as they get sprayed, as this can cause damage to the parts.
Empty the collection bag, thoroughly soak it for about 30 minutes in very hot water and Simple Green, and then scrub it to remove built-up material.
Using Simple Green or other mild degreaser, a cloth, a plastic brush, and/or a plastic scraper, clean up any remaining spots that the pressure washer did not completely clean.
The bedknife and reel blade should be dried to prevent corrosion.
If available, use compressed air to dry all components.
Figure 32: Washing the leaf collector
www.twistertrimmer.com20
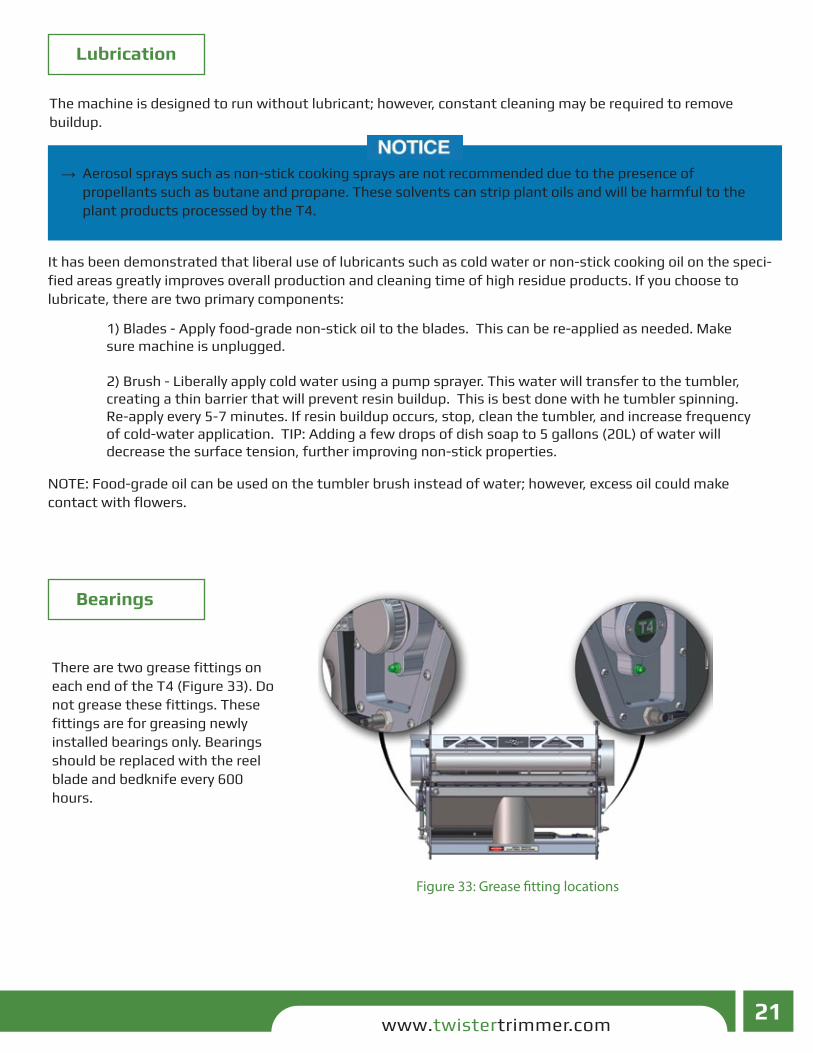
Lubrication
The machine is designed to run without lubricant; however, constant cleaning may be required to remove buildup.
Aerosol sprays such as non-stick cooking sprays are not recommended due to the presence of propellants such as butane and propane. These solvents can strip plant oils and will be harmful to the plant products processed by the T4.
→
It has been demonstrated that liberal use of lubricants such as cold water or non-stick cooking oil on the speci-fied areas greatly improves overall production and cleaning time of high residue products. If you choose to lubricate, there are two primary components:
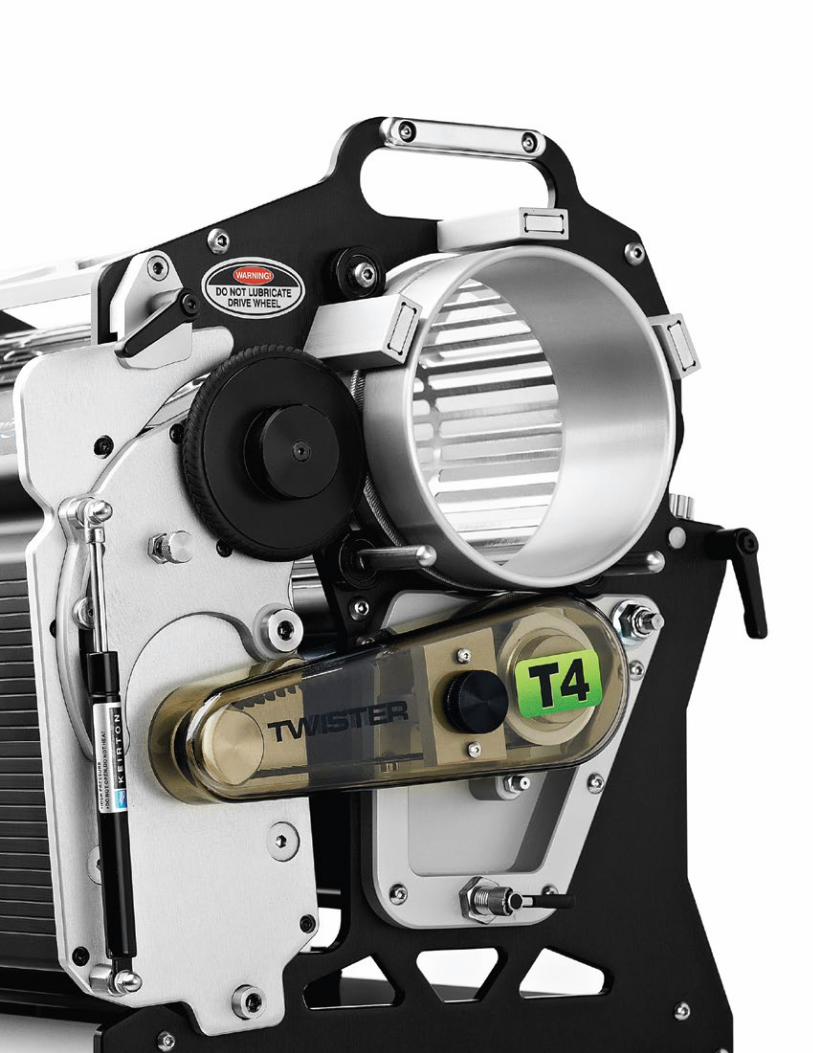
Figure 33: Grease �tting locations
There are two grease fittings on each end of the T4 (Figure 33). Do not grease these fittings. These fittings are for greasing newly installed bearings only. Bearings should be replaced with the reel blade and bedknife every 600 hours.
1) Blades - Apply food-grade non-stick oil to the blades. This can be re-applied as needed. Make sure machine is unplugged.
2) Brush - Liberally apply cold water using a pump sprayer. This water will transfer to the tumbler, creating a thin barrier that will prevent resin buildup. This is best done with he tumbler spinning. Re-apply every 5-7 minutes. If resin buildup occurs, stop, clean the tumbler, and increase frequency of cold-water application. TIP: Adding a few drops of dish soap to 5 gallons (20L) of water will decrease the surface tension, further improving non-stick properties.
NOTE: Food-grade oil can be used on the tumbler brush instead of water; however, excess oil could make contact with flowers.
Bearings
www.twistertrimmer.com21

Reassembly
Follow the disassemble procedure in the reverse order.
Flip the bedknife back down to be in contact with the reel blade Flip up the adjuster crossbar, insert and tighten levers on sides of machine Insert shroud, twist release levers to lock in place (Figure 34) Insert tumbler – Note, it can only be inserted in one end of the machine, and only in one direction (Figure 35) Replace control box on its swivel pin, and tilt it up towards the tumbler Replace drive belt and belt cover Pull out lock pin from motor assembly, allow it to pivot up Pull control box out from tumbler until it is firmly engaged with the drive belt Tighten lock knob to lock the control box in place Replace hopper
→→→→→→→→→→
Replace the shroud, and lock it back in place by twisting the shroud locking pins again, making sure that the pins have fully engaged in holding the shroud in place (Figure 34); if not, you will need to push on the shroud to press it in slightly before you push the locking pins in to hold it in place.
Figure 34: Securing the tumbler
The tumbler can only be insert-ed on the side of the T4 that holds the hopper – it will not fit through the other end. Only insert the non-grooved side of the tumbler into the machine, as the groove needs to be exposed on the same end as the control box (Figure 35).
Note that you may need to readjust the bedknife adjuster clickers after reassembly – make sure to listen to the sound the machine makes when you start it up again, and adjust as necessary as noted in the Adjustment section.
Figure 35: Inserting the tumbler
www.twistertrimmer.comwww.twistertrimmer.com22

Storage
The design and materials of the unit make storage very simple, and because there are very few parts that can corrode, it can be stored in most places safely. There are a few tips to ensure you get the most out of the machine for a very long time.
The machine should never be stored without cleaning, as the buildup of material from previous use will harden, making start-up difficult. Following these steps will ensure smooth start-up on the following use.
Store the machine in a safe dry place. Keep it out of reach of children and other unauthorized persons.
Tips and Tricks
Here are some tips and tricks that users of the T4 have found to improve performance and ease cleaning of the machine:
Some users have found a significant improvement in product quality when the T4 is used in a cold environment, down to about 41° Fahrenheit (5° Celsius). Warm environments increase the transfer of plant material to machine components.
Most varieties of plants process much better when harvested within several hours of being watered.
Multiples T4s in line (2, 3, or 4) can drastically increase performance and output. A steep incline will be required.
5 Gallons of ice water with a few drops of dish soap is the best non-oil alternative.
www.twistertrimmer.com23

Troubleshooting1. Tumbler makes grinding sound This could be due to damage to the tumbler causing it to rub. This may require a replacement tumbler.
2. Tumbler motor is very hot The tumbler motor can get very hot if it is run for long periods - this is normal. The motor is thermally protected and will turn off if too hot.
3. There is a high pitch squeal coming from the blades This can indicate the machine needs cleaning.
4. There is a high speed ticking sound coming from the blades This is normal. A ticking sound is the blades making slight contact. This is necessary to maintain the self-sharpening of the blades. If the sound is more than a faint ticking sound, stop and unplug the machine. Check for adjustment and damage to the blades.
5. Debris is getting clogged up in the leaf collector inlet Depending on the model of leaf collector, there may be a safety guard covering the inlet. Clear the blockage from the guard.
6. There is a lot of material buildup on the brush and tumbler Increase frequency and amount of lubricant applications or clean the machine.
7. Suction from the leaf collector seems weak Ensure there is nothing blocking the inlet. A clean or new collection bag will keep performance high. Buildup can also accumulate in the leaf collector housing around the impeller, reducing performance. Unplug the leaf collector and remove the inlet housing to clean inside impeller housing.
8. The material comes out of the machine under-processed Ensure all components are on and suction is high. Ensuring the machine is level can also improve blade contact. Some materials may benefit from a second pass through the machine.
9. The Warning light is on This indicates that the T4’s blade motor is under high load; this might be corrected by cleaning the machine, loosening the bedknife adjustment (a tight adjustment will press on the reel blade, increasing friction), applying non-stick food-grade oil to the blades, or re-lubricating the bearings.
10. The Fault light is on, and the machine has stopped The T4 has encountered an overload – either it is experiencing too much friction, or the blade has become obstructed or stuck. Unplug the machine, inspect it, make sure there is nothing stuck in the blades, clean it if necessary, and then try restarting it. Unplugging the T4 clears the fault light.
11. The tumbler does not spin Check the tumbler for obstructions, make sure that the drive wheel is fully pressed against the side of the tumbler, and is seated in the center of the groove, and make sure there is no oil or other lubricant on the drive wheel or in the groove.
For all other issues, please call tech support at 1-888-254-3204 – we will be glad to help you.
→
→
→
→
→
→
→
→
→
→
→
www.twistertrimmer.com24

Specification
Input Voltage 115VCurrent Draw 2ABlade Motor 200W / 0.25HP
Tumbler Motor 6W / 1/125HP
Cut Height .040in / 1mmWeight 56lbs / 25.4kg
Shipping Weight 120lbs / 54.4kg(complete w/leaf collector) Length 25in / 63.5cm
Width 15in / 38.1cmHeight 16.5in / 42cmDischarge 5in / 12.7cm
Input Voltage 115VMotor 1HPAmps (running) 10A (NA)Amps (startup) 53A (NA)Motor Speed 3450RPMAirflow Capacity 1190 CFMStatic Pressure 6.45in of H20Impeller 10in / 25.4cmInlet 5 ½in / 13.9cmHeight 19in / 48.3cmWeight 58lbs / 26.3kgCircuit Breaker Required 15A / 120VConnector (plug) 15A 120V (NEMA 5-15)Sound Rating 77 DbFused Yes
Extension Cord 14/3 AWG (minimum AWG size) 15m / 50ft maximum length
Lubrication Grease Gun Blue Grease
Twister T4:
T4 Leaf Collector:
Additional Requirements:
www.twistertrimmer.com25

Manufacturer’s Warranty
The manufacturer will repair or replace, without charge, any parts proved defective in material or workmanship for a period of 3 years.
The warranty period will begin on the date the machine is purchased by the initial purchaser. T4 warranty defects can be remedied at any authorized service dealer or directly at the manufacturer. Any work deemed valid due to a defective part will be free of charge. Any manufacturer approved replacement part may be used for any warranty maintenance or repair.
You may be denied warranty coverage if your machine has failed due to abuse, neglect, improper maintenance, improper electrical connection, normal wear, accident or unapproved modifications.
The manufacturer assumes no risk and shall be subject to no liability for damages or loss resulting from the specific use or application made of the product. In no event will the manufacturer be liable for any special, incidental, or consequential damages (including loss of use, loss of profit, and claims of third parties) however caused, whether by negligence of the manufacturer or otherwise.
If warranty repair is required, please contact the manufacturer at 1-888-254-3204 or [email protected] and provide the following information:
1) Model and serial number.
2) Proof of purchase date.
3) A copy of the original Warranty Registration Card (Unless registration was completed online).
4) Details of the defect or problem (including photos/video).
The machine or defective part then must be returned to the manufacturer for analysis and replacement.
If you have any questions regarding your warranty rights and responsibilities, please contact the manufacturer at [email protected].
DO NOT return the machine to the place of purchase for repair or warranty claims. The place of purchase can only sell replacement parts and will not repair warranty issues unless it is noted as an authorized repair dealer.
www.twistertrimmer.comwww.twistertrimmer.com26

Notes
www.twistertrimmer.com27

www.twistertrimmer.com