Manual 3516 Cat
126
SEBU6711-10 July 2004 Operation and Maintenance Manual G3500 Engines 4WD1-Up (Engine) 5JD1-Up (Engine) 8LD1-Up (Engine) 9TG1-Up (Engine) 2TJ1-Up (Engine) 7NJ1-Up (Engine) 4EK1-Up (Engine) 6JW1-Up (Engine) 8PW1-Up (Engine) 9AW1-Up (Engine) 7SZ1-Up (Engine) 8BZ1-Up (Engine) 5ZZ1-Up (Engine) 8JZ1-Up (Engine)
-
Upload
jairo-alonso-toloza -
Category
Documents
-
view
4.493 -
download
452
description
Manual operacion y mantenimiento
Transcript of Manual 3516 Cat

SEBU6711-10July 2004
Operation andMaintenanceManualG3500 Engines4WD1-Up (Engine)5JD1-Up (Engine)8LD1-Up (Engine)9TG1-Up (Engine)2TJ1-Up (Engine)7NJ1-Up (Engine)4EK1-Up (Engine)6JW1-Up (Engine)8PW1-Up (Engine)9AW1-Up (Engine)7SZ1-Up (Engine)8BZ1-Up (Engine)5ZZ1-Up (Engine)8JZ1-Up (Engine)

i01658146
Important Safety InformationMost accidents that involve product operation, maintenance and repair are caused by failure to observebasic safety rules or precautions. An accident can often be avoided by recognizing potentially hazardoussituations before an accident occurs. A person must be alert to potential hazards. This person should alsohave the necessary training, skills and tools to perform these functions properly.
Improper operation, lubrication, maintenance or repair of this product can be dangerous andcould result in injury or death.Do not operate or perform any lubrication, maintenance or repair on this product, until you haveread and understood the operation, lubrication, maintenance and repair information.Safety precautions and warnings are provided in this manual and on the product. If these hazard warningsare not heeded, bodily injury or death could occur to you or to other persons.
The hazards are identified by the “Safety Alert Symbol” and followed by a “Signal Word” such as“DANGER”, “WARNING” or “CAUTION”. The Safety Alert “WARNING” label is shown below.
The meaning of this safety alert symbol is as follows:
Attention! Become Alert! Your Safety is Involved.The message that appears under the warning explains the hazard and can be either written or pictoriallypresented.
Operations that may cause product damage are identified by “NOTICE” labels on the product and inthis publication.
Caterpillar cannot anticipate every possible circumstance that might involve a potential hazard.The warnings in this publication and on the product are, therefore, not all inclusive. If a tool,procedure, work method or operating technique that is not specifically recommended by Caterpillaris used, you must satisfy yourself that it is safe for you and for others. You should also ensure thatthe product will not be damaged or be made unsafe by the operation, lubrication, maintenance orrepair procedures that you choose.The information, specifications, and illustrations in this publication are on the basis of information thatwas available at the time that the publication was written. The specifications, torques, pressures,measurements, adjustments, illustrations, and other items can change at any time. These changes canaffect the service that is given to the product. Obtain the complete and most current information before youstart any job. Caterpillar dealers have the most current information available.
When replacement parts are required for thisproduct Caterpillar recommends using Caterpil-lar replacement parts or parts with equivalentspecifications including, but not limited to, phys-ical dimensions, type, strength and material.
Failure to heed this warning can lead to prema-ture failures, product damage, personal injury ordeath.

3Table of Contents
Table of Contents
Foreword ................................................................. 4
Safety Section
Safety Messages .................................................... 6
General Hazard Information .................................. 11
Burn Prevention .................................................... 13
Fire Prevention and Explosion Prevention ............ 14
Crushing Prevention and Cutting Prevention ........ 14
Mounting and Dismounting ................................... 15
Ignition Systems ................................................... 15
Before Starting Engine .......................................... 15
Engine Starting ..................................................... 15
Engine Stopping ................................................... 16
Electrical System .................................................. 16
Product Information Section
Model Views and Specifications ........................... 17
Product Identification Information ........................ 23
Operation Section
Lifting and Storage ................................................ 25
Gauges and Indicators .......................................... 27
Features and Controls .......................................... 30
Engine Starting ..................................................... 48
Engine Operation .................................................. 53
Engine Stopping ................................................... 54
Maintenance Section
Refill Capacities .................................................... 57
Maintenance Interval Schedule (TurbochargedAftercooled) ......................................................... 60
Maintenance Interval Schedule (Standby) ............ 61
Maintenance Interval Schedule (Bio-Gas) ............ 62
Maintenance Interval Schedule (NaturallyAspirated) ............................................................ 63
Reference Information Section
Customer Service ................................................ 114
Reference Materials ............................................. 116
Index Section
Index ................................................................... 122

4Foreword
ForewordLiterature InformationThis manual contains safety, operation instructions,lubrication and maintenance information. Thismanual should be stored in or near the engine areain a literature holder or literature storage area. Read,study and keep it with the literature and engineinformation.
English is the primary language for all Caterpillarpublications. The English used facilitates translationand consistency in electronic media delivery.
Some photographs or illustrations in this manualshow details or attachments that may be differentfrom your engine. Guards and covers may havebeen removed for illustrative purposes. Continuingimprovement and advancement of product designmay have caused changes to your engine which arenot included in this manual. Whenever a questionarises regarding your engine, or this manual, pleaseconsult with your Caterpillar dealer for the latestavailable information.
SafetyThis safety section lists basic safety precautions.In addition, this section identifies hazardous,warning situations. Read and understand the basicprecautions listed in the safety section beforeoperating or performing lubrication, maintenance andrepair on this product.
OperationOperating techniques outlined in this manual arebasic. They assist with developing the skills andtechniques required to operate the engine moreefficiently and economically. Skill and techniquesdevelop as the operator gains knowledge of theengine and its capabilities.
The operation section is a reference for operators.Photographs and illustrations guide the operatorthrough procedures of inspecting, starting, operatingand stopping the engine. This section also includes adiscussion of electronic diagnostic information.
MaintenanceThe maintenance section is a guide to engine care.The illustrated, step-by-step instructions are groupedby service hours and/or calendar time maintenanceintervals. Items in the maintenance schedule arereferenced to detailed instructions that follow.
Use service hours to determine intervals. Calendarintervals shown (daily, annually, etc) may be usedinstead of service meter intervals if they provide moreconvenient schedules and approximate the indicatedservice meter reading.
Recommended service should always beperformed at the service hour interval. The actualoperating environment of the engine also governsthe maintenance schedule. Therefore, underextremely severe, dusty, wet or freezing coldoperating conditions, more frequent lubrication andmaintenance than is specified in the maintenanceschedule may be necessary.
The maintenance schedule items are organized fora preventive maintenance management program. Ifthe preventive maintenance program is followed, aperiodic tune-up is not required. The implementationof a preventive maintenance management programshould minimize operating costs through costavoidances resulting from reductions in unscheduleddowntime and failures.
Maintenance IntervalsPerform maintenance on items at multiples of theoriginal requirement. Each level and/or individualitems in each level should be shifted ahead or backdepending upon your specific maintenance practices,operation and application. We recommend thatthe maintenance schedules be reproduced anddisplayed near the engine as a convenient reminder.We also recommend that a maintenance record bemaintained as part of the engine’s permanent record.
See the section in the Operation and MaintenanceManual, “Maintenance Records” for informationregarding documents that are generally acceptedas proof of maintenance or repair. Your authorizedCaterpillar dealer can assist you in adjusting yourmaintenance schedule to meet the needs of youroperating environment.
California Proposition 65 WarningBattery posts, terminals and related accessoriescontain lead and lead compounds. Wash hands afterhandling.

5Foreword
OverhaulMajor engine overhaul details are not covered in theOperation and Maintenance Manual except for theinterval and the maintenance items in that interval.Major repairs are best left to trained personnel oran authorized Caterpillar dealer. Your Caterpillardealer offers a variety of options regarding overhaulprograms. If you experience a major engine failure,there are also numerous after failure overhaul optionsavailable from your Caterpillar dealer. Consult withyour dealer for information regarding these options.

6Safety SectionSafety Messages
Safety Sectioni02115145
Safety MessagesSMCS Code: 1000; 7405
g01069751Illustration 1
There may be several specific safety messageson your engine. The approximate location and adescription of the safety messages are reviewed inthis section. Please become familiar with all of thesafety messages.
Ensure that all of the safety messages are legible.Clean the safety messages or replace the safetymessages if the words cannot be read or if theillustrations are not visible. Use a cloth, water, andsoap for cleaning the safety messages. Do notuse solvents, gasoline, or other harsh chemicals.Solvents, gasoline, or harsh chemicals could loosenthe adhesive that secures the safety messages. Thesafety messages that are loosened could drop offof the engine.

7Safety Section
Safety Messages
Replace any safety message that is damaged ormissing. If a safety message is attached to a partof the engine that is replaced, install a new safetymessage on the replacement part. Your Caterpillardealer can provide new safety messages.
Do not operate or work on this engine unless youhave read and understand the instructions andwarnings in the Operation and Maintenance Man-ual. Failure to follow the instructions or heed thewarnings could result in injury or death. Contactany Caterpillar dealer for replacement manuals.Proper care is your responsibility.
The safety messages that may be attached on theengine are illustrated and described below.
Engine Lifting (1)
g01061192Illustration 2
The safety message for engine lifting is located onthe valve covers.
Improper lift rigging can allow unit to tumble caus-ing injury and damage.
If improper equipment is used to lift the engine, injuryand damage can occur. Use cables that are properlyrated for the weight. Use a spreader bar and attachthe cables according to the information on the safetymessage.
Electrical Shock (2)
g00305892Illustration 3
The safety message for electrical shock is locatedon the valve covers.
Ignition systems can cause electrical shocks.Avoid contacting the ignition system componentsand wiring.
Do not attempt to remove the valve covers whenthe engine is operating. The transformers aregrounded to the valve covers. Personal injury ordeath may result and the ignition system will bedamaged if the valve covers are removed duringengine operation. The engine will not operatewithout the valve covers.
8Safety SectionSafety Messages
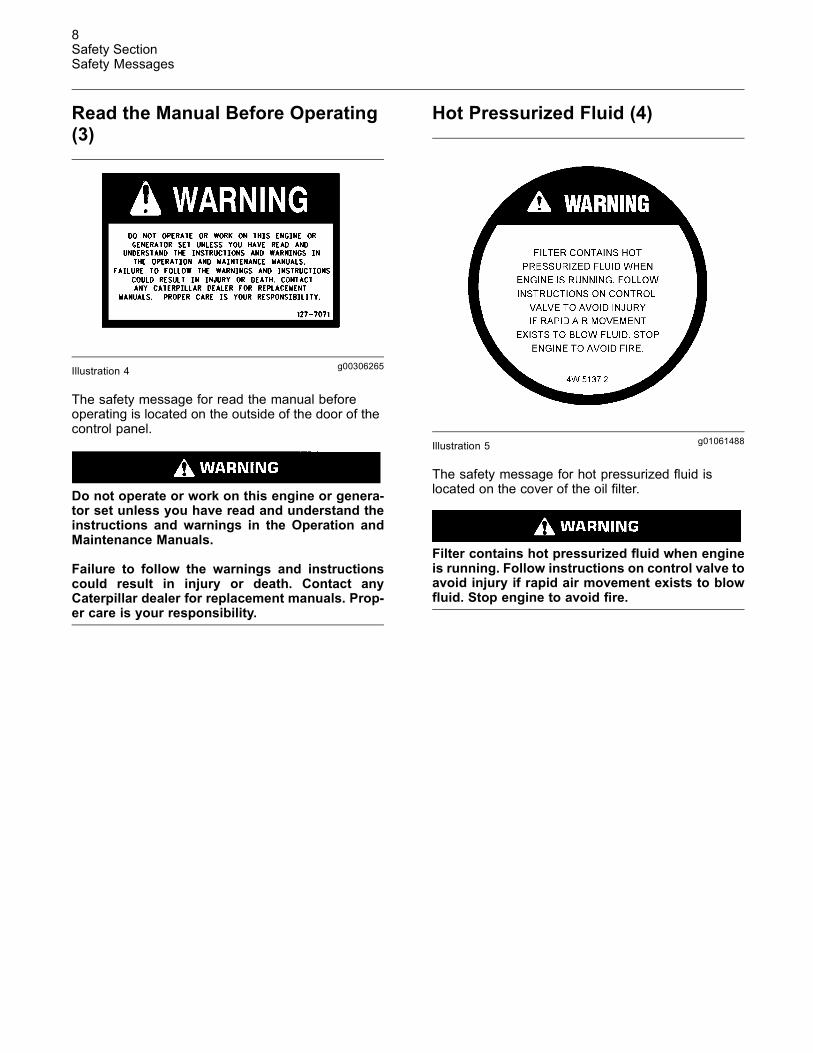
Read the Manual Before Operating(3)
g00306265Illustration 4
The safety message for read the manual beforeoperating is located on the outside of the door of thecontrol panel.
Do not operate or work on this engine or genera-tor set unless you have read and understand theinstructions and warnings in the Operation andMaintenance Manuals.
Failure to follow the warnings and instructionscould result in injury or death. Contact anyCaterpillar dealer for replacement manuals. Prop-er care is your responsibility.
Hot Pressurized Fluid (4)
g01061488Illustration 5
The safety message for hot pressurized fluid islocated on the cover of the oil filter.
Filter contains hot pressurized fluid when engineis running. Follow instructions on control valve toavoid injury if rapid air movement exists to blowfluid. Stop engine to avoid fire.

9Safety Section
Safety Messages
Coupling (5)
g00305692Illustration 6
The safety message for the coupling is located onthe sides of the flywheel housing.
If engine runs and coupling is not properly re-strained, personal injury or property damage mayresult.
Before starting engine, do one of the following:
1. Align and couple the equipment.
2. Remove the loose parts.
3. Center and restrain the loose parts.
Jumper Cable Connections (6)
g00897261Illustration 7
The safety message for the connections for thejumper cables is located near the electric startingmotor. This motor can be located on either side ofthe engine.
IMPROPER JUMPER CABLE CONNECTIONS CANCAUSE EXPLOSION RESULTING IN PERSONALINJURY.
BATTERIES MAY BE LOCATED IN SEPARATECOMPARTMENTS. WHEN USING JUMPER CA-BLES, ALWAYS CONNECT POSITIVE (+) CABLETO POSITIVE (+) TERMINAL OF BATTERY CON-NECTED TO STARTER SOLENOID AND NEGA-TIVE (-) CABLE FROM EXTERNAL SOURCE TOSTARTER NEGATIVE (-) TERMINAL (IF MACHINENOT EQUIPPED WITH STARTER NEGATIVE TER-MINAL, CONNECT TO ENGINE BLOCK.) FOLLOWPROCEDURE IN THE OPERATION MANUAL.

10Safety SectionSafety Messages
Flash Fire (7)
g01061123Illustration 8
The safety messages for flash fire are located on thecrankcase covers.
Flash fire may result in personal injury, ifcrankcase covers are removed within fifteenminutes after emergency shut down. Do notrestart engine until cause for shutdown has beencorrected.
Prelube Pump (8)
g00306385Illustration 9
The safety message for the prelube pump is locatedon the prelube pump.
Motor must be grounded in accordance with na-tional electrical code and local codes, by trainedpersonnel to prevent serious electrical shocks.
Lifting provisions are intended for lifting themotoronly.
Motor has an automatic reset thermal protector. Ifmotor overheats, thermal protector will open mo-tor circuit.
After motor cools sufficiently, thermal protectorwill reset without warning and restart motor.
To service motor, disconnect power source frommotor and any accessory devices and allowmotorto come to a complete standstill.

11Safety Section
General Hazard Information
i02016074
General Hazard InformationSMCS Code: 1000; 4450; 7405
g00104545Illustration 10
Attach a “Do Not Operate” warning tag or a similarwarning tag to the start switch or to the controlsbefore the engine is serviced or before the engine isrepaired. These warning tags (Special Instruction,SEHS7332) are available from your Caterpillardealer. Attach the warning tags to the engine and toeach operator control station. When it is appropriate,disconnect the starting controls.
Do not allow unauthorized personnel on the engine,or around the engine when the engine is beingserviced.
Engine exhaust contains products of combustionwhich may be harmful to your health. Always start theengine and operate the engine in a well ventilatedarea. If the engine is in an enclosed area, vent theengine exhaust to the outside.
Cautiously remove the following parts. To helpprevent spraying or splashing of pressurized fluids,hold a rag over the part that is being removed.
• Filler caps
• Grease fittings
• Pressure taps
• Breathers
• Drain plugs
Use caution when cover plates are removed.Gradually loosen, but do not remove the last twobolts or nuts that are located at opposite ends ofthe cover plate or the device. Before removing thelast two bolts or nuts, pry the cover loose in order torelieve any spring pressure or other pressure.
g00702020Illustration 11
• Wear a hard hat, protective glasses, and otherprotective equipment, as required.
• When work is performed around an engine that isoperating, wear protective devices for ears in orderto help prevent damage to hearing.
• Do not wear loose clothing or jewelry that can snagon controls or on other parts of the engine.
• Ensure that all protective guards and all covers aresecured in place on the engine.
• Never put maintenance fluids into glass containers.Glass containers can break.
• Use all cleaning solutions with care.
• Report all necessary repairs.
Unless other instructions are provided, performthe maintenance under the following conditions:
• The engine is stopped. Ensure that the enginecannot be started.
• Disconnect the batteries when maintenanceis performed or when the electrical system isserviced. Disconnect the battery ground leads.Tape the leads in order to help prevent sparks.
• Do not attempt any repairs that are not understood.Use the proper tools. Replace any equipment thatis damaged or repair the equipment.
California Proposition 65 Warning
Some engine exhaust constituents are known to theState of California to cause cancer, birth defects, andother reproductive harm.

12Safety SectionGeneral Hazard Information
Pressure Air and WaterPressurized air and/or water can cause debrisand/or hot water to be blown out. This could result inpersonal injury.
When pressure air and/or pressure water is used forcleaning, wear protective clothing, protective shoes,and eye protection. Eye protection includes gogglesor a protective face shield.
The maximum air pressure for cleaning purposesmust be below 205 kPa (30 psi). The maximumwater pressure for cleaning purposes must be below275 kPa (40 psi).
Fluid Penetration
g00687600Illustration 12
Always use a board or cardboard when you checkfor a leak. Leaking fluid that is under pressure canpenetrate body tissue. Fluid penetration can causeserious injury and possible death. A pin hole leak cancause severe injury. If fluid is injected into your skin,you must get treatment immediately. Seek treatmentfrom a doctor that is familiar with this type of injury.
Containing Fluid SpillageCare must be taken in order to ensure that fluidsare contained during performance of inspection,maintenance, testing, adjusting and repair of theengine. Prepare to collect the fluid with suitablecontainers before opening any compartment ordisassembling any component that contains fluids.
Refer to Special Publication, NENG2500, “Tools andShop Products Guide” for the following items:
• Tools that are suitable for collecting fluids andequipment that is suitable for collecting fluids
• Tools that are suitable for containing fluids andequipment that is suitable for containing fluids
Obey all local regulations for the disposal of liquids.
Asbestos Information
g00702022Illustration 13
Caterpillar equipment and replacement parts that areshipped from Caterpillar are asbestos free. Caterpillarrecommends the use of only genuine Caterpillarreplacement parts. Use the following guidelineswhen you handle any replacement parts that containasbestos or when you handle asbestos debris.
Use caution. Avoid inhaling dust that might begenerated when you handle components that containasbestos fibers. Inhaling this dust can be hazardousto your health. The components that may containasbestos fibers are brake pads, brake bands, liningmaterial, clutch plates, and some gaskets. Theasbestos that is used in these components is usuallybound in a resin or sealed in some way. Normalhandling is not hazardous unless airborne dust thatcontains asbestos is generated.
If dust that may contain asbestos is present, thereare several guidelines that should be followed:
• Never use compressed air for cleaning.
• Avoid brushing materials that contain asbestos.
• Avoid grinding materials that contain asbestos.
• Use a wet method in order to clean up asbestosmaterials.
• A vacuum cleaner that is equipped with a highefficiency particulate air filter (HEPA) can also beused.
• Use exhaust ventilation on permanent machiningjobs.
• Wear an approved respirator if there is no otherway to control the dust.

13Safety Section
Burn Prevention
• Comply with applicable rules and regulationsfor the work place. In the United States, useOccupational Safety and Health Administration(OSHA) requirements. These OSHA requirementscan be found in “29 CFR 1910.1001”.
• Obey environmental regulations for the disposalof asbestos.
• Stay away from areas that might have asbestosparticles in the air.
SoftwrapKeep the engine room ventilation operating at fullcapacity. Wear a National Institute of OccupationalSafety and Health (NIOSH) approved particulaterespirator. Wear appropriate protective clothingin order to minimize direct contact. Use goodhygiene practices and wash hands thoroughly afterhandling softwrap. Do not smoke until washing handsthoroughly after handling softwrap. Clean up debriswith a vacuum or by wet sweeping. Do not usepressurized air to clean up debris.
Reference: The applicable material safety datasheets can be found at the following web site bysearching by the part number or the name of theproduct:
http://dsf2ws.cat.com/msds/servlet/cat.cis.ecs.msdsSearch.controller.UserIdentificationDisplayServlet
Dispose of Waste Properly
g00706404Illustration 14
Improperly disposing of waste can threaten theenvironment. Potentially harmful fluids should bedisposed of according to local regulations.
Always use leakproof containers when you drainfluids. Do not pour waste onto the ground, down adrain, or into any source of water.
i02088921
Burn PreventionSMCS Code: 1000; 4450; 7405
Do not touch any part of an operating engine.Allow the engine to cool before any maintenanceis performed on the engine. Relieve all pressure inthe appropriate system before any lines, fittings orrelated items are disconnected.
CoolantWhen the engine is at operating temperature, theengine coolant is hot. The coolant is also underpressure. The radiator and all lines to the heaters orto the engine contain hot coolant. Any contact withhot coolant or with steam can cause severe burns.Allow cooling system components to cool before thecooling system is drained.
Check the coolant level after the engine has stoppedand the engine has been allowed to cool. Ensurethat the filler cap is cool before removing the fillercap. The filler cap must be cool enough to touch witha bare hand. Remove the filler cap slowly in orderto relieve pressure.
Cooling system conditioner contains alkali. Alkali cancause personal injury. Do not allow alkali to contactthe skin, the eyes, or the mouth.
OilsHot oil and hot lubricating components can causepersonal injury. Do not allow hot oil or hot componentsto contact the skin.
If the application has a makeup tank, remove the capfor the makeup tank after the engine has stopped.The filler cap must be cool to the touch.
BatteriesThe liquid in a battery is an electrolyte. Electrolyte isan acid that can cause personal injury. Do not allowelectrolyte to contact the skin or the eyes.
Do not smoke while checking the battery electrolytelevels. Batteries give off flammable fumes which canexplode.
Always wear protective glasses when you work withbatteries. Wash hands after touching batteries. Theuse of gloves is recommended.

14Safety SectionFire Prevention and Explosion Prevention
i01027886
Fire Prevention and ExplosionPreventionSMCS Code: 1000; 4450; 7405
A flash fire may result in personal injury if thecrankcase covers are removed within fifteen minutesafter an emergency shutdown.
Fire may result from lubricating oil or from fuel thatis sprayed on hot surfaces. Fire may cause personalinjury and property damage. Inspect all lines andtubes for wear or for deterioration. The lines mustbe properly routed. The lines must have adequatesupport and secure clamps. Tighten all connectionsto the recommended torque. Leaks can cause fires.
Determine whether the engine will be operated in anenvironment that allows combustible gases to bedrawn in through the air inlet system. These gasescould cause the engine to overspeed. This couldresult in bodily injury, property damage, or damageto the engine.
If the application involves the presence of combustiblegases, consult your Caterpillar dealer in order toobtain additional information concerning suitableprotection devices.
Leaking fuel or fuel that is spilled onto hot surfaces oronto electrical components can cause a fire.
All fuels, most lubricants, and some coolant mixturesare flammable. Diesel fuel is flammable. Gasoline isflammable. The mixture of diesel fumes and gasolinefumes is extremely explosive.
Do not smoke while the engine is refueled. Do notsmoke in the refueling area.
Store all fuels and all lubricants in properly markedcontainers. Store the protective containers in a safeplace.
Do not smoke in battery charging areas. Batteriesgive off flammable fumes which can explode.
Do not smoke in areas that contain flammablematerial.
Store oily rags and other flammable material inprotective containers.
Do not weld on pipes or tubes that contain flammablefluids. Do not flame cut pipes or tubes that containflammable fluids. Before pipes or tubes are weldedor flame cut, clean the inside and clean the outsideof the pipes or tubes thoroughly with nonflammablesolvent.
Do not allow flammable materials to accumulate onthe engine.
Do not expose the engine to flames.
Exhaust shields (if equipped) protect hot exhaustcomponents from oil or fuel spray in case of a line,a tube, or a seal failure. Exhaust shields must beinstalled correctly.
Dispose of oil according to local regulations. Oilfilters and fuel filters must be properly installed. Thehousing covers must be tightened to the propertorque when the housing covers are reinstalled.
Batteries must be kept clean. The covers (if equipped)must be kept on the cells. Use the recommendedcables, connections, and battery box covers whenthe engine is operated.
Check the electrical wires daily for wires that areloose or frayed. Before the engine is operated,tighten all loose electrical wires. Repair all frayedelectrical wires.
Wiring must be kept in good condition. Wires mustbe properly routed and securely attached. Routinelyinspect the wiring for wear or for deterioration. Loosewiring, unattached wiring, or unnecessary wiringmust be eliminated. All wires and all cables must beof the recommended gauge. Do not use a wire or acable that is smaller than the recommended gauge.The wires and cables must be connected to a fuse orto a circuit breaker, as required. Do not bypass fusesand/or circuit breakers. Arcing or sparking couldcause a fire. Secure connections, recommendedwiring, and properly maintained battery cables willhelp prevent arcing or sparking.
Fire ExtinguisherEnsure that fire extinguishers are available. Befamiliar with the operation of the fire extinguishers.Inspect the fire extinguishers and service the fireextinguishers regularly. Service the fire extinguisheraccording to the recommendations on the instructionplate.
i01359666
Crushing Prevention andCutting PreventionSMCS Code: 1000; 4450; 7405
Support the component properly when work beneaththe component is performed.

15Safety Section
Mounting and Dismounting
Unless other maintenance instructions are provided,never attempt adjustments while the engine isrunning.
Stay clear of all rotating parts and of all movingparts. Leave the guards in place until maintenanceis performed. After the maintenance is performed,reinstall the guards.
Keep objects away from moving fan blades. The fanblades will throw objects or cut objects.
When objects are struck, wear protective glasses inorder to avoid injury to the eyes.
Chips or other debris may fly off objects when objectsare struck. Before objects are struck, ensure that noone will be injured by flying debris.
i01372247
Mounting and DismountingSMCS Code: 1000; 4450; 7405
Inspect the steps, the handholds, and the work areabefore mounting the engine. Keep these items cleanand keep these items in good repair.
Mount the engine and dismount the engine only atlocations that have steps and/or handholds. Do notclimb on the engine, and do not jump off the engine.
Face the engine in order to mount the engine ordismount the engine. Maintain a three-point contactwith the steps and handholds. Use two feet and onehand or use one foot and two hands. Do not use anycontrols as handholds.
Do not stand on components which cannot supportyour weight. Use an adequate ladder or use a workplatform. Secure the climbing equipment so that theequipment will not move.
Do not carry tools or supplies when you mount theengine or when you dismount the engine. Use a handline to raise and lower tools or supplies.
i00702251
Ignition SystemsSMCS Code: 1550
Ignition systems can cause electrical shocks. Avoidcontacting the ignition system components andwiring.
Do not attempt to remove the valve covers when theengine is operating. The transformers are groundedto the valve covers. Personal injury or death mayresult and the ignition system will be damaged if thevalve covers are removed during engine operation.The engine will not operate without the valve covers.
i00659904
Before Starting EngineSMCS Code: 1000
Inspect the engine for potential hazards.
Before starting the engine, ensure that no one is on,underneath, or close to the engine. Ensure that thearea is free of personnel.
Ensure that the engine is equipped with a lightingsystem that is suitable for the conditions. Ensure thatall lights work properly.
All protective guards and all protective covers mustbe installed if the engine must be started in orderto perform service procedures. To help prevent anaccident that is caused by parts in rotation, workaround the parts carefully.
Do not bypass the automatic shutoff circuits. Do notdisable the automatic shutoff circuits. The circuits areprovided in order to help prevent personal injury. Thecircuits are also provided in order to help preventengine damage.
On the initial start-up of a new engine or an enginethat has been serviced, be prepared to stop theengine if an overspeed condition occurs. This maybe accomplished by shutting off the fuel supply to theengine, or shutting off the ignition system.
See the Service Manual for repairs and foradjustments.
i02136012
Engine StartingSMCS Code: 1000
If a warning tag is attached to the engine start switchor to the controls, DO NOT start the engine or movethe controls. Consult with the person that attachedthe warning tag before the engine is started.
All protective guards and all protective covers mustbe installed if the engine must be started in orderto perform service procedures. To help prevent anaccident that is caused by parts in rotation, workaround the parts carefully.

16Safety SectionEngine Stopping
If there is a possibility that unburned gas remains inthe exhaust system, refer to the purge procedure inthis Operation and Maintenance Manual, “EngineStarting” topic in the Operation Section.
Start the engine from the operator’s compartment orfrom the engine start switch.
Always start the engine according to the procedurethat is described in the Operation and MaintenanceManual, “Engine Starting” topic in the OperationSection. Knowing the correct procedure will help toprevent major damage to the engine components.Knowing the procedure will also help to preventpersonal injury.
To ensure that the jacket water heater (if equipped)and/or the lube oil heater (if equipped) is workingproperly, check the water temperature and the oiltemperature during heater operation.
Engine exhaust contains products of combustionwhich can be harmful to your health. Always start theengine and operate the engine in a well ventilatedarea. If the engine is started in an enclosed area,vent the engine exhaust to the outside.
i00659907
Engine StoppingSMCS Code: 1000
To avoid overheating of the engine and acceleratedwear of the engine components, stop the engineaccording to the instructions in this Operation andMaintenance Manual, “Engine Stopping” topic(Operation Section).
Use the Emergency Stop Button (if equipped) ONLYin an emergency situation. Do not use the EmergencyStop Button for normal engine stopping. After anemergency stop, DO NOT start the engine until theproblem that caused the emergency stop has beencorrected.
On the initial start-up of a new engine or an enginethat has been serviced, make provisions to stopthe engine if an overspeed occurs. This may beaccomplished by shutting off the fuel supply to theengine, or shutting off the ignition system.
i00887114
Electrical SystemSMCS Code: 1000; 1400
Never disconnect any charging unit circuit or batterycircuit cable from the battery when the charging unitis operating. A spark can cause the combustiblegases that are produced by some batteries to ignite.
Check the electrical wires daily for wires that areloose or frayed. Tighten all loose electrical wiresbefore the engine is operated. Repair all frayedelectrical wires before the engine is started.
Grounding PracticesProper grounding is necessary for optimum engineperformance and reliability. Improper grounding willresult in uncontrolled electrical circuit paths and inunreliable electrical circuit paths.
Uncontrolled electrical circuit paths can result indamage to main bearings, to crankshaft journalsurfaces, and to aluminum components. Uncontrolledelectrical circuit paths can also cause electricalactivity that may degrade the engine electronics andcommunications.
For the starting motor, do not attach the batterynegative terminal to the engine block.
Use a ground strap to ground the case of all controlpanels to the engine block.
Ground the engine block with a ground strap that isfurnished by the customer. Connect this ground strapto the ground plane.
Use a separate ground strap to ground the batterynegative terminal for the control system to the groundplane.
Rubber couplings may connect the steel piping ofthe cooling system and the radiator. This causes thepiping and the radiator to be electrically isolated.Ensure that the piping and the radiator is continuouslygrounded to the engine. Use ground straps thatbypass the rubber couplings.
Ensure that all grounds are secure and free ofcorrosion.

17Product Information Section
Model Views and Specifications
Product InformationSection
Model Views andSpecifications
i01626872
Model View IllustrationsSMCS Code: 1000; 4450
The illustrations show various typical features ofG3500 Engines. The illustrations do not show all ofthe options that are available.

18Product Information SectionModel Views and Specifications
g00842723Illustration 15(1) Exhaust bypass(2) Aftercooler(3) Instrument panel(4) Crankcase breather(5) Oil filter(6) Guard (crankshaft vibration damper)(7) Engine control module (ECM)
(8) Oil filler(9) Lifting eye(10) Oil level gauge (dipstick)(11) Air cleaner(12) Jacket water pump(13) Oil screen(14) Oil drain
(15) Exhaust(16) Turbocharger(17) Auxiliary water pump(18) Gas shutoff valve(19) Gas regulator(20) Flywheel housing
i01627027
Product DescriptionSMCS Code: 1000; 4450
The Caterpillar G3500 Engines were developedin order to provide gas engines for industrialapplications and for generator set applications. Theengines have the ability to burn a wide variety ofgaseous fuels.
Fuel SystemThe engines can be equipped with a high pressuregas fuel system or a low pressure gas fuel system.Three different fuel systems are available:
• Low Emission (LE) with high pressure gas
• LE with low pressure gas
• Standard (stochiometric) with high pressure gas

19Product Information Section
Model Views and Specifications
The LE engine with high pressure gas requiresa gas pressure within a range of 207 to 310 kPa(30 to 45 psi). The air/fuel ratio is adjusted so thatthere is excess oxygen in the engine exhaust. Thisreduces the NOx emissions.
The LE engine with low pressure gas requires a gaspressure within a range of 10 to 34 kPa (1.5 to 5 psi).
The LE engines with NOx ratings of two grams havea nominal air/fuel ratio that results in approximatelyeight percent of free oxygen in the exhaust. The LEengines are turbocharged and aftercooled.
The Standard engines require gas pressure within arange of 138 to 172 kPa (20 to 25 psi). The nominalair/fuel ratio results in approximately two percent offree oxygen in the exhaust. The Standard enginesare available with natural aspiration or turbochargedwith aftercooling.
The engines can be equipped with a dual fuel systemin one of the following configurations:
• A carburetor for high pressure gas and a carburetorfor low pressure gas
• Two parallel carburetors for low pressure gas
For low pressure gas engines, the carburetor islocated between the air cleaner and the turbocharger.For high pressure gas engines, the carburetor islocated after the aftercooler and above the throttle.A governor and an actuator controls the carburetor.The governor maintains the engine rpm. The twofollowing types of carburetors are available:
• Fixed venturi
• Adjustable jet
The low pressure gas engines can use either thefixed venturi or the adjustable jet. Standard enginesand LE engines with high pressure gas use theadjustable jet.
The turbocharged aftercooled engines are equippedwith flame arrestors. The flame arrestors are installedat the entrance of each inlet port. The flame arrestorsprevent the engine backfire. The Engine backfire canoccur in the following circumstances:
• Malfunction of ignition
• Engine shutdown
The flame arrestors will extinguish the flame beforethe flame can ignite in the inlet manifold.
Ignition SystemThe engine is equipped with an Electronic IgnitionSystem (EIS). The EIS provides dependable firingand low maintenance. The EIS provides precisecontrol of the following factors:
• Spark voltage
• Spark duration
• Ignition timing
The EIS also provides diagnostic capability thatenhances troubleshooting. The primary ignition wiringis routed internally through the engine.
The engines are equipped with protection fromdetonation (combustion knock). The detonationsensors are mounted on each side of the cylinderblock. The ignition timing is retarded when excessivedetonation is sensed. If detonation continues after fullretardation, then the engine control module (ECM)shuts down the engine.
Lubrication SystemThe engine lubrication oil is supplied by a pumpthat is driven by a gear. The oil is cooled and theoil is filtered. A bypass valve provides unrestrictedflow of lubrication oil to the engine parts if the oilfilter elements become plugged. The bypass valvewill open if the oil filter differential pressure reaches276 kPa (40 psi).
Cooling SystemThe standard cooling system has a centrifugal pumpthat is driven by a gear. Four temperature regulatorsregulate the temperature of the coolant.
The turbocharged engine has a Separate CircuitAftercooler (SCAC). The aftercooler is required tooperate at one of the following three temperatures.The temperature depends on the engine rating andthe application.
• 32 °C (90 °F)
• 54 °C (129 °F)
• 70 °C (158 °F)
20Product Information SectionModel Views and Specifications
Cogeneration uses energy from heat which wouldotherwise be wasted. In a cogeneration engine, theoil cooler is not in the jacket water circuit becausethe jacket water is too hot. The circuit for the oilcooler and the circuit for the aftercooler may beeither a combined circuit or a separate circuit. Inthe combined system, the auxiliary pump circulateswater through both the aftercooler and oil coolercores. The combined system uses a thermostaticcontrol to regulate the oil temperature. This preventsovercooling.
Jacket water for cogeneration can be suppliedat temperatures up to 127 °C (260 °F max). Thecustomer must supply a pump for circulating theheated jacket water. The temperature of the jacketwater is controlled by the customer.
For engines that use landfill gas, the jacket watercoolant temperature is maintained at approximately110 °C (230 °F min). This temperature depends onthe design of the cooling system and the ambientconditions. This temperature is required in order toprevent condensation of the water vapor that is in thefumes of the crankcase. Condensation of the waterenables acids to form. Acids are more likely to formbecause landfill gas contains contaminants such aschlorides, fluorides, and halides. Acids will causesevere internal damage to the engine.
For engines that use landfill gas, the coolant thatis supplied to the aftercooler is maintained ata temperature of 54 °C (129 °F). This preventscondensation of moisture in the inlet air piping.
Engine Service LifeEngine efficiency and maximum utilization of engineperformance depend on adherence to properoperation and maintenance recommendations. Thisincludes the use of recommended lubricants, fuels,and coolants.
For the engine maintenance that is required,refer to the Operation and Maintenance Manual,“Maintenance Interval Schedule” in the MaintenanceSection.
i02151232
SpecificationsSMCS Code: 1000
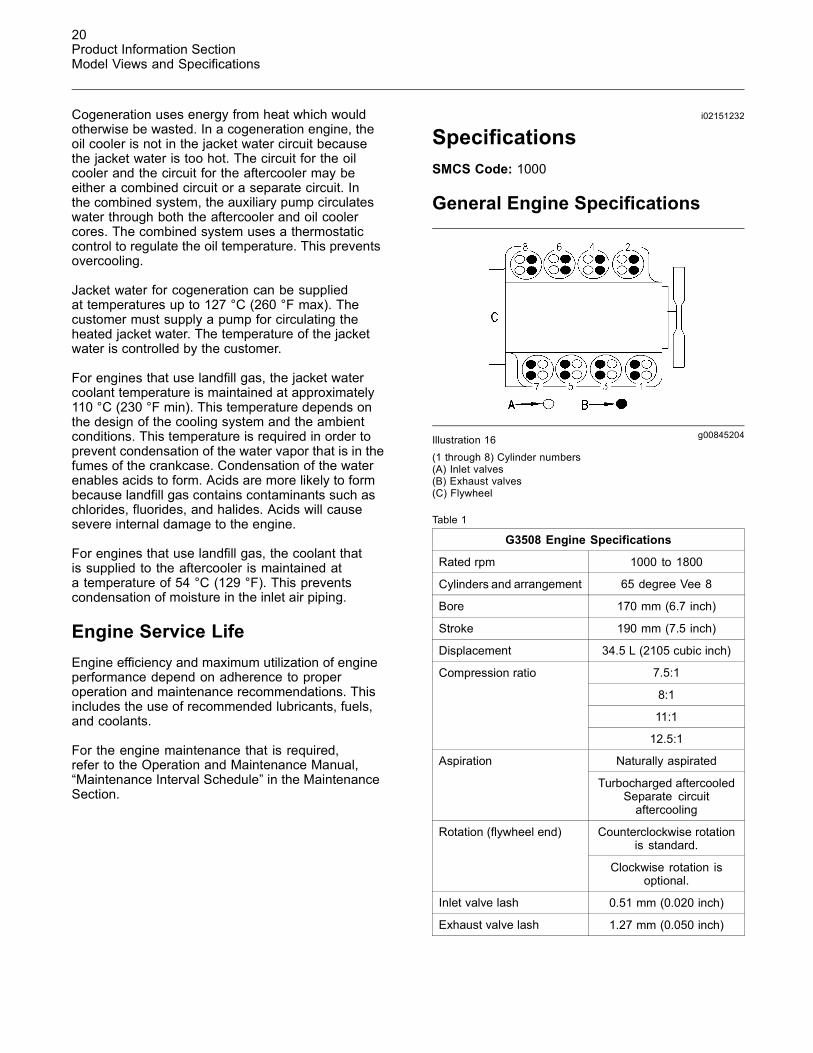
General Engine Specifications
g00845204Illustration 16(1 through 8) Cylinder numbers(A) Inlet valves(B) Exhaust valves(C) Flywheel
Table 1
G3508 Engine Specifications
Rated rpm 1000 to 1800
Cylinders and arrangement 65 degree Vee 8
Bore 170 mm (6.7 inch)
Stroke 190 mm (7.5 inch)
Displacement 34.5 L (2105 cubic inch)
7.5:1
8:1
11:1
Compression ratio
12.5:1
Naturally aspiratedAspiration
Turbocharged aftercooledSeparate circuitaftercooling
Counterclockwise rotationis standard.
Rotation (flywheel end)
Clockwise rotation isoptional.
Inlet valve lash 0.51 mm (0.020 inch)
Exhaust valve lash 1.27 mm (0.050 inch)

21Product Information Section
Model Views and Specifications
g00845207Illustration 17(1 through 12) Cylinder numbers(A) Inlet valves(B) Exhaust valves(C) Flywheel
Table 2
G3512 Engine Specifications
Rated rpm 1000 to 1800
Cylinders and arrangement 65 degree Vee 12
Bore 170 mm (6.7 inch)
Stroke 190 mm (7.5 inch)
Displacement 51.8 L (3158 cubic inch)
7.5:1
8:1
11:1
Compression ratio
12.5:1
Naturally aspiratedAspiration
Turbocharged aftercooledSeparate circuitaftercooling
Counterclockwise rotationis standard.
Rotation (flywheel end)
Clockwise rotation isoptional.
Inlet valve lash 0.51 mm (0.020 inch)
Exhaust valve lash 1.27 mm (0.050 inch)
g00845212Illustration 18(1 through 16) Cylinder numbers(A) Inlet valves(B) Exhaust valves(C) Flywheel
Table 3
G3516 Engine Specifications
Rated rpm 1000 to 1800
Cylinders and arrangement 65 degree Vee 16
Bore 170 mm (6.7 inch)
Stroke 190 mm (7.5 inch)
Displacement 69 L (4210 cubic inch)
7.5:1
8:1
11:1
Compression ratio
12.5:1
Naturally aspiratedAspiration
Turbocharged aftercooledSeparate circuitaftercooling
Counterclockwise rotationis standard.
Rotation (flywheel end)
Clockwise rotation isoptional.
Inlet valve lash 0.51 mm (0.020 inch)
Exhaust valve lash 1.27 mm (0.050 inch)

22Product Information SectionModel Views and Specifications
Crankshaft Positions for ValveLash SettingTable 4
Crankshaft Positions For Valve Lash SettingStandard Counterclockwise Rotation
EngineStroke For The Number1 Piston At Top Center
Position(1)Inlet Valves Exhaust Valves
Compression Stroke 1-2-6-8 1-2-3-7
Exhaust Stroke 3-4-5-7 4-5-6-8G3508
Firing Order 1-2-7-3-4-5-6-8
Compression Stroke 1-3-6-7-10-12 1-4-5-6-9-12
Exhaust Stroke 2-4-5-8-9-11 2-3-7-8-10-11G3512
Firing Order 1-12-9-4-5-8-11-2-3-10-7-6
Compression Stroke 1-2-5-7-8-12-13-14 1-2-3-4-5-6-8-9
Exhaust Stroke 3-4-6-9-10-11-15-16 7-10-11-12-13-14-15-16G3516
Firing Order 1-2-5-6-3-4-9-10-15-16-11-12-13-14-7-8
Crankshaft Positions For Valve Lash SettingOptional Clockwise Rotation
Compression Stroke 1-3-4-8 1-2-7-8
Exhaust Stroke 2-5-6-7 3-4-5-6G3508
Firing Order 1-8-7-2-6-5-4-3
Compression Stroke 1-3-4-6-7-12 1-4-5-8-9-12
Exhaust Stroke 2-5-8-9-10-11 2-3-6-7-10-11G3512
Firing Order 1-4-9-8-5-2-11-10-3-6-7-12
Compression Stroke 1-2-5-6-7-8-13-14 1-2-3-4-5-6-9-10
Exhaust Stroke 3-4-9-10-11-12-15-16 7-8-11-12-13-14-15-16G3516
Firing Order 1-6-5-4-3-10-9-16-15-12-11-14-13-8-7-2(1) For the complete procedure, refer to the Service Manual, “Systems Operations Testing and Adjusting”.
23Product Information Section
Product Identification Information
Product IdentificationInformation
i01627115
Plate Locations and FilmLocationsSMCS Code: 1000; 4450
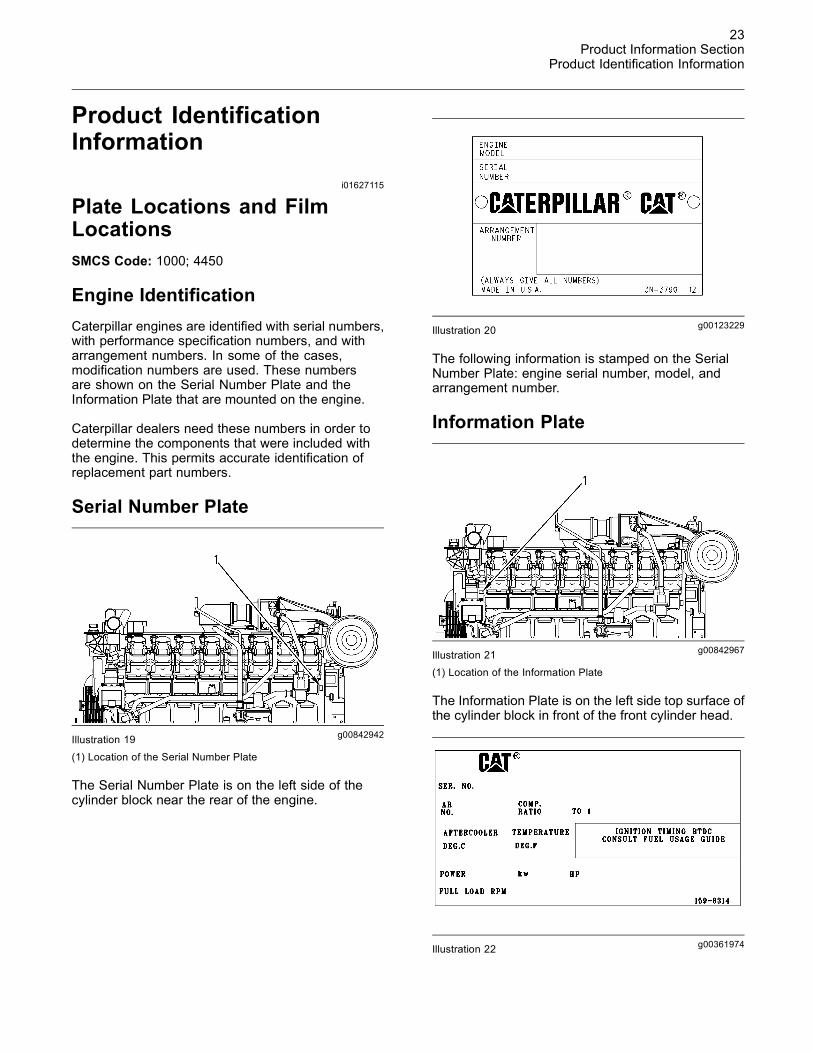
Engine IdentificationCaterpillar engines are identified with serial numbers,with performance specification numbers, and witharrangement numbers. In some of the cases,modification numbers are used. These numbersare shown on the Serial Number Plate and theInformation Plate that are mounted on the engine.
Caterpillar dealers need these numbers in order todetermine the components that were included withthe engine. This permits accurate identification ofreplacement part numbers.
Serial Number Plate
g00842942Illustration 19
(1) Location of the Serial Number Plate
The Serial Number Plate is on the left side of thecylinder block near the rear of the engine.
g00123229Illustration 20
The following information is stamped on the SerialNumber Plate: engine serial number, model, andarrangement number.
Information Plate
g00842967Illustration 21
(1) Location of the Information Plate
The Information Plate is on the left side top surface ofthe cylinder block in front of the front cylinder head.
g00361974Illustration 22
24Product Information SectionProduct Identification Information
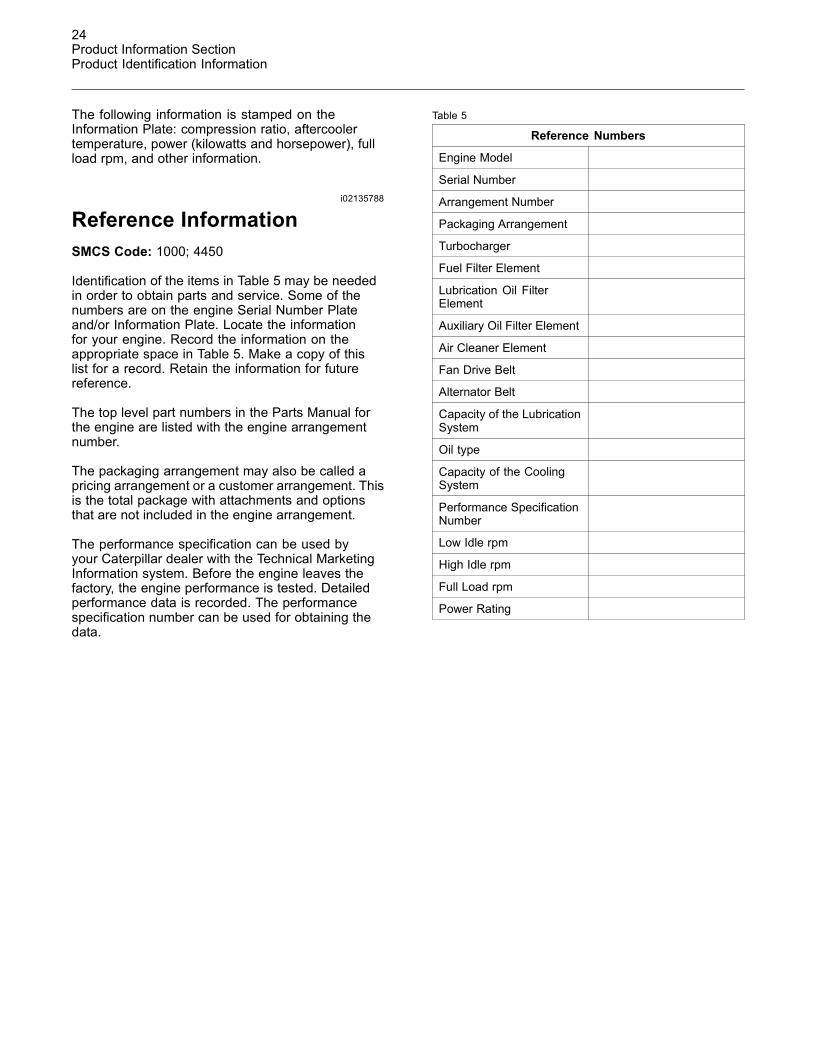
The following information is stamped on theInformation Plate: compression ratio, aftercoolertemperature, power (kilowatts and horsepower), fullload rpm, and other information.
i02135788
Reference InformationSMCS Code: 1000; 4450
Identification of the items in Table 5 may be neededin order to obtain parts and service. Some of thenumbers are on the engine Serial Number Plateand/or Information Plate. Locate the informationfor your engine. Record the information on theappropriate space in Table 5. Make a copy of thislist for a record. Retain the information for futurereference.
The top level part numbers in the Parts Manual forthe engine are listed with the engine arrangementnumber.
The packaging arrangement may also be called apricing arrangement or a customer arrangement. Thisis the total package with attachments and optionsthat are not included in the engine arrangement.
The performance specification can be used byyour Caterpillar dealer with the Technical MarketingInformation system. Before the engine leaves thefactory, the engine performance is tested. Detailedperformance data is recorded. The performancespecification number can be used for obtaining thedata.
Table 5
Reference Numbers
Engine Model
Serial Number
Arrangement Number
Packaging Arrangement
Turbocharger
Fuel Filter Element
Lubrication Oil FilterElement
Auxiliary Oil Filter Element
Air Cleaner Element
Fan Drive Belt
Alternator Belt
Capacity of the LubricationSystem
Oil type
Capacity of the CoolingSystem
Performance SpecificationNumber
Low Idle rpm
High Idle rpm
Full Load rpm
Power Rating

25Operation SectionLifting and Storage
Operation Section
Lifting and Storagei01536259
Product LiftingSMCS Code: 7000; 7002
g00103219Illustration 23
NOTICENever bend the eyebolts and the brackets. Only loadthe eyebolts and the brackets under tension. Remem-ber that the capacity of an eyebolt is less as the anglebetween the supporting members and the object be-comes less than 90 degrees.
When it is necessary to remove a component at anangle, only use a link bracket that is properly rated forthe weight.
Use a hoist to remove heavy components. Usean adjustable lifting beam to lift the engine. Allsupporting members (chains and cables) should beparallel to each other. The chains and cables shouldbe perpendicular to the top of the object that is beinglifted.
Some removals require lifting fixtures in order toobtain proper balance and safety.
To remove the engine ONLY, use the lifting eyes thatare on the engine.
Lifting eyes are designed and installed for the specificengine arrangement. Alterations to the lifting eyesand/or the engine make the lifting eyes and the liftingfixtures obsolete. If alterations are made, ensurethat proper lifting devices are provided. Consult yourCaterpillar dealer for information regarding fixturesfor proper engine lifting.
Engine Lifting with a Generator
NOTICEDo not use the engine lifting eyes to remove the en-gine and generator together.
A lifting plate is provided with the package generatorset. Instructions for lifting the package generator setare stamped on the lifting plate.
Consult your Caterpillar dealer for informationregarding proper fixtures and lifting devices.
Lifting packaged generator sets will not be level if youlift the unit with a single point lift. A counterweight canbe added between the package frame rails wheneverthe application requires frequent relocation of theunit. For complete information about adding thecounterweight, consult your Caterpillar dealer.
The single point lifting eye is secured from thefactory before the enclosure is shipped. The correctorientation of the single point lifting eye will allow youto look through the eye when you stand at the side ofthe enclosure. The lifting eye may stretch when thepackage is lifted. This may cause the locking nutsto loosen. This could cause the lifting eye to swivel.Ensure that the lifting eye is correctly oriented on thepackaged generator set. Ensure that the lifting eyeis tightened to the correct torque before you lift thepackaged generator set.
26Operation SectionLifting and Storage
i02057737
Product StorageSMCS Code: 7002
If the engine will not be started for several weeks, thelubricating oil will drain from the cylinder walls andfrom the piston rings. Rust can form on the cylinderliner surface, which will increase engine wear whichcan reduce engine service life.
To help prevent excessive engine wear, use thefollowing guidelines:
• Complete all of the lubrication recommendationsthat are listed in this Operation and MaintenanceManual, “Maintenance Interval Schedule”(Maintenance Section).
• If freezing temperatures are expected, check thecooling system for adequate protection againstfreezing. See this Operation and MaintenanceManual, “Refill Capacities and Recommendations”(Maintenance Section).
If an engine is out of operation and if use of the engineis not planned, special precautions should be made.If the engine will be stored for more than one month,a complete protection procedure is recommended.
Your Caterpillar dealer will have instructions forpreparing the engine for extended storage periods.
For more detailed information on engine storage, seeSpecial Instruction, SEHS9031, “Storage Procedurefor Caterpillar Products”.
Generator StorageFor information on generator storage, see theliterature that is provided by the OEM of thegenerator. Consult your Caterpillar dealer forassistance.

27Operation Section
Gauges and Indicators
Gauges and Indicatorsi01663514
Gauges and IndicatorsSMCS Code: 7450
Gauges provide indications of engine performance.Ensure that the gauges are in good working order.Determine the normal operating range by observingthe gauges over a period of time.
Noticeable changes in gauge readings can indicatepotential gauge or engine problems. Problems mayalso be indicated by gauge readings that changeeven if the readings are within specifications.Determine and correct the cause of any significantchange in the readings. Consult your Caterpillardealer for assistance.
Your engine may not have the same gauges or all ofthe gauges that are described below.
NOTICEIf no oil pressure is indicated, STOP the engine. Theengine will be damaged from operating without oilpressure.
Engine Oil Pressure – This gaugeindicates the pressure of the engine oil. Thispressure will be highest after a cold engine
is started. The pressure will decrease as the enginewarms up. The pressure will increase when theengine rpm is increased. The pressure will stabilizewhen the engine rpm and temperature are stable.The typical range at low idle rpm is 186 to 344 kPa(27 to 50 psi). The typical range at rated rpm is345 to 600 kPa (50 to 87 psi).
Oil Filter Differential Pressure – Thisgauge indicates the difference in pressurebetween the inlet side and the outlet side of
the engine oil filters. As the oil filter elements becomeplugged, the pressure will increase. Replace theengine oil filter elements when the oil filter differentialpressure reaches 103 kPa (15 psi).
Jacket Water Coolant Temperature –This gauge indicates the temperature of theengine coolant at the outlet for the jacket
water. The temperature may vary according to theload. The temperature should never be allowed toexceed the boiling temperature of the pressurizedcooling system. The operating range is 88 to 100 °C(190 to 210 °F). Higher temperatures may occurunder certain conditions. Engines that use fuel witha low Btu content may have temperatures up to110 °C (230 °F). Cogeneration engines may have amaximum temperature up to 127 °C (260 °F).
The engine should operate within the normaltemperature range. The sensor for jacket watercoolant temperature must be fully submerged in orderto detect the temperature correctly. If the engineis operating above the normal temperature range,perform the following procedure:
1. Reduce the load and/or the engine rpm.
2. Inspect the cooling system for leaks.
3. Determine if the engine must be shut downimmediately or if the engine can be cooled byreducing the load and/or rpm.
Inlet Manifold Air Temperature – Thisgauge indicates the inlet manifold airtemperature to the cylinders. The sensor
for inlet manifold air temperature is located after theaftercooler.
NOTICEHigh inlet manifold air temperature increases the riskof detonation. Detonation can cause damage to theengine. Ensure that the aftercooling system is operat-ing properly.
For operating temperatures and shutdowntemperatures, see this Operation and MaintenanceManual, “Alarms and Shutoffs” topic (OperationSection).
Inlet Manifold Air Pressure (TAEngines) and Inlet Manifold Vacuum(NA Engines) – For TA engines, this
gauge indicates the air pressure (turbochargerboost pressure) in the air plenum (air inlet manifold)after the aftercooler. For NA engines, this gauge isthe pressure of the inlet manifold vacuum. For allengines, this pressure depends on the engine rating,the load, and the operating conditions.
The display on the engine panel is the gaugepressure. The gauge pressure is the differencebetween the barometric pressure and the absolutepressure.

28Operation SectionGauges and Indicators
The Digital Diagnostic Tool can be used to display thepressure that is sensed by the manifold air pressuresensor. If the engine is operating, the display is theabsolute pressure. If the engine is not operating, thedisplay is the barometric pressure.
Note: For more information on Inlet Manifold AirPressure and Inlet Manifold Vacuum, see one of thefollowing two publications:
• Engine Performance, LEBQ6117, “G3500Industrial”
• Engine Performance, LEBQ6169, “G3500Generator Set”
Pyrometer – The pyrometer indicates the exhauststack temperature at the exhaust elbows. For engineswith two exhaust stacks, the two exhaust stacktemperatures may vary slightly. This may be due tovariation of the sensitivity of the two thermocouples.
• For Low Emission engines, the nominal exhauststack temperature is less than 554 °C (1030 °F).
• For Standard engines, the nominal exhaust stacktemperature is less than 510 °C (950 °F).
• The exhaust stack temperature of NA enginesdepends on the engine rpm and the oxygen that isin the exhaust. For NA engines, the nominal rangeis 538 to 649 °C (1000 to 1200 °F).
The pyrometer also indicates the temperature ofthe exhaust gas of each individual cylinder. Thesetemperatures are measured at the exhaust port ofeach cylinder head. The exhaust temperature willvary slightly between the cylinders. Table 6 listsnominal temperatures and maximum temperatures.
Table 6
Exhaust Port Temperatures
Engine NominalTemperature
MaximumTemperature
Low Emission 621 °C (1150 °F) 670 °C (1238 °F)
Standby (LowEmission ) 621 °C (1150 °F) 700 °C (1292 °F)
Standard 643 °C (1190 °F) 700 °C (1292 °F)
Standby(Standard ) 643 °C (1190 °F) 730 °C (1346 °F)
Tachometer – This gauge indicates theengine rpm.
NOTICEAn overspeed can result in serious damage to the en-gine. To help prevent engine damage, never allow theengine to exceed the rated rpm.
Note: The rated rpm is stamped on the engineInformation Plate.
Service Hour Meter – The meter indicatesthe total number of clock hours of engineoperation.
Fuel Filter Differential Pressure – This gauge isprovided by the customer. This gauge indicates thedifference in fuel pressure between the inlet sideand the outlet side of the fuel filter. As the fuel filterelement becomes plugged, the difference in pressurebetween the two sides of the fuel filter increases.
For high pressure gas fuel systems, service the fuelfilter when the fuel filter differential pressure reaches34 kPa (5 psi).
For low pressure gas fuel systems, service thefuel filter when the fuel filter differential pressurereaches1.7 kPa (.25 psi).
Optional GaugesAir Cleaner Differential Pressure –This gauge indicates the difference in airpressure between the inlet side and the
engine side of the air filter element. The pressureis measured from the turbocharger air inlet. As theair filter element becomes plugged, the differencein pressure between the two sides of the aircleaner element will increase. For optimum engineperformance, replace the air filter elements or cleanthe air filter elements when the air cleaner pressuredifferential reaches 2.5 kPa (10 inches of H2O).Maximum air cleaner differential pressure is 3.7 kPa(15 inches of H2O).
Ammeter – This gauge indicates theamount of charge or discharge in thebattery charging circuit. Operation of the
indicator should be to the right side of “0”(zero).
Engine Oil Temperature – This gaugeindicates the engine oil temperature afterthe oil has passed through the oil cooler.
The oil cooler is thermostatically controlled. Theoil temperature is controlled by an 82 °C (180 °F)temperature regulator that is in contact with the oil.The maximum oil temperature at rated rpm and ratedload is 104 °C (220 °F).

29Operation Section
Gauges and Indicators
Coolant Pressure – This gauge can beused for jacket water pressure or auxiliarywater pressure. On cogeneration engines,
this gauge is a differential pressure gauge.

30Operation SectionFeatures and Controls
Features and Controlsi02015329
Performance ParametersSMCS Code: 1000
Note: For information on the following topics, seethe Service Manual, “Systems Operation/Testing andAdjusting” or see Special Instruction, SEHS9769,“Installation and Initial Start-Up Procedure for G3500Engines”.
• Adjusting the carburetor
• Adjusting the control linkage for the carburetor
• Adjusting the exhaust bypass
Consult your Caterpillar dealer for assistance.
Air/Fuel RatioThe correct air/fuel ratio is very important for thefollowing considerations:
• Margin of detonation
• Control of emissions
• Achieving optimum service life for the engine
If the air/fuel ratio is not appropriate for the fuel andthe operating conditions, a failure of the engine mayoccur. The service life of the turbocharger, the valves,and other components may be reduced.
Fuel Supply Pressure
Fluctuations of the fuel pressure can change theair/fuel ratio. For high pressure gas fuel systems,the maximum fluctuation that is allowed in the fuelpressure is 3.4 kPa (0.50 psi). For low pressure gasfuel systems, the maximum fluctuation that is allowedin the fuel pressure is 1.7 kPa (0.25 psi). Ensurea stable fuel pressure to the engine by installinga second gas pressure regulator prior to the gaspressure regulator on the engine.
Gas Pressure Regulator
The gas pressure regulator maintains a pressuredifferential between the air and the fuel that issupplied to the carburetor. Set the pressure of the fuelsupply to a maximum of 1.5 kPa (6 inch of H2O) morethan the pressure of the air supply. The gas pressureregulator will maintain the pressure differential inresponse to changes in the air pressure. If high idleis important, lower the differential pressure to 1 kPa(4 inch of H2O). The higher differential pressures willgive better engine response to load changes.
A water manometer is used to measure the pressuredifferential. This measurement is taken when theengine is operating at high idle rpm. When a load isapplied, the fuel pressure will usually decrease byapproximately 0.25 to 0.5 kPa (1 to 2 inch of H2O).If the performance of the gas pressure regulatoris erratic, the gas pressure regulator may requireservice.
Temperature of the Fuel Supply
Changes in the temperature of the fuel supply affectsthe air/fuel ratio. Warmer fuel is less dense than coldfuel. This results in a leaner mixture that causes anoticeable reduction of power. The recommendedtemperature differential of the air and the fuel is2.8 °C (5 °F).
The maximum fuel temperature depends on thetemperature regulator of the aftercooler:
• For engines with a 32 °C (90 °F) aftercooler, themaximum temperature of the air/fuel mixture is38 °C (100 °F).
• For engines with a 54 °C (130 °F) aftercooler, themaximum temperature of the air/fuel mixture is60 °C (140 °F).
For more information, see Application and InstallationGuide, LEKQ7260, “Low BTU Engines”. Consult yourCaterpillar dealer for assistance.
Temperature of the Air Supply
Changes in the temperature of the air supply affectsthe air/fuel ratio. In addition to seasonal changes,the air temperature changes overnight. Control of thetemperature in the engine room will help to maintainthe air/fuel ratio.
To optimize the inlet air temperature, use ducting anda heat exchanger. This will help to avoid exposureto hot air from a generator. For more information,see Application and Installation Guide, LEKQ7250,“Air Intake”. Consult your Caterpillar dealer forassistance.

31Operation Section
Features and Controls
Carburetor
Engines That Use Bio-Gas
The carburetor that is used on some applicationstends to supply a rich air/fuel mixture during partialload operation. The rich air/fuel mixture and rapidloading can cause detonation. This depends on thefollowing factors:
• Temperature of the inlet air and fuel
• Btu of the fuel
• Air/fuel setting
• Carburetor jet
• Ignition timing
• Deposits in the combustion chamber
To reduce the risk of detonation during loading, adjustthe ramp time so that the load is applied over fiveto ten minutes.
If detonation still occurs, or if startability is inhibited,the air/fuel ratio for partial load operation can bemade leaner. Install 7E-1569 Washers behind eachgas valve of the carburetor. Use a maximum of threewashers per valve. After the washers are installed,adjust the setting for the oxygen at full load.
Optional Air/Fuel Ratio ControlThe engine may be equipped with an air/fuel ratiocontrol system. The system provides the followingcapabilities:
• Control of exhaust emissions
• Adjustment for changes in the fuel BTU
• Engine speed governing
The system consists of the following components:
• Electronic Control Module (ECM)
• Oxygen sensor
• Oxygen buffer
• Speed sensor
• Inlet manifold pressure sensor
• Inlet manifold temperature sensor
• Fuel valve
• Throttle actuator
• Input switches
For more information regarding the Air/FuelRatio Control, see the Service Manual, “SystemsOperation/Testing and Adjusting”.
Angle of the Throttle PlateThe angle of the throttle plate is adjusted for fullload operation. The angle is adjusted by changingthe setting of the exhaust bypass valve. The properangle depends on the type of governor or actuatorthat is used.
• For the Woodward 3161 Governor and the EG3PActuator, adjust the angle of the throttle platebetween 60 and 65 degrees.
The following factors affect the angle of the throttle:
• LHV of the fuel
• Setting of the air/fuel ratio (inlet manifold airpressure)
• Setting of the exhaust bypass (wastegate)
• Altitude
Ensure that the angle of the throttle plate is properlyset. This will maintain the margin for detonation. Thiswill also enable the engine to accept load changeswithout lugging.
Setting of the Exhaust Bypass(Wastegate)The engines are equipped with exhaust bypassvalves that are adjustable. This enables the throttleposition to be correctly set for the application.Adjustments must be made for the followingvariables:
• Altitude
• Setting of the air/fuel ratio
• Methane number of the fuel
The exhaust bypass is adjusted in order to achievethe proper angle of the throttle plate when the engineis operating under a rated load.
Oil ConsumptionHigh loads will cause the engine to consume more oil.

32Operation SectionFeatures and Controls
The rate of oil consumption is called the BrakeSpecific Oil Consumption (BSOC). The unit ofmeasure is grams per brake kilowatt hour (poundsper brake horsepower hour). The BSOC depends onthe following factors: engine model, aspiration, andoperating load.
Table 7 lists the normal mid-life BSOC for G3500Engines under the following conditions:
• Load factor of 100 percent
• Maintenance is performed according to thisOperation and Maintenance Manual, “MaintenanceInterval Schedule” (Maintenance Section).
Table 7
BSOC for G3500 Engines
Naturally Aspirated Engine 0.913 g/bkw h(0.0015 lb/bhp h)
Turbocharged Aftercooled Engine 0.426 g/bkw h(0.0007 lb/bhp h)
i02015359
Sensors and ElectricalComponentsSMCS Code: 1900; 7400
Note: This section contains some general informationabout the engine electronic system and sensors. Formore information, see the following publications:
• Systems Operation/Testing and Adjusting,SENR6412, “G3500 Engines”
• Specifications, SENR6417, “G3500 EngineAttachments”
• Systems Operation/Testing and Adjusting,SENR6418, “G3500 Engine Attachments”
• Electronic Troubleshooting, SENR6413, “G3500Engines”
Electronic Ignition System (EIS)The Caterpillar Electronic Ignition System wasdesigned to replace the type of ignition system thathas a magneto. The following benefits are the mostsignificant advantages of the electronic ignitionsystem:
• Addition of more extensive system diagnostics
• Elimination of parts that are prone to mechanicalwear
• Precise control of ignition timing
The electronic ignition system provides control for thefollowing activities:
• Diagnostics of the engine control system
• Ignition timing
• Protection from detonation
If operating parameters are outside of acceptablelimits, the electronic ignition system provideswarnings. The system may inhibit the engineoperation or may shut down the engine. Also, thesystem can display some of the operating parametersof the engine.
The electronic ignition system includes the followingcomponents:
• Detonation sensors
• EIS control module
• Engine speed/timing sensor
• Ignition harness
• Manifold air pressure sensor
• Sensor harnesses
• Spark plugs
• Transformers
Control of the Electronic Ignition System
g00309805Illustration 24
EIS control module

33Operation Section
Features and Controls
The EIS control module is a sealed unit with noserviceable parts. Sensors are used in order tomonitor engine operation. Wiring harnesses connectthe sensors to the control module. The module usesinformation from the sensors in order to determinethe ignition timing. The information is also used toprovide diagnostics.
Note: On newer engines, there is a small door onthe front face of the control module. Replace thecomputer chip inside the control module if updates orspecial modifications are required.
The primary ignition wiring is routed through theengine block. Ignition timing is based on the followingvariables:
• Map of ignition timing that is desired
• Engine parameters
The operator can use an electronic service tool tochange the following parameters:
• Desired timing
• Map of speed and timing
The EIS control module has outputs to each ignitiontransformer. The module also uses sensors andinternal circuitry to monitor the system components.If a problem develops in a component or a wiringharness, the control module will sense the problem.The control module will notify the operator by creatinga diagnostic code.
Ignition Transformers
Each cylinder has an ignition transformer that islocated under the valve cover. To initiate combustionin each cylinder, the engine control module sends apulse to the primary coil of the ignition transformer.The transformer increases the voltage which createsa spark across the spark plug electrode.
For the electronic ignition system, the transformersare grounded through the valve cover. Use cautionwhen a valve cover is removed.
Always disconnect the ignition harness from thetransformer when a valve cover is removed.
An ignition harness connects each transformer to theengine control module. The harness is routed insidethe engine along the camshaft.
Junction Box
g00787967Illustration 25
(1) Junction box(2) Emergency stop button
Junction box (1) contains these components:
• Gauges
• Meters
• Indicators
• Switches
The junction box also contains the electrical terminalstrips that connect the sensors, pickups, and relaysto the gauges. In addition, the junction box providesshutoff protection for the engine.
Emergency stop button (2) is mounted on the junctionbox. When this button is pressed, both the fuel andthe ignition are shut off.
NOTICEDo not use this method to stop the engine unlessan emergency has occurred. Continuous emergencyshutdowns can cause damage to some engine com-ponents. This will leave unburned fuels in the combus-tion chambers and in the exhaust system. If an emer-gency shutdown occurs, purge the system by crankingthe engine for 5 to 10 seconds with the ignition shutoff.
The emergency stop button must be reset beforethe engine will start. Turn the button clockwise. Thespring-loaded button will move to the reset position.
G3500 Engines use an energize-to-run system.The system can also be configured as anenergize-to-shutoff system.

34Operation SectionFeatures and Controls
g00310783Illustration 26Gas shutoff valve (GSOV)
For an energize-to-run system, the gas shutoff valve(GSOV) must remain energized in order to supplyfuel to the engine.
For an energize-to-shutoff system, the GSOV mustbe energized in order to shut off the fuel to the engine.
The junction box is used to monitor the followingparameters:
• Engine oil pressure
• Engine coolant temperature
If the engine oil pressure is too low, or if the coolanttemperature is too high, a relay will shut off the fuel.
SensorsSensors provide information to the junction box andthe engine control module. The information enablesthe module to control the engine as efficiently aspossible over a wide range of operating conditions.The information is used for monitoring engineoperation via gauges and indicators on the junctionbox and/or the control panel.
The sensors also enable the activation of alarms andshutoffs in response to abnormal operation.
Air Inlet Temperature
A probe for monitoring the air inlet temperature islocated in the air inlet manifold. No adjustment canbe made to the temperature range. Excessive inletair temperature can activate an alarm or a shutdown.
Coolant Level
Monitoring of the coolant level is an optionalattachment.
g00851236Illustration 27
The coolant level sensor is mounted in the expansiontank. If the coolant level is too low, the sensor canactivate an alarm or a shutoff. Coolant must be addedto the cooling system in order to correct the condition.
Detonation
g00455704Illustration 28Detonation sensor
The detonation sensors monitor the engine fordetonation. One sensor is mounted in the center ofeach cylinder bank. The sensor produces a voltagesignal that is proportional to the engine detonation.This information is processed by the engine controlmodule in order to determine detonation levels. Toeliminate detonation, the engine control moduleretards the engine timing, if necessary. If excessivedetonation continues, the engine control module willshut down the engine.

35Operation Section
Features and Controls
Engine Oil Pressure
g00455784Illustration 29
Oil pressure sensor
The engine oil pressure sensor is located in the sideof the engine block. The sensor measures the oilpressure in the bearing oil gallery. Low oil pressurewill cause a shutdown.
Engine Speed/Timing Sensor
g00309907Illustration 30
Engine speed/timing sensor
The engine speed/timing sensor provides accurateinformation about the speed of the crankshaft and theposition of the crankshaft. A ring that is mounted onthe camshaft provides the information that is detectedby the sensor. The engine control module uses theinformation in order to determine ignition timing.
Manifold Air Pressure
g00309908Illustration 31
Manifold air pressure sensor
The manifold air pressure sensor is connected to theair inlet manifold. The sensor monitors the absolutemanifold air pressure. This is the atmosphericpressure plus the gauge pressure. The information isused by the engine control module to determine theengine load. The output of the sensor can be readwith the Digital Diagnostic Tool.
Overspeed
g00318743Illustration 32
(1) Magnetic pickup for the governor(2) Magnetic pickup for the service meter
Two magnetic pickups are mounted in the flywheelhousing. The magnetic pickups monitor the rpm ofthe flywheel ring gear. The following conditions willcause a shutdown:
• The engine rpm exceeds the setpoint foroverspeed.
• The control system does not receive a signal fromthe magnetic pickup.

36Operation SectionFeatures and Controls
Water Temperature
g00455866Illustration 33
Water temperature sensor
The water temperature sensor is located in thewater temperature regulator housing. To monitorthe coolant temperature, the element must be incontact with the coolant. If overheating occurs due tolow coolant level or no coolant, the sensor will notfunction properly. The sensor can be wired into analarm system or an indicator in order to indicate highwater temperature. After an overheated engine isallowed to cool, the contactor is automatically reset.
i02145508
Alarms and ShutoffsSMCS Code: 7400
Engines may be equipped with optional engineprotective devices that are not included in this section.This section contains some general information aboutthe function of typical engine protective devices.
Alarms and shutoffs are electronically controlled.The operation of all alarms and shutoffs utilizecomponents which are actuated by a sensing unit.The alarms and shutoffs are set at critical operatingtemperatures, pressures, or speeds in order toprotect the engine from damage.
The alarms function in order to warn the operatorwhen an abnormal operating condition occurs. Theshutoffs function in order to shut down the enginewhen a more critical abnormal operating conditionoccurs. The shutoffs help to prevent damage to theengine.
Shutoffs may cause unburned gas to remain in theair inlet and in the exhaust manifold.
Unburned gas in the air inlet and exhaust systemmay ignite when the engine is started. Personalinjury and/or property damage may result.
Before starting an engine that may contain un-burned gas, purge the unburned gas from the airinlet and exhaust system. Refer to the topic onpurging unburned gas in the “Starting the Engine”section.
If an engine protective device shuts off the engine,always determine the cause of the shutoff. Makethe necessary repairs before attempting to start theengine.
Become familiar with the following information:
• Types of the alarm and shutoff controls
• Locations of the alarm and shutoff controls
• Conditions which cause each control to function
• Resetting procedure that is required before startingthe engine
Testing Alarms and ShutoffsAlarms must function properly in order to providetimely warning to the operator. Shutoffs help toprevent damage to the engine. It is impossibleto determine if the engine protective devices arein good working order during normal operation.Malfunctions must be simulated in order to test theengine protective devices.
NOTICEDuring testing, abnormal operating conditionsmust besimulated.
The tests must be performed correctly in order to pre-vent possible damage to the engine.
Periodic testing of engine protective devices forproper operation is recommended maintenance. Toprevent damage to the engine, only authorizedservice personnel or your Caterpillar dealershould perform the tests.

37Operation Section
Features and Controls
Setpoints for Alarms and Shutoffs
Inlet Manifold Air Temperature
Table 8 lists information on the operatingtemperatures and the shutdown temperatures forinlet manifold air temperature. The temperaturesare associated with different water temperatureregulators for separate circuit aftercoolers. Thetemperatures are also associated with different typesof gas engines.
Table 8
Approximate Operating Temperatures AndShutdown Temperatures For G3500 Engine
Inlet Manifold Air Temperature
OpeningTemperaturefor the WaterTemperatureRegulator(SCAC)
ApproximateOperatingTemperature
ShutdownTemperature
32 °C (90 °F)Low Emissionengine
43 °C (110 °F) 47 °C (117 °F)
54 °C (130 °F)Low Emissionengine
64 °C (147 °F) 68 °C (154 °F)
70 °C (158 °F)Low Emissionengine
78 °C (172 °F) 81 °C (178 °F)
32 °C (90 °F)Standard engine
41 °C (106 °F) 45 °C (113 °F)
54 °C (130 °F)Standard engine
62 °C (144 °F) 66 °C (151 °F)
Cogeneration and Bio-Gas FuelApplications
G3500 Engines that are in cogeneration and bio-gasapplications operate with jacket water coolanttemperatures that are higher than normal. Theprotective system is optional for cogenerationengines. The protective system is standard forengines that use bio-gas fuel .
Table 9 lists the setpoints for cogeneration engines.Table 10 lists the setpoints for engines that usebio-gas fuel.
Table 9
Setpoints For Cogeneration Engines
Condition Setpoint
Alarm signal of differentialpressure of jacket waterpressure
34.5 kPa (5 psi)
Alarm signal of jacketwater coolant temperature
127 °C (260 °F)
Alarm signal of engine oiltemperature
102 °C (215 °F)
Shutdown temperature ofengine oil
104 °C (220 °F)
Alarm signal of inlet airtemperature or shutdown(1)
68 °C (154 °F)
(1) High inlet air temperature is a shutdown for NA engines. Highinlet air temperature is an alarm for all other engines.
Table 10
Setpoints For Engines that use Bio-Gas Fuel
Condition Setpoint
Alarm signal of differentialpressure of jacket waterpressure
48.3 kPa (7 psi)
Alarm signal of jacketwater coolant temperature
124 °C (255 °F)
Arming relay of jacketwater pressure
98 °C (208 °F)
Shutdown temperature ofengine oil
107 °C (225 °F)
Shutdown temperature ofinlet air
68 °C (154 °F)
Engines Without A Caterpillar RemoteControl Panel (Status)
The customer must provide the relay logic for enginesthat are not equipped with a Caterpillar RemoteControl Panel (Status). The customer must providethe relay logic for the following parameters:
• Oil pressure (high idle limit)
• Oil pressure (low idle limit)
• Jacket water coolant temperature (hightemperature)
• Overspeed
The specific limits are listed in Table 11. Relay logicmust be provided for shutting off the engine in caseany of the limits are reached. Consult your Caterpillardealer for assistance.

38Operation SectionFeatures and Controls
Table 11
G3500 Engine Shutdown Setpoints
Minimum OilPressure
RatedRPM
HighIdleRPM
LowIdleRPM
JacketWater(1)Temp.
OverspeedRPM
1000 275kPa
(40 psi)
100kPa
(15 psi)
105 °C(221 °F)
1200
1400 275kPa
(40 psi)
100kPa
(15 psi)
105 °C(221 °F)
1680
1500 275kPa
(40 psi)
100kPa
(15 psi)
105 °C(221 °F)
1800
1800 275kPa
(40 psi)
100kPa
(15 psi)
105 °C(221 °F)
2160
(1) To prevent overheating, the coolant pressure must be aminimum of 27.6 kPa (4 psi).
i02013999
Control PanelSMCS Code: 7451
Remote Control Panel (Status)This section contains some general information aboutthe Remote Control Panel (Status). For more detailedinformation, see these publications:
• Systems Operation/Testing and Adjusting,SENR6420, “Control Panel (Status-Timing)”
• Electronic Troubleshooting, SENR6413, “G3500Engines”.
g00785285Illustration 34
Remote Control Panel (Status)
(1) “WARNING” indicator(2) “SHUTDOWN” indicator(3) “POWER ON” indicator(4) “DIAGNOSTIC RESET” switch(5) Status control module(6) Engine control switch(7) “EMERGENCY STOP” button
The yellow “WARNING” indicator (1) flashes or stayslighted in order to indicate the occurrence of anabnormal operating condition. A warning is not severeenough to cause a shutdown. However, this signifiesa serious problem. If a warning occurs, a diagnosticcode for the condition is logged in the engine controlmodule. Correct the cause of the warnings as soonas possible in order to avoid problems with operation.
The red “SHUTDOWN” indicator (2) illuminatescontinuously when an adverse operating conditioncauses a shutdown. A diagnostic code for thecondition is logged in the engine control module. Ifthe engine is shut down due to parameters that areout of acceptable limits, the red indicators on thestatus control module (5) will also illuminate.
“POWER ON” indicator (3) illuminates continuouslywhen power is supplied to the control panel.

39Operation Section
Features and Controls
“DIAGNOSTIC RESET” switch (4) is a toggle switchthat is used to clear diagnostic codes from the enginecontrol module. The switch cannot clear individualcodes. Use of the switch will clear all codes that areactive in the engine control module. Do not clear thecodes until the problems that caused the codesare addressed.
Status control module (5) has several enginemonitoring and control functions.
Engine control switch (6) is used to control startingthe engine and stopping the engine.
“EMERGENCY STOP” button (7) is used to stop theengine in an emergency situation. When the button ispressed, the status control module shuts off the fuelvia the gas shutoff valve. The module also terminatesthe ignition. The “EMERGENCY STOP” button mustbe reset before the engine will start.
Status Control Module
The status control module receives information fromthe following sources:
• The operator
• Magnetic pickups
• Transducers (oil pressure and water temperature)
• Optional remote sources
The basic performance of the status control moduleincludes the following functions:
When the status control module receives a signal tostart the engine, the module enables fuel to flow tothe engine. The module activates the starting motor.After the rpm for crank termination is achieved, themodule deactivates the starting motor.
When the status control module receives a signal tostop the engine, the module shuts off the fuel. Themodule sends a signal to the engine control module.The engine control module terminates the ignition.
g00785287Illustration 35(1) Liquid crystal display (LCD)(2) Switch(3) “OVERCRANK” indicator(4) “LOW OIL PRESSURE” indicator(5) “OVERSPEED” indicator(6) “EMERGENCY STOP” indicator(7) “HIGH COOLANT TEMPERATURE” indicator(8) “AUXILIARY SHUTDOWN” indicator
Liquid Crystal Display (LCD) – Symbols for thefollowing parameters are located under LCD (1).The LCD provides a digital display of the status ofthese parameters. When the status of a parameter isdisplayed, an arrow at the bottom of the LCD pointsthe corresponding symbol. The display can be inmetric units or English units.
Hour meter – When the arrow points tothis symbol, the hours of engine operationare displayed.
Engine speed – When the arrow points tothis symbol, the engine rpm is displayed.
System battery voltage –When the arrowpoints to this symbol, the voltage of theelectrical system’s battery is displayed.
Engine oil pressure – When the arrowpoints to this symbol, the engine oilpressure is displayed.
Coolant temperature – When thearrow points to this symbol, the Coolanttemperature is displayed.

40Operation SectionFeatures and Controls
The parameters are displayed sequentially. To lockthe display onto one of the parameters, press switch(2). To resume the sequential display, press theswitch again.
The LCD is also used to display diagnostic codes.A diagnostic code indicates that the system hasdetected a problem with a component that isassociated with the status control module. When adiagnostic code is displayed, the arrow that indicatesthe display of the parameters will be missing. Aflashing “dIAG” will be displayed. If more than onediagnostic code is present, the diagnostic codes willbe displayed in sequence.
To clear the diagnostic codes from the LCD, turn theengine control switch to the “OFF/RESET” position.For information on diagnostic codes, see thesepublications:
• Systems Operation/Testing and Adjusting,SENR6420, “Control Panel (Status-Timing)”
• Electronic Troubleshooting, SENR6413, “G3500Engines”.
• Electronic Troubleshooting, SENR6517, “G3500Air/Fuel Ratio Control”.
The status control module has six indicators(Illustration 35) that indicate engine shutdowns. Theshutdowns that are associated with the indicators aredescribed below.
“OVERCRANK” – If the engine fails tostart within a programmed amount of time orif the number of crank cycles are exceeded,
the status control module will deactivate the startingsequence. Indicator (3) will flash. The engine controlswitch must be turned to the “OFF/RESET” positionbefore another attempt to start the engine can bemade.
“LOW OIL PRESSURE” – There are twosetpoints for low oil pressure. The setpointsdepend on the engine rpm. One setpoint
is for engine rpm that is below the oil step speedsetting. The other setpoint is for engine rpm that isabove the oil step speed setting. If the engine oilpressure decreases below the setpoint, the fuel tothe engine will be shut off. Indicator (4) will flash.
“OVERSPEED” – If the engine rpmexceeds the setpoint for overspeed, the fueland the ignition will be shut off. Indicator
(5) will flash.
Note: A verify button for overspeed is located on theback of the status control module. This enables a testof the overspeed protection system to be performed.See Systems Operation/Testing and Adjusting,SENR6420, “Control Panel (Status-Timing)” forinformation on the service procedure.
“EMERGENCY STOP” – Indicator (6) willflash if the “EMERGENCY STOP” button isused to stop the engine.
Note: Do not use the coolant temperature sensorto monitor the operation of jacket water heaters (ifequipped).
“HIGH COOLANT TEMPERATURE” –If the coolant temperature exceeds thesetpoint, the fuel will be shut off. Indicator
(7) will flash.
“AUXILIARY SHUTDOWN” indicator (8) indicatesthat an external request was used to stop the engine.If the auxiliary shutdown is not used, the “AUXILIARYSHUTDOWN” indicator can be used as a spareindicator.
Engine Control Switch
g00307929Illustration 36
Engine control switch in the “OFF/RESET” position
The engine control switch is a rotary switch that hasfour positions:
• “OFF/RESET”
• “AUTO”
• “MAN. START”
• “COOLDOWN/STOP”

41Operation Section
Features and Controls
Note: Only the indicators on the status controlmodule are reset when the engine control switchis turned to the “OFF/RESET” position. Diagnosticcodes must be cleared with the “DIAGNOSTICRESET” switch (Illustration 34).
“OFF/RESET” – When the engine control switch isturned to this position (12 o’clock), the indicators onthe status control module are reset and the engineshuts down immediately. The power to the enginecontrol module and the status control module is shutoff. This method is not recommended for normalstopping.
“AUTO” – When the engine control switch is in thisposition (3 o’clock), the system is configured forremote operation. When the remote start/stop initiatecontact closes, the engine will start. When the remotestart/stop initiate contact opens, the engine willshut down. If the cooling cycle is programmed, theengine will operate for the cooldown period beforethe engine stops.
“MAN. START” – When the engine control switchis turned to this position (6 o’clock), the engine willstart. The engine will continue to operate when theswitch is in this position. However, if a setpoint for ashutdown is exceeded, the engine will shut down.
“COOLDOWN/STOP” – This is the preferredmethod for normal stopping. When the engine controlswitch is turned to this position (9 o’clock), theengine will continue to operate until a programmablecooling cycle has elapsed. The cooling cycle can beprogrammed for a 0 to 30 minute period. The defaultsetting is five minutes.

42Operation SectionFeatures and Controls
Electronic Modular Control Panel II(EMCP II)
g01041282Illustration 37Electronic Modular Control Panel II (EMCP II)(1) Generator set control (GSC)(2) Diagnostic reset switch(3) Engine control switch (ECS)(4) Panel lights
(5) Optional alarm module (ALM)(6) Optional synchronizing lights module
(SLM)(7) Optional speed potentiometer
(8) Panel light switch (PLS)(9) Emergency stop push button (ESPB)(10) Voltage adjust rheostat (VAR)
The electronic modular control panel II (EMCP II) islocated above the generator distribution housing. Thecontrol panel consists of a main panel with indicators,meters and control switches. This control panel maybe equipped with optional modules in order to matchthe customers’ needs and requirements.
The left side of the control panel contains theGenerator Set Control (GSC). This is the maincomponent of the system. The GSC displaysthe following information: generator output, faultconditions, and key engine parameters. The centersection of the control panel contains switches and anoptional alarm module. The right side of the controlpanel may be blank, or the right side of the controlpanel may contain the Synchronizing Lights Moduleor the Custom Alarm Module.
The main control panel may not contain all of thecomponents which are shown. Some componentsare optional. The optional components may not berequired for your particular application.
Generator Set Control (1) – The generator setcontrol (GSC) is the main component of the EMCPII. See the topic “Generator Set Control (GSC)” inthis section.
Diagnostic Reset Switch (2) – The diagnosticreset switch is a toggle switch that is used to cleardiagnostic codes from the engine control module.The switch cannot clear individual codes. Use of theswitch will clear all the codes that are active in theengine control module.
Note: Do not clear the codes until the problems thatcaused the codes are addressed.
Engine Control Switch (3) – The engine controlswitch (ECS) determines the status of the controlpanel. In the AUTOMATIC position, the engine willstart automatically when a contact is closed. Theengine will shut down after two of the followingconditions are met:
• The contact opens.
• A programmable cooldown period has elapsed.
The cooldown period can be programmed to give a0 to 30 minute cooldown period before the engineshuts down.
In the MANUAL START position, the engine will startand the engine will run. The engine will continue torun while the ECS is in that position.

43Operation Section
Features and Controls
In the STOP position, the fuel solenoid will shut downthe engine after a programmable cool down timeperiod has elapsed.
In the OFF/RESET position, the fault lights are resetand the engine shuts down immediately.
Panel Lights (4) – Panel lights (PL) are controlledby panel lights switch (8). The panel lights switch (8)is an ON/OFF switch.
Alarm Module (5) – The alarm module (ALM) isoptional. The ALM provides a visible, audible warningof engine conditions before these conditions becomesevere enough to shut down the engine or severeenough to keep the engine from starting.
Synchronizing Lights Module (6) – Thesynchronizing lights module uses synchronizing lightsfor paralleling the generator sets. The synchronizinglights module is optional.
Speed Potentiometer (7) – The speedpotentiometer (SP) is optional. The SP can beused with the generator set that has an electronicgovernor. When the governor is equipped with aspeed adjusting motor, the governor switch (GS)can be mounted instead of the SP. The GS raisesor the GS lowers the engine speed. The GS is alsoan option.
Panel Light Switch (8) – The panel lights switchcontrols the panel lights (4).
Emergency Stop Push Button (9) – Theemergency stop push button (ESPB) is used to shutdown the engine during an emergency situation. TheESPB shuts off the fuel. The ESPB also activates theoptional air shutoff, if equipped.
Voltage Adjust Rheostat (10) – The voltage adjustrheostat (VAR) is used to adjust the generator outputvoltage to the desired level.
Below, you can find the descriptions of the followingmain modules of the EMCP II:
• Generator Set Control (GSC)
• Alarm Module (ALM)
• Synchronizing Lights Module
Generator Set Control (GSC)
Functions and features of the GSC
The left side of the control panel contains thegenerator set control (GSC). The GSC is the maincomponent of the system. The GSC displays thefollowing information: generator output, generatorset functions, fault conditions, and key engineparameters. The GSC accepts information from thefollowing sources: operator, engine speed sensor,engine oil pressure sensor, water temperaturesensor, and optional remote sources. This informationis used to determine the “on/off” state of the engine’sair, fuel, and starter.
During normal operating conditions, a signal tells theGSC to start the generator set. The GSC turns onthe engine’s fuel and the engine’s starter. When theengine speed reaches the crank termination speed,the starter is disengaged. When the GSC receives asignal to stop the engine, the GSC shuts the fuel off.
The functions of the GSC are listed below:
• The GSC controls the starting and the stopping ofthe engine (normal conditions).
• The GSC shows engine conditions and generatoroutput information on two displays. The displaysalso show fault codes and GSC programminginformation.
• The GSC monitors the system for faults. If afault occurs, the GSC performs a controlled faultshutdown or the GSC provides a fault alarm. TheGSC uses indicators and displays in order todescribe the fault.
• The GSC contains programmable featuresfor certain applications or requirements of thecustomers.
The features of the GSC are listed below:
• Cycle Crank: The GSC can be programmed tocrank for adjustable time periods.
• Governor Control: When the engine oil pressureincreases past the low oil pressure setpoint,the GSC will indicate to the governor. The GSCindicates that the governor should increase theengine speed from idle rpm to rated RPM.
• Cooldown: When the GSC receives a signal toperform a normal shutdown, the GSC will wait foran amount of time that has been preprogrammedbefore shutting down the engine via the fuel control.

44Operation SectionFeatures and Controls
• Automatic Operation: In the automatic mode, theGSC can be started by a remote initiating signal.Upon loss of the signal (contact opening), the GSCwill perform a normal shutdown.
• Alarm Module Communication: The GSC cantransmit fault conditions and alarm conditions toan alarm module (AM).
• Power Down.: The EMCP II system is designedto remove power from the GSC when the enginecontrol switch (ECS) is in the OFF/RESET modeand when the proper jumper wire is removed. TheGSC will not allow the generator set to power downuntil both the crank termination relay and the fuelcontrol relay are off for about 70 seconds. The GSCwill remain up if the jumper wire is not removed.
• Fuel Solenoid Type: The GSC can beprogrammed to work with an “energized to run” fuelsystem or programmed to work with an “energizedto shutdown” fuel system.
Fault indicators
g00787844Illustration 38Display area of the GSC
(11) Low oil pressure indicator(12) Emergency stop indicator(13) High water temperature indicator(14) Engine overspeed indicator(15) Low coolant level indicator(16) Overcrank indicator(17) Fault alarm indicator(18) Fault shutdown indicator(19) Dedicated shutdown indicators(20) Upper display(21) Alarm codes key
The fault indicators are used to show that a fault ispresent. The fault indicators also describe the fault.The fault indicators are divided into three groups.The three groups are listed below:
• Fault alarm indicator (17)
• Fault shutdown indicator (18)
• Dedicated shutdown indicators (19)
The yellow fault alarm indicator (17) FLASHES whenthe GSC detects an alarm fault. The alarm fault doesnot cause the engine status to change. The enginecan be started. The engine will continue operating,only if the engine is running at the time of the alarmfault. Fault alarm indicator (17) is accompanied by analarm fault code that is shown on upper display (20).The fault code is shown when the alarm codes key(21) is pressed.
The red fault shutdown indicator (18) FLASHES whenthe GSC detects a shutdown fault. The engine will beshut down if the engine is running. The engine willnot be allowed to start. Fault shutdown indicator (18)is accompanied by a fault code that is immediatelyshown on the upper display (20).
The red dedicated shutdown indicators (19) representthe following shutdown faults: low oil pressure,emergency stop, high water temperature, engineoverspeed, low coolant level and engine overcrank.When the GSC detects a fault in one of these areas,the dedicated shutdown indicator that correspondsto the fault FLASHES. The engine is shutdownif the engine is running, and the engine is notallowed to start. No fault codes are associated withthe dedicated shutdown indicators because eachindicator has a descriptive label.
Many of the dedicated shutdown faults depend oncertain setpoints in the GSC.
The conditions that are required to activate thededicated fault shutdowns and the results of eachdedicated fault are in the following list:
Low Oil Pressure – The engine oil pressure dropsbelow the setpoints for low oil pressure shutdownthat are programmed into the GSC. There are twolow oil pressure setpoints. One setpoint is used whenthe engine is at idle speed. The other setpoint is usedwhen the engine is at rated speed. When a low oilpressure fault occurs, the low oil pressure indicatorFLASHES, and the engine is shut down. The engineis not allowed to start until the fault is corrected.

45Operation Section
Features and Controls
Emergency Stop – The operator presses theemergency stop push button (ESPB) on the frontpanel. When an emergency stop condition occurs,the emergency stop indicator FLASHES and theengine is shut down. The engine is not allowed tostart until the condition is corrected.
High Water Temperature – The engine coolanttemperature rises above the setpoint for high watertemperature shutdown that is programmed into theGSC. When the high water temperature fault occurs,the high water temperature indicator FLASHES. Theengine is shutdown and the engine is not allowed tostart until the fault is corrected.
Engine Overspeed – The engine speed exceedsthe setpoint for engine overspeed that is programmedinto the GSC. When a fault for engine overspeedoccurs, the engine overspeed indicator FLASHES.The engine is shutdown and the engine is not allowedto start until the fault is corrected.
Low Coolant Level – The engine coolant leveldrops below the probe of the coolant loss sensor.When the low coolant level fault occurs, the enginecoolant level indicator FLASHES. The engine is shutdown. The engine is not allowed to start until the faultis corrected.
Overcrank – The engine does not start within thesetpoint for total cycle crank time that is programmedinto the GSC. When the overcrank fault occurs, theovercrank indicator FLASHES. The engine is notallowed to start until the fault is corrected.
Note: The GSC can be programmed to overridethe shutdown for low oil pressure and high watertemperature faults. When the operator overridesthe shutdown faults, the GSC responds to thefaults as though the faults are alarm faults. Thecorresponding dedicated shutdown indicator isON CONTINUOUSLY. The engine continues torun. The engine can be restarted, if necessary.When the dedicated shutdown indicator is ONCONTINUOUSLY, the setpoint for shutdown hasbeen exceeded, but the GSC is programmed tooverride the shutdown fault. The GSC does not treatthe shutdown fault as a shutdown fault. The GSCtreats the shutdown fault as an alarm fault. At thefactory, the GSC is programmed to treat a low oilpressure fault and a high water temperature faultas shutdown faults. The operator or the servicetechnician must decide to override these shutdownfaults. The operator or the service technician mustprogram the GSC to treat the shutdown faults asalarm faults.
Display
g00787849Illustration 39Display area of the GSC(20) Upper display(22) Lower display(23) The leftmost key(24) The phase select key(25) The engine meter key
The display consists of the upper display andthe lower display. Both displays are used forprogramming functions when the GSC is in theservice mode.
Upper display
The upper display (20) shows the followingparameters: AC voltage, current, and frequency ofone phase of the generator output. Each phase canbe viewed one at a time by pushing phase select key(24). The upper display (20) is also used to show thevarious fault codes for system faults.
Lower display
The lower display (22) shows system battery voltage,engine hours, engine speed, engine oil pressure,engine coolant temperature and the relay status.
The value for one of these conditions is shown fortwo seconds. Then, the display scrolls to the valuefor the next condition. A small pointer identifiesthe engine condition that corresponds to the valuewhich is showing. When the engine meter key (25) ispressed, the lower display (22) stops scrolling. Thelower display (22) continuously shows one particularvalue. The pointer flashes above the condition of thevalue that is showing. When engine meter key (25)is pressed for a second time, the display (22) willreturn to scrolling.

46Operation SectionFeatures and Controls
The relay status indicators are on the bottom of thelower display (22). When a GSC relay is activated,the corresponding indicator is shown on lower display(22). When a relay is not activated, the correspondingindicator is not shown.
Keypad
g00787845Illustration 40Keypad area of the GSC(17) Fault alarm indicator(18) Fault shutdown indicator(20) Upper display(21) Alarm codes key(22) Lower display(23) Leftmost key(24) Phase select key(25) Engine meter key(26) Lamp test key(27) Exit key(28) Service mode key(29) Keypad
Keypad (29) is used to control the information that isshown on upper display (20) and lower display (22).The seven keys have two sets of functions: normalfunctions and service functions. The normal functionsof the keys are described in the following paragraphs:
Alarm Codes Key (21) – If fault alarm indicator(17) is FLASHING, pressing this key causes upperdisplay (20) to show the corresponding alarm faultcode. If this key is pressed again, the generator ACoutput information will be shown on the upper display(20). If fault alarm indicator (17) is OFF, this key hasno function.
Leftmost Key (23) – This key only functions whenthe GSC is in service mode. This key is used to scrollright.
Phase Select Key (24) – This key selects the phaseof the generator output that is displayed on the GSC.When you press this key, the display shows thevoltage, current, and frequency of each phase oneat a time.
Engine Meter Key (25) – This key controls theviewing of engine parameters on the lower display.Pressing the key stops the scrolling of engineconditions. The value for one particular enginecondition will show continuously. The pointer flashesindicating that the scrolling is stopped. The scrollingof the engine conditions will resume when the enginemeter key is pressed again.
Lamp Test Key (26) – Pressing this key performs alamp test on the GSC and the optional alarm module.On the GSC, the eight fault indicators are ONCONTINUOUSLY. Every segment of upper display(20) and lower display (22) is ON. On the optionalalarm module, all of the indicators are ON and thehorn sounds. The lamp test function turns off if anoperator presses the key and the operator holds thekey for more than ten seconds.
Exit Key (27) – This key only functions when theGSC is in Service Mode.
Service Mode Key (28) – Pressing this key causesthe GSC to enter service mode.
Alarm ModuleThe alarm module (ALM) is optional. The alarmmodule provides visible warnings and the alarmmodule provides audible warnings of engineconditions before these conditions become severeenough that the engine will shut down or the enginewill be unable to start.
One basic alarm module is used to satisfy therequirements for the following modules: standbyNFPA 99 alarm module, standby NFPA 110 alarmmodule, NFPA 99 remote annunciator panel, andprime power alarm. This is accomplished by usingdifferent inputs to the module and different decals onthe front of the module in order to indicate alarmsor shutdown conditions.
The front of the alarm module consists of thefollowing indicators:
• Four amber indicators
• Four red indicators
• An audible alarm
• Acknowledge/Silence switch

47Operation Section
Features and Controls
The amber indicators may display the followingparameters:
• High Coolant Temperature
• Low Coolant Temperature
• Low Coolant Level
• Low Oil Pressure
• Generator On Load
• Charger Malfunction
• Low Engine Oil Level
• Low Fuel Level
The red indicators may display the followingconditions:
• Not In AUTO
• Low DC Voltage
• Air Damper Closed
• Low Oil Pressure Shutdown
• Overcrank Shutdown
• High Coolant Temperature Shutdown
• Overspeed Shutdown
Synchronizing Lights Module
g00787922Illustration 41The location of the Synchronizing Lights Module on the EMCP II(30) Synchronizing lights(31) Synchronizing switch
The optional synchronizing lights module is mountedon the right side of the control panel.
The synchronizing lights module contains thesynchronizing lights (30) and the synchronizingswitch (31).
Synchronizing Lights (30) – The synchronizinglights (30) are used as an aid in paralleling units atno load and under load. Each light is connected tothe side with the load of the generator output circuitbreaker. The lights are used to indicate when thevoltages are in-phase. Close the circuit breaker inorder to connect the generator with the load.
Synchronizing Switch (31) – The synchronizingswitch has two positions: ON (“I”) and OFF(“0”). When this switch is in the ON position, thesynchronizing lamps are enabled. The generatorcircuit breaker can be closed manually whenthe synchronizing switch is on and the lights aresynchronized.
Note: Refer to Operation Section, “ParallelOperation” for information regarding the parallelingof two generators.
When a reverse power relay is added toa synchronizing lights module, the originalsynchronizing lights module will change in thefollowing ways:
• The reverse power relay is mounted on the controlpanel interior.
• A reverse power fault is indicated by the FaultShutdown Indicator on the front of the GSC.
The reverse power relay is a single phase protectiverelay. This relay is energized by power in only onedirection. In a reverse power fault, the relay contactsclose and the engine shuts down. This will take thegenerator off the line. The reverse power relay isequipped with a test switch and adjustments.

48Operation SectionEngine Starting
Engine Startingi02151084
Before Starting EngineSMCS Code: 1000; 1400; 1450
Note: Certain procedures are required before anengine is started for the first time. See SpecialInstruction, SEHS9769, “Installation and InitialStart-UP Procedure for G3500 Engines”.
Perform the required daily maintenance and otherperiodic maintenance before starting the engine. Thiscan prevent major repairs at a later date. See thisOperation and Maintenance Manual, “MaintenanceInterval Schedule” (Maintenance Section).
Walk-Around Inspection
NOTICEFor any type of leak, clean up the fluid. If leaking is ob-served, find the source and correct the leak. If leakingis suspected, check the fluid levels more often thanrecommended until the leak is found or fixed, or untilthe suspicion of a leak is proved to be unwarranted.
To obtain maximum service life for your engine, makea thorough inspection before starting the engine.Make a walk-around inspection of the installation.Look for items such as oil or coolant leaks, loosebolts and trash buildup. Remove any trash. Makerepairs, if necessary.
• The guards must be in the proper place. Repairdamaged guards or replace missing guards.
• Ensure that the areas around the rotating parts areclear.
Air Inlet System
Unburned gas in the air inlet and exhaust systemmay ignite when the engine is started. Personalinjury and/or property damage may result.
Before starting an engine that may contain un-burned gas, purge the unburned gas from the airinlet and exhaust system. Refer to the topic onpurging unburned gas in the “Starting the Engine”section.
• Ensure that the air inlet piping and the air filtersare in place.
• Ensure that all clamps and connections are secure.
• Inspect the air cleaner service indicator (ifequipped). Service the air cleaner filter elementwhen the yellow diaphragm enters the red zone, orthe red piston locks in the visible position.
Cooling System• Inspect the cooling system for leaks or looseconnections. Inspect the condition of all the hosesand pipes for the cooling system. Ensure that theconnections are properly clamped.
• Inspect the water pumps for evidence of leaks.
• Check the coolant level. Add coolant, if necessary.For information on the proper coolant to use, seethis Operation and Maintenance Manual, “RefillCapacities and Recommendations” (MaintenanceSection).
Driven Equipment• If necessary, check the oil levels of the drivenequipment. Perform any maintenance that isrequired for the driven equipment. Refer to theliterature that is provided by the OEM of the drivenequipment.
• If the engine is equipped with a clutch, ensure thatthe clutch is disengaged.
• For generator set engines, ensure that the maincircuit breaker is open.
Electrical SystemInspect the wiring for the following conditions:
• Loose connections
• Wiring that is worn or frayed
Inspect the gauge panel and the control panelfor good condition. Reset any shutoff or alarmcomponents.
Fuel System
NEVER use a flame to check for gas leaks. Use agas detector.
An open flame can ignite mixtures of air and fuel.This will cause explosion and/or fire which couldresult in severe personal injury or death.

49Operation SectionEngine Starting
• Check the fuel lines for leaks with a gas detector.
• Inspect the fuel lines for loose fittings and leaks.Ensure that the fuel lines are properly clamped.
• Ensure that the fuel is supplied to the engine at thecorrect pressure for the engine.
Lubrication System
g00760044Illustration 42Oil level gauge (dipstick)
(1) “ADD” mark(2) “FULL” mark
NOTICEExcessive engine oil will increase oil consumption andresult in excessive deposits in the combustion cham-ber. Do not overfill the engine with oil.
• Check the engine crankcase oil level. Maintain theoil level between the “ADD” and “FULL” marks onthe “ENGINE STOPPED WITH OIL COLD” side ofthe oil level gauge. For information on the properoil to use, see this Operation and MaintenanceManual, “Refill Capacities and Recommendations”(Maintenance Section).
• Check for leaks at the following components:crankshaft seals, crankcase, oil filters, oil galleryplugs, sensors, and valve covers.
• Inspect the tubes, tee pieces, and clamps on thecrankcase breathers.
Starting SystemNote: If the engine is equipped with a system forexternal support, prepare the system before startingthe engine. Ensure that all of the systems for enginesupport are enabled. Perform all prestart checks forthe control system.
Air Starting Motor
• Drain moisture and sediment from the air tank andfrom any other air piping.
• Check the oil level in the lubricator. Keep thelubricator at least half full. Add oil, if necessary.For temperatures above 0 °C (32 °F), use anondetergent 10W oil. For temperatures below0 °C (32 °F), use air tool oil.
• Check the air pressure for starting. The air startingmotor requires a minimum of 690 kPa (100 psi).The maximum allowable air pressure is 1030 kPa(150 psi). Open the air supply valve.
Electric Starting Motor
• Disconnect any battery chargers that are notprotected against the high current drain that iscreated when the electric starting motor engages.
Inspect the wiring, the electrical cables, and thebattery for the following conditions:
• Loose connections
• Wires that are worn or frayed
• Corrosion
i01857649
Cold Weather StartingSMCS Code: 1000; 1250; 1450; 1453; 1456; 1900
Note: Oil pan immersion heaters are notrecommended for heating the lube oil. To ensure thecompatibility of the components, only use equipmentthat is recommended by Caterpillar.
A jacket water heater is required for starting intemperatures as low as 0 °C (32 °F). The jacketwater heater can maintain the water temperature atapproximately 32 °C (90 °F). The heated water willhelp to keep the oil in the engine block warm enoughto flow when the engine is started. A jacket waterheater is required for starting when the temperatureis less than 16 °C (60 °F).
For air starting motors, a larger volume of startingair and/or a higher air pressure may be necessary inorder to start the engine at colder temperatures.
For electric starting, extra battery capacity may benecessary.
Consult your Caterpillar dealer for more informationon the starting aids that are available for cold weatherstarting.

50Operation SectionEngine Starting
i02151089
Starting the EngineSMCS Code: 1000; 1450
Engine exhaust contains products of combustionwhich may be harmful to your health. Always startand operate the engine in a well ventilated areaand, if in an enclosed area, vent the exhaust to theoutside.
NOTICEFor initial start-up of a new or rebuilt engine, and forstart-up of an engine that has been serviced, makeprovision to shut the engine off should an overspeedoccur. This may be accomplished by shutting off thefuel supply and/or the ignition to the engine.
Unburned gas in the air inlet and exhaust systemmay ignite when the engine is started. Personalinjury and/or property damage may result.
Before starting an engine that may contain un-burned gas, purge the unburned gas from the airinlet and exhaust system. Refer to the topic onpurging unburned gas in the “Starting the Engine”section.
Note: Using the “EMERGENCY STOP” button willshut off both the fuel and the ignition.
Do not start the engine or move any of the controlsif there is a “DO NOT OPERATE” warning tag orsimilar warning tag attached to the start switch or tothe controls.
Ensure that no one will be endangered before theengine is started and when the engine is started.
Perform the procedures that are described in thisOperation and Maintenance Manual, “Before StartingEngine” (Operation Section).
Purging Unburned GasThe following events cause unburned gas to remainin the air inlet and in the exhaust manifold:
• Emergency stop
• Engine overspeed
• Unsuccessful successive attempts to start theengine
Unburned gas may remain in the air inlet and exhaustsystem after several unsuccessful attempts to startthe engine. The unburned gas may increase to aconcentration that may ignite during a successiveattempt to start the engine.
Perform the following procedure in order to purgethe unburned gas:
1. Turn the manual gas shutoff valve to the CLOSEDposition.
2. Disable the ignition by disconnecting one of thewires that is labelled “M200” from the emergencystop button.
3. Turn the engine control switch to the STARTposition. Crank the engine for one full crank cyclein order to purge the unburned gas.
4. Enable the ignition by connecting the wire thatwas disconnected in Step 2.
5. Turn the manual gas shutoff valve to the OPENposition.
6. Continue with your previous procedure.
Operation of the Generator SetControl PanelFor information on operation for a specific generatorset control panel, refer to the Operation andMaintenance Manual for the generator and thecontrol panel.
Automatic Starting
When the engine is in the AUTOMATIC mode, theengine can start at anymoment. To avoid personalinjury, always remain clear of the the engine whenthe engine is in the AUTOMATIC mode.
If the engine control switch is in the “AUTO” position,the engine will automatically start when the remotestart/stop initiate contact closes. The engine willaccelerate to rated rpm when the oil pressure issufficient.
Manual Starting1. Ensure that fuel is supplied to the engine. Ensurethat no gas is leaking.

51Operation SectionEngine Starting
2. Ensure that the driven equipment is unloaded.
a. For generator set engines, ensure that themain circuit breaker is open.
b. For industrial engines, unload the compressoror pump. Disengage the clutch (if equipped).Place the transmission and/or otherattachments for the power take-off inNEUTRAL.
Note: Before starting an industrial engine, move thegovernor control lever to the position for 1/2 of ratedrpm.
NOTICEDo not engage the starting motor when flywheel isturning. Do not start the engine under load.
If the engine fails to start within 30 seconds, releasethe starter switch or button and wait two minutes toallow the starting motor to cool before attempting tostart the engine again.
g00319402Illustration 43Engine control switch in the “Man. Start” position
3. Turn the engine control switch to the “Man. Start”position in order to start the engine.
Note: After starting an industrial engine, move thegovernor control lever to the position for low idle rpm.
4. Allow the engine to idle for three to five minutes.The engine speed should stabilize at low idle rpm.Check all of the pressure gauges. Inspect theengine for leaks and listen for unusual noises.When all systems are normal, the rpm may beincreased.
Table 12
Rated RPM And Low Idle RPM
Rated rpm 1000 1200 1400 1500 1800
Low idle rpm 700 900 1000 1000 1200
Starting Failure
Note: If the cycle crank feature is enabled, the StatusControl Module (SCM) will attempt to start the enginefor the programmed period. If the engine fails to startwithin the programmed period, the SCM will executean overcrank fault. The “OVERCRANK” indicator onthe Remote Control Panel (Status) will illuminate. TheSCM must be reset before the engine can be started.Turn the engine control switch to the “OFF/RESET”position.
If the engine fails to start after cranking for 30seconds, stop cranking. Perform the followingprocedure:
1. Turn the engine control switch to the “OFF/RESET”position.
2. Turn the gas supply OFF.
3. Allow the starting motor to cool for two minutes.Crank the engine for approximately 15 secondsin order to disperse any unburned gas from theengine and the exhaust system.
4. Allow the starting motor to cool for two minutes.Turn the gas supply ON. Repeat the startingprocedure.
i02097945
Starting with Jump StartCablesSMCS Code: 1000; 1401; 1402; 1900
Improper jump start cable connections can causean explosion resulting in personal injury.
Prevent sparks near the batteries. Sparks couldcause vapors to explode. Do not allow jump startcable ends to contact each other or the engine.
If the installation is not equipped with a backupbattery system, it may be necessary to start theengine from an external electrical source.
Many batteries which are considered unusable arestill rechargeable. After jump starting, the alternatormay not be able to fully recharge batteries thatare severely discharged. The batteries must becharged to the proper voltage with a battery charger.For information on testing and charging, refer tothe Special Instruction, SEHS7633, “Battery TestProcedure”.

52Operation SectionEngine Starting
NOTICEUsing a battery source with the same voltage as theelectric starting motor. Use ONLY equal voltage forjump starting. The use of higher voltage will damagethe electrical system.
Do not reverse the battery cables. The alternator canbe damaged. Attach ground cable last and removefirst.
When using an external electrical source to start theengine, turn the engine control switch to the “OFF”position. Turn all electrical accessories OFF beforeattaching the jump start cables.
Ensure that the main power switch is in the OFF posi-tion before attaching the jump start cables to the en-gine being started.
1. Turn the start switch on the stalled engine to theOFF position. Turn off all accessories.
2. Connect one positive end of the jump start cableto the positive cable terminal of the dischargedbattery. Connect the other positive end of the jumpstart cable to the positive cable terminal of theelectrical source.
3. Connect one negative end of the jump start cableto the negative cable terminal of the electricalsource. Connect the other negative end of thejump start cable to the engine block or to thechassis ground. This procedure helps to preventpotential sparks from igniting combustible gasesthat are produced by some batteries.
4. Charge the batteries. The engine will not continueto run after starting if the batteries have not beencharged.
5. Start the engine.
6. Immediately after the stalled engine is started,disconnect the jump start cables in reverse order.
Refer to the Electrical Schematic for your engine.Consult your Caterpillar dealer for more information.
i00914166
After Starting EngineSMCS Code: 1000
For new installations and engines that are recentlyrebuilt, carefully monitor the engine in order to detectany unusual engine performance.
The engine rpm can be increased from low idle rpmto rated rpm after one minute.
Engines that use pipeline natural gas are capable oframping to full load in 30 seconds or less. For enginesthat use bio-gas, increased time for ramping theload will help to provide protection from detonation.Avoid detonation during loading. Generally, no loadoperation to full load operation can be accomplishedin five to ten minutes without any problems.
It may be necessary to apply some load in order toattain normal operating temperatures. The operatorcan ramp the load manually. For automatic loading,programmable logic control can be used.
Engaging the Driven Equipment
Generator Set Engines
1. Increase the engine speed to rated rpm.
2. Ensure that the outlet temperature of the jacketwater reaches 77 °C (170 °F). Ensure that thegauges are in the normal ranges for the enginerpm.
3. Close the main circuit breaker in order to applythe load.
Industrial Engines
1. Increase the engine rpm. Ensure that the gaugesare in the normal ranges for the engine rpm.
2. Engage the driven equipment with no load on thedriven equipment.
The engine can be loaded up to 50 percent of fullload before the outlet temperature of the jacketwater reaches 77 °C (170 °F). The temperature isusually achieved in two to four minutes. After thistemperature is reached, begin to ramp the engineto full load.
3. Ramp to full load after the outlet temperature ofthe jacket water reaches 77 °C (170 °F). Fiveminutes may be required.

53Operation SectionEngine Operation
Engine Operationi02097665
Engine OperationSMCS Code: 1000
Proper operation and maintenance are key factors inattaining the maximum service life and economy forthe engine. Follow the instructions in this Operationand Maintenance Manual in order to minimizeoperating costs and maximize the service life of theengine.
Observe the gauges frequently while the engine isoperating. Record the data from the gauges in a logregularly. Compare the data to the specificationsfor normal engine operation. Comparing the dataover time will help to detect changes in engineperformance.
Investigate any significant change in the gaugereadings. Monitor the engine operation and takeaction when discrepancies are found.
Operating the Engine and theDriven EquipmentCheck the gauges and the driven equipmentfrequently while the engine is operating under a load.The engine can be operated for extended periodsof time at full load.
Partial Load OperationExtended operation at low idle or at a reduced loadwill cause increased oil consumption and carbonbuildup in the cylinders. Carbon buildup results inthe following effects:
• Power loss
• Poor performance
• Accelerated wear of components
Caterpillar Engines can be operated at very lightloads (torques) for limited times with no harmfuleffects. Table 13 lists the limits for hours of operationat various torques.
After the time limit for reduced load operation hasexpired, operate the engine for a minimum of twohours at a torque that is more than 70 percent.
For example, an engine is operating at 20 percentof the rated torque. The engine may be operated atthis load factor for a maximum of one-half hour. Afterthe one-half hour, operate this engine for at least twohours at a load factor of more than 70 percent.
To keep engine maintenance at a minimum, followthe guidelines that are listed in Table 13.
Table 13
Time Limits For Low Load Operation
Engine Torque NA Engines TA Engines
0 to 30% 1/2 hour 1/2 hour
31 to 50% 2 hours 2 hours
51 to 60% 24 hours Continuous(1)
61 to 100% Continuous Continuous(1)
(1) For continuous operation of TA engines, the manifold airpressure should be greater than the atmospheric pressure.

54Operation SectionEngine Stopping
Engine Stoppingi02145782
Emergency StoppingSMCS Code: 1000; 7418
NOTICEEmergency shutoff controls are for EMERGENCY useONLY. DO NOT use emergency shutoff devices orcontrols for normal stopping procedure.
Ensure that any system that provides externalsupport to the engine is secured after the engine isstopped.
NOTICEDo not start the engine until the problem necessitatingthe emergency stop has been located and corrected.
Pressing the Emergency Stop Button may causeunburned gas to remain in the air inlet and in theexhaust manifold.
Unburned gas in the air inlet and exhaust systemmay ignite when the engine is started. Personalinjury and/or property damage may result.
Before starting an engine that may contain un-burned gas, purge the unburned gas from the airinlet and exhaust system. Refer to the topic onpurging unburned gas in the “Starting the Engine”section.
Emergency Stop Button
g00786734Illustration 44
(1) Emergency stop button on a junction box
g00786735Illustration 45Remote control panel (status)(1) Emergency stop button(2) Engine control switch(3) “AUXILIARY SHUTDOWN” indicator
Emergency stop button (1) is in the OUT positionfor normal engine operation. Push the button foremergency stopping. This shuts off both the fueland the ignition. The engine will not start when thebutton is locked. To reset the button, turn the buttonclockwise. The spring-loaded button will return to theOUT position.
NOTICEDo not use this method to stop the engine unlessan emergency has occurred. Continuous emergencyshutdowns can cause damage to some engine com-ponents. This will leave unburned fuels in the combus-tion chambers and in the exhaust system. If an emer-gency shutdown occurs, purge the system by crankingthe engine for 5 to 10 seconds with the ignition shutoff.
The control panel must also be reset before theengine will start. To reset the control panel, turnengine control switch (2) to the “OFF/RESET”position.
The customer may also provide other means foremergency stopping. This will cause the fuel to beshut off, but the ignition may not be shut off. Thisshutdown will cause “AUXILIARY SHUTDOWN”indicator (3) to illuminate. The control panel mustbe reset before the engine will start. To reset thecontrol panel, turn engine control switch (2) to the“OFF/RESET” position.

55Operation SectionEngine Stopping
i00720970
Manual Stop ProcedureSMCS Code: 1000; 7418
NOTICEStopping the engine immediately after the engine hasbeen operating under a load can result in overheatingand accelerated wear of the engine components.
Allow the engine to gradually cool before stopping theengine.
Note: Remove the load at a rate that will avoiddetonation.
1. Disengage the driven equipment.
a. For generator set engines, open the maincircuit breaker.
b. For industrial engines, unload the compressoror pump. Disengage the clutch (if equipped).Place the transmission and/or otherattachments for the power take-off inNEUTRAL.
Note: Extended idling can cause excessive oilconsumption and related problems. See thisOperation and Maintenance Manual, “EngineOperation” topic (Operation Section).
2. Reduce the engine rpm to low idle.
Note: If the cooldown feature is not utilized, operatethe engine at low idle rpm for a cooldown periodbefore stopping the engine. If the engine has beenoperated at a low load, operate the engine at low idlefor approximately 30 seconds before stopping theengine. If the engine has been operated at a highload, operate the engine at low idle for three to fiveminutes before stopping the engine.
3. Use one of the following methods in order to stopthe engine:
a. Turn the engine control switch to the“COOLDOWN/STOP” position. If the cooldownfeature is utilized, the engine will operate for aprogrammed period of time before the enginestops. Otherwise, the engine will immediatelyshut off.
g00320124Illustration 46Engine control switch in the “OFF/RESET” position
b. Turn the engine control switch to the“OFF/RESET” position. The engine willimmediately shut off.
c. If the engine control switch is in the “AUTO”position, open the remote start/stop initiatecontact. If the cooldown feature is utilized, theengine will operate for a programmed period oftime before the engine stops. Otherwise, theengine will immediately shut off.
The engine will coast to a stop. Ensure that anysystem that provides external support to the engineis secured after the engine is stopped.

56Operation SectionEngine Stopping
i02150753
After Stopping EngineSMCS Code: 1000
• Check the engine crankcase oil level. Maintainthe oil level between the “ADD” and “FULL” markson the “ENGINE STOPPED” side of the oil levelgauge.
• If necessary, perform minor adjustments. Repairany leaks and tighten loose bolts.
• Note the service hour meter reading. Perform themaintenance that is scheduled in this Operationand Maintenance Manual, “Maintenance IntervalSchedule” (Maintenance Section).
NOTICEOnly use antifreeze/coolant mixtures recommended inthe Refill Capacities and Recommendations section ofthis manual. Failure to do so can cause engine dam-age.
• Allow the engine to cool. Check the coolant level.
• If freezing temperatures are expected, check thecoolant for protection against freezing. The coolingsystem must be protected against freezing to thelowest expected outside temperature. Add theproper coolant/water mixture, if necessary.
• Perform all required periodic maintenance on alldriven equipment. Refer to the instructions that areprovided by the OEM of the driven equipment.
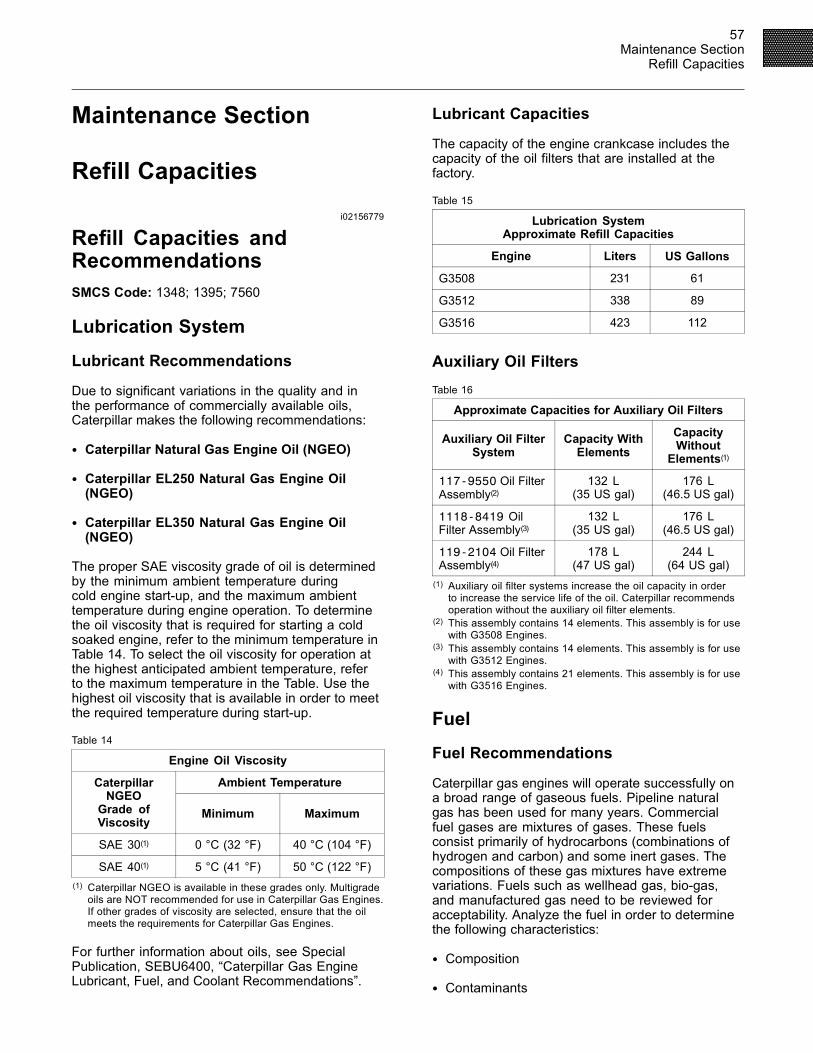
57Maintenance Section
Refill Capacities
Maintenance Section
Refill Capacitiesi02156779
Refill Capacities andRecommendationsSMCS Code: 1348; 1395; 7560
Lubrication System
Lubricant Recommendations
Due to significant variations in the quality and inthe performance of commercially available oils,Caterpillar makes the following recommendations:
• Caterpillar Natural Gas Engine Oil (NGEO)
• Caterpillar EL250 Natural Gas Engine Oil(NGEO)
• Caterpillar EL350 Natural Gas Engine Oil(NGEO)
The proper SAE viscosity grade of oil is determinedby the minimum ambient temperature duringcold engine start-up, and the maximum ambienttemperature during engine operation. To determinethe oil viscosity that is required for starting a coldsoaked engine, refer to the minimum temperature inTable 14. To select the oil viscosity for operation atthe highest anticipated ambient temperature, referto the maximum temperature in the Table. Use thehighest oil viscosity that is available in order to meetthe required temperature during start-up.
Table 14
Engine Oil Viscosity
Ambient TemperatureCaterpillarNGEOGrade ofViscosity
Minimum Maximum
SAE 30(1) 0 °C (32 °F) 40 °C (104 °F)
SAE 40(1) 5 °C (41 °F) 50 °C (122 °F)(1) Caterpillar NGEO is available in these grades only. Multigradeoils are NOT recommended for use in Caterpillar Gas Engines.If other grades of viscosity are selected, ensure that the oilmeets the requirements for Caterpillar Gas Engines.
For further information about oils, see SpecialPublication, SEBU6400, “Caterpillar Gas EngineLubricant, Fuel, and Coolant Recommendations”.
Lubricant Capacities
The capacity of the engine crankcase includes thecapacity of the oil filters that are installed at thefactory.
Table 15
Lubrication SystemApproximate Refill Capacities
Engine Liters US Gallons
G3508 231 61
G3512 338 89
G3516 423 112
Auxiliary Oil FiltersTable 16
Approximate Capacities for Auxiliary Oil Filters
Auxiliary Oil FilterSystem
Capacity WithElements
CapacityWithoutElements(1)
117-9550 Oil FilterAssembly(2)
132 L(35 US gal)
176 L(46.5 US gal)
1118-8419 OilFilter Assembly(3)
132 L(35 US gal)
176 L(46.5 US gal)
119-2104 Oil FilterAssembly(4)
178 L(47 US gal)
244 L(64 US gal)
(1) Auxiliary oil filter systems increase the oil capacity in orderto increase the service life of the oil. Caterpillar recommendsoperation without the auxiliary oil filter elements.
(2) This assembly contains 14 elements. This assembly is for usewith G3508 Engines.
(3) This assembly contains 14 elements. This assembly is for usewith G3512 Engines.
(4) This assembly contains 21 elements. This assembly is for usewith G3516 Engines.
Fuel
Fuel Recommendations
Caterpillar gas engines will operate successfully ona broad range of gaseous fuels. Pipeline naturalgas has been used for many years. Commercialfuel gases are mixtures of gases. These fuelsconsist primarily of hydrocarbons (combinations ofhydrogen and carbon) and some inert gases. Thecompositions of these gas mixtures have extremevariations. Fuels such as wellhead gas, bio-gas,and manufactured gas need to be reviewed foracceptability. Analyze the fuel in order to determinethe following characteristics:
• Composition
• Contaminants

58Maintenance SectionRefill Capacities
• Heat value
• Methane number
• Specific gravity
Field gas can have varying characteristics ofcombustion. Field gas can contain numerousharmful impurities. The impurities can alter the BTUcontent. The impurities can also alter the methanenumber. The impurities include everything fromwater up to complex hydrocarbons that can lead todetonation and severe engine damage. To minimizethese effects, Caterpillar recommends the followingguidelines:
1. Evaluate the fuel with the Caterpillar MethaneNumber Program, LEKQ6378.
Methane values below 30 are not recommendedfor use in a Caterpillar engine. Fuels with amethane number that is below 30 must first beprocessed in order to remove harmful impuritiesin the fuel and raising the methane number intothe acceptable range.
2. If necessary, use an engine that is configuredfor a fuel that has a high energy. Consult theappropriate manual for the engine in order todetermine the recommended engine timing.
3. Reduce the oil change interval according to theresults of the oil analysis.
For further information on fuels, see SpecialPublication, SEBU6400, “Caterpillar Gas EngineLubricant, Fuel, and Coolant Recommendations”.
Cooling System
Coolant Recommendations
During shipping and storage, the engine must beprotected from damage that can be caused byfreezing of the cooling system. If the engine isshipped to a site with freezing temperatures and/orif the engine is stored in a location with freezingtemperatures, the cooling system must containantifreeze that will withstand the lowest ambienttemperature. Frequently check the concentrationof glycol in the coolant/antifreeze. Make sure thatthe concentration is adequate in order to preventfreezing. Otherwise, the cooling system must becompletely drained.
Coolant/antifreeze is normally composed of threeelements: water, glycol, and additives. Each elementmust meet specific guidelines.
Water
Deionized water or distilled water isrecommended for use in engine cooling systems.If distilled water or deionized water is not available,use water with the properties that are listed in Table17.
Table 17
Caterpillar Minimum Acceptable Water Requirements
Property Maximum Limit ASTM Test
Chloride (Cl) 40 mg/L(2.4 grains per US gal)
“D512”,“D4327”
Sulfate (SO4) 100 mg/L(5.9 grains per US gal) “D516”
Total Hardness 170 mg/L(10 grains per US gal) “D1126”
Total Solids 340 mg/L(20 grains per US gal) “D1888”
Acidity pH of 5.5 to 9.0 “D1293”
NOTICEUse of water that does not meet the recommendationsfor the cooling systemwill damage the cooling system.
Do not use these types of water in the cooling system:sea water, softened water that has been conditionedwith salt, hard water, and tap water.
Only use water that meets the recommendations forthe cooling system.
If you are not sure about the properties of your water,consult one of the following sources for a wateranalysis:
• Caterpillar dealer
• Local water utility company
• Agricultural agent
• Independent laboratory
Glycol
NOTICEDo not use Extended Life Coolant (ELC) withCaterpillar Gas Engines.
ELC was not formulated for use in Caterpillar Gas En-gines.
Use only the coolant/antifreeze that is recommended.

59Maintenance Section
Refill Capacities
Preferred – Caterpillar Natural Gas Engine Coolant(NGEC)
Alternatively, use Caterpillar Diesel EngineAntifreeze/Coolant (DEAC) or a commercialheavy-duty coolant/antifreeze that meets “ASTMD6210” or “ASTM D4985” specifications.
NOTICEDo not use a commercial coolant/antifreeze that onlymeets the ASTM “D3306” specification. This type ofcoolant/antifreeze is made for light duty automotiveapplications.
Use only the coolant/antifreeze that is recommended.
Acceptable – In applications that do not requireprotection from boiling or from freezing, a mixture ofCaterpillar SCA and water that meets the propertiesthat are listed in Table 17 is acceptable.
Note: The preferred coolant/antifreeze and theacceptable mixture of SCA and water requiredifferent concentrations of SCA. Refer to the SpecialPublication, SEBU6400, “Supplemental CoolantAdditive (SCA)” topic.
Table 18 is a list of the coolant/antifreeze that isrecommended for Caterpillar Gas Engines. Theservice life of the coolant/antifreeze that is used inCaterpillar Gas Engines is also listed. To achievethis service life, the coolants must be properlymaintained. The maintenance program includesS·O·S coolant analysis.
Table 18
Recommended Coolant/Antifreeze and ServiceLife of the Coolant/Antifreeze
Coolant/Antifreeze Service Life (1)
Caterpillar NGEC
Caterpillar DEACThree Years
Commercial Heavy-DutyCoolant/Antifreeze thatmeets “ASTM D6210”
Two Years
Commercial Heavy-DutyCoolant/Antifreeze thatmeets “ASTM D4985”
One Year
Caterpillar SCA andWater Two Years
Commercial SCA andWater One Year
(1) The service life of coolant is also limited by use (service hours).Refer to the specific engine’s Operation and MaintenanceManual, “Maintenance Interval Schedule”.
Additives
Preferred – Caterpillar Supplemental CoolantAdditive (SCA)
Acceptable – A commercial SCA that provides1200 mg/L (70 grains per US gal) or 1200 ppm ofnitrites in the final mixture of coolant/antifreeze
Note: A 50/50 concentration of CaterpillarNGEC or of Caterpillar DEAC does not require atreatment with an SCA at the initial fill. Commercialheavy-duty coolant/antifreeze that meets “ASTMD6210” or “ASTM D4985” specifications may requirea treatment with an SCA at the initial fill. Read thelabel or the instructions that are provided by the OEMof the product.
To ensure that the correct amount of SCA is in thecooling system, the concentration of SCA must betested on a scheduled basis. Obtain an S·O·S coolantanalysis (Level 1) or use a test kit to check theconcentration of the SCA according to this Operationand Maintenance Manual, “Maintenance IntervalSchedule”.
For further information on coolant, see SpecialPublication, SEBU6400, “Caterpillar Gas EngineLubricant, Fuel, and Coolant Recommendations”.
Coolant Capacities
To properly maintain the cooling system, the TotalCooling System capacity must be determined. TheTotal Cooling System capacity will vary betweenindividual installations. The Total Cooling Systemcapacity equals the capacity of the Jacket WaterCircuit plus the Aftercooler Circuit plus the ExternalSystem capacity. The External System capacityincludes the following components: expansion tank,heat exchanger, radiator, and piping. Refer to thespecifications that are provided by Caterpillar or bythe OEM of the equipment. Record the Total CoolingSystem capacity in the following Table:
Table 19
Cooling SystemApproximate Refill Capacities
System G3508 G3512 G3516
JacketWaterCircuit
114 L30 US gal
148 L39 US gal
205 L53 US gal
AftercoolerCircuit
13 L3.5 US gal
15 L4 US gal
16.5 L4.5 US gal
ExternalSystem
TotalCoolingSystem

60Maintenance SectionMaintenance Interval Schedule
i02151040
Maintenance Interval Schedule(Turbocharged Aftercooled)SMCS Code: 1000; 4450; 7500
When Required
Battery - Replace .................................................. 67Cooling System Coolant Sample (Level 2) -Obtain ................................................................. 74Engine Air Cleaner Element - Replace ................. 79Engine Oil Filter - Change .................................... 86Overhaul Considerations .................................... 105Valve Stem Projection - Measure/Record ............ 110
Daily
Air Starting Motor Lubricator Oil Level - Check .... 65Air Tank Moisture and Sediment - Drain ............... 66Control Panel - Inspect ......................................... 70Cooling System Coolant Level - Check ................ 73Driven Equipment - Inspect/Replace/Lubricate ... 78Engine Air Cleaner Service Indicator - Inspect ..... 81Engine Air Precleaner - Clean .............................. 82Engine Oil Level - Check ...................................... 89Fuel System Fuel Filter Differential Pressure -Check .................................................................. 93Power Take-Off Clutch - Check/Adjust/Lubricate ........................................................... 107Walk-Around Inspection ....................................... 111
Every 250 Service Hours
Battery Electrolyte Level - Check .......................... 68Engine Oil Sample - Obtain .................................. 89
Initial 1000 Service Hours
Cooling System Coolant Sample (Level 1) -Obtain ................................................................. 73Cooling System Supplemental Coolant Additive(SCA) - Test/Add ................................................. 74Engine Mounts - Check ........................................ 83Engine Speed/Timing Sensor - Clean/Inspect ...... 90Speed Sensor - Clean/Inspect ............................ 108Valve Stem Projection - Measure/Record ............ 110
Every 1000 Service Hours
Aftercooler Condensation - Drain ......................... 64Alternator - Inspect ............................................... 66Belts - Inspect/Adjust/Replace .............................. 69Carburetor Air/Fuel Ratio - Check/Adjust ............. 70Crankshaft Vibration Damper - Inspect ................. 76Engine - Clean ...................................................... 78Engine Crankcase Breather - Clean ..................... 82Engine Oil - Change ............................................. 84Engine Oil Filter (Auxiliary) - Change ................... 85Engine Oil Filter - Change .................................... 86Engine Valve Lash and Bridge - Adjust ................ 91
Engine Valve Rotators - Inspect ........................... 92Exhaust Piping - Inspect ....................................... 93Gas Pressure Regulator - Check .......................... 93Gas Pressure Regulator Condensation - Drain .... 94Hoses and Clamps - Inspect/Replace .................. 94Ignition System Spark Plugs - Check/Adjust/Replace ............................................................... 95Ignition System Timing - Check/Adjust ................. 99Inlet Air System - Inspect ...................................... 99Radiator - Clean .................................................. 107
Every 2000 Service Hours
Actuator Control Linkage - Lubricate .................... 64Cooling System Coolant Sample (Level 1) -Obtain ................................................................. 73Cooling System Supplemental Coolant Additive(SCA) - Test/Add ................................................. 74Engine Speed/Timing Sensor - Clean/Inspect ...... 90Speed Sensor - Clean/Inspect ............................ 108
Every 4000 Service Hours
Air Starting Motor Lubricator Bowl - Clean ........... 64Crankcase Blowby - Measure/Record .................. 75Cylinder Pressure - Measure/Record ................... 76Driven Equipment - Check .................................... 78Engine Mounts - Check ........................................ 83Engine Protective Devices - Check ...................... 90Exhaust Bypass - Inspect ..................................... 92Starting Motor - Inspect ...................................... 108Water Pump - Inspect .......................................... 112
Every 8000 Service Hours
Cooling System Coolant Sample (Level 2) -Obtain ................................................................. 74Turbocharger - Inspect ........................................ 109Water Temperature Regulator - Replace ............. 112
Between 9000 and 16 000 Service Hours
Overhaul (Top End) ............................................. 102
Every 24 000 Service Hours or 3 Years
Cooling System Coolant (NGEC) - Change .......... 70
Between 27 000 and 48 000 Service Hours
Overhaul (In-Frame) ........................................... 100
Between 45 000 and 80 000 Service Hours
Overhaul (Major) ................................................. 101

61Maintenance Section
Maintenance Interval Schedule
i02151050
Maintenance Interval Schedule(Standby)SMCS Code: 1000; 4450; 7500
When Required
Cooling System Coolant Sample (Level 2) -Obtain ................................................................. 74
Every Week
Air Starting Motor Lubricator Oil Level - Check .... 65Air Tank Moisture and Sediment - Drain ............... 66Battery Charger - Check ....................................... 67Battery Electrolyte Level - Check .......................... 68Control Panel - Inspect ......................................... 70Cooling System Coolant Level - Check ................ 73Engine Air Cleaner Service Indicator - Inspect ..... 81Engine Air Precleaner - Clean .............................. 82Engine Oil Level - Check ...................................... 89Fuel System Fuel Filter Differential Pressure -Check .................................................................. 93Walk-Around Inspection ....................................... 111
Initial 1000 Service Hours
Cooling System Coolant Sample (Level 1) -Obtain ................................................................. 73
Every 2000 Service Hours
Cooling System Coolant Sample (Level 1) -Obtain ................................................................. 73
Every Year
Actuator Control Linkage - Lubricate .................... 64Aftercooler Condensation - Drain ......................... 64Air Starting Motor Lubricator Bowl - Clean ........... 64Alternator - Inspect ............................................... 66Belts - Inspect/Adjust/Replace .............................. 69Carburetor Air/Fuel Ratio - Check/Adjust ............. 70Cooling System Supplemental Coolant Additive(SCA) - Test/Add ................................................. 74Crankcase Blowby - Measure/Record .................. 75Crankshaft Vibration Damper - Inspect ................. 76Cylinder Pressure - Measure/Record ................... 76Engine Air Cleaner Element - Replace ................. 79Engine Crankcase Breather - Clean ..................... 82Engine Mounts - Check ........................................ 83Engine Oil - Change ............................................. 84Engine Oil Filter (Auxiliary) - Change ................... 85Engine Oil Filter - Change .................................... 86Engine Oil Sample - Obtain .................................. 89Engine Protective Devices - Check ...................... 90Engine Speed/Timing Sensor - Clean/Inspect ...... 90Engine Valve Lash and Bridge - Adjust ................ 91Exhaust Bypass - Inspect ..................................... 92Exhaust Piping - Inspect ....................................... 93
Gas Pressure Regulator Condensation - Drain .... 94Hoses and Clamps - Inspect/Replace .................. 94Ignition System Spark Plugs - Check/Adjust/Replace ............................................................... 95Ignition System Timing - Check/Adjust ................. 99Inlet Air System - Inspect ...................................... 99Radiator - Clean .................................................. 107Starting Motor - Inspect ...................................... 108Valve Stem Projection - Measure/Record ............ 110Water Pump - Inspect .......................................... 112
Every 3 Years
Battery - Replace .................................................. 67Cooling System Coolant (NGEC) - Change .......... 70Turbocharger - Inspect ........................................ 109Water Temperature Regulator - Replace ............. 112
Every 8000 Service Hours
Cooling System Coolant Sample (Level 2) -Obtain ................................................................. 74

62Maintenance SectionMaintenance Interval Schedule
i02151049
Maintenance Interval Schedule(Bio-Gas)SMCS Code: 1000; 4450; 7500
When Required
Battery - Replace .................................................. 67Cooling System Coolant Sample (Level 2) -Obtain ................................................................. 74Engine Air Cleaner Element - Replace ................. 79Engine Oil - Change ............................................. 84Engine Oil Filter - Change .................................... 86Fuel Filtration System - Service ............................ 93Overhaul Considerations .................................... 105Valve Stem Projection - Measure/Record ............ 110
Daily
Air Starting Motor Lubricator Oil Level - Check .... 65Air Tank Moisture and Sediment - Drain ............... 66Control Panel - Inspect ......................................... 70Cooling System Coolant Level - Check ................ 73Driven Equipment - Inspect/Replace/Lubricate ... 78Engine Air Cleaner Service Indicator - Inspect ..... 81Engine Air Precleaner - Clean .............................. 82Engine Oil Level - Check ...................................... 89Fuel System Fuel Filter Differential Pressure -Check .................................................................. 93Power Take-Off Clutch - Check/Adjust/Lubricate ........................................................... 107Walk-Around Inspection ....................................... 111
Every 125 Service Hours
Engine Oil Sample - Obtain .................................. 89
Every 250 Service Hours
Battery Electrolyte Level - Check .......................... 68
Initial 1000 Service Hours
Cooling System Coolant Sample (Level 1) -Obtain ................................................................. 73Cooling System Supplemental Coolant Additive(SCA) - Test/Add ................................................. 74Engine Mounts - Check ........................................ 83Engine Speed/Timing Sensor - Clean/Inspect ...... 90Speed Sensor - Clean/Inspect ............................ 108Valve Stem Projection - Measure/Record ............ 110
Every 1000 Service Hours
Aftercooler Condensation - Drain ......................... 64Alternator - Inspect ............................................... 66Belts - Inspect/Adjust/Replace .............................. 69Carburetor Air/Fuel Ratio - Check/Adjust ............. 70Crankshaft Vibration Damper - Inspect ................. 76Engine - Clean ...................................................... 78
Engine Crankcase Breather - Clean ..................... 82Engine Oil Filter (Auxiliary) - Change ................... 85Engine Oil Filter - Change .................................... 86Engine Valve Lash and Bridge - Adjust ................ 91Engine Valve Rotators - Inspect ........................... 92Exhaust Piping - Inspect ....................................... 93Gas Pressure Regulator - Check .......................... 93Gas Pressure Regulator Condensation - Drain .... 94Hoses and Clamps - Inspect/Replace .................. 94Ignition System Spark Plugs - Check/Adjust/Replace ............................................................... 95Ignition System Timing - Check/Adjust ................. 99Inlet Air System - Inspect ...................................... 99Radiator - Clean .................................................. 107
Every 2000 Service Hours
Actuator Control Linkage - Lubricate .................... 64Cooling System Coolant Sample (Level 1) -Obtain ................................................................. 73Cooling System Supplemental Coolant Additive(SCA) - Test/Add ................................................. 74Engine Speed/Timing Sensor - Clean/Inspect ...... 90Speed Sensor - Clean/Inspect ............................ 108
Every 4000 Service Hours
Air Starting Motor Lubricator Bowl - Clean ........... 64Crankcase Blowby - Measure/Record .................. 75Cylinder Pressure - Measure/Record ................... 76Cylinders - Inspect ................................................ 77Driven Equipment - Check .................................... 78Engine Mounts - Check ........................................ 83Engine Protective Devices - Check ...................... 90Exhaust Bypass - Inspect ..................................... 92Starting Motor - Inspect ...................................... 108Turbocharger - Inspect ........................................ 109Water Pump - Inspect .......................................... 112
Between 7500 and 8000 Service Hours
Overhaul (Top End) ............................................. 102
Every 8000 Service Hours
Cooling System Coolant Sample (Level 2) -Obtain ................................................................. 74Water Temperature Regulator - Replace ............. 112
Between 22 500 and 24 000 Service Hours
Overhaul (In-Frame) ........................................... 100
Every 24 000 Service Hours or 3 Years
Cooling System Coolant (NGEC) - Change .......... 70
Between 37 500 and 40 000 Service Hours
Overhaul (Major) ................................................. 101

63Maintenance Section
Maintenance Interval Schedule
i02151047
Maintenance Interval Schedule(Naturally Aspirated)SMCS Code: 1000; 4450; 7500
When Required
Battery - Replace .................................................. 67Cooling System Coolant Sample (Level 2) -Obtain ................................................................. 74Engine Air Cleaner Element - Replace ................. 79Engine Oil Filter - Change .................................... 86Overhaul Considerations .................................... 105Valve Stem Projection - Measure/Record ............ 110
Daily
Air Starting Motor Lubricator Oil Level - Check .... 65Air Tank Moisture and Sediment - Drain ............... 66Control Panel - Inspect ......................................... 70Cooling System Coolant Level - Check ................ 73Driven Equipment - Inspect/Replace/Lubricate ... 78Engine Air Cleaner Service Indicator - Inspect ..... 81Engine Air Precleaner - Clean .............................. 82Engine Oil Level - Check ...................................... 89Fuel System Fuel Filter Differential Pressure -Check .................................................................. 93Power Take-Off Clutch - Check/Adjust/Lubricate ........................................................... 107Walk-Around Inspection ....................................... 111
Every 250 Service Hours
Battery Electrolyte Level - Check .......................... 68Engine Oil Sample - Obtain .................................. 89
Initial 1000 Service Hours
Cooling System Coolant Sample (Level 1) -Obtain ................................................................. 73Cooling System Supplemental Coolant Additive(SCA) - Test/Add ................................................. 74Engine Mounts - Check ........................................ 83Engine Speed/Timing Sensor - Clean/Inspect ...... 90Speed Sensor - Clean/Inspect ............................ 108Valve Stem Projection - Measure/Record ............ 110
Every 1000 Service Hours
Alternator - Inspect ............................................... 66Belts - Inspect/Adjust/Replace .............................. 69Carburetor Air/Fuel Ratio - Check/Adjust ............. 70Crankshaft Vibration Damper - Inspect ................. 76Engine - Clean ...................................................... 78Engine Crankcase Breather - Clean ..................... 82Engine Oil - Change ............................................. 84Engine Oil Filter (Auxiliary) - Change ................... 85Engine Oil Filter - Change .................................... 86Engine Valve Rotators - Inspect ........................... 92Exhaust Piping - Inspect ....................................... 93
Gas Pressure Regulator - Check .......................... 93Gas Pressure Regulator Condensation - Drain .... 94Hoses and Clamps - Inspect/Replace .................. 94Ignition System Spark Plugs - Check/Adjust/Replace ............................................................... 95Ignition System Timing - Check/Adjust ................. 99Inlet Air System - Inspect ...................................... 99Radiator - Clean .................................................. 107
Every 2000 Service Hours
Actuator Control Linkage - Lubricate .................... 64Cooling System Coolant Sample (Level 1) -Obtain ................................................................. 73Cooling System Supplemental Coolant Additive(SCA) - Test/Add ................................................. 74Engine Speed/Timing Sensor - Clean/Inspect ...... 90Engine Valve Lash and Bridge - Adjust ................ 91Speed Sensor - Clean/Inspect ............................ 108
Every 4000 Service Hours
Air Starting Motor Lubricator Bowl - Clean ........... 64Crankcase Blowby - Measure/Record .................. 75Cylinder Pressure - Measure/Record ................... 76Driven Equipment - Check .................................... 78Engine Mounts - Check ........................................ 83Engine Protective Devices - Check ...................... 90Exhaust Bypass - Inspect ..................................... 92Starting Motor - Inspect ...................................... 108Water Pump - Inspect .......................................... 112
Every 8000 Service Hours
Cooling System Coolant Sample (Level 2) -Obtain ................................................................. 74Water Temperature Regulator - Replace ............. 112
Between 8000 and 10 000 Service Hours
Overhaul (Top End) ............................................. 102
Every 24 000 Service Hours or 3 Years
Cooling System Coolant (NGEC) - Change .......... 70
Between 32 000 and 40 000 Service Hours
Overhaul (In-Frame) ........................................... 100
Between 64 000 and 80 000 Service Hours
Overhaul (Major) ................................................. 101
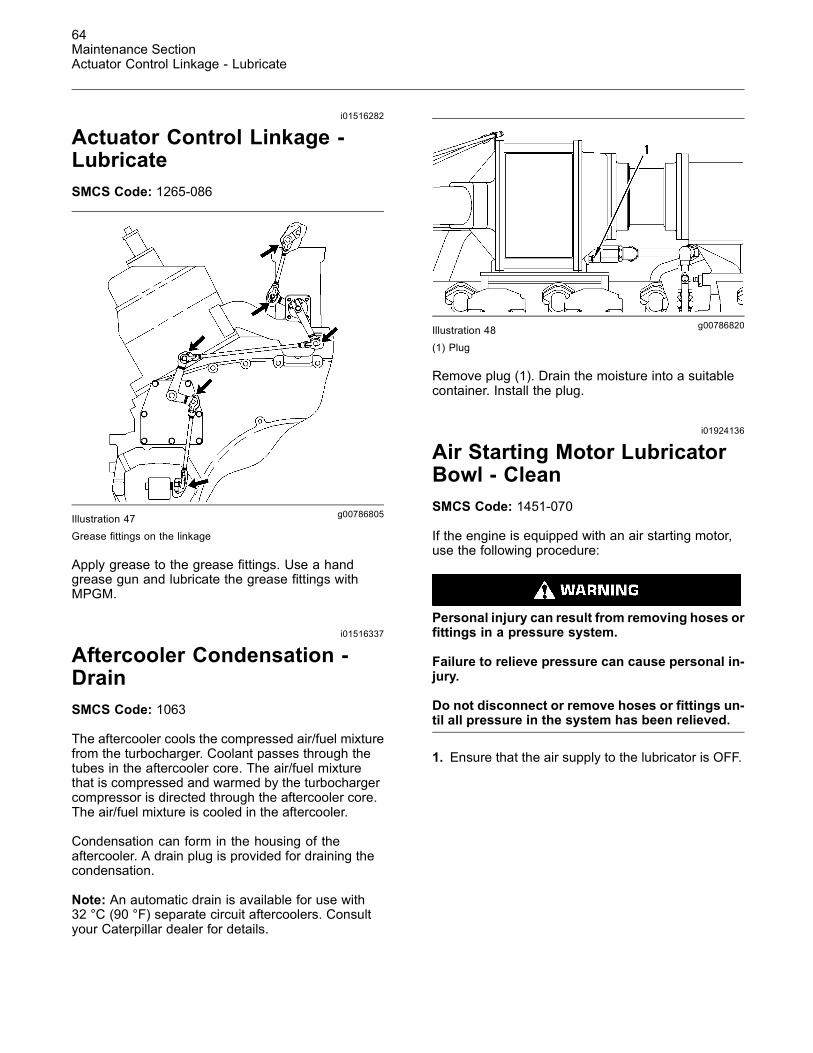
64Maintenance SectionActuator Control Linkage - Lubricate
i01516282
Actuator Control Linkage -LubricateSMCS Code: 1265-086
g00786805Illustration 47Grease fittings on the linkage
Apply grease to the grease fittings. Use a handgrease gun and lubricate the grease fittings withMPGM.
i01516337
Aftercooler Condensation -DrainSMCS Code: 1063
The aftercooler cools the compressed air/fuel mixturefrom the turbocharger. Coolant passes through thetubes in the aftercooler core. The air/fuel mixturethat is compressed and warmed by the turbochargercompressor is directed through the aftercooler core.The air/fuel mixture is cooled in the aftercooler.
Condensation can form in the housing of theaftercooler. A drain plug is provided for draining thecondensation.
Note: An automatic drain is available for use with32 °C (90 °F) separate circuit aftercoolers. Consultyour Caterpillar dealer for details.
g00786820Illustration 48(1) Plug
Remove plug (1). Drain the moisture into a suitablecontainer. Install the plug.
i01924136
Air Starting Motor LubricatorBowl - CleanSMCS Code: 1451-070
If the engine is equipped with an air starting motor,use the following procedure:
Personal injury can result from removing hoses orfittings in a pressure system.
Failure to relieve pressure can cause personal in-jury.
Do not disconnect or remove hoses or fittings un-til all pressure in the system has been relieved.
1. Ensure that the air supply to the lubricator is OFF.

65Maintenance Section
Air Starting Motor Lubricator Oil Level - Check
g00745554Illustration 49(1) Filler plug(2) Bowl(3) Drain valve
2. Slowly loosen filler plug (1) in order to release thepressure from the lubricator.
NOTICECare must be taken to ensure that fluids are containedduring performance of inspection, maintenance, test-ing, adjusting and repair of the product. Be prepared tocollect the fluid with suitable containers before open-ing any compartment or disassembling any compo-nent containing fluids.
Refer to Special Publication, NENG2500, “CaterpillarTools and Shop Products Guide” for tools and suppliessuitable to collect and contain fluids on Caterpillarproducts.
Dispose of all fluids according to local regulations andmandates.
3. Place a suitable container under bowl (2) andopen drain valve (3) in order to drain the oil fromthe bowl.
4. Remove bowl (2). Clean the bowl with warm water.
5. Dry the bowl. Inspect the bowl for cracks. If thebowl is cracked, replace the damaged bowl with anew bowl.
6. Install the bowl.
7. Make sure that drain valve (3) is closed.
8. For instructions on filling the lubricator, see thisOperation and Maintenance Manual, “Air StartingMotor Lubricator Oil Level - Check” topic.
i01924142
Air Starting Motor LubricatorOil Level - CheckSMCS Code: 1451-535
NOTICENever allow the lubricator bowl to become empty. Theair starting motor will be damaged by a lack of lubrica-tion. Ensure that sufficient oil is in the lubricator bowl.
g00745561Illustration 50
1. Observe the oil level in sight gauge (3). If the oillevel is less than 1/2, add oil to the lubricator bowl.
Personal injury can result from removing hoses orfittings in a pressure system.
Failure to relieve pressure can cause personal in-jury.
Do not disconnect or remove hoses or fittings un-til all pressure in the system has been relieved.
2. Ensure that the air supply to the lubricator is OFF.Slowly loosen filler plug (4) in order to releasepressure from the lubricator bowl.
3. Remove filler plug (4). Pour oil into the lubricatorbowl. Use nondetergent “10W” oil for temperaturesthat are greater than 0 °C (32 °F). Use air tool oilfor temperatures that are below 0 °C (32 °F).
4. Install filler plug (4).
Adjust the LubricatorNote: Adjust the lubricator with a constant rate of airflow. After the adjustment, the lubricator will releaseoil in proportion to variations of the air flow.

66Maintenance SectionAir Tank Moisture and Sediment - Drain
1. Ensure that the fuel supply to the engine is OFF.
NOTICEDo not crank the engine continuously for more than30 seconds. Allow the starting motor to cool for twominutes before cranking the engine again.
2. Operate the air starting motor. Observe the dropsof oil that are released in dome (1).
Note: Some lubricators have an adjustment screwrather than a knob.
3. If necessary, adjust the lubricator in orderto release from one to three drops of oil persecond. To increase the rate, turn knob (2)counterclockwise. To decrease the rate, turn theknob clockwise.
i00351324
Air Tank Moisture andSediment - DrainSMCS Code: 1466-543-M&S
Moisture and sediment in the air starting system cancause the following conditions:
• Freezing
• Corrosion of internal parts
• Malfunction of the air starting system
When opening the drain valve, wear protectivegloves, a protective face shield, protective cloth-ing, and protective shoes. Pressurized air couldcause debris to be blown and result in personalinjury.
1. Open the drain valve that is on the bottom of theair tank. Allow the moisture and sediment to drain.
2. Close the drain valve.
i02084374
Alternator - InspectSMCS Code: 1405-040
Inspect the alternator for the following conditions:
• Proper connections
• Clean ports for cooling airflow
• Proper charging of the battery
Observe the ammeter during engine operation inorder to ensure proper battery performance and/orproper performance of the electrical system.
Make repairs, if necessary. See the Service Manualfor service procedures. Consult your Caterpillardealer for assistance.
i02153996
Battery - ReplaceSMCS Code: 1401-510
S/N: 2TJ1-Up
Batteries give off combustible gases which canexplode. A spark can cause the combustible gas-es to ignite. This can result in severe personal in-jury or death.
Ensure proper ventilation for batteries that are inan enclosure. Follow the proper procedures in or-der to help prevent electrical arcs and/or sparksnear batteries. Do not smoke when batteries areserviced.
The battery cables or the batteries should not beremoved with the battery cover in place. The bat-tery cover should be removed before any servic-ing is attempted.
Removing the battery cables or the batteries withthe cover in place may cause a battery explosionresulting in personal injury.
1. Turn the key start switch to the OFF position.Remove the key and all electrical loads.
2. Turn OFF the battery charger. Disconnect thecharger.
3. The NEGATIVE “-” cable connects the NEGATIVE“-” battery terminal to the ground plane. Disconnectthe cable from the NEGATIVE “-” battery terminal.
4. The POSITIVE “+” cable connects the POSITIVE“+” battery terminal to the starting motor.Disconnect the cable from the POSITIVE “+”battery terminal.
67Maintenance Section
Battery - Replace
Note: Always recycle a battery. Never discard abattery. Return used batteries to an appropriaterecycling facility.
5. Remove the used battery.
6. Install the new battery.
Note: Before the cables are connected, ensure thatthe key start switch is OFF.
7. Connect the cable from the starting motor to thePOSITIVE “+” battery terminal.
8. Connect the cable from the ground plane to theNEGATIVE “-” battery terminal.
i02156825
Battery - ReplaceSMCS Code: 1401-510
Batteries give off combustible gases which canexplode. A spark can cause the combustible gas-es to ignite. This can result in severe personal in-jury or death.
Ensure proper ventilation for batteries that are inan enclosure. Follow the proper procedures in or-der to help prevent electrical arcs and/or sparksnear batteries. Do not smoke when batteries areserviced.
The battery cables or the batteries should not beremoved with the battery cover in place. The bat-tery cover should be removed before any servic-ing is attempted.
Removing the battery cables or the batteries withthe cover in place may cause a battery explosionresulting in personal injury.
1. Turn the key start switch to the OFF position.Remove the key and all electrical loads.
2. Turn OFF the battery charger. Disconnect thecharger.
3. The NEGATIVE “-” cable connects the NEGATIVE“-” battery terminal to the ground plane. Disconnectthe cable from the NEGATIVE “-” battery terminal.
4. The POSITIVE “+” cable connects the POSITIVE“+” battery terminal to the starting motor.Disconnect the cable from the POSITIVE “+”battery terminal.
Note: Always recycle a battery. Never discard abattery. Return used batteries to an appropriaterecycling facility.
5. Remove the used battery.
6. Install the new battery.
Note: Before the cables are connected, ensure thatthe key start switch is OFF.
7. Connect the cable from the starting motor to thePOSITIVE “+” battery terminal.
8. Connect the cable from the ground plane to theNEGATIVE “-” battery terminal.
i01039758
Battery Charger - CheckSMCS Code: 1401-535
Checking Before Start-UpCheck the battery charger for proper operation. Ifthe batteries are properly charged, the needle of theammeter will register near “0” (zero).
The battery charger must not produce excessivecurrent during start-up. Alternatively, the chargermust be automatically disconnected for start-up.If the engine has an alternator, the charger mustbe automatically disconnected during start-up andduring engine operation.
Charging the Battery
Never disconnect any charging unit circuit or bat-tery circuit cable from the battery when the charg-ing unit is operated. A spark can cause an explo-sion from the flammable vapor mixture of hydro-gen and oxygen that is released from the elec-trolyte through the battery outlets. Injury to per-sonnel can be the result.
Perform the following procedure to charge thebattery:
1. Ensure that the charger is turned OFF.

68Maintenance SectionBattery Electrolyte Level - Check
2. Adjust the voltage of the charger in order to matchthe voltage of the battery.
3. Connect the POSITIVE “+” lead of the chargerto the POSITIVE “+” battery terminal. Connectthe NEGATIVE “-” lead of the charger to theNEGATIVE “-” battery terminal.
4. Turn ON the battery charger.
Overcharging of Batteries
Overcharging reduces the service life of batteries.Use a battery charger that will not overcharge thebattery. DO NOT charge the battery if the meter ofthe battery charger is in the RED zone.
Overcharging is indicated by the following symptoms:
• The battery is very warm to the touch.
• A strong odor of acid is present.
• The battery emits smoke or a dense vapor (gas).
Perform one of the following procedures if the batteryshows symptoms of overcharging:
• Reduce the rate of charging by a significantamount. Complete the charging at the reducedrate.
• Turn OFF the charger.
Table 20 describes the effects of overcharging ondifferent types of batteries.
Table 20
Effects of Overcharging Batteries
Type of Battery Effect
All of the battery cells havea low level of electrolyte.
When the plates of thebattery are inspectedthrough the filler holes, theplates may appear to bewarped. This is caused byan excessive temperature.
Caterpillar General ServiceBatteriesCaterpillar Premium HighOutput Batteries
The battery may not passa load test.
The battery may not accepta charging current.
Caterpillar MaintenanceFree Batteries
The battery may not passa load test.
Checking After StoppingEnsure that the battery charger is connectedproperly. Observe the meter of the charger. Recordthe amperage.
i01639002
Battery Electrolyte Level -CheckSMCS Code: 1401-535-FLV
When the engine is not run for long periods of time orwhen the engine is run for short periods, the batteriesmay not fully recharge. Ensure a full charge in orderto help prevent the battery from freezing. If batteriesare properly charged, ammeter reading should bevery near zero.
All lead-acid batteries contain sulfuric acid whichcan burn the skin and clothing. Always wear a faceshield and protective clothing when working on ornear batteries.
1. Remove the filler caps. Maintain the electrolytelevel to the “FULL” mark on the battery.

69Maintenance Section
Belts - Inspect/Adjust/Replace
If the addition of water is necessary, use distilledwater. If distilled water is not available use cleanwater that is low in minerals. Do not use artificiallysoftened water.
2. Check the condition of the electrolyte with the1U-7298 Coolant/Battery Tester (°C) or the1U-7297 Coolant/Battery Tester (°F).
3. Keep the batteries clean.
Clean the battery case with one of the followingcleaning solutions:
• A mixture of 0.1 kg (0.2 lb) of baking soda and1 L (1 qt) of clean water
• A mixture of 0.1 L (0.11 qt) of ammonia and 1 L(1 qt) of clean water
Thoroughly rinse the battery case with clean water.
Use a fine grade of sandpaper to clean theterminals and the cable clamps. Clean the itemsuntil the surfaces are bright or shiny. DO NOTremove material excessively. Excessive removalof material can cause the clamps to not fitproperly. Coat the clamps and the terminals with5N-5561 Silicone Lubricant, petroleum jelly orMPGM grease.
i02154849
Belts - Inspect/Adjust/ReplaceSMCS Code: 1357-025; 1357-040; 1357-510
InspectionInspect the alternator belt and the fan drive belts forwear and for cracking. Replace the belts if the beltsare not in good condition.
Check the belt tension according to the information inthe Service Manual, “Specifications”.
Slippage of loose belts can reduce the efficiencyof the driven components. Vibration of loose beltscan cause unnecessary wear on the followingcomponents:
• Belts
• Pulleys
• Bearings
If the belts are too tight, unnecessary stress is placedon the components. This reduces the service life ofthe components.
Adjusting the Alternator Belt
g01092641Illustration 51(1) Mounting bolt(2) Adjusting nuts(3) Mounting bolt
1. Remove the drive belt guard.
2. Loosen mounting bolt (1), adjusting nuts (2) andmounting bolt (3).
3. Turn adjusting nuts (2) in order to increase ordecrease the drive belt tension.
4. Tighten adjusting nuts (2). Tighten mounting bolt(3). Tighten mounting bolt (1). For the propertorque, see the Service Manual, “Specifications”module.
5. Reinstall the drive belt guard.
If new drive belts are installed, check the drive belttension again after 30 minutes of engine operation atthe rated rpm.
Adjusting the Fan Drive Belt1. Loosen the mounting bolt for the pulley.
2. Loosen the adjusting nut for the pulley.
3. Move the pulley in order to adjust the belt tension.
4. Tighten the adjusting nut.
5. Tighten the mounting bolt.

70Maintenance SectionCarburetor Air/Fuel Ratio - Check/Adjust
ReplacementFor applications that require multiple drive belts,replace the drive belts in matched sets. Replacingone drive belt of a matched set will cause the newdrive belt to carry more load because the older drivebelts are stretched. The additional load on the newdrive belt could cause the new drive belt to fail.
i01005891
Carburetor Air/Fuel Ratio -Check/AdjustSMCS Code: 1266-535; 1266
An engine failure may occur if the air/fuel ratio isnot appropriate for the fuel and for the operatingconditions. The service life of the turbocharger, of thevalves, and of the other components may be reduced.
Ensure that the carburetor is adjusted properly sothat the air/fuel ratio is correct.
For information on adjusting the carburetor, refer tothe Service Manual, “Systems Operation/Testingand Adjusting”, or refer to the Special Instruction,“Installation and Initial Start-Up Procedure”.
i01762721
Control Panel - InspectSMCS Code: 4490-040; 7451-040
Inspect the condition of the panel. If a component isdamaged, ensure that the component is repaired orthat the component is replaced. If equipped, ensurethat the electronic displays are operating properly.
Inspect the wiring for good condition. Ensure that thewiring connections are secure.
Record the Data and Review theDataIf equipped, check the gauges and check theindicators frequently during normal operation. Recordthe data in a log. Compare the new data to the datathat was previously recorded. Comparing the newdata to the recorded data will establish the normalgauge readings for the engine. A gauge reading thatis abnormal may indicate a problem with operationor with the gauge.
i02151144
Cooling System Coolant(NGEC) - ChangeSMCS Code: 1350-044
Clean the cooling system before the recommendedmaintenance interval if the following conditions exist:
• The engine overheats frequently.
• Foaming is observed.
• Engine oil has entered the cooling system and thecoolant is contaminated.
NOTICEUse of commercially available cooling system clean-ers may cause damage to cooling system compo-nents. Use only cooling system cleaners that are ap-proved for Caterpillar engines.
Drain the Cooling System1. Stop the engine and allow the engine to cool.Ensure that the engine will not start when thecooling system is drained.
2. Loosen the cooling system filler cap slowly inorder to relieve any pressure. Remove the coolingsystem filler cap.
g00786868Illustration 52Locations of the drain plugs
(1) Jacket water pump(2) Cylinder block(3) Auxiliary water pump
3. Open the cooling system drain valves (ifequipped). If the cooling system is not equippedwith drain valves, remove drain plugs (1), (2), and(3). Drain all of the cooling system components:
• Expansion tank or radiator
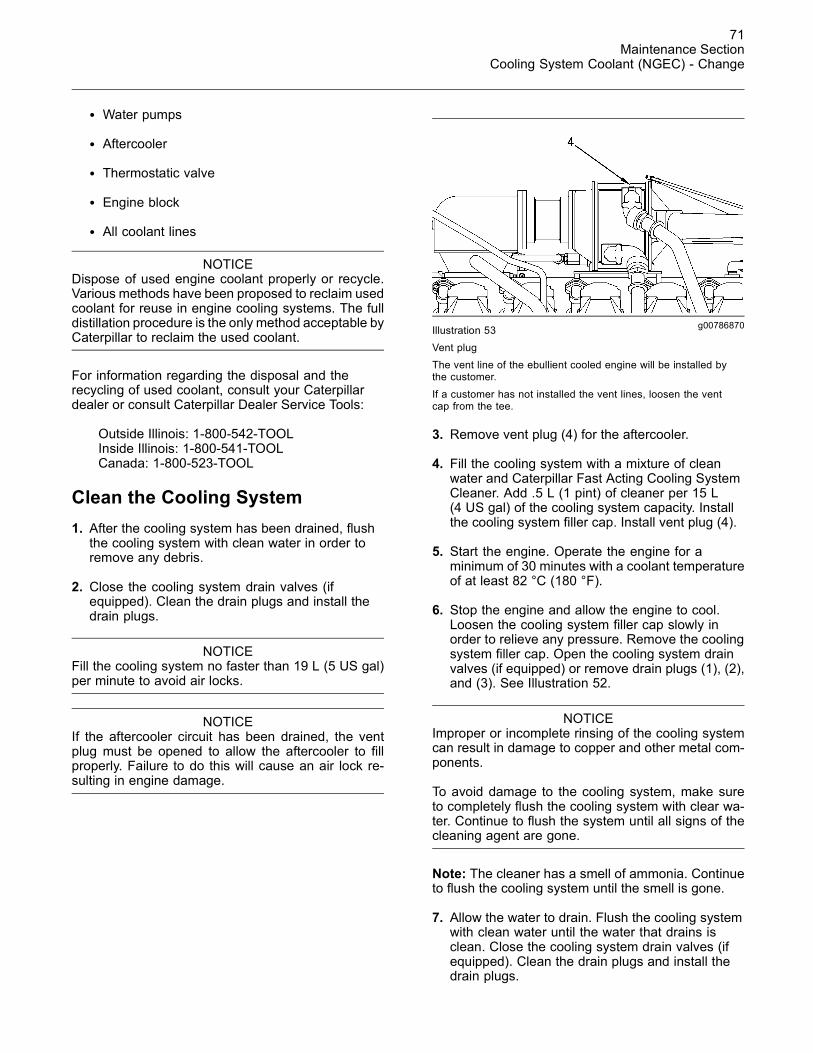
71Maintenance Section
Cooling System Coolant (NGEC) - Change
• Water pumps
• Aftercooler
• Thermostatic valve
• Engine block
• All coolant lines
NOTICEDispose of used engine coolant properly or recycle.Various methods have been proposed to reclaim usedcoolant for reuse in engine cooling systems. The fulldistillation procedure is the only method acceptable byCaterpillar to reclaim the used coolant.
For information regarding the disposal and therecycling of used coolant, consult your Caterpillardealer or consult Caterpillar Dealer Service Tools:
Outside Illinois: 1-800-542-TOOLInside Illinois: 1-800-541-TOOLCanada: 1-800-523-TOOL
Clean the Cooling System1. After the cooling system has been drained, flushthe cooling system with clean water in order toremove any debris.
2. Close the cooling system drain valves (ifequipped). Clean the drain plugs and install thedrain plugs.
NOTICEFill the cooling system no faster than 19 L (5 US gal)per minute to avoid air locks.
NOTICEIf the aftercooler circuit has been drained, the ventplug must be opened to allow the aftercooler to fillproperly. Failure to do this will cause an air lock re-sulting in engine damage.
g00786870Illustration 53Vent plugThe vent line of the ebullient cooled engine will be installed bythe customer.
If a customer has not installed the vent lines, loosen the ventcap from the tee.
3. Remove vent plug (4) for the aftercooler.
4. Fill the cooling system with a mixture of cleanwater and Caterpillar Fast Acting Cooling SystemCleaner. Add .5 L (1 pint) of cleaner per 15 L(4 US gal) of the cooling system capacity. Installthe cooling system filler cap. Install vent plug (4).
5. Start the engine. Operate the engine for aminimum of 30 minutes with a coolant temperatureof at least 82 °C (180 °F).
6. Stop the engine and allow the engine to cool.Loosen the cooling system filler cap slowly inorder to relieve any pressure. Remove the coolingsystem filler cap. Open the cooling system drainvalves (if equipped) or remove drain plugs (1), (2),and (3). See Illustration 52.
NOTICEImproper or incomplete rinsing of the cooling systemcan result in damage to copper and other metal com-ponents.
To avoid damage to the cooling system, make sureto completely flush the cooling system with clear wa-ter. Continue to flush the system until all signs of thecleaning agent are gone.
Note: The cleaner has a smell of ammonia. Continueto flush the cooling system until the smell is gone.
7. Allow the water to drain. Flush the cooling systemwith clean water until the water that drains isclean. Close the cooling system drain valves (ifequipped). Clean the drain plugs and install thedrain plugs.

72Maintenance SectionCooling System Coolant (NGEC) - Change
Cleaning a Cooling System thathas Heavy Deposits or PluggingNote: For the following procedure to be effective,there must be an active flow through the coolingsystem components.
1. After the cooling system has been drained, flushthe cooling system with clean water in order toremove any debris.
2. Close the cooling system drain valves (ifequipped). Clean drain plugs and install drainplugs (1), (2), and (3). See Illustration 52.
NOTICEFill the cooling system no faster than 19 L (5 US gal)per minute to avoid air locks.
NOTICEIf the aftercooler circuit has been drained, the ventplug must be opened to allow the aftercooler to fillproperly. Failure to do this will cause an air lock re-sulting in engine damage.
3. Remove vent plug (4) for the aftercooler. SeeIllustration 53.
4. Fill the cooling system with a mixture of cleanwater and Caterpillar Fast Acting Cooling SystemCleaner. Add .5 L (1 pint) of cleaner per 7.5 L(2 US gal) of the cooling system capacity. Installthe cooling system filler cap. Install vent plug (4).
5. Start the engine. Operate the engine for aminimum of 90 minutes with a coolant temperatureof at least 82 °C (180 °F).
6. Stop the engine and allow the engine to cool.Loosen the cooling system filler cap slowly inorder to relieve any pressure. Remove the coolingsystem filler cap. Open the cooling system drainvalves (if equipped) or remove drain plugs (1),(2), and (3). See Illustration 52. Allow the waterto drain.
NOTICEImproper or incomplete rinsing of the cooling systemcan result in damage to copper and other metal com-ponents.
To avoid damage to the cooling system, make sureto completely flush the cooling system with clear wa-ter. Continue to flush the system until all signs of thecleaning agent are gone.
Note: The cleaner has a smell of ammonia. Continueto flush the cooling system until the smell is gone.
7. Flush the cooling system with clean water untilthe water that drains is clean. Close the coolingsystem drain valves (if equipped). Clean the drainplugs and install the drain plugs.
Fill the Cooling System
NOTICEFill the cooling system no faster than 19 L (5 US gal)per minute to avoid air locks.
Note: For information about the proper coolant touse, and for the capacity of the cooling system,see this Operation and Maintenance Manual, “RefillCapacities and Recommendations” (MaintenanceSection).
1. Remove vent plug (4) for the aftercooler. SeeIllustration 53.
2. Fill the cooling system with coolant/antifreeze.Install vent plug (4). Do not install the coolingsystem filler cap.
3. Start the engine. Operate the engine in order topurge the air from the cavities of the engine block.Allow the coolant to warm and allow the coolantlevel to stabilize. Stop the engine.
4. Check the coolant level. Maintain the coolant tothe proper level on the sight gauge (if equipped).If a sight gauge is not equipped, maintain thecoolant within 13 mm (.5 inch) below the bottom ofthe filler pipe.
5. Clean the cooling system filler cap. Inspect thegaskets of the cooling system filler cap. If thegaskets of the cooling system filler cap aredamaged, discard the old cooling system filler capand install a new cooling system filler cap. If thegaskets of the cooling system filler cap are notdamaged, use a 9S-8140 Pressurizing Pump inorder to pressure test the cooling system filler cap.The correct pressure is stamped on the face ofthe cooling system filler cap. If the cooling systemfiller cap does not maintain the correct pressure,install a new cooling system filler cap.
6. Start the engine. Inspect the cooling system forleaks and for proper operating temperature.

73Maintenance Section
Cooling System Coolant Level - Check
i02017615
Cooling System Coolant Level- CheckSMCS Code: 1350-535-FLV
Climbing equipment may be required to accessthis service point. Refer to the Operation andMaintenance Manual, “Mounting and Dismount-ing” topic for safety information.
NOTICEOverfilling the overflow tank (if equipped) will result indamage to the cooling system.
If the cooling system has an overflow tank, maintainthe coolant level in the tank below 1/2 full in order toavoid damage to the cooling system.
g00760290Illustration 54Normal position of the coolant in the sight gauge during ratedoperation
Observe the coolant level in the sight gauge (ifequipped). When the engine is running at normaloperating temperature, the coolant should be in theupper half of the sight gauge. If the coolant level islow, add the proper coolant mixture.
Add CoolantNote: For the proper coolant mixture to use, seethis Operation and Maintenance Manual, “RefillCapacities and Recommendations” topic.
1. Stop the engine. Allow the engine to cool.
2. Remove the cooling system filler cap slowly inorder to relieve any pressure. Pour the propercoolant mixture into the filler pipe.
g00103639Illustration 55Filler cap gaskets
3. Clean the cooling system filler cap. Inspect thegaskets of the cooling system filler cap. If thegaskets are damaged, replace the old coolingsystem filler cap with a new cooling system fillercap. Install the cooling system filler cap.
4. Start the engine. Inspect the cooling system forleaks.
i02064894
Cooling System CoolantSample (Level 1) - ObtainSMCS Code: 1350-008; 1395-008; 1395-554; 7542
NOTICEAlways use a designated pump for oil sampling, anduse a separate designated pump for coolant sampling.Using the same pump for both types of samples maycontaminate the samples that are being drawn. Thiscontaminate may cause a false analysis and an incor-rect interpretation that could lead to concerns by bothdealers and customers.
For conventional heavy-duty coolant/antifreeze,check the concentration of supplemental coolantadditive (SCA) regularly. The concentration of SCAcan be checked with an S·O·S coolant analysis(Level 1).
Obtain the sample of the coolant as close as possibleto the recommended sampling interval. In orderto receive the full effect of S·O·S analysis, youmust establish a consistent trend of data. In orderto establish a pertinent history of data, performconsistent samplings that are evenly spaced.Supplies for collecting samples can be obtained fromyour Caterpillar dealer.
Use the following guidelines for proper sampling ofthe coolant:

74Maintenance SectionCooling System Coolant Sample (Level 2) - Obtain
• Never collect samples from expansion bottles.
• Never collect samples from the drain for a system.
• Keep the unused sampling bottles stored in plasticbags.
• Keep the lids on empty sampling bottles until youare ready to collect the sample.
• Complete the information on the label for thesampling bottle before you begin to take thesamples.
• Obtain coolant samples directly from the coolantsample port. You should not obtain the samplesfrom any other location.
• In order to avoid contamination, immediately placethe sample in the tube that is provided for mailing.
Submit the sample for Level 1 analysis.
Note: Level 1 results may indicate a need forLevel 2 Analysis.
For additional information about coolant analysis,see the Special Publication, SEBU6400, “CaterpillarGas Engine Lubricant, Fuel and CoolantRecommendations” or consult your Caterpillar dealer.
i02064898
Cooling System CoolantSample (Level 2) - ObtainSMCS Code: 1350-008; 1395-008; 1395-554; 7542
NOTICEAlways use a designated pump for oil sampling, anduse a separate designated pump for coolant sampling.Using the same pump for both types of samples maycontaminate the samples that are being drawn. Thiscontaminate may cause a false analysis and an incor-rect interpretation that could lead to concerns by bothdealers and customers.
Obtain the sample of the coolant as close as possibleto the recommended sampling interval. Suppliesfor collecting samples can be obtained from yourCaterpillar dealer.
Refer to Operation and Maintenance Manual,“Cooling System Coolant Sample (Level 1) - Obtain”for the guidelines for proper sampling of the coolant.
Submit the sample for Level 2 analysis.
For additional information about coolant analysis,see the Special Publication, SEBU6400, “CaterpillarGas Engine Lubricant, Fuel, and CoolantRecommendations” or consult your Caterpillar dealer.
i02017557
Cooling System SupplementalCoolant Additive (SCA) -Test/AddSMCS Code: 1352-045; 1395-081
Cooling system coolant additive contains alkali.To help prevent personal injury, avoid contact withthe skin and eyes. Do not drink cooling systemcoolant additive.
Note: Caterpillar recommends an S·O·S coolantanalysis (Level 1).
Test the Concentration of the SCA
Coolant/Antifreeze and SCA
NOTICEDo not exceed the recommended six percent supple-mental coolant additive concentration.
Test the concentration of the SCA with the 8T-5296Coolant Conditioner Test Kit. Follow the instructionsthat are provided in the kit.
Water and SCA
NOTICEDo not exceed the recommended eight percent sup-plemental coolant additive concentration.
Test the concentration of the SCA with the 8T-5296Coolant Conditioner Test Kit. Use the instructionsthat follow:
1. Fill the syringe to the “1.0 ml” mark with thecoolant.
2. Dispense the 1.0 mL coolant sample from thesyringe into the empty mixing bottle.
3. Add tap water to the mixing bottle in order to bringthe level up to the “10 ml” mark. Place the cap onthe bottle and shake the bottle.

75Maintenance Section
Crankcase Blowby - Measure/Record
4. Add 2 to 3 drops of the “NITRITE INDICATORSOLUTION B” to the mixing bottle. Move the bottlein a circular motion in order to mix the solution.
5. Add 1 drop of “NITRITE TEST SOLUTION A” tothe mixing bottle. Move the bottle in a circularmotion in order to mix the solution.
6. Repeat 5 until the solution changes color from redto light gray, green, or blue. Record the number ofdrops of “NITRITE TEST SOLUTION A” that wererequired to cause the color change.
7. Use Table 21 to interpret the results.
Table 21
Number ofDrops
Concentrationof SCA
MaintenanceRequired
Less than 25 Less than therecommendedconcentration ofSCA
Add SCA.Retest thecoolant.
25 to 30 Therecommendedconcentration ofSCA
None
More than 30 More than therecommendedconcentration ofSCA
Remove thecoolant.Replace withwater onlyRetest thecoolant.
Add the SCA, If Necessary
Pressurized System: Hot coolant can cause seri-ous burns. To open the cooling system filler cap,stop the engine and wait until the cooling systemcomponents are cool. Loosen the cooling systempressure cap slowly in order to relieve the pres-sure.
1. Remove the cooling system filler cap slowly.
Note: Always dispose of fluids according to localregulations.
2. If necessary, drain some coolant in order to allowspace for the addition of the SCA.
NOTICEExcessive supplemental coolant additive concentra-tion can form deposits on the higher temperature sur-faces of the cooling system, reducing the engine’sheat transfer characteristics. Reduced heat transfercould cause cracking of the cylinder head and otherhigh temperature components.
Excessive supplemental coolant additive concentra-tion could also result in blockage of the heat exchang-er, overheating, and/or accelerated wear of the waterpump seal.
Do not exceed the recommended amount of supple-mental coolant additive concentration.
3. Add the proper amount of SCA. The concentrationof the SCA depends on the type of coolant thatis used. To determine the proper amount, seethis Operation and Maintenance Manual, “RefillCapacities and Recommendations” topic.
4. Clean the cooling system filler cap. Install thecooling system filler cap.
i02026805
Crankcase Blowby -Measure/RecordSMCS Code: 1317
Note: For a G3500 Engine that is rated at 1500rpm with 1500 service hours, the crankcaseblowby typically has a range of 259 to 283 L/min(550 to 600 ft3/hr).
Measure the crankcase blowby of new engines.Record the data. Continue to periodically measurethe blowby. Comparing the recorded data to the newdata provides information about the condition of theengine.
Note: Crankcase blowby is one of the three factorsthat help to determine the in-frame overhaul interval.For more information, see this Operation andMaintenance manual, “Overhaul (In-Frame)” topic(Maintenance Section).
After a new engine is used for a short time, theblowby can decrease as the piston rings are seated.The blowby will gradually increase as the followingcomponents show wear:
• piston rings
• cylinder liners

76Maintenance SectionCrankshaft Vibration Damper - Inspect
Note: A problem with the piston rings causes theoil to deteriorate rapidly. Information regarding thecondition of the piston rings can be obtained fromthe measurement of the blowby and the results ofoil analysis.
The blowby of a worn engine may exceed the blowbyof a new engine by two times or more.
A sudden increase in blowby could indicate a brokenpiston ring. The following conditions are otherpotential sources of blowby:
• Worn valve guides
• A turbocharger seal that leaks
A rebuilt engine can have a high blowby due to thefollowing factors:
• The piston rings are not seated properly.
• Worn parts such as valve guides were not replaced.
Excessive blowby may indicate the need for anoverhaul. By keeping a record of the results, agradual increase in the amount of the blowby will benoted until the amount has become excessive.
To measure the blowby, use the 8T-2700 Blowby/AirFlow Indicator. Refer to Special Instruction,SEHS8712, “Using the 8T-2700 Blowby/AirflowIndicator Group”. The instruction is provided with thetool.
Keep a record of the results.
For assistance, consult your Caterpillar dealer.
i01949731
Crankshaft Vibration Damper- InspectSMCS Code: 1205-040
The crankshaft vibration damper limits the torsionalvibration of the crankshaft. The visconic damper hasa weight that is located inside a fluid filled case.
Damage to the crankshaft vibration damper or failureof the damper can increase torsional vibrations. Thiscan result in damage to the crankshaft and to otherengine components. A deteriorating damper cancause excessive gear train noise at variable pointsin the speed range.
A damper that is hot is due to excessive torsionalvibration. Monitor the temperature of the damperduring operation.
The 8T-2821 Temperature Indicator or the 8T-2822Temperature Indicator are recommended formonitoring the temperature of the damper. Evenlyspace four of the adhesive indicators around theouter diameter of the damper.
Note: If you use an infrared thermometer to monitorthe temperature of the damper, use the thermometerduring operation with similar loads and speeds. Keepa record of the data. If the temperature begins to rise,reduce the interval for inspecting the damper.
If the temperature of the damper reaches 110 °C(230 °F), consult your Caterpillar dealer.
Inspect the damper for evidence of dents, cracks,and leaks of the fluid.
If a fluid leak is found, repair the damper orreplace the damper. The fluid in the damper issilicone. Silicone has the following characteristics:transparent, viscous, smooth, and sticky.
Inspect the damper and repair or replace the damperfor any of the following reasons.
• The damper is dented, cracked, or leaking.
• The paint on the damper is discolored from heat.
• The engine has had a failure because of a brokencrankshaft.
• An analysis of the oil has revealed that the frontbearing of the crankshaft is badly worn.
• There is a large amount of gear train wear that isnot caused by a lack of oil.
Removal and InstallationRefer to the Service Manual, “Disassembly andAssembly” or consult your Caterpillar dealer forinformation about damper replacement.
i01664707
Cylinder Pressure -Measure/RecordSMCS Code: 1223-082-CC; 1223; 7450-082
Measure the cylinder pressure of new engines.Record the data. Continue to periodically measurethe cylinder pressure. Comparing the recorded datato the new data provides information about thecondition of the engine.

77Maintenance SectionCylinders - Inspect
Cylinder pressure can be measured during inspectionof the spark plugs. Use the following guidelines forchecking the cylinder pressure:
• Remove all of the spark plugs.
• Fully open the throttle plate.
• Minimize the cranking time to 3 or 4 revolutions.This will enable a maximum consistent crankingspeed for the check. Also, the battery power willbe conserved.
A loss of cylinder pressure or a change of pressurein one or more cylinders may indicate the followingconditions. These conditions may indicate a problemwith lubrication:
• Excessive deposits
• Guttering of valves
• A broken valve
• A piston ring that sticks
• A broken piston ring
• Worn piston rings
• Worn cylinder liners
If the cylinder pressure has risen by one or morecompression ratios, the engine needs a top endoverhaul in order to remove deposits. Failure toremove the deposits will increase the chance fordetonation. Severe guttering of the valves will occur.
To measure the cylinder pressure, use the 193-5859Cylinder Pressure Gauge Gp. Follow the procedurein the Special Instruction, NEHS0798 that is includedwith the gauge group. Record the pressure foreach cylinder. Use the Operation and MaintenanceManual, “Valve Data Sheet” (Reference MaterialsSection).
Illustration 56 is a graph of typical cylinder pressuresfor engines with different compression ratios.
g00828960Illustration 56
(Y) Cylinder pressure in kPa(X) Compression ratio(1) Normal range for cylinder pressure
i00767502
Cylinders - InspectSMCS Code: 1223-040; 1223
Use a borescope to inspect the cylinders. Theinspection will provide information about the internalcondition of the engine.
A borescope with a lens that can be rotated isrecommended. This type of borescope provides aclear view of the combustion chamber and of thebottom deck of the cylinder head. Photographicdocumentation or video documentation is alsorecommended. Consult your Caterpillar dealer forinformation on available borescopes.
To perform this procedure, insert the borescopethrough the openings for the spark plugs. Use theborescope to look for the following conditions:
• Valve wear
• Deposits on the valve seat
• Deposits on the valve face

78Maintenance SectionDriven Equipment - Check
• Polishing of the cylinder walls
• Scratching of the cylinder walls
• Deposits on the cylinder walls that are above theupper limit of the piston stroke
i00449093
Driven Equipment - CheckSMCS Code: 3279-535
To minimize bearing problems and vibration of theengine crankshaft and the driven equipment, thealignment between the engine and driven equipmentmust be maintained properly.
Check the alignment according to the instructionsthat are provided by the following manufacturers:
• Caterpillar
• OEM of the coupling
• OEM of the driven equipment
i00935098
Driven Equipment -Inspect/Replace/LubricateSMCS Code: 3279-040
Observe the driven equipment during operation. Lookfor the following items:
• Unusual noise and vibration
• Loose connections
• Damaged parts
Perform any maintenance that is recommendedby the OEM of the driven equipment. Refer to theliterature of the OEM of the driven equipment for thefollowing service instructions.
• Inspection
• Lubricating grease and lubricating oil requirements
• Specifications for adjustment
• Replacement of components
• Requirements for ventilation
i01664717
Engine - CleanSMCS Code: 1000-070
Personal injury or death can result from high volt-age.
Moisture could create paths of electrical conduc-tivity.
Make sure the unit is off line (disconnected fromutility and/or other generators), locked out andtagged "Do Not Operate".
NOTICEWater or condensation can cause damage to gen-erator components. Protect all electrical componentsfrom exposure to water.
NOTICEAccumulated grease and oil on an engine is a fire haz-ard. Keep the engine clean. Remove debris and fluidspills whenever a significant quantity accumulates onthe engine.
Steam cleaning the engine will remove accumulatedoil and grease. A clean engine provides the followingbenefits:
• Easy detection of fluid leaks
• Maximum heat transfer characteristics
• Ease of maintenance
Note: For more information on cleaning and dryingelectric generators, refer to Special Instruction,SEHS9124, “Cleaning and Drying of Electric SetGenerators”.
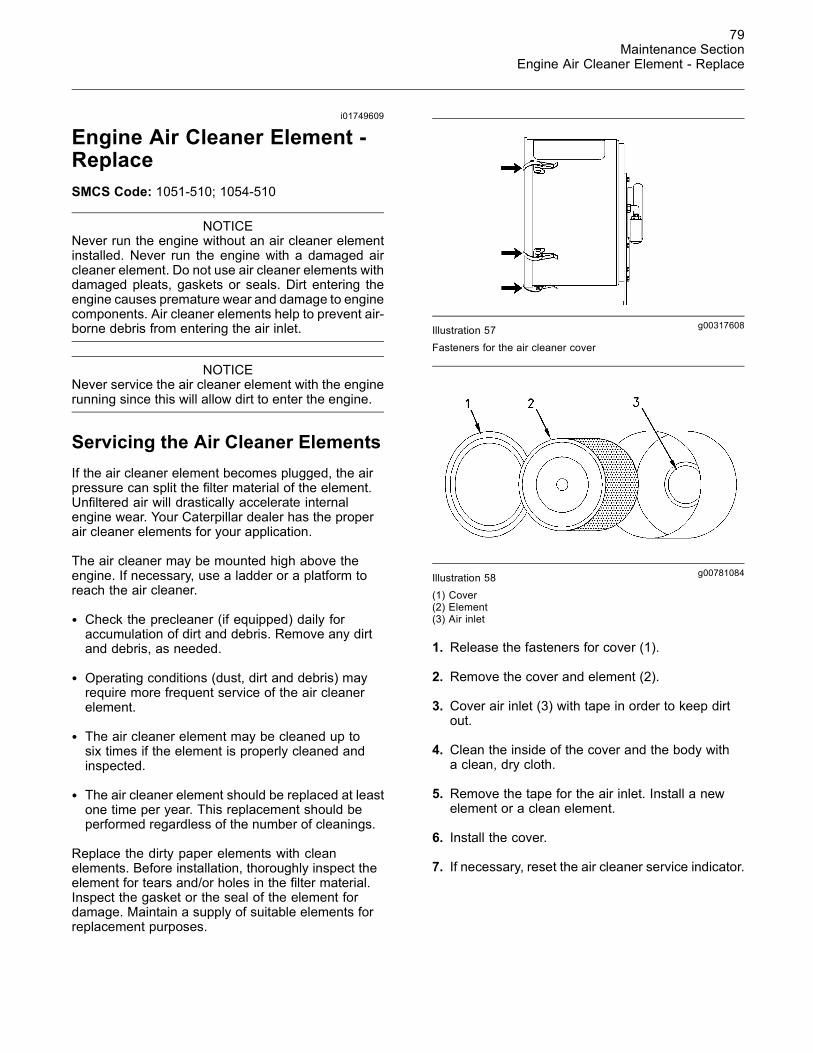
79Maintenance Section
Engine Air Cleaner Element - Replace
i01749609
Engine Air Cleaner Element -ReplaceSMCS Code: 1051-510; 1054-510
NOTICENever run the engine without an air cleaner elementinstalled. Never run the engine with a damaged aircleaner element. Do not use air cleaner elements withdamaged pleats, gaskets or seals. Dirt entering theengine causes premature wear and damage to enginecomponents. Air cleaner elements help to prevent air-borne debris from entering the air inlet.
NOTICENever service the air cleaner element with the enginerunning since this will allow dirt to enter the engine.
Servicing the Air Cleaner ElementsIf the air cleaner element becomes plugged, the airpressure can split the filter material of the element.Unfiltered air will drastically accelerate internalengine wear. Your Caterpillar dealer has the properair cleaner elements for your application.
The air cleaner may be mounted high above theengine. If necessary, use a ladder or a platform toreach the air cleaner.
• Check the precleaner (if equipped) daily foraccumulation of dirt and debris. Remove any dirtand debris, as needed.
• Operating conditions (dust, dirt and debris) mayrequire more frequent service of the air cleanerelement.
• The air cleaner element may be cleaned up tosix times if the element is properly cleaned andinspected.
• The air cleaner element should be replaced at leastone time per year. This replacement should beperformed regardless of the number of cleanings.
Replace the dirty paper elements with cleanelements. Before installation, thoroughly inspect theelement for tears and/or holes in the filter material.Inspect the gasket or the seal of the element fordamage. Maintain a supply of suitable elements forreplacement purposes.
g00317608Illustration 57Fasteners for the air cleaner cover
g00781084Illustration 58(1) Cover(2) Element(3) Air inlet
1. Release the fasteners for cover (1).
2. Remove the cover and element (2).
3. Cover air inlet (3) with tape in order to keep dirtout.
4. Clean the inside of the cover and the body witha clean, dry cloth.
5. Remove the tape for the air inlet. Install a newelement or a clean element.
6. Install the cover.
7. If necessary, reset the air cleaner service indicator.

80Maintenance SectionEngine Air Cleaner Element - Replace
Cleaning the Primary Air CleanerElementsThe primary air cleaner element can be used upto six times if the element is properly cleaned andinspected. When the element is cleaned, check thefilter material for rips or tears. Replace the elementat least one time per year regardless of the numberof cleanings.
Use clean elements while dirty elements are beingcleaned.
NOTICEDo not clean the air cleaner elements by bumping ortapping. This could damage the seals. Do not use el-ements with damaged pleats, gaskets or seals. Dam-aged elements will allow dirt to pass through. Enginedamage could result.
Visually inspect the elements before cleaning. Inspectthe elements for damage to the seal, the gaskets,and the outer cover. Discard any damaged elements.
Air cleaner elements can be cleaned with pressurizedair and with a vacuum.
Pressurized Air
Pressurized air can be used to clean elementsthat have not been cleaned more than two times.Pressurized air will not remove deposits of carbonand oil. Use filtered, dry air with a maximum pressureof 207 kPa (30 psi).
g00281692Illustration 59
Note:When the elements are cleaned, always beginwith the clean side (inside) in order to force dirtparticles toward the dirty side (outside).
Aim the hose so that the air flows inside the elementalong the length of the filter in order to help preventdamage to the paper pleats. Do not aim the streamof air directly at the primary air cleaner element. Dirtcould be forced into the pleats.
Note: Refer to “Inspecting the Primary Air CleanerElements”.
Vacuum Cleaning
Vacuum cleaning is a good method for cleaningelements which require daily cleaning because of adry, dusty environment. Cleaning with pressurized airis recommended prior to vacuum cleaning. Vacuumcleaning will not remove deposits of carbon and oil.
Note: Refer to “Inspecting the Primary Air CleanerElements”.
Inspecting the Primary Air CleanerElements
g00281693Illustration 60
Inspect the clean, dry element. Use a 60 watt bluelight in a dark room or in a similar facility. Placethe blue light in the element. Rotate the element.Inspect the element for tears and/or holes. Inspectthe element for light that may show through the filtermaterial. If it is necessary in order to confirm theresult, compare the element to a new element thathas the same part number.
Do not use an element that has any tears and/orholes in the filter material. Do not use an element withdamaged pleats, gaskets or seals. Discard damagedelements.
Storing Primary Air Cleaner Elements
If an element that passes inspection will not be usedimmediately, store the element for future use.

81Maintenance Section
Engine Air Cleaner Service Indicator - Inspect
g00281694Illustration 61
Do not use paint, a waterproof cover, or plastic as aprotective covering for storage. Restricted air flowmay result. To protect against dirt and damage, wrapthe elements in Volatile Corrosion Inhibited (VCI)paper.
Place the element into a cardboard box for storage.For identification, mark the outside of the containerand mark the element. Include the followinginformation:
• Date of cleaning
• Number of cleanings
Store the container in a dry location.
For more detailed information on cleaning the primaryair cleaner element, refer to Special Publication,SEBF8062, “Procedure to Inspect and Clean AirFilters”.
i01665086
Engine Air Cleaner ServiceIndicator - InspectSMCS Code: 7452-040
A service indicator may be mounted on the aircleaner element or in a remote location.
g00760342Illustration 62Service indicator
Some engines may be equipped with a differentservice indicator.
Observe the service indicator. Clean the air cleanerelement or replace the element when any of thefollowing conditions occur:
• The yellow diaphragm enters the red zone.
• The red piston locks in the visible position.
• The air restriction reaches 3.75 kPa(15 inch of H2O).
g00760341Illustration 63Service indicator on an air cleaner for crankcase ventilation
Some engines are equipped with an air cleaner forcrankcase ventilation. The air cleaner is mountedon a camshaft cover. Clean the air cleaner elementor replace the element when any of the followingconditions occur:
• The yellow diaphragm enters the red zone.
• The red piston locks in the visible position.
• The air restriction reaches 0.25 kPa (1 inch of H2O).
• The air cleaner is saturated with oil.

82Maintenance SectionEngine Air Precleaner - Clean
Inspect the service indicator daily for cracks, holes, orloose fittings. If any of these conditions are present,replace the service indicator.
Test the Service IndicatorService indicators are important instruments.
• Apply vacuum (suction) to the service indicator.
• Reset the service indicator.
If the yellow core does not latch at the greatestvacuum, or if service indicator does not reset easily,obtain a new service indicator. If the new serviceindicator will not reset, the fitting for the serviceindicator may be plugged.
g00351792Illustration 64
Porous filter
A porous filter is part of the fitting that is used formounting of the service indicator. Inspect the filterfor cleanliness. Clean the filter, if necessary. Usecompressed air or a clean, nonflammable solvent.
Note: When service indicator is installed, excessivetightening may crack the top of the service indicator.Tighten the service indicator to a torque of 2 N·m(18 lb in).
Replace the service indicator annually regardless ofthe operating conditions.
i01397717
Engine Air Precleaner - CleanSMCS Code: 1055-070
g00736588Illustration 65Typical precleaner
(1) Wing nut(2) Cover(3) Body
Remove wing nut (1) and cover (2). Check for anaccumulation of dirt and debris in body (3). Clean thebody, if necessary.
After cleaning the precleaner, install cover (2) andwing nut (1).
Note: When the engine is operated in dustyapplications, more frequent cleaning is required.
i01225429
Engine Crankcase Breather -CleanSMCS Code: 1317-070
If the crankcase breather is not maintained on aregular basis, the crankcase breather will becomeplugged. A plugged crankcase breather will causeexcessive crankcase pressure that may causecrankshaft seal leakage.
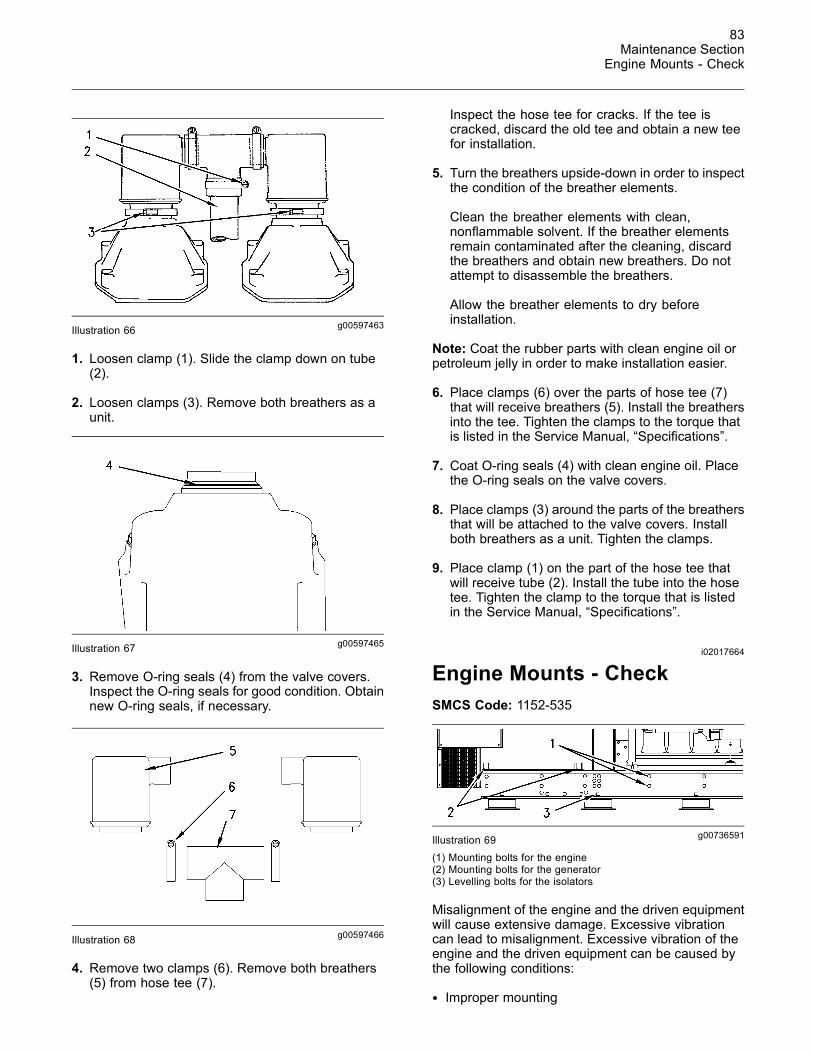
83Maintenance Section
Engine Mounts - Check
g00597463Illustration 66
1. Loosen clamp (1). Slide the clamp down on tube(2).
2. Loosen clamps (3). Remove both breathers as aunit.
g00597465Illustration 67
3. Remove O-ring seals (4) from the valve covers.Inspect the O-ring seals for good condition. Obtainnew O-ring seals, if necessary.
g00597466Illustration 68
4. Remove two clamps (6). Remove both breathers(5) from hose tee (7).
Inspect the hose tee for cracks. If the tee iscracked, discard the old tee and obtain a new teefor installation.
5. Turn the breathers upside-down in order to inspectthe condition of the breather elements.
Clean the breather elements with clean,nonflammable solvent. If the breather elementsremain contaminated after the cleaning, discardthe breathers and obtain new breathers. Do notattempt to disassemble the breathers.
Allow the breather elements to dry beforeinstallation.
Note: Coat the rubber parts with clean engine oil orpetroleum jelly in order to make installation easier.
6. Place clamps (6) over the parts of hose tee (7)that will receive breathers (5). Install the breathersinto the tee. Tighten the clamps to the torque thatis listed in the Service Manual, “Specifications”.
7. Coat O-ring seals (4) with clean engine oil. Placethe O-ring seals on the valve covers.
8. Place clamps (3) around the parts of the breathersthat will be attached to the valve covers. Installboth breathers as a unit. Tighten the clamps.
9. Place clamp (1) on the part of the hose tee thatwill receive tube (2). Install the tube into the hosetee. Tighten the clamp to the torque that is listedin the Service Manual, “Specifications”.
i02017664
Engine Mounts - CheckSMCS Code: 1152-535
g00736591Illustration 69
(1) Mounting bolts for the engine(2) Mounting bolts for the generator(3) Levelling bolts for the isolators
Misalignment of the engine and the driven equipmentwill cause extensive damage. Excessive vibrationcan lead to misalignment. Excessive vibration of theengine and the driven equipment can be caused bythe following conditions:
• Improper mounting

84Maintenance SectionEngine Oil - Change
• Loose bolts
• Deterioration of the isolators
Ensure that the mounting bolts are tightenedto the proper torque. For standard torques, seeSpecifications, SENR3130, “Torque Specifications”.
Ensure that the isolators are free of oil andcontamination. Inspect the isolators for deterioration.Ensure that the bolts for the isolators are tightened tothe proper torque.
Replace any isolator that shows deterioration. Formore information, see the literature that is providedby the OEM of the isolators. Also see the Applicationand Installation Guide for the engine. Consult yourCaterpillar dealer for assistance.
i02017618
Engine Oil - ChangeSMCS Code: 1348-044; 1348
Hot oil and components can cause personal in-jury.
Do not allow hot oil or components to contactskin.
NOTICEEnsure that the engine is stopped before performingthis procedure. Attach a DONOTOPERATE tag to thestarting controls.
Do not drain the oil when the engine is cold. As the oilcools, suspended waste particles settle on the bottomof the oil pan. The waste particles are not removedwhen the cold oil is drained. Drain the crankcase withthe oil warm, immediately after the engine is stopped.This draining method allows the waste particlesthat are suspended in the oil to be drained properly.Failure to follow this recommended procedure willallow the waste particles to be recirculated throughthe engine lubrication system with the new oil.
1. After the engine has been operated at normaloperating temperature, STOP the engine.
Note: Drain the oil into a suitable container. Disposeof fluids according to local regulations.
2. Drain the oil by using one of the followingmethods. Use the method that corresponds to theequipment on the engine.
Note: If a suction device is used in order to removethe oil from the oil pan, ensure that the suction deviceis clean. This will prevent dirt from entering into theoil pan. Be careful not to strike the engine oil suctiontubes or the piston cooling jets.
a. If the engine has an oil drain valve, open thevalve in order to drain the oil. After the oil hasdrained, close the valve.
b. If the engine has a pump for removing dirtyoil, connect a hose to the outlet of the pump.Place the hose in a suitable container. Openthe valve for the drain line. Operate the pumpuntil the crankcase is empty. Close the valve tothe drain line. Disconnect the hose.
c. If the oil drain valve has a “quick connect”coupling, attach the coupling. Open the drainvalve in order to drain the crankcase. Afterthe oil has drained, close the drain valve.Disconnect the coupling.
d. If the engine does not have a drain valve or apump, remove an oil drain plug. Allow the oil todrain. After the oil has drained, clean the drainplug and clean the fitting for the drain plug.Install the drain plug. Tighten the drain plug to145 ± 15 N·m (105 ± 10 lb ft).
Note: Ensure that the dirty oil is thoroughly drainedfrom the pan. Caterpillar recommends a thoroughcleaning of the oil pan with a vacuum and with ragsin order to completely remove all of the old oil. Thiswill help prevent inaccurate oil analysis results and/orshortened life of the oil.
3. Replace the engine oil filter elements before fillingthe crankcase with new oil.
a. For the procedure to change the engine oilfilters, refer to the Operation and MaintenanceManual, “Engine Oil Filter - Change” topic(Maintenance Section).

85Maintenance Section
Engine Oil Filter (Auxiliary) - Change
NOTICEEngine damage can occur if the crankcase is filledabove the “FULL” mark on the oil level gauge (dip-stick).
An overfull crankcase can cause the crankshaft to dipinto the oil. This will reduce the power that is devel-oped and also force air bubbles into the oil. Thesebubbles (foam) can cause the following problems: re-duction of the oil’s ability to lubricate, reduction of oilpressure, inadequate cooling, oil blowing out of thecrankcase breathers, and excessive oil consumption.
Excessive oil consumption will cause deposits to formon the pistons and in the combustion chamber. De-posits in the combustion chamber lead to the followingproblems: guttering of the valves, packing of carbonunder the piston rings, and wear of the cylinder liner.
If the oil level is above the “FULL” mark on the oil levelgauge, drain some of the oil immediately.
Note: For the appropriate oil to use, and forthe amount of oil to use, refer to this Operationand Maintenance Manual, “Refill Capacities andRecommendations” article (Maintenance Section).
4. Remove the oil filler cap. Fill the crankcasethrough the oil filler tube only. Clean the oil fillercap. Install the oil filler cap.
NOTICETo prevent crankshaft damage and to prevent bearingdamage, manually operate the prelube pump or crankthe engine with the fuel supply line closed for 15 to 30seconds. This will ensure that all of the oil filters arefilled with oil before the engine is started.
5. Close the fuel supply line. Crank the engine untilthe oil pressure gauge indicates 70 kPa (10 psi).Open the fuel supply line. Allow the starting motorto cool for two minutes before cranking again.
6. Follow this Operation and Maintenance Manual,“Starting The Engine” procedure (OperationSection). Operate the engine at low idle for twominutes. This will ensure that the lubricationsystem and the oil filters are filled with oil. Inspectthe engine for oil leaks. Ensure that the oil level isbetween the “ADD” and the “FULL” marks on the“LOW IDLE” side of the oil level gauge.
7. Stop the engine and allow the oil to drain back intothe sump for a minimum of ten minutes.
8. Remove the oil level gauge and check the oil level.Maintain the oil level between the “ADD” and the“FULL” marks on the “ENGINE STOPPED” side ofthe oil level gauge.
i02017678
Engine Oil Filter (Auxiliary) -ChangeSMCS Code: 1318
Note: An auxiliary oil filter system enables the oilcapacity of the engine to be increased. Use of theauxiliary oil filter elements is not recommended.
Perform this procedure after the oil has been drainedfrom the auxiliary oil filter housing.
g00787079Illustration 70Auxiliary oil filter housing
(1) Vent plug(2) Drain plug
1. If the engine is equipped with an auxiliary oil filtersystem, remove vent plug (1). Remove drain plug(2). Allow the oil to drain. After the oil has drained,clean the drain plug.

86Maintenance SectionEngine Oil Filter - Change
g00787105Illustration 71
(1) Vent plug(2) Drain plug(3) Nut(4) Washer(5) Plug(6) Bolt(7) Cover(8) Cover gasket(9) Nut(10) Spring retainer(11) Spring(12) Bolt(13) Washer(14) Spider(15) Plate
1. Remove 12 nuts (3), washers (4), and bolts (6).
2. Remove cover (7) and gasket (8). Do not damagethe gasket.
Possible injury can occur during the removal ofthe nut, the spring retainer, and the spring. Springforce will be released when the nut and the springretainer are removed. Be prepared to hold thespring retainer as the nut is loosened.
3. Remove nut (9), spring retainer (10), and spring(11). Hold spring retainer (10) as nut (9) isloosened.
4. Remove bolt (12). Remove washer (13) andspider (14). Remove plate (15).
5. Remove the oil filter elements if the oil filters havebeen installed. Clean the inside of the oil filterhousing.
Inspect the oil filter elements if the oil filters havebeen installed. For instructions on inspectingthe oil filter elements, refer to the Operation andMaintenance Manual, “Engine Oil Filter - Change”topic (Maintenance Section).
6. Ensure that plug (5) is tight.
7. Install drain plug (2). Tighten the drain plug to70 ± 14 N·m (50 ± 10 lb ft).
Note: Use of the auxiliary oil filter elements is notrequired.
8. If the use of auxiliary oil filter elements is desired,install new elements.
9. Install plate (15), spider (14), washer (13), andbolt (12).
10. Install spring (11) on spider (14). Install springretainer (10) and nut (9) on bolt (12).
11. Tighten nut (9) in order to compress spring (11)until the spring retainer bottoms out on bolt (12).Do not overtighten the nut.
12. Fill the oil filter housing with oil. For the correctamount of oil, refer to the Operation andMaintenance Manual, “Refill Capacities andRecommendations” topic (Maintenance Section).
13. Inspect cover gasket (8) for tears, breaks, or otherdamage. If the cover gasket is damaged, replacethe old cover gasket with a new cover gasket.Install cover gasket (8). Install cover (7).
14. Install twelve bolts (6), washers (4), and nuts(3). Tighten nuts sequentially around the coveruntil the nuts are snug. Tighten the nuts to100 ± 15 N·m (75 ± 11 lb ft).
15. Install vent plug (1).
i02154624
Engine Oil Filter - ChangeSMCS Code: 1308-510; 1308
Replace the engine oil filters when any of thefollowing conditions are met:
• Every oil change
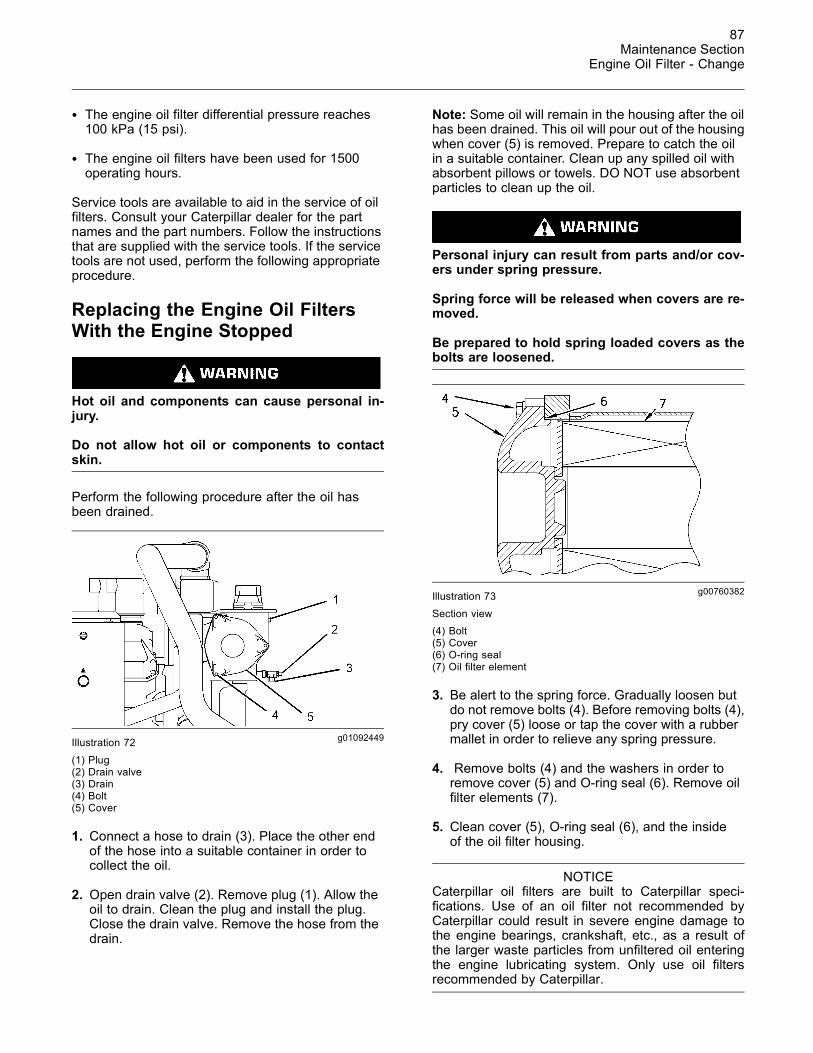
87Maintenance Section
Engine Oil Filter - Change
• The engine oil filter differential pressure reaches100 kPa (15 psi).
• The engine oil filters have been used for 1500operating hours.
Service tools are available to aid in the service of oilfilters. Consult your Caterpillar dealer for the partnames and the part numbers. Follow the instructionsthat are supplied with the service tools. If the servicetools are not used, perform the following appropriateprocedure.
Replacing the Engine Oil FiltersWith the Engine Stopped
Hot oil and components can cause personal in-jury.
Do not allow hot oil or components to contactskin.
Perform the following procedure after the oil hasbeen drained.
g01092449Illustration 72
(1) Plug(2) Drain valve(3) Drain(4) Bolt(5) Cover
1. Connect a hose to drain (3). Place the other endof the hose into a suitable container in order tocollect the oil.
2. Open drain valve (2). Remove plug (1). Allow theoil to drain. Clean the plug and install the plug.Close the drain valve. Remove the hose from thedrain.
Note: Some oil will remain in the housing after the oilhas been drained. This oil will pour out of the housingwhen cover (5) is removed. Prepare to catch the oilin a suitable container. Clean up any spilled oil withabsorbent pillows or towels. DO NOT use absorbentparticles to clean up the oil.
Personal injury can result from parts and/or cov-ers under spring pressure.
Spring force will be released when covers are re-moved.
Be prepared to hold spring loaded covers as thebolts are loosened.
g00760382Illustration 73
Section view(4) Bolt(5) Cover(6) O-ring seal(7) Oil filter element
3. Be alert to the spring force. Gradually loosen butdo not remove bolts (4). Before removing bolts (4),pry cover (5) loose or tap the cover with a rubbermallet in order to relieve any spring pressure.
4. Remove bolts (4) and the washers in order toremove cover (5) and O-ring seal (6). Remove oilfilter elements (7).
5. Clean cover (5), O-ring seal (6), and the insideof the oil filter housing.
NOTICECaterpillar oil filters are built to Caterpillar speci-fications. Use of an oil filter not recommended byCaterpillar could result in severe engine damage tothe engine bearings, crankshaft, etc., as a result ofthe larger waste particles from unfiltered oil enteringthe engine lubricating system. Only use oil filtersrecommended by Caterpillar.

88Maintenance SectionEngine Oil Filter - Change
6. Ensure that the new oil filter elements are in goodcondition. Install the new oil filter elements.
7. Inspect O-ring seal (6). Ensure that the surfacesfor the O-ring seal are clean. Install a newO-ring seal if the old O-ring seal is damaged ordeteriorated.
8. Install O-ring seal (6) and cover (5). Ensure thatthe cover’s retainer is properly seated.
9. Close drain valve (2).
10. Install plug (1).
11.Start the engine. Check for oil leaks.
12.Check the oil level on the “LOW IDLE” side of theoil level gauge. Maintain the oil level between the“ADD” and “FULL” marks on the “LOW IDLE” sideof oil level gauge.
Replacing the Engine Oil FiltersDuring Engine Operation
Filter contains hot pressurized fluid when engineis running.
Follow instructions on control valve to avoid per-sonal injury.
If rapid air movement exists to blow fluid, Stop theengine to avoid fire.
g00850266Illustration 74
If the engine is equipped with duplex oil filters, theengine oil filter elements can be changed while theengine is operation. This is useful if the oil filterelements require more frequent replacement thanthe engine oil.
1. Move the control valve to the “AUX RUN” positionin order to change the main oil filter elements.Move the selector valve to the “MAIN RUN”position in order to change the auxiliary oil filterelements.
2. Allow the oil pressure gauge for the oil filter thatis being changed to reach a “ZERO” pressurereading.
3. Perform Step 1 through Step 12 of “Replacing theEngine Oil Filters With the Engine Stopped”.
4. Open the “FILL” valve for a minimum of fiveminutes in order to fill the new oil filter elements.
5. Close the “FILL” valve. Rotate the control valveto the “RUN” position for the oil filter that wasserviced.
Inspect the Used Oil Filter ElementsCut the used oil filter element open with a utility knife.Cut the filter element free from the end caps. Spreadapart the pleats and inspect the element for metaldebris. An excessive amount of debris in the elementmay indicate early wear or a pending failure.
Use a magnet to differentiate between the ferrousmetals and the nonferrous metals that are foundin the element. Ferrous metals may indicate wearon the steel and the cast iron parts of the engine.Nonferrous metals may indicate wear on thealuminum parts, the brass parts, or the bronze partsof the engine. Parts that may be affected include thefollowing components: main bearings, rod bearings,turbocharger bearings, and cylinder heads.
Aluminum debris may indicate problems with thebearings of the front gears. If an excessive amountof aluminum debris is found, inspect the crankshaftvibration damper and the bearings of the front idlergear.
Due to normal wear and friction, it is not uncommonto find small amounts of debris in the oil filter element.If an excessive amount of debris is found in the oilfilter element, consult your Caterpillar dealer in orderto arrange for further oil analysis.

89Maintenance Section
Engine Oil Level - Check
i02017693
Engine Oil Level - CheckSMCS Code: 1348-535-FLV
The most accurate check of the engine oil level isobtained when the engine is stopped.
g00760401Illustration 75(1) Engine oil level gauge (dipstick)(2) Filler cap
1. Remove filler cap (2) in order to ensure that thecrankcase pressure is equal to the atmosphericpressure.
Excess pressure or a slight vacuum will affectengine oil level that is measured.
2. Ensure that engine oil level gauge (1) is seated.
g00735162Illustration 76
(3) “ENGINE STOPPED WITH OIL COLD” side(4) “ENGINE AT LOW IDLE WITH WARM OIL” side(5) “ADD” mark(6) “FULL” mark
a. If the engine is stopped, remove the engine oillevel gauge. Observe the engine oil level on“ENGINE STOPPED WITH OIL COLD” side(3).
b. If the engine is operating, reduce the enginespeed to low idle. Remove the engine oil levelgauge and observe the engine oil level on“ENGINE AT LOW IDLE WITH WARM OIL”side (4).
The engine oil level should be between “ADD”mark (5) and “FULL” mark (6).
NOTICEEngine damage can occur if the crankcase is filledabove the “FULL” mark on the oil level gauge (dip-stick).
An overfull crankcase can cause the crankshaft to dipinto the oil. This will reduce the power that is devel-oped and also force air bubbles into the oil. Thesebubbles (foam) can cause the following problems: re-duction of the oil’s ability to lubricate, reduction of oilpressure, inadequate cooling, oil blowing out of thecrankcase breathers, and excessive oil consumption.
Excessive oil consumption will cause deposits to formon the pistons and in the combustion chamber. De-posits in the combustion chamber lead to the followingproblems: guttering of the valves, packing of carbonunder the piston rings, and wear of the cylinder liner.
If the oil level is above the “FULL” mark on the oil levelgauge, drain some of the oil immediately.
3. If necessary, add engine oil. For the correctengine oil to use, refer to this Operation andMaintenance Manual, “Refill Capacities andRecommendations” topic (Maintenance Section).Do not fill the crankcase above the “FULL” markon the engine oil level gauge. Clean the filler cap(2). Install the filler cap.
4. Record the amount of engine oil that is added. Forthe next engine oil sample and analysis, includethe total amount of engine oil that has been addedsince the previous oil change. This will help toprovide the most accurate analysis.
i01935337
Engine Oil Sample - ObtainSMCS Code: 1348-554-SM
In addition to a good preventive maintenanceprogram, Caterpillar recommends using S·O·S oilanalysis at regularly scheduled intervals in orderto monitor the condition of the engine and themaintenance requirements of the engine. S·O·S oilanalysis provides infrared analysis, which is requiredfor determining nitration and oxidation levels.

90Maintenance SectionEngine Protective Devices - Check
Obtain the Sample and the Analysis
Hot oil and hot components can cause personalinjury. Do not allow hot oil or hot components tocontact the skin.
Before you take the oil sample, complete the Label,PEEP5031 for identification of the sample. In orderto help obtain the most accurate analysis, providethe following information:
• Engine model
• Service hours on the engine
• The number of hours that have accumulated sincethe last oil change
• The amount of oil that has been added since thelast oil change
To ensure that the sample is representative of theoil in the crankcase, obtain a warm, well mixed oilsample.
To avoid contamination of the oil samples, the toolsand the supplies that are used for obtaining oilsamples must be clean.
Caterpillar recommends using the sampling valvein order to obtain oil samples. The quality and theconsistency of the samples are better when thesampling valve is used. The location of the samplingvalve allows oil that is flowing under pressure to beobtained during normal engine operation.
The 169-8373 Fluid Sampling Bottle isrecommended for use with the sampling valve. Thefluid sampling bottle includes the parts that areneeded for obtaining oil samples. Instructions arealso provided.
NOTICEAlways use a designated pump for oil sampling, anduse a separate designated pump for coolant sampling.Using the same pump for both types of samples maycontaminate the samples that are being drawn. Thiscontaminate may cause a false analysis and an incor-rect interpretation that could lead to concerns by bothdealers and customers.
If the engine is not equipped with a sampling valve,use the 1U-5718 Vacuum Pump. The pump isdesigned to accept sampling bottles. Disposabletubing must be attached to the pump for insertioninto the sump.
For instructions, see Special Publication, PEHP6001,“How To Take A Good Oil Sample”. Consult yourCaterpillar dealer for complete information andassistance in establishing an S·O·S program for yourengine.
i00626013
Engine Protective Devices -CheckSMCS Code: 7400-535
Alarms and shutoffs must function properly. Alarmsprovide timely warning to the operator. Shutoffs helpto prevent damage to the engine. It is impossibleto determine if the engine protective devices arein good working order during normal operation.Malfunctions must be simulated in order to test theengine protective devices.
A calibration check of the engine protective deviceswill ensure that the alarms and shutoffs activateat the setpoints. Ensure that the engine protectivedevices are functioning properly.
NOTICEDuring testing, abnormal operating conditionsmust besimulated.
The tests must be performed correctly in order to pre-vent possible damage to the engine.
To prevent damage to the engine, only authorizedservice personnel or your Caterpillar dealer shouldperform the tests.
Visual InspectionVisually check the condition of all gauges, sensorsand wiring. Look for wiring and components thatare loose, broken, or damaged. Damaged wiringor components should be repaired or replacedimmediately.
i02015492
Engine Speed/Timing Sensor -Clean/InspectSMCS Code: 1905-040; 1905-070; 1907-040;1907-070
An engine speed/timing sensor is mounted in theflywheel housing. The speed/timing sensor providesinformation about engine speed and the position ofthe crankshaft to the ECM.
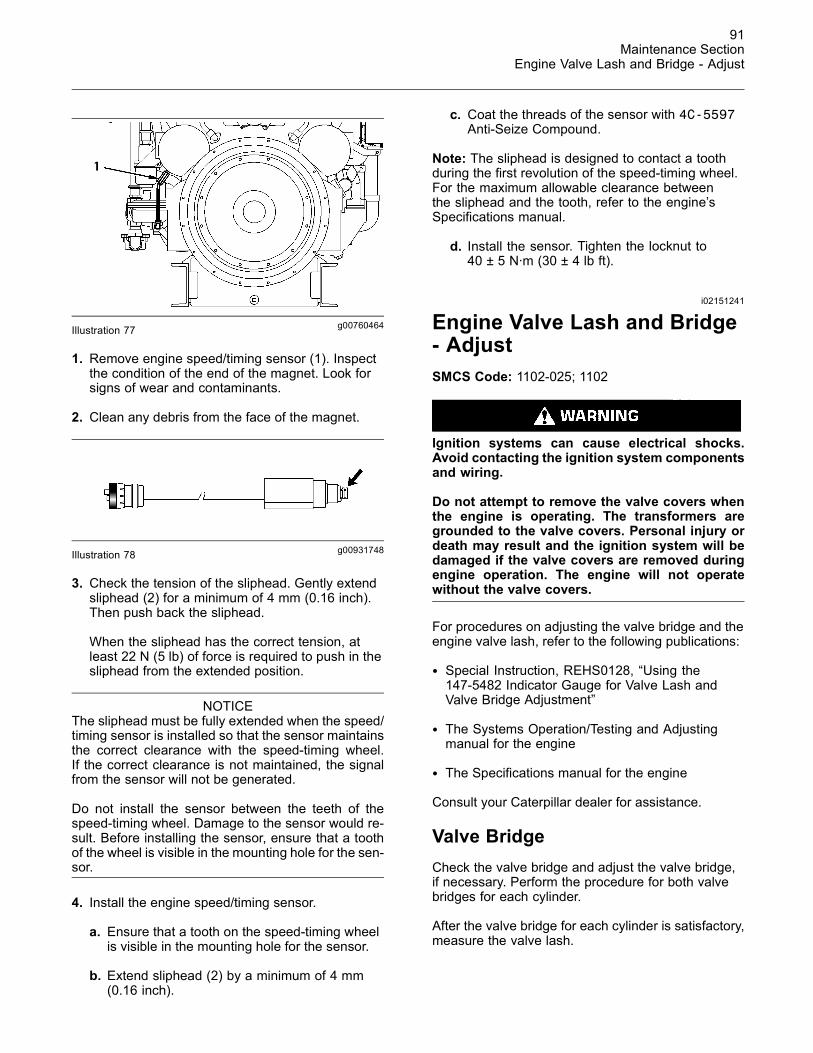
91Maintenance Section
Engine Valve Lash and Bridge - Adjust
g00760464Illustration 77
1. Remove engine speed/timing sensor (1). Inspectthe condition of the end of the magnet. Look forsigns of wear and contaminants.
2. Clean any debris from the face of the magnet.
g00931748Illustration 78
3. Check the tension of the sliphead. Gently extendsliphead (2) for a minimum of 4 mm (0.16 inch).Then push back the sliphead.
When the sliphead has the correct tension, atleast 22 N (5 lb) of force is required to push in thesliphead from the extended position.
NOTICEThe sliphead must be fully extended when the speed/timing sensor is installed so that the sensor maintainsthe correct clearance with the speed-timing wheel.If the correct clearance is not maintained, the signalfrom the sensor will not be generated.
Do not install the sensor between the teeth of thespeed-timing wheel. Damage to the sensor would re-sult. Before installing the sensor, ensure that a toothof the wheel is visible in the mounting hole for the sen-sor.
4. Install the engine speed/timing sensor.
a. Ensure that a tooth on the speed-timing wheelis visible in the mounting hole for the sensor.
b. Extend sliphead (2) by a minimum of 4 mm(0.16 inch).
c. Coat the threads of the sensor with 4C-5597Anti-Seize Compound.
Note: The sliphead is designed to contact a toothduring the first revolution of the speed-timing wheel.For the maximum allowable clearance betweenthe sliphead and the tooth, refer to the engine’sSpecifications manual.
d. Install the sensor. Tighten the locknut to40 ± 5 N·m (30 ± 4 lb ft).
i02151241
Engine Valve Lash and Bridge- AdjustSMCS Code: 1102-025; 1102
Ignition systems can cause electrical shocks.Avoid contacting the ignition system componentsand wiring.
Do not attempt to remove the valve covers whenthe engine is operating. The transformers aregrounded to the valve covers. Personal injury ordeath may result and the ignition system will bedamaged if the valve covers are removed duringengine operation. The engine will not operatewithout the valve covers.
For procedures on adjusting the valve bridge and theengine valve lash, refer to the following publications:
• Special Instruction, REHS0128, “Using the147-5482 Indicator Gauge for Valve Lash andValve Bridge Adjustment”
• The Systems Operation/Testing and Adjustingmanual for the engine
• The Specifications manual for the engine
Consult your Caterpillar dealer for assistance.
Valve BridgeCheck the valve bridge and adjust the valve bridge,if necessary. Perform the procedure for both valvebridges for each cylinder.
After the valve bridge for each cylinder is satisfactory,measure the valve lash.
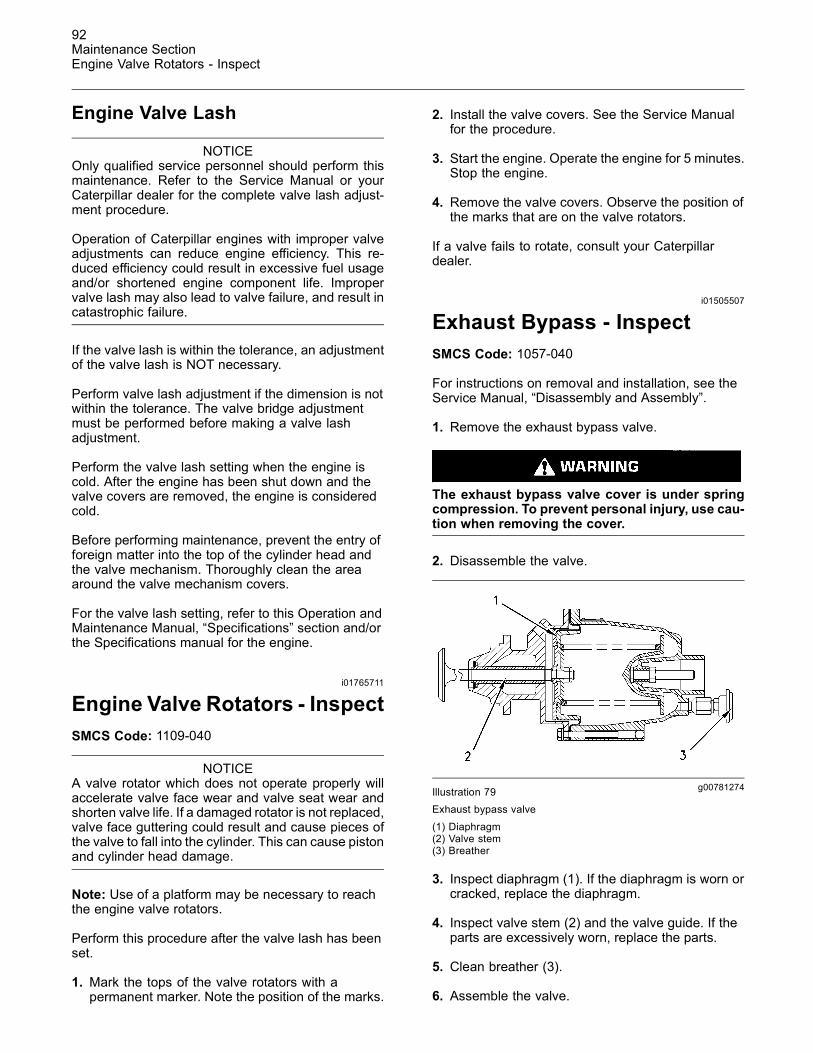
92Maintenance SectionEngine Valve Rotators - Inspect
Engine Valve Lash
NOTICEOnly qualified service personnel should perform thismaintenance. Refer to the Service Manual or yourCaterpillar dealer for the complete valve lash adjust-ment procedure.
Operation of Caterpillar engines with improper valveadjustments can reduce engine efficiency. This re-duced efficiency could result in excessive fuel usageand/or shortened engine component life. Impropervalve lash may also lead to valve failure, and result incatastrophic failure.
If the valve lash is within the tolerance, an adjustmentof the valve lash is NOT necessary.
Perform valve lash adjustment if the dimension is notwithin the tolerance. The valve bridge adjustmentmust be performed before making a valve lashadjustment.
Perform the valve lash setting when the engine iscold. After the engine has been shut down and thevalve covers are removed, the engine is consideredcold.
Before performing maintenance, prevent the entry offoreign matter into the top of the cylinder head andthe valve mechanism. Thoroughly clean the areaaround the valve mechanism covers.
For the valve lash setting, refer to this Operation andMaintenance Manual, “Specifications” section and/orthe Specifications manual for the engine.
i01765711
Engine Valve Rotators - InspectSMCS Code: 1109-040
NOTICEA valve rotator which does not operate properly willaccelerate valve face wear and valve seat wear andshorten valve life. If a damaged rotator is not replaced,valve face guttering could result and cause pieces ofthe valve to fall into the cylinder. This can cause pistonand cylinder head damage.
Note: Use of a platform may be necessary to reachthe engine valve rotators.
Perform this procedure after the valve lash has beenset.
1. Mark the tops of the valve rotators with apermanent marker. Note the position of the marks.
2. Install the valve covers. See the Service Manualfor the procedure.
3. Start the engine. Operate the engine for 5 minutes.Stop the engine.
4. Remove the valve covers. Observe the position ofthe marks that are on the valve rotators.
If a valve fails to rotate, consult your Caterpillardealer.
i01505507
Exhaust Bypass - InspectSMCS Code: 1057-040
For instructions on removal and installation, see theService Manual, “Disassembly and Assembly”.
1. Remove the exhaust bypass valve.
The exhaust bypass valve cover is under springcompression. To prevent personal injury, use cau-tion when removing the cover.
2. Disassemble the valve.
g00781274Illustration 79Exhaust bypass valve
(1) Diaphragm(2) Valve stem(3) Breather
3. Inspect diaphragm (1). If the diaphragm is worn orcracked, replace the diaphragm.
4. Inspect valve stem (2) and the valve guide. If theparts are excessively worn, replace the parts.
5. Clean breather (3).
6. Assemble the valve.

93Maintenance Section
Exhaust Piping - Inspect
7. Install the valve.
i00721010
Exhaust Piping - InspectSMCS Code: 1061-040
Hot engine components can cause injury fromburns. Before performing maintenance on theengine, allow the engine and the components tocool.
Inspect the components of the exhaust system.Repair the components or replace the components ifany of the following conditions occur:
• Damage
• Cracks
• Leaks
• Loose connections
Consult your Caterpillar dealer for assistance.
Water Cooled Exhaust ManifoldsThe water cooled exhaust manifolds do not requiremaintenance unless excessive deposits build up inthe exhaust passages. Buildup of deposits causean increase in back pressure that will cause thefollowing conditions:
• Increased fuel consumption
• Reduced boost pressure
If excessive deposits build up in the exhaustpassages, clean the passages in order to removethe deposits.
i00796401
Fuel Filtration System - ServiceSMCS Code: 1260
Engines that use bio-gas require special equipmentfor processing the fuel. Service the fuel filtrationsystem according to the instructions that are providedby the OEM of the equipment.
i01505536
Fuel System Fuel FilterDifferential Pressure - CheckSMCS Code: 1261-535
A fuel filter differential pressure gauge must beinstalled in order to determine when the fuel filterrequires service. This gauge and the fuel filter aresupplied by the customer.
A fuel filter differential pressure gauge indicates thedifference in fuel pressure between the inlet sideand the outlet side of the fuel filter. The differentialpressure increases as the fuel filter becomesplugged.
Operate the engine at the rated speed and at thenormal operating temperature. Check the fuel filterdifferential pressure. Service of the fuel filter dependson the pressure of the fuel system:
• For low pressure gas fuel systems, service thefuel filter when the fuel filter differential pressurereaches 1.7 kPa (0.25 psi).
• For high pressure gas fuel systems, service thefuel filter when the fuel filter differential pressurereaches 34 kPa (5 psi).
For instructions, see Special Instruction, SEHS9298,“Installation and Maintenance of Gaseous FuelFilters”. Consult your Caterpillar dealer for assistance.
i01642143
Gas Pressure Regulator -CheckSMCS Code: 1270-535
Check the fuel pressure before the gas pressureregulator . Table 22 lists the fuel pressure that isrequired for the gas pressure regulator.
Table 22
Requirements for Fuel Pressure To the GasPressure Regulator
Fuel System Pressure
Low pressure gas 10.3 to 34 ± 2 kPa(1.50 to 5 ± 0.25 psi)
High pressure gasStandard Engine
172 to 207 ±3.5kPa(25 to 30 ± 0.5psi)
High pressure gasLE Engine
242 to 275 ± 3.5 kPa(35 to 40 ± 0.5psi)

94Maintenance SectionGas Pressure Regulator Condensation - Drain
Fuel Differential Pressure of theFuel Supply To the CarburetorThe gas pressure regulator maintains a pressuredifferential between the boost and the fuel thatis supplied to the carburetor. After setting, thegas pressure regulator will maintain the pressuredifferential in response to changes in the boostpressure.
Use a water manometer for measuring the pressuredifferential. Obtain the measurement when theengine is operating at high idle rpm. After a loadis applied, the fuel pressure will usually decreaseby approximately 0.1 to 0.25 kPa (0.50 to 1 inchesof H2O). If the performance of the gas pressureregulator is erratic, the gas pressure regulator mayrequire service.
Natural Gas
Set the differential of the fuel supply to a maximum of1 to 1.2 kPa (4 to 4.5 inches of H2O).
Check the differential pressure in order to maintainthe correct pressure for the fuel that is being burnedand the application of the engine. Refer to theengine’s Systems Operation/Testing and Adjusting.
i01642256
Gas Pressure RegulatorCondensation - DrainSMCS Code: 1270-543
To collect condensation, drip legs should be installedin the following locations:
• Supply line for the gas pressure regulator
• Balance line for the gas pressure regulator
• Supply line to the gas shutoff valve
g00829869Illustration 80(1) Cap on the drip leg for the balance line(2) Cap on the drip leg for the gas supply line to the gas pressure
regulator
1. Close the main gas supply valve.
2. Remove caps (1) and (2) from the drip legs.
3. Allow the moisture to drain into a suitablecontainer. Inspect the drip legs for debris. Cleanthe drip legs, if necessary.
4. Clean the caps. Install the caps.
5. Perform Step 2 through Step 4 for the drip leg onthe supply line to the gas shutoff valve.
6. Open the main gas supply valve.
i02121526
Hoses and Clamps -Inspect/ReplaceSMCS Code: 7554-040; 7554-510
Inspect all hoses for leaks that are caused by thefollowing conditions:
• Cracking
• Softness
• Loose clamps
Replace hoses that are cracked or soft. Tighten anyloose clamps.

95Maintenance Section
Ignition System Spark Plugs - Check/Adjust/Replace
NOTICEDo not bend or strike high pressure lines. Do not in-stall bent or damaged lines, tubes or hoses. Repairany loose or damaged fuel and oil lines, tubes andhoses. Leaks can cause fires. Inspect all lines, tubesand hoses carefully. Tighten all connections to the rec-ommended torque.
Check for the following conditions:
• End fittings that are damaged or leaking
• Outer covering that is chafed or cut
• Exposed wire that is used for reinforcement
• Outer covering that is ballooning locally
• Flexible part of the hose that is kinked or crushed
• Armoring that is embedded in the outer covering
A constant torque hose clamp can be used in placeof any standard hose clamp. Ensure that the constanttorque hose clamp is the same size as the standardclamp.
Due to extreme temperature changes, the hose willheat set. Heat setting causes hose clamps to loosen.This can result in leaks. A constant torque hoseclamp will help to prevent loose hose clamps.
Each installation application can be different. Thedifferences depend on the following factors:
• Type of hose
• Type of fitting material
• Anticipated expansion and contraction of the hose
• Anticipated expansion and contraction of thefittings
Replace the Hoses and the Clamps
Pressurized System: Hot coolant can cause seri-ous burns. To open the cooling system filler cap,stop the engine and wait until the cooling systemcomponents are cool. Loosen the cooling systempressure cap slowly in order to relieve the pres-sure.
1. Stop the engine. Allow the engine to cool.
2. Loosen the cooling system filler cap slowly inorder to relieve any pressure. Remove the coolingsystem filler cap.
Note: Drain the coolant into a suitable, cleancontainer. The coolant can be reused.
3. Drain the coolant from the cooling system to alevel that is below the hose that is being replaced.
4. Remove the hose clamps.
5. Disconnect the old hose.
6. Replace the old hose with a new hose.
7. Install the hose clamps with a torque wrench.
Note: Refer to the Specifications, SENR3130,“Torque Specifications” in order to locate the propertorques.
8. Refill the cooling system.
9. Clean the cooling system filler cap. Inspect thecooling system filler cap’s gaskets. Replacethe cooling system filler cap if the gaskets aredamaged. Install the cooling system filler cap.
10.Start the engine. Inspect the cooling system forleaks.
i01642332
Ignition System Spark Plugs -Check/Adjust/ReplaceSMCS Code: 1555-535
Ignition systems can cause electrical shocks.Avoid contacting the ignition system componentsand wiring.
Do not attempt to remove the valve covers whenthe engine is operating. The transformers aregrounded to the valve covers. Personal injury ordeath may result and the ignition system will bedamaged if the valve covers are removed duringengine operation. The engine will not operatewithout the valve covers.
Maintenance of the spark plugs is required in orderto achieve the following benefits:
• Normal fuel consumption
• Normal level of emissions

96Maintenance SectionIgnition System Spark Plugs - Check/Adjust/Replace
• Maximum service life of the spark plugs
The service life of the spark plugs is affected byfouling due to deposits from the oil and by peakvoltage. Maintenance of the ignition system is alsoaffected by voltage. Higher voltage is required byhigher inlet manifold air pressure and a highercompression ratio. Higher voltage reduces theservice life of components such as spark plugs,wires, and transformers.
Removing the Spark Plug
g00787369Illustration 81(1) Bolt(2) Valve cover(3) O-ring seal
Note: Do not use an impact wrench to remove thecover bolts and do not use an impact wrench to installthe cover bolts.
1. Remove bolts (1). Remove valve cover (2).Inspect O-ring seal (3). If the seal appears to beworn or damaged, discard the seal and use a newseal for assembly.
NOTICEPulling on the wiring harness may break the wires. Donot pull on the wiring harness.
g00787367Illustration 82(4) Wiring harness(5) Transformer(6) Lip seal(7) Spark plug
2. Disconnect wiring harness (4) from transformer(5). Be careful to completely depress the retainerclip away from the connector. Remove transformer(5).
Note: Excessive buildup of oil in the spark plugwell is an indication of a damaged lip seal on thetransformer. If this condition is found, clean thesurface of the seal groove. Replace the seal.
3. Inspect lip seal (6). If the seal is worn or damaged,discard the seal and use a new seal for assembly.
g00787371Illustration 83
(8) O-ring seal
4. Inspect O-ring seal (8). If the seal is hard orcracked, use a new seal for assembly.
Pressurized air can cause personal injury. Whenpressurized air is used for cleaning, wear a pro-tective face shield, protective clothing, and pro-tective shoes.

97Maintenance Section
Ignition System Spark Plugs - Check/Adjust/Replace
5. Debris may have collected in the spark plug well.Thoroughly remove any debris. Use compressedair. The maximum air pressure for cleaningpurposes must be below 207 kPa (30 psi). Ensurethat the area around the spark plug is clean andfree of dirt and debris.
6. Use a 22.23 mm (0.875 inch), 4C-4601 SparkPlug Socket and an extension to loosen sparkplug (7). After the spark plug has been loosened,remove the spark plug by hand in order to detectproblems with the threads. After the spark plughas been removed, discard the used spark pluggasket.
NOTICEDo not use a thread tap. A thread tap will removemetalunnecessarily. The threads could be stripped and thecylinder head could be damaged.
If the spark plug resists removal by hand, applypenetrating oil to the threads. Use the wrench andapply steady pressure to the spark plug until thespark plug is loose.
If the spark plug can not be removed by hand, cleanthe threads with 9U-7511 Spark Plug Seat Cleaner.This tool scrapes debris from the seat and from thethreads in the cylinder head. Be sure to clean anydebris from the cylinder.
Inspecting the Spark Plug
g00787368Illustration 84(1) Terminal post(2) Insulator(3) Shell(4) Gasket(5) Electrode
Inspect the spark plug closely for damage. Thecondition of the spark plug can indicate the operatingcondition of the engine.
Terminal post (1) must not move. If the terminal postcan be moved by hand, carefully tighten the post intothe threads of the insulator. If the post cannot betightened, discard the spark plug.
Inspect insulator (2) for cracks. If a crack is found,discard the spark plug.
Faint marks may extend from shell (3) onto theinsulator. The marks may be a result of corona thatforms at the top of the shell. The conductor willdevelop a corona when a very high voltage potentialionizes the air. This is a normal condition. This is notan indication of leakage between the shell and theinsulator.
Inspect shell (3) for damage. Cracks can be causedby overtightening the spark plug. Overtightening canalso loosen the shell. Discard any spark plug that hasa shell that is cracked or loose.
g00787372Illustration 85(6) Precious metal tips on the electrode and the ground strap
Caterpillar spark plugs have precious metal tips (6)on the electrode and the ground strap. This materialwill gradually erode. Use extreme care when you setthe electrode gap. Maintain even spacing and properalignment between the two precious metal surfaces.
Replace the spark plug if the precious metal is wornoff.
A light brown deposit or a beige deposit around theelectrode is produced by normal operation.
Deposits that are gray or black may be caused bythe following substances:
• Excessive oil
• Use of the wrong oil
• A substance that is introduced through the fuelsystem or the air system

98Maintenance SectionIgnition System Spark Plugs - Check/Adjust/Replace
A spark plug can operate despite a buildup of ash.However, a buildup of ash can cover the electrodegap. This will cause misfire. Large deposits mayretain heat which can cause premature fuel ignition.This can lead to uncontrollable detonation.
Cleaning the Spark PlugThoroughly clean the spark plug. Do not use a wirebrush. Glass beads are the preferred method forcleaning.
Follow these guidelines for using glass beads:
• Always use clean glass beads.
• Use new glass beads for each set of spark plugs.
• Use care in order to clean only the electrode andthe insulator near the electrode.
• Do not use glass beads on the outside of the shellor on the upper part of the insulator.
Checking the Spark PlugAfter the spark plug is clean, measure the sparkplug’s resistance. If the resistance is correct, makesure that the electrode gap is correct before youinstall the spark plug.
Note: A standard ohmmeter cannot be used formeasuring the resistance of a used spark plug.
Use the 142-5055 Insulation Tester Group tomeasure the resistance of the spark plug. Followthe warnings and instructions that are provided withthe tool.
Connect the red lead of the tester to terminal post(1). Because the ground strap is close to electrode(5), you will need to connect a smaller lead to thecenter electrode. Then connect the black lead ofthe tester to the smaller lead. Use the tester’s “KΩ”scale. The correct resistance depends on the sparkplug that is used:
• For the 146-2588 Spark Plug, the correctresistance is approximately 1000 ohms.
• For the 194-8518 Spark Plug, the correctresistance is approximately 500 ohms.
If the resistance is greater than the specification,discard the spark plug and obtain a new spark plug.
Installing the Spark PlugNote: Use the 9U-7516 Spark Plug Gauge tomeasure the electrode gap. Do not use a flat feelergauge for measuring the electrode gap of used sparkplugs. A feeler gauge will incorrectly measure theactual electrode gap because the used preciousmetal tips are curved.
1. Before installing the spark plug, set the electrodegap. The electrode gap depends on the engine’scompression ratio.
a. For compression ratios that are greater than9:1, set the electrode gap to 0.29 ± 0.03 mm(0.011 ± 0.001 inch).
b. For compression ratios of 9:1 or less,set the electrode gap to 0.35 ± 0.03 mm(0.014 ± 0.001 inch).
Adjust the electrode gap, if necessary. Bendthe ground strap at the existing bend. Thenbend the strap near the weld in order to achieveproper alignment and even spacing betweenthe two precious metal surfaces. Measure theelectrode gap after the alignment. Correct theelectrode gap, if necessary.
Note: Do not use anti-seize compound on sparkplugs. Most of the heat is transferred through thethreads and the seat area of the spark plug. Thesurfaces must be in contact in order to provide theheat transfer that is required.
2. Ensure that the spark plug is clean and free ofdirt and oil.
3. Always use a new gasket when a spark plug isinstalled. If a used spark plug is installed, place anew 9Y-6792 Spark Plug Gasket on the sparkplug. Orient the tabs of the gasket toward theelectrode. Otherwise, the gasket may not seatproperly. Do not increase the torque on the sparkplug in order to improve the seal. Do not reuse thegasket. Install a new gasket.
NOTICEDo not overtighten the spark plug. The shell can becracked and the gasket can be deformed. The met-al can deform and the gasket can be damaged. Theshell can be stretched. This will loosen the seal that isbetween the shell and the insulator, allowing combus-tion pressure to blow past the seal. Serious damageto the engine can occur.
Use the proper torque.
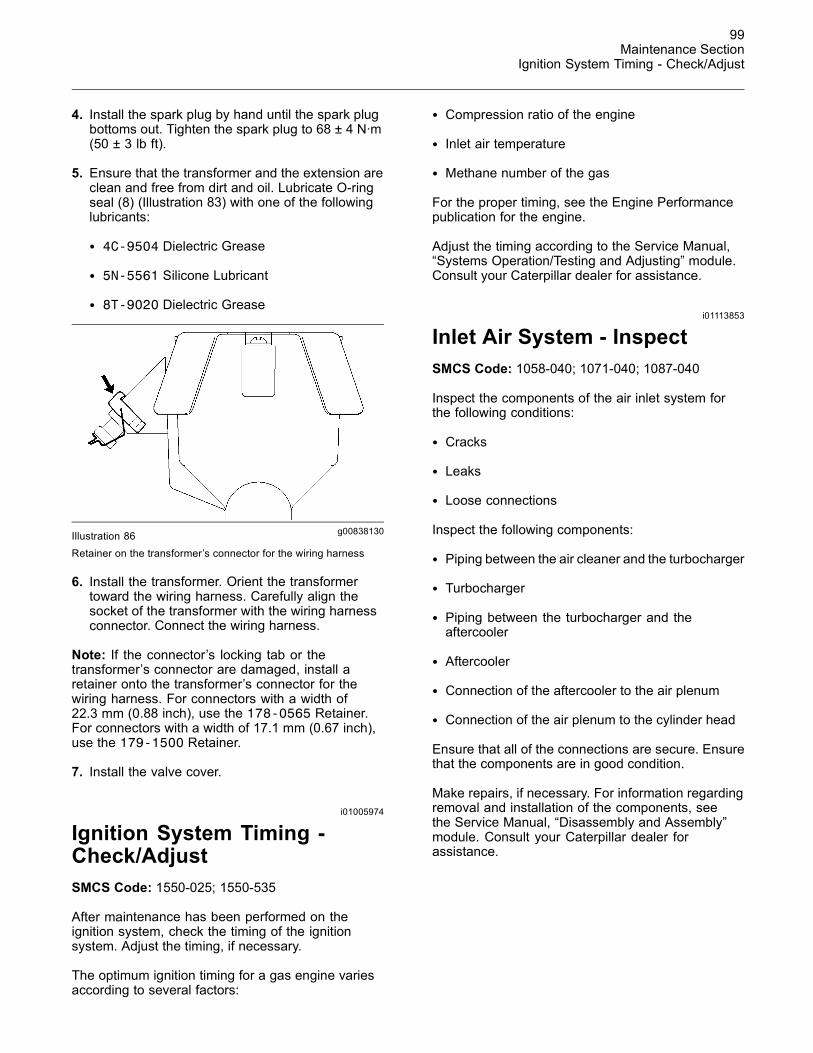
99Maintenance Section
Ignition System Timing - Check/Adjust
4. Install the spark plug by hand until the spark plugbottoms out. Tighten the spark plug to 68 ± 4 N·m(50 ± 3 lb ft).
5. Ensure that the transformer and the extension areclean and free from dirt and oil. Lubricate O-ringseal (8) (Illustration 83) with one of the followinglubricants:
• 4C-9504 Dielectric Grease
• 5N-5561 Silicone Lubricant
• 8T-9020 Dielectric Grease
g00838130Illustration 86Retainer on the transformer’s connector for the wiring harness
6. Install the transformer. Orient the transformertoward the wiring harness. Carefully align thesocket of the transformer with the wiring harnessconnector. Connect the wiring harness.
Note: If the connector’s locking tab or thetransformer’s connector are damaged, install aretainer onto the transformer’s connector for thewiring harness. For connectors with a width of22.3 mm (0.88 inch), use the 178-0565 Retainer.For connectors with a width of 17.1 mm (0.67 inch),use the 179-1500 Retainer.
7. Install the valve cover.
i01005974
Ignition System Timing -Check/AdjustSMCS Code: 1550-025; 1550-535
After maintenance has been performed on theignition system, check the timing of the ignitionsystem. Adjust the timing, if necessary.
The optimum ignition timing for a gas engine variesaccording to several factors:
• Compression ratio of the engine
• Inlet air temperature
• Methane number of the gas
For the proper timing, see the Engine Performancepublication for the engine.
Adjust the timing according to the Service Manual,“Systems Operation/Testing and Adjusting” module.Consult your Caterpillar dealer for assistance.
i01113853
Inlet Air System - InspectSMCS Code: 1058-040; 1071-040; 1087-040
Inspect the components of the air inlet system forthe following conditions:
• Cracks
• Leaks
• Loose connections
Inspect the following components:
• Piping between the air cleaner and the turbocharger
• Turbocharger
• Piping between the turbocharger and theaftercooler
• Aftercooler
• Connection of the aftercooler to the air plenum
• Connection of the air plenum to the cylinder head
Ensure that all of the connections are secure. Ensurethat the components are in good condition.
Make repairs, if necessary. For information regardingremoval and installation of the components, seethe Service Manual, “Disassembly and Assembly”module. Consult your Caterpillar dealer forassistance.

100Maintenance SectionOverhaul (In-Frame)
i01950722
Overhaul (In-Frame)SMCS Code: 1000-020
Scheduling an In-Frame OverhaulGenerally, an in-frame overhaul is performed forevery third top end overhaul. Scheduling an in-frameoverhaul normally depends on the following threeconditions:
• An increase of oil consumption
• An increase of crankcase blowby
• A decrease and a variation of cylinder compression
Each individual condition may not indicate a needfor an overhaul. However, evaluating the threeconditions together is the most accurate method ofdetermining when an overhaul is necessary.
The engine does not require an overhaul if theengine is operating within acceptable limits foroil consumption, crankcase blowby, and cylindercompression.
Periodically measure each of the three conditions.The first measurement should occur during theengine commissioning. This establishes a baselinefor future measurements. Additional measurementsare scheduled at regular intervals in order todetermine a schedule for the next in-frame overhaul.
The following changes in the three conditionsnormally require a scheduled overhaul:
• A 300 percent increase in oil consumption
• A 200 percent increase in crankcase blowby
• A 20 percent loss of cylinder compression
Note: These indications do not require an engineto be shut down for service. These indicationsonly mean that an engine should be scheduled forservice in the near future. If the engine operationis satisfactory, an immediate overhaul is not arequirement.
Monitor the engine as the engine accumulatesservice hours. Consult your Caterpillar dealer aboutscheduling a major overhaul.
Usually, an in-frame overhaul does not requireremoval of the engine. Instead, the service isperformed with the engine in place. If the customerrequires a minimum disruption in the production ofpower, the engine can be replaced with a rebuiltmodel of identical specifications.
Note: The generator or the driven equipment mayalso require service when the engine overhaul isperformed. Refer to the literature that is provided bythe OEM of the driven equipment.
In-Frame Overhaul InformationAn in-frame overhaul includes all of the work that isdone for a top end overhaul. Additionally, some othercomponents that wear are replaced. The conditionof components is inspected. Those components arereplaced, if necessary.
Your Caterpillar dealer can provide these servicesand components. Your Caterpillar dealer can ensurethat the components are operating within theappropriate specifications.
The following definitions explain the terminology forthe services that are performed during an overhaul:
Inspect – Inspect the components according tothe instructions that are in Caterpillar reusabilitypublications. Refer to Guidelines for ReusableParts and Salvage Operations, SEBF8029, “Indexof Publications on Reusability or Salvage of UsedParts”. The guidelines were developed in order tohelp Caterpillar dealers and customers to avoidunnecessary expenditures. New parts are notrequired if the existing parts can still be used,reconditioned, or repaired. If the components arenot in the reusability guidelines, refer to the ServiceManual, “Specifications” module.
Rebuild – The component can be reconditioned inorder to comply with reusability guidelines.
Replace – The service life of the part is exhausted.The part may fail before the next maintenanceinterval. The part must be replaced with a part thatmeets functional specifications. The replacementpart may be a new part, a CAT remanufactured part,a rebuilt part, or a used part. Some worn componentsmay be exchanged with your Caterpillar dealer.Consult your Caterpillar dealer about repair optionsfor your engine.
If you elect to perform an overhaul without theservices of a Caterpillar dealer, be aware of therecommendations in Table 23.

101Maintenance Section
Overhaul (Major)
Table 23
In-Frame Overhaul
Clean Oil suction screen
CleanInspectTest
Aftercooler core
Compressor bypass valve
Fuel metering valve
Electrohydraulic actuator
Hydraulic oil pump
Oil cooler
Oil pump
Pistons
InspectRebuildReplace
Transformers
Exhaust bypass
Prelube pump
Starting motor
Turbochargers
Rebuild
Water pumps
Connecting rod bearings
Cylinder head assemblies
Cylinder liners
Main bearings
Oil temperature regulators
Piston rings
Replace
Water temperature regulators
i01642396
Overhaul (Major)SMCS Code: 7595-020-MJ
Scheduling a Major OverhaulNote: For information on estimating operating hoursbefore an overhaul, see Maintenance ManagementSchedules, SEBU6127.
Generally, a major overhaul is performed at the sixthtop end overhaul. The need for a major overhaul isdetermined by several factors. Some of those factorsare the same factors that determine the in-frameoverhaul:
• An increase of oil consumption
• An increase of crankcase blowby
• A decrease and variation of cylinder compression
Other factors must also be considered for determininga major overhaul:
• The service hours of the engine
• The wear metal analysis of the lube oil
• An increase in the levels of noise and vibration
An increase of wear metals in the lube oil indicatesthat the bearings and the surfaces that wear mayneed to be serviced. An increase in the levels ofnoise and vibration indicates that rotating partsrequire service.
Note: It is possible for oil analysis to indicate adecrease of wear metals in the lube oil. The cylinderliners may be worn so that polishing of the boreoccurs. Also, the increased use of lube oil will dilutethe wear metals.
Monitor the engine as the engine accumulatesservice hours. Consult your Caterpillar dealer aboutscheduling a major overhaul.
Note: The driven equipment may also require servicewhen the engine is overhauled. Refer to the literaturethat is provided by the OEM of the driven equipment.
Major Overhaul InformationA major overhaul includes all of the work that is donefor top end overhauls and in-frame overhauls. Amajor overhaul includes additional parts and labor.Additional parts and labor are required in order tocompletely rebuild the engine. In some cases, theengine is relocated for disassembly.
For the major overhaul, all of the bearings,seals, gaskets, and components that wear aredisassembled. The parts are cleaned and inspected.If necessary, the parts are replaced. The crankshaftis measured for wear. The crankshaft may requireregrinding. Alternatively, the crankshaft may bereplaced with a Caterpillar replacement part.
Your Caterpillar dealer can provide these servicesand components. Your Caterpillar dealer can ensurethat the components are operating within theappropriate specifications.
If you elect to perform an overhaul without theservices of a Caterpillar dealer, be aware of thefollowing recommendations.
Replacing of Components
Replace the following components during the majoroverhaul.

102Maintenance SectionOverhaul (Top End)
• Camshaft bearings
• Connecting rod bearings
• Coupling (tandem engines)
• Cylinder liners
• Piston rings
• Cylinder heads, gaskets, and bolts
• Gaskets and seals
• Gear train bearings
• Main bearings
• Oil temperature regulators
• Water temperature regulators
• Wiring harnesses
Rebuilding or Replacing of Components
Rebuild the following components during the majoroverhaul.
• Carburetor
• Crankshaft vibration damper 1.
• Exhaust bypass
• Gas regulator
• Prelube pump
• Starting motor
• Turbochargers
• Water pumps
Note: 1. Replace the crankshaft vibration damper ifthe damper cannot be rebuilt.
Inspecting Components
Inspect the following components according tothe instructions that are in Caterpillar reusabilitypublications. Refer to Guidelines for ReusableParts and Salvage Operations, SEBF8029, “Indexof Publications on Reusability or Salvage of UsedParts”.
• Aftercooler
• Camshafts
• Camshaft followers
• Connecting rods
• Crankshaft
• Gear train
• Governor
• Inlet air piping
• Oil cooler
• Oil pump
• Pistons
• Transformers
i01645114
Overhaul (Top End)SMCS Code: 7595-020-TE
Scheduling a Top End OverhaulNote: For information on estimating operating hoursbefore an overhaul, see Maintenance ManagementSchedules, SEBU6127.
Top end overhauls are scheduled according tothe recession of the exhaust valve stems. Thismeasurement provides an accurate indication of therate of valve wear. This measurement can be used topredict when a cylinder head requires replacement.
Measure the projection of the exhaust valve stemswithin the first 1000 service hours. This measurementis the baseline. The baseline is a reference forsubsequent measurements. Continue to periodicallymeasure the projection.
Plan for the top end overhaul as the valve stemprojection approaches the maximum limit 1.8 mm(0.07 inch). Perform the top end overhaul when thevalve stem projection has increased by a total of2.3 mm (0.09 inch). Do not allow the projection of theexhaust valve stems to exceed this limit.
Note: Generally, cylinder heads wear out at differentrates. In some cases, servicing the cylinder heads atdifferent times may be the most economic decision.This depends on the valve stem projection of theindividual cylinders. However, this decision mustinclude the costs of additional downtime that iscaused by this procedure. Perform an economicanalysis in order to determine if cylinder heads shouldbe serviced as a group or divided into smaller groups.

103Maintenance SectionOverhaul (Top End)
Note: The generator or the driven equipment mayalso require service when the engine overhaul isperformed.
Top End Overhaul InformationA top end overhaul involves servicing the cylinderheads and turbochargers. Also, some other enginecomponents are inspected.
Top end overhauls require more tools than preventivemaintenance. The following tools are needed forrestoring the engine to factory specifications:
• Torque wrenches
• Dial indicators
• Accurate measurement tools
• Cleaning equipment
• Rebuilding equipment
Caterpillar dealers are equipped with these tools.Caterpillar dealers can provide a flat rate price fora top end overhaul.
Unexpected problems may be found during a topend overhaul. Plan to correct these problems, ifnecessary.
• Buildup in the cylinders from excessive oilconsumption
• Buildup in the cylinders from contamination of thefuel
• Plugging of the aftercooler from coolant that ispoorly maintained
• Plugging of the aftercooler from contamination ofthe inlet air
• Degradation of the oil cooler from hydrogen sulfidein the fuel
Inspect the following components according tothe instructions that are in Caterpillar reusabilitypublications. Refer to Guidelines for ReusableParts and Salvage Operations, SEBF8029, “Indexof Publications on Reusability or Salvage of UsedParts”.
Your Caterpillar dealer can provide these servicesand components. Your Caterpillar dealer can ensurethat the components are operating within theappropriate specifications.
If you elect to perform an overhaul without theservices of a Caterpillar dealer, be aware of thefollowing recommendations.
Replacing of Components
Replace the following components during a top endoverhaul.
• Cylinder heads and gaskets
• Oil temperature regulators
• Water temperature regulators
Rebuilding of Components
Rebuild the following components during a top endoverhaul:
• Carburetor
• Exhaust bypass
• Gas regulator
• Prelube pump
• Starting motor
• Turbochargers
• Water pumps
Note: Periodic inspection of the turbocharger isrecommended for determining when the turbochargerwill require an overhaul. In a few applications, theturbocharger may require rebuilding prior to the topend overhaul. An example is an application withloads that vary frequently. In these cases, rebuildingthe turbocharger normally occurs separately fromrebuilding the cylinder heads. Some applicationscan operate longer before the turbocharger requiresrebuilding. Only experience can determine the actualneed.
Inspecting of Components
Clean the aftercooler core and the oil coolercore. Pressure test the components. Replace thecomponents.
Note: It is difficult to clean the aftercooler core whenproper maintenance is not performed . The tank thatis opposite of the inlet port and the outlet port can notbe removed for cleaning.
Note: This procedure may be used for cleaning boththe aftercooler core and the oil cooler core.
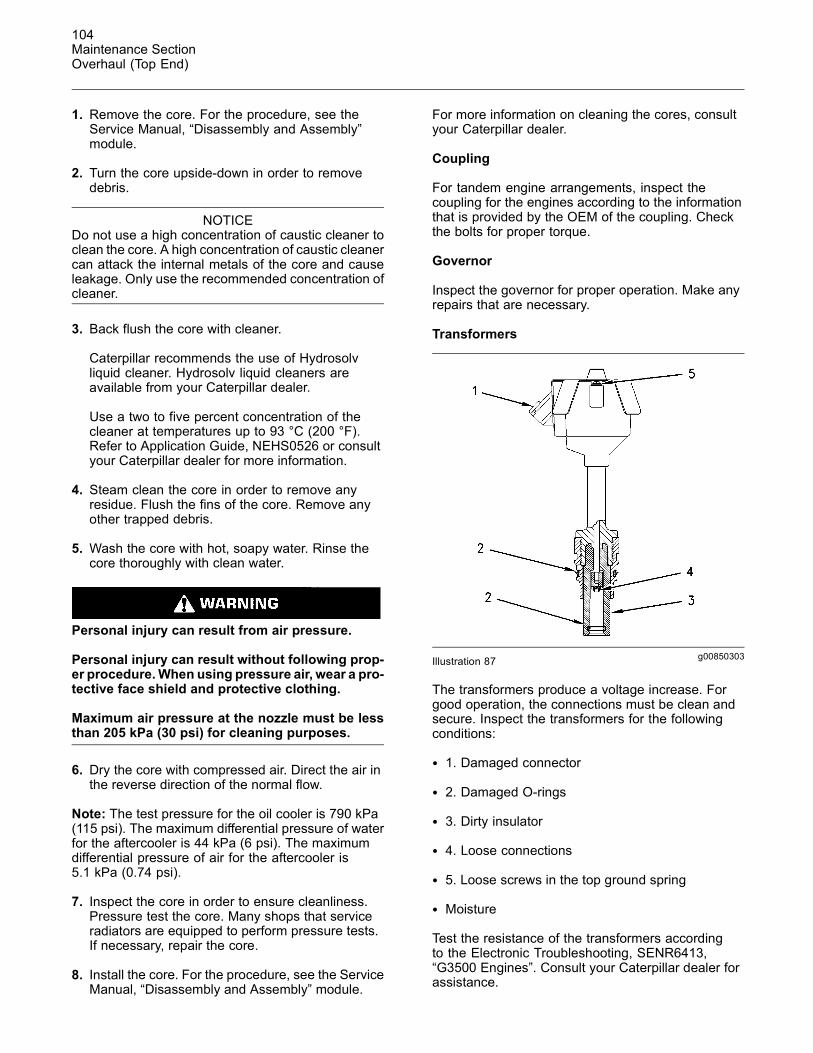
104Maintenance SectionOverhaul (Top End)
1. Remove the core. For the procedure, see theService Manual, “Disassembly and Assembly”module.
2. Turn the core upside-down in order to removedebris.
NOTICEDo not use a high concentration of caustic cleaner toclean the core. A high concentration of caustic cleanercan attack the internal metals of the core and causeleakage. Only use the recommended concentration ofcleaner.
3. Back flush the core with cleaner.
Caterpillar recommends the use of Hydrosolvliquid cleaner. Hydrosolv liquid cleaners areavailable from your Caterpillar dealer.
Use a two to five percent concentration of thecleaner at temperatures up to 93 °C (200 °F).Refer to Application Guide, NEHS0526 or consultyour Caterpillar dealer for more information.
4. Steam clean the core in order to remove anyresidue. Flush the fins of the core. Remove anyother trapped debris.
5. Wash the core with hot, soapy water. Rinse thecore thoroughly with clean water.
Personal injury can result from air pressure.
Personal injury can result without following prop-er procedure.When using pressure air, wear a pro-tective face shield and protective clothing.
Maximum air pressure at the nozzle must be lessthan 205 kPa (30 psi) for cleaning purposes.
6. Dry the core with compressed air. Direct the air inthe reverse direction of the normal flow.
Note: The test pressure for the oil cooler is 790 kPa(115 psi). The maximum differential pressure of waterfor the aftercooler is 44 kPa (6 psi). The maximumdifferential pressure of air for the aftercooler is5.1 kPa (0.74 psi).
7. Inspect the core in order to ensure cleanliness.Pressure test the core. Many shops that serviceradiators are equipped to perform pressure tests.If necessary, repair the core.
8. Install the core. For the procedure, see the ServiceManual, “Disassembly and Assembly” module.
For more information on cleaning the cores, consultyour Caterpillar dealer.
Coupling
For tandem engine arrangements, inspect thecoupling for the engines according to the informationthat is provided by the OEM of the coupling. Checkthe bolts for proper torque.
Governor
Inspect the governor for proper operation. Make anyrepairs that are necessary.
Transformers
g00850303Illustration 87
The transformers produce a voltage increase. Forgood operation, the connections must be clean andsecure. Inspect the transformers for the followingconditions:
• 1. Damaged connector
• 2. Damaged O-rings
• 3. Dirty insulator
• 4. Loose connections
• 5. Loose screws in the top ground spring
• Moisture
Test the resistance of the transformers accordingto the Electronic Troubleshooting, SENR6413,“G3500 Engines”. Consult your Caterpillar dealer forassistance.

105Maintenance Section
Overhaul Considerations
Oil Suction Screen
Hot oil and components can cause personal in-jury.
Do not allow hot oil or components to contactskin.
Clean the oil suction screen after the oil has beendrained.
g00787412Illustration 88(1) Cover(2) O-ring seal(3) Screen assembly
Note: Approximately 1 L (1 qt) of oil will remain in thehousing after the sump has been completely drained.This oil will pour out of the housing when cover (1) isremoved. Prepare to catch the oil in a pan. Clean upany spilled oil with absorbent pillows or towels. DONOT use absorbent particles to clean up the oil.
1. Loosen the bolts from cover (1). Remove cover(1) and O-ring seal (2). Discard the seal. Removescreen assembly (3).
2. Wash screen assembly (3) in clean nonflammablesolvent. Allow the screen assembly to dry beforeinstallation.
3. Remove the side covers from the engine blockand clean the inside of the oil pan. Install the sidecovers.
4. Inspect screen assembly (3) for good condition.Obtain a new screen assembly, if necessary.Install the screen assembly. Install a new O-ringseal (2). Install cover (1).
i01950926
Overhaul ConsiderationsSMCS Code: 7595-043
Overhaul InformationAn overhaul is replacing the major worn componentsof the engine. An overhaul is a maintenance intervalthat is planned. The engine is rebuilt with certainrebuilt parts or new parts that replace the worn parts.
An overhaul also includes the following maintenance:
• Inspection of all the parts that are visible duringthe disassembly
• Replacement of the seals and gaskets that areremoved
• Cleaning of the internal passages of the engineand the engine block
Most owners will save money by overhauling theengine at the intervals that are recommended inthe Operation and Maintenance Manual. It is notpractical to wait until the engine exhibits symptomsof excessive wear or failure. It is not less costly towait. A planned overhaul before failure may be thebest value for the following reasons:
• Costly unplanned downtime can be avoided.
• Many original parts can be reused according to theguidelines for reusable parts.
• The service life of the engine can be extendedwithout the risk of a major catastrophe due toengine failure.
• Achieve the best cost/value relationship per hourof extended service life.
Overhaul Intervals
Top end overhauls are determined by the projectionof exhaust valve stems. In-frame overhauls aredetermined by cylinder compression, crankcaseblowby, and oil consumption. Major overhauls aredetermined by the in-frame tests, and by results ofS·O·S oil analysis.
Some other factors that are important for determiningthe overhaul intervals include the followingconsiderations:
• Performance of preventive maintenance
• Use of recommended lubricants

106Maintenance SectionOverhaul Considerations
• Use of recommended coolants
• Use of recommended fuels
• Proper installation
• Operating conditions
• Operation within acceptable limits
• Engine load
• Engine speed
Note: To avoid oil problems, engines that areturbocharged and aftercooled must be operated at aminimum of 60 percent of rated load.
Generally, engines that are operated at a reducedload and/or speed achieve more service life beforean overhaul. However, this is for engines that areproperly operated and maintained.
Overhaul Inspection
Refer to the Service Manual for the disassembly andassembly procedures that are necessary in orderto perform the required maintenance on the itemsthat are listed. Consult your Caterpillar dealer forassistance.
To determine the reusability publications that areneeded to inspect the engine, refer to Guidelines forReusable Parts and Salvage Operations, SEBF8029,“Index of Publications on Reusability or Salvage ofUsed Parts”.
The Guidelines For Reusable Parts and SalvageOperations is part of an established Caterpillarparts reusability program. These guidelines weredeveloped in order to assist Caterpillar dealers andcustomers reduce costs by avoiding unnecessaryexpenditures for new parts. If the engine parts complywith the established inspection specifications, theparts can be reused. New parts are not necessary ifthe old parts can be reused, repaired, or salvaged.
If the parts are not within the inspection specifications,the parts should be salvaged, repaired, replaced,or exchanged. The use of out-of-spec parts couldresult in unscheduled downtime and/or costly repairs.The use of out-of-spec parts can also contribute toincreased fuel consumption and reduction of engineefficiency.
Your Caterpillar dealer can provide the parts that areneeded to rebuild the engine at the least possiblecost.
Overhaul Programs
An economical way to obtain most of the partsthat are needed for overhauls is to use Caterpillarremanufactured parts. Caterpillar remanufacturedparts are available at a fraction of the cost of newparts. These parts have been rebuilt by Caterpillarand certified for use. The following components areexamples of the remanufactured parts:
• Alternators
• Connecting rods
• Crankshafts
• Cylinder heads
• Oil Pumps
• Starting motors
• Turbochargers
• Water pumps
Consult your Caterpillar dealer for details and for alist of the remanufactured parts that are available.
Your Caterpillar dealer may be offering a variety ofoverhaul options.
A Flat Rate Overhaul guarantees the maximum pricethat you will pay for an overhaul. Flat rate prices onpreventive maintenance programs or major repairoptions are available from many servicing dealersfor all Caterpillar Engines. Consult your Caterpillardealer in order to schedule a before failure overhaul.
Overhaul Recommendation
Caterpillar recommends a scheduled overhaul inorder to minimize downtime. A scheduled overhaulwill provide the lowest cost and the greatest value.Schedule an overhaul with your Caterpillar dealer.
Overhaul programs vary between dealers. To obtainspecific information about the types of overhaulprograms and services, consult your Caterpillardealer.

107Maintenance Section
Power Take-Off Clutch - Check/Adjust/Lubricate
i01506009
Power Take-Off Clutch -Check/Adjust/LubricateSMCS Code: 3055-036; 3055-086
NOTICENew power take-offs should have the clutch adjust-ment checked before being placed into service. Theclutch adjustment should be checked again after thefirst ten hours of operation. New clutch plates have a“wear in” period, and the clutch may require severaladjustments until the new plates are “worn in”.
g00781502Illustration 89(1) Instruction plate(2) Serial number plate
Check the clutch adjustment regularly after “wear in”.Heavy-duty applications which have engagementsthat are frequent and relatively long periods ofclutch slippage require more frequent adjustmentthan light-duty applications. The operating torqueshould be measured in order to determine if a clutchadjustment is required.
Refer to the OEM information and instruction plate(1) for instructions on lubrication, adjustment, andother recommendations for service. Perform themaintenance that is specified on the instruction plate.
Do not operate the engine with the InstructionPlate cover removed from the clutch. Personalinjury may result.
If the clutch is damaged to the point of burst fail-ure, expelled pieces can cause personal injury toanyone in the immediate area. Proper safeguardsmust be followed to help prevent accidents.
i01604510
Radiator - CleanSMCS Code: 1353-070
Note: Adjust the frequency of cleaning according tothe effects of the operating environment.
Inspect the radiator for these items: damaged fins,corrosion, dirt, grease, insects, leaves, oil, and otherdebris. Clean the radiator, if necessary.
Personal injury can result from air pressure.
Personal injury can result without following prop-er procedure.When using pressure air, wear a pro-tective face shield and protective clothing.
Maximum air pressure at the nozzle must be lessthan 205 kPa (30 psi) for cleaning purposes.
Pressurized air is the preferred method for removingloose debris. Direct the air in the opposite directionof the fan’s air flow. Hold the nozzle approximately6 mm (0.25 inch) away from the fins. Slowly move theair nozzle in a direction that is parallel with the tubes.This will remove debris that is between the tubes.
Pressurized water may also be used for cleaning.The maximum water pressure for cleaning purposesmust be less than 275 kPa (40 psi). Use pressurizedwater in order to soften mud. Clean the core fromboth sides.
Use a degreaser and steam for removal of oil andgrease. Clean both sides of the core. Wash the corewith detergent and hot water. Thoroughly rinse thecore with clean water.
After cleaning, start the engine and accelerate theengine to high idle rpm. This will help in the removalof debris and drying of the core. Stop the engine.Use a light bulb behind the core in order to inspectthe core for cleanliness. Repeat the cleaning, ifnecessary.
Inspect the fins for damage. Bent fins may be openedwith a “comb”. Inspect these items for good condition:welds, mounting brackets, air lines, connections,clamps, and seals. Make repairs, if necessary.
For more detailed information on cleaning andinspection, refer to Special Publication, SEBD0518,“Know Your Cooling System”.
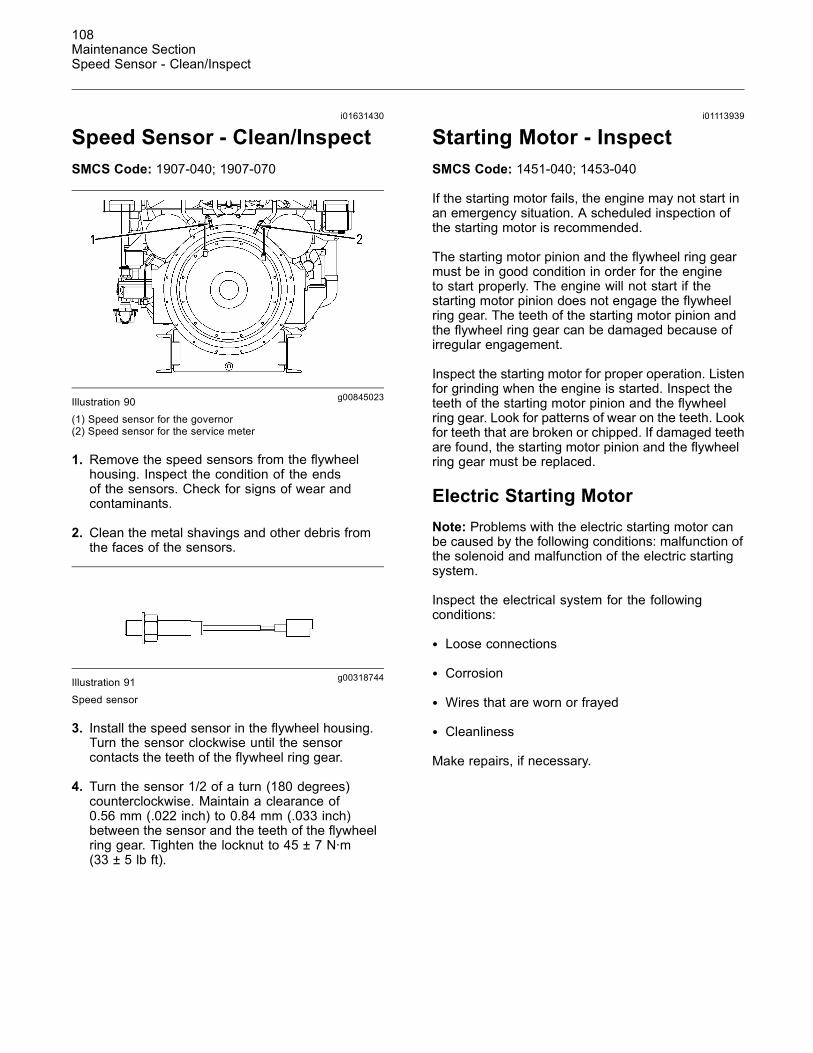
108Maintenance SectionSpeed Sensor - Clean/Inspect
i01631430
Speed Sensor - Clean/InspectSMCS Code: 1907-040; 1907-070
g00845023Illustration 90(1) Speed sensor for the governor(2) Speed sensor for the service meter
1. Remove the speed sensors from the flywheelhousing. Inspect the condition of the endsof the sensors. Check for signs of wear andcontaminants.
2. Clean the metal shavings and other debris fromthe faces of the sensors.
g00318744Illustration 91Speed sensor
3. Install the speed sensor in the flywheel housing.Turn the sensor clockwise until the sensorcontacts the teeth of the flywheel ring gear.
4. Turn the sensor 1/2 of a turn (180 degrees)counterclockwise. Maintain a clearance of0.56 mm (.022 inch) to 0.84 mm (.033 inch)between the sensor and the teeth of the flywheelring gear. Tighten the locknut to 45 ± 7 N·m(33 ± 5 lb ft).
i01113939
Starting Motor - InspectSMCS Code: 1451-040; 1453-040
If the starting motor fails, the engine may not start inan emergency situation. A scheduled inspection ofthe starting motor is recommended.
The starting motor pinion and the flywheel ring gearmust be in good condition in order for the engineto start properly. The engine will not start if thestarting motor pinion does not engage the flywheelring gear. The teeth of the starting motor pinion andthe flywheel ring gear can be damaged because ofirregular engagement.
Inspect the starting motor for proper operation. Listenfor grinding when the engine is started. Inspect theteeth of the starting motor pinion and the flywheelring gear. Look for patterns of wear on the teeth. Lookfor teeth that are broken or chipped. If damaged teethare found, the starting motor pinion and the flywheelring gear must be replaced.
Electric Starting MotorNote: Problems with the electric starting motor canbe caused by the following conditions: malfunction ofthe solenoid and malfunction of the electric startingsystem.
Inspect the electrical system for the followingconditions:
• Loose connections
• Corrosion
• Wires that are worn or frayed
• Cleanliness
Make repairs, if necessary.

109Maintenance Section
Turbocharger - Inspect
Air Starting Motor
Personal injury or death can result from improp-erly checking for a leak.
Always use a board or cardboard when checkingfor a leak. Escaping air or fluid under pressure,even a pin-hole size leak, can penetrate body tis-sue causing serious injury, and possible death.
If fluid is injected into your skin, it must be treatedimmediately by a doctor familiar with this type ofinjury.
Inspect all of the components in the air circuit forthe starting motor. Inspect all of the air lines andconnections for leaks.
If the teeth of the starting motor pinion and/or theflywheel ring gear are damaged, the air circuit forthe starting motor must be examined in order todetermine the cause of the problem.
Removal and Installation of theStarting MotorRefer to the Service Manual, “Disassembly andAssembly” module for information on removing thestarting motor and installing the starting motor.
Consult your Caterpillar dealer for assistance.
i01454354
Turbocharger - InspectSMCS Code: 1052-040
Periodic inspection and cleaning is recommended forthe turbocharger. Fouling of the turbine wheels cancontribute to loss of engine power and overall lossof engine efficiency.
If the turbocharger fails during engine operation,damage to the turbocharger compressor wheeland/or to the engine may occur. Damage to theturbocharger compressor wheel could allow partsfrom the compressor wheel to enter an enginecylinder. This can cause additional damage to thepistons, the valves, and the cylinder head.
NOTICETurbocharger bearing failures can cause large quan-tities of oil to enter the air inlet and exhaust systems.Loss of engine lubricant can result in serious enginedamage.
Minor leakage of a turbocharger housing under ex-tended low idle operation should not cause problemsas long as a turbocharger bearing failure has not oc-curred.
When a turbocharger bearing failure is accompaniedby a significant engine performance loss (exhaustsmoke or engine rpm up at no load), do not continueengine operation until the turbocharger is repaired orreplaced.
An inspection of the turbocharger can minimizeunscheduled downtime. Also, the chance for potentialdamage to other engine parts is reduced.
Note: Turbocharger components require clearancesthat are precise. The turbocharger cartridge must bebalanced due to high rpm.
The following conditions can cause the turbochargerto be out-of-balance:
• The buildup of deposits
• Chipping and/or flaking of deposits
If the turbocharger must be removed for inspection,use caution. Do not break deposits from the turbinewheel. Do not attempt to clean the turbine wheel. Foroptions regarding removal, installation, repair andreplacement, see the Service Manual or consult yourCaterpillar dealer.
1. Remove the exhaust outlet piping and removethe air inlet piping from the turbocharger. Visuallyinspect the piping for the presence of oil.
2. Turn the compressor wheel and the turbine wheelby hand. The assembly should turn freely. Inspectthe compressor wheel and the turbine wheel forcontact with the turbocharger housing. Thereshould not be any visible signs of contact betweenthe turbine wheel or compressor wheel and theturbocharger housing. If there is any indication ofcontact between the rotating turbine wheel or thecompressor wheel and the turbocharger housing,the turbocharger should be reconditioned.
3. Check the compressor wheel for cleanliness.If only the inlet side of the wheel is dirty, dirtand/or moisture is passing through the air filteringsystem. If oil is found only on the back side of thewheel, there is a possibility of a failed turbochargeroil seal.

110Maintenance SectionValve Stem Projection - Measure/Record
The presence of oil may be the result of extendedengine operation at low idle. The presence of oilmay also result from restriction of the inlet air(plugged air filters). This causes oil to leak pastthe seal for the turbocharger compressor.
If oil is found on the compressor wheel and/orat the air inlet, the source of the oil is the fuelcompressor or the PCV system.
Note: Deposits of ash and silicone can accumulateon the turbine wheel. Turbine wheel will becomeunbalanced when the deposits flake off. Theturbocharger cartridge must be replaced when thisoccurs. However, remove deposits from the housing.This will prevent wear on the blades of the newturbine wheel.
4. Inspect the turbine wheel and the nozzle fordeposits of ash and silicone. If deposits of 1.6 mm(0.06 inch) thickness are found or if the turbine isin contact with the housing, the turbocharger mustbe disassembled and cleaned. Removal of thedeposits can be difficult.
5. Inspect the bore of the turbine housing forcorrosion and deposits.
6. Clean the turbocharger compressor housing withstandard shop solvents and a soft bristle brush.
7. Fasten the air inlet piping and the exhaust outletpiping to the turbocharger housing.
i01966163
Valve Stem Projection -Measure/RecordSMCS Code: 1105-082
Valve Recession – The valves and the valve seatsare worn over time. This causes the valves to recedeinto the cylinder head. This condition is called “valverecession”.
The exhaust valves and valve seats show thegreatest wear. The top end overhaul is scheduledaccording to the recession of the exhaust valves.
It is difficult to measure the actual valve recessionin the cylinder head. A simpler method is used todetermine the valve recession:
• Measure the projection of the valve rotator abovethe cylinder head. It is not necessary to remove therocker arms in order to obtain this measurement.
Measure the projection of the exhaust valve rotatorswith a 155-1536 Valve Recession Tool Group.Follow the instructions that are provided with the toolgroup.
Record the measurements on the Operation andMaintenance Manual, “Valve Data Sheet” (ReferenceMaterials Section).
• Measure the projection of the exhaust valverotators after 250 service hours. This measurementis the baseline. The baseline is a reference forsubsequent measurements.
• Measure the projection of the exhaust valverotators at the first 1000 service hours. Illustration92 shows schedules for determining subsequentintervals.
• After 70 percent of the maximum limit has beenreached, measure the projection of the exhaustvalve rotators at every 1000 hours of operation.The 70 percent is 1.60 mm (0.063 inch).
• Plan for the top end overhaul as the projection ofthe valve rotator approaches the maximum limit.Perform the top end overhaul when the projectionof the valve rotator has increased by a total of2.3 mm (0.09 inch). Do not allow the recessionof the exhaust valves to exceed this limit. Thevalve head can break. This will cause severedamage in the combustion chamber.
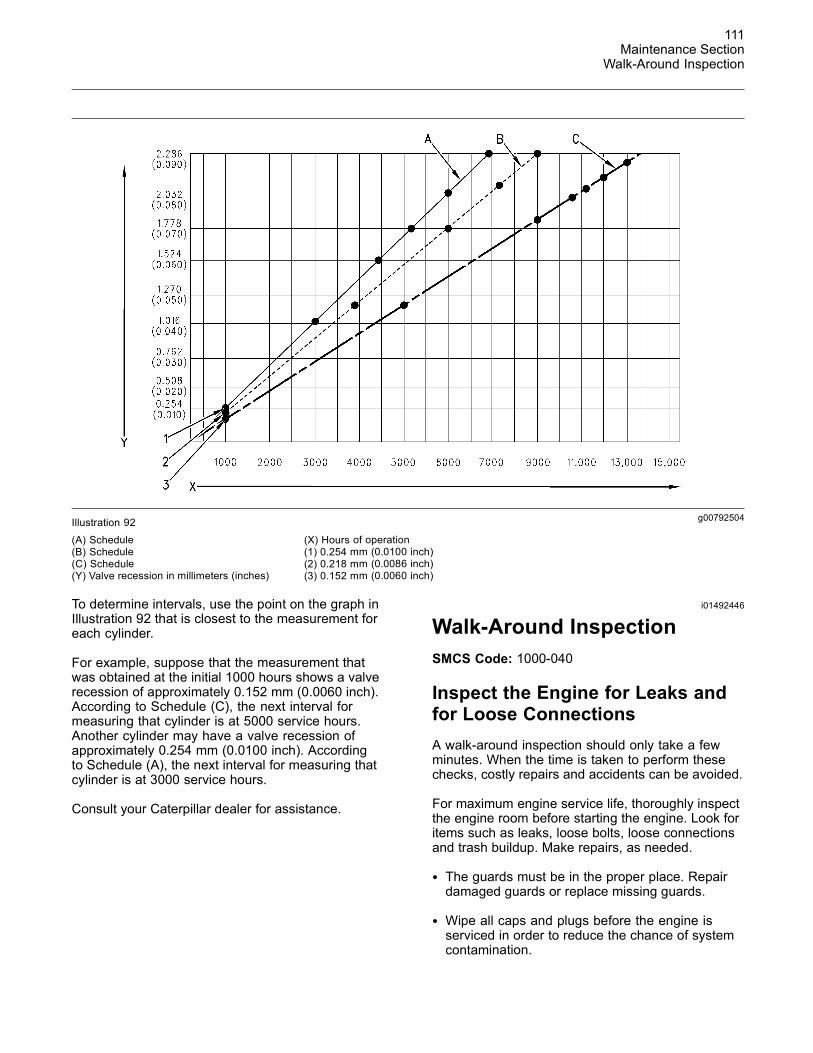
111Maintenance Section
Walk-Around Inspection
g00792504Illustration 92
(A) Schedule(B) Schedule(C) Schedule(Y) Valve recession in millimeters (inches)
(X) Hours of operation(1) 0.254 mm (0.0100 inch)(2) 0.218 mm (0.0086 inch)(3) 0.152 mm (0.0060 inch)
To determine intervals, use the point on the graph inIllustration 92 that is closest to the measurement foreach cylinder.
For example, suppose that the measurement thatwas obtained at the initial 1000 hours shows a valverecession of approximately 0.152 mm (0.0060 inch).According to Schedule (C), the next interval formeasuring that cylinder is at 5000 service hours.Another cylinder may have a valve recession ofapproximately 0.254 mm (0.0100 inch). Accordingto Schedule (A), the next interval for measuring thatcylinder is at 3000 service hours.
Consult your Caterpillar dealer for assistance.
i01492446
Walk-Around InspectionSMCS Code: 1000-040
Inspect the Engine for Leaks andfor Loose ConnectionsA walk-around inspection should only take a fewminutes. When the time is taken to perform thesechecks, costly repairs and accidents can be avoided.
For maximum engine service life, thoroughly inspectthe engine room before starting the engine. Look foritems such as leaks, loose bolts, loose connectionsand trash buildup. Make repairs, as needed.
• The guards must be in the proper place. Repairdamaged guards or replace missing guards.
• Wipe all caps and plugs before the engine isserviced in order to reduce the chance of systemcontamination.

112Maintenance SectionWater Pump - Inspect
NOTICEFor any type of leak, clean up the fluid. If leaking is ob-served, find the source and correct the leak. If leakingis suspected, check the fluid levels more often thanrecommended until the leak is found or fixed, or untilthe suspicion of a leak is proved to be unwarranted.
NOTICEAccumulated grease and/or oil on an engine or deck isa fire hazard. Remove this debris with steam cleaningor high pressure water.
• Ensure that cooling lines are properly clamped.Check for leaks. Check the condition of all pipes.
• Inspect the water pumps for coolant leaks.
Note: The water pump seal is lubricated by coolantin the cooling system. It is normal for a small amountof leakage to occur when the engine cools and theparts contract.
Excessive coolant leakage may indicate the needto replace the water pump seal. For instructionson removal and installation of water pumps and/orseals, refer to the Service Manual, “Disassembly andAssembly” module for the engine or consult yourCaterpillar dealer.
• Inspect the lubrication system for leaks at the frontcrankshaft seal, the rear crankshaft seal, the oilpan, the oil filters and the valve covers.
NEVER use a flame to check for gas leaks. Use agas detector.
An open flame can ignite mixtures of air and fuel.This will cause explosion and/or fire which couldresult in severe personal injury or death.
• Check the fuel system for leaks. Look for loose fuelline clamps.
• Inspect the piping for the air inlet system and theelbows for cracks and for loose clamps.
• Inspect the wiring and the wiring harnesses forloose connections and for worn wires or frayedwires.
• Inspect the ground straps for good connectionsand for good condition.
• Check the condition of the gauges. Replace anygauge that is damaged. Replace any gauge thatcan not be calibrated.
• Inspect the exhaust system for leaks. If a leak isfound, make repairs.
i00524084
Water Pump - InspectSMCS Code: 1361-040
A failed water pump might cause severe engineoverheating problems that could result in cracks inthe cylinder head, a piston seizure or other potentialdamage to the engine.
Visually inspect the water pump for leaks. If leakingof the water pump seals is observed, replace all ofthe water pump seals. Refer to the Service Manualfor the disassembly and assembly procedure.
Inspect the water pump for wear, cracks, pin holesand proper operation. Refer to the Service Manual orconsult your Caterpillar dealer if repair is needed orreplacement is needed.
i01665404
Water Temperature Regulator -ReplaceSMCS Code: 1355-510
Replace the Water TemperatureRegulators in the WaterTemperature Regulator Housingand in the Thermostatic Valve
g00787738Illustration 93
Replace the water temperature regulators beforethe water temperature regulators fail. This is arecommended preventive maintenance practice.Replacing the water temperature regulators reducesthe chances for unscheduled downtime.

113Maintenance Section
Water Temperature Regulator - Replace
A water temperature regulator that fails in apartially opened position can cause overheating orovercooling of the engine.
A water temperature regulator that fails in the closedposition can cause excessive overheating. Excessiveoverheating could result in cracking of the cylinderhead or a seizure of the pistons.
A water temperature regulator that fails in the openposition will cause the engine operating temperatureto be too low during partial load operation. Lowengine operating temperatures during partial loadscould cause an excessive carbon buildup inside thecylinders. This excessive carbon buildup could resultin an accelerated wear of the piston rings and wearof the cylinder liner. Also, a low temperature canallow moisture to condense in the oil. This can formdamaging acids.
NOTICEFailure to replace the water temperature regulator ona regularly scheduled basis could cause severe en-gine damage.
Never operate an engine without the water tempera-ture regulator installed.
If the water temperature regulator is installed incor-rectly, the enginemay overheat, causing cylinder headdamage. Ensure that the new water temperature reg-ulator is installed in the original position.
For the procedure to replace the water temperatureregulators, see the Service Manual, “Disassemblyand Assembly” module. Consult your Caterpillardealer for assistance.
Note: If only the water temperature regulators arereplaced, drain the coolant from the cooling system toa level that is below the water temperature regulatorhousing.

114Reference Information SectionCustomer Service
Reference InformationSection
Customer Servicei02097871
Customer AssistanceSMCS Code: 1000; 4450
USA and CanadaWhen a problem arises concerning the operation ofan engine or concerning the service of an engine,the problem will normally be managed by the dealerin your area.
Your satisfaction is a primary concern to Caterpillarand to Caterpillar dealers. If you have a problem thathas not been handled to your complete satisfaction,follow these steps:
1. Discuss your problem with a manager from thedealership.
2. If your problem cannot be resolved at the dealerlevel without additional assistance, use the phonenumber that is listed below to talk with a FieldService Coordinator:
1-800-447-4986
The normal hours are from 8:00 to 4:30 Mondaythrough Friday Central Standard Time.
3. If your needs have not been met still, submit thematter in writing to the following address:
Caterpillar Inc.Manager, Customer Service, Engine DivisionMossville Bldg ACP.O. Box 610Mossville, Illinois 61552-0610
Please keep in mind: probably, your problem willultimately be solved at the dealership, using thedealership’s facilities, equipment, and personnel.Therefore, follow the steps in sequence when aproblem is experienced.
Outside of the USA and of CanadaIf a problem arises outside the USA and outsideCanada, and if the problem cannot be resolved at thedealer level, consult the appropriate Caterpillar office.
Latin America, Mexico, CarribeanCaterpillar Americas Co.701 Waterford Way, Suite 200Miami, FL 33126-4670USAPhone: 305-476-6800Fax: 305-476-6801
Europe, Africa, and Middle EastCaterpillar Overseas S.A.76 Route de FrontenexP.O. Box 6000CH-1211 Geneva 6SwitzerlandPhone: 22-849-4444Fax: 22-849-4544
Far EastCaterpillar Asia Pte. Ltd.7 Tractor RoadJurong, Singapore 627968Republic of SingaporePhone: 65-662-8333Fax: 65-662-8302
ChinaCaterpillar China Ltd.37/F., The Lee Gardens33 Hysan AvenueCauseway BayG.P.O. Box 3069Hong KongPhone: 852-2848-0333Fax: 852-2848-0440
JapanShin Caterpillar Mitsubishi Ltd.SBS Tower10-1, Yoga 4-ChomeSetagaya-Ku, Tokyo 158-8530JapanPhone: 81-3-5717-1150Fax: 81-3-5717-1177
JapanCaterpillar Power Systems, Inc.SBS Tower (14th floor)4-10-1, YogaSetagaya-Ku, Tokyo 158-0097Phone: 81-3-5797-4300Fax: 81-3-5797-4359
Australia and New ZealandCaterpillar of Australia Ltd.1 Caterpillar DrivePrivate Mail Bag 4Tullamarine, Victoria 3043AustraliaPhone: 03-9953-9333Fax: 03-9335-3366

115Reference Information Section
Customer Service
i01028392
Ordering Replacement PartsSMCS Code: 4450; 7567
When replacement parts are required for thisproduct Caterpillar recommends using Caterpillarreplacement parts or parts with equivalent spec-ifications including, but not limited to, physicaldimensions, type, strength and material.
Failure to heed this warning can lead to prema-ture failures, product damage, personal injury ordeath.
Quality Caterpillar replacement parts are availablefrom Caterpillar dealers throughout the world.Caterpillar dealers’ parts inventories are up-to-date.The parts stocks include all of the parts that arenormally needed to protect your Caterpillar engineinvestment.
When you order parts, please specify the followinginformation:
• Part number
• Part name
• Quantity
If there is a question concerning the part number,please provide your dealer with a completedescription of the needed item.
When a Caterpillar engine requires maintenanceand/or repair, provide the dealer with all theinformation that is stamped on the Information Plate.This information is described in this Operation andMaintenance Manual (Product Information Section).
Discuss the problem with the dealer. Inform thedealer about the conditions of the problem and thenature of the problem. Inform the dealer about whenthe problem occurs. This will help the dealer introubleshooting the problem and solving the problemfaster.
116Reference Information SectionReference Materials
Reference Materialsi00912149
Maintenance RecordsSMCS Code: 1000; 4450
Caterpillar Inc. recommends the retention of accuratemaintenance records. Accurate maintenance recordscan be used for the following purposes:
• Determine operating costs.
• Establish maintenance schedules for other enginesthat are operated in the same environment.
• Show compliance with the required maintenancepractices and maintenance intervals.
Maintenance records can be used for a variety ofother business decisions that are related to enginemaintenance.
Maintenance records are a key element of amaintenance program that is well managed. Accuratemaintenance records can help your Caterpillar dealerto fine tune the recommended maintenance intervalsin order to meet the specific operating situation. Thisshould result in a lower engine operating cost.
Records should be kept for the following items:
Fuel Consumption – A record of fuel consumptionis essential in order to determine when the loadsensitive components should be inspected orrepaired. Fuel consumption also determines overhaulintervals.
Service Hours – A record of service hours isessential to determine when the speed sensitivecomponents should be inspected or repaired.
Documents – These items should be easy toobtain, and these items should be kept in the enginehistory file. All of the documents should show thisinformation: date, service hours, fuel consumption,unit number, and engine serial number. The followingtypes of documents should be kept as proof ofmaintenance or repair for warranty:
Keep the following types of documents as proof ofmaintenance for warranty. Also, keep these types ofdocuments as proof of repair for warranty:
• Dealer work orders and itemized bills
• Owner’s repair costs
• Owner’s receipts
• Maintenance log

117Reference Information Section
Reference Materials
i01176304
Maintenance LogSMCS Code: 1000; 4450
Table 24
Engine Model Customer Identifier
Serial Number Arrangement Number
ServiceHours
QuantityOf Fuel Service Item Date Authorization

118Reference Information SectionReference Materials
i00769479
Valve Data SheetSMCS Code: 1000
Table 25
Engine Model Serial Number Service Hours Authorization
Cylinder CylinderPressure
Valve Location CurrentMeasure
StemBaseline
RotatorBaseline Wear
Pushrod Side1
Exhaust Manifold
Pushrod Side2
Exhaust Manifold
Pushrod Side3
Exhaust Manifold
Pushrod Side4
Exhaust Manifold
Pushrod Side5
Exhaust Manifold
Pushrod Side6
Exhaust Manifold
Pushrod Side7
Exhaust Manifold
Pushrod Side8
Exhaust Manifold
Pushrod Side9
Exhaust Manifold
Pushrod Side10
Exhaust Manifold
Pushrod Side11
Exhaust Manifold
Pushrod Side12
Exhaust Manifold
Pushrod Side13
Exhaust Manifold
Pushrod Side14
Exhaust Manifold
Pushrod Side15
Exhaust Manifold
Pushrod Side16
Exhaust Manifold

119Reference Information Section
Reference Materials
i02097940
Reference MaterialSMCS Code: 1000; 4450
The following literature can be obtained through anyCaterpillar dealer.
Lubricants• Data Sheet, PEHP0002, “Multipurpose LithiumComplex Grease with Molybdenum (MPGM)”
• Data Sheet, PEHP0003, “Multipurpose LithiumComplex Grease (MPG)”
• Data Sheet, PEHP0017, “Special Purpose Grease(SPG) Bearing Lubricant”
• Special Publication, PEDP7036, “S·O·S FluidAnalysis”
• Special Publication, PEHP6001, “How To Take AGood Oil Sample”
• Special Publication, SEBU6400, “CaterpillarGas Engine Lubricant, Fuel, and CoolantRecommendations”
Fuels• Application and Installation Guide, LEKQ7256,“Fuels, Fuel Systems”
• Application and Installation Guide, LEKQ7260,“Low Energy Fuels”
• Special Publication, SEBU6400, “CaterpillarGas Engine Lubricant, Fuel, and CoolantRecommendations”
Coolants• Data Sheet, PEHP7057, “Coolant Analysis”
• Special Publication, PEDP7036, “S·O·S FluidAnalysis”
• Special Publication, SEBD0518, “Know YourCooling System”
• Special Publication, SEBD0970, “Coolant and YourEngine”
• Special Publication, SEBU6400, “CaterpillarGas Engine Lubricant, Fuel, and CoolantRecommendations”
Miscellaneous• Application and Installation Guide, LEKQ7250, “AirIntake”
• Application and Installation Guide, LEKQ7260,“Low BTU Engines”
• Engine Performance, LEBQ6117, “G3500Industrial”
• Engine Performance, LEBQ6169, “G3500Generator Set”
• Electronic Troubleshooting, SENR6413, “G3500Engines”
• Disassembly and Assembly, SENR6419, “G3500Engines”
• Electronic Troubleshooting , SENR6517, “G3500Air/Fuel Ratio Control”
• Service Manual, REG1139F, “Service ManualContents Microfiche”
• Software Program, LEKQ6378, “Methane NumberProgram”
• Special Publication, PECP9067, “One SafeSource” English language for use in NACD, CACO,and APD
• Special Publication, PECP9068, “One SafeSource” English language for use in EAME
• Specifications, SENR3130, “Torque Specifications”
• Specifications, SENR6411, “G3500 Engines”
• Specifications, SENR6417, “G3500 EngineAttachments”
• Special Instruction, GMG00694, “AnalyzingCylinder Condition By Measuring Air Flow”
• Special Instruction, REHS0128, “Using the147-5482 Indicator Gauge For Valve Lash andValve Bridge Adjustment”
• Special Instruction, SEHS7332, “Do Not OperateTag”
• Special Instruction, SEHS7633, “Battery TestProcedure”
• Special Instruction, SEHS8622, “Using the FT-1984 Air-To-Air Aftercooler Leak Test Group”
• Special Instruction, SEHS8712, “Using the8T-2700 Blowby/Airflow Indicator Group”

120Reference Information SectionReference Materials
• Special Instruction, SEHS9031, “StorageProcedure for Caterpillar Products”
• Special Instruction, SEHS9298, “Installation andMaintenance of Gaseous Fuel Filters”
• Special Instruction, SEHS9769, “Installation andInitial Start-Up Procedure for G3500 Engines”
• Special Publication, NEHS0526, “ServiceTechnician Application Guide”
• Special Publication, NENG2500, “Caterpillar Toolsand Shop Products Guide”
• Special Publication, SEBF8029, “Index toGuidelines for Reusable Parts and SalvageOperations”
• Special Publication, SEBF8062, “Procedure toInspect and Clean Air Filters”
• Systems Operation/Testing and Adjusting,SENR6412, “G3500 Engines”
• Systems Operation/Testing and Adjusting,SENR6418, “G3500 Engine Attachments”
• Systems Operation/Testing and Adjusting,SENR6420, “Remote Control Panel (Status)”
Additional Reference MaterialThe “Engine Fluids Data Book” can be obtained fromthe following locations: local technological society,local library, and local college. If necessary, consultEMA at the following address:
Engine Manufacturers AssociationTwo North LaSalle Street, Suite 2200Chicago, Illinois, USA 60602E-mail: [email protected](312) 827-8700Facsimile: (312) 827-8737
The “Society of Automotive Engineers (SAE)Specifications” can be found in your SAE handbook.This publication can also be obtained from thefollowing locations: local technological society, locallibrary, and local college. If necessary, consult SAEat the following address:
SAE International400 Commonwealth DriveWarrendale, PA, USA 15096-0001Telephone: (724) 776-4841
The “American Petroleum Institute Publication No.1509” can be obtained from the following locations:local technological society, local library, and localcollege. If necessary, consult API at the followingaddress:
American Petroleum Institute1220 L St. N.W.Washington, DC, USA 20005Telephone: (202) 682-8000
The International Organization for Standardization(ISO) offers information and customer serviceregarding international standards and standardizingactivities. ISO can also supply information on thefollowing subjects that are not controlled by ISO:national standards, local standards, regulations,certification, and related activities. Consult themember of ISO in your country.
International Organization for Standardization(ISO)1, rue de VarembéCase postale 56CH-1211 Genève 20SwitzerlandTelephone: +41 22 749 01 11Facsimile: +41 22 733 34 30E-mail: [email protected] site: http://www.iso.ch
European classifications are established by theCounseil International Des Machines a Combustion(CIMAC) (International Council on CombustionEngines).
CIMAC Central SecretariatLyoner Strasse 1860528 FrankfurtGermanyTelephone: +49 69 6603 1567Facsimile: +49 69 6603 1566
i00382622
Warranty InformationSMCS Code: 1000
Engine Protection Plans
Extended Warranties and ServiceContracts
A wide variety of protection plans are available forCaterpillar Engines. Consult your Caterpillar dealerfor detailed information on the specific programs andcoverages that are available.

121Reference Information Section
Reference Materials
Consult your Caterpillar dealer for information on aplan that is tailored in order to fit your requirements.

122Index Section
Index
A
Actuator Control Linkage - Lubricate ..................... 64After Starting Engine ............................................. 52Engaging the Driven Equipment ........................ 52
After Stopping Engine............................................ 56Aftercooler Condensation - Drain .......................... 64Air Starting Motor Lubricator Bowl - Clean ............ 64Air Starting Motor Lubricator Oil Level - Check ..... 65Adjust the Lubricator .......................................... 65
Air Tank Moisture and Sediment - Drain................ 66Alarms and Shutoffs .............................................. 36Setpoints for Alarms and Shutoffs ..................... 37Testing Alarms and Shutoffs .............................. 36
Alternator - Inspect ................................................ 66
B
Battery - Replace............................................. 66–67Battery Charger - Check........................................ 67Checking After Stopping .................................... 68Checking Before Start-Up.................................. 67
Battery Electrolyte Level - Check .......................... 68Before Starting Engine .................................... 15, 48Air Inlet System.................................................. 48Cooling System.................................................. 48Driven Equipment .............................................. 48Electrical System ............................................... 48Fuel System....................................................... 48Lubrication System ............................................ 49Starting System.................................................. 49Walk-Around Inspection..................................... 48
Belts - Inspect/Adjust/Replace............................... 69Adjusting the Alternator Belt .............................. 69Adjusting the Fan Drive Belt .............................. 69Inspection........................................................... 69Replacement...................................................... 70
Burn Prevention..................................................... 13Batteries............................................................. 13Coolant............................................................... 13Oils..................................................................... 13
C
Carburetor Air/Fuel Ratio - Check/Adjust .............. 70Cold Weather Starting ........................................... 49Control Panel......................................................... 38Alarm Module..................................................... 46Electronic Modular Control Panel II (EMCP II)... 42Generator Set Control (GSC)............................. 43Remote Control Panel (Status) .......................... 38Synchronizing Lights Module ............................. 47
Control Panel - Inspect .......................................... 70Record the Data and Review the Data .............. 70
Cooling System Coolant (NGEC) - Change .......... 70Clean the Cooling System ................................. 71Cleaning a Cooling System that has HeavyDeposits or Plugging ........................................ 72Drain the Cooling System .................................. 70Fill the Cooling System ...................................... 72
Cooling System Coolant Level - Check................. 73Add Coolant ....................................................... 73
Cooling System Coolant Sample (Level 1) -Obtain .................................................................. 73Cooling System Coolant Sample (Level 2) -Obtain .................................................................. 74Cooling System Supplemental Coolant Additive(SCA) - Test/Add.................................................. 74Add the SCA, If Necessary ................................ 75Test the Concentration of the SCA..................... 74
Crankcase Blowby - Measure/Record ................... 75Crankshaft Vibration Damper - Inspect ................. 76Removal and Installation.................................... 76
Crushing Prevention and Cutting Prevention ........ 14Customer Assistance............................................ 114Outside of the USA and of Canada................... 114USA and Canada.............................................. 114
Customer Service ................................................. 114Cylinder Pressure - Measure/Record .................... 76Cylinders - Inspect................................................. 77
D
Driven Equipment - Check..................................... 78Driven Equipment - Inspect/Replace/Lubricate ..... 78
E
Electrical System................................................... 16Grounding Practices .......................................... 16
Emergency Stopping ............................................. 54Emergency Stop Button ..................................... 54
Engine - Clean....................................................... 78Engine Air Cleaner Element - Replace.................. 79Cleaning the Primary Air Cleaner Elements ...... 80Servicing the Air Cleaner Elements ................... 79
Engine Air Cleaner Service Indicator - Inspect...... 81Test the Service Indicator................................... 82
Engine Air Precleaner - Clean............................... 82Engine Crankcase Breather - Clean...................... 82Engine Mounts - Check ......................................... 83Engine Oil - Change .............................................. 84Engine Oil Filter - Change ..................................... 86Inspect the Used Oil Filter Elements.................. 88Replacing the Engine Oil Filters During EngineOperation ......................................................... 88Replacing the Engine Oil Filters With the EngineStopped............................................................ 87
Engine Oil Filter (Auxiliary) - Change .................... 85Engine Oil Level - Check....................................... 89

123Index Section
Engine Oil Sample - Obtain ................................... 89Obtain the Sample and the Analysis.................. 90
Engine Operation................................................... 53Operating the Engine and the DrivenEquipment ........................................................ 53Partial Load Operation ....................................... 53
Engine Protective Devices - Check ....................... 90Visual Inspection................................................ 90
Engine Speed/Timing Sensor - Clean/Inspect....... 90Engine Starting ................................................ 15, 48Engine Stopping .............................................. 16, 54Engine Valve Lash and Bridge - Adjust ................. 91Engine Valve Lash ............................................. 92Valve Bridge....................................................... 91
Engine Valve Rotators - Inspect ............................ 92Exhaust Bypass - Inspect ...................................... 92Exhaust Piping - Inspect........................................ 93Water Cooled Exhaust Manifolds....................... 93
F
Features and Controls ........................................... 30Fire Prevention and Explosion Prevention ............ 14Fire Extinguisher ................................................ 14
Foreword ................................................................. 5California Proposition 65 Warning ....................... 4Literature Information........................................... 4Maintenance ........................................................ 4Maintenance Intervals.......................................... 4Operation ............................................................. 4Overhaul .............................................................. 5Safety................................................................... 4
Fuel Filtration System - Service............................. 93Fuel System Fuel Filter Differential Pressure -Check................................................................... 93
G
Gas Pressure Regulator - Check........................... 93Fuel Differential Pressure of the Fuel Supply To theCarburetor ........................................................ 94
Gas Pressure Regulator Condensation - Drain ..... 94Gauges and Indicators .......................................... 27Optional Gauges ................................................ 28
General Hazard Information ................................... 11Asbestos Information ......................................... 12Containing Fluid Spillage ................................... 12Dispose of Waste Properly ................................ 13Fluid Penetration................................................ 12Pressure Air and Water...................................... 12Softwrap............................................................. 13
H
Hoses and Clamps - Inspect/Replace ................... 94Replace the Hoses and the Clamps .................. 95
I
Ignition System Spark Plugs - Check/Adjust/Replace................................................................ 95Checking the Spark Plug ................................... 98Cleaning the Spark Plug .................................... 98Inspecting the Spark Plug.................................. 97Installing the Spark Plug .................................... 98Removing the Spark Plug .................................. 96
Ignition System Timing - Check/Adjust .................. 99Ignition Systems .................................................... 15Important Safety Information ................................... 2Inlet Air System - Inspect....................................... 99
L
Lifting and Storage ................................................ 25
M
Maintenance Interval Schedule (Bio-Gas)............. 62Maintenance Interval Schedule (NaturallyAspirated) ............................................................ 63Maintenance Interval Schedule (Standby)............. 61Maintenance Interval Schedule (TurbochargedAftercooled) ......................................................... 60Maintenance Log.................................................. 117Maintenance Records........................................... 116Maintenance Section............................................. 57Manual Stop Procedure......................................... 55Model View Illustrations......................................... 17Model Views and Specifications ............................ 17Mounting and Dismounting.................................... 15
O
Operation Section.................................................. 25Ordering Replacement Parts ................................ 115Overhaul (In-Frame) ............................................ 100In-Frame Overhaul Information........................ 100Scheduling an In-Frame Overhaul ................... 100
Overhaul (Major).................................................. 101Major Overhaul Information ............................. 101Scheduling a Major Overhaul........................... 101
Overhaul (Top End) ............................................. 102Scheduling a Top End Overhaul ...................... 102Top End Overhaul Information ......................... 103
Overhaul Considerations..................................... 105Overhaul Information ....................................... 105

124Index Section
P
Performance Parameters ...................................... 30Air/Fuel Ratio ..................................................... 30Angle of the Throttle Plate ................................. 31Oil Consumption ................................................ 31Optional Air/Fuel Ratio Control .......................... 31Setting of the Exhaust Bypass (Wastegate) ...... 31
Plate Locations and Film Locations....................... 23Engine Identification........................................... 23Information Plate................................................ 23Serial Number Plate........................................... 23
Power Take-Off Clutch - Check/Adjust/Lubricate ............................................................ 107Product Description ............................................... 18Cooling System.................................................. 19Engine Service Life ............................................ 20Fuel System....................................................... 18Ignition System .................................................. 19Lubrication System ............................................ 19
Product Identification Information .......................... 23Product Information Section .................................. 17Product Lifting........................................................ 25Engine Lifting with a Generator.......................... 25
Product Storage..................................................... 26Generator Storage ............................................. 26
R
Radiator - Clean .................................................. 107Reference Information ........................................... 24Reference Information Section ............................. 114Reference Material ............................................... 119Additional Reference Material.......................... 120Coolants............................................................ 119Fuels ................................................................. 119Lubricants ......................................................... 119Miscellaneous ................................................... 119
Reference Materials ............................................. 116Refill Capacities..................................................... 57Refill Capacities and Recommendations............... 57Cooling System.................................................. 58Fuel .................................................................... 57Lubrication System ............................................ 57
S
Safety Messages..................................................... 6Safety Section ......................................................... 6Sensors and Electrical Components ..................... 32Electronic Ignition System (EIS) ........................ 32Junction Box ...................................................... 33Sensors.............................................................. 34
Specifications ........................................................ 20Crankshaft Positions for Valve Lash Setting ...... 22General Engine Specifications........................... 20
Speed Sensor - Clean/Inspect............................. 108
Starting Motor - Inspect ....................................... 108Air Starting Motor ............................................. 109Electric Starting Motor...................................... 108Removal and Installation of the StartingMotor .............................................................. 109
Starting the Engine................................................ 50Automatic Starting.............................................. 50Manual Starting.................................................. 50Operation of the Generator Set Control Panel... 50Purging Unburned Gas ...................................... 50
Starting with Jump Start Cables ............................ 51
T
Table of Contents..................................................... 3Turbocharger - Inspect ........................................ 109
V
Valve Data Sheet.................................................. 118Valve Stem Projection - Measure/Record............. 110
W
Walk-Around Inspection ....................................... 111Inspect the Engine for Leaks and for LooseConnections .................................................... 111
Warranty Information ........................................... 120Engine Protection Plans................................... 120
Water Pump - Inspect ........................................... 112Water Temperature Regulator - Replace.............. 112Replace the Water Temperature Regulators in theWater Temperature Regulator Housing and in theThermostatic Valve.......................................... 112

Product and Dealer InformationNote: For product identification plate locations, see the section “Product Identification Information” in the Operationand Maintenance Manual.
Delivery Date:
Product InformationModel:
Product Identification Number:
Engine Serial Number:
Transmission Serial Number:
Generator Serial Number:
Attachment Serial Numbers:
Attachment Information:
Customer Equipment Number:
Dealer Equipment Number:
Dealer InformationName: Branch:
Address:
Dealer Contact Phone Number Hours
Sales:
Parts:
Service:

©2004 CaterpillarAll Rights Reserved Printed in U.S.A.