MAKER FOR VTIGER CRM fileEMAIL MAKER FOR VTIGER CRM Introduction The Email Maker is extension tool...
72
http://www.its4you.sk/en/ 1 EMAIL MAKER FOR VTIGER CRM Introduction The Email Maker is extension tool designed for the vtiger CRM. Using EMAIL Maker you can create email templates with predefined information and send them from all the modules. There are available all the fields from source and related modules, the fields related to recipients, the company information and many more. The intention was to provide powerful and flexible tool which allows users of vtiger CRM to create own email templates. Using the email templates you can send mass emails from ListViews (e.g. Invoices, Quotes, Products, etc.) and finally save lot of your time. Sending is running in background. You are informed about sending process by small popup window. The Email Maker benefits are: supported mostly inside all modules unlimited number of email templates within one module simple addition, edit, duplication or deletion of the email templates advanced and more creative editing of emails using inserting images, tables, product blocks related blocks or listview blocks and many more Who needs EMAIL Maker? The target group of EMAIL Maker users are people sending emails daily (i.e. invoices, info about products, quotes, orders etc.) In addition it is expected that people would like to send more sophisticated and nice looking emails including images, tables or product related blocks, etc. Let’s see how the EMAIL Maker can save your business time on the following use case. Use case: “It is necessary to send invoice attached to email. In addition it would be nice to add into text of the email some information related to invoice e.g. invoice ID, sum to be paid, date of invoice, info that we are sending a present for free because order was higher than 500 Euro, etc.” Let’s suppose that you spend just 6 minutes with that email, so you can continue with rest 99 invoices/emails?! OR you can prepare email template and anytime you need just to use it and send tens of emails within few clicks.
Transcript of MAKER FOR VTIGER CRM fileEMAIL MAKER FOR VTIGER CRM Introduction The Email Maker is extension tool...

http://www.its4you.sk/en/ 1
EMAIL MAKER FOR VTIGER CRM
Introduction The Email Maker is extension tool designed for the vtiger CRM. Using EMAIL Maker you can create email
templates with predefined information and send them from all the modules. There are available all the fields
from source and related modules, the fields related to recipients, the company information and many more.
The intention was to provide powerful and flexible tool which allows users of vtiger CRM to create own
email templates. Using the email templates you can send mass emails from ListViews (e.g. Invoices, Quotes,
Products, etc.) and finally save lot of your time. Sending is running in background. You are informed about
sending process by small popup window.
The Email Maker benefits are:
supported mostly inside all modules
unlimited number of email templates within one module
simple addition, edit, duplication or deletion of the email templates
advanced and more creative editing of emails using inserting images, tables, product blocks
related blocks or listview blocks and many more
Who needs EMAIL Maker? The target group of EMAIL Maker users are people sending emails daily (i.e. invoices, info about products,
quotes, orders etc.) In addition it is expected that people would like to send more sophisticated and nice
looking emails including images, tables or product related blocks, etc. Let’s see how the EMAIL Maker can
save your business time on the following use case.
Use case: “It is necessary to send invoice attached to email.
In addition it would be nice to add into text of the email
some information related to invoice e.g. invoice ID, sum to
be paid, date of invoice, info that we are sending a present
for free because order was higher than 500 Euro, etc.”
Let’s suppose that you spend just 6 minutes with that email,
so you can continue with rest 99 invoices/emails?! OR you
can prepare email template and anytime you need just to
use it and send tens of emails within few clicks.

http://www.its4you.sk/en/ 2
Content Introduction ......................................................................................................................................................... 1
Who needs EMAIL Maker? .................................................................................................................................. 1
License agreement .............................................................................................................................................. 5
Terms and conditions .......................................................................................................................................... 5
Privacy policy ....................................................................................................................................................... 5
1 How to install EMAIL Maker ........................................................................................................................ 6
1.1 How to upgrade EMAIL Maker ............................................................................................................ 8
2 How to start EMAIL Maker .......................................................................................................................... 9
3 Work area .................................................................................................................................................. 10
3.1 ListView.............................................................................................................................................. 10
3.2 DetailView ......................................................................................................................................... 11
3.3 EditView ............................................................................................................................................. 12
3.3.1 Properties .................................................................................................................................. 13
3.3.2 Module information .................................................................................................................. 14
3.3.3 Other information ..................................................................................................................... 14
3.3.4 Labels ......................................................................................................................................... 15
3.3.5 Product block ............................................................................................................................. 15
3.3.6 Settings ...................................................................................................................................... 16
3.3.7 Sharing ....................................................................................................................................... 16
3.3.8 Display conditions ...................................................................................................................... 17
3.4 Email Maker block ............................................................................................................................. 18
4 Editing email templates ............................................................................................................................. 19
4.1 Create new email template ............................................................................................................... 19
4.2 Add theme ......................................................................................................................................... 21
4.3 Inserting images ................................................................................................................................ 22
4.4 Creating tables ................................................................................................................................... 23
4.5 Using a product blocks ...................................................................................................................... 24
4.5.1 Create new product block ......................................................................................................... 24
4.5.2 Create separate Block for Products and for Services ................................................................ 25
4.5.3 Insert and edit product block template ..................................................................................... 26
4.6 Using related blocks .......................................................................................................................... 26
4.6.1 Create and insert related block ................................................................................................. 26

http://www.its4you.sk/en/ 3
4.6.2 Insert related block .................................................................................................................... 30
4.7 Using ListView block .......................................................................................................................... 31
4.8 Attach documents into templates ..................................................................................................... 32
4.9 Inserting labels .................................................................................................................................. 33
4.10 Template settings .............................................................................................................................. 34
4.10.1 Email subject .............................................................................................................................. 34
4.10.2 Status ......................................................................................................................................... 34
4.10.3 Set as default ............................................................................................................................. 36
5 Sending emails ........................................................................................................................................... 37
5.1 Select Email Addresses ...................................................................................................................... 38
5.2 Compose E-Mail ................................................................................................................................. 39
5.2.1 Emails sent from ........................................................................................................................ 40
5.2.2 Recipients To, Cc, Bcc ................................................................................................................ 41
5.2.3 Attachments .............................................................................................................................. 42
5.2.4 Select Email Template ............................................................................................................... 43
5.3 Email Campaigns ................................................................................................................................ 44
6 Additional features .................................................................................................................................... 48
6.1 Export and import templates ............................................................................................................ 48
6.2 Custom functions ............................................................................................................................... 49
6.2.1 “AFTER” custom functions ......................................................................................................... 51
6.3 Sharing ............................................................................................................................................... 52
6.4 Support of the PDF Maker ................................................................................................................. 53
6.5 Support of Workflow ......................................................................................................................... 54
6.6 Birthday Email cron ........................................................................................................................... 58
7 Settings ...................................................................................................................................................... 59
7.1 Manage profiles ................................................................................................................................. 59
7.2 Self-defined labels ............................................................................................................................. 60
7.3 Product block templates.................................................................................................................... 61
7.4 License settings .................................................................................................................................. 62
7.4.1 Deactivate license ...................................................................................................................... 62
7.4.2 Reactivate license ...................................................................................................................... 63
7.5 Extensions .......................................................................................................................................... 64
7.5.1 Workflow ................................................................................................................................... 64
7.5.2 Unsubscribe email ..................................................................................................................... 64

http://www.its4you.sk/en/ 4
7.5.3 Styles4You ................................................................................................................................. 66
7.6 Uninstall ............................................................................................................................................. 69
Change log of Email Maker ................................................................................................................................ 70
Change log of Manual for Email Maker ............................................................................................................. 72

http://www.its4you.sk/en/ 5
License agreement The EMAIL Maker License will be referred to as "The license" in the remainder of this text.
This irrevocable, perpetual license covers all versions 600.xx of EMAIL Maker.
This license gives the holder right to install EMAIL Maker on ONE productive vtiger CRM installation
and ONE develop vtiger CRM installation for unlimited users.
The license holder is allowed to make modifications to the EMAIL Maker sources but in no event will
the original copyright holders of this library be held responsible for action or actions resulting from
any modifications of the source.
The license holder is not required to publicize or otherwise make available any software used in
conjunction with EMAIL Maker.
The license holder may not re-distribute the library or versions thereof to third party without prior
written permission of the copyright holder.
EMAIL Maker License does not allow the library to be redistributed as part of another product.
The license may be transferred to another vtiger CRM installation only with prior written permission.
The wording of this license may change without notice for future versions of EMAIL Maker.
Terms and conditions We accept all major credit cards, PayPal and Bank transfer. Our deliveries:
Credit Card: delivered immediately
PayPal: delivered immediately
Bank transfer: delivered in 2 - 5 days
After payment you will obtain email with link for download EMAIL Maker and your license key as well.
Privacy policy During installation it is necessary to exchange following information:
vtigerCRM version (e.g. 6.0.0)
EMAIL Maker version (e.g. 600.1.8)
Date and time
Domain in md5 coding format (e.g. 916b25c201a77a6721003c0030977f3b)
Action provided by you (INSTALL, REACTIVATE, DEACTIVATE)
It is strongly required to deactivate the license before moving of installation of Email Maker
to another server (different url) in order to avoid any license conflicts. After movement and
repeated installation you can reactivate your license.

http://www.its4you.sk/en/ 6
1 How to install EMAIL Maker Please provide following steps in order to install EMAIL Maker:
1. Install the .zip (package) file of the Email Maker module via CRM Settings -> Module Manager. Click on the Install from Zip.
Picture 1.1 Installation of EMAIL Maker – step 1
2. Select the .zip (package) file that you downloaded from our shop. Please check that you
accepted the disclaimer and would like to proceed. Click on the button.
Picture 1.2 Installation of EMAIL Maker – step 2
It is highly recommended to finish the installation without any interruption. For successful
installation we need to exchange following information (see previous chapter for details):
vtigerCRM version (e.g. 6.0.0)
EMAIL Maker version (e.g. 600.1.8)
Date and time
Domain in md5 coding format (e.g. 916b25c201a77a6721003c0030977f3b)
Action provided by you (INSTALL, REACTIVATE, DEACTIVATE)

http://www.its4you.sk/en/ 7
3. Verify the import details parsed from the .zip (package) file. Please check that you accepted the
license agreement and click to proceed or to cancel.
Picture 1.3 Installation of EMAIL Maker – step 3
4. Click on button to complete the module import.
Picture 1.4 Installation of EMAIL Maker – step 4
In order to finish installation, please provide following validation steps.
1. Email Maker Validation Step. Please check your Company information and insert license key.
Make sure that your server has Internet access. Click on button. If you want to change
your Company information, click on button.
Picture 1.5 Validation step 1

http://www.its4you.sk/en/ 8
2. If EMAIL Maker is installed successfully you will see following screen. Click on button.
Picture 1.6 Validation step 2 – Finish installation
1.1 How to upgrade EMAIL Maker The upgrade of the EMAIL Maker is initiated in the same way as EMAIL Maker installation or click on Upgrade
link in ListView of EMAIL Maker (Picture 1.7). So please refer to above installation part for details how to
initiate the import of the module from the file. As can be seen on the Picture 1.8 you will be notified that the EMAIL Maker module already exists. The upgrade will start immediately when you click on button. After upgrade the notification about successful upgrade is shown and click on button.
Picture 1.7 Upgrade of the EMAIL Maker
Picture 1.8 Upgrade of the EMAIL Maker
Picture 1.9 Upgrade of the EMAIL Maker

http://www.its4you.sk/en/ 9
2 How to start EMAIL Maker In order to start the EMAIL Maker tool please provide following steps:
1. In vtiger CRM menu (Picture 2.1), please go to All -> Tools and click on EMAIL Maker. As shown
in the picture you can place short link directly into vtiger Main Menu using Customize Main
Menu link.
Picture 2.1 Start EMAIL Maker
2. The screenshot below (Picture 2.2) shows EMAIL Maker ListView which is lunched after
previous step. As can be seen in the picture below, there are no any email templates created
yet. In order to add new template you can click button or link Create New
Template.
Picture 2.2 Add template in ListView
How to create and edit email templates please refer to the chapter 4. Next chapter describes the whole
work area of the EMAIL Maker.

http://www.its4you.sk/en/ 10
3 Work area The Work Area of the EMAIL Maker consists of:
ListView – used for common tasks like add, delete, duplicate template, import and export templates
and access to others tools
DetailView – shows already created email template in details
EditView – allows the preparation of the new email template or editing existing templates
EMAIL Maker block – used for sending emails directly from the DetailView of particular module
3.1 ListView The common tasks like add/delete/duplicate template, import/export templates or start editing have to be
initiated via EMAIL Maker ListView. Go to All -> Tools and click on EMAIL Maker link and EMAIL Maker
ListView will appear on your screen.
Picture 3.1 EMAIL Maker ListView
The main part of the EMAIL Maker ListView consists of the list of the email templates, which gives you
information about a template name, a primary module, category of template, a short description, sharing
info, template owner, info of using in workflow(s) and its status. In the list you can also select one or more
templates and consequently delete or export the selected group of templates. As shown in the picture, it is
also possible to use links in the "Action" column in order to edit or duplicate already created email templates
directly from the ListView. Also there is option to search your template.
There are three buttons above the list of email templates:
contains actions for deletion, import or export of the templates
is used to add new template
allows you to add new template theme
Note: How to import or export email template is described in the chapter 6.1.

http://www.its4you.sk/en/ 11
3.2 DetailView From ListView you can directly open any email template in DetailView. The DetailView consists of:
Properties tab
o gives basic information of the email template
o contains the email template body
Documents tab – button allows you to add documents to the email template as
attachment. This functionality is not available in EditView; before sending email you will be
able to delete this attachment or add additional attachments as well
Email Campaigns – here you can find information in which Campaign(s) was used this Template
Email Workflows – here you can see in which worklow(s) this Template is used
Styles – if you use Styles4You extension here you can find your added styles
Group of buttons
o – switches to EditView and start editing
o – creates duplicate of the template and start editing
o – allows you to delete template
Picture 3.2 DetailView

http://www.its4you.sk/en/ 12
3.3 EditView The EditView shown in the picture below is divided into two areas:
Tabs area – allows user to insert into template different kind of values, fields and to set up
properties, sharing and other common settings of the email template. Tabs area consists of
following tabs, which are described in the following subchapters:
o Properties
o Module information
o Other information
o Labels
o Product block
o Settings
o Sharing
o Display conditions
Editing area – is mainly used for inserting/editing your own text, tables, images etc. and to
make some design adjustment of the template like font change, color, format, size, background
color of the text etc. This editing can be initiated via many toolbars located in the above part of
Editing area. Please refer to the chapter 4 for the details related to editing.
Picture 3.3 EditView

http://www.its4you.sk/en/ 13
3.3.1 Properties
The main purpose of the Properties tab is to define template name and description. Although description is
not required, it is recommended to describe here main purpose and properties of the template for future
edit or re-usage.
Picture 3.4 Properties tab
Name Description
Template name The name of the template. It is mandatory field for template creation.
Description The description of the email template.
Recipient variables (To) Variables related to recipient.
Email subject The subject of the email. You can use simple text, predefined common fields or fields related to primary module if exists.
Table 3-1 Properties tab
Note: If you fill description of template. In selectbox of templates you will see this description after
mouseover (Picture 3.5).
Picture 3.5 Description after mouseover

http://www.its4you.sk/en/ 14
3.3.2 Module information
The EMAIL template can be common for all modules or based on one primary module. To define that the
Module information tab is used.
Picture 3.6 Module information tab
Name Description
Module Template will be based and available only for one selected module and its fields.
Related modules If exists related module(s) to selected module, it is possible here to select and use fields from any related module.
Related blocks Related block(s) to selected module, with buttons to insert, create, edit or delete related block. For details please refer to chapter 4.6.
ListView block Allows adding ListView block. For details please refer to chapter 4.7. Table 3-2 Module information tab
3.3.3 Other information
As shown below Other information tab contains several fields. They are Company and User information,
Terms and Conditions, Current date and Custom functions.
Picture 3.7 Other information tab
Name Description
Company and User information
Comprises mainly group of fields from Company information, Assigned to User, Logged in User, Modified by User and Created by User.
Terms and Conditions Terms and Conditions.
Current date Current date in several formats.
Custom functions Custom functions. For details please refer to chapter 6.2. Table 3-3 Other information tab

http://www.its4you.sk/en/ 15
3.3.4 Labels
Labels tab consists of Global language and Module language part. Labels are very useful especially in case
you need to send emails in two or more languages. Please refer to chapter 4.9 to see details.
Picture 3.8 Labels tab
Name Description
Global language Global labels.
Module language Labels related only to selected module. Table 3-4 Labels tab
3.3.5 Product block
The product block tab allows inserting product block template and editing it. In addition, you can create your
own product block using “Block start”, “Block end” and fields for products and services. How to insert, edit
and create product block is described in chapter 4.5.
Picture 3.9 Product block tab
Name Description
Product block template
Insert predefined product block templates. For details please refer to chapter 4.5.
Product block Block start, Block end. Each product block has to start with “Block start” and ends with “Block end”
Common fields for Products & Services
Fields common for products & services. You can find same fields for products and services separately as well, but it is recommended to prefer common fields in the templates.
Available fields for Products
Fields for products.
Available fields for Services
Fields for services.
Table 3-5 Product block tab

http://www.its4you.sk/en/ 16
3.3.6 Settings
The settings tab allows defining file name, page settings, number format and other settings from usage of
template point of view.
Picture 3.10 Settings tab
Name Description
Category Category of the email template. You can define categories according to your needs directly from this field.
Default from Select here default sender of the email template. This value can be set separately for each logged user.
Ignored picklist values Define picklist values which will be ignored in the final email like None, none, keine etc. Entered values have to be separated with comma.
Status Active / Inactive. Please refer to chapter 4.10.2 for details.
Number format Decimal point separator – comma, dot (but any symbol can be used) Number of decimal points - 0-3 Thousands separator – comma, dot, space (but any symbol can be used)
Set as default Set/unset as default for DetailView and ListView. For details please refer to chapter 4.10.3.
Table 3-6 Settings tab
3.3.7 Sharing
The Sharing tab changes depend on whether email template is shared (Picture 3.11) or public/private
(Picture 3.12). Using this tab you can define how to share your template between you and other users or
groups. Please refer to chapter 6.3 to see details.
Picture 3.11 Sharing tab

http://www.its4you.sk/en/ 17
Picture 3.12 Sharing tab for private/public template
Name Description
Template owner Select template owner from the list.
Sharing Select “Public”, “Private”, “Share” Table 3-7 Sharing tab
3.3.8 Display conditions
Display conditions tab allows set conditions when template is shown or hidden. If you want to show
template without ban, leave conditions empty. There is option to show template if conditions are true or
hide templates if conditions are true. You can set it by choosing Yes if/No if in Displayed tab. In Conditions
tab you can choose if you want that all conditions must be met or At least one of the conditions must be
met. You can add or delete conditions.
Picture 3.13 Display conditions

http://www.its4you.sk/en/ 18
3.4 Email Maker block The EMAIL Maker block can be found inside the specific module. In the module ListView it is necessary to
click on any record to see details and on the left side you can find the block. The EMAIL Maker block is used
to send emails for particular record. Two forms of EMAIL maker block can be seen in the screen:
a) EMAIL Maker block without email template
b) Standard layout of the EMAIL Maker block
Picture 3.14 EMAIL Maker block
How to send emails via EMAIL Maker block is described in the chapter 5.
http://www.its4you.sk/en/ 19
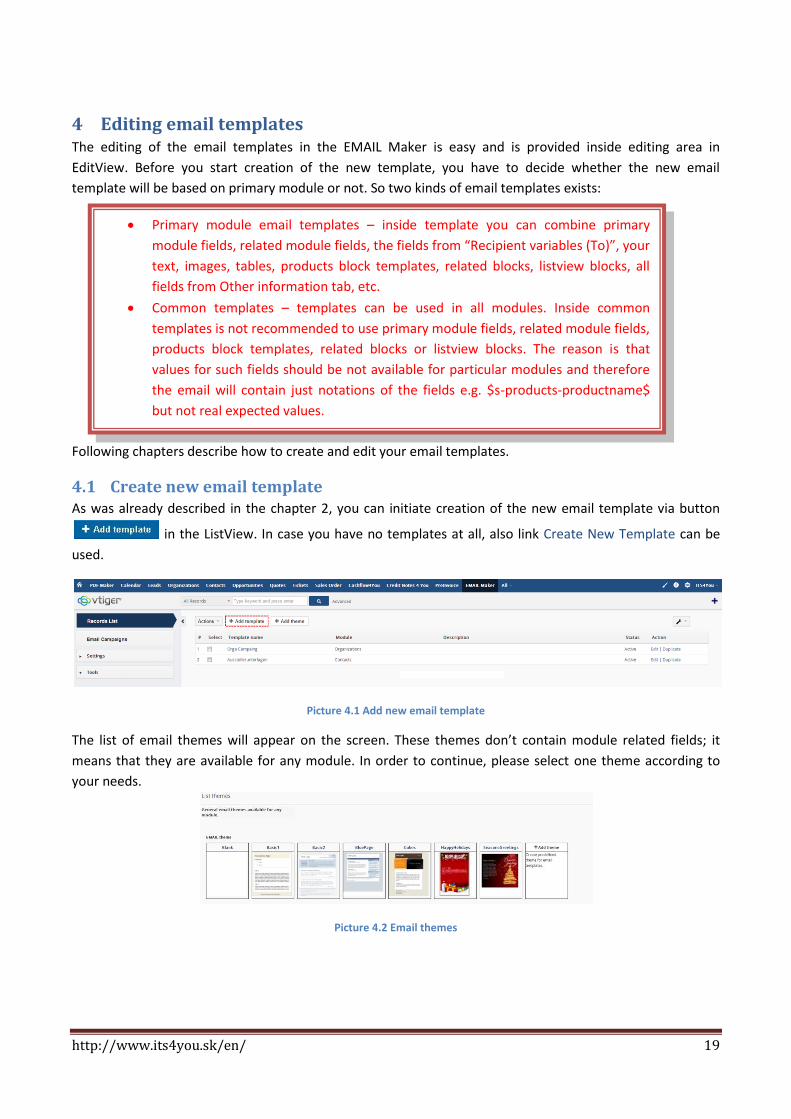
4 Editing email templates The editing of the email templates in the EMAIL Maker is easy and is provided inside editing area in
EditView. Before you start creation of the new template, you have to decide whether the new email
template will be based on primary module or not. So two kinds of email templates exists:
Following chapters describe how to create and edit your email templates.
4.1 Create new email template As was already described in the chapter 2, you can initiate creation of the new email template via button
in the ListView. In case you have no templates at all, also link Create New Template can be
used.
Picture 4.1 Add new email template
The list of email themes will appear on the screen. These themes don’t contain module related fields; it
means that they are available for any module. In order to continue, please select one theme according to
your needs.
Picture 4.2 Email themes
Primary module email templates – inside template you can combine primary
module fields, related module fields, the fields from “Recipient variables (To)”, your
text, images, tables, products block templates, related blocks, listview blocks, all
fields from Other information tab, etc.
Common templates – templates can be used in all modules. Inside common
templates is not recommended to use primary module fields, related module fields,
products block templates, related blocks or listview blocks. The reason is that
values for such fields should be not available for particular modules and therefore
the email will contain just notations of the fields e.g. $s-products-productname$
but not real expected values.
http://www.its4you.sk/en/ 20
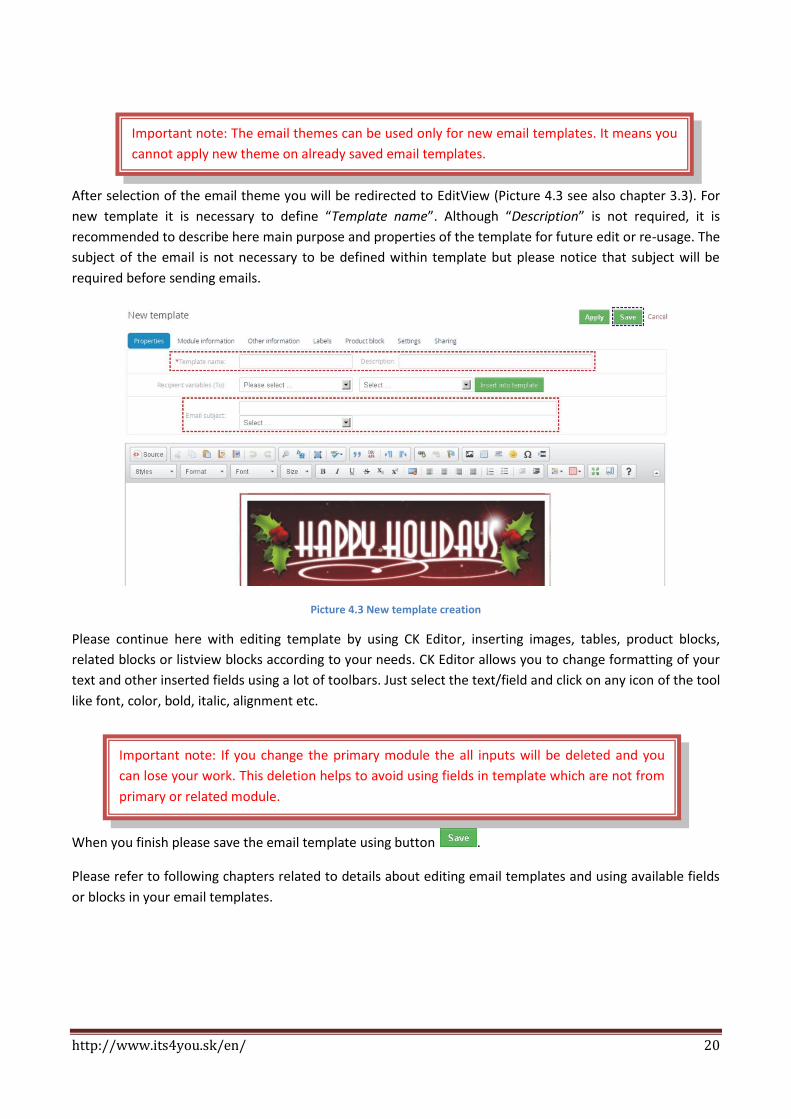
After selection of the email theme you will be redirected to EditView (Picture 4.3 see also chapter 3.3). For
new template it is necessary to define “Template name”. Although “Description” is not required, it is
recommended to describe here main purpose and properties of the template for future edit or re-usage. The
subject of the email is not necessary to be defined within template but please notice that subject will be
required before sending emails.
Picture 4.3 New template creation
Please continue here with editing template by using CK Editor, inserting images, tables, product blocks,
related blocks or listview blocks according to your needs. CK Editor allows you to change formatting of your
text and other inserted fields using a lot of toolbars. Just select the text/field and click on any icon of the tool
like font, color, bold, italic, alignment etc.
When you finish please save the email template using button .
Please refer to following chapters related to details about editing email templates and using available fields
or blocks in your email templates.
Important note: The email themes can be used only for new email templates. It means you
cannot apply new theme on already saved email templates.
Important note: If you change the primary module the all inputs will be deleted and you
can lose your work. This deletion helps to avoid using fields in template which are not from
primary or related module.

http://www.its4you.sk/en/ 21
4.2 Add theme The creation of the EMAIL Maker template consists of email theme selection. Although you can start with
blank template, it is also possible to select one of predefined themes or create your own EMAIL Maker
theme. In order to create new theme click on in the ListView, or click on and then
select . In the window List themes you can edit, duplicate or delete your own templates using icons
.
Picture 4.4 How to create new email theme
The intention of the using themes is to have same email design i.e. background logo, greetings, type of font
etc. and it doesn’t matter for which purpose/module the mail is sent.
In addition the email themes save your time for creation of the new email template. You don’t need to start
creation from the blank template but simply reuse already done steps.
Please note that the email themes are common for all email templates, i.e. they don’t contain module
related fields. Therefore the EditView of email theme consists only of following tabs (see picture on the next
page):
Properties (please refer to 3.3.1 for details regarding fields)
Other information (please refer to 3.3.3 for details regarding fields)
Labels (please refer to 3.3.4 for details regarding fields)

http://www.its4you.sk/en/ 22
Picture 4.5 Add theme EditView tabs
Using above mentioned tabs and related fields, images, tables, etc. you can simply create your own theme.
This theme can be reused anytime for your new email templates.
4.3 Inserting images Images can improve the design of your email templates. CKEditor is used inside the EMAIL Maker and it
allows you to add images into your email templates in an easy and intuitive way. So, if you would like to
insert image please provide following steps:
1. Press the image button on the toolbar.
Picture 4.6 Insert image
2. A pop-up window called "Image Properties" will appear. It includes four tabs that group image
options.
3. Define the URL address of the image. You may also use button in order to browse the
files. Set up other properties of the image.
4. Click to add image into template.
For more info visit following site: http://docs.cksource.com/CKEditor_3.x/Users_Guide/Rich_Text/Images

http://www.its4you.sk/en/ 23
4.4 Creating tables The tables are inseparable component of many email templates. Similarly to images, tables can be inserted
into your templates in few simple steps:
1. Press the insert/edit table button on the toolbar. After that a popup window called "Table
Properties" will appear.
Picture 4.7 Creating tables
2. Set the basic table properties like number of columns and rows, width, height, etc.
3. Click on button.
After that the table is inserted into the template and you can write some text, insert all available fields from
chosen and related Modules or add some images into the new table. You can also make some design
adjustments like bold text, underline, etc.
For more info visit following site: http://docs.cksource.com/CKEditor_3.x/Users_Guide/Rich_Text/Tables

http://www.its4you.sk/en/ 24
4.5 Using a product blocks The product blocks are simple but powerful parts of your email templates. They are used to display all
products/services from modules Invoices, Quotes, Sales Order and Purchase Order in your emails regardless
of the number of products/services for particular record. Below you can find simple example where invoice
contains three products which are automatically seen in the final mail. You don’t need to create template for
three rows in the table, just define start and stop of the product block and product fields according to your
needs. Next chapter describes how to create your own product block. In addition, we also introduced some
default product block templates as well as tool for managing them (7.2).
Picture 4.8 Product block usage
4.5.1 Create new product block
You can find Product block tab in EditView which allows inserting, editing and creating of product blocks. In
case that product block templates are not sufficient for you, it is easy to create your own product block:
1. Go to Product block tab and insert product block start variable (#PRODUCTBLOC_START#) and
product block end (#PRODUCTBLOC_END#).
2. Add all necessary product/service fields according to your needs between (#PRODUCTBLOC_START#)
and (#PRODUCTBLOC_END#) and provide formatting if needed.

http://www.its4you.sk/en/ 25
Picture 4.9 Create product block
4.5.2 Create separate Block for Products and for Services
Since 600.11.0 release is possible to create separate Block for Products and for Services. To create separate
Block please provide following steps:
1. Go to Product block tab and insert product block start variable
(#PRODUCTBLOC_PRODUCTS_START# or #PRODUCTBLOC_SERVICES_START#) and product block end
(#PRODUCTBLOC_ PRODUCTS_END# or #PRODUCTBLOC_ SERVICES_END#).
2. Add all necessary product/service fields according to your needs between
(#PRODUCTBLOC_PRODUCTS_START# or #PRODUCTBLOC_SERVICES_START#) and
(#PRODUCTBLOC_ PRODUCTS_END# or #PRODUCTBLOC_ SERVICES_END#) and provide formatting if
needed.
Picture 4.10 Separate Blocks

http://www.its4you.sk/en/ 26
4.5.3 Insert and edit product block template
There are already created product block templates which you can insert from product block tam and later
edit if needed. These templates are available only for modules Invoices, Quotes, Sales Order and Purchase
Order that displays product block. The product block templates created within product block tool (7.2) can
be added in the same way. You can simply add the whole product block template into your template by:
1. Go to Product block tab.
2. Select product block template.
3. Click on button .
Picture 4.11 Insert product block template
When the product block template is inserted you can modify it according to your needs. For example you
can add new cells / rows / columns, change font, change the background color, etc. You can edit layout like a
table or you can add some new variables / labels as well.
4.6 Using related blocks You can create related blocks for modules based on each more information module and use it inside email
template. Please refer to next chapters to see how to create, insert and edit related blocks.
4.6.1 Create and insert related block
How to create and insert related block will be shown on example based on “Organizations” module. Let’s
suppose that we would like to create simple email template based on module “Organizations”, and we need
to list all invoices for particular organization which were created within last 90 days. In order to do it:
1. Create new template based on Organizations module and put your variables/text into the body of
the template.
2. Go to the Properties tab and click on button.
3. Edit block window will appear on the screen.

http://www.its4you.sk/en/ 27
Picture 4.12 Start creation of the related block
As you can see in the next picture, 5 steps are necessary to create the related block. In this window also all
related entity modules for primary module are shown. First step is to select one related module from the
available list (1.). Please select “Invoice” and click on button.
Picture 4.13 Creation of the related block – step 1
Second step is to select the fields to show in generated pdf template. These fields can be selected from the
related modules (1.). It is possible to change an order of the fields and delete it if necessary. Click to
continue (2.).

http://www.its4you.sk/en/ 28
Picture 4.14 Creation of the related block – step 2
In step 3, we can specify the conditions to filter the results in the template. We can specify conditions in
standard or advanced filters. The standard filters have fields like Date & Time fields whereas advanced filters
have all the fields from the selected modules where the comparator and condition can be chosen based on
type of the selected field.
Picture 4.15 Creation of the related block – step 3
Within step 4 define fields used for sorting (1.) and type of sorting (2.), i.e. ascending or descending sorting.
You can define more fields for sorting. Continue to final step via button .
http://www.its4you.sk/en/ 29
Picture 4.16 Creation of the related block – step 4
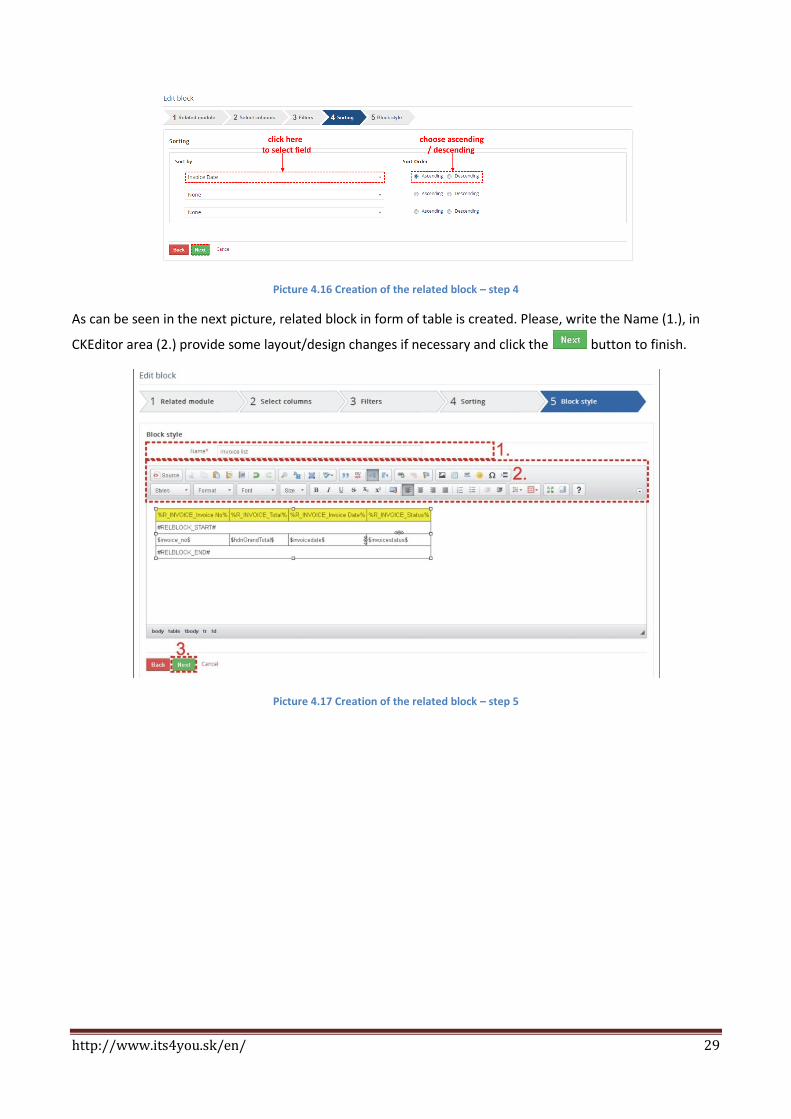
As can be seen in the next picture, related block in form of table is created. Please, write the Name (1.), in
CKEditor area (2.) provide some layout/design changes if necessary and click the button to finish.
Picture 4.17 Creation of the related block – step 5

http://www.its4you.sk/en/ 30
4.6.2 Insert related block
If the related block is created you can continue with editing your template and in order to insert related
block provide following actions:
1. Click to editing area where would you like to have related block.
2. Using dropdown list select your related block.
3. Click on button.
4. Related block is inserted. You can continue with editing of the related block if necessary.
Picture 4.18 Insert related block
Example of the email in Compose Email window and received mails shows next picture.
Picture 4.19 Related block in Compose Email

http://www.its4you.sk/en/ 31
4.7 Using ListView block In case you need to send via email the output of the several records within one mail you can use ListView block. Within this block you can simply set which fields of the records you would like to send. Please refer to below picture which shows simple example of the email consists of list of invoices and related few fields (invoice number, invoice date, status etc.) and how to prepare it. Firstly in the Email Maker EditView (Picture 4.20):
1. Go to Module information tab and select the “Block start” and click .
2. Insert fields you would like to have in ListView block ($s-invoice-invoice_no$..).
3. Insert “Block end” using button .
Provide additional edit steps and save the template. When the template is ready you can use it within
ListView (ONLY!) to prepare mail using following steps:
1. Go to ListView of particular module and select 1 to N records.
2. Click on and select Send Emails with EMAIL Maker.
3. Select ListView block template (language, recipients) and click on .
4. The Compose E-Mail window is shown as well with ListView block to be sent.
Note: Each ListView block has to start with “Block start” (#LISTVIEWBLOCK_START#) and ends with “Block end” (#LISTVIEWBLOCK_END#). ListView block template can be set as default only for ListView; for DetailView it is not applicable.
Picture 4.20 ListView block
http://www.its4you.sk/en/ 32
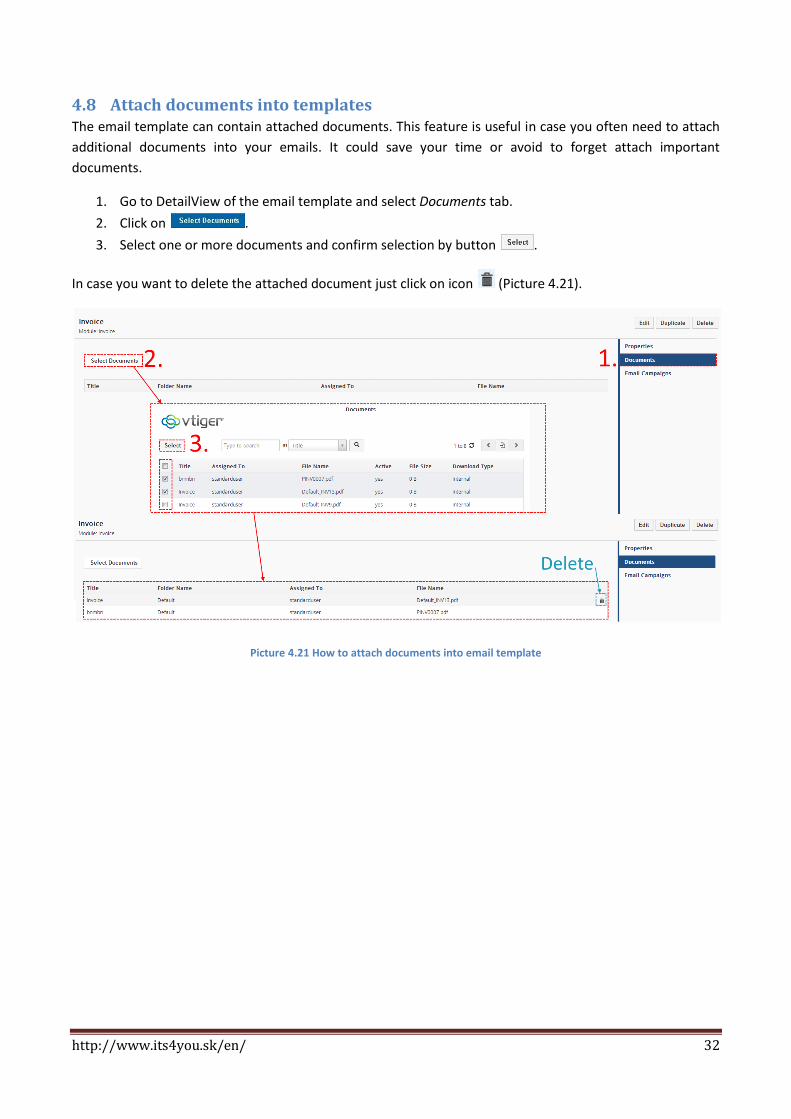
4.8 Attach documents into templates The email template can contain attached documents. This feature is useful in case you often need to attach
additional documents into your emails. It could save your time or avoid to forget attach important
documents.
1. Go to DetailView of the email template and select Documents tab.
2. Click on .
3. Select one or more documents and confirm selection by button .
In case you want to delete the attached document just click on icon (Picture 4.21).
Picture 4.21 How to attach documents into email template
http://www.its4you.sk/en/ 33
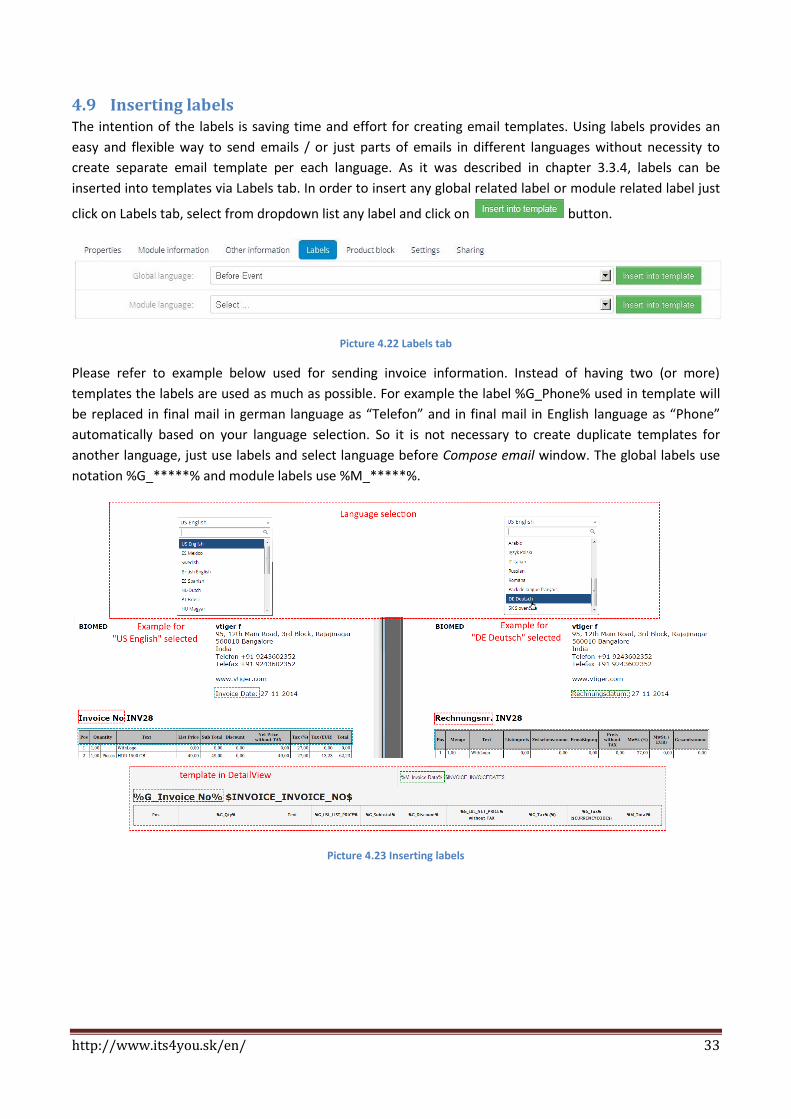
4.9 Inserting labels The intention of the labels is saving time and effort for creating email templates. Using labels provides an
easy and flexible way to send emails / or just parts of emails in different languages without necessity to
create separate email template per each language. As it was described in chapter 3.3.4, labels can be
inserted into templates via Labels tab. In order to insert any global related label or module related label just
click on Labels tab, select from dropdown list any label and click on button.
Picture 4.22 Labels tab
Please refer to example below used for sending invoice information. Instead of having two (or more)
templates the labels are used as much as possible. For example the label %G_Phone% used in template will
be replaced in final mail in german language as “Telefon” and in final mail in English language as “Phone”
automatically based on your language selection. So it is not necessary to create duplicate templates for
another language, just use labels and select language before Compose email window. The global labels use
notation %G_*****% and module labels use %M_*****%.
Picture 4.23 Inserting labels

http://www.its4you.sk/en/ 34
4.10 Template settings
4.10.1 Email subject
In Properties tab of EMAIL Maker you can find “Email subject” definition. This setup gives you the
opportunity to set the email subject according to your needs. You can combine strings, module variables and
some standard variables like Current date. Dropdown list for email subject depends on primary module as
can be seen below.
Picture 4.24 Email subject settings
4.10.2 Status
You can set status as active or inactive for each template. Please take into account that this can be set
separately per logged user, it means this setting is not global. The inactive templates will not appear in the
list of available templates in the pdf maker block. You can find status of existing templates in:
a) ListView (Picture 4.25) – “Status” column
b) DetailView (Picture 4.26) – Properties tab
Picture 4.25 Status and setting of default in ListView

http://www.its4you.sk/en/ 35
Picture 4.26 Status and setting of default in DetailView
To set email template as active / inactive you can use two approaches:
1. Using Tools and links “Set as inactive” (“Set as active“) in DetailView (Picture 4.26). Click on “Set as
inactive” to inactivate given template. If the template is Inactive, the link “Set as active” will be
shown. To activate this template you must click on “Set as active” link.
2. Using Settings tab in EditView – select status from listbox (Picture 4.27)
Picture 4.27 Setting of status and “set as default” using Settings tab

http://www.its4you.sk/en/ 36
4.10.3 Set as default
The particular EMAIL template can be set as default by a logged user, it means this setting is not global. This
default template is specific to that user and to that module. It means that different users can set their own
default templates for each module separately. It is possible to define template as default for DetailView and
default for ListView separately. You can find status of existing templates in
a) ListView (Picture 4.25) – template default for DetailView is marked with text “(default for
DetailView)”, template default for ListView is marked with text “(default for ListView)”. If the
template is default for DetailView as well as for ListView, then in the template name column text
“(default)” is written.
b) DetailView (Picture 4.26) – Properties tab
The behavior of default templates is shown in the below picture:
template default for ListView is automatically selected in Select Email Addresses window
template default for DetailView is automatically selected in EMAIL Maker block
the template is not automatically selected if not set as default, neither in case only one template
exists
Picture 4.28 Default template visibility

http://www.its4you.sk/en/ 37
5 Sending emails In the following picture you can see how to send email using EMAIL Maker:
ListView:
1. Select one or more records and click on Send
Emails with EMAIL Maker from Actions.
2. Select EMAIL Template.
3. Select language to be used.
4. Select Email address/es.
5. Click on button.
DetailView:
1. Select EMAIL template in the EMAIL Maker
block.
2. Select language to be used.
3. Click on link .
4. Select EMAIL address/es.
5. Click on button.
The process of sending emails continues with window “Compose E-Mail”. Click on button to send
email. At the end you are informed about un/successful sending of the email. Please refer to following
chapters for details about each step.
Please note that you can be directly navigated to Compose Email window when you click on or
. It depends on several conditions (primary module, availability of email addresses
or templates, etc.). Please refer to next chapter for details.
Picture 5.1 How to send email

http://www.its4you.sk/en/ 38
5.1 Select Email Addresses The Select Email Addresses window is first (ListView) or second (DetailView) window which is used to select
email template, email recipients or PDF template (only if available). Please provide your selection and
continue with button in order to send email(s).
As you can see in the below picture, the Select Email Addresses window has several forms:
a) In the DetailView window doesn’t contain EMAIL Template part because it is assumed that template
is selected within EMAIL Maker block or you would like to write email without using any template.
b) In the ListView, part related to Emails offers to select email address/es depending on used module.
c) Select Email Addresses window differs also within same module in ListView. It depends whether one
or more records were selected. The concrete email address/es are shown in case that only one
record was selected.
d) Some modules (Documents, Price Books etc.) have no connection to any email, so you can find here
only selection of email template.
In addition to listed situations, it is also possible that window Select Email Addresses will be skipped, for
example:
if for particular record the email address doesn’t exist
there is exactly only one email address per selected record – so it is clear which one will be used
Picture 5.2 Select Email IDs

http://www.its4you.sk/en/ 39
5.2 Compose E-Mail
For successful sending of the email(s) it is enough to click on button in the Compose E-Mail window in
case that email template and recipients were already selected in the previous Select Email IDs window. But
as you can see in the picture below you can provide a lot of actions before sending of the email(s):
1. Change your/sender mail
2. Add additional “To”, “Cc” and “Bcc” recipients or remove recipients.
3. Change subject of the email.
4. Change or select email template
5. Add/remove attachments.
6. Additional edit of the email or email template.
7. Preview of the email or email template.
Picture 5.3 Compose E-Mail window
Some of above actions are described in the following chapters in details.

http://www.its4you.sk/en/ 40
5.2.1 Emails sent from
Within your vtiger you can define several email addresses. These addresses can be used as addresses of the
email sender.
You can simply change the email address of the sender within “Compose E-Mail” window. It can be done
using selectbox. Depending on your preferences and settings, you can select from the email addresses
defined in (see Picture 5.4):
My Preferences / User Login & Role / Primary Email
My Preferences / More Information / Other Email
My Preferences / More Information / Secondary Email
Settings / Outgoing Server / From Email
Picture 5.4 Emails sent from selection

http://www.its4you.sk/en/ 41
5.2.2 Recipients To, Cc, Bcc
Within this chapter is described one of the main parts of Compose Email window related to email recipients.
As described in the picture below you can provide here following actions:
add recipients – you can select the recipients from module Contacts, Organizations, Vendors, Leads,
Users or you can type any email address using selection “Other” or simply you can add recipients by
start typing email address (3 and more characters)
remove recipients (emails)
add next type of recipients – Cc, Bcc
there can be also email select box located in the above part for modules like Invoices, Products,
Purchase orders, Sales orders, Quotes …
Picture 5.5 Actions related to recipients
Please take into account that behavior of using To, Cc and Bcc differs in case of sending emails from ListView
of the particular module in case more than one record was selected:
For modules like Contacts, Organizations, Vendors, Leads …
o At least one recipient has to be defined as To
o In case you would like to send email also to Cc, Bcc recipient only for one selected record
please use sending from DetailView of the module
For modules like Invoices, Products, Purchase orders, Sales orders, Quotes …
o At least one recipient has to be defined as To for each selected record (INV_01, INV_02)
o It is possible to define Cc, Bcc recipient for each particular To, it means Cc, Bcc recipients are
better controlled

http://www.its4you.sk/en/ 42
5.2.3 Attachments
Three ways how to attach the attachments into emails are currently supported in the Email Maker (Picture
5.6):
1. The attachments inserted directly into email template (see chapter 4.8 for details).
2. The attachments inserted within Compose E-Mail window:
a. The document/file from the module “Documents” can be added using .
b. Any local file can be added using .
3. PDF Maker templates (available only for users using also PDF Maker). Please refer to chapter 6.4 for
details.
Picture 5.6 Compose E-Mail – part Attachment
In order to delete any attachment please click on “X” before attachment (see picture).

http://www.its4you.sk/en/ 43
5.2.4 Select Email Template
The Compose E-Mail window contains button . You can select email template from ListView
within window Select Email IDs or from DetailView within EMAIL Maker block. Button can be
used in the following situations:
in case you forgot to select email template from Select Email IDs window or EMAIL Maker block
you would like to use different template but don’t want to close Compose E-Mail window
you initiated sending emails outside EMAIL Maker tool (so you were not able to select email
template), e.g. using PDF Maker tool
Picture 5.7 Select Email Template
When you click on “Email Templates List” window will appear on the screen. You can select
template name to be used. Inside this window also information of primary module and description is
available. Please note that only module related templates or common templates are visible and can be used
for sending emails.

http://www.its4you.sk/en/ 44
5.3 Email Campaigns The new option of EMAIL Maker is make Email Campaign. It allows to you to send mails automatically
without your intervention.
Please note that this will work only with EMAIL Maker Professional.
To access to Email Campaign please click on Email Campaign:
Picture 5.8 Access to Email Campaign
Here you can see all your created Campaigns. Status informs you about progress of sending emails.
Picture 5.9 Email Campaigns
To create new Campaigns please provide following steps:
First step is to click on button (Picture 5.9).
In the next window, you have to fill Email Subject, From Email and Email language, you can also fill
From Name and Description (From Name and From Mail are filled automatically). Then please click
on button.
Email Campaigns functionality needs to correct working have implement workflow of
Email Maker and correct setting of vtiger cron.
More about standard vtiger cron you can read here:
https://wiki.vtiger.com/index.php/Cron

http://www.its4you.sk/en/ 45
Picture 5.10 Create Campaign
Now, choose module, filter (e.g Organizations and All) and Column (Primary Email, Secondary email).
For each supported modules (Contacts, Vendors, Lead, Organizations) you are able to create own
filters. For more info about creating filters please see:
https://wiki.vtiger.com/vtiger6/index.php/Creating_Custom_Filters
Picture 5.11 Create Campaign
In the next step, choose a template for module you have created before. For creating templates
please see (4.1 Create new email template).
Picture 5.12 Choose your template for Campaign
http://www.its4you.sk/en/ 46
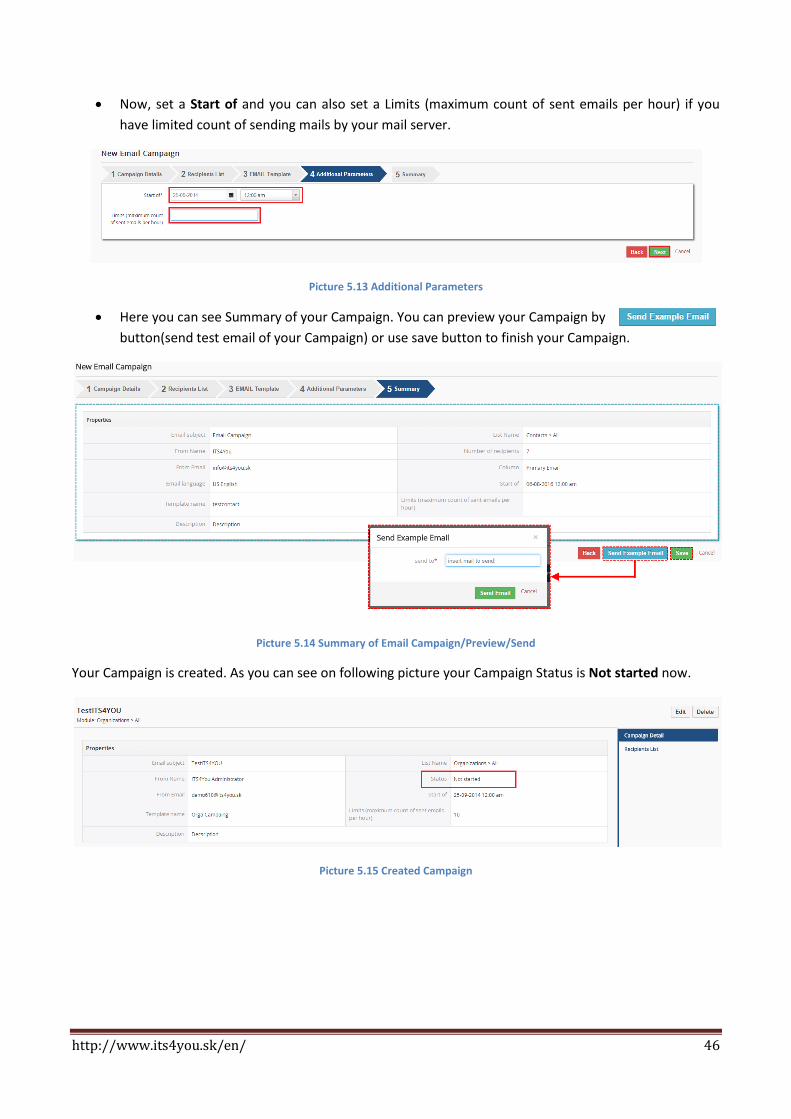
Now, set a Start of and you can also set a Limits (maximum count of sent emails per hour) if you
have limited count of sending mails by your mail server.
Picture 5.13 Additional Parameters
Here you can see Summary of your Campaign. You can preview your Campaign by
button(send test email of your Campaign) or use save button to finish your Campaign.
Picture 5.14 Summary of Email Campaign/Preview/Send
Your Campaign is created. As you can see on following picture your Campaign Status is Not started now.
Picture 5.15 Created Campaign

http://www.its4you.sk/en/ 47
When your Campaign is done, you can see in DetailView of your Campaign that status is Finished and you
can find more info about Campaign (Sent emails, Unsubscribes, Without email address).
Picture 5.16 DetailView of Campaign
Since EMAILMaker version 600.13.0 there is new functionality Recipients List available. Recipients List you
can find in DetailView of Campaign. You can see here Recipient, Email, Subject, Data Sent, Time Sent, Status
Access Count as well as which emails was sent and which emails will be sent because you set maximum
count of emails per hour.
Picture 5.17 Recipients List

http://www.its4you.sk/en/ 48
6 Additional features
6.1 Export and import templates Export and import of the email templates makes it easy to work with EMAIL Maker templates by migration
process or moving templates from development to productive installation.
In order to export EMAIL templates to external sources in EMAIL Maker tool do following steps:
1. In the EMAIL Maker ListView page select one or more templates which would you like to export.
2. Click on and “Export”.
3. In the File Download pop-up dialog select “Save File”.
4. Click to save the templates in *.xml file format.
Picture 6.1 Export of the templates
To import email templates from external sources click on and “Import” (see Picture 6.1 point 2.).
After click the new import page will appear on the screen.
Picture 6.2 Import EMAIL templates page
In the Import pdf templates page, browse the EMAIL Maker template-related data in *.xml format and then
click the button. It will take a few seconds to complete the import. The imported templates can be
found in the EMAIL Maker ListView page.

http://www.its4you.sk/en/ 49
6.2 Custom functions If you need a special treatment of vtiger data in your template, you can use custom (your own) functions.
There is a folder „functions“ under [vTigerROOT]/modules/EMAILMaker/resources, where you can place your
own .php file with functions which would you like to use. This file will be included automatically. Inside this
folder is file „its4you.php“, which contains our functions. These functions are listed in the Table 6-1 and are
provided for you for free. Do not modify this file, because by next version it will be overwritten. If you would
like to use your own functions, please create your own file/files, it means create new .php file under
[vTigerROOT]/modules/EMAILMaker/resources/functions and place here your functions. In order to insert
custom function into template provide following:
1. Go to EditView, and in Other information tab select custom function from selectbox „Custom
functions“. As example in the picture below its4you_if is selected.
2. Click button . It adds function in form
[CUSTOMFUNCTION|functionname|param1|param2|…|CUSTOMFUNCTION] or
[CUSTOMFUNCTION_AFTER|functionname|param1|param2|…|CUSTOMFUNCTION].
3. Finally you have to define function name and parameters of the function as shown in the picture
below.
As you can see in the Picture 6.3 the final text of the sent email depends on result of the custom function.
Picture 6.3 Custom functions
In the above example function with 5 parameters was used, i.e.
[CUSTOMFUNCTION|functionname|param1|param2|param3|param4|param5|CUSTOMFUNCTION]. It is
possible to use functions without parameters as well. In this case use just notation
[CUSTOMFUNCTION|functionname|CUSTOMFUNCTION].

http://www.its4you.sk/en/ 50
Following table contains short description of our its4you_* functions for your email templates.
Name Description
its4you_if [CUSTOMFUNCTION|its4you_if|param1|comparator|param2|whatToReturn1|whatToReturn2|CUSTOMFUNCTION]
This function executes if-else statement based on given parameters: param1 first parameter of comparison comparator comparison sign - one of ==,!=,<,>,<=,>= param2 second parameter of comparison whatToReturn1 value returned when comparison succeeded whatToReturn2 value returned when comparison didn’t succeed
its4you_getTemplateId [CUSTOMFUNCTION|its4you_getTemplateId|CUSTOMFUNCTION]
This function returns id of current template.
its4you_getContactImage [CUSTOMFUNCTION|its4you_getContactImage|id|width|height|CUSTOMFUNCTION]
Please note that function has to be executed after sending email. So please use notation CUSTOMFUNCTION_AFTER
This function returns image of contact. id – as parameter use $s-contacts-crmid$ width - width of returned image (10%, 100px) height - height of returned image (10%, 100px)
its4you_sum [CUSTOMFUNCTION|its4you_sum|arg1|arg2|CUSTOMFUNCTION]
This function returns sum of input values: arg1+arg2+…+argN. Function is inserted with two arguments by default but you can edit it and add more arguments.
its4you_deduct [CUSTOMFUNCTION|its4you_deduct|arg1|arg2|CUSTOMFUNCTION]
This function returns deducted value arg1-arg2-...-argN (all following values are deducted from the first one). Function is inserted with two arguments by default but you can edit it and add more arguments.
its4you_multiplication [CUSTOMFUNCTION|its4you_multiplication|arg1|arg2|CUSTOMFUNCTION]
This function returns multiplication of all input values: arg1*arg2*…*argN. Function is inserted with two arguments by default but you can edit it and add more arguments.
its4you_divide [CUSTOMFUNCTION|its4you_divide|arg1|arg2|CUSTOMFUNCTION]
This function returns divided value arg1/arg2/.../argN. Function is inserted with two arguments by default but you can edit it and add more arguments.
its4you_formatNumberToPDF [CUSTOMFUNCTION|its4you_formatNumberToPDF|value|CUSTOMFUNCTION]
This function returns formatted value and is used by other functions. value – int
its4you_formatNumberFromPDF [CUSTOMFUNCTION|its4you_formatNumberFromPDF|value|CUSTOMFUNCTION]
This function returns converted value into integer and is used by other functions. value - int
Table 6-1 its4you functions
Important note: It is not allowed to use one custom function inside another one, i.e. to use
custom function as parameter of another custom function.

http://www.its4you.sk/en/ 51
6.2.1 “AFTER” custom functions
As you can see in the picture below, the custom functions are divided into two groups:
BEFORE - [CUSTOMFUNCTION|functionname|param1|…|paramN|CUSTOMFUNCTION]
o custom function is executed before sending email
o the result of the custom function is visible i.e. inside Compose E-Mail window in case of one recipient was
selected
AFTER - [CUSTOMFUNCTION_AFTER| functionname|param1|…|paramN|CUSTOMFUNCTION_AFTER]
o custom function is executed after click on button in Compose E-Mail window
o the result of the custom function is not visible before sending email, i.e. you have to check outgoing
emails to see result if you needed
Picture 6.4 Custom function groups
The “After custom functions” were developed due to fields “Recipient variables (To)”. The reason is that
although email recipients are selected in ListView there is still possibility to add additional “To:” recipients
within “Compose E-Mail window”. In case that you would like to use fields “Recipient variables (To)” in your
email templates as parameters of custom function, the custom function has to be executed after click on
button in “Compose E-Mail window”. The explanation is also seen in the following picture were
“Mailing Country” from “Recipient variables (To)” is used in CUSTOMFUNCTION as well as
CUSTOMFUNCTION_AFTER. Wrong result of CUSTOMFUNCTION is shown in Compose E-Mail view and
therefore also in final sent email.
Picture 6.5 Differences of before/after custom functions for “Recipient variables (To)” fields
Important note: Always use CUSTOFUNCTION_AFTER for fields “Recipient variables (To)”.

http://www.its4you.sk/en/ 52
From before/after custom function point of view, there is no difference in final sent email for other than
“Recipient variables (To)” fields i.e. primary module fields, related modules fields etc. It means it is also
correct if the CUSTOMFUNCTION_AFTER is used for other fields. The only one disadvantage is that in
Compose E-Mail window you cannot see the result of the custom function.
Picture 6.6 Differences of before/after custom functions for “Non-Recipient variables (To)” fields
6.3 Sharing Using Sharing tab you can define template owner and how to share your template between you and other
users or groups. You can setup sharing for different entities & members. In order to share your template:
1. Select “Share” from the list.
2. Select “Entity” from the list. Available entities are: groups, roles, roles & subordinates, users.
3. Select member of entity
4. Click to add it to “Selected Members”
5. Click to remove selected member from “Selected Members”
Picture 6.7 Sharing

http://www.its4you.sk/en/ 53
6.4 Support of the PDF Maker The PDF Maker extension tool designed for vtiger CRM powerful and flexible tool which allows users of
vtiger CRM to create own pdf templates. The PDF Maker and EMAIL Maker are supported each other. It
means that:
a) from ListView you can send emails based on EMAIL Maker templates including PDF files created by
PDF Maker as attachment by simple selection of both templates in the Select EMAIL IDs window (see
also chapters 5.1 and 5.2.3). Just click on button in order to use PDF Maker
template.
b) from DetailView you can also use both EMAIL Maker and PDF Maker templates in one email. There
are two approaches (the first approach is faster and simple)
I) Select the PDF Maker template in PDF Maker block and continue with ; then in
Compose E-Mail window click on in order to use EMAIL Maker template for
your email (see chapter 5.2.4).
II) In case you already created and stored PDF file please select the EMAIL Maker template
from EMAIL Maker block and continue to Compose E-Mail window where you can attach
PDF file by (see chapter 5.2.3).
For details about PDF Maker tool please refer to
http://www.its4you.sk/images/pdf_maker/pdf_maker_for_vtiger6_crm.pdf.
Picture 6.8 Support of the PDF Maker
http://www.its4you.sk/en/ 54
6.5 Support of Workflow You are able to create Workflow with sending email from EMAIL Maker. It is easy and comfortable to create
a template and set Workflow.
More info about Workflows you can find: https://wiki.vtiger.com/vtiger6/index.php/Workflows
Please note that this will work only with EMAIL Maker Professional.
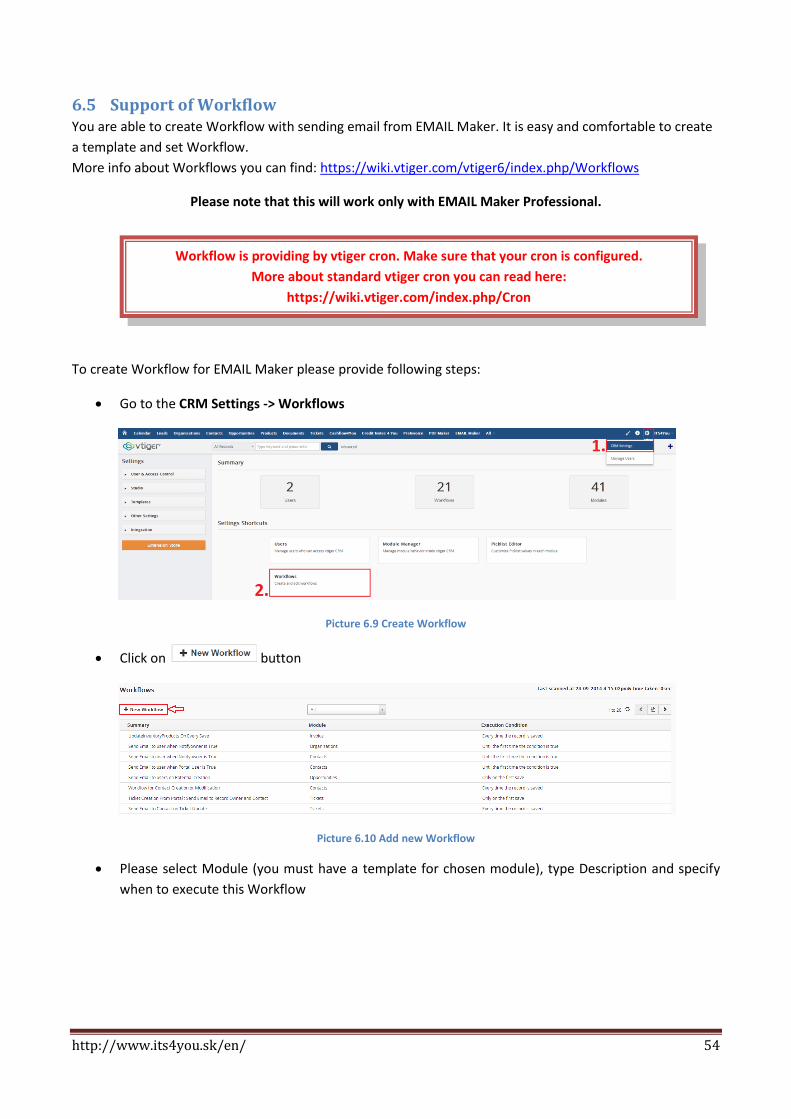
To create Workflow for EMAIL Maker please provide following steps:
Go to the CRM Settings -> Workflows
Picture 6.9 Create Workflow
Click on button
Picture 6.10 Add new Workflow
Please select Module (you must have a template for chosen module), type Description and specify
when to execute this Workflow
Workflow is providing by vtiger cron. Make sure that your cron is configured.
More about standard vtiger cron you can read here:
https://wiki.vtiger.com/index.php/Cron

http://www.its4you.sk/en/ 55
Picture 6.11 First step to set Workflow
If you want, next window offers to you to set the conditionals for your Workflow
Picture 6.12 Set conditions of Workflow
Now please click on button and choose Send Email from EMAIL Maker
Picture 6.13 Add To Do
In this window you are able to set your Email. Please type Task Title, you can enter From and you
need to fill To. Then please click on Email content.

http://www.its4you.sk/en/ 56
Picture 6.14 Add Task for Workflow
Choose your template for chosen module and click on button
Picture 6.15 Choose your Template
Finally, please click on button to finalize your Workflow
Picture 6.16 Finalize of your Wokflow
Here is your Workflow located
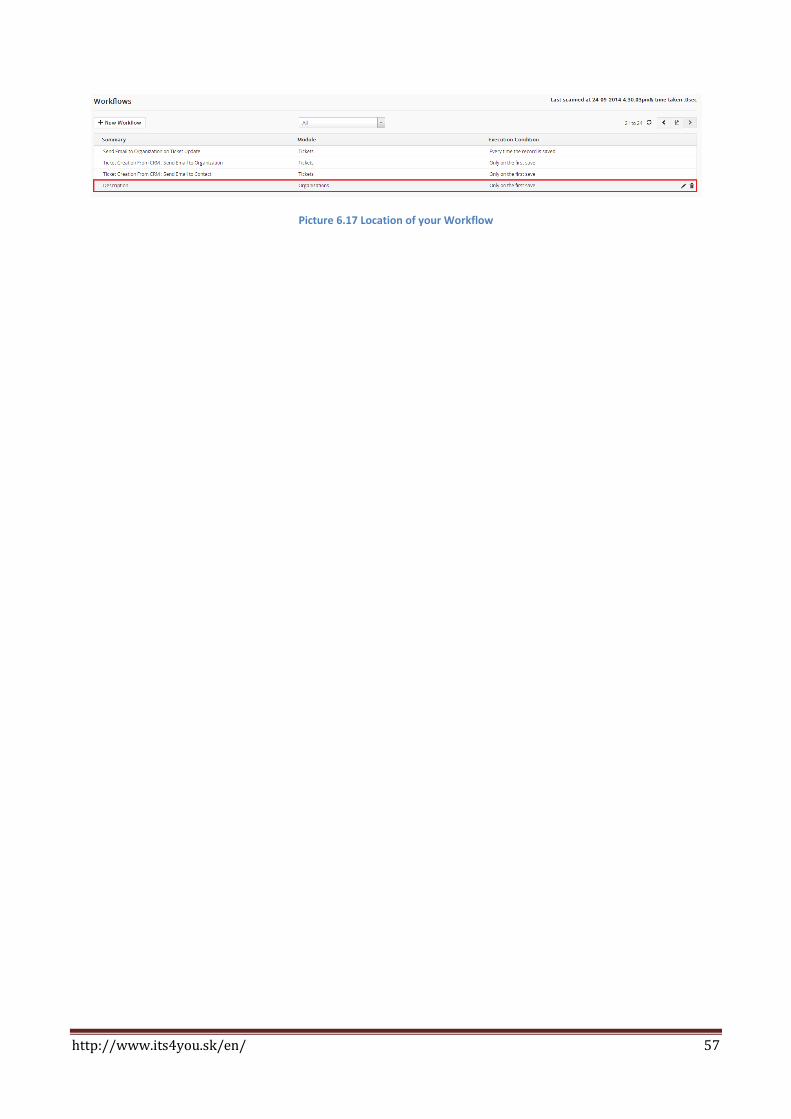
http://www.its4you.sk/en/ 57
Picture 6.17 Location of your Workflow
http://www.its4you.sk/en/ 58
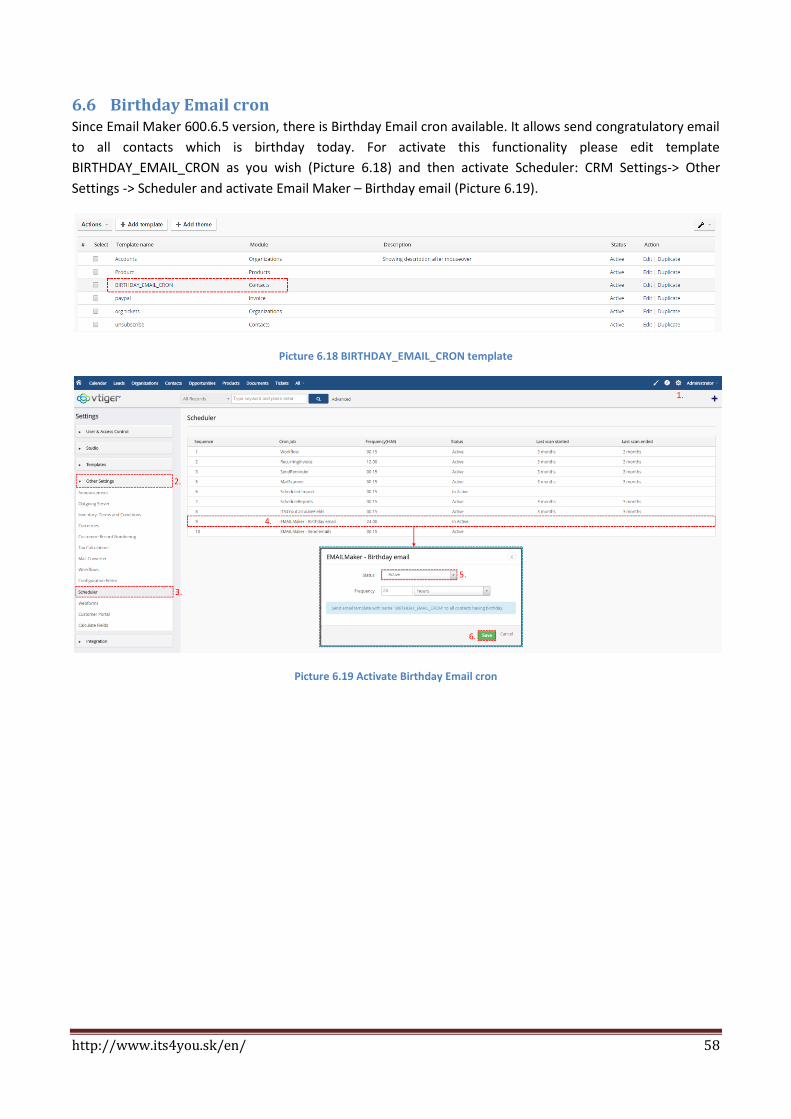
6.6 Birthday Email cron Since Email Maker 600.6.5 version, there is Birthday Email cron available. It allows send congratulatory email
to all contacts which is birthday today. For activate this functionality please edit template
BIRTHDAY_EMAIL_CRON as you wish (Picture 6.18) and then activate Scheduler: CRM Settings-> Other
Settings -> Scheduler and activate Email Maker – Birthday email (Picture 6.19).
Picture 6.18 BIRTHDAY_EMAIL_CRON template
Picture 6.19 Activate Birthday Email cron

http://www.its4you.sk/en/ 59
7 Settings The EMAIL Maker settings are accessible directly from the ListView and consist of (Picture 7.1):
Profiles – manage user-specific Email Maker access to different roles
Self-defined labels – manage your own labels
Product block templates – manage your own product block templates
License settings – manage all settings related to your license
Extensions – extensions for EMAIL Maker
Uninstall Email Maker – remove EMAIL Maker completely from your vtiger
Picture 7.1 EMAIL Maker settings
7.1 Manage profiles
You may define EMAIL Maker privileges for all profiles. Click on to edit privileges. You may select
Create/Edit, View and Delete privileges. Click to save changes.
Picture 7.2 Manage profiles

http://www.its4you.sk/en/ 60
7.2 Self-defined labels If the global and module related labels are not sufficient for you, it is possible to define self-defined labels. In
order to define self-defined please use following step:
1. Click on button.
2. Define label key C_***** and value for your current language. Click on button.
3. In order to define values for other installed languages click on “Other values” link.
4. Define label value for additional languages and click on button.
You can also find here button which allows you to delete unnecessary labels.
7.3 How to define self-defined labels

http://www.its4you.sk/en/ 61
7.3 Product block templates
As can be seen in the picture below, you can simply add - , edit - , duplicate - or delete
- product block templates. In order to delete product block template it is necessary to check the
checkbox related to product block template firstly and then click on button .
Picture 7.4 Product block templates management
When you click on button following window will appear on your screen (Picture 7.5). In order to
create and save your own product block template please provide following steps:
1. Define product block template name.
2. Insert product block template start (#PRODUCTBLOC_START#) and product block template end
(#PRODUCTBLOC_END#).
3. Add all necessary product/service fields according to your needs between (#PRODUCTBLOC_START#)
and (#PRODUCTBLOC_END#) and provide formatting if needed.
4. Click on button.
Picture 7.5 Create new product block template

http://www.its4you.sk/en/ 62
7.4 License settings
7.4.1 Deactivate license
If you want to deactivate your license please provide following step:
1. Click on button
Picture 7.6 Deactivate Email Maker
2. Confirm deactivation using button
Picture 7.7 Deactivate Email Maker
After deactivation of license you can list or export your email templates, but you cannot add, edit, delete or
use them. The Actions link to work with templates is not visible in the ListView and DetailView and EMAIL
Maker block is not visible either. To use Email Maker again properly, you need to activate license key. Please,
click on and provide activate step.
Picture 7.8 Deactivated Email Maker
Picture 7.9 Activate Email Maker

http://www.its4you.sk/en/ 63
7.4.2 Reactivate license
In case that some problem occurs with license key (moving, copying, migrating, changing Company info) you need to reactivate your license key. To reactivate license key please provide following steps:
1. Click on
Picture 7.10 Reactivate license
2. Confirm with
Picture 7.11 Reactivate license

http://www.its4you.sk/en/ 64
7.5 Extensions Here you can find extensions for EMAIL Maker. There are Workflow and Unsubscribe email extensions now.
7.5.1 Workflow
Allows you send email by using EMAIL Maker within the Workflow settings. For more info please check
chapter Support of Workflow.
7.5.2 Unsubscribe email
Picture 7.12 Unsubscribe email
You can use UnsbuscibeEmail.php within your webpage or vice versa you can edit UnsbuscibeEmail.php
according to your needs. For info of define please click on button or provide following steps:
Inside UnsbuscibeEmail.php is necessary to define (Picture 7.11):
$server_path – this is your vtiger URL. If you are using “vtiger On Demand” you’ll find it in your
browser’s address bar
$user_name – this is the username you use to login to the vtiger CRM, see also “My Preferences”
$user_access_key – the access key can be retrieved by logging into your vtiger CRM account, going
to “My Preferences”
Sentence shown after successful unsubscribing (row 77)
Sentence shown when email address has not been unsubscribed (row 79)
Note: Since Email Maker version 600.7.0 there is Unsubscribe email available also for Leads module.

http://www.its4you.sk/en/ 65
Picture 7.13 Edit of UnsubscribeEmail.php
The final step is to put custom function its4you_unsubscribeemail into your template. There are just two
parameters which you need to modify inside custom function [CUSTOMFUNCTION_AFTER|
its4you_unsubscribeemail|$accounts-crmid$|$contacts-crmid$|URL_ADDRESS|Unsubscribe
email|CUSTOMFUNCTION_AFTER]:
parameter 3 – URL_ADDRESS – url address of your unsubscribe email web page
parameter 4 – Text of the unsubscribe link
Next picture shows process of unsubscribing contact which leads to change his “Email Opt Out” to “yes”.
Picture 7.14 Process of unsubscribing from emails

http://www.its4you.sk/en/ 66
7.5.3 Styles4You
Styles4You extension allows to you manage your CSS styles and assigned it to templates.
To install Styles4You please provide following steps:
1. Open EMAIL Maker
2. In Settings part choose Extensions
3. Download zip file by Download button
4. Install Styles4You via module manager or Install button
Picture 7.15 How to install Styles4You
Now Styles4You is installed into EMAIL Maker. To see your styles click on Styles in EMAIL Maker.
Picture 7.16 Styles4You
Here you can also add, edit and delete your styles. To add style please click on button.
Picture 7.17 How to add new style
http://www.its4you.sk/en/ 67
Fill name, choose priority and insert your style. Priority is used when you add more style to one template.
EMAIL Maker takes CSS with smaller number.
Picture 7.18 How to create Style4You
To add your styles to template please open your template and click on Styles.
Picture 7.19 How to add style to template
Now, click on button to select style or to create new style.
Picture 7.20 Select styles

http://www.its4you.sk/en/ 68
Now, your style has been added to your template.
Picture 7.21 Styles4You
Style used in your template you can also find in EditView of template in CSS Style part.
Picture 7.22 Style in EditView of template

http://www.its4you.sk/en/ 69
7.6 Uninstall Since EMAIL Maker version 600.3.0 there is available option to remove EMAIL Maker from you vtiger. To
uninstall please provide following steps:
Go to the ListView of EMAIL Maker and choose option Uninstall Email Maker
7.23 Uninstall EMAIL Maker – step 1
Click on button
7.24 Uninstall EMAIL Maker – step 2
Confirm uninstall with button
7.25 Uninstall EMAIL Maker – step 3
Now, EMAIL Maker is removed from your vTiger and your license is deactivated. To use EMAIL Maker again
you need to provide installation and validation steps (see chapter How to install EMAIL Maker).

http://www.its4you.sk/en/ 70
Change log of Email Maker
October 2016:600.15.0 – 600.15.2
Styles4You new variable “Modified by User”, “Created by User” available (Other information)
minor improvements and bug fixes
July 2016: 600.14.0 – 600.14.1 Sharing and Owner in ListView
Seaching in ListView
Category of template shown also in Workflow
minor improvements
bug fixes
June 2016: 600.12.0 – 600.13.0 Email choosing change to multiselectbox before compose window
Increased size of Subject
French translation of Email Maker
Subject and Workflow in ListView (Picture 3.1 EMAIL Maker ListView)
Recipient List of Email Campaign. (Picture 5.17 Recipients List)
minor improvements and bug fixes
Email Campaigns tab and Email Workflows tab in DetailView of template (Picture 3.2 DetailView)
Preview of Email Campaign (Picture 5.14 Summary of Email Campaign/Preview/Send)
April 2016: 600.11.3 “Select all records” issue fixed
April 2016: 600.11.0 – 600.11.2 Template owner is who creates the Template
Showing fields from MultiCompany 4 You
Fixed Issue of fields from Available fields for Products and Available fields for Services
Fixed showing Currency Fields
Option to create separate Blocks for Products and for Services
Fixed Issue with Pop-Up Window
Faster loading Edit and Create Email Template pages
October – December 2015: 600.10.1 – 600.10.4 Minor improvements
Translation of Multipicklist values
Option to add Site_URL into template by using $siteurl$ variable
Birthday email cron and Status Sent fixed
Fixed workflow with attachment
VAT BLOCK shown also with 0%
August 2015: 600.10.0 Option to use conditions to display template (Display conditions)
July 2015: 600.9.0
minor improvements and bug fixes correction of translation fixed privileges for Detail/Edit/Delete

http://www.its4you.sk/en/ 71
June 2015: 600.8.0 compatibility with Vtiger 6.3
May 2015: 600.7.0 bug fixes
Unsubscribe email available for Leads
April 2015: 600.6.4 – 600.6.6 Bug fixes
Showing description after mouseover (Picture 3.5)
Birthday Email Cron (chapter Birthday Email cron)
20th March 2015: 600.6.0 Available option to add custom Company Info into template
New way of licensing (chapter License settings)
Improved option to add to,cc,bcc recipients (chapter Recipients To, Cc, Bcc)
Bug fixes
Compatibility with Vtiger 6.2
19th December 2014: 600.5.1
upgrade option
December 2014: 600.5.0 fixed sorting in related blocks
license activation in vtiger 6.1 fixed
October 2014: 600.4.0 Unsubscribe function (chapter Unsubscribe email) Bug fixes
November 2014: 600.3.0 available option to Uninstall EMAIL Maker (chapter Uninstall)
30th September 2014: 600.2.0 Email Maker Professional version available
o Option to create Email Campaign (EMAIL Maker Pro) o Support of Workflow for Email Maker (EMAIL Maker Pro)
6th June 2014: 600.1.11 minor improvements and bug fixes
April - June 2014: 600.1.2 – 600.1.10 minor improvements and bug fixes related to movement of the EMAIL Maker to vtiger 6
22th April 2014: 600.1.0 first initiate version for vtiger 6 based on main functionalities of EMAIL Maker for vtiger 5.x

http://www.its4you.sk/en/ 72
Change log of Manual for Email Maker
November 2016: manual based on EMAIL Maker version 600.15.2
new chapter: Styles4You updated chapters: ListView, DetailView
June 2016: manual based on EMAIL Maker version 600.13.0 updated chapters: Email Campaigns
updated pictures: Picture 3.1 EMAIL Maker ListView, Picture 3.2 DetailView, Picture 4.28 Default template visibility, Picture 5.1 How to send email
new pictures: Picture 5.17 Recipients List
April 2016: manual based on EMAIL Maker version 600.11.2 new chapters: 4.5.2 Create separate Block for Products and for Services
updated chapters: 5.3 Email Campaigns, 6.5 Support of Workflow
August 2015: manual based on EMAIL Maker version 600.10.0 updated chapters: Properties, Unsubscribe email, Email Campaigns new chapters: Birthday Email cron, Display conditions
20th March 2015:
updated chapters: Sending emails, How to install EMAIL Maker, License settings
19th December 2014: manual based on EMAIL Maker version 600.5.1 updated chapter: How to upgrade EMAIL Maker
November 2014: manual based on EMAIL Maker version 600.4.0 new chapters: 7.2 Self-defined labels, 7.5 Extensions, 7.6 Uninstall
30th September 2014: 600.2.0 new chapters: What’s new? 5.3 Email Campaigns, 6.5 Support of Workflow
18th June 2014: based on 600.1.11 first initiate version for vtiger 6