Maintenance Tool Operation Guide · Using the Maintenance Tool (Windows) Summary of the Maintenance...
93
Maintenance Tool Operation Guide CMP0183-01 EN
Transcript of Maintenance Tool Operation Guide · Using the Maintenance Tool (Windows) Summary of the Maintenance...
Maintenance ToolOperation Guide
CMP0183-01 EN
Copyrights and Trademarks
Copyrights and Trademarks
No part of this publication may be reproduced, stored in a retrieval system, or transmitted in any form or by anymeans, electronic, mechanical, photocopying, recording, or otherwise, without the prior written permission of SeikoEpson Corporation. The information contained herein is designed only for use with this Epson printer. Epson is notresponsible for any use of this information as applied to other printers.
Neither Seiko Epson Corporation nor its affiliates shall be liable to the purchaser of this product or third parties fordamages, losses, costs, or expenses incurred by the purchaser or third parties as a result of accident, misuse, or abuse ofthis product or unauthorized modifications, repairs, or alterations to this product, or (excluding the U.S.) failure tostrictly comply with Seiko Epson Corporation’s operating and maintenance instructions.
Seiko Epson Corporation shall not be liable for any damages or problems arising from the use of any options or anyconsumable products other than those designated as Original Epson Products or Epson Approved Products by SeikoEpson Corporation.
Seiko Epson Corporation shall not be held liable for any damage resulting from electromagnetic interference thatoccurs from the use of any interface cables other than those designated as Epson Approved Products by Seiko EpsonCorporation.
EPSON®, EPSON EXCEED YOUR VISION, EXCEED YOUR VISION and their logos are registered trademarks ortrademarks of Seiko Epson Corporation.
Microsoft® and Windows® are registered trademarks of Microsoft Corporation.
Apple®, Macintosh®, Mac OS®, and OS X® are registered trademarks of Apple Inc.
General Notice: Other product names used herein are for identification purposes only and may be trademarks of theirrespective owners. Epson disclaims any and all rights in those marks.
© 2019 Seiko Epson Corporation. All rights reserved.
Meaning of Symbols
c Important: Important must be followed to avoid damage to this product.
Note: Notes contain important information on the operation of this product.
Operating System Versions
In this documentation, the following abbreviations are used.
SL-D800 Series Maintenance Tool Operation Guide
Copyrights and Trademarks
2
Windows refers to Windows 10, 8, 7.
❏ Windows 10 refers to Windows 10 Pro, Windows 10 Pro x64.
❏ Windows 8.1 refers to Windows 8.1, Windows 8.1 Pro.
❏ Windows 8 refers to Windows 8, Windows 8 Pro.
❏ Windows 7 refers to Windows 7 Professional.
Macintosh refers to Mac.
❏ Mac refers to macOS Mojave/macOS High Sierra/macOS Sierra/OS X El Capitan/OS X Yosemite/OS XMavericks/OS X Mountain Lion/Mac OS X v10.7.x/Mac OS X v10.6.8.
SL-D800 Series Maintenance Tool Operation Guide
Copyrights and Trademarks
3
Contents
Copyrights and TrademarksCopyrights and Trademarks. . . . . . . . . . . . . . . . . . 2Meaning of Symbols. . . . . . . . . . . . . . . . . . . . . . . . 2Operating System Versions. . . . . . . . . . . . . . . . . . . 2
Using the Maintenance Tool (Windows)Summary of the Maintenance Tool. . . . . . . . . . . . . 5
Starting and Closing. . . . . . . . . . . . . . . . . . . . . . 5Explanation of the Main Screen. . . . . . . . . . . . . . 7
Printer maintenance. . . . . . . . . . . . . . . . . . . . . . . 11Using Printer maintenance. . . . . . . . . . . . . . . . 11Diagnostic Cleaning. . . . . . . . . . . . . . . . . . . . . 13Forced Cleaning. . . . . . . . . . . . . . . . . . . . . . . . 14Nozzle Check. . . . . . . . . . . . . . . . . . . . . . . . . . 15
Paper Settings. . . . . . . . . . . . . . . . . . . . . . . . . . . . 18Current media. . . . . . . . . . . . . . . . . . . . . . . . . 18Print Head Alignment. . . . . . . . . . . . . . . . . . . . 18Paper Feed Adjustment. . . . . . . . . . . . . . . . . . . 21Gray Adjustment. . . . . . . . . . . . . . . . . . . . . . . 24
Printer Management. . . . . . . . . . . . . . . . . . . . . . . 40Registering Printers. . . . . . . . . . . . . . . . . . . . . . 40Canceling Registration for Printers. . . . . . . . . . 40Changing the Printer Name. . . . . . . . . . . . . . . . 41Replace Printer. . . . . . . . . . . . . . . . . . . . . . . . . 43Firmware Update. . . . . . . . . . . . . . . . . . . . . . . 44
System Environment Settings. . . . . . . . . . . . . . . . 46Setting the Print Data Temporary StorageFolder. . . . . . . . . . . . . . . . . . . . . . . . . . . . . . . . 46Update the Paper Information. . . . . . . . . . . . . . 47Collect Logs. . . . . . . . . . . . . . . . . . . . . . . . . . . 50
Troubleshooting. . . . . . . . . . . . . . . . . . . . . . . . . . 52About error messages. . . . . . . . . . . . . . . . . . . . 52Cannot perform Replace Printer fromMaintenance Tool. . . . . . . . . . . . . . . . . . . . . . . 53Cannot Perform Printer Registration/CancelRegistration Correctly. . . . . . . . . . . . . . . . . . . . 53
Using the Maintenance Tool (Mac)Summary of the Maintenance Tool. . . . . . . . . . . . 54
Starting and Closing. . . . . . . . . . . . . . . . . . . . . 54List of Functions. . . . . . . . . . . . . . . . . . . . . . . . 56
Printer Window. . . . . . . . . . . . . . . . . . . . . . . . . . 57Adjusting the Print Head. . . . . . . . . . . . . . . . . . . . 58
Performing Head Maintenance. . . . . . . . . . . . . 58
Nozzle Check. . . . . . . . . . . . . . . . . . . . . . . . . . 60Diagnostic Cleaning. . . . . . . . . . . . . . . . . . . . . 62Forced Cleaning. . . . . . . . . . . . . . . . . . . . . . . . 63Print Head Alignment. . . . . . . . . . . . . . . . . . . . 65
Operation Condition Settings. . . . . . . . . . . . . . . . 68Time Before Switching to Sleep Mode. . . . . . . . 68Warning Buzzer. . . . . . . . . . . . . . . . . . . . . . . . 69Quick Print Mode. . . . . . . . . . . . . . . . . . . . . . . 70Paper Settings. . . . . . . . . . . . . . . . . . . . . . . . . . 71Periodic Nozzle Check. . . . . . . . . . . . . . . . . . . 74
Adding a Printer/Updating Paper Information. . . . 75Troubleshooting. . . . . . . . . . . . . . . . . . . . . . . . . . 77
About error messages. . . . . . . . . . . . . . . . . . . . 77
AppendixOPEN SOURCE SOFTWARE LICENSE TERMS. . . . . . . . . . . . . . . . . . . . . . . . . . . . . . . . . . . . . . 78EPSON END USER SOFTWARE LICENSEAGREEMENT . . . . . . . . . . . . . . . . . . . . . . . . . . . 86
SL-D800 Series Maintenance Tool Operation Guide
Contents
4
Using the Maintenance Tool (Windows)
Summary of the Maintenance Tool
From your computer you can perform adjustment and maintenance operations such as checking the printer's status,making settings, performing head cleaning and so on.
The maintenance tool provides an operator mode and an administrator mode. The startup method and items that canbe used differ depending on the mode you are using.
You need administrator rights for your OS to start administrator mode.
Starting and Closing
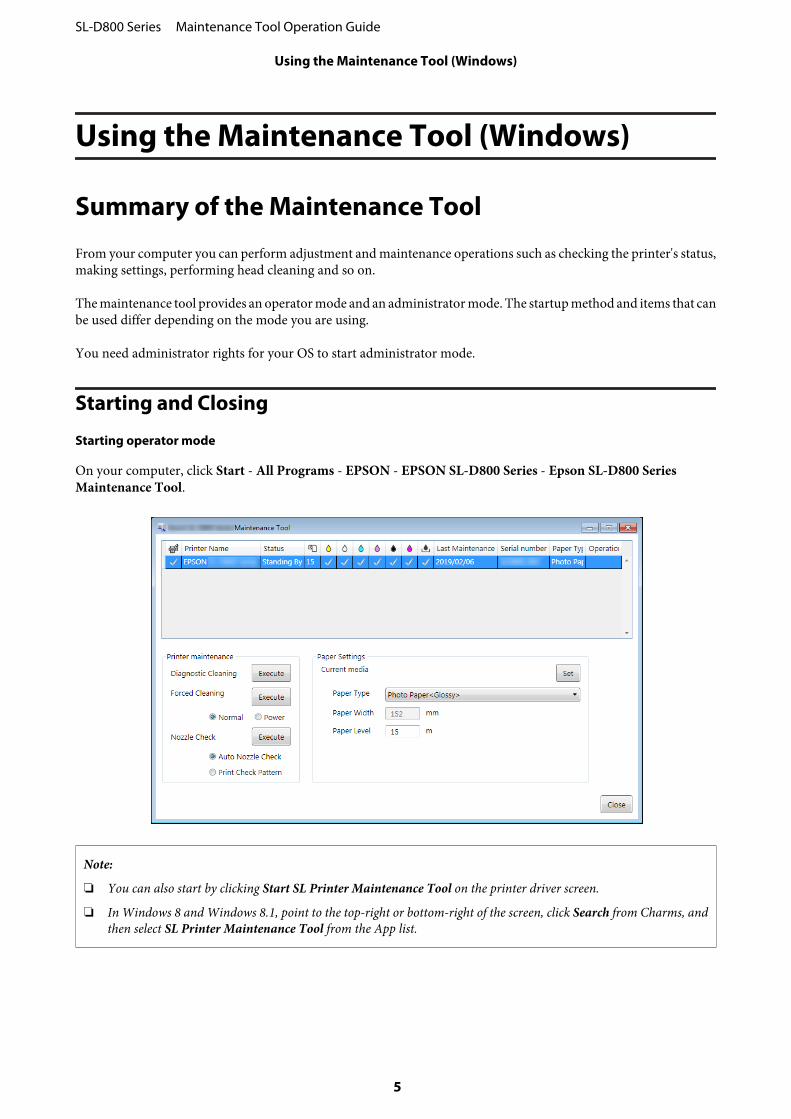
Starting operator mode
On your computer, click Start - All Programs - EPSON - EPSON SL-D800 Series - Epson SL-D800 SeriesMaintenance Tool.
Note:
❏ You can also start by clicking Start SL Printer Maintenance Tool on the printer driver screen.
❏ In Windows 8 and Windows 8.1, point to the top-right or bottom-right of the screen, click Search from Charms, andthen select SL Printer Maintenance Tool from the App list.
SL-D800 Series Maintenance Tool Operation Guide
Using the Maintenance Tool (Windows)
5
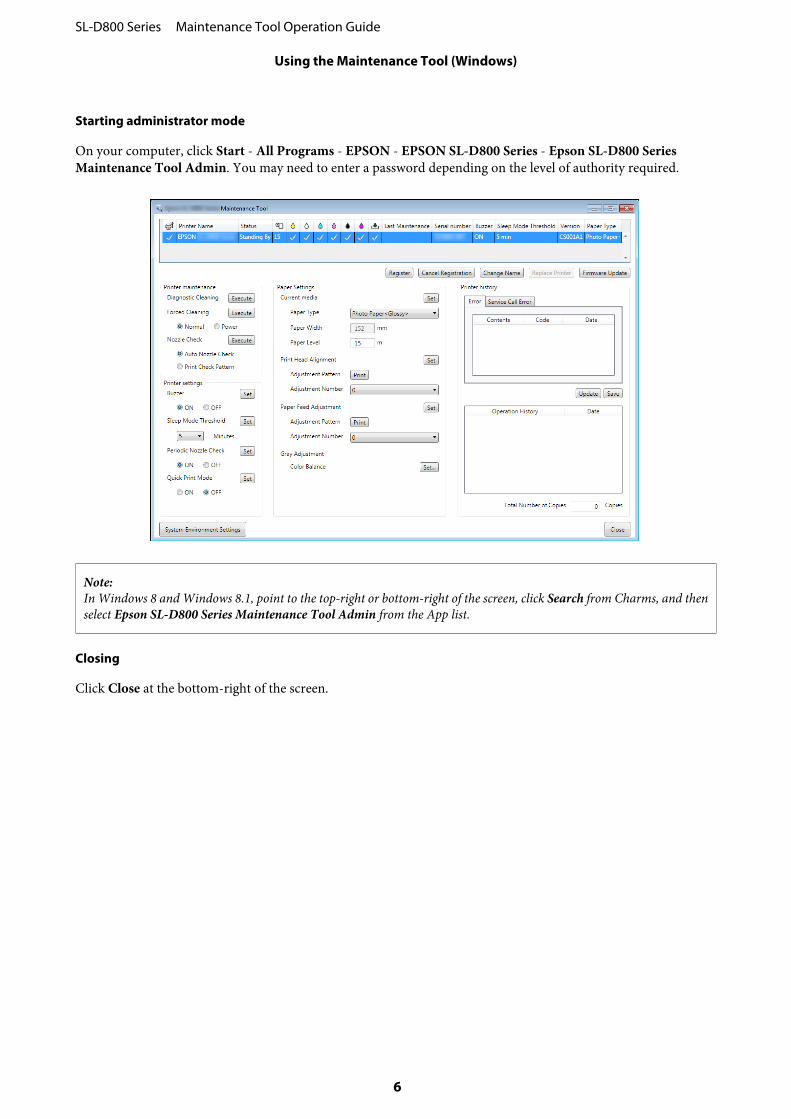
Starting administrator mode
On your computer, click Start - All Programs - EPSON - EPSON SL-D800 Series - Epson SL-D800 SeriesMaintenance Tool Admin. You may need to enter a password depending on the level of authority required.
Note:In Windows 8 and Windows 8.1, point to the top-right or bottom-right of the screen, click Search from Charms, and thenselect Epson SL-D800 Series Maintenance Tool Admin from the App list.
Closing
Click Close at the bottom-right of the screen.
SL-D800 Series Maintenance Tool Operation Guide
Using the Maintenance Tool (Windows)
6
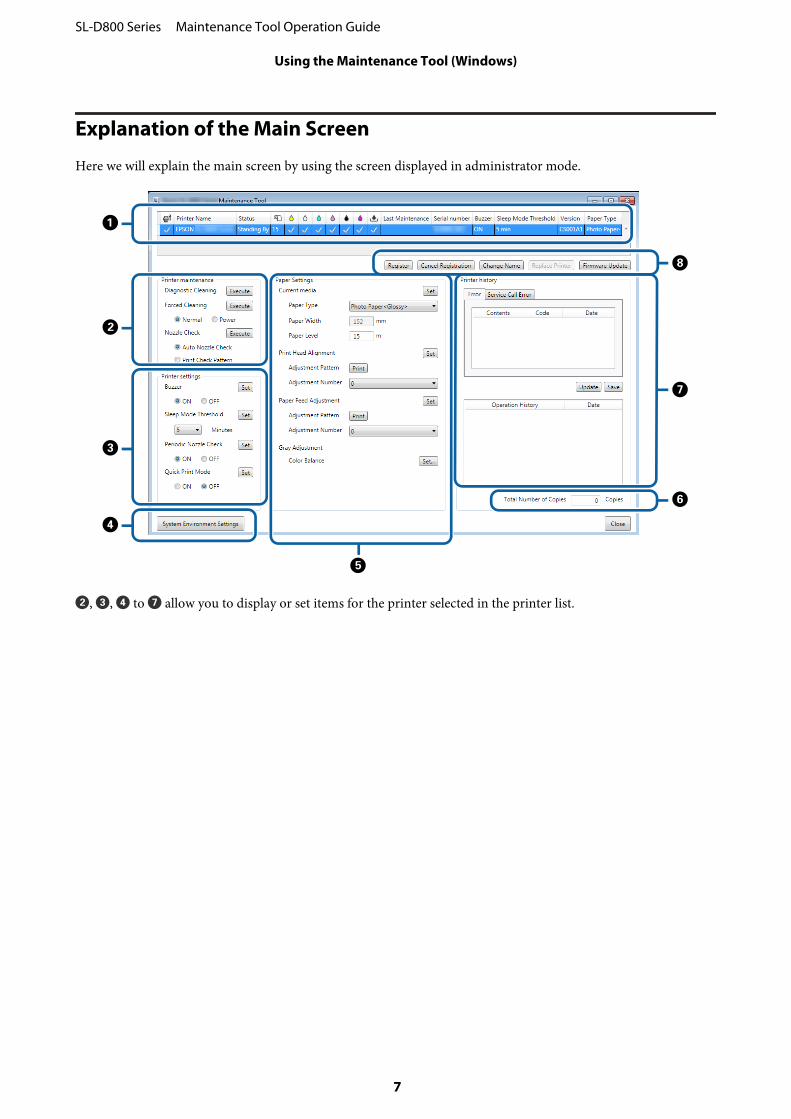
Explanation of the Main Screen
Here we will explain the main screen by using the screen displayed in administrator mode.
B, C, D to G allow you to display or set items for the printer selected in the printer list.
SL-D800 Series Maintenance Tool Operation Guide
Using the Maintenance Tool (Windows)
7
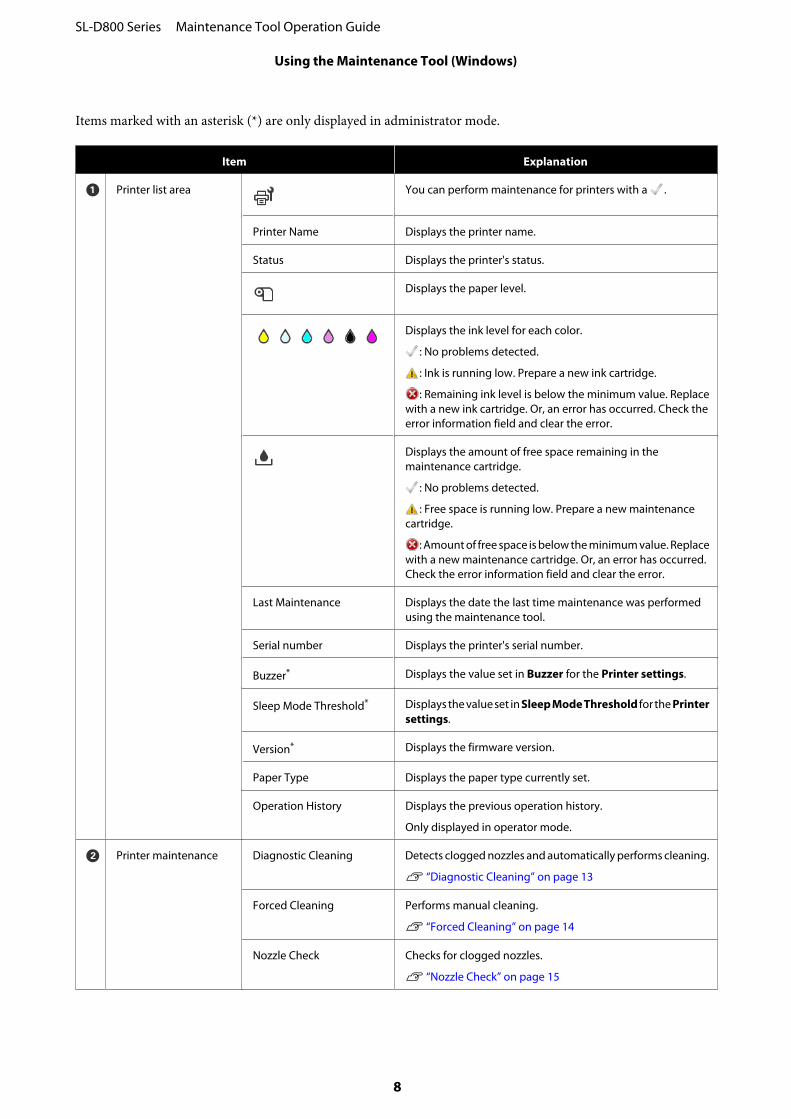
Items marked with an asterisk (*) are only displayed in administrator mode.
Item Explanation
A Printer list area You can perform maintenance for printers with a .
Printer Name Displays the printer name.
Status Displays the printer's status.
Displays the paper level.
Displays the ink level for each color.
: No problems detected.
: Ink is running low. Prepare a new ink cartridge.
: Remaining ink level is below the minimum value. Replacewith a new ink cartridge. Or, an error has occurred. Check theerror information field and clear the error.
Displays the amount of free space remaining in themaintenance cartridge.
: No problems detected.
: Free space is running low. Prepare a new maintenancecartridge.
: Amount of free space is below the minimum value. Replacewith a new maintenance cartridge. Or, an error has occurred.Check the error information field and clear the error.
Last Maintenance Displays the date the last time maintenance was performedusing the maintenance tool.
Serial number Displays the printer's serial number.
Buzzer* Displays the value set in Buzzer for the Printer settings.
Sleep Mode Threshold* Displays the value set in Sleep Mode Threshold for the Printersettings.
Version* Displays the firmware version.
Paper Type Displays the paper type currently set.
Operation History Displays the previous operation history.
Only displayed in operator mode.
B Printer maintenance Diagnostic Cleaning Detects clogged nozzles and automatically performs cleaning.
U “Diagnostic Cleaning” on page 13
Forced Cleaning Performs manual cleaning.
U “Forced Cleaning” on page 14
Nozzle Check Checks for clogged nozzles.
U “Nozzle Check” on page 15
SL-D800 Series Maintenance Tool Operation Guide
Using the Maintenance Tool (Windows)
8
Item Explanation
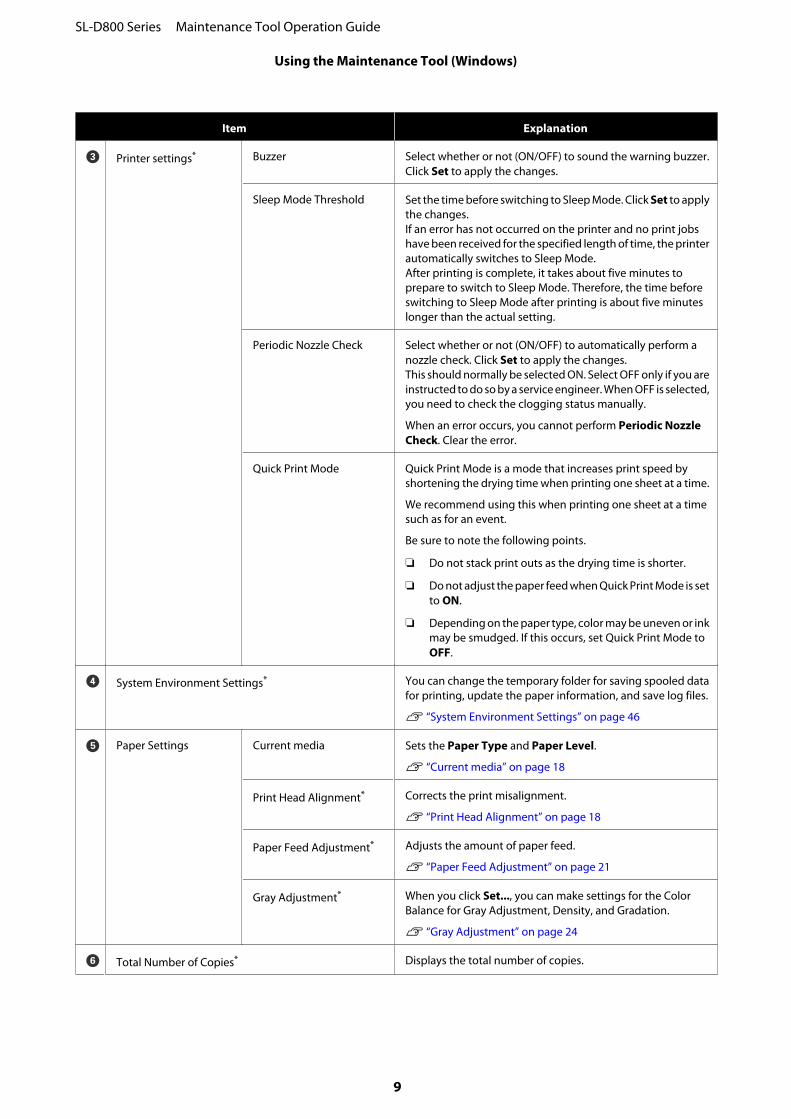
C Printer settings* Buzzer Select whether or not (ON/OFF) to sound the warning buzzer.Click Set to apply the changes.
Sleep Mode Threshold Set the time before switching to Sleep Mode. Click Set to applythe changes.If an error has not occurred on the printer and no print jobshave been received for the specified length of time, the printerautomatically switches to Sleep Mode.After printing is complete, it takes about five minutes toprepare to switch to Sleep Mode. Therefore, the time beforeswitching to Sleep Mode after printing is about five minuteslonger than the actual setting.
Periodic Nozzle Check Select whether or not (ON/OFF) to automatically perform anozzle check. Click Set to apply the changes.This should normally be selected ON. Select OFF only if you areinstructed to do so by a service engineer. When OFF is selected,you need to check the clogging status manually.
When an error occurs, you cannot perform Periodic NozzleCheck. Clear the error.
Quick Print Mode Quick Print Mode is a mode that increases print speed byshortening the drying time when printing one sheet at a time.
We recommend using this when printing one sheet at a timesuch as for an event.
Be sure to note the following points.
❏ Do not stack print outs as the drying time is shorter.
❏ Do not adjust the paper feed when Quick Print Mode is setto ON.
❏ Depending on the paper type, color may be uneven or inkmay be smudged. If this occurs, set Quick Print Mode toOFF.
D System Environment Settings* You can change the temporary folder for saving spooled datafor printing, update the paper information, and save log files.
U “System Environment Settings” on page 46
E Paper Settings Current media Sets the Paper Type and Paper Level.
U “Current media” on page 18
Print Head Alignment* Corrects the print misalignment.
U “Print Head Alignment” on page 18
Paper Feed Adjustment* Adjusts the amount of paper feed.
U “Paper Feed Adjustment” on page 21
Gray Adjustment* When you click Set..., you can make settings for the ColorBalance for Gray Adjustment, Density, and Gradation.
U “Gray Adjustment” on page 24
F Total Number of Copies* Displays the total number of copies.
SL-D800 Series Maintenance Tool Operation Guide
Using the Maintenance Tool (Windows)
9
Item Explanation
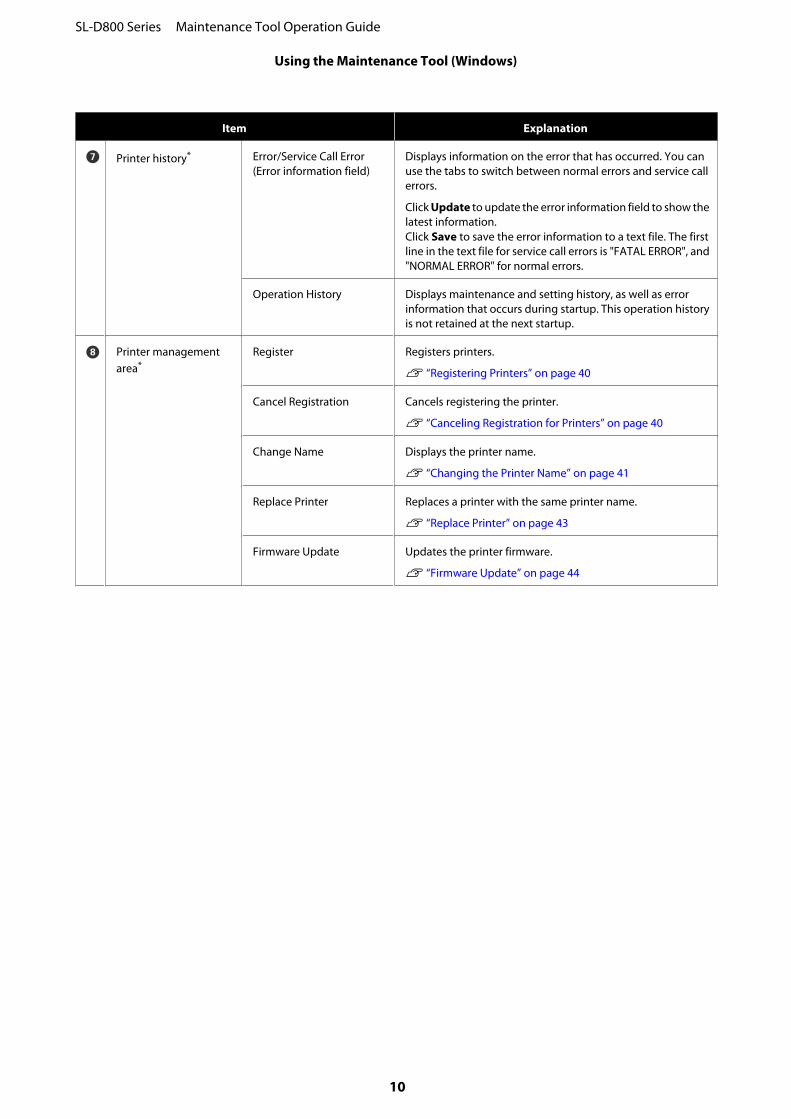
G Printer history* Error/Service Call Error(Error information field)
Displays information on the error that has occurred. You canuse the tabs to switch between normal errors and service callerrors.
Click Update to update the error information field to show thelatest information.Click Save to save the error information to a text file. The firstline in the text file for service call errors is "FATAL ERROR", and"NORMAL ERROR" for normal errors.
Operation History Displays maintenance and setting history, as well as errorinformation that occurs during startup. This operation historyis not retained at the next startup.
H Printer managementarea*
Register Registers printers.
U “Registering Printers” on page 40
Cancel Registration Cancels registering the printer.
U “Canceling Registration for Printers” on page 40
Change Name Displays the printer name.
U “Changing the Printer Name” on page 41
Replace Printer Replaces a printer with the same printer name.
U “Replace Printer” on page 43
Firmware Update Updates the printer firmware.
U “Firmware Update” on page 44
SL-D800 Series Maintenance Tool Operation Guide
Using the Maintenance Tool (Windows)
10
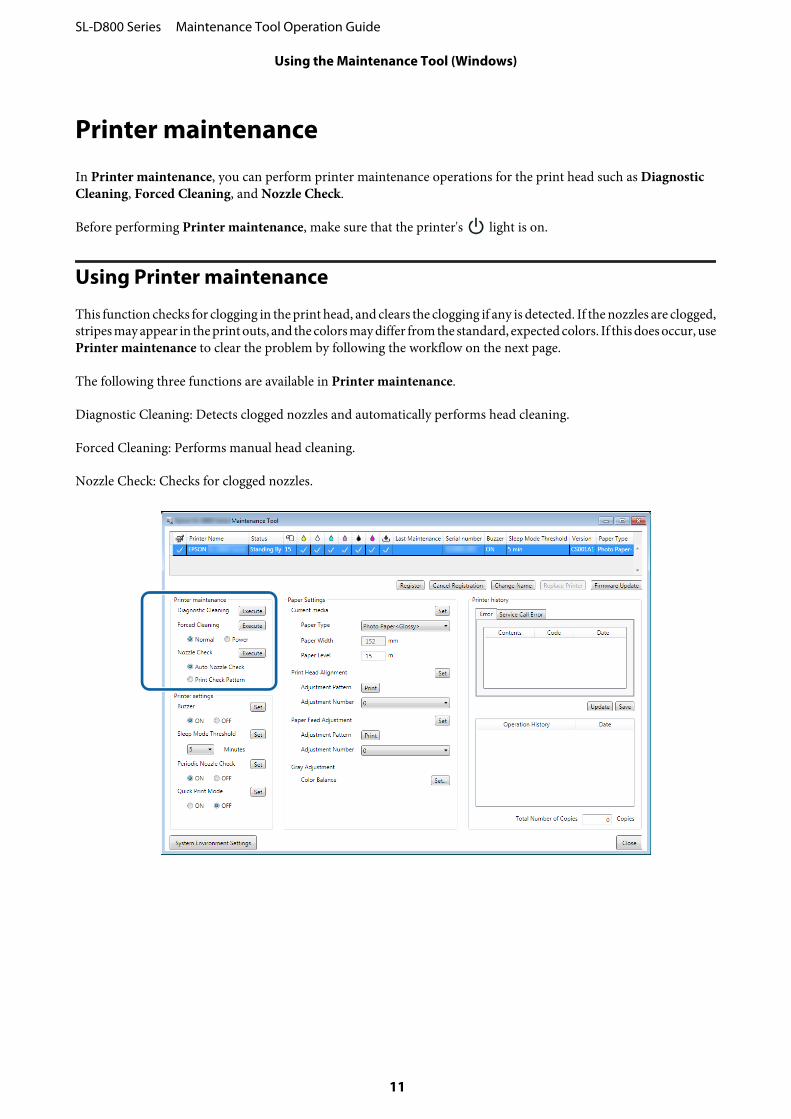
Printer maintenance
In Printer maintenance, you can perform printer maintenance operations for the print head such as DiagnosticCleaning, Forced Cleaning, and Nozzle Check.
Before performing Printer maintenance, make sure that the printer's light is on.
Using Printer maintenance
This function checks for clogging in the print head, and clears the clogging if any is detected. If the nozzles are clogged,stripes may appear in the print outs, and the colors may differ from the standard, expected colors. If this does occur, usePrinter maintenance to clear the problem by following the workflow on the next page.
The following three functions are available in Printer maintenance.
Diagnostic Cleaning: Detects clogged nozzles and automatically performs head cleaning.
Forced Cleaning: Performs manual head cleaning.
Nozzle Check: Checks for clogged nozzles.
SL-D800 Series Maintenance Tool Operation Guide
Using the Maintenance Tool (Windows)
11
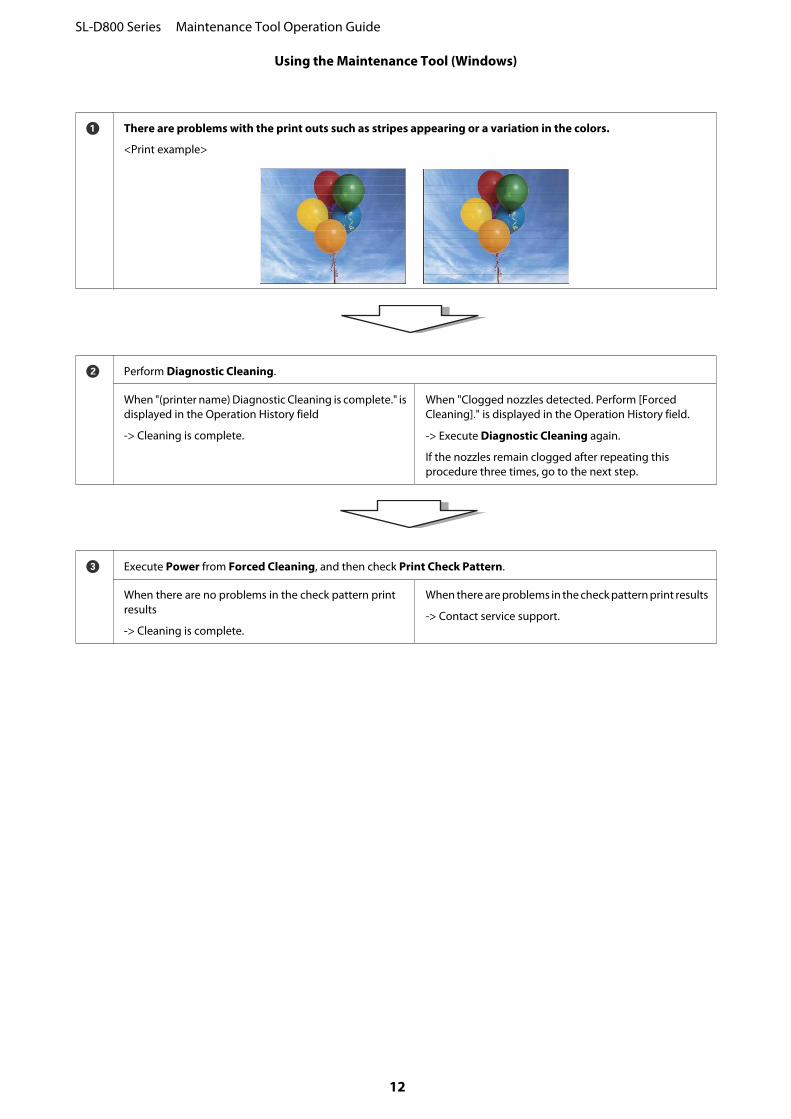
A There are problems with the print outs such as stripes appearing or a variation in the colors.
<Print example>
B Perform Diagnostic Cleaning.
When "(printer name) Diagnostic Cleaning is complete." isdisplayed in the Operation History field
-> Cleaning is complete.
When "Clogged nozzles detected. Perform [ForcedCleaning]." is displayed in the Operation History field.
-> Execute Diagnostic Cleaning again.
If the nozzles remain clogged after repeating thisprocedure three times, go to the next step.
C Execute Power from Forced Cleaning, and then check Print Check Pattern.
When there are no problems in the check pattern printresults
-> Cleaning is complete.
When there are problems in the check pattern print results
-> Contact service support.
SL-D800 Series Maintenance Tool Operation Guide
Using the Maintenance Tool (Windows)
12
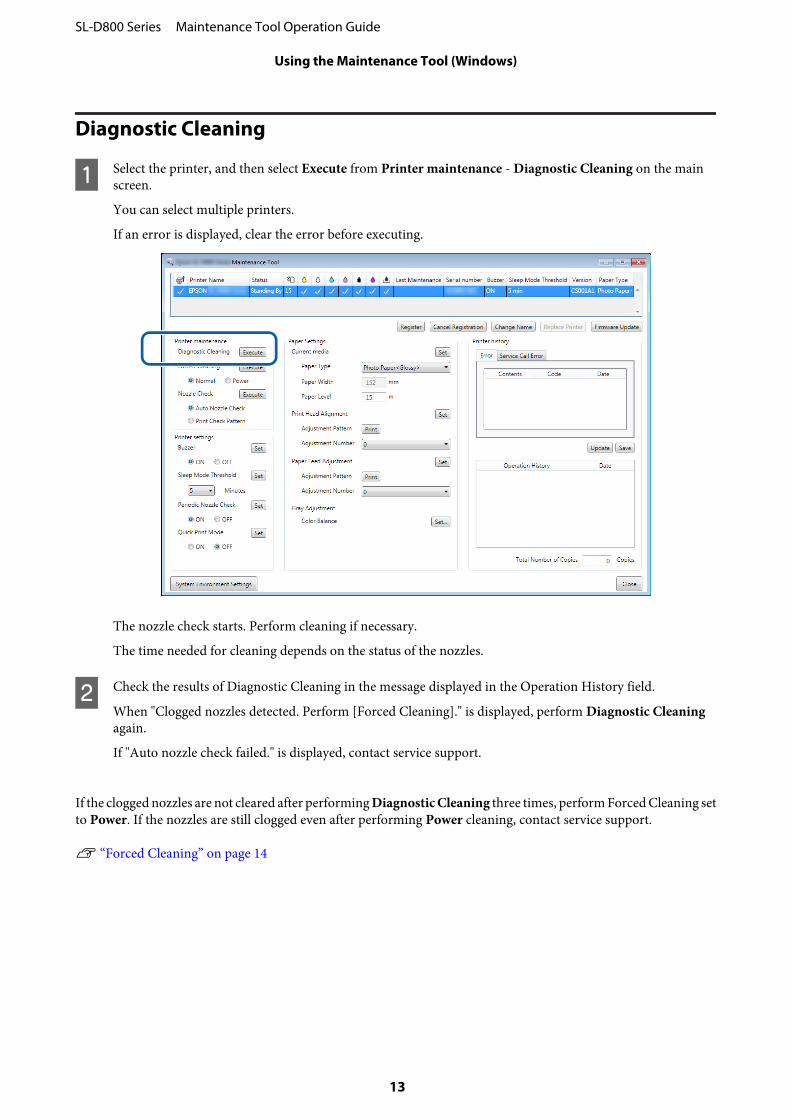
Diagnostic Cleaning
A Select the printer, and then select Execute from Printer maintenance - Diagnostic Cleaning on the mainscreen.
You can select multiple printers.
If an error is displayed, clear the error before executing.
The nozzle check starts. Perform cleaning if necessary.
The time needed for cleaning depends on the status of the nozzles.
B Check the results of Diagnostic Cleaning in the message displayed in the Operation History field.
When "Clogged nozzles detected. Perform [Forced Cleaning]." is displayed, perform Diagnostic Cleaningagain.
If "Auto nozzle check failed." is displayed, contact service support.
If the clogged nozzles are not cleared after performing Diagnostic Cleaning three times, perform Forced Cleaning setto Power. If the nozzles are still clogged even after performing Power cleaning, contact service support.
U “Forced Cleaning” on page 14
SL-D800 Series Maintenance Tool Operation Guide
Using the Maintenance Tool (Windows)
13
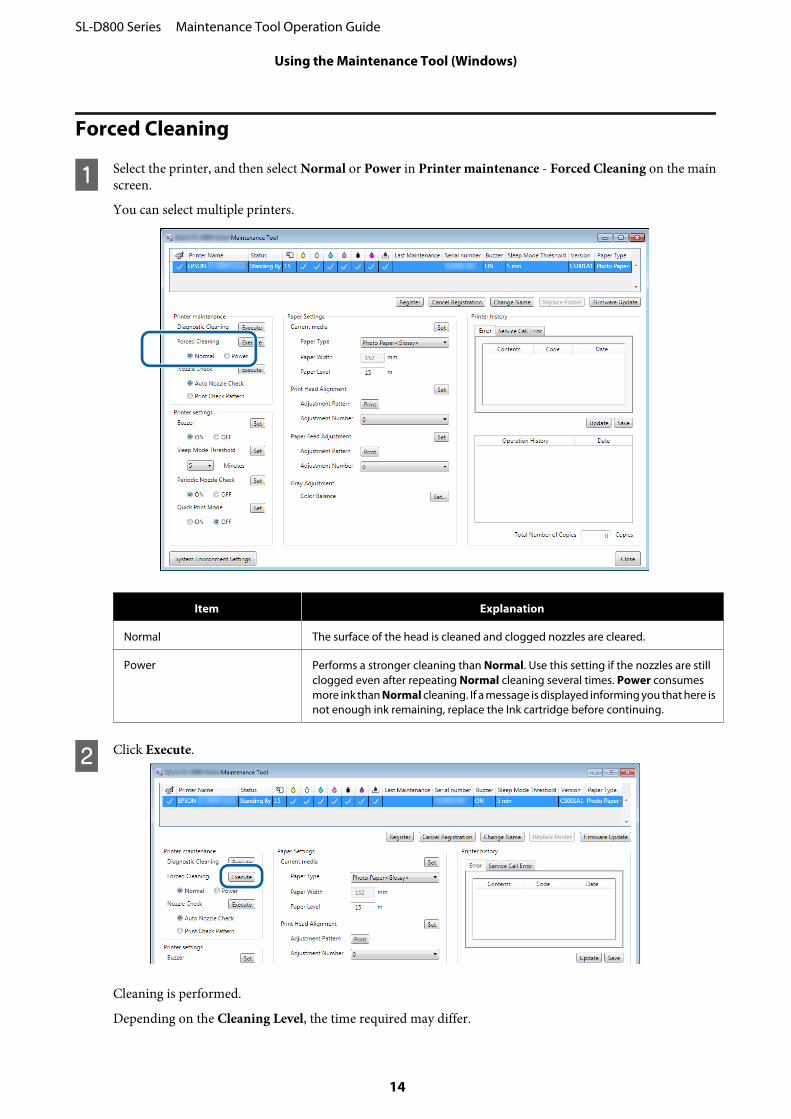
Forced Cleaning
A Select the printer, and then select Normal or Power in Printer maintenance - Forced Cleaning on the mainscreen.
You can select multiple printers.
Item Explanation
Normal The surface of the head is cleaned and clogged nozzles are cleared.
Power Performs a stronger cleaning than Normal. Use this setting if the nozzles are stillclogged even after repeating Normal cleaning several times. Power consumesmore ink than Normal cleaning. If a message is displayed informing you that here isnot enough ink remaining, replace the Ink cartridge before continuing.
B Click Execute.
Cleaning is performed.
Depending on the Cleaning Level, the time required may differ.
SL-D800 Series Maintenance Tool Operation Guide
Using the Maintenance Tool (Windows)
14
C Check the Head Cleaning results.
Check the condition of the nozzles in Nozzle Check.
U “Nozzle Check” on page 15
If the nozzles are clogged, perform Normal cleaning. If the nozzles are still clogged even after repeating Normalseveral times, perform Power cleaning.
If the nozzles are still clogged even after performing Power cleaning, contact service support.
Nozzle Check
The Nozzle Check function checks if the print head nozzles are clogged. The printer uses the Auto Nozzle Checkfunction to automatically check for clogged nozzles, and then Print Check Pattern prints a check pattern for a visualconfirmation.
After the nozzle check, perform Forced Cleaning if necessary.
Auto Nozzle Check
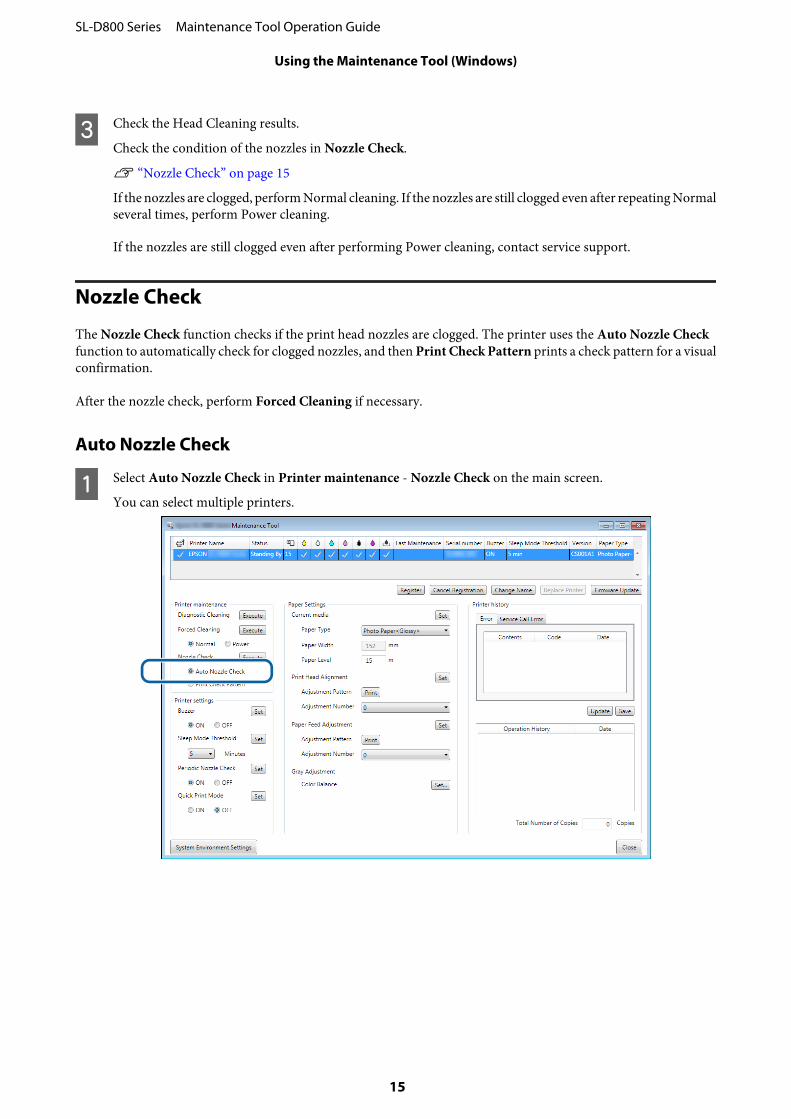
A Select Auto Nozzle Check in Printer maintenance - Nozzle Check on the main screen.
You can select multiple printers.
SL-D800 Series Maintenance Tool Operation Guide
Using the Maintenance Tool (Windows)
15
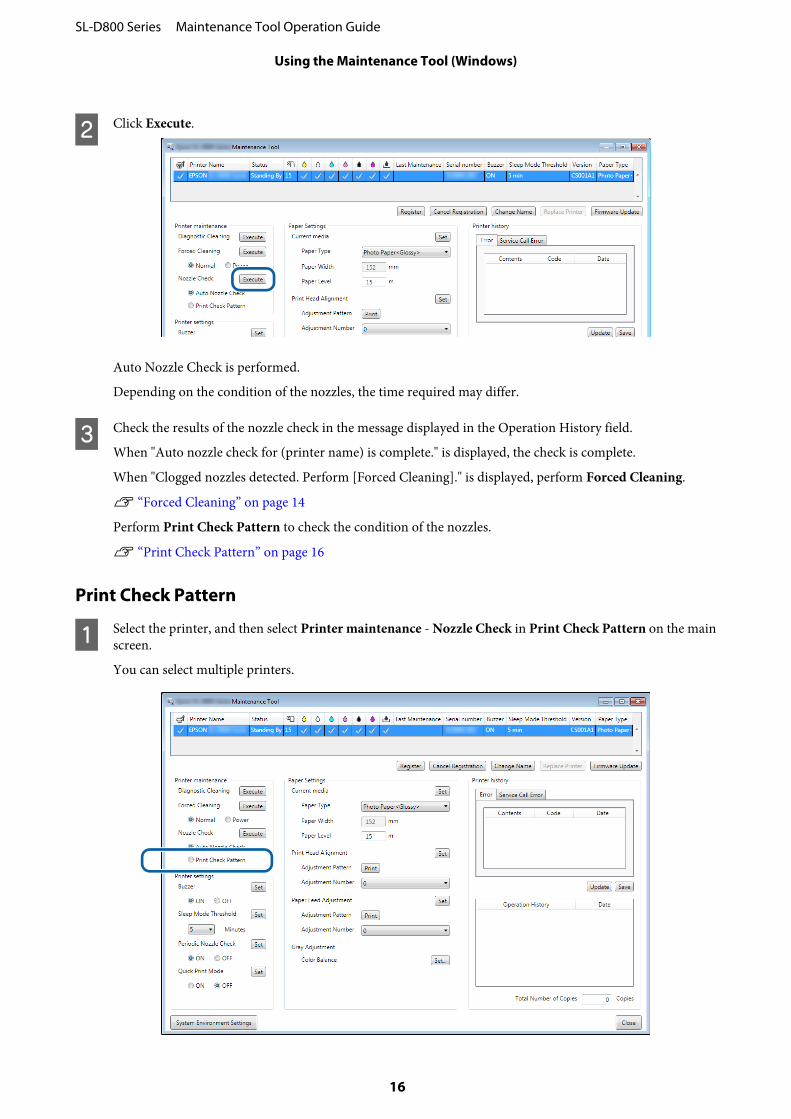
B Click Execute.
Auto Nozzle Check is performed.
Depending on the condition of the nozzles, the time required may differ.
C Check the results of the nozzle check in the message displayed in the Operation History field.
When "Auto nozzle check for (printer name) is complete." is displayed, the check is complete.
When "Clogged nozzles detected. Perform [Forced Cleaning]." is displayed, perform Forced Cleaning.
U “Forced Cleaning” on page 14
Perform Print Check Pattern to check the condition of the nozzles.
U “Print Check Pattern” on page 16
Print Check Pattern
A Select the printer, and then select Printer maintenance - Nozzle Check in Print Check Pattern on the mainscreen.
You can select multiple printers.
SL-D800 Series Maintenance Tool Operation Guide
Using the Maintenance Tool (Windows)
16
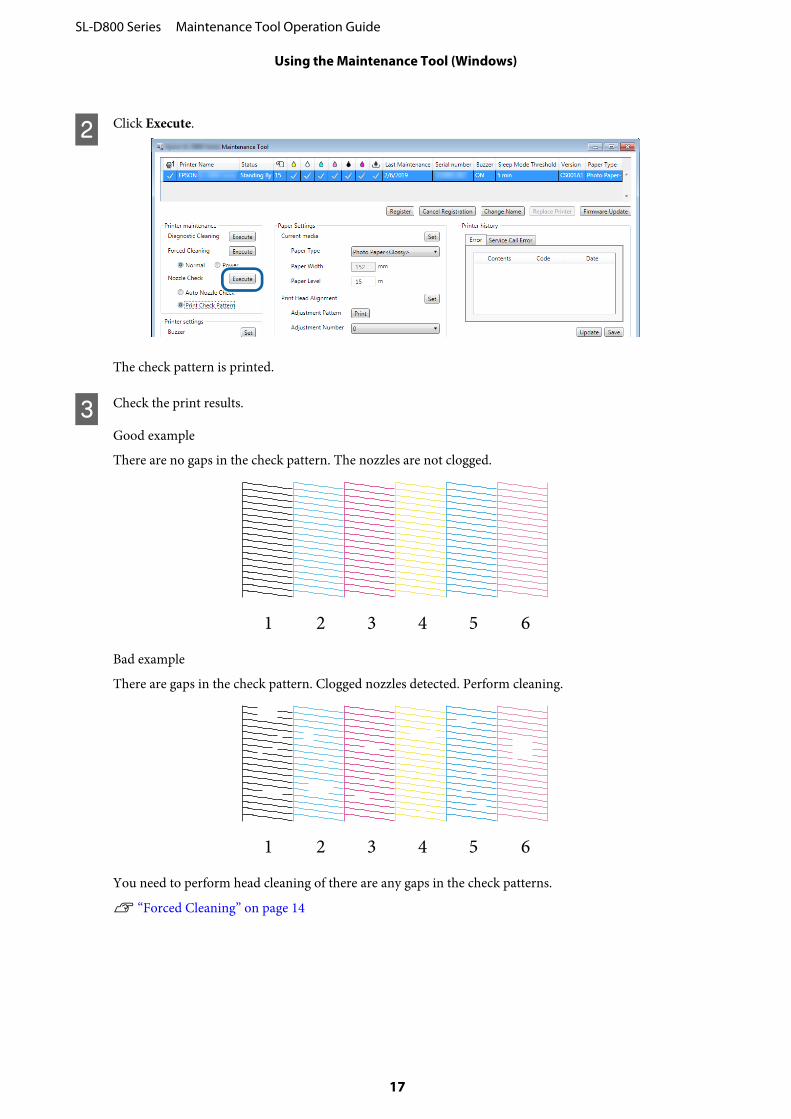
B Click Execute.
The check pattern is printed.
C Check the print results.
Good example
There are no gaps in the check pattern. The nozzles are not clogged.
Bad example
There are gaps in the check pattern. Clogged nozzles detected. Perform cleaning.
You need to perform head cleaning of there are any gaps in the check patterns.
U “Forced Cleaning” on page 14
SL-D800 Series Maintenance Tool Operation Guide
Using the Maintenance Tool (Windows)
17
Paper Settings
In Paper Settings, you can set the type and amount of paper remaining for the paper currently loaded, and makeprinter settings such as Print Head Alignment, Paper Feed Adjustment, and Gray Adjustment.
Current media
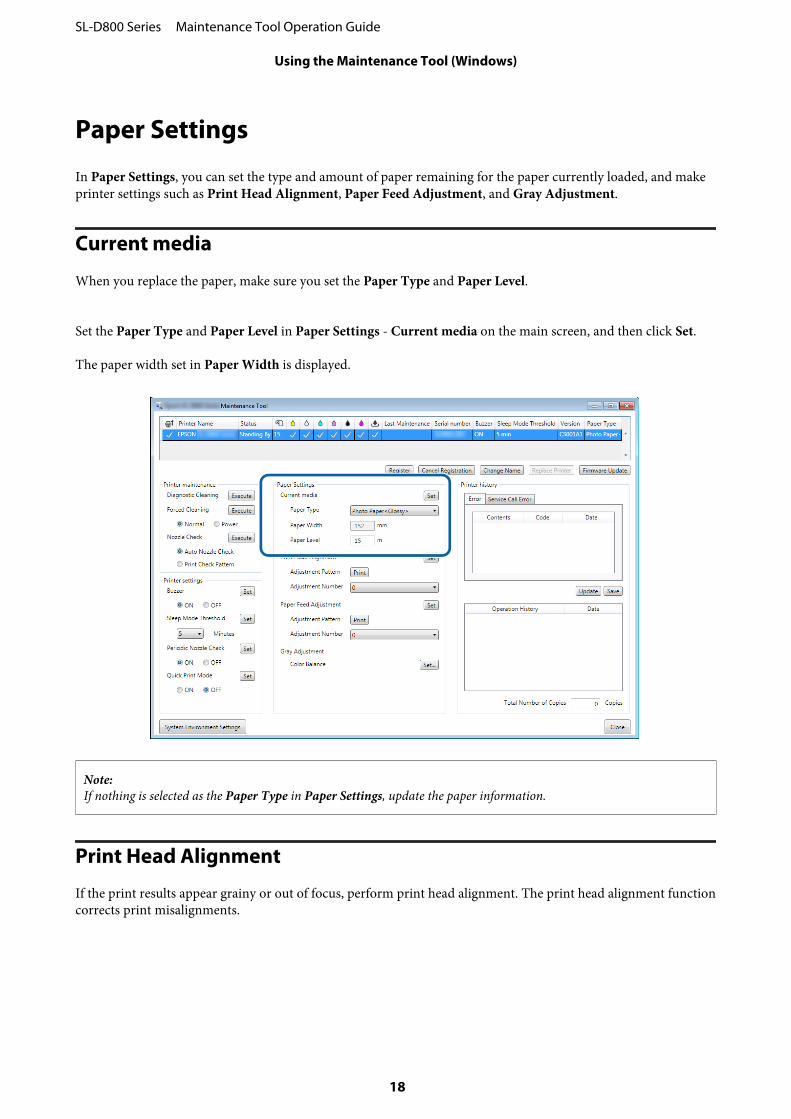
When you replace the paper, make sure you set the Paper Type and Paper Level.
Set the Paper Type and Paper Level in Paper Settings - Current media on the main screen, and then click Set.
The paper width set in Paper Width is displayed.
Note:If nothing is selected as the Paper Type in Paper Settings, update the paper information.
Print Head Alignment
If the print results appear grainy or out of focus, perform print head alignment. The print head alignment functioncorrects print misalignments.
SL-D800 Series Maintenance Tool Operation Guide
Using the Maintenance Tool (Windows)
18
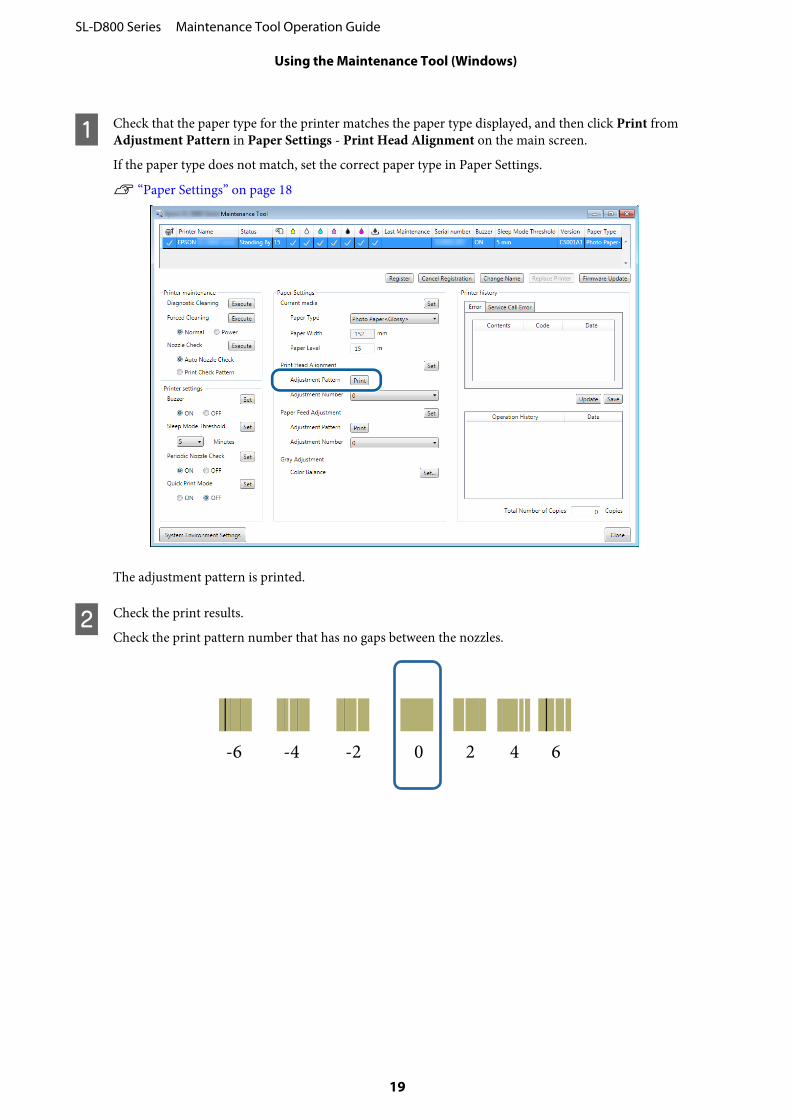
A Check that the paper type for the printer matches the paper type displayed, and then click Print fromAdjustment Pattern in Paper Settings - Print Head Alignment on the main screen.
If the paper type does not match, set the correct paper type in Paper Settings.
U “Paper Settings” on page 18
The adjustment pattern is printed.
B Check the print results.
Check the print pattern number that has no gaps between the nozzles.
SL-D800 Series Maintenance Tool Operation Guide
Using the Maintenance Tool (Windows)
19
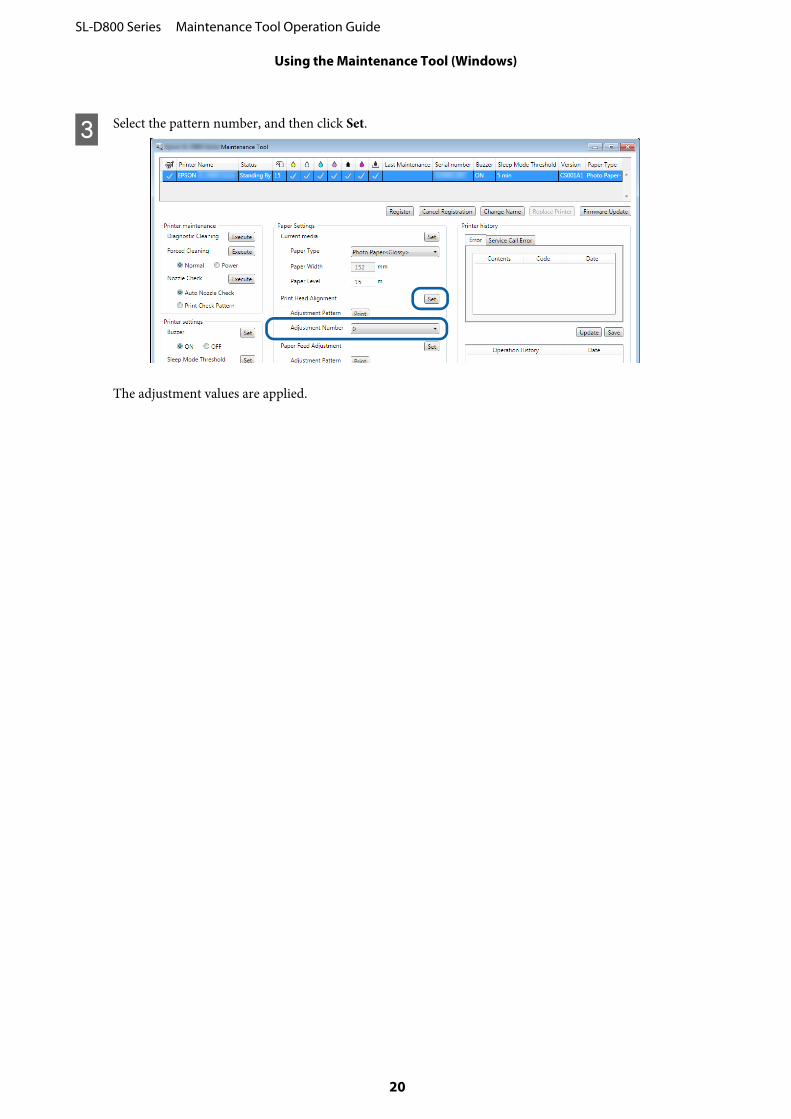
C Select the pattern number, and then click Set.
The adjustment values are applied.
SL-D800 Series Maintenance Tool Operation Guide
Using the Maintenance Tool (Windows)
20
Paper Feed Adjustment
Paper feed amount errors may occur in the printer due to changes in the surroundings or changes over time. If theimage quality declines, you may be able to improve it by correcting the paper feed amount.
Do not use this when Quick Print Mode is set to ON.
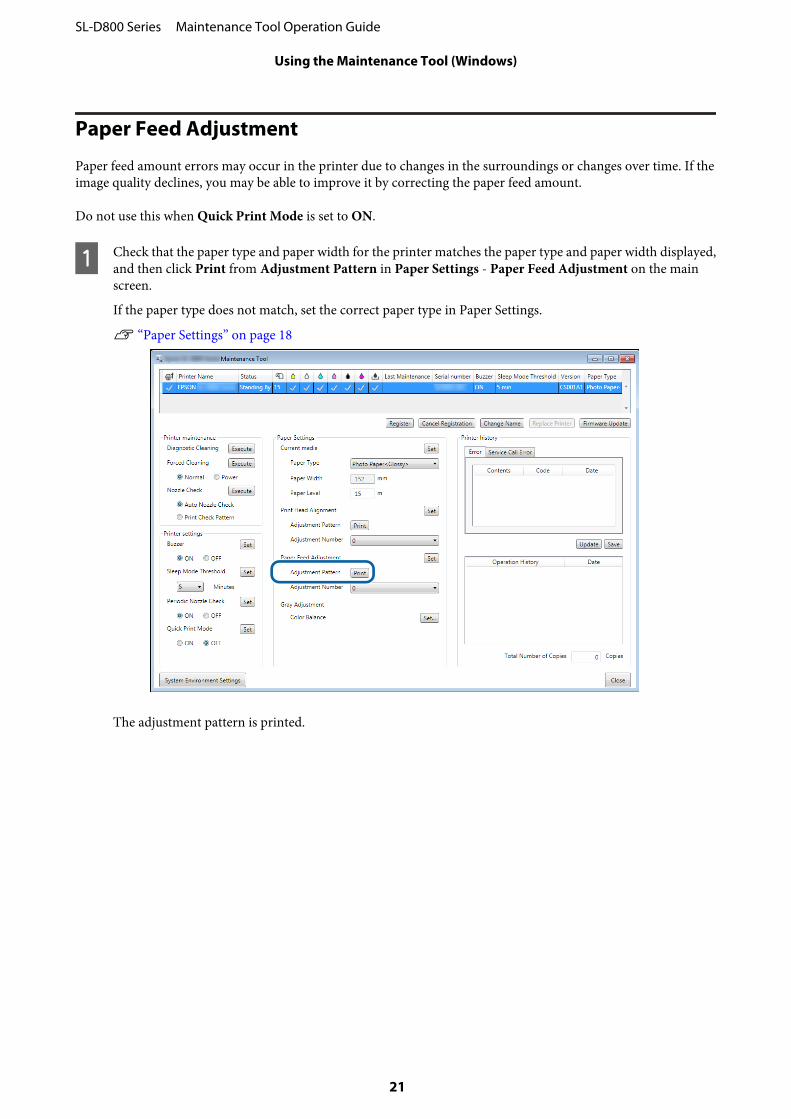
A Check that the paper type and paper width for the printer matches the paper type and paper width displayed,and then click Print from Adjustment Pattern in Paper Settings - Paper Feed Adjustment on the mainscreen.
If the paper type does not match, set the correct paper type in Paper Settings.
U “Paper Settings” on page 18
The adjustment pattern is printed.
SL-D800 Series Maintenance Tool Operation Guide
Using the Maintenance Tool (Windows)
21
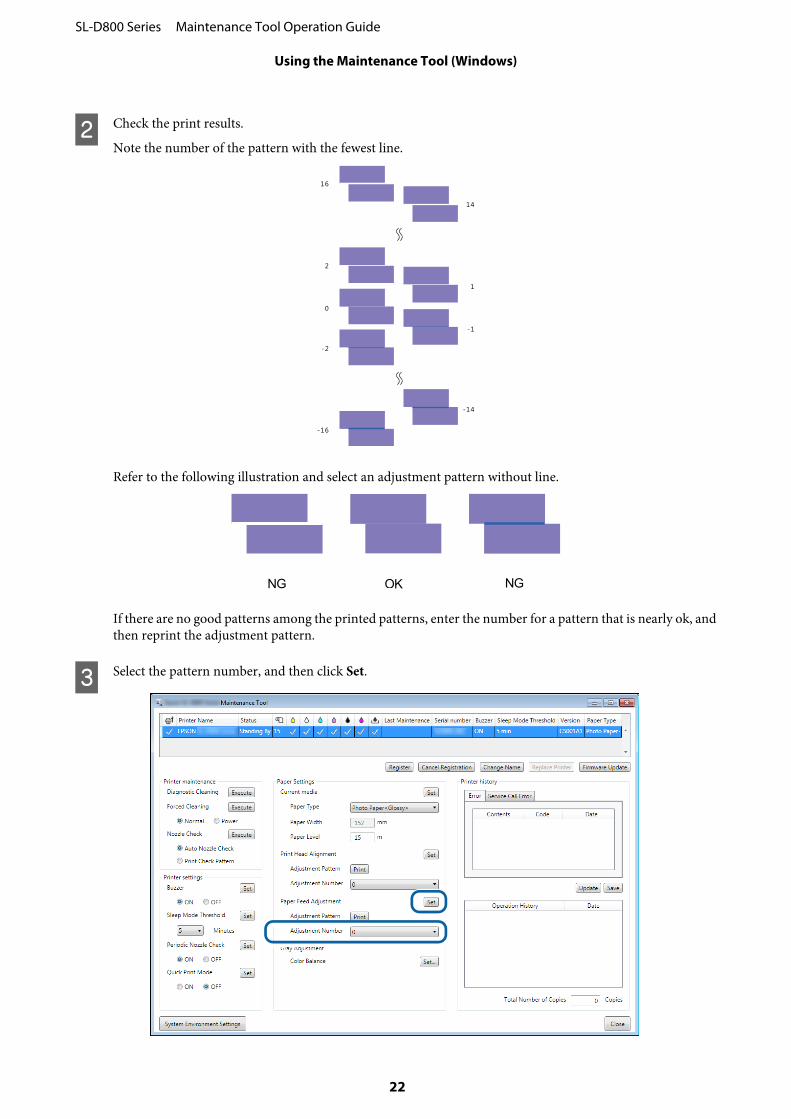
B Check the print results.
Note the number of the pattern with the fewest line.
Refer to the following illustration and select an adjustment pattern without line.
If there are no good patterns among the printed patterns, enter the number for a pattern that is nearly ok, andthen reprint the adjustment pattern.
C Select the pattern number, and then click Set.
SL-D800 Series Maintenance Tool Operation Guide
Using the Maintenance Tool (Windows)
22

The adjustment values are applied.
SL-D800 Series Maintenance Tool Operation Guide
Using the Maintenance Tool (Windows)
23
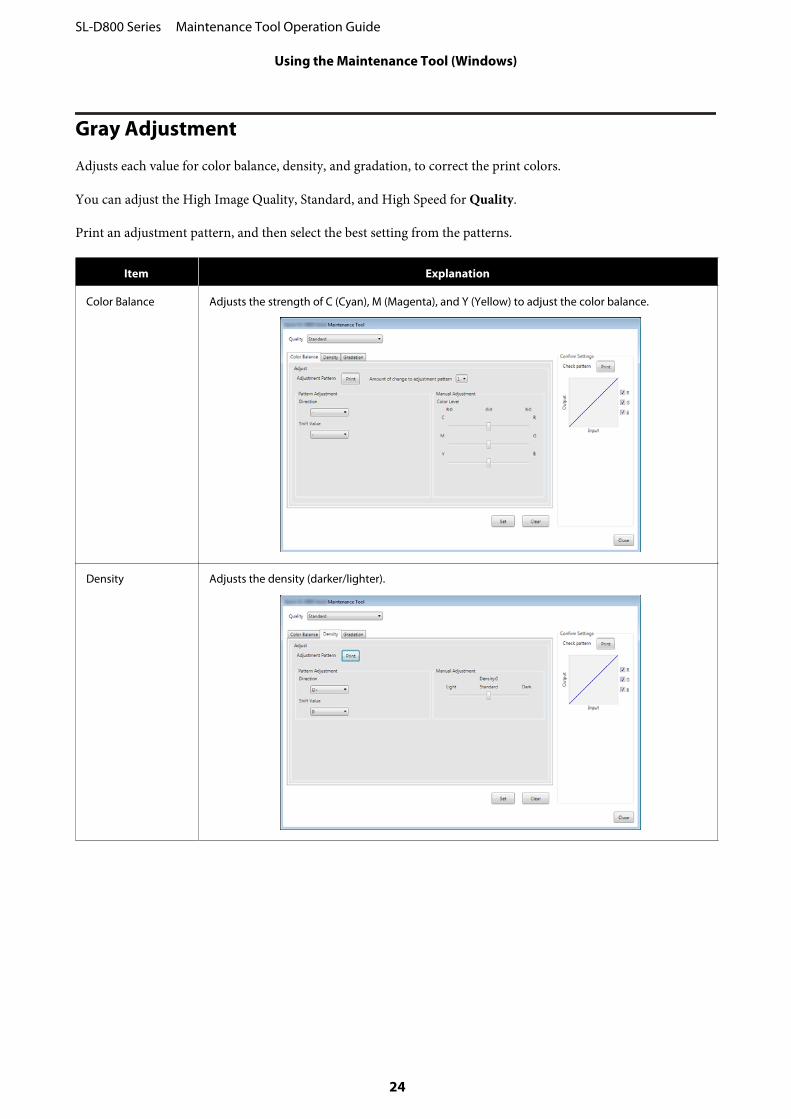
Gray Adjustment
Adjusts each value for color balance, density, and gradation, to correct the print colors.
You can adjust the High Image Quality, Standard, and High Speed for Quality.
Print an adjustment pattern, and then select the best setting from the patterns.
Item Explanation
Color Balance Adjusts the strength of C (Cyan), M (Magenta), and Y (Yellow) to adjust the color balance.
Density Adjusts the density (darker/lighter).
SL-D800 Series Maintenance Tool Operation Guide
Using the Maintenance Tool (Windows)
24
Item Explanation
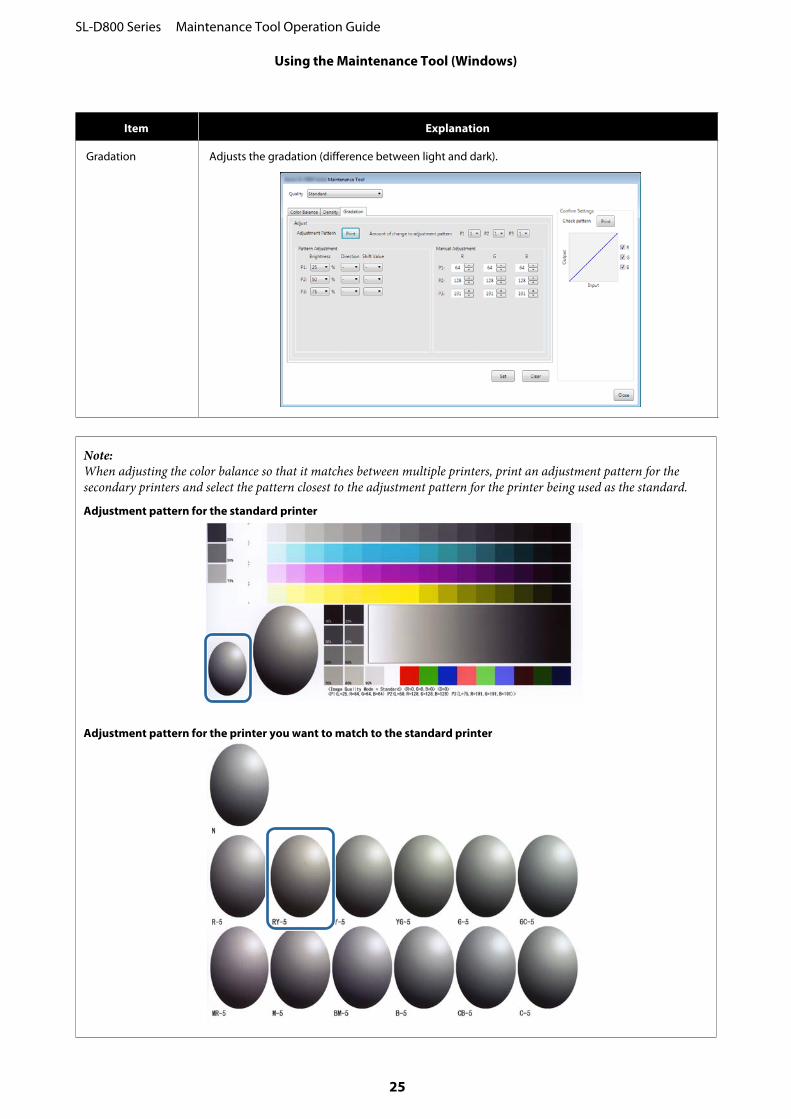
Gradation Adjusts the gradation (difference between light and dark).
Note:When adjusting the color balance so that it matches between multiple printers, print an adjustment pattern for thesecondary printers and select the pattern closest to the adjustment pattern for the printer being used as the standard.
Adjustment pattern for the standard printer
Adjustment pattern for the printer you want to match to the standard printer
SL-D800 Series Maintenance Tool Operation Guide
Using the Maintenance Tool (Windows)
25
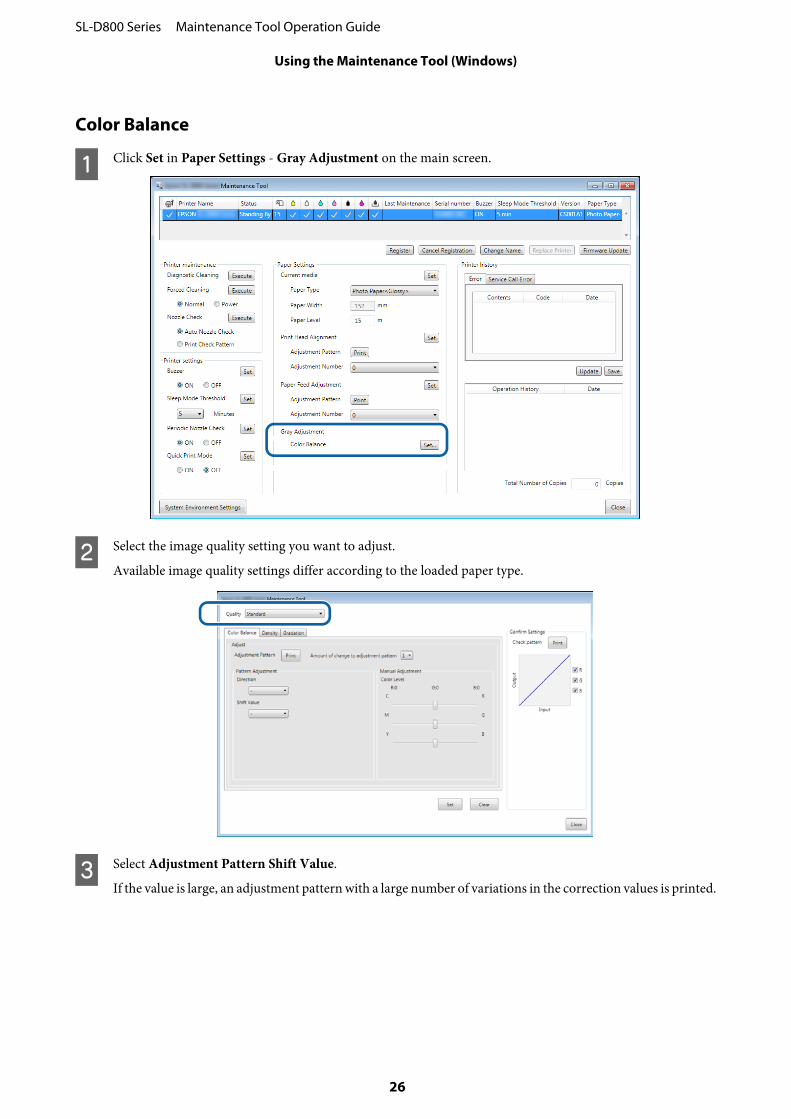
Color Balance
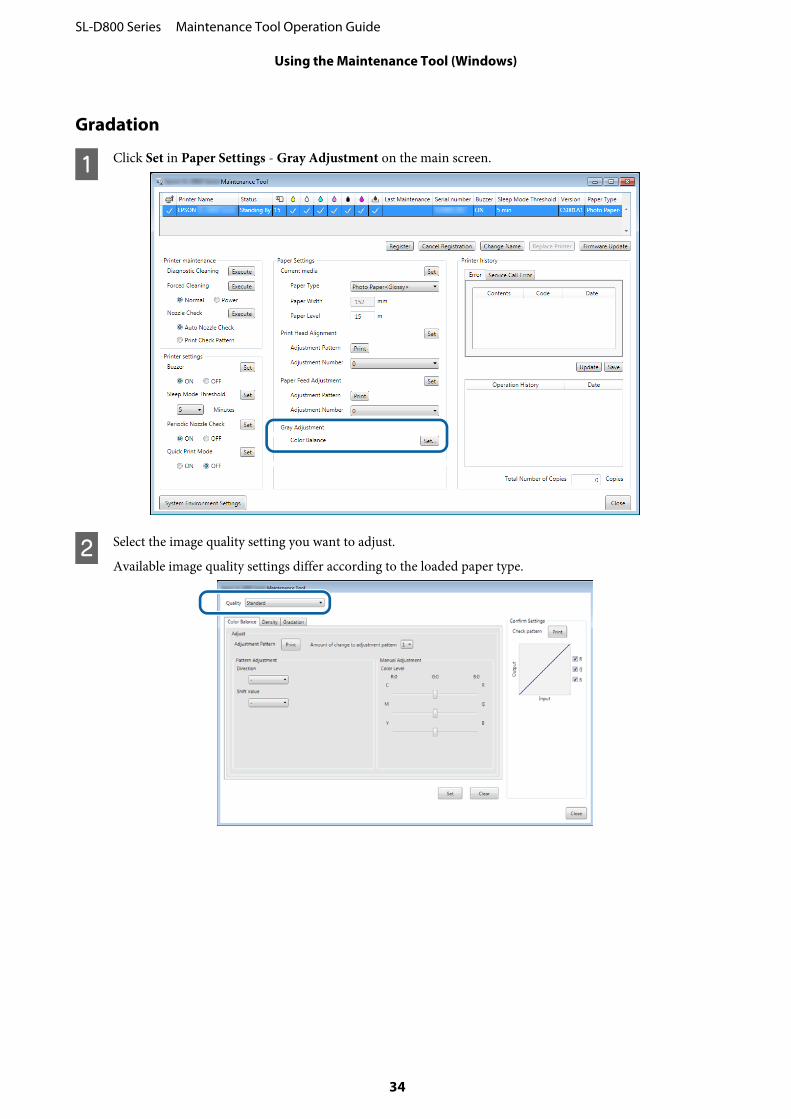
A Click Set in Paper Settings - Gray Adjustment on the main screen.
B Select the image quality setting you want to adjust.
Available image quality settings differ according to the loaded paper type.
C Select Adjustment Pattern Shift Value.
If the value is large, an adjustment pattern with a large number of variations in the correction values is printed.
SL-D800 Series Maintenance Tool Operation Guide
Using the Maintenance Tool (Windows)
26
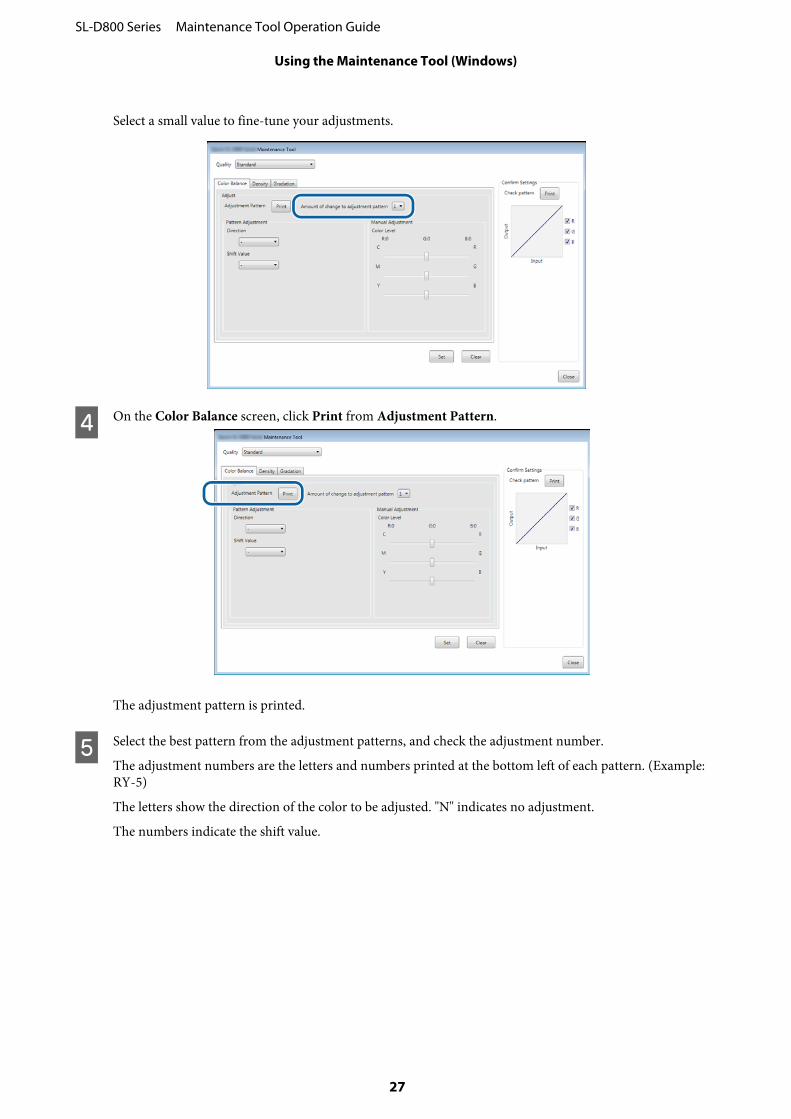
Select a small value to fine-tune your adjustments.
D On the Color Balance screen, click Print from Adjustment Pattern.
The adjustment pattern is printed.
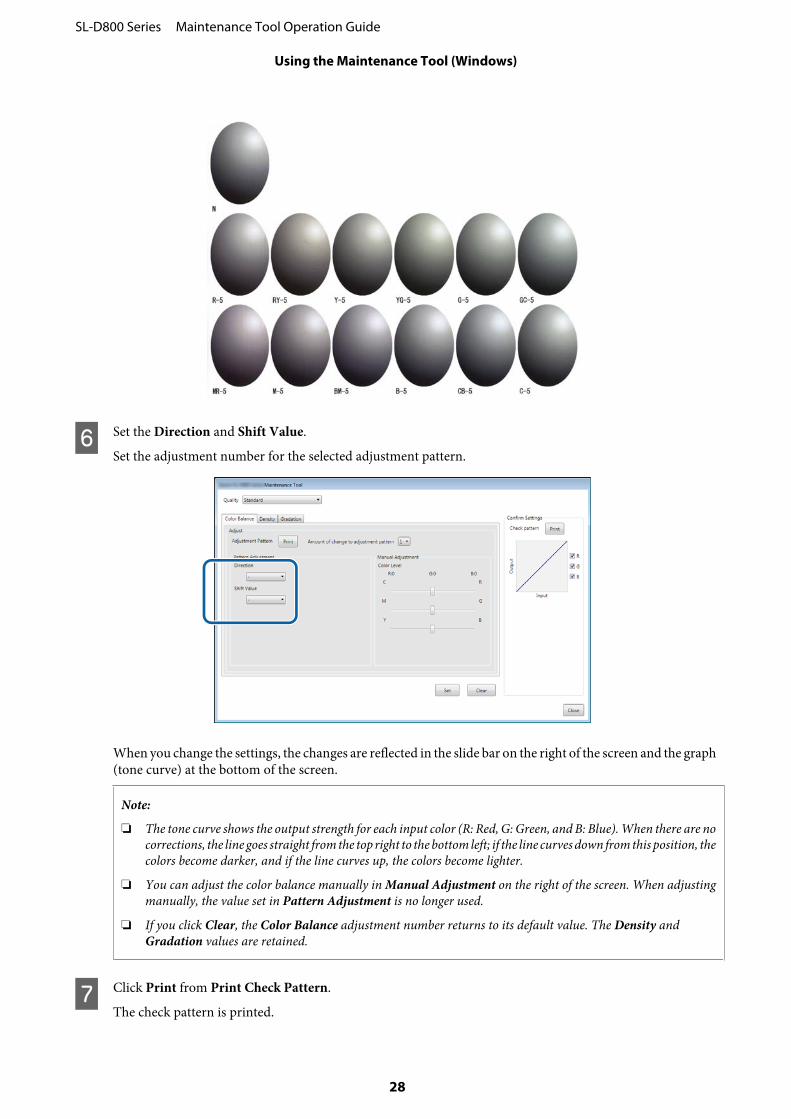
E Select the best pattern from the adjustment patterns, and check the adjustment number.
The adjustment numbers are the letters and numbers printed at the bottom left of each pattern. (Example:RY-5)
The letters show the direction of the color to be adjusted. "N" indicates no adjustment.
The numbers indicate the shift value.
SL-D800 Series Maintenance Tool Operation Guide
Using the Maintenance Tool (Windows)
27
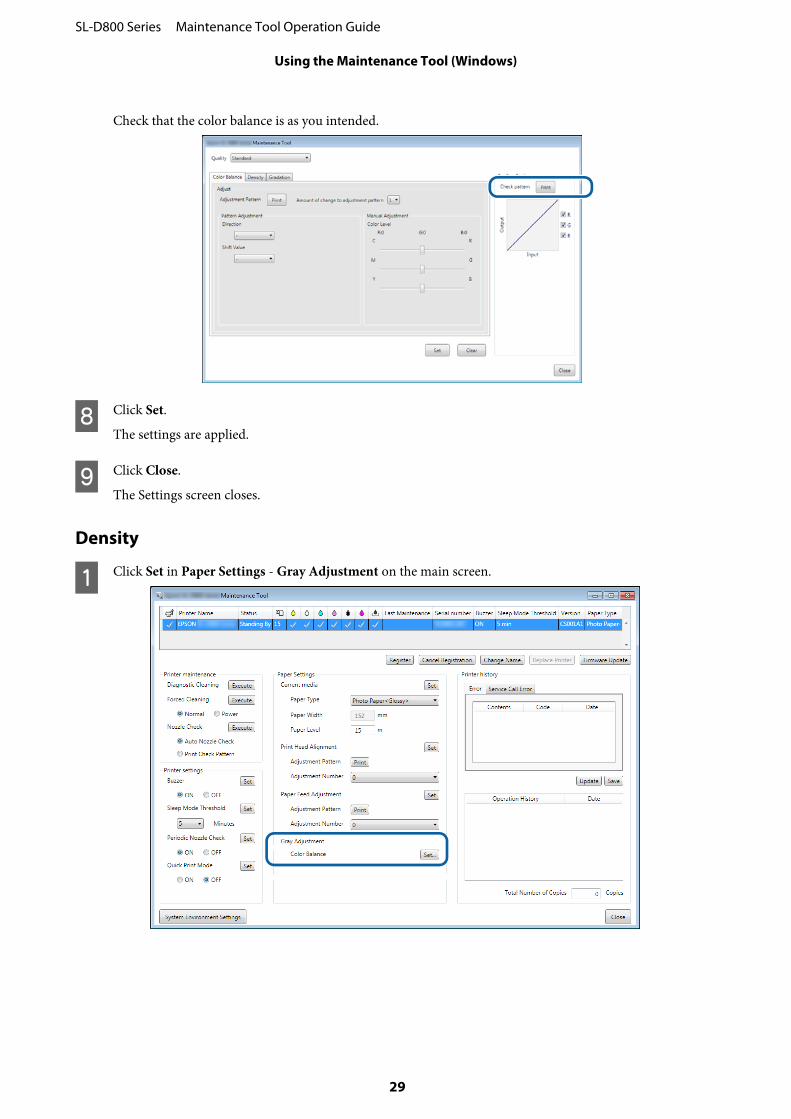
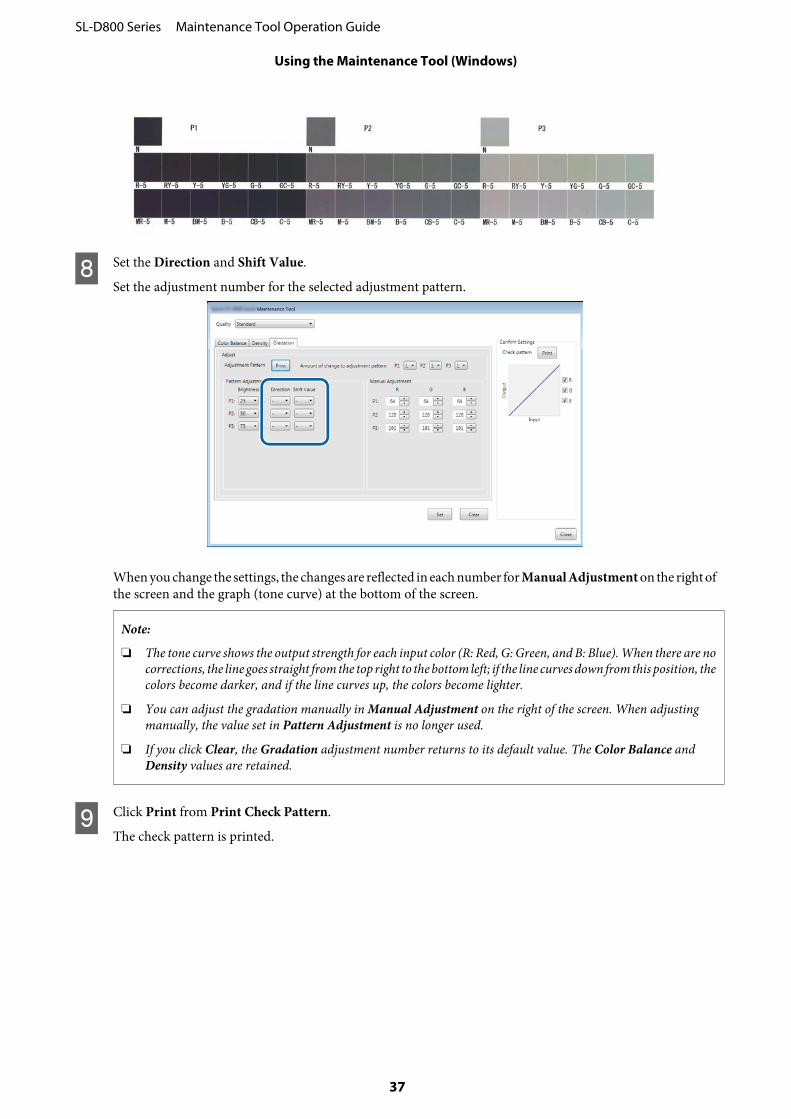
F Set the Direction and Shift Value.
Set the adjustment number for the selected adjustment pattern.
When you change the settings, the changes are reflected in the slide bar on the right of the screen and the graph(tone curve) at the bottom of the screen.
Note:
❏ The tone curve shows the output strength for each input color (R: Red, G: Green, and B: Blue). When there are nocorrections, the line goes straight from the top right to the bottom left; if the line curves down from this position, thecolors become darker, and if the line curves up, the colors become lighter.
❏ You can adjust the color balance manually in Manual Adjustment on the right of the screen. When adjustingmanually, the value set in Pattern Adjustment is no longer used.
❏ If you click Clear, the Color Balance adjustment number returns to its default value. The Density andGradation values are retained.
G Click Print from Print Check Pattern.
The check pattern is printed.
SL-D800 Series Maintenance Tool Operation Guide
Using the Maintenance Tool (Windows)
28
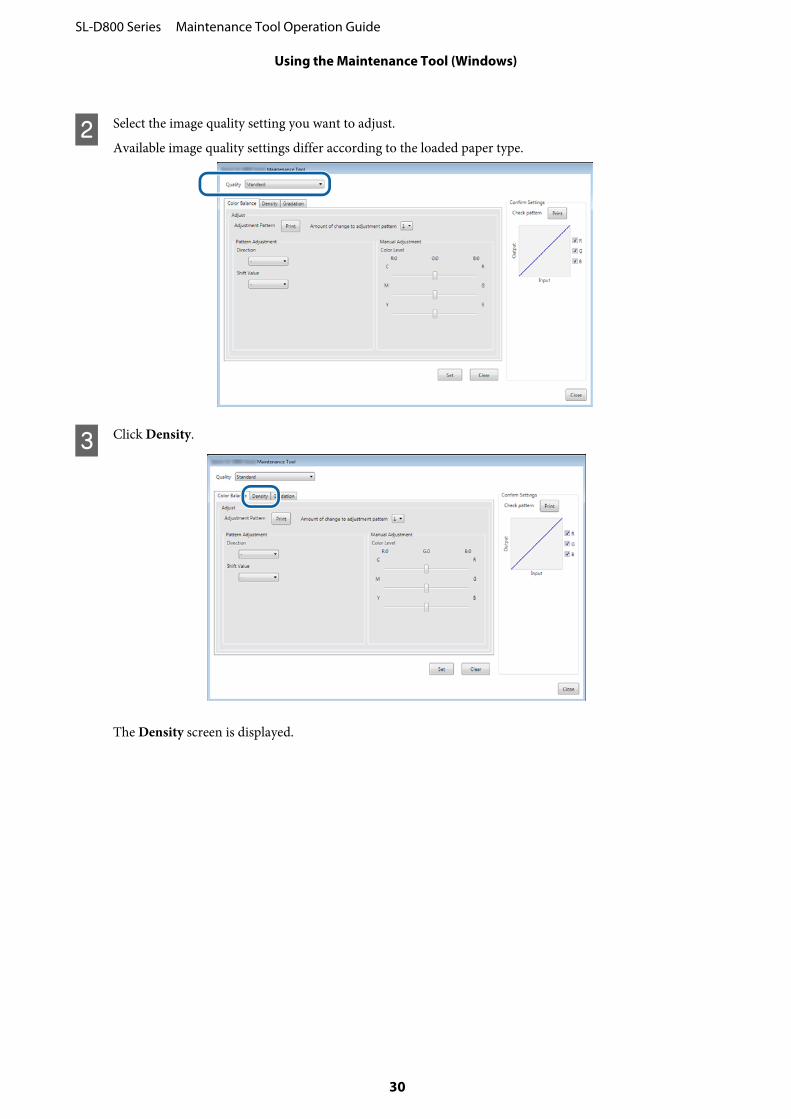
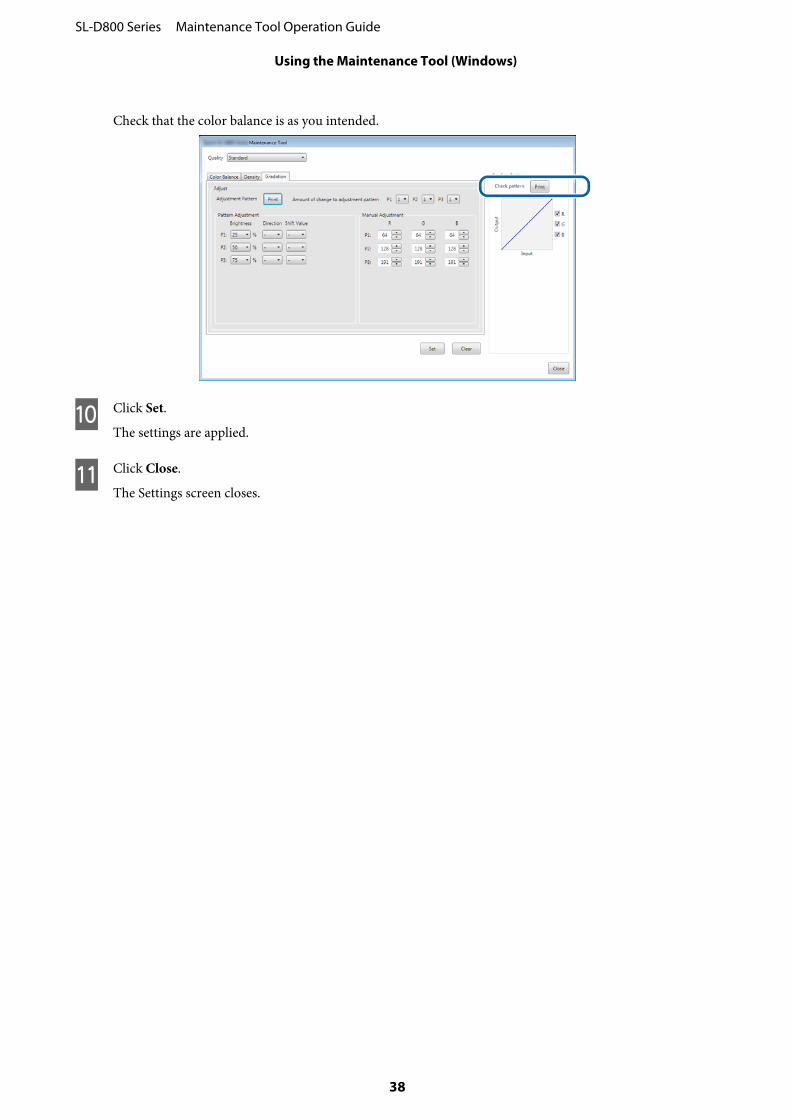
Check that the color balance is as you intended.
H Click Set.
The settings are applied.
I Click Close.
The Settings screen closes.
Density
A Click Set in Paper Settings - Gray Adjustment on the main screen.
SL-D800 Series Maintenance Tool Operation Guide
Using the Maintenance Tool (Windows)
29
B Select the image quality setting you want to adjust.
Available image quality settings differ according to the loaded paper type.
C Click Density.
The Density screen is displayed.
SL-D800 Series Maintenance Tool Operation Guide
Using the Maintenance Tool (Windows)
30
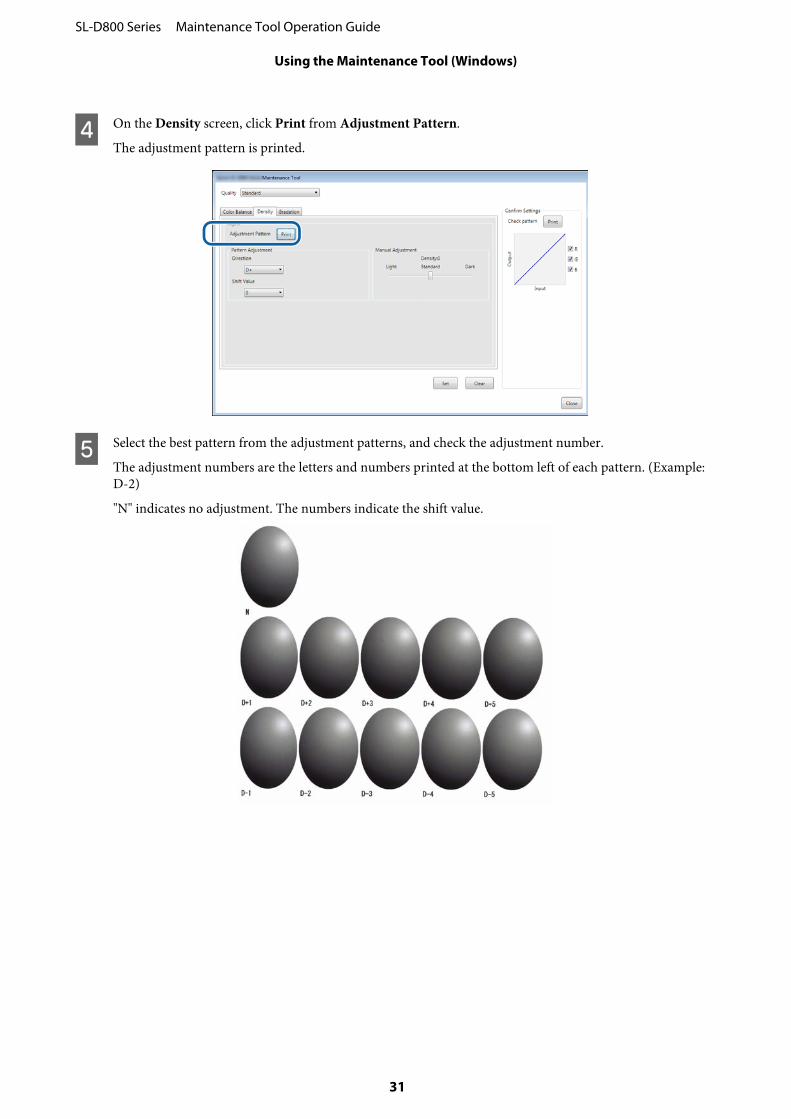
D On the Density screen, click Print from Adjustment Pattern.
The adjustment pattern is printed.
E Select the best pattern from the adjustment patterns, and check the adjustment number.
The adjustment numbers are the letters and numbers printed at the bottom left of each pattern. (Example:D-2)
"N" indicates no adjustment. The numbers indicate the shift value.
SL-D800 Series Maintenance Tool Operation Guide
Using the Maintenance Tool (Windows)
31
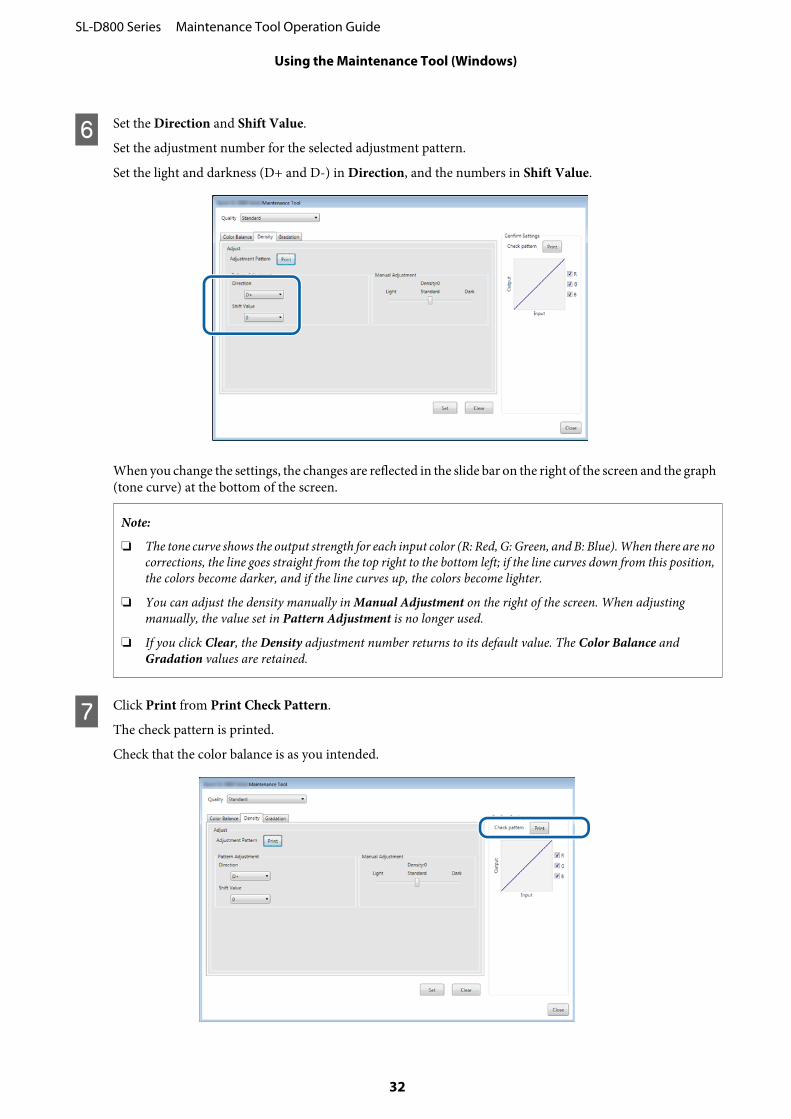
F Set the Direction and Shift Value.
Set the adjustment number for the selected adjustment pattern.
Set the light and darkness (D+ and D-) in Direction, and the numbers in Shift Value.
When you change the settings, the changes are reflected in the slide bar on the right of the screen and the graph(tone curve) at the bottom of the screen.
Note:
❏ The tone curve shows the output strength for each input color (R: Red, G: Green, and B: Blue). When there are nocorrections, the line goes straight from the top right to the bottom left; if the line curves down from this position,the colors become darker, and if the line curves up, the colors become lighter.
❏ You can adjust the density manually in Manual Adjustment on the right of the screen. When adjustingmanually, the value set in Pattern Adjustment is no longer used.
❏ If you click Clear, the Density adjustment number returns to its default value. The Color Balance andGradation values are retained.
G Click Print from Print Check Pattern.
The check pattern is printed.
Check that the color balance is as you intended.
SL-D800 Series Maintenance Tool Operation Guide
Using the Maintenance Tool (Windows)
32

H Click Set.
The settings are applied.
I Click Close.
The Settings screen closes.
SL-D800 Series Maintenance Tool Operation Guide
Using the Maintenance Tool (Windows)
33
Gradation
A Click Set in Paper Settings - Gray Adjustment on the main screen.
B Select the image quality setting you want to adjust.
Available image quality settings differ according to the loaded paper type.
SL-D800 Series Maintenance Tool Operation Guide
Using the Maintenance Tool (Windows)
34
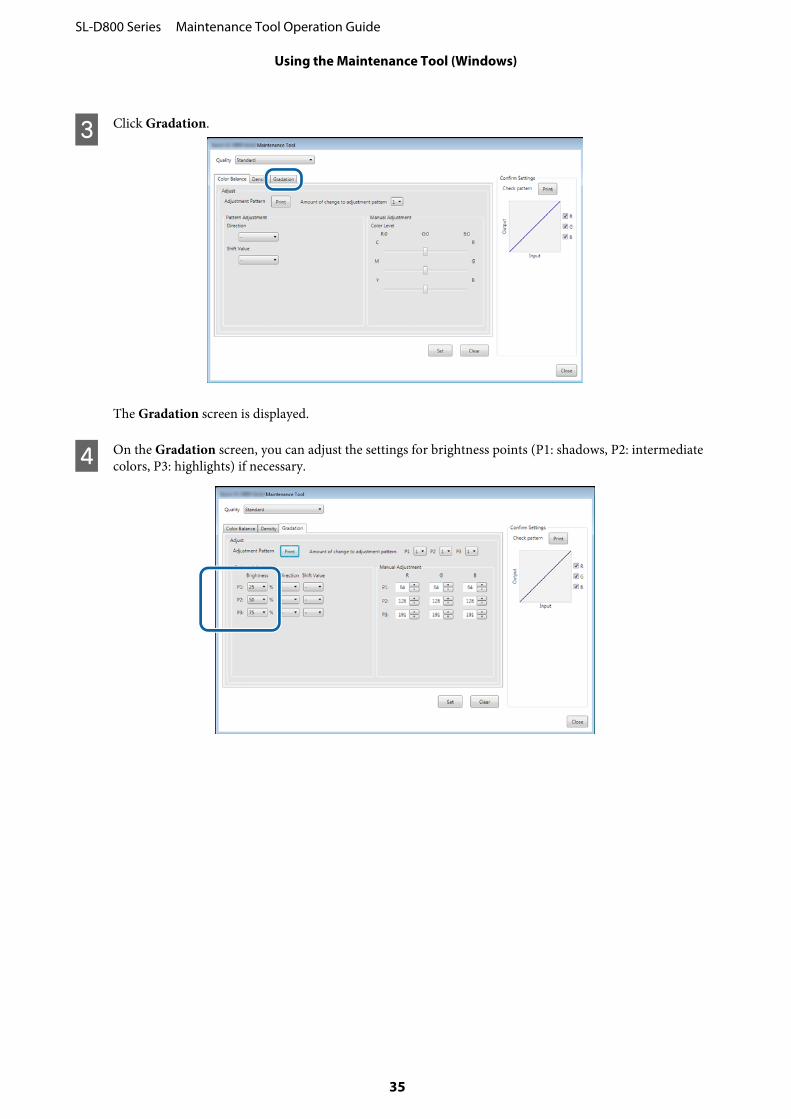
C Click Gradation.
The Gradation screen is displayed.
D On the Gradation screen, you can adjust the settings for brightness points (P1: shadows, P2: intermediatecolors, P3: highlights) if necessary.
SL-D800 Series Maintenance Tool Operation Guide
Using the Maintenance Tool (Windows)
35
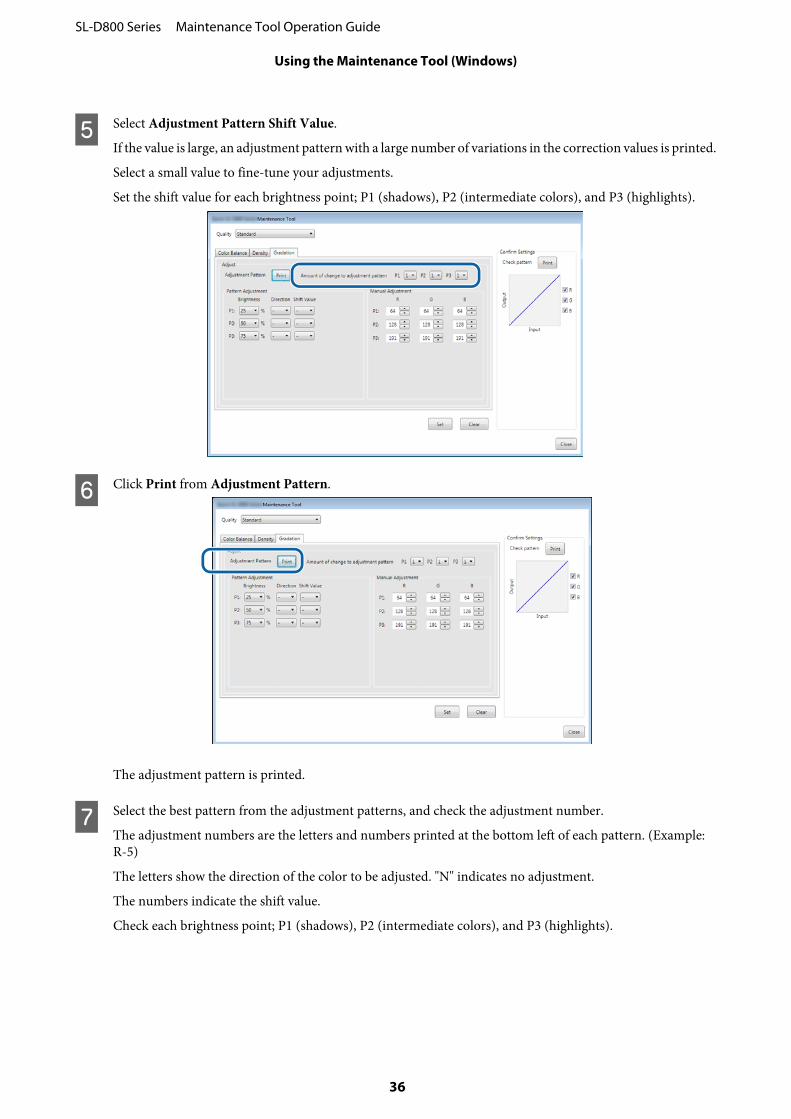
E Select Adjustment Pattern Shift Value.
If the value is large, an adjustment pattern with a large number of variations in the correction values is printed.
Select a small value to fine-tune your adjustments.
Set the shift value for each brightness point; P1 (shadows), P2 (intermediate colors), and P3 (highlights).
F Click Print from Adjustment Pattern.
The adjustment pattern is printed.
G Select the best pattern from the adjustment patterns, and check the adjustment number.
The adjustment numbers are the letters and numbers printed at the bottom left of each pattern. (Example:R-5)
The letters show the direction of the color to be adjusted. "N" indicates no adjustment.
The numbers indicate the shift value.
Check each brightness point; P1 (shadows), P2 (intermediate colors), and P3 (highlights).
SL-D800 Series Maintenance Tool Operation Guide
Using the Maintenance Tool (Windows)
36
H Set the Direction and Shift Value.
Set the adjustment number for the selected adjustment pattern.
When you change the settings, the changes are reflected in each number for Manual Adjustment on the right ofthe screen and the graph (tone curve) at the bottom of the screen.
Note:
❏ The tone curve shows the output strength for each input color (R: Red, G: Green, and B: Blue). When there are nocorrections, the line goes straight from the top right to the bottom left; if the line curves down from this position, thecolors become darker, and if the line curves up, the colors become lighter.
❏ You can adjust the gradation manually in Manual Adjustment on the right of the screen. When adjustingmanually, the value set in Pattern Adjustment is no longer used.
❏ If you click Clear, the Gradation adjustment number returns to its default value. The Color Balance andDensity values are retained.
I Click Print from Print Check Pattern.
The check pattern is printed.
SL-D800 Series Maintenance Tool Operation Guide
Using the Maintenance Tool (Windows)
37
Check that the color balance is as you intended.
J Click Set.
The settings are applied.
K Click Close.
The Settings screen closes.
SL-D800 Series Maintenance Tool Operation Guide
Using the Maintenance Tool (Windows)
38
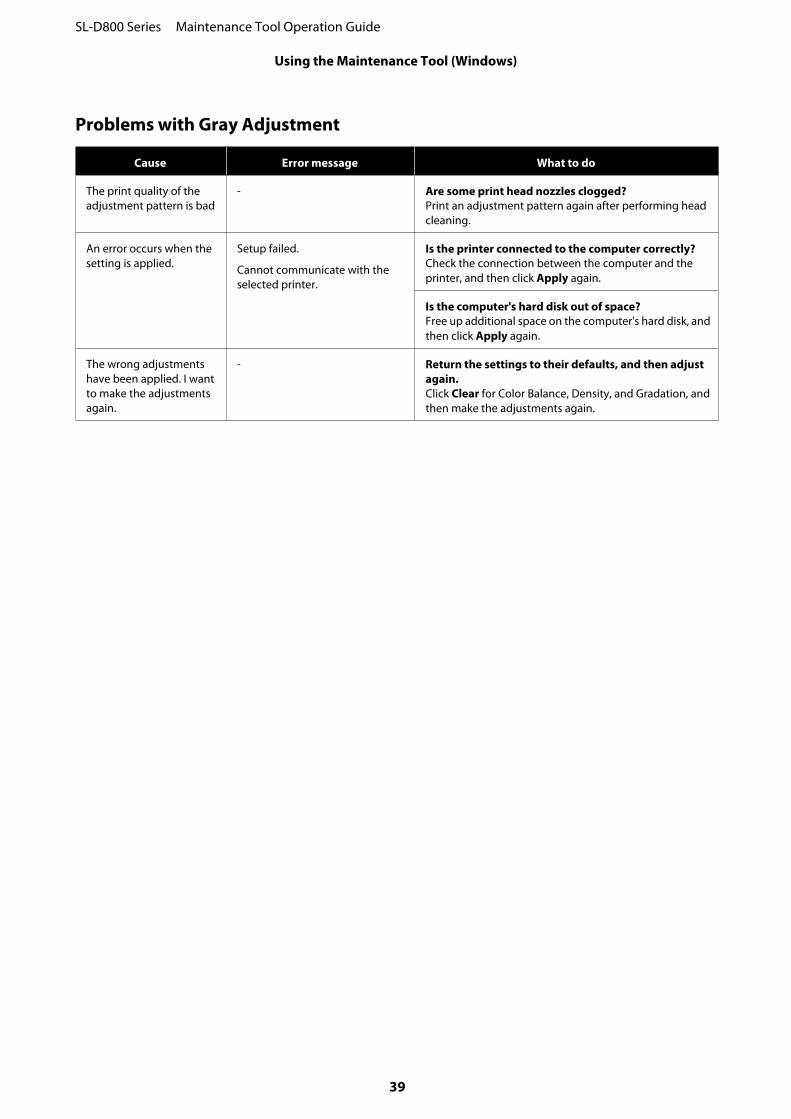
Problems with Gray Adjustment
Cause Error message What to do
The print quality of theadjustment pattern is bad
- Are some print head nozzles clogged?Print an adjustment pattern again after performing headcleaning.
An error occurs when thesetting is applied.
Setup failed.
Cannot communicate with theselected printer.
Is the printer connected to the computer correctly?Check the connection between the computer and theprinter, and then click Apply again.
Is the computer's hard disk out of space?Free up additional space on the computer's hard disk, andthen click Apply again.
The wrong adjustmentshave been applied. I wantto make the adjustmentsagain.
- Return the settings to their defaults, and then adjustagain.Click Clear for Color Balance, Density, and Gradation, andthen make the adjustments again.
SL-D800 Series Maintenance Tool Operation Guide
Using the Maintenance Tool (Windows)
39
Printer Management
See the following when performing printer management operations such as registering printers or updating thefirmware.
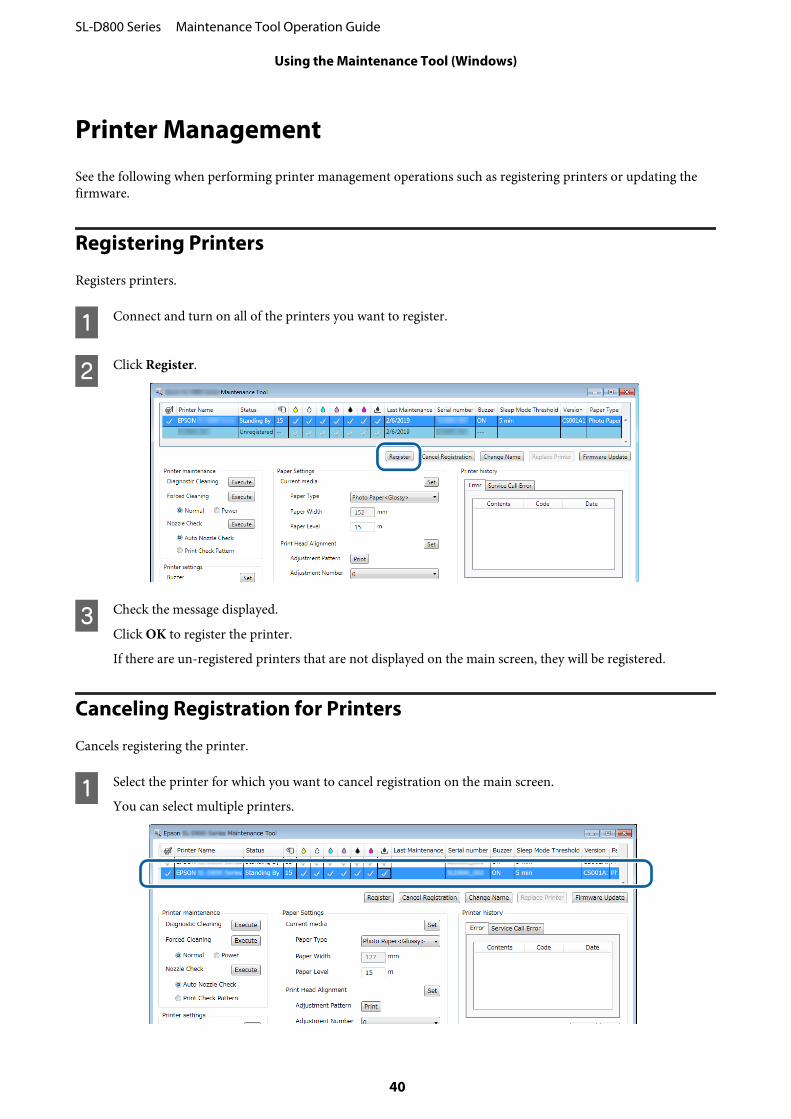
Registering Printers
Registers printers.
A Connect and turn on all of the printers you want to register.
B Click Register.
C Check the message displayed.
Click OK to register the printer.
If there are un-registered printers that are not displayed on the main screen, they will be registered.
Canceling Registration for Printers
Cancels registering the printer.
A Select the printer for which you want to cancel registration on the main screen.
You can select multiple printers.
SL-D800 Series Maintenance Tool Operation Guide
Using the Maintenance Tool (Windows)
40
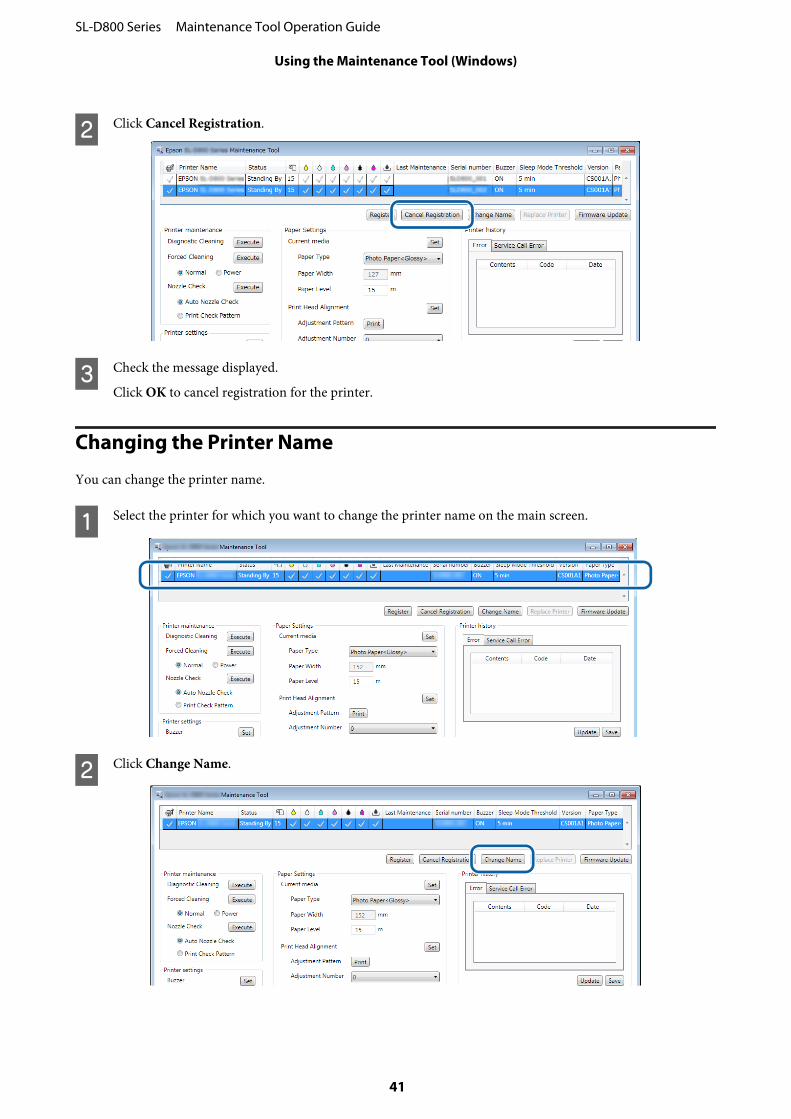
B Click Cancel Registration.
C Check the message displayed.
Click OK to cancel registration for the printer.
Changing the Printer Name
You can change the printer name.
A Select the printer for which you want to change the printer name on the main screen.
B Click Change Name.
SL-D800 Series Maintenance Tool Operation Guide
Using the Maintenance Tool (Windows)
41
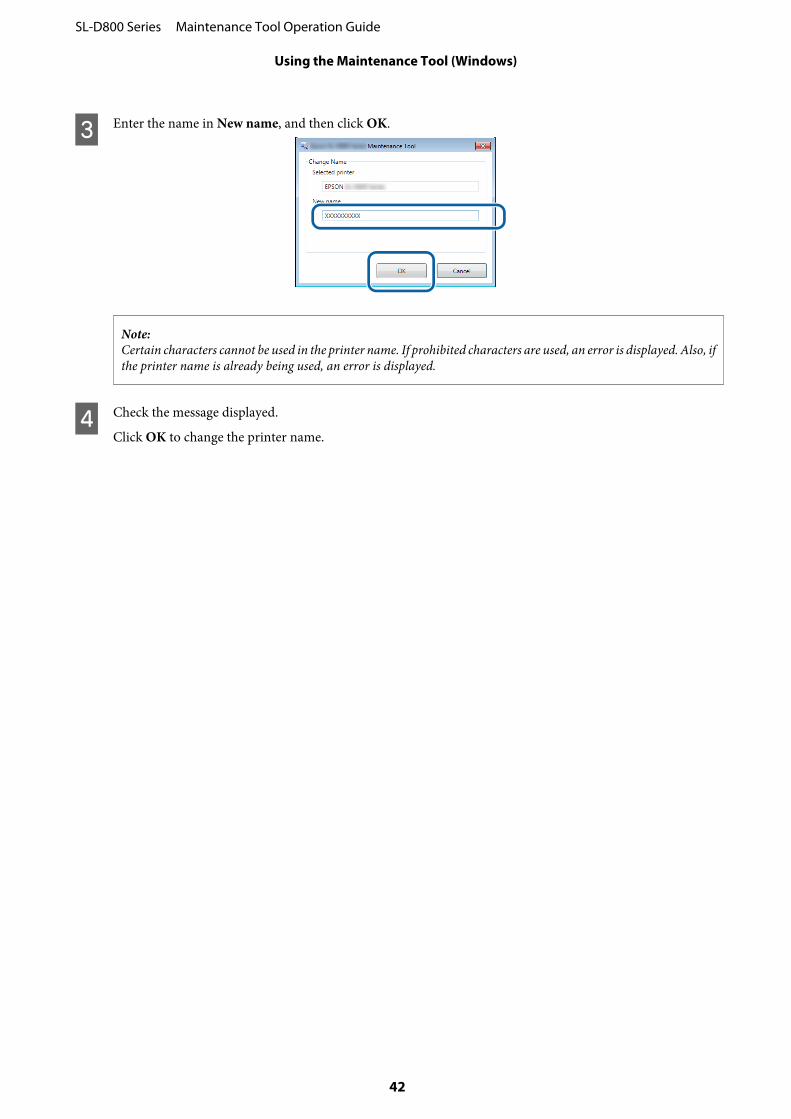
C Enter the name in New name, and then click OK.
Note:Certain characters cannot be used in the printer name. If prohibited characters are used, an error is displayed. Also, ifthe printer name is already being used, an error is displayed.
D Check the message displayed.
Click OK to change the printer name.
SL-D800 Series Maintenance Tool Operation Guide
Using the Maintenance Tool (Windows)
42
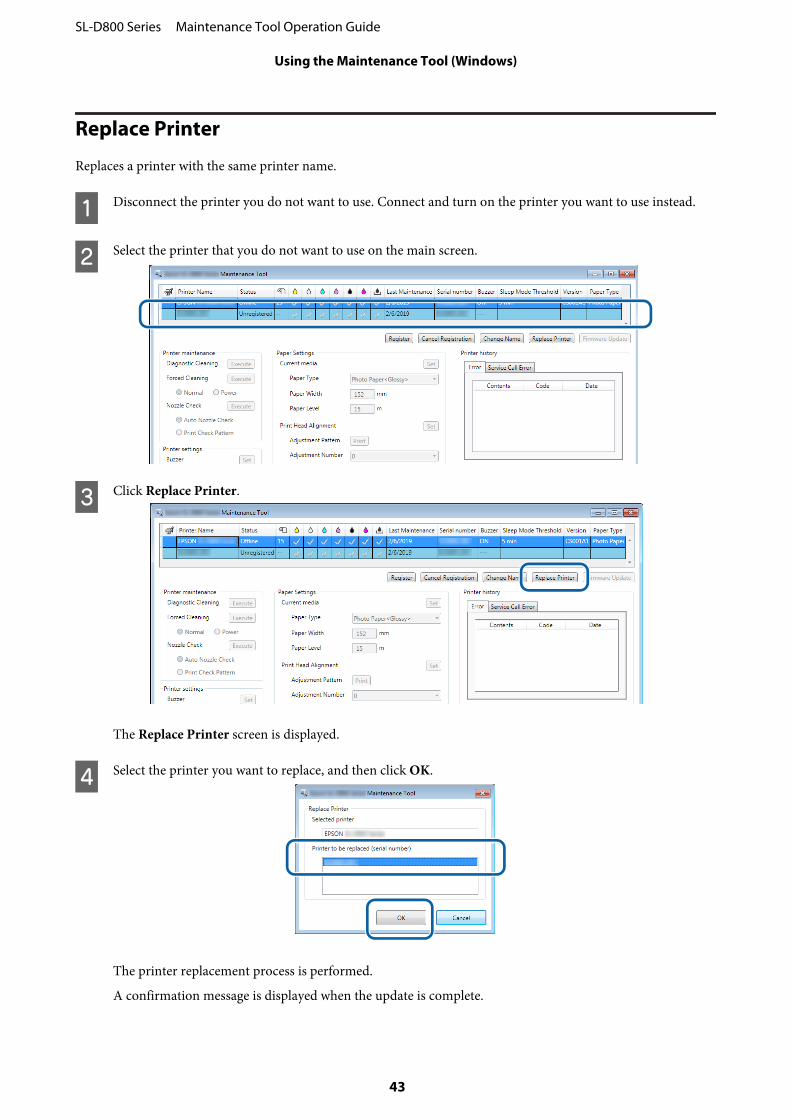
Replace Printer
Replaces a printer with the same printer name.
A Disconnect the printer you do not want to use. Connect and turn on the printer you want to use instead.
B Select the printer that you do not want to use on the main screen.
C Click Replace Printer.
The Replace Printer screen is displayed.
D Select the printer you want to replace, and then click OK.
The printer replacement process is performed.
A confirmation message is displayed when the update is complete.
SL-D800 Series Maintenance Tool Operation Guide
Using the Maintenance Tool (Windows)
43
Note:Note: When an updated paper type file is available, the paper information for printers that were additionallyregistered is updated.U “Update the Paper Information” on page 47
E Register the paper information again in Paper Settings.
U “Paper Settings” on page 18
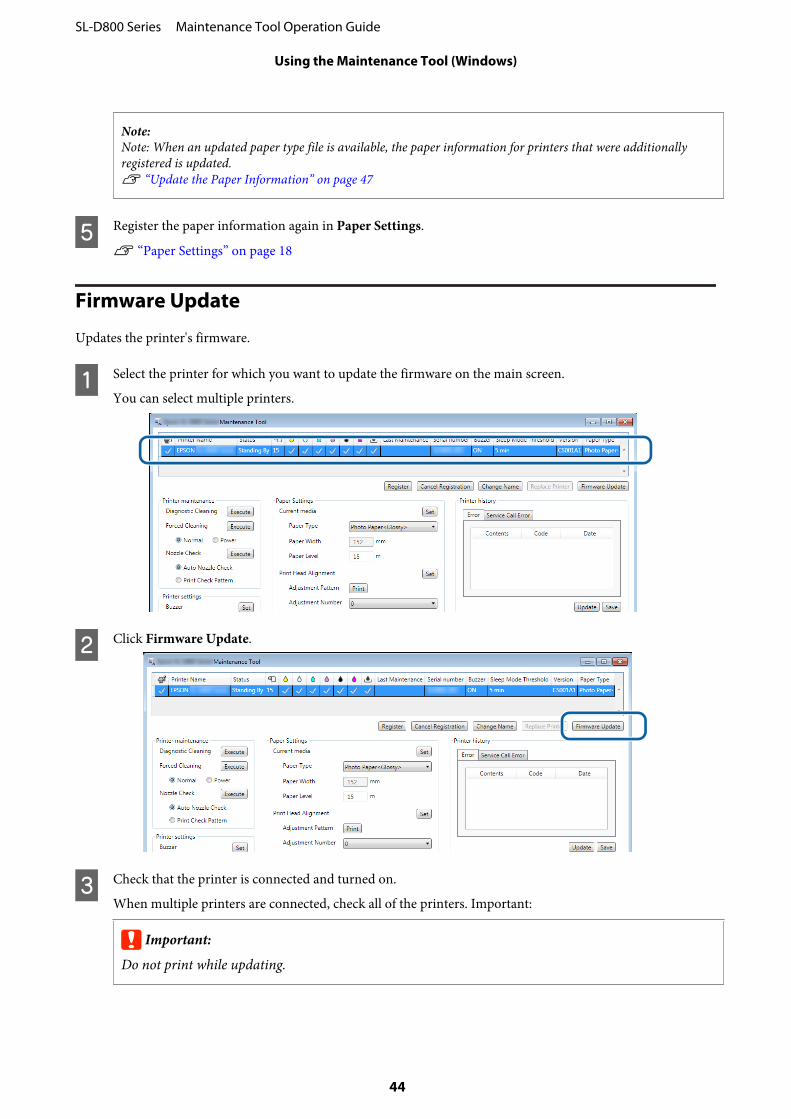
Firmware Update
Updates the printer's firmware.
A Select the printer for which you want to update the firmware on the main screen.
You can select multiple printers.
B Click Firmware Update.
C Check that the printer is connected and turned on.
When multiple printers are connected, check all of the printers. Important:
c Important:
Do not print while updating.
SL-D800 Series Maintenance Tool Operation Guide
Using the Maintenance Tool (Windows)
44
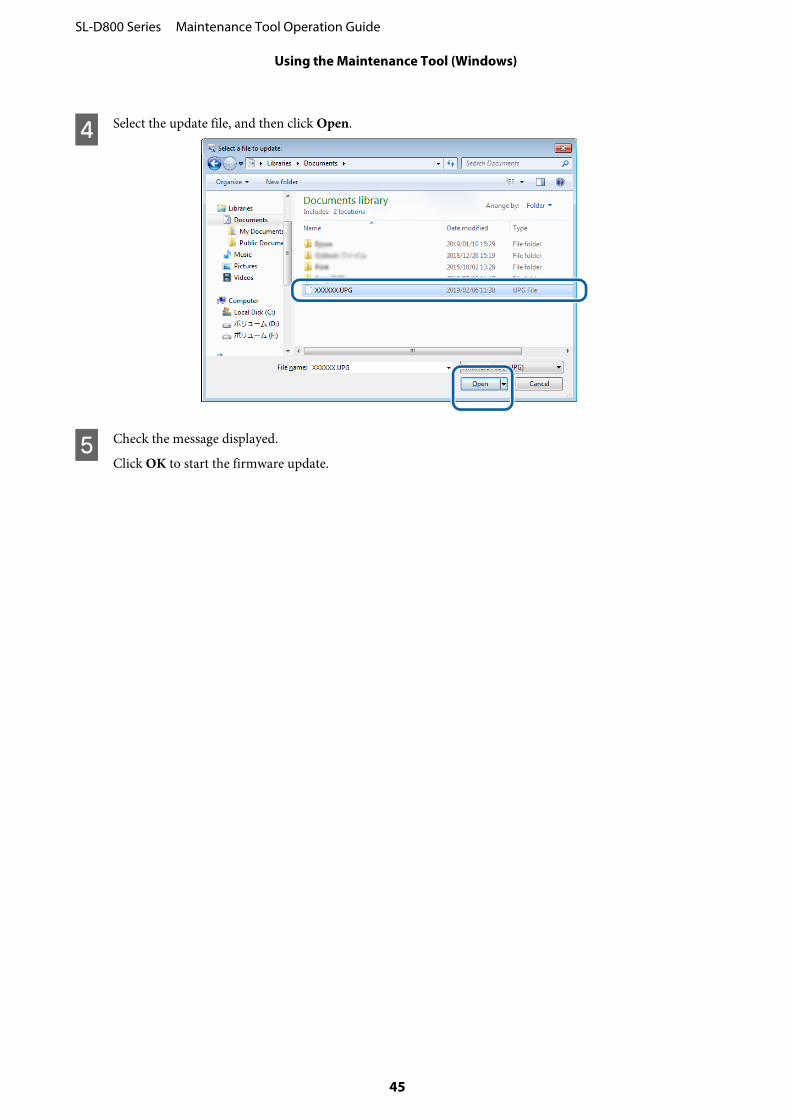
D Select the update file, and then click Open.
E Check the message displayed.
Click OK to start the firmware update.
SL-D800 Series Maintenance Tool Operation Guide
Using the Maintenance Tool (Windows)
45
System Environment Settings
In System Environment Settings, you can set the temporary storage folder for print data, update paper information,and collect logs.
Setting the Print Data Temporary Storage Folder
Sets the temporary storage folder for print data that was generated by the printer driver.
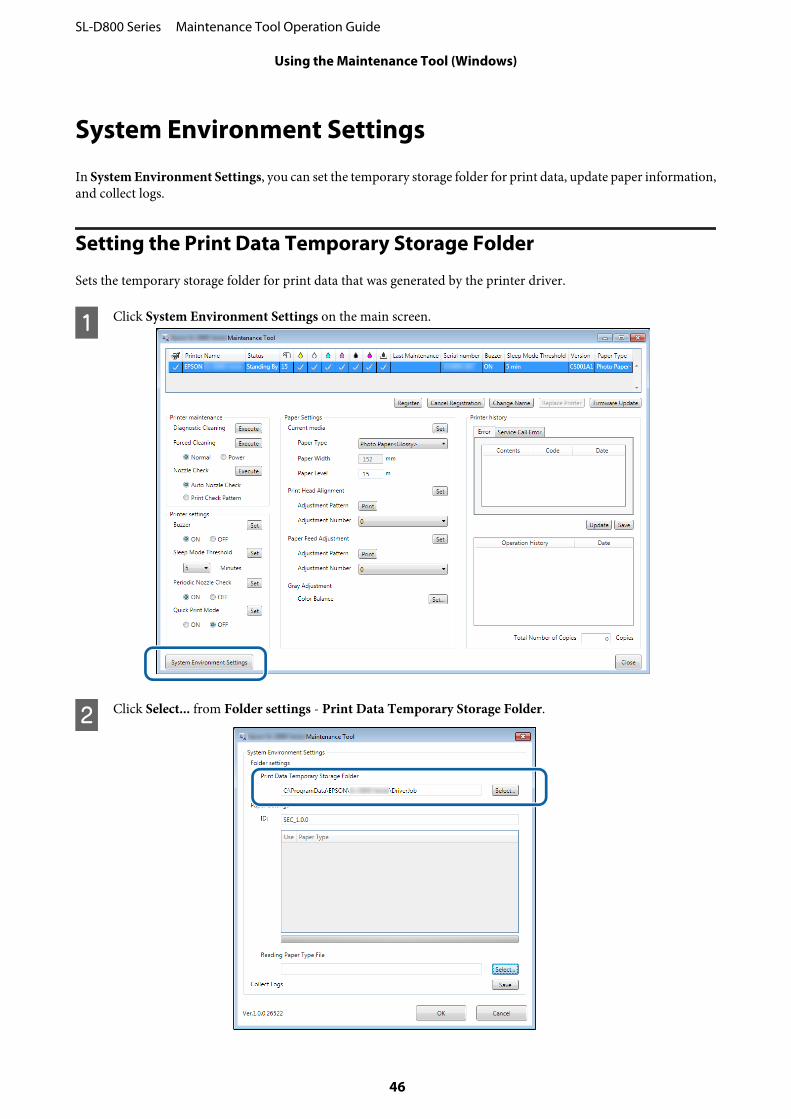
A Click System Environment Settings on the main screen.
B Click Select... from Folder settings - Print Data Temporary Storage Folder.
SL-D800 Series Maintenance Tool Operation Guide
Using the Maintenance Tool (Windows)
46
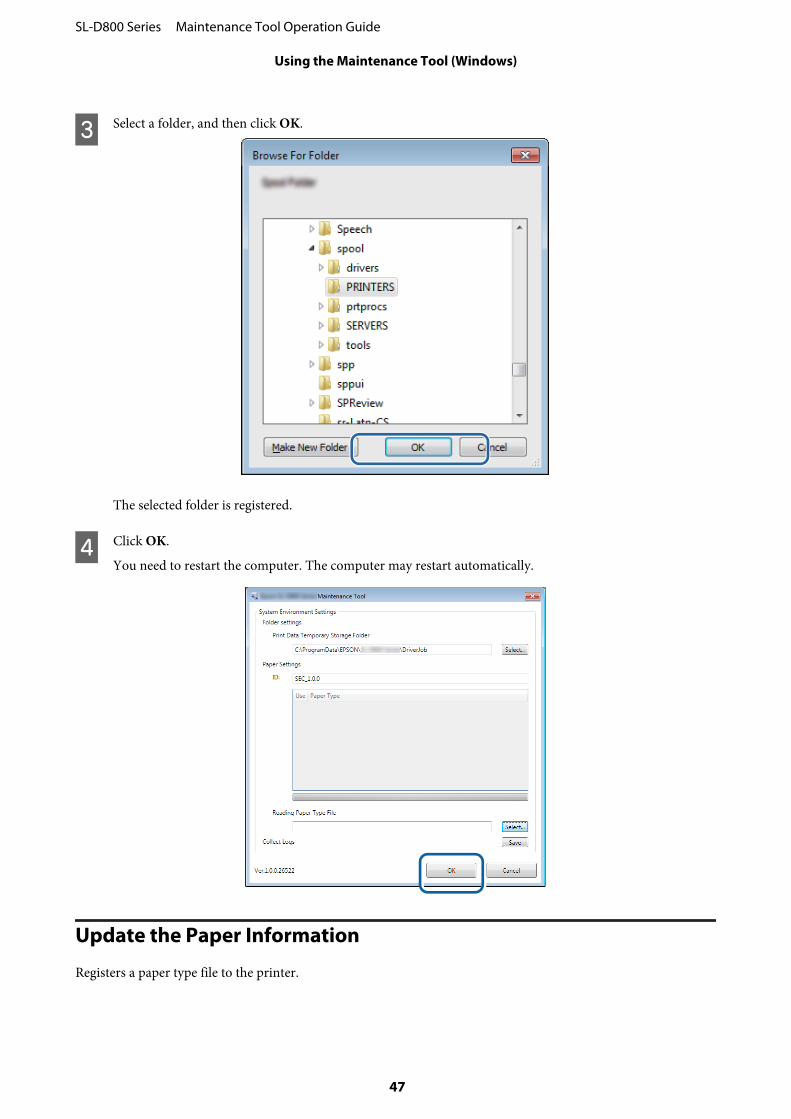
C Select a folder, and then click OK.
The selected folder is registered.
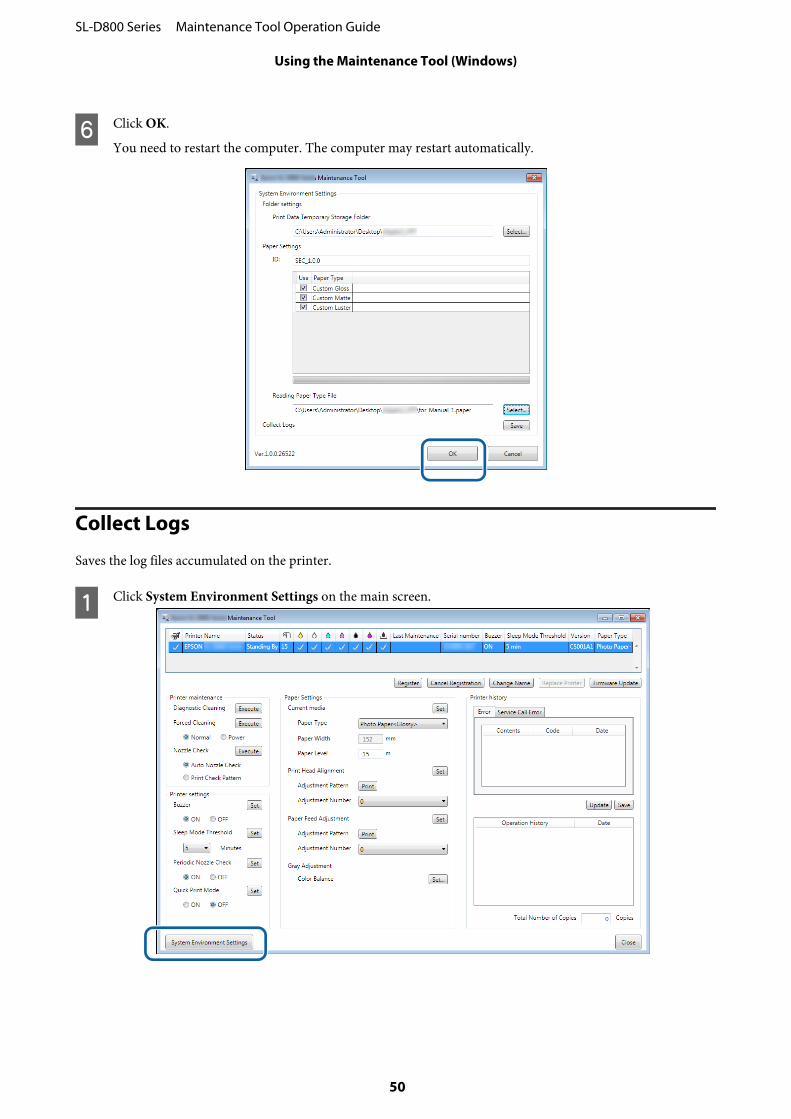
D Click OK.
You need to restart the computer. The computer may restart automatically.
Update the Paper Information
Registers a paper type file to the printer.
SL-D800 Series Maintenance Tool Operation Guide
Using the Maintenance Tool (Windows)
47

A Click System Environment Settings on the main screen.
B Click Select... from Paper Settings - Reading Paper Type File.
SL-D800 Series Maintenance Tool Operation Guide
Using the Maintenance Tool (Windows)
48
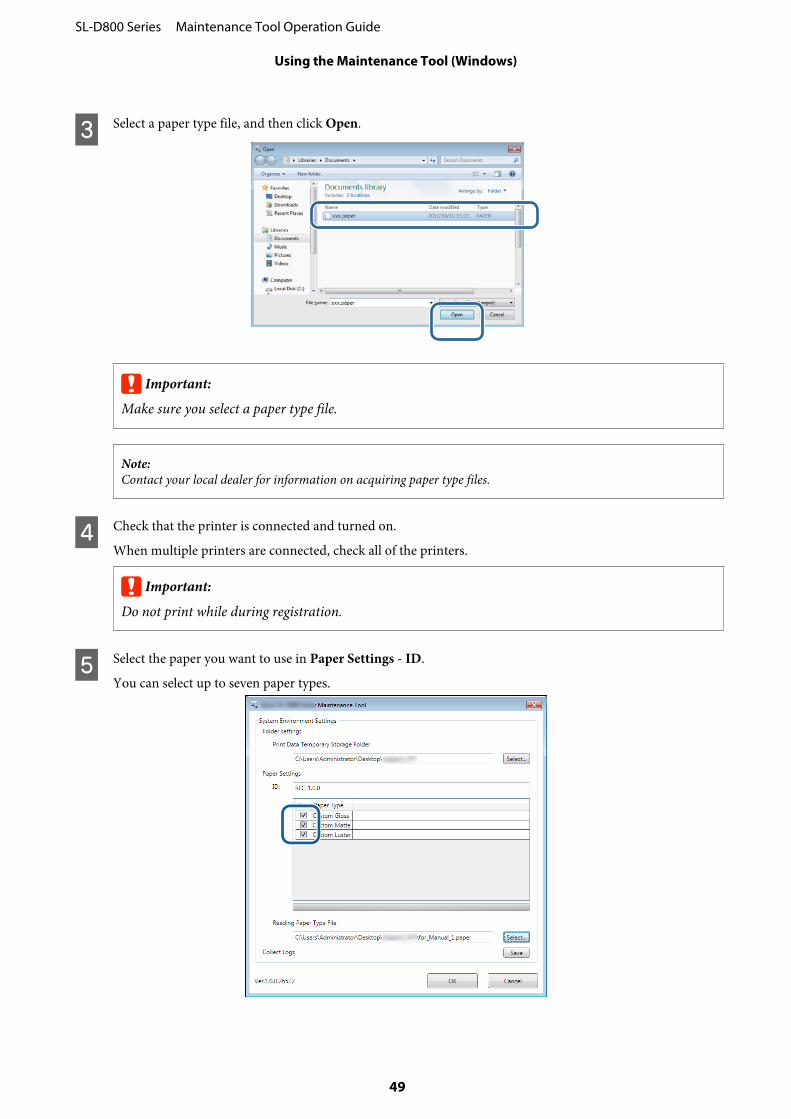
C Select a paper type file, and then click Open.
c Important:
Make sure you select a paper type file.
Note:Contact your local dealer for information on acquiring paper type files.
D Check that the printer is connected and turned on.
When multiple printers are connected, check all of the printers.
c Important:
Do not print while during registration.
E Select the paper you want to use in Paper Settings - ID.
You can select up to seven paper types.
SL-D800 Series Maintenance Tool Operation Guide
Using the Maintenance Tool (Windows)
49
F Click OK.
You need to restart the computer. The computer may restart automatically.
Collect Logs
Saves the log files accumulated on the printer.
A Click System Environment Settings on the main screen.
SL-D800 Series Maintenance Tool Operation Guide
Using the Maintenance Tool (Windows)
50
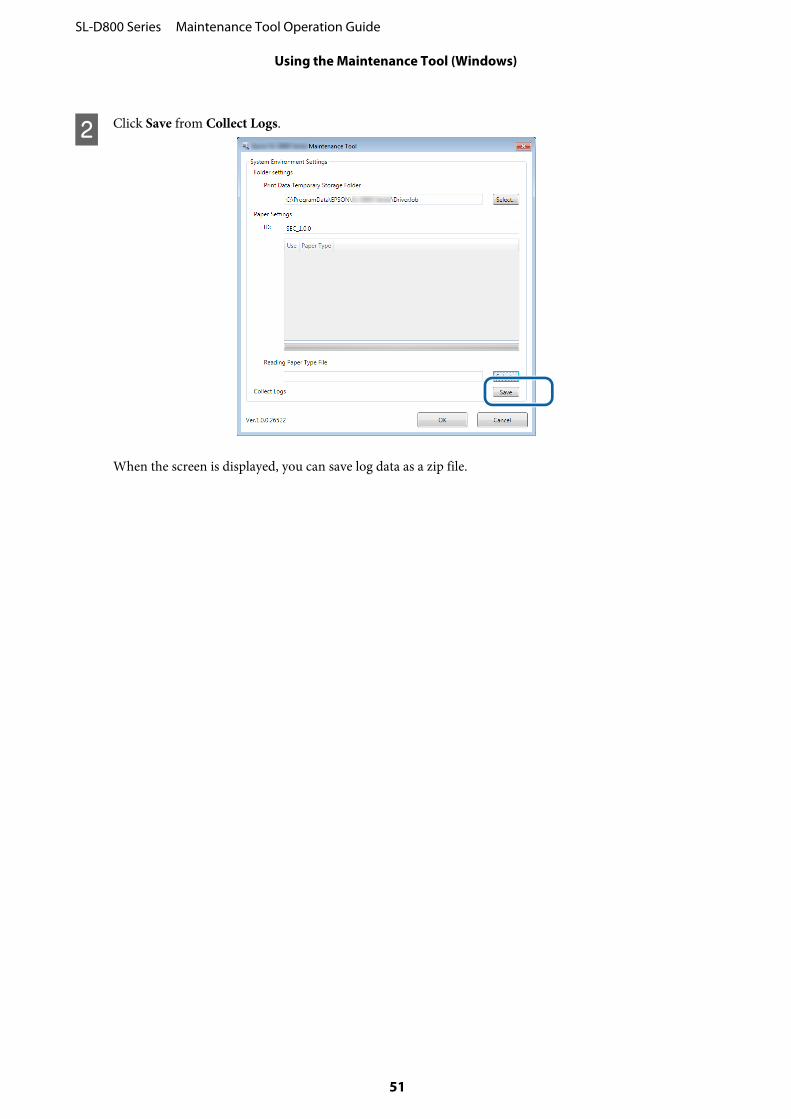
B Click Save from Collect Logs.
When the screen is displayed, you can save log data as a zip file.
SL-D800 Series Maintenance Tool Operation Guide
Using the Maintenance Tool (Windows)
51
Troubleshooting
About error messages
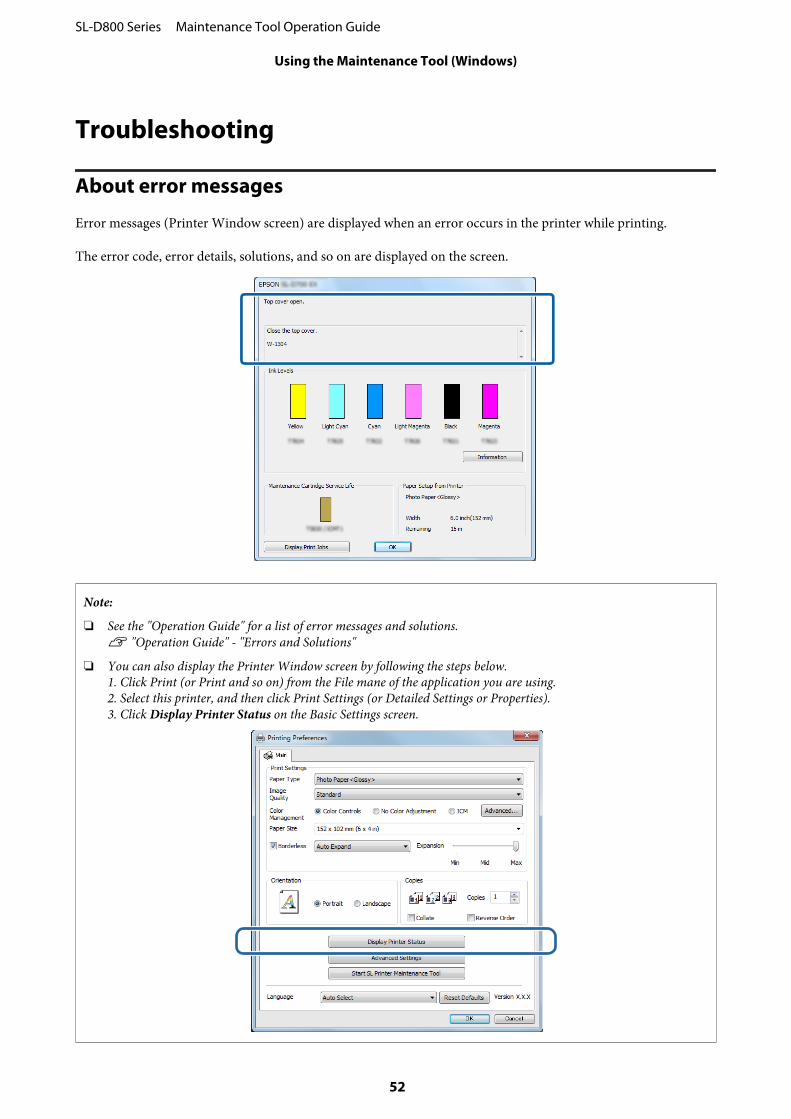
Error messages (Printer Window screen) are displayed when an error occurs in the printer while printing.
The error code, error details, solutions, and so on are displayed on the screen.
Note:
❏ See the "Operation Guide" for a list of error messages and solutions.U "Operation Guide" - "Errors and Solutions"
❏ You can also display the Printer Window screen by following the steps below.1. Click Print (or Print and so on) from the File mane of the application you are using.2. Select this printer, and then click Print Settings (or Detailed Settings or Properties).3. Click Display Printer Status on the Basic Settings screen.
SL-D800 Series Maintenance Tool Operation Guide
Using the Maintenance Tool (Windows)
52
Cannot perform Replace Printer from Maintenance Tool
Cause What to do
When the printer you want toreplace is not displayed.
Is the printer icon displayed under "Unspecified" in the "Devices and Printers" or"Printers and Faxes" folder?If the icon is displayed under Unspecified, do the following:
1. Click OK on the message displayed, and then close Maintenance Tool.
2. Click Start - Control Panel - Hardware and Sound - Device Manager - Otherdevices.
3. Right-click EPSON SL-D800 Series, and then click Update Driver Software.
4. Click Search automatically for updated driver software.
5. After the driver software is updated, click Close.
6. Start Maintenance Tool, and replace the printer.U “Replace Printer” on page 43
Cannot Perform Printer Registration/Cancel Registration Correctly
Cause What to do
When you cannot perform PrinterRegistration/Cancel Registrationcorrectly.
Is the printer icon displayed under "Unspecified" in the "Devices and Printers" or"Printers and Faxes" folder?If the icon is displayed under Unspecified, do the following:
1. Click OK on the message displayed, and then close Maintenance Tool.
2. Click Start - Control Panel - Hardware and Sound - Device Manager - Otherdevices.
3. Right-click EPSON SL-D800 Series, and then click Update Driver Software.
4. Click Search automatically for updated driver software.
5. After the driver software is updated, click Close.
6. Start Maintenance Tool, and then register the printer.U “Registering Printers” on page 40
SL-D800 Series Maintenance Tool Operation Guide
Using the Maintenance Tool (Windows)
53
Using the Maintenance Tool (Mac)
Summary of the Maintenance Tool
From your computer you can perform adjustment and maintenance operations such as checking the printer's status,making settings, performing head cleaning and so on.
Starting and Closing
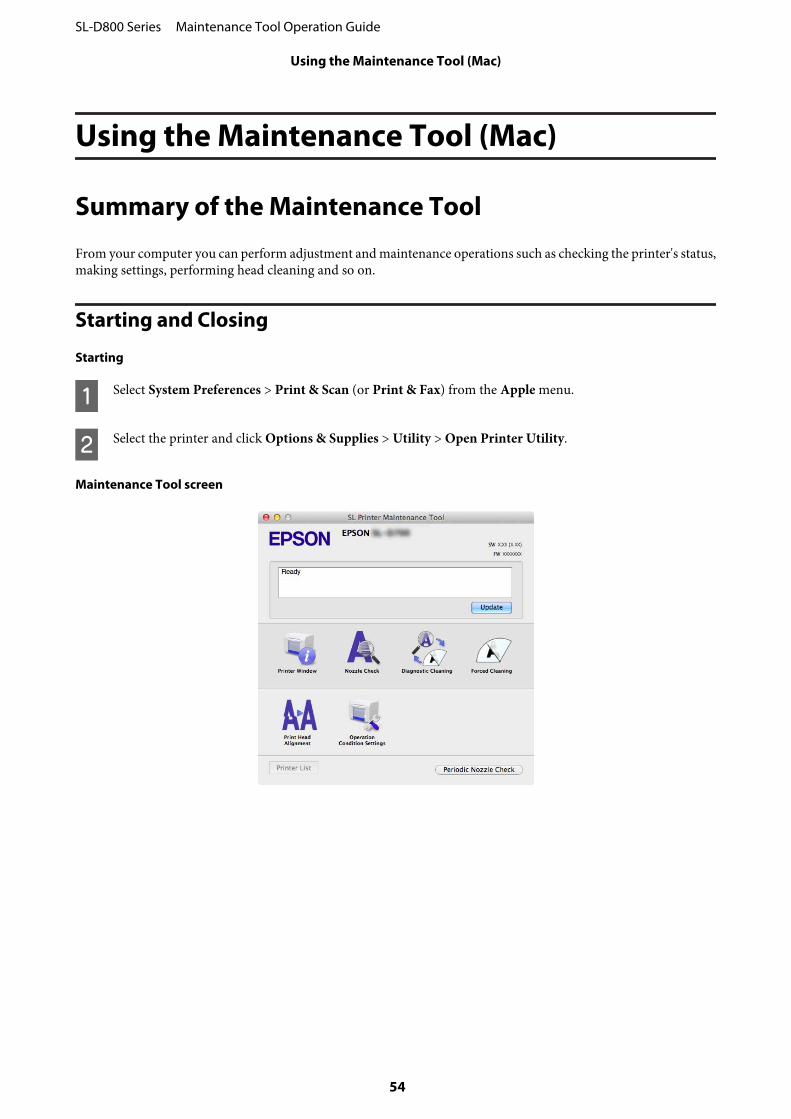
Starting
A Select System Preferences > Print & Scan (or Print & Fax) from the Apple menu.
B Select the printer and click Options & Supplies > Utility > Open Printer Utility.
Maintenance Tool screen
SL-D800 Series Maintenance Tool Operation Guide
Using the Maintenance Tool (Mac)
54
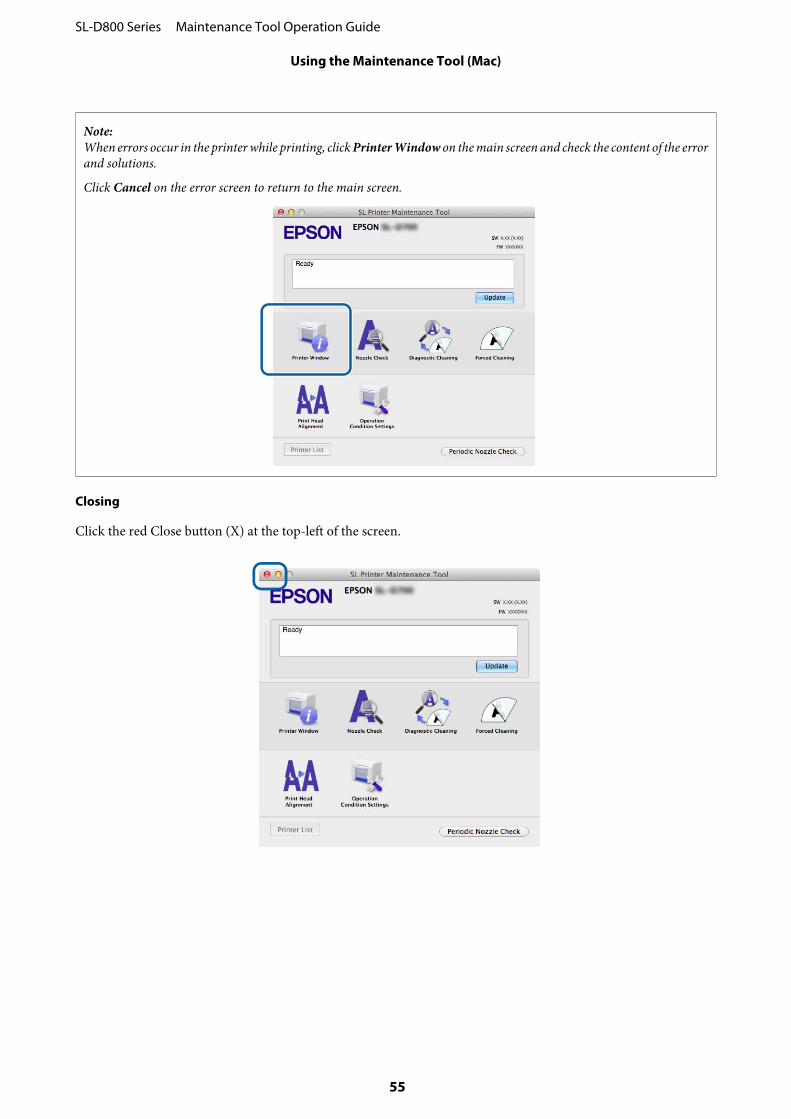
Note:When errors occur in the printer while printing, click Printer Window on the main screen and check the content of the errorand solutions.
Click Cancel on the error screen to return to the main screen.
Closing
Click the red Close button (X) at the top-left of the screen.
SL-D800 Series Maintenance Tool Operation Guide
Using the Maintenance Tool (Mac)
55
List of Functions
Main ScreenFunctions
Setting Item Settings
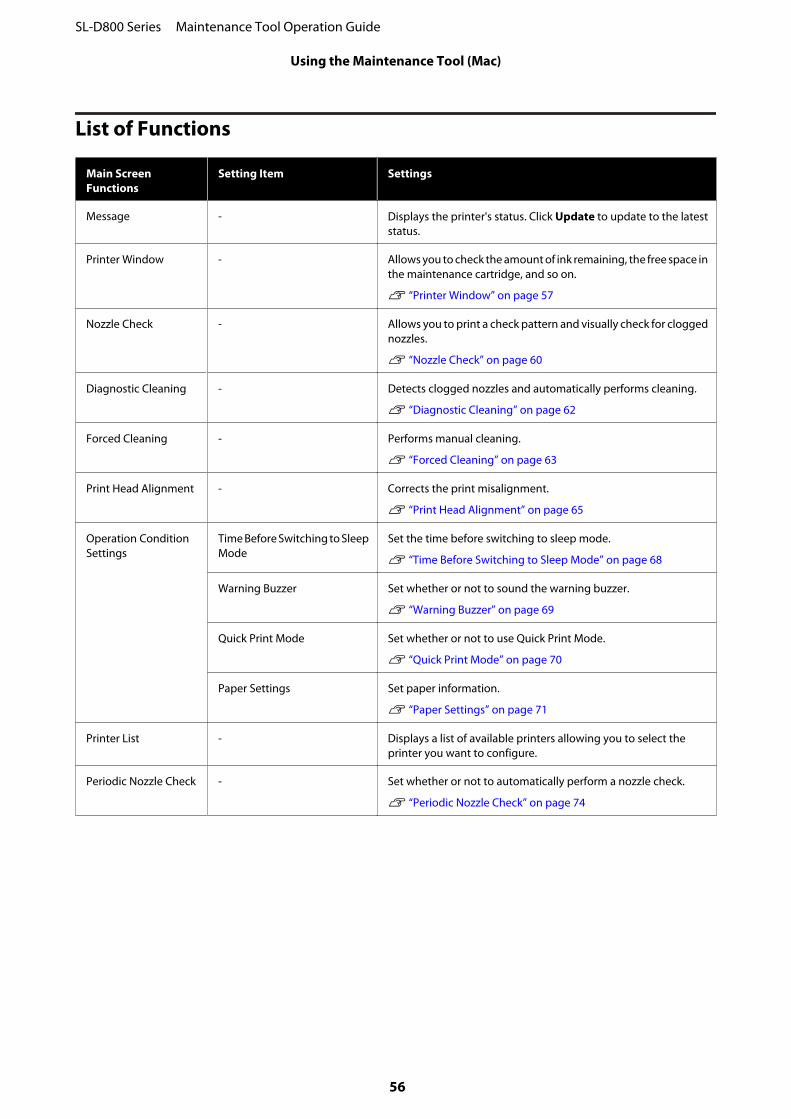
Message - Displays the printer's status. Click Update to update to the lateststatus.
Printer Window - Allows you to check the amount of ink remaining, the free space inthe maintenance cartridge, and so on.
U “Printer Window” on page 57
Nozzle Check - Allows you to print a check pattern and visually check for cloggednozzles.
U “Nozzle Check” on page 60
Diagnostic Cleaning - Detects clogged nozzles and automatically performs cleaning.
U “Diagnostic Cleaning” on page 62
Forced Cleaning - Performs manual cleaning.
U “Forced Cleaning” on page 63
Print Head Alignment - Corrects the print misalignment.
U “Print Head Alignment” on page 65
Operation ConditionSettings
Time Before Switching to SleepMode
Set the time before switching to sleep mode.
U “Time Before Switching to Sleep Mode” on page 68
Warning Buzzer Set whether or not to sound the warning buzzer.
U “Warning Buzzer” on page 69
Quick Print Mode Set whether or not to use Quick Print Mode.
U “Quick Print Mode” on page 70
Paper Settings Set paper information.
U “Paper Settings” on page 71
Printer List - Displays a list of available printers allowing you to select theprinter you want to configure.
Periodic Nozzle Check - Set whether or not to automatically perform a nozzle check.
U “Periodic Nozzle Check” on page 74
SL-D800 Series Maintenance Tool Operation Guide
Using the Maintenance Tool (Mac)
56
Printer Window
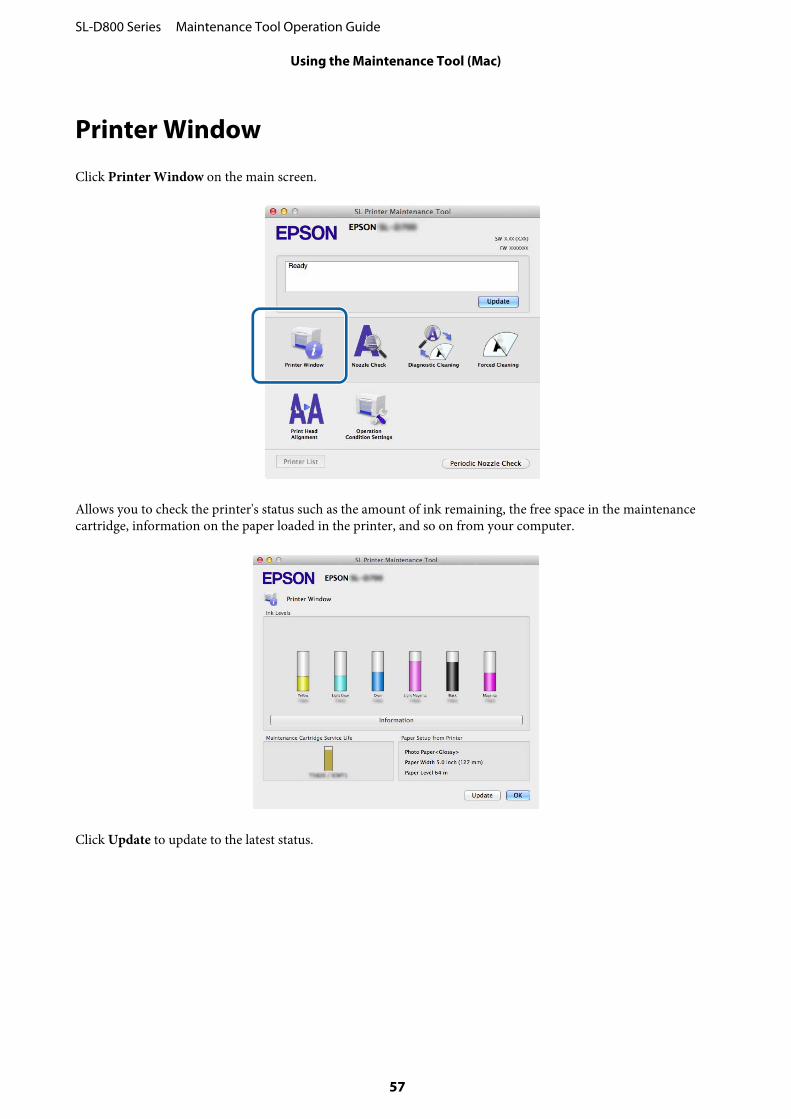
Click Printer Window on the main screen.
Allows you to check the printer's status such as the amount of ink remaining, the free space in the maintenancecartridge, information on the paper loaded in the printer, and so on from your computer.
Click Update to update to the latest status.
SL-D800 Series Maintenance Tool Operation Guide
Using the Maintenance Tool (Mac)
57
Adjusting the Print Head
Performing Head Maintenance
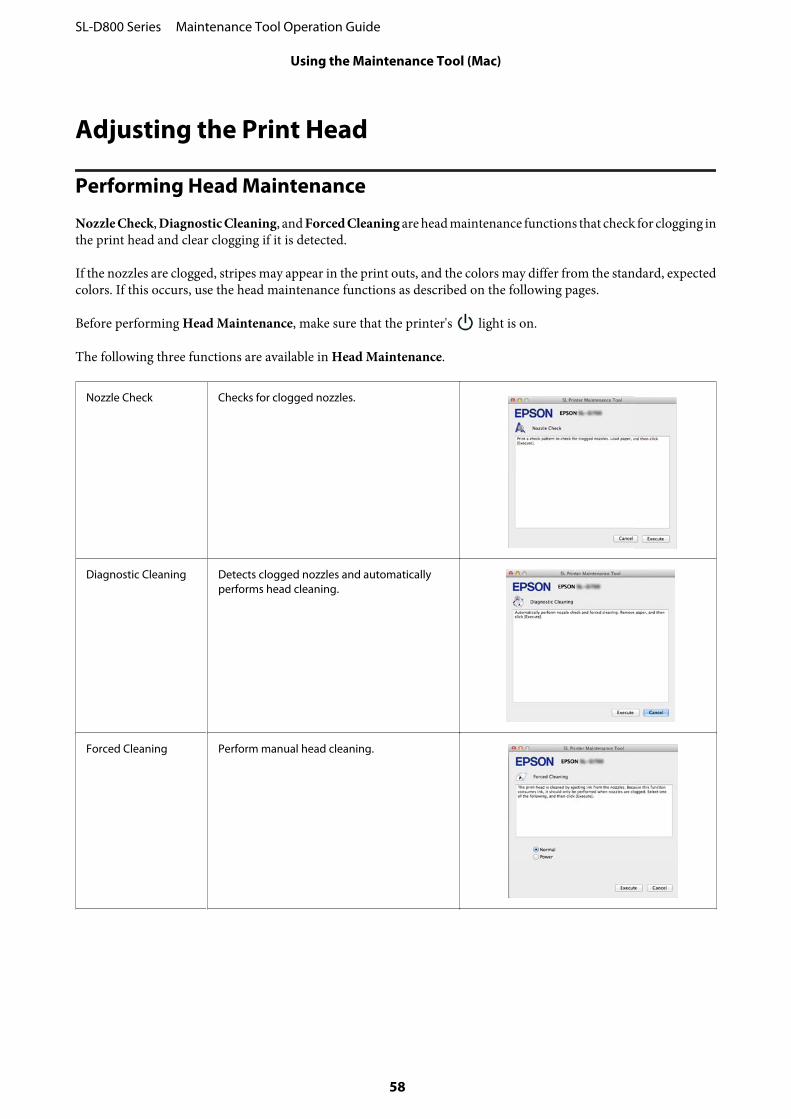
Nozzle Check, Diagnostic Cleaning, and Forced Cleaning are head maintenance functions that check for clogging inthe print head and clear clogging if it is detected.
If the nozzles are clogged, stripes may appear in the print outs, and the colors may differ from the standard, expectedcolors. If this occurs, use the head maintenance functions as described on the following pages.
Before performing Head Maintenance, make sure that the printer's light is on.
The following three functions are available in Head Maintenance.
Nozzle Check Checks for clogged nozzles.
Diagnostic Cleaning Detects clogged nozzles and automaticallyperforms head cleaning.
Forced Cleaning Perform manual head cleaning.
SL-D800 Series Maintenance Tool Operation Guide
Using the Maintenance Tool (Mac)
58
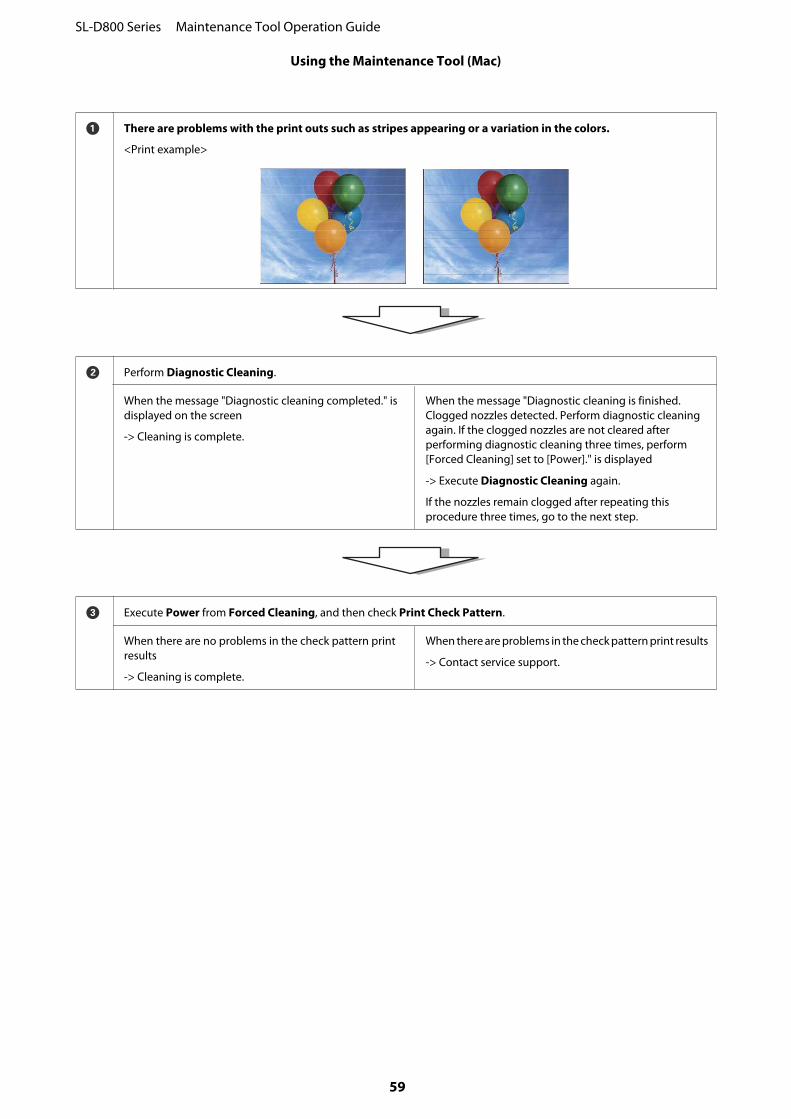
A There are problems with the print outs such as stripes appearing or a variation in the colors.
<Print example>
B Perform Diagnostic Cleaning.
When the message "Diagnostic cleaning completed." isdisplayed on the screen
-> Cleaning is complete.
When the message "Diagnostic cleaning is finished.Clogged nozzles detected. Perform diagnostic cleaningagain. If the clogged nozzles are not cleared afterperforming diagnostic cleaning three times, perform[Forced Cleaning] set to [Power]." is displayed
-> Execute Diagnostic Cleaning again.
If the nozzles remain clogged after repeating thisprocedure three times, go to the next step.
C Execute Power from Forced Cleaning, and then check Print Check Pattern.
When there are no problems in the check pattern printresults
-> Cleaning is complete.
When there are problems in the check pattern print results
-> Contact service support.
SL-D800 Series Maintenance Tool Operation Guide
Using the Maintenance Tool (Mac)
59
Nozzle Check
The Nozzle Check function checks if the print head nozzles are clogged. Print a check pattern and visually check forclogged nozzles.
After the nozzle check, perform Forced Cleaning if necessary.
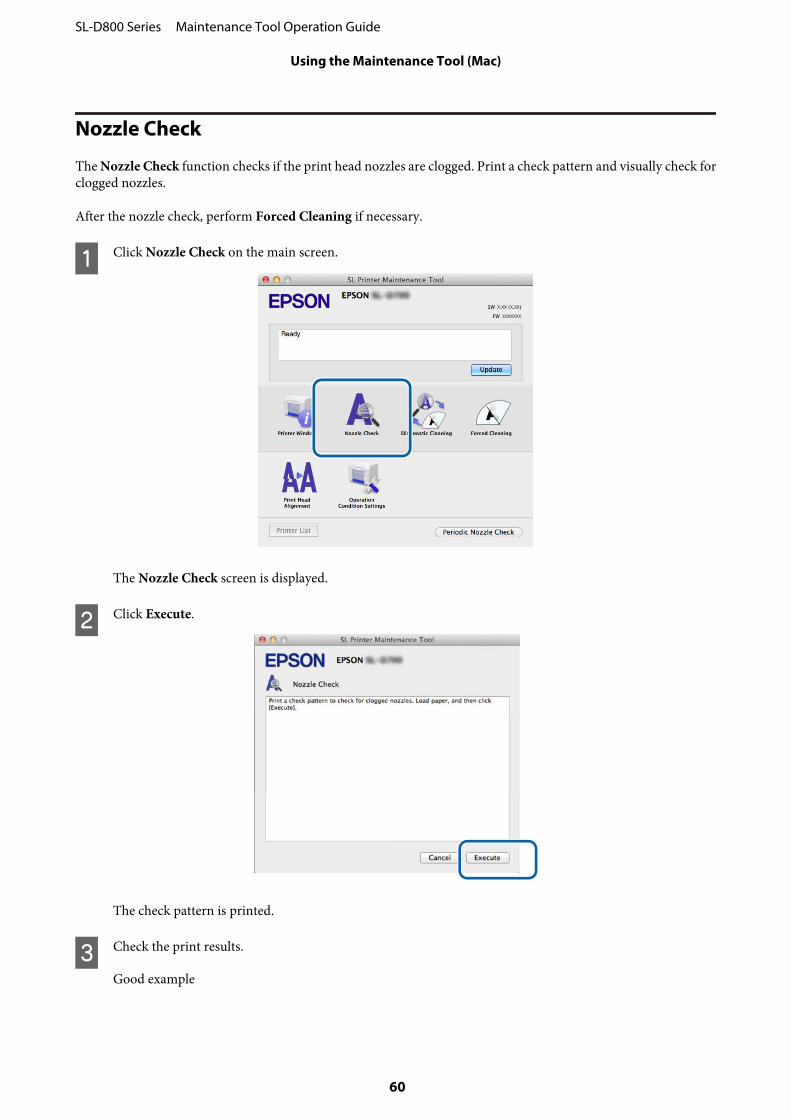
A Click Nozzle Check on the main screen.
The Nozzle Check screen is displayed.
B Click Execute.
The check pattern is printed.
C Check the print results.
Good example
SL-D800 Series Maintenance Tool Operation Guide
Using the Maintenance Tool (Mac)
60
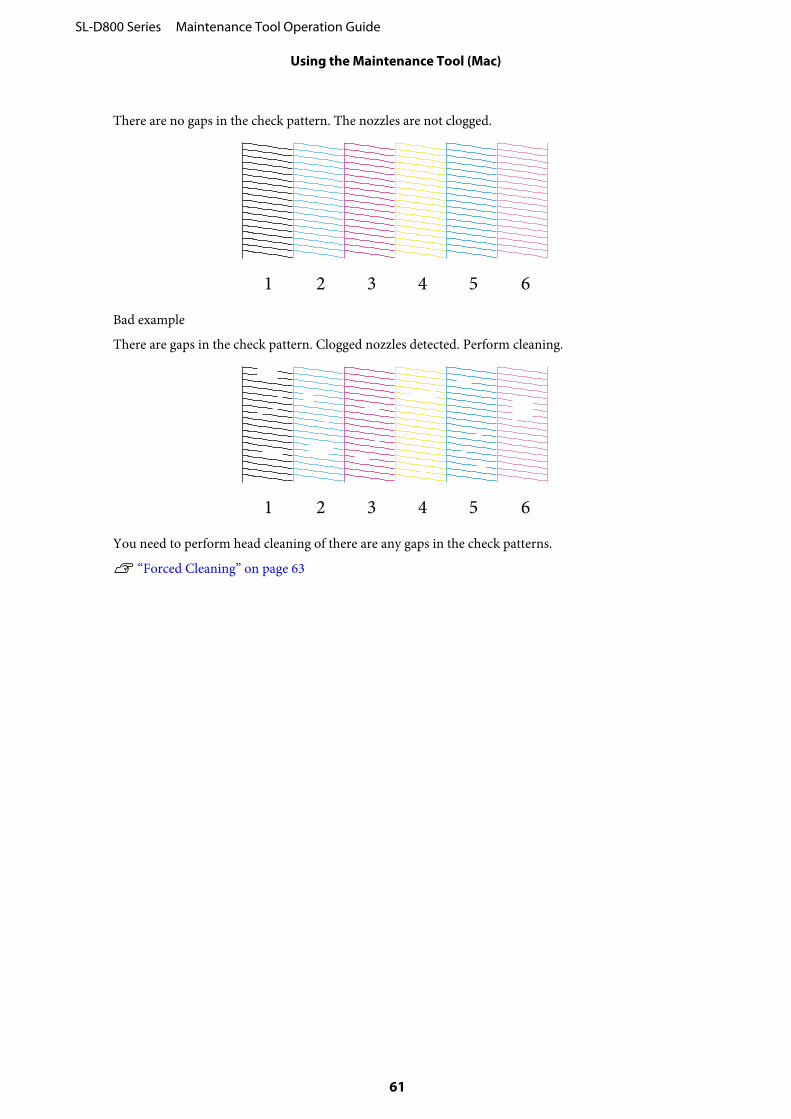
There are no gaps in the check pattern. The nozzles are not clogged.
Bad example
There are gaps in the check pattern. Clogged nozzles detected. Perform cleaning.
You need to perform head cleaning of there are any gaps in the check patterns.
U “Forced Cleaning” on page 63
SL-D800 Series Maintenance Tool Operation Guide
Using the Maintenance Tool (Mac)
61
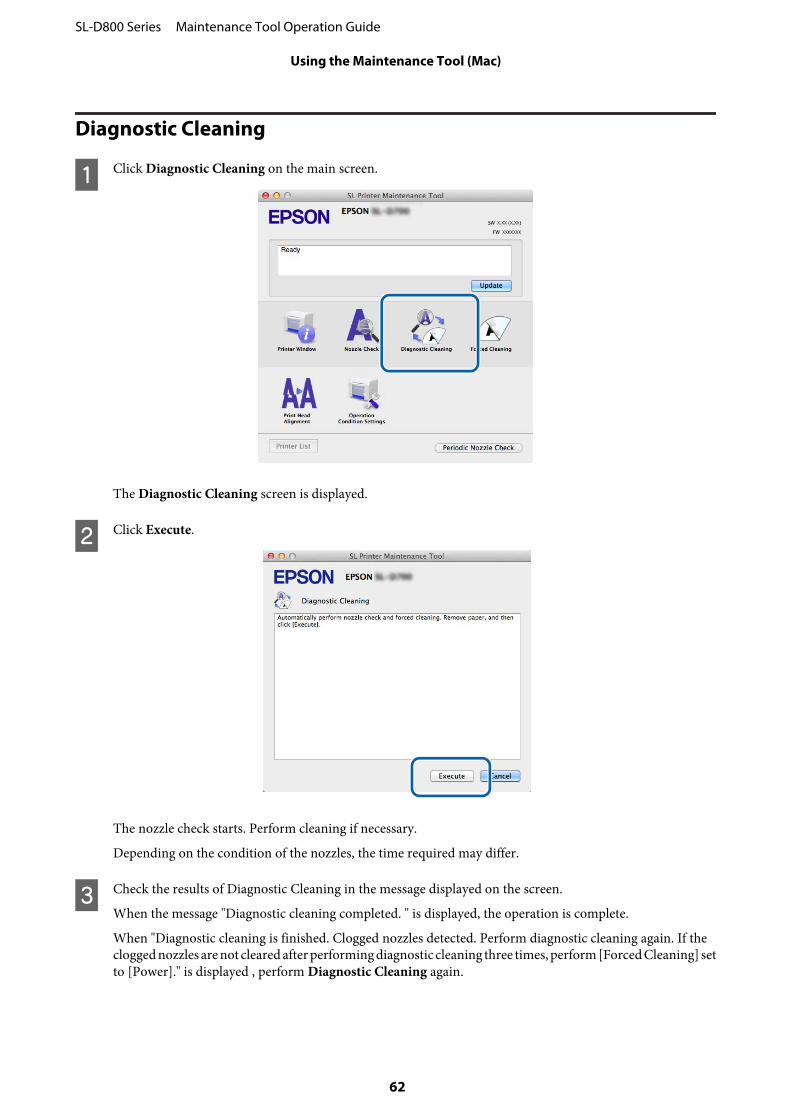
Diagnostic Cleaning
A Click Diagnostic Cleaning on the main screen.
The Diagnostic Cleaning screen is displayed.
B Click Execute.
The nozzle check starts. Perform cleaning if necessary.
Depending on the condition of the nozzles, the time required may differ.
C Check the results of Diagnostic Cleaning in the message displayed on the screen.
When the message "Diagnostic cleaning completed. " is displayed, the operation is complete.
When "Diagnostic cleaning is finished. Clogged nozzles detected. Perform diagnostic cleaning again. If theclogged nozzles are not cleared after performing diagnostic cleaning three times, perform [Forced Cleaning] setto [Power]." is displayed , perform Diagnostic Cleaning again.
SL-D800 Series Maintenance Tool Operation Guide
Using the Maintenance Tool (Mac)
62
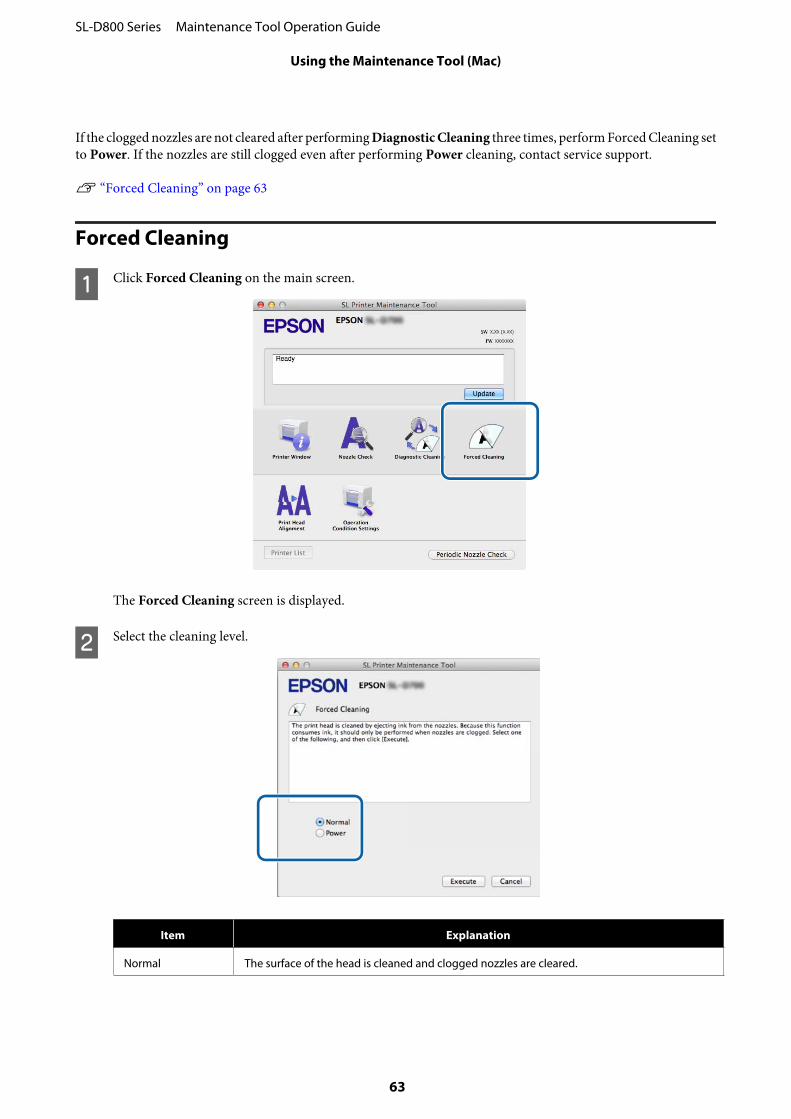
If the clogged nozzles are not cleared after performing Diagnostic Cleaning three times, perform Forced Cleaning setto Power. If the nozzles are still clogged even after performing Power cleaning, contact service support.
U “Forced Cleaning” on page 63
Forced Cleaning
A Click Forced Cleaning on the main screen.
The Forced Cleaning screen is displayed.
B Select the cleaning level.
Item Explanation
Normal The surface of the head is cleaned and clogged nozzles are cleared.
SL-D800 Series Maintenance Tool Operation Guide
Using the Maintenance Tool (Mac)
63
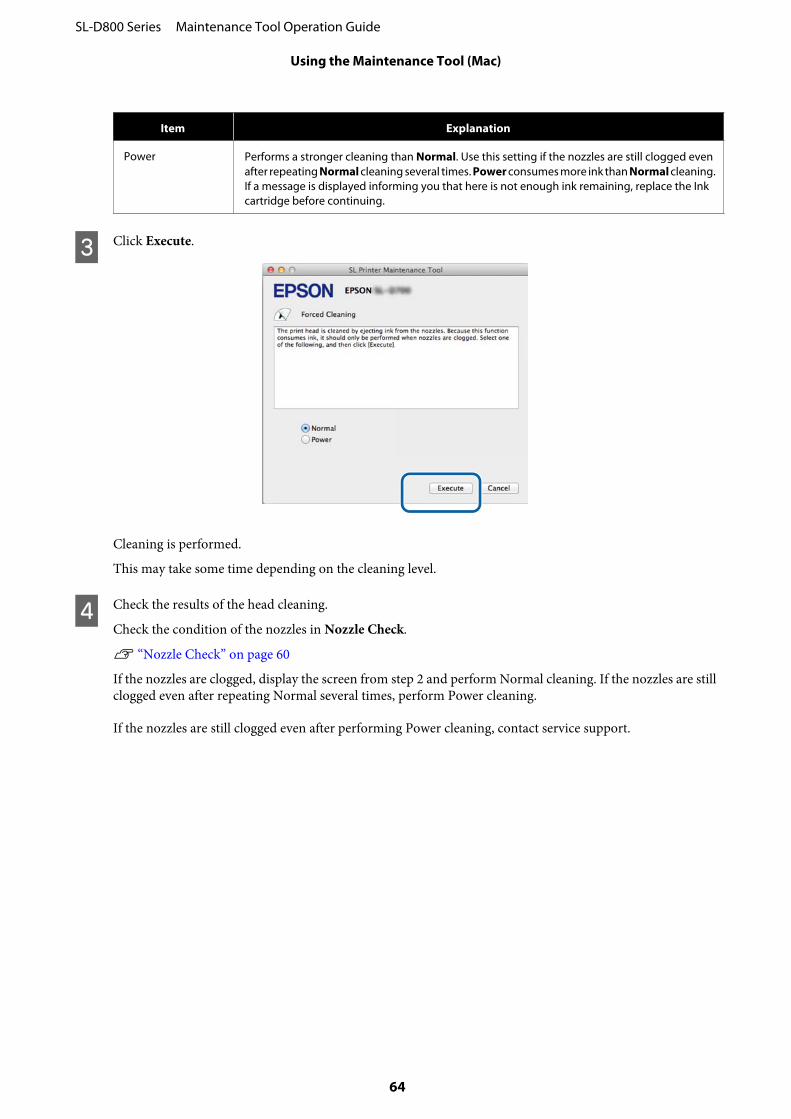
Item Explanation
Power Performs a stronger cleaning than Normal. Use this setting if the nozzles are still clogged evenafter repeating Normal cleaning several times. Power consumes more ink than Normal cleaning.If a message is displayed informing you that here is not enough ink remaining, replace the Inkcartridge before continuing.
C Click Execute.
Cleaning is performed.
This may take some time depending on the cleaning level.
D Check the results of the head cleaning.
Check the condition of the nozzles in Nozzle Check.
U “Nozzle Check” on page 60
If the nozzles are clogged, display the screen from step 2 and perform Normal cleaning. If the nozzles are stillclogged even after repeating Normal several times, perform Power cleaning.
If the nozzles are still clogged even after performing Power cleaning, contact service support.
SL-D800 Series Maintenance Tool Operation Guide
Using the Maintenance Tool (Mac)
64

Print Head Alignment
If print quality declines due to prints appearing grainy or out of focus, perform Print Head Alignment. The Print HeadAlignment function corrects print misalignments and paper feed amount.
A Click Print Head Alignment on the main screen.
The Print Head Alignment screen is displayed.
B Check that the paper type displayed matches the paper type for this printer, and then click Print.
If the paper type does not match, set the correct paper type in Paper Settings.
U “Paper Settings” on page 71
To adjust paper feeding without performing Print Head Alignment, click Skip go to step 5.
The adjustment pattern is printed.
SL-D800 Series Maintenance Tool Operation Guide
Using the Maintenance Tool (Mac)
65
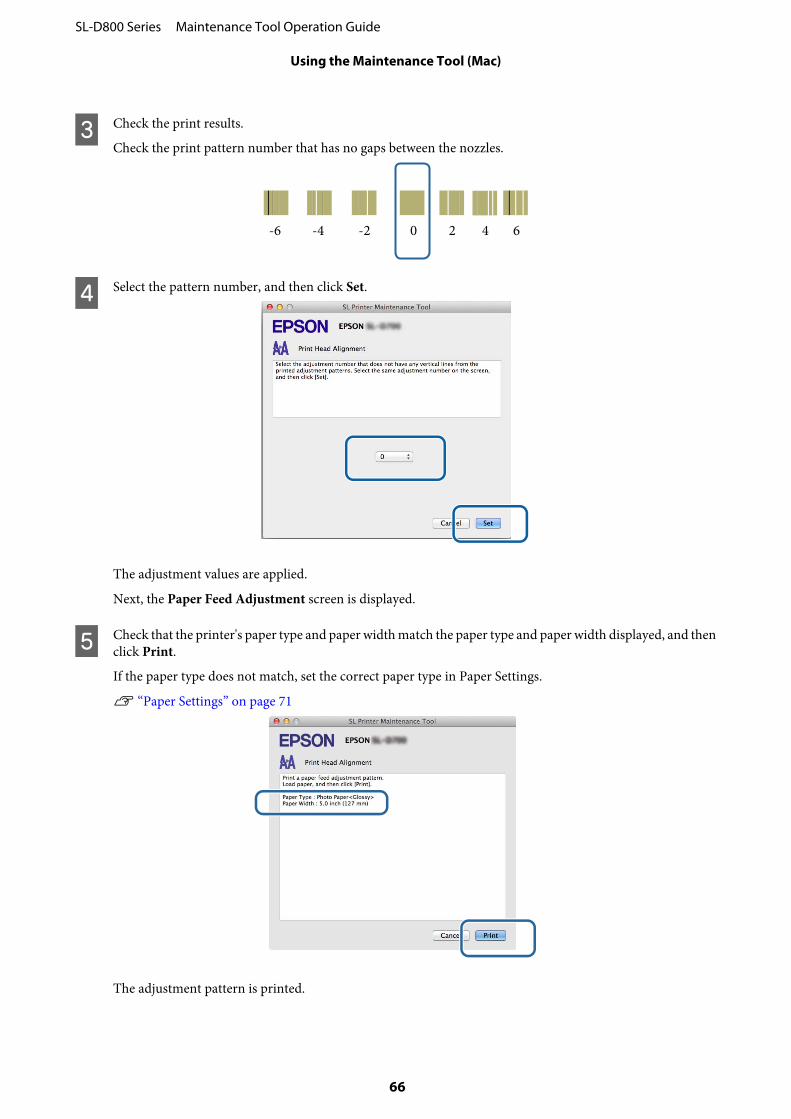
C Check the print results.
Check the print pattern number that has no gaps between the nozzles.
D Select the pattern number, and then click Set.
The adjustment values are applied.
Next, the Paper Feed Adjustment screen is displayed.
E Check that the printer's paper type and paper width match the paper type and paper width displayed, and thenclick Print.
If the paper type does not match, set the correct paper type in Paper Settings.
U “Paper Settings” on page 71
The adjustment pattern is printed.
SL-D800 Series Maintenance Tool Operation Guide
Using the Maintenance Tool (Mac)
66

F Check the print results.
Note the number of the pattern with the fewest line.
Refer to the following illustration and select an adjustment pattern without line.
If there are no good patterns among the printed patterns, enter the number for a pattern that is nearly ok, andthen reprint the adjustment pattern.
G Select the pattern number, and then click Set.
The adjustment values are applied.
SL-D800 Series Maintenance Tool Operation Guide
Using the Maintenance Tool (Mac)
67
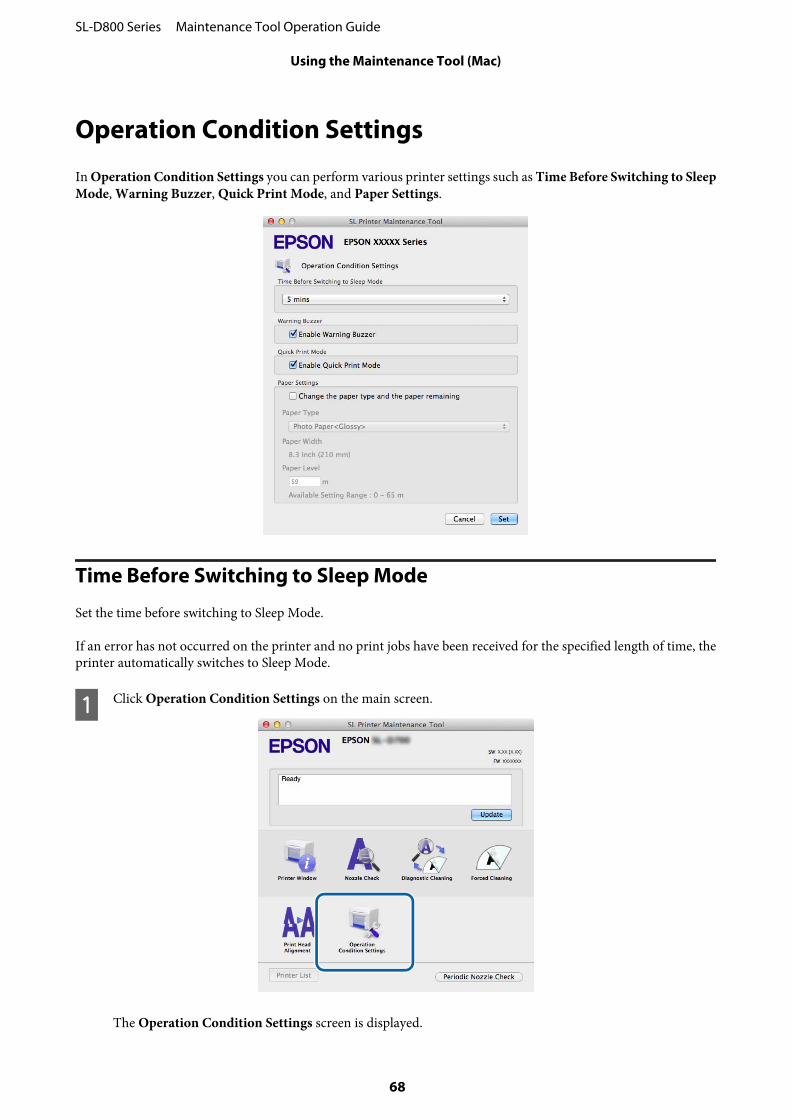
Operation Condition Settings
In Operation Condition Settings you can perform various printer settings such as Time Before Switching to SleepMode, Warning Buzzer, Quick Print Mode, and Paper Settings.
Time Before Switching to Sleep Mode
Set the time before switching to Sleep Mode.
If an error has not occurred on the printer and no print jobs have been received for the specified length of time, theprinter automatically switches to Sleep Mode.
A Click Operation Condition Settings on the main screen.
The Operation Condition Settings screen is displayed.
SL-D800 Series Maintenance Tool Operation Guide
Using the Maintenance Tool (Mac)
68

B Select Time Before Switching to Sleep Mode, and then click Set.
Once the set time has passed, the printer switches to Sleep Mode.
Settings: Shortest, 5 mins, 10 mins, 15 mins, 30 mins, 1 hour, 2 hours
Note:After printing is complete, it takes about five minutes to prepare to switch to Sleep Mode. Therefore, the time beforeswitching to Sleep Mode after printing is about five minutes longer than the actual setting.
Warning Buzzer
Set whether or not to sound the warning buzzer.
A Click Operation Condition Settings on the main screen.
The Operation Condition Settings screen is displayed.
SL-D800 Series Maintenance Tool Operation Guide
Using the Maintenance Tool (Mac)
69
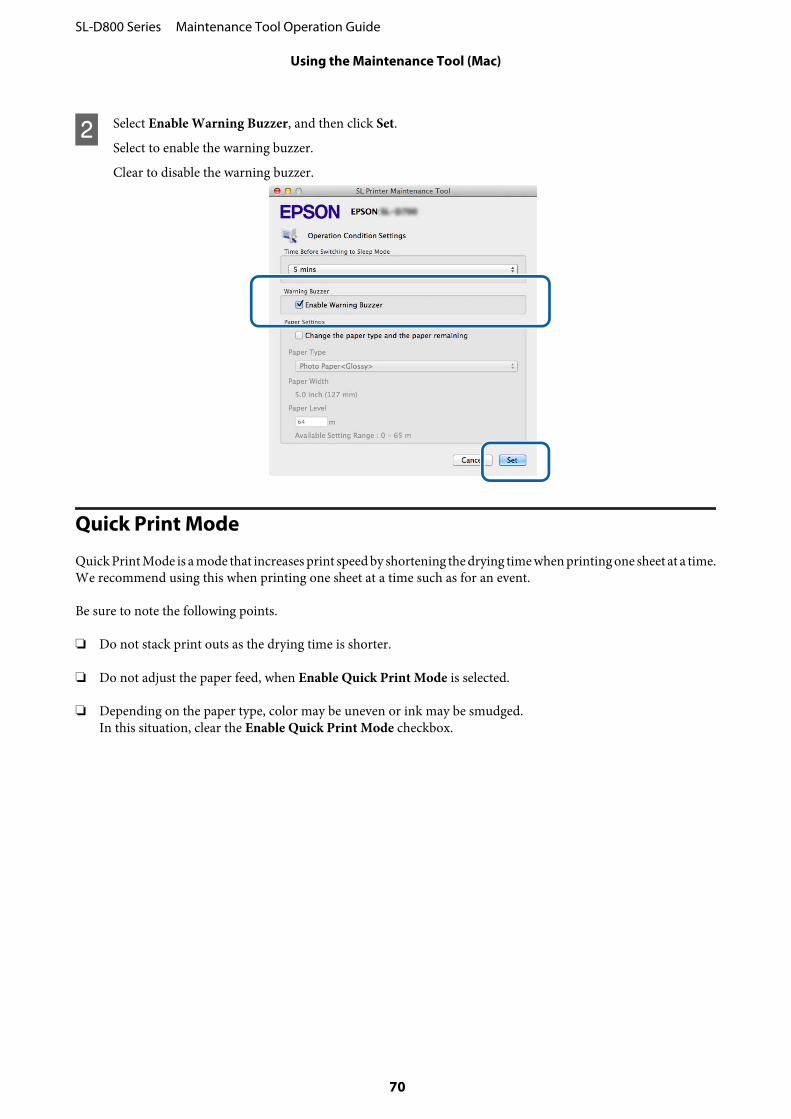
B Select Enable Warning Buzzer, and then click Set.
Select to enable the warning buzzer.
Clear to disable the warning buzzer.
Quick Print Mode
Quick Print Mode is a mode that increases print speed by shortening the drying time when printing one sheet at a time.We recommend using this when printing one sheet at a time such as for an event.
Be sure to note the following points.
❏ Do not stack print outs as the drying time is shorter.
❏ Do not adjust the paper feed, when Enable Quick Print Mode is selected.
❏ Depending on the paper type, color may be uneven or ink may be smudged.In this situation, clear the Enable Quick Print Mode checkbox.
SL-D800 Series Maintenance Tool Operation Guide
Using the Maintenance Tool (Mac)
70
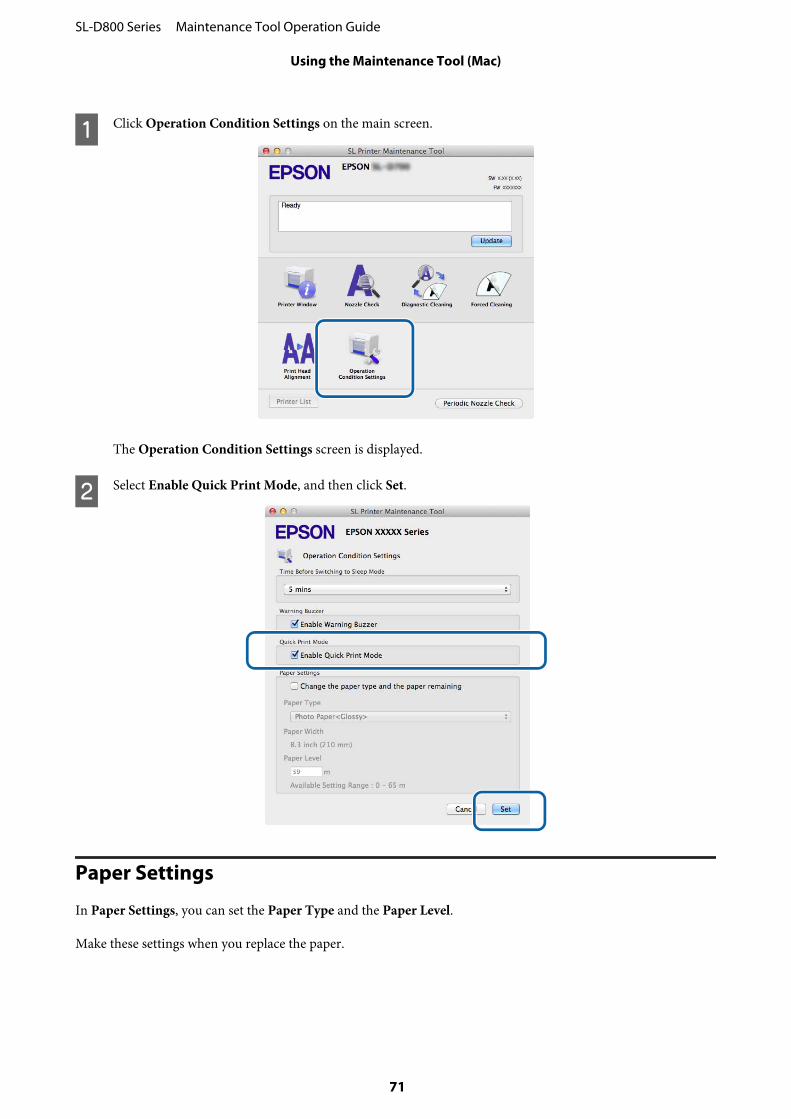
A Click Operation Condition Settings on the main screen.
The Operation Condition Settings screen is displayed.
B Select Enable Quick Print Mode, and then click Set.
Paper Settings
In Paper Settings, you can set the Paper Type and the Paper Level.
Make these settings when you replace the paper.
SL-D800 Series Maintenance Tool Operation Guide
Using the Maintenance Tool (Mac)
71
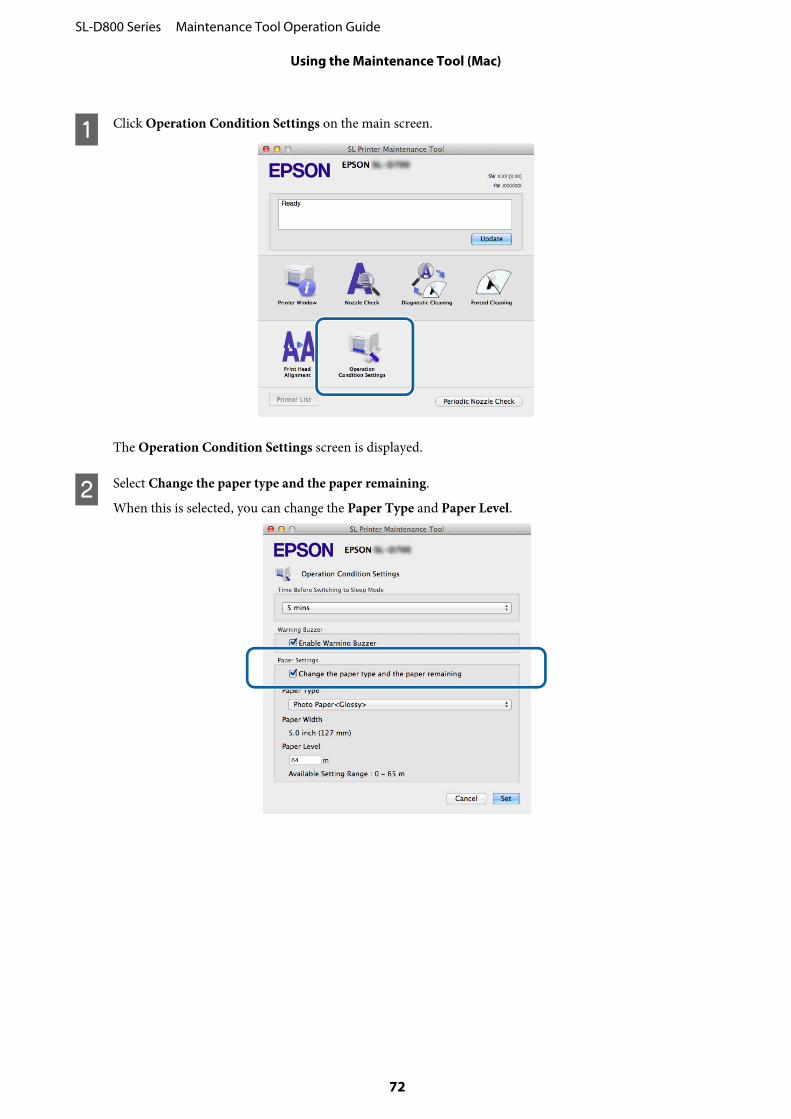
A Click Operation Condition Settings on the main screen.
The Operation Condition Settings screen is displayed.
B Select Change the paper type and the paper remaining.
When this is selected, you can change the Paper Type and Paper Level.
SL-D800 Series Maintenance Tool Operation Guide
Using the Maintenance Tool (Mac)
72
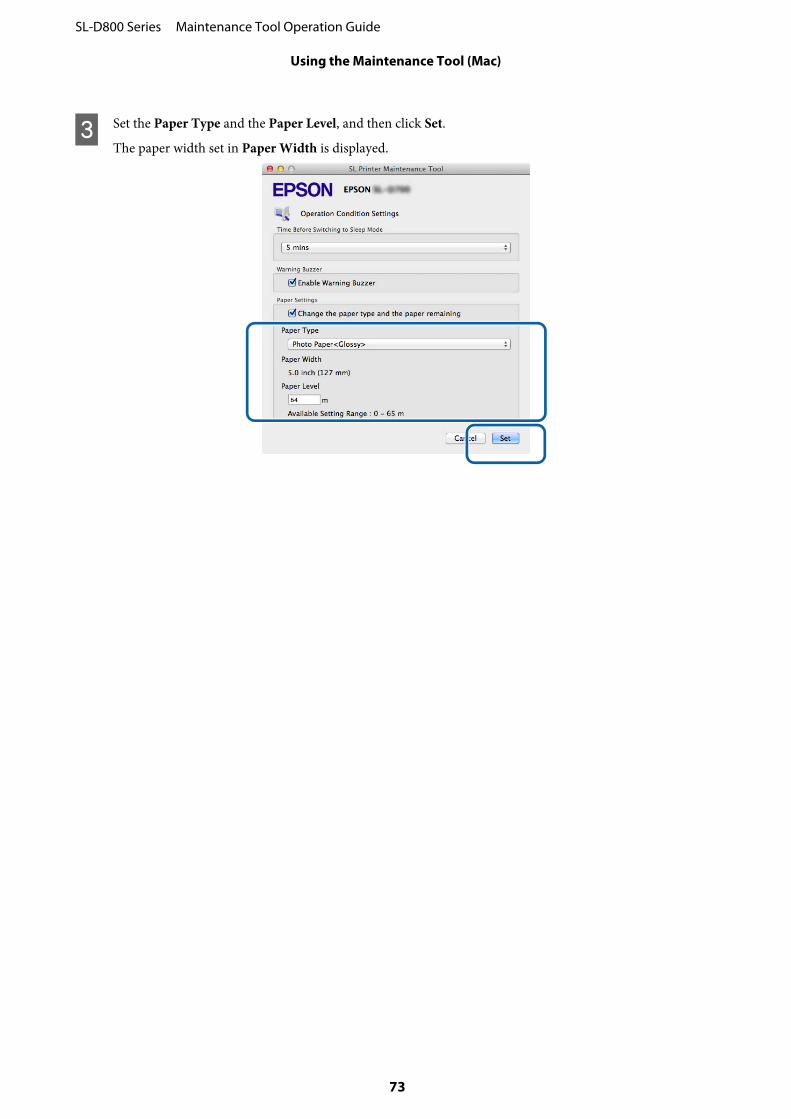
C Set the Paper Type and the Paper Level, and then click Set.
The paper width set in Paper Width is displayed.
SL-D800 Series Maintenance Tool Operation Guide
Using the Maintenance Tool (Mac)
73
Periodic Nozzle Check
Set whether or not to automatically perform a Nozzle Check.
This should normally be enabled. Only disable this function if you are instructed to do so by a service engineer. If this isdisabled, it is necessary to check the clogging status manually.
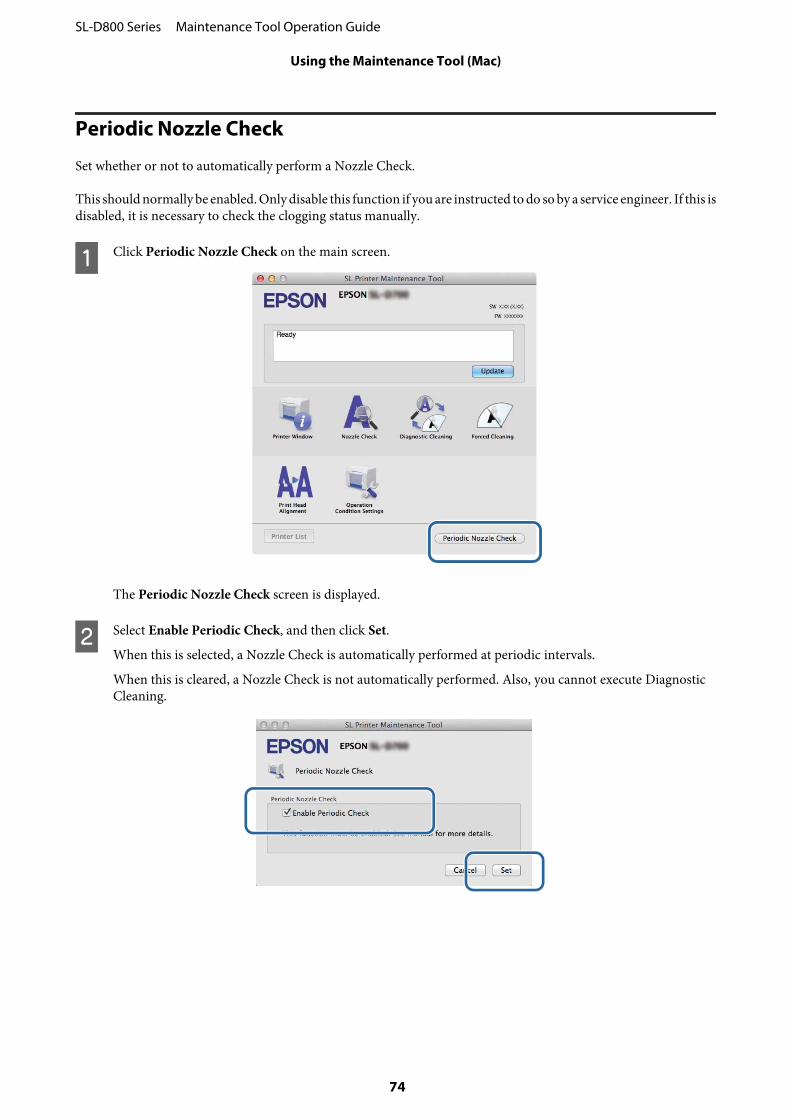
A Click Periodic Nozzle Check on the main screen.
The Periodic Nozzle Check screen is displayed.
B Select Enable Periodic Check, and then click Set.
When this is selected, a Nozzle Check is automatically performed at periodic intervals.
When this is cleared, a Nozzle Check is not automatically performed. Also, you cannot execute DiagnosticCleaning.
SL-D800 Series Maintenance Tool Operation Guide
Using the Maintenance Tool (Mac)
74
Adding a Printer/Updating Paper Information
You need to install the printer driver when performing the following operations.
❏ Adding a printer
❏ Updating paper information (Registering information for a paper type file to the printer)
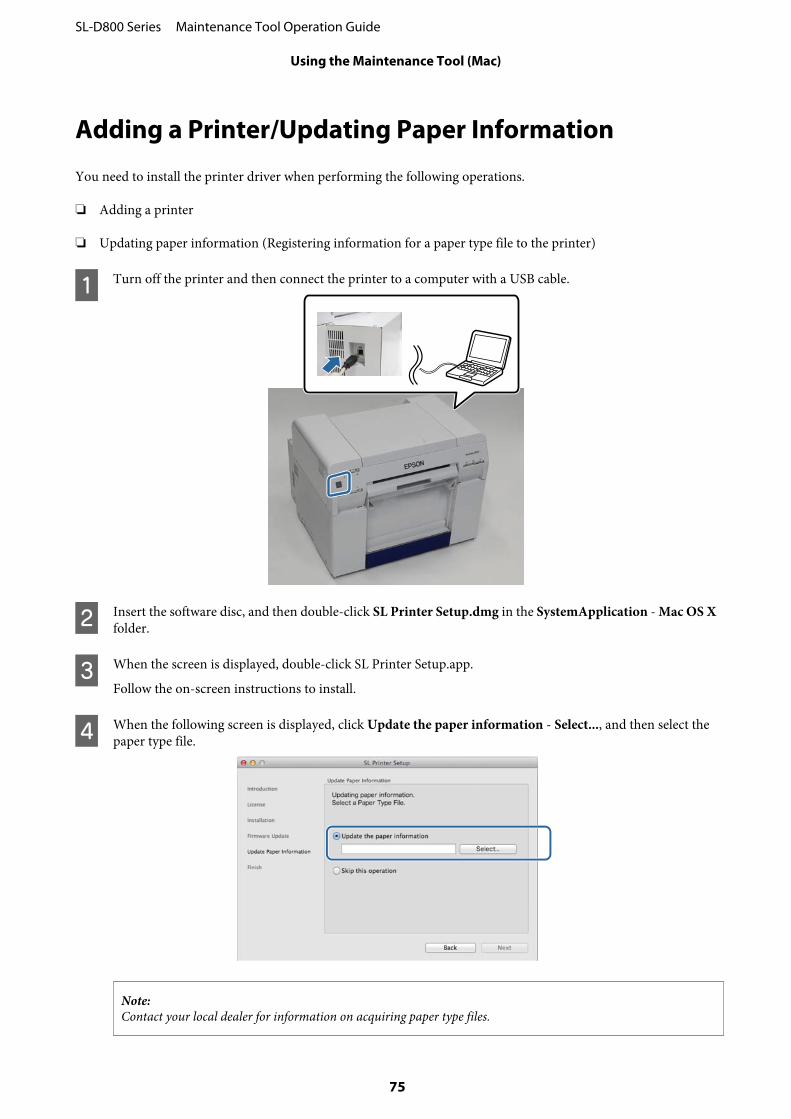
A Turn off the printer and then connect the printer to a computer with a USB cable.
B Insert the software disc, and then double-click SL Printer Setup.dmg in the SystemApplication - Mac OS Xfolder.
C When the screen is displayed, double-click SL Printer Setup.app.
Follow the on-screen instructions to install.
D When the following screen is displayed, click Update the paper information - Select..., and then select thepaper type file.
Note:Contact your local dealer for information on acquiring paper type files.
SL-D800 Series Maintenance Tool Operation Guide
Using the Maintenance Tool (Mac)
75
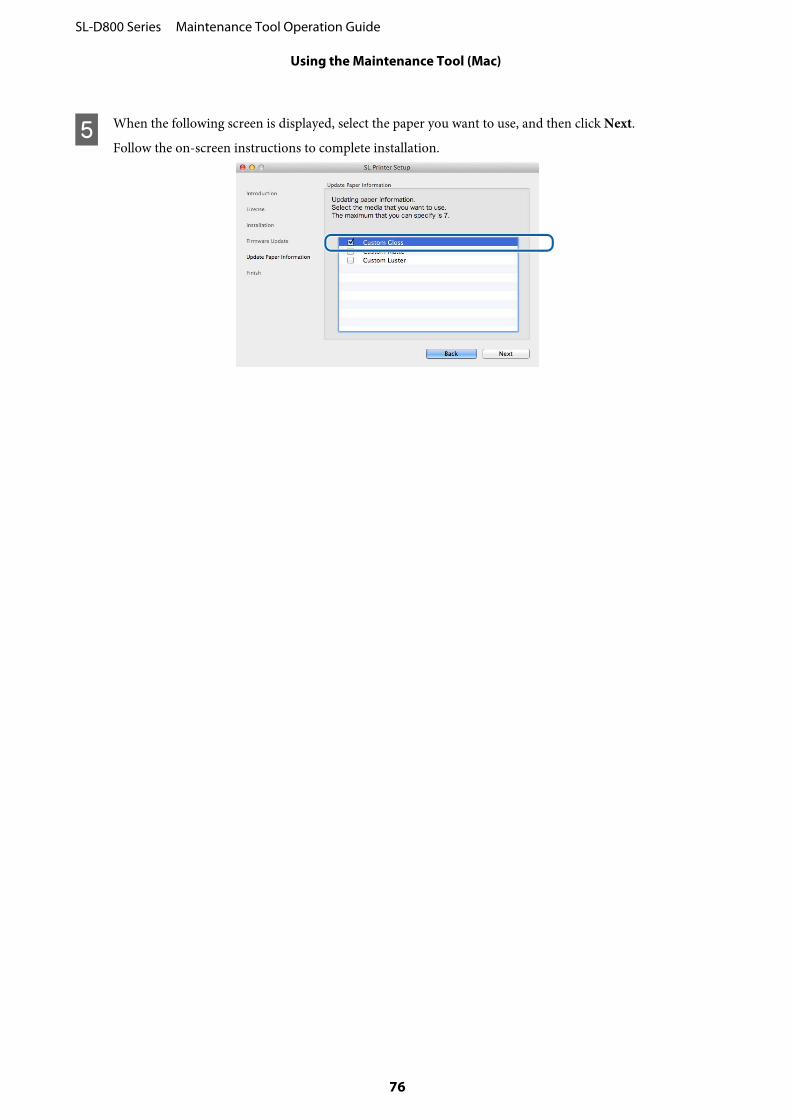
E When the following screen is displayed, select the paper you want to use, and then click Next.
Follow the on-screen instructions to complete installation.
SL-D800 Series Maintenance Tool Operation Guide
Using the Maintenance Tool (Mac)
76
Troubleshooting
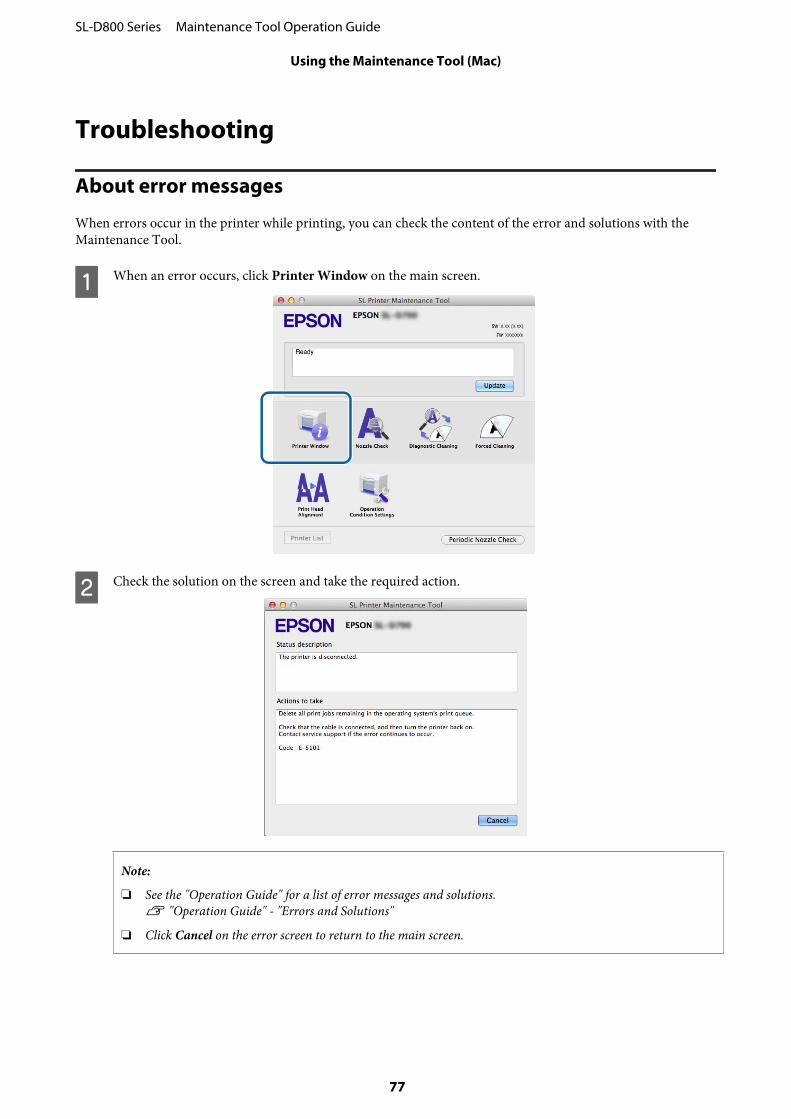
About error messages
When errors occur in the printer while printing, you can check the content of the error and solutions with theMaintenance Tool.
A When an error occurs, click Printer Window on the main screen.
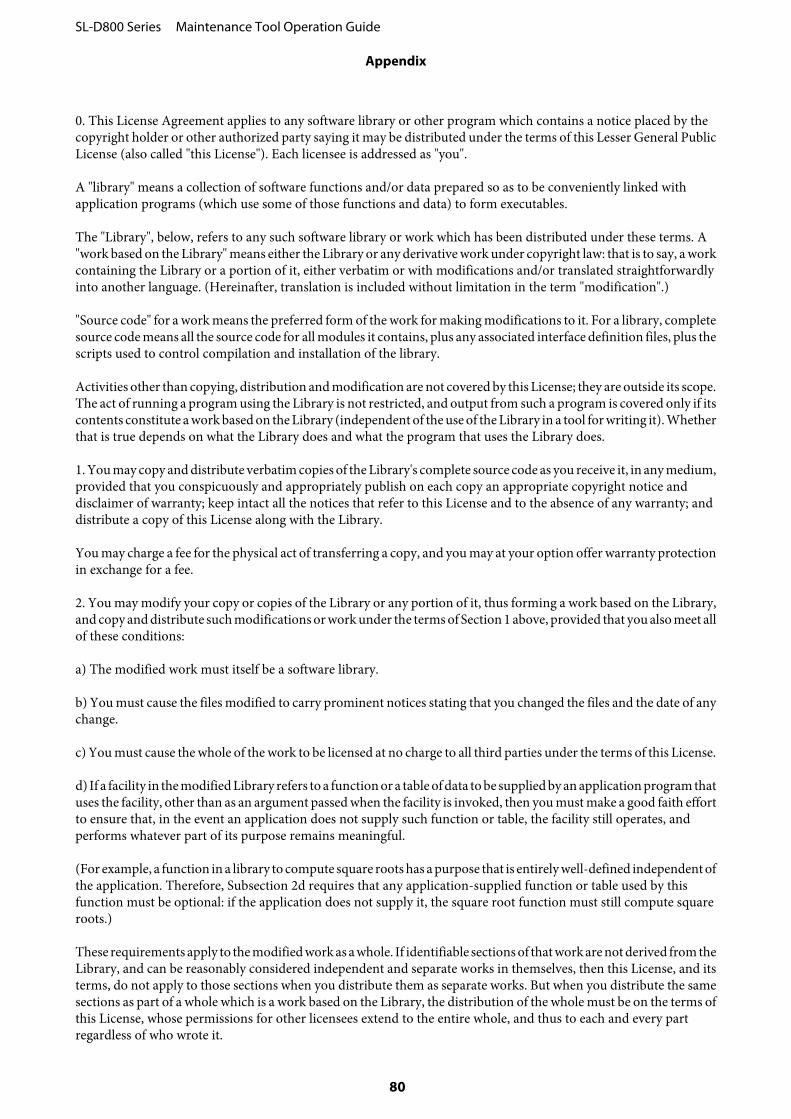
B Check the solution on the screen and take the required action.
Note:
❏ See the "Operation Guide" for a list of error messages and solutions.U "Operation Guide" - "Errors and Solutions"
❏ Click Cancel on the error screen to return to the main screen.
SL-D800 Series Maintenance Tool Operation Guide
Using the Maintenance Tool (Mac)
77

Appendix
OPEN SOURCE SOFTWARE LICENSE TERMS
GNU LGPLThis printer product includes the open source software programs which apply the GNU Lesser General Public LicenseVersion 2 or later version ("LGPL Programs").We provide the source code of the LGPL Programs until seven (7) years after the discontinuation of same model of thisprinter product. If you desire to receive the source code of the LGPL Programs, please see the “Contacting CustomerSupport” in Appendix or Printing Guide of this User's Guide, and contact the customer support of your region.
These LGPL Programs are WITHOUT ANY WARRANTY; without even the implied warranty ofMERCHANTABILITY AND FITNESS FOR A PARTICULAR PURPOSE. See the GNU General Public License formore details.
The list of LGPL Programs is as follows and the names of author are described in the source code of the LGPLPrograms.
LGPL Programs7za.exe 9.14
The GNU Lesser General Public License Version 2 is as follows. You also can see the GNU Lesser General PublicLicense Version 2 at http://www.gnu.org/licenses/.
GNU LESSER GENERAL PUBLIC LICENSEVersion 2.1, February 1999
Copyright (C) 1991, 1999 Free Software Foundation, Inc.51 Franklin Street, Fifth Floor, Boston, MA 02110-1301 USAEveryone is permitted to copy and distribute verbatim copies of this license document, but changing it is not allowed.
[This is the first released version of the Lesser GPL. It also counts as the successor of the GNU Library Public License,version 2, hence the version number 2.1.]
Preamble
The licenses for most software are designed to take away your freedom to share and change it. By contrast, the GNUGeneral Public Licenses are intended to guarantee your freedom to share and change free software--to make sure thesoftware is free for all its users.
This license, the Lesser General Public License, applies to some specially designated software packages--typicallylibraries--of the Free Software Foundation and other authors who decide to use it. You can use it too, but we suggestyou first think carefully about whether this license or the ordinary General Public License is the better strategy to use inany particular case, based on the explanations below.
When we speak of free software, we are referring to freedom of use, not price. Our General Public Licenses are designedto make sure that you have the freedom to distribute copies of free software (and charge for this service if you wish);that you receive source code or can get it if you want it; that you can change the software and use pieces of it in new freeprograms; and that you are informed that you can do these things.
SL-D800 Series Maintenance Tool Operation Guide
Appendix
78

To protect your rights, we need to make restrictions that forbid distributors to deny you these rights or to ask you tosurrender these rights. These restrictions translate to certain responsibilities for you if you distribute copies of thelibrary or if you modify it.
For example, if you distribute copies of the library, whether gratis or for a fee, you must give the recipients all the rightsthat we gave you. You must make sure that they, too, receive or can get the source code. If you link other code with thelibrary, you must provide complete object files to the recipients, so that they can relink them with the library aftermaking changes to the library and recompiling it. And you must show them these terms so they know their rights.
We protect your rights with a two-step method: (1) we copyright the library, and (2) we offer you this license, whichgives you legal permission to copy, distribute and/or modify the library.
To protect each distributor, we want to make it very clear that there is no warranty for the free library. Also, if thelibrary is modified by someone else and passed on, the recipients should know that what they have is not the originalversion, so that the original author's reputation will not be affected by problems that might be introduced by others.
Finally, software patents pose a constant threat to the existence of any free program. We wish to make sure that acompany cannot effectively restrict the users of a free program by obtaining a restrictive license from a patent holder.Therefore, we insist that any patent license obtained for a version of the library must be consistent with the full freedomof use specified in this license.
Most GNU software, including some libraries, is covered by the ordinary GNU General Public License. This license,the GNU Lesser General Public License, applies to certain designated libraries, and is quite different from the ordinaryGeneral Public License. We use this license for certain libraries in order to permit linking those libraries into non-freeprograms.
When a program is linked with a library, whether statically or using a shared library, the combination of the two islegally speaking a combined work, a derivative of the original library. The ordinary General Public License thereforepermits such linking only if the entire combination fits its criteria of freedom. The Lesser General Public Licensepermits more lax criteria for linking other code with the library.
We call this license the "Lesser" General Public License because it does Less to protect the user's freedom than theordinary General Public License. It also provides other free software developers Less of an advantage over competingnon-free programs. These disadvantages are the reason we use the ordinary General Public License for many libraries.However, the Lesser license provides advantages in certain special circumstances.
For example, on rare occasions, there may be a special need to encourage the widest possible use of a certain library, sothat it becomes a de-facto standard. To achieve this, non-free programs must be allowed to use the library. A morefrequent case is that a free library does the same job as widely used non-free libraries. In this case, there is little to gain bylimiting the free library to free software only, so we use the Lesser General Public License.
In other cases, permission to use a particular library in non-free programs enables a greater number of people to use alarge body of free software. For example, permission to use the GNU C Library in non-free programs enables manymore people to use the whole GNU operating system, as well as its variant, the GNU/Linux operating system.
Although the Lesser General Public License is Less protective of the users' freedom, it does ensure that the user of aprogram that is linked with the Library has the freedom and the wherewithal to run that program using a modifiedversion of the Library.
The precise terms and conditions for copying, distribution and modification follow. Pay close attention to thedifference between a "work based on the library" and a "work that uses the library". The former contains code derivedfrom the library, whereas the latter must be combined with the library in order to run.
GNU LESSER GENERAL PUBLIC LICENSE
TERMS AND CONDITIONS FOR COPYING, DISTRIBUTION AND MODIFICATION
SL-D800 Series Maintenance Tool Operation Guide
Appendix
79
0. This License Agreement applies to any software library or other program which contains a notice placed by thecopyright holder or other authorized party saying it may be distributed under the terms of this Lesser General PublicLicense (also called "this License"). Each licensee is addressed as "you".
A "library" means a collection of software functions and/or data prepared so as to be conveniently linked withapplication programs (which use some of those functions and data) to form executables.
The "Library", below, refers to any such software library or work which has been distributed under these terms. A"work based on the Library" means either the Library or any derivative work under copyright law: that is to say, a workcontaining the Library or a portion of it, either verbatim or with modifications and/or translated straightforwardlyinto another language. (Hereinafter, translation is included without limitation in the term "modification".)
"Source code" for a work means the preferred form of the work for making modifications to it. For a library, completesource code means all the source code for all modules it contains, plus any associated interface definition files, plus thescripts used to control compilation and installation of the library.
Activities other than copying, distribution and modification are not covered by this License; they are outside its scope.The act of running a program using the Library is not restricted, and output from such a program is covered only if itscontents constitute a work based on the Library (independent of the use of the Library in a tool for writing it). Whetherthat is true depends on what the Library does and what the program that uses the Library does.
1. You may copy and distribute verbatim copies of the Library's complete source code as you receive it, in any medium,provided that you conspicuously and appropriately publish on each copy an appropriate copyright notice anddisclaimer of warranty; keep intact all the notices that refer to this License and to the absence of any warranty; anddistribute a copy of this License along with the Library.
You may charge a fee for the physical act of transferring a copy, and you may at your option offer warranty protectionin exchange for a fee.
2. You may modify your copy or copies of the Library or any portion of it, thus forming a work based on the Library,and copy and distribute such modifications or work under the terms of Section 1 above, provided that you also meet allof these conditions:
a) The modified work must itself be a software library.
b) You must cause the files modified to carry prominent notices stating that you changed the files and the date of anychange.
c) You must cause the whole of the work to be licensed at no charge to all third parties under the terms of this License.
d) If a facility in the modified Library refers to a function or a table of data to be supplied by an application program thatuses the facility, other than as an argument passed when the facility is invoked, then you must make a good faith effortto ensure that, in the event an application does not supply such function or table, the facility still operates, andperforms whatever part of its purpose remains meaningful.
(For example, a function in a library to compute square roots has a purpose that is entirely well-defined independent ofthe application. Therefore, Subsection 2d requires that any application-supplied function or table used by thisfunction must be optional: if the application does not supply it, the square root function must still compute squareroots.)
These requirements apply to the modified work as a whole. If identifiable sections of that work are not derived from theLibrary, and can be reasonably considered independent and separate works in themselves, then this License, and itsterms, do not apply to those sections when you distribute them as separate works. But when you distribute the samesections as part of a whole which is a work based on the Library, the distribution of the whole must be on the terms ofthis License, whose permissions for other licensees extend to the entire whole, and thus to each and every partregardless of who wrote it.
SL-D800 Series Maintenance Tool Operation Guide
Appendix
80

Thus, it is not the intent of this section to claim rights or contest your rights to work written entirely by you; rather, theintent is to exercise the right to control the distribution of derivative or collective works based on the Library. Inaddition, mere aggregation of another work not based on the Library with the Library (or with a work based on theLibrary) on a volume of a storage or distribution medium does not bring the other work under the scope of thisLicense.
3. You may opt to apply the terms of the ordinary GNU General Public License instead of this License to a given copy ofthe Library. To do this, you must alter all the notices that refer to this License, so that they refer to the ordinary GNUGeneral Public License, version 2, instead of to this License. (If a newer version than version 2 of the ordinary GNUGeneral Public License has appeared, then you can specify that version instead if you wish.) Do not make any otherchange in these notices.
Once this change is made in a given copy, it is irreversible for that copy, so the ordinary GNU General Public Licenseapplies to all subsequent copies and derivative works made from that copy.
This option is useful when you wish to copy part of the code of the Library into a program that is not a library.
4. You may copy and distribute the Library (or a portion or derivative of it, under Section 2) in object code orexecutable form under the terms of Sections 1 and 2 above provided that you accompany it with the completecorresponding machine-readable source code, which must be distributed under the terms of Sections 1 and 2 above ona medium customarily used for software interchange.
If distribution of object code is made by offering access to copy from a designated place, then offering equivalent accessto copy the source code from the same place satisfies the requirement to distribute the source code, even though thirdparties are not compelled to copy the source along with the object code.
5. A program that contains no derivative of any portion of the Library, but is designed to work with the Library by beingcompiled or linked with it, is called a "work that uses the Library". Such a work, in isolation, is not a derivative work ofthe Library, and therefore falls outside the scope of this License.
However, linking a "work that uses the Library" with the Library creates an executable that is a derivative of the Library(because it contains portions of the Library), rather than a "work that uses the library". The executable is thereforecovered by this License. Section 6 states terms for distribution of such executables.
When a "work that uses the Library" uses material from a header file that is part of the Library, the object code for thework may be a derivative work of the Library even though the source code is not.
Whether this is true is especially significant if the work can be linked without the Library, or if the work is itself a library.The threshold for this to be true is not precisely defined by law.
If such an object file uses only numerical parameters, data structure layouts and accessors, and small macros and smallinline functions (ten lines or less in length), then the use of the object file is unrestricted, regardless of whether it islegally a derivative work. (Executables containing this object code plus portions of the Library will still fall underSection 6.)
Otherwise, if the work is a derivative of the Library, you may distribute the object code for the work under the terms ofSection 6. Any executables containing that work also fall under Section 6, whether or not they are linked directly withthe Library itself.
6. As an exception to the Sections above, you may also combine or link a "work that uses the Library" with the Library toproduce a work containing portions of the Library, and distribute that work under terms of your choice, provided thatthe terms permit modification of the work for the customer's own use and reverse engineering for debugging suchmodifications.
SL-D800 Series Maintenance Tool Operation Guide
Appendix
81
You must give prominent notice with each copy of the work that the Library is used in it and that the Library and its useare covered by this License. You must supply a copy of this License. If the work during execution displays copyrightnotices, you must include the copyright notice for the Library among them, as well as a reference directing the user tothe copy of this License. Also, you must do one of these things:
a) Accompany the work with the complete corresponding machine-readable source code for the Library includingwhatever changes were used in the work (which must be distributed under Sections 1 and 2 above); and, if the work isan executable linked with the Library, with the complete machine-readable "work that uses the Library", as object codeand/or source code, so that the user can modify the Library and then relink to produce a modified executablecontaining the modified Library. (It is understood that the user who changes the contents of definitions files in theLibrary will not necessarily be able to recompile the application to use the modified definitions.)
b) Use a suitable shared library mechanism for linking with the Library. A suitable mechanism is one that (1) uses atrun time a copy of the library already present on the user's computer system, rather than copying library functions intothe executable, and (2) will operate properly with a modified version of the library, if the user installs one, as long as themodified version is interface-compatible with the version that the work was made with.
c) Accompany the work with a written offer, valid for at least three years, to give the same user the materials specified inSubsection 6a, above, for a charge no more than the cost of performing this distribution.
d) If distribution of the work is made by offering access to copy from a designated place, offer equivalent access to copythe above specified materials from the same place.
e) Verify that the user has already received a copy of these materials or that you have already sent this user a copy.
For an executable, the required form of the "work that uses the Library" must include any data and utility programsneeded for reproducing the executable from it. However, as a special exception, the materials to be distributed neednot include anything that is normally distributed (in either source or binary form) with the major components(compiler, kernel, and so on) of the operating system on which the executable runs, unless that component itselfaccompanies the executable.
It may happen that this requirement contradicts the license restrictions of other proprietary libraries that do notnormally accompany the operating system. Such a contradiction means you cannot use both them and the Librarytogether in an executable that you distribute.
7. You may place library facilities that are a work based on the Library side-by-side in a single library together withother library facilities not covered by this License, and distribute such a combined library, provided that the separatedistribution of the work based on the Library and of the other library facilities is otherwise permitted, and providedthat you do these two things:
a) Accompany the combined library with a copy of the same work based on the Library, uncombined with any otherlibrary facilities. This must be distributed under the terms of the Sections above.
b) Give prominent notice with the combined library of the fact that part of it is a work based on the Library, andexplaining where to find the accompanying uncombined form of the same work.
8. You may not copy, modify, sublicense, link with, or distribute the Library except as expressly provided under thisLicense. Any attempt otherwise to copy, modify, sublicense, link with, or distribute the Library is void, and willautomatically terminate your rights under this License. However, parties who have received copies, or rights, from youunder this License will not have their licenses terminated so long as such parties remain in full compliance.
9. You are not required to accept this License, since you have not signed it. However, nothing else grants youpermission to modify or distribute the Library or its derivative works. These actions are prohibited by law if you do notaccept this License. Therefore, by modifying or distributing the Library (or any work based on the Library), youindicate your acceptance of this License to do so, and all its terms and conditions for copying, distributing ormodifying the Library or works based on it.
SL-D800 Series Maintenance Tool Operation Guide
Appendix
82
10. Each time you redistribute the Library (or any work based on the Library), the recipient automatically receives alicense from the original licensor to copy, distribute, link with or modify the Library subject to these terms andconditions. You may not impose any further restrictions on the recipients' exercise of the rights granted herein. Youare not responsible for enforcing compliance by third parties with this License.
11. If, as a consequence of a court judgment or allegation of patent infringement or for any other reason (not limited topatent issues), conditions are imposed on you (whether by court order, agreement or otherwise) that contradict theconditions of this License, they do not excuse you from the conditions of this License. If you cannot distribute so as tosatisfy simultaneously your obligations under this License and any other pertinent obligations, then as a consequenceyou may not distribute the Library at all. For example, if a patent license would not permit royalty-free redistribution ofthe Library by all those who receive copies directly or indirectly through you, then the only way you could satisfy both itand this License would be to refrain entirely from distribution of the Library.
If any portion of this section is held invalid or unenforceable under any particular circumstance, the balance of thesection is intended to apply, and the section as a whole is intended to apply in other circumstances.
It is not the purpose of this section to induce you to infringe any patents or other property right claims or to contestvalidity of any such claims; this section has the sole purpose of protecting the integrity of the free software distributionsystem which is implemented by public license practices. Many people have made generous contributions to the widerange of software distributed through that system in reliance on consistent application of that system; it is up to theauthor/donor to decide if he or she is willing to distribute software through any other system and a licensee cannotimpose that choice.
This section is intended to make thoroughly clear what is believed to be a consequence of the rest of this License.
12. If the distribution and/or use of the Library is restricted in certain countries either by patents or by copyrightedinterfaces, the original copyright holder who places the Library under this License may add an explicit geographicaldistribution limitation excluding those countries, so that distribution is permitted only in or among countries not thusexcluded. In such case, this License incorporates the limitation as if written in the body of this License.
13. The Free Software Foundation may publish revised and/or new versions of the Lesser General Public License fromtime to time. Such new versions will be similar in spirit to the present version, but may differ in detail to address newproblems or concerns.
Each version is given a distinguishing version number. If the Library specifies a version number of this License whichapplies to it and "any later version", you have the option of following the terms and conditions either of that version orof any later version published by the Free Software Foundation. If the Library does not specify a license versionnumber, you may choose any version ever published by the Free Software Foundation.
14. If you wish to incorporate parts of the Library into other free programs whose distribution conditions areincompatible with these, write to the author to ask for permission. For software which is copyrighted by the FreeSoftware Foundation, write to the Free Software Foundation; we sometimes make exceptions for this. Our decisionwill be guided by the two goals of preserving the free status of all derivatives of our free software and of promoting thesharing and reuse of software generally.
NO WARRANTY
15. BECAUSE THE LIBRARY IS LICENSED FREE OF CHARGE, THERE IS NO WARRANTY FOR THE LIBRARY,TO THE EXTENT PERMITTED BY APPLICABLE LAW. EXCEPT WHEN OTHERWISE STATED IN WRITINGTHE COPYRIGHT HOLDERS AND/OR OTHER PARTIES PROVIDE THE LIBRARY "AS IS" WITHOUTWARRANTY OF ANY KIND, EITHER EXPRESSED OR IMPLIED, INCLUDING, BUT NOT LIMITED TO, THEIMPLIED WARRANTIES OF MERCHANTABILITY AND FITNESS FOR A PARTICULAR PURPOSE. THEENTIRE RISK AS TO THE QUALITY AND PERFORMANCE OF THE LIBRARY IS WITH YOU. SHOULD THELIBRARY PROVE DEFECTIVE, YOU ASSUME THE COST OF ALL NECESSARY SERVICING, REPAIR ORCORRECTION.
SL-D800 Series Maintenance Tool Operation Guide
Appendix
83
16. IN NO EVENT UNLESS REQUIRED BY APPLICABLE LAW OR AGREED TO IN WRITING WILL ANYCOPYRIGHT HOLDER, OR ANY OTHER PARTY WHO MAY MODIFY AND/OR REDISTRIBUTE THELIBRARY AS PERMITTED ABOVE, BE LIABLE TO YOU FOR DAMAGES, INCLUDING ANY GENERAL,SPECIAL, INCIDENTAL OR CONSEQUENTIAL DAMAGES ARISING OUT OF THE USE OR INABILITY TOUSE THE LIBRARY (INCLUDING BUT NOT LIMITED TO LOSS OF DATA OR DATA BEING RENDEREDINACCURATE OR LOSSES SUSTAINED BY YOU OR THIRD PARTIES OR A FAILURE OF THE LIBRARY TOOPERATE WITH ANY OTHER SOFTWARE), EVEN IF SUCH HOLDER OR OTHER PARTY HAS BEENADVISED OF THE POSSIBILITY OF SUCH DAMAGES.
END OF TERMS AND CONDITIONS
How to Apply These Terms to Your New Libraries
If you develop a new library, and you want it to be of the greatest possible use to the public, we recommend making itfree software that everyone can redistribute and change. You can do so by permitting redistribution under these terms(or, alternatively, under the terms of the ordinary General Public License).
To apply these terms, attach the following notices to the library. It is safest to attach them to the start of each source fileto most effectively convey the exclusion of warranty; and each file should have at least the "copyright" line and a pointerto where the full notice is found.
<one line to give the library's name and a brief idea of what it does.>Copyright (C) <year> <name of author>This library is free software; you can redistribute it and/or modify it under the terms of the GNU Lesser General PublicLicense as published by the Free Software Foundation; either version 2.1 of the License, or (at your option) any laterversion.
This library is distributed in the hope that it will be useful, but WITHOUT ANY WARRANTY; without even theimplied warranty of MERCHANTABILITY or FITNESS FOR A PARTICULAR PURPOSE. See the GNU LesserGeneral Public License for more details.
You should have received a copy of the GNU Lesser General Public License along with this library; if not, write to theFree Software
Foundation, Inc., 51 Franklin Street, Fifth Floor, Boston, MA 02110-1301 USA
Also add information on how to contact you by electronic and paper mail.You should also get your employer (if you work as a programmer) or your school, if any, to sign a "copyrightdisclaimer" for the library, if necessary. Here is a sample; alter the names:
Yoyodyne, Inc., hereby disclaims all copyright interest in the library `Frob' (a library for tweaking knobs) written byJames Random Hacker.
<signature of Ty Coon>, 1 April 1990Ty Coon, President of Vice
That's all there is to it!
7-Zip Command line version~~~~~~~~~~~~~~~~~~~~~~~~~~License for use and distribution~~~~~~~~~~~~~~~~~~~~~~~~~~~~~~~~7-Zip Copyright (C) 1999-2010 Igor Pavlov.
7za.exe is distributed under the GNU LGPL license
SL-D800 Series Maintenance Tool Operation Guide
Appendix
84

Notes:You can use 7-Zip on any computer, including a computer in a commercial organization. You don't need to register orpay for 7-Zip.
GNU LGPL information--------------------This library is free software; you can redistribute it and/or modify it under the terms of the GNU Lesser General PublicLicense as published by the Free Software Foundation; either version 2.1 of the License, or (at your option) any laterversion.
This library is distributed in the hope that it will be useful, but WITHOUT ANY WARRANTY; without even theimplied warranty of MERCHANTABILITY or FITNESS FOR A PARTICULAR PURPOSE. See the GNU LesserGeneral Public License for more details.
You can receive a copy of the GNU Lesser General Public License from http://www.gnu.org/
SL-D800 Series Maintenance Tool Operation Guide
Appendix
85
EPSON END USER SOFTWARE LICENSE AGREEMENT
NOTICE TO USER: PLEASE READ THIS AGREEMENT CAREFULLY BEFORE INSTALLING OR USING THISPRODUCT. IF YOU ARE LOCATED IN THE UNITED STATES, SECTIONS 19-23 OF THIS DOCUMENT APPLYTO YOU. SECTION 22 CONTAINS A BINDING ARBITRATION PROVISION THAT LIMITS YOUR ABILITYTO SEEK RELIEF IN A COURT BEFORE A JUDGE OR JURY, AND WAIVES YOUR RIGHT TO PARTICIPATE INCLASS ACTIONS OR CLASS ARBITRATIONS FOR CERTAIN DISPUTES. AN “OPT-OUT” IS AVAILABLEUNDER SECTION 22.7 FOR THOSE WHO WISH TO BE EXCLUDED FROM THE ARBITRATION AND CLASSWAIVER.
This is a legal agreement (“Agreement”) between you (an individual or entity, referred to hereinafter as “you”) andSeiko Epson Corporation (including its affiliates, “Epson”) for the enclosed software programs, including any relateddocumentation, firmware, or updates (collectively referred to hereinafter as the “Software”). The Software is providedby Epson and its suppliers for use only with the corresponding Epson brand computer peripheral product (the “EpsonHardware”). BEFORE INSTALLING, COPYING OR OTHERWISE USING THE SOFTWARE, YOU NEED TOREVIEW AND AGREE TO THE TERMS AND CONDITIONS OF THIS AGREEMENT INCLUDING THE EPSONPRIVACY POLICY stated in Section 17. If you agree, click on the Agree (“ACCEPT”, “OK” or any similarrepresentation of agreement) button below. If you do not agree with the terms and conditions of this Agreement, clickon the Disagree (“EXIT”, “Cancel” or any similar representation of disagreement) button and return the Software,along with the packaging and related materials, to Epson or the place of purchase for a full refund.
1. Grant of License. Epson grants you a limited, nonexclusive license to (i) download, install and use the Software foryour personal and internal business use on hard disks or other computer storage devices, or in the case of a softwareapplication (also referred to as “Software”), on the smartphone, tablet, or other mobile device (collectively, “Device”),provided that the Software is used (i) only in a single location (e.g., a home or office or place of business), or in the caseof a mobile device, on a Device owned or otherwise controlled by you, and (ii) only in connection with EpsonHardware owned by you. You may allow other users of the Epson Hardware connected to your network to use theSoftware, provided that you shall ensure that such users use the Software only in accordance with this Agreement. Youagree to be responsible for and indemnify Epson for liabilities incurred as a consequence of use by such users. You maymake backup copies of the Software, as necessary, provided the backup is only used to support your use of the EpsonHardware.
2. Upgrades and Updates. If you acquire an upgrade, updated version, modified version, or additions to or for theSoftware from Epson, the upgrade, updated version, modified version, or addition, shall be included in the definedterm Software and governed by this Agreement. You acknowledge that Epson has no obligation to provide you withany Updates (as defined below in this Section 2) to the Software. Epson may, however, from time to time, issue updatedversions of the Software and the Software may automatically connect to Epson or third-party servers via the Internet tocheck for available updates to the Software, such as bug fixes, patches, upgrades, additional or enhanced functions,plug-ins and new versions (collectively, “Updates”) and may either (a) automatically electronically update the versionof the Software that you are using on your personal device or (b) give you the option of manually downloadingapplicable Updates. If you installed the EPSON Software Updater and do not wish to allow Epson to check for availableupdates to the Software, you may disable this feature by uninstalling EPSON Software Updater. By installing theSoftware and not disabling any automated check for Updates, if applicable, you hereby agree and consent toautomatically request and receive Updates from Epson or third-party servers, and that the terms and conditions of thisAgreement shall apply to all of these Updates.
SL-D800 Series Maintenance Tool Operation Guide
Appendix
86
3. Other Rights and Limitations. You agree not to modify, adapt or translate the Software and further agree not toattempt to reverse engineer, decompile, disassemble or otherwise attempt to discover the source code of the Software.You may not rent, lease, distribute, lend the Software to third parties or incorporate the Software into a revenuegenerating product or service. You may, however, transfer all of your rights to use the Software to another person orlegal entity, provided that the recipient also agrees to the terms of this Agreement and you transfer the Software,including all copies, updates and prior versions, and the Epson Hardware, to such person or entity. The Software islicensed as a single unit, and its component programs may not be separated for some other use. Further, you agree notto place the Software onto or into a shared environment accessible via a public network such as the Internet orotherwise accessible by others outside the single location referred to in Section 1 above.
4. Ownership. Title, ownership rights, and intellectual property rights in and to the Software shall remain with Epsonor its licensors and suppliers. The Software is protected by United States Copyright Law, copyright laws of Japan andinternational copyright treaties, as well as other intellectual property laws and treaties. There is no transfer to you ofany title to or ownership of the Software and this License shall not be construed as a sale of any rights in the Software.You agree not to remove or alter any copyright, trademark, registered mark and other proprietary notices on anycopies of the Software. Epson and/or its licensors and suppliers reserve all rights not granted. The Software may alsocontain images, illustrations, designs and photos (“Materials”), and the copyright of such material belongs to Epsonand/or its licensors and suppliers, protected by national and/or international intellectual property laws, conventionsand treaties. For clarity, (1) the Materials shall be used for non-commercial purposes only, (2) the Materials shall beedited, adjusted and copied only in the manner designated by the Software, and (3) you may use the Materials only forlawful personal use, home use or as otherwise legally permitted.
5. Open Source and Other Third-Party Components. Notwithstanding the foregoing license grant, you acknowledgethat certain components of the Software may be covered by third-party licenses, including so-called “open source”software licenses, which means any software licenses approved as open source licenses by the Open Source Initiative orany substantially similar licenses, including without limitation any license that, as a condition of distribution of thesoftware licensed under such license, requires that the distributor make the software available in source code format(such third-party components, “Third-Party Components”). A list of Third-Party Components, and associatedlicense terms (as required), for particular versions of the Software is indicated at the end of this Agreement, relevantuser manual/CD, or the license information displayed on your Device/in Software. To the extent required by thelicenses covering Third-Party Components, the terms of such licenses will apply in lieu of the terms of this Agreement.To the extent the terms of the licenses applicable to Third-Party Components prohibit any of the restrictions in thisAgreement with respect to such Third-Party Components, such restrictions will not apply to such Third-PartyComponent.
6. Multiple Versions of Software. You may receive or obtain the Software in more than one version (e.g. for differentoperating environments; two or more language translation versions; downloaded from an Epson server or on aCD-ROM), however, regardless of the type or number of copies you receive, you still may use only the media or versionappropriate for the license granted in Section 1 above.
SL-D800 Series Maintenance Tool Operation Guide
Appendix
87
7. Disclaimer of Warranty and Remedy. If you obtained the Software by media from Epson or a dealer, Epson warrantsthat the media on which the Software is recorded will be free from defects in workmanship and materials under normaluse for a period of 90 days from the date of delivery to you. If the media is returned to Epson or the dealer from whichthe media was obtained within 90 days of the date of delivery to you, and if Epson determines the media to be defectiveand provided the media was not subject to misuse, abuse, misapplication or use in defective equipment, Epson willreplace the media, upon your return to Epson of the Software, including all copies of any portions thereof. Youacknowledge and agree that the use of the Software is at your sole risk. THE SOFTWARE IS PROVIDED "AS IS" ANDWITHOUT ANY WARRANTY OF ANY KIND. EPSON AND ITS SUPPLIERS DO NOT AND CANNOTWARRANT THE PERFORMANCE OR RESULTS YOU MAY OBTAIN BY USING THE SOFTWARE. Epson doesnot warrant that the operation of the Software will be uninterrupted, error free, free from viruses or other harmfulcomponents or vulnerabilities, or that the functions of the Software will meet your needs or requirements. Epson’s soleand exclusive liability and your exclusive remedy for breach of warranty shall be limited to either, at Epson’s option,the replacement of the media for the Software or to refund your money upon returning the Software and EpsonHardware. Any replacement Software will be warranted for the remainder of the original warranty period or thirty(30) days, whichever is longer. If the above remedy fails for any reason, Epson’s entire liability for a breach of warrantyshall be limited to a refund of the price paid for the Epson Hardware. Epson is not liable for performance delays or fornonperformance due to causes beyond its reasonable control. This Limited Warranty is void if failure of the Softwareresulted from accident, abuse, or misapplication. THE STATED LIMITED WARRANTIES AND REMEDY AREEXCLUSIVE AND IN LIEU OF ALL OTHERS. EPSON DISCLAIMS ALL OTHER WARRANTIES, EITHEREXPRESS OR IMPLIED, INCLUDING WITHOUT LIMITATION, ALL WARRANTIES OFNON-INFRINGEMENT, MERCHANTABILITY, AND FITNESS FOR A PARTICULAR PURPOSE. SOMESTATES OR JURISDICTIONS, HOWEVER, DO NOT ALLOW EXCLUSIONS OR LIMITATIONS OF IMPLIEDWARRANTIES, AND IN SUCH STATES, THE ABOVE LIMITATION MAY NOT APPLY TO YOU.
8. Limitation of Liability. TO THE MAXIMUM EXTENT PERMITTED BY APPLICABLE LAW, IN NO EVENTWILL EPSON OR ITS SUPPLIERS BE LIABLE FOR ANY DAMAGES, WHATSOEVER, WHETHER DIRECT,INDIRECT, SPECIAL, INCIDENTAL, OR CONSEQUENTIAL DAMAGES, WHETHER ARISING UNDERCONTRACT, TORT (INCLUDING NEGLIGENCE), STRICT LIABILITY, BREACH OF WARRANTY,MISREPRESENTATION, OR OTHERWISE, INCLUDING WITHOUT LIMITATION, DAMAGES FOR LOSS OFBUSINESS PROFITS, BUSINESS INTERRUPTION, LOSS OF BUSINESS INFORMATION, OR OTHERPECUNIARY LOSS, ARISING OUT OF THE USE OF OR INABILITY TO USE THE SOFTWARE, OR ARISINGOUT OF THIS AGREEMENT, EVEN IF EPSON OR ITS REPRESENTATIVE HAS BEEN ADVISED OF THEPOSSIBILITY OF SUCH DAMAGES. SOME STATES DO NOT ALLOW THE EXCLUSION OR LIMITATION OFDAMAGES IN CERTAIN TRANSACTIONS, AND IN SUCH STATES, THE ABOVE LIMITATIONS ANDEXCLUSIONS MAY NOT APPLY.
9. U.S. Government Acquisition of the Software. This Section applies to all acquisitions of the Software by or for theU.S. Government (“Government”), or by any prime contractor or subcontractor (at any tier) under any contract,grant, cooperative agreement, “other transaction” (“OT”), or other activity with the Government. By acceptingdelivery of the Software, the Government, any prime contractor, and any subcontractor agree that the Softwarequalifies as “commercial” computer software within the meaning of FAR Part 12, paragraph (b) of FAR Subpart27.405, or DFARS Subpart 227.7202, as applicable, and that no other regulation, or FAR or DFARS data rights clause,applies to the delivery of this Software to the Government. Accordingly, the terms and conditions of this Agreementgovern the Government’s (and the prime contractor and subcontractor’s) use and disclosure of the Software, andsupersede any conflicting terms and conditions of the contract, grant, cooperative agreement, OT, or other activitypursuant to which the Software is delivered to the Government. If this Software fails to meet the Government’s needs,if this Agreement is inconsistent in any respect with Federal law, or if the above cited FAR and DFARS provisions donot govern, the Government agrees to return the Software, unused, to Epson.
SL-D800 Series Maintenance Tool Operation Guide
Appendix
88
10. Export Restriction. You agree that the Software will not be shipped, transferred or exported into any country orused in any manner prohibited by the United States Export Administration Act or any other export laws, restrictionsor regulations.
11. Entire Agreement. This Agreement is the entire agreement between the parties related to the Software andsupersedes any purchase order, communication, advertisement, or representation concerning the Software.
12. Binding Agreement; Assignees. This Agreement shall be binding upon, and inure to the benefit of, the partieshereto and their respective successors, assigns and legal representatives.
13. Severability; Modifications. If any provision herein is found void or unenforceable by a court of competentjurisdiction (subject to Section 22.8 and 22.9 if you are a located in the U.S.), it will not affect the validity of the balanceof the Agreement, which shall remain valid and enforceable according to its terms. This Agreement may only bemodified in writing signed by an authorized representative of Epson.
14. Indemnification. You agree that you will indemnify and hold harmless, and upon Epson’s request, defend Epsonand its directors, officers, shareholders, employees and agents from and against any and all losses, liabilities, damages,costs, expenses (including reasonable attorneys’ fees), actions, suits, and claims arising from (i) any breach of any ofyour obligations in this Agreement or (ii) any use of the Software or the Epson Hardware. If Epson asks you to defendany such action, suit or claim, Epson will have the right, at its own expense, to participate in the defense thereof withcounsel of its choice. You will not settle any third-party claims for which Epson is entitled to indemnification withoutthe prior written approval of Epson.
15. Termination. Without prejudice to any other rights Epson has, your license rights under Section 1 above and yourwarranty rights under Section 7 above, shall automatically terminate upon failure by you to comply with thisAgreement. Upon termination of such rights, you agree that the Software, and all copies thereof, will be immediatelydestroyed.
16. Capacity and Authority to Contract. You represent that you are of the legal age of majority in your state orjurisdiction of residence and have all necessary authority to enter into this Agreement, including, if applicable, dueauthorization by your employer to enter into this Agreement.
SL-D800 Series Maintenance Tool Operation Guide
Appendix
89
17. Privacy, Information Processing. The Software may have the ability to connect over the Internet to transmit data toand from your Device. For example, if you install the Software, the Software may cause your Device to sendinformation about your Epson Hardware such as model and serial number, country identifier, language code,operating system information, and Epson Hardware usage information to an Epson Internet site which may returnpromotional or service information to your Device for display. Any processing of information provided through theSoftware, shall be according to applicable data protection laws and the Epson Privacy Policy located at https://global.epson.com/privacy/area_select_confirm_eula.html. To the extent permitted by applicable laws, by agreeing tothe terms of this Agreement and by installing the Software, you consent to the processing and storage of yourinformation in and/or outside your country of residence. If there is a specific privacy policy incorporated into theSoftware and/or displayed when you use the Software (for example, in the case of certain software applicationsoftware), such specific privacy policy shall prevail over the Epson Privacy Policy stated above.
18. Third Party Websites. You may, through hypertext or other computer links from the Software, gain access towebsites and use certain services that are not under the control of or operated by Epson, but rather are controlled bythird parties. You acknowledge and agree that Epson is not responsible for such third party sites or services, includingtheir accuracy, completeness, timeliness, validity, copyright compliance, legality, decency, quality, or any other aspectthereof. These third party websites/services are subject to different terms and conditions and when you access and usethird party websites/services, you will be legally bound by the terms and conditions of those websites/services. If thereis a conflict between this Agreement and terms and conditions of third party websites/services, the third partywebsites’/services’ terms and conditions will govern with respect to your access and use of those websites/services.Although Epson may provide a link to a third party website/service from the Software, such a link is not anauthorization, endorsement, sponsorship or affiliation by Epson with respect to such website/services, its content, itsowners or its providers. Epson provides such links for your reference and convenience only. Accordingly, Epsonmakes no representations whatsoever concerning such websites/services and does not provide any support related tosuch third party sites or services. Epson has not tested any information, products or software found on such websites/services and therefore cannot make any representations whatsoever with respect thereto. You agree that Epson is notresponsible for the content or operation of such websites/services, and it is up to you to take precautions to ensure thatwhatever you select is free of items such as viruses, worms, Trojan horses and other items of a destructive nature. Youare solely responsible for determining the extent to which you may use any content at any other websites/services towhich you link from this Software.
(IF YOU ARE LOCATED IN THE UNITED STATES, THE FOLLOWING SECTIONS 19 - 23 APPLY TO YOU)
19. Ink Purchases. For certain Epson printer products sold in North America, the Software may also display an optionto buy ink from Epson. If you click on the buy button, the Software will cause your Device to display Epson Hardwarecartridge types and ink levels and provide other information about your cartridges, such as the colors, availablecartridge sizes, and prices for replacement ink cartridges, which you may purchase online from Epson.
20. Downloadable Updates. You may also be able to download from an Epson Internet site updates or upgrades to theSoftware if such updates or upgrades are made available. If you agree to install the Software, any transmissions to orfrom the Internet, and data collection and use, will be in accordance with Epson’s then-current Privacy Policy, and byinstalling the Software you agree that such then-current Privacy Policy shall govern such activities.
SL-D800 Series Maintenance Tool Operation Guide
Appendix
90
21. Epson Accounts and Promotional Messages. In addition, if you install the Software and register your EpsonHardware with Epson, and/or you create an account at the Epson Store, and provided your consent to such use, youagree that Epson may merge the data collected in connection with installation of the Software, registration of yourEpson Hardware and/or creation of your Epson Store account, consisting of personal information and non-personallyidentifiable information, and use such merged data to send you Epson promotional or service information. If you donot wish to send information about your Epson Hardware or receive promotional or service information, you will beable to disable these features on a Windows system through the Monitoring Preferences section in the driver. On a Macoperating system, you can disable these features by uninstalling the Epson Customer Research Participation and LowInk Reminder software.
22. DISPUTES, BINDING INDIVIDUAL ARBITRATION, AND WAIVER OF CLASS ACTIONS AND CLASSARBITRATIONS
22.1 Disputes. The terms of this Section 22 shall apply to all Disputes between you and Epson. The term “Dispute” ismeant to have the broadest meaning permissible under law and includes any dispute, claim, controversy or actionbetween you and Epson arising out of or relating to this Agreement, the Software, Epson Hardware, or othertransaction involving you and Epson, whether in contract, warranty, misrepresentation, fraud, tort, intentional tort,statute, regulation, ordinance, or any other legal or equitable basis. “DISPUTE” DOES NOT INCLUDE IP CLAIMS,or more specifically, a claim or cause of action for (a) trademark infringement or dilution, (b) patent infringement, (c)copyright infringement or misuse, or (d) trade secret misappropriation (an “IP Claim”). You and Epson also agree,notwithstanding Section 22.6, that a court, not an arbitrator, may decide if a claim or cause of action is for an IPClaim.
22.2 Binding Arbitration. You and Epson agree that all Disputes shall be resolved by binding arbitration according tothis Agreement. ARBITRATION MEANS THAT YOU WAIVE YOUR RIGHT TO A JUDGE OR JURY IN ACOURT PROCEEDING AND YOUR GROUNDS FOR APPEAL ARE LIMITED. Pursuant to this Agreement,binding arbitration shall be administered by JAMS, a nationally recognized arbitration authority, pursuant to its codeof procedures then in effect for consumer related disputes, but excluding any rules that permit joinder or class actionsin arbitration (for more detail on procedure, see Section 22.6 below). You and Epson understand and agree that (a) theFederal Arbitration Act (9 U.S.C. §1, et seq.) governs the interpretation and enforcement of this Section 22, (b) thisAgreement memorializes a transaction in interstate commerce, and (c) this Section 22 shall survive termination of thisAgreement.
22.3 Pre-Arbitration Steps and Notice. Before submitting a claim for arbitration, you and Epson agree to try, for sixty(60) days, to resolve any Dispute informally. If Epson and you do not reach an agreement to resolve the Dispute withinthe sixty (60) days, you or Epson may commence an arbitration. Notice to Epson must be addressed to: EpsonAmerica, Inc., ATTN: Legal Department, 3840 Kilroy Airport Way, Long Beach, CA 90806 (the “Epson Address”).The Dispute Notice to you will be sent to the most recent address Epson has in its records for you. For this reason, it isimportant to notify us if your address changes by emailing us at [email protected] or writing us at the EpsonAddress above. Notice of the Dispute shall include the sender’s name, address and contact information, the facts givingrise to the Dispute, and the relief requested (the “Dispute Notice”). Following receipt of the Dispute Notice, Epson andyou agree to act in good faith to resolve the Dispute before commencing arbitration.
22.4 Small Claims Court. Notwithstanding the foregoing, you may bring an individual action in the small claims courtof your state or municipality if the action is within that court’s jurisdiction and is pending only in that court.
SL-D800 Series Maintenance Tool Operation Guide
Appendix
91
22.5 WAIVER OF CLASS ACTIONS AND CLASS ARBITRATIONS. YOU AND EPSON AGREE THAT EACHPARTY MAY BRING DISPUTES AGAINST THE OTHER PARTY ONLY IN AN INDIVIDUAL CAPACITY, ANDNOT AS A PLAINTIFF OR CLASS MEMBER IN ANY CLASS OR REPRESENTATIVE PROCEEDING,INCLUDING WITHOUT LIMITATION FEDERAL OR STATE CLASS ACTIONS, OR CLASS ARBITRATIONS.CLASS ACTION LAWSUITS, CLASS-WIDE ARBITRATIONS, PRIVATE ATTORNEY-GENERAL ACTIONS,AND ANY OTHER PROCEEDING WHERE SOMEONE ACTS IN A REPRESENTATIVE CAPACITY ARE NOTALLOWED. ACCORDINGLY, UNDER THE ARBITRATION PROCEDURES OUTLINED IN THIS SECTION,AN ARBITRATOR SHALL NOT COMBINE OR CONSOLIDATE MORE THAN ONE PARTY’S CLAIMSWITHOUT THE WRITTEN CONSENT OF ALL AFFECTED PARTIES TO AN ARBITRATION PROCEEDING.
22.6 Arbitration Procedure. If you or Epson commences arbitration, the arbitration shall be governed by the rules ofJAMS that are in effect when the arbitration is filed, excluding any rules that permit arbitration on a class orrepresentative basis (the “JAMS Rules”), available at http://www.jamsadr.com or by calling 1-800-352-5267, andunder the rules set forth in this Agreement. All Disputes shall be resolved by a single neutral arbitrator, and both partiesshall have a reasonable opportunity to participate in the selection of the arbitrator. The arbitrator is bound by the termsof this Agreement. The arbitrator, and not any federal, state or local court or agency, shall have exclusive authority toresolve all disputes arising out of or relating to the interpretation, applicability, enforceability or formation of thisAgreement, including any claim that all or any part of this Agreement is void or voidable. Notwithstanding this broaddelegation of authority to the arbitrator, a court may determine the limited question of whether a claim or cause ofaction is for an IP Claim, which is excluded from the definition of “Disputes” in Section 22.1 above. The arbitrator shallbe empowered to grant whatever relief would be available in a court under law or in equity. The arbitrator may awardyou the same damages as a court could, and may award declaratory or injunctive relief only in favor of the individualparty seeking relief and only to the extent necessary to provide relief warranted by that party’s individual claim. Insome instances, the costs of arbitration can exceed the costs of litigation and the right to discovery may be more limitedin arbitration than in court. The arbitrator’s award is binding and may be entered as a judgment in any court ofcompetent jurisdiction.
You may choose to engage in arbitration hearings by telephone. Arbitration hearings not conducted by telephone shalltake place in a location reasonably accessible from your primary residence, or in Orange County, California, at youroption.
a) Initiation of Arbitration Proceeding. If either you or Epson decides to arbitrate a Dispute, both parties agree to thefollowing procedure:
(i) Write a Demand for Arbitration. The demand must include a description of the Dispute and the amount ofdamages sought to be recovered. You can find a copy of a Demand for Arbitration at http://www.jamsadr.com(“Demand for Arbitration”).
(ii) Send three copies of the Demand for Arbitration, plus the appropriate filing fee, to: JAMS, 500 North State CollegeBlvd., Suite 600 Orange, CA 92868, U.S.A.
(iii) Send one copy of the Demand for Arbitration to the other party (same address as the Dispute Notice), or asotherwise agreed by the parties.
b) Hearing Format. During the arbitration, the amount of any settlement offer made shall not be disclosed to thearbitrator until after the arbitrator determines the amount, if any, to which you or Epson is entitled. The discovery orexchange of non-privileged information relevant to the Dispute may be allowed during the arbitration.
c) Arbitration Fees. Epson shall pay, or (if applicable) reimburse you for, all JAMS filings and arbitrator fees for anyarbitration commenced (by you or Epson) pursuant to provisions of this Agreement.
SL-D800 Series Maintenance Tool Operation Guide
Appendix
92
d) Award in Your Favor. For Disputes in which you or Epson seeks $75,000 or less in damages exclusive of attorney’sfees and costs, if the arbitrator’s decision results in an award to you in an amount greater than Epson’s last written offer,if any, to settle the Dispute, Epson will: (i) pay you $1,000 or the amount of the award, whichever is greater; (ii) pay youtwice the amount of your reasonable attorney’s fees, if any; and (iii) reimburse you for any expenses (including expertwitness fees and costs) that your attorney reasonably accrues for investigating, preparing, and pursuing the Dispute inarbitration. Except as agreed upon by you and Epson in writing, the arbitrator shall determine the amount of fees,costs, and expenses to be paid by Epson pursuant to this Section 22.6d).
e) Attorney’s Fees. Epson will not seek its attorney’s fees and expenses for any arbitration commenced involving aDispute under this Agreement. Your right to attorney’s fees and expenses under Section 22.6(d) above does not limityour rights to attorney’s fees and expenses under applicable law; notwithstanding the foregoing, the arbitrator may notaward duplicative awards of attorney’s fees and expenses.
22.7 Opt-out. You may elect to opt-out (exclude yourself) from the final, binding, individual arbitration procedureand waiver of class and representative proceedings specified in this Agreement by sending a written letter to the EpsonAddress within thirty (30) days of your assent to this Agreement (including without limitation the purchase,download, installation of the Software or other applicable use of Epson Hardware, products and services) that specifies(i) your name, (ii) your mailing address, and (iii) your request to be excluded from the final, binding individualarbitration procedure and waiver of class and representative proceedings specified in this Section 22. In the event thatyou opt-out consistent with the procedure set forth above, all other terms shall continue to apply, including therequirement to provide notice prior to litigation.
22.8 Amendments to Section 22. Notwithstanding any provision in this Agreement to the contrary, you and Epsonagree that if Epson makes any future amendments to the dispute resolution procedure and class action waiverprovisions (other than a change to Epson’s address) in this Agreement, Epson will obtain your affirmative assent to theapplicable amendment. If you do not affirmatively assent to the applicable amendment, you are agreeing that you willarbitrate any Dispute between the parties in accordance with the language of this Section 22 (or resolve disputes asprovided for in Section 22.7, if you timely elected to opt-out when you first assented to this Agreement).
22.9 Severability. If any provision in this Section 22 is found to be unenforceable, that provision shall be severed withthe remainder of this Agreement remaining in full force and effect. The foregoing shall not apply to the prohibitionagainst class or representative actions as provided in Section 22.5. This means that if Section 22.5 is found to beunenforceable, the entire Section 22 (but only Section 22) shall be null and void.
23. For New Jersey Residents. NOTWITHSTANDING ANY TERMS SET FORTH IN THIS AGREEMENT, IF ANYOF THE PROVISIONS SET FORTH IN SECTIONS 7 OR 8 ARE HELD UNENFORCEABLE, VOID ORINAPPLICABLE UNDER NEW JERSEY LAW, THEN ANY SUCH PROVISION SHALL NOT APPLY TO YOUBUT THE REST OF THE AGREEMENT SHALL REMAIN BINDING ON YOU AND EPSON.NOTWITHSTANDING ANY PROVISION IN THIS AGREEMENT, NOTHING IN THIS AGREEMENT ISINTENDED TO, NOR SHALL IT BE DEEMED OR CONSTRUED TO, LIMIT ANY RIGHTS AVAILABLE TO YOUUNDER THE TRUTH-IN-CONSUMER CONTRACT, WARRANTY AND NOTICE ACT.
Rev. December 2018
SL-D800 Series Maintenance Tool Operation Guide
Appendix
93