
Mail Server r
29
MAIL SERVER SET UP IN UBUNTU Fire up an Ubuntu 12.04 AWS Instance with a Suitable Security Group Start up an Elastic Block Store (EBS) server instance - at the time of writing, Ubuntu 12.04 is one of the options right there in the quick start menu for launching a new instance. Mail servers don't generally have to be all that big if you aren't in the business of email; a micro instance has served me just fine for a fairly well trafficked web site with a mailing list of thousands, for example. That said, the server produced by following this guide runs at close to 80% memory utilization for a micro instance when operating unloaded - a sudden blizzard of unexpected web traffic would probably cause issues. So adjust your expectations accordingly. Firewall settings in AWS are managed through assignment of Security Groups. You'll probably want to create one before starting the server. The Security Group should allow inbound TCP traffic from any IP address to these ports: 25 (SMTP), 80 (HTTP), 110 (POP3), 143 (IMAP), 443 (HTTPS), 465 (SMTPS), 993 (IMAPS), and 995 (POP3S). That is in addition to whatever rules you might have for SSH access over port 22 - it is not a good idea to leave that open to the world, so lock it down to the IP address ranges you use. In fact it is a good idea to restrict all inbound traffic to the server to your IP address ranges while you are building it. You can adjust the rules to allow traffic from the rest of the world after you're certain that everything is secure and shipshape. For details follow the bwlow links which contain the mail server configuration bulding mail server from scratch . https://www.exratione.com/2012/05/a-mailserver-on-ubuntu-1204-postfix-dovecot- mysql/
-
Upload
shankartall -
Category
Documents
-
view
26 -
download
5
Transcript of Mail Server r

MAIL SERVER SET UP IN UBUNTU
Fire up an Ubuntu 12.04 AWS Instance with a Suitable Security Group
Start up an Elastic Block Store (EBS) server instance - at the time of writing, Ubuntu 12.04 is one of the options right there in the quick start menu for launching a new instance. Mail servers don't generally have to be all that big if you aren't in the business of email; a micro instance has served me just fine for a fairly well trafficked web site with a mailing list of thousands, for example. That said, theserver produced by following this guide runs at close to 80% memory utilization for a micro instance when operating unloaded - a sudden blizzard of unexpected web traffic would probably cause issues. So adjust your expectations accordingly.
Firewall settings in AWS are managed through assignment of Security Groups. You'll probably want to create one before starting the server. The Security Group should allow inbound TCP traffic from any IP address to these ports: 25 (SMTP), 80 (HTTP), 110 (POP3), 143 (IMAP), 443 (HTTPS), 465 (SMTPS),993 (IMAPS), and 995 (POP3S). That is in addition to whatever rules you might have for SSH access over port 22 - it is not a good idea to leave that open to the world, so lock it down to the IP address ranges you use.
In fact it is a good idea to restrict all inbound traffic to the server to your IP address ranges while you are building it. You can adjust the rules to allow traffic from the rest of the world after you're certain that everything is secure and shipshape.
For details follow the bwlow links which contain the mail server configuration bulding mail server from scratch .
https://www.exratione.com/2012/05/a-mailserver-on-ubuntu-1204-postfix-dovecot-mysql/

STEPS TO FOLLOW
REQUIRED APPLICATIONS TO INSTALL :
→ Postfix: sends and receives mail via the SMTP protocol. It will only relay mail on to other mailservers if the mail is sent by an authenticated user, but anyone can send mail to this server for localdelivery.
• Dovecot: a POP and IMAP server that manages local mail directories and allows users to log in and download their mail. It also handles user authentication.
• Postgrey: greylists incoming mail, requiring unfamiliar deliverers to wait for a while and then resend. This is one of the better tools for cutting down on spam.
• amavisd-new: a manager for organizing various antivirus and spam checking content filters. • Clam AntiVirus: a virus detection suite. • SpamAssassin: for sniffing out spam in emails. • Postfix Admin: a web front end for administering mail users and domains. • Web mail depends on the user there are different web mails available like
roundcube,horde,squrriel mail any one of this can be used as web mail for users that can send and receive mails.
Configuration process :
STEP 1:
Host name should be configuredUse the following command to change the host name.Command: hostname mail.example.com
After adding the hostname.The host name should be set in the hosts.And add your hostname to the first line of /etc/hosts can be done using text editor.
It support to look as:127.0.0.1 mail.example.com localhost
STEP 2:
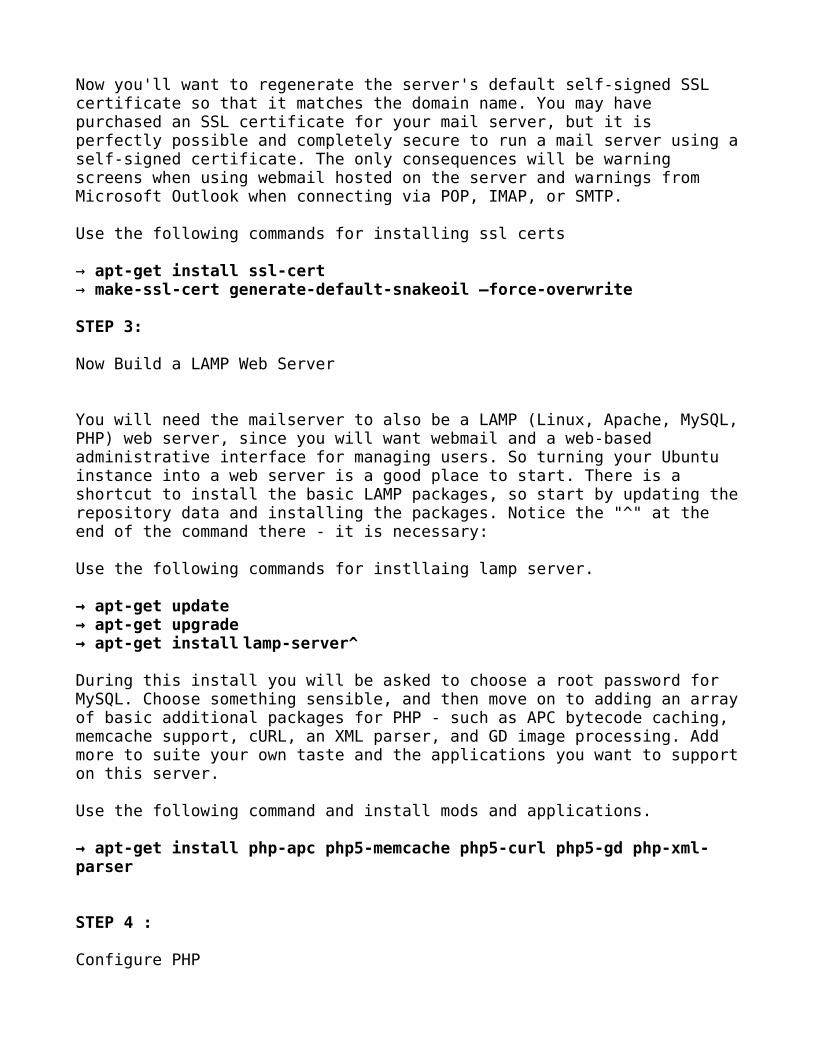
Now you'll want to regenerate the server's default self-signed SSL certificate so that it matches the domain name. You may have purchased an SSL certificate for your mail server, but it is perfectly possible and completely secure to run a mail server using aself-signed certificate. The only consequences will be warning screens when using webmail hosted on the server and warnings from Microsoft Outlook when connecting via POP, IMAP, or SMTP.
Use the following commands for installing ssl certs
→ apt-get install ssl-cert→ make-ssl-cert generate-default-snakeoil –force-overwrite
STEP 3:
Now Build a LAMP Web Server
You will need the mailserver to also be a LAMP (Linux, Apache, MySQL,PHP) web server, since you will want webmail and a web-based administrative interface for managing users. So turning your Ubuntu instance into a web server is a good place to start. There is a shortcut to install the basic LAMP packages, so start by updating therepository data and installing the packages. Notice the "^" at the end of the command there - it is necessary:
Use the following commands for instllaing lamp server.
→ apt-get update→ apt-get upgrade→ apt-get install lamp-server^
During this install you will be asked to choose a root password for MySQL. Choose something sensible, and then move on to adding an arrayof basic additional packages for PHP - such as APC bytecode caching, memcache support, cURL, an XML parser, and GD image processing. Add more to suite your own taste and the applications you want to supporton this server.
Use the following command and install mods and applications.
→ apt-get install php-apc php5-memcache php5-curl php5-gd php-xml-parser
STEP 4 :
Configure PHP

The default configuration for PHP and the additional packages mentioned above is sufficient for most casual usage. So unless you have something complicated or high-powered in mind, you should probably only change the expose_php setting in /etc/php5/apache2/php.ini. Set it to "Off":
123456
; Decides whether PHP may expose the fact that it is installed on the server; (e.g. by adding its signature to the Web server header). It is nosecurity; threat in any way, but it makes it possible to determine whether you use PHP; on your server or not.; http://php.net/expose-phpexpose_php = Off
STEP 5: Configure Apache:
The expected end result for Apache is that it will serve a single site with a couple of running web applications: webmail and Postfix Admin hidden away in a subdirectory. All traffic will be directed to HTTPS - there is no good reason to allow non-secure access to any of what will be on the web server.
Firstly configure the following lines in /etc/apache2/conf.d/security to minimize the information that Apache gives out in its response headers:
123456789101112131415161718
## ServerTokens# This directive configures what you return as the Server HTTP response# Header. The default is 'Full' which sends information about the OS-Type# and compiled in modules.# Set to one of: Full | OS | Minimal | Minor | Major | Prod# where Full conveys the most information, and Prod the least.#ServerTokens Prod ## Optionally add a line containing the server version and virtual host# name to server-generated pages (internal error documents, FTP directory

19
# listings, mod_status and mod_info output etc., but not CGI generated# documents or custom error documents).# Set to "EMail" to also include a mailto: link to the ServerAdmin.# Set to one of: On | Off | EMail#ServerSignature Off
Make sure that mod_rewrite, mod_ssl, and the default SSL virtual host is enabled - you'll need these line items to be able to force visitors to use HTTPS.
12a2enmod rewrite ssla2ensite default-ssl
The default site configuration in /etc/apache2/sites-available/default can be edited to look something like this for the sake of simplicity:
1234567891011121314151617
<VirtualHost *:80> ServerAdmin webmaster@localhost DocumentRoot /var/www <Directory "/"> Options FollowSymLinks AllowOverride All </Directory> ErrorLog ${APACHE_LOG_DIR}/error.log # Possible values include: debug, info, notice, warn, error, crit, # alert, emerg. LogLevel warn CustomLog ${APACHE_LOG_DIR}/access.log combined</VirtualHost>
But of course your taste and needs may vary. Keeping the same simple approach, the upper portion of the SSL configuration in /etc/apache2/sites-available/default-ssl can be set up as follows:
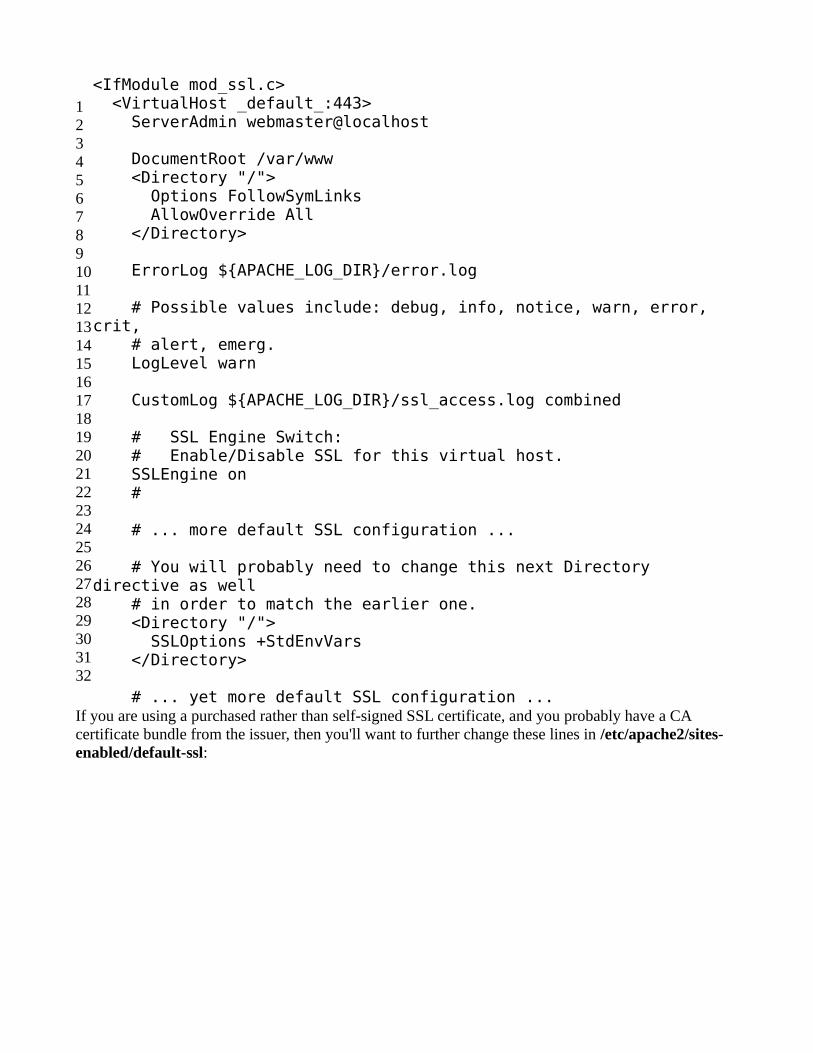
1234567891011121314151617181920212223242526272829303132
<IfModule mod_ssl.c> <VirtualHost _default_:443> ServerAdmin webmaster@localhost DocumentRoot /var/www <Directory "/"> Options FollowSymLinks AllowOverride All </Directory> ErrorLog ${APACHE_LOG_DIR}/error.log # Possible values include: debug, info, notice, warn, error, crit, # alert, emerg. LogLevel warn CustomLog ${APACHE_LOG_DIR}/ssl_access.log combined # SSL Engine Switch: # Enable/Disable SSL for this virtual host. SSLEngine on # # ... more default SSL configuration ... # You will probably need to change this next Directory directive as well # in order to match the earlier one. <Directory "/"> SSLOptions +StdEnvVars </Directory> # ... yet more default SSL configuration ...
If you are using a purchased rather than self-signed SSL certificate, and you probably have a CA certificate bundle from the issuer, then you'll want to further change these lines in /etc/apache2/sites-enabled/default-ssl:
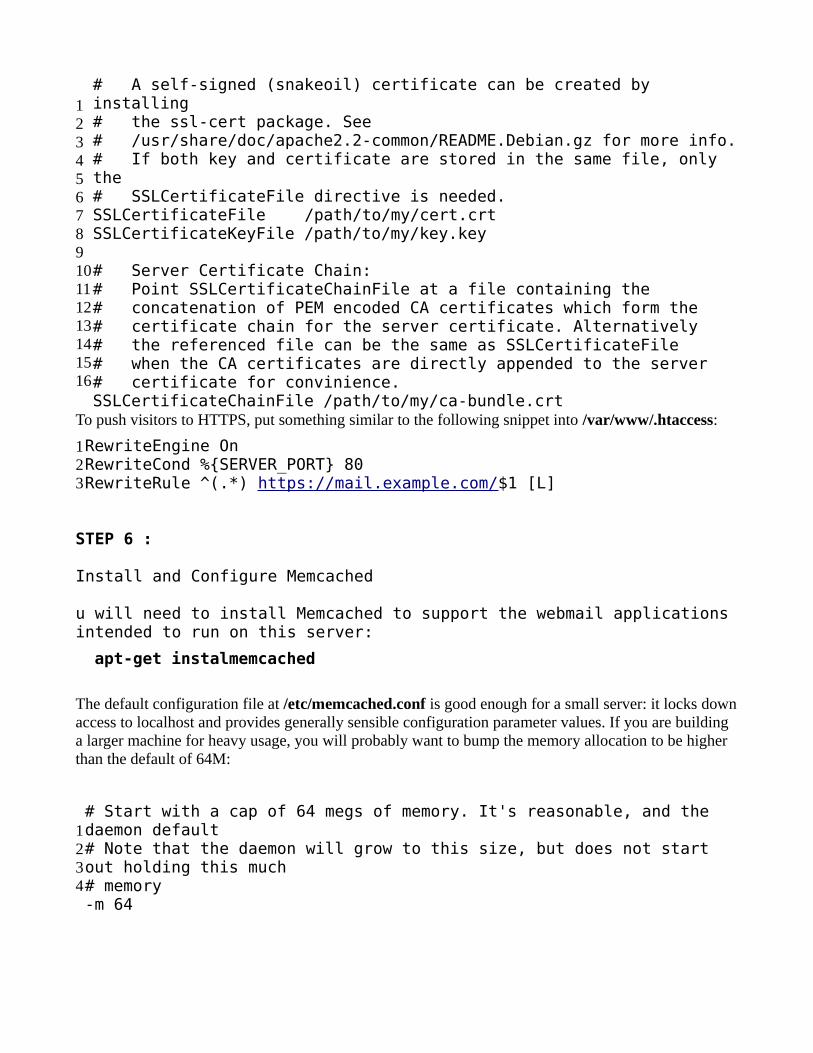
12345678910111213141516
# A self-signed (snakeoil) certificate can be created by installing# the ssl-cert package. See# /usr/share/doc/apache2.2-common/README.Debian.gz for more info.# If both key and certificate are stored in the same file, only the# SSLCertificateFile directive is needed.SSLCertificateFile /path/to/my/cert.crtSSLCertificateKeyFile /path/to/my/key.key # Server Certificate Chain:# Point SSLCertificateChainFile at a file containing the# concatenation of PEM encoded CA certificates which form the# certificate chain for the server certificate. Alternatively# the referenced file can be the same as SSLCertificateFile# when the CA certificates are directly appended to the server# certificate for convinience.SSLCertificateChainFile /path/to/my/ca-bundle.crt
To push visitors to HTTPS, put something similar to the following snippet into /var/www/.htaccess:
123
RewriteEngine OnRewriteCond %{SERVER_PORT} 80RewriteRule ^(.*) https://mail.example.com/$1 [L]
STEP 6 :
Install and Configure Memcached
u will need to install Memcached to support the webmail applications intended to run on this server:
apt-get instalmemcached
The default configuration file at /etc/memcached.conf is good enough for a small server: it locks downaccess to localhost and provides generally sensible configuration parameter values. If you are building a larger machine for heavy usage, you will probably want to bump the memory allocation to be higher than the default of 64M:
1234
# Start with a cap of 64 megs of memory. It's reasonable, and the daemon default# Note that the daemon will grow to this size, but does not start out holding this much# memory-m 64

STEP 7:
Install the Mailserver Packages
Now we're ready to start in on the harder stuff. As for the LAMP server, there is a shortcut for installingthe basic packages for a mail server. Again, note the "^" at the end of the command:
apt-get install mail-server^
When Postfix installs, you will be asked to choose a general type of mail configuration - select "Internet site". You will be asked for the system mail name, which is the hostname of your mailserver - e.g.mail.example.com. What this gives you is pretty much just bare bones,aimed at a mailserver that manages its users as straightforward Unix users, and which doesn't use a SQL database to store data. So we needthe rest of the cast - such as MySQL support for Postfix and Dovecot,and the coterie of spam-mashing packages. You might also have to install IMAP support for Dovecot, as it may or may not be included inthe mail-server packages:
123
apt-get install postfix-mysql dovecot-mysql dovecot-imapd postgrey apt-get install amavis clamav clamav-daemon spamassassinapt-get install php5-imap
The php5-imap package actually supports POP3 as well as the IMAP protocol, and will be needed by Postfix Admin and many of the possible options for PHP webmail applications. Restart Apache to have that running and ready:
The php5-imap package actually supports POP3 as well as the IMAP protocol, and will be needed by Postfix Admin and many of the possible options for PHP webmail applications. Restart Apache to havethat running and ready:
1service apache2 restartNext you'll want some optional packages that extend the abilities of the spam and virus detection packages, such as by allowing greater inspection of attached files:
12
apt-get install libnet-dns-perl pyzor razorapt-get install arj bzip2 cabextract cpio file gzip nomarch pax unzip zip
You probably also want a package for dealing with RAR-format archives - but I've found unrar-free to be somewhat buggy and unstable, while unrar is not free. So you may just choose to skip that and shrug.
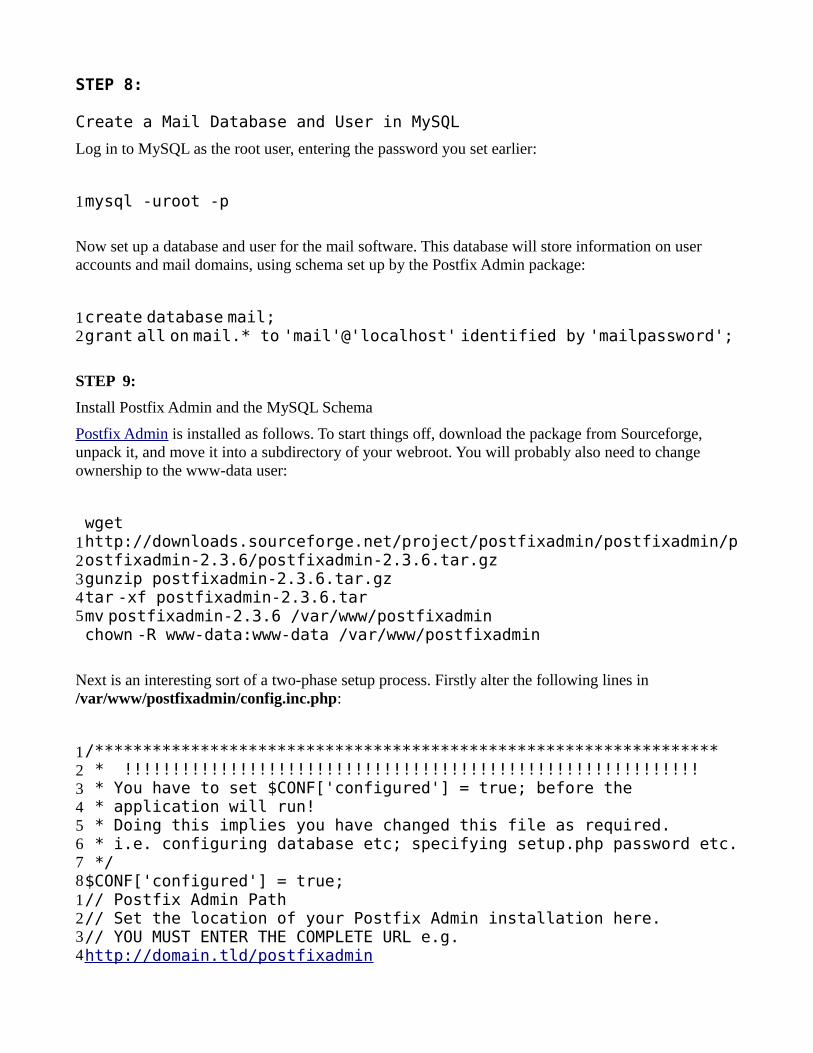
STEP 8:
Create a Mail Database and User in MySQL
Log in to MySQL as the root user, entering the password you set earlier:
1mysql -uroot -p
Now set up a database and user for the mail software. This database will store information on user accounts and mail domains, using schema set up by the Postfix Admin package:
12create database mail;grant all on mail.* to 'mail'@'localhost' identified by 'mailpassword';
STEP 9:
Install Postfix Admin and the MySQL Schema
Postfix Admin is installed as follows. To start things off, download the package from Sourceforge, unpack it, and move it into a subdirectory of your webroot. You will probably also need to change ownership to the www-data user:
12345
wget http://downloads.sourceforge.net/project/postfixadmin/postfixadmin/postfixadmin-2.3.6/postfixadmin-2.3.6.tar.gzgunzip postfixadmin-2.3.6.tar.gztar -xf postfixadmin-2.3.6.tarmv postfixadmin-2.3.6 /var/www/postfixadminchown -R www-data:www-data /var/www/postfixadmin
Next is an interesting sort of a two-phase setup process. Firstly alter the following lines in /var/www/postfixadmin/config.inc.php:
12345678
/***************************************************************** * !!!!!!!!!!!!!!!!!!!!!!!!!!!!!!!!!!!!!!!!!!!!!!!!!!!!!!!!!!!! * You have to set $CONF['configured'] = true; before the * application will run! * Doing this implies you have changed this file as required. * i.e. configuring database etc; specifying setup.php password etc. */$CONF['configured'] = true;
1234
// Postfix Admin Path// Set the location of your Postfix Admin installation here.// YOU MUST ENTER THE COMPLETE URL e.g. http://domain.tld/postfixadmin

$CONF['postfix_admin_url'] = 'https://mail.example.com/postfixadmin';
123456789
// Database Config// mysql = MySQL 3.23 and 4.0, 4.1 or 5// mysqli = MySQL 4.1+// pgsql = PostgreSQL$CONF['database_type'] = 'mysql';$CONF['database_host'] = 'localhost';$CONF['database_user'] = 'mail';$CONF['database_password'] = 'mailpassword';$CONF['database_name'] = 'mail';
123456789101112
// Site Admin// Define the Site Admins email address below.// This will be used to send emails from to create mailboxes.$CONF['admin_email'] = '[email protected]'; // Mail Server// Hostname (FQDN) of your mail server.// This is used to send email to Postfix in order to create mailboxes.//// Set this to localhost for now, but change it later.$CONF['smtp_server'] = 'localhost';$CONF['smtp_port'] = '25';
12345678910
// Encrypt// In what way do you want the passwords to be crypted?// md5crypt = internal postfix admin md5// md5 = md5 sum of the password// system = whatever you have set as your PHP system default// cleartext = clear text passwords (ouch!)// mysql_encrypt = useful for PAM integration// authlib = support for courier-authlib style passwords// dovecot:CRYPT-METHOD = use dovecotpw -s 'CRYPT-METHOD'. Example:dovecot:CRAM-MD5$CONF['encrypt'] = 'md5crypt';
123456789101112
// Mailboxes// If you want to store the mailboxes per domain set this to 'YES'.// Examples:// YES: /usr/local/virtual/domain.tld/[email protected]// NO: /usr/local/virtual/[email protected]$CONF['domain_path'] = 'NO';// If you don't want to have the domain in your mailbox set this to'NO'.// Examples:// YES: /usr/local/virtual/domain.tld/[email protected]// NO: /usr/local/virtual/domain.tld/username// Note: If $CONF['domain_path'] is set to NO, this setting will beforced to YES.
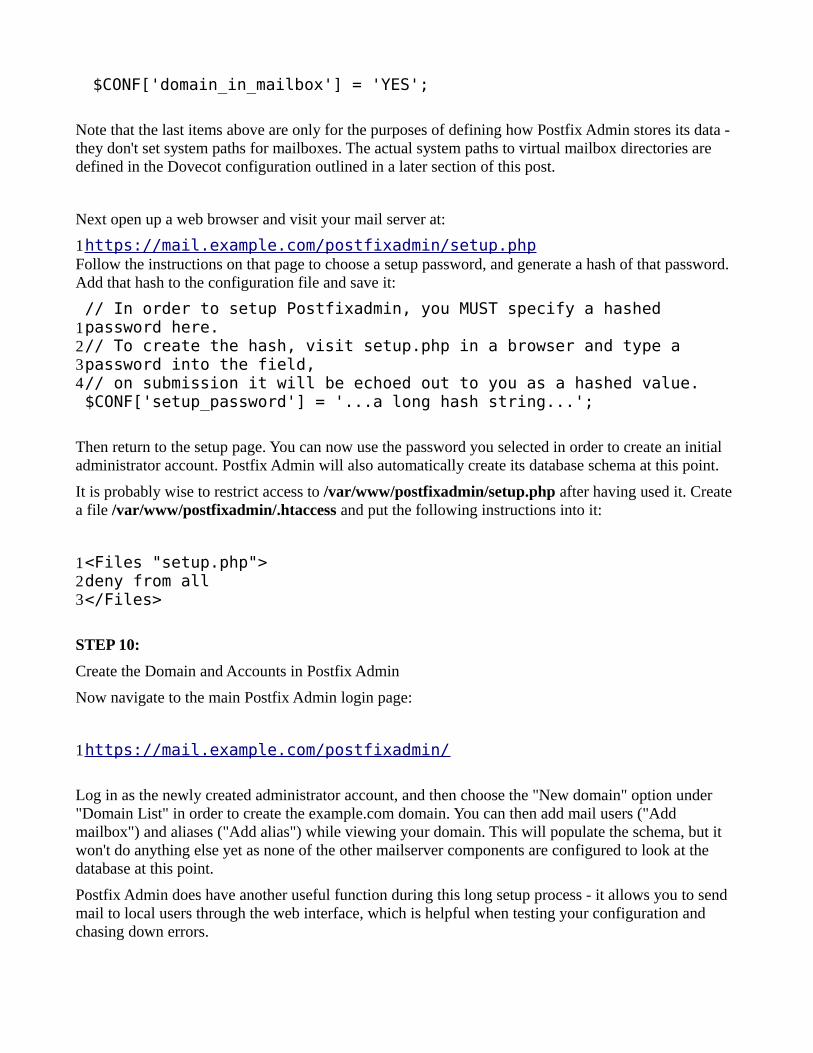
$CONF['domain_in_mailbox'] = 'YES';
Note that the last items above are only for the purposes of defining how Postfix Admin stores its data - they don't set system paths for mailboxes. The actual system paths to virtual mailbox directories are defined in the Dovecot configuration outlined in a later section of this post.
Next open up a web browser and visit your mail server at:
1https://mail.example.com/postfixadmin/setup.phpFollow the instructions on that page to choose a setup password, and generate a hash of that password. Add that hash to the configuration file and save it:
1234
// In order to setup Postfixadmin, you MUST specify a hashed password here.// To create the hash, visit setup.php in a browser and type a password into the field,// on submission it will be echoed out to you as a hashed value.$CONF['setup_password'] = '...a long hash string...';
Then return to the setup page. You can now use the password you selected in order to create an initial administrator account. Postfix Admin will also automatically create its database schema at this point.
It is probably wise to restrict access to /var/www/postfixadmin/setup.php after having used it. Create a file /var/www/postfixadmin/.htaccess and put the following instructions into it:
123
<Files "setup.php">deny from all</Files>
STEP 10:
Create the Domain and Accounts in Postfix Admin
Now navigate to the main Postfix Admin login page:
1https://mail.example.com/postfixadmin/
Log in as the newly created administrator account, and then choose the "New domain" option under "Domain List" in order to create the example.com domain. You can then add mail users ("Add mailbox") and aliases ("Add alias") while viewing your domain. This will populate the schema, but it won't do anything else yet as none of the other mailserver components are configured to look at the database at this point.
Postfix Admin does have another useful function during this long setup process - it allows you to send mail to local users through the web interface, which is helpful when testing your configuration and chasing down errors.
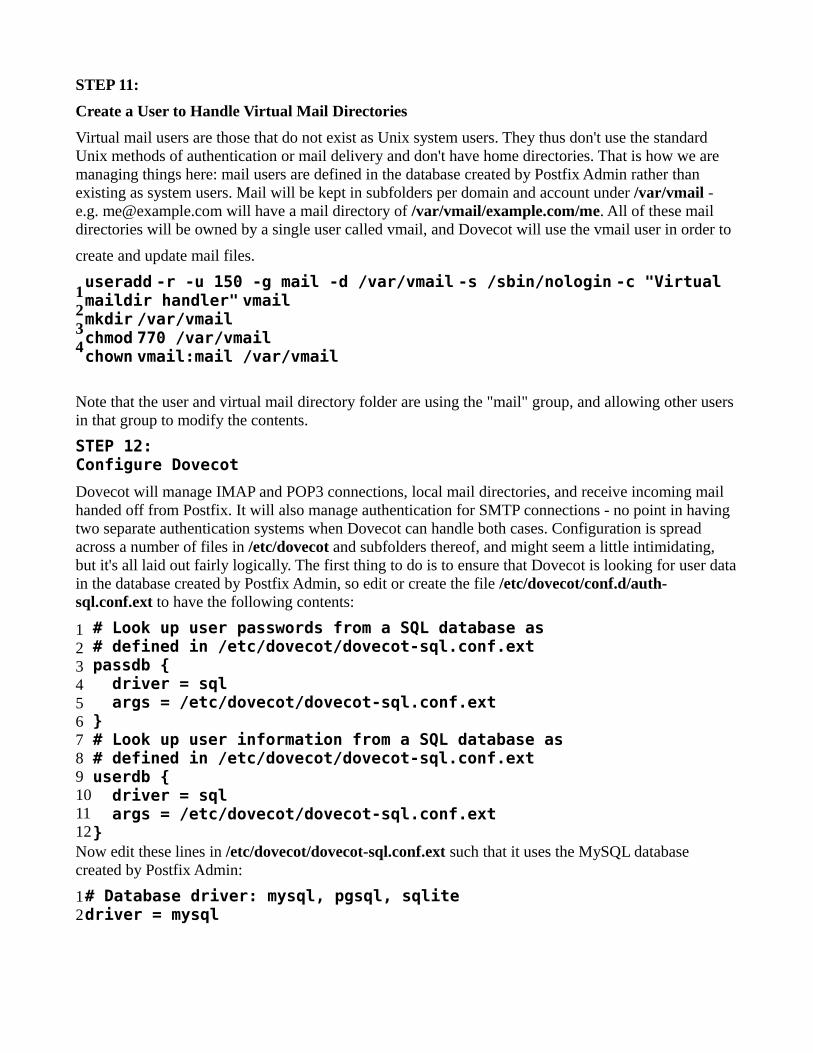
STEP 11:
Create a User to Handle Virtual Mail Directories
Virtual mail users are those that do not exist as Unix system users. They thus don't use the standard Unix methods of authentication or mail delivery and don't have home directories. That is how we are managing things here: mail users are defined in the database created by Postfix Admin rather than existing as system users. Mail will be kept in subfolders per domain and account under /var/vmail - e.g. [email protected] will have a mail directory of /var/vmail/example.com/me. All of these mail directories will be owned by a single user called vmail, and Dovecot will use the vmail user in order to
create and update mail files.
1234
useradd -r -u 150 -g mail -d /var/vmail -s /sbin/nologin -c "Virtual maildir handler" vmailmkdir /var/vmailchmod 770 /var/vmailchown vmail:mail /var/vmail
Note that the user and virtual mail directory folder are using the "mail" group, and allowing other users in that group to modify the contents.
STEP 12:Configure Dovecot
Dovecot will manage IMAP and POP3 connections, local mail directories, and receive incoming mail handed off from Postfix. It will also manage authentication for SMTP connections - no point in having two separate authentication systems when Dovecot can handle both cases. Configuration is spread across a number of files in /etc/dovecot and subfolders thereof, and might seem a little intimidating, but it's all laid out fairly logically. The first thing to do is to ensure that Dovecot is looking for user datain the database created by Postfix Admin, so edit or create the file /etc/dovecot/conf.d/auth-sql.conf.ext to have the following contents:
123456789101112
# Look up user passwords from a SQL database as # defined in /etc/dovecot/dovecot-sql.conf.extpassdb { driver = sql args = /etc/dovecot/dovecot-sql.conf.ext}# Look up user information from a SQL database as # defined in /etc/dovecot/dovecot-sql.conf.extuserdb { driver = sql args = /etc/dovecot/dovecot-sql.conf.ext}
Now edit these lines in /etc/dovecot/dovecot-sql.conf.ext such that it uses the MySQL database created by Postfix Admin:
12# Database driver: mysql, pgsql, sqlitedriver = mysql

123456
# Examples:# connect = host=192.168.1.1 dbname=users# connect = host=sql.example.com dbname=virtual user=virtual password=blarg# connect = /etc/dovecot/authdb.sqlite#connect = host=localhost dbname=mail user=mail password=mailpassword
123456
# Default password scheme.## List of supported schemes is in# http://wiki2.dovecot.org/Authentication/PasswordSchemes#default_pass_scheme = MD5-CRYPT
12345
# Define the query to obtain a user password.password_query = \ SELECT username as user, password, '/var/vmail/%d/%n' as userdb_home, \ 'maildir:/var/vmail/%d/%n' as userdb_mail, 150 as userdb_uid, 8 asuserdb_gid \ FROM mailbox WHERE username = '%u' AND active = '1'
12345
# Define the query to obtain user information.user_query = \ SELECT '/var/vmail/%d/%n' as home, 'maildir:/var/vmail/%d/%n' as mail, \ 150 AS uid, 8 AS gid, concat('dirsize:storage=', quota) AS quota \ FROM mailbox WHERE username = '%u' AND active = '1'
Then change the controlling definitions in /etc/dovecot/conf.d/10-auth.conf such that Dovecot will read the SQL configuration files. While you are there, you should also make sure that plaintext authentication is disabled unless the connection is encrypted or local:
12345
# Disable LOGIN command and all other plaintext authentications unless# SSL/TLS is used (LOGINDISABLED capability). Note that if the remote IP# matches the local IP (ie. you're connecting from the same computer), the# connection is considered secure and plaintext authentication is allowed.disable_plaintext_auth = yes
12345
# Space separated list of wanted authentication mechanisms:# plain login digest-md5 cram-md5 ntlm rpa apop anonymous gssapi otp skey# gss-spnego# NOTE: See also disable_plaintext_auth setting.auth_mechanisms = plain login
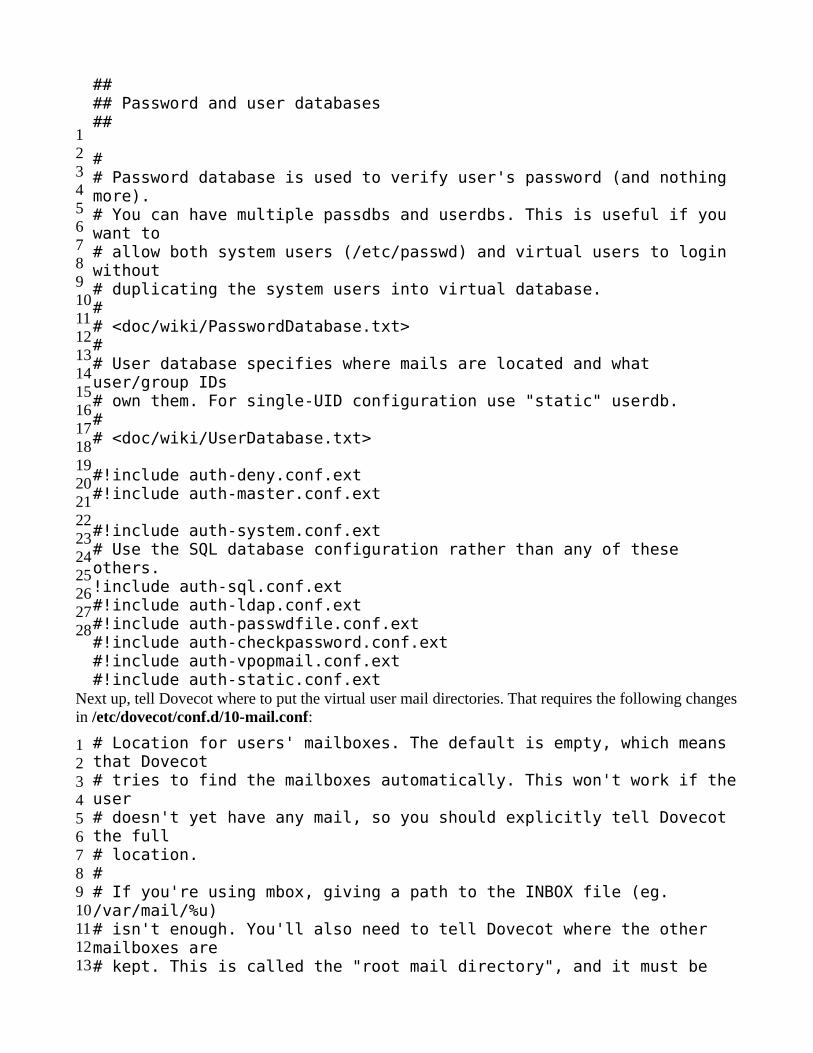
12345678910111213141516171819202122232425262728
#### Password and user databases## ## Password database is used to verify user's password (and nothing more).# You can have multiple passdbs and userdbs. This is useful if you want to# allow both system users (/etc/passwd) and virtual users to login without# duplicating the system users into virtual database.## <doc/wiki/PasswordDatabase.txt>## User database specifies where mails are located and what user/group IDs# own them. For single-UID configuration use "static" userdb.## <doc/wiki/UserDatabase.txt> #!include auth-deny.conf.ext#!include auth-master.conf.ext #!include auth-system.conf.ext# Use the SQL database configuration rather than any of these others.!include auth-sql.conf.ext#!include auth-ldap.conf.ext#!include auth-passwdfile.conf.ext#!include auth-checkpassword.conf.ext#!include auth-vpopmail.conf.ext#!include auth-static.conf.ext
Next up, tell Dovecot where to put the virtual user mail directories. That requires the following changesin /etc/dovecot/conf.d/10-mail.conf:
12345678910111213
# Location for users' mailboxes. The default is empty, which means that Dovecot# tries to find the mailboxes automatically. This won't work if theuser# doesn't yet have any mail, so you should explicitly tell Dovecot the full# location.## If you're using mbox, giving a path to the INBOX file (eg. /var/mail/%u)# isn't enough. You'll also need to tell Dovecot where the other mailboxes are# kept. This is called the "root mail directory", and it must be

14151617181920212223242526
the first# path given in the mail_location setting.## There are a few special variables you can use, eg.:## %u - username# %n - user part in user@domain, same as %u if there's no domain# %d - domain part in user@domain, empty if there's no domain# %h - home directory## See doc/wiki/Variables.txt for full list. Some examples:## mail_location = maildir:~/Maildir# mail_location = mbox:~/mail:INBOX=/var/mail/%u# mail_location = mbox:/var/mail/%d/%1n/%n:INDEX=/var/indexes/%d/%1n/%n## <doc/wiki/MailLocation.txt>#mail_location = maildir:/var/vmail/%d/%n
12345
# System user and group used to access mails. If you use multiple, userdb# can override these by returning uid or gid fields. You can use either numbers# or names. <doc/wiki/UserIds.txt>mail_uid = vmailmail_gid = mail
12345678
# Valid UID range for users, defaults to 500 and above. This is mostly# to make sure that users can't log in as daemons or other system users.# Note that denying root logins is hardcoded to dovecot binary and can't# be done even if first_valid_uid is set to 0.## Use the vmail user uid here.first_valid_uid = 150last_valid_uid = 150
If you are bringing your own SSL certificate to the party, you have to let Dovecot know about by editing these lines in /etc/dovecot/conf.d/10-ssl.conf. Remember to include your CA certificate bundle if provided with one by the certificate issuer:
1234567
# SSL/TLS support: yes, no, required. <doc/wiki/SSL.txt>ssl = yes # PEM encoded X.509 SSL/TLS certificate and private key. They're opened before# dropping root privileges, so keep the key file unreadable by anyone but

891011121314151617181920
# root. Included doc/mkcert.sh can be used to easily generate self-signed# certificate, just make sure to update the domains in dovecot-openssl.cnfssl_cert = </path/to/my/cert.pemssl_key = </path/to/my/key.pem # If key file is password protected, give the password here. Alternatively# give it when starting dovecot with -p parameter. Since this file is often# world-readable, you may want to place this setting instead to a different# root owned 0600 file by using ssl_key_password = <path.#ssl_key_password = # PEM encoded trusted certificate authority. Set this only if you intend to use# ssl_verify_client_cert=yes. The file should contain the CA certificate(s)# followed by the matching CRL(s). (e.g. ssl_ca = </etc/ssl/certs/ca.pem)#ssl_ca = </path/to/ca.pem
Next, edit these lines in /etc/dovecot/conf.d/10-master.conf to add the Postfix option:
123456789101112131415161718
service auth { # auth_socket_path points to this userdb socket by default. It's typically # used by dovecot-lda, doveadm, possibly imap process, etc. Its default # permissions make it readable only by root, but you may need to relax these # permissions. Users that have access to this socket are able to get a list # of all usernames and get results of everyone's userdb lookups. unix_listener auth-userdb { mode = 0600 user = vmail group = mail } unix_listener /var/spool/postfix/private/auth { mode = 0660 # Assuming the default Postfix user and group user = postfix group = postfix }
You may have to explicitly set a postmaster address in /etc/dovecot/conf.d/15-lda.conf; if you see "Invalid settings: postmaster_address setting not given" showing up in the mail log, then this is the fix

for that. Make sure that a suitable alias or mailbox exists for your chosen postmaster address:
123
# Address to use when sending rejection mails.# Default is postmaster@<your domain>.postmaster_address = [email protected]
You'll want to change the Dovecot configuration to be accessible to both dovecot and vmail users:
12chown -R vmail:dovecot /etc/dovecotchmod -R o-rwx /etc/dovecot
A final note on Dovecot: it only creates a user's mail directory when mail is first delivered to that virtual user. So creating a user in Postfix Admin will not result in the immediate creation of a mail directory under /var/vmail, and that's just fine.
STEP 13 :
Configure Amavis, ClamAV, and SpamAssassin
Before configuring Postfix, we may as well take a short detour into configuring the spam and virus tools. Their default configuration is close to what most people will need, and tools like SpamAssassin auto-detect many of the optional additional packages you may have installed. If you have specialist needs or greater knowledge, you can of course spend a fair amount of time here crafting intricate rules. For the casual user, this is a quick and straightforward process, however. Note that here we are putting off the portions relating to integration with Postfix - e.g. additions to the master.cf file - into the Postfix section of this post.
First add Amavis and ClamAV users to one another's groups to enable them to collaborate:
12adduser clamav amavisadduser amavis clamav
Then turn on Amavis by editing /etc/amavis/conf.d/15-content_filter_mode - the software is disabled by default, so uncomment the @bypass... lines:
1234567891011121314151617181920
use strict; # You can modify this file to re-enable SPAM checking through spamassassin# and to re-enable antivirus checking. ## Default antivirus checking mode# Please note, that anti-virus checking is DISABLED by# default.# If You wish to enable it, please uncomment the following lines: @bypass_virus_checks_maps = ( \%bypass_virus_checks, \@bypass_virus_checks_acl, \$bypass_virus_checks_re); ## Default SPAM checking mode# Please note, that anti-spam checking is DISABLED by

21222324
# default.# If You wish to enable it, please uncomment the following lines: @bypass_spam_checks_maps = ( \%bypass_spam_checks, \@bypass_spam_checks_acl, \$bypass_spam_checks_re); 1; # ensure a defined return
Now enable SpamAssassin by editing these lines in /etc/default/spamassassin:
12# Change to one to enable spamdENABLED=1
1234
# Cronjob# Set to anything but 0 to enable the cron job to automatically update# spamassassin's rules on a nightly basisCRON=1
SpamAssassin under Amavis will only check mail that's determined to be arriving for local delivery. There are a couple of ways to tell Amavis which mails are for local delivery, but here we'll set it up to check the database set up by Postfix Admin. Edit /etc/amavis/conf.d/50-user to look like this:
1234567891011121314151617181920212223242526272829
use strict; ## Place your configuration directives here. They will override those in# earlier files.## See /usr/share/doc/amavisd-new/ for documentation and examples of# the directives you can use in this file# # Three concurrent processes. This should fit into the RAM available on an# AWS micro instance. This has to match the number of processes specified# for Amavis in /etc/postfix/master.cf.$max_servers = 3; # Add spam info headers if at or above that level - this ensures they# are always added.$sa_tag_level_deflt = -9999; # Check the database to see if mail is for local delivery, and thus# should be spam checked.@lookup_sql_dsn = ( ['DBI:mysql:database=mail;host=127.0.0.1;port=3306', 'mail',

303132
'mailpassword']);$sql_select_policy = 'SELECT domain from domain WHERE CONCAT("@",domain) IN (%k)'; # Uncomment to bump up the log level when testing.# $log_level = 2; #------------ Do not modify anything below this line -------------1; # ensure a defined return
You will have to restart these processes to pick up the new configuration:
12service amavis restartservice spamassassin restart
STEP 14:
Configure Postfix
Postfix handles incoming mail via the SMTP protocol, and its configuration files have be set up to allow it to integrate with the various other packages we have installed so far. At a high level, we want Postfix to hand off incoming mail to the spam and virus checkers before passing it on to Dovecot for delivery, and to authenticate virtual users who are connecting over SMTP in order to to send mail.
Firstly create files describing for Postfix where to find information on users and domains. Note that the "hosts" directive in these files must be exactly the same as the "bind-address" in /etc/mysql/my.cnf. If one side says "localhost" and the other side says "127.0.0.1" then you may find that Postfix cannot connect to MySQL - strange but true. Here are the needed Postfix files:
/etc/postfix/mysql_virtual_alias_domainaliases_maps.cf
12345678
user = mailpassword = mailpasswordhosts = 127.0.0.1dbname = mailquery = SELECT goto FROM alias,alias_domain WHERE alias_domain.alias_domain = '%d' AND alias.address=concat('%u', '@', alias_domain.target_domain) AND alias.active = 1
/etc/postfix/mysql_virtual_alias_maps.cf
12345678
user = mailpassword = mailpasswordhosts = 127.0.0.1dbname = mailtable = aliasselect_field = gotowhere_field = addressadditional_conditions = and active = '1'
/etc/postfix/mysql_virtual_domains_maps.cf

12345678
user = mailpassword = mailpasswordhosts = 127.0.0.1dbname = mailtable = domainselect_field = domainwhere_field = domainadditional_conditions = and backupmx = '0' and active = '1'
/etc/postfix/mysql_virtual_mailbox_domainaliases_maps.cf
12345678
user = mailpassword = mailpasswordhosts = 127.0.0.1dbname = mailquery = SELECT maildir FROM mailbox, alias_domain WHERE alias_domain.alias_domain = '%d' AND mailbox.username=concat('%u', '@', alias_domain.target_domain ) AND mailbox.active = 1
/etc/postfix/mysql_virtual_mailbox_maps.cf
12345678
user = mailpassword = mailpasswordhosts = 127.0.0.1dbname = mailtable = mailboxselect_field = CONCAT(domain, '/', local_part)where_field = usernameadditional_conditions = and active = '1'
Now create the file /etc/postfix/header_checks, which will contain some directives to remove certain headers when relaying mail. This improves privacy for the sending users by such things as stripping theoriginal IP address and mail software identifiers, for example. This file will be referenced in the main Postfix configuration:
123456
/^Received:/ IGNORE/^User-Agent:/ IGNORE/^X-Mailer:/ IGNORE/^X-Originating-IP:/ IGNORE/^x-cr-[a-z]*:/ IGNORE/^Thread-Index:/ IGNORE
The following is the complete main Postfix configuration file at /etc/postfix/main.cf, which contains a fair number of complex choices and options on how mail is relayed and how SMTP behaves. It is far beyond the scope of this post to explain each and every choice of best practice or configuration parameter in detail. I strongly suggest that you spend some time reading up on Postfix configuration, asthis is where it is easy to fall down and produce a suboptimal or faulty mailserver.
1234
# See /usr/share/postfix/main.cf.dist for a commented, more complete version # The first text sent to a connecting process.
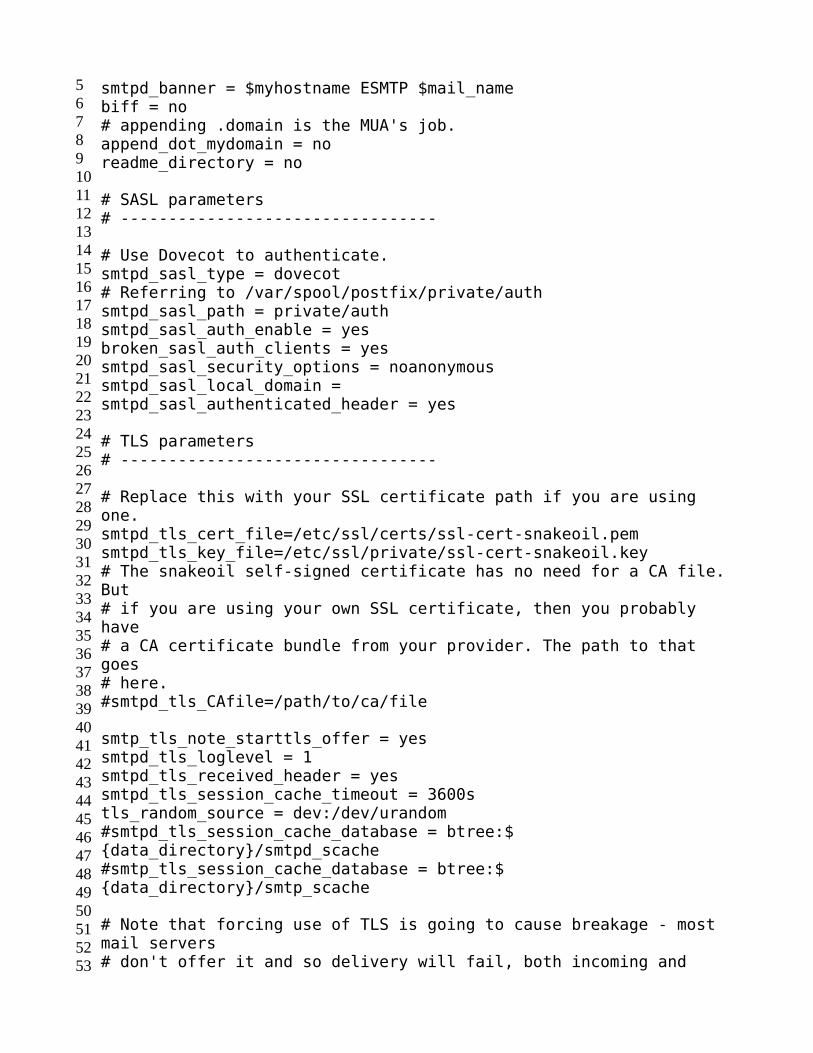
567891011121314151617181920212223242526272829303132333435363738394041424344454647484950515253
smtpd_banner = $myhostname ESMTP $mail_namebiff = no# appending .domain is the MUA's job.append_dot_mydomain = noreadme_directory = no # SASL parameters# --------------------------------- # Use Dovecot to authenticate.smtpd_sasl_type = dovecot# Referring to /var/spool/postfix/private/authsmtpd_sasl_path = private/authsmtpd_sasl_auth_enable = yesbroken_sasl_auth_clients = yessmtpd_sasl_security_options = noanonymoussmtpd_sasl_local_domain =smtpd_sasl_authenticated_header = yes # TLS parameters# --------------------------------- # Replace this with your SSL certificate path if you are using one.smtpd_tls_cert_file=/etc/ssl/certs/ssl-cert-snakeoil.pemsmtpd_tls_key_file=/etc/ssl/private/ssl-cert-snakeoil.key# The snakeoil self-signed certificate has no need for a CA file. But# if you are using your own SSL certificate, then you probably have# a CA certificate bundle from your provider. The path to that goes# here.#smtpd_tls_CAfile=/path/to/ca/file smtp_tls_note_starttls_offer = yessmtpd_tls_loglevel = 1smtpd_tls_received_header = yessmtpd_tls_session_cache_timeout = 3600stls_random_source = dev:/dev/urandom#smtpd_tls_session_cache_database = btree:${data_directory}/smtpd_scache#smtp_tls_session_cache_database = btree:${data_directory}/smtp_scache # Note that forcing use of TLS is going to cause breakage - most mail servers# don't offer it and so delivery will fail, both incoming and

54555657585960616263646566676869707172737475767778798081828384858687888990919293949596979899100101102
outgoing. This is# unfortunate given what various governmental agencies are up to these days. # These are Postfix 2.2 only.## Enable (but don't force) use of TLS on incoming smtp connections.smtpd_use_tls = yessmtpd_enforce_tls = no# Enable (but don't force) use of TLS on outgoing smtp connections.smtp_use_tls = yessmtp_enforce_tls = no # These are Postfix 2.3 and later.## Enable (but don't force) all incoming smtp connections to use TLS.smtpd_tls_security_level = may# Enable (but don't force) all outgoing smtp connections to use TLS.smtp_tls_security_level = may # See /usr/share/doc/postfix/TLS_README.gz in the postfix-doc package for# information on enabling SSL in the smtp client. # SMTPD parameters# --------------------------------- # Uncomment the next line to generate "delayed mail" warnings#delay_warning_time = 4h# will it be a permanent error or temporaryunknown_local_recipient_reject_code = 450# how long to keep message on queue before return as failed.# some have 3 days, I have 16 days as I am backup server for some people# whom go on holiday with their server switched off.maximal_queue_lifetime = 7d# max and min time in seconds between retries if connection failedminimal_backoff_time = 1000smaximal_backoff_time = 8000s# how long to wait when servers connect before receiving rest of datasmtp_helo_timeout = 60s# how many address can be used in one message.# effective stopper to mass spammers, accidental copy in whole

103104105106107108109110111112113114115116117118119120121122123124125126127
address list# but may restrict intentional mail shots.smtpd_recipient_limit = 16# how many error before back off.smtpd_soft_error_limit = 3# how many max errors before blocking it.smtpd_hard_error_limit = 12 # This next set are important for determining who can send mail and relay mail# to other servers. It is very important to get this right - accidentally producing# an open relay that allows unauthenticated sending of mail is a Very Bad Thing.## You are encouraged to read up on what exactly each of these options accomplish. # Requirements for the HELO statementsmtpd_helo_restrictions = permit_mynetworks, warn_if_reject reject_non_fqdn_hostname, reject_invalid_hostname, permit# Requirements for the sender detailssmtpd_sender_restrictions = permit_sasl_authenticated, permit_mynetworks, warn_if_reject reject_non_fqdn_sender, reject_unknown_sender_domain, reject_unauth_pipelining, permit# Requirements for the connecting serversmtpd_client_restrictions = reject_rbl_client sbl.spamhaus.org, reject_rbl_client blackholes.easynet.nl, reject_rbl_client dnsbl.njabl.org# Requirement for the recipient address. Note that the entry for# "check_policy_service inet:127.0.0.1:10023" enables Postgrey.smtpd_recipient_restrictions = reject_unauth_pipelining, permit_mynetworks, permit_sasl_authenticated, reject_non_fqdn_recipient, reject_unknown_recipient_domain, reject_unauth_destination, check_policy_service inet:127.0.0.1:10023, permitsmtpd_data_restrictions = reject_unauth_pipelining # require proper helo at connectionssmtpd_helo_required = yes# waste spammers time before rejecting themsmtpd_delay_reject = yesdisable_vrfy_command = yes # General host and delivery info# ---------------------------------- myhostname = mail.example.commyorigin = /etc/hostname

To be clear, if you are using a purchased SSL certificate - and have a CA certificate bundle from the issuer - then you will have to alter these lines in /etc/postfix/main.cf:
12345678
# Replace this with your SSL certificate path if you are using one.smtpd_tls_cert_file=/path/to/my/cert.pemsmtpd_tls_key_file=/path/to/my/key.key# The snakeoil self-signed certificate has no need for a CA file. But# if you are using your own SSL certificate, then you probably have# a CA certificate bundle from your provider. The path to that goes# here.#smtpd_tls_CAfile=/path/to/ca/file
Further, if you are running Postfix version 2.10 or later, which might be the case if you are reading this recipe for pointers on an installation on a later version of Ubuntu, then you will need to add the following lines:
123
# This is a new option as of Postfix 2.10, and is required in addition to# smtpd_recipient_restrictions for things to work properly in this setup.smtpd_relay_restrictions = reject_unauth_pipelining, permit_mynetworks, permit_sasl_authenticated, reject_non_fqdn_recipient, reject_unknown_recipient_domain, reject_unauth_destination, check_policy_service inet:127.0.0.1:10023, permit
You must also add some material to /etc/postfix/master.cf, and here is the entire file for clarity, including much of the default material from the package install - such as commented options:
12345678910111213141516171819202122
## Postfix master process configuration file. For details on the format# of the file, see the master(5) manual page (command: "man 5 master").## Do not forget to execute "postfix reload" after editing this file.## ==========================================================================# service type private unpriv chroot wakeup maxproc command + args# (yes) (yes) (yes) (never) (100)# ========================================================================== # SMTP on port 25, unencrypted.smtp inet n - - - - smtpd#smtp inet n - - - 1
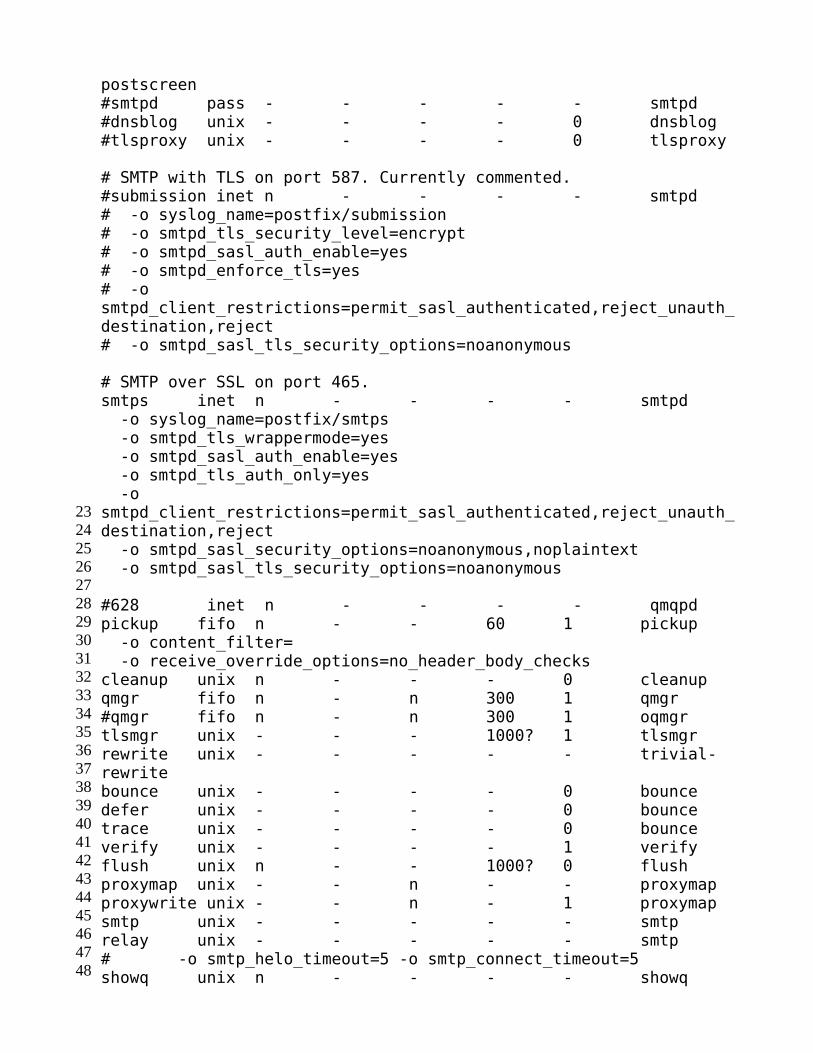
2324252627282930313233343536373839404142434445464748
postscreen#smtpd pass - - - - - smtpd#dnsblog unix - - - - 0 dnsblog#tlsproxy unix - - - - 0 tlsproxy # SMTP with TLS on port 587. Currently commented.#submission inet n - - - - smtpd# -o syslog_name=postfix/submission# -o smtpd_tls_security_level=encrypt# -o smtpd_sasl_auth_enable=yes# -o smtpd_enforce_tls=yes# -o smtpd_client_restrictions=permit_sasl_authenticated,reject_unauth_destination,reject# -o smtpd_sasl_tls_security_options=noanonymous # SMTP over SSL on port 465.smtps inet n - - - - smtpd -o syslog_name=postfix/smtps -o smtpd_tls_wrappermode=yes -o smtpd_sasl_auth_enable=yes -o smtpd_tls_auth_only=yes -o smtpd_client_restrictions=permit_sasl_authenticated,reject_unauth_destination,reject -o smtpd_sasl_security_options=noanonymous,noplaintext -o smtpd_sasl_tls_security_options=noanonymous #628 inet n - - - - qmqpdpickup fifo n - - 60 1 pickup -o content_filter= -o receive_override_options=no_header_body_checkscleanup unix n - - - 0 cleanupqmgr fifo n - n 300 1 qmgr#qmgr fifo n - n 300 1 oqmgrtlsmgr unix - - - 1000? 1 tlsmgrrewrite unix - - - - - trivial-rewritebounce unix - - - - 0 bouncedefer unix - - - - 0 bouncetrace unix - - - - 0 bounceverify unix - - - - 1 verifyflush unix n - - 1000? 0 flushproxymap unix - - n - - proxymapproxywrite unix - - n - 1 proxymapsmtp unix - - - - - smtprelay unix - - - - - smtp# -o smtp_helo_timeout=5 -o smtp_connect_timeout=5showq unix n - - - - showq

Note that Amavis is restricted to three processes, which should be fine for most casual to moderate use. The processes are memory-heavy, so start low and add more only if you need to due to volume of mail - see the notes in this guide for pointers on how to do that.
Restart Everything, and Test the Server
Restart all the necessary processes to pick up configuration changes:
12345
service postfix restartservice spamassassin restartservice clamav-daemon restartservice amavis restartservice dovecot restart
Now start testing! Keep an eye on /var/log/mail.err and /var/log/mail.log for error messages and try logging in to POP and IMAP, sending mail to an account created on the server, and sending mail from the server. If you find issues, then Google is your friend when it comes to searching on specific error messages in order to identify where the configuration is wrong, or when something unexpected crops up.
Thats the end of the mail server configuration.
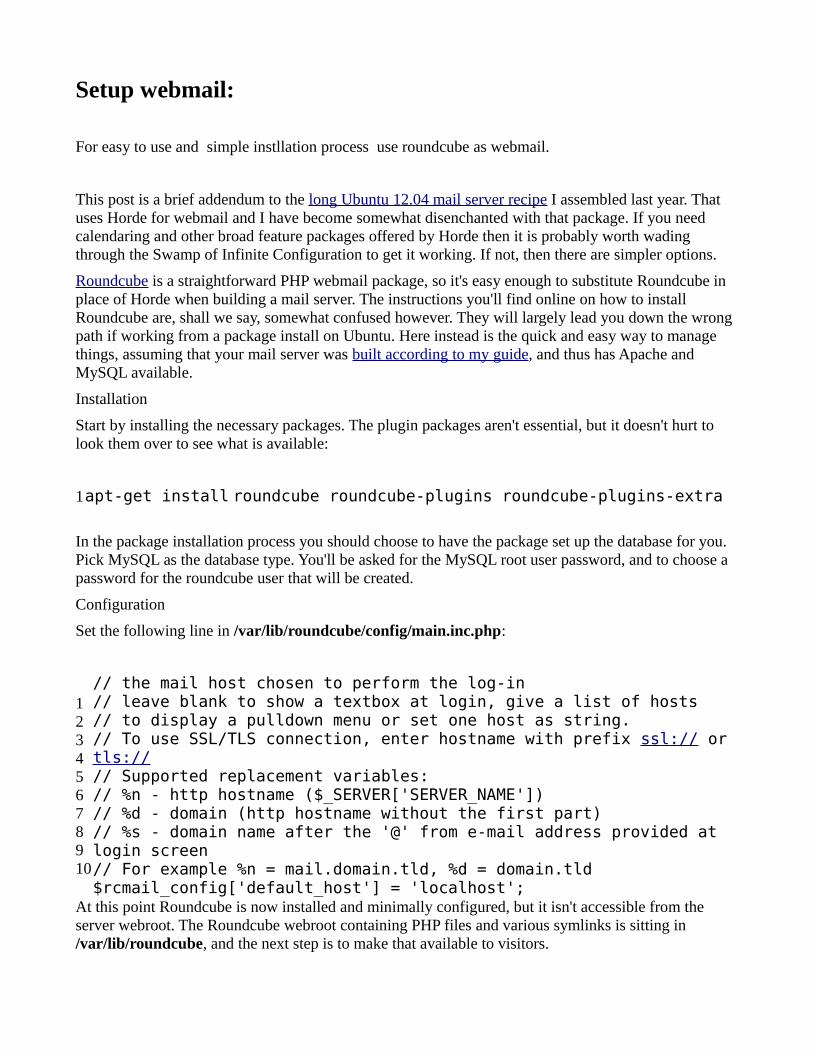
Setup webmail:
For easy to use and simple instllation process use roundcube as webmail.
This post is a brief addendum to the long Ubuntu 12.04 mail server recipe I assembled last year. That uses Horde for webmail and I have become somewhat disenchanted with that package. If you need calendaring and other broad feature packages offered by Horde then it is probably worth wading through the Swamp of Infinite Configuration to get it working. If not, then there are simpler options.
Roundcube is a straightforward PHP webmail package, so it's easy enough to substitute Roundcube in place of Horde when building a mail server. The instructions you'll find online on how to install Roundcube are, shall we say, somewhat confused however. They will largely lead you down the wrong path if working from a package install on Ubuntu. Here instead is the quick and easy way to manage things, assuming that your mail server was built according to my guide, and thus has Apache and MySQL available.
Installation
Start by installing the necessary packages. The plugin packages aren't essential, but it doesn't hurt to look them over to see what is available:
1apt-get install roundcube roundcube-plugins roundcube-plugins-extra
In the package installation process you should choose to have the package set up the database for you. Pick MySQL as the database type. You'll be asked for the MySQL root user password, and to choose a password for the roundcube user that will be created.
Configuration
Set the following line in /var/lib/roundcube/config/main.inc.php:
12345678910
// the mail host chosen to perform the log-in// leave blank to show a textbox at login, give a list of hosts// to display a pulldown menu or set one host as string.// To use SSL/TLS connection, enter hostname with prefix ssl:// or tls://// Supported replacement variables:// %n - http hostname ($_SERVER['SERVER_NAME'])// %d - domain (http hostname without the first part)// %s - domain name after the '@' from e-mail address provided at login screen// For example %n = mail.domain.tld, %d = domain.tld$rcmail_config['default_host'] = 'localhost';
At this point Roundcube is now installed and minimally configured, but it isn't accessible from the server webroot. The Roundcube webroot containing PHP files and various symlinks is sitting in /var/lib/roundcube, and the next step is to make that available to visitors.
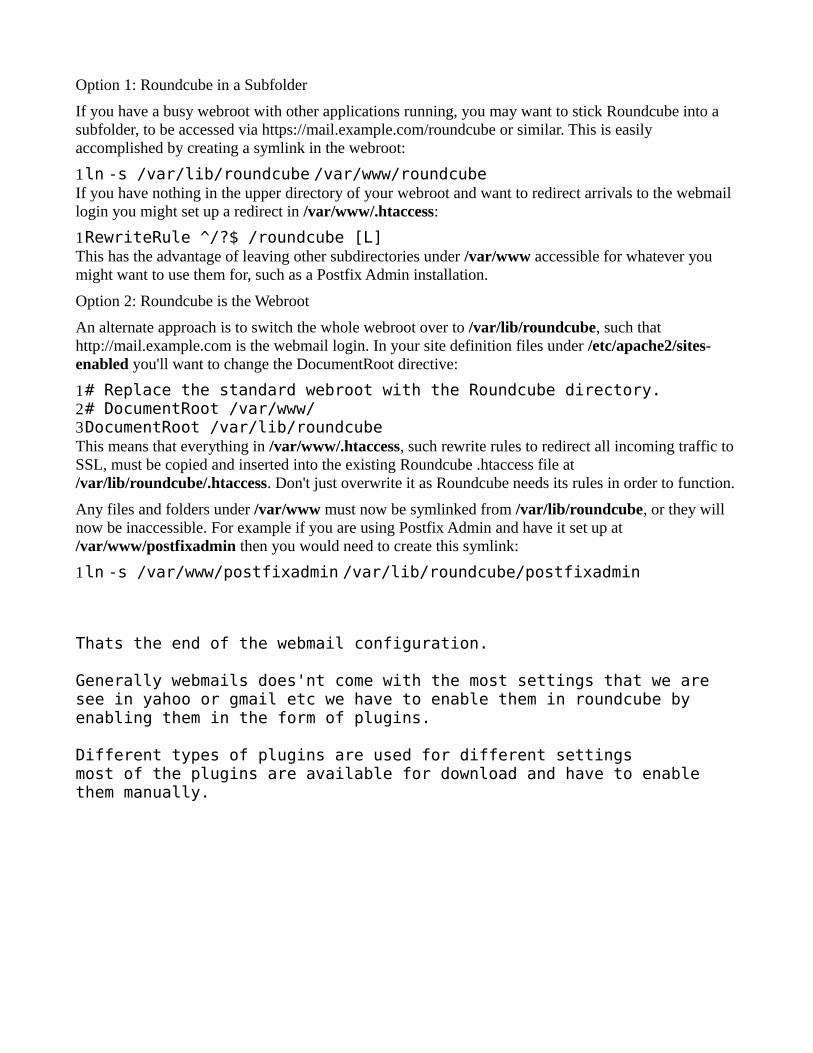
Option 1: Roundcube in a Subfolder
If you have a busy webroot with other applications running, you may want to stick Roundcube into a subfolder, to be accessed via https://mail.example.com/roundcube or similar. This is easily accomplished by creating a symlink in the webroot:
1ln -s /var/lib/roundcube /var/www/roundcubeIf you have nothing in the upper directory of your webroot and want to redirect arrivals to the webmail login you might set up a redirect in /var/www/.htaccess:
1RewriteRule ^/?$ /roundcube [L]This has the advantage of leaving other subdirectories under /var/www accessible for whatever you might want to use them for, such as a Postfix Admin installation.
Option 2: Roundcube is the Webroot
An alternate approach is to switch the whole webroot over to /var/lib/roundcube, such that http://mail.example.com is the webmail login. In your site definition files under /etc/apache2/sites-enabled you'll want to change the DocumentRoot directive:
123
# Replace the standard webroot with the Roundcube directory.# DocumentRoot /var/www/DocumentRoot /var/lib/roundcube
This means that everything in /var/www/.htaccess, such rewrite rules to redirect all incoming traffic to SSL, must be copied and inserted into the existing Roundcube .htaccess file at /var/lib/roundcube/.htaccess. Don't just overwrite it as Roundcube needs its rules in order to function.
Any files and folders under /var/www must now be symlinked from /var/lib/roundcube, or they will now be inaccessible. For example if you are using Postfix Admin and have it set up at /var/www/postfixadmin then you would need to create this symlink:
1ln -s /var/www/postfixadmin /var/lib/roundcube/postfixadmin
Thats the end of the webmail configuration.
Generally webmails does'nt come with the most settings that we are see in yahoo or gmail etc we have to enable them in roundcube by enabling them in the form of plugins.
Different types of plugins are used for different settingsmost of the plugins are available for download and have to enable them manually.


![Wire Security WhitepaperSecurity+Whitepaper.pdf · Client Server E-Mail Server c 2 R [0;2192 1] Register(Profilename,E-Mail) E-Mailc FetchE-Mail E-MailResponse c (UUID,Cookie) Figure2.1:](https://static.fdocuments.us/doc/165x107/5ea2faa32c7e7d620457d27b/wire-security-whitepaper-security-client-server-e-mail-server-c-2-r-02192.jpg)


