LUBRICATION AND MAINTENANCE CHART - jholst.netjholst.net/63-service-manual/lubrication.pdf ·...
18
LUBRICATION AND MAINTENANCE 0-1 LUBRICATION AND MAINTENANCE CHART N Engine OH Filter Element (Replace) every 6 months to coincide with an oil change. Battery {Check Level) every 2 months. PSF Power Steering Reservoir (Check Level). Fill to top of filler neck when cold, halfway when hot (every 6 months). Crankcase Dipstick Check level when refueling. EO Engine Oil (Change) every 2 months (not to exceed 4,000 miles). Use oil for service "MS" Above +32° ..... 30 20W-40, 10W-30 Above +10° .20W 10W-30 Above —10° 10W 10W-30, 5W-20 Below —10° 5W-20 Carburetor Air Cleaner (Clean every 6 months). Not to exceed 8,000 Miles (Replace Element) 32,000 Miles. HTF Brake Master Cylinder (Check Level) Fill to VA- inch below top of reservoir (every 6 months). MML Front Suspension Ball Joints (every 6 months). Inspect seals for damage, replace if necessary. After replacing seal or when relubricating, remove plug, use special gun or proper adapter. Install plug. (Every 32,000 Miles) Relubricate using special adapter. Fill until grease flows from upper ball joint bleed holes or lower joint seal lower lip. Do not rupture seals. Reinstall plug. MML Steering Linkage Pivot Seals (every 6 months). Inspect seals for damage, replace if damaged or worn. UJ2 Universal Joints every 6 months, inspect seals for leakage. Relubricate as necessary. MP Universal Joint Spline every 6 months inspect for leakage. Relubricate as necessary. Above -10°, 80; -10°, 75. Disassemble, fill half-full. MP Rear Axle (Check Level) every 6 months. Above —10°, 90; as low as —30°, 80; below — 3 0 ° , 75. Maintain level V2 -inch below fill plug hole. (Sure Grip —Use MHL Lube.) SURE-GRIP IDENTIFICATION: Metal tag attached to housing near fill plug. CAPACITIES Engine Oil 5 qts. (Add 1 qt. when replacing filter element) Cooling System (Add 1 qt. for heater) Rear Axle Transmission (refill) TorqueFlite 1 6 qts. 4 pts. 1 8 pts. A Prepacked bearing # Cooling system drain IMPERIAL Engine Coolant—Check level and/or Anti-Freeze every 2 months. Cooling system pressure, 14 pounds; with air conditioning, 16 pounds. DCL Distributor Cam every 6 months. EO Distributor Oil Cup and Wick under Rotor every 6 months. "In Line" Carburetor Fuel Filter (Replace) 16,000 Miles. Manifold Heat Control Valve treat with solvent every 6 months. Engine Crankcase Vent Valve (Clean) every 6 months. Automatic Transmission every 6 months. Check level, engine idling and thoroughly warm, NEU- TRAL position. To overcome difficult starting below — 10°, replace IV2 pints fluid with kerosene. Do not dilute more than once during any one season. Engine Tune-Up every 10,000 Miles. Body Hardware (every 6 months). DPO Door and Tailgate Hinges and Rotors. SL Striker Plates and Torsion Bar Roller Cams. Hood Hinges and Locks—License Plate Mount- ing Springs—Fuel Tank Cover. Deck Lid Latch. Front Wheel Bearings (Inspect—Repack if neces- or sary) 16,000 Miles (Clean, Repack and Adjust) AMG 32,000 Miles. Tighten front wheel adjusting nut to 9 0 in.-lb., position lock nut over adjusting nut so that one set of slots on lock nut aligns with drilled hole in axle spindle. Back off adjusting and lock nuts one slot and install cotter key. TIRES Pressure Front Rear 8.20-15 24 24 Rotate Tires using spare every 5,000 Miles. KEY TO LUBRICANTS Automatic Trans. Fluid Type "A" Suffix "A" Automotive Multi-Purpose Grease Chassis Lubricant Distributor Cam Lubricant Engine Oil High Temperature Brake Fluid Speedometer Cable Lubricant MoPar Hypoid Lubricant Lubriplate MoPar Multi-Mileage Lubricant Multi-Purpose Gear Lubricant Dripless Penetrating Oil Power Steering Fluid Manifold Heat Control Valve Solvent Stainless Stick Lubricant Wheel Bearing Lubricant—Medium Universal Joint Lubricant 63x417
Transcript of LUBRICATION AND MAINTENANCE CHART - jholst.netjholst.net/63-service-manual/lubrication.pdf ·...
LUBRICATION AND MAINTENANCE 0-1
LUBRICATION AND MAINTENANCE CHART N
Engine OH Filter Element (Replace) every 6 months to coincide with an oil c h a n g e .
Battery {Check Level) every 2 months.
PSF Power Steering Reservoir (Check Level) . Fill to top of filler neck when cold, h a l f w a y when hot (every 6 months).
C r a n k c a s e Dipstick Check level when refueling.
E O Engine O i l (Change) every 2 months (not to e x c e e d 4 , 0 0 0 miles).
Use oil for service " M S "
Above + 3 2 ° . . . . . 3 0 2 0 W - 4 0 , 1 0 W - 3 0 Above + 1 0 ° . 2 0 W 1 0 W - 3 0 Above — 1 0 ° 1 0 W 1 0 W - 3 0 , 5 W - 2 0 Below — 1 0 ° 5 W - 2 0
Carburetor A i r Cleaner (Clean every 6 months). Not to e x c e e d 8 , 0 0 0 Miles (Rep lace Element) 3 2 , 0 0 0 Miles.
HTF Brake Master Cyl inder (Check Level) Fill to VA-inch below top of reservoir (every 6 months).
MML Front Suspension Ball Joints (every 6 months). Inspect seals for d a m a g e , r e p l a c e if necessary . After replacing seal or when relubricating, remove plug, use special gun or proper a d a p t e r . Install plug.
(Every 3 2 , 0 0 0 Miles) Relubricate using special a d a p t e r . Fill until g rease flows from upper bal l joint b leed holes or lower joint s e a l lower l ip. Do not rupture seals. Reinstall p lug.
MML Steering Linkage Pivot Seals (every 6 months). Inspect seals for d a m a g e , r e p l a c e if d a m a g e d or worn.
U J 2 Universa l Joints every 6 months, inspect seals for l e a k a g e . Relubricate as necessary .
MP Universa l Joint Spline every 6 months inspect for l e a k a g e . Relubricate as necessary . Above - 1 0 ° , 8 0 ; - 1 0 ° , 7 5 . Disassemble, fill half-full.
MP Rear A x l e (Check Level) every 6 months. Above — 1 0 ° , 9 0 ; as low as — 3 0 ° , 8 0 ; below — 3 0 ° , 7 5 . Maintain level V2 -inch below fill plug hole. (Sure Gr ip — U s e MHL Lube.) SURE-GRIP IDENTIFICATION: Metal tag attached to housing n e a r fill plug.
C A P A C I T I E S
Engine Oi l 5 qts. (Add 1 qt. when replacing filter element)
Cooling System (Add 1 qt. for heater)
Rear Axle
Transmission (refill) TorqueFlite
1 6 qts.
4 pts.
1 8 pts.
A Prepacked bearing
# Cooling system drain
IMPERIAL
Engine C o o l a n t — C h e c k level a n d / o r Ant i -Freeze every 2 months. Cooling system pressure, 14 pounds; with air conditioning, 16 pounds.
DCL Distributor C a m every 6 months.
E O Distributor O i l Cup a n d Wick under Rotor every 6 months.
" I n L i n e " Carburetor Fuel Filter (Replace) 1 6 , 0 0 0 Miles.
Mani fold Heat Control V a l v e treat with solvent every 6 months.
Engine Crankcase Vent V a l v e (Clean) every 6 months.
Automat ic T ransmiss ion every 6 months. Check level , engine idling and thoroughly warm, N E U TRAL position. To overcome difficult starting below — 10° , replace IV2 pints fluid with kerosene. Do not dilute more than once during any one season.
Eng ine Tune-Up every 10 ,000 Miles.
B o d y Hardware (every 6 months).
D P O Door and Tai lgate Hinges a n d Rotors.
SL Striker Plates and Torsion Bar Roller C a m s .
Hood Hinges a n d L o c k s — L i c e n s e Plate Mounting Spr ings—Fue l Tank C o v e r .
Deck Lid Latch.
Front Wheel Bearings ( Inspect—Repack if neces-or sa ry ) 16 ,000 Miles (C lean , Repack and Adjust) A M G 3 2 , 0 0 0 Miles.
Tighten front wheel adjusting nut to 9 0 in.-lb., position lock nut over adjusting nut so that one set of slots on lock nut aligns with drilled hole in a x l e spindle. Back off adjusting and lock nuts one slot and install cotter key .
TIRES Pressure Front Rear 8 . 2 0 - 1 5 2 4 2 4
Rotate Tires using spare every 5 , 0 0 0 Miles.
K E Y T O L U B R I C A N T S
Automat ic Trans . F lu id Type " A " Suffix " A " Automot ive Mult i -Purpose G r e a s e C h a s s i s Lubricant Distributor C a m Lubr icant Engine O i l High Temperature Brake F lu id Speedometer Cable Lubricant MoPar Hypoid Lubricant Lubriplate MoPar Mult i -Mi leage Lubricant Mult i -Purpose G e a r Lubricant Dripless Penetrating O i l Power Steering Fluid Manifold Heat Control V a l v e Solvent Stainless Stick Lubricant Wheel Bear ing Lubr icant—Medium Universa l Joint Lubricant
6 3 x 4 1 7
0-2 LUBRICATION AND MAINTENANCE
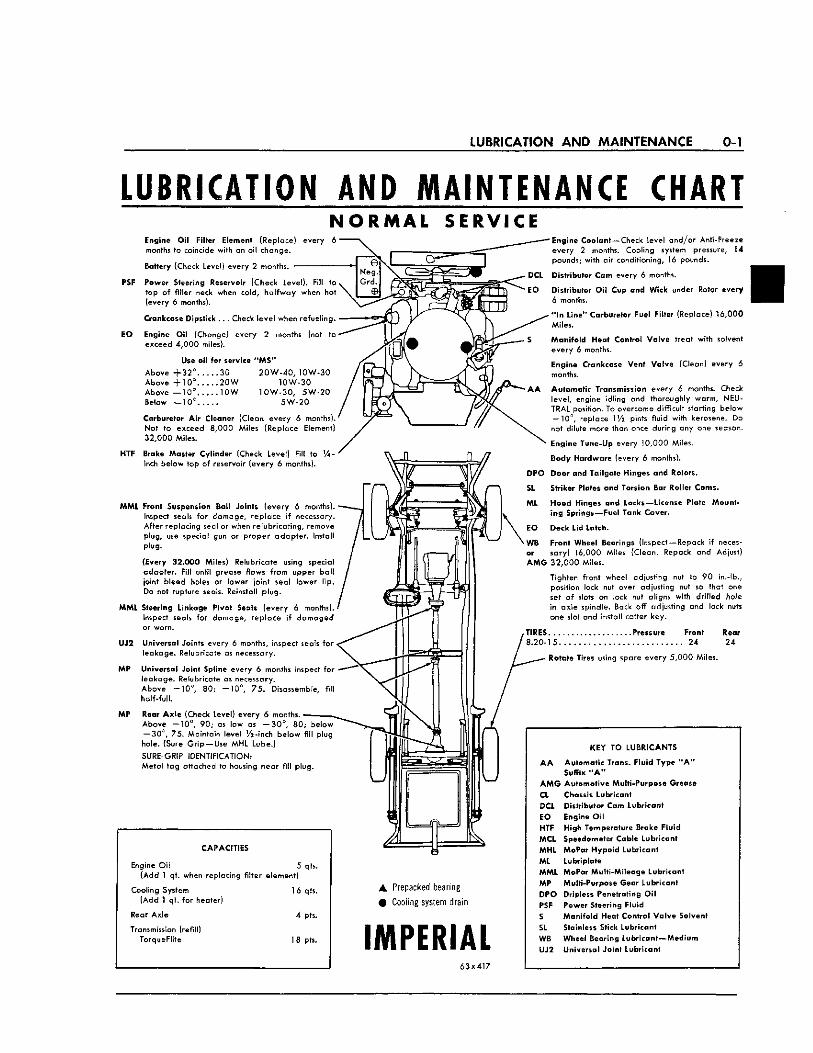
LUBRICATION AND MAINTENANCE CHART Engine O i l Filter Element (Replace) every 6 months to coincide with an oil change .
Battery (Check Level) every 2 months.
N O R M A L S E R V I C E 3 0 0 , Newport
P S F P o w e r Steering Reservoi r (Check Level ) . Fill to top of filler neck when cold , h a l f w a y when hot (every 6 months).
C r a n k c a s e Dipstick Check level when refuel ing.
E O Engine O i l (Change) every 2 months (not to e x c e e d 4 , 0 0 0 miles).
Use oil for serv ice " M S "
A b o v e + 3 2 ° 3 0 2 0 W - 4 0 , 1 0 W - 3 0 A b o v e + 1 0 ° 2 0 W 1 0 W - 3 0 Above — 1 0 ° 1 0 W 1 0 W - 3 0 , 5 W - 2 0 Below — 1 0 ° 5 W - 2 0
Carburetor A i r C l e a n e r (Clean every 6 months). Not to e x c e e d 8 , 0 0 0 Miles (Replace Element) 3 2 , 0 0 0 Miles.
M P M a n u a l Steering G e a r (Check Level) A b o v e — 3 0 ° , 8 0 ; below — 3 0 ° , 7 5 (every 6 months).
HTF Brake Master Cy l inder (Check Level) Fill to J 4 -inch below top of reservoir (every 6 months).
MML Front Suspens ion Bal l Joints (every 6 months). Inspect seals for d a m a g e , rep lace if necessary . After replacing sea l or when relubricating, remove plug, use specia l gun or proper a d a p t e r . Install plug.
(Every 3 2 , 0 0 0 Mi les) Relubricate using specia l a d a p t e r . Fill until g r e a s e flows from upper bal l joint b leed holes or lower joint s e a l lower l ip. Do not rupture seals . Reinstall plug.
MML Steering L inkage Pivot Sea ls (every 6 months). Inspect seals for d a m a g e , rep lace if d a m a g e d or worn,
A M G Clutch Torque Shaft (every 3 2 , 0 0 0 Miles). Disassemble, repack both ends.
A A M a n u a l T r a n s m i s s i o n (Check Level) every 6 months. Maintain level to fill plug hole.
E O Gearshi f t Lever (every 6 months) . . . Remove rubber boot from floor pane l , a p p l y lubricant to pivot points and yoke selector mechanism.
U J 2 Un iversa l Joints every 6 months, inspect sea ls for l e a k a g e . Relubricate as necessary .
M P Rear A x l e (Check Level) every 6 months. — 1 — — Above - 1 0 ° , 9 0 ; as low as — 3 0 ° , 8 0 ; below — 3 0 ° , 7 5 . Maintain level Vi-inch below fill plug hole. (Sure G r i p — U s e MHL Lube.) S U R E - G R I P IDENTIFICATION: Metal tag at tached to housing near fill p lug.
C A P A C I T I E S
Engine O i l 5 qts. (Add 1 qt. when replacing filter element)
Cooling System 1 6 qts. (Add 1 qt. for heater)
Rear Ax le 4 pts.
Transmission (refill) TorqueFlite 1 8 pts. Manual AVi pts.
• Position for lift adapter
A Prepacked bearing
# Cooling system drain
CHRYSLER 6 3 x 4 1 8
Engine C o o l a n t — C h e c k level a n d / o r Ant i -Freeze every 2 months. Cooling system pressure, 14 pounds; with air conditioning, 16 pounds.
DCL Distributor C a m every 6 months.
E O Distributor O i l C u p a n d Wick under Rotor every 6 months.
" I n L i n e " Carburetor Fuel Filter (Replace) 1 6 , 0 0 0 Miles.
S Mani fo ld Heat Control V a l v e treat with solvent every 6 months.
Eng ine C r a n k c a s e Vent V a l v e (Clean) every 6 months.
Automat ic T ransmiss ion every 6 months. Check level , engine idling and thoroughly warm, N E U TRAL position. To overcome difficult starting below — 10° , rep lace 1 Vi pints fluid with kerosene. Do not dilute more than once during any one season .
Engine Tune-Up every 10 ,000 Miles.
Body Hardware (every 6 months).
D P O Door a n d Tai lgate Hinges a n d Rotors.
SL Striker Plates a n d Torsion Bar Roller C a m s .
Hood Hinges a n d Locks—-License Plate Mounting S p r i n g s — F u e l Tank C o v e r .
Deck Lid Latch .
Front Wheel Bear ings ( Inspect—Repack if neces-or sa ry ) 1 6 , 0 0 0 Miles (C lean , Repack and Adjust) A M G 3 2 , 0 0 0 Miles.
Tighten front wheel adjusting nut to 7 0 in.-lb., position lock nut over adjusting nut so that one set of slots on lock nut aligns with dril led hole in a x l e spindle. Back off adjusting and lock nuts one slot and install cotter key.
T I R E S . . . Rear 8 . 0 0 - 1 4 3 0 0 - J 2 4 2 4 8 . 0 0 - 1 4 2 4 2 2 8 . 5 0 - 1 4 Newport , Town & C o u n t r y . . . 2 2 2 4 * 8 . 5 0 - 1 4 2 4 2 2 9 . 0 0 - 1 4 N e w Yorker , Town & Country. 2 2 2 4 *
*Wi th h e a v y l o a d , 2 8 .
Rotate Tires using s p a r e every 5 , 0 0 0 Miles.
A A
A M G CL DCL E O HTF M C L MHL ML MML MP D P O PSF S
SL WB U J 2
K E Y T O L U B R I C A N T S
Automat ic T r a n s . F lu id Type " A " Suffix " A " Automot ive Mult i -Purpose G r e a s e C h a s s i s Lubricant Distributor C a m Lubricant
Eng ine O i l High Temperature Brake F lu id Speedometer C a b l e Lubricant MoPar Hypoid Lubricant Lubriplate MoPar Mult i -Mi leage Lubr icant Mult i -Purpose G e a r Lubricant Dr ip less Penetrating O i l P o w e r Steering F lu id Mani fo ld Heat Control V a l v e Solvent Sta in less Stick Lubricant Wheel Bear ing Lubr ican t—Medium Un iversa l Joint Lubricant
LUBRICATION AND MAINTENANCE 0-3
GROUP 0
LUBRICATION AND MAINTENANCE CONTENTS
Page Air Cleaner 6 Alternator 7 Battery 7 Body Maintenance 7 Brakes 8 Capacities Chart 3 Carburetor Choke Piston 6 Certified Car Care—Brake System 16 Certified Car Care—Engine Tune-up 16 Certified Car Care—Front Suspension . . . . . . . . . . . . . . . 17 Certified Car Care—Semi-Annua I Maintenance 16 Certified Car Care—Maintenance Record 18 Chassis Lubrication 8 Clutch Torque Shaft. 10 Cooling System 11 Crankcase Ventilator Valve 6 Distributor 11 Engine Oil 4
Frequency of Oil Change 5 Fuel Filter 7 Gearshift Lever 12 Headlamps 12 Manifold Heat Control Valve. 7 Oil Filter 7 1,000 Mile Inspection. 15 Parts Requiring No Lubrication 12 Propeller Shafts and Universal Joints. 12 Rear Axle and Sure-Grip. 13 Selection of Lubricant 5 Speedometer Cable 13 Steering 13 Tires . . . . . 14 Transmission 14 Wheel Bearings 11 Windshield Wipers 15
SUMMARY OF LUBRICATION AND MAINTENANCE SERVICES
Maintenance and lubrication services recommendations for the 1963 Chrysler Corporation cars have been compiled (designed etc.) to provide maximum protection to vehicle owners against all types of driving conditions. These, as well as driving habits, are so varied that to prescribe the lubrication and maintenance services on a mileage basis only did not take care of those who drove fewer miles during equal length time periods, especially during adverse weather conditions.
These recommendations, therefore, have been related to the best of our ability to time intervals, yet limited by mileage where necessary. In general, semiannual lubrication and maintenance services have been prescribed for most items. Exceptions to this include two month intervals between engine oil
changes, (not to exceed 4,000 miles) opposed to the front suspension lubrication every 32,000 miles.
CERTIFIED CAR CARE Certified Car Care is a thorough servicing program
that helps make sure the vehicles you sell get the regular attention you know they need.
Certified Car Care helps build business for you in the surest way known — through customer satisfaction, not to mention the extra profits from the service department. Tell your owner that the best approach to trouble-free driving is Certified Car Care . . .
A practical plan to build sales and service for you, providing for regular customer service at your dealerships.
1. ENGINE OIL Lubricants are classified and graded according to
standards recommended by the Society of Automotive Engineers (SAE), the American Petroleum Institute (API) and the National Lubricating Grease Institute (NLGI).
The SAE grade number indicates the viscosity of
the lubricant. (Example, SAE 30). Engine oils may have a dual number, one of which is SAE 10W-30. This marking indicates that the oil is comparable to SAE 10W, SAE 20W and SAE 30 grades.
The API designations relate to the type of service for which the engine oil is recommended. The three designations are "MS" "MM" and "ML". AH engines
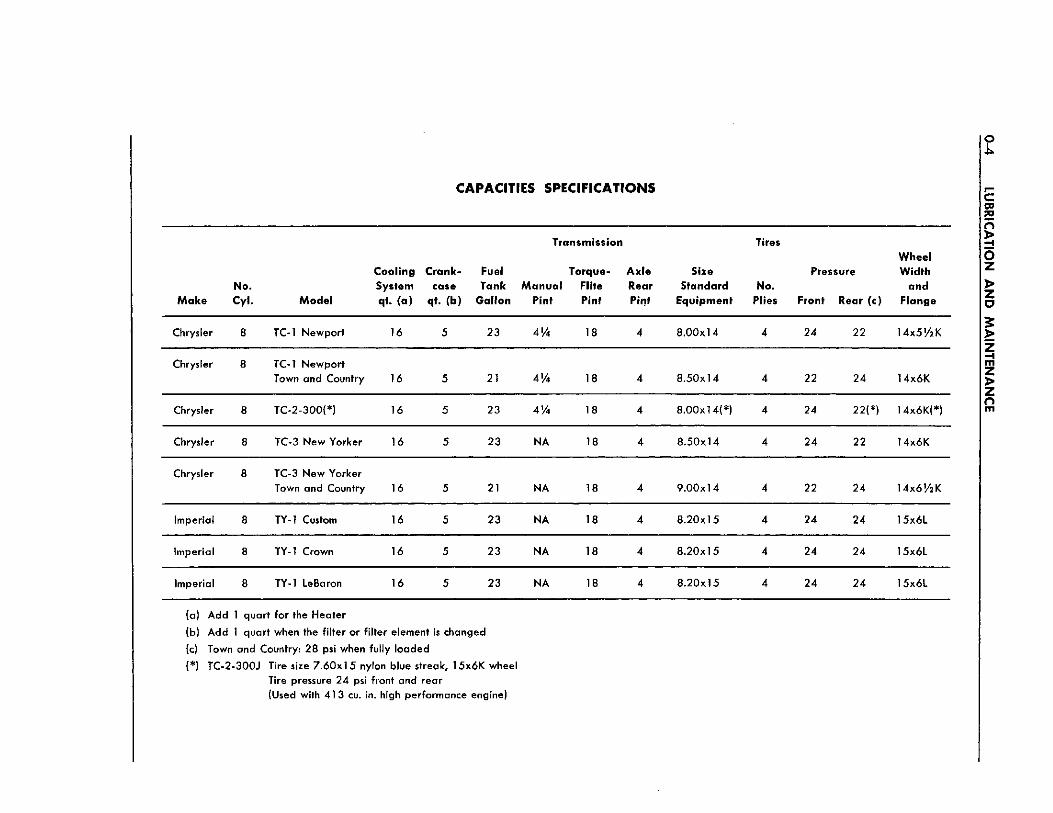
CAPACITIES SPECIFICATIONS
Transmission Tires Wheel
Make No. Cyl. Model
Cooling System qt. (a)
Crankcase
qt. (b)
Fuel Tank
Gallon Manual
Pint
Torque-Flile Pint
Axle Rear Pint
Size Standard
Equipment No.
Plies
Pressure
Front Rear (c)
Width and
Flange
Chrysler 8 TC-l Newport 16 5 23 18 4 8.00x14 4 24 22 14x5!/2K
Chrysler 8 TC-l Newport Town and Country 16 5 21 13 4 8.50x14 4 22 24 14x6K
Chrysler 8 TC-2-300(*) 16 5 23 414 18 4 8.00x14(*) 4 24 22(*) 14x6K(*)
Chrysler 3 TC-3 New Yorker 16 5 23 NA 18 4 8.50x14 4 24 22 14x6K
Chrysler 8 TC-3 New Yorker Town and Country 16 5 21 NA 18 4 9.00x14 4 22 24 14x61/2 K
Imperial 8 TY-1 Custom 16 5 23 NA 18 4 8.20x15 4 24 24 15x6L
Imperial 8 TY-1 Crown 16 5 23 NA 18 4 8.20x15 4 24 24 15x6L
Imperial 8 TY-1 LeBaron 16 5 23 NA 18 4 8.20x15 4 24 24 15x6L
(a) Add 1 quart for the Heater (b) Add 1 quart when the filter or filter element is changed (c) Town and Country.- 28 psi when fully loaded (*) TC-2-300J Tire size 7.60x15 nylon blue streak, 15x6K wheel
Tire pressure 24 psi front and rear (Used with 41 3 cu. in. high performance engine)
LUBRICATION AND MAINTENANCE 0-5
require the MS oils. Both the SAE number and the MS designation
should be marked on the container. Complete information pertaining to the lubrication
points, is shown in Figures 1 and 2, for Imperial and Chrysler Models. 2 . SELECTION O F LUBRICANT
For all engines, and in all types of operations, only oils should be used which conform to the requirements of the API classification "For Service MS". "Straight Mineral Oils" should never be used.
Both the SAE number and the MS designation should be marked on the container.
For the best performance and engine protection oils should be selected according to the anticipated temperature, as shown in the following table: Anticipated Temperature
Range Above +30°F. As Low as +10°F. As Low As -10°F. Below —10°F.
Viscosity Number
SAE 30, 10W-30, 20W-40 SAE 20W, 10W-30 SAE 10W, 5W-20, 10W-30 SAE 5W-20
Chrysler Corporation does not recommend the use of any lubricants which do not have both an SAE designation and an MS service Classification printed on the container.
Materials Added to Engine Oils For most types of service, it is not necessary to
add any materials to the crankcase oils. In some instances, however, driving conditions such as short trips, or infrequent use of the vehicle, may cause rust to form in the engine. Mopar Engine Oil Supplement, an anti-rust material, is available to prevent this occurrence. Mopar Engine Oil Supplement also has anti-scuff properties and should be used during the break-in period after a major engine overhaul. 3 . FREQUENCY O F OIL CHANGE
The engine oil change period will vary widely depending upon the type of operation, weather conditions and other operating variables.
Chrysler Corporation recommends that engine oil should be changed every two months, or up to 4,000 miles, whichever occurs first.
Every 4,000 miles under favorable operating conditions, such as highway driving.
Every two months for adverse conditions of operations such as less than 10 miles per trip.
For short trips in cold weather, or driving on dusty roads the oil changes should be made more frequently.
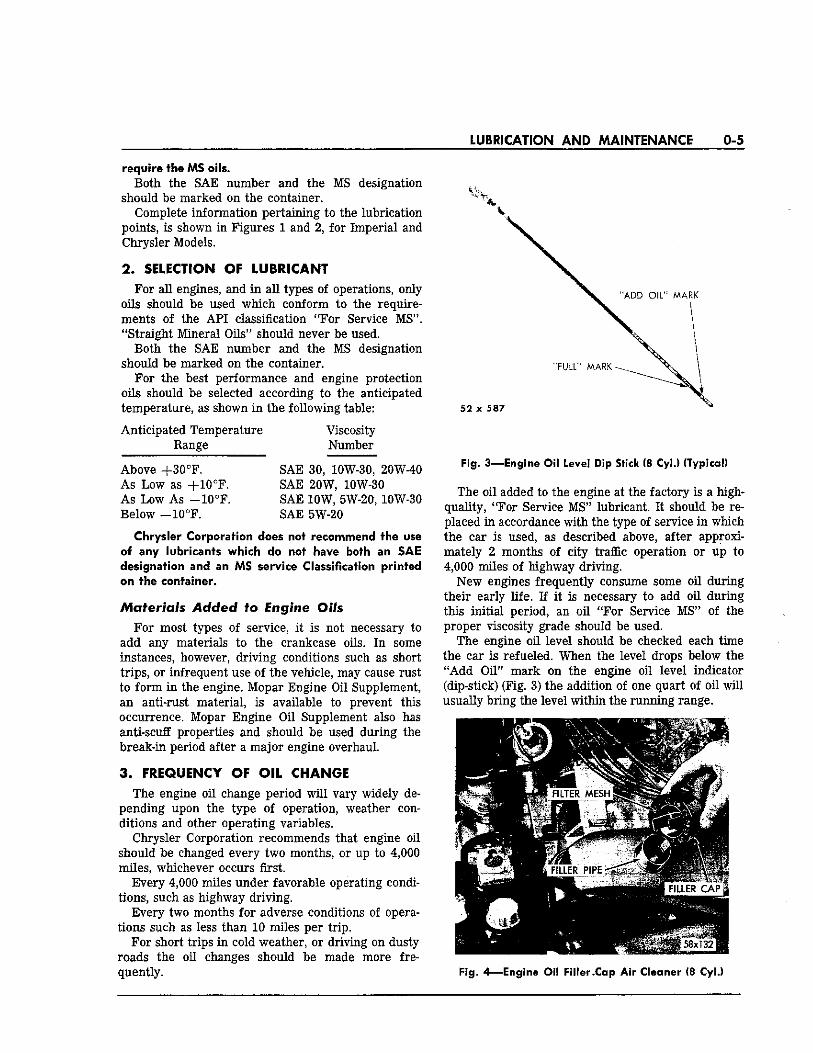
'ADD OIL" MARK
"FULL" MARK
52 x 587
Fig. 3—Engine Oil Level Dip Stick (8 Cyl.) (Typical)
The oil added to the engine at the factory is a high-quality, "For Service MS" lubricant. It should be replaced in accordance with the type of service in which the car is used, as described above, after approximately 2 months of city traffic operation or up to 4,000 miles of highway driving.
New engines frequently consume some oil during their early life. If it is necessary to add oil during this initial period, an oil "For Service MS" of the proper viscosity grade should be used.
The engine oil level should be checked each time the car is refueled. When the level drops below the "Add Oil" mark on the engine oil level indicator (dip-stick) (Fig. 3) the addition of one quart of oil will usually bring the level within the running range.
} ' • 58xl32j
Fig. 4—Engine Oil Filler .Cap Air Cleaner (8 Cyl.)
0-6 LUBRICATION AND MAINTENANCE
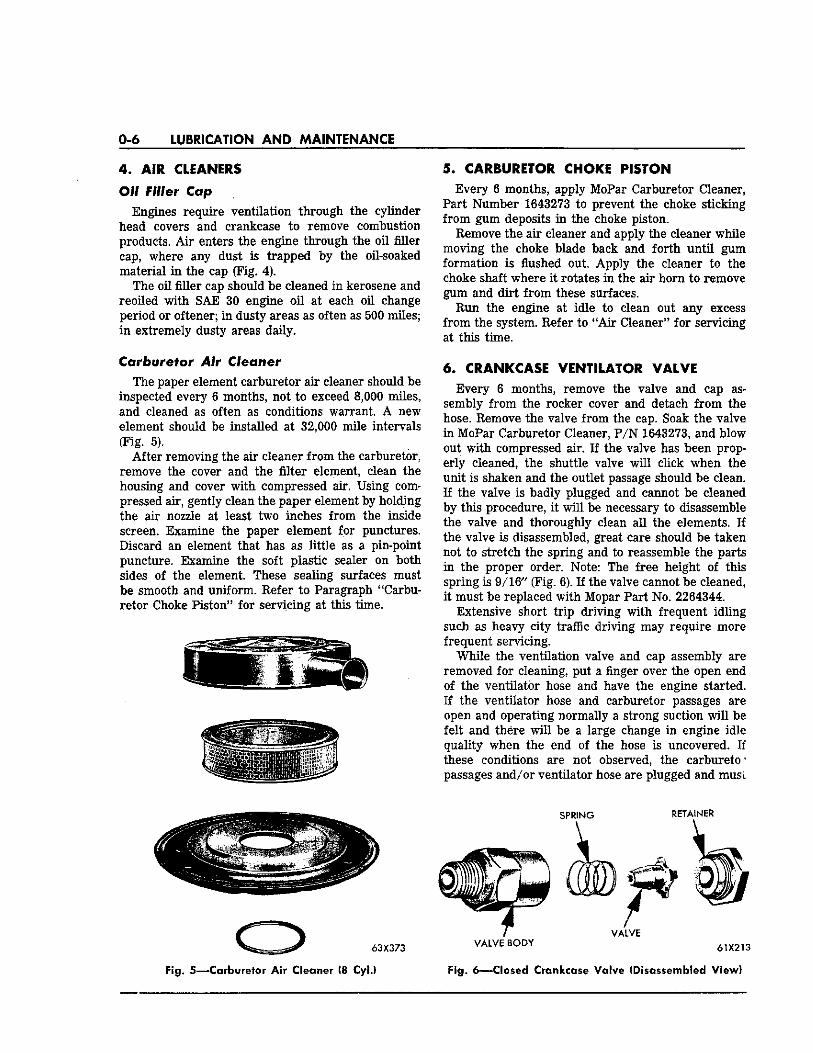
4 . AIR CLEANERS
Oi l Filler Cap Engines require ventilation through the cylinder
head covers and crankcase to remove combustion products. Air enters the engine through the oil filler cap, where any dust is trapped by the oil-soaked material in the cap (Fig. 4).
The oil filler cap should be cleaned in kerosene and reoiled with SAE 30 engine oil at each oil change period or oftener; in dusty areas as often as 500 miles; in extremely dusty areas daily. Carburetor Air Cleaner
The paper element carburetor air cleaner should be inspected every 6 months, not to exceed 8,000 miles, and cleaned as often as conditions warrant. A new element should be installed at 32,000 mile intervals (Fig. 5).
After removing the air cleaner from the carburetor, remove the cover and the filter element, clean the housing and cover with compressed air. Using compressed air, gently clean the paper element by holding the air nozzle at least two inches from the inside screen. Examine the paper element for punctures. Discard an element that has as little as a pin-point puncture. Examine the soft plastic sealer on both sides of the element. These sealing surfaces must be smooth and uniform. Refer to Paragraph "Carburetor Choke Piston" for servicing at this time.
Fig. 5—Carburetor Air Cleaner (8 Cyl.)
5. CARBURETOR CHOKE PISTON Every 6 months, apply MoPar Carburetor Cleaner,
Part Number 1643273 to prevent the choke sticking from gum deposits in the choke piston.
Remove the air cleaner and apply the cleaner while moving the choke blade back and forth until gum formation is flushed out. Apply the cleaner to the choke shaft where it rotates in the air horn to remove gum and dirt from these surfaces.
Run the engine at idle to clean out any excess from the system. Refer to "Air Cleaner" for servicing at this time. 6. CRANKCASE VENTILATOR V A L V E
Every 6 months, remove the valve and cap assembly from the rocker cover and detach from the hose. Remove the valve from the cap. Soak the valve in MoPar Carburetor Cleaner, P/N 1643273, and blow out with compressed air. If the valve has been properly cleaned, the shuttle valve will click when the unit is shaken and the outlet passage should be clean. If the valve is badly plugged and cannot be cleaned by this procedure, it will be necessary to disassemble the valve and thoroughly clean all the elements. If the valve is disassembled, great care should be taken not to stretch the spring and to reassemble the parts in the proper order. Note: The free height of this spring is 9/16" (Fig. 6). If the valve cannot be cleaned, it must be replaced with Mopar Part No. 2264344.
Extensive short trip driving with frequent idling such as heavy city traffic driving may require more frequent servicing.
While the ventilation valve and cap assembly are removed for cleaning, put a finger over the open end of the ventilator hose and have the engine started. If the ventilator hose and carburetor passages are open and operating normally a strong suction will be felt and there will be a large change in engine idle quality when the end of the hose is uncovered. If these conditions are not observed, the carbureto* passages and/or ventilator hose are plugged and must
SPRING RETAINER
VALVE BODY 6 } m
Fig. 6—Closed Crankcase Valve (Disassembled View)
LUBRICATION AND MAINTENANCE 0-7
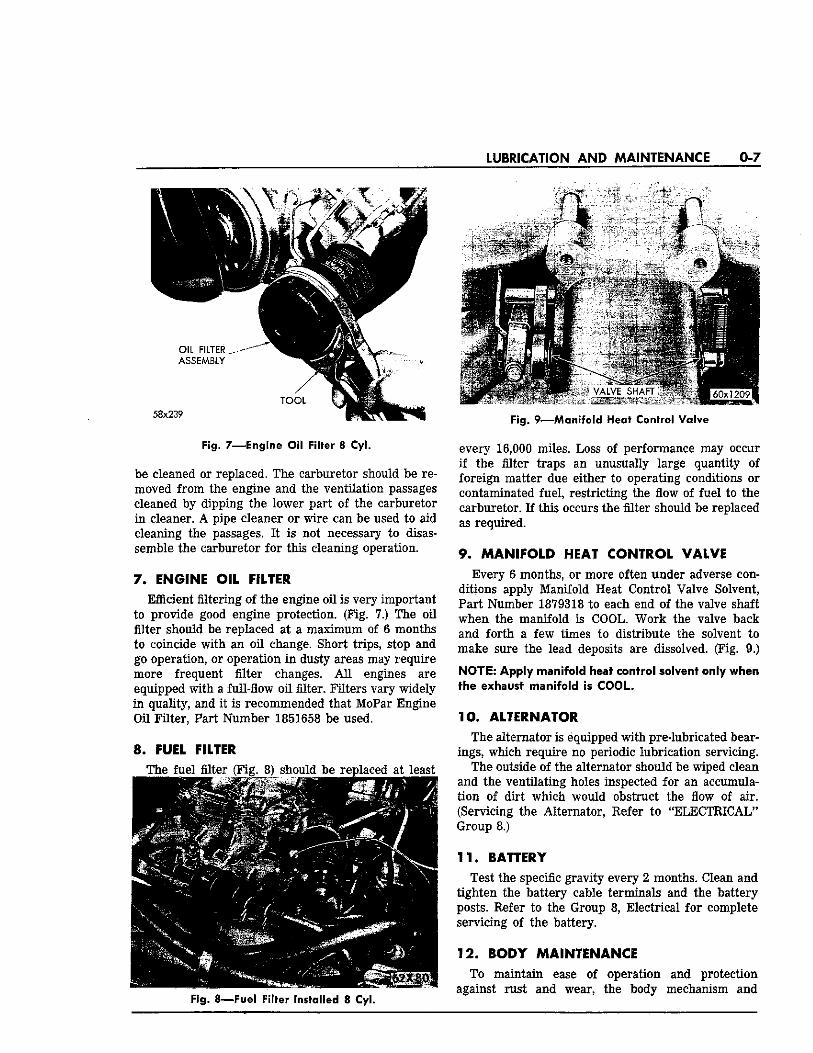
Fig. 7—Engine Oil Filter 8 Cyl.
be cleaned or replaced. The carburetor should be removed from the engine and the ventilation passages cleaned by dipping the lower part of the carburetor in cleaner. A pipe cleaner or wire can be used to aid cleaning the passages. It is not necessary to disassemble the carburetor for this cleaning operation. 7. ENGINE OIL FILTER
Efficient filtering of the engine oil is very important to provide good engine protection. (Fig. 7.) The oil filter should be replaced at a maximum of 6 months to coincide with an oil change. Short trips, stop and go operation, or operation in dusty areas may require more frequent filter changes. All engines are equipped with a full-flow oil filter. Filters vary widely in quality, and it is recommended that MoPar Engine Oil Filter, Part Number 1851658 be used. 8. FUEL FILTER
Fig. 8 —Fuel Filter Installed 8 Cyl.
Fig. 9—Manifold Heat Control Valve
every 16,000 miles. Loss of performance may occur if the filter traps an unusually large quantity of foreign matter due either to operating conditions or contaminated fuel, restricting the flow of fuel to the carburetor. If this occurs the filter should be replaced as required. 9 . MANIFOLD HEAT CONTROL VALVE
Every 6 months, or more often under adverse conditions apply Manifold Heat Control Valve Solvent, Part Number 1879318 to each end of the valve shaft when the manifold is COOL. Work the valve back and forth a few times to distribute the solvent to make sure the lead deposits are dissolved. (Fig. 9.) NOTE: Apply manifold heat control solvent only when the exhaust manifold is COOL.
10 . ALTERNATOR The alternator is equipped with pre-lubricated bear
ings, which require no periodic lubrication servicing. The outside of the alternator should be wiped clean
and the ventilating holes inspected for an accumulation of dirt which would obstruct the flow of air. (Servicing the Alternator, Refer to "ELECTRICAL" Group 8.) 11 . BATTERY
Test the specific gravity every 2 months. Clean and tighten the battery cable terminals and the battery posts. Refer to the Group 8, Electrical for complete servicing of the battery. 12 . BODY MAINTENANCE
To maintain ease of operation and protection against rust and wear, the body mechanism and
0-8 LUBRICATION AND MAINTENANCE
throttle linkages will require lubrication every 6 months. Prior to applying any lubricants, the parts should be wiped clean to remove dust and grit. The excess oil or lubricant should be removed.
Particular attention should be given to external lock cylinders during fall and winter months to insure protection from water and ice.
Lubricate the following:
Item Type of Lubricant Remarks
All external lock cylinders Door check arms, hood hinges and
lock Door lock vacuum intrusion guard
Fuel Tank access cover hinge and pin
Parking brake mechanism foot and hand operated
Tailgate locks Throttle Control Bellcrank side of
firewall engine Door hinges and other hard to lubri
cate places Door latch rotor Tailgate Hinges Door Lock Striker Plates Tailgate lock striker plates and
dovetail surfaces
Lubriplate Lubriplate Lubriplate
Lubriplate Lubriplate Lubriplate Lubriplate MoPar Dripless Pene
trating Oil MoPar Dripless Pene
trating Oil MoPar Dripless Pene
trating Oil Mopar Stainless Stick
Lubricant Mopar Stainless Stick
Lubricant
Apply directly Apply directly, use sparingly Remove the front door trim panel, apply lu
bricant to pivots; inspect tubing except Imperial.
Apply directly, use sparingly Apply a light film directly Apply to inner surfaces through access hole,
use sparingly Apply directly to bearing areas Apply directly. Do not apply to ramp or out
side of roller. Apply 2 or 3 drops to outside and inside rotor
bearing surfaces. Apply directly, use sparingly Apply directly Apply directly
13 . BRAKES Under normal driving conditions, the brakes are
self adjusting so that major brake adjustments are unnecessary.
Brake linings should be inspected for wear every 16,000 miles or more frequently if severe brake use is experienced.
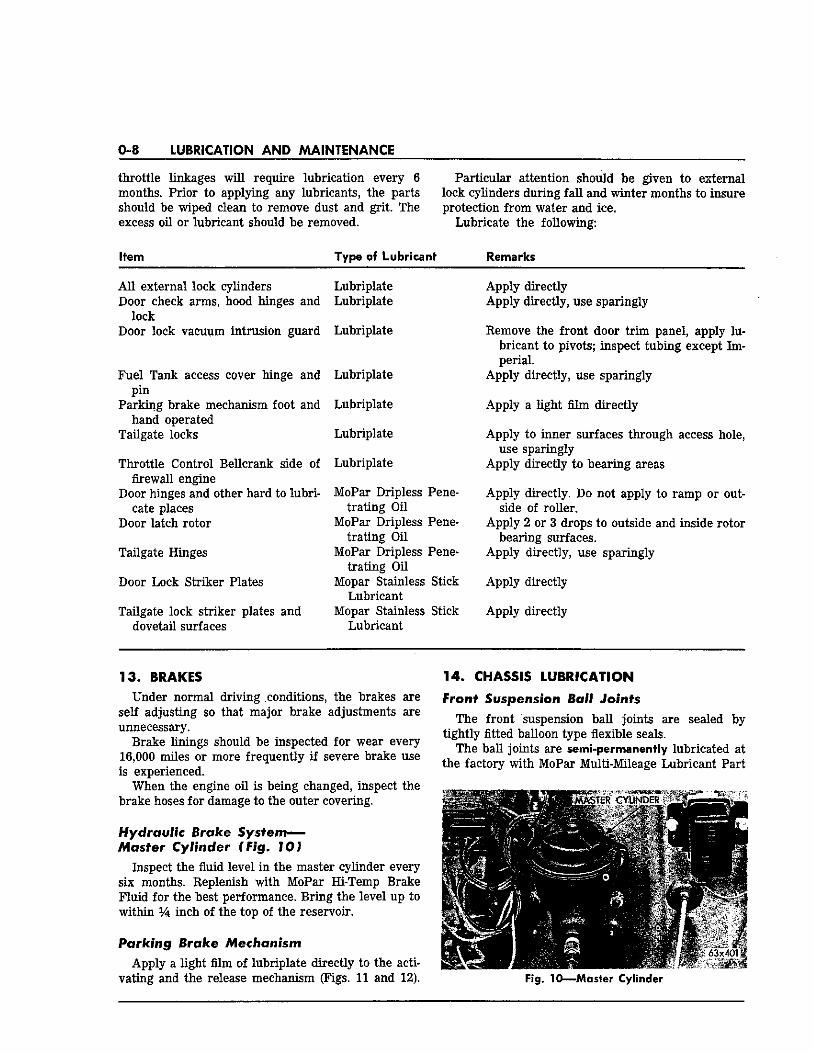
When the engine oil is being changed, inspect the brake hoses for damage to the outer covering. Hydraulic Brake S y s t e m — Master Cylinder (Fig. 10)
Inspect the fluid level in the master cylinder every six months. Replenish with MoPar Hi-Temp Brake Fluid for the best performance. Bring the level up to within % inch of the top of the reservoir. Parking Brake Mechanism
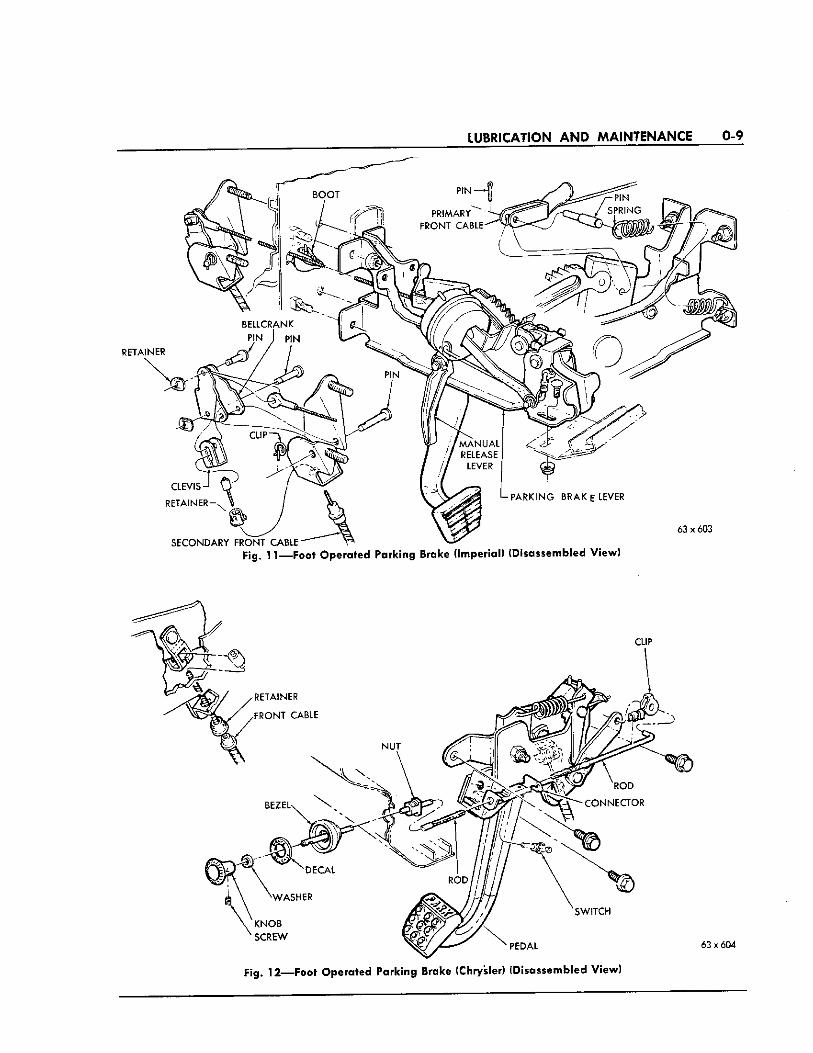
Apply a light film of lubriplate directly to the activating and the release mechanism (Figs. 11 and 12).
14. CHASSIS LUBRICATION
Front Suspension Ball Joints The front suspension ball joints are sealed by
tightly fitted balloon type flexible seals. The baU joints are semi-permanently lubricated at
the factory with MoPar Multi-Mileage Lubricant Part
Fig. 10—Master Cylinder
LUBRICATION AND MAINTENANCE 0-9
Fig. 12—Foot Operated Parking Brake (Chrysler) (Disassembled View)
0-10 LUBRICATION AND MAINTENANCE
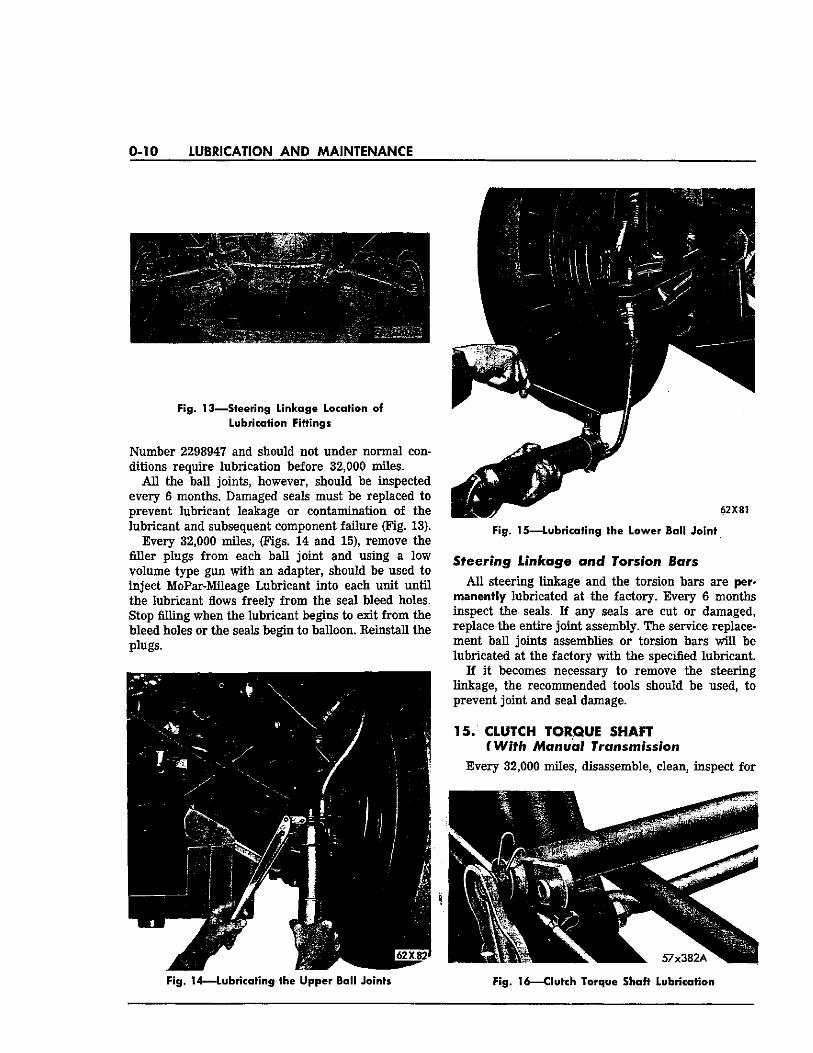
Fig, 13—Steering Linkage Location of Lubrication Fittings
Number 2298947 and should not under normal conditions require lubrication before 32,000 miles.
All the ball joints, however, should be inspected every 6 months. Damaged seals must be replaced to prevent lubricant leakage or contamination of the lubricant and subsequent component failure (Fig. 13).
Every 32,000 miles, (Figs. 14 and 15), remove the filler plugs from each ball joint and using a low volume type gun with an adapter, should be used to inject MoPar-Mileage Lubricant into each unit until the lubricant flows freely from the seal bleed holes. Stop filling when the lubricant begins to exit from the bleed holes or the seals begin to balloon. Reinstall the plugs.
mm Fig. 15—Lubricating the Lower Ball Joint
Steering Linkage and Torsion Bars All steering linkage and the torsion bars are per
manently lubricated at the factory. Every 6 months inspect the seals. If any seals are cut or damaged, replace the entire joint assembly. The service replacement ball joints assemblies or torsion bars will be lubricated at the factory with the specified lubricant.
If it becomes necessary to remove the steering linkage, the recommended tools should be used, to prevent joint and seal damage. 15 . CLUTCH TORQUE SHAFT
(With Manual Transmission
Every 32,000 miles, disassemble, clean, inspect for
Fig. 14—Lubricating the Upper Ball Joints Fig. 16—Clutch Torque Shaft Lubrication
LUBRICATION AND MAINTENANCE 0-11
wear, relubricate with Multipurpose Chassis Lubricant. (Fig. 16).
The clutch linkage and the shift linkage should be lubricated with Multipurpose Grease as required by increased effort or noisy operation.
Refer to Group 6, "Clutch" for service procedures. 16 . C O O L I N G SYSTEM
Inspect the level of the cooling system every 2 months. The cooling system should be drained, rinsed and refilled with proper coolant in the spring and again in the fall. When necessary to remove accumulations of rust and other deposits, maximum cleanliness can be restored by using Cooling System Cleaner according to the directions listed on the container. Always discard any old solutions removed. When ready for refilling, refill with water and protect against corrosion by adding MoPar Rust Resistor, or refill with MoPar Anti-freeze and water, depending upon the season. NOTE: The spring draining may be dispensed with if, the cooling system contains antifreeze added at the factory, or if MoPar antifreeze in concentrations greater than 40% was added during the previous fall and the coolant is not rusty in appearance.
When draining the cooling system the drain plugs on both banks of the engine should be opened, and the drain cock at the bottom of the radiator opened.
Sufficient permanent type anti-freeze should be used in the cooling system at all times to prevent freezing in the heater core on vehicles equipped with air conditioning. The coolant solution must contain 20% glycol-type anti-freeze during the summer months to provide for protection against temperatures down to +15 F. at the heater core. In the winter, protect for the lowest anticipated temperature range,
but never use less than 20% glycol-type anti-freeze to ensure adequate protection against corrosion. Coolant with antifreeze concentrations less than 40% should not be used more than one season.
All models are equipped with a 180° thermostat. With this thermostat, permanent type anti-freeze must be used. Should an alcohol-type anti-freeze be used, a 160° F. thermostat must be installed. CAUTION: The factory does not recommend the use of a 160° thermostat for cars equipped with air conditioning.
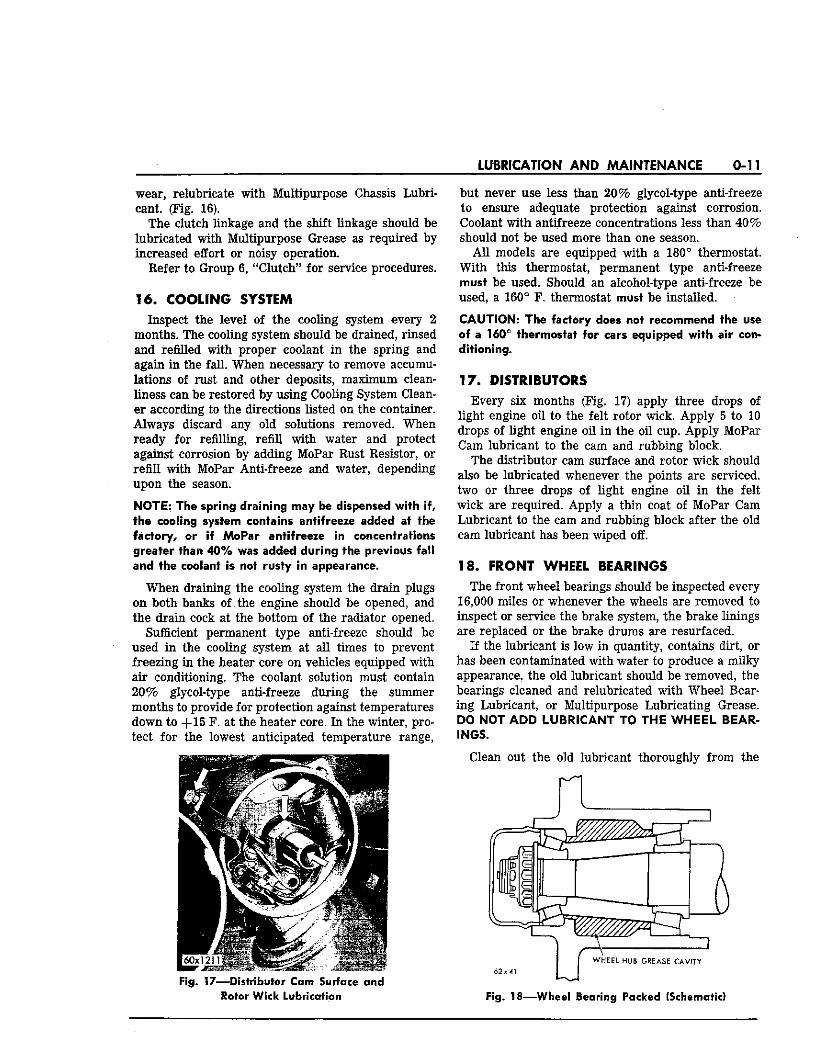
17 . DISTRIBUTORS Every six months (Fig. 17) apply three drops of
light engine oil to the felt rotor wick. Apply 5 to 10 drops of light engine oil in the oil cup. Apply MoPar Cam lubricant to the cam and rubbing block.
The distributor cam surface and rotor wick should also be lubricated whenever the points are serviced, two or three drops of light engine oil in the felt wick are required. Apply a thin coat of MoPar Cam Lubricant to the cam and rubbing block after the old cam lubricant has been wiped off. 18. FRONT WHEEL BEARINGS
The front wheel bearings should be inspected every 16,000 miles or whenever the wheels are removed to inspect or service the brake system, the brake linings are replaced or the brake drums are resurfaced.
If the lubricant is low in quantity, contains dirt, or has been contaminated with water to produce a milky appearance, the old lubricant should be removed, the bearings cleaned and relubricated with Wheel Bearing Lubricant, or Multipurpose Lubricating Grease. DO NOT ADD LUBRICANT TO THE WHEEL BEARINGS.
Clean out the old lubricant thoroughly from the
Fig. 17—Distributor Cam Surface and Rotor Wick Lubrication
62x41
Fig. 18—Wheel Bearing Packed (Schematic)
0-12 LUBRICATION AND MAINTENANCE
157x325
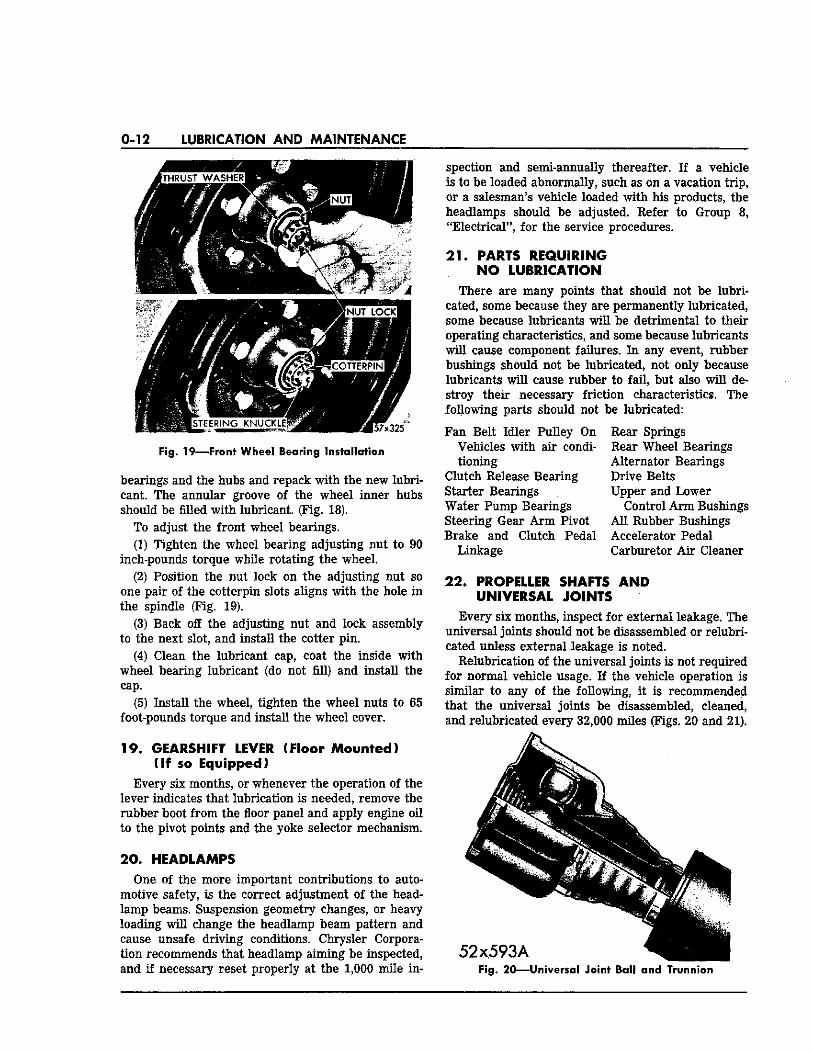
Fig. 19—Front Wheel Bearing Installation
bearings and the hubs and repack with the new lubricant. The annular groove of the wheel inner hubs should be filled with lubricant. (Fig. 18).
To adjust the front wheel bearings. (1) Tighten the wheel bearing adjusting nut to 90
inch-pounds torque while rotating the wheel. (2) Position the nut lock on the adjusting nut so
one pair of the cotterpin slots aligns with the hole in the spindle (Fig. 19).
(3) Back off the adjusting nut and lock assembly to the next slot, and install the cotter pin.
(4) Clean the lubricant cap, coat the inside with wheel bearing lubricant (do not fill) and install the cap.
(5) Install the wheel, tighten the wheel nuts to 65 foot-pounds torque and install the wheel cover. 19 . GEARSHIFT LEVER (Floor Mounted)
( I f so Equipped) Every six months, or whenever the operation of the
lever indicates that lubrication is needed, remove the rubber boot from the floor panel and apply engine oil to the pivot points and the yoke selector mechanism. 2 0 . HEADLAMPS
One of the more important contributions to automotive safety, is the correct adjustment of the headlamp beams. Suspension geometry changes, or heavy loading will change the headlamp beam pattern and cause unsafe driving conditions. Chrysler Corporation recommends that headlamp aiming be inspected, and if necessary reset properly at the 1,000 mile in
spection and semi-annually thereafter. If a vehicle is to be loaded abnormally, such as on a vacation trip, or a salesman's vehicle loaded with his products, the headlamps should be adjusted. Refer to Group 8, "Electrical", for the service procedures. 2 1 . PARTS REQUIRING
N O LUBRICATION There are many points that should not be lubri
cated, some because they are permanently lubricated, some because lubricants will be detrimental to their operating characteristics, and some because lubricants will cause component failures. In any event, rubber bushings should not be lubricated, not only because lubricants will cause rubber to fail, but also will destroy their necessary friction characteristics. The following parts should not be lubricated: Fan Belt Idler Pulley On
Vehicles with air conditioning
Clutch Release Bearing Starter Bearings Water Pump Bearings Steering Gear Arm Pivot Brake and Clutch Pedal
Linkage
Rear Springs Rear Wheel Bearings Alternator Bearings Drive Belts Upper and Lower
Control Arm Bushings All Rubber Bushings Accelerator Pedal Carburetor Air Cleaner
2 2 . PROPELLER SHAFTS AND UNIVERSAL JOINTS
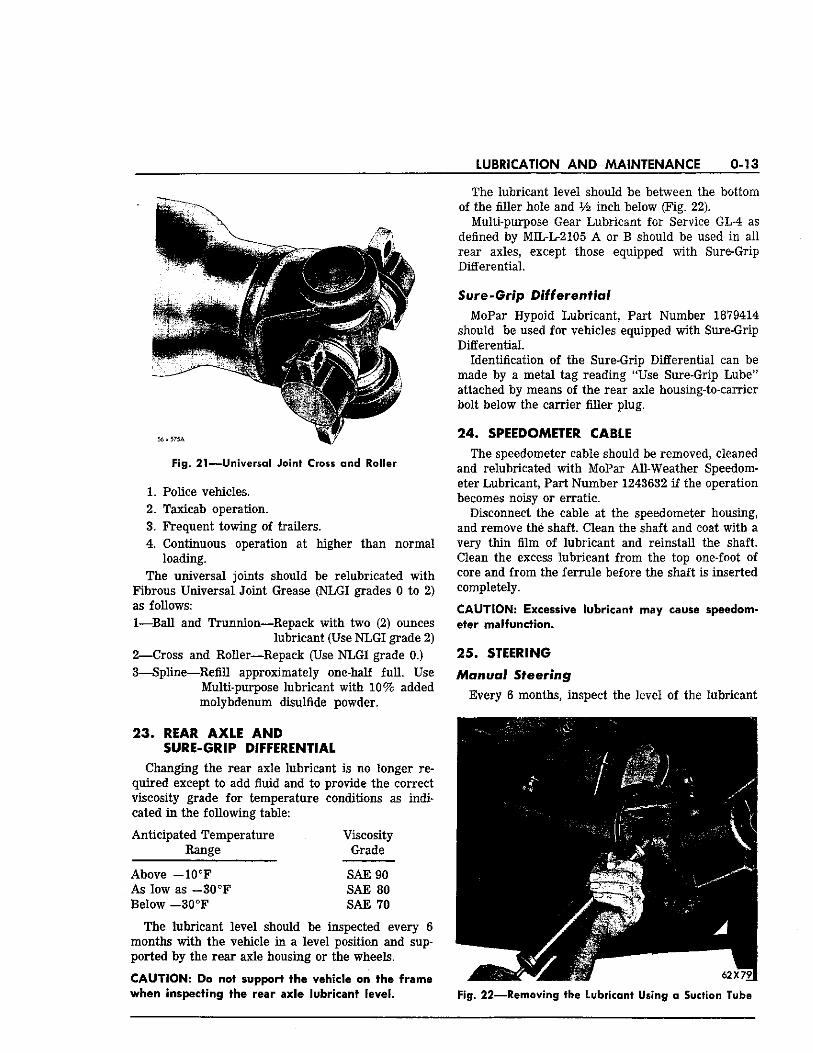
Every six months, inspect for external leakage. The universal joints should not be disassembled or relubri-cated unless external leakage is noted.
Relubrication of the universal joints is not required for normal vehicle usage. If the vehicle operation is similar to any of the following, it is recommended that the universal joints be disassembled, cleaned, and relubricated every 32,000 miles (Figs. 20 and 21).
5 2 x 5 9 3 A Fig. 20—Universal Joint Ball and Trunnion
LUBRICATION AND MAINTENANCE 0-13
Fig. 21—Universal Joint Cross and Roller
1. Police vehicles. 2. Taxicab operation. 3. Frequent towing of trailers. 4. Continuous operation at higher than normal
loading. The universal joints should be relubricated with
Fibrous Universal Joint Grease (NLGI grades 0 to 2) as follows: 1— Ball and Trunnion—Repack with two (2) ounces
lubricant (Use NLGI grade 2) 2— Cross and Roller—Repack (Use NLGI grade 0.) 3— Spline—Refill approximately one-half full. Use
Multi-purpose lubricant with 10% added molybdenum disulfide powder.
2 3 . REAR A X L E AND SURE-GRIP DIFFERENTIAL
Changing the rear axle lubricant is no longer required except to add fluid and to provide the correct viscosity grade for temperature conditions as indicated in the following table: Anticipated Temperature Viscosity
Range Grade Above —10°F SAE 90 As low as —30°F SAE 80 Below -30°F SAE 70
The lubricant level should be inspected every 6 months with the vehicle in a level position and supported by the rear axle housing or the wheels. CAUTION: Do not support the vehicle on the frame when inspecting the rear axle lubricant level.
The lubricant level should be between the bottom of the filler hole and V2 inch below (Fig. 22).
Multi-purpose Gear Lubricant for Service GL-4 as defined by MIL-L-2105 A or B should be used in all rear axles, except those equipped with Sure-Grip Differential. Sure-Grip Differential
MoPar Hypoid Lubricant, Part Number 1879414 should be used for vehicles equipped with Sure-Grip Differential.
Identification of the Sure-Grip Differential can be made by a metal tag reading "Use Sure-Grip Lube" attached by means of the rear axle housing-to-carrier bolt below the carrier filler plug. 24 . SPEEDOMETER CABLE
The speedometer cable should be removed, cleaned and relubricated with MoPar All-Weather Speedometer Lubricant, Part Number 1243632 if the operation becomes noisy or erratic.
Disconnect the cable at the speedometer housing, and remove the shaft. Clean the shaft and coat with a very thin film of lubricant and reinstall the shaft. Clean the excess lubricant from the top one-foot of core and from the ferrule before the shaft is inserted completely. CAUTION: Excessive lubricant may cause speedometer malfunction.
2 5 . STEERING
Manual Steering
Every 6 months, inspect the level of the lubricant
Fig. 22—Removing the Lubricant Using a Suction Tube
0-14 LUBRICATION AND MAINTENANCE
Fig. 23—Manual Steering Gear Lubrication
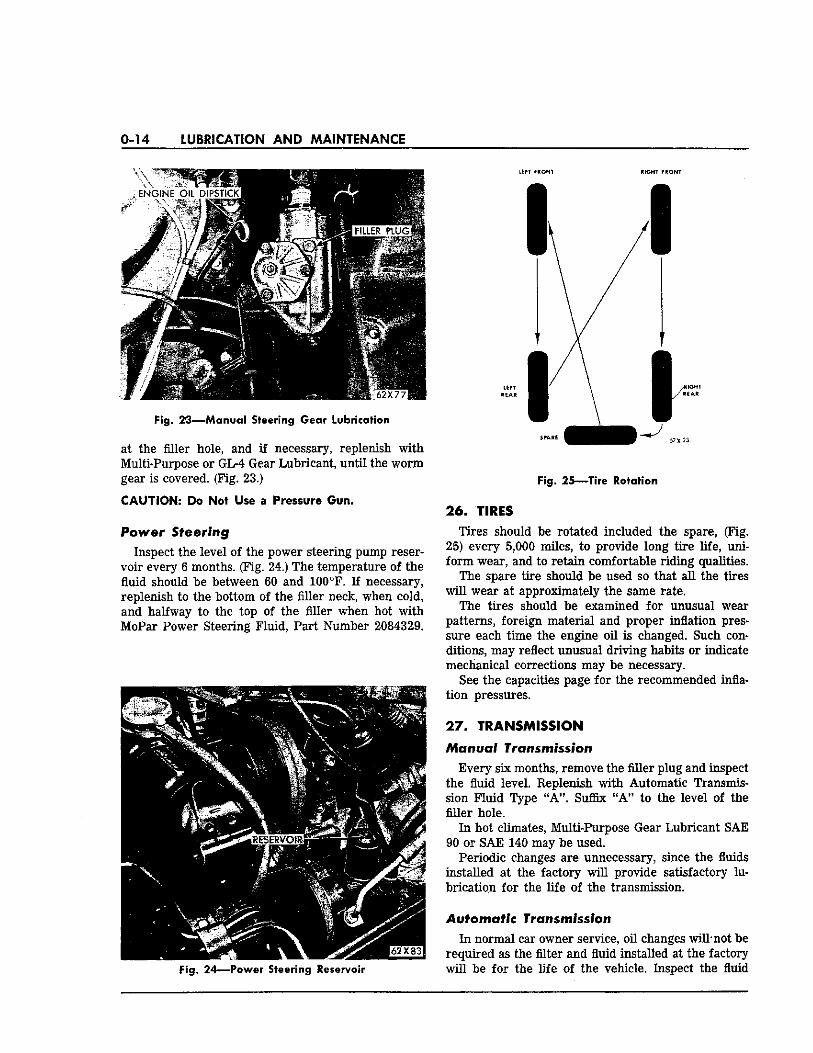
at the filler hole, and if necessary, replenish with Multi-Purpose or GL-4 Gear Lubricant, until the worm gear is covered. (Fig. 23.) CAUTION: Do Not Use a Pressure Gun.
P o w e r Steering Inspect the level of the power steering pump reser
voir every 6 months. (Fig. 24.) The temperature of the fluid should be between 60 and 100°F. If necessary, replenish to the bottom of the filler neck, when cold, and halfway to the top of the filler when hot with MoPar Power Steering Fluid, Part Number 2084329.
Fig. 24—Power Steering Reservoir
LEFT FRONT RIGHT FRONT
Fig. 25—Tire Rotation
2 6 . TIRES Tires should be rotated included the spare, (Fig.
25) every 5,000 miles, to provide long tire life, uniform wear, and to retain comfortable riding qualities.
The spare tire should be used so that all the tires will wear at approximately the same rate.
The tires should be examined for unusual wear patterns, foreign material and proper inflation pressure each time the engine oil is changed. Such conditions, may reflect unusual driving habits or indicate mechanical corrections may be necessary.
See the capacities page for the recommended inflation pressures. 2 7 . TRANSMISSION
Manual Transmission Every six months, remove the filler plug and inspect
the fluid level. Replenish with Automatic Transmission Fluid Type "A". Suffix "A" to the level of the filler hole.
In hot climates, Multi-Purpose Gear Lubricant SAE 90 or SAE 140 may be used.
Periodic changes are unnecessary, since the fluids installed at the factory will provide satisfactory lubrication for the life of the transmission. Automatic Transmission
In normal car owner service, oil changes will-not be required as the filter and fluid installed at the factory will be for the life of the vehicle. Inspect the fluid
LUBRICATION AND MAINTENANCE 0-15
level every 6 months with the engine and transmission at normal operating temperature.
(1) With the parking brake on and the engine idling, depress each push button momentarily, ending with the "N" (Neutral) button pushed in.
(2) The fluid level should be slightly below the full mark, but never above the "F" mark when the engine is at its normal warmed condition described above. Add or remove the fluid as necessary to bring to this level. CAUTION: To prevent dirt from entering the transmission make certain that the dip stick cap is reseated properly onto the filler tube.
If it is necessary to inspect the fluid level when the transmission is cold, the fluid should be at, or slightly below the "Add One Pint" mark. If below the mark, add one pint of fluid then recheck the level.
Chrysler Corporation does not recommend the addition of any fluids to the transmission other than Automatic Transmission Fluid, Type "A" Suffix "A". The only exception to this policy are the uses of refined kerosene to aid starting in very cold weather, the use of special dyes to aid in detecting fluid leaks and the use of MoPar Automatic Transmission Sealer, Part Number 2298923, in high mileage vehicles. The above sealer is not intended for use in NEW units.
If starting is difficult when the average temperature consistently ranges below —10°F, drain IV2 pints of transmission fluid and replace with refined kerosene. This service should be performed only once during the low-temperature season. Thereafter, any replenishment should be with Automatic Transmission Fluid, Type "A", Suffix "A". Frequency of Lubrication
The fluid and the filter installed at the factory will provide satisfactory lubrication and protection of the automatic transmission for the life of the vehicle.
Fig. 26—Converter Drain Plug
Therefore, the oil changes will not be required except when the service is severe as described below. If the regular operation of the vehicle is similar to any of the following, the transmission should be adjusted and the oil and filter changed approximately every 32,000 miles. For extreme severe service, it may be necessary to change the fluid as often as every 10,000 miles (Fig. 26).
1. Police vehicles. 2. Taxicab operation. 3. Frequent towing of trailers. 4. Continuous operation at higher than normal
loading. Refer to the transmission, Group 21, for the oil
change procedure.
2 8 . WINDSHIELD WIPERS If the windshield wipers are smearing or in general,
poor wiping of the windshields the rubber blade should be replaced with a new one.
Depress the release on the top of the blade and the rubber blade will slide off. Replace with the new rubber blade. Slide the blade into the catch to fasten. Refer to MoPar parts list for the correct blade.
IOOO MILES OR T W O MONTHS INSPECTION SERVICE COUPON When your vehicle has been driven 1,000 miles or
two months, and within 12 months after delivery, we will test it and perform a complete inspection service. This will include any necessary adjustments required to insure standard performance and operation of your car. There will be no charge for this service—you pay only for fluids and anti-freeze used. Listed below are some of the services and inspections that will be performed.
1. Road Test Vehicle—Test performance of engine, shifting pattern of transmission, over-all ability of braking system, steering characteristics and general functioning of vehicles.
2. Engine—Adjust distributor contact points. Set ignition timing. Set engine idle speed and carburetor idle mixture. Adjust tappets (on cars with mechanical tappets).
3. Brakes—Inspect service and parking brakes, adjust if necessary. Inspect all brake line connections and fluid level.
4. Clutch*—Determine clutch pedal free play. 5. Cooling System—Inspect all hose connections,
fluid level, and test anti-freeze. Adjust all drive belts. Test heater* and/or air conditioner* units for operation.
0-16 LUBRICATION AND MAINTENANCE
6. Steering—Adjust steering gear cross shaft. Center steering wheel. Inspect condition of permanently lubricated steering linkage seals and semi-permanent-ly lubricated ball joint seals.
7. Automatic Transmission*—Adjust transmission kickdown band and throttle linkage. Inspect for leaks, and fluid level.
8. Manual Transmission*—Adjust rods and linkage. Inspect lubricant level.
9. Rear Axle—Tighten carrier mounting and spring
"U" bolts. Inspect lubricant level. 10. Wheels and Tires—Determine front wheel toe-
in and car height, adjust if necessary. Adjust front wheel bearings. Inflate tires to recommended pressures.
11. Safety inspection—Aim of headlights, horn(s), windshield wipers and washers*, exhaust system, tires, glass, steering, mirrors, brakes, front and rear lights. * If so equipped
CERTIFIED CAR C A R E — E N G I N E TUNE-UP 1. Spark Plugs—Remove and inspect each spark
plug to determine if it can be cleaned and adjusted, or should be replaced with a new spark plug. Most plugs can be cleaned, adjusted and reused at 10,000 mile intervals. At 20,000 miles the original plugs need replacement.
2. Distributor—Remove the distributor cap and rotor, clean and inspect. Inspect the ignition breaker points for pitting, bluing, and misalignment, and adjust (lubricate cam and wick). Assure that all distributor secondary wires and tower caps are clean and seated properly at all connections. Set ignition timing to proper factory specifications, advance up to 5° for high altitude or the use of higher octane fuels, and
retard as much as 5° to eliminate spark detonation. 3. Carburetor—Remove the air cleaner filter and
clean properly. Check the fast idle speed at cam index. Adjust the carburetor idle mixture and fast idle speed to proper settings. Tighten the carburetor air horn to manifold nuts, also, clean the crankcase ventilator valve. Be assured that the manifold heat control valve and the carburetor choke piston are operating properly and are each re-treated with their specific solvent.
4. Electrical—Inspect the battery specific gravity. Clean and tighten the battery terminals and connections. Test the battery line voltage at the starter. Test the starter cranking ability.
CERTIFIED CAR C A R E — S E M I - A N N U A L MAINTENANCE SERVICE Replace—Engine Oil Filter element. Lubricate—Distributor Oil Cup (5 drops). Manifold
Heat Control Valve with special MoPar solvent, carburetor choke piston and throttle linkage.
Wipe Clean and Lubricate, if necessary—Door Hinges and other Hard-to-lubricate places, Door Latch Rotor, Door Lock Striker Plates, Door Check Arms, Hood Hinges and Lock, All External Lock Cylinders, Parking Brake Mechanism, Door Lock—Vacuum intrusion guard, Deck Lid Latch, Fuel Tank Access Cover Hinge and Pin, Throttle Control Bellcrank (engine
side of firewall.) All Town & Country as Noted: Tail Gate Hinges, Tail Gate Locks, Tail Gate Lock Striker Plates and Dovetail Surfaces, Tail Gate Torsion Bar Roller Cam.
Check Levels and Add Fluids, if necessary—Transmission—(conventional or automatic), Rear Axle Differential, Steering Gear Pump (Power Steering), Manual Steering Gear, Engine Coolant—Check Antifreeze, Brake Master Cylinder, Battery
Inspect—Condition of ball joint and steering linkage pivot and clean the ventilation valve.
CERTIFIED CAR C A R E — B R A K E SYSTEM MAINTENANCE SERVICE 1. Remove both front wheel, tire and drum assem
blies. NOTE: Front brakes do 60% of the braking. The
condition of the front brakes will serve as an indicator of the condition of the rear brakes.
2. Blow out any accumulated dust or dirt. 3. Inspect lining wear pattern and determine re
maining lining life.
4. Inspect condition of shoe return springs, inspect freedom of shoe movement, wheel cylinders, dust boots and backing plates.
5. Inspect the brake drums for excessive out of round, score marks, hard spots, and spider webbing.
6. Safety inspect all brake lines, brake tees and hoses. Safety check all conditions. Inspect the lower outside portion of the rear brake backing plates,

LUBRICATION AND MAINTENANCE 0-17
CERTIFIED CAR C A R E — B R A K E SYSTEM MAINTENANCE S E R V I C E — (Continued)
leakage inside will usually show at this point. 7. Fill master cylinder reservoir to the proper level. 8. (a) 16,000 Miles—Inspect the wheel bearing
grease—repack if necessary. (b) 32,000 Miles—Clean all grease off the spin
dles and wheel bearings. Re-pack the wheel bearings
and, after the wheel assemblies are reinstalled, adjust both front wheel bearings.
9. Adjust service brakes, on Models without automatic brake adjusters.
10. Inspect and, if necessary, adjust the parking brake.
CERTIFIED CAR C A R E — F R O N T SUSPENSION ALIGNMENT
1. Determine if vehicle needs the front suspension system aligned. Three important reasons can indicate this need:
a. Tire wear pattern and/or
b. Car pulls in one direction on brake application. and/or
c. Car leads, left or right, in normal driving. 2. Inflate all tires to the same pressure.
3. Inspect, if necessary, adjust front suspension height at torsion bars.
4. Inspect, if necessary, adjust camber, caster, and toe-in.
5. Inspect the condition of the steering linkage and inspect the seal condition of suspension parts.
6. Inspect the steering gear lubricant level. 7. Aim all headlights.
CERTIFIED CAR CARE MAINTENANCE CHART NEXT SERVICE D U E -
2 MONTH SERVICE DUE DATE
4 MONTH SERVICE DUE DATE
6 MONTH SERVICE DUE DATE
1 1 EV
ERY
TWO
M
ON
THS
CHANGE ENGINE OIL (NOT TO EXCEED 4,000 MILES)
(CHECK BATTERY & ENGINE COOLANT)
CHANGE OIL FILTER (Coincide with an Oil Change)
INSPECT TRANSMISSION UJ u FLUID REAR AXLE z < h-
LEVEL STEERING UNIT z *Q<£ MASTER CYLINDER
INSPECT SUSPENSION BALL JOINTS SEALS STEERING LINKAGE PIVOTS
z>< UNIVERSAL JOINTS z>< BODY MECHANISMS & THROTTLE LINKAGES
SE
MI-A
NN
U
HAVE
C
EVER
Y LUBE DISTRIBUTOR
SE
MI-A
NN
U
HAVE
C
EVER
Y
MANIFOLD HEAT VALVE
SE
MI-A
NN
U
HAVE
C
EVER
Y
CHOKE PISTON
SE
MI-A
NN
U
HAVE
C
EVER
Y
CLEAN CARBURETOR AIR CLEANER (Not to Exceed 8,000 Miles) CRANKCASE VENT VALVE OIL FILLER CAP
ITEN
ANCE
M
ILEA
GES
INCI
DE W
ITH
IC
E IN
TERV
AL EVERY 5,000 MILES
ROTATE TIRES USING SPARE
ITEN
ANCE
M
ILEA
GES
INCI
DE W
ITH
IC
E IN
TERV
AL
EVERY 10,000 MILES TUNE-UP ENGINE
ITEN
ANCE
M
ILEA
GES
INCI
DE W
ITH
IC
E IN
TERV
AL
EVERY 16,000 MILES BRAKE MAINTENANCE & LINING INSPECTION
MIL
EAG
E M
AIN
HA
VE D
ON
E A
T
INDI
CATE
D T
O C
O
TWO
MO
NTH
SER
V INSPECT FRONT WHEEL BEARINGS
MIL
EAG
E M
AIN
HA
VE D
ON
E A
T
INDI
CATE
D T
O C
O
TWO
MO
NTH
SER
V
REPLACE FUEL FILTER
MIL
EAG
E M
AIN
HA
VE D
ON
E A
T
INDI
CATE
D T
O C
O
TWO
MO
NTH
SER
V
EVERY 20,000 MILES ALIGN SUSPENSION & HEADLIGHTS
MIL
EAG
E M
AIN
HA
VE D
ON
E A
T
INDI
CATE
D T
O C
O
TWO
MO
NTH
SER
V
EVERY 32,000 MILES LUBE FRONT SUSPENSION BALL JOINTS M
ILEA
GE
MA
IN
HAVE
DO
NE
AT
IN
DICA
TED
TO
CO
TW
O M
ON
TH S
ERV
LUBE CLUTCH TORQUE SHAFT
MIL
EAG
E M
AIN
HA
VE D
ON
E A
T
INDI
CATE
D T
O C
O
TWO
MO
NTH
SER
V
REPLACE CARBURETOR AIR CLEANER
ENTER DATE WHEN SERVICE IS PERFORMED ENTER MILEAGE WHEN SERVICE IS PERFORMED SERVICING DEALER—SIGN HERE—