Lotus Notes Client Installation & Configuration
13
Vedanta Resources Lotus Notes Client Installation & Configuration Prepared by: Lauren Information Technologies Pvt. Ltd. 3F, Jains Arcade, 14th Road, Khar Danda, Khar (West),
-
Upload
api-3827584 -
Category
Documents
-
view
4.612 -
download
3
Transcript of Lotus Notes Client Installation & Configuration

Vedanta ResourcesLotus Notes Client
Installation & Configuration
Prepared by:
Lauren Information Technologies Pvt. Ltd.3F, Jains Arcade, 14th Road,Khar Danda, Khar (West),Mumbai 400 052Tel : 91 - 22 – 2600 7701Fax : 91 - 22 – 2600 7702www.lauren.co.in

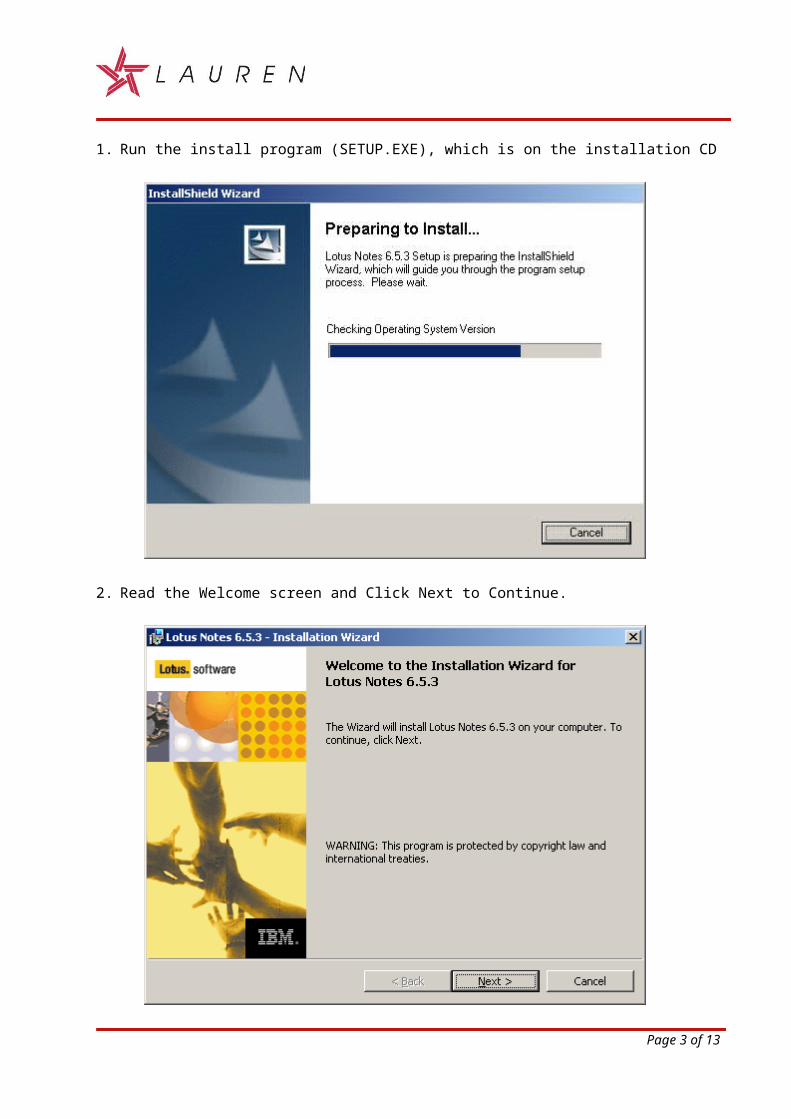
1. Run the install program (SETUP.EXE), which is on the installation CD
2. Read the Welcome screen and Click Next to Continue.
Page 2 of 11
3. Read the License Agreement and Select ‘I accept the terms in the license agreement’ click Next to Continue.
4. Enter the Name and the Company and select the ‘Only for me (Single User Install) Option as shown below. Click Next to Continue.
Page 3 of 11

5. Choose the program and data directory as shown below in which to copy the software, and then Click Next to Continue.
6. “By Default ‘Notes Client’ icon is selected Click Next to Continue.
Page 4 of 11

7. Click on Install to begin the installation.
8. Lotus Notes Client Installation process begins along with the program features you selected.
Page 5 of 11

9. Click Finish to complete the installation of Lotus Notes Client program.
10.Choose Start - Programs - Lotus Applications - Lotus Notes to start the Configuration of Lotus Notes Client. Lotus Notes Client Configuration screen will start.
Page 6 of 11

11.Lotus Notes Client Configuration Welcome screen will start. Click Next to Continue.
12.Enter your Notes User name and respective Domino server name as shown below. Click Next Continue.
Page 7 of 11

13.Select ‘Set up a connection to a local area network (LAN)’. Click Next to Continue.
14.Enter the respective Location Domino server name, select TCP/IP protocol and also enter respective Location Domino server IP address. Click Next to Continue.
Page 8 of 11

15.Click on Browse and select your User ID file. Click Next to Continue.
16.Enter the password of your User ID File. Click OK
17.Enter the Instant messaging server name. Click Next to continue.
Page 9 of 11

18.Don’t select any services given in the below screen. Click next or Finish completing your Lotus Notes Configuration Setup.
19.Click OK below screen.
20.Enter the notes password and select the ‘Save your password’ and click on ‘Log on’.
Page 10 of 11

21.Select “No Thanks, just give me the defaults”
22.From the Bookmarks folder on the left side of the screen, Select Databases, Right-Click on Workspace and select Set Bookmark as Home Page.
23.Click on View -> Show Unread
24.You can now start using Lotus Notes Client
Page 11 of 11