Lionbridge Connector for Sitecore User...
145
Lionbridge Connector for Sitecore User Guide Version 4.1.0 January 3, 2020
Transcript of Lionbridge Connector for Sitecore User...
Lionbridge Connector for Sitecore
User Guide Version 4.1.0January 3, 2020
Copyright© Copyright 2020 Lionbridge Technologies, Inc. All rights reserved.
Lionbridge and the Lionbridge logotype are registered trademarks or trademarks of Lionbridge Technologies, Inc. in the United States and other countries. All other trademarks used herein are the property of their respective owners. The opinions of third-party contributors remain theirs alone and do not necessarily represent the views of Lionbridge Technologies.
Lionbridge Connector for Sitecore User Guide Page 2Version 4.1.0 January 3, 2020

Contents
1 Welcome to the Lionbridge Connector for Sitecore 6
1.1 The Translation Lifecycle 6
1.2 How the Connector Helps You Manage Your Translation Lifecycle 6
1.3 Using this Guide 7
1.4 How to Contact Lionbridge Connector Support 9
1.4.1 Submitting a Support Ticket 10
1.4.2 Information to Include in a Support Ticket 10
1.4.3 Viewing and Updating Your Support Ticket in Zendesk 11
1.4.4 Signing Up for a Zendesk Account for Lionbridge Connectors 12
1.4.5 Getting a Zendesk Password if You Previously Emailed Lionbridge Connectors 13
2 Getting Started with the Lionbridge Connector for Sitecore 16
2.1 Key Features 16
2.1.1 Multiple Ways of Sending Content for Translation 16
2.1.2 Optimizing Translation Costs (Use Local TM) 17
2.1.3 Selecting a Translation Provider 17
2.2 The Connector at a Glance 18
2.3 Working with Lists 20
2.3.1 Navigating Pages in a List 20
2.3.2 Setting Column Width 22
2.3.3 Sorting by Column 22
2.3.4 Changing Column Order 23
2.4 Grouping Content Items by Column 24
3 Creating Content for Translation 27
3.1 Attaching a New Content Item to a Translation Workflow 27
3.2 Attaching a Translation Workflow to an Existing Content Item 33
3.3 Filtering Fields in Items that Do Not Need Translation 34
4 Sending Content to Translation 42
4.1 Workflow States 42
Lionbridge Connector for Sitecore User Guide Page 3Version 4.1.0 January 3, 2020
4.2 Submitting a Content Item for Translation using the Content Editor 43
4.3 Submitting Content for Translation from the Experience Editor 51
4.4 Sending Multiple Content Items for Translation 58
4.4.1 Specifying Initial Settings in the Bulk Translation Wizard 59
4.4.2 Choosing which Items to Translate 62
4.4.3 Specifying Filters for Source Content 64
4.4.3.1 Adding a Source Filter when Sending Multiple Items for Translation 67
4.4.4 Excluding Items from Translation 69
4.4.5 Setting Translation Options 74
4.4.6 Reviewing and Submitting Content Items for Translation 80
4.5 Submitting Content for Translation from Sitecore Search Results 82
4.6 Submitting Content for Translation from the Translation Queue 84
4.7 Understanding the Send Dependent Items Check Box 91
5 Monitoring Translation Status 94
5.1 Translation Statuses 94
5.2 Viewing Your Translation Status Summary 95
5.3 Monitoring the Status of Translation Jobs 96
5.4 Monitoring Items in a Translation Job 102
5.5 Monitoring Status for a Single Item 105
6 Monitoring Items in a Workflow with the Enhanced Workbox 109
6.1 Displaying Content Items in the Workbox 110
6.2 Viewing Workflow Details and Receiving Updates 111
6.3 Viewing All Content Items in a Workflow State and Receiving Updates 112
6.4 Viewing Content Item Details 113
6.5 Changing the Workflow State of Individual Content Items 115
6.6 Changing the Workflow State of Multiple Content Items 118
6.7 Viewing the History of Workflow-State Changes to a Content Item 119
6.8 Comparing Multiple Versions of a Content Item 120
Lionbridge Connector for Sitecore User Guide Page 4Version 4.1.0 January 3, 2020
7 Reviewing Translated Content 124
8 Post-Translation Features 126
8.1 Archiving Completed Translation Jobs 126
8.2 Requesting Translation Corrections 128
8.3 Updating a Remote Translation Memory (TM) 131
8.3.1 Updating a Remote TM for a Single Item 133
8.3.2 Updating a Remote TM for Multiple Items 135
8.4 Clearing Backup Data 138
Index 142
Lionbridge Connector for Sitecore User Guide Page 5Version 4.1.0 January 3, 2020
1 Welcome to the Lionbridge Connector for SitecoreWelcome to the Lionbridge Connector for Sitecore ("Connector"). The Connector enables you to automate sending and retrieving content from Sitecore, which dramatically reduces the effort required to create, maintain, and publish Web content in multiple languages.
If you configure Freeway as a translation provider, you can automate sending and retrieving content from Sitecore directly to and from Freeway.
If you have configure onDemand as a translation provider, you can automate sending and retrieving content from Sitecore directly to and from onDemand.
1.1 The Translation Lifecycle
The translation lifecycle is the broad process of selecting content, sending it out for translation, and then receiving the translated content back from translation.
This set of steps usually fits inside a larger, more general process called the content lifecycle, which is the process of creating, reviewing, editing, approving, and publishing content.
When you consider the translation lifecycle and the content lifecycle together, you have the global content value chain, which is the strategy for managing multilingual content.
The content lifecycle and the translation lifecycle are impacted by the workflow steps you implement in Sitecore to manage multilingual content.
Remember that localizing content is a subset of steps in the broader content lifecycle. This will improve your focus on key localization considerations, improve processes, and keep all content stakeholders included. Together, this results in better content management.
1.2 How the Connector Helps You Manage Your Translation Lifecycle
The Lionbridge Connector for Sitecore ("Connector") is a plug-in module for Sitecore. It provides a range of features and user interface enhancements in Sitecore that enable you to select, send, monitor, and retrieve content for translation into any language Sitecore supports.
These features automate the process, which dramatically reduces the effort and time required to export and re-import content that needs to be localized. This is very helpful when translating large volumes of content or ensuring that translated content is quickly re-imported to meet deadlines.
When you use the Connector, you manage your translation lifecycle entirely from within Sitecore:
Lionbridge Connector for Sitecore User Guide Page 6Version 4.1.0 January 3, 2020
1 Welcome to the Lionbridge Connector for Sitecore 1 Welcome to the Lionbridge Connector for Sitecore
1. The Connector exports your content from Sitecore in either XML or HTML format and delivers these content files to the central, hosted Clay Tablet Platform.
2. The Clay Tablet Platform delivers your content to your translation provider, based on routing rules that your company chooses and the Lionbridge Connector Team implements.
3. When the translated content is ready, the Clay Tablet Platform retrieves it from your translators and delivers it to the Connector.
4. The Connector automatically re-imports the content into the correct location in Sitecore.
You can then review, revise, reject, or publish the translated content as needed.
Note: Neither the Connector nor the Clay Tablet Platform performs any translation. Similarly, the Lionbridge Connector Team does not provide any translation services. Your company chooses the translation provider that performs the translation.
1.3 Using this Guide
Purpose of this guide
This guide describes how to use the Lionbridge Connector for Sitecore ("Connector") to manage your translation lifecycle. It describes how to send Sitecore items for translation and receive them back from translation.
Who should use this guide
This guide is intended for content editors, project, marketing, localization or translation managers, or others who are responsible for creating, editing, or approving content for translation that resides in your Sitecore CMS. This guide is also useful for translation providers who receive content from your Sitecore CMS, because it describes your company's translation management process.
What your company setup should be
This document assumes that:
Your company already has a functioning instance of Sitecore.
The Lionbridge Connector for Sitecore ("Connector") has been implemented, configured, and tested on your Sitecore CMS.
The Lionbridge Connector Team has set up the Clay Tablet Platform to send content to your translation providers.
Lionbridge Connector for Sitecore User Guide Page 7Version 4.1.0 January 3, 2020
1 Welcome to the Lionbridge Connector for Sitecore 1.3 Using this Guide
If Lionbridge is your company's translation provider, it assumes that either Freeway or onDemand is already set up for your company.
What you should already know
This document assumes that:
You are familiar with the Connector's configuration for your Sitecore CMS, and the reasons for choosing certain configuration options. This is important because your company's configuration determines which features are available.
You have a strong working knowledge of the Sitecore Content Editor.
You are familiar with the basic concepts of the Sitecore Workflow features. This is crucial, because workflow is a core concept required to use the Connector.
You are familiar with your company's translation process and requirements.
You have valid user credentials to log into Sitecore.
You have the required permissions to access the Connector functionality described in this guide.
Note: Not all the features described in this guide may be available. Feature availability depends on both your company's Connector setup and the roles to which you are assigned. If you cannot access functionality that you need, contact your company's Sitecore administrator.
How this guide is organized
This guide contains the following chapters:
Chapter Description
"Welcome to the Lionbridge Connector for Sitecore" on page 6
A brief description of the connector solution for Sitecore and how it fits into the translation lifecycle. It also includes information about this guide and Lionbridge Connector Support contact information.
"Getting Started with the Lionbridge Connector for Sitecore" on page 16
How to get started and an overview of the Lionbridge Connector for Sitecore interface and key features.
"Creating Content for Translation" on page 27
How to create, adapt, and filter Sitecore content so that you can send it out for translation using the Lionbridge Connector for Sitecore.
"Sending Content to Translation" on page 42
How to use the Lionbridge Connector for Sitecore to send out content for translation.
Lionbridge Connector for Sitecore User Guide Page 8Version 4.1.0 January 3, 2020
1 Welcome to the Lionbridge Connector for Sitecore 1.3 Using this Guide
Chapter Description
"Monitoring Translation Status" on page 94
How to monitor the translation status of content that you sent out for translation.
"Reviewing Translated Content" on page 124
How to review and publish translated content after it automatically returns from the translation provider to the Sitecore CMS.
"Post-Translation Features" on page 126
How to perform post-translation tasks, including synchronizing translations, requesting a translation correction, updating a remote TM (translation memory) server, and clearing the translation backup data.
How to find out more about Lionbridge Connector for Sitecore
For information on installing and configuring the Lionbridge Connector for Sitecore, read the Lionbridge Connector for Sitecore Installation and Configuration Guide.
Documentation conventions
This guide uses the following conventions:
Convention Description
Bold Highlights screen elements such as buttons, menu items, and fields.
Courier Highlights input, file names, and paths.
Italics Highlights terms to emphasize, variables, or document titles.
> Indicates a menu choice. For example, "Select Sitecore Desktop > All Applications > Lionbridge Translation > Translation Filter."
1.4 How to Contact Lionbridge Connector Support
Email @: [email protected]
Telephone: +1-416-363-0888
You can submit a support ticket either:
by email
from the Lionbridge Connector Zendesk page, using your web browser
Lionbridge Connector for Sitecore User Guide Page 9Version 4.1.0 January 3, 2020
1 Welcome to the Lionbridge Connector for Sitecore 1.4 How to Contact Lionbridge Connector Support
1.4.1 Submitting a Support Ticket
1. Do one of the following:
Email [email protected], and cc (carbon copy) anyone to include in the ticket correspondence.
Important: Include the information and attachments in your email that are listed in the sub-sections below.
Create a ticket in Zendesk:
a. Open the Lionbridge Connector Zendesk page in your browser: https://connectors.zendesk.com.
b. Sign in to Zendesk.
Note: If you do not have sign-in credentials yet, then click either Sign up or Get a password, and follow the onscreen instructions.
Important: Include the information and attachments that are listed in the sub-sections below.
c. Click Submit a request. d. In the CCs field, add anyone to include in the ticket correspondence.
Zendesk automatically creates a ticket and responds to everyone included in the cc field.
2. Everyone in the original cc receives updates unless they request to be removed from the ticket.
Important: Check your email spam folder (especially first-time Zendesk users) as sometimes email notifications from Zendesk are marked as spam.
When the issue is resolved, Lionbridge closes the ticket.
1.4.2 Information to Include in a Support Ticket
client name
CMS or content system name and version
Connector or App version installed
name of job for which the issue occurs
date of job submission
detailed description of the issue
any error text–copy and paste, if applicable
Lionbridge Connector for Sitecore User Guide Page 10Version 4.1.0 January 3, 2020
1 Welcome to the Lionbridge Connector for Sitecore 1.4.1 Submitting a Support Ticket
Files to attach to the support ticket:
CMS log files for the date the issue occurred
Connector or App log files for the date the issue occurred
screen capture of the issue
1.4.3 Viewing and Updating Your Support Ticket in Zendesk
Important: You must log into Zendesk to view your support tickets there.
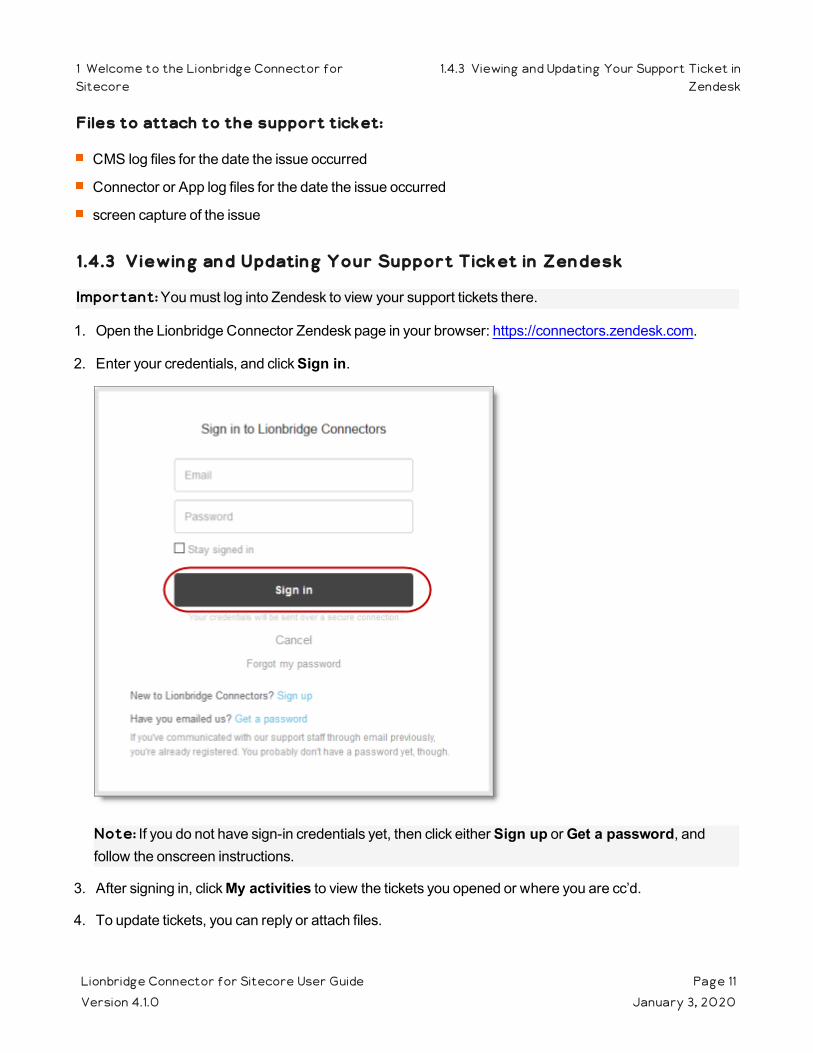
1. Open the Lionbridge Connector Zendesk page in your browser: https://connectors.zendesk.com.
2. Enter your credentials, and click Sign in.
Note: If you do not have sign-in credentials yet, then click either Sign up or Get a password, and follow the onscreen instructions.
3. After signing in, click My activities to view the tickets you opened or where you are cc’d.
4. To update tickets, you can reply or attach files.
Lionbridge Connector for Sitecore User Guide Page 11Version 4.1.0 January 3, 2020
1 Welcome to the Lionbridge Connector forSitecore
1.4.3 Viewing and Updating Your Support Ticket inZendesk

For more information, refer to "Submitting and tracking support requests" in Zendesk's Help Center guide for end-users, at: https://support.zendesk.com/hc/en-us/articles/203664386-Help-Center-guide-for-agents-and-end-users.
Important: Zendesk refers to a support ticket as a support request. These terms are interchangeable.
1.4.4 Signing Up for a Zendesk Account for Lionbridge Connectors
You can create a new Zendesk account for Lionbridge Connectors.
Note: If you have previously emailed Lionbridge Connectors Support at [email protected] to create a support ticket, you can get a password for your email account. For detailed instructions, see "How to Get a Password if You Have Previously Emailed Lionbridge Connectors."
To sign up for a Zendesk account:
1. Open the Lionbridge Connector Zendesk page in your browser: https://connectors.zendesk.com.
2. Click Sign up link.
Lionbridge Connector for Sitecore User Guide Page 12Version 4.1.0 January 3, 2020
1 Welcome to the Lionbridge Connector forSitecore
1.4.4 Signing Up for a Zendesk Account for LionbridgeConnectors
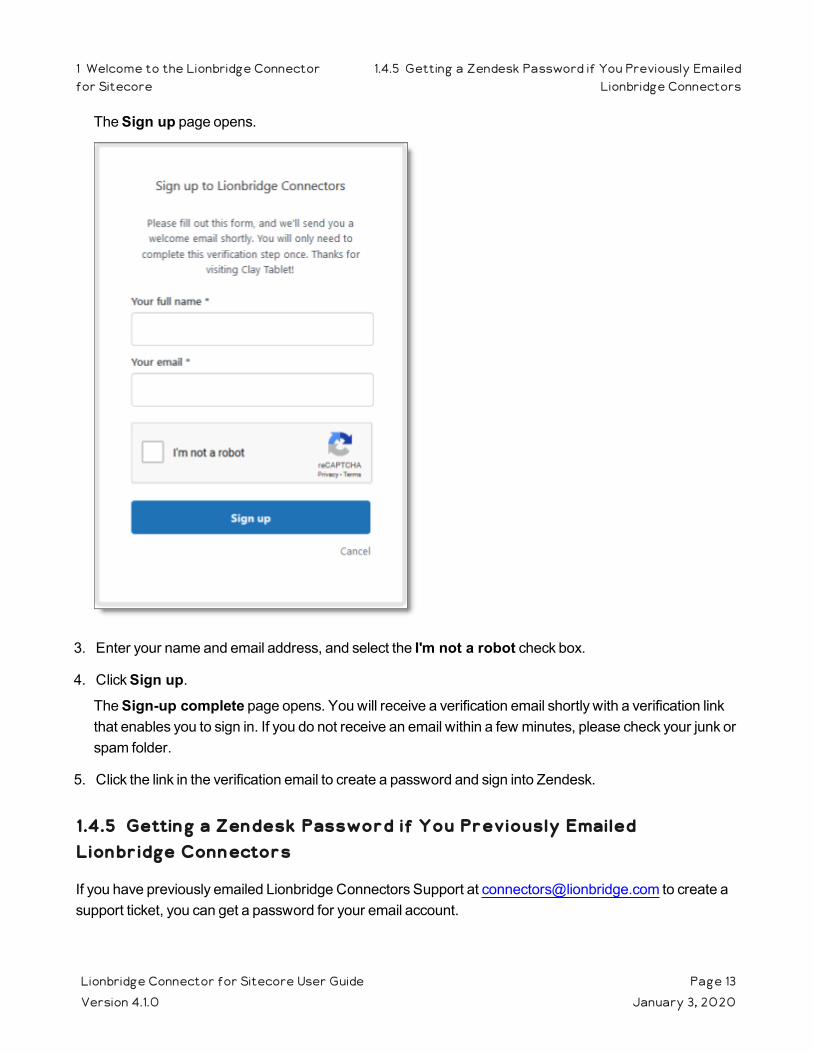
The Sign up page opens.
3. Enter your name and email address, and select the I'm not a robot check box.
4. Click Sign up.The Sign-up complete page opens. You will receive a verification email shortly with a verification link that enables you to sign in. If you do not receive an email within a few minutes, please check your junk or spam folder.
5. Click the link in the verification email to create a password and sign into Zendesk.
1.4.5 Getting a Zendesk Password if You Previously Emailed Lionbridge Connectors
If you have previously emailed Lionbridge Connectors Support at [email protected] to create a support ticket, you can get a password for your email account.
Lionbridge Connector for Sitecore User Guide Page 13Version 4.1.0 January 3, 2020
1 Welcome to the Lionbridge Connectorfor Sitecore
1.4.5 Getting a Zendesk Password if You Previously EmailedLionbridge Connectors
To get a password:
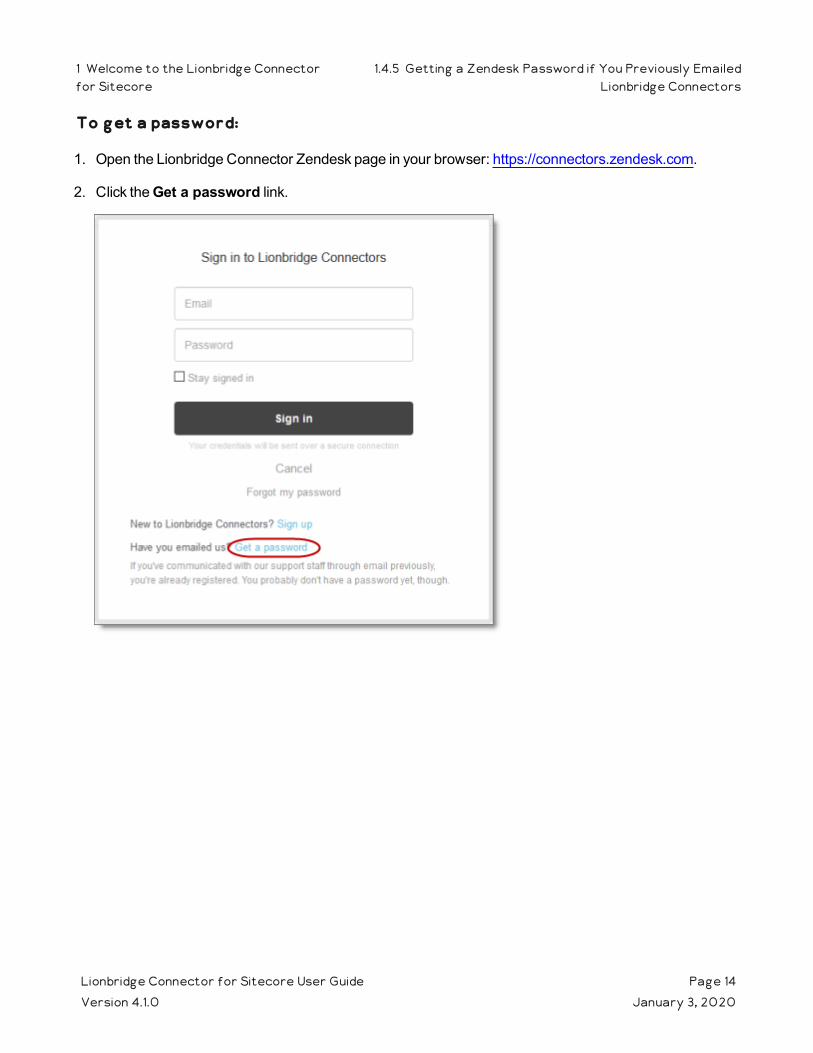
1. Open the Lionbridge Connector Zendesk page in your browser: https://connectors.zendesk.com.
2. Click the Get a password link.
Lionbridge Connector for Sitecore User Guide Page 14Version 4.1.0 January 3, 2020
1 Welcome to the Lionbridge Connectorfor Sitecore
1.4.5 Getting a Zendesk Password if You Previously EmailedLionbridge Connectors

The Please set me up with a new password page opens.
3. Enter the email address from which you emailed Lionbridge Connectors Support ([email protected]).
4. Click Submit.Zendesk sends you an email with instructions for creating your password.
5. Follow the instructions in the email from Zendesk to create your password.
You can now sign in to Zendesk to create, view and update your support tickets.
Lionbridge Connector for Sitecore User Guide Page 15Version 4.1.0 January 3, 2020
1 Welcome to the Lionbridge Connectorfor Sitecore
1.4.5 Getting a Zendesk Password if You Previously EmailedLionbridge Connectors
2 Getting Started with the Lionbridge Connector for SitecoreThe Connector supports the Mozilla Firefox, Google Chrome, and Microsoft Internet Explorer 11 web browsers.
To access the Connector, log into Sitecore.
Tip: To view the Connector user interface in Japanese, change your language setting in Sitecore. For detailed instructions, see https://doc.sitecore.net/sitecore_experience_platform/content_authoring/the_editing_tools/change_your_personal_settings. Note that your Sitecore administrator must install the Connector language pack to support viewing the Connector user interface in Japanese.
2.1 Key Features
The Lionbridge Connector for Sitecore (the "Connector") has the following key features:
"Multiple Ways of Sending Content for Translation" on page 16
"Optimizing Translation Costs (Use Local TM)" on page 17
"Selecting a Translation Provider" on page 17
2.1.1 Multiple Ways of Sending Content for Translation
There are the following multiple ways to send content items out for translation:
Send a single content item for translation from the Sitecore Content Editor. For details, see "Submitting a Content Item for Translation using the Content Editor" on page 43.
Send a single content item for translation from the Sitecore Experience Editor. For details, see "Submitting Content for Translation from the Experience Editor" on page 51.
Send multiple content items using the Bulk Translation wizard. You can filter to exclude content, and send out requests for translations of one target language at a time. For details, see "Sending Multiple Content Items for Translation" on page 58.
Send multiple content items from Sitecore search results. For details, see "Submitting Content for Translation from Sitecore Search Results" on page 82.
Depending on your company's Connector configuration, you may be able to send content out for translation either immediately or via a queue.
Send content immediately to the translation provider.
Lionbridge Connector for Sitecore User Guide Page 16Version 4.1.0 January 3, 2020
2 Getting Started with the Lionbridge Connector forSitecore
2 Getting Started with the Lionbridge Connector forSitecore
Send content via the Translation Queue, which enables you to group items together by project and priority, target language, and require additional approval. For details, see "Submitting Content for Translation from the Translation Queue" on page 84.
2.1.2 Optimizing Translation Costs (Use Local TM)
The Use Local TM feature helps you reduce translation costs, by reducing the quantity of content that Connector sends to translation providers. With this feature, the Connector sends only changed content fields out for translation. To do this, it checks each field of the source version for any content changes.
However, this feature needs Connector translation backup data, and it increases the Connector processing time before sending out the items for translation. For information on enabling Connector translation backup data, refer to the Lionbridge Connector for Sitecore Installation and Configuration Guide.
This feature is available:
by selecting the Use Local TM check box in the Translation Options page of the Bulk Translation wizard, as described in "Sending Multiple Content Items for Translation" on page 58.
by selecting the Use LocalTM check box in the Automatic Item Export for Translation dialog box, as described in "Submitting a Content Item for Translation using the Content Editor" on page 43 and "Submitting Content for Translation from the Experience Editor" on page 51.
2.1.3 Selecting a Translation Provider
If your company has multiple translation providers, your company's Connector setup may enable you to select which one to use when you send out items for translation.
This feature is available:
in the Translation Queue, as described in "Submitting Content for Translation from the Translation Queue" on page 84.
in the Translation Options page of the Bulk Translation wizard, as described in "Sending Multiple Content Items for Translation" on page 58.
when sending an individual content item for translation from the Sitecore Content Editor, as described in "Submitting a Content Item for Translation using the Content Editor" on page 43.
when sending an individual content item for translation from the Sitecore Page Editor, as described in "Submitting Content for Translation from the Experience Editor" on page 51.
Lionbridge Connector for Sitecore User Guide Page 17Version 4.1.0 January 3, 2020
2 Getting Started with the Lionbridge Connector forSitecore
2.1.2 Optimizing Translation Costs (Use LocalTM)
2.2 The Connector at a Glance
You access the Lionbridge Connector for Sitecore ("Connector") directly from the Sitecore user interfaces–from the Content Editor and the Experience Editor.
Note: Not all Connector features are available in all Sitecore user interfaces.
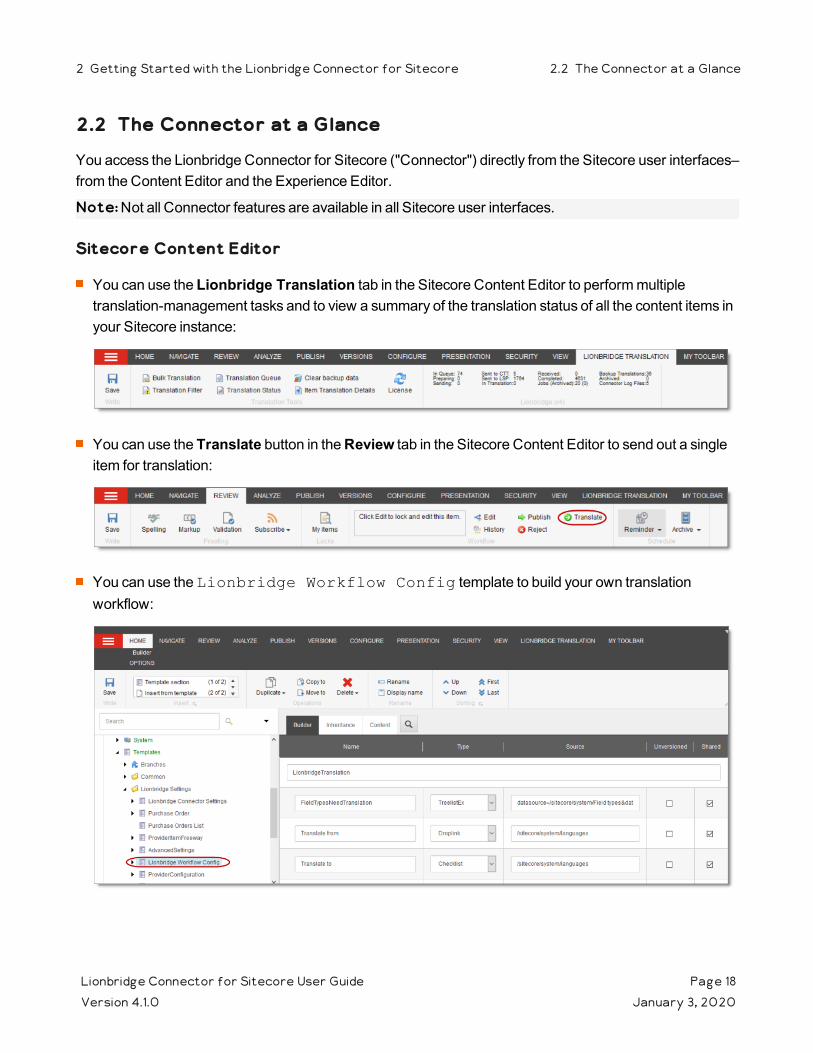
Sitecore Content Editor
You can use the Lionbridge Translation tab in the Sitecore Content Editor to perform multiple translation-management tasks and to view a summary of the translation status of all the content items in your Sitecore instance:
You can use the Translate button in the Review tab in the Sitecore Content Editor to send out a single item for translation:
You can use the Lionbridge Workflow Config template to build your own translation workflow:
Lionbridge Connector for Sitecore User Guide Page 18Version 4.1.0 January 3, 2020
2 Getting Started with the Lionbridge Connector for Sitecore 2.2 The Connector at a Glance
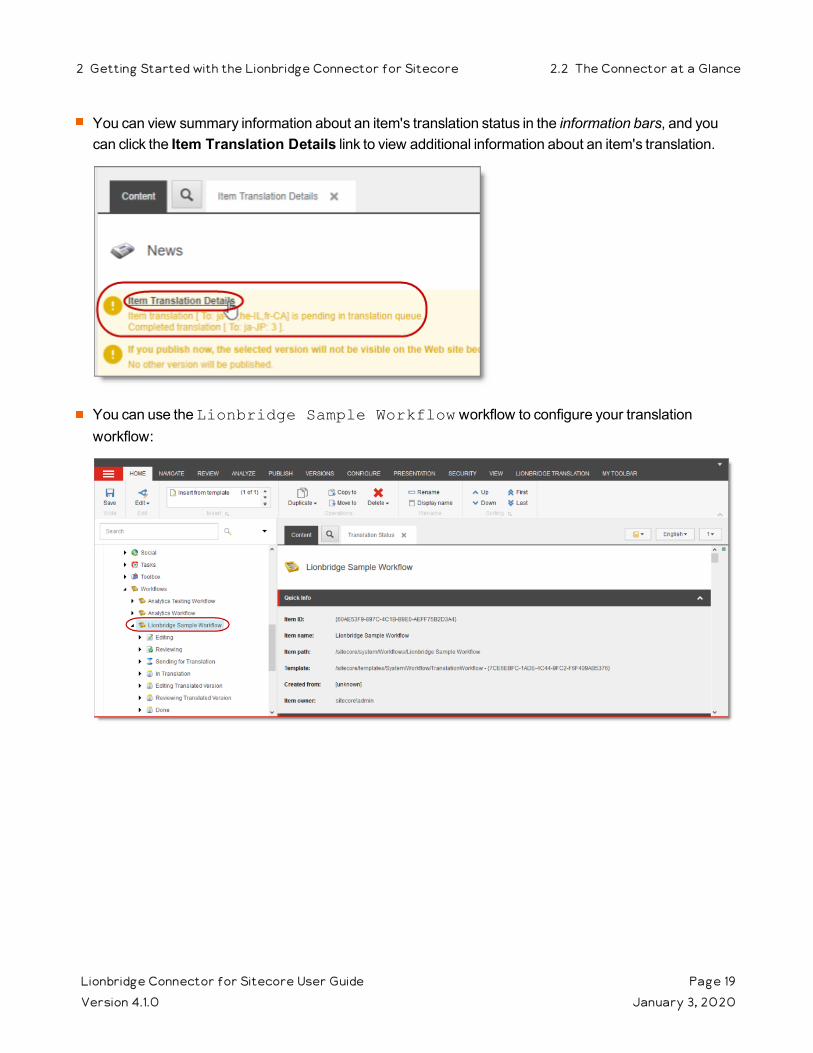
You can view summary information about an item's translation status in the information bars, and you can click the Item Translation Details link to view additional information about an item's translation.
You can use the Lionbridge Sample Workflow workflow to configure your translation workflow:
Lionbridge Connector for Sitecore User Guide Page 19Version 4.1.0 January 3, 2020
2 Getting Started with the Lionbridge Connector for Sitecore 2.2 The Connector at a Glance
Sitecore Experience Editor
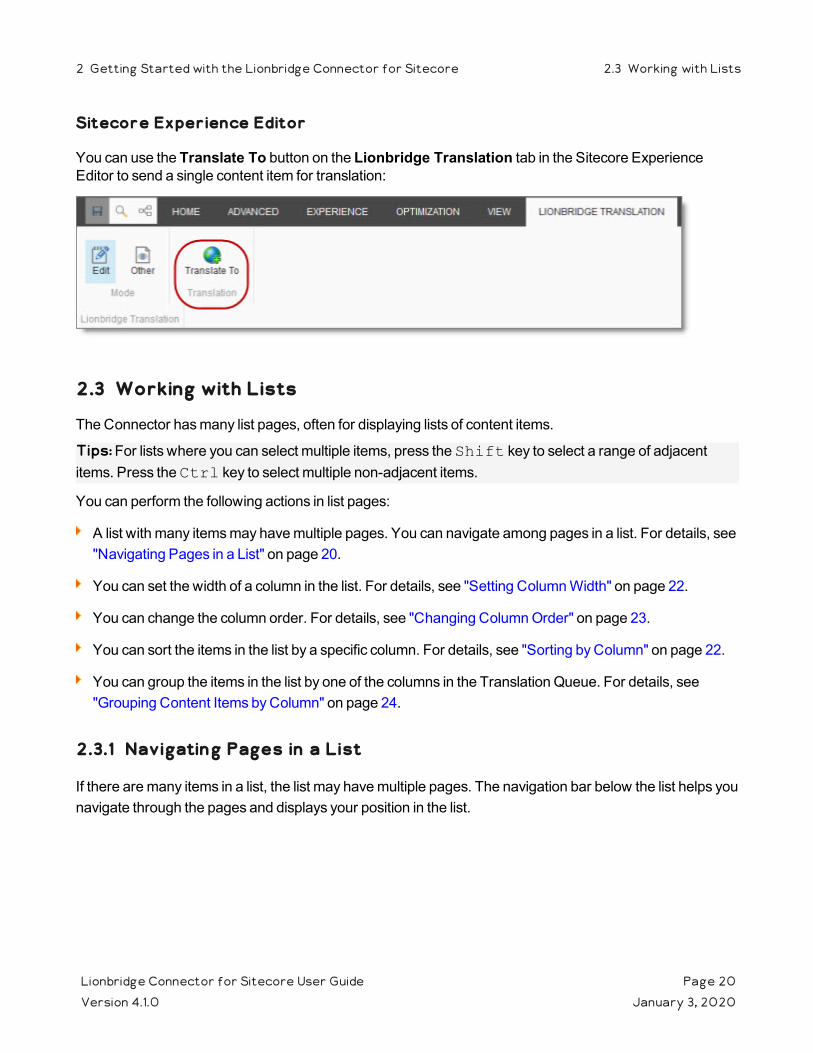
You can use the Translate To button on the Lionbridge Translation tab in the Sitecore Experience Editor to send a single content item for translation:
2.3 Working with Lists
The Connector has many list pages, often for displaying lists of content items.
Tips: For lists where you can select multiple items, press the Shift key to select a range of adjacent items. Press the Ctrl key to select multiple non-adjacent items.
You can perform the following actions in list pages:
A list with many items may have multiple pages. You can navigate among pages in a list. For details, see "Navigating Pages in a List" on page 20.
You can set the width of a column in the list. For details, see "Setting Column Width" on page 22.
You can change the column order. For details, see "Changing Column Order" on page 23.
You can sort the items in the list by a specific column. For details, see "Sorting by Column" on page 22.
You can group the items in the list by one of the columns in the Translation Queue. For details, see "Grouping Content Items by Column" on page 24.
2.3.1 Navigating Pages in a List
If there are many items in a list, the list may have multiple pages. The navigation bar below the list helps you navigate through the pages and displays your position in the list.
Lionbridge Connector for Sitecore User Guide Page 20Version 4.1.0 January 3, 2020
2 Getting Started with the Lionbridge Connector for Sitecore 2.3 Working with Lists
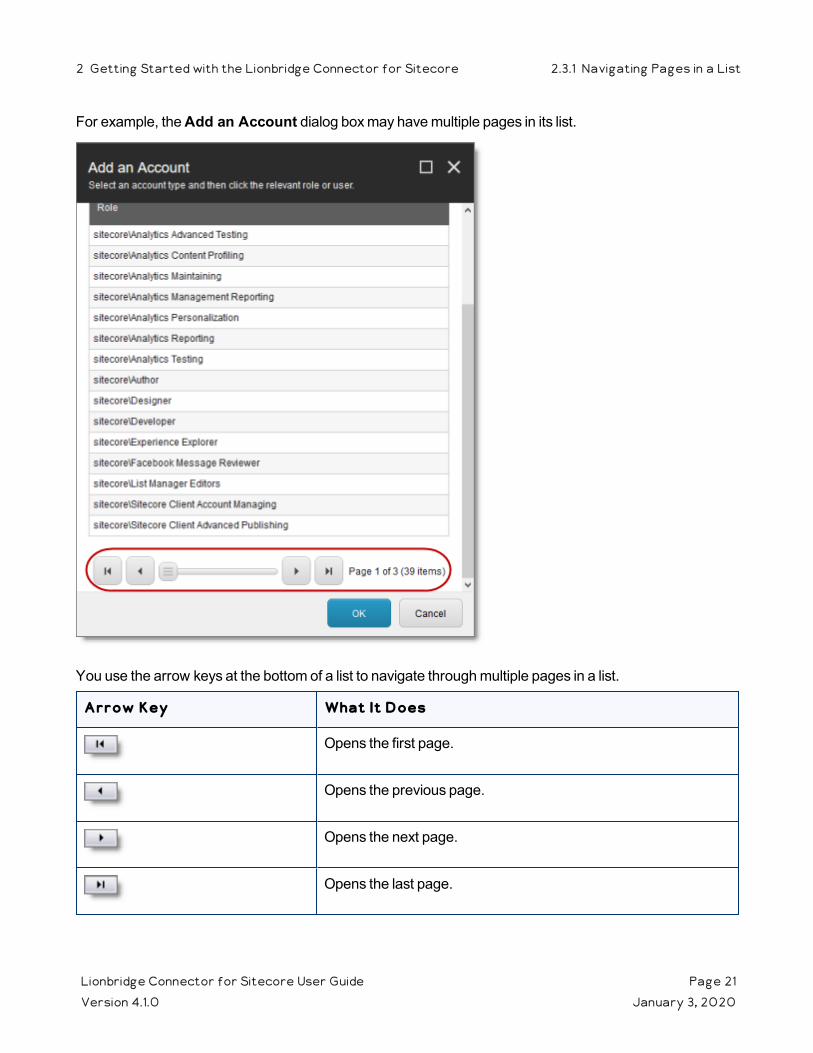
For example, the Add an Account dialog box may have multiple pages in its list.
You use the arrow keys at the bottom of a list to navigate through multiple pages in a list.
Arrow Key What It Does
Opens the first page.
Opens the previous page.
Opens the next page.
Opens the last page.
Lionbridge Connector for Sitecore User Guide Page 21Version 4.1.0 January 3, 2020
2 Getting Started with the Lionbridge Connector for Sitecore 2.3.1 Navigating Pages in a List
The bottom right corner of the windows displays the current page in the list, the total number of pages in the list, and the total number of items in the list. The maximum number of items displayed in a list page depends on the particular list.
2.3.2 Setting Column Width
You can set the width of any column in a list.
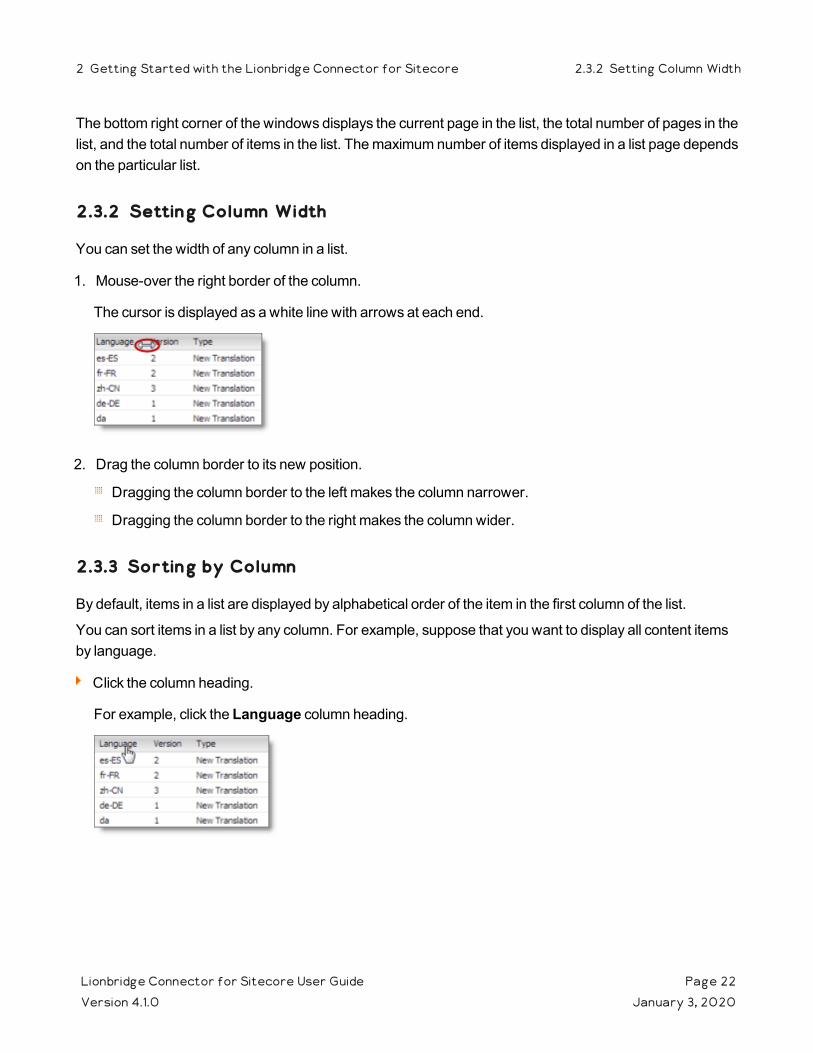
1. Mouse-over the right border of the column.
The cursor is displayed as a white line with arrows at each end.
2. Drag the column border to its new position.
Dragging the column border to the left makes the column narrower.
Dragging the column border to the right makes the column wider.
2.3.3 Sorting by Column
By default, items in a list are displayed by alphabetical order of the item in the first column of the list.
You can sort items in a list by any column. For example, suppose that you want to display all content items by language.
Click the column heading.
For example, click the Language column heading.
Lionbridge Connector for Sitecore User Guide Page 22Version 4.1.0 January 3, 2020
2 Getting Started with the Lionbridge Connector for Sitecore 2.3.2 Setting Column Width

The first time you click in the column heading, the column contents are sorted in ascending order. The arrow in the column heading indicates the sort order.
If you want to reverse the sort order, click again in the column heading.
2.3.4 Changing Column Order
You can change the order in which columns in lists are displayed. For example, suppose you want to move the Language column to the right of the Version column.
1. Click the column heading to move.
For example, click the Language column heading.
2. While you hold down the cursor, drag the column heading to the new position. (A copy of the column heading "floats" above the table.) Red arrows indicate the new position of the column.
Lionbridge Connector for Sitecore User Guide Page 23Version 4.1.0 January 3, 2020
2 Getting Started with the Lionbridge Connector for Sitecore 2.3.4 Changing Column Order
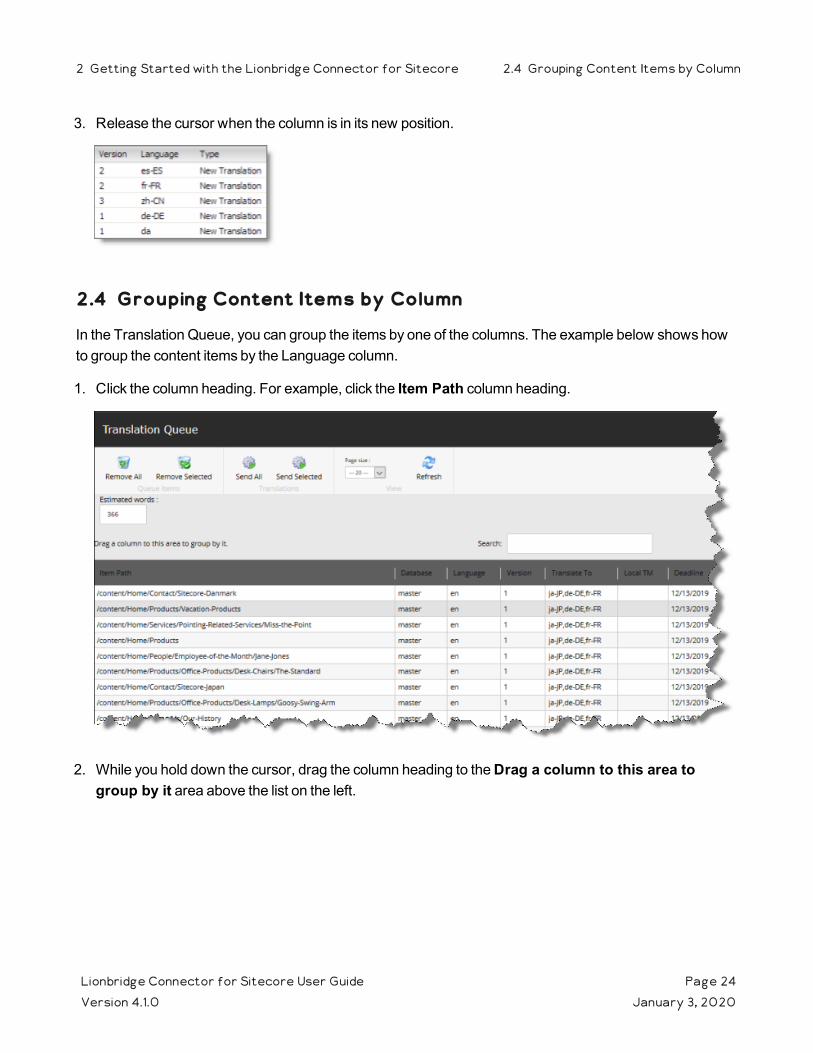
3. Release the cursor when the column is in its new position.
2.4 Grouping Content Items by Column
In the Translation Queue, you can group the items by one of the columns. The example below shows how to group the content items by the Language column.
1. Click the column heading. For example, click the Item Path column heading.
2. While you hold down the cursor, drag the column heading to the Drag a column to this area to group by it area above the list on the left.
Lionbridge Connector for Sitecore User Guide Page 24Version 4.1.0 January 3, 2020
2 Getting Started with the Lionbridge Connector for Sitecore 2.4 Grouping Content Items by Column
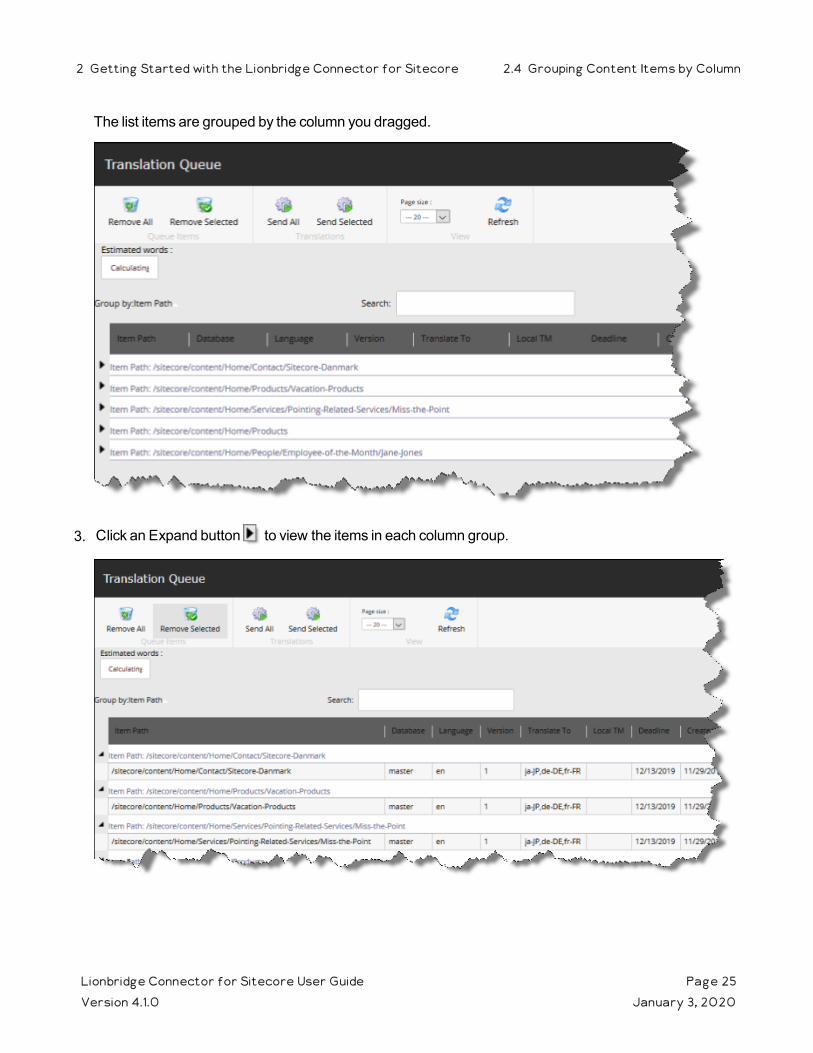
The list items are grouped by the column you dragged.
3. Click an Expand button to view the items in each column group.
Lionbridge Connector for Sitecore User Guide Page 25Version 4.1.0 January 3, 2020
2 Getting Started with the Lionbridge Connector for Sitecore 2.4 Grouping Content Items by Column
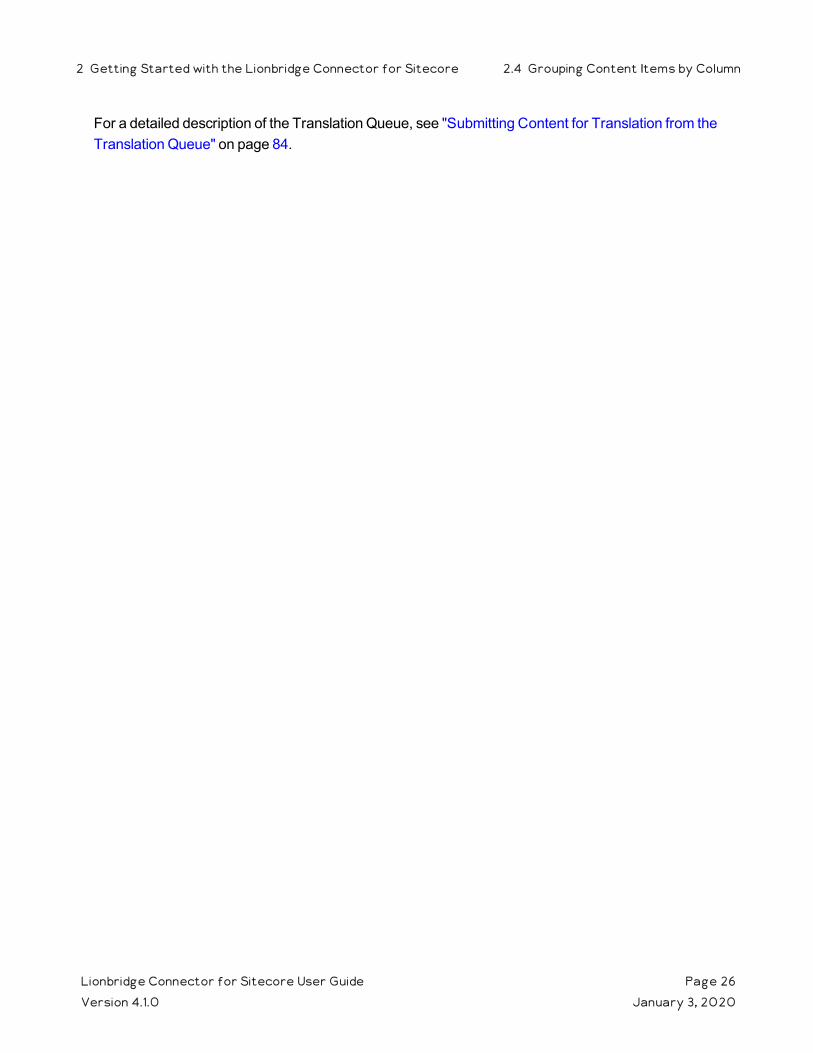
For a detailed description of the Translation Queue, see "Submitting Content for Translation from the Translation Queue" on page 84.
Lionbridge Connector for Sitecore User Guide Page 26Version 4.1.0 January 3, 2020
2 Getting Started with the Lionbridge Connector for Sitecore 2.4 Grouping Content Items by Column

3 Creating Content for TranslationIf you are sending a single content item for translation, it must have a translation workflow assigned.
There are three ways to do this when you create a content item:
Assign it to the sitecore/System/Templates/Lionbridge Settings/Lionbridge Workflow Config template. This template uses the translation workflow, which is contained in the sitecore/System/Workflows/Lionbridge Sample Workflow.
Assign it to your own template. Ensure that your template uses the translation workflow, which is contained in the sitecore/System/Workflows/Lionbridge Sample Workflow.
Assign it to your own template, which uses your own workflow. Ensure that the base template of your workflow is /sitecore/templates/System/Workflow/TranslationWorkflow. For detailed instructions, refer to the Lionbridge Connector for Sitecore Installation and Configuration Guide.
If a content item was already created, but a translation workflow was not assigned to it, you must assign a translation workflow to that item. For details, see page 33.
If you are sending multiple content items together using the Bulk Translation feature, you do not need to assign a translation workflow to individual content items. You can assign a translation workflow and assign a workflow state to all items without an assigned workflow. For details, see "Sending Multiple Content Items for Translation" on page 58.
3.1 Attaching a New Content Item to a Translation Workflow
To create an item that you can send for translation individually, you must either use a template that has the Clay Tablet workflow attached, or use a template that is attached to your custom translation workflow.
Note: If you will be sending an item for translation using the Bulk Translation feature, described in "Sending Multiple Content Items for Translation" on page 58, you do not need to assign a template with a translation workflow to the item.
1. In the Sitecore Content Editor, under Content in the content tree, locate the place in the tree where you want to create a new item that will be sent for translation. Next, right-click and select Insert > Insert from Template in the context menu. The Insert from Template dialog box opens.
Lionbridge Connector for Sitecore User Guide Page 27Version 4.1.0 January 3, 2020
3 Creating Content for Translation 3 Creating Content for Translation
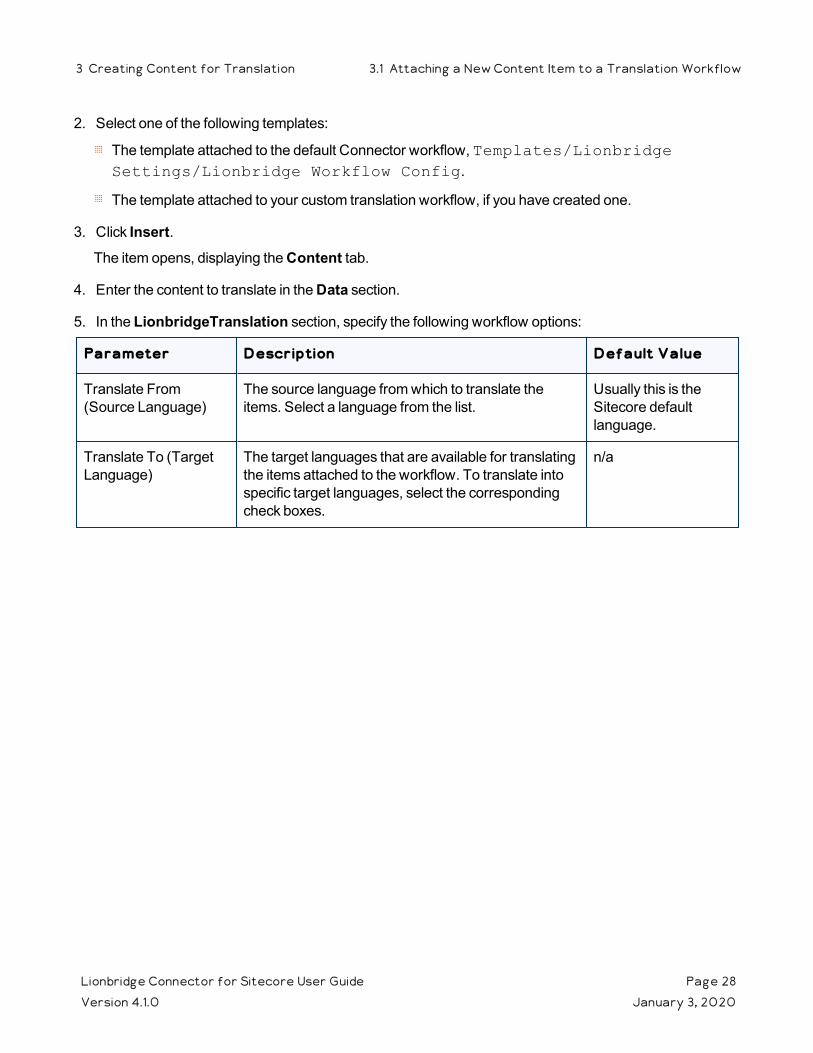
2. Select one of the following templates:
The template attached to the default Connector workflow, Templates/Lionbridge Settings/Lionbridge Workflow Config.
The template attached to your custom translation workflow, if you have created one.
3. Click Insert.The item opens, displaying the Content tab.
4. Enter the content to translate in the Data section.
5. In the LionbridgeTranslation section, specify the following workflow options:
Parameter Description Default Value
Translate From (Source Language)
The source language from which to translate the items. Select a language from the list.
Usually this is the Sitecore default language.
Translate To (Target Language)
The target languages that are available for translating the items attached to the workflow. To translate into specific target languages, select the corresponding check boxes.
n/a
Lionbridge Connector for Sitecore User Guide Page 28Version 4.1.0 January 3, 2020
3 Creating Content for Translation 3.1 Attaching a New Content Item to a Translation Workflow
Parameter Description Default Value
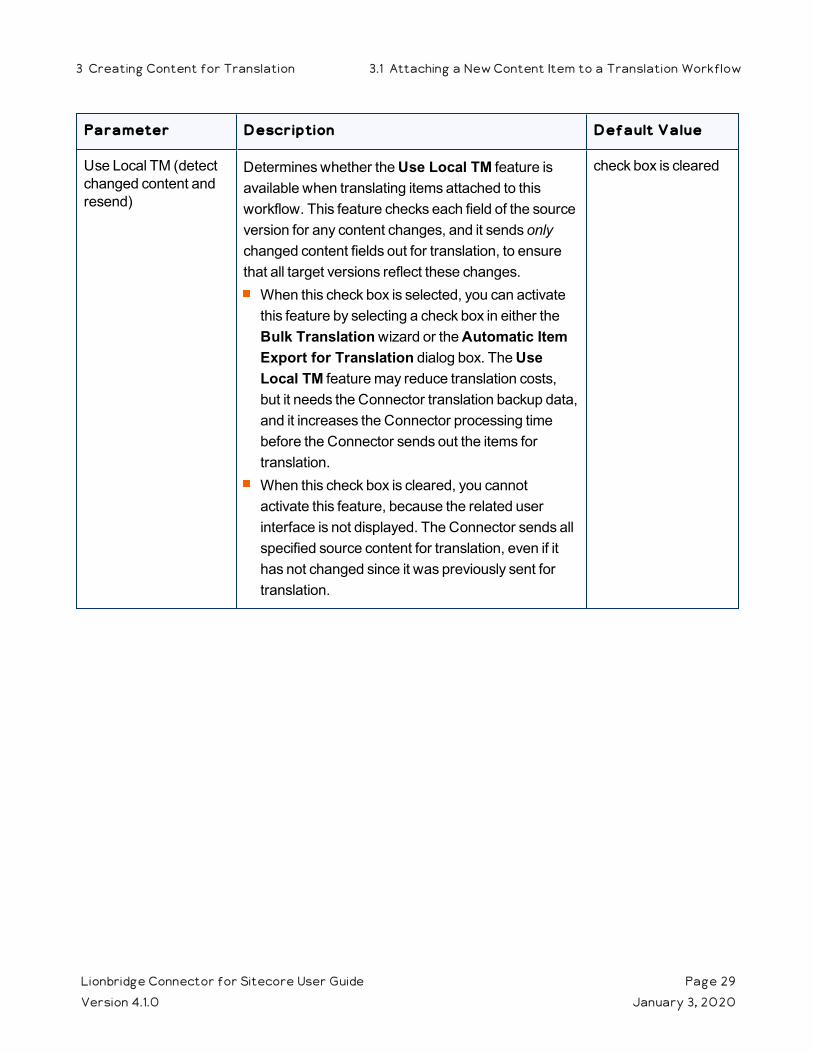
Use Local TM (detect changed content and resend)
Determines whether the Use Local TM feature is available when translating items attached to this workflow. This feature checks each field of the source version for any content changes, and it sends only changed content fields out for translation, to ensure that all target versions reflect these changes.When this check box is selected, you can activate this feature by selecting a check box in either the Bulk Translation wizard or the Automatic Item Export for Translation dialog box. The Use Local TM feature may reduce translation costs, but it needs the Connector translation backup data, and it increases the Connector processing time before the Connector sends out the items for translation.When this check box is cleared, you cannot activate this feature, because the related user interface is not displayed. The Connector sends all specified source content for translation, even if it has not changed since it was previously sent for translation.
check box is cleared
Lionbridge Connector for Sitecore User Guide Page 29Version 4.1.0 January 3, 2020
3 Creating Content for Translation 3.1 Attaching a New Content Item to a Translation Workflow

Parameter Description Default Value
Requested Translation Timeframe (Days)
Determines the translation deadline when sending out the translation automatically, without using the user interface that supports entering this information in the Delivery Date field. This information is sent to the translation provider as metadata of the translation package. If you set this parameter to 14, the deadline will be two calendar weeks after you submit an item for translation. Recommendation: Discuss whether to use this feature with your translation provider(s).Note about Lionbridge onDemand: This feature is not supported when the translation provider is Lionbridge onDemand, because onDemand provides an estimated delivery date based on the content submitted for translation.
15
Workflow State to set when Sending Content for Translation
The workflow state to set when a source item has been selected for translation.
/sitecore/system/Workflows/Lionbridge Sample Workflow/Sending for Translation
Workflow State to set (for Source Content) once content has been sent for translation
The workflow state to set for a source item after the Connector has sent it out for translation. For example, in some companies, when you send out the content for translation, the source is ready for publishing. In this scenario, you can set this state to Done, which is a publishable state. Alternatively, if your company has a final review process, you can set this to another state that is not publishable.
By default, this state is not set, so the source item's state does not change when you send it out for translation.
Workflow State to set for Content while it is out for translation
The workflow state to set for target content when an item is being translated. The default In Translation workflow state enables you to see which items are still out for translation. It facilitates following up with your translator about items that you have sent out for translation, but that you have not yet received back.
/sitecore/system/Workflows/Lionbridge Sample Workflow/In Translation
Lionbridge Connector for Sitecore User Guide Page 30Version 4.1.0 January 3, 2020
3 Creating Content for Translation 3.1 Attaching a New Content Item to a Translation Workflow
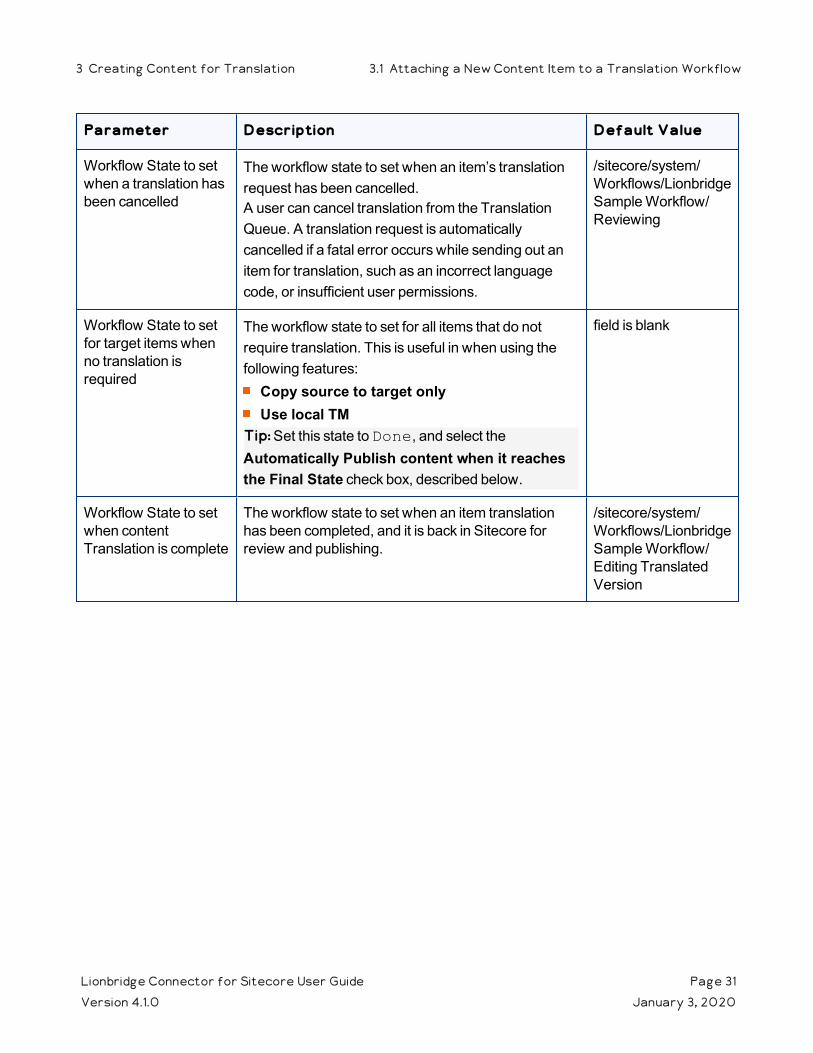
Parameter Description Default Value
Workflow State to set when a translation has been cancelled
The workflow state to set when an item’s translation request has been cancelled.A user can cancel translation from the Translation Queue. A translation request is automatically cancelled if a fatal error occurs while sending out an item for translation, such as an incorrect language code, or insufficient user permissions.
/sitecore/system/Workflows/Lionbridge Sample Workflow/Reviewing
Workflow State to set for target items when no translation is required
The workflow state to set for all items that do not require translation. This is useful in when using the following features:
Copy source to target only Use local TM
Tip: Set this state to Done, and select the Automatically Publish content when it reaches the Final State check box, described below.
field is blank
Workflow State to set when content Translation is complete
The workflow state to set when an item translation has been completed, and it is back in Sitecore for review and publishing.
/sitecore/system/Workflows/Lionbridge Sample Workflow/Editing Translated Version
Lionbridge Connector for Sitecore User Guide Page 31Version 4.1.0 January 3, 2020
3 Creating Content for Translation 3.1 Attaching a New Content Item to a Translation Workflow
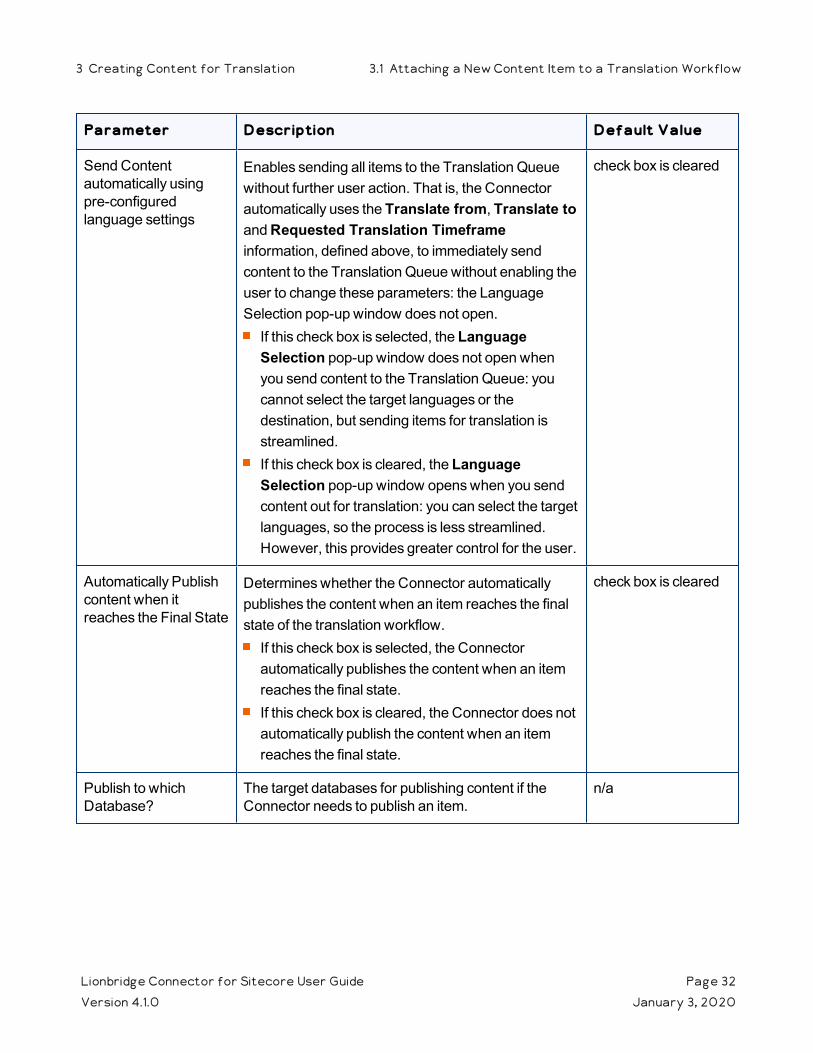
Parameter Description Default Value
Send Content automatically using pre-configured language settings
Enables sending all items to the Translation Queue without further user action. That is, the Connector automatically uses the Translate from, Translate to and Requested Translation Timeframe information, defined above, to immediately send content to the Translation Queue without enabling the user to change these parameters: the Language Selection pop-up window does not open. If this check box is selected, the Language Selection pop-up window does not open when you send content to the Translation Queue: you cannot select the target languages or the destination, but sending items for translation is streamlined. If this check box is cleared, the Language Selection pop-up window opens when you send content out for translation: you can select the target languages, so the process is less streamlined. However, this provides greater control for the user.
check box is cleared
Automatically Publish content when it reaches the Final State
Determines whether the Connector automatically publishes the content when an item reaches the final state of the translation workflow.If this check box is selected, the Connector automatically publishes the content when an item reaches the final state. If this check box is cleared, the Connector does not automatically publish the content when an item reaches the final state.
check box is cleared
Publish to which Database?
The target databases for publishing content if the Connector needs to publish an item.
n/a
Lionbridge Connector for Sitecore User Guide Page 32Version 4.1.0 January 3, 2020
3 Creating Content for Translation 3.1 Attaching a New Content Item to a Translation Workflow
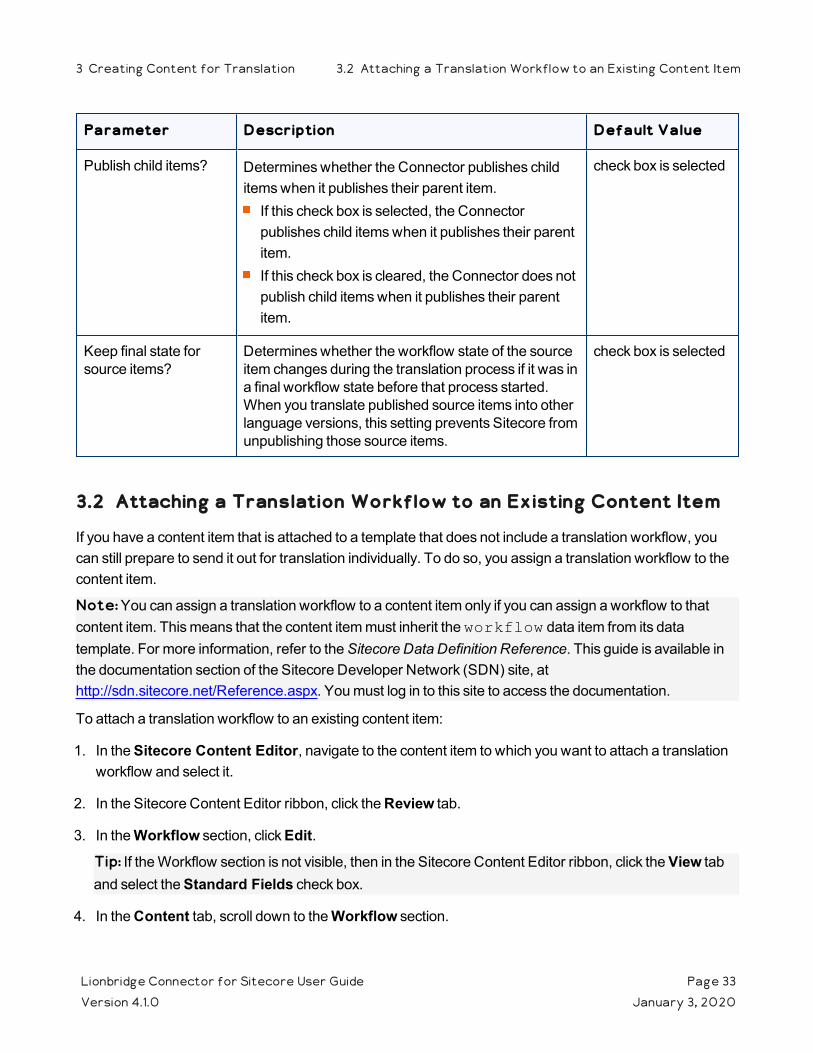
Parameter Description Default Value
Publish child items? Determines whether the Connector publishes child items when it publishes their parent item.If this check box is selected, the Connector publishes child items when it publishes their parent item. If this check box is cleared, the Connector does not publish child items when it publishes their parent item.
check box is selected
Keep final state for source items?
Determines whether the workflow state of the source item changes during the translation process if it was in a final workflow state before that process started. When you translate published source items into other language versions, this setting prevents Sitecore from unpublishing those source items.
check box is selected
3.2 Attaching a Translation Workflow to an Existing Content Item
If you have a content item that is attached to a template that does not include a translation workflow, you can still prepare to send it out for translation individually. To do so, you assign a translation workflow to the content item.
Note: You can assign a translation workflow to a content item only if you can assign a workflow to that content item. This means that the content item must inherit the workflow data item from its data template. For more information, refer to the Sitecore Data Definition Reference. This guide is available in the documentation section of the Sitecore Developer Network (SDN) site, at http://sdn.sitecore.net/Reference.aspx. You must log in to this site to access the documentation.
To attach a translation workflow to an existing content item:
1. In the Sitecore Content Editor, navigate to the content item to which you want to attach a translation workflow and select it.
2. In the Sitecore Content Editor ribbon, click the Review tab.
3. In the Workflow section, click Edit.
Tip: If the Workflow section is not visible, then in the Sitecore Content Editor ribbon, click the View tab and select the Standard Fields check box.
4. In the Content tab, scroll down to the Workflow section.
Lionbridge Connector for Sitecore User Guide Page 33Version 4.1.0 January 3, 2020
3 Creating Content for Translation 3.2 Attaching a Translation Workflow to an Existing Content Item
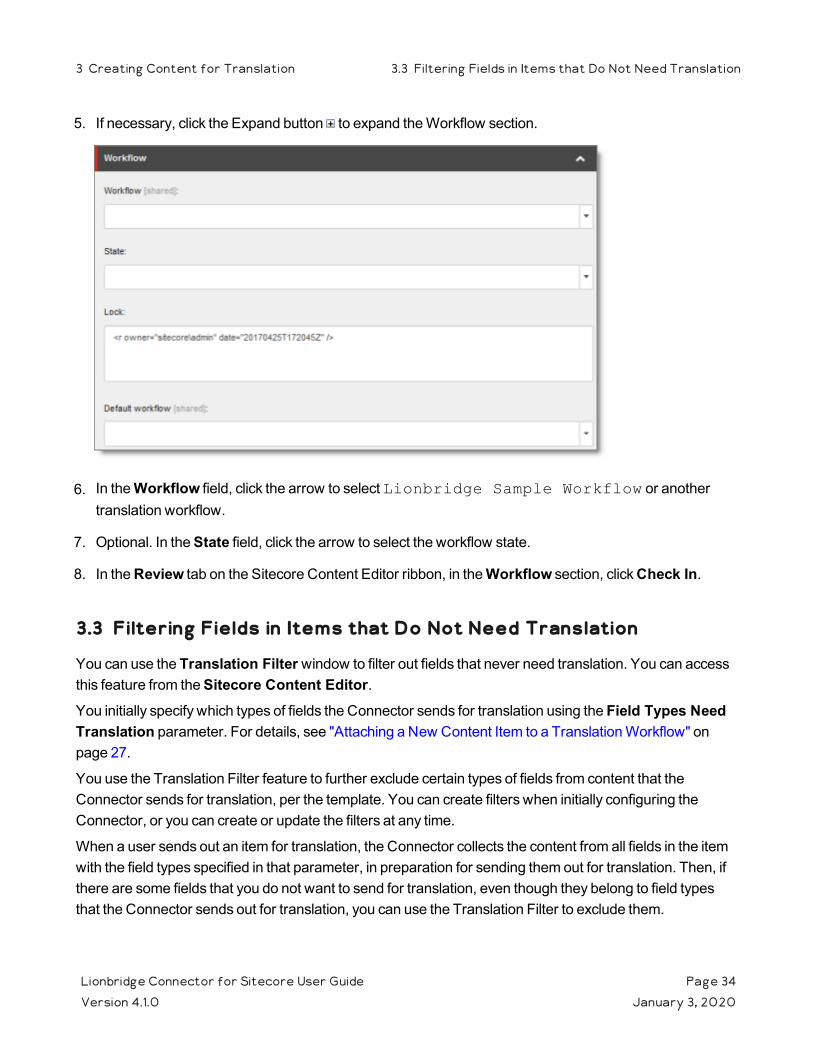
5. If necessary, click the Expand button to expand the Workflow section.
6. In the Workflow field, click the arrow to select Lionbridge Sample Workflow or another translation workflow.
7. Optional. In the State field, click the arrow to select the workflow state.
8. In the Review tab on the Sitecore Content Editor ribbon, in the Workflow section, click Check In.
3.3 Filtering Fields in Items that Do Not Need Translation
You can use the Translation Filter window to filter out fields that never need translation. You can access this feature from the Sitecore Content Editor.You initially specify which types of fields the Connector sends for translation using the Field Types Need Translation parameter. For details, see "Attaching a New Content Item to a Translation Workflow" on page 27.
You use the Translation Filter feature to further exclude certain types of fields from content that the Connector sends for translation, per the template. You can create filters when initially configuring the Connector, or you can create or update the filters at any time.
When a user sends out an item for translation, the Connector collects the content from all fields in the item with the field types specified in that parameter, in preparation for sending them out for translation. Then, if there are some fields that you do not want to send for translation, even though they belong to field types that the Connector sends out for translation, you can use the Translation Filter to exclude them.
Lionbridge Connector for Sitecore User Guide Page 34Version 4.1.0 January 3, 2020
3 Creating Content for Translation 3.3 Filtering Fields in Items that Do Not Need Translation
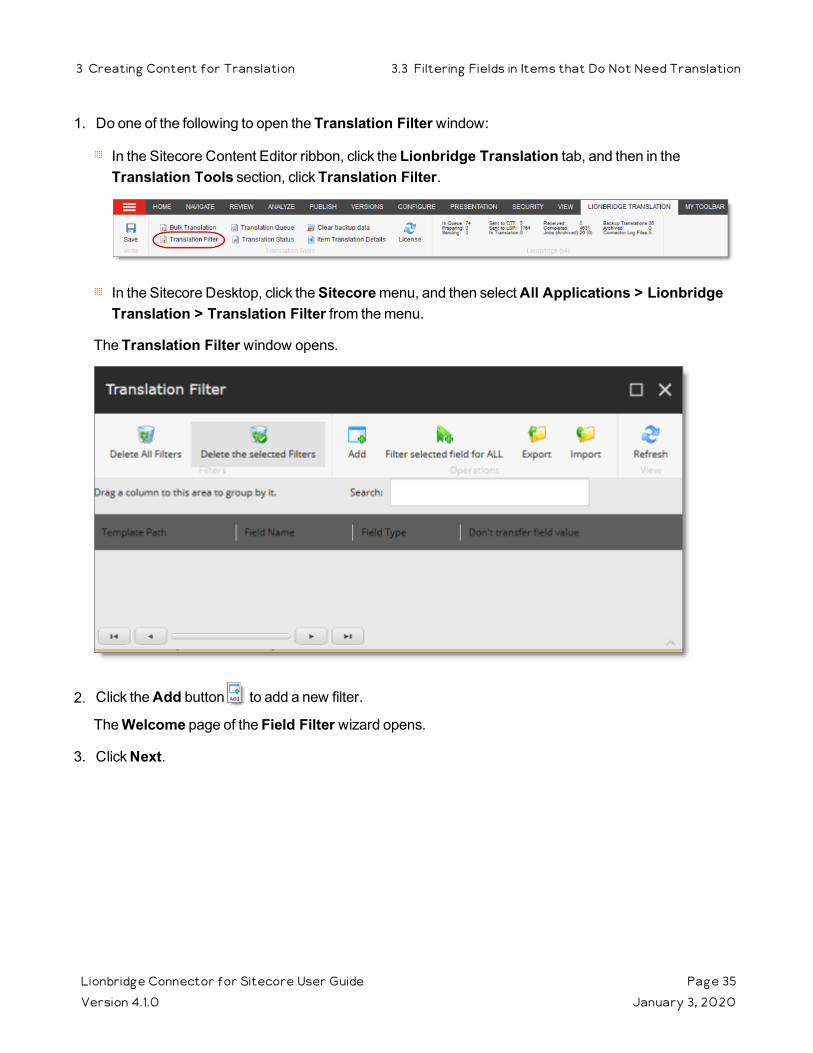
1. Do one of the following to open the Translation Filter window:
In the Sitecore Content Editor ribbon, click the Lionbridge Translation tab, and then in the Translation Tools section, click Translation Filter.
In the Sitecore Desktop, click the Sitecore menu, and then select All Applications > Lionbridge Translation > Translation Filter from the menu.
The Translation Filter window opens.
2. Click the Add button to add a new filter.
The Welcome page of the Field Filter wizard opens.
3. Click Next.
Lionbridge Connector for Sitecore User Guide Page 35Version 4.1.0 January 3, 2020
3 Creating Content for Translation 3.3 Filtering Fields in Items that Do Not Need Translation
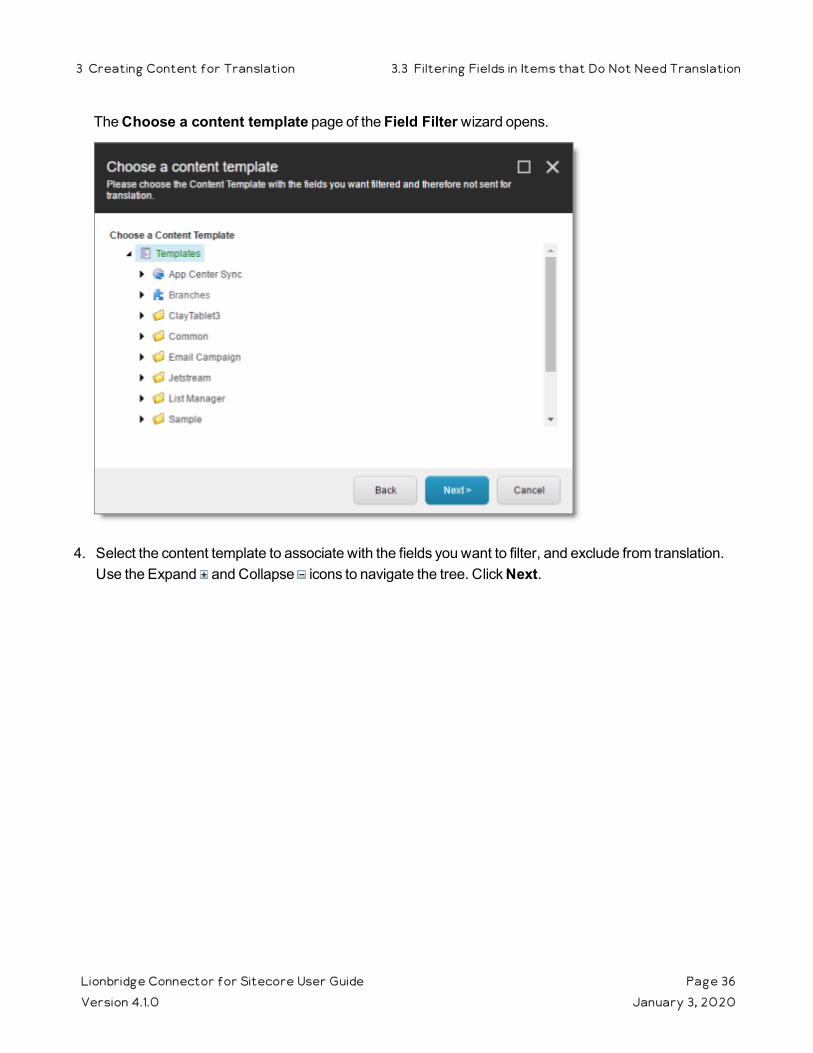
The Choose a content template page of the Field Filter wizard opens.
4. Select the content template to associate with the fields you want to filter, and exclude from translation. Use the Expand and Collapse icons to navigate the tree. Click Next.
Lionbridge Connector for Sitecore User Guide Page 36Version 4.1.0 January 3, 2020
3 Creating Content for Translation 3.3 Filtering Fields in Items that Do Not Need Translation
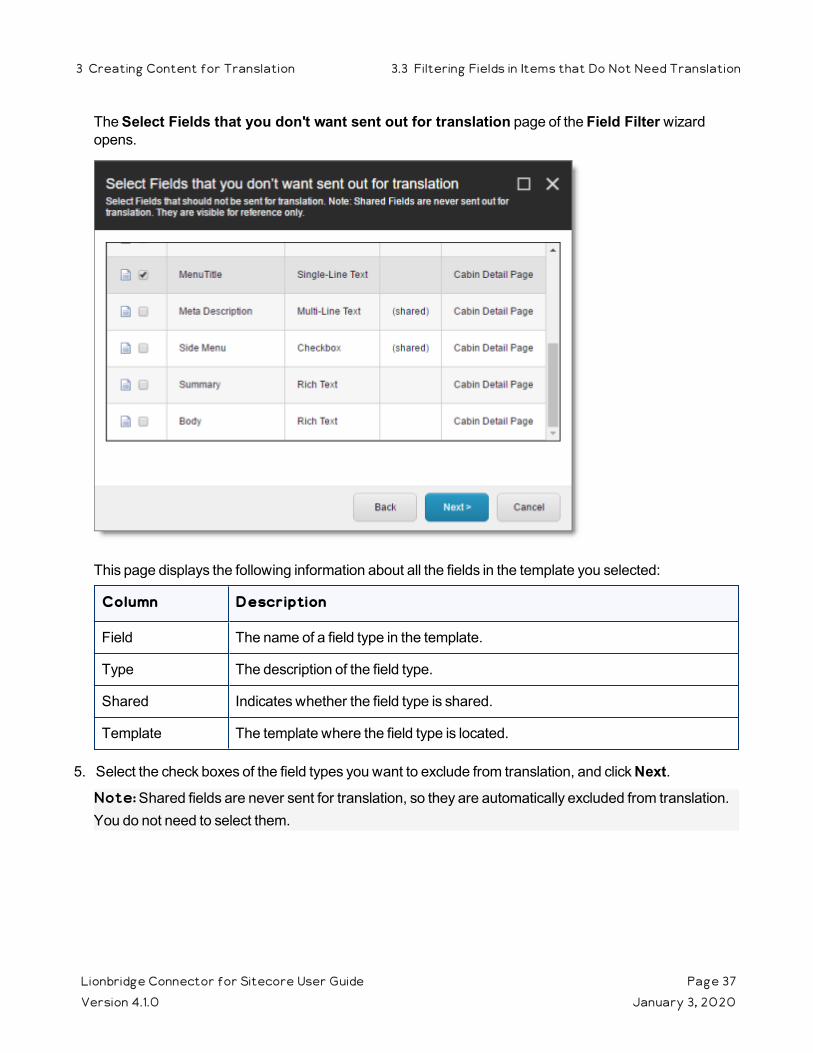
The Select Fields that you don't want sent out for translation page of the Field Filter wizard opens.
This page displays the following information about all the fields in the template you selected:
Column Description
Field The name of a field type in the template.
Type The description of the field type.
Shared Indicates whether the field type is shared.
Template The template where the field type is located.
5. Select the check boxes of the field types you want to exclude from translation, and click Next.
Note: Shared fields are never sent for translation, so they are automatically excluded from translation. You do not need to select them.
Lionbridge Connector for Sitecore User Guide Page 37Version 4.1.0 January 3, 2020
3 Creating Content for Translation 3.3 Filtering Fields in Items that Do Not Need Translation
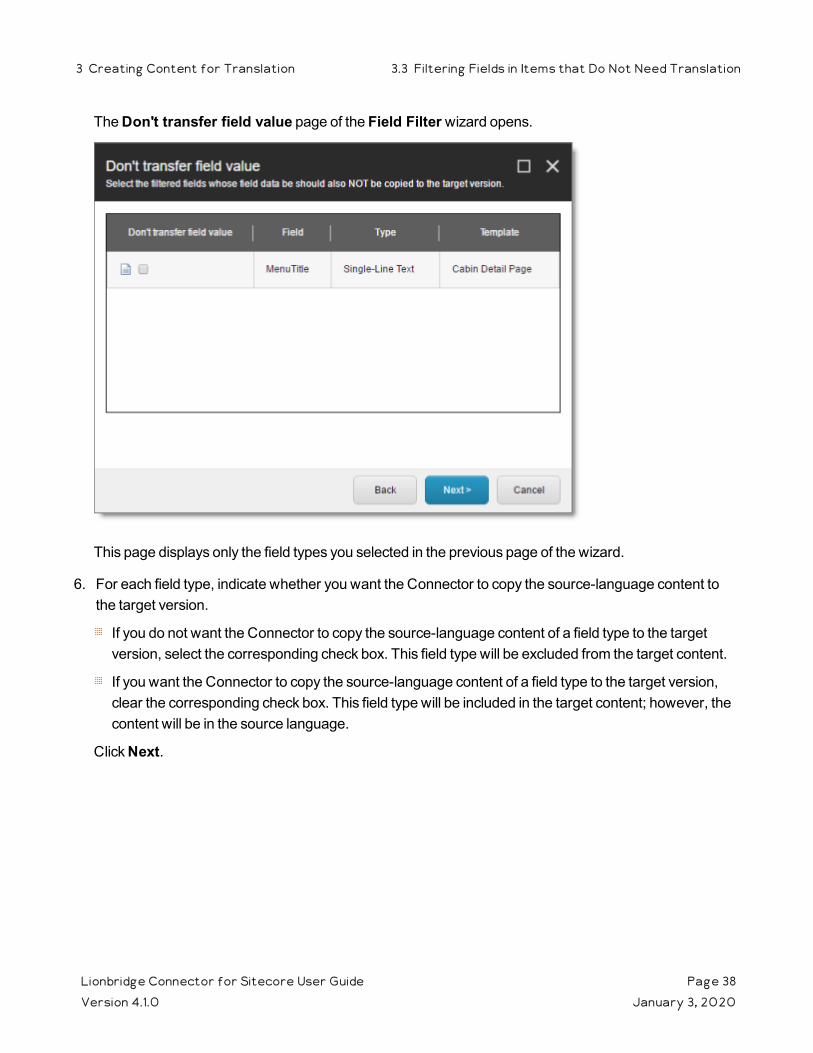
The Don't transfer field value page of the Field Filter wizard opens.
This page displays only the field types you selected in the previous page of the wizard.
6. For each field type, indicate whether you want the Connector to copy the source-language content to the target version.
If you do not want the Connector to copy the source-language content of a field type to the target version, select the corresponding check box. This field type will be excluded from the target content.
If you want the Connector to copy the source-language content of a field type to the target version, clear the corresponding check box. This field type will be included in the target content; however, the content will be in the source language.
Click Next.
Lionbridge Connector for Sitecore User Guide Page 38Version 4.1.0 January 3, 2020
3 Creating Content for Translation 3.3 Filtering Fields in Items that Do Not Need Translation
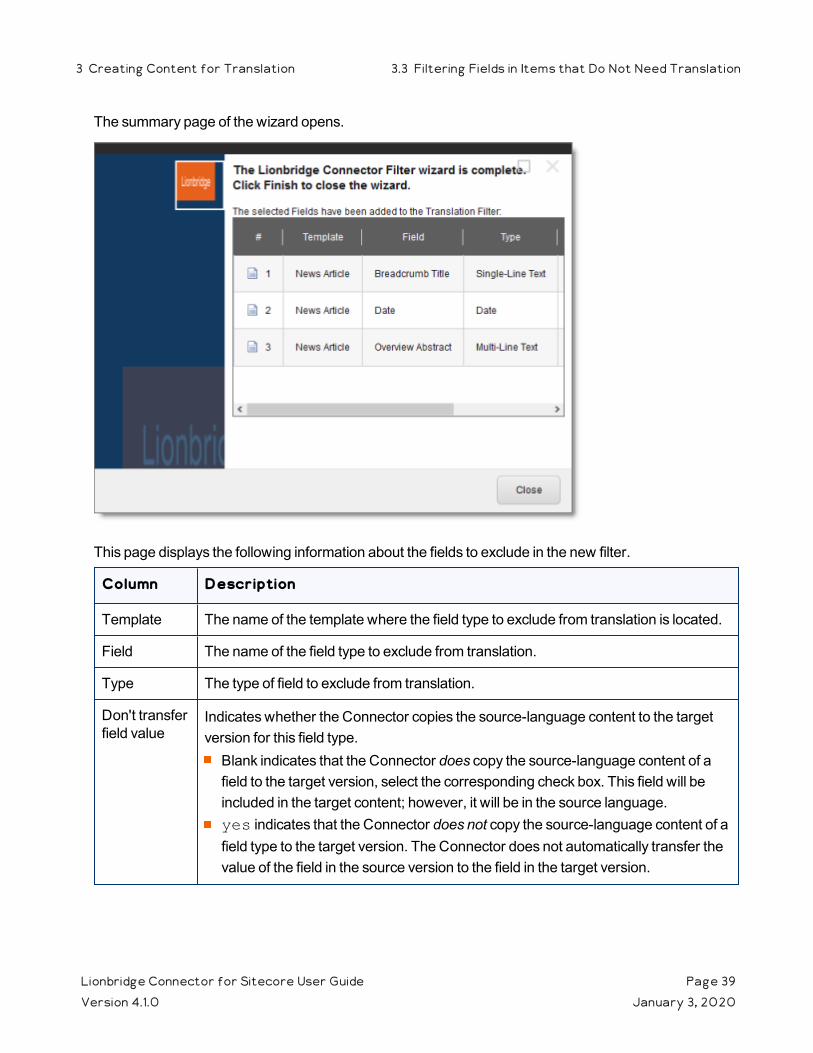
The summary page of the wizard opens.
This page displays the following information about the fields to exclude in the new filter.
Column Description
Template The name of the template where the field type to exclude from translation is located.
Field The name of the field type to exclude from translation.
Type The type of field to exclude from translation.
Don't transfer field value
Indicates whether the Connector copies the source-language content to the target version for this field type.Blank indicates that the Connector does copy the source-language content of a field to the target version, select the corresponding check box. This field will be included in the target content; however, it will be in the source language.yes indicates that the Connector does not copy the source-language content of a field type to the target version. The Connector does not automatically transfer the value of the field in the source version to the field in the target version.
Lionbridge Connector for Sitecore User Guide Page 39Version 4.1.0 January 3, 2020
3 Creating Content for Translation 3.3 Filtering Fields in Items that Do Not Need Translation
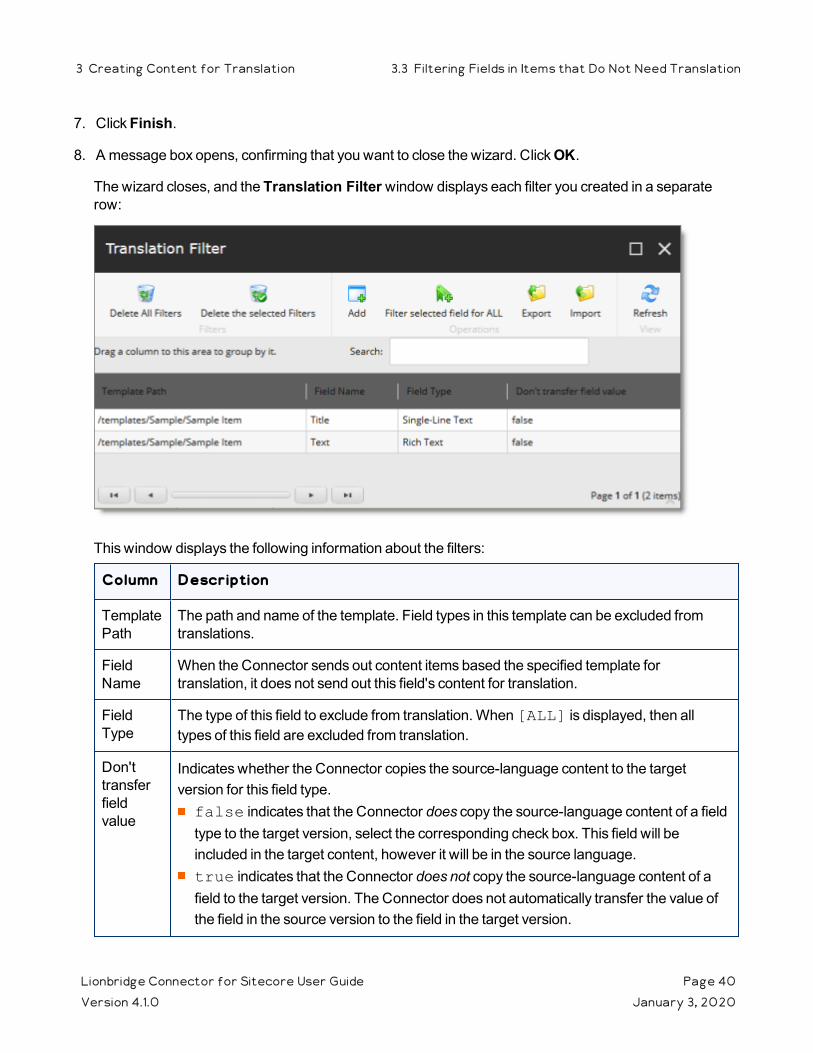
7. Click Finish.
8. A message box opens, confirming that you want to close the wizard. Click OK.
The wizard closes, and the Translation Filter window displays each filter you created in a separate row:
This window displays the following information about the filters:
Column Description
Template Path
The path and name of the template. Field types in this template can be excluded from translations.
Field Name
When the Connector sends out content items based the specified template for translation, it does not send out this field's content for translation.
Field Type
The type of this field to exclude from translation. When [ALL] is displayed, then all types of this field are excluded from translation.
Don't transfer field value
Indicates whether the Connector copies the source-language content to the target version for this field type.false indicates that the Connector does copy the source-language content of a field type to the target version, select the corresponding check box. This field will be included in the target content, however it will be in the source language.true indicates that the Connector does not copy the source-language content of a field to the target version. The Connector does not automatically transfer the value of the field in the source version to the field in the target version.
Lionbridge Connector for Sitecore User Guide Page 40Version 4.1.0 January 3, 2020
3 Creating Content for Translation 3.3 Filtering Fields in Items that Do Not Need Translation
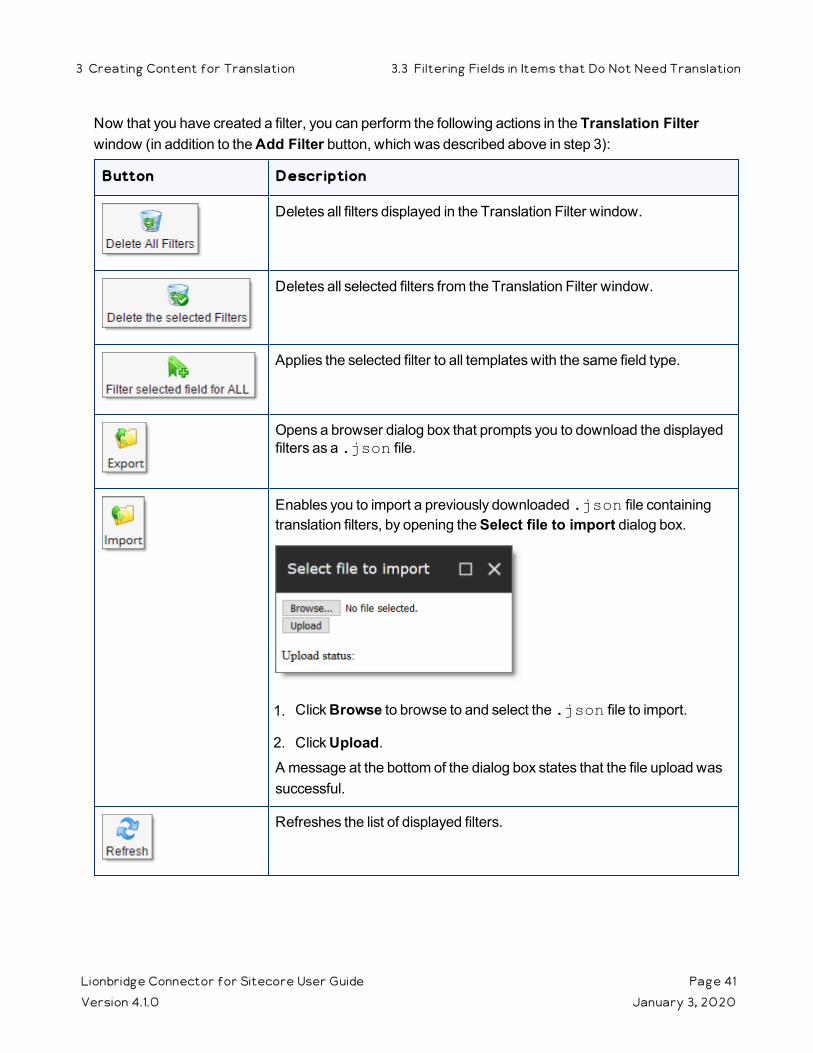
Now that you have created a filter, you can perform the following actions in the Translation Filter window (in addition to the Add Filter button, which was described above in step 3):
Button Description
Deletes all filters displayed in the Translation Filter window.
Deletes all selected filters from the Translation Filter window.
Applies the selected filter to all templates with the same field type.
Opens a browser dialog box that prompts you to download the displayed filters as a .json file.
Enables you to import a previously downloaded .json file containing translation filters, by opening the Select file to import dialog box.
1. Click Browse to browse to and select the .json file to import.
2. Click Upload.A message at the bottom of the dialog box states that the file upload was successful.
Refreshes the list of displayed filters.
Lionbridge Connector for Sitecore User Guide Page 41Version 4.1.0 January 3, 2020
3 Creating Content for Translation 3.3 Filtering Fields in Items that Do Not Need Translation
4 Sending Content to TranslationIf you send a single content item for translation, it must be in a workflow state that enables it to be sent for translation. This corresponds to the Reviewing workflow state that is part of the default Lionbridge Sample Workflow translation workflow. If you send multiple content items for translation using the Bulk Translation feature, you can assign a workflow and workflow state to the items at that time.
When the Connector sends out content items for translation, the following events occur:
1. The Connector exports the content from the Sitecore CMS as HTML or XML files. The format is determined by the ClayTablet.PackedFileFormat setting in the CT3Translation.config file. For details, refer to the Lionbridge Connector for Sitecore Installation and Configuration Guide.
2. The Connector creates placeholders for the content of the language versions of the specified target languages.
3. The Connector delivers the export files to the Clay Tablet Platform, along with information about the target languages, and source location within Sitecore. The Clay Tablet Platform then delivers these files to the translation provider(s) specified in your company's routing rules.
Note: Using the translation workflow for a content item does not obligate you to send out that content item for translation. You can move the content item through the entire workflow without sending it out for translation.
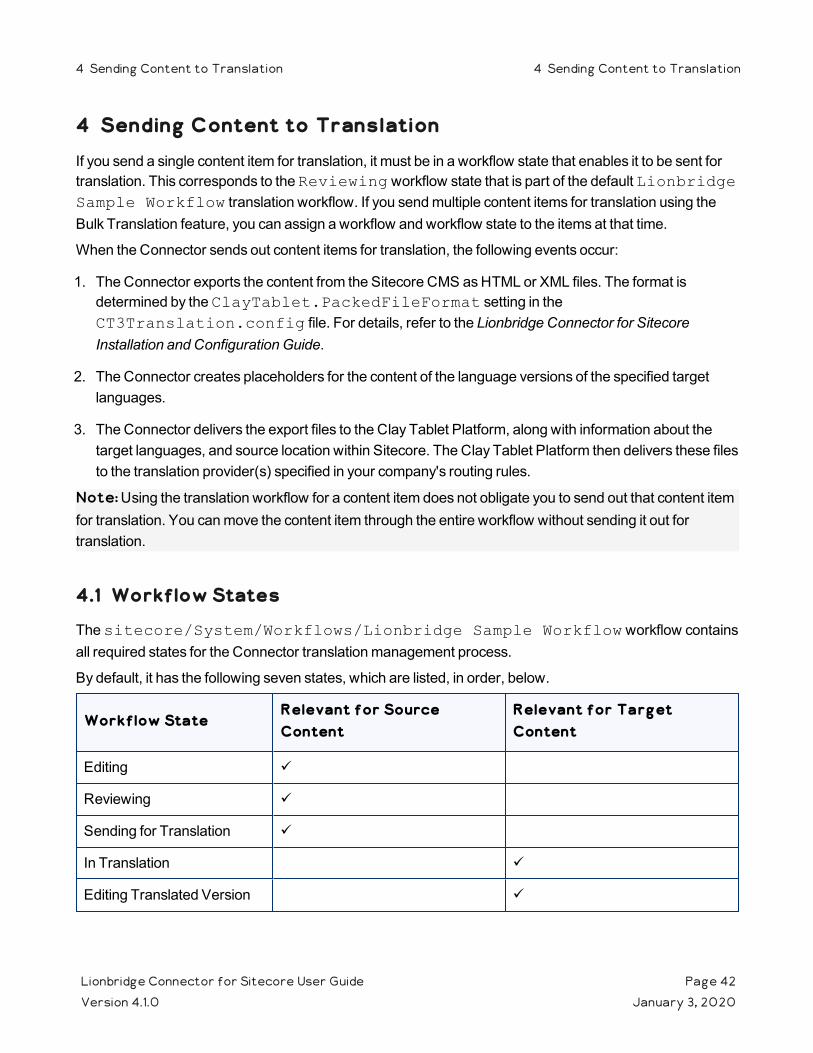
4.1 Workflow States
The sitecore/System/Workflows/Lionbridge Sample Workflow workflow contains all required states for the Connector translation management process.
By default, it has the following seven states, which are listed, in order, below.
Workflow StateRelevant for Source Content
Relevant for Target Content
Editing ü
Reviewing ü
Sending for Translation ü
In Translation ü
Editing Translated Version ü
Lionbridge Connector for Sitecore User Guide Page 42Version 4.1.0 January 3, 2020
4 Sending Content to Translation 4 Sending Content to Translation
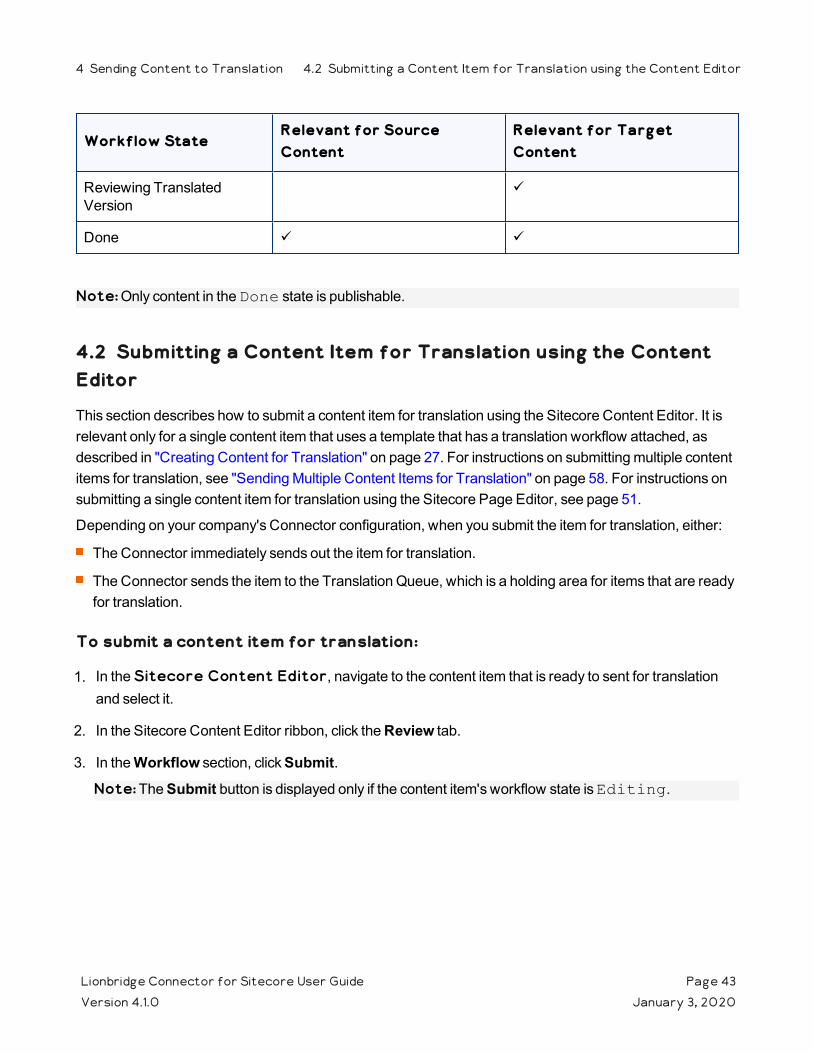
Workflow StateRelevant for Source Content
Relevant for Target Content
Reviewing Translated Version
ü
Done ü ü
Note: Only content in the Done state is publishable.
4.2 Submitting a Content Item for Translation using the Content Editor
This section describes how to submit a content item for translation using the Sitecore Content Editor. It is relevant only for a single content item that uses a template that has a translation workflow attached, as described in "Creating Content for Translation" on page 27. For instructions on submitting multiple content items for translation, see "Sending Multiple Content Items for Translation" on page 58. For instructions on submitting a single content item for translation using the Sitecore Page Editor, see page 51.
Depending on your company's Connector configuration, when you submit the item for translation, either:
The Connector immediately sends out the item for translation.
The Connector sends the item to the Translation Queue, which is a holding area for items that are ready for translation.
To submit a content item for translation:
1. In the Sitecore Content Editor, navigate to the content item that is ready to sent for translation and select it.
2. In the Sitecore Content Editor ribbon, click the Review tab.
3. In the Workflow section, click Submit.
Note: The Submit button is displayed only if the content item's workflow state is Editing.
Lionbridge Connector for Sitecore User Guide Page 43Version 4.1.0 January 3, 2020
4 Sending Content to Translation 4.2 Submitting a Content Item for Translation using the Content Editor
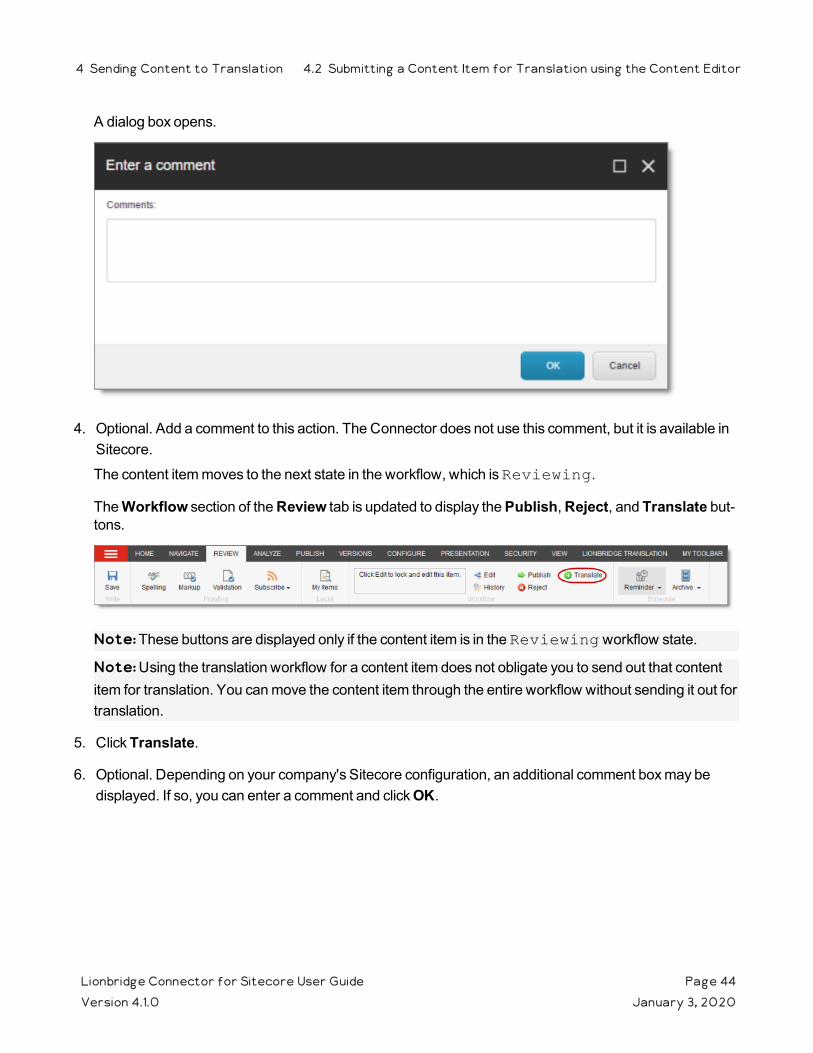
A dialog box opens.
4. Optional. Add a comment to this action. The Connector does not use this comment, but it is available in Sitecore.
The content item moves to the next state in the workflow, which is Reviewing.
The Workflow section of the Review tab is updated to display the Publish, Reject, and Translate but-tons.
Note: These buttons are displayed only if the content item is in the Reviewing workflow state.
Note: Using the translation workflow for a content item does not obligate you to send out that content item for translation. You can move the content item through the entire workflow without sending it out for translation.
5. Click Translate.
6. Optional. Depending on your company's Sitecore configuration, an additional comment box may be displayed. If so, you can enter a comment and click OK.
Lionbridge Connector for Sitecore User Guide Page 44Version 4.1.0 January 3, 2020
4 Sending Content to Translation 4.2 Submitting a Content Item for Translation using the Content Editor
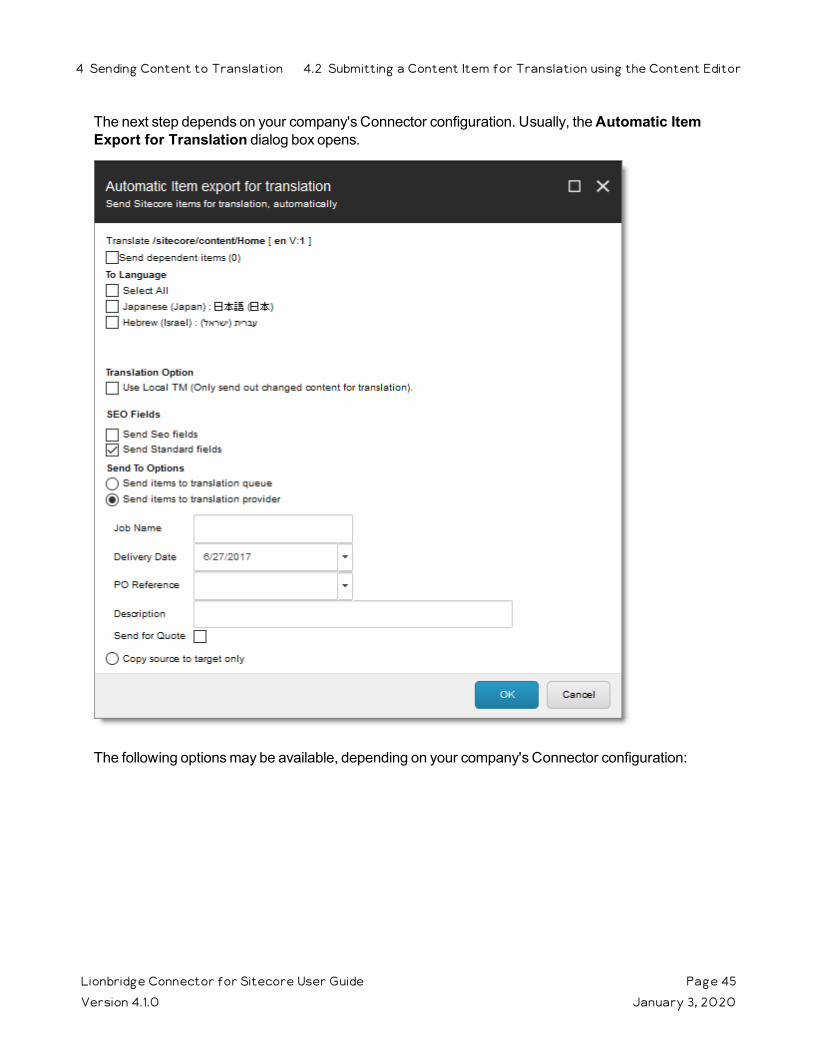
The next step depends on your company's Connector configuration. Usually, the Automatic Item Export for Translation dialog box opens.
The following options may be available, depending on your company's Connector configuration:
Lionbridge Connector for Sitecore User Guide Page 45Version 4.1.0 January 3, 2020
4 Sending Content to Translation 4.2 Submitting a Content Item for Translation using the Content Editor

Option Description
Send Dependent Items
Select this check box to include items from the layout and final layout that are dependent on the selected content item. This is useful, for example, if a page item has multiple layers with different data sources, and you want to translate all the items displayed in the page. The number in parentheses indicates the number of dependent items. For a detailed description of the default behavior of this check box, see "Understanding the Send Dependent Items Check Box" on page 91.
Profile If you have been assigned to a team profile, select the team profile to use for this translation job. Displayed only if you have been assigned to a team profile.
To Language
Select the check boxes for the target languages into which you want to translate the content. If you want to translate the content into all available target languages, select the Select All check box.When you select a target language, if an error states that the language code is misconfigured, it means that you do not have read access to that language. You require read access to a language to send out content for translation to that language. If you select a target language for which this content item is currently in translation, then a warning message is displayed. Click OK to close the warning message. Depending on your company's Connector configuration, some languages may already be selected. If so, you can clear any selected languages that you do not want to include.
Note: Your company's Connector configuration determines the format of the displayed language name. For more information, refer to the Lionbridge Connector for Sitecore Installation and Configuration Guide.
Lionbridge Connector for Sitecore User Guide Page 46Version 4.1.0 January 3, 2020
4 Sending Content to Translation 4.2 Submitting a Content Item for Translation using the Content Editor
Option Description
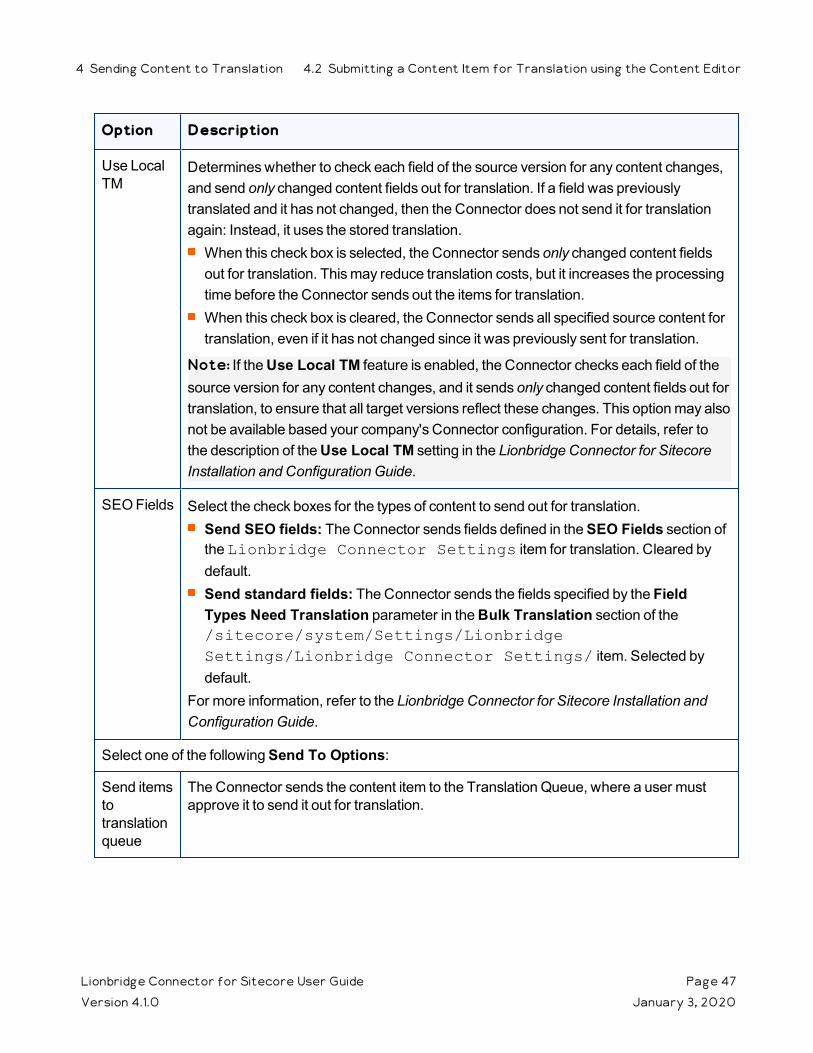
Use Local TM
Determines whether to check each field of the source version for any content changes, and send only changed content fields out for translation. If a field was previously translated and it has not changed, then the Connector does not send it for translation again: Instead, it uses the stored translation.When this check box is selected, the Connector sends only changed content fields out for translation. This may reduce translation costs, but it increases the processing time before the Connector sends out the items for translation.When this check box is cleared, the Connector sends all specified source content for translation, even if it has not changed since it was previously sent for translation.
Note: If the Use Local TM feature is enabled, the Connector checks each field of the source version for any content changes, and it sends only changed content fields out for translation, to ensure that all target versions reflect these changes. This option may also not be available based your company's Connector configuration. For details, refer to the description of the Use Local TM setting in the Lionbridge Connector for Sitecore Installation and Configuration Guide.
SEO Fields Select the check boxes for the types of content to send out for translation.Send SEO fields: The Connector sends fields defined in the SEO Fields section of the Lionbridge Connector Settings item for translation. Cleared by default.Send standard fields: The Connector sends the fields specified by the Field Types Need Translation parameter in the Bulk Translation section of the /sitecore/system/Settings/Lionbridge Settings/Lionbridge Connector Settings/ item. Selected by default.
For more information, refer to the Lionbridge Connector for Sitecore Installation and Configuration Guide.
Select one of the following Send To Options:
Send items to translation queue
The Connector sends the content item to the Translation Queue, where a user must approve it to send it out for translation.
Lionbridge Connector for Sitecore User Guide Page 47Version 4.1.0 January 3, 2020
4 Sending Content to Translation 4.2 Submitting a Content Item for Translation using the Content Editor
Option Description
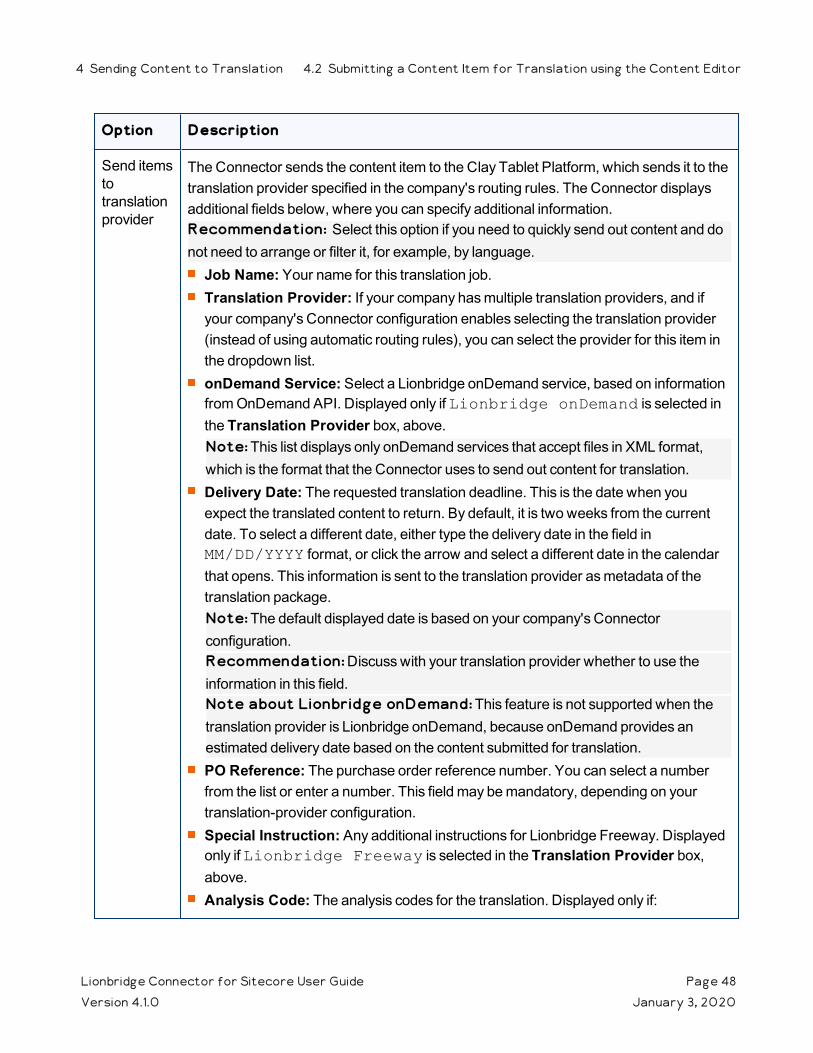
Send items to translation provider
The Connector sends the content item to the Clay Tablet Platform, which sends it to the translation provider specified in the company's routing rules. The Connector displays additional fields below, where you can specify additional information.Recommendation: Select this option if you need to quickly send out content and do not need to arrange or filter it, for example, by language.
Job Name: Your name for this translation job.Translation Provider: If your company has multiple translation providers, and if your company's Connector configuration enables selecting the translation provider (instead of using automatic routing rules), you can select the provider for this item in the dropdown list.onDemand Service: Select a Lionbridge onDemand service, based on information from OnDemand API. Displayed only if Lionbridge onDemand is selected in the Translation Provider box, above. Note: This list displays only onDemand services that accept files in XML format, which is the format that the Connector uses to send out content for translation.Delivery Date: The requested translation deadline. This is the date when you expect the translated content to return. By default, it is two weeks from the current date. To select a different date, either type the delivery date in the field in MM/DD/YYYY format, or click the arrow and select a different date in the calendar that opens. This information is sent to the translation provider as metadata of the translation package.Note: The default displayed date is based on your company's Connector configuration.Recommendation: Discuss with your translation provider whether to use the information in this field.Note about Lionbridge onDemand: This feature is not supported when the translation provider is Lionbridge onDemand, because onDemand provides an estimated delivery date based on the content submitted for translation.PO Reference: The purchase order reference number. You can select a number from the list or enter a number. This field may be mandatory, depending on your translation-provider configuration.Special Instruction: Any additional instructions for Lionbridge Freeway. Displayed only if Lionbridge Freeway is selected in the Translation Provider box, above.Analysis Code: The analysis codes for the translation. Displayed only if:
Lionbridge Connector for Sitecore User Guide Page 48Version 4.1.0 January 3, 2020
4 Sending Content to Translation 4.2 Submitting a Content Item for Translation using the Content Editor
Option Description
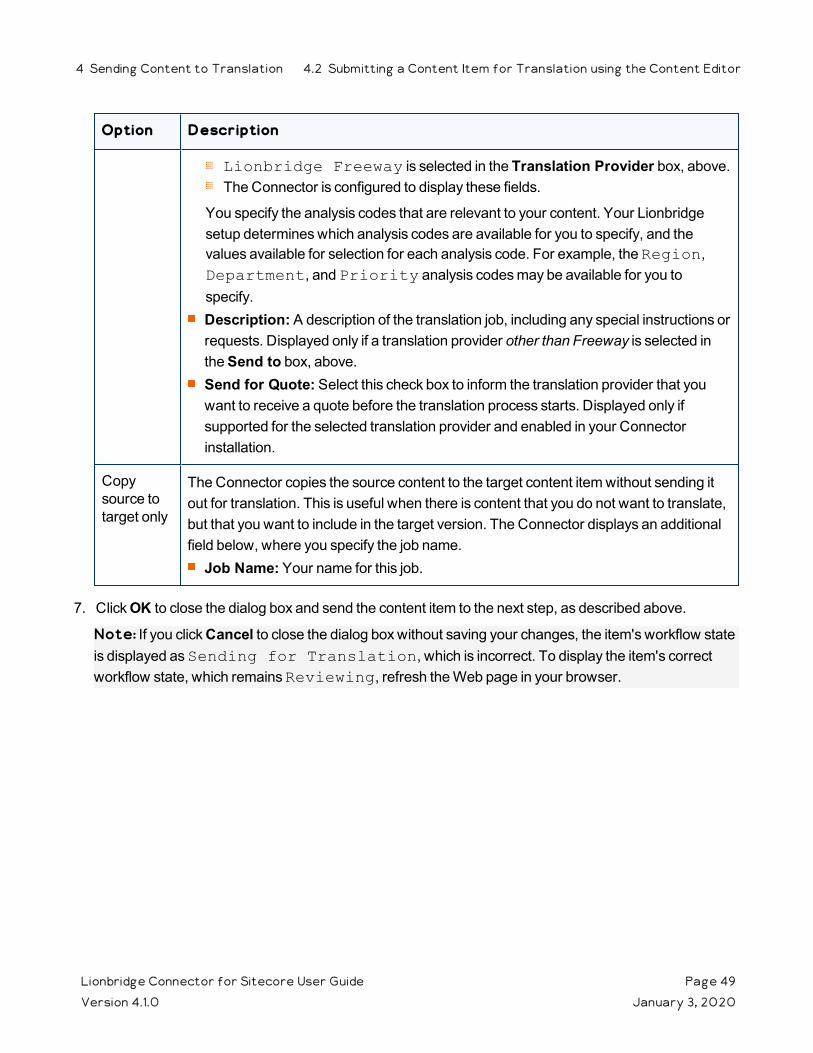
Lionbridge Freeway is selected in the Translation Provider box, above.The Connector is configured to display these fields.
You specify the analysis codes that are relevant to your content. Your Lionbridge setup determines which analysis codes are available for you to specify, and the values available for selection for each analysis code. For example, the Region, Department, and Priority analysis codes may be available for you to specify.Description: A description of the translation job, including any special instructions or requests. Displayed only if a translation provider other than Freeway is selected in the Send to box, above.Send for Quote: Select this check box to inform the translation provider that you want to receive a quote before the translation process starts. Displayed only if supported for the selected translation provider and enabled in your Connector installation.
Copy source to target only
The Connector copies the source content to the target content item without sending it out for translation. This is useful when there is content that you do not want to translate, but that you want to include in the target version. The Connector displays an additional field below, where you specify the job name.
Job Name: Your name for this job.
7. Click OK to close the dialog box and send the content item to the next step, as described above.
Note: If you click Cancel to close the dialog box without saving your changes, the item's workflow state is displayed as Sending for Translation, which is incorrect. To display the item's correct workflow state, which remains Reviewing, refresh the Web page in your browser.
Lionbridge Connector for Sitecore User Guide Page 49Version 4.1.0 January 3, 2020
4 Sending Content to Translation 4.2 Submitting a Content Item for Translation using the Content Editor
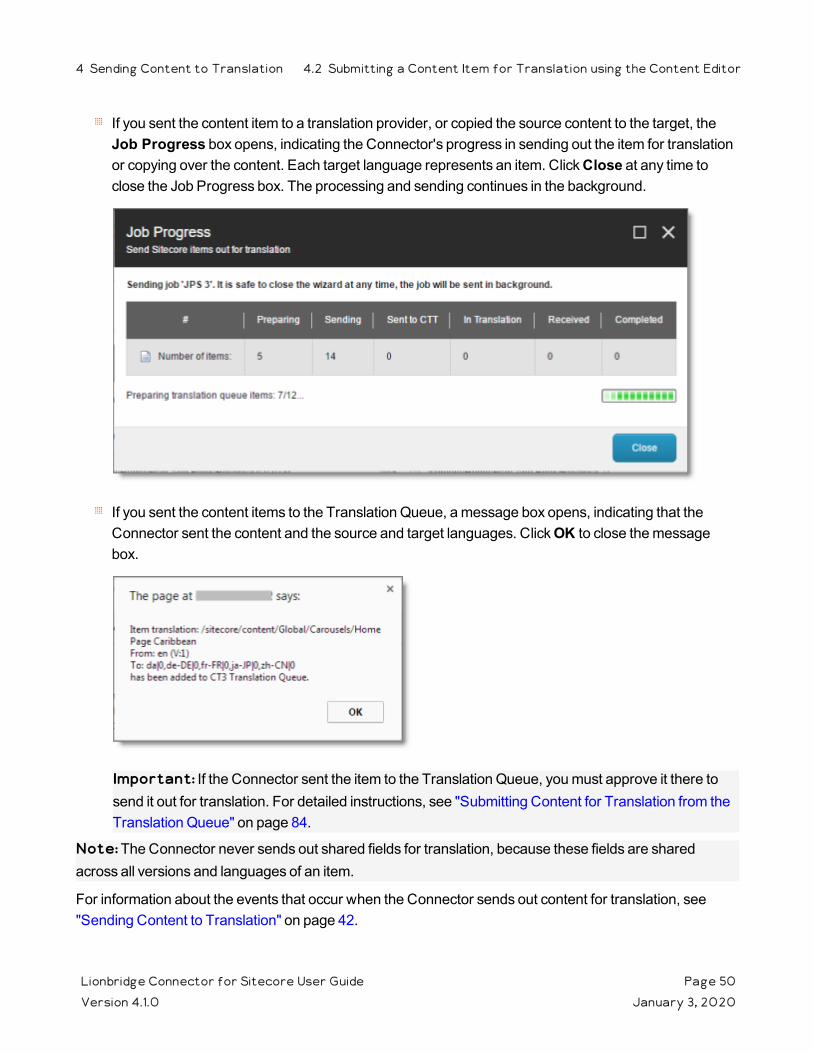
If you sent the content item to a translation provider, or copied the source content to the target, the Job Progress box opens, indicating the Connector's progress in sending out the item for translation or copying over the content. Each target language represents an item. Click Close at any time to close the Job Progress box. The processing and sending continues in the background.
If you sent the content items to the Translation Queue, a message box opens, indicating that the Connector sent the content and the source and target languages. Click OK to close the message box.
Important: If the Connector sent the item to the Translation Queue, you must approve it there to send it out for translation. For detailed instructions, see "Submitting Content for Translation from the Translation Queue" on page 84.
Note: The Connector never sends out shared fields for translation, because these fields are shared across all versions and languages of an item.
For information about the events that occur when the Connector sends out content for translation, see "Sending Content to Translation" on page 42.
Lionbridge Connector for Sitecore User Guide Page 50Version 4.1.0 January 3, 2020
4 Sending Content to Translation 4.2 Submitting a Content Item for Translation using the Content Editor
Tip: You can monitor the translation progress from within the Sitecore Content Editor. For detailed instructions, see "Monitoring Translation Status" on page 94.
4.3 Submitting Content for Translation from the Experience Editor
This section describes how to submit a content item for translation using the Sitecore Experience Editor. Depending on your company's Connector configuration, when you submit the item for translation, either:
The Connector immediately sends out the item for translation.
The Connector sends the item to the Translation Queue, which is a holding area for items that are ready for translation.
For instructions on submitting a content item for translation using the Sitecore Content Editor, see page 84.
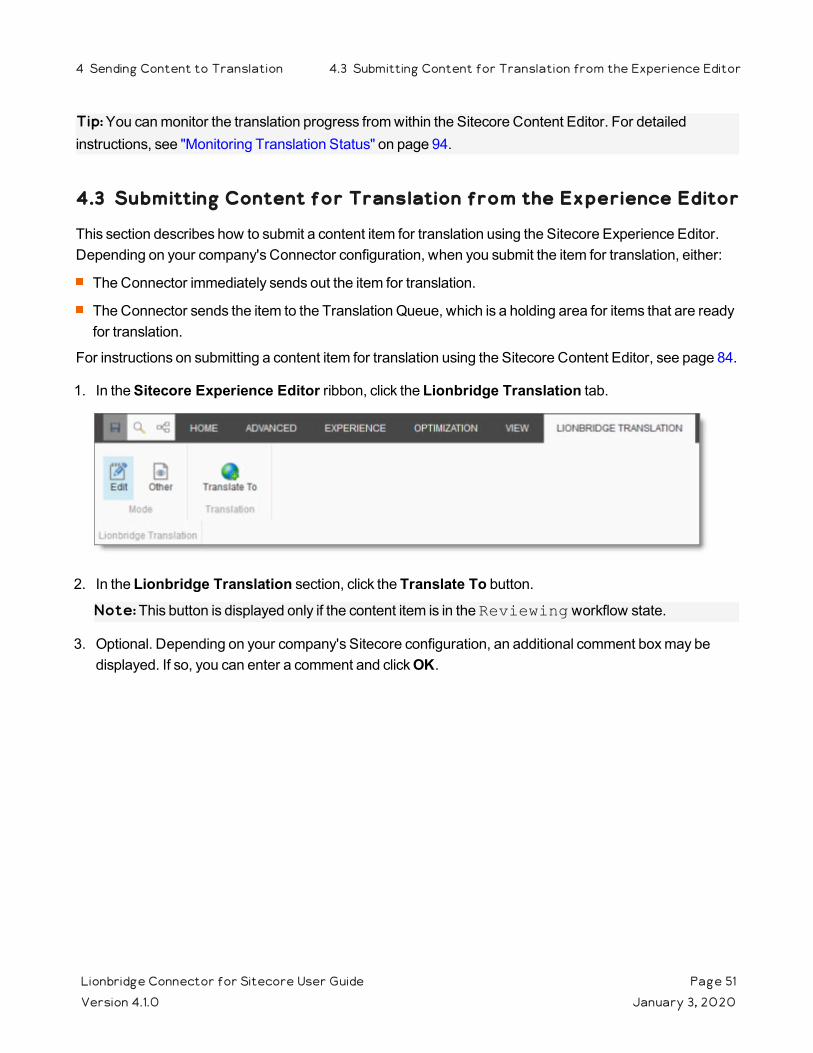
1. In the Sitecore Experience Editor ribbon, click the Lionbridge Translation tab.
2. In the Lionbridge Translation section, click the Translate To button.
Note: This button is displayed only if the content item is in the Reviewing workflow state.
3. Optional. Depending on your company's Sitecore configuration, an additional comment box may be displayed. If so, you can enter a comment and click OK.
Lionbridge Connector for Sitecore User Guide Page 51Version 4.1.0 January 3, 2020
4 Sending Content to Translation 4.3 Submitting Content for Translation from the Experience Editor

The Automatic Item export for translation dialog box opens.
The following options may be available, depending on your company's Connector configuration:
Option Description
Send Dependent Items
Select this check box to include items from the layout and final layout that are dependent on the selected content item. This is useful, for example, if a page item has multiple layers with different data sources, and you want to translate all the items displayed in the page. The number in parentheses indicates the number of dependent items. For a detailed description of the default behavior of this check box, see "Understanding the Send Dependent Items Check Box" on page 91.
Lionbridge Connector for Sitecore User Guide Page 52Version 4.1.0 January 3, 2020
4 Sending Content to Translation 4.3 Submitting Content for Translation from the Experience Editor

Option Description
Profile If you have been assigned to a team profile, select the team profile to use for this translation job. Displayed only if you have been assigned to a team profile.
To Language
Select the check boxes for the target languages into which you want to translate the content. If you want to translate the content into all available target languages, select the Select All check box.When you select a target language, if an error states that the language code is misconfigured, it means that you do not have read access to that language. You require read access to a language to send out content for translation to that language. If you select a target language for which this content item is currently in translation, then a warning message is displayed. Click OK to close the warning message. Depending on your company's Connector configuration, some languages may already be selected. If so, you can clear any selected languages that you do not want to include.
Note: Your company's Connector configuration determines the format of the displayed language name. For more information, refer to the Lionbridge Connector for Sitecore Installation and Configuration Guide.
Use Local TM
Determines whether to check each field of the source version for any content changes, and send only changed content fields out for translation. If a field was previously translated and it has not changed, then the Connector does not send it for translation again: Instead, it uses the stored translation.When this check box is selected, the Connector sends only changed content fields out for translation. This may reduce translation costs, but it increases the processing time before the Connector sends out the items for translation.When this check box is cleared, the Connector sends all specified source content for translation, even if it has not changed since it was previously sent for translation.
Note: If the Use Local TM feature is enabled, the Connector checks each field of the source version for any content changes, and it sends only changed content fields out for translation, to ensure that all target versions reflect these changes. This option may also not be available based your company's Connector configuration. For details, refer to the description of the Use Local TM setting in the Lionbridge Connector for Sitecore Installation and Configuration Guide.
Lionbridge Connector for Sitecore User Guide Page 53Version 4.1.0 January 3, 2020
4 Sending Content to Translation 4.3 Submitting Content for Translation from the Experience Editor

Option Description
SEO Fields Select the check boxes for the types of content to send out for translation.Send SEO fields: The Connector sends fields defined in the SEO Fields section of the Lionbridge Connector Settings item for translation. Cleared by default.Send standard fields: The Connector sends the fields specified by the Field Types Need Translation parameter in the Bulk Translation section of the /sitecore/system/Settings/Lionbridge Settings/Lionbridge Connector Settings/ item. Selected by default.
For more information, refer to the Lionbridge Connector for Sitecore Installation and Configuration Guide.
Select one of the following Send To Options:
Send items to translation queue
The Connector sends the content item to the Translation Queue, where a user must approve it to send it out for translation.
Lionbridge Connector for Sitecore User Guide Page 54Version 4.1.0 January 3, 2020
4 Sending Content to Translation 4.3 Submitting Content for Translation from the Experience Editor

Option Description
Send items to translation provider
The Connector sends the content item to the Clay Tablet Platform, which sends it to the translation provider specified in the company's routing rules. The Connector displays additional fields below, where you can specify additional information.Recommendation: Select this option if you need to quickly send out content and do not need to arrange or filter it, for example, by language.
Job Name: Your name for this translation job.Translation Provider: If your company has multiple translation providers, and if your company's Connector configuration enables selecting the translation provider (instead of using automatic routing rules), you can select the provider for this item in the dropdown list.onDemand Service: Select a Lionbridge onDemand service, based on information from OnDemand API. Displayed only if Lionbridge onDemand is selected in the Translation Provider box, above. Note: This list displays only onDemand services that accept files in XML format, which is the format that the Connector uses to send out content for translation.Delivery Date: The requested translation deadline. This is the date when you expect the translated content to return. By default, it is two weeks from the current date. To select a different date, either type the delivery date in the field in MM/DD/YYYY format, or click the arrow and select a different date in the calendar that opens. This information is sent to the translation provider as metadata of the translation package.Note: The default displayed date is based on your company's Connector configuration.Recommendation: Discuss with your translation provider whether to use the information in this field.Note about Lionbridge onDemand: This feature is not supported when the translation provider is Lionbridge onDemand, because onDemand provides an estimated delivery date based on the content submitted for translation.PO Reference: The purchase order reference number. You can select a number from the list or enter a number. This field may be mandatory, depending on your translation-provider configuration.Special Instruction: Any additional instructions for Lionbridge Freeway. Displayed only if Lionbridge Freeway is selected in the Translation Provider box, above.Analysis Code: The analysis codes for the translation. Displayed only if:
Lionbridge Connector for Sitecore User Guide Page 55Version 4.1.0 January 3, 2020
4 Sending Content to Translation 4.3 Submitting Content for Translation from the Experience Editor

Option Description
Lionbridge Freeway is selected in the Translation Provider box, above.The Connector is configured to display these fields.
You specify the analysis codes that are relevant to your content. Your Lionbridge setup determines which analysis codes are available for you to specify, and the values available for selection for each analysis code. For example, the Region, Department, and Priority analysis codes may be available for you to specify.Description: A description of the translation job, including any special instructions or requests. Displayed only if a translation provider other than Freeway is selected in the Send to box, above.Send for Quote: Select this check box to inform the translation provider that you want to receive a quote before the translation process starts. Displayed only if supported for the selected translation provider and enabled in your Connector installation.
Copy source to target only
The Connector copies the source content to the target content item without sending it out for translation. This is useful when there is content that you do not want to translate, but that you want to include in the target version. The Connector displays an additional field below, where you specify the job name.
Job Name: Your name for this job.
4. Click OK to close the dialog box and send the content item to the next step, as described above.
Note: If you click Cancel to close the dialog box without saving your changes, the item's workflow state is displayed as Sending for Translation, which is incorrect. To display the item's correct workflow state, which remains Reviewing, refresh the Web page in your browser.
Lionbridge Connector for Sitecore User Guide Page 56Version 4.1.0 January 3, 2020
4 Sending Content to Translation 4.3 Submitting Content for Translation from the Experience Editor

If you sent the content item to a translation provider, or copied the source content to the target, the Job Progress box opens, indicating the Connector's progress in sending out the item for translation or copying over the content. Each target language represents an item. Click Close at any time to close the Job Progress box. The processing and sending continues in the background.
If you sent the content items to the Translation Queue, a message box opens, indicating that the Connector sent the content and the source and target languages. Click OK to close the message box.
Important: If the Connector sent the item to the Translation Queue, you must approve it there to send it out for translation. For detailed instructions, see "Submitting Content for Translation from the Translation Queue" on page 84.
Note: The Connector never sends out shared fields for translation, because these fields are shared across all versions and languages of an item.
For information about the events that occur when the Connector sends out content for translation, see "Sending Content to Translation" on page 42.
Lionbridge Connector for Sitecore User Guide Page 57Version 4.1.0 January 3, 2020
4 Sending Content to Translation 4.3 Submitting Content for Translation from the Experience Editor
4.4 Sending Multiple Content Items for Translation
The Bulk Translation feature enables you to select, send, and receive large quantities of content for translation in only a few clicks.
This is useful for quickly sending out entire sections, sites, or content trees for translation.
You access the Bulk Translation feature from either the Lionbridge Translation tab on the Sitecore Content Editor ribbon, or from the Start menu on the Sitecore Desktop.
You can also access this feature from Sitecore search results. For details, see "Submitting Content for Translation from Sitecore Search Results" on page 82.
Important: When you use the Bulk Translation tool, you can initially select a large set of content items, based on the content tree, and then in subsequent steps you exclude items from that group that you do not want to send out for translation.
Bulk translation and workflow
Recall that you do not need to attach a translation workflow to the content items when you use the bulk translation feature. However, the Assign Translation Workflow to items with no workflow defined? option in the wizard enables you to attach a workflow to the items you send out, and you can set the workflow state for those items. This is recommended because it helps manage those items later, especially in the workbox.
Recommendation: Plot out your requirements before starting the Bulk Translation wizard, because this feature has powerful implications. Consider the following issues:
Does every item already have a workflow attached?
If every item does not already have a workflow attached, do you want to attach the translation workflow to those items?
If you want to attach the translation workflow to items previously without a workflow, which workflow state do you want to assign to those items?
What are the repercussions of attaching the workflow and assigning the workflow state to these items?
To send content for translation using the Bulk Translation feature, you complete the following steps:
1. Open the Bulk Translation wizard and specify initial settings in the Settings page of the wizard. For detailed instructions, see "Specifying Initial Settings in the Bulk Translation Wizard" on page 59.
2. In the Choose Items page of the wizard, you choose which items to send for translation. For detailed instructions, see "Choosing which Items to Translate" on page 62.
Lionbridge Connector for Sitecore User Guide Page 58Version 4.1.0 January 3, 2020
4 Sending Content to Translation 4.4 Sending Multiple Content Items for Translation
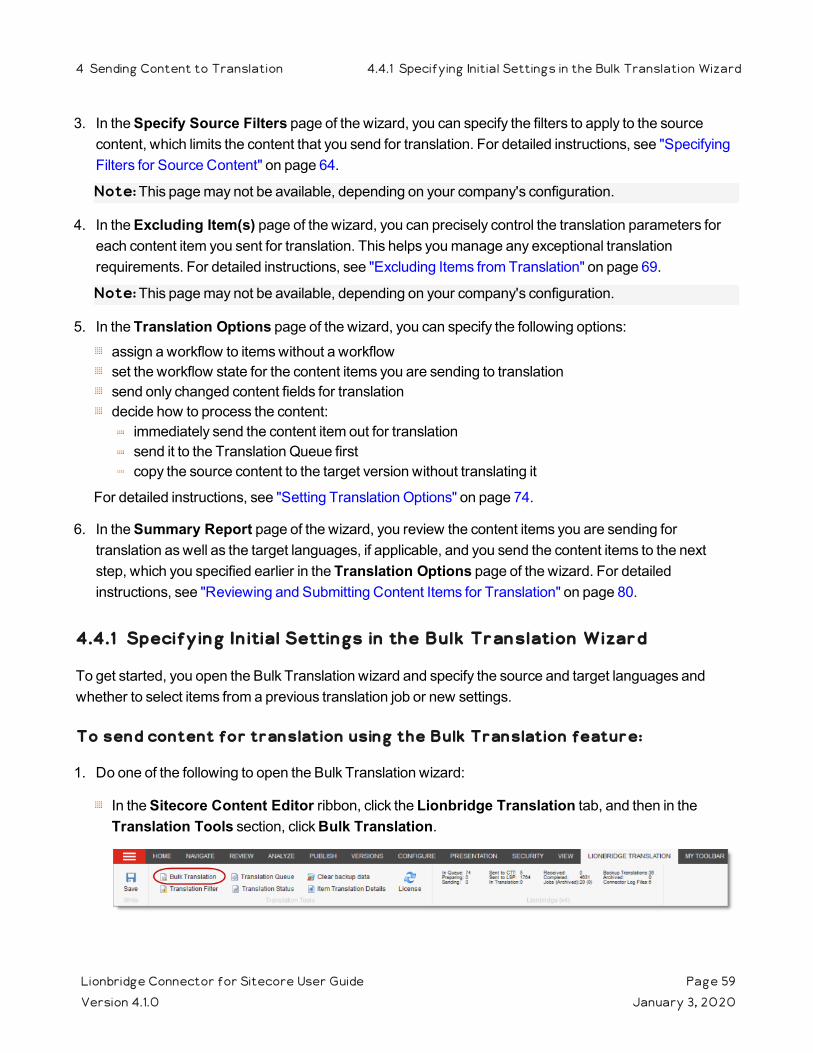
3. In the Specify Source Filters page of the wizard, you can specify the filters to apply to the source content, which limits the content that you send for translation. For detailed instructions, see "Specifying Filters for Source Content" on page 64.
Note: This page may not be available, depending on your company's configuration.
4. In the Excluding Item(s) page of the wizard, you can precisely control the translation parameters for each content item you sent for translation. This helps you manage any exceptional translation requirements. For detailed instructions, see "Excluding Items from Translation" on page 69.
Note: This page may not be available, depending on your company's configuration.
5. In the Translation Options page of the wizard, you can specify the following options:assign a workflow to items without a workflowset the workflow state for the content items you are sending to translationsend only changed content fields for translationdecide how to process the content:
immediately send the content item out for translationsend it to the Translation Queue firstcopy the source content to the target version without translating it
For detailed instructions, see "Setting Translation Options" on page 74.
6. In the Summary Report page of the wizard, you review the content items you are sending for translation as well as the target languages, if applicable, and you send the content items to the next step, which you specified earlier in the Translation Options page of the wizard. For detailed instructions, see "Reviewing and Submitting Content Items for Translation" on page 80.
4.4.1 Specifying Initial Settings in the Bulk Translation Wizard
To get started, you open the Bulk Translation wizard and specify the source and target languages and whether to select items from a previous translation job or new settings.
To send content for translation using the Bulk Translation feature:
1. Do one of the following to open the Bulk Translation wizard:
In the Sitecore Content Editor ribbon, click the Lionbridge Translation tab, and then in the Translation Tools section, click Bulk Translation.
Lionbridge Connector for Sitecore User Guide Page 59Version 4.1.0 January 3, 2020
4 Sending Content to Translation 4.4.1 Specifying Initial Settings in the Bulk Translation Wizard
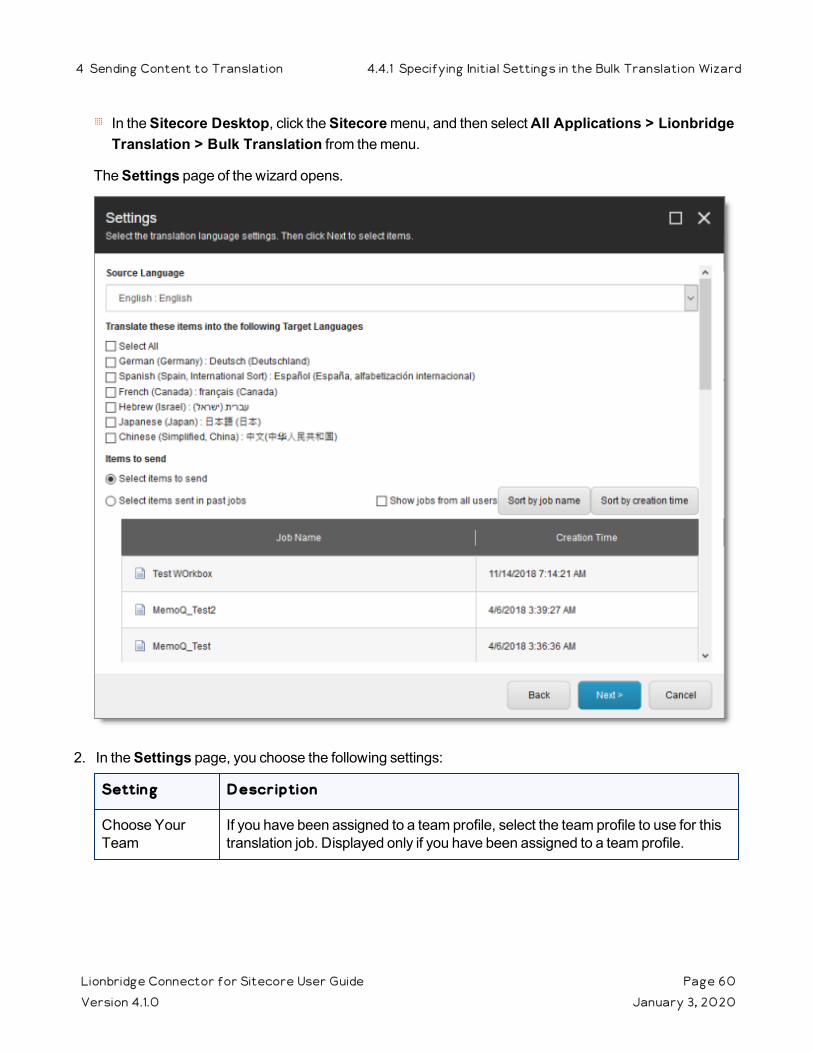
In the Sitecore Desktop, click the Sitecore menu, and then select All Applications > Lionbridge Translation > Bulk Translation from the menu.
The Settings page of the wizard opens.
2. In the Settings page, you choose the following settings:
Setting Description
Choose Your Team
If you have been assigned to a team profile, select the team profile to use for this translation job. Displayed only if you have been assigned to a team profile.
Lionbridge Connector for Sitecore User Guide Page 60Version 4.1.0 January 3, 2020
4 Sending Content to Translation 4.4.1 Specifying Initial Settings in the Bulk Translation Wizard
Setting Description
Source Language
The Connector will send items in this source language for translation. By default this is the default Sitecore language. You can select another language from the list.Note: Your company's Connector configuration determines the format of the displayed language name. For more information, refer to the Lionbridge Connector for Sitecore Installation and Configuration Guide.
Translate these items into the following Target Languages
Select the check boxes for all the target languages into which you want to translate the source content. The list displays all the Sitecore languages that are set up for the Connector. Tip: Use the Select All check box to select all available languages.When you select a target language, if an error states that the language code is misconfigured, it means that you do not have read access to that language. You require read access to a language to send out content for translation to that language. Note: In the later Excluding Item(s) page of this wizard, you can select individual content items from the list of content items and modify their target languages. This is useful for any specific exceptions that may require special target language treatment.Note: Your company's Connector configuration determines the format of the displayed language name. For more information, refer to the Lionbridge Connector for Sitecore Installation and Configuration Guide.
Lionbridge Connector for Sitecore User Guide Page 61Version 4.1.0 January 3, 2020
4 Sending Content to Translation 4.4.1 Specifying Initial Settings in the Bulk Translation Wizard

Setting Description
Items to send This section displays the names of items you can send for translation and the date and time they were created. By default, these items are sorted in order of reverse chronological creation date. To sort these items by name, click Sort by job name. To sort these items by date, click Sort by creation date.
You can choose one of the following settings: Select items to send: This displays all items in the specified source language.Tip: If you opened the wizard from Sitecore search results, ensure that Select items to send is selected.Select items sent in past jobs: This displays all items in the specified source language that were previously sent for translation.
If you are an admin user, you can select the Show jobs from all users check box to view jobs submitted by other users. This enables you to select items from those jobs to send for translation.
Note: Later in the wizard you can exclude items from this list.
3. When you are done, click Next.
If in the previous step you selected Select items to send, then the Choose Items page of the wizard opens. For detailed instructions, see "Choosing which Items to Translate" on page 62.
If in the previous step you selected Select items sent in past jobs, then the Translation Options page of the wizard opens. For detailed instructions, see "Setting Translation Options" on page 74.
4.4.2 Choosing which Items to Translate
After selecting the Select items to send radio button and then clicking Next in the Settings page of the Bulk Translation wizard, the Choose Items page opens.
Lionbridge Connector for Sitecore User Guide Page 62Version 4.1.0 January 3, 2020
4 Sending Content to Translation 4.4.2 Choosing which Items to Translate
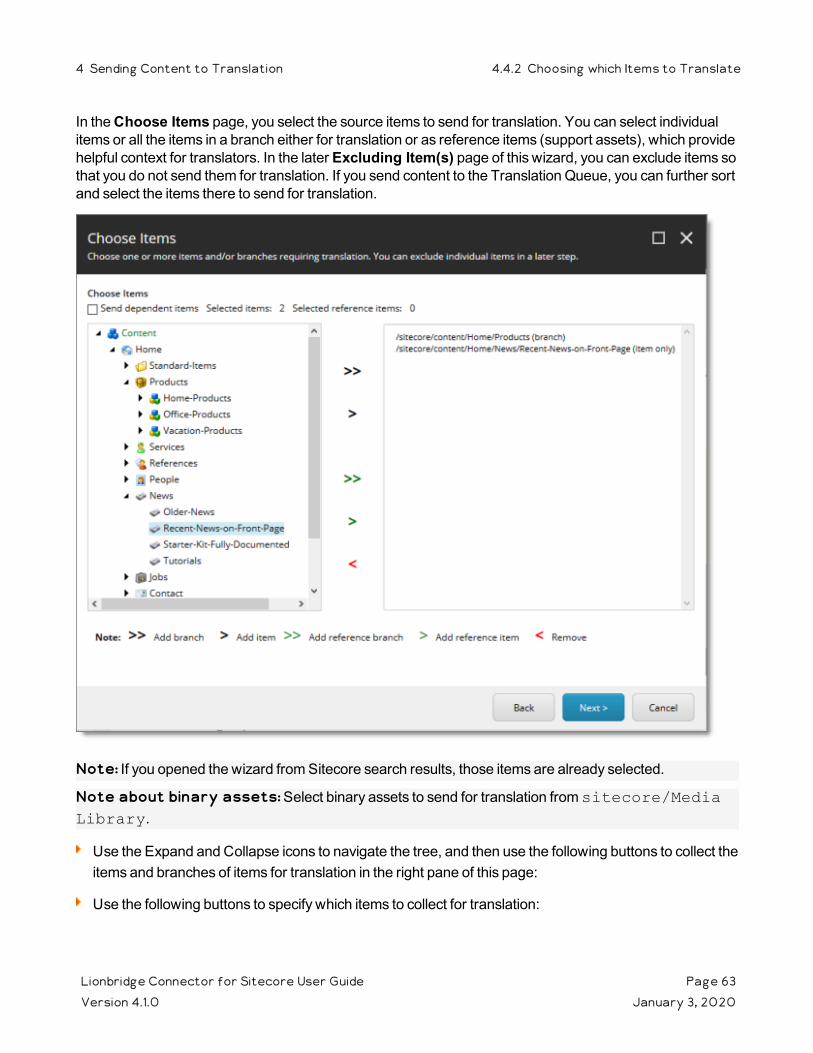
In the Choose Items page, you select the source items to send for translation. You can select individual items or all the items in a branch either for translation or as reference items (support assets), which provide helpful context for translators. In the later Excluding Item(s) page of this wizard, you can exclude items so that you do not send them for translation. If you send content to the Translation Queue, you can further sort and select the items there to send for translation.
Note: If you opened the wizard from Sitecore search results, those items are already selected.
Note about binary assets: Select binary assets to send for translation from sitecore/Media Library.
Use the Expand and Collapse icons to navigate the tree, and then use the following buttons to collect the items and branches of items for translation in the right pane of this page:
Use the following buttons to specify which items to collect for translation:
Lionbridge Connector for Sitecore User Guide Page 63Version 4.1.0 January 3, 2020
4 Sending Content to Translation 4.4.2 Choosing which Items to Translate
To add a branch of content items to the right pane, select it and click the black double-arrow icon . It is displayed in the right pane following by (branch).
To add one content item to the right pane, select it and click the black single-arrow icon . It is displayed in the right pane following by (item).To add a branch of reference files to the right pane, select it and click the green double-arrow icon
. It is displayed in the right pane, in green, under the Reference items heading, following by (branch). To add one reference file to the right pane, select it and click the green single-arrow icon . It is displayed in the right pane, in green, under the Reference items heading, following by (item).To remove one or more items from the right pane, select them and click .
Tip: If you specify the highest root in your Sitecore project and click , all content from a site or Content Server, you can send all your project content for translation at one time.
Optional. To include items from the layout and final layout that are dependent on the selected content items, select the Send dependent items check box at the top of the page. This is useful, for example, if a page item has multiple layers with different data sources, and you want to translate all the items displayed in the page. For a detailed description of the default behavior of this check box, see "Understanding the Send Dependent Items Check Box" on page 91.
Notes: Your company can configure which dependent items the Connector sends for translation when this check box is selected. It can also configure the default value of this check box. For detailed instructions, refer to the Lionbridge Connector for Sitecore Installation and Configuration Guide.
When you are done, click Next.
The Specify Source Filters page of the wizard opens. For detailed instructions, see "Specifying Filters for Source Content" on page 64.
Note: This page may not be available, depending on your company's configuration. For detailed configuration instructions, refer to the Lionbridge Connector for Sitecore Installation and Configuration Guide. If this page is hidden, then the Excluding Item(s) page of the wizard opens instead. For detailed instructions, see "Excluding Items from Translation" on page 69. If that page is also hidden, based on your company's configuration, then the Translation Options page of the wizard opens instead. For detailed instructions, see "Setting Translation Options" on page 74.
4.4.3 Specifying Filters for Source Content
After clicking Next in the Choose Items page of the Bulk Translation wizard, the Specify Source Filters page opens.
Lionbridge Connector for Sitecore User Guide Page 64Version 4.1.0 January 3, 2020
4 Sending Content to Translation 4.4.3 Specifying Filters for Source Content
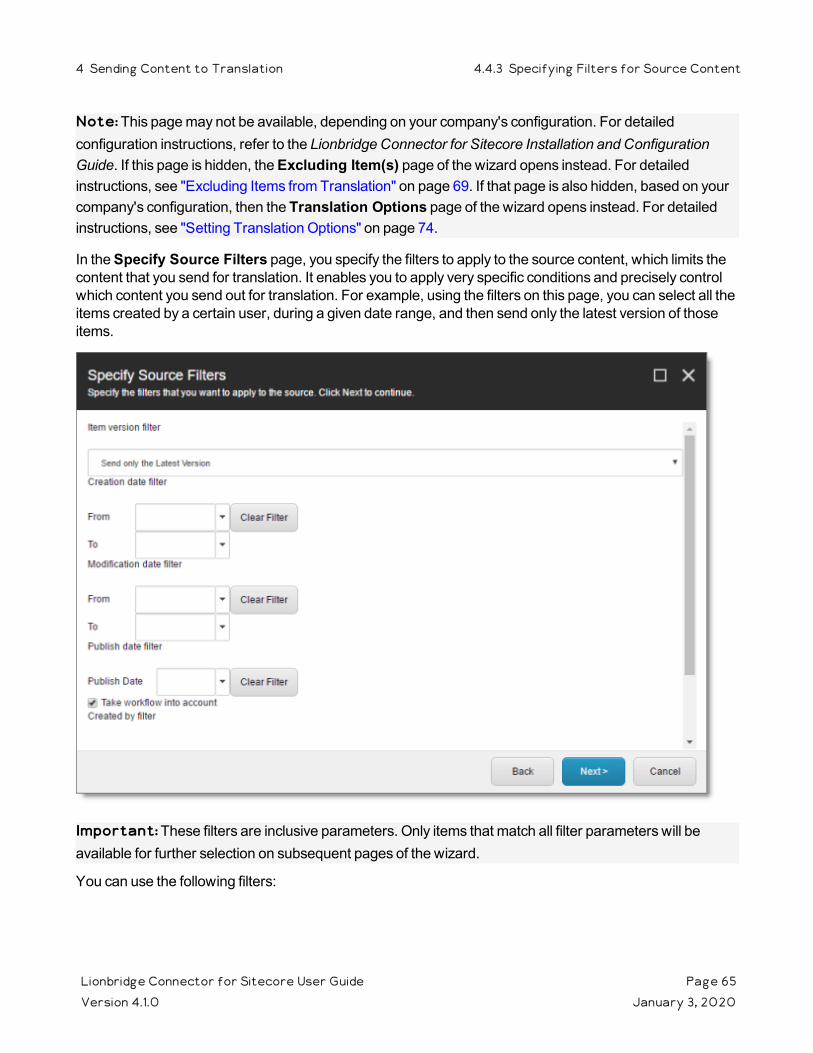
Note: This page may not be available, depending on your company's configuration. For detailed configuration instructions, refer to the Lionbridge Connector for Sitecore Installation and Configuration Guide. If this page is hidden, the Excluding Item(s) page of the wizard opens instead. For detailed instructions, see "Excluding Items from Translation" on page 69. If that page is also hidden, based on your company's configuration, then the Translation Options page of the wizard opens instead. For detailed instructions, see "Setting Translation Options" on page 74.
In the Specify Source Filters page, you specify the filters to apply to the source content, which limits the content that you send for translation. It enables you to apply very specific conditions and precisely control which content you send out for translation. For example, using the filters on this page, you can select all the items created by a certain user, during a given date range, and then send only the latest version of those items.
Important: These filters are inclusive parameters. Only items that match all filter parameters will be available for further selection on subsequent pages of the wizard.
You can use the following filters:
Lionbridge Connector for Sitecore User Guide Page 65Version 4.1.0 January 3, 2020
4 Sending Content to Translation 4.4.3 Specifying Filters for Source Content
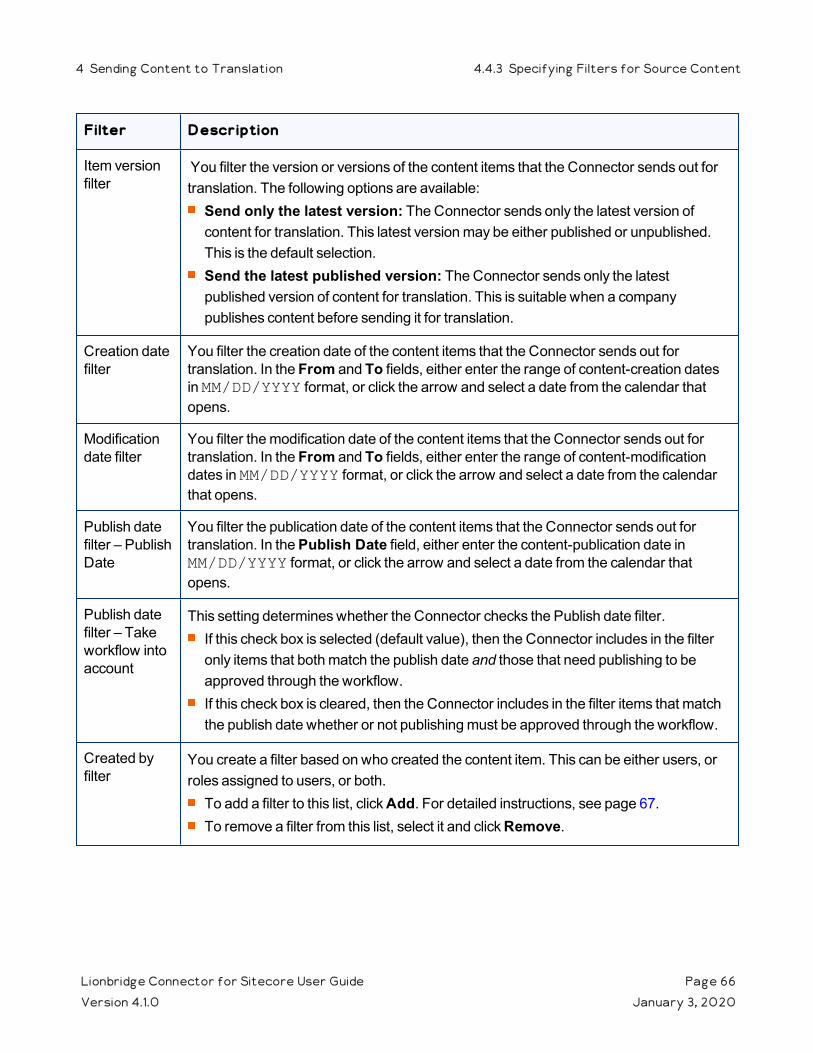
Filter Description
Item version filter
You filter the version or versions of the content items that the Connector sends out for translation. The following options are available:
Send only the latest version: The Connector sends only the latest version of content for translation. This latest version may be either published or unpublished. This is the default selection.Send the latest published version: The Connector sends only the latest published version of content for translation. This is suitable when a company publishes content before sending it for translation.
Creation date filter
You filter the creation date of the content items that the Connector sends out for translation. In the From and To fields, either enter the range of content-creation dates in MM/DD/YYYY format, or click the arrow and select a date from the calendar that opens.
Modification date filter
You filter the modification date of the content items that the Connector sends out for translation. In the From and To fields, either enter the range of content-modification dates in MM/DD/YYYY format, or click the arrow and select a date from the calendar that opens.
Publish date filter – Publish Date
You filter the publication date of the content items that the Connector sends out for translation. In the Publish Date field, either enter the content-publication date in MM/DD/YYYY format, or click the arrow and select a date from the calendar that opens.
Publish date filter – Take workflow into account
This setting determines whether the Connector checks the Publish date filter.If this check box is selected (default value), then the Connector includes in the filter only items that both match the publish date and those that need publishing to be approved through the workflow.If this check box is cleared, then the Connector includes in the filter items that match the publish date whether or not publishing must be approved through the workflow.
Created by filter
You create a filter based on who created the content item. This can be either users, or roles assigned to users, or both. To add a filter to this list, click Add. For detailed instructions, see page 67.To remove a filter from this list, select it and click Remove.
Lionbridge Connector for Sitecore User Guide Page 66Version 4.1.0 January 3, 2020
4 Sending Content to Translation 4.4.3 Specifying Filters for Source Content
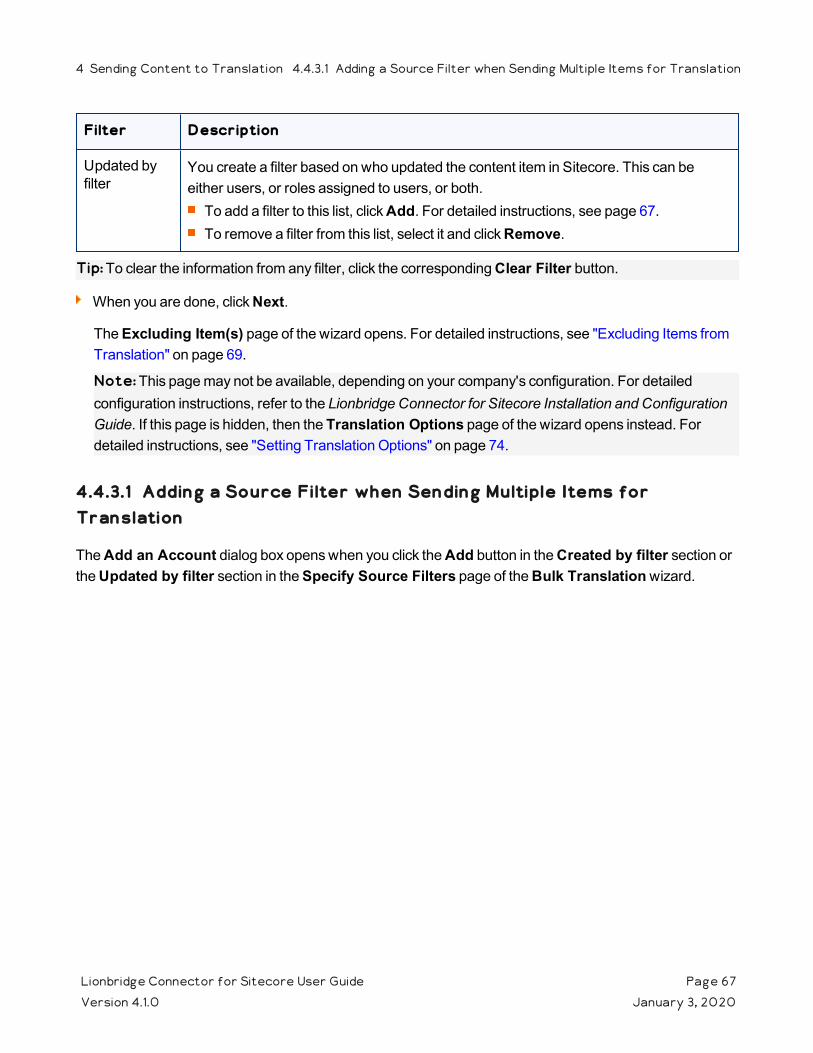
Filter Description
Updated by filter
You create a filter based on who updated the content item in Sitecore. This can be either users, or roles assigned to users, or both.To add a filter to this list, click Add. For detailed instructions, see page 67.To remove a filter from this list, select it and click Remove.
Tip: To clear the information from any filter, click the corresponding Clear Filter button.
When you are done, click Next.
The Excluding Item(s) page of the wizard opens. For detailed instructions, see "Excluding Items from Translation" on page 69.
Note: This page may not be available, depending on your company's configuration. For detailed configuration instructions, refer to the Lionbridge Connector for Sitecore Installation and Configuration Guide. If this page is hidden, then the Translation Options page of the wizard opens instead. For detailed instructions, see "Setting Translation Options" on page 74.
4.4.3.1 Adding a Source Filter when Sending Multiple Items for Translation
The Add an Account dialog box opens when you click the Add button in the Created by filter section or the Updated by filter section in the Specify Source Filters page of the Bulk Translation wizard.
Lionbridge Connector for Sitecore User Guide Page 67Version 4.1.0 January 3, 2020
4 Sending Content to Translation 4.4.3.1 Adding a Source Filter when Sending Multiple Items for Translation
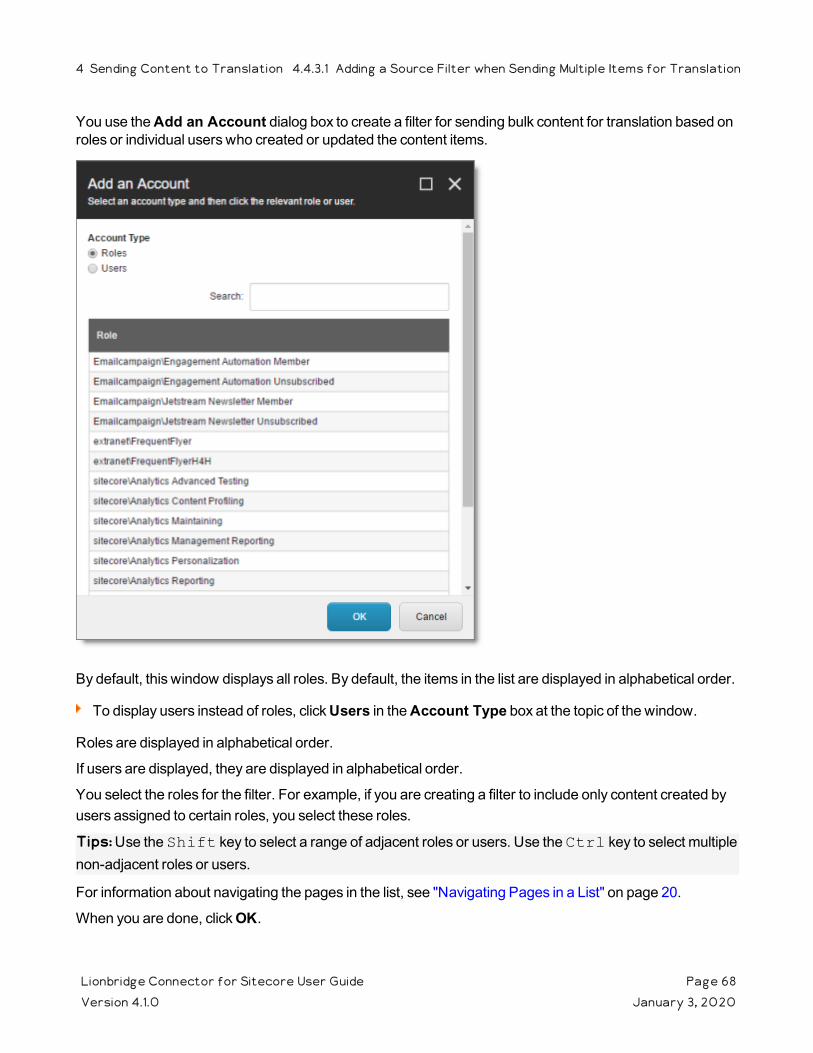
You use the Add an Account dialog box to create a filter for sending bulk content for translation based on roles or individual users who created or updated the content items.
By default, this window displays all roles. By default, the items in the list are displayed in alphabetical order.
To display users instead of roles, click Users in the Account Type box at the topic of the window.
Roles are displayed in alphabetical order.
If users are displayed, they are displayed in alphabetical order.
You select the roles for the filter. For example, if you are creating a filter to include only content created by users assigned to certain roles, you select these roles.
Tips: Use the Shift key to select a range of adjacent roles or users. Use the Ctrl key to select multiple non-adjacent roles or users.
For information about navigating the pages in the list, see "Navigating Pages in a List" on page 20.
When you are done, click OK.
Lionbridge Connector for Sitecore User Guide Page 68Version 4.1.0 January 3, 2020
4 Sending Content to Translation 4.4.3.1 Adding a Source Filter when Sending Multiple Items for Translation
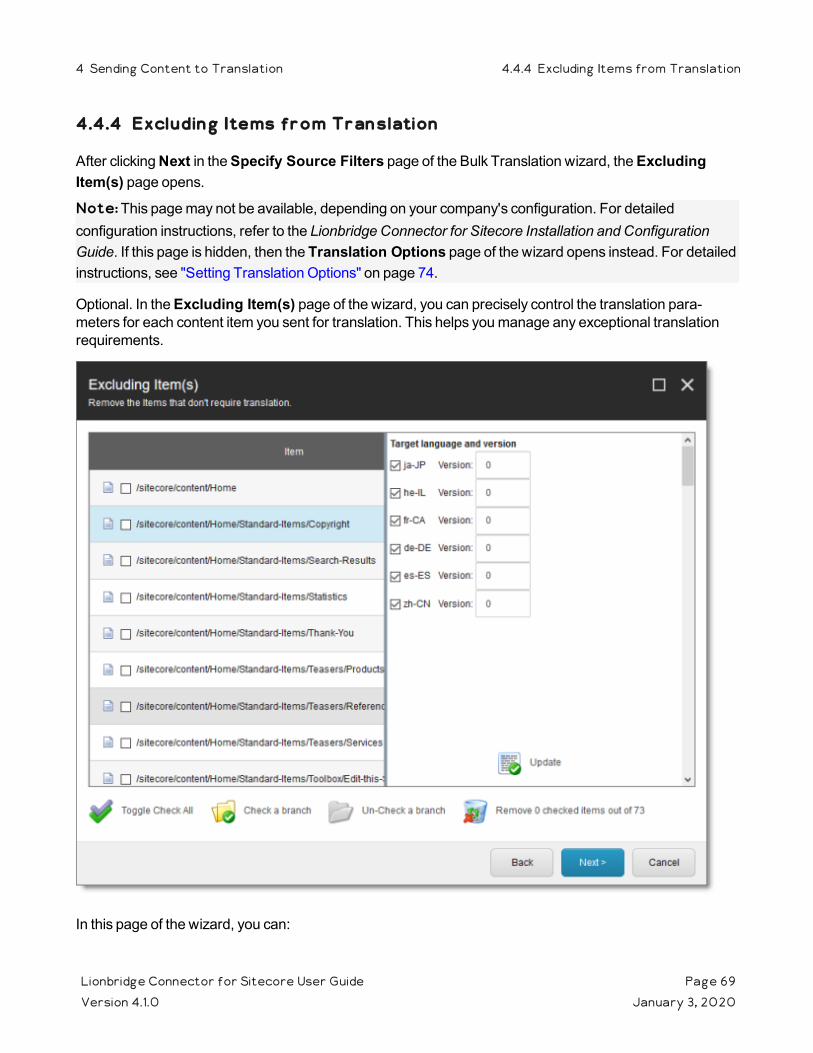
4.4.4 Excluding Items from Translation
After clicking Next in the Specify Source Filters page of the Bulk Translation wizard, the Excluding Item(s) page opens.
Note: This page may not be available, depending on your company's configuration. For detailed configuration instructions, refer to the Lionbridge Connector for Sitecore Installation and Configuration Guide. If this page is hidden, then the Translation Options page of the wizard opens instead. For detailed instructions, see "Setting Translation Options" on page 74.
Optional. In the Excluding Item(s) page of the wizard, you can precisely control the translation para-meters for each content item you sent for translation. This helps you manage any exceptional translation requirements.
In this page of the wizard, you can:
Lionbridge Connector for Sitecore User Guide Page 69Version 4.1.0 January 3, 2020
4 Sending Content to Translation 4.4.4 Excluding Items from Translation
Remove content items from the list, so that you do not send them out for translation.
Note: If you previously selected the Send dependent items check box at the bottom of the earlier Choose Items page in this wizard, above, then if you exclude some items from the list, their dependent items will automatically be excluded.
Change the target language of each item to send out for translation. For example, you may select a section of your web site to be bulk exported for translation into German, but you want to translate the top-level page items of that section into Spanish and French too.
Change the version of each item to send out for translation for each target language. For example, you may want an older version of the source content translated into a specific target language.
Remove one or more content items from the list, so that you do not send it out for translation.
Select the corresponding check boxes in the left page, and click Remove X checked items out of Y at the bottom of the list, where X is the number of items that are already selected for removal, and Y is the total number of items displayed in the list.
Tips: Use the Shift key to select a range of adjacent items. Use the Ctrl key to select multiple non-
adjacent items. To select or clear all content items in the list, click Toggle Check All.
Select a branch to exclude its child items from the list of content items to send out for translation.
Tip: You can also exclude a branch that was not selected explicitly in the earlier Choose Items page of the wizard. This enables you to exclude items that were automatically included when you selected the Send dependent items check box on that page.
Lionbridge Connector for Sitecore User Guide Page 70Version 4.1.0 January 3, 2020
4 Sending Content to Translation 4.4.4 Excluding Items from Translation
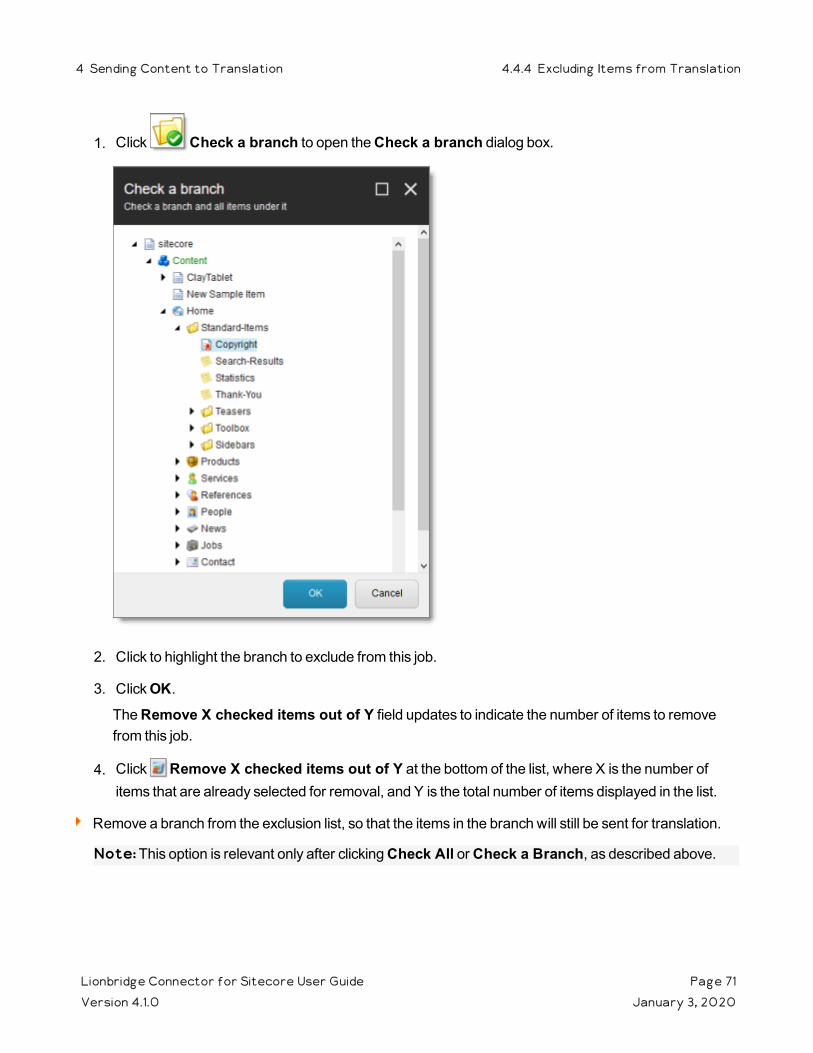
1. Click Check a branch to open the Check a branch dialog box.
2. Click to highlight the branch to exclude from this job.
3. Click OK. The Remove X checked items out of Y field updates to indicate the number of items to remove from this job.
4. Click Remove X checked items out of Y at the bottom of the list, where X is the number of items that are already selected for removal, and Y is the total number of items displayed in the list.
Remove a branch from the exclusion list, so that the items in the branch will still be sent for translation.
Note: This option is relevant only after clicking Check All or Check a Branch, as described above.
Lionbridge Connector for Sitecore User Guide Page 71Version 4.1.0 January 3, 2020
4 Sending Content to Translation 4.4.4 Excluding Items from Translation
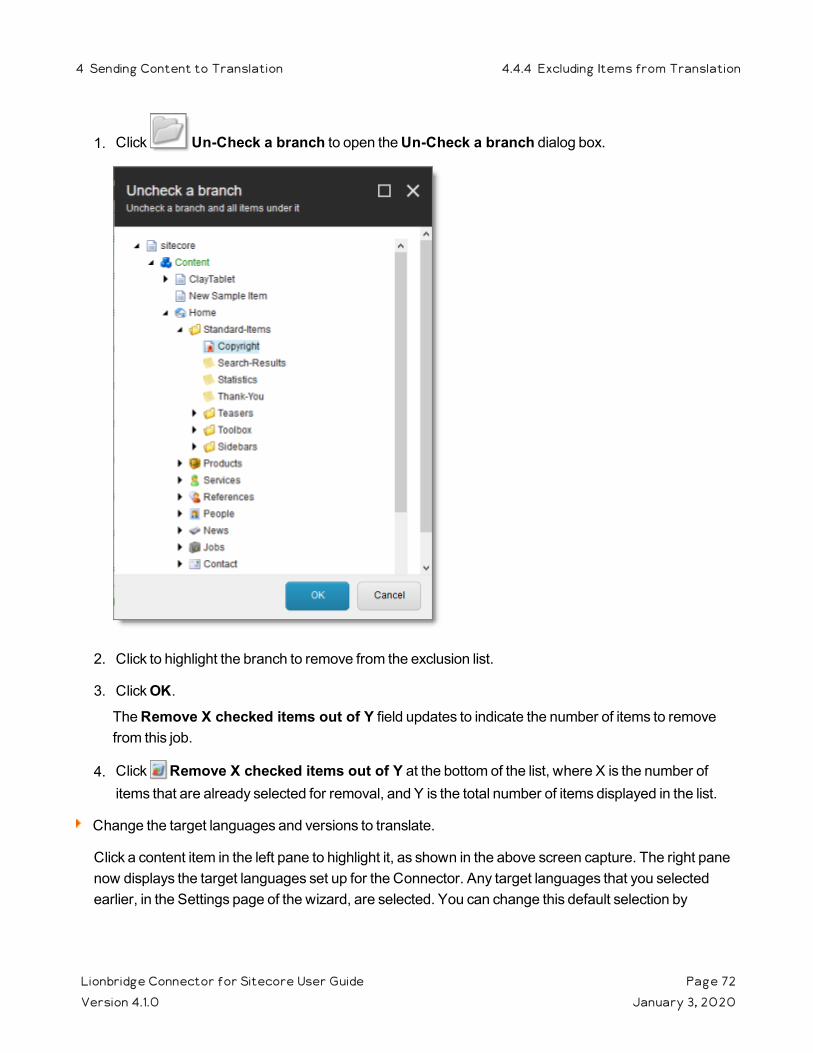
1. Click Un-Check a branch to open the Un-Check a branch dialog box.
2. Click to highlight the branch to remove from the exclusion list.
3. Click OK. The Remove X checked items out of Y field updates to indicate the number of items to remove from this job.
4. Click Remove X checked items out of Y at the bottom of the list, where X is the number of items that are already selected for removal, and Y is the total number of items displayed in the list.
Change the target languages and versions to translate.
Click a content item in the left pane to highlight it, as shown in the above screen capture. The right pane now displays the target languages set up for the Connector. Any target languages that you selected earlier, in the Settings page of the wizard, are selected. You can change this default selection by
Lionbridge Connector for Sitecore User Guide Page 72Version 4.1.0 January 3, 2020
4 Sending Content to Translation 4.4.4 Excluding Items from Translation
selecting the check boxes for additional target languages or clearing the check boxes for selected target languages.
Change the version assigned to the content item
Change the version number in the Version box for the language. If you select Default, the version number is incremented by one.
To save your changes to a target language and version for a content item, click Update at the bottom of the right pane.
When you are done, click Next.
The Translation Options page of the wizard opens. For detailed instructions, see "Setting Translation Options" on page 74.
Lionbridge Connector for Sitecore User Guide Page 73Version 4.1.0 January 3, 2020
4 Sending Content to Translation 4.4.4 Excluding Items from Translation
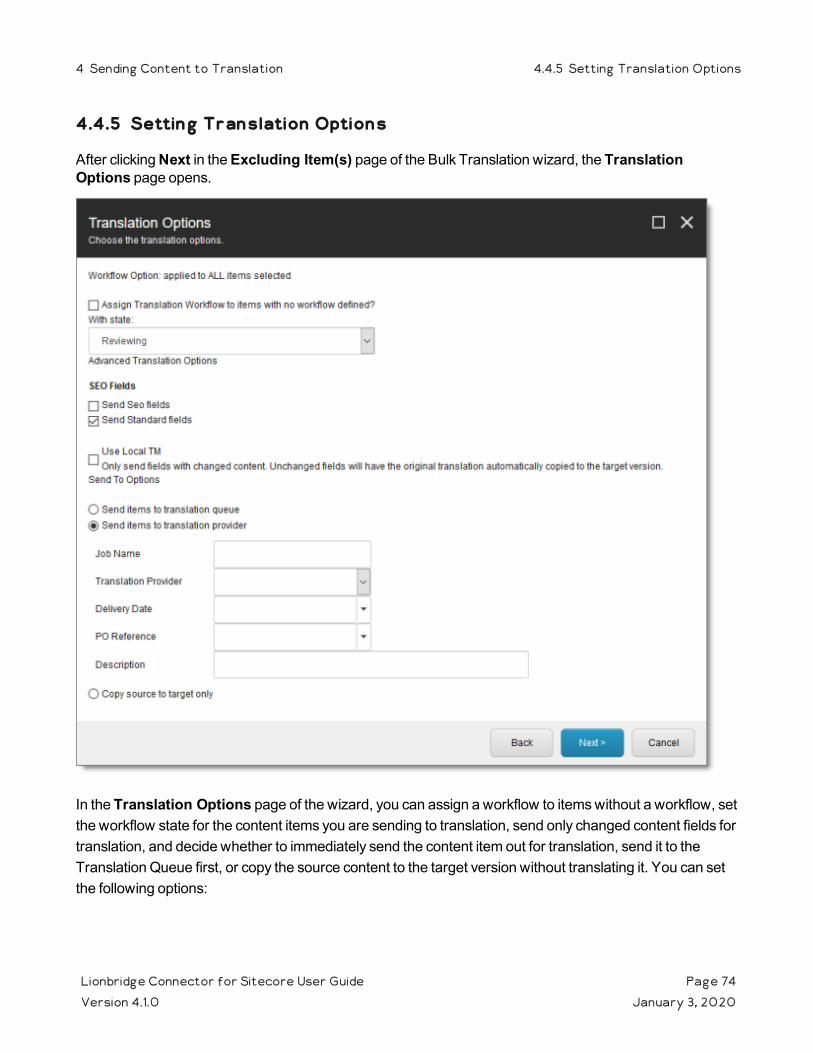
4.4.5 Setting Translation Options
After clicking Next in the Excluding Item(s) page of the Bulk Translation wizard, the Translation Options page opens.
In the Translation Options page of the wizard, you can assign a workflow to items without a workflow, set the workflow state for the content items you are sending to translation, send only changed content fields for translation, and decide whether to immediately send the content item out for translation, send it to the Translation Queue first, or copy the source content to the target version without translating it. You can set the following options:
Lionbridge Connector for Sitecore User Guide Page 74Version 4.1.0 January 3, 2020
4 Sending Content to Translation 4.4.5 Setting Translation Options
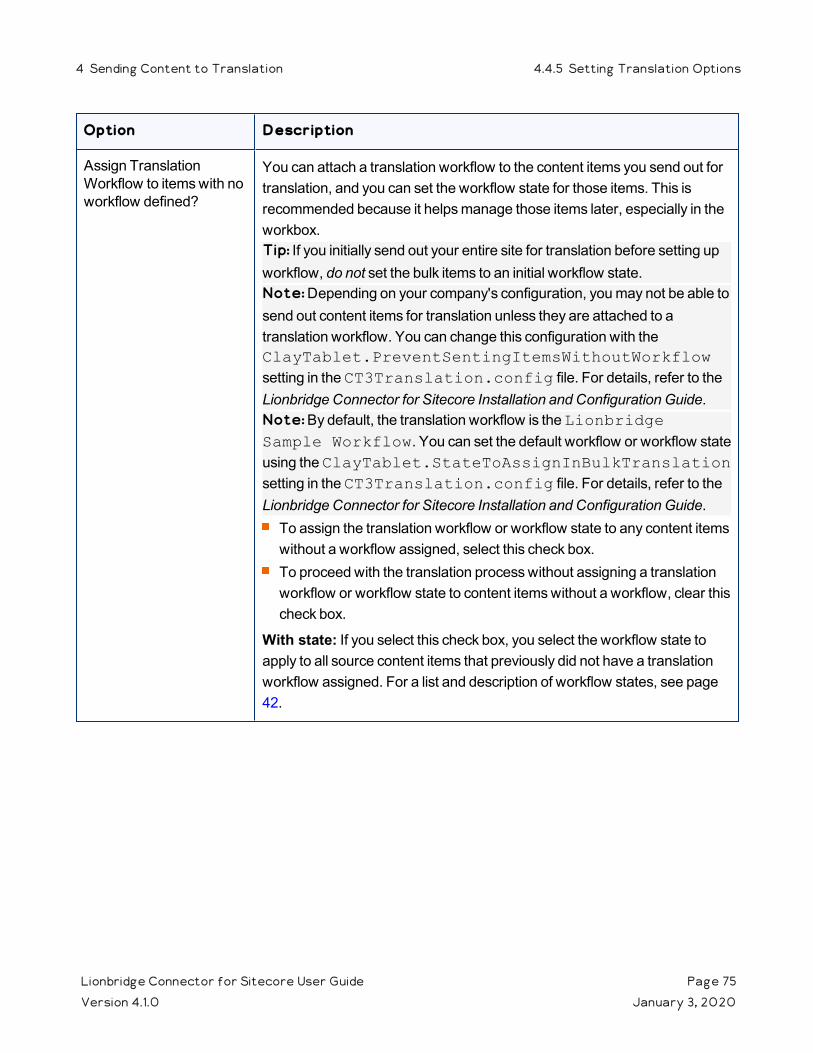
Option Description
Assign Translation Workflow to items with no workflow defined?
You can attach a translation workflow to the content items you send out for translation, and you can set the workflow state for those items. This is recommended because it helps manage those items later, especially in the workbox. Tip: If you initially send out your entire site for translation before setting up workflow, do not set the bulk items to an initial workflow state.Note: Depending on your company's configuration, you may not be able to send out content items for translation unless they are attached to a translation workflow. You can change this configuration with the ClayTablet.PreventSentingItemsWithoutWorkflow setting in the CT3Translation.config file. For details, refer to the Lionbridge Connector for Sitecore Installation and Configuration Guide.Note: By default, the translation workflow is the Lionbridge Sample Workflow. You can set the default workflow or workflow state using the ClayTablet.StateToAssignInBulkTranslation setting in the CT3Translation.config file. For details, refer to the Lionbridge Connector for Sitecore Installation and Configuration Guide.To assign the translation workflow or workflow state to any content items without a workflow assigned, select this check box. To proceed with the translation process without assigning a translation workflow or workflow state to content items without a workflow, clear this check box.
With state: If you select this check box, you select the workflow state to apply to all source content items that previously did not have a translation workflow assigned. For a list and description of workflow states, see page 42.
Lionbridge Connector for Sitecore User Guide Page 75Version 4.1.0 January 3, 2020
4 Sending Content to Translation 4.4.5 Setting Translation Options
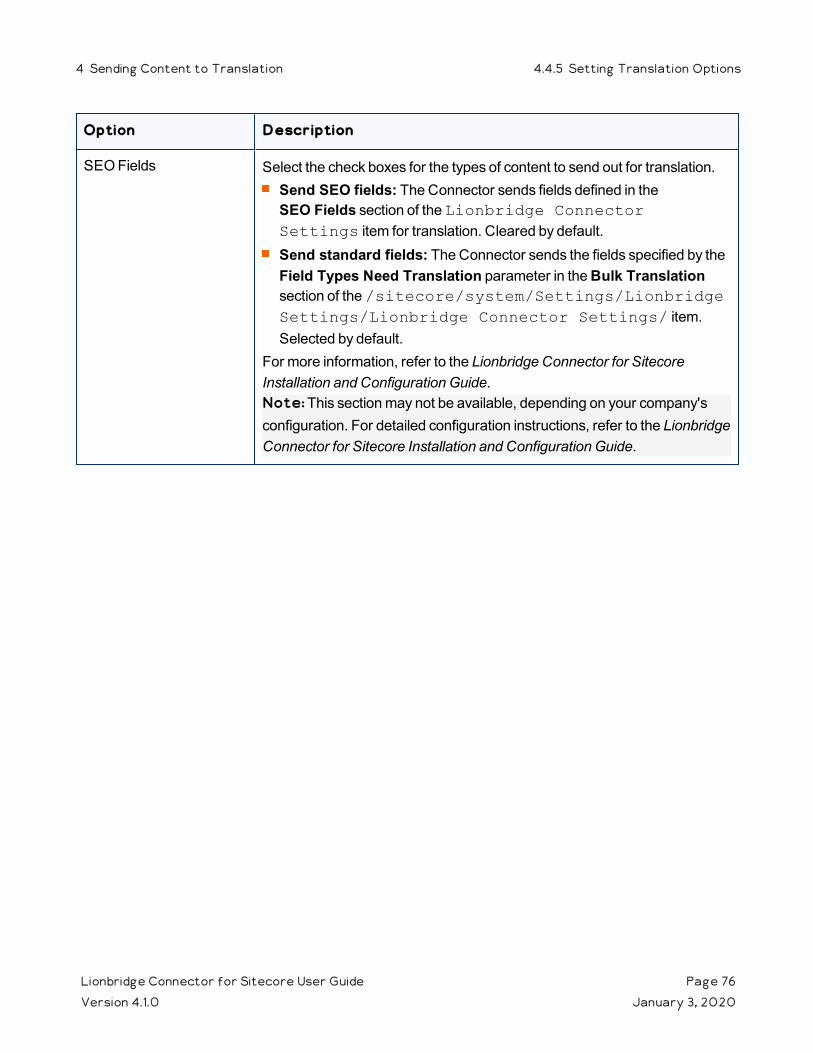
Option Description
SEO Fields Select the check boxes for the types of content to send out for translation.Send SEO fields: The Connector sends fields defined in the SEO Fields section of the Lionbridge Connector Settings item for translation. Cleared by default.Send standard fields: The Connector sends the fields specified by the Field Types Need Translation parameter in the Bulk Translation section of the /sitecore/system/Settings/Lionbridge Settings/Lionbridge Connector Settings/ item. Selected by default.
For more information, refer to the Lionbridge Connector for Sitecore Installation and Configuration Guide.Note: This section may not be available, depending on your company's configuration. For detailed configuration instructions, refer to the Lionbridge Connector for Sitecore Installation and Configuration Guide.
Lionbridge Connector for Sitecore User Guide Page 76Version 4.1.0 January 3, 2020
4 Sending Content to Translation 4.4.5 Setting Translation Options
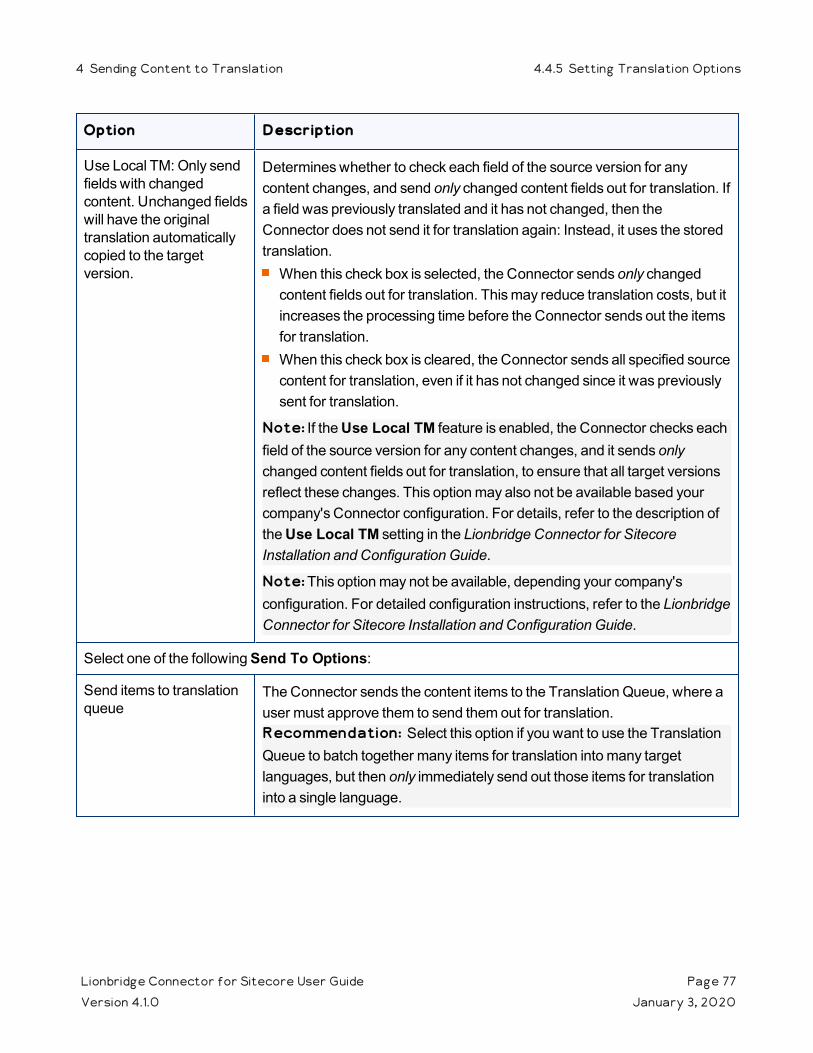
Option Description
Use Local TM: Only send fields with changed content. Unchanged fields will have the original translation automatically copied to the target version.
Determines whether to check each field of the source version for any content changes, and send only changed content fields out for translation. If a field was previously translated and it has not changed, then the Connector does not send it for translation again: Instead, it uses the stored translation.When this check box is selected, the Connector sends only changed content fields out for translation. This may reduce translation costs, but it increases the processing time before the Connector sends out the items for translation.When this check box is cleared, the Connector sends all specified source content for translation, even if it has not changed since it was previously sent for translation.
Note: If the Use Local TM feature is enabled, the Connector checks each field of the source version for any content changes, and it sends only changed content fields out for translation, to ensure that all target versions reflect these changes. This option may also not be available based your company's Connector configuration. For details, refer to the description of the Use Local TM setting in the Lionbridge Connector for Sitecore Installation and Configuration Guide.
Note: This option may not be available, depending your company's configuration. For detailed configuration instructions, refer to the Lionbridge Connector for Sitecore Installation and Configuration Guide.
Select one of the following Send To Options:
Send items to translation queue
The Connector sends the content items to the Translation Queue, where a user must approve them to send them out for translation.Recommendation: Select this option if you want to use the Translation Queue to batch together many items for translation into many target languages, but then only immediately send out those items for translation into a single language.
Lionbridge Connector for Sitecore User Guide Page 77Version 4.1.0 January 3, 2020
4 Sending Content to Translation 4.4.5 Setting Translation Options
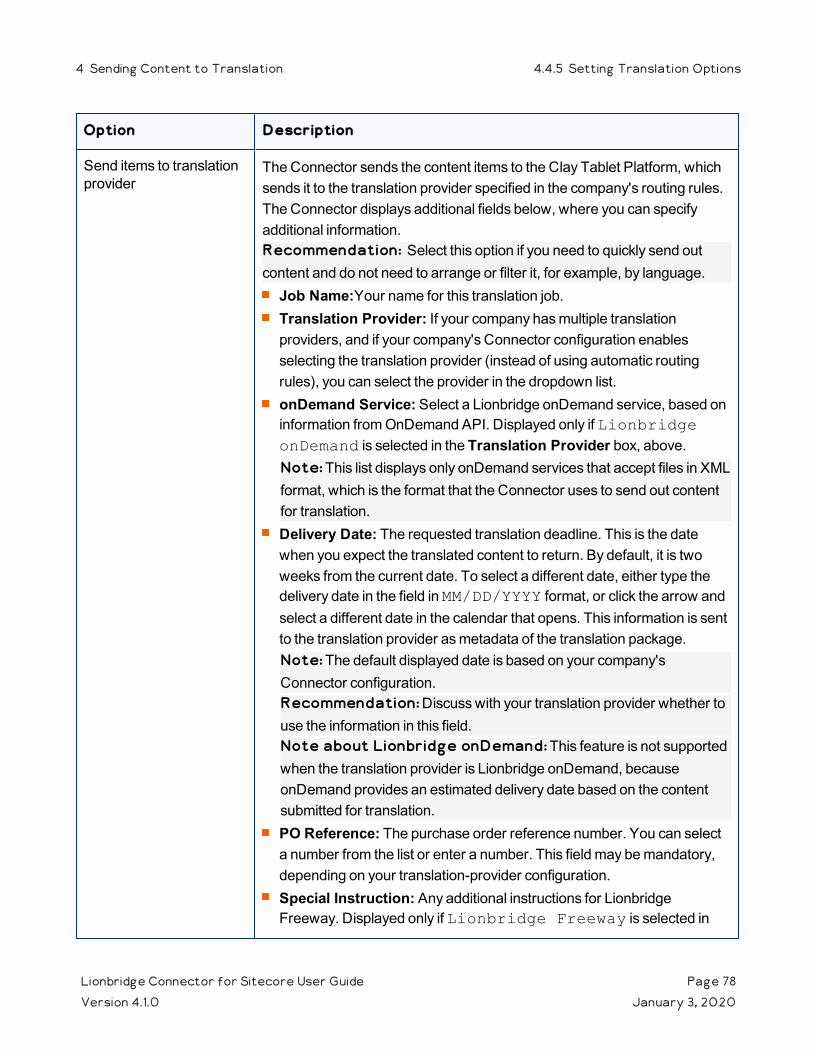
Option Description
Send items to translation provider
The Connector sends the content items to the Clay Tablet Platform, which sends it to the translation provider specified in the company's routing rules. The Connector displays additional fields below, where you can specify additional information.Recommendation: Select this option if you need to quickly send out content and do not need to arrange or filter it, for example, by language.
Job Name:Your name for this translation job.Translation Provider: If your company has multiple translation providers, and if your company's Connector configuration enables selecting the translation provider (instead of using automatic routing rules), you can select the provider in the dropdown list.onDemand Service: Select a Lionbridge onDemand service, based on information from OnDemand API. Displayed only if Lionbridge onDemand is selected in the Translation Provider box, above. Note: This list displays only onDemand services that accept files in XML format, which is the format that the Connector uses to send out content for translation.Delivery Date: The requested translation deadline. This is the date when you expect the translated content to return. By default, it is two weeks from the current date. To select a different date, either type the delivery date in the field in MM/DD/YYYY format, or click the arrow and select a different date in the calendar that opens. This information is sent to the translation provider as metadata of the translation package.Note: The default displayed date is based on your company's Connector configuration.Recommendation: Discuss with your translation provider whether to use the information in this field.Note about Lionbridge onDemand: This feature is not supported when the translation provider is Lionbridge onDemand, because onDemand provides an estimated delivery date based on the content submitted for translation.PO Reference: The purchase order reference number. You can select a number from the list or enter a number. This field may be mandatory, depending on your translation-provider configuration. Special Instruction: Any additional instructions for Lionbridge Freeway. Displayed only if Lionbridge Freeway is selected in
Lionbridge Connector for Sitecore User Guide Page 78Version 4.1.0 January 3, 2020
4 Sending Content to Translation 4.4.5 Setting Translation Options

Option Description
the Translation Provider box, above.Analysis Code: The analysis codes for the translation. Displayed only if:Lionbridge Freeway is selected in the Translation Provider box, above.The Connector is configured to display these fields.
You specify the analysis codes that are relevant to your content. Your Lionbridge setup determines which analysis codes are available for you to specify, and the values available for selection for each analysis code. For example, the Region, Department, and Priority analysis codes may be available for you to specify.Description: A description of the translation job, including any special instructions or requests. Displayed only if a translation provider other than Freeway is selected in the Send to box, above.Send for Quote: Select this check box to inform the translation provider that you want to receive a quote before the translation process starts. Displayed only if supported for the selected translation provider and enabled in your Connector installation.
Copy source to target only The Connector copies the source content to the target content item without sending it out for translation. This is useful when there is content that you do not want to translate, but that you want to include in the target version. The Connector displays an additional field below, where you specify the job name.
Job Name: Your name for this job.
When you are done, click Next.
The Summary Report page of the wizard opens. For detailed instructions, see "Reviewing and Submitting Content Items for Translation" on page 80.
Lionbridge Connector for Sitecore User Guide Page 79Version 4.1.0 January 3, 2020
4 Sending Content to Translation 4.4.5 Setting Translation Options
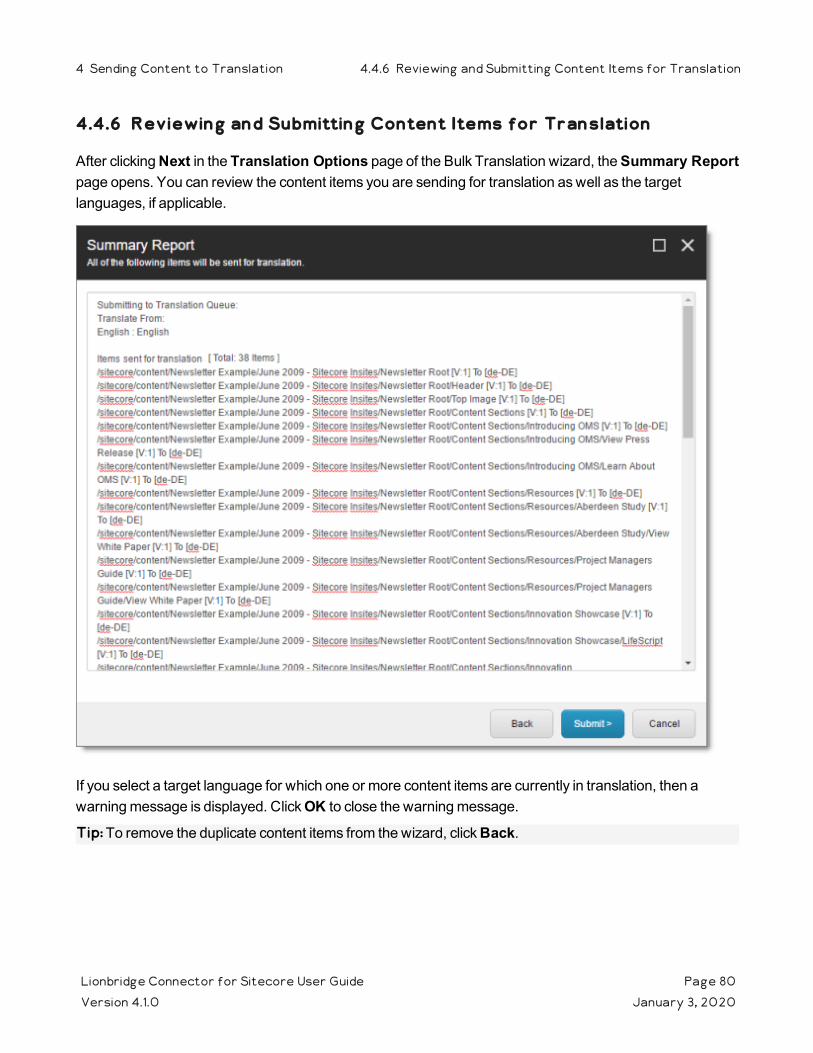
4.4.6 Reviewing and Submitting Content Items for Translation
After clicking Next in the Translation Options page of the Bulk Translation wizard, the Summary Report page opens. You can review the content items you are sending for translation as well as the target languages, if applicable.
If you select a target language for which one or more content items are currently in translation, then a warning message is displayed. Click OK to close the warning message.
Tip: To remove the duplicate content items from the wizard, click Back.
Lionbridge Connector for Sitecore User Guide Page 80Version 4.1.0 January 3, 2020
4 Sending Content to Translation 4.4.6 Reviewing and Submitting Content Items for Translation
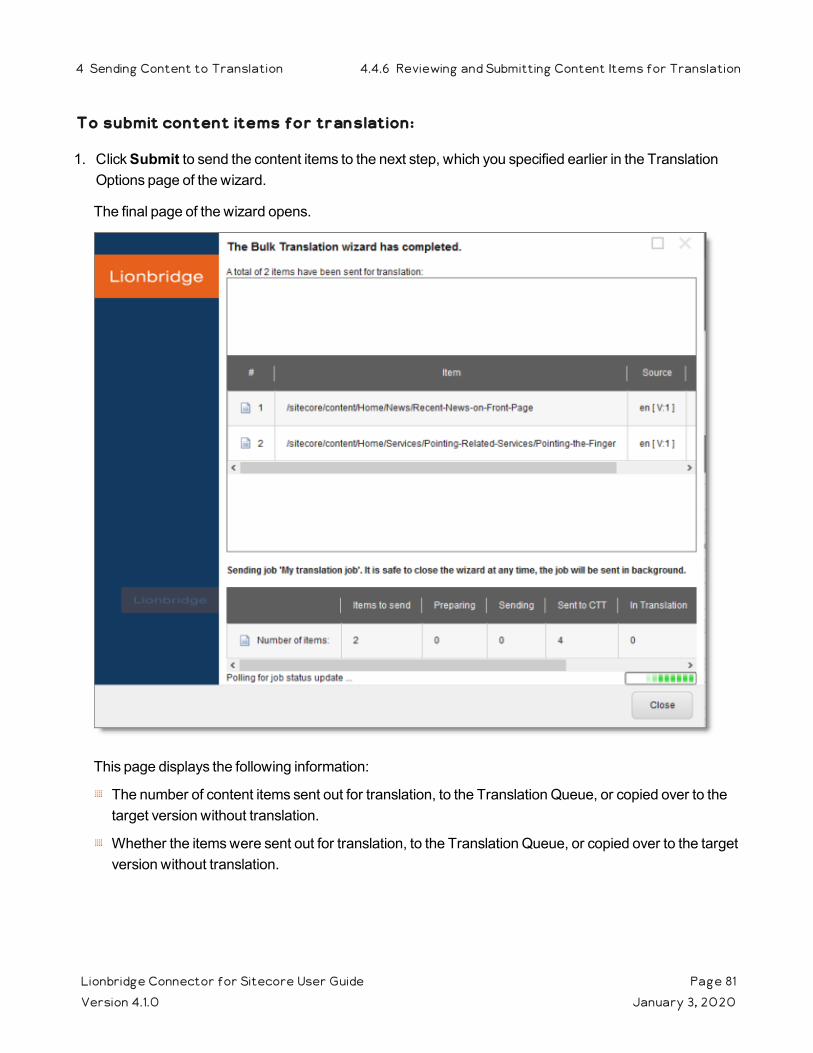
To submit content items for translation:
1. Click Submit to send the content items to the next step, which you specified earlier in the Translation Options page of the wizard.
The final page of the wizard opens.
This page displays the following information:
The number of content items sent out for translation, to the Translation Queue, or copied over to the target version without translation.
Whether the items were sent out for translation, to the Translation Queue, or copied over to the target version without translation.
Lionbridge Connector for Sitecore User Guide Page 81Version 4.1.0 January 3, 2020
4 Sending Content to Translation 4.4.6 Reviewing and Submitting Content Items for Translation

Important: If the Connector sent the items to the Translation Queue, you must approve them there to send them out for translation. For detailed instructions, see "Submitting Content for Translation from the Translation Queue" on page 84.
A list of all content items, including their paths, that the Connector sent out for translation, to the Translation Queue or copied over to the target version without translation.
If you sent the content items to a translation provider, or copied the source content to the target, the Job Progress box is displayed at the bottom of the page, indicating the Connector's progress in sending out the items for translation or copying over the content. The Number of Items refers to the number of content items in the source language. In the other columns, each target language represents an item.
2. Click Close to close the wizard.The processing and sending continues in the background.
4.5 Submitting Content for Translation from Sitecore Search Results
You can send content items from Sitecore search results to the Bulk Translation wizard. In the Bulk Translation wizard, you can choose to send these content items:
directly to a translation provider
to the Translation Queue, so that you can send them to a translation provider later
copy the source files to the target version without translation
To send content for translation from Sitecore search results:
1. In the Sitecore Content Editor, in the content area, click the Search icon to open the Search tab, so that the Search bar and button are displayed.
2. In the Search field, enter the keywords that characterize the items that you want to search for, or build a query, and then click Search. For detailed instructions on searching in Sitecore, refer to the Sitecore documentation, at: https://doc.sitecore.net/sitecore_experience_platform/content_
Lionbridge Connector for Sitecore User Guide Page 82Version 4.1.0 January 3, 2020
4 Sending Content to Translation 4.5 Submitting Content for Translation from Sitecore Search Results
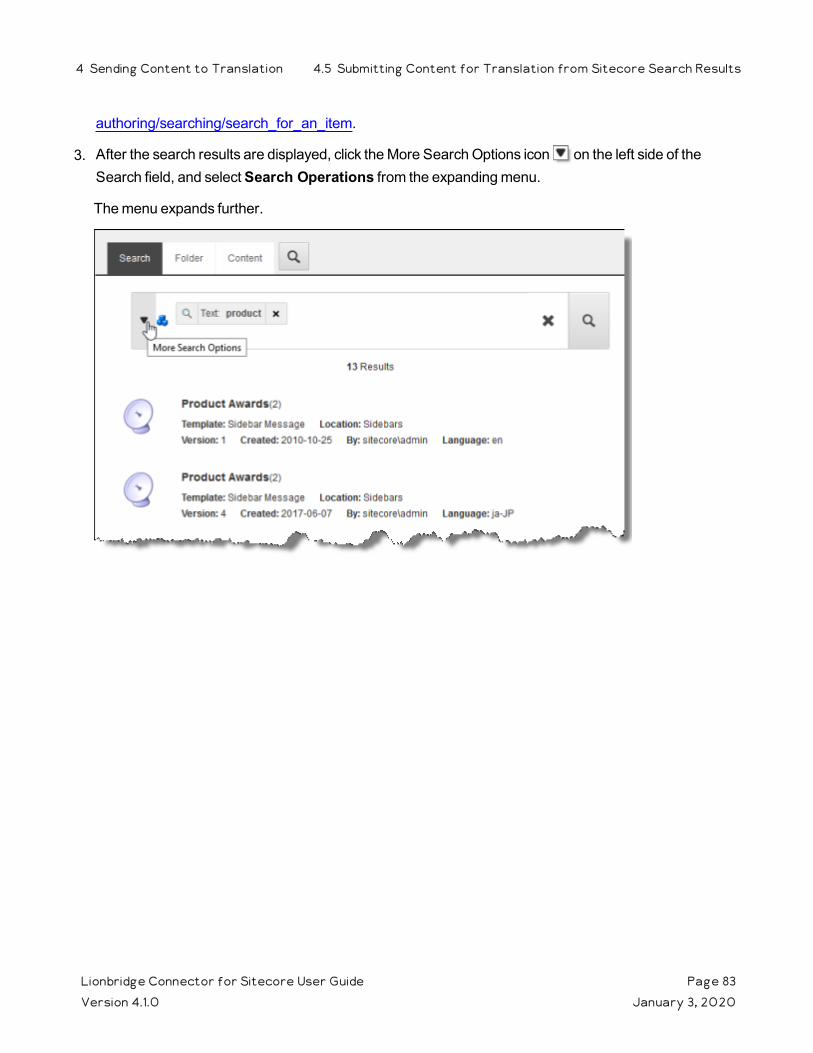
authoring/searching/search_for_an_item.
3. After the search results are displayed, click the More Search Options icon on the left side of the Search field, and select Search Operations from the expanding menu.
The menu expands further.
Lionbridge Connector for Sitecore User Guide Page 83Version 4.1.0 January 3, 2020
4 Sending Content to Translation 4.5 Submitting Content for Translation from Sitecore Search Results

4. Under Search Operations, click the Translate link.
The Bulk Translation wizard opens.
5. Follow the steps in the Bulk Translation wizard to send the content items directly to your translation provider, to the Translation Queue, or to copy the source items to the target version without translation. For detailed instructions, see "Sending Multiple Content Items for Translation" on page 58.
Note: In the Bulk Translation wizard, ensure that in the Settings page, in the Items to send section, you do not change the default selection of Select items to send. On the next page of the wizard (the Choose Items page), the items from the Sitecore search results are automatically selected.
4.6 Submitting Content for Translation from the Translation Queue
You submit content for translation from the Translation Queue in the following scenarios:
When you reviewed content, you submitted it to the Translation Queue, by selecting the Send items to translation queue radio button, instead of immediately sending it for translation, as described in the previous sections:
"Submitting a Content Item for Translation using the Content Editor" on page 43
Lionbridge Connector for Sitecore User Guide Page 84Version 4.1.0 January 3, 2020
4 Sending Content to Translation 4.6 Submitting Content for Translation from the Translation Queue
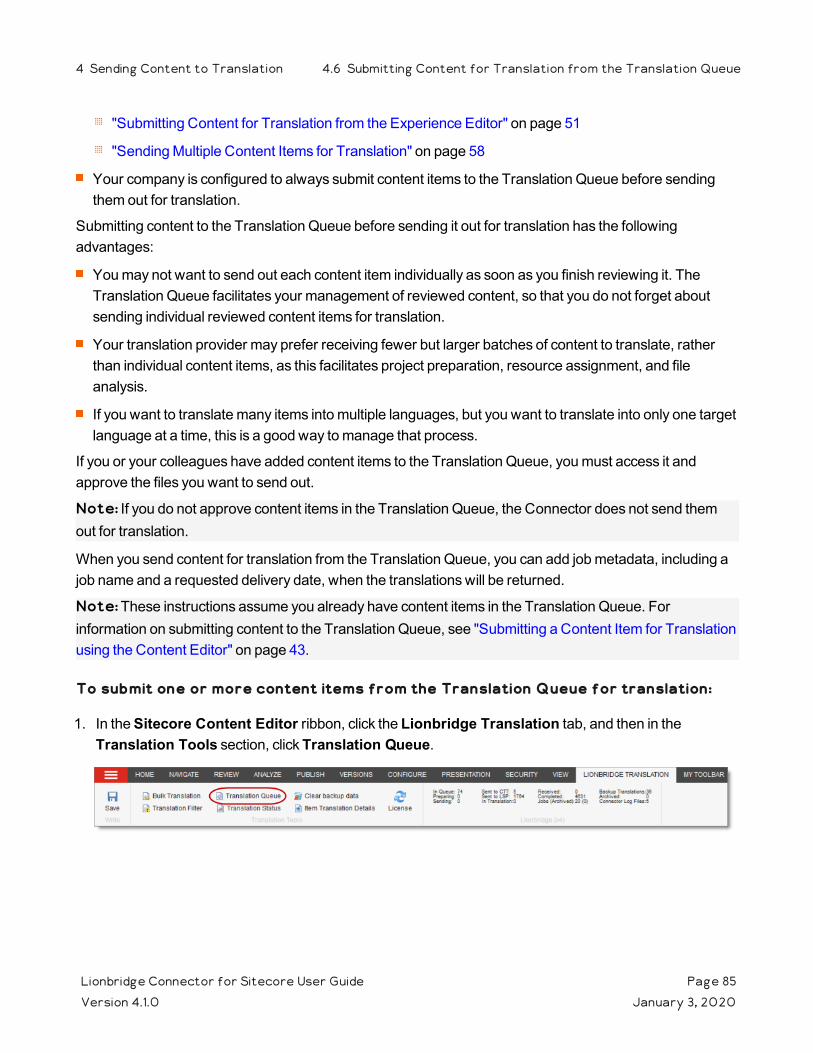
"Submitting Content for Translation from the Experience Editor" on page 51
"Sending Multiple Content Items for Translation" on page 58
Your company is configured to always submit content items to the Translation Queue before sending them out for translation.
Submitting content to the Translation Queue before sending it out for translation has the following advantages:
You may not want to send out each content item individually as soon as you finish reviewing it. The Translation Queue facilitates your management of reviewed content, so that you do not forget about sending individual reviewed content items for translation.
Your translation provider may prefer receiving fewer but larger batches of content to translate, rather than individual content items, as this facilitates project preparation, resource assignment, and file analysis.
If you want to translate many items into multiple languages, but you want to translate into only one target language at a time, this is a good way to manage that process.
If you or your colleagues have added content items to the Translation Queue, you must access it and approve the files you want to send out.
Note: If you do not approve content items in the Translation Queue, the Connector does not send them out for translation.
When you send content for translation from the Translation Queue, you can add job metadata, including a job name and a requested delivery date, when the translations will be returned.
Note: These instructions assume you already have content items in the Translation Queue. For information on submitting content to the Translation Queue, see "Submitting a Content Item for Translation using the Content Editor" on page 43.
To submit one or more content items from the Translation Queue for translation:
1. In the Sitecore Content Editor ribbon, click the Lionbridge Translation tab, and then in the Translation Tools section, click Translation Queue.
Lionbridge Connector for Sitecore User Guide Page 85Version 4.1.0 January 3, 2020
4 Sending Content to Translation 4.6 Submitting Content for Translation from the Translation Queue
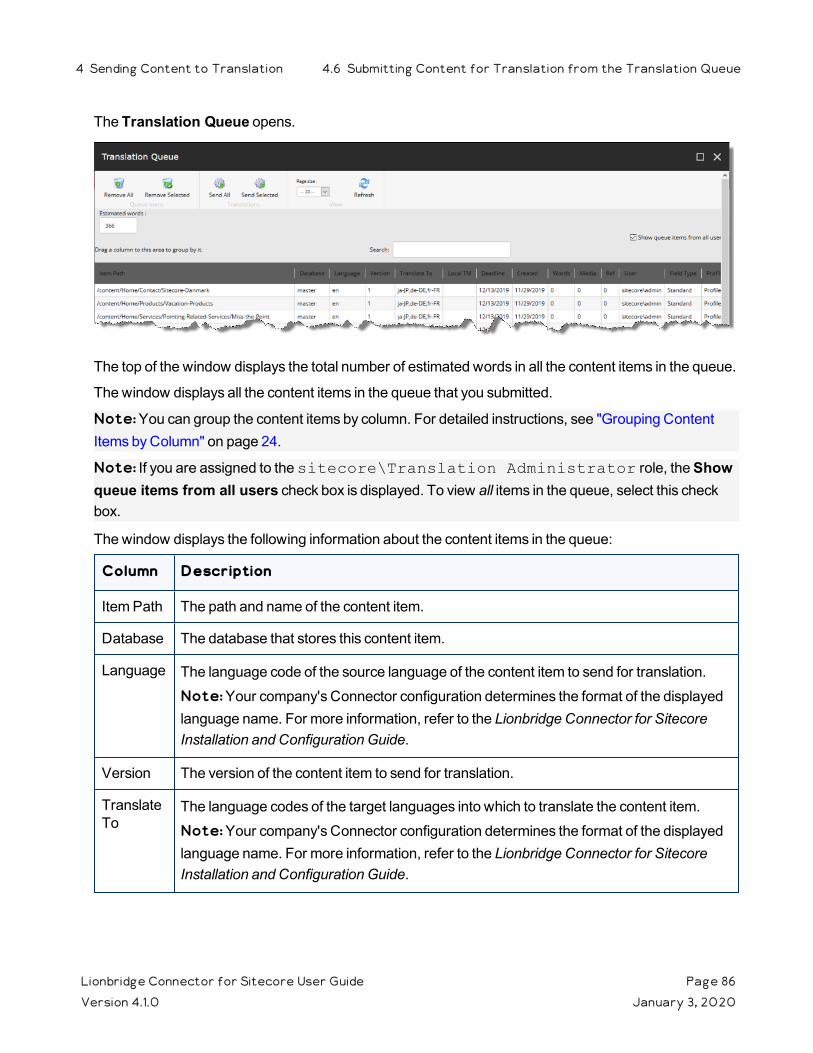
The Translation Queue opens.
The top of the window displays the total number of estimated words in all the content items in the queue.
The window displays all the content items in the queue that you submitted.
Note: You can group the content items by column. For detailed instructions, see "Grouping Content Items by Column" on page 24.
Note: If you are assigned to the sitecore\Translation Administrator role, the Show queue items from all users check box is displayed. To view all items in the queue, select this check box.
The window displays the following information about the content items in the queue:
Column Description
Item Path The path and name of the content item.
Database The database that stores this content item.
Language The language code of the source language of the content item to send for translation.Note: Your company's Connector configuration determines the format of the displayed language name. For more information, refer to the Lionbridge Connector for Sitecore Installation and Configuration Guide.
Version The version of the content item to send for translation.
Translate To
The language codes of the target languages into which to translate the content item.Note: Your company's Connector configuration determines the format of the displayed language name. For more information, refer to the Lionbridge Connector for Sitecore Installation and Configuration Guide.
Lionbridge Connector for Sitecore User Guide Page 86Version 4.1.0 January 3, 2020
4 Sending Content to Translation 4.6 Submitting Content for Translation from the Translation Queue
Column Description
Local TM Indicates whether the Use Local TM feature is enabled for this content item. This feature sends only changed content fields out for translation, which reduces translation costs.If this column has a value of Yes, then this feature is enabled for this content item.If this column is blank, then this feature is not enabled for this content item.
Deadline The requested date for received the translated content back from the translation provider, in MM/DD/YYYY format.
Created The date when the source content item was created, in MM/DD/YYYY format.
Words The number of words in the content item.
Media Indicates whether the content item is a binary asset, such as a .jpg or .pdf file or another media file.
Ref Indicates whether the content item is a reference file (support asset), which provides helpful context for the translator.
User The user who submitted this content item to the queue. Displayed only if you are assigned to the sitecore\Translation Administrator role, and if you selected the Show queue items from all users check box, described above.
Field Type
The field type of the content item.
Profile If the user who submitted this content item to the queue is assigned to one or more team profiles, then this is the team profile used when submitting this item to the queue.
Note: To change the number of items displayed on a page in the queue, select a number from the Page size dropdown list. By default, 20 items are displayed on a page.
2. Do one of the following:
Select one or more content items to send for translation, and click Send Selected.
Tips: Use the Shift key to select a range of adjacent items. Use the Ctrl key to select multiple non-adjacent items.
Click Send All.
Lionbridge Connector for Sitecore User Guide Page 87Version 4.1.0 January 3, 2020
4 Sending Content to Translation 4.6 Submitting Content for Translation from the Translation Queue
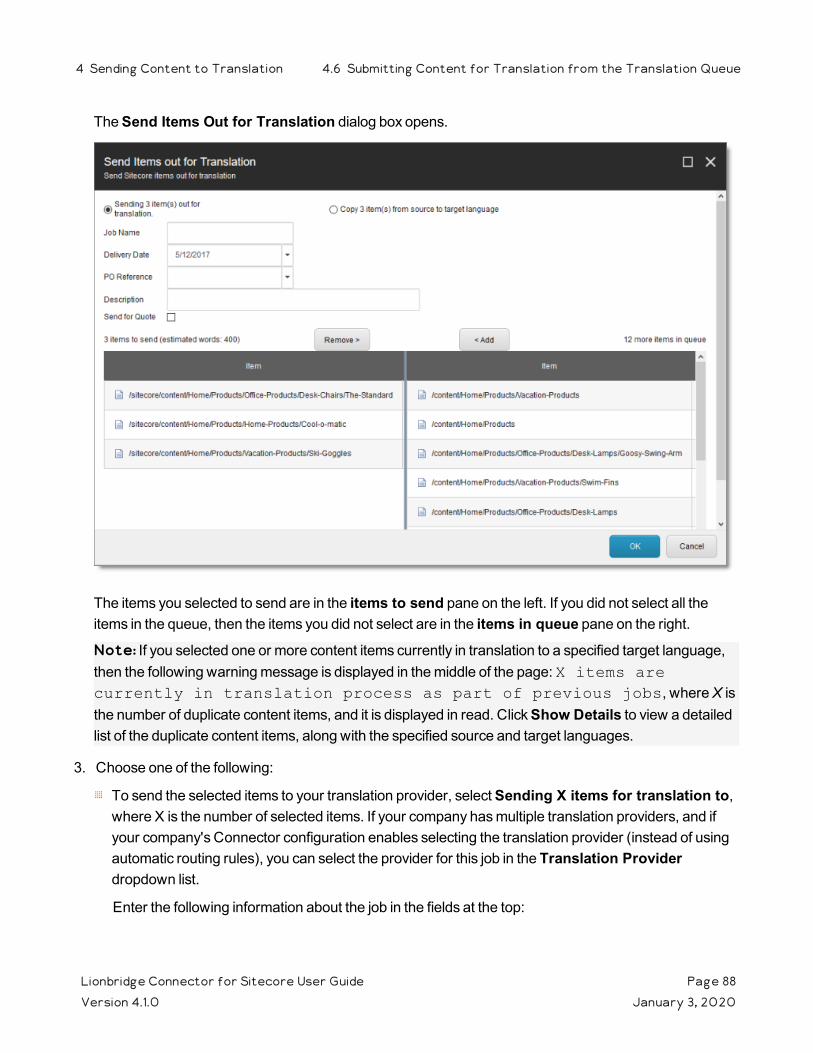
The Send Items Out for Translation dialog box opens.
The items you selected to send are in the items to send pane on the left. If you did not select all the items in the queue, then the items you did not select are in the items in queue pane on the right.
Note: If you selected one or more content items currently in translation to a specified target language, then the following warning message is displayed in the middle of the page: X items are currently in translation process as part of previous jobs, where X is the number of duplicate content items, and it is displayed in read. Click Show Details to view a detailed list of the duplicate content items, along with the specified source and target languages.
3. Choose one of the following:
To send the selected items to your translation provider, select Sending X items for translation to, where X is the number of selected items. If your company has multiple translation providers, and if your company's Connector configuration enables selecting the translation provider (instead of using automatic routing rules), you can select the provider for this job in the Translation Provider dropdown list.
Enter the following information about the job in the fields at the top:
Lionbridge Connector for Sitecore User Guide Page 88Version 4.1.0 January 3, 2020
4 Sending Content to Translation 4.6 Submitting Content for Translation from the Translation Queue
Option Description
Profile If you have been assigned to a team profile, select the team profile to use for this translation job. Displayed only if you have been assigned to a team profile.
Delivery Date
The requested translation deadline. This is the date when you expect the translated content to return. By default, it is two weeks from the current date. To select a different date, either type the delivery date in the field in MM/DD/YYYY format, or click the arrow and select a different date in the calendar that opens.
This information is sent to the translation provider as metadata of the translation package.Note: The default displayed date is based on your company's Connector configuration.Recommendation: Discuss with your translation provider whether to use the information in this field.Note about Lionbridge onDemand: This feature is not supported when the translation provider is Lionbridge onDemand, because onDemand provides an estimated delivery date based on the content submitted for translation.
onDemand Service
Select a Lionbridge onDemand service, based on information from OnDemand API. Displayed only if Lionbridge onDemand is selected in the Translation Provider box, above.Note: This list displays only onDemand services that accept files in XML format, which is the format that the Connector uses to send out content for translation.
PO Reference
The purchase order reference number. You can select a number from the list or enter a number. This field may be mandatory, depending on your translation-provider configuration.
Description A description of the translation job, including any special instructions or requests. Displayed only if a translation provider other than Freeway is selected in the Send to box, above.
Job Name Your name for this translation job.
Send for Quote
Select this check box to inform the translation provider that you want to receive a quote before the translation process starts. Displayed only if supported for the selected translation provider and enabled in your Connector installation.
Special Instruction
Any additional instructions for Freeway. Displayed only if Freeway is selected in the Sending items for translation to box, above.
Lionbridge Connector for Sitecore User Guide Page 89Version 4.1.0 January 3, 2020
4 Sending Content to Translation 4.6 Submitting Content for Translation from the Translation Queue
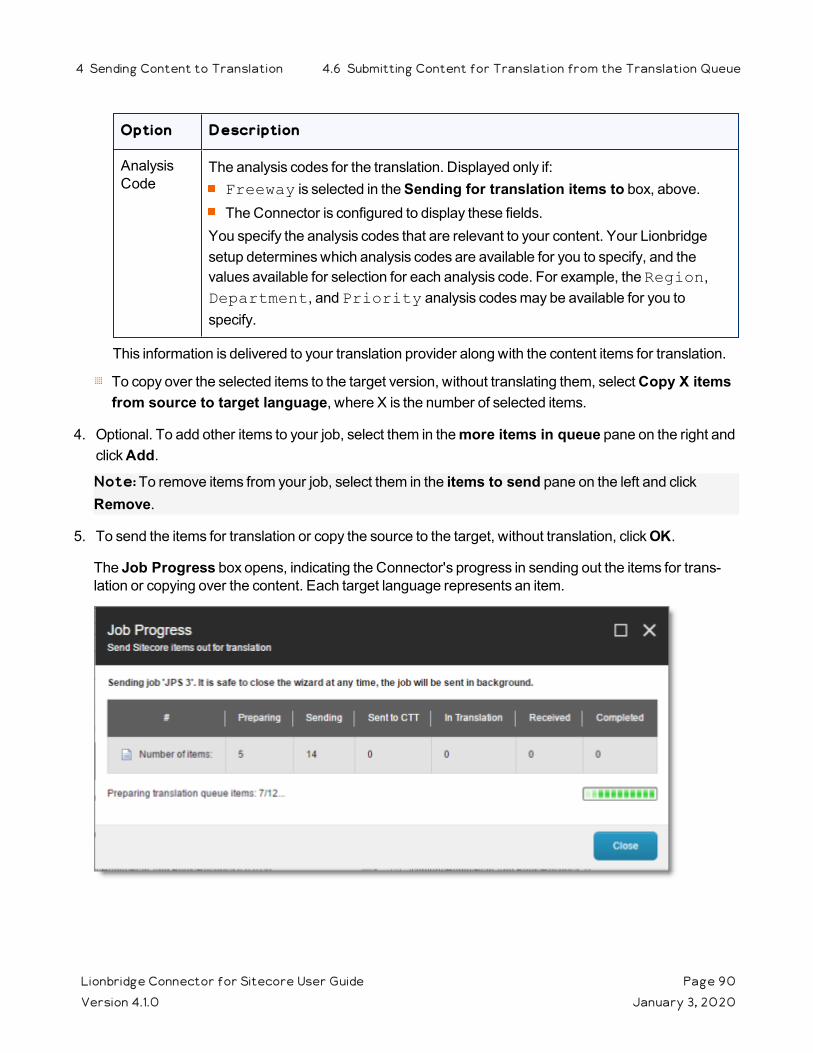
Option Description
Analysis Code
The analysis codes for the translation. Displayed only if:Freeway is selected in the Sending for translation items to box, above.The Connector is configured to display these fields.
You specify the analysis codes that are relevant to your content. Your Lionbridge setup determines which analysis codes are available for you to specify, and the values available for selection for each analysis code. For example, the Region, Department, and Priority analysis codes may be available for you to specify.
This information is delivered to your translation provider along with the content items for translation.
To copy over the selected items to the target version, without translating them, select Copy X items from source to target language, where X is the number of selected items.
4. Optional. To add other items to your job, select them in the more items in queue pane on the right and click Add.
Note: To remove items from your job, select them in the items to send pane on the left and click Remove.
5. To send the items for translation or copy the source to the target, without translation, click OK.
The Job Progress box opens, indicating the Connector's progress in sending out the items for trans-lation or copying over the content. Each target language represents an item.
Lionbridge Connector for Sitecore User Guide Page 90Version 4.1.0 January 3, 2020
4 Sending Content to Translation 4.6 Submitting Content for Translation from the Translation Queue
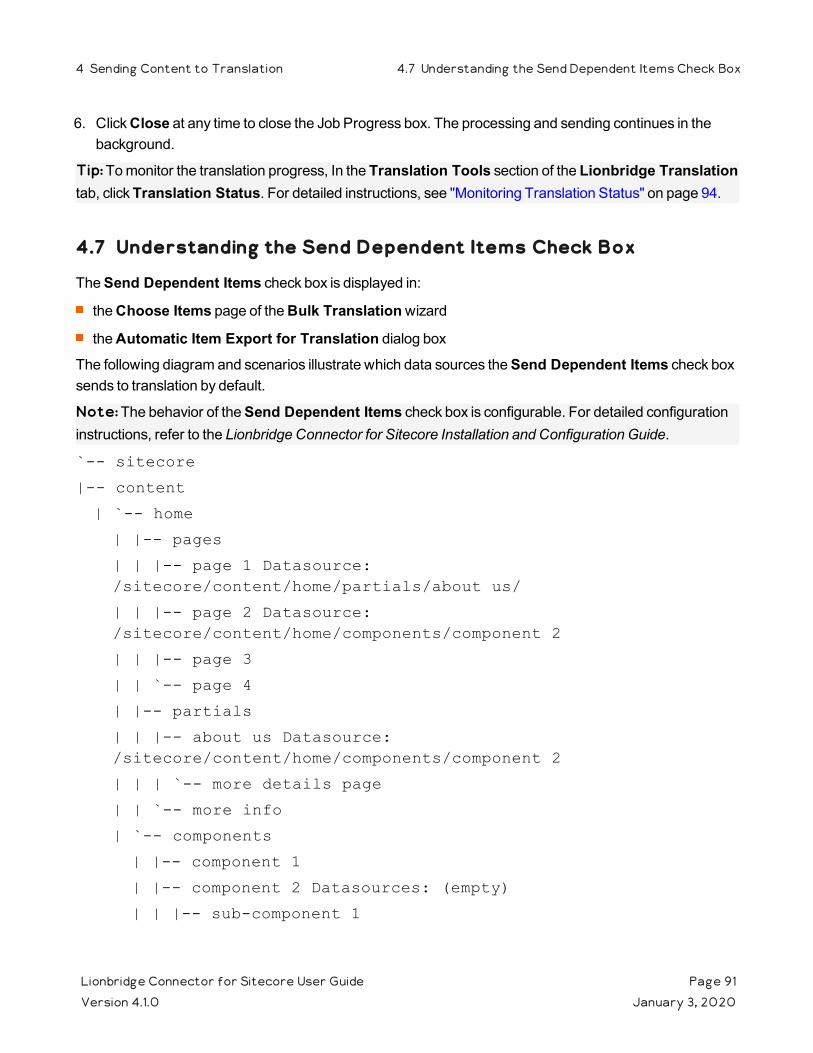
6. Click Close at any time to close the Job Progress box. The processing and sending continues in the background.
Tip: To monitor the translation progress, In the Translation Tools section of the Lionbridge Translation tab, click Translation Status. For detailed instructions, see "Monitoring Translation Status" on page 94.
4.7 Understanding the Send Dependent Items Check Box
The Send Dependent Items check box is displayed in:
the Choose Items page of the Bulk Translation wizard
the Automatic Item Export for Translation dialog boxThe following diagram and scenarios illustrate which data sources the Send Dependent Items check box sends to translation by default.
Note: The behavior of the Send Dependent Items check box is configurable. For detailed configuration instructions, refer to the Lionbridge Connector for Sitecore Installation and Configuration Guide.
`-- sitecore
|-- content
| `-- home
| |-- pages
| | |-- page 1 Datasource: /sitecore/content/home/partials/about us/
| | |-- page 2 Datasource: /sitecore/content/home/components/component 2
| | |-- page 3
| | `-- page 4
| |-- partials
| | |-- about us Datasource: /sitecore/content/home/components/component 2
| | | `-- more details page
| | `-- more info
| `-- components
| |-- component 1
| |-- component 2 Datasources: (empty)
| | |-- sub-component 1
Lionbridge Connector for Sitecore User Guide Page 91Version 4.1.0 January 3, 2020
4 Sending Content to Translation 4.7 Understanding the Send Dependent Items Check Box
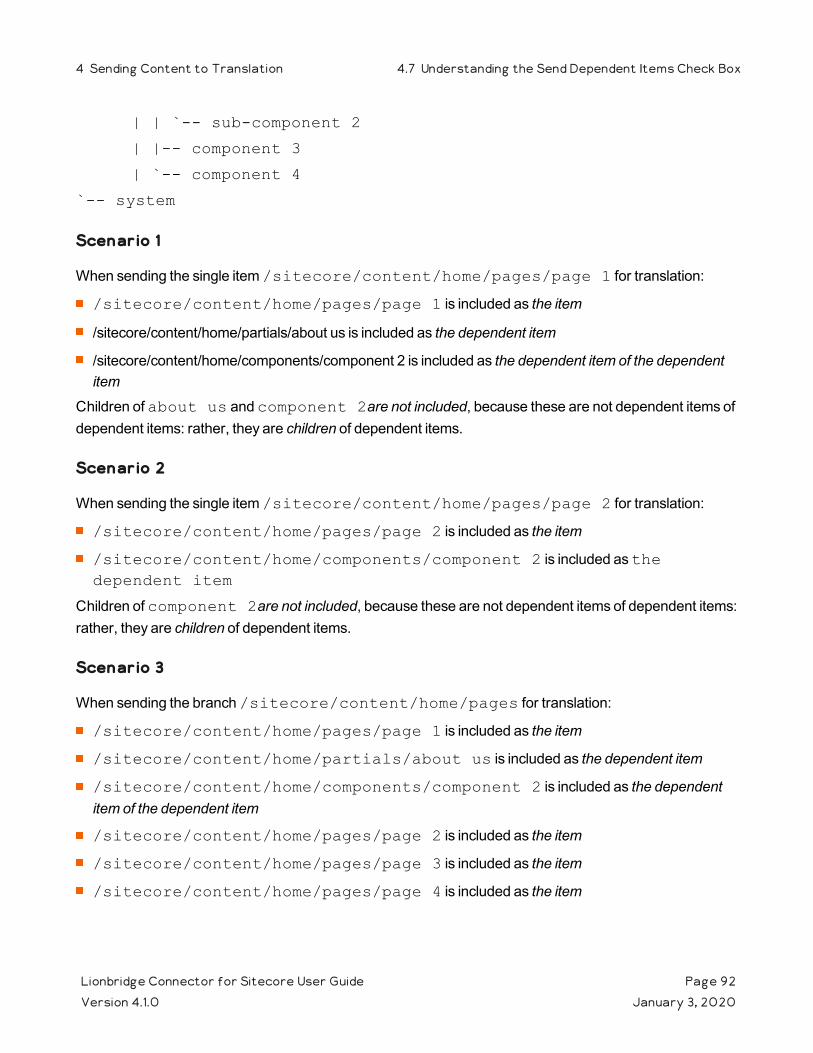
| | `-- sub-component 2
| |-- component 3
| `-- component 4
`-- system
Scenario 1
When sending the single item /sitecore/content/home/pages/page 1 for translation:
/sitecore/content/home/pages/page 1 is included as the item
/sitecore/content/home/partials/about us is included as the dependent item
/sitecore/content/home/components/component 2 is included as the dependent item of the dependent item
Children of about us and component 2are not included, because these are not dependent items of dependent items: rather, they are children of dependent items.
Scenario 2
When sending the single item /sitecore/content/home/pages/page 2 for translation:
/sitecore/content/home/pages/page 2 is included as the item
/sitecore/content/home/components/component 2 is included as the dependent item
Children of component 2are not included, because these are not dependent items of dependent items: rather, they are children of dependent items.
Scenario 3
When sending the branch /sitecore/content/home/pages for translation:
/sitecore/content/home/pages/page 1 is included as the item
/sitecore/content/home/partials/about us is included as the dependent item
/sitecore/content/home/components/component 2 is included as the dependent item of the dependent item
/sitecore/content/home/pages/page 2 is included as the item
/sitecore/content/home/pages/page 3 is included as the item
/sitecore/content/home/pages/page 4 is included as the item
Lionbridge Connector for Sitecore User Guide Page 92Version 4.1.0 January 3, 2020
4 Sending Content to Translation 4.7 Understanding the Send Dependent Items Check Box
Children of component 2are not included, because the branch of /sitecore/content/home/pages is sent for translation: the branch of component 2 is not sent for translation.
Lionbridge Connector for Sitecore User Guide Page 93Version 4.1.0 January 3, 2020
4 Sending Content to Translation 4.7 Understanding the Send Dependent Items Check Box
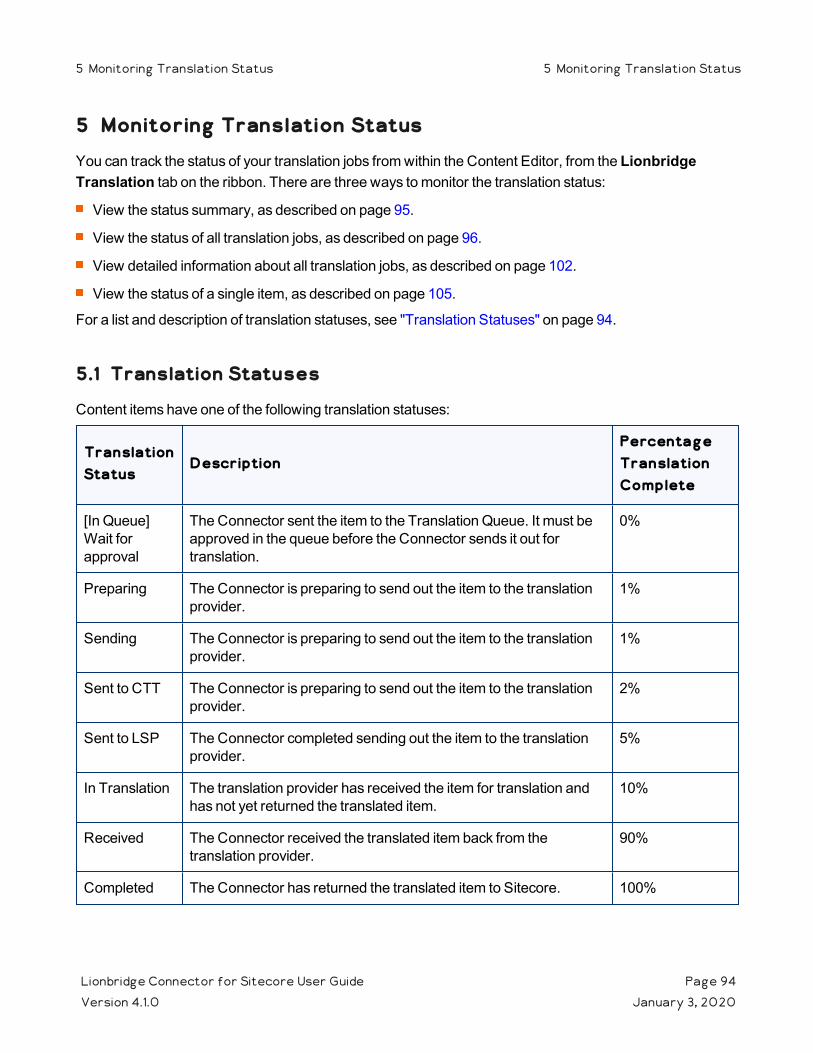
5 Monitoring Translation StatusYou can track the status of your translation jobs from within the Content Editor, from the Lionbridge Translation tab on the ribbon. There are three ways to monitor the translation status:
View the status summary, as described on page 95.
View the status of all translation jobs, as described on page 96.
View detailed information about all translation jobs, as described on page 102.
View the status of a single item, as described on page 105.
For a list and description of translation statuses, see "Translation Statuses" on page 94.
5.1 Translation Statuses
Content items have one of the following translation statuses:
Translation Status
DescriptionPercentage Translation Complete
[In Queue] Wait for approval
The Connector sent the item to the Translation Queue. It must be approved in the queue before the Connector sends it out for translation.
0%
Preparing The Connector is preparing to send out the item to the translation provider.
1%
Sending The Connector is preparing to send out the item to the translation provider.
1%
Sent to CTT The Connector is preparing to send out the item to the translation provider.
2%
Sent to LSP The Connector completed sending out the item to the translation provider.
5%
In Translation The translation provider has received the item for translation and has not yet returned the translated item.
10%
Received The Connector received the translated item back from the translation provider.
90%
Completed The Connector has returned the translated item to Sitecore. 100%
Lionbridge Connector for Sitecore User Guide Page 94Version 4.1.0 January 3, 2020
5 Monitoring Translation Status 5 Monitoring Translation Status

Translation Status
DescriptionPercentage Translation Complete
No field to translate
There are no fields to translate in the content item. (The fields may have been excluded by the Translation Filter or the filter in the Bulk Translation wizard.)
100%
5.2 Viewing Your Translation Status Summary
You can view a summary of the translation status of all content items in this Sitecore instance.
To view this summary, on the Sitecore Content Editor ribbon, click the Lionbridge Translation tab. The summary is displayed on the Translation Statuses section of Lionbridge Translation tab.
The following information is displayed about your content items:
Information DescriptionPercentage Translation Complete
In Queue The number of content items in the Translation Queue. 0%
Preparing The number of content items that the Connector is preparing to sent to the Clay Tablet Platform.
1%
Sending The number of content items that the Connector is currently sending to the Clay Tablet Platform.
n/a
Sent to CTT The number of content items that the Connector sent to the Clay Tablet Platform, which is currently preparing to send them out for translation.
2%
Sent to LSP The number of content items that the translation vendor has received to translate.
5%
In Translation The number of content items that the translation vendor has received to translate.
10%
Lionbridge Connector for Sitecore User Guide Page 95Version 4.1.0 January 3, 2020
5 Monitoring Translation Status 5.2 Viewing Your Translation Status Summary
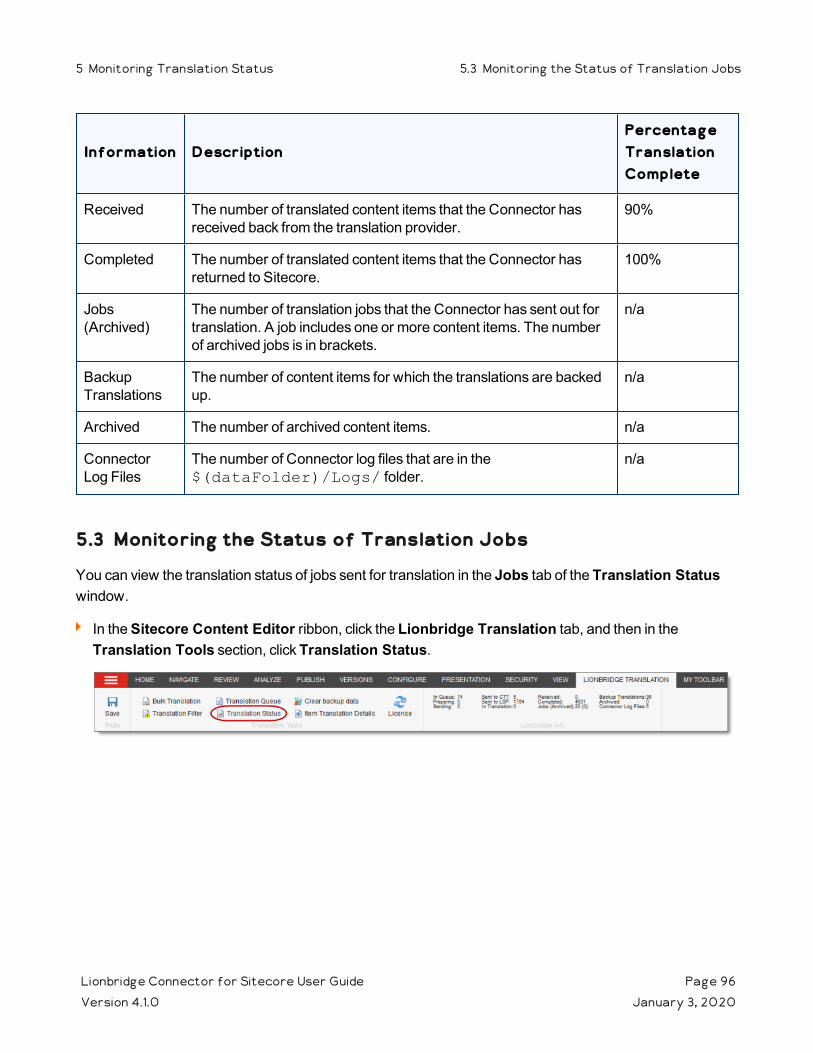
Information DescriptionPercentage Translation Complete
Received The number of translated content items that the Connector has received back from the translation provider.
90%
Completed The number of translated content items that the Connector has returned to Sitecore.
100%
Jobs (Archived)
The number of translation jobs that the Connector has sent out for translation. A job includes one or more content items. The number of archived jobs is in brackets.
n/a
Backup Translations
The number of content items for which the translations are backed up.
n/a
Archived The number of archived content items. n/a
Connector Log Files
The number of Connector log files that are in the $(dataFolder)/Logs/ folder.
n/a
5.3 Monitoring the Status of Translation Jobs
You can view the translation status of jobs sent for translation in the Jobs tab of the Translation Status window.
In the Sitecore Content Editor ribbon, click the Lionbridge Translation tab, and then in the Translation Tools section, click Translation Status.
Lionbridge Connector for Sitecore User Guide Page 96Version 4.1.0 January 3, 2020
5 Monitoring Translation Status 5.3 Monitoring the Status of Translation Jobs
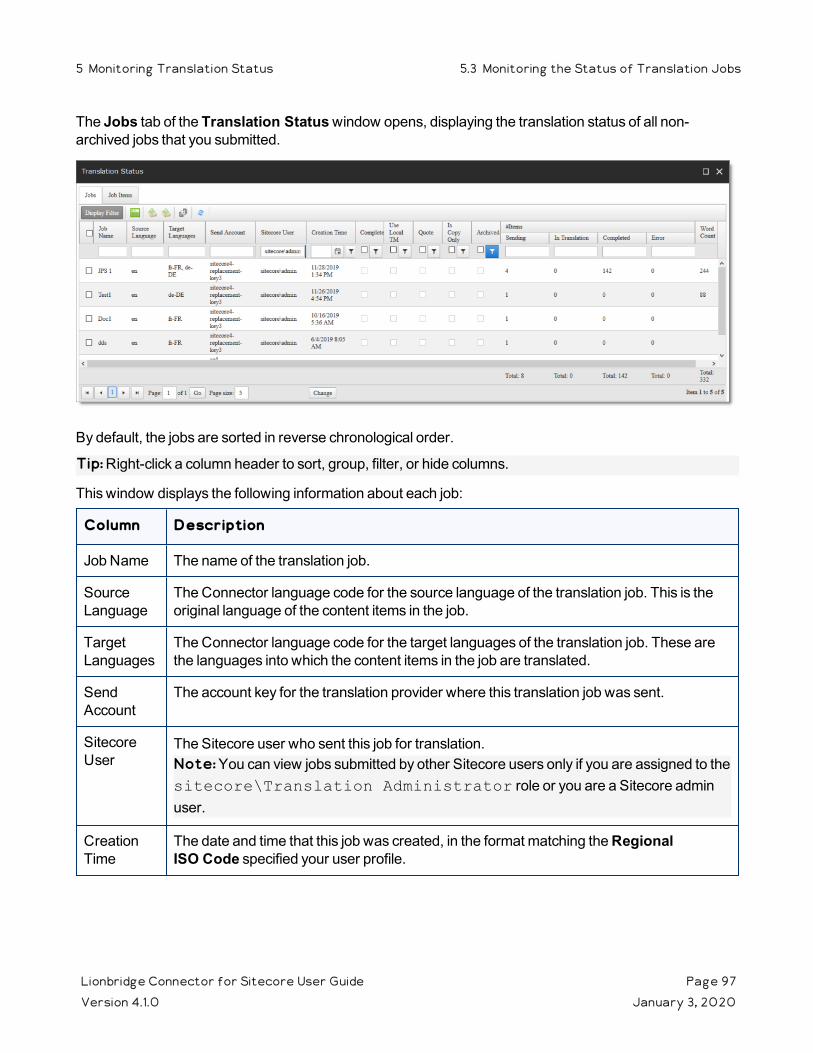
The Jobs tab of the Translation Status window opens, displaying the translation status of all non-archived jobs that you submitted.
By default, the jobs are sorted in reverse chronological order.
Tip: Right-click a column header to sort, group, filter, or hide columns.
This window displays the following information about each job:
Column Description
Job Name The name of the translation job.
Source Language
The Connector language code for the source language of the translation job. This is the original language of the content items in the job.
Target Languages
The Connector language code for the target languages of the translation job. These are the languages into which the content items in the job are translated.
Send Account
The account key for the translation provider where this translation job was sent.
Sitecore User
The Sitecore user who sent this job for translation.Note: You can view jobs submitted by other Sitecore users only if you are assigned to the sitecore\Translation Administrator role or you are a Sitecore admin user.
Creation Time
The date and time that this job was created, in the format matching the Regional ISO Code specified your user profile.
Lionbridge Connector for Sitecore User Guide Page 97Version 4.1.0 January 3, 2020
5 Monitoring Translation Status 5.3 Monitoring the Status of Translation Jobs
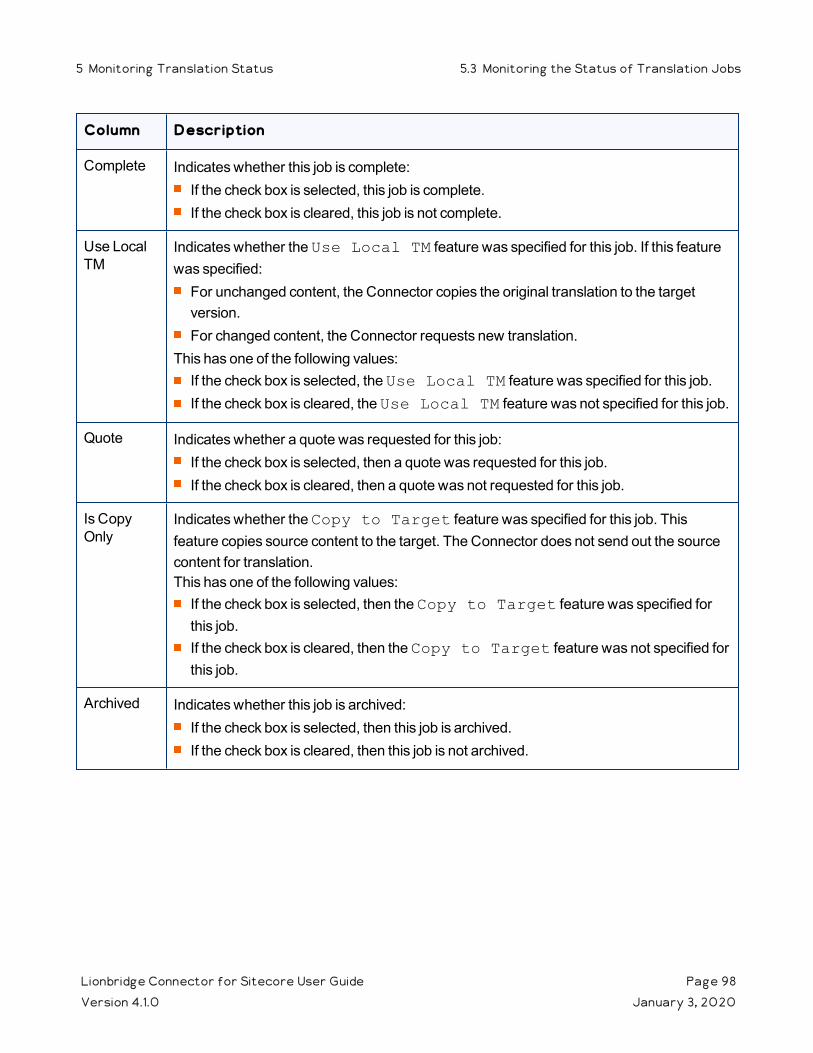
Column Description
Complete Indicates whether this job is complete:If the check box is selected, this job is complete.If the check box is cleared, this job is not complete.
Use Local TM
Indicates whether the Use Local TM feature was specified for this job. If this feature was specified:For unchanged content, the Connector copies the original translation to the target version. For changed content, the Connector requests new translation.
This has one of the following values:If the check box is selected, the Use Local TM feature was specified for this job.If the check box is cleared, the Use Local TM feature was not specified for this job.
Quote Indicates whether a quote was requested for this job:If the check box is selected, then a quote was requested for this job.If the check box is cleared, then a quote was not requested for this job.
Is Copy Only
Indicates whether the Copy to Target feature was specified for this job. This feature copies source content to the target. The Connector does not send out the source content for translation.This has one of the following values:If the check box is selected, then the Copy to Target feature was specified for this job.If the check box is cleared, then the Copy to Target feature was not specified for this job.
Archived Indicates whether this job is archived:If the check box is selected, then this job is archived.If the check box is cleared, then this job is not archived.
Lionbridge Connector for Sitecore User Guide Page 98Version 4.1.0 January 3, 2020
5 Monitoring Translation Status 5.3 Monitoring the Status of Translation Jobs
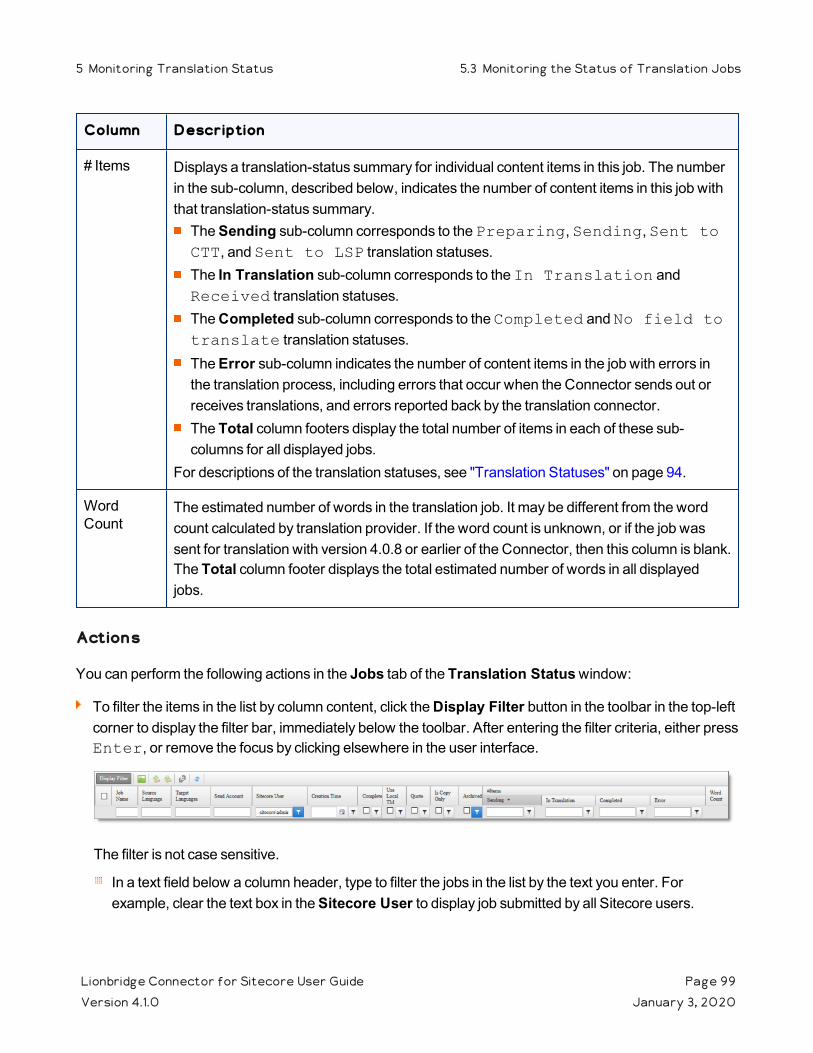
Column Description
# Items Displays a translation-status summary for individual content items in this job. The number in the sub-column, described below, indicates the number of content items in this job with that translation-status summary.The Sending sub-column corresponds to the Preparing, Sending, Sent to CTT, and Sent to LSP translation statuses.The In Translation sub-column corresponds to the In Translation and Received translation statuses.The Completed sub-column corresponds to the Completed and No field to translate translation statuses.The Error sub-column indicates the number of content items in the job with errors in the translation process, including errors that occur when the Connector sends out or receives translations, and errors reported back by the translation connector.The Total column footers display the total number of items in each of these sub-columns for all displayed jobs.
For descriptions of the translation statuses, see "Translation Statuses" on page 94.
Word Count
The estimated number of words in the translation job. It may be different from the word count calculated by translation provider. If the word count is unknown, or if the job was sent for translation with version 4.0.8 or earlier of the Connector, then this column is blank.The Total column footer displays the total estimated number of words in all displayed jobs.
Actions
You can perform the following actions in the Jobs tab of the Translation Status window:
To filter the items in the list by column content, click the Display Filter button in the toolbar in the top-left corner to display the filter bar, immediately below the toolbar. After entering the filter criteria, either press Enter, or remove the focus by clicking elsewhere in the user interface.
The filter is not case sensitive.
In a text field below a column header, type to filter the jobs in the list by the text you enter. For example, clear the text box in the Sitecore User to display job submitted by all Sitecore users.
Lionbridge Connector for Sitecore User Guide Page 99Version 4.1.0 January 3, 2020
5 Monitoring Translation Status 5.3 Monitoring the Status of Translation Jobs
Note: You can view jobs submitted by other Sitecore users only if you are assigned to the sitecore\Translation Administrator role.
Under the Creation Time column header, click the calendar icon and select a date from the calendar that opens.
In a check box below a column header, click to select or clear a check box to filter the jobs in the list to match the check box. For example, to display only archived jobs, select the Archived check box.
If the filter icon is displayed, click to display additional filter options for that column. For example, to display both active and archived jobs, click the filter icon under the Archived column header, and then select No Filter from the pop-up menu. If an additional filter option is selected, then the filter icon is blue .
Notes about the # Items column In the sub-columns under the # Items column, you can filter by a range of values, using the Between or NotBetween filter options. Each of these options requires two distinct values. Use a blank space between the two values in the field. For example, to
filter all values between 2 and 4 in a sub-column, enter 2 4, click the filter icon , and then select the Between filter option.
Tip: In some columns, you may need to increase the column width to display the filter icon. Refer to the screen capture above to view which column headers have a filter icon.
Note about the languages columns: Although the Source Language and Target Languages columns display both languages and version numbers, you can filter these columns only by language.
To export the data displayed in the Jobs tab as an .html file, click the Export Table button in the toolbar in the top-left corner. Depending on your browser settings, the Connector either downloads the file to your computer or prompts you to save or open the file. This file opens in Microsoft Excel as a properly formatted spreadsheet.
Tip: The exported .html file contains its own stylesheet, located here: /sitecore modules/Shell/CT3Translation/Lib/TranslationViewExport.css. You can modify this to change the look and feel of the exported file.
To archive completed jobs so that they are hidden by default in the Jobs tab:
Note: This feature is available only if you are assigned to the sitecore\Translation Administrator role or if you are a Sitecore admin user. For detailed instructions, see "Archiving Completed Translation Jobs" on page 126.
Lionbridge Connector for Sitecore User Guide Page 100Version 4.1.0 January 3, 2020
5 Monitoring Translation Status 5.3 Monitoring the Status of Translation Jobs
1. Select the check boxes for the jobs to archive.
2. Click the Archive selected jobs button in the toolbar in the top-left corner.
A message box opens, confirming that you want to archive the selected jobs.
3. Click OK to proceed.
Recommendation: Archive only completed jobs. If you archive a job that is in progress (for example, with In Translation status), then the Connector will no longer process the content items in that job. A warning is displayed if you try to archive a job that is in progress.
To unarchive archived jobs so that they are displayed by default in the Jobs tab:
Note: This feature is available only if you are assigned to the sitecore\Translation Administrator role or if you are a Sitecore Admin user. For detailed instructions, see "Archiving Completed Translation Jobs" on page 126.
1. Ensure that archived jobs are displayed. To display archived jobs, click the Display Filter button in the toolbar in the top-left corner to display the filter bar, immediately below the toolbar, and then select the check box in the Archived column header.
2. Select the check boxes for the jobs to unarchive.
3. Click the Unarchive selected jobs button in the toolbar in the top-left corner.
A message box opens, confirming that you want to unarchive the selected jobs.
4. Click OK to proceed.
To update a remote TM (translation memory) server with the latest changes from multiple items in a single translation job:
1. Select the check box for the job with the items to send to the remote TM server.
2. Click the Update Remote TM button in the toolbar in the top-left corner.
The Lionbridge Connector Remote TM Update Wizard opens. For detailed instructions, see "Updating a Remote TM for Multiple Items" on page 135.
To refresh the list of jobs in the Jobs tab, click the Refresh button.
To view additional information about one or more jobs:
1. Select the check boxes for the jobs.
Lionbridge Connector for Sitecore User Guide Page 101Version 4.1.0 January 3, 2020
5 Monitoring Translation Status 5.3 Monitoring the Status of Translation Jobs
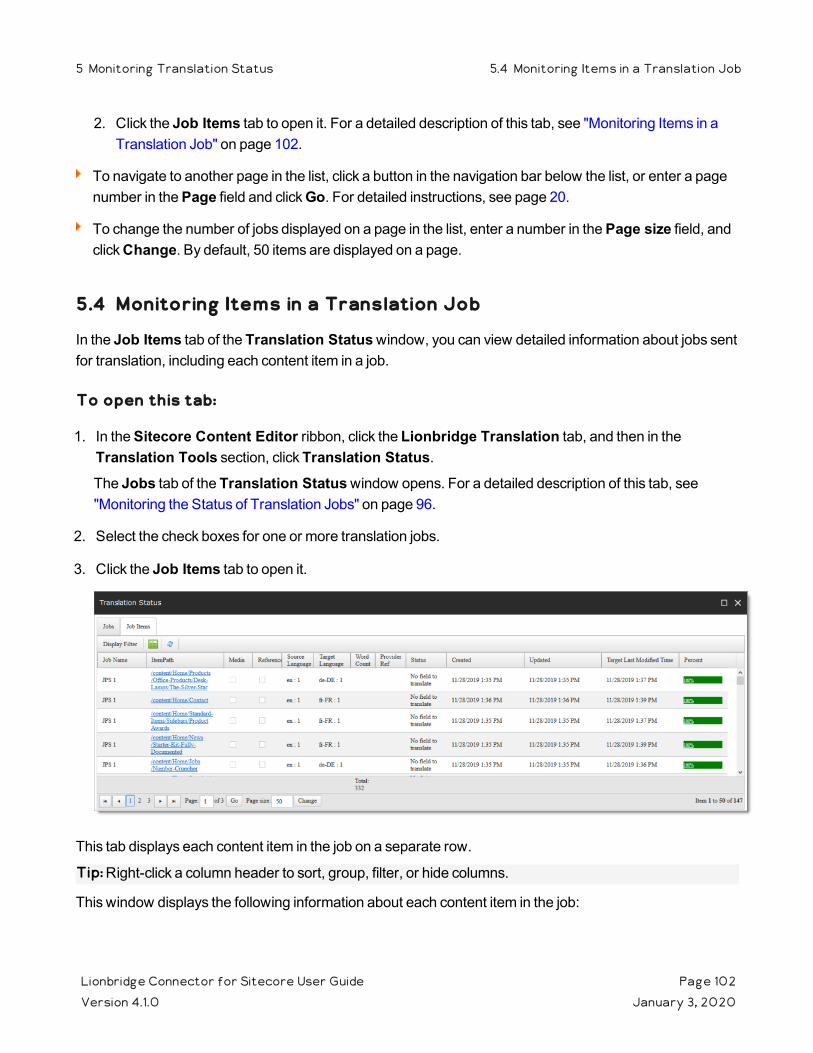
2. Click the Job Items tab to open it. For a detailed description of this tab, see "Monitoring Items in a Translation Job" on page 102.
To navigate to another page in the list, click a button in the navigation bar below the list, or enter a page number in the Page field and click Go. For detailed instructions, see page 20.
To change the number of jobs displayed on a page in the list, enter a number in the Page size field, and click Change. By default, 50 items are displayed on a page.
5.4 Monitoring Items in a Translation Job
In the Job Items tab of the Translation Status window, you can view detailed information about jobs sent for translation, including each content item in a job.
To open this tab:
1. In the Sitecore Content Editor ribbon, click the Lionbridge Translation tab, and then in the Translation Tools section, click Translation Status.The Jobs tab of the Translation Status window opens. For a detailed description of this tab, see "Monitoring the Status of Translation Jobs" on page 96.
2. Select the check boxes for one or more translation jobs.
3. Click the Job Items tab to open it.
This tab displays each content item in the job on a separate row.
Tip: Right-click a column header to sort, group, filter, or hide columns.
This window displays the following information about each content item in the job:
Lionbridge Connector for Sitecore User Guide Page 102Version 4.1.0 January 3, 2020
5 Monitoring Translation Status 5.4 Monitoring Items in a Translation Job

Column Description
Job Name The name of the translation job.
Item Path The path and name of the content item sent for translation.Tip: If the translation is complete, click the link to view the translated version of the content item in a pop-up window.
Media This file is a binary asset, such as a .jpg or .pdf file.
Is Reference
This file is a reference file (support asset), which provides helpful context for the translator.
Source Language
The Connector language code for the source language of the content item sent for translation. This is the original language of the content item. The number is the incremental version number of the source content item.
Target Language
The Connector language code for the target language into which to translate the content item. Each target language is displayed in a separate row. The number is the incremental version number of the target content item. If the target (translated) version of an item is not the latest version, then:The version number is displayed in bold.
An information icon is displayed. Clicking this icon displays a message that the current translated item is not the latest version of the item.
Word Count
The estimated number of words in the content item. It may be different from the word count calculated by translation provider. If the word count is unknown, or if the content items are in jobs sent for translation with version 4.0.8 or earlier of the Connector, this column is blank.The Total column footer displays the total estimated number of words in all displayed content items.
Provider Ref
The Lionbridge Freeway project ID. Displayed only when the translation provider is Lionbridge Freeway.
Status The translation status of the content item. For a list and description of translation statuses, see page 94. If an error has occurred, the status is displayed in red. To view details about the error in the translation process, click the error icon . A message box opens, displaying identifying information and the error message.
Encrypted Indicates whether or not the content item has been encrypted. Displayed only if encryption is enabled for your company. For more information, refer to the Lionbridge Connector for Sitecore Installation and Configuration Guide.
Lionbridge Connector for Sitecore User Guide Page 103Version 4.1.0 January 3, 2020
5 Monitoring Translation Status 5.4 Monitoring Items in a Translation Job
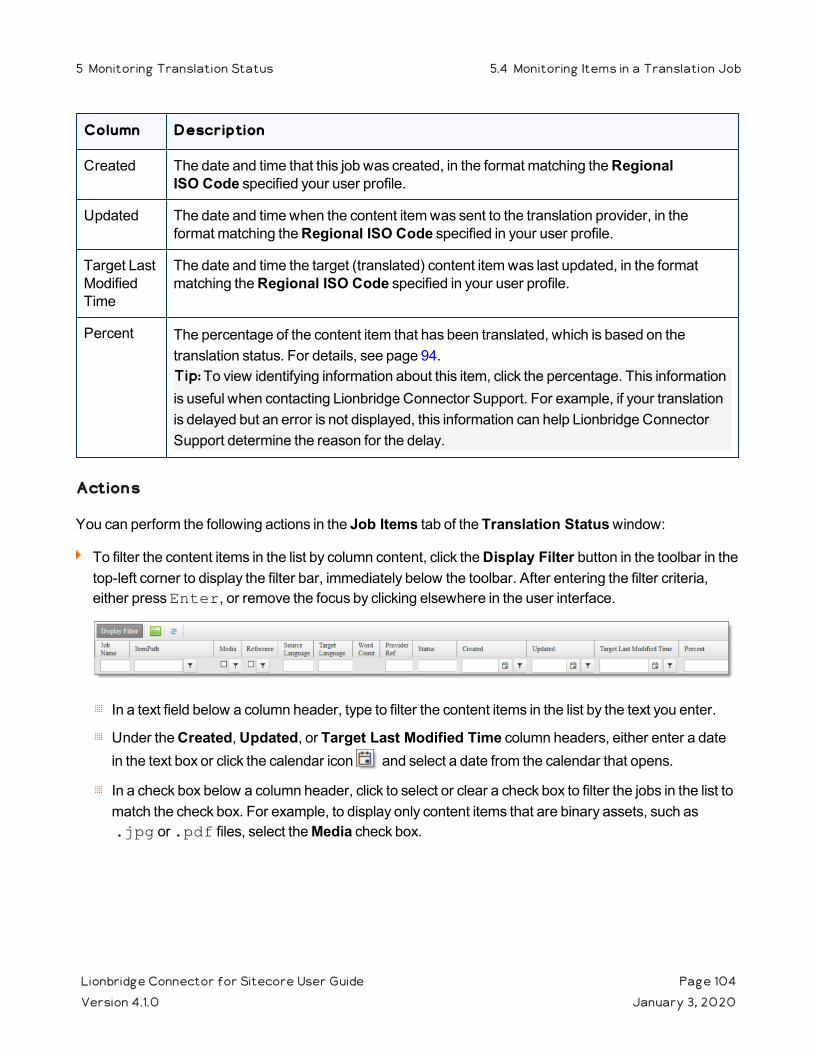
Column Description
Created The date and time that this job was created, in the format matching the Regional ISO Code specified your user profile.
Updated The date and time when the content item was sent to the translation provider, in the format matching the Regional ISO Code specified in your user profile.
Target Last Modified Time
The date and time the target (translated) content item was last updated, in the format matching the Regional ISO Code specified in your user profile.
Percent The percentage of the content item that has been translated, which is based on the translation status. For details, see page 94.Tip: To view identifying information about this item, click the percentage. This information is useful when contacting Lionbridge Connector Support. For example, if your translation is delayed but an error is not displayed, this information can help Lionbridge Connector Support determine the reason for the delay.
Actions
You can perform the following actions in the Job Items tab of the Translation Status window:
To filter the content items in the list by column content, click the Display Filter button in the toolbar in the top-left corner to display the filter bar, immediately below the toolbar. After entering the filter criteria, either press Enter, or remove the focus by clicking elsewhere in the user interface.
In a text field below a column header, type to filter the content items in the list by the text you enter.
Under the Created, Updated, or Target Last Modified Time column headers, either enter a date in the text box or click the calendar icon and select a date from the calendar that opens.
In a check box below a column header, click to select or clear a check box to filter the jobs in the list to match the check box. For example, to display only content items that are binary assets, such as .jpg or .pdf files, select the Media check box.
Lionbridge Connector for Sitecore User Guide Page 104Version 4.1.0 January 3, 2020
5 Monitoring Translation Status 5.4 Monitoring Items in a Translation Job
If the filter icon is displayed, click to display additional filter options for that column. For example, for a date field, click the filter icon under the corresponding column header, and select one of the following items from the pop-up menu:
No Filter: No additional filter is applied. This is the default setting for all filters in this tab.
Equal To: This filters all jobs by the exact value in the text box. For example, for a date field, this filters by the exact date.
Greater Than: This filters all jobs by a value greater than in the text box. For example, for a date field, this displays only jobs with a date after the date specified in the text box.
Less Than: This filters all jobs by a value less than in the text box. For example, for a date field, this displays only jobs with a date before the date specified in the text box.
If an additional filter option is selected, then the filter icon is blue .
To export the data displayed in the Job Items tab as an .html file, click the Export Table button in the toolbar in the top-left corner. Depending on your browser settings, the Connector either downloads the file to your computer or prompts you to save or open the file. This file opens in Microsoft Excel as a properly formatted spreadsheet.
Tip: The exported .html file contains its own stylesheet, located here: /sitecore modules/Shell/CT3Translation/Lib/TranslationViewExport.css. You can modify this to change the look and feel of the exported file.
To refresh the list of jobs in the Job Items tab, click the Refresh button.
To navigate to another page in the list, click a button in the navigation bar below the list, or enter a page number in the Page field and click Go. For detailed instructions, see page 20.
To change the number of jobs displayed on a page in the list, enter a number in the Page size field, and click Change. By default, 100 items are displayed on a page.
5.5 Monitoring Status for a Single Item
You can view the translation status of a single content item, or of a group of content items under a common root folder.
1. Navigate to the content item whose translation status you want to check.
2. In the Sitecore Content Editor ribbon, click the Lionbridge Translation tab.
Lionbridge Connector for Sitecore User Guide Page 105Version 4.1.0 January 3, 2020
5 Monitoring Translation Status 5.5 Monitoring Status for a Single Item
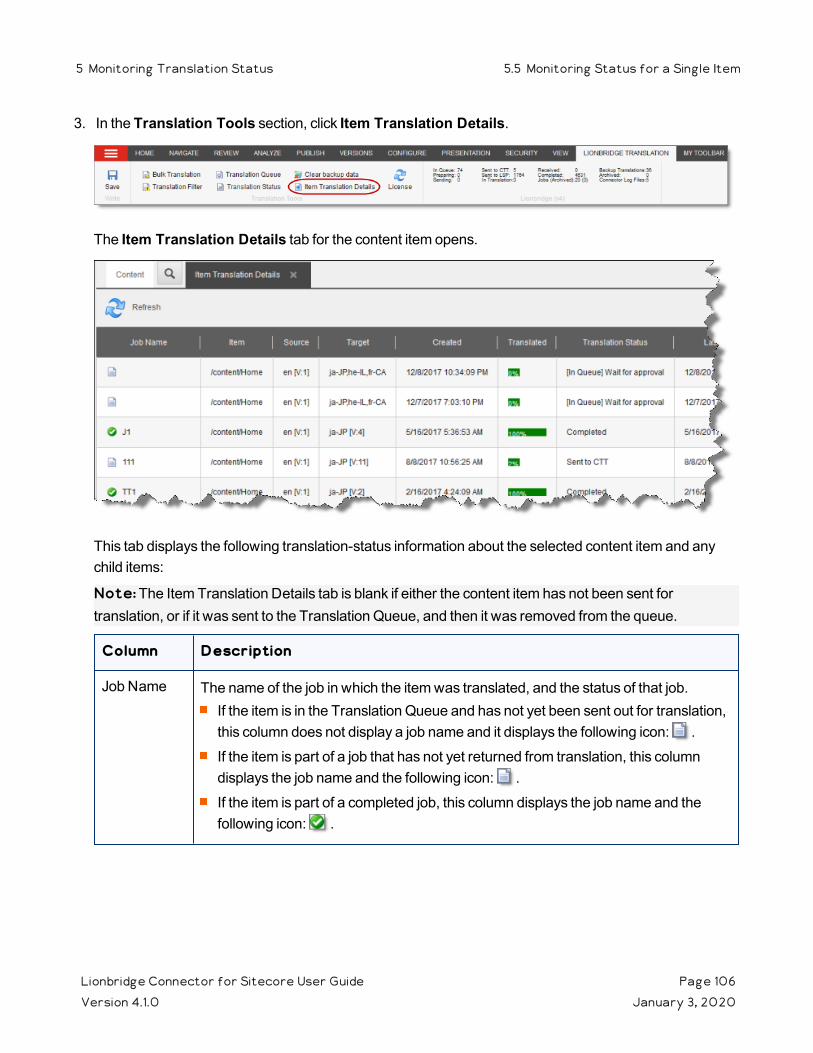
3. In the Translation Tools section, click Item Translation Details.
The Item Translation Details tab for the content item opens.
This tab displays the following translation-status information about the selected content item and any child items:
Note: The Item Translation Details tab is blank if either the content item has not been sent for translation, or if it was sent to the Translation Queue, and then it was removed from the queue.
Column Description
Job Name The name of the job in which the item was translated, and the status of that job. If the item is in the Translation Queue and has not yet been sent out for translation, this column does not display a job name and it displays the following icon: .If the item is part of a job that has not yet returned from translation, this column displays the job name and the following icon: .If the item is part of a completed job, this column displays the job name and the following icon: .
Lionbridge Connector for Sitecore User Guide Page 106Version 4.1.0 January 3, 2020
5 Monitoring Translation Status 5.5 Monitoring Status for a Single Item
Column Description
Item This is the item path and name. The preceding icon indicates the translation status, as described below:
One of the following statuses: Completed; No field to translate.
All other statuses.For a list and description of translation statuses, see page 94.
Source The ISO code of the source language and the version number of the source content. For example, if this content item is in English, and it is the first version, this is en [V:1].
Target The regional ISO code of the target language and the version number of the target content. For example, if this content item is in Japanese, and it is the first version, this is ja-JP [V:1].Note: If there are multiple translation targets, then multiple regional ISO codes and version numbers are displayed.
Created The date and time when the content item was created, in the format matching the Regional ISO Code specified in your user profile.
Translated A percentage indicating how much of the content item has been translated. This is based on the translation status, which is described in "Translation Statuses" on page 94.
Translation Status
For a list and description of translation statuses, see page 94.
Last Update The date and time when the content item was last updated, in the following format: MM/DD/YYYY HH:MM:SS.
TNS Type Translation type. This is one of the following:New Translation: New translation requested.Fix Translation: Translation correction requested.Use Local TM: New translation requested for changed content. For unchanged content, the Connector copies the original translation to the target version.Copy to Target: Source content copied to target without translation.Queued Translation: Content is in Translation Queue.
Lionbridge Connector for Sitecore User Guide Page 107Version 4.1.0 January 3, 2020
5 Monitoring Translation Status 5.5 Monitoring Status for a Single Item
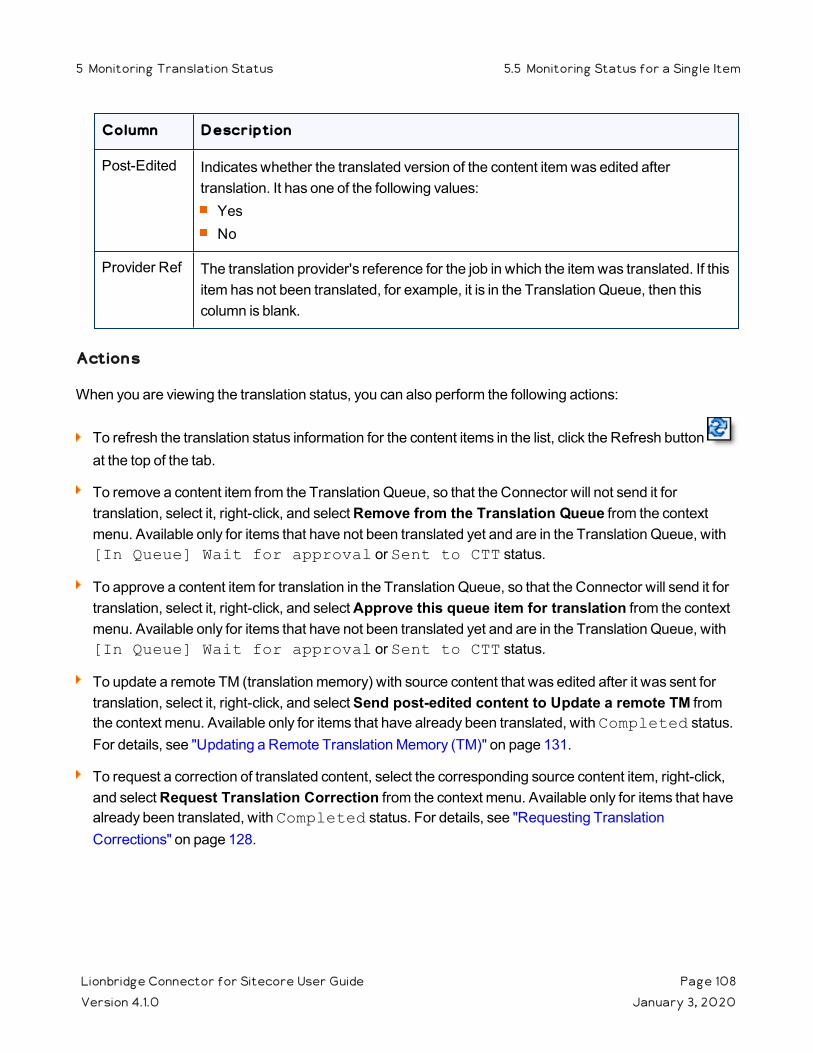
Column Description
Post-Edited Indicates whether the translated version of the content item was edited after translation. It has one of the following values:YesNo
Provider Ref The translation provider's reference for the job in which the item was translated. If this item has not been translated, for example, it is in the Translation Queue, then this column is blank.
Actions
When you are viewing the translation status, you can also perform the following actions:
To refresh the translation status information for the content items in the list, click the Refresh button at the top of the tab.
To remove a content item from the Translation Queue, so that the Connector will not send it for translation, select it, right-click, and select Remove from the Translation Queue from the context menu. Available only for items that have not been translated yet and are in the Translation Queue, with [In Queue] Wait for approval or Sent to CTT status.
To approve a content item for translation in the Translation Queue, so that the Connector will send it for translation, select it, right-click, and select Approve this queue item for translation from the context menu. Available only for items that have not been translated yet and are in the Translation Queue, with [In Queue] Wait for approval or Sent to CTT status.
To update a remote TM (translation memory) with source content that was edited after it was sent for translation, select it, right-click, and select Send post-edited content to Update a remote TM from the context menu. Available only for items that have already been translated, with Completed status. For details, see "Updating a Remote Translation Memory (TM)" on page 131.
To request a correction of translated content, select the corresponding source content item, right-click, and select Request Translation Correction from the context menu. Available only for items that have already been translated, with Completed status. For details, see "Requesting Translation Corrections" on page 128.
Lionbridge Connector for Sitecore User Guide Page 108Version 4.1.0 January 3, 2020
5 Monitoring Translation Status 5.5 Monitoring Status for a Single Item
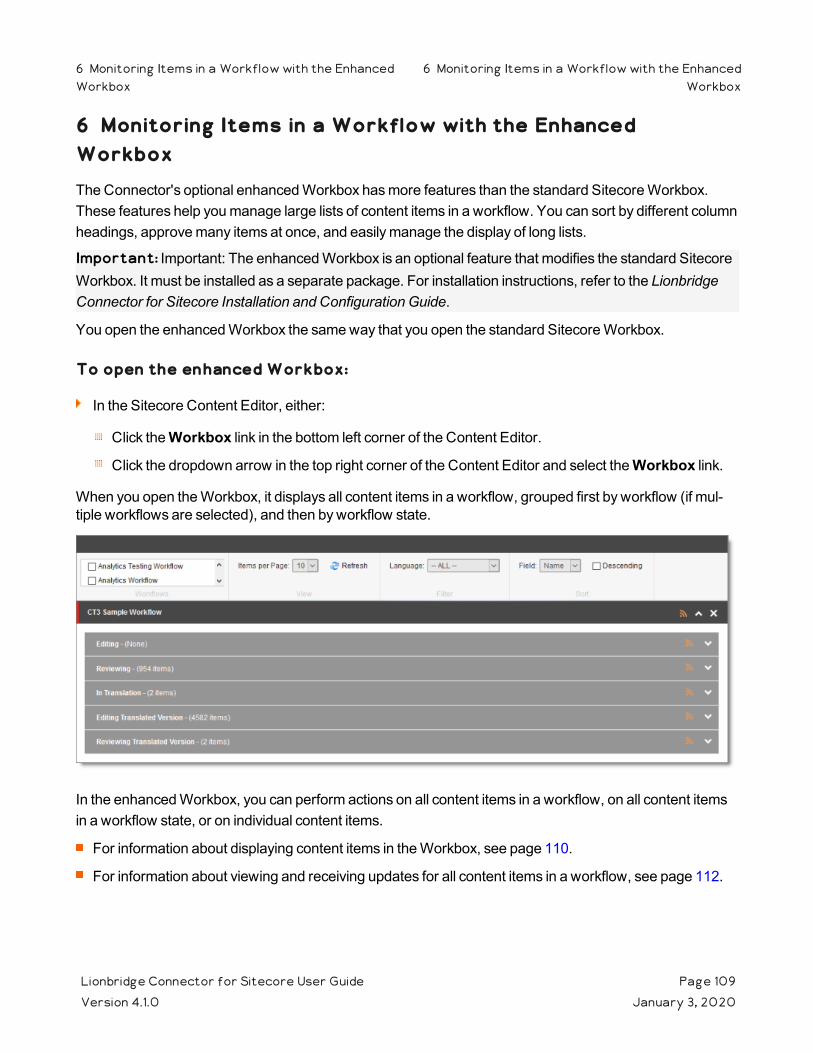
6 Monitoring Items in a Workflow with the Enhanced WorkboxThe Connector's optional enhanced Workbox has more features than the standard Sitecore Workbox. These features help you manage large lists of content items in a workflow. You can sort by different column headings, approve many items at once, and easily manage the display of long lists.
Important: Important: The enhanced Workbox is an optional feature that modifies the standard Sitecore Workbox. It must be installed as a separate package. For installation instructions, refer to the Lionbridge Connector for Sitecore Installation and Configuration Guide.
You open the enhanced Workbox the same way that you open the standard Sitecore Workbox.
To open the enhanced Workbox:
In the Sitecore Content Editor, either:
Click the Workbox link in the bottom left corner of the Content Editor.
Click the dropdown arrow in the top right corner of the Content Editor and select the Workbox link.
When you open the Workbox, it displays all content items in a workflow, grouped first by workflow (if mul-tiple workflows are selected), and then by workflow state.
In the enhanced Workbox, you can perform actions on all content items in a workflow, on all content items in a workflow state, or on individual content items.
For information about displaying content items in the Workbox, see page 110.
For information about viewing and receiving updates for all content items in a workflow, see page 112.
Lionbridge Connector for Sitecore User Guide Page 109Version 4.1.0 January 3, 2020
6 Monitoring Items in a Workflow with the EnhancedWorkbox
6 Monitoring Items in a Workflow with the EnhancedWorkbox
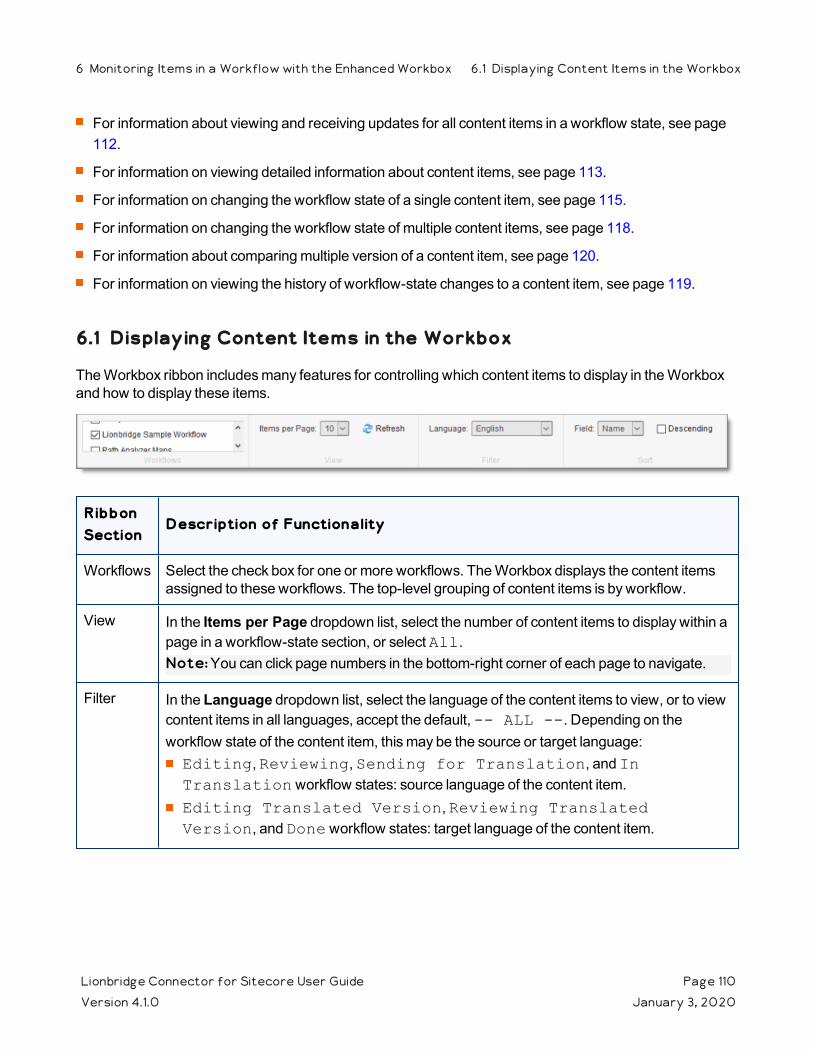
For information about viewing and receiving updates for all content items in a workflow state, see page 112.
For information on viewing detailed information about content items, see page 113.
For information on changing the workflow state of a single content item, see page 115.
For information on changing the workflow state of multiple content items, see page 118.
For information about comparing multiple version of a content item, see page 120.
For information on viewing the history of workflow-state changes to a content item, see page 119.
6.1 Displaying Content Items in the Workbox
The Workbox ribbon includes many features for controlling which content items to display in the Workbox and how to display these items.
Ribbon Section
Description of Functionality
Workflows Select the check box for one or more workflows. The Workbox displays the content items assigned to these workflows. The top-level grouping of content items is by workflow.
View In the Items per Page dropdown list, select the number of content items to display within a page in a workflow-state section, or select All. Note: You can click page numbers in the bottom-right corner of each page to navigate.
Filter In the Language dropdown list, select the language of the content items to view, or to view content items in all languages, accept the default, -- ALL --. Depending on the workflow state of the content item, this may be the source or target language:Editing, Reviewing, Sending for Translation, and In Translation workflow states: source language of the content item.Editing Translated Version, Reviewing Translated Version, and Done workflow states: target language of the content item.
Lionbridge Connector for Sitecore User Guide Page 110Version 4.1.0 January 3, 2020
6 Monitoring Items in a Workflow with the Enhanced Workbox 6.1 Displaying Content Items in the Workbox
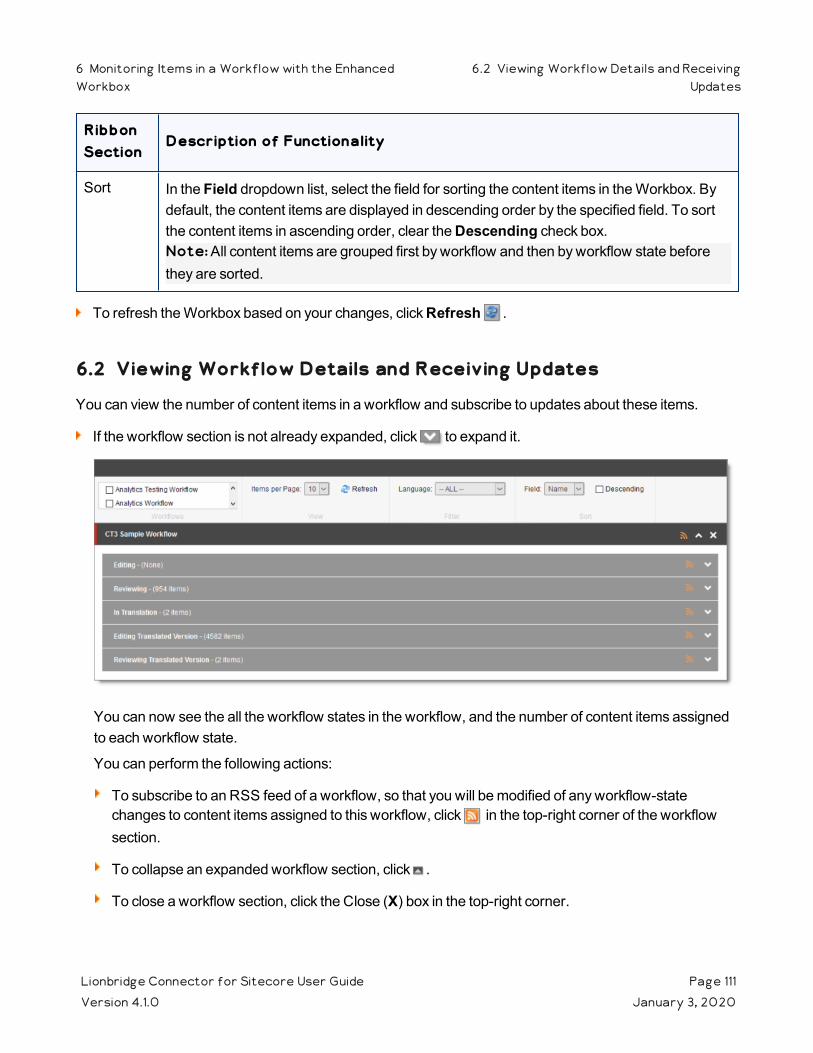
Ribbon Section
Description of Functionality
Sort In the Field dropdown list, select the field for sorting the content items in the Workbox. By default, the content items are displayed in descending order by the specified field. To sort the content items in ascending order, clear the Descending check box.Note: All content items are grouped first by workflow and then by workflow state before they are sorted.
To refresh the Workbox based on your changes, click Refresh .
6.2 Viewing Workflow Details and Receiving Updates
You can view the number of content items in a workflow and subscribe to updates about these items.
If the workflow section is not already expanded, click to expand it.
You can now see the all the workflow states in the workflow, and the number of content items assigned to each workflow state.
You can perform the following actions:
To subscribe to an RSS feed of a workflow, so that you will be modified of any workflow-state changes to content items assigned to this workflow, click in the top-right corner of the workflow section.
To collapse an expanded workflow section, click .
To close a workflow section, click the Close (X) box in the top-right corner.
Lionbridge Connector for Sitecore User Guide Page 111Version 4.1.0 January 3, 2020
6 Monitoring Items in a Workflow with the EnhancedWorkbox
6.2 Viewing Workflow Details and ReceivingUpdates
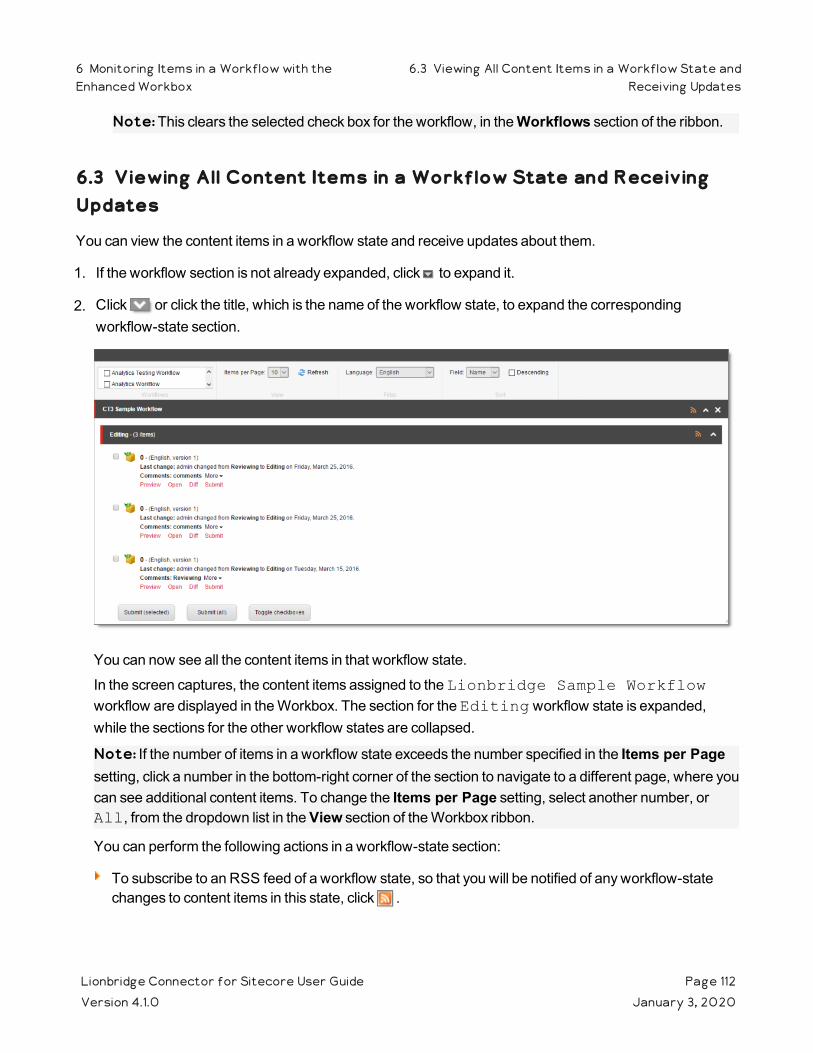
Note: This clears the selected check box for the workflow, in the Workflows section of the ribbon.
6.3 Viewing All Content Items in a Workflow State and Receiving Updates
You can view the content items in a workflow state and receive updates about them.
1. If the workflow section is not already expanded, click to expand it.
2. Click or click the title, which is the name of the workflow state, to expand the corresponding workflow-state section.
You can now see all the content items in that workflow state.
In the screen captures, the content items assigned to the Lionbridge Sample Workflow workflow are displayed in the Workbox. The section for the Editing workflow state is expanded, while the sections for the other workflow states are collapsed.
Note: If the number of items in a workflow state exceeds the number specified in the Items per Page setting, click a number in the bottom-right corner of the section to navigate to a different page, where you can see additional content items. To change the Items per Page setting, select another number, or All, from the dropdown list in the View section of the Workbox ribbon.
You can perform the following actions in a workflow-state section:
To subscribe to an RSS feed of a workflow state, so that you will be notified of any workflow-state changes to content items in this state, click .
Lionbridge Connector for Sitecore User Guide Page 112Version 4.1.0 January 3, 2020
6 Monitoring Items in a Workflow with theEnhanced Workbox
6.3 Viewing All Content Items in a Workflow State andReceiving Updates
To collapse an expanded workflow-state section, click , or click the title of the section.
To view details about the content items in this state, see page 113.
To change the workflow state of a single content item, see page 115.
To change the workflow state of multiple content items, see page 118.
To view the history of workflow-state changes to a single content item, see page 119.
To compare multiple versions of a single content item, see page 120.
6.4 Viewing Content Item Details
You can view detailed information about a content item in a specific workflow and workflow state.
1. Ensure that the section for the workflow to which the content item is assigned is displayed in the Workbox. If it is not displayed, select the corresponding check box in the Workflows section of the Workbox ribbon. For details, see page 110.
2. Ensure that the section for the workflow to which the content item is assigned is expanded. If it is not expanded, click to expand it.
3. Ensure that the section for the workflow-state section to which the content item is assigned is expanded. If it is not expanded, click , or click the title of the section, which is the name of the workflow state, to expand it.
Lionbridge Connector for Sitecore User Guide Page 113Version 4.1.0 January 3, 2020
6 Monitoring Items in a Workflow with the Enhanced Workbox 6.4 Viewing Content Item Details
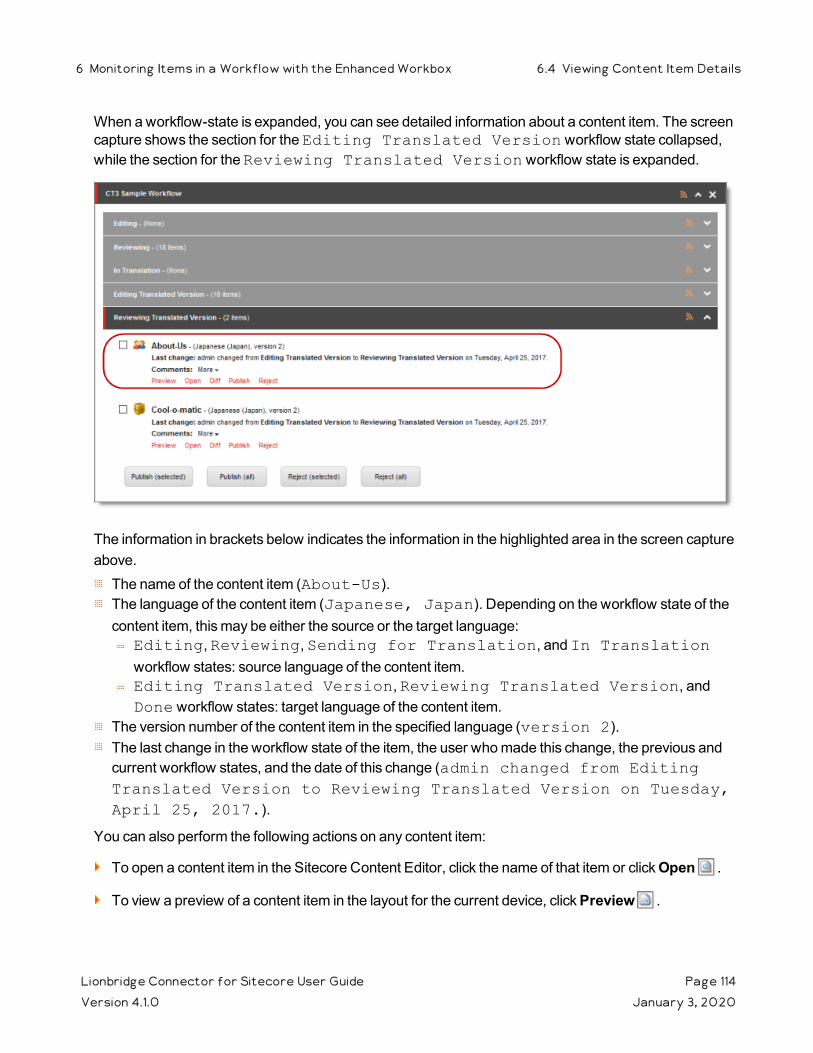
When a workflow-state is expanded, you can see detailed information about a content item. The screen capture shows the section for the Editing Translated Version workflow state collapsed, while the section for the Reviewing Translated Version workflow state is expanded.
The information in brackets below indicates the information in the highlighted area in the screen capture above.
The name of the content item (About-Us).The language of the content item (Japanese, Japan). Depending on the workflow state of the content item, this may be either the source or the target language:
Editing, Reviewing, Sending for Translation, and In Translation workflow states: source language of the content item.Editing Translated Version, Reviewing Translated Version, and Done workflow states: target language of the content item.
The version number of the content item in the specified language (version 2).The last change in the workflow state of the item, the user who made this change, the previous and current workflow states, and the date of this change (admin changed from Editing Translated Version to Reviewing Translated Version on Tuesday, April 25, 2017.).
You can also perform the following actions on any content item:
To open a content item in the Sitecore Content Editor, click the name of that item or click Open .
To view a preview of a content item in the layout for the current device, click Preview .
Lionbridge Connector for Sitecore User Guide Page 114Version 4.1.0 January 3, 2020
6 Monitoring Items in a Workflow with the Enhanced Workbox 6.4 Viewing Content Item Details
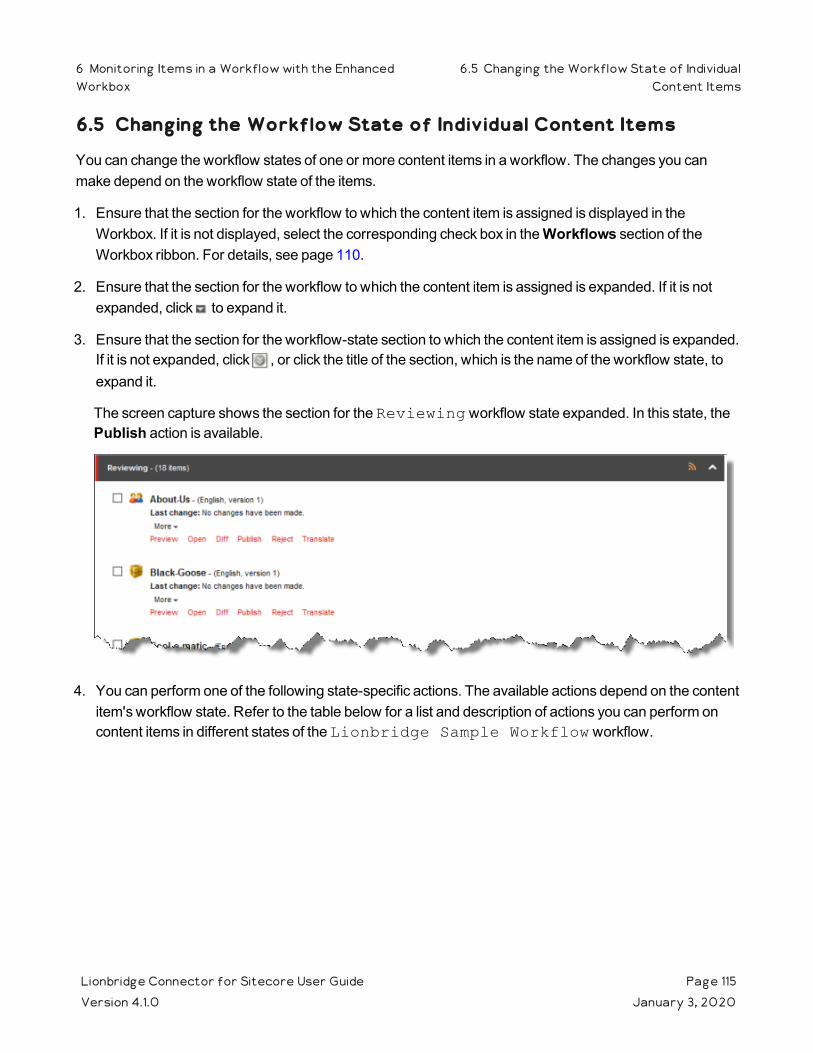
6.5 Changing the Workflow State of Individual Content Items
You can change the workflow states of one or more content items in a workflow. The changes you can make depend on the workflow state of the items.
1. Ensure that the section for the workflow to which the content item is assigned is displayed in the Workbox. If it is not displayed, select the corresponding check box in the Workflows section of the Workbox ribbon. For details, see page 110.
2. Ensure that the section for the workflow to which the content item is assigned is expanded. If it is not expanded, click to expand it.
3. Ensure that the section for the workflow-state section to which the content item is assigned is expanded. If it is not expanded, click , or click the title of the section, which is the name of the workflow state, to expand it.
The screen capture shows the section for the Reviewing workflow state expanded. In this state, the Publish action is available.
4. You can perform one of the following state-specific actions. The available actions depend on the content item's workflow state. Refer to the table below for a list and description of actions you can perform on content items in different states of the Lionbridge Sample Workflow workflow.
Lionbridge Connector for Sitecore User Guide Page 115Version 4.1.0 January 3, 2020
6 Monitoring Items in a Workflow with the EnhancedWorkbox
6.5 Changing the Workflow State of IndividualContent Items
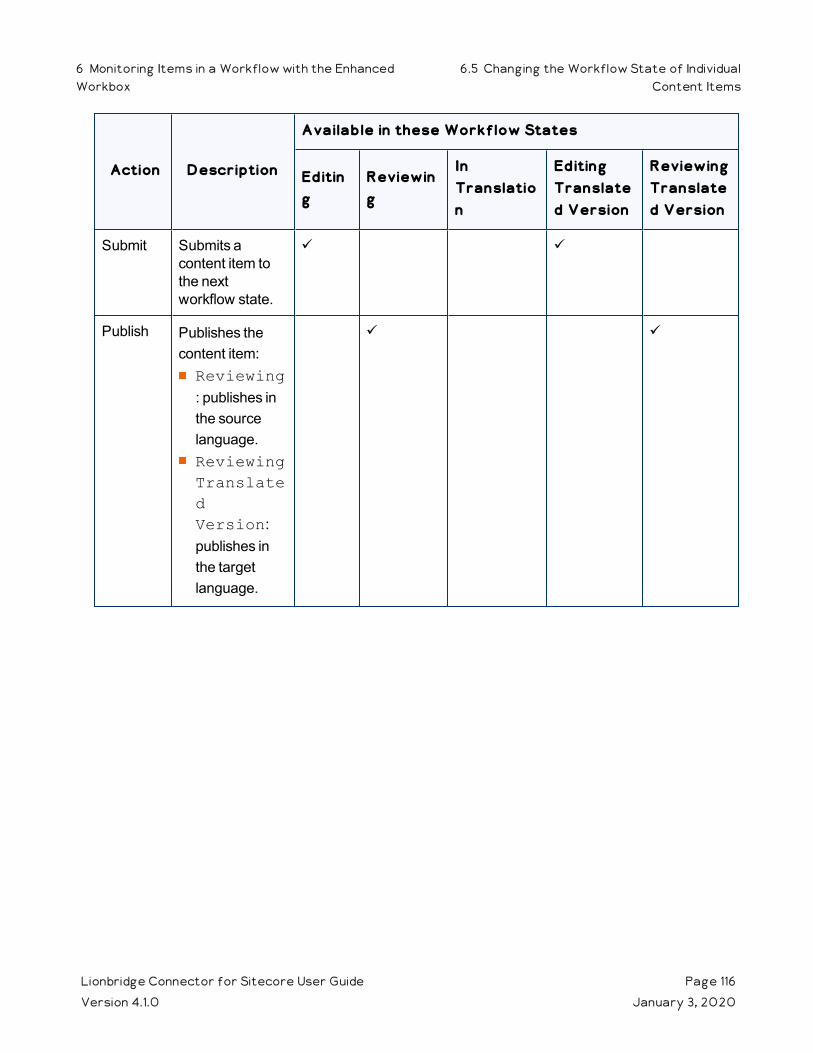
Action Description
Available in these Workflow States
Editing
Reviewing
In Translation
Editing Translated Version
Reviewing Translated Version
Submit Submits a content item to the next workflow state.
ü ü
Publish Publishes the content item:Reviewing: publishes in the source language.Reviewing Translated Version: publishes in the target language.
ü ü
Lionbridge Connector for Sitecore User Guide Page 116Version 4.1.0 January 3, 2020
6 Monitoring Items in a Workflow with the EnhancedWorkbox
6.5 Changing the Workflow State of IndividualContent Items
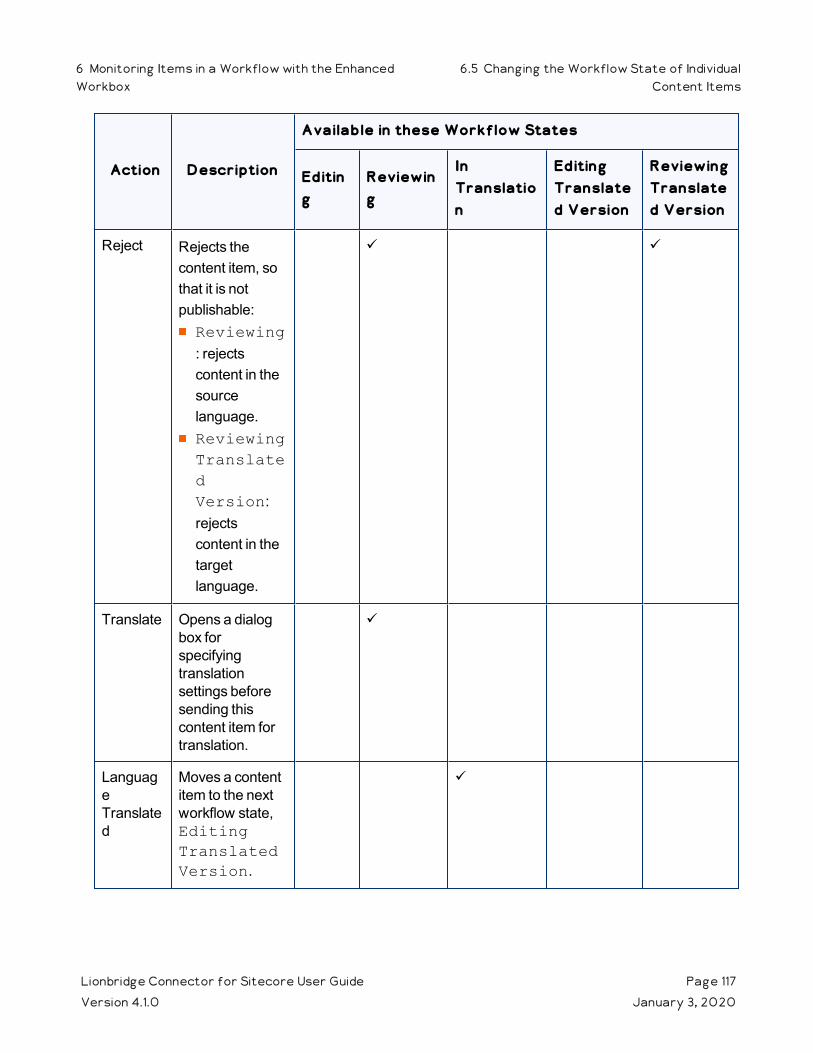
Action Description
Available in these Workflow States
Editing
Reviewing
In Translation
Editing Translated Version
Reviewing Translated Version
Reject Rejects the content item, so that it is not publishable:Reviewing: rejects content in the source language.Reviewing Translated Version: rejects content in the target language.
ü ü
Translate Opens a dialog box for specifying translation settings before sending this content item for translation.
ü
Language Translated
Moves a content item to the next workflow state, Editing Translated Version.
ü
Lionbridge Connector for Sitecore User Guide Page 117Version 4.1.0 January 3, 2020
6 Monitoring Items in a Workflow with the EnhancedWorkbox
6.5 Changing the Workflow State of IndividualContent Items
6.6 Changing the Workflow State of Multiple Content Items
You can perform any workflow-state-specific actions on multiple content items that are in the same workflow state. For example, you can publish or reject multiple content items in the Reviewing Translated Version workflow state. Different actions are available, depending on the workflow state, as described in "Changing the Workflow State of Individual Content Items" on page 115.
To change the workflow state of multiple content items:
1. Ensure that the section for the workflow to which the content item is assigned is displayed in the Workbox. If it is not displayed, select the corresponding check box in the Workflows section of the Workbox ribbon. For details, see page 110.
2. Ensure that the section for the workflow to which the content item is assigned is expanded. If it is not expanded, click to expand it.
3. Ensure that the section for the workflow-state section to which the content item is assigned is expanded. If it is not expanded, click , or click the title of the section, which is the name of the workflow state, to expand it.
4. Optional. Select the check boxes for the content items for which you want to perform the common action.
Note: If you want to perform the action on all the content items in the workflow-state section, skip this step.
Lionbridge Connector for Sitecore User Guide Page 118Version 4.1.0 January 3, 2020
6 Monitoring Items in a Workflow with the EnhancedWorkbox
6.6 Changing the Workflow State of MultipleContent Items
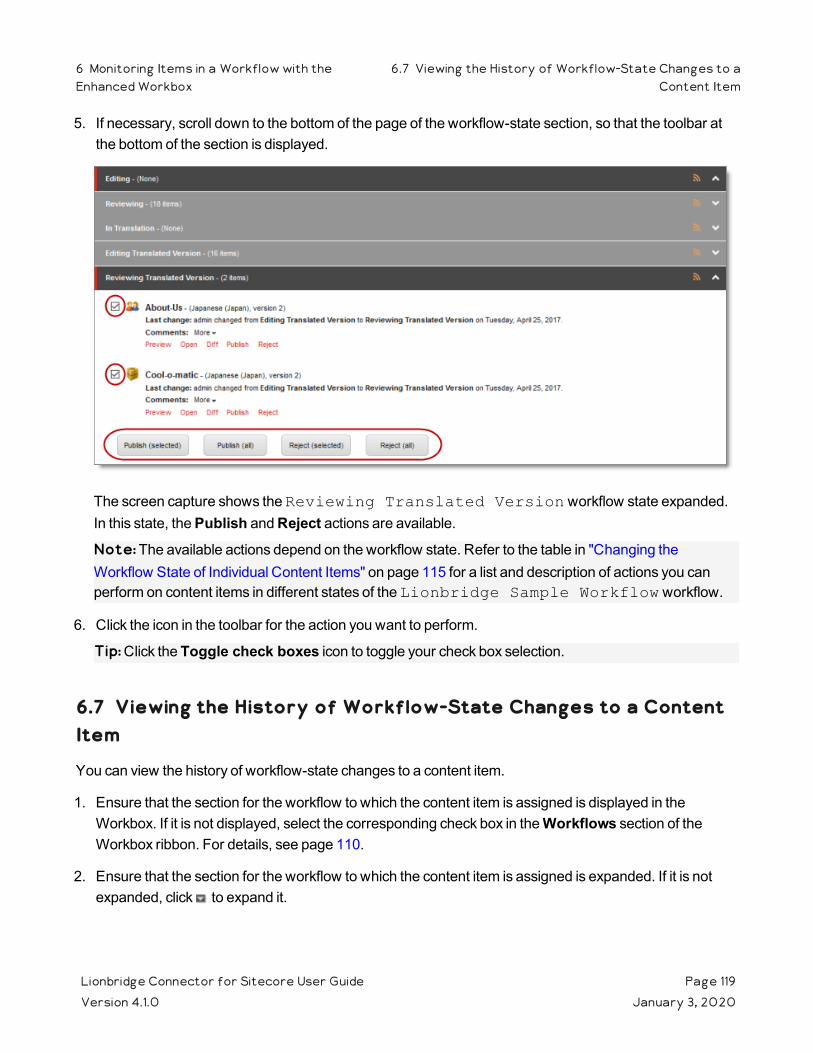
5. If necessary, scroll down to the bottom of the page of the workflow-state section, so that the toolbar at the bottom of the section is displayed.
The screen capture shows the Reviewing Translated Version workflow state expanded. In this state, the Publish and Reject actions are available.
Note: The available actions depend on the workflow state. Refer to the table in "Changing the Workflow State of Individual Content Items" on page 115 for a list and description of actions you can perform on content items in different states of the Lionbridge Sample Workflow workflow.
6. Click the icon in the toolbar for the action you want to perform.
Tip: Click the Toggle check boxes icon to toggle your check box selection.
6.7 Viewing the History of Workflow-State Changes to a Content Item
You can view the history of workflow-state changes to a content item.
1. Ensure that the section for the workflow to which the content item is assigned is displayed in the Workbox. If it is not displayed, select the corresponding check box in the Workflows section of the Workbox ribbon. For details, see page 110.
2. Ensure that the section for the workflow to which the content item is assigned is expanded. If it is not expanded, click to expand it.
Lionbridge Connector for Sitecore User Guide Page 119Version 4.1.0 January 3, 2020
6 Monitoring Items in a Workflow with theEnhanced Workbox
6.7 Viewing the History of Workflow-State Changes to aContent Item

3. Ensure that the section for the workflow-state section to which the content item is assigned is expanded. If it is not expanded, click , or click the title of the section, which is the name of the workflow state, to expand it.
4. In the workflow-state section, locate the content item whose history you want to view.
5. To view the history of workflow-state changes to a content item, click More.
A window opens, displaying information about each change in the workflow state of this content item. The information in brackets below indicates the information in this screen capture:
The user name of the user who changed the workflow state of this item (admin).The date of the change to the workflow state of this item (Tuesday, April 25, 2017).
Tip: Use the scroll bar to scroll to the right side of the window, which displays the date.
The previous and new workflow state. When an item is created, Item created is displayed.
6. When you are done viewing the history of the item, click the Close box (X) in the top-right corner to close the window.
6.8 Comparing Multiple Versions of a Content Item
You can compare multiple versions of a content item.
1. Ensure that the section for the workflow to which the content item is assigned is displayed in the Workbox. If it is not displayed, select the corresponding check box in the Workflows section of the Workbox ribbon. For details, see page 110.
2. Ensure that the section for the workflow to which the content item is assigned is expanded. If it is not expanded, click to expand it.
Lionbridge Connector for Sitecore User Guide Page 120Version 4.1.0 January 3, 2020
6 Monitoring Items in a Workflow with the EnhancedWorkbox
6.8 Comparing Multiple Versions of a ContentItem
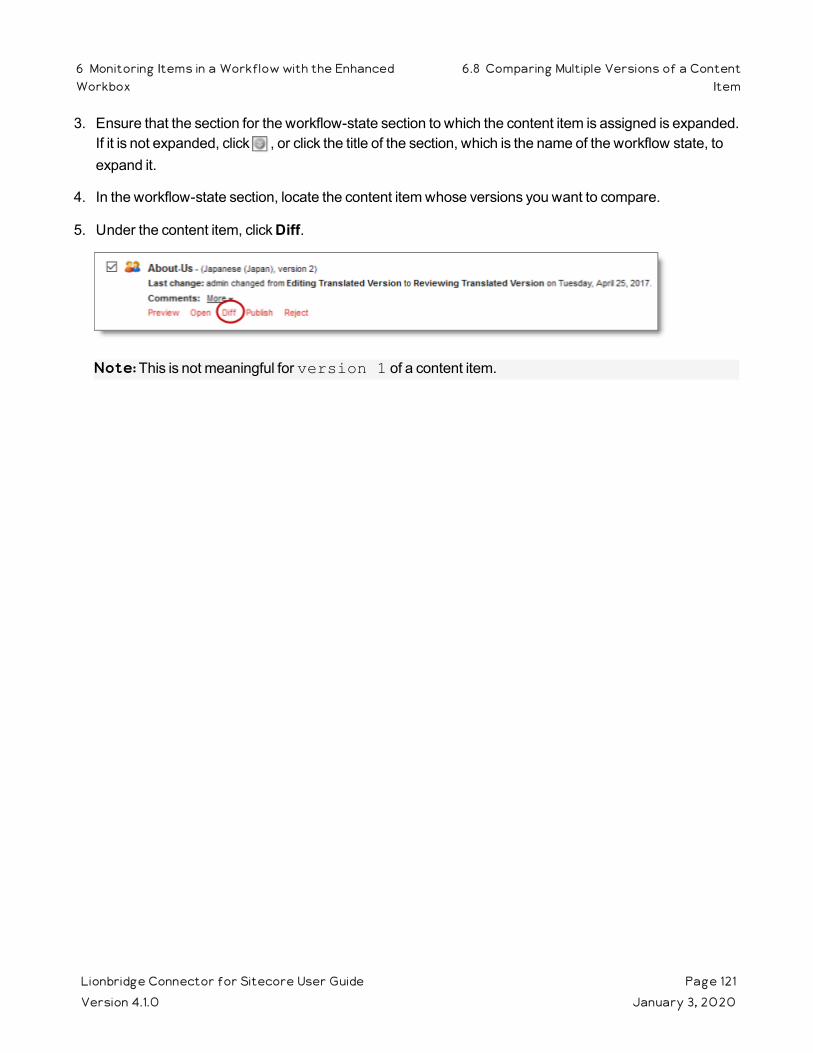
3. Ensure that the section for the workflow-state section to which the content item is assigned is expanded. If it is not expanded, click , or click the title of the section, which is the name of the workflow state, to expand it.
4. In the workflow-state section, locate the content item whose versions you want to compare.
5. Under the content item, click Diff.
Note: This is not meaningful for version 1 of a content item.
Lionbridge Connector for Sitecore User Guide Page 121Version 4.1.0 January 3, 2020
6 Monitoring Items in a Workflow with the EnhancedWorkbox
6.8 Comparing Multiple Versions of a ContentItem
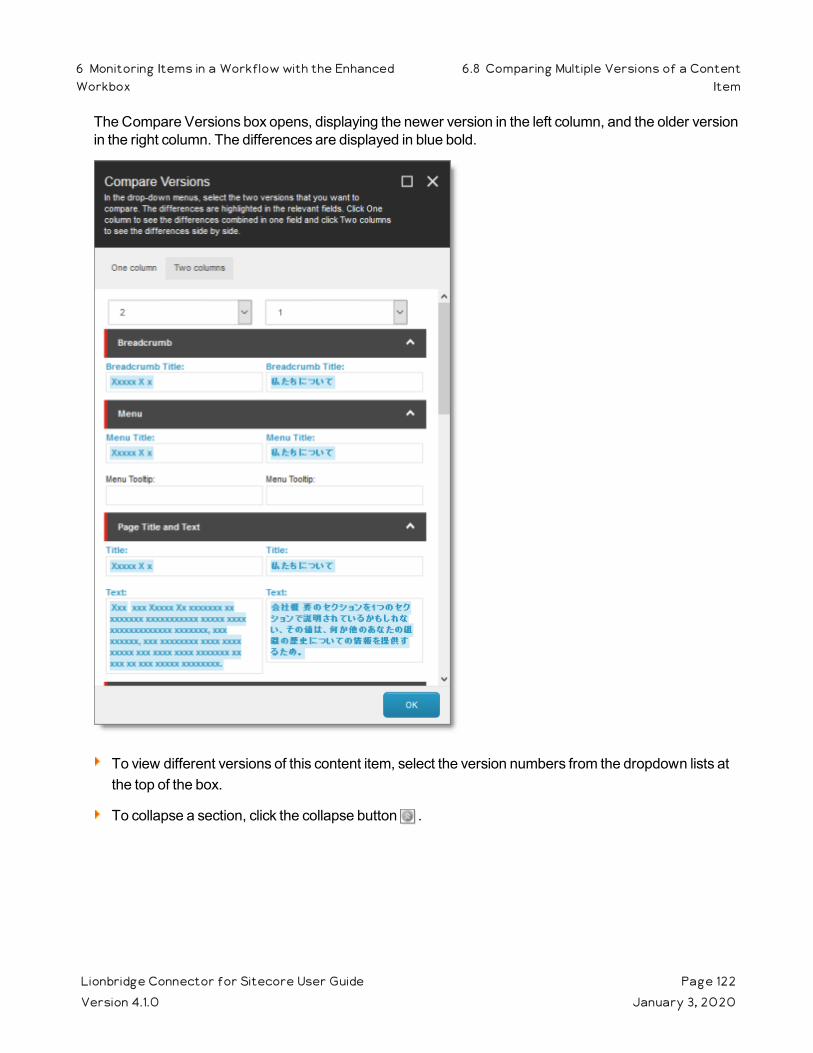
The Compare Versions box opens, displaying the newer version in the left column, and the older version in the right column. The differences are displayed in blue bold.
To view different versions of this content item, select the version numbers from the dropdown lists at the top of the box.
To collapse a section, click the collapse button .
Lionbridge Connector for Sitecore User Guide Page 122Version 4.1.0 January 3, 2020
6 Monitoring Items in a Workflow with the EnhancedWorkbox
6.8 Comparing Multiple Versions of a ContentItem
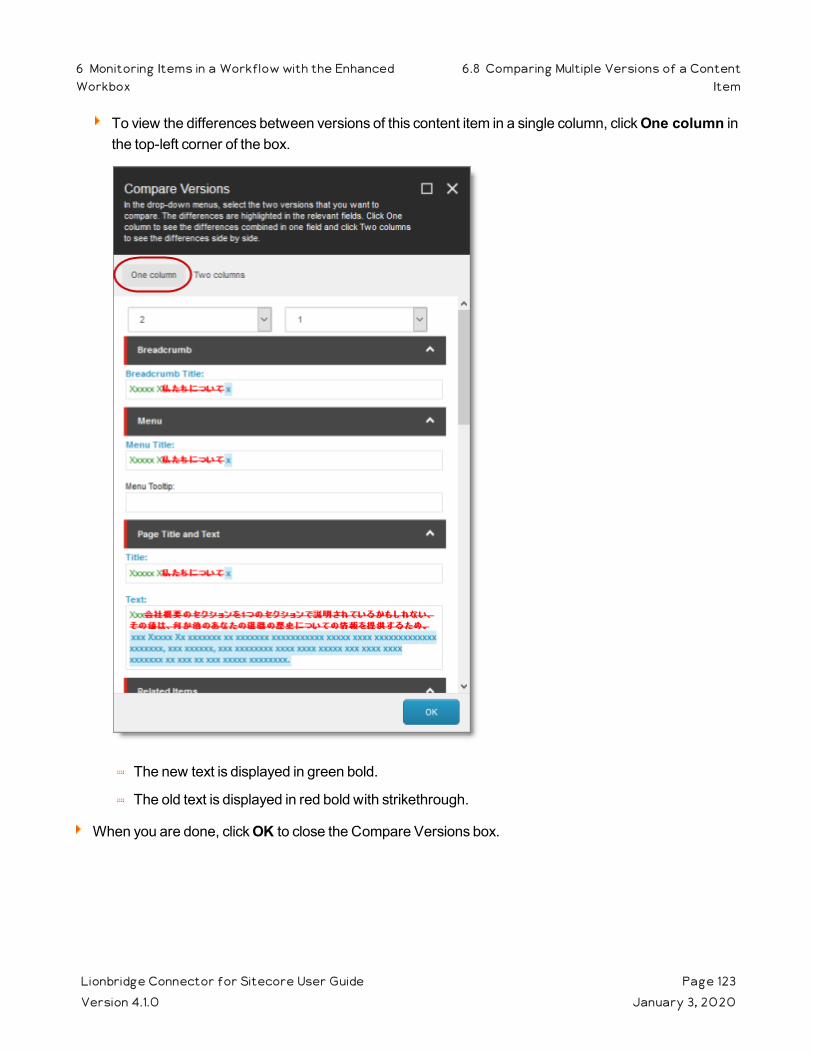
To view the differences between versions of this content item in a single column, click One column in the top-left corner of the box.
The new text is displayed in green bold.
The old text is displayed in red bold with strikethrough.
When you are done, click OK to close the Compare Versions box.
Lionbridge Connector for Sitecore User Guide Page 123Version 4.1.0 January 3, 2020
6 Monitoring Items in a Workflow with the EnhancedWorkbox
6.8 Comparing Multiple Versions of a ContentItem
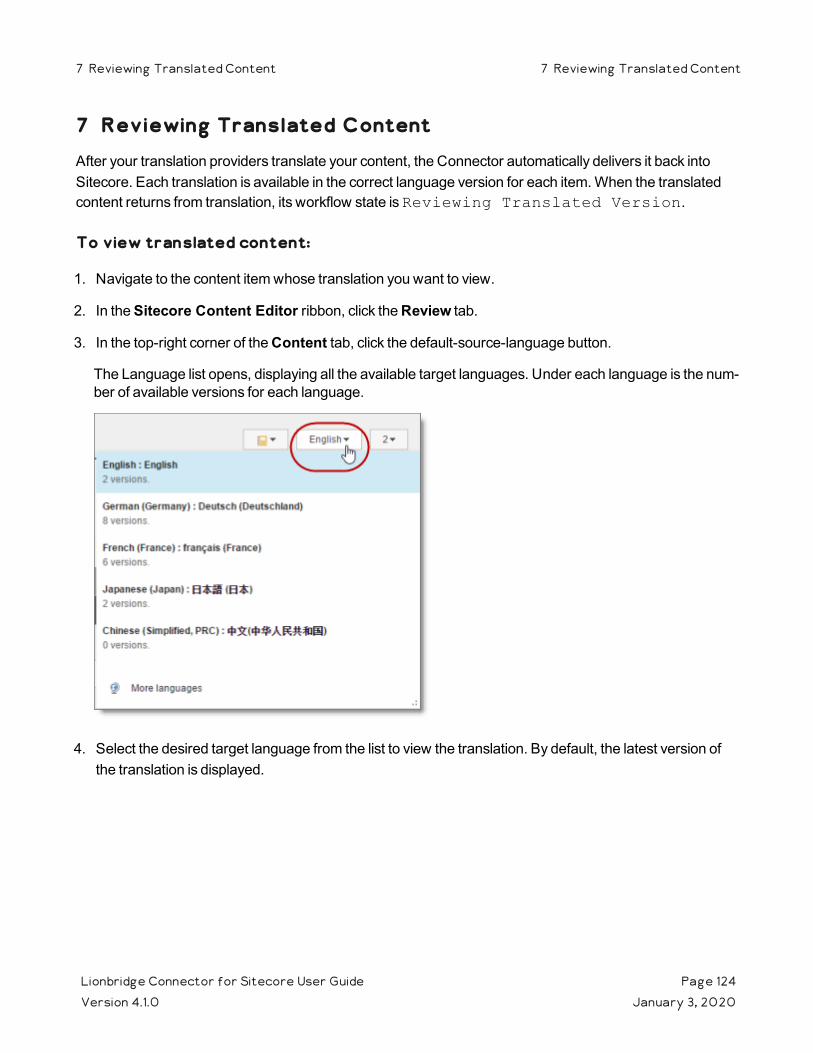
7 Reviewing Translated ContentAfter your translation providers translate your content, the Connector automatically delivers it back into Sitecore. Each translation is available in the correct language version for each item. When the translated content returns from translation, its workflow state is Reviewing Translated Version.
To view translated content:
1. Navigate to the content item whose translation you want to view.
2. In the Sitecore Content Editor ribbon, click the Review tab.
3. In the top-right corner of the Content tab, click the default-source-language button.
The Language list opens, displaying all the available target languages. Under each language is the num-ber of available versions for each language.
4. Select the desired target language from the list to view the translation. By default, the latest version of the translation is displayed.
Lionbridge Connector for Sitecore User Guide Page 124Version 4.1.0 January 3, 2020
7 Reviewing Translated Content 7 Reviewing Translated Content
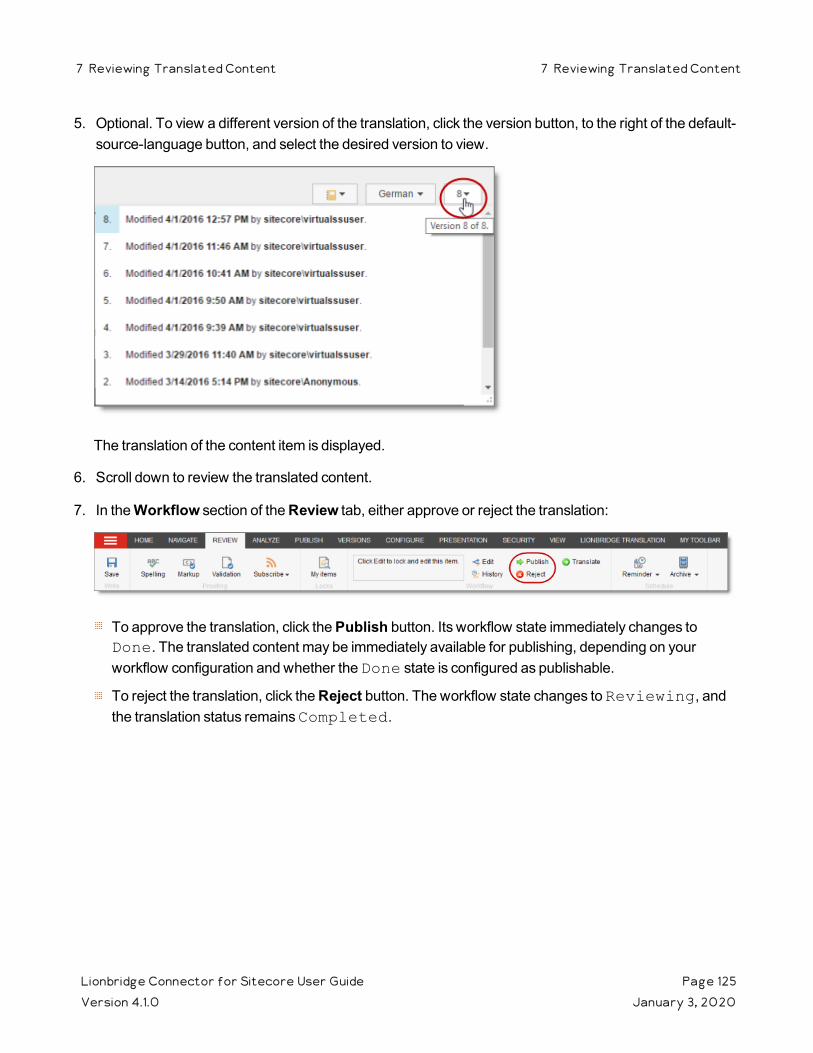
5. Optional. To view a different version of the translation, click the version button, to the right of the default-source-language button, and select the desired version to view.
The translation of the content item is displayed.
6. Scroll down to review the translated content.
7. In the Workflow section of the Review tab, either approve or reject the translation:
To approve the translation, click the Publish button. Its workflow state immediately changes to Done. The translated content may be immediately available for publishing, depending on your workflow configuration and whether the Done state is configured as publishable.
To reject the translation, click the Reject button. The workflow state changes to Reviewing, and the translation status remains Completed.
Lionbridge Connector for Sitecore User Guide Page 125Version 4.1.0 January 3, 2020
7 Reviewing Translated Content 7 Reviewing Translated Content
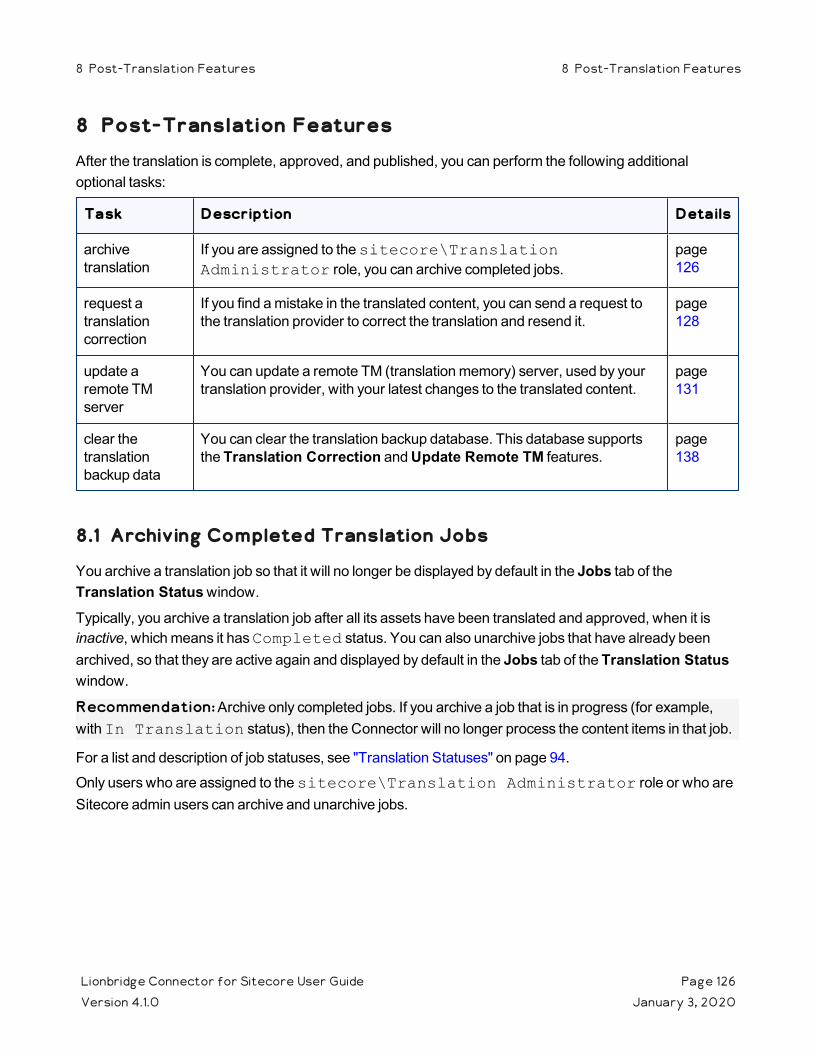
8 Post-Translation FeaturesAfter the translation is complete, approved, and published, you can perform the following additional optional tasks:
Task Description Details
archive translation
If you are assigned to the sitecore\Translation Administrator role, you can archive completed jobs.
page 126
request a translation correction
If you find a mistake in the translated content, you can send a request to the translation provider to correct the translation and resend it.
page 128
update a remote TM server
You can update a remote TM (translation memory) server, used by your translation provider, with your latest changes to the translated content.
page 131
clear the translation backup data
You can clear the translation backup database. This database supports the Translation Correction and Update Remote TM features.
page 138
8.1 Archiving Completed Translation Jobs
You archive a translation job so that it will no longer be displayed by default in the Jobs tab of the Translation Status window.Typically, you archive a translation job after all its assets have been translated and approved, when it is inactive, which means it has Completed status. You can also unarchive jobs that have already been archived, so that they are active again and displayed by default in the Jobs tab of the Translation Status window.
Recommendation: Archive only completed jobs. If you archive a job that is in progress (for example, with In Translation status), then the Connector will no longer process the content items in that job.
For a list and description of job statuses, see "Translation Statuses" on page 94.
Only users who are assigned to the sitecore\Translation Administrator role or who are Sitecore admin users can archive and unarchive jobs.
Lionbridge Connector for Sitecore User Guide Page 126Version 4.1.0 January 3, 2020
8 Post-Translation Features 8 Post-Translation Features

To archive completed jobs:
1. In the Sitecore Content Editor ribbon, click the Lionbridge Translation tab, and then in the Translation Tools section, click Translation Status.
The Jobs tab of the Translation Status window opens. For a detailed description of this window, see "Monitoring the Status of Translation Jobs" on page 96.
2. Select the check boxes of the jobs to archive.
3. Click the Archive selected jobs button in the toolbar in the top-left corner.
A message box opens, confirming that you want to archive the selected jobs.
4. Click OK to proceed.
Recommendation: Archive only completed jobs. If you archive a job that is in progress (for example, with In Translation status), then the Connector will no longer process the content items in that job. A warning is displayed if you try to archive a job that is in progress.
To archive completed jobs:
1. Ensure that archived jobs are displayed in the Jobs tab of the Translation Status window. To display archived jobs, click the Display Filter button in the toolbar in the top-left corner to display the filter bar, immediately below the toolbar, and then select the check box in the Archived column header. For more
Lionbridge Connector for Sitecore User Guide Page 127Version 4.1.0 January 3, 2020
8 Post-Translation Features 8.1 Archiving Completed Translation Jobs
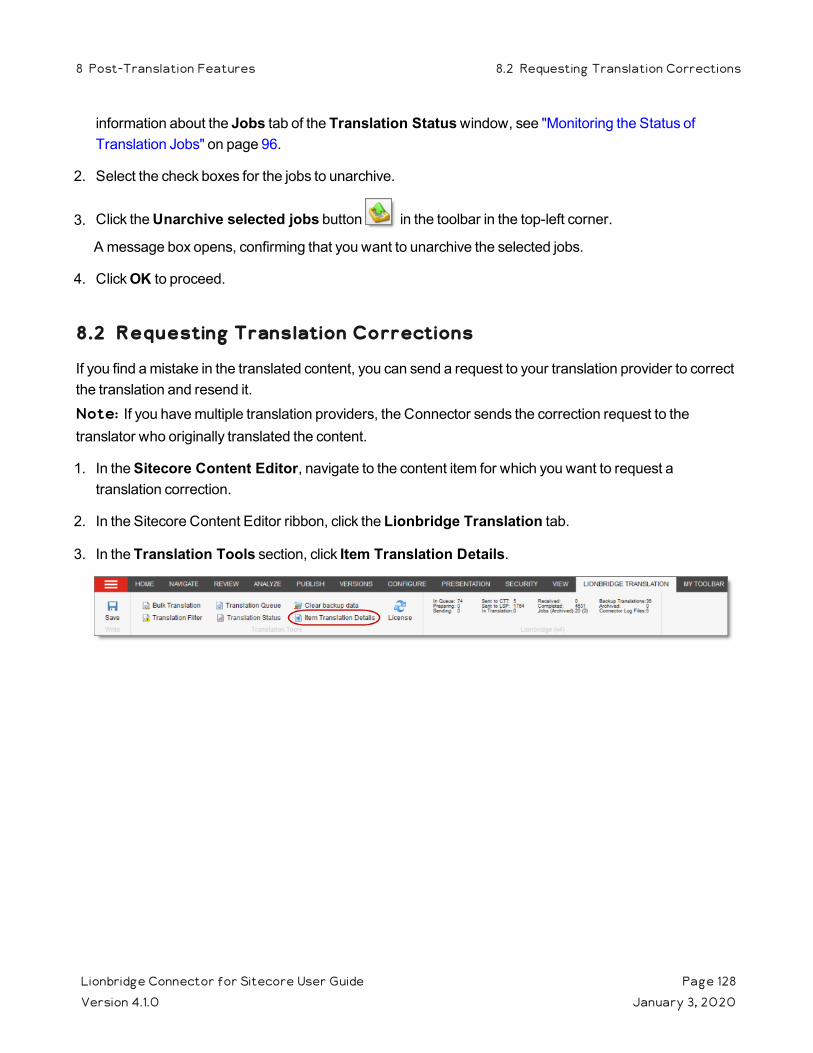
information about the Jobs tab of the Translation Status window, see "Monitoring the Status of Translation Jobs" on page 96.
2. Select the check boxes for the jobs to unarchive.
3. Click the Unarchive selected jobs button in the toolbar in the top-left corner.
A message box opens, confirming that you want to unarchive the selected jobs.
4. Click OK to proceed.
8.2 Requesting Translation Corrections
If you find a mistake in the translated content, you can send a request to your translation provider to correct the translation and resend it.Note: If you have multiple translation providers, the Connector sends the correction request to the translator who originally translated the content.
1. In the Sitecore Content Editor, navigate to the content item for which you want to request a translation correction.
2. In the Sitecore Content Editor ribbon, click the Lionbridge Translation tab.
3. In the Translation Tools section, click Item Translation Details.
Lionbridge Connector for Sitecore User Guide Page 128Version 4.1.0 January 3, 2020
8 Post-Translation Features 8.2 Requesting Translation Corrections
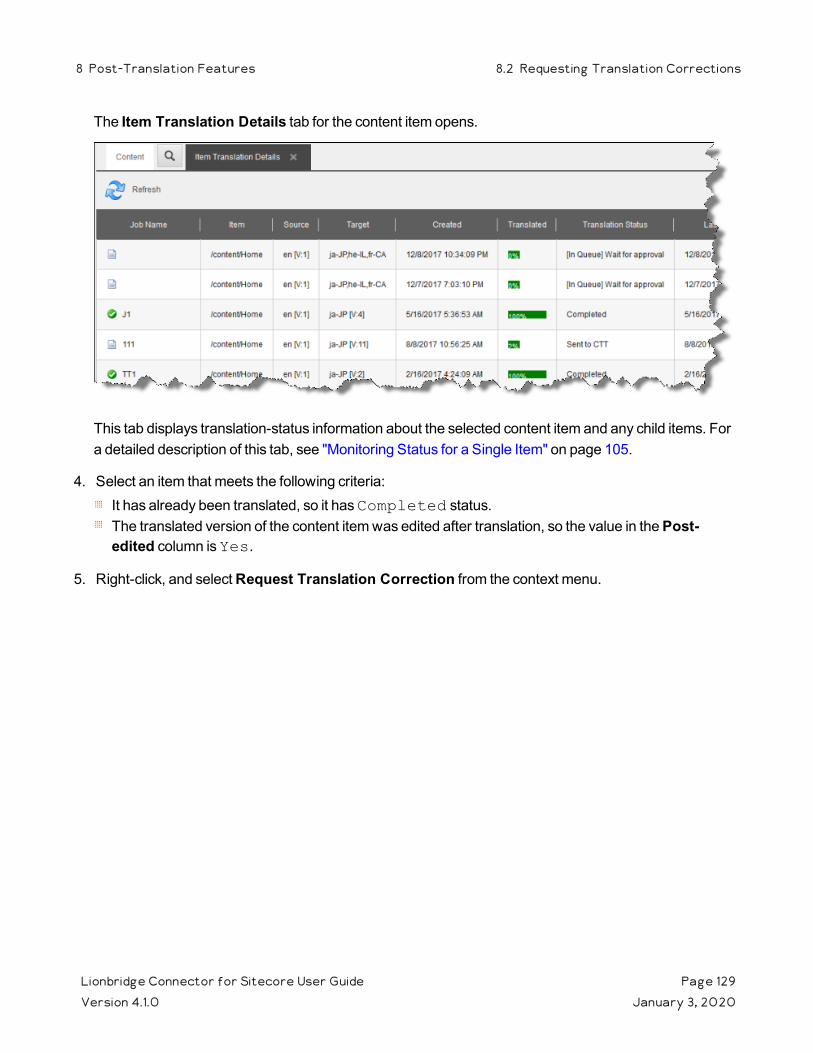
The Item Translation Details tab for the content item opens.
This tab displays translation-status information about the selected content item and any child items. For a detailed description of this tab, see "Monitoring Status for a Single Item" on page 105.
4. Select an item that meets the following criteria:It has already been translated, so it has Completed status.The translated version of the content item was edited after translation, so the value in the Post-edited column is Yes.
5. Right-click, and select Request Translation Correction from the context menu.
Lionbridge Connector for Sitecore User Guide Page 129Version 4.1.0 January 3, 2020
8 Post-Translation Features 8.2 Requesting Translation Corrections
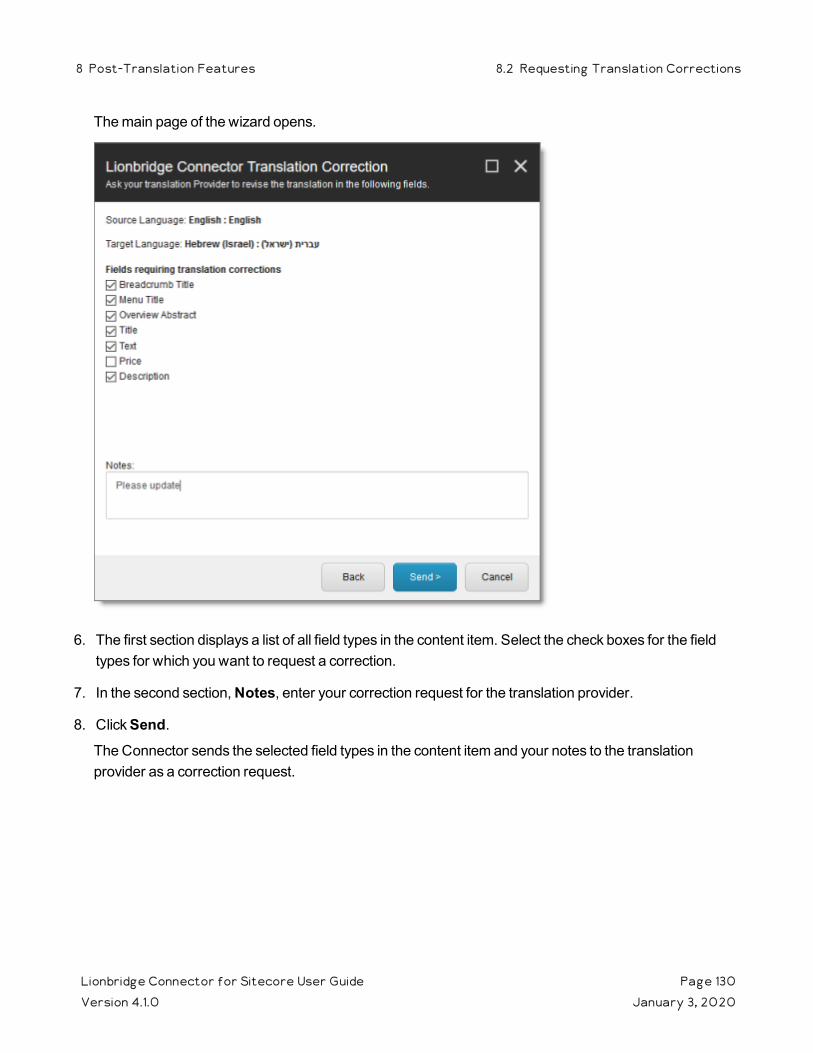
The main page of the wizard opens.
6. The first section displays a list of all field types in the content item. Select the check boxes for the field types for which you want to request a correction.
7. In the second section, Notes, enter your correction request for the translation provider.
8. Click Send.The Connector sends the selected field types in the content item and your notes to the translation provider as a correction request.
Lionbridge Connector for Sitecore User Guide Page 130Version 4.1.0 January 3, 2020
8 Post-Translation Features 8.2 Requesting Translation Corrections
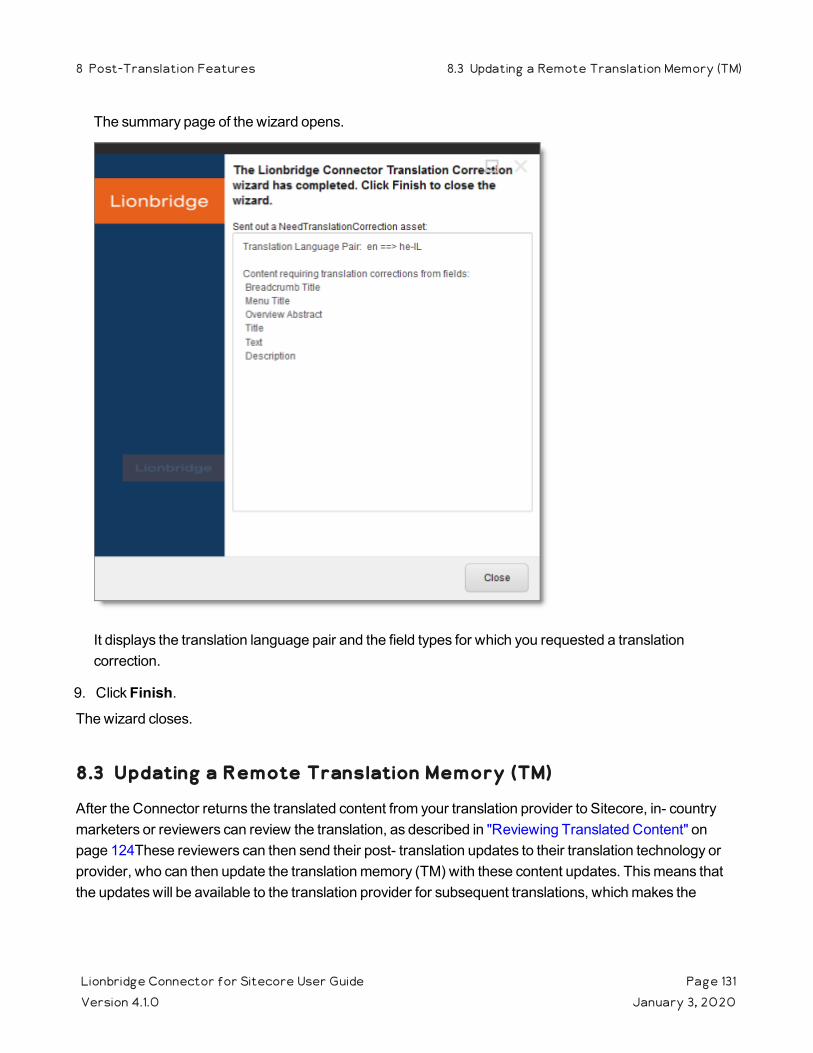
The summary page of the wizard opens.
It displays the translation language pair and the field types for which you requested a translation correction.
9. Click Finish.The wizard closes.
8.3 Updating a Remote Translation Memory (TM)
After the Connector returns the translated content from your translation provider to Sitecore, in- country marketers or reviewers can review the translation, as described in "Reviewing Translated Content" on page 124These reviewers can then send their post- translation updates to their translation technology or provider, who can then update the translation memory (TM) with these content updates. This means that the updates will be available to the translation provider for subsequent translations, which makes the
Lionbridge Connector for Sitecore User Guide Page 131Version 4.1.0 January 3, 2020
8 Post-Translation Features 8.3 Updating a Remote Translation Memory (TM)
translation process more efficient. Your translation provider's TM (translation memory) server is a remote TM.
Your changes will be copied to the UpdateTM folder that resides on your translation provider's FTP server.
Note: This feature is available only with the Clay Tablet FTP Connector. The location of the remote TM server is specified by the TNS_UpdateTMFolder setting in the FTP configuration file, which is configured by the Lionbridge Connector team.
To send updates to the translation provider's translation memory (TM), you do one of the following:
You send updates for a single item from the Content Editor, in the Translation Status tab for the item, as described in "Updating a Remote TM for a Single Item" on page 133.
Note: When you send updated content from a single item to update a remote TM, you can specify which field types to send.
You send updates for multiple items in a single translation job from the Jobs tab in the Connector's Translation Status window, as described in "Updating a Remote TM for Multiple Items" on page 135.
The Connectors sends an XML file to the translation technology or provider with the updates. This file includes:
the original source content
the original translated content
the updated translated content
Best practices for updating a remote translation memory (TM):
Make only small post- translation updates in the Sitecore authoring environment, and then use this feature to send those updates to the translation provider. If you require large updates or rewrites, discuss this directly with your translation provider to ensure that all changes are captured efficiently. In this scenario, the translation provider can redo the translations and redeliver the updates via the Connector.
Create a primary review process for translation that captures most changes to translated content, so that the translation provider can update its TM directly. The secondary review process in Sitecore then captures only small and minor post- translation updates.
A project manager at the translation provider should review the suggested updates and ensure that the translation memory is updated with these changes.
Important: Updating the remote TM is not an automatic process. The translation provider must review all the changes and transform them into a format to update the TM. The translation provider may charge a service fee for this work.
Lionbridge Connector for Sitecore User Guide Page 132Version 4.1.0 January 3, 2020
8 Post-Translation Features 8.3 Updating a Remote Translation Memory (TM)
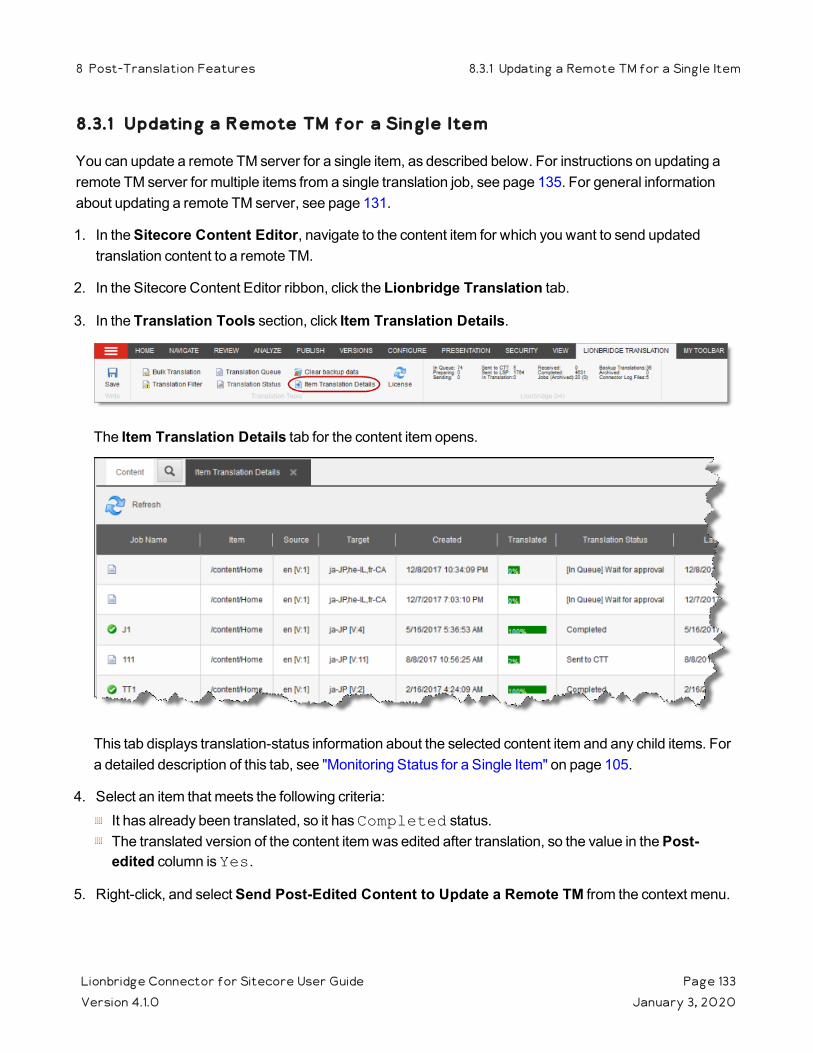
8.3.1 Updating a Remote TM for a Single Item
You can update a remote TM server for a single item, as described below. For instructions on updating a remote TM server for multiple items from a single translation job, see page 135. For general information about updating a remote TM server, see page 131.
1. In the Sitecore Content Editor, navigate to the content item for which you want to send updated translation content to a remote TM.
2. In the Sitecore Content Editor ribbon, click the Lionbridge Translation tab.
3. In the Translation Tools section, click Item Translation Details.
The Item Translation Details tab for the content item opens.
This tab displays translation-status information about the selected content item and any child items. For a detailed description of this tab, see "Monitoring Status for a Single Item" on page 105.
4. Select an item that meets the following criteria:It has already been translated, so it has Completed status.The translated version of the content item was edited after translation, so the value in the Post-edited column is Yes.
5. Right-click, and select Send Post-Edited Content to Update a Remote TM from the context menu.
Lionbridge Connector for Sitecore User Guide Page 133Version 4.1.0 January 3, 2020
8 Post-Translation Features 8.3.1 Updating a Remote TM for a Single Item
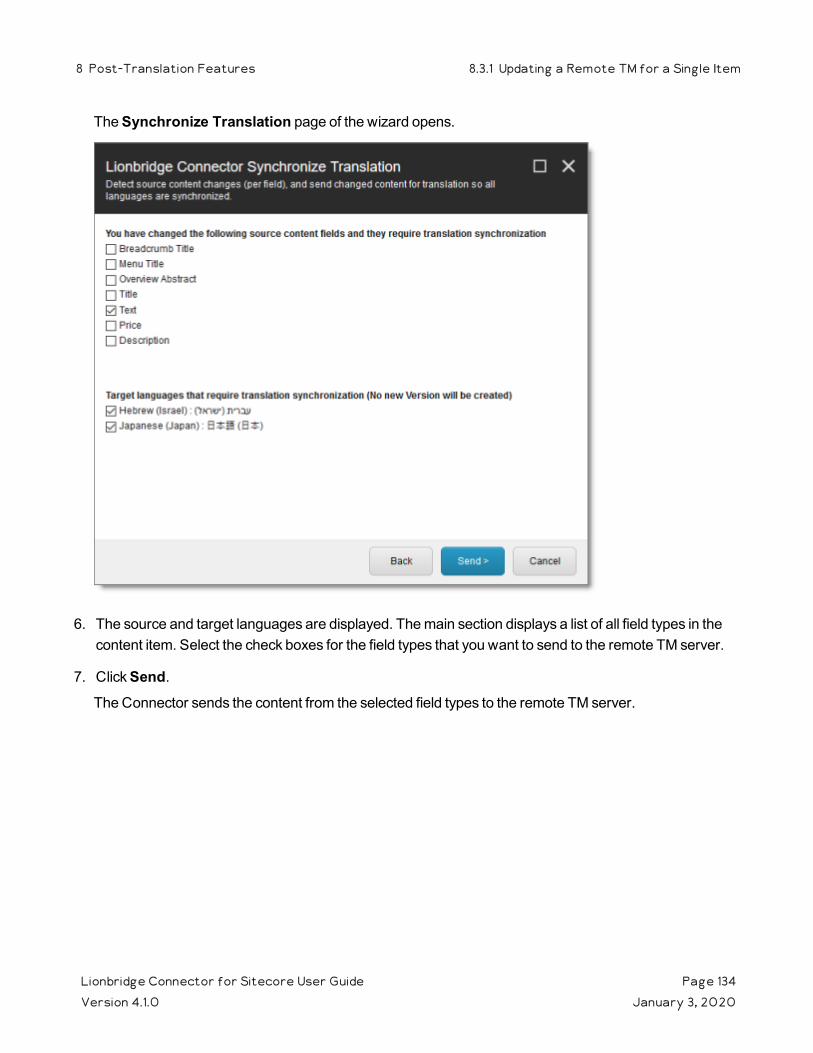
The Synchronize Translation page of the wizard opens.
6. The source and target languages are displayed. The main section displays a list of all field types in the content item. Select the check boxes for the field types that you want to send to the remote TM server.
7. Click Send.The Connector sends the content from the selected field types to the remote TM server.
Lionbridge Connector for Sitecore User Guide Page 134Version 4.1.0 January 3, 2020
8 Post-Translation Features 8.3.1 Updating a Remote TM for a Single Item

The summary page of the wizard opens.
It displays the translation language pair and the field types for which the Connector sends content to the remote TM server.
8. Click Finish.The wizard closes.
8.3.2 Updating a Remote TM for Multiple Items
You can update a remote TM server for multiple items from a single translation job, as described below. For instructions on updating a remote TM server for a single item, see page 133. For general information about updating a remote TM server, see page 131.
Lionbridge Connector for Sitecore User Guide Page 135Version 4.1.0 January 3, 2020
8 Post-Translation Features 8.3.2 Updating a Remote TM for Multiple Items

1. In the Sitecore Content Editor ribbon, click the Lionbridge Translation tab, and then in the Translation Tools section, click Translation Status.
The Jobs tab of the Translation Status window opens, displaying the translation status of all jobs that you submitted.
For detailed information about the Jobs tab of the Translation Status window, see "Monitoring the Status of Translation Jobs" on page 96.
2. Select the check box for the job with the items to send to the remote TM server.
3. Click the Update Remote TM button in the toolbar in the top-left corner.
The Welcome page of the Lionbridge Connector Remote TM Update Wizard opens.
4. Click Next.
Lionbridge Connector for Sitecore User Guide Page 136Version 4.1.0 January 3, 2020
8 Post-Translation Features 8.3.2 Updating a Remote TM for Multiple Items
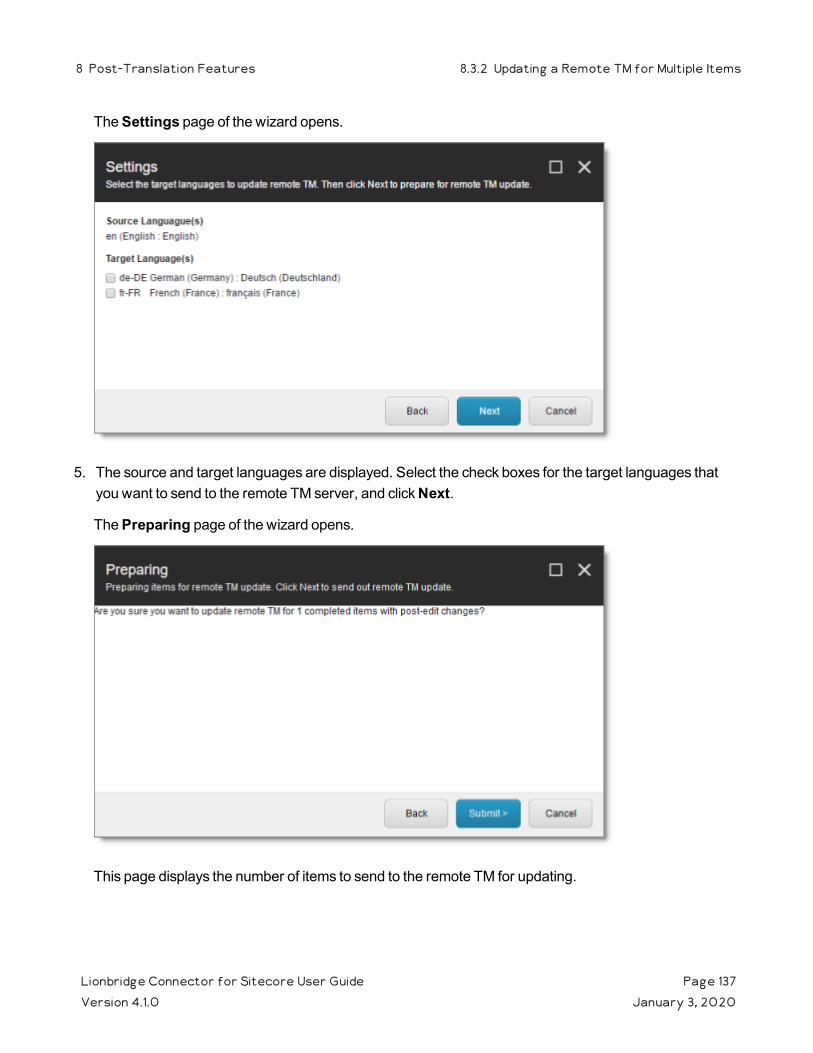
The Settings page of the wizard opens.
5. The source and target languages are displayed. Select the check boxes for the target languages that you want to send to the remote TM server, and click Next.
The Preparing page of the wizard opens.
This page displays the number of items to send to the remote TM for updating.
Lionbridge Connector for Sitecore User Guide Page 137Version 4.1.0 January 3, 2020
8 Post-Translation Features 8.3.2 Updating a Remote TM for Multiple Items
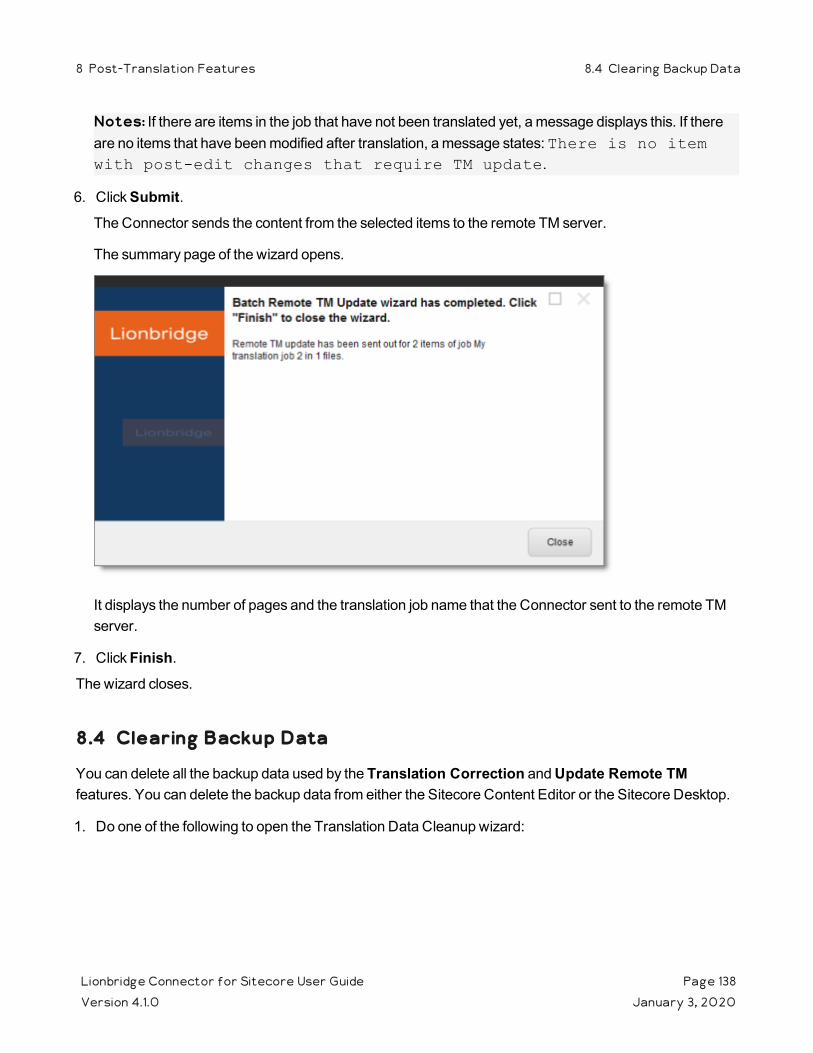
Notes: If there are items in the job that have not been translated yet, a message displays this. If there are no items that have been modified after translation, a message states: There is no item with post-edit changes that require TM update.
6. Click Submit.The Connector sends the content from the selected items to the remote TM server.
The summary page of the wizard opens.
It displays the number of pages and the translation job name that the Connector sent to the remote TM server.
7. Click Finish.The wizard closes.
8.4 Clearing Backup Data
You can delete all the backup data used by the Translation Correction and Update Remote TM features. You can delete the backup data from either the Sitecore Content Editor or the Sitecore Desktop.
1. Do one of the following to open the Translation Data Cleanup wizard:
Lionbridge Connector for Sitecore User Guide Page 138Version 4.1.0 January 3, 2020
8 Post-Translation Features 8.4 Clearing Backup Data
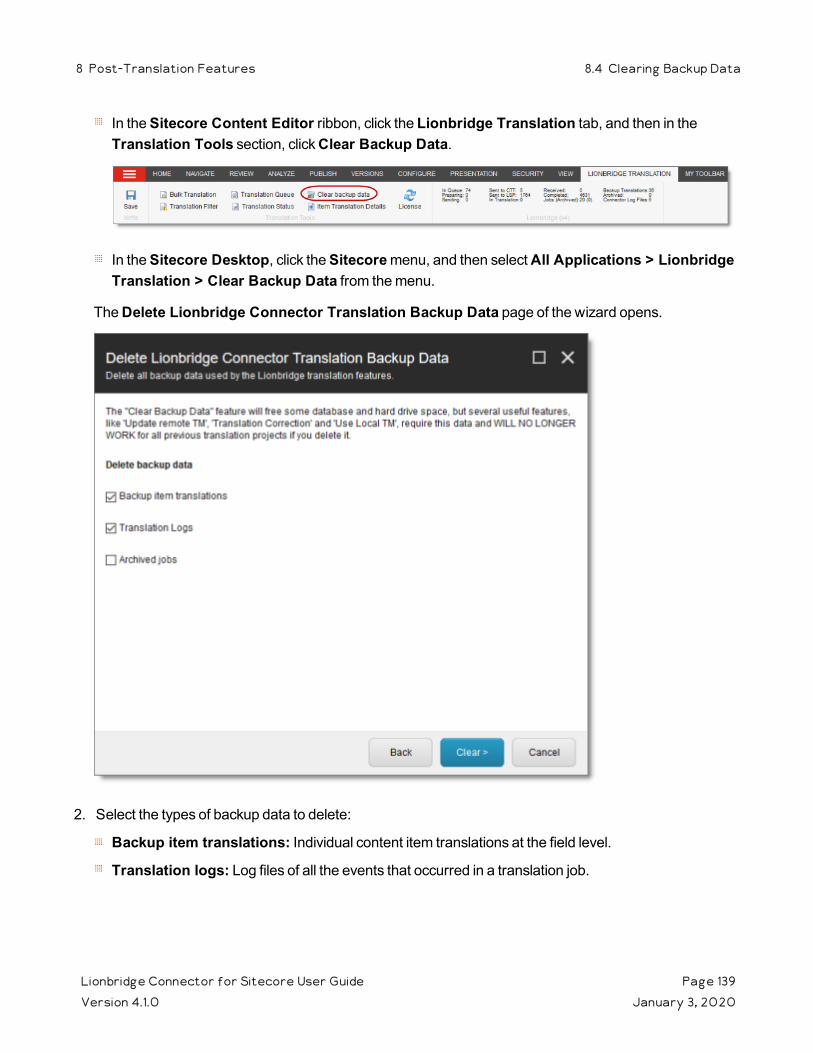
In the Sitecore Content Editor ribbon, click the Lionbridge Translation tab, and then in the Translation Tools section, click Clear Backup Data.
In the Sitecore Desktop, click the Sitecore menu, and then select All Applications > Lionbridge Translation > Clear Backup Data from the menu.
The Delete Lionbridge Connector Translation Backup Data page of the wizard opens.
2. Select the types of backup data to delete:
Backup item translations: Individual content item translations at the field level.
Translation logs: Log files of all the events that occurred in a translation job.
Lionbridge Connector for Sitecore User Guide Page 139Version 4.1.0 January 3, 2020
8 Post-Translation Features 8.4 Clearing Backup Data

Archived jobs: Data in archived jobs.
3. Click Clear.
A warning message box opens.
4. If you are sure you want to delete the backup data, click OK.
Lionbridge Connector for Sitecore User Guide Page 140Version 4.1.0 January 3, 2020
8 Post-Translation Features 8.4 Clearing Backup Data
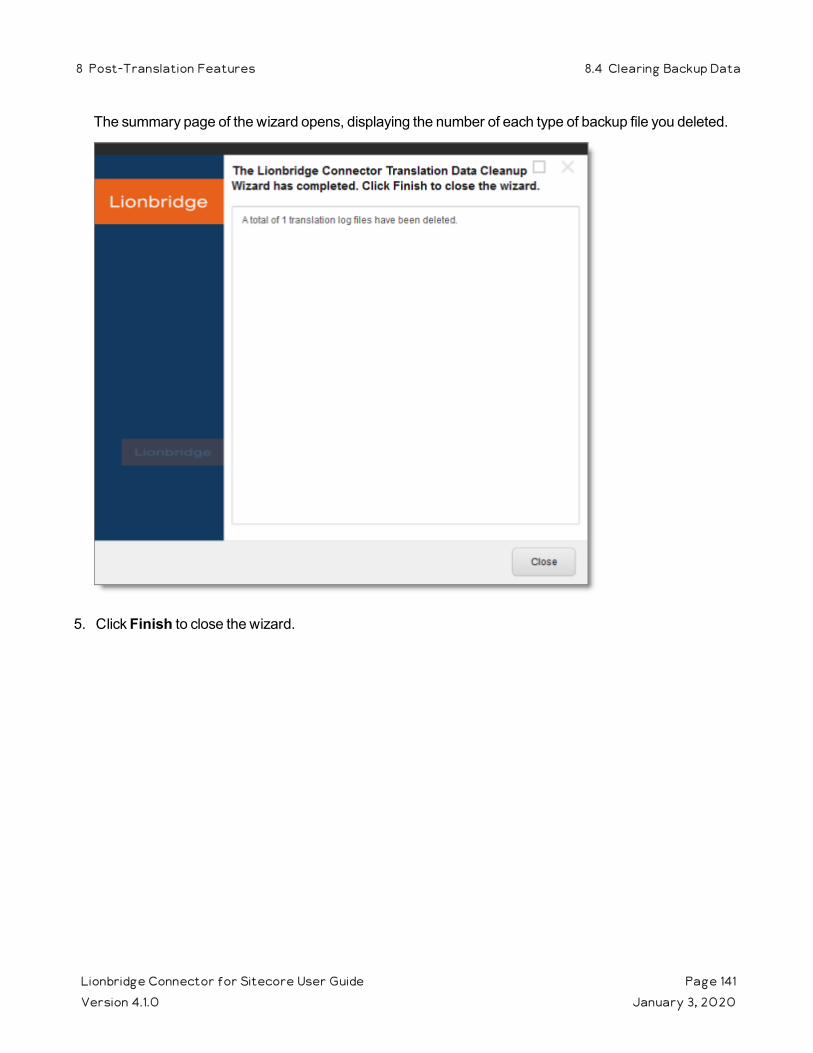
The summary page of the wizard opens, displaying the number of each type of backup file you deleted.
5. Click Finish to close the wizard.
Lionbridge Connector for Sitecore User Guide Page 141Version 4.1.0 January 3, 2020
8 Post-Translation Features 8.4 Clearing Backup Data
Index
A
Add an Account dialog box 67archived jobs 126Automatic Item Export for Translation dialog boxin the Content Editor 45in the Page Editor 52
B
backup data, clearing 138Bulk Translation button in the Content Editor 59Bulk Translation menu item on the Desktop 60Bulk Translation wizardChoose Items page 62-63Excluding Item(s) page 69final page 81overview 58Settings page 59-60Specify Source Filters page 64-65Summary Report page 80Translation Options page 74
C
Choose Items page, Bulk Translation wizard 62Clear Backup Data button in the Content
Editor 138Clear Backup Data menu item on the
Desktop 138columnschanging order 23setting width 22sorting by 22
Compare Versions boxone columns 123two columns 122
completed jobs, archiving 126contentattaching a translation workflow 33attaching to a template 27filtering items that do not need translation 34reviewing translated 124
Content Editor, sending content for translation from the 43
content itemschanging the workflow state of multiple 118changing the workflow state of one 115comparing multiple versions of 120viewing details in the Workbox 113viewing the history of workflow-state changes
to 119Content tab, Workflow section, in the Content
Editor 34content, creating for translationattaching new content to a template 27overview 27
content, sending for translationadding a source filter for multiple items 67content items from Sitecore search results 82from the Translation Queue 84multiple items 58overview 16process overview 42single item from the Content Editor 43single item from the Experience Editor 51
correction, requesting a 128
D
data, clearing backup 138documentation conventions 9
E
Excluding Item(s) page, Bulk Translation wizard 69
Experience Editor, sending content for translation from the 51
F
feature overview 16Field Filter wizard 34Choose a Content Template page 36Don't transfer field value page 38Select Fields that you don’t want sent out for
translation page 37
Lionbridge Connector for Sitecore User Guide Page 142Version 4.1.0 January 3, 2020
summary page 39
G
guide 7
I
introduction 6Item Translation Details button in the Content
Editor 105Item Translation Details tab 128, 133
J
Job Items tab, Translation Status window 102Job Progress boxfrom the Page Editor 57from Translation Queue 90when sending a single item from the Content
Editor 50Jobs tab, Translation Status window 96jobs, archiving completed 126
L
Lionbridge Connector for Sitecore Installation and Configuration Guide 9
Lionbridge Connector Support 9getting a Zendesk password 13information to include in a ticket 10signing up for a Zendesk account 12submit a ticket 10viewing and updating your ticket 11
listschanging column order 23navigating pages 20overview 20setting column width 22sorting by column 22
O
overview 18
P
pages, navigating in a list 20post-translation features, overview 126Publish button in the Content Editor 124
R
Reject button in the Content Editor 124remote TM server, updating 131for a single item 133for multiple items 135
Remote TM Update wizard 135Preparing page 137Settings page 137summary page 138
Request Translation Correction context menu item 128
S
search results, sending content for translation from the 82
Send Dependent Items check box, understanding 91
Send Items Out for Translation dialog box 88Send Post-Edited Content to Update a Remote
TM context menu item 131sending for translationfrom Sitecore search results 82from the Experience Editor 51
Settings page, Bulk Translation wizard 59Sitecore search results, sending content for
translation from the 82Specify Source Filters page, Bulk Translation
wizard 64statuses, translation 94Summary Report page, Bulk Translation
wizard 80
Lionbridge Connector for Sitecore User Guide Page 143Version 4.1.0 January 3, 2020
support 9getting a Zendesk password 13information to include in a ticket 10signing up for a Zendesk account 12submit a ticket 10viewing and updating your ticket 11
T
template, attaching a new content item 27TM server, updating a remote 131for a single item 133for multiple items 135
Translate button in the Content Editor 44Translate To button in the Page Editor 51translation-memory (TM) server, updating a
remote 131for a single item 133for multiple items 135
Translation Correction wizard 128main page 130summary page 131
Translation Data Cleanup wizard 138Delete Lionbridge Connector Translation
Backup Data page 139summary page 141
Translation Filter window 34translation jobsmonitoring details 102
translation lifecycle 6and the Connector 6
Translation Memory Update wizard 133summary page 135Synchronize Translation page 134
Translation Options page, Bulk Translation wizard 74
translation provider, selecting 17Translation Queue 84grouping content items by column 24
Translation Queue button in the Content Editor 84
Translation Queue menu item on the Desktop 84
Translation Status button in the Content Editor 96
Translation Status tab in the Content Editor 105Translation Status windowJob Items tab 102
Jobs tab 96translation status, monitoringfor a single item 105for jobs 96for multiple items, grouping by column 24overview 94summary 95
translation statuses 94Translation Statuses section in the Content
Editor 95translation, requesting a correction 128
U
Use Local TM feature 17
W
Workboxchanging the state of individual content
items 115changing the state of multiple content
items 118comparing multiple versions of a content
item 120display options 110opening 109overview 109ribbon 110viewing content item details 113viewing the history of workflow-state changes
to a content item 119viewing workflow-state details 112viewing workflow details 111
workflowreceiving updates about changes to content
items in a 111viewing details 111
Workflow section of Content tab in the Content Editor 34
workflow states 42changing for a content item 115changing for multiple content items 118receiving updates about changes to content
items in a 112viewing details 112
Lionbridge Connector for Sitecore User Guide Page 144Version 4.1.0 January 3, 2020
viewing the history of these changes to a content item 119
Lionbridge Connector for Sitecore User Guide Page 145Version 4.1.0 January 3, 2020