Lecture On Osteotomies - Becker Rhinoplasty Center performing osteotomies and repositioning the...
28
Lecture On Osteotomies Welcome to the 6th PENN Rhinoplasty Course. It is nice to have you all here at our course, which for the first time we are having here in the Chelsea Hotel in Atlantic City. My co- course directors are Dr. Ara Chalian and Dr. Stephen Goldstein, and we would like to welcome you all. As you know, we have a wonderful guest faculty joining us. Dr. Shan Baker from the University of Michigan, Dr. Stephen Perkins from Indiana, Dr. J. Regan Thomas, the Chairman at the University of Illinois at Chicago, Dr. Ed Williams, who is in private practice in New York, and Dr. Gary Burget from Chicago. We also have the benefit of our Penn faculty, Dr. Tim Greco, Dr. Paul Carniol, and Dr. Scott Bartlett. I want to thank them all for being here, and I want to thank you all, the audience and the participants for coming. I am looking forward to a wonderful two days talking about rhinoplasty.
Transcript of Lecture On Osteotomies - Becker Rhinoplasty Center performing osteotomies and repositioning the...

Lecture On Osteotomies
Welcome to the 6th PENN Rhinoplasty Course. It is nice to have you all here at our course,
which for the first time we are having here in the Chelsea Hotel in Atlantic City. My co-
course directors are Dr. Ara Chalian and Dr. Stephen Goldstein, and we would like to
welcome you all.
As you know, we have a wonderful guest faculty joining us. Dr. Shan Baker from the
University of Michigan, Dr. Stephen Perkins from Indiana, Dr. J. Regan Thomas, the
Chairman at the University of Illinois at Chicago, Dr. Ed Williams, who is in private
practice in New York, and Dr. Gary Burget from Chicago. We also have the benefit of our
Penn faculty, Dr. Tim Greco, Dr. Paul Carniol, and Dr. Scott Bartlett. I want to thank them
all for being here, and I want to thank you all, the audience and the participants for coming.
I am looking forward to a wonderful two days talking about rhinoplasty.

My first lecture this morning is on the subject of Technical Considerations in Rhinoplasty,
Modification of the Nasal Dorsum (Reduction and Augmentation) and Osteotomies. So this
is a lecture discussing – in a short amount of allotted time - some technical aspects of
rhinoplasty.
I am going to begin by describing my approach for taking down the nasal hump. To briefly
summarize my approach: I resect the nasal hump with a scalpel and osteotome. I make fine-
tuning adjustments to the profile with a scalpel and a powered rasp. I close the "open roof"
by performing osteotomies and repositioning the nasal bones. I re-support the cartilage part
of the profile with spreader grafts.
Now, for a little more detail:

I pre-mark the skin with a marker before I do anything else in the surgery, even before I
inject any infiltrative anesthesia. I think that helps to set the desired hump reduction, to
guide things. Once I have lifted the skin-soft tissue envelope and achieve the appropriate
surgical exposure, I like to do the hump reduction in an en bloc or one-piece fashion. I do it
that way because it allows me to carefully examine what I have taken out, which helps to
achieve a precise result.
So, using a scalpel I incise or cut (but do not yet remove) the cartilage part of the bump.
Once I have incised the cartilage part, I seat the bone knife, the osteotome, at the junction,
the bony-cartilaginous junction as shown in this slide (above). Then while I guide the
osteotome, my assistant will gently tap, tap; tap, tap, and that will result in the cutting of the
bony part too. That accomplishes and completes the initial phase of the hump reduction.
We always calculate to take a hump off that stops short of our desired final result. It is
preferable to leave the last 10 percent of the hump reduction to a calibrated, careful scalpel
excision for the cartilaginous portion, and a precise powered rasping and smoothing of the
bony portion. We'lld iscuss this below.
I like to do the hump reduction this way because I think it is the most precise way to do it.
After the initial, en bloc portion of hump reduction, I can look at the patient's new profile,
and also I can examine what I have taken off for any irregularities. This can be a helpful
guides as I proceed to the last phase of the hump reduction, the final smoothing of the
patient's nasal profile.

Here's a patient before and after. You can see on her side view that we did a very
significant hump reduction. This is a very happy patient, as you might imagine.
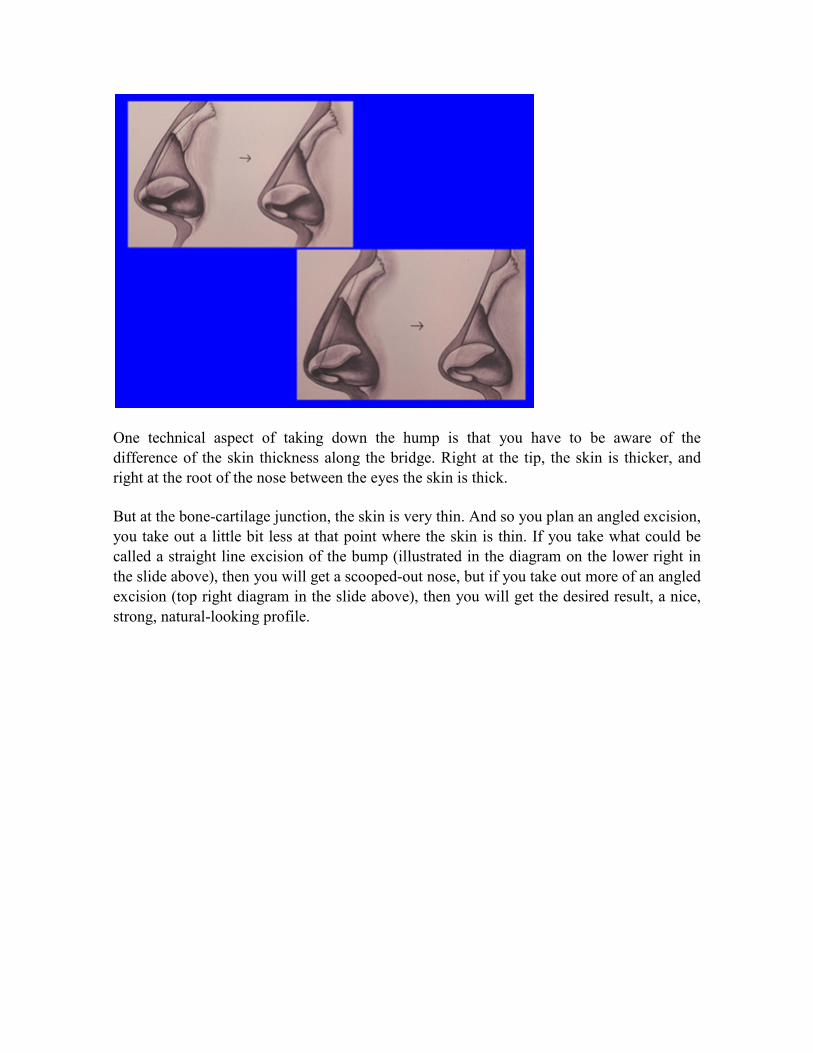
One technical aspect of taking down the hump is that you have to be aware of the
difference of the skin thickness along the bridge. Right at the tip, the skin is thicker, and
right at the root of the nose between the eyes the skin is thick.
But at the bone-cartilage junction, the skin is very thin. And so you plan an angled excision,
you take out a little bit less at that point where the skin is thin. If you take what could be
called a straight line excision of the bump (illustrated in the diagram on the lower right in
the slide above), then you will get a scooped-out nose, but if you take out more of an angled
excision (top right diagram in the slide above), then you will get the desired result, a nice,
strong, natural-looking profile.

Now one thing that I have been doing recently is taking down the hump under direct vision.
Traditionally it has been done in an endonasal fashion where you don't watch the hump, but
you just do it by feel. I have done that for many years quite successfully, but about 2 years
ago Dr Thomas asked me to write a textbook chapter on the subject of "Open versus Closed
Rhinoplasty." In doing some research in preparation of this chapter, I came across an article
written by Dr. Wayne Larrabee from Seattle. Dr. Larrabee wrote a chapter entitled "Open
Rhinoplasty in the Upper Portion of the Nose", and I would just direct you to some
comments that he made.
He wrote that the benefits of the open technique are most obvious in the lower and middle
thirds of the nose, but in our experience, the incidence of postoperative profile irregularities
has been reduced when procedures are performed through the open approach.

He also wrote that, although there is a tendency to treat the bony pyramid in an essentially
closed fashion even when using the open approach, the benefits of increased exposure to
the dorsum available with the open rhinoplasty approach should be exploited whenever
possible to improve surgical results.
The point of this is that if all you are doing is taking down the bump, then maybe you don't
need to do an open rhinoplasty if it is a conservative profile reduction, but if you have the
nose open anyway for other technical reasons, then why not look at what you're doing and
do this under direct visualization? So that would be, I think, a teaching point and a take-
home point from this lecture.
And so I have actually started to do that. And here is what it looks like. You can see exactly
where the osteotome is placed, and that can help you in making fine adjustments when
undertaking the bony hump reduction.
The right size is an 8-10 mm osteotome, larger is problematic. You can see this being
performed in this picture where you can really see what I'm seeing, that I have incised the
cartilage and the osteotome is seated right at that bone cartilage junction, and as my

assistant gently tap, tap; tap, taps the osteotome, I will see this slowly advance, and I will
be able to make little microchanges to the path of my osteotome and complete the desired
hump reduction
And there are good reasons to do that. A very common problem that I see when people
come to me from elsewhere for revision rhinoplasty is that too much was taken from the
bony part. The part that we are trying to cut with the osteotome, that part is actually thicker
and harder than the deeper part of the bone. So if your osteotome is not extremely sharp,
there is an increased risk that the bone knife will dive deep and take out too much bone,
like this patient here, where they took out too much bone but not enough of the cartilage
part of the profile,
So the idea of watching the bony hump reduction, of not only doing it by feel but also by
visualization, so that you can see it happening and make adjustments as needed to the
trajectory of the osteotome, I think that is a useful thing.

One of the reasons I like to take this out in one piece is that I can look at it, and as you can
see on this bump, there is a little piece that did not come out cleanly, and so I will need to
reduce that. That will happen sometimes, and that is why we have rasps. Now there is a
rasp that I use called a powered rasp. It has a reciprocating speed of approximately 15,000
RPM, and it reciprocates back and forth approximately 2 mm. So it is a very exact, very
precise tool.
What that allows me to do is that if I see one little spot where there is a little rough edge or
a little place that did not come out cleanly, I can smooth that down under direct vision and
very exactly. This is, in my opinion, much superior to a manual rasp, where you are relying
on your own hand to move the rasp back and forth. If you think about woodworking as an
analogy, if you are going to use a hand sander for manual sanding versus powered sanding,
a powered instrument is more exact, and you have a better chance of getting a really great
result, and so my preference for equipment for rasping is to use a powered rasp.

Now, I have done a lot of research and writing about powered instrumentation with my
mentors and colleagues, Dr. Dean Toriumi, Dr. Charlie Gross, and Dr. Eugene Tardy.

We have tried various different instruments, and we have even looked at the nasal bones of
cadavers after rasping with manual instrument and then after using a powered instrument,
and you can see how the one is so rough, and the one with the powered instrument is so
smooth. It makes sense that that would be true, but also seeing it sometimes is believing it,
and so I hope that I can persuade you about that.

There are a lot of different powered instruments including powered burs, but in my opinion,
the powered rasp is the most effective. It is the right smoothing tool. If you were going to
smooth something in the woodshop, you would use a smoothing back-and-forth motion to
sand something down, and that is the right motion to smooth an edge. Here again is a
picture of the powered rasp. We use one that is an air-driven one from the operating room
wall.

And then here is a patient who has very thin skin, and even before surgery you can see how
you can see the bony edges. You are just going to want to be very careful in a patient like
this, that you smooth everything down, and so after taking down this hump in the way I
have described, we also then will use the powered rasp to finely smooth it, and we really
fuss over this area to do everything we can to get it just right. This is a 4-year after surgery
result, and I think you can see the nice improvement, and he is certainly quite happy too.
So, to review, when I take a bump down, I don't aim to take it down to the intended final
profile with the first pass of the scalpel and the osteotome. On the contrary, I aim to take
down a bit less than that, and then I take it down the rest of the way, little by little, to the
final profile. For the bony part, we use the powered rasp, and for the cartilage part, we use a
fresh scalpel and just take little slivers of cartilage until we get it just right. We keep the
computer imaging pictures of the goal of surgery in the room, so that we rely not just on

our memory but the actual pictures that we reviewed with the patient where we have
established the desired goal.
Now, when talking about hump reduction, we really should talk about spreader grafts,
because the cartilaginous part of the nose needs support after hump reduction. If you don't
put in spreader grafts after hump reduction, then that cartilaginous part of the nose may
collapse. Most of you in the audience are of course familiar, but for the medical students
who are here, spreader grafts are little cartilage grafts, most often taken from deeper inside
the nose, usually from the septum, and they are placed in a space that is in between the
septum and the upper lateral cartilage.
Here is a picture, a diagram of these cartilages being sewn into place. We are not making
the nose wider with spreader grafts, we are just maintaining the width and strength of the
nose. If you don't do that, then there is a risk that the hump reduction may cause the nose to
over-narrow.
Spreader grafts are a subject worthy of an entire lecture, but I would like to make just one
important comment about them here. One of our guests at this meeting, Dr. Steve Perkins, I
know that in his lecture he will reiterate the need for spreader grafts when humps are taken
down. Dr. Perkins has a 30-year history of performing rhinoplasty. He has been in practice
for a long time, and as he will tell you, he used to do, and he has written about in the

literature, he used to do rhinoplasty through a closed approach and did not use spreader
grafts in these patients. However, he has written and lectured more recently that he saw
many of these patients come back with problems; specifically where he needed to go back
and put in spreader grafts. He now has switched to placing spreader grafts routinely when
the hump is taken down. I think you will agree that someone with 30 years of experience is
someone we should listen to. He used to do it the other way, and now he is placing spreader
grafts when he takes down the bump. I believe it is best to learn this lesson.
Here is a patient who had a very big nose and a big hump taken down, and you really need
to re-support this middle area by putting these spreader grafts in place. Which is what we
did!

And then, here's another patient, who had a nasal bump and a twisted nose. We used the
spreader grafts for support, and also to help create straightness. After we took down her
bump, we also not only created a wonderful profile but also placed a spreader graft just on
the left side to balance the nose from the front, and you can see she has a wonderfully
straight nose and a beautiful profile. I think you will agree that the spreader grafts did not
widen her nose, did not make her nose too wide.

Another technical element related to hump reduction are osteotomies. After you have taken
down the hump, you get what is called an open roof - you can see a diagram of this here.
All that means is that you have taken off the top of the roof, so to speak, and so the roof of
the nose is open. The surgeon needs to reposition the nasal bones to narrow them a bit, to
close the roof of the nose. Otherwise that creates a deformity that is very unpleasing.
So, to do this, to close the open roof, we will perform osteotomies, or cuts in the nasal
bone, to allow repositioning. We usually make two cuts - a bone cut in the middle, which
are shown in this first picture and is called a medial osteotomy, and then on the side, which
is shown in the second picture above and are called lateral osteotomies.

If there is a patient who has a twist of the nose because of an inherent twist of the bone
itself, we might need to even make a middle cut which is called an intermediate osteotomy.
That was done in this patient here and had a nice straightening result for him.
Now there are two ways to make an osteotomy. One is the endonasal, or inside-the-nose
approach – that is our preference. Others prefer a percutaneous – or through-the-skin
approach. This is used by some surgeons but I believe they are in the minority, especially in
the US.

It is important to use an osteotome of the proper size. One that is too large can do
substantial damage to the soft tissue. You know, if you use an osteotome that is too big,
then you can also damage the soft tissue of the nose. I believe this happens, that some
surgeons are using osteotomes that I feel are too large. I have had patients come in and say
that they have a friend who had a rhinoplasty, and she was swollen and bruised for weeks.
That is simply not what we see in our practice.
Part of that relates to using very meticulous technique, using local anesthesia with
epinephrine so that we don't get a lot of bleeding, but also that comes from using
instruments that are not too big, so that they don't traumatize the soft tissue.
Here is a picture of an osteotome from an operating room elsewhere, and let me tell you,
these are big osteotomes! They are approximately 4-5 mm wide and they have a big guard.
I would personally never use an osteotome this size in a rhinoplasty. As you cut through the
bone, these are going to really injure and cut the tissue and create bleeding and swelling.

We actually did some research in which we measured the thickness of the bone along the
path of the osteotome. We wanted to identify a scientific basis for the selection of an
osteotome, to determine an ideal width for an osteotome . As you can see here, our research
was published in the journal Plastic and Reconstructive Surgery, and was chosen as a
highlighted article for the journal's YearBook that year. Our research also resulted in a new
surgical instrument, offered by Medtronic Corporation, which is coincidentally called the
Becker Osteotome. I should disclose that I receive no royalties or payments from the sale of
this instrument.

In any case, for this research study we obtained x-rays such as this one, from healthy adult
men and adult women, and we measured how thick the bone is along the line of an
osteotomy. It turns out that the bone in this area is about 2.5 to 3 mm thick, so an osteotome
need not be any wider than that.
The osteotomes you see shown here are - from the right - 2 mm, 2.5, 3 and 4 mm wide. The
2-mm osteotome with a small guard is a little bit too small. You can use a 2-mm osteotome

without a guard, but some surgeons find that difficult. A 2.5 or 3-mm osteotome is just
right and, a 4 mm osteotome is a bit larger than needed.
As this diagram shows, if you use a 4-mm osteotome, then you will cause tearing of the
inner lining 95% of the time. If you use a 3-mm guarded osteotome, then about 30% of the
time you will get a little tear of the lining, and if you use a 2.5 mm osteotome, which very
successfully cuts the nasal bone (because that is how thick it is), then you only get a little
tear 5% of the time.
So as I mentioned, we worked with an instrument company to design 2.5 and 3-mm
osteotomes with a little guard. That little guard is just so that you can engage the bone and
so the osteotome won't slip off, so it makes it a very reliable instrument and a reliable
technique. We find that using these osteotomes, we get really minimal tearing of the tissue,
and we also had very minimal bruising and swelling, and the patients continue to be quite
pleased.

Now in the last few minutes, we are going to talk about the opposite of taking down the
bump; we are going to talk about augmenting the bridge. This is a subject that could
encompass an hour, but we only have a few minutes, so we will really just hit the
highlights.
There are some people, whether by an injury or from previous surgery or from birth, they
have a bridge that is too low for them, and they would like it built up. We like to use
cartilage for that, either taken from inside the nose (the septum), or also from behind the
ear. For more severe cases we will use rib.
Above are photos of a patient who – after a traumatic injury - had a nose that was too short
and also scooped. By building up the bridge, we were able not only to give him a more
masculine-appearing profile, but also to cause the tip to get pushed down a little bit and
thereby lengthen the nose.

Here is a young lady who had a softball injury, and you can see we created a more
feminine-appearing nose for her.
As this diagram shows, if you use a 4-mm osteotome, then you will cause tearing of the
inner lining 95% of the time. If you use a 3-mm guarded osteotome, then about 30% of the
time you will get a little tear of the lining, and if you use a 2.5 mm osteotome, which very
successfully cuts the nasal bone (because that is how thick it is), then you only get a little
tear 5% of the time.
So as I mentioned, we worked with an instrument company to design 2.5 and 3-mm
osteotomes with a little guard. That little guard is just so that you can engage the bone and
so the osteotome won't slip off, so it makes it a very reliable instrument and a reliable

technique. We find that using these osteotomes, we get really minimal tearing of the tissue,
and we also had very minimal bruising and swelling, and the patients continue to be quite
pleased.
Now in the last few minutes, we are going to talk about the opposite of taking down the
bump; we are going to talk about augmenting the bridge. This is a subject that could
encompass an hour, but we only have a few minutes, so we will really just hit the
highlights.
There are some people, whether by an injury or from previous surgery or from birth, they
have a bridge that is too low for them, and they would like it built up. We like to use
cartilage for that, either taken from inside the nose (the septum), or also from behind the
ear. For more severe cases we will use rib.
Above are photos of a patient who – after a traumatic injury - had a nose that was too short
and also scooped. By building up the bridge, we were able not only to give him a more
masculine-appearing profile, but also to cause the tip to get pushed down a little bit and
thereby lengthen the nose.

Here is a young lady who had a softball injury, and you can see we created a more
feminine-appearing nose for her.
Here's a woman who had a motor vehicle accident, as I recall, and she had what we call
Boxer's nose deformity, where the middle part of her nose has collapsed. We rebuilt that
with a triple-layer graft using a closed approach, and you can see the wonderful profile that
we achieved for her.

This is a very delightful woman, delightful patient. She had a problem where her nose
completely collapsed, and so this is a very complicated problem that is really a
reconstructive surgery, and we used rib cartilage for her, and we really needed to rebuild
the entire nose. You can see that we got a pretty nice result for her. She was certainly quite
pleased.
And finally, this is a gentleman who suffered a traumatic injury to his nose and then
developed a severe infection in his nose after this injury. These two things together caused
his nose to collapse, and we also rebuilt his nose with rib. We don't have time to discuss rib

cartilage reconstruction in too much detail now, but basically you rebuild the L-strut of the
nose and rebuild an entire structure over the existing nose.
So this is an overview of modification of the bridge – reduction and augmentation - and
osteotomies. This is a lot of material to cover in the allotted time, and so this lecture was
just an overview. I will certainly discuss the application of these techniques in my other
lectures today and tomorrow, and I will certainly look forward to talking to each of you if
any of you have any questions. Thank you very much.