LCDL Digitization Guidelines & Instructions · SCDL recommends access image files be created as...
17
Digitization Guidelines & Instructions August 2017 Reviewed and Updated Annually Distilled from the August 2010 document “Technical Guidelines for Digitizing Cultural Heritage Materials: Creation of Raster Image Master Files” created by the Federal Agencies Digitization Initiative (FADGI) - Still Image Working Group. http://www.digitizationguidelines.gov/guidelines/digitize-technical.html
Transcript of LCDL Digitization Guidelines & Instructions · SCDL recommends access image files be created as...

Digitization Guidelines & Instructions
August 2017 Reviewed and Updated Annually
Distilled from the August 2010 document “Technical Guidelines for Digitizing Cultural Heritage Materials: Creation of Raster Image Master Files” created by the Federal Agencies Digitization Initiative (FADGI) - Still Image Working Group.
http://www.digitizationguidelines.gov/guidelines/digitize-technical.html

LCDL Digitization Guidelines & Instructions 1
Table of Contents
Digitization Guidelines.............................................................................................. 2 Introduction .....................................................................................................................................2
Media Types to be Digitized.............................................................................................................2
Master Files ......................................................................................................................................2
Access Files .......................................................................................................................................3
Resolution .......................................................................................................................................3
Naming Conventions ........................................................................................................................5
File Organization ..............................................................................................................................5
Digitization Instructions ........................................................................................... 6
Introduction .....................................................................................................................................6
Scanning with the Epson Scan Utility ...............................................................................................6
Batch Processing Image Files Using Photoshop ............................................................................ 13
Digitization At A Glance .......................................................................................... 16

2 LCDL Digitization Guidelines & Instructions
Digitization Guidelines Introduction The Lowcountry Digital Library (LCDL) uses digitization not just as a means of increasing access to a physical collection but also as a preservation method. Digitization protects original historical documents and analog records from further deterioration and damage because it can eliminate repetitive handling. Therefore, quality digitization is critical to the success of any digital project. These digitization guidelines adhere to international standards and best practices for digitization, such as the Federal Digitization Guidelines Initiative, and if followed, will produce high quality archival images useful for both access and preservation. Different types of items require different digitization settings. Books, manuscripts, photographs, slides, and negatives all have different digitization needs. Therefore it is important to establish scanning best practices and guidelines based on the item format.
Media Types to be Digitized Most media that needs to be digitized can be broken down into 5 general categories. These categories are: Printed Text: Any mechanically printed or typed material, such as books, pamphlets, etc. Manuscripts: Any hand written material, including but not limited to journals, letters, etc. Photographs: Any color or black and white, printed photographs Slides: Any color or black and white mounted slides 35mm Negatives/Transparencies: Any color or black and white film transparencies If you have the need to digitize any media not covered by the above 5 categories, please contact your SCDL regional contact for information and guidelines specific to your project.
Master Files These guidelines provide technical approaches to the creation of digital (pixel-based) master files. In creating master files, the primary objective is to produce digital images that look like the original items and to create a “reasonable reproduction” without enhancement. However, practice may vary from institution to institution regarding the amount of processing or editing that is performed on master files. In general, master files have the following attributes:
• Maintain the essential features and information of the original
• Represent the best copy produced by a digitizing organization, with best defined as meeting the objectives of a particular project or program
• Represent digital content that the organization intends to maintain and manage for the long term
• Are created primarily for the production of a range of copies used for specific purposes (such as derivatives and duplicates)
LCDL Digitization Guidelines & Instructions 3
• Document the image at the time of scanning, not what it may once have looked like if restored to its original condition
Institutions may create one or more digital master copies depending on the nature of the originals and the intended purpose of digitization. Digitization should be use neutral and should not geared for any one specific output. If digitization is done to recommended image parameters and all other requirements as described in these guidelines, we believe the master image files produced should be usable for a wide variety of applications and outputs, including web usage and reproduction requests. Generally, given the high costs and effort for digitization projects, we do not recommend digitizing to anything less than LCDL’s minimum standards. While there are several files formats that might be appropriate as master image files, including TIFF, JP2 and even versions of RAW files (CR2, NEF, DNG), the most widely used and recommended are uncompressed TIFF files1. Therefore, LCDL recommends that master image files be created as TIFFs. TIFF is a lossless format and is excellent for preservation.
Access Files The term “access file” refers to the digital file that is served up to the public through your digital repository or digital library system. Access files require a smaller file size to facilitate rapid load times on your website. Also, since computer monitor resolution ranges from 72-96 pixels per inch, these access files can and should be a lower resolution than your master files. You can create access files from your master files using the batch processing capabilities of Photoshop or Photoshop Elements. SCDL recommends access image files be created as JPEGs. JPEGs have a very small file size, but are not a lossless format and therefore are not suitable as master files.
Resolution The term “resolution” is defined as “an imaging system’s ability to resolve finely spaced detail”. When we talk about image resolution, we generally use descriptive terms like sharp, blurry, and in (or out of) focus. Image resolution refers to the number of pixels per inch in the image. A higher image resolution generally equates to higher quality image. This is true because more pixels, which are basically just bits of information, are being stored in the same amount of space. The lower the resolution, the less information overall that you store in the digital file. However, it is worth noting that more isn’t always better. Digitization at a high resolution will not improve upon the
1 Sustainability of Digital Formats, Planning for Library of Congress Collections, accessed 29 September, 2015.
http://www.digitalpreservation.gov/formats/content/still_preferences.shtml

4 LCDL Digitization Guidelines & Instructions
quality of the item digitized.2 Digitizing at higher resolutions also yields larger file sizes. Larger file sizes can dramatically increase your need for digital storage. Therefore, it is important to find the right balance when choosing the appropriate resolution for your scanning project. Printed text generally require a lower resolution than photographs, slides, and negatives because these documents typically do not have as much visual information that needs to be captured. Photograph can contain rich visual material in color, texture and lighting and therefore can require higher scanning resolutions. The below information will help you determine the best resolution to capture high quality, archival digital images while not creating unnecessarily large digital files.
Media Type Minimum Digitization Specifications
Books/Typed Pages (≥5”x8”)
Smaller sized books (<5”x8”)
300 ppi, 24-bit RGB color
450 ppi, 24-bit RGB color
Manuscripts/handwritten documents
(≥8”x10”)
Smaller sized manuscripts (<8”x10”)
450 ppi, 24-bit RGB color
600 ppi, 24-bit RGB color
Photographs (black and white) 600 ppi, 16-bit grayscale
Photographs (color) 600 ppi, 24-bit RGB color
Slides (black and white) 2100 ppi for 35mm slides, 16-bit grayscale
Slides (color) 2100 ppi for 35mm slides, 24-bit RGB color
Film Negatives or Transparencies
(black and white)
2100 ppi for 35mm film, 16-bit grayscale
800 ppi for 4”x5” originals, 16-bit grayscale
Film Negatives or Transparencies
(color)
2100 ppi for 35mm film, 24-bit RGB color
800 ppi for 4”x5” originals, 24-bit RGB color
If you feel a project would best be scanned below any of the above minimum digitization specifications, please confirm this with your regional scanning center coordinator prior to starting the project.
2 Digitizing a simple, printed page of text (usually printed at 150-300 dots per inch or dpi) at an extraordinarily high resolution can actually yield lower quality image then if the item was digitized at an appropriate resolution. The same is true of an old newspaper that used a 200 dpi halftone. Digitizing these items at a high resolution won’t produce a higher quality image than the original. What tends to happen is that the flaws on the page (the discolorations in the paper, the tear on the corner) become more obvious.
LCDL Digitization Guidelines & Instructions 5
A Word on Naming Conventions What you name your digital files should not be an afterthought and should be kept as useful and platform-independent as possible. To minimize any conflicts, file names should be:
• Lowercase
• Contain no spaces
• Contain no special characters except underscores (__) or dashes (-) Examples: The Charleston Museum is scanning a collection of plantation photographs. An example of a good naming convention for those files might be “cm_plantation_001.tiff”. This file name identifies the institution, the collection and the order of the images. The College of Charleston is digitizing Box 1 of the Drayton Papers (MSS#0152). An example of a good naming convention for those files might be “cofc_mss0152b1_001.tiff”. This file name identifies the institution, the manuscript and box number of the archival collection and the order of the images.
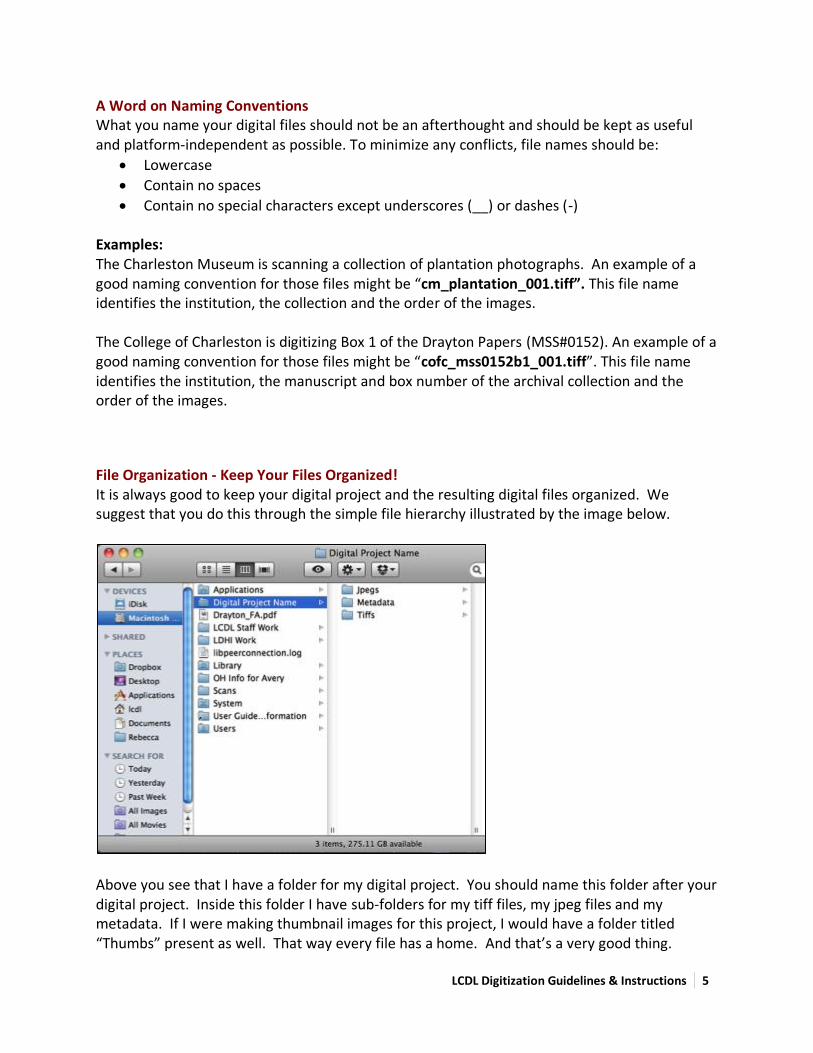
File Organization - Keep Your Files Organized! It is always good to keep your digital project and the resulting digital files organized. We suggest that you do this through the simple file hierarchy illustrated by the image below.
Above you see that I have a folder for my digital project. You should name this folder after your digital project. Inside this folder I have sub-folders for my tiff files, my jpeg files and my metadata. If I were making thumbnail images for this project, I would have a folder titled “Thumbs” present as well. That way every file has a home. And that’s a very good thing.

6 LCDL Digitization Guidelines & Instructions
Digitization Instructions Introduction This document includes screenshots and instructions on how to digitize an item using the Epson Scan Utility as well as basic information on how to batch create JPEG files from TIFF files using Photoshop’s batch processing capability. While these instructions are for specific software and hardware, we hope that these screenshots can be broadly useful as there are similarities across digitization platforms and products. These instructions are not meant as a substitute for your product or software instruction manual. When in doubt, read the manual. Scanning with the Epson Scan Utility The below set of instructions were created for the Epson Scan Utility v3.4.9.6 but may apply to earlier/later versions of the Epson Scan Utility. 1. Turn on your scanner. After your scanner is powered up, then open the Epson Scan Utility. 2. Select “Professional Mode” in the top menu of the Epson Scan Utility window.

LCDL Digitization Guidelines & Instructions 7
3. Now that you are in Professional Mode, you will see that we have several options available to configure. For the purposes of this tutorial, we are going to leave the Document Type, Document Source and Auto Exposure Type settings at the default. If you were digitizing transparent material, you can adjust these settings accordingly. You can also select the appropriate Image Type setting here as well. For the most part, the typical setting is 24-bit color. Please consult your SCDL Digitization Guidelines to confirm hat this is the appropriate setting for your materials.
8 LCDL Digitization Guidelines & Instructions
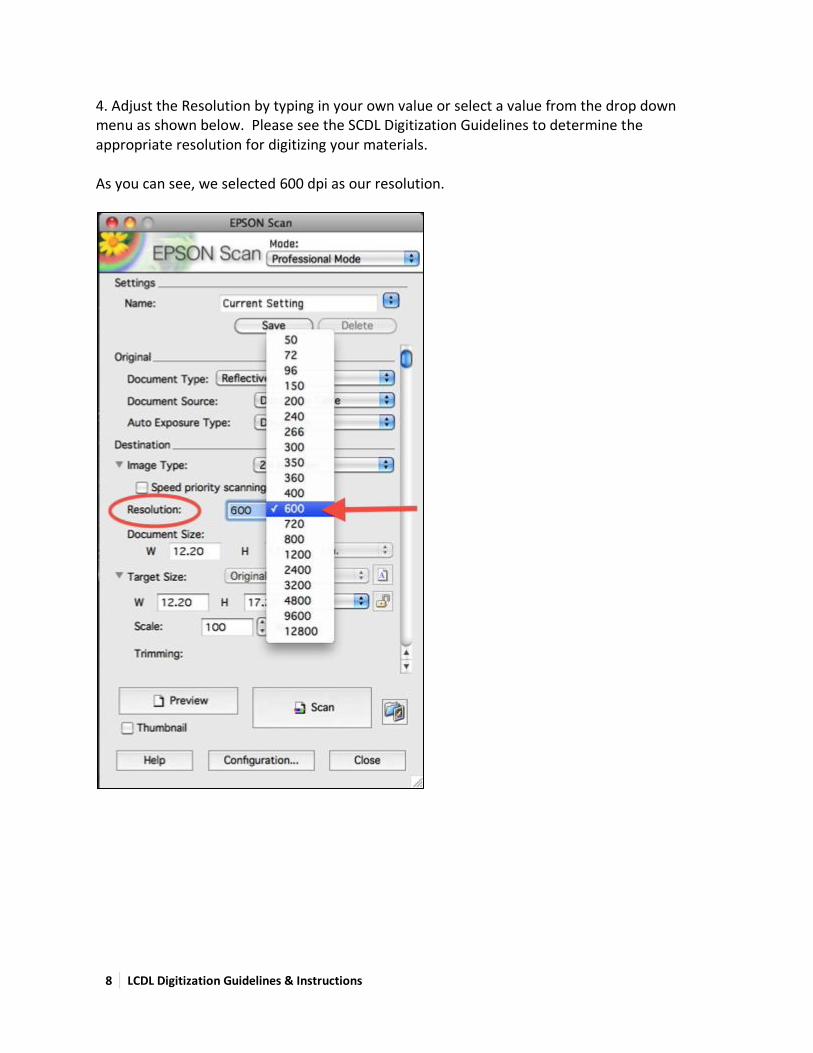
4. Adjust the Resolution by typing in your own value or select a value from the drop down menu as shown below. Please see the SCDL Digitization Guidelines to determine the appropriate resolution for digitizing your materials. As you can see, we selected 600 dpi as our resolution.
LCDL Digitization Guidelines & Instructions 9
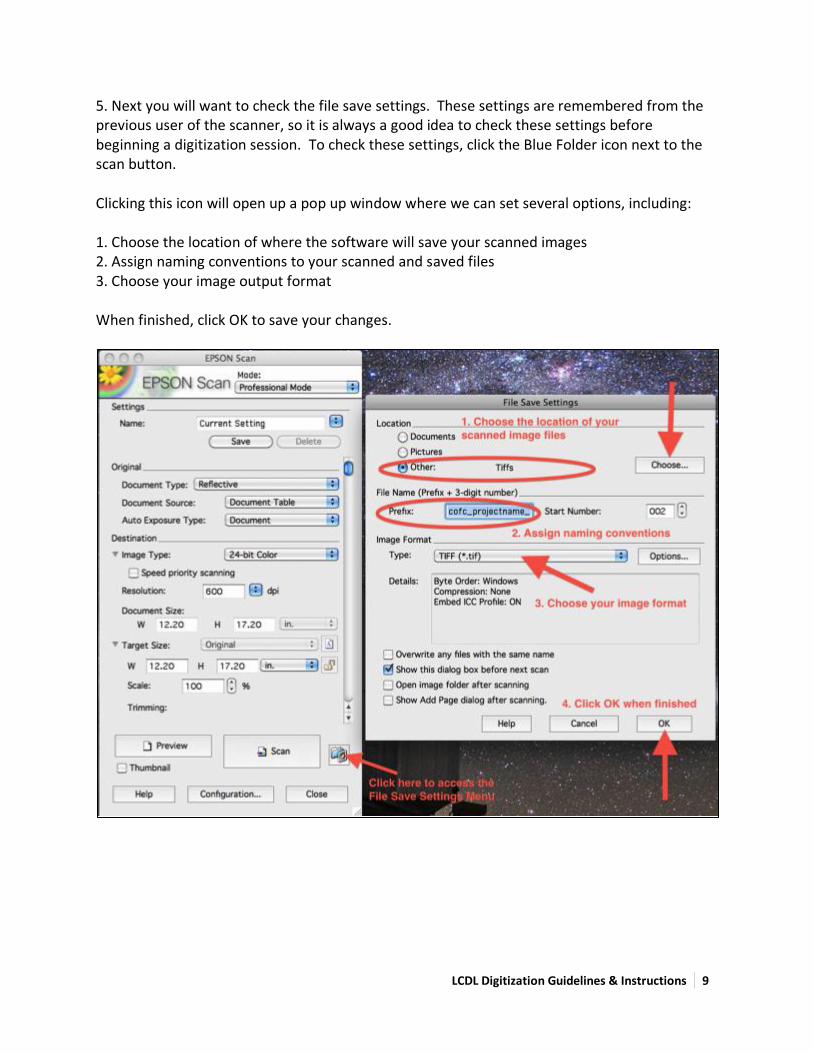
5. Next you will want to check the file save settings. These settings are remembered from the previous user of the scanner, so it is always a good idea to check these settings before beginning a digitization session. To check these settings, click the Blue Folder icon next to the scan button. Clicking this icon will open up a pop up window where we can set several options, including: 1. Choose the location of where the software will save your scanned images 2. Assign naming conventions to your scanned and saved files 3. Choose your image output format When finished, click OK to save your changes.

10 LCDL Digitization Guidelines & Instructions
6. Now that your file save settings are set, we are ready to scan. First, we will preview our scan. To do this, position the item to be digitized on the scanner bed with the intended capture-side face down. (Please note: This will be different for transparent media. Please read your scanner manual for hardware specific instructions on how to digitize transparent media.) When the item is placed on the scanner bed and you have closed the scanner lid, click “Preview”.
After you click “Preview”, a preview window opens that will display your preview image (in this case we are scanning a photograph). Using the selection tool, draw a box around the image you want to capture. Be sure not to cut off or crop out any part of the image. Then click “Scan”
LCDL Digitization Guidelines & Instructions 11
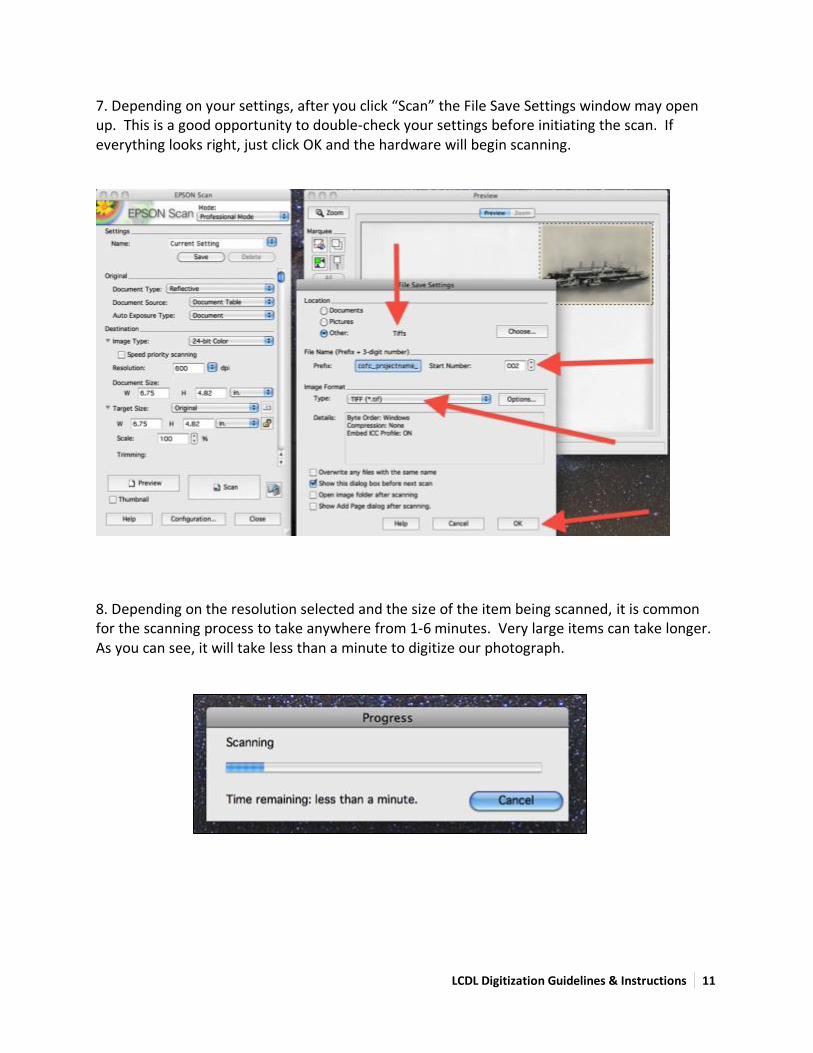
7. Depending on your settings, after you click “Scan” the File Save Settings window may open up. This is a good opportunity to double-check your settings before initiating the scan. If everything looks right, just click OK and the hardware will begin scanning.
8. Depending on the resolution selected and the size of the item being scanned, it is common for the scanning process to take anywhere from 1-6 minutes. Very large items can take longer. As you can see, it will take less than a minute to digitize our photograph.

12 LCDL Digitization Guidelines & Instructions
9. Now that you have scanned your first item, you can double check to make sure your item was saved in the right folder. Yep! Looks like out Tiff is right where we want it to be. Hooray!
Pro-Tip: What do you do if you opened your scanned image and you noticed that the color seemed off. Too vibrant or too amber? I’ve heard people describe some scans of older letters as looking like they were “glowing”. This might indicate that your scanner has “Color Correction” settings enabled. To disable this feature, click “Configuration”, and then click “Color” from the pop-up display. Be sure “No Color Correction” is selected. Click OK. That’s It!

LCDL Digitization Guidelines & Instructions 13
Batch Processing Image Files Using Photoshop’s Image Processor
The below set of instructions were created for Photoshop CS5 but may apply to earlier/later versions of the same software. These instructions will help you create batches of JPEG or Thumbnail files from your newly scanned TIFF images. Open up Photoshop and from the “File” menu select “Scripts”. From the “Scripts” drop-down menu, select “Image Processor...” to open the Image Processor display.
14 LCDL Digitization Guidelines & Instructions
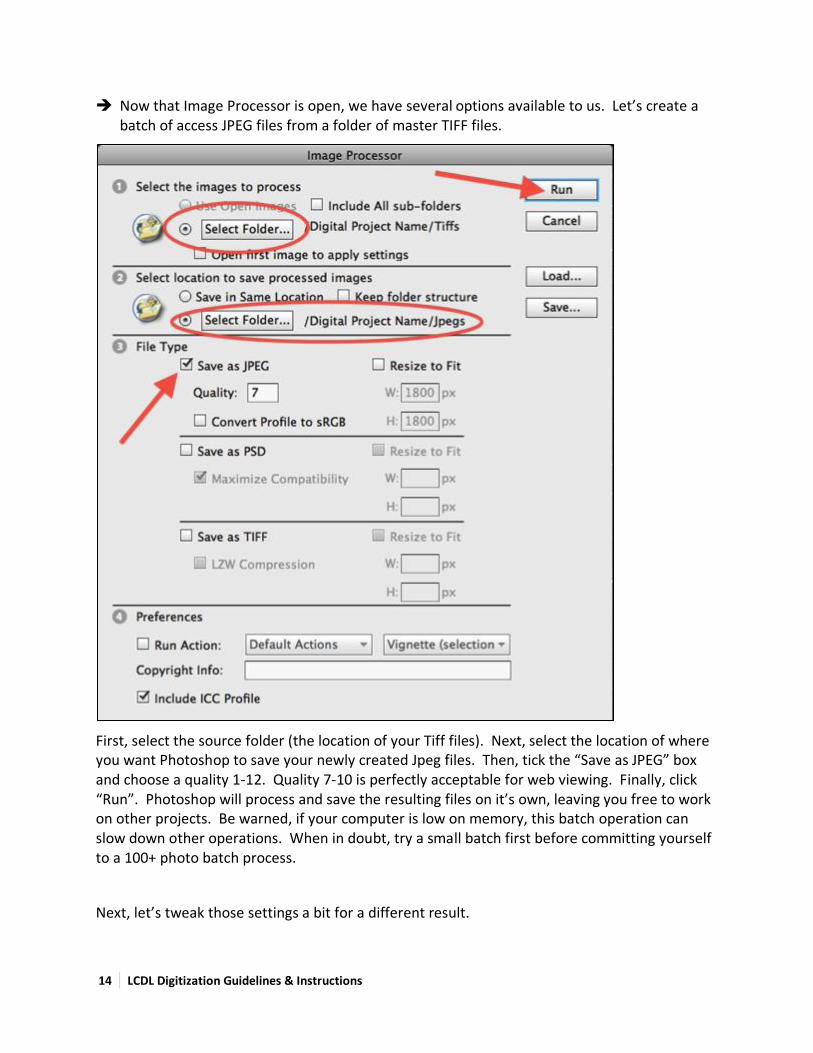
Now that Image Processor is open, we have several options available to us. Let’s create a batch of access JPEG files from a folder of master TIFF files.
First, select the source folder (the location of your Tiff files). Next, select the location of where you want Photoshop to save your newly created Jpeg files. Then, tick the “Save as JPEG” box and choose a quality 1-12. Quality 7-10 is perfectly acceptable for web viewing. Finally, click “Run”. Photoshop will process and save the resulting files on it’s own, leaving you free to work on other projects. Be warned, if your computer is low on memory, this batch operation can slow down other operations. When in doubt, try a small batch first before committing yourself to a 100+ photo batch process.
Next, let’s tweak those settings a bit for a different result.

LCDL Digitization Guidelines & Instructions 15
Let’s create a batch of access JPEG files that need to fit within a certain size limit from a folder of master TIFF files. In this example, I want to create access JPEGS that are no larger than 1800 pixels on their largest size. This process is also useful if you need to create thumbnail images (images no larger than 100px/side, for example). You may never need to do this, but it’s always good to know how.
Just like the first example, select the source folder (the location of your Tiff files). Next, select the location of where you want Photoshop to save your newly created Jpeg files. Then, tick the “Save as JPEG” box and choose a quality 1-12. This time, tick the “Resize to Fit” box and type in your specified parameters. Finally, click “Run” and let Photoshop work it’s magic.
16 LCDL Digitization Guidelines & Instructions
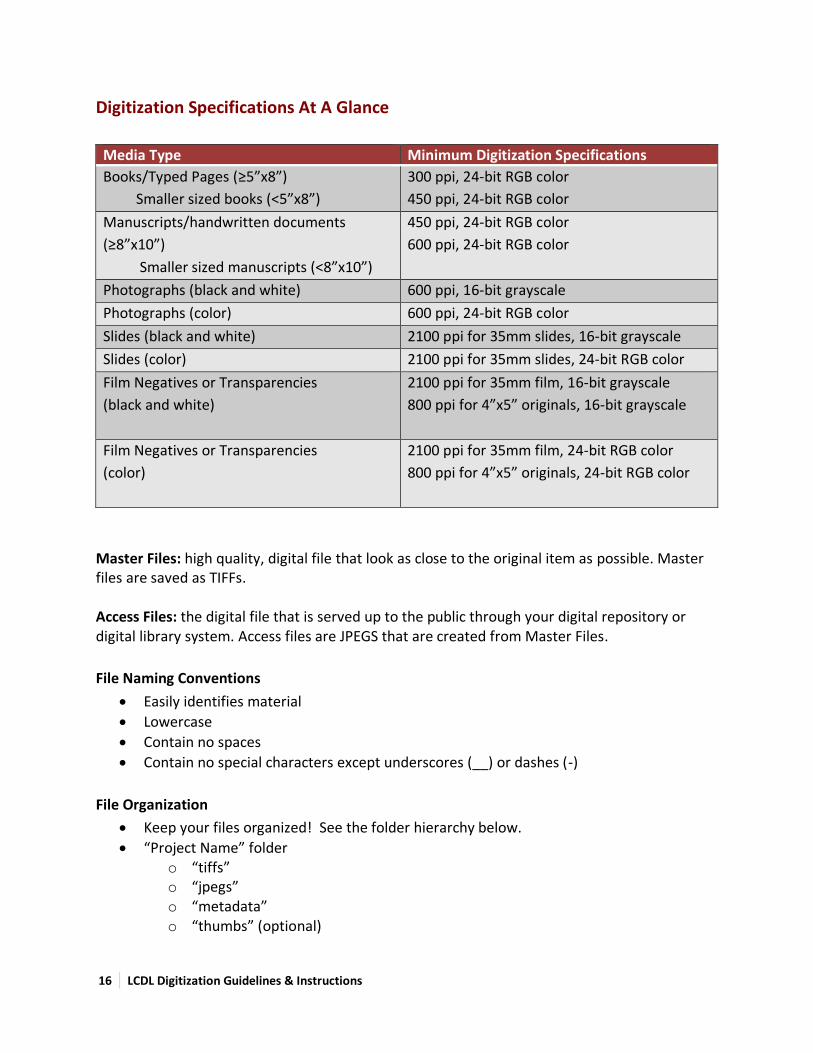
Digitization Specifications At A Glance
Media Type Minimum Digitization Specifications
Books/Typed Pages (≥5”x8”)
Smaller sized books (<5”x8”)
300 ppi, 24-bit RGB color
450 ppi, 24-bit RGB color
Manuscripts/handwritten documents
(≥8”x10”)
Smaller sized manuscripts (<8”x10”)
450 ppi, 24-bit RGB color
600 ppi, 24-bit RGB color
Photographs (black and white) 600 ppi, 16-bit grayscale
Photographs (color) 600 ppi, 24-bit RGB color
Slides (black and white) 2100 ppi for 35mm slides, 16-bit grayscale
Slides (color) 2100 ppi for 35mm slides, 24-bit RGB color
Film Negatives or Transparencies
(black and white)
2100 ppi for 35mm film, 16-bit grayscale
800 ppi for 4”x5” originals, 16-bit grayscale
Film Negatives or Transparencies
(color)
2100 ppi for 35mm film, 24-bit RGB color
800 ppi for 4”x5” originals, 24-bit RGB color
Master Files: high quality, digital file that look as close to the original item as possible. Master files are saved as TIFFs. Access Files: the digital file that is served up to the public through your digital repository or digital library system. Access files are JPEGS that are created from Master Files.
File Naming Conventions
• Easily identifies material
• Lowercase
• Contain no spaces
• Contain no special characters except underscores (__) or dashes (-)
File Organization
• Keep your files organized! See the folder hierarchy below.
• “Project Name” folder o “tiffs” o “jpegs” o “metadata” o “thumbs” (optional)