Lab Admin Guide - Cengageassets.cengage.com/pdf/gui_sam-lab-admin.pdfLab Admin Guide Contents...
40
SAM Assessment, Training and Projects for Microsoft Office Lab Admin Guide
Transcript of Lab Admin Guide - Cengageassets.cengage.com/pdf/gui_sam-lab-admin.pdfLab Admin Guide Contents...

SAM Assessment, Training and Projects for Microsoft Office
Lab Admin Guide
Contents Overview 1
Introduction 1 Product Architecture Review 1 Definitions 1
System Requirements 2 Workstation Requirements 2 Network Requirements 3
Network Testing 3
Network Best Practices and Recommendations 5
Setting Up SAM Workstations 6 Setting Up Your Browser 6
Supported Browsers 6
Enabling JavaScript 6
Setting Up Pop-Ups (IE Only) 8
Disabling Pop-Up Blockers 8
Disabling Ad Blockers 11 Setting Up Your Computer 11
Necessary Software 11
Disk Protection Software 12
Monitor Resolution 12
Tips for Macintosh Users 13 Accessing Documentation 14
SAM Administration 15 User Administration 15
SAM User Roles 15 Searching for and Selecting a User Account 16 Adding a User Account 17
User Account Field Names and Descriptions 17 Importing User Records 18
User Import Format 18
User Import Procedure 19
©2014 Cengage Learning. 20 Channel Center Street. Boston, MA 02210 SAM i
Editing a User’s Account 22 Resetting or Adjusting a Student’s Exams 22 Deactivating a User’s Record 23 Admin Settings 23
Database Management 24
Global Options 27
Modifying Global Options 28
Appendix A: Troubleshooting Guide i Login and SAM Access Issues i Recovering and Resuming from a Crash or Lost Connection i
Internet Explorer i
Firefox for Windows i
Chrome for Windows ii
Safari for Macintosh ii Troubleshooting Project-Related Problems ii
Wrong Key iii
Wrong Name iii
Wrong Format iii
Wrong Application iii
Virus Detected iii
Maximum File Size Exceeded iv Technical Support and Maintenance for SAM iv
Technical Support Availability iv
Server Availability v
Maintenance v
Upgrades v
Appendix B: SAM License Agreement i
©2014 Cengage Learning. 20 Channel Center Street. Boston, MA 02210 SAM ii
Overview
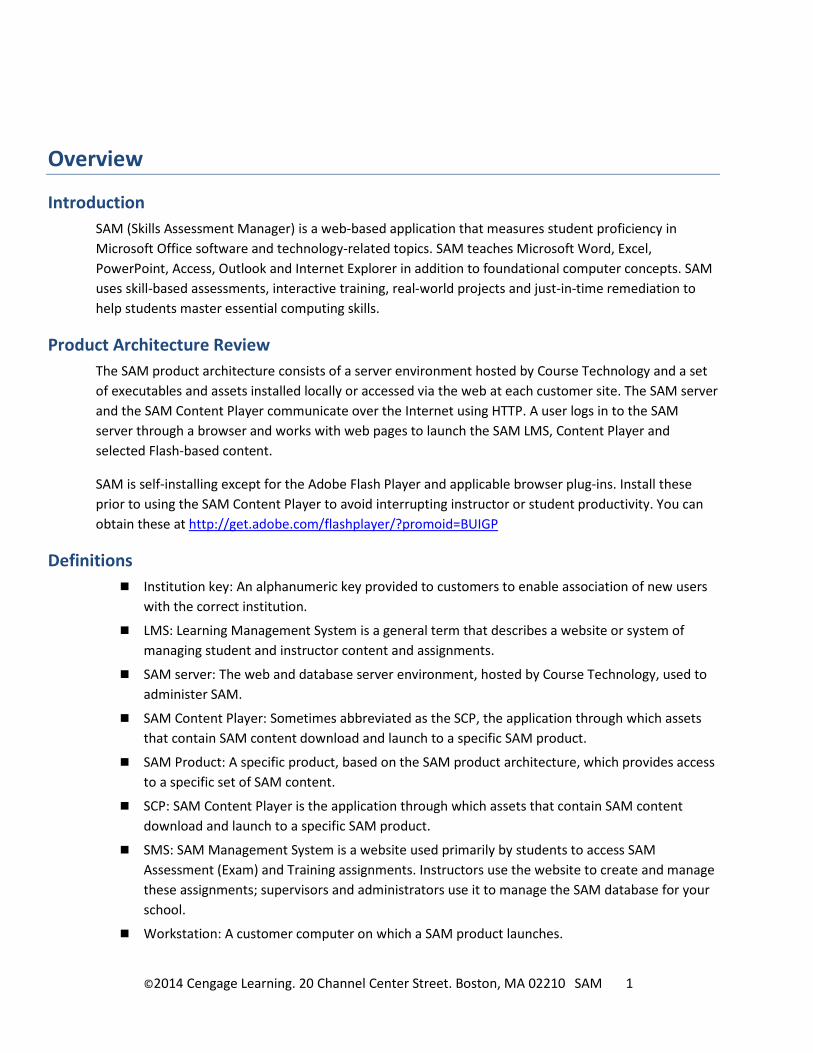
Introduction SAM (Skills Assessment Manager) is a web-based application that measures student proficiency in Microsoft Office software and technology-related topics. SAM teaches Microsoft Word, Excel, PowerPoint, Access, Outlook and Internet Explorer in addition to foundational computer concepts. SAM uses skill-based assessments, interactive training, real-world projects and just-in-time remediation to help students master essential computing skills.
Product Architecture Review The SAM product architecture consists of a server environment hosted by Course Technology and a set of executables and assets installed locally or accessed via the web at each customer site. The SAM server and the SAM Content Player communicate over the Internet using HTTP. A user logs in to the SAM server through a browser and works with web pages to launch the SAM LMS, Content Player and selected Flash-based content.
SAM is self-installing except for the Adobe Flash Player and applicable browser plug-ins. Install these prior to using the SAM Content Player to avoid interrupting instructor or student productivity. You can obtain these at http://get.adobe.com/flashplayer/?promoid=BUIGP
Definitions Institution key: An alphanumeric key provided to customers to enable association of new users
with the correct institution.
LMS: Learning Management System is a general term that describes a website or system of managing student and instructor content and assignments.
SAM server: The web and database server environment, hosted by Course Technology, used to administer SAM.
SAM Content Player: Sometimes abbreviated as the SCP, the application through which assets that contain SAM content download and launch to a specific SAM product.
SAM Product: A specific product, based on the SAM product architecture, which provides access to a specific set of SAM content.
SCP: SAM Content Player is the application through which assets that contain SAM content download and launch to a specific SAM product.
SMS: SAM Management System is a website used primarily by students to access SAM Assessment (Exam) and Training assignments. Instructors use the website to create and manage these assignments; supervisors and administrators use it to manage the SAM database for your school.
Workstation: A customer computer on which a SAM product launches.
©2014 Cengage Learning. 20 Channel Center Street. Boston, MA 02210 SAM 1

System Requirements
Workstation Requirements Each workstation running a SAM product must meet the following minimum system requirements:
Requirements Details
Computer Processor: Intel Pentium 4 or higher processor required; Intel Centrino or an equivalent multi-core processor recommended
Memory: 512 MB RAM required; 1 GB RAM recommended
Operating Systems: Vista SP1 32- or 64-bit, Windows 7 32- or 64-bit or Windows 8 32- or 64-bit; Macintosh OS X 10.6 Snow Leopard or higher
Audio and Video Graphics: SVGA Resolution: Minimum recommended 1024 x 768 Color: 32-bit Video Memory: 64 MB minimum; 128 MB
recommended Video Card: Modern DirectX compatible
Network Internet Connection: 56K modem minimum; broadband connection (cable, DSL, T1 or ISDN) recommended; persistent connection required
Software and Disk Storage Web Browsers: 4 MB Adobe Flash Player 11 recommended; versions
10.2 or higher have been tested and are supported; versions prior to 10.1 are not supported: 2 MB
Adobe Reader 8 minimum; 9 recommended: 22.4 MB
For SAM 2010 Projects: Microsoft Office 2010 Professional for Windows
For SAM 2013 Projects: Microsoft Office 2013 Professional for Windows, Professional Plus, RT and Office 365 (Home Premium, University) NOTE: Refer to your Microsoft documentation for current disk storage requirements.
For up-to-date system requirements for Microsoft products, refer to the following page on the Microsoft
©2014 Cengage Learning. 20 Channel Center Street. Boston, MA 02210 SAM 2
website:
For the Windows Vista operating system: http://support.microsoft.com/kb/919183
For the Windows 7 operating system: http://windows.microsoft.com/en-us/windows7/products/system-requirements
For the Windows 8 operating system: http://windows.microsoft.com/en-us/windows-8/system-requirements
Network Requirements Network Testing SAM provides a media rich, interactive learning experience for Cengage customer institutions and their students. It relies heavily on content rendered in Flash and other formats for delivery to the students’ workstations. The considerable size of these content objects can have a negative impact on SAM’s overall performance (network communications congestion and latency).
The following are check points and recommendations for your institution’s network.
NOTE: The results of these tests may vary significantly from day to day and at different times of the day as network bandwidth is consumed. These tests can provide an early warning of potential problems.
Performance Testing
From a workstation within the campus network (preferably the classroom or lab area where students use SAM), go to http://www.speakeasy.net/speedtest/. Run a test and record the results for the download and upload speeds. Download speeds in excess of 1 Mbps produce the best SAM user experience.
©2014 Cengage Learning. 20 Channel Center Street. Boston, MA 02210 SAM 3

Testing a Non-SAM Application
Testing a media rich application like YouTube or some other Flash video streaming application indicates how well SAM will perform. If you see issues with YouTube, like sputtering or choppy audio/video, expect SAM users to see similar problems.
Trace Route Testing
From a workstation within the campus network (preferably in the classroom or lab area where students use SAM), run the following command from the Windows command line:
Tracert sam.cengage.com
Download Speeds
Download Speeds
©2014 Cengage Learning. 20 Channel Center Street. Boston, MA 02210 SAM 4
Hop counts and transmit times are critical.
More than 18 hops may potentially cause issues.
Transmit times should be in the range of 40-120ms.
Ping Testing
From a workstation within the campus network (preferably the classroom or lab area where students and instructors use SAM), run the following command from the Windows command line: Ping -t sam.cengage.com
The round trip times should be less than 120ms for optimal performance.
Packet loss should be under 1% for optimal performance.
Network Best Practices and Recommendations
Available Bandwidth
Each user typically uses up to 1 mbps of bandwidth to download and use SAM training content. Therefore, a class with 30 students should have ideally 30 Mbps of available capacity during training sessions. Exam and project sessions require significantly less bandwidth.
Running SAM Alone
SAM is a media-rich application that requires plenty of bandwidth and critical system memory to provide the best user experience. Do not run other applications during SAM sessions, especially during exams.
Using Social Networking Applications with SAM
Social networking applications running during a SAM session can have a negative impact on overall workstation performance. Disallow or block these applications on workstations when students use SAM.
Firewall settings
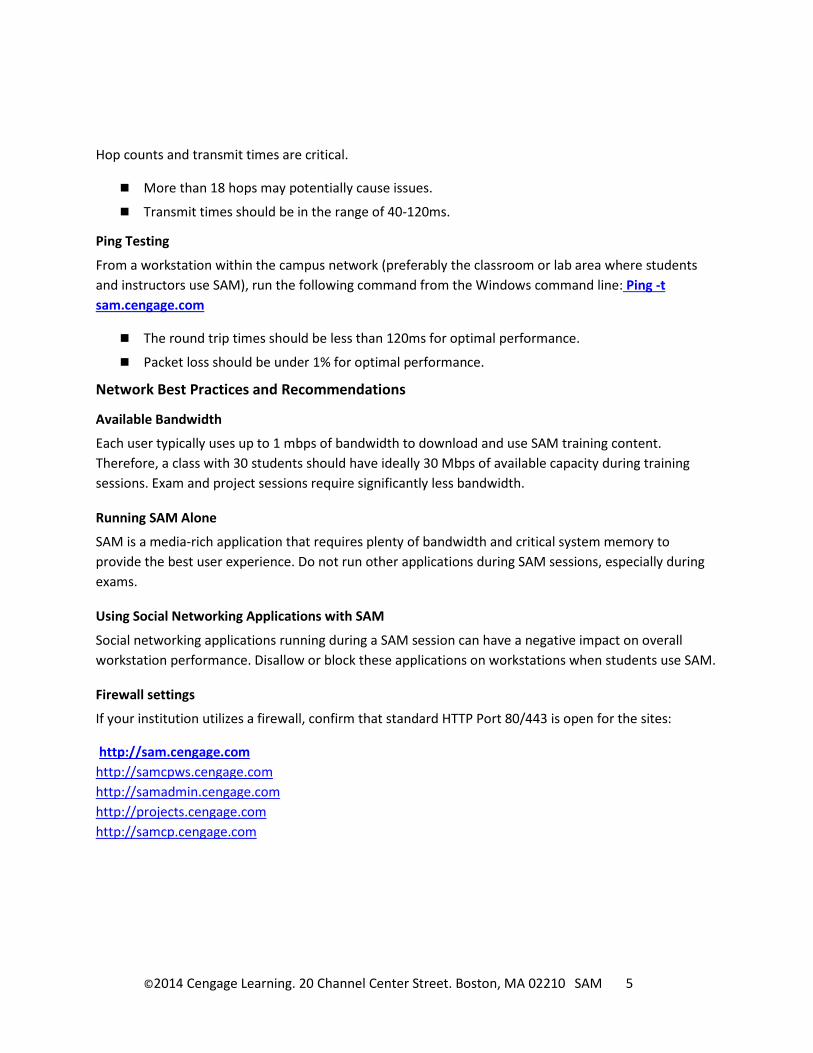
If your institution utilizes a firewall, confirm that standard HTTP Port 80/443 is open for the sites:
http://sam.cengage.com http://samcpws.cengage.com http://samadmin.cengage.com http://projects.cengage.com http://samcp.cengage.com
©2014 Cengage Learning. 20 Channel Center Street. Boston, MA 02210 SAM 5

Setting Up SAM Workstations
Setting Up Your Browser Supported Browsers You can access SAM using the following browsers:
Operating System Supported Browsers
Windows Vista SP1, Windows 7 and 8 Internet Explorer 9 through 11 for 32-bit version of Windows or 64-bit versions running in 32-bit emulation mode; Firefox (latest version and latest -1); Chrome (latest version and latest -1) NOTES: SAM 2010 Assessment and Training
content is not tested on Chrome. Compatibility Mode is not supported for
Internet Explorer.
Macintosh OS X 10.6, 10.7 and 10.8 Snow Leopard
Safari 5.0 or 6.0 (for Mac OS 10.8 only); Firefox (latest version and latest -1)
Confirm these settings in your browser:
JavaScript is enabled.
Pop-up Blocking is disabled, either entirely or for the SAM URLs: http://sam.cengage.com
Ad blocking software is disabled for the URLS: http://sam.cengage.com
Enabling JavaScript To use SAM, verify that JavaScript is enabled in your browser. To confirm its status and enable it if necessary, use the appropriate procedure for your browser.
Internet Explorer
Step Action
1 Start Internet Explorer.
2 On the Tools menu, click Internet Options. Result: The Internet Options dialog box opens.
3 Click the Security tab.
©2014 Cengage Learning. 20 Channel Center Street. Boston, MA 02210 SAM 6

Step Action
4 Click Trusted Sites.
5 Click Custom level. Result: The Security Settings – Internet Zone dialog box opens.
6 Scroll to the Scripting section.
7 Under Active Scripting, confirm that the Enable option button is selected.
8 Click OK to close the Security Settings – Internet Zone dialog box.
9 Click OK to close the Internet Options dialog box.
Firefox for Windows
Step Action
1 Start Firefox.
2 On the Tools menu click Options. Result: The Options dialog box opens.
3 Click the Content tab.
4 Confirm that the Enable JavaScript check box is selected.
5 To the right of the Enable JavaSrcipt check box, click Advanced. Result: The Advanced JavaScript Settings dialog box opens.
6 Confirm that the Hide the status bar check box is selected.
7 In the Advanced JavaScript Settings dialog box, click OK to close.
8 In the Options dialog box, click OK to save your changes.
Chrome for Windows
Step Action
1 Start Chrome.
2 On the Customize and Control Google Chrome menu in the upper-right corner of the browser window, click Settings. Result: The Settings dialog box opens.
3 Click the Show Advanced Settings link.
4 Click Content Settings.
5 Confirm that the Allow All Sites to Run JavaScript check box is selected.
6 In the Content Settings dialog box, click Done to save your changes.
©2014 Cengage Learning. 20 Channel Center Street. Boston, MA 02210 SAM 7

Safari for Macintosh
Step Action
1 On the Safari menu, click Preferences. Result: The Preferences dialog box opens.
2 Click the Security tab.
3 Confirm that the Enable JavaScript check box is selected.
4 Close the Preferences dialog box to save your changes.
Setting Up Pop-Ups (IE Only) SAM requires that pop-ups in Internet Explorer always display in a new window instead of a new tab. Use the following procedure to set up this display requirement:
Step Action
1 On the Tools menu, click Internet Options. Result: The Internet Options dialog box displays.
2 On the General tab under the Tabs Category, click Settings. Result: The Tabbed Browsing Settings dialog box opens.
3 Under When a pop-up is encountered, select Always open pop-ups in a new window.
4 Click OK to save your changes and close the Tabbed Browsing Settings dialog box.
5 Click OK to close the Internet Options dialog box.
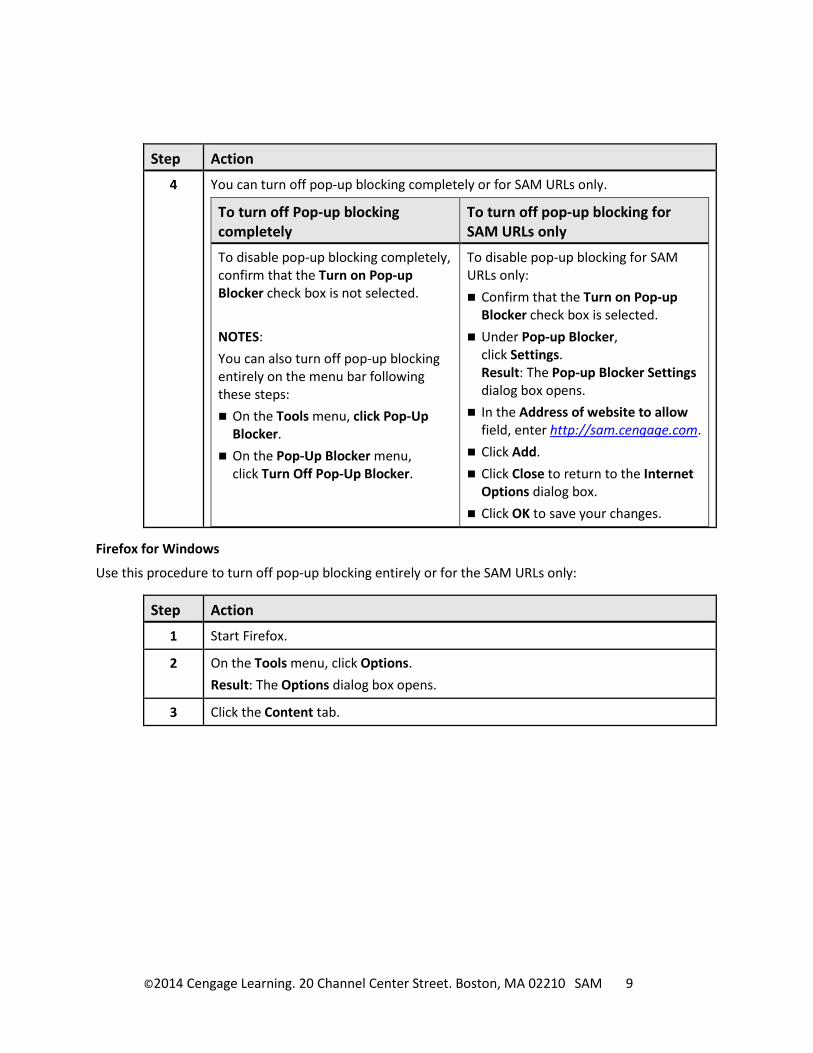
Disabling Pop-Up Blockers To use SAM, you need to disable pop-up blocking software on the browser for the URL http://sam.cengage.com. Use the procedure appropriate to your browser to disable pop-up blocking.
Internet Explorer
Use this procedure to turn off pop-up blocking entirely or for the SAM URLs only:
Step Action
1 Start Internet Explorer.
2 On the Tools menu, click Internet Options. Result: The Internet Options dialog box opens.
3 Click the Privacy tab.
©2014 Cengage Learning. 20 Channel Center Street. Boston, MA 02210 SAM 8
Step Action
4 You can turn off pop-up blocking completely or for SAM URLs only.
To turn off Pop-up blocking completely
To turn off pop-up blocking for SAM URLs only
To disable pop-up blocking completely, confirm that the Turn on Pop-up Blocker check box is not selected. NOTES: You can also turn off pop-up blocking entirely on the menu bar following these steps: On the Tools menu, click Pop-Up
Blocker. On the Pop-Up Blocker menu,
click Turn Off Pop-Up Blocker.
To disable pop-up blocking for SAM URLs only: Confirm that the Turn on Pop-up
Blocker check box is selected. Under Pop-up Blocker,
click Settings. Result: The Pop-up Blocker Settings dialog box opens.
In the Address of website to allow field, enter http://sam.cengage.com.
Click Add. Click Close to return to the Internet
Options dialog box. Click OK to save your changes.
Firefox for Windows
Use this procedure to turn off pop-up blocking entirely or for the SAM URLs only:
Step Action
1 Start Firefox.
2 On the Tools menu, click Options. Result: The Options dialog box opens.
3 Click the Content tab.
©2014 Cengage Learning. 20 Channel Center Street. Boston, MA 02210 SAM 9
Step Action
4 You can turn off Pop-up blocking completely or for SAM URLs only.
To turn off Pop-up blocking completely
To turn off pop-up blocking for SAM URLs only
Confirm that the Block pop-up windows check box is not selected.
If not selected, click Exceptions to the right of the check box.
In the Address of website field, enter the URL http://sam.cengage.com.
Click Exceptions to the right of the check box. Result: The Allow Sites – Pop-ups dialog box displays.
Click Allow.
5 On the Allow Sites – Pop-ups dialog box, click Close.
6 In the Options dialog box, click OK to save your changes.
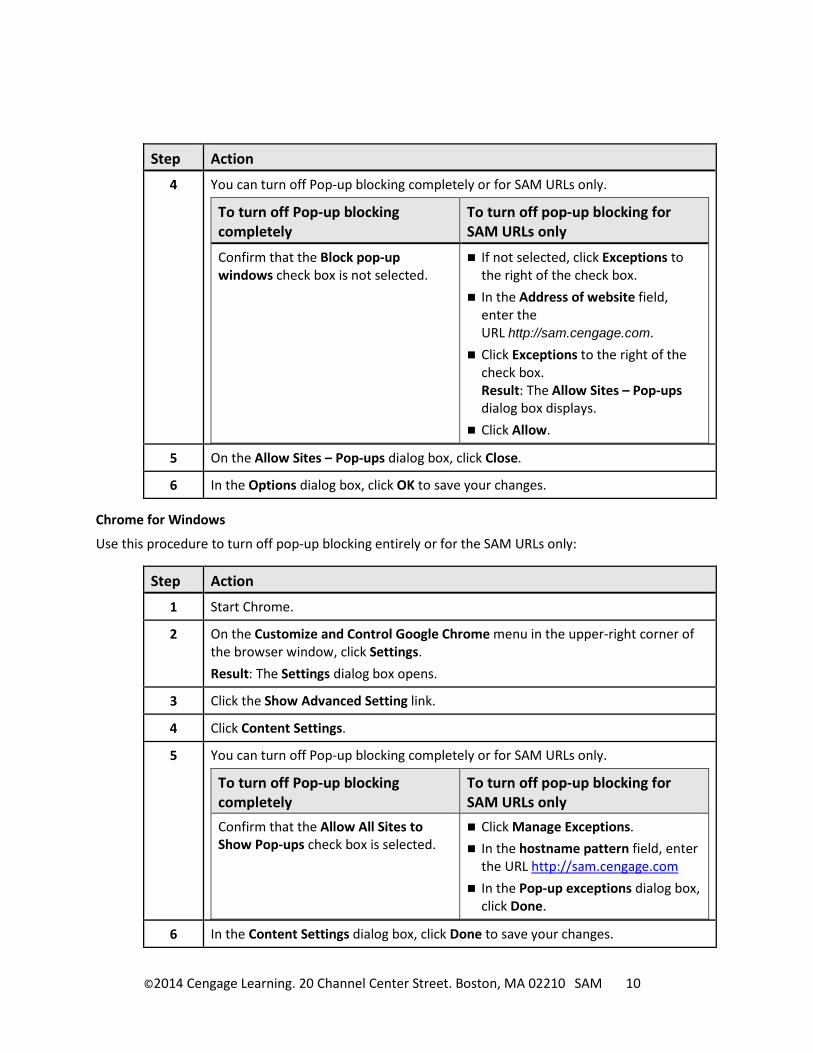
Chrome for Windows
Use this procedure to turn off pop-up blocking entirely or for the SAM URLs only:
Step Action
1 Start Chrome.
2 On the Customize and Control Google Chrome menu in the upper-right corner of the browser window, click Settings. Result: The Settings dialog box opens.
3 Click the Show Advanced Setting link.
4 Click Content Settings.
5 You can turn off Pop-up blocking completely or for SAM URLs only.
To turn off Pop-up blocking completely
To turn off pop-up blocking for SAM URLs only
Confirm that the Allow All Sites to Show Pop-ups check box is selected.
Click Manage Exceptions. In the hostname pattern field, enter
the URL http://sam.cengage.com In the Pop-up exceptions dialog box,
click Done.
6 In the Content Settings dialog box, click Done to save your changes.
©2014 Cengage Learning. 20 Channel Center Street. Boston, MA 02210 SAM 10
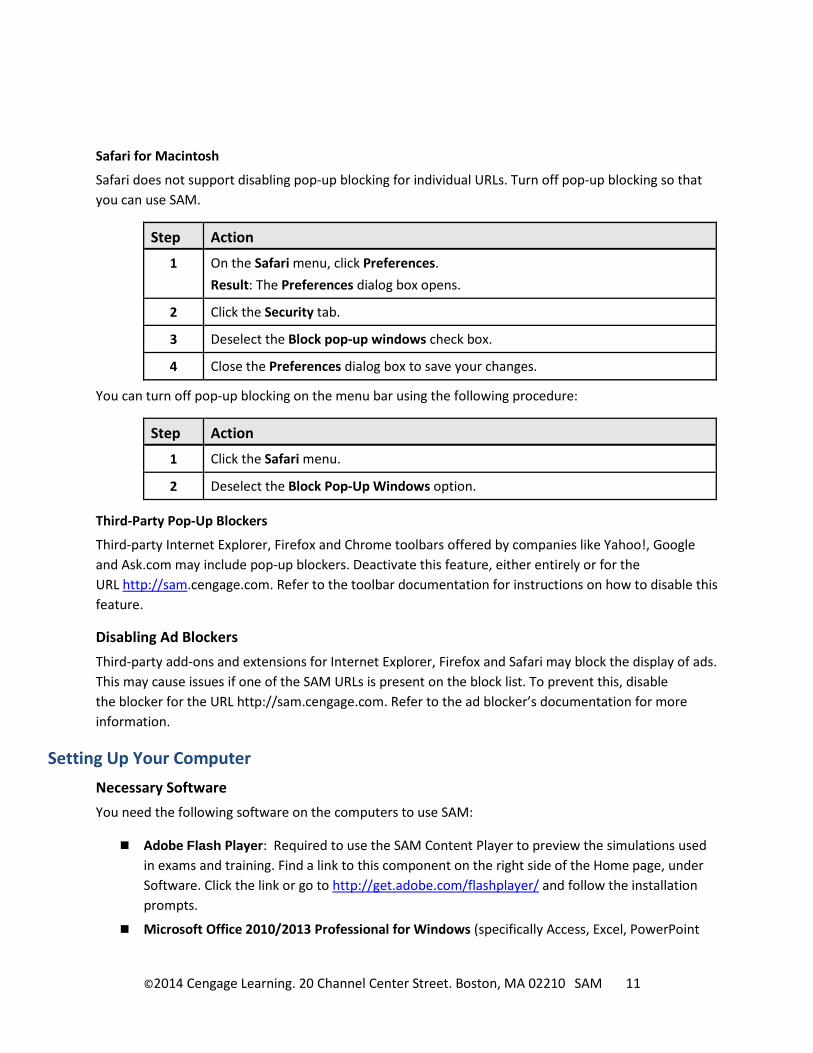
Safari for Macintosh
Safari does not support disabling pop-up blocking for individual URLs. Turn off pop-up blocking so that you can use SAM.
Step Action
1 On the Safari menu, click Preferences. Result: The Preferences dialog box opens.
2 Click the Security tab.
3 Deselect the Block pop-up windows check box.
4 Close the Preferences dialog box to save your changes.
You can turn off pop-up blocking on the menu bar using the following procedure:
Step Action
1 Click the Safari menu.
2 Deselect the Block Pop-Up Windows option.
Third-Party Pop-Up Blockers
Third-party Internet Explorer, Firefox and Chrome toolbars offered by companies like Yahoo!, Google and Ask.com may include pop-up blockers. Deactivate this feature, either entirely or for the URL http://sam.cengage.com. Refer to the toolbar documentation for instructions on how to disable this feature.
Disabling Ad Blockers Third-party add-ons and extensions for Internet Explorer, Firefox and Safari may block the display of ads. This may cause issues if one of the SAM URLs is present on the block list. To prevent this, disable the blocker for the URL http://sam.cengage.com. Refer to the ad blocker’s documentation for more information.
Setting Up Your Computer Necessary Software You need the following software on the computers to use SAM:
Adobe Flash Player: Required to use the SAM Content Player to preview the simulations used in exams and training. Find a link to this component on the right side of the Home page, under Software. Click the link or go to http://get.adobe.com/flashplayer/ and follow the installation prompts.
Microsoft Office 2010/2013 Professional for Windows (specifically Access, Excel, PowerPoint
©2014 Cengage Learning. 20 Channel Center Street. Boston, MA 02210 SAM 11

and Word): Needed to complete projects. Go to http://office.microsoft.com/en-us/products/FX100487411033.aspx?pid=CL100571081033&ofcresset=1 to purchase and download Microsoft Office for Windows. NOTE: You cannot use Microsoft Office 2007 for Windows or Microsoft Office 2008 for Macintosh.
Adobe Reader: Enables you to read the SAM user manuals. Go to http://get.adobe.com/reader/ to download Adobe Reader.
Disk Protection Software If your institution uses disk image protection software like Deep Freeze or Clean Slate, you should install Adobe Flash Player, Adobe Reader, Microsoft Office 2010/2013 and project related Office files in a safe area of the workstation’s disk so they are not overwritten by these utilities.
Monitor Resolution In order to use the SAM Content Player most effectively, set the monitors to a display resolution of 1024 x 768 or higher. This setting enables SAM simulations to display fully on a 17-inch or larger monitor. If you specify a lower resolution, you need to scroll to view the entire simulation.
You can check the current resolution and change it using the following procedures:
Windows Vista
Step Action
1 Right-click anywhere on your computer Desktop. Result: A shortcut menu displays.
2 On the shortcut menu, click Personalize. Result: The Personalize appearance and sounds dialog box displays.
3 Click Display Settings. Result: The Display Settings dialog box displays.
If… Then…
Current resolution is less than 1024 x 768,
Drag the slider toward High until the desired setting displays.
Record the current setting so you can restore it later if desired.
Current resolution is 1024 x 768 or greater,
No action is necessary.
4 Click OK to save your changes and close the Display Properties dialog box.
©2014 Cengage Learning. 20 Channel Center Street. Boston, MA 02210 SAM 12
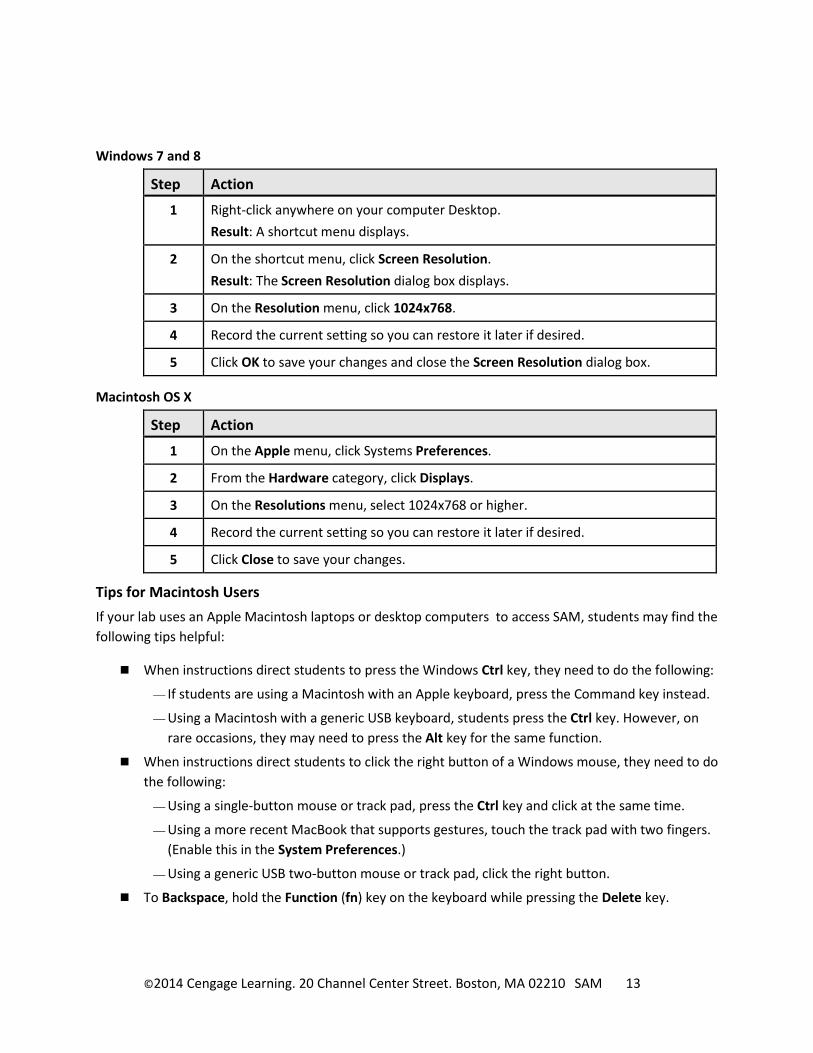
Windows 7 and 8
Step Action
1 Right-click anywhere on your computer Desktop. Result: A shortcut menu displays.
2 On the shortcut menu, click Screen Resolution. Result: The Screen Resolution dialog box displays.
3 On the Resolution menu, click 1024x768.
4 Record the current setting so you can restore it later if desired.
5 Click OK to save your changes and close the Screen Resolution dialog box.
Macintosh OS X
Step Action
1 On the Apple menu, click Systems Preferences.
2 From the Hardware category, click Displays.
3 On the Resolutions menu, select 1024x768 or higher.
4 Record the current setting so you can restore it later if desired.
5 Click Close to save your changes.
Tips for Macintosh Users If your lab uses an Apple Macintosh laptops or desktop computers to access SAM, students may find the following tips helpful:
When instructions direct students to press the Windows Ctrl key, they need to do the following:
— If students are using a Macintosh with an Apple keyboard, press the Command key instead.
— Using a Macintosh with a generic USB keyboard, students press the Ctrl key. However, on rare occasions, they may need to press the Alt key for the same function.
When instructions direct students to click the right button of a Windows mouse, they need to do the following:
— Using a single-button mouse or track pad, press the Ctrl key and click at the same time.
— Using a more recent MacBook that supports gestures, touch the track pad with two fingers. (Enable this in the System Preferences.)
— Using a generic USB two-button mouse or track pad, click the right button.
To Backspace, hold the Function (fn) key on the keyboard while pressing the Delete key.
©2014 Cengage Learning. 20 Channel Center Street. Boston, MA 02210 SAM 13
Accessing Documentation Users can download the following manuals to help them use the SAM. Links to these documents display on the right side of the Home page under Documentation.
Instructor Manual: Provides detailed instructions on how to use SAM to manage courses, enrollment and assignments.
Student Manual: Provides detailed instructions on how to use SAM to complete assignments.
Documents are available in Adobe Acrobat (.pdf) format. Viewing these documents requires the Adobe Reader software. This may be installed on the computer already. Download it from http://get.adobe.com/reader/.
©2014 Cengage Learning. 20 Channel Center Street. Boston, MA 02210 SAM 14

SAM Administration
User Administration As supervisor, you are responsible for entering your institution’s initial set of SAM users, generally administrators and instructors. You might also need to enter or import user records for students.
SAM User Roles Each new SAM user account has a role that determines its access. SAM supports the following roles:
Role Set up by Access Rights
Supervisor Sets up the Institution Key Can access all SAM staff functionality, including the Admin Settings
area Can create administrator, instructor and student accounts but not
additional supervisors Can change roles of administrators and instructors but not students
Administrator The institution’s designated supervisor
Can access all SAM staff functionality including the Admin Settings area
Can create instructor and student user accounts
Creator (Section)
Can add/remove students, instructors and owners Can add/edit assignments associated with their sections Can deactivate any assignments associated with their sections,
whether or not they created the assignments. Cannot deactivate an assignment scheduled in multiple sections;
right reserved by the assignment creator Can access/edit the Gradebook for a section Can run all reports Can edit/deactivate the section
©2014 Cengage Learning. 20 Channel Center Street. Boston, MA 02210 SAM 15
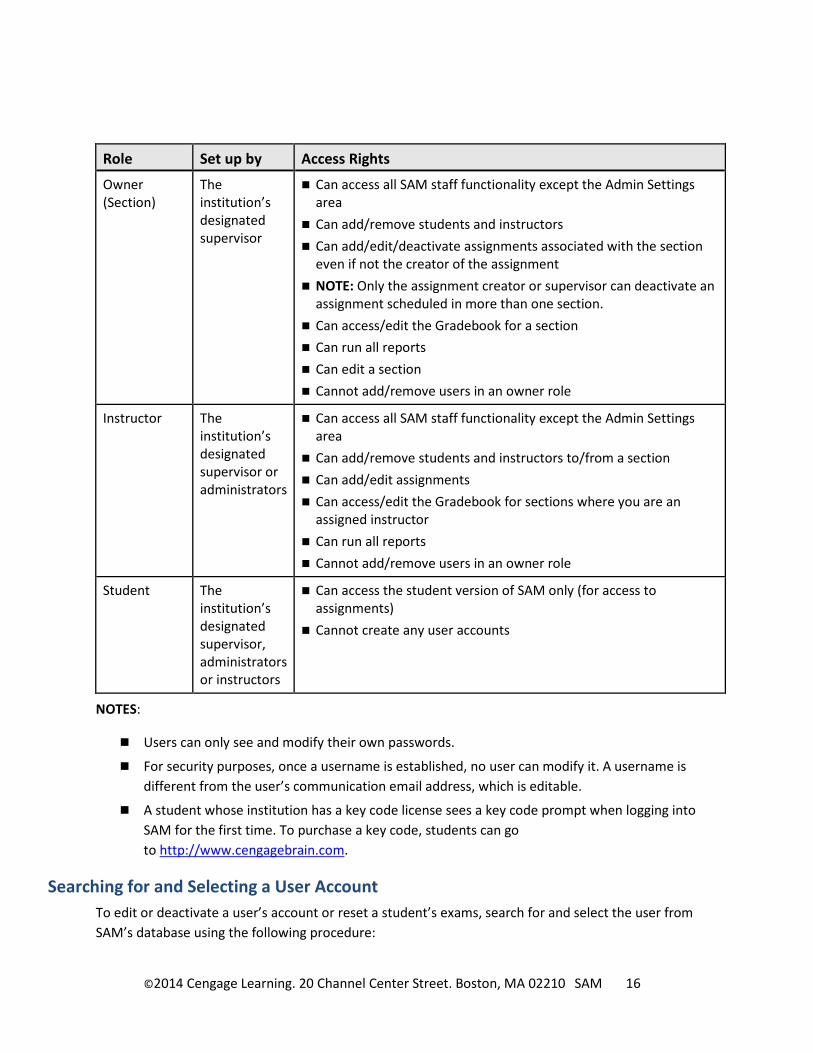
Role Set up by Access Rights
Owner (Section)
The institution’s designated supervisor
Can access all SAM staff functionality except the Admin Settings area
Can add/remove students and instructors Can add/edit/deactivate assignments associated with the section
even if not the creator of the assignment NOTE: Only the assignment creator or supervisor can deactivate an
assignment scheduled in more than one section. Can access/edit the Gradebook for a section Can run all reports Can edit a section Cannot add/remove users in an owner role
Instructor The institution’s designated supervisor or administrators
Can access all SAM staff functionality except the Admin Settings area
Can add/remove students and instructors to/from a section Can add/edit assignments Can access/edit the Gradebook for sections where you are an
assigned instructor Can run all reports Cannot add/remove users in an owner role
Student The institution’s designated supervisor, administrators or instructors
Can access the student version of SAM only (for access to assignments)
Cannot create any user accounts
NOTES:
Users can only see and modify their own passwords.
For security purposes, once a username is established, no user can modify it. A username is different from the user’s communication email address, which is editable.
A student whose institution has a key code license sees a key code prompt when logging into SAM for the first time. To purchase a key code, students can go to http://www.cengagebrain.com.
Searching for and Selecting a User Account To edit or deactivate a user’s account or reset a student’s exams, search for and select the user from SAM’s database using the following procedure:
©2014 Cengage Learning. 20 Channel Center Street. Boston, MA 02210 SAM 16

Step Action
1 On the Navigation bar, click Users. Result: The Users page displays.
2 Click the appropriate option button to search by last name, first name or username. NOTE: You can narrow the search by role and section by selecting from the appropriate drop-down menus.
3 Enter your search criteria and click Search. Result: The search result(s) display.
4 In the search results, you can: Click the student’s name to view the record.
— Click Close when finished. Click the option to the left of the student’s name to select.
— Click Edit, Reset Exam or Deactivate as necessary to continue. Click Clear to reset the search criteria.
Adding a User Account To add a new user, use the following procedure:
Step Action
1 On the Navigation bar, click Users. Result: The Users page displays.
2 Click Add New. Result: The Users – Add New page displays.
3 Enter the requested information. An * indicates a mandatory field. See the table below for field names and descriptions.
4 Click Save. Result: The Users page displays.
User Account Field Names and Descriptions
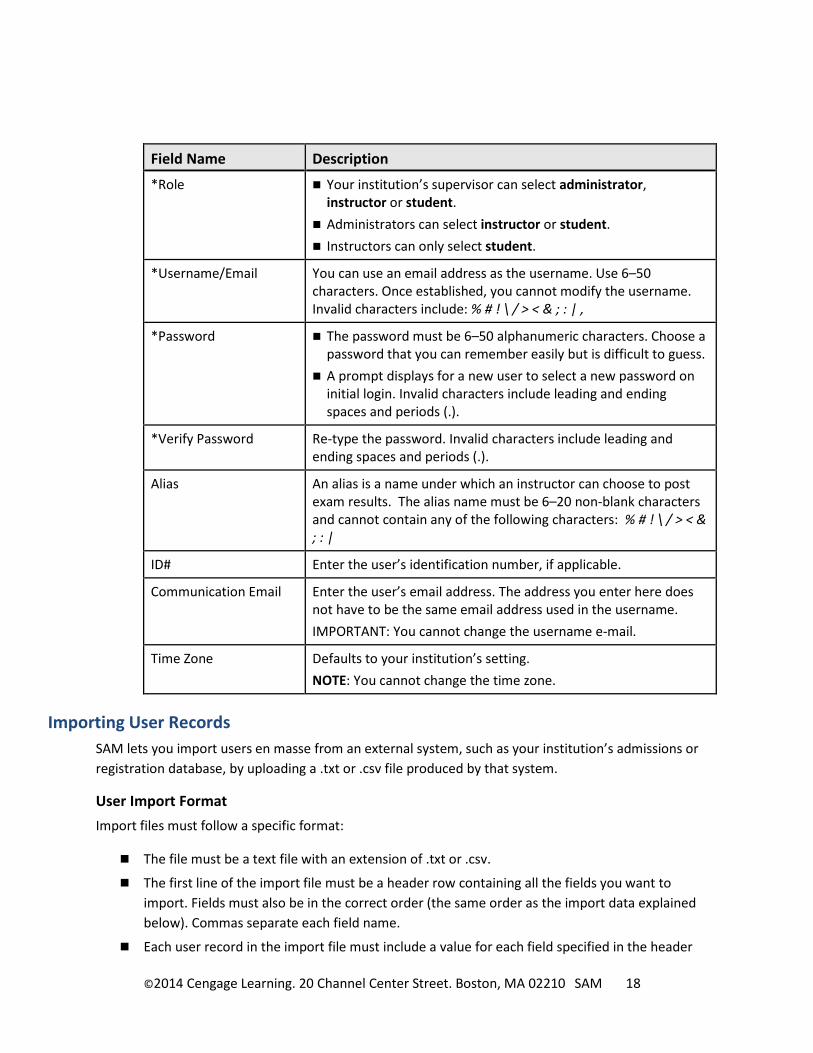
Field Name Description
*First name Enter the user’s first name. It cannot contain any of the following characters: % # ! \ / > < & ; : | ,
Middle Initial Enter the user’s middle initial.
*Last Name Enter the user’s last name. It cannot contain any of the following characters: % # ! \ / > < & ; : | ,
©2014 Cengage Learning. 20 Channel Center Street. Boston, MA 02210 SAM 17
Field Name Description
*Role Your institution’s supervisor can select administrator, instructor or student.
Administrators can select instructor or student. Instructors can only select student.
*Username/Email You can use an email address as the username. Use 6–50 characters. Once established, you cannot modify the username. Invalid characters include: % # ! \ / > < & ; : | ,
*Password The password must be 6–50 alphanumeric characters. Choose a password that you can remember easily but is difficult to guess.
A prompt displays for a new user to select a new password on initial login. Invalid characters include leading and ending spaces and periods (.).
*Verify Password Re-type the password. Invalid characters include leading and ending spaces and periods (.).
Alias An alias is a name under which an instructor can choose to post exam results. The alias name must be 6–20 non-blank characters and cannot contain any of the following characters: % # ! \ / > < & ; : |
ID# Enter the user’s identification number, if applicable.
Communication Email Enter the user’s email address. The address you enter here does not have to be the same email address used in the username. IMPORTANT: You cannot change the username e-mail.
Time Zone Defaults to your institution’s setting. NOTE: You cannot change the time zone.
Importing User Records SAM lets you import users en masse from an external system, such as your institution’s admissions or registration database, by uploading a .txt or .csv file produced by that system.
User Import Format Import files must follow a specific format:
The file must be a text file with an extension of .txt or .csv.
The first line of the import file must be a header row containing all the fields you want to import. Fields must also be in the correct order (the same order as the import data explained below). Commas separate each field name.
Each user record in the import file must include a value for each field specified in the header
©2014 Cengage Learning. 20 Channel Center Street. Boston, MA 02210 SAM 18
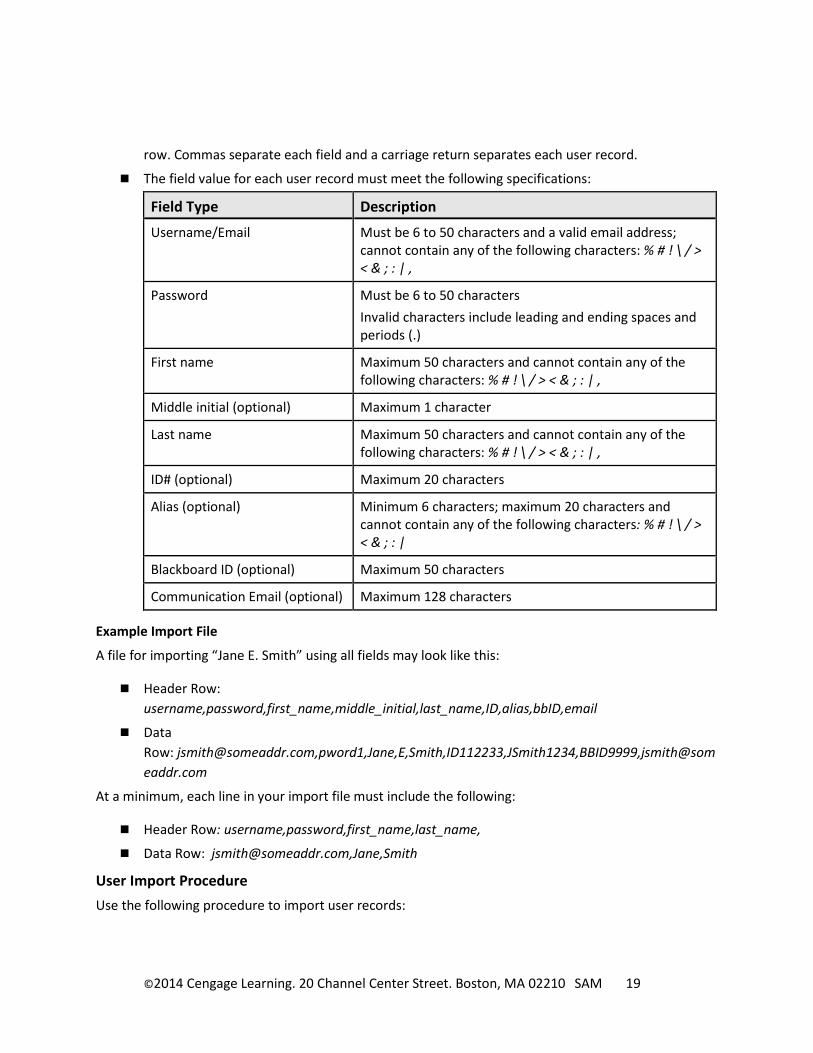
row. Commas separate each field and a carriage return separates each user record.
The field value for each user record must meet the following specifications:
Field Type Description
Username/Email Must be 6 to 50 characters and a valid email address; cannot contain any of the following characters: % # ! \ / > < & ; : | ,
Password Must be 6 to 50 characters Invalid characters include leading and ending spaces and periods (.)
First name Maximum 50 characters and cannot contain any of the following characters: % # ! \ / > < & ; : | ,
Middle initial (optional) Maximum 1 character
Last name Maximum 50 characters and cannot contain any of the following characters: % # ! \ / > < & ; : | ,
ID# (optional) Maximum 20 characters
Alias (optional) Minimum 6 characters; maximum 20 characters and cannot contain any of the following characters: % # ! \ / > < & ; : |
Blackboard ID (optional) Maximum 50 characters
Communication Email (optional) Maximum 128 characters
Example Import File
A file for importing “Jane E. Smith” using all fields may look like this:
Header Row: username,password,first_name,middle_initial,last_name,ID,alias,bbID,email
Data Row: [email protected],pword1,Jane,E,Smith,ID112233,JSmith1234,BBID9999,[email protected]
At a minimum, each line in your import file must include the following:
Header Row: username,password,first_name,last_name,
Data Row: [email protected],Jane,Smith
User Import Procedure Use the following procedure to import user records:
©2014 Cengage Learning. 20 Channel Center Street. Boston, MA 02210 SAM 19

Step Action
1 On the Navigation bar, click Users. Result: The Users page displays.
2 Click Import Users. Result: The Import Users wizard starts and displays the first step, Introduction. Once in the wizard, you can exit and return to the Users page by clicking Cancel.
3 After reading the Introduction, click Next to display Step 2 of the wizard, Assign to Sections.
4 Assign students to sections now or at a later time.
To assign students to sections now
To assign student to sections at a later date
Click Yes. From the Select Sections
menu, select the student(s) you want to assign.
Click Next.
Result: Step 3 of the wizard, Import User File, displays.
Click No. Click Next.
Result: Step 3 of the wizard, Import User File, displays.
5 Click Browse. Result: The Choose File dialog box displays.
6 Select the necessary .txt or .csv file with the student information to import. Click Open. When the dialog box closes, click the Next. Result: Step 4 of the wizard, User Property Mapping, displays.
7 For the imported file, select and map the Import File Properties that correspond with SAM Properties. For each user account’s SAM Properties, select the corresponding column header
in the input file that maps to the SAM Properties column. For example, BBID in the user input file maps to the SAM Property Blackboard ID.
Click Next. Result: Step 5 of the wizard, Confirm User Property Mapping, displays.
©2014 Cengage Learning. 20 Channel Center Street. Boston, MA 02210 SAM 20

Step Action
8 Confirm the mapping specified in Step 4 of the wizard.
If… Then…
Mapping is correct, Click Next. Result: Step 6 of the wizard, Import Validity Check, displays.
Mapping is incorrect, Click Back to return to Step 4 and make the necessary corrections.
Click Next. Result: Step 5 of the wizard, Confirm User Property, displays. Click Next. Result: Step 6 of the wizard, Mapping Import Validity Check, displays.
9 Step 6 of the wizard displays detected errors in the imported information. Click Print Summary to view a report. To resolve the problems, you can do any of the following:
If… Then…
You made a mistake when importing file properties,
Click Back, until you return to Step 4.
Make your corrections.
There are errors in your import file,
Click Cancel to exit the wizard. Make the necessary
corrections using a text editor like Notepad.
Only a few user records contain errors,
Click Next. The report omits erroneous records from the import. They can be entered manually using SAM or imported in another file import.
There are no errors Click Next.
©2014 Cengage Learning. 20 Channel Center Street. Boston, MA 02210 SAM 21

Step Action
10 Resolve imported username conflicts, if any. Each username must be unique. If any of the imported usernames conflict with an existing username, the system displays a Conflict Resolution screen enabling you to enter an alternative username or cancel the import. Result: After you resolve any conflicts, if any, Step 7 of the wizard, Import Complete, displays.
11 Click Print Summary to view a report of the import. When finished, click Close.
Editing a User’s Account To edit a user’s account, use the following procedure:
Step Action
1 On the Navigation bar, click Users. Result: The Users page displays.
2 Search for and select a user’s record.
3 Click Edit. Result: The Users – Edit page displays, defaulting to the Properties tab.
4 Make any necessary corrections to the properties.
5 Click the Sections tab and add or remove the user to or from sections as necessary.
6 Click Save. Result: The Users page displays.
Resetting or Adjusting a Student’s Exams Occasionally you might need to reset a student’s exam to remove the grade (for example, if you offer a make-up test or adjust a score). To reset an exam or adjust a score, use the following procedure:
Step Action
1 On the Navigation bar, click Users. Result: The Users page displays.
2 Search for and select a student’s record.
3 Click Reset Exam. Result: The Reset Exam window displays listing exams the student has taken.
©2014 Cengage Learning. 20 Channel Center Street. Boston, MA 02210 SAM 22
Step Action
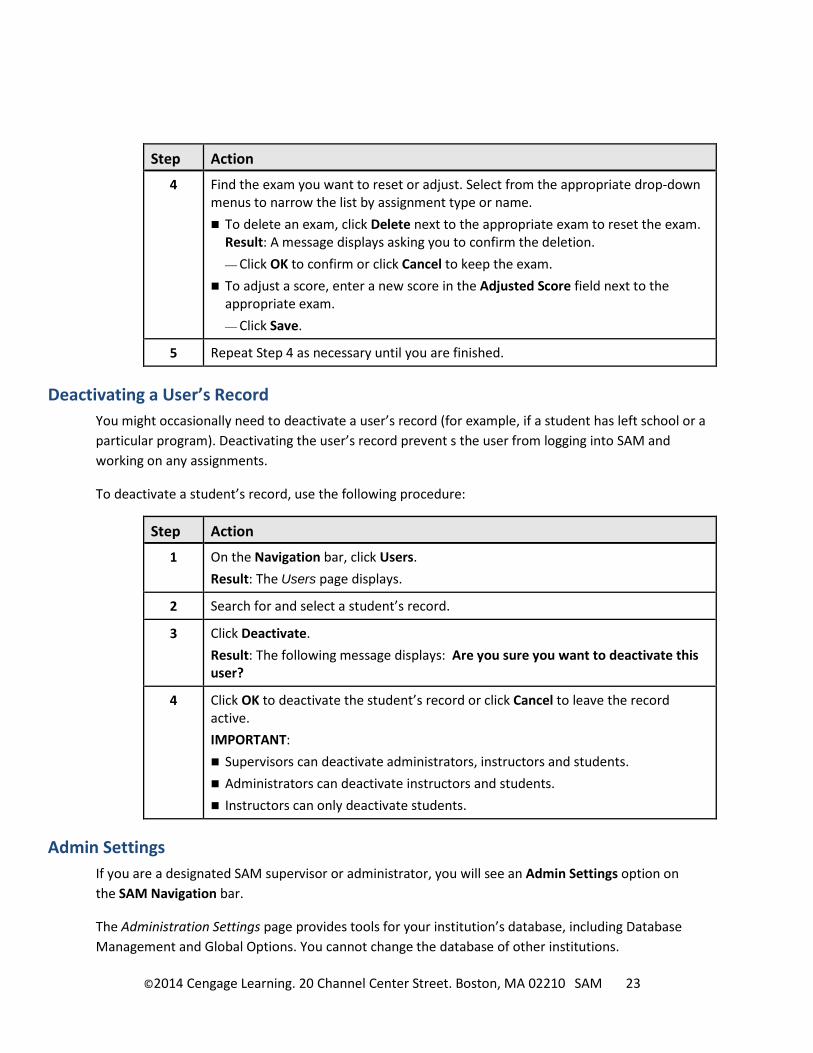
4 Find the exam you want to reset or adjust. Select from the appropriate drop-down menus to narrow the list by assignment type or name. To delete an exam, click Delete next to the appropriate exam to reset the exam.
Result: A message displays asking you to confirm the deletion. — Click OK to confirm or click Cancel to keep the exam.
To adjust a score, enter a new score in the Adjusted Score field next to the appropriate exam. — Click Save.
5 Repeat Step 4 as necessary until you are finished.
Deactivating a User’s Record You might occasionally need to deactivate a user’s record (for example, if a student has left school or a particular program). Deactivating the user’s record prevent s the user from logging into SAM and working on any assignments.
To deactivate a student’s record, use the following procedure:
Step Action
1 On the Navigation bar, click Users. Result: The Users page displays.
2 Search for and select a student’s record.
3 Click Deactivate. Result: The following message displays: Are you sure you want to deactivate this user?
4 Click OK to deactivate the student’s record or click Cancel to leave the record active. IMPORTANT: Supervisors can deactivate administrators, instructors and students. Administrators can deactivate instructors and students. Instructors can only deactivate students.
Admin Settings If you are a designated SAM supervisor or administrator, you will see an Admin Settings option on the SAM Navigation bar.
The Administration Settings page provides tools for your institution’s database, including Database Management and Global Options. You cannot change the database of other institutions.
©2014 Cengage Learning. 20 Channel Center Street. Boston, MA 02210 SAM 23
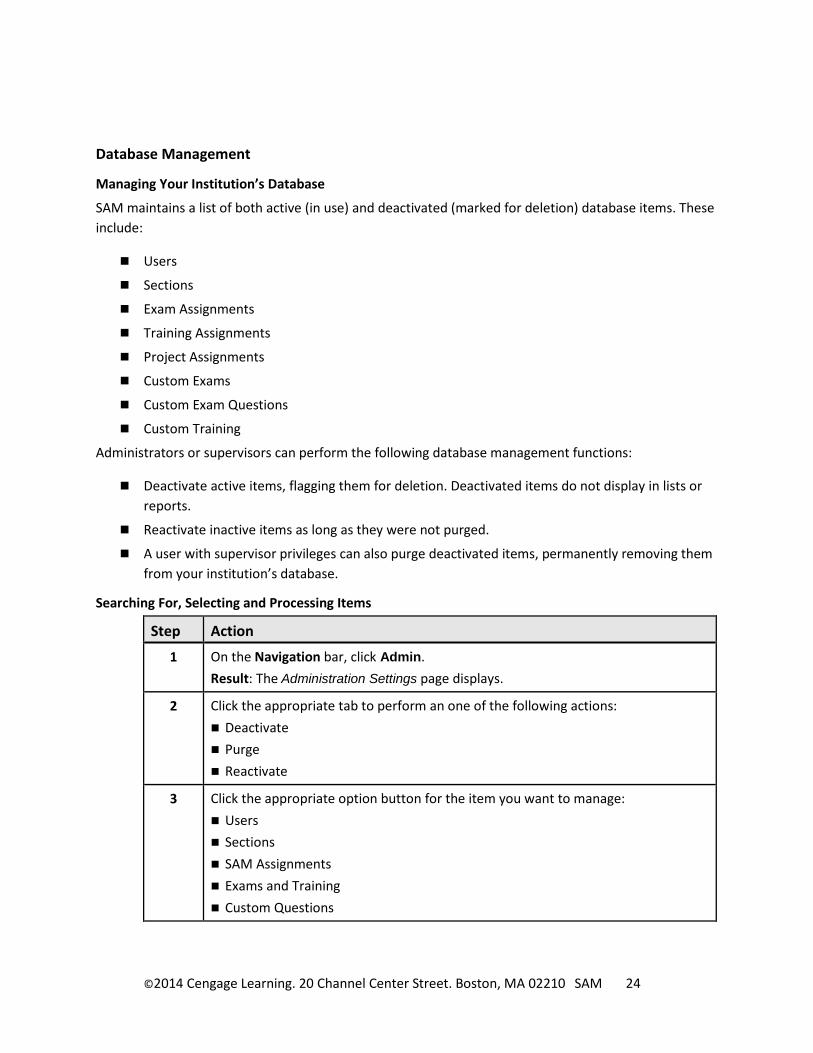
Database Management
Managing Your Institution’s Database
SAM maintains a list of both active (in use) and deactivated (marked for deletion) database items. These include:
Users
Sections
Exam Assignments
Training Assignments
Project Assignments
Custom Exams
Custom Exam Questions
Custom Training
Administrators or supervisors can perform the following database management functions:
Deactivate active items, flagging them for deletion. Deactivated items do not display in lists or reports.
Reactivate inactive items as long as they were not purged.
A user with supervisor privileges can also purge deactivated items, permanently removing them from your institution’s database.
Searching For, Selecting and Processing Items
Step Action
1 On the Navigation bar, click Admin. Result: The Administration Settings page displays.
2 Click the appropriate tab to perform an one of the following actions: Deactivate Purge Reactivate
3 Click the appropriate option button for the item you want to manage: Users Sections SAM Assignments Exams and Training Custom Questions
©2014 Cengage Learning. 20 Channel Center Street. Boston, MA 02210 SAM 24
Step Action
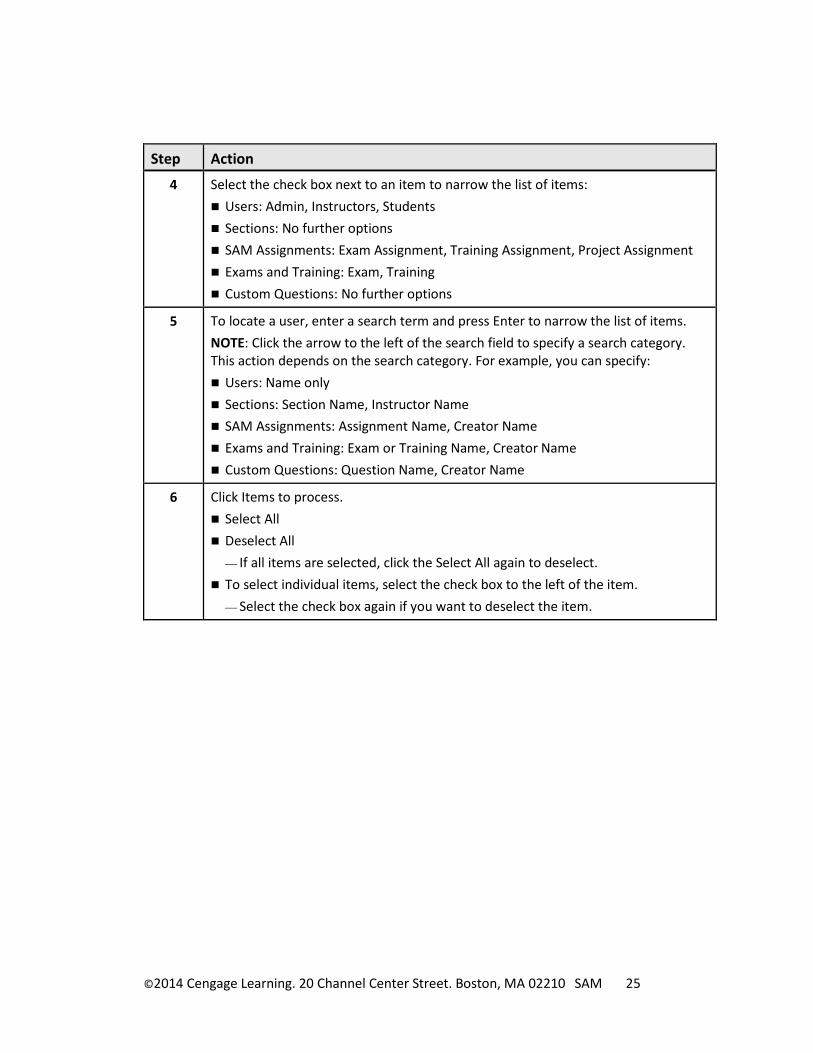
4 Select the check box next to an item to narrow the list of items: Users: Admin, Instructors, Students Sections: No further options SAM Assignments: Exam Assignment, Training Assignment, Project Assignment Exams and Training: Exam, Training Custom Questions: No further options
5 To locate a user, enter a search term and press Enter to narrow the list of items. NOTE: Click the arrow to the left of the search field to specify a search category. This action depends on the search category. For example, you can specify: Users: Name only Sections: Section Name, Instructor Name SAM Assignments: Assignment Name, Creator Name Exams and Training: Exam or Training Name, Creator Name Custom Questions: Question Name, Creator Name
6 Click Items to process. Select All Deselect All
— If all items are selected, click the Select All again to deselect. To select individual items, select the check box to the left of the item.
— Select the check box again if you want to deselect the item.
©2014 Cengage Learning. 20 Channel Center Street. Boston, MA 02210 SAM 25
Step Action
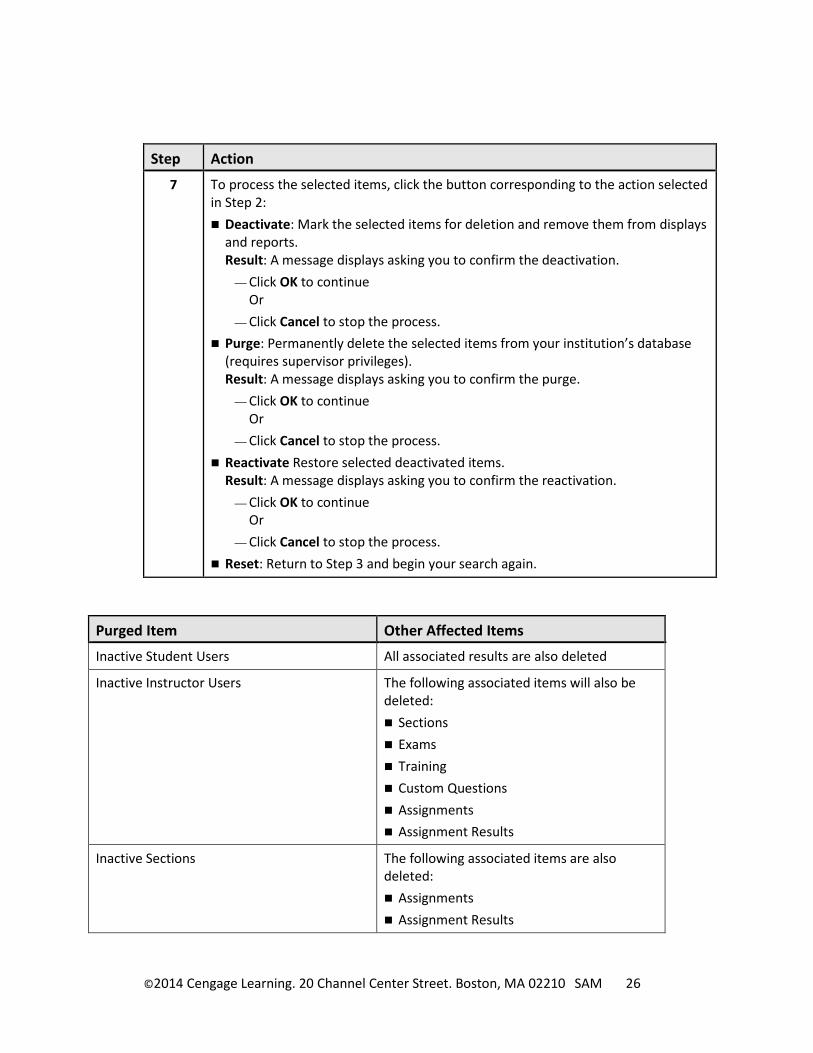
7 To process the selected items, click the button corresponding to the action selected in Step 2: Deactivate: Mark the selected items for deletion and remove them from displays
and reports. Result: A message displays asking you to confirm the deactivation.
— Click OK to continue Or
— Click Cancel to stop the process. Purge: Permanently delete the selected items from your institution’s database
(requires supervisor privileges). Result: A message displays asking you to confirm the purge.
— Click OK to continue Or
— Click Cancel to stop the process. Reactivate Restore selected deactivated items.
Result: A message displays asking you to confirm the reactivation. — Click OK to continue
Or — Click Cancel to stop the process.
Reset: Return to Step 3 and begin your search again.
Purged Item Other Affected Items
Inactive Student Users All associated results are also deleted
Inactive Instructor Users The following associated items will also be deleted: Sections Exams Training Custom Questions Assignments Assignment Results
Inactive Sections The following associated items are also deleted: Assignments Assignment Results
©2014 Cengage Learning. 20 Channel Center Street. Boston, MA 02210 SAM 26

Purged Item Other Affected Items
Inactive Custom Exams The following associated items are also deleted: Assignments Assignment Results
Inactive Exam Assignments All associated results are also deleted
Inactive Custom Training The following associated items are also deleted:
Assignments Assignment Results
Inactive Training Assignments All associated results also deleted
Inactive Custom Questions The custom questions are deleted from all associated exams
Global Options
Managing Your Institution’s Global Options
Global Options provides settings that control how your institution and its students use SAM. These settings include:
Managing Your Institution’s Global Options
Global Options provides settings that control how your institution and its students use SAM. These settings include:
Global Option Description
Allow own account creation
If… Then…
Selected, Users can click New User on the Login page to create accounts.
Not selected, Only the supervisor, administrator or instructor can create the new student account using either manual account creation or SAM’s import feature.
©2014 Cengage Learning. 20 Channel Center Street. Boston, MA 02210 SAM 27
Global Option Description
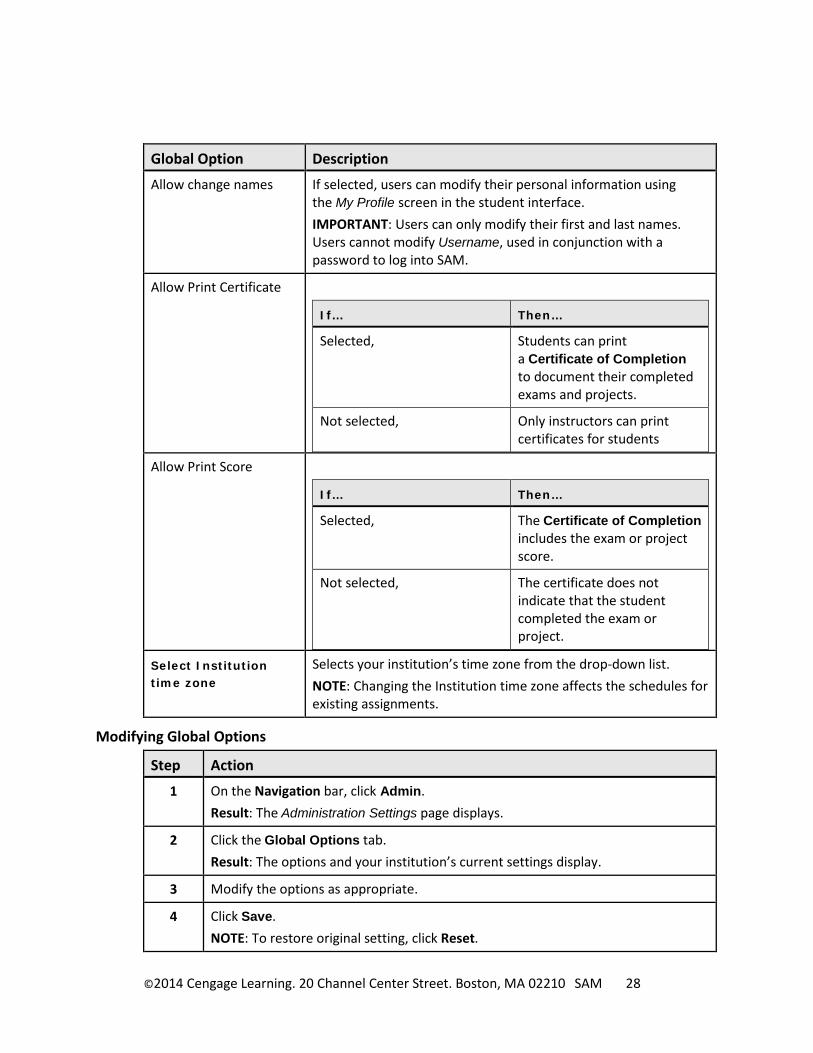
Allow change names If selected, users can modify their personal information using the My Profile screen in the student interface. IMPORTANT: Users can only modify their first and last names. Users cannot modify Username, used in conjunction with a password to log into SAM.
Allow Print Certificate
If… Then…
Selected, Students can print a Certificate of Completion to document their completed exams and projects.
Not selected, Only instructors can print certificates for students
Allow Print Score
If… Then…
Selected, The Certificate of Completion includes the exam or project score.
Not selected, The certificate does not indicate that the student completed the exam or project.
Select Institution time zone
Selects your institution’s time zone from the drop-down list. NOTE: Changing the Institution time zone affects the schedules for existing assignments.
Modifying Global Options
Step Action
1 On the Navigation bar, click Admin. Result: The Administration Settings page displays.
2 Click the Global Options tab. Result: The options and your institution’s current settings display.
3 Modify the options as appropriate.
4 Click Save. NOTE: To restore original setting, click Reset.
©2014 Cengage Learning. 20 Channel Center Street. Boston, MA 02210 SAM 28
Appendix A: Troubleshooting Guide The following section provides some basic explanations of screens that may display during the normal use of the SAM LMS and Content Player.
Login and SAM Access Issues The online help that displays on the SAM Login Page at http://sam.cengage.com provides help in configuring your specific browser for use with SAM and avoiding any additional warnings or pop-up boxes from appearing while using the site.
You can also find setup information in the Setting Up SAM Workstations section earlier in this document.
Recovering and Resuming from a Crash or Lost Connection If a user’s computer crashes or loses the connection to SAM during an exam or training assignment, the user can restart it once conditions return to normal. The user logs in as usual, goes to the SAM Assignments page and re-selects the assignment. The assignment displays in red. The Content Player begins where the user left off. Any completed questions and tasks are saved.
If the user has a problem logging back in to SAM or re-starting the Content Player, clearing the browser’s temporary Internet and history files may help. Procedures follow:
Internet Explorer
Step Action
1 Start Internet Explorer.
2 On the Tools menu, click Delete Browsing History. Result: The Delete Browsing History dialog box opens.
3 Select the Temporary Internet Files and History check boxes.
4 Confirm that the other check boxes are not selected.
5 Click Delete.
Firefox for Windows
Step Action
1 Start Firefox.
2 On the Tools menu, click Clear Recent History. Result: The Clear Recent History dialog box opens.
©2014 Cengage Learning. 20 Channel Center Street. Boston, MA 02210 SAM i

Step Action
3 From the drop-down menu, select the appropriate time range to clear. NOTE: If you are not certain, click Everything.
4 Select the Browsing & Download History and Cache check boxes.
5 Confirm that the other check boxes are not selected.
6 Click Clear Now.
Chrome for Windows
Step Action
1 Start Chrome.
2 On the Tools menu, click Clear browsing data.
3 Select the following: Clear browsing history Clear download history Delete cookies and other site and plug-in data.
4 In the Clear Browsing Data dialog box, click Empty the Cache.
5 Confirm that the other check boxes are not selected.
6 Click Clear browsing data.
Safari for Macintosh
Step Action
1 Start Safari.
2 On the Safari menu, click Reset Safari. Result: The Reset Safari dialog box displays.
3 Select the Clear History and Empty Cache check boxes.
4 Confirm that the other check boxes are not selected.
5 Click Reset.
Troubleshooting Project-Related Problems When uploading completed project file, SAM checks for five things:
The embedded key in the uploaded file matches the key assigned to your start file
The uploaded file name matches the name expected by SAM
The file type matches that of the project’s start file. If a Word 2010 or Word 2013
©2014 Cengage Learning. 20 Channel Center Street. Boston, MA 02210 SAM ii
document(Example: .docx extension) is expected, you need to upload a Word 2010 document or Word 2013 document.
The file contains no viruses
The file does not exceed SAM’s maximum file size (Office 2010: 1741 KB; Office 2013: 5 MB )
If the completed project file fails any of these tests during upload, SAM does not accept it and an appropriate alert displays. To resolve these problems, do the following:
Wrong Key If this occurs, you are not using the same SAM account used to download the original start file. Log back in to SAM using the correct start file and account.
Wrong Name If this occurs, rename the file with the name expected by SAM Refer to the Project information on the My Sam Assignments page for the correct file name.
Wrong Format This occurs when users change the format of the project start file with the Save As function. Example: You saved a Word 2010 document as a Word 97-2003 file. Use the Save As function again to save the document using the format that SAM /2013 expects.
If a user saved a document in a format other than its native format (Example: A user saved a Word document as an HTML document) and the user does not have the original start file, download a new start file from the Start Files section on the My SAM Assignments page and start over.
Wrong Application This error occurs if a user worked on a project file using an application other than Office 2010 SAM rejects project files created by applications including the following:
Office 2008 for Macintosh
WordPad on Windows
Office 2010 Starter Edition on Windows
Any version of the full Office 2007 suite (This requires SAM 2007)
Any third-party application that supports Office 2010 file formats
Virus Detected If this occurs, you need to run an anti-virus utility to disinfect the computer and any other computer on which the file was stored. Popular products include Norton AntiVirus and McAfee VirusScan.
The anti-virus utility will do one of two things to the project file:
If possible, it will disinfect the project file and the student should be able to submit it again for
©2014 Cengage Learning. 20 Channel Center Street. Boston, MA 02210 SAM iii
grading.
The anti-virus utility could also quarantine or delete the file. If this is the case, the student needs to download the project file again from the Project information on the MY SAM ASSIGNMENTS page and start over.
Maximum File Size Exceeded This occurs if the file you are uploading is has exceeded the maximum size (Office 2010: 1741 KB; Office 2013: 5 MB). The student needs to edit the file, removing any extraneous content and attempt to upload it again. For Access projects, compress the database prior to submission to SAM. From the Office menu, select Manage/Compact and Repair Database.
Technical Support and Maintenance for SAM SAM Technical Support is available for faculty, staff and students utilizing or working with Course Technology products.
The following section details the Technical Support and Maintenance Procedures of Course Technology:
Technical Support Availability You can contact Technical Support by calling 800-354-9706 during business hours (see below.) This phone number also displays in the TECHNICAL SUPPORT box on the welcome box of the product. Technical Support standard is to respond to phone requests in an average response time of less than three (3) minutes for incoming calls.
Day Hours
Monday – Thursday 8:30am to 9:00pm, Eastern Time
Friday 8:30am to 6:00pm, Eastern Time
In addition to phone support, you can get technical support by email by sending a message at any time to http://poweron.cengage.com/magellan/TechSupport/login.aspx
Course Technology also offers assistance over the Internet via online chat seven days a week, 24 hours a day. To use this facility do the following:
Step Action
1 Go to http://academic.cengage.com/support/.
2 From the Faculty or Student drop-down menu, select SAM.
3 Click Go.
4 Under the appropriate heading on the SAM Support page, click Chat Online.
When an issue requires escalation from Technical Support to the SAM Development Team (the
©2014 Cengage Learning. 20 Channel Center Street. Boston, MA 02210 SAM iv
“SAMDT”), the response time expectations for the SAMDT to respond to Technical Support are as follows: The SAMDT is expected to respond to High Priority requests within two (2) hours, to Medium Priority requests within one (1) business day and to Standard Priority requests within two (2) business days.
Course Technology’s product development process includes reviewing customer feedback and recurring requests on a regular basis.
Server Availability Excluding scheduled maintenance outages, we make every reasonable effort to provide a server Availability of 99.5%. “Availability” is the amount of time SAM is available and capable of receiving, processing and responding to incoming transactions from the requesting users. If the Internet in general is having problems or a customer’s Internet service provider is having problems, any downtime resulting from such problems is not deducted from SAM’s Availability time.
Maintenance To perform system maintenance, backup and upgrade functions, we anticipate that there will be eight (8) hours of scheduled maintenance downtime per quarter. We schedule downtime during a low usage time, typically Sunday mornings. For normal maintenance, Course Technology will make all reasonable efforts to notify SAM instructors, administrators and supervisors of the scheduled maintenance two (2) weeks prior to the maintenance.
Course Technology retains the right to shut down, reboot, modify or fix servers at any time if it is necessary to prevent security breaches or operational failures (including but not limited to viruses, worms, date bombs, time bombs or denial of service attacks). This may require loss of access to the system for a period of time but such protective actions constitute scheduled down time.
Upgrades Course Technology may provide SAM users with upgrades of the software. We will notify SAM supervisors, administrators and instructors of impending upgrades. This notification will include notification of any new functionality and content to inform users what’s new in their SAM software.
©2014 Cengage Learning. 20 Channel Center Street. Boston, MA 02210 SAM v

THE ABOVE PROCEDURES COMPRISE THE STANDARDS AND EXPECTATIONS COURSE TECHNOLOGY HAS SET FOR ITSELF REGARDING TECHNICAL SUPPORT AND MAINTENANCE. NOTHING CONTAINED THEREIN SHALL GIVE RISE TO ANY RIGHTS IN ANY PERSON OR OTHER ENTITY OTHER THAN COURSE TECHNOLOGY AND COURSE TECHNOLOGY SHALL HAVE NO LIABILILTY TO ANY PERSON OR OTHER ENTITY FOR FAILURE TO MEET SUCH STANDARDS OR EXPECTATIONS.
©2014 Cengage Learning. 20 Channel Center Street. Boston, MA 02210 SAM vi

Appendix B: SAM License Agreement This is a legal document between Course Technology ("Course Technology") and you. Course Technology is willing to license the Software to you only upon the condition that you accept all of the terms contained in this license agreement. If you agree to all of the terms contained in this license agreement, please so indicate by selecting the "I AGREE" option below. If you do not agree to the terms of this license agreement, please select the "I DISAGREE" option below. If you elect to decline and have purchased your User Manual for the Software (User Manual), you may return it to Course Technology to the address noted below, along with all packaging, proof of purchase and a letter from the institution on whose system the Software is installed certifying that no user profile has been created for you. If Course Technology receives these materials within 30 days of your purchase of the User Manual, Course Technology will issue a refund to you for any fee paid by you for the returned User Manual.
License Agreement
License Grant. Course Technology ("Course Technology") grants to you, subject to termination as provided in this License Agreement, a nonexclusive, nontransferable license ("License") to use the Skills Assessment Management computer software as accessed through a local area network or single central processing unit ("Workstation"), any accompanying printed information relating to the Software, including the User Manual (collectively, the "Software"). The Software is subject to protection under the copyright, trade secret laws, where applicable and other intellectual property laws of the United States and other jurisdictions. With this License, you acquire only the right to use the object code version of the Software while the License is in effect and do not acquire any rights of ownership in the Software. You shall not be considered to be an "owner of a copy" and shall not have rights granted under 17 USC Sec. 117 to make adaptations of the Software. You may use the Software on a single microcomputer by accessing the Software through the Workstation.
License Prohibitions. You may not: rent, sell, lease, lend, sublicense, give or permit access to the Software to any third party; remove or obscure Course Technology's proprietary rights notices; alter, decompile or disassemble, nor attempt to alter, decompile or disassemble, nor permit the alteration, decompilation or disassembly of the Software; use the Software on any service bureau, time sharing or any interactive or similar system; develop software derivative of or interfacing with the Software; use the Software to provide training on the Software to third parties; use or copy Software other than as authorized by this Agreement. You may not assign this License Agreement without Course Technology's prior written consent.
License Termination. In the event that you fail to comply with any term or condition in this License Agreement, the License will terminate immediately without notice to you and Course Technology may pursue all appropriate legal remedies.
Disclaimer. Course Technology gives no warranties and you hereby waive, all warranties, express, implied or statutory, including without limitation, ANY IMPLIED WARRANTY OF MERCHANTABILITY,
©2014 Cengage Learning. 20 Channel Center Street. Boston, MA 02210 SAM i

FITNESS FOR AN INTENDED OR PARTICULAR PURPOSE, non-infringement or otherwise, respecting the Software Course Technology licenses the Software to you "as is" and "where is," and without any warranty of any kind. Course Technology makes no warranty that the functions contained in the Software will meet your requirements or that operation of the Software will be uninterrupted or error free or that the Software will operate in the hardware combination you select or that all program defects will be corrected.
Limitation of Liability. For all claims relating to Course Technology's performance or nonperformance under this Agreement, whether in contract, tort, strict liability or otherwise, including without limitation, claims for failure of the Software to operate as warranted, your sole and exclusive remedy and Course Technology's sole and exclusive liability will be Course Technology’s refund to you of the price for the User Manual for the Software.
In no event shall Course Technology be liable for: indirect, special or consequential damages including lost business; lost profits or lost data; interest, penalties or assessments imposed under applicable tax laws or otherwise; third party claims by your affiliates, partners or customers or otherwise; or damages with respect to which you contributed or acted as an intervening cause, regardless of whether foreseeable, even if Course Technology has been advised of the possibility of such damages.
Some states do not permit the exclusion of implied warranties or the exclusion or limitation of incidental or consequential damages, so the foregoing may not apply to you.
Restricted Rights. You may not sell or re-sell the Software to the U.S. Government. If the U.S. Government acquires the Software from any party other than Course Technology, then the Software is provided with restricted rights applicable to commercial computer software. Use, duplication or disclosure by the U.S. Government is subject to restrictions as set forth in subparagraphs (a) through (d) of The Rights in Technical Data and Computer Software clause at FAR 52.227 and subparagraph at DFAR 252.227-7013 (Department of Defense contract). Contractor/manufacturer is: Course Technology, 20 Channel Center Street, Boston, Massachusetts 02210.
General. THIS AGREEMENT SHALL BE GOVERNED BY THE LAWS OF THE STATE OF MASSACHUSETTS (WITHOUT REGARD TO PRINCIPLES OF CONFLICTS OF LAW).
You acknowledge that you have read this agreement and understand and agree to be bound by its terms and conditions. You agree that this agreement is the complete and exclusive statement of agreement between Course Technology and you and supersedes any agreement, oral or written and any other communications between Course Technology and you relating to the License of the Software.
If you have any questions concerning this Agreement, you should contact Course Technology at: Course Technology, 20 Channel Center Street, Boston, Massachusetts 02210. This Agreement may be assigned by Course Technology without notice to you.
©2014 Cengage Learning. 20 Channel Center Street. Boston, MA 02210 SAM ii
PLEASE INDICATE WHETHER YOU HAVE READ AND UNDERSTOOD THE FOREGOING BY PRESSING EITHER "I AGREE" OR "I DISAGREE". IF YOU CLICK "I AGREE", YOU MAY PROCEED TO THE NEXT SCREEN. IF YOU CLICK "I DISAGREE", YOUR ENROLLMENT WILL TERMINATE
©2014 Cengage Learning. 20 Channel Center Street. Boston, MA 02210 SAM iii