Kurzy File (PC3) - audiosite - · Web viewKurzy File (PC3) General Information Setting...
24
Kurzy File (PC3) 1. General Information 2. Setting Controllers 3. Program mode 4. Setups mode 5. FX 6. Storage 7. MIDI 8. Sounds 9. Menus 10. VAST
-
Upload
phungthuan -
Category
Documents
-
view
219 -
download
4
Transcript of Kurzy File (PC3) - audiosite - · Web viewKurzy File (PC3) General Information Setting...

Kurzy File (PC3)
1. General Information
2. Setting Controllers
3. Program mode
4. Setups mode
5. FX
6. Storage
7. MIDI
8. Sounds
9. Menus
10. VAST

General Information
Kurzweil FTP site: ftp://ftp.kurzweilmusicsystems.com
Pressing the ARP and SW switches together brings up the Quick Arpeggiator Configure Page (note: arpeggiator settings are saved in Setup Mode).
The PC3 always uses real values of measurement, rather than just arbitrary numbers, for adjustable parameters. This means that you specify pitch in semitones (ST) and cents (ct), and amplitude in decibels (dB).

Setting Controllers
To reverse the ribbon (ie low ƒ will be at the cable end):
set the value of the Ctrl Scale parameter to -100, and the value of the Ctrl Offset parameter to 127
If a physical controller is unplugged (eg volume pedal) the PANIC button needs to be applied to restore normality.
Default settings for controllers is in Setup “126 Internal Voices”
(the settings are shown on p181 of the v2 Reference Guide).
Default settings for pedals:
Switch Pedal 1 Controller 64 (Sustain)Switch Pedal 2 Controller 66 (Sostenuto)Switch Pedal 3 Controller 67 (Soft) Continuous Control Pedal 1 Controller 11 (Expression / Volume)Continuous Control Pedal 2 Controller 4 (Foot Pedal) produces a “wah” effect
in many setups
Most VAST programs use the sliders for these functions:
A Data Filter frequency, Brightness
B MIDI 13 Filter resonance, Tremolo rate control
C MIDI 22 Layer volume, Envelope control, Lo EQ
D MIDI 23 Layer volume, Envelope control, Hi EQ
E MIDI 24 Layer volume for thumps and release
F MIDI 25 FX control 1
G MIDI 26 FX distortion drive
H MIDI 27 FX distortion warmth
I MIDI 28 Reverb / delay control

The SW switch default assignment is MIDI 29, and often enables a Layer, or effect.
Intuitive Data Entry
Many parameters have values that correspond to standard physical controllers. In many cases, you can select these values “intuitively,” rather than having to scroll through the Control Source list. Do this by selecting the desired parameter, then holding the ENTER button while moving the desired physical control.For example, on the LAYER page in the Program Editor, you can set the range of the currently selected layer as follows: use the cursor buttons to move the cursor to the value for the LoKey parameter, press (and hold) the Enter button, then press the note you wish to be the lowest note for the currently displayed layer. The note you triggered will appear as the value for the LoKey parameter. Repeat the process for the HiKey parameter.Another example: select Program 199 while in Program mode. Press Edit to enter the Program Editor. Press the PITCH soft button to select the PITCH page. Move the cursor to the Src1 parameter. Hold the Enter button, and move the Pitch Wheel. PWheel will be selected as the value for Src1.You can also use the keyboard to choose control sources, since most key numbers correspond to a value on the control source list. If you have a certain control source that you use over and over (for example, LFO1), this can be the quickest way to enter its value. To do this: highlight a parameter which uses a value from the control source list, hold down Enter, then strike the key corresponding to the control source you want to choose. LFO1, for example, is assigned to B5.Also, for almost every parameter, you can hold the Enter button and move the Data Slider (Slider A) to run through the range of values for the currently selected parameter. This is not as precise as the Alpha Wheel, but much faster.
To set the controller values in Program Mode: Edit>SetCtl (this will capture drawbar settings in KB3 mode).
Controller assigning shortcut:
Hold the ENTER switch down while moving the desired controller. It will then appear in the active field of the screen.
p7-19 to 7-31 of the manual give a detailed description of Controller settings.

Program mode
VAST - Common page: use for overall program settings –
PB range
Mono / Poly
Portamento
Output Gain (useful to match program levels)
KB3 – Misc page: use for overall program settings –
Volume adjust (useful to match program levels)
Sustain
Leslie speed switch
PB Range

Setups Mode
The Control Setup is a Setup object edited and stored in Setup Mode but used by Program Mode. The Control Setup defines the CC destinations for the PC3’s physical controllers (wheels, sliders, pedals, etc.) in Program mode. These assignments are the MIDI CC numbers that the PC3’s physical controllers send while in Program mode. Parameters in the Program Editor can then be assigned to respond to these CC numbers.
The factory Programs use Setup 126 Internal voices as the default Control Setup [not a good idea to edit or overwrite this program]. If you edit or overwrite the default Control Setup (126 Internal Voices), you can always recall the original control setup by deleting the setup stored at ID# 126. This will return the setup to its default settings. You can delete a setup by using the Delete soft button in the Setup Editor.
When selecting or editing the Control Setup, only Zone 1 of the setup has an effect on program mode (see Table 6-4 of the Musicians Guide).

Effects

Storage

MIDI
If you’re using a different MIDI controller, you can make use of Setup mode even if your MIDI controller can transmit on only one MIDI channel at a time. To do this, go to the RECEIVE page in MIDI mode (by pressing the RECV soft button while in MIDI mode), and set the Local Keyboard Channel parameter to a value that matches the transmit channel of your MIDI controller. When you select Setup mode, the PC3 will interpret incoming MIDI information according to the settings for the currently selected setup. See the discussion of the Local Keyboard Channel parameter in Chapter 10 for details.
The Destination parameter on the CH/PROG page determines where MIDI messages are sent. Usually this should be kept at its default setting USB_MIDI+MIDI+LOCAL, and the MIDI message destination for Program mode should be set with the Destination parameter on the MIDI Mode Transmit page (see page 10‐2 for details.) The Destination parameter on the CH/PROG page works in combination with the Destination parameter on the MIDI Mode Transmit page. For example if the Destination parameter on the CH/PROG page is set to MIDI+LOCAL, then MIDI messages will not be sent to the USB port, even if USB_MIDI+MIDI+LOCAL is selected for the Destination parameter on the MIDI Mode Transmit page.
Setup ch/Prog page:InputChannelIn Setup mode, an external MIDI device (such as a keyboard or sequencer) will play notes of a single program by default (if the Local Keyboard Channel parameter is set to off, see page 10 ‐9 for details.) The played program will be on a Zone that has a Channel parameter (on the CH/ PROG page), which matches the channel on which the external MIDI device is transmitting. (If no Zone’s Channel parameter matches, the external device will play notes of the last program that was using that channel in Program Mode or from a previously loaded Song or Setup.)When the Program of a Setup Zone is played from an external MIDI device, Setup MIDI parameters (most noticeably key range and transposition) will not be applied. If you want these parameters applied, set the Input Channel parameter to match the channel on which the external MIDI device is transmitting. See the Input Channel Settings section below for details on setting an Input Channel. (To play the entire Setup from an external MIDI device, see Local Keyboard Channel (LocalKbdCh) on page 10‐9.) When Local Keyboard Channel is set to something other than Off, the Input Channel parameter has no effect and will appear in parentheses.Input Channel basically has the same effect as Local Keyboard Channel, except you can choose to play only one or some Setup Zones from an external device, instead of all Zones. To play more than one Zone from an external device, set each desired Zone’s Input Channel parameter to match the channel on which the external MIDI device is transmitting. It is also possible to use the Input Channel parameter to use multiple external devices which each play a specific Zone or Zones. For details on controlling assignments made to the PC3’s physical controllers (sliders, switches, mod wheel, etc.) from an external MIDI device when using an Input Channel, see Continuous Controller Messages From External MIDI Devices on page 10‐10.
Input Channel Settings
When setting a MIDI channel number for the Input Channel parameter, channel 1 for example, you can choose 1 L+M or 1 M (scroll past 16 L+M to see all the choices.) A channel number with a setting of L+M indicates that the zone will be playable from the PC3 keyboard (L for Local) and from the external MIDI controller (M for MIDI.) A channel number with a setting of M indicates that the zone will be playable only from the external MIDI controller, and not from the PC3 keyboard. You can also choose Any L+M or Any M for the Input Channel setting. Any L+M and Any M will make the zone receive MIDI on any channel that an external device is transmitting. This is useful if you are using a single external MIDI controller and are not sure which channel it is transmitting on.

Sounds
Presets (by type)
Acoustic Pianos
1-16
129-144
842, 843
E Pianos
17-33
145-163
257-272
769-771, 781 (FM)
Synths
34-40
81-87
88- 96 (pads)
164-168 (polysynths)
209-224
273-288
305-368 (Classic synths, Mellotron)
377-384 (pads)
774-778 (polysynths)
782-787 (leads)
788-793 (pads)
962-996
1001-1018
1019-1024 (VA raw waveforms)
Clavinets
41-48
169-176

289-304
Electronic Organ
49-56 (B3)
178-184 (60s organs)
886-950 (B3)
959-961
Horns
57-64 (section)
185-192 (Pop Sax & Brass)
Strings
65-72
193-200 (Pop Strings)
472-480 (solo)
513-628 (ind. Sections)
629-640 (pads)
Voices
73-80
201-208
779, 780, 485
Acoustic Guitars
97-101
Electric Guitars
102-104
225-232
772, 773
Basses
105-112

233-240
Drum Kits
113-122
241-248
369-376
641-745
951-957 (GM kits)
Tuned Percussion
123-128
249-256
502-512
Misc
177 (Accordion)
970 Blues Harmonica
Orchestral
385-422
Percussion
492-501
794, 958 (GM)
Woodwinds
423-444
Brass
445-471
Harp
481-484
Pipe Organ
486-491
795-841 (ind. Stops)
GM

4096-4223

Menus
Program Edit (VAST):
KEYMAP used to select samples
LAYER set key-range, PB (mono or poly), sustain pedal for each layer
PITCH
AMP
ALG (and EditAlg submenu)
DSPCTL control of the Algorithm DSP functions
DSPMOD for setting Controllers to effect the Algorithm DSP functions
OUTPUT used for Pan assignments
COMMON use for overall settings for the program
LFO parameters for the two LFOs
ASR parameters for the two ASR (Attack Sustain Release) envelopes
FUN Four mathematical functions (see K2661 manual p553 for details)
AMPENV Attack Decay release EG for amplitude. Natural = the sample EG
ENV2 EG with bipolar (±) values possible
ENV3 “ “
ENVCTL setup key-tracking and controllers for the EGs
PROGFX FX settings for the entire Program
LYR_FX Layer FX settings
CTLS Sets the initial Controller values for the Program
SETCTL captures the current values of sliders, mod wheel, and SW
NEWLYR Creates a new layer (from Prog 999 - Default)
DUPLYR Makes a copy of the current layer
IMPLYR Copy a layer form another Program
DELLYR Delete layer

NAME
SAVE
DELETE
INFO
Program Edit (KB3):
TONEWH sound source settings
DRAWBR drawbar settings
SETDBR captures the current drawbar settings
PITCH
AMP
PERC1 percussion settings
PERC2 more percussion settings
KEYCLK key-click settings
MISC use for overall settings for the program
EQ 4 band EQ (actually effects tonewheel levels)
OUTPUT pan, out gain, exp. Pedal for the program
PROGFX same as for VAST
LFO “
ASR “
FUN “
INFO “
NAME
SAVE
DELETE

Setup Edit
CH/PROG Preset selection, MIDI settings (inc Zones), Outputs
KEYVEL set key-range, velocity curves etc for zones
PANVOL set entry and exit volumes for zones
BEND PB ranges for zones
WHEEL set PB and Mod wheel parameters for zones
SLIDER assign the sliders to zones (A to E)
SLID2 “ (F to I)
CPEDAL assign pedals to zones
PRESS assign aftertouch to zones
FTSW1 (sus) assign Footswitch 1 to zones
FTSW2 (sos) assign Footswitch 2 to zones
FTSW3 (soft) assign Footswitch 3 to zones
ARPSW assigns the ARP switch
SWITCH assigns SW
RIBBON assigns the Ribbon Controller
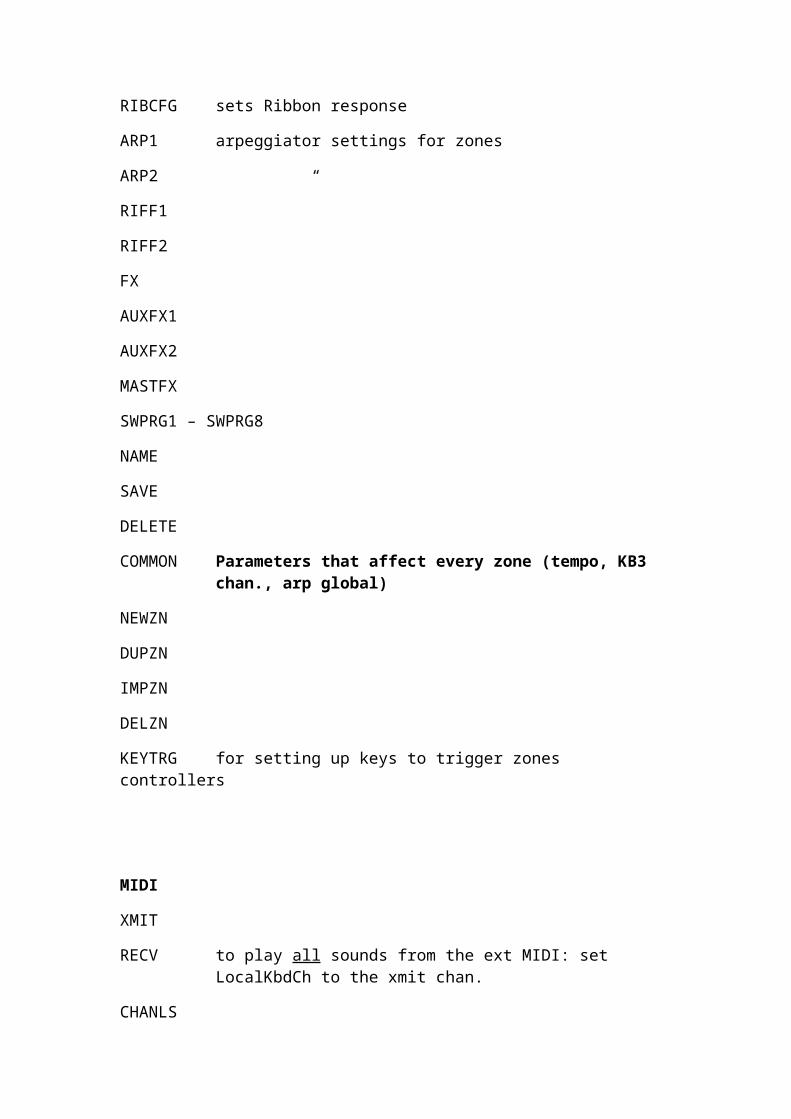
RIBCFG sets Ribbon response
ARP1 arpeggiator settings for zones
ARP2 “
RIFF1
RIFF2
FX
AUXFX1
AUXFX2
MASTFX
SWPRG1 – SWPRG8
NAME
SAVE
DELETE

COMMON Parameters that affect every zone (tempo, KB3 chan., arp global)
NEWZN
DUPZN
IMPZN
DELZN
KEYTRG for setting up keys to trigger zones controllers
MIDI
XMIT
RECV to play all sounds from the ext MIDI: set LocalKbdCh to the xmit chan.
CHANLS
PRGCHG
RSTCHA
PANIC
Note: pushing the EDIT button in MIDI mode goes to Setup edit.
MASTER
MAIN Master tune, transpose, display controllers
MAPS velocity maps, AT maps, intonation maps
OUTPUT mirror primary outputs
TEMPO system tempo (does not apply to Setup mode)
GM ON
OBJECT
UTILS MIDI monitor
CLOCK Stopwatch
RESET Restores to Factory default

LOADER
ABOUT
SAVE note: the Master Table is auto-saved (unless Master Table Lock is on)
PRVIEW

VAST
Architecture:
Synthesis: KVA Oscillators – 22 types, 59 Algorithms
KB3:
Up to 91 oscillators (tonewheels), divided into Upper (samples), and Lower (sinewaves). Note: each Lower uses one voice per tonewheel.