Jeep CJ5 Installation - Rally Tops · 1. Preform the pre-installation instructions. CJ5...
5
WARNING The top on this vehicle is designed only for additional protection against the elements. Do not rely on the top to contain occupants within the vehicle or to protect against intrusion of foreign objects, nor injury during an accident. Make sure all brackets and screws are tight. Periodically check for tightness and retighten when necessary. WEAR SEAT BELTS AT ALL TIMES PLEASE READ CAREFULLY BEFORE STARTING INSTALLATION To safely lift and install this hardtop, you will need the assistance of at least one other person. Follow the instructions and perform the steps in the sequence given. Short cuts to the directions may result in an unsatisfactory installation. CJ5 Installation Instructions 1976-1983 Parts List 1. 6 ea. 5/16 x 1 1/2 Hex Bolts 2. 6 ea. 5/16 x 18 Weld Nuts 3. 6 ea. 3/8 Flat Washers 4. 2 ea. Wood Spacers 5. 2 ea. Closed Catches 6. 4 ea. Sheet Metal Screws 7. 2 ea. Keys
Transcript of Jeep CJ5 Installation - Rally Tops · 1. Preform the pre-installation instructions. CJ5...

WARNINGThe top on this vehicle is designed only for additional
protection against the elements.
Do not rely on the top to contain occupants within the vehicle or to protect against intrusion of foreign
objects, nor injury during an accident.
Make sure all brackets and screws are tight. Periodically check for tightness and retighten when
necessary.
WEAR SEAT BELTS AT ALL TIMES
PLEASE READ CAREFULLY BEFORE STARTING INSTALLATION
To safely lift and install this hardtop, you will need the assistance of at least one other person.
Follow the instructions and perform the steps in the sequence given. Short cuts to the directions may result in
an unsatisfactory installation.
CJ5 Installation Instructions 1976-1983
Parts List1. 6 ea. 5/16 x 1 1/2 Hex Bolts2. 6 ea. 5/16 x 18 Weld Nuts3. 6 ea. 3/8 Flat Washers4. 2 ea. Wood Spacers5. 2 ea. Closed Catches6. 4 ea. Sheet Metal Screws7. 2 ea. Keys

1. Preform the pre-installation instructions.
CJ5 Installation Instructions
4. Tape spacer to the rear of the door opening.
2. Install the catches in the visor holes. Install top and bolts but don’t tighten yet.
3. Tape spacer on the rear of the door.
5. Adjust the door, by loosening the three hinge bolts on both hinges.IMPORTANT!!The bolt shown by the arrow is not to be tighten more than hand tight.
7. You might have to go back and forth on the door and top adjustments, before you get it.
6. Loosen the two screws to adjust the catch. When your satisfied, install the remaining two screws and tighten.
8. Tighten the rail bolts and the cam locks.Please send us a picture. We are proud of our work.

Hinge Alignment Examples
Fig. #1 These hinges are not stock. Look at the placement of the hinge. See the stock hinge in fig. 2. It sits down more. Also notice that Fig. #1 hinge is set back into the door. Look at Fig 2, itʼs not so far back.
Fig. #2
Fig. #1
Fig. #3
Look at Fig #3 The top hinge in Fig#1 is stopping the lower hinge from going down, and the looks like itʼs too far back. Should be like Fig. #4
Fig. #4

The door on the left is properly fitted. Notice the notch in the door matches the windshield to body contour. Now look at the door on the right, see the door notch is too high. The door needs to come down, so that is matches the windshield to body contour.
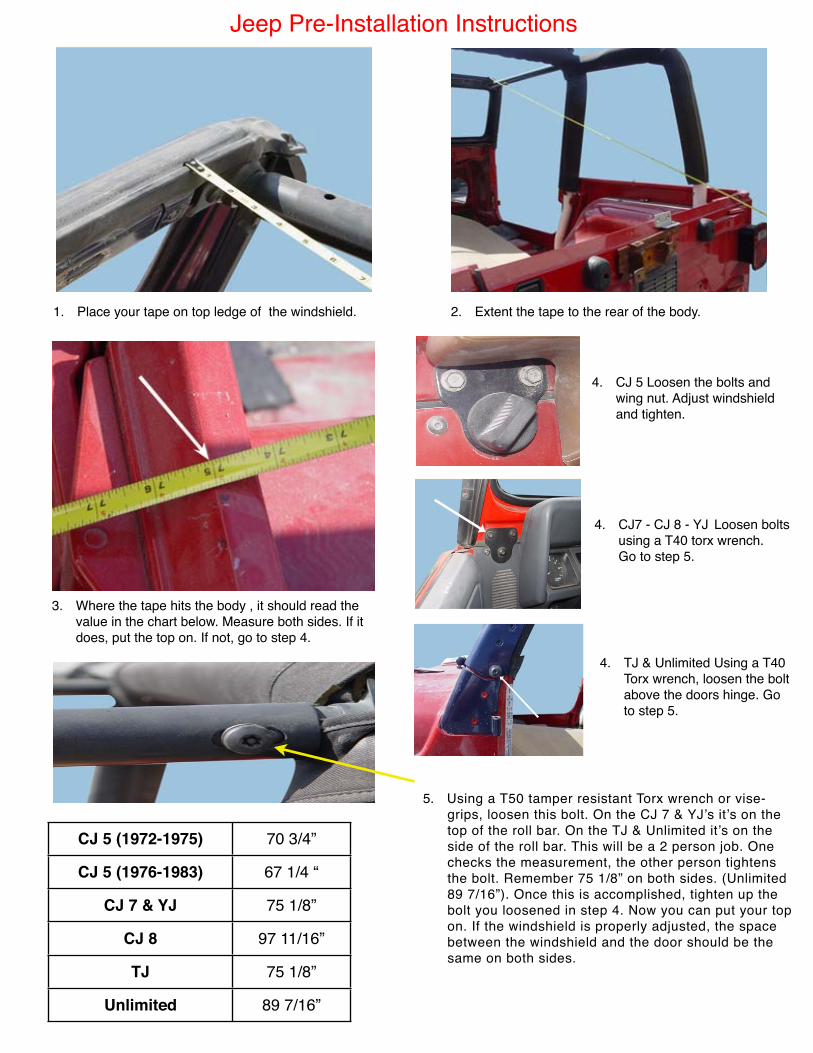
CJ 5 (1972-1975) 70 3/4”
CJ 5 (1976-1983) 67 1/4 “
CJ 7 & YJ 75 1/8”
CJ 8 97 11/16”
TJ 75 1/8”
Unlimited 89 7/16”
Jeep Pre-Installation Instructions
1.! Place your tape on top ledge of !the windshield. 2.! Extent the tape to the rear of the body.
3.! Where the tape hits the body , it should read the !!! value in the chart below. Measure both sides. If it !! does, put the top on. If not, go to step 4.
4.! CJ 5 Loosen the bolts and ! !! wing nut. Adjust windshield !!! and tighten.
4.! CJ7 - CJ 8 - YJ!Loosen bolts !! using a T40 torx wrench. !! Go to step 5.
4.! TJ & Unlimited Using a T40 !! Torx wrench, loosen the bolt ! above the doors hinge. Go !! to step 5.
5.! Using a T50 tamper resistant Torx wrench or vise-! !! grips, loosen this bolt. On the CJ 7 & YJ’s it’s on the !! top of the roll bar. On the TJ & Unlimited it’s on the ! !! side of the roll bar. This will be a 2 person job. One !!! checks the measurement, the other person tightens !!! the bolt. Remember 75 1/8” on both sides. (Unlimited !! 89 7/16”). Once this is accomplished, tighten up the !!! bolt you loosened in step 4. Now you can put your top ! on. If the windshield is properly adjusted, the space !!! between the windshield and the door should be the !!! same on both sides.


![jeep cj5 manual de instrucoes 1958 [jipenet]](https://static.fdocuments.us/doc/165x107/5571f31d49795947648d86b2/jeep-cj5-manual-de-instrucoes-1958-jipenet.jpg)