MONTERINGSANVISNING · INSTALLATION INSTRUCTIONS...
16
Saab 9-3 M03- 900 Installation instructions SCdefault MONTERINGSANVISNING · INSTALLATION INSTRUCTIONS MONTAGEANLEITUNG · INSTRUCTIONS DE MONTAGE SITdefault Saab 9-3 M03- Branching lead kit Accessories Part No. Group Date Instruction Part No. Replaces 12 787 135 9:87-40 Oct 02 12 788 443 12 788 443 Mar 02 F930A043
Transcript of MONTERINGSANVISNING · INSTALLATION INSTRUCTIONS...
Saab 9-3 M03-
900 Installation instructionsSCdefault
MONTERINGSANVISNING · INSTALLATION INSTRUCTIONS MONTAGEANLEITUNG · INSTRUCTIONS DE MONTAGE
SITdefault
Saab 9-3 M03- Branching lead kit
Accessories Part No. Group Date Instruction Part No. Replaces
12 787 135 9:87-40 Oct 02 12 788 443 12 788 443 Mar 02
F930A043
2 12 788 443
Saab 9-3 M03-
1 Extension cable 2.0 m2 Extension cable 2.5 m3 Branch connector4 Bolt5 Nut6 Cable tie (x16)7 230 V socket8 Screw (x2)9 Grommet
F930A019
1
2
9
6
4 3 785
12 788 443 3
Saab 9-3 M03-
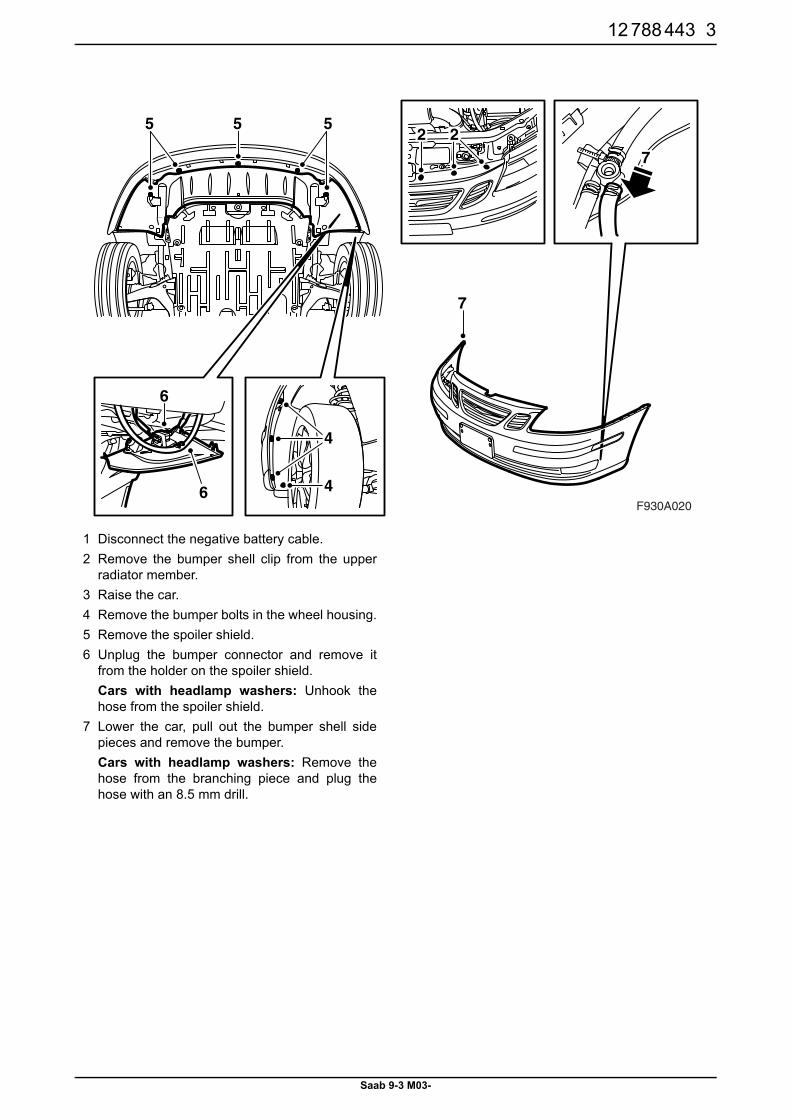
1 Disconnect the negative battery cable.2 Remove the bumper shell clip from the upper
radiator member.3 Raise the car.4 Remove the bumper bolts in the wheel housing.5 Remove the spoiler shield.6 Unplug the bumper connector and remove it
from the holder on the spoiler shield.Cars with headlamp washers: Unhook thehose from the spoiler shield.
7 Lower the car, pull out the bumper shell sidepieces and remove the bumper.Cars with headlamp washers: Remove thehose from the branching piece and plug thehose with an 8.5 mm drill.
6
4
46F930A020
55 52 2
7
7
4 12 788 443
Saab 9-3 M03-
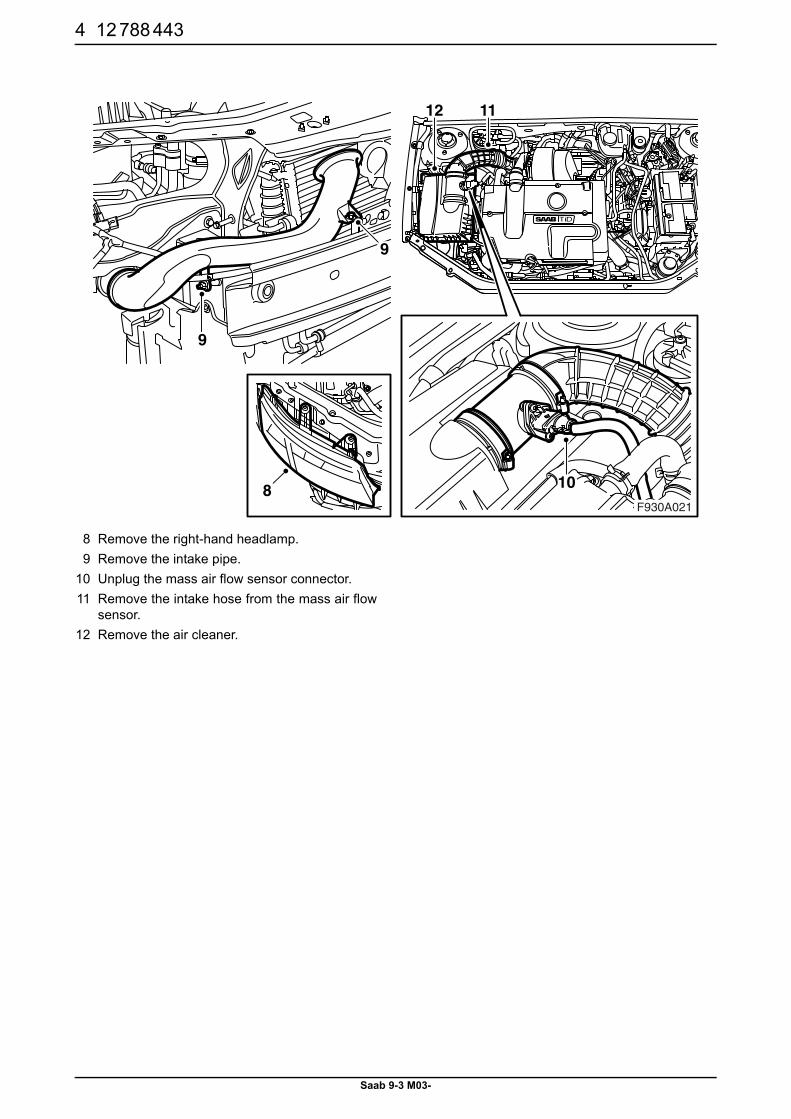
8 Remove the right-hand headlamp.9 Remove the intake pipe.
10 Unplug the mass air flow sensor connector.11 Remove the intake hose from the mass air flow
sensor.12 Remove the air cleaner.
F930A021
1112
8 10
9
9
12 788 443 5
Saab 9-3 M03-
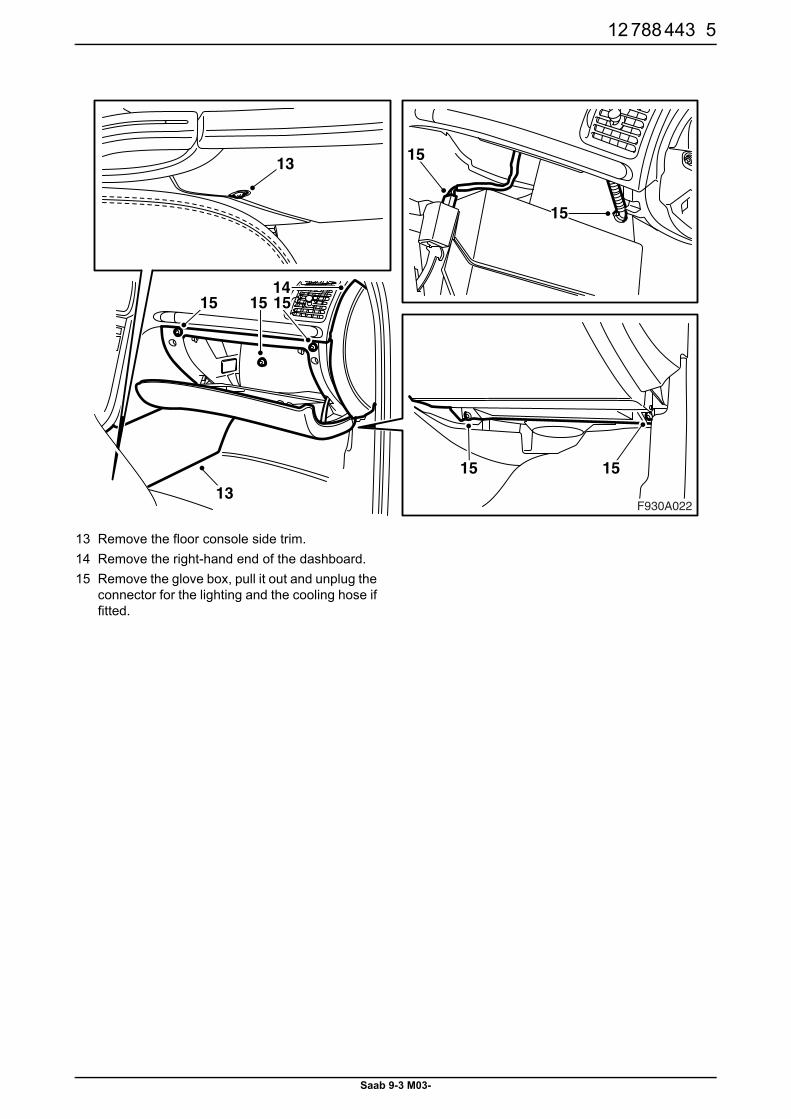
13 Remove the floor console side trim.14 Remove the right-hand end of the dashboard.15 Remove the glove box, pull it out and unplug the
connector for the lighting and the cooling hose iffitted.
F930A022
15
1515
15
13
15
1513
15
14
6 12 788 443
Saab 9-3 M03-
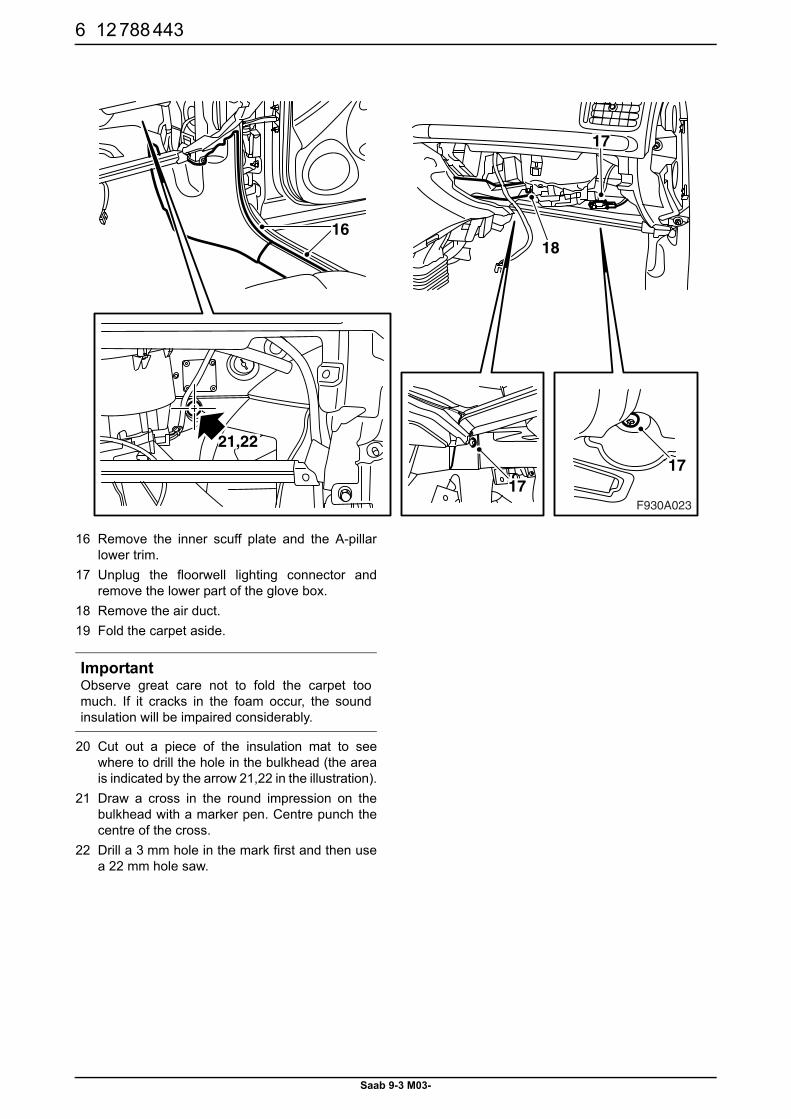
16 Remove the inner scuff plate and the A-pillarlower trim.
17 Unplug the floorwell lighting connector andremove the lower part of the glove box.
18 Remove the air duct.19 Fold the carpet aside.
20 Cut out a piece of the insulation mat to seewhere to drill the hole in the bulkhead (the areais indicated by the arrow 21,22 in the illustration).
21 Draw a cross in the round impression on thebulkhead with a marker pen. Centre punch thecentre of the cross.
22 Drill a 3 mm hole in the mark first and then usea 22 mm hole saw.
ImportantObserve great care not to fold the carpet toomuch. If it cracks in the foam occur, the soundinsulation will be impaired considerably.
F930A023
21,22
17
1717
1816
12 788 443 7
Saab 9-3 M03-
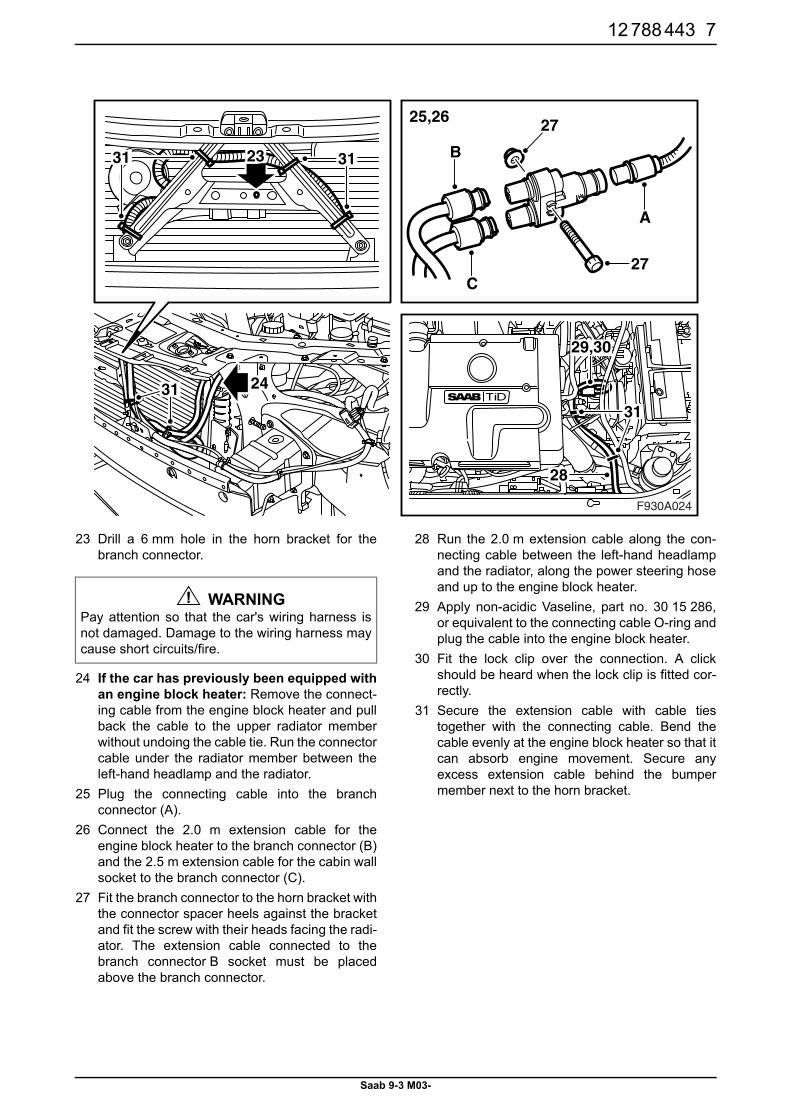
23 Drill a 6 mm hole in the horn bracket for thebranch connector.
24 If the car has previously been equipped withan engine block heater: Remove the connect-ing cable from the engine block heater and pullback the cable to the upper radiator memberwithout undoing the cable tie. Run the connectorcable under the radiator member between theleft-hand headlamp and the radiator.
25 Plug the connecting cable into the branchconnector (A).
26 Connect the 2.0 m extension cable for theengine block heater to the branch connector (B)and the 2.5 m extension cable for the cabin wallsocket to the branch connector (C).
27 Fit the branch connector to the horn bracket withthe connector spacer heels against the bracketand fit the screw with their heads facing the radi-ator. The extension cable connected to thebranch connector B socket must be placedabove the branch connector.
28 Run the 2.0 m extension cable along the con-necting cable between the left-hand headlampand the radiator, along the power steering hoseand up to the engine block heater.
29 Apply non-acidic Vaseline, part no. 30 15 286,or equivalent to the connecting cable O-ring andplug the cable into the engine block heater.
30 Fit the lock clip over the connection. A clickshould be heard when the lock clip is fitted cor-rectly.
31 Secure the extension cable with cable tiestogether with the connecting cable. Bend thecable evenly at the engine block heater so that itcan absorb engine movement. Secure anyexcess extension cable behind the bumpermember next to the horn bracket.
WARNINGPay attention so that the car's wiring harness isnot damaged. Damage to the wiring harness maycause short circuits/fire.
F930A024
25,26
29,30
31
28
27
A
C
B
27
31 24
23 3131
8 12 788 443
Saab 9-3 M03-
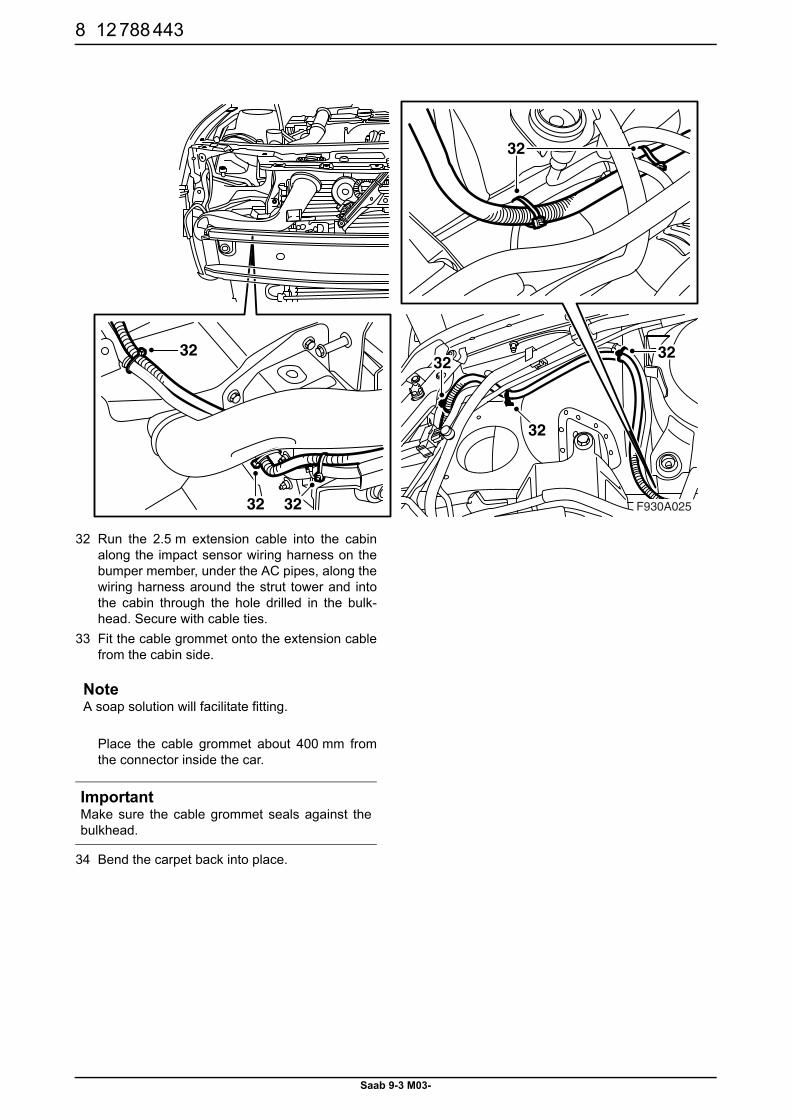
32 Run the 2.5 m extension cable into the cabinalong the impact sensor wiring harness on thebumper member, under the AC pipes, along thewiring harness around the strut tower and intothe cabin through the hole drilled in the bulk-head. Secure with cable ties.
33 Fit the cable grommet onto the extension cablefrom the cabin side.
Place the cable grommet about 400 mm fromthe connector inside the car.
34 Bend the carpet back into place.
NoteA soap solution will facilitate fitting.
ImportantMake sure the cable grommet seals against thebulkhead.
F930A025
32
3232
32
32
32
32
12 788 443 9
Saab 9-3 M03-
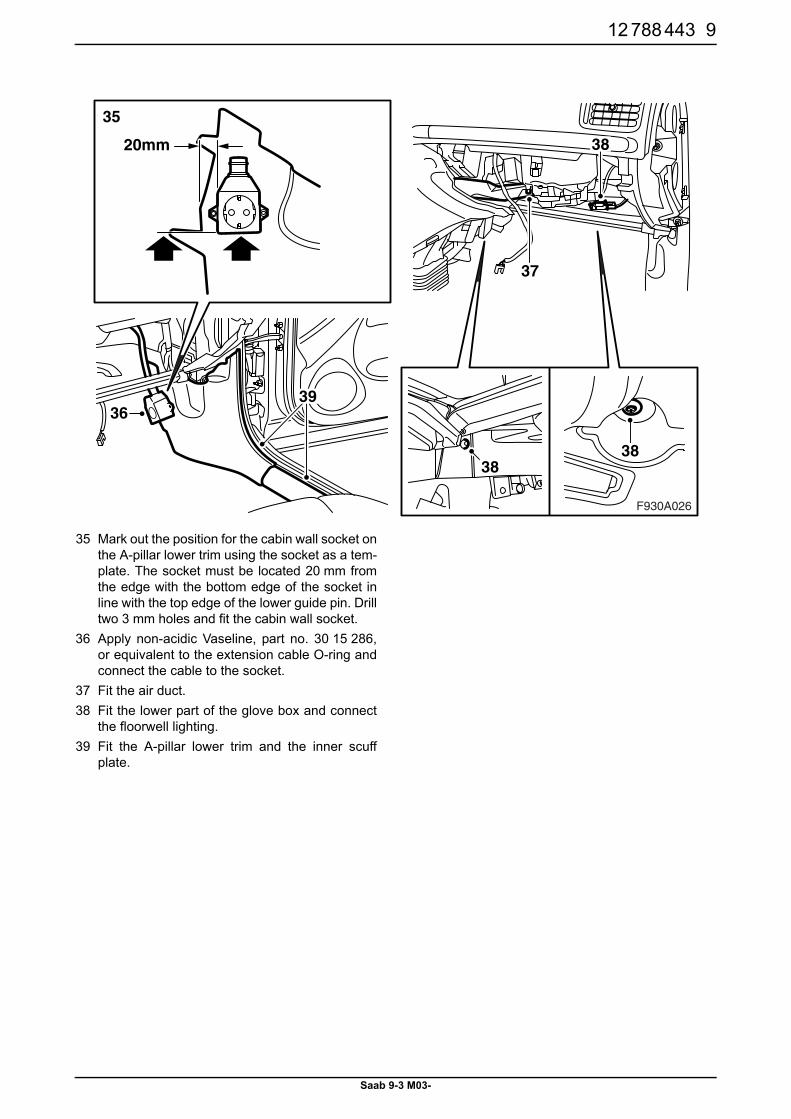
35 Mark out the position for the cabin wall socket onthe A-pillar lower trim using the socket as a tem-plate. The socket must be located 20 mm fromthe edge with the bottom edge of the socket inline with the top edge of the lower guide pin. Drilltwo 3 mm holes and fit the cabin wall socket.
36 Apply non-acidic Vaseline, part no. 30 15 286,or equivalent to the extension cable O-ring andconnect the cable to the socket.
37 Fit the air duct.38 Fit the lower part of the glove box and connect
the floorwell lighting.39 Fit the A-pillar lower trim and the inner scuff
plate.
F930A026
20mm
35
37
3838
3936
38
10 12 788 443
Saab 9-3 M03-
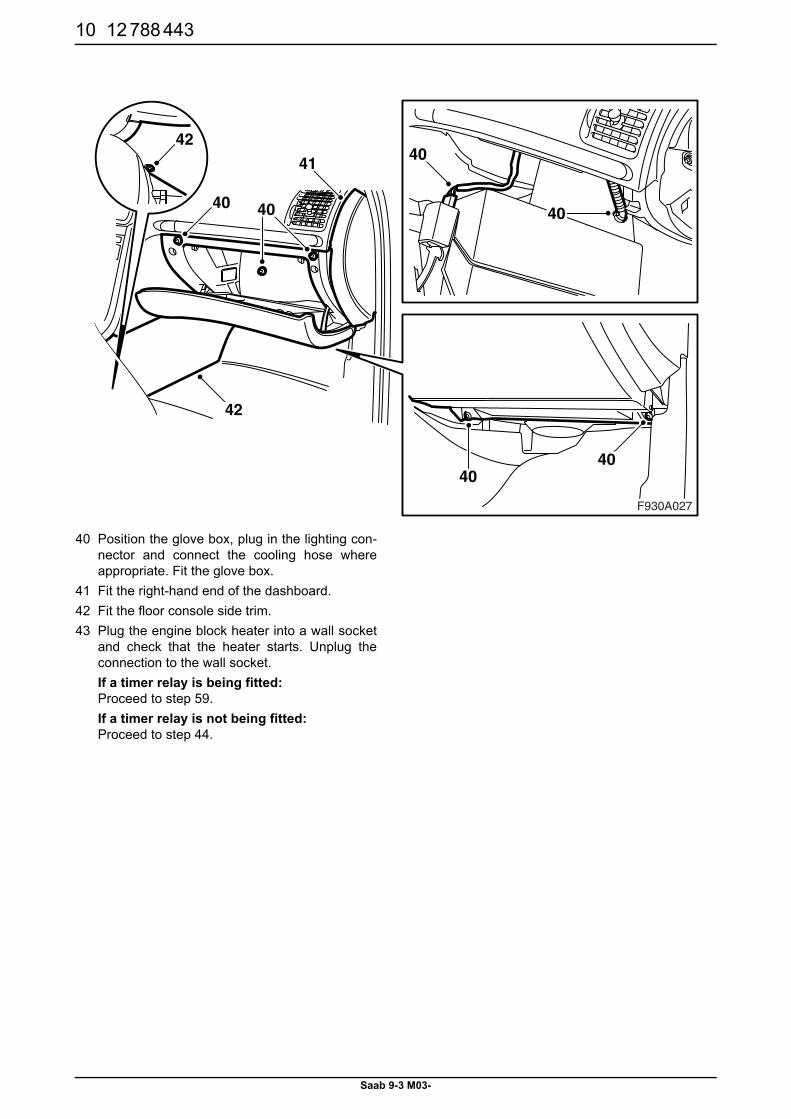
40 Position the glove box, plug in the lighting con-nector and connect the cooling hose whereappropriate. Fit the glove box.
41 Fit the right-hand end of the dashboard.42 Fit the floor console side trim.43 Plug the engine block heater into a wall socket
and check that the heater starts. Unplug theconnection to the wall socket.If a timer relay is being fitted: Proceed to step 59.If a timer relay is not being fitted: Proceed to step 44.
F930A027
41
4040
42
42
40
40
4040
12 788 443 11
Saab 9-3 M03-
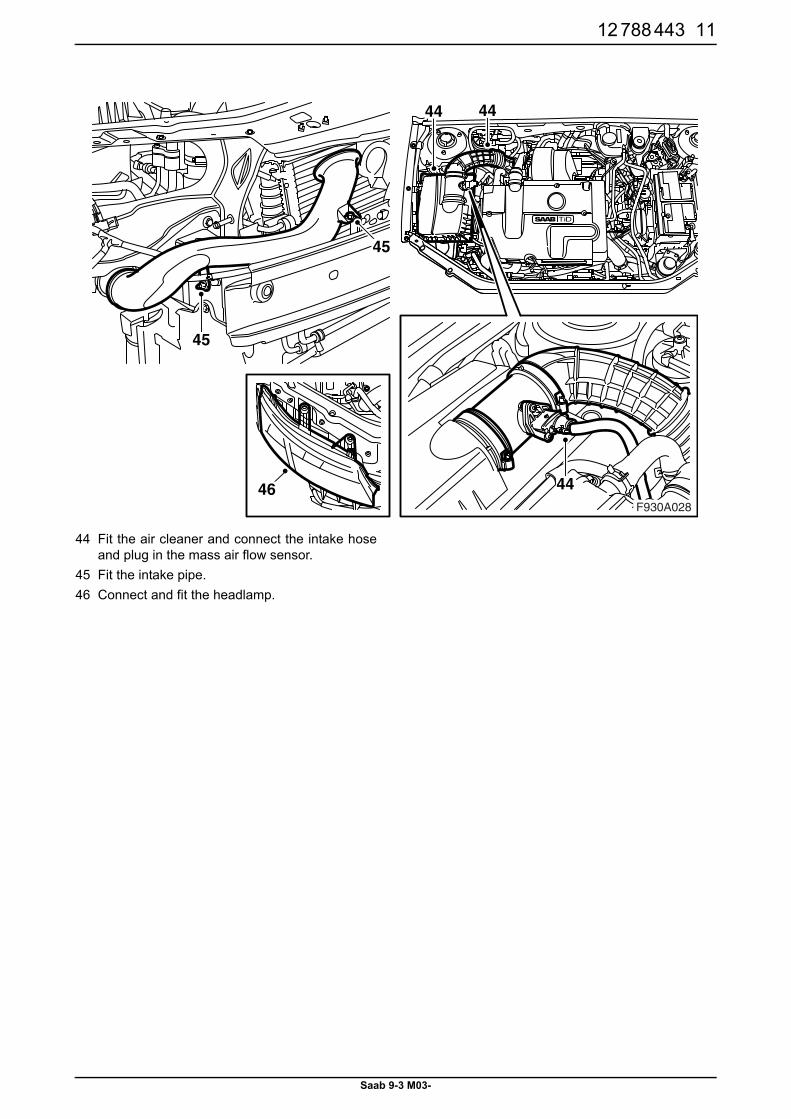
44 Fit the air cleaner and connect the intake hoseand plug in the mass air flow sensor.
45 Fit the intake pipe.46 Connect and fit the headlamp.
F930A02846 44
44 44
45
45
12 12 788 443
Saab 9-3 M03-
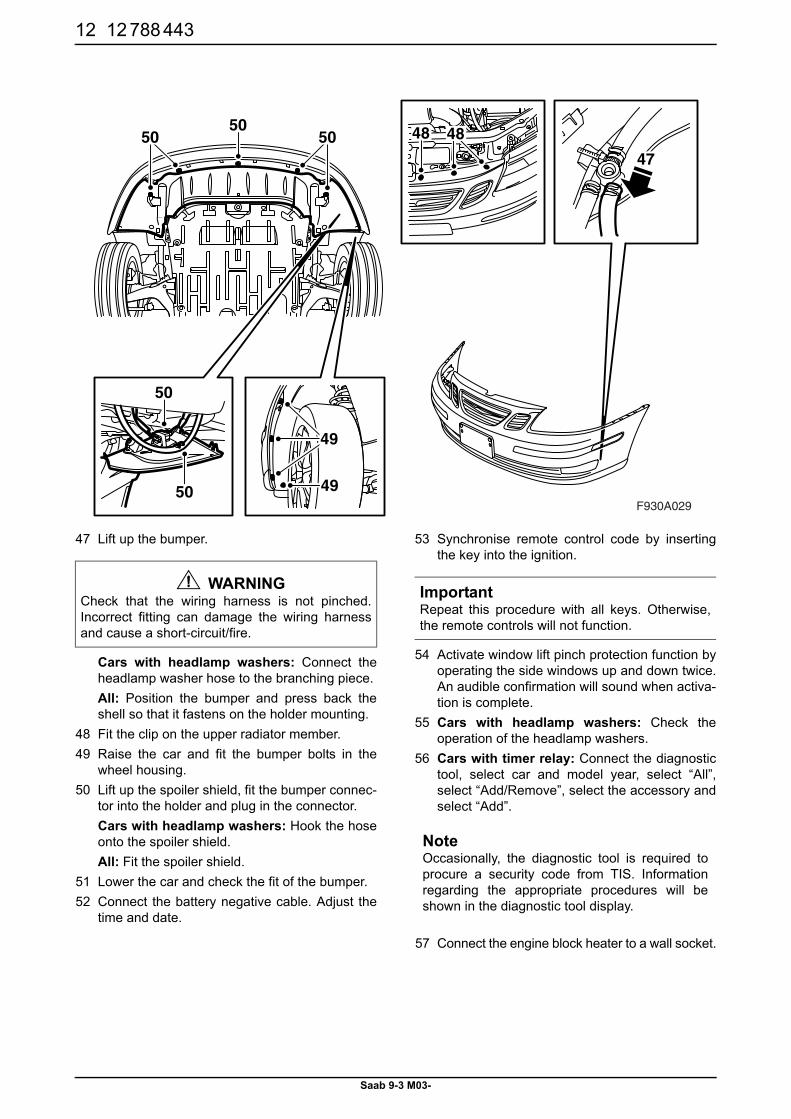
47 Lift up the bumper.
Cars with headlamp washers: Connect theheadlamp washer hose to the branching piece.All: Position the bumper and press back theshell so that it fastens on the holder mounting.
48 Fit the clip on the upper radiator member.49 Raise the car and fit the bumper bolts in the
wheel housing.50 Lift up the spoiler shield, fit the bumper connec-
tor into the holder and plug in the connector.Cars with headlamp washers: Hook the hoseonto the spoiler shield.All: Fit the spoiler shield.
51 Lower the car and check the fit of the bumper.52 Connect the battery negative cable. Adjust the
time and date.
53 Synchronise remote control code by insertingthe key into the ignition.
54 Activate window lift pinch protection function byoperating the side windows up and down twice.An audible confirmation will sound when activa-tion is complete.
55 Cars with headlamp washers: Check theoperation of the headlamp washers.
56 Cars with timer relay: Connect the diagnostictool, select car and model year, select “All”,select “Add/Remove”, select the accessory andselect “Add”.
57 Connect the engine block heater to a wall socket.
WARNINGCheck that the wiring harness is not pinched.Incorrect fitting can damage the wiring harnessand cause a short-circuit/fire.
F930A029
5050
50
50
50 49
49
47
48 48
ImportantRepeat this procedure with all keys. Otherwise,the remote controls will not function.
NoteOccasionally, the diagnostic tool is required toprocure a security code from TIS. Informationregarding the appropriate procedures will beshown in the diagnostic tool display.
12 788 443 13
Saab 9-3 M03-
58 Press the SIDC button “CUSTOMIZE”, select“Engine block heater”, press “SET”, select“Manual control”, press “SET”, select “Heateron”, press “SET” and make sure the engineblock heater starts.Select “Manual control”, press “SET”, select“Heater off”, press “SET”, select “Back” and“Finish”.
14 12 788 443
Saab 9-3 M03-
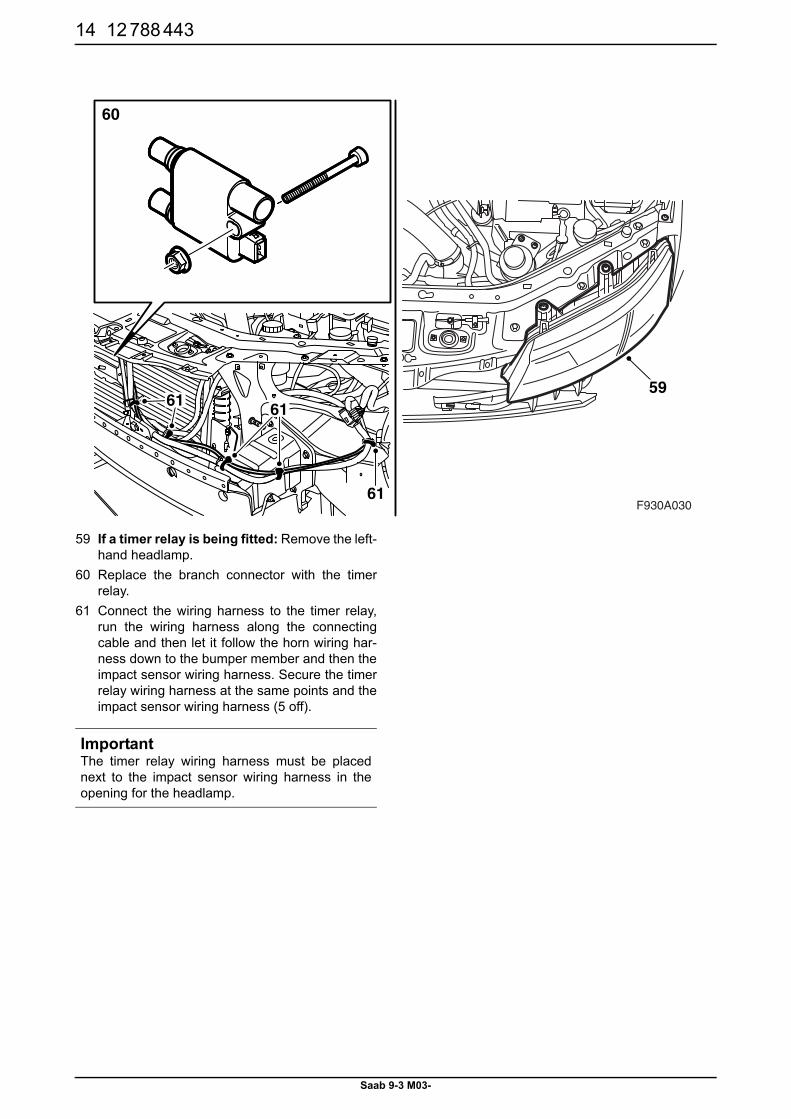
59 If a timer relay is being fitted: Remove the left-hand headlamp.
60 Replace the branch connector with the timerrelay.
61 Connect the wiring harness to the timer relay,run the wiring harness along the connectingcable and then let it follow the horn wiring har-ness down to the bumper member and then theimpact sensor wiring harness. Secure the timerrelay wiring harness at the same points and theimpact sensor wiring harness (5 off).
ImportantThe timer relay wiring harness must be placednext to the impact sensor wiring harness in theopening for the headlamp.
F930A030
59
61
6161
60
12 788 443 15
Saab 9-3 M03-
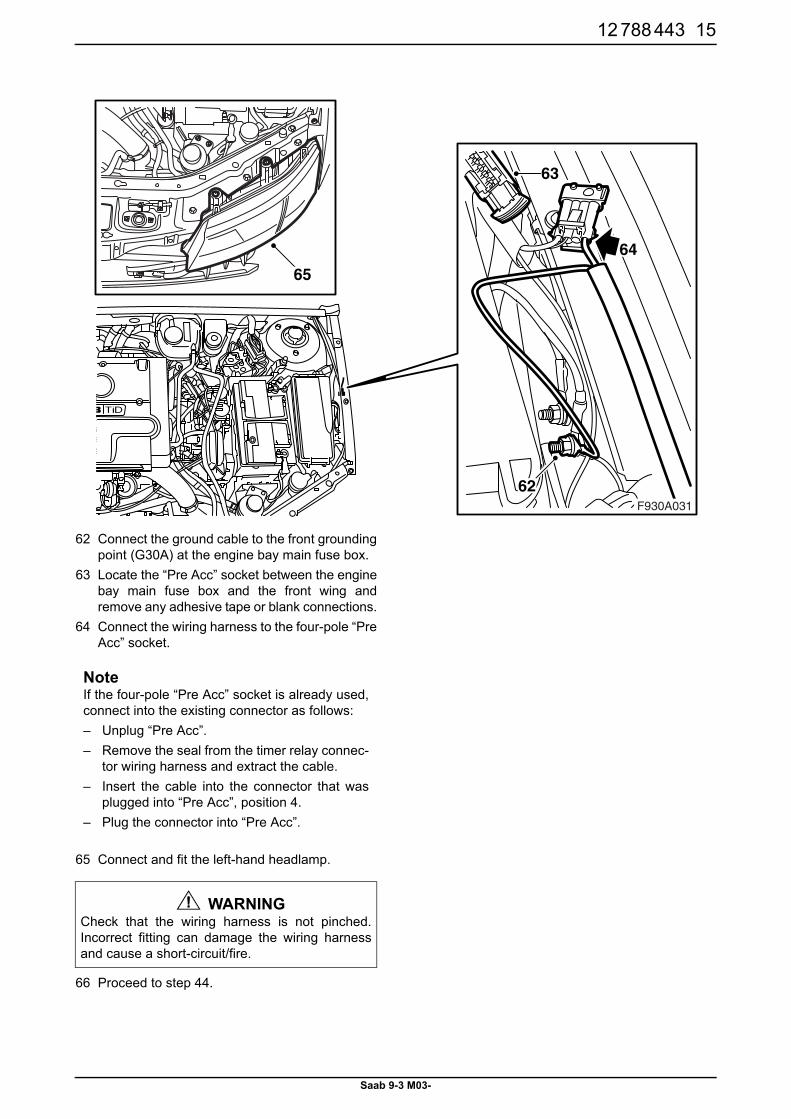
62 Connect the ground cable to the front groundingpoint (G30A) at the engine bay main fuse box.
63 Locate the “Pre Acc” socket between the enginebay main fuse box and the front wing andremove any adhesive tape or blank connections.
64 Connect the wiring harness to the four-pole “PreAcc” socket.
65 Connect and fit the left-hand headlamp.
66 Proceed to step 44.
NoteIf the four-pole “Pre Acc” socket is already used,connect into the existing connector as follows:– Unplug “Pre Acc”.– Remove the seal from the timer relay connec-
tor wiring harness and extract the cable.– Insert the cable into the connector that was
plugged into “Pre Acc”, position 4.– Plug the connector into “Pre Acc”.
WARNINGCheck that the wiring harness is not pinched.Incorrect fitting can damage the wiring harnessand cause a short-circuit/fire.
F930A031
63
62
64
65
16 12 788 443
Saab 9-3 M03-
User instructions� The extension cable must be made of oil-resist-
ant rubber and approved for outdoor use with across-sectional area of at least 3x1.5 mm2.
� The heater system may only be connected to agrounded socket.
� Handle all cables with care. Pay particular atten-tion to the risk of pinching between the bonnetand the body of the car and the risk of cuts onsharp metal components.
� Inspect regularly the extension cable for damageor ageing. Damaged cables must be renewedimmediately.
WARNINGCheck the ground connection between the con-necting cable ground pin, the heater casing andthe car body regularly to prevent electric shocks.
NoteThe function of the heater will be at risk if:
� there are impurities in the coolant
� the coolant level is too low or if there is air inthe system
� there is ice slush in the system
� radiator sealant is used