ISUCUTTER3FS User Manual - News - ISU Judging … by the Caller, the operator sets the Trim In /...
27
Swiss Timing LTD Phone +41 32 488 36 11 P.O. Box 138, Rue de l’Envers 1 [email protected] CH-2606 Corgémont - Switzerland www.swisstiming.com ISUCUTTER3FS User Manual Document Version 1.0 l January 2016
Transcript of ISUCUTTER3FS User Manual - News - ISU Judging … by the Caller, the operator sets the Trim In /...

Swiss Timing LTD Phone +41 32 488 36 11 P.O. Box 138, Rue de l’Envers 1 [email protected] CH-2606 Corgémont - Switzerland www.swisstiming.com
ISUCUTTER3FS
User Manual
Document Version 1.0 l January 2016

Documentation Updates Swiss Timing SP reserves the right to make improvements in the products described in this documentation at any time without prior notice. Furthermore, Swiss Timing SP reserves the right to revise this documentation in its content at any time and without any obligation to notify any person or organization of such revision. Disclaimer The information provided in this documentation has been obtained from sources believed to be reliable, accurate and current. However, Swiss Timing SP makes no representation or warranty, express or implied, with respect, but not limited to, the completeness, accuracy, correctness and actuality of the content of this documentation. Swiss Timing SP specifically disclaims any implied warranty of merchantability, quality and/or fitness for any particular purpose. Swiss Timing SP shall not be liable for errors contained in this documentation or for incidental or consequential damages in connection with the supply, performance or use of this documentation. Environment
This symbol indicates that this product should not be disposed with household waste. It has to be returned to a local authorized collection system. By following this procedure you will contribute to the protection of the environment and human health. The recycling of the materials will help to conserve natural resources.
Copyright © Swiss Timing SP All rights reserved. This documentation may not, as a whole or in part, be copied, translated, reproduced, transmitted or reduced and/or
stored to any electronic medium or machine-readable form without the prior written consent of Swiss Timing SP

TABLE OF CONTENTS
1 INTRODUCTION ................................................................................................................... 1
2 HARDWARE NOTES ............................................................................................................. 2
1.1 Recommended Hardware ................................................................................................. 2
1.2 Tested Hardware ............................................................................................................... 2
3 INSTALLATION OF TERADEK CUBE........................................................................................ 3
1.3 PREINSTALLATION ............................................................................................................. 3
1.4 Configuration Using the Web Frontend ............................................................................ 3
4 INSTALLATION OF ISUCUTTER3FS ........................................................................................ 9
1.5 Requirements .................................................................................................................... 9
1.6 Installation of ISUCutter3FS .............................................................................................. 9
1.7 Preferred Network Configuration ................................................................................... 10
5 OPERATION OF ISUCUTTER3FS .......................................................................................... 11
1.8 Starting the System ......................................................................................................... 11
1.9 Recording ........................................................................................................................ 11
1.10 Video Cutting ................................................................................................................... 13
1.10.1 Insert a Clip ...................................................................................................... 13
1.10.2 Changing the Start and End Position ............................................................... 13
1.10.3 Delete Clip ........................................................................................................ 15
1.10.4 Undo ................................................................................................................. 15
1.11 Commands ...................................................................................................................... 16
6 PROGRAM CONFIGURATION ............................................................................................. 17
7 RTSP CONFIGURATION ...................................................................................................... 18
8 FAQ AND TROUBLESHOOTING ........................................................................................... 19
1.12 The video screen of ISUCutter3FS remains black or is frozen. ....................................... 19
1.13 The video image is hitching or is not indicated properly. ............................................... 19
1.14 ISUCutter3FS cannot be connected to the Scoring System ............................................ 19
9 APPENDIX A ...................................................................................................................... 20
1.15 Index of tables ................................................................................................................. 20
1.16 Index of Figures ............................................................................................................... 20
1.17 Version History ................................................................................................................ 20

Field Hockey Quickstart / MST2012
Version 1.0 Page 1
1 INTRODUCTION
About this document
This document describes the operation of ISUCutter3FS.
Associated Documents
FS ISUScoreFS Manual FS ISUCalcFS Manual FS ISUCutterFS Manual
About the ISUCutter3FS application
This application is an optional feature that provides a Video Replay feature in the Scoring system. This application processes the video signal of RTSP device and saves the complete performance of a Skater. Supported by the Caller, the operator sets the Trim In / Trim Out marks for the individual elements. These marks are then sent to the Judges terminals. This application provides an easy to handle option to review and replay the performance elements. Trim In and Trim Out marks can be modified, replaced and deleted as desired.

Page 2 Version 1.0
2 HARDWARE NOTES
1.1 Recommended Hardware
- i3 or higher - Microsoft® Windows® 7/8/10 64bit - At least 4 GB RAM - At least 128 GB hard drive - 1 Gbit network connection - RTSP device: Teradek Cube with HDMI/HDSDI source depending on camera used For the capturing of the video signal, we recommend at least a consumer HDMI camera. However, we rather recommend a semi-professional or professional camera with an integrated monitor to easily follow the skater. In addition, depending on the number of video clients used, it is necessary to split the video signal to another RTSP device. Although the cutting and caller application can be controlled with keyboard, we recommend using a mouse and a big screen.
1.2 Tested Hardware
ISU Judging – System Judges
- ASUS EeeTop ET1620 - MSI AP16 Flex
ISU Judging System – Technical Panel, Cutter
- Lenovo i3 notebook - Dell i7 Latitude - Dell i7 M4800 Precision

Field Hockey Quickstart / MST2012
Version 1.0 Page 3
3 INSTALLATION OF TERADEK CUBE
1.3 PREINSTALLATION
First, configure the correct IP in order to use the web frontend. Proceed as follows: 1. Connect the cube to the power and start the device, using the small dip switch. Wait until the
small display indicates the operating status. 2. Enter the menu by pressing the black cursor button 3. Navigate to 'Network Setup' 4. Navigate to 'Ethernet' 5. Navigate to 'Configure' 6. Navigate to 'IP Address' 7. Enter your IP address for the Teradek:
Figure 1 – Teradek cube IP setting
8. Return by pressing the red button 9. You may have to change the subnet mask.
1.4 Configuration Using the Web Frontend
Connect the cube to your network and use a notebook or other computer connected. Open a browser and enter "http://" plus the IP address of the Teradek (e.g. 'http://192.168.1.123'). Upon first access of the web frontend, a setup wizard will automatically start. Just follow the individual steps and select a decoder 'VLC (RTSP) software decoder such as VLC'.

Page 4 Version 1.0
On the second access of the web frontend, a login screen appears where you use 'admin'/'admin' by default. First, go to Video Setup -> Device Setup and activate the de-interlacer. You may further disable audio to improve the system performance. Then go to Video Setup -> Stream Settings and on Quickview Stream. Please disable this stream for better performance. On Primary Stream, note down the link for this stream, because you will later need this information when configuring ISUCutter3FS. Furthermore, update the Teradek with the latest firmware. A tutorial how to do this is available on the Teradek website: https://support.teradek.com/hc/en-us/sections/203355508-Cube-Cube-Pro-Brik.

Field Hockey Quickstart / MST2012
Version 1.0 Page 5
In the new firmware, please activate the RTSP/RTP Multicast Package by adding a predefined license in the following screen:
Figure 2 – Teradek cube licenses and add-ons
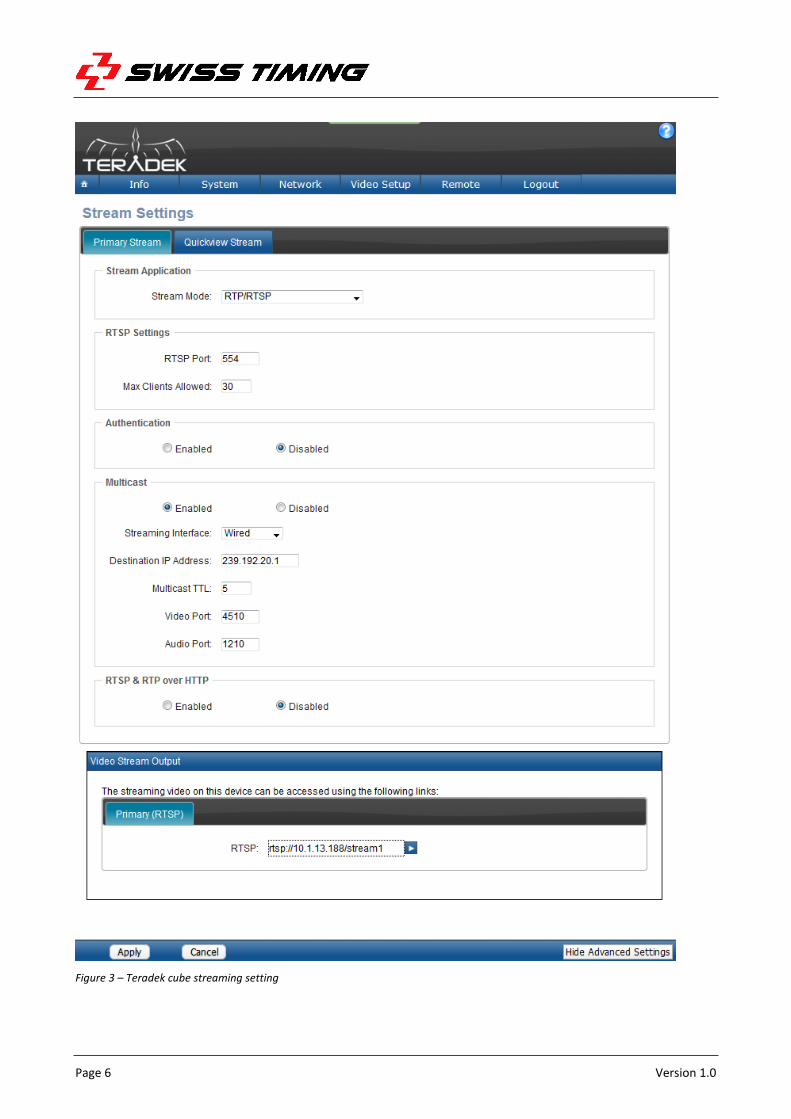
We recommend changing the streaming from unicast to multicast in the Streaming settings:
Page 6 Version 1.0
Figure 3 – Teradek cube streaming setting

Field Hockey Quickstart / MST2012
Version 1.0 Page 7
Please check the correct video input and encoder settings with Video Setup -> Encoder Settings and Show Advanced Settings (in the lower right part of the window):
Figure 4 – Teradek cube encoder setting
Video bitrate should not be lower than 2 Mbit (2000000 bps) and not higher than 2.5 Mbit, if more than 8 clients are connected to the Teradek with unicast. If less than 5 clients are connected, a bit rate of 5 Mbps can be used. For multicast, a bit rate above 7 Mbit is recommended. Key frame interval must be the lowest selectable value – in this case 0.5 sec. Compression profile should be changed to 'Main' or 'Baseline', if there are issues on the video clients. All other settings should be the same as indicated in Figure 4 – Teradek cube encoder setting.

Page 8 Version 1.0
Note: If you're using two Teradek Cubes with multicast in one network, you have to use unique multicast IP addresses.
Field Hockey Quickstart / MST2012
Version 1.0 Page 9
4 INSTALLATION OF ISUCUTTER3FS
1.5 Requirements
The target PC needs to be set up as follows: - All hardware components are installed and set up properly - Windows ® 7/8/10 64 bit with all updates - Firewall, virus defender, automatic updates should be turned off - Unnecessary apps should be de-installed to avoid network traffic.
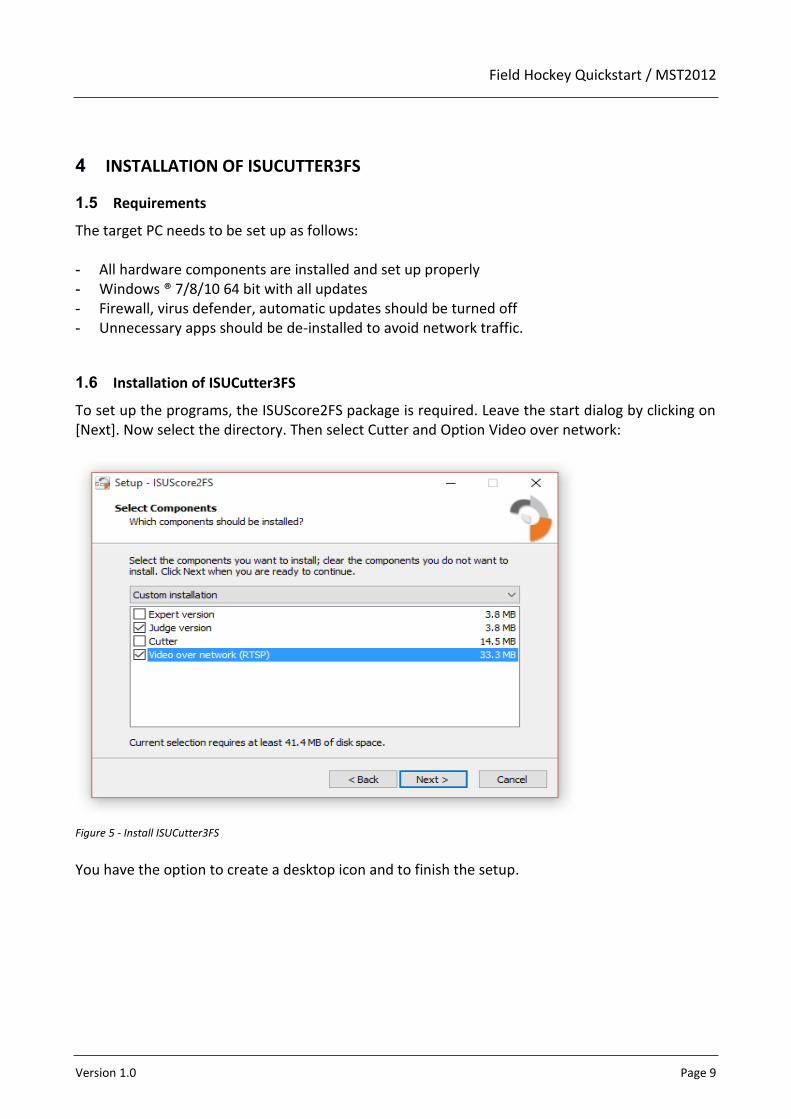
1.6 Installation of ISUCutter3FS
To set up the programs, the ISUScore2FS package is required. Leave the start dialog by clicking on [Next]. Now select the directory. Then select Cutter and Option Video over network:
Figure 5 - Install ISUCutter3FS
You have the option to create a desktop icon and to finish the setup.

Page 10 Version 1.0
1.7 Preferred Network Configuration
Device IP
Teradek Cube 192.168.1.200
Calc Notebook 192.168.1.100
Technical Panel 192.168.1.101
Cutter Notebook 192.168.1.102
Judge 1 192.168.1.111
Judge 2 192.168.1.112
...
Judge N 192.168.1.(110+N)
Table 1 – Preferred Network Configuration
Field Hockey Quickstart / MST2012
Version 1.0 Page 11
5 OPERATION OF ISUCUTTER3FS
1.8 Starting the System
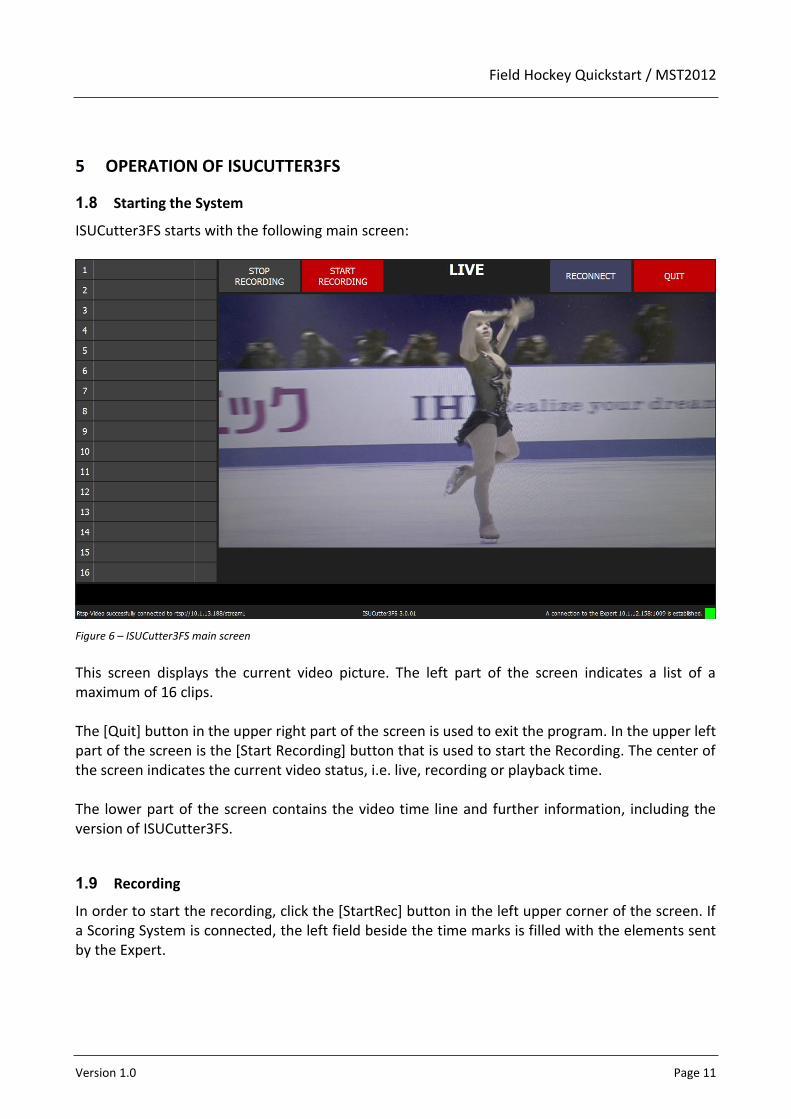
ISUCutter3FS starts with the following main screen:
Figure 6 – ISUCutter3FS main screen
This screen displays the current video picture. The left part of the screen indicates a list of a maximum of 16 clips. The [Quit] button in the upper right part of the screen is used to exit the program. In the upper left part of the screen is the [Start Recording] button that is used to start the Recording. The center of the screen indicates the current video status, i.e. live, recording or playback time. The lower part of the screen contains the video time line and further information, including the version of ISUCutter3FS.
1.9 Recording
In order to start the recording, click the [StartRec] button in the left upper corner of the screen. If a Scoring System is connected, the left field beside the time marks is filled with the elements sent by the Expert.
Page 12 Version 1.0
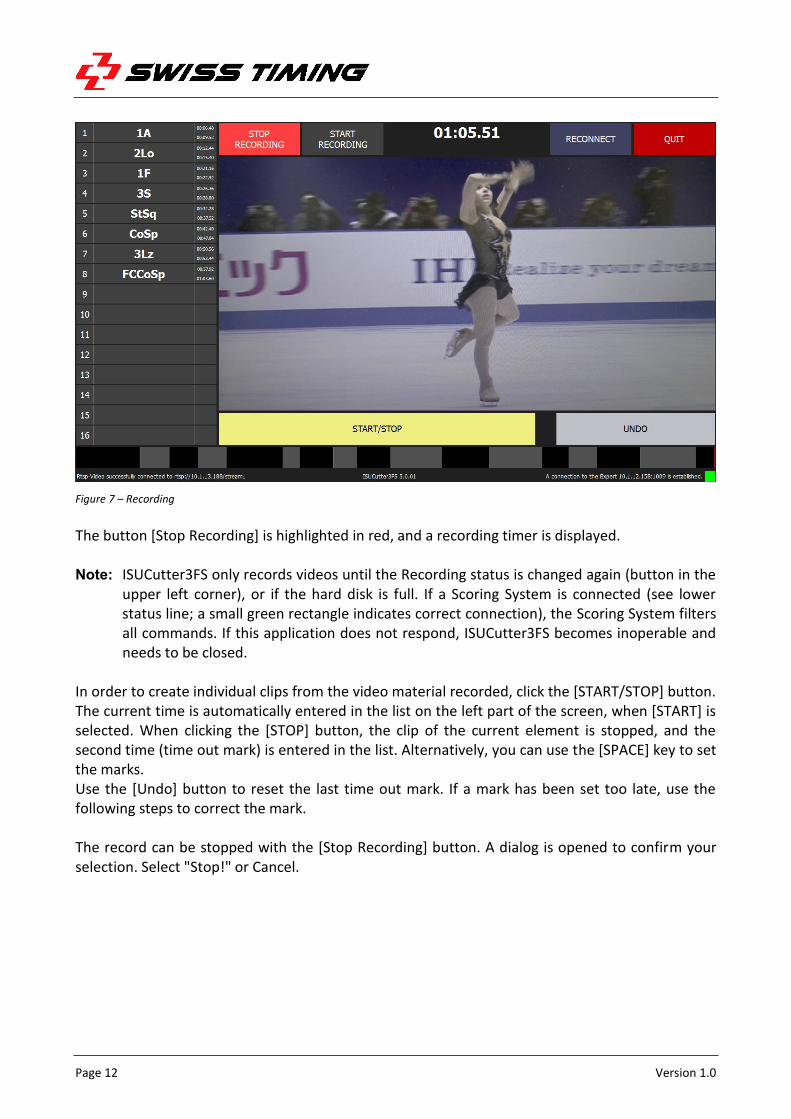
Figure 7 – Recording
The button [Stop Recording] is highlighted in red, and a recording timer is displayed. Note: ISUCutter3FS only records videos until the Recording status is changed again (button in the
upper left corner), or if the hard disk is full. If a Scoring System is connected (see lower status line; a small green rectangle indicates correct connection), the Scoring System filters all commands. If this application does not respond, ISUCutter3FS becomes inoperable and needs to be closed.
In order to create individual clips from the video material recorded, click the [START/STOP] button. The current time is automatically entered in the list on the left part of the screen, when [START] is selected. When clicking the [STOP] button, the clip of the current element is stopped, and the second time (time out mark) is entered in the list. Alternatively, you can use the [SPACE] key to set the marks. Use the [Undo] button to reset the last time out mark. If a mark has been set too late, use the following steps to correct the mark. The record can be stopped with the [Stop Recording] button. A dialog is opened to confirm your selection. Select "Stop!" or Cancel.

Field Hockey Quickstart / MST2012
Version 1.0 Page 13
1.10 Video Cutting
Switch to the cutting mode by clicking the [Stop Recording] button.
Figure 8 - Video Cutting
The lower part of the screen now provides buttons to insert, copy and delete clips. Below is the time bar and the clips contained therein. Elements marked with a review request by the Expert are marked with a red boxed 'R' allowing the video cut system operator to edit these elements with high priority. Start the playback of one element by clicking on it in the left list. The element is highlighted in the list.
1.10.1 Insert a Clip
In order to insert a clip (for video cutting purposes) or an element (performance), first select a position in the clip list. Then define the time by clicking on the time bar. The application now switches from the current video picture to the indicated time in the video. The video is stopped. Now click on the [INS ELEM] button. The clip is created and consists only of the still picture.
1.10.2 Changing the Start and End Position
The cutting marks are called in and out marks. First select an element. Then click in the timeline or use the mouse wheel on the video window for navigating to the new in or out point. Then press [TRIM IN] or [TRIM OUT] button.

Page 14 Version 1.0

Field Hockey Quickstart / MST2012
Version 1.0 Page 15
1.10.3 Delete Clip
In order to delete a clip, select the desired clip from the left list. Click the [DEL ELEM] button. A dialog box is opened in which you have to confirm that you really want to delete the clip. Note: The naming of the scoring system remains the same.
1.10.4 Undo
You can undo every step by clicking the [UNDO] button.

Page 16 Version 1.0
1.11 Commands
Button Action
Esc Exits the program or exits a dialog box
Enter Confirmation of dialog box
Space In the Playback mode: Pause or resume the current clip In the Recording mode: set new time in / time out marks
F1 / Ins In the Cutting mode: a clip is inserted
F3 / Del In the Cutting mode: the current clip is deleted. In the Recording mode: the last cutting mark is deleted.
F4 / Pos1 In the Playback mode: A new In point is set.
F5 / End In the Playback mode: A new Out point is set.
F6 In the Playback mode: The clip is stopped or continued.
F7 In the Playback mode: The clip is replayed in normal speed (rewind)
F11 / L In the Playback mode: back to the live picture
F12 / Break Switch from the cutting to the recording mode and back.
Arrow up In the cutting mode: selects the previous clip from the clip list.
Arrow down In the cutting mode: selects the next clip of the clip list
Arrow left In the Playback mode: switches to the previous screen.
Arrow right In the Playback mode: jumps to the next image.
I Re-initialize video
C Re-connect to Caller / Expert
D Close connection to the Caller and activate local work
Table 2 - Keyboard shortcuts
Field Hockey Quickstart / MST2012
Version 1.0 Page 17
6 PROGRAM CONFIGURATION
The ISUCutter3FS folder contains the configuration file dvcutter.ini: [dv]
recframes = 50
playframes = 50
playdelay = 100
file = temp.dv
input = 0
deinterlace = false
[isu]
ip = 127.0.0.1
port = 1111
For down compatibility reasons it has the old [dv] section, which can be ignored, but the [isu] section is still needed to configure the connection to the technical panel. Our example shows the Scoring system (Expert) on the local PC with port 1111.

Page 18 Version 1.0
7 RTSP CONFIGURATION
The ISUCutter3FS folder contains the video configuration file rtsp.ini: [rtsp]
; fps =
file = temp.h264
stream1 = rtsp://192.168.1.200/stream1
deinterlacing = 0
resync = 1
loglevel = 0
'file' specifies the location of the recording file. The local folder is the program folder, i.e. the file = temp.h264 stores the file directly in the program folder. Make sure you have write access to this folder. 'stream1' specifies the URL for the RTSP stream. 'deinterlacing' is reserved for future use. 'resync' = 1 means that a resync is done after each skater to be sure all timings are in sync. If 'resync' = 0 a complete re-init is done. 'loglevel' = 0 is the indicator for what kind of messages are logged. 0 is errors only, above 30 is verbose.

Field Hockey Quickstart / MST2012
Version 1.0 Page 19
8 FAQ AND TROUBLESHOOTING
1.12 The video screen of ISUCutter3FS remains black or is frozen.
ISUCutter3FS does not receive data from the RTSP stream. - Check if all devices connected to network. - Check if camera is connected to RTSP device - Check if all devices are powered and running. - Check for errors shown at RTSP device. Re-connect all devices with the PC. Re-start ISUCutter3FS or re-initialize it using 'Reconnect' in the File menu.
1.13 The video image is hitching or is not indicated properly.
This issue may be caused by performance problems: - Processor too slow; other applications may impact the performance - Network jam - Video bit rate is too low - Too many clients are connected to the RTSP device
1.14 ISUCutter3FS cannot be connected to the Scoring System
Check whether: - All network components are connected and working properly - The network has been set up correctly, i.e. if the Scoring PC is connected to the network - The Scoring System is running properly - ISUCutter3FS contains the correct IP address and the correct port.

Page 20 Version 1.0
9 APPENDIX A
1.15 Index of tables
Table 1 – Preferred Network Configuration ...................................................................................... 10
Table 2 - Keyboard shortcuts ............................................................................................................. 16
1.16 Index of Figures
Figure 1 – Teradek cube IP setting ....................................................................................................... 3
Figure 2 – Teradek cube licenses and add-ons .................................................................................... 5
Figure 3 – Teradek cube streaming setting .......................................................................................... 6
Figure 4 – Teradek cube encoder setting ............................................................................................ 7
Figure 5 - Install ISUCutter3FS ............................................................................................................. 9
Figure 6 – ISUCutter3FS main screen ................................................................................................. 11
Figure 7 – Recording .......................................................................................................................... 12
Figure 8 - Video Cutting ..................................................................................................................... 13
1.17 Version History
Version Date Modifications since last version
1.0 27.01.2016 Initial version

Field Hockey Quickstart / MST2012
Version 1.0 Page 21
NOTES


Swiss Timing LTD Phone +41 32 488 36 11 P.O. Box 138, Rue de l’Envers 1 [email protected] CH-2606 Corgémont - Switzerland www.swisstiming.com