Introduction to Unreal Engine and C++...
60
Distributed Programming Edirlei Soares de Lima <[email protected]> Lecture 04 - Introduction to Unreal Engine and C++ Programming
Transcript of Introduction to Unreal Engine and C++...

Distributed Programming
Edirlei Soares de Lima
Lecture 04 - Introduction to Unreal Engine and C++ Programming

Editor – Unity vs. Unreal
Recommended reading: Unreal Engine 4 For Unity Developershttps://docs.unrealengine.com/en-us/GettingStarted/FromUnity
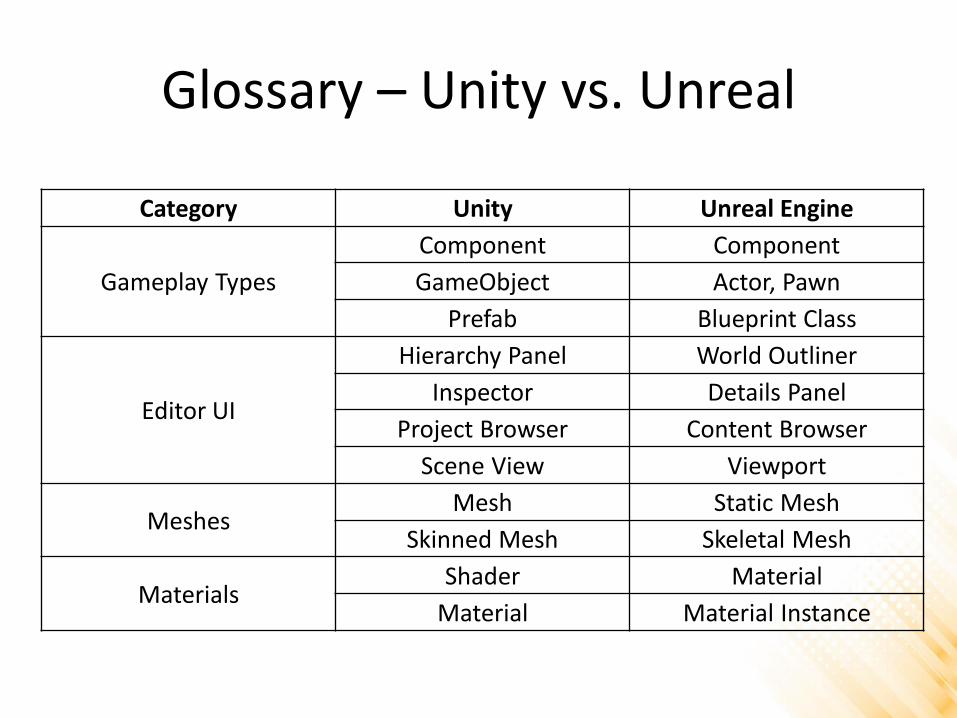
Glossary – Unity vs. Unreal
Category Unity Unreal Engine
Gameplay Types
Component Component
GameObject Actor, Pawn
Prefab Blueprint Class
Editor UI
Hierarchy Panel World Outliner
Inspector Details Panel
Project Browser Content Browser
Scene View Viewport
MeshesMesh Static Mesh
Skinned Mesh Skeletal Mesh
MaterialsShader Material
Material Material Instance

Glossary – Unity and Unreal
Category Unity Unreal Engine
Effects Particle Effect Effect, Particle, Cascade
Game UI UI UMG
Animation AnimationSkeletal Animation
System
2D Sprite Editor Paper2D
ProgrammingC# C++
Script Blueprint
PhysicsRaycast Line Trace, Shape Trace
Rigid Body Collision, Physics
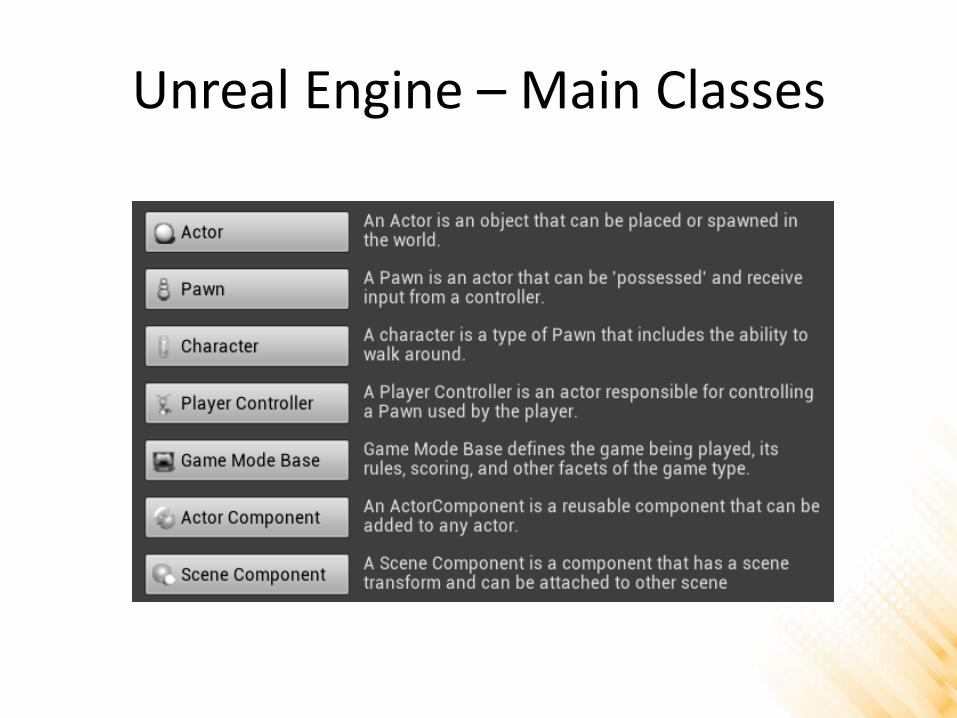
Unreal Engine – Main Classes

Unreal Engine – Main Classes
UObject
AActor
AController
AAIController APlayerController
ALight
ADirectionalLight
APawn
ACharacter
AGameModeBase
UActorComponent
USceneComponent
UCameraComponent

First Game Tutorial
• Concept: a game where the player must collect all coins and then go to specific location to complete the level.
• Gameplay elements:– Player character (walk and jump);
– Collectible coins: after collecting all coins,
the player must go the “level complete” area
to finish the level.
– Enemies (zombies): patrol the level and
attack the player. If the enemy touches the
player, is game over;
– GUI messages: number of collected coins,
game over, and level completed messages;

First Game Tutorial
• Create a new C++ Third Person Project:

First Game Tutorial
• Base project:
• Next step: create a collectible item (a coin).

First Game Tutorial
• Low poly coin model: – http://www.inf.puc-rio.br/~elima/dp/coin.fbx
• Importing the FBX model: drag and drop
Import Uniform Scale = 100.0

First Game Tutorial
• Create a new C++ class: CollectibleCoin
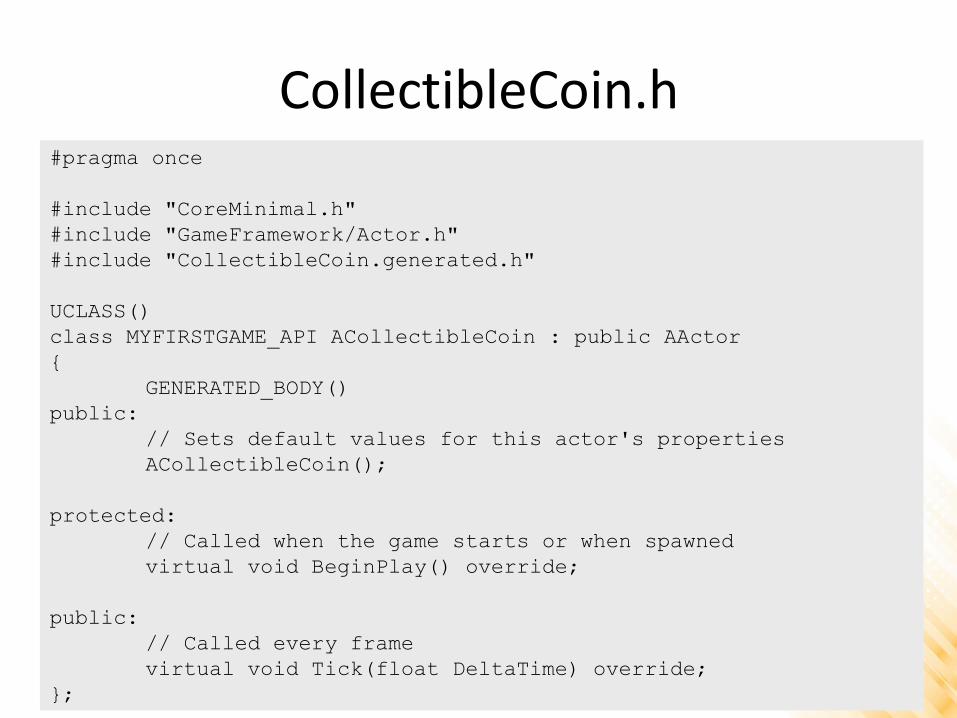
CollectibleCoin.h#pragma once
#include "CoreMinimal.h"
#include "GameFramework/Actor.h"
#include "CollectibleCoin.generated.h"
UCLASS()
class MYFIRSTGAME_API ACollectibleCoin : public AActor
{
GENERATED_BODY()
public:
// Sets default values for this actor's properties
ACollectibleCoin();
protected:
// Called when the game starts or when spawned
virtual void BeginPlay() override;
public:
// Called every frame
virtual void Tick(float DeltaTime) override;
};

CollectibleCoin.cpp
#include "CollectibleCoin.h"
// Sets default values
ACollectibleCoin::ACollectibleCoin()
{
// Set this actor to call Tick() every frame.
PrimaryActorTick.bCanEverTick = true;
}
// Called when the game starts or when spawned
void ACollectibleCoin::BeginPlay()
{
Super::BeginPlay();
}
// Called every frame
void ACollectibleCoin::Tick(float DeltaTime)
{
Super::Tick(DeltaTime);
}

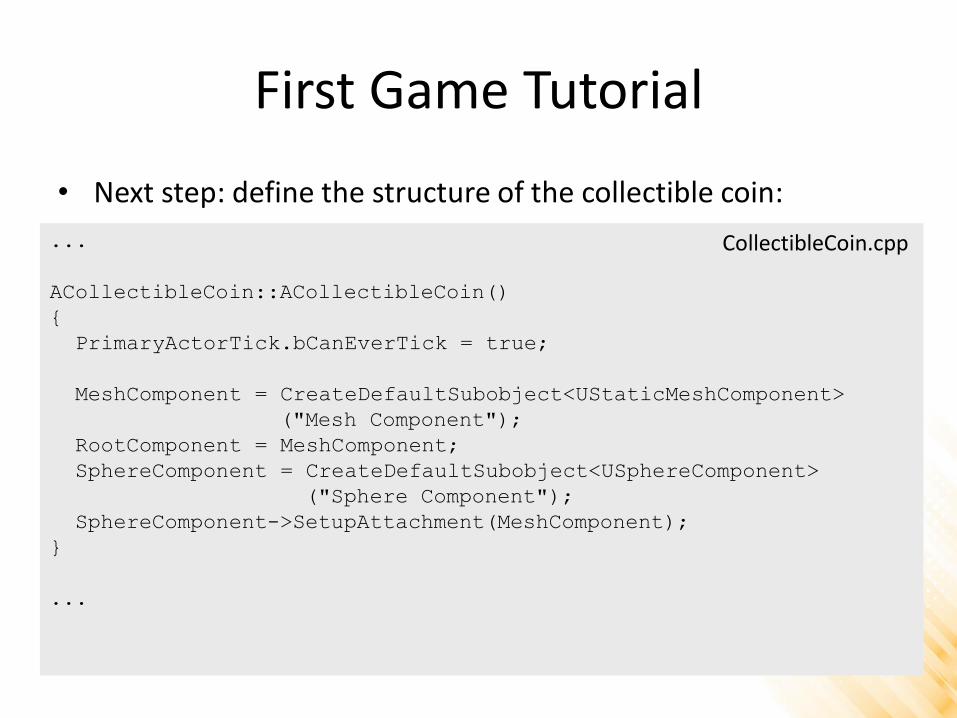
First Game Tutorial
• Next step: define the structure of the collectible coin:
...
#include "Components/SphereComponent.h"
#include "CollectibleCoin.generated.h"
...
protected:
UPROPERTY(VisibleAnywhere, Category = "Components")
UStaticMeshComponent* MeshComponent;
UPROPERTY(VisibleAnywhere, Category = "Components")
USphereComponent* SphereComponent;
virtual void BeginPlay() override;
...
CollectibleCoin.h
First Game Tutorial
• Next step: define the structure of the collectible coin:
...
ACollectibleCoin::ACollectibleCoin()
{
PrimaryActorTick.bCanEverTick = true;
MeshComponent = CreateDefaultSubobject<UStaticMeshComponent>
("Mesh Component");
RootComponent = MeshComponent;
SphereComponent = CreateDefaultSubobject<USphereComponent>
("Sphere Component");
SphereComponent->SetupAttachment(MeshComponent);
}
...
CollectibleCoin.cpp

First Game Tutorial
• Next step: create a Blueprint Class for the collectible coin:

First Game Tutorial
• In the Blueprint editor, select the mesh of the coin:
• Then, compile the blueprint and place it in the level.

First Game Tutorial
• Rotating the coin in the game:
...
public:
UPROPERTY(EditAnywhere, Category = "Gameplay")
float RotationSpeed;
...
CollectibleCoin.h
...
void ACollectibleCoin::Tick(float DeltaTime)
{
Super::Tick(DeltaTime);
AddActorLocalRotation(FRotator(RotationSpeed * DeltaTime, 0, 0));
}
...
CollectibleCoin.cpp

First Game Tutorial
• Destroying the coin when the player collides:
...
public:
...
virtual void NotifyActorBeginOverlap(AActor* OtherActor) override;
...
CollectibleCoin.h
...
void ACollectibleCoin::NotifyActorBeginOverlap(AActor* OtherActor)
{
Super::NotifyActorBeginOverlap(OtherActor);
Destroy(this);
}
...
CollectibleCoin.cpp
First Game Tutorial
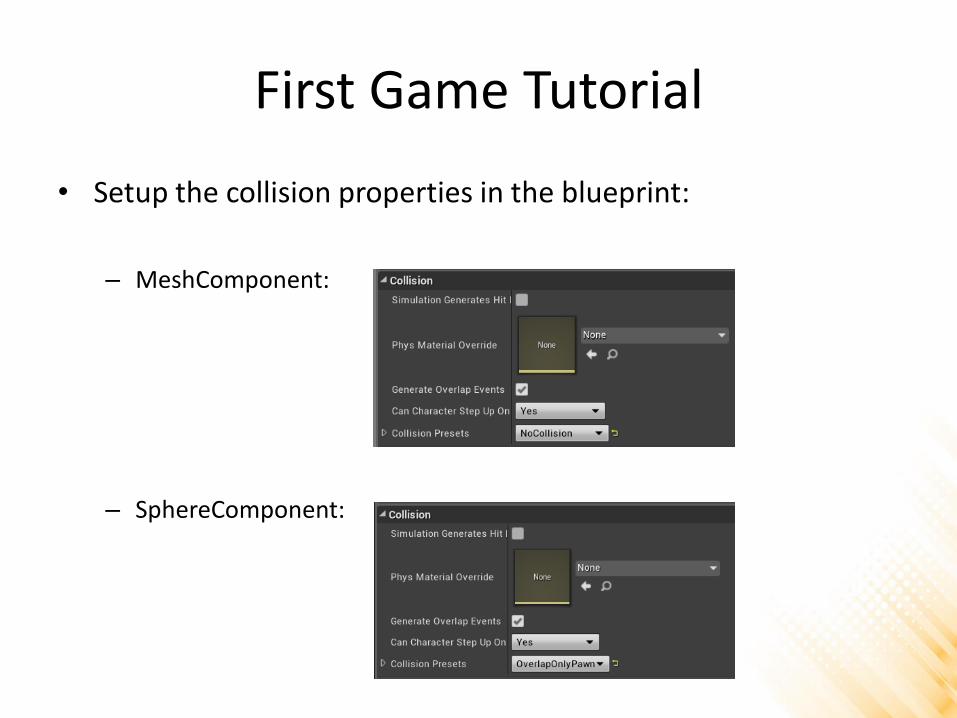
• Setup the collision properties in the blueprint:
– MeshComponent:
– SphereComponent:

UProperty SpecifiersProperty Tag Effect
VisibleAnywhereIndicates that this property is visible in all property windows, but cannot be edited.
EditAnywhereIndicates that this property can be edited by property windows, on archetypes and instances.
EditDefaultsOnlyIndicates that this property can be edited by property windows, but only on archetypes.
BlueprintReadOnlyThis property can be read by Blueprints, but not modified.
BlueprintReadWriteThis property can be read or written from a Blueprint.
EditInstanceOnlyIndicates that this property can be edited by property windows, but only on instances, not on archetypes.
https://docs.unrealengine.com/en-US/Programming/UnrealArchitecture/Reference/Properties/Specifiers
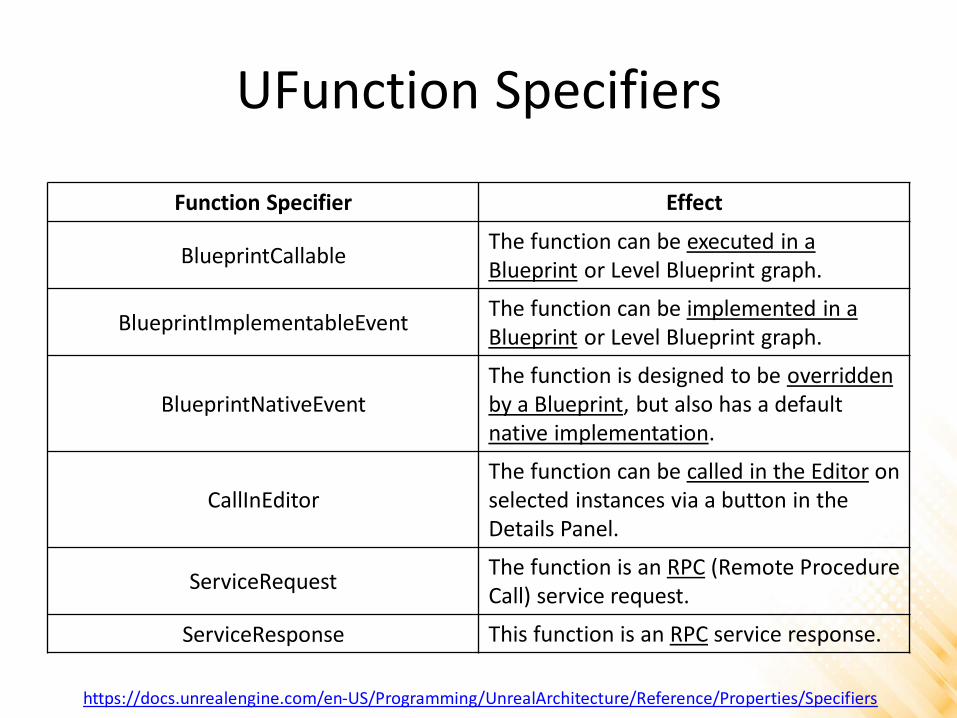
UFunction Specifiers
Function Specifier Effect
BlueprintCallableThe function can be executed in a Blueprint or Level Blueprint graph.
BlueprintImplementableEventThe function can be implemented in a Blueprint or Level Blueprint graph.
BlueprintNativeEventThe function is designed to be overridden by a Blueprint, but also has a default native implementation.
CallInEditorThe function can be called in the Editor on selected instances via a button in the Details Panel.
ServiceRequestThe function is an RPC (Remote Procedure Call) service request.
ServiceResponse This function is an RPC service response.
https://docs.unrealengine.com/en-US/Programming/UnrealArchitecture/Reference/Properties/Specifiers
First Game Tutorial
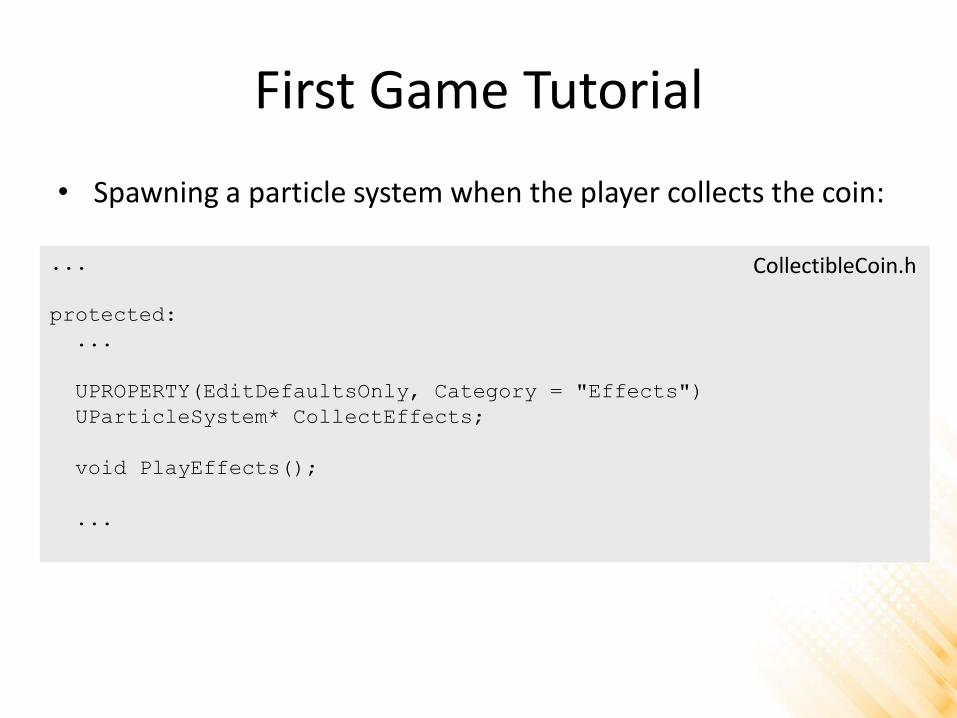
• Spawning a particle system when the player collects the coin:
...
protected:
...
UPROPERTY(EditDefaultsOnly, Category = "Effects")
UParticleSystem* CollectEffects;
void PlayEffects();
...
CollectibleCoin.h

First Game Tutorial
• Spawning a particle system when the player collects the coin:
#include "Kismet/GameplayStatics.h"
...
void ACollectibleCoin::NotifyActorBeginOverlap(AActor* OtherActor)
{
Super::NotifyActorBeginOverlap(OtherActor);
PlayEffects();
Destroy(this);
}
void ACollectibleCoin::PlayEffects()
{
UGameplayStatics::SpawnEmitterAtLocation(this, CollectEffects,
GetActorLocation());
}
CollectibleCoin.cpp
First Game Tutorial
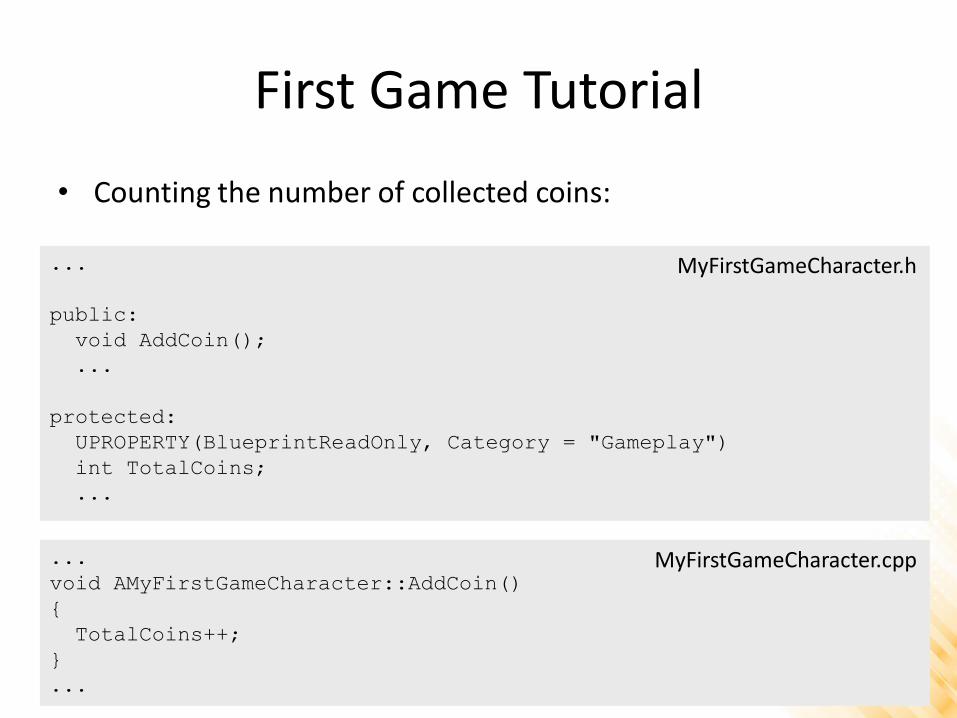
• Counting the number of collected coins:
...
public:
void AddCoin();
...
protected:
UPROPERTY(BlueprintReadOnly, Category = "Gameplay")
int TotalCoins;
...
MyFirstGameCharacter.h
...
void AMyFirstGameCharacter::AddCoin()
{
TotalCoins++;
}
...
MyFirstGameCharacter.cpp

First Game Tutorial
• Counting the number of collected coins:
...
void ACollectibleCoin::NotifyActorBeginOverlap(AActor* OtherActor)
{
Super::NotifyActorBeginOverlap(OtherActor);
AMyFirstGameCharacter* character = Cast<AMyFirstGameCharacter>
(OtherActor);
if (character)
{
character->AddCoin();
PlayEffects();
Destroy(this);
}
}
...
CollectibleCoin.cpp
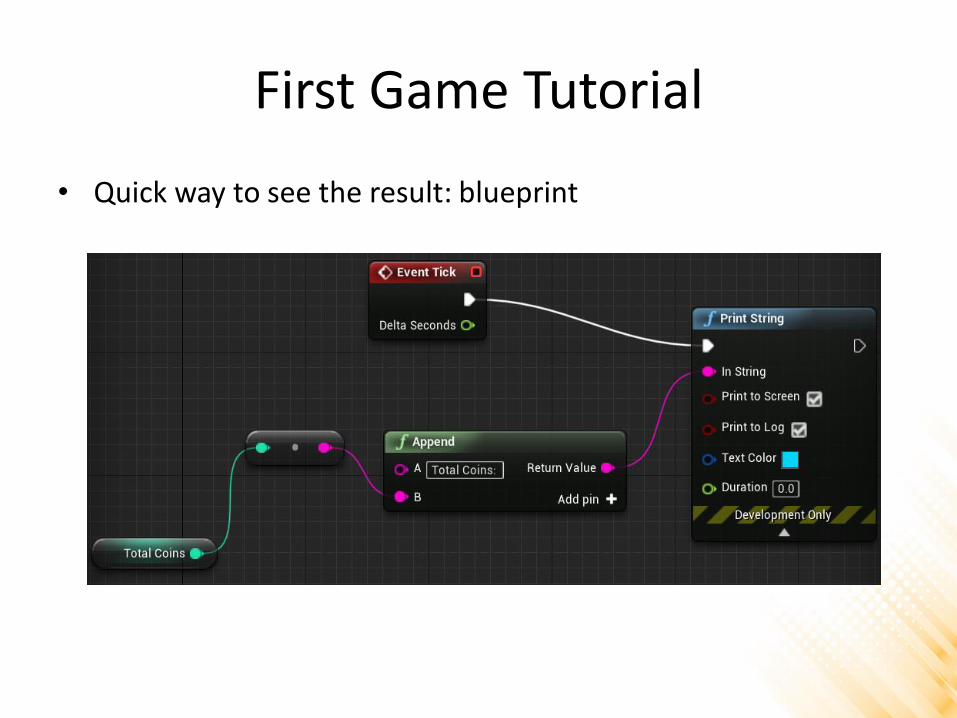
First Game Tutorial
• Quick way to see the result: blueprint

First Game Tutorial
• Quick way to see the result: C++ code
...
void AMyFirstGameCharacter::Tick(float DeltaTime)
{
Super::Tick(DeltaTime);
if (GEngine)
{
GEngine->AddOnScreenDebugMessage(-1, 0.0f, FColor::Blue,
FString::Printf(TEXT("Total Coins: %d"), TotalCoins));
}
}
...

First Game Tutorial
• Quick way to see the result: C++ code for console debug
...
void AMyFirstGameCharacter::AddCoin()
{
TotalCoins++;
UE_LOG(LogTemp, Log, TEXT("Total Coins: %d"), TotalCoins);
}
...

First Game Tutorial
• Displaying the information in the game UI with a Widget Blueprint:1. First, show total number of coins collected by the player;
2. After collecting all coins in the level, show the message “All coins collected!!!”.
• Step 1: create a Widget Blueprint

First Game Tutorial
• Step 2: instantiate the Widget Blueprint in the BeginPlayevent of the ThirdPersonCharacter blueprint.

First Game Tutorial
• Step 3: create a method to count the number of coins in the level (Game Mode class) and a variable to store the information.
private:
int CountCoinsInLevel();
...
protected:
UPROPERTY(BlueprintReadOnly, Category = "Gameplay")
int TotalLevelCoins;
MyFirstGameGameMode.h
AMyFirstGameGameMode::AMyFirstGameGameMode(){
...
TotalLevelCoins = CountCoinsInLevel();
}
int AMyFirstGameGameMode::CountCoinsInLevel(){
TArray<AActor*> FoundCoins;
UGameplayStatics::GetAllActorsOfClass(GetWorld(),
ACollectibleCoin::StaticClass(), FoundCoins);
return FoundCoins.Num();
}
MyFirstGameGameMode.cpp

First Game Tutorial
• Step 4: bind the text value and create the Widget Blueprint logic.

First Game Tutorial
• Level complete area: alter collecting all coins, the player can go to this area to complete the level.
UCLASS()
class MYFIRSTGAME_API ALevelCompleteArea : public AActor
{
...
protected:
UPROPERTY(VisibleAnywhere, Category = "Components")
class UBoxComponent* BoxComponent;
UFUNCTION()
void HandleBeginOverlap(UPrimitiveComponent* OverlappedComponent,
AActor* OtherActor, UPrimitiveComponent* OtherComp,
int32 OtherBodyIndex, bool bFromSweep, const
FHitResult & SweepResult);
};
LevelCompleteArea.h

First Game Tutorial
• Level complete area: alter collecting all coins, the player can go to this area to complete the level.
ALevelCompleteArea::ALevelCompleteArea()
{
BoxComponent = CreateDefaultSubobject<UBoxComponent>("BoxComponent");
BoxComponent->SetBoxExtent(FVector(200.0f, 200.0f, 200.0f));
BoxComponent->SetCollisionEnabled(ECollisionEnabled::QueryOnly);
BoxComponent->SetCollisionResponseToAllChannels(ECR_Ignore);
BoxComponent->SetCollisionResponseToChannel(ECC_Pawn, ECR_Overlap);
RootComponent = BoxComponent;
BoxComponent->OnComponentBeginOverlap.AddDynamic(this,
&ALevelCompleteArea::HandleBeginOverlap);
}
LevelCompleteArea.cpp

First Game Tutorial
• Level complete area: alter collecting all coins, the player can go to this area to complete the level.
void ALevelCompleteArea::HandleBeginOverlap(UPrimitiveComponent*
OverlappedComponent, AActor* OtherActor,
UPrimitiveComponent* OtherComp, int32 OtherBodyIndex,
bool bFromSweep, const FHitResult & SweepResult){
AMyFirstGameCharacter* character = Cast<AMyFirstGameCharacter>
(OtherActor);
AMyFirstGameGameMode* gamemode = Cast<AMyFirstGameGameMode>
(GetWorld()->GetAuthGameMode());
if ((character)&& (gamemode)){
if (character->GetTotalCoins() == gamemode->GetTotalLevelCoins()){
gamemode->CompleteLevel(character, true);
}
}
}
LevelCompleteArea.cpp

First Game Tutorial
• Level complete area: alter collecting all coins, the player can go to this area to complete the level.
public:
...
FORCEINLINE int GetTotalLevelCoins() const {return TotalLevelCoins;}
void CompleteLevel(APawn* character, bool succeeded);
UFUNCTION(BlueprintImplementableEvent, Category = "GameMode")
void OnLevelCompleted(APawn* character, bool succeeded);
MyFirstGameGameMode.h
...
void AMyFirstGameGameMode::CompleteLevel(APawn* character,
bool succeeded){
if (character){
character->DisableInput(nullptr);
}
OnLevelCompleted(character, succeeded);
}
MyFirstGameGameMode.cpp

First Game Tutorial
• Level complete area: alter collecting all coins, the player can go to this area to complete the level.
1. Create a Widget Blueprint with a “Level Completed!” message;

First Game Tutorial
• Level complete area: alter collecting all coins, the player can go to this area to complete the level.
2. In the Widget, create a new boolean variable to represent succeeded value and a blueprint to bind the correct message based on variable value;

First Game Tutorial
• Level complete area: alter collecting all coins, the player can go to this area to complete the level.
3. Create a Blueprint for the Game Mode and instantiate the Widget in the LevelCompleted event;

First Game Tutorial
• Level complete area: if the player goes to the level complete area without collecting all coins, a sound notification is played.
protected:
...
UPROPERTY(EditDefaultsOnly, Category = "Sounds")
USoundBase* LevelNotCompletedSound;
LevelCompleteArea.h
void ALevelCompleteArea::HandleBeginOverlap(...){
...
if ((character)&& (gamemode)){
if (character->GetTotalCoins() == gamemode->GetTotalLevelCoins()){
gamemode->CompleteLevel(character, true);
}
else{
UGameplayStatics::PlaySound2D(this, LevelNotCompletedSound);
}
}
}
LevelCompleteArea.cpp

First Game Tutorial
• Moving the camera to a spectator viewpoint location after completing the level:
1. Create a blueprint class with a camera (actor class);
2. Place the camera in the spectator viewpoint location;

First Game Tutorial
3. Move the camera to the spectator viewpoint: Blueprint solution
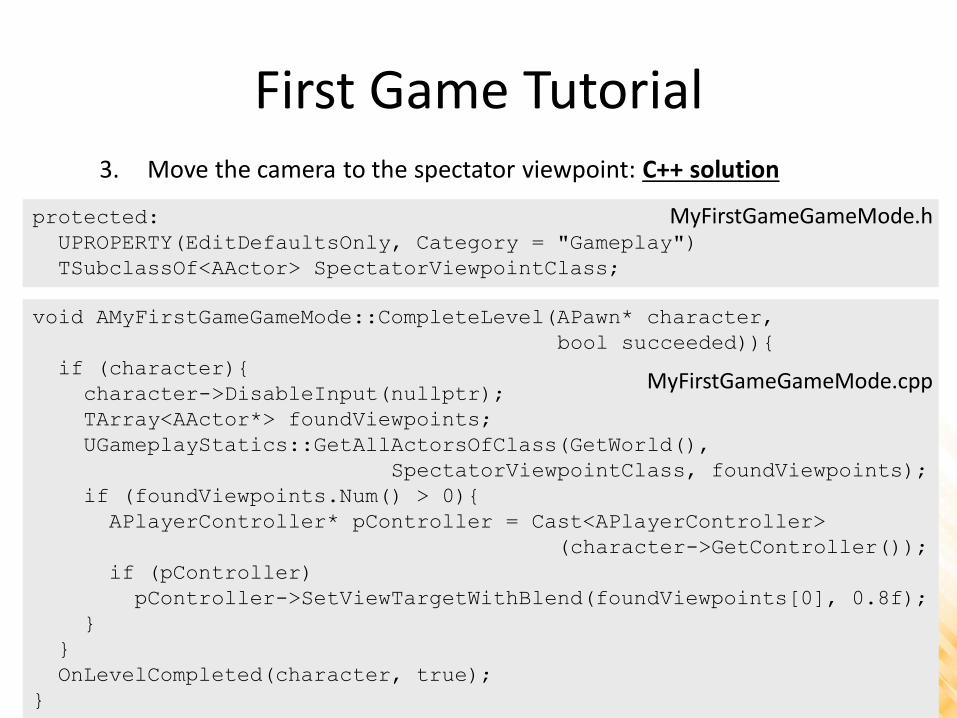
First Game Tutorial3. Move the camera to the spectator viewpoint: C++ solution
protected:
UPROPERTY(EditDefaultsOnly, Category = "Gameplay")
TSubclassOf<AActor> SpectatorViewpointClass;
MyFirstGameGameMode.h
void AMyFirstGameGameMode::CompleteLevel(APawn* character,
bool succeeded)){
if (character){
character->DisableInput(nullptr);
TArray<AActor*> foundViewpoints;
UGameplayStatics::GetAllActorsOfClass(GetWorld(),
SpectatorViewpointClass, foundViewpoints);
if (foundViewpoints.Num() > 0){
APlayerController* pController = Cast<APlayerController>
(character->GetController());
if (pController)
pController->SetViewTargetWithBlend(foundViewpoints[0], 0.8f);
}
}
OnLevelCompleted(character, true);
}
MyFirstGameGameMode.cpp

First Game Tutorial
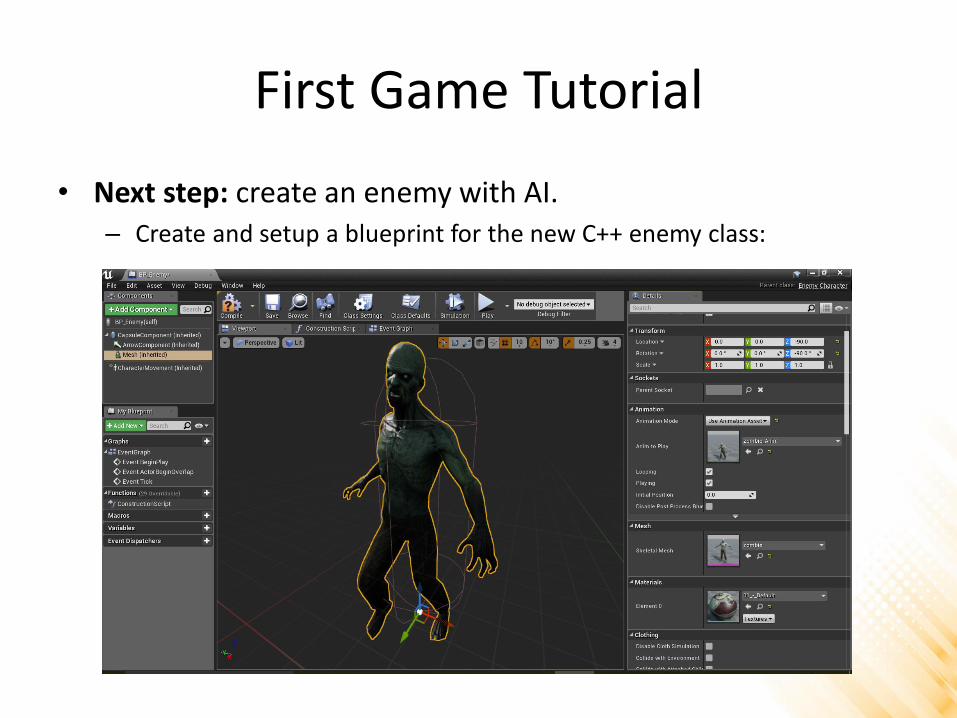
• Next step: create an enemy with AI that walks between waypoints. When the enemy sees the player, he follows and attacks the player. – Create new C++ class for the enemy: base class Character
– Download and import the enemy model:• http://www.inf.puc-rio.br/~elima/dp/zombie.zip
First Game Tutorial
• Next step: create an enemy with AI.– Create and setup a blueprint for the new C++ enemy class:

First Game Tutorial
• Next step: create an enemy with AI.– Add a Nav Mesh Bounds Volume and resize it so that it fits all of the
walkable space in the level:

First Game Tutorial
• Next step: create an enemy with AI.– Place some waypoints (Target Point) in the level:
First Game Tutorial
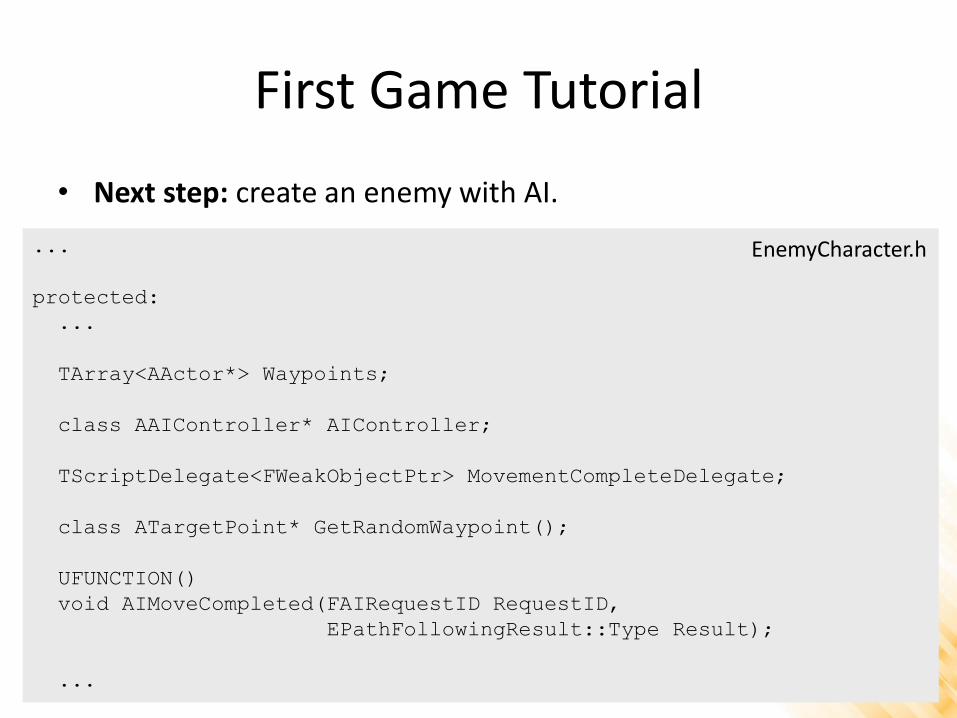
• Next step: create an enemy with AI.
...
protected:
...
TArray<AActor*> Waypoints;
class AAIController* AIController;
TScriptDelegate<FWeakObjectPtr> MovementCompleteDelegate;
class ATargetPoint* GetRandomWaypoint();
UFUNCTION()
void AIMoveCompleted(FAIRequestID RequestID,
EPathFollowingResult::Type Result);
...
EnemyCharacter.h

First Game Tutorial
• Next step: create an enemy with AI.
#include "Engine/TargetPoint.h"
#include "AIController.h"
void AEnemyCharacter::BeginPlay()
{
Super::BeginPlay();
UGameplayStatics::GetAllActorsOfClass(GetWorld(),
ATargetPoint::StaticClass(), Waypoints);
AIController = Cast<AAIController>(GetController());
this->bUseControllerRotationYaw = false;
if ((Waypoints.Num() > 0)&&(AIController)){
MovementCompleteDelegate.BindUFunction(this, "AIMoveCompleted");
AIController->ReceiveMoveCompleted.Add(MovementCompleteDelegate);
AIController->MoveToActor(GetRandomWaypoint());
}
}
EnemyCharacter.cpp

First Game Tutorial
• Next step: create an enemy with AI.
ATargetPoint* AEnemyCharacter::GetRandomWaypoint()
{
int index = FMath::RandRange(0, Waypoints.Num() - 1);
return Cast<ATargetPoint>(Waypoints[index]);
}
void AEnemyCharacter::AIMoveCompleted(FAIRequestID RequestID,
EPathFollowingResult::Type Result){
if (Result == EPathFollowingResult::Success)
{
if ((Waypoints.Num() > 0) && (AIController))
{
AIController->MoveToActor(GetRandomWaypoint());
}
}
}
EnemyCharacter.cpp
First Game Tutorial
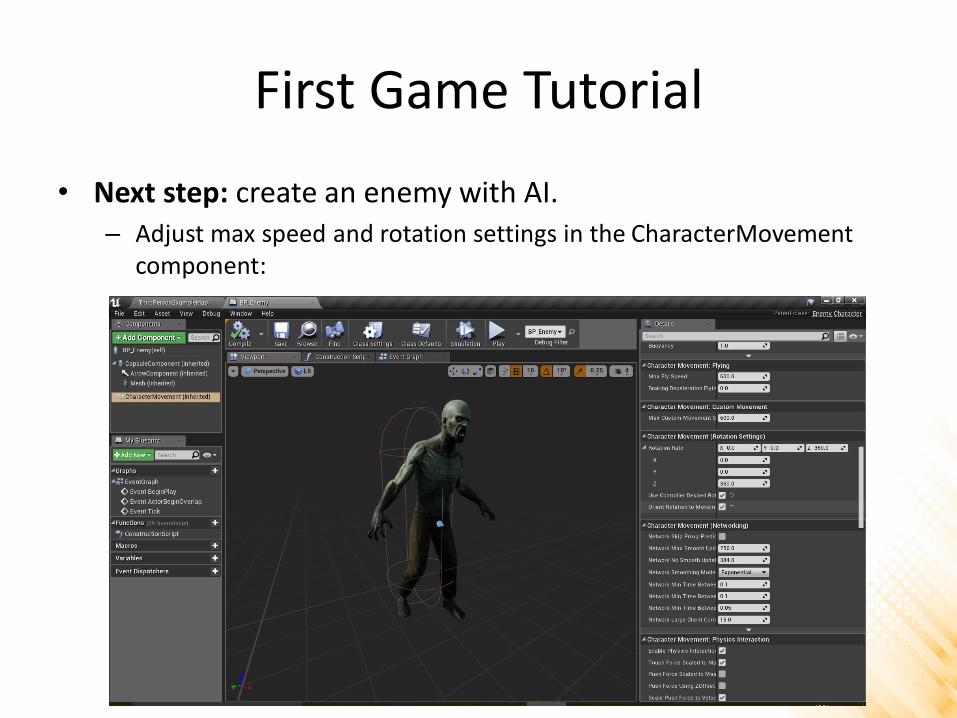
• Next step: create an enemy with AI.– Adjust max speed and rotation settings in the CharacterMovement
component:
First Game Tutorial
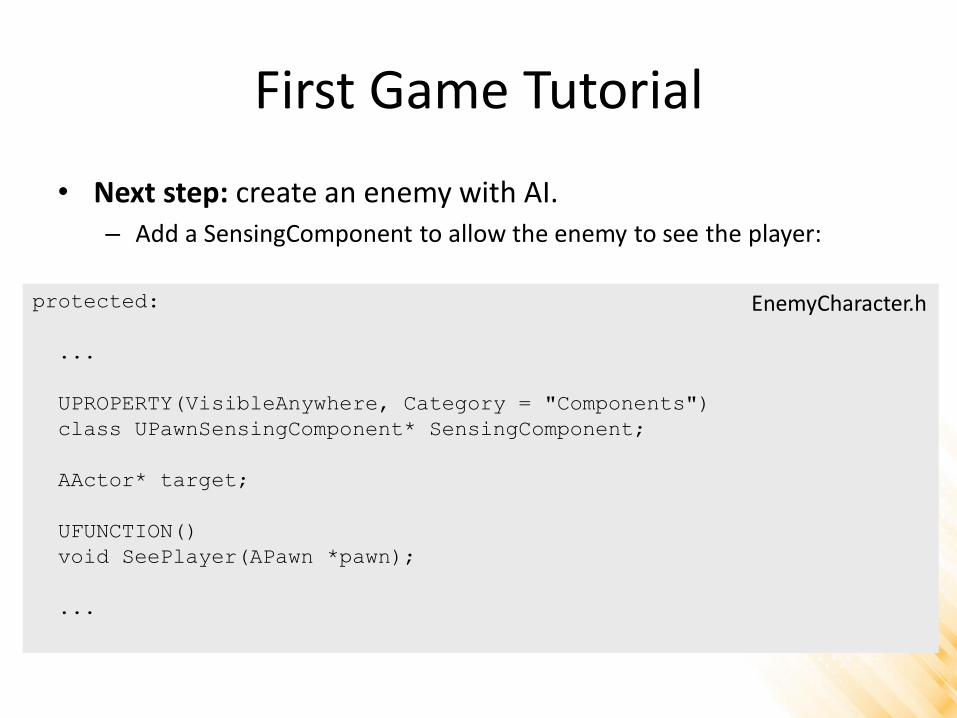
• Next step: create an enemy with AI.– Add a SensingComponent to allow the enemy to see the player:
protected:
...
UPROPERTY(VisibleAnywhere, Category = "Components")
class UPawnSensingComponent* SensingComponent;
AActor* target;
UFUNCTION()
void SeePlayer(APawn *pawn);
...
EnemyCharacter.h

First Game Tutorial
• Next step: create an enemy with AI.– Add a SensingComponent to allow the enemy to see the player:
AEnemyCharacter::AEnemyCharacter()
{
SensingComponent = CreateDefaultSubobject<UPawnSensingComponent>
("SensingComponent");
SensingComponent->OnSeePawn.AddDynamic(this,
&AEnemyCharacter::SeePlayer);
SensingComponent->SetSensingUpdatesEnabled(true);
}
void AEnemyCharacter::SeePlayer(APawn *pawn)
{
if ((pawn) && (AIController) && (!target)) {
target = pawn;
this->GetMesh()->GlobalAnimRateScale = 2.5f;
this->GetCharacterMovement()->MaxWalkSpeed = 150.0f;
AIController->MoveToActor(pawn);
}
}
EnemyCharacter.cpp

First Game Tutorial
• Next step: create an enemy with AI.– Add a SensingComponent to allow the enemy to see the player:
void AEnemyCharacter::Tick(float DeltaTime)
{
Super::Tick(DeltaTime);
if (target)
{
if (FVector::Dist(GetActorLocation(), target->GetActorLocation())
> SensingComponent->SightRadius)
{
this->GetMesh()->GlobalAnimRateScale = 1.0f;
this->GetCharacterMovement()->MaxWalkSpeed = 50;
target = nullptr;
AIController->MoveToActor(GetRandomWaypoint());
}
}
}
EnemyCharacter.cpp

First Game Tutorial
• Next step: create an enemy with AI.– Adjust the sight properties in the enemy blueprint:

First Game Tutorial• Next step: create an enemy with AI.
– If the enemy gets to the player position, show the game over message:
void AEnemyCharacter::AIMoveCompleted(FAIRequestID RequestID,
EPathFollowingResult::Type Result){
if (Result == EPathFollowingResult::Success){
if (target){
AMyFirstGameCharacter* character = Cast<AMyFirstGameCharacter>
(target);
AMyFirstGameGameMode* gamemode = Cast<AMyFirstGameGameMode>
(GetWorld()->GetAuthGameMode());
if ((character) && (gamemode)){
gamemode->CompleteLevel(character, false);
}
target = nullptr;
}
if ((Waypoints.Num() > 0) && (AIController)){
AIController->MoveToActor(GetRandomWaypoint());
}
}
}

First Game Tutorial
• Next step: create an enemy with AI.– If the player collides with the enemy, the enemy follows him:
UFUNCTION()
void EnemyComponentHit(UPrimitiveComponent* HitComponent,
AActor* OtherActor, UPrimitiveComponent* OtherComp,
FVector NormalImpulse, const FHitResult& Hit);
EnemyCharacter.h
void AEnemyCharacter::BeginPlay(){
Super::BeginPlay();
GetCapsuleComponent()->OnComponentHit.AddDynamic(this,
&AEnemyCharacter::EnemyComponentHit);
...
}
void AEnemyCharacter::EnemyComponentHit(...)
{
SeePlayer(Cast<APawn>(OtherActor));
}
EnemyCharacter.cpp

Exercise 1
1) Finish the implementation of the game and balance the gameplay.
a) Add more coins to the level;
b) Add more enemies to the level;
c) Add more waypoints to the level;
d) Adjust the position of the coins, enemies and waypoints;
e) Balance the speed of the enemies according to the speed of the player;
f) Make the game more challenging and fun to play!

Further Reading
• Carnall, B. (2016). Unreal Engine 4.X By Example. PacktPublishing. ISBN: 978-1785885532.
• Web Resources:
– Introduction to C++ Programming in UE4 -https://docs.unrealengine.com/en-US/Programming/Introduction
– Coding Standard - https://docs.unrealengine.com/en-US/Programming/Development/CodingStandard
– Gameplay Programming - https://docs.unrealengine.com/en-us/Programming/UnrealArchitecture