INTRODUCTION TO ADVANCED ENDODONTICS A LABORATORY COURSE · 3. To become familiar with various...
29
INTRODUCTION TO ADVANCED ENDODONTICS A LABORATORY COURSE This course will introduce you to the various techniques of access preparation, chemomechanical instrumentation and obturation of the root canal system. With this background you can make an intelligent decision in selecting the mode of treatment best suited for a particular clinical situation. This laboratory course will also provide a means for evaluating the resident's incoming level of proficiency in clinical endodontics. Every effort is made to simulate actual clinical conditions. The resident will use a dental operatory to perform endodontic treatment on extracted teeth mounted in a mannequin head. This course is divided into two sections. The first section is devoted to manual techniques and the second involves the introduction of NiTi rotary techniques, regenerative endo and other clinical procedures. The course is conducted during the summer term of the first year. In addition to the laboratory exercises, the Intro Course provides an overview of the foundation sciences for understanding the mechanisms and management of apical periodontitis. OBJECTIVES 1. To recognize and create adequate straight-line access through the orifices into the canal system. 2. To become familiar with various techniques of chemomechanical instrumentation. 3. To become familiar with various techniques of root canal obturation. 4. To demonstrate the ability to understand and follow directions precisely. 5. To introduce you to the complexities of endodontic anatomy. 6. To practice intra-oral photography. 7. To generate your own instructional materials relating to endodontic access, chemomechanical instrumentation, obturation, and endodontic anatomy. 8. To become familiar with digital radiography and demonstrate adequate radiographic technique. 9. To learn and demonstrate the ability to document and present endodontic cases appropriately in digital case presentation style (which will be used throughout your residency). 10. To review the foundation sciences of endodontics including mechanisms and management of apical periodontitis.
Transcript of INTRODUCTION TO ADVANCED ENDODONTICS A LABORATORY COURSE · 3. To become familiar with various...
INTRODUCTION TO ADVANCED ENDODONTICS
A LABORATORY COURSE
This course will introduce you to the various techniques of access preparation, chemomechanical
instrumentation and obturation of the root canal system. With this background you can make an
intelligent decision in selecting the mode of treatment best suited for a particular clinical
situation. This laboratory course will also provide a means for evaluating the resident's incoming
level of proficiency in clinical endodontics.
Every effort is made to simulate actual clinical conditions. The resident will use a dental
operatory to perform endodontic treatment on extracted teeth mounted in a mannequin head.
This course is divided into two sections. The first section is devoted to manual techniques
and the second involves the introduction of NiTi rotary techniques, regenerative endo and other
clinical procedures. The course is conducted during the summer term of the first year. In
addition to the laboratory exercises, the Intro Course provides an overview of the foundation
sciences for understanding the mechanisms and management of apical periodontitis.
OBJECTIVES
1. To recognize and create adequate straight-line access through the orifices into the canal
system.
2. To become familiar with various techniques of chemomechanical instrumentation.
3. To become familiar with various techniques of root canal obturation.
4. To demonstrate the ability to understand and follow directions precisely.
5. To introduce you to the complexities of endodontic anatomy.
6. To practice intra-oral photography.
7. To generate your own instructional materials relating to endodontic access,
chemomechanical instrumentation, obturation, and endodontic anatomy.
8. To become familiar with digital radiography and demonstrate adequate radiographic
technique.
9. To learn and demonstrate the ability to document and present endodontic cases
appropriately in digital case presentation style (which will be used throughout your
residency).
10. To review the foundation sciences of endodontics including mechanisms and management
of apical periodontitis.

2
REFERENCES
1. Department Video Tapes
2. Pathways of the Pulp - 7th edition, Stephen Cohen and Richard C. Burns, Mosby Co., 1998.
3. Pathways of the Pulp - 11th edition, Ken Hargreaves and Lou Berman, Mosby Co., 2016.
4. Endodontics - 4th edition, John Ingle & Leif Bakland, Williams & Wilkins, 1994.
5. Endodontics - 3rd edition, John Ingle & Jerry Taintor, Lea & Febiger, 1985.
6. Endodontics – 2nd edition, John Ingle & Edward Beveridge, Lea & Febiger, 1976.
7. Endodontic Therapy - 4th edition, Frank Weine, Mosby Co., 1989.
8. Essential Endodontology – 2nd edition, D. Orstavik and T. Pitt ford, Blackwell Munksgaard,
2008. [Optional text]
9. Weine FS, Kelly RF, Lio PJ. The effect of preparation procedures on original canal shape
and on apical foramen shape. J Endod 1975;1:255-62.
10. Gutmann J, Lovdahl P. Problem Solving in Endodontics 2011:Mosby, chapter 8. Problem
Solving In tooth isolation, access openings, and identification of orifice location.
11. Gutmann J, Lovdahl P. Problem Solving in Endodontics 2011:Mosby, chapter 10. Problem
Solving Clinical Techniques in Enlargening and Shaping the root canal.
12. Gutmann J, Lovdahl P. Problem Solving in Endodontics 2011:Mosby, chapter 12. Problem
Solving challenges in root canal obturation.
13. Krasner P, Rankow H. Anatomy of the Pulp-Chamber floor. J Endod 30:5, 2004.
14. Wong M, Peters DD, Lorton L. Comparison of gutta-percha filling techniques: compaction
(mechanical), vertical (warm) and lateral condensation techniques, part 1. J Endod
1981;7:551-8.
15. Wong M, Peters DD, Lorton L, Bernier WE. Comparison of gutta-percha filling techniques:
three chloroform - gutta-percha filling techniques, part 2. J Endod 1982;8:4-9.
16. Allison DA, Michelich RJ, Walton RE. The influence of master cone adaptation on the
quality of the apical seal. J Endod 1981;7:61-5.
17. Holcomb JQ, Pitts DL, Nicholls JI. Further investigation of spreader loads required to
cause vertical root fracture during lateral condensation. J Endod 1987;13:277-84.
18. Schilder H. Cleaning and shaping the root canal. Dent Clin North Am 1974;18:269-96.
3
19. Schilder H. Filling root canals in three dimensions. Dent Clin North Am 1967; Nov:723-
44.
20. Roane JB, Sabala CL, Duncanson MG. The "Balanced Force" concept for instrumentation
of curved canals. J Endod 1985;11:203-11.
21. Southard DW, Oswald RJ, Natkin E. Instrumentation of curved molar root canals with
the Roane technique. J Endod 1987;13:479-89.
22. Gutmann J, Lovdahl P. Problem Solving in Endodontics 2011:Mosby, chapter 13. Problem
Solving challenges in compromised roots, root canal systems and anatomic deviations.
23. Abou-Rass M, Frank AL, Glick D. The anticurvature filing method to prepare the curved
root canal. J Am Dent Assoc 1980;101:792-4.
24. Leeb J. Canal orifice enlargement as related to biomechanical preparation. J Endod
1983;9:463-70.
25. Abou-Rass M, Jastrab RJ. The use of rotary instruments as auxiliary aids to root canal
preparation of molars. J Endod 1982;8:78-82.
26. Montgomery S. Root canal wall thickness of mandibular molars after biomechanical
preparation. J Endod 1985;11:257-63.
27. Fu H, Cunningham W. Endosonics--the ultrasonic synergistic system of endodontics. Endod
Dent Traumatol 1985;1:201-6.
28. Goerig AC, Michelich RJ, Schultz HH. Instrumentation of root canals in molars using the
step-down technique. J Endod 1982;8:550-4.
29. Lemon R. Nonsurgical repair of perforation defects. Dent Clin North Am 1992;36:439-
57.
30. Nakata TT, Bae KS, Baumgartner JC. Perforation repair comparing mineral trioxide
aggregate and amalgam using an anaerobic bacterial leakage model. J Endod 1998;24:184-
6.
31. Card SJ, Sigurdsson A, Orstavik D, Trope M. The effectiveness of increased apical
enlargement in reducing intracanal bacteria. J Endod 2002;28:779-8.
32. Gani O, Visvisian C. Apical canal diameter in the first upper molar at various ages. J
Endod 1999;25:689-91.
33. Bogen G, Kuttler S. Mineral Trioxide Aggregate obturation: a review and case series. J
Endod 35:777-90, 2009.
4
34. Hulsmann M. Methods for removing metal obstructions from the root canal. Endod Dent
Traumatol 1993;9:223-37.
35. Ruddle CJ. Nonsurgical retreatment. J Endod 2004;30:827-45.
36. Hachmeiser D, Schindler W, Walker W, Thomas D. The sealing ability of mineral trioxide
aggregate in a model of apexification. J Endod 28:686-90, 2002.
37. Witherspoon D, Small J, Regan J, Nunn M. Retrospective analysis of open apex teeth
obturated with MTA. J Endod 34:1171-6, 2008.
38. Banchs F, Trope M. Revascularization of immature permanent teeth with apical
periodontitis: new treatment protocol? J Endod 30:196-200, 2004.
39. Anibal Diogenes Regenerative Endodontics. Chap 10 in: Pathways of the Pulp 11th edition
2016.
40. Bose R, Nummikoski P, Hargreaves KM. A retrospective evaluation of radiographic
outcomes in immature teeth with necrotic root canal systems treated with regenerative
endodontic procedure. J Endod 35: 1343-9, 2009.
41. Rotstein I, Mor C, Friedman S. Prognosis of intracoronal bleaching with sodium perborate
preparations in vitro: 1-year study. J Endod 19:10-2, 1993.
42. Iqbal M, Rafailov H, Kratchman S, Karabucak B. A comparison of three methods for
preparing centering platforms around separated instruments in curved canals. J Endod
32:48-51, 2006.
43. Eleazer P, O’Connor R. Innovative uses for hypodermic needles in endodontics. J Endod
25:190-1, 1999.
44. Suter B. A new method for retrieving silver points and separated instruments from root
canals. J Endod 24:446-8, 1998.
45. Terauchi Y, O’Leary L, Kikuchi I, Asanagi M, Yoshioka T, Kobayashi C, Suda H. Evaluation
of the efficiency of a new file removal system in comparison with two conventional
systems. J Endod 33:585-8, 2007.
46. Gutmann J, Lovdahl P. Problem Solving in Endodontics 2011:Mosby, chapter 9 Problem
Solving techniques for the Revision of Previous Root Canal Procedures.
47. Bertrand M, Pellegrino J, Rocca J, Klinghofer A, Bolla M. Removal of Thermafil root canal
filling material. J Endod 23:54-7, 1997.
48. Royzenblat A. Goodell G. Comparison of removal times of Thermafil plastic obturators
using ProFile rotary instruments at different rotational speeds in moderately curved
canals. J Endod 33:256-8, 2007

5
49. Stropko JJ. Canal morphology of maxillary molars: clinical observations of canal
configurations. J Endod 1999;25(6):446-450.

6
MATERIALS
1. Endodontic Kit
2. Endodontic mannequin with mounted extracted teeth
3. Teeth: The following are the minimum requirements for this course. It is recommended
that you have extras, and it is highly desirable for you to experiment with "hybrid
techniques" on additional teeth as time allows. The teeth should be stored in glycerin
(diluted to 1/2 strength with water) or 10% formalin.
NUMBER REQUIRED
TOOTH 1st Section 2nd Section Total
Maxillary Central Incisor 1 5 6
Maxillary Lateral Incisor
Maxillary First Bicuspid (two roots) 1 1
Maxillary Second Bicuspid (one root) 1 1
Maxillary First or Second Molar 2 1 3
Maxillary or Mandibular Cuspid 1 1
Mandibular Incisor (Central or Lateral) 1 2 3
Mandibular Bicuspid (two roots) 1 1
Mandibular Cuspid
Mandibular First or Second Molar 1 3 4
Typical TOTAL (minimum) 30*
*Actually fewer needed, some exercises allow choice of tooth type.
NOTE: After teeth are selected, they should be cleaned by soaking them in Clorox (full
strength) for 20 minutes. Over-soaking will result in the formation of a white
decalcified film on the root surfaces which will make photographing of the root
sections less pleasing. The cementum and dentin will actually be damaged also.
Save all teeth that have separated files for Exercise V in Part II !

7
CASE PRESENTATION PROCEDURES
The course is divided into two sections and, at the end of each section, all of the cases will
be presented to the class by digitally projecting the clinical photographs, radiographs, and dental
operating microscope (DOM) photographs that you will do in PowerPoint presentations. This is a
learning experience for all and most residents find that they learn more from cases that went
awry. Thus, plan on presenting and discussing “the good, the bad, and the ugly”. It is expected
that details of each case be noted, and if procedures differed from the stated techniques, that
you be able to explain and justify that deviation. Since these projects are to simulate clinical
endodontic procedures, procedural accidents should be handled as well as possible, and presented
as such.
A portfolio of your cases should be placed on the Department server at the completion
of the course (cfs\links\endo\projects\All_Public\GradEndo\IntroAdvEndo).
The digital documentation for each case should be created in the following sequence:
Radiograph #1 - facial-lingual view (clinical)
Radiograph #2 - mesio-distal view (proximal)
Radiograph #3 - evaluation pre-op view(s) in mannequin
Clinical Photograph #1 - Pre-access
Clinical Photograph #2 - Access
Radiograph #4 - first instrument(s) to working length
Radiograph #5 - final instrument(s) (Master Apical File, "MAF")
Clinical Photograph #3 - Modified access (if applicable)
Clinical Photograph #4 - Orifices just before obturation (try to get all orifices at once)
Radiograph #6 - master cone(s) fitted (Optional according to exercise)
Radiograph #7 - condensation
Radiograph #8 - post-op in mannequin
Clinical Photograph #5 - Orifices just after obturation (try to get all orifices at once)
Radiograph #9 - after treatment facial-lingual clinical view(s)
Radiograph #10 - after treatment mesio-distal proximal view(s)
DOM Photograph #1 - apex undisturbed
DOM Photograph #2 - apex skimmed
DOM Photograph #3 - first sign of filling material(s)

8
DOM Photograph #4 - 1 mm from apex
DOM Photograph #5 - 3 mm from apex
DOM Photograph #6 - 5 mm from apex
DOM Photograph #7 - 7 mm from apex
DOM Photograph #8 - 9 mm from apex
Additional DOM photographs are encouraged if interesting findings are found during your
dissection of each root (e.g. multiple foramina, accessory canals, lateral canals, missed canals).
You should observe the root constantly during dissection rather than just dissect to certain
mm locations and then photograph. You will miss interesting anatomy and alterations
created by your preparation procedures and obturation techniques. Digital radiography is a
routine part of the course. Computer projection of digital radiographic images is the norm as are
digital dissection microscopic images. You will become familiar with Adobe Photoshop and
PowerPoint presentation graphic programs as well as digital Xray software (MiPacs). The course
grade will reflect performance during the seminar presentations as well as the case presentation
documentation.
RADIOGRAPHIC PROCEDURES
Radiographs:
Ten (10) digital radiographs, (see below) are taken of each tooth. Place them in the
appropriate digital exam format.
See previous page for description of required radiographic images.
During certain exercises the master cone fitted radiograph (#6) can be eliminated.
Radiographic Procedures:
A. Before mounting the teeth in the dentoform:
Radiograph #1 & 2: Take facial-lingual and mesio-distal views of each tooth.
Place a small piece of soft wax on the crown to hold the tooth in the proper position on
the digital sensor (always double bag sensor with Schick bag and finger cot).
The exposure settings will vary from one radiographic unit to the next. Experiment with
settings between 4 and 10 impulses. After this radiographic image is taken, attach
soft wax at the apex(s) prior to mounting the teeth in the dentoform.
B. After mounting the teeth in the dentoform (dentoforms have been modified for digital
sensors): The following radiographs are required:
Radiograph #3: Evaluation (Pre-Op) in mannequin

9
Radiograph #4: First instrument (premolars with 2 canals and mandibular molars
require an additional film taken at 20 degrees from the mesial
or distal).
Radiograph #5: Final instrument(s) (MAF)
Radiograph #6: Master cone(s) fitted (Tug-back). This radiograph may be
omitted during some exercises.
Radiograph #7: Condensation (before temporary restoration placement and rubber
dam removal)
Radiograph #8: Post-op (after rubber dam removal; tooth still in dentoform)
Radiograph #9 & 10: After the root canal treatment is completed, remove the tooth
from the dentoform and repeat the two views of radiograph #1
& 2 (above) that were taken before the tooth was placed in the
dentoform
CLINICAL PHOTOGRAPHS
Endodontic photography can place special demands on the camera setup. Because often we
take photographs of single teeth or apices of teeth during surgery. On the other hand, full-face
views are also required to document a case well. A variety of camera setups can be used. Ideally,
images will be taken with a DOM (dental operating microscope).
Access preparation is an important step in being able to provide successful endodontic
therapy. It can enhance or hinder the delivery of that treatment. A pre-access image is
required as is an initial access image taken at the time of working length determination. An
additional access image just before obturation should be taken if major revisions of the access
were made to facilitate total canal preparation. This usually is the case. The pre-access, access,
modified access, and the two orifice images should be taken in this course with the digital
camera mounted on the dissecting microscope in the lab or on the SOM in the dental treatment
room. Your clinical images will essentially be a “Carr” series originally proposed by Dr. Gary Carr
of San Diego, California.
Case presentation is not complete without the photographic images that accompany the
radiographic images.

10
SECTION ONE
The following exercises will expose the student to various techniques and filling materials.
After obturation, immediately place each tooth in a small bottle containing a wet 2" x 2" gauze.
The tooth number, by exercise, will be written on the cap. Cap the bottle tightly and place it in
an incubator (Endodontic Dept. Laboratory, Rm. 4.518U) for at least 2 days. This will keep the
tooth moist and prevent cracking while the root canal sealer is setting.
SELECT THE TEETH:
Remember, the following is required for documentation of each exercise:
*Radiograph the teeth prior to mounting in the dentoform. Dentoform modification has been
done for digital sensors.
*Radiographs and photographs taken during the exercise.
*Post treatment radiographs with tooth out of the dentoform.
*Section and photograph under the dissecting microscope/SOM and photograph.
*Prepare a separate PowerPoint file for each individual case for presentation.
*Maintain the raw digital images and the photographic images in their JPEG format.
Organize them by individual exercise.
Exercise I:
Tooth #1:
Maxillary Central Incisor
Tooth #2: Mandibular Incisor
Instrumentation: Weine (Filing and Flare)
NOTE: No rotation of files (reaming action) is advocated.
Obturation: Lateral Condensation with gutta-percha and Roth Sealer

11
Reference: Weine; 4th ed. pages 285-308. (Anderson)
Weine FS, Kelly RF, Lio PJ. The effect of preparation procedures on original
canal shape and on apical foramen shape. J Endod 1975;1:255-62.
(Alelyani)
Gutmann J, Lovdahl P. Problem Solving in Endodontics 2011:Mosby, chapter 8.
Problem Solving In tooth isolation, access openings, and identification of
orifice location. (all read)
Gutmann J, Lovdahl P. Problem Solving in Endodontics 2011:Mosby, chapter 10.
Problem Solving Clinical Techniques in Enlarging and Shaping the root canal. (all
read)
Gutmann J, Lovdahl P. Problem Solving in Endodontics 2011:Mosby, chapter 12.
Problem Solving challenges in root canal obturation. (all read)
Additional
Objective:
Prior to instrumentation explore the canal system of the mandibular incisor
with a #8 or #10 file in which you have placed an apical bend. Search for the
lingual canal in the mandibular incisor. Clinically locate the foramen and the
direction of exit. Does it correspond to your radiographic estimate of WL?
Which should you believe?
Exercise II:
Tooth #3: Maxillary 1st Bicuspid (two roots)
Instrumentation: Ingle (Ream and File) - Quarter turn pull
Obturation: Halothane dip of gutta-percha (“Slam Dunk”). Either a standard or
nonstandard gutta-percha cone is fit 2 mm short of WL. After placement of
sealer the cone is dipped in halothane for 5-7 seconds (chloroform for 1-3 sec)
and seated completely to WL. Do not remove the cone. Use lateral
condensation.
12
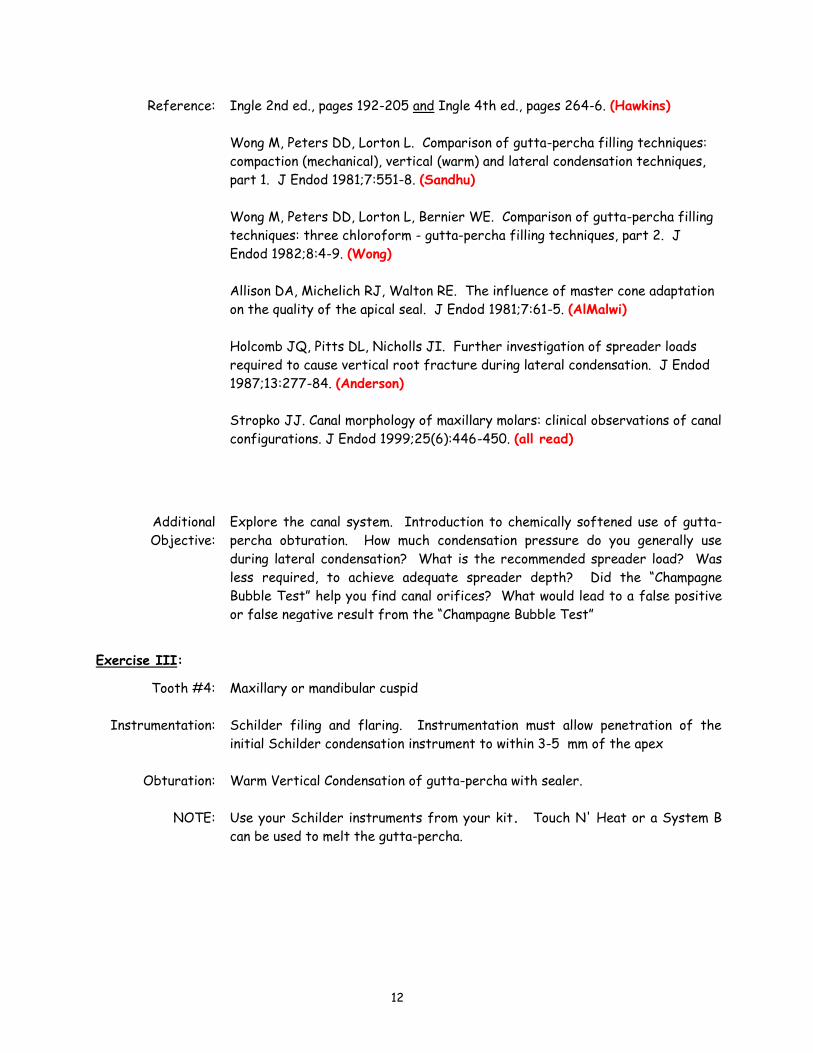
Reference: Ingle 2nd ed., pages 192-205 and Ingle 4th ed., pages 264-6. (Hawkins)
Wong M, Peters DD, Lorton L. Comparison of gutta-percha filling techniques:
compaction (mechanical), vertical (warm) and lateral condensation techniques,
part 1. J Endod 1981;7:551-8. (Sandhu)
Wong M, Peters DD, Lorton L, Bernier WE. Comparison of gutta-percha filling
techniques: three chloroform - gutta-percha filling techniques, part 2. J
Endod 1982;8:4-9. (Wong)
Allison DA, Michelich RJ, Walton RE. The influence of master cone adaptation
on the quality of the apical seal. J Endod 1981;7:61-5. (AlMalwi)
Holcomb JQ, Pitts DL, Nicholls JI. Further investigation of spreader loads
required to cause vertical root fracture during lateral condensation. J Endod
1987;13:277-84. (Anderson)
Stropko JJ. Canal morphology of maxillary molars: clinical observations of canal
configurations. J Endod 1999;25(6):446-450. (all read)
Additional
Objective:
Explore the canal system. Introduction to chemically softened use of gutta-
percha obturation. How much condensation pressure do you generally use
during lateral condensation? What is the recommended spreader load? Was
less required, to achieve adequate spreader depth? Did the “Champagne
Bubble Test” help you find canal orifices? What would lead to a false positive
or false negative result from the “Champagne Bubble Test”
Exercise III:
Tooth #4: Maxillary or mandibular cuspid
Instrumentation: Schilder filing and flaring. Instrumentation must allow penetration of the
initial Schilder condensation instrument to within 3-5 mm of the apex
Obturation: Warm Vertical Condensation of gutta-percha with sealer.
NOTE: Use your Schilder instruments from your kit. Touch N' Heat or a System B
can be used to melt the gutta-percha.
13
Reference:
Pathways of the Pulp 11th ed. Chapters 12, 13, 14, 15 (all read)
Schilder H. Cleaning and shaping the root canal. Dent Clin North Am 1974;18:
269-96. (Alelyani)
Schilder H. Filling root canals in three dimensions. Dent Clin North Am 1967;
Nov:723-44. (Hawkins)
Additional
Objective:
Tapering preparations and access requirements. Concept of “Three Dimensional
Obturation.”
Exercise IV:
Tooth #5: Maxillary Molar - (the tooth selected should have an apical or mid-root
curvature and be moderately calcified)
Instrumentation: Roane “Balanced Force” technique. Use Gates Glidden burs to the curve (#2
apically to #4 at orifice) to preflare the canal. Reestablish an apical control
zone to a minimum size #40 or #45 after enlargement at the radiographic
canal length.
Obturation: MB & DB canals - Thermafils with sealer
Palatal canal - Lateral Condensation with gutta-percha using Chloroform or
halothane dip technique described in Exercise II.
Reference: Roane JB, Sabala CL, Duncanson MG. The "Balanced Force" concept for
instrumentation of curved canals. J Endod 1985;11:203-11. (Sandhu)
Southard DW, Oswald RJ, Natkin E. Instrumentation of curved molar root
canals with the Roane technique. J Endod 1987;13:479-89. (Wong)
Gutmann J, Lovdahl P. Problem Solving in Endodontics 2011:Mosby, chapter 13.
Problem Solving challenges in compromised roots, root canal systems and
anatomic deviations. (all read)
Krasner P, Rankow H. Anatomy of the Pulp-Chamber floor. J Endod 30:5, 2004
(all read)
Thermafil Video tape
Additional
Objective:
To introduce the student to the use of Gates-Glidden drills within the canal as
a means of preflaring. To understand the concept of the “apical control zone.”
To search for the fourth (MB2) orifice. SAVE THIS TOOTH FOR
EXERCISE XI of PART II !

14
Exercise V:
Tooth #6:
Mandibular 1st Molar
Instrumentation: Mandibular Molar - Balanced Force
MB - Ingle Quarter Turn and Pull with Stepback. Use anticurvature flaring.
ML - Balanced Force
Distal - Schilder Filing and Flaring as in Exercise III
Obturation: Mandibular Molar-
MB canal - Lateral Condensation of gutta-percha with sealer
ML canal - Halothane softened gutta-percha with lateral condensation and
sealer
D canal - Obtura
Reference: Obtura Videotape
Abou-Rass M, Frank AL, Glick D. The anticurvature filing method to prepare
the curved root canal. J Am Dent Assoc 1980;101:792-4. (AlMalwi)
Leeb J. Canal orifice enlargement as related to biomechanical preparation. J
Endod 1983;9:463-70. (Anderson)
Abou-Rass M, Jastrab RJ. The use of rotary instruments as auxiliary aids to
root canal preparation of molars. J Endod 1982;8:78-82 (Hawkins)
Montgomery S. Root canal wall thickness of mandibular molars after bio-
mechanical preparation. J Endod 1985;11:257-63. (Alelyani)
Additional
Objective:
To understand the concept of “anticurvature filing.” Note the mesial canal
preparations. Which technique of canal preparation demonstrated the most
transportation. To introduce injectable GP techniques and condensation.
Exercise VI:
Tooth #7: Maxillary 2nd Premolar
Instrumentation: Ultrasonic instrumentation with Analytic, Amadent P5 or Spartan units
Obturation: Chloroform or Halothane dipped lateral condensation

15
Reference: Ingle 4th ed. pp 175-9. (Sandhu)
Martin H, Cunningham W. Endosonics--the ultrasonic synergistic system of
endodontics. Endod Dent Traumatol 1985;1:201-6. (All read)
Additional
Objective:
To introduce the student to the use of ultrasonic means of canal preparation
Exercise VII:
Tooth #8: Mandibular Bicuspid (two canals)
Instrumentation: Prepare the more difficult canal with quarter turn and pull with minimal flare
and use more of a Balanced Force technique on the easier one. Concentrate on
early preflaring to the point at which the canals bifurcate.
Obturation: Use techniques that maximize the GP flow, either Chemical Dip or Warm
vertical.
Reference:
Goerig A, Michelich R, Schulz, H. J Endod 1982;8:550-4 (All read).
Pathways of the Pulp 11th ed., Chaps 5 (All read)
Additional
Objective:
To become familiar with the anatomy of bifurcated mandibular bicuspids and
how this anatomy affects canal system preparation and obturation.
Exercise VIII:
Tooth #9:
Maxillary 1st Molar
Instrumentation: MB - File & Ream. Concentrate on maintaining a standard .02 taper as much as
possible.
DB - Weine Filing and Flare. Gates-Glidden burs or Peeso reamers may be used
at the orifice only. Provide a standard .02 taper to the canal.
Palatal Canal - Ingle Quarter turn pull with flaring.

16
Obturation: MB & DB - silver cones coated with AH26 as the sealer. Let a faculty member
check the fit of the silver cone prior to cementation. Place a notch on the
silver points 2mm coronal to the canal orifice and twist off the silver points
after obturation (this will give a 2mm “handle” to focus your efforts during the
subsequent re-treatment exercise).
Palatal canal - Thermafil. Use AH-26 sealer in all canals
Close the access with an Amalgam restoration (NO base). The silver points
are often difficult to distinguish from amalgam during retreatment
exercises and therefore this represents a good simulation of the clinical
silver point retreatment case. Save this tooth for the next exercise!
Reference: Weine; 4th ed., pages 308-338. (Wong)
Weine; 4th ed., pages 416-430 (AlMalwi)
Ingle; 3rd ed., pages 255-258. (Anderson)
Pathways of the Pulp 11th ed., Chap 7 (All read)
Additional
Objective:
Using silver cones is now considered obsolete. Historically it had been
advocated in fine curved canals. The technique of canal preparation may
contribute to selection of obturation material and technique. Silver cone
preparations were classically taught as a machined round minimally tapered
preparation. With latex allergy increasingly common, what other alternative
materials could be used?
Exercise IX:
Tooth #10:
Maxillary 1st Molar used in Exercise VIII.
Retreatment: Trade teeth with one of the other residents so that you will not be retreating
the same tooth you previously filled. Assume that this silver cone treatment
was initially performed 10 years ago and is clinically successful. For Prosthetic
reasons you are asked to retreat the case before the tooth is to be restored
with a post retained crown.
Instrumentation: Modify the access preparation as necessary to retrieve the silver cones.
Retrieve the silver cones and Thermafil device (if possible) by any means
clinically possible. Retreat each of the canals with a different method of
instrumentation using the canal and root anatomy as the deciding factor.

17
Obturation: Use a different method of obturation in each canal based on what technique
you think is most appropriate for the preparation design but include at least 1
canal obturated with a warm vertical compaction using .04 GP cones.
Reference: Pathways of the Pulp; 11th ed., Chap 8 (Re-Tx) (All Read)
Gutmann J, Lovdahl P. Problem Solving in Endodontics 2011 Chap 14. (All Read)
Additional
Objective:
Think about what your discussion with the patient prior to retreatment should
involve. Possible alternatives, risks, benefits, etc.
THIS COMPLETES THE FIRST SECTION EXERCISES !!
18
SECTION TWO
OBJECTIVE
To become acquainted with and gain proficiency in rotary techniques of root canal preparation.
We will practice each rotary system on a plastic block before we try it in any of the
teeth!
Exercise I:
Tooth #1: Maxillary Central Incisor
Tooth #2: Mandibular Incisor or Maxillary Canine or Single Canal Bicuspid
Instrumentation: LightSpeed System. Prepare canal according to LightSpeed directions
Obturation: Obturate one tooth with warm vertical condensation. Obturate one tooth with
SimpliFill (optional). Pick a tooth which you have been able to prepare parallel
with little or no taper in the apical 4-5 mm if you decide to use SimpliFill.
Reference: LightSpeed Video Tapes. (ALL)
Card SJ, Sigurdsson A, Orstavik D, Trope M. The effectiveness of increased
apical enlargement in reducing intracanal bacteria. J Endod 2002;28:779-83;
(Alelyani)
Shuping G, Orstavik D, Sigurdsson A, Trope M. J Endod 26:751, 2000.
(Hawkins)
Pathways of the Pulp - 11th edition Chap 3 (all read)
Additional
Objective:
The use of a completely rotary method of canal preparation will never
completely replace the need for hand instruments. A well-trained endodontist
needs these skills and understanding of the applications of nickel-titanium
instruments. To evaluate different canal preparation shapes and their
relationship to different obturation techniques.
Exercise II:
Tooth #3: Maxillary Central Incisor, and
Tooth #4: Mandibular Incisor or Maxillary Canine or Single Canal Bicuspid

19
Instrumentation: ProFile System. Prepare canal crowndown according to ProFile directions.
Obturation: Obturate one of the teeth with ProRoot MTA using the Lawaty technique as
described by Bogen and Kuttler (2009). As an alternative to the Lawaty
method, use a pre-fitted gutta percha cone and “tamp down” the MTA in the
other tooth. As you back-fill with MTA, cut off sections of the GP cone so
that its diameter corresponds with the diameter of the root canal system
where you are tamping down the MTA. What were the advantages and
disadvantages of each approach? Which one did you prefer? Obturate the
second tooth with BioDentin using either the Lawaty or GP cone method. Do
you prefer working with ProRoot MTA or BioDentin? Why? (Please contact Ms
Sanda Sierra to obtain the MTA and BioDentin).
Reference: ProFile Video Tapes (ALL)
Gani O, Visvisian C. Apical canal diameter in the first upper molar at various
ages. J Endod 1999;25:689-91. (Sandhu)
Bogen G, Kuttler S. Mineral Trioxide Aggregate Obturation: a review and case
series. J Endod 35:777-90, 2009. (all read)
Additional
Objective:
The use of a completely rotary method of canal preparation will never
completely replace the need for hand instruments. A well-trained endodontist
needs these skills and understanding of the applications of nickel-titanium
instruments. To evaluate different canal preparation shapes and their
relationship to different obturation techniques.
Exercise III:
Tooth #5: Maxillary incisor (MTA Apexification)
Instrumentation: The primary purpose of this assignment is to learn MTA apexification for the
immature permanent tooth with incomplete root development. First,
instrument the canal system up to an .06 tapered rotary NiTil file of your
choice to a MAF of 40, then prepare a blunderbuss open apex using the method
described by Hachmeister and colleagues. Inject Ca(OH)2 paste (UltraCal™)
the entire length of the root canal system using a Max-i-Probe 30g needle.
Take a radiograph of the paste treatment. Remove the paste by irrigating with
6% NaOCl and then obturate.
Obturation: Adapt a small piece of CollaPlug at apex, perform MTA apexification with
indirect ultrasonic condensation and verify position and density of MTA by a
radiograph. Complete obturation with internal bonding with composite (Build-
It™, Pentron Inc) using the method described by Witherspoon and colleagues.

20
Additional
Objective:
To become familiar with MTA apexification and internal bonding with a dual
cured composite.
References: Hachmeiser D, Schindler W, Walker W, Thomas D. The sealing ability of
mineral trioxide aggregate in a model of apexification. J Endod 28:686-90,
2002. (Wong)
Witherspoon D, Small J, Regan J, Nunn M. Retrospective analysis of open apex
teeth obturated with MTA. J Endod 34:1171-6, 2008. (all read)
Exercise IV:
Teeth #6-7: Maxillary incisor (Regendo)
Instrumentation: The primary purpose of this assignment is to learn regenerative endodontic
treatment for the immature permanent tooth with incomplete root
development. First, instrument the teeth up to an .06 tapered rotary NiTil
file of your choice to a MAF of 40, then prepare a blunderbuss open apex using
the method described by Hachmeister and colleagues. There is no-to-minimal
instrumentation for regenerative procedures. Instead, slowly irrigate the
root canal system with 1.5% NaOCl. Note the potential for exposure of NaOCl
to the periapical tissue. Be prepared to discuss why NaOCl irrigation is
associated with minimal patient complaints of pain under these conditions.
What is different under these conditions compared to an NaOCL accident?
Obturation: Tooth #6: Mix up triple antibiotic paste (TAP)
(ciprofloxacin:metronidazole:minocycline) with sterile water (creamy
consistency is ~500-1000mg/ml) and inject into root canal system using a
Centrix™ syringe. Take a photo of the root and crown before placing TAP,
after placing TAP to the CEJ and 2 days after placing TAP all the way to the
access opening. The use of TAP in clinical procedures of regenerative
endodontics has been described by Banchs and Trope 2004, Hargreaves et al.,
2008 and Jung et al., 2008. Remove TAP by irrigation with 17% EDTA, and
place a Colla-Plug 3mm apical to the CEJ (this will cover the blood in clinical
cases). Place 3mm MTA with indirect ultrasonic condensation from the Colla-
Plug to the CEJ. Seal access with Z100 composite. See mpeg movie by Drs.
Shiloah and Lovelace.
Tooth #7: Treat as tooth #6, but stop after placing the MTA. Incubate the
access opening with TAP for 3 days and take before and after photographs.
What color changes are noticed? What causes this staining? Remove the stain
by the “walking bleach” (sodium perborate paste mixed with water) method as
described by Rotstein et al. (1993) and seal the access with Cavit. Take
photographs at 1,3 and 7 days. If needed, repeat with a second treatment.
The place DAP (metronidazole:ciprofloxacin) into the coronal pulp chamber and
repeat photographs at 1, 3 and 7 days. Is there a difference? Why?

21
Additional
Objective:
To become familiar with placement and potential staining of triple antibiotic
paste in regenerative endodontic procedures. Note that provoking bleeding
into the root canal system is a critical clinical step in this procedure. Recent
studies indicate that anesthesia with a vasoconstrictor containing local
anesthetic often leads to reduced bleeding potential. Remember to consider
the use of 3% mepivacaine without vasoconstrictor when performing the
bleeding step on your patients. Why would the second appointment use 17%
EDTA instead of NaOCl? What are the advantages/disadvantages to this
sequence?
References:
Banchs F, Trope M. Revascularization of immature permanent tooth with apical
periodontitis: new treatment protocol? J Endod 30:196, 2004. (all read)
Jung I, Lee S-J, Hargreaves K. Biologically based treatment of immature
permanent teeth with pulpal necrosis: A case Series. J Endod 34:876, 2008.
(all read)
Bose R, Nummikoski P, Hargreaves K. A retrospective evaluation of
radiographic outcomes in immature teeth with necrotic root canal systems
treated with regenerative endodontic procedures. J Endod 35:1343, 2009. (all
read)
Diogenes & Company. Regenerative Endodontics. Pathways of the Pulp, 11th
edition (Chap 10), 2016. (all read)
Murray PE, Garcia-Godoy F, Hargreaves KM. Regenerative endodontics: a
review of current status and a call for action. J Endod 2007;33(4):377-390.
(AlMalwi)
Lovelace TW, Henry MA, Hargreaves KM, Diogenes A. Evaluation of the
delivery of mesenchymal stem cells into the root canal space of necrotic
immature teeth after clinical regenerative endodontic procedure. J Endod
2011;37(2):133-138. (Anderson)
Exercise V:
Teeth #8-10: Select three teeth that have had separated files from previous exercises (or
see Dr. Hargreaves who can help you generate teeth for this exercise…).
22
Instrumentation: Depends on circumstances; ideally, use teeth with separated files of .04 taper
or larger. Prepare a centering platform as described by Iqbal et al., 2006.
Remove one file using the method described by Eleazer and O’Connor 1999.
Remove one file each using the Masseran and ultrasonic filing methods
described by Terauchi et al 2007.
Obturation: System B
Additional
Objective:
To become familiar with different methods of retrieving or bypassing
separated instruments
Reference: Iqbal M, Rafailov H, Kratchman S, Karabucak B. A comparison of three methods
for preparing centering platforms around separated instruments in curved
canals. J Endod 32:48-51, 2006. (Alelyani)
Eleazer P, O’Connor R. Innovative uses for hypodermic needles in endodontics.
J Endod 25:190-1, 1999. (Hawkins)
Suter B. A new method for retrieving silver points and separated instruments
from root canals. J Endod 24:446-8, 1998. (Sandhu)
Terauchi Y, O’Leary L, Kikuchi I, Asanagi M, Yoshioka T, Kobayashi C, Suda H.
Evaluation of the efficiency of a new file removal system in comparison with
two conventional systems. J Endod 33:585-8, 2007. (Wong)
Ruddle C. Nonsurgical retreatment. J Endod 30:827-45, 2004. (all read)
Re-review on your own: Pathways 11th: Chap 8 and Gutmann Chap 9. (no
abstract)
Exercise VI:
Tooth #11: Maxillary or Mandibular 1st Molar
Instrumentation: Protaper instrumentation only (to file F3 or F4)
Obturation: Do not obturate this tooth at this point
23
Reference: Lemon R. Nonsurgical repair of perforation defects. Dent Clin North Am
1992;36:439-57. (AlMalwi)
Pace R, Giuliani V, Pagavino G. Mineral trioxide aggregate as repair material for
furcal perforation: case series. J Endod 2008;34(9):1130-1133.
Mente J, Hage N, Pfefferle T, Koch MJ, Geletneky B, Dreyhaupt J, et al.
Treatment outcome of mineral trioxide aggregate: repair of root perforations.
J Endod 2010;36(2):208-213.
Additional
Objective:
To perform an internal repair of a strip perforation within the root canal
system using ultrasonically placed MTA and Biodentin, followed by gutta-percha
obturation using warm vertical compaction. Place make a pererforation in two
of the root canal systems. If you need assistance, Dr. Hargreaves will “visit”
with your patient after instrumentation, creating two procedural error s(Strip
perforation) that you will repair.
Additional
Objective:
How do you like working with ProRoot MTA versus BioDentin? Why are they
classified as calcium silicate cements? Self examination and evaluation of the
technique you have gravitated towards.
Exercise VII:
Tooth #12: Maxillary or Mandibular 1st Molar
Instrumentation: Protaper (SX to F1) followed by apical preparation with Profiles (size 25-30-
35-40 ) or K3 (size 25-30-35 or40 ) instruments
Obturation: MB and DB Canals (MB or ML in Mand) with vertical condensation. P (or D)
canal with lateral condensation.
Reference: https://www.youtube.com/watch?v=LXzzNFJ5cckhttps://www.youtube.com/w
atch?v=0AxxMEcz-Aw
Additional
Objective:
Remember the concept of maintaining curves and yet providing adequate
coronal flare.
Exercise VIII:
Tooth #13: Mandibular or Maxillary 1st Molar
Instrumentation: Protaper (SX to F1) followed by apical preparation with Profiles (size 25-30-
35-40 ) or K3 (size 25-30-35-40 ) instruments
24
Obturation: Warm vertical compaction; then prepare the distal canal to receive a cemented,
parallel-sided prefabricated post. Cement the post with a resin-based luting
agent, then trade models with your fellow residents and remove their post
using ultrasonic instrumentation.
Reference: https://www.youtube.com/watch?v=LXzzNFJ5cckhttps://www.youtube.com/w
atch?v=0AxxMEcz-Aw
Hulsmann M. Methods for removing metal obstructions from the root canal.
Endod Dent Traumatol 1993;9:223-37.
Additional
Objective:
To experience hybrid preparation techniques utilizing two major rotary
instrument systems. To gain experience in permanent post removal with
ultrasonic instrumentation.
Exercise IX:
Tooth #16: Use the maxillary molar from Exercise IV of Part I.
Instrumentation: This is a re-treatment exercise to remove the two Thermafil carriers and the
GP in this previously obturated tooth. Remove one Thermafil carrier using the
solvent/hand file method described by Bertrand et al., and the rotary file
method described by Royzenblat et al. Remove the GP in the palatal system
using heat. Re-instrument the three systems using the method of your choice.
Obturation: Wave of condensation using the System B and Obtura backfill.
Additional
Objective:
Compare two methods for removal of Thermafill carriers.
References: Bertrand M, Pellegrino J, Rocca J, Klinghofer A, Bolla M. Removal of Thermafil
root canal filling material. J Endod 23:54-7, 1997. (Anderson)
Royzenblat A. Goodell G. Comparison of removal times of Thermafil plastic obturators using
ProFile rotary instruments at different rotational speeds in moderately curved canals. J Endod
33:256-8, 2007. (Alelyani)
Make sure your digital documentation is complete and organized so that all raw images and
PowerPoint presentations are ready to copy to a CD.

25
THIS COMPLETES THE SECOND SECTION EXERCISES !!

26
DENTAL OPERATING MICROSCOPE (DOM)
PROCEDURES
After obturation, the teeth are sectioned prior to being examined, and photographed using a
dOM. For best results use a dark blue or dark green rubber dam background when
photographing the specimens. The rubber dam can be punched and the apex or root section
isolated through the punched hole. Also because of the dust generated during shaving of the
root, it is desirable to place the rubber dam in position only for the photograph. Dissecting
procedures will be performed under the hood in the endodontic lab or in the dental treatment
room with the high volume evacuator adjacent to the tooth.
Using a non-crosscut fissure bur for the dissections will leave a smoother surface across the
cut surface, and improve the esthetics of the photograph. You will discover that moving the bur
in one particular direction will disturb the GP less than in the other direction. Just prior to the
photograph make sure the GP surface is smooth and not rippled. Shave the root surface
gradually while viewing it under the microscope. You never know what aberrations in canal
morphology or inconsistencies in the endodontic procedures will be seen. Make sure the
photographic quality is excellent before proceeding with the dissection. You can never go
back! Focus is critical as is proper lighting.
Compare the results from the different instrumentation and obturation techniques and then
use this information to make intelligent decisions about your own method of treatment. Since
we will present cases throughout the course, you should perform dissections as you finish
the exercises rather than waiting until you have done all the exercises before dissecting.
Doing it this way will magnify your learning experience.
NOTE: Mark the mm's on the side of the root with a pencil or fine Sharpie. Identify the
exercise # and root as well as the root surface you marked for future reference (e.g., B or L).
Orientation becomes confusing during presentation unless you know the orientation of the root.
MAGNIFICATION
Use the largest single magnification that includes the entire cut root surface. Orient
the root with the widest dimension horizontal to coincide with the widest dimension of the
film plane. Do not attempt to image more than one root of molar teeth in a single frame.
Interesting findings should be enlarged and imaged separately.
VIEW (sectioned teeth), One Root at a Time!!
Image #1 - Apex undisturbed (Focus on the Foramen)
Image #2 - Apex skimmed*
Image #3 - First sign of filling material(s)*
27
Image #4 - 1 mm from the Apex
Image #5 - 3 mm from the Apex
Image #6 - 5 mm from the Apex
Image #7 - 7 mm from the Apex
Image #8 - 9 mm from the Apex
Interesting findings at other distances from the apex should also be photographed.
*May coincide
USING THE DOM
Faculty will demonstrate the procedure to you. You will gain experience in digital
radiography, Adobe Photoshop, and MS PowerPoint programs. We will also use the DOMs in the
treatment rooms with Nikon Coolpix cameras on the digital adaptors.
DIGITAL
MICROSCOPIC CAMERAS
We will demonstrate how to use your Canon or Sony camera to acquire images from the operating
microscope.
28
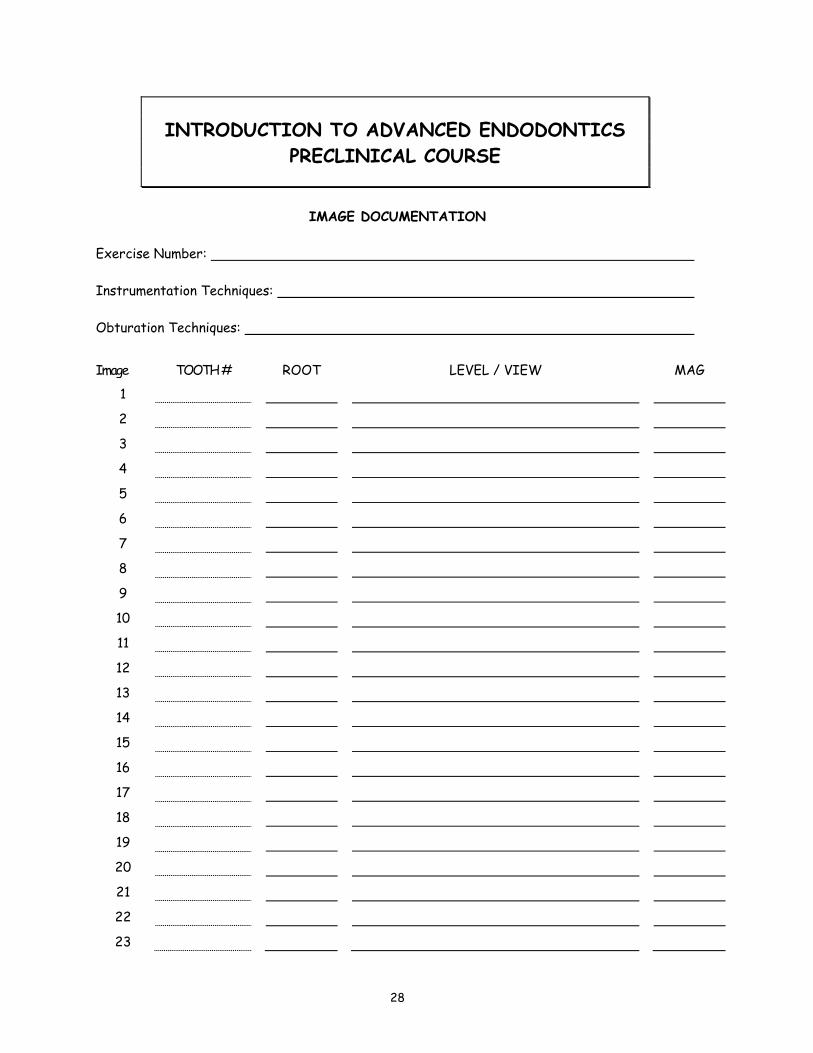
INTRODUCTION TO ADVANCED ENDODONTICS
PRECLINICAL COURSE
IMAGE DOCUMENTATION
Exercise Number:
Instrumentation Techniques:
Obturation Techniques:
Image TOOTH # ROOT LEVEL / VIEW MAG
1
2
3
4
5
6
7
8
9
10
11
12
13
14
15
16
17
18
19
20
21
22
23

29