Introduction to Adobe Fireworks CS4 - G&C Logistic Support ... Tutorial.pdf · of Adobe Photoshop®...
24
TUTORIAL Introduction to Adobe® Fireworks® CS4 October 2008
Transcript of Introduction to Adobe Fireworks CS4 - G&C Logistic Support ... Tutorial.pdf · of Adobe Photoshop®...

TUTORIAL
Introduction to Adobe® Fireworks® CS4
October 2008

© 2008 Adobe Systems Incorporated. All rights reserved.
If this tutorial is distributed with software that includes an end user agreement, this guide, as well as the software described in it, is furnished under license and may be used or copied only in accordance with the terms of such license. Except as permitted by any such license, no part of this guide may be reproduced, stored in a retrieval system, or transmitted, in any form or by any means, electronic, mechanical, recording, or otherwise, without the prior written permission of Adobe Systems Incorporated. Please note that the content in this guide is protected under copyright law even if it is not distributed with software that includes an end user license agreement.
The content of this guide is furnished for informational use only, is subject to change without notice, and should not be construed as a commitment by Adobe Systems Incorporated. Adobe Systems Incorporated assumes no responsibility or liability for any errors or inaccuracies that may appear in the informational content contained in this guide.
Any references to company names in sample templates are for demonstration purposes only and are not intended to refer to any actual organization.
Adobe and the Adobe logo, Acrobat, Fireworks, and Photoshop are either registered trademarks or trademarks of Adobe Systems Incorporated in the United States and/or other countries.
Adobe Systems Incorporated, 345 Park Avenue, San Jose, California 95110, USA. Notice to U.S. Government End Users. The Software and Documentation are “Commercial Items,” as that term is defined at 48 C.F.R. §2.101, consisting of “Commercial Computer Software” and “Commercial Computer Software Documentation,” as such terms are used in 48 C.F.R. §12.212 or 48 C.F.R. §227.7202, as applicable. Consistent with 48 C.F.R. §12.212 or 48 C.F.R. §§227.7202-1 through 227.7202-4, as applicable, the Commercial Computer Software and Commercial Computer Software Documentation are being licensed to U.S. Government end users (a) only as Commercial Items and (b) with only those rights as are granted to all other end users pursuant to the terms and conditions herein. Unpublished-rights reserved under the copyright laws of the United States. Adobe Systems Incorporated, 345 Park Avenue, San Jose, CA 95110-2704, USA. For U.S. Government End Users, Adobe agrees to comply with all applicable equal opportunity laws including, if appropriate, the provisions of Executive Order 11246, as amended, Section 402 of the Vietnam Era Veterans Readjustment Assistance Act of 1974 (38 USC 4212), and Section 503 of the Rehabilitation Act of 1973, as amended, and the regulations at 41 CFR Parts 60-1 through 60-60, 60-250, and 60-741. The affirmative action clause and regulations contained in the preceding sentence shall be incorporated by reference.

Page 1 Introduction to Adobe® Fireworks® CS4
TABLE OF CONTENTS Introduction ...................................................................................................................................... 2 Setting up the Fireworks workspace ................................................................................................... 3 Going from idea to wireframe ............................................................................................................ 5 Creating an initial design ................................................................................................................. 15 Where to go from here ..................................................................................................................... 22

Page 2 Introduction to Adobe® Fireworks® CS4
INTRODUCTION In this tutorial, you will go through the process of creating a website application in Adobe® Fireworks® CS4—from sketching the original page design to developing wireframes, to creating the final design. All the essential tools and instructions will be covered in this article to help you begin creating websites and designs within Fireworks CS4 right away. If you are already familiar with Fireworks, you’ll get a tour of some new features included in Fireworks CS4 as you follow along. We will be designing the web page for a fictitious company called Ignition Carshare. This company offers membership to a car sharing service—allowing members to reserve and use vehicles for a couple of hours or as long as multiple days. The website requirements include presenting the car share services available to potential customers and providing existing members with an interface to reserve vehicles and manage their accounts. You can find the files that you will use during this tutorial in the folder titled “Tutorial Working Files.”

Page 3 Introduction to Adobe® Fireworks® CS4
SETTING UP THE FIREWORKS WORKSPACE Before you start working with Fireworks, it’s a good idea to become familiar with the interface. A good way to do this is to customize the interface and make it your own. As you continue to use Fireworks, it is likely you’ll adapt the interface to suit your own unique workflow needs and personalize it further, but here are some tips to get you started. Set the Fireworks preferences
1) Select Edit > Preferences (Windows) or Fireworks > Preferences (Mac).
2) In the General category, change the number of “Undo Steps” to 80 or higher. When making detailed edits that involve many small brush strokes it is easy to run out of undos quickly. Setting a higher Maximum Undo level allows more flexibility.
3) In the Edit category, select “Precise cursors.” This option displays the cursor as a crosshair for all tools, rather than the standard icon cursors. This setting gives you greater precision in your work.
4) In the Photoshop Import/Open category, select the check box next to Clipping masks: Flatten to maintain appearance (see Figure 1). This option maintains the appearance of Adobe Photoshop® clipping path masks when they are imported into Fireworks CS4.
Figure 1. Setting the Photoshop Import options in the Fireworks Preferences dialog box
5) Click OK.

Page 4 Introduction to Adobe® Fireworks® CS4
Organize the panels Panels are an essential element of the Fireworks design workflow. Familiarizing yourself with all of the available panels will allow you to work more efficiently. Let’s begin in the iconic mode with only the panel names displayed. From the drop-down menu in the dark gray bar in the upper right corner of the screen, select Iconic Mode with Panel Names (see Figure 2).
Figure 2. Click the downward arrow icon next to Expanded Mode to choose the option to Select Iconic Mode with Panel Names This option displays all of the standard panels so that you can see them and select them when needed. Depending on the type of designs you create, you may find that you use these panels frequently:
• The Color Palette is an advanced interface useful when working with color. • The Path panel is helpful when working with vectors. • The Info panel and the Path panel are both used frequently. Place both panels in an
area that is easy to access. Fireworks CS4 gives you a great deal of control over how the panels are arranged on your interface. Later in this tutorial we’ll discuss some other recommended strategies for organizing your workspace. Show the rulers When the rulers are displayed, you can drag out guides on to your document. Guides are an excellent design aid when working in Fireworks, so it is a good idea to show the rulers as you are working. It’s important to note that rulers may be shown only when a document is open in Fireworks.
• To show the rulers, select View > Rulers.

Page 5 Introduction to Adobe® Fireworks® CS4
GOING FROM IDEA TO WIREFRAME Every design starts out as an idea. Sometimes that idea is sketched out on paper; other times you’ve only envisioned it in your mind. In either case, it is a good idea first to solidify your thoughts in a wireframe format before you begin the design phase. A wireframe gives you the flexibility to make changes without worrying about design details. It also provides an opportunity to get approval from your client on the design direction early in the process. In this section we’ll take a rough sketch of an idea and turn it into a simple but flexible wireframe. At the same time, we’ll use several new features available in Fireworks CS4 that increase productivity and reduce your production time. If you haven’t already, be sure to download the sample files from the folder titled “Tutorial Working Files.” Create a new document
1) Launch Fireworks CS4.
2) Select File > New.
3) In the New Document dialog box, set the width of the canvas to 1024 pixels and the height to 640 pixels.
4) Set the canvas color to white.
5) Click OK.
Import the sketch
1) Select File > Import.
2) Navigate to the sample files folder and select the file named sketch.jpg.
3) Click the right-angle shaped cursor on the canvas in the upper left corner (0,0) to place the imported sketch at that location. The sketch should be centered horizontally on the canvas. Alternately, you can simply drag and drop the file from your file system onto the Fireworks canvas (see Figure 3).

Page 6 Introduction to Adobe® Fireworks® CS4
Figure 3. The imported sketch is centered horizontally on the canvas
Use guides, smart guides, and tooltips To quickly create an accurate layout use guides and tooltips:
1) Make sure that the rulers are visible by selecting View > Show Rulers.
2) Enable guide snapping by selecting View > Guides > Snap to Guides.
3) Enable smart guides by choosing View > Smart Guides. Select the options to Show Smart Guides and Snap to Smart Guides.
4) Enable Tooltips by selecting View > Tooltips.
5) From the top ruler, drag a horizontal guide onto the canvas. Use the tooltip to position the guide at precisely 76 pixels.
6) Drag a second horizontal guide onto the canvas. Position it at 604 pixels. Tip: Press Shift as you drag out a guide (or anytime after guides are placed on the canvas) to see the distance between the current guide, all other guides, and the edge of the canvas.
7) Select the imported sketch and position it so that the top and bottom of the main content area roughly matches the two guides you just placed on the canvas.
8) In the Layers panel, click the second column next to the sketch object to lock the layer (see Figure 4). We’ll use this sketch layer as a background reference as we lay out the wireframe elements.
Page 7 Introduction to Adobe® Fireworks® CS4
Figure 4. Lock the layer by clicking in the second column from the left to make the lock icon appear
Create the wireframe layout Creating the wireframe involves drawing some basic rectangles and text. The full design will be added later, after the overall layout is more developed.
1) At the bottom of the Layers panel, click the New/Duplicate Layer button to create a new layer.
2) From the Tools panel, select the Rectangle tool in the Vector group.
3) In the Properties panel, use the Fill drop-down menu to select None from the list. Click the Stroke color swatch and choose a dark gray color from the color picker that pops up.
4) Drag out a rectangle to fill the area between the two guides that covers almost the entire canvas. There should be approximately 6 pixels remaining uncovered by the rectangle on both the left and right edges of the canvas. Make sure the rectangle is perfectly centered horizontally. To do this, open the Align panel (Window > Align). Select the “To Canvas” icon and choose the option “Align horizontal center” (see Figure 5).
Figure 5. In the Align panel, select the “To canvas” button and choose the icon to center the rectangle horizontally
5) Draw a small rectangle in the top right corner to represent a button. Using the tooltips,
start drawing the rectangle at approximately x = 850 and y = 35. Drag to the right and down. Using the smart guides, align the right side of the small rectangle with the right side of the content box (larger rectangle). Press the Up arrow key while dragging the rectangle to add slightly rounded corners (see Figure 6).
Figure 6. Press the Up arrow on your keyboard while dragging the mouse to draw a rectangle with rounded corners
Page 8 Introduction to Adobe® Fireworks® CS4
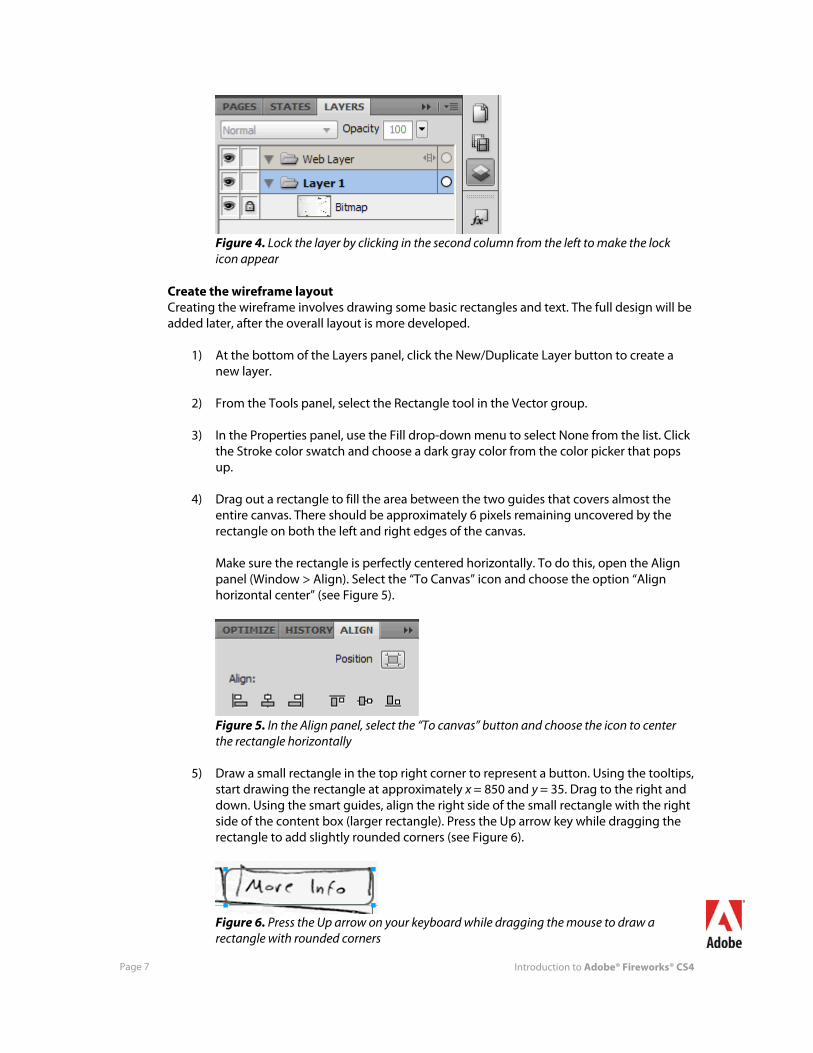
6) With the newly created button rectangle selected, Alt-drag (Windows) or Option-drag
(Mac) to the left to create a copy of the rectangle, leaving a little bit of space between the two buttons.
7) Repeat this step (Edit > Repeat Duplicate). This action creates a second copy with the same gap space between copies (see Figure 7).
Figure 7. Create three copies of the rounded buttons
8) Repeat steps 4–8 to build a smaller set of four buttons in the bottom left area of the document.
9) Now it’s time to add the text labels. From the Tools panel, select the Text tool in the Vector group.
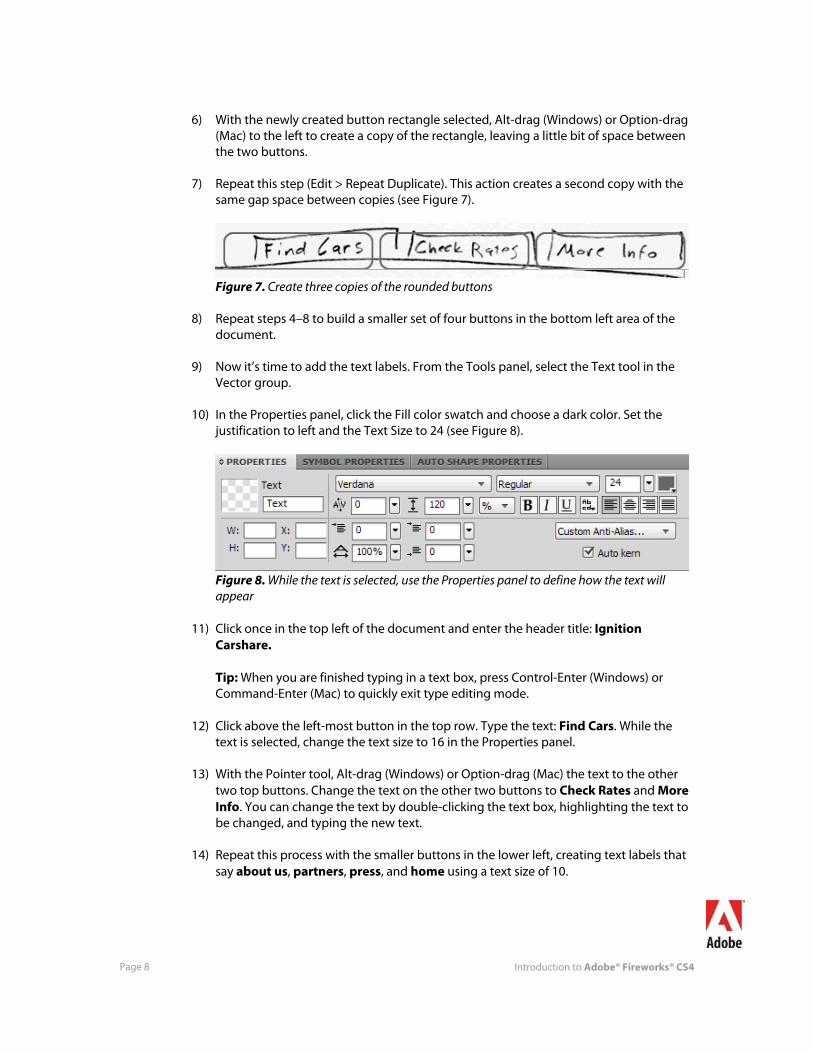
10) In the Properties panel, click the Fill color swatch and choose a dark color. Set the justification to left and the Text Size to 24 (see Figure 8).
Figure 8. While the text is selected, use the Properties panel to define how the text will appear
11) Click once in the top left of the document and enter the header title: Ignition Carshare. Tip: When you are finished typing in a text box, press Control-Enter (Windows) or Command-Enter (Mac) to quickly exit type editing mode.
12) Click above the left-most button in the top row. Type the text: Find Cars. While the text is selected, change the text size to 16 in the Properties panel.
13) With the Pointer tool, Alt-drag (Windows) or Option-drag (Mac) the text to the other two top buttons. Change the text on the other two buttons to Check Rates and More Info. You can change the text by double-clicking the text box, highlighting the text to be changed, and typing the new text.
14) Repeat this process with the smaller buttons in the lower left, creating text labels that say about us, partners, press, and home using a text size of 10.

Page 9 Introduction to Adobe® Fireworks® CS4
15) To hide the image of the sketch from the canvas, select the Layer panel (which may be grouped with the Pages tab) and scroll down to Layer 1. Click on the eye icon next to Layer 1 to turn the visibility off (see Figure 9). The layer containing the sketch image is no longer displayed.
Figure 9. Toggle the visibility of Layer 1 off by clicking the eye icon to hide the sketch
16) With the sketch layer turned off, your image should look like Figure 10.
Figure 10. The wireframe design of the Ignition Carshare page

Page 10 Introduction to Adobe® Fireworks® CS4
Create the other pages of the wireframe Now that you have created the very basic wireframe of the site layout, the next step is to create a few pages showing various content. Fireworks CS4 allows you to create as many pages as needed, with shared and unique items on each page.
1) Open the Pages panel (Window > Pages) if it isn’t already displayed on the right side of the workspace.
2) With the current page selected, click the panel Options menu. Choose the option to “Set As Master page” from the list that appears (see Figure 11).
Figure 11. Set Page 1 as the master page using the panel Options menu
3) At the bottom of the Pages panel, click Add Page three times to add three blank pages. Each page displays the master page in the background.
4) Double-click the page names to rename them to match the three button labels at the top: Find Cars, Check Rates, and More Info (see Figure 12).

Page 11 Introduction to Adobe® Fireworks® CS4
Figure 12. In the Pages panel, create three new pages and name them to correspond with each page of the site
5) Navigate to the Master Page by selecting it in the Pages panel.
6) On the Master Page, select and copy the rectangle behind the Find Cars text at the top of the document.
7) Click the Find Cars page in the Pages panel (not the Master Page) to select it.
8) Paste a copy of the rectangle on Find Cars page.
9) In the Properties panel, change the fill color to a light gray to orient the site visitor that this is the active page.
10) Returning to the Master Page, select and copy the text label: Find Cars.
11) Click the Find Cars page in the Pages panel, and paste the Find Cars text over the newly created light gray rectangle.
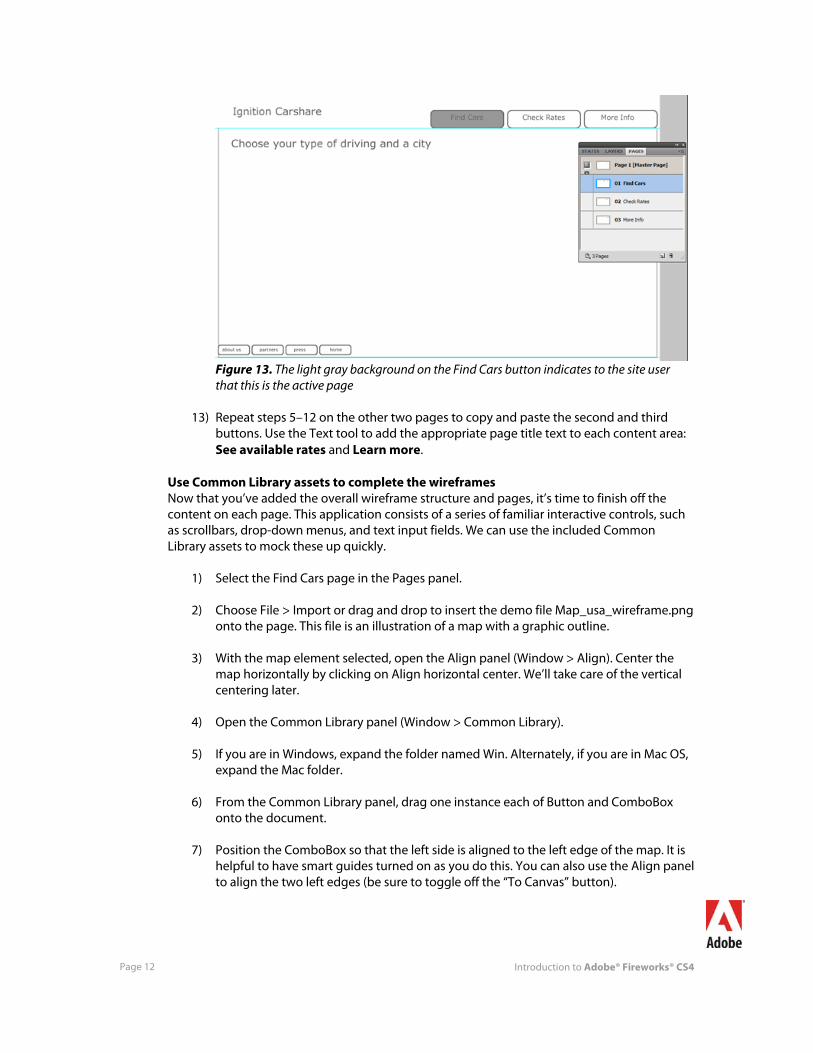
12) Use the Text tool to add a page title at the top of the content area: Choose your type of driving and a city (see Figure 13).
Page 12 Introduction to Adobe® Fireworks® CS4
Figure 13. The light gray background on the Find Cars button indicates to the site user that this is the active page
13) Repeat steps 5–12 on the other two pages to copy and paste the second and third buttons. Use the Text tool to add the appropriate page title text to each content area: See available rates and Learn more.
Use Common Library assets to complete the wireframes Now that you’ve added the overall wireframe structure and pages, it’s time to finish off the content on each page. This application consists of a series of familiar interactive controls, such as scrollbars, drop-down menus, and text input fields. We can use the included Common Library assets to mock these up quickly.
1) Select the Find Cars page in the Pages panel.
2) Choose File > Import or drag and drop to insert the demo file Map_usa_wireframe.png onto the page. This file is an illustration of a map with a graphic outline.
3) With the map element selected, open the Align panel (Window > Align). Center the map horizontally by clicking on Align horizontal center. We’ll take care of the vertical centering later.
4) Open the Common Library panel (Window > Common Library).
5) If you are in Windows, expand the folder named Win. Alternately, if you are in Mac OS, expand the Mac folder.
6) From the Common Library panel, drag one instance each of Button and ComboBox onto the document.
7) Position the ComboBox so that the left side is aligned to the left edge of the map. It is helpful to have smart guides turned on as you do this. You can also use the Align panel to align the two left edges (be sure to toggle off the “To Canvas” button).

Page 13 Introduction to Adobe® Fireworks® CS4
8) From the Tools panel, select the Scale tool in the Select group. Drag the middle right sizing handle of the ComboBox so that it is about 400 pixels wide.
9) Alt-drag (Windows) or Option-drag (Mac) the ComboBox to the right to create a duplicate copy.
10) Select the Scale tool again, and drag the middle right sizing handle to rescale the second ComboBox to approximately 160 pixels wide.
11) Move the Button to the remaining horizontal space to the right of the two ComboBoxes. Use the Scale tool to resize the Button as Needed.
12) Select the Text tool. Set the text size to 16. Type the words Type of Driving above the first ComboBox.
13) With the Pointer tool, Alt-drag (Windows) or Option-drag (Mac) the text box to the right. Position the copied text above the second ComboBox box. Use the Text tool to change the text to City.
14) Open the Symbol Properties panel (Window > Symbol Properties).
15) Select the first ComboBox. In the Symbol Properties panel, set the Label to Personal.
16) Select the second ComboBox. In the Symbol Properties panel, set the Label to Boston.
17) Select the Button. In the Symbol Properties panel, set the Label to Go (see Figure 14).
Figure 14. The Find Cars page with the added ComboBoxes and Button from the Common Library
You can repeat this process to add the other Common Library UI assets. In the sample files folder, open the file named Ignition_Carshare_Source.png to view the other wireframe pages.

Page 14 Introduction to Adobe® Fireworks® CS4
Export an interactive PDF Now that you have created the basic wireframe of the application flow and structure, it is useful to export the entire document as a multiple page document complete with interaction to send to the client for review.
1) Navigate to the Master Page by selecting it in the Pages panel.
2) From the Tools panel, select the Hotspot tool in the Web group.
3) Draw a hotspot over the top of the first button. Draw two more hotspots over the second button and third buttons. Tip: Alternately, you can select the three rectangles that comprise the buttons, right-click, and choose “Insert Hotspot” and then choose “Multiple.” This will add a hotspot around each of the selected objects.
4) Select the first hotspot with the Pointer tool. In Properties panel, set the link to Find Cars.html. Select the second hotspot and set the link to Check Rates.html. Select the third hotspot and set the link to More Info.html. Since the hotspots are located on the Master Page, every page will be linked to each other when the interactive PDF is exported.
5) Select File > Export. Choose Adobe PDF (.pdf) from the Export drop-down menu.
6) Click on Options. Since this is just a simple wireframe, set the quality to Medium, and select the option to Convert to grayscale. Click OK to exit the Adobe PDF Export Options dialog box.
7) Make sure the check box next to “View PDF after Export” is checked. Click Export.
Now you can view the PDF, click through the pages, and make comments as needed using all the tools available in Adobe Acrobat®. An interactive PDF is ideal for facilitating the client review process because the client can click through the flow of the site. This allows them to experience the presentation of pages as site visitors will experience them in the final product.

Page 15 Introduction to Adobe® Fireworks® CS4
CREATING AN INITIAL DESIGN Now that you’ve created the wireframe and defined the application flow and layout, it’s time to add an attractive skin onto the design. This is usually the most involved part of creating a layout, but Fireworks CS4 has many useful features to speed up the creative process while maintaining the ability to edit the document to make future changes. If you created the wireframe in the previous section of this tutorial, you’ve already experienced how guides, smart guides, and tooltips help you precisely line up the elements on the page. You can continue to benefit from using guides, smart guides, and tooltips as you follow along with this section, but these features will not be called out directly. Create a new document At this stage, we recommended that you save a copy of your complete wireframe as a backup. This way you can work with the original wireframe file directly to turn it into a complete design, using some of the already created elements and structure. Create the background design The first task is to create a background design on the Master Page you made in the wireframe:
1) Navigate to the Master Page using the Pages panel.
2) In the Layers panel, create a new layer and double-click the layer name to rename it: Design.
3) Drag the old layer, which contains the wireframe, above the new layer. Lock this layer by clicking the lock column to the left of the wireframe thumbnail. You have now separated the wireframe from the new layer where you will draw the design. The wireframe is helpful because it can serve as a reference, but it will not get in the way since it is on a separate, locked layer. Tip: You can click the eyeball icon in the Layers panel to hide the wireframe layer whenever desired.
4) With the Design layer selected, draw a background rectangle that covers the canvas completely. If you have smart guides turned on, the rectangle dimensions will snap to the canvas edges exactly.
5) With the rectangle selected, choose Edit > Copy, and then Edit > Paste. This will create a clone of the rectangle in the same place. Tip: When you copy and paste an element in Fireworks CS4, the pasted item is placed in the same location where it was copied, if that location is still fully visible on the screen. If that location is not fully visible (due to zooming or panning), it will place the pasted item in the center of the screen. Using Edit > Clone will create a clone of the selected element(s) that will always be placed in the exact same spot as the original, regardless of canvas display or position.
6) With the new clone rectangle selected, select the Scale tool. Drag the top middle handle to resize the top edge down to approximately 590 pixels.

Page 16 Introduction to Adobe® Fireworks® CS4
7) In the Properties panel, reduce the opacity of the clone rectangle to 80 percent. This is the beginning of the header area and content area.
8) To add a photographic background image, select File > Import. From the sample files folder choose grass_bg.jpg.
9) Position the grass image over the top of the content area rectangle. There will be some overlap.
10) From the Layers panel, select the content area rectangle and choose Edit > Copy.
11) Select the background grass image and choose Modify > Mask > Paste as Mask. This action uses the rectangle copied to your clipboard as a “mask” for the grass so that the image will be cropped to match the size of the content rectangle. Tip: If you move the image, both the image and the mask will move together. However, if you click the link icon in the Layers panel you can move either the image or the mask separately, allowing you to reposition one without moving the other.
12) In the Layers panel, drag the grass image so that it is located below the content area rectangle. This placement gives the grass a very muted background appearance because it is only showing through the 80 percent opaque rectangle above it. Tip: With an object selected, you can press Control-Up Arrow (Windows) or Command-Up Arrow (Mac) to move the object up in the Layers panel. Control-Down Arrow (Windows) or Command-Down Arrow (Mac) will move the object down. You can also use Control-Shift-Up Arrow and Control-Shift-Down Arrow (Windows) or Command-Shift-Up Arrow and Command-Shift-Down Arrow (Mac) to move an object to the very top or bottom of the layer stack.
13) With the background image selected, change the blend mode in the Properties panel from Normal to Multiply. The Multiply blend mode makes dark areas in an object blend into the objects below it and darken them, while making the light areas in the image disappear. The grass image is now subtly displayed along the bottom.
Add details In any design, the more attention you give to the details, the more polished the results will appear. At this point you have a good start, but there’s a lot more that can be done to refine the pages.
1) From the Tools panel, select the Line tool from the Vector group.
2) Drag a long horizontal line between the header area and the content area. Click on the left side of the document, and press Shift as you drag to the right to lock the line into a 90-degree angle (horizontally).
3) Set the line color in the Properties panel to solid black (#000000).
4) Set the opacity in the Properties panel to 15 to make it a very transparent object. The resulting design displays a thin light divider on the header area. It is to your advantage to use a solid color (like black) and lower the opacity because later if the underlying color changes, the shadow will remain without having to reset its color as well.

Page 17 Introduction to Adobe® Fireworks® CS4
5) Select the Rectangle tool and drag out a rectangle with a width of 1024 pixels and height of 10 pixels directly above the line you just created.
6) Set the rectangle Stroke color to none and set the Fill to Gradient > Linear.
7) Click the Fill swatch and edit the gradient. Set the start color to solid black, and the end color as solid black. Change the start opacity to 0 and the end opacity to 100.
8) In the Properties panel, set the rectangle’s opacity to 10. Now there is a soft shadow in the header area, creating a subtle sense of depth.
Add text
1) Select the Text tool.
2) Click in the upper left header area and enter the application title: IGNITION CARSHARE.
3) After you have finished typing, click the canvas or press Control-Enter (Windows) or Command-Enter (Mac) to commit the text.
4) With the text object still selected, change the fill color to white in the Properties panel.
5) Also in the Properties panel, set the font to a desired font and set the text size to 14. Tip: Fireworks measures all font sizes in pixels, not points.
6) Double-click the text to edit it. Double-click the word “CARSHARE” to select the whole word.
7) In the Properties panel, change the fill color to a very light blue, #B9E1F2. In this step you have changed a single text box to contain two words of different colors. We can change any of the text styles based on individual words or characters using the same method.
8) With the Text tool selected, click in the top right area of the document.
9) Add three new text boxes: Join Now!, Help, and Sign in. Click on the canvas to commit the text. Tip: You can also use the method described earlier in this tutorial: Create one text box, Alt-Shift-drag (Windows) or Option-Shift-drag (Mac) to create a duplicate copy. Then choose Edit > Repeat Duplicate. This action creates a second copy with the same gap space between copies.
10) Set the text color of the Join Now! text to white. Set the color of the Help and Sign In text to gray, #595959.
11) Repeat the same process to add text to the lower left side of the design. Set this text to a solid black fill color, with 45 percent opacity in the Properties panel.

Page 18 Introduction to Adobe® Fireworks® CS4
12) Use the Line tool to add a small, 1 pixel vertical line between two of the text boxes. Set the line to solid black and set the opacity to 15 in the Properties panel.
13) Use Alt-Shift-drag (Windows) or Option-Shift-drag (Mac) to duplicate the line between the other text boxes. Tip: If you are unsure about the spacing of your text boxes and dividers, select all of them and open the Align panel (Window > Align). Make sure Align to Canvas is turned off, and select the icon to Space evenly horizontally. Tip: If a 1 pixel line appears blurry, choose Pencil > 1px Hard from the Stroke drop-down menu in the Properties panel.
Add Live Filters Fireworks CS4 includes both traditional filters and “live” filters. Live Filters are effects and styles—such as shadows, glows, and blurs—which can be added to objects and edited or removed at any time later. They are called “live” because unlike traditional filters which permanently alter your objects, the filters can be modified later. Live Filters can be applied to any visible object in Fireworks, including bitmaps, vectors, and text.
1) Select the Join Now text box.
2) In the Properties panel, click the Add Filter button (+).
3) Choose Shadow and Glow > Drop Shadow. Set the following properties: • Distance: 1 • Softness: 1 • Opacity: 50% • Angle: 270
4) Select both the Help and the Sign In text boxes.
5) Repeat Step 3, but this time set the color to white instead of black.
Design the main navigation At this point the background design is complete. You may remember that the main button tabs are on the Master Layer in the wireframe. In this series of steps, we’ll put them on the pages in the design.
1) Navigate to the page named Find Cars in the Pages panel.
2) In the Layers panel, click New Layer.
3) Double-click the layer name and rename it: Navigation.
4) In the Tools panel, press the Rectangle tool to reveal the full list of shape tools. Select the Rounded Rectangle Tool.
5) Draw a rounded rectangle that is approximately 110 pixels wide by 35 pixels high.

Page 19 Introduction to Adobe® Fireworks® CS4
6) Open the Auto Shape Properties panel (Window > Auto Shape Properties). Unlock the corners so that you can change each corner individually. Set the bottom left and bottom right corner roundness to 0, and the top left and top right roundness to 5 to create a tab shape.
7) With the Pointer tool, move the tab to the top of the content area border.
8) With the tab shape selected, copy and paste it to create a clone in the same spot as the original.
9) With the clone selected, click the Stroke color swatch and select white, #FFFFFF. Remove the fill of the clone completely by setting the Fill drop-down menu to None. Tip: You can use the Swap Fill/Stroke Color control to quickly and simultaneously remove the fill and set the stroke color.
10) Choose Modify > Ungroup to ungroup the tab shape. With the shape ungrouped, you can make precise edits to the points and curves of the shape, although the auto shape control handles are removed.
11) From the Tools panel, choose the Knife tool in the Vector group. Click below the tab and drag up, crossing over the bottom side of the tab to cut open the path.
12) From the Tools panel, choose the Subselection tool in the Select group to select the two points you just created. Press the Delete key to remove them. Now the entire bottom of the tab is gone, leaving a stroke that covers the left, top, and right side of the tab. In order to get this effect, we separated the stroke as a different path rather than just adding the stroke to the original tab shape.
13) To add a shadow around the tab, select the original tab shape. In the Properties panel, click the Add Filter button (+). Select Shadow and Glow > Drop Shadow. Set the properties to the following values: • Distance: 3 • Softness: 3 • Opacity: 25% • Angle: 90
By setting the angle to 90 degrees, the drop shadow will not spill over onto the content area below it. This gives the appearance that the tab is connected to the content area frame below it.
14) To add text to the tab graphics, select the Text tool and click to add the text FIND CARS located directly above the tab. In the Properties panel, select center justification and click bold. Set the Fill color to black, #000000 and set the opacity to 65 using the opacity slider. At this point, the tab graphic is done. This tab represents the active page. Now we just need to modify it slightly to create the other tabs, which represent the inactive pages.
Page 20 Introduction to Adobe® Fireworks® CS4
15) Use the Pointer tool to drag a rectangle that encircles all of the tab graphics, including the original tab shape, the stroke tab shape, and the text. Copy and paste the objects to create a clone located in the same place.
16) Move the cloned graphics to the right. Tip: In addition to holding down the Shift key while dragging with the Pointer tool to lock objects to 45 degree angles of movement, you can simply use your keyboard arrow keys to “nudge” objects across short distances. If you press Shift as you press the arrow keys, the object will nudge 10 pixels at a time.
17) Select both the tab shape and the stroke shape. In the Properties panel, set the opacity to 25. Now you have the active, and inactive graphics for the tabs. Change the text of the new tab to CHECK RATES. Then duplicate a third tab, and change its text to MORE INFO.
At this stage, the design of the interface is complete. The only remaining task is to populate the design with content. Add interface components Fireworks CS4 includes many components in the Common Library. Additionally, you can make your own components complete with editable properties.
1) From the sample files folder, open the file named Carshare_widgets.fw.png.
2) Select the symbols that you wish to add. Choose Edit > Copy.
3) Return to your tutorial work file. Choose Edit > Paste.
4) Open the Symbol Properties panel (Window > Symbol Properties). Use the fields to modify the editable properties of the symbol.
5) To learn how the graphics of a symbol are created, simply double-click the symbol to open it up. After you have examined the contents of the symbol, click the blue arrow located in the upper left corner to return to the canvas. Tip: Some edits you make to a symbol will propagate to all instances of the symbol. Other changes will be overridden by the Symbol Properties and will use the values that have been entered there.
Add content to Find Cars page
1) Navigate to the page Find Cars in the Pages panel.
2) Select File > Import.
3) From the sample files folder, choose the file named Carshare_map.fw.png.
4) Copy the assets from the Carshare_widgets.fw.png, as described above, and position the items as shown in Figure 15.

Page 21 Introduction to Adobe® Fireworks® CS4
Figure 15. The map view displays the locations where cars are available You have completed the process of designing a web page in Fireworks CS4. If you would like additional practice using the Ignition Carshare assets, navigate to the page Find Cars – locations in the Pages panel and use it as a guide. Start by creating a new page in your tutorial work document titled Find Cars – locations. Then copy the layers onto the new page to use them as the background (see Figure 16).
Figure 16. Use the layers in the page “Find Cars – locations” to recreate the page in your working copy of the tutorial document

Adobe Systems Incorporated
345 Park Avenue, San Jose, CA 95110-2704 USA www.adobe.com Adobe, the Adobe logo, Acrobat, Fireworks, and Photoshop are either registered trademarks or trademarks of Adobe Systems Incorporated in the United States and/or other countries. All other trademarks are the property of their respective owners. © 2008 Adobe Systems Incorporated. All rights reserved. 10/08
WHERE TO GO FROM HERE To find more articles and tutorials to help you get up to speed using Fireworks, please visit the Getting started section of the Fireworks Developer Center. If you’d like to learn more about training options, check out the Fireworks training page. For additional information on using Fireworks, please see the Fireworks Developer Center.