Interior Installation Instructions - Barron Designs
6
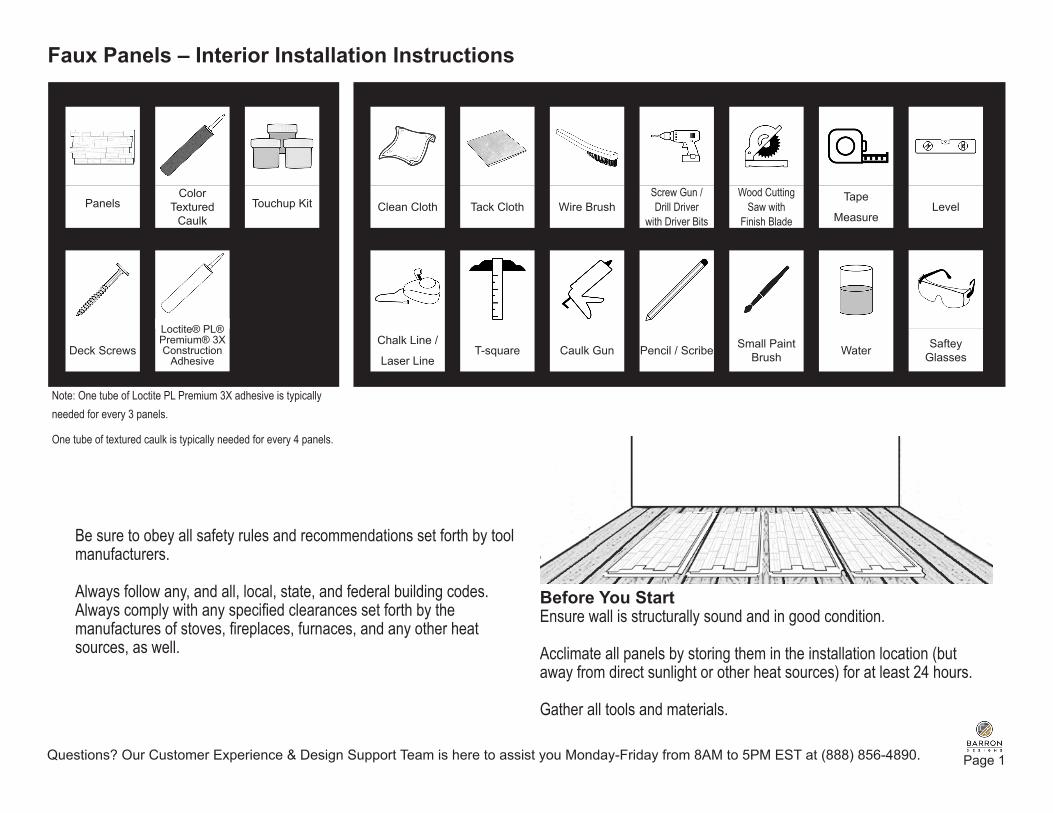
Page 1 Faux Panels – Interior Installation Instructions Tools:t Tools: Tools: Tack Cloth Wire Brush T-square Clean Cloth Chalk Line / Laser Line Caulk Gun Small Paint Brush Water Pencil / Scribe Level Saftey Glasses Wood Cutting Saw with Finish Blade Screw Gun / Drill Driver with Driver Bits Tape Measure Touchup Kit Color Textured Caulk Deck Screws Panels Loctite® PL® Premium® 3X Construction Adhesive Materials: Be sure to obey all safety rules and recommendations set forth by tool manufacturers. Always follow any, and all, local, state, and federal building codes. Always comply with any specified clearances set forth by the manufactures of stoves, fireplaces, furnaces, and any other heat sources, as well. Before You Start Ensure wall is structurally sound and in good condition. Acclimate all panels by storing them in the installation location (but away from direct sunlight or other heat sources) for at least 24 hours. Gather all tools and materials. Note: One tube of Loctite PL Premium 3X adhesive is typically needed for every 3 panels. One tube of textured caulk is typically needed for every 4 panels. Questions? Our Customer Experience & Design Support Team is here to assist you Monday-Friday from 8AM to 5PM EST at (888) 856-4890.
Transcript of Interior Installation Instructions - Barron Designs
Page 1
Faux Panels – Interior Installation InstructionsTools:tTools:Tools:
Tack Cloth Wire Brush
T-square
Clean Cloth
Chalk Line /
Laser Line Caulk Gun Small Paint Brush WaterPencil / Scribe
Level
Saftey Glasses
Wood Cutting Saw with
Finish Blade
Screw Gun / Drill Driver
with Driver Bits
Tape
Measure Touchup Kit Color
Textured Caulk
Deck Screws
Panels
Loctite® PL® Premium® 3X Construction
Adhesive
Materials:
Be sure to obey all safety rules and recommendations set forth by tool manufacturers.
Always follow any, and all, local, state, and federal building codes. Always comply with any specified clearances set forth by the manufactures of stoves, fireplaces, furnaces, and any other heat sources, as well.
Before You Start Ensure wall is structurally sound and in good condition.
Acclimate all panels by storing them in the installation location (but away from direct sunlight or other heat sources) for at least 24 hours.
Gather all tools and materials.
Note: One tube of Loctite PL Premium 3X adhesive is typically needed for every 3 panels. One tube of textured caulk is typically needed for every 4 panels.
Questions? Our Customer Experience & Design Support Team is here to assist you Monday-Friday from 8AM to 5PM EST at (888) 856-4890.

Page 2
Work Flow Work Flow
Finger Side
Left to Right Installation
Right to Left Installation
Slot SideSlot Side Finger Side
Sample installation patterns Every installation is unique, so you will have to make adjustments based on your project.
Installation will run left to right or right to left depending on the panel style. Orient one of your panels so that the flat lip on the long side (A) is up. If the fingers project to the left, the installation will run left to right. If the fingers are on the right side of the panel, the installation will go right to left.
HINT: Seams are offset for a more realistic look.To reduce waste, try to use reserved portions from previously cut panels to start and finish. Panels may require shimming and trimming for proper alignment.
Page 3
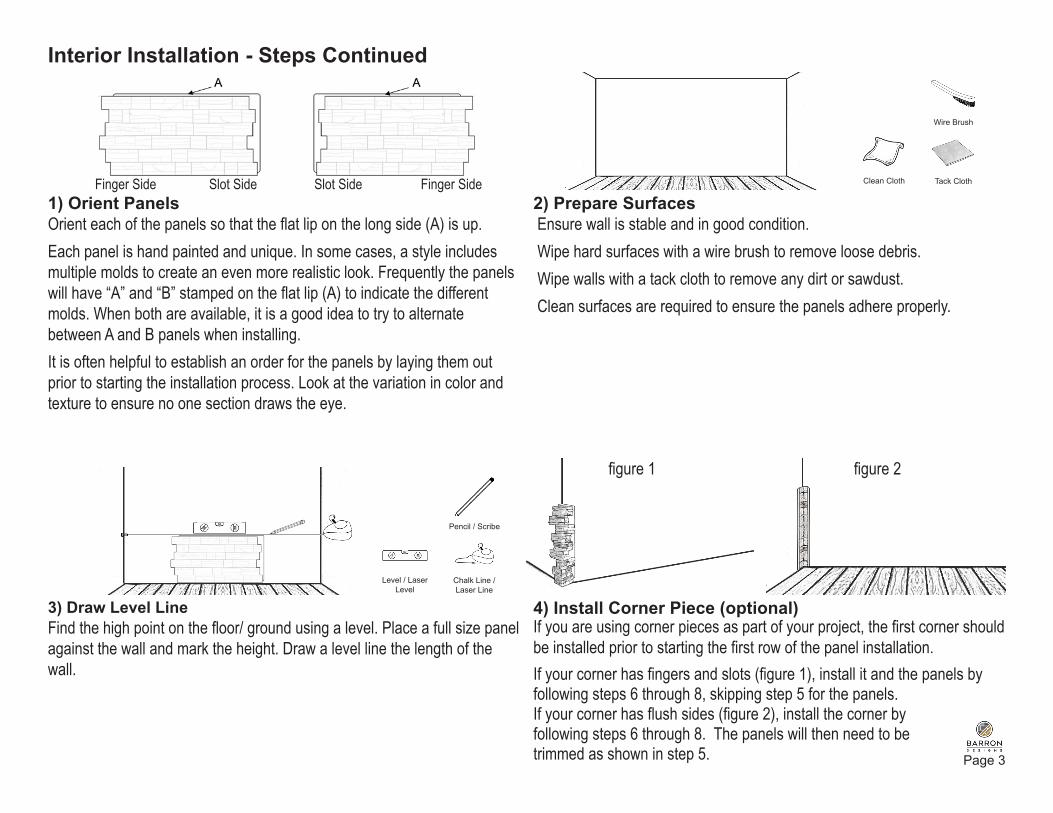
2) Prepare SurfacesEnsure wall is stable and in good condition. Wipe hard surfaces with a wire brush to remove loose debris. Wipe walls with a tack cloth to remove any dirt or sawdust. Clean surfaces are required to ensure the panels adhere properly.
4) Install Corner Piece (optional) If you are using corner pieces as part of your project, the first corner should be installed prior to starting the first row of the panel installation. If your corner has fingers and slots (figure 1), install it and the panels by following steps 6 through 8, skipping step 5 for the panels.If your corner has flush sides (figure 2), install the corner by following steps 6 through 8. The panels will then need to be trimmed as shown in step 5.
Finger Side Slot Side Finger SideSlot Side1) Orient Panels Orient each of the panels so that the flat lip on the long side (A) is up.Each panel is hand painted and unique. In some cases, a style includes multiple molds to create an even more realistic look. Frequently the panels will have “A” and “B” stamped on the flat lip (A) to indicate the different molds. When both are available, it is a good idea to try to alternate between A and B panels when installing.It is often helpful to establish an order for the panels by laying them out prior to starting the installation process. Look at the variation in color and texture to ensure no one section draws the eye.
3) Draw Level Line Find the high point on the floor/ ground using a level. Place a full size panel against the wall and mark the height. Draw a level line the length of the wall.
Pencil / Scribe
Chalk Line / Laser Line
Level / Laser Level
Tack Cloth
Wire Brush
Clean Cloth
Interior Installation - Steps Continued
figure 1 figure 2

Page 4
Interior Installation - Steps Continued
NOTE For the first row, styles that interlock on all 4 sides will also need to be trimmed in order to sit flush against the floor/ground.
HINT: This style of panel will not be able to have a staggered seam for install
HINT: Since the heights need to be identical this is a good time to trim the bottom from each of the panels needed for the first row
Wood CuttingSaw
Tape Measure
Wood Cutting Sawwith Finish Blade
T-square
7) Adhere Panel to WallUse a slight twisting motion to ensure good contact.Ensure panel is level, lines up with the level line drawn in step 3 and plumb with the edge of the wall.
6) Apply Adhesive Wipe the back of the panel with a tack cloth to remove any loose particles. Turn the panel over on a smooth, soft surface and apply an even bead of adhesive to the panel as shown with beads running vertically starting 1 inch from the edge and in 3 inch increments along the interior of the panel and a dab on the back of each finger.
LevelCaulk Gun
Tack Cloth
Loctite PL 3x
3 in max1 in max
5) Trim First Panel Plan this cut based on the overall width of the installation and the total number of panels required to span the wall. We recommend cutting off at least ¼ of the panel. The slot side will be used first. Reserve the finger side for use later in the project. Turn the panel over on a soft surface and mark where you intend to cut the panel. Trim the panel, using a wood cutting saw with a finish blade.
Not recommended to trim only the fingers
Tape Measure
T-square Wood Cutting Sawwith Finish Blade
Pencil / Scribe Pencil / Scribe
Page 5
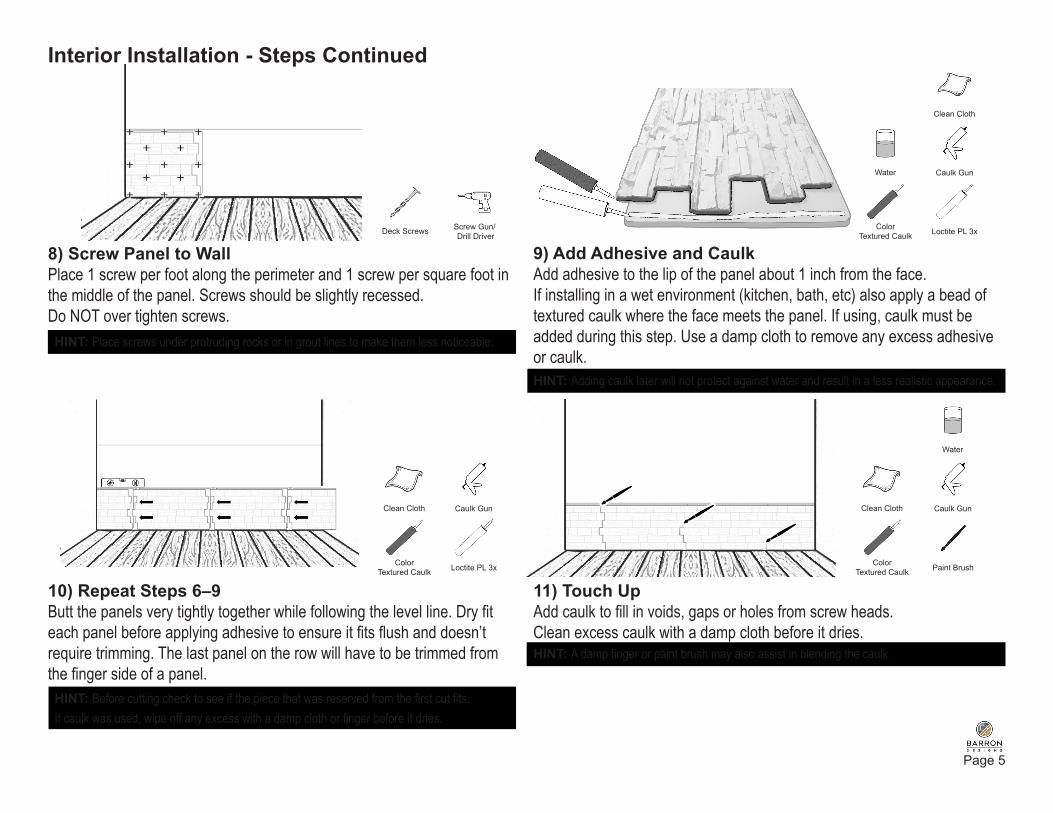
10) Repeat Steps 6–9Butt the panels very tightly together while following the level line. Dry fit each panel before applying adhesive to ensure it fits flush and doesn’t require trimming. The last panel on the row will have to be trimmed from the finger side of a panel.HINT: Before cutting check to see if the piece that was reserved from the first cut fits.If caulk was used, wipe off any excess with a damp cloth or finger before it dries.
Caulk Gun
ColorTextured Caulk
Clean Cloth
Loctite PL 3x
11) Touch Up Add caulk to fill in voids, gaps or holes from screw heads.Clean excess caulk with a damp cloth before it dries.HINT: A damp finger or paint brush may also assist in blending the caulk.
Caulk Gun
ColorTextured Caulk
Clean Cloth
Paint Brush
Water
9) Add Adhesive and Caulk Add adhesive to the lip of the panel about 1 inch from the face. If installing in a wet environment (kitchen, bath, etc) also apply a bead of textured caulk where the face meets the panel. If using, caulk must be added during this step. Use a damp cloth to remove any excess adhesive or caulk.HINT: Adding caulk later will not protect against water and result in a less realistic appearance.
Loctite PL 3x
Caulk Gun
Clean Cloth
ColorTextured Caulk
Water
8) Screw Panel to Wall Place 1 screw per foot along the perimeter and 1 screw per square foot in the middle of the panel. Screws should be slightly recessed. Do NOT over tighten screws.HINT: Place screws under protruding rocks or in grout lines to make them less noticeable.
Screw Gun/ Drill DriverDeck Screws
Interior Installation - Steps Continued

Page 6
13) Touch-up As Needed Repair any large gouges with wood putty. Once dry, lightly sand the repair so that it matches the surrounding area. Paint and Touch up as needed, paying close attention to screw holes and caulked seams. If your touch-up kit contains a base coat, use a cotton swab to apply a light layer of the base coat and allow it to dry completely (about 30 minutes). Using a paint brush, apply the appropriate paint then dab with a soft cloth to blend and allow to dry completely (about 30 minutes). If your touch-up kit contains a wash, apply the wash using a paint brush and dab with a soft cloth to blend.
Clean Cloth
Touch-up Kit
Paint Brush
Water
12) Start Next RowFor multiple rows, start the next row directly above the first panel, taking care to offset the seams. Panels are designed to butt up to create a shiplap joint. Before installing each panel on the next row apply adhesive to the top lip of the panel below. Take care when placing the panel to ensure a tight fit with the panel below. HINT: you will most likely need to trim the height of the panels used for the top row. Making all of those cuts prior to starting the installation of that row is advisable.
offset
Pencil/ Scribe
LevelChalk Line/ Laser Line
Interior Installation - Steps Continued
Caulk Gun
Loctite PL 3x
HINT: You may have to mix colors to achieve the desired shade. Paint can be thinned by adding water. Start with lighter colors.