Instructions for use of S5 Endo Motor - Sendoline® Introduction Qualifications of the user We have...
52
Instructions for use of S5 Endo Motor 0413
Transcript of Instructions for use of S5 Endo Motor - Sendoline® Introduction Qualifications of the user We have...
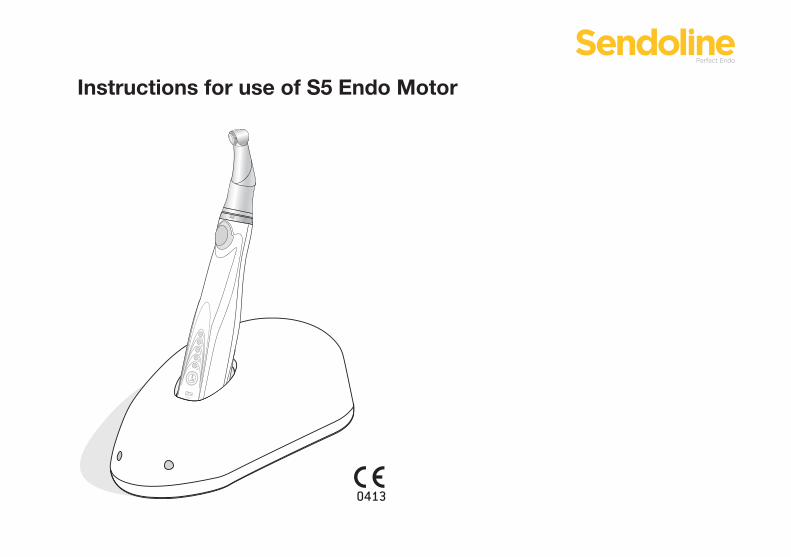
Instructions for use of S5 Endo Motor
0413
2
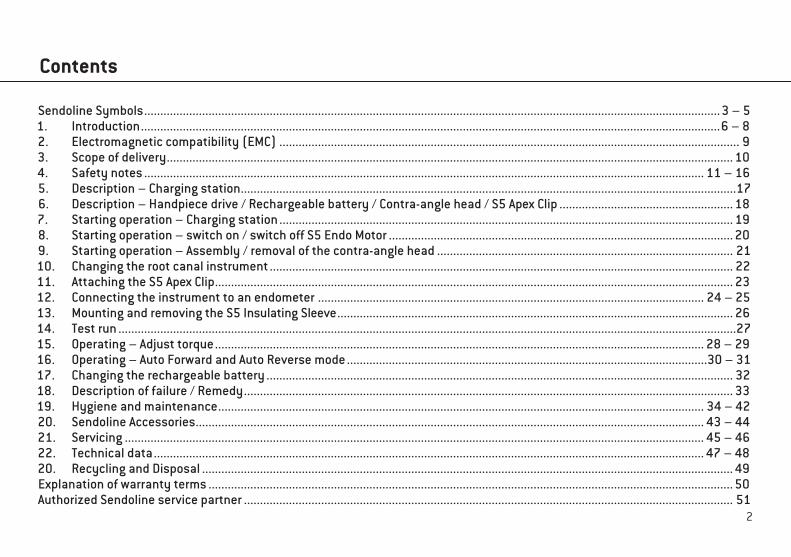
Contents
Sendoline Symbols ................................................................................................................................................................................... 3 – 51. Introduction ....................................................................................................................................................................................6 – 82. Electromagnetic compatibility (EMC) ............................................................................................................................................... 93. Scope of delivery ................................................................................................................................................................................ 104. Safety notes .............................................................................................................................................................................. 11 – 165. Description – Charging station ..........................................................................................................................................................176. Description – Handpiece drive / Rechargeable battery / Contra-angle head / S5 Apex Clip ...................................................... 187. Starting operation – Charging station ............................................................................................................................................. 198. Starting operation – switch on / switch off S5 Endo Motor ........................................................................................................... 209. Starting operation – Assembly / removal of the contra-angle head ............................................................................................ 2110. Changing the root canal instrument ................................................................................................................................................ 2211. Attaching the S5 Apex Clip ................................................................................................................................................................. 2312. Connecting the instrument to an endometer ........................................................................................................................ 24 – 2513. Mounting and removing the S5 Insulating Sleeve ........................................................................................................................... 2614. Test run ................................................................................................................................................................................................2715. Operating – Adjust torque ........................................................................................................................................................ 28 – 2916. Operating – Auto Forward and Auto Reverse mode ................................................................................................................30 – 3117. Changing the rechargeable battery ................................................................................................................................................. 3218. Description of failure / Remedy ........................................................................................................................................................ 3319. Hygiene and maintenance ....................................................................................................................................................... 34 – 4220. Sendoline Accessories .............................................................................................................................................................. 43 – 4421. Servicing .................................................................................................................................................................................... 45 – 4622. Technical data ........................................................................................................................................................................... 47 – 4820. Recycling and Disposal ..................................................................................................................................................................... 49Explanation of warranty terms ................................................................................................................................................................... 50Authorized Sendoline service partner ........................................................................................................................................................ 51

3
Sendoline Symbols
WARNING!(Risk of injury)
ATTENTION!(to prevent damage occurring)
General explanations,without risk to
persons or objects
Sterilizableup to the stated temperature
Thermo washerdisinfectable
Only for USACaution: Federal law restricts this device to sale by or on the order of a dentist, physician or any other practitioner licensed by the law of the state in which he or she practices to use or order the use of the device.
Symbols in the Instructions for use
Service
4
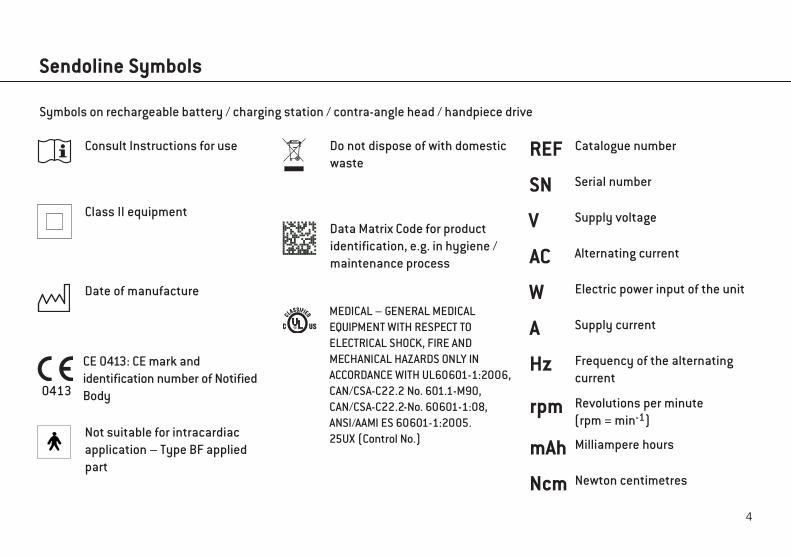
Sendoline Symbols
Symbols on rechargeable battery / charging station / contra-angle head / handpiece drive
Consult Instructions for use
Class II equipment
Date of manufacture
Catalogue numberREFSerial numberSN
Do not dispose of with domestic waste
Revolutions per minute(rpm = min-1)
rpm
Alternating currentAC
W Electric power input of the unit
Supply voltageV
Supply currentAFrequency of the alternating current
Hz
Data Matrix Code for productidentification, e.g. in hygiene /maintenance process
Not suitable for intracardiac application – Type BF applied part
MEDICAL – GENERAL MEDICALEQUIPMENT WITH RESPECT TO ELECTRICAL SHOCK, FIRE AND MECHANICAL HAZARDS ONLY IN ACCORDANCE WITH UL60601-1:2006,CAN/CSA-C22.2 No. 601.1-M90,CAN/CSA-C22.2-No. 60601-1:08,ANSI/AAMI ES 60601-1:2005.25UX (Control No.)
Newton centimetresNcm
Milliampere hoursmAh
CE 0413: CE mark and identification number of Notified Body0413
5
Sendoline Symbols
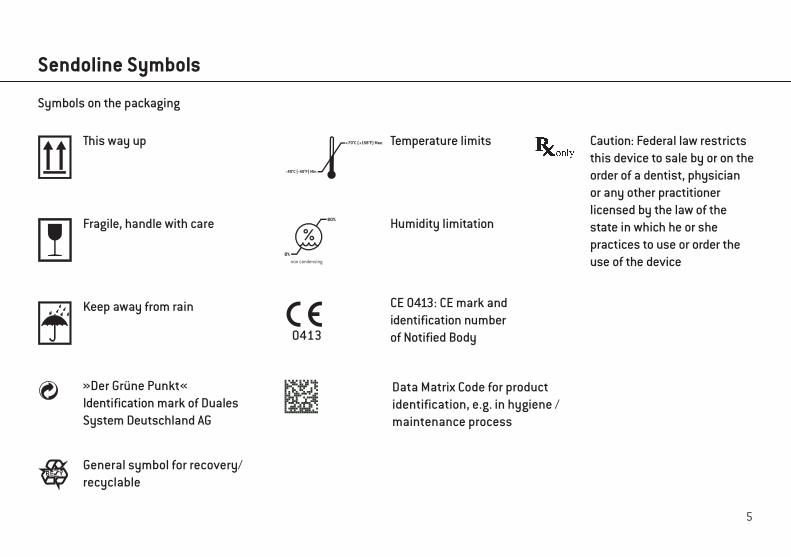
Symbols on the packaging
This way up Caution: Federal law restricts this device to sale by or on the order of a dentist, physician or any other practitioner licensed by the law of the state in which he or she practices to use or order the use of the device
Fragile, handle with care
Keep away from rain
»Der Grüne Punkt«Identification mark of Duales System Deutschland AG
RE YGeneral symbol for recovery/recyclable
CE 0413: CE mark and identification number of Notified Body
Data Matrix Code for productidentification, e.g. in hygiene /maintenance process
Temperature limits
Humidity limitation
0413

1. Introduction
For your safety and the safety of your patientsThese instructions explain to you how to handle your Sendoline product. However, we must also warn against possible hazardous situations. Your safety, the safety of your team, and of course, the safety of your patients is of paramount importance to us.
It is therefore essential to read the safety notes on pages 11 to 16.
Intended useThe Sendoline S5 Endo Motor is a modular electrical system comprising a handpiece drive, a rechargeable battery, a contra-angle head and a charging station for mechanical preparation of the root canal. The application area extends to endodontic procedures using a special root canal instrument which is intended by the manufacturer for use in the mechanical and rotary preparation of the root canal.
Misuse may damage the S5 Endo Motor and hence cause risks and hazards for patients, users and third parties.
6

7
Introduction
Qualifications of the userWe have based our development and design of the S5 Endo Motor on the »dentists« target group.
Skilled applicationThe S5 Endo Motor is intended only for informed use in the medical dental field, according to its purpose of use in compliance with the valid health and safety at work regulations, the valid accident prevention regulations as well as in compliance with these Instructions for Use. The S5 Endo Motor should be maintained according to the manufacturer‘s recommendations and in line with infection control procedures for the safety and well-being of patients. Improper use, (e.g. poor hygienic maintenance), non-compliance with our instructions or the use of accessories and spare parts which are not approved by Sendoline, invalidate all claims under warranty and any other claims.
7

8
Introduction
Production according to EU directiveEU Directive 93/42/EEC has been used as a basis in the design and manufacture of this medical product and it applies to the
> S5 Endo Motor (charging station, drive handpiece, contra-angle head and rechargeable battery Li-Ion 3.7 V)
in the condition as delivered by us. This declaration does not apply to non-specified fittings, mountings etc.
Responsibility of the manufacturerThe manufacturer can only accept responsibility for the safety, reliability and performance of the S5 Endo Motor it is used in compliance with the following directions:
> The S5 Endo Motor must be used in accordance with these Instructions for use.
> The S5 Endo Motor has no components that can be repaired by the user. Assembly, modifications or repairs must only be undertaken by an authorized Sendoline service partner (see page 51).
> The electrical installation at the premises must comply with the regulations of IEC 60364-7-710 (»Installation of electrical equipment in rooms used for medical purposes«) or with the regulations applicable in your country.
> Unauthorized opening of the equipment invalidates all claims under warranty and any other claims.
0413

9
2. Electromagnetic compatibility (EMC)
Notes on electromagnetic compatibility (EMC)Medical electrical equipment is subject to particular precautions with regards to EMC and must be installed and put intooperation in accordance with the EMC notes included.
Sendoline guarantees the compliance of the device with the EMC requirements only when used with original Sendoline accessories and spare parts. The use of other accessories / other spare parts can lead to an increased emission of electromagnetic interference or to a reduced resistance against electromagnetic interference.
You can obtain the current EMC manufacturer’s declaration directly from the manufacturer.
HF communication equipmentDo not use any portable and mobile HF communication equipment (e.g. mobile telephones) during operation. These may affect medical electrical equipment.

10
3. Scope of delivery
After unpacking the following parts must be present:
REF 1100000 ❍ drive handpiece REF 1100001❍ contra-angle head REF 1100002❍ charging station REF 1100003❍ rechargeable battery Li-Ion 3.7 V REF 1100004❍ mains cable REF 05464400 (Europe)❍ S5 Apex Clip REF 07735600
alternative specification❍ mains cable REF 05456100 (USA, CAN, J) / REF 05457700 (UK, IRL) / REF 05467600 (AUS, NZ)

11
4. Safety notes
It is essential to comply with the following instructions> Before using the handpiece drive and the charging station for the first time, store it at room temperature for 24 hours.> Check the handpiece drive, the contra-angle head, the charging station and the mains cable for damage and loose parts prior to every use. Correct any faults or refer to an authorized Sendoline service partner (see page 51). Do not operate the S5 Endo Motor if it is damaged.> Always ensure the correct operating conditions.> Only use REF 1100002 Sendoline contra-angle head.> Perform a test run prior to each treatment.> Do not activate the press-button of the contra-angle head during operation or slowing down. This leads to detachment of the root canal instrument and overheating of the press button.> Avoid contact between the instrument head and soft tissue (danger of burning due to the press-button heating up).> The drive handpiece should only be placed in the holder as it may heat up. Do not place it on the patient’s body!> Always use rubber dam during endodontic treatment.
Hygienic maintenance prior to initial useThe items are in a clean condition when delivered.> Disinfect the handpiece drive and charging station (see page 35).> Sterilize and lubricate the contra-angle head.

12
Safety notes
It is essential to comply with the following instructions when using the rechargeable battery.> The Li-lon 3.7 V rechargeable battery is not sterilizable.> Only use Sendoline rechargeable batteries REF 1100004. Other types of rechargeable battery may lead to a risk of fire or explosion.> Only use the Sendoline rechargeable battery REF 1100004 in connection with the Sendoline handpiece drive
REF 1100001 and the battery charging station REF 1100003.> The rechargable battery used in the unit may cause a risk of fire or acid burns if not used properly (e.g. charging in a
charging station other than the one provided).> The rechargeable battery must not be taken apart, heated to above 100 °C (212 °F) or burnt.> Do not short-circuit a rechargeable battery.> Do not subject rechargeable batteries to mechanical shock.> Defective or disused rechargeable batteries must be disposed of immediately.> In the event of a rechargeable battery leaking, do not allow the liquid to come in contact with the skin or eyes. If contact
has been made, wash the affected area with copious amounts of water ans seek medical advice.> Keep the rechargeable battery out of the reach of children.
Use only suitable and serviceable toolsAlways follow the instructions of the manufacturer of the root canal instruments (e.g. in terms of speed, torque, described application).
Improper useInproper use, in addition to incorrect assembly, installation, modification or repairs of the S5 Endo Motor or non-compliance with our instructions invalidates all claims under warranty and any other claims!

13
Safety notes
Risks due to electromagnetic fieldsThe functionality of implantable systems, such as cardiac pacemakers and ICD (implantable cardioverter defibrillator) can be affected by electric, magnetic and electromagnetic fields.
> Find out if patient and user have implanted device before using the product and consider the application.> Weigh the risks and benefits> Keep the product away from implanted systems.> Make appropriate emergency provisions and take immediate action on any signs of ill-health.> Symptoms such as raised heartbeat, irregular pulse and dizziness can be signs of a problem with a cardiac pacemaker or ICD (implantable cardioverter defibrillator).

1414
Safety notes
Danger zones M and GIn accordance with IEC 60601-1/ANSI/AAMI ES 60601-1, the S5 Endo Motor is not suitable for use in potentially explosive atmospheres or with potentially explosive mixtures of anaesthetic substances containing oxygen or nitrous oxide.
The S5 Endo Motor is not suitable for use in oxygen enriched atmospheres.
Zone M is defined as a »medical environment« and constitutes the part of a room in which potentially explosive atmospheres may form due to the use of anaesthetics or medical antiseptics and antibacterial soaps; such atmospheres are typically localized and temporary. Zone M comprises a truncated pyramid below the operating table which is tilted outwards at a 30° angle.
Zone G, also known as an »enclosed medical gas system«, does not necessarily include areas enclosed around all sides, in which explosive mixtures are continuously or temporarily generated, directed or used in small quantities.
14
Safety notes
1515
Safety notes
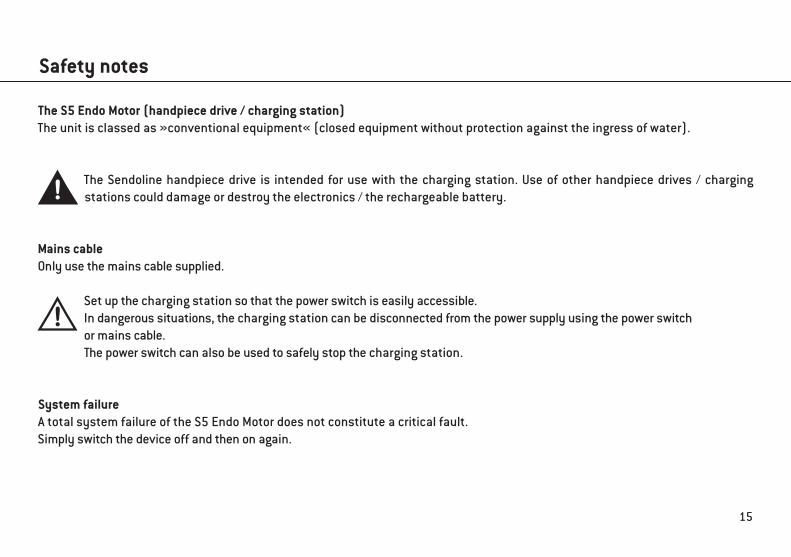
The S5 Endo Motor (handpiece drive / charging station)The unit is classed as »conventional equipment« (closed equipment without protection against the ingress of water).
The Sendoline handpiece drive is intended for use with the charging station. Use of other handpiece drives / charging stations could damage or destroy the electronics / the rechargeable battery.
Mains cableOnly use the mains cable supplied.
Set up the charging station so that the power switch is easily accessible.In dangerous situations, the charging station can be disconnected from the power supply using the power switch or mains cable.The power switch can also be used to safely stop the charging station.
System failureA total system failure of the S5 Endo Motor does not constitute a critical fault.Simply switch the device off and then on again.
16
Safety notes
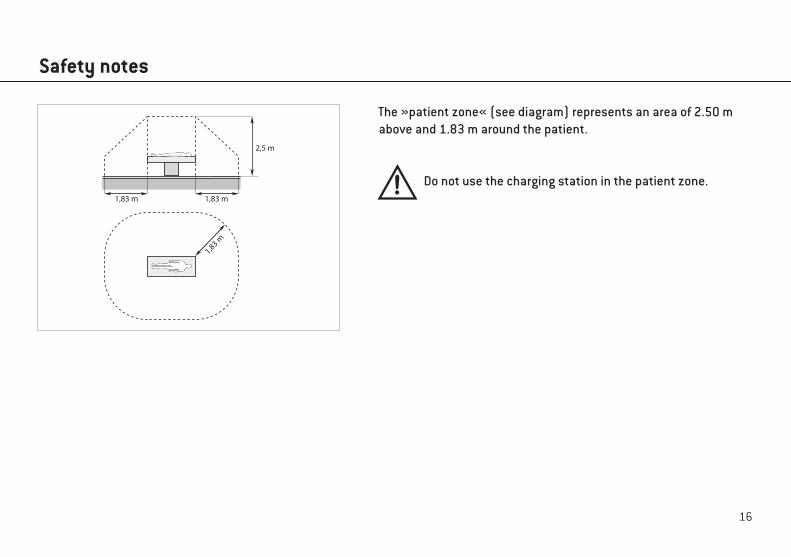
The »patient zone« (see diagram) represents an area of 2.50 m above and 1.83 m around the patient.
Do not use the charging station in the patient zone.
1,83 m
2,5 m
1,83 m1,83 m

17
5. Description – Charging station
charging slot for handpiece drive
power socket
power switchON / OFF (I / 0)
charging control LED (charge)(orange)
control LED (power) ON(green)

18
6. Description – Handpiece drive / Rechargeable battery / Contra-angle head / S5 Apex Clip
button for: unit ON and torque settings
plug contact into handpiece drive
torque display4,0 = 4 Ncm max 400 gcm
button for:unit ON andmotor ON / OFF
Sendoline coupling for contra-angle head
charging contacts
press-button
rechargeable battery cover
rechargeable battery-capacity display
control LED ring for torque
� S5 Apex Clip

7. Starting operation – Charging station
Plug the mains cable into the charging station.
Rechargeable battery is charged.
Charge control LED(orange) comes on.
Place the handpiece drive in the charging station.
Note the positioning. All the handpiece drive LEDs light up briefly.
> Charge the rechargeable battery completely before the first use. This will take about 100 minutes.> The handpiece drive can remain on the switched-on charging station until the next use.> If the rechargeable battery has enough capacity, the charge control LED (orange) will light up briefly (for about 1 sec.). Rechargeable battery is not charging.> If the rechargeable battery does not have enough capacity, the charge control LED (orange) lights up. Rechargeable battery is charging.
Always place the charging station on a flat level surface.Ensure that the charging station can be disconnected easily from the power supply.
19

20
8. Starting operation – switch on / switch off S5 Endo Motor
Turn the S5 Endo Motor on at the power switch.
Power control LED(green) lights up.
Switch on S5 Endo Motor
Connect the S5 Endo Motor to the power supply.
Switch off S5 Endo Motor
Turn the S5 Endo Motor off at the power switch.
Disconnect the S5 Endo Motor from the power supply.
21
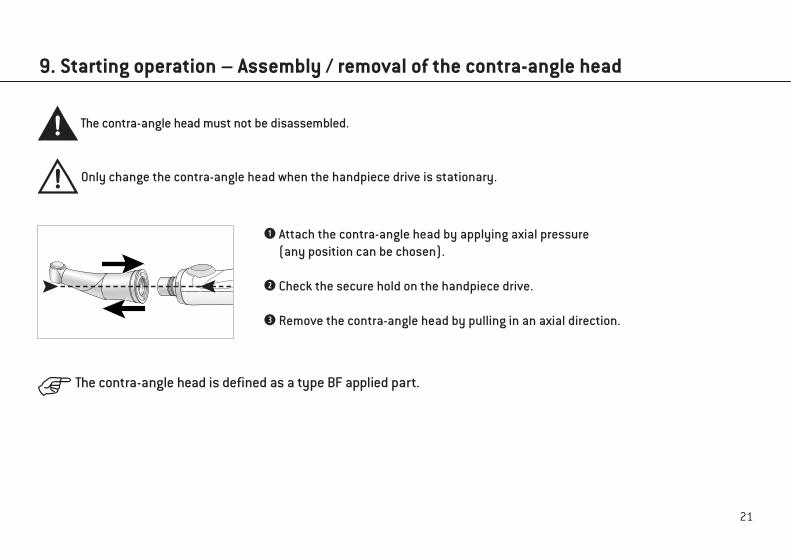
9. Starting operation – Assembly / removal of the contra-angle head
Attach the contra-angle head by applying axial pressure (any position can be chosen).
Check the secure hold on the handpiece drive.
Remove the contra-angle head by pulling in an axial direction.
Only change the contra-angle head when the handpiece drive is stationary.
The contra-angle head must not be disassembled.
The contra-angle head is defined as a type BF applied part.

10. Changing the root canal instrument
Insert root canal instrument until back stop (a) and turn until it engages (b).
Remove the root canal instrument by pushing the press-button.
Check secure location by applying slight axial tension.
22
Root canal instrument> Use only root canal instruments which are in perfect condition. Follow the operating instructions of the manufacturer.> Insert the root canal instrument only when the contra-angle head is stationary.> Insert the contra-angle head only when the handpiece drive is stationary.> Do not interfere with the running or slowing down of root canal instruments.
23
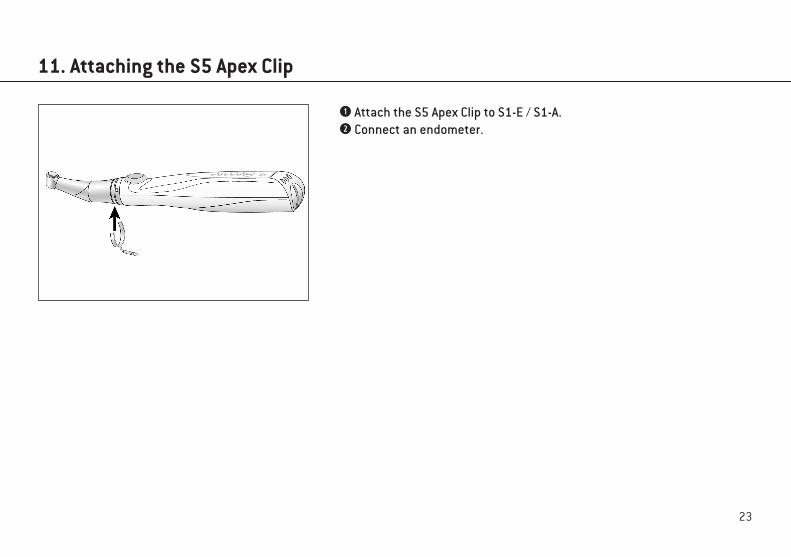
11. Attaching the S5 Apex Clip
Attach the S5 Apex Clip to S1-E / S1-A. Connect an endometer.

24
12. Connecting the instrument to an endometer
With the S5 Apex Clip of the S5 Endo Motor a measuring cable for an endometer can be connected to the S5 Endo Motor contra angle handpiece in order to check the exact position of the instrument in the root canal.
Use only endometers, which are approved in the respective country.
Please observe the operating instructions pertaining to the endometer being used.
Attach an S5 Apex Clip. Connect the measuring cable of the endometer to the clip‘s contact pin. Perform the measurement in accordance with the equipment
manufacturer‘s specifications.

25
Connecting the instrument to an endometer
Calibration
The manufacturer of the endometer stipulates that a calibration must be performed.
Insert a root canal instrument into the contra-angle handpiece. Connect the cable of the file clamp (without the actual file clamp) onto the clip of the instrument.Perform the calibration in accordance with the equipment manufacturer‘s specifications.
The Apex Locator function is used to support the root canal preparation process in combination with a treatment center with the apex measurement function. However, you must always take at least one X-ray to determine the depth for preparatory work. A clinical evaluation including knowledge of the anatomy of root canals is important for interpreting the results.
When performing the apex measurement, wear appropriate insulated gloves. While performing the treatment always use a cofferdam and the S5 Insulating Sleeve. This will prevent inaccurate measurements caused by undesired leakage currents. During the measurement, the instrument must not come into contact with the patient‘s mucosa, metallic tooth restorations, or the mucosal electrode.

26
Removing an S5 Insulating Sleeve
The motor is at a standstill.
Remove the root canal instrument Remove the S5 Insulating Sleeve. Dispose of the S5 Insulating Sleeve.
13. Mounting and removing the S5 Insulating Sleeve
NOTICE! S5 Insulating Sleeves are only used once. Change the S5 Insulating Sleeve after each patient.
Mounting the S5 Insulating Sleeve
> The S5 Insulating Sleeve is sterile.> The motor is at a standstill.> A root canal instrument is not clamped in place.
Twist the S5 Insulating Sleeve carefully this way and pull it fully over the instrument. Attach the file.

27
14. Test run
> Plug the contra-angle head into the handpiece drive.> Insert root canal instrument.> Start the handpiece drive.> If you observe problems (e.g. vibrations, unusual noises, overheating), stop the handpiece drive immediately and contact an authorized Sendoline service partner (see Page 51).
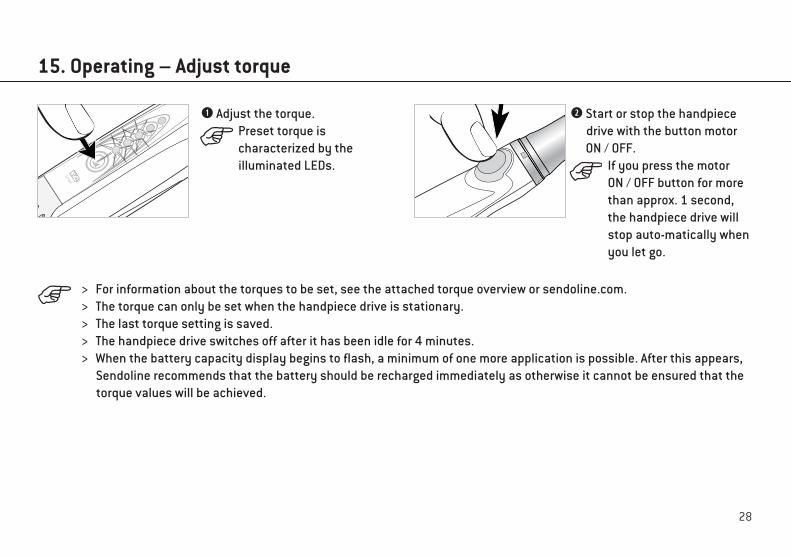
15. Operating – Adjust torque
Start or stop the handpiece drive with the button motor
ON / OFF.If you press the motor ON / OFF button for more than approx. 1 second, the handpiece drive will stop auto-matically when you let go.
Adjust the torque.Preset torque is characterized by the illuminated LEDs.
> For information about the torques to be set, see the attached torque overview or sendoline.com.> The torque can only be set when the handpiece drive is stationary.> The last torque setting is saved.> The handpiece drive switches off after it has been idle for 4 minutes.> When the battery capacity display begins to flash, a minimum of one more application is possible. After this appears,
Sendoline recommends that the battery should be recharged immediately as otherwise it cannot be ensured that the torque values will be achieved.
28

29
Operating – Adjust torque
Press the torque settings button for approx. 10 seconds.The middle 3 LEDs flash after 5 seconds.
The change in torque sequence is saved when the 2 outer LEDs flash.To change the factory-set torque sequence again (from high to low torque),repeat this process.
Adjusting torque sequence (from low to high torque)

30
16. Operating – Auto Forward and Auto Reverse mode
The factory setting is Auto Forward mode
When the preset torque is reached, the handpiece drive runs in an anti-clockwise direction. The drive then stops, freeing the file.
Auto Reverse mode
When the preset torque is reached in Auto Forward mode, the file automatically turns in the opposite direction, then continues rotating in a clockwise direction, freeing the file.
Restore factory settings: Press and hold the torque settings button for approx. 15 seconds.The LEDs flash in a particular sequence (see page 33) and afterwards the factory setting has been restored.
31
Operating – Auto Forward and Auto Reverse mode
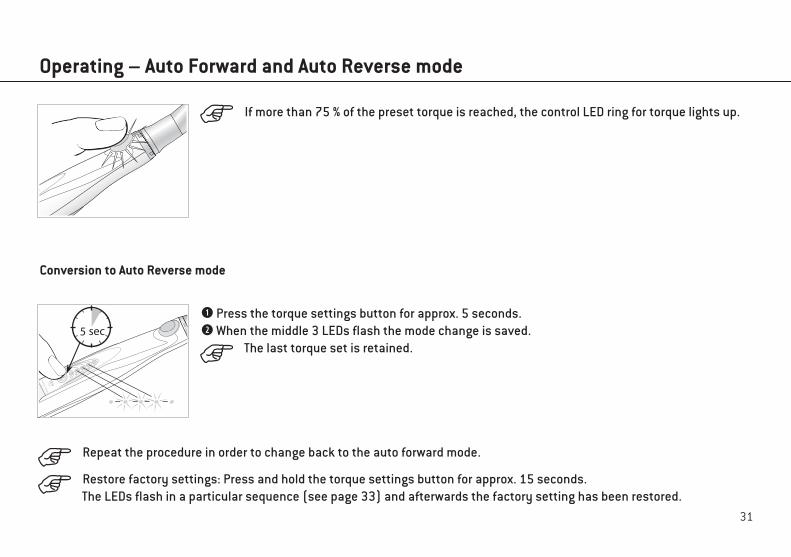
Conversion to Auto Reverse mode
Press the torque settings button for approx. 5 seconds. When the middle 3 LEDs flash the mode change is saved.
The last torque set is retained.
If more than 75 % of the preset torque is reached, the control LED ring for torque lights up.
Repeat the procedure in order to change back to the auto forward mode.

32
17. Changing the rechargeable battery
Remove rechargeable battery cover.
Close rechargeable battery cover.
Note the positioning.
Insert the new rechargeable battery. Connect the plug contacts.
Note the positioning.
Disconnect the plug contacts. Remove rechargeable battery.
Replace the battery if power fails relatively quickly after a full charge.
33
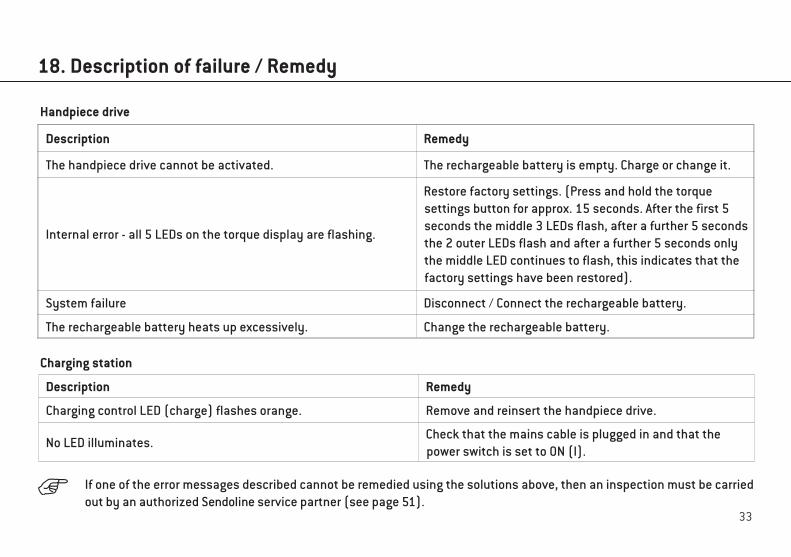
18. Description of failure / Remedy
If one of the error messages described cannot be remedied using the solutions above, then an inspection must be carried out by an authorized Sendoline service partner (see page 51).
Handpiece drive
Description Remedy
The handpiece drive cannot be activated. The rechargeable battery is empty. Charge or change it.
Internal error - all 5 LEDs on the torque display are flashing.
Restore factory settings. (Press and hold the torque settings button for approx. 15 seconds. After the first 5 seconds the middle 3 LEDs flash, after a further 5 seconds the 2 outer LEDs flash and after a further 5 seconds only the middle LED continues to flash, this indicates that the factory settings have been restored).
System failure Disconnect / Connect the rechargeable battery.
The rechargeable battery heats up excessively. Change the rechargeable battery.
Charging station
Description Remedy
Charging control LED (charge) flashes orange. Remove and reinsert the handpiece drive.
No LED illuminates. Check that the mains cable is plugged in and that the
power switch is set to ON (I).

34
19. Hygiene and maintenance
> Follow your country-specific directives, standards and guidelines for cleaning, disinfection and sterilization.> The contra-angle head can be prepared manually or mechanically.
> Wear protective clothing.> Remove the mains cable from the charging station.> Remove the contra-angle head from the handpiece drive.> Remove the root canal instrument.> Remove the S5 Apex Clip.> The handpiece drive and the charging station are not approved for mechanical cleaning (thermo washer disinfection)
and sterilisation.
> Clean and disinfect the contra-angle head immediately after every treatment to rinse out any liquids that may have entered (e.g. blood, saliva, etc.) and prevent the internal parts seizing up.
> Clean and disinfect the handpiece drive immediately after every treatment.
> Sterilize the contra-angle head following manual or mechanical cleaning, disinfection and lubrication.

35
Hygiene and maintenance
Handpiece drive and charging station
> The mains cable of the charging station unit must not be connected.> Do not immerse the handpiece drive and the charging station unit or clean it under running water.
Pre-disinfection> If heavily soiled: Clean first with disinfectant cloths.
Only use disinfectants that have no protein-fixing effects.
Manual cleaning and disinfectionThe surface of the handpiece drive and the charging station may be wiped clean.
> Disinfection using disinfectants or application of disinfectant by wiping is recommended.> Only use disinfectants which are certified by officially approved institutions and which do not contain chlorine. For USA: Use EPA registered disinfectants.> Observe the manufacturer’s recommendations regarding the use of disinfectants.
Ensure that no liquids penetrate the handpiece drive or charging station.
Do not place the handpiece drive and the charging station in liquid disinfectant or in an ultrasonic bath.

Hygiene and maintenance
Contra-angle head
Pre-disinfection> If heavily soiled, clean first with disinfectant cloths.
Only use disinfectants that have no protein-fixing effects.
Manual cleaning (internal and external) Rinse under demineralized water (< 38 °C) with the aid of a brush. Remove any liquid residues (absorbent cloth, blow dry with compressed air).
36
Do not place the contra-angle head in liquid disinfectant or in an ultrasonic bath.

37
Hygiene and maintenance
After manual cleaning and disinfection, you must carry out a final thermal disinfection (unwrapped) or sterilization (wrapped) in the class B or S steam sterilizer (according to EN 13060).
Manual disinfectionSendoline recommends wiping disinfection.
> Use only disinfectants which do not contain chlorine and which are certified by officially recognized institutes.
For USA: Use EPA registered disinfectants.> Note the manufacturer’s specifications for the use of the disinfectants.
Contra-angle head

38
Hygiene and maintenance
Contra-angle head
Mechanical cleaning and disinfection internal and external
The contra-angle head can be cleaned and disinfected in a thermo washer disinfector.
Sendoline recommends processing with thermo washer disinfector.Note the manufacturer’s specifications on equipment, cleaning agents and detergents.
> Make sure, that the contra-angle head is completely dry internally and externally after thermo washer disinfection. Remove any liquid residues with compressed air.
39
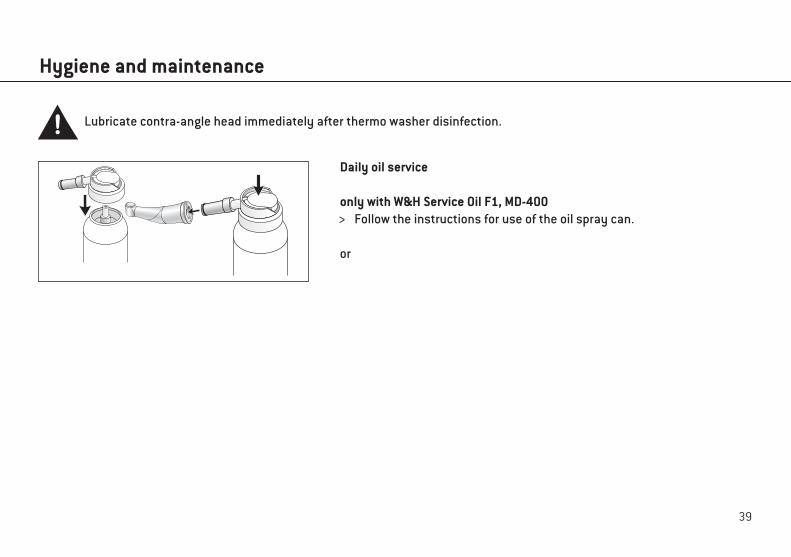
Hygiene and maintenance
Lubricate contra-angle head immediately after thermo washer disinfection.
Daily oil service
only with W&H Service Oil F1, MD-400> Follow the instructions for use of the oil spray can.
or

40
Hygiene and maintenance
Test run following oil service Push the contra-angle head onto the handpiece drive. Place the contra-angle head with head downwards. Run the handpiece drive for 30 seconds to remove excess oil.> Repeat the complete hygiene and maintenance process at any sign of
dirt re-emerging. Wipe the contra-angle head and the handpiece drive with gauze or a
soft cloth.
Only with W&H Assistina> See instructions for use of Assistina. Push the universal adaptor onto the contra-angle head. Assemble / remove the appropriate adaptor onto the maintenance
attachment of the Assistina. Push the button and remove the universal adaptor from the contra-angle head.Recommended lubrication cycles (W&H Service Oil F1 und Assistina)> Essential after internal cleaning> Before each sterilizationor> After 30 minutes of use or> At least twice daily
30 sek
41
Hygiene and maintenance
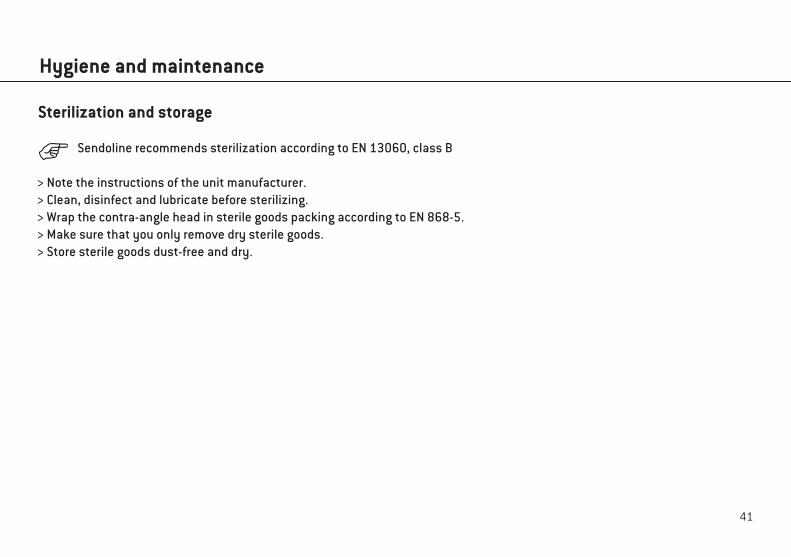
Sterilization and storage
Sendoline recommends sterilization according to EN 13060, class B
> Note the instructions of the unit manufacturer.> Clean, disinfect and lubricate before sterilizing.> Wrap the contra-angle head in sterile goods packing according to EN 868-5.> Make sure that you only remove dry sterile goods.> Store sterile goods dust-free and dry.

42
Hygiene and maintenance
Approved sterilization procedures
Follow your country-specific directives, standards and guidelines.
> Steam sterilization class B with sterilizers in accordance with EN 13060. Sterilization holding time a minimum of 3 minutes at 134 °C (273.2 °F)
or
> Steam sterilization class S with sterilizers in accordance with EN 13060. The sterilizer manufacturer must give its express approval for the sterilization of contra-angles. Sterilization holding time a minimum of 3 minutes at 134 °C (273.2 °F)
Before restart operationWait until the contra-angle head have cooled down and are completely dry.

43
20. Sendoline Accessories Use only original Sendoline accessories / spare partsor accessories approved by Sendoline
1100001Handpiece drive
1100004Rechargeable battery
Li-Ion 3.7 V
1100002Contra-angle head
10940021W&H Service Oil F1,
MD-400 (6 pcs)02038200
Spray cap with nozzle for contra-angle handpieces
1100003Charging station
1100006Handpiece holder
301W&H Assistina
1100005Assistina adaptorfor S5 Endo Motorcontra-angle head

44
Sendoline Accessories Use only original Sendoline accessories / spare partsor accessories approved by Sendoline
07735600S5 Apex Clip
6310283S5 Insulating Sleeve
45
21. Servicing
Regular checkingRegular servicing of function and safety of the S5 Endo Motor including the accessories is necessary and should be carried out at least once every three years, unless shorter intervals are prescribed by law. The inspection must be undertaken by a qualified organization and must include the following procedures:
Handpiece drive> Visual inspection for outside damage> Visual inspection of internal components and electronic boards on suspicion of safety interference, e. g. mechanical damage of the enclosure or indicators for overheated or burned (electronic) components> Functional test
Charging station> Visual inspection for outside damage> Measurement of enclosure leakage current> Visual inspection of internal components and electronic boards on suspicion of safety interference, e. g. mechanical damage of the enclosure or indicators for overheated or burned (electronic) components> Functional test
We recommend that only an authorized Sendoline service partner (see Page 51) should undertake this servicing and checking.

46
Servicing
RepairsIf a faults occurs, always return the complete the S5 Endo Motor, because an inspection of all components will be necessary!
Returns> Refer all questions to an authorized Sendoline service partner (see Page 51).> Always return equipment in the original packaging!

47
22. Technical data
Handpiece drive EB-3SHrechargeable battery type: Li-Ionmains voltage: 3.7 Vrated capacity: 680 mAhrotational speed on root canal instrument: 300 min-1
torque levels on root canal instrument: setting 1 max. 4.0 Ncm setting 2 max. 3.0 Ncm setting 3 max. 2.3 Ncm setting 4 max. 1.2 Ncm setting 5 max. 0.5 Ncmdimensions (BxTxH): 140 x 28 x 26 mmweight: 85 g
Charging stationmains voltage: 100 – 240 Vallowable voltage fluctuation: ± 10 %frequency: 50 – 60 Hzrated current: 0,08 – 0,12 Apower: 5 Wdimensions (WxDxH): 95 x 159 x 65 mmweight: 345 g

48
Technical data
Contra-angle head EB-16Stransmission ratio: 16:1coupling typ: Sendoline couplingrecommended root canal instruments*: files for rotating root canal preparation for min. 300 min-1
Instrument shaft diameter (type 1) inaccordance with ISO 1797-1: Ø 2.35 mm*min. chuck length: engagingweight: 35 g
* In choosing the correct operating conditions, the user must ensure that there is no risk to the user, the patient or third parties.
Physical characteristicsTemperature for storage and transport: -40 °C (-40 °F) to +70 °C (+158 °F)Air humidity for storage and transport: 8 % to 80 % (relative), non condensingTemperature in operation: +10 °C (+50 °F) to +40 °C (+104 °F)Air humidity in operation: 15 % to 80 % (relative), non condensing
Pollution level: 2Overvoltage category: IIAltitude: up to 3,000 m above sea level

49
23. Recycling and Disposal
RecyclingSendoline considers that it has a special duty towards the environment. The S5 Endo Motor along with its packaging has been designed to be as environmentally friendly as possible.
Disposal of the S5 Endo Motor (charging station / handpiece drive / rechargeable battery / contra-angle head)Follow your country-specific laws, directives, standards and guidelines for the disposal of used electrical devices.Ensure that the parts are not contaminated on disposal.
Disposal of the packaging materialAll packaging materials have been selected according to environmental compatibility and disposal aspects and can be recycled. Please send old packaging materials to the relevant collection and reprocessing system. This way, you will contribute to the recycling of raw materials and the avoidance of waste.

This Sendoline product has been manufactured with great care by highly qualified specialists. A wide variety of tests and controls guarantee faultless operation. Please note that claims under warranty can only be validated when all the directions in the Instructions for use have been followed.
As manufacturer, Sendoline is liable for material or manufacturing defects from the date of purchase within a warranty period of
12 months for the handpiece drive, the contra-angle handpiece, the charging station and rechargeable battery Li-lon 3,7 V.
We accept no responsibility for damage caused by incorrect handling or by repairs carried out by third parties not authorized to do so by Sendoline!
Claims under warranty – accompanied by proof of purchase – must be sent to the vendor or to an authorized Sendoline service partner. The provision of service under warranty extends neither the warranty period nor any other guarantee period.
1 2 m o n t h s w a r r a n t y
E x p l a n a t i o n o f w a r r a n t y t e r m s

Authorized Sendoline service partner
Sendoline AB, Box 7037 Tillverkarvägen 6 SE-187 11 Täby SwedenPhone: +46 (0)8 445 88 30, Fax: +46 (0)8 445 88 33, E-mail: [email protected]
51

Manufacturer
Sendoline ABBox 7037 Tillverkarvägen 6 SE-187 11 Täby Sweden
t +46 (0) 8 445 88 30, f +46 (0) 8 445 88 [email protected] sendoline.com
Form-Nr. 50632 AENRev. 003 / 27.06.2016
Subject to alterations
0413