Instructions for Use and Care XANA PLUS - HouseNeeds · Instructions for Use and Care XANA PLUS...
32
Instructions for Use and Care XANA PLUS WARNING Please read all instructions carefully before installing or using this heater and keep them for future reference. This heater must be installed by qualified personnel only and according the regulations. Otherwise, all claims will be dismissed.
Transcript of Instructions for Use and Care XANA PLUS - HouseNeeds · Instructions for Use and Care XANA PLUS...
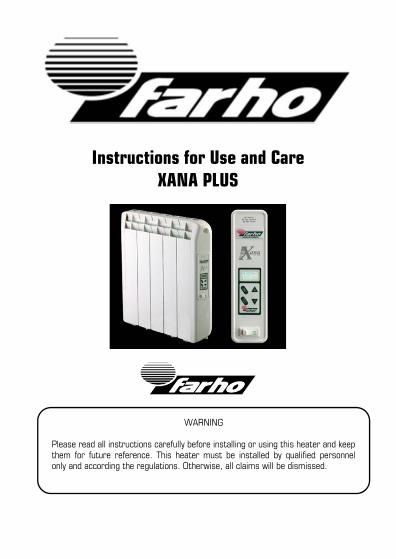
Instructions for Use and Care
XANA PLUS
WARNING
Please read all instructions carefully before installing or using this heater and keep them for future reference. This heater must be installed by qualified personnel only and according the regulations. Otherwise, all claims will be dismissed.


1
INDEX ................................................................................................. 1IMPORTANT INSTRUCTIONS ................................................................. 2INSTALLATION..................................................................................... 4
Power supply ................................................................................... 4Position ........................................................................................... 5Fitting ............................................................................................. 6
OPERATING INSTRUCTIONS .................................................................. 8General Information .......................................................................... 8Description of the Keypad and Display ................................................ 9How to select a Language ............................................................... 10How to set the time ........................................................................ 11How to switch between ºF and ºC ? ................................................... 12How to raise or lower the required temperature ................................ 12How to know whether or not a radiator is consuming.......................... 13How to block or unblock the keypad .................................................. 13How to activate or deactivate the programs ...................................... 14How to see the saved programs? ..................................................... 15How to customize programs? .......................................................... 16How to reset the heater? ................................................................ 20
TROUBLESHOOTING........................................................................... 21The FARHO XANA PLUS is not responding to the controls .................. 21The FARHO XANA PLUS is not heating ............................................. 21
TECHNICAL CHARACTERISTICS........................................................... 23CARE AND MAINTENANCE ................................................................. 24GUARANTEE TERMS AND CONDITIONS ............................................... 25
INDEX
2
IMPORTANT INSTRUCTIONS
When using electrical appliances, basic precautions should always be followed to reduce the risk of fire, electric shock, and injury to persons, including the following: 1. Read all instructions before installing or using this heater.
2. This heater is hot when in use. To avoid burns, do not let bare skin touch hot surfaces. Keep combustible materials, such as furniture, pillows, bedding, papers, clothes, etc. and curtains at least 3 feet from the front of the heater and keep them away from the sides and rear.
3. Extreme caution is necessary when any heater is used by or near children or invalids and whenever the heater is left operating and unattended.
4. Do not operate any heater with a damaged cord or plug or after the heater malfunctions, has been dropped or damaged in any manner. Discard heater, or return to authorized service facility for examination and/or repair.
5. Do not use outdoors.
6. To disconnect heater, turn controls to off, then remove plug from outlet.
7. Do not insert or allow foreign objects to enter any ventilation or exhaust opening as this may cause an electric shock or fire, or damage the heater.
8. To prevent a possible fire, do not block air intakes or exhaust in any manner.
9. A heater has hot and arcing or sparking parts inside. Do not use it in areas where gasoline, paint, or flammable vapors or liquids are used or stored.
10. This heater is not intended for use in bathrooms, laundry areas and similar indoor locations. Never locate heater where it may fall into a bathtub or other water container.
3
11. Do not run cord under carpeting. Do not cover cord with throw rugs, runners, or similar coverings. Do not route cord under furniture or appliances. Arrange cord away from traffic area and where it will not be tripped over.
12. Connect to properly grounded outlets only.
13. To prevent a possible fire, do not block air intakes or exhaust in any manner. Do not use on soft surfaces, like a bed, where openings may become blocked.
14. Always plug heaters directly into a wall outlet/receptacle. Never use with an extension cord or relocatable power tap (outlet/power strip).
15. Use this heater only as described in this manual. Any other use not recommended by the manufacturer may cause fire, electric shock, or injury to persons.
16. This heater may include an audible or visual alarm to warn that parts of the heater are getting excessively hot. If the alarm sounds (or illuminates), immediately turn the heater off and inspect for any objects on or adjacent to the heater that may have blocked the airflow or otherwise caused high temperatures to have occurred.
DO NOT OPERATE THE HEATER WITH THE ALARM SOUNDING (OR ILLUMINATING).
“SAVE THESE INSTRUCTIONS”

4
FARHO heaters are for use on 120 V. The cord has a plug as shown at A. An adapter as shown at C is available for connecting three-blade grounding-type plugs to two-slot receptacles. The green grounding lug extending from the adapter must be connected to a permanent ground such as a properly grounded outlet box. The adapter should not be used if a three-slot grounded receptacle is available.
The heater should be connected to the mains only after it has been properly fitted and secured to the wall (See section “FITTING” in this manual).
INSTALLATION
Power supply
5
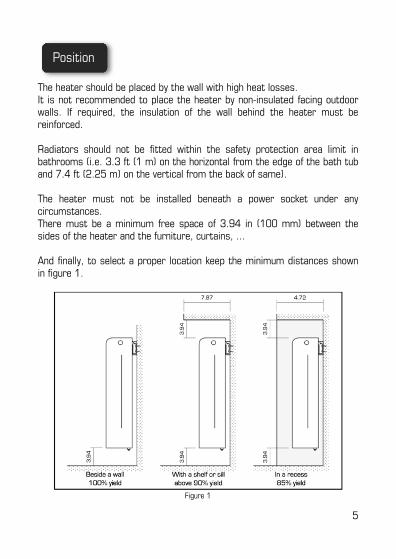
The heater should be placed by the wall with high heat losses. It is not recommended to place the heater by non-insulated facing outdoor walls. If required, the insulation of the wall behind the heater must be reinforced. Radiators should not be fitted within the safety protection area limit in bathrooms (i.e. 3.3 ft (1 m) on the horizontal from the edge of the bath tub and 7.4 ft (2.25 m) on the vertical from the back of same). The heater must not be installed beneath a power socket under any circumstances. There must be a minimum free space of 3.94 in (100 mm) between the sides of the heater and the furniture, curtains, ... And finally, to select a proper location keep the minimum distances shown in figure 1.
Figure 1
Position

6
In order to fix the heater to the wall, there are three brackets supplied with the appliance. There are two identical brackets (hanging brackets) and one different from the other (safety bracket). Screw the two identical brackets (hanging brackets) to the wall. Distances A and B are shown in the table below. A is the distance between brackets, and B is the height from the ground (B=23.62 inches in all models). For more information see Figure 2
Fitting of Header Brackets
Model Distance (A) Distance (B)
XANA PLUS-3 6,30 in 23,62 in
XANA PLUS -5 12,60 in 23,62 in
XANA PLUS -7 18,90 in 23,62 in
XANA PLUS -9 25,20 in 23,62 in
XANA PLUS -11 31,50 in 23,62 in
XANA PLUS -13 37,80 in 23,62 in Table 1
CAUTION HIGH TEMPERATURE, RISK OF FIRE. Keep electrical cords, drapery, furnishings, and other combustibles at least 3 feet (0.9 m) from the front of the heater and away from the side and rear.
To reduce the risk of fire, do not store or use gasoline or other flammable vapors and liquids in the vicinity of the heater.
Fitting

7
Figure 2
Once the heater is properly fitted, place and screw the safety bracket as shown in Figure 3.
Figure 3

8
WARNING: THE APPLIANCE MUST NOT BE COVERED UNDER ANY CIRCUMSTANCE!
Thank you for purchasing a FARHO heater. This item has been manufactured following a quality advanced production process. FARHO heaters stand out for its elegant shape, its user friendliness, its great heating power, its safety of use and its operation. Thanks to our special fluid and our control system, FARHO heaters are able to emit the heat on the most efficient way. To fulfill with the user's heating requirements, the number of heaters of the room shall be properly sized. Think FARHO as a heating system not as an isolated heater. A properly sized heating system provides great comfort with low power consumption. After your heating system has been installed you want to ensure that the heat remains inside the house. Check the isolation of doors, windows, walls and roofs. A well insulated house keeps the cold outside, while the heat remains inside.
OPERATING INSTRUCTIONS
The heater must be properly installed before it is used.
General Information

9
The handling of the heater FARHO Xana Plus (XP) is performed through intuitive menus.
There are only four buttons: 1. OK Key 2. UP key 3. MENU key / CANCEL key 4. DOWN key Standby screen explanation: 1. Time 2. Programs activated indicator 3. Day of the week 4. Room temperature 5. Required temperature
The battery used in this device may present a risk of fire or chemical burn hazard if mistreated. Do not recharge, disassemble, heat above 212°F (100°C) or incinerate. Replace battery with Great Power Battery Co, Part No. CR2032 Only. Use of another battery may present a risk of fire or explosion. The battery shall only be replaced by a qualified trained service technician. Dispose of used battery promptly. Keep away from children. Do not disassemble and do not depose of in fire
Description of the Keypad and Display

10
The FARHO Xana Plus heater, lets you choose from the following languages: English, Spanish, French, German, Italian, Portuguese, Hungarian, Galician, Basque and Catalan. Follow the steps below to change the language:
1. Press the key.
2. Press the key once, so the indicator now points to "Configuration"
3. Press the key.
4. Press the key once, so the indicator now points to “Languages”.
5. Press the key.
6. Press the and key, till the indicator points to your preferred Language.
7. Press the key.
How to select a Language
All you have to do to access the menu is to press the key
and scroll down using and keys. Press the key of the options menu in order to select one of the menu options.
To return to the previous menu, simply press the key again.
Go to the “Configuration” menu and select your preferred language from the “Language” section.
11
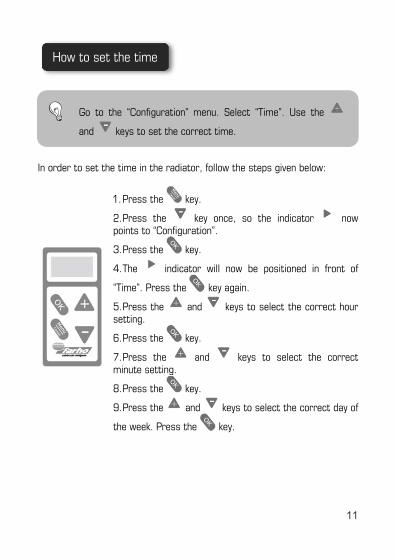
In order to set the time in the radiator, follow the steps given below:
1. Press the key.
2. Press the key once, so the indicator now points to “Configuration”.
3. Press the key.
4. The indicator will now be positioned in front of
“Time”. Press the key again.
5. Press the and keys to select the correct hour setting.
6. Press the key.
7. Press the and keys to select the correct minute setting.
8. Press the key.
9. Press the and keys to select the correct day of
the week. Press the key.
How to set the time
Go to the “Configuration” menu. Select “Time”. Use the
and keys to set the correct time.

12
The FARHO Xana Plus heater lets you choose between two temperature scales (Fahrenheit or Celsius).
1. Press the key.
2. Press the key once, so the indicator now points to “Configuration”.
3. Press the key.
4. Press the key 5 times, so the indicator now points to “ºF->ºC” or “ºC->ºF" depending on your current settings..
5. Press the key.
6. Press the and keys to select the desired temperature scale (ºF or ºC).
7. Press the key.
While in standby screen press the and keys to raise or lower the required temperature. The FARHO heater will automatically adjust the heat emission efficiently until reaching the temperature level you had set.
How to switch between ºF and ºC ?
How to raise or lower the required temperature
Go to the “Configuration” menu and select your preferred scale of temperature from the “ºF->ºC” or “ºC->ºF" section.
Press the and keys to raise and lower the operating temperature, respectively.

13
Look at the standby screen of the heater. If the "required temperature value" flickers, then the heater is at consumption mode. Otherwise, the heater is at idle mode.
The FARHO XANA PLUS heaters have a keypad blocking function to avoid its handling by children, or unauthorized persons. How to block the keypad:
While in standby screen, press the key and hold on a few seconds till the screen shows “Blocked”. How to unblock the keypad:
While in standby screen, press the key and hold on a few seconds till the screen shows “Unblocked”
How to know whether or not a radiator is consuming
How to block or unblock the keypad
While in the standby screen, when the heater is at consumption mode, the "required temperature value" flickers.
While in standby screen, press the key and hold on a few seconds till the screen shows “Blocked” or “Unblocked”.
14
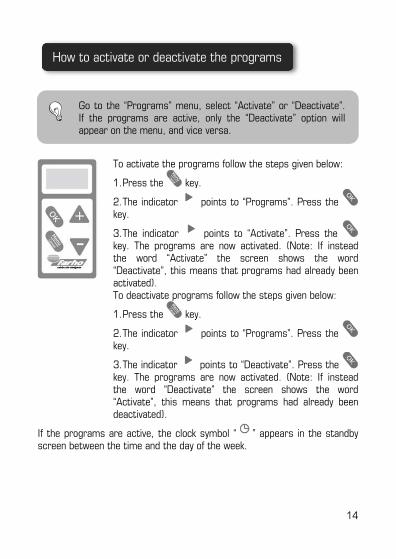
To activate the programs follow the steps given below:
1. Press the key.
2. The indicator points to “Programs”. Press the key.
3. The indicator points to “Activate”. Press the key. The programs are now activated. (Note: If instead the word “Activate” the screen shows the word “Deactivate”, this means that programs had already been activated). To deactivate programs follow the steps given below:
1. Press the key.
2. The indicator points to “Programs”. Press the key.
3. The indicator points to “Deactivate”. Press the key. The programs are now activated. (Note: If instead the word “Deactivate” the screen shows the word “Activate”, this means that programs had already been deactivated).
If the programs are active, the clock symbol “ ” appears in the standby screen between the time and the day of the week.
How to activate or deactivate the programs
Go to the “Programs” menu, select “Activate” or “Deactivate”. If the programs are active, only the “Deactivate” option will appear on the menu, and vice versa.

15
If you wish to see the previously saved programs follow the next steps:
1. Press the key.
2. The indicator points to “Programs”. Press the
key.
3. Press the key once, so the indicator points to “See”.
4. Press the key.
5. Press or to select the day of the week
you want to see. Press the key.
6. Scroll and in order to see the different blocks of that day.
7. Remember that you can always press the key to return to the previous menu. “See programs” menu explanation 1* Day of the week 2* Time zone (Each day is divided into 6 different time zones 3* Preset temperature 4* Time zone start time 5* Time zone finish time 6* Time zone dividing line
How to see the saved programs?
Go to “Programs” menu and then to “See” menu. Choose the day of the week you wish to see. Scroll up and down in order to see the different program blocks of that day.
16
Xana Plus heater allows to set 6 different program blocks for each day of the week. Each block includes the start time, the end time and the temperature required for that time period. Please, keep in mind that a block is not allowed to start in one day and ends in a different day. To make a program that involves two different days, split it in two blocks, one finishing at 00:00 of the first day and the other starting at 00:00 of the next day (each one in its corresponding day of the week). In order to help you doing the programs, we have included a table showing all the blocks for all the days of the week (see page 20). You can use it as a template to perform programs that best suit your needs, and then you only need to follow that table and the instructions below to set the programs in the heater:
How to customize programs?
Go to “Programs” menu and select “Edit”. Check the days of the week you wish to customize. Then, select “Accept” by
pressing the key. Use the , and keys to set and accept the start time, the finish time and the required temperature for each block. Repeat this operation for each block (keep in mind you have six time blocks). If you do not
wish to enter any more blocks, press the key at the beginning of a new one.
17
1. Press the key.
2. The indicator points to “Programs”. Press the
key.
3. Press the key twice, the indicator points to “Edit”.
4. Press the key.
5. Press or in order to scroll down the menu to
set the indicator in front of the day of the week you wish to customize.
6. Press the key. The symbol beside the day of
the week turns into . This indicates that the day in question has been selected. 7. Repeat step 5 and 6 until you have selected all of the days of the week you wish to customize.
8. Press the key until the indicator points to “Accept”.
9. Press the key.
10. Press the and keys to select the starting hour of the block.
11. Press the key.
12. Press the and keys to select the starting minute of the block.
13. Press the key.
14. Press the and keys to select the end hour of the block.
15. Press the key.
16. Press the and keys to select the end minute of the block.

18
17. Press the key.
18. Press the and keys to enter the desired operating temperature for that block.
19. Press the key. 20. Repeat steps 10 to 19 to customize all the blocks you wish.
21. If you press at the begin of a block with no time selected (--:--), the heater saves the previously customized blocks and finish the customization process. If you fill all the 6 blocks, the customization process ends automatically when you enter de required temperature for this block. The screen shows “OK”.

19
Day
s of
the
wee
k
Sund
ay
Star
t
End
Tem
p
Star
t
End
Tem
p
Star
t
End
Tem
p
Star
t
End
Tem
p
Star
t
End
Tem
p
Star
t
End
Tem
p
Satu
rday
St
art
End
Tem
p
Star
t
End
Tem
p
Star
t
End
Tem
p
Star
t
End
Tem
p
Star
t
End
Tem
p
Star
t
End
Tem
p
Frid
ay
Star
t
End
Tem
p
Star
t
End
Tem
p
Star
t
End
Tem
p
Star
t
End
Tem
p
Star
t
End
Tem
p
Star
t
End
Tem
p
Thur
sday
St
art
End
Tem
p
Star
t
End
Tem
p
Star
t
End
Tem
p
Star
t
End
Tem
p
Star
t
End
Tem
p
Star
t
End
Tem
p
Wed
nesd
ay
Star
t
End
Tem
p
Star
t
End
Tem
p
Star
t
End
Tem
p
Star
t
End
Tem
p
Star
t
End
Tem
p
Star
t
End
Tem
p
Tues
day
Star
t
End
Tem
p
Star
t
End
Tem
p
Star
t
End
Tem
p
Star
t
End
Tem
p
Star
t
End
Tem
p
Star
t
End
Tem
p
Mon
day
Star
t
End
Tem
p
Star
t
End
Tem
p
Star
t
End
Tem
p
Star
t
End
Tem
p
Star
t
End
Tem
p
Star
t
End
Tem
p
Bloc
k
1 2 3 4 5 6

20
1. Press the key.
2. The indicator points to “Configuration”.
3. Press the key.
4. Press the key four times, the indicator points to “Reset”.
5. Press the key. 6. The radiator will ask for confirmation before resetting.
7. Press and keys to select “YES” or “NO”.
8. Press the key. If you choose “YES”, the radiator will now be reset.
How to reset the heater?
If you reset the heater, all of your customized programs will be deleted. If you have any control device, such as Nexho UC, Nexho RM or Nexho NT, you should uninstall that heater in it too. Otherwise the control device will show errors when you send orders to the zone in which the heater was previously installed.
Go to "Configuration" menu and then choose "Reset". The
heater will ask you for confirmation. Use the and keys
to select "Yes" and press .

21
If your heater is not working properly, or if you are having troubles with the new FARHO home automated system, you may find a solution in the following list:
If the screen shows the word "Blocked" every time you press a key of the pad, it means that the heater keypad is blocked. Please see the section entitled "How to block or unblock the keypad" If the keypad don´t act as expected, turn off the heater using the switch placed beneath the keypad, wait a few seconds and turn on the heater again.
If the room temperature is lower than the required temperature and the heater is not heating check the next:
If the required temperature is flickering, wait a few minutes. Perhaps it is too soon to feel the heat in the surface of the heater. If the required temperature is not flickering, maybe the heater is waiting for permission to start heating. If you have a control device, such as Nexho UC, Nexho RM or Nexho NT and the power control is active, no heater starts to heat before the control device checks the availability of free power. In this case wait until other
TROUBLESHOOTING
The FARHO XANA PLUS is not responding to the controls
The FARHO XANA PLUS is not heating

22
heater stop heating so it release some power and, if it is enough, the control device allows a new heater to start heating. If you have a control device and the power control is not active, or if you don´t have a control device, go to the configuration menu of the heater and look for "Power". Once in "Power" menú set the power OFF (---). If none of the above solves the problem, turn off the heater using the switch placed beneath the keypad, wait a few seconds and turn on the heater again.

23
Technical Characteristics Model XANA PLUS Model
XANA PLUS
120V
Power
Rating
W
Dimension
Width x Depth x Heigth
in
Weight
lb
Nº of
Elements
XANA PLUS-3 330 14,57 x 3,74 x 23,23 16.50 3
XANA PLUS -5 550 20,87 x 3,74 x 23,23 25.35 5
XANA PLUS -7 770 27,17 x 3,74 x 23,23 34.17 7
XANA PLUS -9 990 33,47 x 3,74 x 23,23 43.00 9
XANA PLUS -11 1210 39,77 x 3,74 x 23,23 51.80 11
XANA PLUS -13 1430 46,07 x 3,74 x 23,23 60.52 13 Table 2
TECHNICAL CHARACTERISTICS

24
WARNING: THE APPLIANCE MUST NOT BE COVERED UNDER ANY CIRCUMSTANCE! Leave the “DO NOT COVER” warning on the upper face of the radiator, as it will constantly remind the end user. Air must be freely able to enter into contact with all heater surfaces. Before cleaning, make sure the power has been turned off and that the heating element is cool. Use pH neutral detergents to clean the radiator. All other servicing should be performed by qualified service personnel only.
CARE AND MAINTENANCE

25
Farho guarantees the proper and correct operation of the appliance for 2 years from the date of purchase, as long as it is used for the domestic purposes for which it has been manufactured. Further to the aforementioned, FARHO extends the term of the guarantee 3 more years, except for carriage costs which will be paid by the customer. FARHO may, at its own discretion, require the customer to ship the unit back to the factory for diagnosis before making a determination as to whether it is covered by this warranty. Shipping costs to the FARHO factory (including but not limited to, freight, insurance, customs fees and taxes, and any other expenses) will be the responsibility of the customer.
If it is determined that the new product defect is covered by the warranty, FARHO will repair, or substitute the product at its own discretion to the customer at no charge.
Warranty is limited to the repair or substitution of the product.
FARHO warranty does not cover:
1. Improper installation, connection, operation, maintenance, and/or storage, 2. Minor defects not interfering with the operation of the product, possible indemnities, misuse or improper usage 3. Abnormal or unusual operating conditions or application outside the specifications for the product
GUARANTEE TERMS AND CONDITIONS

26
4. Application in any way different from that for which the products were designed, 5. Repairs or alterations performed by individuals other than FARHO employees or an authorized representative 6. Breakdowns provoked by atmospheric or geological phenomena (frost, storms, rains, etc.) as well as those arising from inappropriate voltage. 7. Parts or components that have received knocks during carriage or the fitting operation. 8. Cleaning operations of the appliance, or parts thereof, provoked by dirt, grease or other circumstances related to the premises where the appliance has been fitted.
The seller will have the property of parts replaced.
Farho will not be liable for damages such as the possible appearance of stains on walls and ceilings of the house motivated by dirt, dusty ambiance, or other circumstances of lack of hygiene on the room where the heater is located. Any other type of compensation is excluded, and no other type of claims, direct or indirect (including third parties) will be accepted, even in the cases where there is a lack of replacement for any given period of time.
Any other expense or related costs such as (labor, transport, food/hotel allowance, product assembly, disassembly, etc) will be payed by the buyer. It will be FARHO´s responsibility the cost of parts replaced and the time required for the replacement.
This clause is not intended to limit the liability of the manufacturer in a manner contrary to the provisions of the applicable national law nor to exclude its liability for matters that, under those rules may not be excluded.
The buyer waives the guarantee provided for in this Article, in the case of failing to meet at least one of their contractual obligations, particularly with respect to payment terms.

27
Any warranty repairs in or out of warranty, must be claimed in writing by the purchaser to the company FARHO.
As regards to the parts replaced or repaired, and only for them, the warranty period has a new beginning and expires three months after completion of the intervention of replacement or repair.
In the case where FARHO is responsible for defective products, the compensation may not exceed the amount of the purchase price of such defective products.
In any case, the company FARHO assumes no responsibility for indirect damages, including, for example, loss of customers, sales, production, profits, image, including damages to the buyer resulting from potential actions brought against third partie.

FARHO USA
12800 N.W. 38 Avenue – Miami FL 33054-4525
Tlf.: (305) 777-7262 Fax: (305) 777-7261 www.farho.com
LOW- CONSUMPTION FARHO ELECTRIC HEATERS HEATER MODEL XP Nº:……………………………………..……………………………….........................W:…………………………….…………… A …………………….……..…………… Voltage 120V 50/60 Hz SELLER/INSTALLER:……………………………………........……………….…………Name:……………………………...…………. Town/City:………...…………………. Address:…….……………………………………... Phone:…...………......…………. USER Name:…………………………………………. Town/City:……......…………………. Address:………………………..……….....….Date appliance:………………………. Nº:.……………………………………………………Seller/Installer stamp To be completed by seller/installer


FARHO USA 12800 N.W. 38 Avenue – Miami
FL 33054-4525 Tlf.: (305) 777-7262 Fax: (305) 777-7261
www.farho.com