INSTRUCTION MANUAL - Team ORION Team Orion Advantage Race Spec ENGLISH 3 ENGLISH Content Packaging...
82
INSTRUCTION MANUAL ENGLISH | GERMAN | FRENCH | ITALIAN | JAPANESE
Transcript of INSTRUCTION MANUAL - Team ORION Team Orion Advantage Race Spec ENGLISH 3 ENGLISH Content Packaging...

INSTRUCTION MANUALENGLISH | GERMAN | FRENCH | ITALIAN | JAPANESE
Team Orion Advantage Race Spec2
EN
GLIS
H
www.teamorion.com 3
EN
GLI
SH
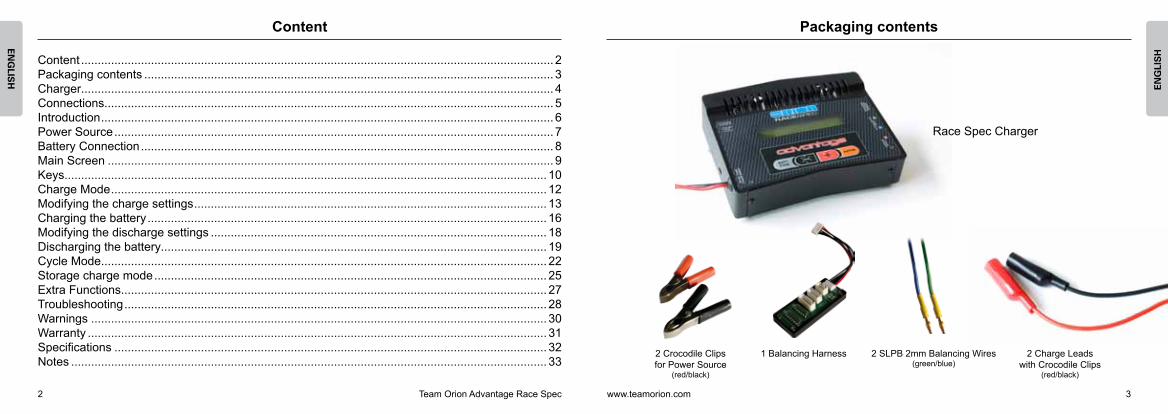
Packaging contentsContent
Race Spec Charger
2 Crocodile Clipsfor Power Source
(red/black)
1 Balancing Harness 2 SLPB 2mm Balancing Wires(green/blue)
2 Charge Leadswith Crocodile Clips
(red/black)
Content .............................................................................................................................................. 2Packaging contents ........................................................................................................................... 3Charger.............................................................................................................................................. 4Connections....................................................................................................................................... 5Introduction ........................................................................................................................................ 6Power Source .................................................................................................................................... 7Battery Connection ............................................................................................................................ 8Main Screen ...................................................................................................................................... 9Keys................................................................................................................................................. 10Charge Mode ................................................................................................................................... 12Modifying the charge settings .......................................................................................................... 13Charging the battery ........................................................................................................................ 16Modifying the discharge settings ..................................................................................................... 18Discharging the battery.................................................................................................................... 19Cycle Mode...................................................................................................................................... 22Storage charge mode ...................................................................................................................... 25Extra Functions................................................................................................................................ 27Troubleshooting ............................................................................................................................... 28Warnings ......................................................................................................................................... 30Warranty .......................................................................................................................................... 31Specifications .................................................................................................................................. 32Notes ............................................................................................................................................... 33

Team Orion Advantage Race Spec4
EN
GLIS
H
www.teamorion.com 5
EN
GLI
SH
ConnectionsCharger
Car battery connection (with SLPB balancing wire)
Connection of battery with external balancing connector
Power Supply Connection Charger and various connections available
Power supply leads (arrow)Race Spec Panel:- Batt Type- Decrease (-)- Increase (+)- Enter
Rear twin cooling fans
1 Battery Connection2 SLPB 2mm Balancing Ports3 Balancing Adapter Port
1 2 3
Team Orion Advantage Race Spec6
EN
GLIS
H
www.teamorion.com 7
EN
GLI
SH
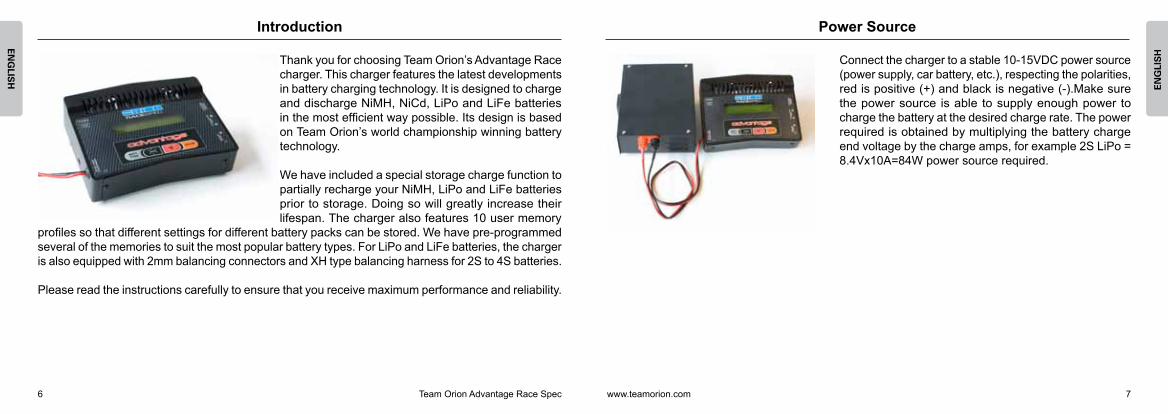
Connect the charger to a stable 10-15VDC power source (power supply, car battery, etc.), respecting the polarities, red is positive (+) and black is negative (-).Make sure the power source is able to supply enough power to charge the battery at the desired charge rate. The power required is obtained by multiplying the battery charge end voltage by the charge amps, for example 2S LiPo = 8.4Vx10A=84W power source required.
Introduction
Thank you for choosing Team Orion’s Advantage Race charger. This charger features the latest developments in battery charging technology. It is designed to charge and discharge NiMH, NiCd, LiPo and LiFe batteries in the most efficient way possible. Its design is based on Team Orion’s world championship winning battery technology.
We have included a special storage charge function to partially recharge your NiMH, LiPo and LiFe batteries prior to storage. Doing so will greatly increase their lifespan. The charger also features 10 user memory
profiles so that different settings for different battery packs can be stored. We have pre-programmed several of the memories to suit the most popular battery types. For LiPo and LiFe batteries, the charger is also equipped with 2mm balancing connectors and XH type balancing harness for 2S to 4S batteries.
Please read the instructions carefully to ensure that you receive maximum performance and reliability.
Power Source
Team Orion Advantage Race Spec8
EN
GLIS
H
www.teamorion.com 9
EN
GLI
SH
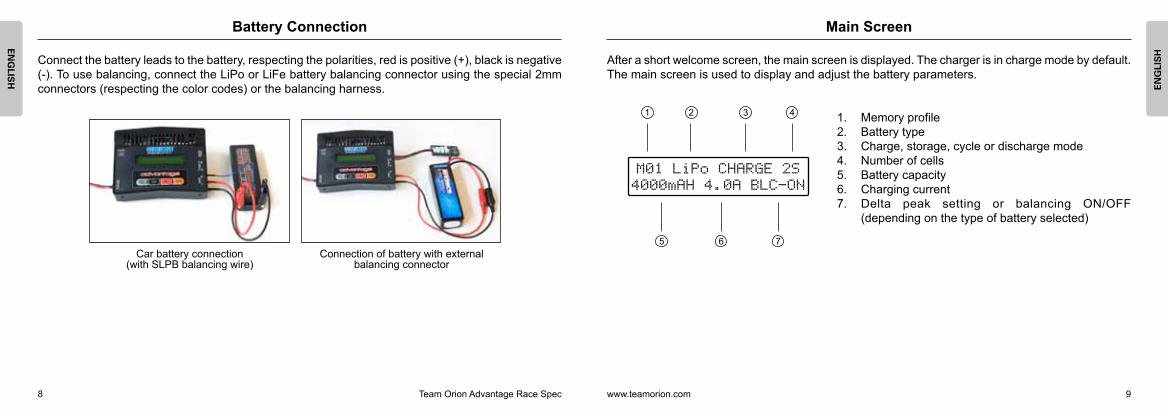
Battery Connection
Connect the battery leads to the battery, respecting the polarities, red is positive (+), black is negative (-). To use balancing, connect the LiPo or LiFe battery balancing connector using the special 2mm connectors (respecting the color codes) or the balancing harness.
Car battery connection (with SLPB balancing wire)
Connection of battery with external balancing connector
Main Screen
After a short welcome screen, the main screen is displayed. The charger is in charge mode by default. The main screen is used to display and adjust the battery parameters.
1. Memory profile2. Battery type3. Charge, storage, cycle or discharge mode4. Number of cells5. Battery capacity6. Charging current7. Delta peak setting or balancing ON/OFF
(depending on the type of battery selected)
1 2 3 4
5 6 7
Team Orion Advantage Race Spec10
EN
GLIS
H
www.teamorion.com 11
EN
GLI
SH
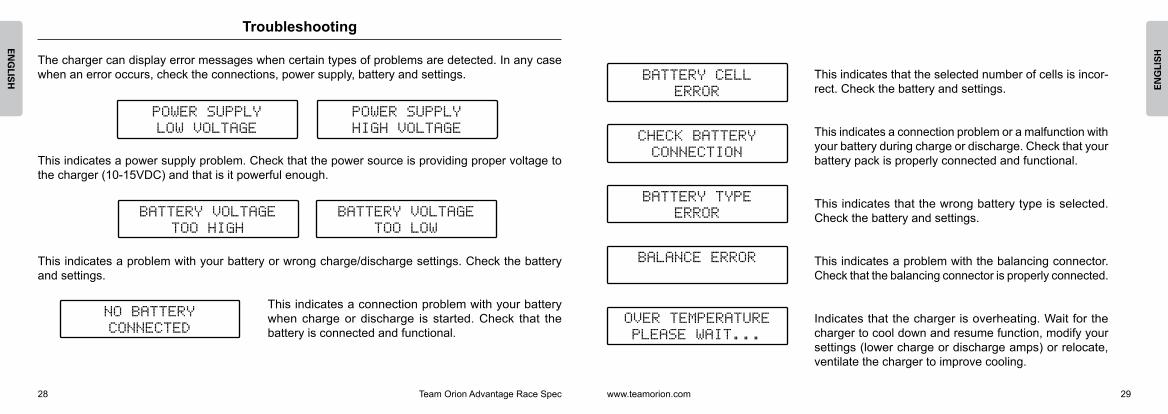
Voltage input/output display(useful for detecting power supply problems)
Battery internal resistance display
LiPo/LiFe individual cell voltage display
The BATT TYPE key is also used to display input and output voltages from the main screen and battery internal resistance or individual cell voltage (only for LiPo/LiFe with balancing connector) during or after charge and discharge.
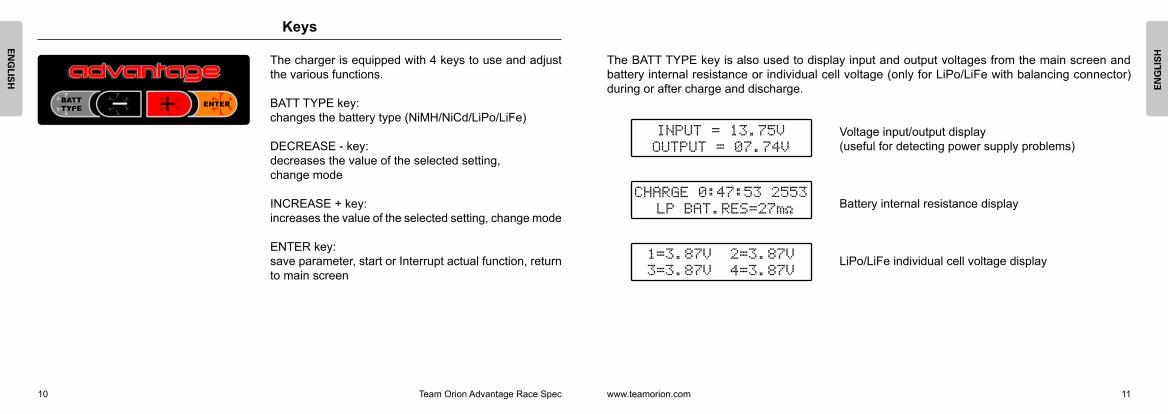
Keys
The charger is equipped with 4 keys to use and adjust the various functions.
BATT TYPE key:changes the battery type (NiMH/NiCd/LiPo/LiFe)
DECREASE - key: decreases the value of the selected setting, change mode
INCREASE + key: increases the value of the selected setting, change mode
ENTER key: save parameter, start or Interrupt actual function, return to main screen

Team Orion Advantage Race Spec12
EN
GLIS
H
www.teamorion.com 13
EN
GLI
SH
Charge Mode Modifying the charge settings
Select the memory profile referring to the battery type you wish to charge. If no compatible settings are available, you will have to make your own settings.
To make your own settings, press the ENTER key to enter setup mode. Select the memory profile to use, the battery type, the number of cells, the cell‘s capacity, the charge rate (1C by default) and depending on the battery type, the delta-peak value or if you wish to use balancing or not (only for LiPo/LiFe with balancing connector).
Once the proper settings are made, press the ENTER key until the battery check and then the charge screen appear. Your battery is now charging and the charge will be automatically interrupted once the battery is full.
Follow this procedure to modify the charge settings to meet the battery requirements. From the main screen, use “+” or “-“ to select charge mode (indicated by CHARGE).
Every memory profile contains settings for each type of battery compatible with the charger. The new settings will be automatically saved to the memory profile which is actually in use.Use settings compatible with your battery, always follow the battery manufacturer’s indications.
1. Press the ENTER key, the memory profile selection will blink; use the + or - keys to select the memory profile you wish to use, from 1 to 10.
LiPo/LiFe battery charge screen NIMH/NICD battery charge screen
Warning: If you are not familiar with charging batteries, read these instructions carefully. You must use the proper settings to charge your batteries in a safe and reliable way. Using incorrect settings can result in damage to personal property and be harmful to people. Always follow the manufacturer’s charge recommendations.

Team Orion Advantage Race Spec14
EN
GLIS
H
www.teamorion.com 15
EN
GLI
SH
2. Press the ENTER key, the battery type selection will blink; use the BATT TYPE key to select the type of battery, NiCd, NiMH, LiPo or LiFe.
3. Press the ENTER key, the number of cells selection will blink; use the + or - keys to selectthe number of cells, from 1 to 10 NiCd/NiMH and 1 to 4 LiPo/LiFe.
4. Press the ENTER key, the capacity selection will blink; use the + or - keys to select the capacity (200 to 9900mAh). As an extra safety measure when charging a NiMH or NiCd battery, the charger will stop charging if the selected capacity is reached, whether the battery really is 100% full or not.
5. Press the ENTER key, the charge current selection will blink (1C by default), use the +or - keys to select a different charge current (0.2 to 10A).
6. Press the ENTER key, depending on the battery type you have selected, the delta-peak value selection or the balancing selection will blink. Use the + or - keys to select the delta-peak value (1-20mV/cell) or to switch charge cell balancing ON or OFF (LiPo or LiFe battery only).
7. Press the ENTER key again, the setup is completed.
Charge CurrentThe charge current is automatically adjusted in relation to the capacity setting. A higher charge current will charge your battery faster, but it can also overheat and damage the battery. Only change this setting if you are an experienced user.
Delta-peak adjustmentDuring charge, a NiCd/NiMH battery voltage increases until the battery is full. Once the battery is full the battery voltage begins to drop. The delta-peak system measures this drop in voltage and interrupts the charge once the preset voltage drop value has been reached. A certain amount of overcharge is usually required to ensure the highest performance from the cells. A higher value will overcharge your batteries more and a lower value will overcharge your batteries less. Usually NiCd batteries require a higher value (10mV-20mV/cell) and NiMH batteries require a lower value (0mV-10mV/cell). It is recommended to use the lowest value that will allow your battery to fully charge without false peaking (premature delta-peak cutoff). This setting is greatly influenced by the quality of the battery you are charging, its age and its wear level.
Balancing Cell balancing equalizes all the cells within LiPo and LiFe batteries. Balancing ensures optimal charge and performance and increases safety. Cell balancing can take a long time to complete if the level of unbalance is high.
If balancing is switched on, the balancing connectors must be connected; if balancing is switched off the balancing connectors are not required. The charger is equipped with two 2mm balancing connectors and another connector allows the use of a balancing harness. Different types of balancing connectors exist and each type requires its own compatible harness.
Note: Only disable balancing if you understand the underlying risks and disadvantages.

Team Orion Advantage Race Spec16
EN
GLIS
H
www.teamorion.com 17
EN
GLI
SH
Charging the battery
After you have selected the right parameters and con-nected the battery, press and hold the ENTER key. The battery check will be displayed.
If the battery is properly connected and functional the charge screen will be displayed.
While charging NiMH/NiCd batteries, the charge might be interrupted before the battery is fully charged (battery should be slightly warm to the touch if it is charged). If this is the case you may restart the charge process again or try using a higher delta-peak value.
With LiPo or LiFe batteries, if the voltage is too low, the charger will perform a slow charge to increase the voltage of the cells inside the battery before starting the fast charge. Cell balancing will only take place at the end of the fast charge; cell balancing can take a long time to complete if the level of unbalance is high. While balancing, the charger will display the „LIPO BALANCE“ message.
Note: Depending on the conditions of use, the charger thermal protection might activate so that the charger can cool down. After a brief interruption the charge will resume and continue normally.
The charge will be interrupted when anyone of these conditions is met:
• the automatic delta-peak cut-off system activates• the charged capacity reaches the preset value (for NiMH/NiCd)• the charger software has determined that the LiPo/LiFe battery is full.
Press the ENTER key to display the final charge data, indicating the total charge time, total charged capacity (in mAh), the battery’s peak voltage (for NiMH/NiCd) and the battery’s final voltage.
Press the BATT TYPE key to display the battery internal resistance or individual cell voltage (only for LiPo/LiFe with balancing connector). Press the ENTER key to go back to the charge screen
At the end of the charge cycle, the “BATTERY CHARGE COMPLETE” message will appear.
Charge end data LiPo/LiFe Charge end data NiMH/NiCd

Team Orion Advantage Race Spec18
EN
GLIS
H
www.teamorion.com 19
EN
GLI
SH
Follow this procedure to modify the discharge settings from the main screen, use the + or -keys to select discharge mode from the main screen (indicated by “DISCHARGE”).
You can change the settings if required:
1. Press the ENTER key, the discharge current selection will blink, use the + or - keys to select a different discharge current (0.1A to 10A, 80W maximum).
2. Press the ENTER key, the discharge cut-off voltage selection will blink, use the + or - keys to select a different cut-off voltage. The limit is 0.7V for NiCd/NiMH, 2.8V/cell for LiPo and 2.5V/cell for LiFe.
Modifying the discharge settings
The charger will display the default settings for the selected type of battery.
Discharging the battery
After you have selected the right parameters to discharge your battery, press and hold the ENTER key. The battery check will be displayed.
If the battery is properly connected and functional the discharge screen will be displayed.
The charger will discharge the batteries down to cutoff value.
With LiPo and LiFe batteries, if the battery voltage is over the cutoff limit, the charger will balance the cells (if required and balancing mode is switched on) and then discharge the battery down to the cutoff limit. When balancing, the screen will display the „LIPO BALANCE“ message.
After discharge It is recommended to recharge LiPo and LiFe batteries as they can be damaged if stored empty.
Note: Depending on the conditions of use, the charger thermal protection might activate so that the charger can cool down. After a brief interruption the discharge will resume and continue normally.
Note: Changing the default cut-off voltage setting to a lower value can damage the battery. Only modify this setting if you are an experienced user.

Team Orion Advantage Race Spec20
EN
GLIS
H
www.teamorion.com 21
EN
GLI
SH
Press the BATT TYPE key to display the battery internal resistance and individual cell voltage (only for LiPo/LiFe with balancing connector).
Discharge capacityA battery discharge capacity indicates the storage capacity of a battery. A battery with a higher discharge capacity will give more effective run-time than a battery with a lower discharge capacity (if tested and used in the same conditions).
Average discharge voltageA battery average discharge voltage indicates the power output of the battery at a determined di-scharge rate. A battery with a higher value will be more powerful than a battery with a lower value (if tested and used in the same conditions).
At the end of the discharge cycle, the “BATTERY DI-SCHARGE COMPLETE” message will appear.
Press the ENTER key to display the final discharge data, indicating the total discharge time, total discharged capacity (in mAh), battery’s average discharge voltage and the battery’s final voltage.
Internal resistanceA battery internal resistance is an indicator of the battery performance. In general, a battery with a lower value will be more powerful than a similar battery with a higher value (if tested and used in the same conditions). You cannot compare batteries using different chemistries.
Press the ENTER key to return to the discharge screen.

Team Orion Advantage Race Spec22
EN
GLIS
H
www.teamorion.com 23
EN
GLI
SH
Cycle Mode
From the main screen, use the + or - keys to select the cycle mode from the main screen (indicated by “CYCLE MODE”). The cycle mode is used to do an automatic charge->discharge or discharge->charge cycle to your batteries. Cycling is useful for checking your batteries performance and regenerating batteries which have been stored for a certain period of time.
After you have selected the cycling mode, press and hold the ENTER key. The battery check will be displayed.
The charger uses the actual charge and discharge settings. Make sure that these settings are compatible with the battery.
From the cycle screen, press “ENTER” and use “+” or “-“ to select if you want to make a charge-> discharge or discharge->charge cycle to your battery. To regenerate batteries, use the charge-> discharge cycle. It is recommended to use only low discharge currents for discharge->charge cycling as high currents can overheat and damage the battery.
Depending on the type of cycle you have selected, the charge or discharge screen will be displayed.
After discharge It is recommended to recharge LiPo batteries as they can be damaged if stored empty. Once the cycle is complete, the “CYCLE COMPLETE” message is displayed”.
Charge screen
Charge->discharge cycle end screen
Discharge screen
Discharge->charge cycleend screen
Note: depending on the conditions of use, the charger thermal protection might activate so that the charger can cool down. After a brief interruption the charge or discharge will resume and continue normally.

Team Orion Advantage Race Spec24
EN
GLIS
H
www.teamorion.com 25
EN
GLI
SH
Press the ENTER KEY to display the final charge or discharge data (depending on the cycle mode).
Press the BATT TYPE key to display the battery internal resistance and individual cell voltage (only for LiPo/LiFe with balancing connector).
Press the ENTER key to go back to the cycle screen.
Charge end data screen Discharge end data
Storage charge mode
From the main screen, press the + or – key to select storage mode (indicated by „STORAGE“).The special storage mode will discharge and/or recharge your NiMH, NiCd, LiPo or LiFe battery so that it is in optimal state for storage. Doing this will minimize the risk of cell damage due to deep discharge if the battery is stored for a long period of time.
Press and hold the ENTER key. The battery check will be displayed.
The charge and discharge settings of the actual memory profile will be used, make sure that the settings are compatible with the battery.
If the battery is properly connected and functional, the storage charge will start. If the selected battery type is NiMH or NiCd, the battery will be discharged, then recharged to 50% of the selected capacity.
With LiPo and LiFe batteries, the battery will be recharged and balanced to 3.85V/cell for LiPo and 3.3V/cell for LiFe. If the voltage is above 3.85V/cell for LiPo and 3.3V/cell for LiFe, the storage charge will stop as there is enough energy stored inside the batteries for a safe storage.

Team Orion Advantage Race Spec26
EN
GLIS
H
www.teamorion.com 27
EN
GLI
SH
Press the BATT TYPE key to display the battery internal resistance and individual cell voltage in LiPo and LiFe mode (if the balancing connector is used). Press the ENTER key to go back to the storage screen.
Charge screen Discharge screen
Note: depending on the conditions of use, the charger thermal protection might activate so that the charger can cool down. After a brief interruption the charge/discharge will resume and continue normally.
At the end of the storage charge cycle, the “BATTERY STORAGE COMPLETE” message will appear.
Press the ENTER key to display the final charge data, indicating the total charge time, total charged capacity (in mAh) and the battery’s final voltage.
Extra Functions
To switch the buzzer off (on by default), press and hold the - key while powering up the charger. To switch the buzzer on, press and hold the + key while powering up the charger.
To display the actual input and output voltages, press and hold the BATT TYPE key from the charge main screen.
The decrease - and increase + keys are also used to switch the LCD backlight on or off when the charger is charging or discharging.
Team Orion Advantage Race Spec28
EN
GLIS
H
www.teamorion.com 29
EN
GLI
SH
Troubleshooting
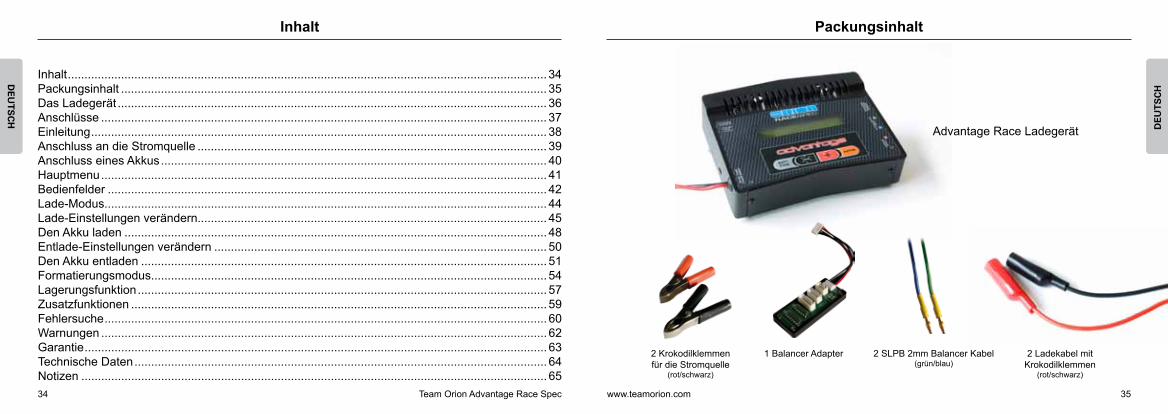
The charger can display error messages when certain types of problems are detected. In any case when an error occurs, check the connections, power supply, battery and settings.
This indicates a power supply problem. Check that the power source is providing proper voltage to the charger (10-15VDC) and that is it powerful enough.
This indicates a problem with your battery or wrong charge/discharge settings. Check the battery and settings.
This indicates a connection problem with your battery when charge or discharge is started. Check that the battery is connected and functional.
This indicates that the selected number of cells is incor-rect. Check the battery and settings.
This indicates a connection problem or a malfunction with your battery during charge or discharge. Check that your battery pack is properly connected and functional.
This indicates that the wrong battery type is selected. Check the battery and settings.
This indicates a problem with the balancing connector. Check that the balancing connector is properly connected.
Indicates that the charger is overheating. Wait for the charger to cool down and resume function, modify your settings (lower charge or discharge amps) or relocate, ventilate the charger to improve cooling.

Team Orion Advantage Race Spec30
EN
GLIS
H
www.teamorion.com 31
EN
GLI
SH
Warnings
• Always setup the charger parameters according to your batteries manufacturer specifications. • This charger is only designed to charge LiPo or LiFe batteries with 1 to 4 cells and NiMH or NiCd
batteries with 1 to 10 cells. • Never leave the charger unsupervised while it is powered on. • Never let children operate the charger without supervision from an adult. • Use the charger in a well ventilated area, away from people and electrically conductive or
inflammable materials. • The charger and batteries can become hot during use. Take great care before handling them.• If the battery has suspicious reactions during the charge or discharge, such as overheating,
venting or leaking, immediately disconnect the battery and store it in a safe location, away from people and inflammable materials.
Warranty
Team Orion guarantees this product to be free from manufacturing and workmanship defects. The warranty does not cover incorrect installation, components worn by use, or any other problem resulting from incorrect use or handling of the product. No liability will be accepted for any damage resulting from the use of this product. By the act of connecting and operating this product, the user accepts all resulting liability.
Is considered incorrect use:
• Failure to follow instructions.• Improper use of the product (abusive use, out of spec, etc.).• Failure to adapt settings for proper function (improper connections, wrong gearing, installation,
setup, etc.).• Overload, overheating (desoldering, melting, etc.).• Running in inadequate conditions (damage or rust from rain, humidity, etc.).• Improper maintenance (presence of dirt, etc.).• Disassembly, modification by the user (modifying original connectors, wires, components, etc.).• Mechanical damage due to external causes.

Team Orion Advantage Race Spec32
EN
GLIS
H
www.teamorion.com 33
EN
GLI
SH
Specifications
Circuit Microprocessor controlled advanced digital circuitCharging Mode: fast charge, CC/CV and special storage modeCharging Capability: NiMH/NiCd 1-10 cells, LiPo/LiFe 1-4 cellsCharge current: adjustable 0.2-10ABalancing: adjustable on/offDelta peak: adjustable 0-20mV/cellDischarge Current: adjustable 0.1-10A (variable with number of cells,75W max)Discharge Cut-off Voltage: adjustableUser Profile Memory: 10Display: Laser Blue LCDMulti-Protection System: Input and output reverse polarity protectionInput Voltage: 10-15 VDCDimensions: 155x120x50mmWeight: 702gr
Notes
Team Orion Advantage Race Spec34
DE
UT
SC
H
www.teamorion.com 35
DE
UT
SC
H
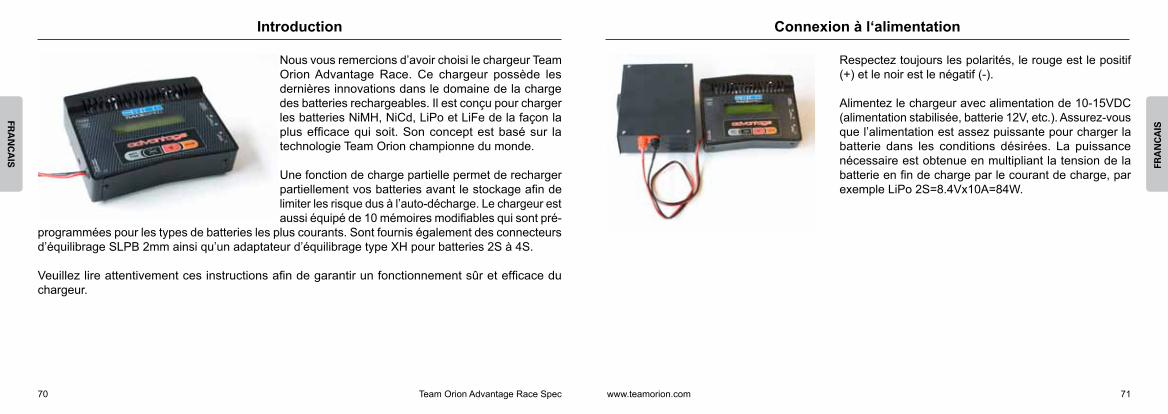
PackungsinhaltInhalt
Advantage Race Ladegerät
2 Krokodilklemmenfür die Stromquelle
(rot/schwarz)
1 Balancer Adapter 2 SLPB 2mm Balancer Kabel(grün/blau)
2 Ladekabel mitKrokodilklemmen
(rot/schwarz)
Inhalt ................................................................................................................................................ 34Packungsinhalt ................................................................................................................................ 35Das Ladegerät ................................................................................................................................. 36Anschlüsse ...................................................................................................................................... 37Einleitung ......................................................................................................................................... 38Anschluss an die Stromquelle ......................................................................................................... 39Anschluss eines Akkus .................................................................................................................... 40Hauptmenu ...................................................................................................................................... 41Bedienfelder .................................................................................................................................... 42Lade-Modus..................................................................................................................................... 44Lade-Einstellungen verändern......................................................................................................... 45Den Akku laden ............................................................................................................................... 48Entlade-Einstellungen verändern .................................................................................................... 50Den Akku entladen .......................................................................................................................... 51Formatierungsmodus....................................................................................................................... 54Lagerungsfunktion ........................................................................................................................... 57Zusatzfunktionen ............................................................................................................................. 59Fehlersuche ..................................................................................................................................... 60Warnungen ...................................................................................................................................... 62Garantie ........................................................................................................................................... 63Technische Daten ............................................................................................................................ 64Notizen ............................................................................................................................................ 65

Team Orion Advantage Race Spec36
DE
UT
SC
H
www.teamorion.com 37
DE
UT
SC
H
AnschlüsseDas Ladegerät
Anschluss eines LiPo-Akkus für Autos (mit SLPB Balancer Kabel)
Anschluss eines Akkus mit demBalancer Adapter
Anschluss an dieStromquelle
Anschluss der Kabelans Gerät
Anschlusskabel für die Stromquelle (Pfeil)
Race Spec Bedienfelder:- Batt Type- Vermindern (-)- Erhöhen (+)- Enter
Rückseite mit zwei Ventilatoren
1 Akku-Anschluss2 SLPB 2mm Balancer Anschluss3 Balancer Adapter Anschluss
1 2 3

Team Orion Advantage Race Spec38
DE
UT
SC
H
www.teamorion.com 39
DE
UT
SC
H
Verbinden Sie das Ladegerät mit einer stabilisierten 10-15V DC Stromquelle (Netzgerät, Autobatterie etc.). Sorgen Sie dafür, dass die Stromquelle genug Leistung abgibt, um die erforderlichen Ladeströme zu erreichen. Die erforderliche Leistung kann berechnet werden, indem man die Endspannung des Akkus mit dem Ladestrom multipliziert. Beispiel für einen 2S LiPo Akku: 8.4Vx10A=84W. Es ist also eine Stromquelle mit mindestens 84W erforderlich.
Einleitung
Vielen Dank, dass Sie sich für den Team Orion Clubman LiPo Edition Lader entschieden haben. Dieses Gerät ist mit der neusten Ladetechnologie ausgestattet.Dieser Lader ist konstruiert worden, um Akkus des Typs NiMH, NiCd, LiPo und LiFe möglichst effizient zu laden und entladen. Das Design basiert auf der Erfahrung von Team Orion, dank der schon zahlreiche Weltmeistertitel gewonnen werden konnten.
Wir haben eine spezielle Lagerungs-Ladung entwickelt, um NiMH-, LiPo- und LiFe-Akkus partiell zu laden und so optimal zu lagern. Dies verlängert die Lebensdauer
Ihrer Akkus. Der Lader ist mit 10 Speicherplätzen ausgestattet, die es erlauben, verschiedene Ein-stellungen zu speichern. Für die wichtigsten Akku-Typen haben wir Speicherplätze vorprogrammiert.Für LiPo- und LiFe-Akkus ist der Lader mit einem 2mm Balancer-Anschluss und einem XH-Anschluss für 2S und 4S Akkus ausgestattet.
Bitte lesen Sie diese Anleitung sorgfältig durch, um Ihr Gerät optimal und sicher zu nutzen.
Anschluss an die Stromquelle

Team Orion Advantage Race Spec40
DE
UT
SC
H
www.teamorion.com 41
DE
UT
SC
H
Anschluss eines Akkus
Schliessen Sie den Akku ans Gerät. Beachten Sie dabei die korrekte Polung, rot für positiv (+) und schwarz für negativ (-). Verbinden Sie den Balancer-Anschluss Ihres LiPo oder LiFe Akkus mit dem korrekten Balancer-Anschluss des Geräts, um die Balancer-Funktion zu verwenden.
Anschluss eines LiPo-Akkus für Autos (mit SLPB Balancer Kabel)
Anschluss eines Akkus mit demBalancer Adapter
Hauptmenu
Nach einem Begrüssungsbildschirm wird das Hauptmenu erscheinen. Der Lader befindet sich im Lade-Modus. Das Hauptmenu enthält die folgenden Parameter:
1. Speicherposition2. Akku-Typ3. Modus (Laden, Entladen oder Lagern)4. Anzahl Zellen5. Kapazität6. Ladestrom7. Delta Peak- oder Balancer-Einstellung ON/OFF
(abhängig vom gewählten Akku-Typ)
1 2 3 4
5 6 7

Team Orion Advantage Race Spec42
DE
UT
SC
H
www.teamorion.com 43
DE
UT
SC
H
Eingangs- und Ausgangsspannung(nützlich, um Probleme mit der Stromquelle zu erkennen)
Anzeige des Innenwiderstands
Anzeige der individuellen Zellspannung bei LiPo und LiFe Akkus
Bedienfelder
Der Lader ist mit vier Tasten ausgestattet, um die ver-schiedenen Einstellungen vornehmen zu können.
BATT TYPE Taste:Ändert den Akku-Typ (NiMH/NiCd/LiPo/LiFe)
Verkleinern - Taste:Vermindert den gewählten Wert
Vergrössern + Taste:Erhöht den gewählten Wert
ENTER Taste: Zum nächsten Parameter wechseln, aktuelle Funktion starten/stoppen, zurück zum Hauptmenu
Die BATT TYPE Taste wird auch verwendet, um die Eingangs- und Ausgangsspannung anzuzeigen (ausgehend vom Hauptmenu). Auch kann damit während oder nach der Ladung/Entladung der Innenwiderstand oder die individuelle Zellspannung angezeigt werden (nur für LiPo/LiFe Akkus und mit Verwendung des Balancer-Kabels)

Team Orion Advantage Race Spec44
DE
UT
SC
H
www.teamorion.com 45
DE
UT
SC
H
Lade-Modus Lade-Einstellungen verändern
Wählen Sie das gewünschte Speicherprofil für den Akku-Typ, den Sie laden möchten. Wenn keine passenden Einstellungen vorhanden sind, müssen Sie Ihr eigenes Speicherprofil erstellen.
Hierzu drücken Sie ENTER, um zum Setup-Modus zu gelangen. Wählen Sie den Speicherplatz, den Akku-Typ, die Anzahl Zellen, die Kapazität, die Laderate (1C ist Standard) und - abhängig vom verwendeten Akku-Typ - den Delta-Peak Wert oder bestimmen Sie, ob Sie den Balancer verwenden möchten oder nicht (nur für LiPo/LiFe Akkus mit Balancer-Anschluss).
Sobald Sie die korrekten Einstellungen vorgenommen haben, drücken Sie ENTER bis der Bildschirm „BATTERY CHECK“ und anschliessen das Lademenu angezeigt werden. Ihr Akku wird nun geladen und automatisch unterbrochen, wenn er voll ist.
Folgen Sie diesen Anweisungen, um die Ladeeinstellungen Ihrem Akku anzupassen. Drücken Sie im Hauptmenu “+” oder “-“ um den Lademodus zu wählen (CHARGE).
Jede Speicherposition kann je ein Profil pro Akku-Typ abspeichern. Die Einstellungen werden auto-matisch in die aktuell gewählte Speicherposition gespeichert. Verwenden Sie nur Werte, die mit Ihrem Akku kompatibel sind und befolgen Sie die Anweisungen des Akku-Herstellers.
1. Drücken Sie ENTER. Der Speicherplatz blinkt. Verwenden Sie + und -, um den gewünschten Speicherplatz von 1 bis 10 zu bestimmen.
LiPo/LiFe Lademenu NiMH/NiCd Lademenu
Warning: Wenn Sie mit dem Laden von Akkus nicht vertraut sind, lesen Sie die folgenden Be-schreibungen sorgfältig durch. Um die Akkus sicher und verlässlich laden zu können, sollten Sie die richtigen Einstellungen verwenden. Falsche Einstellungen können das Umfeld beschädigen und Personen verletzen. Befolgen Sie immer die Lade-Anweisungen des Akku-Herstellers.

Team Orion Advantage Race Spec46
DE
UT
SC
H
www.teamorion.com 47
DE
UT
SC
H
2. Drücken Sie ENTER. Der Akku-Typ blinkt. Verwenden Sie die BATT TYPE Taste, um den ge-wünschten Akku-Typ zu wählen (NiCd, NiMH, LiPo oder LiFe).
3. Drücken Sie ENTER. Die Anzahl Zellen blinkt. Verwenden Sie + und -, um die Anzahl Zellen zu bestimmen (1 bis 10 bei NiCd/NiMH Akkus, 1 bis 4 bei LiPo/LiFe Akkus).
4. Drücken Sie ENTER. Die Kapazität blinkt. Verwenden Sie + und -, um die korrekte Kapazität einzustellen (200 bis 9900mAh). Bei NiMH und NiCd Akkus wird die Ladung bei dieser Kapazität gestoppt, egal, ob der Akkus 100% voll ist oder nicht. Dies ist eine Sicherheitsmassnahme.
5. Drücken Sie ENTER. Der Ladestrom blinkt (Standardeinstellung: 1C). Verwenden Sie + und -, um den Ladestrom eintzustellen (0.2 bis 10A)
6. Drücken Sie Enter. Je nach gewähltem Akku-Typ wird der Delta Peak Wert oder die Balancer-Einstellung blinken. Verwenden Sie + und -, um den Delta Peak Wert (1-20mV/Zelle) zu wählen oder die Balancer Funktion ein- bzw. auszuschalten (nur bei LiPo oder LiFe Akkus).
7. Drücken Sie ENTER, um das Setup abzuschliessen.
LadestromDer Ladestrom wird automatisch im Verhältnis zur gewählten Kapazität des Akkus gewählt. Ein höherer Ladestrom wird den Akku schneller laden, aber er kann überhitzen und bei zu hohem Strom Schaden nehmen. Ändern Sie diese Einstellung deshalb nur, wenn Sie ein erfahrener Anwender sind.
Delta Peak EinstellungWährend der Ladung steigt die Spannung eines NiCd/NiMH Akkus. Sobald der Akku voll ist, beginnt die Spannung zu sinken. Das Delta Peak System misst diesen Spannungsabfall und unterbricht die Ladung, wenn die Abfall so gross ist, wie der eingestellte Delta Peak Wert im Ladegerät.Für beste Leistungswerte ist es meist angebracht, den Akku leicht zu „überladen“. Ein hoher Delta Peak Wert überlädt den Akku mehr, ein tieferer überlädt ihn weniger. Normalerweise benötigen NiCd Akkus einen höheren Wert (10mV-20mV/Zelle) und NiMH Akkus einen tieferen Wert (0mV-10mV/Zelle)Wir empfehlen, den Akku mit dem tiefst möglichen Delta Peak Wert zu laden, ohne zu früh abzu-schalten (wenn der Wert zu tief ist, kann eine „normale“ Spannungsschwankung während der Ladung fälschlicherweise als Lade-Ende interpretiert werden). Der Delta Peak Wert hängt von der Qualität der Zelle, deren Alter und Abnützung ab.
BalancingBalancing ist das abgleichen der Zellen eines LiPo oder LiFe Akkus. Es optimiert die Ladung und Leistung und erhöht die Sicherheit. Das Balancen kann viel Zeit in Anspruch nehmen, wenn die Zellbalance sehr unterschiedlich ist.
Wenn das Balancen eingeschaltet ist, muss das Balancer-Kabel angeschlossen sein; wenn es ausgeschaltet ist, ist das Balancer-Kabel nicht erforderlich. Der Lader ist mit zwei 2mm Balancer-Anschlüssen ausgestattet. Ein weiterer Anschluss ist für den Balancer-Adapter vorhanden. Es existie-ren verschiedene Balancer-Anschlüsse auf dem Markt, weshalb das passende Kabel erforderlich ist.
Achtung: Schalten Sie das Balancen nur aus, wenn Sie die Gefahren und Nachteile kennen.

Team Orion Advantage Race Spec48
DE
UT
SC
H
www.teamorion.com 49
DE
UT
SC
H
Den Akku laden
Wenn Sie die korrekten Einstellungen vorgenommen und den Akku angeschlossen haben, drücken und halten Sie die ENTER bis der Battery Check Bildschirm erscheint.
Wenn der Akku funktionstüchtig ist, erscheint das Lade-Menu.
Bei NiMH/NiCd Akkus kann die Ladung unterbrochen werden, bevor die Ladung vollständig ist (der Akku sollte leicht warm werden, wenn er vollgeladen ist). Wenn dies der Fall ist, starten Sie die Ladung erneut und verwenden Sie gegebenfalls einen höheren Delta Peak Wert.
Wenn die Spannung eines LiPo oder LiFe Akkus zu tief ist, wird das Ladegerät zuerst eine Langsam-ladung starten, um die Spannung zu erhöhen. Erst danach beginnt die Schnellladung. Das Balancen wird erst am Ende der Schnellladung vorgenommen; dieser Vorgang kann viel Zeit in Anspruch nehmen, wenn die Zellen in sehr unbalanciertem Zustand sind. Während dem Balancen erscheint die Meldung „LIPO BALANCE“.
Bemerkung: Je nach äusseren Bedingungen kann der Lader den Hitzeschutz einschalten, damit er abkühlen kann. Nach einem kurzen Unterbruch wird der laufende Vorgang wieder fortgesetzt.
Das Ladegerät unterbricht die Ladung, sobald eine der folgenden Bedingungen erfüllt ist:
• die automatische Delta Peak Abschaltung wird aktiviert• die maximale Kapazität wird erreicht (bei NiMH/NiCd Akkus)• die Ladesoftware hat die Volladung der LiPo/LiFe Zellen erkannt
Drücken Sie ENTER, um die Ladedaten anzuzeigen: totale Ladezeit, geladene Kapazität (in mAh), die Abschaltspannung (NiMH/NiCd) und die Ladeendspannung des Akkus.
Drücken Sie BATT TYPE, um den Innenwiderstand des Akkus oder die individuelle Zellspannung (nur für LiPo/LiFe mit eingestecktem Balancer-Kabel) anzuzeigen. Drücken Sie ENTER, um wieder zum Lademenu zu gelangen.
Am Ende der Ladung erscheint die Meldung“BATTERY CHARGE COMPLETE”
Lade-Enddaten bei LiPo/LiFe Lade-Enddaten bei NiMH/NiCd

Team Orion Advantage Race Spec50
DE
UT
SC
H
www.teamorion.com 51
DE
UT
SC
H
Folgen Sie diesen Anweisungen, um die Entladeeinstellungen Ihrem Akku anzupassen. Drücken Sie im Hauptmenu “+” oder “-“ um den Entlademodus zu wählen (DISCHARGE).
So können Sie die Einstellungen abändern:
1. Drücken Sie ENTER. Der Entladestrom blinkt. Verwenden Sie + und -, um einen anderen Entla-destrom zu wählen (0.1 bis 10A, maximal 80W)
2. Drücken Sie ENTER. Die Abschaltspannung blinkt. Verwenden Sie + und -, um einen anderen Wert zu wählen. Das Limit liegt bei 0.7V für NiCd/NiMH, 2.8V/Zelle für LiPo und 2.5V/Zelle bei LiFe.
Entlade-Einstellungen verändern
Der Lader zeigt die Standard-Einstellungen für den entsprechenden Akku-Typ an.
Den Akku entladen
Wenn Sie die korrekten Einstellungen vorgenommen und den Akku angeschlossen haben, drücken und halten Sie die ENTER bis der Battery Check Bildschirm erscheint.
Wenn der Akku funktionstüchtig ist, erscheint das Entlade-Menu.
Der Akku wird bis Erreichen der Abschaltspannung entladen.
Bei LiPo und LiFe Akkus wird der Balancer-Vorgang gestartet, falls die Zellspannung über der Ab-schaltspannung liegt (falls notwendig und die Funktion eingeschaltet ist). Danach findet die Entladung bis Erreichen der Abschaltspannung statt. Während dem Balancer-Vorgang erscheint die Meldung „LIPO BALANCE“.
Wir empfehlen, LiPo und LiFe Akkus nach der Entladung zu laden, da diese Akkus beschädigt werden können, wenn sie leer gelagert werden.
Bemerkung: Je nach äusseren Bedingungen kann der Lader den Hitzeschutz einschalten, damit er abkühlen kann. Nach einem kurzen Unterbruch wird der laufende Vorgang wieder fortgesetzt.
Bemerkung: Eine zu tiefe Abschaltspannung kann den Akku beschädigen. Verändern Sie diesen Wert nur, wenn Sie ein erfahrener Anwender sind.

Team Orion Advantage Race Spec52
DE
UT
SC
H
www.teamorion.com 53
DE
UT
SC
H
Drücken Sie BATT TYPE, um den Innenwiderstand des Akkus und die individuelle Zellspannung (nur für LiPo/LiFe mit eingestecktem Balancer-Kabel) anzuzeigen.
Entladene KapazitätDie entladene Kapazität entspricht der Kapazität die der Akku speichern kann. Ein Akku mit einem höheren Wert ermöglicht längere Fahrzeiten als ein Akku mit einem tieferen Wert (unter gleichen Bedingungen getestet).
Durchschnitts-EntladespannungDie Durchschnitts-Entladespannung gibt Aufschluss über die Leistungsabgabe eines Akkus bei einem bestimmten Entladestrom. Ein Akku mit einem höheren Wert ist leistungsfähiger als ein Akku mit einem tieferen Wert (unter gleichen Bedingungen getestet).
Am Ende der Entladung erscheint die Meldung“BATTERY DISCHARGE COMPLETE”
Drücken Sie ENTER, um die Entladeenddaten anzu-zeigen: totale Entladezeit, total entladene Kapazität (in mAh), Durchschnitts-Entladespannung und die Entladeendspannung.
InnenwiderstandDer Innenwiderstand eines Akkus ist ein Hinweis auf seine Leistung. Generell ist ein Akku mit einem tieferen Innenwiderstand leistungsfähiger als ein Akku mit einem höheren Innenwiderstand (unter gleichen Bedingungen getestet). Innenwiderstände verschiedener Akku-Typen zu vergleichen ist jedoch nicht sinnvoll.
Drücken Sie ENTER, um zum Entlade-Menuzu gelangen

Team Orion Advantage Race Spec54
DE
UT
SC
H
www.teamorion.com 55
DE
UT
SC
H
Formatierungsmodus
Wählen Sie im Hauptmenu mit + und - den Formatie-rungsmodus (“CYCLE MODE”). Dieser Modus erlaubt eine automatische Ladung->Entladung oder Entladung-> Ladung des Akkus. So kann der Zustand des Akkus ermittelt werden und Akkus, die lange gelagert wurden, können wieder aktiviert werden.
Wenn Sie die korrekten Einstellungen vorgenommen und den Akku angeschlossen haben, drücken und halten Sie die ENTER bis der Battery Check Bildschirm erscheint.
Der Lader verwendet die Lade- und Entladeeinstellungen, die sich im aktuellen Speicherprofil ver-wenden. Kontrollieren Sie, dass diese korrekt sind.
Drücken Sie im Formierungs-Menu ENTER und definieren Sie mit + und -, ob eine Ladung->Entladung oder eine Entladung->Ladung durchgeführt werden soll. Um ältere Akkus zu regenerieren, verwenden Sie Ladung->Entladung. Verwenden Sie bei Entladung->Ladung nur tiefe Entladeströme, da zu hohe Ströme den Akku beschädigen können.
Je nach gewähltem Modus wird der Lade- oder der Entladebildschirm angezeigt.
Wir empfehlen, LiPo und LiFe Akkus nach der Entladung zu laden, da diese Akkus beschädigt werden können, wenn sie leer gelagert werden. Am Ende des Vorgangs erscheint die Meldung“BATTERY DISCHARGE COMPLETE”
Lade-Bildschirm
Ende derLadung->Entladung
Entlade-Bildschirm
Ende derEntladung->Ladung
Bemerkung: Je nach äusseren Bedingungen kann der Lader den Hitzeschutz einschalten, damit er abkühlen kann. Nach einem kurzen Unterbruch wird der laufende Vorgang wieder fortgesetzt.

Team Orion Advantage Race Spec56
DE
UT
SC
H
www.teamorion.com 57
DE
UT
SC
H
Drücken Sie ENTER, um die entsprechenden Ladeenddaten anzuzeigen (je nach gewähltem Modus)
Drücken Sie BATT TYPE, um den Innenwiderstand des Akkus und die individuelle Zellspannung (nur für LiPo/LiFe mit eingestecktem Balancer-Kabel) anzuzeigen.
Drücken Sie ENTER, um zum Formatierungs-Menuzu gelangen.
Enddaten Ladung Enddaten Entladung
Lagerungsfunktion
Drücken und halten Sie die ENTER bis der Battery Check Bildschirm erscheint.
Der Lader verwendet die Lade- und Entladeeinstellungen, die sich im aktuellen Speicherprofil ver-wenden. Kontrollieren Sie, dass diese korrekt sind.
Wenn der Akku korrekt angeschlossen und funktionstüchtig ist, startet die Lagerungsfunktion. NiMH und NiCd Akkus werden zuerst entladen und dann bis zu einer Kapazität von 50% geladen.
LiPo und LiFe Akkus werden geladen, mit der Balancer-Funktion behandelt (bis zu 3.85V/Zelle für LiPo und 3.3V/Zelle für LiFe). Wenn die Spannung über 3.85V bzw. 3.3V/Zelle liegt, stoppt der Vorgang, da genug Energie im Akku gespeichert ist, um diesen sicher zu lagern.
Wählen Sie im Hauptmenu mit + und - den Lagerungs-modus (“STORAGE”). Dieser Modus entlädt und/oder lädt Ihre Akkus so auf, dass sie optimal für die Lagerung vorbereitet sind. So kann das Risiko einer Beschädigung der Zellen bei der längeren Lagerung verringert werden.

Team Orion Advantage Race Spec58
DE
UT
SC
H
www.teamorion.com 59
DE
UT
SC
H
Lade-Bildschirm Entlade-Bildschirm
Am Ende des Vorgangs erscheint die Meldung“BATTERY STORAGE COMPLETE”.
Drücken Sie ENTER, um die Lagerungsdaten anzuzei-gen: totale Ladezeit, total geladene Kapazität (in mAh) und die Ladeendspannung des Akkus.
Drücken Sie BATT TYPE, um den Innenwiderstand des Akkus und die individuelle Zellspannung (nur für LiPo/LiFe mit eingestecktem Balancer-Kabel) anzuzeigen. Drücken Sie ENTER, um zum Lagerungs-Menu zu gelangen.
Zusatzfunktionen
Um die Tastentöne auszuschalten, drücken und halten Sie - während dem Anschluss des Laders an die Stromquelle. Um sie wieder einzuschalten, drücken Sie + während dem Anschluss des Laders an die Stromquelle.
Um die aktuelle Eingangs- und Ausgangsspannung anzuzeigen, drücken und halten Sie BATT TYPE im Hauptmenu.
Mit + und - kann die Hintergrundbeleuchtung während der Ladung/Entladung ein- und ausgeschaltet werden.
Bemerkung: Je nach äusseren Bedingungen kann der Lader den Hitzeschutz einschalten, damit er abkühlen kann. Nach einem kurzen Unterbruch wird der laufende Vorgang wieder fortgesetzt.

Team Orion Advantage Race Spec60
DE
UT
SC
H
www.teamorion.com 61
DE
UT
SC
H
Fehlersuche
Das Ladegerät zeigt im Falle von Störungen eine Fehlermeldung an. Überprüfen Sie in jedem Fall die Anschlüsse, die Stromquelle, Ihren Akku und die verwendeten Einstellungen.
Zeigt ein Problem mit der Stromquelle an. Überprüfen Sie, ob diese eine Spannung von 10-15V abgibt und ob sie genug leistungsfähig ist.
Zeigt ein Problem mit Ihrem Akku an oder mit falschen Lade-/Entlade-Einstellungen. Überprüfen Sie den Akku und die Einstellungen.
Zeigt ein Problem mit dem Anschluss des Akkus oder mit dem Akku an. Überprüfen Sie den Anschluss des Akkus und dessen Funktion.
Die Anzahl Zellen ist nicht korrekt. Überprüfen Sie den Akku und die Einstellungen.
Zeigt ein Problem mit dem Anschluss des Akkus oder mit dem Akku an. Überprüfen Sie den Anschluss des Akkus und dessen Funktion.
Der falsche Akku-Typ ist ausgewählt. Überprüfen Sie den Akku und die Einstellungen.
Ein Problem mit dem Balancer-Kabel liegt vor. Überprüfen Sie den korrekten Anschluss.
Der Lader ist zu warm. Warten Sie, bis er abkühlt. Ver-wenden Sie gegebenfalls andere Einstellungen (tieferer Lade-/Entladestrom) oder laden Sie an einem kühleren Ort bzw. belüften Sie den Lader besser.

Team Orion Advantage Race Spec62
DE
UT
SC
H
www.teamorion.com 63
DE
UT
SC
H
Warnungen
• Vergewissern Sie sich, dass Sie die Anweisungen des Akku-Herstellers befolgen. • Dieser Lader lädt nur Akkus des Typs NiMH und NiCd mit 1 bis 10 Zellen sowie LiPo und LiFe
Akkus mit 1 bis 4 Zellen. • Lassen Sie den Lader nie unbeaufsichtigt, wenn er eingeschaltet ist.• Kinder müssen bei der Bedienung des Geräts immer von einer erwachsenen Person betreut
werden. • Laden Sie nur in einem gut belüfteten Bereich, mit Abstand zu Personen und leitfähigen oder
entflammbaren Materialien.• Das Ladegerät und die Akkus können bei der Ladung warm werden; beachten Sie dies während
und nach der Ladung. • Wenn der Akku während der Ladung auffällige Reaktionen zeigt (Überhitzen, Überdruck), entfer-
nen Sie den Akku sofort und lagern Sie ihn abseits von Menschen und entflammbaren Materialien.
Garantie
Team Orion garantiert, dass dieses Produkt frei ist von Herstellungsfehlern. Die Garantie deckt keine Beschädigung durch falsche Installation, Schäden durch Gebrauchsabnützung oder andere Probleme durch nicht korrekte Bedienung oder nicht korrekten Gebrauch des Geräts. Team Orion trägt keine Verantwortung für Schäden, die durch den Gebrauch dieses Geräts entstehen. Mit dem Gebrauch dieses Geräts übernimmt der Benutzer jegliche Verantwortung.
Nicht korrekte Bedienung sind:
• Nichbefolgen der Anleitung• Unsachgemässer Einsatz des Produkts• Gebrauch falsche Einstellungen• Überladung, Überhitzen• Gebrauch in nicht adäquater Umgebung (Regen, Hitze etc.)• Demontieren und Abändern des Geräts (Ändern der Originalanschlüsse, Kabel, Komponenten
etc.)• Mechanische Schäden durch äussere Einwirkung

Team Orion Advantage Race Spec64
DE
UT
SC
H
www.teamorion.com 65
DE
UT
SC
H
Technische Daten Notizen
Aufbau Microprocessor controlled advanced digital circuitLademodus: Schnellladung, CC/CV und LagerungsladungZelltypen: NiMH/NiCd 1-10 Zellen, LiPo/LiFe 1-4 ZellenLadestrom: einstellbar 0.2-10ABalancing: einstellbar on/offDelta Peak: einstellbar 0-20mV/ZelleEntladestrom: einstellbar 0.1-10A (je nach Anzahl Zellen, 75W max)Entladeschlussspannung: einstellbarSpeicherprofile: 10Display: LCD (Laser-Blau)Multi-Sicherheits-System: Eingangs- und Ausgangs-VerpolungsschutzEingangsspannung: 10-15 VDCAbmessungen: 155x120x50mmGewicht: 702g

Team Orion Advantage Race Spec66
FRA
NC
AIS
www.teamorion.com 67
FRA
NC
AIS
Contenu de la boîteContenu
Chargeur Advantage Race
Pinces crocodiles pour l’alimentation
(rouge/noir)
Adaptateur pouréquilibrage 2S-4S type XH
2x adaptateur d’équilibrage 2mm
(vert/bleu)
Câbles de charge avec pinces crocodiles
(rouge/noir)
Contenu ........................................................................................................................................... 66Contenu de la boîte ......................................................................................................................... 67Chargeur.......................................................................................................................................... 68Connexions...................................................................................................................................... 69Introduction ...................................................................................................................................... 70Connexion à l‘alimentation .............................................................................................................. 71Connexion de la batterie.................................................................................................................. 72Ecran principale ............................................................................................................................... 73Touches ........................................................................................................................................... 74Mode charge.................................................................................................................................... 76Modification des paramètres de charge .......................................................................................... 77Charge de la batterie ....................................................................................................................... 80Modification des paramètres de décharge ...................................................................................... 82Décharge de la batterie ................................................................................................................... 83Mode cycle ...................................................................................................................................... 86Mode charge partielle ...................................................................................................................... 89Fonctions supplémentaires.............................................................................................................. 91Dépannage ...................................................................................................................................... 92Mises en garde ................................................................................................................................ 94Garantie ........................................................................................................................................... 95Spécifications .................................................................................................................................. 96Notes ............................................................................................................................................... 97

Team Orion Advantage Race Spec68
FRA
NC
AIS
www.teamorion.com 69
FRA
NC
AIS
ConnexionsChargeur
Connexion d’une batterie LiPo pour voiture (avec câble d’équilibrage SLPB)
Connexion d’une batterie LiPo avecadaptateur d’équilibrage
Connexion de l’alimentation
Connexionspossibles
Câble d‘alimentationTouches :- Touche BATT TYPE- Touche DIMINUER –- Touche AUGMENTER +- Touche ENTER
Double ventilateur derefroidissement
1 Connecteurs batterie2 Connecteurs équilibrage SLPB 2mm3 Connecteur adaptateur pour équilibrage
1 2 3
Team Orion Advantage Race Spec70
FRA
NC
AIS
www.teamorion.com 71
FRA
NC
AIS
Respectez toujours les polarités, le rouge est le positif (+) et le noir est le négatif (-).
Alimentez le chargeur avec alimentation de 10-15VDC (alimentation stabilisée, batterie 12V, etc.). Assurez-vous que l’alimentation est assez puissante pour charger la batterie dans les conditions désirées. La puissance nécessaire est obtenue en multipliant la tension de la batterie en fin de charge par le courant de charge, par exemple LiPo 2S=8.4Vx10A=84W.
Introduction
Nous vous remercions d’avoir choisi le chargeur Team Orion Advantage Race. Ce chargeur possède les dernières innovations dans le domaine de la charge des batteries rechargeables. Il est conçu pour charger les batteries NiMH, NiCd, LiPo et LiFe de la façon la plus efficace qui soit. Son concept est basé sur la technologie Team Orion championne du monde.
Une fonction de charge partielle permet de recharger partiellement vos batteries avant le stockage afin de limiter les risque dus à l’auto-décharge. Le chargeur est aussi équipé de 10 mémoires modifiables qui sont pré-
programmées pour les types de batteries les plus courants. Sont fournis également des connecteurs d’équilibrage SLPB 2mm ainsi qu’un adaptateur d’équilibrage type XH pour batteries 2S à 4S.
Veuillez lire attentivement ces instructions afin de garantir un fonctionnement sûr et efficace du chargeur.
Connexion à l‘alimentation

Team Orion Advantage Race Spec72
FRA
NC
AIS
www.teamorion.com 73
FRA
NC
AIS
Connexion de la batterie
Connectez la batterie au chargeur en respectant les polarités, le rouge est le positif (+) et le noir est le négatif (-). Après un bref message de bienvenue, l’écran principal est affiché. Le chargeur se trouve en mode charge par défaut. Connectez la batterie au chargeur.
Connexion d’une batterie LiPo pour voiture (avec câble d’équilibrage SLPB)
Connexion d’une batterie LiPo avec adaptateur d’équilibrage
Ecran principale
L’écran principal permet de modifier et d’afficher les paramètres de la batterie.
1. Mémoire2. Type de batterie3. Mode charge, charge partielle, cycle ou décharge4. Nombre d’éléments5. Capacité de la batterie6. Courant de charge7. Réglage du delta-peak ou équilibrage activé/désac-
tivé (selon le type de batterie)
1 2 3 4
5 6 7

Team Orion Advantage Race Spec74
FRA
NC
AIS
www.teamorion.com 75
FRA
NC
AIS
Affichage tensions entrée/sortie (utile en cas de prob-lèmes d’alimentation)
Affichage résistance interne
Affichage tensions individuelles LiPo/LiFe
Touches
Le chargeur est équipé de 4 touches permettant d’utiliser et de régler les diverses fonctions.
Touche BATT TYPE : modifie le type de la batterie (NiMH/NiCd/LiPo/LiFe)
Touche DIMINUER - : diminue la valeur du paramètre actuel, changer de mode
Touche AUGMENTER + : augmente la valeur du paramètre actuel, changer de mode
Touche ENTER : valide le paramètre, démarre ou interromps la fonction sélectionnée, retour à l’écran principal
La touche BATT TYPE permet aussi d’afficher les tensions d’entrée et de sortie depuis l’écran principal ou la résistance interne de la batterie ou la tension individuelle de chaque élément pendant ou après la charge ou la décharge de batteries (seulement LiPo/LiFe avec connecteur d’équilibrage).
Team Orion Advantage Race Spec76
FRA
NC
AIS
www.teamorion.com 77
FRA
NC
AIS
Mode charge Modification des paramètres de charge
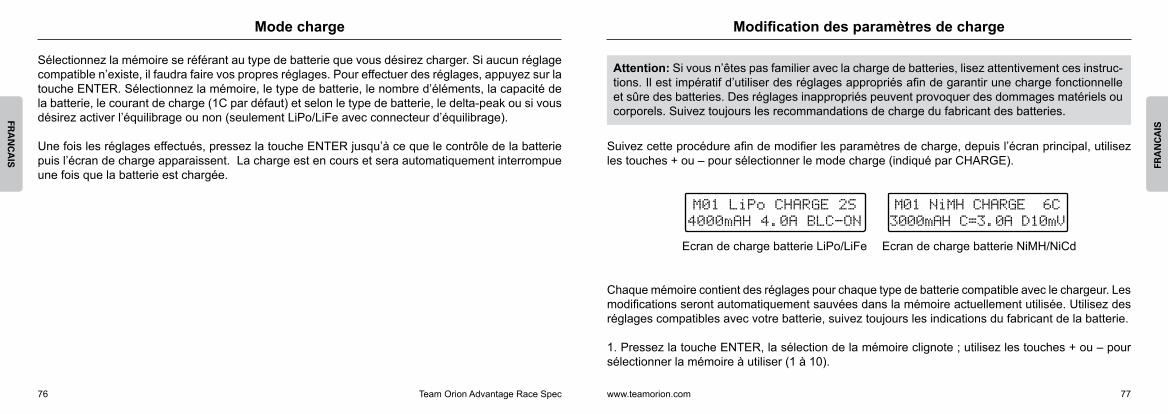
Sélectionnez la mémoire se référant au type de batterie que vous désirez charger. Si aucun réglage compatible n’existe, il faudra faire vos propres réglages. Pour effectuer des réglages, appuyez sur la touche ENTER. Sélectionnez la mémoire, le type de batterie, le nombre d’éléments, la capacité de la batterie, le courant de charge (1C par défaut) et selon le type de batterie, le delta-peak ou si vous désirez activer l’équilibrage ou non (seulement LiPo/LiFe avec connecteur d’équilibrage).
Une fois les réglages effectués, pressez la touche ENTER jusqu’à ce que le contrôle de la batterie puis l’écran de charge apparaissent. La charge est en cours et sera automatiquement interrompue une fois que la batterie est chargée.
Suivez cette procédure afin de modifier les paramètres de charge, depuis l’écran principal, utilisez les touches + ou – pour sélectionner le mode charge (indiqué par CHARGE).
Chaque mémoire contient des réglages pour chaque type de batterie compatible avec le chargeur. Les modifications seront automatiquement sauvées dans la mémoire actuellement utilisée. Utilisez des réglages compatibles avec votre batterie, suivez toujours les indications du fabricant de la batterie.
1. Pressez la touche ENTER, la sélection de la mémoire clignote ; utilisez les touches + ou – pour sélectionner la mémoire à utiliser (1 à 10).
Ecran de charge batterie LiPo/LiFe Ecran de charge batterie NiMH/NiCd
Attention: Si vous n’êtes pas familier avec la charge de batteries, lisez attentivement ces instruc-tions. Il est impératif d’utiliser des réglages appropriés afin de garantir une charge fonctionnelle et sûre des batteries. Des réglages inappropriés peuvent provoquer des dommages matériels ou corporels. Suivez toujours les recommandations de charge du fabricant des batteries.
Team Orion Advantage Race Spec78
FRA
NC
AIS
www.teamorion.com 79
FRA
NC
AIS
2. Pressez la touche ENTER, la sélection du type de batterie clignote ; utilisez la touche BATT TYPE pour sélectionner le type de batterie, NiCd, NiMH, LiPo ou LiFe.
3. Pressez la touche ENTER, la sélection du nombre d’éléments clignote : utilisez les touches + ou – pour sélectionner le nombre d’éléments, de 1 à 10 éléments NiCd/NiMH et 1 à 4 éléments LiPo/LiFe.
4. Pressez la touche ENTER, la sélection de la capacité de la batterie clignote ; utilisez les touches + ou – pour sélectionner la capacité (200 à 9900mAh). Par mesure de sécurité, lorsque vous chargez une batterie NiMH ou NiCd, la charge est automatiquement interrompue une fois que la capacité atteint la valeur préréglée, que la batterie soit réellement pleine ou non.
5. Pressez la touche ENTER, la sélection du courant de charge clignote (1C par défaut) ; utilisez les touches + ou – pour sélectionner le courant de charge (0.2 à 10A).
6. Pressez la touche ENTER, selon le type de batterie sélectionné, le réglage du delta-peak ou la sélection pour la fonction équilibrage clignote. Utilisez les touches + et – pour modifier la valeur du delta-peak (0-20mV/élément) ou pour activer ou désactiver l’équilibrage (seulement LiPo/LiFe).
7. Presse la toucher ENTER une dernière fois, le réglages sont mémorisés.
Courant de chargeLe courant de charge est automatiquement adapté en relation avec le réglage de capacité. Un courant de charge plus élevé charge la batterie plus rapidement, mais il peut aussi la faire surchauffer et l’endommager. Ne modifiez ce paramètre que si vous êtes un utilisateur expérimenté.
Delta-peakPendant la charge, la tension des batteries NiMH ou NiCd augmente jusqu’à ce que la batterie soit pleine. Une fois que la batterie est pleine, la tension chute. Le système delta-peak mesure cette chute de tension est interrompt la charge lorsqu’elle atteint la valeur préréglée. Une certaine surcharge des batteries est nécessaire afin de garantir des bonnes performances. Une valeur de delta-peak élevée surcharge plus les batteries et une valeur faible les surcharge moins. Les batteries NiCd nécessitent des valeurs plus élevées (10-20mV) et les batteries NiMH des valeurs plus faibles (0-10mV). Il est recommandé d’utiliser la valeur la plus faible possible sans que la charge ne soit interrompue intempestivement. La qualité et l’état d’usure des batteries peuvent fortement influer sur le réglage.
EquilibrageL’équilibrage équilibre la tension des éléments des batteries LiPo et LiFe. L’équilibrage garantit une charge et des performances optimales de la part de la batterie tout en augmentant la sécurité. L’équilibrage rallonge le temps de charge si les éléments sont déséquilibrés.
Il faut obligatoirement raccorder les connecteurs d’équilibrage lorsque l’équilibrage est activé. Le chargeur est équipé de deux ports d’équilibrage de 2mm et un autre port qui permet le raccorde-ment d’un adaptateur d’équilibrage. Il existe plusieurs type de connecteur et chaque type nécessite l’utilisation d’un adaptateur compatible.
Attention: Désactivez l’équilibrage uniquement si vous en connaissez les risques sous-jacents ainsi que les désavantages.

Team Orion Advantage Race Spec80
FRA
NC
AIS
www.teamorion.com 81
FRA
NC
AIS
Charge de la batterie
Une fois les bons paramètres sélectionnés et la batterie raccordée, pressez et maintenez la touche ENTER, l’écran de contrôle de la batterie s’affiche.
Si la batterie est bien connectée et fonctionnelle, l’écran de charge s’affiche.
Avec les batteries NiMH/NiCd, la charge peut s’interrompre prématurément avant que la batterie ne soit complètement chargée (batterie légèrement chaude au toucher). Dans ce cas vous pouvez relancer la charge ou utiliser une valeur de delta-peak plus élevée.
Avec les batteries LiPo ou LiFe, si la tension de la batterie est trop faible, le chargeur effectuera une charge lente avant de passer en mode charge rapide. L’équilibrage des éléments est effectué en fin de charge. Pendant l’équilibrage, le chargeur affiche le message « LIPO BALANCE ».
Note : selon les conditions d’utilisation, la protection thermique du chargeur peut s’activer afin que le chargeur puisse se refroidir. Dès qu’une température de fonctionnement optimale est atteinte, le chargeur résume automatiquement la fonction en cours.
La charge est automatiquement interrompue par l’un de ces paramètres:
• activation du système automatique delta-peak• la capacité chargée atteint la capacité préréglée (seul NiMH/NiCd)• le programme détermine que la batterie LiPo/LiFe est pleine
Pressez la touche ENTER pour afficher les données finales de charge, temps de charge, capacité chargée (mAh), tension de crête de la batterie (seul. NiMH/NiCd) et la tension finale de la batterie.
Pressez la touche ENTER pour afficher les données finales de charge, temps de charge, capacité chargée (mAh), tension de crête de la batterie (seul. NiMH/NiCd) et la tension finale de la batterie. Pressez la touche ENTER pour retourner à l’écran de charge.
En fin de charge, le message “BATTERY CHARGE COMPLETE” est affiché à l’écran.
Données en fin de charge LiPo/LiFe Données en fin de charge NiMH/NiCd

Team Orion Advantage Race Spec82
FRA
NC
AIS
www.teamorion.com 83
FRA
NC
AIS
Suivez cette procédure afin de modifier les paramètres de décharge, depuis l’écran principal utilisez les touches + ou – pour sélectionner le mode décharge (indiqué par DISCHARGE).
Vous pouvez ajuster les paramètres si nécessaire.
1. Pressez la touche ENTER, la sélection du courant de décharge clignote. Utilisez les touches + ou – pour sélectionner un courant de décharge différent (0.1 à 10A, 80W maximum).
2. Pressez la touche ENTER, la sélection de la tension de coupure de décharge clignote. Utilisez les touches + ou – pour sélectionner une tension différente. La limite est 0.7V pour les batteries NiCd/NiMh, 2.8V/él. pour les batteries LiPo et 2.5V/él. pour les batteries LiFe.
Modification des paramètres de décharge
Le chargeur affiche les paramètres par défaut pour le type de batterie sélectionné.
Décharge de la batterie
Une fois les bons paramètres sélectionnés, pressez et maintenez la touche ENTER. L’écran de contrôle de la batterie s’affiche.
Si la batterie est bien connectée et fonctionnelle, l’écran de décharge s’affiche.
Le chargeur décharge les batteries jusqu’à la tension de coupure.
Avec les batteries LiPo et LiFe, si la tension de la batterie est plus élevée que la tension de coupure, le chargeur équilibre les éléments (si nécessaire et si l’équilibrage est activé), puis décharge la batterie jusqu’à la tension de coupure. Pendant l’équilibrage, l’écran affiche « LIPO BALANCE ».
Il est recommandé de recharger immédiatement les batteries LiPo et LiFe après la décharge.
Note : selon les conditions d’utilisation, la protection thermique du chargeur peut s’activer afin que le chargeur puisse se refroidir. Dès qu’une température de fonctionnement optimale est atteinte, le chargeur résume automatiquement la fonction en cours.
Attention: Modifier la tension de coupure par défaut peut endommager la batterie, ne le faites que si vous êtes un utilisateur expérimenté.

Team Orion Advantage Race Spec84
FRA
NC
AIS
www.teamorion.com 85
FRA
NC
AIS
Pressez la touche BATT TYPE pour afficher la résistance interne de la batterie ou la tension indivi-duelle des éléments (seulement LiPo/LiFe avec connecteur d’équilibrage).
Capacité en déchargeLa capacité en décharge de la batterie indique sa capacité de stockage. Une batterie avec une capacité plus élevée aura une autonomie majeure par rapport à une batterie avec une capacité plus faible (pour autant que le test et l’utilisation soient faits dans les mêmes conditions).
Tension moyenne en déchargeLa tension moyenne en décharge de la batterie indique sa puissance avec un courant de décharge déterminé. Une batterie avec une tension moyenne plus élevée aura plus de puissance par rapport à une batterie avec une tension moyenne plus faible (pour autant que le test et l’utilisation soient faits dans les mêmes conditions).
A la fin de la décharge, le message “BATTERY DI-SCHARGE COMPLETE” est affiché à l’écran.
Pressez la touche ENTER pour afficher les données finales de décharge, qui indiquent le temps de décharge, la capacité déchargée (mAh). La tension moyenne de la batterie pendant la décharge ainsi que la tension finale de la batterie.
Résistance interneLa résistance interne de la batterie indique renseigne sur ses performances. En général, une batterie avec une résistance interne plus faible sera plus performante qu’une batterie avec une résistance interne plus élevée (pour autant que le test et l’utilisation soient faits dans les même conditions).
Pressez la touche ENTER pour retournerà l’écran de décharge.
Team Orion Advantage Race Spec86
FRA
NC
AIS
www.teamorion.com 87
FRA
NC
AIS
Mode cycle
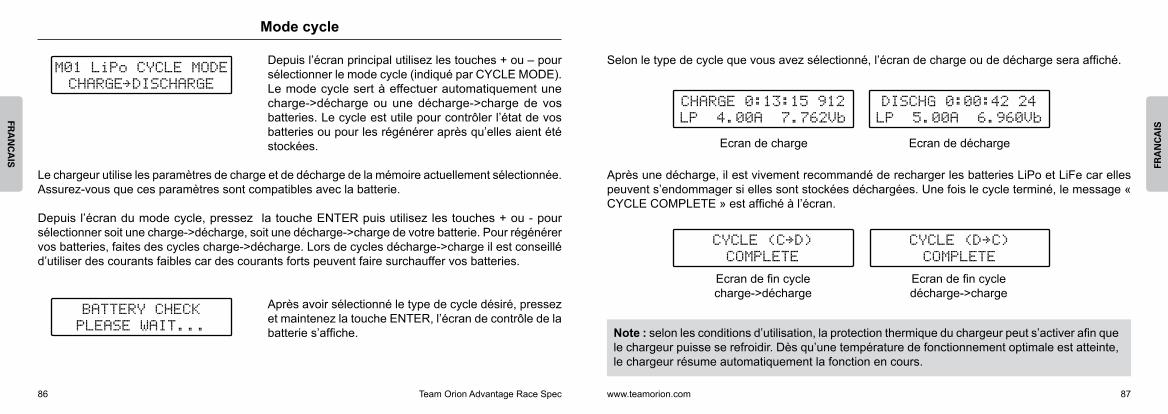
Depuis l’écran principal utilisez les touches + ou – pour sélectionner le mode cycle (indiqué par CYCLE MODE). Le mode cycle sert à effectuer automatiquement une charge->décharge ou une décharge->charge de vos batteries. Le cycle est utile pour contrôler l’état de vos batteries ou pour les régénérer après qu’elles aient été stockées.
Après avoir sélectionné le type de cycle désiré, pressez et maintenez la touche ENTER, l’écran de contrôle de la batterie s’affiche.
Le chargeur utilise les paramètres de charge et de décharge de la mémoire actuellement sélectionnée. Assurez-vous que ces paramètres sont compatibles avec la batterie.
Depuis l’écran du mode cycle, pressez la touche ENTER puis utilisez les touches + ou - pour sélectionner soit une charge->décharge, soit une décharge->charge de votre batterie. Pour régénérer vos batteries, faites des cycles charge->décharge. Lors de cycles décharge->charge il est conseillé d’utiliser des courants faibles car des courants forts peuvent faire surchauffer vos batteries.
Selon le type de cycle que vous avez sélectionné, l’écran de charge ou de décharge sera affiché.
Après une décharge, il est vivement recommandé de recharger les batteries LiPo et LiFe car elles peuvent s’endommager si elles sont stockées déchargées. Une fois le cycle terminé, le message « CYCLE COMPLETE » est affiché à l’écran.
Ecran de charge
Ecran de fin cycle charge->décharge
Ecran de décharge
Ecran de fin cycle décharge->charge
Note : selon les conditions d’utilisation, la protection thermique du chargeur peut s’activer afin que le chargeur puisse se refroidir. Dès qu’une température de fonctionnement optimale est atteinte, le chargeur résume automatiquement la fonction en cours.

Team Orion Advantage Race Spec88
FRA
NC
AIS
www.teamorion.com 89
FRA
NC
AIS
Pressez la touche ENTER pour afficher soit les données de fin de charge, soit les données de fin de décharge.
Pressez la touche BATT TYPE pour afficher la résistance interne de la batterie ou la tension indivi-duelle des éléments (seulement LiPo/LiFe avec connecteur d’équilibrage).
Pressez la touche ENTER pour retourner à l’écran principal du mode cycle.
Données en fin de charge Données en fin de décharge
Mode charge partielle
Pressez et maintenez la touche ENTER, l’écran de contrôle de la batterie s’affiche.
Le chargeur utilise les réglages de la mémoire actuellement sélectionnée, assurez-vous que les paramètres sont compatibles avec la batterie.
Si la batterie est bien connectée et fonctionnelle, la charge partielle commence.
Si le type de batterie sélectionné est NiMH ou NiCd, la batterie sera déchargée puis rechargée à 50% de la capacité préréglée. Avec les batteries LiPo ou LiFe, la batterie sera rechargée à 3.85V/él. LiPo et 3.3V/él. LiFe. Si la tension est plus élevée que ces valeurs, la charge est interrompue car la batterie contient assez d’énergie pour être stockée.
Depuis l’écran principal utilisez les touches + ou – pour sélectionner le mode charge partielle (indiqué par STORAGE). Le mode de charge partielle décharge et/ou recharge vos batteries NiMH, NiCd , LiPo ou LiFe afin qu’elles soient en conditions optimales pour le stockage. Ceci permet de diminuer les risques de dommages dus à une décharge trop profonde lors d’un stockage prolongé.

Team Orion Advantage Race Spec90
FRA
NC
AIS
www.teamorion.com 91
FRA
NC
AIS
Ecran de charge Ecran de décharge
A la fin de la charge partielle, le message “BATTERY STORAGE COMPLETE” est affiché à l’écran.
Pressez la touche ENTER pour afficher les données finales de charge, temps de charge, capacité chargée (mAh), tension de crête de la batterie (seul. NiMH/NiCd) et la tension finale de la batterie.
Vous pouvez afficher la résistance interne de la batterie ou les tensions individuelles des éléments (LiPo/LiFe avec connecteur d’équilibrage) en pressant la touche BATT TYPE pendant la charge ou la décharge.
Fonctions supplémentaires
Pour désactiver le buzzer (activé par défaut), pressez et maintenez la touche - lorsque vous branchez le chargeur sur l’alimentation. Pour réactiver le buzzer, pressez et maintenez la touche + lorsque vous branchez le chargeur sur l’alimentation.
Pour afficher les tensions d’entrée et de sortie, pressez et maintenez la touche BATT TYPE depuis l’écran principal.
Les touches + et – permettent aussi d’enclencher ou de désenclencher le rétro-éclairage pendant que le chargeur charge ou décharge une batterie.
Note : selon les conditions d’utilisation, la protection thermique du chargeur peut s’activer afin que le chargeur puisse se refroidir. Dès qu’une température de fonctionnement optimale est atteinte, le chargeur résume automatiquement la fonction en cours.

Team Orion Advantage Race Spec92
FRA
NC
AIS
www.teamorion.com 93
FRA
NC
AIS
Dépannage
Le charger peut afficher des messages d’erreur lorsque certains défauts sont détectés. Dans tous les cas, vérifiez l’alimentation, la batterie et les réglages.
Ceci indique un problème d’alimentation. Vérifiez que votre alimentation fourni un courant entre 10 et 15V et qu’elle est suffisamment puissante.
Ceci indique un défaut de la batterie ou des réglages erronés. Vérifiez la batterie et les réglages.
Ceci indique un problème de connexion avec la batterie au démarrage de la charge ou la décharge. Vérifiez que la batterie est bien raccordée et fonctionnelle.
Ceci indique un problème avec le nombre d’élément sélectionné dans les réglages. Vérifiez que le nombre est en rapport avec la batterie.
Ceci indique un problème de connexion avec la batterie pendant la charge ou la décharge. Vérifiez que la batterie est bien raccordée et fonctionnelle.
Ceci indique une erreur avec le type de batterie sélecti-onné. Vérifiez la batterie et les réglages.
Ceci indique un problème avec le connecteur d’équilibrage. Vérifiez que le connecteur d’équilibrage est bien raccordé.
Ceci indique que le chargeur surchauffe. Attendez que le chargeur refroidisse et qu’il résume automatiquement la fonction en cours. Vous pouvez aussi diminuer le courant de charge ou de décharge, relocaliser le chargeur ou améliorer sa ventilation.

Team Orion Advantage Race Spec94
FRA
NC
AIS
www.teamorion.com 95
FRA
NC
AIS
Mises en garde
• Réglez toujours les paramètres du chargeur en suivant les recommandations du fabricant.• Ce chargeur est conçu pour charger uniquement des batteries d’accumulateurs NiMH/NiCd de
1à 10 éléments et LiPo/LiFe de 1 à 4 éléments.• Lorsqu’il est en fonction, ne laissez jamais le chargeur sans supervision.• Ne laissez pas les enfants utiliser le chargeur sans la supervision d’un adulte.• Utilisez le chargeur uniquement dans un endroit bien ventilé, à l’écart des personnes et des
matières conductrices d’électricité ou inflammables.• Le chargeur et les batteries peuvent chauffer pendant l’utilisation. Faites attention lorsque vous
les manipulez.• Si la batterie réagit de façon anormale pendant la charge ou la décharge, tel que suréchauffement,
fuite de gaz ou de liquide, déconnectez immédiatement la batterie du chargeur et stockez la dans un endroit sûr, à l’écart des personnes et des matériaux inflammables.
Garantie
Team Orion garanti que ce produit ne comporte pas de défauts de fabrication. Cette garantie n’est pas valable lors d’une mauvaise utilisation, d’usure due à l’utilisation ou tout autre problème résultant d’une utilisation ou d’une manipulation inappropriée du produit. Aucune responsabilité ne sera assumée pour un quelconque dommage résultant de l’utilisation du produit. Du fait de connecter et d’utiliser ce produit, l’utilisateur accepte toutes les responsabilités découlant de son utilisation.
Sont considérés comme mauvaise utilisation:
• Ne pas suivre les instructions.• Utilisation inadaptée (abus, utilisation extrême, etc.) :• Réglages inadaptés (mauvaises connexions, rapport inadapté, mauvaise installation, etc.).• Surcharge, surchauffe (éléments dessoudés, brûlés, etc.).• Conditions d’utilisation inappropriées (humidité, pluie, etc.).• Mauvais entretien (présence de saleté, etc.).• Démontage, modifications par l’utilisateur (modification des connecteurs, câbles, composants,
etc.).• Dommage dus aux chocs

Team Orion Advantage Race Spec96
FRA
NC
AIS
www.teamorion.com 97
FRA
NC
AIS
Spécifications Notes
Curcuit Circuit digital contrôlé par microprocesseurModes de charge charge rapide, CC/CV et charge partielleCapacité de charge NiMH/NiCd 1-10 éléments, LiPo/LiFe 1-4 élémentsCourant de charge réglable 0.2-10AEquilibrage réglable, on/offDelta peak réglable 0-20mV/élémentCourant de décharge réglable 0.1-10A (variable selon le nombre d’éléments, 80W max)Tension de coupure de décharge réglableMémoires réglages 10Affichage LCD laser bleu, rétro éclairé Système de protection multiple, protection contre les inversions de polaritéTension d’alimentation 10-15 VDCDimensions 155x120x50mmPoids 702gr

Team Orion Advantage Race Spec98
ITALIA
NO
www.teamorion.com 99
ITA
LIA
NO
Contenuto imballaggioIndice
Caricabatteria Advantage Race
Connettori alimentazionecon pinze cocodrillo
Due cavetti con spina2mm per bilanciamento LiPo
Adattatore bilanciamento 2S-4S tipo XH
Connettori batteria conpinze cocodrillo
Indice ............................................................................................................................................... 98Contenuto imballaggio .................................................................................................................... 99Caricabatteria ................................................................................................................................ 100Collegamenti.................................................................................................................................. 101Introduzione ................................................................................................................................... 102Collegamento ................................................................................................................................ 103Collegamento della batteria ........................................................................................................... 104Menu principale ............................................................................................................................. 105Tasti ............................................................................................................................................... 106Carica ............................................................................................................................................ 108Impostazione dei parametri di carica ............................................................................................. 109Carica della batteria....................................................................................................................... 112Impostazione dei parametri di scarica ........................................................................................... 114Scarica della batteria ..................................................................................................................... 115Ciclatore ........................................................................................................................................ 118Carica parziale............................................................................................................................... 121Funzioni accessorie ....................................................................................................................... 123Segnalazione difetti ....................................................................................................................... 124Avvertenze ..................................................................................................................................... 126Garanzia ........................................................................................................................................ 127Specifiche tecniche:....................................................................................................................... 128Note ............................................................................................................................................... 129

Team Orion Advantage Race Spec100
ITALIA
NO
www.teamorion.com 101
ITA
LIA
NO
CollegamentiCaricabatteria
Collegamento batteria LiPo per auto(con cavetto bilanciamento SLPB)
Collegamento batteria LiPocon adattatore bilanciamento
Collegamento alimentazione
Vari collegamentidisponibili
Cavo collegamentoalimentazione
Tasti- Tasto BATT TYPE- Tasto DIMINUIRE- Tasto AUMENTARE- Tasto ENTER
Doppio ventilatore di raffredamento
1 Connettori batteria2 Connettori bilanciamento SLPB 2mm3 Connettore adattatore bilanciamento
1 2 3

Team Orion Advantage Race Spec102
ITALIA
NO
www.teamorion.com 103
ITA
LIA
NO
Rispettate sempre le polarità, il rosso è il polo positivo (+) e il nero quello negativo (-).Collegate il caricabatterie ad un’alimentazione 10-15VDC (batteria 12V, alimentazione stabilizzata, ecc.). Assicuratevi che l’alimentazione sia capace di fornire abbastanza energia per caricare la batteria con le im-postazioni desiderate. La potenza necessaria si ottiene moltiplicando il voltaggio di fine carica con la corrente di carica, esempio per batteria LiPo 2S = 8.4Vx10A=84W.
Introduzione
La ringraziamo per avere scelto il caricabatterie Team Orion Advantage Race. Questo caricabatterie è dotato delle ultime tecnologie per la carica delle batterie e permette di caricare batterie NiMH, NiCd, LiPo e LiFe. E’ inoltre dotato di una funzione di carica parziale che permette di ricaricare parzialmente quelle che non saranno utilizzate per un periodo di tempo prolungato, in modo tale da limitare i rischi di danni dovuti all’autoscarica.
Il caricabatterie possiede anche 10 memorie modifi-cabili che sono pre-programmate per i tipi di batterie
più diffusi. Sono forniti anche due connettori SLPB da 2mm e un adattatore di equilibraggio typo XH per batterie da 2S a 4S.
Vi preghiamo di leggere attentamente le istruzioni per potere sfruttare al meglio il vostro caricabatterie.
Collegamento
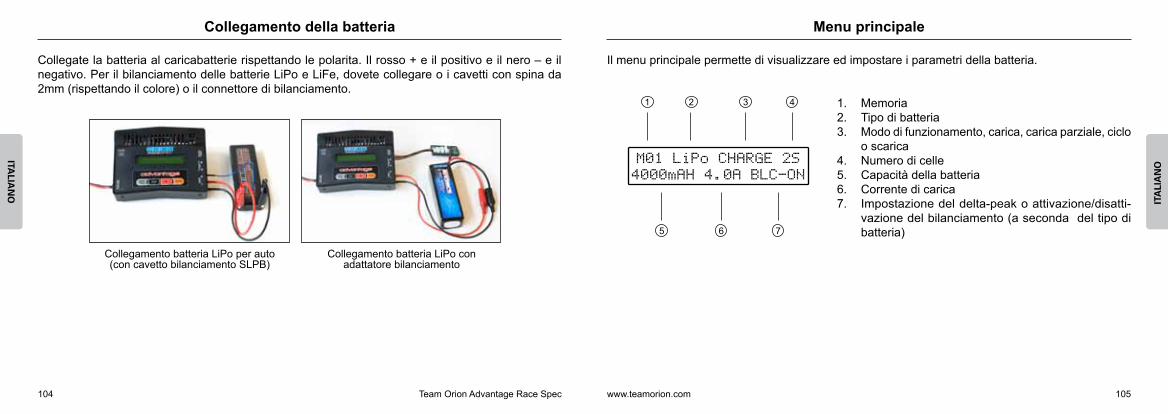
Team Orion Advantage Race Spec104
ITALIA
NO
www.teamorion.com 105
ITA
LIA
NO
Collegamento della batteria
Collegate la batteria al caricabatterie rispettando le polarita. Il rosso + e il positivo e il nero – e il negativo. Per il bilanciamento delle batterie LiPo e LiFe, dovete collegare o i cavetti con spina da 2mm (rispettando il colore) o il connettore di bilanciamento.
Collegamento batteria LiPo per auto(con cavetto bilanciamento SLPB)
Collegamento batteria LiPo conadattatore bilanciamento
Menu principale
Il menu principale permette di visualizzare ed impostare i parametri della batteria.
1. Memoria2. Tipo di batteria3. Modo di funzionamento, carica, carica parziale, ciclo
o scarica4. Numero di celle5. Capacità della batteria6. Corrente di carica7. Impostazione del delta-peak o attivazione/disatti-
vazione del bilanciamento (a seconda del tipo di batteria)
1 2 3 4
5 6 7

Team Orion Advantage Race Spec106
ITALIA
NO
www.teamorion.com 107
ITA
LIA
NO
Visualizzazione voltaggio entrata/uscita (permette di identificare eventuali problemi di alimentazione)
Visualizzazione resistenza interna
Visualizzazione voltaggi individuali LiPo/LiFe
Tasti
Il caricabatterie è provvisto di 4 tasti che permettono di utilizzare e impostare le varie funzioni.
Tasto BATT TYPE: modifica il tipo della batteria (NiMH/NiCd/LiPo/LiFe)
Tasto DIMINUIRE: diminuisce il valore del parametro attuale, cambia la funzione
Tasto AUMENTARE: aumenta il valore del parametro attuale, cambia la funzione
Tasto ENTER: convalida il parametro attuale, attiva e disattiva la funzione attuale, ritorna al menu principale
Il tasto BATT TYPE permette anche di visualizzare i voltaggi in entrata e in uscita nel menu principale. Durante la ricarica e la scarica il tasto BATT TYPE permette anche di visualizzare la resistenza interna e il voltaggio individuale (con LiPo/LiFe e connettore di bilanciamento).

Team Orion Advantage Race Spec108
ITALIA
NO
www.teamorion.com 109
ITA
LIA
NO
Carica Impostazione dei parametri di carica
Selezionate la memoria che si riferisce al tipo di batteria che desiderate caricare. Se non esistono impostazioni compatibili con la vostra batteria, dovete effettuare le impostazioni necessarie. Per effettuare le impostazioni, premete sul tasto ENTER, selezionate la memoria, il tipo di batteria, il numero di celle, la capacità della batteria, la corrente di carica (1C predefinito) e a seconda del tipo di batteria, il delta-peak o se desiderate utilizzare l’equilibraggio (solo per LiPo/LiFe con connettore di bilanciamento).
Una volta che avete selezionato le impostazioni, premete il tasto ENTER finché il menu di controllo e poi il menu ricarica saranno visualizzati. Il caricabatterie sta caricando la batteria e la ricarica sarà automaticamente interrotta quando la batteria sarà carica.
Seguite questa procedura per impostare i parametri di ricarica. Dal menu principale, utilizzate il tasto + o – per selezionare il modo di ricarica carica (indicato da CHARGE).
Ogni memoria contiene impostazioni per ogni tipo di batteria compatibile con il caricabatterie. Le nuove impostazioni sono automaticamente memorizzate nella memoria attualmente selezionata. Utilizzate impostazioni compatibili con la vostra batteria e seguite sempre le indicazioni del produttore.
1. Premete il tasto ENTER, la selezione della memoria lampeggia; premete i tasti + o – per impostare la memoria da utilizzare.
Menu carica LiPo/LiFe Menu carica NiMH/NiCd
Attentione: Se non siete pratici della carica delle batterie, leggete attentamente queste istruzioni. E’ necessario utilizzare impostazioni adeguate per garantire una ricarica affidabile e sicura delle batterie. Impostazioni scorrette possono provocare danni a cose o a persone. Seguite sempre le istruzioni di ricarica del produttore della batteria.
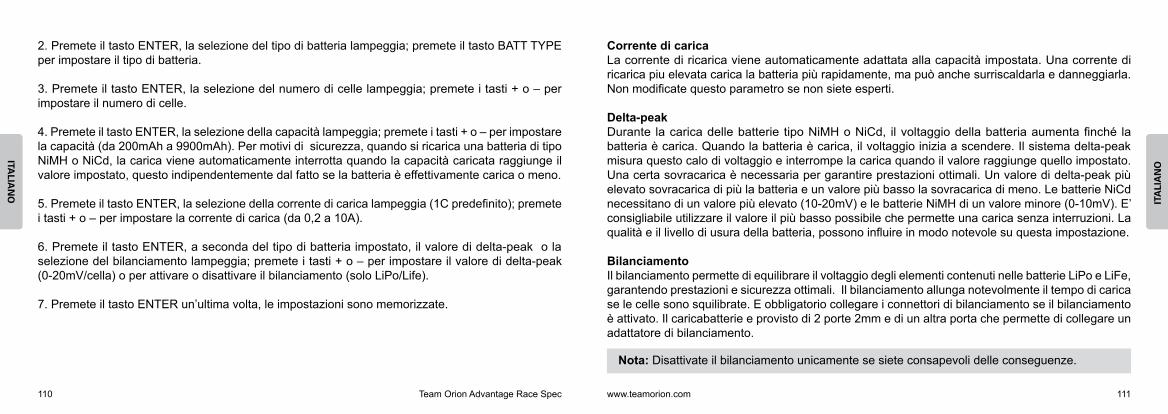
Team Orion Advantage Race Spec110
ITALIA
NO
www.teamorion.com 111
ITA
LIA
NO
2. Premete il tasto ENTER, la selezione del tipo di batteria lampeggia; premete il tasto BATT TYPE per impostare il tipo di batteria.
3. Premete il tasto ENTER, la selezione del numero di celle lampeggia; premete i tasti + o – per impostare il numero di celle.
4. Premete il tasto ENTER, la selezione della capacità lampeggia; premete i tasti + o – per impostare la capacità (da 200mAh a 9900mAh). Per motivi di sicurezza, quando si ricarica una batteria di tipo NiMH o NiCd, la carica viene automaticamente interrotta quando la capacità caricata raggiunge il valore impostato, questo indipendentemente dal fatto se la batteria è effettivamente carica o meno.
5. Premete il tasto ENTER, la selezione della corrente di carica lampeggia (1C predefinito); premete i tasti + o – per impostare la corrente di carica (da 0,2 a 10A).
6. Premete il tasto ENTER, a seconda del tipo di batteria impostato, il valore di delta-peak o la selezione del bilanciamento lampeggia; premete i tasti + o – per impostare il valore di delta-peak (0-20mV/cella) o per attivare o disattivare il bilanciamento (solo LiPo/Life).
7. Premete il tasto ENTER un’ultima volta, le impostazioni sono memorizzate.
Corrente di caricaLa corrente di ricarica viene automaticamente adattata alla capacità impostata. Una corrente di ricarica piu elevata carica la batteria più rapidamente, ma può anche surriscaldarla e danneggiarla. Non modificate questo parametro se non siete esperti.
Delta-peakDurante la carica delle batterie tipo NiMH o NiCd, il voltaggio della batteria aumenta finché la batteria è carica. Quando la batteria è carica, il voltaggio inizia a scendere. Il sistema delta-peak misura questo calo di voltaggio e interrompe la carica quando il valore raggiunge quello impostato. Una certa sovracarica è necessaria per garantire prestazioni ottimali. Un valore di delta-peak più elevato sovracarica di più la batteria e un valore più basso la sovracarica di meno. Le batterie NiCd necessitano di un valore più elevato (10-20mV) e le batterie NiMH di un valore minore (0-10mV). E’ consigliabile utilizzare il valore il più basso possibile che permette una carica senza interruzioni. La qualità e il livello di usura della batteria, possono influire in modo notevole su questa impostazione.
BilanciamentoIl bilanciamento permette di equilibrare il voltaggio degli elementi contenuti nelle batterie LiPo e LiFe, garantendo prestazioni e sicurezza ottimali. Il bilanciamento allunga notevolmente il tempo di carica se le celle sono squilibrate. E obbligatorio collegare i connettori di bilanciamento se il bilanciamento è attivato. Il caricabatterie e provisto di 2 porte 2mm e di un altra porta che permette di collegare un adattatore di bilanciamento.
Nota: Disattivate il bilanciamento unicamente se siete consapevoli delle conseguenze.

Team Orion Advantage Race Spec112
ITALIA
NO
www.teamorion.com 113
ITA
LIA
NO
Carica della batteria
Una volta eseguita l’impostazione e con la batteria col-legata, premete il tasto “ENTER”, il menu di controllo viene visualizzato.
Se la batteria è funzionante e collegata correttamente, il menu di carica viene visualizzato.
Con le batterie tipo NiMH/NiCd, la carica può interrompersi prima che la batteria sia carica interamente (lievemente calda). In tale caso, si puo riavviare la carica o utilizzare un valore di delta-peak piu elevato.
Con le batterie LiPo/LiFe, se il voltaggio della batteria e troppo basso, il caricabatteria esegue una carica lenta prima della carica rapida. Il bilanciamento aviene alla fine della carica. Durante il bilan-ciamento il menu visualizza “LIPO BALANCE”.
Nota: a seconda delle condizioni d’uso, la protezione termica potrebbe attivarsi per permettere al caricabatterie di raffreddarsi. Una volta che la temperatura diventa ottimale, il caricabatterie riprende automaticamente la funzione in corso.
La carica viene automaticamente interrotta tramite uno di questi parametri:
• attivazione del sistema automatico delta-peak• la capacità caricata raggiunge quella impostata (solo per NiMH/NiCd)• il programma determina che la batteria è carica (solo LiPo/LiFe)
Premete il tasto ENTER per visualizzare i dati finali di carica, tempo di carica, capacità caricata (mAh), picco di voltaggio (solo per NiMH/NiCd) e voltaggio finale della batteria.
Premete il tasto BATT TYPE per visualizzare la resistenza interna della batteria o i voltaggi indivi-duali delle celle (solo per LiPo/LiFe con connettore di bilanciamento). Premete il tasto ENTER per visualizzare il menu ricarica.
A la fine della carica, il menu visualizza “BATTERY CHARGE COMPLETE”.
Dati di carica LiPo/LiFe Dati di carica NiMH/NiCd

Team Orion Advantage Race Spec114
ITALIA
NO
www.teamorion.com 115
ITA
LIA
NO
Seguite questa procedura per impostare i parametri di scarica. Dal menu principale, utilizzate il tasto + o – per selezionare il menu di scarica (indicato da DISCHARGE).
Potete modificare le impostazioni se lo desiderate.
1. Premete il tasto ENTER, la selezione della corrente di scarica lampeggia; premete i tasti + o – per impostare la corrente di scarica (da 0,1 a 10°, 80W max).
2. Premete il tasto ENTER, la selezione del voltaggio di fine scarica lampeggia; premete i tasti + o – per impostare il voltaggio. Il limite e 0,7V/cella per NiMH/NiCd, 2.8V/cella per LiPo, 2.5V/cella per LiFe.
Impostazione dei parametri di scarica
Il menu visualizza le impostazioni predefinite per il tipo di batteria selezionato.
Scarica della batteria
Una volta eseguita l’impostazione e con la batteria col-legata, premete il tasto “ENTER”, il menu di controllo viene visualizzato.
Se la batteria è funzionante e collegata correttamente, il menu scarica viene visualizzato.
Il caricabatterie scarica la batteria fino al voltaggio di fine scarica.
Con le batterie LiPo e LiFe, se il voltaggio è più alto del voltaggio di fine scarica, il caricabatterie bilancia la batteria prima di scaricarla. Durante il bilanciamento, la schermata visualizza “LIPO BALANCE”.
Si consiglia di ricaricare le batterie LiPo e LiFe dopo la scarica.
Nota: a seconda delle condizioni d’uso, la protezione termica può attivarsi per permettere al caricabatterie di raffreddarsi. Una volta che la temperatura diventa ottimale, il caricabatterie riprende automaticamente la funzione in corso.
Attenzione: Modificare il voltaggio di fine scarica puo danneggiare la batteria. Modificatelo solamente se siete un utente esperto.

Team Orion Advantage Race Spec116
ITALIA
NO
www.teamorion.com 117
ITA
LIA
NOPremete il tasto BATT TYPE per visualizzare la resistenza interna della batteria o i voltaggi individuali
delle celle (solo per LiPo/LiFe con connettore di bilanciamento).
Capacità in scaricaLa capacità in scarica indica la capacità della batteria ad immagazzinare energia. Una batteria con una capacità più elevata avrà un’autonomia maggiore rispetto ad una batteria con una capacità minore.
Voltaggio medio in scaricaIl voltaggio medio in scarica indica la potenza della batteria con una determinata corrente. Una batteria con un voltaggio maggiore sara più potente che un batteria con un voltaggio minore (pertanto che siano analizzate e utilizzate nello stesso modo).
A la fine della scarica, la schermata visualizza“BATTERY DISCHARGE COMPLETE”.
Premete il tasto ENTER per visualizzare i dati finali di scarica, tempo di scarica, capacità scaricata (mAh), voltaggio medio durante la scarica e voltaggio finale della batteria.
Resistenza internaLa resistenza interna da un’indicazione sulle prestazioni di una batteria. Una batteria con una resis-tenza minore sarà più potente che un batteria con un voltaggio minore (pertanto che siano analizzate e utilizzate nello stesso modo).
Premete il tasto ENTER per visualizzare il menu di scarica.

Team Orion Advantage Race Spec118
ITALIA
NO
www.teamorion.com 119
ITA
LIA
NO
Ciclatore
Dallo schermo principale, utilizzate il tasto + o – per selezionare il modo ciclatore (indicato da CYCLE MODE). Il cycle mode permette di effettuare automaticamente un ciclo di carica->scarica o una ciclo di scarica->carica della batteria. Il ciclatore permette di controllare lo stato delle batterie e anche di rigenerarle se sono state ferme per un certo tempo.
Una volta eseguita la selezione e con la batteria col-legata, premete il tasto “ENTER”, il menu di controllo viene visualizzata.
Il caricabatterie utilizza le impostazioni di carica e di scarica della memoria attualmente selezionata. Assicuratevi che le impostazioni sono compatibili con la batteria.
Nel menu cycle mode, premete il tasto ENTER e poi i tasti + o – per selezionare o un ciclo carica-> scarica o un ciclo scarica->carica della batteria. Per rigenerare la batteria, fate dei cicli carica->scarica. Se fate un ciclo scarica->carica, usate correnti di carica e di scarica basse in modo tale da non fare surriscaldare la batteria.
Se la batteria è funzionante e collegata correttamente, e a seconda del tipo di ciclo selezionato, il menu carica o scarica viene visualizzato.
Si consiglia di ricaricare le batterie LiPO e LiFe dopo la scarica. A la fine della scarica, la schermata visualizza “CYCLE COMPLETE”.
Schermata carica
Schermo di fine ciclo carica->scarica
Schermata scarica
Schermo di fine cicloscarica->carica
Nota: a seconda delle condizioni d’uso, la protezione termica può attivarsi per permettere al caricabatterie di raffreddarsi. Una volta che la temperatura diventa ottimale, il caricabatterie riprende automaticamente la funzione in corso.
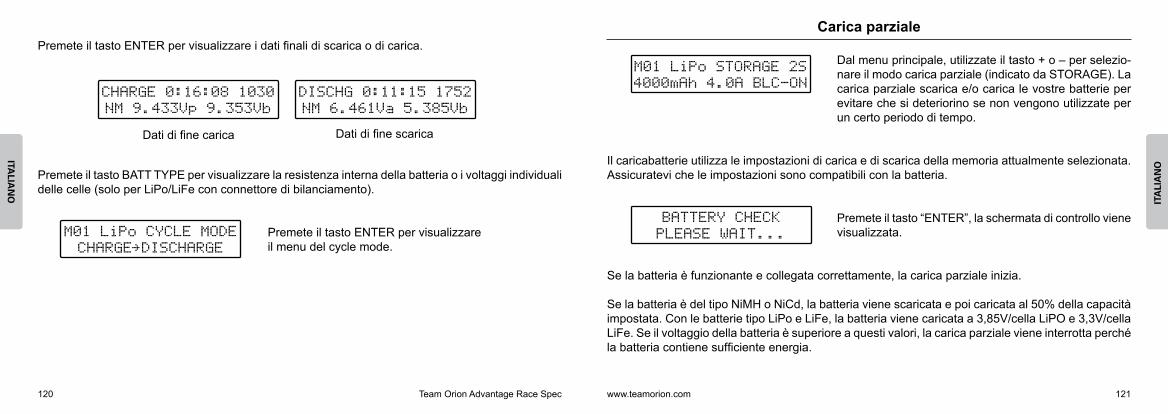
Team Orion Advantage Race Spec120
ITALIA
NO
www.teamorion.com 121
ITA
LIA
NO
Premete il tasto ENTER per visualizzare i dati finali di scarica o di carica.
Premete il tasto BATT TYPE per visualizzare la resistenza interna della batteria o i voltaggi individuali delle celle (solo per LiPo/LiFe con connettore di bilanciamento).
Premete il tasto ENTER per visualizzareil menu del cycle mode.
Dati di fine carica Dati di fine scarica
Carica parziale
Premete il tasto “ENTER”, la schermata di controllo viene visualizzata.
Il caricabatterie utilizza le impostazioni di carica e di scarica della memoria attualmente selezionata. Assicuratevi che le impostazioni sono compatibili con la batteria.
Se la batteria è funzionante e collegata correttamente, la carica parziale inizia.
Se la batteria è del tipo NiMH o NiCd, la batteria viene scaricata e poi caricata al 50% della capacità impostata. Con le batterie tipo LiPo e LiFe, la batteria viene caricata a 3,85V/cella LiPO e 3,3V/cella LiFe. Se il voltaggio della batteria è superiore a questi valori, la carica parziale viene interrotta perché la batteria contiene sufficiente energia.
Dal menu principale, utilizzate il tasto + o – per selezio-nare il modo carica parziale (indicato da STORAGE). La carica parziale scarica e/o carica le vostre batterie per evitare che si deteriorino se non vengono utilizzate per un certo periodo di tempo.

Team Orion Advantage Race Spec122
ITALIA
NO
www.teamorion.com 123
ITA
LIA
NO
Schermata carica Schermata scarica
A la fine della carica parziale, la schermata visualizza “BATTERY STORAGE COMPLETE”.
Premete il tasto ENTER per visualizzare i dati finali, tempo di carica, capacità caricata (mAh), picco di voltaggio (solo per NiMH/NiCd) e voltaggio finale della batteria.
Premete il tasto BATT TYPE per visualizzare la resistenza interna della batteria o i voltaggi individuali delle celle (solo per LiPo/LiFe con connettore di bilanciamento).
Funzioni accessorie
Per disattivare il buzzer, mantenete premuto il tasto – quando collegate il caricabatterie all’alimentazione. Per attivarlo mantenete premuto il tasto + quando collegate il caricabatterie all’alimentazione.
Premete il tasto BATT TYPE per visualizzare gli voltaggi in entrata e in uscita dallo schermo principale.
I tasti + e – permettono di disattivare o attivare la retro illuminazione mentre il caricabatterie, carica o scarica una batteria.
Nota: a seconda delle condizioni d’uso, la protezione termica può attivarsi per permettere al caricabatterie di raffreddarsi. Una volta che la temperatura diventa ottimale, il caricabatterie riprende automaticamente la funzione in corso.
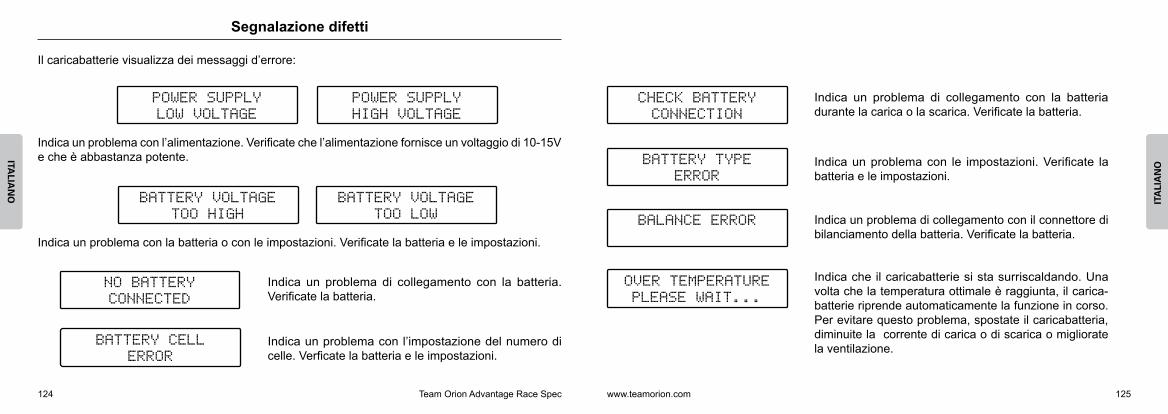
Team Orion Advantage Race Spec124
ITALIA
NO
www.teamorion.com 125
ITA
LIA
NO
Segnalazione difetti
Il caricabatterie visualizza dei messaggi d’errore:
Indica un problema con l’alimentazione. Verificate che l’alimentazione fornisce un voltaggio di 10-15V e che è abbastanza potente.
Indica un problema con la batteria o con le impostazioni. Verificate la batteria e le impostazioni.
Indica un problema di collegamento con la batteria. Verificate la batteria.
Indica un problema con l’impostazione del numero di celle. Verficate la batteria e le impostazioni.
Indica un problema di collegamento con la batteria durante la carica o la scarica. Verificate la batteria.
Indica un problema con le impostazioni. Verificate la batteria e le impostazioni.
Indica un problema di collegamento con il connettore di bilanciamento della batteria. Verificate la batteria.
Indica che il caricabatterie si sta surriscaldando. Una volta che la temperatura ottimale è raggiunta, il carica-batterie riprende automaticamente la funzione in corso. Per evitare questo problema, spostate il caricabatteria, diminuite la corrente di carica o di scarica o migliorate la ventilazione.

Team Orion Advantage Race Spec126
ITALIA
NO
www.teamorion.com 127
ITA
LIA
NO
Avvertenze
• Usate sempre le impostazioni raccomandate dal produttore delle batterie.• Questo caricabatterie può caricare unicamente batterie NiMH/NiCd da 1 a 10 celle e LiPo/LiFe
da 1 a 4 celle.• Non lasciate il caricabatterie senza sorveglianza quando è in funzione.• Non lasciate bambini ad utilizzare il caricabatterie senza la sorveglianza di un adulto.• Utilizzate il caricabatterie in un posto ben ventilato, lontano da persone e da materiali infiammabili. • Il caricabatterie e le batterie possono diventare calde durante l’utilizzo. Siate attenti quando
toccate il caricabatterie o le batterie.• Se la batteria ha delle reazioni anomale durante la carica o la scarica, come surriscaldamento,
sfiato di gas o perdita di liquido, scollegate immediatamente la batterie e conservatela in un posto sicuro, lontano da persone e da materiali infiammabili.
Garanzia
Team Orion garantisce che questo prodotto è privo di diffetti nel materiale e nell’assemblaggio. La garanzia non copre danni dovuti ad un’installazione sbagliata ed all’utilizzo di componenti o qualunque altro danno dovuto a un uso scorretto del prodotto. Team Orion non accetta alcuna responsabilità per qualunque danno inerente all’utilizzo di questo prodotto. Utilizzando questo prodotto, l’utente si fa automaticamente carico della piena responsabilità .
E’ considerato come uso scorretto:
• Non seguire le istruzioni• Utilizzo scorretto del prodotto• Non utilizzare le impostazioni consigliate (impostazioni, collegamento, montaggio, etc.)• Sovracarica, surriscaldamento (dissaldamento, bruciatura, etc.)• Utilizzo in condizioni inadeguate (polvere, umidita, pioggia, etc.)• insufficiente manutenzione• Smontaggio, modifica del prodotto dall’utente (modificae dei connettori originali, cavi, etc.)• Guasti meccanici dovuti a cause esterne.

Team Orion Advantage Race Spec128
ITALIA
NO
www.teamorion.com 129
ITA
LIA
NO
Specifiche tecniche: Note
Circuito Circuito digitale controllato da microprocessoreModi di carica Rapida, CC/CV, parzialeCorrente di carica 0,2-10ABilanciamento DisattivabileDelta peak Regolabile 0-20mV/cellaCorrente di scarica 0,1-10A (variabile a secondo il numero di celle, 80W max)Voltaggio fine scarica RegolabileMemorie 10Schermo LCD laser bluSistema multi protezione Inversioni di polarita in entrata e in uscitaAlimentazione 10-15VDCDimensioni 155x120x50mmPeso 702gr

Team Orion Advantage Race Spec130
JAPA
NE
SE
www.teamorion.com 131
JAPA
NE
SE
パッケージ内容 目次
レーススペック チャージャー
電源用ワニ口クリップ x 2 (赤/黒)
バランシングポートアダプター
SLPBバッテリー用2mmバランシングコード x 2 (緑/青)
ワニ口クリップ付充電コード x 2 (赤/黒)
パッケージ内容 ..................................................................... 131充電器各部名称 ..................................................................... 132接続 ............................................................................... 133はじめに ........................................................................... 134電源 ............................................................................... 135バッテリーの接続 ................................................................... 136メイン画面 ......................................................................... 137キー................................................................................ 138充電モード ......................................................................... 140充電設定の変更 ..................................................................... 141バッテリーの充電.................................................................... 144放電設定の変更 ..................................................................... 146バッテリーの放電 ................................................................... 147サイクルモード ..................................................................... 150ストレージ充電モード ............................................................... 153その他の機能 ....................................................................... 155トラブルシューティング.............................................................. 156警告................................................................................ 158保証................................................................................ 159仕様 ............................................................................... 160メモ................................................................................ 161

Team Orion Advantage Race Spec132
JAPA
NE
SE
www.teamorion.com 133
JAPA
NE
SE
接続 充電器各部名称
カー用バッテリーの接続(SLPBバランシングコードを使用)
バランシングボードを使用した接続
電源の接続 充電器に各種コードを接続した状態
電源接続コード(矢印)操作パネル - BATT TYPEキー- 減少(-) キー- 増加(+) キー- ENTER キー
二連冷却用ファン
1 バッテリー接続口2 SLPB 2mm バランシングポート3 バランシングアダプターポート
1 2 3

Team Orion Advantage Race Spec134
JAPA
NE
SE
www.teamorion.com 135
JAPA
NE
SE
充電器をDC 10~15Vの安定した電源(安定化電源、実車用バッテリーなど)に接続します。ご使用になる電源が、バッテリーを充電するのに十分な電力を供給できることをお確かめください。必要な電力は充電するバッテリーの充電終了時の電圧と充電電流を掛けることで算出できます。例えば、2S LiPoバッテリーを10Aで充電する場合、8.4V × 10A = 84Wの電力が必要となります。
はじめに
ティームオリオン アドバンテージレーススペックチャージャーをお買い上げいただきありがとうございます。この充電器は最先端のバッテリー充電テクノロジーを搭載しています。本製品は、ティームオリオンが世界選手権優勝で培った技術により、ニッケル水素(NiMH)、ニカド(NiCd)、リポ(LiPo)、リフェ(LiFe)バッテリーを可能な限り効率の良い方法で充電及び放電するよう設計されています。
本製品はストレージ充電機能を備えます。この機能は、NiMH、NiCd、LiPo、LiFeバッテリーを途中まで充電し、保管に最適な状態にコンディションを整え
ます。これにより、バッテリーの寿命を大幅に延ばすことが可能です。また、10種類のユーザー充電設定をメモリープロファイルに記憶でき、複数の種類のバッテリーに対する充電設定を簡単に切り替えることができます。標準的なバッテリーに対する設定をあらかじめ工場出荷時に記憶してあり、購入後すぐにご使用いただけます。LiPoおよびLiFeバッテリーのバランス充電用に2mmのバランシングコネクターと2Sから4Sまでのバッテリーに対応するXHコネクタータイプのバランシングボードを備えます。
安全にご使用いただくため、ご使用前にこの取扱説明書を良くお読みください。
電源
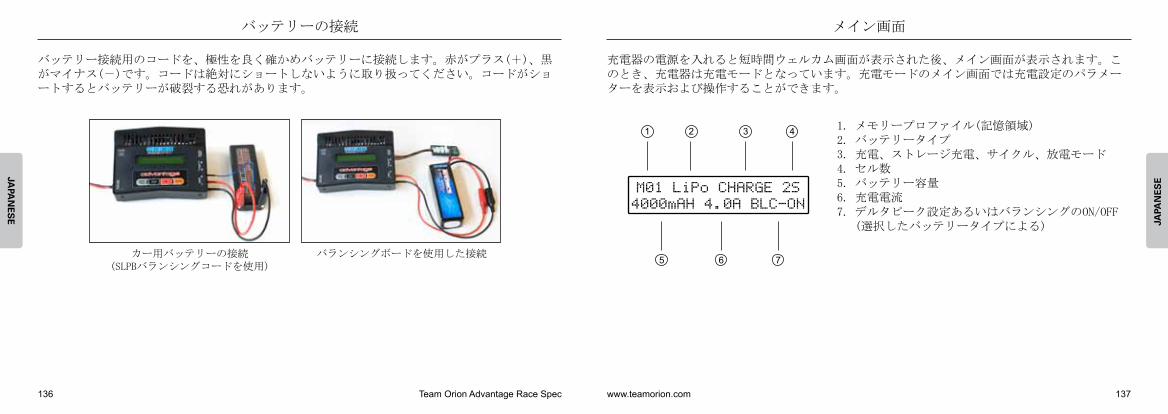
Team Orion Advantage Race Spec136
JAPA
NE
SE
www.teamorion.com 137
JAPA
NE
SE
バッテリーの接続
バッテリー接続用のコードを、極性を良く確かめバッテリーに接続します。赤がプラス(+)、黒がマイナス(-)です。コードは絶対にショートしないように取り扱ってください。コードがショートするとバッテリーが破裂する恐れがあります。
カー用バッテリーの接続 (SLPBバランシングコードを使用)
バランシングボードを使用した接続
メイン画面
充電器の電源を入れると短時間ウェルカム画面が表示された後、メイン画面が表示されます。このとき、充電器は充電モードとなっています。充電モードのメイン画面では充電設定のパラメーターを表示および操作することができます。
1. メモリープロファイル(記憶領域)2. バッテリータイプ3. 充電、ストレージ充電、サイクル、放電モード4. セル数5. バッテリー容量6. 充電電流7. デルタピーク設定あるいはバランシングのON/OFF (選択したバッテリータイプによる)
1 2 3 4
5 6 7

Team Orion Advantage Race Spec138
JAPA
NE
SE
www.teamorion.com 139
JAPA
NE
SE
入力及び出力電圧表示画面(電源の問題を発見するのに便利です。)
バッテリー内部抵抗表示画面
LiPo/LiFeセル毎の電圧表示画面
メイン画面でBATT TYPEキーを長押しすると入力及び出力電圧を表示します。また、充電あるいは放電中にBATT TYPEキーを押すとバッテリーの内部抵抗やセル毎の電圧(LiPoおよびLiFeバッテリーでバランシングコネクターを使用した場合のみ)を表示します。BATT TYPEキーを押すと表示が切り替わります。
キー
この充電器には4個のキーが備わり様々な機能を設定することができます。
BATT TYPEキー:バッテリーの種類(NiMH/NiCd/LiPo/LiFe)を変更します。
減少(-)キー:選択したパラメーターの値を減らします。機能モードを変更します。
増加(+)キー:選択したパラメーターの値を増やします。機能モードを変更します。
ENTERキー:パラメーターの保存、機能の開始・停止、メイン画面への移行を行います。
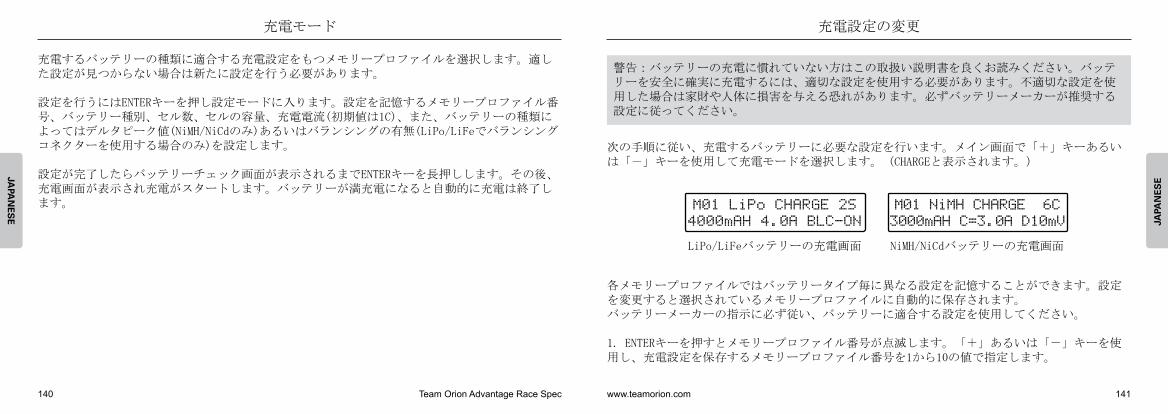
Team Orion Advantage Race Spec140
JAPA
NE
SE
www.teamorion.com 141
JAPA
NE
SE
充電モード 充電設定の変更
充電するバッテリーの種類に適合する充電設定をもつメモリープロファイルを選択します。適した設定が見つからない場合は新たに設定を行う必要があります。
設定を行うにはENTERキーを押し設定モードに入ります。設定を記憶するメモリープロファイル番号、バッテリー種別、セル数、セルの容量、充電電流(初期値は1C)、また、バッテリーの種類によってはデルタピーク値(NiMH/NiCdのみ)あるいはバランシングの有無(LiPo/LiFeでバランシングコネクターを使用する場合のみ)を設定します。
設定が完了したらバッテリーチェック画面が表示されるまでENTERキーを長押しします。その後、充電画面が表示され充電がスタートします。バッテリーが満充電になると自動的に充電は終了します。
次の手順に従い、充電するバッテリーに必要な設定を行います。メイン画面で「+」キーあるいは「-」キーを使用して充電モードを選択します。(CHARGEと表示されます。)
各メモリープロファイルではバッテリータイプ毎に異なる設定を記憶することができます。設定を変更すると選択されているメモリープロファイルに自動的に保存されます。バッテリーメーカーの指示に必ず従い、バッテリーに適合する設定を使用してください。
1. ENTERキーを押すとメモリープロファイル番号が点滅します。「+」あるいは「-」キーを使用し、充電設定を保存するメモリープロファイル番号を1から10の値で指定します。
LiPo/LiFeバッテリーの充電画面 NiMH/NiCdバッテリーの充電画面
警告:バッテリーの充電に慣れていない方はこの取扱い説明書を良くお読みください。バッテリーを安全に確実に充電するには、適切な設定を使用する必要があります。不適切な設定を使用した場合は家財や人体に損害を与える恐れがあります。必ずバッテリーメーカーが推奨する設定に従ってください。

Team Orion Advantage Race Spec142
JAPA
NE
SE
www.teamorion.com 143
JAPA
NE
SE
2. ENTERキーを押すとバッテリータイプが点滅します。BATT TYPEキーを使用して、充電するバッテリーに対応する種別をNiCd(ニカド)、NiMH(ニッケル水素)、LiPo(リポ)、LiFe(リフェ)から選択します。
3. ENTERキーを押すとセル数が点滅します。「+」あるいは「-」キーを使用してセル数を設定します。NiCd/NiMHの場合は1から10、LiPo/LiFeの場合は1から4の値で設定します。
4. ENTERキーを押すとバッテリー容量が点滅します。「+」あるいは「-」キーを使用してバッテリーの容量(200~9900mAh)を設定します。安全のため、NiCdおよびNiMHバッテリーの場合は充電容量がここで設定したバッテリー容量に達すると100%満充電かどうかに関わらず充電を終了します。
5. ENTERキーを押すと充電電流が点滅(初期状態では1C)します。「+」あるいは「-」キーを使用して充電電流を設定します。(0.2~10A)
6. ENTERキーを押すと、選択したバッテリータイプによりデルタピーク設定あるいはバランシング設定が点滅します。「+」あるいは「-」キーを使用してデルタピーク値(セルあたり1~20mV)の設定(NiMHおよびNiCdバッテリーのみ)、あるいはバランシング充電のON/OFFの設定(LiPoおよびLiFeバッテリーのみ)を行ってください。
7. ENTERキーをもう一度押すと設定が完了します。
充電電流 充電電流はバッテリー容量設定に合わせて自動的に変化します。充電電流を大きくすると充電が速く進みますがバッテリーの温度が上がりダメージを与える恐れがあります。十分に経験のある場合のみこの設定を変更してください。
デルタピーク設定 充電中、NiMHおよびNiMHバッテリーの電圧はバッテリーが満充電になるまで上昇します。バッテリーが満充電になるとバッテリーの電圧が降下を始めます。デルタピーク検出機能により電圧の降下が検出され、その値があらかじめ設定したデルタピーク設定値に達すると充電を終了します。セルの性能を最大限に引き出すためには通常ある程度の過充電が必要とされます。高いデルタピーク設定値ではより過充電が進み、低い値ではあまり進みません。一般的にNiCdバッテリーでは高い設定値(セルあたり10mV~20mV)が必要で、NiMHバッテリーでは低い値(セルあたり1mV~10mV)が必要とされます。デルタピークの誤検出(充電の早期終了)をしない範囲でできるだけ低い値を設定することを推奨します。また、この設定はバッテリーの品質や使用期間、損耗度により大きく影響を受けます。
バランシング バランシングによりLiPoおよびLiFeバッテリーの全てのセルが平均化されます。バランシングによりバッテリーの充電状態、性能、安全性を最大限に高めることが可能となります。セル間の電圧差が大きい場合、バランシングに掛かる時間は長くなります。
バランシングをONにする場合はバランシングコネクターを接続する必要があります。バランシングをOFFにする場合は接続する必要はありません。充電器には2つの2mmバランシングポートおよびバランシングボードを接続するためのポートが装備されています。バランシングコネクターにはいくつかの種類があり、適切なバランシングボードあるいは変換ハーネスを使用する必要があります。
バランシングを使用しない場合のリスクと不利益を良く理解した上でバランス機能をOFFにしてください。

Team Orion Advantage Race Spec144
JAPA
NE
SE
www.teamorion.com 145
JAPA
NE
SE
バッテリーの充電
各パラメーターの適切な設定が完了したら、バッテリーを接続します。次にENTERキーを長押ししてください。バッテリーチェック画面が表示されます。
バッテリーが正しく接続されていて正常であれば充電画面が表示されます。
NiMH/NiCdバッテリーの充電中はバッテリーが満充電になる前に充電が終了する場合があります(満充電であればバッテリーは暖かくなっているはずです)。この場合はデルタピーク設定を一段階高く設定し、もう一度充電操作を行ってください。
LiPo/LiFeバッテリーの電圧が低すぎる場合、急速充電を開始する前にバッテリーの電圧を高めるための低速充電を行います。バランシングは急速充電の後でのみ行われます。セル間の電圧差が大きい場合はバランシングが終了するまでの時間が長くなる場合があります。バランシング中はディスプレイに”LIPO BALANCE”と表示されます。
注意:使用状況により充電器の温度プロテクターが動作し、クールダウンを行うことがありますが、短時間の中断のあと充電は正常に再開します。
次の条件のどれかが満たされると充電は終了します。
・ デルタピーク検出によるカットオフが動作した場合・ 充電容量が設定値に達した場合(NiMH/NiCdのみ)・ 充電器のソフトウェアがLiPo/LiFeバッテリーの満充電を判定した場合・ ENTERキーが押された場合(強制終了)
充電終了後にENTERキーを押すと最終充電データを表示します。表示項目は、充電時間、充電容量(mAh)、バッテリーのピーク電圧(Vp:NiMH/NiCdの場合のみ表示)およびバッテリーの最終電圧(Vb)です。
最終充電データの表示中にBATT TYPEキーを押すとバッテリーの内部抵抗やセル毎の電圧(LiPo/LiFeのみ)を表示します。BATT TYPEキーを押すと表示が切り替わります。ENTERキーを押すとメイン画面に戻ります。
充電が終了すると”BATTERY CHARGE COMPLETE”と表示されます。
LiPo/LiFeの最終充電データ NiMH/NiCdの最終充電データ

Team Orion Advantage Race Spec146
JAPA
NE
SE
www.teamorion.com 147
JAPA
NE
SE
次の手順に従い、メイン画面から放電設定を変更します。「+」あるいは「-」キーを押してメイン画面から放電モードを選択します。(DISCHARGEと表示されます)
必要に応じ設定を変更してください。
1.ENTERキーを押すと放電電流設定が点滅します。「+」あるいは「-」キーで放電電流値を変更します。(0.2Aから10A、ただし最大80Wまで)
2.ENTERキーを押すと放電カットオフ設定が点滅します。「+」あるいは「-」キーでカットオフ電圧を変更します。下限値はNiCd/NiMHの場合は0.7V、LiPoの場合は2.8V/Cell、LiFeの場合は2.0V/Cellとなります。
放電設定の変更
選択したバッテリー用の初期設定が表示されます。
バッテリーの放電
放電の設定が完了したらENTERキーを長押ししてください。バッテリーチェック画面が表示されます。
バッテリーが正しく接続されていて正常であれば放電画面が表示されます。
カットオフ電圧に到達するまで放電が行われます。
LiPoおよびLiFeバッテリーの場合、電圧がカットオフ値以上の場合はまずセル間のバランシングを行い(バランシングモードがONでバランシングが必要な場合)、次にカットオフ電圧まで放電を行います。バランシング中は画面に”LiPO BALANCE”と表示されます。
LiPoおよびLiFeバッテリーの場合、放電後に再充電することをおすすめします。空の状態で保管するとバッテリーを傷める場合があります。
注意:使用状況により充電器の温度プロテクターが動作し、クールダウンを行うことがありますが、短時間の中断のあと充電は正常に再開します。
注意:カットオフ電圧を初期値より低い値に設定するとバッテリーを傷める場合があります。バッテリーの放電に慣れていない場合は設定を変更しないでください。

Team Orion Advantage Race Spec148
JAPA
NE
SE
www.teamorion.com 149
JAPA
NE
SE
最終放電データの表示中にBATT TYPEキーを押すとバッテリーの内部抵抗と各セルの電圧(LiPo/LiFeでバランシングコネクターを接続している場合のみ)を表示します。BATT TYPEキーを押すと表示が切り替わります。
放電容量とは 放電容量とはバッテリーが蓄えることのできる電気エネルギーの量で、より高い放電容量を持つバッテリーほど走行時間が長くなります。(同条件で比較した場合)
平均放電電圧とは 平均放電電圧とはある特定の放電電流におけるバッテリーの出力を示します。より高い平均放電電圧を持つバッテリーほどパワフルです。(同条件で比較した場合)
放電が終了すると”BATTERY DISCHARGE COMPLETE”メッセージが表示されます。
ENTERキーを押すと最終放電データを表示します。表示される情報は、放電時間、放電容量(mAh)、平均放電電圧(Va)、放電終了電圧(Vb)です。
内部抵抗とは バッテリーの内部抵抗はバッテリーの性能を示します。一般的に、より低い内部抵抗を持つバッテリーほど、同等のバッテリーで高い内部抵抗を持つものよりパワフルです。(同条件で比較した場合)。バッテリーの種類が異なる場合はこの値で性能を比較することはできません。
ENTERキーを押すと放電モードのメイン画面に戻ります。

Team Orion Advantage Race Spec150
JAPA
NE
SE
www.teamorion.com 151
JAPA
NE
SE
サイクルモード
メイン画面で「+」あるいは「-」キーを押してサイクルモードを選択します。(CYCLE MODEと表示されます)。サイクルモードでは自動的に充電→放電、あるいは放電→充電サイクルを実行します。この機能により、バッテリーの性能を確認したり、長期保管していたバッテリーを活性化したりすることができます。
設定が完了したらENTERキーを長押しします。バッテリーチェック画面が表示されます。
サイクルモードでは充電モードおよび放電モードで選択されている設定が使用されます。これらの設定がバッテリーと適合していることをご確認ください。
サイクル画面でENTERキーを押し、「+」あるいは「-」キーで放電→充電、充電→放電サイクルを切り替えます。バッテリーを活性化するには放電→充電サイクルを選択してください。放電→充電サイクルを使用する場合、高い放電電流によりバッテリーを傷める可能性がありますので放電電流を低く設定してください。
選択したサイクルにより、充電あるいは放電画面が表示されます。
サイクルが終了すると”CYCLE COMPLETE”と表示されます。LiPoおよびLiFeバッテリーの充電→放電サイクルのあとで長期保管するとバッテリーを傷める場合がありますので再充電することをおすすめします。
充電画面
充電→放電サイクル終了画面
放電画面
放電→充電サイクル終了画面
注意:使用状況により充電器の温度プロテクターが動作し、クールダウンを行うことがありますが、短時間の中断のあと充電は正常に再開します。
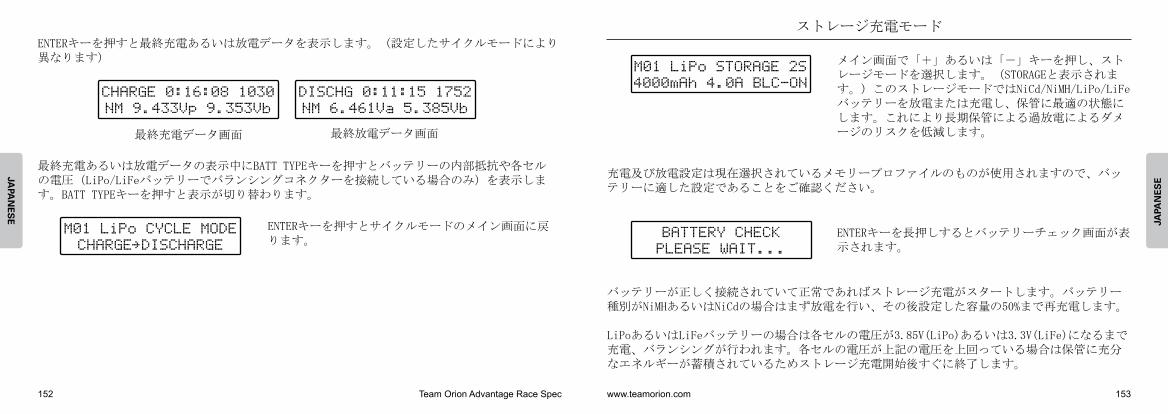
Team Orion Advantage Race Spec152
JAPA
NE
SE
www.teamorion.com 153
JAPA
NE
SE
ENTERキーを押すと最終充電あるいは放電データを表示します。(設定したサイクルモードにより異なります)
最終充電あるいは放電データの表示中にBATT TYPEキーを押すとバッテリーの内部抵抗や各セルの電圧(LiPo/LiFeバッテリーでバランシングコネクターを接続している場合のみ)を表示します。BATT TYPEキーを押すと表示が切り替わります。
ENTERキーを押すとサイクルモードのメイン画面に戻ります。
最終充電データ画面 最終放電データ画面
ストレージ充電モード
メイン画面で「+」あるいは「-」キーを押し、ストレージモードを選択します。(STORAGEと表示されます。)このストレージモードではNiCd/NiMH/LiPo/LiFeバッテリーを放電または充電し、保管に最適の状態にします。これにより長期保管による過放電によるダメージのリスクを低減します。
ENTERキーを長押しするとバッテリーチェック画面が表示されます。
充電及び放電設定は現在選択されているメモリープロファイルのものが使用されますので、バッテリーに適した設定であることをご確認ください。
バッテリーが正しく接続されていて正常であればストレージ充電がスタートします。バッテリー種別がNiMHあるいはNiCdの場合はまず放電を行い、その後設定した容量の50%まで再充電します。
LiPoあるいはLiFeバッテリーの場合は各セルの電圧が3.85V(LiPo)あるいは3.3V(LiFe)になるまで充電、バランシングが行われます。各セルの電圧が上記の電圧を上回っている場合は保管に充分なエネルギーが蓄積されているためストレージ充電開始後すぐに終了します。

Team Orion Advantage Race Spec154
JAPA
NE
SE
www.teamorion.com 155
JAPA
NE
SE
BATT TYPEキーを押すと内部抵抗や各セルの電圧(LiPoおよびLiFeでバランシング端子が使用されている場合)を表示します。BATT TYPEキーを押すと表示が切り替わります。ENTERキーを押すとストレージモードのメイン画面に戻ります。
充電画面 放電画面
注意:使用状況により充電器の温度プロテクターが動作し、クールダウンを行うことがありますが、短時間の中断のあと充電は正常に再開します。
ストレージ充電サイクルが完了すると”BATTERY STO-RAGE COMPLETE”と表示されます。
ENTERキーを押すと最終充電データを表示します。表示されるのは、充電時間、充電容量(mAh)、バッテリーの最終電圧です。
その他の機能
ブザーをOFFにするには(初期状態ではON)「-」キーを押しながら充電器の電源を入れてください。ブザーをONにするには「+」キーを押しながら充電器の電源を入れてください。
電源の電圧及びバッテリーの電圧を表示するにはメイン画面でBATT TYPEキーを長押ししてください。
充電および放電中に「+」キーあるいは「-」キーを押すとLCD画面のバックライトを点灯あるいは消灯することができます。

Team Orion Advantage Race Spec156
JAPA
NE
SE
www.teamorion.com 157
JAPA
NE
SE
トラブルシューティング
充電器が何らかの問題を検出するとエラーメッセージを表示する場合があります。エラーが発生したときはまず接続、電源、バッテリーおよび設定を確認してください。
このメッセージは電源の問題を示します。電源が適切な電圧(DC 10~15V)を供給していることおよび充分な電流供給能力を持っていることをお確かめください。
このメッセージはバッテリーの問題あるいは不適切な充放電設定を示します。バッテリーと設定をお確かめください。
このメッセージは充放電開始時のバッテリーの接続に関する問題を示します。バッテリーが正しく接続されていて正常であることをお確かめください。
このメッセージはセル数の設定が正しくないことを示します。バッテリーと設定を確認してください。
このメッセージは充放電中に接続に関する問題やバッテリーの故障が発生したことを示します。バッテリーが正しく接続されていて正常であることをお確かめください。
このメッセージは不適切なバッテリータイプが選択されていることを示します。バッテリーと設定をお確かめください。
このメッセージはバランシングコネクターに関する問題を示します。バランシングコネクターが正しく接続されていることをお確かめください。
このメッセージは充電器がオーバーヒートしていることを示します。充電器が冷えて動作するのを待ってください。また、設定の変更(充放電電流を下げる)や設置場所の変更、風通しを良くするなどして充電器の冷却状況を改善してください。
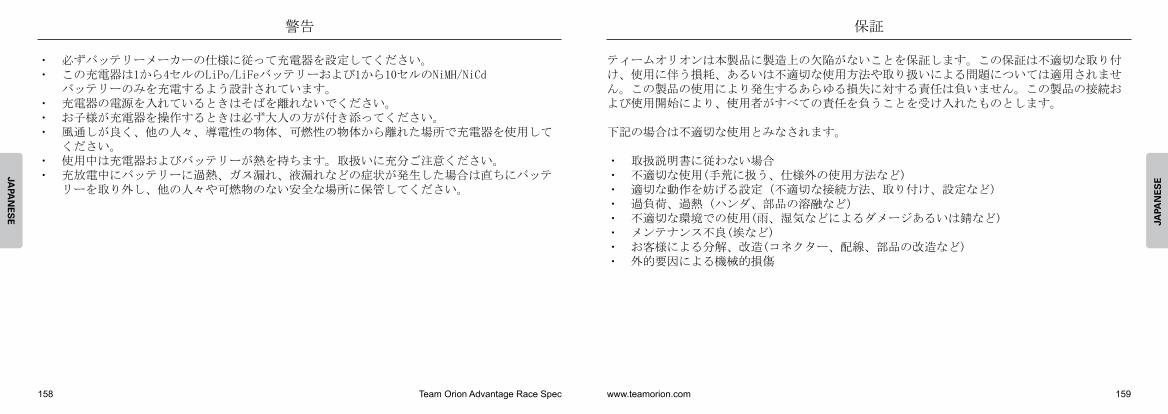
Team Orion Advantage Race Spec158
JAPA
NE
SE
www.teamorion.com 159
JAPA
NE
SE
警告
・ 必ずバッテリーメーカーの仕様に従って充電器を設定してください。・ この充電器は1から4セルのLiPo/LiFeバッテリーおよび1から10セルのNiMH/NiCd バッテリーのみを充電するよう設計されています。・ 充電器の電源を入れているときはそばを離れないでください。・ お子様が充電器を操作するときは必ず大人の方が付き添ってください。・ 風通しが良く、他の人々、導電性の物体、可燃性の物体から離れた場所で充電器を使用して ください。・ 使用中は充電器およびバッテリーが熱を持ちます。取扱いに充分ご注意ください。・ 充放電中にバッテリーに過熱、ガス漏れ、液漏れなどの症状が発生した場合は直ちにバッテ リーを取り外し、他の人々や可燃物のない安全な場所に保管してください。
保証
ティームオリオンは本製品に製造上の欠陥がないことを保証します。この保証は不適切な取り付け、使用に伴う損耗、あるいは不適切な使用方法や取り扱いによる問題については適用されません。この製品の使用により発生するあらゆる損失に対する責任は負いません。この製品の接続および使用開始により、使用者がすべての責任を負うことを受け入れたものとします。
下記の場合は不適切な使用とみなされます。
・ 取扱説明書に従わない場合・ 不適切な使用(手荒に扱う、仕様外の使用方法など)・ 適切な動作を妨げる設定(不適切な接続方法、取り付け、設定など)・ 過負荷、過熱(ハンダ、部品の溶融など)・ 不適切な環境での使用(雨、湿気などによるダメージあるいは錆など)・ メンテナンス不良(埃など)・ お客様による分解、改造(コネクター、配線、部品の改造など)・ 外的要因による機械的損傷

Team Orion Advantage Race Spec160
JAPA
NE
SE
www.teamorion.com 161
JAPA
NE
SE
仕様
回路 マイクロプロセッサーによるアドバンスドデジタル回路充電モード 急速充電、CC/CV、ストレージ充電モード対応バッテリー NiMH/NiCd 1~10セル、LiPo/LiFe 1~4セル、200~9999mAh充電電流 可変 0.2~10Aバランシング ON/OFF設定可能デルタピーク 可変 1~20mV/セル放電電流 可変 0.2~10A (バッテリーの電圧により異なる:最大80W) 最大設定可能値: LiPo/LiFe 1~2セル:10A、3セル:7A、4セル:5A NiMH/NiCd 1~6セル:10A、7セル:9A、8セル:8A、9セル:7A、10セル:6A放電カットオフ電圧 可変設定記憶領域 10個ディスプレイ 青色LCD安全機能 入力及び出力端子逆接続保護機能入力電圧 DC 10~15V寸法 155x120x50mm重量 702g
メモ

www.teamorion.com 2009 © Team Orion