Instructio Operation Manual DVD 3295080121
169
3-295-080- 12(1) RDR-HXD790/HXD890/HXD990/HXD1090 RDR-HXD795/HXD895/HXD995/HXD1095 DVD Recorder Operating Instructions To find out useful hints, tips and information about Sony products and services please visit: www.sony-europe.com/myproduct
-
Upload
sjaak-janssen -
Category
Documents
-
view
216 -
download
0
Transcript of Instructio Operation Manual DVD 3295080121

8/18/2019 Instructio Operation Manual DVD 3295080121
http://slidepdf.com/reader/full/instructio-operation-manual-dvd-3295080121 1/168
3-295-080-12(1)
© 2008 Sony Corporation
RDR-HXD790/HXD890/HXD990/HXD1090RDR-HXD795/HXD895/HXD995/HXD1095
DVD RecorderOperating Instructions
To find out useful hints, tips and information about Sony products and
services please visit: www.sony-europe.com/myproduct

8/18/2019 Instructio Operation Manual DVD 3295080121
http://slidepdf.com/reader/full/instructio-operation-manual-dvd-3295080121 2/168
2
WARNING
To reduce the risk of fire or
electric shock, do not expose this
apparatus to rain or moisture.
To avoid electrical shock, do not
open the cabinet. Refer servicingto qualified personnel only.
The mains lead must be changed
only at a qualified service shop.Batteries or batteries installed
apparatus shall not be exposed to
excessive heat such as sunshine,fire or the like.
This appliance is classified as aCLASS 1 LASER product. The
CLASS 1 LASER PRODUCT
MARKING is located on the rear
of the unit.
CAUTION
The use of optical instruments
with this product will increase eye
hazard. As the laser beam used inthis DVD recorder is harmful to
eyes, do not attempt to
disassemble the cabinet.Refer servicing to qualified
personnel only.
This label is located on the laser
protective housing inside theenclosure.
Notice for customers in theUnited Kingdom andRepublic of IrelandA molded plug complying with
BS1363 is fitted to this equipment
for your safety and convenience.
Should the fuse in the plug
supplied need to be replaced, a 5
AMP fuse approved by ASTA orBSI to BS1362, (i.e., marked with
or mark) must be used.
If the plug supplied with thisequipment has a detachable fuse
cover, be sure to attach the fuse
cover after you change the fuse.
Never use the plug without the
fuse cover. If you should lose the
fuse cover, please contact yournearest Sony service station.
Precautions This unit operates on 220 –
240 V AC, 50/60 Hz. Check that
the unit’s operating voltage is
identical with your local power
supply.
• To prevent fire or shock hazard,do not place objects filled with
liquids, such as vases, on the
apparatus.• Install this system so that the
mains lead can be unplugged
from the wall socket
immediately in the event of
trouble.
GUIDE Plus+ and G-LINK are (1)
registered trademarks or
trademarks of, (2) manufacturedunder license from and (3) subject
of various international patents
and patent applications owned by,
or licensed to, Gemstar-TV Guide
International, Inc. and/or its
related affiliates.
GEMSTAR-TV GUIDE
INTERNATIONAL, INC. AND/ OR ITS RELATED AFFILIATES
ARE NOT IN ANY WAY
LIABLE FOR THE ACCURACY
OF THE PROGRAM
SCHEDULE INFORMATION
PROVIDED BY THE GUIDEPLUS+ SYSTEM. IN NO
EVENT SHALL GEMSTAR-TV
GUIDE INTERNATIONAL,INC. AND /OR ITS RELATED
AFFILIATES BE LIABLE FOR
ANY AMOUNTSREPRESENTING LOSS OF
PROFITS, LOSS OF BUSINESS,
OR INDIRECT, SPECIAL, ORCONSEQUENTIAL DAMAGES
IN CONNECTION WITH THE
PROVISION OR USE OF ANY
INFORMATION, EQUIPMENT,
OR SERVICES RELATING TO
THE GUIDE PLUS+ SYSTEM.

8/18/2019 Instructio Operation Manual DVD 3295080121
http://slidepdf.com/reader/full/instructio-operation-manual-dvd-3295080121 3/168
3
Disposal of Old Electrical
& Electronic Equipment(Applicable in the
European Union and
other European
countries with separate
collection systems)
This symbol on the product or onits packaging indicates that this
product shall not be treated as
household waste. Instead it shall
be handed over to the applicable
collection point for the recycling
of electrical and electronicequipment. By ensuring this
product is disposed of correctly,
you will help prevent potentialnegative consequences for the
environment and human health,
which could otherwise be caused
by inappropriate waste handling
of this product. The recycling of
materials will help to conserve
natural resources. For moredetailed information about
recycling of this product, pleasecontact your local Civic Office,
your household waste disposal
service or the shop where youpurchased the product.
Disposal of waste
batteries (applicable in
the European Union and
other European
countries with separate
collection systems)
This symbol on the battery or onthe packaging indicates that the
battery provided with this product
shall not be treated as householdwaste.
By ensuring these batteries are
disposed of correctly, you willhelp prevent potentially negative
consequences for the environment
and human health which couldotherwise be caused by
inappropriate waste handling of
the battery. The recycling of the
materials will help to conserve
natural resources.
In case of products that for safety,
performance or data integrity
reasons require a permanentconnection with an incorporated
battery, this battery should be
replaced by qualified service staff
only.
To ensure that the battery will be
treated properly, hand over theproduct at end-of-life to the
applicable collection point for the
recycling of electrical andelectronic equipment.
For all other batteries, please viewthe section on how to remove the
battery from the product safely.
Hand the battery over to theapplicable collection point for the
recycling of waste batteries.
For more detailed information
about recycling of this product or
battery, please contact your localCivic Office, your household
waste disposal service or the shop
where you purchased the product.
The manufacturer of thisproduct is Sony Corporation,1-7-1 Konan Minato-kuTokyo, 108-0075 Japan. TheAuthorized Representativefor EMC and product safety
is Sony Deutschland GmbH,Hedelfinger Strasse 61,70327 Stuttgart, Germany.For any service or guaranteematters please refer to theaddresses given in separateservice or guaranteedocuments.

8/18/2019 Instructio Operation Manual DVD 3295080121
http://slidepdf.com/reader/full/instructio-operation-manual-dvd-3295080121 4/168
4
Precautions
This equipment has been tested
and found to comply with the
limits set out in the EMC
Directive using a connectioncable shorter than 3 metres.
On safetyShould any solid object or
liquid fall into the cabinet,
unplug the recorder and have it
checked by qualified personnel
before operating it any further.
About the hard disk driveThe hard disk has a high storage
density, which enables long
recording durations and quick
access to the written data.
However, it can easily be
damaged by shock, vibration or
dust, and should be kept away
from magnets. To avoid losing
important data, observe the
following precautions.
• Do not apply a strong shock tothe recorder.
• Do not place the recorder in a
location subject to mechanical
vibrations or in an unstable
location.
• Do not place the recorder on
top of a hot surface, such as a
VCR or amplifier (receiver).
• Do not use the recorder in a
place subject to extreme
changes in temperature(temperature gradient less
than 10 °C/hour).
• Do not move the recorder
with its mains lead connected.
• Do not disconnect the mains
lead while the power is on.
• When disconnecting the
mains lead, turn off the power
and make sure that the hard
disk drive is not operating (the
clock is displayed in the front
panel display for at least
30 seconds and all recording
or dubbing has stopped).
• Do not move the recorder for
one minute after you have
unplugged the mains lead.
• Do not attempt to replace or
upgrade the hard disk by
yourself, as this may result in
malfunction.
If the hard disk drive should
malfunction, you cannot
recover lost data. The hard disk
drive is only a temporary
storage space.
About repairing the hard
disk drive• The contents of the hard disk
drive may be checked in case
of repair or inspection during
a malfunction or
modification. However, the
contents will not be backed up
or saved by Sony.
• If the hard disk needs to be
formatted or replaced, it will
be done at the discretion of
Sony. All contents of the hard
disk drive will be erased,
including contents that violatecopyright laws.
On power sources• The recorder is not
disconnected from the AC
power source (mains) as long
as it is connected to the wall
outlet, even if the recorder
itself has been turned off.
• If you are not going to use the
recorder for a long time, besure to disconnect the
recorder from the wall outlet.
To disconnect the AC power
cord (mains lead), grasp the
plug itself; never pull the
cord.
On placement• Place the recorder in a location
with adequate ventilation to
prevent heat build-up in the
recorder.
• Do not place the recorder on a
soft surface such as a rug that
might block the ventilationholes.
• Do not place the recorder in a
confined space such as a
bookshelf or similar unit.
• Do not place the recorder in a
location near heat sources, or
in a place subject to direct
sunlight, excessive dust, or
mechanical shock.
• Do not place the recorder in
an inclined position. It is
designed to be operated in a
horizontal position only.
• Keep the recorder and discs
away from equipment with
strong magnets, such as
microwave ovens, or large
loudspeakers.
• Do not place heavy objects on
the recorder.
On recordingMake trial recordings before
making the actual recording.
On compensation for lostrecordingsSony is not liable and will not
compensate for any lost
recordings or relevant losses,
including when recordings arenot made due to reasons
including recorder failure, or
when the contents of a
recording are lost or damaged as
a result of recorder failure or
repair undertaken to the
recorder. Sony will not restore,
recover, or replicate the
recorded contents under any
circumstances.

8/18/2019 Instructio Operation Manual DVD 3295080121
http://slidepdf.com/reader/full/instructio-operation-manual-dvd-3295080121 5/168
5
Copyrights• Television programmes,
films, video tapes, discs, and
other materials may be
copyrighted. Unauthorized
recording of such material
may be contrary to the
provisions of the copyrightlaws. Also, use of this
recorder with cable television
transmission may require
authorization from the cable
television transmitter and/or
programme owner.
• This product incorporates
copyright protection
technology that is protected
by U.S. patents and other
intellectual property rights.
Use of this copyright
protection technology must be
authorized by Macrovision,
and is intended for home and
other limited viewing uses
only unless otherwise
authorized by Macrovision.
Reverse engineering or
disassembly is prohibited.
• This Product includesFontAvenue® fonts licenced
by NEC corporation.
FontAvenue is a registered
trademark of NEC
corporation.
• “ ” and x-Application are
trademarks of Sony
Corporation.
Copy guard functionSince the recorder has a copy
guard function, programmes
received through an external
tuner (not supplied) may
contain copy protection signals
(copy guard function) and as
such may not be recordable,
depending on the type of signal.
If you have any questions or
problems concerning your
recorder, please consult your
nearest Sony dealer.
About this manual
• In this manual, the internal
hard disk drive is written as
“HDD,” and “disc” is used asa general reference for the
HDD, DVDs, or CDs unless
otherwise specified by the text
or illustrations.
• Icons, such as , listed
at the top of each explanation
indicate what kind of media
can be used with the function
being explained. For details,
see “Recordable and Playable
Discs” on page 151.
• Instructions in this manual
describe the controls on the
remote. You can also use the
controls on the recorder if
they have the same or similar
names as those on the remote.
• The on-screen display
illustrations used in this
manual may not match the
graphics displayed on yourTV screen.
• RDR-HXD795/HXD895/
HXD995/HXD1095 is used
for illustration purposes.
• The explanations regarding
DVDs in this manual refer to
DVDs created on this
recorder. The explanations do
not apply to DVDs that are
created on other recorders and
played back on this recorder.
IMPORTANT NOTICE
Caution: This recorder iscapable of holding a stillvideo image or on-screendisplay image on yourtelevision screenindefinitely. If you leave thestill video image or on-screen display imagedisplayed on your TV for anextended period of time yourisk permanent damage toyour television screen.Plasma display panels andprojection televisions areespecially susceptible to this.
Check your model name
The instructions in thismanual are for 8 models:RDR-HXD790, RDR-HXD795, RDR-HXD890,
RDR-HXD895, RDR-HXD990, RDR-HXD995,RDR-HXD1090, and RDR-HXD1095. Check yourmodel name by looking atthe front panel of therecorder.
DVD

8/18/2019 Instructio Operation Manual DVD 3295080121
http://slidepdf.com/reader/full/instructio-operation-manual-dvd-3295080121 6/168
6
Table of ContentsWARNING . . . . . . . . . . . . . . . . . . . . . . . . . . . . . . . . . . . . . . . . . . . . . . . . . . 2
Precautions . . . . . . . . . . . . . . . . . . . . . . . . . . . . . . . . . . . . . . . . . . . . . . . . . 4
Guide to Parts and Controls . . . . . . . . . . . . . . . . . . . . . . . . . . . . . . . . . . . . 12
Hookups and Settings . . . . . . . . . . . . . . . . . . . . . . . . . . . . . . . .17Hooking Up the Recorder . . . . . . . . . . . . . . . . . . . . . . . . . . . . . . . . . . . . . . 17
Checking hookup and setting methods. . . . . . . . . . . . . . . . . . . . . . . . . 17
Step 1: Connecting the Aerial Cable and Set Top Box Controller . . . . . . . 18
A: Receiving Freeview (For digital broadcasting) . . . . . . . . . . . . . . . . . 18
B: Receiving Freeview and analogue terrestrial broadcastings . . . . . .19
C: Receiving cable or satellite (For analogue broadcasting). . . . . . . . . 20
D: Receiving terrestrial (For analogue broadcasting) . . . . . . . . . . . . . . 21
Step 2: Connecting the Video Cords/HDMI Cord . . . . . . . . . . . . . . . . . . . . 22
About the SMARTLINK features (for SCART connections only). . . . . . 24
About the “Control for HDMI” functions for ‘BRAVIA’ Sync
(for HDMI connections only) . . . . . . . . . . . . . . . . . . . . . . . . . . . . . . 24
Step 3: Connecting the Audio Cords/HDMI Cord . . . . . . . . . . . . . . . . . . . . 25
Step 4: Inserting a Conditional Access Module (CAM)
(RDR-HXD795/HXD895/HXD995/HXD1095 only) . . . . . . . . . . . . . . . . 26
Step 5: Connecting the Mains Lead . . . . . . . . . . . . . . . . . . . . . . . . . . . . . .27
Step 6: Preparing the Remote . . . . . . . . . . . . . . . . . . . . . . . . . . . . . . . . . .27
Controlling TVs with the remote . . . . . . . . . . . . . . . . . . . . . . . . . . . . . . 28If you have a Sony DVD player or more than one Sony DVD
recorder. . . . . . . . . . . . . . . . . . . . . . . . . . . . . . . . . . . . . . . . . . . . . . 29
Changing programme positions of the recorder using the remote . . . . 29
Step 7: Easy Setup . . . . . . . . . . . . . . . . . . . . . . . . . . . . . . . . . . . . . . . . . . 30
Setting up the GUIDE Plus+® system (For analogue broadcasting/
in areas with GUIDE Plus+ only). . . . . . . . . . . . . . . . . . . . . . . . . . . 32
Connecting a VCR or Similar Device . . . . . . . . . . . . . . . . . . . . . . . . . . . . .34
Connecting to the LINE 1/DECODER jack . . . . . . . . . . . . . . . . . . . . . . 34
Connecting to the LINE 2 IN jacks on the front panel . . . . . . . . . . . . . .35Connecting an External Decoder . . . . . . . . . . . . . . . . . . . . . . . . . . . . . . . .36
Connecting a decoder . . . . . . . . . . . . . . . . . . . . . . . . . . . . . . . . . . . . . . 36
Setting external decoder (PAY-TV/Canal Plus analogue decoder)
programme positions. . . . . . . . . . . . . . . . . . . . . . . . . . . . . . . . . . . .37

8/18/2019 Instructio Operation Manual DVD 3295080121
http://slidepdf.com/reader/full/instructio-operation-manual-dvd-3295080121 7/168
7
1. Inserting a Disc . . . . . . . . . . . . . . . . . . . . . . . . . . . . . . . . . . . . . . . . . . .38
2. Recording a Programme . . . . . . . . . . . . . . . . . . . . . . . . . . . . . . . . . . . . 38
Checking the disc status while recording . . . . . . . . . . . . . . . . . . . . . . . 40
3. Playing the Recorded Programme (Title List) . . . . . . . . . . . . . . . . . . . . 40
Displaying the playing time and play information . . . . . . . . . . . . . . . . . 434. Changing the Name of a Recorded Programme . . . . . . . . . . . . . . . . . . 44
5. Labelling and Protecting a Disc . . . . . . . . . . . . . . . . . . . . . . . . . . . . . . . 45
Labelling a disc . . . . . . . . . . . . . . . . . . . . . . . . . . . . . . . . . . . . . . . . . . . 45
Protecting a disc . . . . . . . . . . . . . . . . . . . . . . . . . . . . . . . . . . . . . . . . . . 45
6. Playing the Disc on Other DVD Equipment (Finalise) . . . . . . . . . . . . . .46
Unfinalising a disc . . . . . . . . . . . . . . . . . . . . . . . . . . . . . . . . . . . . . . . . . 48
7. Reformatting a Disc . . . . . . . . . . . . . . . . . . . . . . . . . . . . . . . . . . . . . . . . 49
Guide to Digital Services (For Freeview) . . . . . . . . . . . . . . . .50Viewing the EPG (Electronic Programme Guide) Display . . . . . . . . . . . . . 50
Programme Information . . . . . . . . . . . . . . . . . . . . . . . . . . . . . . . . . . . . . . . 51
Displaying the programme information . . . . . . . . . . . . . . . . . . . . . . . . . 51
Viewing Teletext (not available in some areas). . . . . . . . . . . . . . . . . . . 51
Viewing a Digital Text Service (models for the UK only) . . . . . . . . . . . . . . 52
Selecting digital text from dedicated digital teletext channels . . . . . . . . 52
Selecting digital text from other channels . . . . . . . . . . . . . . . . . . . . . . . 52
Recording (For Freeview) . . . . . . . . . . . . . . . . . . . . . . . . . .53Timer Recording (EPG/Series/Manual) . . . . . . . . . . . . . . . . . . . . . . . . . . . 53
Recording TV programmes using the EPG. . . . . . . . . . . . . . . . . . . . . . 53
Recording programmes using Series Recording
(models for the UK only) . . . . . . . . . . . . . . . . . . . . . . . . . . . . . . . . . 55
Setting the timer manually (Manual) . . . . . . . . . . . . . . . . . . . . . . . . . . . 56
Using the Quick Timer function . . . . . . . . . . . . . . . . . . . . . . . . . . . . . . .58
Creating chapters in a title . . . . . . . . . . . . . . . . . . . . . . . . . . . . . . . . . .58
Checking/Changing/Cancelling Timer Settings (Timer List) . . . . . . . . . . . . 59
Recording from Connected Equipment . . . . . . . . . . . . . . . . . . . . . . . . . . . 60
Seven Basic Operations — Getting to Know Your DVD Recorder
,continued
F o r F r e e v i e w

8/18/2019 Instructio Operation Manual DVD 3295080121
http://slidepdf.com/reader/full/instructio-operation-manual-dvd-3295080121 8/168
8
GUIDE Plus+ (For analogue broadcasting/in areas withGUIDE Plus+ only) . . . . . . . . . . . . . . . . . . . . . . . . . . . . . . .61
Viewing the GUIDE Plus+ Display . . . . . . . . . . . . . . . . . . . . . . . . . . . . . . . 61
Listing Up Your Favourite Programme Information (My TV) . . . . . . . . . . . 63
Making Changes to the GUIDE Plus+ System . . . . . . . . . . . . . . . . . . . . . . 64
Searching for the GUIDE Plus+ host channel (Setup) . . . . . . . . . . . . .64Changing the GUIDE Plus+ host channel manually (Setup). . . . . . . . . 64
Checking programme positions (Editor) . . . . . . . . . . . . . . . . . . . . . . . . 65
Disabling programme positions (Editor) . . . . . . . . . . . . . . . . . . . . . . . . 65
Recording (For analogue broadcasting) . . . . . . . . . . . . . . . .66Timer Recording (GUIDE Plus+/Manual) . . . . . . . . . . . . . . . . . . . . . . . . . . 66
One Button Recording (GUIDE Plus+ (in areas with GUIDE Plus+
service only)). . . . . . . . . . . . . . . . . . . . . . . . . . . . . . . . . . . . . . . . . . 66
Setting the timer manually (Schedule) . . . . . . . . . . . . . . . . . . . . . . . . . 68Using the Quick Timer function . . . . . . . . . . . . . . . . . . . . . . . . . . . . . . .69
Recording stereo and bilingual programmes . . . . . . . . . . . . . . . . . . . . 70
Creating chapters in a title . . . . . . . . . . . . . . . . . . . . . . . . . . . . . . . . . .70
Checking/Changing/Cancelling Timer Settings (Schedule) . . . . . . . . . . . .71
Checking/changing timer settings . . . . . . . . . . . . . . . . . . . . . . . . . . . . . 71
Cancelling timer settings . . . . . . . . . . . . . . . . . . . . . . . . . . . . . . . . . . . . 71
Recording from Connected Equipment . . . . . . . . . . . . . . . . . . . . . . . . . . . 72
Playback . . . . . . . . . . . . . . . . . . . . . . . . . . . . . . . . . . . . . . . .73Playing . . . . . . . . . . . . . . . . . . . . . . . . . . . . . . . . . . . . . . . . . . . . . . . . . . . . 73
Playback options. . . . . . . . . . . . . . . . . . . . . . . . . . . . . . . . . . . . . . . . . . 75
Playing a specific portion repeatedly (A-B Repeat). . . . . . . . . . . . . . . . 77
Playing repeatedly (Repeat) . . . . . . . . . . . . . . . . . . . . . . . . . . . . . . . . . 77
Creating your own programme (Programme) . . . . . . . . . . . . . . . . . . . . 78
Advanced Playback Functions . . . . . . . . . . . . . . . . . . . . . . . . . . . . . . . . . . 79
Pausing a TV broadcast (TV Pause/Pause Live TV) . . . . . . . . . . . . . . 79
Playing from the beginning of the programme you are recording
(Chase Play) . . . . . . . . . . . . . . . . . . . . . . . . . . . . . . . . . . . . . . . . . . 79Playing a previous recording while making another
(Simultaneous Rec and Play) . . . . . . . . . . . . . . . . . . . . . . . . . . . . .80
Searching for a Time/Title/Chapter/Track, etc. . . . . . . . . . . . . . . . . . . . . . 80
F o r
a n a l o g u e b r o a d c a s t i n g

8/18/2019 Instructio Operation Manual DVD 3295080121
http://slidepdf.com/reader/full/instructio-operation-manual-dvd-3295080121 9/168
9
Erasing and Editing . . . . . . . . . . . . . . . . . . . . . . . . . . . . . . . . .82Before Editing . . . . . . . . . . . . . . . . . . . . . . . . . . . . . . . . . . . . . . . . . . . . . . .82
Erasing and Editing a Title . . . . . . . . . . . . . . . . . . . . . . . . . . . . . . . . . . . . . 83
Editing multiple titles (Multi-Mode) . . . . . . . . . . . . . . . . . . . . . . . . . . . .83
Erasing a section of a title (A-B Erase) . . . . . . . . . . . . . . . . . . . . . . . . . 84
Dividing a title (Divide) . . . . . . . . . . . . . . . . . . . . . . . . . . . . . . . . . . . . . 84
Erasing and Editing a Chapter . . . . . . . . . . . . . . . . . . . . . . . . . . . . . . . . . . 85
Dividing a chapter (Divide) . . . . . . . . . . . . . . . . . . . . . . . . . . . . . . . . . . 86
Erasing a chapter (Erase) . . . . . . . . . . . . . . . . . . . . . . . . . . . . . . . . . . . 86
Combining multiple chapters (Combine) . . . . . . . . . . . . . . . . . . . . . . . . 86
Creating and Editing a Playlist . . . . . . . . . . . . . . . . . . . . . . . . . . . . . . . . . . 87
Moving a Playlist title (Move) . . . . . . . . . . . . . . . . . . . . . . . . . . . . . . . .87
Combining multiple Playlist titles (Combine) . . . . . . . . . . . . . . . . . . . . . 87
Dividing a Playlist title (Divide) . . . . . . . . . . . . . . . . . . . . . . . . . . . . . . . 87
Moving a chapter (Move) . . . . . . . . . . . . . . . . . . . . . . . . . . . . . . . . . . . 88
Dubbing (HDD y DVD) . . . . . . . . . . . . . . . . . . . . . . . . . . . . . .89Before Dubbing . . . . . . . . . . . . . . . . . . . . . . . . . . . . . . . . . . . . . . . . . . . . . 89
HDD/DVD Dubbing . . . . . . . . . . . . . . . . . . . . . . . . . . . . . . . . . . . . . . . . . . 90
Dubbing Using Dubbing List . . . . . . . . . . . . . . . . . . . . . . . . . . . . . . . . . . . . 90
Making a Backup Disc (DVD Backup) . . . . . . . . . . . . . . . . . . . . . . . . . . . .93
HDD Camcorder Dubbing . . . . . . . . . . . . . . . . . . . . . . . . . . . . .94Before HDD Camcorder Dubbing . . . . . . . . . . . . . . . . . . . . . . . . . . . . . . . . 94
Preparing for HDD camcorder dubbing. . . . . . . . . . . . . . . . . . . . . . . . . 95
One-Touch Dubbing from HDD Camcorder (ONE-TOUCH DUB) . . . . . . . 96
Dubbing from HDD Camcorder Using the On-Screen Display
(HDD-Cam Dubbing) . . . . . . . . . . . . . . . . . . . . . . . . . . . . . . . . . . . . . .96
DV Camcorder Dubbing . . . . . . . . . . . . . . . . . . . . . . . . . . . . . .98Before DV Camcorder Dubbing . . . . . . . . . . . . . . . . . . . . . . . . . . . . . . . . .98
Preparing for DV camcorder dubbing . . . . . . . . . . . . . . . . . . . . . . . . . . 98
Dubbing an Entire DV Format Tape (DV One-Touch Dubbing) . . . . . . . . 100
Dubbing Selected Scenes (DV Manual Dubbing) . . . . . . . . . . . . . . . . . . 100
Playing from a DV Camcorder . . . . . . . . . . . . . . . . . . . . . . . . . . . . . . . . . 101
,continued

8/18/2019 Instructio Operation Manual DVD 3295080121
http://slidepdf.com/reader/full/instructio-operation-manual-dvd-3295080121 10/168
10
Music Jukebox . . . . . . . . . . . . . . . . . . . . . . . . . . . . . . . . . . . 102About Jukebox . . . . . . . . . . . . . . . . . . . . . . . . . . . . . . . . . . . . . . . . . . . . .102
Preparing for Using Jukebox . . . . . . . . . . . . . . . . . . . . . . . . . . . . . . . . . . 102
Connecting the USB device . . . . . . . . . . . . . . . . . . . . . . . . . . . . . . . . 102
Copying tracks or albums (USB t HDD). . . . . . . . . . . . . . . . . . . . . . 102
Copying audio tracks (DISC t HDD) . . . . . . . . . . . . . . . . . . . . . . . . 103
Copying tracks or albums on the HDD (HDD y HDD) . . . . . . . . . . . 103
Playing Audio Tracks Using Jukebox/USB Device . . . . . . . . . . . . . . . . . 104
Adding audio tracks to a Playlist (HDD only) . . . . . . . . . . . . . . . . . . . 105
Playback options. . . . . . . . . . . . . . . . . . . . . . . . . . . . . . . . . . . . . . . . . 105
Playing repeatedly (Repeat) . . . . . . . . . . . . . . . . . . . . . . . . . . . . . . . . 105
Creating your own programme (Programme) (USB device only) . . . . 106
Managing Audio Tracks on the Music Jukebox (HDD only) . . . . . . . . . . . 107
Photo Album . . . . . . . . . . . . . . . . . . . . . . . . . . . . . . . . . . . . . 108About the “Photo Album” Function . . . . . . . . . . . . . . . . . . . . . . . . . . . . . .108
Preparing for Using the “Photo Album” Function . . . . . . . . . . . . . . . . . . . 108
Connecting the USB device . . . . . . . . . . . . . . . . . . . . . . . . . . . . . . . . 108
Copying JPEG image files to the HDD (DISC/USB t HDD). . . . . . . 108
Copying all JPEG image files from the connected USB device
(USB t DVD-RW/DVD-R). . . . . . . . . . . . . . . . . . . . . . . . . . . . . .109
Copying JPEG image files or albums on the HDD
(HDD y HDD). . . . . . . . . . . . . . . . . . . . . . . . . . . . . . . . . . . . . . . 110
Copying JPEG image albums to a disc
(HDD t DVD-RW/DVD-R) . . . . . . . . . . . . . . . . . . . . . . . . . . . . .110
Copying JPEG image files to a disc (HDD t DVD-RW/DVD-R) . . . . 111
Using the “Photo Album” List . . . . . . . . . . . . . . . . . . . . . . . . . . . . . . . . . . 112
Playing a slideshow. . . . . . . . . . . . . . . . . . . . . . . . . . . . . . . . . . . . . . . 114
Creating a Slideshow with Your Favourite Music and Graphic Effects
(x-Pict Story) (HDD only) . . . . . . . . . . . . . . . . . . . . . . . . . . . . . . . . . . 115
Managing JPEG Image Files on the HDD . . . . . . . . . . . . . . . . . . . . . . . . 117
Printing JPEG Image Files . . . . . . . . . . . . . . . . . . . . . . . . . . . . . . . . . . . . 118

8/18/2019 Instructio Operation Manual DVD 3295080121
http://slidepdf.com/reader/full/instructio-operation-manual-dvd-3295080121 11/168
11
Settings and Adjustments . . . . . . . . . . . . . . . . . . . . . . . . . . . . 120Adjusting Picture Quality . . . . . . . . . . . . . . . . . . . . . . . . . . . . . . . . . . . . . 120
Using the Setup Menus . . . . . . . . . . . . . . . . . . . . . . . . . . . . . . . . . . . . . . 123
Disc Settings (Disc Setup) . . . . . . . . . . . . . . . . . . . . . . . . . . . . . . . . . . . . 123
Recorder Settings (Basic) . . . . . . . . . . . . . . . . . . . . . . . . . . . . . . . . . . . . 124
Aerial Reception Settings (Digital Tuner) . . . . . . . . . . . . . . . . . . . . . . . . . 126
Aerial Reception Settings (Analog Tuner) . . . . . . . . . . . . . . . . . . . . . . . . 127
Video Settings (Video In/Out) . . . . . . . . . . . . . . . . . . . . . . . . . . . . . . . . . . 130
Audio Input Settings (Audio In) . . . . . . . . . . . . . . . . . . . . . . . . . . . . . . . .132
Audio Output Settings (Audio Out) . . . . . . . . . . . . . . . . . . . . . . . . . . . . . .133
Language Settings (Language) . . . . . . . . . . . . . . . . . . . . . . . . . . . . . . . .134
Recording Settings (Recording) . . . . . . . . . . . . . . . . . . . . . . . . . . . . . . . . 135
Playback Settings (Playback) . . . . . . . . . . . . . . . . . . . . . . . . . . . . . . . . . . 137
Limitation Settings (Parental Lock) . . . . . . . . . . . . . . . . . . . . . . . . . . . . . 138
HDMI Settings (HDMI Output) . . . . . . . . . . . . . . . . . . . . . . . . . . . . . . . . . 139
Other Settings (Options) . . . . . . . . . . . . . . . . . . . . . . . . . . . . . . . . . . . . .141
Other Settings (Options 2) . . . . . . . . . . . . . . . . . . . . . . . . . . . . . . . . . . . . 142
Additional Information . . . . . . . . . . . . . . . . . . . . . . . . . . . . . . 143Troubleshooting . . . . . . . . . . . . . . . . . . . . . . . . . . . . . . . . . . . . . . . . . . . . 143
Resetting the Recorder . . . . . . . . . . . . . . . . . . . . . . . . . . . . . . . . . . . . . . 150
Recordable and Playable Discs . . . . . . . . . . . . . . . . . . . . . . . . . . . . . . . . 151
Playable Discs . . . . . . . . . . . . . . . . . . . . . . . . . . . . . . . . . . . . . . . . . . . . . 153
About Recording/Dubbing Mode . . . . . . . . . . . . . . . . . . . . . . . . . . . . . . . 154
Language Code List . . . . . . . . . . . . . . . . . . . . . . . . . . . . . . . . . . . . . . . . . 158
Country/Area Code . . . . . . . . . . . . . . . . . . . . . . . . . . . . . . . . . . . . . . . . . 158
Notes About This Recorder . . . . . . . . . . . . . . . . . . . . . . . . . . . . . . . . . . . 159
Notes on MP3 Audio Tracks, JPEG Image Files, DivX Video Files,
and i.Link . . . . . . . . . . . . . . . . . . . . . . . . . . . . . . . . . . . . . . . . . . . . . . 160
Specifications . . . . . . . . . . . . . . . . . . . . . . . . . . . . . . . . . . . . . . . . . . . . . . 162
Index . . . . . . . . . . . . . . . . . . . . . . . . . . . . . . . . . . . . . . . . . . . . . . . . . . . . 164

8/18/2019 Instructio Operation Manual DVD 3295080121
http://slidepdf.com/reader/full/instructio-operation-manual-dvd-3295080121 12/168
12
Guide to Parts and Controls
For more information, see the pages in parentheses.
A HDD (38)Records to or plays titles on HDD.
DVD (38)Records to or plays titles on DVD.
B [ / 1 (on/standby) (30)Turns the recorder on or off.
C Z (open/close) (38)Opens or closes the disc tray.
D PROG (programme) +/– (38)The + button has a tactile dot*.
E Number buttons (80)The number 5 button has a tactile dot*.
F INPUT (input select) (60, 72)Selects an input source.
G AUDIO (75)The AUDIO button has a tactile dot*.
H CLEAR (44, 77, 78)
I ANGLE (75, 114)Changes the angles or rotates an image
during slideshow.
J TV/DVD (28)
Switches between TV mode and DVDmode.
K SUBTITLE (75)Selects a subtitle language.
L (text) (51, 52)This button function is not available in
some areas.
M MENU (73)
Displays the disc’s menu.
N Green (50, 61)
O Yellow (50, 61)
P Red (50, 61)
Q Blue (50, 61)
R SYSTEM MENU (120)
TITLE LIST (40, 73, 83)
TOP MENU (73)
GUIDE (50, 61)Displays EPG or GUIDE Plus+® system
screen.
S TIMER (56, 59)
T INFO (information) (50, 62)Displays the programme information.
U< / M / m / , /ENTER (30)Selects a desired item.
VO RETURN (30)
EXIT (126)Cancels scanning of programme
positions.
Remote

8/18/2019 Instructio Operation Manual DVD 3295080121
http://slidepdf.com/reader/full/instructio-operation-manual-dvd-3295080121 13/168
13
W DISPLAY (43)
Displays the playing status or disc
information.
X. / > (previous/next) (75,
105)
PAGE +/– (50, 62)Changes the programme list by page.
/ (instant replay/instant
advance) (75)
mc / CM (search/
slow/freeze frame) (75, 105)
DAY +/– (62)Changes the programme list by day.
H (play) (73, 114)
X (pause) (39, 75, 105, 114)
x (stop) (73, 104, 114)The H button has a tactile dot*.
Y TV PAUSE (79)
Z z REC (38)
x REC STOP (38)
HDD/DVD DUB (90)Starts dubbing the current playing title
or cancels the dubbing.
REC MODE (38)Selects the recording mode.
wj ZOOM (114)Zooms an image during a slideshow.
wk TV [ / 1 (on/standby) (28)TVt (input select) (28)
TV 2 (volume) +/– (28)
TV PROG (programme) +/– (28)The + button has a tactile dot*.
wl PLAY MODE (77, 80)
* Use the tactile dot as a reference when operating
the recorder.
,continued
8/18/2019 Instructio Operation Manual DVD 3295080121
http://slidepdf.com/reader/full/instructio-operation-manual-dvd-3295080121 14/168
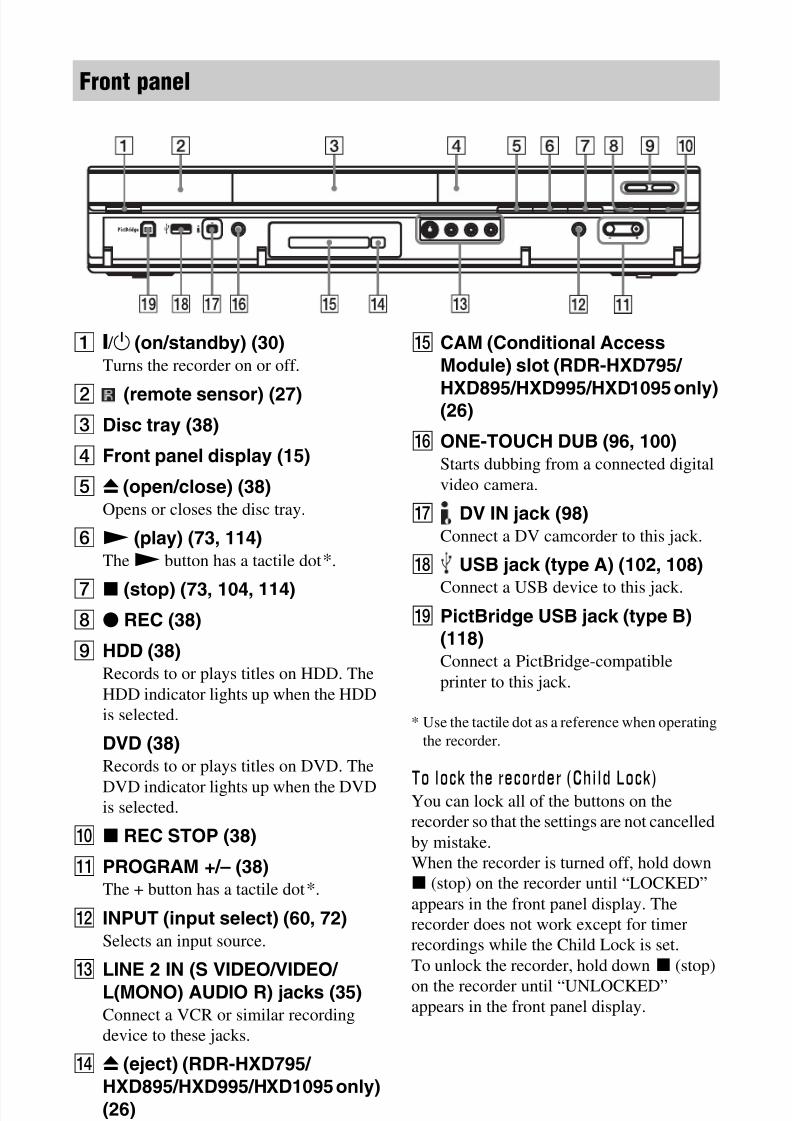
14
A [ / 1 (on/standby) (30)Turns the recorder on or off.
B (remote sensor) (27)
C Disc tray (38)
D Front panel display (15)
E Z (open/close) (38)Opens or closes the disc tray.
FN (play) (73, 114)The N button has a tactile dot*.
G x (stop) (73, 104, 114)
H z REC (38)
I HDD (38)Records to or plays titles on HDD. The
HDD indicator lights up when the HDD
is selected.
DVD (38)Records to or plays titles on DVD. The
DVD indicator lights up when the DVDis selected.
J x REC STOP (38)
K PROGRAM +/– (38)The + button has a tactile dot*.
L INPUT (input select) (60, 72)Selects an input source.
M LINE 2 IN (S VIDEO/VIDEO/
L(MONO) AUDIO R) jacks (35)Connect a VCR or similar recording
device to these jacks.
N Z (eject) (RDR-HXD795/
HXD895/HXD995/HXD1095 only)
(26)Removes the CAM from the CAM slot.
O CAM (Conditional Access
Module) slot (RDR-HXD795/
HXD895/HXD995/HXD1095 only)(26)
P ONE-TOUCH DUB (96, 100)Starts dubbing from a connected digital
video camera.
Q DV IN jack (98)Connect a DV camcorder to this jack.
R USB jack (type A) (102, 108)
Connect a USB device to this jack.
S PictBridge USB jack (type B)
(118)Connect a PictBridge-compatible
printer to this jack.
* Use the tactile dot as a reference when operating
the recorder.
To lock the recorder (Child Lock)You can lock all of the buttons on the
recorder so that the settings are not cancelled
by mistake.
When the recorder is turned off, hold down
x (stop) on the recorder until “LOCKED”
appears in the front panel display. The
recorder does not work except for timer
recordings while the Child Lock is set.
To unlock the recorder, hold down x (stop)
on the recorder until “UNLOCKED”appears in the front panel display.
Front panel

8/18/2019 Instructio Operation Manual DVD 3295080121
http://slidepdf.com/reader/full/instructio-operation-manual-dvd-3295080121 15/168
15
A Displays the following:• Playing time
• Current title/chapter/track/index
number
• Recording time/recording mode• Clock
• Programme position
• EPG indication (61)
“EPG” appears when receiving the
GUIDE Plus+ data.
• TV Direct Rec. indication (38)
“TV” appears in the right most two
digits.
• UPDATE indication
“UPDATE” appears when the
recorder is updating the EPG
information.
B NTSC indicator (125, 131)Lights up when NTSC colour system is
selected.
C VPS/PDC indicator (57, 69)Lights up when the VPS/PDC function
is turned on.
D Timer indicator (66)Lights up when the timer for recording
is set.
E Disc typeLights up when a recordable DVD-R or
DVD-RW disc is loaded.
F Command Mode indicator (141)Displays the Command Mode of the
remote.
When the Command Mode for the
recorder is set to “3 (Default setting),”
either “1” or “2” does not appear.
G Recording statusH Dubbing direction indicator
I Playing status
Front panel display
,continued
8/18/2019 Instructio Operation Manual DVD 3295080121
http://slidepdf.com/reader/full/instructio-operation-manual-dvd-3295080121 16/168
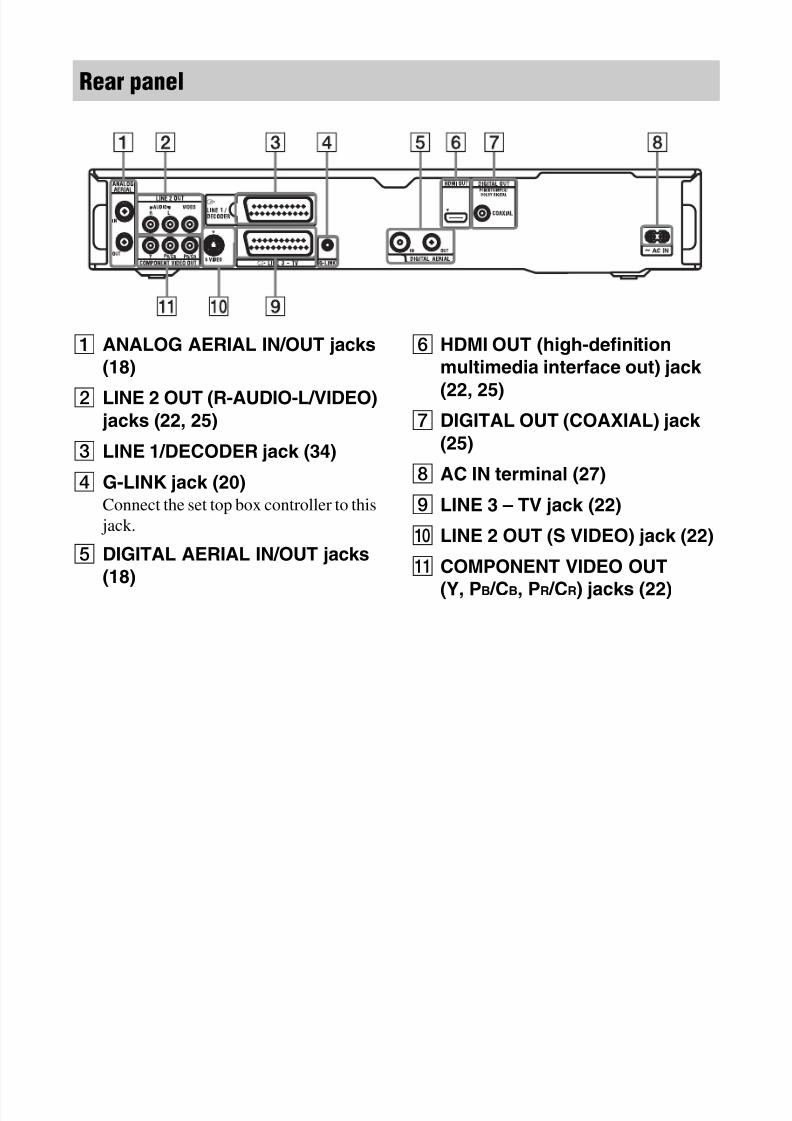
16
A ANALOG AERIAL IN/OUT jacks
(18)
B LINE 2 OUT (R-AUDIO-L/VIDEO)jacks (22, 25)
C LINE 1/DECODER jack (34)
D G-LINK jack (20)Connect the set top box controller to this
jack.
E DIGITAL AERIAL IN/OUT jacks
(18)
F HDMI OUT (high-definition
multimedia interface out) jack
(22, 25)G DIGITAL OUT (COAXIAL) jack
(25)
H AC IN terminal (27)
I LINE 3 – TV jack (22)
J LINE 2 OUT (S VIDEO) jack (22)
K COMPONENT VIDEO OUT
(Y, PB /CB, PR /CR) jacks (22)
Rear panel

8/18/2019 Instructio Operation Manual DVD 3295080121
http://slidepdf.com/reader/full/instructio-operation-manual-dvd-3295080121 17/168
17
H o o k u p s a n d S e t t i n g s
Hookups and Settings
Hooking Up the Recorder
Follow steps 1 through 7 to hook up and adjust the settings of the recorder. Do not connectthe mains lead until you reach “Step 5: Connecting the Mains Lead” on page 27.
b Notes
• See “Specifications” (page 162) for a list of supplied accessories.
• Plug in cords securely to prevent unwanted noise.
• Refer to the instructions supplied with the components to be connected.
• You cannot connect this recorder to a TV that does not have a SCART or video input jack.
• Be sure to disconnect the mains lead of each component before connecting.
The recorder incorporates both analogue and digital tuners. The programme guide and timer
recording method differ depending on which one you select. Depending on the broadcasts you
are receiving and your equipment, select one of the following aerial hookups. Do NOT set
“LINE 1 In” to “Decoder” in the “Video In/Out” setup (page 131) when making connection C.
b Note
Analogue broadcasts are scheduled to end at different times, depending on the country/area.
After analogue broadcasts end in your area, you will not be able to use hookup D to view TV broadcasts.
At that time, change to hookup A to view digital broadcasts.
Checking hookup and setting methods
When you receive Hookup Programme guide Timer recording usingprogramme guide
Freeview A (page 18) Digital Service(page 50)
See page 53.
Both Freeview andanalogue terrestrialbroadcasting
B (page 19) Select Digital Service orGUIDE Plus+ (page 30).
See page 53 when usingDigital Service.See page 66 when usingGUIDE Plus+.
Satellite, Cable C (page 20) GUIDE Plus+ (page 61) See page 66.
Terrestrial D (page 21) GUIDE Plus+ (page 61) See page 66.

8/18/2019 Instructio Operation Manual DVD 3295080121
http://slidepdf.com/reader/full/instructio-operation-manual-dvd-3295080121 18/168
18
Step 1: Connecting the Aerial Cable and Set Top BoxController
b Notes
• If your aerial is a flat cable (300-ohm twin lead cable), use an external aerial connector (not supplied) toconnect the aerial to the recorder.
• If you have separate cables for AERIAL antennas, use an AERIAL UHF/VHF band mixer (not supplied)
to connect the aerial to the recorder.
• If you disconnect the recorder’s mains lead, you will not be able to view the signals from the connected
set top box receiver.
Use this hookup if you can receive Freeview.With this hookup, you can record any programme position by selecting the programme
position on the recorder.
1 Disconnect the aerial cable from your TV, and connect it to DIGITAL AERIAL IN on
the rear panel of the recorder.
2 Connect DIGITAL AERIAL OUT of the recorder to the aerial input of your TV using the
supplied aerial cable.
z Hint
For RDR-HXD795/HXD895/HXD995/HXD1095 (except models for the UK) only
When connecting to an indoor aerial, use one with a signal amplifier rated at 5 V, 30 mA. Then set “AerialPower” to “On” in the “Digital Tuner” setup (page 127).
A: Receiving Freeview (For digital broadcasting)
DVD recorder
TV
to aerial input
to DIGITAL AERIAL OUTto DIGITAL AERIAL IN
Aerial cable (supplied)
: Signal flow
Wall

8/18/2019 Instructio Operation Manual DVD 3295080121
http://slidepdf.com/reader/full/instructio-operation-manual-dvd-3295080121 19/168
19
H o o k u p s a n d S e t t i n g s
This recorder has separate built-in TV tuners for terrestrial digital and terrestrial analogue TV
broadcasts. Use this hookup if you want to view both Freeview and analogue terrestrial
broadcastings.
With this hookup, you can record any programme position by selecting the programme
position on the recorder.
* Aerial cable is supplied for some models.
1 Disconnect the aerial cable from your TV, and connect it to the DIGITAL AERIAL IN
jack on the rear panel of the recorder.
2 Connect the DIGITAL AERIAL OUT jack and the ANALOG AERIAL IN jack using thesupplied short aerial cable.
3 Connect the ANALOG AERIAL OUT jack of the recorder to the aerial input of your TVusing the supplied long aerial cable.
B: Receiving Freeview and analogue terrestrial broadcastings
DVD recorder
TV
to aerial input
to DIGITALAERIAL IN
to DIGITALAERIAL OUTAerial cable
(short, supplied)*
: Signal flow
Wall
to ANALOGAERIAL OUT
to ANALOGAERIAL IN
Aerial cable (long, supplied)
,continued

8/18/2019 Instructio Operation Manual DVD 3295080121
http://slidepdf.com/reader/full/instructio-operation-manual-dvd-3295080121 20/168
20
With this hookup, you can record any programme position on the set top box receiver.
To watch cable programmes, you need to match the programme position on the recorder to
the aerial output programme position on the set top box receiver.
*1 If your set top box receiver does not have an aerial output jack, connect the aerial to the recorder’s
ANALOG AERIAL IN jack.*2 Connect only if your set top box receiver has a SCART connector.
If the set top box receiver can output RGB signals
This recorder accepts RGB signals. If the set top box receiver can output RGB signals,connect the TV SCART connector on the set top box receiver to the LINE 1/DECODER jack,
and set “LINE 1 In” to “RGB” in the “Video In/Out” setup (page 131). Refer to the
instructions supplied with the set top box receiver.
C: Receiving cable or satellite (For analogue broadcasting)
ANT IN
TO TV
DVD recorder
: Signal flow
Set top boxreceiver
to ANALOGAERIAL OUT
to aerial input
SCART cord*2
(not supplied)
Wall
TV
Set top boxcontroller(page 21)
Place the set top box controllernear the remote sensor on theset top box receiver.
to G-LINK
to ANALOGAERIAL IN
Aerial cable*1 (not supplied)
Aerial cable
(supplied)

8/18/2019 Instructio Operation Manual DVD 3295080121
http://slidepdf.com/reader/full/instructio-operation-manual-dvd-3295080121 21/168
21
H o o k u p s a n d S e t t i n g s
About the set top box receiver control function (in areas with GUIDE Plus+ only)You can use the set top box receiver control function with hookup C.
When using the set top box receiver control function:
– The recorder controls the set top box receiver via the supplied set top box controller.
– The recorder controls programme positions on the set top box receiver for timer recording.
– You can use the recorder’s remote control to change programme positions on the set top box
receiver whenever the set top box receiver and recorder are turned on.After making hookup C, check that the recorder correctly controls the set top box receiver
(page 32).
Use this hookup if you watch cable programme positions without a set top box receiver. Also
use this hookup if you are only connecting an aerial antenna.
With this hookup, you can record any programme position by selecting the programme
position on the recorder.
1 Disconnect the aerial cable from your TV, and connect it to ANALOG AERIAL IN on
the rear panel of the recorder.
2 Connect ANALOG AERIAL OUT of the recorder to the aerial input of your TV using
the supplied aerial cable.
D: Receiving terrestrial (For analogue broadcasting)
DVD recorder
TV
to aerial input
to ANALOG AERIAL IN
to ANALOG AERIAL OUT
Aerial cable (supplied)
: Signal flow
Wall

8/18/2019 Instructio Operation Manual DVD 3295080121
http://slidepdf.com/reader/full/instructio-operation-manual-dvd-3295080121 22/168
22
Step 2: Connecting the Video Cords/HDMI Cord
Select one of the following patterns,A throughE, according to the input jack on your TV
monitor, projector, or audio component such as an AV amplifier (receiver). This will enable
you to view pictures.
D
B
EC
A
Audio/videocord (not
supplied)
Component videocord (not supplied)
(yellow)
TV, projector, or audiocomponent
TV, projector, oraudio component
(green)
S-video cord(not supplied)
TV, projector, oraudio component
(red)(blue)
: Signal flow
to COMPONENTVIDEO OUT
to LINE 2 OUT(S VIDEO)
to LINE 2 OUT(VIDEO)
SCART cord (not supplied)
toT LINE 3 – TV
DVD recorder
TV
HDMI cord(not supplied)
TV, projector, or audiocomponent
to HDMI OUT
(green) (red)(blue)

8/18/2019 Instructio Operation Manual DVD 3295080121
http://slidepdf.com/reader/full/instructio-operation-manual-dvd-3295080121 23/168
23
H o o k u p s a n d S e t t i n g s
A SCART input jackWhen setting “LINE 3 Out” to “S-Video” or
“RGB” in the “Video In/Out” setup
(page 131), use a SCART cord that
conforms to the selected signal.
B Video input jackYou will enjoy standard quality images.
C S VIDEO input jackYou will enjoy high quality images.
D Component video input jacks (Y, PB /
CB, PR /CR)You will enjoy accurate colour reproduction
and high quality images.
If your TV accepts progressive 525p/625pformat signals, use this connection and set
“Progressive” to “Compatible” in the “Easy
Setup” setup (page 30). Then set
“Component Video Out” to “Progressive” in
the “Video In/Out” setup to send progressive
video signals. For details, see “Component
Video Out” on page 130.
E HDMI input jackUse a certified HDMI cord (not supplied) to
enjoy high quality digital picture and sound
through the HDMI OUT jack.
When connecting a Sony TV that is
compatible with the “Control for HDMI”
function, see page 24.
To see the signals from the connected set top
box receiver when the set top box receiver is
connected to the recorder using a SCARTcord only, turn the recorder on.
When connecting to the HDMI jackFollow the steps below. Improper handling
may damage the HDMI jack and the
connector.
1 Carefully align the HDMI jack on the
rear of the recorder and the HDMI
connector by checking their shapes.Make sure the connector is not upside
down or tilted.
2 Insert the HDMI connector straight into
the HDMI jack.
Do not bend or apply pressure to the
HDMI connector.
b Notes
• Be sure to disconnect the HDMI cord when
moving the recorder.
• Do not apply too much pressure to the cabinet
wall, if you place the recorder on the cabinet
with the HDMI cord connected. It may damage
the HDMI jack or the HDMI cord.
• Do not twist the HDMI connector while
connecting to or disconnecting from the HDMI
jack to avoid damaging the HDMI jack and
connector.
When playing “wide screen” imagesSome recorded images may not fit your TV
screen. To change the picture size, see
page 137.
If you are connecting to a VCRConnect your VCR to the LINE 1/
DECODER jack on the recorder (page 34).
Not straightConnector is upsidedown
,continued

8/18/2019 Instructio Operation Manual DVD 3295080121
http://slidepdf.com/reader/full/instructio-operation-manual-dvd-3295080121 24/168
24
b Notes
• Do not connect more than one type of video cord
between the recorder and your TV at the same
time.
• Do not make connectionsA andE at the same
time.
• When you connect the recorder to your TV via
the SCART jacks, the TV’s input source is set tothe recorder automatically when you start
playback. If necessary, press the TVt button
on the remote to return the input to the TV.
• If you connect the recorder to a TV with
SMARTLINK, set “LINE 3 Out” to “Video” in
the “Video In/Out” setup.
• You cannot connect the HDMI OUT jack
(connectionE) to DVI jacks that are not HDCP
compliant (e.g., DVI jacks on PC displays).
• Component video and RGB signals are not
output when using the HDMI connection.
* This DVD recorder incorporates High-
Definition Multimedia Interface (HDMI™)
technology.
HDMI, the HDMI logo and High-Definition
Multimedia Interface are trademarks or
registered trademarks of HDMI Licensing LLC.
If the connected TV (or other connected
equipment such as a set top box receiver)
complies with SMARTLINK, NexTView
Link *3, MEGALOGIC*1, EASYLINK*2,
CINEMALINK*2, Q-Link *3, EURO VIEW
LINK*4, or T-V LINK*5, you can enjoy thefollowing SMARTLINK features.
• TV Direct Rec. (page 39)
• One-Touch Play (page 74)
• Preset Download
You can download the tuner preset data
from your TV to this recorder, and tune the
recorder according to that data in “Easy
Setup.”
• NexTView Download
You can easily set the timer by using the
NexTView Download function on your
TV.
To prepare for the SMARTLINK featuresSet “LINE 3 Out” to “Video” in the “Video
In/Out” setup (page 131) and
“SMARTLINK” to “This Recorder Only” in
the “Options” setup (page 141).
b Notes
• For correct SMARTLINK connection, you will
need a SCART cord that has the full 21 pins.
Refer as well to your TV’s instruction manual
for this connection.
• Not all TVs respond to the functions above.
*1“MEGALOGIC” is a registered trademark ofGrundig Corporation.
*2 “EASYLINK” and “CINEMALINK” are
trademarks of Philips Corporation.*3 “Q-Link” and “NexTView Link” are
trademarks of Panasonic Corporation.*4 “EURO VIEW LINK” is a trademark of
Toshiba Corporation.*5 “T-V LINK” is a trademark of JVC
Corporation.
By connecting Sony components that are
compatible with the “Control for HDMI”
function with an HDMI cord (not supplied),
operation is simplified as below:
• One-Touch Play (page 74)
• System Power-Off
When you turn the TV off using the power
button on the TV’s remote, the recorder
and components compatible with the
“Control for HDMI” function turn off
automatically. However, the recorder does
not turn off while recording or dubbing
even if you turn off the TV.
• ‘BRAVIA’ Sync displayYou can control the recorder by pressing
the SYNC MENU button on the TV’s
remote.
b Notes
• Depending on the connected component, the
“Control for HDMI” function may not work.
Refer to the operating instructions supplied with
the component.
• You can use the ‘BRAVIA’ Sync display featureonly when the connected TV has the SYNC
MENU button. For details on ‘BRAVIA’ Sync,
refer to the operating instructions supplied with
the TV.
• To use the ‘BRAVIA’ Sync features, set
“Control for HDMI” to “On” (default) in the
“HDMI Output” setup (page 140).
About the SMARTLINKfeatures (for SCARTconnections only)
About the “Control for HDMI”functions for ‘BRAVIA’ Sync(for HDMI connections only)

8/18/2019 Instructio Operation Manual DVD 3295080121
http://slidepdf.com/reader/full/instructio-operation-manual-dvd-3295080121 25/168
25
H o o k u p s a n d S e t t i n g s
Step 3: Connecting the Audio Cords/HDMI Cord
Select one of the following patterns,A orB, according to the input jack on your TV monitor,
projector, or audio component such as an AV amplifier (receiver). This will enable you to
listen to sound.
* The yellow plug is used for video signals (page 22).
A Digital audio input jackIf your audio component has a Dolby*1
Digital, DTS*2, or MPEG audio decoder and
a digital input jack, use this connection. You
can enjoy Dolby Digital (5.1ch), DTS
(5.1ch), and MPEG audio (5.1ch) surround
effects.
If you connect a Sony audio component that
is compatible with the “Control for HDMI”
function, refer to the operating instructions
supplied with the audio component.
VIDEO
AUDIO
INPUT
L
R
A
B
Audio component witha decoder
(white)
TV, projector, oraudio component
Audio/video cord(not supplied)
: Signal flow
Coaxial digital cord(not supplied)
to DIGITAL OUT (COAXIAL)
to LINE 2 OUT (R-AUDIO-L)
Rear (L)
DVD recorder
(red)
(yellow)*
(yellow)
(white)
(red)
[Speakers]
Front (L)
[Speakers]
to coaxial/HDMI digital input
Rear (R)
Front (R)
SubwooferCentre
HDMI cord(not supplied)
to HDMI OUT
or
,continued
8/18/2019 Instructio Operation Manual DVD 3295080121
http://slidepdf.com/reader/full/instructio-operation-manual-dvd-3295080121 26/168
26
B Audio L/R (left/right) input jacksThis connection will use your TV’s or audio
component’s two speakers for sound.
z Hint
For correct speaker location, refer to the operating
instructions supplied with the connected
components.
b Notes
• Do not connect your TV’s audio output jacks to
the LINE IN (R-AUDIO-L) jacks at the same
time. This will cause unwanted noise to come
from your TV’s speakers.
• With connectionB, do not connect the LINE IN
(R-AUDIO-L) and LINE 2 OUT (R-AUDIO-L)
jacks to your TV’s audio output jacks at the same
time. This will cause unwanted noise to comefrom your TV’s speakers.
• With connectionA, after you have completed
the connection, make the appropriate settings in
the “Audio Out” setup (page 133). Otherwise, no
sound or a loud noise will come from your
speakers.
• When you connect the recorder to an audio
component using an HDMI cord, you will need
to do one of the following:
– Connect the audio component to the TV with
the HDMI cord, or– Connect the recorder to the TV with a video
cord other than HDMI cord (component video
cord, S-video cord, or audio/video cord).
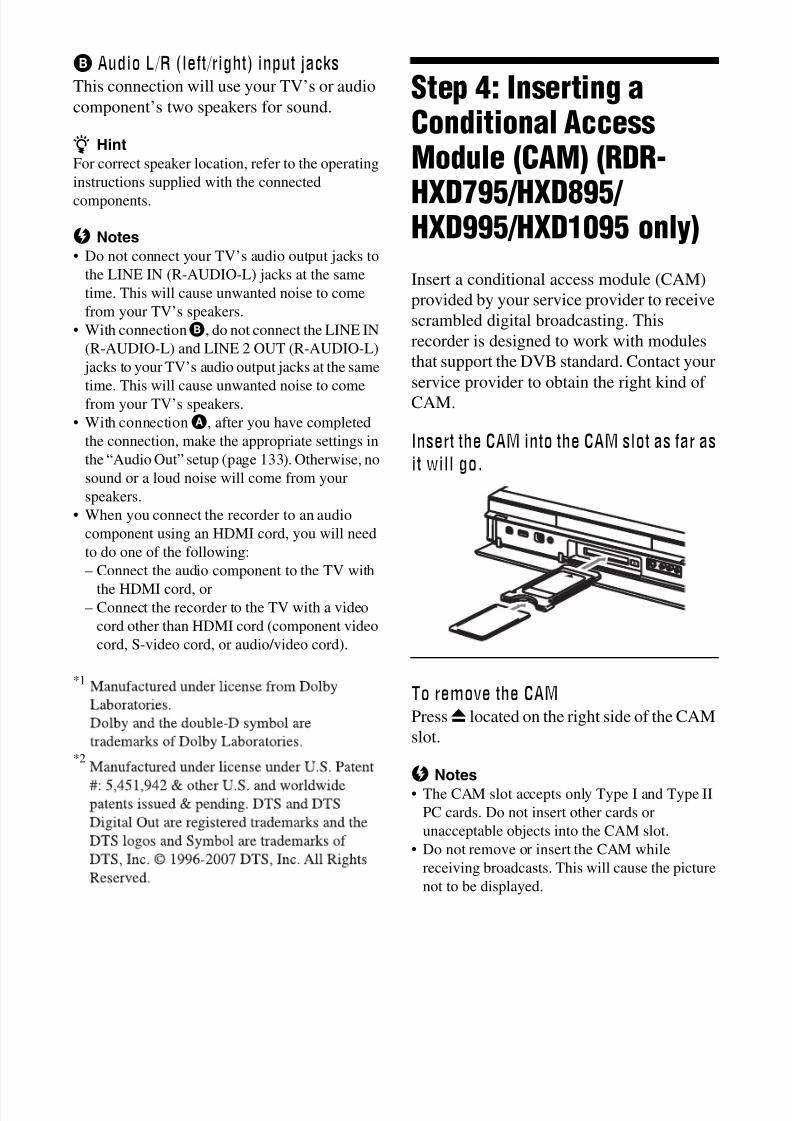
Step 4: Inserting aConditional AccessModule (CAM) (RDR-
HXD795/HXD895/ HXD995/HXD1095 only)
Insert a conditional access module (CAM)
provided by your service provider to receive
scrambled digital broadcasting. This
recorder is designed to work with modules
that support the DVB standard. Contact your
service provider to obtain the right kind of
CAM.
Insert the CAM into the CAM slot as far as
it will go.
To remove the CAMPress Z located on the right side of the CAM
slot.
b Notes
• The CAM slot accepts only Type I and Type II
PC cards. Do not insert other cards or
unacceptable objects into the CAM slot.
• Do not remove or insert the CAM while
receiving broadcasts. This will cause the picture
not to be displayed.
*1
*2
8/18/2019 Instructio Operation Manual DVD 3295080121
http://slidepdf.com/reader/full/instructio-operation-manual-dvd-3295080121 27/168
27
H o o k u p s a n d S e t t i n g s
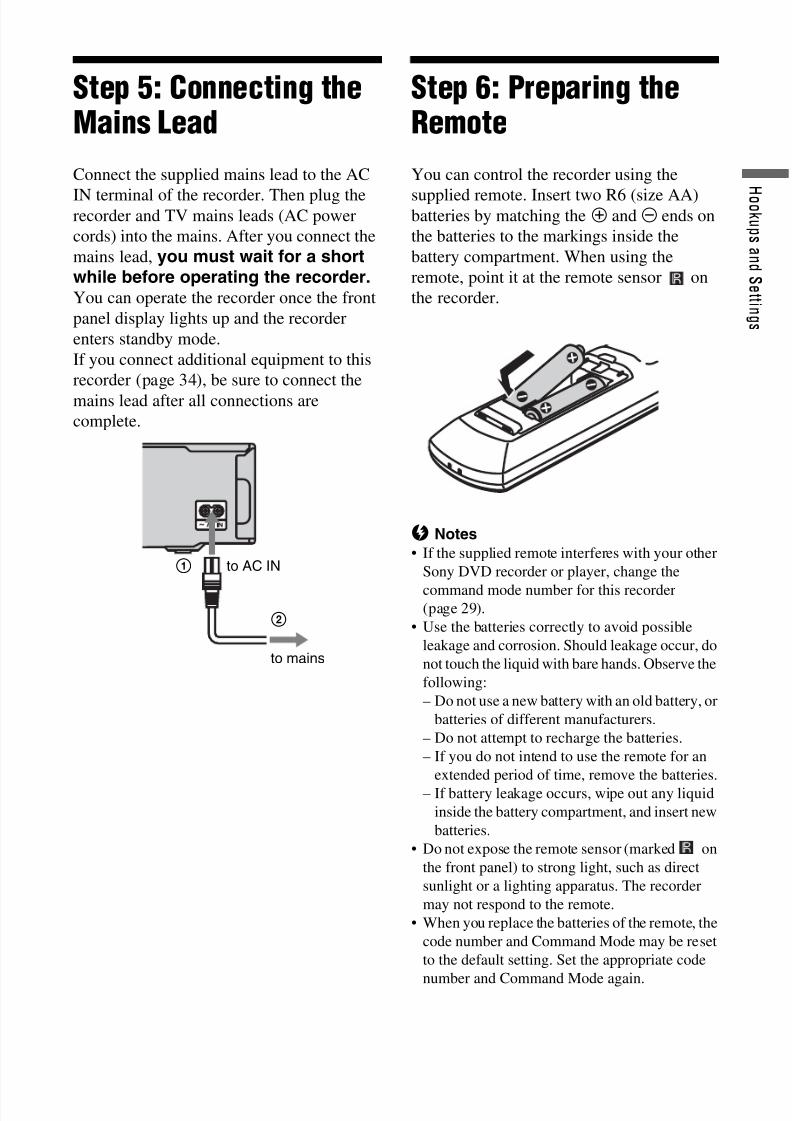
Step 5: Connecting theMains Lead
Connect the supplied mains lead to the AC
IN terminal of the recorder. Then plug therecorder and TV mains leads (AC power
cords) into the mains. After you connect the
mains lead, you must wait for a shortwhile before operating the recorder. You can operate the recorder once the front
panel display lights up and the recorder
enters standby mode.
If you connect additional equipment to this
recorder (page 34), be sure to connect the
mains lead after all connections are
complete.
Step 6: Preparing theRemote
You can control the recorder using the
supplied remote. Insert two R6 (size AA)batteries by matching the 3 and # ends on
the batteries to the markings inside the
battery compartment. When using the
remote, point it at the remote sensor on
the recorder.
b Notes
• If the supplied remote interferes with your other
Sony DVD recorder or player, change the
command mode number for this recorder(page 29).
• Use the batteries correctly to avoid possible
leakage and corrosion. Should leakage occur, do
not touch the liquid with bare hands. Observe the
following:
– Do not use a new battery with an old battery, or
batteries of different manufacturers.
– Do not attempt to recharge the batteries.
– If you do not intend to use the remote for an
extended period of time, remove the batteries.
– If battery leakage occurs, wipe out any liquid
inside the battery compartment, and insert new
batteries.
• Do not expose the remote sensor (marked on
the front panel) to strong light, such as direct
sunlight or a lighting apparatus. The recorder
may not respond to the remote.
• When you replace the batteries of the remote, the
code number and Command Mode may be reset
to the default setting. Set the appropriate code
number and Command Mode again.
to mains
to AC IN1
2
,continued

8/18/2019 Instructio Operation Manual DVD 3295080121
http://slidepdf.com/reader/full/instructio-operation-manual-dvd-3295080121 28/168
28
You can adjust the remote’s signal to control
your TV.
b Notes
• Depending on the connected unit, you may not
be able to control your TV with some or all of the
buttons below.
• If you enter a new code number, the code
number previously entered will be erased.
1 Hold down TV [ / 1 located at thebottom of the remote.Do not press the [ / 1 button at the top of
the remote.
2 With TV [ / 1 pressed down, enter the
TV’s manufacturer code using thenumber buttons.For instance, to enter “09,” press “0”
then “9.” After you enter the lastnumber, release the TV [ / 1 button.
Code numbers of controllable TVsIf more than one code number is listed,
try entering them one at a time until you
find the one that works with your TV.
The remote performs the following:
Controlling TVs with theremote
TV 2 +/–
Numberbuttons
TVt
TV PROG+/–
TV [ / 1
TV/DVD
DISPLAY
Manufacturer Code number
Sony 01 (default)Grundig 11
Hitachi 24
ITT 15, 16
JVC 33
LG/Goldstar 76
Loewe 45
Nokia 15, 16, 69, 73
Panasonic 17, 49
Philips 06, 07, 08, 72
Saba 12, 13, 74
Samsung 22, 23, 71
Sanyo 25
Sharp 29
Telefunken 36
Thomson 43, 75
Toshiba 38
Buttons Operations
TV [ / 1 Turns your TV on oroff.
TV 2 (volume)+/–
Adjusts the volumeof your TV.
TV PROG +/– Selects theprogramme positionon your TV.
TVt (inputselect)
Switches your TV’sinput source.
8/18/2019 Instructio Operation Manual DVD 3295080121
http://slidepdf.com/reader/full/instructio-operation-manual-dvd-3295080121 29/168
29
H o o k u p s a n d S e t t i n g s
To operate the TV/DVD button
(for SCART connections only)The TV/DVD button switches between TV
mode and DVD mode. Press the TV/DVD
button when in stop mode or no menu
appears on the TV screen. Point your remote
at the recorder when using this button.TV mode: switch to this when you use the
TV’s tuner mainly. When you start
playback, the input source for the TV is set
to the recorder automatically.
DVD mode: switch to this when you use the
recorder’s tuner mainly.
To check the current mode, press DISPLAY
(page 43).
If the supplied remote interferes with your
other Sony DVD recorder or player, set the
command mode number for this recorder
and the supplied remote to one that differs
from the other Sony DVD recorder or playerafter you have completed “Step 7: Easy
Setup.”
The default command mode setting for this
recorder and the supplied remote is “3
(Default setting).”
You can check the current Command Mode
in the front panel display. For details, see
page 141.
You can change programme positions of the
recorder using the number buttons.
Example: for channel 50
Press “5,” “0,” then press ENTER.
z Hint
If the aerial cables are connected to both DIGITAL
AERIAL IN and ANALOG AERIAL IN jacks,
you can switch between digital broadcasting and
analogue broadcasting using the INPUT button.
If you have a Sony DVD playeror more than one Sony DVDrecorder
The default command mode setting for thisrecorder and the supplied remote is “3
(Default setting).”
The remote does not function if different
command modes are set for the recorder
and remote. Set the same command mode.
Changing programmepositions of the recorder usingthe remote

8/18/2019 Instructio Operation Manual DVD 3295080121
http://slidepdf.com/reader/full/instructio-operation-manual-dvd-3295080121 30/168
30
Step 7: Easy Setup
Make the basic adjustments by following the
on-screen instructions in “Easy Setup.”
Be careful not to disconnect the cables or
exit the “Easy Setup” function during thisprocedure.
1 Turn on the recorder and your TV.
Then switch the input selector on your
TV so that the signal from therecorder appears on your TV screen.The “Language” display appears.
• If the “Language” display does notappear, select “Easy Setup” in the
“Basic” setup from “Initial Setup” in
the System Menu (page 125).
2 Select a language for the on-screen
displays using < / M / m / ,, and
press ENTER.The initial settings message appears.
3 Select “Start” using M / m, and press
ENTER.Follow the on-screen instructions to
make the following settings.
Aerial Power (for RDR-HXD795/ HXD895/HXD995/HXD1095 (except
models for the UK) only)Selects whether to supply the power to
the indoor aerial connected to the
DIGITAL AERIAL IN jack.
• To supply the power whether the
recorder is turned on or in standby,
select “On.”
• To supply the power only when the
recorder is turned on, select “Auto.”
• Select “Off” to not supply the power.
D.TV Auto Channel Setting• If the aerial cable is connected to the
DIGITAL AERIAL IN jack (hookup
A or B), select “Auto Scan.” Then,
select your country/region using < /
,, and press ENTER. The recorder
will automatically capture and store
the available TV and Radio channels.
• If the aerial cable is connected to the
ANALOG AERIAL IN jack (hookupC or D) only, select “Do not set.”
For details, see page 18.
A.TV Auto Channel Setting• If the aerial cable is connected to the
ANALOG AERIAL IN jack (except
hookup A) and the TV is connected to
this recorder not using SMARTLINK,
select “Auto Scan.” Then, select yourcountry/region using < / ,, and
press ENTER. The programme
position order will be set according to
the country/region you set.
[ / 1
< / M / m / ,,ENTEREXIT/
ORETURN
TV [ / 1
GUIDE
8/18/2019 Instructio Operation Manual DVD 3295080121
http://slidepdf.com/reader/full/instructio-operation-manual-dvd-3295080121 31/168
31
H o o k u p s a n d S e t t i n g s
• If the aerial cable is connected to the
ANALOG AERIAL IN jack (except
hookup A) and the TV is connected to
this recorder with SMARTLINK,
select “Download from TV” (For
details, refer to the operating
instructions supplied with your TV).
Then, select your country/region using
< / ,, and press ENTER. The tuner
preset data will be downloaded from
your TV to this recorder.
• If the aerial cable is connected to the
DIGITAL AERIAL IN jack (hookup
A) only, or to skip this setting, select
“Do not set.” Then, select your
country/region using < / ,, and
press ENTER.To set the programme positions
manually, see page 126.
For details, see page 18.
Clock SettingThe recorder will automatically set the
clock when any digital channels have
been scanned and stored. If the clock has
already been set, this setting is skippedand the “EPG Type Select” setting
screen appears.
• Select “Auto” when a programme
position in your local area broadcasts a
time signal. The “Auto Clock Setting”
display appears.
Select a programme position that
carries a time signal and then “Start”
using < / , / m, and press ENTER.
If a clock signal cannot be found, pressO RETURN, and set the clock
manually.
• Select “Manual” to set the clock
manually. The “Manual Clock
Setting” display appears.
1 Select the time zone for your area
or GMT (Greenwich Mean Time)
using < / ,, and press m.
2 Select “On” using < / , if you
are now on summer time, and
press ENTER.
3 Set the day, month, year, hour and
minutes using < / M / m / ,, and
press ENTER to start the clock.
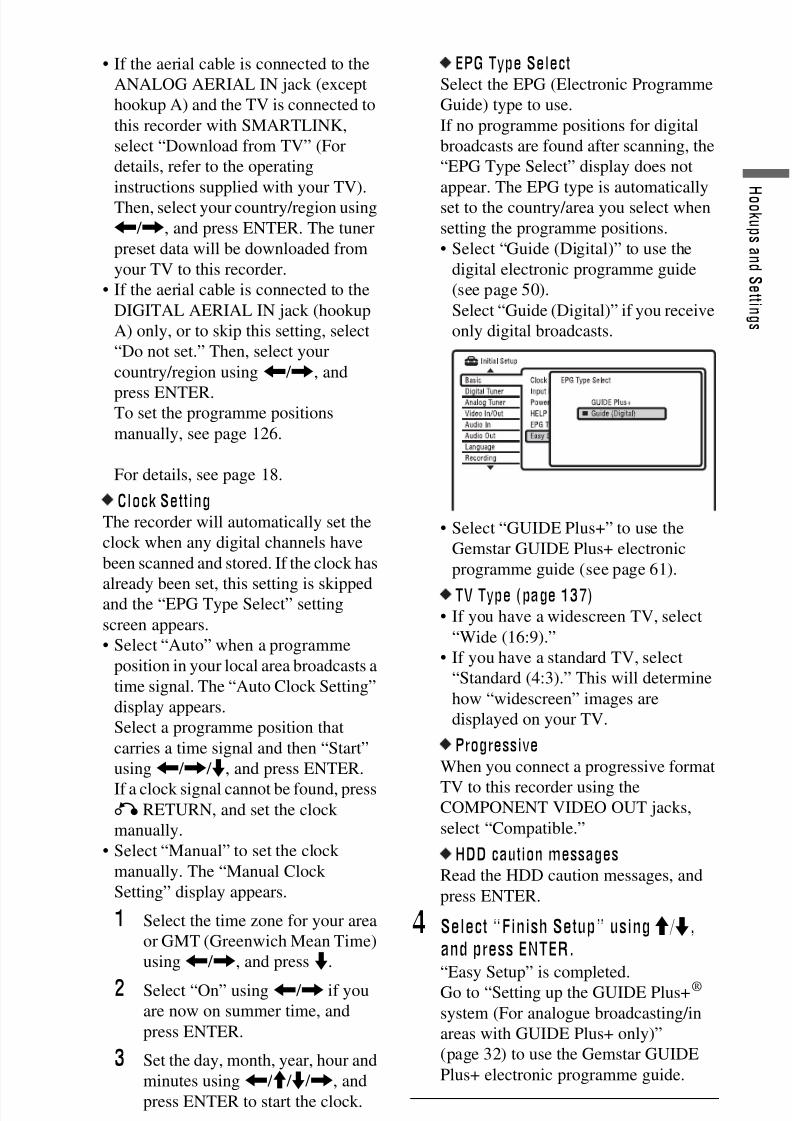
EPG Type SelectSelect the EPG (Electronic Programme
Guide) type to use.
If no programme positions for digital
broadcasts are found after scanning, the
“EPG Type Select” display does not
appear. The EPG type is automatically
set to the country/area you select when
setting the programme positions.
• Select “Guide (Digital)” to use the
digital electronic programme guide
(see page 50).
Select “Guide (Digital)” if you receive
only digital broadcasts.
• Select “GUIDE Plus+” to use the
Gemstar GUIDE Plus+ electronic
programme guide (see page 61).
TV Type (page 137)• If you have a widescreen TV, select
“Wide (16:9).”
• If you have a standard TV, select
“Standard (4:3).” This will determine
how “widescreen” images are
displayed on your TV.
ProgressiveWhen you connect a progressive format
TV to this recorder using theCOMPONENT VIDEO OUT jacks,
select “Compatible.”
HDD caution messagesRead the HDD caution messages, and
press ENTER.
4 Select “Finish Setup” using M / m,and press ENTER.“Easy Setup” is completed.
Go to “Setting up the GUIDE Plus+®
system (For analogue broadcasting/in
areas with GUIDE Plus+ only)”
(page 32) to use the Gemstar GUIDE
Plus+ electronic programme guide.
To return to the previous stepPress O RETURN.
,continued

8/18/2019 Instructio Operation Manual DVD 3295080121
http://slidepdf.com/reader/full/instructio-operation-manual-dvd-3295080121 32/168
32
z Hint
If you want to run “Easy Setup” again, select
“Easy Setup” in the “Basic” setup from “Initial
Setup” in the System Menu (page 125).
Follow the instructions below to set up the
GUIDE Plus+ system and use the connected
set top box receiver.
1Press GUIDE.The GUIDE Plus+ system “Basic
Setup” appears.
2 Select an item using M / m, and press
ENTER. Then set each item.
LanguageSelect a language for the on-screen
displays using M / m, and press ENTER.
CountrySelect a country/area using M / m, and
press ENTER.
Postal CodeEnter your postal code using < / M / m /
,, and press ENTER.
If “Country” is set to “Others,” you
cannot enter a postal code and the
GUIDE Plus+ system will not search for
a host channel.
• If you do not need to set up the GUIDE
Plus+ system, press SYSTEM MENU
to exit.
• Even if you cannot use the GUIDE
Plus+ system where you live, you can
still set up a manual recording. See
“Setting the timer manually
(Schedule)” on page 68.
External Receiver 1/ExternalReceiver 2/External Receiver 3 (onlywhen connecting the set top boxreceiver)
1 Press ENTER to select “Continue.”
2 Select the set top box receiver type
using M / m, and press ENTER.
3 Select the provider using M / m, and
press ENTER.
4 Select the receiver brand using M /
m, and press ENTER.
If you select “Other providers,” you
can select a receiver brand from a
list of all available brands.
If your receiver brand is not on thelist, select “???.”
The receiver brand list is
automatically updated, so your
receiver may be available at a later
date. Select your brand when it
becomes available. Until then, use
“???.”
5 Select the connection you used for
your set top box receiver using M / m, and press ENTER.
When the set top box receiver is
connected to the recorder using
hookup C with both an aerial cable
and a SCART cord, select either
“Line1” or “Antenna.”
The display asks for confirmation.
6 Press ENTER to select “Continue.”
The Video Window switches to thespecified programme position.
7 Select “YES” using M / m, and press
ENTER.
The display asks for confirmation.
If the Video Window does not
switch to the specified programme
position, select “NO” and press
ENTER until the Video Window
switches to the specified
programme position.
Setting up the GUIDE Plus+®
system (For analoguebroadcasting/in areas withGUIDE Plus+ only)

8/18/2019 Instructio Operation Manual DVD 3295080121
http://slidepdf.com/reader/full/instructio-operation-manual-dvd-3295080121 33/168
33
H o o k u p s a n d S e t t i n g s
3 Turn off the recorder to receive GUIDE
Plus+ system data.
b Note
You cannot set tuner system or “OSD Language”to a country/region or language that is not
supported by the GUIDE Plus+ system.
If you cannot get the recorder to control
your set top box receiverCheck the connection and position of the set
top box controller (page 20).
If your set top box receiver still does not
operate with this recorder, refer to the
instructions supplied with your set top box
receiver and contact your cable or satellite
company to see if they can provide you with
a compatible set top box receiver.
b Notes
• The list of external receivers controllable by the
GUIDE Plus+ system is updated constantly and
is distributed through GUIDE Plus+ system data
signals. Since the time your recorder has been
produced and the time you installed yourrecorder for the first time, new external receiver
codes might have been added.
• If the external receiver is still not on the list or is
not controlled properly by the recorder, please
call Customer Support to report the brand and
model of your external receiver.
To fix the set top box controller to your set
top box receiverOnce you have confirmed that the set top
box controller controls your set top box
receiver, fix it in place.
1 Remove the backing on the double-
sided tape.
2 Attach it so that the set top box
controller is directly above the remote
control sensor on your set top box
receiver.
To change the basic GUIDE Plus+ settings
1 Press GUIDE.
2 Select “Setup” in the Menu Bar using M /
,, and press ENTER.
3 Select “Basic Setup” using M / m, and
press ENTER.
4 Repeat from step 2 of “Setting up the
GUIDE Plus+® system (For analogue
broadcasting/in areas with GUIDE
Plus+ only)” on page 32.
To receive GUIDE Plus+ system
data your recorder must be turned off
when not in use. If your recorder is
connected to a set top box receiver,be sure to leave the set top box
receiver turned on. After initial
setup, it may take up to 24 hours to
begin receiving TV programme
listings.
8/18/2019 Instructio Operation Manual DVD 3295080121
http://slidepdf.com/reader/full/instructio-operation-manual-dvd-3295080121 34/168
34
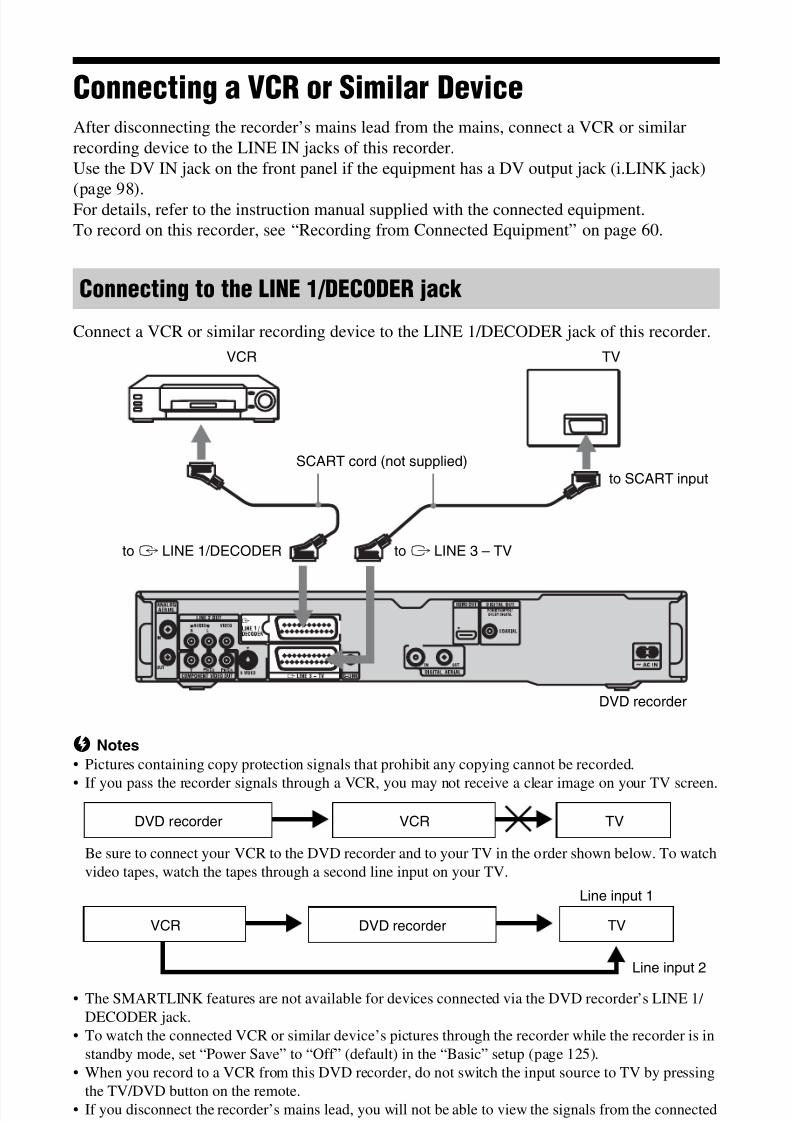
Connecting a VCR or Similar DeviceAfter disconnecting the recorder’s mains lead from the mains, connect a VCR or similar
recording device to the LINE IN jacks of this recorder.
Use the DV IN jack on the front panel if the equipment has a DV output jack (i.LINK jack)
(page 98).For details, refer to the instruction manual supplied with the connected equipment.
To record on this recorder, see “Recording from Connected Equipment” on page 60.
Connect a VCR or similar recording device to the LINE 1/DECODER jack of this recorder.
b Notes
• Pictures containing copy protection signals that prohibit any copying cannot be recorded.
• If you pass the recorder signals through a VCR, you may not receive a clear image on your TV screen.
Be sure to connect your VCR to the DVD recorder and to your TV in the order shown below. To watch
video tapes, watch the tapes through a second line input on your TV.
• The SMARTLINK features are not available for devices connected via the DVD recorder’s LINE 1/
DECODER jack.
• To watch the connected VCR or similar device’s pictures through the recorder while the recorder is in
standby mode, set “Power Save” to “Off” (default) in the “Basic” setup (page 125).
• When you record to a VCR from this DVD recorder, do not switch the input source to TV by pressing
the TV/DVD button on the remote.
• If you disconnect the recorder’s mains lead, you will not be able to view the signals from the connected
VCR.
Connecting to the LINE 1/DECODER jack
TV
DVD recorder
toT LINE 3 – TV
VCR
toi LINE 1/DECODER
SCART cord (not supplied)
to SCART input
VCRDVD recorder TV
Line input 1
Line input 2
DVD recorderVCR TV

8/18/2019 Instructio Operation Manual DVD 3295080121
http://slidepdf.com/reader/full/instructio-operation-manual-dvd-3295080121 35/168
35
H o o k u p s a n d S e t t i n g s
Connect a VCR or similar recording device to the LINE 2 IN jacks of this recorder. If the
equipment has an S-video jack, you can use an S-video cord instead of an audio/video cord.
z Hint
When the connected equipment outputs only monaural sound, connect to only the L(MONO) and VIDEO
input jacks on the front of the recorder. Do not connect the R input jack.
b Notes• Do not connect the yellow LINE IN (VIDEO) jack when using an S-video cord.
• Do not connect the output jack of this recorder to another equipment’s input jack with the other
equipment’s output jack connected to the input jack of this recorder. This may cause noise (feedback).
• Do not connect more than one type of video cord between the recorder and your TV at the same time.
Connecting to the LINE 2 IN jacks on the front panel
OUTPUT
S VIDEO AUDIOL R
VIDEO
VCR, etc.
Audio/video cord
(not supplied)
S-video cord
(not supplied)
DVD recorder: Signal flow
to LINE 2 IN

8/18/2019 Instructio Operation Manual DVD 3295080121
http://slidepdf.com/reader/full/instructio-operation-manual-dvd-3295080121 36/168
36
Connecting an External Decoder
You can watch or record external decoder (PAY-TV/Canal Plus analogue decoder)
programmes if you connect a decoder (not supplied) to the recorder. Disconnect the recorder’s
mains lead from the mains when connecting the decoder. Note that when you set “LINE 1 In”
to “Decoder” in step 7 of “Setting external decoder (PAY-TV/Canal Plus analogue decoder)programme positions” (page 37), you will not be able to select “L1” because Line 1 will
become a dedicated line for the decoder.
Connecting a decoder
TV
Aerial cable(supplied)
SCART cord(not supplied)
External decoder (PAY-TV/ Canal Plus analogue decoder)
to AERIAL OUT to i LINE 1/DECODER
DVD recorder
to AERIAL IN
to SCART input
SCART cord(not supplied)
toT LINE 3 – TV

8/18/2019 Instructio Operation Manual DVD 3295080121
http://slidepdf.com/reader/full/instructio-operation-manual-dvd-3295080121 37/168
37
H o o k u p s a n d S e t t i n g s
To watch or record PAY-TV/Canal Plus
analogue programmes, set your recorder toreceive the programme positions using the
on-screen display.
In order to set the programme positions
correctly, be sure to follow all of the steps
below.
1 Press SYSTEM MENU.The System Menu appears.
2 Select “Initial Setup,” and pressENTER.
3 Select “Video In/Out,” and press
ENTER.
4 Select “LINE 3 Out,” and press
ENTER.
5 Press M / m to select “Video” or
“RGB,” and press ENTER.
6 Select “LINE 1 In,” and press ENTER.
7 Press M / m to select “Decoder,” andpress ENTER.
8 Press O RETURN to return thecursor to the left column.
9 Select “Analog Tuner,” and pressENTER.
10 Select “Manual CH Setting,” andpress ENTER.
11 Select “Next Screen,” and pressENTER.
12 Select your country/region, and press
ENTER.
13 Select the desired programme
position using PROG +/– or number
buttons.14 Select “Channel” using M / m, and
select the external decoder
programme position using < / ,.
15 Select “Sound System” using M / m,
and select an available TV system, B/
G, D/K, I, or L using < / ,.To receive broadcasts in France, select
“L.”
16 Select “Decoder” using M / m, and
select “On” using < / ,.
17 Press SYSTEM MENU to exit the
menu.
To return to the previous step
Press O RETURN.
b Notes
• If you disconnect the recorder’s mains lead, you
will not be able to view the signals from the
connected decoder.
• To watch the connected external decoder (PAY-
TV/Canal Plus analogue decoder) programmes
during recording, press the PROGRAM + button
on the recorder (“SCART THRU” appears on
the front panel display). To return to the previous
display, press the PROGRAM – button on the
recorder (“SCART NORM” appears on the front
panel display). The recorder automatically
switches to the programme tuned by the
recorder’s tuner after the recording has finished.
To watch the connected external decoder (PAY-
TV/Canal Plus analogue decoder) programmes
while the recorder is in standby mode, set
“Power Save” to “Off” (default) in the “Basic”
setup (page 125).
Setting external decoder (PAY-TV/Canal Plus analoguedecoder) programme positions
Programme position

8/18/2019 Instructio Operation Manual DVD 3295080121
http://slidepdf.com/reader/full/instructio-operation-manual-dvd-3295080121 38/168
38
Seven Basic Operations— Getting to Know Your DVD Recorder
1. Inserting a Disc
1 Press DVD.
2 Press Z (open/close), and place a
disc on the disc tray.
3 Press Z (open/close) to close the
disc tray.Wait until “LOAD” disappears from the
front panel display.
Unused DVDs are formatted
automatically.
• For DVD-RW discs
DVD-RWs are formatted in the
recording format (VR mode or Video
mode) set by “Format DVD-RW” of
“Basic” in the “Disc Setup” setup
(page 123).
• For DVD-R discsDVD-Rs are automatically formatted
in Video mode. To format an unused
DVD-R in VR mode, format the disc
in the “Format” setup (page 49)
before you make a recording.
If the disc is recordable on this recorder,
you can manually re-format the disc to
make a blank disc (page 49).
2. Recording aProgramme
This section introduces the basic operation
to record a current TV programme to the
hard disk (HDD) or to a disc (DVD). For an
explanation of how to make timer
recordings, see page 53 (Digital
broadcasting) or page 66 (Analogue
broadcasting).
1 Press HDD or DVD.If you want to record to a DVD, insert a
recordable DVD.
2 Press PROG +/– to select theprogramme position or input source
you want to record.To switch between digital broadcasting
and analogue broadcasting, pressINPUT. (Available when the aerial
cables are connected to both DIGITAL
AERIAL IN and ANALOG AERIAL
IN jacks only.)
+RDVD VCD CD
DATA CD
-RWVR
-RWVideo+RW
-RVR
DATA DVD-RVideo
DVDZ (open/ close)
Recording/playing side facing down
+RW -RWVR -RWVideo +RHDD
-RVR
-RVideo
HDD DVD
PROG +/–
REC MODEz RECx RECSTOP
INPUT
X

8/18/2019 Instructio Operation Manual DVD 3295080121
http://slidepdf.com/reader/full/instructio-operation-manual-dvd-3295080121 39/168
39
39
S e v e n B a s i c O p e r a t i o n s — G e t t i n g t o K n o wY o u r D V D R e c o r d e r
3 Press REC MODE repeatedly to select
the recording mode.Each time you press the button, the
display on the TV screen changes as
follows:
* Available when “Manual Rec. Mode” is set
to “On (go to setup)” in the “Recording”
setup (page 135).
For more details about the recording
mode, see page 154.
4 Press z REC.Recording starts.
To stop recordingPress x REC STOP.
To pause recordingPress X.
To resume recording, press X again.
To watch another TV programme while
recordingIf your TV is connected to theT LINE 3 –
TV jack, set your TV to the TV input using
the TV/DVD button and select the
programme you want to watch. If your TV is
connected to the LINE 2 OUT or
COMPONENT VIDEO OUT jacks, set the
TV to TV input using the TVt button
(page 28).
TV Direct Rec. (for SMARTLINKconnections only)When the TV is turned on and the recorder is
turned off, press TV PAUSE. The recorder
automatically turns on and starts recording
what you are watching on the TV to the
HDD.
Set “TV Pause” to “TV’s Tuner” in the
“Options 2” setup (page 142).
b Notes
• To turn off the TV Direct Rec. function, set
“SMARTLINK” to “Pass Through” in the
“Options” setup (page 141).
• Some buttons, such as the TITLE LIST button or
H button, do not work when “TV” appears in
the front panel display.
• If you press the [ / 1 button while recording, therecorder stops recording and turns off.
• After pressing the z REC button, it may take a
short while to start recording.
• It may take a short while for recorder to stop or
pause recording.
• You cannot change the recording mode while
recording.
• Programmes are recorded in the original aspect
ratio when recording to the HDD (when “HDD
Recording Format” is set to “Video Mode Off”
in the “Recording” setup (page 137))/DVD-RWs/DVD-Rs (VR mode).
• When recording to DVD-R DLs (Video mode),
the title is divided when the layer switches.
• If there is a power failure, the programme you
are recording may be erased.
• You cannot watch a PAY-TV/Canal Plus
programme while recording another PAY-TV/
Canal Plus programme.
• To use the TV Direct Rec. function, you must
first correctly set the recorder’s clock.
,continued

8/18/2019 Instructio Operation Manual DVD 3295080121
http://slidepdf.com/reader/full/instructio-operation-manual-dvd-3295080121 40/168
40
You can check the recording information
such as recording time or disc type.
Press DISPLAY during recording.The recording information appears.
A Recording mode
B Recording time
C Disc type/format
D Recording status
To turn off the displayPress DISPLAY repeatedly.
3. Playing the RecordedProgramme (Title List)
To play a recorded title, select the title from
the Title List.
1 Press HDD or DVD.If you select DVD, insert a DVD (see “1.
Inserting a Disc” on page 38).
Playback starts automatically depending
on the disc.
2 Press TITLE LIST.Example: 4-Title List for HDD
Checking the disc status whilerecording
+RW -RWVR -RWVideo +RHDD
-RVR
-RVideo
< / M / m / ,,ENTER
HDD DVD
TITLE LIST

8/18/2019 Instructio Operation Manual DVD 3295080121
http://slidepdf.com/reader/full/instructio-operation-manual-dvd-3295080121 41/168
41
41
S e v e n B a s i c O p e r a t i o n s — G e t t i n g t o K n o wY o u r D V D R e c o r d e r
A Disc type:
Displays the media type, HDD or DVD.
B Total number of titles
C Sub-menu:
Press , to display the sub-menu.
The sub-menu displays optionsapplicable only to the selected item. The
displayed options differ depending upon
the model, situation, and disc type.
D Scroll bar:
Appears when all of the titles do not fit
on the list. To view the hidden titles,
press M / m.
E Title information:
“Recording”: Indicates that the title is
currently being recorded.
: Indicates a protected title.
“NEW”: Indicates that the title is newly
recorded (not played back) (HDD only).
: Press DISPLAY to display
“ .” “ ” indicates titles
containing “Copy-Once” copy
protection signals (HDD only)
(page 157).: Indicates that the title is recorded
using the Update function.
Genre icons: Indicates the title’s genre
(HDD only).
: Indicates a bilingual programme
(HDD only).
F Remaining time of the current disc in
the current recording mode (example:
SP mode)
3 Select a title using M / m, and press
ENTER.Playback starts from the selected title.
To stop playbackPress x (stop).
To scroll the list display by page (Page
mode)Press . / > while the Title List is
displayed. Each time you press . / >,the Title List changes to the previous/next
page of titles.
About the Title List for DVD-RWs/DVD-Rs
(VR mode)You can switch the Title List to show
Original or Playlist titles.
1 Press < while the Title List is
displayed.2 Select “Play List” using M / m, and press
ENTER.
3 Select “Original” or “Play List” using
M / m, and press ENTER.
To change the title order for HDD (Sort
Titles)
1 Press < while the Title List is
displayed.
2 Select “Sort Titles” using M / m, and
press ENTER.
3 Select the item using M / m, and press
ENTER.
Sub-menu
Order Sorted
By Date In order of when the titleswere recorded. The title
that is recorded mostrecently is listed at thetop.
Unseen Title In order of when the titleswere recorded. The titlethat is recorded mostrecently and has not beenplayed is listed at the top.
By Title In alphabetical order.
By Number In order of recorded titlenumber.
,continued
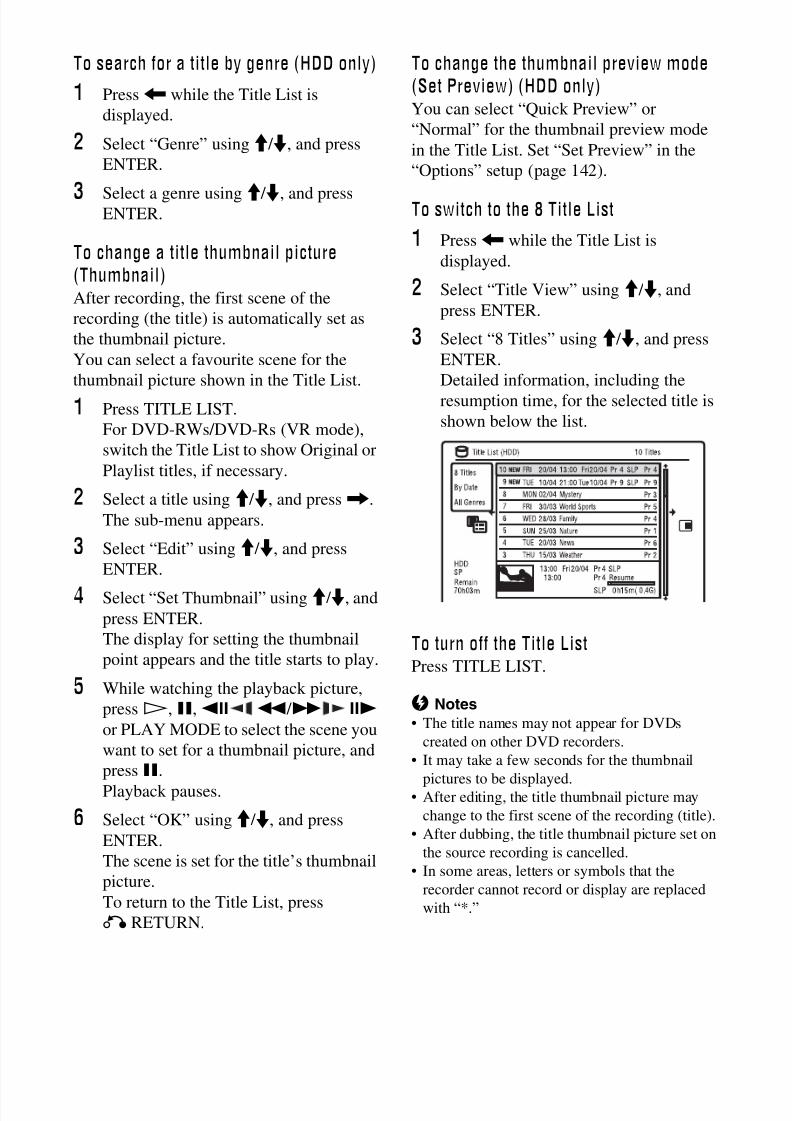
8/18/2019 Instructio Operation Manual DVD 3295080121
http://slidepdf.com/reader/full/instructio-operation-manual-dvd-3295080121 42/168
42
To search for a title by genre (HDD only)
1 Press < while the Title List is
displayed.
2 Select “Genre” using M / m, and press
ENTER.
3 Select a genre using M / m, and pressENTER.
To change a title thumbnail picture
(Thumbnail)After recording, the first scene of the
recording (the title) is automatically set as
the thumbnail picture.
You can select a favourite scene for the
thumbnail picture shown in the Title List.
1 Press TITLE LIST.
For DVD-RWs/DVD-Rs (VR mode),
switch the Title List to show Original or
Playlist titles, if necessary.
2 Select a title using M / m, and press ,.
The sub-menu appears.
3 Select “Edit” using M / m, and press
ENTER.
4 Select “Set Thumbnail” using M / m, and
press ENTER.
The display for setting the thumbnail
point appears and the title starts to play.
5 While watching the playback picture,
press H, X, c m / M C
or PLAY MODE to select the scene you
want to set for a thumbnail picture, and
press X.
Playback pauses.
6 Select “OK” using M / m, and press
ENTER.
The scene is set for the title’s thumbnail
picture.
To return to the Title List, press
O RETURN.
To change the thumbnail preview mode
(Set Preview) (HDD only)You can select “Quick Preview” or
“Normal” for the thumbnail preview mode
in the Title List. Set “Set Preview” in the
“Options” setup (page 142).
To switch to the 8 Title List
1 Press < while the Title List is
displayed.
2 Select “Title View” using M / m, and
press ENTER.
3 Select “8 Titles” using M / m, and press
ENTER.
Detailed information, including the
resumption time, for the selected title is
shown below the list.
To turn off the Title ListPress TITLE LIST.
b Notes
• The title names may not appear for DVDs
created on other DVD recorders.
• It may take a few seconds for the thumbnail
pictures to be displayed.• After editing, the title thumbnail picture may
change to the first scene of the recording (title).
• After dubbing, the title thumbnail picture set on
the source recording is cancelled.
• In some areas, letters or symbols that the
recorder cannot record or display are replaced
with “*.”

8/18/2019 Instructio Operation Manual DVD 3295080121
http://slidepdf.com/reader/full/instructio-operation-manual-dvd-3295080121 43/168
43
43
S e v e n B a s i c O p e r a t i o n s — G e t t i n g t o K n o wY o u r D V D R e c o r d e r
You can check the playing time of the
current title, chapter, track, or disc. Also,
you can check the disc name recorded on the
DVD/CD.
Press DISPLAY repeatedly.
The displays differ depending on the disc
type or playing status.
In stop modeExample: DVD-RW in VR mode
During playbackExample: DVD-R in Video mode
A Playing status
B Shows that the Resume Play isavailable (page 74).
C Current selected recording mode
(maximum DVD recording time)
(page 154)
D Remaining time
E Station name and programme position
number
F Audio setting for the current
programme
G Recording restrictions for the current
programmeH TV mode or DVD mode (page 29)
I Disc information
J Title type (Original or Playlist) for
DVD-RW/DVD-R in VR mode
K Disc type/format (page 151)
Displays the finalised disc in Video
mode as “DVD-VIDEO.”
L Title number-Chapter number
(page 80)
M Playing time
N Multi-angles indicator (page 75)
O Copy-protected indicator (page 157)
P Data transfer bar and rate
To turn off the displayPress DISPLAY repeatedly.
z Hints
• When “On Screen Display” is set to “On”
(default) in the “Options” setup (page 141),
information automatically appears on the screen
when the recorder is operated.
• To increase disc space, see “To open up disc
space” (page 82).
b Note
Playing time of MP3 audio tracks may not be
displayed correctly.
Displaying the playing timeand play information
+R
DVD VCD CD
DATA CD
-RWVR -RWVideo+RW
-RVideo
HDD
DATA DVD
-RVR
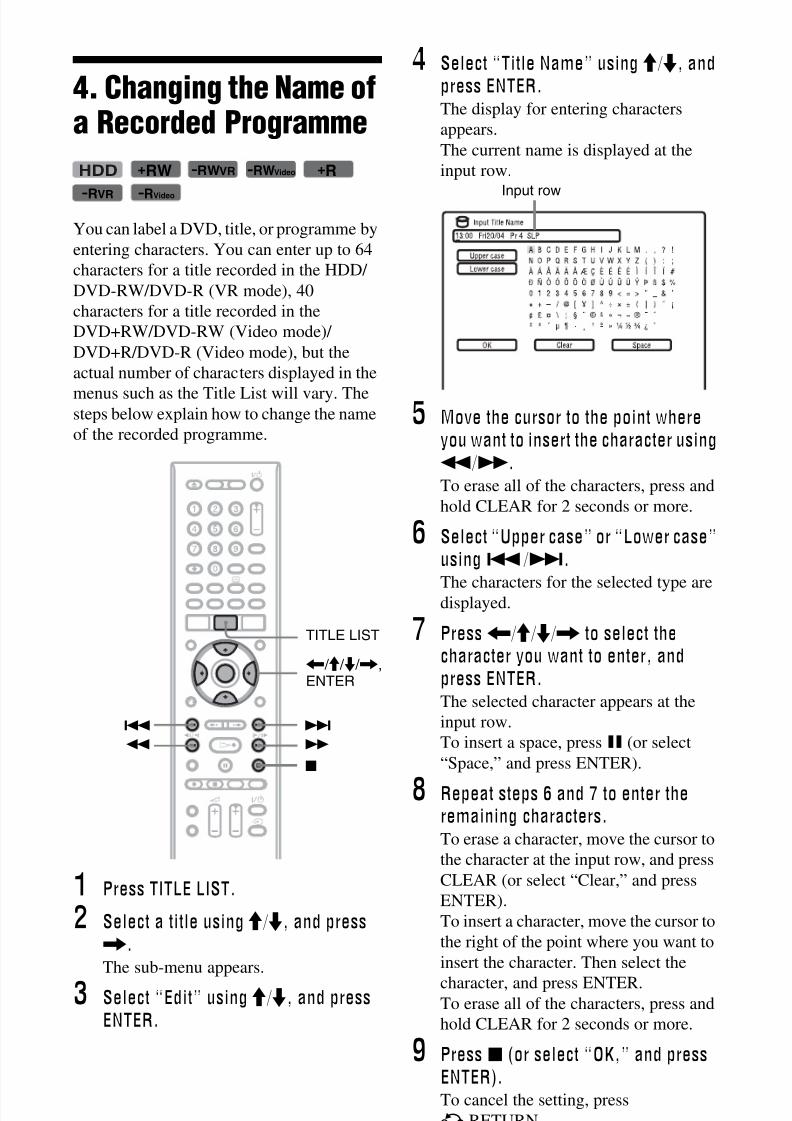
8/18/2019 Instructio Operation Manual DVD 3295080121
http://slidepdf.com/reader/full/instructio-operation-manual-dvd-3295080121 44/168
44
4. Changing the Name ofa Recorded Programme
You can label a DVD, title, or programme by
entering characters. You can enter up to 64
characters for a title recorded in the HDD/
DVD-RW/DVD-R (VR mode), 40
characters for a title recorded in the
DVD+RW/DVD-RW (Video mode)/
DVD+R/DVD-R (Video mode), but the
actual number of characters displayed in the
menus such as the Title List will vary. Thesteps below explain how to change the name
of the recorded programme.
1 Press TITLE LIST.
2 Select a title using M / m, and press
,.The sub-menu appears.
3 Select “Edit” using M / m, and press
ENTER.
4 Select “Title Name” using M / m, and
press ENTER.The display for entering characters
appears.
The current name is displayed at the
input row.
5 Move the cursor to the point where
you want to insert the character using
m / M.To erase all of the characters, press and
hold CLEAR for 2 seconds or more.
6 Select “Upper case” or “Lower case”
using . / >.
The characters for the selected type aredisplayed.
7 Press < / M / m / , to select thecharacter you want to enter, and
press ENTER.The selected character appears at the
input row.
To insert a space, press X (or select
“Space,” and press ENTER).
8 Repeat steps 6 and 7 to enter theremaining characters.To erase a character, move the cursor to
the character at the input row, and press
CLEAR (or select “Clear,” and press
ENTER).
To insert a character, move the cursor to
the right of the point where you want to
insert the character. Then select the
character, and press ENTER.To erase all of the characters, press and
hold CLEAR for 2 seconds or more.
9 Press x (or select “OK,” and press
ENTER).To cancel the setting, press
O RETURN.
+RW -RWVR -RWVideo
-RVR
+RHDD
-RVideo
< / M / m / ,,ENTER
TITLE LIST
.
m
>
M
x
Input row

8/18/2019 Instructio Operation Manual DVD 3295080121
http://slidepdf.com/reader/full/instructio-operation-manual-dvd-3295080121 45/168
45
45
S e v e n B a s i c O p e r a t i o n s — G e t t i n g t o K n o wY o u r D V D R e c o r d e r
5. Labelling andProtecting a Disc
You can execute options effective for the
entire disc in the “Disc Setup” setup.
1 Insert a disc.See “1. Inserting a Disc” on page 38.
2 Press SYSTEM MENU.The System Menu appears.
3 Select “Disc Setup,” and press
ENTER.
4 Select “Basic,” and press ENTER.
5 Select “Input Disc Name,” and press
ENTER.
6 Select “Next Screen,” and press
ENTER.Enter the disc name (page 44).
You can enter up to 64 characters for aDVD-RW/DVD-R (VR mode) disc
name, and 40 characters for a
DVD+RW/DVD-RW (Video mode)/
DVD+R/DVD-R (Video mode) disc
name.
b Note
The disc name may not appear when the disc is
played on other DVD equipment.
1 Insert a disc.See “1. Inserting a Disc” on page 38.
2 Press SYSTEM MENU.The System Menu appears.
3 Select “Disc Setup,” and press
ENTER.
Labelling a disc
< / M / m / ,,ENTER
SYSTEM
MENU
+RW -RWVR -RWVideo -RVR+R
-RVideo Protecting a disc
-RWVR -RVR
,continued
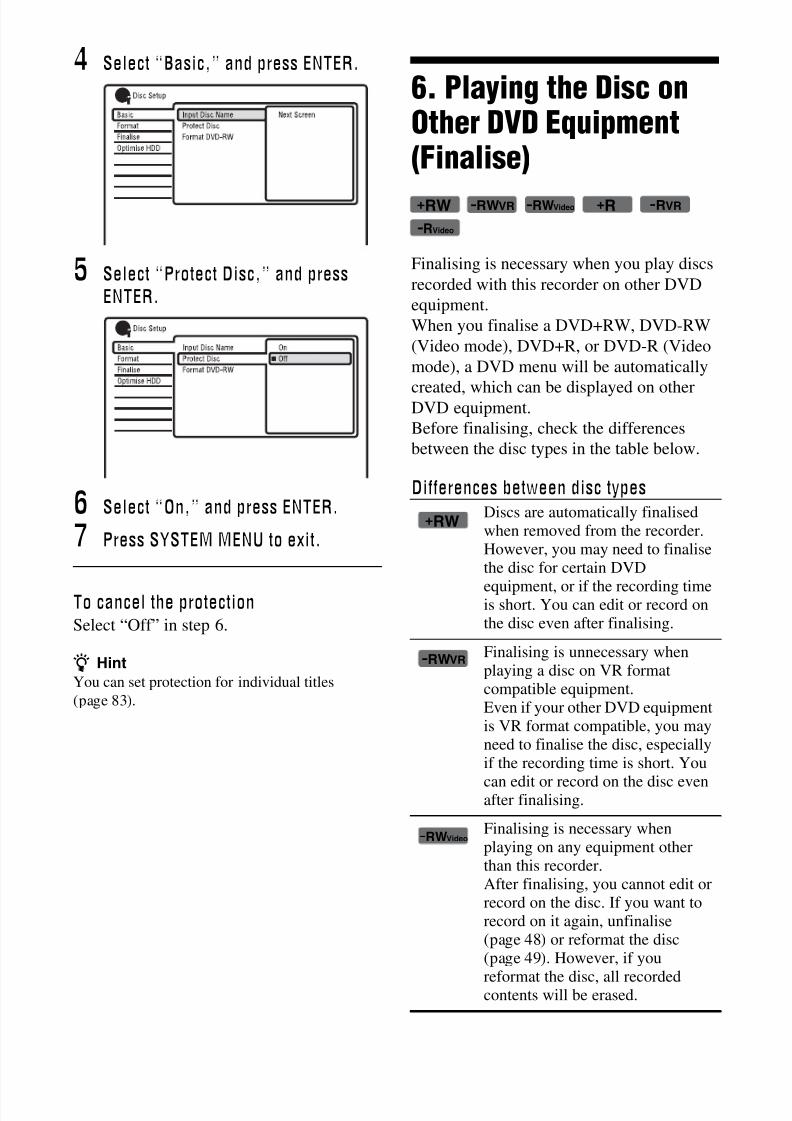
8/18/2019 Instructio Operation Manual DVD 3295080121
http://slidepdf.com/reader/full/instructio-operation-manual-dvd-3295080121 46/168
46
4 Select “Basic,” and press ENTER.
5 Select “Protect Disc,” and press
ENTER.
6 Select “On,” and press ENTER.
7 Press SYSTEM MENU to exit.
To cancel the protectionSelect “Off” in step 6.
z Hint
You can set protection for individual titles
(page 83).
6. Playing the Disc onOther DVD Equipment(Finalise)
Finalising is necessary when you play discs
recorded with this recorder on other DVD
equipment.
When you finalise a DVD+RW, DVD-RW
(Video mode), DVD+R, or DVD-R (Video
mode), a DVD menu will be automatically
created, which can be displayed on otherDVD equipment.
Before finalising, check the differences
between the disc types in the table below.
Differences between disc types
Discs are automatically finalisedwhen removed from the recorder.However, you may need to finalisethe disc for certain DVD
equipment, or if the recording timeis short. You can edit or record onthe disc even after finalising.
Finalising is unnecessary whenplaying a disc on VR formatcompatible equipment.Even if your other DVD equipmentis VR format compatible, you mayneed to finalise the disc, especiallyif the recording time is short. You
can edit or record on the disc evenafter finalising.
Finalising is necessary whenplaying on any equipment otherthan this recorder.After finalising, you cannot edit orrecord on the disc. If you want torecord on it again, unfinalise(page 48) or reformat the disc(page 49). However, if you
reformat the disc, all recordedcontents will be erased.
+RW -RWVR -RWVideo -RVR+R
-RVideo
+RW
-RWVR
-RWVideo

8/18/2019 Instructio Operation Manual DVD 3295080121
http://slidepdf.com/reader/full/instructio-operation-manual-dvd-3295080121 47/168
47
47
S e v e n B a s i c O p e r a t i o n s — G e t t i n g t o K n o wY o u r D V D R e c o r d e r 1 Insert a disc.
See “1. Inserting a Disc” on page 38.
2 Press SYSTEM MENU.The System Menu appears.
3 Select “Disc Setup,” and press
ENTER.
4 Select “Finalise,” and press ENTER.
5 Select “Finalise,” and press ENTER.
6 Select “Next Screen,” and press
ENTER.For DVD-RW/DVD-R (VR mode), the
recorder starts finalising the disc. Go to
step 9.
7 (DVD+RW/DVD-RW (Video mode)/ DVD+R/DVD-R (Video mode) only)
Select a title menu style, and press
ENTER.The menu appears in the selected title
menu style when the “top menu” (or
“menu” for a DVD+RW/DVD+R) is
selected on the DVD equipment.
8 (DVD+RW/DVD-RW (Video mode)/
DVD+R/DVD-R (Video mode) only)
Select “Yes,” and press ENTER.The recorder starts finalising the disc.
9 Press SYSTEM MENU to exit.
z Hint
You can check whether the disc has been finalisedor not. Press DISPLAY after step 1 (page 43).
b Notes
• Depending on the condition of the disc,
recording, or the DVD equipment, discs may not
play even if the discs are finalised.
• The recorder may not be able to finalise the disc
if it was recorded on another recorder.
• Inserting an unfinalised disc into other DVD
equipment may damage the recorded contents.
• When using a DVD+RW, you can edit or record
on the disc even after finalising. However, the
title menu will not be displayed. Finalise the disc
again to display the title menu.
Finalising is necessary. The disccan be played only on equipmentthat supports DVD-R in VR mode.You can edit or record on the disceven after finalising (except DVD-R DL in VR mode).
Finalising is necessary whenplaying on any equipment otherthan this recorder.After finalising, you cannot edit orrecord on the disc.
-RVR
+R
-RVideo
< / M / m / ,,ENTER
SYSTEMMENU
,continued

8/18/2019 Instructio Operation Manual DVD 3295080121
http://slidepdf.com/reader/full/instructio-operation-manual-dvd-3295080121 48/168
48
For DVD-RWs (Video mode)DVD-RWs (Video mode) that have been
finalised to prohibit additional recording orediting can be unfinalised to allow further
recording or editing.
For DVD-RWs (VR mode)If you cannot record or edit on a DVD-RW
(VR mode) that has been finalised with other
DVD equipment, unfinalise the disc.
b Note
The recorder is not able to unfinalise DVD-RWs
(Video mode) that have been finalised on another
recorder.
1 Insert a disc.See “1. Inserting a Disc” on page 38.
2 Press SYSTEM MENU.The System Menu appears.
3 Select “Disc Setup,” and pressENTER.
4 Select “Finalise,” and press ENTER.
5 Select “Unfinalise,” and press
ENTER.
6 Select “Start,” and press ENTER.The recorder starts unfinalising the disc.
Unfinalising may take several minutes.
Unfinalising a disc
-RWVR -RWVideo

8/18/2019 Instructio Operation Manual DVD 3295080121
http://slidepdf.com/reader/full/instructio-operation-manual-dvd-3295080121 49/168
49
49
S e v e n B a s i c O p e r a t i o n s — G e t t i n g t o K n o wY o u r D V D R e c o r d e r
7. Reformatting a Disc
New discs are automatically formatted when
inserted. If necessary, you can manually re-format a DVD+RW, DVD-RW, or DVD-R
disc to make a blank disc. For DVD-RWs or
DVD-Rs, you can select a recording format
(VR mode or Video mode) according to your
needs.
1 Insert a disc.See “1. Inserting a Disc” on page 38.
2 Press SYSTEM MENU.The System Menu appears.
3 Select “Disc Setup,” and pressENTER.
4 Select “Format,” and press ENTER.
5 Select an item, and press ENTER.“VR Mode”: Formats DVD-RWs/DVD-
Rs in VR mode.
“Video Mode”: Formats DVD-RWs/
DVD-Rs in Video mode.
“Format DVD+RW”: Formats
DVD+RWs.
6 Select “Start,” and press ENTER.All contents on the disc are erased.
z Hint
By reformatting, you can change the recording
format on DVD-RWs, or record again on DVD-
RWs that have been finalised.
b Note
You cannot reformat recorded DVD-Rs.
+RW -RWVR -RWVideo -RVR -RVideo
< / M / m / ,,ENTER
SYSTEMMENU

8/18/2019 Instructio Operation Manual DVD 3295080121
http://slidepdf.com/reader/full/instructio-operation-manual-dvd-3295080121 50/168
50
Guide to Digital Services
(For Freeview)
Viewing the EPG
(Electronic ProgrammeGuide) Display
The Electronic Programme Guide is a guide
showing the television programme schedule
for a day or more at a time on your television
(via the Digital Terrestrial Television tuner
included in this recorder).
The EPG provides a quick and easy way to:
• View a complete list of all available
channels.
• View a channel list related to a chosen date
or genre.
• Set a programme to be recorded (page 53).
b Notes
• Digital Services availability and content depend
on the broadcaster.• Digital Services are not instantly available when
the recorder is first turned on.
• In some areas, not all programme information is
displayed if you display the EPG while
recording.
Press GUIDE.This display consists of an information box
and an 8-channel programme list covering a
30-minute period.
Example of EPG Display:
A Indicates the currently selected
channel number and station name
with the programme title and genre.
B Indicates the currently selected
programme and allows you to move
around the list.
Press ENTER to watch the selected
programme.
C Channel name
D Indicates if a timer recording is
associated with the programme
(page 53).
E Colour buttons
Press the same colour button on the
remote (“Timer,” “Jump,” and
“Search”).
F Truncated programme title in case the
name is too long to be displayed in the
cell.
G Indicates that short programmes that
are not displayed on the list are
scheduled.
H Time slot
I Indicates the current time and date.
< / M / m / ,,ENTER
PAGE +PAGE –
EXIT/
O RETURN
GUIDE
INFO
Blue button
Yellow button
Red button
Green button

8/18/2019 Instructio Operation Manual DVD 3295080121
http://slidepdf.com/reader/full/instructio-operation-manual-dvd-3295080121 51/168
51
G u i d e t o D i g i t a l S e r v i c e s ( F o r F r e e v i e w )
Available buttons in the programme list
Programme Information
You can view descriptions of the
programmes being broadcast now and next.
1 Select a channel.
2 Press INFO.The Information display appears
showing a description of the current
programme on view.
Available buttons in the Information
display
You can view the Teletext that comes
simultaneously with certain programmes.
Press (text).The Teletext screen appears.
You can also use any of colour buttons.
To exit the Teletext servicePress (text) again.
Buttons Operations
< / M / m / , Selects the desired item.
PAGE +/– Displays the previous/nexteight channels.
INFO Displays the detailedinformation of theprogramme (page 51).
Colour buttons(red, yellow,green, blue)
Activates the same colourfunction on the screen.
O RETURN Closes the display.
Displaying the programmeinformation
Buttons Operations
M / m Toggles the displaybetween description of thecurrent/next programme.
< / , Displays programmeinformation for otherchannels.
ENTER Displays the selectedchannel.
INFO Displays the detailedprogramme information.
Viewing Teletext (notavailable in some areas)

8/18/2019 Instructio Operation Manual DVD 3295080121
http://slidepdf.com/reader/full/instructio-operation-manual-dvd-3295080121 52/168
52
Viewing a Digital TextService (models for theUK only)
Many digital TV channels broadcast
information via their text service. This
digital service includes high-quality digital
text and graphics along with advanced
navigation options. Additionally, this
recorder has access to dedicated text
channels transmitted by the broadcasters.
b Note
The appearance, content and navigation methodsof all digital text services are decided by the
broadcaster.
1 Select a dedicated channel that isbroadcasting digital text.You can search for a dedicated digital
text channel using the “Electronic
Programme Guide” (page 50).
The text page is displayed.
2 Once the text page is displayed (thismay take some time), follow the on-
screen instructions to obtain your
required selection.On some pages the TV programme may
also be displayed on the text screen. On-
screen instructions will inform you how
to change the displayed programme.
If you are instructed to press “OK” or
“Select” when viewing the text pages,
press ENTER.
To exit the text serviceFollow the on-screen instructions, or press
PROG +/–.
Digital text services may also be available
on other digital channels. This is sometimes
indicated by a small symbol on your TVscreen, superimposed on the programme you
are watching.
1 Select a channel.
2 Press (text) or the buttonindicated on screen by the
broadcaster.The text information appears.
3 Access required information using< / M / m / ,, the colour buttons and/
or the number buttons.
To exit the text serviceFollow the on-screen instructions, or press
(text) or EXIT/ O RETURN.
Selecting digital text fromdedicated digital teletextchannels
Selecting digital text fromother channels
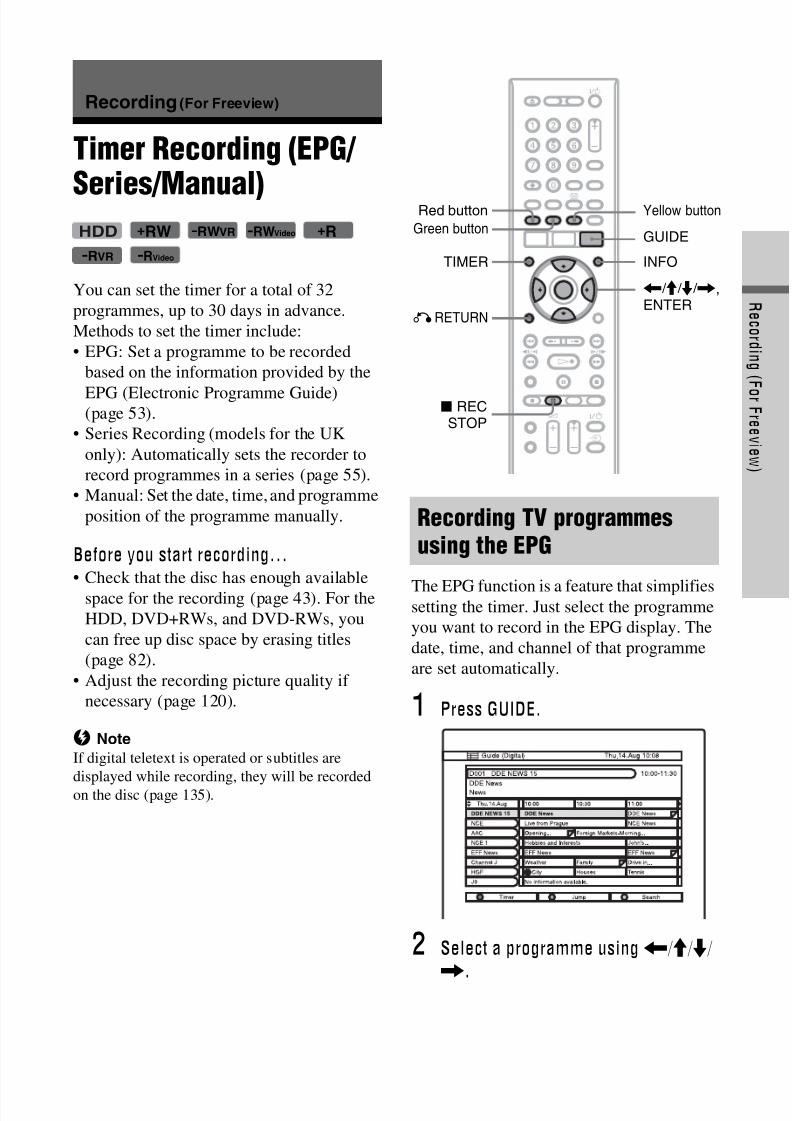
8/18/2019 Instructio Operation Manual DVD 3295080121
http://slidepdf.com/reader/full/instructio-operation-manual-dvd-3295080121 53/168
53
R e c o r d i n g ( F o r F r e e v i e w )
Recording (For Freeview)
Timer Recording (EPG/
Series/Manual)
You can set the timer for a total of 32
programmes, up to 30 days in advance.
Methods to set the timer include:
• EPG: Set a programme to be recorded
based on the information provided by the
EPG (Electronic Programme Guide)(page 53).
• Series Recording (models for the UK
only): Automatically sets the recorder to
record programmes in a series (page 55).
• Manual: Set the date, time, and programme
position of the programme manually.
Before you start recording…• Check that the disc has enough available
space for the recording (page 43). For the
HDD, DVD+RWs, and DVD-RWs, you
can free up disc space by erasing titles
(page 82).
• Adjust the recording picture quality if
necessary (page 120).
b Note
If digital teletext is operated or subtitles are
displayed while recording, they will be recorded
on the disc (page 135).
The EPG function is a feature that simplifiessetting the timer. Just select the programme
you want to record in the EPG display. The
date, time, and channel of that programme
are set automatically.
1 Press GUIDE.
2 Select a programme using < / M / m /
,.
+RW -RWVR -RWVideo
-RVR
+RHDD
-RVideo
Recording TV programmesusing the EPG
< / M / m / ,,ENTER
x RECSTOP
TIMER
GUIDE
Red button Yellow button
ORETURN
INFO
Green button
,continued

8/18/2019 Instructio Operation Manual DVD 3295080121
http://slidepdf.com/reader/full/instructio-operation-manual-dvd-3295080121 54/168
54
3 Press the red button.The date, start and stop times,
programme position, recording mode,
etc., settings appear.
• If you want to change the setting,
follow step 3 of “Setting the timer
manually (Manual)” (page 56).
• (Models for the UK only) You can set
“EPG Link” (page 56) or “Series
Recording” (page 55).
4 Select “OK,” and press ENTER.“ ” (red) appears next to the
programme which is set for timer
recording. Your recorder will
automatically begin recording when the
programme starts.Unlike a VCR, there is no need to turn
off the recorder before the timer
recording starts.
• To modify the timer setting, see
page 59.
To search for programmes by date
(Jump)
1 Press the green button while the
programme list is displayed.
2 Select a date in the “Date” row.
3 Select a time in the “Time” row.
4 Select “Jump,” and press ENTER.
To search for programmes by genre
(Search)
1 Press the yellow button while the
programme list is displayed.
2 Select a date in the “Date” row.
3 Select a time in the “Time” row.
4 Select the “Genre” row, and press
ENTER.
5 Select a genre using < / M / m / ,, and
press ENTER.
6 Select “OK,” and press ENTER.
7 Select “Search,” and press ENTER.
To stop recording during timer recordingPress x REC STOP.
Note that it may take a few seconds for the
recorder to stop recording.
On-screen instructions may appear after
pressing x REC STOP. In this case, follow
the on-screen instructions.
Rec. Mode AdjustIf there is not enough available disc space for
the recording, the recorder automatically
adjusts the recording mode to enable the
entire programme to be recorded. Set “Rec.
Mode Adjust” to “On” in the “Recording”
setup (page 135).
z Hints
• When you select “AUTO” for the recording
mode, the recorder automatically maximises the
recording quality for the space available on the
inserted disc (if recording to DVD), or to fit on
to a blank DVD disc (if recording to HDD).
• This recorder is featured with an EPG timer auto
extend functionality that allows EPG timer
recordings to be made in case of an early start
(before the scheduled start time) or late finish
(after the scheduled end time).

8/18/2019 Instructio Operation Manual DVD 3295080121
http://slidepdf.com/reader/full/instructio-operation-manual-dvd-3295080121 55/168
55
R e c o r d i n g ( F o r F r e e v i e w )
Series Recording is a feature which allows
you to automatically record programmes in aseries, using the information from the EPG.
You can also search for programmes related
to the timer settings.
b Notes
• This function cannot be used when the
broadcaster does not include series information
with the programme data.
• The timer recordings with “Series Recording”
set to “On” are recorded to the HDD.
1 After step 2 of “Recording TV
programmes using the EPG,” pressINFO.The yellow button (“Series”) in the on-
screen display is activated when the
selected programme has series
information.
2 Press the yellow button (“Series”).Series programmes of the selected
programme are listed.
3 Press the red button.The date, start and stop times,
programme position, recording mode,
etc., settings appear.
4 Select “Set Details,” and press
ENTER.
5 Set “Series Recording” to “On,” and
press O RETURN.
6 Select “OK,” and press ENTER.
The selected programme is set forrecording and appears in the Timer List.
The other programmes in the series will
be set for recording (appear in the Timer
List) as each previous recording is
completed.
(red): Indicates that the whole
programme is set to be recorded.
(grey): Indicates that the programme
is set to be recorded using Series
Recording.
• To modify the timer setting, see
page 59.
About Split ProgrammesMovies and other programmes that are split
into 2 or more parts are called Split
Programmes. If you set the timer for one part
of a Split Programme, the other parts that
start within 3 hours are automaticallyrecorded. For example, if the first half is set
to be recorded, the last half will be recorded
automatically.
To use this function, set “EPG Link” to “On”
(default) in step 4 above.
Recording programmes usingSeries Recording (models forthe UK only)
,continued

8/18/2019 Instructio Operation Manual DVD 3295080121
http://slidepdf.com/reader/full/instructio-operation-manual-dvd-3295080121 56/168
56
To search for programmes related to the
timer settings (EPG Link)When you set timer recording for a
programme that has series information, you
can search for related programmes such as
listed below.
To use this function, set “EPG Link” to “On”(default) in step 4 above.
• Repeat programmes: You can search for
repeat broadcasts of the programme which
is set for timer recording (Alternate
Search).
• Programmes in a series: You can search for
the next programme in the series of a
programme which is set for timer
recording (Series Search).
• Recommended programmes: You cansearch for recommended programmes
linked to the programme which is set for
timer recording (Recommendation
Search).
1 Press TIMER.
2 Select the timer setting, and press ,.
3 When the following options appear in
the sub-menu, select an option, andpress ENTER.
“Alternate Search”: Searches for repeat
programmes.
“Series Search”: Searches for
programmes in a series.
“Recommendation Search”: Searches
for programmes recommended by
broadcaster as a link for current series.
To set the programme for recording,follow the instructions for “Recording
TV programmes using the EPG”
(page 53) from step 2.
About EPG LinkThe EPG Link function automatically
updates the date, start and stop times of timer
settings when the broadcaster changes them
and updates the EPG accordingly. For
example, if a programme with timer setting
starts before or ends after the scheduled
time, the timer setting is automatically
extended to record the whole programme.
To use the EPG Link function, set “EPG
Link” to “On” (default) in step 4 above.
b Notes
• Only the earliest part of the Split Programme is
displayed on the Timer List.
• When “EPG Link” is set to “On,” you cannot
change the date, start and stop time settings.
1 Press TIMER.The “Timer List” display appears.
2 Select the “New Input” row, andpress ENTER.
Setting the timer manually(Manual)

8/18/2019 Instructio Operation Manual DVD 3295080121
http://slidepdf.com/reader/full/instructio-operation-manual-dvd-3295080121 57/168
57
R e c o r d i n g ( F o r F r e e v i e w )
3 Select an item using < / , and
adjust using M / m. Then press
ENTER.The adjustable items are listed below.
“Pr/CH”: Sets the programme position.
An analogue programme can also be
selected.“Date”: Sets the date (up to 30 days
later). Select a recording pattern by
pressing M repeatedly to set the timer
for the same daily or weekly
programmes.
“Start”: Sets the start time.
“Stop”: Sets the stop time.
“Extend”: Sets duration when a timer
recording is in progress. If the
programme set to be recorded daily or
weekly is extended, the manually
extended time set here will be added to
the subsequent timer recording times.
Note that when “VPS/PDC” is set to
“On,” you cannot make the “Extend”
setting.
• If you make a mistake, select the item
and change the setting.
4 Select “OK,” and press ENTER.The “Timer List” display appears.
The timer recording indicator lights up
on the front panel display and the
recorder is ready to start recording.
• To record a satellite programme, turn
on the satellite tuner and select the
satellite programme you want to
record. Leave the satellite tuner turned
on until the recorder finishesrecording.
• To modify the timer setting, see
page 59.
To stop recording during timer recordingPress x REC STOP.
Note that it may take a few seconds for the
recorder to stop recording.
On-screen instructions may appear afterpressing x REC STOP. In this case, follow
the on-screen instructions.
To make the detailed settings
1 Select “Set Details” in step 3 above, and
press ENTER.
2 Select an item using M / m and set using
< / ,.
“Record to”: Sets the recording
destination. If there is not enough
available DVD disc space for the
recording, the recorder automatically
records the programme to the HDD even
if you select “DVD” (Recovery
Recording).
“Recording Mode”: Sets the recording
mode (page 154).
“VPS/PDC”: Sets the VPS/PDC
function. See “About the VPS/PDCfunction (For analogue broadcasting
only)” below.
“Update”: Sets the recorder
automatically replacing the previous
timer recording with the new one.
“Genre”: Sets the genre.
• (Models for the UK only) For details
about “EPG Link” and “Series
Recording,” see “Recording
programmes using Series Recording
(models for the UK only)” on page 55.
You cannot set these items to “On”
when setting the timer manually.
To enter a title nameSelect “Set Title Name” in step 3 above, and
press ENTER (page 44).
About the VPS/PDC function (Foranalogue broadcasting only)VPS/PDC signals are transmitted with TV
programmes in some broadcast systems.
These signals ensure that timer recordings
are made regardless of any broadcast delays,
early starts, or broadcast interruptions.
To use the VPS/PDC functionSet “VPS/PDC” to “On” (see “To make the
detailed settings” on page 57).When you turn on this function, the recorder
starts scanning the channels before the timer
recording starts.
z Hint
You can use the “Rec. Mode Adjust” function
(page 54).
,continued

8/18/2019 Instructio Operation Manual DVD 3295080121
http://slidepdf.com/reader/full/instructio-operation-manual-dvd-3295080121 58/168
58
b Notes
• If a message indicating that the HDD is full
appears on the screen, change the recording
destination to “DVD,” or make available space
for the recording (page 83).
• Check that the clock is correctly set before
setting the timer recording. If not, the timer
recording cannot be made.• Even if the timer is set for the same daily or
weekly programme, the timer recording cannot
be made if it overlaps with a programme that has
priority. “Overlap” will appear next to the
overlapped setting in the Timer List. Check the
priority order of the settings (page 59).
• Even if the timer is set, timer recordings cannot
be made while recording a programme that has
priority.
• The beginning of some recordings may not be
made when using the VPS/PDC function.• The “Rec. Mode Adjust” function only works
with a timer recording and the VPS/PDC
function set to off. It does not function with
Quick Timer.
• The recording mode cannot be set to “AUTO”
when “VPS/PDC” is set to “On.”
You can set the recorder to record in 30-
minute increments.
Press z REC repeatedly to set the
duration.Each press advances the time in 30-minute
increments. The maximum duration is six
hours.
The time counter decreases minute by
minute to 0:00, then the recorder stops
recording (the power turns off).
To cancel the Quick TimerPress z REC repeatedly until “0:00”
appears in the front panel display. Therecorder returns to normal recording mode.
To stop recording, press x REC STOP.
b Note
If you turn off the recorder during recording,
recording is stopped.
The recorder can automatically divide a
recording (a title) into chapters by inserting
chapter marks. To select chapter mark
intervals or disable this function, see “Auto
Chapter (HDD/VR),” “Auto Chapter
(Video),” or “Auto Chapter (DVD+R/
+RW)” in the “Recording” setup (page 136).
When recording to the HDD, a DVD-R (VR
mode) or a DVD-RW (VR mode), you can
edit chapter marks (page 85).
Using the Quick Timer function
(normal recording)
Creating chapters in a title

8/18/2019 Instructio Operation Manual DVD 3295080121
http://slidepdf.com/reader/full/instructio-operation-manual-dvd-3295080121 59/168
59
R e c o r d i n g ( F o r F r e e v i e w )
Checking/Changing/ Cancelling TimerSettings (Timer List)
You can check, change, or cancel the timer
settings using the Timer List.
b Note
(Models for the UK only) To change the EPG
timer settings, set “EPG Link” to “Off” in “Set
Details.”
1 Press TIMER.The “Timer List” display appears.
When all of the timer settings are not
visible on the display, press M / m to view
the hidden timer settings.
2 Select the timer setting you want to
check/change/cancel, and press ,.The sub-menu appears.
3 Select an option, and press ENTER.“Modify”:
Changes the timer setting.
Select an item using < / , and adjust
using M / m. Select “OK” and press
ENTER.
“Erase”:
Erases the timer setting.
Select “Yes” and press ENTER.
“Skip Once”:
Cancels the daily or weekly recordings
only once. After cancelling the timer
setting, “Skip Once” appears next to the
timer setting in the Timer List.
“Alternate Search” (models for the UK
only) (page 56)
“Series Search” (models for the UK
only) (page 56)
“Recommendation Search” (models for
the UK only) (page 56)
To change or cancel the setting, repeat
steps 2 and 3 above.
When the timer settings overlap• The programme that starts first has priority
and the entire programme is recorded.
• After finishing the previous recording, the
other recording starts with several tens-of-
second’s delay (when the end-time of one
recording and the start-time of another are
the same).
• When the recordings start at the same time,
only one of them will be recorded. Cancel
the timer setting for the programme thatyou are not going to record.
z Hints
• For manual timer settings, you cannot modify
the timer setting for the current recording, but
you can extend the duration of the recording time
while recording (page 57).
For timer settings using the EPG, you can
modify the timer setting for the current recording
while recording, but you cannot extend theduration of the recording (even when recording
is stopped).
(Models for the UK only) For timer settings
using the EPG, you can modify the timer setting
for the current recording while recording, and
extend the duration of the recording only when
“EPG Link” is set to “Off.”
• You can move to the first row/bottom row of the
Timer List using . / > while the list is
displayed.
b Notes
• When “VPS/PDC” is set to “On” for one or more
timer recordings, the start times may change in
the event of a broadcast delay or early start.
• Even if the timer is set, timer recordings cannot
be made while recording a programme that has
priority.
+RW -RWVR -RWVideo
-RVR
+RHDD
-RVideo

8/18/2019 Instructio Operation Manual DVD 3295080121
http://slidepdf.com/reader/full/instructio-operation-manual-dvd-3295080121 60/168
60
Recording fromConnected Equipment
You can record from a connected VCR or
similar device. To connect a VCR or similar
device, see “Connecting a VCR or Similar
Device” on page 34.
1 Press HDD or DVD.If you select DVD, insert a recordable
DVD (see “1. Inserting a Disc” on
page 38).
2 Press INPUT to select an input sourceaccording to the connection you
made.The front panel display changes as
follows:
3 Select the desired audio signal whenrecording a bilingual programme to
the HDD or DVD+RWs/DVD+Rs/
DVD-RWs/DVD-Rs (Video mode).Set “External Audio” to “Bilingual” and
“Bilingual Recording” to “A/L” or “B/
R” in the “Audio In” setup (page 132).
4Press REC MODE repeatedly to select
the recording mode.For details about the recording mode,
see page 154.
5 Insert the source tape into theconnected equipment and set to
playback pause.
6 Press z REC.This recorder starts recording.
7 Press the pause (or play) button on
the connected equipment to cancel
the playback pause status.The connected equipment starts
playback and the playback image is
recorded by this recorder.
To stop recording, press x REC STOPon this recorder.
If you connect a DV camcorder with a DV
IN jackSee “DV Camcorder Dubbing” on page 98.
If you connect an HDD camcorder with a
USB jackSee “HDD Camcorder Dubbing” on
page 94.
b Notes
• When recording a video game image, the screen
may not be clear.
• Any programme that contains a Copy-Never
copy guard signal cannot be recorded.
• When “Bilingual Recording” is set to “A/L” or
“B/R” in step 3, you cannot select the sound
when playing in the following cases.– When recording to the HDD (“HDD
Recording Format” is set to “Video Mode Off”
in the “Recording” setup (page 137))/
DVD-RW/DVD-R (VR mode) in PCM mode.
– When recording to the HDD (“HDD
Recording Format” is set to “Video Mode On”
in the “Recording” setup (page 137))/
DVD+RW/DVD+R/DVD-RW/DVD-R
(Video mode).
• You cannot select “L1” in step 2 if “LINE 1 In”
is set to “Decoder” in the “Video In/Out” setup
(page 131).
+RW -RWVR -RWVideo
-RVR
+RHDD
-RVideo
programme position

8/18/2019 Instructio Operation Manual DVD 3295080121
http://slidepdf.com/reader/full/instructio-operation-manual-dvd-3295080121 61/168
61
G U
I D E P l u s + ( F o r a n a l o g u e b r o a
d c a s t i n g / i n a r e a s wi t h G U I D E
P l u s + o n l y )
GUIDE Plus+ (For analogue
broadcasting/in areas with GUIDE Plus+ only)
Viewing the GUIDE Plus+
DisplayThe GUIDE Plus+® system is a free
interactive programme guide. It displays up
to seven days of programme listings,
including programme titles, promotions, and
broadcast information. GUIDE Plus+ data
for the television programme listings are
carried by your local broadcast host channel
and are received through your aerial, set topbox receiver, or direct cable connection from
the wall.
Visit www.europe.guideplus.com for a list
of all European host channels.
These are just a few of the ways to use the
GUIDE Plus+ system.
– Search for programmes by listing them
according to category (such as Movies or
Sport) or by using the Keyword Search
function (page 67).
– Once you have found the programme you
are looking for, use the GUIDE Plus+
system to set the timer for recording
(page 66).
– You can set the system to display your
favourite programmes according to
conditions that you set, such as category
and keyword (page 63).
b Note
The GUIDE Plus+ system cannot be used when
“Input Line System” is set to “NTSC” in the
“Basic” setup (page 125).
Press GUIDE.The GUIDE Plus+ system “Home Screen”
appears.
A Video Window: This shows the
programme you were watching when
you pressed GUIDE.B Action Bar: When the same colour
button on the remote is pressed, the
Action Bar functions. The Action Bar
function differs according to the
screen.
C Information Box: Shows information
about the selected programme when
the “Home Screen” is displayed.Contents will differ according to the
displayed screen.
< / M / m / ,,ENTER
PAGE –
GUIDE
Blue button
PAGE +
DAY – DAY +
Red buttonYellow buttonGreen button
INFO
,continued

8/18/2019 Instructio Operation Manual DVD 3295080121
http://slidepdf.com/reader/full/instructio-operation-manual-dvd-3295080121 62/168
62
D Menu Bar: Press the blue button
(“Home”), and press M to move the
cursor to the Menu Bar. Then select
one of the following features using
< / ,, and press ENTER.
“Grid”: Shows the programmes for
the current time slot and next 7 days.“Search”: Allows you to search for
titles by category or by keyword
(page 67). The displayed category
depends upon the programme data
received by this recorder. Movies,
Sport, and Children are examples of
possible categories.
“My TV”: Sets the profile for your
favourite programmes (page 63).
“Schedule”: Displays the list of timer
settings (page 71).
“Info”: Shows information when
available.
“Editor”: Allows you to edit the
channel lineup and channel display
(page 65).
“Setup”: Allows you to change thelanguage, country/region, postal code,
input source, or host channel.
E “Home” position: When you press the
blue button (“Home”), the cursor
returns to the last programme position
on the “Grid.”
F Tiles: Shows the programme titles and
category; green (sports), purple(movies), blue (children’s), teal
(others).
Select a programme using < / M / m /
,, and press ENTER to watch the
programme.
G Broadcast station Logo: Shows the
broadcast station logo.
H Time Slot: Indicates the currentlyselected time slot. Use < / , to
select a different time slot.
Available buttons in the GUIDE Plus+
system “Home Screen”
To unlock the Video WindowThe Video Window is locked so that it does
not change programme positions when you
move the cursor across other titles.
From “Grid,” select the logo of the
programme position that is locked, and press
the red button (“Unlock”). “ ” changes to
“ ” and the Video Window is unlocked. To
lock the Video Window, select the logo of
the programme position you want to lockand press the red button (“Lock”).
b Notes
• The Video Window is locked during recording
and the lock indicator appears in the Video
Window. You cannot unlock the Video Window
while recording.
• If you are watching programmes through a set
top box receiver, the Video Window may not
change as fast as you move the cursor. In this
case, lock the Video Window (page 62).
Buttons Operations
Blue button(“Home”)
Returns to the “Home”position on the “Grid.”
GUIDE Closes the GUIDE Plus+system.
PAGE +/– Changes the programme listby page.
DAY +/– Changes the programme listby day.
INFO Shows information about theselected programme.

8/18/2019 Instructio Operation Manual DVD 3295080121
http://slidepdf.com/reader/full/instructio-operation-manual-dvd-3295080121 63/168
63
G U
I D E P l u s + ( F o r a n a l o g u e b r o a
d c a s t i n g / i n a r e a s wi t h G U I D E
P l u s + o n l y )
Listing Up YourFavourite ProgrammeInformation (My TV)
You can set a profile and list up only your
favourite programme information.
1 Press GUIDE.
2 Press M to move the cursor to theMenu Bar.
3 Select “My TV” using < / ,.
4 Press the yellow button (“Profile”).
5 Select “Channels,” “Categories,” or
“Keywords,” and press the yellow
button (“Add”).“Channels”: Select the programme
position using < / M / m / ,, and press
ENTER. To add more programme
positions, press the yellow button(“Add”). You can register up to 16
programme positions.
To cancel the registration, select a
programme position, and press the red
button (“Delete”).
“Categories”: Select the category using
< / M / m / ,, and press ENTER. To add
more categories, press the yellow button
(“Add”). You can register up to 4
categories.
To cancel the registration, select a
category, and press the red button
(“Delete”).
“Keywords”: Enter a keyword. See “To
search for a programme by keyword” on
page 67. To add more keywords, press
the yellow button (“Add”). You can
register up to 16 keywords.
To cancel the registration, select akeyword, and press the red button
(“Delete”).
6 Press ENTER.
To change the profile settingsRepeat from step 3 above.
To select and watch a programme from“My TV”
1 After step 3 above, press ENTER.
The programmes that match the profile
conditions are displayed.
2 Select a programme using < / M / m / ,,
and press ENTER.
“My TV”

8/18/2019 Instructio Operation Manual DVD 3295080121
http://slidepdf.com/reader/full/instructio-operation-manual-dvd-3295080121 64/168
64
Making Changes to theGUIDE Plus+ System
You can customize the GUIDE Plus+
system. If the host channel has been changedor moved, and the programme guide data
cannot be received, you can resolve the
problem by following the steps below.
The default host channel setting is set to“Automatic,” so you should not have to
change the host channel setting. However, if
the host channel has changed or moved,
update the host channel setting.
If the set top box receiver is connected to the
recorder using a SCART cord only
(page 20), see “Changing the GUIDE Plus+
host channel manually (Setup)” on page 64.
1 Press GUIDE.
2 Press M to move the cursor to the
Menu Bar.
3 Select “Setup” using < / ,.The GUIDE Plus+ setup menu appears.
4 Select “Host Channel Setup” usingM / m, and press ENTER.
5 Press the yellow button (“Reset”).
6 Press [ / 1 to turn off the recorder.
7 Wait for one day until the programme
guide data can be received.If the programme guide data has not
been received after waiting for a day,
search for the host channel at the
following website and set the host
channel manually (“Changing theGUIDE Plus+ host channel manually
(Setup)” (page 64)).
www.europe.guideplus.com
If the set top box receiver is connected to the
recorder using a SCART cord only and you
want to receive the programme guide data
from your set top box receiver, search for the
host channel on the following website and
set it for your area, following the steps
below:
www.europe.guideplus.com
1 After step 4 of “Searching for the
GUIDE Plus+ host channel (Setup),”press the yellow button (“Change”)
twice.“Manual” appears.
2 Select “Source” using ,.
3 Press the yellow button (“Source”)
repeatedly to select the input source.
4 Select “Prog. No.” using ,.
5 Enter the programme position
number using the number buttons.
6 Press the green button (“Save”).The display asks for confirmation.
Searching for the GUIDE Plus+host channel (Setup)
“Setup”
Changing the GUIDE Plus+ hostchannel manually (Setup)

8/18/2019 Instructio Operation Manual DVD 3295080121
http://slidepdf.com/reader/full/instructio-operation-manual-dvd-3295080121 65/168
65
G U
I D E P l u s + ( F o r a n a l o g u e b r o a
d c a s t i n g / i n a r e a s wi t h G U I D E
P l u s + o n l y )
7 Select “Confirm” using < / ,, and
press ENTER.The display returns to the GUIDE Plus+
setup menu.
8 Wait one day until the programme
guide data can be received.
To cancel the settingsPress the red button (“Back”).
To check the GUIDE Plus+ systeminformation
1 Select “Setup” in the Menu Bar, and
press ENTER.
2 Select “GUIDE Plus+ system
Information” using M / m, and press
ENTER.
b Note
The GUIDE Plus+ system is reset when you make
changes to the host channel settings.
Check whether programme position
numbers are the same as the programme
position numbers set in the “Analog Tuner”
setup.
If you want to make adjustments to the
channel settings or change the channel
name, see “Aerial Reception Settings
(Analog Tuner)” (page 127).
1 Press GUIDE.
2 Press M to move the cursor to the
Menu Bar.
3 Select “Editor” using < / ,.
4 Press ENTER.
5 Press , to move the cursor to the
right column.
6 Select the programme position you
want to check using M / m.To change the input source, press the red
button (“Source”).
To change the programme position,
press the green button (“Prog. No.”),
then enter a programme position numberusing the number buttons, and press
ENTER.
z Hint
To receive from the recorder a programme
position that can be received by either the set top
box receiver or the recorder, change the input
source in step 6.
If any programme positions are unused or
contain unwanted channels, you can hide
them.
1 After step 4 of “Checking programme
positions (Editor),” in the leftcolumn, select the programmeposition you want to hide or display
using M / m.
2 Press the red button (“On/Off”).The disabled positions will turn grey.
To show the disabled positions, press
the red button (“On/Off”) again.
b Notes
• You cannot record a programme position if it is
not set in “Aerial Reception Settings (Analog
Tuner)” (page 127) even if it is set to “On” in the
“Editor” in the Menu Bar.
• If you are using your set top box receiver to
receive programmes (when the set top box
receiver is connected to the recorder using a
SCART cord only, page 20) and are able to
receive the same programme with both the settop box receiver and the recorder, change the
“Source” to receive the programme with the
recorder’s tuner.
Checking programmepositions (Editor)
“Editor”
Disabling programmepositions (Editor)

8/18/2019 Instructio Operation Manual DVD 3295080121
http://slidepdf.com/reader/full/instructio-operation-manual-dvd-3295080121 66/168
66
Recording (For analogue
broadcasting)
Timer Recording (GUIDE
Plus+/Manual)
You can set the timer for a total of 32
programmes (8 programmes when using the
VPS/PDC function), up to 30 days in
advance.
Methods to set the timer include:• One Button Recording (GUIDE Plus+
system)
• Setting the timer manually (GUIDE Plus+
system)
Before you start recording…• Check that the disc has enough available
space for the recording (page 43). For the
HDD, DVD+RWs, and DVD-RWs, you
can free up disc space by erasing titles(page 82).
• Adjust the recording picture quality if
necessary (page 120).
• Turn on the set top box receiver and
connect the set top box controller, when
the recorder is connected to a set top box
receiver and you want to record using the
GUIDE Plus+ system.
b Note
Do not operate your set top box receiver just
before or during a timer recording. This may
prevent the accurate recording of a programme.
You can use the GUIDE Plus+ system to set
the timer to record a programme up to seven
days in advance.
1 Press GUIDE.
2 Select a programme using < / M / m /
,.
+RW -RWVR -RWVideo
-RVR
+RHDD
-RVideo
One Button Recording (GUIDEPlus+ (in areas with GUIDEPlus+ service only))
< / M / m / ,,ENTER
x RECSTOP
GUIDE
z REC
Yellow buttonGreen button
Red button
TIMER
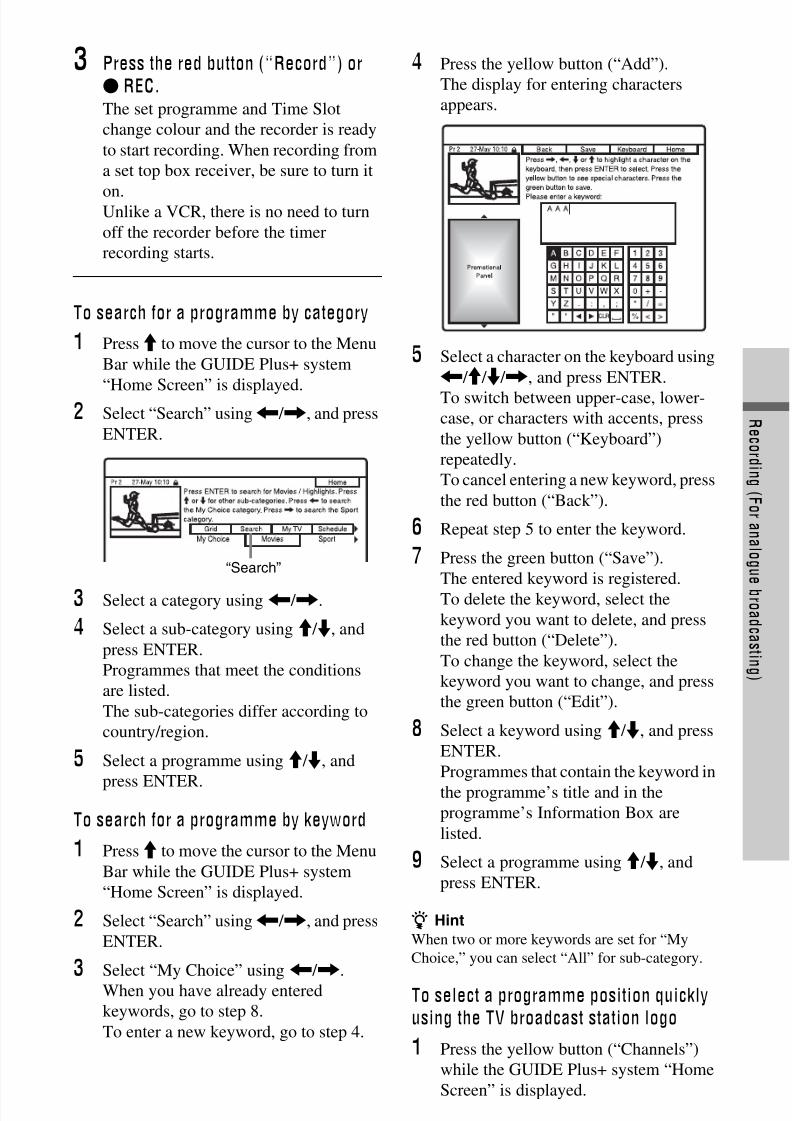
8/18/2019 Instructio Operation Manual DVD 3295080121
http://slidepdf.com/reader/full/instructio-operation-manual-dvd-3295080121 67/168
67
R e c o r d i n g ( F o r a n a l o g u
e b r o a d c a s t i n g )
3 Press the red button (“Record”) or
z REC.The set programme and Time Slot
change colour and the recorder is ready
to start recording. When recording from
a set top box receiver, be sure to turn it
on.Unlike a VCR, there is no need to turn
off the recorder before the timer
recording starts.
To search for a programme by category
1 Press M to move the cursor to the Menu
Bar while the GUIDE Plus+ system
“Home Screen” is displayed.2 Select “Search” using < / ,, and press
ENTER.
3 Select a category using < / ,.
4 Select a sub-category using M / m, and
press ENTER.
Programmes that meet the conditions
are listed.
The sub-categories differ according to
country/region.
5 Select a programme using M / m, and
press ENTER.
To search for a programme by keyword
1 Press M to move the cursor to the Menu
Bar while the GUIDE Plus+ system
“Home Screen” is displayed.
2 Select “Search” using < / ,, and press
ENTER.
3 Select “My Choice” using < / ,.
When you have already entered
keywords, go to step 8.
To enter a new keyword, go to step 4.
4 Press the yellow button (“Add”).
The display for entering characters
appears.
5 Select a character on the keyboard using
< / M / m / ,, and press ENTER.
To switch between upper-case, lower-case, or characters with accents, press
the yellow button (“Keyboard”)
repeatedly.
To cancel entering a new keyword, press
the red button (“Back”).
6 Repeat step 5 to enter the keyword.
7 Press the green button (“Save”).
The entered keyword is registered.
To delete the keyword, select the
keyword you want to delete, and press
the red button (“Delete”).
To change the keyword, select the
keyword you want to change, and press
the green button (“Edit”).
8 Select a keyword using M / m, and press
ENTER.
Programmes that contain the keyword in
the programme’s title and in the
programme’s Information Box are
listed.
9 Select a programme using M / m, and
press ENTER.
z Hint
When two or more keywords are set for “My
Choice,” you can select “All” for sub-category.
To select a programme position quicklyusing the TV broadcast station logo
1 Press the yellow button (“Channels”)
while the GUIDE Plus+ system “Home
Screen” is displayed.
“Search”
,continued

8/18/2019 Instructio Operation Manual DVD 3295080121
http://slidepdf.com/reader/full/instructio-operation-manual-dvd-3295080121 68/168
68
2 Select the TV broadcast station logo
using < / M / m / ,, and press ENTER.
The display returns to “Grid” and the
programme currently being broadcast
by the selected TV station is selected.
3 Select a programme using < / ,, and
press ENTER.
To confirm, change, or cancel a timer
recordingSee “Checking/Changing/Cancelling Timer
Settings (Schedule)” on page 71.
To stop recording during timer recordingPress x REC STOP.
Note that it may take a few seconds for the
recorder to stop recording.
On-screen instructions may appear after
pressing x REC STOP. In this case, follow
the on-screen instructions.
Rec. Mode AdjustIf there is not enough available disc space for
the recording, the recorder automatically
adjusts the recording mode to enable the
entire programme to be recorded. Set “Rec.Mode Adjust” to “On” in the “Recording”
setup (page 135).
z Hint
When you select “AUTO” for the recording mode,
the recorder automatically maximises the
recording quality for the space available on the
inserted disc (if recording to DVD), or to fit on to
a blank DVD disc (if recording to HDD).
b Notes
• If a message indicating that the HDD is full
appears on the screen, change the recording
destination to “DVD,” or make available space
for the recording (page 83).
• The last recording mode you selected manually
becomes the default recording mode for timer
recordings made from the GUIDE Plus+ system.
• You cannot adjust the recording quality (HDD or
DVD) once the recording starts.
• The beginning of some recordings may not bemade when using the VPS/PDC function.
• You cannot extend the recording duration time
when “VPS/PDC” is selected (page 69).
• The “Rec. Mode Adjust” function only works
with a timer recording to DVD, and the VPS/
PDC function set to off.
• The recording mode cannot be set to “AUTO”
when “VPS/PDC” is set to “On.”
1 Press TIMER.The schedule list appears.
2 Press the green button (“Manual”).
3 Set the yellow-highlighted date using
the number buttons and < / M / m / ,.Then press the green button
(“Next”).
4 Set the start time using the number
buttons and < / M / m / ,. Then press
the green button (“Next”).
5 Set the stop time using the numberbuttons and < / M / m / ,. Then pressthe green button (“Next”).
6 Select the input source using M / m,and select the programme position
using the number buttons or M / m.
7 Press the green button (“Next”).The display for entering characters
appears. You can change the title name,if necessary.
8 Press the green button (“Save”).The date, start and stop times,
programme position, etc. settings
appear.
Setting the timer manually(Schedule)
Date

8/18/2019 Instructio Operation Manual DVD 3295080121
http://slidepdf.com/reader/full/instructio-operation-manual-dvd-3295080121 69/168
69
R e c o r d i n g ( F o r a n a l o g u
e b r o a d c a s t i n g )
9 Press the corresponding colour
button repeatedly to set the recording
quality, frequency, or destination.• Yellow button (“Destination”): Sets
the recording destination. If there is
not enough available DVD disc space
for the recording, the recorderautomatically records the programme
to the HDD even if you select “DVD”
(Recovery Recording). When you set a
daily or weekly timer, “HDDr” allows
you to replace the previous timer
recording with the new one
automatically (HDD only).
• Green button (“Frequency”): Selects
the recording pattern.
• Red button (“Quality”): Selects the
recording mode (page 154).
10 Press , to display “Timing,” then
press the corresponding colourbutton repeatedly to set the duration
or genre.• Green button (“Timing”): Selects the
duration time or to set the VPS/PDC
function. See “About the VPS/PDCfunction” below.
• Yellow button (“Genre”): Selects a
particular HDD genre, if necessary.
11 Press GUIDE to exit the GUIDE Plus+
system.The recorder is ready to start recording.
• To modify the timer setting such as the
VPS/PDC function, see page 71.
To stop recording during timer recordingPress x REC STOP.
Note that it may take a few seconds for the
recorder to stop recording.
On-screen instructions may appear after
pressing x REC STOP. In this case, follow
the on-screen instructions.
z Hint
You can use the “Rec. Mode Adjust” function
(page 68).
b Notes
• If a message indicating that the HDD is full
appears on the screen, change the recording
destination to “DVD,” or make available spacefor the recording (page 83).
• When you set the recording destination to
“HDDr,” the previous timer recording will be
replaced with the new one even if you have not
watched it.
About the VPS/PDC functionVPS/PDC signals are transmitted with TV
programmes in some broadcast systems.
These signals ensure that timer recordingsare made regardless of any broadcast delays,
early starts, or broadcast interruptions.
To use the VPS/PDC functionSelect “VPS / PDC” in step 10 above.
When you turn on this function, the recorder
starts scanning the channels before the timer
recording starts.
b Note
If a message indicating that the HDD is fullappears on the screen, change the recording
destination to “DVD,” or make available space for
the recording (page 83).
You can set the recorder to record in 30-
minute increments.
For details, see page 58.
Using the Quick Timer function
,continued

8/18/2019 Instructio Operation Manual DVD 3295080121
http://slidepdf.com/reader/full/instructio-operation-manual-dvd-3295080121 70/168
70
The recorder automatically receives and
records stereo and bilingual programmes
based on the ZWEITON system or theNICAM system.
The HDD (when “HDD Recording Format”
is set to “Video Mode Off” in the
“Recording” setup (page 137)) and a DVD-
RW (VR mode) or DVD-R (VR mode) can
record both main and sub sounds. You can
switch between main and sub when playing
the disc.
The HDD (when “HDD Recording Format”
is set to “Video Mode On” in the
“Recording” setup (page 137)) and a
DVD+RW, DVD+R, DVD-RW (Video
mode), or DVD-R (Video mode) can record
only one sound track (main or sub) at a time.
Before recording starts, set “Bilingual
Recording” to “A/L” (default) or “B/R” in
the “Audio In” setup (page 132).
About HDD Recording format, seepage 137.
ZWEITON (German stereo) systemWhen a stereo-based programme is
received, “Stereo” appears.
When a bilingual ZWEITON-based
programme is received, “L,” “R,” or “L+R”
appears.
NICAM systemTo record a NICAM programme, be sure to
set “NICAM Select” to “NICAM” (default)
in the “Audio In” setup. If the sound is not
clear when listening to NICAM broadcasts,
set “NICAM Select” to “Standard”
(page 132).
The recorder can automatically divide a
recording (a title) into chapters by inserting
chapter marks. To select chapter mark
intervals or disable this function, see “Auto
Chapter (HDD/VR),” “Auto Chapter
(Video),” or “Auto Chapter (DVD+R/
+RW)” in the “Recording” setup (page 136).
When recording to the HDD, a DVD-R (VR
mode) or a DVD-RW (VR mode), you can
edit chapter marks (page 85).
Recording stereo and bilingualprogrammes
Creating chapters in a title

8/18/2019 Instructio Operation Manual DVD 3295080121
http://slidepdf.com/reader/full/instructio-operation-manual-dvd-3295080121 71/168
71
R e c o r d i n g ( F o r a n a l o g u
e b r o a d c a s t i n g )
Checking/Changing/ Cancelling TimerSettings (Schedule)
You can change or cancel timer settings
using the schedule list.
1 Press TIMER.The schedule list appears.
2 Select the timer setting you want tochange using m.You can check the selected timer setting
highlighted in pink.
To change the setting, go to step 3.If not changing the setting, go to step 6.
3 Press the green button (“Edit”).
4 In the left column, select an item
using the red button (“Back”) or the
green button (“Next”), and adjustusing the number buttons or < / M / m / ,.
5 Press the corresponding colourbutton repeatedly to change settings.• To change the recording destination,
press the yellow button
(“Destination”). If there is not enough
available DVD disc space for the
recording, the recorder automatically
records the programme to the HDD
even if you select “DVD” (Recovery
Recording). When you set a daily or
weekly timer, “HDDr” allows you toreplace the previous timer recording
with the new one automatically (HDD
only).
• To set the recording pattern, press the
green button (“Frequency”).
• To change the recording mode, press
the red button (“Quality”) (page 154).
6 Press , to display “Timing.”
7 Press the green button (“Timing”)
repeatedly to change the durationtime or to set the VPS/PDC function.See “About the VPS/PDC function” on
page 69.
• If you want to record to a particular
HDD genre, press the yellow button
(“Genre”) repeatedly.
8 Press GUIDE to exit the GUIDE Plus+system.The new settings become effective.
In step 2 of “Checking/changing timer
settings,” select the timer setting you
want to cancel using M / m, and press thered button (“Delete”).
To close the schedule listPress GUIDE.
Checking/changing timersettings
+RW -RWVR -RWVideo
-RVR
+RHDD
-RVideo
Cancelling timer settings
,continued
8/18/2019 Instructio Operation Manual DVD 3295080121
http://slidepdf.com/reader/full/instructio-operation-manual-dvd-3295080121 72/168
72
When the timer settings overlap• The programme that starts first has priority
and the entire programme is recorded.
• After finishing the previous recording, the
other recording starts with several tens-of-
second’s delay (when the end-time of one
recording and the start-time of another arethe same).
• When the recordings start at the same time,
only one of them will be recorded. Cancel
the timer setting for the programme that
you are not going to record.
b Note
When “VPS / PDC” is set for one or more timer
recordings, the start times may change in the event
of a broadcast delay or early start.
Recording fromConnected Equipment
You can record from a connected VCR or
similar device. To connect a VCR or similar
device, see “Connecting a VCR or Similar
Device” on page 34.
For details, see page 60.
+RW -RWVR -RWVideo
-RVR
+RHDD
-RVideo

8/18/2019 Instructio Operation Manual DVD 3295080121
http://slidepdf.com/reader/full/instructio-operation-manual-dvd-3295080121 73/168
73
P l a y b a c k
Playback
Playing
1 Press HDD or DVD.• If you select DVD, insert a disc (see
“1. Inserting a Disc” on page 38).
• If you insert a DVD VIDEO, VIDEOCD, DATA DVD or DATA CD, press
H. Playback starts.
2 Press TITLE LIST.If the Title List is already displayed, skip
this step.
Example: HDD
3 Select a title using M / m, and press
ENTER.Playback starts from the selected title.
z Hint
You can also use the H button in step 3 to start
playback.
b Note
When any video titles are recorded on a DATA
DVD, the MP3 audio tracks on that DATA DVD
cannot be played.
To use the DVD’s MenuWhen you play a DVD VIDEO, or a
finalised DVD+RW, DVD-RW (Video
mode), DVD+R, or DVD-R (Video mode),
you can display the disc’s menu by pressing
TOP MENU or MENU.
b Note
The H button is not available in the disc’s menu.
To play VIDEO CDs/Super VIDEO CDs withPBC functionsPBC (Playback Control) allows you to play
VIDEO CDs/Super VIDEO CDs
interactively using the menu on your TV
screen.
When you start playing a VIDEO CD/Super
VIDEO CD with PBC functions, the menu
appears.
Select an item using the number buttons, and
press ENTER. Then, follow the instructions
in the menu (press H when “Press
SELECT” appears).
b Note
Some playback options such as search, repeat play
or programme play cannot be played with PBC
function. To play with playback options, start
playback without PBC functions using the Title
List.
+R
DVD VCD
-RWVR
-RWVideo+RW
-RVR
HDD
-RVideo
DATA DVD
CD
DATA CD
H/X/x
< / M / m / ,,ENTER
SUBTITLEAUDIO
/
HDD DVD
>.
TITLE LIST
PLAYMODE
ANGLE
,continued

8/18/2019 Instructio Operation Manual DVD 3295080121
http://slidepdf.com/reader/full/instructio-operation-manual-dvd-3295080121 74/168
74
To play DivX video files or audio tracks in
a disc containing both file types
1 Press < while the Title List (DVD/CD)
is displayed.
2 Select “Data Format” using M / m, and
press ENTER.
3 Select “CD,” “MP3” or “DivX” using
M / m, and press ENTER.
4 Return to the Title List, then select an
album, title or track, and press ENTER
or H.
To stop playbackPress x.
To resume playback from the point where
you stopped (Resume Play)When you press H again after you stop
playback, the recorder resumes playback
from the point where you pressed x.
To start from the beginning, press x again,
and press H. Playback starts from the
beginning of the title/track/scene.
b Notes
• You cannot resume playback during TV Pause.
• Resume Play is not available for Super VIDEO
CDs.
• The point where you stopped playing is cleared
from memory when:
– you open the disc tray (except HDD).
– you play another title (except HDD).
– you start playback using the Title List (except
HDD).– you edit the title after stopping playback.
– you change the settings on the recorder.
– you make a recording (except HDD).
– you disconnect the mains lead.
To play restricted DVDs (Parental Lock)If you play a restricted DVD, the display for
entering your password appears on your TV
screen.
Enter your four-digit password using the
number buttons, and press ENTER.
The recorder starts playback.
To register or change the password, see
“Limitation Settings (Parental Lock)” on
page 138.
One-Touch Play (for SCART/HDMI
connections only)Press H. With one touch of the H button,
the recorder and your TV automatically turn
on and the TV’s input is switched to therecorder. Playback starts automatically.
b Notes
• When using the HDMI connection, there may be
a delay, before the playback picture appears on
the TV screen, and the beginning portion of the
playback picture may not be displayed. • To use the One-Touch Play function, set
“Control for HDMI” to “On” (default) in the
“HDMI Output” setup (page 140).

8/18/2019 Instructio Operation Manual DVD 3295080121
http://slidepdf.com/reader/full/instructio-operation-manual-dvd-3295080121 75/168
75
P l a y b a c k
To check the position of the buttons below, see the illustration on page 73.
Playback options
Buttons Operations
ANGLE Changes the angles for a scene when pressed during playback.When the disc has various angles (multi-angles) recorded,“ ” appears on the screen.
To switch the angle mark indicator to off, set “Angle Indicator”to “Off” in the “Playback” setup (page 138).
AUDIO Selects one of the audio tracks recorded on the disc when pressedrepeatedly in normal playback mode.
: Selects the language.
: Selects the main or sub sound.
: Selects stereo or
monaural audio tracks.
*1 DivX video file only*2 MP3 audio track only
SUBTITLE
* DivX video file only
Selects a subtitle language when pressed repeatedly.
/ (instant replay/
instant advance)
* DivX video file only
Each time you press , replays the scene for the following
duration.5 seconds t 15 seconds t 30 seconds t 1 minute t 2 minutes t 3 minutes t 5 minutes t 10 minutes t 20 minutes t advances the time in 10-minute increments t 2 hours
Each time you press , briefly fast forwards the current scenefor the following duration.30 seconds t 1 minute t 1 minute 30 seconds t 2 minutes
t 3 minutes t 5 minutes t 10 minutes t 20 minutes t
advances the time in 10-minute increments t 2 hours. (previous)/
> (next)Goes to the beginning of the previous/next title/chapter/scene/ track when pressed during playback.Goes to the beginning of the first title/track when pressed in stopmode.
DVD
-RWVR -RVR
VCD
HDD
DVD
DATA CD
CD
DATA DVD
DATA DVD*1
DATA CD*1
DVD
-RWVR -RVRHDD
VCD CD DATA DVD*2
DATA CD*2
DVD DATA DVD*
DATA CD *
-RWVR
-RWVideo
+RW
-RVR+R
DVD
HDD
-RVideo DATA DVD*
DATA CD *
,continued

8/18/2019 Instructio Operation Manual DVD 3295080121
http://slidepdf.com/reader/full/instructio-operation-manual-dvd-3295080121 76/168
76
b Notes
• Angles and subtitles cannot be changed with
titles recorded on this recorder.• JPEG image files made with a DVD camcorder
can only be played as a slideshow. For video
files containing JPEG image files and movies,
the recorder can play movie parts only.
Notes on playing DVDs with a DTS soundtrackDTS audio signals are output only through the
DIGITAL OUT (COAXIAL) jack.
When you play a DVD with DTS sound tracks, set“DTS Output” to “On” in the “Audio Out” setup
(page 133).
Notes on playing DTS sound tracks on aCD
• When playing DTS-encoded CDs, excessivenoise will be heard from the LINE 3-TV/LINE 1/
DECODER/LINE 2 OUT (R-AUDIO-L) jacks.
To avoid possible damage to the audio system,
the user should take proper precautions when the
LINE 3-TV/LINE 1/DECODER/LINE 2 OUT
(R-AUDIO-L) jacks of the recorder are
connected to an amplification system. To enjoy
DTS Digital Surround™ playback, an external
DTS decoder must be connected to the
DIGITAL OUT jack of the recorder.• Set the sound to “Stereo” using the AUDIO
button when you play DTS sound tracks on a CD
(page 75).
(fast reverse/fast forward)
Fast reverses/fast forwards the disc when pressed duringplayback.Search speed changes as follows:
fast reverse fast forward
mFR1*1 T t MFF1*2
mFR2 T T t t MFF2
mFR3*3 T T T t t t MFF3*3
mFR4*3 T T T T t t t t MFF4*3
When you press and hold the button, fast forward/fast reversecontinues at the selected speed until you release the button.
*1 When you press m once during playback, you can play Reverse
play (not available for VIDEO CDs/Super VIDEO CDs/DivX
video files/audio tracks).*2 When you press M once during playback, you can play quickly
with sound (Scan Audio) (not available for VIDEO CDs/Super
VIDEO CDs).*3 Not available for VIDEO CDs/Super VIDEO CDs/audio tracks.
To resume normal playback, press H.
(slow, freeze frame)
*1 Playback direction only*2 DivX video file only
Plays in slow motion when pressed for more than one second inpause mode.Plays one frame at a time when pressed briefly in pause mode.To resume normal playback, press H.
X (pause) Pauses playback.To resume normal playback, press H.
Buttons Operations
-RWVR
-RWVideo
+RW
-RVR+R
VCDDVD*1
HDD
-
RVideo
DATA DVD*1*2
DATA CD*1*2

8/18/2019 Instructio Operation Manual DVD 3295080121
http://slidepdf.com/reader/full/instructio-operation-manual-dvd-3295080121 77/168
77
P l a y b a c k
1 Press PLAY MODE during playback.For audio tracks on a CD, press ,
while the Title List is displayed, andselect “Play Mode.”
The “Play Mode” menu appears.
2 Select “A-B Repeat,” and press
ENTER.“Set point A” is selected.
3 While monitoring the sound, press
ENTER at the starting point (point A)
of the portion to be played
repeatedly.“Set point B” is selected.
4 Continue playing to locate the ending
point (point B), and press ENTER.A-B Repeat starts.
To cancel A-B RepeatPress CLEAR. Or, set “A-B Repeat” to
“Off” in the “Play Mode” menu.
b Notes
• When playing an HDD/DVD VIDEO/DVD-RW
(Video mode)/DVD-R (Video mode), set the
start and stop points within the same title.
• “A-B Repeat” is not available for MP3 audio
tracks.
You can repeatedly play all the titles/tracks/
files or a single title/chapter/track on the
HDD, a disc or an album.
1 Press PLAY MODE during playback.For audio tracks on a DATA DVD/
DATA CD/CD, press , while the Title
List is displayed, and select “Play
Mode.”
The “Play Mode” menu appears.
2 Select “Repeat,” and press ENTER.
3 Select an item to be repeated using
M / m.“Repeat Title” (for HDD/DVDs/DATA
DVDs*1 /DATA CDs*1): repeats the
current title.
“Repeat Chapter” (for HDD/DVDs):
repeats the current chapter.
“Repeat Track” (for VIDEO CDs*2 /
CDs/DATA DVDs/DATA CDs):
repeats the current track.
“Repeat Programme”: repeats thecurrent programme (page 78).
“Repeat Disc” (for VIDEO CDs*2 /
DVD-RWs/DVD-Rs (VR mode)/CDs/
DATA DVDs/DATA CDs): repeats the
entire disc.
“Repeat Album” (for DATA DVDs*3 /
DATA CDs*3): repeats the current
album.*1 DivX video file only
*2 Available only when playing without PBCfunctions
*3 Audio tracks only
4 Press ENTER.Repeat play starts.
To cancel Repeat playPress CLEAR. Or, set “Repeat” to “Repeat
Off” in the “Play Mode” menu.
b Note
You can select “Repeat Programme” only during
Programme play.
Playing a specific portionrepeatedly (A-B Repeat)
Playing repeatedly (Repeat)
,continued

8/18/2019 Instructio Operation Manual DVD 3295080121
http://slidepdf.com/reader/full/instructio-operation-manual-dvd-3295080121 78/168
78
*1 finalised disc only*2 MP3 audio tracks only
You can play the contents of the HDD or a
disc in the order you want by arranging the
order of the titles/chapters/albums/tracks on
the HDD or disc to create your own
programme. You can make a programme of
up to 24 chapters/tracks, etc.
1 Press PLAY MODE during playback.For audio tracks on a DATA DVD/
DATA CD/CD, press , while the Title
List is displayed, and select “Play
Mode.”
The “Play Mode” menu appears.
2 Select “Programme,” and press
ENTER.
3 Select “Input/Edit Programme,” andpress ENTER.The “Input/Edit Programme” display
differs depending upon the disc type.
Example: DVD
4 Select a title or album (example: Title
01) using M / m, and press ,.
5 Select a chapter or track (example:
Chapter 001) using M / m, and press
ENTER.The chapter or track is programmed.
If you make a mistake, select the step
number (example: 01.) using < / M / m,
and press CLEAR.
6 To programme other chapters or
tracks, press < / M / m / , to select a
step number, and repeat steps 4 and5.
7 Press H.Programme play starts.
To stop Programme playPress x (stop).
To cancel Programme playPress CLEAR during playback. Or, set
“Programme” to “Cancel Programme Play”
in the “Play Mode” menu.
To erase the programmePress CLEAR in stop mode. Or, set
“Programme” to “Erase Programme List” in
the “Play Mode” menu.
z Hints
• The programme you made remains after
Programme play finishes. To play the same
programme again, set “Programme” to “Start
Programme Play” in the “Play Mode” menu.However, the programme is cleared after you
remove the disc or press [ / 1.
• You can repeat Programme play. During
Programme play, set “Repeat” to “Repeat
Programme” in the “Play Mode” menu
(page 77).
Creating your own programme(Programme)
VCD-RWVideoHDD -RVideo CD*1*1
DATA DVD DATA CD*2 *2

8/18/2019 Instructio Operation Manual DVD 3295080121
http://slidepdf.com/reader/full/instructio-operation-manual-dvd-3295080121 79/168
79
P l a y b a c k
Advanced PlaybackFunctions
You can pause a current TV broadcast, and
record it on the HDD, then continue
watching the programme at a later time. This
is useful when you receive an unexpected
phone call or visitor while watching TV.
When connecting the recorder to your TVusing the SCART jack, do the following.
– set “SMARTLINK” to “This Recorder
Only” in the “Options” setup (page 141).
– set “TV Pause” to “TV’s Tuner” in the
“Options 2” setup (page 142).
– preset programme positions by
downloading from your TV using
“Download from TV” of “Auto Channel
Setting” in the “Analog Tuner” setup(page 127).
If you do not make the SCART connection,
set “TV Pause” to “Recorder’s Tuner” in the
“Options 2” setup (page 142).
1 While viewing a TV broadcast, pressTV PAUSE.The picture pauses, and the recorder
starts recording the current TV channel
to the HDD.It may take up to 10 seconds to start
recording.
2 Press H to resume watching the
programme.You can fast forward/fast reverse,
pause, or stop the programme using
m / M, X and x without affecting
the recording.
3 Press x REC STOP to stop recording.
b Notes
• The picture does not pause and the recorder
starts only recording in the following cases.
– when the programme positions are preset
differently between the recorder and the
connected TV.
– when watching the programme from the
external equipment connected to your TV.• The picture tuned by the recorder pauses when
“TV Pause” is set to “Recorder’s Tuner” in the
“Options 2” setup (page 142).
• You may not be able to use the “TV Pause”
function depending on some TVs. For details,
refer to the operating instructions supplied with
your TV.
• The “TV Pause” function will not work correctly
when watching TV via the connected component
such as a VCR or digital tuner. The “TV Pause”
function works only with the channel selected onthe TV.
• You cannot use the “TV Pause” function as a
recording feature from the component (VCR,
etc.) connected to the LINE 1/DECODER jack.
• The “TV Pause” function will not work if the
connected TV does not comply with
SMARTLINK. To check whether your TV
complies with SMARTLINK, refer to the
operating instructions supplied with your TV.
“Chase Play” allows you to view the
recorded part of a programme on the HDD
while the recording is being made. You donot need to wait until the recording finishes.
Press H while recording.Playback starts from the beginning of the
programme you are recording.
When you fast forward to the point that you
are recording, “Chase Play” returns to
normal playback.
Pausing a TV broadcast (TVPause/Pause Live TV)
HDD
Playing from the beginning ofthe programme you arerecording (Chase Play)
HDD
,continued

8/18/2019 Instructio Operation Manual DVD 3295080121
http://slidepdf.com/reader/full/instructio-operation-manual-dvd-3295080121 80/168
80
“Simultaneous Rec and Play” allows you to
view a previously recorded programme
while recording programmes. Playback
continues even if a timer recording starts.
Use this function as follows:
• While recording to the HDD:
Play another title on the HDD.
Play a previously recorded programme on
a DVD by pressing the DVD button.
• While recording to a DVD:
Play a previously recorded programme on
the HDD by pressing the HDD button.
You can also play a DVD VIDEO, VIDEO
CD, Super VIDEO CD, DATA DVD, or
DATA CD while recording on the HDD.
Example: Play another title on the HDD
while recording to the HDD.
1 While recording, press TITLE LIST to
display the HDD Title List.
2 Select the title you want to play, and
press ENTER.
Playback starts from the selected title.
Example: Play a DVD while recording tothe HDD.
1 While recording, press DVD and insert
the DVD into the recorder.
2 Press TITLE LIST to display the DVD
Title List.
3 Select the title you want to play, and
press ENTER.
Playback starts from the selected title.
b Note
You cannot play a DVD, DivX video or VIDEO
CD recorded in the NTSC colour system while
recording on the HDD in the PAL/SECAM colour
system.
Searching for a Time/ Title/Chapter/Track,etc.
* DivX video file only
You can search a disc by title, chapter, scene
or track. As titles and tracks are assigned
individual numbers, select the title or track
by entering its number. You can also searchfor a scene using the time code.
1 Press PLAY MODE during playback.The “Play Mode” menu appears.
2 Select “Search Mode,” and press
ENTER.
3 Select a search method, and press
ENTER.“Time Search” (for HDD/DVDs/DATA
DVDs*1 /DATA CDs*1 /VIDEO
CDs*2*3): Searches for a starting point
by entering the time code.
“Title Search” (for HDD/DVDs/DATA
DVDs*1 /DATA CDs*1)
“Chapter Search” (for HDD/DVDs)
“Track Search” (for VIDEO CDs*3)*1 DivX video file only
*2 Except Super VIDEO CDs*3 Available only when playing without PBC
functions
The display for entering the number
appears.
4 Press the number buttons to selectthe number of the title, chapter, time
code, etc., you want.
For example: Time SearchTo find a scene at 2 hours, 10 minutes,
and 20 seconds, enter “21020.”
If you make a mistake, select another
number.
Playing a previous recordingwhile making another(Simultaneous Rec and Play)
+R
DVD VCD
DATA CD
-RWVR -RWVideo+RWHDD
DATA DVD-RVR
-RVideo
+R
DVD VCD
-RWVR -RWVideo+RW
-RVR
HDD
-RVideo
DATA CD
DATA DVD
*
*

8/18/2019 Instructio Operation Manual DVD 3295080121
http://slidepdf.com/reader/full/instructio-operation-manual-dvd-3295080121 81/168
81
P l a y b a c k
5 Press ENTER.Playback starts from the selected
number.
z Hint
You can search for a title/track/chapter by entering
the title/track/chapter number using the number
buttons during playback.
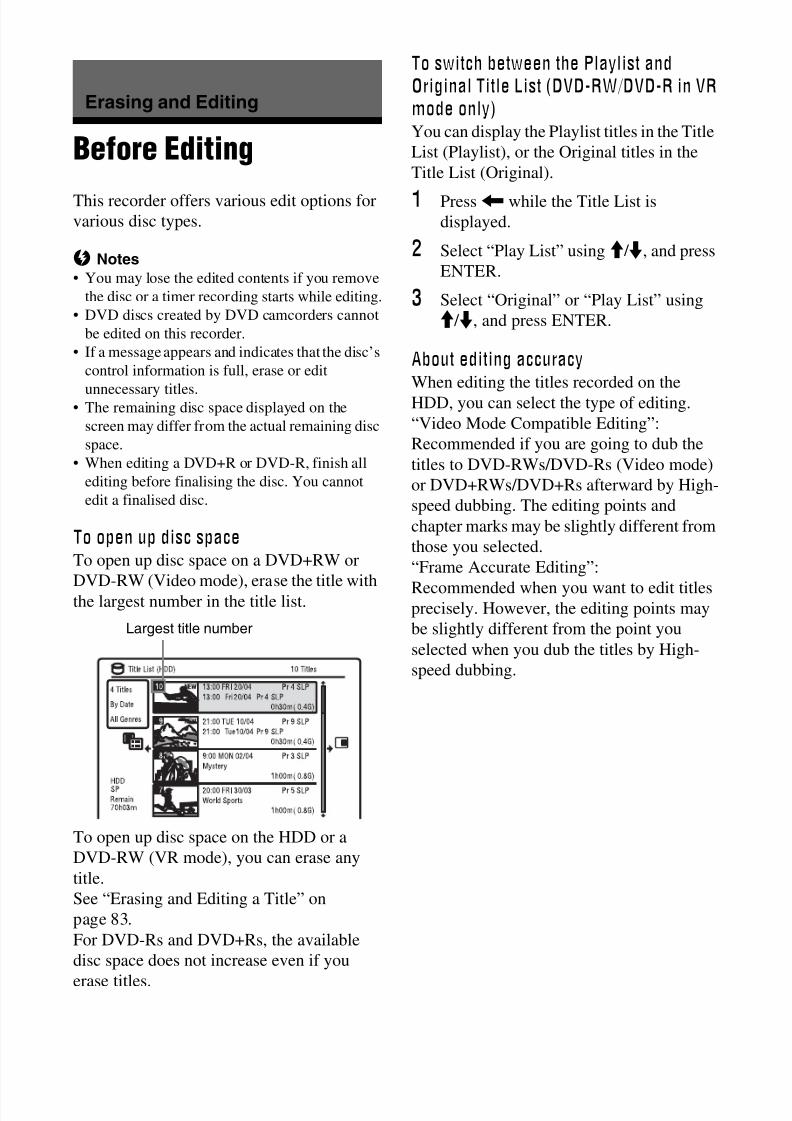
8/18/2019 Instructio Operation Manual DVD 3295080121
http://slidepdf.com/reader/full/instructio-operation-manual-dvd-3295080121 82/168
82
Erasing and Editing
Before Editing
This recorder offers various edit options forvarious disc types.
b Notes
• You may lose the edited contents if you remove
the disc or a timer recording starts while editing.
• DVD discs created by DVD camcorders cannot
be edited on this recorder.
• If a message appears and indicates that the disc’s
control information is full, erase or edit
unnecessary titles.• The remaining disc space displayed on the
screen may differ from the actual remaining disc
space.
• When editing a DVD+R or DVD-R, finish all
editing before finalising the disc. You cannot
edit a finalised disc.
To open up disc spaceTo open up disc space on a DVD+RW or
DVD-RW (Video mode), erase the title withthe largest number in the title list.
To open up disc space on the HDD or a
DVD-RW (VR mode), you can erase any
title.
See “Erasing and Editing a Title” on
page 83.
For DVD-Rs and DVD+Rs, the available
disc space does not increase even if you
erase titles.
To switch between the Playlist and
Original Title List (DVD-RW/DVD-R in VR
mode only)You can display the Playlist titles in the Title
List (Playlist), or the Original titles in the
Title List (Original).
1 Press < while the Title List isdisplayed.
2 Select “Play List” using M / m, and press
ENTER.
3 Select “Original” or “Play List” using
M / m, and press ENTER.
About editing accuracyWhen editing the titles recorded on the
HDD, you can select the type of editing.
“Video Mode Compatible Editing”:
Recommended if you are going to dub the
titles to DVD-RWs/DVD-Rs (Video mode)
or DVD+RWs/DVD+Rs afterward by High-
speed dubbing. The editing points and
chapter marks may be slightly different from
those you selected.
“Frame Accurate Editing”:
Recommended when you want to edit titlesprecisely. However, the editing points may
be slightly different from the point you
selected when you dub the titles by High-
speed dubbing.
Largest title number

8/18/2019 Instructio Operation Manual DVD 3295080121
http://slidepdf.com/reader/full/instructio-operation-manual-dvd-3295080121 83/168
83
E r a s i n
g a n d E d i t i n g
Erasing and Editing aTitle
This section explains the basic edit
functions. Note that editing is irreversible.
To edit DVD-RWs/DVD-Rs (VR mode)
without changing the original recordings,
create a Playlist title (page 87).
1 Press TITLE LIST.For DVD-RWs/DVD-Rs in VR mode,
switch the Title List (Original orPlaylist), if necessary.
2 Select a title, and press ,.The sub-menu appears.
3 Select an option, and press ENTER.You can make the following edits to the
title.
“Erase”: Erases the selected title. Select
“Yes” when asked for confirmation.“Edit”: Allows you to make the
following edits.
• “Title Name”: Allows you to enter or
re-enter a title name (page 44).
• “Set Thumbnail”: Changes the title’s
thumbnail picture that appears in the
Title List (page 42).
• “A-B Erase”: Erases a section of the
title (page 84).
• “Divide”: Divides a title into two titles(page 84).
• “Chapter Edit”: Edits chapters in a title
(page 85).
• “Set Genre”: Assigns a genre to a title.
• “Protect”: Protects the title. “ ”
appears next to the protected title.
• “Move”: Changes the title’s playing
order (page 87).
• “Combine”: Combines two titles intoone (page 87).
“Genre Name”: Allows you to enter a
genre name (up to 12 characters)
(page 44).
“Multi-Mode”: Allows you to select and
edit multiple titles at one time (page 83).
“Create”: Creates a Playlist (page 87).
“Undo”: Undoes the last edit you made.
z Hint
You can label or re-label DVDs (page 45).
You can select and edit up to 24 titles at one
time.
1 Press TITLE LIST.2 Press ,.
The sub-menu appears.
3 Select “Multi-Mode,” and press
ENTER.The display for selecting titles to be
edited appears.
4 Select a title, and press ENTER.A check mark appears in the check box.
To clear the check mark, press ENTERagain.
5 Repeat step 4 to select all of the titles
you want to edit.
6 When you finish selecting titles,
press ,.The sub-menu appears.
7 Select an option, and press ENTER.“Erase”: Erases the selected titles.
“Protect”: Protects the titles. “ ”
appears next to the protected title.
“Unprotected”: Unprotects the titles.
“Change Genre”: Changes the genre of
the titles.
+RW -RWVR -RWVideo +RHDD
-RVR
-RVideo
Editing multiple titles (Multi-Mode)
HDD
,continued

8/18/2019 Instructio Operation Manual DVD 3295080121
http://slidepdf.com/reader/full/instructio-operation-manual-dvd-3295080121 84/168
84
z Hint
You can exit “Multi-Mode” by pressing , and
selecting “Single-Mode” while selecting titles.
You can select a section (scene) in a title and
erase it. Note that erasing scenes in a title
cannot be undone.
1 After step 2 of “Erasing and Editing a
Title,” select “Edit,” and press
ENTER.2 Select “A-B Erase,” and press
ENTER.For the HDD, select a type of editing,
and press ENTER. For details, see
page 82.
The display for setting point A appears.
The title starts to play.
3 Select point A using m / M or H,
and press X.
• To return to the beginning of the title,
press X and then press ..
4 Select “From,” and press ENTER.The position of point A is displayed.
5 Press H.
6 Select point B using m / M or H,
and press X.7 Select “To,” and press ENTER.
The position of point B is displayed.
8 Select “Yes,” and press ENTER.The scene is erased.
To cancel “A-B Erase”Press O RETURN. The Title List appears.
z Hint
A chapter mark is inserted after the scene is erased.
The chapter mark divides the title into separate
chapters on either side of the mark.
b Notes
• Images or sound may be momentarily
interrupted at the point where you erase a section
of a title.
• Sections shorter than five seconds may not be
erased.
If you want to dub a long title to a disc but do
not want to reduce the picture quality, divide
the title into two shorter titles. Note that
dividing a title cannot be undone.* Only playlist titles can be divided for DVD-
RWs/DVD-Rs in VR mode.
1 After step 2 of “Erasing and Editing aTitle,” select “Edit,” and press
ENTER.
2 Select “Divide,” and press ENTER.For the HDD, select a type of editing,
and press ENTER. For details, see
page 82.
The display for setting the dividing
point appears.
The title starts to play.
3 Select the dividing point using m /
M or H, and press X.• To return to the beginning of the title,
press X and then press ..
Erasing a section of a title
(A-B Erase)-RWVRHDD -RVR
Dividing a title (Divide)
-RWVRHDD -RVR* *

8/18/2019 Instructio Operation Manual DVD 3295080121
http://slidepdf.com/reader/full/instructio-operation-manual-dvd-3295080121 85/168
85
E r a s i n
g a n d E d i t i n g
4 Press ENTER.For the HDD, the display asks for
confirmation.
5 Select “Yes,” and press ENTER (HDD
only).The title is divided into two.
Erasing and Editing aChapter
You can edit individual chapters within a
title. To edit DVD-RWs/DVD-Rs (VR
mode) without changing the original
recordings, create a Playlist (page 87).
1 Press TITLE LIST.For DVD-RWs/DVD-Rs in VR mode,
switch the Title List (Original or
Playlist), if necessary.
2 Select a title containing the chapter
you want to edit, and press ,.The sub-menu appears.
3 Select “Edit,” and press ENTER.
4 Select “Chapter Edit,” and pressENTER.For the HDD, select a type of editing,
and press ENTER. For details, see
page 82.
5 Select an option, and press ENTER.You can make the following edits to the
chapter.
“Divide”: Divides a chapter into two
(page 86).
“Erase/Move”
• “Erase”: Erases the selected chapter
(page 86).• “Move” (for Playlist titles on DVD-
RWs/DVD-Rs in VR mode): Changes
the chapter’s playing order (page 88).
“Combine”: Combines two chapters
into one (page 86).
-RWVRHDD -RVR
,continued

8/18/2019 Instructio Operation Manual DVD 3295080121
http://slidepdf.com/reader/full/instructio-operation-manual-dvd-3295080121 86/168
86
1 After step 4 of “Erasing and Editing a
Chapter,” select “Divide.”
2 Select a chapter using < / ,.
3 Select the dividing point using m / M or H, and press X.• To return to the beginning of the
chapter, press X and then press ..
4 Press ENTER.The chapter is divided into two.
1 After step 4 of “Erasing and Editing aChapter,” select “Erase.”
2 Select a chapter using < / ,, and
press ENTER.
3 (For a Playlist chapter only)
Select “Erase,” and press ENTER.
The display asks for confirmation.
4 Select “Yes,” and press ENTER.The chapter is erased.
1 After step 4 of “Erasing and Editing a
Chapter,” select “Combine.”
2 Move the combining bar using < / ,, and press ENTER.The two adjacent chapters of the
combining bar are combined.
b Note
Chapters cannot be combined if they are
automatically created from an HDD camcorder
dubbing.
Dividing a chapter (Divide)
Erasing a chapter (Erase)
Combining multiple chapters(Combine)
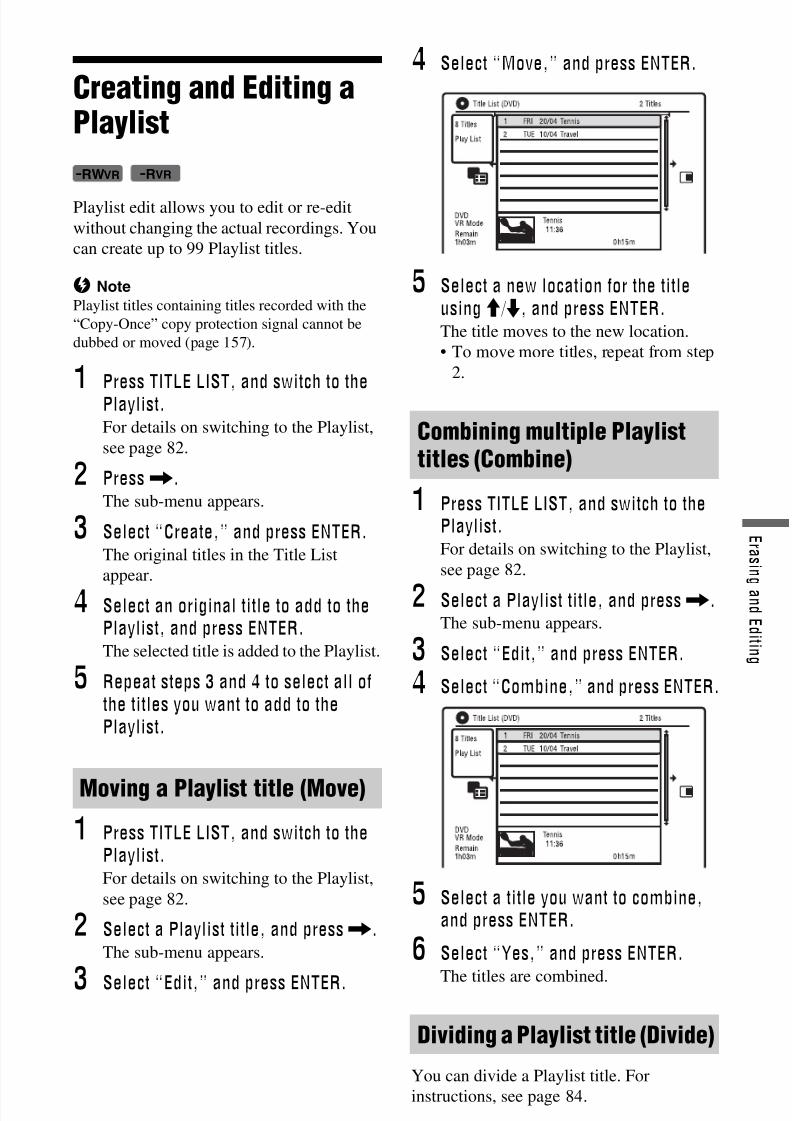
8/18/2019 Instructio Operation Manual DVD 3295080121
http://slidepdf.com/reader/full/instructio-operation-manual-dvd-3295080121 87/168
87
E r a s i n
g a n d E d i t i n g
Creating and Editing aPlaylist
Playlist edit allows you to edit or re-edit
without changing the actual recordings. You
can create up to 99 Playlist titles.
b Note
Playlist titles containing titles recorded with the
“Copy-Once” copy protection signal cannot be
dubbed or moved (page 157).
1Press TITLE LIST, and switch to the
Playlist.For details on switching to the Playlist,
see page 82.
2 Press ,.The sub-menu appears.
3 Select “Create,” and press ENTER.The original titles in the Title List
appear.
4 Select an original title to add to thePlaylist, and press ENTER.The selected title is added to the Playlist.
5 Repeat steps 3 and 4 to select all of
the titles you want to add to thePlaylist.
1 Press TITLE LIST, and switch to thePlaylist.For details on switching to the Playlist,
see page 82.
2 Select a Playlist title, and press ,.The sub-menu appears.
3 Select “Edit,” and press ENTER.
4 Select “Move,” and press ENTER.
5 Select a new location for the title
using M / m, and press ENTER.The title moves to the new location.
• To move more titles, repeat from step
2.
1 Press TITLE LIST, and switch to thePlaylist.For details on switching to the Playlist,
see page 82.
2 Select a Playlist title, and press ,.The sub-menu appears.
3 Select “Edit,” and press ENTER.
4 Select “Combine,” and press ENTER.
5 Select a title you want to combine,and press ENTER.
6 Select “Yes,” and press ENTER.
The titles are combined.
You can divide a Playlist title. For
instructions, see page 84.
Moving a Playlist title (Move)
-RWVR -RVR
Combining multiple Playlisttitles (Combine)
Dividing a Playlist title (Divide)
,continued

8/18/2019 Instructio Operation Manual DVD 3295080121
http://slidepdf.com/reader/full/instructio-operation-manual-dvd-3295080121 88/168
88
1 Press TITLE LIST, and switch to the
Playlist.For details on switching to the Playlist,
see page 82.
2 Select a Playlist title containing the
chapter you want to edit, and press
,.The sub-menu appears.
3 Select “Edit,” and press ENTER.
4 Select “Chapter Edit,” and pressENTER.
5 Select “Erase/Move.”
6 Select a chapter using < / ,, andpress ENTER.
7 Select “Move,” and press ENTER.
8 Select a new location for the chapter
using < / ,, and press ENTER.The chapter moves to the new location.
Moving a chapter (Move)

8/18/2019 Instructio Operation Manual DVD 3295080121
http://slidepdf.com/reader/full/instructio-operation-manual-dvd-3295080121 89/168
89
D u b b i n g ( H D D y D V D )
Dubbing (HDD y DVD)
Before Dubbing
In this section, “dubbing” refers to “copyinga recorded title on the internal hard disk
drive (HDD) to another disc, or vice versa.”
You can dub a playing title using the HDD/
DVD DUB button (see “HDD/DVD
Dubbing” on page 90) or you can select to
dub multiple titles all at once (see “Dubbing
Using Dubbing List” on page 90). You can
also dub an entire DVD disc to make a
backup copy (see “Making a Backup Disc(DVD Backup)” on page 93).
Before you start, read the following
precautions, which are common to all
dubbing methods.
Before you start…• You cannot record both the main and sub
sound on the HDD (when “HDD
Recording Format” is set to “Video Mode
On” in the “Recording” setup),DVD+RWs, DVD-RWs (Video mode),
DVD+Rs, or DVD-Rs (Video mode). For
bilingual programmes, set “Bilingual
Recording” to either “A/L” (default) or “B/
R” in the “Audio In” setup (page 132).
About HDD Recording format, see
page 137.
• A title name in the dubbing source is
dubbed. However, only up to 40 characters
of a title name are dubbed when dubbing
from the HDD to a DVD+RW/DVD-RW
(Video mode)/DVD+R/DVD-R (Video
mode).
• The chapter marks in the dubbing source
are dubbed. The position of chapter marks
may be slightly changed from the original.
However, the chapter marks in the dubbing
source are not retained in the dubbed title
when dubbing to a DVD-RW/DVD-R(Video mode), DVD+RW, or DVD+R at
normal speed. The chapter marks are
automatically inserted according to the
“Auto Chapter (Video)” and “Auto
Chapter (DVD+R/+RW)” settings in the
“Recording” setup (page 136).
• The “Set Thumbnail” setting in the
dubbing source is dubbed as a thumbnail
picture marker (except when dubbing from
a DVD+RW/DVD-RW (Video mode)/
DVD+R/DVD-R (Video mode)). The
position of thumbnail picture markers may
be slightly changed from the original.
z Hint
When you dub a Playlist title, it is recorded as an
Original title.
b Notes
• You cannot make a recording while dubbing.
• Before playing a dubbed disc on other DVD
equipment, finalise the disc (page 46, 91).
• You cannot dub from DVD VIDEOs to the
HDD.• Titles containing mixed aspect ratios cannot be
dubbed to a DVD+RW/DVD+R/DVD-RW/
DVD-R (Video mode) using the HDD/DVD
DUB button.
• Titles over 8 hours cannot be dubbed to single-
layer DVD+RWs/DVD+Rs.
• Low resolution (SEP through LP modes) 16:9
size titles cannot be dubbed to a DVD+RW/
DVD+R/DVD-RW/DVD-R (Video mode).
• Titles recorded in Dolby Digital 5.1 ch audio are
down-converted to 2-channel audio when
dubbed at normal speed (“Real time” dubbing).
• About the “Move” function, see page 157.

8/18/2019 Instructio Operation Manual DVD 3295080121
http://slidepdf.com/reader/full/instructio-operation-manual-dvd-3295080121 90/168
90
HDD/DVD Dubbing
You can dub a single title by pressing theHDD/DVD DUB button during playback.
You can also dub from finalised DVD-RWs/
DVD-Rs (Video mode) to the HDD.
1 Start playback of a title.For playing a title, see “Playing” on
page 73.
2 Press HDD/DVD DUB.
The recorder starts dubbing the currentplaying title from the beginning.
The recorder turns off automatically
when you do not use the recorder for
more than 20 minutes after the dubbing
has finished.
To cancel dubbingPress and hold HDD/DVD DUB for more
than one second.
When dubbing is stopped partway, no part of
the title will be moved to the dubbing target.
However, note that this will decrease the free
space for DVD+Rs/DVD-Rs.
About dubbing modeTitles on the HDD are dubbed to a disc at
high speed (“High-Speed” dubbing).
Titles on a disc are dubbed to the HDD atnormal speed (“Real time” dubbing).
For the minimum required time for “High-
Speed” dubbing, see page 157.
To convert the recording mode (only
when dubbing from a disc to the HDD)Before step 1, press REC MODE to select
the recording mode.
b Note
You cannot use the HDD/DVD DUB button in the
following cases. Dub the title using Dubbing List
(page 90).
– When dubbing the title recorded in MN6 mode
or longer duration mode to a DVD+RW/
DVD+R.
– When dubbing the title recorded in HQ+ mode to
a DVD.
Dubbing Using DubbingList
You can select the titles you want to dub
using Dubbing List. You can also edit titles
before dubbing without changing the
original titles.
1 Press SYSTEM MENU.The System Menu appears.
2 Select “Dubbing,” and press ENTER.3 Select a dubbing direction, and press
ENTER.To dub titles from the HDD to a disc,
select “HDD -> DVD.”
To dub titles from a disc to the HDD,
select “DVD/CD -> HDD.”
4 Select “Create New Dubbing List,”and press ENTER.The Dubbing List appears.
• If you have previously saved a
Dubbing List and want to resume
editing it, select “Use Previous
Dubbing List,” and go to step 7.
A Direction of dubbing
B Total number of titles to be
dubbed
+RW -RWVR -RWVideo +RHDD
-RVR -RVideo+RW -RWVR -RWVideo
-RVR
+RHDD
-RVideo

8/18/2019 Instructio Operation Manual DVD 3295080121
http://slidepdf.com/reader/full/instructio-operation-manual-dvd-3295080121 91/168

8/18/2019 Instructio Operation Manual DVD 3295080121
http://slidepdf.com/reader/full/instructio-operation-manual-dvd-3295080121 92/168
92
To edit titles on the Dubbing List
1 Follow steps 1 to 7 of “Dubbing Using
Dubbing List” on page 90.
The “Title Edit” display appears.
2 Select a title you want to edit, and press
ENTER.
The sub-menu appears.
3 Select an option, and press ENTER.
The options differ depending on the
dubbing direction or disc type.
“Erase”: Erases the selected title.
“Title Name”: Names or renames a title
(page 44).
“A-B Erase”: Erases the section of the
title (page 84).
“Move”: Changes the order of titles(page 87).
“Preview”: Allows you to check the
content of a title.
“Divide”: Divides a title into two titles
(page 84).
“Combine”: Combines two titles
(page 87).
“Chapter Edit”: Edits chapters
(page 85).“Set Thumbnail”: Changes the title’s
thumbnail frame that appears in the Title
List (page 42).
“Recording Mode”: Sets the picture
quality of the dubbing.
“Bilingual”: Sets how a bilingual audio
programme is dubbed.
“Cancel”: Exits the sub-menu.
4 Repeat steps 2 and 3 to edit all of the
titles.
5 Go to step 8 of “Dubbing Using
Dubbing List” on page 90 to dub edited
titles.
b Notes
• The Dubbing List you created remains after
dubbing. To edit the existing Dubbing List,
select “Use Previous Dubbing List” in step 4.
The Dubbing List is cleared when:
– you change “Input Line System” setting in the
“Basic” setup (page 125).
– you reset the recorder (page 150).– you open the disc tray (except when dubbing
from the HDD).
– you edit the titles on a disc (except when
dubbing from the HDD).
– you switch the Title List to Original or Playlist
(when dubbing from DVD-RWs/DVD-Rs in
VR mode only).
– you finalise the disc.
• The “seams” that are left over from editing may
remain on the disc after dubbing to DVD+RWs/
DVD-RWs (Video mode)/DVD+Rs/DVD-Rs(Video mode).
• Finalisation is cancelled if a timer recording
starts, even if you set “Finalise” to “Yes” in
step 9.

8/18/2019 Instructio Operation Manual DVD 3295080121
http://slidepdf.com/reader/full/instructio-operation-manual-dvd-3295080121 93/168
93
D u b b i n g ( H D D y D V D )
Making a Backup Disc(DVD Backup)
You can dub all of the contents on a finalised
DVD+RW/DVD+R or finalised DVD-RW/
DVD-R (Video mode) to another recordable
DVD+RW/DVD-RW or unused DVD+R/
DVD-R via the HDD as a backup copy.
b Note
Backup discs of unfinalised discs cannot be made.
1 Press SYSTEM MENU.The System Menu appears.
2 Select “Dubbing,” and press ENTER.
3 Select “DVD Backup,” and press
ENTER.
4 Select “Start new DVD Backup,” and
press ENTER.• If you have previously dubbed backup
data to the HDD, select “Resumewriting data,” and go to step 7.
5 Insert the DVD you are going to make
a backup of.
6 Select “Start,” and press ENTER.The recorder starts dubbing all of the
contents on a DVD to the HDD.
7Press Z (open/close), and replace
the DVD with a recordable DVD+RW/ DVD-RW or an unused DVD+R/DVD-
R.To make a backup disc of DVD+RWs/
DVD+Rs, insert a recordable
DVD+RW or unused DVD+R.
To make a backup disc of DVD-RWs/
DVD-Rs, insert a recordable DVD-RW
or unused DVD-R.
8 Select “Start,” and press ENTER.The recorder starts “High-Speed”
dubbing the contents that were dubbed
to the HDD in step 6.
9 Select “Cancel,” and press ENTER.The disc is automatically finalised.
• To make another backup disc, replace
discs, select “Start,” and press
ENTER.
10 Select “Yes” or “No,” and press
ENTER.To erase the backup data on the HDD,
select “Yes.”
To make another backup disc later,
select “No.”
The recorder turns off automatically
when you do not use the recorder for
more than 20 minutes after the dubbing
has finished.
To display the dubbing informationPress DISPLAY while dubbing.
To cancel DVD backup during dubbingPress and hold HDD/DVD DUB for more
than one second.
To erase backup data on the HDD
1 Select “Erase back-up data” in step 4,
and press ENTER.
The display asks for confirmation.
2 Select “Yes,” and press ENTER.
b Notes
• When dubbing to a DVD+R/DVD-R is stopped
partway in step 8, you cannot play or record on
the disc. However, a DVD+RW/DVD-RW can
be used again after it is reformatted.• You cannot make a backup disc of DVD+R DLs/
DVD-R DLs.
• You may not use the “DVD Backup” function
depending on the recording quality or physical
condition of the disc, or characteristics of the
recording device and authoring software.
+RW -RWVideo +R -RVideo

8/18/2019 Instructio Operation Manual DVD 3295080121
http://slidepdf.com/reader/full/instructio-operation-manual-dvd-3295080121 94/168
94
HDD Camcorder Dubbing
Before HDD Camcorder
DubbingYou can dub the contents of a Sony HDD
camcorder to the hard disk drive of the
recorder via the USB jack on the front panel.
Methods to dub from the HDD camcorder
include:
• One-Touch Dubbing (Incremental
Dubbing)
• Dubbing using the on-screen display
(Incremental Dubbing/Full Dubbing)
Follow the instructions in “Preparing for
HDD camcorder dubbing,” and then move
on to the section on dubbing.
z Hints
• If you want to dub by way of the LINE IN jacks,
see “Recording from Connected Equipment” on
page 72.
• If you want to record the contents of the HDD
camcorder on a DVD, dub them to the HDD ofthe recorder first, and then edit the title on the
HDD and dub it to a DVD.
• Parts finished dubbing remain on the recorder
when the HDD space of the recorder becomes
full or you stop dubbing partway.
• Dolby Digital 5.1 ch audio recorded in the HDD
camcorder can be dubbed to the recorder in the
same format, without down-conversion.
b Notes
• No timer recordings or other operations are
available when dubbing from the HDD
camcorder.
• The supported device is Sony HDD SD
(standard definition) camcorder released in or
before April 2008.
• The recorder does not support the AVCHDformat (HD (high definition) image quality).
You can dub MPEG-2 format images (SD
(standard definition) images) only.
• When the HDD camcorder contains still images
and moving images, only moving images can be
dubbed to the recorder.
• Playlist made with the HDD camcorder cannot
be dubbed to the recorder.
• You cannot set the recording mode for HDD
camcorder dubbing.
• When dubbing from the HDD camcorder, therecorder recognises and uses the shooting date
and time information of the HDD camcorder. If
the HDD camcorder’s clock is incorrect, the
recorder may not dub the contents properly. Set
the HDD camcorder’s clock correctly before
shooting.
• Images of the HDD camcorder are not displayed
when dubbing.
• You cannot record date, time, or the contents of
the HDD camcorder memory onto the recorder.
• If you dub the contents recorded in high quality
mode in the HDD camcorder to the recorder, it
may take longer to finish dubbing than the
recording.
• Set the recorder and HDD camcorder to the same
colour system.
How titles and chapters are createdIn each dubbing operation, the contents
dubbed to the recorder are divided into titles
by the shooting date. If the date has been
changed to the next day during one shooting
session, the shot image is included in the title
of the date when the shooting session started.
The title is divided into chapters. Each
shooting session on the HDD camcorder
becomes a chapter.
z Hint
The title names are automatically labelled as “USB
*** (start time of the first shooting session).”
b Note
The dubbed contents are divided into titles in the
following cases, even if they were all recorded in
the same day:
– When the total recording time exceeds 12 hours.
– When the total number of scenes exceeds 99.

8/18/2019 Instructio Operation Manual DVD 3295080121
http://slidepdf.com/reader/full/instructio-operation-manual-dvd-3295080121 95/168
95
H D D C a m c o r d e r D
u b b i n g
Connect an HDD camcorder to the USB jack
on the recorder.
Refer as well to the instruction manualsupplied with the HDD camcorder before
connecting.
1 Turn on your HDD camcorder and the
recorder.
2 Connect your HDD camcorder to the
USB jack on the front panel.
3 Set your HDD camcorder to the USBconnection mode (example:
“ COMPUTER” or “ USB
CONNECT”).For details, refer to the operating
instructions supplied with the HDD
camcorder.
To restart the connected USB deviceSelect “Restart USB Device” of “USB” in
the “Options 2” setup (page 142).
b Notes
• Connect the HDD camcorder directly to the
recorder.
• Do not disconnect the USB cable while dubbing.
• When signal input to the USB jack (type A) on
the front panel or recorder operation cannot be
performed correctly when using an HDD
camcorder, connect the HDD camcorder to theLINE IN jack and follow the instructions of
“Recording from Connected Equipment” on
page 72.
• The recorder can recognise and store the
shooting date and time information of up to 10
HDD camcorders. If you connect 11 or more
HDD camcorders, one-touch dubbing and
“Incremental Dubbing” cannot be made
properly.
Preparing for HDD camcorderdubbing
DVD recorder
to USB jack
USB cable(not supplied)
USB output
HDD camcorder
: Signal flow
8/18/2019 Instructio Operation Manual DVD 3295080121
http://slidepdf.com/reader/full/instructio-operation-manual-dvd-3295080121 96/168
96
One-Touch Dubbing fromHDD Camcorder (ONE-TOUCH DUB)
You can dub contents of your HDD
camcorder onto the HDD of the recorder
with a single press of the ONE-TOUCH
DUB button on the recorder.
When dubbing from the HDD camcorder for
the first time, all of the contents are dubbed
to the recorder. The next time, only newly
shot sessions that have not been dubbed yetare dubbed to the recorder.
Follow steps 1 to 3 of “Preparing for HDD
camcorder dubbing” on page 95, and
press ONE-TOUCH DUB on the recorder.The recorder starts dubbing the contents on
the HDD camcorder to the HDD Title List of
the recorder.
The recorder turns off automatically if you
do not use the recorder for more than20 minutes after the dubbing has finished.
To stop during dubbingPress x REC STOP.
Note that it may take a few seconds for the
recorder to stop dubbing.
b Notes
• The one-touch dubbing button on the HDDcamcorder does not function with the recorder.
• In One-Touch Dubbing, the contents that have
already been dubbed to the recorder cannot be
dubbed again, even after you erase them from
the recorder. To dub the same contents to the
recorder again, dub the entire contents of the
HDD camcorder (see “Dubbing from HDD
Camcorder Using the On-Screen Display (HDD-
Cam Dubbing)” on page 96).
• Data about the dubbed contents are all cleared
when you reset the recorder (page 150).
• If the USB jack and the DV IN jack on the
recorder are both connected to a compatible
digital video camera, One-Touch Dubbing is
performed via the USB jack.
Dubbing from HDDCamcorder Using the On-Screen Display (HDD-
Cam Dubbing)
You can dub the contents of your HDD
camcorder onto the HDD of the recorder
using the on-screen display.
Methods to dub from the HDD camcorder
include:
• Incremental Dubbing
The recorder automatically detects the
contents recorded on the connected HDD
camcorder, and starts dubbing from the
contents following the last dubbed
contents if there are contents that have
already been dubbed.
• Full Dubbing
The recorder dubs all contents of the HDD
camcorder, including the contents that
have already been dubbed to the recorder.
1 Follow steps 1 to 3 of “Preparing for
HDD camcorder dubbing” onpage 95.
2 Press SYSTEM MENU.The System Menu appears.
3 Select “HDD-Cam/DV,” and press
ENTER.4 Select “HDD-Cam Dubbing,” and
press ENTER.
5 Select “Incremental Dubbing” or
“Full Dubbing,” and press ENTER.To dub newly shot contents only, select
“Incremental Dubbing.”
To dub all contents of the HDD
camcorder, select “Full Dubbing.”The display asks for confirmation.
HDD
HDD
8/18/2019 Instructio Operation Manual DVD 3295080121
http://slidepdf.com/reader/full/instructio-operation-manual-dvd-3295080121 97/168
97
H D D C a m c o r d e r D
u b b i n g
6 Select “Yes,” and press ENTER.The recorder starts dubbing the contents
on the HDD camcorder to the HDD Title
List of the recorder.
The recorder turns off automatically if
you do not use the recorder for more
than 20 minutes after the dubbing hasfinished.
To stop dubbingPress x REC STOP. Or, select “Exit” in
step 6, and press ENTER.
b Note
With “Incremental Dubbing,” the contents that
have already been dubbed to the recorder are notdubbed again, even after you erase them from the
recorder. You can dub only newly shot contents.

8/18/2019 Instructio Operation Manual DVD 3295080121
http://slidepdf.com/reader/full/instructio-operation-manual-dvd-3295080121 98/168
98
DV Camcorder Dubbing
Before DV Camcorder
DubbingThis section explains dubbing with a DV
camcorder and playing the contents of a DV
camcorder via the DV IN jack on the front
panel. If you want to dub by way of the
LINE IN jacks, see “Recording from
Connected Equipment” on page 72.
The DV IN jack on this recorder conforms to
the i.LINK standard.
Follow the instructions in “Preparing for DV
camcorder dubbing,” and then move on to
the section on dubbing. For more
information about i.LINK, see “About
i.LINK” on page 161.
How chapters are createdThe contents dubbed to the HDD or DVD
become a single title. This title is divided
into chapters. When dubbing to the HDD ora DVD-RW/DVD-R (VR mode) and when
“Auto Chapter (HDD/VR)” is set to “On” in
the “Recording” setup (page 136), each
shooting session on the tape becomes a
chapter on the disc. For other discs, the
recorder divides the title into chapters
according to the “Auto Chapter (Video)” or
“Auto Chapter (DVD+R/+RW)” setting in
the “Recording” setup (page 136).
You can connect a DV camcorder to the DV
IN jack on the recorder to record or edit from
a DV/Digital8 format tape. Operation is
straightforward because the recorder will
fast forward and rewind the tape for you –you do not need to operate your DV
camcorder.
Refer as well to the instruction manual
supplied with the DV camcorder before
connecting.
z Hint
If you plan to do additional editing on a disc after
the initial dub, use the DV IN jack and record on a
DVD-RW/DVD-R (VR mode) or HDD.
b Notes
• You cannot make a recording while DV
camcorder dubbing.• The DV IN jack is for input only. It will not
output signals.
• You cannot use the DV IN jack when:
– signal input to the DV IN jack on the front
panel or recorder operation cannot be
performed correctly when using a digital video
camera (see “About i.LINK” on page 161).
Connect the camera to the LINE IN jack and
follow the instructions of “Recording from
Connected Equipment” on page 72.
– the input signal is not in DVC-SD format. Donot connect a MICRO MV format digital video
camera even if it has an i.LINK jack.
– the images on the tape contain copy protection
signals, which limit recording.
• If you want to play DVDs dubbed from a DV
camcorder on other DVD equipment, finalise the
disc (page 46).
• Set the recorder and DV camcorder to the same
colour system (page 125).
Hookups
Preparing for DV camcorderdubbing
DVD recorder
to DV IN
i.LINK cable(not supplied)
DV output
DV camcorder
: Signal flow
8/18/2019 Instructio Operation Manual DVD 3295080121
http://slidepdf.com/reader/full/instructio-operation-manual-dvd-3295080121 99/168
99
D V C a m c
o r d e r D u b b i n g
1 Press HDD or DVD to select the
recording destination.If you select DVD, insert a disc (see “1.
Inserting a Disc” on page 38).
2 Insert the source DV/Digital8 format
tape into your DV camcorder.For the recorder to record or edit, your
DV camcorder must be set to video
playback mode.
3 Press REC MODE on the remote
repeatedly to select the recordingmode.The recording mode changes as follows:
For details about the recording mode,
see page 154. Note that you cannot
select further manual recording mode
options.
4 Set the “External Audio” setting inthe “Audio In” setup (page 132).
5 Set the “DV Input” setting in the
“Audio In” setup (page 132).You are ready to start dubbing. Select
one of the dubbing methods on the
following pages.
To playback DV/Digital8 format tapeYou can check the contents of DV/Digital8
format tape before dubbing. For details, see
“Playing from a DV Camcorder” onpage 101.
b Notes
• You cannot connect more than one piece of
digital video equipment to the recorder.
• You cannot control the recorder using another
device or another recorder of the same model.
• You cannot record date, time, or the contents of
the cassette memory onto the disc.
• If you record from a DV/Digital8 format tapethat is recorded in multiple sound tracks, such as
a tape with multiple sampling frequencies
(48 kHz, 44.1 kHz, or 32 kHz), no sound or an
unnatural sound will be output when playing
back the sampling frequency switch point on the
disc.
• In order to use this recorder’s “Auto Chapter”
setting (page 98), be sure to correctly set the
clock on your DV camcorder before shooting.
• The recorded picture may be momentarily
affected or the start and end points of a title maybe different from what you have set if the source
DV/Digital8 format tape is in any of the
following conditions. In this case, connect your
digital video camera to the LINE IN jack and
follow the instructions of “Recording from
Connected Equipment” (page 72).
– There is a blank space in the recorded portion
of the tape.
– The tape’s time code is not sequential.
– If the picture size or the recording mode on the
tape being dubbed changes.
• A blank or black coloured screen will be dubbed
when the recorder is set to a different colour
system from the DV tape contents’ system. Set
“Input Line System” in the “Basic” setup to the
same colour system as the DV tape contents’
system (page 125).

8/18/2019 Instructio Operation Manual DVD 3295080121
http://slidepdf.com/reader/full/instructio-operation-manual-dvd-3295080121 100/168
100
Dubbing an Entire DVFormat Tape (DV One-Touch Dubbing)
You can record the entire contents of a DV/
Digital8 format tape onto a disc with a single
press of the ONE-TOUCH DUB button on
the recorder. The recorder controls the DV
camcorder for the whole process, and
completes the recording.
Follow steps 1 to 5 of “Preparing for DVcamcorder dubbing” on page 98, andpress ONE-TOUCH DUB on the recorder.The recorder rewinds the tape and then starts
recording the tape contents.
After the recording is finished, the recorder
rewinds the tape in the DV camcorder, and
finalises the recorded disc (except DVD-
RW/DVD-R (VR mode)) automatically.
To stop during recordingPress and hold x REC STOP for more than
3 seconds.
Note that it may take a few seconds for the
recorder to stop recording.
b Notes
• When a blank space between the recordings on
the tape continues for more than two minutes,DV One-Touch Dubbing ends automatically.
• The recorder will pause recording when there is
a blank space or an image containing copy
protection signals on the tape. The recorder will
resume recording automatically when receiving
a recordable signal.
• Finalisation is cancelled if a timer recording
starts (except for DVD-RW/DVD-R (VR
mode)).
• DV One-Touch Dubbing ends automatically
when there are images containing copy
protection signals at the beginning of the tape.
• When connecting digital video cameras to both
DV IN jack and USB jack, pressing the ONE-
TOUCH DUB button starts dubbing from the
HDD camcorder. Disconnect the HDD
camcorder from the USB jack to dub from the
DV camcorder.
Dubbing SelectedScenes (DV ManualDubbing)
You can select and dub scenes while playing
a DV/Digital8 format tape.
1 Follow steps 1 to 5 of “Preparing for
DV camcorder dubbing” on page 98.
2Press SYSTEM MENU.The System Menu appears.
3 Select “HDD-Cam/DV,” and press
ENTER.
4 Select “DV Manual Dubbing,” and
press ENTER.
5 Select the recording destination,
“Record to Hard Disk Drive” or
“Record to DVD,” and press ENTER.
6 Press H.The scene starts to play.
7 Find the point on the DV/Digital8
format tape that you want to start
dubbing from using m / M or c / C, and press X.
8 Select “Start Rec.,” and pressENTER.The recorder starts dubbing.
9 Select “Pause Rec,” and press
ENTER.The recorder pauses dubbing.
10 Repeat steps 6 to 9 to dub more
scenes.
11 Select “Stop Rec,” and press ENTER.The selected scenes are dubbed as a
single title.
To exit “DV Manual Dubbing”Press SYSTEM MENU.
+RW -RWVR -RWVideo
-RVR
+RHDD
-RVideo
+RW -RWVR -RWVideo
-RVR
+RHDD
-RVideo

8/18/2019 Instructio Operation Manual DVD 3295080121
http://slidepdf.com/reader/full/instructio-operation-manual-dvd-3295080121 101/168
101
D V C a m c
o r d e r D u b b i n g
z Hint
You can turn off the dubbing menu by pressing the
DISPLAY button during dubbing. Press the
DISPLAY button again to display the dubbing
menu.
b Note
You cannot set a scene to be shorter than onesecond.
Playing from a DVCamcorder
1 Connect your DV camcorder to the DV
IN jack on the front panel.
2 Press SYSTEM MENU.The System Menu appears.
3 Select “HDD-Cam/DV,” and press
ENTER.
4 Select “DV Playback,” and press
ENTER.
5 Start playback on the DV camcorder.Images from the DV camcorder appear
on your TV screen.
To cancel playbackPress SYSTEM MENU.
z Hint
You can dub the playing tape contents. During
playback, press HDD or DVD to select the
dubbing destination, and press z REC. To stop
dubbing, press x REC STOP.

8/18/2019 Instructio Operation Manual DVD 3295080121
http://slidepdf.com/reader/full/instructio-operation-manual-dvd-3295080121 102/168
102
Music Jukebox
About Jukebox
There are two methods to use Jukebox:connecting the USB device or copying audio
tracks to the HDD.
When using Jukebox, you can do following:
• Store audio tracks on the HDD.
• Play audio tracks using various play
modes.
• Label tracks, albums, or artists.
• Create a Playlist.
Notes on copying• You cannot copy audio tracks on the HDD to
discs or USB devices.
• Some audio tracks may not be copied depending
on the file size.
• An artist name, album name, and MP3 audio
track name are copied, and albums and MP3
tracks are stored in each artist folder. However,
albums and MP3 audio tracks are stored in the
“Unknown” folder when their artist name cannot
be copied.
• Audio tracks from a CD are stored in the artist
folder labelled “Unknown.” Names are
automatically labelled; “A_*****_F_*****” for
album, “A_*****_F_*****_T_*****” for
audio tracks.
• When copying is stopped partway, tracks that
have finished copying before you stop will
remain copied onto the HDD as an album.
You can check which albums have been copied
in the Music Jukebox list (page 104).
• No other operations are available when copyingaudio tracks.
• While copying audio tracks, timer recordings are
unavailable. If the timer is set during copying,
the recorder starts the timer recording after
copying is finished.
• Copy-protected CDs cannot be copied to the
HDD.
Preparing for UsingJukebox
Connect a USB device to the USB jack on
the recorder, or copy audio tracks from theconnected USB device or CDs/DATA CDs/
DATA DVDs to the HDD.
You can connect a USB device to the USB
jack on the recorder to listen to the MP3
audio tracks or copy to the HDD. Refer to
the operating instructions supplied with theUSB device before connecting.
b Note
Some USB devices may not work with this
recorder.
You can copy up to 99 albums or 999 audio
tracks on the USB device to the HDD.
1 Connect the USB device to the USB
jack on the recorder (page 102).
2 Press SYSTEM MENU.The System Menu appears.
3Select “Music Jukebox,” and press
ENTER.
4 Select “Listen to Music from USB
Device,” and press ENTER.The “Music Jukebox (USB)” appears.
5 Select an album to copy using M / m,
and press ,.The sub-menu appears.
Connecting the USB device
Copying tracks or albums(USB t HDD)
USB device
DVD recorder
to USB jack

8/18/2019 Instructio Operation Manual DVD 3295080121
http://slidepdf.com/reader/full/instructio-operation-manual-dvd-3295080121 103/168
103
M u s i c J u k e b o x
6 Select “Edit” using M / m, and press
ENTER.
7 Select an item using M / m, and press
ENTER.To copy all albums, select “Copy all to
HDD.”
To copy the selected albums, select
“Copy to HDD.”
The display asks for confirmation.
8 Select “Yes” using < / ,, and
press ENTER.The albums are copied to the HDD.
• To copy more albums, repeat from
step 5.
To cancel copyingPress ENTER.
1Insert a disc that you are going to
copy to the HDD.
2 Press SYSTEM MENU.The System Menu appears.
3 Select “Dubbing,” and press ENTER.
4 Select “DVD/CD -> HDD” using M / m,
and press ENTER.The copying starts.
To cancel copyingPress ENTER.
b Note
Before copying, select “CD” or “MP3” under
“Data Format” in the Title List (DVD/CD)
(page 74).
1 Press SYSTEM MENU.The System Menu appears.
2 Select “Music Jukebox,” and pressENTER.
3 Select “Listen to Music / Edit,” andpress ENTER.The “Music Jukebox (HDD)” appears.
4 Select an artist using M / m, and press
ENTER.
5 Select an album using M / m, andpress ENTER.If you want to copy the album, press ,
instead of ENTER, then go to step 7.
6 Select a track to copy using M / m, andpress ,.The sub-menu appears.
7 Select “Edit” using M / m, and press
ENTER.
8 Select “Copy Album” or “Copy
Track” using M / m, and press ENTER.
9 Select a copy destination (an artist or
album) using M / m, and press ENTER.The display asks for confirmation.
10 Select “Yes” using < / ,, and
press ENTER.The albums or tracks are copied to the
HDD.
• To copy more tracks or albums, repeat
from step 4.
To cancel copyingPress ENTER.
Copying audio tracks(DISC t HDD)
Copying tracks or albums onthe HDD (HDD y HDD)

8/18/2019 Instructio Operation Manual DVD 3295080121
http://slidepdf.com/reader/full/instructio-operation-manual-dvd-3295080121 104/168
104
Playing Audio TracksUsing Jukebox/USBDevice
1 Press SYSTEM MENU.The System Menu appears.
2 Select “Music Jukebox,” and press
ENTER.
3 Select “Listen to Music / Edit” or
“Listen to Music from USB Device,”and press ENTER.
To listen to the audio tracks on theHDD, select “Listen to Music / Edit.”
To listen to the MP3 audio tracks from
the connected USB device, select
“Listen to Music from USB Device.”
The Music Jukebox list appears.
4 Select an artist, album, or track, and
press H.(HDD only) To display an album list,
select an artist using M / m, and press
ENTER.
To display a track list, select an album
using M / m, and press ENTER.
Playback starts.
To stop playbackPress x (stop).
To return to the previous displayPress O RETURN. If you cannot return to
the artist list or album list using
O RETURN, see “To change the display
mode (Original list only)” on page 104.
To scroll the list display by page (Page
mode)Press SUBTITLE (previous)/ANGLE (next)
while the Music Jukebox list is displayed.
Each time you press SUBTITLE (previous)/
ANGLE (next), the Music Jukebox list
changes to the previous/next page of the list.
To change the play information (HDD
only)Press DISPLAY repeatedly.
Each time you press the button, information
below the artist/album/track list is changed.
About the Playlist and Original list (HDDonly)You can switch the “Music Jukebox (HDD)”
to show tracks in Original list or Playlist.
1 Press < while the “Music Jukebox
(HDD)” is displayed.
2 Select “Play List” using M / m, and press
ENTER.
3 Select an item using M / m, and press
ENTER.
To change the display mode (Original list
only)
1 Press < while the “Music Jukebox
(HDD)” is displayed.
2 Select “Display Mode” using M / m, and
press ENTER.
3 Select an item using M / m, and press
ENTER.
Item Display
Original Tracks in the Original list.
Play List 1Play List 2Play List 3Play List 4
Tracks in each Playlist.
Favourites Tracks in order ofplayback frequency. The
track that is most oftenplayed is listed at the top.
Item Display
Artist (HDDonly)
Artist list appears.
Album Album list appears.
Track Track list appears.
8/18/2019 Instructio Operation Manual DVD 3295080121
http://slidepdf.com/reader/full/instructio-operation-manual-dvd-3295080121 105/168
105
M u s i c J u k e b o x
You can add audio tracks on the HDD to the
Playlist. You can add up to 25 audio tracks
to each Playlist.
1 After step 2 of “Playing Audio TracksUsing Jukebox/USB Device,” select
“Listen to Music / Edit,” and press
ENTER.Switch the display to the Original list
(page 104).
2 Select a track to add to the Playlist,
and press ,.The sub-menu appears.
3 Select “Add to Play List,” and press
ENTER.
4 Select a Playlist, and press ENTER.The track is added to the selected
Playlist.
5 Repeat steps 2 to 4 to select all of thetracks you want to add to the Playlist.• To check the Playlist tracks, switch to
the Playlist.
You can repeatedly play tracks or a single
track.
1 Press , during playback.If you are playing tracks on the HDD, go
to step 3.
2 (USB device only) Select “Play
Mode” using M / m, and press ENTER.The “Play Mode” menu appears.
3 Select “Repeat” using M / m, and
press ENTER.
4 Select an item using M / m.“Repeat Artist” (HDD only): repeats
tracks of the current artist.
“Repeat Album”: repeats the current
album.“Repeat Track”: repeats the current
track.
“Repeat Play List” (HDD only): repeats
the current Playlist.
“Repeat Programme” (USB device
only): repeats the current programme
(page 106).
5 Press ENTER.
Repeat play starts.
To cancel Repeat playSet “Repeat” to “Repeat Off” in step 4.
b Note
You can select “Repeat Programme” only during
Programme play.
Adding audio tracks to aPlaylist (HDD only)
Playback options
Buttons Operations
. / > (previous/ next)
Goes to the next or previoustrack when pressed duringplayback.
m / M(fastreverse/ fastforward)
Fast reverses/fast forwards thedisc when pressed duringplayback.Search speed changes asfollows:
fast reverse fast forward
mFR1 T t MFF1
mFR2 T T t t
MFF2
When you press and hold thebutton, fast forward/fastreverse continues at theselected speed until yourelease the button.To resume normal playback,press H.
X (pause) Pauses playback.To resume normal playback,press H.
Playing repeatedly (Repeat)
Buttons Operations
,continued

8/18/2019 Instructio Operation Manual DVD 3295080121
http://slidepdf.com/reader/full/instructio-operation-manual-dvd-3295080121 106/168
106
You can play the contents of the connected
USB device in the order you want by
arranging the order of the tracks on theconnected USB device to create your own
programme. You can make a programme of
up to 24 tracks.
1 Press , while the “Music Jukebox(USB)” is displayed.
2 Select “Play Mode” using M / m, andpress ENTER.
The “Play Mode” menu appears.
3 Select “Programme,” and press
ENTER.
4 Select “Input/Edit Programme,” and
press ENTER.
5 Select an album (example: Album 01)
using M / m, and press ,.
6 Select a track (example: Track 001)
using M / m, and press ENTER.The track is programmed.
If you make a mistake, select the step
number (example: 01.) using < / M / m,
and press CLEAR.
7 To programme other tracks, press
< / M / m / , to select a step number,
and repeat steps 5 and 6.
8 Press H.Programme play starts.
To stop Programme playPress x (stop).
To cancel Programme playSet “Programme” to “Cancel Programme
Play” in the “Play Mode” menu during
playback.
To erase the programme
Set “Programme” to “Erase ProgrammeList” in the “Play Mode” menu.
z Hints
• The programme you made remains after
Programme play finishes. To play the same
programme again, set “Programme” to “Start
Programme Play” in the “Play Mode” menu.
However, the programme is cleared after you
press [ / 1.
• You can repeat Programme play. During
Programme play, set “Repeat” to “RepeatProgramme” in the “Play Mode” menu
(page 105).
Creating your own programme(Programme) (USB device only)
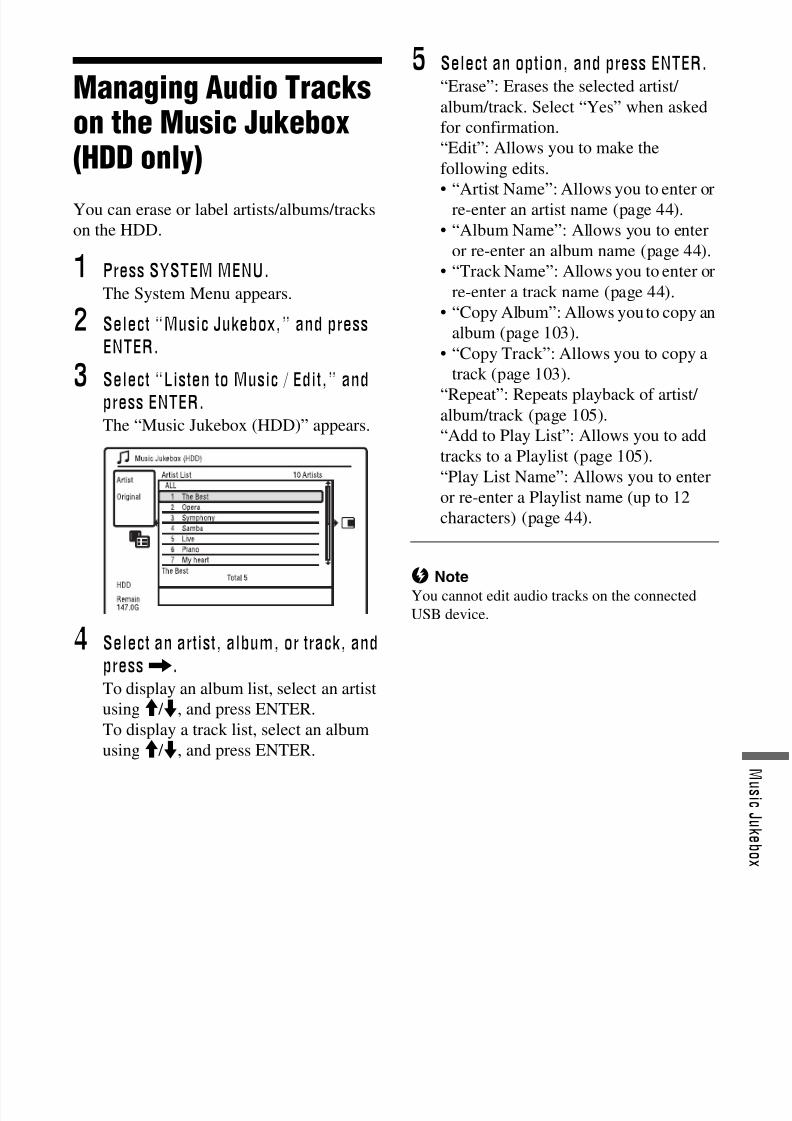
8/18/2019 Instructio Operation Manual DVD 3295080121
http://slidepdf.com/reader/full/instructio-operation-manual-dvd-3295080121 107/168
107
M u s i c J u k e b o x
Managing Audio Trackson the Music Jukebox(HDD only)
You can erase or label artists/albums/tracks
on the HDD.
1 Press SYSTEM MENU.The System Menu appears.
2 Select “Music Jukebox,” and press
ENTER.
3 Select “Listen to Music / Edit,” and
press ENTER.The “Music Jukebox (HDD)” appears.
4 Select an artist, album, or track, and
press ,.To display an album list, select an artist
using M / m, and press ENTER.
To display a track list, select an album
using M / m, and press ENTER.
5 Select an option, and press ENTER.“Erase”: Erases the selected artist/
album/track. Select “Yes” when asked
for confirmation.
“Edit”: Allows you to make the
following edits.
• “Artist Name”: Allows you to enter orre-enter an artist name (page 44).
• “Album Name”: Allows you to enter
or re-enter an album name (page 44).
• “Track Name”: Allows you to enter or
re-enter a track name (page 44).
• “Copy Album”: Allows you to copy an
album (page 103).
• “Copy Track”: Allows you to copy a
track (page 103).
“Repeat”: Repeats playback of artist/ album/track (page 105).
“Add to Play List”: Allows you to add
tracks to a Playlist (page 105).
“Play List Name”: Allows you to enter
or re-enter a Playlist name (up to 12
characters) (page 44).
b Note
You cannot edit audio tracks on the connected
USB device.

8/18/2019 Instructio Operation Manual DVD 3295080121
http://slidepdf.com/reader/full/instructio-operation-manual-dvd-3295080121 108/168
108
Photo Album
About the “Photo
Album” FunctionThe “Photo Album” function enables you to
do following.
• Store JPEG image files on the HDD.
• View JPEG image files on the HDD,
DATA DVDs (DVD-RWs/DVD-Rs)/
DATA CDs, or connected USB device.
• Edit JPEG image files.
• Print JPEG image files.
• Copy JPEG image files and slideshow to
DVD-RWs/DVD-Rs.
• Create a slideshow with your favourite
music and graphic effects (x-Pict Story).
Preparing for Using the“Photo Album” Function
Connect a USB device to the USB jack on
the recorder, or copy JPEG image files fromDATA CDs/DATA DVDs or the connected
USB device to the HDD.
You can connect a USB device (digital still
camera, Memory card reader, and USB
memory) to the USB jack on the recorder to
view JPEG image files or copy to the HDD.Refer to the operating instructions supplied
with the USB device before connecting.
b Note
Some USB devices may not work with this
recorder.
1 Insert a disc that you are going tocopy to the HDD or connect the USB
device to the USB jack on the
recorder.
2 Press SYSTEM MENU.The System Menu appears.
Connecting the USB device
Copying JPEG image files to
the HDD (DISC/USB t HDD)
DVD recorder
to USB jack
USB cable (not supplied)
USB output
Digital still camera
: Signal flow

8/18/2019 Instructio Operation Manual DVD 3295080121
http://slidepdf.com/reader/full/instructio-operation-manual-dvd-3295080121 109/168
109
P h o t o A l b u m
3 Select “Photo Album,” and press
ENTER.The “Photo Album” menu appears.
4 Select the item, and press ENTER.To copy from DATA CDs/DATA
DVDs (DVD-RWs/DVD-Rs), select
“View Photos on a DVD/CD.”
To copy from the connected USB
device, select “View Photos on a USB
Device.”
The “Photo Album” list appears.
Example: DVD/CD
5 Select an album or JPEG image file
using M / m, and press ,.The sub-menu appears.
6 Select “Multi-Mode” using M / m, andpress ENTER.• To copy all the albums and JPEG
image files, select “Copy all to HDD,”
and go to step 11.
• To copy the album or file selected in
step 5 only, select “Copy to HDD,”
and go to step 11.
7 Select an album or JPEG image file,and press ENTER.A check mark appears in the check box
by the selected item.
• To clear the check mark, press ENTER
again.
• To clear all check marks, press , to
select “Single-Mode” from the sub-
menu.
8 Repeat step 7 to select all of thealbums or JPEG image files you want
to copy.
9 Press ,.The sub-menu appears.
10 Select “Copy to HDD,” and press
ENTER.The display asks for confirmation.
11 Select “Yes,” and press ENTER.• To cancel, select “No.”
1 Connect the USB device to the USBjack on the recorder.
2 Insert a blank DVD-RW/DVD-R (Videomode).
3 Press SYSTEM MENU.The System Menu appears.
4 Select “Photo Album,” and press
ENTER.The “Photo Album” menu appears.
5 Select “Copy Photos from a DigitalCamera,” and press ENTER.The display asks for confirmation.
6 Select “Yes,” and press ENTER.• To cancel, select “No.”
z Hint
See “7. Reformatting a Disc” (page 49) to format
DVD-RWs/DVD-Rs in Video mode.
b Notes
• During copying, other operations cannot be
performed.
• While copying JPEG image files, timer
recordings are unavailable. If the timer is set
during copying, the recorder starts the timer
recording after copying is finished.
Copying all JPEG image filesfrom the connected USBdevice (USB t DVD-RW/DVD-R)
,continued

8/18/2019 Instructio Operation Manual DVD 3295080121
http://slidepdf.com/reader/full/instructio-operation-manual-dvd-3295080121 110/168
8/18/2019 Instructio Operation Manual DVD 3295080121
http://slidepdf.com/reader/full/instructio-operation-manual-dvd-3295080121 111/168
111
P h o t o A l b u m
7 Select an album, and press ENTER.A check mark appears in the check box
by the selected item.
• To clear the check mark, press ENTER
again.
• To clear all check marks, press , to
select “Single-Mode” from the sub-menu.
8 Repeat step 7 to select all of the
albums you want to copy.
9 Press ,.The sub-menu appears.
10 Select “Copy to DVD,” and pressENTER.
The display asks for confirmation.
11 Select “Yes,” and press ENTER.The selected JPEG image albums are
copied in the “PICTURE” folder on the
disc.
The JPEG image album names are
automatically labelled as
“***ALBUM.”
If you want to play the disc on other
DVD equipment, finalise the disc(page 46).
• To cancel, select “No.”
z Hints
• See “7. Reformatting a Disc” (page 49) to format
DVD-RWs/DVD-Rs in Video mode.
• See the “Photo Album” list to check which
albums have been copied (page 112).
b Notes
• You may not be able to play the slideshow
depending on DVD equipment.
• You cannot copy JPEG image files to a
recordable DVD which has been recorded using
other recorders/devices.
• DATA DVDs finalised on this recorder may not
be able to play on other equipment.
• You can record up to 99 slideshows to a disc.
• When copying an album containing more than
99 JPEG image files to a disc, slideshows will be
created with every 99 JPEG image files and
recorded to a disc.
• For DVDs, the available disc space does not
increase even if you erase slideshows.
You can copy the edited JPEG image files to
a DVD-RW/DVD-R (Video mode).
A slideshow is also recorded to the disc as avideo file. You can play the slideshow on
other DVD equipment that may not be
compatible with the playback of JPEG
image files.
1 Follow steps 1 to 4 of “Copying JPEG
image albums to a disc(HDD t DVD-RW/DVD-R)” on
page 110.The “Photo Album” list appears.
2 Select an album using M / m, andpress ENTER.The photo list appears.
3 Select a JPEG image file using M / m,
and press ,.The sub-menu appears.
4 Select “Multi-Mode,” and pressENTER.To copy the JPEG image file selected in
step 3 only, go to step 8.
5 Select a JPEG image file, and press
ENTER.A check mark appears in the check box
by the selected item.
• To clear the check mark, press ENTER
again.• To clear all check marks, press , to
select “Single-Mode” from the sub-
menu.
6 Repeat step 5 to select all of the JPEG
image files you want to copy.
7 Press ,.The sub-menu appears.
8 Select “Copy to DVD,” and press
ENTER.The display asks for confirmation.
Copying JPEG image files to adisc (HDD t DVD-RW/DVD-R)
,continued

8/18/2019 Instructio Operation Manual DVD 3295080121
http://slidepdf.com/reader/full/instructio-operation-manual-dvd-3295080121 112/168
112
9 Select “Yes,” and press ENTER.The selected JPEG image files are
copied in the “PICTURE” folder on the
disc.
The JPEG image file names are
automatically labelled as “PHOT****.”
If you want to play the disc on otherDVD equipment, finalise the disc
(page 46).
• To cancel, select “No.”
To select a JPEG image file from a
different album
1 Switch to the album list in step 5.
For instructions, see “To switchbetween the album list and JPEG image
file list” on page 114.
2 Select an album using M / m, and press
<.
3 Switch to the JPEG image file list.
For instructions, see “To switch
between the album list and JPEG image
file list” on page 114.
4 Select a JPEG image file using M / m, andpress ENTER.
z Hints
• See “7. Reformatting a Disc” (page 49) to format
DVD-RWs/DVD-Rs in Video mode.
• See the “Photo Album” list to check which JPEG
image files have been copied (page 112).
b Notes
• You may not be able to play the slideshowdepending on DVD equipment.
• You cannot copy JPEG image files to a
recordable DVD which has been recorded using
other recorders/devices.
• DATA DVDs finalised on this recorder may not
be able to play on other equipment.
• You can record up to 99 slideshows to a disc.
• For DVDs, the available disc space does not
increase even if you erase slideshows.
Using the “PhotoAlbum” List
You can play JPEG image files on the HDD,
DATA DVDs/DATA CDs, or connectedUSB device using the “Photo Album” list.
1 Press SYSTEM MENU.The System Menu appears.
2 Select “Photo Album,” and pressENTER.The “Photo Album” menu appears.
3 Select the item, and press ENTER.To play JPEG image files on the HDD,
select “View/Edit Photos on the HDD.”
To play JPEG image files on DATA
CDs/DATA DVDs, select “View Photos
on a DVD/CD.”
To play JPEG image files on the
connected USB device, select “View
Photos on a USB Device.”
The “Photo Album” list appears.
4 Select an album using M / m, and
press ENTER.To show the 4-Photo List or 1-Photo
List, press < to select “Title View,”
and press ENTER, then select “4
Photos” or “1 Photo” using M / m, and
press ENTER.

8/18/2019 Instructio Operation Manual DVD 3295080121
http://slidepdf.com/reader/full/instructio-operation-manual-dvd-3295080121 113/168
113
P h o t o A l b u m
12-Photo List (Example: HDD)
4-Photo List
1-Photo List
A Album name
B Album size
C Sub-menu:
Press , to display the sub-menu.
The sub-menu displays options
applicable only to the selected item. Thedisplayed options differ depending upon
the model, situation, and disc type.
For details about the sub-menu options,
see “Managing JPEG Image Files on the
HDD” on page 117.
D Scroll bar:
Appears when all of the JPEG image
files do not fit on the list. To view the
hidden JPEG image files, press M / m.
E Album and JPEG image file
information:
Displays the image, JPEG image file
number, recording date and time, JPEG
image file name, and JPEG image file
size. “ ” appears for protected JPEG
image files.
F Remaining space on the HDD
To scroll the list display by page (Page
mode)Press . / > while the “Photo Album”
list is displayed. Each time you press . /
>, the “Photo Album” list changes to the
previous/next page of albums/JPEG image
files.
m
m
Sub-menu
,continued
8/18/2019 Instructio Operation Manual DVD 3295080121
http://slidepdf.com/reader/full/instructio-operation-manual-dvd-3295080121 114/168
114
To switch between the album list and
JPEG image file list
1 Press < while the “Photo Album” list
is displayed.
2 Select “Display Mode” using M / m, and
press ENTER.
3 Select “File” or “Album” using M / m,
and press ENTER.
z Hints
• You can switch the thumbnail picture on the
album list among the JPEG image files in the
selected album by pressing m / M.
• You can switch to the previous or next album by
pressing m / M on the JPEG image file list.
To turn off the “Photo Album” listPress SYSTEM MENU.
To display the detailed information
1 Select a JPEG image file, and press ,.
2 Select “Detailed Information,” and press
ENTER.
The detailed information for the selected
JPEG image file appears.
To reload the files or foldersWhen a disc or the connected USB device
contains 1,000 or more files and/or 100 or
more folders, select “Read next” in the
“Photo Album” list, and press ENTER to
view unloaded files or folders.
It may take a few minutes to load files or
folders.
b Note
The thumbnail for a file that cannot be playable on
the recorder is displayed as “ .”
1 Follow steps 1 to 4 of “Using the
“Photo Album” List.”The “Photo Album” list appears.
Switch between the album list and JPEGimage file list, if necessary.
2 Select an album or JPEG image fileusing M / m, and press H.The slideshow starts.
z Hint
You can start a slideshow by selecting “Start
Slideshow” from the sub-menu.
b Notes
• Depending on the aspect ratio, some pictures
may be displayed with black bands at top and
bottom, or left and right.
• Large picture files may take a few seconds to
display. This is not a malfunction.
To stop a slideshowPress x (stop) or O RETURN.
To pause a slideshowPress X (pause).
To view the previous/next image during aslideshowPress . / >.
To zoom an image
Press ZOOM repeatedly during a slideshow.Each time you press ZOOM, the
magnification changes as shown below.
2× t 4× t normal magnification
You can move the area you want to zoom
using < / M / m / ,.
To rotate an imagePress ANGLE repeatedly during a
slideshow.
Each time you press ANGLE, the image
turns clockwise by 90°.
Playing a slideshow
8/18/2019 Instructio Operation Manual DVD 3295080121
http://slidepdf.com/reader/full/instructio-operation-manual-dvd-3295080121 115/168
115
P h o t o A l b u m
To play a slideshow with the sound (HDD
only)You can enjoy a slideshow while listening to
the sound stored in the HDD. First prepare
Music Playlists by adding audio tracks using
Jukebox (see “Adding audio tracks to a
Playlist (HDD only)” on page 105).1 Select “View/Edit Photos on the HDD”
in step 3 of “Using the “Photo Album”
List” on page 112.
The “Photo Album” list appears.
Switch between the album list and JPEG
image file list, if necessary.
2 Select an album or JPEG image file
using M / m, and press ,.
3 Select “Start Audio Slideshow,” and
press ENTER.
4 Select the desired Music Playlist or
“Favourites” using < / ,.
5 Select “Start,” and press ENTER.
The slideshow and the playback from
the first track of the selected Music
Playlist start.
b Notes
• While playing a slideshow with the sound, you
cannot do the following:
– Zoom, rotate, skip or pause an image.
– Display information on the screen by pressing
DISPLAY.
• If there is no audio track in the selected Music
Playlist, the slideshow is played back with no
sound.
Creating a Slideshowwith Your FavouriteMusic and Graphic
Effects (x-Pict Story)(HDD only)
You can easily create and play your own
slideshow with your favourite music in
Music Playlist and graphic effects using the
JPEG image files on the HDD (x-Pict Story).
First prepare Music Playlists by adding
audio tracks using Jukebox (see “Adding
audio tracks to a Playlist (HDD only)” on
page 105). The created x-Pict Story is
automatically stored in the Title List (HDD)
and you can copy it onto a recordable disc.
1 Press SYSTEM MENU.The System Menu appears.
2 Select “Photo Album,” and press
ENTER.The “Photo Album” menu appears.
3 Select “View/Edit Photos on the
HDD,” and press ENTER.The “Photo Album (HDD)” list appears.
4 Select an album, and press ,.The sub-menu appears.
5 Select “Create x-Pict Story” using M /
m, and press ENTER.
,continued

8/18/2019 Instructio Operation Manual DVD 3295080121
http://slidepdf.com/reader/full/instructio-operation-manual-dvd-3295080121 116/168
116
6 Select a graphic effect and a Music
Playlist using < / M / m / ,.• “Theme”: Select a theme. The
recorder adds graphic effects
according to the theme you set from
the following:
“Happy moments (1)”: with simplegraphic effects
“Happy moments (2)”: with simple
graphic effects rapidly changing
“Nostalgic memories”: in
monochrome
“Sweetest recollections”: with moving
graphic effects
“Blissful life”: with moving graphic
effects rapidly changing
“Normal”: no graphic effects• “Play List”: Select the desired Music
Playlist or “Favourites.” For an
explanation of how to make a Music
Playlist, see “Adding audio tracks to a
Playlist (HDD only)” on page 105.
7 Select “Next,” and press ENTER.The copyright message appears on the
screen.
8 Select “Yes” using < / ,, and
press ENTER.The x-Pict Story is saved as a video file
in the Title List on the HDD.
The title names are automatically
labelled as “x-Pict_Story ***” using the
name of the selected album folder.
To stop creating x-Pict StoryPress and hold x REC STOP for more than
3 seconds.
z Hints
• The order of audio tracks in the created x-Pict
Story is followed by that of Music Playlist. If
you want to change its order, change the order of
Music Playlist before creating an x-Pict Story.
• If the selected folder has no name, the title names
are automatically labelled with the date when thex-Pict Story was created.
• An x-Pict Story is created in the HQ mode.
• To edit x-Pict Story titles, see “Erasing and
Editing” on page 82.
b Notes
• You cannot make a recording while creating an
x-Pict Story.
• If there is no JPEG image file in the selected
folder, you cannot create an x-Pict Story.
• If there is no audio track in the selected Music
Playlist, the x-Pict Story is created with no
sound.• The selected Music Playlist may not be played
back to the end depending on the number of
JPEG image files.
• If the HDD is full, a warning message appears
and you cannot create an x-Pict Story.
• While creating an x-Pict Story, you cannot do
the following:
– Zoom, rotate, skip or pause an image.
– Display information on the screen by pressing
DISPLAY.
• The order of graphic effects changes at randomevery time you create an x-Pict Story in the same
theme.
• Do not disconnect (remove) or connect (insert)
the USB cable, i.LINK cable or CAM while
creating an x-Pict Story. This may cause the x-
Pict Story to be created incorrectly.
• The graphic effect may not show a smooth
motion or not appear correctly on the created x-
Pict Story depending on conditions, such as size
of the image files.
To play an x-Pict StoryYou can play a created x-Pict Story from the
Title List on the HDD.
For details, see “3. Playing the Recorded
Programme (Title List)” on page 40.
To dub an x-Pict StoryYou can dub a created x-Pict Story to DVDs.
For details, see “Dubbing (HDD y DVD)”on page 89. If you want to play the disc on
other DVD equipment, finalise the disc
(page 46).

8/18/2019 Instructio Operation Manual DVD 3295080121
http://slidepdf.com/reader/full/instructio-operation-manual-dvd-3295080121 117/168
117
P h o t o A l b u m
Managing JPEG ImageFiles on the HDD
1 Press SYSTEM MENU.
The System Menu appears.
2 Select “Photo Album,” and press
ENTER.The “Photo Album” menu appears.
3 Select “View/Edit Photos on theHDD,” and press ENTER.The “Photo Album (HDD)” list appears.
4 Select an album or JPEG image file,
and press ,.The sub-menu appears.
5 Select an option, and press ENTER.You can make the following edits to the
album/JPEG image file.
“Start Slideshow”: Starts a slideshow
(page 114).
“Start Audio Slideshow” (HDD only):
Starts a slideshow with the sound
(page 115).
“Create x-Pict Story”: Creates a new x-
Pict Story (page 115).
“New Album”: Creates a new album.
“Album Options”• “Erase Album”: Erases the selected
album.
• “Copy Album Contents”: Copies all
JPEG image files in the selected album
to the HDD (page 110).
• “Rename Album”: Changes the
selected album name (page 44).
• “Protect Album Contents”: Protects all
JPEG image files in the selected
album.
• “Cancel Protection”: Cancels
protection of all JPEG image files in
the selected album.
“Copy to DVD”: Copies the selected
album or JPEG image file to a DVD
(page 110).
“Multi-Mode”: Selects multiple albums
or JPEG image files to edit.
“Copy all to HDD”: Copies all the
albums and JPEG image files to the
HDD (page 108).
“Copy to HDD”: Copies the selected
album or JPEG image file to the HDD
(page 108).
“File Options”
• “Erase”: Erases the selected JPEG
image file.
• “Copy”: Copies the selected JPEG
image file (page 110).
• “Rename File”: Changes the selectedJPEG image file name (page 44).
• “Protect”: Protects the selected JPEG
image file. Select again to cancel the
protection.
“Print”: Prints the selected JPEG image
file (page 118).
“Detailed Information”: Displays the
detailed information for the selected
JPEG image file (page 114).
“Single-Mode”: Cancels “Multi-Mode.”
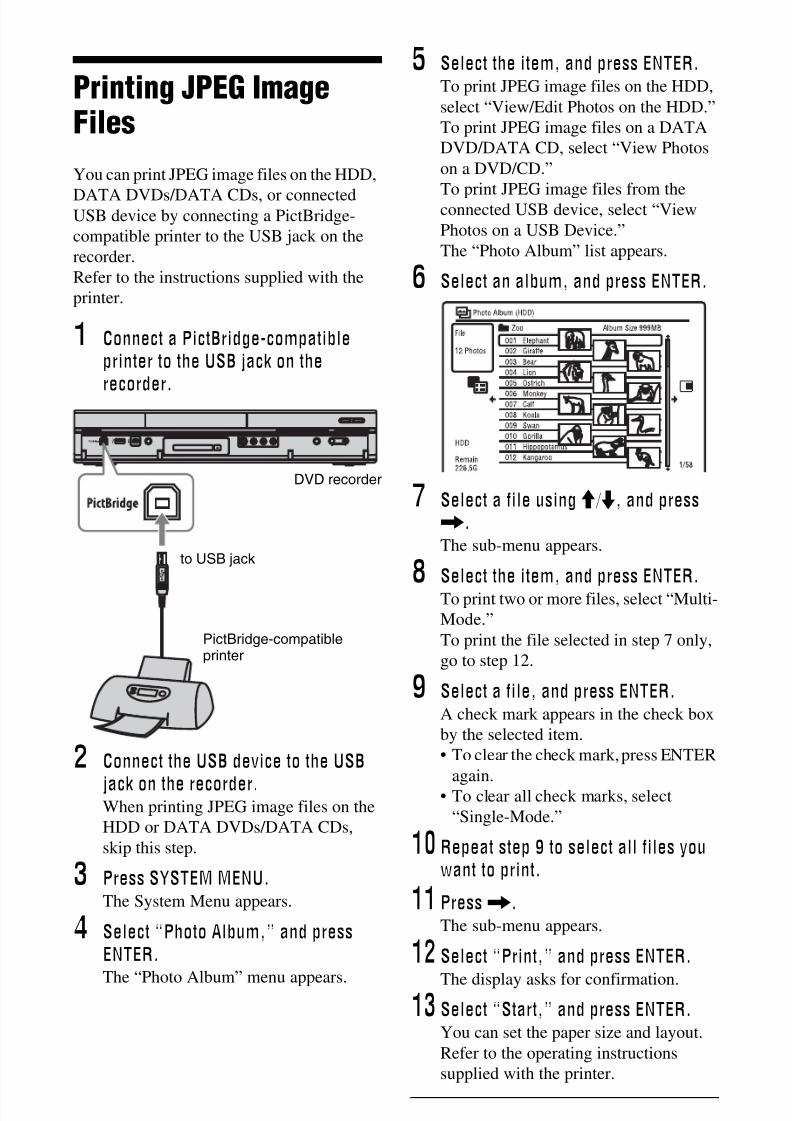
8/18/2019 Instructio Operation Manual DVD 3295080121
http://slidepdf.com/reader/full/instructio-operation-manual-dvd-3295080121 118/168
118
Printing JPEG ImageFiles
You can print JPEG image files on the HDD,
DATA DVDs/DATA CDs, or connectedUSB device by connecting a PictBridge-
compatible printer to the USB jack on the
recorder.
Refer to the instructions supplied with the
printer.
1 Connect a PictBridge-compatible
printer to the USB jack on the
recorder.
2 Connect the USB device to the USB
jack on the recorder.When printing JPEG image files on the
HDD or DATA DVDs/DATA CDs,
skip this step.
3 Press SYSTEM MENU.The System Menu appears.
4 Select “Photo Album,” and press
ENTER.
The “Photo Album” menu appears.
5 Select the item, and press ENTER.To print JPEG image files on the HDD,
select “View/Edit Photos on the HDD.”
To print JPEG image files on a DATA
DVD/DATA CD, select “View Photos
on a DVD/CD.”
To print JPEG image files from theconnected USB device, select “View
Photos on a USB Device.”
The “Photo Album” list appears.
6 Select an album, and press ENTER.
7 Select a file using M / m, and press,.The sub-menu appears.
8 Select the item, and press ENTER.To print two or more files, select “Multi-
Mode.”
To print the file selected in step 7 only,
go to step 12.
9 Select a file, and press ENTER.A check mark appears in the check box
by the selected item.
• To clear the check mark, press ENTER
again.
• To clear all check marks, select
“Single-Mode.”
10 Repeat step 9 to select all files you
want to print.
11 Press ,.The sub-menu appears.
12 Select “Print,” and press ENTER.
The display asks for confirmation.
13 Select “Start,” and press ENTER.You can set the paper size and layout.
Refer to the operating instructions
supplied with the printer.
DVD recorder
to USB jack
PictBridge-compatibleprinter

8/18/2019 Instructio Operation Manual DVD 3295080121
http://slidepdf.com/reader/full/instructio-operation-manual-dvd-3295080121 119/168
119
P h o t o A l b u m
To cancel printingPress ENTER.
To display the connected printerSelect “Confirm Printer” of “USB” in the
“Options 2” setup (page 142).
To restart the connected USB deviceSelect “Restart USB Device” of “USB” in
the “Options 2” setup (page 142).
z Hint
Printing options, such as paper size or layout,
differ depending on the printer. For details, refer to
the instructions supplied with the printer.

8/18/2019 Instructio Operation Manual DVD 3295080121
http://slidepdf.com/reader/full/instructio-operation-manual-dvd-3295080121 120/168
120
Settings and Adjustments
Adjusting Picture
Quality
* DivX video file only
You can adjust the picture quality from the
connected equipment, such as a TV or VCR,
and also the picture quality of broadcaststhat the recorder can receive by selecting a
preset setting. You can also adjust the
picture quality by changing detailed settings,
and store up to three settings in the memory.
1 Press SYSTEM MENU in stop mode.For adjusting playback picture quality,
press SYSTEM MENU during
playback.
The System Menu appears.
2 Select “Picture Adjustment,” and
press ENTER.
3 Select a preset setting using < / ,,
and press ENTER.
For recording
For playback
To check the detailed settings for the
selected preset, press DISPLAY.
4 Press SYSTEM MENU to exit.
To create your own setting
1Select “Memory1,” “Memory2,” or
“Memory3” in step 3.
2 Select “Detailed Settings,” and press
ENTER.
The display for adjusting detailed
settings appears.
3 Select an item using M / m, and adjust
settings using < / ,.
For explanation of each setting, see the
tables below.4 Press SYSTEM MENU to exit.
The setting is automatically stored as the
setting you selected in step 1.
Tuner TV broadcast
VCR Video cassettes
DTV Digital broadcast
Memory1/ Memory2/ Memory3
Your own settings. Tocreate your own settings,see “To create your ownsetting” on page 120.
+R
DVD VCD
-RWVR -RWVideo+RW
-RVR
HDD
-RVideo DATA DVD
DATA CD
*
*
Dynamic Produces a bolddynamic picture byincreasing the picturecontrast and the colourintensity.
Standard Displays a standardpicture.
Professional Displays an originalpicture.
Memory1/ Memory2/ Memory3
Your own settings. Tocreate your ownsettings, see “To createyour own setting” on
page 120.

8/18/2019 Instructio Operation Manual DVD 3295080121
http://slidepdf.com/reader/full/instructio-operation-manual-dvd-3295080121 121/168
121
S e t t i n g s a n d
A d j u s t m e n t s
Setting options for recording picturequalityFor details about each setting, see the
explanation of the display.
* For analogue broadcasting only
Setting options for playback picturequalityFor details about each setting, see the
explanation of the display.
Prog.Motion
Adjusts the progressive videosignal when “Component
Video Out” is set to“Progressive” (page 130) orwhen using the HDMIconnection.Select “Motion” for a picture,including subjects that movedynamically.Select “Still” for a picturewith little movement.
Cinema Converts the progressivevideo signal to match the typeof DVD software that you arewatching when “ComponentVideo Out” is set to“Progressive” (page 130) orwhen using the HDMIconnection.Select “Auto” to detect thesoftware type (Film-based orVideo-based) automatically
and select the appropriateconversion mode. Normallyselect this position.Select “Off” to fix theconversion mode to the modefor Video-based software.
3-D Y/C* Adjusts the brightness/colourseparation for the videosignals.Select “Motion” for a picture,
including subjects that movedynamically.Select “Still” for a picturewith little movement.
YNR* (luminancenoisereduction)
Reduces noise contained inthe luminance element of thevideo signal.
CNR*(chromanoisereduction)
Reduces noise contained inthe chroma element of thevideo signal.
Detail* Adjusts the sharpness ofimages outlines.
WhiteAGC*
Turn on for automatic whitelevel adjustment.
WhiteEnhancer*
Adjusts the intensity of white.
BlackEnhancer*
Adjusts the intensity of black.
BlackLevel*
Selects the black level (setuplevel) for the NTSC videosignals.Select “ON” to set the blacklevel of the input signals to thestandard level. Normally,select “OFF” position.
Hue* Adjusts the colour balance.
Chroma
Level*
Makes the colours deeper or
lighter.
Prog.Motion
Adjusts the progressive videosignal when “Component
Video Out” is set to“Progressive” (page 130) orwhen “Screen Resolution” isset to other than “720 x 576i”(or “720 x 480i”) (page 139).Select “Motion” for a picture,including subjects that movedynamically.Select “Still” for a picturewith little movement.
Cinema Converts the progressivevideo signal to match the typeof DVD software that you arewatching when “ComponentVideo Out” is set to“Progressive” (page 130) orwhen “Screen Resolution” isset to other than “720 x 576i”(or “720 x 480i”) (page 139).Select “Auto1” to
automatically detect thesoftware type (Film-based orVideo-based) and select theappropriate conversion mode.Normally select this position.If the picture appearsunnatural, select “Auto2,”“On,” or “Off.”
,continued

8/18/2019 Instructio Operation Manual DVD 3295080121
http://slidepdf.com/reader/full/instructio-operation-manual-dvd-3295080121 122/168
122
b Notes
• If the outlines of the images on your screen
become blurred, set “BNR” and/or “MNR” to
“Off.”
• Depending on the disc or the scene being played,
the above BNR or MNR effects may be hard to
discern. Also, these functions may not work with
some screen sizes.• The following settings are not available for the
signals output from the HDMI jack.
– “Sharpness”
– “White Enhancer”
– “Black Enhancer”
– “Black Level”
– “Gamma Correction”
– “Hue”
– “Chroma Level”
YNR(luminancenoisereduction)
Reduces noise contained inthe luminance element of thevideo signal.
BNR (blocknoisereduction)
Reduces “block noise” ormosaic-like patterns in thepicture.
MNR (mosquitonoisereduction)
Reduces the faint noiseappearing around the outlinesof the images. The noisereduction effects areautomatically adjusted withineach setting range accordingto the video bit rate and otherfactors.
Sharpness Sharpens the outlines of theimages.
Detail Adjusts the sharpness ofimages outlines.
WhiteEnhancer
Adjusts the intensity of white.
Black
Enhancer
Adjusts the intensity of black.
BlackLevel
Selects the black level (setuplevel) for the video signals.Select “ON” to raise the blacklevel. Select this when thepicture appears too dark.Select “OFF” to set the blacklevel of the input signals to thestandard level. Normally,
select this position.
GammaCorrection
Adjusts how dark areas look.
Hue Adjusts the colour balance.
ChromaLevel
Makes the colours deeper orlighter.

8/18/2019 Instructio Operation Manual DVD 3295080121
http://slidepdf.com/reader/full/instructio-operation-manual-dvd-3295080121 123/168
123
S e t t i n g s a n d
A d j u s t m e n t s
Using the Setup Menus
You can change the settings of the recorder,
such as picture quality settings, audio
settings, etc.
1 Press SYSTEM MENU while the
recorder is in stop mode.
2 Select “Disc Setup” or “Initial
Setup” using M / m, and press ENTER.
3 Select the desired setup item usingM / m, then press ENTER.See the explanations in the following
sections.
The default settings are underlined.
Disc Settings (DiscSetup)
You can adjust DVD related settings.
Input Disc NameYou can label a disc.
For details, see page 45.
Protect DiscYou can protect a disc against erasure.
For details, see page 45.
Format DVD-RW (DVD-RW only)The recorder automatically starts formatting
in VR mode or Video mode, whichever is
selected below, when a new, unformatted
DVD-RW is inserted.
You can manually re-format a DVD+RW,
DVD-RW, or DVD-R disc to make a blank
disc.For details, see page 49.
Finalises a disc to play it on other DVD
equipment.
For details, see page 46.
Basic
VR Mode Automatically formats thedisc in VR mode.
VideoMode
Automatically formats thedisc in Video mode.
Format
Finalise
,continued

8/18/2019 Instructio Operation Manual DVD 3295080121
http://slidepdf.com/reader/full/instructio-operation-manual-dvd-3295080121 124/168
124
As you record, erase and edit recordings
repeatedly, the HDD file system gradually
becomes fragmented. To ‘clean up’ all the
fragmented files, optimise the HDD
periodically. When the HDD needs
optimising, a message recommending
optimisation will appear automatically.
To cancel optimisation, press ENTER. The
HDD will be partly optimised.
b Notes
• It will take about eight hours to optimise the
HDD. During optimisation, other operations,
such as recording or playback, cannot be
performed.
• You cannot optimise the HDD when the HDD
disc space is insufficient for optimising. Erase
titles to open up disc space (page 83).
You can format the HDD and resolve the
problem when the hard disk error occurred.
“Format HDD.” can be selected only whenthe hard disk needs formatting. Note that all
of the recorded content on the HDD will be
erased.
Recorder Settings(Basic)
You can make clock and other recorder-
related settings.
The recorder will automatically set the clock
when any digital channels have been
scanned and stored.
Auto (Auto Clock Set)
Turns on the Auto Clock Set function whena programme position in your local area
broadcasts a time signal.
1 Press < / , repeatedly until the
programme position of the station that
carries a time signal appears.
2 Press m to select “Start,” and press
ENTER.
• If the recorder does not receive a time
signal from any station, press
O RETURN and set the clock
manually.
• If the Auto Clock Set function did not
set the clock correctly for your local
area, try another station for the Auto
Clock Set function or set the clock
manually.
Manual (Manual Clock Set)Set the clock manually.
1 Press < / , to select the time zone for
your area or GMT (Greenwich Mean
Time), and press m.
2 Select “On” using < / , if you are now
on summer time, and press ENTER.
3 Set the day, month, year, hour, and
minutes using < / M / m / ,, and press
ENTER to start the clock.
To change the numbers, press < to
return to the item to be changed, and
press M / m.
Optimise HDD
Format HDD.
Clock Setting

8/18/2019 Instructio Operation Manual DVD 3295080121
http://slidepdf.com/reader/full/instructio-operation-manual-dvd-3295080121 125/168
125
S e t t i n g s a n d
A d j u s t m e n t s
Selects the colour system when recording
from the connected equipment.
This setting is effective only when recording
from an external input.
b Notes
• When picture noise appears after you change the
“Input Line System” setting, change the “Input
Colour System” setting (page 130). If picturenoise still appears, hold down x (stop) on the
recorder, and press INPUT on the recorder.
• When you change the “Input Line System”
setting, the Dubbing List is erased.
Selects whether this recorder is in power
save mode when the power is turned off(standby).
b Note
Power Save mode does not function in the
following cases, even when “Power Save” is set to
“Mode 1” or “Mode 2.”
– There is a timer setting with “VPS / PDC” in the
schedule list or Timer List.– The SMARTLINK features are not available
when “Power Save” is set to “Mode 1” or “Mode
2.”
Selects the EPG (Electronic Programme
Guide) type to use.
The default setting varies depending on the
country/region.
Select this to run the “Easy Setup”
programme.
Follow the instructions for “Easy Setup”
(page 30) from step 2.
Input Line System
NTSC Records in NTSC or PAL-60colour system.
PAL/ SECAM
Records in PAL or SECAMcolour system.
Power Save
Mode 1 Only aerial input signals areoutput to the connected TVwhen the recorder is instandby.
Mode 2 No input signals are outputwhen the recorder is instandby.
Off Does not set to power savemode. Normally, select thissetting.
HELP Setting
On Displays Help information forGUI displays.
Off Does not set to HELP settingmode.
EPG Type Select
GUIDEPlus+
Select this to use the GemstarGUIDE Plus+ electronicprogramme guide (page 61).
Guide(Digital)
Select this to use the digitalelectronic programme guide(page 50).
Easy Setup (Resetting theRecorder)

8/18/2019 Instructio Operation Manual DVD 3295080121
http://slidepdf.com/reader/full/instructio-operation-manual-dvd-3295080121 126/168
126
Aerial ReceptionSettings (Digital Tuner)
You can make digital tuner and programme
position settings for the recorder.
Scans available digital channels, and
replaces all the channels already stored in
the channel list with the scanned results.
Select your country/region using < / ,,
and press ENTER.
The recorder scans available digital channelsand stores them.
To cancel the scan, press SYSTEM MENU
or EXIT.
If any programme positions are unused or
contain unwanted channels, you can disable
them (page 126).
b Note
The timer settings for the replaced channels are
deleted.
Scans digital channels and adds found
channels to the channel list.
After the programme positions have been
set, you can change the order of each
programme position in the displayed list.
1 Press M / m to select a programmeposition you want to move, and press
ENTER.
• To display other pages, press M / m
repeatedly.
2 Press M / m to select the programme
position number to swap for the one
selected in step 1, and press ENTER.
The programme position numbers are
swapped.• To move other programme positions,
repeat from step 1.
You can skip or lock certain channels.
1 Enter your four-digit password using the
number buttons, and press ENTER.
To set a password, see page 138.
2 Select the programme position you want
to skip or lock using M / m, and press
ENTER.
3 Select an option, and press ENTER.
• To skip the programme position, select
.
• To lock the programme position,
select .A check mark appears in the check box
next to the selected programme position.
Selects whether to skip radio or data
channels.
Replace Channels
Add New Channels
Channel Sort
Channel Options
Auto Skip
Off No channels are skipped.
Radio Radio channels are skipped.
Data Data channels are skipped.
Radio &Data
Radio and data channels areskipped when selectingchannels.

8/18/2019 Instructio Operation Manual DVD 3295080121
http://slidepdf.com/reader/full/instructio-operation-manual-dvd-3295080121 127/168
127
S e t t i n g s a n d
A d j u s t m e n t s
You can check the signal strength and
quality of the channel.
To scan a digital channel, select a channel
using < / ,, and select “Add New
Channels,” then press ENTER.
Selects whether to supply the power to theaerial connected to the DIGITAL AERIAL
IN jack.
b Note
If the setting keeps reverting to “Off” even when
“On” or “Auto” is selected or broadcast signals
cannot be received properly, check theconnections and try to reset the setting.
Selects main and sub audio/subtitle
languages or teletext language for bilingual
programmes.
Aerial ReceptionSettings (Analog Tuner)
You can make analogue tuner and
programme position settings for therecorder.
Auto ScanIf you connect a TV to this recorder not
using SMARTLINK, you can preset
programme positions automatically using
“Auto Scan.”
Select your country/region using < / ,,
and press ENTER.
The programme position order will be set
according to the country/region you set.
If any programme positions are unused or
contain unwanted channels, you can disable
them (page 128).
Download from TVIf you connect a TV to this recorder with
SMARTLINK, you can preset programme
positions by downloading from your TV.
For details, refer to the operating
instructions supplied with your TV.
Select your country/region using < / ,,
and press ENTER.
The tuner preset data will be downloaded
from your TV to this recorder.
If any programme positions are unused or
contain unwanted channels, you can disable
them (page 128).
Signal Check
Aerial Power (RDR-HXD795/ HXD895/HXD995/HXD1095(except models for the UK)only)
On The power is always suppliedto the aerial connected to theDIGITAL AERIAL IN jack.
Auto The power is supplied to theaerial connected to theDIGITAL AERIAL IN jack
when the recorder is turnedon.
Off The power is not supplied tothe aerial connected to theDIGITAL AERIAL IN jack.
D.TV Language
Auto Channel Setting
,continued

8/18/2019 Instructio Operation Manual DVD 3295080121
http://slidepdf.com/reader/full/instructio-operation-manual-dvd-3295080121 128/168
128
Presets programme positions manually.
If some programme positions could not be
set using the “Easy Setup” function, you can
set them manually.
If there is no sound or if the picture is
distorted, the wrong tuner system may have
been preset during “Easy Setup.” Set the
correct tuner system manually in the steps
below.
1 Select your country/region using < /
,, and press ENTER.
2 Press PROG +/– to select the
programme position.
3 Select the item you want to change using
M / m, and change the settings using < /
,, then press ENTER.
• To preset another programme position,
repeat from step 2.
Skip
CH SystemSelect the region to get the best broadcastreception.
ChannelPress < / , repeatedly until the
programme position you want is displayed.• To select a cable or satellite programme
position, press < / , until the
programme position you want is displayed.
Receivable channels
* To receive broadcasts in France, select “L.”
Manual CH Setting
On Select this when theprogramme position is unusedor contains unwantedprogramme positions.The selected position will beskipped when you pressPROG +/–.
Off Does not skip the selectedprogramme position.
Programme position
FR Select this when in France.
Western
Euro
Select this when in West
European countries.
UK & IE Select this when in GreatBritain/Ireland.
EasternEuro
Select this when in EastEuropean countries.
TV system Channel coverage
BG (West EuropeanCountries, exceptthose listed below)
E2 – E12 VHF
Italian A – H VHF
E21 – E69 UHF
S1 – S20 CATV
S21 – S41 HYPER
S01 – S05 CATV
DK (East EuropeanCountries)
R1 – R12 VHF
R21 – R69 UHF
S1 – S20 CATV
S21 – S41 HYPER
S01 – S05 CATV
I (Great Britain/ Ireland)
Ireland A – J VHF
South Africa 4 – 11, 13VHF
B21 – B69 UHF
S1 – S20 CATV
S21 – S41 HYPER
S01 – S05 CATV
L* (France) F2 – F10 VHF
F21 – F69 UHF
B – Q CATV
S21 – S41 HYPER

8/18/2019 Instructio Operation Manual DVD 3295080121
http://slidepdf.com/reader/full/instructio-operation-manual-dvd-3295080121 129/168
129
S e t t i n g s a n d
A d j u s t m e n t s
Tuning the French CATV channelsThis recorder can scan the CATV channels
B to Q and the HYPER frequency channels
S21 to S41. On the Channel Set menu, the
channels are indicated as CC1 to CC44. For
example, channel B is indicated by Channel
Set number CC1, and channel Q is indicated
by Channel Set number CC23 (see the table
below). If the CATV channel you want to
preset is indicated by its frequency (for
example, 152.75 MHz), refer to the table
below to find the corresponding channel
number.
AFT
• If the Auto Fine Tuning function does not
work effectively, select “Off” and press m.
Press < / , to obtain a clearer picture,
and press ENTER.
Corre-spondingchannel
ChannelSet
number
ReceivableFrequency
range (MHz)
B CC1 116.75–124.75
C CC2 124.75–132.75
D CC3 132.75–140.75
D CC4 140.75–148.75
E CC5 148.75–156.75
F CC6 156.75–164.75
F CC7 164.75–172.75G CC8 172.75–180.75
H CC9 180.75–188.75
H CC10 188.75–196.75
I CC11 196.75–204.75
J CC12 204.75–212.75
J CC13 212.75–220.75
K CC14 220.75–228.75
L CC15 228.75–236.75
L CC16 236.75–244.75
M CC17 244.75–252.75
N CC18 252.75–260.75
N CC19 260.75–268.75
O CC20 268.75–276.75
P CC21 276.75–284.75
P CC22 284.75–292.75
Q CC23 292.75–300.75
S21 CC24 299.25–307.25
S22 CC25 307.25–315.25
S23 CC26 315.25–323.25
S24 CC27 323.25–331.25
S25 CC28 331.25–339.25
S26 CC29 339.25–347.25
S27 CC30 347.25–355.25
S28 CC31 355.25–363.25
S29 CC32 363.25–371.25
S30 CC33 371.25–379.25
S31 CC34 379.25–387.25
S32 CC35 387.25–395.25
S33 CC36 395.25–403.25
S34 CC37 403.25–411.25
S35 CC38 411.25–419.25
S36 CC39 419.25–427.25
S37 CC40 427.25–435.25
S38 CC41 435.25–443.25
S39 CC42 443.25–451.25
S40 CC43 451.25–459.25
S41 CC44 459.25–467.25
On Turns on the Auto FineTuning function.Normally select this position.
Off Allows you to adjust thepicture manually.
Corre-spondingchannel
ChannelSet
number
ReceivableFrequency
range (MHz)
,continued

8/18/2019 Instructio Operation Manual DVD 3295080121
http://slidepdf.com/reader/full/instructio-operation-manual-dvd-3295080121 130/168
130
Sound SystemSelect an available TV system (page 128).
Name
Changes or enters a new station name (up to5 characters). The recorder must receive
programme position information (e.g.,
SMARTLINK information) for station
names to appear automatically.
Press ,, then press < / , repeatedly to
select a character.
To change the characters, press M / m to
move the cursor, and press < / ,.
DecoderSets the external decoder (PAY-TV/Canal
Plus analogue decoder) channels.
For details, see page 37.
After the programme positions have been
set, you can change the order of eachprogramme position in the display list.
1 Press M / m to select the programme
position number you want to swap, and
press ,.
• To display other pages, press . /
> repeatedly.
2 Press M / m to select the programme
position number to swap for the one
selected in step 1, and press ENTER.The programme position numbers are
swapped.
• To swap the programme position
number of another station, repeat from
step 1.
Video Settings (Video In/ Out)
You can adjust items related to the image,
such as size and colour, according to the typeof TV, tuner, or decoder connected to the
recorder.
Selects the colour system when picture noise
appears after you change the “Input Line
System” setting (page 125).
z Hint
When “Input Line System” is set to “NTSC,” you
can select “Auto,” “3.58NTSC,” or “PAL-60.”
b Note
“Input Colour System” cannot be set when
viewing digital broadcasts.
Selects the signal format in which the
recorder outputs video signals: interlace or
progressive, from the COMPONENT
VIDEO OUT jacks.
B/G Select this when in WestEuropean countries, exceptthose listed in “Receivablechannels” on page 128.
D/K Select this when in EastEuropean countries.
I Select this when in GreatBritain/Ireland.
L Select this when in France.
Channel Swapping
Input Colour System
Auto Recorder automaticallydetects signals of coloursystems and selects theappropriate colour system.
PAL Selects the PAL coloursystem when “Input LineSystem” is set to “PAL/ SECAM.”
SECAM Selects the SECAM coloursystem when “Input LineSystem” is set to “PAL/ SECAM.”
Component Video Out
Normal(Inter-lace)
Outputs signals in theinterlace format.
Progressive Outputs signals in theprogressive format. Selectthis when you want to viewprogressive signals.

8/18/2019 Instructio Operation Manual DVD 3295080121
http://slidepdf.com/reader/full/instructio-operation-manual-dvd-3295080121 131/168
131
S e t t i n g s a n d
A d j u s t m e n t s
b Notes
• When you set “LINE 3 Out” to “RGB,” you
cannot set “Component Video Out.”
• When you connect the recorder to a monitor or
projector via only the COMPONENT VIDEO
OUT jacks, do not set “LINE 3 Out” to “RGB.”
If you set “LINE 3 Out” to “RGB,” in this case,
the picture may not appear.• When picture noise appears after you set the
recorder to progressive format, hold down x
(stop) on the recorder, and press Z (open/close)
on the recorder.
• No video signals are output when using the
HDMI connection.
Selects a method of outputting video signals
for the LINE 3 – TV jack.
b Notes
• If your TV does not accept S-video or RGB
signals, the image will not be displayed in the
selected method on the TV screen even if you
select “S-Video” or “RGB.” Refer to the
instructions supplied with your TV.
• SMARTLINK is available only when “Video” is
selected.
• RGB signals are not output when using the
HDMI connection.
Selects a method of inputting video signals
for the LINE 1/DECODER jack. The picture
will not be clear if this setting does not
match the type of video input signal.
Sets the recorder to convert signals of the
NTSC colour system to the PAL coloursystem to play NTSC discs on PAL-only
TVs. Refer to the operating instructions
supplied with your TV.
LINE 3 Out
Video Outputs video signals.
S-Video Outputs S-video signals.
RGB Outputs RGB signals.
LINE 1 In
Video Inputs video signals.
S-Video Inputs S-video signals.
RGB Inputs RGB signals.
Decoder Select this whenconnecting to an externaldecoder (PAY-TV/Canal
Plus analogue decoder). Ifyou connect to a cable box/ satellite receiver such asCanalSat, do not select thisoption.
NTSC on PAL TV
On Plays NTSC discs on PAL-only TVs.
Off Select this if the connectedTV is a multi-system
(NTSC-compatible) TV.
8/18/2019 Instructio Operation Manual DVD 3295080121
http://slidepdf.com/reader/full/instructio-operation-manual-dvd-3295080121 132/168
132
Audio Input Settings(Audio In)
You can adjust the sound according to the
playback and connection conditions.
For details on NICAM system, see page 70.
If the playback sound is distorted, set this
item to “Compression.” The recorder
reduces the audio output level.
This function affects the output of thefollowing jacks:
– LINE 2 OUT R-AUDIO-L jacks
– LINE 3 – TV jack
– LINE 1/DECODER jack
b Note
When receiving audio input signals from the DV
input jack, the recorder automatically selects
“Stereo” or “Bilingual” regardless of the “External
Audio” setting.
Selects the sound to be recorded.
b Notes
• When recording a bilingual audio signal to the
HDD (when “HDD Recording Format” is set to
“Video Mode Off” (page 137) (except in PCM
mode)) or a DVD-RW/DVD-R in VR mode
(except in PCM mode), both audio channels are
recorded and you can select the sound when
playing.
• Bilingual audio streams cannot be recorded
simultaneously from digital broadcasts.
Select the setting for the audio input when
DV camcorder dubbing.
Select “Mix (Stereo 1: 75 %)”/“Mix (Stereo
1: 50 %)”/“Mix (Stereo 1: 25 %)” or “Stereo
2” only if you have added a second audio
when recording with your digital video
camera.
NICAM Select
NICAM Normally select thisposition.
Standard Select this if the soundfrom NICAM broadcasts isnot clear.
Analog Tuner Level
Normal Normally select thisposition.
Compression Select this when the
playback sound from thespeakers is distorted.
External Audio
Stereo Select this whenreceiving stereoprogrammes from
connected equipment.
Bilingual Select this whenreceiving bilingualprogrammes fromconnected equipment.
Bilingual Recording
A/L Records the main soundfor the bilingualprogramme.
B/R Records the sub soundfor the bilingualprogramme.
DV Input
Stereo 1 Records originalsound only.Normally selectthis when dubbinga DV format tape.
Stereo 2 Records additional
audio only.
Mix (Stereo 1: 75 %)
Records both stereo1 and 2.
Mix (Stereo 1: 50 %)
Mix (Stereo 1: 25 %)

8/18/2019 Instructio Operation Manual DVD 3295080121
http://slidepdf.com/reader/full/instructio-operation-manual-dvd-3295080121 133/168
133
S e t t i n g s a n d
A d j u s t m e n t s
Audio Output Settings(Audio Out)
You can switch the method of outputting
audio signals when you connect acomponent such as an amplifier (receiver)
with a digital input jack.
b Note
If you connect a component that does not accept
the selected audio signal, a loud noise (or no
sound) will come from the speakers, and may
affect your ears or cause speaker damage.
Selects the type of Dolby Digital signal.
b Note
If the HDMI OUT jack is connected to equipment
not compatible with Dolby Digital signals, thePCM signals will be automatically output even
when you select “Dolby Digital.”
Selects whether or not to output DTS
signals.
b Note
When HDMI output is performed to equipment not
compatible with DTS signals, the signals will not
be output regardless of the “DTS Output” setting.
Selects the sampling frequency of the audio
signal.
b Notes
• “96 kHz PCM Output” setting has no effect
when audio signals are output from the LINE 2
OUT (R-AUDIO-L) jacks or LINE 3 – TV/LINE1/DECODER jack. If the sampling frequency is
96 kHz, signals are simply converted to
analogue signals and output.
• If the HDMI OUT jack is connected to
equipment not compatible with 96 kHz signals,
48 kHz PCM will be automatically output even
when you select “96 kHz.”
Selects the type of MPEG audio signal.
Dolby Digital Output (HDD/ DVDs only)
Dolby Digital Select this when therecorder is connected to anaudio component with abuilt-in Dolby Digital
decoder.
Dolby Digital-> PCM
Select this when therecorder is connected to anaudio component lacking abuilt-in Dolby Digitaldecoder.
DTS Output (DVD VIDEOs only)
On Select this when the
recorder is connected to anaudio component with abuilt-in DTS decoder.
Off Select this when therecorder is connected to anaudio component without abuilt-in DTS decoder.
96 kHz PCM Output (DVD
VIDEOs only)
96 kHz ->48 kHz
The audio signals of DVDVIDEOs are converted to48 kHz and output.
96 kHz All signals containing
96 kHz are output withoutconversion. However, thesignals are output at48 kHz if copyright-protected signals arecontained.
MPEG Output (DVD VIDEOsonly)
MPEG Select this when therecorder is connected to anaudio component with abuilt-in MPEG decoder.
MPEG ->PCM
Select this when therecorder is connected to anaudio component without abuilt-in MPEG decoder. Ifyou play MPEG audiosound tracks, the recorderoutputs stereo signals viathe DIGITAL OUT(COAXIAL) jack.
,continued

8/18/2019 Instructio Operation Manual DVD 3295080121
http://slidepdf.com/reader/full/instructio-operation-manual-dvd-3295080121 134/168
134
b Note
If the HDMI OUT jack is connected to equipment
not compatible with MPEG audio signals, the
PCM signals will be automatically output even
when you select “MPEG.”
Selects the dynamic range (difference
between soft and loud sounds) setting when
playing a DVD that conforms to “Audio
DRC.” This affects the output from the
following jacks:
– LINE 2 OUT R-AUDIO-L jacks
– LINE 3 – TV jack – LINE 1/DECODER jack
– DIGITAL OUT (COAXIAL)/HDMI OUT
jack only when “Dolby Digital Output” is
set to “Dolby Digital -> PCM” (page 133).
Language Settings(Language)
You can make language settings.
Switches the display language on the screen.
Switches the language of the sound track.
Switches the language of the subtitles
recorded on the disc.
The “Auto Language” function is available
when “Audio Language” and “Subtitle
Language” are set to the same language, and
“Subtitle Display” is set to “On.”
Audio DRC (Dynamic RangeControl) (DVDs only)
On Makes low sounds cleareven if you turn the volumedown.
Off Normally select thisposition.
OSD Language
Audio Language (DVD VIDEOonly)
Subtitle Language (DVD VIDEOonly)
Auto Language
On For DVD VIDEOs whosemain audio track is the
language you set in “AudioLanguage” and “SubtitleLanguage,” the recorderplays the main audio trackwithout subtitles.For DVD VIDEOs whosemain audio track is not thelanguage you set in “AudioLanguage” and “SubtitleLanguage,” the recorderplays the main audio track
with subtitles in thelanguage you set.
Off Turns off the function.

8/18/2019 Instructio Operation Manual DVD 3295080121
http://slidepdf.com/reader/full/instructio-operation-manual-dvd-3295080121 135/168
135
S e t t i n g s a n d
A d j u s t m e n t s
Switches the language for the DVD menu.
Select “w/Subtitle Language” to set the
same language as the language you set in“Subtitle Language.”
z Hint
If you select “Others” in “Audio Language,”
“Subtitle Language,” or “DVD Menu Language,”
press m, and enter a language code from
“Language Code List” on page 158.
b Note
If you select a language in “DVD Menu
Language,” “Subtitle Language,” or “Audio
Language” that is not recorded on the DVD
VIDEO, one of the recorded languages will be
automatically selected.
Recording Settings(Recording)
You can adjust recording settings.
You can select further options for recording
mode (manual recording mode). The default
setting is “Off” (standard recording mode).
You can check the approximate recording
times for the HDD and the different DVD
types in each recording mode on page 155.
1 Select “On (go to setup)” using M / m,
and press ENTER.
2 Select a recording mode using < / ,,
and press ENTER.
To easily select a manual recording
mode, press REC MODE repeatedly to
display “MN,” and select a manual
recording mode using < / ,.
DVD Menu Language (DVDVIDEO only)
Subtitle Display
On Displays subtitles.
Off Does not display subtitles.
Assist Subtitle Displays special assistivesubtitles, where available.
Manual Rec. Mode
Rec. Mode Adjust
On Automatically adjusts therecording mode to enablethe entire programme to berecorded (page 68).
Off Turns off the function.
Subtitle Recording
On Records digital broadcastsubtitles.
Off No digital broadcastsubtitles are recorded.
,continued

8/18/2019 Instructio Operation Manual DVD 3295080121
http://slidepdf.com/reader/full/instructio-operation-manual-dvd-3295080121 136/168
136
Selects a scene for the thumbnail picture
shown in the Title List.
b Notes
• The actual chapter mark interval may vary
depending on the amount of information
contained in the video to be recorded.
• Chapter marks are automatically inserted, where
the date or time information changes on the tape,
when “Auto Chapter (HDD/VR)” is set to “On”
during DV dubbing to the HDD or a DVD-RW/
DVD-R (VR mode).
Set Thumbnail
0 seconds The first frame of the title
is set for the thumbnailpicture.
30 seconds The frame at 30 secondsfrom the first frame is setfor the thumbnail picture.
3 minutes The frame at 3 minutesfrom the first frame is setfor the thumbnail picture.
Auto Chapter (HDD/VR) (HDD/ DVD-RW/DVD-R in VR modeonly)
On The recorder detectschanges in the picture and
sound and automaticallyinserts chapter marks (upto 99 chapters for one titlerecorded on the HDD).
Off No chapter mark isinserted.
Auto Chapter (Video) (DVD-RW/ DVD-R in Video mode only)
No
Separation
No chapter mark is
inserted.
10 minutes Inserts chapter marks atapproximately 10-minuteintervals.
15 minutes Inserts chapter marks atapproximately 15-minuteintervals.
Auto Chapter (DVD+R/+RW)(DVD+RW/DVD+R only)
NoSeparation
No chapter mark isinserted.
10 minutes Inserts chapter marks atapproximately 10-minute
intervals.
15 minutes Inserts chapter marks atapproximately 15-minuteintervals.

8/18/2019 Instructio Operation Manual DVD 3295080121
http://slidepdf.com/reader/full/instructio-operation-manual-dvd-3295080121 137/168
137
S e t t i n g s a n d
A d j u s t m e n t s
Selects the HDD recording format.
z Hint
The HDD contents recorded in Video mode can be
dubbed to a disc at high speed (page 89).
b Note
Bilingual audio streams cannot be recordedsimultaneously from digital broadcasts.
Playback Settings(Playback)
You can adjust playback settings.
Select the playback picture size according to
the type of connected TV (widescreen/wide
mode TV or conventional 4:3 screen TV).
b Note
Depending on the disc, “4:3 Letter Box” may be
selected automatically instead of “4:3 Pan Scan”
or vice-versa.
HDD Recording Format
Video ModeOff
Records to the HDD in VRmode.
When recording stereo andbilingual programmes,both main and sub soundscan be recorded.
Video ModeOn
Records to the HDD inVideo mode.When recording stereo andbilingual programmes,only one sound track (mainor sub) can be recorded.
Set “Bilingual Recording”to “A/L” (default) or “B/R”in the “Audio In” setup(page 132).
TV Type
4:3 Letter Box Select this whenconnecting to a 4:3 screen
TV. Displays a widepicture with bands on theupper and lower portionsof the screen.
4:3 Pan Scan Select this whenconnecting to a 4:3 screenTV. Automaticallydisplays a wide picture onthe entire screen and cutsoff the portions that do not
fit.
16:9 Select this whenconnecting to a widescreenTV or TV with a widemode function.
4:3 Pan Scan
4:3 Letter Box
16:9
,continued

8/18/2019 Instructio Operation Manual DVD 3295080121
http://slidepdf.com/reader/full/instructio-operation-manual-dvd-3295080121 138/168
138
Selects the picture quality in pause mode.
Limitation Settings(Parental Lock)
You can set the password and limit the
operations.
You can set or change password that gives
access to the “Channel Options” settings in
the “Digital Tuner” setup and the “Parental
Lock” settings.Enter your four-digit password using the
number buttons, and press ENTER.
To change the password, enter your four-
digit password in the “Current Password”
row using the number buttons, and press
ENTER. Then enter a new password in the
“New Password” row using the number
buttons.
The password setting/password changing
setting is completed.
b Note
If you forgot your password, reset the recorder
(page 150).
Playback of some DVD VIDEOs can belimited according to a predetermined level,
such as the age of the users. Scenes may be
blocked or replaced with different scenes.
1 Select “Standard,” and press ENTER.
2 Enter your four-digit password using the
number buttons, and press ENTER.
Pause Mode
Field Outputs a stable, generallyshake-free image.
Frame Outputs a sharp image, butmay be prone to shake.
Auto Outputs a generally lesssharp but more stable stillimage.
Seamless Playback (HDD/
DVD-RW/DVD-R in VR modeonly)
On Playback is smooth, butwith a trade-off against theaccuracy of the edit points.
Off You may notice
momentary interruption atedited points duringplayback of a VR modePlaylist.
Angle Indicator (DVD VIDEOsonly)
On Displays “ ” on the TVscreen if various angles(multi-angles) for a sceneare recorded on the disc.
Off Does not display “ ” onthe TV screen.
Set Password/ChangePassword
DVD Playback (DVD VIDEOonly)

8/18/2019 Instructio Operation Manual DVD 3295080121
http://slidepdf.com/reader/full/instructio-operation-manual-dvd-3295080121 139/168
139
S e t t i n g s a n d
A d j u s t m e n t s
3 Select “Code” (geographic area) as the
playback limitation level, and press
ENTER.
The area is selected.
• When you select “Number,” press the
number buttons to select and enter a
country/area code in the table
(page 158), and press ENTER.
4 Select “Change Level,” and press
ENTER.
5 Enter your four-digit password using the
number buttons, and press ENTER.
6 Select the level.
The lower the value, the stricter the
limitation.
Discs rated higher than the selectedlevel will be restricted.
7 Press ENTER.
The DVD Playback setting is
completed.
To cancel the DVD Playback setting for
the disc, select “Off” in step 6.
Viewing of some digital TV programmes
can be limited according to the age limit you
set. To watch programmes that exceed the
age limit you set, your password is required.
When recording a locked programme, the
“D.TV Age Limit” setting is automatically
cancelled and the programme can be viewed.
In addition, you can watch the recorded title
without having to enter a password.
(for customers in France/Denmark/Finland,
or Sweden only)
1 Enter your four-digit password using the
number buttons, and press ENTER.
2 Select an age as limitation level, and
press ENTER.
The setting is completed.
To cancel the setting, select “Off.”
HDMI Settings (HDMIOutput)
You can adjust items related to the HDMI
connection.
b Note
You can select “HDMI Output” only when
connecting equipment to the HDMI OUT jack.
Selects the type of video signals output from
the HDMI OUT jack. If the picture is notclear, natural or to your satisfaction, try
another option that suits the disc and your
TV/projector, etc. For details, refer also to
the instruction manual supplied with the TV/
projector, etc.
*1 Can be selected only when “Input Line System”
is set to “PAL/SECAM” in the “Basic” setup
(page 125).*2 Can be selected only when “Input Line System”
is set to “NTSC” in the “Basic” setup
(page 125).
D.TV Age Limit
Screen Resolution
1920 x 1080p Sends 1920×1080p videosignals.
1920 x 1080i Sends 1920×1080i videosignals.
1280 x 720p Sends 1280×720p videosignals.
720 x 576p*1 Sends 720×576p videosignals.
720 x 480p*2 Sends 720×480p videosignals.
720 x 576i*1 Sends 720×576i videosignals.
720 x 480i*2 Sends 720×480i videosignals.
,continued
8/18/2019 Instructio Operation Manual DVD 3295080121
http://slidepdf.com/reader/full/instructio-operation-manual-dvd-3295080121 140/168
140
b Notes
• When picture noise appears after you change the
“Screen Resolution” setting, hold down x (stop)
on the recorder, and press Z (open/close) on the
recorder.
• When “Colour” is set to “YCbCr 4:2:2” in the
“HDMI Output” setup, you cannot select “720 x
576i” (or “720 x 480i”).
This setting is effective only when you set
“TV Type” to “16:9” in the “Playback”
setup.
Adjust this setting to watch 4:3 aspect ratio
signals. If you can change the aspect ratio on
your TV, change the setting on your TV, notthis recorder.
Note that this setting is effective only for
HDMI connection.
Selects the method of outputting video
signals for the HDMI jack.
b Notes• Some settings may not be available depending
on the connected device.
• When a DVI device is connected, you cannot
select “YCbCr 4:2:2” or “YCbCr 4:4:4.”
• When “Screen Resolution” is set to “720 x 576i”
(or “720 x 480i”) in the “HDMI Output” setup,
you cannot select “YCbCr 4:2:2.”
Selects the type of audio signal output from
the HDMI OUT jack.
b Notes
• The PCM signals may not be output even whenyou select “Auto” depending on the “Audio Out”
settings, number of audio channels, and the
HDMI-connected device.
• The “Audio Output” function is not available
when a DVI device is connected.
4:3 Video Output
Full Select this when you canchange the aspect ratio onyour TV.
Normal Select this when you
cannot change the aspectratio on your TV. Shows a4:3 size video with theaspect ratio as it is.
Colour
RGB (0-255) Outputs RGB (0-255)signals. Select this whenconnecting to an RGB (0-
255) device.
RGB (16-235) Outputs RGB (16-235)signals. Select this ifcolours appear overlyrich and the blackappears too deep.
16:9 aspect ratio TV
YCbCr 4:2:2 Outputs 10-bit YCbCr4:2:2 component signals.
YCbCr 4:4:4 Outputs 8-bit YCbCr4:4:4 component signals.
Audio Output
Auto Outputs Dolby Digital,MPEG and DTS audiosignals as a bitstreamsignal. Normally selectthis position.
PCM Converts all audiosignals except for DTSsignals to PCM.
BitstreamPriority
Select this if theconnected device iscompatible withbitstream audio.
Control for HDMI
On Allows you to use the“Control for HDMI”function (page 24).
Off Turns off the function.

8/18/2019 Instructio Operation Manual DVD 3295080121
http://slidepdf.com/reader/full/instructio-operation-manual-dvd-3295080121 141/168
141
S e t t i n g s a n d
A d j u s t m e n t s
Other Settings (Options)
You can make other operation settings.
Adjusts the lighting of the front panel
display.
Changes the Command Mode of the
recorder to avoid interference with your
other Sony DVD recorder or player.
1 Select a Command Mode (“1,” “2,” or
“3 (Default setting)”), and press
ENTER.
2 Set the Command Mode for the remote
so it matches the Command Mode for
the recorder you set above.
Follow the steps below to set the
Command Mode on the remote.
1 Hold down ENTER.
2 While holding down ENTER, enter
the Command Mode code number
using the number buttons.
3 Hold down both the number and
ENTER buttons at the same time for
more than three seconds.
z Hint
You can check the Command Mode for the
recorder in the front panel display (page 15).
When the Command Mode is set to “3 (Default
setting),” “1” or “2” does not appear.
b Note
Set “Power Save” to “Off” in the “Basic” setup(page 125) to set “SMARTLINK” to “Pass
Through.”
Registration CodeDisplays the registration code of DivX video
files for this recorder.
For more information, go to http:// www.divx.com/vod on the Internet.
On Screen Display
On Automatically displaysinformation on the screenwhen the recorder is turnedon, etc.
Off Displays information onlywhen DISPLAY is
pressed.
Front Panel Display
On Bright lighting.
Off Turns off the lighting andsaves power consumptionwhen the power is off.
Command Mode
b Note
The default command mode setting for this
recorder and the supplied remote is “3
(Default setting).”
The remote does not function if different
command modes are set for the recorder and
remote. Set the same command mode.
SMARTLINK
This RecorderOnly
Allows you to use theSMARTLINK functionwith the recorder when therecorder is in standbymode.
Pass Through Allows you to use theSMARTLINK functionwith the connectedequipment when therecorder is in standbymode.
DivX
,continued
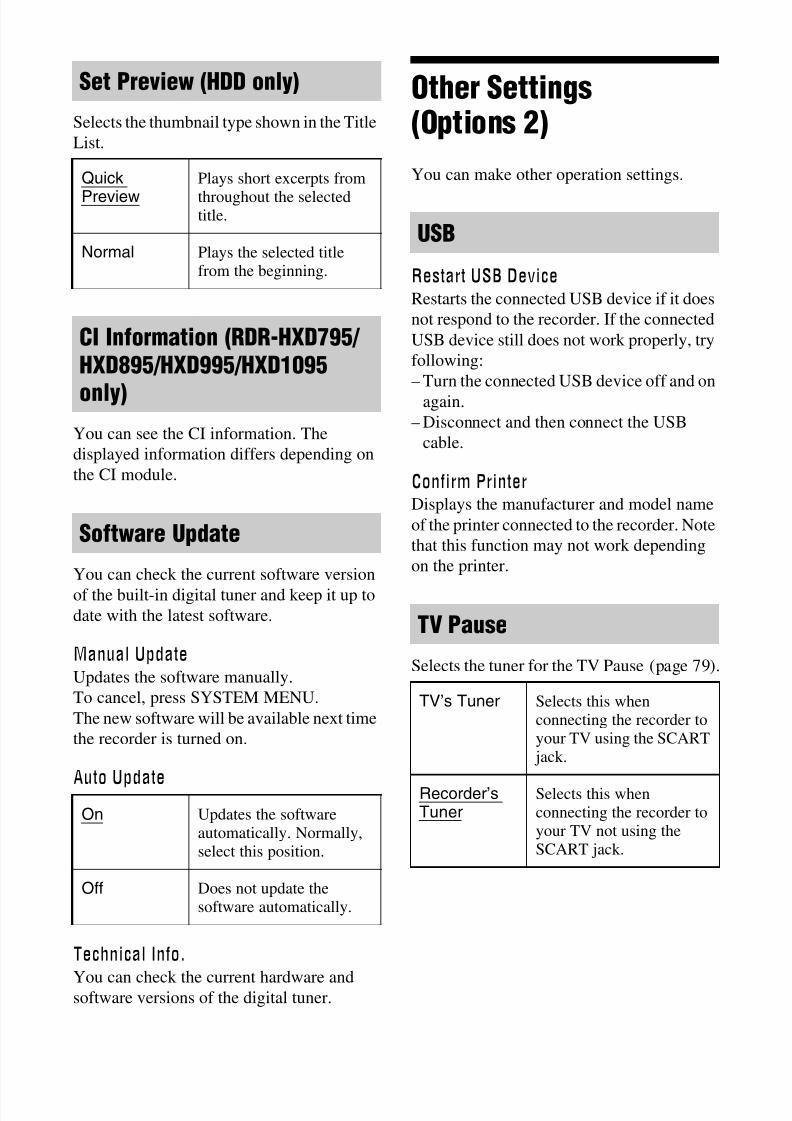
8/18/2019 Instructio Operation Manual DVD 3295080121
http://slidepdf.com/reader/full/instructio-operation-manual-dvd-3295080121 142/168
142
Selects the thumbnail type shown in the Title
List.
You can see the CI information. The
displayed information differs depending on
the CI module.
You can check the current software version
of the built-in digital tuner and keep it up to
date with the latest software.
Manual UpdateUpdates the software manually.
To cancel, press SYSTEM MENU.
The new software will be available next time
the recorder is turned on.
Auto Update
Technical Info.
You can check the current hardware andsoftware versions of the digital tuner.
Other Settings(Options 2)
You can make other operation settings.
Restart USB DeviceRestarts the connected USB device if it does
not respond to the recorder. If the connected
USB device still does not work properly, try
following:
– Turn the connected USB device off and on
again.
– Disconnect and then connect the USB
cable.
Confirm PrinterDisplays the manufacturer and model name
of the printer connected to the recorder. Note
that this function may not work depending
on the printer.
Selects the tuner for the TV Pause (page 79).
Set Preview (HDD only)
Quick
Preview
Plays short excerpts from
throughout the selectedtitle.
Normal Plays the selected titlefrom the beginning.
CI Information (RDR-HXD795/ HXD895/HXD995/HXD1095
only)
Software Update
On Updates the softwareautomatically. Normally,select this position.
Off Does not update thesoftware automatically.
USB
TV Pause
TV’s Tuner Selects this whenconnecting the recorder toyour TV using the SCART jack.
Recorder’sTuner
Selects this whenconnecting the recorder toyour TV not using theSCART jack.

8/18/2019 Instructio Operation Manual DVD 3295080121
http://slidepdf.com/reader/full/instructio-operation-manual-dvd-3295080121 143/168
143
A d d
i t i o n a l I n f o r m a t i o n
Additional Information
Troubleshooting
If you experience any of the followingdifficulties while using the recorder, use this
troubleshooting guide to help remedy the
problem before requesting repairs. Should
any problem persist, consult your nearest
Sony dealer.
The power does not turn on., Check that the mains lead is connected
securely.
The power of the recorder turns off at the
same time as the TV is turned off., This is caused by the ‘BRAVIA’ Sync
features. Set “Control for HDMI” to “Off”
in the “HDMI Output” setup to cancel this
function (page 140).
The channel is not found or stored ormissed., Make sure that your aerial is properly
connected to the recorder.
, Confirm with your dealer that you are in anarea that can receive a digital signal.
, Check your aerial installation.
There is no picture., Re-connect all connecting cords securely.
, The connecting cords are damaged.
, Check the connection to your TV
(page 18).
, Switch the input selector on your TV (such
as to “VCR” and “AV 1”) so that the signal
from the recorder appears on the TV
screen.
, Check that the “Video In/Out” setup is set
to the appropriate item that conforms to
your system (page 130).
, If you connect the recorder to your TV via
only the COMPONENT VIDEO OUT
jacks, set “Component Video Out” in the
“Video In/Out” setup to “Progressive”
(page 130).
, (For RDR-HXD790/HXD890/HXD990/
HXD1090) A scrambled channel is
selected.
, (For RDR-HXD795/HXD895/HXD995/
HXD1095) A scrambled channel is
selected. Insert the proper CAM (page 26).
, A HD (High Definition) programme is
selected.
, A radio channel is selected.
, When playing a double-layer DVD, thevideo and audio may be momentarily
interrupted at the point where the layersswitch.
Picture noise appears., If the picture output signal from your
recorder passes through your VCR to get to
your TV, or if you are connected to a
combination TV/VIDEO player, the copy-
protection signal applied to some DVD
programmes could affect picture quality. If
you still experience this problem even
when you connect your recorder directly to
your TV, try connecting your recorder to
your TV’s S VIDEO input.
, You have set the recorder to progressive
format even though your TV cannot accept
the progressive signal. In this case, hold
down x (stop) on the recorder, and press
Z (open/close) on the recorder.
, Even if your TV is compatible withprogressive format (525p/625p) signals,
the image may be affected when you set
the recorder to progressive format. In this
case, hold down x (stop) on the recorder,
and press Z (open/close) on the unit and
the recorder is set to normal (interlace)
format.
, You are playing a title recorded in a colour
system that is different from your TV.
, Noise may appear in the pictures recorded
on the HDD, which is due to the
characteristics of HDD, and is not a
malfunction.
, When playing a double-layer DVD, the
video and audio may be momentarily
interrupted at the point where the layers
switch.
Power
Tuner
Picture
,continued

8/18/2019 Instructio Operation Manual DVD 3295080121
http://slidepdf.com/reader/full/instructio-operation-manual-dvd-3295080121 144/168
144
There is no picture or picture noiseappears when connected to the DV IN
jack., Try the following:1Turn the recorder off
and on again.2Turn the connected
equipment off and on again.3Disconnect
and then connect the i.LINK cable again.
There is no picture or picture noise appears
when connected to the HDMI OUT jack., Try the following:1Turn the recorder off
and on again.2Turn the connected
equipment off and on again.3Disconnect
and then connect the HDMI cord again.
, If the HDMI OUT jack is used for video
output, changing the “Screen Resolution”setting in the “HDMI Output” setup may
solve the problem (page 139). Connect the
TV and the recorder using a video jack
other than HDMI OUT, and switch the
TV’s input to the connected video input so
that you can see the on-screen displays.
Change the “Screen Resolution” setting in
the “HDMI Output” setup, and switch the
TV’s input back to HDMI. If the picture
still does not appear, repeat the steps and
try other options.
, The recorder is connected to an input
device that is not HDCP compliant
(page 22).
, When picture noise appears after you
change the “Screen Resolution” setting,
hold down x (stop) on the recorder, and
press Z (open/close) on the recorder.
TV programme reception does not fill thescreen., Set the channel manually in “Manual CH
Setting” in the “Analog Tuner” setup
(page 128).
, Select the correct source using the INPUT
button, or select a channel of any TV
programme using the PROG +/– buttons.
The picture is breaking up., The signal strength is low.
, Check aerial installation.
TV programme pictures are distorted., Reorient the TV aerial.
, Adjust the picture (refer to the TV’s
instruction manual).
, Place the recorder and TV farther apart.
, Place the TV and any bunched aerial
cables farther apart.
, The aerial cable is connected to the
AERIAL OUT jack on the recorder.
Connect the cable to the AERIAL IN jack.
, The recorder’s colour system is different
from your TV. Hold down x (stop) on the
recorder, and press INPUT on the recorder
to change the recorder’s colour system.
TV channels cannot be changed., A timer recording started, which changed
the channels.
, The channel is skipped (page 128).
, The Parental Lock is activated (page 138).
The picture from equipment connected to
the recorder’s input jack does not appearon the screen., If the equipment is connected to the LINE
1/DECODER jack, select “L1” in the front
panel display by pressing INPUT.
If the equipment is connected to the LINE
2 IN jacks, select “L2” in the front panel
display by pressing INPUT.
The playback picture or TV programme
from the equipment connected throughthe recorder is distorted., If the playback picture output from a DVD
player, VCR, or tuner goes through your
recorder before reaching your TV, the
copy-protection signal applied to some
programmes could affect picture quality.
Disconnect the playback equipment in
question and connect it directly to your
TV.
The picture does not fill the screen., Set “TV Type” in the “Playback” setup in
accordance with the screen size of your TV
(page 137).
The picture does not fill the screen, eventhough the picture size is set in “TV
Type” in the “Playback” setup., The picture size of the title is fixed.
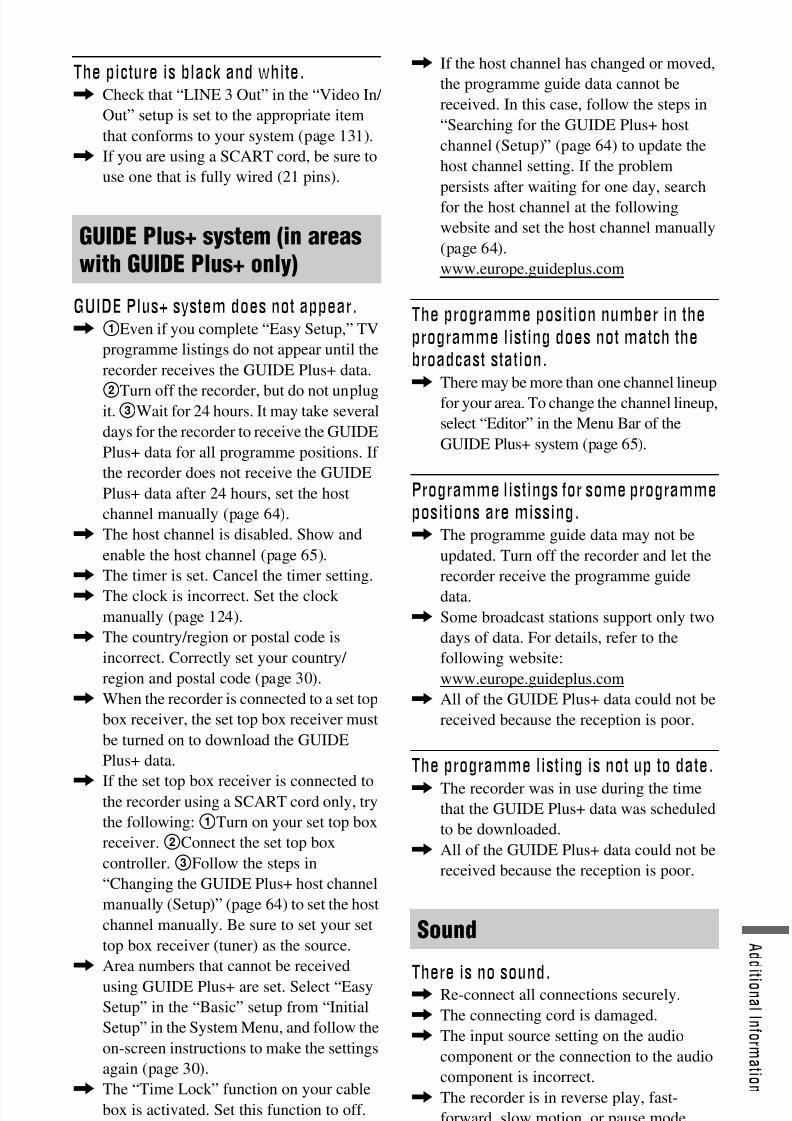
8/18/2019 Instructio Operation Manual DVD 3295080121
http://slidepdf.com/reader/full/instructio-operation-manual-dvd-3295080121 145/168
145
A d d
i t i o n a l I n f o r m a t i o n
The picture is black and white., Check that “LINE 3 Out” in the “Video In/
Out” setup is set to the appropriate item
that conforms to your system (page 131).
, If you are using a SCART cord, be sure to
use one that is fully wired (21 pins).
GUIDE Plus+ system does not appear., 1Even if you complete “Easy Setup,” TV
programme listings do not appear until the
recorder receives the GUIDE Plus+ data.
2Turn off the recorder, but do not unplugit.3Wait for 24 hours. It may take several
days for the recorder to receive the GUIDE
Plus+ data for all programme positions. If
the recorder does not receive the GUIDE
Plus+ data after 24 hours, set the host
channel manually (page 64).
, The host channel is disabled. Show and
enable the host channel (page 65).
, The timer is set. Cancel the timer setting.
, The clock is incorrect. Set the clock
manually (page 124).
, The country/region or postal code is
incorrect. Correctly set your country/
region and postal code (page 30).
, When the recorder is connected to a set top
box receiver, the set top box receiver must
be turned on to download the GUIDE
Plus+ data.
, If the set top box receiver is connected tothe recorder using a SCART cord only, try
the following:1Turn on your set top box
receiver.2Connect the set top box
controller.3Follow the steps in
“Changing the GUIDE Plus+ host channel
manually (Setup)” (page 64) to set the host
channel manually. Be sure to set your set
top box receiver (tuner) as the source.
, Area numbers that cannot be received
using GUIDE Plus+ are set. Select “Easy
Setup” in the “Basic” setup from “Initial
Setup” in the System Menu, and follow the
on-screen instructions to make the settings
again (page 30).
, The “Time Lock” function on your cable
box is activated. Set this function to off.
, If the host channel has changed or moved,
the programme guide data cannot be
received. In this case, follow the steps in
“Searching for the GUIDE Plus+ host
channel (Setup)” (page 64) to update the
host channel setting. If the problem
persists after waiting for one day, search
for the host channel at the following
website and set the host channel manually
(page 64).
www.europe.guideplus.com
The programme position number in the
programme listing does not match thebroadcast station., There may be more than one channel lineup
for your area. To change the channel lineup,
select “Editor” in the Menu Bar of the
GUIDE Plus+ system (page 65).
Programme listings for some programmepositions are missing., The programme guide data may not be
updated. Turn off the recorder and let the
recorder receive the programme guide
data.
, Some broadcast stations support only two
days of data. For details, refer to the
following website:
www.europe.guideplus.com
, All of the GUIDE Plus+ data could not be
received because the reception is poor.
The programme listing is not up to date.
, The recorder was in use during the timethat the GUIDE Plus+ data was scheduled
to be downloaded.
, All of the GUIDE Plus+ data could not be
received because the reception is poor.
There is no sound., Re-connect all connections securely.
, The connecting cord is damaged.
, The input source setting on the audio
component or the connection to the audio
component is incorrect.
, The recorder is in reverse play, fast-
forward, slow motion, or pause mode.
GUIDE Plus+ system (in areaswith GUIDE Plus+ only)
Sound
,continued

8/18/2019 Instructio Operation Manual DVD 3295080121
http://slidepdf.com/reader/full/instructio-operation-manual-dvd-3295080121 146/168
146
, If the audio signal does not come through
the DIGITAL OUT (COAXIAL)/HDMI
OUT jacks, check the “Audio Out” setup
(page 133).
, The recorder supports only MP3 audio,
Dolby Digital and MPEG audio for DivX
video files. Press AUDIO and select MP3
audio or MPEG audio.
No sound is output from the HDMI OUT
jack., Try the following:1Turn the recorder off
and on again.2Turn the connected
equipment off and on again.3Disconnect
and then connect the HDMI cord again.
, The HDMI OUT jack is connected to a
DVI device (DVI jacks do not accept audio
signals).
, The equipment connected to the HDMI
OUT jack does not conform to the audio
signal format. In this case, set “Audio
Output” to “PCM” in the “HDMI Output”
setup (page 140).
Sound distortion occurs.
, Set “Analog Tuner Level” in the “AudioIn” setup to “Compression” (page 132).
Sound is noisy., When playing a CD with DTS sound
tracks, noise will come from the LINE 2
OUT R-AUDIO-L jacks, LINE 3 – TV
jack, or LINE 1/DECODER jack
(page 76).
The sound volume is low., The sound volume is low on some DVDs.
The sound volume may improve if you set
“Audio DRC” in the “Audio Out” setup to
“On” (page 134).
, Set “Analog Tuner Level” in the “Audio
In” setup to “Normal” (page 132).
An alternate audio track cannot berecorded or played., When recording from connected
equipment, set “External Audio” to
“Bilingual” in the “Audio In” setup
(page 132).
, Multilingual tracks (main and sub) cannot
be recorded on the HDD (when Video
Mode On), DVD+RWs, DVD-RWs
(Video mode), DVD+Rs, or DVD-Rs
(Video mode). To record the language, set
“Bilingual Recording” in the “Audio In”
setup to “A/L” or “B/R” before recording
(page 132). To record both the main and
sub sounds on a disc, record on DVD-
RWs/DVD-Rs (VR mode). To record on
the HDD, set “HDD Recording Format” to
“Video Mode Off” in the “Recording”
setup (page 137).
, If you have connected an audio component
to the DIGITAL OUT (COAXIAL) jack
and want to change the audio track for the
HDD (when “HDD Recording Format” isset to “Video Mode Off” in the
“Recording” setup (page 137))/DVD-
RWs/DVD-Rs (VR mode) during
playback, set “Dolby Digital Output” in
the “Audio Out” setup to “Dolby Digital ->
PCM” (page 133).
, Bilingual audio streams cannot be
recorded simultaneously from digital
broadcasts.
The sound is breaking up., The signal strength is low.
, Check aerial installation.
The programme position cannot bechanged from the programme positionyou are recording., Set the TV’s input source to “TV.”
Recording does not start immediately
after you press z REC., Operate the recorder only after “LOAD,”
“FORMAT,” or “INFO WRITE”
disappears from the front panel display.
Nothing was recorded even though youset the timer setting correctly., There was a power failure during
recording.
Recording/Timer recording/ Editing

8/18/2019 Instructio Operation Manual DVD 3295080121
http://slidepdf.com/reader/full/instructio-operation-manual-dvd-3295080121 147/168
147
A d d
i t i o n a l I n f o r m a t i o n
, The recorder’s internal clock stopped due
to a power failure that lasted for more than
1 hour. Reset the clock (page 124).
, The channel was disabled after the timer
recording was set. See “Manual CH
Setting” on page 128.
, The programme position was hidden after
the timer recording was set. (See
“Disabling programme positions (Editor)”
on page 65.)
, Disconnect the mains lead from the mains,
and connect it again.
, The programme contains copy protection
signals that restrict copying.
, Another timer setting overlapped the timer
setting (page 59, 72).
, There is no DVD inside the recorder., There is not enough disc space for the
recording.
, The set top box receiver was turned off.
, The set top box controller was incorrectly
connected (page 18).
, The settings in “Setup” in the Menu bar
have been changed (page 64).
, The recorder was in the process of
dubbing.
, A scrambled channel is selected.
Recording does not stop immediatelyafter you press x REC STOP., It will take a few seconds for the recorder
to input disc data before recording can
stop.
On-screen instructions may appear after
pressing x REC STOP. In this case,
follow the on-screen instructions.
Recording does not stop after you press
x., Press x REC STOP.
Timer recording is not complete or didnot start from the beginning., There was a power failure during
recording. If the power recovers when
there is a timer recording, the recorder
resumes recording.
Should the power failure continue for more
than 1 hour, reset the clock (page 124).
, Another timer setting overlapped the timer
setting (page 59, 72).
, Disc space was not sufficient.
, The VPS/PDC function is working.
Contents previously recorded wereerased., Data that is not playable on this recorder
but was recorded on a DVD with a PC will
be erased from the disc when the disc is
inserted.
The VPS/PDC function does not operate., Check that the clock and date are set
correctly.
, Check that the VPS/PDC time you set is
correct (there might be a mistake in the TV
programme guide). If the broadcast you
wanted to record did not send the correct
VPS/PDC information, the recorder will
not start recording., If the reception is poor, the VPS/PDC
signal might be altered and the recorder
might not start recording.
, The VPS/PDC function may not work if
the GUIDE Plus+ host channel setup is not
complete.
, The VPS/PDC function does not work
when the GUIDE Plus+ data is being
downloaded.
The recorder does not play any type of
disc (except HDD)., The disc is upside down. Insert the disc
with the labelled side facing up.
, The disc is not correctly inserted.
, Moisture has condensed inside therecorder. In this case, if the recorder is on,
leave it on (if it is off, leave it off) for about
an hour until the moisture evaporates.
, If the disc was recorded on another
recorder and was not finalised (page 46),
the recorder cannot play the disc.
The recorder does not start playback from
the beginning., Resume play was activated (page 74).
, You have inserted a DVD whose Title
menu or DVD menu automatically appears
on the TV screen when it is first inserted.
Use the menu to start playback.
Playback
,continued
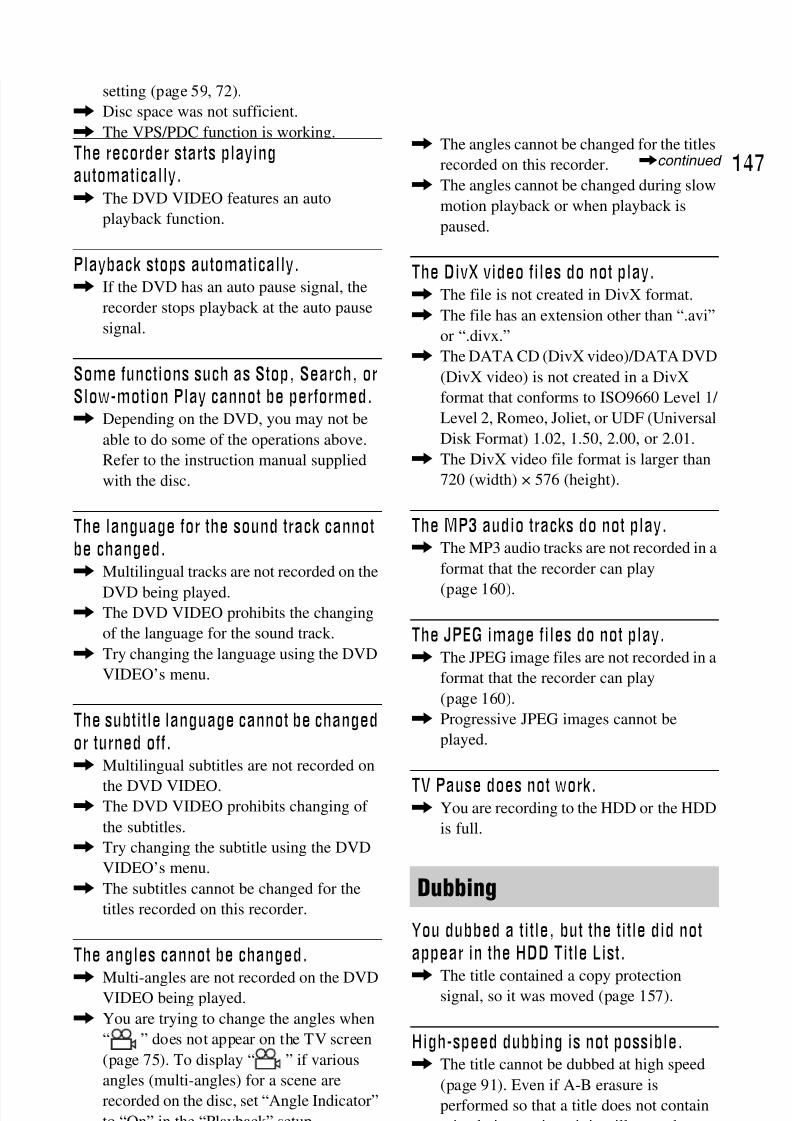
8/18/2019 Instructio Operation Manual DVD 3295080121
http://slidepdf.com/reader/full/instructio-operation-manual-dvd-3295080121 148/168
148
The recorder starts playingautomatically., The DVD VIDEO features an auto
playback function.
Playback stops automatically., If the DVD has an auto pause signal, the
recorder stops playback at the auto pause
signal.
Some functions such as Stop, Search, orSlow-motion Play cannot be performed., Depending on the DVD, you may not be
able to do some of the operations above.
Refer to the instruction manual supplied
with the disc.
The language for the sound track cannot
be changed., Multilingual tracks are not recorded on the
DVD being played.
, The DVD VIDEO prohibits the changing
of the language for the sound track.
, Try changing the language using the DVD
VIDEO’s menu.
The subtitle language cannot be changed
or turned off., Multilingual subtitles are not recorded on
the DVD VIDEO.
, The DVD VIDEO prohibits changing of
the subtitles.
, Try changing the subtitle using the DVD
VIDEO’s menu., The subtitles cannot be changed for the
titles recorded on this recorder.
The angles cannot be changed., Multi-angles are not recorded on the DVD
VIDEO being played.
, You are trying to change the angles when
“ ” does not appear on the TV screen
(page 75). To display “ ” if variousangles (multi-angles) for a scene are
recorded on the disc, set “Angle Indicator”
to “On” in the “Playback” setup
(page 138).
, The DVD VIDEO prohibits changing
angles.
, Try changing the angle using the DVD
VIDEO’s menu.
, The angles cannot be changed for the titles
recorded on this recorder.
, The angles cannot be changed during slow
motion playback or when playback is
paused.
The DivX video files do not play., The file is not created in DivX format.
, The file has an extension other than “.avi”
or “.divx.”
, The DATA CD (DivX video)/DATA DVD
(DivX video) is not created in a DivX
format that conforms to ISO9660 Level 1/
Level 2, Romeo, Joliet, or UDF (Universal
Disk Format) 1.02, 1.50, 2.00, or 2.01.
, The DivX video file format is larger than
720 (width) × 576 (height).
The MP3 audio tracks do not play., The MP3 audio tracks are not recorded in a
format that the recorder can play
(page 160).
The JPEG image files do not play., The JPEG image files are not recorded in a
format that the recorder can play
(page 160).
, Progressive JPEG images cannot be
played.
TV Pause does not work., You are recording to the HDD or the HDD
is full.
You dubbed a title, but the title did not
appear in the HDD Title List., The title contained a copy protection
signal, so it was moved (page 157).
High-speed dubbing is not possible.
, The title cannot be dubbed at high speed(page 91). Even if A-B erasure is
performed so that a title does not contain
mixed picture sizes, it is still treated as a
title with mixed picture sizes.
HDD/DVD Dubbing is not possible., The title cannot be dubbed (page 90).
Dubbing

8/18/2019 Instructio Operation Manual DVD 3295080121
http://slidepdf.com/reader/full/instructio-operation-manual-dvd-3295080121 149/168
149
A d d
i t i o n a l I n f o r m a t i o n
HDD camcorder dubbing is not possible., An HDD camcorder which is not
supported by this recorder is connected
(page 94).
, The HDD camcorder is not set to the USB
connection mode (page 95).
, The HDD camcorder contains only thecontents that have already been dubbed to
the recorder when you are dubbing using
the ONE-TOUCH DUB button or
“Incremental Dubbing.”
The clock has stopped., Set the clock again (page 124).
The clock is wrong., Set the clock again (page 124). If you
cannot set the clock, wait until the clock
data is received and the clock is
automatically adjusted.
The timer indicator is flashing., The disc does not have enough space.
, Insert a recordable disc into the recorder.
, The inserted DVD is protected (page 45).
The clock does not appear in the front
panel display when the recorder is turnedoff., “Front Panel Display” is set to “Off” in the
“Options” setup (page 141).
The title or station name is not correctlydisplayed., In some areas, letters or symbols that the
recorder cannot record or display are
replaced with “*.”
The remote does not function., Different command modes are set for the
recorder and remote. Set the same
command mode (page 141). The default
command mode setting for this recorder
and the supplied remote is “3 (Default
setting).” You can check the current
command mode in the front panel display
(page 141).
, The batteries are weak.
, The remote is too far from the recorder.
, The remote’s manufacturer code returned
to the default setting when you replaced
the batteries. Reset the code (page 28)., The remote is not pointed at the remote
sensor on the recorder.
The recorder does not detect a USB
device connected to the recorder.,
Make sure that the USB device is securelyconnected to the recorder (page 142).
, Check if the USB device or a cable is
damaged.
, Check if the USB device is on.
, The USB device is connected via a USB
hub. Connect the USB device directly to
the recorder.
Display language on the screen switches
automatically., When “Control for HDMI” is set to “On”
(default) in the “HDMI Output” setup
(page 140), the display language on the
screen automatically switches, according
to the language setting of the connected
TV, if you change the language settings on
your TV, etc.
The ‘BRAVIA’ Sync features do notoperate., Your TV is not compatible with the
‘BRAVIA’ Sync features.
, “Control for HDMI” is set to “Off” in the
“HDMI Output” setup (page 140).
, The recorder is connected to the TV via an
amplifier. Connect the recorder directly to
the TV.
Display
Remote control
Others
,continued

8/18/2019 Instructio Operation Manual DVD 3295080121
http://slidepdf.com/reader/full/instructio-operation-manual-dvd-3295080121 150/168
150
The recorder does not operate properly., Press down [ / 1 on the recorder for more
than five seconds until the recorder turns
off. Then, press [ / 1 again to turn on the
recorder.
, When static electricity, etc., causes the
recorder to operate abnormally, turn off therecorder and wait until the clock appears in
the front panel display. Then, unplug the
recorder and after leaving it off for a while,
plug it in again.
The disc tray does not open after youpress Z (open/close)., It may take a few seconds for the disc tray
to open after you have recorded or edited aDVD. This is because the recorder is
adding disc data to the disc.
Any buttons do not function and
“LOCKED” appears in the front panel
display., The recorder is locked. Cancel the Child
Lock (page 14).
The disc tray does not open and“TRAYLOCKED” appears in the front
panel display., Contact your Sony dealer or local
authorized Sony service facility.
“REPAIR” appears in the front panel
display., The recorder’s repair function is activated
to repair the hard disk drive or disc. Leave
the recorder on until “REPAIR” disappears
from the front panel display. Some data
may be lost even if the repair function is
activated.
“E01” appears in the front panel display.
, There is a problem in the HDD. Contactyour nearest Sony dealer. Note that
contents on the HDD may be erased when
servicing this unit.
“E02” appears in the front panel display., The HDD information is incorrect. You
cannot make a new recording to the HDD.
Format the HDD following the instructions
of “Format HDD.” (page 124). Note that
all of the recorded contents on the HDD
will be erased. If this does not fix theproblem, contact your nearest Sony dealer.
“UPDATE” appears in the front panel
display., The recorder is updating the EPG and other
information.
The Parental Lock does not work.
, Check the “D.TV Age Limit” setting in the
“Parental Lock” setup (page 139).
Mechanical sounds are heard when the
recorder is off., While the recorder is updating the EPG
information, operational noises (such as
the internal fan) may be heard, even when
the power is off. This is not a malfunction.
, While the recorder is adjusting the clock
for the Auto Clock Set function or
updating the EPG information, operational
noises may be heard, even when the power
is off. This is not a malfunction.
Resetting the Recorder
You can reset the recorder to all its factory
settings.
1 Make sure that the recorder is turned
on and remove the disc.
2 Hold down x (stop) on the recorder
and press [ / 1 on the recorder.
All settings are reset and the recorderturns off.

8/18/2019 Instructio Operation Manual DVD 3295080121
http://slidepdf.com/reader/full/instructio-operation-manual-dvd-3295080121 151/168
151
A d d
i t i o n a l I n f o r m a t i o n
Recordable and Playable Discs
Type Disc Logo Icon usedin this
manual
Formatting(new discs)
Compatibility with otherDVD players (finalising)
Hard diskdrive(internal)
VRmode
Select “VideoMode Off” in“HDD RecordingFormat”(page 137)
Dub HDD contents to aDVD (VR mode) to playon other DVD players
Videomode
Select “VideoMode On”(default) in “HDD
Recording Format”(page 137)
Dub HDD contents to aDVD (Video mode) toplay on other DVD
players
DVD+RW Automaticallyformatted in +VRmode (DVD+RWVIDEO)
Playable on DVD+RWcompatible players(automatically finalised)
DVD-RW VRmode
Format in VRmode (page 38)
Playable only on VRmode compatible players(finalisation unnecessary)
Videomode
Format in Videomode (page 38)
Playable on most DVDplayers (finalisationnecessary) (page 46)
DVD+R Automatically
formatted in +VRmode (DVD+RVIDEO)
Playable on most DVD
players (finalisationnecessary) (page 46)
DVD+R DL
DVD-R VRmode
Format in VRmode (page 38)*1
Formatting is
performed in the“Format” setup(page 49).
Playable only on DVD-Rin VR mode compatibleplayers (finalisation
necessary) (page 46)
DVD-RDL
Videomode
Automaticallyformatted in Videomode
Playable on most DVDplayers (finalisationnecessary) (page 46)
HDD
+RW
-RWVR
-RWVideo
+R
-
RVR
-RVideo
,continued

8/18/2019 Instructio Operation Manual DVD 3295080121
http://slidepdf.com/reader/full/instructio-operation-manual-dvd-3295080121 152/168
152
Usable disc versions (as of April 2008)• 8x-speed or slower DVD+RWs
• 6x-speed or slower DVD-RWs (Ver.1.1,
Ver.1.2 with CPRM*2)
• 16x-speed or slower DVD+Rs
• 16x-speed or slower DVD-Rs (Ver.2.0,
Ver.2.1 with CPRM
*2
)• 8x-speed or slower DVD+R DL (Double
Layer) discs
• 8x-speed or slower DVD-R DL (Dual
Layer) discs (Ver.3.0 with CPRM*2)
“DVD+RW,” “DVD-RW,” “DVD+R,” “DVD+R
DL,” “DVD-R,” and “DVD-R DL” are
trademarks.
*1
When an unformatted DVD-R is inserted intothis recorder, it is automatically formatted in
Video mode. To format a new DVD-R in VR
mode, format in the “Format” setup (page 49).*2 CPRM (Content Protection for Recordable
Media) is a coding technology that protects
copyrights for images.
Discs that cannot be recorded on• DVD-RAMs
Maximum recordable number of titles
* The maximum length for one title is 12 hours.
b Notes
• You cannot mix VR mode and Video mode on
the same DVD-RW. To change the disc’s
format, reformat the disc (page 49). Note that the
disc’s contents will be erased after reformatting.
• You cannot shorten the time required for
recording even with high-speed discs.
• It is recommended that you use discs with “ForVideo” printed on their packaging.
• You cannot add new recordings to DVD+Rs,
DVD-Rs, or DVD-RWs (Video mode) that
contain recordings made on other DVD
equipment.
• In some cases, you may not be able to add new
recordings to DVD+RWs that contain
recordings made on other DVD equipment. If
you do add a new recording, note that this
recorder will rewrite the DVD menu.
• You cannot edit recordings on DVD+RWs,DVD-RWs (Video mode), DVD+Rs, or DVD-
Rs that are made on other DVD equipment.
• If the disc contains PC data unrecognisable by
this recorder, the data may be erased.
• You may not be able to record, edit, or dub on
some recordable discs, depending on the disc.
• Do not insert any discs that cannot be recorded or
played on this recorder. This may cause the
recorder to malfunction.
Disc Number of titles
HDD* 999
DVD-RW/DVD-R 99
DVD+RW/DVD+R 49
DVD+R DL 49
DVD-R DL 99

8/18/2019 Instructio Operation Manual DVD 3295080121
http://slidepdf.com/reader/full/instructio-operation-manual-dvd-3295080121 153/168
153
A d d
i t i o n a l I n f o r m a t i o n
Playable Discs
“DVD VIDEO” and “CD” are trademarks.
DivX, DivX Certified, and associated logos are
trademarks of DivX, Inc. and are used under
license.
DivX® is a video file compression technology,
developed by DivX, Inc.
* If the DVD-RAM has a removable cartridge,
remove the cartridge before playback.
Discs that cannot be played• PHOTO CDs
• CD-ROMs/CD-Rs/CD-RWs that are
recorded in a format different from the
formats mentioned in the table above.• Data part of CD-Extras
• BDs (Blu-ray Discs)
• HD DVDs
• Discs recorded with an AVCHD-
compatible DVD video camera
• DVD-ROMs/DVD+RWs/DVD-RWs/
DVD+Rs/DVD-Rs that do not contain
DVD Video, DivX video, JPEG image
files, or MP3 audio tracks.
• DVD Audio discs• Cartridge-only type DVD-RAMs.
• HD layer on Super Audio CDs
• DVD VIDEOs with a different region code
(page 154).
• DVDs that were recorded on a different
recorder and not correctly finalised.
Note on playback operations of DVD
VIDEOs/VIDEO CDsSome playback operations of DVD
VIDEOs/VIDEO CDs may be intentionally
set by software producers. Since this
recorder plays DVD VIDEOs/VIDEO CDs
according to the disc contents the software
producers designed, some playback features
may not be available. Refer to the
instructions supplied with the DVD
VIDEOs/VIDEO CDs.
Type Disc LogoIcon used inthis manual
Characteristics
DVD VIDEO
Discs such as movies that can bepurchased or rentedThis recorder also recognises DVD-RAMs* as DVD Video compatiblediscs.
VIDEO CDVIDEO CDs or CD-Rs/CD-RWs inVIDEO CD/Super VIDEO CD format
CDMusic CDs or CD-Rs/CD-RWs inmusic CD format
DATA DVD —
DVD+RWs/DVD+Rs/DVD-RAMs*containing MP3 audio tracks or DivXvideo filesDVD-RWs/DVD-Rs/DVD-ROMscontaining MP3 audio tracks, JPEGimage files or DivX video files
DATA CD —CD-ROMs/CD-Rs/CD-RWscontaining either MP3 audio tracks,JPEG image files or DivX video files
DVD
VCD
CD
DATA DVD
DATA CD
,continued

8/18/2019 Instructio Operation Manual DVD 3295080121
http://slidepdf.com/reader/full/instructio-operation-manual-dvd-3295080121 154/168
154
Region code (DVD VIDEO only)Your recorder has a region code printed on
the rear of the unit and will only play DVD
VIDEOs (playback only) labelled with
identical region codes. This system is used to
protect copyrights.
DVD VIDEOs labelled will also playon this recorder.
If you try to play any other DVD VIDEO,
the message “Playback prohibited by region
code.” will appear on the TV screen.
Depending on the DVD VIDEO, no region
code indication may be labelled even though
playing the DVD VIDEO is prohibited by
area restrictions.
Music discs encoded with copyright
protection technologiesThis product is designed to play back discs
that conform to the Compact Disc (CD)
standard.
Various music discs encoded with copyrightprotection technologies are being marketed
by some record companies. Please be aware
that among those discs, there are some that
do not conform to the CD standard and may
not be playable by this product.
Note on DualDiscsA DualDisc is a two sided disc product
which mates DVD recorded material on one
side with digital audio material on the otherside.
However, since the audio material side does
not conform to the Compact Disc (CD)
standard, playback on this product is not
guaranteed.
b Notes
• Some DVD+RWs/DVD+Rs, DVD-RWs/DVD-
Rs, DVD-RAMs, or CD-RWs/CD-Rs cannot be
played on this recorder due to the recording
quality or physical condition of the disc, or the
characteristics of the recording device and
authoring software. The disc will not play if it
has not been correctly finalised. For moreinformation, refer to the operating instructions
for the recording device.
• If the disc contains PC data unrecognisable by
this recorder, the data may be erased.
• Do not insert any discs that cannot be recorded or
played on this recorder. This may cause the
recorder to malfunction.
About Recording/ Dubbing Mode
Like the standard ×3 recording modes of
video tapes, you can select the desired
recording mode using the REC MODE
button.
Recording modes with higher quality
provide a more beautiful recording, but the
large data volume also results in a shorter
recording time.
Conversely, a longer duration provides a
longer recording time, but the lower data
volume results in a coarser picture quality.
To select further options for recording mode
(manual recording mode), set “Manual Rec.
Mode” to “On (go to setup)” in the“Recording” setup (page 135). To record
pictures in higher quality than HQ mode on
the HDD, set “Manual Rec. Mode” to “On
(go to setup),” and then select “HQ+.” The
table on the following pages shows the
approximate recording times for the HDD
and the different DVD types in each manual
recording mode, as well as the standard
recording mode equivalents.
z Hint
To easily select a manual recording mode, press
REC MODE repeatedly to display “MN,” and
select a manual recording mode using < / ,.
ALL
Region code

8/18/2019 Instructio Operation Manual DVD 3295080121
http://slidepdf.com/reader/full/instructio-operation-manual-dvd-3295080121 155/168
155
A d d
i t i o n a l I n f o r m a t i o n
Recording time in each recording modeBold lines indicate noticeable level differences in recording picture quality.
Recordingmode
Approx. recording time (hours)
HDD DVD+RW/ DVD-RW/ DVD+R/ DVD-R
DVD+R DL/ DVD-R DL
RDR-
HXD790/ HXD795
RDR-
HXD890/ HXD895
RDR-
HXD990/ HXD995
RDR-
HXD1090/ HXD1095
HQ+*1 17 23 36 73 – –
PCM*2 25 34 53 105 1 hr. 1 min. 1 hr. 51 min.
HQ MN32 25 34 53 105 1 hr. 1 min. 1 hr. 51 min.
MN31 27 36 57 115 1 hr. 5 min. 1 hr. 57 min.
MN30 29 39 61 120 1 hr. 10 min. 2 hr. 6 min.
MN29 31 42 66 130 1 hr. 15 min. 2 hr. 15 min.
MN28 33 45 70 140 1 hr. 20 min. 2 hr. 24 min.
MN27 36 48 75 150 1 hr. 25 min. 2 hr. 33 min.
HSP MN26 37 50 79 155 1 hr. 30 min. 2 hr. 41 min.
MN25 39 53 84 165 1 hr. 35 min. 2 hr. 50 min.
MN24 42 56 88 175 1 hr. 40 min. 2 hr. 59 min.
MN23 44 59 92 185 1 hr. 45 min. 3 hr. 8 min.
MN22 46 62 97 195 1 hr. 50 min. 3 hr. 17 min.SP MN21 51 68 105 210 2 3 hr. 35 min.
MN20 54 73 115 230 2 hr. 10 min. 3 hr. 53 min.
MN19 59 79 120 245 2 hr. 20 min. 4 hr. 11 min.
LSP MN18 63 84 130 265 2 hr. 30 min. 4 hr. 29 min.
MN17 67 90 140 280 2 hr. 40 min. 4 hr. 47 min.
MN16 72 96 150 300 2 hr. 50 min. 5 hr. 5 min.
ESP MN15 75 100 155 315 3 5 hr. 23 min.
MN14 78 105 165 335 3 hr. 10 min. 5 hr. 41 min.
MN13 82 110 175 350 3 hr. 20 min. 5 hr. 59 min.
MN12 86 115 185 370 3 hr. 30 min. 6 hr. 17 min.
MN11 90 120 190 390 3 hr. 40 min. 6 hr. 35 min.
MN10 93 125 200 405 3 hr. 50 min. 6 hr. 53 min.
LP MN9 100 135 210 420 4 7 hr. 11 min.
MN8 110 150 235 475 4 hr. 30 min. 8 hr. 4 min.
MN7 120 165 265 530 5 8 hr. 58 min.
EP MN6*3 150 200 315 635 6 10 hr. 46 min.
MN5*3 175 235 370 745 7 12 hr. 34 min.
,continued

8/18/2019 Instructio Operation Manual DVD 3295080121
http://slidepdf.com/reader/full/instructio-operation-manual-dvd-3295080121 156/168
156
*1 Records in higher quality (15 Mbps).
When recording to the HDD in HQ+ mode, recordings are made in “Video Mode Off” format regardless
of the “HDD Recording Format” setting (page 137).
HQ+ mode is not available for DVDs. When recording to DVDs, the recording mode automatically
switches to HQ mode even if you set to HQ+ mode.*2 Audio signals are recorded in 48 kHz PCM format, and video signals are recorded in HQ mode. When
recording a bilingual programme, select the sound to be recorded (page 132).*3 Titles recorded in MN6 or lower mode cannot be dubbed to DVD+RWs/DVD+Rs at high speed.*4 SEP, MN1, MN2, or MN3 mode is not available for DVD+RWs/DVD+Rs/DVD+R DLs. When
recording to DVD+RWs/DVD+Rs, the recording mode automatically switches to SLP mode even if
you set to SEP, MN1, MN2, or MN3 mode.
ResolutionThe first figure refers to when “Input Line
System” is set to “NTSC”; the second when
set to “PAL/SECAM” in the “Basic” setup
(page 125).
For the HDD (“HDD Recording Format” isset to “Video Mode Off”)/DVD-RW (VRmode)/DVD-R (VR mode)HQ+, PCM, MN32 to MN16: 720 × 480 /
720 × 576
MN15 to MN12: 544 × 480 / 544 × 576
MN11 to MN9: 480 × 480 / 544 × 576
MN8 and MN7: 352 × 480 / 352 × 576MN6 to MN1: 352 × 240 / 352 × 288
For the HDD (“HDD Recording Format” isset to “Video Mode On”)/DVD+RW/DVD-RW(Video mode)/DVD+R/DVD-R (Video mode)PCM, MN32 to MN9: 720 × 480 / 720 × 576
MN8 and MN7: 352 × 480 / 352 × 576
MN6 to MN1: 352 × 240 / 352 × 288
z HintAudio signals are recorded in Dolby Digital 2 ch
format (except for PCM mode).
b Notes
• The maximum continuous recording time to the
HDD is 12 hours for a single title. A title longer
than 12 hours is divided.• Situations below may cause slight inaccuracies
with the recording time.
– Recording a programme with poor reception,
or a programme or video source of low picture
quality.
– Recording on a disc that has already been
edited.
– Recording only a still picture or just sound.
SLP MN4*3
200 270 425 850 8 14 hr. 21 min.
SEP MN3*3*4 255 340 530 1060 10 17 hr. 57 min.
MN2*3*4 300 405 635 1275 12 21 hr. 32 min.
MN1*3*4 340 455 710 1420 13 hr. 22 min. 24
Recordingmode
Approx. recording time (hours)
HDD DVD+RW/ DVD-RW/ DVD+R/ DVD-R
DVD+R DL/ DVD-R DL
RDR-HXD790/ HXD795
RDR-HXD890/ HXD895
RDR-HXD990/ HXD995
RDR-HXD1090/ HXD1095
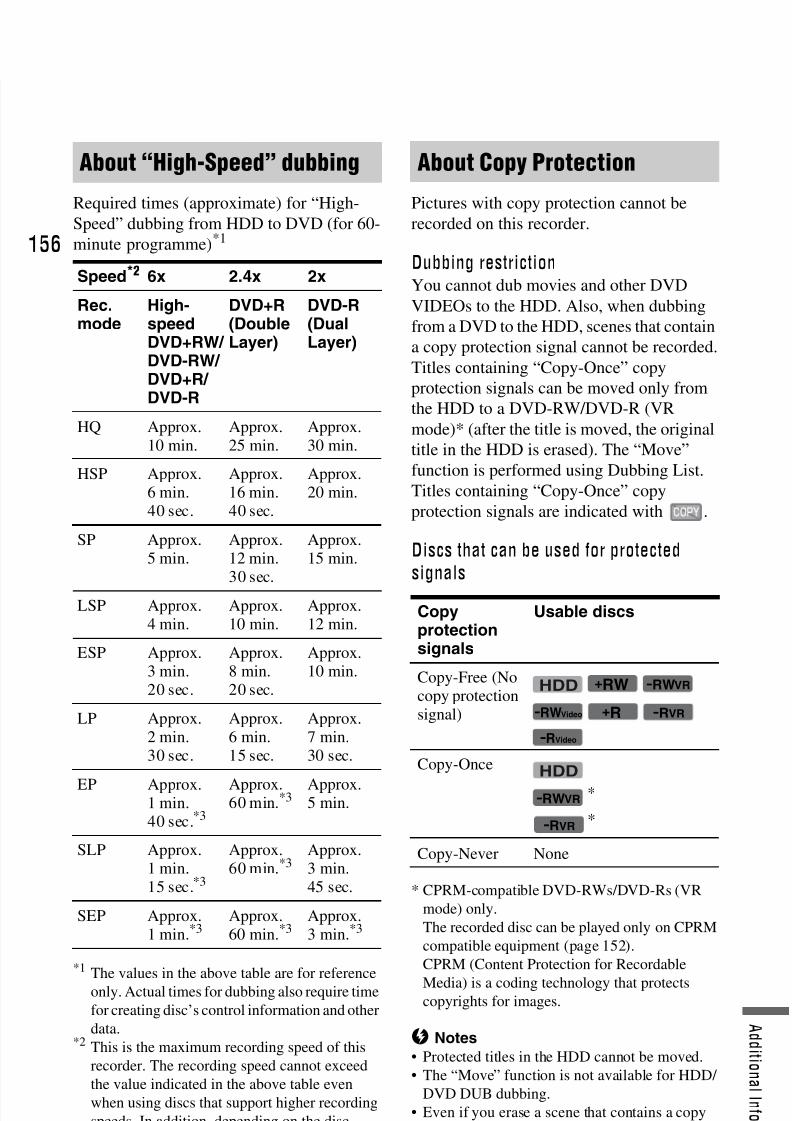
8/18/2019 Instructio Operation Manual DVD 3295080121
http://slidepdf.com/reader/full/instructio-operation-manual-dvd-3295080121 157/168
157
A d d
i t i o n a l I n f o r m a t i o n
Required times (approximate) for “High-
Speed” dubbing from HDD to DVD (for 60-
minute programme)*1
*1 The values in the above table are for reference
only. Actual times for dubbing also require time
for creating disc’s control information and other
data.*2 This is the maximum recording speed of this
recorder. The recording speed cannot exceedthe value indicated in the above table even
when using discs that support higher recording
speeds. In addition, depending on the disc
condition, the recorder may be unable to record
at the maximum recording speed indicated in
the table.*3 “High-Speed” dubbing is not available when
dubbing titles recorded in SEP, SLP, or EP
mode to DVD+RWs and DVD+Rs.
Pictures with copy protection cannot be
recorded on this recorder.
Dubbing restrictionYou cannot dub movies and other DVD
VIDEOs to the HDD. Also, when dubbing
from a DVD to the HDD, scenes that contain
a copy protection signal cannot be recorded.
Titles containing “Copy-Once” copy
protection signals can be moved only from
the HDD to a DVD-RW/DVD-R (VR
mode)* (after the title is moved, the original
title in the HDD is erased). The “Move”
function is performed using Dubbing List.Titles containing “Copy-Once” copy
protection signals are indicated with .
Discs that can be used for protected
signals
* CPRM-compatible DVD-RWs/DVD-Rs (VR
mode) only.
The recorded disc can be played only on CPRM
compatible equipment (page 152).
CPRM (Content Protection for Recordable
Media) is a coding technology that protects
copyrights for images.
b Notes
• Protected titles in the HDD cannot be moved.• The “Move” function is not available for HDD/
DVD DUB dubbing.
• Even if you erase a scene that contains a copy
protection signal, the recording restrictions on
that title are retained.
About “High-Speed” dubbing
Speed*2 6x 2.4x 2x
Rec.mode
High-speedDVD+RW/ DVD-RW/ DVD+R/ DVD-R
DVD+R(DoubleLayer)
DVD-R(DualLayer)
HQ Approx.10 min.
Approx.25 min.
Approx.30 min.
HSP Approx.6 min.40 sec.
Approx.16 min.40 sec.
Approx.20 min.
SP Approx.5 min.
Approx.12 min.30 sec.
Approx.15 min.
LSP Approx.4 min.
Approx.10 min.
Approx.12 min.
ESP Approx.
3 min.20 sec.
Approx.
8 min.20 sec.
Approx.
10 min.
LP Approx.2 min.30 sec.
Approx.6 min.15 sec.
Approx.7 min.30 sec.
EP Approx.1 min.40 sec.*3
Approx.60 min.*3
Approx.5 min.
SLP Approx.
1 min.15 sec.*3
Approx.
60 min.*3
Approx.
3 min.45 sec.
SEP Approx.1 min.*3
Approx.60 min.*3
Approx.3 min.*3
About Copy Protection
Copyprotectionsignals
Usable discs
Copy-Free (Nocopy protectionsignal)
Copy-Once
*
*
Copy-Never None
+RW -RWVR
-RWVideo
-RVideo
+R
HDD
-RVR
HDD
-RWVR
-RVR

8/18/2019 Instructio Operation Manual DVD 3295080121
http://slidepdf.com/reader/full/instructio-operation-manual-dvd-3295080121 158/168
158
Language Code List
For details, see page 134.
The language spellings conform to the ISO 639: 1988 (E/F) standard.
Country/Area Code
For details, see page 138.
Number, Language (Code)
Number, Area (Code)
0118, Argentina (ar)0121, Australia (au)
0120, Austria (at)0205, Belgium (be)0218, Brazil (br)0301, Canada (ca)0312, Chile (cl)0314, China (cn)0411, Denmark (dk)
0609, Finland (fi)0618, France (fr)
0405, Germany (de)0811, Hong Kong (hk)0914, India (in)0904, Indonesia (id)0920, Italy (it)1016, Japan (jp)1118, Korea (kr)
1325, Malaysia (my)1324, Mexico (mx)
1412, Netherlands (nl)1426, New Zealand (nz)1415, Norway (no)1611, Pakistan (pk)1608, Philippines (ph)1620, Portugal (pt)1821, Russia (ru)
1907, Singapore (sg)0519, Spain (es)
1905, Sweden (se)0308, Switzerland (ch)2023, Taiwan (tw)2008, Thailand (th)0702, United Kingdom
(gb)2119, USA (us)

8/18/2019 Instructio Operation Manual DVD 3295080121
http://slidepdf.com/reader/full/instructio-operation-manual-dvd-3295080121 159/168
159
A d d
i t i o n a l I n f o r m a t i o n
Notes About ThisRecorder
On operation
• If the recorder is brought directly from acold to a warm location, or is placed in a
very damp room, moisture may condense
on the lenses inside the recorder. Should
this occur, the recorder may not operate
properly. In this case, if the recorder is on,
leave it on (if it is off, leave it off) for about
an hour until the moisture evaporates.
• When you move the recorder, take out any
discs and do not apply shock or vibration to
the hard disk drive to avoid damaging the
disc or hard disk drive (page 4).
On adjusting volumeDo not turn up the volume while listening to
a section with very low level inputs or no
audio signals. If you do, the speakers may be
damaged when a peak level section is
played.
On cleaningClean the cabinet, panel, and controls with a
soft cloth slightly moistened with a mild
detergent solution. Do not use any type of
abrasive pad, scouring powder or solvent
such as alcohol or benzine.
On cleaning discs, disc/lens cleanersDo not use cleaning discs or disc/lens
cleaners (including wet or spray types).
These may cause the recorder to
malfunction.
Notes about the discs• To keep the disc clean, handle the disc by
its edge. Do not touch the surface. Dust,
fingerprints, or scratches on the disc may
cause it to malfunction.
• Do not expose the disc to direct sunlight or
heat sources such as hot air ducts, or leave
it in a car parked in direct sunlight as the
temperature may rise considerably inside
the car.
• After playing, store the disc in its case.
• Clean the disc with a cleaning cloth. Wipethe disc from the centre out.
• Do not use solvents such as benzine,
thinner, commercially available cleaners,
or anti-static spray intended for vinyl LPs.• Do not use the following discs.
– A disc that has a non-standard shape
(e.g., card, heart).
– A disc with a label or sticker on it.
– A disc that has cellophane tape or sticker
adhesive on it.
On replacement of partsIn the event that this unit is repaired,
repaired parts may be collected for reuse orrecycling purposes.
About CopyrightANY USE OF THIS PRODUCT OTHER
THAN CONSUMER PERSONAL USE IN
ANY MANNER THAT COMPLIES WITH
THE MPEG-2 STANDARD FOR
ENCODING VIDEO INFORMATION
FOR PACKAGED MEDIA ISEXPRESSLY PROHIBITED WITHOUT A
LICENSE UNDER APPLICABLE
PATENTS IN THE MPEG-2 PATENT
PORTFOLIO, WHICH LICENSE IS
AVAILABLE FROM MPEG LA, L.L.C.,
250 STEELE STREET, SUITE 300,
DENVER, COLORADO 80206.

8/18/2019 Instructio Operation Manual DVD 3295080121
http://slidepdf.com/reader/full/instructio-operation-manual-dvd-3295080121 160/168
160
Notes on MP3 AudioTracks, JPEG ImageFiles, DivX Video Files,
and i.Link
MP3 is an audio compression technology
that satisfies certain ISO/MPEG regulations.
JPEG is an image compression technology.
You can play MP3 (MPEG1 Audio Layer 3)
format audio tracks on the HDD, DATA
CDs (CD-ROMs/CD-Rs/CD-RWs) or
DATA DVDs (DVD-ROMs/DVD-RWs/
DVD-Rs/DVD+RWs/DVD+Rs/DVD-
RAMs) or play JPEG image files on the
HDD, DATA CDs (CD-ROMs/CD-Rs/CD-
RWs) or DATA DVDs (DVD-ROMs/DVD-
RWs/DVD-Rs).DivX® is a video file compression
technology, developed by DivX, Inc. This
product is an official DivX® Certified
product. You can play DATA CDs (CD-
ROMs/CD-Rs/CD-RWs) and DATA DVDs
(DVD-ROMs/DVD+RWs/DVD+Rs/DVD-
RWs/DVD-Rs/DVD-RAMs) that contain
DivX video files.
DATA DVDs must be recorded according to
ISO9660 Level 1, Level 2, Romeo, Joliet, orUDF (Universal Disk Format) 1.02, 1.50,
2.00*, or 2.01 format for the recorder to
recognise the MP3 tracks, JPEG image files,
and DivX video files.
DATA CDs must be recorded according to
ISO9660 Level 1, Level 2, Romeo, or Joliet
format for the recorder to recognise the MP3
tracks, JPEG image files, and DivX video
files.You can also play discs recorded in
MultiSession/Border.
Refer to the instructions supplied with the
disc drives and the recording software (not
supplied) for details on the recording format.
* Not available for MP3 audio tracks.
Note on MultiSession/Border discsIf audio tracks and images in Music CD
format or Video CD format are recorded in
the first session/border, only the first
session/border will be played back.
The recorder can play the following tracks
and files:
– MP3 audio tracks with the extension
“.mp3.”
– JPEG image files with the extension“.jpeg” or “.jpg.”
– Baseline JPEG image files that conform to
the Exif 2.2* image files format, and
Y:CB:CR is 4:4:4, 4:2:2, or 4:2:0.
– DivX video files with the extension “.avi”
or “.divx.”* “Exchangeable Image File Format”: The file
format used by digital still cameras.
z HintSince a disc with many trees takes longer to start
playback, it is recommended that you create
albums with no more than two trees.
b Notes
• The recorder will play any data with the
extension “.mp3,” “.jpeg,” “.jpg,” “.avi,” or
“.divx” even if they are not in MP3, JPEG, or
DivX format. Playing these data may generate a
loud noise which could damage your speaker
system.• Depending on the disc, normal playback may not
be possible. For example, the picture may be
unclear, playback may not appear smooth, the
sound may skip, and so on.
• Depending on the disc, playback may take some
time to start.
• Some files cannot be played.
• For MP3 audio tracks and DivX video files, the
recorder can play up to 99 albums each on a
DATA CD or DATA DVD. Up to 99 tracks and
files under an album can be played.
• For JPEG image files, the recorder can load up to
99 albums and/or up to 999 files under an album
on a DATA CD/DATA DVD or the connected
USB device at a time. To view unloaded albums,
reload them.
About MP3 audio tracks, JPEGimage files, and DivX videofiles
MP3 audio tracks, JPEG imagefiles, or DivX video files thatthe recorder can play

8/18/2019 Instructio Operation Manual DVD 3295080121
http://slidepdf.com/reader/full/instructio-operation-manual-dvd-3295080121 161/168
161
A d d
i t i o n a l I n f o r m a t i o n
• Proceeding to the next or another album may
take some time.
• The image size that can be displayed is limited.
The following image sizes can be displayed:
width 160–5,120 pixels by height 120–3,840
pixels.
• This recorder supports MP3 audio tracks
recorded with a sampling frequency of 32 kHz,44.1 kHz, and 48 kHz.
• No more than a 1 GB MP3 audio track can be
played.
• The recorder does not conform to audio tracks in
mp3PRO format.
• The recorder cannot play a DivX video file of a
size larger than 720 (width) × 576 (height)/4 GB.
• The recorder may not play a DivX video file
when the file has been combined from two or
more DivX video files.
Notes on copying JPEG image files/MP3
audio tracks• You cannot copy JPEG image files/MP3 audio
tracks to the HDD if:
– The total number of JPEG image albums on
the HDD exceeds 999.
– The total number of JPEG image files/MP3
audio tracks under an album exceeds 999.
– The MP3 audio tracks are 1 GB or larger.
• Note that the size of JPEG image files copied tothe HDD may be automatically increased to fit
the TV screen.
• You cannot copy JPEG image files onto a DATA
DVD finalised on other recorders or devices.
• If a warning message indicating that the HDD is
full appears, erase several albums or files to
make space. For details on erasing tracks or files,
see page 107 or 117.
The DV IN jack on this recorder is i.LINK-
compliant for digital video cameras.
i.LINK is a more familiar term for IEEE
1394 data transport bus proposed by SONY,
and is a trademark approved by many
corporations.
IEEE 1394 is an international standard
standardized by the Institute of Electrical
and Electronics Engineers.
For details on how to dub when this recorder
is connected to other video equipment
having DV jacks, see page 98.
The DV IN jack on this recorder can only
input DVC-SD signals. It cannot outputsignals. The DV IN jack will not accept
MICRO MV signals from equipment such as
a MICRO MV digital video camera with an
i.LINK jack.
For further precautions, see the notes on
page 98.
For details on precautions when connecting
this recorder, also refer to the instruction
manuals for the equipment to be connected.
b Note
Normally, only one piece of equipment can be
connected to this recorder by the i.LINK cable
(DV connecting cable). When connecting this
recorder to i.LINK-compatible equipment having
two or more i.LINK jacks (DV jacks), refer to the
instruction manual of the equipment to be
connected.
i.LINK and are trademarks.
About i.LINK

8/18/2019 Instructio Operation Manual DVD 3295080121
http://slidepdf.com/reader/full/instructio-operation-manual-dvd-3295080121 162/168
162
Specifications
System
Laser: Semiconductor laser
Transmission standards (Digital
broadcasting): DVB-T
Channel coverage (Digital
broadcasting):
VHF: 170 MHz to 230 MHz
UHF: 470 MHz to 862 MHz
Channel coverage (Analogue
broadcasting):
PAL (B/G, D/K, I)/SECAM (L)
VHF: E2 to E12, R1 to R12, F2 toF10, Italian A to H, Ireland A to J,
South Africa 4 to 11, 13
UHF: E21 to E69, R21 to R69, B21 to
B69, F21 to F69
CATV: S01 to S05, S1 to S20, France
B to Q
HYPER: S21 to S41
The above channel coverage merely ensuresthe channel reception within these ranges. It
does not guarantee the ability to receive
signals in all circumstances. The channels
that can be received differ depending on the
country/region.
Video reception: Frequency
synthesizer system
Audio reception: Split carrier systemAerial out: 75-ohm asymmetrical aerial
socket
Timer: Clock: Quartz locked/Timer
indication: 24-hour cycle (digital)
Video recording format: MPEG-2,
MPEG-1
Audio recording format/applicable
bit rate: Dolby Digital 2 ch
256 kbps/128 kbps (in EP, SLP, andSEP mode), PCM
Inputs and outputs
LINE 2 OUT
(AUDIO): Phono jack/2 Vrms/10 kilohms
(VIDEO): Phono jack/1.0 Vp-p
(S VIDEO): 4-pin mini DIN/Y: 1.0 Vp-p,
C: 0.3 Vp-p (PAL)
LINE 2 IN(AUDIO): Phono jack/2 Vrms/more than
22 kilohms
(VIDEO): Phono jack/1.0 Vp-p
(S VIDEO): 4-pin mini DIN/Y: 1.0 Vp-p,
C: 0.3 Vp-p (PAL)
LINE 3 – TV: 21-pin
CVBS OUT
S-Video/RGB OUT (upstream)
LINE 1/DECODER: 21-pin
CVBS IN/OUT
S-Video/RGB IN
Decoder
DV IN: 4-pin/i.LINK S100
DIGITAL OUT (COAXIAL): Phono
jack/0.5 Vp-p/75 ohms
COMPONENT VIDEO OUT
(Y, PB /CB, PR /CR):Phono jack/Y: 1.0 Vp-p,
PB /CB: 0.7 Vp-p, PR /CR: 0.7 Vp-p
G-LINK: mini jack
HDMI OUT: HDMI™ Connector
USB:
USB jack Type A (For connecting
digital still camera, Memory card
reader, USB memory and HDD
camcorder)USB jack Type B (For connecting
PictBridge-compatible printers)
Conditional access module (RDR-
HXD795/HXD895/HXD995/
HXD1095 only): CAM (Conditional
Access Module) slot

8/18/2019 Instructio Operation Manual DVD 3295080121
http://slidepdf.com/reader/full/instructio-operation-manual-dvd-3295080121 163/168
163
A d d
i t i o n a l I n f o r m a t i o n
General
Power requirements: 220-240 V AC,
50/60 Hz
Power consumption:
RDR-HXD790/HXD890/HXD990/
HXD1090: 47 W
RDR-HXD795/HXD895/HXD995/ HXD1095: 49 W
Dimensions (approx.):
430 × 76.5 × 288 mm (width/height/
depth) incl. projecting parts
Hard disk drive capacity:
RDR-HXD790/HXD795: 120 GB
RDR-HXD890/HXD895: 160 GB
RDR-HXD990/HXD995: 250 GB
RDR-HXD1090/HXD1095: 500 GB
Mass (approx.): 4.7 kg
Operating temperature: 5ºC to 35ºC
Operating humidity: 25% to 80%
Supplied accessories:
Mains lead (1)
Aerial cable (1)*
Remote commander (remote) (1)
Set top box controller (1)R6 (size AA) batteries (2)
* Two aerial cables are supplied for some models.
Specifications and design are subject to
change without notice.

8/18/2019 Instructio Operation Manual DVD 3295080121
http://slidepdf.com/reader/full/instructio-operation-manual-dvd-3295080121 164/168
164
Index
Words in quotations appear
in the on-screen displays.
Numerics“96 kHz PCM Output” 133
A“A.TV Auto Channel
Setting” 30
“A-B Erase” 84
“A-B Repeat” 77“Add New Channels” 126
“Add to Play List” 105
Adjusting
playback picture 120
recording picture 120
Aerial 18
“Aerial Power” 30, 127
“AFT” 129
“Album Name” 107
“Alternate Search” 56
“Analog Tuner” 127
“Analog Tuner Level” 132
ANGLE 75, 114
“Angle Indicator” 75, 138
“Artist Name” 107
AUDIO 75Audio cord 25
“Audio DRC” 134
“Audio In” 132
Audio input 26
“Audio Language” 134
“Audio Out” 133
“Auto” 124
“Auto Channel Setting”
127“Auto Chapter (DVD+R/
+RW)” 136
“Auto Chapter (HDD/
VR)” 136
“Auto Chapter (Video)” 136
Auto Clock Set 31, 124
“Auto Language” 134
“Auto Scan” 127
“Auto Skip” 126
B“Basic” 123, 124
Batteries 27
“Bilingual Recording” 132
Bilingual recording 70
‘BRAVIA’ Sync 24
C
CAM 26Canal Plus 36
“Cancel Protection” 117
CD 153
“CH System” 128
“Change Genre” 83
“Change Password” 138
“Channel” 128
“Channel Options” 126
“Channel Sort” 126“Channel Swapping” 130
Chapter 43, 58, 70
“Chapter Edit” 85
Chapter number 43
“Chapter Search” 80
“Chase Play” 79
Checking/changing/
cancelling timer settings 59, 71
Child Lock 14
“CI Information” 142
“Clock Setting” 31, 124
“Combine” 86, 87
“Command Mode” 29,141
COMPONENT VIDEO
OUT 23“Component Video Out” 130
Conditional Access
Module 26
“Confirm Printer” 142
Connecting
a printer 118
the aerial cable 18
the audio cords 25
the HDMI cord 22,25
the set top boxcontroller 18
the USB device 102,108
the video cords 22
Controlling TVs with the
remote 28
“Copy” 110
“Copy Album” 103
“Copy Album Contents” 110
“Copy all to HDD” 108
“Copy Photos from a
Digital Camera” 109
Copy protection signals 157
“Copy to DVD” 110, 111
“Copy to HDD” 108“Copy Track” 103
Copy-Free 157
Copying
albums 102
audio tracks 102
JPEG image files 108
Copy-Never 157
Copy-Once 157
Country /Area code 158CPRM 152
“Create x-Pict Story” 115
Creating a Playlist 87
D“D.TV Age Limit” 139
“D.TV Auto Channel
Setting” 30
“D.TV Language” 127
DATA CD 153
DATA DVD 153
“Decoder” 37, 130
DIGITAL OUT
(COAXIAL) 25

8/18/2019 Instructio Operation Manual DVD 3295080121
http://slidepdf.com/reader/full/instructio-operation-manual-dvd-3295080121 165/168
165
Digital Services
Digital Text viewing 52
EPG 50
Programme
information 51
“Digital Tuner” 126Disc settings 45, 46, 49,123
“Disc Setup” 45, 46, 49,123
Disc space 82
Disc types 151, 153
“Divide” 84, 86, 87
DivX
“Registration Code” 141
DivX video files 73
Dolby Digital 25, 133
“Download from TV” 127
DTS 25, 133
Dubbing
Dubbing List 90
HDD/DVD DUB 90“High-Speed” 157
Move 157
DV camcorder 98
DV camcorder dubbing 98
“DV Manual
Dubbing” 100
“DV One-Touch
Dubbing” 100
“DV Playback” 101DV IN 98
“DV Input” 99, 132
“DV Manual Dubbing” 100
“DV One-Touch
Dubbing” 100
“DV Playback” 101
“DVD Backup” 93
“DVD Menu Language” 135
“DVD Playback” 138
DVD VIDEO 153
DVD+R 151
DVD+RW 151
DVD-R 151
DVD-RAM 153
DVD-RW 151
EEasy Setup 30, 125
“Edit” 83, 107
Editing 82
chapters 85
Playlist 87
titles 83
“Editor” 62Enter characters 44
EPG
Viewing a list of
available
channels 50
“EPG Type Select” 31,125
“Erase” 59, 83, 86, 107,
117“Erase Album” 117
“External Audio” 132
F“Finalise” 46
Finalising 46
“Format” 49
“Format DVD-RW” 123
“Format HDD.” 124
Formatting 49
“Frame Accurate Editing” 82
Freeze Frame 76
Front panel 14
“Front Panel Display” 141
Front panel display 15
“Full Dubbing” 96
G“Genre Name” 83
“Grid” 62
GUIDE 61, 66
GUIDE Plus+ system 61,66
HHandling discs 159
HDD camcorder 94
HDD camcorder dubbing 94
“Full Dubbing” 96
“HDD-Cam
Dubbing” 96One-Touch Dubbing
96
“HDD Recording Format” 137
“HDD-Cam Dubbing” 96
HDMI
“4:3 Video Output” 140
“Audio Output” 140“Colour” 140
“Control for HDMI” 140
“Screen Resolution” 139
HDMI cord 22, 25
HDMI OUT 23, 25
“HDMI Output”
139
“HELP Setting” 125
Ii.LINK 161
“Info” 62
INPUT 60
“Input Colour System” 130
“Input Line System” 125
JJukebox 102
,continued

8/18/2019 Instructio Operation Manual DVD 3295080121
http://slidepdf.com/reader/full/instructio-operation-manual-dvd-3295080121 166/168
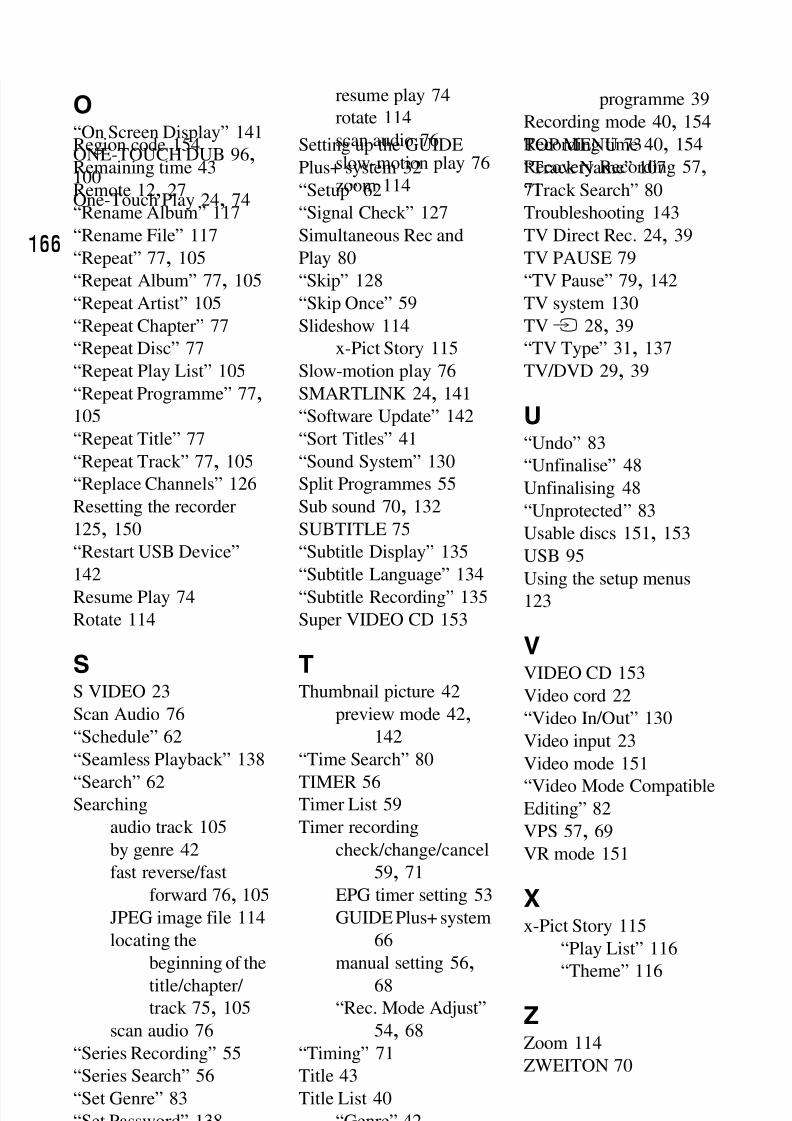
8/18/2019 Instructio Operation Manual DVD 3295080121
http://slidepdf.com/reader/full/instructio-operation-manual-dvd-3295080121 167/168
167
Region code 154
Remaining time 43
Remote 12, 27
“Rename Album” 117
“Rename File” 117
“Repeat” 77, 105
“Repeat Album” 77, 105“Repeat Artist” 105
“Repeat Chapter” 77
“Repeat Disc” 77
“Repeat Play List” 105
“Repeat Programme” 77,105
“Repeat Title” 77
“Repeat Track” 77, 105
“Replace Channels” 126
Resetting the recorder 125, 150
“Restart USB Device” 142
Resume Play 74
Rotate 114
SS VIDEO 23
Scan Audio 76
“Schedule” 62
“Seamless Playback” 138
“Search” 62
Searching
audio track 105
by genre 42
fast reverse/fast
forward 76, 105
JPEG image file 114
locating the
beginning of the
title/chapter/
track 75, 105
scan audio 76
“Series Recording” 55
“Series Search” 56
“Set Genre” 83
“Set Password” 138
“Set Preview” 142
“Set Thumbnail” 83, 136
Set top box controller 18,33
Set top box receiver 20
Setting up the GUIDE
Plus+ system 32
“Setup” 62
“Signal Check” 127
Simultaneous Rec and
Play 80
“Skip” 128“Skip Once” 59
Slideshow 114
x-Pict Story 115
Slow-motion play 76
SMARTLINK 24, 141
“Software Update” 142
“Sort Titles” 41
“Sound System” 130
Split Programmes 55
Sub sound 70, 132
SUBTITLE 75
“Subtitle Display” 135
“Subtitle Language” 134
“Subtitle Recording” 135
Super VIDEO CD 153
TThumbnail picture 42
preview mode 42,142
“Time Search” 80
TIMER 56
Timer List 59
Timer recording
check/change/cancel 59, 71
EPG timer setting 53
GUIDE Plus+ system 66
manual setting 56,68
“Rec. Mode Adjust” 54, 68
“Timing” 71
Title 43
Title List 40
“Genre” 42
“Sort Titles” 41
thumbnail 42
“Title Name” 83
Title number 43
“Title Search” 80
TOP MENU 73
“Track Name” 107
“Track Search” 80
Troubleshooting 143
TV Direct Rec. 24, 39
TV PAUSE 79
“TV Pause” 79, 142TV system 130
TVt 28, 39
“TV Type” 31, 137
TV/DVD 29, 39
U“Undo” 83
“Unfinalise” 48Unfinalising 48
“Unprotected” 83
Usable discs 151, 153
USB 95
Using the setup menus 123
VVIDEO CD 153Video cord 22
“Video In/Out” 130
Video input 23
Video mode 151
“Video Mode Compatible
Editing” 82
VPS 57, 69
VR mode 151
Xx-Pict Story 115
“Play List” 116
“Theme” 116
ZZoom 114
ZWEITON 70

8/18/2019 Instructio Operation Manual DVD 3295080121
http://slidepdf.com/reader/full/instructio-operation-manual-dvd-3295080121 168/168