installation manual SEP 120 360 900 ST · SEP 120 /360 /900 ST t: +44 (0)1543 379212 e:...
2
SEP 120/360/900 ST www.sepura-technologies.com installation manual 1 Before Starting Assembly, please check contents are as follows: • 1 White Felt Bag Filter with black tube • 1 Silexa Filter • 1 Test Bottle • 1 Cleaner Tower (120,360 or 900) • 1 Drilled Lid • - Metal Retaining Springs SEP120 = 1 x 170mm SEP360 = 1 x 250mm SEP900 = 2 x 400mm Service interval kit comprising; • moulded plastic mount + screw • printed card • self-adhesive Timestrip. Fitting kit containing; • 1 Straight adaptor 15mm x 1/2” BSP • 1 Blanking Plug - large • 1 Elbow 15mm • 1 Assembled Porting Block • 3 Porting Block Small Blanking Plugs • 4 Screw 4.8x45mm and washers • 2 Grab Taps • 1 Blue nylon adaptor • 1 Black Tube: SEP120 = 73mm SEP360 = 100mm SEP900 = 180mm Insert the boss on the reverse of the mount (c) into the pre-drilled hole in the separator lid. Peel backing from timestrip (a) and attach to the plastic card (b) within the dotted lines. Flex the card, passing the ends through the slots on the top surface of the mount. To activate, press firmly on the timestrip label at the point indicated. After a few minutes a red line will appear, to indicate ‘time in service’ up to 12 months A replacement card and timestrip will be supplied with each service kit. i ii iii General Installation notes • Please ensure a steady fall in the pipe run from the outlet point to the foul drain. • Never discharge condensate to a storm drain or to surface water; always connect to a foul drain or sewer. • Remember that it’s the user’s responsibility to check with the local authority as to the permissible discharges in their area. Testing Quality Replace filters before outlet cloudiness exceeds the ppm limit for your region. Test outlet quality weekly using kit provided. Further information is available on our website below. (c) (b) (a) Service Indicator - assembly and attachment
Transcript of installation manual SEP 120 360 900 ST · SEP 120 /360 /900 ST t: +44 (0)1543 379212 e:...

SEP 120/360/900 ST
www.sepura-technologies.com
installation manual
1 Before Starting Assembly, pleasecheck contents are as follows:
•1 White Felt Bag Filter with black tube
•1 Silexa Filter
•1 Test Bottle
•1 Cleaner Tower (120,360 or 900)
•1 Drilled Lid
• - Metal Retaining Springs
SEP120 = 1 x 170mmSEP360 = 1 x 250mmSEP900 = 2 x 400mm
Service interval kit comprising;• moulded plastic mount + screw• printed card• self-adhesive Timestrip.
Fitting kit containing;• 1 Straight adaptor 15mm x 1/2” BSP• 1 Blanking Plug - large• 1 Elbow 15mm• 1 Assembled Porting Block• 3 Porting Block Small Blanking Plugs• 4 Screw 4.8x45mm and washers• 2 Grab Taps• 1 Blue nylon adaptor• 1 Black Tube:
SEP120 = 73mmSEP360 = 100mmSEP900 = 180mm
Insert the boss on the reverse ofthe mount (c) into the pre-drilledhole in the separator lid.
Peel backing from timestrip (a)and attach to the plastic card (b)within the dotted lines.
Flex the card, passing the endsthrough the slots on the topsurface of the mount.
To activate, press firmly on the timestrip label at the point indicated.
After a few minutes a red line will appear, to indicate ‘time inservice’ up to 12 months
A replacement card and timestrip will be supplied witheach service kit.
i
ii
iii
General Installation notes
• Please ensure a steady fall in the pipe run from the outlet point to the foul drain.
• Never discharge condensate to a storm drain or to surface water; always connect to a foul drain or sewer.
• Remember that it’s the user’s responsibility to check with the local authority as to the permissible discharges in their area.
Testing Quality
Replace filters before outletcloudiness exceeds the ppmlimit for your region.
Test outlet quality weeklyusing kit provided.
Further information is available on our website below.
(c)(b)
(a)
Service Indicator - assembly and attachment
SEP 120/360/900 ST
www.sepura-technologies.com
t: +44 (0)1543 379212e: [email protected]
2 3 4
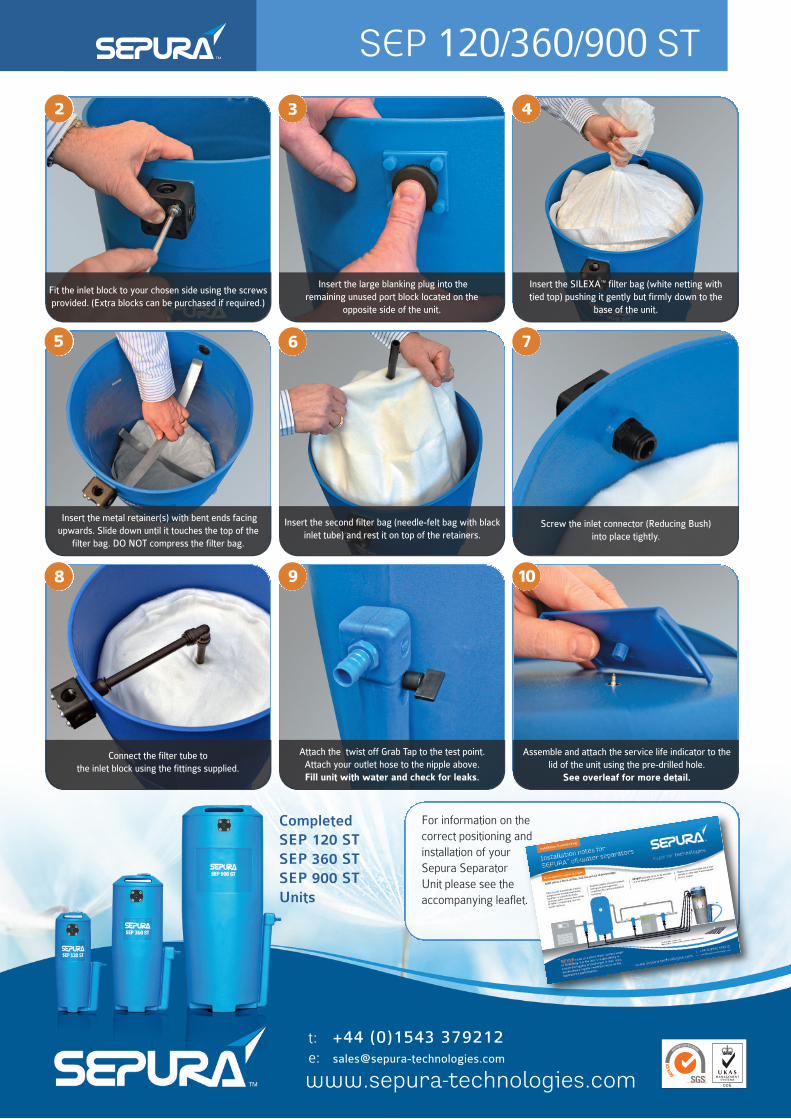
Fit the inlet block to your chosen side using the screwsprovided. (Extra blocks can be purchased if required.)
CompletedSEP 120 STSEP 360 STSEP 900 STUnits
Insert the large blanking plug into the remaining unused port block located on the
opposite side of the unit.
Insert the SILEXA™ filter bag (white netting with tied top) pushing it gently but firmly down to the
base of the unit.
Insert the metal retainer(s) with bent ends facingupwards. Slide down until it touches the top of the
filter bag. DO NOT compress the filter bag.
Insert the second filter bag (needle-felt bag with blackinlet tube) and rest it on top of the retainers.
Screw the inlet connector (Reducing Bush) into place tightly.
Connect the filter tube tothe inlet block using the fittings supplied.
Attach the twist off Grab Tap to the test point. Attach your outlet hose to the nipple above. Fill unit with water and check for leaks.
For information on thecorrect positioning andinstallation of yourSepura Separator Unit please see theaccompanying leaflet.
Assemble and attach the service life indicator to thelid of the unit using the pre-drilled hole.
See overleaf for more detail.
5 6 7
8 9 10