Installation Manual -...
31
HPTB/1132/CON8-H-LTX Includes Interface Adapter Cards for: Bailey Infi90 System Honeywell SMS Moore Products APACS Triconex TMR System 9 Installation Manual IMTB005A1 (991213A)
Transcript of Installation Manual -...

HPTB/1132/CON8-H-LTXIncludes Interface Adapter Cards for:
Bailey Infi90 SystemHoneywell SMS
Moore Products APACSTriconex TMR System 9
Installation Manual
IMTB005A1(991213A)

2
DisclaimerThe contents of this publication are presented for informational purposes only, and while every effort hasbeen made to ensure their accuracy, they are not to be construed as warranties or guarantees, expressed orimplied, regarding the products or services described herein or their use or applicability. We reserve theright to modify or improve the designs or specifications of such products at any time without notice.
Copyright and Trademark InformationThis manual is copyright of Elcon Instruments with all rights reserved. This manual may not be copied, inwhole or in part, without the written consent of Elcon Instruments.Elcon Instruments reserves the right to make changes to this manual without notice.
Asset Management Solutions (AMS) is a registered trademark of Fisher-Rosemount Systems.HART is a registered trademark of the HART� Communication Foundation.Windows is a trademark of Microsoft Corporation.All other marks are property of their respective owners.

3
Table of Contents
1. General Description. . . . . . . . . . . . . . . . . . . . . . . . . . . . . . . . . . . . . . . . . . . . . . . . . . . . . . . . . . 51.1 Introduction. . . . . . . . . . . . . . . . . . . . . . . . . . . . . . . . . . . . . . . . . . . . . . . . . . . . . . . . . . . . . . . . . 5
1.1.1 Purpose. . . . . . . . . . . . . . . . . . . . . . . . . . . . . . . . . . . . . . . . . . . . . . . . . . . . . . . . . . 51.1.2 Functions. . . . . . . . . . . . . . . . . . . . . . . . . . . . . . . . . . . . . . . . . . . . . . . . . . . . . . . . . 51.1.3 HART Overview. . . . . . . . . . . . . . . . . . . . . . . . . . . . . . . . . . . . . . . . . . . . . . . . . . . 51.1.4 Specifications. . . . . . . . . . . . . . . . . . . . . . . . . . . . . . . . . . . . . . . . . . . . . . . . . . . . . 6
1.1.4.1 1700 MUX Specifications. . . . . . . . . . . . . . . . . . . . . . . . . . . . . . . . . . . . .61.1.4.2 HPSM Termination Board Specifications. . . . . . . . . . . . . . . . . . . . . . . . .61.1.4.3 RS-485 Line Specifications. . . . . . . . . . . . . . . . . . . . . . . . . . . . . . . . . . . 7
1.2 Asset Management Solutions Software. . . . . . . . . . . . . . . . . . . . . . . . . . . . . . . . . . . . . . . . . . . . 71.3 Associated Tools and Test Equipment. . . . . . . . . . . . . . . . . . . . . . . . . . . . . . . . . . . . . . . . . . . . . 71.4 Quality Assurance. . . . . . . . . . . . . . . . . . . . . . . . . . . . . . . . . . . . . . . . . . . . . . . . . . . . . . . . . . . . . 71.5 Certifications and Compliance. . . . . . . . . . . . . . . . . . . . . . . . . . . . . . . . . . . . . . . . . . . . . . . . . . . 71.6 Unpacking and Inspection. . . . . . . . . . . . . . . . . . . . . . . . . . . . . . . . . . . . . . . . . . . . . . . . . . . . . . .81.7 Storage. . . . . . . . . . . . . . . . . . . . . . . . . . . . . . . . . . . . . . . . . . . . . . . . . . . . . . . . . . . . . . . . . . . . . 8
2. Installation. . . . . . . . . . . . . . . . . . . . . . . . . . . . . . . . . . . . . . . . . . . . . . . . . . . . . . . . . . . . . . . . . . . 82.1 Environmental Conditions. . . . . . . . . . . . . . . . . . . . . . . . . . . . . . . . . . . . . . . . . . . . . . . . . . . . . . 82.2 Intrinsic Safety. . . . . . . . . . . . . . . . . . . . . . . . . . . . . . . . . . . . . . . . . . . . . . . . . . . . . . . . . . . . . . . 82.3 Mounting. . . . . . . . . . . . . . . . . . . . . . . . . . . . . . . . . . . . . . . . . . . . . . . . . . . . . . . . . . . . . . . . . . . .92.4 Cables. . . . . . . . . . . . . . . . . . . . . . . . . . . . . . . . . . . . . . . . . . . . . . . . . . . . . . . . . . . . . . . . . . . . . . 92.5 Wiring. . . . . . . . . . . . . . . . . . . . . . . . . . . . . . . . . . . . . . . . . . . . . . . . . . . . . . . . . . . . . . . . . . . . . . 9
2.5.1 Power. . . . . . . . . . . . . . . . . . . . . . . . . . . . . . . . . . . . . . . . . . . . . . . . . . . . . . . . . . . .92.5.2 RS-485. . . . . . . . . . . . . . . . . . . . . . . . . . . . . . . . . . . . . . . . . . . . . . . . . . . . . . . . . . .92.5.3 Field Connections. . . . . . . . . . . . . . . . . . . . . . . . . . . . . . . . . . . . . . . . . . . . . . . . . . 102.5.4 HART Communicator. . . . . . . . . . . . . . . . . . . . . . . . . . . . . . . . . . . . . . . . . . . . . . . 11
2.5.4.1 1700 HHT. . . . . . . . . . . . . . . . . . . . . . . . . . . . . . . . . . . . . . . . . . . . . . . . . 112.6 Grounding. . . . . . . . . . . . . . . . . . . . . . . . . . . . . . . . . . . . . . . . . . . . . . . . . . . . . . . . . . . . . . . . . . . 11
3. Operation. . . . . . . . . . . . . . . . . . . . . . . . . . . . . . . . . . . . . . . . . . . . . . . . . . . . . . . . . . . . . . . . . . . . .123.1 Initial Setup. . . . . . . . . . . . . . . . . . . . . . . . . . . . . . . . . . . . . . . . . . . . . . . . . . . . . . . . . . . . . . . . . . 12
3.1.1 1700 Settings. . . . . . . . . . . . . . . . . . . . . . . . . . . . . . . . . . . . . . . . . . . . . . . . . . . . . . 123.1.1.1 Address. . . . . . . . . . . . . . . . . . . . . . . . . . . . . . . . . . . . . . . . . . . . . . . . . . . 133.1.1.2 Baud Rate. . . . . . . . . . . . . . . . . . . . . . . . . . . . . . . . . . . . . . . . . . . . . . . . . 13
3.1.2 RS-485/RS-232 Converter. . . . . . . . . . . . . . . . . . . . . . . . . . . . . . . . . . . . . . . . . . . .133.1.3 HPTB Jumper Settings. . . . . . . . . . . . . . . . . . . . . . . . . . . . . . . . . . . . . . . . . . . . . . 13
3.2 Start-up Sequence. . . . . . . . . . . . . . . . . . . . . . . . . . . . . . . . . . . . . . . . . . . . . . . . . . . . . . . . . . . . . 133.3 Controls. . . . . . . . . . . . . . . . . . . . . . . . . . . . . . . . . . . . . . . . . . . . . . . . . . . . . . . . . . . . . . . . . . . . .133.4 Indicators. . . . . . . . . . . . . . . . . . . . . . . . . . . . . . . . . . . . . . . . . . . . . . . . . . . . . . . . . . . . . . . . . . . .133.5 Modes of Operation. . . . . . . . . . . . . . . . . . . . . . . . . . . . . . . . . . . . . . . . . . . . . . . . . . . . . . . . . . . 14
4. Theory of Operation (Principles of Operation) . . . . . . . . . . . . . . . . . . . . . . . . . . . . . . . 144.1 HART Filters. . . . . . . . . . . . . . . . . . . . . . . . . . . . . . . . . . . . . . . . . . . . . . . . . . . . . . . . . . . . . . . . .154.2 Multiple Multiplexers. . . . . . . . . . . . . . . . . . . . . . . . . . . . . . . . . . . . . . . . . . . . . . . . . . . . . . . . . . 15
5. Troubleshooting. . . . . . . . . . . . . . . . . . . . . . . . . . . . . . . . . . . . . . . . . . . . . . . . . . . . . . . . . . . . . . 155.1 1700 MUX. . . . . . . . . . . . . . . . . . . . . . . . . . . . . . . . . . . . . . . . . . . . . . . . . . . . . . . . . . . . . . . . . . 15
6. Maintenance. . . . . . . . . . . . . . . . . . . . . . . . . . . . . . . . . . . . . . . . . . . . . . . . . . . . . . . . . . . . . . . . . . 167. Parts List. . . . . . . . . . . . . . . . . . . . . . . . . . . . . . . . . . . . . . . . . . . . . . . . . . . . . . . . . . . . . . . . . . . . . 168. Warranty. . . . . . . . . . . . . . . . . . . . . . . . . . . . . . . . . . . . . . . . . . . . . . . . . . . . . . . . . . . . . . . . . . . . . 179. Glossary. . . . . . . . . . . . . . . . . . . . . . . . . . . . . . . . . . . . . . . . . . . . . . . . . . . . . . . . . . . . . . . . . . . . . . 1810. Contact Information. . . . . . . . . . . . . . . . . . . . . . . . . . . . . . . . . . . . . . . . . . . . . . . . . . . . . . . . . . 19
4
Figures
Figure 1. HPTB/1132/CON8-H-LTX Layout. . . . . . . . . . . . . . . . . . . . . . . . . . . . . . . . . . . . . . . . 6Figure 2. RS-485 Wiring. . . . . . . . . . . . . . . . . . . . . . . . . . . . . . . . . . . . . . . . . . . . . . . . . . . . . . . . . . . . .10Figure 3. 1700 MUX Labels. . . . . . . . . . . . . . . . . . . . . . . . . . . . . . . . . . . . . . . . . . . . . . . . . . . . . . . . . 12Figure 4. 1700 MUX Block Diagram. . . . . . . . . . . . . . . . . . . . . . . . . . . . . . . . . . . . . . . . . . . . . . . . .14
Tables
Table 1. Maximum Wiring Lengths. . . . . . . . . . . . . . . . . . . . . . . . . . . . . . . . . . . . . . . . . . . . . . . . . 10Table 2. Shield Terminals. . . . . . . . . . . . . . . . . . . . . . . . . . . . . . . . . . . . . . . . . . . . . . . . . . . . . . . . . . . 11Table 3. 1700 MUX LED Indications. . . . . . . . . . . . . . . . . . . . . . . . . . . . . . . . . . . . . . . . . . . . . . . . 16Table 4. Replaceable Parts. . . . . . . . . . . . . . . . . . . . . . . . . . . . . . . . . . . . . . . . . . . . . . . . . . . . . . . . . . 16
Appendix A – Wiring Diagrams
BAILEY INFI90IA-BA-AI-01-I-R. . . . . . . . . . . . . . . . . . . . . . . . . . . . . . . . . . . . . . . . . . . . . . . . . . . . . . . . . . . . . 21IA-BA-AI-03-BC. . . . . . . . . . . . . . . . . . . . . . . . . . . . . . . . . . . . . . . . . . . . . . . . . . . . . . . . . . . . . .22IA-BA-AO-HFT-01. . . . . . . . . . . . . . . . . . . . . . . . . . . . . . . . . . . . . . . . . . . . . . . . . . . . . . . . . . . 23
HONEYWELL SMSIA-ELCO-AIO-01. . . . . . . . . . . . . . . . . . . . . . . . . . . . . . . . . . . . . . . . . . . . . . . . . . . . . . . . . . . . 24
MOORE PRODUCTS APACSIA-MP-EAM-ISI. . . . . . . . . . . . . . . . . . . . . . . . . . . . . . . . . . . . . . . . . . . . . . . . . . . . . . . . . . . . . .25IA-MP-HFM-ISI. . . . . . . . . . . . . . . . . . . . . . . . . . . . . . . . . . . . . . . . . . . . . . . . . . . . . . . . . . . . . .26IA-MP-SAM-NIS. . . . . . . . . . . . . . . . . . . . . . . . . . . . . . . . . . . . . . . . . . . . . . . . . . . . . . . . . . . . . 27IA-MP-VIM-ISI. . . . . . . . . . . . . . . . . . . . . . . . . . . . . . . . . . . . . . . . . . . . . . . . . . . . . . . . . . . . . . 28
TRICONEX TMR SYSTEM 9IA-TR9-AI-02-I-S. . . . . . . . . . . . . . . . . . . . . . . . . . . . . . . . . . . . . . . . . . . . . . . . . . . . . . . . . . . . .29IA-TR9-AI-03-I-S. . . . . . . . . . . . . . . . . . . . . . . . . . . . . . . . . . . . . . . . . . . . . . . . . . . . . . . . . . . . .30IA-TR9-AO-01-I-S. . . . . . . . . . . . . . . . . . . . . . . . . . . . . . . . . . . . . . . . . . . . . . . . . . . . . . . . . . . .31

5
1. General Description1.1 Introduction
This manual provides guidance for the installation, operation, and maintenance of your Elcon 1700 Multiplexer, andtermination board model number, HPTB/1132/CON8-H-LTX. This includes Interface Adapter Cards (IAC’s) forBailey Infi90, Honeywell SMS, Moore Products APACS, and Triconex TMR System 9 control systems. The IAC’sare used to customize the HPTB/1132/CON8-H-LTX for individual control systems and modules.
The Elcon 1700 Multiplexer will be referred to in this manual as the 1700 MUX. All further references to theHPTB/1132/CON8-H-LTX will be simply HPTB. Interface Adapter Cards will be referenced as IAC’s in general.References to specific IAC’s will include the model of that IAC. Please note that any references to HART filterswill only apply to IAC’S that specifically include such filters. When referring to the 1700 MUX, HPTB, and IAC’sas a whole, they will be called the HART Interface Solution, or simply HIS.
To avoid damage, failure, or improper operation, read this manual carefully before installing and operating theequipment.
1.1.1 Purpose
The 1700 MUX is a HART signal multiplexer unit, which allows access to HART communication on existing4-20mA wiring.
1.1.2 Functions
Your HART Interface Solution interfaces up to 32 field located HART devices. The 1700 MUX is the heart of thesystem. It acts as a gateway device, routing communications between the maintenance workstation PC and theHART devices. The 1700 MUX uses the HART protocol on both the RS-485 link to the maintenance workstationPC and on the Bell 202 Frequency Shift Keying (FSK) link (base HART protocol) to each of the HART devices. Itinterrogates each HART device, retrieves device information, and stores it in an internal database. This informationis available to the maintenance workstation software.
Furthermore, the 1700 MUX acts as a message coordinator for communication between the maintenanceworkstation PC and the HART devices. In this way, the 1700 MUX is transparent to the user. In fact, the user hasaccess to each HART device as if connected directly at the device itself. Additionally, the 1700 MUX may beconnected in a HART RS-485 multidrop network. A maintenance workstation PC can use this multidrop networkfor configuration, maintenance, calibration, diagnostics, and data access.
HART Interface Solutions are supplied by ELCON with several models in order to allow simple and reliableconnection with Smart devices.
1.1.3 HART Overview
HART is an acronym for "Highway Addressable Remote Transducer". The HART protocol makes use of the Bell202 FSK standard to superimpose digital signals at a low level on top of the 4-20mA signal. This enables two-waycommunication and makes it possible for additional information beyond just the normal process variable to becommunicated to/from a smart field instrument. The HART protocol communicates without interrupting the 4-20mA signal and allows a host application (master) to get two or more digital updates per second from a fielddevice. As the digital FSK signal is phase continuous, there is no interference with the 4-20mA signal.

6
1.1.4 Specifications
1.1.4.1 1700 MUX Specifications
POWER SUPPLY: 24 VDC nominal (22 V - 28 V) at 100 mAPOWER DISSIPATION: 3 W maximumFUSE: Wickmann Type TR5/IEC 127-3, 250 V Time Lag Fuse; Current: 315 mA; Breaking capacity; 35 A at 250 VMODULE CONNECTION: DIN 41612 96-way plugENVIRONMENTAL CONDITION LIMITS:
Operating temperature: 0 to 55°C (32 to 131°F)Storage Temperature: -20 to 75°C (-4 to 167°F)Relative Humidity: 5 to 90% non-condensing (up to 35°C)
SIGNAL CHANNELS: Up to 32 signal pairs unbalancedINPUT IMPEDENCE: 5K –j220 (typ @ 500Hz)OFF-STATE LEAKAGE: <3 microAmp DC (-40 to +105°C)COMMUNICATION PORT: RS-485 differential pair (isolated)DIGITAL COMMUNICATION SPEED: 9600 baud or 19200 baud
1.1.4.2 HPTB Termination Board Specifications
MOUNTING: Mounts to backplane with four mounting screws (See Figure 1).CONNECTIONS: Phoenix Contact 5.08mm screw terminals for power, RS-485, and Field Devices; 4-40 Screwterminals for shield connections; Control System Connections are made via the IAC’s (See Appendix A).POWER FUSE: 3.15A, 5x20mmDIMENSIONS: (See Figure 1)
Length = 11.1” (281mm)Width = 7.4” (187mm)Height = 2.25” (57mm) [6.75” (172mm) w/MUX installed]
HPTB/1132/CON8-H-LTX General Layout
Figure 1
7
1.1.4.3 RS-485 Line Specifications
COMMUNICATION PORT: RS-485 differential pair (isolated). An RS-232 to RS-485 converter is needed toconnect the PC host station to the board Terminal block (see Figure 3).DIGITAL COMMUNICATION SPEED: 9600 bps or 19200 bps (user selectable)MULTI-DROP ADDRESSING: up to 31 1700 MUX modules (32 channels each)MULTI-NETWORK OPERATION: Available within software optionsMAXIMUM NUMBER OF 1700 MULTIPLEXERS IN NETWORK: 31NETWORK TOTAL: 992 per Serial LineMULTI-NETWORK OPERATION: 4 Serial Lines; Available within maintenance software packageSMART PROTOCOL PRESENTLY SUPPORTED: HARTOUTPUT NETWORK: RS-485 (use an RS-232 to RS-485 converter Keithley type M1000 to connect the PCmaintenance station).BAUD RATE: 9600 bps or 19200 bps (user selectable)TOTAL NUMBER OF BITS: 11 bitsNUMBER OF DATA BITS: 8 bitsPARITY: ODDNUMBER OF STOP BITS: 1 bitTRANSMISSION TYPE: 2-wire
1.2 Asset Management Solutions (AMS) Software
AMS software provides an easy-to-use means for integrating various device management software packages into aunified system. AMS operates under the Microsoft® Windows® format. It combines the various device (or asset)management tasks into an application with a common look-and-feel and centralized data storage.
AMS provides access to functionality available via the HART communications protocol for any HART devicewhose Device Description (DD) is registered with the HART Communication Foundation.
For more information on installation of AMS software, consult the AMS Installation Guide.
1.3 Associated Tools and Test Equipment
No special tools or test equipment are required.
1.4 Quality Assurance
All Elcon Instruments production is performed under a Quality Assurance program following written procedures,which are specific for each line of instruments, during the manufacturing, intermediate testing and inspection, andfinal inspection phases.
Each 1700 MUX unit undergoes accelerated thermic aging (burn-in) for a minimum 200 hours at 50°C (122°F) withat least 1 cooling thermic cycle at 0°C (32°F) and back to 50°C (122°F). The purpose is to identify weakcomponents that may develop initial fault mechanisms due to "Infant Mortality". Only after a positive burn-in test,instruments undergo a complete final inspection performed with computerized automatic testing equipmentspecifically developed by Elcon for this purpose.
1.5 Certifications and Compliance
HART Interface Solutions are CE compliant.
This Equipment is suitable for use in Class I, Division 2, Groups A, B, C, and D or non-hazardous locations only.Equipment must be mounted in an enclosure that meets the requirements of ANSI/ISA S82.01 & S82.03 and theNational Electrical Code.

8
1.6 Unpacking and Inspection
Upon receipt of the materials, you should check the integrity of the packing and the contents. In case of damage dueto shipping, you should promptly and properly report to the shipper, supplying all necessary information.
If instruments are not for immediate use, we recommend that you check that all characteristics shown on theinstruments label meet order specifications (model, supply voltage and frequency, input/output range, certification,tag etc.) as well as the actual application requirements.
If not installed, equipment should be stored following recommendations of the next section.
1.7 Storage
In case of storage of instruments and accessories, proper care should be taken to protect them from any possibledamage. Always store instruments in their sealed original packaging until they are installed.
Provide adequate protection to prevent damages that may be caused by exposure to:• Rain, excessive humidity and/or temperature excursions (inadequate sheltering).• Dust (build-up of a corrosive patina that may cause oxidations and reduce isolation).• Aggressive and polluting atmospheres with consequent corrosion.• Access by insects/rodents (damage of packing or content).• Mechanical shocks or unauthorized packing opening.• Intense vibrations (loosening of fastened parts, fatigue failures, etc.).• Any other possible risk.
Make sure the storage temperature does not exceed the limits of –20 to +55°C (-4 to 131°F) for medium/long termstorage (days/months) and -25 to +75°C (-13 to 167°F) for short term storage (a few hours) transportation/shipment.
If inspection is completed, pack instruments in their original packing. List the contents on the packaging to avoidunnecessary further inspections.
2. Installation2.1 Environmental Conditions
HIS products, like most modern electronic equipment, can operate in wide temperature and humidity ranges.However, practical consideration suggests a guideline on operating environment for best results.
• Keep operating temperature below 35°C (95° F), ideally between 20°C and 25°C (68 and 77°F), avoiding wideand rapid temperature excursions.
• Control relative humidity within 40 to 60% to avoid risks of static charges or condensation.• Limit the presence of corrosive atmosphere, fumes and dust, sealing and purifying the control room area and
using air filters in the cabinet air intakes (clean cable entry path), if necessary.• Reduce vibrations (if any) to safe levels.
2.2 Intrinsic Safety
The HIS system can interface HART devices located in Hazardous areas by interposition of suitable galvanicallyisolated Intrinsically Safe Barriers. The barriers must allow bidirectional HART signal communication in additionto the normal 4-20 mA loop current processing.

9
2.3 Mounting
The 1700 MUX is a plug-in unit that must be inserted in the appropriate termination board position. Exercise care inthe insertion to mate the connector's pins, then firmly press the module to engage the connector. Then fasten thefixing screws to firmly secure the module to the termination board.
The HPTB is designed to be mounted on a standard enclosure panel backplane. The board should be mounted nearthe marshalling panels or termination panels.
2.4 Cables
The HIS system is designed to be used with the original DCS cables. All signals pass through the HPTB and to theDCS via the IAC’s. The IAC’s are custom made for it’s respective DCS I/O card and associated cable. Please referto Appendix A for information on your specific IAC and cable compatiblity.
2.5 Wiring
The 1700 MUX is a plug in unit and is connected to the HPTB by a multipole connector. Therefore, all electricalconnections (supply, field connection, serial lines, etc.) are made at the termination board unit. Please refer toAppendix A for more information on proper wiring of different I/O types to your HPTB/IAC combination.
2.5.1 Power
Connect 24 VDC to the one of the 3-pin removable terminals at the end of the HPTB. The connector is polarized, soyou cannot insert it incorrectly. The polarity is marked on the board and the terminals. Supply 1 and Supply 2 aresimply provided for redundant power supplies. It is not necessary to provide 24 VDC to both. The 1700 MUX andfield devices can be powered by one supply only.
WARNING! Improper supply connections can seriously damage the instrumentand result in risk of fire or explosion in hazardous locations!
DC SUPPLY REQUIREMENTS: Check correct polarity of supply line, making sure that voltage excursions nevergo lower than 21.5 V (including ripple effect) or higher than 28 V.
WARNING! Note that a crude, poorly filtered or unregulated supply canproduce destructive (hundreds of volts) voltage spikes during supply transformerswitch-off transient; this could cause minor problems to electro-mechanicalcomponents like relays or solenoids but will surely degrade or destroy electronicequipments. In case of doubt, provide over-voltage limiting by adequatelydimensioned surge arresters on primary winding and voltage limiters (powerzeners, zenamic, etc.) on the DC supply line to limit transients within 30-35Vpeak.
SUPPLY CONDUCTORS SIZING:A single unit requiring 100 mA will have a conductor sizing based on mechanical strength rather than currentcarrying capacity. A reverse polarity shunt diode and series fuse protection are provided to avoid damaging themodule in case of accidentally reversed polarity connection. In this case, the reverse voltage is clamped at -0.6 Vand the T.B. slow blow fuse blows. Restore correct supply polarity and replace the blown fuse with the spare onesupplied in the T.B. spare fuse holder (take care to reinstall a good, properly sized, new spare fuse!).
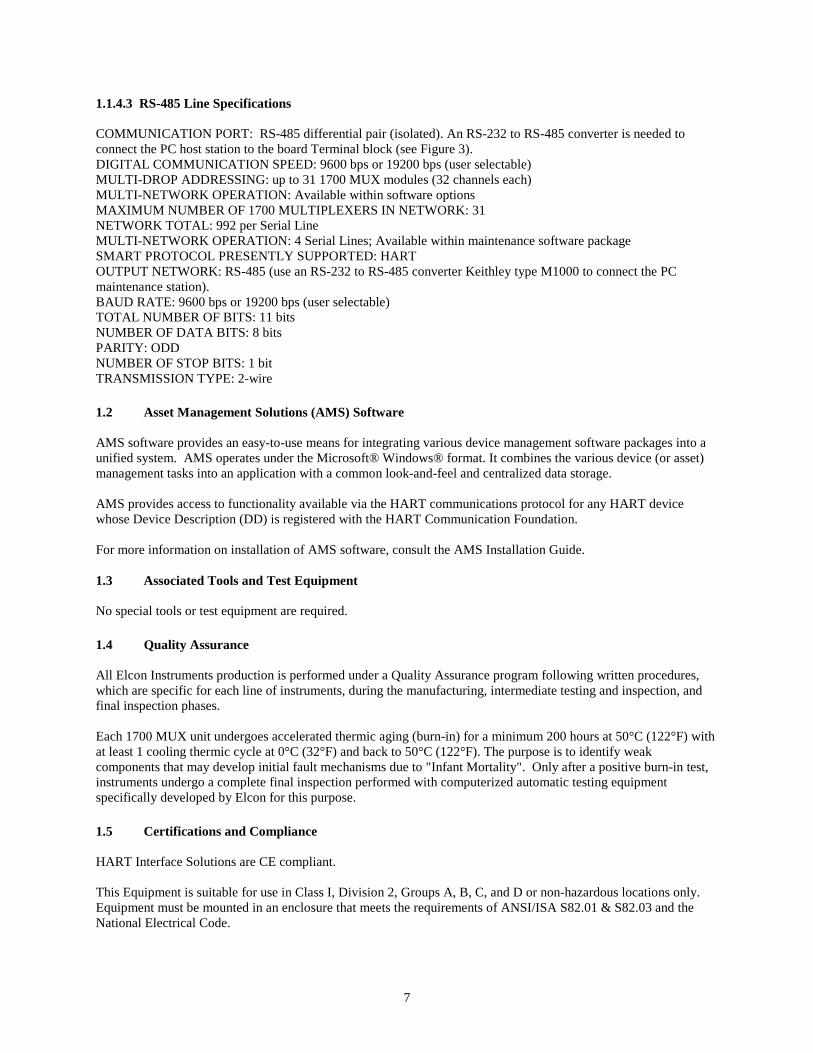
2.5.2 RS-485 (See Table 1)
RS-485 wiring is connected as shown in Figure 2. These wires carry data from the HIS to the PC via anRS-485/RS-232 converter. Connect the converter to a serial port on the PC as indicated in the converter’sdocumentation.
10
Table 1Maximum Wiring Lengths
Communication Protocol Maximum Cable LengthFeet Meters
RS-232 50 15RS-485 4000 1200HART 900 to 6500 275 to 2000
RS-485 cable length can be increased if high performance cables are used.HART cable length depends on the capacitance of the cable and device, and the load resistor. The general rule is:R x C < 65ms. Consult “HART- A Technical Description” for more details. This is a free document published bythe HART Communication Foundation.
RS-485 Wiring
Figure 2
2.5.3 Field Connections (See Appendix A)
Field wiring can have many variations, depending on the type of field device. The wiring will either be in parallel orseries. This reference is made to the I/O loop whether the wiring already exists or not. Most wiring scenarios areshown in Appendix A. If your application does not match those shown, please contact your nearest Elconrepresentative (See Chapter 10).
Y G R B
DAT
A +
DAT
A --
+24
Vdc
GN
D
RS-485 OUT
Keithley M1000RS-232 / RS-485 Converter
A
A
A
A
100 ohm terminationresistor on the last MUX
B A G
B G
B G
GB
GB
1700 MUX
GN
DAB
RS-485
Mod 1132/C
ON
8-H
1415
1617
1819
20SH
D21
2223
2425
2627
28SH
D29
3031
32
1700 MUX
GN
DAB
RS-485
Mod 1132/C
ON
8-H
1415
1617
1819
20SH
D21
2223
2425
2627
28SH
D29
3031
32
1700 MUX
GN
DAB
RS-485
Mod 1132/C
ON
8-H
1415
1617
1819
20SH
D21
2223
2425
2627
28SH
D29
3031
32

11
2.5.4 HART Communicator
In HART communications, there is one slave (field device) and up to two masters (e.g. Multiplexer, HARTCommunicator, I/O module). The HART Communicator can be connected to the field side terminals as a secondarymaster. In your software settings, the 1700 MUX must to be the primary master in order to use the HARTCommunicator.
There cannot be more than two masters. If three or more masters are connected, a primary/ secondary conflict willoccur and communications will cease with all devices on that loop. When the 1700 MUX is used with a HARTcompatible I/O system, the 1700 MUX must be configured as the secondary master. Otherwise, configure the 1700MUX as the primary master. The HHT is a secondary master by default, and can be connected to the loop when noother device on that loop is configured as a secondary master.
WARNING! Do not connect the HART Communicator to any Intrinsically Safefield wiring unless the terminal is approved as Intrinsically Safe and suitable forthe actual hazardous location classification of the specific hazardous location.Also consider HART Communicator safety parameters and equivalentcapacitance and inductance before concluding that you can safely connect it tothe I. S. side of the circuit.
2.5.4.1 1700 HHT
The 1700 HHT is an adapter (sold separately) that allows the user to replace the 1700 MUX with test points toconnect a Hand Held Communicator. The 1700 HHT can only be inserted in place of the 1700 MUX. Therefore, itshould only be used temporarily. Like the 1700 MUX, the 1700 HHT can be inserted and removed with powerapplied to the HPSM.
2.6 Grounding
The HPTB provides several separate shield terminals. These terminals simply allow compliance with local groundand shield requirements. Please refer to your local electrical standards for proper shield requirements. Table 3outlines the description of the shield terminals on the HPTB.
Table 2Shield Terminals
Shield Name/Location CharacteristicsDC Supply 1 & 2 SHD For 24VDC Shields
Common SHD & Field terminal shields Common landing of all 32 I/O device shield wiresRS-485 Shield Lug To connect RS-485 ground terminal (G) to ground
Chassis Ground Connect to cabinet earth ground

12
3. Operation3.1 Initial Setup
The default settings for each 1700 MUX are as follows:Address = 1Baud Rate = 19200
3.1.1 1700 Settings (See Figure 3)
The User Switches buffer has eight inputs from a low profile DIL switch reachable through the front label.The functions of the switches are as follows:
Switch 7 (T) Reserved for TEST purposes Switch 6 (R1) BAUD RATE 1
Switch 5 (R0) BAUD RATE 0Switch 4 (B4) ADDRESS 4Switch 3 (B3) ADDRESS 3Switch 2 (B2) ADDRESS 2Switch 1 (B1) ADDRESS 1Switch 0 (B0) ADDRESS 0
Further information is given on the front and side labels (Figure 3). In particular, the side label gives the correctsetting of every DIP switch combination.
1700 MUX Labels
1 2 3 4 5 6 7 8 9 10 11 12 13 14 15 16 17 18 19 20 21 22 23 24 25 26 27 28 29 30 310ADDRESS
AVAILABLE
NOT
NOT AVAILABLE192009600BAUDRATE
NORMAL OP. TEST (See Manual)TEST
B4B3B2B1B0
R0R1
T
ONOFF
SERIAL No. __________________
C. N. _______________________
32 Channels MUX 1700 Multiplexer
ELCON INSTRUMENTSINTRINSIC SAFETY SPECIALISTS
ELCONINSTRUMENTS
TR1R0B4B3B2B1B0
TEST
BAUD
ADDRESS
MUX 1700Multiplexer
Tx
FaultPower On
123
Figure 3

13
3.1.1.1 Address
The address of the 1700 MUX is determined by the DIP switches as noted above. Each MUX on the same RS-485network must have a different address, but they do not have to be sequential and do not necessarily need to start ataddress 1. Possible addresses are 1-31. Address 0 is invalid and cannot be used. Note that network properties ofthe software setup refers to “multi-dropping.” This refers to multiple 1700 MUXs on the same network, notmultiple devices on the same I/O loop (also referred to as “multi-dropping”). Multi-dropping should be enabled inthe network setup.
3.1.1.2 Baud Rate
The baud rate of the 1700 MUX must match the baud rate of the PC Com-Port and the RS-232/RS-485 converter.All three units must have the same baud rate to function properly. The baud rate can be either 9200 or 19200 and isselected as shown in Figure 3.
3.1.2 RS-232/RS-485 Converter
An RS-232 to RS-485 converter must be placed between the HIS and the computer’s RS-232 port. Elconrecommends the Keithley M1000 for non-CE applications. Other models of RS-232 to RS-485 converters can beused, but have not been tested by Elcon. Alternate brands are available with CE certification.
If only one RS-232 to RS-485 converter is used in setting up the system, then the RS-485 network must be less than1200 meters (4000 feet). If the network surpasses 4000 feet, an RS-232 to RS-485 repeater can be used. TheKeithley M1000 can fulfill this function. The repeater amplifies the original RS-485 signal when it is transmittedover long distances.
3.1.3 HPTB Jumper Settings
The jumper settings on the field side of the HPTB depend entirely on the type of device connected and the type ofIAC used. Please refer to Appendix A to determine the proper jumper settings for your application.
3.2 Start-up Sequence
Proper start-up sequence for the 1700 MUX is as follows:1. Make all field and control connections to the HPTB2. Connect RS-485 wires and adjust network settings3. Apply field power or source 4-20mA4. Turn on power to or plug in the 1700 MUX5. After the 1700 MUX has completed the start-up sequence, then start AMS
3.3 Controls
The only controls on the Elcon equipment are the DIP switches noted above. All other settings are a function of thesoftware. Please refer to your software instruction manual for further details.
3.4 Indicators (See Figure 3)
Three LEDs on the front of the 1700 MUX indicate status. Normal operation is as follows:
• Power ON: Green LED lit when power is applied to the 1700 MUX. Power is automatically applied when the1700 MUX is plugged into the HPTB.
• Tx: Shows 1700 MUX communication with field devices.• Fault: Fault LED should not be lit during normal operation.
One LED on the termination board is a power indication showing 24 VDC available.
14
3.5 Modes of Operation
• SCAN MODE: Command to the 1700 MUX from the software telling the 1700 MUX to periodically scan eachdevice automatically. Otherwise, the 1700 MUX will only communicate with a device when told to do so bythe software.
• BURST MODE: When a field device is in burst mode, it automatically sends information without beingcommanded to do so. This is a break from the master-slave nature of HART communication, but the 1700MUX will support it when burst mode is selected in the software.
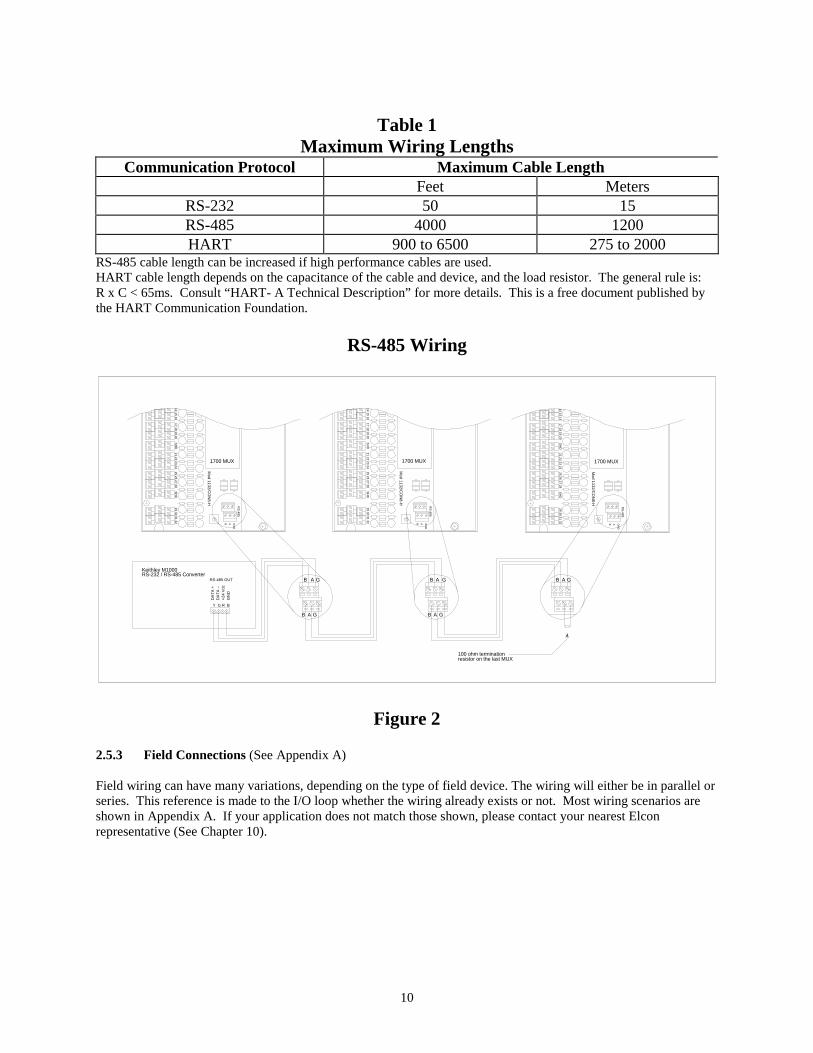
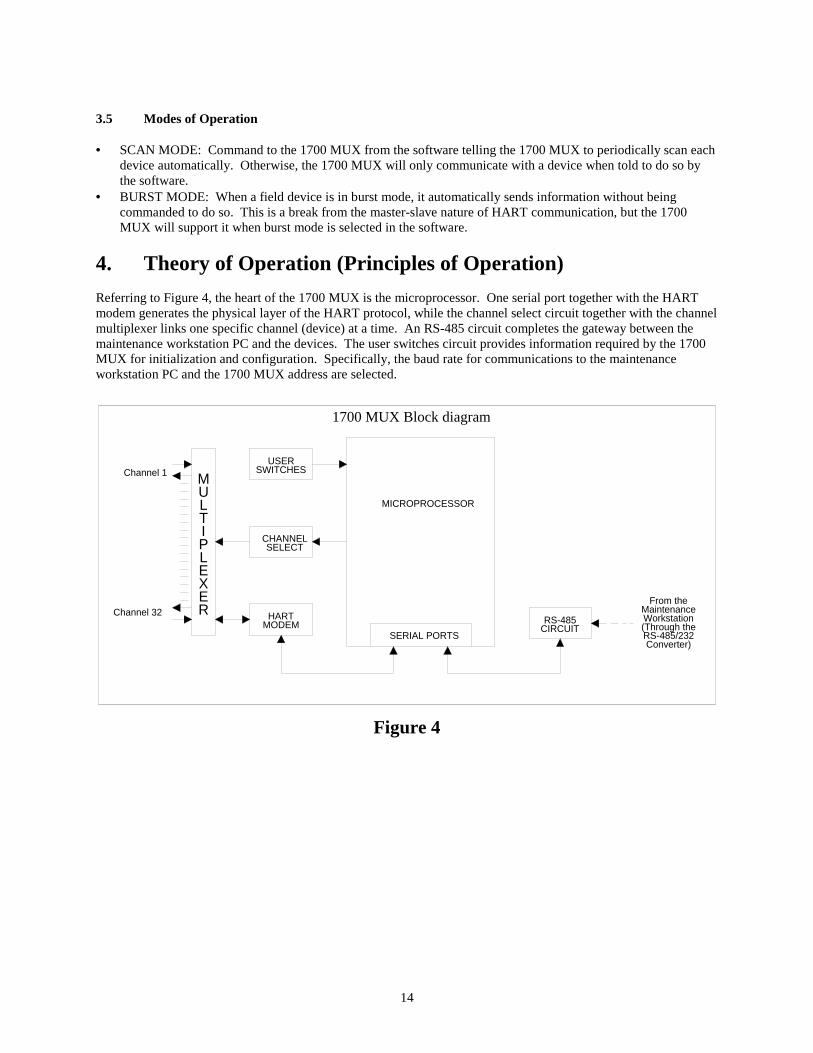
4. Theory of Operation (Principles of Operation)Referring to Figure 4, the heart of the 1700 MUX is the microprocessor. One serial port together with the HARTmodem generates the physical layer of the HART protocol, while the channel select circuit together with the channelmultiplexer links one specific channel (device) at a time. An RS-485 circuit completes the gateway between themaintenance workstation PC and the devices. The user switches circuit provides information required by the 1700MUX for initialization and configuration. Specifically, the baud rate for communications to the maintenanceworkstation PC and the 1700 MUX address are selected.
USERSWITCHES
HARTMODEM
CHANNELSELECT
MULTIPLEXERChannel 32
Channel 1
SERIAL PORTSRS-485
CIRCUIT
MICROPROCESSOR
From theMaintenanceWorkstation(Through theRS-485/232Converter)
1700 MUX Block diagram
Figure 4
15
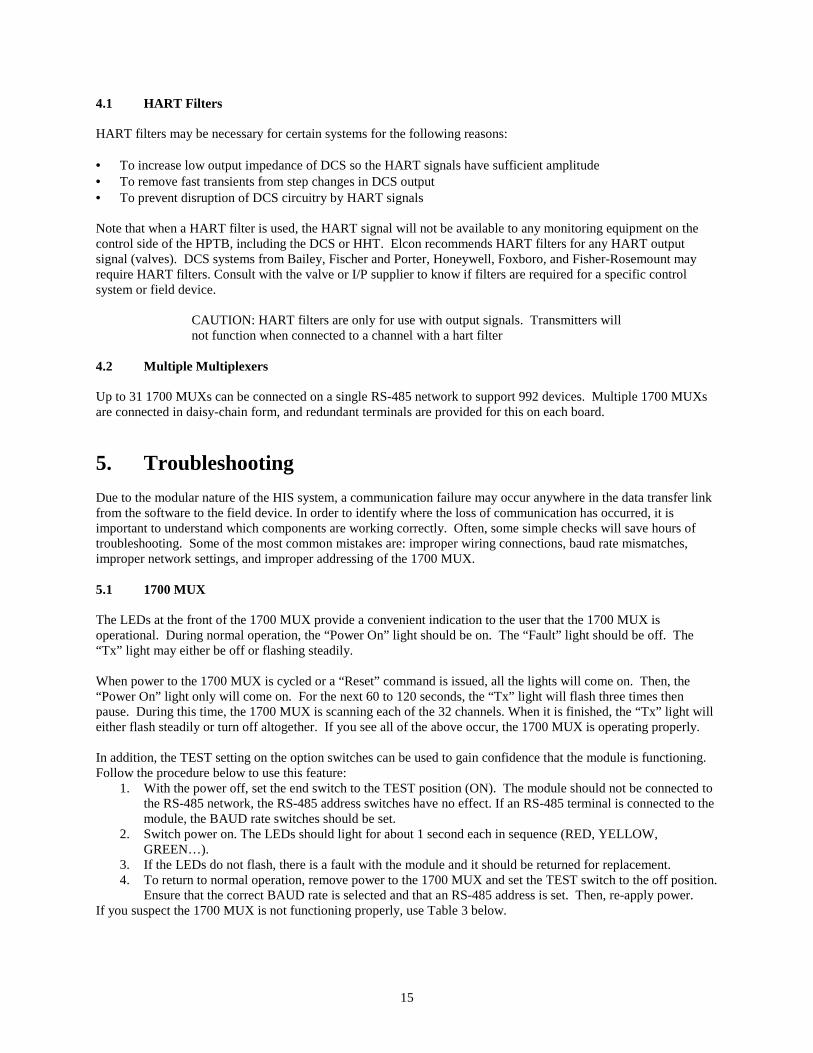
4.1 HART Filters
HART filters may be necessary for certain systems for the following reasons:
• To increase low output impedance of DCS so the HART signals have sufficient amplitude• To remove fast transients from step changes in DCS output• To prevent disruption of DCS circuitry by HART signals
Note that when a HART filter is used, the HART signal will not be available to any monitoring equipment on thecontrol side of the HPTB, including the DCS or HHT. Elcon recommends HART filters for any HART outputsignal (valves). DCS systems from Bailey, Fischer and Porter, Honeywell, Foxboro, and Fisher-Rosemount mayrequire HART filters. Consult with the valve or I/P supplier to know if filters are required for a specific controlsystem or field device.
CAUTION: HART filters are only for use with output signals. Transmitters willnot function when connected to a channel with a hart filter
4.2 Multiple Multiplexers
Up to 31 1700 MUXs can be connected on a single RS-485 network to support 992 devices. Multiple 1700 MUXsare connected in daisy-chain form, and redundant terminals are provided for this on each board.
5. TroubleshootingDue to the modular nature of the HIS system, a communication failure may occur anywhere in the data transfer linkfrom the software to the field device. In order to identify where the loss of communication has occurred, it isimportant to understand which components are working correctly. Often, some simple checks will save hours oftroubleshooting. Some of the most common mistakes are: improper wiring connections, baud rate mismatches,improper network settings, and improper addressing of the 1700 MUX.
5.1 1700 MUX
The LEDs at the front of the 1700 MUX provide a convenient indication to the user that the 1700 MUX isoperational. During normal operation, the “Power On” light should be on. The “Fault” light should be off. The“Tx” light may either be off or flashing steadily.
When power to the 1700 MUX is cycled or a “Reset” command is issued, all the lights will come on. Then, the“Power On” light only will come on. For the next 60 to 120 seconds, the “Tx” light will flash three times thenpause. During this time, the 1700 MUX is scanning each of the 32 channels. When it is finished, the “Tx” light willeither flash steadily or turn off altogether. If you see all of the above occur, the 1700 MUX is operating properly.
In addition, the TEST setting on the option switches can be used to gain confidence that the module is functioning.Follow the procedure below to use this feature:
1. With the power off, set the end switch to the TEST position (ON). The module should not be connected tothe RS-485 network, the RS-485 address switches have no effect. If an RS-485 terminal is connected to themodule, the BAUD rate switches should be set.
2. Switch power on. The LEDs should light for about 1 second each in sequence (RED, YELLOW,GREEN…).
3. If the LEDs do not flash, there is a fault with the module and it should be returned for replacement.4. To return to normal operation, remove power to the 1700 MUX and set the TEST switch to the off position.
Ensure that the correct BAUD rate is selected and that an RS-485 address is set. Then, re-apply power.If you suspect the 1700 MUX is not functioning properly, use Table 3 below.

16
Table 31700 MUX LED Indications
Symptom Cause SolutionLights flash sequentially TEST switch is ON Switch off the power
Put TEST switch OFFRestart the system
No LEDs lit Power fail or fuse open Check 24 VDC supply LEDand fuse
Only yellow LED lit Scanning is disabled.If scanning is enabled, then noHART devices were detectedby the 1700 MUX
Check wiring continuity
Red LED lit Self-test fault Contact Elcon Instruments forfurther instructions
6. MaintenanceElcon Instruments apparatus do not require any particular maintenance under normal operating conditions. They aredesigned to operate trouble-free and with high stability for long periods.
WARNING! Any repair made by unauthorized personnel may completelyinvalidate the safety characteristics of the unit and could void all warranties.Repair not made by Elcon Instruments is fully at user's risk and responsibility.In addition, the warranty terms of the unit will be null and void to all effect.
7. Parts ListTable 4 is a representation of the parts on the HPSM that can be replaced by the user. There are no parts in or on the1700 MUX itself that can be replaced in the field. If any other parts need to be replaced, please contact your nearestElcon Instruments representative for instructions.
Table 4Replaceable Parts
Part Number Description501300 Supply ID label502401 Terminal blocks MVSTBW 2.5/3-ST-5.08507500 Jumper Shunts, 0.100”, Low Profile508100 Fuse 5x20 time-lag, 3.15 Amp F1508200 Vertical fuse holder for 3.15 Amp F1

17
8. WarrantyElcon offers an extended period of warranty assistance performed at their factory. Each instrument to be repairedwill be thoroughly analyzed to locate the cause and mode of possible faults and correlate them with the initial,intermediate, and final testing documentation. This allows Elcon to trace with more accuracy the fault causes, thusobtaining valuable indications, reliability statistics, and qualitative evaluation for the purpose of maintaining thequality and reliability of their products under strict control.
WARRANTY CONDITIONS.Elcon Instruments certifies that all the instruments of their manufacture are immune from defects or loss of essentialquality, and whenever they are apparatus, Elcon also guarantees proper operation. The duration of the warrantyperiod is clearly indicated in the order confirmation and starts from the date of delivery or on-site test (if required).Unless otherwise specified, the warranty is for 12 months from delivery date. The warranty does not coverconsumable items.
TERMS - CONDITIONS - WARRANTY LIMITS.
1. Form of reportThe action due to the customer for vices, defects, or loss of quality is subject to the terms of articles 1495, 1497C.C. (Italian Civil Code). The denunciation of the defect or quality loss must be made by the customer byregistered mail, telex, fax, or equivalent written form to be sent to the main office of Elcon Instruments.
2. Limit-burden obligation of the customer to conserve the warranty
a) The warranty is limited to repairing and substitution, FOB Elcon Instruments factory, of the useless parts, for aconfirmed defect of materials and/or workmanship, free of charge, and the remaining, shipping, dismountingand mounting expenses (operations that in any case must be done in accordance with the supplier), at thecustomer's charge. In no case will Elcon Instruments be held responsible for expenses, for loss of profit and/ordamage, direct or indirect, that can be incurred by the customer due to a fault or defect of the material.
b) The warranty ends for instruments or materials damaged by:• Shipment• Storage not conforming to the instruction manual specifications• Incorrect installation• Loss of adequate protection for the type of installation (mechanical, climatic, etc.)• Incorrect application of power supply voltage• Erroneous wiring of the power supply line (applied on input or output measuring circuits)
c) The warranty ends for instruments or materials if repaired, modified, or simply tampered with, even if only inpart, by personnel not authorized by Elcon Instruments and also ends if used in improper way and/or notconforming with the given instructions.
d) The warranty is valid only if payment has been received from the customer in a timely fashion, as per theoriginal agreement; otherwise it is void.
e) All parts that are subject to normal wear and inevitable deterioration are excluded from this warranty.
f) In case of having to return the instrument to one of the Elcon Instruments authorized labs for repair, thecustomer shall obtain a written authorization with shipping instructions from Elcon Instruments. Shipmentexpenses, all the concerned burdens, and the risk of loss or damage of the returned instrument are exclusivelyborn by the customer. The same rules apply also when the instrument needs to be replaced.

18
g) During the warranty period, the customer will allow any personnel appointed by Elcon Instruments to executecontrol of the instruments and materials.
h) The customer cannot require cancellation of the contract in reason of vices or defects, but only their eliminationor, when they cannot be repaired, the replacement of the instruments, if available on the market. In case thereplacement is for any reason impossible, Elcon Instruments has the faculty to offer instruments of the same orequivalent type, quality and efficiency, suitable to the same use. If the customer refuses such offer withoutjustified motivation, he is entitled to reimbursement of the money already paid or a refund of the real incurredexpenses.
i) For items subsupplied by Elcon Instruments the standard warranty terms as given by the original manufacturerare applicable.
j) The warranty must be considered for material repaired, substituted on ex works basis.
Such warranty replaces and supersedes any other declared or implicit warranty.
9. GlossaryDCS Distributed Control SystemFSK Frequency Shift KeyingHART®Highway Addressable Remote TransducerHHT Hand Held TerminalIS Intrinsic SafetyMW Maintenance WorkstationPC Personal ComputerPLC Programmable Logic ControllerTB Termination Board

19
10. Contact InformationElcon Instruments SRLItalyVia delle Industrie, 420050 Mezzago (MI)PO Box 14 - 20050 Mezzago (MI)Telephone: ++39 039 6292 1General Fax: ++39 039 6292 240Sales Fax: ++39 039 6292 290E-mail: [email protected]: www.elconinstruments.com
Elcon Instruments Inc.USA1275 Buford Hwy.Suite 105Suwanee, GA 30024Telephone: ++1 770 271 5519Fax: ++1 770 271 8049Toll Free: ++1 800 253 5266E-mail: [email protected]
Elcon InstrumentsAsia - PacificSuite 5005 Bayside Plaza376-380 Bay St.Brighton - Le - SandsSydney, N.S.W. 2216 - AustraliaTelephone: ++61 2 9556 1188Fax: ++61 2 9556 3400E-mail: [email protected]
Elcon Intrinsic Safety LTDUnited KingdomHeighington LaneNewton AycliffeCo DurhamDL5 6XZTelephone: ++44 1325 314 455Fax: ++44 1325 314 456

20
Appendix A
I/OWiring Diagrams
&Jumper Settings

21
IA-BA
-AI-01-I-R
1700
MU
X GNDAB
RS-485SUPPLY 1
SUPPLY 2 ELC
ON
INST
RU
MEN
TSSH
SH
FUSE 13.15A
FUSE 23.15A
SPAREFUSE
Mod 1132/CON8-H
CH 1 2 3 4 SHD 5 6 7 8 9 10 11 12 SHD 13 14 15 16 17 18 19 20 SHD 21 22 23 24 25 26 27 28 SHD 29 30 31 32
+24V
B
C
SHD 1
JA1
JB1
JB2
JA3
JA2
1 11 1 1
3 3 3 3 3
CH 1 2 3 4
+24V
B
C
6.70" (170.18mm
)
6.80" (172.7mm)11.10" (281.94mm)
Rev. Date Apr.Detalis No.DateFileScale
ELCON INSTRUMENTS, INC.
TITLE13 SEP 99
DC SUPPLYTERMINALS
GNDAB
IN
OUT
JP 1A
JP 1B
ANALO
G
NOTES:
1) Interface Adapter Card Jumper Selection determinesAI or AO operation.- JPA1 & JPB1 "IN" for connection to IMASI02- JPA1 & JPB1 "OUT" for connection to IMASO01
2) FOR 24VDC LOOP SUPPLY TO TRANSMITTERS- Install JA on position 2-3- Install JB on position 2-3- Connect XMTR on terminals +24V (positive) and C (negative)
3) 4-20mA FROM FIELD- Install JA on position 2-3- Install JB on position 1-2- Connect XMTR on terminals C (positive) and B (negative)
4) 1-5V FROM FIELD- Install JA on position 1-2- Install JB on position 1-2- Connect XMTR on terminals C (positive) and B (negative)
5) I/P FROM FIELD- Install JA on position 1-2- Install JB on position 1-2- Connect I/P on terminals C (positive) and B (negative)
6) When connected to IMASI02 module,channels 16 and 32 may not be used.
7) When connected to IMASO01 module,channels 15 & 16 and 31 & 32 may not be used.
8) Redundancy is supported for Input signals only.
TO FIELD DEVICES
1132/CON8-H-LTXw/ IA-BA-AI-01-I-RBailey 15 ch. (x2)
IMASI02or
14 ch. (x2)IMASO01
LY-IABAAI01IR-A0
This drawing, including the information it bears, is property of ELCON INSTRUMENTSand must be held in strict confidence and properly safeguarded at all times. It may notbe copied or reproduced, or provided or revealed to any other party, except with theprior written authorization of ELCON INSTRUMENTS, and any authorized copy orreproduction must include this legend.
Interface Adapter CardConfiguration Jumpers
Cable Connector to IMASI02

22
IA-BA
-AI-03-BC
1700
MU
X GNDAB
RS-485SUPPLY 1
SUPPLY 2 ELC
ON
INST
RU
MEN
TSSH
SH
FUSE 13.15A
FUSE 23.15A
SPAREFUSE
Mod 1132/CON8-H
CH 1 2 3 4 SHD 5 6 7 8 9 10 11 12 SHD 13 14 15 16 17 18 19 20 SHD 21 22 23 24 25 26 27 28 SHD 29 30 31 32
+24V
B
C
SHD 1
JA1
JB1
JB2
JA3
JA2
1 11 1 1
3 3 3 3 3
CH 1 2 3 4
+24V
B
C
6.70" (170.18mm
)
6.80" (172.7mm)11.10" (281.94mm)
TO FIELD DEVICES
Rev. Date Apr.Detalis No.DateFileScale
ELCON INSTRUMENTS, INC.
TITLE13 SEP 99
DC SUPPLYTERMINALS
GNDAB
NOTES:
1) FOR 24VDC LOOP SUPPLY TO TRANSMITTERS- Install JA on position 1-2- Install JB on position 2-3- Connect XMTR on terminals +24V (positive) and C (negative)
2) 4-20mA FROM FIELD- Install JA on position 1-2- Install JB on position 1-2- Connect XMTR on terminals C (positive) and B (negative)
3) 1-5V FROM FIELD- Install JA on position 1-2- Install JB on position 1-2- Connect XMTR on terminals C (positive) and B (negative)- Remove resistor R16-R30
4) Since IMASI02 is a 15 channel module,channels 16 and 32 may not be used.
5) For use with AI signals only.
1132/CON8-H-LTXw/ IA-BA-AI-03-BC
Bailey 15 ch. (x2)
IMASI02
LY-IABAAI03BC-A0
This drawing, including the information it bears, is property of ELCON INSTRUMENTSand must be held in strict confidence and properly safeguarded at all times.It may not be copied or reproduced, or provided or revealed to any other party,except with the prior written authorization of ELCON INSTRUMENTS, and anyauthorized copy or reproduction must include this legend.
Cable Connector to IMASI02
Impedance BoostingComponents & 250ohm Shunts

23
IA-BA
-AO
-HFT-01
1700
MU
X GNDAB
RS-485SUPPLY 1
SUPPLY 2 ELC
ON
INST
RU
MEN
TSSH
SH
FUSE 13.15A
FUSE 23.15A
SPAREFUSE
Mod 1132/CON8-H
CH 1 2 3 4 SHD 5 6 7 8 9 10 11 12 SHD 13 14 15 16 17 18 19 20 SHD 21 22 23 24 25 26 27 28 SHD 29 30 31 32
+24V
B
C
SHD 1
JA1
JB1
JB2
JA3
JA2
1 11 1 1
3 3 3 3 3
CH 1 2 3 4
+24V
B
C
6.70" (170.18mm
)
6.80" (172.7mm)11.10" (281.94mm)
TO FIELD DEVICES
Rev. Date Apr.Detalis No.DateFileScale
ELCON INSTRUMENTS, INC.
TITLE LY-IABAAOHFT01-A0
1132/CON8-H-LTXw/ IA-BA-AO-HFT-01
13 SEP 99
NOTES:
- Install JA on position 1-2- Install JB on position 1-2
- Connect I/P on terminals C (positive) and B (negative)
Since IMASO01 is a 14 channel module,channels 15 & 16 and 31 & 32 may not be used.
For use with AO signals only.
GNDAB
Bailey 14 ch. (x2)w/HART filters
IMASO01This drawing, including the information it bears, is property of ELCON INSTRUMENTSand must be held in strict confidence and properly safeguarded at all times.It may not be copied or reproduced, or provided or revealed to any other party,except with the prior written authorization of ELCON INSTRUMENTS, and anyauthorized copy or reproduction must include this legend.
HART Filter Components
Cable Connector to IMASO01
24
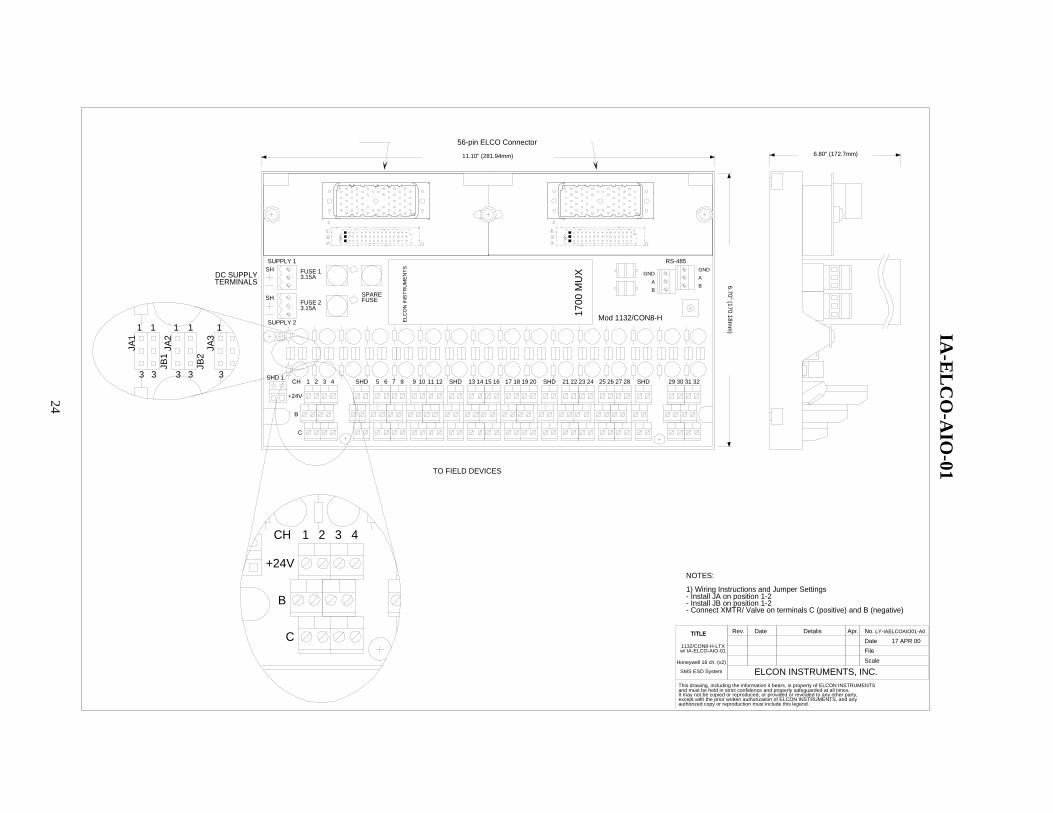
IA-ELC
O-A
IO-01
1700
MU
X GNDAB
RS-485SUPPLY 1
SUPPLY 2 ELC
ON
INS
TRU
ME
NTSSH
SH
FUSE 13.15A
FUSE 23.15A
SPAREFUSE
Mod 1132/CON8-H
CH 1 2 3 4 SHD 5 6 7 8 9 10 11 12 SHD 13 14 15 16 17 18 19 20 SHD 21 22 23 24 25 26 27 28 SHD 29 30 31 32
+24V
B
C
SHD 1
JA1
JB1
JB2
JA3
JA2
1 11 1 1
3 3 3 3 3
CH 1 2 3 4
+24V
B
C
6.70" (170.18mm
)
6.80" (172.7mm)11.10" (281.94mm)
TO FIELD DEVICES
Rev. Date Apr.Detalis No.DateFileScale
ELCON INSTRUMENTS, INC.
TITLE
DC SUPPLYTERMINALS
GNDAB
This drawing, including the information it bears, is property of ELCON INSTRUMENTSand must be held in strict confidence and properly safeguarded at all times.It may not be copied or reproduced, or provided or revealed to any other party,except with the prior written authorization of ELCON INSTRUMENTS, and anyauthorized copy or reproduction must include this legend.
1132/CON8-H-LTXw/ IA-ELCO-AIO-01
Honeywell 16 ch. (x2)
SMS ESD System
LY-IAELCOAIO01-A0
17 APR 00
56-pin ELCO Connector
NOTES:
1) Wiring Instructions and Jumper Settings- Install JA on position 1-2- Install JB on position 1-2- Connect XMTR/ Valve on terminals C (positive) and B (negative)

25
IA-M
P-EA
M-ISI
1700
MU
X GNDAB
RS-485SUPPLY 1
SUPPLY 2 ELC
ON
INST
RU
MEN
TSSH
SH
FUSE 13.15A
FUSE 23.15A
SPAREFUSE
Mod 1132/CON8-H
CH 1 2 3 4 SHD 5 6 7 8 9 10 11 12 SHD 13 14 15 16 17 18 19 20 SHD 21 22 23 24 25 26 27 28 SHD 29 30 31 32
+24V
B
C
SHD 1
JA1
JB1
JB2
JA3
JA2
1 11 1 1
3 3 3 3 3
CH 1 2 3 4
+24V
B
C
6.70" (170.18mm
)
6.80" (172.7mm)11.10" (281.94mm)
TO FIELD DEVICES
DC SUPPLYTERMINALS
GNDAB
49-pin AMP Moore Products Connector
NOTES:
1) FOR 24VDC LOOP SUPPLY TO TRANSMITTERS- Install JA on position 1-2- Install JB on position 1-2- Move JP jumper (on IAC) to PWR- Connect XMTR on terminals C (positive) and B (negative)
2) 4-20mA or 1-5V FROM FIELD (Self-powered XMTR)- Install JA on position 1-2- Install JB on position 1-2- Move JP jumper (on IAC) to VIN- Connect XMTR on terminals C (positive) and B (negative)
3) Analog Output- Install JA on position 1-2- Install JB on position 1-2- Move JP jumper (on IAC) to PWR- Connect Valve on terminals C (positive) and B (negative)
4) Jumper Number = Channel Number
Rev. Date Apr.Detalis No.DateFileScale
ELCON INSTRUMENTS, INC.
TITLE
This drawing, including the information it bears, is property of ELCON INSTRUMENTSand must be held in strict confidence and properly safeguarded at all times.It may not be copied or reproduced, or provided or revealed to any other party,except with the prior written authorization of ELCON INSTRUMENTS, and anyauthorized copy or reproduction must include this legend.
1132/CON8-H-LTXw/ IA-MP-EAM-ISI
Moore Products 16 ch. (x2)
Enhanced Analog Module
LY-IAMPEAMISI-A0
18 APR 00

26
IA-M
P-HFM
-ISI
1700
MU
X GNDAB
RS-485SUPPLY 1
SUPPLY 2 ELC
ON
INS
TRU
ME
NTSSH
SH
FUSE 13.15A
FUSE 23.15A
SPAREFUSE
Mod 1132/CON8-H
CH 1 2 3 4 SHD 5 6 7 8 9 10 11 12 SHD 13 14 15 16 17 18 19 20 SHD 21 22 23 24 25 26 27 28 SHD 29 30 31 32
+24V
B
C
SHD 1
JA1
JB1
JB2
JA3
JA2
1 11 1 1
3 3 3 3 3
CH 1 2 3 4
+24V
B
C
6.70" (170.18mm
)
6.80" (172.7mm)11.10" (281.94mm)
TO FIELD DEVICES
DC SUPPLYTERMINALS
GNDAB
49-pin AMP Moore Products Connector
Rev. Date Apr.Detalis No.DateFileScale
ELCON INSTRUMENTS, INC.
TITLE
This drawing, including the information it bears, is property of ELCON INSTRUMENTSand must be held in strict confidence and properly safeguarded at all times.It may not be copied or reproduced, or provided or revealed to any other party,except with the prior written authorization of ELCON INSTRUMENTS, and anyauthorized copy or reproduction must include this legend.
18 APR 001132/CON8-H-LTXw/ IA-MP-HFM-ISI
Moore Products 16 ch. (x2)
HART Fieldbus Module
LY-IAMPHFMISI-A0
NOTES:
1) FOR 24VDC LOOP SUPPLY TO TRANSMITTERS- Install JA on position 2-3- Install JB on position 2-3- Connect XMTR on terminals +24V (positive) and C (negative)
2) 4-20mA FROM FIELD- Install JA on position 2-3- Install JB on position 1-2- Connect XMTR on terminals C (positive) and B (negative)
3) 1-5V FROM FIELD- Install JA on position 1-2- Install JB on position 1-2- Connect XMTR on terminals C (positive) and B (negative)
4) Jumper Number = Channel Number
5) Insert +24V Jumper on IAC to connect 24V from I/O card to 24V on termination board
6) Insert SHD jumper on IAC
27
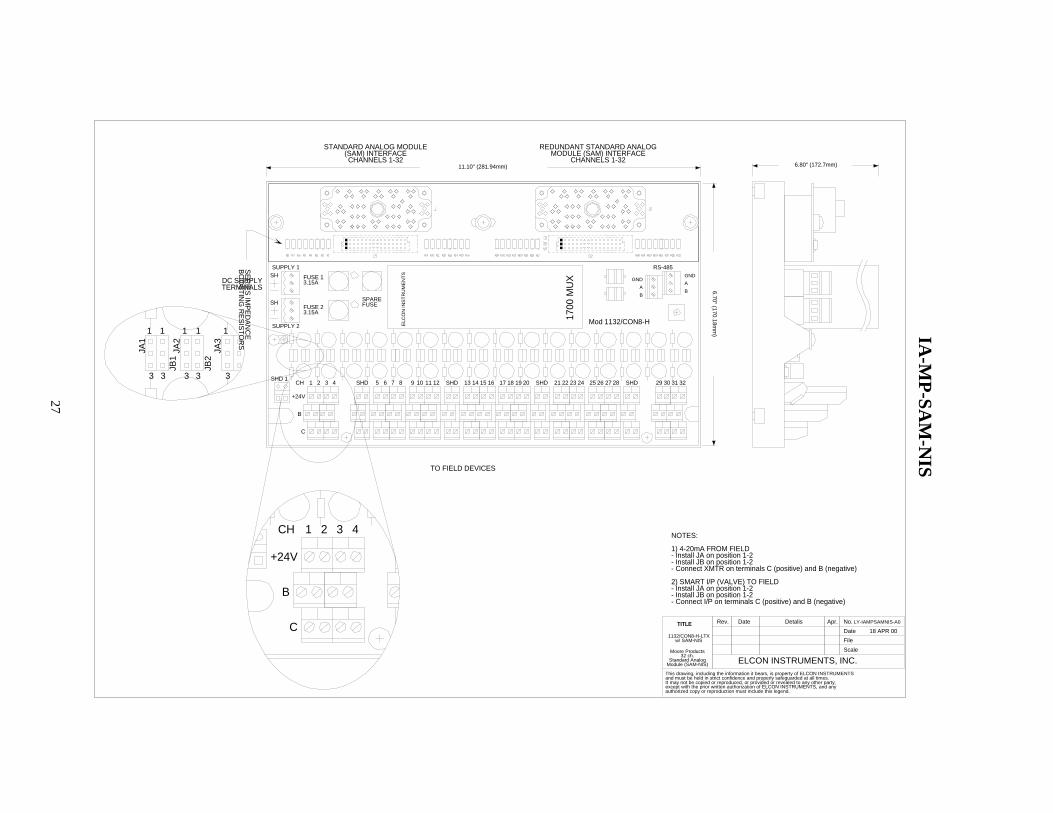
IA-M
P-SAM
-NIS
1700
MU
X GNDAB
RS-485SUPPLY 1
SUPPLY 2 ELC
ON
INS
TRU
ME
NTSSH
SH
FUSE 13.15A
FUSE 23.15A
SPAREFUSE
Mod 1132/CON8-H
CH 1 2 3 4 SHD 5 6 7 8 9 10 11 12 SHD 13 14 15 16 17 18 19 20 SHD 21 22 23 24 25 26 27 28 SHD 29 30 31 32
+24V
B
C
SHD 1
JA1
JB1
JB2
JA3
JA2
1 11 1 1
3 3 3 3 3
CH 1 2 3 4
+24V
B
C
6.70" (170.18mm
)
6.80" (172.7mm)11.10" (281.94mm)
TO FIELD DEVICES
Rev. Date Apr.Detalis No.DateFileScale
ELCON INSTRUMENTS, INC.
TITLE
DC SUPPLYTERMINALS
GNDAB
This drawing, including the information it bears, is property of ELCON INSTRUMENTSand must be held in strict confidence and properly safeguarded at all times.It may not be copied or reproduced, or provided or revealed to any other party,except with the prior written authorization of ELCON INSTRUMENTS, and anyauthorized copy or reproduction must include this legend.
SERIES IM
PEDAN
CE
BOO
STING
RESISTO
RS
NOTES:
1) 4-20mA FROM FIELD- Install JA on position 1-2- Install JB on position 1-2- Connect XMTR on terminals C (positive) and B (negative)
2) SMART I/P (VALVE) TO FIELD- Install JA on position 1-2- Install JB on position 1-2- Connect I/P on terminals C (positive) and B (negative)
1132/CON8-H-LTXw/ SAM-NIS
Moore Products32 ch.
Standard AnalogModule (SAM-NIS)
LY-IAMPSAMNIS-A0
18 APR 00
STANDARD ANALOG MODULE(SAM) INTERFACECHANNELS 1-32
REDUNDANT STANDARD ANALOGMODULE (SAM) INTERFACE
CHANNELS 1-32

28
IA-M
P-VIM
-ISI
1700
MU
X GNDAB
RS-485SUPPLY 1
SUPPLY 2 ELC
ON
INST
RU
MEN
TSSH
SH
FUSE 13.15A
FUSE 23.15A
SPAREFUSE
Mod 1132/CON8-H
CH 1 2 3 4 SHD 5 6 7 8 9 10 11 12 SHD 13 14 15 16 17 18 19 20 SHD 21 22 23 24 25 26 27 28 SHD 29 30 31 32
+24V
B
C
SHD 1
JA1
JB1
JB2
JA3
JA2
1 11 1 1
3 3 3 3 3
CH 1 2 3 4
+24V
B
C
6.70" (170.18mm
)
6.80" (172.7mm)11.10" (281.94mm)
TO FIELD DEVICES
DC SUPPLYTERMINALS
GNDAB
49-pin AMP Moore Products Connector
Rev. Date Apr.Detalis No.DateFileScale
ELCON INSTRUMENTS, INC.
TITLE
This drawing, including the information it bears, is property of ELCON INSTRUMENTSand must be held in strict confidence and properly safeguarded at all times.It may not be copied or reproduced, or provided or revealed to any other party,except with the prior written authorization of ELCON INSTRUMENTS, and anyauthorized copy or reproduction must include this legend.
18 APR 001132/CON8-H-LTXw/ IA-MP-VIM-ISI
Moore Products 16 ch. (x2)
Voltage Input Module
LY-IAMPVIMISI-A0
LOC
AL TEMPER
ATUR
ESEN
SOR
S
NOTES:
1) FOR 24VDC LOOP SUPPLY TO TRANSMITTERS- Install JA on position 2-3- Install JB on position 2-3- Connect XMTR on terminals +24V (positive) and C (negative)
2) 4-20mA FROM FIELD- Install JA on position 2-3- Install JB on position 1-2- Connect XMTR on terminals C (positive) and B (negative)
3) 1-5V FROM FIELD- Install JA on position 1-2- Install JB on position 1-2- Connect XMTR on terminals C (positive) and B (negative)
4) Jumper Number = Channel Number

29
IA-T
R9-A
I-02-I
1700
MU
X GNDAB
RS-485SUPPLY 1
SUPPLY 2 ELC
ON
INST
RU
MEN
TSSH
SH
FUSE 13.15A
FUSE 23.15A
SPAREFUSE
Mod 1132/CON8-H
CH 1 2 3 4 SHD 5 6 7 8 9 10 11 12 SHD 13 14 15 16 17 18 19 20 SHD 21 22 23 24 25 26 27 28 SHD 29 30 31 32
+24V
B
C
SHD 1
JA1
JB1
JB2
JA3
JA2
1 11 1 1
3 3 3 3 3
CH 1 2 3 4
+24V
B
C
6.70" (170.18mm
)
6.80" (172.7mm)11.10" (281.94mm)
TO FIELD DEVICES
Rev. Date Apr.Detalis No.DateFileScale
ELCON INSTRUMENTS, INC.
TITLE
DC SUPPLYTERMINALS
GNDAB
This drawing, including the information it bears, is property of ELCON INSTRUMENTSand must be held in strict confidence and properly safeguarded at all times.It may not be copied or reproduced, or provided or revealed to any other party,except with the prior written authorization of ELCON INSTRUMENTS, and anyauthorized copy or reproduction must include this legend.
1132/CON8-H-LTXw/ IA-TR9-AI-02-I-S
Triconex System 9Tricon TMRI/O Module
3700 (32 AI)
LY-IATR9AI02IS-A0
18 APR 00
NOTES:
1) FOR 24VDC LOOP SUPPLY TO TRANSMITTERS- Install JA on position 2-3- Install JB on position 2-3- Connect XMTR on terminals +24V (positive) and C (negative)
2) 1-5V FROM FIELD/1-5 TO CONTROL ROOM or 4-20mA FROM FIELD/4-20mA TO CONTROL ROOM- Install JA on position 1-2- Install JB on position 1-2- Connect XMTR on terminals C (positive) and B (negative)
3) 4-20mA FROM FIELD/1-5V TO CONTROL ROOM- Install JA on position 2-3- Install JB on position 1-2- Connect XMTR on terminals C (positive) and B (negative)
4) For use with AI signals only.
Connectors to Module 3700

30
IA-T
R9-A
I-03-I
1700
MU
X GNDAB
RS-485SUPPLY 1
SUPPLY 2 ELC
ON
INST
RU
MEN
TSSH
SH
FUSE 13.15A
FUSE 23.15A
SPAREFUSE
Mod 1132/CON8-H
CH 1 2 3 4 SHD 5 6 7 8 9 10 11 12 SHD 13 14 15 16 17 18 19 20 SHD 21 22 23 24 25 26 27 28 SHD 29 30 31 32
+24V
B
C
SHD 1
JA1
JB1
JB2
JA3
JA2
1 11 1 1
3 3 3 3 3
CH 1 2 3 4
+24V
B
C
6.70" (170.18mm
)
6.80" (172.7mm)11.10" (281.94mm)
TO FIELD DEVICES
Rev. Date Apr.Detalis No.DateFileScale
ELCON INSTRUMENTS, INC.
TITLE
DC SUPPLYTERMINALS
GNDAB
This drawing, including the information it bears, is property of ELCON INSTRUMENTSand must be held in strict confidence and properly safeguarded at all times.It may not be copied or reproduced, or provided or revealed to any other party,except with the prior written authorization of ELCON INSTRUMENTS, and anyauthorized copy or reproduction must include this legend.
L11 2
CJW
1132/CON8-H-LTXw/ IA-TR9-AI-03-I-S
LY-IATR9AI03IS-A0
9 FEB 00
NOTES:
1) FOR 24VDC LOOP SUPPLY TO TRANSMITTERS- Install JA on position 2-3- Install JB on position 2-3- Connect XMTR on terminals +24V (positive) and C (negative)
2) 1-5V FROM FIELD/1-5 TO CONTROL ROOM or 4-20mA FROM FIELD/4-20mA TO CONTROL ROOM- Install JA on position 1-2- Install JB on position 1-2- Connect XMTR on terminals C (positive) and B (negative)
3) 4-20mA FROM FIELD/1-5V TO CONTROL ROOM- Install JA on position 2-3- Install JB on position 1-2- Connect XMTR on terminals C (positive) and B (negative)
4) L1 (Jumper on IAC) set in pos.1(W) if the IAC is connectedto the first 32 AI channels (of the total 64 that the I/O cardcan handle). It is set on pos. 2(CJ) if the IAC is connected tothe second 32 AI channels.
5) For use with AI signals only.
Triconex System 9Tricon TMRI/O Module
3704E (64 AI)
CABLE CONNECTION TO MODULE 3704E

31
IA-T
R9-A
O-01-I
1700
MU
X GNDAB
RS-485SUPPLY 1
SUPPLY 2 ELC
ON
INST
RU
MEN
TSSH
SH
FUSE 13.15A
FUSE 23.15A
SPAREFUSE
Mod 1132/CON8-H
CH 1 2 3 4 SHD 5 6 7 8 9 10 11 12 SHD 13 14 15 16 17 18 19 20 SHD 21 22 23 24 25 26 27 28 SHD 29 30 31 32
+24V
B
C
SHD 1
JA1
JB1
JB2
JA3
JA2
1 11 1 1
3 3 3 3 3
CH 1 2 3 4
+24V
B
C
TO FIELD DEVICES
Rev. Date Apr.Detalis No.DateFileScale
ELCON INSTRUMENTS, INC.
TITLE
DC SUPPLYTERMINALS
GNDAB
This drawing, including the information it bears, is property of ELCON INSTRUMENTSand must be held in strict confidence and properly safeguarded at all times.It may not be copied or reproduced, or provided or revealed to any other party,except with the prior written authorization of ELCON INSTRUMENTS, and anyauthorized copy or reproduction must include this legend.
1132/CON8-H-LTXw/ IA-TR9-AO-01-I-S
Triconex System 9Tricon TMRI/O Module
3805E (8 AO)
LY-IATR9AO01IS-A0
18 APR 00
11.10" (281.94mm)
7.50" (190.50mm
)
6.80" (172.7mm)
NOTES:
1) FOR ANALOG OUTPUT SIGNALS- Install JA on position 1-2- Install JB on position 1-2- Connect vALVE on terminals C (positive) and B (negative)
2) For use with AO signals only.