Installation Instructions for Microsoft SharePoint...
27
Mindjet ® on-premise Installation Instructions for Microsoft ® SharePoint ® 2010
-
Upload
truongminh -
Category
Documents
-
view
225 -
download
0
Transcript of Installation Instructions for Microsoft SharePoint...

Mindjet® on-premise
Installation Instructions for Microsoft
® SharePoint
® 2010

on-premise Mindjet on-premise Installation Instructions for Microsoft SharePoint 2010
© 2012 Mindjet All Rights Reserved Version 1.0, December 6, 2012 i
Contents
Introduction to Mindjet on-Premise with SharePoint ................................................................. 1
Deploy with SharePoint 2010 ........................................................................................................ 5
Installation ........................................................................................................................... 5
Add the Mindjet on-premise Solution Package to your SharePoint Farm ............. 5
Deploy the Mindjet on-premise Solution Package ................................................. 6
File Associator Installation ................................................................................... 10
License and Administration .................................................................................. 10
Enable the Mindjet on-premise Web Application Feature.................................... 13
Activate Mindjet on-premise Templates ............................................................... 13
Activate and use the Web Part ............................................................................ 13
Add .mmap as a MIME Type in IIS ................................................................................... 15
Client Prerequisites .............................................................................................. 15
Configure the SharePoint Server ......................................................................... 16
Uninstall Mindjet MapShare ........................................................................................................ 20
Remove all instances of the Mindjet MapShare Web Part ............................................... 20
Remove the Mindjet MapShare Web Part from the sites collection gallery ......... 20
Undeploy the Mindjet MapShare Web Part Solution ........................................... 21
Uninstall Mindjet on-premise ..................................................................................................... 22
Remove all instances of the Mindjet Viewer Web Part ..................................................... 22
Remove the Mindjet on-premise Web Part from the sites collection gallery ....... 22
Un-deploy the Mindjet on-premise Web Part Solution ......................................... 23
User Documentation .................................................................................................................... 24
Technical Support ........................................................................................................................ 25

on-premise Mindjet on-premise Installation Instructions for Microsoft SharePoint 2010
© 2012 Mindjet All Rights Reserved Version 1.0, December 6, 2012 1
INTRODUCTION TO MINDJET ON-PREMISE WITH SHAREPOINT
Mindjet on-premise gives companies utilizing Microsoft SharePoint the ability to view and display Mindjet
map (.mmap) files directly within the SharePoint environment, without requiring any proprietary software
installed on the individual user’s local computer. In addition, you can configure the SharePoint server to
let users edit maps directly from SharePoint lists and embed map Web Parts in your SharePoint sites.
Mindjet on-premise adds five distinct capabilities to your SharePoint environment:
1. View maps: Allows users with SharePoint access to view any map stored in a document list.
Users can select View in Browser in the document list to open the selected map in Mindjet.

on-premise Mindjet on-premise Installation Instructions for Microsoft SharePoint 2010
© 2012 Mindjet All Rights Reserved Version 1.0, December 6, 2012 2
2. Edit maps: Allows users with SharePoint access to edit any map stored in SharePoint. Users can
select Edit in Browser to open and begin editing a map.
3. Interact with SharePoint items: This allows users to both search and create SharePoint tasks
from the map. Once a task has been sent to SharePoint or brought into a .mmap file via the
SharePoint search, data from the task will be synched bi-directionally between the map and
SharePoint.

on-premise Mindjet on-premise Installation Instructions for Microsoft SharePoint 2010
© 2012 Mindjet All Rights Reserved Version 1.0, December 6, 2012 3
4. Create new maps from SharePoint: SharePoint users can create new documents from the
document library. A template library is installed on each site collection and SharePoint
Administrators can add templates that they would like users to have access to.
5. Viewer Web Part: Allows a user with page edit privileges to add a Web Part to a SharePoint
page that displays a Mindjet map. The Web Part references a map file stored in a SharePoint
document list and displays it in an embedded viewer in your SharePoint page.

on-premise Mindjet on-premise Installation Instructions for Microsoft SharePoint 2010
© 2012 Mindjet All Rights Reserved Version 1.0, December 6, 2012 4
For more information about using the Mindjet Viewer (including a description of functionality):
1. Click the Mindjet button on the Viewer’s bottom toolbar.
2. Then click Mindjet Viewer Help.

on-premise Mindjet on-premise Installation Instructions for Microsoft SharePoint 2010
© 2012 Mindjet All Rights Reserved Version 1.0, December 6, 2012 5
DEPLOY WITH SHAREPOINT 2010
Note: if you have installed a version of the Mindjet MapShare on your SharePoint server,
please use the uninstall instructions from Uninstall Mindjet MapShare (page 20) to remove the
application from your system
Mindjet on-premise provides integrated map support to your SharePoint 2010 environment by adding the
following functionalities:
� View & Edit: View and edit any Mindjet map (.mmap or .xmmap file) stored in a document list
from the browser.
� Viewer Web Part: Display a specific map (.mmap or .xmmap file) in a SharePoint page.
� Create New Maps: From a document library, create new map files.
The product consists of two Windows® Solution files (WSP) that can be installed into SharePoint using
basic Stsadm operations.
WINDOWS SOLUTION FILE (WSP) SHAREPOINT VERSION FEATURES
Mindjet.SharePoint.2010.wsp 2010 Viewer & Viewer Web Part
Mindjet.SharePoint.FileTypeAssociator.wsp 2010 Mindjet file association
Installation
Mindjet on-premise has the following requirements for installation:
� That you have administrative privileges for the server(s) hosting SharePoint
� That Stsadm.exe is available on your SharePoint server. The default location for this utility is:
C:\Program Files\Common Files\Microsoft Shared\web server extensions\14\BIN\
Add the Mindjet on-premise Solution Package to your SharePoint Farm
1. Copy the WSP file into a folder on the Application server of your SharePoint server.
Example: C:\Mindjet.

on-premise Mindjet on-premise Installation Instructions for Microsoft SharePoint 2010
© 2012 Mindjet All Rights Reserved Version 1.0, December 6, 2012 6
2. Open a command prompt window—on Windows Server® 2008, make sure you open the
command prompt as Administrator.
3. Change the directory to the location of your Stsadm utility folder.
4. Add the Viewer/Viewer Web Part solution package (WSP) by executing the following command:
Stsadm.exe –o addsolution –filename C:\Mindjet\Mindjet.SharePoint.2010.wsp
Note: If you do not have SPTimer activated, you will see the following message after
executing the command in Step 4:
“The timer job for this operation has been created, but it will fail because the
administrative service for this server is not enabled.”
This will be addressed in the next step.
5. Run execadmsvcjobs to immediately process timer jobs to complete, adding the solution to your
SharePoint server by executing the following command:
Stsadm.exe –o execadmsvcjobs
Deploy the Mindjet on-premise Solution Package
There are two ways to deploy the Mindjet on-premise Solution package:
� via SharePoint Central Administration
� from the command line
Each has its own benefits:
� The Central Administration utility allows you to easily deploy the solution package to all
SharePoint servers in a multi-server environment.
� The command line approach allows administrators to write scripts.
The following installation procedure uses the Central Administration utility to deploy Mindjet on-premise.
For information on how to deploy a WSP via the command line, please read the following Microsoft
TechNet article: http://technet.microsoft.com/en-us/library/cc262459(office.12).aspx.

on-premise Mindjet on-premise Installation Instructions for Microsoft SharePoint 2010
© 2012 Mindjet All Rights Reserved Version 1.0, December 6, 2012 7
1. Open the SharePoint Central Administration page by selecting SharePoint 2010 Central
Administration from the Start Menu.
2. Click on the System Settings link in the Central Administration page.

on-premise Mindjet on-premise Installation Instructions for Microsoft SharePoint 2010
© 2012 Mindjet All Rights Reserved Version 1.0, December 6, 2012 8
3. Click the Manage farm solutions link.
4. Click the Mindjet.SharePoint.2010.wsp link.

on-premise Mindjet on-premise Installation Instructions for Microsoft SharePoint 2010
© 2012 Mindjet All Rights Reserved Version 1.0, December 6, 2012 9
5. Click the Deploy Solution link.
The Deploy Solution page will appear. The default settings will deploy the WSP to all SharePoint web
application servers immediately. (To deploy only to specific web application, please see your SharePoint
documentation.)
6. Click OK to deploy the Mindjet.SharePoint.2010.wsp package. (Select the web application that you
would like to deploy to.)
When this step is completed, you will return to the Solution Management page.

on-premise Mindjet on-premise Installation Instructions for Microsoft SharePoint 2010
© 2012 Mindjet All Rights Reserved Version 1.0, December 6, 2012 10
File Associator Installation
To install the Mindjet.SharePoint.FileTypeAssociator.wsp, complete steps 1 through 6 above using the
Mindjet.SharePoint.FileTypeAssociator.wsp file instead of the Mindjet.SharePoint.2010.wsp. This solution
will, by default, deploy to all the web applications in your farm.
Deploy the solution to your farm.
License and Administration
After deploying the Solution, you must use the Mindjet on-premise Administration page to provide your
Mindjet Administration email and your license key.
1. Open the SharePoint Central Administration page.
2. Click on the Mindjet on-premise Administration link.

on-premise Mindjet on-premise Installation Instructions for Microsoft SharePoint 2010
© 2012 Mindjet All Rights Reserved Version 1.0, December 6, 2012 11
3. On the next page, enter your license key and your Administration email address.
The Mindjet on-premise Administration page allows a SharePoint administrator to view the following:
� Mindjet on-premise Administrator email address—this email address is displayed in error
messages sent to users, so that they can contact the Administrator directly. Warning messages
relating to license key expiration or license non-compliance also contain this email.

on-premise Mindjet on-premise Installation Instructions for Microsoft SharePoint 2010
© 2012 Mindjet All Rights Reserved Version 1.0, December 6, 2012 12
� License Key—if the Administrator does not enter a license key into the product during
installation, the installed system will be a trial version of Mindjet on-premise. Trial versions expire
30 days after the installation date.
o If you purchase additional user licenses or extend your subscription term for Mindjet on-
premise, you will be given a new license key. After the Administrator enters the new license
key, the number of Licenses Purchased (see below) and/or the Contract Expiration Date (see
below) will be updated within the product to reflect your purchase, and will include the total
number of user licenses allowed during your new subscription term.
� Notifications and Reminders—the notifications will be displayed to users as pop-up messages.
o Subscription expiration messages are displayed if the corresponding checkbox is selected.
o When no more seats are available for users, new users will receive a popup message when
they try to edit the map.
� License Contract Number—each SharePoint server farm installation will have its own contract
associated with it. If you need to purchase additional licenses, you must reference this License
Contract Number when you call your sales representative.
� Licenses Purchased—this is the total number of user licenses that have been purchased for the
server farm installation.
� Licenses Used—when a user saves a map into SharePoint from Mindjet on-premise, they are
counted as a Licensed User. (Note: users who view maps and/or edit maps without saving the
changes back into SharePoint are not counted as Licensed Users.) You can control the number
of users who will be counted as Licensed Users by setting map file permissions in SharePoint to
read-only, so that the user (or user group) cannot save changes back to the SharePoint location.
o Users are considered Licensed for 90 days from the date they last saved a map from Mindjet
into SharePoint; if a user does not access the application for 90 days, they are no longer
considered a Licensed User.
o When the number of licenses used exceeds the number of licenses purchased, any
additional users (those not already counted as Licensed) who attempt to save a map from
Mindjet into SharePoint will receive a warning message containing the Administrator email
address. Note: these un-licensed users will still be able to save the map they are working on
when they receive the notification; they simply need to close the error message first.
� Installation date—The Mindjet on-premise license expires after the license period lapses.
o Contract Expiration date—two weeks after the Contract Expiration date, users will receive a
warning message when they use Mindjet on-premise advising them that the license has
expired. If the administrator has entered an email address in the SharePoint Administrator
email address field, this address will be displayed in the warning message so that users will
know who to contact.

on-premise Mindjet on-premise Installation Instructions for Microsoft SharePoint 2010
© 2012 Mindjet All Rights Reserved Version 1.0, December 6, 2012 13
o Licensed Users—this displays the names of users who have saved maps into SharePoint
and the last date they have saved a map.
Enable the Mindjet on-premise Web Application Feature
1. Under Application Management, click Manage web applications.
2. Highlight the web application to enable Mindjet functionality.
3. In the Web Applications tab, click Manage Features.
4. Find "Mindjet on-premise" in the list of features and click Activate.
5. Wait for the status to change to "Active.”
Activate Mindjet on-premise Templates
1. On the site collection where Mindjet Templates are desired, go to Site Actions -> Site Settings.
2. Under Site Collection Administration, select Site Collection Features.
3. Find the “Mindjet Templates” feature, and click Activate.
Activate and use the Web Part
Activate the Web Part in the Site Page
1. In the upper left corner in the Site Actions menu, click Site Settings.
2. Click Site Collection Administration, and then click Site Collection Features.
3. Scroll down, select Mindjet Viewer Web Part, and then click Activate.
You should now see a “Mindjet” category in the Insert Web Part menu on your SharePoint site.

on-premise Mindjet on-premise Installation Instructions for Microsoft SharePoint 2010
© 2012 Mindjet All Rights Reserved Version 1.0, December 6, 2012 14
Use the Web Part
When you insert the Web Part on the page, you must modify it to indicate the map you want it to display.
In the Web Part’s upper-right corner, click the pull-down, and then click
Edit Web Part.
Define the properties of the Web Part:
Enter the Title text
Specify the size

on-premise Mindjet on-premise Installation Instructions for Microsoft SharePoint 2010
© 2012 Mindjet All Rights Reserved Version 1.0, December 6, 2012 15
Link to the map in the title
(so the user can click on the title to open
the map in Mindjet).
Link to the map in the Viewer Properties,
to specify which map to display.
Add .mmap as a MIME Type in IIS
The Edit in Browser feature of Mindjet on-premise allows SharePoint users who have an installed
desktop copy of Mindjet to check out maps from the SharePoint portal, edit them, and save the maps
back to SharePoint. To enable this feature, please follow the steps below on the SharePoint Server.
There are some prerequisites on the client side to make the feature functional.
Client Prerequisites
� The client and server should reside on the same domain.
� SharePoint OpenDocument Class Active X version control should be installed on the client.
(Please consult with your System Administrators on how to get this component. This may require
installation of Microsoft Office 2007 or higher.)
� If you access your SharePoint site using FQDN based URL, you should add the site to your
“Local Intranet” sites.

on-premise Mindjet on-premise Installation Instructions for Microsoft SharePoint 2010
© 2012 Mindjet All Rights Reserved Version 1.0, December 6, 2012 16
Configure the SharePoint Server
Web server (IIS) configuration for .mmap file extension
(Note: Detailed steps follow for both IIS 7 and IIS 6.)
Add the following MIME type to IIS using the IIS Manager:
Extension: .mmap / .xmmap
MIME type: application/vnd.mindjet.mindmanager
Set up file extension for IIS 7
1. Open IIS Manager.
2. Select the host name, and then double-click MIME types.

on-premise Mindjet on-premise Installation Instructions for Microsoft SharePoint 2010
© 2012 Mindjet All Rights Reserved Version 1.0, December 6, 2012 17
3. Right–click in the list, and then click Add.
4. Add the file extension name, .mmap, and then click OK.
5. Repeat steps 3 and 4 for the .xmmap file extension.
6. Restart IIS.
Set up file extension for IIS 6
1. Click Start, Administrative tools, IIS Manager.
2. Select the host name, and then click Properties.

on-premise Mindjet on-premise Installation Instructions for Microsoft SharePoint 2010
© 2012 Mindjet All Rights Reserved Version 1.0, December 6, 2012 18
3. Click MIME Types.
4. Click New.

on-premise Mindjet on-premise Installation Instructions for Microsoft SharePoint 2010
© 2012 Mindjet All Rights Reserved Version 1.0, December 6, 2012 19
5. Add the file extension name, .mmap, and then click OK.
6. Repeat steps 4 and 5 for the .xmmap file extension.
7. Restart IIS.
Note: if the SharePoint server and the Windows Client are on separate Windows domains, make
sure that the Client’s logged-in account is added to the appropriate group(s) on the SharePoint
server, and a trust is set up between both domains.
Consult your network administrator for instructions.

on-premise Mindjet on-premise Installation Instructions for Microsoft SharePoint 2010
© 2012 Mindjet All Rights Reserved Version 1.0, December 6, 2012 20
UNINSTALL MINDJET MAPSHARE
To uninstall Mindjet MapShare from your SharePoint 2010 environment, follow the steps below.
Remove all instances of the Mindjet MapShare Web Part
1. Log into the SharePoint site using your browser.
2. On the page that contains the MapShare Viewer Web Part, click Site Actions, and then click Edit
Page.
3. Right-click on the Web Part, and then click Delete.
4. Click OK, and save the page.
Note: You will need to repeat this process for all the sites that contain the MapShare Web Part.
Remove the Mindjet MapShare Web Part from the sites collection gallery
1. Log into the SharePoint root site using your browser.
2. Click Site Actions, and then click Site Settings.
3. Under Galleries, click Web Parts.
on-premise Mindjet on-premise Installation Instructions for Microsoft SharePoint 2010
© 2012 Mindjet All Rights Reserved Version 1.0, December 6, 2012 21
4. Select the MindjetViewerWebPart and click Edit.
5. In the pop-up window, click Delete Item.
6. Go back to Site Actions, and then click Site Settings.
7. Under the Site Collection Administration, click Site collection features.
8. On the features page, if the Mindjet Viewer is still active, click Deactivate on the right.
Undeploy the Mindjet MapShare Web Part Solution
Use the Central Administration utility to undeploy Mindjet MapShare through the Deploy Solution page.
Follow instructions in the Deploy the Mindjet on-premise Solution Package (page 6) section of this
document for how to get to the page.
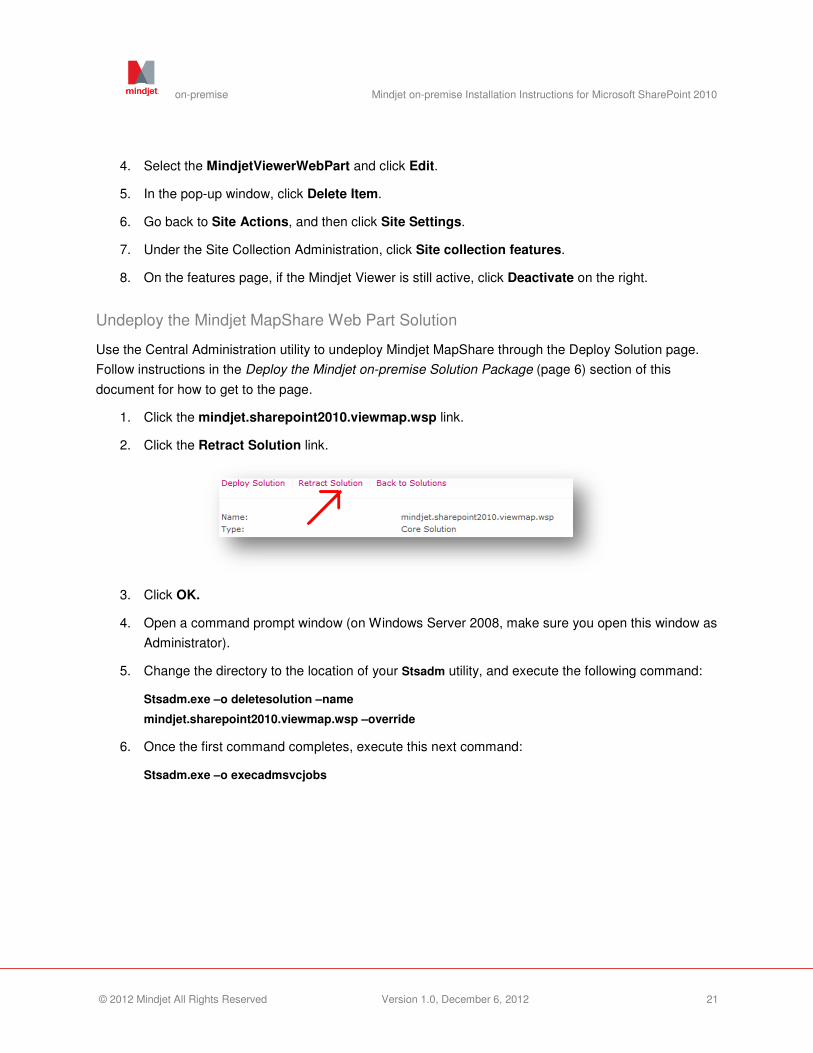
1. Click the mindjet.sharepoint2010.viewmap.wsp link.
2. Click the Retract Solution link.
3. Click OK.
4. Open a command prompt window (on Windows Server 2008, make sure you open this window as
Administrator).
5. Change the directory to the location of your Stsadm utility, and execute the following command:
Stsadm.exe –o deletesolution –name
mindjet.sharepoint2010.viewmap.wsp –override
6. Once the first command completes, execute this next command:
Stsadm.exe –o execadmsvcjobs

on-premise Mindjet on-premise Installation Instructions for Microsoft SharePoint 2010
© 2012 Mindjet All Rights Reserved Version 1.0, December 6, 2012 22
UNINSTALL MINDJET ON-PREMISE
To uninstall Mindjet on-premise from your SharePoint 2010 environment, follow the steps below.
Remove all instances of the Mindjet Viewer Web Part
1. Log into the SharePoint site using your browser.
2. On the page that contains the Mindjet on-premise Web Part, click Site Actions, and then click
Edit Page.
3. Right-click on the Web Part, and then click Delete.
4. Click OK, and save the page.
Note: You will need to repeat this process for all the sites that contain the Mindjet Web Part.
Remove the Mindjet on-premise Web Part from the sites collection gallery
1. Log in to the SharePoint root site using your browser.
2. Click Site Actions, and then click Site Settings.

on-premise Mindjet on-premise Installation Instructions for Microsoft SharePoint 2010
© 2012 Mindjet All Rights Reserved Version 1.0, December 6, 2012 23
3. Under Galleries, click Web Parts.
4. Select the MindjetViewerWebPart and click Edit.
5. In the pop-up window, click Delete Item.
6. Go back to Site Actions, and then click Site Settings.
7. Under the Site Collection Administration, click Site collection features.
8. On the features page, if the Mindjet Viewer Web Part is still active, click Deactivate on the right.
Un-deploy the Mindjet on-premise Web Part Solution
Use the Central Administration utility to undeploy Mindjet on-premise through the Deploy Solution page.
Follow instructions in the Deploy the Mindjet on-premise Solution Package (page 6) section of this
document for how to get to the page.
1. Click the mindjet.sharepoint.2010.wsp link.
2. Click the Retract Solution link.
3. Click OK.
4. Open a command prompt window (on Windows Server 2008, make sure you open this window as
the Administrator).
5. Change the directory to the location of your Stsadm utility, and execute the following command:
Stsadm.exe –o deletesolution –name
mindjet.sharepoint.2010.wsp –override
6. Once the first command completes, execute this next command:
Stsadm.exe –o execadmsvcjobs

on-premise Mindjet on-premise Installation Instructions for Microsoft SharePoint 2010
© 2012 Mindjet All Rights Reserved Version 1.0, December 6, 2012 24
USER DOCUMENTATION
Users can access Mindjet’s Online Help from the mapping window’s ribbon, from both the Help tab and
the File tab. Help for using the Mindjet Viewer commands is available from the Viewer’s menu.
Mindjet’s Help includes instructions for using features such as:
� Viewing maps from SharePoint lists
� Editing maps from SharePoint lists
� Creating new maps from SharePoint
� Using and customizing the Mindjet Viewer Web Part
If your users do not have internet access, or if they prefer a printable reference, you can download the
Mindjet on-premise User Guide to your SharePoint site and inform your users of its location. The guide
is available in English, French, and German at the following URL’s:
English:
http://onlinehelp.mindjet.com/help/MJonpremise/ENU/documents/Mindjet_onpremise_UserGuide.pdf
French:
http://onlinehelp.mindjet.com/help/MJonpremise/FRE/documents/Mindjet_onpremise_UserGuide.pdf
German:
http://onlinehelp.mindjet.com/help/MJonpremise/GER/documents/Mindjet_onpremise_UserGuide.pdf

on-premise Mindjet on-premise Installation Instructions for Microsoft SharePoint 2010
© 2012 Mindjet All Rights Reserved Version 1.0, December 6, 2012 25
TECHNICAL SUPPORT
Both site administrators and users can access technical support (including Knowledge Base articles, User
Forums, and other online resources) at http://www.mindjet.com/support, or submit a support request for
additional assistance.
The material in this document is for informational purposes only and is subject to change without notice. While reasonable efforts have been made in the preparation of this document to assure its accuracy, Mindjet makes no representation or warranty expressed, implied, or statutory, as to its completeness, accuracy, or suitability, and assumes no liability from the use of the information contained herein.
This software and related documentation are provided under a license agreement containing restrictions on use and disclosure and are protected by patent, copyright, trademark, and other intellectual property laws. Except as expressly provided in any written license agreement from Mindjet, the furnishing of this document does not give you any license to these patents, copyrights, trademarks, or other intellectual property.
Mindjet and the Mindjet logo are trademarks of Mindjet, which may be registered in the U.S. and other countries. Microsoft, Office, SharePoint, Windows, and Windows Server are registered trademarks of Microsoft Corporation in the United States and other countries.
© 2012 Mindjet. All rights reserved.