Installation Guide - Squarespace · PDF fileInstallation Guide . 2 ... finished application...
17
Installation Guide
Transcript of Installation Guide - Squarespace · PDF fileInstallation Guide . 2 ... finished application...
Installation Guide
2
1 Warranty, Storage & Maintenance To maintain the performance and look of your SilverWood Stone cultured stone product, and to benefit from the advantages of our industry leading warranty, this product must be installed with care. To insure warranty compliance, be sure to carefully read and understand this manual prior to installation.
IMPORTANT: Compliance with SilverWood Stone’s preparation, installation,
storage, maintenance and care requirements, and with applicable local/regional building codes is mandatory. Failure to comply with these requirements and codes may void applicable warranties, affect product performance and lead to personal injury.
WARNING: Do not install products you believe to be conflicting with local/regional
building codes. Before you begin, refer to your local/ provincial/ state and national building codes for requirements regarding the installation of interior feature walls, interior decorative stone, manufactured stone siding, breather membrane, house wrap, caulking, fastening, etc. Follow the manufacturers’ instructions for installing the breather membrane (MortairVent), and house wrap. For more information regarding building codes, consult the Government of Canada’s National Model Construction Codes at www.nationalcodes.nrc.gc.ca and The International Code Council (ICC) at www.iccsafe.org
Storage
Store flat and keep dry prior to installation. Installing wet panels may result in something happening?! Do not place product directly on the ground. Protect edges and corners from breakage. Product should not come into contact with other stone product; use wood strapping or cardboard to prevent interaction. To further prevent breakage, when working with panels, carry product on edge. SilverWood Stone is not responsible for damage caused by improper storage and handling of the product.
Maintenance
Our manufactured stone surfaces require very little maintenance and should be cleaned using water, or warm water and mild soap. Water pressure from a garden hose and the use of a soft bristle brush will be sufficient. Do not use a pressure washer, particulate or sand blasting device, or harsh chemicals (i.e. bleach, acid, detergents). Staining, sealing or treating is not required or recommended. Failure to follow recommended maintenance and care may affect the product warranty.
3
2 General Requirements
SilverWood Stone can be installed over steel studs or braced wood with a maximum spacing of 16”. When installing SilverLine Atlantic Drystack cultured stone over foam insulated OSB or sheathing install-furring strips similar to vinyl siding installation 16” apart, mortared panels do not require this.
In extreme cases irregularities in framing and sheathing can mirror through the finished application
Avoid over-driving fasteners, which can result in non-adhesion of product or breaking of the panels. Do not use an impact driver to install fasteners for this reason.
A water-resistive barrier as recommended in this guide must be used to maintain warranty and is required in accordance with local building code requirements.
The water-resistive barrier must be appropriately installed with penetration and junction flashing in accordance with local building code requirements. SilverWood Stone will assume no responsibility for water infiltration.
Adjacent finished grade must slope away from the building in accordance with local building codes typically a 6” minimum over 10’ or 2%.
Do not install SilverWood Stone products on a horizontal plane or ceiling. Vertical wall applications only.
Maintain a 2” minimum clearance between SilverWood Stone products and driveways, paths and steps. Do not caulk gap.
Proper flashing, counter-flashing and kick-out flashing is to be installed, as per roofing manufacturers instructions, wherever SilverWood Stone product is used.
Products finish may lighten slightly in the first two years due to elemental curing- this is normal and within the products parameters.
Do not install SilverWood Stone products, such that they may remain in contact with standing water.
Minimize exposure to salt
Cutting Instructions- Outdoors 1. Position cutting/trimming station so that dust will not blow in the direction
of the user or others in the working area. 2. The following methods may be used: A) Handheld grinder with high-speed
diamond cutting wheel designed for masonry and stone. B) Dust reducing circular saw with high-speed diamond blade designed for masonry/stone.
3. Use eye and respiratory protection when cutting or trimming product. 4. When working with stone products a hardhat, toe protection and a face
shield is recommended. 5. Do not cut or trim SilverWood Stone products indoors. 6. Never use a toothed blade or wheel not designed to cut stone or masonry. 7. Panels may be cut with a wet saw. Ensure product is rinsed immediately
following the cut. Failure to do so will cause dust to adhere permanently.
If concerns exist about cement dust exposure levels or you do not comply with the above, practices you should consult a qualified industrial hygienist for further information.
4
3 Installation
Note: This panel symbol represents a modification in the instruction guidelines for installing SilverWood Stones mortared veneer panel products only. Ignore these guidelines if installing SilverLine Drystack. For mortared installation it is recommended you read the entire manual and take special note of these symbols.
Wall Preparation
Inspect the exterior wall prior to installation to ensure framing is a minimum 16” ODC spacing and that sheathing is a minimum of either 7/16” OSB or ½” plywood. Verify that appropriate flashing, J-channel, caulking and water resistive barrier have been installed or are part of your installation materials. Interior wall boarding and roofing should be installed prior to SilverWood Stone products’. Corners should be sheathed to meet building codes and prevent racking. Consult a professional civil/engineer for applications over 30’. Drystack products use an 8” anchor spacing specifically designed to accommodate most ICF foundation installations. When installing panels over concrete block or poured foundation pressure treated furring strips should be installed and fastened to the wall with both a foundation fastener and polyurethane adhesive. Check wall for defects or irregularities and contact the builder or contractor to correct any deficiencies before you proceed.
Water Resistive Barrier Installation (WRB) SilverWood Stone products were designed to be installed in conjunction with a vented water resistive barrier. This barrier is mandatory to maintain warranty eligibility. MortairVent™ is the recommended WRB and can be found through your local SilverWood Stone distributor. If using a different WRB product contact your distributor for information regarding warranty protection. Following installation instructions provided by the manufacturer, install a minimum of one layer of WRB (MortairVent™) to the structures sheathing. Ensure its installation meets building code requirements, terminates at least 16” past all outside and inside corners and integrates with flashing materials. In order to prevent insect intrusion fold the bottom portion of the barrier behind itself to create a “lip” where it meets the base of the starter strip.
5
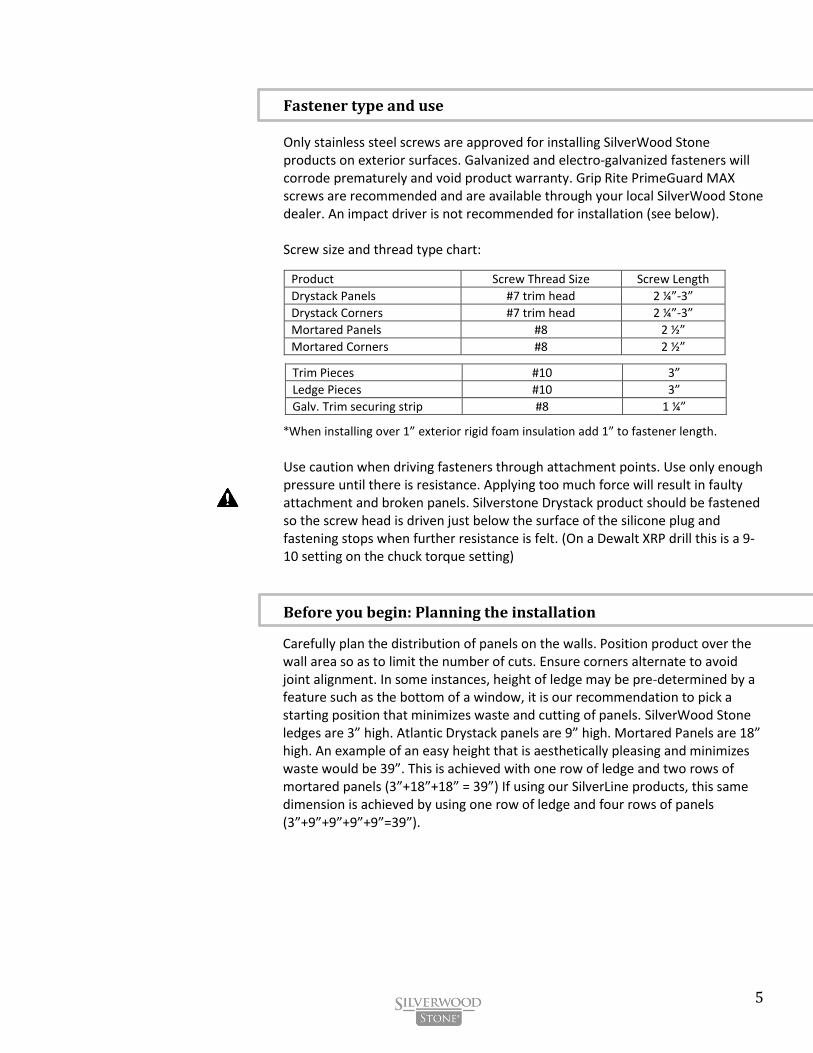
Fastener type and use Only stainless steel screws are approved for installing SilverWood Stone products on exterior surfaces. Galvanized and electro-galvanized fasteners will corrode prematurely and void product warranty. Grip Rite PrimeGuard MAX screws are recommended and are available through your local SilverWood Stone dealer. An impact driver is not recommended for installation (see below). Screw size and thread type chart:
*When installing over 1” exterior rigid foam insulation add 1” to fastener length.
Use caution when driving fasteners through attachment points. Use only enough pressure until there is resistance. Applying too much force will result in faulty attachment and broken panels. Silverstone Drystack product should be fastened so the screw head is driven just below the surface of the silicone plug and fastening stops when further resistance is felt. (On a Dewalt XRP drill this is a 9-10 setting on the chuck torque setting)
Before you begin: Planning the installation
Carefully plan the distribution of panels on the walls. Position product over the wall area so as to limit the number of cuts. Ensure corners alternate to avoid joint alignment. In some instances, height of ledge may be pre-determined by a feature such as the bottom of a window, it is our recommendation to pick a starting position that minimizes waste and cutting of panels. SilverWood Stone ledges are 3” high. Atlantic Drystack panels are 9” high. Mortared Panels are 18” high. An example of an easy height that is aesthetically pleasing and minimizes waste would be 39”. This is achieved with one row of ledge and two rows of mortared panels (3”+18”+18” = 39”) If using our SilverLine products, this same dimension is achieved by using one row of ledge and four rows of panels (3”+9”+9”+9”+9”=39”).
Product Screw Thread Size Screw Length
Drystack Panels #7 trim head 2 ¼”-3”
Drystack Corners #7 trim head 2 ¼”-3”
Mortared Panels #8 2 ½”
Mortared Corners #8 2 ½”
Trim Pieces #10 3”
Ledge Pieces #10 3”
Galv. Trim securing strip #8 1 ¼”

6
Installing the starter strip/row SilverWood Stone starter strip consists of the first row of installed product. Depending on the aesthetic or functional application this can be ledger piece, molding or accent trim, or standard panels. Use a laser level and chalk line to ensure a perfect level. Panels are designed to interlock and maintain a straight line, however checking level and alignment of the panels regularly is recommended. When using trim or ledge pieces to start a project flash the top before starting panels to prevent water intrusion. Do not caulk bottom gap. See trim installation for more detail when using trim as starter course. Installers’ Tip: Use a straight piece of dimensional lumber fastened to the exterior wall to mark the top line of product to be installed. Butt the positive lip or topside of first row of corner and panels to this edge.
Installing Panels Atlantic Drystack panels are engineered with an interlocking lip system to prevent water intrusion and facilitate ease of installation. Ensure that each panel has its positive tongue edge facing up and that panels are adequately staggered throughout installation to prevent lining-up of vertical seams. (See corner installation below to see how this is accomplished) Drystack installation is done from right to left of the building surface. If using corner pieces begin from right corner piece. If panels do not sit correctly in their grooves, or mold castings prevent a snug fit a handheld grinder is used to trim the excess. An approved stainless screw must be used at each of the 8 fastening points on each panel, these fastening points are easily found below the indicator arrow markings on the top lip of the panel. They appear as a small “burr” or silicone nub in the concrete between the mortar lines of stacked stone. Be sure to not drive the fastener through the anchor points. To ensure even color and tone distribution mix products from different pallets.
Mortared panels are also designed to be installed between fastened corners. Begin by attaching Corner pieces to the wall using the appropriate length #8 screws starting at the bottom of the panel. Tighten screw so screw head is snug against the panel. Ensure that a fastener is driven into each attachment hole in the panel (7-8 per panel). Stagger panels and mix products from different pallets to ensure an even color distribution.
7
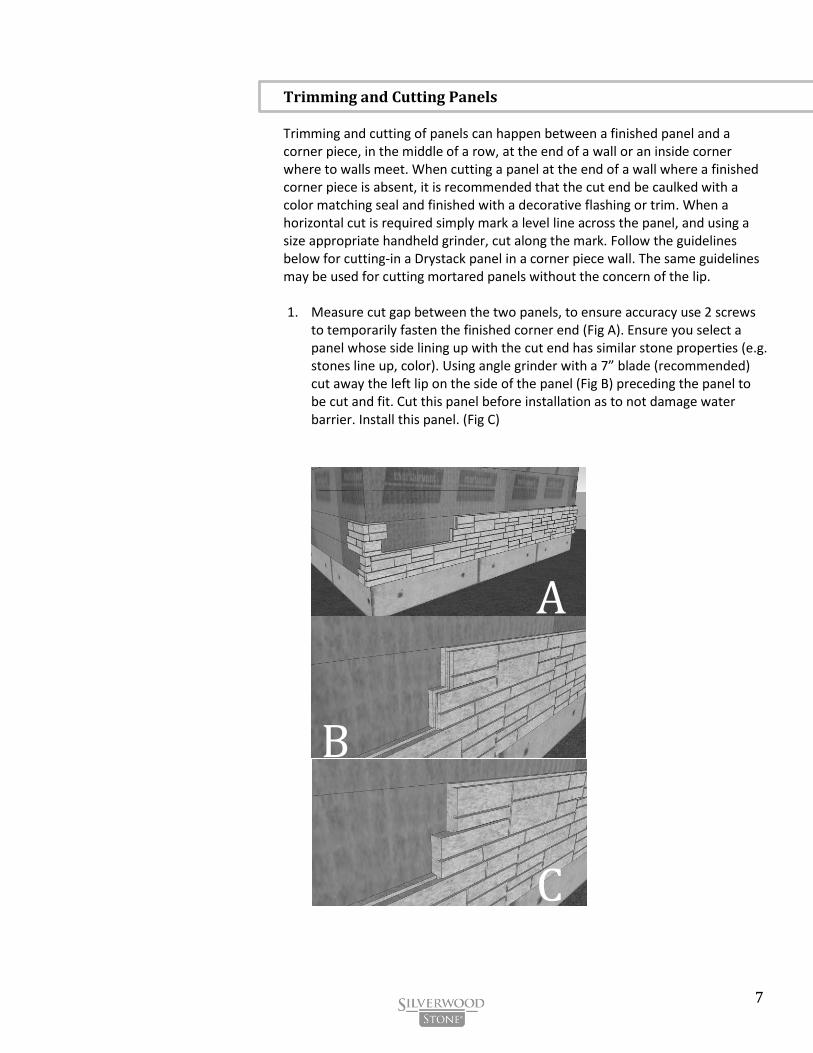
Trimming and Cutting Panels Trimming and cutting of panels can happen between a finished panel and a corner piece, in the middle of a row, at the end of a wall or an inside corner where to walls meet. When cutting a panel at the end of a wall where a finished corner piece is absent, it is recommended that the cut end be caulked with a color matching seal and finished with a decorative flashing or trim. When a horizontal cut is required simply mark a level line across the panel, and using a size appropriate handheld grinder, cut along the mark. Follow the guidelines below for cutting-in a Drystack panel in a corner piece wall. The same guidelines may be used for cutting mortared panels without the concern of the lip. 1. Measure cut gap between the two panels, to ensure accuracy use 2 screws
to temporarily fasten the finished corner end (Fig A). Ensure you select a panel whose side lining up with the cut end has similar stone properties (e.g. stones line up, color). Using angle grinder with a 7” blade (recommended) cut away the left lip on the side of the panel (Fig B) preceding the panel to be cut and fit. Cut this panel before installation as to not damage water barrier. Install this panel. (Fig C)
A
B
C
8
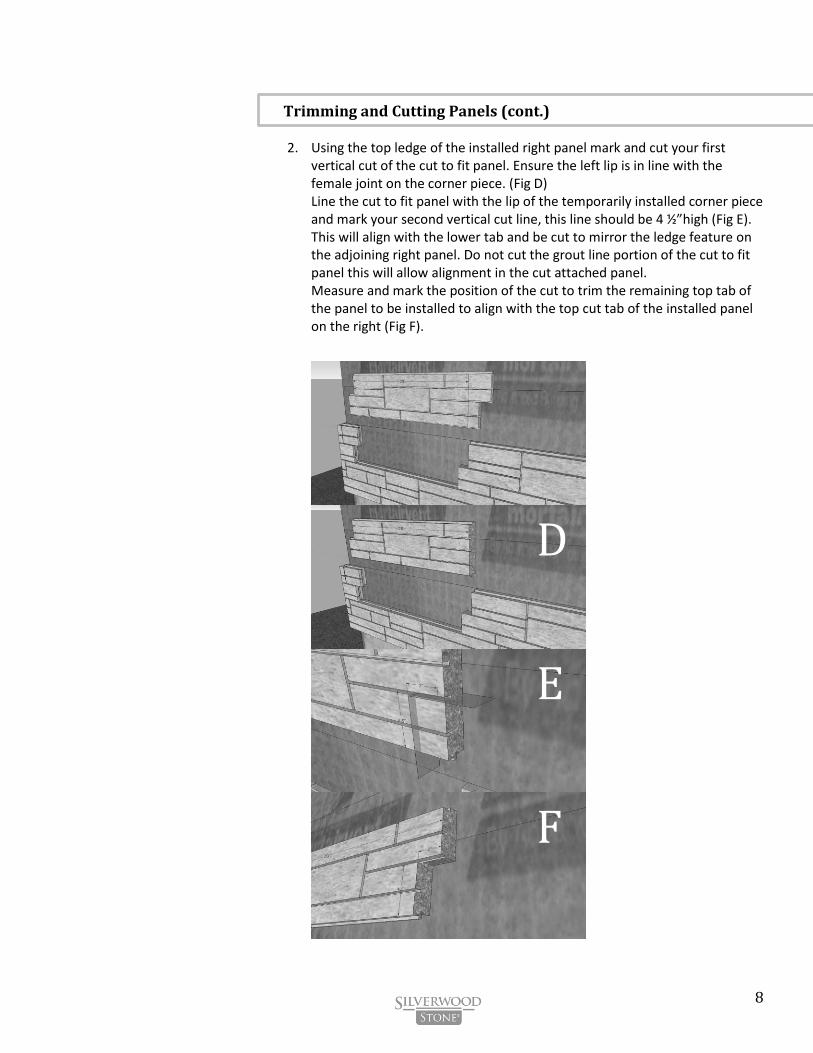
Trimming and Cutting Panels (cont.) 2. Using the top ledge of the installed right panel mark and cut your first
vertical cut of the cut to fit panel. Ensure the left lip is in line with the female joint on the corner piece. (Fig D) Line the cut to fit panel with the lip of the temporarily installed corner piece and mark your second vertical cut line, this line should be 4 ½”high (Fig E). This will align with the lower tab and be cut to mirror the ledge feature on the adjoining right panel. Do not cut the grout line portion of the cut to fit panel this will allow alignment in the cut attached panel. Measure and mark the position of the cut to trim the remaining top tab of the panel to be installed to align with the top cut tab of the installed panel on the right (Fig F).
D
E
F

9
Trimming and Cutting Panels (cont.) 3. After panels have been trimmed remove temporary anchors from the corner
or adjoining left-most piece and dry-fit the two pieces to ensure proper fit and seating (Fig G). Caulk all cut sides of panels before fastening to wall. Caulk top channel of adjoining cut panel and smooth with finder to seal the vertical seam. Finish installing cut panel and corner (Fig H).
IMPORTANT: Before installing the cut panel use a color matched caulk and seal the cut side of the product, ensure that there are no caulk gaps and that entire ledge is sealed to prevent water intrusion.
G
H
Cutting with 7” wheel
10
Installing Trim and Ledge
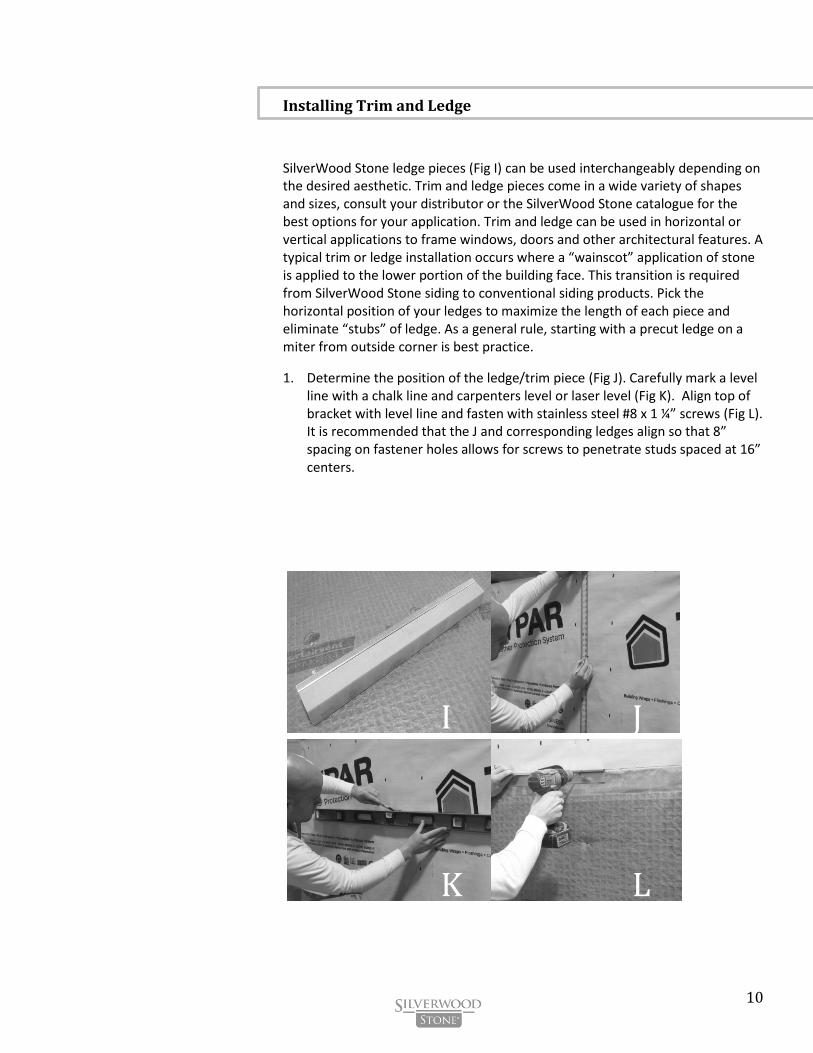
SilverWood Stone ledge pieces (Fig I) can be used interchangeably depending on the desired aesthetic. Trim and ledge pieces come in a wide variety of shapes and sizes, consult your distributor or the SilverWood Stone catalogue for the best options for your application. Trim and ledge can be used in horizontal or vertical applications to frame windows, doors and other architectural features. A typical trim or ledge installation occurs where a “wainscot” application of stone is applied to the lower portion of the building face. This transition is required from SilverWood Stone siding to conventional siding products. Pick the horizontal position of your ledges to maximize the length of each piece and eliminate “stubs” of ledge. As a general rule, starting with a precut ledge on a miter from outside corner is best practice.
1. Determine the position of the ledge/trim piece (Fig J). Carefully mark a level line with a chalk line and carpenters level or laser level (Fig K). Align top of bracket with level line and fasten with stainless steel #8 x 1 ¼” screws (Fig L). It is recommended that the J and corresponding ledges align so that 8” spacing on fastener holes allows for screws to penetrate studs spaced at 16” centers.
I
J
K
L
11
Installing Trim and Ledge (cont.)
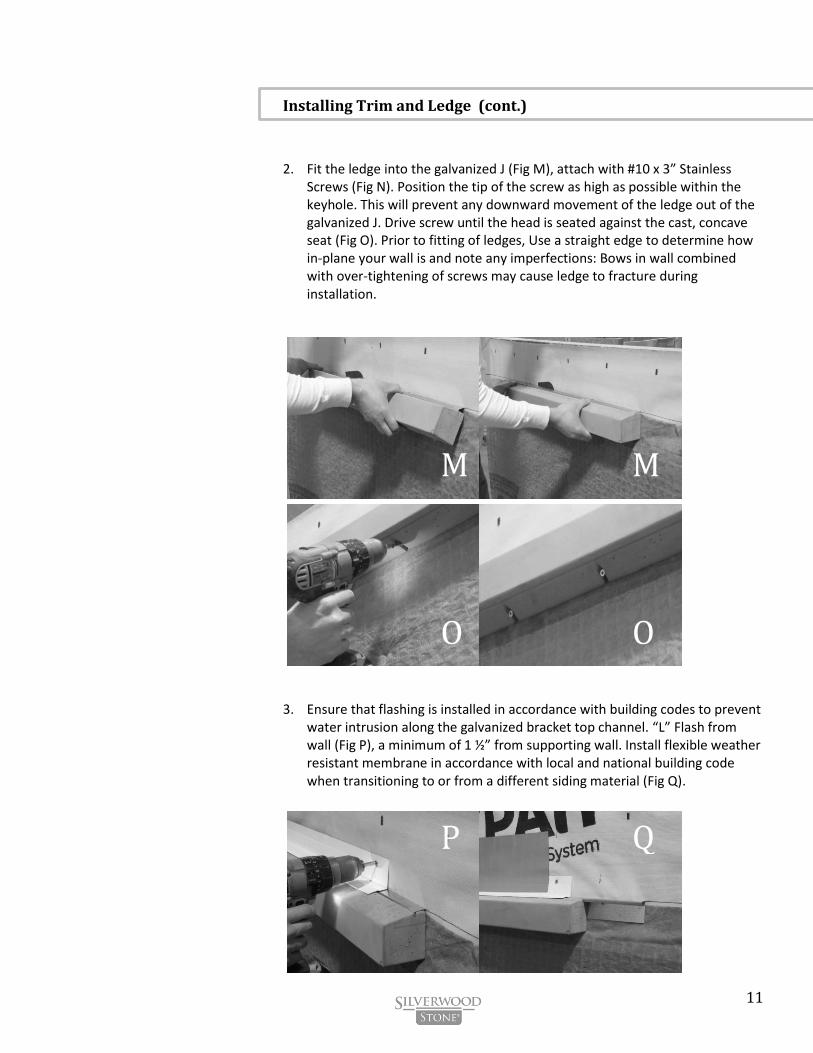
2. Fit the ledge into the galvanized J (Fig M), attach with #10 x 3” Stainless Screws (Fig N). Position the tip of the screw as high as possible within the keyhole. This will prevent any downward movement of the ledge out of the galvanized J. Drive screw until the head is seated against the cast, concave seat (Fig O). Prior to fitting of ledges, Use a straight edge to determine how in-plane your wall is and note any imperfections: Bows in wall combined with over-tightening of screws may cause ledge to fracture during installation.
3. Ensure that flashing is installed in accordance with building codes to prevent water intrusion along the galvanized bracket top channel. “L” Flash from wall (Fig P), a minimum of 1 ½” from supporting wall. Install flexible weather resistant membrane in accordance with local and national building code when transitioning to or from a different siding material (Fig Q).
M
O
M
O
P
Q

12
Installing SilverLine Drystack Corners
SilverLine Drystack corners are installed in the same way as Drystack panels; from left to right and begin the starter strip and installation when they are used. Follow Drystack panel fastening and Fastener use sections for further details.
There are two variations of SilverLine corners, which are designed to alternate up the wall corner to stagger vertical seams throughout the installation. If you are starting with a corner that has a longer right “leg” then the corner installed above it will have a longer left “leg” (See image below).
Alternating Corner Pieces

13
Installing SilverWood Stone Mortared Corners
Mortared corner panels are installed in the same fashion as mortared panels. Begin by attaching Corner pieces to the wall using the appropriate length #8 screws starting at the bottom of the panel. Tighten screw so screw head is snug against the panel. Ensure that a fastener is driven into each attachment hole in the panel (7-8 per panel).
The shape of each corner allows for it to be inverted 180 degrees with the “long leg” oriented to the left or right (Fig R). Alternate the position of each corner unit as illustrated as you work up the outside corner of your structure (Fig S). This will serve to stagger the position of joints between panels. Measure and mark corner to ensure that 18” center-to-center spacing is maintained between corner units. Panels can then be added, working away from outside corners (Fig T).
R
S
T
T

14
Installing Inside Corners There are 3 available methods to finish inside corners.
1) Coping is the recommended method and yields the best results. Join the panels and use coping method similar to coping interior baseboards. Apply caulk in the joint prior to pressing the coped joints together. A flexible adhesive weatherproofing flashing behind the corner piece is recommended.
2) Install a vinyl trim piece, weatherproof 2”X2” trim piece or a 90° corner flashing piece where the two walls meet and butt the joining panels against it. Caulk the space between the flashing and the cut panel. A flexible adhesive weatherproofing flashing behind the corner piece is recommended.
3) Thirdly, the corners can be mitered to fit the corner. Follow caulking and weatherproofing instruction from the first two methods. This is the least effective method for adjoining inside corner panels and should be avoided.
15
Installing Accessory Pieces
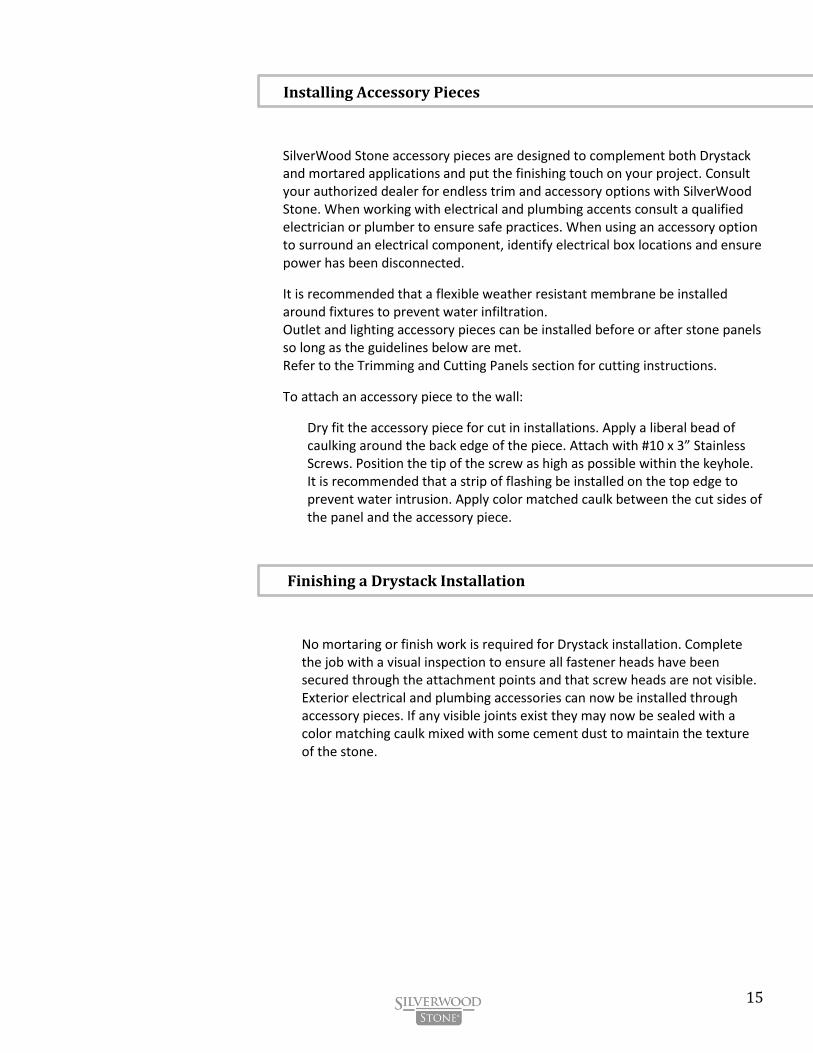
SilverWood Stone accessory pieces are designed to complement both Drystack and mortared applications and put the finishing touch on your project. Consult your authorized dealer for endless trim and accessory options with SilverWood Stone. When working with electrical and plumbing accents consult a qualified electrician or plumber to ensure safe practices. When using an accessory option to surround an electrical component, identify electrical box locations and ensure power has been disconnected.
It is recommended that a flexible weather resistant membrane be installed around fixtures to prevent water infiltration. Outlet and lighting accessory pieces can be installed before or after stone panels so long as the guidelines below are met. Refer to the Trimming and Cutting Panels section for cutting instructions.
To attach an accessory piece to the wall:
Dry fit the accessory piece for cut in installations. Apply a liberal bead of caulking around the back edge of the piece. Attach with #10 x 3” Stainless Screws. Position the tip of the screw as high as possible within the keyhole. It is recommended that a strip of flashing be installed on the top edge to prevent water intrusion. Apply color matched caulk between the cut sides of the panel and the accessory piece.
Finishing a Drystack Installation
No mortaring or finish work is required for Drystack installation. Complete the job with a visual inspection to ensure all fastener heads have been secured through the attachment points and that screw heads are not visible. Exterior electrical and plumbing accessories can now be installed through accessory pieces. If any visible joints exist they may now be sealed with a color matching caulk mixed with some cement dust to maintain the texture of the stone.
16
Grouting a Mortared Panel Installation
This step is what most new installers find most challenging, but it is important to remember that this is the critical step that provides the durability and authentic look of traditional stone installation. With a little patience and attention to detail, you can easily achieve a “better than professional” installation. Once you have become proficient at applying mortar you can typically expect to spend one hour mortaring for every two hours spent installing panels. a) Measure Masonry Cement and Masonry Sand in 1:2 Ratio. (One shovel-full of cement to two of sand is a good batch size to start with. This will result in a little less than half a five-gallon bucket of mixed mortar. Once you have become quicker at applying mortar, a batch size of four-gallons can be easily placed before the mortar sets. b) Add Water and Bonding Agent in proper proportions and mix for at least one minute until mixing paddle leaves 1-2″ deep impression in mortar when removed from mixing bucket. If the impression is any deeper you will have a hard time squeezing mortar from the bag. If impression is less, then water content is too high and you will have poor quality mortar that will have poor adhesion and be less resistant to water penetration. c) Fill grout bag. d) Squeeze into all joints, both on the panels and between the panels. As you work, try to ensure that you are filling the joints back to front and not simply “bridging” the surface. To ensure you do not miss any joints try to work in one direction and fill only one panel high at a time. e) When mortar has cured to “putty like” consistency (You can move it with your finger, but it does not stick). Flatten the mortar in the joints with narrow trowel or brick joiner. This step ensures mortar adhesion with the panel joint and provides a traditional, neat finish. f) When margins of troweled joints “crumble” to the touch, use a stiff bristle brush to remove excess grout and trowel marks. If you notice brush becoming wet from mortar then you are brushing too early. This will result in mortar residue on the face of the stone that will have to be cleaned-off later to achieve a neat appearance. If you brush too late you will not be able to easily remove rough edges and trowel marks. * It is not recommended that this step be performed in direct sunlight or temperatures exceeding 27 degrees C. Moisture will be drawn from mortar before it has cured and cracking of the mortar will result.

17
SilverWood Stone does not make any representations, warranties or guarantees, express or implied, as to the accuracy or completeness of the installation manual. Users must be aware that updates and amendments will be made from time to time to the manual. It is the user's responsibility to determine whether there have been any such updates or amendments. Neither SilverWood Stone nor any of its directors, officers, employees or agents shall be liable in contract, tort or in any other manner whatsoever to any person for any loss, damage, injury, liability, cost or expense of any nature, including without limitation incidental, special, direct or consequential damages arising out of or in connection with the use of this manual.
SilverWood Stone
Corporation
819 Royal Rd
Fredericton, N.B.
Canada, E3G 6M1
www.silverwoodstone.com