![[ba] Validity date from [BA] COUNTRY [ba] United States ...](https://static.fdocuments.us/doc/165x107/6191cacde75d406c8e1bf890/ba-validity-date-from-ba-country-ba-united-states-.jpg)
Inside Out - Amazon Web Servicesfree-patterns.s3.amazonaws.com/LogCabinInside_Out.pdf · Inside...
8
14745 Carmenita Road, Norwalk, California 90650 . (800) 450-2030 . www.AnthologyFabrics.com Inside Out
Transcript of Inside Out - Amazon Web Servicesfree-patterns.s3.amazonaws.com/LogCabinInside_Out.pdf · Inside...
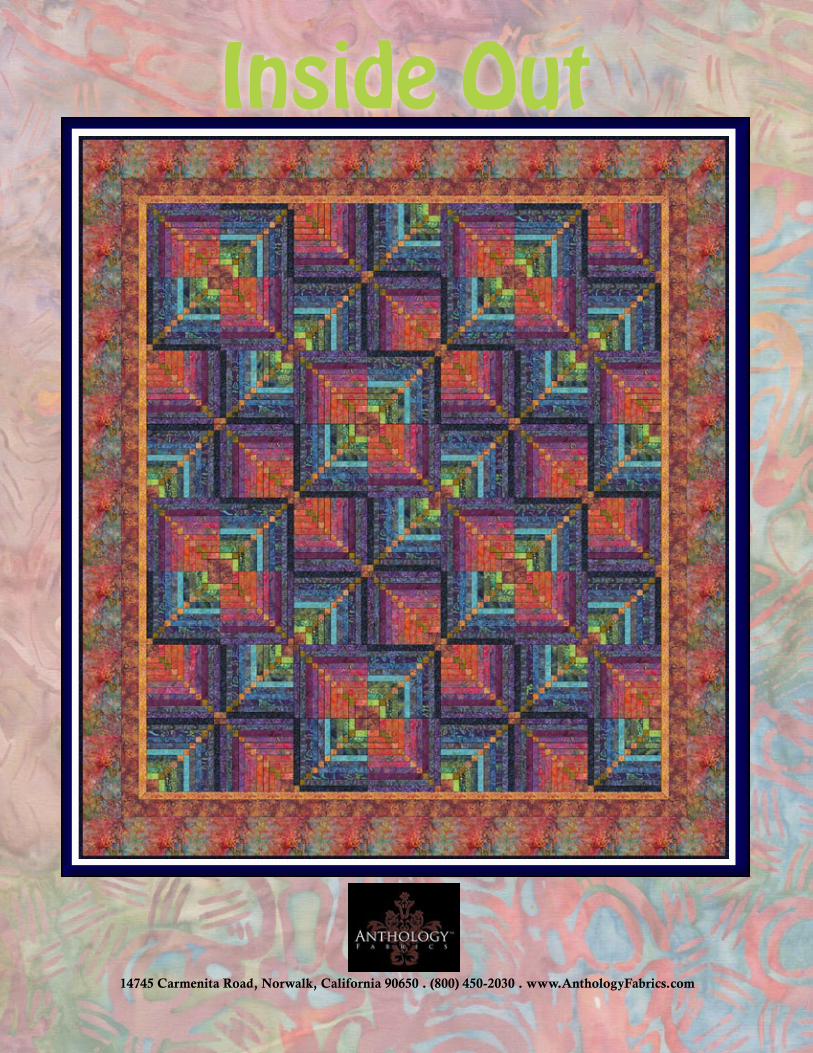
14745 Carmenita Road, Norwalk, California 90650 . (800) 450-2030 . www.AnthologyFabrics.com
Inside Out
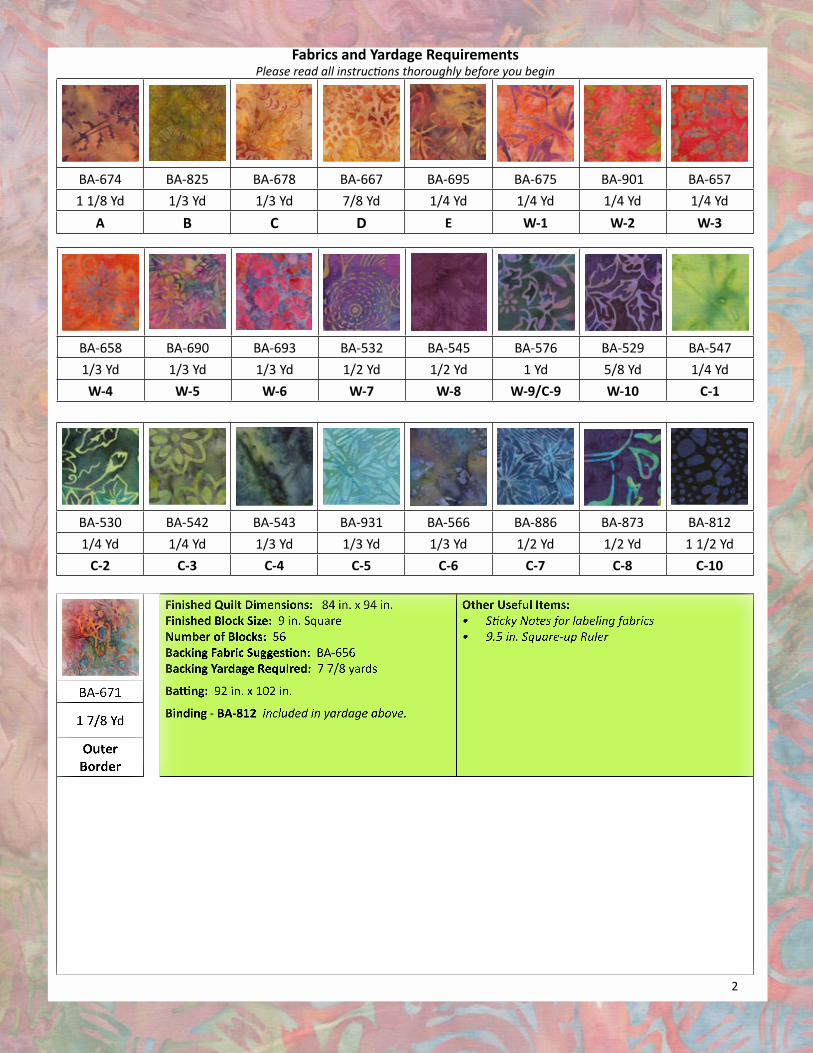
BA-674 BA-825 BA-678 BA-667 BA-695 BA-675 BA-901 BA-6571 1/8 Yd 1/3 Yd 1/3 Yd 7/8 Yd 1/4 Yd 1/4 Yd 1/4 Yd 1/4 Yd
A B C D E W-1 W-2 W-3
Fabrics and Yardage RequirementsPlease read all instructions thoroughly before you begin
2
BA-658 BA-690 BA-693 BA-532 BA-545 BA-576 BA-529 BA-5471/3 Yd 1/3 Yd 1/3 Yd 1/2 Yd 1/2 Yd 1 Yd 5/8 Yd 1/4 YdW-4 W-5 W-6 W-7 W-8 W-9/C-9 W-10 C-1
BA-530 BA-542 BA-543 BA-931 BA-566 BA-886 BA-873 BA-8121/4 Yd 1/4 Yd 1/3 Yd 1/3 Yd 1/3 Yd 1/2 Yd 1/2 Yd 1 1/2 Yd
C-2 C-3 C-4 C-5 C-6 C-7 C-8 C-10
Finished Quilt Dimensions: 84 in. x 94 in.Finished Block Size: 9 in. SquareNumber of Blocks: 56Backing Fabric Suggestion: BA-656 Backing Yardage Required: 7 7/8 yards
Batting: 92 in. x 102 in.
Binding - BA-812 included in yardage above.
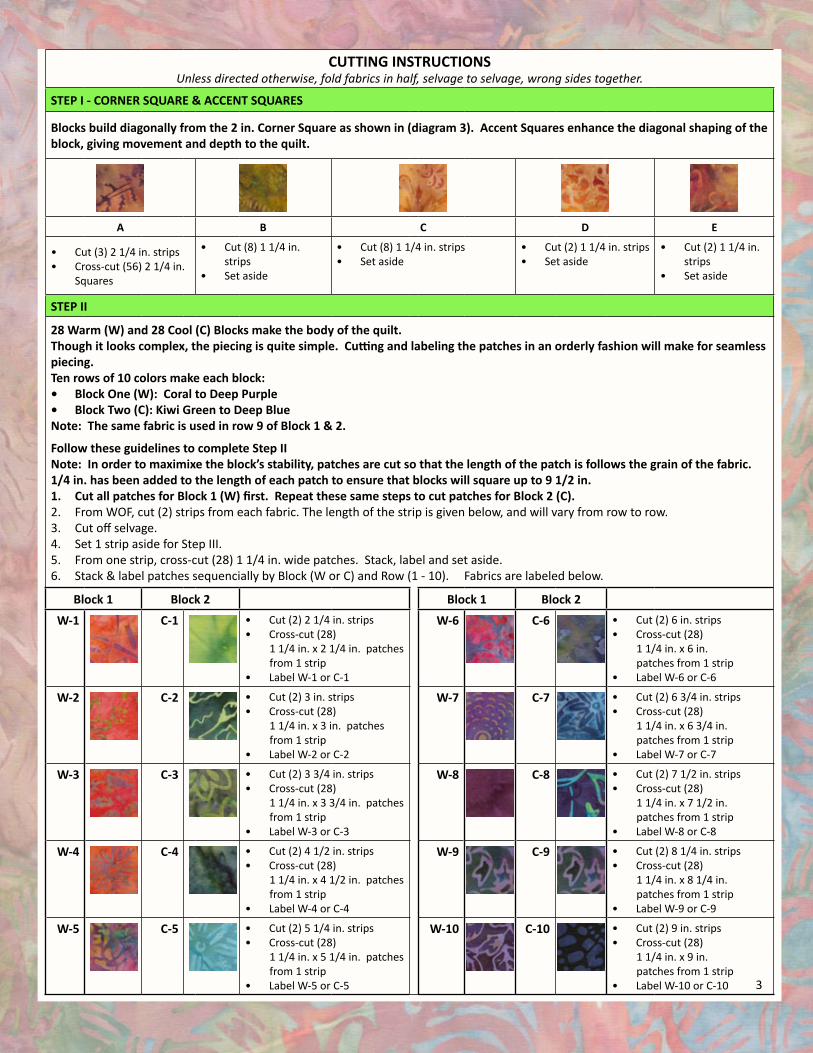
CUTTING INSTRUCTIONSUnless directed otherwise, fold fabrics in half, selvage to selvage, wrong sides together.
STEP I - CORNER SQUARE & ACCENT SQUARES
Blocks build diagonally from the 2 in. Corner Square as shown in (diagram 3). Accent Squares enhance the diagonal shaping of the block, giving movement and depth to the quilt.
A B C D E
• Cut (3) 2 1/4 in. strips • Cross-cut (56) 2 1/4 in.
Squares
• Cut (8) 1 1/4 in. strips
• Set aside
• Cut (8) 1 1/4 in. strips • Set aside
• Cut (2) 1 1/4 in. strips • Set aside
• Cut (2) 1 1/4 in. strips
• Set aside
STEP II
28 Warm (W) and 28 Cool (C) Blocks make the body of the quilt.Though it looks complex, the piecing is quite simple. Cutting and labeling the patches in an orderly fashion will make for seamless piecing. Ten rows of 10 colors make each block: • Block One (W): Coral to Deep Purple • Block Two (C): Kiwi Green to Deep Blue Note: The same fabric is used in row 9 of Block 1 & 2.
Follow these guidelines to complete Step II Note: In order to maximixe the block’s stability, patches are cut so that the length of the patch is follows the grain of the fabric. 1/4 in. has been added to the length of each patch to ensure that blocks will square up to 9 1/2 in. 1. Cut all patches for Block 1 (W) first. Repeat these same steps to cut patches for Block 2 (C).2. From WOF, cut (2) strips from each fabric. The length of the strip is given below, and will vary from row to row. 3. Cut off selvage.4. Set 1 strip aside for Step III. 5. From one strip, cross-cut (28) 1 1/4 in. wide patches. Stack, label and set aside. 6. Stack & label patches sequencially by Block (W or C) and Row (1 - 10). Fabrics are labeled below.
Block 1 Block 2 Block 1 Block 2
W-1 C-1 • Cut (2) 2 1/4 in. strips• Cross-cut (28) 1 1/4 in. x 2 1/4 in. patches from 1 strip • Label W-1 or C-1
W-6 C-6 • Cut (2) 6 in. strips• Cross-cut (28) 1 1/4 in. x 6 in. patches from 1 strip • Label W-6 or C-6
W-2 C-2 • Cut (2) 3 in. strips• Cross-cut (28) 1 1/4 in. x 3 in. patches from 1 strip • Label W-2 or C-2
W-7 C-7 • Cut (2) 6 3/4 in. strips• Cross-cut (28) 1 1/4 in. x 6 3/4 in. patches from 1 strip • Label W-7 or C-7
W-3 C-3 • Cut (2) 3 3/4 in. strips• Cross-cut (28) 1 1/4 in. x 3 3/4 in. patches from 1 strip • Label W-3 or C-3
W-8 C-8 • Cut (2) 7 1/2 in. strips• Cross-cut (28) 1 1/4 in. x 7 1/2 in. patches from 1 strip • Label W-8 or C-8
W-4 C-4 • Cut (2) 4 1/2 in. strips• Cross-cut (28) 1 1/4 in. x 4 1/2 in. patches from 1 strip • Label W-4 or C-4
W-9 C-9 • Cut (2) 8 1/4 in. strips• Cross-cut (28) 1 1/4 in. x 8 1/4 in. patches from 1 strip • Label W-9 or C-9
W-5 C-5 • Cut (2) 5 1/4 in. strips• Cross-cut (28) 1 1/4 in. x 5 1/4 in. patches from 1 strip • Label W-5 or C-5
W-10 C-10 • Cut (2) 9 in. strips• Cross-cut (28) 1 1/4 in. x 9 in. patches from 1 strip • Label W-10 or C-10 3
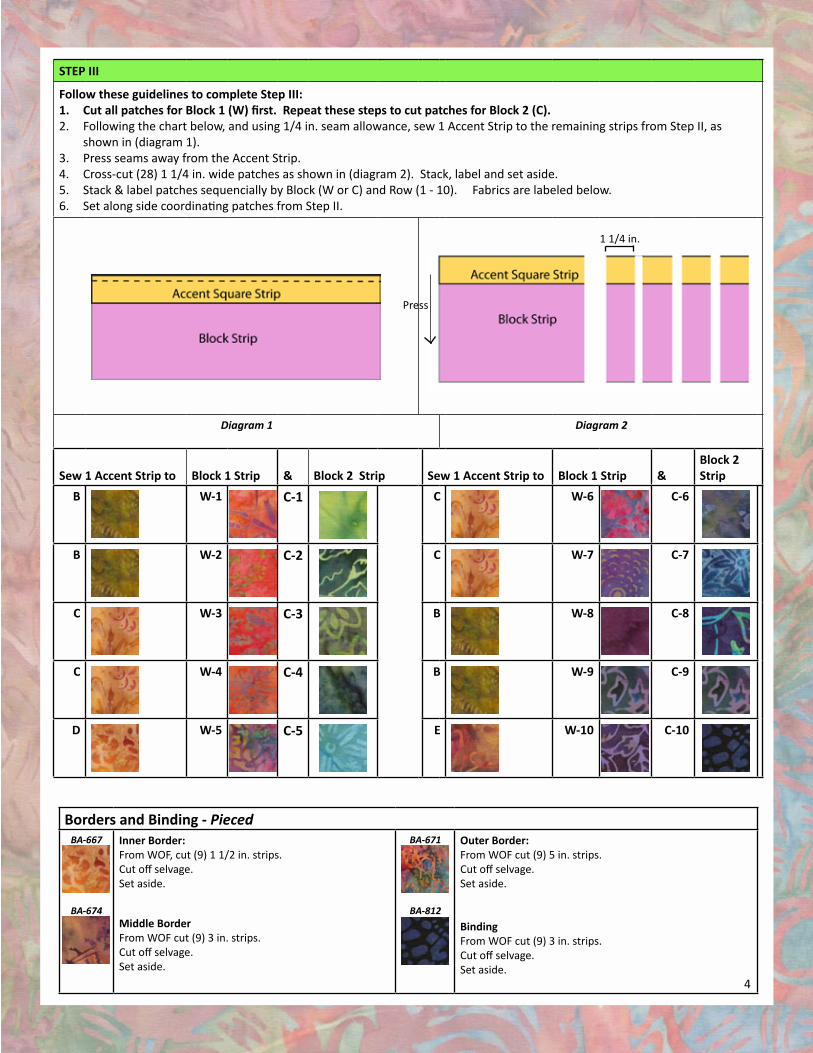
STEP III
Follow these guidelines to complete Step III:1. Cut all patches for Block 1 (W) first. Repeat these steps to cut patches for Block 2 (C).2. Following the chart below, and using 1/4 in. seam allowance, sew 1 Accent Strip to the remaining strips from Step II, as
shown in (diagram 1).3. Press seams away from the Accent Strip.4. Cross-cut (28) 1 1/4 in. wide patches as shown in (diagram 2). Stack, label and set aside.5. Stack & label patches sequencially by Block (W or C) and Row (1 - 10). Fabrics are labeled below.6. Set along side coordinating patches from Step II.
Diagram 1 Diagram 2
Sew 1 Accent Strip to Block 1 Strip & Block 2 Strip Sew 1 Accent Strip to Block 1 Strip &Block 2 Strip
B W-1 C-1 C W-6 C-6
B W-2 C-2 C W-7 C-7
C W-3 C-3 B W-8 C-8
C W-4 C-4 B W-9 C-9
D W-5 C-5 E W-10 C-10
4
Borders and Binding - PiecedBA-667
BA-674
Inner Border:From WOF, cut (9) 1 1/2 in. strips. Cut off selvage.Set aside.
Middle BorderFrom WOF cut (9) 3 in. strips.Cut off selvage.Set aside.
BA-671
BA-812
Outer Border:From WOF cut (9) 5 in. strips.Cut off selvage.Set aside.
BindingFrom WOF cut (9) 3 in. strips.Cut off selvage.Set aside.
1 1/4 in.
Press
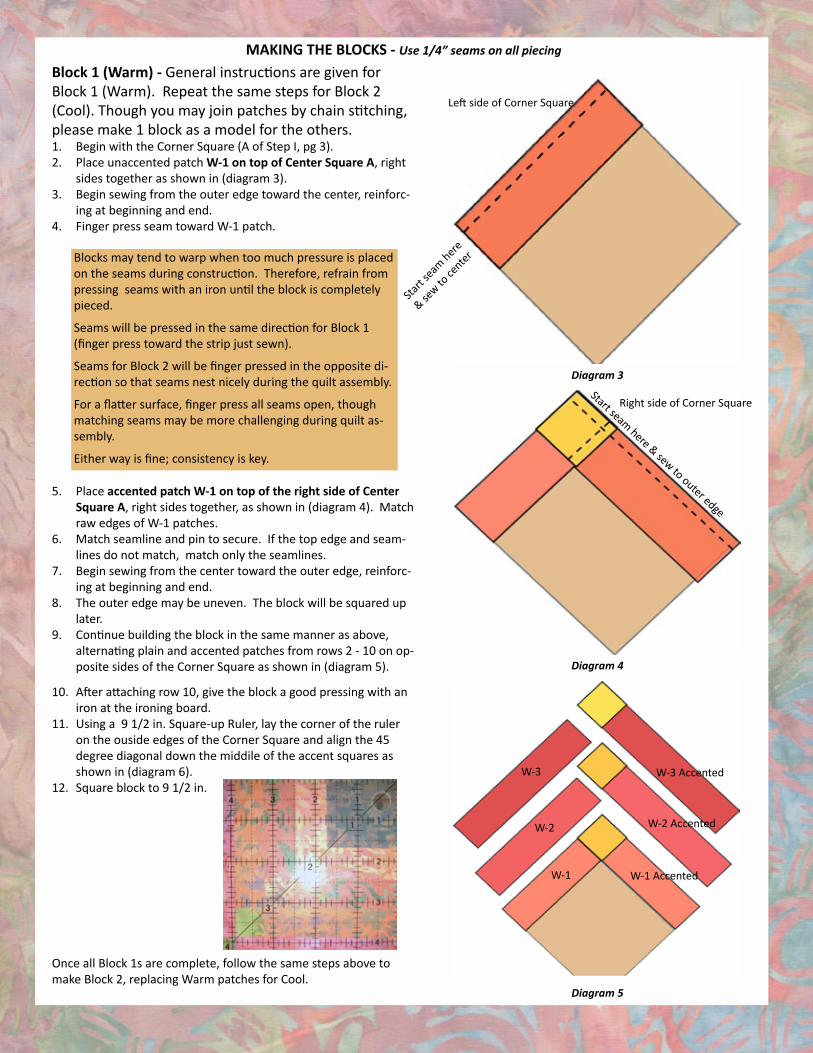
MAKING THE BLOCKS - Use 1/4” seams on all piecing
Block 1 (Warm) - General instructions are given for Block 1 (Warm). Repeat the same steps for Block 2 (Cool). Though you may join patches by chain stitching, please make 1 block as a model for the others. 1. Begin with the Corner Square (A of Step I, pg 3). 2. Place unaccented patch W-1 on top of Center Square A, right
sides together as shown in (diagram 3). 3. Begin sewing from the outer edge toward the center, reinforc-
ing at beginning and end.4. Finger press seam toward W-1 patch.
Diagram 3
5. Place accented patch W-1 on top of the right side of Center Square A, right sides together, as shown in (diagram 4). Match raw edges of W-1 patches.
6. Match seamline and pin to secure. If the top edge and seam-lines do not match, match only the seamlines.
7. Begin sewing from the center toward the outer edge, reinforc-ing at beginning and end.
8. The outer edge may be uneven. The block will be squared up later.
9. Continue building the block in the same manner as above, alternating plain and accented patches from rows 2 - 10 on op-posite sides of the Corner Square as shown in (diagram 5). Diagram 4
10. After attaching row 10, give the block a good pressing with an iron at the ironing board.
11. Using a 9 1/2 in. Square-up Ruler, lay the corner of the ruler on the ouside edges of the Corner Square and align the 45 degree diagonal down the middile of the accent squares as shown in (diagram 6).
12. Square block to 9 1/2 in.
Once all Block 1s are complete, follow the same steps above to make Block 2, replacing Warm patches for Cool.
Diagram 5
Left side of Corner Square
Start
seam here
& sew to
centerBlocks may tend to warp when too much pressure is placed
on the seams during construction. Therefore, refrain from pressing seams with an iron until the block is completely pieced.
Seams will be pressed in the same direction for Block 1 (finger press toward the strip just sewn).
Seams for Block 2 will be finger pressed in the opposite di-rection so that seams nest nicely during the quilt assembly.
For a flatter surface, finger press all seams open, though matching seams may be more challenging during quilt as-sembly.
Either way is fine; consistency is key.
Start seam here & sew to outer edge
W-1 W-1 Accented
W-2
W-3
W-2 Accented
W-3 Accented
Right side of Corner Square
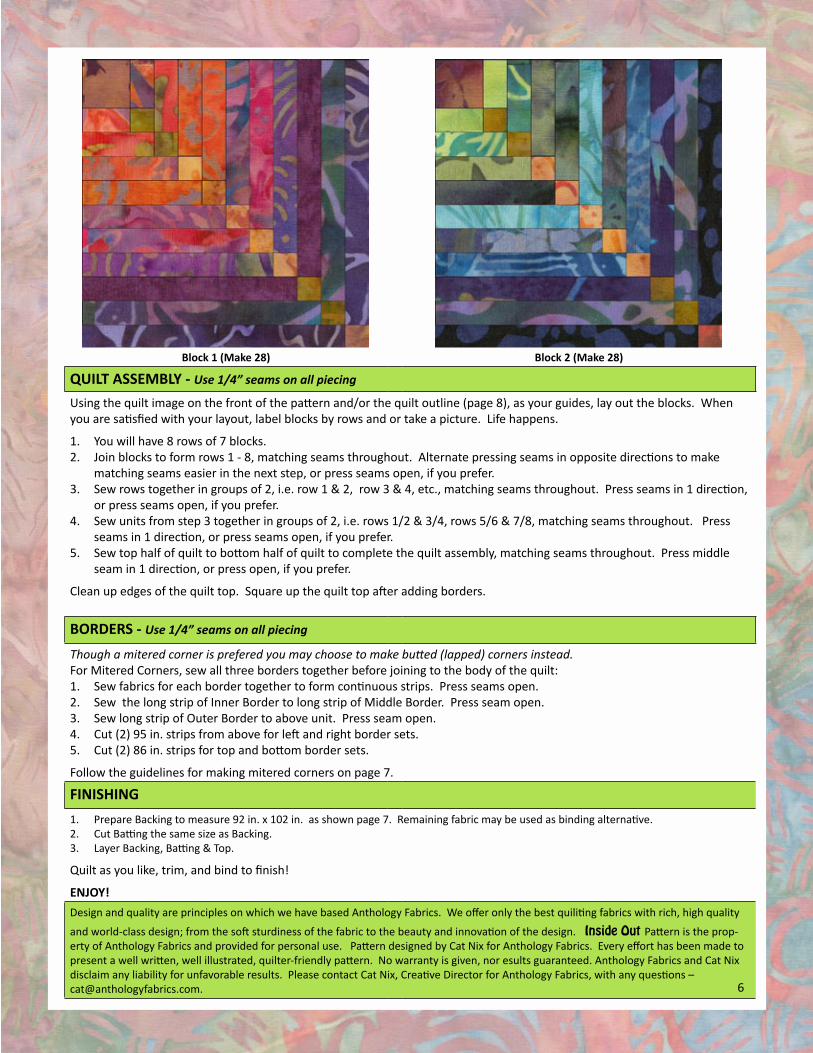
Block 1 (Make 28) Block 2 (Make 28)
QUILT ASSEMBLY - Use 1/4” seams on all piecing
Using the quilt image on the front of the pattern and/or the quilt outline (page 8), as your guides, lay out the blocks. When you are satisfied with your layout, label blocks by rows and or take a picture. Life happens.
1. You will have 8 rows of 7 blocks. 2. Join blocks to form rows 1 - 8, matching seams throughout. Alternate pressing seams in opposite directions to make
matching seams easier in the next step, or press seams open, if you prefer.3. Sew rows together in groups of 2, i.e. row 1 & 2, row 3 & 4, etc., matching seams throughout. Press seams in 1 direction,
or press seams open, if you prefer.4. Sew units from step 3 together in groups of 2, i.e. rows 1/2 & 3/4, rows 5/6 & 7/8, matching seams throughout. Press
seams in 1 direction, or press seams open, if you prefer.5. Sew top half of quilt to bottom half of quilt to complete the quilt assembly, matching seams throughout. Press middle
seam in 1 direction, or press open, if you prefer.
Clean up edges of the quilt top. Square up the quilt top after adding borders.
BORDERS - Use 1/4” seams on all piecing
Though a mitered corner is prefered you may choose to make butted (lapped) corners instead. For Mitered Corners, sew all three borders together before joining to the body of the quilt: 1. Sew fabrics for each border together to form continuous strips. Press seams open.2. Sew the long strip of Inner Border to long strip of Middle Border. Press seam open.3. Sew long strip of Outer Border to above unit. Press seam open.4. Cut (2) 95 in. strips from above for left and right border sets. 5. Cut (2) 86 in. strips for top and bottom border sets.
Follow the guidelines for making mitered corners on page 7.
FINISHING1. Prepare Backing to measure 92 in. x 102 in. as shown page 7. Remaining fabric may be used as binding alternative.2. Cut Batting the same size as Backing.3. Layer Backing, Batting & Top.
Quilt as you like, trim, and bind to finish!
ENJOY!Design and quality are principles on which we have based Anthology Fabrics. We offer only the best quiliting fabrics with rich, high quality
and world-class design; from the soft sturdiness of the fabric to the beauty and innovation of the design. Inside Out Pattern is the prop-erty of Anthology Fabrics and provided for personal use. Pattern designed by Cat Nix for Anthology Fabrics. Every effort has been made to present a well written, well illustrated, quilter-friendly pattern. No warranty is given, nor esults guaranteed. Anthology Fabrics and Cat Nix disclaim any liability for unfavorable results. Please contact Cat Nix, Creative Director for Anthology Fabrics, with any questions – [email protected]. 6

MAKING MITERED CORNERS - Use 1/4 in. seams through out.
1. Fold the quilt top in half horizontally and vertically to find the center of each side. Mark or place a pin at the fold to desig-nate the middle of each side.
2. Fold each Border Set in half to find the middle of each unit. Mark or place a pin at the fold to designate the middle of each Border unit.
3. Match the center point of the Border unit with the middle of one side of the quilt top. Pin in place, aligning raw edges.4. Continue pinning the Border unit to the quilt top. 5. Using a 1/4 in. seam, sew the side border unit to the quilt top, starting and stopping ¼ in. from the ends and backstitching
to secure. 6. Sew top or bottom border unit to the adjoining side of the quilt as above.7. Press seam allowances toward the border.8. Working on the ironing board, lay one corner out flat with right side facing up. One end of the border strip should overlap
the other.9. Double check that the strips are positioned correctly by placing a bias square ruler over the corner – the edges of the border
strips should line up with the edges of the ruler. 10. Fold the top border strip (top layer) under so that the right sides of the two border strips are facing one another – creating
a 45 degree angle. Slide the top border strip out towards the end of the strip until the point of the 45 degree angle is at the corner of the quilt top.
11. Press to crease fabric.12. To ensure an accurate finished corner, lay a bias square ruler over the pressed corner.13. The printed diagonal line on the ruler should follow the pressed fold. The outside edge of the ruler should follow the outside
edges of the border fabric. If these don’t all line up, make some adjustments, repress and recheck with the ruler.14. Pin the ends of the two border units together. Fold the quilt over, leaving the two ends of the border units laying flat on the
ironing board. 15. Pin the border units together along the pressed crease to secure. 16. Sew corner together by sewing in the pressed crease, reinforcing at the beginning and end of the seam. 17. Sew from the corner of the quilt toward the outer edge.18. Open up the sewn corner to check that everything is correct and seams match.19. Press seam and square corner to outer edges to fit the corner.20. Trim to 1/2 in. beyond the outer edge.21. Repeat steps (3 - 19) for the three remaining corners.22. Square up the quilt top.
PREPARING THE BACKING
7
Backing44 in.
30 in.
30 in.
92 in.
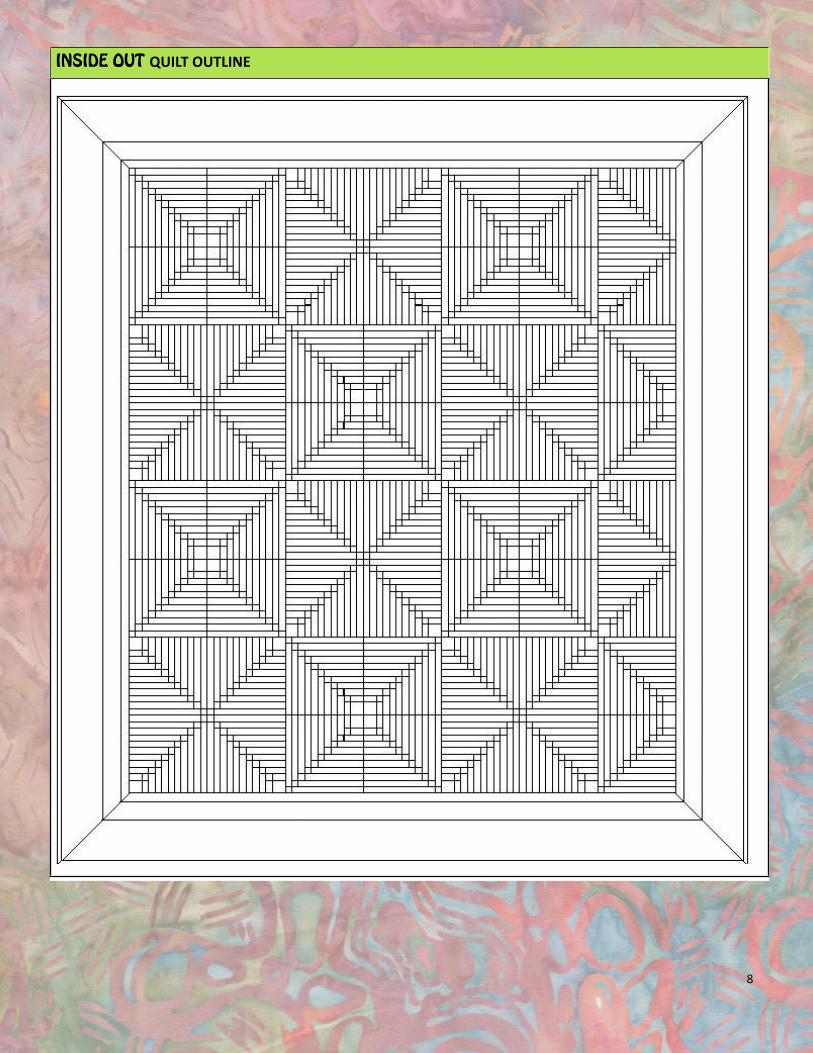
INSIDE OUT QUILT OUTLINE
8