Infotainment System Guide - GMC · 2020-01-10 · Acadia/Acadia Denali, Enclave, Traverse...
102
2013 Acadia/Acadia Denali, Enclave, Traverse Infotainment System M Infotainment System ...... 3 Introduction ................. 3 Infotainment .................... 3 Overview ....................... 4 Steering Wheel Controls ....... 7 Using the System .............. 8 Software Updates ............. 13 Radio ....................... 14 AM-FM Radio ................. 14 HD Radio Technology ......... 18 Satellite Radio ................ 19 Pandora Internet Radio ....... 20 Stitcher Internet Radio ........ 25 Pictures ....................... 28 Audio Players ............. 29 CD/DVD Player ............... 29 MP3 .......................... 32 USB Port ...................... 36 Auxiliary Devices .............. 40 Bluetooth Audio ............... 41 Rear Seat Infotainment ... 41 Rear Seat Entertainment (RSE) System ...................... 41 Navigation ................. 51 Using the Navigation System ...................... 51 Maps .......................... 54 Navigation Symbols ........... 54 Destination .................... 56 OnStar ® System .............. 65 Settings ....................... 66 Global Positioning System (GPS) ............... 75 Vehicle Positioning ............ 76 Problems with Route Guidance .................... 77 If the System Needs Service ...................... 77 Map Data Updates ............ 77 Database Coverage Explanations ................. 78 Voice Recognition ........ 78 Bluetooth Phone/ Devices ................... 83 Bluetooth ..................... 83 Using Voice Recognition ...... 84 Pairing a Phone Using the Infotainment System ......... 84 Trademarks and License Agreements .............. 96 Index ..................... i-1
Transcript of Infotainment System Guide - GMC · 2020-01-10 · Acadia/Acadia Denali, Enclave, Traverse...
Black plate (1,1)Acadia/Acadia Denali, Enclave, Traverse Infotainment System - 2013 - CRC - 1/3/13
2013 Acadia/Acadia Denali, Enclave,Traverse Infotainment System M
Infotainment System . . . . . . 3
Introduction . . . . . . . . . . . . . . . . . 3Infotainment . . . . . . . . . . . . . . . . . . . . 3Overview . . . . . . . . . . . . . . . . . . . . . . . 4Steering Wheel Controls . . . . . . . 7Using the System . . . . . . . . . . . . . . 8Software Updates . . . . . . . . . . . . . 13
Radio . . . . . . . . . . . . . . . . . . . . . . . 14AM-FM Radio . . . . . . . . . . . . . . . . . 14HD Radio Technology . . . . . . . . . 18Satellite Radio . . . . . . . . . . . . . . . . 19Pandora Internet Radio . . . . . . . 20Stitcher Internet Radio . . . . . . . . 25Pictures . . . . . . . . . . . . . . . . . . . . . . . 28
Audio Players . . . . . . . . . . . . . 29CD/DVD Player . . . . . . . . . . . . . . . 29MP3 . . . . . . . . . . . . . . . . . . . . . . . . . . 32USB Port . . . . . . . . . . . . . . . . . . . . . . 36Auxiliary Devices . . . . . . . . . . . . . . 40Bluetooth Audio . . . . . . . . . . . . . . . 41
Rear Seat Infotainment . . . 41Rear Seat Entertainment (RSE)System . . . . . . . . . . . . . . . . . . . . . . 41
Navigation . . . . . . . . . . . . . . . . . 51Using the NavigationSystem . . . . . . . . . . . . . . . . . . . . . . 51
Maps . . . . . . . . . . . . . . . . . . . . . . . . . . 54Navigation Symbols . . . . . . . . . . . 54Destination . . . . . . . . . . . . . . . . . . . . 56OnStar® System . . . . . . . . . . . . . . 65Settings . . . . . . . . . . . . . . . . . . . . . . . 66Global PositioningSystem (GPS) . . . . . . . . . . . . . . . 75
Vehicle Positioning . . . . . . . . . . . . 76Problems with RouteGuidance . . . . . . . . . . . . . . . . . . . . 77
If the System NeedsService . . . . . . . . . . . . . . . . . . . . . . 77
Map Data Updates . . . . . . . . . . . . 77Database CoverageExplanations . . . . . . . . . . . . . . . . . 78
Voice Recognition . . . . . . . . 78
Bluetooth Phone/Devices . . . . . . . . . . . . . . . . . . . 83Bluetooth . . . . . . . . . . . . . . . . . . . . . 83Using Voice Recognition . . . . . . 84Pairing a Phone Using theInfotainment System . . . . . . . . . 84
Trademarks and LicenseAgreements . . . . . . . . . . . . . . 96
Index . . . . . . . . . . . . . . . . . . . . . i-1

Black plate (2,1)Acadia/Acadia Denali, Enclave, Traverse Infotainment System - 2013 - CRC - 1/3/13

Black plate (3,1)Acadia/Acadia Denali, Enclave, Traverse Infotainment System - 2013 - CRC - 1/3/13
Infotainment System 3
Introduction
Infotainment
The names, logos, emblems,slogans, vehicle model names, andvehicle body designs appearing inthis manual including but not limitedto GM, the GM logo, GMC, the GMCTruck Emblem, BUICK, the BUICKEmblem, CHEVROLET, theCHEVROLET Emblem, and thenames ACADIA, ACADIA DENALI,ENCLAVE, and TRAVERSE aretrademarks and/or service marks ofGeneral Motors LLC, itssubsidiaries, affiliates, or licensors.
The information in this manualsupplements the owner manual.
This manual describes features thatmay or may not be on your specificvehicle either because they areoptions that you did not purchase ordue to changes subsequent to theprinting of this owner manual.
Please refer to the purchasedocumentation relating to yourspecific vehicle to confirm each ofthe features found on your vehicle.For vehicles first sold in Canada,substitute the name “GeneralMotors of Canada Limited” forGMC, Buick, and Chevrolet MotorDivisions wherever it appears inthis manual.
Keep this manual with the ownermanual in the vehicle, so it will bethere if it is needed. If the vehicle issold, leave this manual in thevehicle.
Litho in U.S.A.Part No. 22782343 C Third Printing ©2013 General Motors LLC. All Rights Reserved.

Black plate (4,1)Acadia/Acadia Denali, Enclave, Traverse Infotainment System - 2013 - CRC - 1/3/13
4 Infotainment System
Canadian Vehicle Owners(Propriétaires des VéhiculesCanadiens)
A French language copy of thismanual can be obtained from yourdealer or from:
On peut obtenir un exemplaire dece guide en français auprès duconcessionnaire ou à l'adressesuivante:
Helm, IncorporatedP.O. Box 07130Detroit, MI 48207
1-800-551-4123Numéro de poste 6438 de languefrançaisewww.helminc.com
OverviewThe infotainment system is controlled by using the buttons, touch screen,steering wheel controls, and voice recognition.
See Using the System on page 8.
CD Radio Shown, CD/DVD Radio Similar

Black plate (5,1)Acadia/Acadia Denali, Enclave, Traverse Infotainment System - 2013 - CRC - 1/3/13
Infotainment System 5
1. PUSH/O (Volume/Power)
2. Z (Eject)
3. CD/DVD (if equipped) Slot
4. AUX Port
5. PUSH SEL (Select)
6. D (Home Page)
7. SRCE (Source)
8. FAV (Favorites Menu)
9. © SEEK (Previous/Reverse)
10. SEEK ¨ (Next/Forward)
11. / BACK
CD Radio with Navigation Shown, CD/DVD Radio with Navigation Similar
1. PUSH/O (Volume/Power)
2. Z (Eject)
3. AUX Port
4. PUSH SEL (Select)
5. D (Home Page)
6. SRCE (Source)
7. SEEK ¨ (Next/Forward)
8. © SEEK (Previous/Reverse)
9. RPT (Repeat)
10. NAV (Navigation)
11. DEST (Destination)
12. / BACK

Black plate (6,1)Acadia/Acadia Denali, Enclave, Traverse Infotainment System - 2013 - CRC - 1/3/13
6 Infotainment System
Infotainment Controls
PUSH/O (Volume/Power):
. Press to turn the system onand off.
. Turn to adjust the volume.
Z (Eject): Press to eject adisc from the CD or DVD player(if equipped). See CD/DVD Playeron page 29.
AUX Port: 3.5 mm (1/8 in)connection for external audiodevices.
PUSH SEL (Select):. Turn to manually find a station or
highlight a menu selection.. Press to select a highlighted
selection.
D (Home Page): Press to go tothe Home Page. See “Home Page”in this section.
SRCE (Source): Press to changethe audio source to AM, FM,SiriusXM® (if equipped), Pandora®,
Stitcher®, CD/DVD (if equipped,USB, iPod®, AUX, or Bluetooth®
Audio.
FAV (Favorites Menu): In AM, FM,or SiriusXM, press to display orchange the current favorite pagenumber above the preset buttons.Keep pressing to scroll through thefavorites pages. The stored stationsfor each list display on the bottom ofthe screen.
Favorite Pages
Press to select the number offavorite pages displayed on thescreen. The choice is 1–6 pages.
The number of preset favorite pagescan be changed by pressing theSettings button on a Home Page,then pressing Favorites Pages, andthen selecting the number of favoritepages.
DEST (Destination):. Press to enter a destination.. If a destination has already been
entered, press to access theDestination Menu. SeeDestination on page 56.
NAV (Navigation):. Press to view the vehicle's
current position on the mapscreen.
. Continue pressing to cyclethrough the full map and splitscreens.
RPT (Repeat): Press to repeat thelast voice guidance prompt.

Black plate (7,1)Acadia/Acadia Denali, Enclave, Traverse Infotainment System - 2013 - CRC - 1/3/13
Infotainment System 7
© SEEK (Previous/Reverse):. AM, FM, SiriusXM (if equipped):
Press to seek to the previousstrong station. Press and holdfor Scan. Press © SEEK again tostop the scan.
. CD, USB, Pandora, Stitcher,Bluetooth Audio: Press to seekto the beginning of the current orprevious track.
. CD, USB, Bluetooth Audio:Press and hold to quicklyreverse through a track. Releasethe button to return to playingspeed. See CD/DVD Player onpage 29, USB Port on page 36,or Bluetooth Audio on page 41.
SEEK ¨ (Next/Forward):. AM, FM, SiriusXM (if equipped):
Press to seek to the next strongstation. Press and hold for Scan.Press SEEK ¨ again to stopthe scan.
. CD, USB, Pandora, Stitcher,Bluetooth Audio: Press to seekor skip the next track orprogram.
. CD, USB, Bluetooth Audio:Press and hold to fast forwardthrough a track. Release thebutton to return to playingspeed. See CD/DVD Player onpage 29, USB Port on page 36,or Bluetooth Audio on page 41.
/ BACK: Press to return to theprevious screen in a menu.
Language
To change the language of thenavigation screens, see “VehiclePersonalization” in the ownermanual.
English or Metric Units
To change the navigation screensfrom English or metric, see “DriverInformation Center (DIC)” in theowner manual.
Steering Wheel Controls
Vehicles with audio steering wheelcontrols could differ depending onthe vehicle's options. Some audiocontrols can be adjusted at thesteering wheel.
c /w orc /x (Next/Previous): Press to select presetor favorite radio stations, selecttracks on a CD/DVD, or selecttracks.

Black plate (8,1)Acadia/Acadia Denali, Enclave, Traverse Infotainment System - 2013 - CRC - 1/3/13
8 Infotainment System
To select tracks on an iPod or USB:
. Press and holdc /w orc /x while listening to a songlisted in the main audio page, toquickly move forward or inreverse through the tracks.
. Track information is displayed onthe screen. Releasec /w orc /x when the desired trackis reached.
b /g (Mute/Voice Recognition):. Press to make or accept a call.. Press to initiate voice
recognition.. Press and hold to silence the
vehicle speakers only.. Press and hold again or adjust
the volume using the up anddown arrows to turn thesound on.
c /x (End): Press to reject anincoming call, or end a current call.
SRCE (Source): Press to switchbetween the radio, CD, and forequipped vehicles, DVD, frontauxiliary, rear auxiliary, Pandora,Stitcher, and iPod/USB.
¨ (Seek): Press to go to the nextradio station while in AM, FM,or SiriusXM®.
Press ¨ to go to the next track orchapter while sourced to the CD orDVD slot.
Press ¨ to select a track on an iPodor USB device.
For vehicles with an uplevel radio:
1. Press and hold ¨ until a beep isheard to place the radio intoSCAN mode. A station will playfor five seconds before movingto the next station.
2. To stop the SCAN function,press ¨ again.
3. In CD/DVD, iPod, or AUX USB,press and hold to quickly moveforward through the tracks.Release to stop on the desiredtrack.
+ e or − e (Volume): Press toincrease or to decrease the volume.
Using the SystemThe infotainment system iscontrolled by touching the screenand by using the knobs andother buttons.
Voice recognition, through thesteering wheel controls, can beused to control the infotainmentfeatures.
Press b / g on the steering wheelcontrols to begin voice recognition.See Voice Recognition on page 78.
For vehicles with Bluetooth throughthe OnStar® system; press tointeract, then say “OnStar.” See”OnStar Overview” in the ownermanual.

Black plate (9,1)Acadia/Acadia Denali, Enclave, Traverse Infotainment System - 2013 - CRC - 1/3/13
Infotainment System 9
Home Page
The infotainment system displays aHome Page to access all of theapplications. The current selectedsource is framed with a red boxoutline.
Back: Press to go back to theprevious page or menu.
Home: From any page, press tocycle through the Home Pages tostart a different application. TheHome Page can have up to threepages with eight icons per page.Each of these pages can becustomized to contain your choiceof icons. They may also bere-ordered on each screen to taste.
FAV (Favorites): Press to displaythe favorites list or add a favorite.
g (Voice Recognition): Press tobegin voice recognition. See VoiceRecognition on page 78. Press andhold to mute the radio.
Menu: Press to enter the HomePage menu.
Next r : Press to go to the nextHome Page.
q Previous: Press to go to theprevious Home Page.
Home Page Customization
All three Home Pages can becustomized individually to containup to eight icons.
To add screen buttons:
1. Press Menu.
2. Press Customize.
3. Press a screen button to add orremove from the first HomePage. A checkmark indicates itwill be displayed. The maximumnumber of buttons on any HomePage is eight.
4. Press Done.
To move screen buttons:
1. Press Sort.
2. Press an icon to switch withanother icon on the Home Page.
3. Press Done.
To restore Home Page defaults:
1. Press Menu.
2. Press Restore Home PageDefaults.
3. Press Yes or Cancel.
Black plate (10,1)Acadia/Acadia Denali, Enclave, Traverse Infotainment System - 2013 - CRC - 1/3/13
10 Infotainment System
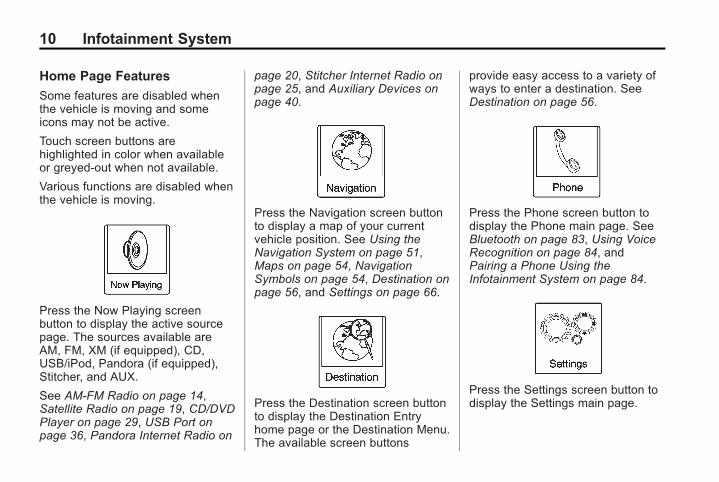
Home Page Features
Some features are disabled whenthe vehicle is moving and someicons may not be active.
Touch screen buttons arehighlighted in color when availableor greyed-out when not available.
Various functions are disabled whenthe vehicle is moving.
Press the Now Playing screenbutton to display the active sourcepage. The sources available areAM, FM, XM (if equipped), CD,USB/iPod, Pandora (if equipped),Stitcher, and AUX.
See AM-FM Radio on page 14,Satellite Radio on page 19, CD/DVDPlayer on page 29, USB Port onpage 36, Pandora Internet Radio on
page 20, Stitcher Internet Radio onpage 25, and Auxiliary Devices onpage 40.
Press the Navigation screen buttonto display a map of your currentvehicle position. See Using theNavigation System on page 51,Maps on page 54, NavigationSymbols on page 54, Destination onpage 56, and Settings on page 66.
Press the Destination screen buttonto display the Destination Entryhome page or the Destination Menu.The available screen buttons
provide easy access to a variety ofways to enter a destination. SeeDestination on page 56.
Press the Phone screen button todisplay the Phone main page. SeeBluetooth on page 83, Using VoiceRecognition on page 84, andPairing a Phone Using theInfotainment System on page 84.
Press the Settings screen button todisplay the Settings main page.

Black plate (11,1)Acadia/Acadia Denali, Enclave, Traverse Infotainment System - 2013 - CRC - 1/3/13
Infotainment System 11
From this display, adjust featuressuch as time and date, radio,phone, navigation, vehicle, anddisplay. See Settings on page 66.
Press the Tone screen button todisplay the Tone main page. Adjustthe tone and speakers by pressingthe screen buttons to change thelevels of sound for treble, midrange,bass, fade, and balance. SeeAM-FM Radio on page 14.
Press the Picture Viewer screenbutton to view pictures on your USBdrive or SD card. Pictures on the SD
card can only be viewed through aUSB adapter. See Pictures onpage 28.
Press the FM screen button todisplay the FM main page and playthe current or last tuned FM station.See AM-FM Radio on page 14.
Press the AM screen button todisplay the AM main page and playthe current or last tuned AM station.See AM-FM Radio on page 14.
Press the XM screen button(if equipped) to display the XM mainpage and play the current or lasttuned SiriusXM channel. SeeSatellite Radio on page 19.
Press the Pandora screen button(if equipped) to display the Pandorahome page and streamspersonalized radio stations basedon artists, songs, genres, andcomedians. See Pandora InternetRadio on page 20.

Black plate (12,1)Acadia/Acadia Denali, Enclave, Traverse Infotainment System - 2013 - CRC - 1/3/13
12 Infotainment System
Press the Stitcher screen button(if equipped) to display the Stitcherhome page and streams news,sports, and entertainment showsthrough the audio system. SeeStitcher Internet Radio on page 25.
Press the CD/DVD screen button todisplay the CD main page andplay the current or last CD trackselected. See CD/DVD Player onpage 29.
Press the E Bluetooth screen buttonto display the Bluetooth Audio mainpage to play music through aBluetooth device. See BluetoothAudio on page 41.
Press the iPod screen button todisplay the iPod main page and playthe current or last track selected.See USB Port on page 36.
Press the USB screen button todisplay the USB main page and playthe current or last track selected.See USB Port on page 36.
Press the Front AUX screen buttonto access any connected auxiliarydevice. See Auxiliary Devices onpage 40.

Black plate (13,1)Acadia/Acadia Denali, Enclave, Traverse Infotainment System - 2013 - CRC - 1/3/13
Infotainment System 13
Press the optional Rear AUX screenbutton to access a connectedauxiliary device such as a DVD forrear seat entertainment playback.See Rear Seat Entertainment (RSE)System on page 41.
Press the Weather screen button(if equipped) to display theweather main page. Select otherweather-related options from thatlist. See “Weather (If Equipped)”under Settings on page 66.
Press the Traffic screen button(if equipped) to display theTraffic main page. Select othertraffic-related options from that list.See “SiriusXM® NavTraffic” underSettings on page 66.
Cleaning High Gloss Surfacesand Vehicle Information andRadio Displays
For vehicles with high glosssurfaces or vehicle displays, use amicrofiber cloth to wipe surfaces.Before wiping the surface with themicrofiber cloth, use a soft bristlebrush to remove dirt that couldscratch the surface. Then use themicrofiber cloth by gently rubbing toclean. Never use window cleanersor solvents. Periodically hand washthe microfiber cloth separately,
using mild soap. Do not use bleachor fabric softener. Rinse thoroughlyand air dry before next use.
Notice: Do not attach a devicewith a suction cup to the display.This may cause damage andwould not be covered by thewarranty.
Software UpdatesThe vehicle may require updatesdownloaded from the GM website.Log into the website with either anew username and password, or anexisting OnStar.com username andpassword. Periodically check thewebsite for software updates.These updates can provide featureenhancements, new features, andsupport for new devices. Detailedinstructions will be provided on thewebsite. After the update is saved tothe USB drive, save the update tothe vehicle.

Black plate (14,1)Acadia/Acadia Denali, Enclave, Traverse Infotainment System - 2013 - CRC - 1/3/13
14 Infotainment System
To update:
1. Place the vehicle in P (Park),start the engine, and turn theradio on. The engine must berunning until the update iscompleted.
2. Insert the USB drive into theUSB port.
3. Choose either the Update orDismiss screen button toproceed.
4. The radio will search the USBdrive for software and verify theupdate.
5. The radio will also show theprogress for each update.
The message “Software UpdateSuccessful” will display and theradio will restart.
After the update, Bluetooth deviceswill need to be re-paired and USBdevices may need to be re-indexed.
Remove the USB drive when theupdate is complete.
See the website informationfollowing.
Website Information
Buick
In the U.S., visit www.buick.com.
In Canada, visit www.buick.ca.
GMC
In the U.S., visit www.gmc.com.
In Canada, visit www.gmc.gm.ca.
Chevrolet
In the U.S., visit www.chevrolet.com.
In Canada, visit www.chevrolet.ca.
Customer Assistance Offices
See the owner manual for CustomerAssistance Office phone numbers.
Radio
AM-FM Radio
Playing the Radio
PUSH/O (Power/Volume):
. Press to turn the radio on or off.
. Turn to increase or decrease thevolume of the active source.
The steering wheel controls canalso be used to adjust the volume.See Steering Wheel Controls onpage 7.
Audio Source
To access AM, FM, or XM (ifequipped), do one of the following:. Press the AM, FM, or XM
(if equipped) screen button.. Press the SRCE radio button to
scroll through the options.A source ribbon will appear atthe bottom of the screenallowing you to select the oneyou want.

Black plate (15,1)Acadia/Acadia Denali, Enclave, Traverse Infotainment System - 2013 - CRC - 1/3/13
Infotainment System 15
. Say “Tune AM,” “Tune FM,” or“Tune XM,” or “AM,” “FM,” or“XM” using voice recognition.
Infotainment System Settings
Tone Settings
To access the tone settings, pressthe Tone Settings button on theHome Page, or press the PUSHSEL knob while in an audio source.
To adjust the settings:. Bass: Press + or − to change
the level.. Middle: Press + or − to change
the level.. Treble: Press + or − to change
the level.
. EQ (If Equipped): Press o or pto scroll through the preset EQoptions.
. Stereo/Surround/DSP Mode(If Equipped): Press o or p toscroll through the preset DigitalSignal Processing (DSP) ortoggle between Stereo andSurround (5.1 DVD only) modes.
. Fade: Press the F or R buttonfor more sound from the front orrear speakers. The middleposition balances the soundbetween the front and rearspeakers.
. Balance: Press the L or R buttonfor more sound from the left orright speakers. The middleposition balances the soundbetween the left and rightspeakers.
Finding a Station
Press SRCE to select AM, FM,SiriusXM (if equipped).
Turn the PUSH SEL knob to find aradio station. To select a presetstation, press FAV to scroll throughthe favorite page, then press apreset button on the radio or thescreen button.
Seeking a Station
Press © SEEK or SEEK ¨ to search
for a station, or use the ¨ on thesteering wheel controls (SWC).
Press and hold © SEEK or SEEK ¨button to scan up or down the band,pausing on each station forfive seconds. Touch © SEEK or
SEEK ¨ again to cancel.

Black plate (16,1)Acadia/Acadia Denali, Enclave, Traverse Infotainment System - 2013 - CRC - 1/3/13
16 Infotainment System
AM
To access the AM menu press theMenu screen button and thefollowing may display:
Favorites List: Press to display thefavorites list.
AM Station List: Press to display alist of AM stations.
Update Station List: Press todisplay the list of AM stations.Press refresh to update the list.
Tag Song: Press to tag a song todownload to an iPod when it isconnected, and to purchase it at alater time. Song tagging is onlyavailable while listening to anHD broadcast.
HD Enable/Disable: Press toenable or disable the HD radiofunction.
FM
To access the FM Menu, press theMenu screen button and thefollowing may display:
Favorites List: Press to display thefavorites list.
FM Station List: Press to display alist of FM stations.
Update Station List: Press todisplay the list of FM stations. Pressrefresh to update the list. A FMstation list update may take severalminutes. To decrease the time tobuild a station list will only bepopulated with non HD stations.

Black plate (17,1)Acadia/Acadia Denali, Enclave, Traverse Infotainment System - 2013 - CRC - 1/3/13
Infotainment System 17
Tag Song: Press to tag a song todownload to an iPod when it isconnected, and to purchase it at alater time. Song tagging is onlyavailable while listening to an HDbroadcast,
HD Enable/Disable: Press toenable or disable the HD function.
SiriusXM (If Equipped)
To access the XM Menu, press theMenu screen button and thefollowing may display:
Favorites List: Press to display thefavorites list.
XM Channel List: Press to displaya list of SiriusXM channels.
XM Category List: Press to displaya list of SiriusXM categories.
Storing Radio Station Presets
Up to 30 preset stations canbe stored. AM, FM, and XM (ifequipped) can be mixed, across upto six pages of favorite pages.
1. From the AM, FM, or XM mainpage, press and hold one of thepreset screen buttons at thebottom of the screen. After a fewseconds, a beep is heard andthe new preset informationdisplays on that screen button.
2. Repeat for each preset.
Mixed-Band Presets
Each favorite page can store fivepreset stations. The presets within apage can be from different radiobands.
To scroll through the pages, pressFAV or the FAV screen button on thetop bar. The current page numberdisplays above the preset buttons.The stored stations for each favoritepage display on the preset buttons.
To change the number of favoritepages displayed:
1. Press Settings on theHome Page.
2. Press Favorite Pages.

Black plate (18,1)Acadia/Acadia Denali, Enclave, Traverse Infotainment System - 2013 - CRC - 1/3/13
18 Infotainment System
3. Select the number of pages todisplay.
Recalling a Preset Station
To recall a preset station from afavorites page, do one the following:. Press the FAV screen button at
the top bar to display the presetpop-up. Press one of the presetscreen buttons to go to theselected preset station.
. In the AM, FM, or XM (ifequipped) main page, press oneof the preset screen buttons togo to the selected preset station.
HD Radio TechnologyHD Radio Technology is theDIGITAL evolution of AM and FMradio. HD Radio Technology is afree service that offers new featureslike static-free sound, moreprogramming choices on local FMHD2/HD3/HD4/HD5/HD6/HD7channels, on-screen informationsuch as artist and song title, as wellas album art if the station is
broadcasting it. Some HD Radiostations broadcast station art andalbum art as part of the HD service.HD Radio station art is stored in theradio and may take up tofive minutes to learn for each stationthat supports station art. Album artis broadcast at the beginning ofsongs. If tuning into the middle of asong, the art may not be available.
HD Radio Technology StationAccess
To access HD Radio stations:
1. Tune the radio to the station.If the station is broadcasting HDRadio Technology, the radio willautomatically switch to digitalaudio and will have an orangeHD logo.
2. Press © SEEK or SEEK ¨ totune to the previous or next HDsub channel.
There might be a delay before thestation starts playing while thesignal is processed.
The HD Radio channel number isindicated next to the logo.
HD Radio channels can be savedas favorites. Songs can be taggedfor download to a connectediPhone®, or iPod touch®. SeeAM-FM Radio on page 14 or USBPort on page 36.
For a list of all channels, seewww.hdradio.com.
HD Radio TechnologyTroubleshooting
Digital Audio Delay: Wait for thesignal to process. This can take upto eight seconds.
Volume Change, Audio Skip,Echo, Digital Audio Lost: Stationsignal strength may be weak or thestation is out of range. Verify properreception on another channel.
If listening to channel HD1 and thesignal is losing reception, the radiowill go back to the main non-HDRadio station.

Black plate (19,1)Acadia/Acadia Denali, Enclave, Traverse Infotainment System - 2013 - CRC - 1/3/13
Infotainment System 19
If listening to channels HD2 toHD7 and the signal is losingreception, the radio mutes until thesignal can be recovered or until thestation is changed.
Digital HD broadcasting signals areweaker than the normal signalstrength of the analog station, soHD listening may not deliver thesame range as non HD stationlistening. The radio will indicate lossof HD signal by displaying “No HDSignal.”
Satellite RadioVehicles with a valid SiriusXM®
satellite radio subscription canreceive SiriusXM programming.
SiriusXM satellite radio has a widevariety of programming andcommercial-free music, coast tocoast, and in digital-quality sound.For more information, seewww.siriusxm.com or call1-866-635-2349 in the U.S.In Canada, see www.xmradio.ca orcall 1-877-209-0079.
When SiriusXM is active, the stationname, number, category name,song title, and artist display on thescreen. SiriusXM may update thebackground picture at any time.
SiriusXM Categories
SiriusXM stations are organized incategories.
Adding or Removing SiriusXMCategories
Using the Home Page:
1. Press the Settings screen buttonon the Home Page.
2. Select XM Categories.
3. Select or deselect a category.A checkmark will indicate thatthe category is selected.
Press “Show All XM Categories” torestore all SiriusXM categories.
Using the XM playing screen:
1. Press the Menu screen button.
2. Select XM Categories.
3. Select or deselect a category.A checkmark will indicate thatthe category is selected.
SiriusXM Messages
XL (Explicit LanguageChannels): These stations, or anyothers, can be blocked by request,by calling 1-866-635-2349 inthe U.S., and 1-877-209-0079 inCanada.
XM Updating: The encryption codein the receiver is being updated.No action is required.
Loading XM: The audio system isacquiring and processing audio andtext data. No action is needed.
Channel Off Air: This station is notcurrently in service.
Channel Unauth: This station isblocked or cannot be received.
Channel Unavailable: Thispreviously assigned station is nolonger assigned.

Black plate (20,1)Acadia/Acadia Denali, Enclave, Traverse Infotainment System - 2013 - CRC - 1/3/13
20 Infotainment System
No Artist Info: No artistinformation is available at this timeon this station.
No Title Info: No song titleinformation is available at this timeon this station.
No CAT Info: No categoryinformation is available at this timeon this station.
No Information: No text orinformational messages areavailable at this time on this station.
No XM Signal: The vehicle may bein a location where the SiriusXMsignal is being blocked. When thevehicle is moved into an open area,the signal should return.
CAT Not Found: There are nostations available for the selectedcategory.
XM Radio ID: If tuned to station 0,this message alternates with theSiriusXM radio eight-digit radio IDlabel. This label is needed toactivate the service.
Unknown: If this message isreceived when tuned to station 0,there could be a receiver fault.Consult with your dealer.
XM Not Available: If this messagedoes not clear within a short periodof time, the receiver could have afault. Consult with your dealer.
Pandora Internet Radio
Pandora®
Pandora is a free Internet radioservice that streams personalizedradio stations based on artists,songs, genres, and comedians.Create stations with the Pandoraapplication downloaded on a phoneor device, then use - (thumbs up)
or , (thumbs down) to personalizestations. To set up an account, orfor more information, go towww.pandora.com. Pandora maynot be available in Canada orMexico.
A phone or tablet with Internetconnection is required for thisapplication. Personal cell phonedata plans are used. Make sure thelatest version is installed on thedevice and the volume is turned up.
To install Pandora:. On an Android™ phone or
Android Tablet, go to the GooglePlay Market and search forPandora. Install to the phone,not to the SD card.
. On a BlackBerry® phone, go tothe BlackBerry App World™ andsearch for Pandora.
. On an iPhone, iPad, or iPodtouch, go to the iTunes® Storeand search for Pandora.

Black plate (21,1)Acadia/Acadia Denali, Enclave, Traverse Infotainment System - 2013 - CRC - 1/3/13
Infotainment System 21
Launching Pandora
Connect the iPhone®, iPad®,or iPod touch® to the USB port,or connect an Android or BlackBerrythrough Bluetooth. See AuxiliaryDevices on page 40 or Bluetooth onpage 83. For first-time use, set upthe stations before connecting to thevehicle. The Pandora icon will beavailable on the Home Page.
The USB jack will charge Apple®
devices drawing up to one amp ofcurrent. IPad will not chargebecause the USB jack does notprovide enough amperage.
The signal strength and battery levelmeters indicate the conditions of thepaired phone. Performance issuesof this feature may arise when eithersignal or battery levels are low,
Launch Using the iPhone, iPodTouch, or iPad
1. Plug the device into the USBport. The phone screen must beunlocked.
2. To launch, do one of thefollowing:. Make sure the device is
unlocked so the “Allow”button can be pressed onthe device.
. Press Pandora on theHome Page.
. Press b / g and say“Pandora” or “PlayPandora.”
. Press the Source buttonand select from the sourceribbon of options.
To relaunch Pandora, press thePandora source again from eitherthe Home Page or source ribbon.
If nothing happens when theavailable Pandora screen button ispressed, download the latestPandora application to the deviceand retry. Also, verify you are in agood signal area.
Pandora will always be highlightedon the Home Page when an iPhone,iPad, or iPod touch having theapplication capability is connectedusing the USB port. To use, log intoyour account.
Launch Using an Android Phone
1. Pair the Android phone usingBluetooth.
2. Use one of the following tolaunch:. Press the application on the
device.. Press Pandora on the
Home Page.

Black plate (22,1)Acadia/Acadia Denali, Enclave, Traverse Infotainment System - 2013 - CRC - 1/3/13
22 Infotainment System
. Press b / g and say“Pandora” or “PlayPandora.”
After Pandora has been launched,press the Pandora icon to accessPandora features.
If nothing happens when theavailable Pandora screen button ispressed, download the latestPandora application to the deviceand retry. Also, verify you are in agood signal area.
Launch Using a BlackBerry Phone
The phone must be unlocked.To launch Pandora service:
1. Pair the BlackBerry phone usingBluetooth.
2. Use one of the following tolaunch:. Press the application on
the device.. Press Pandora on the
Home Page.
. Press b / g and say“Pandora” or “TunePandora.”
After Pandora has been launched,press the Pandora icon to accessPandora features.
If nothing happens when theavailable Pandora screen button ispressed, download the latestPandora application to the deviceand retry. Also, verify you are in agood signal area.
If the “Please See Device” messageis shown, the login screen maydisplay on the device.
Pandora Menus
Press Menu on the Pandoramain page.
Pandora has a menu system withthe following:
Bookmark: When pressed during asong, a choice displays to bookmarkthe artist or song. This sends thebookmark to the Pandora account.
Shuffle: Press to play the stationsin random order.
User-Created Stations: Press toplay a user-created station. Pressthe ! screen button and say“Play [your station].”
Pandora Features
Pandora service has features to ratesongs, skip songs, or changestations.

Black plate (23,1)Acadia/Acadia Denali, Enclave, Traverse Infotainment System - 2013 - CRC - 1/3/13
Infotainment System 23
, (Thumbs Down): Whenpressed, Pandora stores thisinformation, changes to the nextsong, and does not play this songon this station again. This helpsPandora choose which songsshould not play on this station.This feature is only available onuser-created stations.
- (Thumbs Up): When pressed,Pandora stores this information andf is highlighted for the remainder ofthe song. This helps Pandorachoose which songs should play onthis station.
d (Next Song): When pressed,Pandora changes to the next song.
Pandora Skip Limit While Usingthe Free Version
Pandora offers a skip song service.The limit is six songs per hour perstation. This also applies to thethumbs down feature. The song willcontinue to play, but Pandora storesthis information and will not play thatsong again.
Pandora Advertisement WhileUsing the Free Version
Pandora may play advertisements.Ads normally displayed on thephones will not be seen whileconnected to the vehicle. Artistname and song title will not bedisplayed, and the skip track buttonis not available.
Switching Between Pandora andStitcher
To switch between Pandora andStitcher, press the desiredapplication icon on the radio. ForiPhone, iPod touch, or iPad, makesure the device is unlocked so the“Allow” button can be pressed on
the device. This is not required forAndroid devices. See StitcherInternet Radio on page 25. TheSRCE button on the radio can alsobe used.
Pandora Troubleshooting
Unable to Connect Device toVehicle
If the device is unable to connect tothe USB or Bluetooth:
1. Turn the vehicle off.
2. Remove the key fromthe ignition.
3. Open and close the driver door,wait about one minute, and try toconnect the device again.
Unable to Start Pandora
If the device is unable to launchPandora:. Check that the latest version of
Pandora is installed.. Check that there is an active
account logged into Pandora.

Black plate (24,1)Acadia/Acadia Denali, Enclave, Traverse Infotainment System - 2013 - CRC - 1/3/13
24 Infotainment System
. Check that there is a good signalstrength. The signal strength andphone battery level can bechecked on the radio screen.
. Have at least one stationcreated.
. For Android and BlackBerrydevices, check that the device ispaired with the vehicle, and theBluetooth icon on the display ishighlighted.
. For iPhone, iPod touch, or iPaddevices, check that the USBcable is connected to the USBport and the screen is unlocked.
. Close Pandora on the deviceand launch again. Devices thatallow multitasking may requirean extra step to quit the Pandoraapplication. See the cell phonemanufacturer's user guide.
Thumbs Up or Thumbs DownError
If there is an error trying to rate asong with the , or - buttons, themessage “Thumbs Down Error” or“Thumbs Up Error” may display.Press OK to retry.
Loss of Audio
Loss of Pandora audio can happenin different ways:. Weak or lost data connection.
The signal strength and phonebattery level can be checked onthe radio screen.
. Device needs to be charged.
. Application needs to berelaunched.
. Connection between phone andradio lost.
. If any iPhone, iPod touch,or iPad is connected toBluetooth and the dockconnector, unplug the dockconnector and plug it in again.
. Volume is too low. Turn up thevolume on the device.
If the connection is lost between theapplication and device, a message“Please unlock your phone or restartthe phone app and try again” maydisplay. Press OK to retry.
Common Pandora Messages
Paused or Audio Paused:Playback is paused on the radio ordevice. Pressk or play on theradio page for Pandora source.
No Stations Found: Logged in butno stations have been created.
Communication Failure orApplication Unexpectedly Quit orNetwork Connection Could NotBe Established: Communicationfailure between the radio and thephone application, or between thephone and data connection, or thedevice is locked.
See www.pandora.com/help formore information. If the service willnot work, see your dealer forassistance.

Black plate (25,1)Acadia/Acadia Denali, Enclave, Traverse Infotainment System - 2013 - CRC - 1/3/13
Infotainment System 25
Stitcher Internet Radio
Stitcher®
Stitcher is a free Internet radioservice that streams personalizedradio stations based on artists,songs, genres, and comedians.Create stations with the Stitcherapplication downloaded on a phoneor device, then press - (thumbs up)
or , (thumbs down) on the radiojust as on the device to personalizestations. To set up an account, orfor more information, go towww.stitcher.com. Stitcher may beavailable as a worldwide internetservice.
A phone or tablet with Internetconnection is required for thisapplication. Personal cell phonedata plans are used. Make sure thelatest version is installed on thedevice and the volume is turned up.
To install Stitcher:. On an Android phone or Android
Tablet, go to the Google PlayMarket and search for Stitcher.Install to the phone, not to theSD card.
. On an iPhone, iPad, or iPodtouch, go to the iTunes Storeand search for Stitcher.
Launching Stitcher
Connect the iPhone, iPad, or iPodtouch to the USB port, or connect aGoogle Play through Bluetooth. SeeAuxiliary Devices on page 40 orBluetooth on page 83. For first timeuse, set up the stations before
connecting to the vehicle. TheStitcher icon will be available onthe Home Page.
The signal strength and battery levelmeters indicate the conditions of thepaired phone. Performance issuesof this feature may arise when eithersignal or battery levels are low,
Launch Using the iPhone, iPodTouch, or iPad
1. Plug the device into the USBport. The phone screen must beunlocked.
2. To launch, do one of thefollowing:. Make sure the device is
unlocked so the “Allow”button can be pressed onthe device.
. Press the application on thedevice.
. Press Stitcher on theHome Page.
. Press b / g and say“Stitcher” or “Play Stitcher.”

Black plate (26,1)Acadia/Acadia Denali, Enclave, Traverse Infotainment System - 2013 - CRC - 1/3/13
26 Infotainment System
To relaunch Stitcher, press theStitcher source again from either theHome Page or source ribbon.
If nothing happens when theavailable Stitcher screen button ispressed, download the latestStitcher application to the deviceand retry. Also, verify you are in agood signal area.
Stitcher will always be highlightedon the Home Page when an iPhone,iPad, or iPod touch is connectedusing the USB port. To use, log intoyour account.
If the “Please See Device” messageis shown, the login screen maydisplay on the device.
Launch Using an Android Phone
1. Pair the Android phone usingBluetooth.
2. Use one of the following tolaunch:. Press the application on the
device.. Press Stitcher on the
Home Page.
. Press b / g and say“Stitcher” or “Play Stitcher.”
After Stitcher has been launched,press the Stitcher icon to accessStitcher features.
If nothing happens when theavailable Stitcher screen button ispressed, download the latestStitcher application to the deviceand retry. Also, verify you are in agood signal area.
If the “Please See Device” messageis shown, the login screen maydisplay on the device.
Stitcher Menu
Stitcher has a menu page displayingpreselected list items to choosefrom. Select the desired line item.
Stitcher Features
If available, Stitcher has a thumbsup or down method of ratingprograms.

Black plate (27,1)Acadia/Acadia Denali, Enclave, Traverse Infotainment System - 2013 - CRC - 1/3/13
Infotainment System 27
q (Favorites): Press to mark theprogram as a favorite.
Stitcher Troubleshooting
Unable to Connect Device toVehicle
If the device is unable to connect tothe USB or Bluetooth:
1. Turn the vehicle off.
2. Remove the key from theignition.
3. Open and close the driver door,wait about one minute, and try toconnect the device again.
Unable to Start Stitcher
If the device is unable to launchStitcher:. Check that the latest version of
Stitcher is installed.. Check that there is an active
account logged into Stitcher.. Check that you have good signal
strength.
. Have at least one stationcreated.
. For Android devices, check thatthe device is paired with thevehicle, and the Bluetooth iconon the display is highlighted.
. For iPhone, iPod touch, or iPaddevices, check that the USBcable is connected to the USBport and the screen is unlocked.
. Close Stitcher on the device andlaunch again. Devices that allowmultitasking may require anextra step to quit the Stitcherapplication. See the cell phonemanufacturer's user guide.
Thumbs Up or Thumbs DownError
If there is an error trying to rate asong with the , or - buttons, themessage “Thumbs Down Error” or“Thumbs Up Error” may display.Press OK to retry.
Loss of Audio
Loss of Stitcher audio can happenin different ways:. Weak or lost data connection.. Device needs to be charged.. Application needs to be
relaunched.. Connection between phone and
radio lost.. If any iPhone, iPod touch,
or iPad is connected toBluetooth and the dockconnector, unplug the dockconnector and plug it in again.
. Volume is too low. Turn up thevolume on the device.
If the connection is lost between theapplication and device, a message“Please unlock your phone or restartthe phone app and try again” maydisplay. Press OK to retry.

Black plate (28,1)Acadia/Acadia Denali, Enclave, Traverse Infotainment System - 2013 - CRC - 1/3/13
28 Infotainment System
Common Stitcher Messages
Paused or Audio Paused:Playback is paused on the radio ordevice. Pressk or play on theradio page for Stitcher source.
No Stations Found: Logged in butno stations have been created.Press OK to continue.
Communication Failure orApplication Unexpectedly Quit orNetwork Connection Could NotBe Established: Communicationfailure between the radio and thephone application, or between thephone and data connection, or thedevice is locked.
See www.stitcher.com/help for moreinformation. If the service will notwork, see your dealer forassistance.
PicturesPictures can only be viewed usingUSB devices. If pictures are on anSD card, transfer to a USB deviceor use a USB-SD adapter. File sizesabove approximately four megapixels may not show. Only jpeg,bmp, and gif files are supported.
1. Press the Picture Viewer screenbutton on the Home Page.
2. The system does a search tofind the picture folders.A “Please wait” messagedisplays until the search isfinished.
3. A list displays. Select a pictureto view.
4. Once a picture displays, thefollowing options are available:
Info: Press to turn file nameinformation on or off.
S : Press to display the previouspicture.
T : Press to display the nextpicture.
Menu: Press to open the PictureViewer Main Settings screen.
If the displayed picture screen is notused within six seconds, the upperand lower bar options will disappear.Touch-tap the screen to re-displaythe upper and lower bar.
Black plate (29,1)Acadia/Acadia Denali, Enclave, Traverse Infotainment System - 2013 - CRC - 1/3/13
Infotainment System 29
Audio Players
CD/DVD PlayerThe player can be used for CD,MP3 audio, and Video.
With the vehicle on, insert a discinto the slot, label side up. Theplayer pulls it in and begins playing.
The system is capable of playing:. Most audio CDs. CD-R. CD-RW. MP3 or unprotected WMA
formats. DVD-Video. DVD-R/RW. DVD+R/RW
When playing any compatiblerecordable disc, the sound qualitycan be reduced due to disc quality,the method of recording, the quality
of the music that has beenrecorded, or the way the disc hasbeen handled.
There can be increased skipping,difficulty in recording tracks,difficulty in finding tracks, and/ordifficulty in loading and ejecting.If these problems occur, check thedisc for damage or try a knowngood disc.
To avoid damage to the CD/DVDplayer:. Do not use scratched or
damaged discs.. Do not apply labels to discs. The
labels could get caught in theplayer.
. Insert only one disc at a time.
. Keep the loading slot free offoreign materials, liquids, anddebris.
. Use a marking pen to label thetop of the disc.
DVD-A is not a supported media.Although sound may be heard, fullfunction is not available.
Loading and Ejecting Discs
To load a disc:
1. Turn the vehicle on.
2. Insert a disc into the slot, labelside up. The player pulls it in therest of the way. If the disc isdamaged or improperly loaded,there is an error and the discejects.
The disc automatically plays onceloaded.
PressZ to eject a disc from theCD/DVD player. If the disc is notremoved within a short period oftime, it is automatically pulled backinto the player.

Black plate (30,1)Acadia/Acadia Denali, Enclave, Traverse Infotainment System - 2013 - CRC - 1/3/13
30 Infotainment System
Playing an Audio CD
1. Press the Disc screen button onthe Home Page or selectthe disc.
2. From the Disc screen, press theMenu screen button to displaythe menu options.
3. Press to select the desiredoption.
On the Disc main page, a tracknumber displays at the beginning ofeach track. Song, Artist, elapsedtime, and Album informationdisplays when available.
Use the following controls to playthe disc:
© SEEK (Previous):. Press to seek to the beginning of
the current or previous track.If the track has been playing forless than eight seconds, it seeksto the previous track. If longerthan eight seconds, the currenttrack starts from the beginning.
SEEK ¨ (Next):. Press to seek to the next track.
To fast forward or reverse through atrack, press[ orr buttons at thebottom of the screen. Press thePlay/Pause button at the bottom ofthe screen to resume play or pauseif not fast forwarding or fastreversing.
PUSH SEL (Select): Turn to theright or left to select the next orprevious track.
Playing a DVD Video
Press the Disc screen button on theHome Page or select Disc from thesource pop-up to display the DVDmain page.
Play/Pause: Press to start, stop,and resume playback.
Disc Menu: Press to activate theDVD Disc Menu.
FFWD (Fast Forward): Press toquickly move forward through thevideo. Continuing to press theFFWD button will increase theFFWD speed up to 32x. Press Playto resume play mode.
REW (Fast Reverse): Press toquickly move in reverse through thevideo. Continuing to press the REWbutton will continue to increase theREW speed up to 32x. Press Playto resume play mode.

Black plate (31,1)Acadia/Acadia Denali, Enclave, Traverse Infotainment System - 2013 - CRC - 1/3/13
Infotainment System 31
From the DVD main page, press theMenu screen button to display theDVD Menu options.
Cursor: Press to access theCursor menu. The arrows and othercursor options allow navigation ofthe DVD menu options. The Cursormenu options are only available if aDVD has a menu and when thevehicle is in P (Park).
Audio: Press to cycle through theaudio options if available on disc.An example of this would be topress Audio to change betweensurround sound or stereo sound.
Subtitle: Press to cycle through theavailable subtitle options.
Viewing Mode: Press to changethe viewing mode of the videoscreen. The options are Wide, Full,and Zoom.
Brightness: Press − or + to adjustthe brightness of a video, if it isactive.
Search: Press to perform anumbered title or chapter search.
Angle: Press to display the viewingangle of the DVD, depending on theDVD, while the DVD is playing.Continue pressing to cycle throughthe viewing angles.
Error Messages
If Disc Error displays and/or the disccomes out, it could be for one of thefollowing reasons:. The disc has an invalid or
unknown format.. The disc is very hot. Try the disc
again when the temperaturereturns to normal.
. The road is very rough. Try thedisc again when the road issmoother.
. The disc is dirty, scratched, wet,or upside down.
. The air is very humid. Try thedisc again later.
. There was a problem whileburning the disc.
. The label is caught in the DVDplayer.
If the CD/DVD is not playingcorrectly, for any other reason, try aknown good CD/DVD.
If any error continues, contact yourdealer.

Black plate (32,1)Acadia/Acadia Denali, Enclave, Traverse Infotainment System - 2013 - CRC - 1/3/13
32 Infotainment System
MP3
Playing an MP3 CD
To play an MP3 CD, follow thesame instructions as “Playing anAudio CD.”
The following guidelines must bemet when creating an MP3 disc,otherwise the CD might not play:. Sampling rate: 16 kHz,
22.05 kHz, 24 kHz, 32 kHz,44.1 kHz, and 48 kHz.
. Bit rates supported: 8, 16, 24,32, 40, 48, 56, 64, 80, 96, 112,128, 144, 160, 192, 224, 256,and 320 kbps.
. Maximum number of folders:eight folders with 255 files perfolder.
. Maximum of 1,000 files ona disc.
. Recorded on a CD-R or CD-RWwith a maximum capacity of700 MB.
. The Artist/Album/Song Titles/Genre information requires a CDto be fully scanned before themusic navigator works withthese menus.
MP3 Audio
Press the Menu screen button whilethat source is active to access theCD Audio Menu.
Press any of the following buttonson the CD Audio Menu:
Folders: Press to view the foldersstored on the disc. Select a folder toview the list of all songs in thatfolder. There might be a delaybefore the list displays. Select asong from the list to begin playback.
Playlists: Press to view theplaylists stored on the disc. Select aplaylist to view the list of all songs inthat playlist. There might be a delaybefore the list displays. Select asong from the list to begin playback.

Black plate (33,1)Acadia/Acadia Denali, Enclave, Traverse Infotainment System - 2013 - CRC - 1/3/13
Infotainment System 33
Artists: Press to view the list ofartists stored on the disc. Select anartist name to view a list of all songsby the artist. There might be a delaybefore the list displays. Select asong from the list to begin playback.
Genres: Press to view the genres.Select a genre to view a list of allsongs of that genre. Select a songfrom the list to begin playback.
Albums: Press to view the albumson the disc. Select the album toview a list of all songs on the album.There might be a delay before thelist displays. Select a song from thelist to begin playback.
Tracks (Song Titles): Press todisplay a list of all songs on thedisc. Songs are displayed as storedon the disc. There might be a delaybefore the list displays. To beginplayback, select a song from the list.
Root Directory
The root directory is treated as afolder. All files contained directlyunder the root directory areaccessed prior to any root directoryfolders.
Empty Folders
If a root directory or folder is emptyor contains only folders, the playeradvances to the next folder in thefile structure that contains acompressed audio file. The emptyfolder(s) are not displayed ornumbered.
No Folder
When the CD only containscompressed audio files without anyfolders or playlists, all files areunder the root folder.
File System and Naming
The song titles, artists, albums, andgenres are taken from the file's ID3tag and are only displayed if presentin the tag. If a song title is notpresent in the ID3 tag, the radiodisplays the file name as thetrack name.
Preprogrammed Playlists (CDModels Only, DVD Models Do NotSupport Playlists)
The radio recognizespreprogrammed playlists; however,there is no editing capability. Theseplaylists are treated as specialfolders containing compressedaudio song files.
Black plate (34,1)Acadia/Acadia Denali, Enclave, Traverse Infotainment System - 2013 - CRC - 1/3/13
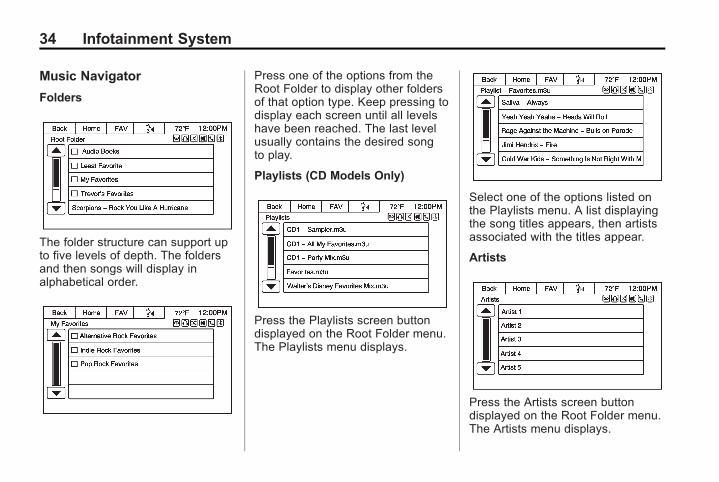
34 Infotainment System
Music Navigator
Folders
The folder structure can support upto five levels of depth. The foldersand then songs will display inalphabetical order.
Press one of the options from theRoot Folder to display other foldersof that option type. Keep pressing todisplay each screen until all levelshave been reached. The last levelusually contains the desired songto play.
Playlists (CD Models Only)
Press the Playlists screen buttondisplayed on the Root Folder menu.The Playlists menu displays.
Select one of the options listed onthe Playlists menu. A list displayingthe song titles appears, then artistsassociated with the titles appear.
Artists
Press the Artists screen buttondisplayed on the Root Folder menu.The Artists menu displays.

Black plate (35,1)Acadia/Acadia Denali, Enclave, Traverse Infotainment System - 2013 - CRC - 1/3/13
Infotainment System 35
Select an artist from the Artistsmenu to display a list of albums.
Albums
Select an album from the Albumsmenu to display a list of songs.Select a song for playback.
Genres
Press the Genres screen buttondisplayed on the Root Folder menu.The Genres menu displays.
Follow the same instructions asgiven for Artist. Each menuselection will eventually lead to thesong for playback.
Tracks
Press the Song Titles screen buttondisplayed on the Root Folder menu.The Song Titles menu displays.Select the desired song forplayback.
Composers
Press the Composers screen buttondisplayed on the Root Folder menu.The Composers menu displays.Select a composer to display a listof albums from the composer.

Black plate (36,1)Acadia/Acadia Denali, Enclave, Traverse Infotainment System - 2013 - CRC - 1/3/13
36 Infotainment System
Select the album to display a list ofsongs. Select the desired song forplayback.
USB Port
Playing from a USB
A USB mass storage device can beconnected to the USB port.
The USB port is in the upperinstrument panel storage area.
USB MP3 Player and USBDrives
. The USB MP3 players and USBdrives connected must complywith the USB Mass StorageClass specification (USB MSC)and supports formats of FAT32,FAT16, NTFS, and HFS+.
. Hard disk drives are notsupported.
. The radio will not be able to playback write-protected music.
. The following restrictions applyfor the data stored on a USBMP3 player or USB device:
‐ Maximum folder structuredepth: eight levels.
‐ Maximum number of MP3/WMA files that can bedisplayed: 10,000.
‐ Playlist entries must be in theform of relative paths.
‐ The system attribute forfolders/files that contain audiodata must not be set.
To play a USB device, do one of thefollowing:. Connect the USB and it begins
to play.. Press the Now Playing or USB
screen button on theHome Page.
. Press SRCE to scroll until theUSB source screen is available.
. Press b /g on the steeringwheel controls to play USB,Artist, Album, Song Title,or Song Genre. See VoiceRecognition on page 78.

Black plate (37,1)Acadia/Acadia Denali, Enclave, Traverse Infotainment System - 2013 - CRC - 1/3/13
Infotainment System 37
The following playlist formats aresupported:. M3U (Standard and Extended). iTunes. PLS (Standard)
While the USB source is active, usethe following to operate:
PUSH SEL Knob: Turn to scrollthrough the list. Turn quickly to fastscroll alphabetically through largelists.
© SEEK (Previous/Reverse):. Press to seek to the beginning of
the current or previous track.If the track has been playing forless than eight seconds, theprevious track plays. If playinglonger than eight seconds, thecurrent track restarts.
. Press and hold to reversequickly through tracks. Releaseto play the track landed upon.
SEEK ¨ (Next/Forward):. Press to seek to the next track.. Press and hold to advance
quickly through tracks. Releaseto play the track landed upon.
Shuffle: Press to play the tracksrandomly. Press again to stopshuffle. Look for the shuffle icon toturn on in the radio display.
USB Menu
The following are available throughthe USB Audio Menu:
Folders: Press to open a folder listto access the files within the folderstructure.
Playlists:
1. Press to view the playlists onthe USB.
2. Select a playlist to view the listof all songs in that playlist.
3. Select a song from the list tobegin playback.
Artists:
1. Press to view the list of artistson the USB.
2. Select an artist name to view alist of all albums by the artist.
3. To select a song, press AllSongs or press an album andthen select a song from the list.
Albums:
1. Press to view the albums onthe USB.
2. Select the album to view a list ofall songs on the album.
3. Select a song from the list tobegin playback.

Black plate (38,1)Acadia/Acadia Denali, Enclave, Traverse Infotainment System - 2013 - CRC - 1/3/13
38 Infotainment System
Genres:
1. Press to view the genres onthe USB.
2. Select a genre to view a list ofall songs of that genre.
3. Select a song from the list tobegin playback.
Songs:
1. Press to display a list of allsongs on the USB.
2. Songs are displayed as they arestored on the device. To beginplayback, select a song fromthe list.
File System and Naming
The songs, artists, albums, andgenres are taken from the file’ssong information and are onlydisplayed if present. The radiodisplays the file name as the trackname if the song information isnot available.
Playing from an iPod
This feature supports the followingiPod models:. iPod classic® (6th generation). iPod nano® (3G, 4G, 5G,
and 6G). iPod touch® (1G, 2G, 3G,
and 4G). iPhone® (2G, 3G, 3GS, 4,
and 4S). iPad® (1G, 2G)
There may be problems with theoperation and function in thefollowing situations:. When connecting an iPod on
which a more recent version ofthe firmware is installed than issupported by the infotainmentsystem.
. When connecting an iPod onwhich firmware from otherproviders is installed.
To connect an iPod:
1. Connect one end of the standardiPod USB cable to the iPod'sdock connector.
2. Connect the other end to theUSB port in the upper instrumentpanel storage area.
Shuffle: Press to play the tracksrandomly. The shuffle icon shouldturn on in the display. Press again tostop shuffle.
iPod music information displays onthe radio’s display and beginsplaying through the vehicle’s audiosystem.

Black plate (39,1)Acadia/Acadia Denali, Enclave, Traverse Infotainment System - 2013 - CRC - 1/3/13
Infotainment System 39
The iPod battery rechargesautomatically while the vehicle is on.The iPod shuts off and stopscharging when the vehicle isshut off.
If the iPod is an unsupported model,it can still be listened to in thevehicle by connecting to theauxiliary input jack using a standard3.5 mm (1/8 in) stereo cable.
iPod Menu
Use the iPod Audio Menu to select:
Playlists:
1. Press to view the playlists onthe iPod.
2. Select a playlist name to view alist of all songs in the playlist.
3. Select the song from the list tobegin playback.
Artists:
1. Press to view the artists onthe iPod.
2. Select an artist name to view alist of all albums with songs bythe artist.
3. Select an album.
4. Select the song from the list tobegin playback.
Albums:
1. Press to view the albums onthe iPod.
2. Select an album name to view alist of all songs on the album orselect All Songs to view allsongs on the iPod.
3. Select the song from the list tobegin playback.
Genres:
1. Press to view the genres onthe iPod.
2. Select a genre name to view alist of artists of that genre.
3. Select an artist to view albumsor All Albums to view all albumsof that genre.
4. Select Artist to view albums.
5. Select Album to view songs.
6. Select the song from the list tobegin playback.
Podcasts:
1. Press to view the podcasts onthe iPod.
2. Select a podcast name to beginplayback.
Songs:
1. Press to view a list of all songson the iPod.
2. Select the song from the list tobegin playback.

Black plate (40,1)Acadia/Acadia Denali, Enclave, Traverse Infotainment System - 2013 - CRC - 1/3/13
40 Infotainment System
Composers:
1. Press to view the composers onthe iPod.
2. Select the composer to view alist of songs by that composer.
3. Select a song from the list tobegin playback.
Audio Books:
1. Press to view the audio bookson the iPod.
2. Select the audio book from thelist to begin playback.
Playing from an iPhoneor iPad®
This feature supports iPhone 3G,iPhone 3GS, iPhone 4, iPhone 4S,and iPad.
If music is available on the iPhone4S, it can be heard through theradio.
Follow the same instructions asstated earlier for using an iPod. Touse voice recognition to play music,
say “Play USB,” “Play Artist,” PlayAlbum,” “Play Song,” or “PlayGenre.” See Voice Recognition onpage 78.
When an iPhone and iPod Touchare connected through USB andBluetooth, the audio may not beheard when iPod source on theradio is selected. Select eitherdock connector on the phone ordisconnect and reconnect thedevice.
The USB jack will charge Apple®
devices drawing up to one amp ofcurrent. IPad will not chargebecause the USB jack does notprovide enough amperage.
Bluetooth Audio and VoiceRecognition
See Bluetooth Audio on page 41and Voice Recognition on page 78for information using voicerecognition with Bluetooth Audio,
Make sure all devices have thelatest software download.
Auxiliary DevicesThis vehicle has an auxiliary inputjack in the front of the radio and anoptional auxiliary input jack in therear. The rear auxiliary is availablewhen a connected DVD radio ispresent along with Rear SeatEntertainment (RSE).. Laptop computer. MP3 player. Tape player
This jack is not an audio output.Do not plug headphones into theauxiliary input jack. Set up anyauxiliary device while the vehicle isin P (Park).
The device volume may needadjusting for good sound.
Connect a 3.5 mm (1/8 in) cablefrom the auxiliary device to theauxiliary input jack. When adevice is connected, the systemautomatically begins playing audiofrom the device over the vehiclespeakers.

Black plate (41,1)Acadia/Acadia Denali, Enclave, Traverse Infotainment System - 2013 - CRC - 1/3/13
Infotainment System 41
If an auxiliary device has alreadybeen connected, but a differentsource is currently active, do one ofthe following:. Press SRCE to scroll all of the
available audio source screens,until the AUX source screen isselected.
. Say “Play Front AUX” or “PlayRear AUX” using voicerecognition to play the auxiliarydevice.
Bluetooth AudioIf equipped, music may be playedfrom a paired Bluetooth device. See“Pairing a Phone/Device” underBluetooth on page 83. Devicesusing AVCRP 1.3 profiles aresupported.
To play music through Bluetoothdevice:
1. Power on the device, pair, andconnect the device.
2. Music can be launched by doingone of the following:
. Press 4 on theHome Page.
. Press SRCE until BluetoothAudio is selected.
Rear SeatInfotainment
Rear Seat Entertainment(RSE) SystemThe vehicle may have a DVD RearSeat Entertainment (RSE) system.The RSE system works with thevehicle's audio system. The DVDplayer is part of the front radio. TheRSE system includes a radio with aDVD player, a video display screen,audio/video jacks, two wirelessheadphones, and a remote control.See Overview on page 4 for moreinformation on the vehicle'sinfotainment system.
Before Driving
The RSE is designed for rear seatpassengers only. The driver cannotsafely view the video screen whiledriving and should not try to do so.

Black plate (42,1)Acadia/Acadia Denali, Enclave, Traverse Infotainment System - 2013 - CRC - 1/3/13
42 Infotainment System
In severe or extreme weatherconditions, the RSE system might ormight not work until the temperatureis within the operating range. Theoperating range for the RSE systemis above −20°C (−4°F) or below60°C (140°F). If the temperature ofthe vehicle is outside of this range,heat or cool the vehicle until thetemperature is within the operatingrange of the RSE system.
Parental Control
The RSE system may have aParental Control feature, dependingon the radio. To enable ParentalControl, press and hold the radiopower button for more thantwo seconds to stop all systemfeatures such as: radio, videoscreen, RSA, DVD and/or CD. WhileParental Control is on, Q displays.
When the radio is turned back on,Parental Control is unlocked.
Headphones
A. Battery cover
B. Channel 1 or 2 switch
C. Power button
D. Volume control
E. Power indicator light
The RSE includes two 2-channelwireless headphones that arededicated to this system. Channel 1is dedicated to the video screenmovie, while Channel 2 is dedicatedto RSA selections.
These headphones are used tolisten to media such as CDs, DVDs,MP3/WMAs, DVD-As, radio (AM,FM, or XM equipped), any auxiliarysource connected to rear A/V jacks,or the front auxiliary input jack, ifthe vehicle has this feature. Thewireless headphones have a powerbutton, channel 1 or 2 switch,and a volume control. Switch theheadphones off when not in use.
Push the power button to turn onthe headphones. An indicator lightlocated on the headphones comeson. If the light does not come on,the batteries might need to bereplaced. Intermittent sound or staticon the headphones can also be anindication of weak batteries or if outof range of the signal. See “BatteryReplacement” later in this sectionfor more information.
To adjust the volume on theheadphones, use the volume controllocated on the right side.

Black plate (43,1)Acadia/Acadia Denali, Enclave, Traverse Infotainment System - 2013 - CRC - 1/3/13
Infotainment System 43
Infrared transmitters are located atthe rear of the RSE overheadconsole. The headphones shut offautomatically to save the batterypower if the RSE system and RSAare shut off or if the headphones areout of range of the transmitters formore than three minutes. Moving toofar forward or stepping out of thevehicle, can cause the headphonesto lose the audio signal.
For optimal audio performance, theheadphones must be worn correctly.Headphones should be worn withthe headband over the top of thehead for best audio reception. Thesymbol L (Left) appears on theoutside bottom edge of the ear cupand should be positioned on theleft ear. The symbol R (Right)appears on the outside bottom edgeof the ear cup and should bepositioned on the right ear.
Notice: Do not store theheadphones in heat or directsunlight. This could damage theheadphones and repairs will notbe covered by the warranty.Storage in extreme cold canweaken the batteries. Keep theheadphones stored in a cool,dry place.
If the foam ear pads attached to theheadphones become worn ordamaged, the pads can be replacedseparately from the headphone set.To purchase replacement ear pads,call 1-888-293-3332, then promptzero (0), or contact your dealer.
Headphones should be stored in thefront floor console and not in thefront seat back pocket. Headphonedamage can occur when the secondrow seats are folded forward.
Battery Replacement
To change the batteries on theheadphones:
1. Turn the screw to loosen thebattery door located on the leftside of the headphones. Slidethe battery door open.
2. Replace the two batteries in thecompartment. Make sure thatthey are installed correctly, usingthe diagram on the inside of thebattery compartment.
3. Replace the battery door andtighten the door screw.
If the headphones are to be storedfor a long period of time, remove thebatteries and keep them in a cool,dry place.

Black plate (44,1)Acadia/Acadia Denali, Enclave, Traverse Infotainment System - 2013 - CRC - 1/3/13
44 Infotainment System
Audio/Video (A/V) Jacks
A. Yellow: Video Input
B. White: Left Audio Input
C. Red: Right Audio Input
The RCA type A/V jacks are colorcoded to match typical homeentertainment system equipment.
The A/V jacks, located on the rearof the floor console, allow audio orvideo signals to be connected froman auxiliary device such as acamcorder or a video game unit tothe RSE system.
Adapter connectors or cables (notsupplied) might be required toconnect the auxiliary device to theA/V jacks. Refer to themanufacturer’s instructions forproper usage.
Power for auxiliary devices is notsupplied by the radio system.
To use the auxiliary inputs of theRSE system, connect an externalauxiliary device to the color-codedA/V jacks and turn both the auxiliarydevice and the video screen poweron. If the video screen is in the DVDplayer mode, pressing the AUX(auxiliary) button on the remotecontrol switches the video screenfrom the DVD player mode to theauxiliary device. The radio can listento the audio of the connectedauxiliary device by sourcing toauxiliary. See Auxiliary Devices onpage 40 for more information.
How to Change the RSE VideoScreen Settings
The screen display mode (normal,full, and zoom), screen brightness,and setup menu language can bechanged from the on screen setupmenu by using the remote control.To change a setting:
1. Pressz.
2. Usen,q, p,o andr tonavigate and use thesetup menu.
3. Pressz again to remove thesetup menu from the screen.
Audio Output
Audio from the DVD player orauxiliary inputs can be heardthrough the following sources:. Wireless headphones. Vehicle speakers. Vehicle-wired headphone jacks
on the RSA system, if thevehicle has this feature.

Black plate (45,1)Acadia/Acadia Denali, Enclave, Traverse Infotainment System - 2013 - CRC - 1/3/13
Infotainment System 45
The RSE system always transmitsthe audio signal to the wirelessheadphones, if there is audioavailable. See “Headphones” earlierin this section for more information.
The DVD player is capable ofoutputting audio to the wiredheadphone jacks on the RSAsystem, if the vehicle has thisfeature. The DVD player can beselected as an audio source on theRSA system. See Rear Seat Audio(RSA) System in the owner manual.
When a device is connected to theA/V jacks, or the radio's auxiliaryinput jack, if the vehicle has thisfeature, the rear seat passengersare able to hear audio from theauxiliary device through the wirelessor wired headphones. The front seatpassengers are able to listen toplayback from this device throughthe vehicle speakers by selectingAUX as the source up front onthe radio.
Video Screen
The video screen is located in theoverhead console. When the videoscreen is not in use, push it up intoits locked position.
To use the video screen:
1. Push the release button locatedon the overhead console.
2. Move the screen to the desiredposition.
If a DVD is playing and the screenis raised to its locked position, thescreen remains on; this is normal,and the DVD continues to playthrough the previous audio source.PressP on the remote control oreject the disc to turn off the screen.
The infrared receivers for thewireless headphones and theremote control are located at therear of the overhead console.
Notice: Avoid directly touchingthe video screen, as damage mayoccur. See “Cleaning the VideoScreens” later in this section formore information.
Remote Control
To use the remote control, aim it atthe transmitter window at the rear ofthe overhead console and press thedesired button. Direct sunlight orvery bright light could affect theability of the RSE transmitter toreceive signals from the remotecontrol.
Black plate (46,1)Acadia/Acadia Denali, Enclave, Traverse Infotainment System - 2013 - CRC - 1/3/13
46 Infotainment System
If the remote control does not seemto be working, the batteries mightneed to be replaced. See “BatteryReplacement” later in this section.Objects blocking the line of sightcould also affect the function of theremote control.
If a CD or DVD is in the Radio DVDslot, the remote control O buttoncan be used to turn on the videoscreen display and start the disc.The radio can also turn on the videoscreen display. See Overview onpage 4 for more information.
Notice: Storing the remotecontrol in a hot area or in directsunlight can damage it, and therepairs will not be covered by thewarranty. Storage in extreme coldcan weaken the batteries. Keepthe remote control stored in acool, dry place.
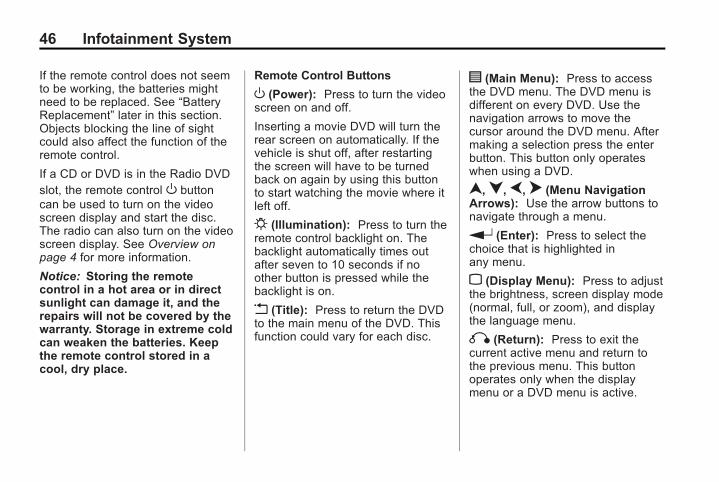
Remote Control Buttons
O (Power): Press to turn the videoscreen on and off.
Inserting a movie DVD will turn therear screen on automatically. If thevehicle is shut off, after restartingthe screen will have to be turnedback on again by using this buttonto start watching the movie where itleft off.
P (Illumination): Press to turn theremote control backlight on. Thebacklight automatically times outafter seven to 10 seconds if noother button is pressed while thebacklight is on.
v (Title): Press to return the DVDto the main menu of the DVD. Thisfunction could vary for each disc.
y (Main Menu): Press to accessthe DVD menu. The DVD menu isdifferent on every DVD. Use thenavigation arrows to move thecursor around the DVD menu. Aftermaking a selection press the enterbutton. This button only operateswhen using a DVD.
n,q, p,o (Menu NavigationArrows): Use the arrow buttons tonavigate through a menu.
r (Enter): Press to select thechoice that is highlighted inany menu.
z (Display Menu): Press to adjustthe brightness, screen display mode(normal, full, or zoom), and displaythe language menu.
q (Return): Press to exit thecurrent active menu and return tothe previous menu. This buttonoperates only when the displaymenu or a DVD menu is active.

Black plate (47,1)Acadia/Acadia Denali, Enclave, Traverse Infotainment System - 2013 - CRC - 1/3/13
Infotainment System 47
c (Stop): Press to stop playing,rewinding, or fast forwarding a DVD.Press twice to return to thebeginning of the DVD.
s (Play/Pause): Press to startplaying a DVD. Press while a DVDis playing to pause it. Press again tocontinue playing the DVD.
When the DVD is playing,depending on the radio, play maybe slowed down by pressingsthen[. The DVD continues playingin a slow play mode. Depending onthe radio, perform reverse slow playby pressings thenr. To cancel
slow play mode, presss again.
t (Previous Track/Chapter):Press to return to the start of thecurrent track or chapter. Press againto go to the previous track orchapter. This button might not workwhen the DVD is playing thecopyright information or thepreviews.
u (Next Track/Chapter): Press togo to the beginning of the nextchapter or track. This button mightnot work when the DVD is playingthe copyright information or thepreviews.
r (Fast Reverse): Press toquickly reverse the DVD or CD.To stop fast reversing a DVD video,presss. To stop fast reversing a
DVD audio or CD, releaser. Thisbutton might not work when theDVD is playing the copyrightinformation or the previews.
[ (Fast Forward): Press to fastforward the DVD or CD. To stop fastforwarding a DVD video, presss.To stop fast forwarding a DVD audioor CD, release[. This button mightnot work when the DVD is playingthe copyright information or thepreviews.
e (Audio): Press to change audiotracks on DVDs that have thisfeature when the DVD is playing.The format and content of thisfunction vary for each disc.
{ (Subtitles): Press to turn ON/OFF subtitles and to move throughsubtitle options when a DVD isplaying. The format and content ofthis function vary for each disc.
AUX (Auxiliary): Press to switchthe system between the DVD playerand an auxiliary source.
2 (Camera): Press to changecamera angles on DVDs that havethis feature when a DVD is playing.The format and content of thisfunction vary for each disc.

Black plate (48,1)Acadia/Acadia Denali, Enclave, Traverse Infotainment System - 2013 - CRC - 1/3/13
48 Infotainment System
1 through 0 (Numeric Keypad):The numeric keypad provides thecapability of direct chapter or tracknumber selection.
\ (Clear): Press withinthree seconds after entering anumeric selection, to clear allnumerical inputs.
} 10 (Double Digit Entries): Pressto select chapter or track numbersgreater than nine. Press this buttonbefore entering the number.
If the remote control becomes lostor damaged, a new universalremote control can be purchased.If this happens, make sure theuniversal remote control uses aToshiba® code set.
Battery Replacement
To change the remote controlbatteries:
1. Slide the rear cover back on theremote control.
2. Replace the two batteries in thecompartment. Make sure thatthey are installed correctly, usingthe diagram on the inside of thebattery compartment.
3. Replace the battery cover.
If the remote control is to be storedfor a long period of time, remove thebatteries and keep them in a cool,dry place.

Black plate (49,1)Acadia/Acadia Denali, Enclave, Traverse Infotainment System - 2013 - CRC - 1/3/13
Infotainment System 49
Tips and Troubleshooting Chart
Problem Recommended Action
There is no power. The ignition might not be turned to ON/RUN orACC/ACCESSORY.
The picture does not fill the screen. There are blackborders on the top and bottom or on both sides, or thepicture looks stretched out.
Check the display mode settings in the setup menu bypressing the display menu button on the remote control.
In auxiliary mode, the picture moves or scrolls. Check the auxiliary input connections at both devices.
The remote control does not work. Check to make sure there is no obstruction betweenthe remote control and the transmitter window.Check the batteries to make sure they are not dead orinstalled incorrectly.
After stopping the player, and pushing Play, sometimesthe DVD starts where it left off and sometimes at thebeginning.
If the stop button was pressed one time, the DVD playerresumes playing where the DVD was stopped. If thestop button was pressed two times, the DVD playerbegins to play from the beginning of the DVD.

Black plate (50,1)Acadia/Acadia Denali, Enclave, Traverse Infotainment System - 2013 - CRC - 1/3/13
50 Infotainment System
Tips and Troubleshooting Chart (cont'd)
Problem Recommended Action
The auxiliary source is running, but there is no picture orsound.
Check that the RSE video screen is in theauxiliary source mode.Check the auxiliary input connections at both devices.
There is sound but no picture for a movie. Check that the RSE video screen is turned on by usingthe remote control power button.
Sometimes the wireless headphone audio cuts out orbuzzes.
Check for obstructions, low batteries, reception range,and interference from cellular telephone towers, oruse a cellular telephone in the vehicle.Check that the headphones are on correctly using theL (left) and R (right) on the headphones.
The remote and/or the headphones are lost. See your dealer for assistance.
The DVD is playing, but there is no picture or sound. Check that the RSE video screen is sourced to theDVD player.

Black plate (51,1)Acadia/Acadia Denali, Enclave, Traverse Infotainment System - 2013 - CRC - 1/3/13
Infotainment System 51
DVD Display Error Messages
The DVD display error messagedepends on which radio the vehiclehas. The video screen might displayone of the following:
Disc Load/Eject Error: Thismessage displays when there aredisc load or eject problems.
Disc Error: This message displaysif the disc is inserted with the disclabel wrong side up, or if the disc isdamaged.
Disc Region Error: This messagedisplays if the disc is not from acorrect region.
DVD Distortion
Video distortion can occur whenoperating cellular phones, scanners,CB radios, Global Position Systems(GPS)*, two-way radios, mobilefaxes, or walkie talkies.
It might be necessary to turn off theDVD player when operating one ofthese devices in or near the vehicle.
*Excludes the OnStar® System.
Cleaning the RSE OverheadConsole
When cleaning the RSE overheadconsole surface, use only a cleancloth dampened with clean water.
Cleaning the Video Screen
Use only a clean cloth dampenedwith clean water. Use care whendirectly touching or cleaning thescreen, as damage could result.
Navigation
Using the NavigationSystemUse the NAV button on thefaceplate or the Navigation buttonon the Home Page to access thenavigation map.
Press the NAV button again tochange between alternative views ofthe normal split and full map views.

Black plate (52,1)Acadia/Acadia Denali, Enclave, Traverse Infotainment System - 2013 - CRC - 1/3/13
52 Infotainment System
Press the map mode icon at thebottom right side of the map todisplay a list of map views. Pressthe desired map view.
The NAV button on the faceplatecan also be used to navigatethrough the map modes.
The Menu screen button at thebottom right side of the displayaccesses the Navigation Menu.
The touch-sensitive buttonsavailable are:
POI Category Search
1. Press to access Select POICategories to choose a methodfor searching POIs. The methodof search can be narrowed byentering specific ways forsearching the POI categories.
2. Press the Search screen buttonto display the list of POICategories.
3. Select the desired POI.A Destination Confirmationdisplays options for saving orentering a route.
Not all listed Categories my beselectable while the vehicle is inmotion. The All POIs category isalways selectable.
Franchise Search
Press to access POI FranchiseSearch to choose a method forsearching POI franchises. Themethod of search can be narrowedby entering specific ways forsearching the POI franchises.

Black plate (53,1)Acadia/Acadia Denali, Enclave, Traverse Infotainment System - 2013 - CRC - 1/3/13
Infotainment System 53
Searching for POI franchises willdisplay the same menus as ifsearching for POI categories. Followthe instructions as stated earlierwhen searching for POI categories.
Show POIs on Map
Press to access the Show POIs onMap menu. Press On or Off todisplay the icons on the map. If Onis selected, press the desired iconsto show on the map.
Pressing NAV will display the mapalong with the selected icons.
Exit List
Press to display a list of POI exitswhile on the highway.
BACK TRACK
Press to initiate the BACK TRACKfeature.
Current Position Information
1. Press to display a split screenshowing detailed informationabout the vehicle position. Thisfeature can also be accessed by
pressing the vehicle informationtab on the lower center of thedisplay.
2. When on route, press Save toAddress Book to save theselected destination displayedon the map.
Traffic
Press Traffic to display TrafficSettings. Press to enable or disablethe traffic setting options.
Map Adjustments
The system lets you adjust the scaleof view on the map. Also, as youdrive, the map scrolls automaticallybased on the direction of travel.
Map Scales
There are twomethods to changethe map scale:. Press + or − next to the map
scale button on the left bottomcorner of the map screen tochange the zoom level.
. Press the actual scale bar at thebottom of the map to the desiredincrement of zoom.
The map scale bar times out ifthe zoom level is not changedwithin a few seconds.

Black plate (54,1)Acadia/Acadia Denali, Enclave, Traverse Infotainment System - 2013 - CRC - 1/3/13
54 Infotainment System
The scale can be configured formetric or English units. To changefrom metric to English, see “DriverInformation Center (DIC)” in theowner manual.
Scroll Features. To scroll within the map, touch
anywhere on the map screenand the scroll symbol displays.
. Press the map to center at thedesired location.
. Press and hold the screen in anydirection outside the scrollsymbol to scroll the map in thatdirection.
. Scroll speed increases whentouching closer to the edge ofthe screen.
. Press NAV on the faceplate toexit map scrolling and return tothe current vehicle location onthe map.
Press the cycling arrows at the topof the map screen to toggle from thenormal top bar (audio informationbar) to the Back, Home, FAV, andthe local voice recognition icon.
MapsThis section includes basicinformation about the mapdatabase.
The maps are stored in thenavigation system.
Detailed Areas
Road network attributes arecontained in the map database fordetailed areas. Attributes includeinformation such as street names,street addresses, and turnrestrictions. A detailed area includesall major highways, service roads,
and residential roads. The detailedareas include points of interest(POIs) such as restaurants, airports,banks, hospitals, police stations,gas stations, tourist attractions, andhistorical monuments. The mapdatabase may not include data fornewly constructed areas or mapdatabase corrections that arecompleted after the production ofsystem. The navigation systemprovides full route guidance in thedetailed map areas.
Navigation SymbolsFollowing are the most commonsymbols that appear on a mapscreen.
The vehicle symbol indicates thecurrent position and headingdirection of the vehicle on the map.

Black plate (55,1)Acadia/Acadia Denali, Enclave, Traverse Infotainment System - 2013 - CRC - 1/3/13
Infotainment System 55
The destination symbol marks thefinal destination after a route hasbeen planned.
The waypoint symbol marks one ormore set waypoints.
A waypoint is a stopover destinationpoint added to the planned route.
The estimated time and distance tothe destination are displayed.
If waypoints have been added to thecurrent route, each waypointdestination displays estimated timeand distance.
This symbol indicates that the mapview is North up: North up displaysNorth at the top of the map screenregardless of the direction thevehicle is traveling. Select thisscreen symbol to change the viewto Heading up.
This symbol indicates that the mapview is Heading up.
Heading up view displays thedirection the vehicle is traveling atthe top of the map screen. Theshaded triangle indicates North.
Press this screen symbol to changeto 3D mode.
The 3D symbol is the same as theHeading up symbol, but the map isin 3D.
Press this again to change back tothe North up symbol.
The No GPS symbol appears whenthere is no Global PositioningSystem (GPS) satellite signal.
This symbol at the bottom of a mapscreen brings up the map modespop-up screen.

Black plate (56,1)Acadia/Acadia Denali, Enclave, Traverse Infotainment System - 2013 - CRC - 1/3/13
56 Infotainment System
Destination
If route guidance is not active, pressthe Destination Entry screen buttonon the Home Page or the DESTbutton on the faceplate to accessthe Destination screen. Severaloptions can be selected to plan aroute by entering destinations.Some destination entry items suchas Previous Destinations andAddress Book may be grayed out ifno destination was previouslyentered or saved.
If route guidance is active, press theDEST button on the faceplate toaccess other destination options onthe route.
Alpha-Numeric Keyboard
Letters of the alphabet, symbols,punctuation, and numbers, whenavailable, display on the navigationscreen as alpha/numeric keyboards.The alpha keyboard displays whendata needs to be entered.
QWERTY or ABCDEF: Press totoggle between QWERTY orABCDEF keyboard characterlayouts.
Symbols: Use to select symbols.
Space: Use to enter a spacebetween characters or the words ofa name.
Delete: Press to delete an incorrectcharacter that has been selected.Press and hold will erase all of thetext entered on the selected line.
Address Entry
Press the Address screen button todisplay the Enter Address screen.Set a route by entering the statename, city name, street name,house number, or junction.
If no state or province has beenentered previously, the city andstate fields are not available. Pressthe screen button at the right of thecity name to select a state orprovince.
If the state or province waspreviously set and is displayed,press the screen button at the rightof the city name to change theselected state or province.
To make name selection easier, thesystem highlights only charactersthat are available after thepreviously entered one.

Black plate (57,1)Acadia/Acadia Denali, Enclave, Traverse Infotainment System - 2013 - CRC - 1/3/13
Infotainment System 57
State: Select a state name.
City: Enter a city name.
Street: Enter a street name.
House #: Enter a valid addressnumber.
Junction: Enter a street name thatintersects with the selected street.
After entering the destinationinformation and selecting Done, theDestination Confirmation screendisplays preference options. Chooseone of these or simply startguidance from the screen.
The State, City, Street, House #,or Junction must be entered inorder.
Entering the State name first:
1. Select the state name, unless apreviously entered state alreadyexists.
2. Enter the city name.
3. Enter the street name. Use theDelete screen button to deletean incorrectly entered character.
A list displays if five or fewernames are available. If there aremore than five, there is a matchcounter with a number ofavailable streets. Press the Listscreen button to view the list andselect the street.
4. Enter the house number.
5. Press the Done screen button atany time and the system tries toresolve a destination based onthe entered information, thendisplays it on the DestinationConfirmation screen.
6. Press the Start Guidance screenbutton and the route calculates.
Entering the street name first:
1. Make sure the state has beenentered before selecting thestreet name field. Enter thestreet name. Do not enterdirectional information or streettype. Use the Delete screenbutton to delete an incorrectcharacter.
A list displays if six or fewernames are available. If there aremore than six, press the Listscreen button to view the list andselect the street.
2. Select the city from the list orenter the city name.
3. Enter the house number.
4. Press the Done screen button.
5. Press the Start Guidance screenbutton and the route calculates.

Black plate (58,1)Acadia/Acadia Denali, Enclave, Traverse Infotainment System - 2013 - CRC - 1/3/13
58 Infotainment System
Points of Interest (POI)
Press the POI screen button on theDestination Entry page. Severaloptions can be selected to plan aroute.
The POI entry list allows selection ofa destination.
Entering by POI name:
1. Select Name.
2. Enter the POI name.
3. Select a few of the characters orspell the name in full, bypressing on the alpha keyboard.
4. Press the List screen button,or if the list has five or feweritems, a list of POIs willimmediately display.
5. Press on the desired POI.
6. Press the Start Guidance screenbutton and the route calculates.
Previous Destinations
Select a destination from thePrevious Destinations List. Up to15 points that have been previouslyentered can be recalled. If the list isfull, the oldest destinations areautomatically deleted once thenewest destinations are added.

Black plate (59,1)Acadia/Acadia Denali, Enclave, Traverse Infotainment System - 2013 - CRC - 1/3/13
Infotainment System 59
Address Book
If no destination is saved to theaddress book, save a destination:
1. Press the Home PageDestination or DEST faceplatebutton.
2. Enter an address using any ofthe destination methods(Address Entry, POI Entry, etc.).
3. On the Destination Confirmationscreen, select Save.
4. The system displays the optionsName, Number, Icon, and Done.Press Done to save thedestination.
5. To customize the address bookentry, select Name, Number,or Icon.
If a destination is already saved tothe address book, press the HomePage Destination or DEST faceplatebutton to display the Address Bookscreen button.
Choose a destination by selectingan address that has been stored inthe address book:
1. Press the Address Book screenbutton. A list displays theaddress book entries.
2. Select the destination fromthe list.
3. Press the Start Guidance screenbutton and the route calculates.
To edit address book entries:
1. Select an item from theaddress book.
2. On the Destination Confirmationscreen, select Edit.
3. The system displays the optionsName, Number, Icon, andDelete. Press Delete to deletethe destination from theaddress book.
4. To customize the address bookentry, select Name, Number,or Icon.
Latitude/Longitude Coordinates
Choose a destination based onlatitudinal and longitudinalcoordinates.
To enter the location as coordinates,latitude and longitude:
1. Press the Home PageDestination screen button. Pressthe Lat./Long. screen button todisplay the screen above.
2. Enter the Latitude and Longitudecoordinates for the destination indegrees, minutes, and seconds.
3. Press the Search screen buttonif the information is correct.
4. Press the Start Guidance screenbutton. The route calculates.

Black plate (60,1)Acadia/Acadia Denali, Enclave, Traverse Infotainment System - 2013 - CRC - 1/3/13
60 Infotainment System
Trips
Adding a trip:
1. Press the Home PageDestination or DEST faceplatebutton to display the Tripsscreen button.
2. Press the Trips screen button todisplay Trips List.
3. Select New Trip to display ascreen instructing to add awaypoint.
4. Press OK and the Add Waypointscreen displays.
5. Press Add to display theWaypoint Entry screen. Selectthe preferred way of entry. See“Waypoints” later in this section,
Selecting a trip:
1. Press the Home PageDestination or DEST faceplatebutton to display the Tripsscreen button.
2. Press the Trips screen button todisplay a list of available trips.
3. Select a trip to display theDestination Confirmation screen.
4. Press the Start Trip screenbutton. The route calculates.
Deleting a trip:
1. Press the Home PageDestination or DEST faceplatebutton to display the Tripsscreen button. Press this buttonto display the list of availabletrips.
2. Select the trip to be deleted.
3. Press Edit Trip.
4. Press Delete Trip.
Changing the trip name:
1. Press the Home PageDestination or DEST faceplatebutton to display the Tripsscreen button. Press this buttonto display the list of availabletrips. Select the trip to edit.
2. Press Edit Trip.
3. Select Edit Name.
4. Using the keypad, enterthe name.
5. Press OK. The new name will bein the Trips List.
Pick from Map
1. Press the Home PageDestination or DEST button onthe faceplate to display the Pickfrom Map screen button. Press
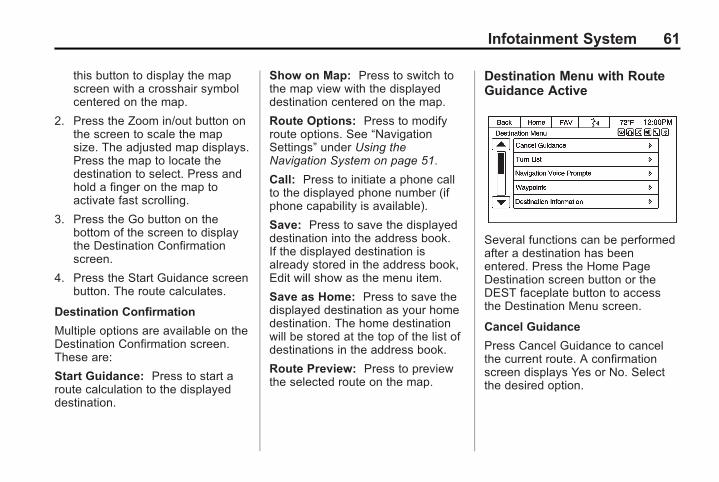
Black plate (61,1)Acadia/Acadia Denali, Enclave, Traverse Infotainment System - 2013 - CRC - 1/3/13
Infotainment System 61
this button to display the mapscreen with a crosshair symbolcentered on the map.
2. Press the Zoom in/out button onthe screen to scale the mapsize. The adjusted map displays.Press the map to locate thedestination to select. Press andhold a finger on the map toactivate fast scrolling.
3. Press the Go button on thebottom of the screen to displaythe Destination Confirmationscreen.
4. Press the Start Guidance screenbutton. The route calculates.
Destination Confirmation
Multiple options are available on theDestination Confirmation screen.These are:
Start Guidance: Press to start aroute calculation to the displayeddestination.
Show on Map: Press to switch tothe map view with the displayeddestination centered on the map.
Route Options: Press to modifyroute options. See “NavigationSettings” under Using theNavigation System on page 51.
Call: Press to initiate a phone callto the displayed phone number (ifphone capability is available).
Save: Press to save the displayeddestination into the address book.If the displayed destination isalready stored in the address book,Edit will show as the menu item.
Save as Home: Press to save thedisplayed destination as your homedestination. The home destinationwill be stored at the top of the list ofdestinations in the address book.
Route Preview: Press to previewthe selected route on the map.
Destination Menu with RouteGuidance Active
Several functions can be performedafter a destination has beenentered. Press the Home PageDestination screen button or theDEST faceplate button to accessthe Destination Menu screen.
Cancel Guidance
Press Cancel Guidance to cancelthe current route. A confirmationscreen displays Yes or No. Selectthe desired option.

Black plate (62,1)Acadia/Acadia Denali, Enclave, Traverse Infotainment System - 2013 - CRC - 1/3/13
62 Infotainment System
Turn List
Select Turn List to view a list ofmaneuvers for the entire route.Press the Avoid screen button nextto one of the turn maneuvers toavoid a segment of roads.A confirmation screen displaysAvoid or Cancel. Select the desiredoption. A maximum of eight avoidedsegments are allowed.
Navigation Voice Prompts
. Press the Settings icon on theHome Page to accessNavigation Settings.
. Select Navigation Settings toaccess the NavigationSettings menu.
. Press to view the option foradjusting the navigation voicevolume.
. Press Navigation Voice Volumeto display a mix of options forincreasing or decreasing theNavigation Voice Prompt versusthe Audio Volume duringguidance prompts.
Press the Volume Test screenbutton to test the volume of thevolume setting.
Waypoints
Select Waypoints to view options fororganizing, setting, or deletingwaypoints.

Black plate (63,1)Acadia/Acadia Denali, Enclave, Traverse Infotainment System - 2013 - CRC - 1/3/13
Infotainment System 63
Up to three waypoints can be addedto the current route. The waypointscan be sorted (moved) or deleted.
To add a waypoint:
1. From the Waypoints menu,press Add Waypoint.
2. Enter the waypoint by any of theadd destination methods. Thesystem calculates and highlightsthe route and the route can bestarted.
3. To add more waypoints, pressAdd Waypoint to add thewaypoint in the order desired onthe route.
To save a waypoint as a trip, selectSave as Trip. Enter a trip name forthat destination on the keyboard.A confirmation stating the trip hasbeen stored displays.
Destination Information
Press to display the DestinationDetail screen. The details of theselected route show the start, anystops along the route, and the finish.
Avoid List
Select Avoid to display a list ofavoided road segments with theoption to remove the avoided itemsfrom the list.

Black plate (64,1)Acadia/Acadia Denali, Enclave, Traverse Infotainment System - 2013 - CRC - 1/3/13
64 Infotainment System
Detour
Press Detour to display the routedetour options. Select to detour thewhole route or by a specificdistance.
Route Options
This feature can be accessed fromthe Destination Confirmation Menu,Navigation Settings Menu, andDestination Menu with RouteGuidance Active. See “NavigationSettings.”
Current Route Overview
Press to display the map with theoverview of the route.
Suspend Guidance
Press to suspend guidance of acurrent route. A confirmationscreens displays and the guidanceis suspended. To resume guidance,press DEST on the faceplate, thenpress Resume Guidance on screen.
Driving on a Route
Urgent Maneuver Alert
The system will give an indicationthat the next maneuver is close.
Driving on a Highway
Driving on a Residential Road

Black plate (65,1)Acadia/Acadia Denali, Enclave, Traverse Infotainment System - 2013 - CRC - 1/3/13
Infotainment System 65
OnStar® SystemOnStar Turn-by-Turn
An OnStar® subscriber has theability to connect to the OnStarsystem and ask an OnStar Advisorto download a destination or provideturn-by-turn directional guidance.OnStar will send addressinformation and location coordinatesof the destination into the navigationsystem.
No Active Route. Press the Call OnStar button to
initiate the OnStar turn-by-turnroute guidance.
. If the system receives theindication that there is an activeOnStar subscription, the helptext is displayed with instructionson how to set up a route.
. Turn-by-Turn is available to bothnavigation and non-navigationradio systems. Only a navigationradio system will accept OnStardestination downloads onthe map.
OnStar Non-Navigation RadioSystem
When OnStar turn-by-turn routeguidance is activated, a display ofthe route appears on the right sideof the screen.
Screen buttons below the guidancemap are:
RPT (Repeat): The audiblemaneuver prompt is repeated.
Prvw (Previous): Press to beginroute preview that creates amaneuver and audio prompt withthe corresponding icons.
Dest (Destination): Press to showthe destination address anddistance to destination withcorresponding audio prompt.
Previous Destinations
Previously downloaded OnStardestinations saved under PreviousDestinations in the OnStar system,where they can be accessed orsaved to the address book in theOnStar system.
OnStar Destination Download
Navigation radios can use theOnStar destination download andenter a destination while underwaythrough an OnStar Advisor.
For activated systems:. Press the OnStar call button to
ask for an OnStar Advisor.

Black plate (66,1)Acadia/Acadia Denali, Enclave, Traverse Infotainment System - 2013 - CRC - 1/3/13
66 Infotainment System
. State the destination andrequest it to be downloaded tothe navigation system.
. The destination will then displayin detail on the Destination Entryscreen where the StartGuidance, Show On Map, Save,etc., can be used.
Settings
Press Settings on the Home Pageto adjust features and preferences,such as Time, Date, BluetoothDevice List, Voice Recognition,Favorite Pages, Display Settings,Navigation Settings, etc. Some ofthe options for Settings areexplained in the owner manual.
1. Press the Settings screen buttonon the Home Page.
2. Touch-tap the scroll bar or turnand press the PUSH SEL knobuntil the desired option displays.Select the desired settings tochange.
A few of the setting options changethe way the navigation systemdisplays or reacts while in use.
Bluetooth Device List
Press to display paired bluetoothdevices. Press any one of theoptions to complete a function, suchas New Device, Delete, Delete All.
See Bluetooth Audio on page 41.
Voice Recognition
Voice recognition allows forhands-free operation within thenavigation, audio, and phoneapplications. See Voice Recognitionon page 78 and Bluetooth onpage 83.
Press to display voice recognitionoptions.. Voice Prompt Volume: Press to
adjust the prompt volume.. Prompt Length: Press to select
short or long prompts.

Black plate (67,1)Acadia/Acadia Denali, Enclave, Traverse Infotainment System - 2013 - CRC - 1/3/13
Infotainment System 67
Display Settings
Press to adjust the screen settings.. Press Display Off to turn the
display settings off.. Press Rear Camera to display
two options that can be selectedand turned on or off:
‐ Symbols
‐ Guidelines. Press Brightness to adjust the
image background.
Display Mode (NavigationRadio Only). Auto Setting to adjusts the
screen background automaticallydepending on the exteriorlighting conditions.
. The Day setting brightens themap background.
. The Night setting darkens themap background.
Speed Dependent Volume
Select OFF, Low, Medium, or Highsensitivity to automatically adjustthe volume to minimize the effectsof unwanted background noise that
can result from changing roadsurfaces, driving speeds, or openwindows. This feature works best atlower volume settings wherebackground noise is typically louderthan the sound system volume.
Audible Touch Feedback
Press + or − to increase ordecrease the volume of touchfeedback.

Black plate (68,1)Acadia/Acadia Denali, Enclave, Traverse Infotainment System - 2013 - CRC - 1/3/13
68 Infotainment System
Ringtone Volume
Press + or − to increase ordecrease the volume of the ringtonewhile receiving an incoming callfrom a Bluetooth connected cellphone.
Notification Prompt Volume
Press + or − to increase ordecrease the voice recognitionnotification prompt.
Set Time
. Press the up or down arrows toincrease or decrease the Hours,Minutes, AM, PM, or 24 hr onthe clock.
. Press and hold to quicklyincrease or decrease the timesettings.
. Press OK or the Back screenbutton to save the adjustmentsthat were made.
Set Date
. Press the up or down arrows toincrease or decrease the Month,Day, and Year settings.
. Press and hold to quicklyincrease or decrease the datesettings.
. Press OK or the Back screenbutton to save the adjustmentsthat were made.
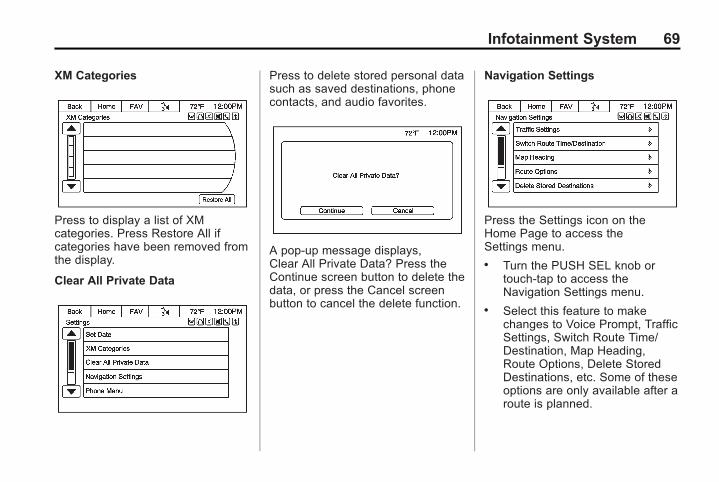
Black plate (69,1)Acadia/Acadia Denali, Enclave, Traverse Infotainment System - 2013 - CRC - 1/3/13
Infotainment System 69
XM Categories
Press to display a list of XMcategories. Press Restore All ifcategories have been removed fromthe display.
Clear All Private Data
Press to delete stored personal datasuch as saved destinations, phonecontacts, and audio favorites.
A pop-up message displays,Clear All Private Data? Press theContinue screen button to delete thedata, or press the Cancel screenbutton to cancel the delete function.
Navigation Settings
Press the Settings icon on theHome Page to access theSettings menu.. Turn the PUSH SEL knob or
touch-tap to access theNavigation Settings menu.
. Select this feature to makechanges to Voice Prompt, TrafficSettings, Switch Route Time/Destination, Map Heading,Route Options, Delete StoredDestinations, etc. Some of theseoptions are only available after aroute is planned.

Black plate (70,1)Acadia/Acadia Denali, Enclave, Traverse Infotainment System - 2013 - CRC - 1/3/13
70 Infotainment System
Navigation Voice Prompts: TheVoice Prompt Menu allows changesto the voice prompt features.
Traffic Settings: Press to enableor disable the traffic feature.
Switch Route Time/Destination:Select this button to switch the navmap display arrival time andmileage between waypoints andfinal destination.
Map Heading: Select to choosebetween North up, Heading up or3D views while navigating.
Route Options: Press to displaythe various route optionpreferences.
Delete Stored Destinations: Pressthe Delete screen button to deletedestinations from Address Book,Previous Destinations, Trips, andDownloaded POIs.

Black plate (71,1)Acadia/Acadia Denali, Enclave, Traverse Infotainment System - 2013 - CRC - 1/3/13
Infotainment System 71
Database Information: Press todisplay the information about theInfotainment system installed on thevehicle.
SiriusXM® NavTraffic(If Equipped)
The navigation system might have aNavTraffic receiver. It is asubscription service providedthrough SiriusXM Satellite Radio.A service fee is required to receivethe NavTraffic service. Real-timetraffic information is provided to fullyintegrate the navigation system todisplay current traffic conditions forthe chosen route. See “TrafficSettings” in this section.
A screen displays to indicate if theSiriusXM NavTraffic subscription isnot activated.
If activated, traffic informationdisplays:. Unscheduled traffic incident
data, such as accidents anddisabled vehicles.
. Scheduled traffic incident data,such as road construction androad closures.
. Traffic flow information (rate ofspeed data). Flow data might notbe available in all markets.
Traffic information is delivered to thevehicle by the XM Radio satellites.NavTraffic provides continuouslyupdated traffic information.
NavTraffic currently broadcasts thetraffic information for many marketsnationally. The service may beavailable in more cities in the future.Visit www.xmnavtraffic.com for moredetails on local coverage.
Traffic Settings
Press to display the Traffic menu.
Traffic (On/Off): Press to enable ordisable the traffic feature.
Traffic Voice Prompts (On/Off):Press to enable or disable the trafficvoice prompts.
Traffic Events Sort Method: Pressto display a submenu of sortoptions.. Sort by Distance: Press to
display traffic events in order ofdistance with the closest eventshown first.
. Sort by Name: Press to displaytraffic events in alphabeticalorder.

Black plate (72,1)Acadia/Acadia Denali, Enclave, Traverse Infotainment System - 2013 - CRC - 1/3/13
72 Infotainment System
Show Traffic Icons: Press todisplay traffic icons on the map.
. All Traffic Events On: Press toenable display of all traffic iconson the map.
. All Traffic Events Off: Press todisable display of all traffic iconson the map.
. User Defined Events: Press todefine the individual types oficons displayed for traffic flowand traffic conditions.
Traffic Flow
The traffic flow status will display ingreen, yellow, or red lines besidethe road.. Red indicates significantly
impaired traffic flow withaverage speed of less than25 mph (40 km).
. Yellow indicates slightly impairedtraffic flow with average speedbetween 25 and 45 mph (40 kmand 73 km).
. Green indicates normal trafficflow with average speed above45 mph (73 km).
Closed Road, Traffic Delays,Roadworks, and Advisories
Select the traffic event group fordisplay on the map screen. Someevents may cover more than onetraffic condition. See the followingtraffic conditions.
Traffic Conditions
The following traffic condition iconsmay display:
Stopped Traffic Traffic Jam
Accident Road Closed
Lane Narrows Road Work,Construction

Black plate (73,1)Acadia/Acadia Denali, Enclave, Traverse Infotainment System - 2013 - CRC - 1/3/13
Infotainment System 73
Alert Road Condition
Road Visibility Other
Route Options
Press to display the various routeoption preferences.
Fastest, Shortest, or Other: Pressone of these options while planninga route.
Automatic Recalculation: Ifenabled and a route with fewertraffic delays is found, the systemwill automatically recalculate withoutuser confirmation.
Calculate After Confirmation: Ifenabled, the system will provide apop-up if a possible guidance routeis available to detour around trafficevents on the route. Select Yes fromthe pop-up and the new route will becalculated. SiriusXM® NavTrafficinformation might not be providedfor the alternate route, depending onwhat type of road the vehicle istraveling.
Avoid Freeways: Press to avoidmajor roads. A checkmark appearsto indicate the Avoid mode is on.
Avoid Toll Roads: Press to avoidtoll roads. A checkmark appears toindicate the Avoid mode is on.
Avoid Ferries: Press to avoidferries. A checkmark appears toindicate the Avoid mode is on.
Avoid Tunnels: Press to avoidtunnels. A checkmark appears toindicate the Avoid mode is on.
Phone Menu
Press to display options for settingthe phone. See Bluetooth onpage 83 for more information onphone settings.

Black plate (74,1)Acadia/Acadia Denali, Enclave, Traverse Infotainment System - 2013 - CRC - 1/3/13
74 Infotainment System
Display Settings
Display Mode: Press DisplayMode to change the screenbackground. This setting controlsmap colors.
Display Off: Press to turn theDisplay option off.
Rear Vision Camera (If Equipped)
The Rear Vision Camera can assistwhen backing up by displaying aview of the area behind the vehicle.
An image appears on the system’sscreen so that the driver can checkthe surroundings for safety.
Adjust the brightness of the screenby pressing the − or + screenbutton. See “Rear Vision Camera(RVC)” in the owner manual.
Low Fuel Alert (If Equipped)
If the vehicle reaches a low fuellevel, the system displays an alertabout the low fuel condition. Pressthe Show Fuel Stations screenbutton to view nearby gas stations,and start guidance if desired.
If the remaining driving distance isavailable from the system, this isincluded in the alert.
Weather (If Equipped)
From the Home Page, press theWeather icon on the Home Page.The system displays theweather menu.
Current Weather
The current weather page showsthe current weather condition in thecity of the vehicle's current position.On this page, select the Menuscreen button to access otherweather options, such as WeatherForecast, Weather Along the Route,Weather Alert, Select Location byCity, Select Location in Map, andRestore your Car’s Position.

Black plate (75,1)Acadia/Acadia Denali, Enclave, Traverse Infotainment System - 2013 - CRC - 1/3/13
Infotainment System 75
Allow approximately 15 minutes forthe current weather in the area todisplay.
Extended Forecast
Press to show the extendedforecast.
Weather Along the Route
If a destination is set, there is theoption to view weather conditionsfor up to three locations along theroute:. Current vehicle position.. Midway point from current
position to final destination.. Current weather condition of the
destination city.
Weather Alerts
From the XM Weather Menu, pressthe Weather Alerts screen button todisplay any current weatheradvisory warnings in effect near thecurrent position.
Weather Around Other Cities
Select this option to view weatherconditions around or in a specificcity entered by name or selectedfrom the map.
Restore to Current Location
Press the Restore Current Locationsscreen button to display the weathercondition for the city where thevehicle is currently located, if thesystem was modified to viewweather conditions in another city.
Global PositioningSystem (GPS)The position of the vehicle isdetermined by using satellitesignals, various vehicle signals, andmap data.
At times, other interference such asthe satellite condition, roadconfiguration, condition of thevehicle, and/or other circumstancescan affect the navigation system'sability to determine the accurateposition of the vehicle.

Black plate (76,1)Acadia/Acadia Denali, Enclave, Traverse Infotainment System - 2013 - CRC - 1/3/13
76 Infotainment System
The GPS shows the current positionof the vehicle using signals sent bythe GPS Satellites. When thevehicle is not receiving signals fromthe satellites, a symbol appears onthe map screen. See NavigationSymbols on page 54.
This system might not be availableor interference can occur if any ofthe following are true:. Signals are obstructed by tall
buildings, trees, large trucks,or a tunnel.
. Satellites are being repaired orimproved.
For more information if the GPS isnot functioning properly, seeProblems with Route Guidance onpage 77 and If the System NeedsService on page 77.
Vehicle PositioningAt times, the position of the vehicleon the map could be inaccurate dueto one or more of the followingreasons:. The road system has changed.. The vehicle is driving on slippery
road surfaces such as sand,gravel, or snow.
. The vehicle is traveling onwinding roads or long straightroads.
. The vehicle is approaching a tallbuilding or a large vehicle.
. The surface streets run parallelto a freeway.
. The vehicle has been transferredby a vehicle carrier or a ferry.
. The current position calibrationis set incorrectly.
. The vehicle is traveling at highspeed.
. The vehicle changes directionsmore than once, or the vehicle isturning on a turn table in aparking lot.
. The vehicle is entering and/orexiting a parking lot, garage, or alot with a roof.
. The GPS signal is not received.
. A roof carrier is installed on thevehicle.
. Tire chains have been installed.
. The tires are replaced or worn.
. The tire pressure for the tires isincorrect.
. This is the first navigation useafter the map data is updated.
. The 12-volt battery isdisconnected for several days.
. The vehicle is driving in heavytraffic where driving is at lowspeeds, and the vehicle isstopped and started repeatedly.

Black plate (77,1)Acadia/Acadia Denali, Enclave, Traverse Infotainment System - 2013 - CRC - 1/3/13
Infotainment System 77
Problems with RouteGuidanceInappropriate route guidance canoccur under one or more of thefollowing conditions:. The turn was not made on the
road indicated.. Route guidance might not be
available when using automaticrerouting for the next right orleft turn.
. The route might not be changedwhen using automatic rerouting.
. There is no route guidance whenturning at an intersection.
. Plural names of places might beannounced occasionally.
. It could take a long time tooperate automatic reroutingduring high-speed driving.
. Automatic rerouting mightdisplay a route returning to theset waypoint if heading for adestination without passingthrough a set waypoint.
. The route prohibits the entry of avehicle due to a regulation bytime or season or any otherregulation that may be given.
. Some routes might not besearched.
. The route to the destinationmight not be shown if there arenew roads, if roads haverecently changed, or if certainroads are not listed in the mapdata. See Maps on page 54.
To recalibrate the vehicle's positionon the map, park with the vehiclerunning for two to five minutes, untilthe vehicle position updates.
If the System NeedsServiceIf the navigation system needsservice and the steps listed herehave been followed but there arestill problems, see your dealer forassistance.
Map Data UpdatesThe map data in the vehicle is themost up-to-date informationavailable when the vehicle wasproduced. The map data is updatedperiodically, provided that the mapinformation has changed.
For questions about the operation ofthe navigation system or the updateprocess, contact the GM Nav DiscCenter toll-free phone number,1-877-NAV-DISC (1-877-628-3472)or go to the center's website,www.gmnavdisc.com. If updates areneeded, call the GM Nav DiscCenter. To order map data, have thevehicle's Vehicle IdentificationNumber (VIN) available. See“Vehicle Identification Number(VIN)” in the owner manual.
After receiving the updated mapdata, see Maps on page 54.

Black plate (78,1)Acadia/Acadia Denali, Enclave, Traverse Infotainment System - 2013 - CRC - 1/3/13
78 Infotainment System
Database CoverageExplanationsCoverage areas vary with respect tothe level of map detail available forany given area. Some areas featuregreater levels of detail than others.If this happens, it does not meanthere is a problem with the system.As the map data is updated, moredetail can become available forareas that previously had limiteddetail. See Map Data Updates onpage 77.
Voice RecognitionVoice recognition allows forhands-free operation within theaudio, and phone applications. Thisfeature can be started by pressingeither the g button on the steeringwheel or the voice recognition iconon the touchscreen display.
However, not all features withinthese areas are supported by voicecommands. Generally, only complextasks which require multiple manualinteractions to complete aresupported by voice commands.
For example, tasks that take morethan one or two button presses suchas selecting a song or artist to playfrom a media device would besupported by voice commands.Other tasks, like adjusting thevolume or seeking up or down areaudio features that are easilyperformed by pressing one or twobuttons, and are not supported byvoice commands.
Most voice commands except forvoice keypad, can be completed ina single command. If the task takesmore than one command tocomplete, the first command wouldbe to indicate the kind of task that isto be performed. The system willreply prompting dialog to help speakthe necessary information.
Voice recognition can be used whenthe ignition is on or when RetainedAccessory Power (RAP) is active.See “Retained Accessory Power(RAP)” in the owner manual.
Using Voice Recognition
Voice recognition becomesavailable once the system has beeninitialized. Initialization takes placeonce the ignition is turned on.This may take a few moments.
1. Press g on the steering wheelcontrol to activate voicerecognition, or press the voice

Black plate (79,1)Acadia/Acadia Denali, Enclave, Traverse Infotainment System - 2013 - CRC - 1/3/13
Infotainment System 79
recognition icon on theinfotainment touchscreen onthe radio.. If voice recognition is
started from the steeringwheel control, the radiodisplays the selections andvisual dialog content. Thecommands may then betouched or spoken.
. If voice recognition isstarted from theinfotainment touchscreenon the radio, the lists andcontrols are verbal and thevisual displays through theradio. The commands maythen be touched or spoken.
2. The audio system mutes and thesystem plays a prompt followedby a beep.
3. Wait until after the beepcompletes, then clearly speakone of the commands describedin this section.
Press g to interrupt any voicerecognition. This will terminatethe prompt. The beep is heardimmediately, and a commandcan be stated without havingto wait.
There are two voice prompt modessupported:. Long verbal prompts: The longer
prompts provide moreinformation regarding thesupported actions for that voicerecognition session.
. Short prompts: The shortprompts provide simple setupand action commands.
If a command is not heard during ashort period of time, the voicerecognition process times out.
Prompts and Screen Displays
The system prompts and displayscreens will adjust to reflect thecommands during the voicerecognition session.
While voice is active, there may becorresponding buttons and screendisplays available to interact withthe system so that some of thefunctions can be manually done.Pressing any of the buttons ordisplays to finish a function that wasinitiated through voice recognitionwill terminate the session. If themanual functions are only partiallycompleted, the voice recognition willproceed until finished.

Black plate (80,1)Acadia/Acadia Denali, Enclave, Traverse Infotainment System - 2013 - CRC - 1/3/13
80 Infotainment System
Canceling Voice Recognition
. Pressx on the steering wheelcontrols. This will terminate thevoice recognition session anddisplay the screen prior to whenvoice recognition was initiated.
. Press the z or the circled arrowdisplaying on the upper cornersof the screen to terminate or goback up the voice menurespectively during the voicerecognition session.
. Press or say “Cancel” or “Exit” toterminate or go back to thevoice menu, during the voicerecognition session and displaythe screen prior to when voicerecognition was initiated.
Helpful Hints for SpeakingCommands
The voice recognition applicationcan usually understand directcommands of the applicationand task.
An example of a direct commandwould be, “Phone.” The system mayanswer with a prompt of, “Say Callfollowed by the number or contactname.” The direct command for thistask would be, “Call 555-1212.”
If the phone number has beensaved as a name or place, the directcommand would be, “Call David’soffice number.”
Directed Dialog
A directed dialog is an interactionbetween a person speaking thecommand and the system promptingfor specific information necessary tocomplete the task. Many times thesystem may repeat what the personhas stated as a command. This isdone as a confirmation to makesure the command is understood.
Voice Recognition forthe Radio
All audio screens have a voicerecognition button to launch anaudio voice recognition session.If browsing the radio when the voice
button is pressed, the voicerecognition screens for Radiodisplay.
The following list shows Radiofeatures that are controllable byvoice recognition commands.A voice recognition command wouldhave to include all necessaryinstructions for the system to carryout each command:
Help: Voice control help for Radiofunctionality.
Tune FM: Most recently tuned FMstation.
Tune AM: Most recently tuned AMstation.
Tune XM: Most recently tuned XMchannel.
Tune FM <frequency> HD<number>: Listen to an HD FMradio frequency.
Tune AM <frequency> HD<number>: Listen to an HD AMradio frequency.

Black plate (81,1)Acadia/Acadia Denali, Enclave, Traverse Infotainment System - 2013 - CRC - 1/3/13
Infotainment System 81
Tune XM <number>: Listen to anXM channel (by number).
Tune XM <channel name>: Listento an XM channel (by name).
Voice Recognition for MyMedia
All audio screens have a voicerecognition button to launch anaudio voice recognition session.If browsing My Media when thevoice button is pressed, the voicerecognition screens for My Mediadisplay.
The following list shows My Mediafeatures that are controllable byvoice recognition commands.A voice recognition command wouldhave to include all necessaryinstructions for the system tocarry out each command:
Help: Voice control help forMy Media functionality.
Play <device name>: Specificdevice Disc, AUX, BluetoothUSB, iPod.
Play Genre: Play music from aspecific genre.
Play Artist: Play music by aspecific artist.
Play Album: Play music from thespecific album.
Play Song: Play track including CDand DVD.
Play Playlist: Play music in apre-defined playlist.
Play Audio Book: Audio book byTitle.
Play Podcast: Listen to Podcast.
General Navigation Command
Cancel: Instructs the system tocancel the command.
Voice Recognition forNavigation
If the voice button is pressed whileon a map screen, the system beginsa voice recognition session.
Destination and GuidanceCommands
Destination (Available for English,Spanish, and Frenchlanguages): Instructs the systemthat the user wants to enter adestination using voice recognition.After this command is stated, thesystem displays a menu for enteringthe destination by address orcontacts stored in the address book.If address is selected, the systemprompts for more information suchas country, city, state, housenumber. If entering the destinationby contacts, the system will promptfor a contact name as stored.
Set the Destination by using voicerecognition:
1. Press the g steering wheelcontrol button. The audio systemmutes, and a beep is heard.

Black plate (82,1)Acadia/Acadia Denali, Enclave, Traverse Infotainment System - 2013 - CRC - 1/3/13
82 Infotainment System
2. Say the command “DestinationAddress.” The system replieswith “Say the City and State orSay Change Country.” If thecountry is incorrect, go toStep 5. Otherwise, say the cityand state for the destination.
During the session, the city andstate matches to the spoken cityand state name. The systemasks the user to select an itemfrom the candidate list either bypressing the desired choice,or by saying the list number ofthe desired choice.
3. The system replies “Say theHouse Number and StreetName.” Say the house numberand street name for thedestination. The house andstreet address as well as theclosest match to the spokennumber are similar to the cityand state commands.
4. This address is now set as thedestination. Select the StartGuidance screen button to begin
destination route guidance. Atthat point there are additionaloptions to review the destinationlocation on the map, or topreview the route, detailed laterin this manual.
5. After saying “Change Country,”the system replies with “Say theName of the Country or Territoryfor the address wanted.” Say thecorrect country or territory.The system will return to theDestination Address menu andask, “Say the City and State orSay Change Country” as inStep 2.
Pandora/Stitcher Commands
“Pandora” or “Play Pandora”:Starts Pandora application.
“Stitcher” or “Play Stitcher”:Starts Stitcher application.
“Thumbs Up” or “ThumbsDown”: Rates the programmaterial currently playing underPandora or Stitcher.
“Shuffle”: Starts shuffle play of thePandora or Stitcher stations on thedevice.
Weather Commands
“Weather”: Starts the weatherapplication.
“Local Weather”: Accesses thelocal weather.
“Forecast”: Accesses the localforecast.
OnStar (if equipped) Command
OnStar: This command instructsthe system to connect to OnStar.Enter the OnStar voice recognitionsystem. See “OnStar” in the ownermanual.
Help Commands
‐ Help

Black plate (83,1)Acadia/Acadia Denali, Enclave, Traverse Infotainment System - 2013 - CRC - 1/3/13
Infotainment System 83
Bluetooth Phone/Devices
BluetoothFor vehicles equipped withBluetooth capability, the system caninteract with many cell phones,allowing:. Placement and receipt of calls in
a hands-free mode.. Sharing of the address book or
contact list with the vehicle. Notall phones are compatible forcontacts list downloading.
. Control of and playback ofPandora and Stitcherapplications.
. Audio Streaming.
To minimize driver distraction,before driving, and with thevehicle parked:. Become familiar with the
features of the cell phone.Organize the phone book andcontact lists clearly and deleteduplicate or rarely used entries.If possible, program speed dialor other shortcuts.
. Review the controls andoperation of the infotainmentsystem.
. Pair cell phone(s) to the vehicle.The system may not work withall cell phones. See “Pairing” inthis section.
. See “Storing and Deleting PhoneNumbers” in this section.
{ WARNING
When using a cell phone, it canbe distracting to look too long ortoo often at the screen of the
(Continued)
WARNING (Continued)
phone or the infotainment(navigation) system. Taking youreyes off the road too long or toooften could cause a crashresulting in injury or death.Focus your attention on driving.
Vehicles with a Bluetooth systemcan use a Bluetooth-capable cellphone with a Hands-Free Profile tomake and receive phone calls.The infotainment system and voicerecognition are used to control thesystem. The system can be usedwhile in ON/RUN or ACC/ACCESSORY. The range of theBluetooth system can be up to9.1 m (30 ft). Not all phones supportall functions and not all phones workwith the Bluetooth system. Seewww.gm.com/bluetooth for moreinformation about compatiblephones.

Black plate (84,1)Acadia/Acadia Denali, Enclave, Traverse Infotainment System - 2013 - CRC - 1/3/13
84 Infotainment System
Bluetooth Controls
Use the buttons on the infotainmentsystem and the steering wheel tooperate the Bluetooth system.
Steering Wheel Controls
g (Push to Talk):. Press to answer incoming calls,
confirm system information, andstart voice recognition.
. Press and hold to mute theradio.
Infotainment System Controls
For information about how tonavigate the menu system using theinfotainment controls, see Overviewon page 4.
Voice Recognition
The voice recognition system usescommands to control the systemand dial phone numbers.
Noise: The system may notrecognize voice commands if thereis too much background noise.
When to Speak: A tone sounds toindicate that the system is ready fora voice command. Wait for the toneand then speak.
How to Speak: Speak clearly in acalm and natural voice.
Audio System
When using the Bluetooth system,sound comes through the vehicle'sfront audio system speakers andoverrides the audio system. Use thevolume bar during a call to changethe volume level. The adjustedvolume level remains in memory forlater calls. The system maintains aminimum volume level.
Other Information
The Bluetooth® word mark andlogos are owned by the Bluetooth®
SIG, Inc. and any use of such marksby General Motors is under license.Other trademarks and trade namesare those of their respective owners.
See “Radio Frequency Identification(RFID)” in the owner manual forinformation regarding Part 15 of the
Federal CommunicationsCommission (FCC) rules andIndustry Canada StandardsRSS-GEN/210/220/310.
Using Voice Recognition
To use voice recognition, press gon the steering wheel.
If you know the command youwould like to execute, say thecommand. If the command is notknown, say “Help” while in any voicerecognition menu.
See Voice Recognition on page 78.
Pairing a Phone Usingthe Infotainment SystemPairing a New Bluetooth Device
1. Press the Settings screen buttonon the Home Page to access theSettings menu. Press BluetoothDevices from the Settings menuto display the BluetoothDevice List.

Black plate (85,1)Acadia/Acadia Denali, Enclave, Traverse Infotainment System - 2013 - CRC - 1/3/13
Infotainment System 85
2. Press the New Device screenbutton to start the process ofadding a new Bluetooth deviceto the radio system.
3. Once New Device is pressed,the radio becomes discoverablefor three minutes.
4. When a device is discovered,the screen changes to thepairing screen. If the Bluetoothdevice does not connect to theradio within 60 seconds, thescreen times out, returns to theBluetooth Device List, andcancels the discoverableprocess.
5. During the start of the pairingprocess, a pop-up screen willask to select <Your Vehicle>. If aPIN is to be entered, useXXXXXX. Enter the PIN into theBluetooth device.
6. Once the radio is selected fromthe Bluetooth device, the samePIN must be entered to continuethe pairing process. Press theChange PIN screen button toenter a matching PIN. Thekeypad screen displays tocomplete this function.
7. Automatic 6-digit PIN numbermay appear on newer phones.Look for the same number tomatch on both the radio anddevice being paired. Select YESon both radio and device tocomplete the pairing process.

Black plate (86,1)Acadia/Acadia Denali, Enclave, Traverse Infotainment System - 2013 - CRC - 1/3/13
86 Infotainment System
8. A pop-up displays to confirm thepairing was successful.
9. After initial pairing, a pop-up onthe device may appear to acceptand allow the radio permissionto download the phone devicephone/address book for lateruse. Press Always Accept,if offered on the device isrecommended for normal use.No other paired device can seethe other device’s suchinformation. This information isalso not accessible if the devicefrom which this informationoriginated is not currently paired,in range and connected.
10. For Blackberry® devices, turnoff the Automatic Echo controlfrom within the Device menu inthe phone. Leaving this featureon can cause noise problemsduring hand free calls.
For information about how tonavigate the menu system using theinfotainment controls, see Overviewon page 4.
Pairing
A Bluetooth-enabled cell phonemust be paired to the Bluetoothsystem and then connected to thevehicle before it can be used. Seeyour cell phone manufacturer's userguide for Bluetooth functions beforepairing the cell phone. If a Bluetoothphone is not connected, calls canbe made using OnStar Hands-FreeCalling, if available. See “OnStar” inthe owner manual.
Pairing Information. Up to ten cell phones can be
paired to the Bluetooth system.Up to a total 10,000 phonecontacts and numbers can bestored across 10 paired phones.
. The system will attempt toconnect to the last knownconnected device if multiplepaired devices are in range ofthe system.
. The pairing process is disabledwhen the vehicle is moving.
. Pairing only needs to becompleted once, unless thepairing information on the cellphone changes or the cell phoneis deleted from the system.
. Only one paired cell phone canbe connected to the Bluetoothsystem at a time.
. If multiple paired cell phones arewithin range of the system, thesystem connects to the firstavailable paired cell phone in theorder that they were first paired

Black plate (87,1)Acadia/Acadia Denali, Enclave, Traverse Infotainment System - 2013 - CRC - 1/3/13
Infotainment System 87
to the system. To link to adifferent paired phone, see“Linking to a Different Phone”later in this section.
Pairing a Phone
Pairing is not allowed while thevehicle is in motion.
1. Select Settings from the HomePage or speak, “Pair Phone”after starting a voice recognitionsession.
2. Select Bluetooth Devices.
3. Select New Device (Phone).A four or six-digit PersonalIdentification Number (PIN)appears on the display. The PINis used in Step 5 and must beconfirmed both on the phoneand radio.
4. Start the pairing process on thecell phone to be paired to thevehicle. See the cell phonemanufacturer's user guide forinformation on this process.
5. Locate the device named in thelist on the cell phone. Follow theinstructions on the cell phone toenter and confirm the PINprovided in Step 3. After the PINis entered, the system promptsyou to indicate pairing issuccessful. The name of thepaired device depends on thedevice and how it is set up. Theradio will automatically use thedevice name. The systemresponds with “<Phone name>has been successfully paired”after the pairing process iscomplete.
6. Repeat Steps 1–5 to pairadditional phones.
Listing All Paired and ConnectedPhones
1. Select Settings from theHome Page.
2. Select Bluetooth Device List.
Deleting a Paired Phone
1. Select Settings from theHome Page.
2. Select Bluetooth Device List.
3. Select the phone to delete andfollow the on screen prompts.
It is recommended the radio shouldalso be deleted from the BluetoothDevice List.
Connecting to a Different Phone
To link to a different phone, the newphone must be in the vehicle andavailable to be connected to theBluetooth system before theprocess is started.
1. Select Settings from theHome Page.
2. Select Bluetooth Device List.
3. Select the new phone to link toand follow the on screenprompts.
If delete is selected, thehighlighted phone will bedeleted.

Black plate (88,1)Acadia/Acadia Denali, Enclave, Traverse Infotainment System - 2013 - CRC - 1/3/13
88 Infotainment System
Making a Call Using the PhoneBook Contacts and Call List
For cell phones that support thephone book feature, the Bluetoothsystem can use the contacts storedon your cell phone to make calls.See your cell phone manufacturer’suser guide or contact your wirelessprovider to find out if this feature issupported by your phone. Also see,“Pairing a New Bluetooth Device”later in this section.
When a cell phone supports thephone book feature, the Contactsand Call List menus areautomatically available. There maybe a delay for this information toappear, especially after first pairingthe device, and depends on howmany Contacts entries are stored inthe phone.
The Contacts menu allows you toaccess the contacts stored in thecell phone to make a call.
The Call List menu allows you toaccess the phone numbers from theIncoming Calls, Outgoing Calls, andMissed Calls menus on your cellphone to make a call.
To make a call using theContacts menu:
1. Press the Phone screen buttonon the Home Page to display thePhone main menu.
2. Select the Menu screen buttonto display the Phone menu.
3. Select Contacts.
4. Search through the list byselecting the letter group thecontact entry begins with. Boththe screen scroll button or thePUSH SEL knob can be used.
5. Select the name or number youwant to call.
6. Depending on how theContact is stored in the phone,determines if the radio will showmultiple contact numbers. Selectthe desired number to call.

Black plate (89,1)Acadia/Acadia Denali, Enclave, Traverse Infotainment System - 2013 - CRC - 1/3/13
Infotainment System 89
To make a call using the CallList menu:
1. Press the Phone screen buttonon the Home Page to display thePhone main menu.
2. Press the Menu screen button todisplay the Phone menu.
3. Select Call List.
4. Select the Incoming Calls,Outgoing Calls, or MissedCalls list.
5. Select the name or number youwant to call.
Making a Call
1. Press the Phone screen buttonon the Home Page to display thePhone screen.
2. Press the Menu button on thescreen to access thePhone menu.
Enter Number
Use this option to enter a phonenumber and make a call.
1. Turn the PUSH SEL knob, thenpress it to select Dial Pad. A dialpad displays.

Black plate (90,1)Acadia/Acadia Denali, Enclave, Traverse Infotainment System - 2013 - CRC - 1/3/13
90 Infotainment System
2. Enter the phone number bypressing the numbers on thekeypad.
3. Press the Call screen button tomake the call.
Phone Book
The Phone Book feature is onlysupported if that feature is availableon the Bluetooth phone. See yourcell phone manufacturer's userguide for more information.
Phone Book contacts can beaccessed by pressing the Contactsscreen button on the Phone menuscreen.
Select Contacts from thePhone Menu.
1. Turn the PUSH SEL knob toselect the letter groupassociated with the person orplace to call.
2. Press the PUSH SEL knob toselect the letter group.
3. Select the person or placeto call.

Black plate (91,1)Acadia/Acadia Denali, Enclave, Traverse Infotainment System - 2013 - CRC - 1/3/13
Infotainment System 91
4. Press the PUSH SEL knob ornumber on the screen to makethe call.
Call Lists
The Call List selection from thePhone menu screen can be used toshow a list of incoming calls,outgoing calls, and missed calls.
1. Press the Phone screen buttonon the Home Page to display thePhone screen.
2. Press the Menu screen button.
3. Select the Call List screenbutton.
4. Turn the PUSH SEL knob,or press to select eitherIncoming Calls, Outgoing Calls,or Missed Calls.
Once one of these options has beenselected, a menu displays. A list ofpersons and places will display forthe selected option.
Turn the PUSH SEL knob, thenpress this knob or press theappropriate screen button to selectsomeone on that list. A menudisplays showing the phone numberfor that person.
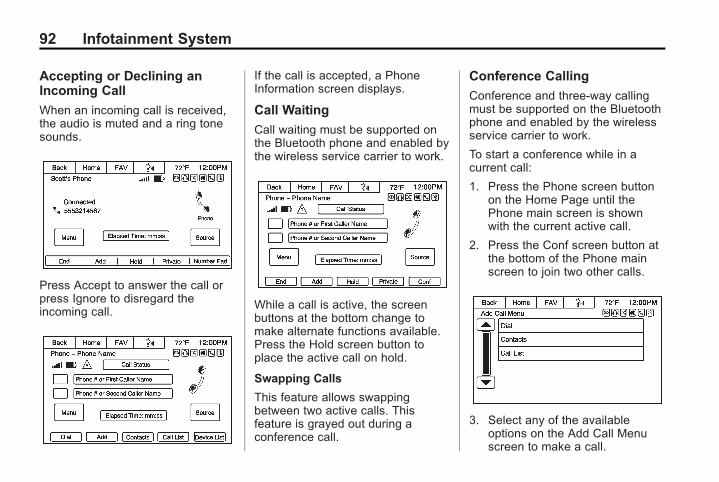
Black plate (92,1)Acadia/Acadia Denali, Enclave, Traverse Infotainment System - 2013 - CRC - 1/3/13
92 Infotainment System
Accepting or Declining anIncoming Call
When an incoming call is received,the audio is muted and a ring tonesounds.
Press Accept to answer the call orpress Ignore to disregard theincoming call.
If the call is accepted, a PhoneInformation screen displays.
Call Waiting
Call waiting must be supported onthe Bluetooth phone and enabled bythe wireless service carrier to work.
While a call is active, the screenbuttons at the bottom change tomake alternate functions available.Press the Hold screen button toplace the active call on hold.
Swapping Calls
This feature allows swappingbetween two active calls. Thisfeature is grayed out during aconference call.
Conference Calling
Conference and three-way callingmust be supported on the Bluetoothphone and enabled by the wirelessservice carrier to work.
To start a conference while in acurrent call:
1. Press the Phone screen buttonon the Home Page until thePhone main screen is shownwith the current active call.
2. Press the Conf screen button atthe bottom of the Phone mainscreen to join two other calls.
3. Select any of the availableoptions on the Add Call Menuscreen to make a call.

Black plate (93,1)Acadia/Acadia Denali, Enclave, Traverse Infotainment System - 2013 - CRC - 1/3/13
Infotainment System 93
4. Make another call. The first callwill be placed on hold while thesecond call is dialing andconnected.
5. To make a conference call,select the Conf screen button onthe Phone main screen and bothcalls merge into oneconference call.
Ending a Call
To end a call:
1. Press the Phone screen buttonon the Home Page to display thePhone screen.
2. While a call is active, the Dialscreen button at the bottom ofthe Phone screen changesto End.
3. Press the End screen button orthec /w on the steeringwheel controls to end the call.
Dual Tone Multi-Frequency(DTMF) Tones
The in-vehicle Bluetooth system cansend numbers during a call. This isused when calling a menu-drivenphone system.
1. While in a call and on the phonescreen, press the Number Padbutton.
2. Press digits corresponding to theDTMF tones to be sent.
The DTMF Tones will be generatedon the network as you enter eachnumber.

Black plate (94,1)Acadia/Acadia Denali, Enclave, Traverse Infotainment System - 2013 - CRC - 1/3/13
94 Infotainment System
Ringtones
The phone must support in-bandringtones for this feature to work.See the Product Manual.
1. Press the Phone screen buttonon the Home Page to display thePhone screen.
2. Press the Menu screen button todisplay the Phone Menu.
3. Press Ringtones to display theRingtones menu.
Device List
1. Press the Phone screen buttonon the Home Page to display thePhone screen.
2. Press the Menu screen button todisplay the Phone Menu.
3. Press Device List to display theBluetooth Device List. The listconsists of devices that havebeen paired to the vehicle.

Black plate (95,1)Acadia/Acadia Denali, Enclave, Traverse Infotainment System - 2013 - CRC - 1/3/13
Infotainment System 95
4. Press the desired device toconnect. The pop-up displayshould remain on display untilthe device is connected. TheContact and Call history isdownloaded in the backgroundwhile the device is connecting.
Deleting a Bluetooth Device
1. Press the Menu screen buttonfrom the Phone main menu todisplay the Phone Menu screen.
2. Press the Device List option todisplay the BluetoothDevice List.
3. Select the device, and press theDelete screen button associatedwith the selected device.
4. To Delete all devices, press theDelete All screen button at thebottom of the display.

Black plate (96,1)Acadia/Acadia Denali, Enclave, Traverse Infotainment System - 2013 - CRC - 1/3/13
96 Infotainment System
Trademarks andLicense AgreementsFCC Information
See “Radio Frequency Statement”in the owner manual for informationregarding Part 15 of the FederalCommunications Commission (FCC)rules and with Industry CanadaStandards RSS-GEN/210/220/310.
“Made for iPod” and “Made foriPhone” mean that an electronicaccessory has been designed toconnect specifically to iPod oriPhone and has been certified bythe developer to meet Appleperformance standards.
iPod and iPhone are trademarks ofApple Computer, Inc., registered inthe U.S. and other countries.
Fees and Taxes: Subscription fee,taxes, one time activation fee, andother fees may apply. Subscriptionfee is consumer only. All fees andprogramming subject to change.Subscriptions subject toCustomer Agreement available atwww.siriusxm.com. SiriusXM®
service only available in the48 contiguous United States andCanada.
In Canada: Some deterioration ofservice may occur in extremenorthern latitudes. This is beyondthe control of SiriusXM® SatelliteRadio.
Explicit Language Notice: Channelswith frequent explicit language areindicated with an “XL” preceding thechannel name. Channel blocking isavailable for SiriusXM SatelliteRadio receivers by notifyingSiriusXM:. USA Customers:
See www.siriusxm.com orcall 1-866-635-2349.
. Canadian Customers:See www.xmradio.ca orcall 877-209-0079.
It is prohibited to copy, decompile,disassemble, reverse engineer,hack, manipulate, or otherwisemake available any technology orsoftware incorporated in receiverscompatible with the SiriusXMSatellite Radio System or thatsupport the SiriusXM website, theOnline Service or any of its content.Furthermore, the AMBER voicecompression software included inthis product is protected byintellectual property rights including

Black plate (97,1)Acadia/Acadia Denali, Enclave, Traverse Infotainment System - 2013 - CRC - 1/3/13
Infotainment System 97
patent rights, copyrights, andtrade secrets of Digital VoiceSystems, Inc.
General Requirements:
1. A License Agreement fromSiriusXM is required for anyproduct that incorporatesSiriusXM Technology and/or foruse of any of the SiriusXMmarks to be manufactured,distributed, or marketed in theSiriusXM Service Area.
2. For products to be distributed,marketed, and/or sold inCanada, a separate agreementis required with CanadianSatellite Radio Inc. (operating asXM Canada).
Manufactured under license fromDolby Laboratories. Dolby and thedouble-D symbol are trademarks ofDolby Laboratories.
Bluetooth
The Bluetooth® word mark andlogos are owned by the Bluetooth®
SIG, Inc. and any use of such marksby General Motors is under license.Other trademarks and trade namesare those of their respective owners.
Pandora (If Equipped)
Pandora is a registered trademarkof Pandora Media, Inc., used underlicense.
Map End User LicenseAgreement
TERMS AND CONDITIONS
Please read the terms andconditions at www.telenav.comcarefully before you use theTeleNav Software. Your use of theTeleNav Software indicates that youaccept these terms and conditions.In brief, you use this service at yourown choice and risk. TeleNav andits suppliers assume noresponsibility for any damage orloss to you or a third party resultingfrom such use. Please driveresponsibly, obey all traffic laws,and enter destinations, POIs orother data only while your vehicle isparked.

Black plate (98,1)Acadia/Acadia Denali, Enclave, Traverse Infotainment System - 2013 - CRC - 1/3/13
98 Infotainment System
Disclaimer of Warranty
TELENAV EXPRESSLYDISCLAIMS AND EXCLUDES ALLWARRANTIES IN CONNECTIONWITH THE TELENAV SOFTWARE,WHETHER STATUTORY,EXPRESS OR IMPLIED,INCLUDING ALL WARRANTIESWHICH MAY ARISE FROMCOURSE OF DEALING, CUSTOMOR TRADE AND INCLUDING, BUTNOT LIMITED TO, THE IMPLIEDWARRANTIES OFMERCHANTABILITY, FITNESSFOR A PARTICULAR PURPOSEAND NON-INFRINGEMENT OFTHIRD PARTY RIGHTS WITHRESPECT TO THE TELENAVSOFTWARE.
Disclaimer of Liability
UNDER NO CIRCUMSTANCESSHALL TELENAV OR ITS suppliersBE LIABLE TO YOU OR TOANYONE ELSE FOR ANYINDIRECT, INCIDENTAL,CONSEQUENTIAL, PUNITIVE ORSPECIAL DAMAGES arising out ofor in connection with the use by youor anyone else of the TeleNavSoftware, EVEN IF TELENAV HASBEEN ADVISED OF THEPOSSIBILITY OF SUCHDAMAGES. THE ENTIRELIABILITY OF TELENAV AND OFALL OF its suppliers SHALL BELIMITED TO THE AMOUNTACTUALLY PAID BY YOU FORTHE TELENAV SOFTWARE.
SOME STATES AND/ORJURISDICTIONS DO NOT ALLOWTHE EXCLUSION OR LIMITATIONOF INCIDENTAL ORCONSEQUENTIAL DAMAGES, SOTHE ABOVE LIMITATIONS OREXCLUSIONS MAY NOT APPLYTO YOU.

Black plate (1,1)Acadia/Acadia Denali, Enclave, Traverse Infotainment System - 2013 - CRC - 1/3/13
INDEX i-1
AAccepting or Declining anIncoming Call . . . . . . . . . . . . . . . . . . 92
Adding or Removing SiriusXMCategories . . . . . . . . . . . . . . . . . . . . . 19
AM-FM Radio . . . . . . . . . . . . . . . . . . . . 14AudioBluetooth . . . . . . . . . . . . . . . . . . . . . . .41
Audio Output . . . . . . . . . . . . . . . . . . . . 44Audio PlayersCD/DVD . . . . . . . . . . . . . . . . . . . . . . . .29MP3 . . . . . . . . . . . . . . . . . . . . . . . . . . . .32
Audio System . . . . . . . . . . . . . . . . . . . . 84Audio/Video (A/V) Jacks . . . . . . . . . 44AuxiliaryDevices . . . . . . . . . . . . . . . . . . . . . . . . .40
BBefore Driving . . . . . . . . . . . . . . . . . . . 41Bluetooth . . . . . . . . . . . . . . . . . . . . .83, 97Bluetooth Audio . . . . . . . . . . . . . . . . . 41Bluetooth Audio and VoiceRecognition . . . . . . . . . . . . . . . . . . . . 40
Bluetooth Controls . . . . . . . . . . . . . . . 84
CCall Waiting . . . . . . . . . . . . . . . . . . . . . . 92Canadian Vehicle Owners(Propriétaires des VéhiculesCanadiens) . . . . . . . . . . . . . . . . . . . . . . 4
Canceling Voice Recognition . . . . 80CD/DVD Player . . . . . . . . . . . . . . . . . . 29Cleaning High Gloss Surfacesand Vehicle Information andRadio Displays . . . . . . . . . . . . . . . . . 13
Cleaning the RSE OverheadConsole . . . . . . . . . . . . . . . . . . . . . . . . 51
Cleaning the Video Screen . . . . . . 51Conference Calling . . . . . . . . . . . . . . 92ControlsSteering Wheel . . . . . . . . . . . . . . . . . . 7
Customer Assistance Offices . . . . 14
DDatabase CoverageExplanations . . . . . . . . . . . . . . . . . . . 78
Destination and GuidanceCommands . . . . . . . . . . . . . . . . . . . . . 81
Destination Menu with RouteGuidance Active . . . . . . . . . . . . . . . 61
Destination, Navigation . . . . . . . . . . 56Detailed Areas . . . . . . . . . . . . . . . . . . . 54Device List . . . . . . . . . . . . . . . . . . . . . . 94DevicesAuxiliary . . . . . . . . . . . . . . . . . . . . . . . .40
Driving on a Route . . . . . . . . . . . . . . . 64Dual Tone Multi-Frequency(DTMF) Tones . . . . . . . . . . . . . . . . . . 93
DVDRear Seat EntertainmentSystem . . . . . . . . . . . . . . . . . . . . . . . .41
DVD Display Error Messages . . . . 51DVD Distortion . . . . . . . . . . . . . . . . . . 51DVD/CD Player . . . . . . . . . . . . . . . . . . 29

Black plate (2,1)Acadia/Acadia Denali, Enclave, Traverse Infotainment System - 2013 - CRC - 1/3/13
i-2 INDEX
EEnding a Call . . . . . . . . . . . . . . . . . . . . 93English or Metric Units . . . . . . . . . . . . 7Error Messages . . . . . . . . . . . . . . . . . 31
FFinding a Station . . . . . . . . . . . . . . . . 15
GGeneral Navigation Command . . . 81Global PositioningSystem (GPS) . . . . . . . . . . . . . . . . . . 75
HHD Radio Technology . . . . . . . . . . . 18Headphones . . . . . . . . . . . . . . . . . . . . . 42Helpful Hints for SpeakingCommands . . . . . . . . . . . . . . . . . . . . . 80
Home Page . . . . . . . . . . . . . . . . . . . . . . . 9Home Page Customization . . . . . . . 9Home Page Features . . . . . . . . . . . . 10
IInfotainment . . . . . . . . . . . . . . . . . . . . . . 3Infotainment Controls . . . . . . . . . . . . . 6Infotainment SystemPairing a Phone . . . . . . . . . . . . . . . .84
Infotainment System Settings . . . . 15Internet RadioPandora . . . . . . . . . . . . . . . . . . . . . . . .20
LLanguage . . . . . . . . . . . . . . . . . . . . . . . . . 7Launching Pandora . . . . . . . . . . . . . . 21Launching Stitcher . . . . . . . . . . . . . . . 25Loading and Ejecting Discs . . . . . . 29Low Fuel Alert (If Equipped) . . . . . 74
MMaking a Call . . . . . . . . . . . . . . . . . . . . 89Making a Call Using thePhone Book Contacts andCall List . . . . . . . . . . . . . . . . . . . . . . . . 88
Map Adjustments . . . . . . . . . . . . . . . . 53Map Data Updates . . . . . . . . . . . . . . . 77
Map End User LicenseAgreement . . . . . . . . . . . . . . . . . . . . . 97
Map Scales . . . . . . . . . . . . . . . . . . . . . . 53Maps . . . . . . . . . . . . . . . . . . . . . . . . . . . . 54Mixed-Band Presets . . . . . . . . . . . . . 17MP3 . . . . . . . . . . . . . . . . . . . . . . . . . . . . . 32Music Navigator . . . . . . . . . . . . . . . . . 34
NNavigationDestination . . . . . . . . . . . . . . . . . . . . .56Symbols . . . . . . . . . . . . . . . . . . . . . . . .54Using the System . . . . . . . . . . . . . . .51
OOnStar (if equipped)Command . . . . . . . . . . . . . . . . . . . . . . 82
OnStar® System . . . . . . . . . . . . . . . . . 65Other Information . . . . . . . . . . . . . . . . 84Overview, Infotainment System . . . 4

Black plate (3,1)Acadia/Acadia Denali, Enclave, Traverse Infotainment System - 2013 - CRC - 1/3/13
INDEX i-3
PPairing . . . . . . . . . . . . . . . . . . . . . . . . . . . 86Pairing a Phone Using theInfotainment System . . . . . . . . . . . 84
Pandora (If Equipped) . . . . . . . . . . . 97Pandora Internet Radio . . . . . . . . . . 20Pandora Troubleshooting . . . . . . . . 23Pandora/Stitcher Commands . . . . 82Pandora® . . . . . . . . . . . . . . . . . . . . . . . . 20Parental Control . . . . . . . . . . . . . . . . . 42PhoneBluetooth . . . . . . . . . . . . . . . . . . . . . . .83
Pictures . . . . . . . . . . . . . . . . . . . . . . . . . 28Playing a DVD Video . . . . . . . . . . . . 30Playing an Audio CD . . . . . . . . . . . . 30Playing an MP3 CD . . . . . . . . . . . . . . 32Playing from a USB . . . . . . . . . . . . . . 36
Playing from an iPhoneor iPad® . . . . . . . . . . . . . . . . . . . . . . . . 40
Playing from an iPod . . . . . . . . . . . . 38Playing the Radio . . . . . . . . . . . . . . . . 14PortUSB . . . . . . . . . . . . . . . . . . . . . . . . . . . .36
Problems with RouteGuidance . . . . . . . . . . . . . . . . . . . . . . 77
RRadioHD . . . . . . . . . . . . . . . . . . . . . . . . . . . . .18
RadiosAM-FM Radio . . . . . . . . . . . . . . . . . . .14CD/DVD Player . . . . . . . . . . . . . . . . .29Satellite . . . . . . . . . . . . . . . . . . . . . . . . .19
Rear Seat EntertainmentSystem . . . . . . . . . . . . . . . . . . . . . . . . . 41
Remote Control . . . . . . . . . . . . . . . . . . 45Ringtones . . . . . . . . . . . . . . . . . . . . . . . 94
SSatellite Radio . . . . . . . . . . . . . . . . . . . 19Scroll Features . . . . . . . . . . . . . . . . . . 54Settings . . . . . . . . . . . . . . . . . . . . . . . . . 66SiriusXM Categories . . . . . . . . . . . . . 19SiriusXM Messages . . . . . . . . . . . . . 19SiriusXM® NavTraffic(If Equipped) . . . . . . . . . . . . . . . . . . . 71
Software Updates . . . . . . . . . . . . . . . 13Steering Wheel Controls . . . . . . . . . . 7Stitcher Troubleshooting . . . . . . . . . 27Stitcher® . . . . . . . . . . . . . . . . . . . . . . . . . 25Storing Radio Station Presets . . . 17Symbols, Navigation . . . . . . . . . . . . . 54SystemInfotainment . . . . . . . . . . . . . . . . . . . . . 3
System Needs Service, If . . . . . . . . 77

Black plate (4,1)Acadia/Acadia Denali, Enclave, Traverse Infotainment System - 2013 - CRC - 1/3/13
i-4 INDEX
UUpdatesMap Data . . . . . . . . . . . . . . . . . . . . . . .77Software . . . . . . . . . . . . . . . . . . . . . . . .13
USB MP3 Player and USBDrives . . . . . . . . . . . . . . . . . . . . . . . . . . 36
USB Port . . . . . . . . . . . . . . . . . . . . . . . . 36Using the System . . . . . . . . . . . . . . . . . 8Using Voice Recognition . . . . . .84, 78
VVehiclePositioning . . . . . . . . . . . . . . . . . . . . .76
Video Screen . . . . . . . . . . . . . . . . . . . . 45ViewingPictures . . . . . . . . . . . . . . . . . . . . . . . .28
Voice Recognition . . . . . . . . . . . .78, 84Voice Recognition for MyMedia . . . . . . . . . . . . . . . . . . . . . . . . . . 81
Voice Recognition forNavigation . . . . . . . . . . . . . . . . . . . . . 81
Voice Recognition for theRadio . . . . . . . . . . . . . . . . . . . . . . . . . . 80
WWeather (If Equipped) . . . . . . . . . . . 74Weather Commands . . . . . . . . . . . . . 82Website Information . . . . . . . . . . . . . 14