Industrial Panel Roof and Wall Detailing Manual
35
Industrial Panel Roof and Wall Detailing Manual Corporate Office: 3449 Hempland Road, Lancaster, PA 17601 (800) 477-2741 Architectural Systems: 308 Alabama Blvd., Jackson, GA 30233 (800) 884-4484 Additional Locations: 2402 Industry Way, Cedar City, UT 84720 (800) 432-2725 Route 24 West, Gridley, IL 71744 (800) 451-3974 Route 3, Box 632, Idabel, OK 74745 (800) 926-8509 658 Boekel Road, Rathdrum, ID 83858 (888) 432-2725 1820 East 26th St., Marshfield, WI 54449 (800) 528-0878 Highway 41 South & 55 Lamb Loop Road, Tifton, GA 31793 (800) 749-8144 World Wide Web Address: www.fabral.com E-mail Address: [email protected] NOTE: The details in this manual are for through-fastened panels only. Fabral’s standing seam panels have their own manuals. Refer to the respective standing seam panel manual for installation instructions and details. Due to product improvements, changes and other factors, Fabral reserves the right to change or delete information herein without prior notice. 9832-148 11/02 I-220 ©2001 Fabral
Transcript of Industrial Panel Roof and Wall Detailing Manual
Industrial Panel Roof and Wall
Detailing Manual
Corporate Office: 3449 Hempland Road, Lancaster, PA 17601 (800) 477-2741
Architectural Systems:
308 Alabama Blvd., Jackson, GA 30233 (800) 884-4484
Additional Locations: 2402 Industry Way, Cedar City, UT 84720 (800) 432-2725
Route 24 West, Gridley, IL 71744 (800) 451-3974 Route 3, Box 632, Idabel, OK 74745 (800) 926-8509
658 Boekel Road, Rathdrum, ID 83858 (888) 432-2725 1820 East 26th St., Marshfield, WI 54449 (800) 528-0878
Highway 41 South & 55 Lamb Loop Road, Tifton, GA 31793 (800) 749-8144
World Wide Web Address: www.fabral.com E-mail Address: [email protected]
NOTE: The details in this manual are for through-fastened panels only. Fabral’s standing seam panels have their own manuals. Refer to the respective standing seam panel manual for installation instructions and details. Due to product improvements, changes and other factors, Fabral reserves the right to change or delete information herein without prior notice. 9832-148 11/02 I-220 ©2001 Fabral
TABLE OF CONTENTS
Panel profiles 3 UNINSULATED ROOF DETAILS Ridge (unvented) 6 Ridge (vented) 7 Endwall 8 Eave without gutter 9 Eave with gutter 10 Gable 11 Sidewall 12 Valley 13 Penetration 14 UNINSULATED WALL DETAILS Uninsulated wall section 16 Opening in sidewall with horizontal panels 17 Opening in sidewall with vertical panels 18 Wall expansion joint 19 Base 20 Outside corner with vertical panels 21 Inside corner with vertical panels 22 Outside panel with horizontal panels 23 Inside corner with horizontal panels 24 Sidewall 25 Sill 26 Jamb 27 INSULATED WALL DETAILS Insulated wall assembly 28 Inside corner 29 Outside corner 30 Sidewall (low and high) 31 Insulated wall section (side view) 32 Insulated wall section (end view) 33 VARIOUS Panel installation sequence and endlap 34 Maintenance instruction 35

4" RIB
7/8" CORRUGATED
1/2" CORRUGATED
35 9/16" OVERALL32" COVERAGE
4" 1"
6"
12" COVERAGE
1 7/16"
12" COVERAGE
1 7/16"
32" COVERAGE36 1/4" OVERALL
2 2/3"
41 1/4" OVERALL
37 1/3" COVERAGE
2 2/3" 1/2"
7/8"
24 3/4" OVERALL24" COVERAGE
24" COVERAGE
24 3/4" OVERALL
2 1/2"
1 1/2"
13 3/8" OVERALL
13 3/8" OVERALL
CFP 6
CFP 12
LP-15
LP-25
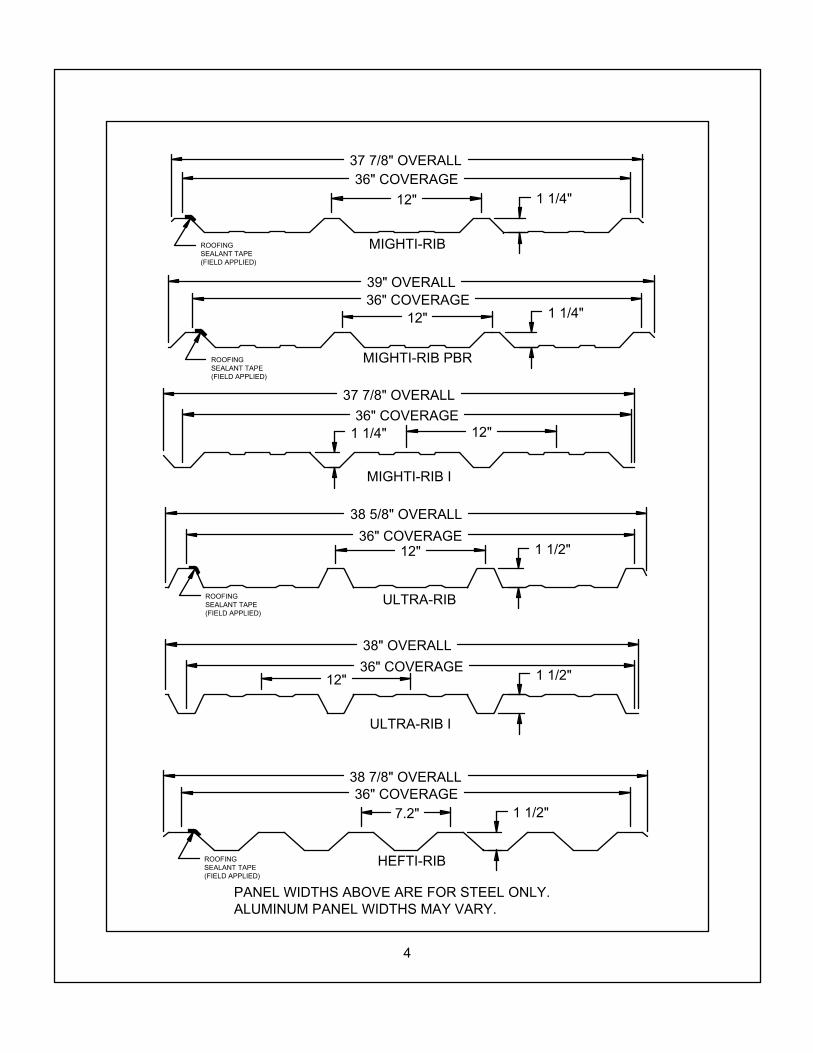
PANEL WIDTHS ABOVE ARE FOR STEEL ONLY. ALUMINUM PANEL WIDTHS MAY VARY.
4
ROOFINGSEALANT TAPE(FIELD APPLIED)
ROOFINGSEALANT TAPE(FIELD APPLIED)
ROOFINGSEALANT TAPE(FIELD APPLIED)
ROOFINGSEALANT TAPE(FIELD APPLIED)
ULTRA-RIB I
MIGHTI-RIB PBR
ULTRA-RIB
36" COVERAGE7.2"
38 7/8" OVERALL
1 1/2"
36" COVERAGE12"
38 5/8" OVERALL
1 1/2"
12"
36" COVERAGE
36" COVERAGE12"
12"36" COVERAGE
37 7/8" OVERALL
37 7/8" OVERALL
39" OVERALL
38" OVERALL
36" COVERAGE12" 1 1/2"
MIGHTI-RIB I
MIGHTI-RIB
HEFTI-RIB
PANEL WIDTHS ABOVE ARE FOR STEEL ONLY. ALUMINUM PANEL WIDTHS MAY VARY.
1 1/4"
1 1/4"
1 1/4"
ROOFINGSEALANT TAPE(FIELD APPLIED)
ROOFINGSEALANT TAPE(FIELD APPLIED)
ROOFINGSEALANT TAPE(FIELD APPLIED)
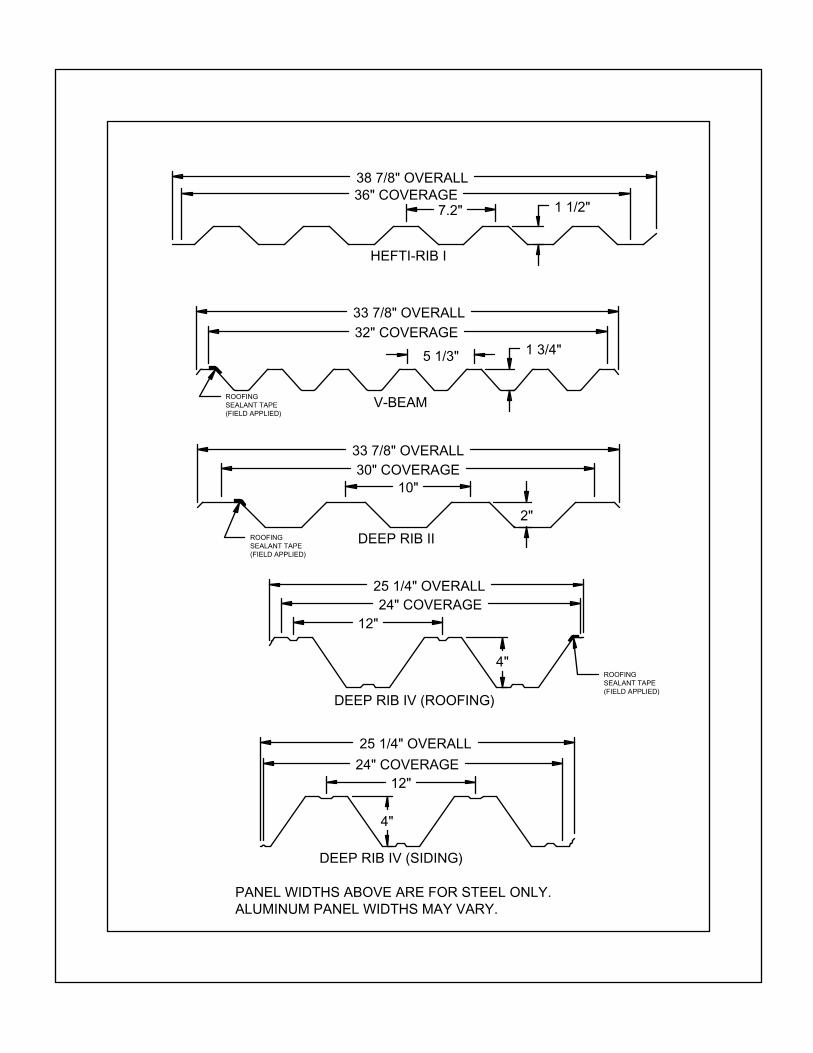
HEFTI-RIB I
25 1/4" OVERALL
12"24" COVERAGE
4"
25 1/4" OVERALL24" COVERAGE
12"
4"
30" COVERAGE33 7/8" OVERALL
10"
2"
32" COVERAGE
33 7/8" OVERALL
5 1/3"
38 7/8" OVERALL36" COVERAGE
7.2"
1 3/4"
1 1/2"
V-BEAM
DEEP RIB II
DEEP RIB IV (ROOFING)
DEEP RIB IV (SIDING)
PANEL WIDTHS ABOVE ARE FOR STEEL ONLY. ALUMINUM PANEL WIDTHS MAY VARY.
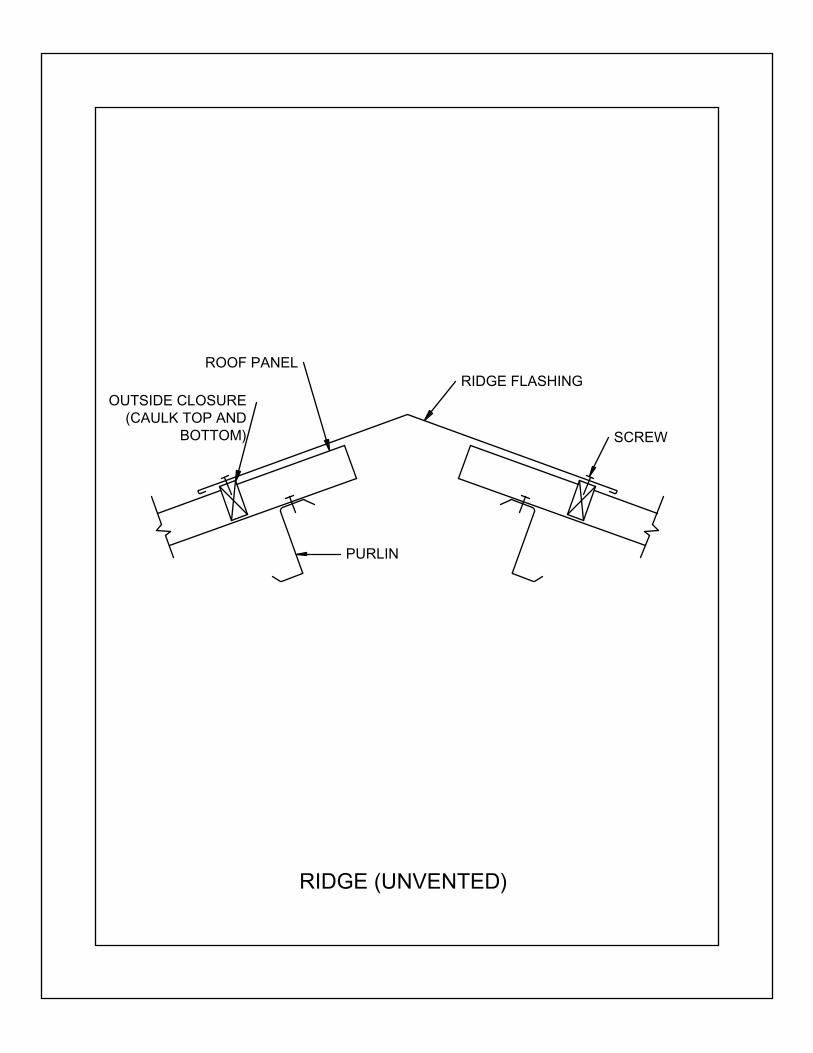
RIDGE (UNVENTED)
PURLIN
ROOF PANEL
OUTSIDE CLOSURE(CAULK TOP AND
BOTTOM)
RIDGE FLASHING
SCREW
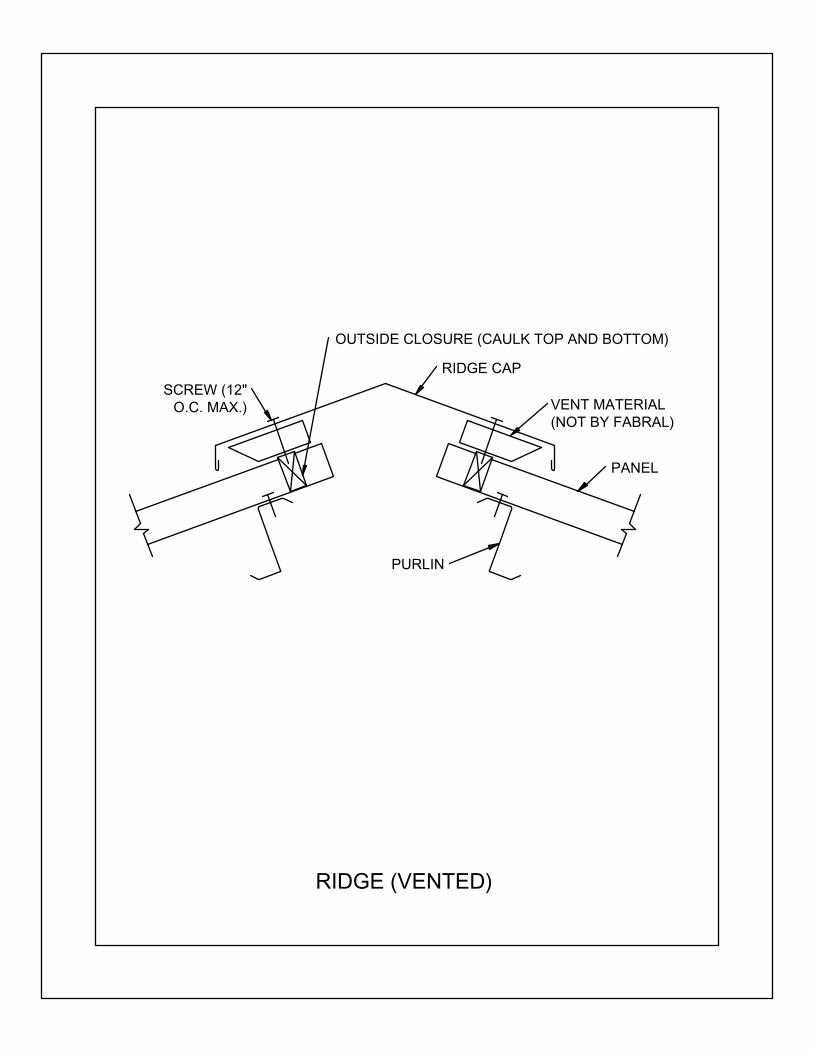
PANEL
PURLIN
RIDGE CAP
VENT MATERIAL(NOT BY FABRAL)
OUTSIDE CLOSURE (CAULK TOP AND BOTTOM)
SCREW (12"O.C. MAX.)
RIDGE (VENTED)
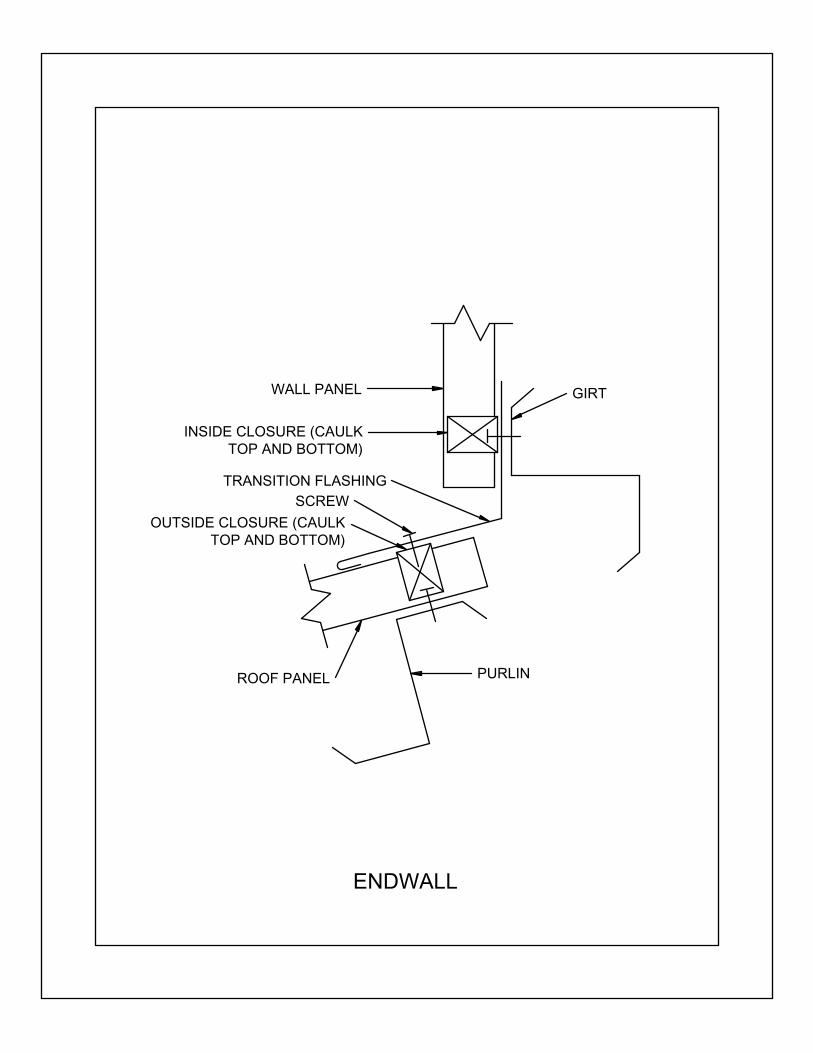
ENDWALL
WALL PANEL GIRT
TRANSITION FLASHING
ROOF PANEL PURLIN
INSIDE CLOSURE (CAULKTOP AND BOTTOM)
OUTSIDE CLOSURE (CAULKTOP AND BOTTOM)
SCREW

EAVE WITHOUT GUTTER
OUTSIDE CLOSURE (CAULKTOP AND BOTTOM)
INSIDE CLOSURE (CAULKTOP AND BOTTOM)
WALL PANEL
EAVE FLASHING
ROOF PANEL

EAVE WITH GUTTER
OUTSIDE CLOSURE (CAULKTOP AND BOTTOM)
1" MINIMUM
GUTTER SUPPORT
INSIDE CLOSURE (CAULKTOP AND BOTTOM)
ROOF PANEL
GUTTER
WALL PANEL
EAVE STRUT
10
PURLIN
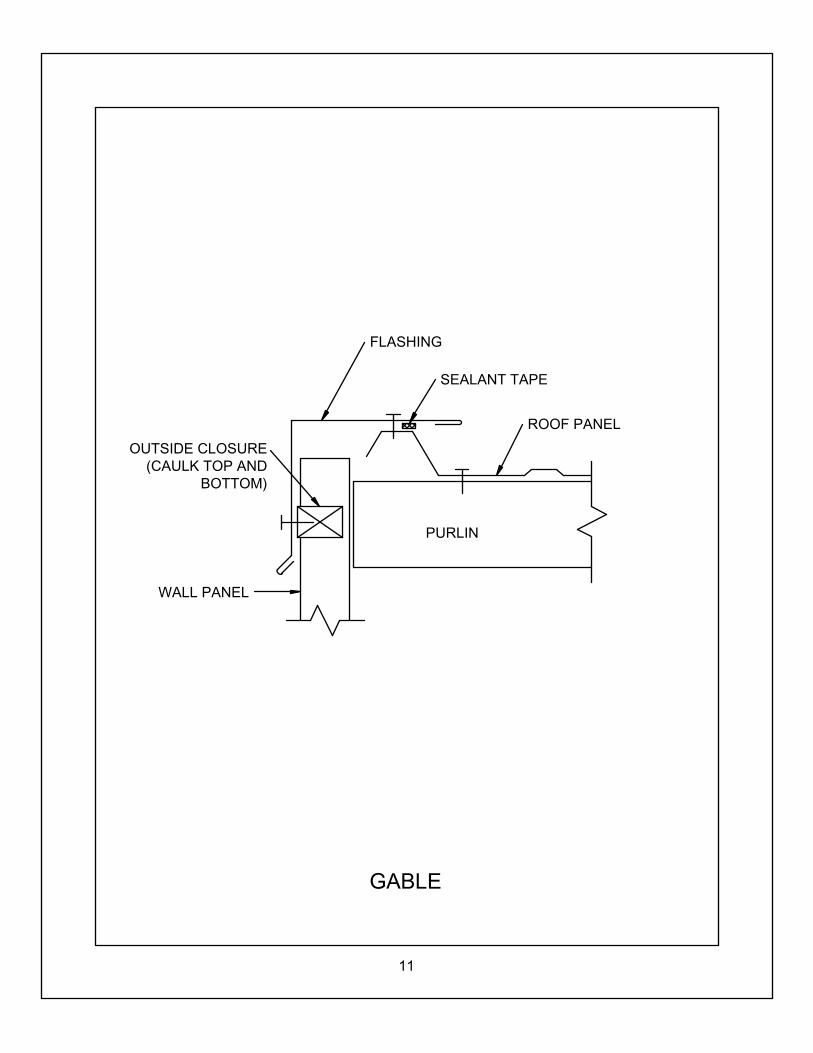
GABLE
FLASHING
SEALANT TAPE
ROOF PANEL
WALL PANEL
OUTSIDE CLOSURE(CAULK TOP AND
BOTTOM)
11
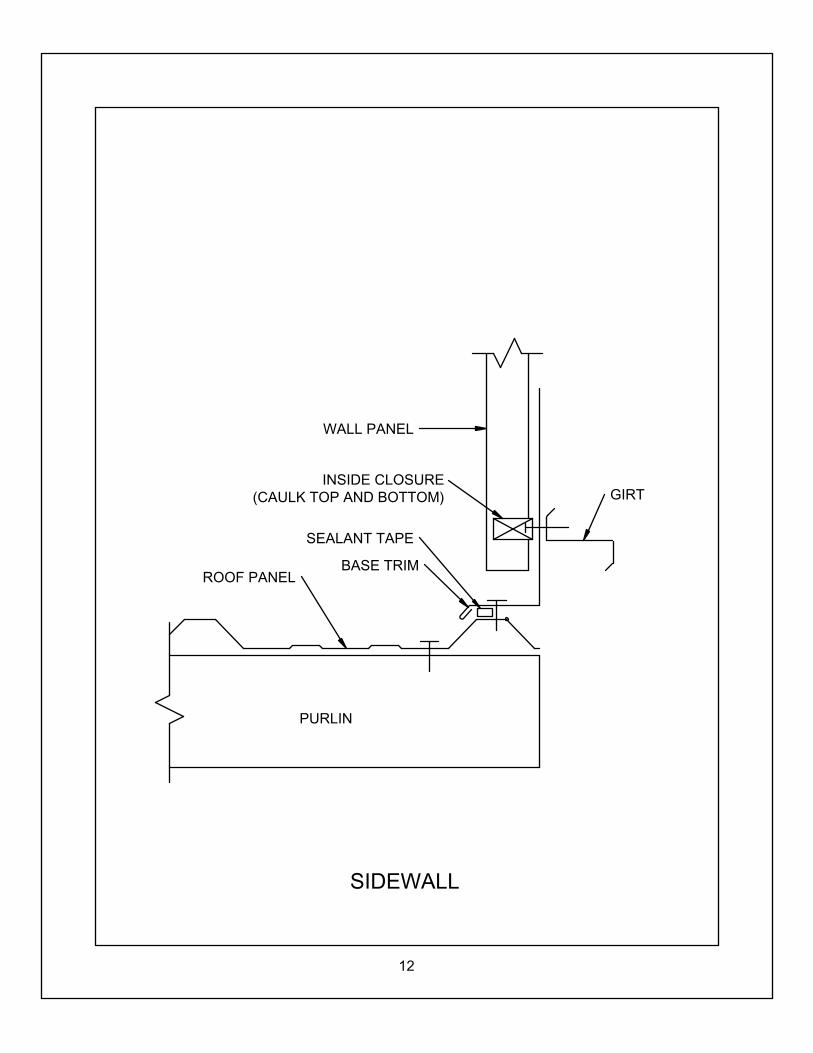
SIDEWALL
PURLIN
SEALANT TAPE
GIRT
WALL PANEL
INSIDE CLOSURE(CAULK TOP AND BOTTOM)
BASE TRIMROOF PANEL
12
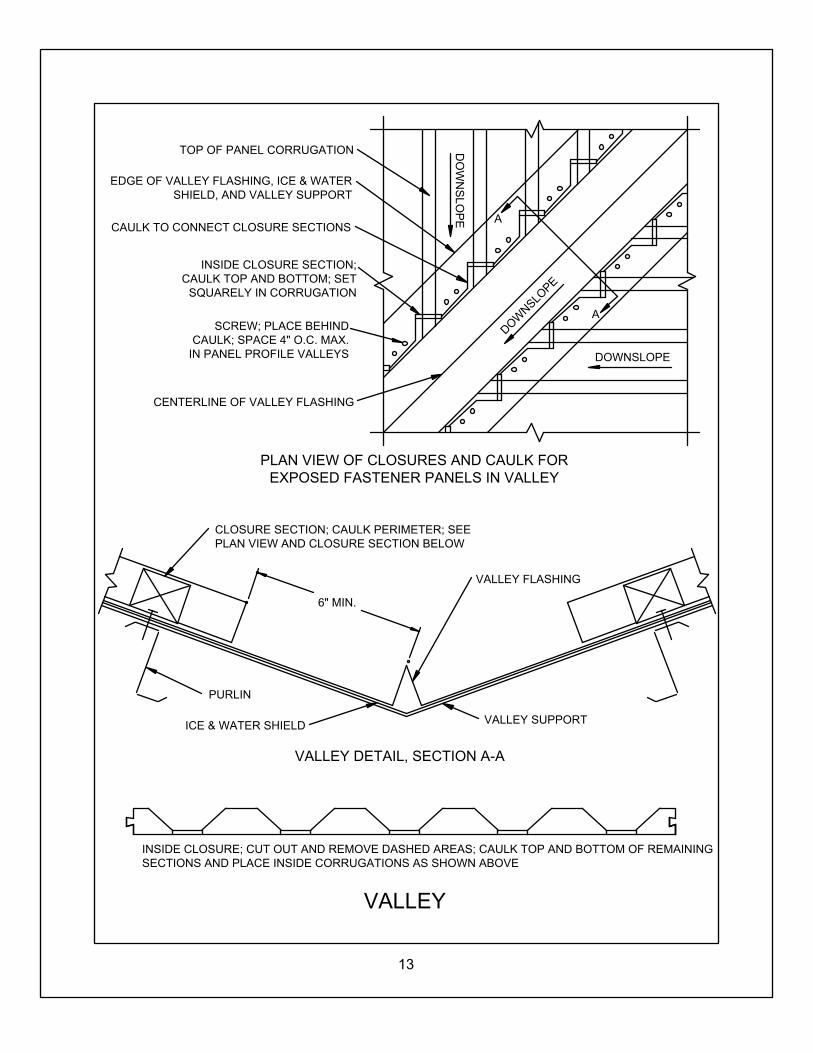
VALLEY
6" MIN.
PURLIN
VALLEY SUPPORTICE & WATER SHIELD
PLAN VIEW OF CLOSURES AND CAULK FOR EXPOSED FASTENER PANELS IN VALLEY
DOWNSLOPE
INSIDE CLOSURE SECTION;CAULK TOP AND BOTTOM; SET
SQUARELY IN CORRUGATION
DOWNSLO
PE
CENTERLINE OF VALLEY FLASHING
TOP OF PANEL CORRUGATION
EDGE OF VALLEY FLASHING, ICE & WATERSHIELD, AND VALLEY SUPPORT
CAULK TO CONNECT CLOSURE SECTIONS
DO
WN
SLO
PE
INSIDE CLOSURE; CUT OUT AND REMOVE DASHED AREAS; CAULK TOP AND BOTTOM OF REMAINING SECTIONS AND PLACE INSIDE CORRUGATIONS AS SHOWN ABOVE
SCREW; PLACE BEHINDCAULK; SPACE 4" O.C. MAX.
IN PANEL PROFILE VALLEYS
A
A
VALLEY DETAIL, SECTION A-A
CLOSURE SECTION; CAULK PERIMETER; SEEPLAN VIEW AND CLOSURE SECTION BELOW
VALLEY FLASHING
13
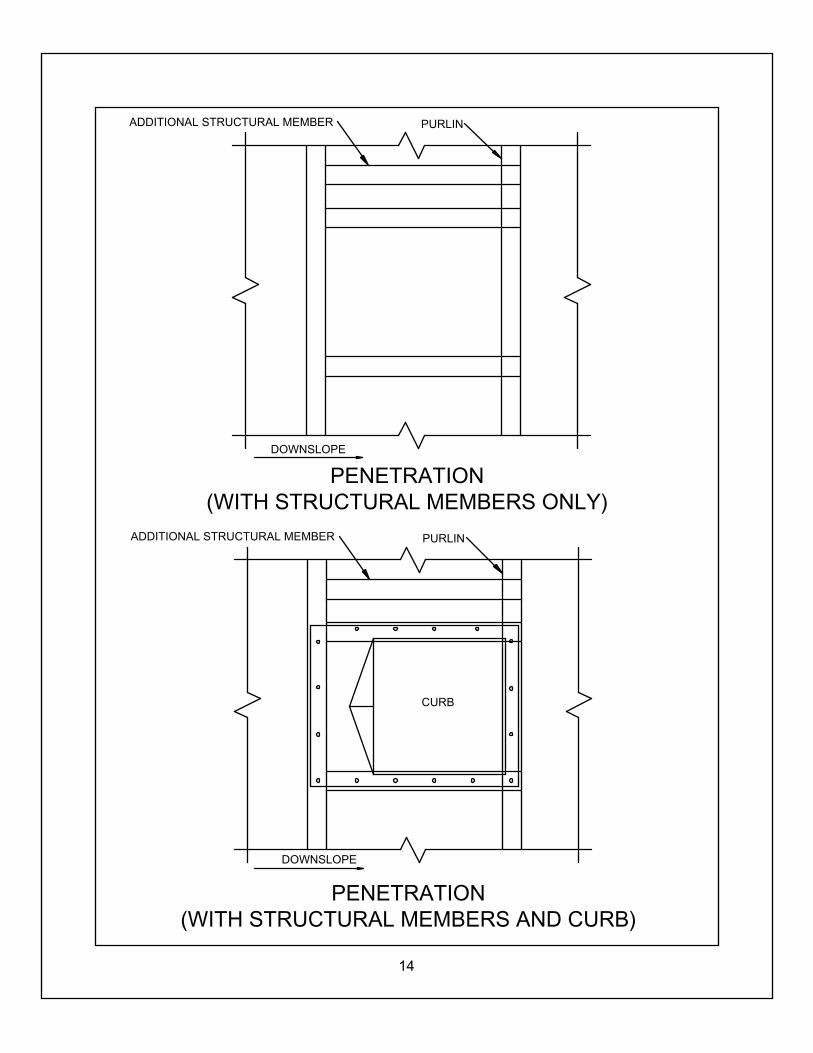
DOWNSLOPE
DOWNSLOPE
CURB
PENETRATION(WITH STRUCTURAL MEMBERS ONLY)
PENETRATION(WITH STRUCTURAL MEMBERS AND CURB)
PURLINADDITIONAL STRUCTURAL MEMBER
ADDITIONAL STRUCTURAL MEMBER PURLIN
14
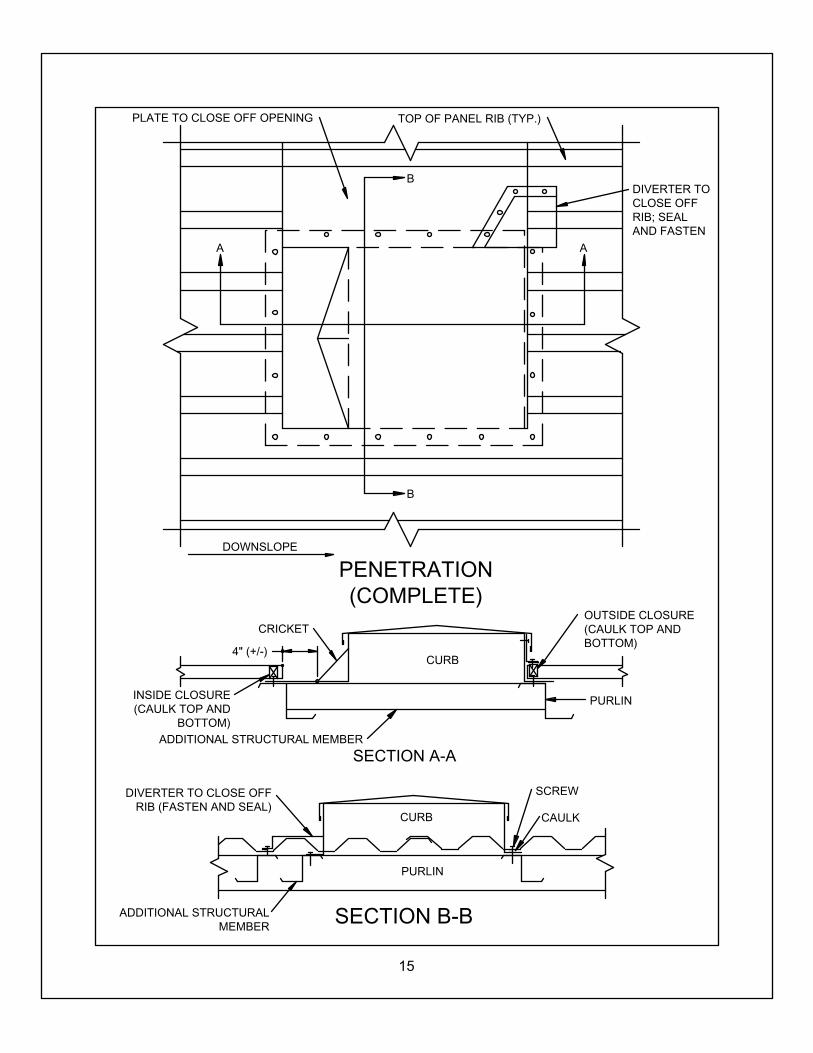
PURLIN
DOWNSLOPE
SECTION A-A
A
B
SECTION B-B
4" (+/-)CURB
CURB
PENETRATION(COMPLETE)
B
A
PURLIN
TOP OF PANEL RIB (TYP.)PLATE TO CLOSE OFF OPENING
DIVERTER TOCLOSE OFFRIB; SEALAND FASTEN
OUTSIDE CLOSURE(CAULK TOP ANDBOTTOM)
ADDITIONAL STRUCTURAL MEMBER
CRICKET
INSIDE CLOSURE(CAULK TOP AND
BOTTOM)
DIVERTER TO CLOSE OFFRIB (FASTEN AND SEAL)
SCREW
CAULK
ADDITIONAL STRUCTURALMEMBER
15
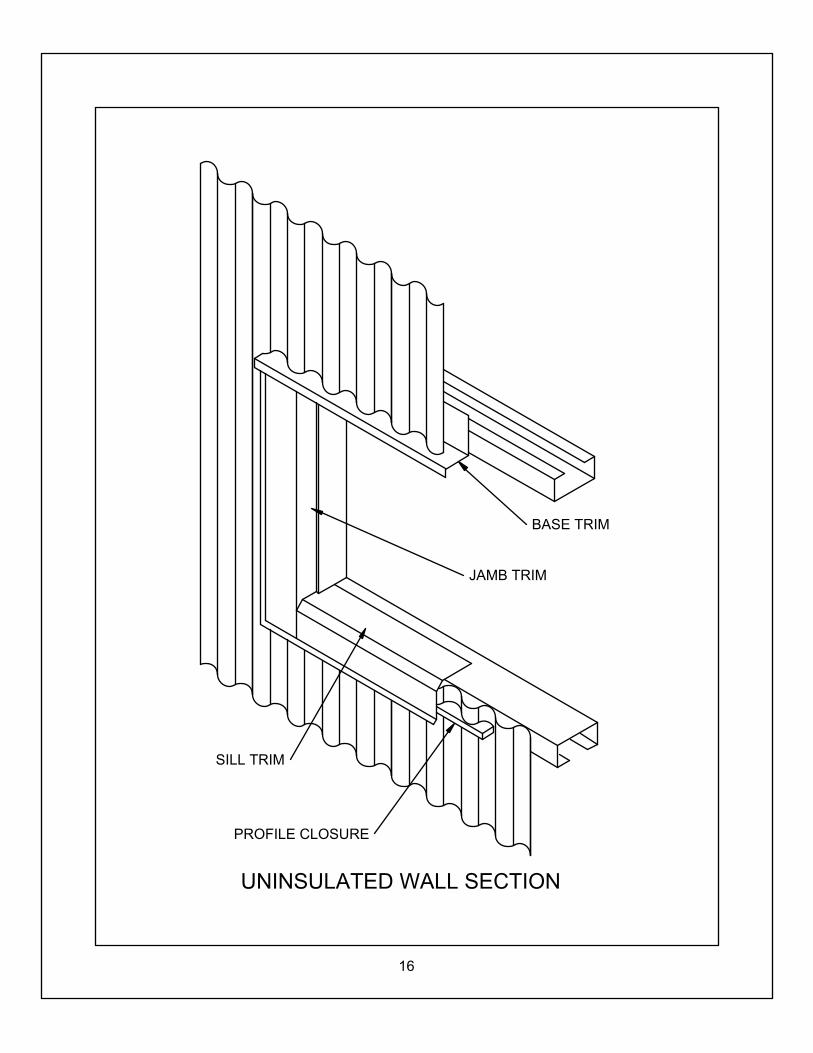
UNINSULATED WALL SECTION
BASE TRIM
JAMB TRIM
SILL TRIM
PROFILE CLOSURE
16

WALL PANEL
WALL PANEL
J-FLASHING
WALL PANEL
SCREW
OUTSIDE CLOSURE(CAULK TOP AND
BOTTOM)
DRIP FLASHING (CAULKAND ANGLE DOWNWARD)
SCREW (12" O.C.)
SECTION C-C
SECTION A-A
NOTE: IF THE PANEL "ENDS" ON THE RIB AT THE OPENING FOR SECTIONS A-A OR B-B, ATTACH A "Z" THAT IS AS TALL AS THE PANEL IS DEEP TO THE GIRT. USE THE APPROPRIATE FLASHING AS SHOWN FOR SECTIONS A-A AND B-B. ATTACH THE PANEL TO THE "Z". SEE DETAIL BELOW.
SECTION B-B
GIRT
ELEVATION OF OPENING IN SIDEWALL WITH HORIZONTAL PANELS
B
B
CC
A
A
SCREW (12" O.C.)
J-FLASHING (CAULKAND ANGLEDOWNWARD)
FRAME AROUNDOPENING
GIRT
WALL PANEL
Z
17

SECTION A-A
SCREW (12" O.C.)DRIP FLASHING(ANGLE DOWNWARD)
WALL PANEL
GIRT
SECTION B-B
SCREW (12" O.C.)
WALL PANEL
J-FLASHING
SCREW (12" O.C.)J-FLASHING (ANGLEDOWNWARD)
GIRT
SECTION C-C
WALL PANEL
ELEVATION OF OPENING IN SIDEWALL WITH VERTICAL PANELS
B B
A
A
C
C
OUTSIDE CLOSURE;CAULK PERIMETER
INSIDE CLOSURE;CAULK TOP AND BOTTOM
UNIVERSAL CLOSURE; CAULK TOP ANDBOTTOM; CLOSURE IS NOT NECESSARYIF PANEL "ENDS" WITH RIB AT FLASHING
BUT MUST BE CAULKED AT FLASHING
18
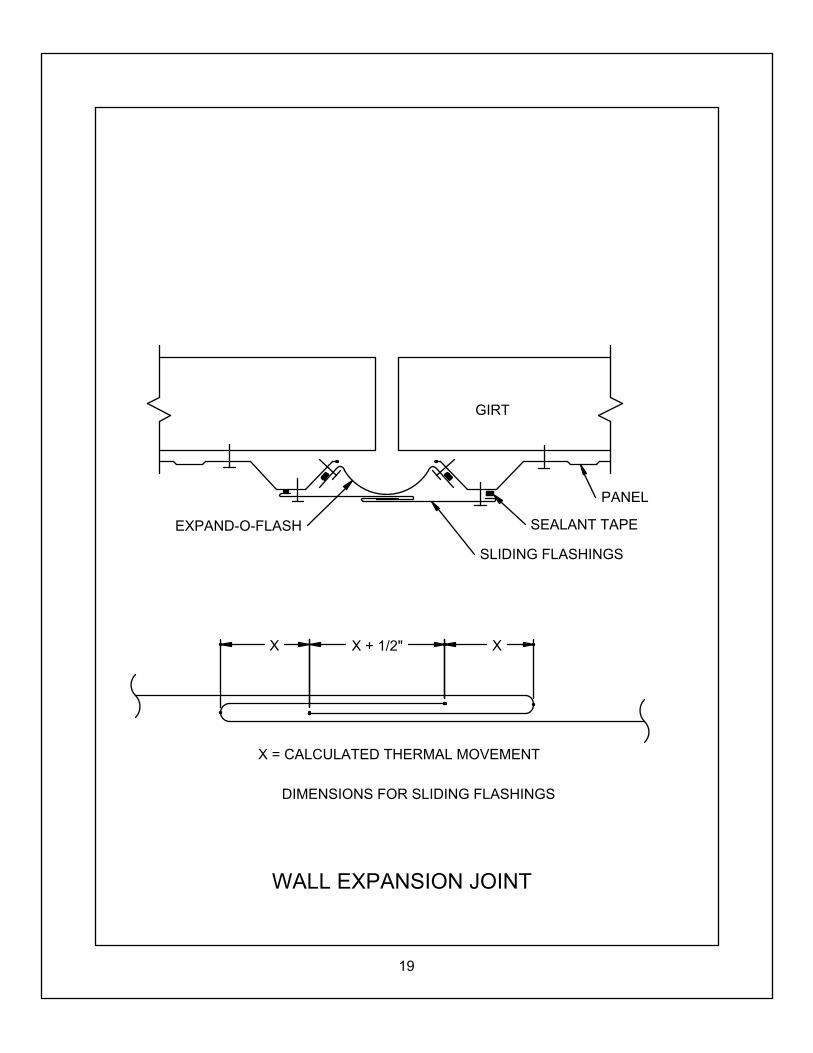
GIRT
DIMENSIONS FOR SLIDING FLASHINGS
X = CALCULATED THERMAL MOVEMENT
WALL EXPANSION JOINT
X X + 1/2" X
SLIDING FLASHINGS
EXPAND-O-FLASH SEALANT TAPE
PANEL
19
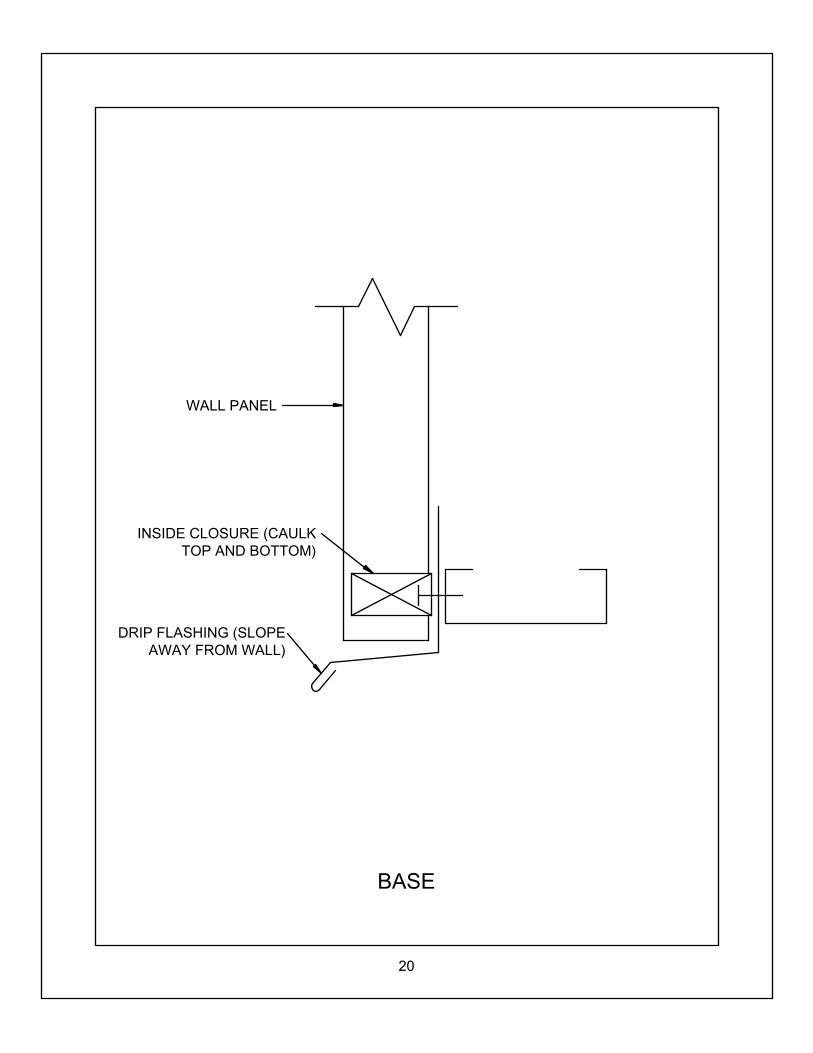
BASE
INSIDE CLOSURE (CAULKTOP AND BOTTOM)
DRIP FLASHING (SLOPEAWAY FROM WALL)
WALL PANEL
20
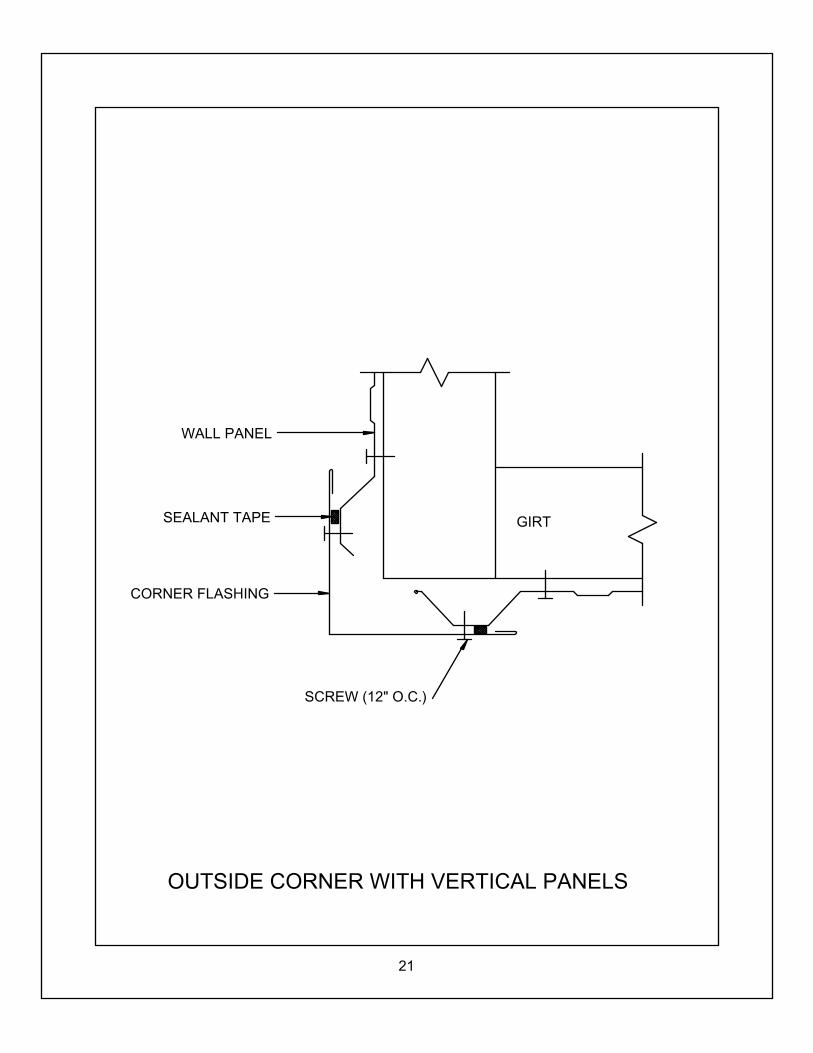
GIRT
OUTSIDE CORNER WITH VERTICAL PANELS
WALL PANEL
SEALANT TAPE
CORNER FLASHING
SCREW (12" O.C.)
21
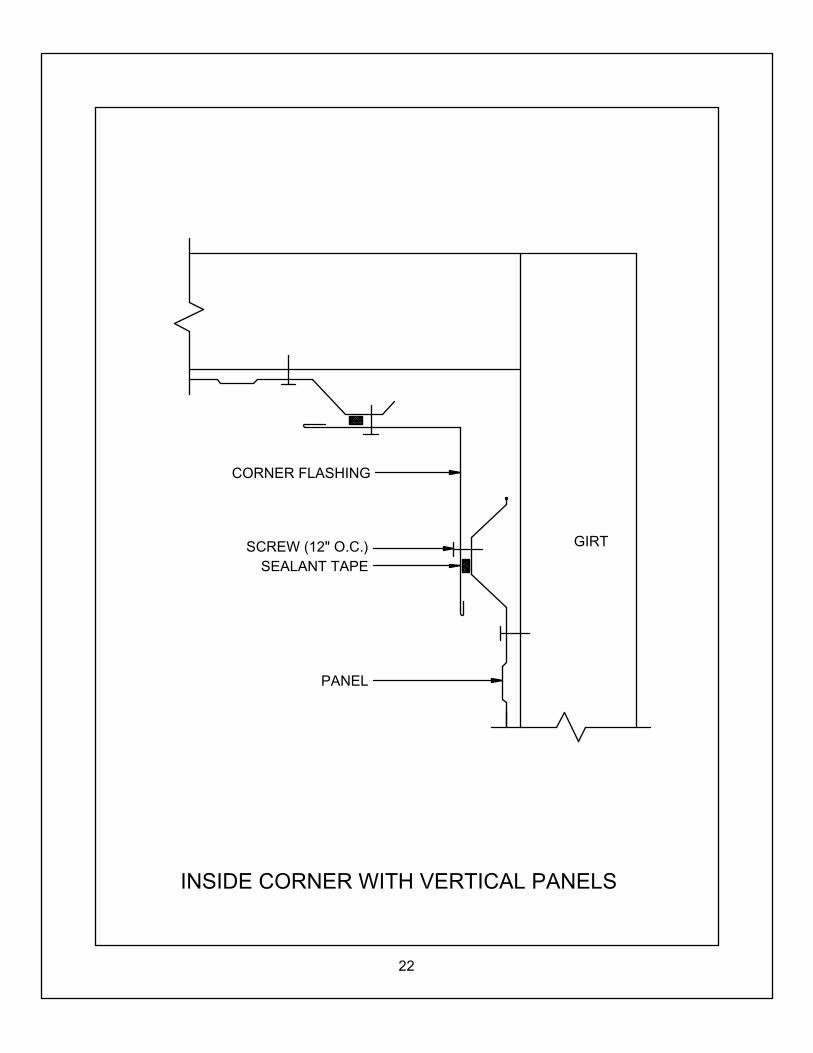
GIRT
INSIDE CORNER WITH VERTICAL PANELS
CORNER FLASHING
SCREW (12" O.C.)SEALANT TAPE
PANEL
22
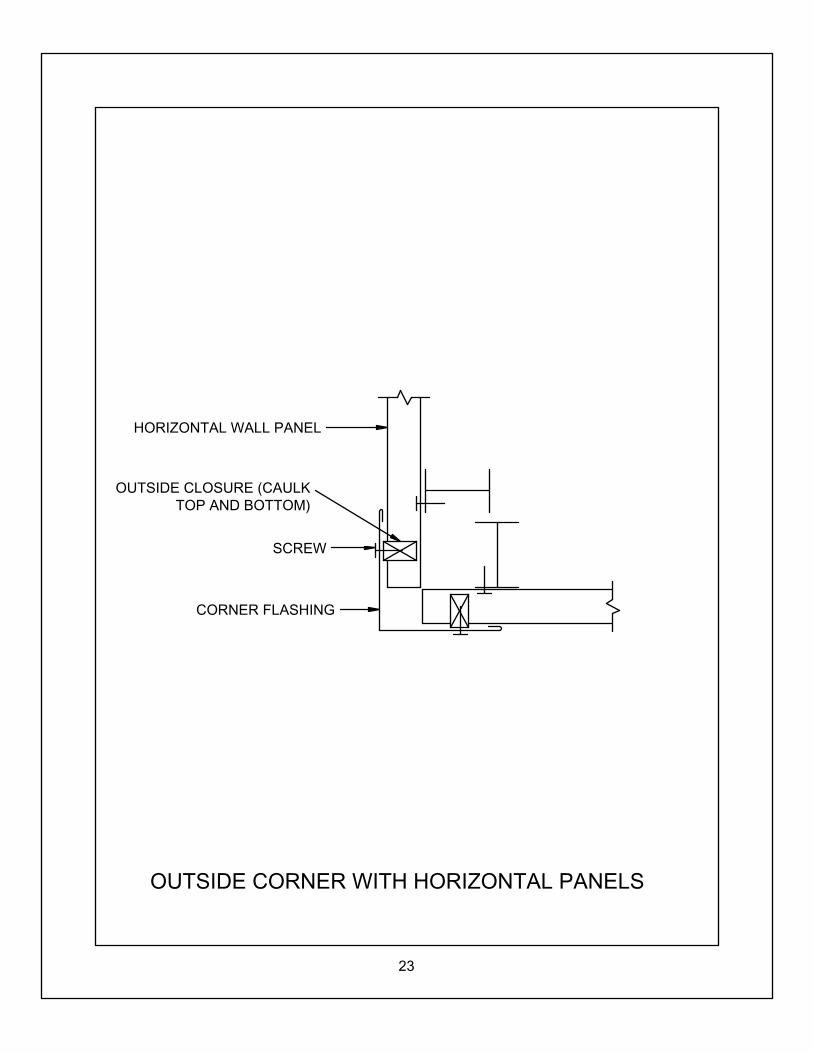
OUTSIDE CORNER WITH HORIZONTAL PANELS
OUTSIDE CLOSURE (CAULKTOP AND BOTTOM)
SCREW
HORIZONTAL WALL PANEL
CORNER FLASHING
23
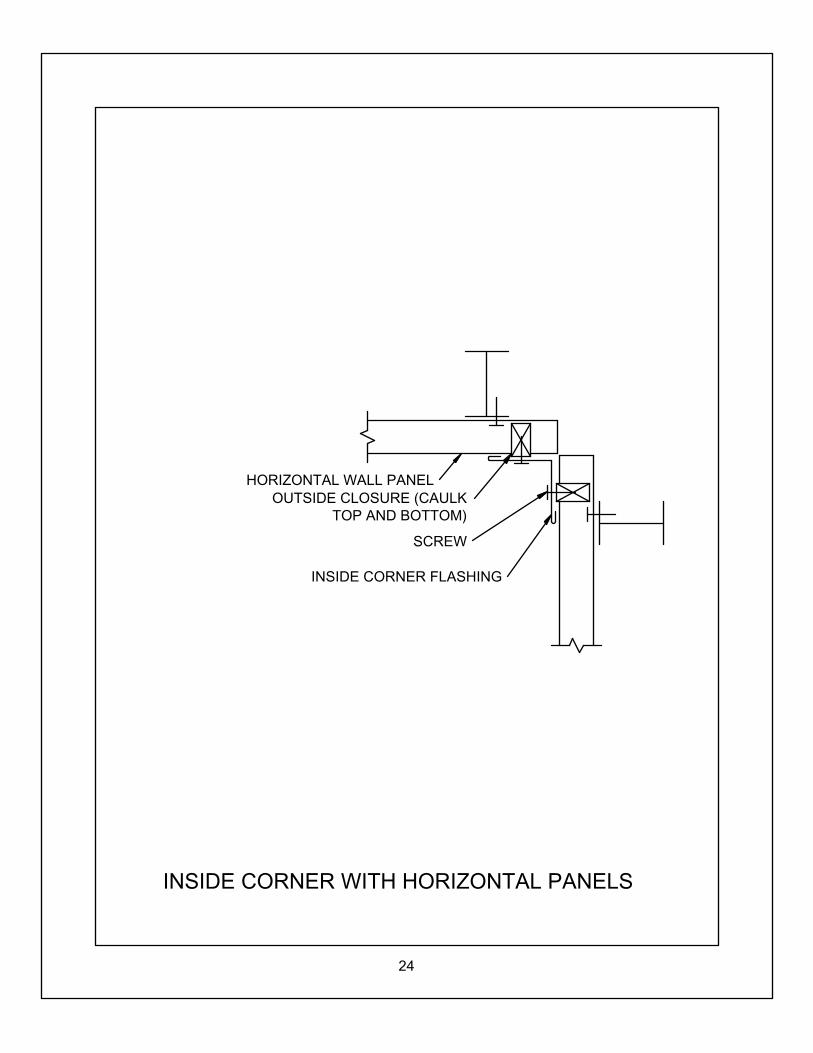
OUTSIDE CLOSURE (CAULKTOP AND BOTTOM)
SCREW
INSIDE CORNER WITH HORIZONTAL PANELS
HORIZONTAL WALL PANEL
INSIDE CORNER FLASHING
24
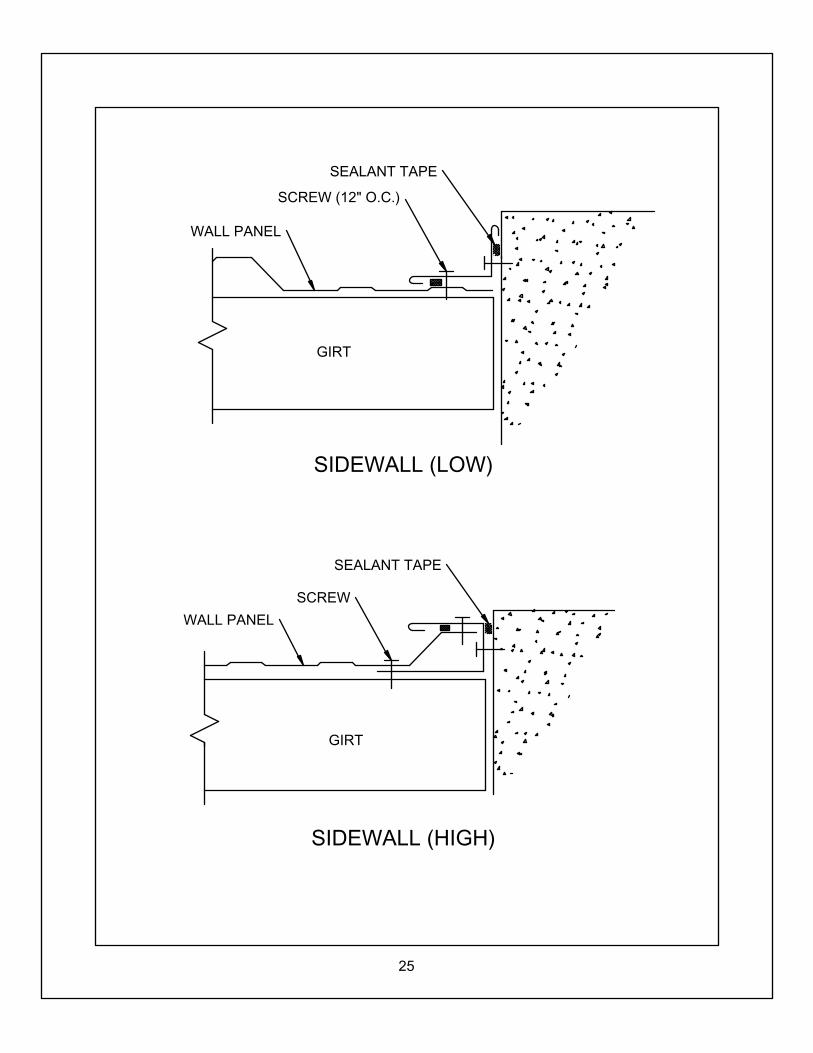
GIRT
GIRT
SIDEWALL (HIGH)
SIDEWALL (LOW)
SEALANT TAPE
SCREW (12" O.C.)
WALL PANEL
WALL PANEL
SCREW
SEALANT TAPE
25
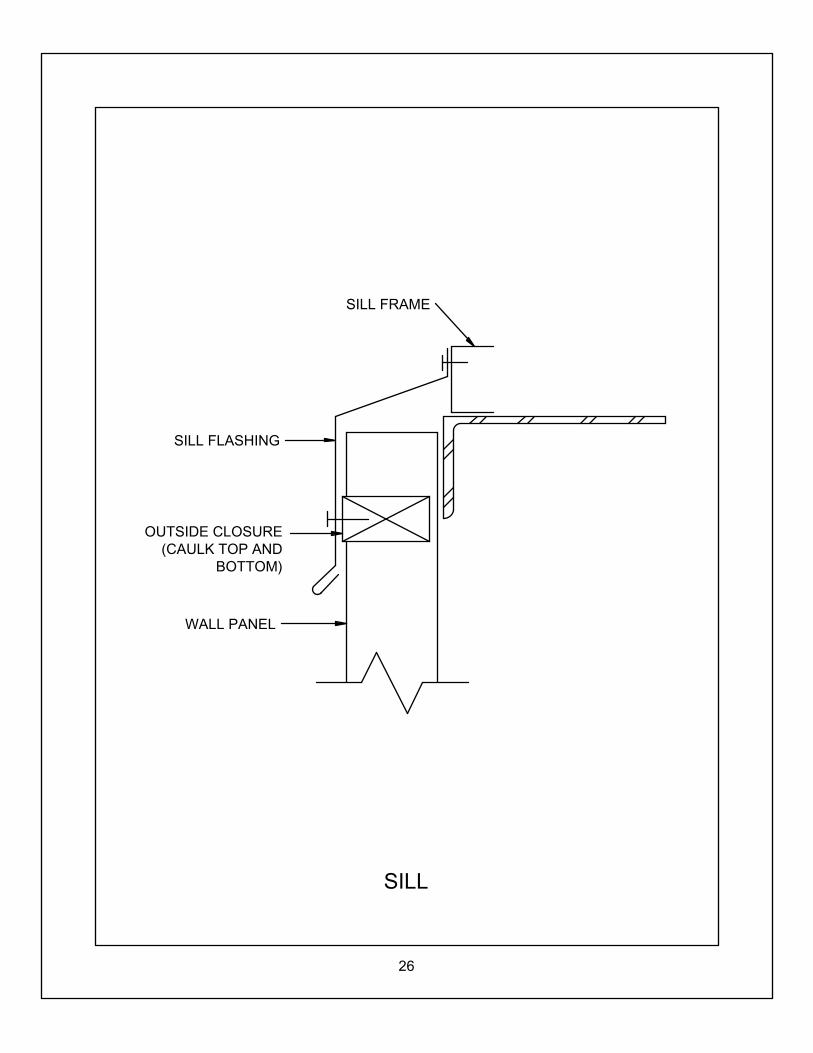
SILL
OUTSIDE CLOSURE(CAULK TOP AND
BOTTOM)
WALL PANEL
SILL FLASHING
SILL FRAME
26
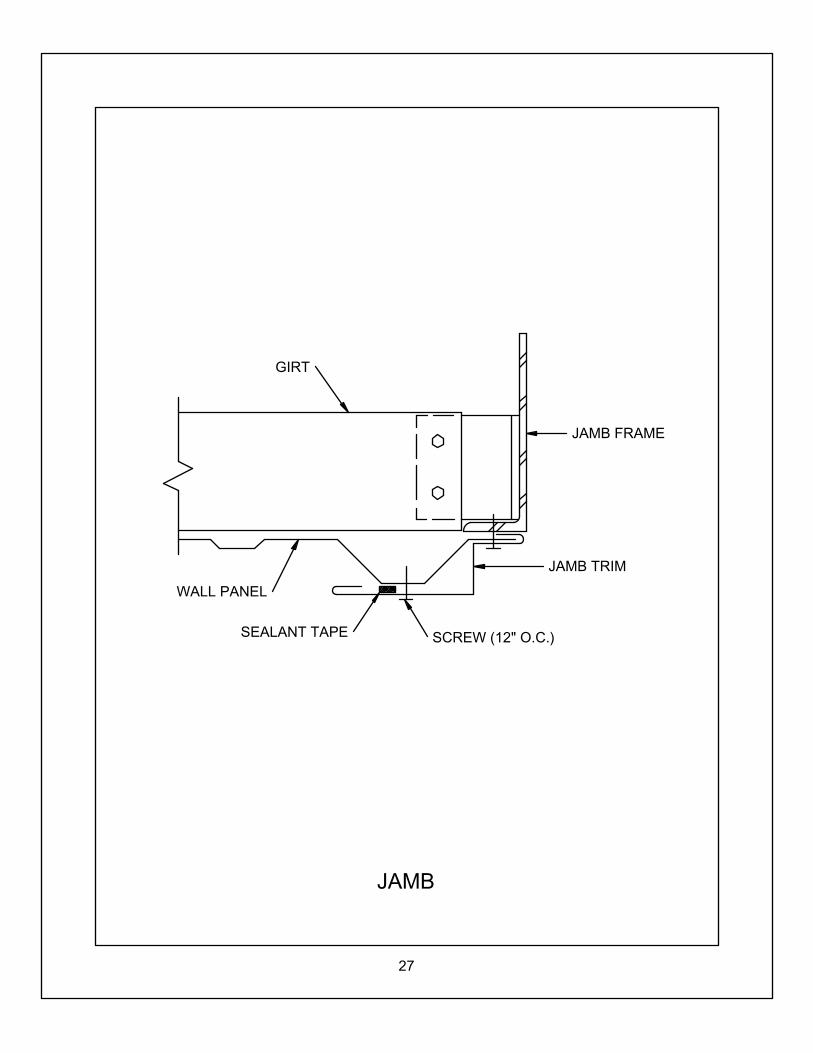
JAMB
GIRT
JAMB FRAME
JAMB TRIM
SCREW (12" O.C.)SEALANT TAPE
WALL PANEL
27
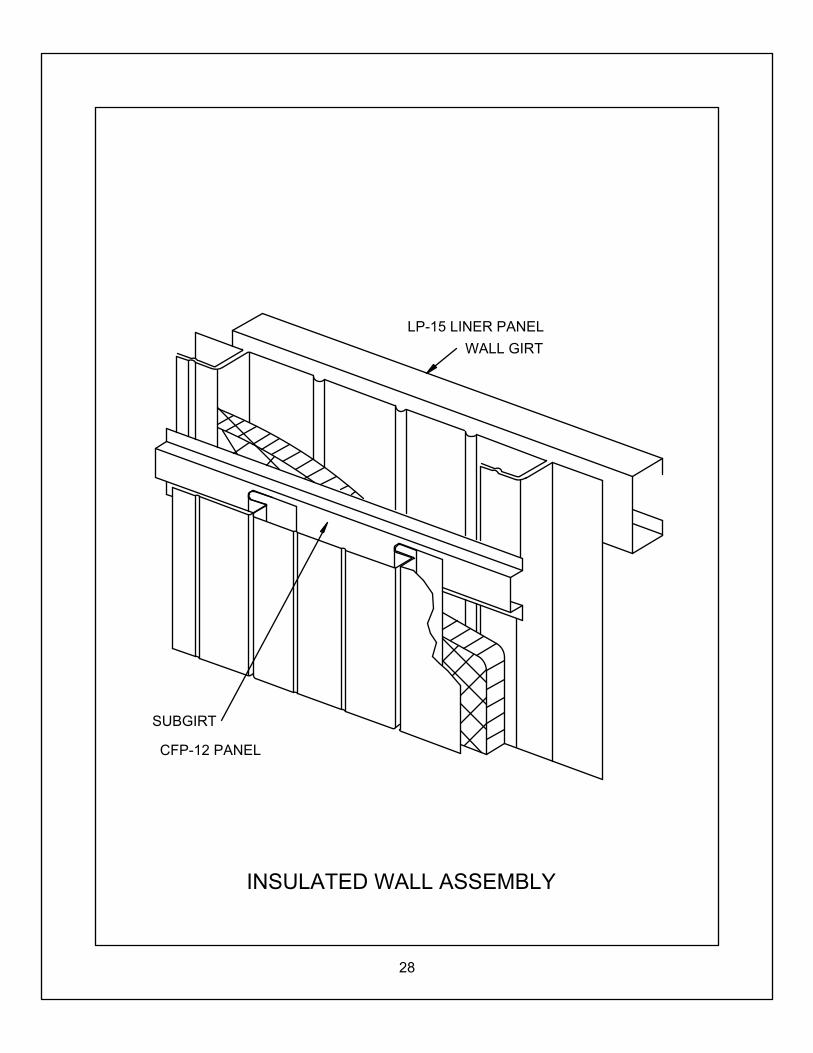
CFP-12 PANEL
SUBGIRT
LP-15 LINER PANEL
WALL GIRT
INSULATED WALL ASSEMBLY
28
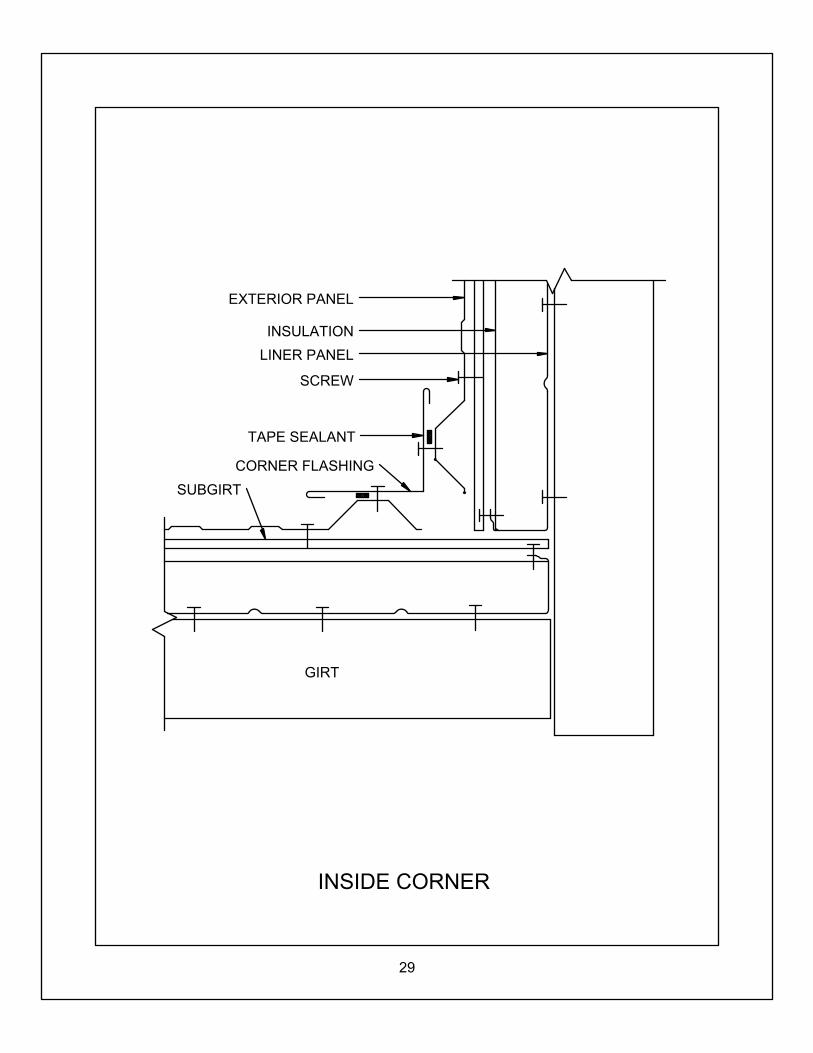
GIRT
INSIDE CORNER
SUBGIRT
CORNER FLASHING
TAPE SEALANT
SCREW
LINER PANEL
INSULATION
EXTERIOR PANEL
29
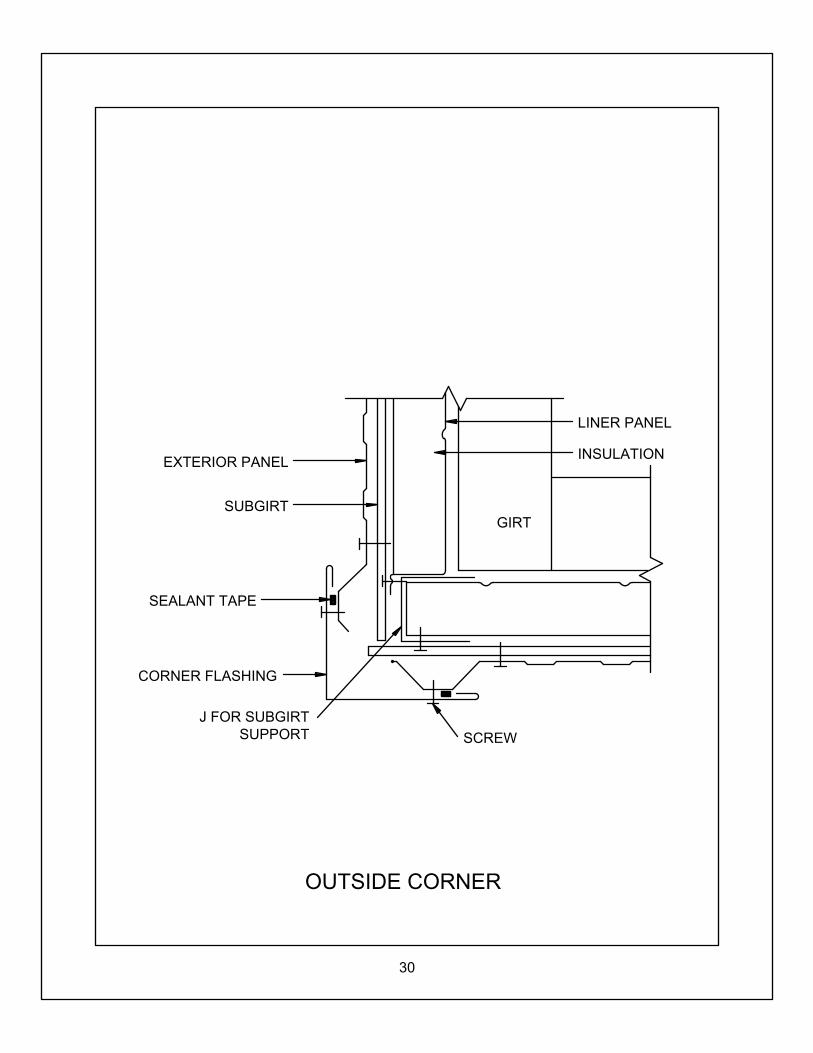
GIRT
OUTSIDE CORNER
LINER PANEL
INSULATIONEXTERIOR PANEL
SUBGIRT
SEALANT TAPE
CORNER FLASHING
SCREW
J FOR SUBGIRTSUPPORT
30

INSULATED WALL SECTION
EXTERIOR PANEL
SUBGIRT
INSULATION
LINER PANEL
4'-0"MAXIMUM
GIRT
NOTE: SUBGIRTS MUST BE PLACED AT EACH MAIN GIRT WITH AT LEAST ONE SUBGIRT BETWEEN MAIN GIRTS. MAXIMUM SUBGIRT SPACING IS 4'-0" O.C.
31
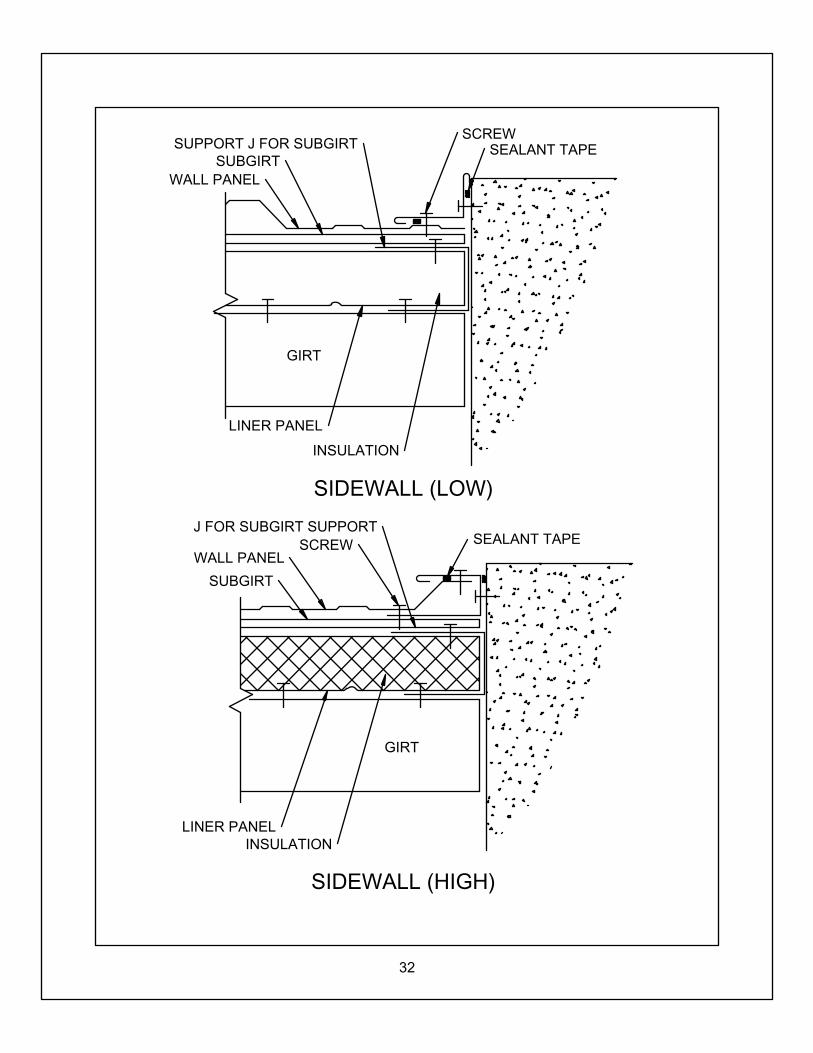
GIRT
GIRT
SIDEWALL (LOW)
SIDEWALL (HIGH)
WALL PANELSUBGIRT
SEALANT TAPESCREW
LINER PANEL
INSULATION
SEALANT TAPESCREWWALL PANEL
SUBGIRT
LINER PANELINSULATION
SUPPORT J FOR SUBGIRT
J FOR SUBGIRT SUPPORT
32
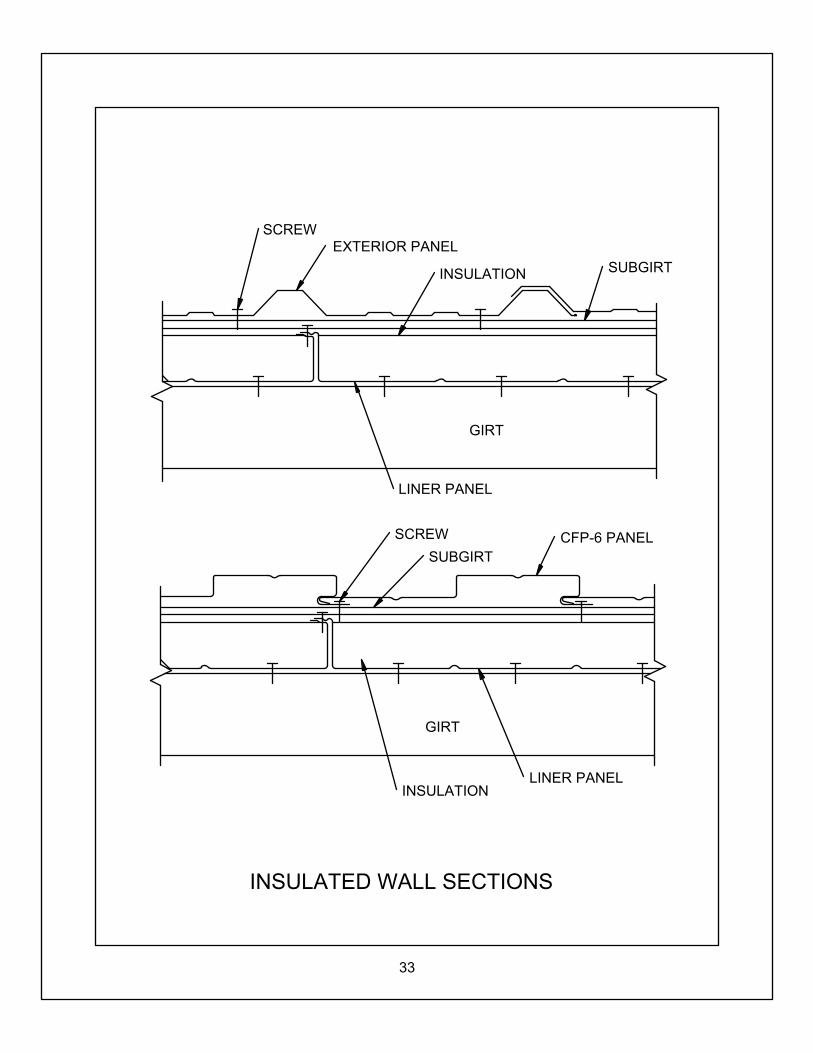
GIRT
GIRT
INSULATED WALL SECTIONS
LINER PANEL
SUBGIRTINSULATION
SCREWEXTERIOR PANEL
CFP-6 PANELSUBGIRT
SCREW
LINER PANELINSULATION
33

PANEL INSTALLATION SEQUENCE
SEALANT TAPE
SLOPE ENDLAP LENGTH2:12 & LESSER 12"3:12 9"4:12 & GREATER 6"
ENDLAP
SCREW
ENDLAPLENGTH
7
8
5 3 1
6 4 2
PREVAILING WIND DIRECTION
DO
WN
SLO
PE
EAVELINE
RIDGELINE
34
MAINTENANCE INSTRUCTIONS FOR FABRAL'S METAL PANELS I. MAINTENANCE BY INSTALLER BEFORE LEAVING JOBSITE. A. REMOVE METAL FILINGS from panels and flashings at the end of each day. Filings from
drilling, grinding and cutting can start to rust overnight. At end of project, make final check for any filings. If rust spots have already appeared they can be removed with a non-abrasive cleaner. Do not use abrasive cleaners.
B. TOUCH-UP PAINT should be used on scratches, but should be used sparingly and applied with a small artist's brush. If scratches penetrate the zinc coating on galvanized material, a zinc rich primer should be applied in the scratch before the touch-up paint is applied.
C. CLEAN OR POWER WASH panels as necessary after completion of project. This includes removing excess unsightly caulking. Caulking can be removed with mineral spirits. Rinse residue with clean water.
D. REMOVE DEBRIS AND CRATING MATERIAL from the site. II. ROUTINE MAINTENANCE FOR METAL PANELS BY OWNER OR OWNER'S AGENT OVER LIFE OF BUILDING. A. FILE ALL JOB RECORDS, including project plans, specifications, shop drawings,
warranties (if any), etc., for future reference. B. SET UP MAINTENANCE INSPECTION SCHEDULE. Metal panels normally require little
maintenance, but to assure optimum serviceability, a routine inspection should be conducted at intervals no greater than once a year. NOTE: STEEP METAL ROOFS CAN BE SLIPPERY. A QUALIFIED METAL ROOFING CONTRACTOR MAY BE REQUIRED FOR ROOF INSPECTIONS.
C. KEEP GUTTERS AND DOWNSPOUTS CLEAR of debris that can impede water flow. D. IMMEDIATELY REMOVE ANY VEGETATION OR DEBRIS that contacts metal panels.
This includes tree branches, leaves, weeds, grass, etc. E. CLEAN METAL PANELS as necessary with a 5% solution, in water, of commonly used
commercial and industrial detergent. Use a cloth, soft bristle brush, or pressure washer. Rinse completely with water. When surfaces are dulled by heavy deposits of dirt or other contaminants, a heavy -duty, a cup of dry powdered laundry detergent (such as Tide) mixed with water may be used, followed by a water rinse. Mildew may be removed by a solution of a cup of dry powdered laundry detergent (such as Tide), b cup tri-sodium phosphate (such as Soilax), 1 quart sodium hypochlorite 5% solution (bleach), mixed with 3 quarts of water. (Note: do not use bleach on Galvalume-coated panels.) Tar, grease or oil may be removed by using denatured alcohol, isopropyl alcohol, or mineral spirits followed by a water rinse. Proceed with caution as aggressive cleaning with any of the above-described procedures may damage the coating and thus void any warranty.
F. REPAIR DAMAGE that may have occurred to panels with caulking, touch-up paint, etc. G. CORRECT ANY SIGNS OF CORROSION OR DETERIORATION as necessary. III. ADDITIONAL ROUTINE MAINTENANCE FOR METAL PANELS. A. ELIMINATE ANY CONDITIONS THAT ARE CAUSING WATER TO POND AND
ACCUMULATE on panels. B. RESEAL CURBS, GUTTERS, FLASHINGS, CLOSURES, PENETRATIONS, ETC. as
necessary to maintain the weathertightness of the system. Typically, a non-acid cured silicone caulk or a one part polyurethane sealant (such as Sikaflex 201) is best for such repairs. The owner may wish to hire a qualified, experienced metal contractor for these repairs.
C. REMOVE SALT DEPOSITS by a fresh water rinse in salt spray areas.