Importing Family Tree Maker into Older Versions of...
12
Importing FTM 2008 and Later into RootsMagic 22 April 2016 Page 1 Importing Family Tree Maker into Older Versions of RootsMagic This guide is only needed if you have older versions of RootsMagic. RootsMagic 7.1.0.0 and later can directly import Family Tree Maker files. (See Magic Guide “Family Tree Maker Direct Import in RootsMagic”) This Magic Guide covers: A. Importing FTM 2006 and Earlier Directly into RootsMagic B. Importing FTM 2008 or Later into RootsMagic Preparing to Move your Family Tree Maker Database Importing your GEDCOM into RootsMagic C. Media A. Importing FTM 2006 and Earlier Directly into RootsMagic 1. Open RootsMagic. If a file is open, go to the File menu and select Close. Once the screen is blank, go to the File menu and select Import. 2. On the Import File window, select Family Tree Maker (2006 and earlier). 3. Click “Search for files” if you do not know where the file is stored. If you know where your file is, click “I know where the file is.” 3 .
-
Upload
truongcong -
Category
Documents
-
view
217 -
download
0
Transcript of Importing Family Tree Maker into Older Versions of...
Importing FTM 2008 and Later into RootsMagic 22 April 2016 Page 1
Importing Family Tree Maker into Older Versions of
RootsMagic
This guide is only needed if you have older versions of RootsMagic. RootsMagic 7.1.0.0
and later can directly import Family Tree Maker files. (See Magic Guide “Family Tree Maker
Direct Import in RootsMagic”)
This Magic Guide covers:
A. Importing FTM 2006 and Earlier Directly into RootsMagic
B. Importing FTM 2008 or Later into RootsMagic
Preparing to Move your Family Tree Maker Database
Importing your GEDCOM into RootsMagic
C. Media
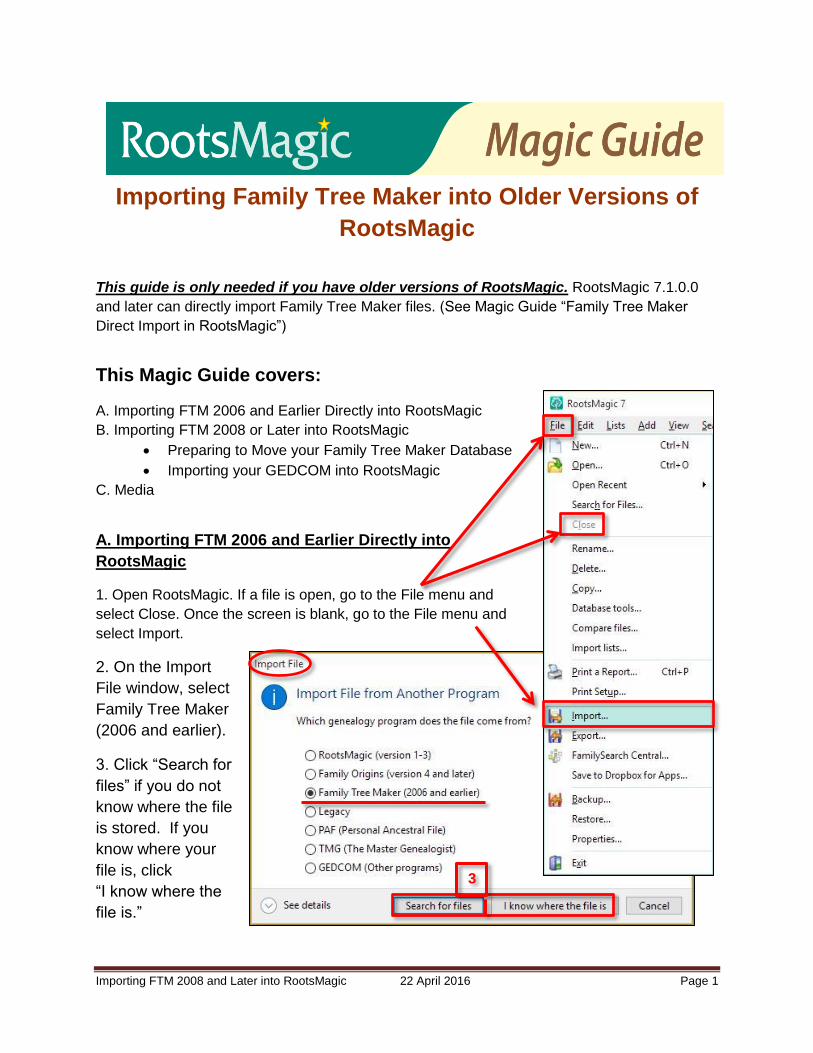
A. Importing FTM 2006 and Earlier Directly into
RootsMagic
1. Open RootsMagic. If a file is open, go to the File menu and
select Close. Once the screen is blank, go to the File menu and
select Import.
2. On the Import
File window, select
Family Tree Maker
(2006 and earlier).
3. Click “Search for
files” if you do not
know where the file
is stored. If you
know where your
file is, click
“I know where the
file is.”
3
.

Importing FTM 2008 and Later into RootsMagic 22 April 2016 Page 2
4. Name your file.
5. Verify that
the file location
is correct. If
not, click the
“File location”
button to save
someplace
else.
6. Choose
where you want
the file to be
saved. This
example shows
that the file will
be saved to Documents>ROOTSMAGIC>Files.
7. Click the “Select Folder” button to save the selection and return to the New File
window.
Importing FTM 2008 and Later into RootsMagic 22 April 2016 Page 3
9.
.
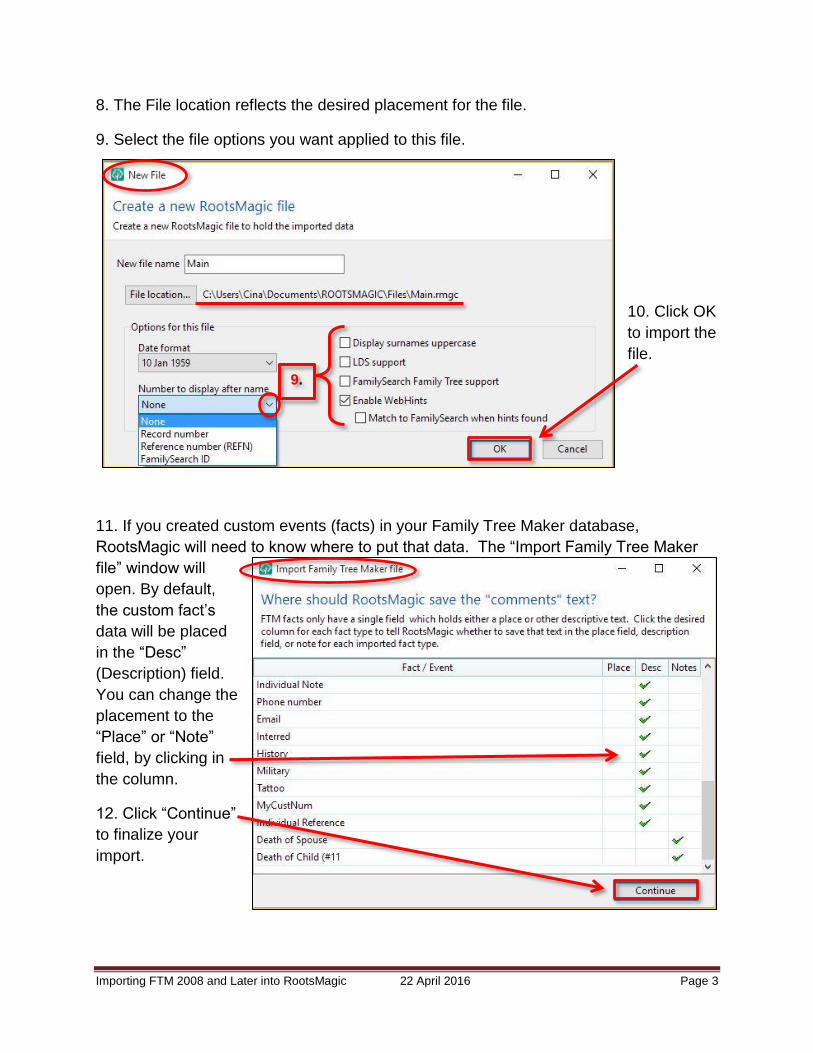
8. The File location reflects the desired placement for the file.
9. Select the file options you want applied to this file.
10. Click OK
to import the
file.
11. If you created custom events (facts) in your Family Tree Maker database,
RootsMagic will need to know where to put that data. The “Import Family Tree Maker
file” window will
open. By default,
the custom fact’s
data will be placed
in the “Desc”
(Description) field.
You can change the
placement to the
“Place” or “Note”
field, by clicking in
the column.
12. Click “Continue”
to finalize your
import.
Importing FTM 2008 and Later into RootsMagic 22 April 2016 Page 4
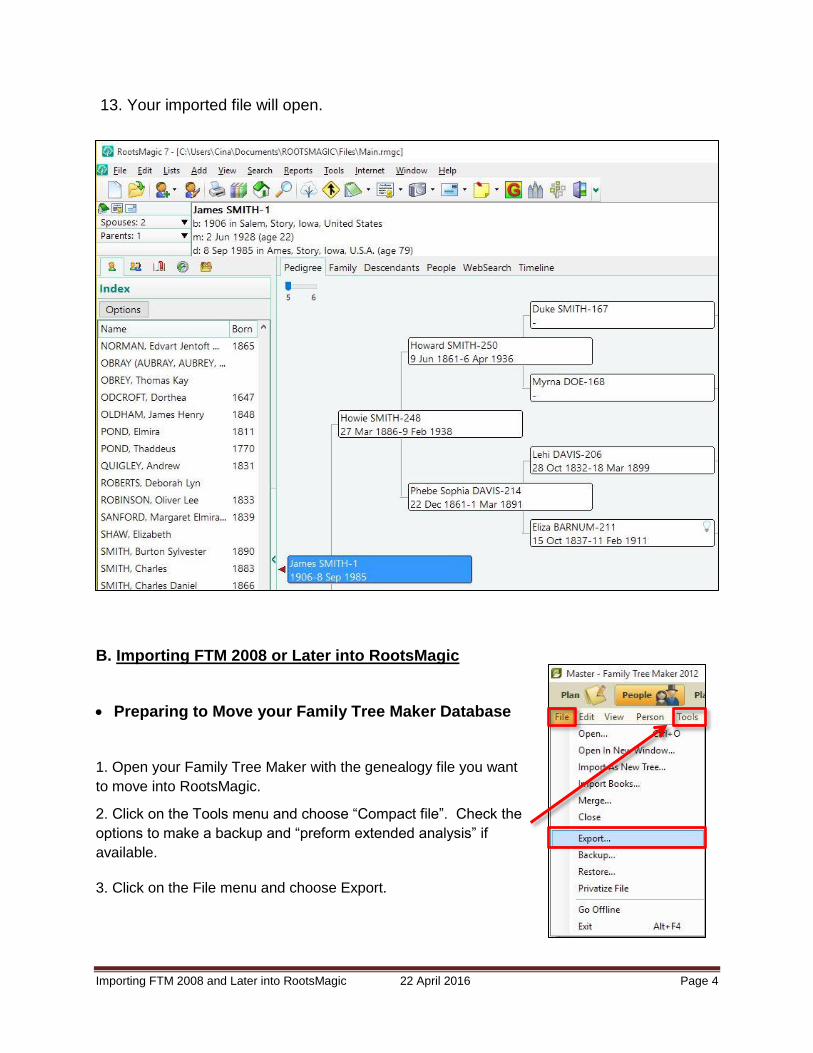
13. Your imported file will open.
B. Importing FTM 2008 or Later into RootsMagic
Preparing to Move your Family Tree Maker Database
1. Open your Family Tree Maker with the genealogy file you want
to move into RootsMagic.
2. Click on the Tools menu and choose “Compact file”. Check the
options to make a backup and “preform extended analysis” if
available.
3. Click on the File menu and choose Export.
Importing FTM 2008 and Later into RootsMagic 22 April 2016 Page 5
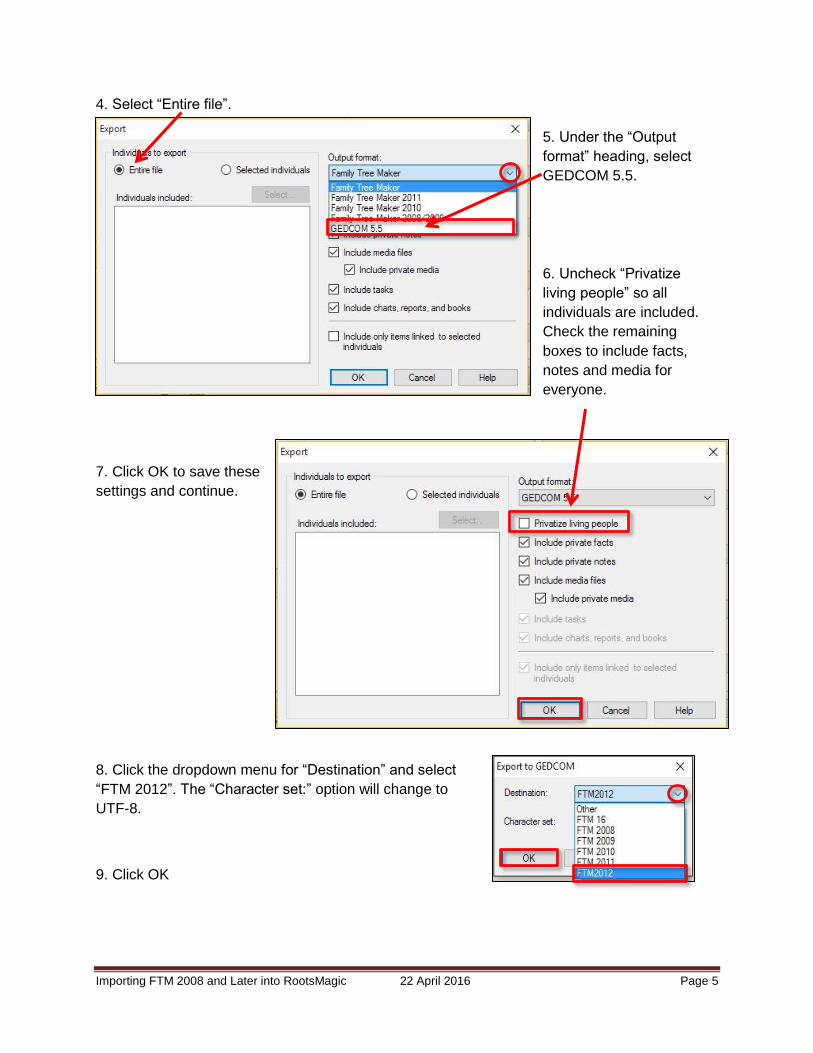
4. Select “Entire file”.
5. Under the “Output
format” heading, select
GEDCOM 5.5.
6. Uncheck “Privatize
living people” so all
individuals are included.
Check the remaining
boxes to include facts,
notes and media for
everyone.
7. Click OK to save these
settings and continue.
8. Click the dropdown menu for “Destination” and select
“FTM 2012”. The “Character set:” option will change to
UTF-8.
9. Click OK
Importing FTM 2008 and Later into RootsMagic 22 April 2016 Page 6
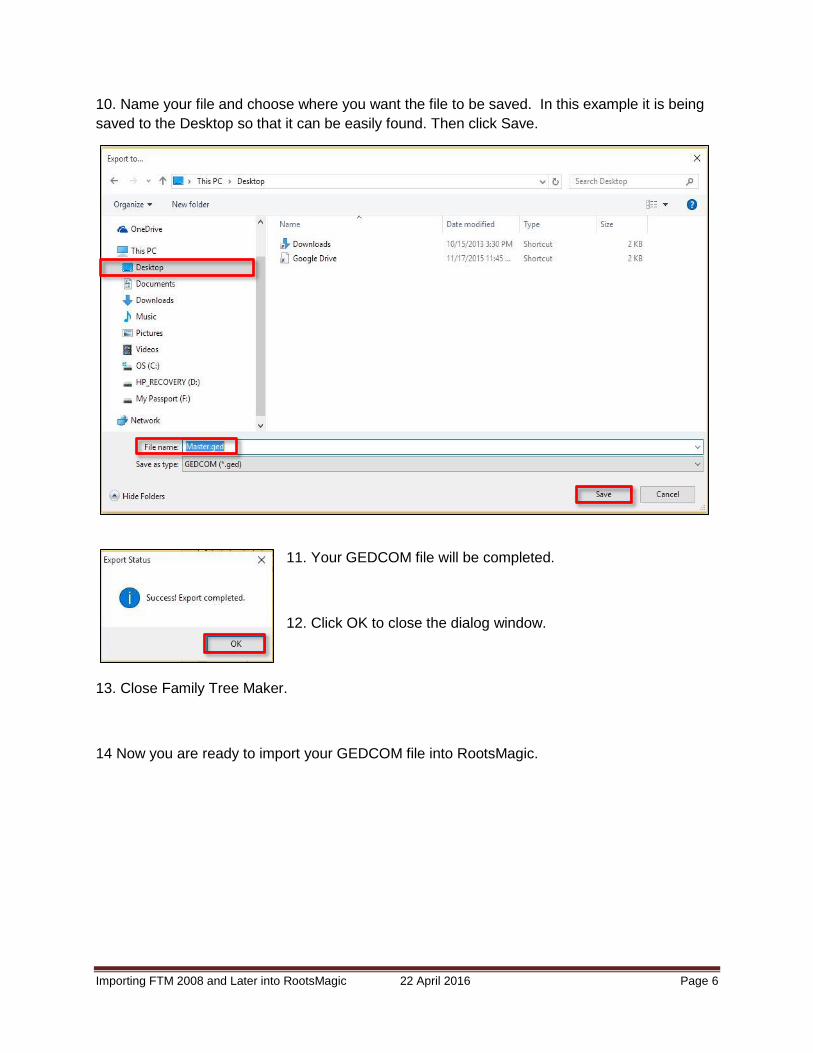
10. Name your file and choose where you want the file to be saved. In this example it is being
saved to the Desktop so that it can be easily found. Then click Save.
11. Your GEDCOM file will be completed.
12. Click OK to close the dialog window.
13. Close Family Tree Maker.
14 Now you are ready to import your GEDCOM file into RootsMagic.
Importing FTM 2008 and Later into RootsMagic 22 April 2016 Page 7
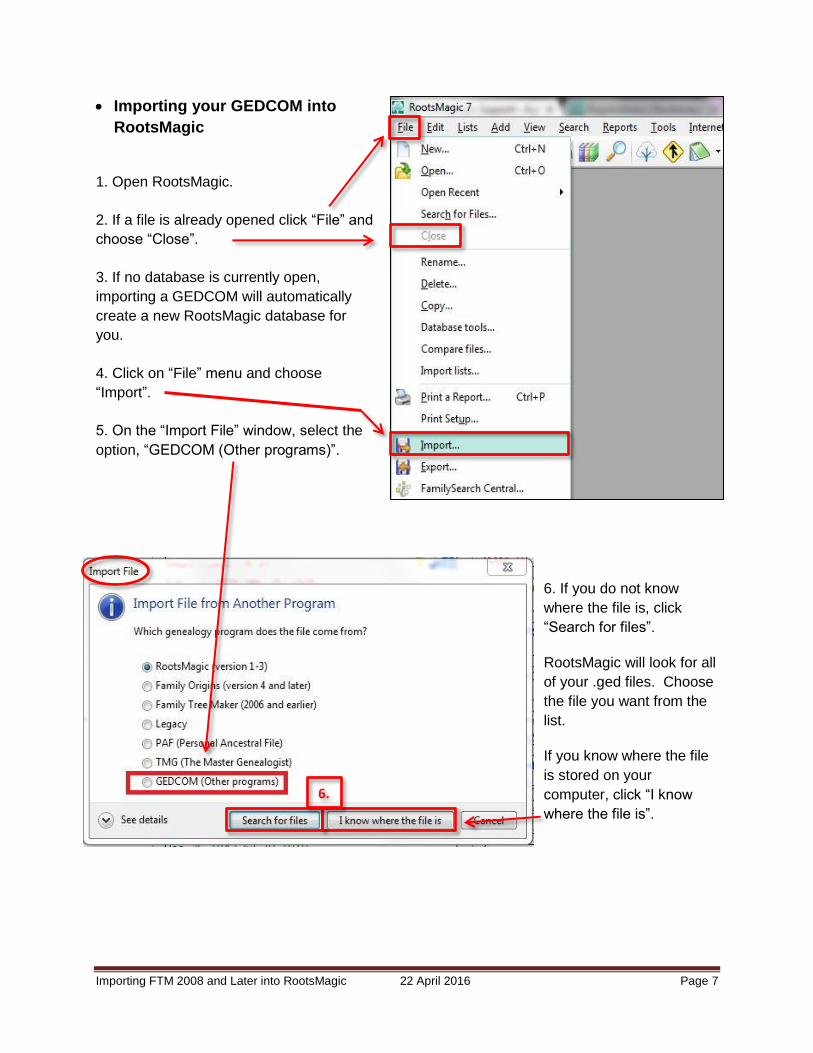
Importing your GEDCOM into
RootsMagic
1. Open RootsMagic.
2. If a file is already opened click “File” and
choose “Close”.
3. If no database is currently open,
importing a GEDCOM will automatically
create a new RootsMagic database for
you.
4. Click on “File” menu and choose
“Import”.
5. On the “Import File” window, select the
option, “GEDCOM (Other programs)”.
6. If you do not know
where the file is, click
“Search for files”.
RootsMagic will look for all
of your .ged files. Choose
the file you want from the
list.
If you know where the file
is stored on your
computer, click “I know
where the file is”.
6.
Importing FTM 2008 and Later into RootsMagic 22 April 2016 Page 8
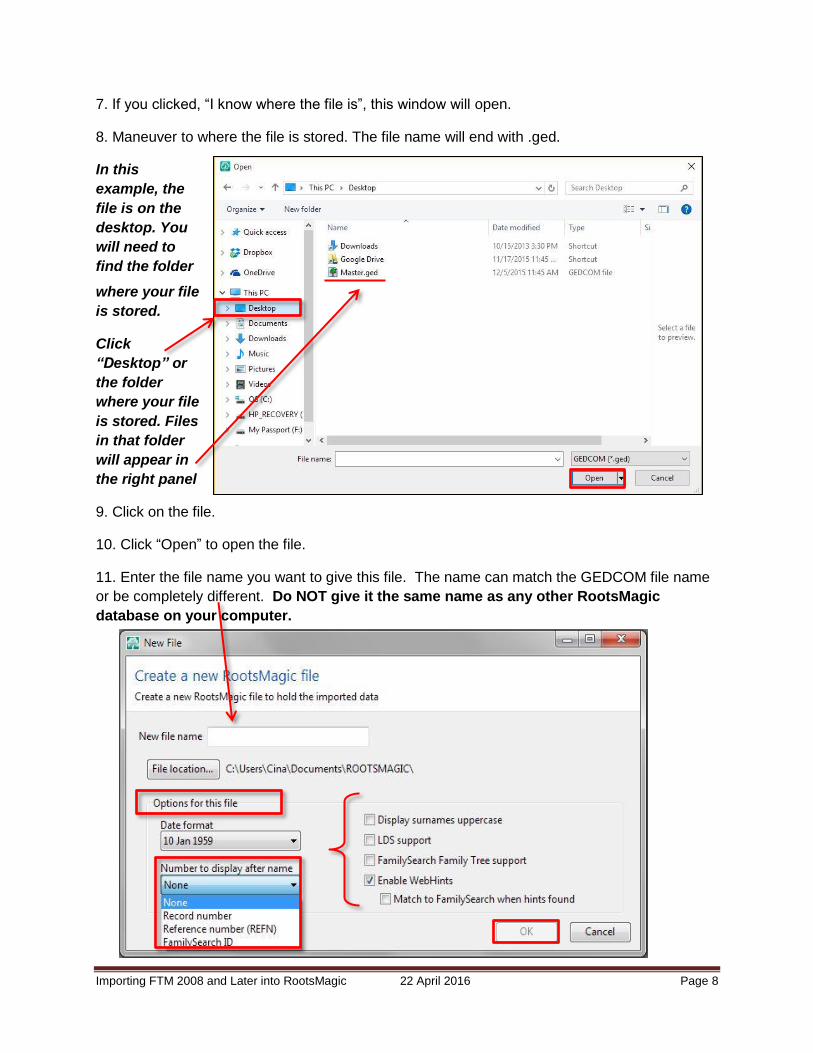
7. If you clicked, “I know where the file is”, this window will open.
8. Maneuver to where the file is stored. The file name will end with .ged.
In this
example, the
file is on the
desktop. You
will need to
find the folder
where your file
is stored.
Click
“Desktop” or
the folder
where your file
is stored. Files
in that folder
will appear in
the right panel
9. Click on the file.
10. Click “Open” to open the file.
11. Enter the file name you want to give this file. The name can match the GEDCOM file name
or be completely different. Do NOT give it the same name as any other RootsMagic
database on your computer.
Importing FTM 2008 and Later into RootsMagic 22 April 2016 Page 9
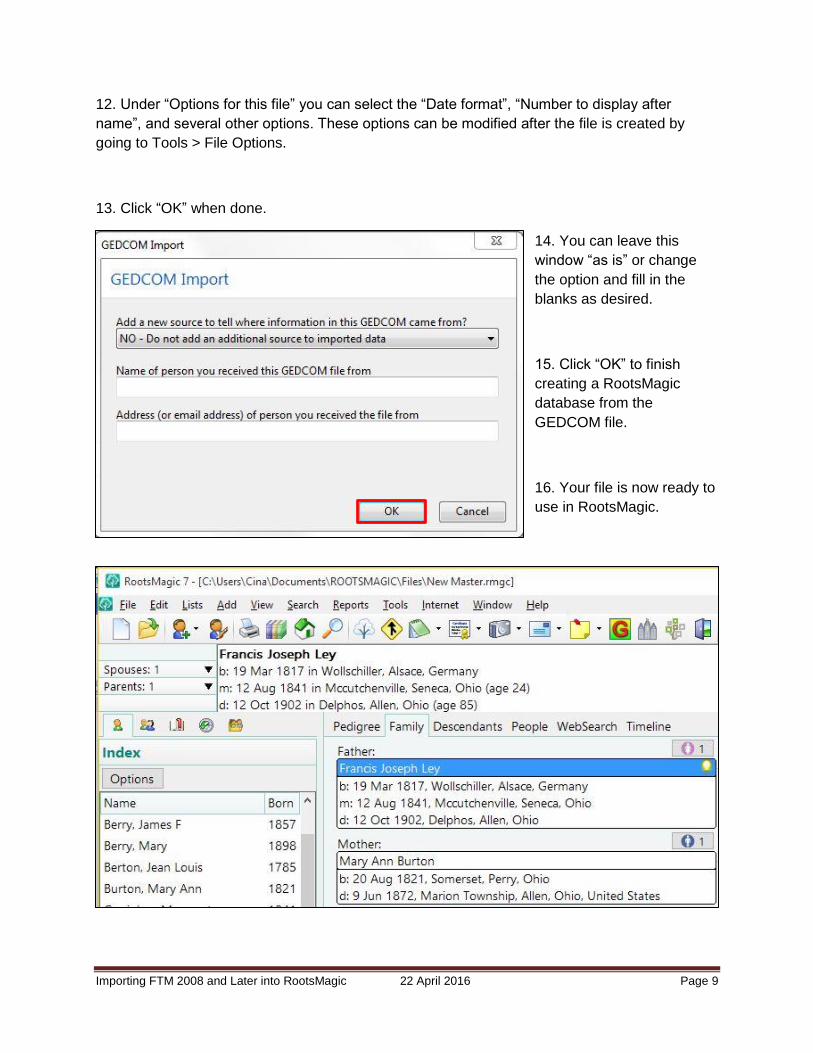
12. Under “Options for this file” you can select the “Date format”, “Number to display after
name”, and several other options. These options can be modified after the file is created by
going to Tools > File Options.
13. Click “OK” when done.
14. You can leave this
window “as is” or change
the option and fill in the
blanks as desired.
15. Click “OK” to finish
creating a RootsMagic
database from the
GEDCOM file.
16. Your file is now ready to
use in RootsMagic.
Importing FTM 2008 and Later into RootsMagic 22 April 2016 Page 10
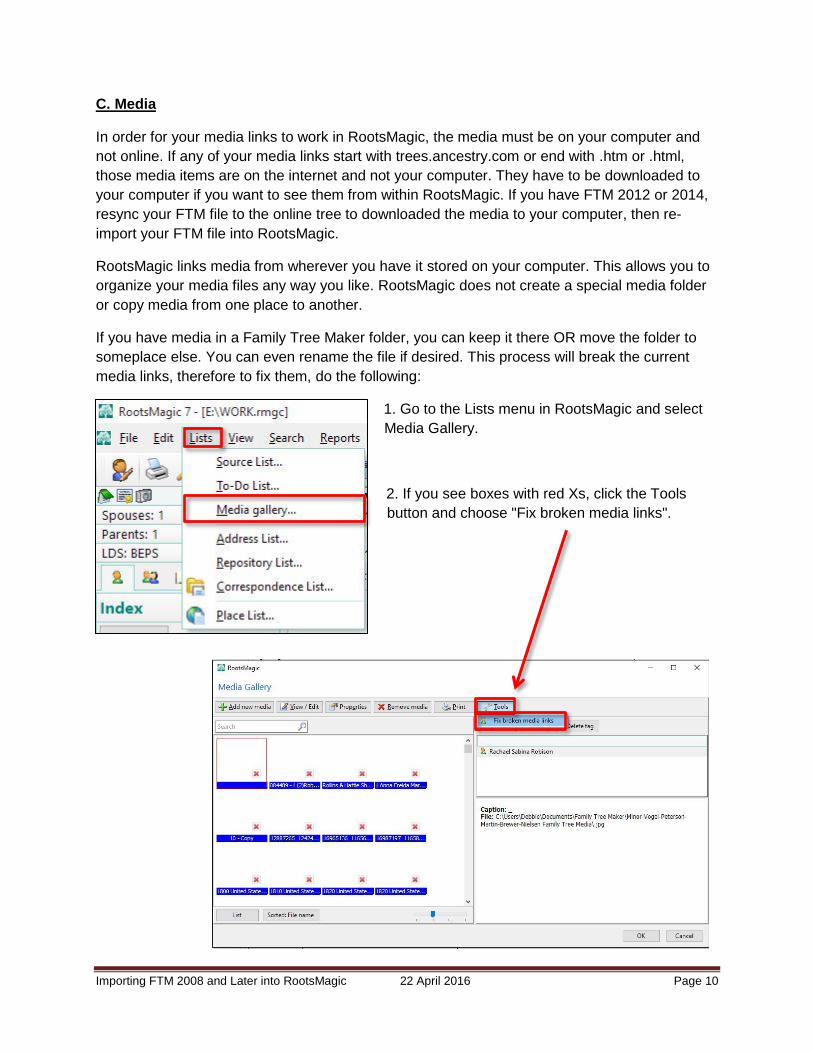
C. Media
In order for your media links to work in RootsMagic, the media must be on your computer and
not online. If any of your media links start with trees.ancestry.com or end with .htm or .html,
those media items are on the internet and not your computer. They have to be downloaded to
your computer if you want to see them from within RootsMagic. If you have FTM 2012 or 2014,
resync your FTM file to the online tree to downloaded the media to your computer, then re-
import your FTM file into RootsMagic.
RootsMagic links media from wherever you have it stored on your computer. This allows you to
organize your media files any way you like. RootsMagic does not create a special media folder
or copy media from one place to another.
If you have media in a Family Tree Maker folder, you can keep it there OR move the folder to
someplace else. You can even rename the file if desired. This process will break the current
media links, therefore to fix them, do the following:
1. Go to the Lists menu in RootsMagic and select
Media Gallery.
2. If you see boxes with red Xs, click the Tools
button and choose "Fix broken media links".

Importing FTM 2008 and Later into RootsMagic 22 April 2016 Page 11
3. A new window will open. The
default is to look for the media on <All
drives>. If you don't know where the
media is stored, or if it is stored in
different areas on your computer,
keep the default option of <All
drives>.
4. If you wish to focus your search to a
specific folder or sub-folders, change
the option from <All drives> to <A
folder>.
5. Another window will open so that you can maneuver to the correct folder.
6. Select/highlight the folder and click
the "Select folder" button.
7. Click OK to start the search.
8. RootsMagic will look for your media.
If only one version of the file is found, it
will be linked to RootsMagic
automatically.
Importing FTM 2008 and Later into RootsMagic 22 April 2016 Page 12
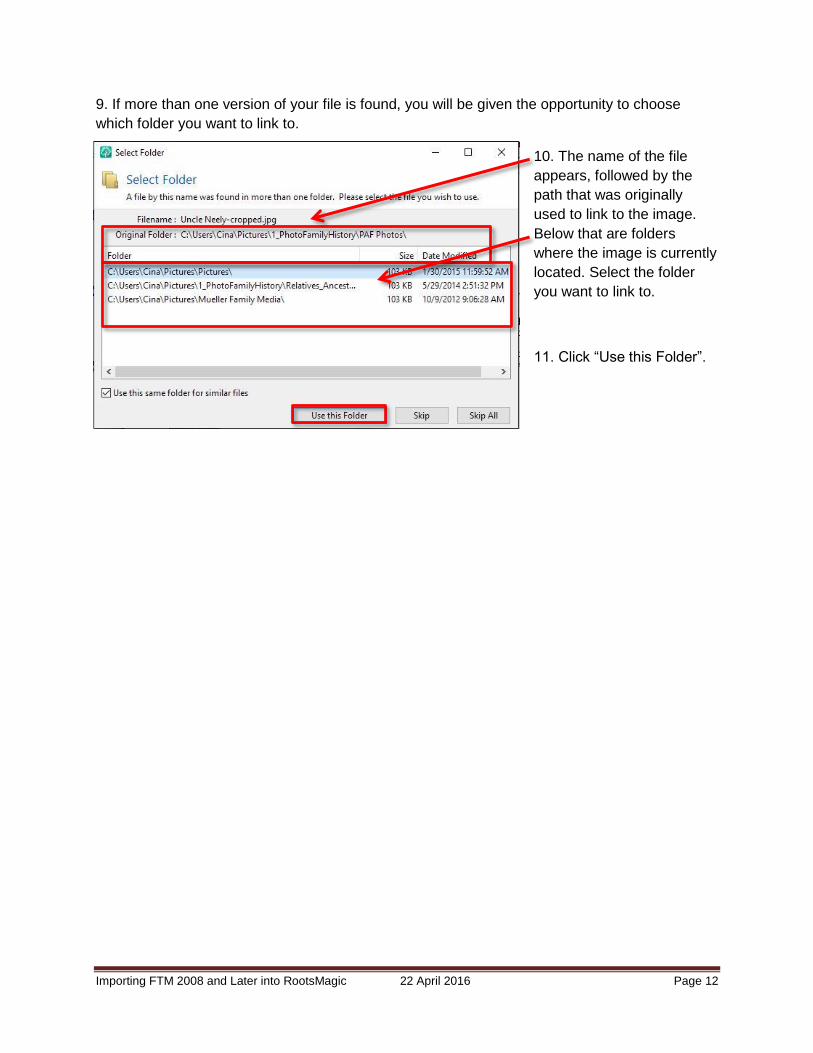
9. If more than one version of your file is found, you will be given the opportunity to choose
which folder you want to link to.
10. The name of the file
appears, followed by the
path that was originally
used to link to the image.
Below that are folders
where the image is currently
located. Select the folder
you want to link to.
11. Click “Use this Folder”.