Importing Opportunities & Leads
9
Pipeliner CRM Principia Guide Importing Leads & Opportunities © 2015 Pipelinersales Inc. www.pipelinersales.com
-
Upload
pipeliner-crm -
Category
Software
-
view
35 -
download
1
Transcript of Importing Opportunities & Leads
Pipeliner CRM Principia Guide
Importing Leads & Opportunities
© 2015 Pipelinersales Inc. www.pipelinersales.com

CONTENT
1. Creating and understanding CSV Files 3
1.1. How do I create CSV File 3
1.2. How do I check CSV Configuration 4
2. Uploading and importing Opportunities or Leads 5
2.1. How do I upload my CSV 5
2.2. Import Wizard – Part 1: CSV Configuration 6
2.3. Import Wizard – Part 2: Fields Mapping 7
2.4. Import Wizard – Part 3: Opportunities or Leads Validating 8
Importing Leads & OpportunitiesLearn how to import opportunities and leads into Pipeliner Sales CRM Application.
PIPeLIneR CRM PRInCIPIa GUIde
2Importing Leads & Opportunities
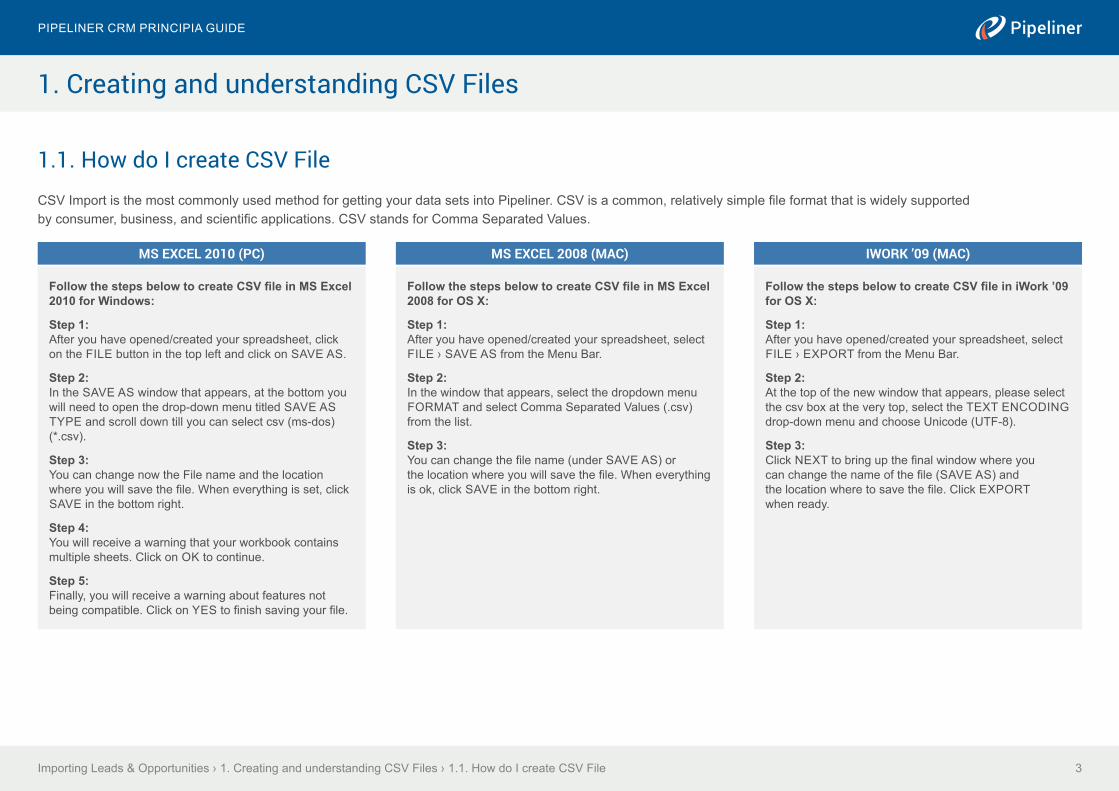
1.1. How do I create CSV FileCSV Import is the most commonly used method for getting your data sets into Pipeliner. CSV is a common, relatively simple file format that is widely supportedby consumer, business, and scientific applications. CSV stands for Comma Separated Values.
Importing Leads & Opportunities › 1. Creating and understanding CSV Files › 1.1. How do I create CSV File
PIPeLIneR CRM PRInCIPIa GUIde
3
1. Creating and understanding CSV Files
MS EXCEL 2010 (PC) MS EXCEL 2008 (MAC) IWORK ’09 (MAC)
Follow the steps below to create CSV file in MS Excel 2010 for Windows:
Step 1:after you have opened/created your spreadsheet, click on the FILe button in the top left and click on SaVe aS.
Step 2:In the SaVe aS window that appears, at the bottom you will need to open the drop-down menu titled SaVe aS TYPe and scroll down till you can select csv (ms-dos) (*.csv).
Step 3:You can change now the File name and the location where you will save the file. When everything is set, click SaVe in the bottom right.
Step 4:You will receive a warning that your workbook contains multiple sheets. Click on OK to continue.
Step 5:Finally, you will receive a warning about features not being compatible. Click on YeS to finish saving your file.
Follow the steps below to create CSV file in MS Excel 2008 for OS X:
Step 1:after you have opened/created your spreadsheet, select FILe › SaVe aS from the Menu Bar.
Step 2:In the window that appears, select the dropdown menu FORMaT and select Comma Separated Values (.csv) from the list.
Step 3:You can change the file name (under SaVe aS) or the location where you will save the file. When everything is ok, click SaVe in the bottom right.
Follow the steps below to create CSV file in iWork ’09 for OS X:
Step 1:after you have opened/created your spreadsheet, select FILe › eXPORT from the Menu Bar.
Step 2:at the top of the new window that appears, please select the csv box at the very top, select the TeXT enCOdInG drop-down menu and choose Unicode (UTF-8).
Step 3:Click neXT to bring up the final window where you can change the name of the file (SaVe aS) and the location where to save the file. Click eXPORT when ready.
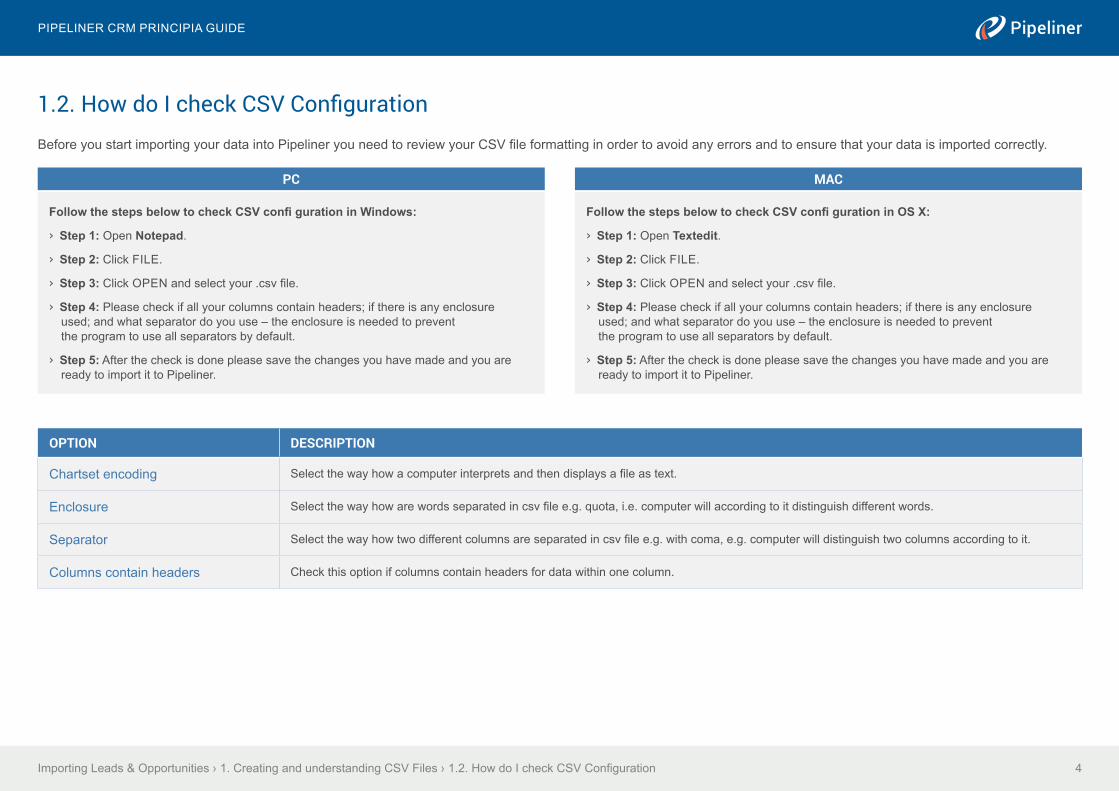
1.2. How do I check CSV ConfigurationBefore you start importing your data into Pipeliner you need to review your CSV file formatting in order to avoid any errors and to ensure that your data is imported correctly.
Importing Leads & Opportunities › 1. Creating and understanding CSV Files › 1.2. How do I check CSV Configuration
PIPeLIneR CRM PRInCIPIa GUIde
4
PC
Follow the steps below to check CSV confi guration in Windows:
› Step 1: Open Notepad.
› Step 2: Click FILe.
› Step 3: Click OPen and select your .csv file.
› Step 4: Please check if all your columns contain headers; if there is any enclosure used; and what separator do you use – the enclosure is needed to prevent the program to use all separators by default.
› Step 5: after the check is done please save the changes you have made and you are ready to import it to Pipeliner.
MAC
Follow the steps below to check CSV confi guration in OS X:
› Step 1: Open Textedit.
› Step 2: Click FILe.
› Step 3: Click OPen and select your .csv file.
› Step 4: Please check if all your columns contain headers; if there is any enclosure used; and what separator do you use – the enclosure is needed to prevent the program to use all separators by default.
› Step 5: after the check is done please save the changes you have made and you are ready to import it to Pipeliner.
OPTION DESCRIPTION
Chartset encoding Select the way how a computer interprets and then displays a file as text.
enclosure Select the way how are words separated in csv file e.g. quota, i.e. computer will according to it distinguish different words.
Separator Select the way how two different columns are separated in csv file e.g. with coma, e.g. computer will distinguish two columns according to it.
Columns contain headers Check this option if columns contain headers for data within one column.
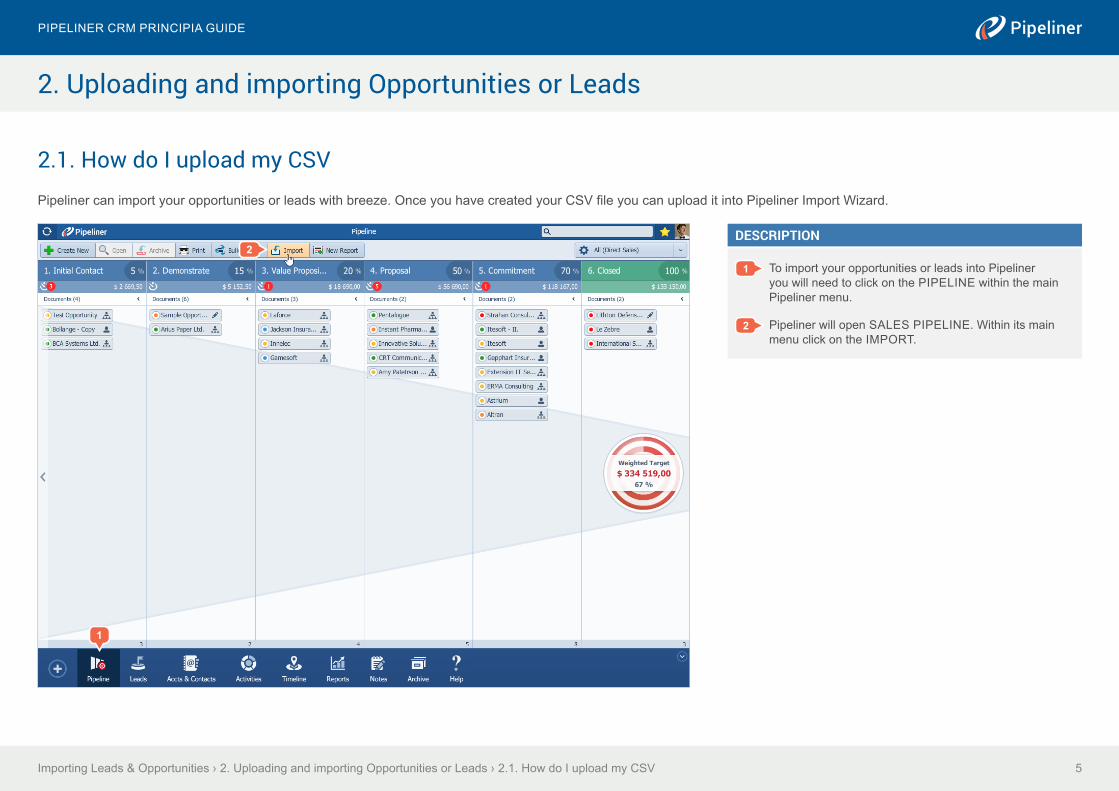
2.1. How do I upload my CSVPipeliner can import your opportunities or leads with breeze. Once you have created your CSV file you can upload it into Pipeliner Import Wizard.
Importing Leads & Opportunities › 2. Uploading and importing Opportunities or Leads › 2.1. How do I upload my CSV
PIPeLIneR CRM PRInCIPIa GUIde
5
2. Uploading and importing Opportunities or Leads
1
DESCRIPTION
1 To import your opportunities or leads into Pipeliner you will need to click on the PIPeLIne within the main Pipeliner menu.
2 Pipeliner will open SaLeS PIPeLIne. Within its main menu click on the IMPORT.
2
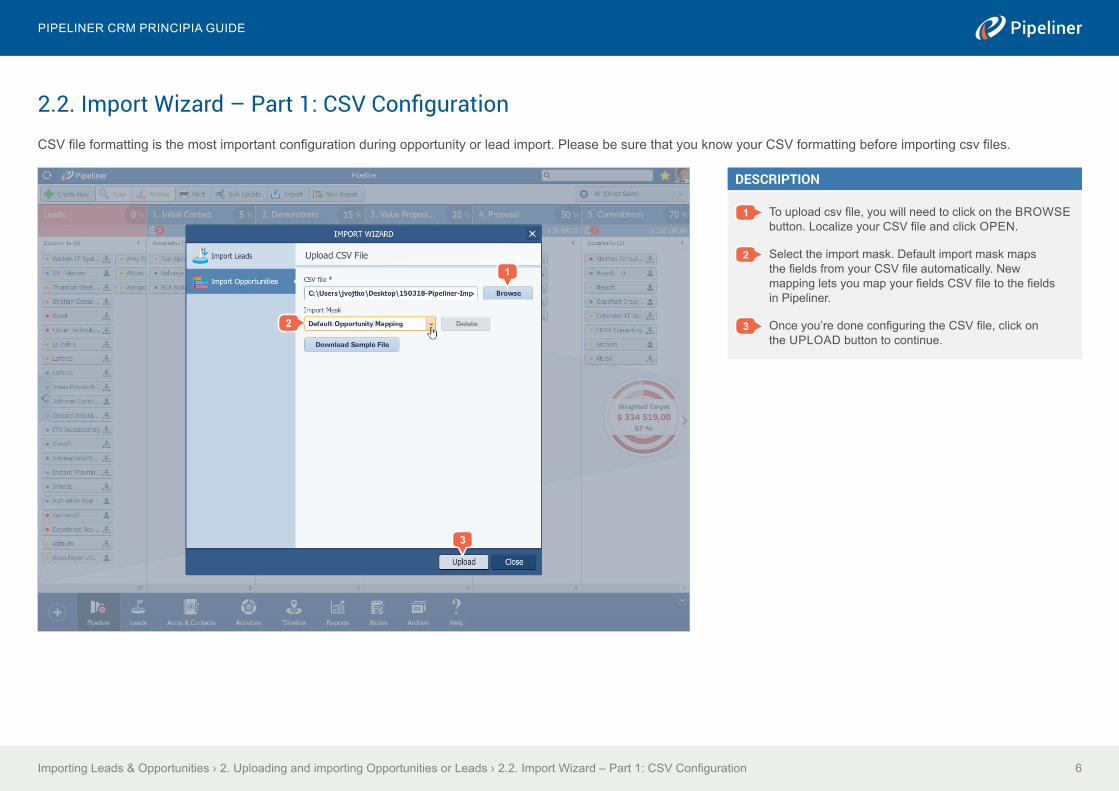
2.2. Import Wizard – Part 1: CSV ConfigurationCSV file formatting is the most important configuration during opportunity or lead import. Please be sure that you know your CSV formatting before importing csv files.
Importing Leads & Opportunities › 2. Uploading and importing Opportunities or Leads › 2.2. Import Wizard – Part 1: CSV Configuration
PIPeLIneR CRM PRInCIPIa GUIde
6
2
3
1
DESCRIPTION
1 To upload csv file, you will need to click on the BROWSe button. Localize your CSV file and click OPen.
2 Select the import mask. default import mask maps the fields from your CSV file automatically. New mapping lets you map your fields CSV file to the fields in Pipeliner.
3 Once you’re done configuring the CSV file, click on the UPLOad button to continue.
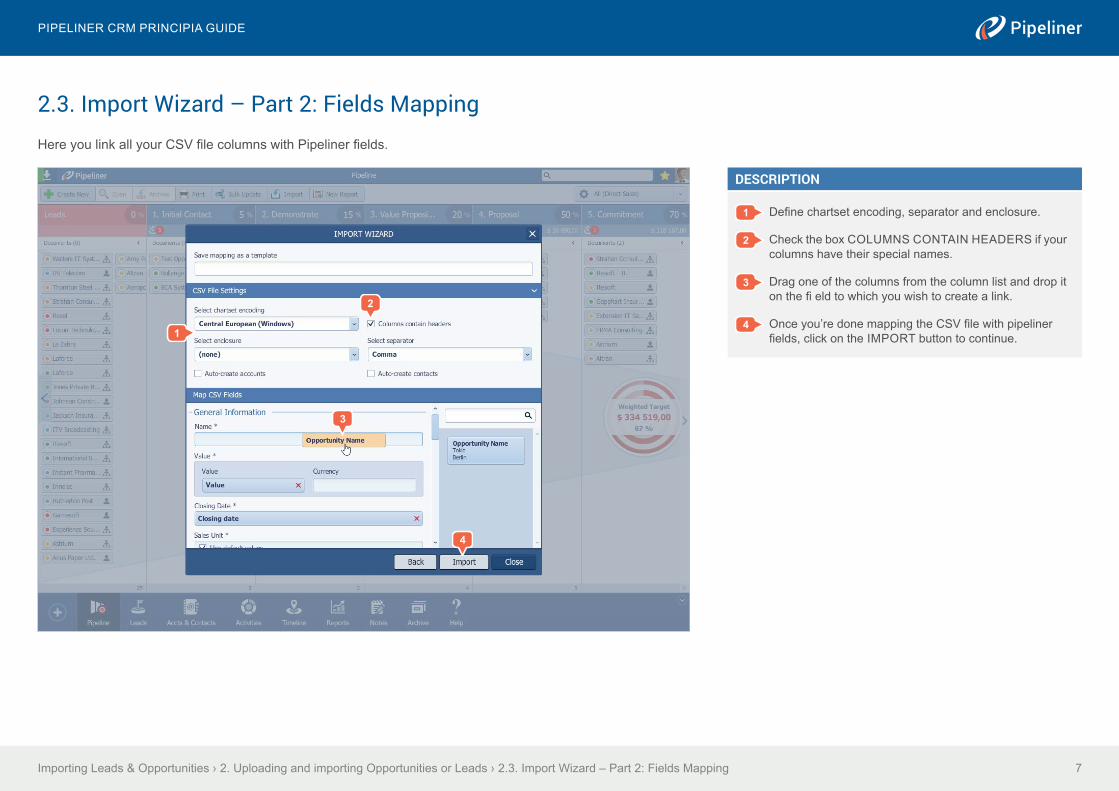
2.3. Import Wizard – Part 2: Fields MappingHere you link all your CSV file columns with Pipeliner fields.
Importing Leads & Opportunities › 2. Uploading and importing Opportunities or Leads › 2.3. Import Wizard – Part 2: Fields Mapping
PIPeLIneR CRM PRInCIPIa GUIde
7
1
4
2
3
DESCRIPTION
1 Define chartset encoding, separator and enclosure.
2 Check the box COLUMnS COnTaIn HeadeRS if your columns have their special names.
3 drag one of the columns from the column list and drop it on the fi eld to which you wish to create a link.
4 Once you’re done mapping the CSV file with pipeliner fields, click on the IMPORT button to continue.
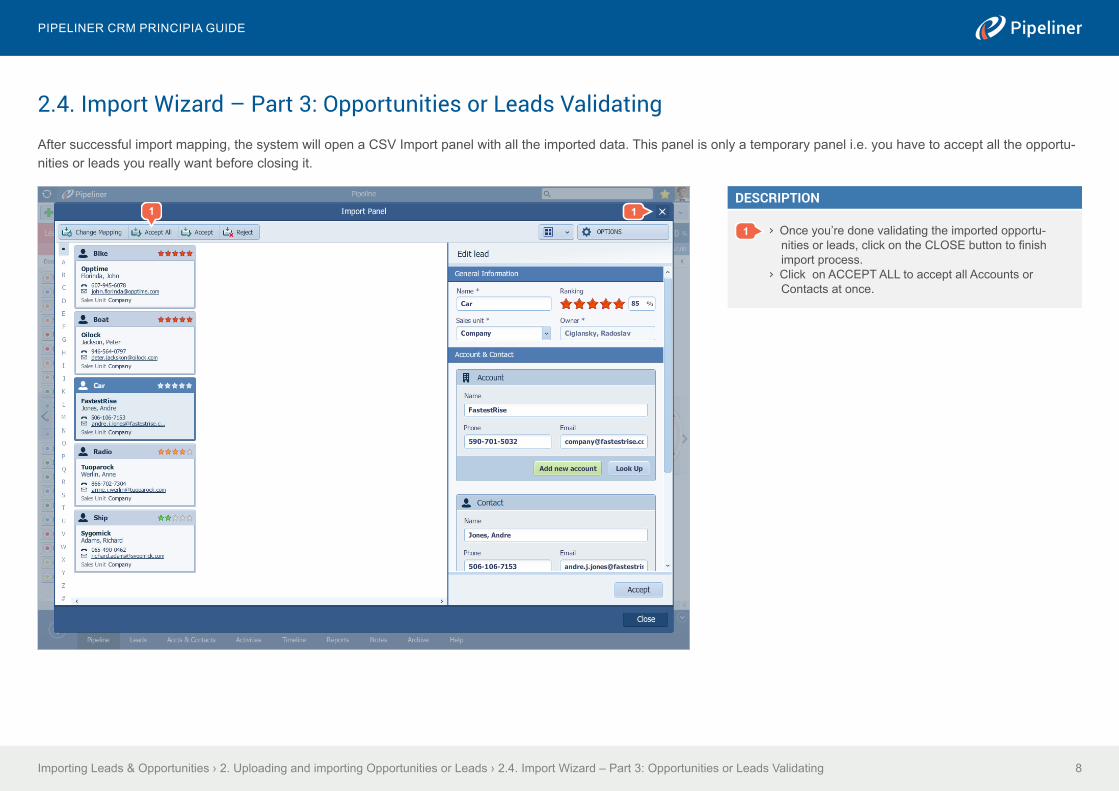
2.4. Import Wizard – Part 3: Opportunities or Leads Validatingafter successful import mapping, the system will open a CSV Import panel with all the imported data. This panel is only a temporary panel i.e. you have to accept all the opportu-nities or leads you really want before closing it.
Importing Leads & Opportunities › 2. Uploading and importing Opportunities or Leads › 2.4. Import Wizard – Part 3: Opportunities or Leads Validating
PIPeLIneR CRM PRInCIPIa GUIde
8
1DESCRIPTION
1 › Once you’re done validating the imported opportu-nities or leads, click on the CLOSE button to finish import process.
› Click on aCCePT aLL to accept all accounts or Contacts at once.
1

© 2015 Pipelinersales Inc. Microsoft® Office®, Microsoft® Outlook® are either registered trademarks or trademarks of Microsoft Corporation in the United States and/or other countries.
www.pipelinersales.comVisit us and learn more!
The information contained in this document represents the current view of Pipelinersales Inc. on the issues discussed as of the date of publication. Because Pipelinersales Inc. must respond to changing market conditions, it should not be interpreted to be a commitment on the part of Pipelinersales Inc., and Pipelinersales Inc. cannot guarantee the accuracy of any information presented after the date of publication. This document is for informational purposes only.
PIPELINERSALES INC. MAKES NO WARRANTIES, EXPRESS, IMPLIED OR STATUTORY, AS TO THE INFORMATION IN THIS DOCUMENT.
Information in this document, including URL and other Internet Web site references, is subject to change without notice. Unless otherwise noted, the companies, organizations, products, domain names, E-Mail addresses, logos, people, places, and events depicted in
examples herein are fictitious. No association with any real company, organization, product, domain name, E-Mail address, logo, person, place, or event is intended or should be inferred. Complying with all applicable copyright laws is the responsibility of the user. Without limiting the rights under copyright, no part of this document may be reproduced, stored in or introduced into a retrieval system, or transmitted in any form or by any means (electronic, mechanical, pho-tocopying, recording, or otherwise), or for any purpose, without the express written permission of Pipelinersales Inc.
Pipelinersales Inc. may have patents, patent applications, trademarks, copyrights, or other intel-lectual property rights covering subject matter in this document. Except as expressly provided in any written license agreement from Pipelinersales Inc., the furnishing of this document does not give you any license to these patents, trademarks, copyrights, or other intellectual property.
PIPeLIneR CRM PRInCIPIa GUIde