Implementation Guide - Myriad Software
160
Implementation Guide
Transcript of Implementation Guide - Myriad Software

Implementation Guide

Version 4.x
Printed in the United States of America
1st Edition, April 2004
Last Revision 12/30/2005
Copyright © 2004-2006 Myriad Software
All rights reserved by Myriad Software. Companies, names, and data used in examples herein are fictitious unless otherwise noted. No part of this document may be reproduced or transmitted in
any form or by any means, electronic or mechanical, for any purpose, without the express written permission of Myriad Software.
Eclicktic is a registered trademark of Myriad Software.
Microsoft is a registered trademark, and Internet Explorer, Word, Windows, Windows 95, Windows 98, Windows NT, Windows 2000, Windows ME, and Windows XP are trademarks of Microsoft
Corporation. All other brand names are trademarks or registered trademarks of their respective companies.
10805 Rancho Bernardo Rd., Suite 250
San Diego, CA 92127-5701
(800) 676-4243 Sales/Support
(858) 675-4544 Fax
www.myriadsoft.com
Table of Contents
Eclicktic Implementation Guide Table of Contents
iv
Table of Contents
Introduction...................................................................................7
Introduction ...........................................................................................8
The Software ...............................................................................................8
Myriad Service..............................................................................................8
Support and Escalation Policies ................................................................9
Hours...........................................................................................................9
Contacting Support .......................................................................................9
Support Procedures ......................................................................................9
Software Fixes............................................................................................10
Enhancements............................................................................................11
Escalation Path...........................................................................................11
Documentation ..................................................................................... 12
Optional Modules .................................................................................. 12
Definition of Terms ............................................................................... 13
Using Eclicktic ..............................................................................15
Tabs ..........................................................................................................16
Action Buttons............................................................................................16
Lookup ......................................................................................................17
Grid ...........................................................................................................18
Hotkey Reference .......................................................................................22
Equivalent Big Ticket Retail Manager Programs ............................................23
Implementation Checklist............................................................29
Implementation Checklist ...................................................................... 30
System Configuration ..................................................................31
System Configuration..................................................................................32
Administration ............................................................................................32
Company ...................................................................................................33
Sales..........................................................................................................34
Inventory ...................................................................................................37
Merchandising ............................................................................................38
Labels ........................................................................................................40
A/R............................................................................................................41
Eclicktic Implementation Guide Table of Contents
v
EDI............................................................................................................42
System ......................................................................................................43
Commissions ..............................................................................................44
IC Verify ....................................................................................................45
Parts..........................................................................................................46
Maintenance Modules ..................................................................47
Chart of Accounts Maintenance .............................................................. 48
Prerequisites ..............................................................................................48
Code Maintenance ................................................................................ 51
Advertising.................................................................................................52
Charge Backs .............................................................................................53
Discontinued ..............................................................................................54
Follow Up...................................................................................................56
Inventory Adjustments................................................................................58
Not Available for Sale..................................................................................60
Payment Hold.............................................................................................63
Promotion ..................................................................................................64
Purchase Orders .........................................................................................66
Receivables ................................................................................................67
Return Reason ...........................................................................................70
Salesperson Type .......................................................................................72
Service.......................................................................................................73
Commission Maintenance ...................................................................... 75
Delivery Calendar Maintenance .............................................................. 80
Delivery Zone Maintenance.................................................................... 83
Finance Program Maintenance ............................................................... 84
Sales/Serviceperson Maintenance........................................................... 85
Tax Maintenance .................................................................................. 87
Truck Maintenance................................................................................ 90
Department Maintenance....................................................................... 91
Group Model Maintenance ..................................................................... 95
Option Group Maintenance .................................................................... 97
Vendor Maintenance ........................................................................... 100
Model Maintenance ............................................................................. 109
Customer Account Maintenance ........................................................... 123
Eclicktic Implementation Guide Table of Contents
vi
Payment Method Maintenance ............................................................. 125
Bank Account Maintenance .................................................................. 128
Accounting Period Maintenance............................................................ 130
Budget Maintenance ........................................................................... 132
Company Maintenance ........................................................................ 134
Recurring JE Maintenance.................................................................... 136
G/L Mapping Maintenance ................................................................... 138
Store/Location Maintenance................................................................. 140
User Maintenance and Security ............................................................ 147
Template Users ........................................................................................ 153
Zip Code Maintenance ......................................................................... 155
Index ..........................................................................................157
Index................................................................................................. 158

Introduction
Eclicktic Implementation Guide Introduction
8
Introduction
The Software Eclicktic™ for Windows is built on the Microsoft Visual FoxPro platform to provide the most powerful and flexible application designed specifically for mid-volume home furnishings retailers.
This full-featured software program will manage a furniture retail business from order through delivery, and from banking through balancing.
All Eclicktic software is hardware independent—which means you can choose the PCs and network of your choice to use with Eclicktic for Windows.
Myriad Service When you are using a Myriad system, the Myriad team is always here for you. Our partnerships with our customers are important to us. We pride ourselves on our "Quick Response" support program. We are always just a toll-free phone call away when you need advice.
Eclicktic Implementation Guide Introduction
9
Support and Escalation Policies
Hours Support hours are from 6:00 a.m. until 5:00 p.m., Pacific Standard Time.
Contacting Support • Direct Support: (866) MYRIAD1 or (866) 697-4231
• Telephone: (800) 676-4243
• E-mail: [email protected]
• Fax: (858) 675-4544
• Web Site: www.myriadsoft.com
Note that a user name and password is required for access to some sections of the Myriad web site. These are provided in the introductory letter you received from Myriad.
Support Procedures Prior to going “live” and for a short period thereafter, your interaction with Myriad will be almost exclusively with our Training department. The purpose of this phase is to ensure that you have a complete understanding of our software and its use in daily operations.
Following the Training phase, the Application Support department will assist with any problems or questions that arise in the use of the Eclicktic program. The Technical Support department will handle more technical issues, such as report printing or upgrade difficulty.
Customers in the implementation phase will call (800) 676-4243. Customers who’ve been contacted by Myriad Software informing them that their account has been transitioned into a maintenance stage (Application or Technical Support) will call the following direct toll-free number: (800) 866-MYRIAD1 or (800) 866-697-4231.
Calls direct to the Application and Technical Support number will be automatically routed to the first available representative. If a representative is not immediately available, your support request will be recorded and placed into a queue. Items in the queue are handled in the order they were received, unless an issue’s impact to your operations warrants escalation.
If a representative is not immediately available, your information is recorded and placed into a queue. Items in the queue are handled in the order they were received, unless an issue’s impact to your operations warrants escalation.
The follow up response time for these recorded Application Support and Technical Support calls is a maximum of 3 business hours, with an average response time of 1-2 business hours. Some issues may require research and/or development work to correct however, and in these cases the resolution time will depend upon the nature of the issue.
Eclicktic Implementation Guide Introduction
10
When an issue is reported to support, an incident is entered into the Myriad system, and the support representative will provide a tracking number for the issue. This number should be used in future communication with Myriad when referring to the same issue.
There are three types of requests:
Service – A Service Request is entered when the support staff either cannot duplicate the problem or they believe it is due to environmental issues. Usually this indicates that only data needs to be corrected, and there is not a problem with the program. Service requests typically require involvement by Myriad’s development staff.
Software Fix – A Software Fix Request is entered when the support staff is able to duplicate the problem. This indicates that the problem is indeed a program issue and that a programming change is required.
Enhancement – If a feature is needed which is not currently available in the program, the client should enter an Enhancement Request on the Myriad web site.
A Level of Severity is assigned to all new issues, defined as follows:
1 The issue severely impacts operations, and there is no available workaround
2 The issue significantly impacts operations, and a reasonable workaround is available
3 The issue does not significantly impact operations, and a workaround is available
Level 1 issues are given the highest priority, followed by Levels 2 and 3.
Specific details are required by Support in order to successfully diagnose a problem. This includes the exact text of any error messages, the steps needed to reproduce a problem, and any steps that may have already been taken in troubleshooting. The Support and Development departments may also need to connect with your system in order to make a data correction or replace program files, so this connection should be made available as well.
You may encounter issues that are hardware or network-related. In these cases, Myriad recommends that you retain the services of a qualified system administrator or consultant. If necessary, Myriad will work with this third party to resolve problems that are related to our application.
Depending upon your service agreement, support may be limited to specific contacts in your organization. The selection of these contacts will normally be limited to those who have attended Myriad training and are familiar with your company’s operations.
Software Fixes Although rigorous quality assurance testing is performed on all of our software prior to release, it is the nature of software development that some issues will remain hidden until the program is used in a live environment. When a problem is reported to Myriad, and the problem is determined to be a program issue rather than an issue with data or the network environment, it is immediately turned over to the Development department for correction. Depending upon the impact to the client’s operations and other factors, the issue may be corrected immediately and then copied to the client’s system, or the type of change may require a delay for inclusion in a patch or upgrade. In the latter case, every effort will be made to find a reasonable workaround or other temporary solution to the problem.
Eclicktic Implementation Guide Introduction
11
Upgrades Upgrades and patches are provided free of charge to clients with a current service agreement. These files are available for download in the restricted area of the Myriad web site.
All major upgrades are accompanied by Release Notes in the form of a PDF file. Adobe Acrobat Reader is required to view or print this document.
Enhancements Myriad has an on-going enhancement program, with many new features resulting from customer feedback. Typically, enhancement requests are submitted by clients who have been using Eclicktic for six months or more, since they have a more complete understanding of the application and are therefore in a better position to recognize potential improvements to the system.
Enhancement requests are submitted via the Myriad web site. These requests are then given careful consideration by an Enhancement Committee, made up of experienced support, training, and development personnel. If it is determined that an enhancement would be beneficial to multiple clients, is not detrimental to existing functionality, and is in keeping with the direction Myriad intends for the application, the request will go into a pool of enhancements. Enhancements are selected from this pool for scheduling in upcoming releases.
During Myriad’s annual Users’ Conference, clients have the opportunity to vote for those enhancements they would most like to see in the program. Because conference votes are very influential when Myriad schedules development for the coming year, it is important that a key representative from each client attend the Enhancement meeting at the conference.
Custom development services are available for requests specific to a particular client's operational needs or requests to expedite development, requiring that it be added to a previously scheduled development release. To obtain a quote and availability information, please contact Myriad Software.
Because releases are scheduled as much as a year in advance, and individual enhancements assigned to releases many months ahead of time, we cannot guarantee that even funded enhancements will be completed by a specific date.
Escalation Path Myriad will make every effort to resolve any issues encountered. If a satisfactory resolution has not been reached, the issue may be escalated by contacting support.
1 Client contacts support to escalate an outstanding issue that is severely impacting operations.
2 Support escalates to Development Department, with a carbon copy to Director of Development and Director of Client Services.
3 Approximately 48 hours is required to begin researching escalated software issues. Resolution time is dependent upon the nature of the issue and development effort required.
4 Should further escalation be required, contact the Director of Client Services or the Director of Development.
Eclicktic Implementation Guide Introduction
12
Documentation Each Myriad Software release is accompanied by an impressive set of thorough, accurate, and detailed documentation, in the form of Online Help and Release Notes.
Other documentation resources available include step-by-step “How To” instructions for many common tasks, training and system administrator guides, and the web site knowledge base.
Optional Modules Barcoding - The Barcoding package contains templates and labels designed to print barcodes.
Browser Edition - A web-based application, designed for handheld PDA/scanners. The Browser Edition Sales Floor module provides instant and portable access to inventory availability and pricing information, as well as a shopping cart system to store items of interest for the customer. The Inventory Control module provides the ability to receive, transfer, and change the status of items, as well as perform inventory counts.
Contracts - The Contracts module provides a system for tracking installment and revolving contracts, print statements, enter credit applications, and perform collection actions.
CRM (Customer Relationship Management) - Manage sales ups, follow-up tasks, and sales goals, as well as analyze salesperson performance.
EDI (Electronic Data Interchange) - The EDI module provides communication between manufacturer and retailer, using the Internet. Purchase Orders and other data are transferred quickly and easily.
RouteView - Eclicktic integrates with RouteView, a map-based delivery routing software package.
Third-Party Financing - Eclicktic supports transactions with GE Card Services through ICVerify.
For more information on optional Eclicktic modules, please contact the Myriad Software Sales department at 800-676-4243.

Eclicktic Implementation Guide Introduction
13
Definition of Terms CBO - Customer Back Order
Check Box - Used for settings that can be in only one of two states—on or off.
Close Day - A process used to close the day for written business and inventory movement.
Container - A representation of an actual shipping container. In Eclicktic, the container holds items in the form of Purchase Order lines, and tracks the total size and weight of those items.
Download - The process of receiving data from a remote computer.
Drop-down List - A field that is limited to certain valid entries. These entries are selected from a list that is accessed by clicking a down-arrow to the right of the field.
EDI - Electronic Data Interchange. A method of transmitting data between systems, using the Internet.
Export - The process of creating a data file in a format that may be used by other applications.
Finalized Sales Order - A sale in which the items have been delivered or picked up.
GMROI - Gross Margin Return on Investment. The amount of return on every dollar invested.
Grid - A table used to enter information in rows and columns, similar to a spreadsheet.
Group Model - A group of models that are combined for ease of pricing and selling. For example, a group could be created for a bedroom set, with a single price for the entire group—since purchasing an entire group may result in a discount over the total price of the individual items.
L12 - Last 12 months.
LT - Lead Time. The number of days or weeks it takes from the time a model is ordered until it arrives from the vendor.
Lookup - An Eclicktic Window that allows the user to search for information in a database.
Mapping - pre-defined default posting directions.
Match Receiving - The process of matching the Purchase Order Receiving to the Accounts Payable Invoice.
Model - A catalogue item created in Model Maintenance. A model can be either an inventory or non-inventory item.
Open Sales Order - A sale in which the items have not been delivered or picked up.
Option Group - An Option Group determines the available options for a model. For example, an Option Group might consist of a main cover, throw pillows, and an optional swivel base. One Option Group may be used on multiple (similar) models, or there may be a different Option Group for each model.
Eclicktic Implementation Guide Introduction
14
Queue - In Eclicktic, a holding place for functions that will be automatically processed, such as reports and reindexing.
Radio Button - A type of control switch in software applications. A radio button is similar to a check box, except circular. Two or more radio buttons are grouped together, and only one radio button in a group may be selected at a time.
SPIFF - Special Price Incentive from Factory. Additional commission amounts that may be earned when an item is sold.
Stock Option - A pre-defined set of options for a model. Stock Options are typically used for the most popular combination of options ordered. An unlimited number of Stock Options may be created for each model.
Subsidiary - In Eclicktic, used to describe the data that supports or backs up General Ledger entries. For example, Sales Order documents are the subsidiary to the Sales G/L account figures.
Tooltip - A form of help that appears when the user holds the mouse pointer over a button momentarily, without clicking. A small text box displays that button’s function.
Turn Rate - The rate at which inventory is cycled.
Upcharge - The additional price of an option added to a model. For example, adding quilting to a chair’s fabric might add $50 to the price of the chair.
Upload - The process of sending data to a remote computer.
Using Eclicktic
Eclicktic Implementation Guide Using Eclicktic
16
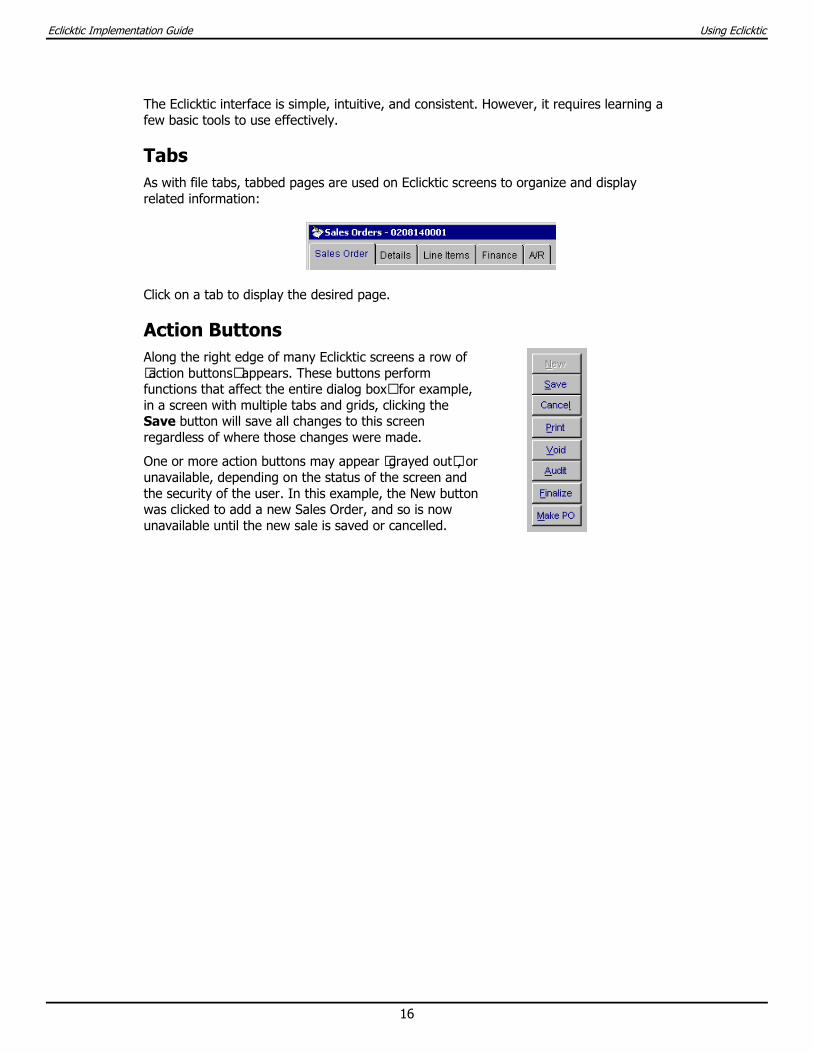
The Eclicktic interface is simple, intuitive, and consistent. However, it requires learning a few basic tools to use effectively.
Tabs As with file tabs, tabbed pages are used on Eclicktic screens to organize and display related information:
Click on a tab to display the desired page.
Action Buttons Along the right edge of many Eclicktic screens a row of “action buttons” appears. These buttons perform functions that affect the entire dialog box—for example, in a screen with multiple tabs and grids, clicking the Save button will save all changes to this screen regardless of where those changes were made.
One or more action buttons may appear “grayed out”, or unavailable, depending on the status of the screen and the security of the user. In this example, the New button was clicked to add a new Sales Order, and so is now unavailable until the new sale is saved or cancelled.
Eclicktic Implementation Guide Using Eclicktic
17
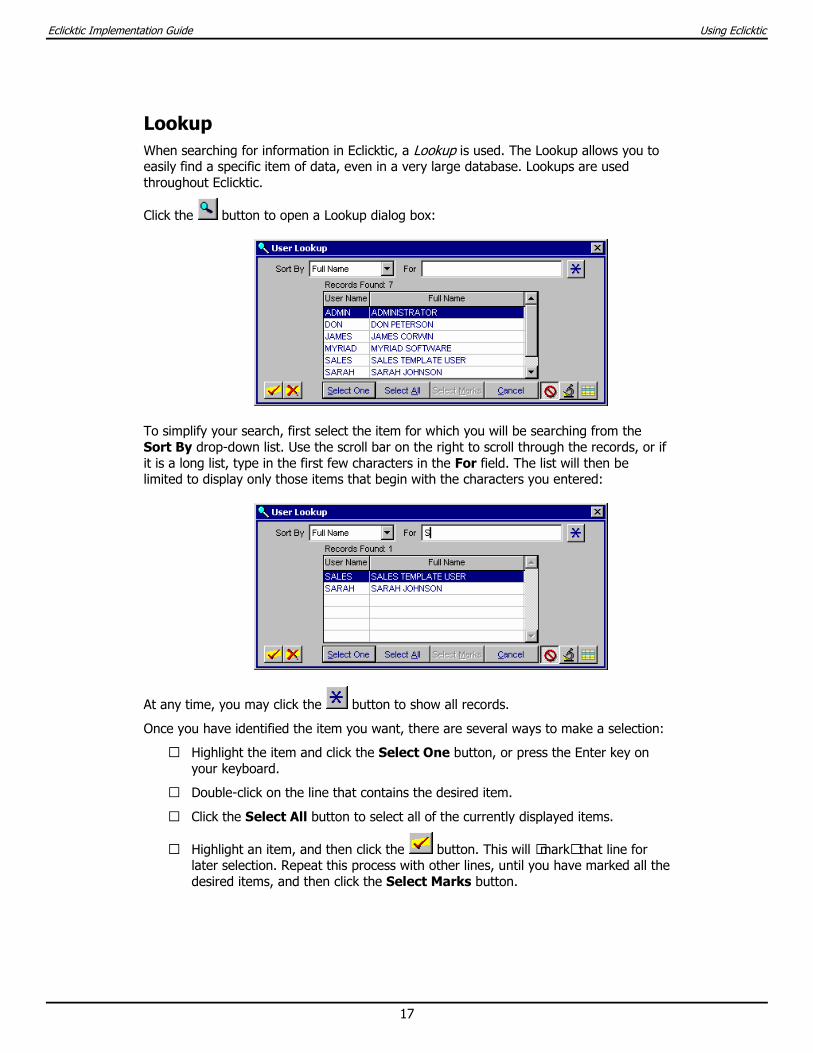
Lookup When searching for information in Eclicktic, a Lookup is used. The Lookup allows you to easily find a specific item of data, even in a very large database. Lookups are used throughout Eclicktic.
Click the button to open a Lookup dialog box:
To simplify your search, first select the item for which you will be searching from the Sort By drop-down list. Use the scroll bar on the right to scroll through the records, or if it is a long list, type in the first few characters in the For field. The list will then be limited to display only those items that begin with the characters you entered:
At any time, you may click the button to show all records.
Once you have identified the item you want, there are several ways to make a selection:
• Highlight the item and click the Select One button, or press the Enter key on your keyboard.
• Double-click on the line that contains the desired item.
• Click the Select All button to select all of the currently displayed items.
• Highlight an item, and then click the button. This will “mark” that line for later selection. Repeat this process with other lines, until you have marked all the desired items, and then click the Select Marks button.
Eclicktic Implementation Guide Using Eclicktic
18
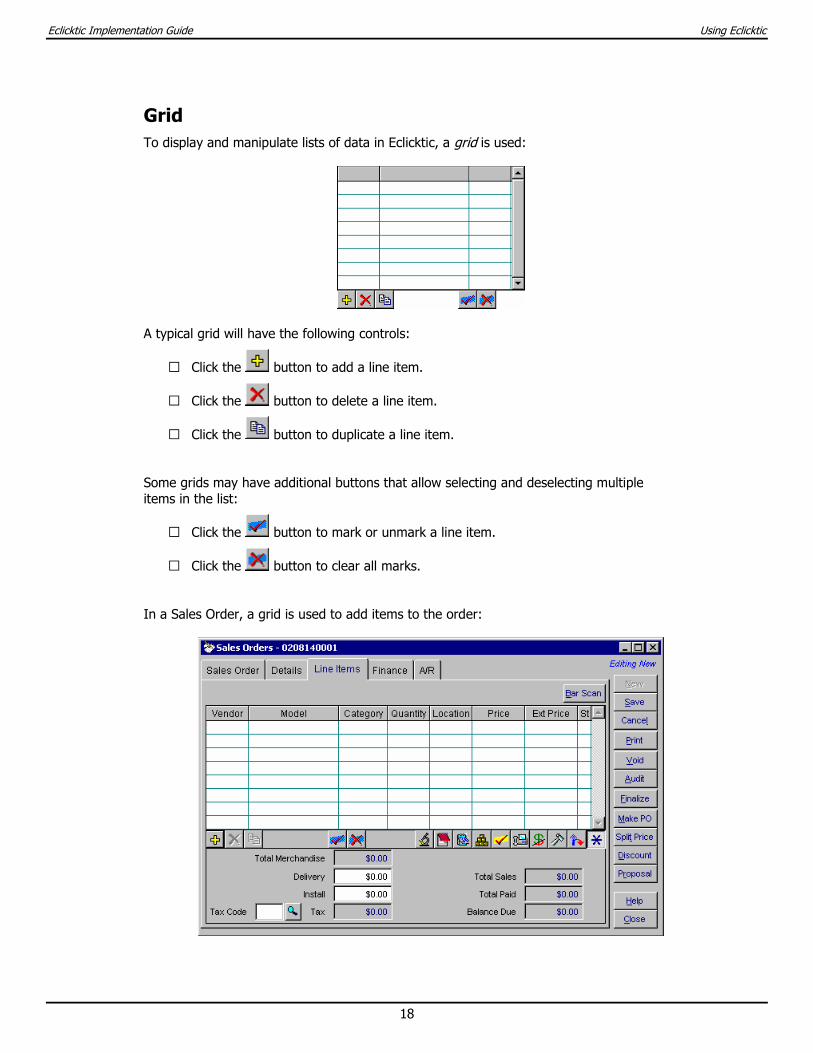
Grid To display and manipulate lists of data in Eclicktic, a grid is used:
A typical grid will have the following controls:
• Click the button to add a line item.
• Click the button to delete a line item.
• Click the button to duplicate a line item.
Some grids may have additional buttons that allow selecting and deselecting multiple items in the list:
• Click the button to mark or unmark a line item.
• Click the button to clear all marks.
In a Sales Order, a grid is used to add items to the order:
Eclicktic Implementation Guide Using Eclicktic
19
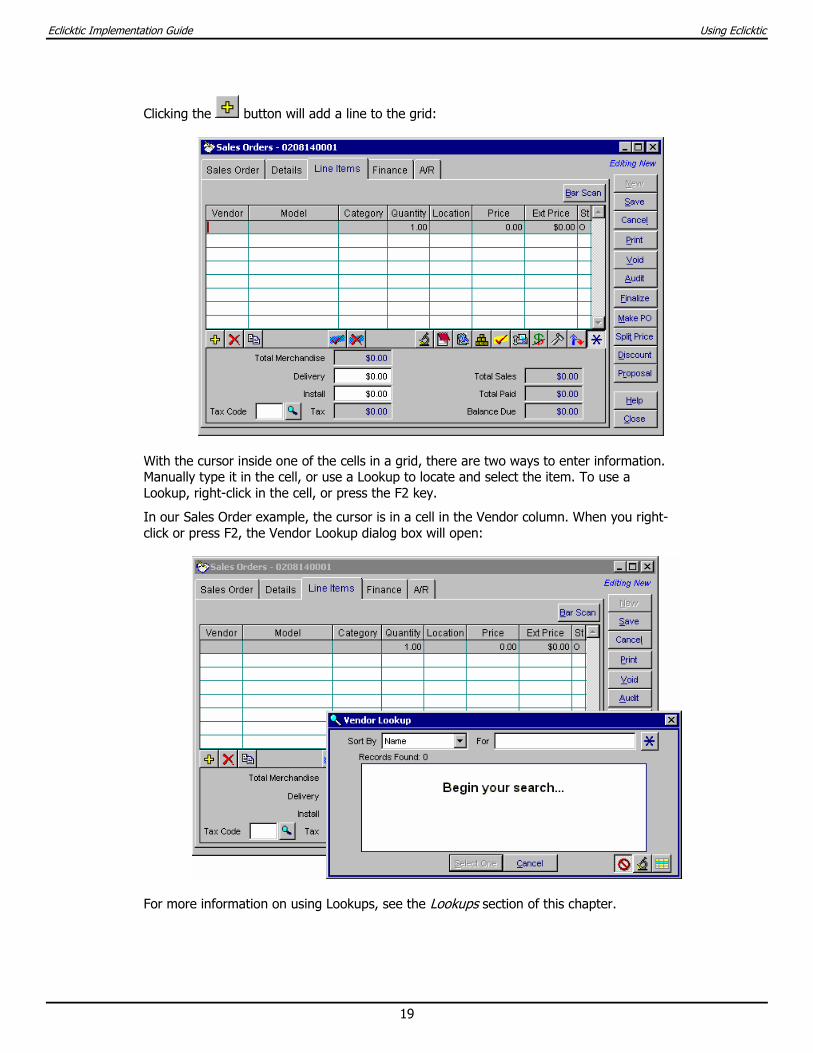
Clicking the button will add a line to the grid:
With the cursor inside one of the cells in a grid, there are two ways to enter information. Manually type it in the cell, or use a Lookup to locate and select the item. To use a Lookup, right-click in the cell, or press the F2 key.
In our Sales Order example, the cursor is in a cell in the Vendor column. When you right-click or press F2, the Vendor Lookup dialog box will open:
For more information on using Lookups, see the Lookups section of this chapter.
Eclicktic Implementation Guide Using Eclicktic
20
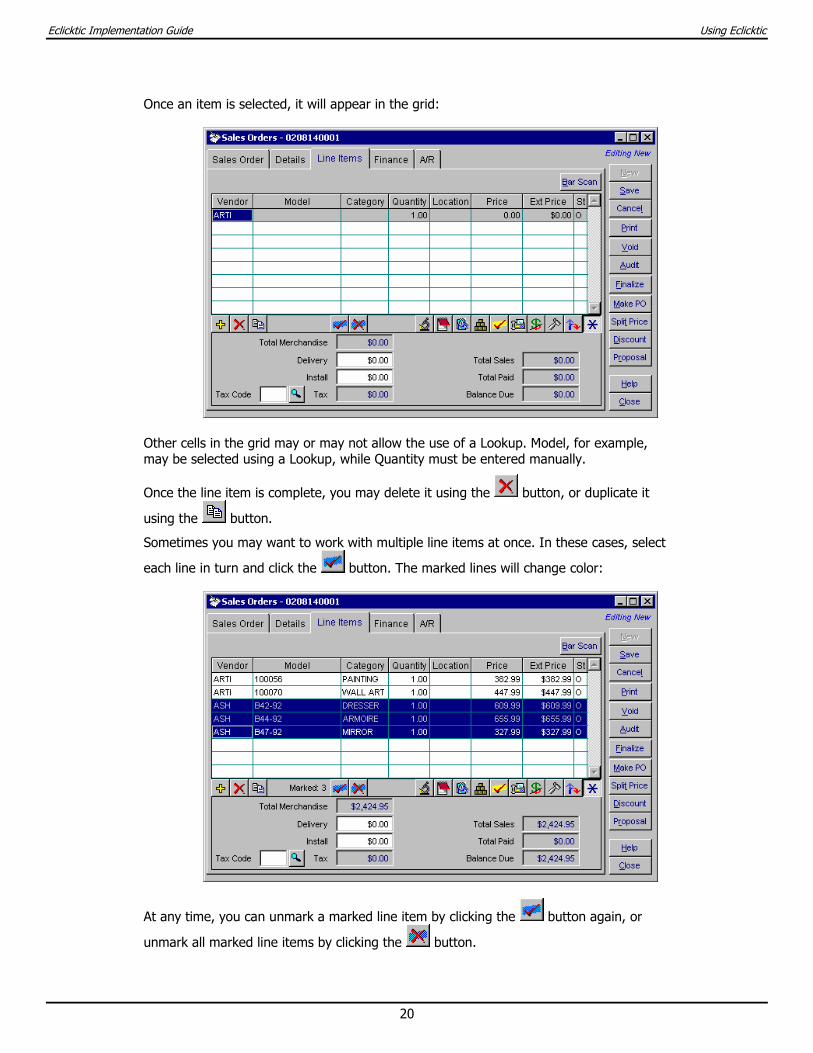
Once an item is selected, it will appear in the grid:
Other cells in the grid may or may not allow the use of a Lookup. Model, for example, may be selected using a Lookup, while Quantity must be entered manually.
Once the line item is complete, you may delete it using the button, or duplicate it
using the button.
Sometimes you may want to work with multiple line items at once. In these cases, select
each line in turn and click the button. The marked lines will change color:
At any time, you can unmark a marked line item by clicking the button again, or
unmark all marked line items by clicking the button.
Eclicktic Implementation Guide Using Eclicktic
21
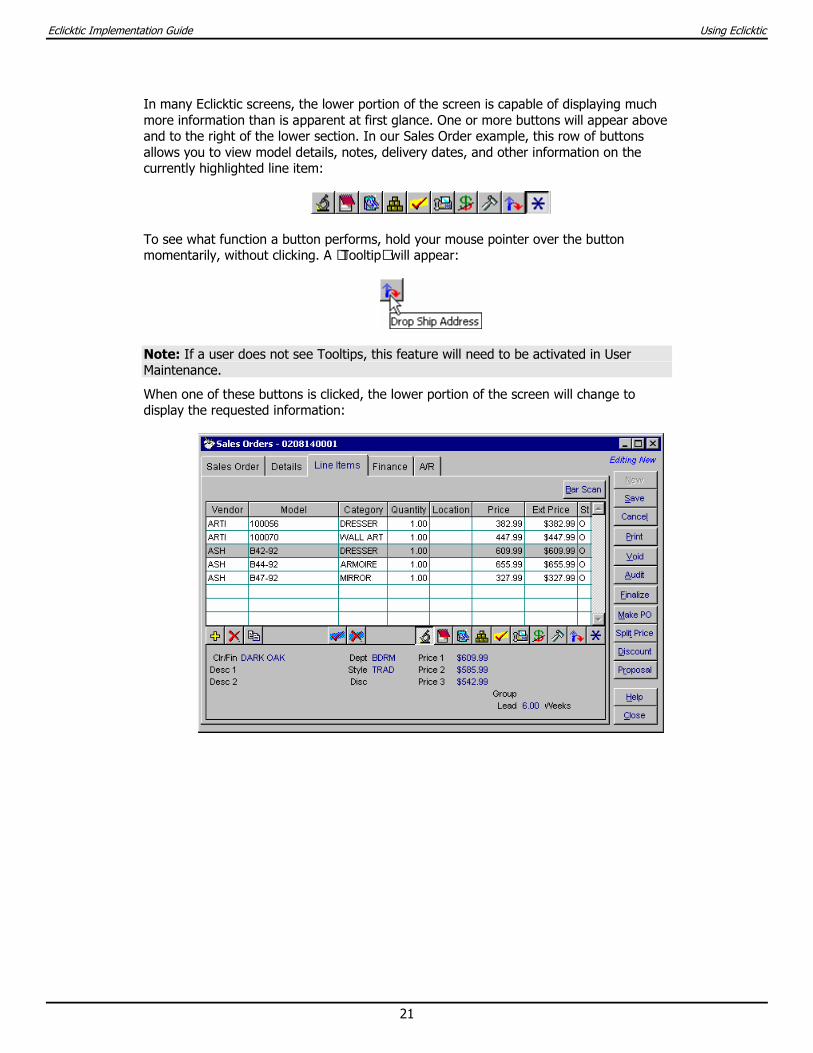
In many Eclicktic screens, the lower portion of the screen is capable of displaying much more information than is apparent at first glance. One or more buttons will appear above and to the right of the lower section. In our Sales Order example, this row of buttons allows you to view model details, notes, delivery dates, and other information on the currently highlighted line item:
To see what function a button performs, hold your mouse pointer over the button momentarily, without clicking. A “Tooltip” will appear:
Note: If a user does not see Tooltips, this feature will need to be activated in User Maintenance.
When one of these buttons is clicked, the lower portion of the screen will change to display the requested information:
Eclicktic Implementation Guide Using Eclicktic
22
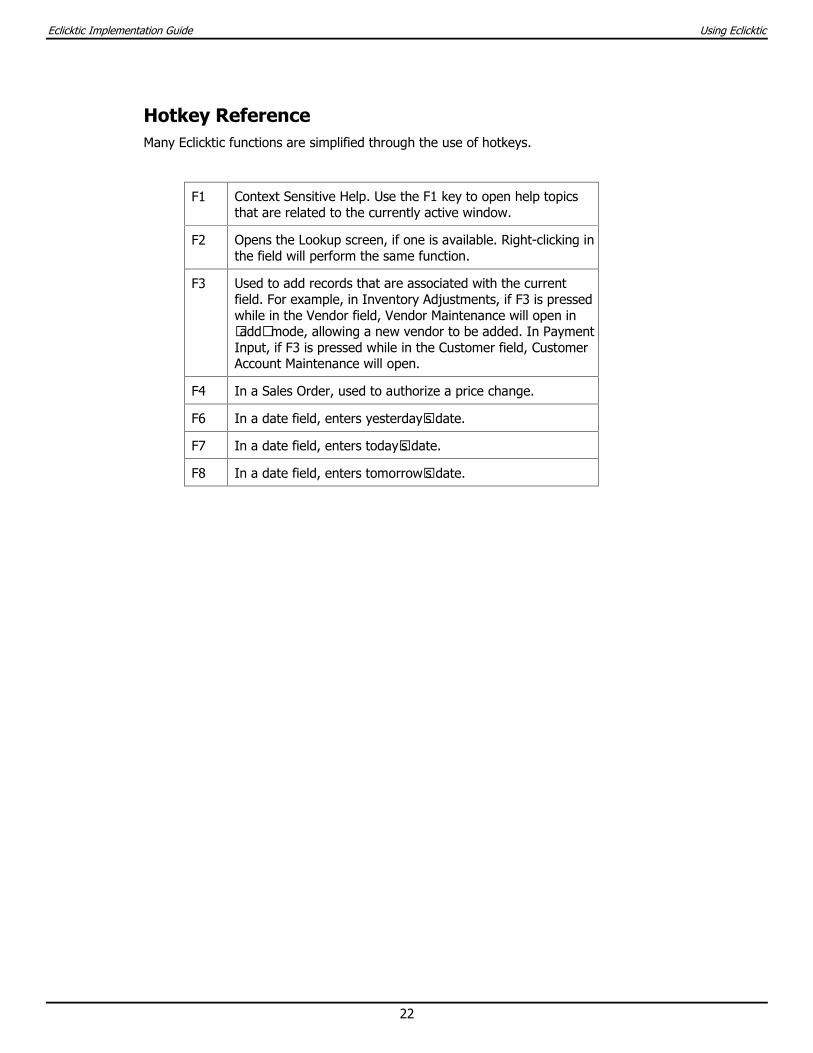
Hotkey Reference Many Eclicktic functions are simplified through the use of hotkeys.
F1 Context Sensitive Help. Use the F1 key to open help topics that are related to the currently active window.
F2 Opens the Lookup screen, if one is available. Right-clicking in the field will perform the same function.
F3 Used to add records that are associated with the current field. For example, in Inventory Adjustments, if F3 is pressed while in the Vendor field, Vendor Maintenance will open in “add” mode, allowing a new vendor to be added. In Payment Input, if F3 is pressed while in the Customer field, Customer Account Maintenance will open.
F4 In a Sales Order, used to authorize a price change.
F6 In a date field, enters yesterday’s date.
F7 In a date field, enters today’s date.
F8 In a date field, enters tomorrow’s date.
Eclicktic Implementation Guide Using Eclicktic
23
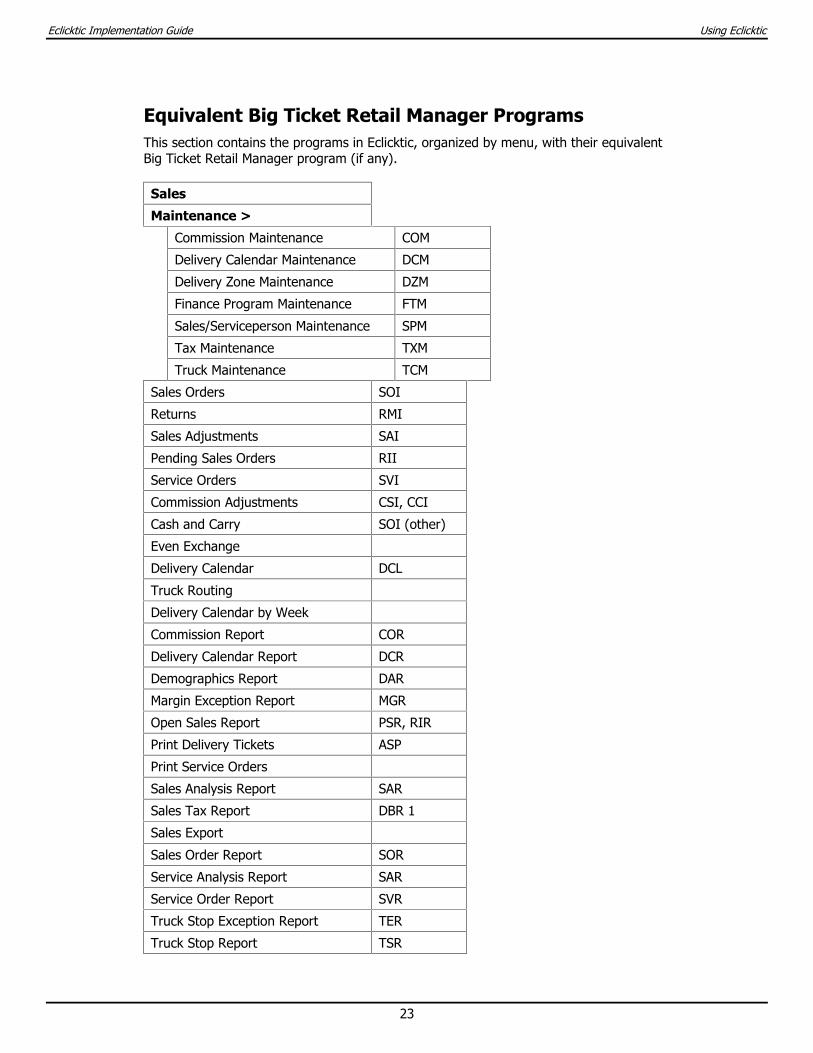
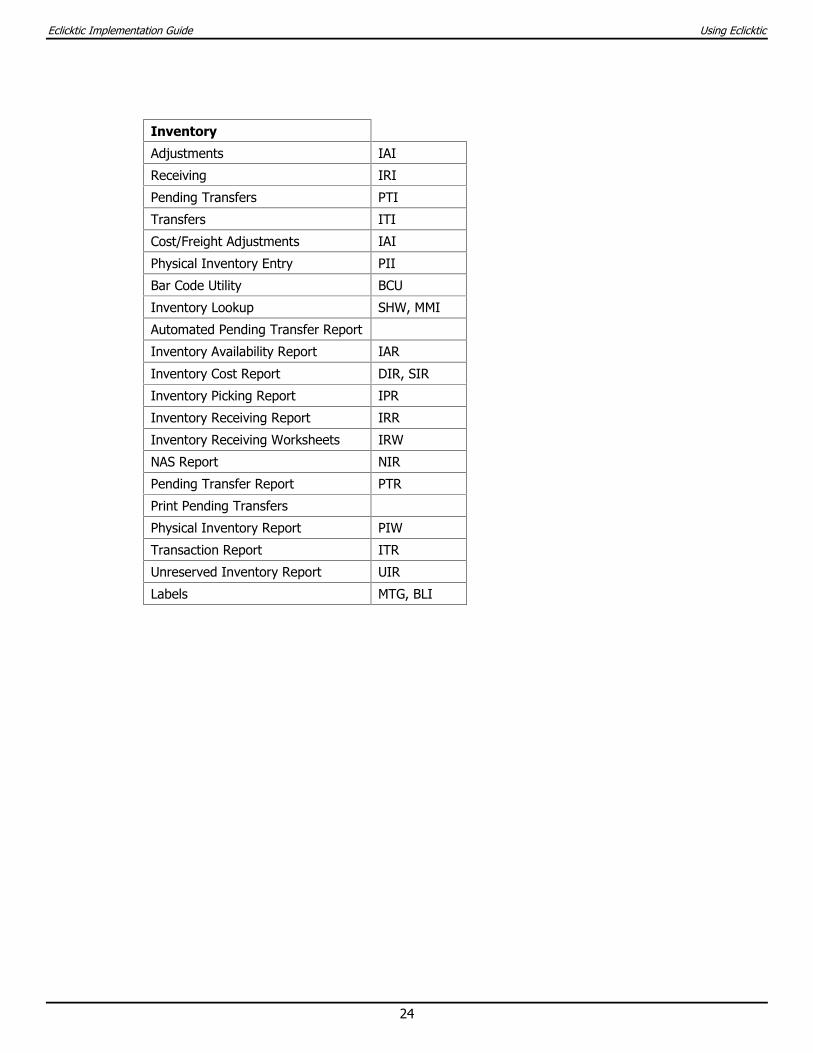
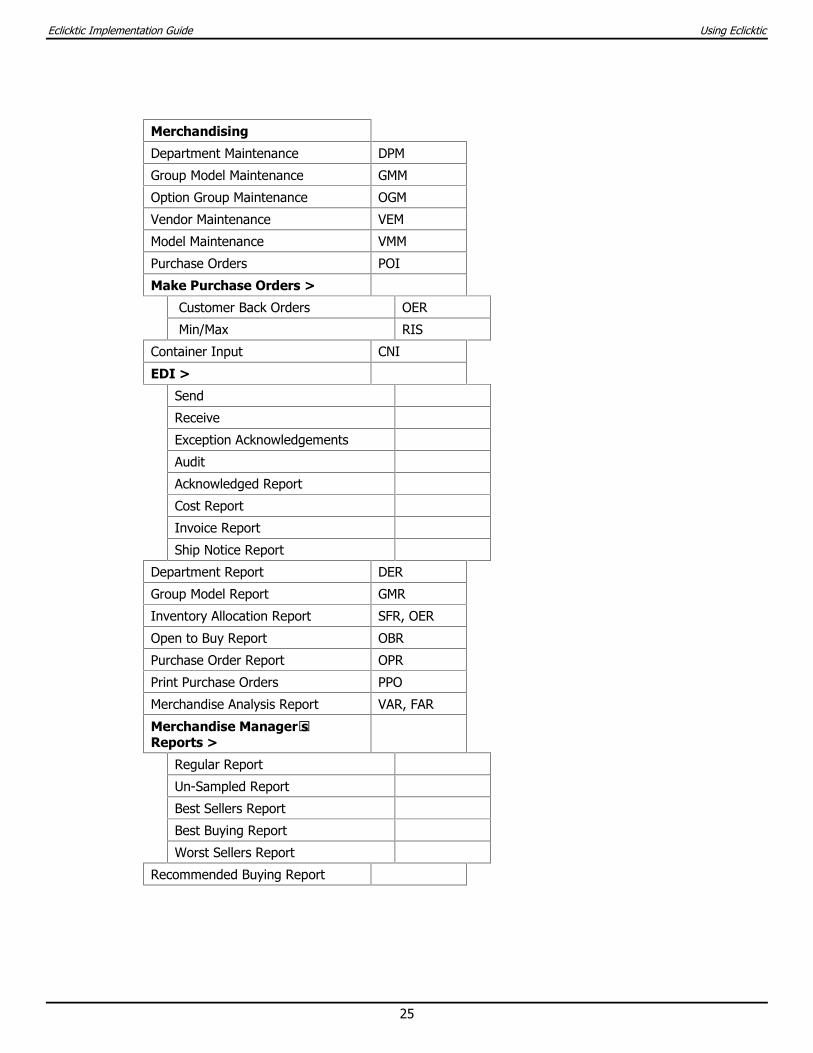
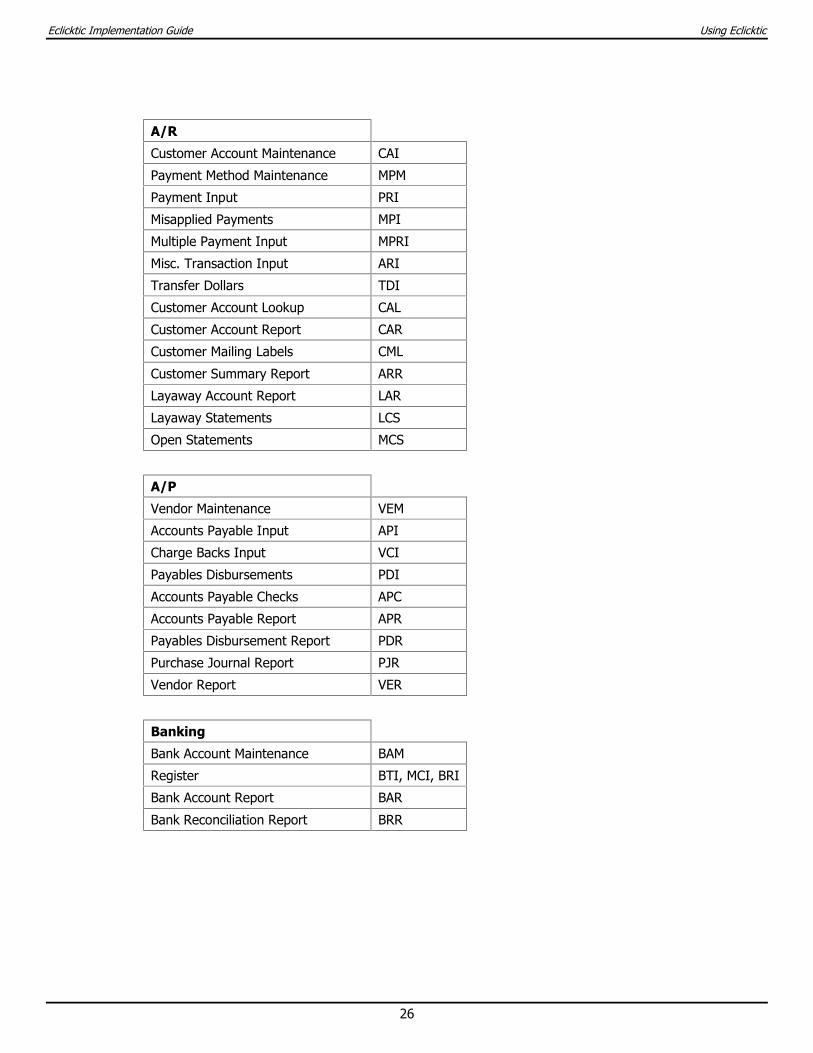
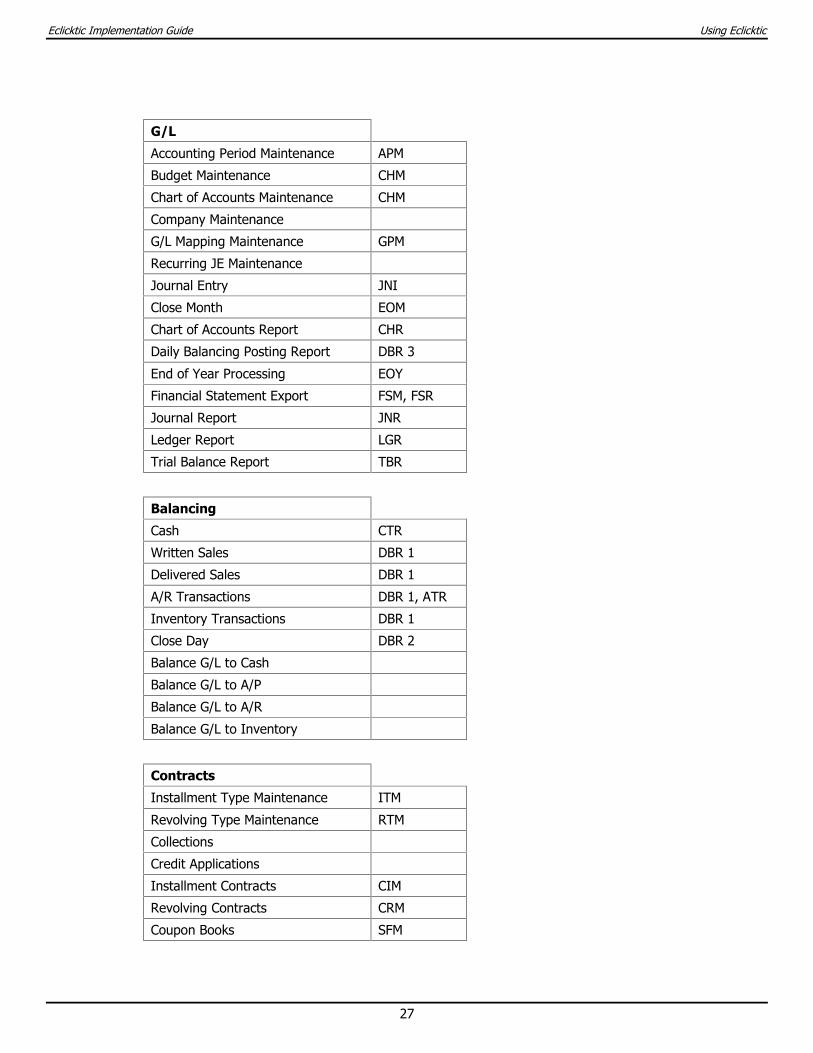
Equivalent Big Ticket Retail Manager Programs This section contains the programs in Eclicktic, organized by menu, with their equivalent Big Ticket Retail Manager program (if any).
Sales
Maintenance >
Commission Maintenance COM
Delivery Calendar Maintenance DCM
Delivery Zone Maintenance DZM
Finance Program Maintenance FTM
Sales/Serviceperson Maintenance SPM
Tax Maintenance TXM
Truck Maintenance TCM
Sales Orders SOI
Returns RMI
Sales Adjustments SAI
Pending Sales Orders RII
Service Orders SVI
Commission Adjustments CSI, CCI
Cash and Carry SOI (other)
Even Exchange
Delivery Calendar DCL
Truck Routing
Delivery Calendar by Week
Commission Report COR
Delivery Calendar Report DCR
Demographics Report DAR
Margin Exception Report MGR
Open Sales Report PSR, RIR
Print Delivery Tickets ASP
Print Service Orders
Sales Analysis Report SAR
Sales Tax Report DBR 1
Sales Export
Sales Order Report SOR
Service Analysis Report SAR
Service Order Report SVR
Truck Stop Exception Report TER
Truck Stop Report TSR
Eclicktic Implementation Guide Using Eclicktic
24
Inventory
Adjustments IAI
Receiving IRI
Pending Transfers PTI
Transfers ITI
Cost/Freight Adjustments IAI
Physical Inventory Entry PII
Bar Code Utility BCU
Inventory Lookup SHW, MMI
Automated Pending Transfer Report
Inventory Availability Report IAR
Inventory Cost Report DIR, SIR
Inventory Picking Report IPR
Inventory Receiving Report IRR
Inventory Receiving Worksheets IRW
NAS Report NIR
Pending Transfer Report PTR
Print Pending Transfers
Physical Inventory Report PIW
Transaction Report ITR
Unreserved Inventory Report UIR
Labels MTG, BLI
Eclicktic Implementation Guide Using Eclicktic
25
Merchandising
Department Maintenance DPM
Group Model Maintenance GMM
Option Group Maintenance OGM
Vendor Maintenance VEM
Model Maintenance VMM
Purchase Orders POI
Make Purchase Orders >
Customer Back Orders OER
Min/Max RIS
Container Input CNI
EDI >
Send
Receive
Exception Acknowledgements
Audit
Acknowledged Report
Cost Report
Invoice Report
Ship Notice Report
Department Report DER
Group Model Report GMR
Inventory Allocation Report SFR, OER
Open to Buy Report OBR
Purchase Order Report OPR
Print Purchase Orders PPO
Merchandise Analysis Report VAR, FAR
Merchandise Manager’s Reports >
Regular Report
Un-Sampled Report
Best Sellers Report
Best Buying Report
Worst Sellers Report
Recommended Buying Report
Eclicktic Implementation Guide Using Eclicktic
26
A/R
Customer Account Maintenance CAI
Payment Method Maintenance MPM
Payment Input PRI
Misapplied Payments MPI
Multiple Payment Input MPRI
Misc. Transaction Input ARI
Transfer Dollars TDI
Customer Account Lookup CAL
Customer Account Report CAR
Customer Mailing Labels CML
Customer Summary Report ARR
Layaway Account Report LAR
Layaway Statements LCS
Open Statements MCS
A/P
Vendor Maintenance VEM
Accounts Payable Input API
Charge Backs Input VCI
Payables Disbursements PDI
Accounts Payable Checks APC
Accounts Payable Report APR
Payables Disbursement Report PDR
Purchase Journal Report PJR
Vendor Report VER
Banking
Bank Account Maintenance BAM
Register BTI, MCI, BRI
Bank Account Report BAR
Bank Reconciliation Report BRR
Eclicktic Implementation Guide Using Eclicktic
27
G/L
Accounting Period Maintenance APM
Budget Maintenance CHM
Chart of Accounts Maintenance CHM
Company Maintenance
G/L Mapping Maintenance GPM
Recurring JE Maintenance
Journal Entry JNI
Close Month EOM
Chart of Accounts Report CHR
Daily Balancing Posting Report DBR 3
End of Year Processing EOY
Financial Statement Export FSM, FSR
Journal Report JNR
Ledger Report LGR
Trial Balance Report TBR
Balancing
Cash CTR
Written Sales DBR 1
Delivered Sales DBR 1
A/R Transactions DBR 1, ATR
Inventory Transactions DBR 1
Close Day DBR 2
Balance G/L to Cash
Balance G/L to A/P
Balance G/L to A/R
Balance G/L to Inventory
Contracts
Installment Type Maintenance ITM
Revolving Type Maintenance RTM
Collections
Credit Applications
Installment Contracts CIM
Revolving Contracts CRM
Coupon Books SFM
Eclicktic Implementation Guide Using Eclicktic
28
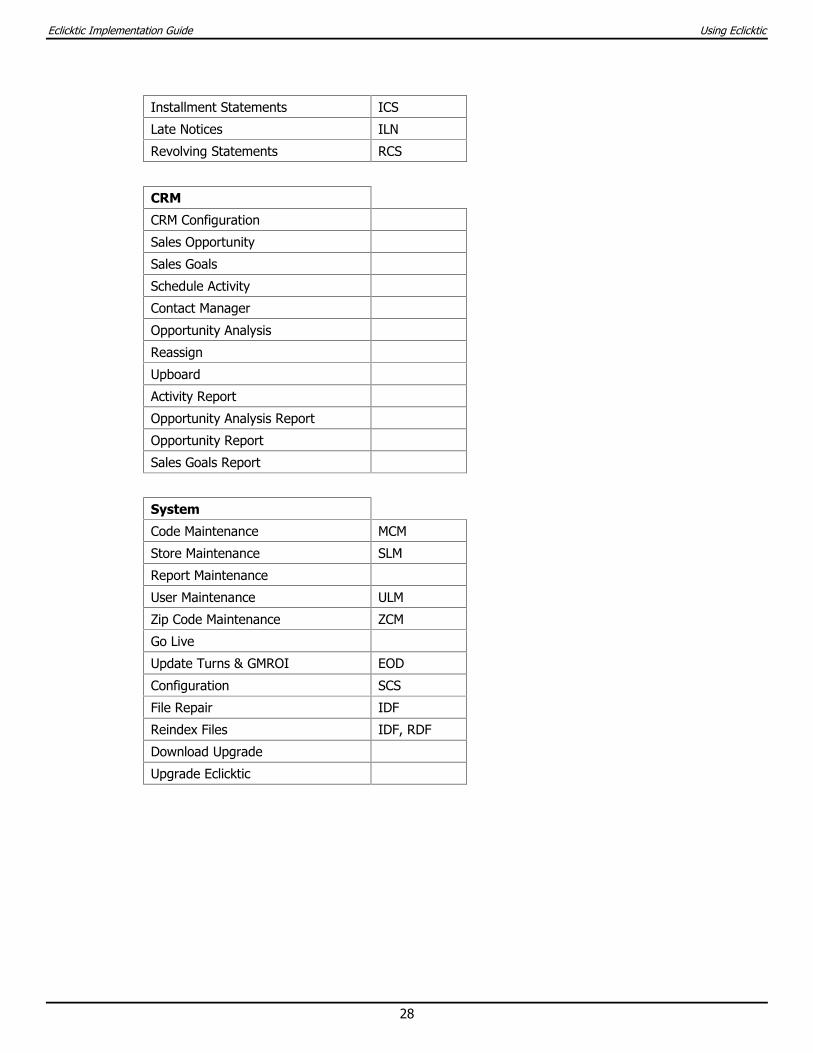
Installment Statements ICS
Late Notices ILN
Revolving Statements RCS
CRM
CRM Configuration
Sales Opportunity
Sales Goals
Schedule Activity
Contact Manager
Opportunity Analysis
Reassign
Upboard
Activity Report
Opportunity Analysis Report
Opportunity Report
Sales Goals Report
System
Code Maintenance MCM
Store Maintenance SLM
Report Maintenance
User Maintenance ULM
Zip Code Maintenance ZCM
Go Live
Update Turns & GMROI EOD
Configuration SCS
File Repair IDF
Reindex Files IDF, RDF
Download Upgrade
Upgrade Eclicktic
Implementation Checklist
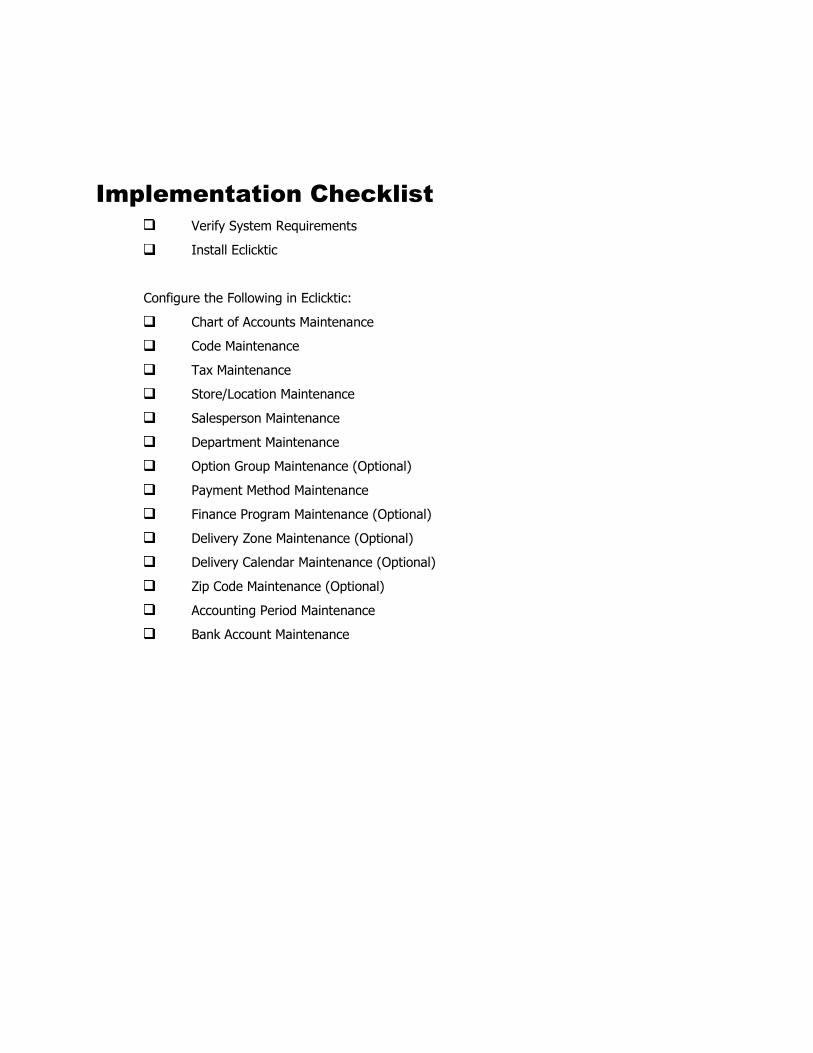
Implementation Checklist Verify System Requirements
Install Eclicktic
Configure the Following in Eclicktic:
Chart of Accounts Maintenance
Code Maintenance
Tax Maintenance
Store/Location Maintenance
Salesperson Maintenance
Department Maintenance
Option Group Maintenance (Optional)
Payment Method Maintenance
Finance Program Maintenance (Optional)
Delivery Zone Maintenance (Optional)
Delivery Calendar Maintenance (Optional)
Zip Code Maintenance (Optional)
Accounting Period Maintenance
Bank Account Maintenance

System Configuration
Eclicktic Implementation Guide System Configuration
32
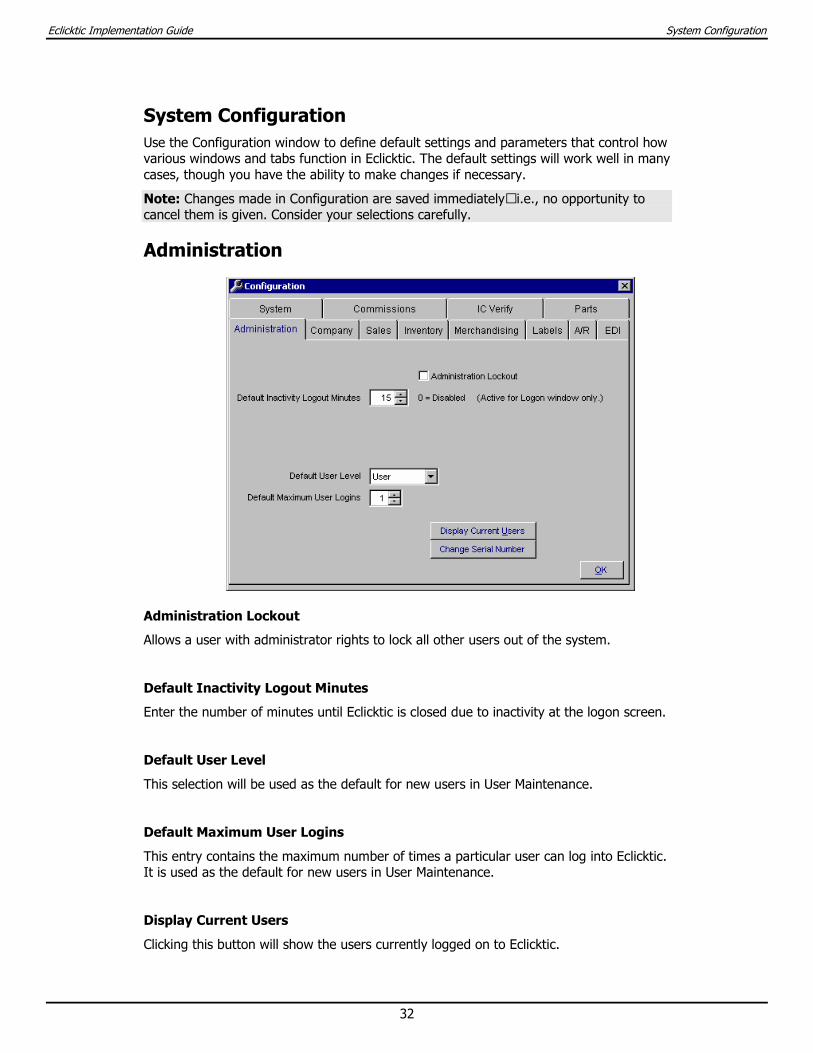
System Configuration Use the Configuration window to define default settings and parameters that control how various windows and tabs function in Eclicktic. The default settings will work well in many cases, though you have the ability to make changes if necessary.
Note: Changes made in Configuration are saved immediately—i.e., no opportunity to cancel them is given. Consider your selections carefully.
Administration
Administration Lockout
Allows a user with administrator rights to lock all other users out of the system.
Default Inactivity Logout Minutes
Enter the number of minutes until Eclicktic is closed due to inactivity at the logon screen.
Default User Level
This selection will be used as the default for new users in User Maintenance.
Default Maximum User Logins
This entry contains the maximum number of times a particular user can log into Eclicktic. It is used as the default for new users in User Maintenance.
Display Current Users
Clicking this button will show the users currently logged on to Eclicktic.
Eclicktic Implementation Guide System Configuration
33
Change Serial Number
Clicking this button allows you to enter the Eclicktic serial number assigned to your company.
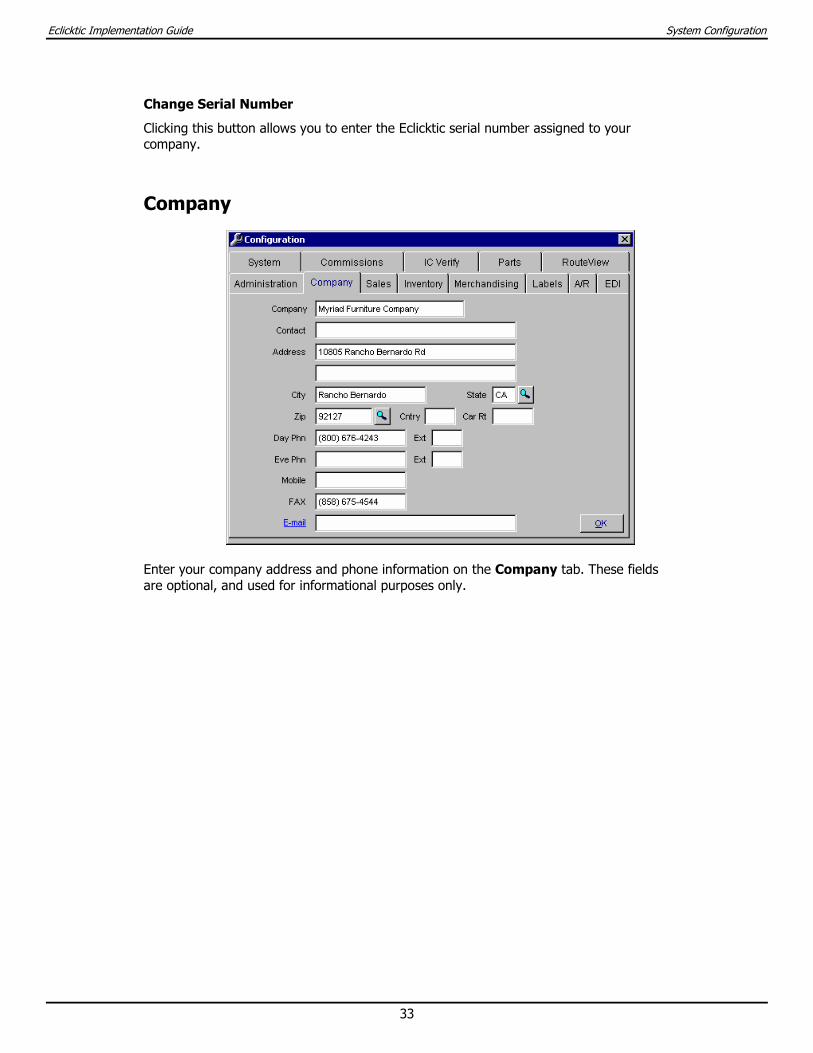
Company
Enter your company address and phone information on the Company tab. These fields are optional, and used for informational purposes only.

Eclicktic Implementation Guide System Configuration
34
Sales
Customer Number
Select the option to use for entering your customer account numbers.
• Manual Entry will allow the user to enter a customer account number by hand. This allows using the customer’s phone number or name for the account number.
• Sequential will create sequential customer numbers automatically. When this option is selected, a field will appear that allows you to enter a beginning number.
• System Generated will create customer numbers with reference to the system date, such as 0312310001 or 0312310002. These numbers use the current date in the form YYMMDD, followed by a sequential four-digit number.
Sales Order Number
Select the option to use for entering your Sales Order numbers.
• Manual Entry will allow the user to enter any Sales Order number.
• Sequential will create Sales Order numbers automatically. When this option is selected, a field will appear that allows you to enter a beginning number.
• System Generated will create Sales Order numbers with reference to the system date, such as 0312310001 or 0312310002. These numbers use the current date in the form YYMMDD, followed by a sequential four-digit number.
Pending Sale Hold Days
If you will be using the Pending Sales module in Sales Orders, this will automatically enter a “hold until” date based on the number of days that you enter in this field.
Eclicktic Implementation Guide System Configuration
35
Require Advertising Source
This will require users to enter a valid advertising code in all Sales Orders. These codes may be added in Code Maintenance.
Require Follow Up
This will require users to enter a valid follow up code in all Sales Orders. This code will be applied to the customer master and Sales Order. Follow up codes may be added in Code Maintenance.
Use Delivery Calendar
This must be checked in order to access the Delivery Calendar for scheduled delivery dates. The Delivery Calendar must be created in Delivery Calendar Maintenance.
Use Delivery Calendar for Service Orders
This must be checked in order to access the Delivery Calendar for scheduled service dates in Service Orders. The Delivery Calendar must be created in Delivery Calendar Maintenance.
Show Times on Delivery Calendar Slots
If this is checked, the Delivery Calendar will show the delivery times. If it is not checked, only AM or PM will appear.
Allow Import of Shopping Carts from Browser
If this is checked, the Sales Order - Line Items tab will allow importing of shopping cart items from the Browser Edition Sales Module.
Display Extra Financing Fields
If you would like to use the additional fields for external financing in Sales Orders, check this box.
Warn if Balance Due on Finalize
If you want to be reminded that there is a balance due on a Sales Order prior to finalizing, check this box.
Use Prevue Sales Orders
This is only used if you have a display catalog system.
Eclicktic Implementation Guide System Configuration
36
Display Customer Account Lookup Summary
If this is not checked, you will not see the account summary on the first page of the Customer Lookup screen.
Allow to Sell from Showroom Locations
When this is checked, the option to sell from showroom locations will be available.
Default SO Line Written Date from the Header
If this is checked, when entering a new line item on an existing Sales Order, the written date for new line items will be the same date as the written date from the Sales Order header.
Require Service Code on Service Orders
This will require users to enter a valid Service Code on all Service Orders. Service Codes may be added in Code Maintenance.
Require Reason Code on Returns
This will require users to enter a valid Return Reason Code for all Returns. Return Reason Codes may be added in Code Maintenance.
Warn on Finalize of Zero Cost Items
If this is checked, and a user attempts to finalize a Sales Order line item with zero cost, a warning will appear.

Eclicktic Implementation Guide System Configuration
37
Inventory
Include Showroom in Net Inventory
This will designate if showroom quantities will be included in net available inventory in Inventory Lookup.
Include Pending Sales in CBO Inventory
If this is checked, Pending Sales will be included with Customer Backorder merchandise in Inventory Lookup.
Commission Code
This commission code will be used for new models created through screens other than Model Maintenance. It will be applied if there is no default commission code in Vendor Maintenance.
Reason Code for Barcode Physical Inventory
This is the default code used for updating inventory when doing a physical inventory through bar coding.
Model Lookup Defaults
When checked, these items will be included when searching for models:
• Include Groups
• Include Special Orders
• Include Discontinued
Eclicktic Implementation Guide System Configuration
38
• Include Parts
Inventory Lookup Defaults
When checked, these items will be included when searching for inventory:
• In Stock Only. This will include only models that have available inventory.
• Discontinued Only If In Stock. This will include only models marked as discontinued, but that have available inventory.
• Break By Cover - Options Only. If you are using options, the inventory may be viewed by cover. This box would be used only when looking for options items, not case goods.
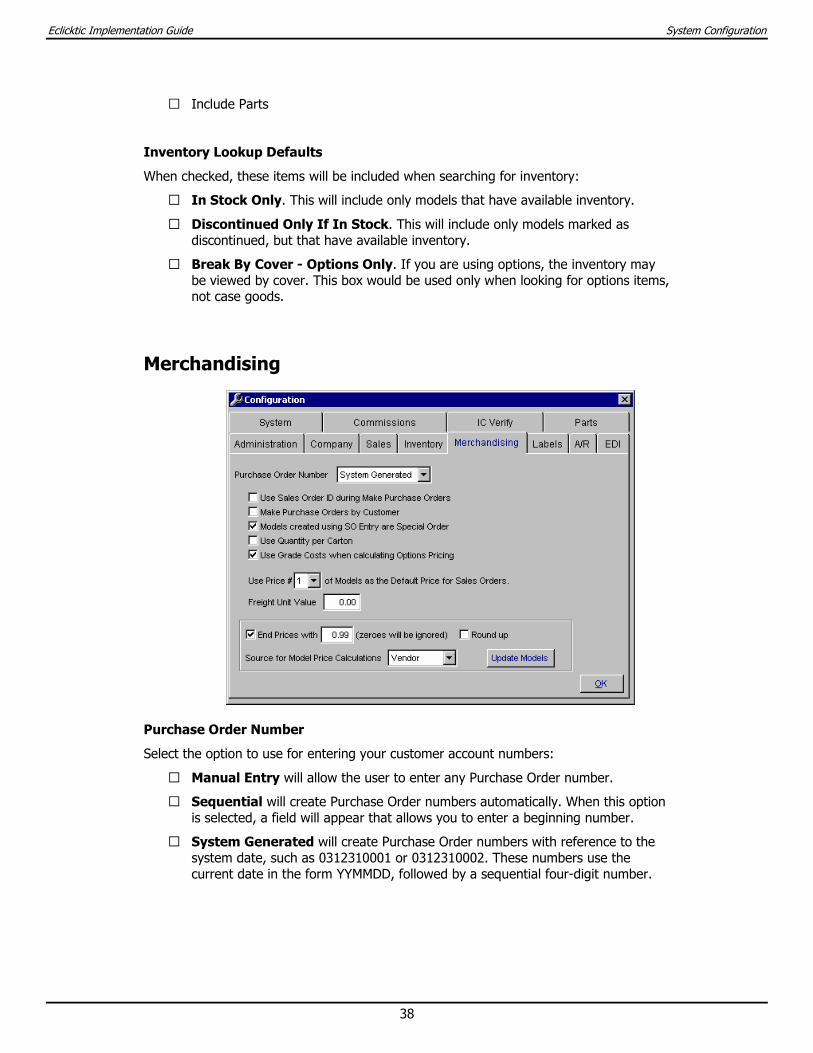
Merchandising
Purchase Order Number
Select the option to use for entering your customer account numbers:
• Manual Entry will allow the user to enter any Purchase Order number.
• Sequential will create Purchase Order numbers automatically. When this option is selected, a field will appear that allows you to enter a beginning number.
• System Generated will create Purchase Order numbers with reference to the system date, such as 0312310001 or 0312310002. These numbers use the current date in the form YYMMDD, followed by a sequential four-digit number.

Eclicktic Implementation Guide System Configuration
39
Use Sales Order ID during Make Purchase Orders
If this box is checked, when making purchase orders for customer sales orders, the Purchase Order number and the Sales Order number will be the same.
Make Purchase Orders by Customer
If this is checked, a separate purchase order will be created for each customer, even if customers are ordering models from the same vendor. If it is not checked, purchase orders may include items being ordered for multiple customers.
Models created using SO Entry are Special Order
If this is checked, when new models are created through the sales order, they will be marked as special order models in Model Maintenance.
Use Price #1 (#2 or #3) of Models as the Default Price for Sales Orders
Specify which of the three price points from the Model Maintenance Price tab to use as the default sales price in Sales Orders.
Freight Unit Value
This is a custom field for Norwalk Furniture. Use this field to enter the default freight unit as assigned to your area.
End Prices with
This field designates if model prices calculated in Model Maintenance should end in specific digits, such as 9.99 or .95.
Round Up
If this is checked, model prices should be rounded up to the next highest rounding value, as defined in the End Prices with field. For example, if the End Prices with field is set to .95, it would round a price of $223.07 up to $223.95.
If this box is not checked, the price will be rounded to the nearest amount containing the rounding value defined in the End Prices with field. For example, if the End Prices With field is set to .95, it would round a price of $223.07 to $222.95.
Source for Model Price Calculations
In Model Maintenance, on the Prices tab, gross margin percentages or markup factors are displayed. If you would like these to be obtained from Department Maintenance, select Department from the drop-down list. If you would like them to be obtained from Vendor Maintenance, select Vendor from the drop-down list.
Eclicktic Implementation Guide System Configuration
40
Update Models
If you should change any of the settings outlined above and want to update models already created, click the Update Models button to change existing models.
Labels
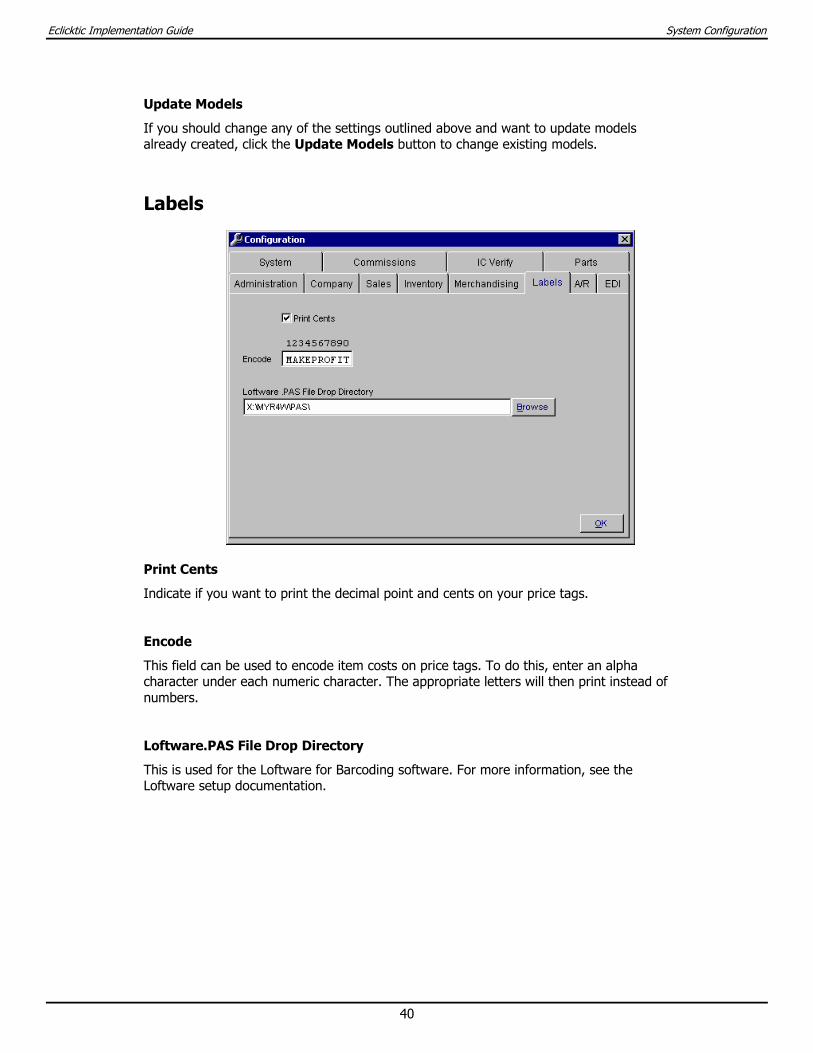
Print Cents
Indicate if you want to print the decimal point and cents on your price tags.
Encode
This field can be used to encode item costs on price tags. To do this, enter an alpha character under each numeric character. The appropriate letters will then print instead of numbers.
Loftware.PAS File Drop Directory
This is used for the Loftware for Barcoding software. For more information, see the Loftware setup documentation.
Eclicktic Implementation Guide System Configuration
41
A/R
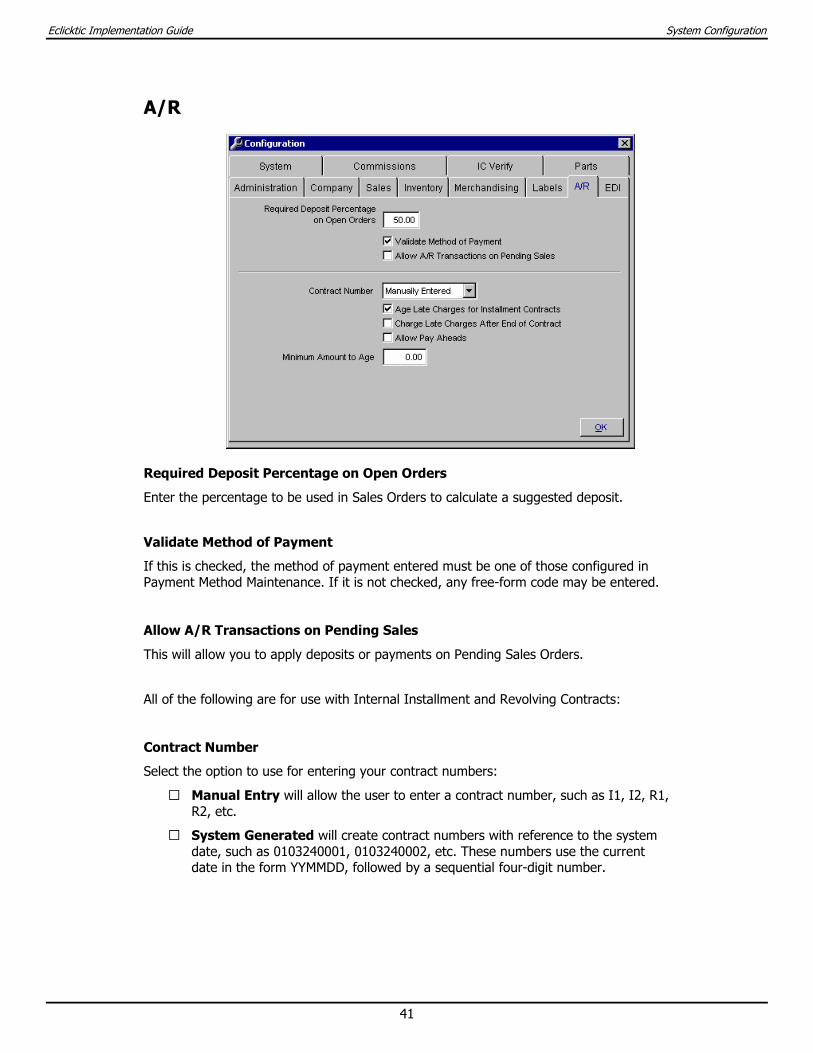
Required Deposit Percentage on Open Orders
Enter the percentage to be used in Sales Orders to calculate a suggested deposit.
Validate Method of Payment
If this is checked, the method of payment entered must be one of those configured in Payment Method Maintenance. If it is not checked, any free-form code may be entered.
Allow A/R Transactions on Pending Sales
This will allow you to apply deposits or payments on Pending Sales Orders.
All of the following are for use with Internal Installment and Revolving Contracts:
Contract Number
Select the option to use for entering your contract numbers:
• Manual Entry will allow the user to enter a contract number, such as I1, I2, R1, R2, etc.
• System Generated will create contract numbers with reference to the system date, such as 0103240001, 0103240002, etc. These numbers use the current date in the form YYMMDD, followed by a sequential four-digit number.
Eclicktic Implementation Guide System Configuration
42
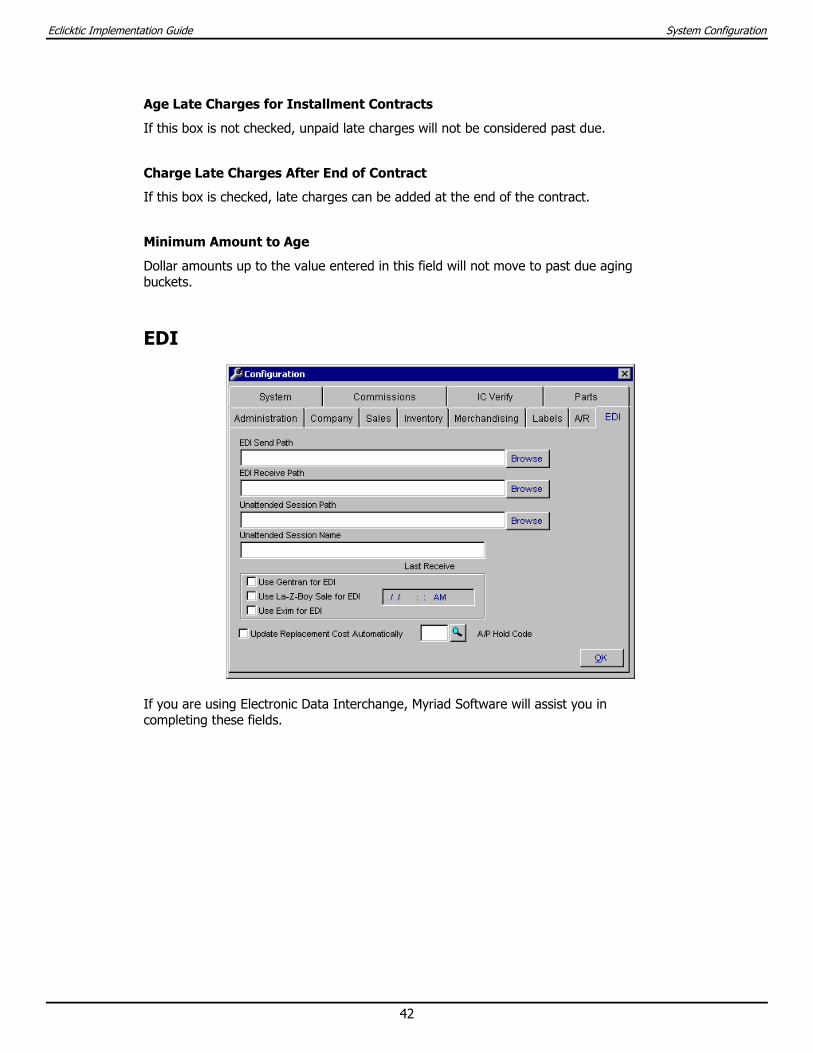
Age Late Charges for Installment Contracts
If this box is not checked, unpaid late charges will not be considered past due.
Charge Late Charges After End of Contract
If this box is checked, late charges can be added at the end of the contract.
Minimum Amount to Age
Dollar amounts up to the value entered in this field will not move to past due aging buckets.
EDI
If you are using Electronic Data Interchange, Myriad Software will assist you in completing these fields.
Eclicktic Implementation Guide System Configuration
43
System
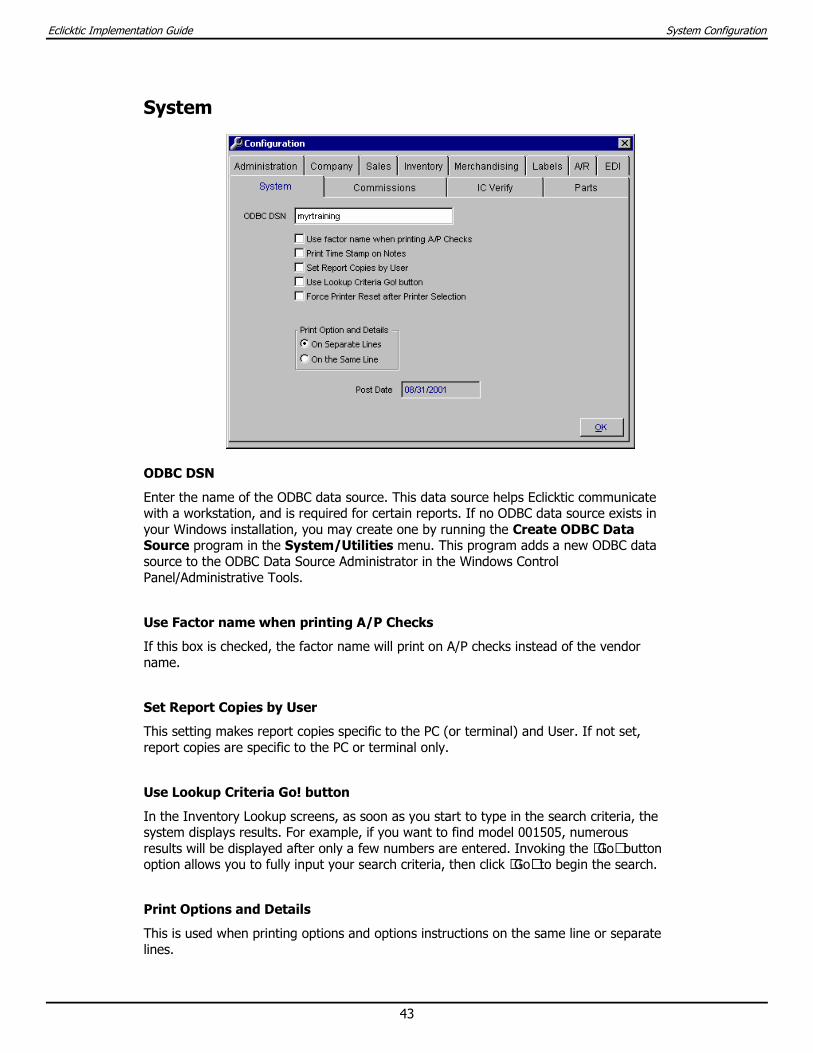
ODBC DSN
Enter the name of the ODBC data source. This data source helps Eclicktic communicate with a workstation, and is required for certain reports. If no ODBC data source exists in your Windows installation, you may create one by running the Create ODBC Data Source program in the System/Utilities menu. This program adds a new ODBC data source to the ODBC Data Source Administrator in the Windows Control Panel/Administrative Tools.
Use Factor name when printing A/P Checks
If this box is checked, the factor name will print on A/P checks instead of the vendor name.
Set Report Copies by User
This setting makes report copies specific to the PC (or terminal) and User. If not set, report copies are specific to the PC or terminal only.
Use Lookup Criteria Go! button
In the Inventory Lookup screens, as soon as you start to type in the search criteria, the system displays results. For example, if you want to find model 001505, numerous results will be displayed after only a few numbers are entered. Invoking the “Go” button option allows you to fully input your search criteria, then click “Go” to begin the search.
Print Options and Details
This is used when printing options and options instructions on the same line or separate lines.

Eclicktic Implementation Guide System Configuration
44
Post Date
Use Go Live (under System) this is a beginning date to be used for the Daily Balancing report to begin your first post date, then it will automatically update as you post through Daily Balancing.
Commissions
If you wish to pay commissions for bonuses or use a sliding scale by sales volume, use this program.
Bonus Based on Type
You can have bonuses paid by Dollar, Profit, or Gross Margin levels.
Bonus Based on Date
Select to pay on either Written or Delivered business date.
Bonus Schedule
Use the Bonus Schedule grid to set the bonus schedule by the dollar, profit, or gross margin volume amount levels or on a sliding scale.
Eclicktic Implementation Guide System Configuration
45
Process by A/R
This check box designates if commissions should be calculated on the Commission Report and paid based on the payment method code entered for A/R transactions. This will override any other commission structure.
Overhead Penalty %
Enter a global overhead percentage to deduct from calculated commissions for sales personnel to account for the overhead costs of running your operations. For example, enter 2.0 if two percent of the salesperson's commissions should be deducted to account for overhead costs.
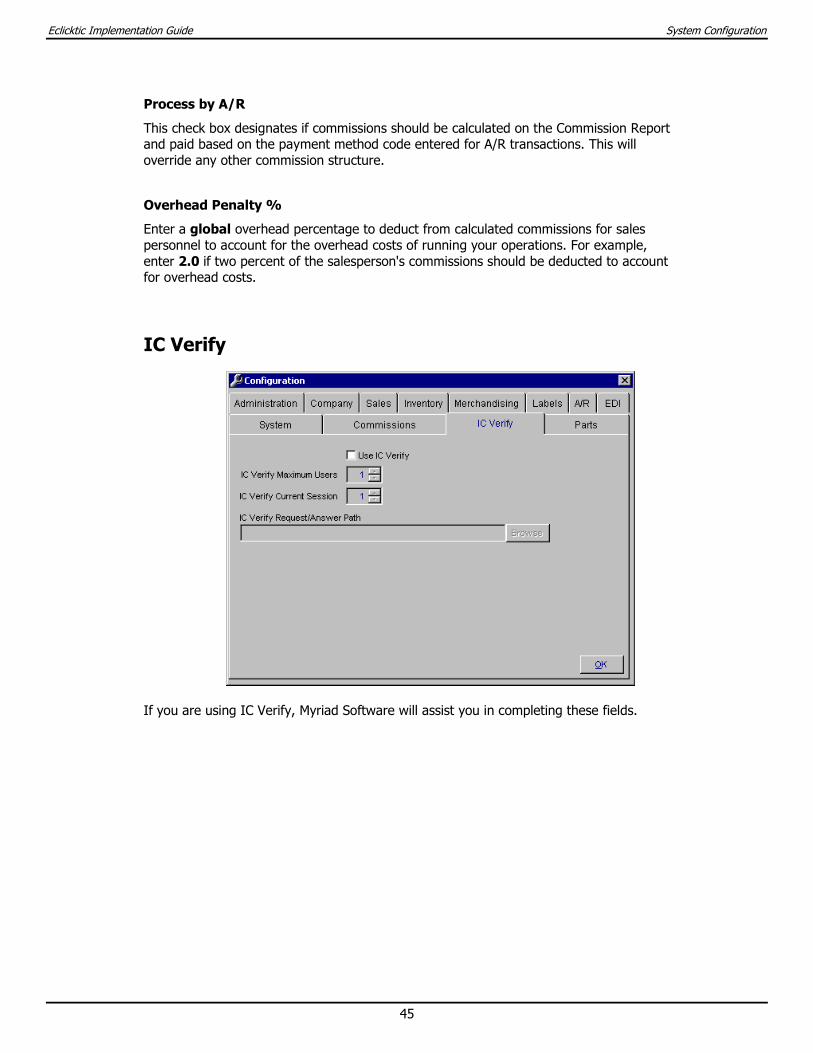
IC Verify
If you are using IC Verify, Myriad Software will assist you in completing these fields.
Eclicktic Implementation Guide System Configuration
46
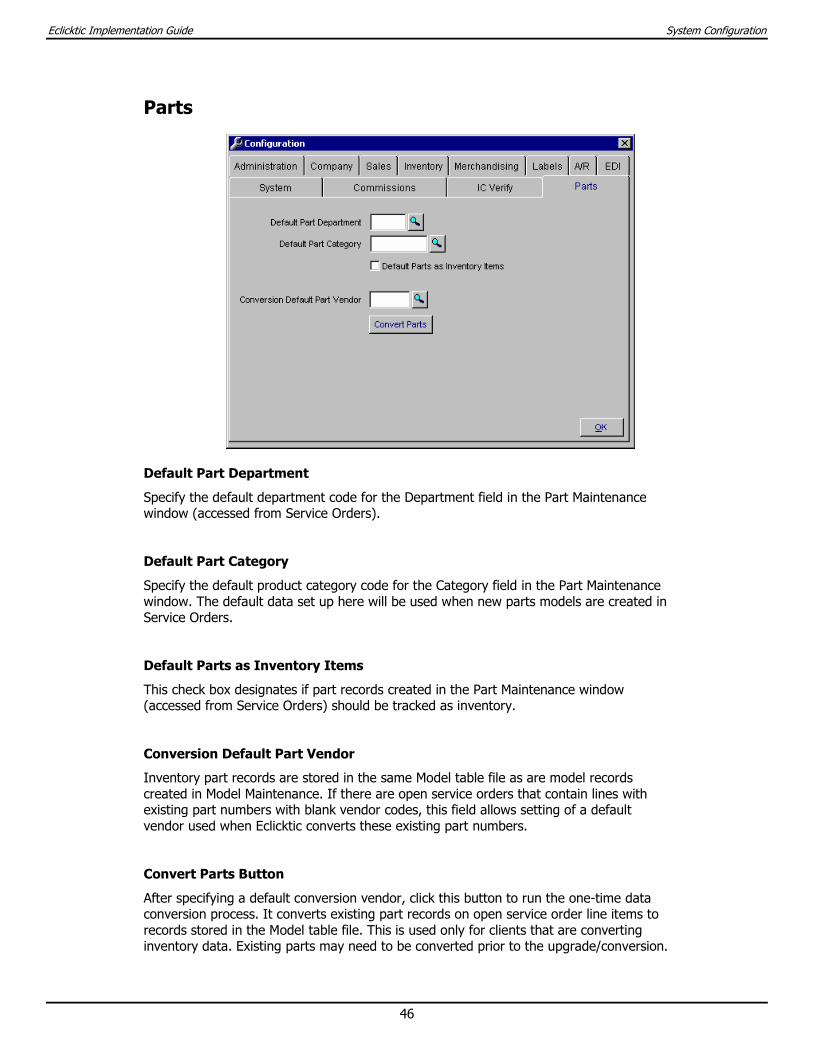
Parts
Default Part Department
Specify the default department code for the Department field in the Part Maintenance window (accessed from Service Orders).
Default Part Category
Specify the default product category code for the Category field in the Part Maintenance window. The default data set up here will be used when new parts models are created in Service Orders.
Default Parts as Inventory Items
This check box designates if part records created in the Part Maintenance window (accessed from Service Orders) should be tracked as inventory.
Conversion Default Part Vendor
Inventory part records are stored in the same Model table file as are model records created in Model Maintenance. If there are open service orders that contain lines with existing part numbers with blank vendor codes, this field allows setting of a default vendor used when Eclicktic converts these existing part numbers.
Convert Parts Button
After specifying a default conversion vendor, click this button to run the one-time data conversion process. It converts existing part records on open service order line items to records stored in the Model table file. This is used only for clients that are converting inventory data. Existing parts may need to be converted prior to the upgrade/conversion.
Maintenance Modules
Eclicktic Implementation Guide Maintenance Modules
48
Chart of Accounts Maintenance The Chart of Accounts Maintenance program is used to set up the General Ledger Chart of Accounts. Many programs will require the selection of a general ledger account number to which to post.
Each account number must be established as an Asset, Liability, Income, Capital, or an Expense account:
A - ASSETS
All assets account numbers should begin with the number “100”.
L - LIABILITIES
All liabilities accounts should begin with the number “200”.
C - CAPITAL
Capital accounts will usually be in the “300” series.
I - INCOME
Income accounts, including sales, will typically begin with “400”.
E - EXPENSES
Expense accounts will begin with a “500” series and end in the “900’s”.
To make formatting your financial statements easier, it is important to keep in mind that numbers within each type of account should have a flow as well. For example, all current assets may begin with “10xx” through “15xx”, where all long-term assets would begin with “16xx” through “19xx”.
You may also set up “sub-accounts”, typically done for a multi-store or multi-profit center company. These are the digits shown after the decimal point.
Sub-account logic is typically used to create the capability of printing your financial statements for profit centers, by store or by company. If you are a multi-store environment, you will probably want to take advantage of this feature, since it will allow you to print G/L reports and financial statements for just one profit center or store.
Even if you only have a single store operation today, if you ever plan to become a multi-store or multi-company entity, it is recommended that you use “01” as the sub-account number for all of your accounts. When you add your next store or company, use “02” after the decimal point to designate store 2 or company 2, and so forth.
Prerequisites There are no system prerequisites, but a lot of thought should be given to setting up your Chart of Account numbers. If you already have a system, you should be able to adapt your current account logic to the program. Your Accountant or CPA may also provide you with a recommended Chart of Accounts listing.
Eclicktic Implementation Guide Maintenance Modules
49
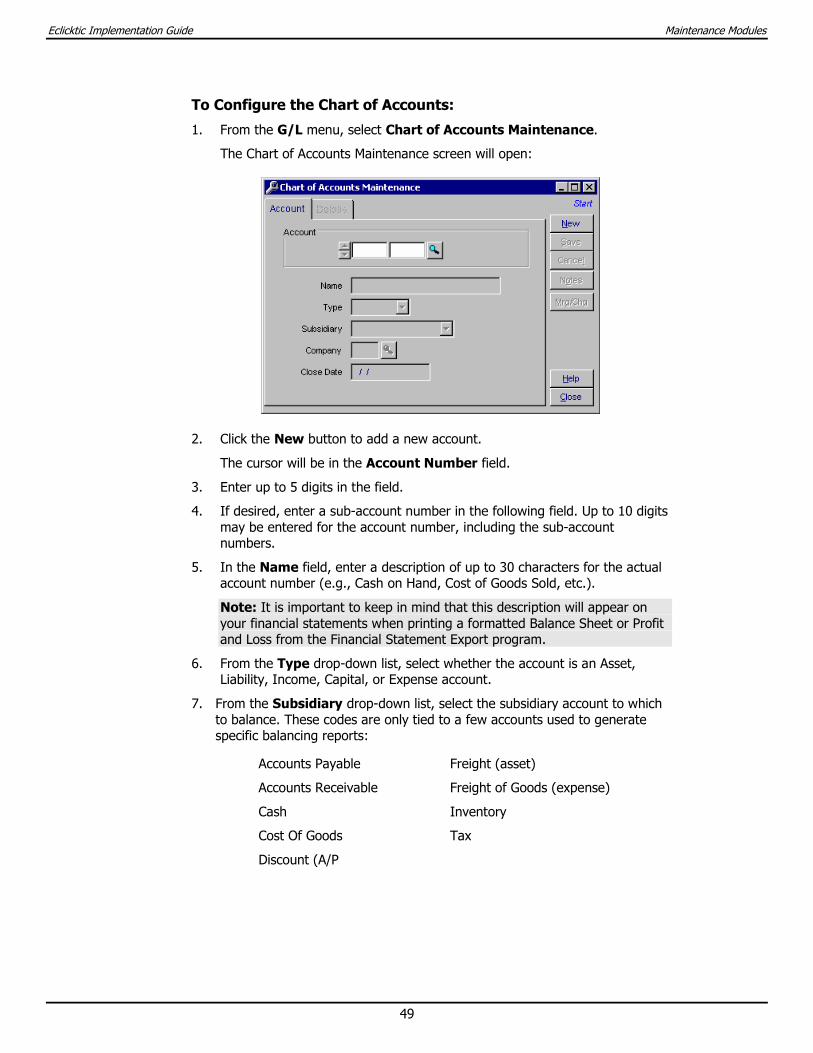
To Configure the Chart of Accounts:
1. From the G/L menu, select Chart of Accounts Maintenance.
The Chart of Accounts Maintenance screen will open:
2. Click the New button to add a new account.
The cursor will be in the Account Number field.
3. Enter up to 5 digits in the field.
4. If desired, enter a sub-account number in the following field. Up to 10 digits may be entered for the account number, including the sub-account numbers.
5. In the Name field, enter a description of up to 30 characters for the actual account number (e.g., Cash on Hand, Cost of Goods Sold, etc.).
Note: It is important to keep in mind that this description will appear on your financial statements when printing a formatted Balance Sheet or Profit and Loss from the Financial Statement Export program.
6. From the Type drop-down list, select whether the account is an Asset, Liability, Income, Capital, or Expense account.
7. From the Subsidiary drop-down list, select the subsidiary account to which to balance. These codes are only tied to a few accounts used to generate specific balancing reports:
Accounts Payable Freight (asset)
Accounts Receivable Freight of Goods (expense)
Cash Inventory
Cost Of Goods Tax
Discount (A/P
Eclicktic Implementation Guide Maintenance Modules
50
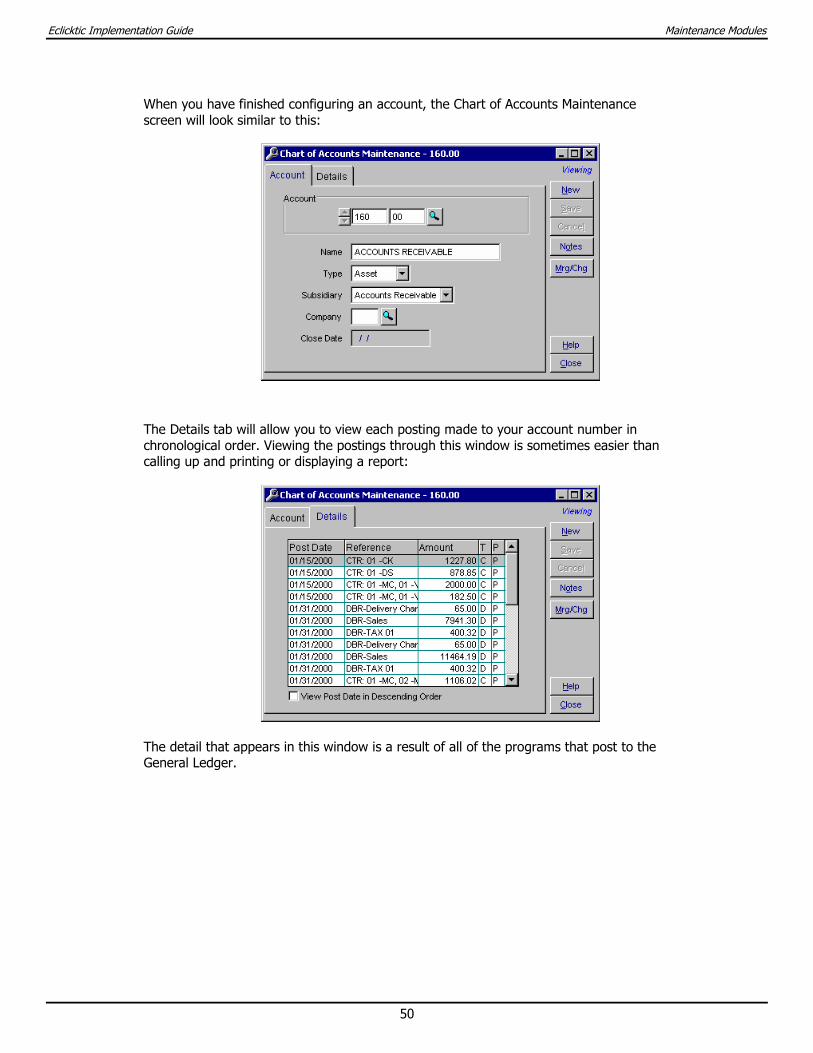
When you have finished configuring an account, the Chart of Accounts Maintenance screen will look similar to this:
The Details tab will allow you to view each posting made to your account number in chronological order. Viewing the postings through this window is sometimes easier than calling up and printing or displaying a report:
The detail that appears in this window is a result of all of the programs that post to the General Ledger.

Eclicktic Implementation Guide Maintenance Modules
51
Code Maintenance Code Maintenance allows you to set up codes that will be used in various programs or reports throughout Eclicktic. These codes will be used for a specific type of transaction, or for sorting report information.
All Code Maintenance programs allow up to a three-character alphanumeric code or special characters to be established. You may set up an unlimited number of codes.
These codes can also be used in various screens and reports to include or exclude information.
Code Maintenance includes:
Advertising Codes Promotions Codes
Chargebacks Codes Purchase Orders Codes
Discontinued Codes Purchase Order Status Codes
Follow-up Codes Receivables Codes
Inventory Adjustments Codes Return Reason Codes
Not Available for Sale Codes Salesperson Types Codes
Payment Hold Codes Service Codes
To Open Code Maintenance:
From the System menu, select Code Maintenance.
The Code Maintenance screen will open:
The procedures in the rest of this section assume that the Code Maintenance screen remains open.
Eclicktic Implementation Guide Maintenance Modules
52
Advertising Advertising codes can be used to track sales dollar information by the type of advertising source. The Demographics Report will help you to analyze the sales dollars for each advertising code for any given day or date range. You can also send mailers, using your customer mailing list, to specific advertising sources that were tracked when you input your sales.
Any three-character alphanumeric code may be used to help you define your advertising sources.
Examples include:
C = Cable R = Radio
D = Direct Mail T = Television
I = Invitation Only W = Word of Mouth
N = Newspaper
To Enter New Advertising Codes:
1. From the Code Category drop-down list, select Advertising.
2. Click the New button.
3. Enter up to three characters in the Code field, and then press Enter.
4. Enter a description for the code in the Name field.
5. Click the Save button.
To View or Modify Existing Advertising Codes:
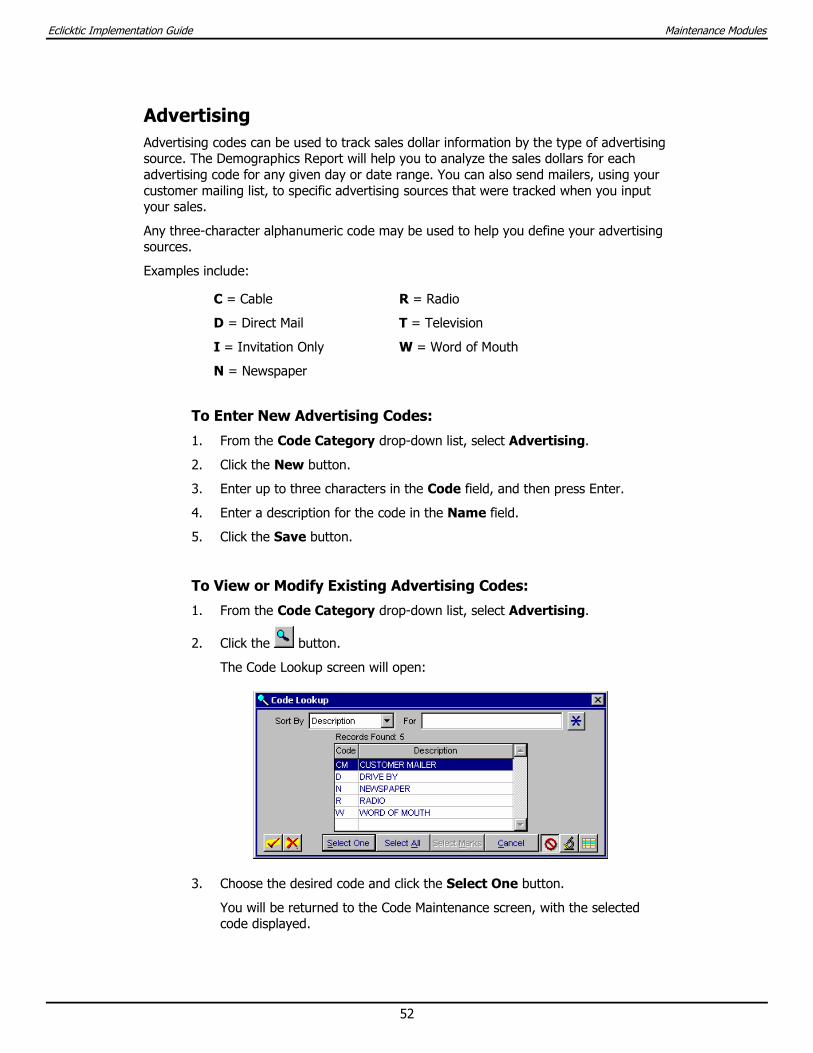
1. From the Code Category drop-down list, select Advertising.
2. Click the button.
The Code Lookup screen will open:
3. Choose the desired code and click the Select One button.
You will be returned to the Code Maintenance screen, with the selected code displayed.
Eclicktic Implementation Guide Maintenance Modules
53
The following programs use Advertising Codes:
• Sales Orders
• Demographic Report
• Sales Analysis Report
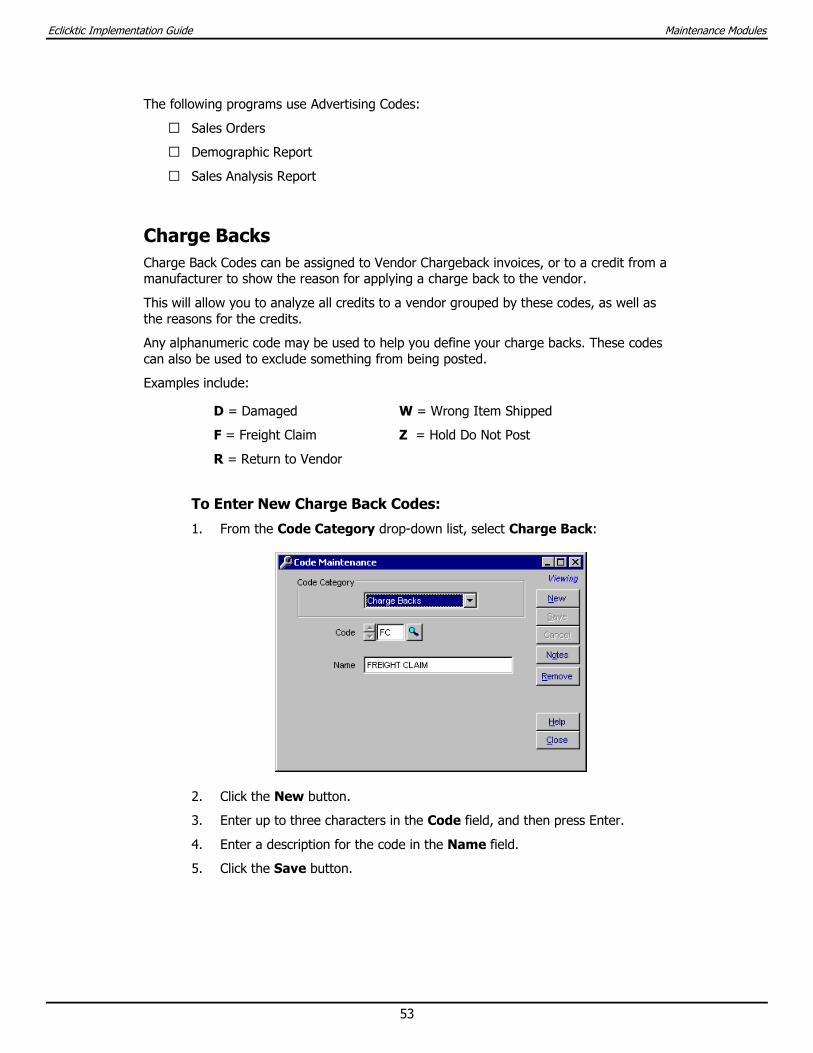
Charge Backs Charge Back Codes can be assigned to Vendor Chargeback invoices, or to a credit from a manufacturer to show the reason for applying a charge back to the vendor.
This will allow you to analyze all credits to a vendor grouped by these codes, as well as the reasons for the credits.
Any alphanumeric code may be used to help you define your charge backs. These codes can also be used to exclude something from being posted.
Examples include:
D = Damaged W = Wrong Item Shipped
F = Freight Claim Z = Hold Do Not Post
R = Return to Vendor
To Enter New Charge Back Codes:
1. From the Code Category drop-down list, select Charge Back:
2. Click the New button.
3. Enter up to three characters in the Code field, and then press Enter.
4. Enter a description for the code in the Name field.
5. Click the Save button.
Eclicktic Implementation Guide Maintenance Modules
54
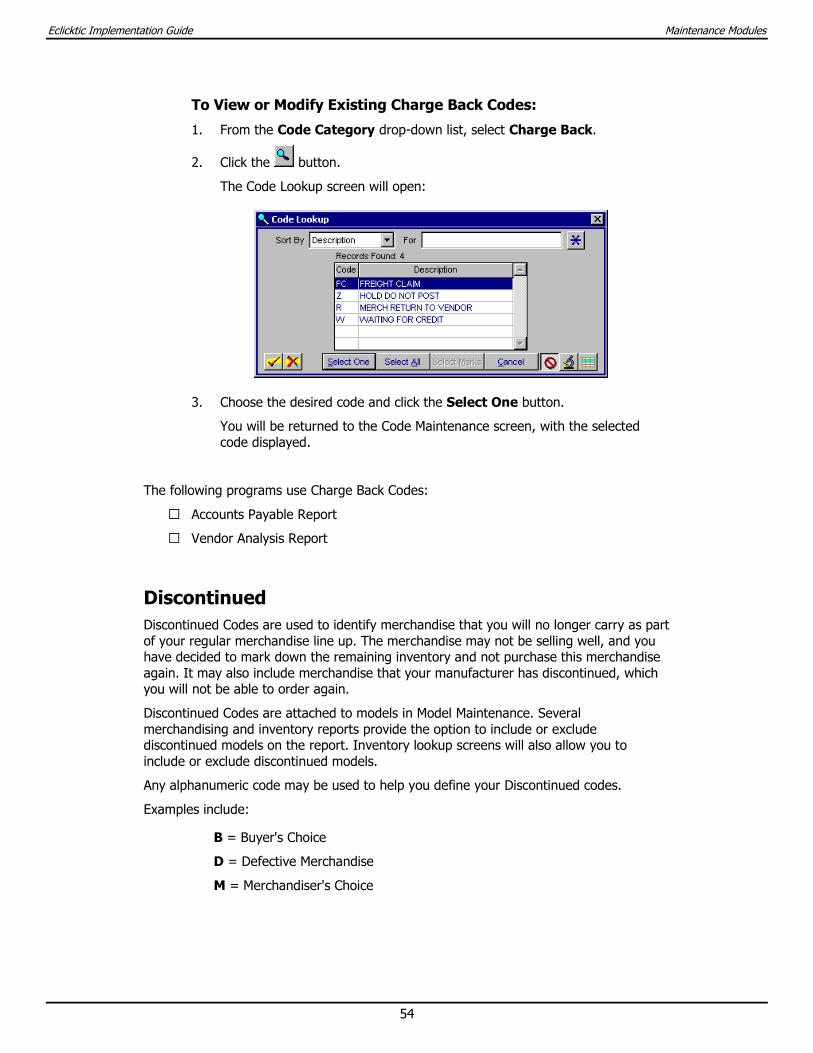
To View or Modify Existing Charge Back Codes:
1. From the Code Category drop-down list, select Charge Back.
2. Click the button.
The Code Lookup screen will open:
3. Choose the desired code and click the Select One button.
You will be returned to the Code Maintenance screen, with the selected code displayed.
The following programs use Charge Back Codes:
• Accounts Payable Report
• Vendor Analysis Report
Discontinued Discontinued Codes are used to identify merchandise that you will no longer carry as part of your regular merchandise line up. The merchandise may not be selling well, and you have decided to mark down the remaining inventory and not purchase this merchandise again. It may also include merchandise that your manufacturer has discontinued, which you will not be able to order again.
Discontinued Codes are attached to models in Model Maintenance. Several merchandising and inventory reports provide the option to include or exclude discontinued models on the report. Inventory lookup screens will also allow you to include or exclude discontinued models.
Any alphanumeric code may be used to help you define your Discontinued codes.
Examples include:
B = Buyer's Choice
D = Defective Merchandise
M = Merchandiser's Choice
Eclicktic Implementation Guide Maintenance Modules
55
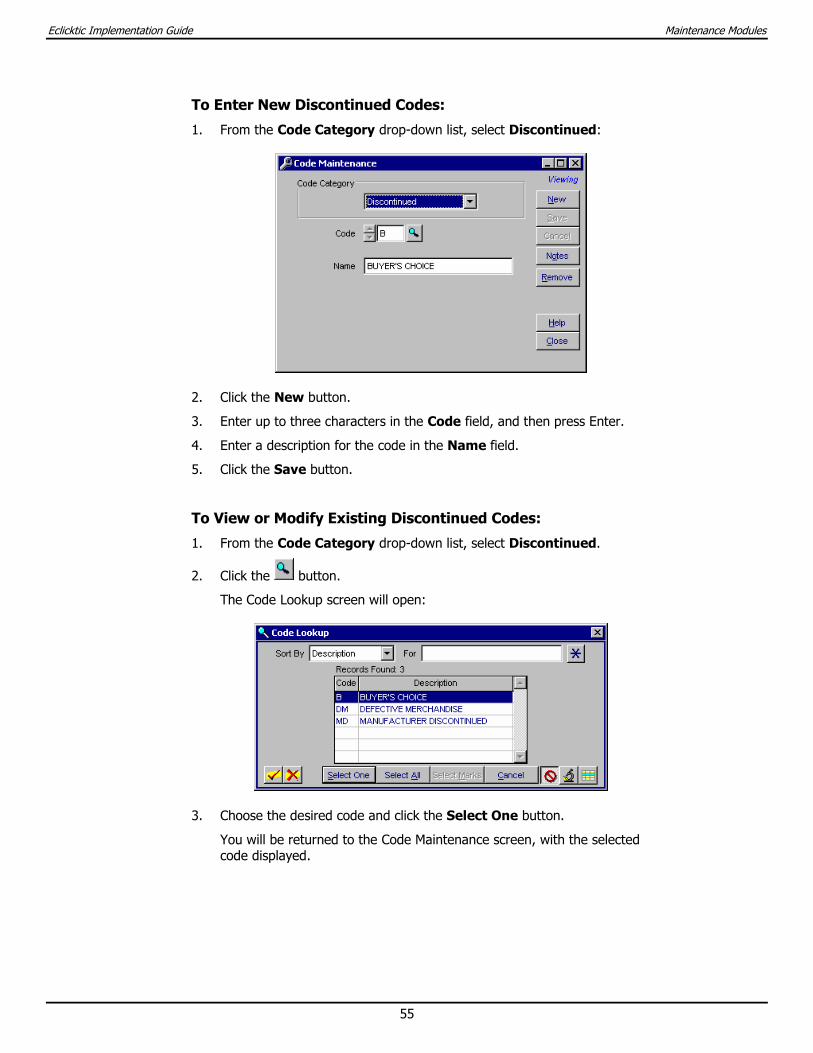
To Enter New Discontinued Codes:
1. From the Code Category drop-down list, select Discontinued:
2. Click the New button.
3. Enter up to three characters in the Code field, and then press Enter.
4. Enter a description for the code in the Name field.
5. Click the Save button.
To View or Modify Existing Discontinued Codes:
1. From the Code Category drop-down list, select Discontinued.
2. Click the button.
The Code Lookup screen will open:
3. Choose the desired code and click the Select One button.
You will be returned to the Code Maintenance screen, with the selected code displayed.
Eclicktic Implementation Guide Maintenance Modules
56
The following programs use Discontinued Codes:
• Model Maintenance
• Inventory Lookup
• Merchandise Manager’s Report
• Physical Inventory Report
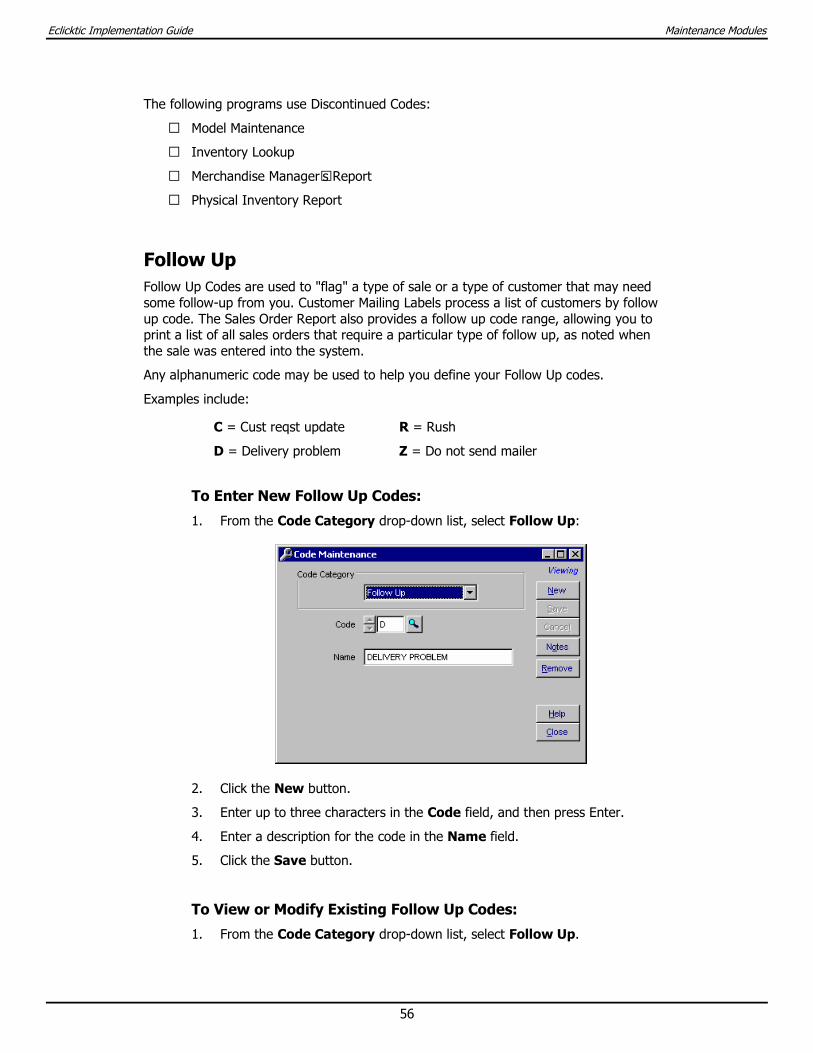
Follow Up Follow Up Codes are used to "flag" a type of sale or a type of customer that may need some follow-up from you. Customer Mailing Labels process a list of customers by follow up code. The Sales Order Report also provides a follow up code range, allowing you to print a list of all sales orders that require a particular type of follow up, as noted when the sale was entered into the system.
Any alphanumeric code may be used to help you define your Follow Up codes.
Examples include:
C = Cust reqst update R = Rush
D = Delivery problem Z = Do not send mailer
To Enter New Follow Up Codes:
1. From the Code Category drop-down list, select Follow Up:
2. Click the New button.
3. Enter up to three characters in the Code field, and then press Enter.
4. Enter a description for the code in the Name field.
5. Click the Save button.
To View or Modify Existing Follow Up Codes:
1. From the Code Category drop-down list, select Follow Up.

Eclicktic Implementation Guide Maintenance Modules
57
2. Click the button.
The Code Lookup screen will open:
3. Choose the desired code and click the Select One button.
You will be returned to the Code Maintenance screen, with the selected code displayed.
The following programs use Follow Up Codes:
• Sales Orders
• Sales Order Report
• Customer Account Maintenance
• Customer Mailing Labels
• Demographics Report
Eclicktic Implementation Guide Maintenance Modules
58
Inventory Adjustments Once you are using Eclicktic on a day-to-day basis, you will typically "add" inventory to the system through Purchase Order Receiving, and "deduct" inventory by delivering merchandise on a sale. However, initially you will need to enter your entire physical inventory into the system. You may choose to use Physical Inventory Entry or Inventory Adjustments for the input of your physical quantities.
You may also make rare adjustments to your inventory cost via Inventory Adjustments whenever your perpetual or physical inventory (usually keyed through Purchase Order Receiving) cost does not match the manufacturer's invoice price. If, before the invoice is paid, MR-Match Receiving is being used in the Accounts Payable Input screen to adjust the cost and freight on merchandise received, an inventory adjustment is not needed. If the merchandise is received and booked at the wrong cost, a cost adjustment will need to be input into the system.
This will help to match your book vs. physical inventory for balancing purposes. This program can also be used to devalue old inventory.
You will need to create codes or "reasons" why you will be adding or deducting inventory using this program, as well as codes for adjusting the cost of an existing item in inventory.
When these Inventory Adjustment Codes are used in Inventory Adjustment, it is important to determine if the transaction entered into the system will need to affect the general ledger. If the general ledger should be affected, the inventory adjustment code will need to be mapped in the General Ledger Mapping Maintenance program. These transactions will then update the General Ledger when the Daily Balancing Report is run to post your daily or monthly business.
Any alphanumeric code may be used to help you define your Inventory Adjustment codes.
Recommended Inventory Adjustment Codes:
Codes not mapped in G/L Mapping Maintenance
APM = A/P MATCH – NOT MAPPED (APM) Hard Coded
PHY = PHYSICAL INV. – NOT MAPPED (PHY) Hard Coded
XIN = TRANSFER IN – NOT MAPPED (XIN) Hard Coded
XOU = TRANSFER OUT – NOT MAPPED (XOU) Hard Coded
S = STARTING INV. – NOT MAPPED
R = RTRN TO VEND – (SUB) NOT MAPPED
E = ERROR IN RCVG – (SUB) NOT MAPPED
Codes to be mapped in G/L Mapping Maintenance
B = BEYOND REPAIR – (SUB) MAPPED I = INV. FOUND – (ADD) MAPPED
C = CANNOT LOCATE – (SUB) MAPPED D = INV. DEVALUE ADJ. – (COST/FRT) MAPPED
Eclicktic Implementation Guide Maintenance Modules
59
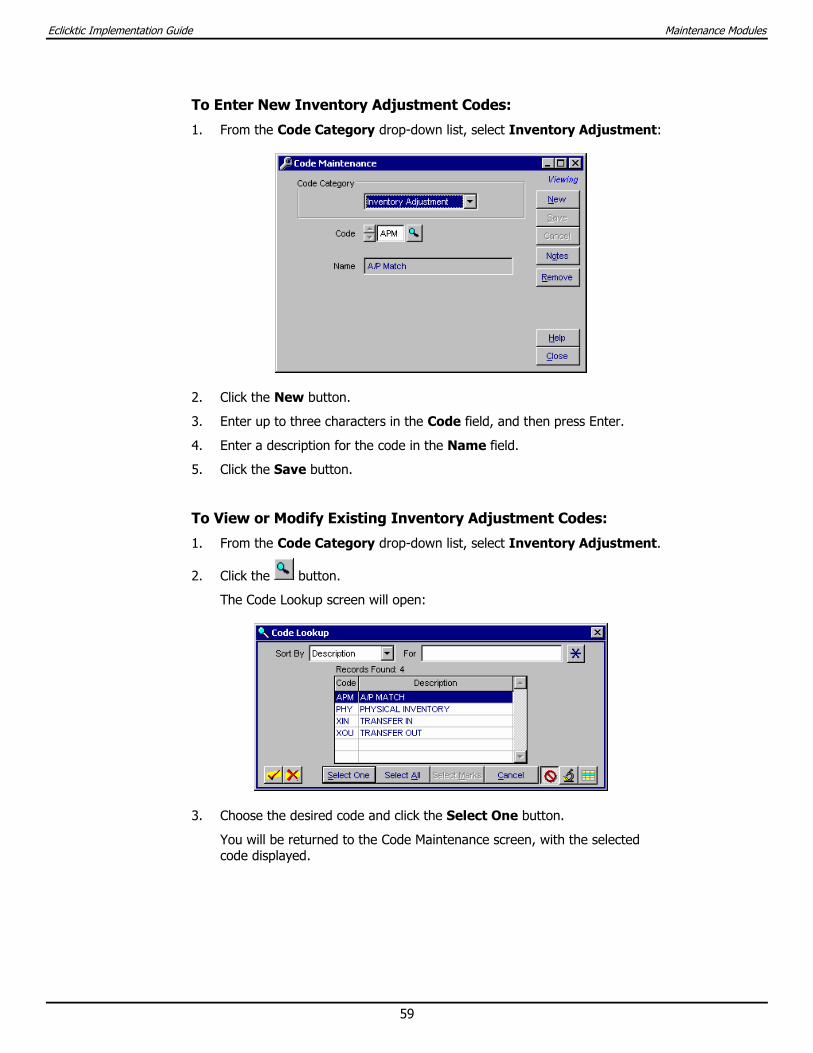
To Enter New Inventory Adjustment Codes:
1. From the Code Category drop-down list, select Inventory Adjustment:
2. Click the New button.
3. Enter up to three characters in the Code field, and then press Enter.
4. Enter a description for the code in the Name field.
5. Click the Save button.
To View or Modify Existing Inventory Adjustment Codes:
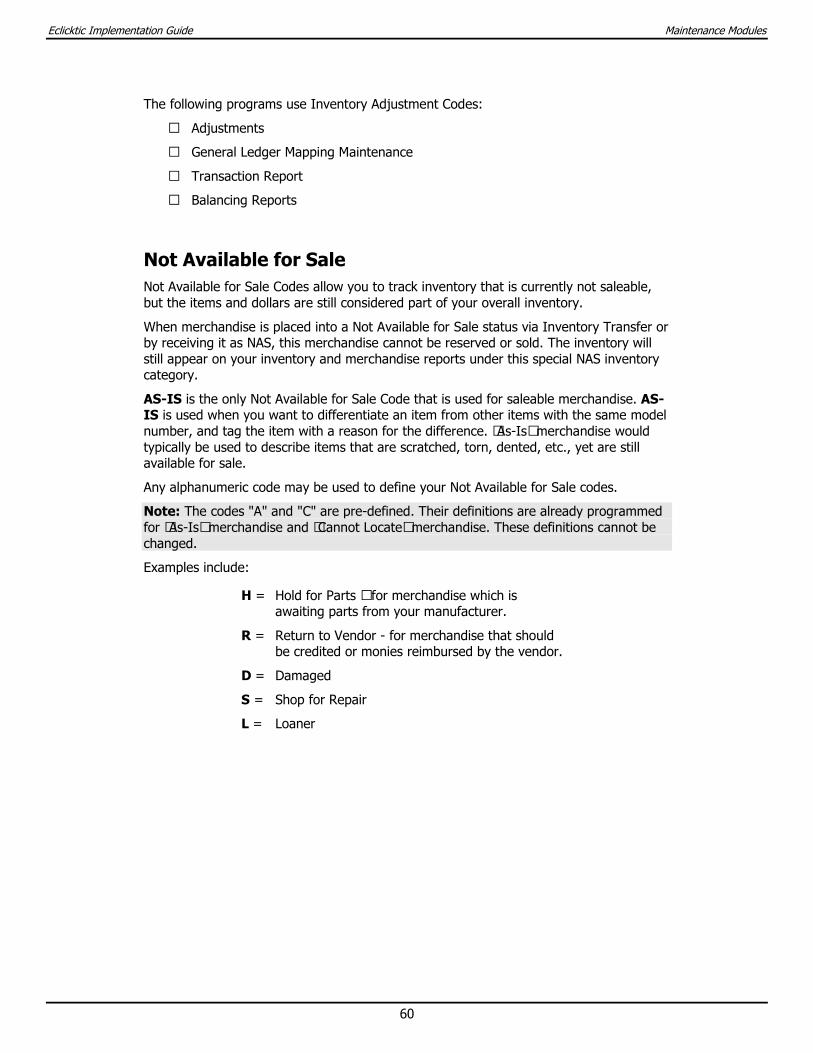
1. From the Code Category drop-down list, select Inventory Adjustment.
2. Click the button.
The Code Lookup screen will open:
3. Choose the desired code and click the Select One button.
You will be returned to the Code Maintenance screen, with the selected code displayed.
Eclicktic Implementation Guide Maintenance Modules
60
The following programs use Inventory Adjustment Codes:
• Adjustments
• General Ledger Mapping Maintenance
• Transaction Report
• Balancing Reports
Not Available for Sale Not Available for Sale Codes allow you to track inventory that is currently not saleable, but the items and dollars are still considered part of your overall inventory.
When merchandise is placed into a Not Available for Sale status via Inventory Transfer or by receiving it as NAS, this merchandise cannot be reserved or sold. The inventory will still appear on your inventory and merchandise reports under this special NAS inventory category.
AS-IS is the only Not Available for Sale Code that is used for saleable merchandise. AS-IS is used when you want to differentiate an item from other items with the same model number, and tag the item with a reason for the difference. “As-Is” merchandise would typically be used to describe items that are scratched, torn, dented, etc., yet are still available for sale.
Any alphanumeric code may be used to define your Not Available for Sale codes.
Note: The codes "A" and "C" are pre-defined. Their definitions are already programmed for “As-Is” merchandise and “Cannot Locate” merchandise. These definitions cannot be changed.
Examples include:
H = Hold for Parts – for merchandise which is awaiting parts from your manufacturer.
R = Return to Vendor - for merchandise that should be credited or monies reimbursed by the vendor.
D = Damaged
S = Shop for Repair
L = Loaner
Eclicktic Implementation Guide Maintenance Modules
61
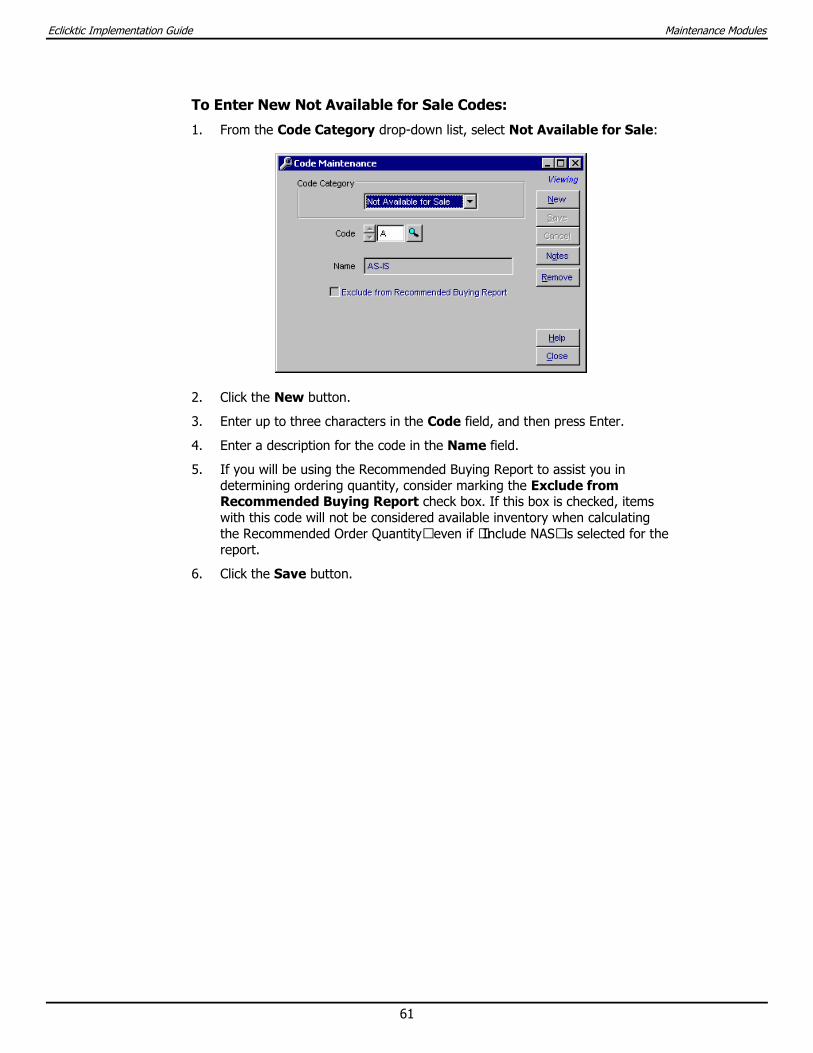
To Enter New Not Available for Sale Codes:
1. From the Code Category drop-down list, select Not Available for Sale:
2. Click the New button.
3. Enter up to three characters in the Code field, and then press Enter.
4. Enter a description for the code in the Name field.
5. If you will be using the Recommended Buying Report to assist you in determining ordering quantity, consider marking the Exclude from Recommended Buying Report check box. If this box is checked, items with this code will not be considered available inventory when calculating the Recommended Order Quantity—even if “Include NAS” is selected for the report.
6. Click the Save button.

Eclicktic Implementation Guide Maintenance Modules
62
To View or Modify Existing Not Available for Sale Codes:
1. From the Code Category drop-down list, select Not Available for Sale.
2. Click the button.
The Code Lookup screen will open:
3. Choose the desired code and click the Select One button.
You will be returned to the Code Maintenance screen, with the selected code displayed.
To find out more about using NAS codes to flag un-saleable merchandise, see the Inventory Receiving and Inventory Transfer programs.
Besides physically transferring inventory to a different location, Inventory Transfer can be used to move an item from an “available for sale” status to a Not Available for Sale status, or to move an item out of an NAS status and make it available for sale. The physical location of the item may be changed at the same time as the status. Refer to the Inventory Transfer program for details.
The Not Available for Sale Report will show you all inventory items coded with an NAS status, their quantity, location, cost, and other information.
The following programs use Not Available for Sale Codes:
• Inventory Lookup
• Transfers
• Receivings
• NAS Report
• Physical Inventory Report
• Inventory Receiving Report
Eclicktic Implementation Guide Maintenance Modules
63
Payment Hold Hold codes can be assigned to A/P Invoices to temporarily prompt payment of that invoice. Any invoices that you would like to enter, but for which you do not want to print a check due to disputed amounts or merchandise not received, can be flagged as “on hold”. Even if you accidentally disburse an invoice for payment that has a hold code, the system will not include that invoice in the check run. Therefore, if you have a hold code on an invoice and the problem has since been rectified, you must go back and remove the hold code.
Holds can automatically be removed if you are using EDI (Electronic Data Interchange).
Examples include:
D = $$ Discrepancy P = Product Not Received
M = Merchandise Not Received Z = Hold-Do not Post
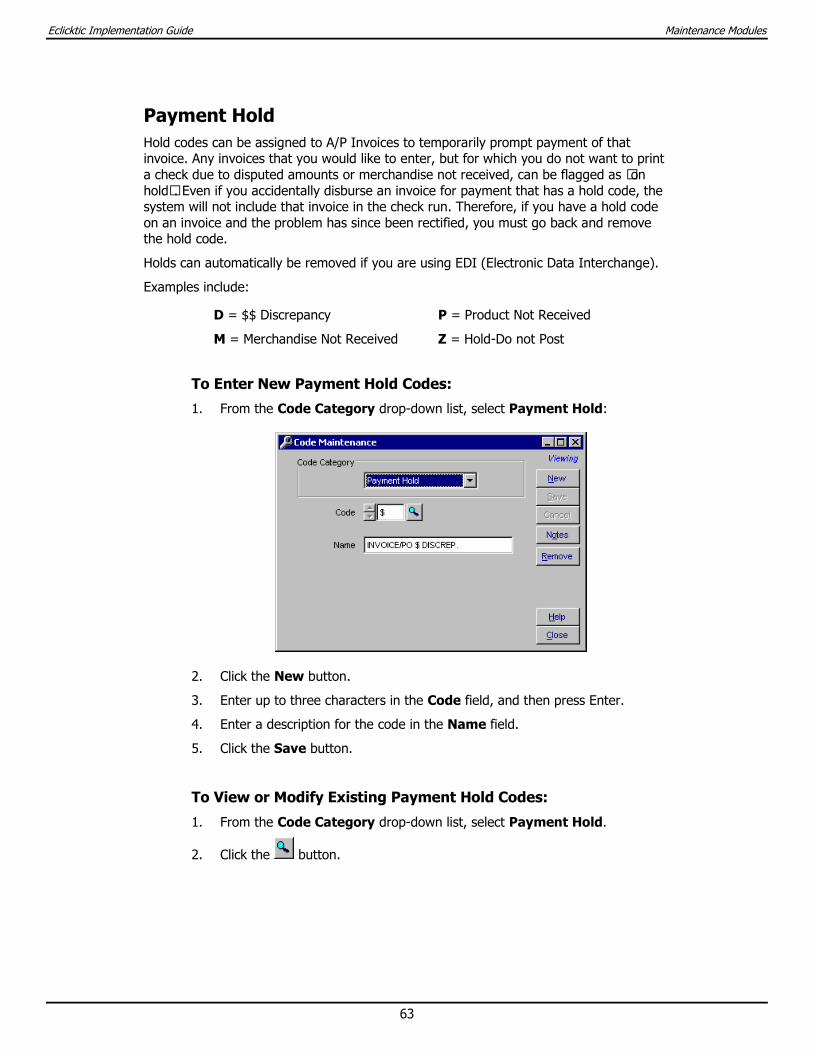
To Enter New Payment Hold Codes:
1. From the Code Category drop-down list, select Payment Hold:
2. Click the New button.
3. Enter up to three characters in the Code field, and then press Enter.
4. Enter a description for the code in the Name field.
5. Click the Save button.
To View or Modify Existing Payment Hold Codes:
1. From the Code Category drop-down list, select Payment Hold.
2. Click the button.
Eclicktic Implementation Guide Maintenance Modules
64
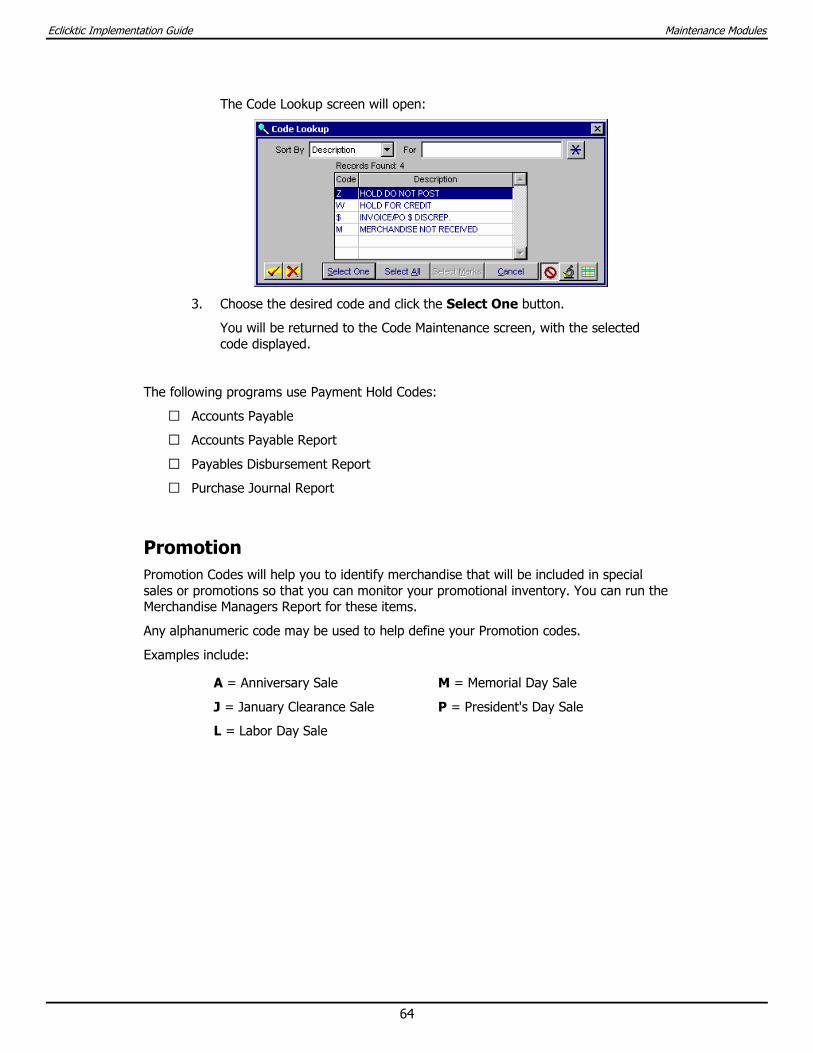
The Code Lookup screen will open:
3. Choose the desired code and click the Select One button.
You will be returned to the Code Maintenance screen, with the selected code displayed.
The following programs use Payment Hold Codes:
• Accounts Payable
• Accounts Payable Report
• Payables Disbursement Report
• Purchase Journal Report
Promotion Promotion Codes will help you to identify merchandise that will be included in special sales or promotions so that you can monitor your promotional inventory. You can run the Merchandise Managers Report for these items.
Any alphanumeric code may be used to help define your Promotion codes.
Examples include:
A = Anniversary Sale M = Memorial Day Sale
J = January Clearance Sale P = President's Day Sale
L = Labor Day Sale

Eclicktic Implementation Guide Maintenance Modules
65
To Enter New Promotion Codes:
1. From the Code Category drop-down list, select Promotion:
2. Click the New button.
3. Enter up to three characters in the Code field, and then press Enter.
4. Enter a description for the code in the Name field.
5. Click the Save button.
To View or Modify Existing Promotion Codes:
1. From the Code Category drop-down list, select Promotion.
2. Click the button.
The Code Lookup screen will open:
3. Choose the desired code and click the Select One button.
You will be returned to the Code Maintenance screen, with the selected code displayed.
Eclicktic Implementation Guide Maintenance Modules
66
The following programs use Promotion Codes:
• Model Maintenance
• Merchandise Managers Report
• Physical Inventory Report
Purchase Orders Purchase Order Codes are used to help you select specific types of Purchase Orders that you would like to track. This code is helpful when running the Open Purchase Order Report, which allows you to print a list of "flagged" Purchase Orders instead of printing a copy of the Purchase Order by PO number, one by one.
Any alphanumeric code may be used to help you define your Purchase Order codes.
Examples include:
K = Stock Order
M = Market Sample
SO = Special Order
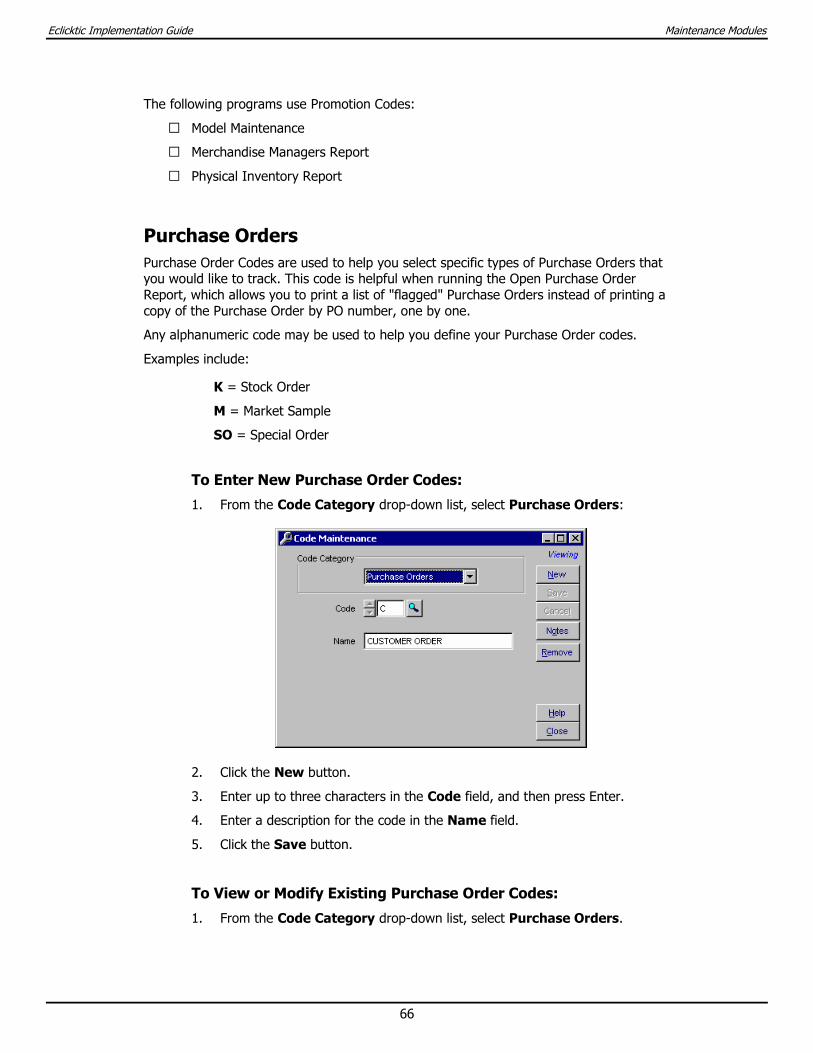
To Enter New Purchase Order Codes:
1. From the Code Category drop-down list, select Purchase Orders:
2. Click the New button.
3. Enter up to three characters in the Code field, and then press Enter.
4. Enter a description for the code in the Name field.
5. Click the Save button.
To View or Modify Existing Purchase Order Codes:
1. From the Code Category drop-down list, select Purchase Orders.
Eclicktic Implementation Guide Maintenance Modules
67
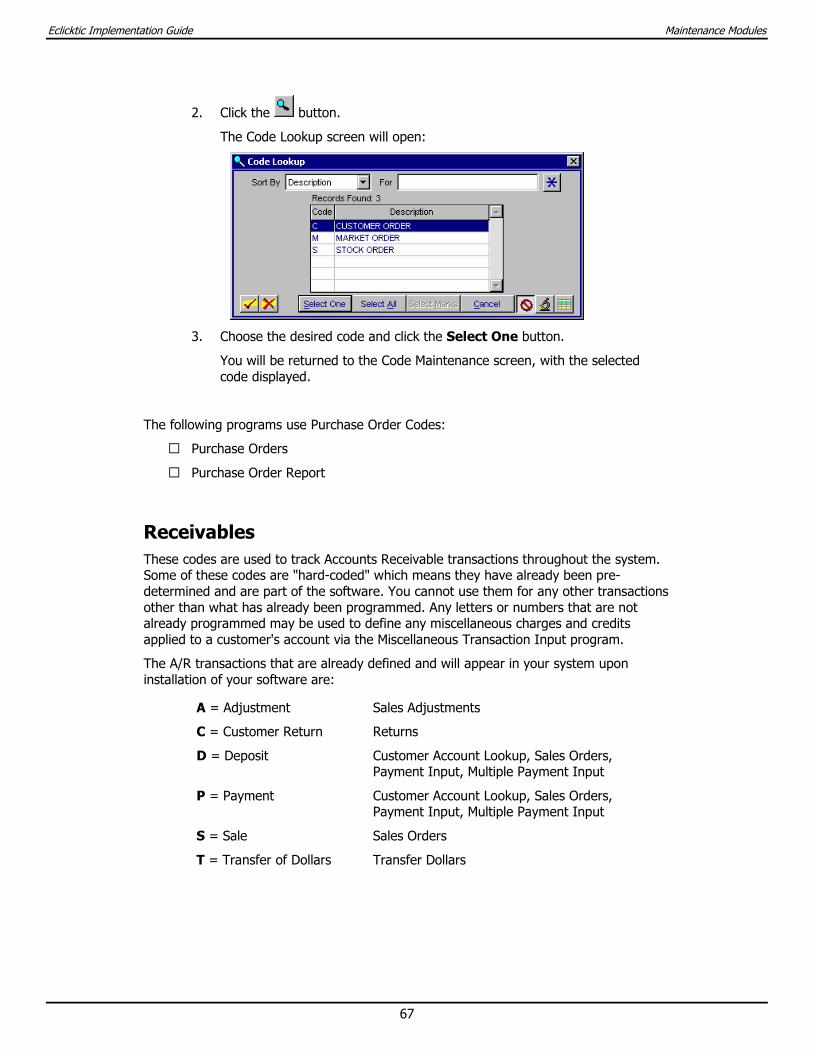
2. Click the button.
The Code Lookup screen will open:
3. Choose the desired code and click the Select One button.
You will be returned to the Code Maintenance screen, with the selected code displayed.
The following programs use Purchase Order Codes:
• Purchase Orders
• Purchase Order Report
Receivables These codes are used to track Accounts Receivable transactions throughout the system. Some of these codes are "hard-coded" which means they have already been pre-determined and are part of the software. You cannot use them for any other transactions other than what has already been programmed. Any letters or numbers that are not already programmed may be used to define any miscellaneous charges and credits applied to a customer's account via the Miscellaneous Transaction Input program.
The A/R transactions that are already defined and will appear in your system upon installation of your software are:
A = Adjustment Sales Adjustments
C = Customer Return Returns
D = Deposit Customer Account Lookup, Sales Orders, Payment Input, Multiple Payment Input
P = Payment Customer Account Lookup, Sales Orders, Payment Input, Multiple Payment Input
S = Sale Sales Orders
T = Transfer of Dollars Transfer Dollars
Eclicktic Implementation Guide Maintenance Modules
68
These codes may also be used, and may need to be mapped in General Ledger Mapping:
W = Write Off Misc. Transaction Input, Customer Account Report
4 = NSF check Misc. Transaction Input
Note: These codes are pre-programmed and cannot be changed. These types of A/R transactions will appear on the Balancing Reports and Customer Account Lookup screen via integration with different programs, such as Sales Orders, Returns, Inventory Adjustments, and Misc. Transaction Input.
The system uses these codes to describe the type of transactions performed in the system and viewed on the Balancing Report and in Customer Account Lookup for A/R details. Deposits and Payments post to the General Ledger through the Bank Register program when making a bank deposit. Transfer of Dollars does not need to affect the General Ledger because you are only transferring monies on the physical (subsidiary) side of the system, not affecting the General Ledger.
It is best to create good descriptions that will assist you in understanding the charge or adjustment to a customer’s account. The code descriptions can be viewed in Customer Account Lookup for A/R when referencing a specific sales order. The codes are seen on the Balancing reports describing the type of transaction entered into Eclicktic.
The remaining letters or numbers can be used to establish additional receivable transaction codes that will be used to apply miscellaneous debits or credits to a customer’s account in Misc. Transaction Input. The following are examples of additional codes that can be created:
FI = Finance Co. Disc. (Credit) DON = Donation/Charity (Credit)
FC = Finance Charges (Debit) RCC = Refund Bankcard/Cash (Debit) not mpd
GC = Gift Cert – Promo (Credit) RC = Refund Check (Debit) not mpd
STK = Restocking Fee (Debit) TR = Trade Merchandise (Credit)
L = Late Charge (Debit) Z = Conversion Bal (Debit) not mpd
Note: Some of the codes that you have created should be "mapped" in General Ledger Mapping Maintenance if you wish to have the entries hit the General Ledger when the Daily Balancing Report is run to post. If you are applying a debit or credit to a customers account, you will usually need to affect the General Ledger, debiting A/R and crediting some income or expense account.
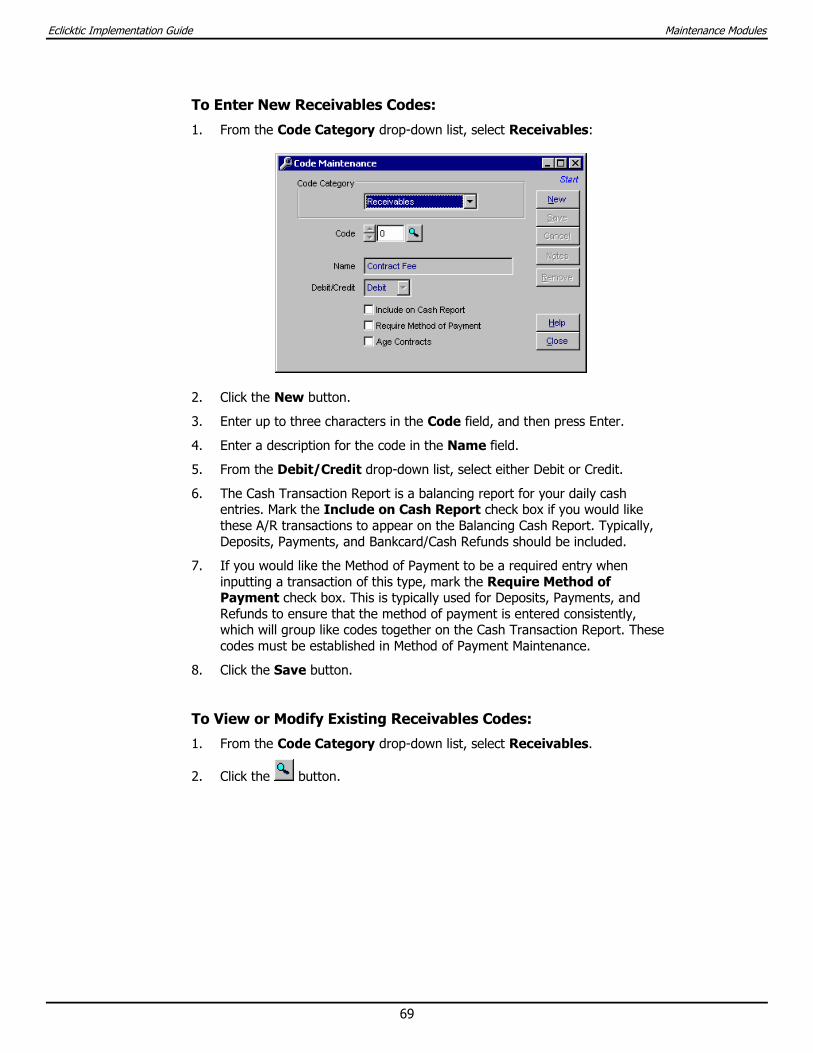
Eclicktic Implementation Guide Maintenance Modules
69
To Enter New Receivables Codes:
1. From the Code Category drop-down list, select Receivables:
2. Click the New button.
3. Enter up to three characters in the Code field, and then press Enter.
4. Enter a description for the code in the Name field.
5. From the Debit/Credit drop-down list, select either Debit or Credit.
6. The Cash Transaction Report is a balancing report for your daily cash entries. Mark the Include on Cash Report check box if you would like these A/R transactions to appear on the Balancing Cash Report. Typically, Deposits, Payments, and Bankcard/Cash Refunds should be included.
7. If you would like the Method of Payment to be a required entry when inputting a transaction of this type, mark the Require Method of Payment check box. This is typically used for Deposits, Payments, and Refunds to ensure that the method of payment is entered consistently, which will group like codes together on the Cash Transaction Report. These codes must be established in Method of Payment Maintenance.
8. Click the Save button.
To View or Modify Existing Receivables Codes:
1. From the Code Category drop-down list, select Receivables.
2. Click the button.
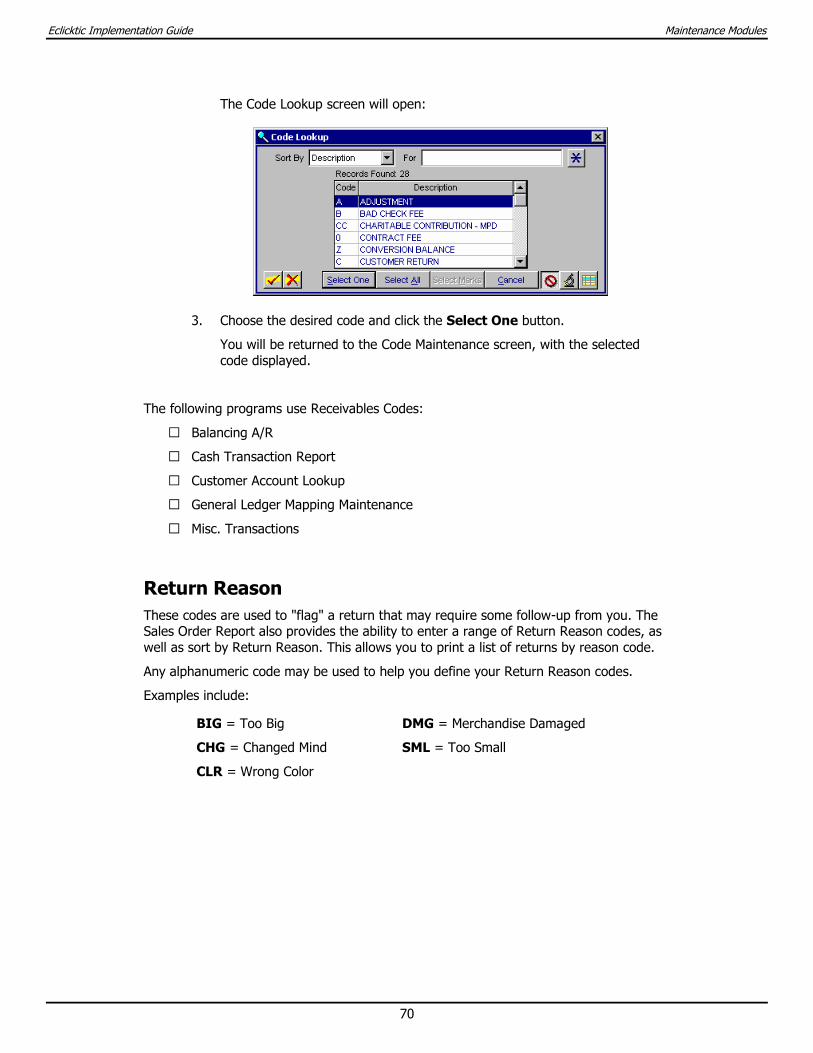
Eclicktic Implementation Guide Maintenance Modules
70
The Code Lookup screen will open:
3. Choose the desired code and click the Select One button.
You will be returned to the Code Maintenance screen, with the selected code displayed.
The following programs use Receivables Codes:
• Balancing A/R
• Cash Transaction Report
• Customer Account Lookup
• General Ledger Mapping Maintenance
• Misc. Transactions
Return Reason These codes are used to "flag" a return that may require some follow-up from you. The Sales Order Report also provides the ability to enter a range of Return Reason codes, as well as sort by Return Reason. This allows you to print a list of returns by reason code.
Any alphanumeric code may be used to help you define your Return Reason codes.
Examples include:
BIG = Too Big DMG = Merchandise Damaged
CHG = Changed Mind SML = Too Small
CLR = Wrong Color
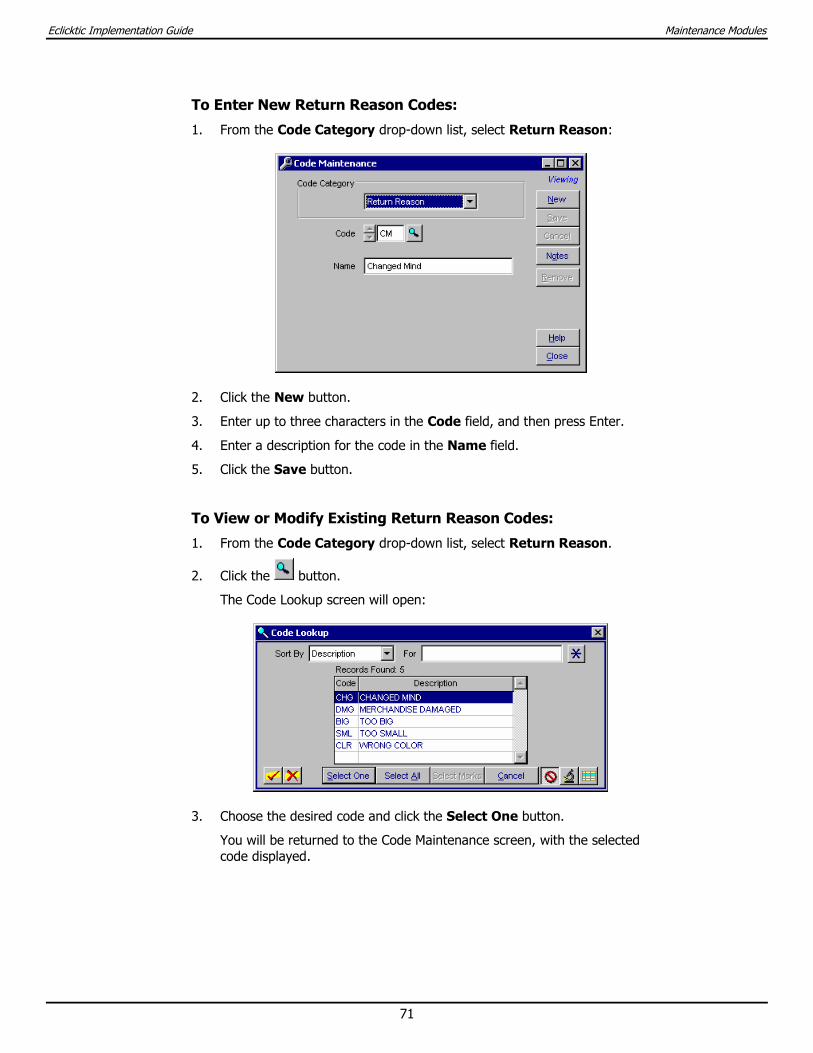
Eclicktic Implementation Guide Maintenance Modules
71
To Enter New Return Reason Codes:
1. From the Code Category drop-down list, select Return Reason:
2. Click the New button.
3. Enter up to three characters in the Code field, and then press Enter.
4. Enter a description for the code in the Name field.
5. Click the Save button.
To View or Modify Existing Return Reason Codes:
1. From the Code Category drop-down list, select Return Reason.
2. Click the button.
The Code Lookup screen will open:
3. Choose the desired code and click the Select One button.
You will be returned to the Code Maintenance screen, with the selected code displayed.
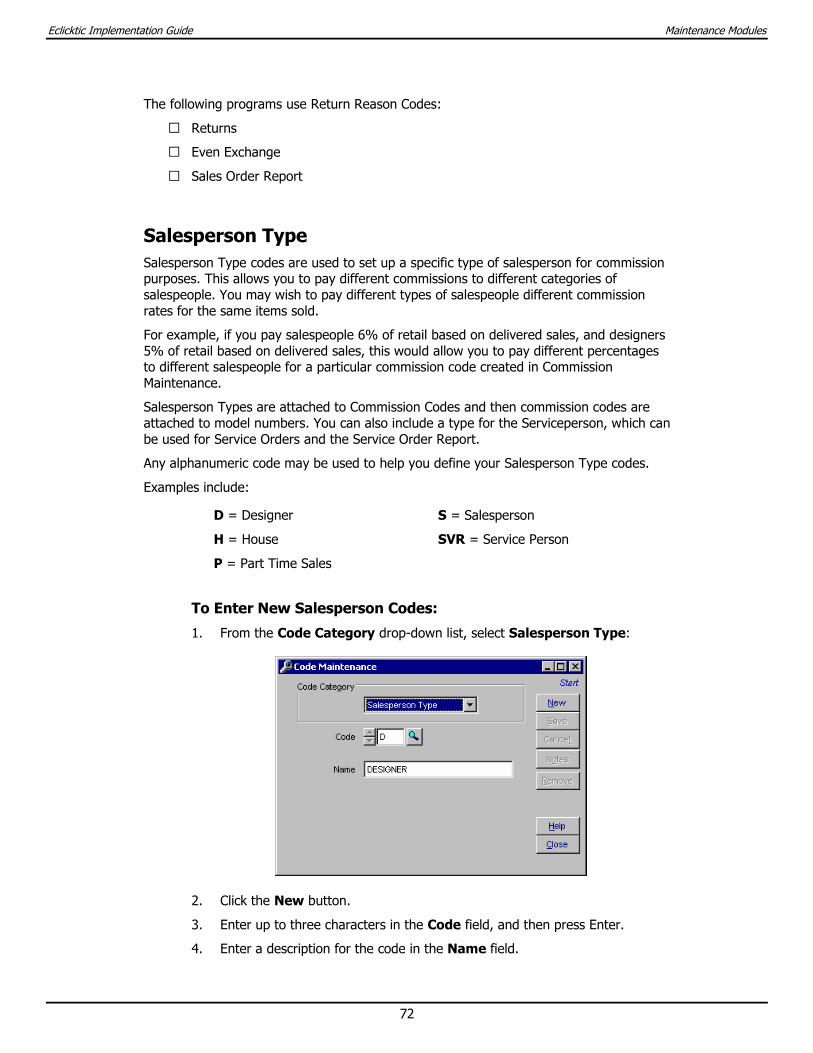
Eclicktic Implementation Guide Maintenance Modules
72
The following programs use Return Reason Codes:
• Returns
• Even Exchange
• Sales Order Report
Salesperson Type Salesperson Type codes are used to set up a specific type of salesperson for commission purposes. This allows you to pay different commissions to different categories of salespeople. You may wish to pay different types of salespeople different commission rates for the same items sold.
For example, if you pay salespeople 6% of retail based on delivered sales, and designers 5% of retail based on delivered sales, this would allow you to pay different percentages to different salespeople for a particular commission code created in Commission Maintenance.
Salesperson Types are attached to Commission Codes and then commission codes are attached to model numbers. You can also include a type for the Serviceperson, which can be used for Service Orders and the Service Order Report.
Any alphanumeric code may be used to help you define your Salesperson Type codes.
Examples include:
D = Designer S = Salesperson
H = House SVR = Service Person
P = Part Time Sales
To Enter New Salesperson Codes:
1. From the Code Category drop-down list, select Salesperson Type:
2. Click the New button.
3. Enter up to three characters in the Code field, and then press Enter.
4. Enter a description for the code in the Name field.
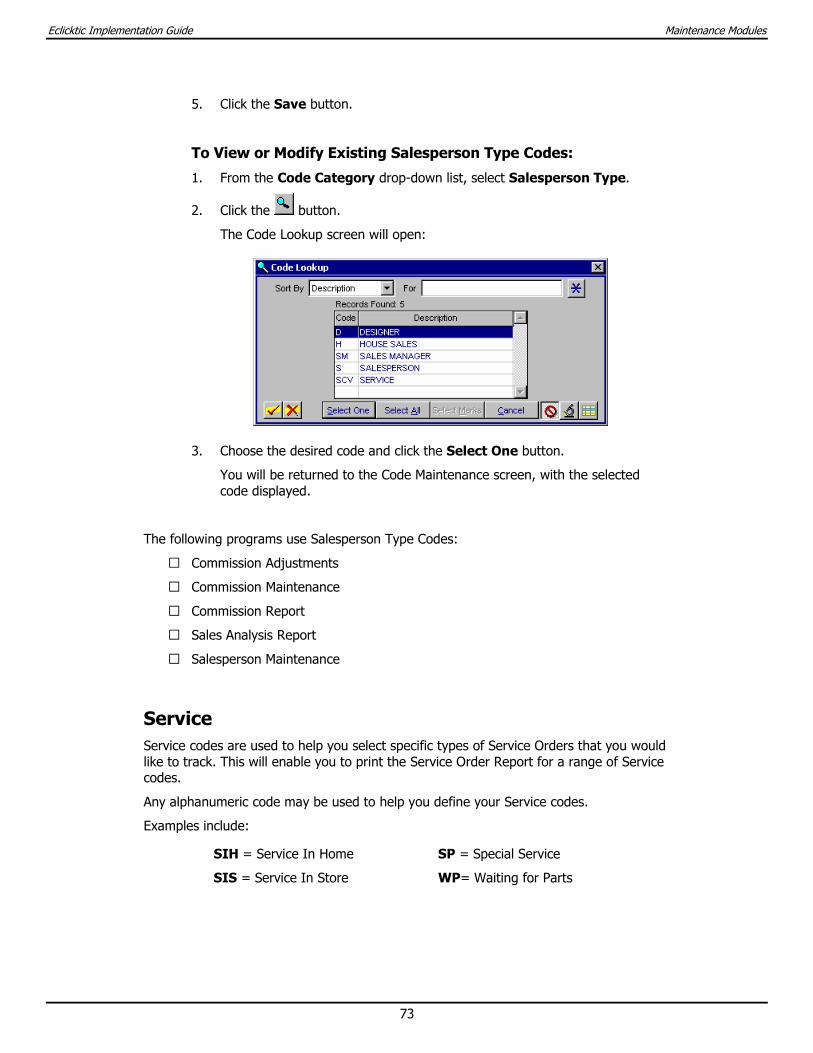
Eclicktic Implementation Guide Maintenance Modules
73
5. Click the Save button.
To View or Modify Existing Salesperson Type Codes:
1. From the Code Category drop-down list, select Salesperson Type.
2. Click the button.
The Code Lookup screen will open:
3. Choose the desired code and click the Select One button.
You will be returned to the Code Maintenance screen, with the selected code displayed.
The following programs use Salesperson Type Codes:
• Commission Adjustments
• Commission Maintenance
• Commission Report
• Sales Analysis Report
• Salesperson Maintenance
Service Service codes are used to help you select specific types of Service Orders that you would like to track. This will enable you to print the Service Order Report for a range of Service codes.
Any alphanumeric code may be used to help you define your Service codes.
Examples include:
SIH = Service In Home SP = Special Service
SIS = Service In Store WP= Waiting for Parts
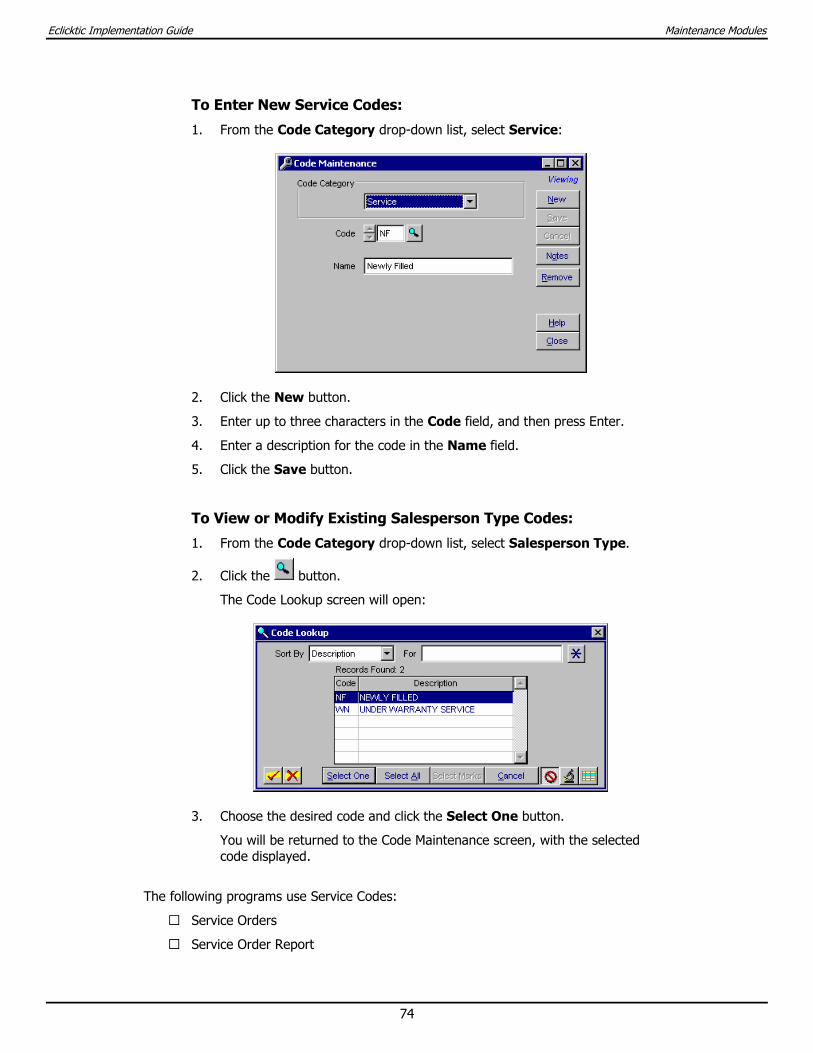
Eclicktic Implementation Guide Maintenance Modules
74
To Enter New Service Codes:
1. From the Code Category drop-down list, select Service:
2. Click the New button.
3. Enter up to three characters in the Code field, and then press Enter.
4. Enter a description for the code in the Name field.
5. Click the Save button.
To View or Modify Existing Salesperson Type Codes:
1. From the Code Category drop-down list, select Salesperson Type.
2. Click the button.
The Code Lookup screen will open:
3. Choose the desired code and click the Select One button.
You will be returned to the Code Maintenance screen, with the selected code displayed.
The following programs use Service Codes:
• Service Orders
• Service Order Report
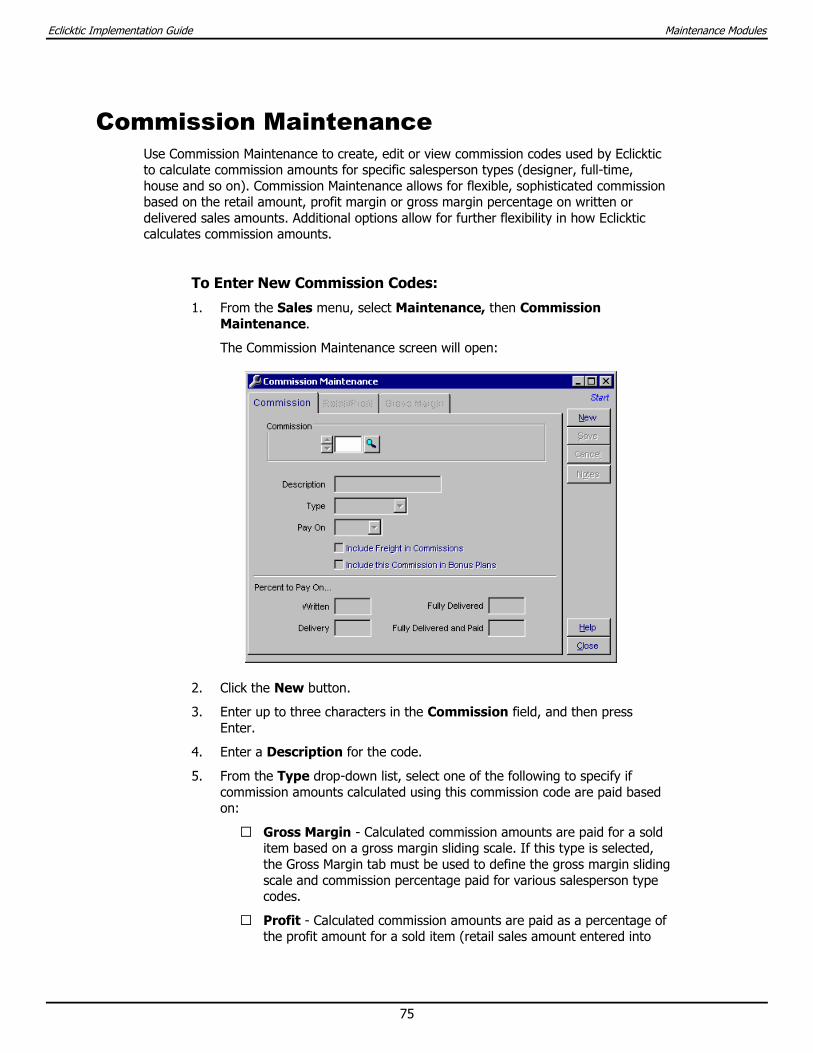
Eclicktic Implementation Guide Maintenance Modules
75
Commission Maintenance Use Commission Maintenance to create, edit or view commission codes used by Eclicktic to calculate commission amounts for specific salesperson types (designer, full-time, house and so on). Commission Maintenance allows for flexible, sophisticated commission based on the retail amount, profit margin or gross margin percentage on written or delivered sales amounts. Additional options allow for further flexibility in how Eclicktic calculates commission amounts.
To Enter New Commission Codes:
1. From the Sales menu, select Maintenance, then Commission Maintenance.
The Commission Maintenance screen will open:
2. Click the New button.
3. Enter up to three characters in the Commission field, and then press Enter.
4. Enter a Description for the code.
5. From the Type drop-down list, select one of the following to specify if commission amounts calculated using this commission code are paid based on:
• Gross Margin - Calculated commission amounts are paid for a sold item based on a gross margin sliding scale. If this type is selected, the Gross Margin tab must be used to define the gross margin sliding scale and commission percentage paid for various salesperson type codes.
• Profit - Calculated commission amounts are paid as a percentage of the profit amount for a sold item (retail sales amount entered into
Eclicktic Implementation Guide Maintenance Modules
76
the Sales Orders Line Items tab less the cost of the sold item). If this type is selected, the Retail/Profit tab must be used to define the commission percentage paid for various salesperson type codes.
• Retail - Calculated commission amounts are paid as a percentage of the retail sales amount entered for a sold item into the Sales Orders Line Items tab. If this type is selected, the Retail/Profit tab must be used to define the commission percentage paid for various salesperson type codes.
6. If Gross Margin was selected in the Type field, select one of the following from the Pay On drop-down list to specify if commission amount is paid based on:
• Retail - Calculated commission amounts are paid based on the retail sales amount entered for a sold item into the Sales Orders Line Items tab.
• Profit - Calculated commission amounts are paid based on the profit amount for a sold item (retail sales amount entered into the Sales Orders Line Items tab less the cost of the sold item).
This field is disabled if Retail or Profit were selected in the Type field.
7. Mark the Include Freight in Commissions check box if the landed cost for a sold item should be used when calculating commission amounts using this code. If it is not checked, cost minus freight will be used when calculating commission amounts.
8. Mark the Include this Commission in Bonus Plans check box if commission amounts calculated using this code should be included in volume sale amounts when paying bonuses on bonus plans.
9. Use the Percent to Pay On fields to specify what percentage of the calculated commission amount for this commission code is based on the written, delivered, fully delivered, or fully paid and fully delivered amounts on a sales order line item:
• Written - Enter the percentage of the calculated commission amount that is based on the written sales order amount. If the entire commission amount is based on the written sales order amount, enter 100.00.
• Delivery – Enter the percentage of the calculated commission amount that is based on the delivered sales order amount. If the entire commission amount is based on the delivered sales order amount, enter 100.00. This reports commission to be paid by line item as they are delivered.
• Fully Delivered - Enter the percentage of the calculated commission amount that is based on the fully delivered sales order amount. For example, if ten units of an item have sold on a sales order, all ten units must be delivered before the commission amount is calculated. If the entire commission amount is based on the fully delivered sales order amount, enter 100.00.
• Fully Delivered and Paid - Enter the percentage of the calculated commission amount that is based on the fully delivered and fully paid sales order amount. For example, if ten units of an item have

Eclicktic Implementation Guide Maintenance Modules
77
sold on a sales order, all ten units must be fully delivered and paid for in full before the commission amount is calculated. If the entire commission amount is based on the fully delivered and fully paid sales order amount, enter 100.00.
Note: In a typical commission structure, you might pay 50% on written and 50% on delivered sales. Entering 100% in the Written field and 100% in the Delivered field (for example) would double the commission paid—if the commission percentage on the Retail/Profit tab was 10%, a $1,000 sale would result in $100 commission paid when the sale is written, and an additional $100 commission paid on delivery.
10. Click the Retail/Profit tab.
If the Type field in the Commission tab is set to Profit or Retail for this commission code, use this tab to define the commission percentage paid for various salesperson type codes.
Salesperson codes (created in Salesperson Maintenance) for each of your sales personnel are assigned a single salesperson Type code that is defined in Code Maintenance. Salesperson Type codes identify specific types of sales personnel (designer, full-time, house, etc.) for commissioning purposes. A single commission code is assigned to each individual model number in Model Maintenance. The assigned commission specifies the commission structure to pay for sales of the specific model.
Multiple salesperson types can be associated with a commission code, allowing calculation and payment of commission amounts for the same model, depending on salesperson type for the assigned salesperson.
Note: If the Type field in the Commission tab is set to Gross Margin for this commission code, use the Gross Margin tab to define the gross margin sliding scales and associated commission percentages.
11. Click the button to add a new Salesperson Type. Enter a new salesperson type in the grid, or press the F2 key to select it from a lookup.
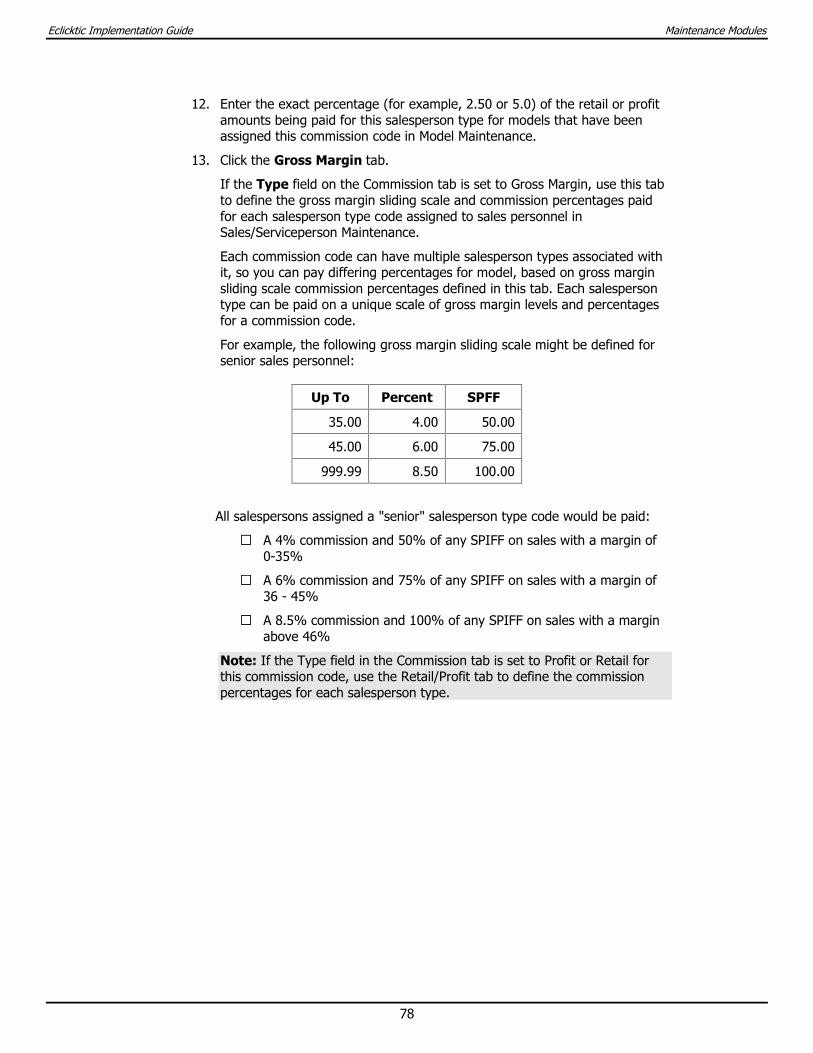
Eclicktic Implementation Guide Maintenance Modules
78
12. Enter the exact percentage (for example, 2.50 or 5.0) of the retail or profit amounts being paid for this salesperson type for models that have been assigned this commission code in Model Maintenance.
13. Click the Gross Margin tab.
If the Type field on the Commission tab is set to Gross Margin, use this tab to define the gross margin sliding scale and commission percentages paid for each salesperson type code assigned to sales personnel in Sales/Serviceperson Maintenance.
Each commission code can have multiple salesperson types associated with it, so you can pay differing percentages for model, based on gross margin sliding scale commission percentages defined in this tab. Each salesperson type can be paid on a unique scale of gross margin levels and percentages for a commission code.
For example, the following gross margin sliding scale might be defined for senior sales personnel:
Up To Percent SPFF
35.00 4.00 50.00
45.00 6.00 75.00
999.99 8.50 100.00
All salespersons assigned a "senior" salesperson type code would be paid:
• A 4% commission and 50% of any SPIFF on sales with a margin of 0-35%
• A 6% commission and 75% of any SPIFF on sales with a margin of 36 - 45%
• A 8.5% commission and 100% of any SPIFF on sales with a margin above 46%
Note: If the Type field in the Commission tab is set to Profit or Retail for this commission code, use the Retail/Profit tab to define the commission percentages for each salesperson type.
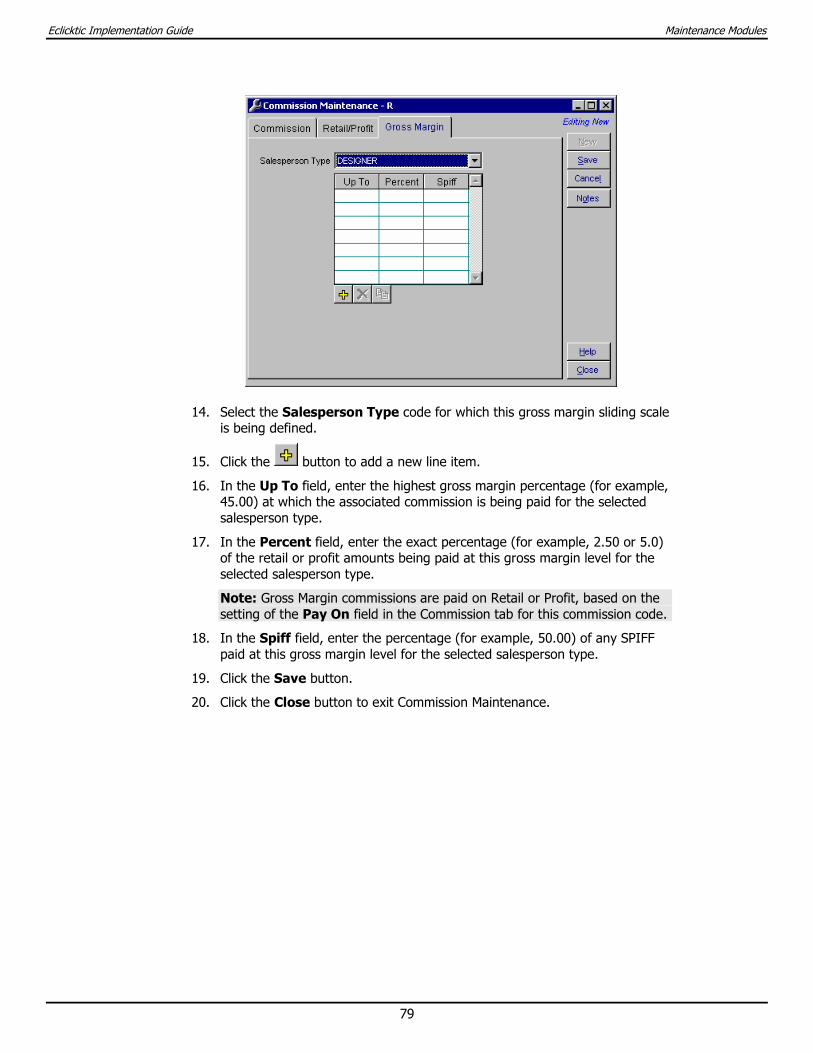
Eclicktic Implementation Guide Maintenance Modules
79
14. Select the Salesperson Type code for which this gross margin sliding scale is being defined.
15. Click the button to add a new line item.
16. In the Up To field, enter the highest gross margin percentage (for example, 45.00) at which the associated commission is being paid for the selected salesperson type.
17. In the Percent field, enter the exact percentage (for example, 2.50 or 5.0) of the retail or profit amounts being paid at this gross margin level for the selected salesperson type.
Note: Gross Margin commissions are paid on Retail or Profit, based on the setting of the Pay On field in the Commission tab for this commission code.
18. In the Spiff field, enter the percentage (for example, 50.00) of any SPIFF paid at this gross margin level for the selected salesperson type.
19. Click the Save button.
20. Click the Close button to exit Commission Maintenance.
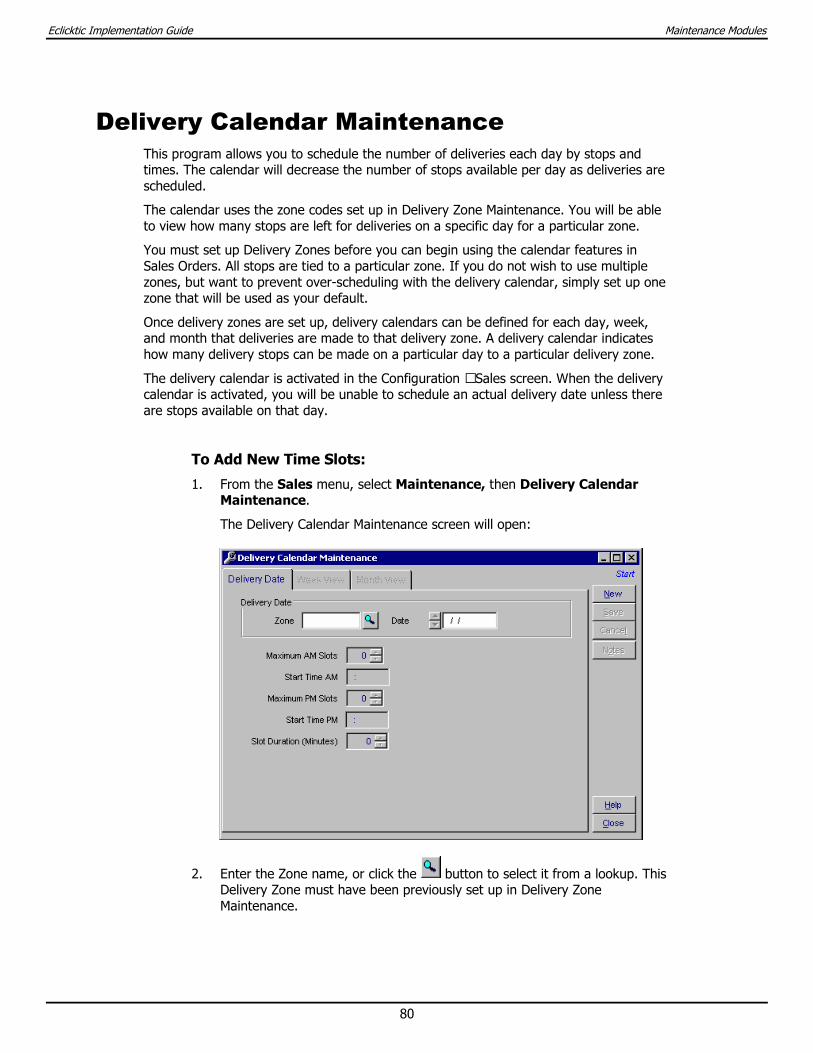
Eclicktic Implementation Guide Maintenance Modules
80
Delivery Calendar Maintenance This program allows you to schedule the number of deliveries each day by stops and times. The calendar will decrease the number of stops available per day as deliveries are scheduled.
The calendar uses the zone codes set up in Delivery Zone Maintenance. You will be able to view how many stops are left for deliveries on a specific day for a particular zone.
You must set up Delivery Zones before you can begin using the calendar features in Sales Orders. All stops are tied to a particular zone. If you do not wish to use multiple zones, but want to prevent over-scheduling with the delivery calendar, simply set up one zone that will be used as your default.
Once delivery zones are set up, delivery calendars can be defined for each day, week, and month that deliveries are made to that delivery zone. A delivery calendar indicates how many delivery stops can be made on a particular day to a particular delivery zone.
The delivery calendar is activated in the Configuration – Sales screen. When the delivery calendar is activated, you will be unable to schedule an actual delivery date unless there are stops available on that day.
To Add New Time Slots:
1. From the Sales menu, select Maintenance, then Delivery Calendar Maintenance.
The Delivery Calendar Maintenance screen will open:
2. Enter the Zone name, or click the button to select it from a lookup. This Delivery Zone must have been previously set up in Delivery Zone Maintenance.
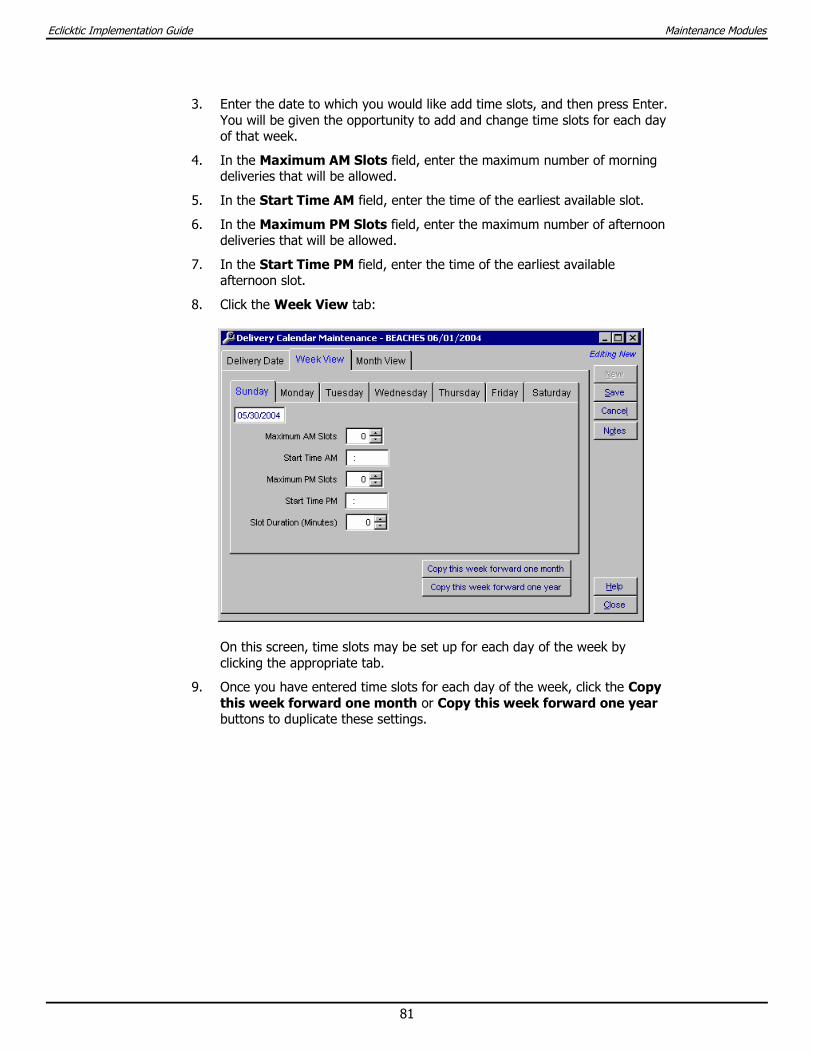
Eclicktic Implementation Guide Maintenance Modules
81
3. Enter the date to which you would like add time slots, and then press Enter. You will be given the opportunity to add and change time slots for each day of that week.
4. In the Maximum AM Slots field, enter the maximum number of morning deliveries that will be allowed.
5. In the Start Time AM field, enter the time of the earliest available slot.
6. In the Maximum PM Slots field, enter the maximum number of afternoon deliveries that will be allowed.
7. In the Start Time PM field, enter the time of the earliest available afternoon slot.
8. Click the Week View tab:
On this screen, time slots may be set up for each day of the week by clicking the appropriate tab.
9. Once you have entered time slots for each day of the week, click the Copy this week forward one month or Copy this week forward one year buttons to duplicate these settings.
Eclicktic Implementation Guide Maintenance Modules
82
10. Click the Month View tab to see the entire month’s time slots:
11. Click the Save button.
12. Click the Close button to exit Delivery Calendar Maintenance.

Eclicktic Implementation Guide Maintenance Modules
83
Delivery Zone Maintenance Use Delivery Zone Maintenance to create an alphanumeric code for each zone or area in which deliveries are made. To access and use Delivery Calendar Maintenance, at least one delivery zone must be established.
Delivery zones may be defined to represent a geographical region. For instance, you can define a delivery zone for a zip code or for a range of zip codes. They can also be defined to represent a store. You would then assign all sales from a particular store or group of stores to a particular zone. In addition, you might define a delivery zone to represent a delivery truck, depending on how many deliveries each truck is capable of making.
To Add a New Delivery Zone:
1. From the Sales menu, select Maintenance, and then Delivery Zone Maintenance.
The Delivery Zone Maintenance screen will open:
2. Click the New button.
3. Enter up to ten characters in the Zone field, and then press Enter.
4. Enter a description of the zone in the Name field.
5. Mark the Sales and/or Service check boxes.
6. Click the Save button.
7. Click the Close button to exit Delivery Zone Maintenance.

Eclicktic Implementation Guide Maintenance Modules
84
Finance Program Maintenance Use Finance Program Maintenance to create alphanumeric codes for tracking financing programs offered by external finance companies such as Avco, Bencharge, GECC, Wells Fargo Finance, etc. For each finance program code, a penalty percentage can optionally be entered to assess against the salesperson's commissions when a customer elects to use financing from the specified finance company. This allows you to recover some of the costs associated with the use of external customer financing.
When a sales order is being externally financed by a third party, this code is entered in the Finance Program field on the Sales Orders - Finance tab to denote the type of finance program. These codes also allow for sales reporting by finance type using the Sales Order Report.
Examples of finance programs are:
• 60 Days Same as Cash
• 90 Days Same as Cash
• 1 Year, No Interest, No Down Payment
To Add a New Finance Program:
1. From the Sales menu, select Maintenance, and then Finance Program Maintenance.
The Finance Program Maintenance screen will open:
2. Click the New button.
3. Enter up to three characters in the Finance Program field, and then press Enter.
4. Enter a description of the Finance Program in the Name field.
5. In the Penalty Percent field, enter the discount percentage (if any) charged by this finance company for using their services.
6. Click the Save button.
7. Click the Close button to exit Finance Program Maintenance.

Eclicktic Implementation Guide Maintenance Modules
85
Sales/Serviceperson Maintenance Use Sales/Serviceperson Maintenance to create an alphanumeric code for each sales and service person.
The primary purpose of Salesperson codes is to identify sales personnel on order transactions for commissioning and sales tracking purposes. Once defined, salesperson codes are entered in Pending Sales Orders, Returns, Even Exchanges, Sales Adjustments, and Sales Orders. They are also used to calculate commission amounts earned, as well as commission amounts being deducted from customer returns and sales adjustments (that is, damage allowances).
The primary purpose of Serviceperson codes is to identify service personnel. Once defined, service person codes are assigned when service order transactions are entered in Service Orders.
To Add a New Sales/Serviceperson:
1. From the Sales menu, select Maintenance, and then Sales/Serviceperson Maintenance.
The Sales/Serviceperson Maintenance screen will open:
2. Click the New button.
3. Enter up to three characters in the Sales/Serviceperson field, and then press Enter.
4. In the Name field, enter the Salesperson’s full name.
5. Enter the Salesperson Type in the Type field, or click the button to select it from a lookup. The Salesperson Type codes must have been defined in Code Maintenance, located on the System menu.
6. Mark the Salesperson and/or Serviceperson check boxes.
Eclicktic Implementation Guide Maintenance Modules
86
7. Click the Address tab:
8. Enter this employee’s contact information.
9. Click the Save button.
10. Click the Close button to exit Sales/Serviceperson Maintenance.
Eclicktic Implementation Guide Maintenance Modules
87
Tax Maintenance The Tax Maintenance program is provided to create sales tax codes that will be used throughout your sales programs to calculate the appropriate tax dollars based on the code and percentage set up in this program.
You should include codes to calculate tax dollars, as well as any tax exempt codes where you may not want any tax dollars calculated, but still want to track sales dollars for those tax exempt sales (e.g., for resale, out of state, etc.).
This program is also used to define whether tax should be calculated on delivery or installation charges that are entered via the sales programs.
Note: The Model Maintenance program, used to configure all merchandise items, provides the ability to define whether an item is taxable or not. This is useful for items that you would not want to tax, like fabric treatments, and still gives you the ability to track sales dollars for those items.
To Enter New Tax Codes:
1. From the Sales menu, select Maintenance, then Tax Maintenance.
The Tax Maintenance screen will open:
2. Click the New button.
3. Enter up to three characters in the Tax field, and then press Enter.
4. Enter a description for the code in the Name field.
5. Mark the Installation check box if installation charges should be taxed.
6. Mark the Delivery check box if delivery charges should be taxed.
7. Mark the Discontinued check box to prevent further use of this tax code in Eclicktic.
Note: Obsolete tax codes cannot be deleted because sales, inventory, and customer history is associated with the transactions entered into Sales Orders, Service Orders, Store Maintenance, and Pending Sales Orders. This check box would normally be used only if the tax percentage changes or becomes outdated for other reasons.

Eclicktic Implementation Guide Maintenance Modules
88
8. Click the Authority Breakout tab.
Use this tab to specify the tax authority breakout percentages for the specified tax code. In many instances, certain portions of a calculated sales tax amount for an order must be paid to different taxing localities or authorities. For example, if a 7.75% sales tax is being levied on taxable sales, the following tax authority breakout might apply:
9. Click the Options tab.
Use this tab to configure a Use Percent (if any), the maximum tax amount, and multiple tiered taxation information used to calculate sales tax in certain states:
10. If a “use” tax must be paid as an expense based on the cost of the item, enter the Use Percentage. This percentage is in addition to the sales tax percentages defined for the tax code on the Authority Breakout tab. For example, in some states, carpet is not only subject to sales tax, but also to a special use tax paid by the retailer.
11. In the Max Amount field, enter the maximum tax amount that can be charged, regardless of the total amount of the sale. This field currently applies only to the state of Alaska.
Eclicktic Implementation Guide Maintenance Modules
89
12. If multiple tier taxation is being used with this tax code, mark the Use Multiple Tiered Tax check box. The fields that follow may then be accessed:
Multiple tier taxation allows entry of a tax percentage for each of three levels. The tax rates are on a sliding scale, based on the sale of individual items. To illustrate this, we’ll use the following ranges:
$0.00 - $1,600.00 is taxed by the county at 9.75%
$1,600.01 - $3,200.00 is taxed by the state at 2.75%
$3,200.01 and above is taxed by the state at 7%
If an item is purchased for $2,000, the first $1,600 would be taxed at 9.75%, and the remaining $400 would be taxed at 2.75%. If two items are purchased at the same time for $1,000 each, they are both taxed at the first rate, because the individual items do not exceed $1,600.00.
13. Enter the appropriate Rate Percent and Minimum tax amounts, as well as the corresponding tax Authority if desired.
14. Click the Save button.
15. Click the Close button to exit Tax Maintenance.
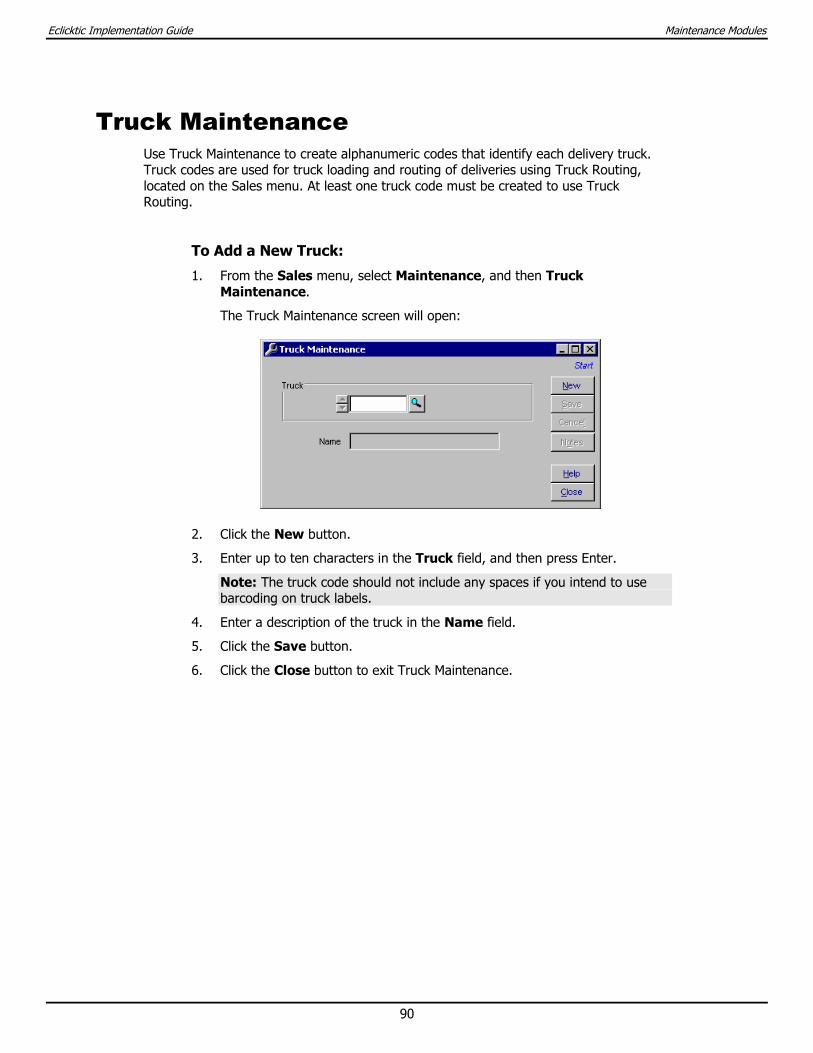
Eclicktic Implementation Guide Maintenance Modules
90
Truck Maintenance Use Truck Maintenance to create alphanumeric codes that identify each delivery truck. Truck codes are used for truck loading and routing of deliveries using Truck Routing, located on the Sales menu. At least one truck code must be created to use Truck Routing.
To Add a New Truck:
1. From the Sales menu, select Maintenance, and then Truck Maintenance.
The Truck Maintenance screen will open:
2. Click the New button.
3. Enter up to ten characters in the Truck field, and then press Enter.
Note: The truck code should not include any spaces if you intend to use barcoding on truck labels.
4. Enter a description of the truck in the Name field.
5. Click the Save button.
6. Click the Close button to exit Truck Maintenance.
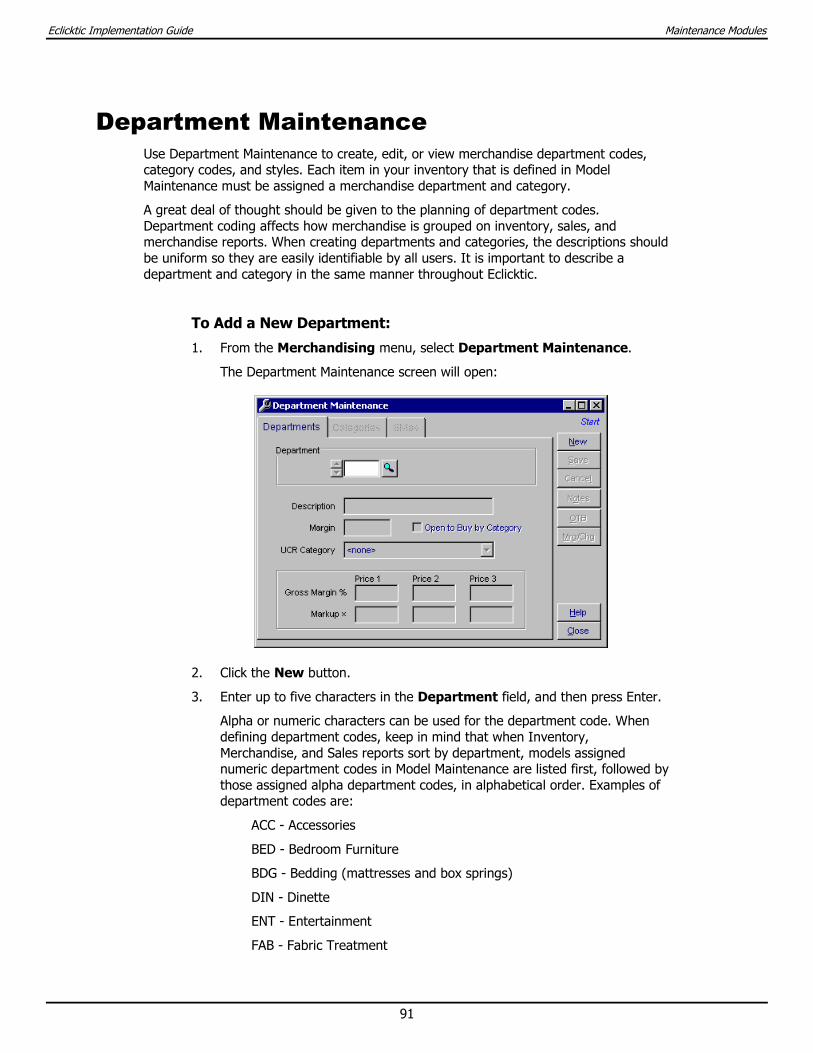
Eclicktic Implementation Guide Maintenance Modules
91
Department Maintenance Use Department Maintenance to create, edit, or view merchandise department codes, category codes, and styles. Each item in your inventory that is defined in Model Maintenance must be assigned a merchandise department and category.
A great deal of thought should be given to the planning of department codes. Department coding affects how merchandise is grouped on inventory, sales, and merchandise reports. When creating departments and categories, the descriptions should be uniform so they are easily identifiable by all users. It is important to describe a department and category in the same manner throughout Eclicktic.
To Add a New Department:
1. From the Merchandising menu, select Department Maintenance.
The Department Maintenance screen will open:
2. Click the New button.
3. Enter up to five characters in the Department field, and then press Enter.
Alpha or numeric characters can be used for the department code. When defining department codes, keep in mind that when Inventory, Merchandise, and Sales reports sort by department, models assigned numeric department codes in Model Maintenance are listed first, followed by those assigned alpha department codes, in alphabetical order. Examples of department codes are:
ACC - Accessories
BED - Bedroom Furniture
BDG - Bedding (mattresses and box springs)
DIN - Dinette
ENT - Entertainment
FAB - Fabric Treatment
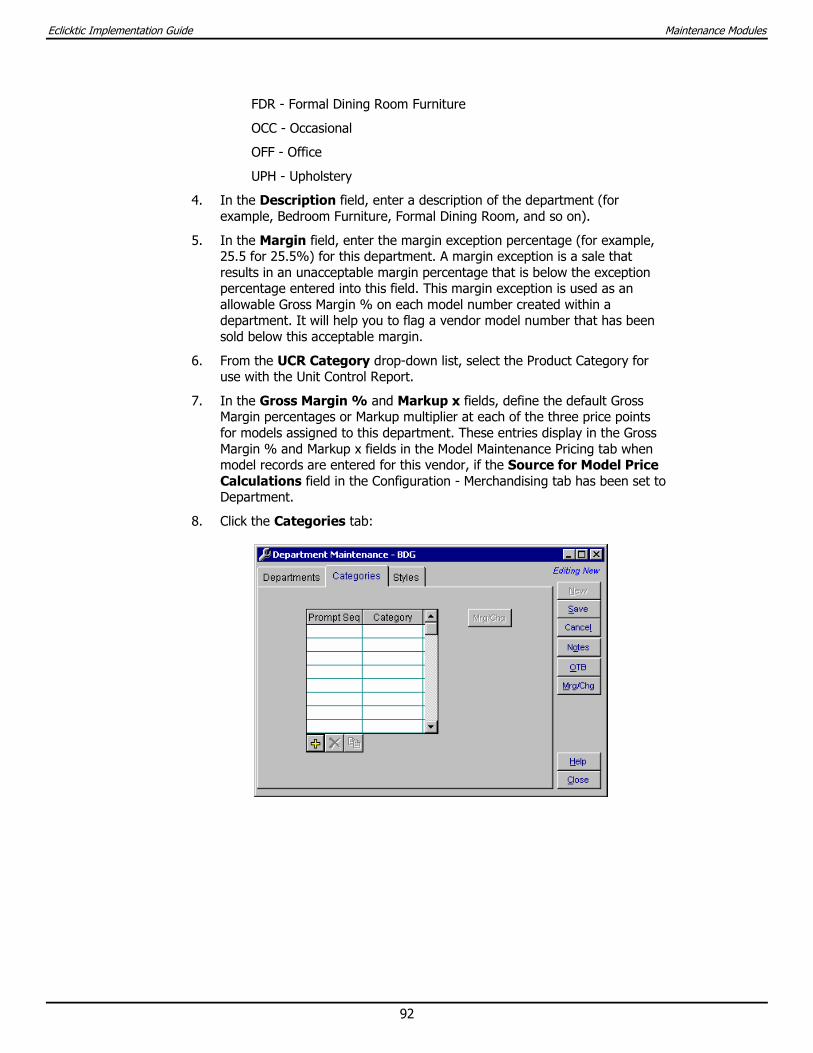
Eclicktic Implementation Guide Maintenance Modules
92
FDR - Formal Dining Room Furniture
OCC - Occasional
OFF - Office
UPH - Upholstery
4. In the Description field, enter a description of the department (for example, Bedroom Furniture, Formal Dining Room, and so on).
5. In the Margin field, enter the margin exception percentage (for example, 25.5 for 25.5%) for this department. A margin exception is a sale that results in an unacceptable margin percentage that is below the exception percentage entered into this field. This margin exception is used as an allowable Gross Margin % on each model number created within a department. It will help you to flag a vendor model number that has been sold below this acceptable margin.
6. From the UCR Category drop-down list, select the Product Category for use with the Unit Control Report.
7. In the Gross Margin % and Markup x fields, define the default Gross Margin percentages or Markup multiplier at each of the three price points for models assigned to this department. These entries display in the Gross Margin % and Markup x fields in the Model Maintenance Pricing tab when model records are entered for this vendor, if the Source for Model Price Calculations field in the Configuration - Merchandising tab has been set to Department.
8. Click the Categories tab:
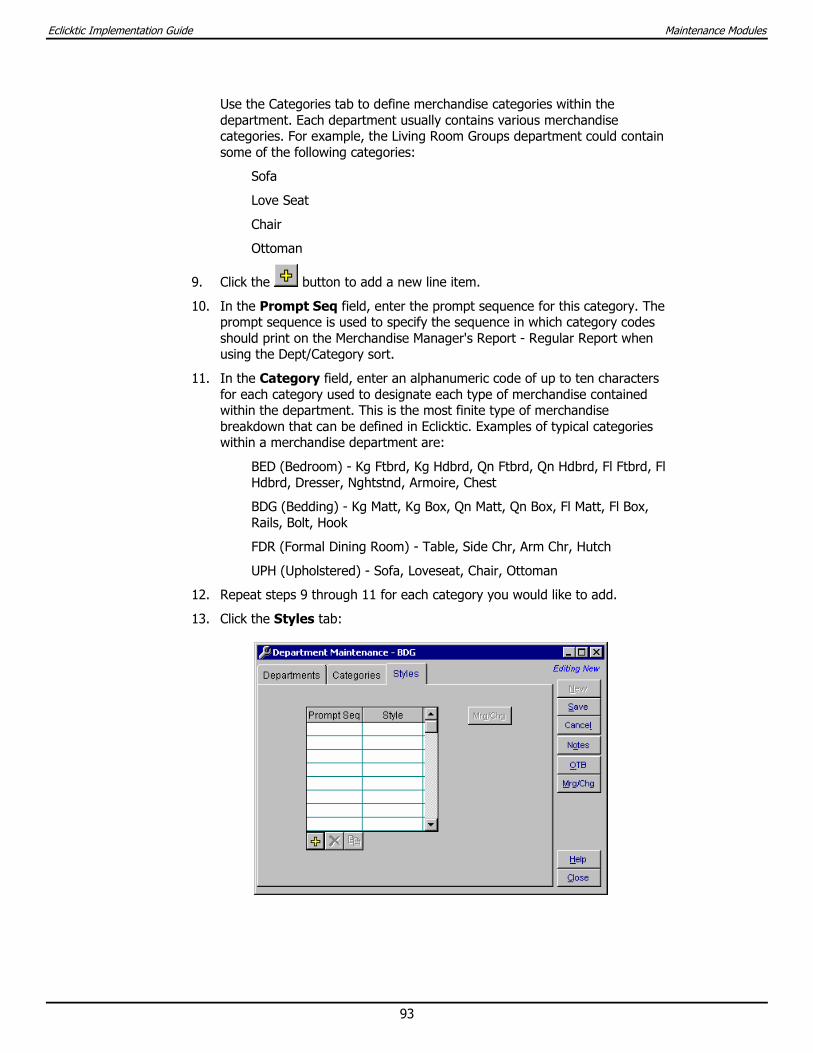
Eclicktic Implementation Guide Maintenance Modules
93
Use the Categories tab to define merchandise categories within the department. Each department usually contains various merchandise categories. For example, the Living Room Groups department could contain some of the following categories:
Sofa
Love Seat
Chair
Ottoman
9. Click the button to add a new line item.
10. In the Prompt Seq field, enter the prompt sequence for this category. The prompt sequence is used to specify the sequence in which category codes should print on the Merchandise Manager's Report - Regular Report when using the Dept/Category sort.
11. In the Category field, enter an alphanumeric code of up to ten characters for each category used to designate each type of merchandise contained within the department. This is the most finite type of merchandise breakdown that can be defined in Eclicktic. Examples of typical categories within a merchandise department are:
BED (Bedroom) - Kg Ftbrd, Kg Hdbrd, Qn Ftbrd, Qn Hdbrd, Fl Ftbrd, Fl Hdbrd, Dresser, Nghtstnd, Armoire, Chest
BDG (Bedding) - Kg Matt, Kg Box, Qn Matt, Qn Box, Fl Matt, Fl Box, Rails, Bolt, Hook
FDR (Formal Dining Room) - Table, Side Chr, Arm Chr, Hutch
UPH (Upholstered) - Sofa, Loveseat, Chair, Ottoman
12. Repeat steps 9 through 11 for each category you would like to add.
13. Click the Styles tab:

Eclicktic Implementation Guide Maintenance Modules
94
Use the Styles tab to define style codes that designate the types of merchandise styles within the department. Each department usually contains various style groupings. Entry of style codes is an optional; while department and code codes must be assigned to models in Model Maintenance, entry of style codes is not required.
When defining style codes, careful thought should be given to the style types you would like to use to identify styles in each of your individual departments (they can vary from department to department). An example of styles within the Dining Room department may include:
Traditional
Contemporary
Early American
14. Click the button to add a new line item.
15. In the Prompt Seq field, enter the prompt sequence for this style. The prompt sequence is used to specify the sequence in which style codes should print on the Merchandise Manager's Report - Regular Report when using the Dept/Style sort.
16. In the Style field, enter an alphanumeric code of up to ten characters for each style in the department.
17. Repeat steps 14 through 16 for each style you would like to add.
18. Click the Save button.
19. Click the Close button to exit Department Maintenance.
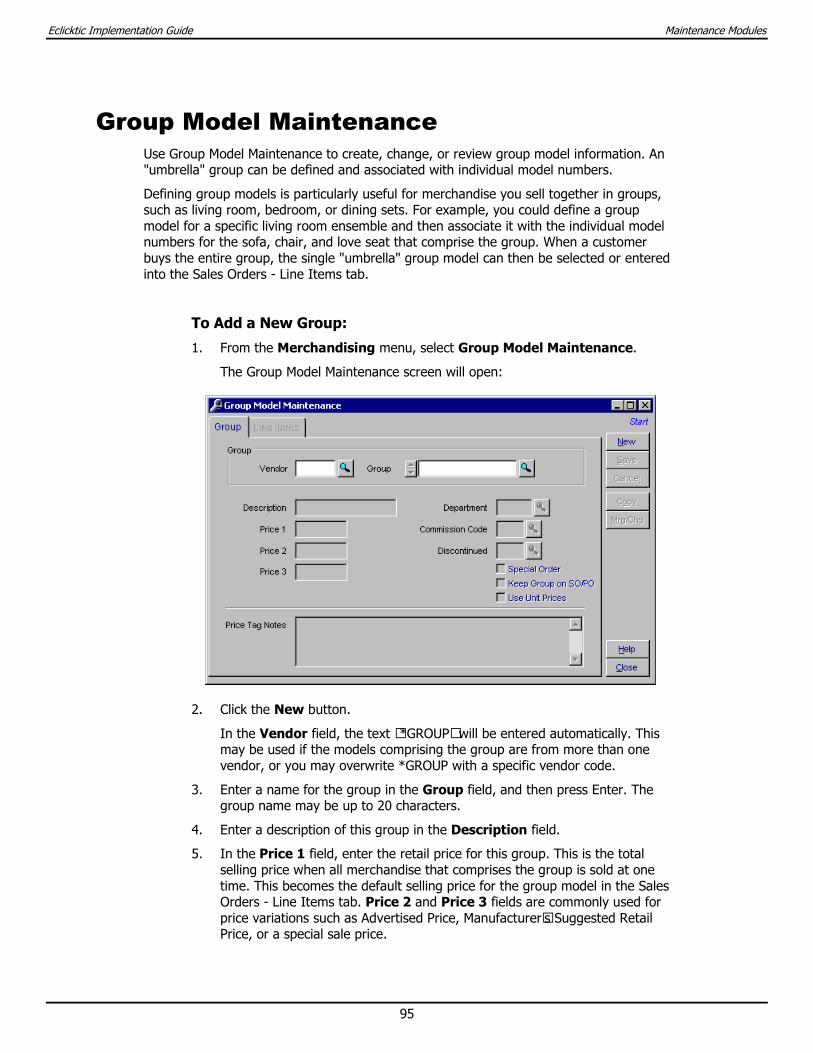
Eclicktic Implementation Guide Maintenance Modules
95
Group Model Maintenance Use Group Model Maintenance to create, change, or review group model information. An "umbrella" group can be defined and associated with individual model numbers.
Defining group models is particularly useful for merchandise you sell together in groups, such as living room, bedroom, or dining sets. For example, you could define a group model for a specific living room ensemble and then associate it with the individual model numbers for the sofa, chair, and love seat that comprise the group. When a customer buys the entire group, the single "umbrella" group model can then be selected or entered into the Sales Orders - Line Items tab.
To Add a New Group:
1. From the Merchandising menu, select Group Model Maintenance.
The Group Model Maintenance screen will open:
2. Click the New button.
In the Vendor field, the text “*GROUP” will be entered automatically. This may be used if the models comprising the group are from more than one vendor, or you may overwrite *GROUP with a specific vendor code.
3. Enter a name for the group in the Group field, and then press Enter. The group name may be up to 20 characters.
4. Enter a description of this group in the Description field.
5. In the Price 1 field, enter the retail price for this group. This is the total selling price when all merchandise that comprises the group is sold at one time. This becomes the default selling price for the group model in the Sales Orders - Line Items tab. Price 2 and Price 3 fields are commonly used for price variations such as Advertised Price, Manufacturer’s Suggested Retail Price, or a special sale price.
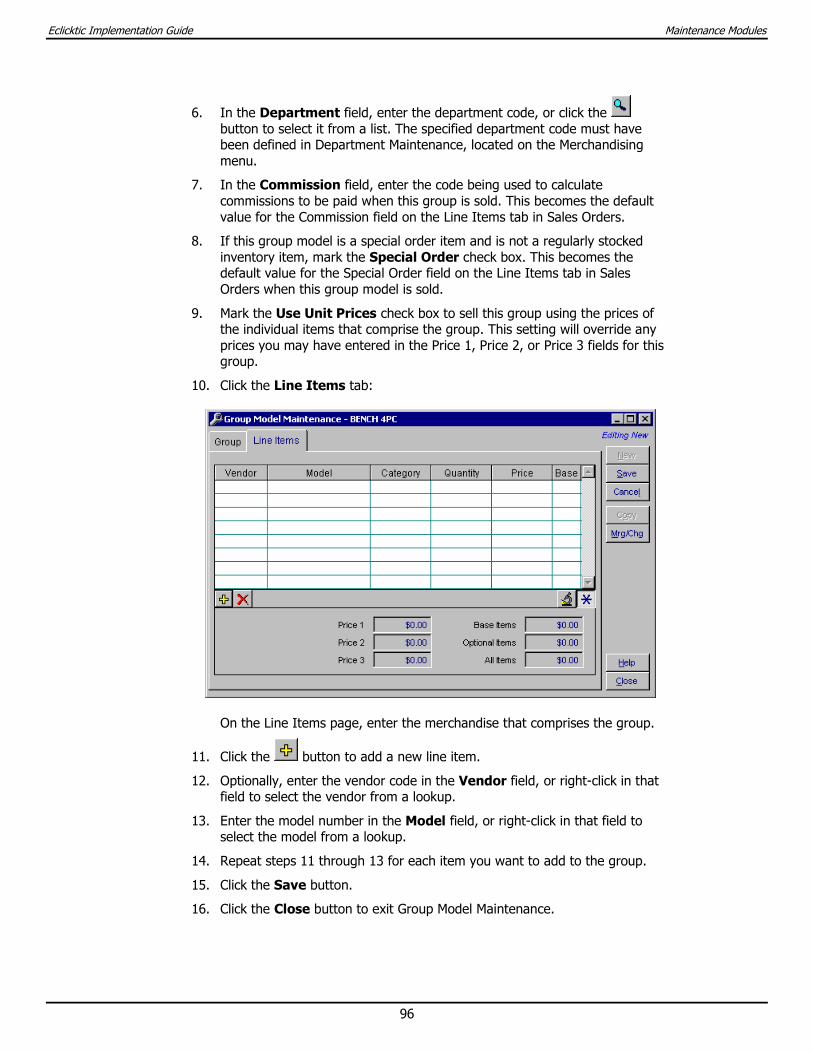
Eclicktic Implementation Guide Maintenance Modules
96
6. In the Department field, enter the department code, or click the button to select it from a list. The specified department code must have been defined in Department Maintenance, located on the Merchandising menu.
7. In the Commission field, enter the code being used to calculate commissions to be paid when this group is sold. This becomes the default value for the Commission field on the Line Items tab in Sales Orders.
8. If this group model is a special order item and is not a regularly stocked inventory item, mark the Special Order check box. This becomes the default value for the Special Order field on the Line Items tab in Sales Orders when this group model is sold.
9. Mark the Use Unit Prices check box to sell this group using the prices of the individual items that comprise the group. This setting will override any prices you may have entered in the Price 1, Price 2, or Price 3 fields for this group.
10. Click the Line Items tab:
On the Line Items page, enter the merchandise that comprises the group.
11. Click the button to add a new line item.
12. Optionally, enter the vendor code in the Vendor field, or right-click in that field to select the vendor from a lookup.
13. Enter the model number in the Model field, or right-click in that field to select the model from a lookup.
14. Repeat steps 11 through 13 for each item you want to add to the group.
15. Click the Save button.
16. Click the Close button to exit Group Model Maintenance.
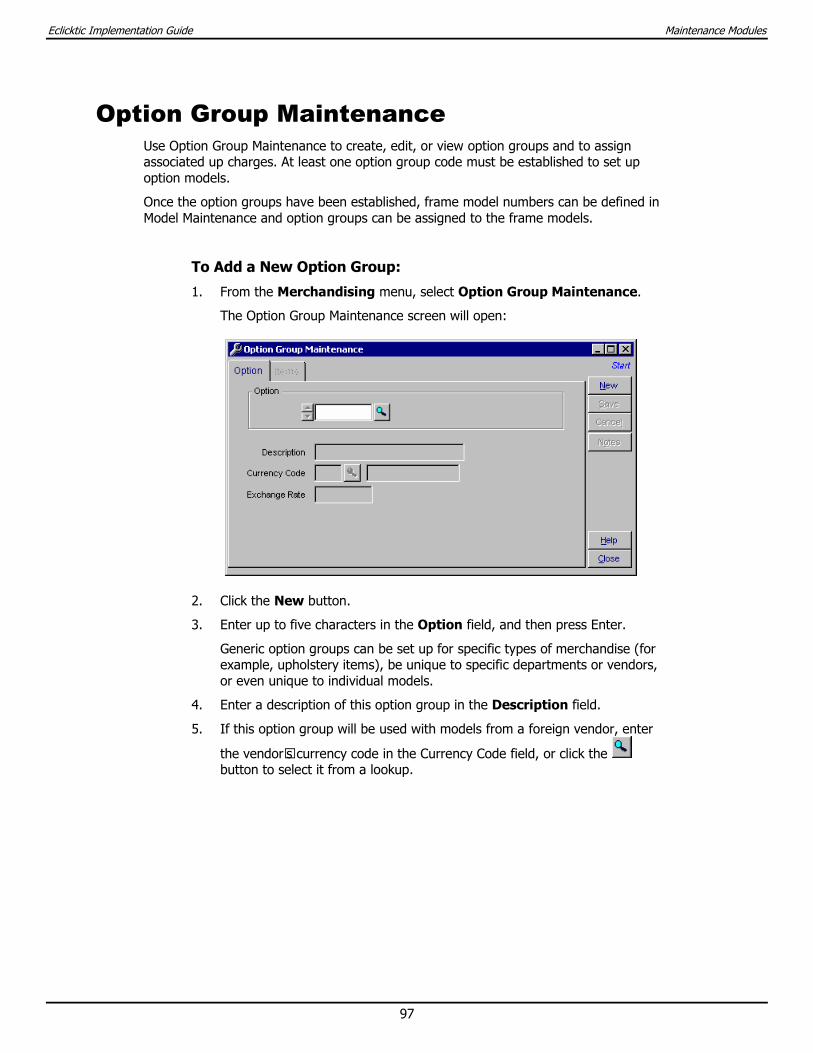
Eclicktic Implementation Guide Maintenance Modules
97
Option Group Maintenance Use Option Group Maintenance to create, edit, or view option groups and to assign associated up charges. At least one option group code must be established to set up option models.
Once the option groups have been established, frame model numbers can be defined in Model Maintenance and option groups can be assigned to the frame models.
To Add a New Option Group:
1. From the Merchandising menu, select Option Group Maintenance.
The Option Group Maintenance screen will open:
2. Click the New button.
3. Enter up to five characters in the Option field, and then press Enter.
Generic option groups can be set up for specific types of merchandise (for example, upholstery items), be unique to specific departments or vendors, or even unique to individual models.
4. Enter a description of this option group in the Description field.
5. If this option group will be used with models from a foreign vendor, enter
the vendor’s currency code in the Currency Code field, or click the button to select it from a lookup.

Eclicktic Implementation Guide Maintenance Modules
98
6. Click the Items tab:
Use the Items tab to define the options available for the option group. Options would include items like:
Main Cover Fabric
Second Fabric
Pillows
Casters
Welting
For each option established, an associated up charge can also be entered.
7. Click the button to add a new line item.
8. In the Item field, enter the name of the option.
9. In the Up Charge field, enter the amount that is added to the cost of a model when this option is selected. Typically the Main Cover will not have an up charge, since the cost is determined by the grade of the main cover.
Note: If this option group is to be used with models from a foreign vendor, the up charge must be entered in the foreign currency used with that vendor.
10. Check the Validate box if this item is a cover selection.
Selecting this check box allows you to enter the fabric or finish in the Options window when the model is sold or ordered. If it is not checked, you will only be able select the option, not select a fabric for it. For example, a chair might have three options—Main Cover, Outside Cover, and Swivel Base. The Main and Outside Covers are customizable, and you will need the ability to select a fabric for those options. The Swivel Base does not require selecting a fabric or finish, and so would not be validated.
11. If you will be using finishes as well as fabrics, or if you will be limiting options to certain types of fabrics, enter a code in the Type field that identifies the type of option.
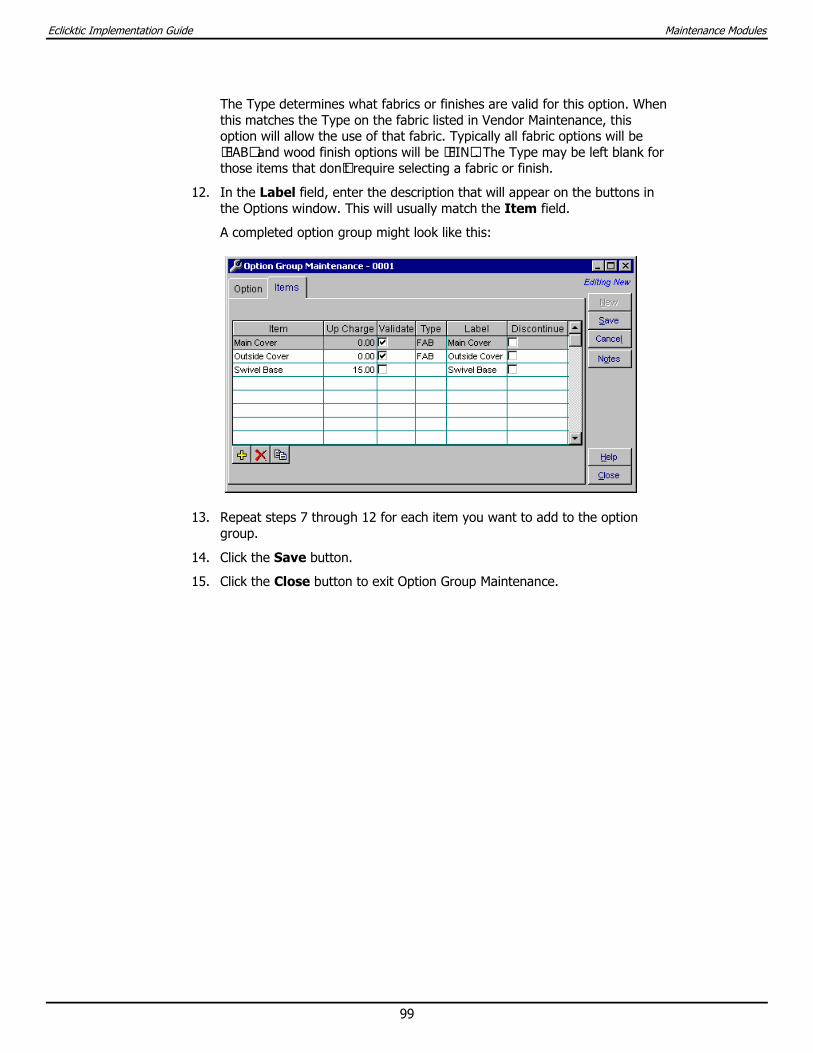
Eclicktic Implementation Guide Maintenance Modules
99
The Type determines what fabrics or finishes are valid for this option. When this matches the Type on the fabric listed in Vendor Maintenance, this option will allow the use of that fabric. Typically all fabric options will be “FAB” and wood finish options will be “FIN”. The Type may be left blank for those items that don’t require selecting a fabric or finish.
12. In the Label field, enter the description that will appear on the buttons in the Options window. This will usually match the Item field.
A completed option group might look like this:
13. Repeat steps 7 through 12 for each item you want to add to the option group.
14. Click the Save button.
15. Click the Close button to exit Option Group Maintenance.
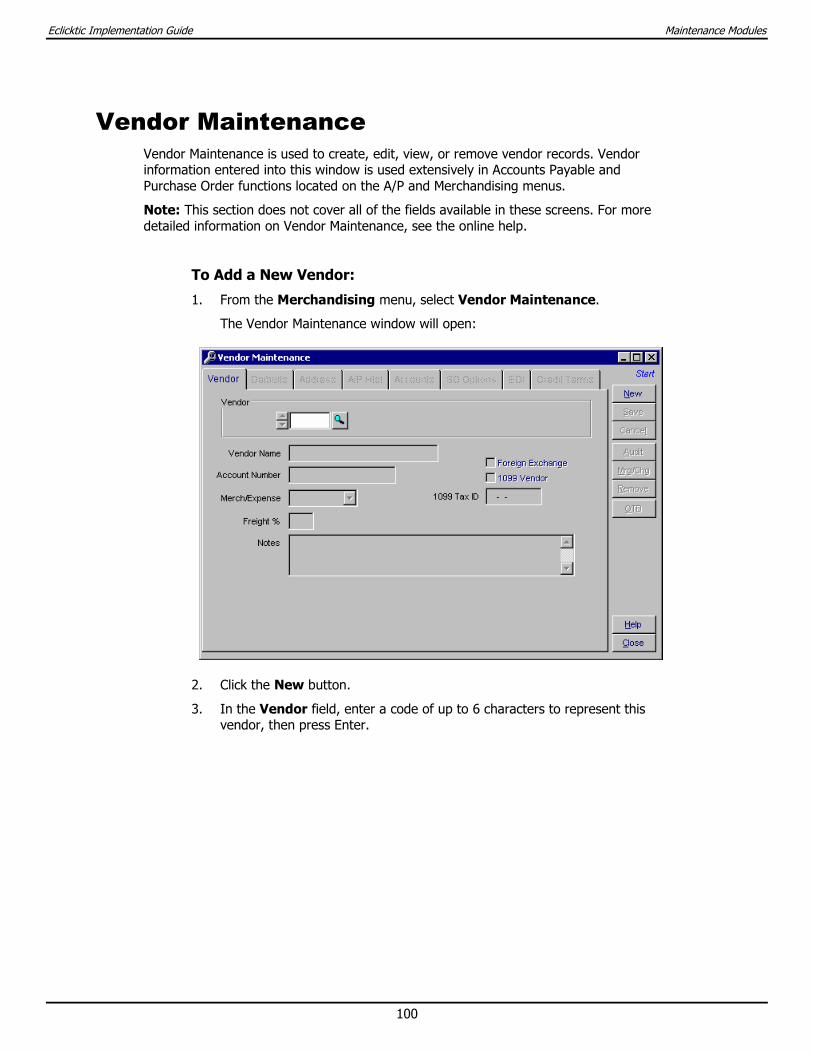
Eclicktic Implementation Guide Maintenance Modules
100
Vendor Maintenance Vendor Maintenance is used to create, edit, view, or remove vendor records. Vendor information entered into this window is used extensively in Accounts Payable and Purchase Order functions located on the A/P and Merchandising menus.
Note: This section does not cover all of the fields available in these screens. For more detailed information on Vendor Maintenance, see the online help.
To Add a New Vendor:
1. From the Merchandising menu, select Vendor Maintenance.
The Vendor Maintenance window will open:
2. Click the New button.
3. In the Vendor field, enter a code of up to 6 characters to represent this vendor, then press Enter.
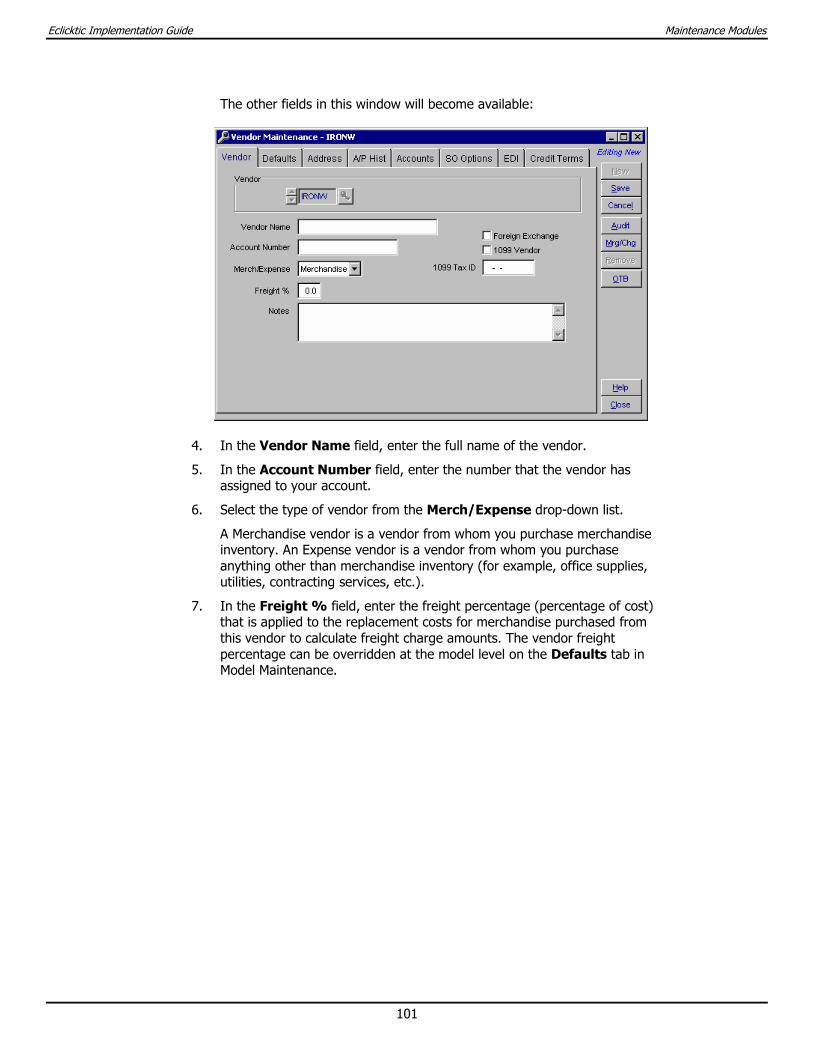
Eclicktic Implementation Guide Maintenance Modules
101
The other fields in this window will become available:
4. In the Vendor Name field, enter the full name of the vendor.
5. In the Account Number field, enter the number that the vendor has assigned to your account.
6. Select the type of vendor from the Merch/Expense drop-down list.
A Merchandise vendor is a vendor from whom you purchase merchandise inventory. An Expense vendor is a vendor from whom you purchase anything other than merchandise inventory (for example, office supplies, utilities, contracting services, etc.).
7. In the Freight % field, enter the freight percentage (percentage of cost) that is applied to the replacement costs for merchandise purchased from this vendor to calculate freight charge amounts. The vendor freight percentage can be overridden at the model level on the Defaults tab in Model Maintenance.
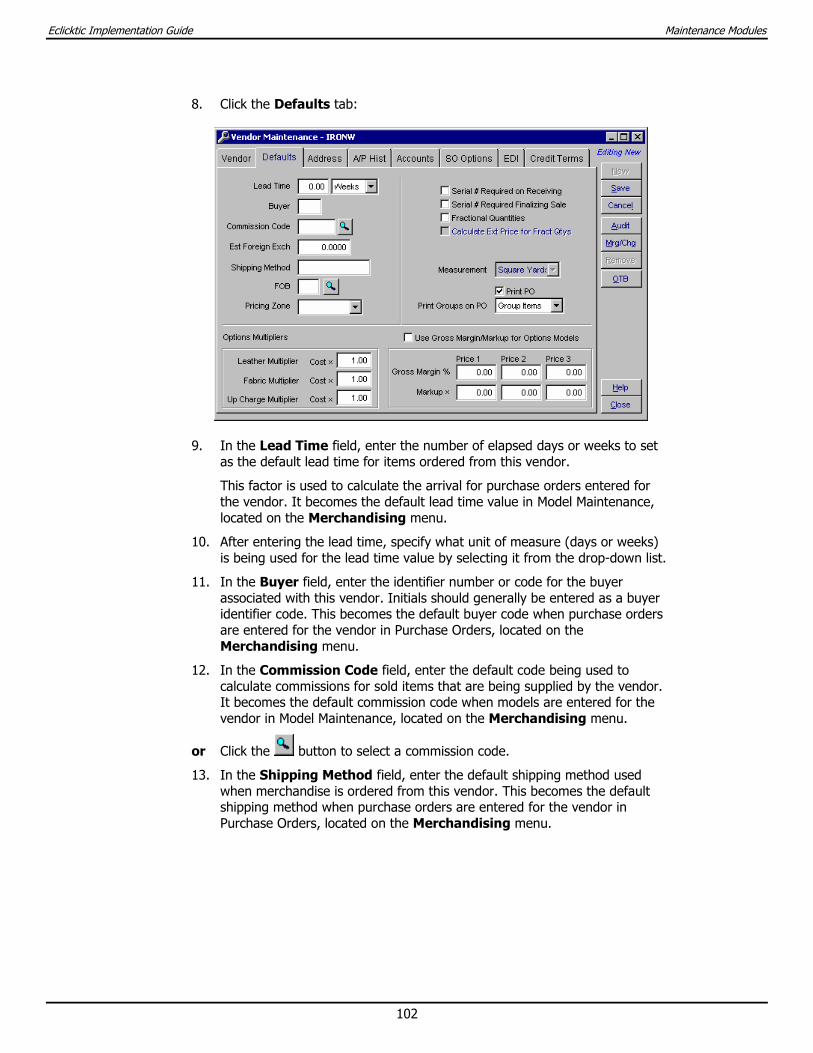
Eclicktic Implementation Guide Maintenance Modules
102
8. Click the Defaults tab:
9. In the Lead Time field, enter the number of elapsed days or weeks to set as the default lead time for items ordered from this vendor.
This factor is used to calculate the arrival for purchase orders entered for the vendor. It becomes the default lead time value in Model Maintenance, located on the Merchandising menu.
10. After entering the lead time, specify what unit of measure (days or weeks) is being used for the lead time value by selecting it from the drop-down list.
11. In the Buyer field, enter the identifier number or code for the buyer associated with this vendor. Initials should generally be entered as a buyer identifier code. This becomes the default buyer code when purchase orders are entered for the vendor in Purchase Orders, located on the Merchandising menu.
12. In the Commission Code field, enter the default code being used to calculate commissions for sold items that are being supplied by the vendor. It becomes the default commission code when models are entered for the vendor in Model Maintenance, located on the Merchandising menu.
or Click the button to select a commission code.
13. In the Shipping Method field, enter the default shipping method used when merchandise is ordered from this vendor. This becomes the default shipping method when purchase orders are entered for the vendor in Purchase Orders, located on the Merchandising menu.
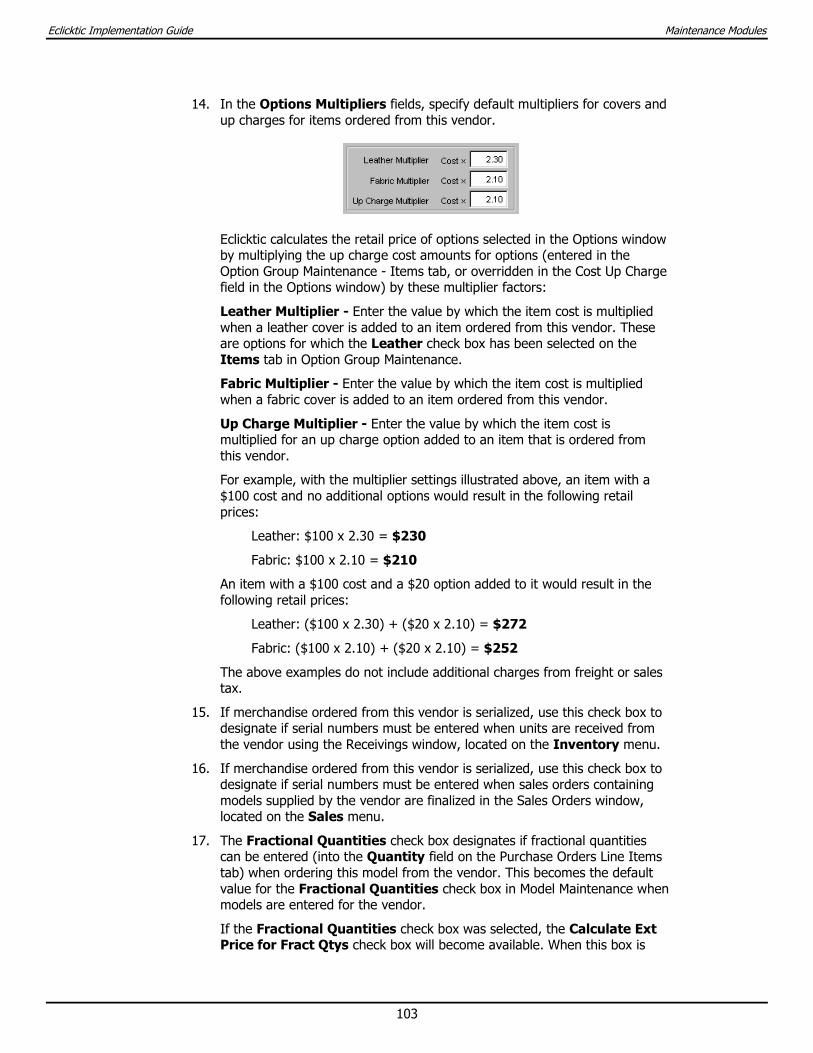
Eclicktic Implementation Guide Maintenance Modules
103
14. In the Options Multipliers fields, specify default multipliers for covers and up charges for items ordered from this vendor.
Eclicktic calculates the retail price of options selected in the Options window by multiplying the up charge cost amounts for options (entered in the Option Group Maintenance - Items tab, or overridden in the Cost Up Charge field in the Options window) by these multiplier factors:
Leather Multiplier - Enter the value by which the item cost is multiplied when a leather cover is added to an item ordered from this vendor. These are options for which the Leather check box has been selected on the Items tab in Option Group Maintenance.
Fabric Multiplier - Enter the value by which the item cost is multiplied when a fabric cover is added to an item ordered from this vendor.
Up Charge Multiplier - Enter the value by which the item cost is multiplied for an up charge option added to an item that is ordered from this vendor.
For example, with the multiplier settings illustrated above, an item with a $100 cost and no additional options would result in the following retail prices:
Leather: $100 x 2.30 = $230
Fabric: $100 x 2.10 = $210
An item with a $100 cost and a $20 option added to it would result in the following retail prices:
Leather: ($100 x 2.30) + ($20 x 2.10) = $272
Fabric: ($100 x 2.10) + ($20 x 2.10) = $252
The above examples do not include additional charges from freight or sales tax.
15. If merchandise ordered from this vendor is serialized, use this check box to designate if serial numbers must be entered when units are received from the vendor using the Receivings window, located on the Inventory menu.
16. If merchandise ordered from this vendor is serialized, use this check box to designate if serial numbers must be entered when sales orders containing models supplied by the vendor are finalized in the Sales Orders window, located on the Sales menu.
17. The Fractional Quantities check box designates if fractional quantities can be entered (into the Quantity field on the Purchase Orders Line Items tab) when ordering this model from the vendor. This becomes the default value for the Fractional Quantities check box in Model Maintenance when models are entered for the vendor.
If the Fractional Quantities check box was selected, the Calculate Ext Price for Fract Qtys check box will become available. When this box is

Eclicktic Implementation Guide Maintenance Modules
104
checked, the extended price of sales order line items for this vendor will be based on fractional quantities.
18. The Print PO check box designates if hard copy forms should be batch-printed for purchase orders created for this vendor when using the Print Purchase Orders process. This becomes the default setting for the Print Purchase Orders check box on the Details tab in Purchase Orders and can be overridden for individual purchase orders.
19. The Print Groups on PO drop-down list designates how group model information should be printed on the hard copy form for purchase orders (created for this vendor) that contain group models. Select Group Items to print the individual items that comprise the group model entered on the purchase order. Select Groups to print only the name of the group model entered on the purchase order.
This becomes the default value for the Print Groups on PO field on the Details tab in Purchase Orders and can be overridden for specific purchase orders.
20. Mark the Use Gross Margin/Markup for Options Models check box to use Gross Margin/Markup for Options models rather than the Options Multipliers.
21. Use the Gross Margin fields to define the default landed Gross Margin percentages at each of the three price points for models ordered from this vendor. If the Source for Model Price Calculations field on the Merchandising tab in Configuration has been set to Vendor, these entries display in the Gross Margin % fields in the Model Maintenance Pricing tab when model records are entered for this vendor.
or Use the Markup x fields to define the default landed Markup multiplier factors at each of the three price points for models ordered from this vendor. If the Source for Model Price Calculations field on the Merchandising tab in Configuration has been set to Vendor, these entries display in the Markup x fields in the Model Maintenance Pricing tab when model records are entered for this vendor.
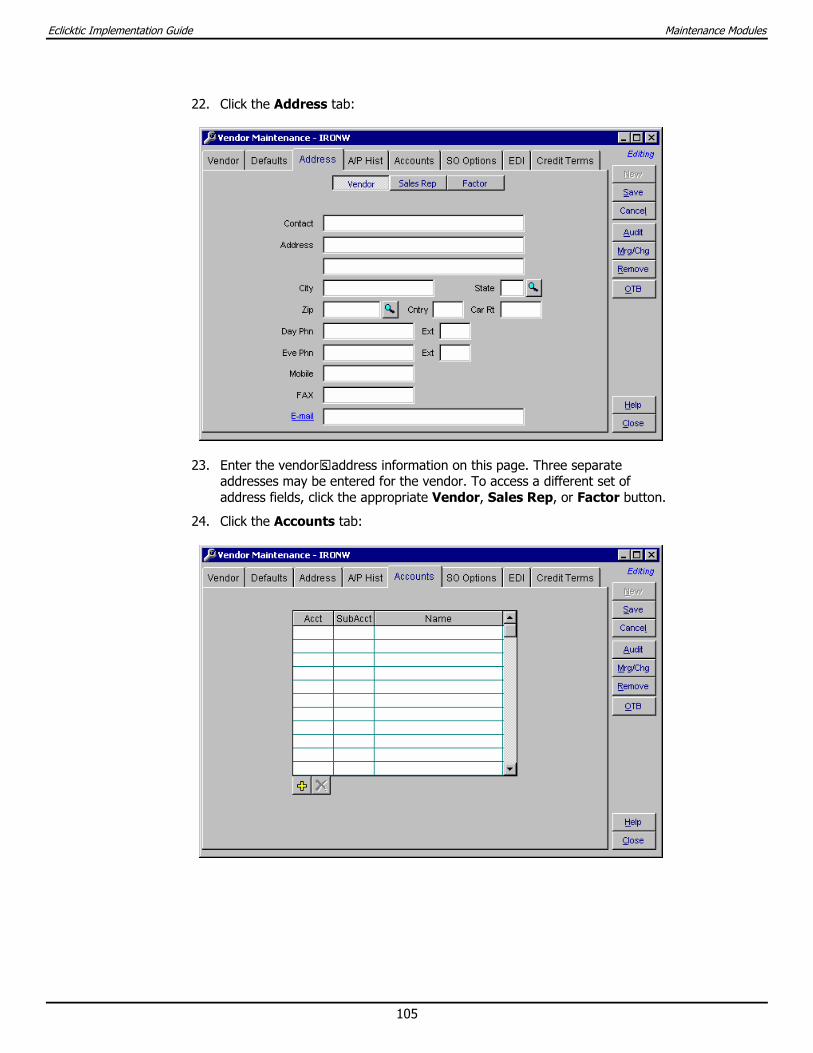
Eclicktic Implementation Guide Maintenance Modules
105
22. Click the Address tab:
23. Enter the vendor’s address information on this page. Three separate addresses may be entered for the vendor. To access a different set of address fields, click the appropriate Vendor, Sales Rep, or Factor button.
24. Click the Accounts tab:
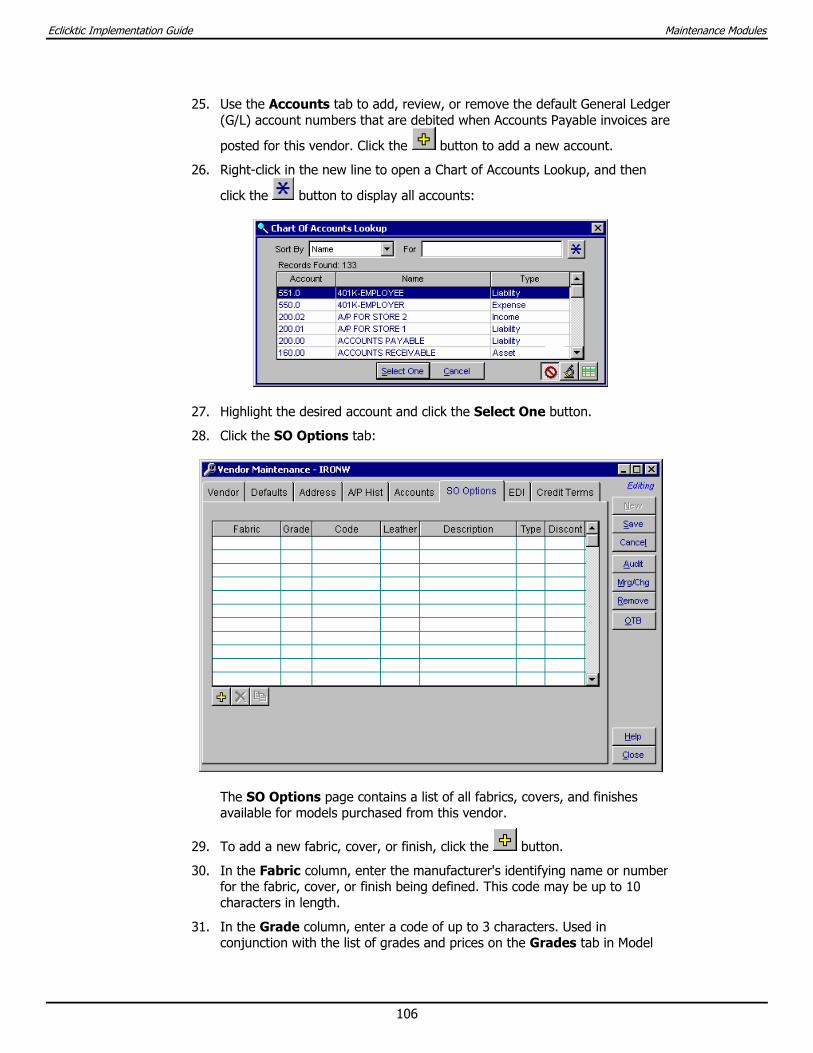
Eclicktic Implementation Guide Maintenance Modules
106
25. Use the Accounts tab to add, review, or remove the default General Ledger (G/L) account numbers that are debited when Accounts Payable invoices are
posted for this vendor. Click the button to add a new account.
26. Right-click in the new line to open a Chart of Accounts Lookup, and then
click the button to display all accounts:
27. Highlight the desired account and click the Select One button.
28. Click the SO Options tab:
The SO Options page contains a list of all fabrics, covers, and finishes available for models purchased from this vendor.
29. To add a new fabric, cover, or finish, click the button.
30. In the Fabric column, enter the manufacturer's identifying name or number for the fabric, cover, or finish being defined. This code may be up to 10 characters in length.
31. In the Grade column, enter a code of up to 3 characters. Used in conjunction with the list of grades and prices on the Grades tab in Model

Eclicktic Implementation Guide Maintenance Modules
107
Maintenance, the grade entered here is used to determine the price of a model when this fabric is applied as the main cover.
32. The Code determines what fabrics are available for a model. If this code is listed on the Grades tab in Model Maintenance, this fabric will be available for use on that model. The same code may be used on many fabrics and many models.
33. Mark the Leather check box if this fabric is leather. If you are using the Options Multipliers on the Defaults tab to calculate retail pricing, the Leather check box on this screen allows you to price a leather item higher than the identical item in vinyl (or other fabric), even if their wholesale cost is the same.
34. Enter up to 25 characters in the Description column.
35. The Option Type determines what fabrics are valid for a particular option. When this matches the Type in a model’s Option Group, that option will allow the use of this fabric.
36. Click the Credit Terms tab:
Use the Credit Terms tab to add, delete, duplicate, or review default credit terms for the vendor. This information is used on the Schedule tab in Accounts Payable Input to calculate credit terms (due date, discount date, and discount amount) for invoices entered for the vendor. It is also used to automatically calculate credit terms for invoices received from the vendor by the EDI - Receive process.
37. Click the button to add a new line.
38. In the Discount column, enter the percentage or amount of discount the vendor offers you for prompt payment of invoices. For example, enter 2.50 into this field for 2.5% discount or 20.00 for a fixed twenty-dollar discount on a promptly paid invoice.
Eclicktic Implementation Guide Maintenance Modules
108
39. In the Type column, specify if the discount amount entered into the Discount field is a percentage or dollar amount. Select $ Amount or % Percent.
40. In the Discount Days column, enter the maximum number of days between invoice date and prompt payment date that are allowed for the discount to be taken. For example, if the terms are 2%/10/Net 30, enter 10 into this field.
41. In the Net Days column, enter the number of days after the invoice date that the invoice becomes past due. For example, if the terms are 2%/10/Net 30, enter 30 into this field.
42. Click the Save button.
43. Click the Close button to exit Vendor Maintenance.
Eclicktic Implementation Guide Maintenance Modules
109
Model Maintenance Use Model Maintenance to create, change, or review model and part master information. Model records store static and planning information for every model and part tracked throughout Eclicktic. The information stored in these records is used extensively in the Sales, Inventory, and Merchandising menus.
Note: This document does not cover all of the fields available in these screens. For more detailed information on Model Maintenance, see the online help.
Models versus Parts
Models are regularly stocked inventory items that are purchased from vendors and then sold on sales orders. The model number is a unique identifier and is commonly the manufacturer's or vendor's assigned item identification number.
If the Inventory check box is selected for a model, it indicates an item for which perpetual inventory counts and locations are being tracked in Eclicktic. If this box is not checked, it indicates an item (such as fabric treatment) for which inventory counts and locations are not being tracked.
Parts are model records for which the Part check box has been selected in Model Maintenance. They are typically service parts that are entered on service orders.
If the Inventory check box is selected for a part, it indicates an inventory part for which perpetual inventory counts and locations are being tracked in Eclicktic. Inventory parts can also be sold and entered on sales orders. If this box is not checked, it indicates a non-inventory parts item for which inventory counts are not tracked. They are typically service parts that are entered on service orders and purchased on purchase orders. Non-inventory parts cannot be entered on sales orders.
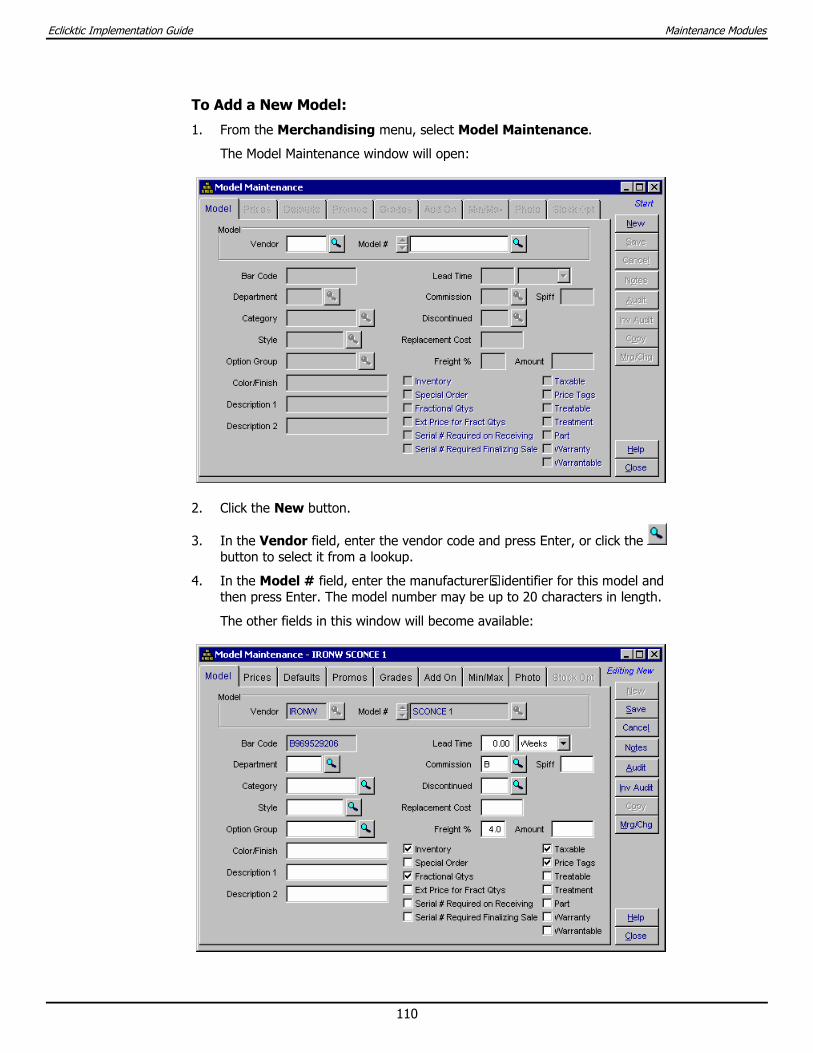
Eclicktic Implementation Guide Maintenance Modules
110
To Add a New Model:
1. From the Merchandising menu, select Model Maintenance.
The Model Maintenance window will open:
2. Click the New button.
3. In the Vendor field, enter the vendor code and press Enter, or click the button to select it from a lookup.
4. In the Model # field, enter the manufacturer’s identifier for this model and then press Enter. The model number may be up to 20 characters in length.
The other fields in this window will become available:
Eclicktic Implementation Guide Maintenance Modules
111
5. In the Department field, enter the department code, or click the button to select it from a lookup. The specified department code must have been defined in Department Maintenance, located on the Merchandising menu.
6. In the Category field, enter the category code, or click the button to select it from a lookup. The specified category code must have been defined in Department Maintenance.
7. In the Style field, enter the style code, or click the button to select it from a lookup. The specified style code must have been defined in Department Maintenance.
8. If this model uses Options, enter the Option Group code, or click the button to select it from a lookup. This allows entry of options for the model on sales orders and purchase orders. It also allows access to the Stock Opt tab to define preset Stock Options for the model. The specified option group code must have been defined in Option Group Maintenance, located on the Merchandising menu.
9. Optionally, enter the model’s color or finish in the Color/Finish field.
10. Optionally, enter descriptions in the Description 1 and Description 2 fields. These fields are printed along with the model number on many reports and labels.
11. In the Lead Time field, enter the number of elapsed days or weeks it takes from the time this model is ordered until it arrives from the vendor. The default value comes from the Lead Time field in Vendor Maintenance.
12. After entering a number in the Lead Time field, select Days or Weeks from the associated drop-down list.
13. In the Commission field, enter the code being used to calculate commissions to be paid when this model or part is sold. This becomes the default value for the Commission field on the Line Items tab in Sales Orders. The default value comes from the Commission field on the Defaults tab in Vendor Maintenance. This is a required field.
14. In the Spiff field, enter the dollar amount to be paid to a salesperson upon sale of this model if a SPIFF (Special Promotion Incentive From Factory) is being offered for this model or part.
15. In the Replacement Cost field, enter the unit replacement cost for the model or part. This would normally be the purchase cost of the item. This is used as the default cost for the item in Receivings and Purchase Orders, and also as a gross margin figure on the Merchandise Manager's Reports. If the model simply represents a generic frame to which option selections are added when the item is sold, you could skip entry of a replacement cost. In this scenario, Eclicktic would "build" a replacement cost based on the type of fabric grades or options selected by the customer.
16. In the Freight % field, enter the freight percentage (percentage of cost) to apply to the unit replacement cost for the model or part to calculate freight charge amounts. The default value comes from the Freight % field in Vendor Maintenance.
Eclicktic Implementation Guide Maintenance Modules
112
17. If the Freight % field was left blank, enter a fixed freight dollar charge amount into the Amount field.
18. Mark the Inventory check box if this model or part is an actual inventory item for which physical quantities are being tracked. If this box is checked, the item will be also be included in physical inventory and cycle counts.
If this model or part is a non-inventory item (for which physical quantities are not being tracked), uncheck the Inventory box. The check box would normally be cleared for items such as fabric treatments, for which quantity tracking is not required.
19. Mark the Special Order check box if this model or part is a special order item and is not a regularly stocked inventory item. This becomes the default value for the Special Order field on the Line Items tab in Sales Orders when this model is sold.
Eclicktic automatically assigns this setting if the model or part was created using the F3 function in the Model field on the Line Items tab in Sales Orders.
Leave the box unchecked if this model or part is not a special order item and is a regularly stocked inventory item. Eclicktic automatically assigns this setting if the model or part was created using the F3 function in the Model field on the Line Items tab in Purchase Orders.
20. Mark the Fractional Quantities check box if fractional quantities can be entered (into the Quantity field on the Line Items tab in Purchase Orders) when ordering this model or part from the vendor. The default comes from the Fractional Quantities check box on the Defaults tab in Vendor Maintenance.
If this box is checked, Eclicktic will not perform automatic ordering in multiples of the Quantity per Carton.
21. If the Fractional Quantities check box was selected, the Calculate Ext Price for Fract Qtys check box will become available. When this box is checked, the extended price of sales order line items for this vendor will be based on fractional quantities.
22. If this model or part number is serialized, use the Serial Number # Required on Receiving check box to designate if serial numbers must be entered when units are received from the vendor using the Receivings window, located on the Inventory menu.
23. If this model or part number is serialized, use the Serial Number # Required Finalizing Sale check box to designate if serial numbers must be entered when sales orders containing this item are finalized in the Sales Orders window, located on the Sales menu.
24. Mark the Taxable check box if this model or part is considered a taxable item when entered in Sales Orders, Returns, Sales Adjustments, or Service Orders.
25. The Price Tags check box designates if price tags should be generated and printed by the Price Change Labels process when price changes are entered for the model or part on the Prices tab in Model Maintenance.
26. The Treatable check box designates if treatments (for example, scotchgarding or Fabricoat) can be applied to this item.
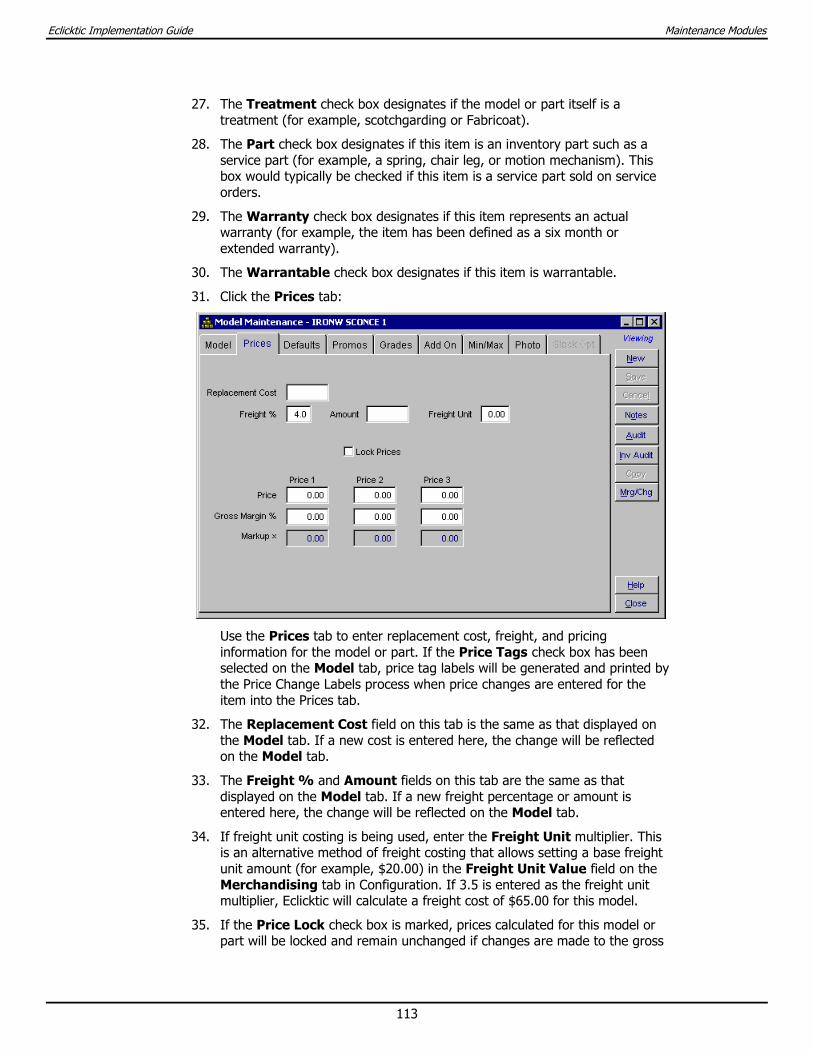
Eclicktic Implementation Guide Maintenance Modules
113
27. The Treatment check box designates if the model or part itself is a treatment (for example, scotchgarding or Fabricoat).
28. The Part check box designates if this item is an inventory part such as a service part (for example, a spring, chair leg, or motion mechanism). This box would typically be checked if this item is a service part sold on service orders.
29. The Warranty check box designates if this item represents an actual warranty (for example, the item has been defined as a six month or extended warranty).
30. The Warrantable check box designates if this item is warrantable.
31. Click the Prices tab:
Use the Prices tab to enter replacement cost, freight, and pricing information for the model or part. If the Price Tags check box has been selected on the Model tab, price tag labels will be generated and printed by the Price Change Labels process when price changes are entered for the item into the Prices tab.
32. The Replacement Cost field on this tab is the same as that displayed on the Model tab. If a new cost is entered here, the change will be reflected on the Model tab.
33. The Freight % and Amount fields on this tab are the same as that displayed on the Model tab. If a new freight percentage or amount is entered here, the change will be reflected on the Model tab.
34. If freight unit costing is being used, enter the Freight Unit multiplier. This is an alternative method of freight costing that allows setting a base freight unit amount (for example, $20.00) in the Freight Unit Value field on the Merchandising tab in Configuration. If 3.5 is entered as the freight unit multiplier, Eclicktic will calculate a freight cost of $65.00 for this model.
35. If the Price Lock check box is marked, prices calculated for this model or part will be locked and remain unchanged if changes are made to the gross
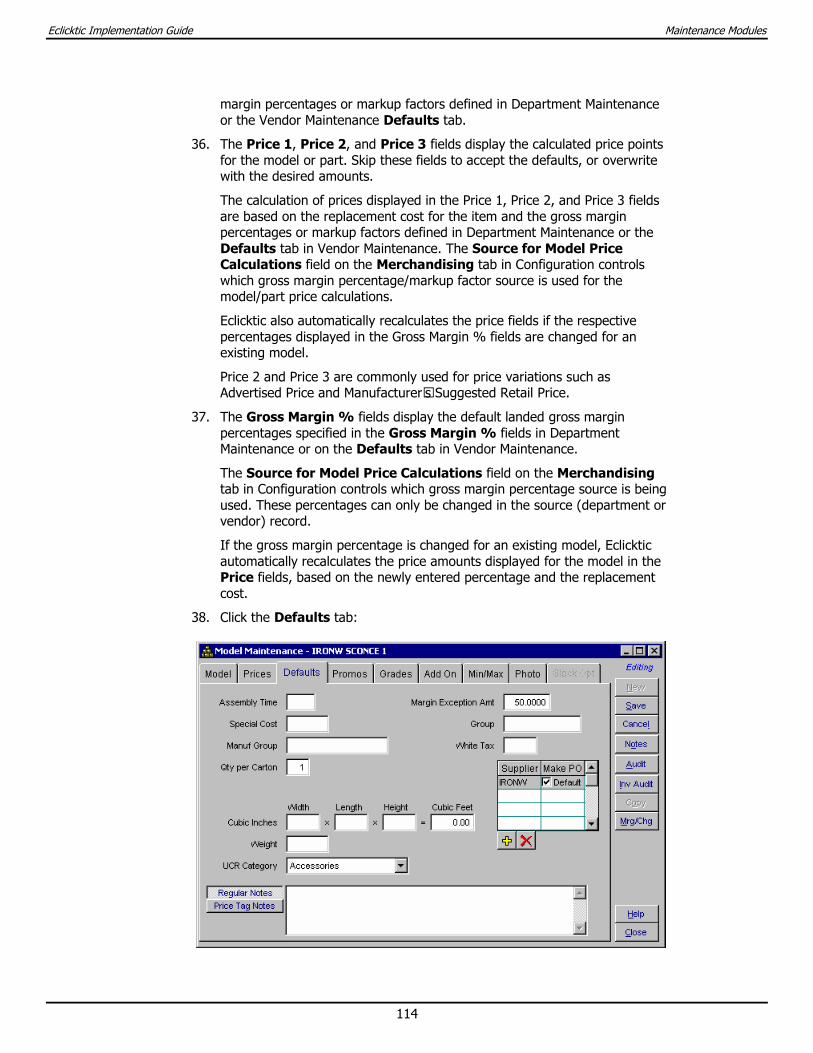
Eclicktic Implementation Guide Maintenance Modules
114
margin percentages or markup factors defined in Department Maintenance or the Vendor Maintenance Defaults tab.
36. The Price 1, Price 2, and Price 3 fields display the calculated price points for the model or part. Skip these fields to accept the defaults, or overwrite with the desired amounts.
The calculation of prices displayed in the Price 1, Price 2, and Price 3 fields are based on the replacement cost for the item and the gross margin percentages or markup factors defined in Department Maintenance or the Defaults tab in Vendor Maintenance. The Source for Model Price Calculations field on the Merchandising tab in Configuration controls which gross margin percentage/markup factor source is used for the model/part price calculations.
Eclicktic also automatically recalculates the price fields if the respective percentages displayed in the Gross Margin % fields are changed for an existing model.
Price 2 and Price 3 are commonly used for price variations such as Advertised Price and Manufacturer’s Suggested Retail Price.
37. The Gross Margin % fields display the default landed gross margin percentages specified in the Gross Margin % fields in Department Maintenance or on the Defaults tab in Vendor Maintenance.
The Source for Model Price Calculations field on the Merchandising tab in Configuration controls which gross margin percentage source is being used. These percentages can only be changed in the source (department or vendor) record.
If the gross margin percentage is changed for an existing model, Eclicktic automatically recalculates the price amounts displayed for the model in the Price fields, based on the newly entered percentage and the replacement cost.
38. Click the Defaults tab:
Eclicktic Implementation Guide Maintenance Modules
115
Use the Defaults tab to define default settings and values for the model record. Most of the defaults entered into this tab can be overridden when transactions are entered for the item throughout Eclicktic.
39. In the Assembly Time field, enter the time, if any, required to assemble this item.
40. In the Special Cost field, enter the best price at which this item was ever purchased. This field is for information purposes only and is not used in any calculations.
41. In the Manuf Group field, enter the manufacturer's group tracking number or name to identify this model record as part of a specific group of items. The code is used to group items on the Merchandise Manager's Reports, located on the Merchandising menu.
42. In the Qty per Carton field, enter the number of pieces shipped in each carton. If the Use Quantity per Carton check box has been selected on the Merchandising tab in Configuration, this model is automatically ordered in multiples of the quantity entered into this field when creating purchase orders.
Note: Eclicktic does not perform automatic ordering in multiples of the quantity per carton if the Fractional Qtys check box has been selected for the model in Model Maintenance.
For more information and examples on the use of multiple quantities per carton, see the Eclicktic online help.
43. In the Cubic Inches fields, enter the Width, Length, and Height dimensions of the shipping carton used for the item when shipped from the vendor. These become the default values for the Width, Length, and Height fields on the Line Items tab in Purchase Orders.
44. In the Weight field, enter the weight, in pounds, of the entire shipping carton. This becomes the default value for the Weight field on the Line Items tab in Purchase Orders.
45. In the Margin Exception Amt field, specify the margin exception percentage (for example, 25.5 for 25.5%) to apply to this model record. A margin exception is a sale that results in an unacceptable margin percentage that is below the exception percentage entered into this field.
If the Item Margin Exceptions check box is selected in the Margin Exception Report, it compares the gross margin percentage when this item is sold on a sales order against this margin exception percentage. Sales order line items with a gross margin less than this specified percentage print on the report.
Skip the field to accept the default margin exception percentage. The displayed percentage is the amount defined for the assigned department code in Department Maintenance.
46. In the Group field, enter a group tracking number or name to identify this model record as part of a specific department group. The code is used to group items on the Merchandise Manager's Reports, located on the Merchandising menu.
Eclicktic Implementation Guide Maintenance Modules
116
47. If this model is subject to a White Goods Tax, enter the flat tax amount in the White Tax field. This amount is added to other applicable sales taxes upon sale of this item.
48. Use the table to specify the suppliers (vendors) of this inventory item. The default comes from the vendor code entered into the Vendor field on the Model tab.
If the vendor who supplies the item is the same as the vendor who is paid for the ordered item, skip the field to accept the default vendor code. If
required, delete the default vendor code by clicking the button.
To add additional suppliers for this model, click the button to add a new supplier grid line item. The cursor positions itself to the first available grid line, allowing entry of a new supplier (vendor code). Enter the code of the vendor who supplies the item. The specified vendor code must have been defined in Vendor Maintenance, located on the Merchandising menu.
If the vendor code is unknown, right-click or press F2 to access Vendor Lookup and select the vendor code from a list.
49. The Make PO Default check box designates which supplier is the default vendor when purchase orders are generated for this model using Make Purchase Orders - Customer Back Orders or Make Purchase Orders - Min/Max.
Note: If multiple suppliers are displayed in this grid, only one can be designated as the default supplier for the item.
50. Click the Regular Notes button and enter any desired text in the field to the right of the button. This allows for entry of additional descriptive text for the item beyond the two lines of description that can be entered into the Models tab. Regular Notes print on reports and forms throughout Eclicktic.
51. Click the Price Tag Notes button and enter any desired text in the field to the right of the button. This text displays on price tags printed using Price Changes, located on the Labels submenu within the Inventory menu. Price tag notes are typically used to print more details about the item on the tag. For example, it might describe other group pieces that accompany this item, cover options and up charges. Another example of price tag note text would be:
"Also available in Pine, Oak, and Cherry.
Available in Leather - Upcharges apply"
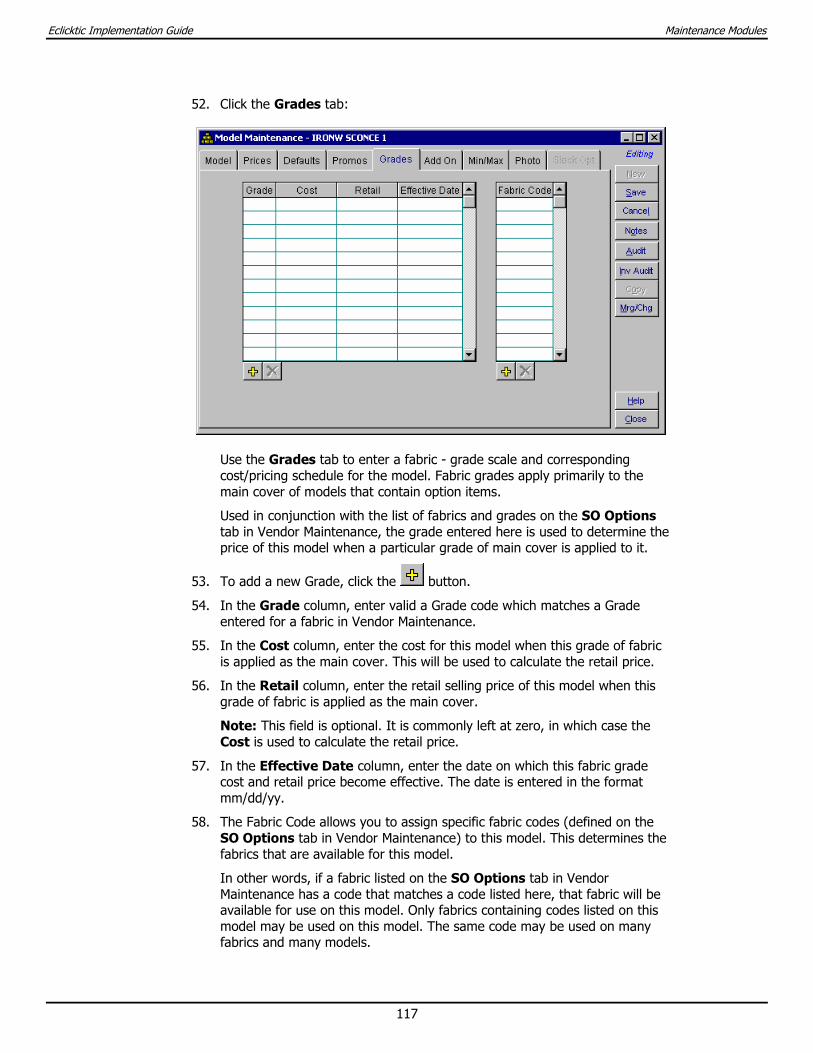
Eclicktic Implementation Guide Maintenance Modules
117
52. Click the Grades tab:
Use the Grades tab to enter a fabric - grade scale and corresponding cost/pricing schedule for the model. Fabric grades apply primarily to the main cover of models that contain option items.
Used in conjunction with the list of fabrics and grades on the SO Options tab in Vendor Maintenance, the grade entered here is used to determine the price of this model when a particular grade of main cover is applied to it.
53. To add a new Grade, click the button.
54. In the Grade column, enter valid a Grade code which matches a Grade entered for a fabric in Vendor Maintenance.
55. In the Cost column, enter the cost for this model when this grade of fabric is applied as the main cover. This will be used to calculate the retail price.
56. In the Retail column, enter the retail selling price of this model when this grade of fabric is applied as the main cover.
Note: This field is optional. It is commonly left at zero, in which case the Cost is used to calculate the retail price.
57. In the Effective Date column, enter the date on which this fabric grade cost and retail price become effective. The date is entered in the format mm/dd/yy.
58. The Fabric Code allows you to assign specific fabric codes (defined on the SO Options tab in Vendor Maintenance) to this model. This determines the fabrics that are available for this model.
In other words, if a fabric listed on the SO Options tab in Vendor Maintenance has a code that matches a code listed here, that fabric will be available for use on this model. Only fabrics containing codes listed on this model may be used on this model. The same code may be used on many fabrics and many models.
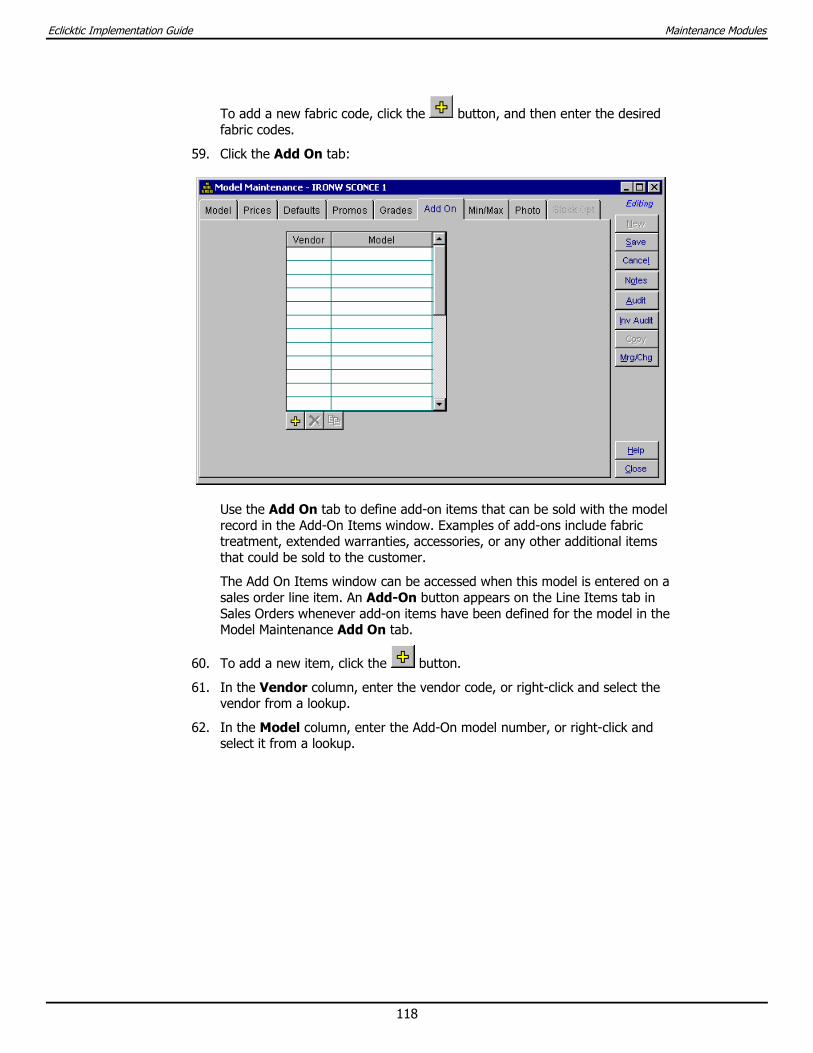
Eclicktic Implementation Guide Maintenance Modules
118
To add a new fabric code, click the button, and then enter the desired fabric codes.
59. Click the Add On tab:
Use the Add On tab to define add-on items that can be sold with the model record in the Add-On Items window. Examples of add-ons include fabric treatment, extended warranties, accessories, or any other additional items that could be sold to the customer.
The Add On Items window can be accessed when this model is entered on a sales order line item. An Add-On button appears on the Line Items tab in Sales Orders whenever add-on items have been defined for the model in the Model Maintenance Add On tab.
60. To add a new item, click the button.
61. In the Vendor column, enter the vendor code, or right-click and select the vendor from a lookup.
62. In the Model column, enter the Add-On model number, or right-click and select it from a lookup.
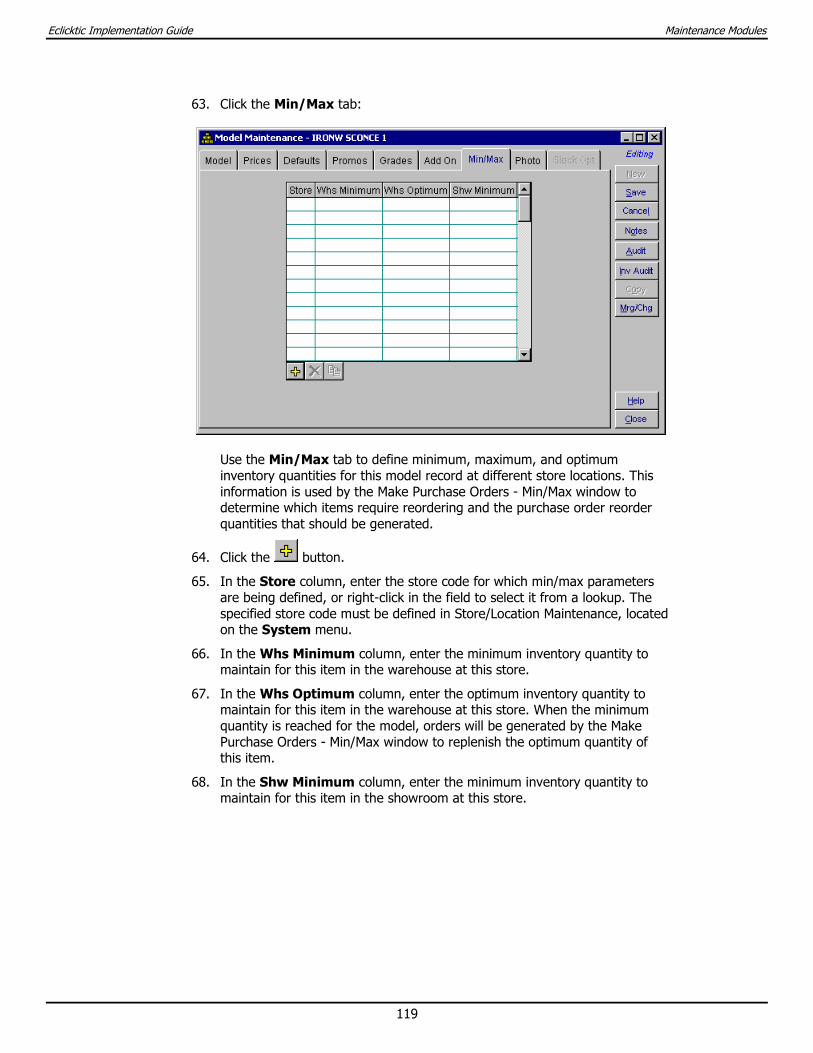
Eclicktic Implementation Guide Maintenance Modules
119
63. Click the Min/Max tab:
Use the Min/Max tab to define minimum, maximum, and optimum inventory quantities for this model record at different store locations. This information is used by the Make Purchase Orders - Min/Max window to determine which items require reordering and the purchase order reorder quantities that should be generated.
64. Click the button.
65. In the Store column, enter the store code for which min/max parameters are being defined, or right-click in the field to select it from a lookup. The specified store code must be defined in Store/Location Maintenance, located on the System menu.
66. In the Whs Minimum column, enter the minimum inventory quantity to maintain for this item in the warehouse at this store.
67. In the Whs Optimum column, enter the optimum inventory quantity to maintain for this item in the warehouse at this store. When the minimum quantity is reached for the model, orders will be generated by the Make Purchase Orders - Min/Max window to replenish the optimum quantity of this item.
68. In the Shw Minimum column, enter the minimum inventory quantity to maintain for this item in the showroom at this store.
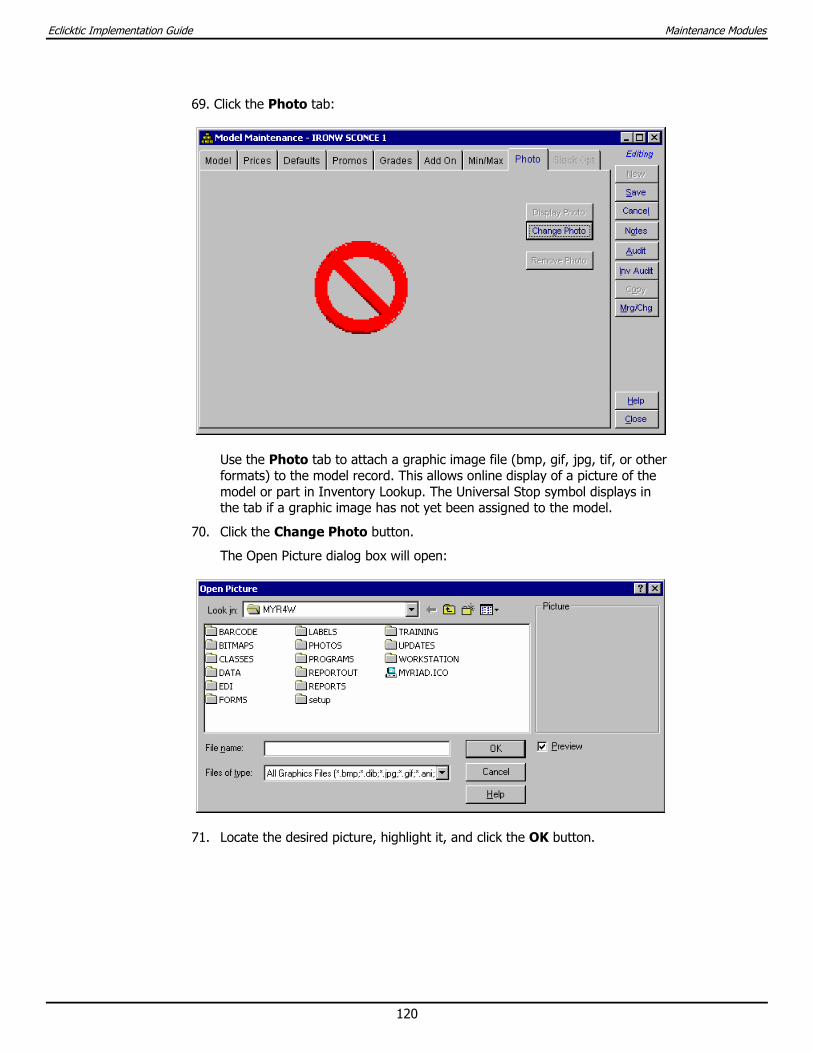
Eclicktic Implementation Guide Maintenance Modules
120
69. Click the Photo tab:
Use the Photo tab to attach a graphic image file (bmp, gif, jpg, tif, or other formats) to the model record. This allows online display of a picture of the model or part in Inventory Lookup. The Universal Stop symbol displays in the tab if a graphic image has not yet been assigned to the model.
70. Click the Change Photo button.
The Open Picture dialog box will open:
71. Locate the desired picture, highlight it, and click the OK button.
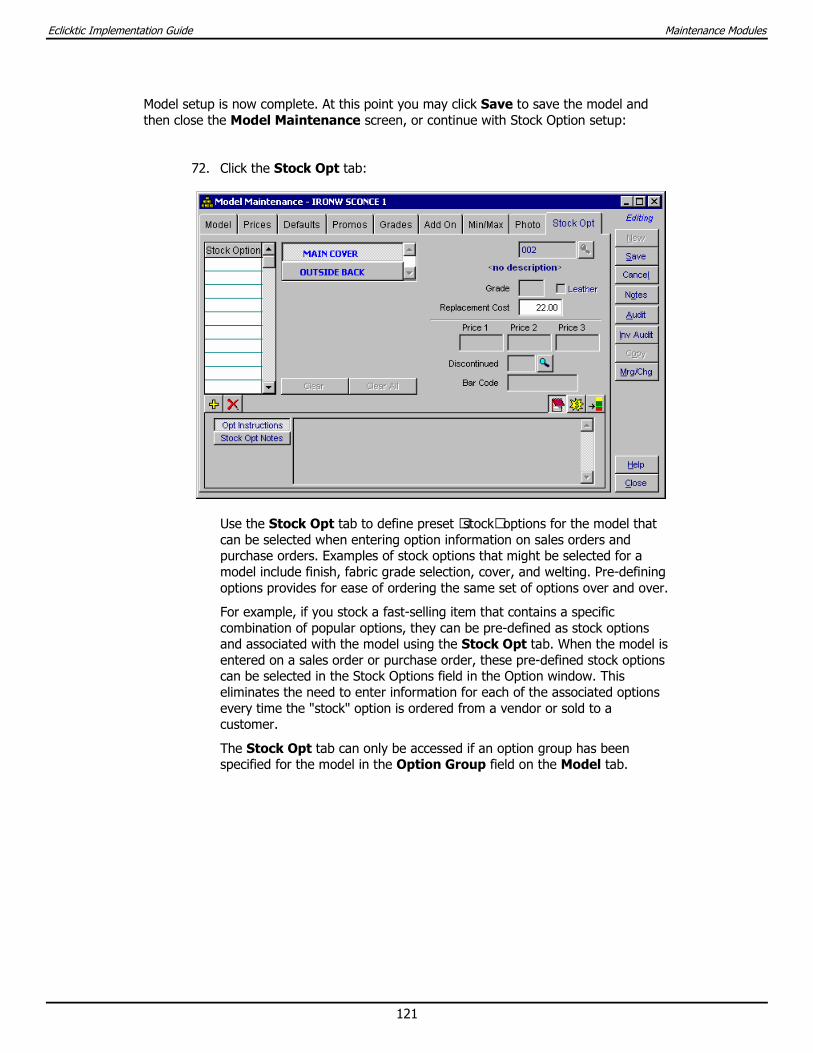
Eclicktic Implementation Guide Maintenance Modules
121
Model setup is now complete. At this point you may click Save to save the model and then close the Model Maintenance screen, or continue with Stock Option setup:
72. Click the Stock Opt tab:
Use the Stock Opt tab to define preset “stock” options for the model that can be selected when entering option information on sales orders and purchase orders. Examples of stock options that might be selected for a model include finish, fabric grade selection, cover, and welting. Pre-defining options provides for ease of ordering the same set of options over and over.
For example, if you stock a fast-selling item that contains a specific combination of popular options, they can be pre-defined as stock options and associated with the model using the Stock Opt tab. When the model is entered on a sales order or purchase order, these pre-defined stock options can be selected in the Stock Options field in the Option window. This eliminates the need to enter information for each of the associated options every time the "stock" option is ordered from a vendor or sold to a customer.
The Stock Opt tab can only be accessed if an option group has been specified for the model in the Option Group field on the Model tab.
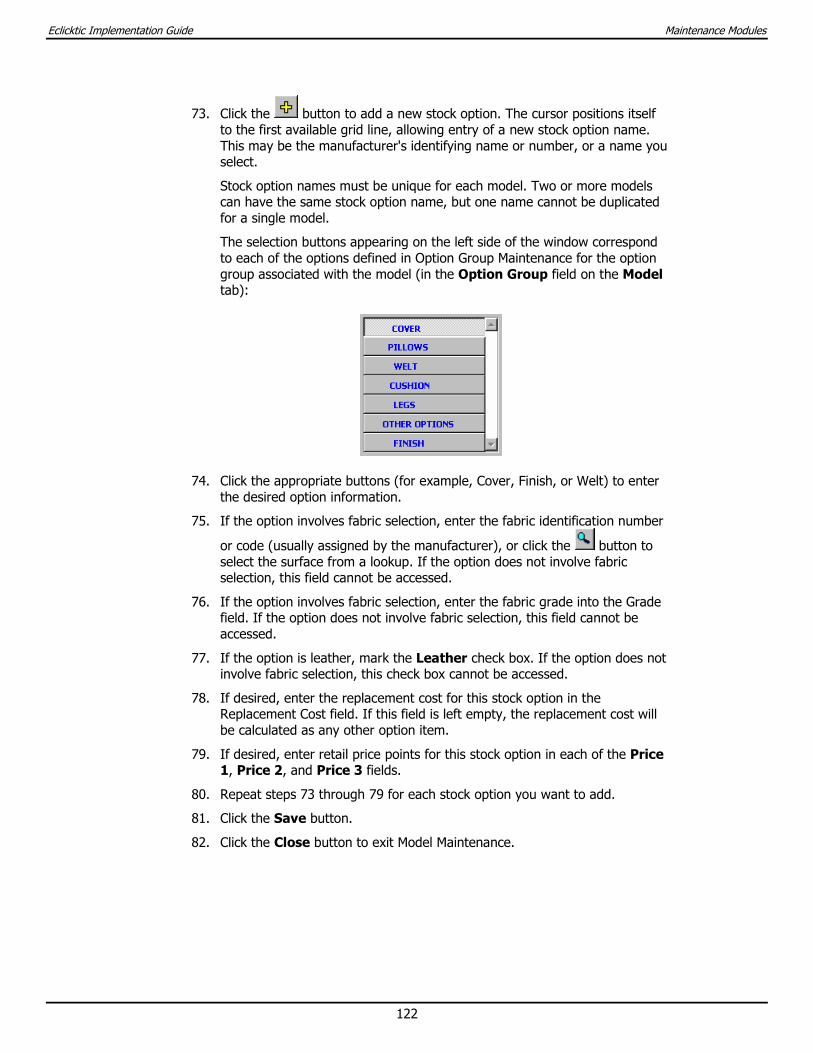
Eclicktic Implementation Guide Maintenance Modules
122
73. Click the button to add a new stock option. The cursor positions itself to the first available grid line, allowing entry of a new stock option name. This may be the manufacturer's identifying name or number, or a name you select.
Stock option names must be unique for each model. Two or more models can have the same stock option name, but one name cannot be duplicated for a single model.
The selection buttons appearing on the left side of the window correspond to each of the options defined in Option Group Maintenance for the option group associated with the model (in the Option Group field on the Model tab):
74. Click the appropriate buttons (for example, Cover, Finish, or Welt) to enter the desired option information.
75. If the option involves fabric selection, enter the fabric identification number
or code (usually assigned by the manufacturer), or click the button to select the surface from a lookup. If the option does not involve fabric selection, this field cannot be accessed.
76. If the option involves fabric selection, enter the fabric grade into the Grade field. If the option does not involve fabric selection, this field cannot be accessed.
77. If the option is leather, mark the Leather check box. If the option does not involve fabric selection, this check box cannot be accessed.
78. If desired, enter the replacement cost for this stock option in the Replacement Cost field. If this field is left empty, the replacement cost will be calculated as any other option item.
79. If desired, enter retail price points for this stock option in each of the Price 1, Price 2, and Price 3 fields.
80. Repeat steps 73 through 79 for each stock option you want to add.
81. Click the Save button.
82. Click the Close button to exit Model Maintenance.

Eclicktic Implementation Guide Maintenance Modules
123
Customer Account Maintenance Use Customer Account Maintenance to enter, edit, or view customer account records. Customer information entered into this window is used extensively in Accounts Receivable and sales order functions (located on the A/R and Sales menus).
To Add a New Customer:
1. From the A/R menu, select Customer Account Maintenance.
The Customer Account Maintenance screen will open:
2. Click the New button.
3. Depending on the setting in the Customer Number field in the Configuration - Sales tab (located on the System menu), the Customer field will display an automatically generated customer code, or it will require manual entry of a customer code. If it requires manual entry, enter up to 10 characters to identify this customer, and then press Enter. A commonly used identifier is the customer’s 10-digit home telephone number.
4. From the Type drop-down list, select Company or Individual.
5. Enter the new customer’s name and address information in the remaining fields on this tab.
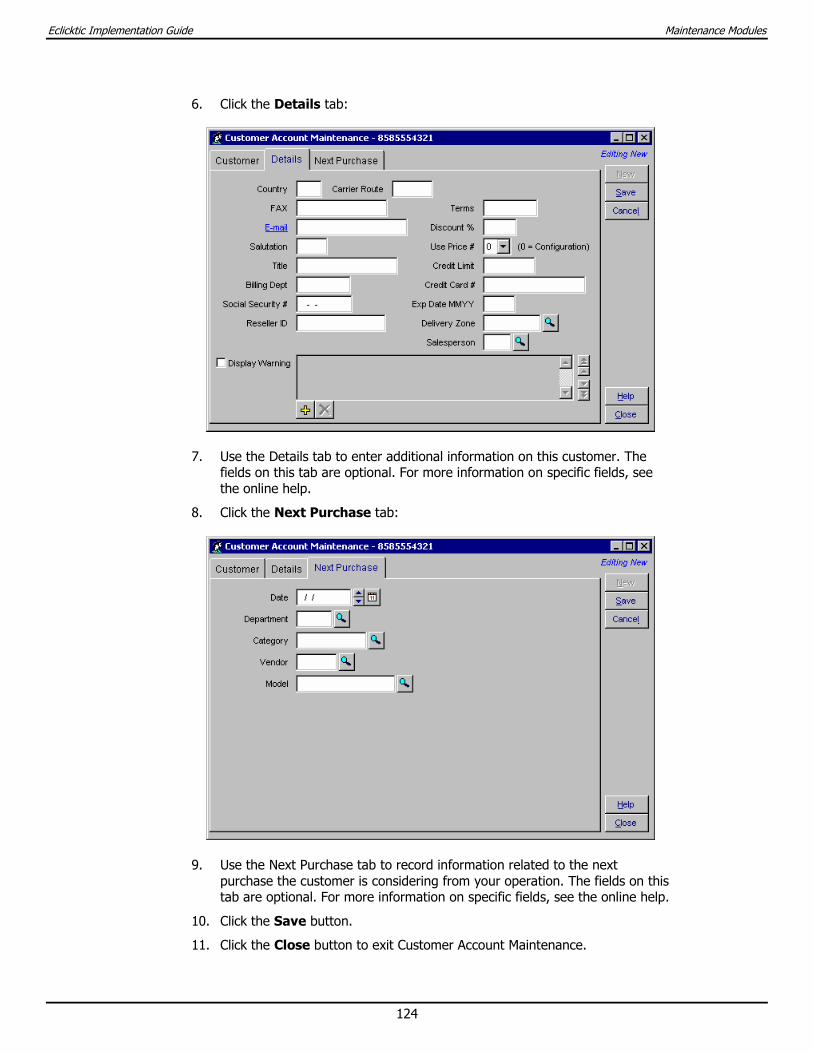
Eclicktic Implementation Guide Maintenance Modules
124
6. Click the Details tab:
7. Use the Details tab to enter additional information on this customer. The fields on this tab are optional. For more information on specific fields, see the online help.
8. Click the Next Purchase tab:
9. Use the Next Purchase tab to record information related to the next purchase the customer is considering from your operation. The fields on this tab are optional. For more information on specific fields, see the online help.
10. Click the Save button.
11. Click the Close button to exit Customer Account Maintenance.
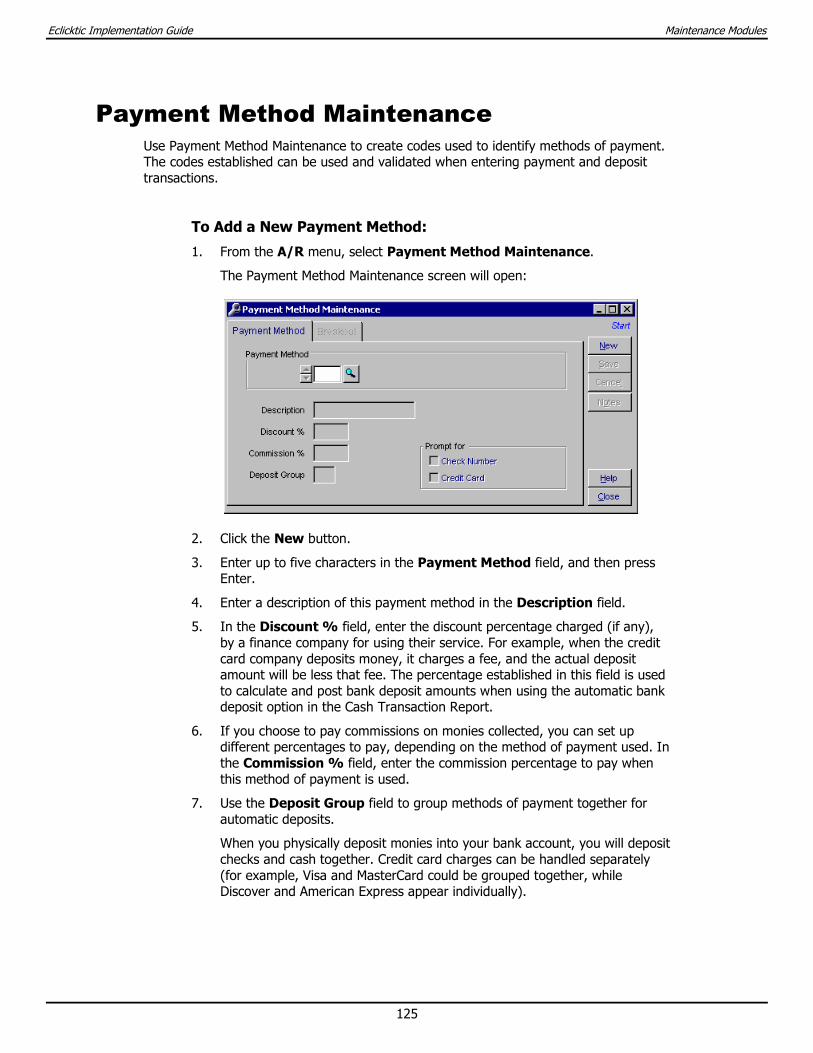
Eclicktic Implementation Guide Maintenance Modules
125
Payment Method Maintenance Use Payment Method Maintenance to create codes used to identify methods of payment. The codes established can be used and validated when entering payment and deposit transactions.
To Add a New Payment Method:
1. From the A/R menu, select Payment Method Maintenance.
The Payment Method Maintenance screen will open:
2. Click the New button.
3. Enter up to five characters in the Payment Method field, and then press Enter.
4. Enter a description of this payment method in the Description field.
5. In the Discount % field, enter the discount percentage charged (if any), by a finance company for using their service. For example, when the credit card company deposits money, it charges a fee, and the actual deposit amount will be less that fee. The percentage established in this field is used to calculate and post bank deposit amounts when using the automatic bank deposit option in the Cash Transaction Report.
6. If you choose to pay commissions on monies collected, you can set up different percentages to pay, depending on the method of payment used. In the Commission % field, enter the commission percentage to pay when this method of payment is used.
7. Use the Deposit Group field to group methods of payment together for automatic deposits.
When you physically deposit monies into your bank account, you will deposit checks and cash together. Credit card charges can be handled separately (for example, Visa and MasterCard could be grouped together, while Discover and American Express appear individually).

Eclicktic Implementation Guide Maintenance Modules
126
For example, Group Code 1 would be assigned to each the following payment method codes:
CK - Check
CS - Cash
F1 - Finance Company 1 Check
F2 - Finance Company 2 Check
Group Code 2 would be assigned to each the following payment method codes:
MC - MasterCard
VS - Visa
Group Code 3 would be assigned to each the following payment method codes:
AX - American Express
Group Code 4 would be assigned to each the following payment method codes:
DS - Discover
8. A Check Number field appears on all payment windows. The Prompt for Check Number check box designates if individual check numbers can be entered and viewed in the Check Number field for each payment or deposit when using this payment method code.
9. If you are using a Point of Sale keyboard with a credit card swiping feature, the Prompt for Credit Card check box designates if credit card processing is being used for this payment method code.
Note: To enable credit card processing, the IC Verify third-party software package must be loaded, and the Use IC Verify check box must be selected in the Configuration - IC Verify tab, located on the System menu.
10. Click the Breakout tab:
Eclicktic Implementation Guide Maintenance Modules
127
Use the Payment Method Maintenance Breakout tab to enter bank account breakouts and G/L account distribution information used when using the automatic bank deposits feature in the Cash Transaction Report, located on the Balancing menu.
Note: The Cash Transaction Report makes one lump sum deposit for payment methods that contain the same bank account number. If your bank statement breaks down deposits for each method of payment, it will be difficult to reconcile these lump sum deposits. If this is the case, you must continue using the Banking Register to enter bank deposits.
11. Click the button to add a new line item.
12. In the Store field, enter the store code to which this specific G/L account mapping applies when using the Bank Register or making deposits using the Cash Transaction Report. Multi-store locations will establish mappings for each store location.
13. In the Bank field, enter the name of the bank to which the G/L mapping applies.
14. In the A/R Acct and A/R Sub fields, enter the Accounts Receivable G/L account number that is credited when an automatic deposit is made for the store into the specified bank.
or Right-click in the A/R Acct field to select the account from a lookup.
15. When the credit card company deposits money, it usually charges a discount fee and the actual deposit amount will be less the fee. The percentage established in the Discount % field in the Payment Method tab is used to calculate and post bank deposit amounts when using the automatic bank deposit option in the Cash Report.
The Disc Acct and Disc Sub fields are used to enter your General Ledger Discount account number. These fields are optional.
16. Click the Save button.
17. Click the Close button to exit Payment Method Maintenance.

Eclicktic Implementation Guide Maintenance Modules
128
Bank Account Maintenance Use the Bank Account Maintenance window to enter, update, or review bank account codes. A bank account code must be established for each bank account through which you process business transactions and wish to track in Eclicktic. This allows additional security so that when checks are printing or other bank transactions are being entered, they are posted to the correct bank account.
Even if you maintain a business relationship with only one bank, a separate bank account code must be defined for each individual account (checking, savings, money market). The bank account code is used to reference any transactions that affect that an account. This allows reconciliation of each individual account with your bank statements.
To Add a New Bank Account:
1. From the Banking menu, select Bank Account Maintenance.
The Bank Account Maintenance screen will open:
2. Click the New button.
3. Enter up to 20 characters in the Account field, and then press Enter.
Note: It is recommended that you keep the code simple, using a minimum number of characters (three to five is usually best). The name of the bank (as entered into the Bank Name field in step 2) appears along with the bank code number in other windows and reports, so there is no need to create a lengthy bank account code. Create the accounts in the order in which you want them to appear in Bank Account Lookup.
4. Enter the name of the bank in the Bank Name field.
5. In the Default Account fields, enter the default G/L account and sub-account number for the Cash asset account used throughout Eclicktic for posting of cash journals created from transactions (for example, bank deposits or A/P checks) entered for this bank account code. Establishing a default Cash G/L account for the banking account relieves the need to enter a Cash G/L account every time the bank account code is used in Eclicktic.
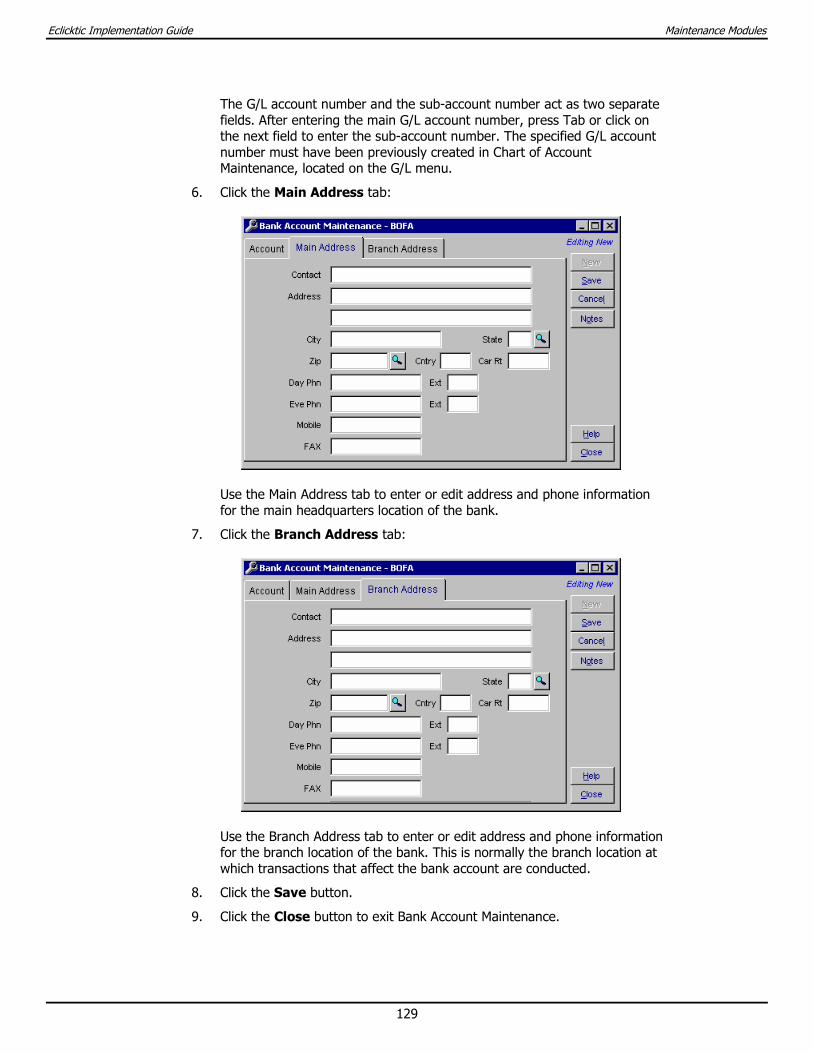
Eclicktic Implementation Guide Maintenance Modules
129
The G/L account number and the sub-account number act as two separate fields. After entering the main G/L account number, press Tab or click on the next field to enter the sub-account number. The specified G/L account number must have been previously created in Chart of Account Maintenance, located on the G/L menu.
6. Click the Main Address tab:
Use the Main Address tab to enter or edit address and phone information for the main headquarters location of the bank.
7. Click the Branch Address tab:
Use the Branch Address tab to enter or edit address and phone information for the branch location of the bank. This is normally the branch location at which transactions that affect the bank account are conducted.
8. Click the Save button.
9. Click the Close button to exit Bank Account Maintenance.

Eclicktic Implementation Guide Maintenance Modules
130
Accounting Period Maintenance Use Accounting Period Maintenance to create, edit or view the accounting periods for a specified fiscal year. Fiscal years can be defined at any point within the year to accommodate mid-year accounting conversion. Up to 13 non-overlapping periods can be defined for a fiscal year. Accounting Period Maintenance is a prerequisite to use of the General Ledger and accounting modules.
To Add New Accounting Periods:
1. From the G/L menu, select Accounting Period Maintenance.
The Accounting Period Maintenance screen will open:
2. Click the New button.
3. Various windows and reports in Eclicktic prompt for entry of the fiscal year code whenever you are posting information to the General Ledger. In the Fiscal Year field, enter up to a five-character alphanumeric code to designate the fiscal year, and then press Enter.
The fiscal year code should be easy to remember and reflect your actual fiscal year. For example, FY05, 2005 or 05 could be used to identify Fiscal Year 2005. If the fiscal year spans two calendar years, codes such as 04/05 can also be used.
4. In the Description field, enter an easily identifiable description of the fiscal year (for example, Fiscal Year 2005). This description displays for verification purposes when the fiscal year code is entered into accounting windows or reports in Eclicktic. This is particularly helpful if a somewhat cryptic fiscal year code is being used that is not easily identifiable.
5. In the Periods field, enter the number of accounting periods within this fiscal year. Up to 13 periods can be entered.

Eclicktic Implementation Guide Maintenance Modules
131
6. In the Start Date and End Date fields, enter the beginning and ending
dates for this fiscal year, or click the buttons to select the dates from a calendar.
7. In the Closed Date field, enter the date on which accounting is closed for the fiscal year. Only users with Administrator privileges can enter a closing date for a fiscal year.
8. Click the Periods tab:
Use the Periods tab to enter start dates for each accounting period in the specified fiscal year.
9. Click the Set Defaults button to automatically calculate the start/ending dates of each accounting period, based on the start/end dates specified on the Fiscal Year tab. Optionally, the start date for each accounting period may be entered manually in the Start Date column.
10. Click the Save button.
11. Click the Close button to exit Accounting Period Maintenance.

Eclicktic Implementation Guide Maintenance Modules
132
Budget Maintenance Use Budget Maintenance to establish budgetary amounts for individual G/L accounts and accounting periods within a specified fiscal year. Budget amounts can be entered for any or all accounting periods within the specified fiscal year.
To Add or Edit Budget Amounts:
1. From the G/L menu, select Budget Maintenance.
The Budget Maintenance screen will open:
2. In the Fiscal Year field, enter the fiscal year code, or click the button to select it from a lookup.
3. In the Account field, enter the main G/L account and sub-account
numbers, or click the button to select the account from a lookup. The specified account number must have been defined in Chart of Accounts Maintenance.
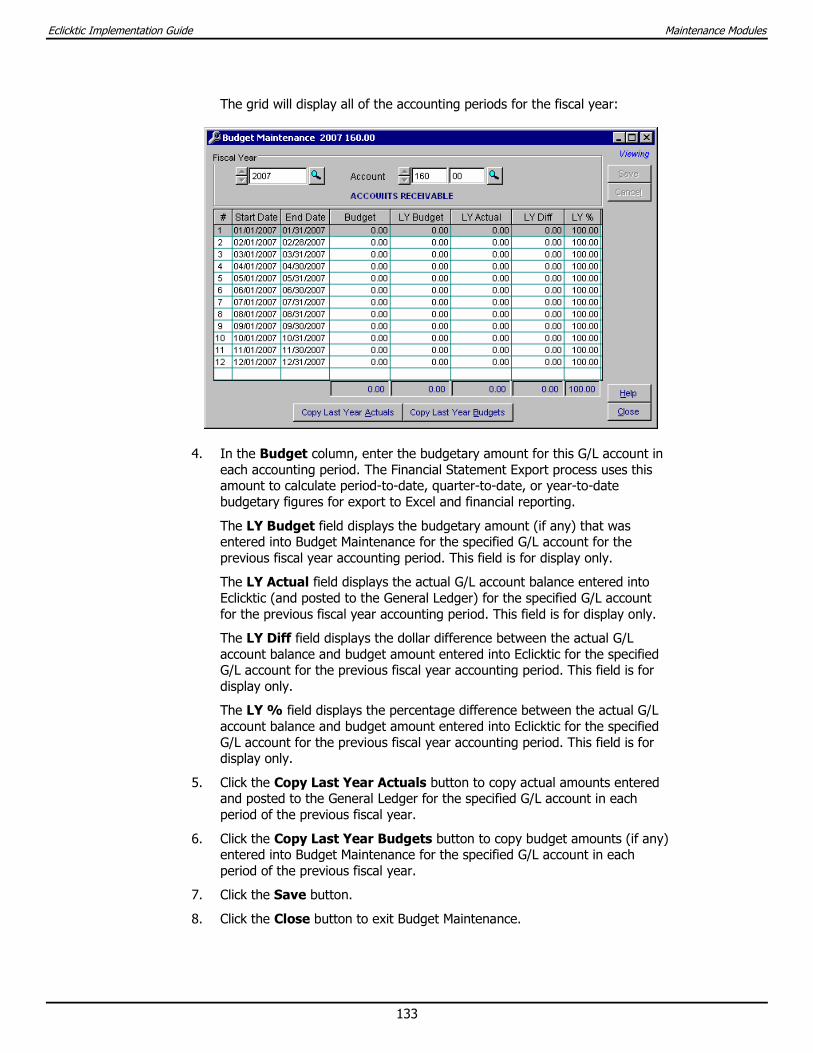
Eclicktic Implementation Guide Maintenance Modules
133
The grid will display all of the accounting periods for the fiscal year:
4. In the Budget column, enter the budgetary amount for this G/L account in each accounting period. The Financial Statement Export process uses this amount to calculate period-to-date, quarter-to-date, or year-to-date budgetary figures for export to Excel and financial reporting.
The LY Budget field displays the budgetary amount (if any) that was entered into Budget Maintenance for the specified G/L account for the previous fiscal year accounting period. This field is for display only.
The LY Actual field displays the actual G/L account balance entered into Eclicktic (and posted to the General Ledger) for the specified G/L account for the previous fiscal year accounting period. This field is for display only.
The LY Diff field displays the dollar difference between the actual G/L account balance and budget amount entered into Eclicktic for the specified G/L account for the previous fiscal year accounting period. This field is for display only.
The LY % field displays the percentage difference between the actual G/L account balance and budget amount entered into Eclicktic for the specified G/L account for the previous fiscal year accounting period. This field is for display only.
5. Click the Copy Last Year Actuals button to copy actual amounts entered and posted to the General Ledger for the specified G/L account in each period of the previous fiscal year.
6. Click the Copy Last Year Budgets button to copy budget amounts (if any) entered into Budget Maintenance for the specified G/L account in each period of the previous fiscal year.
7. Click the Save button.
8. Click the Close button to exit Budget Maintenance.
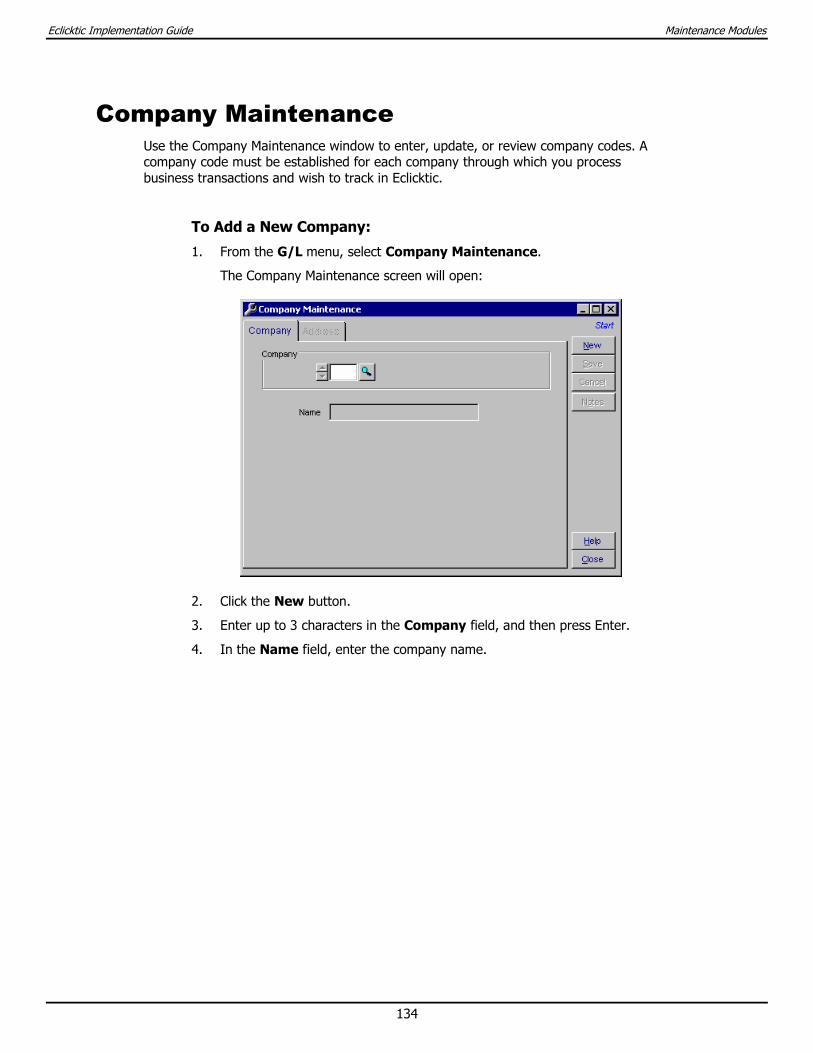
Eclicktic Implementation Guide Maintenance Modules
134
Company Maintenance Use the Company Maintenance window to enter, update, or review company codes. A company code must be established for each company through which you process business transactions and wish to track in Eclicktic.
To Add a New Company:
1. From the G/L menu, select Company Maintenance.
The Company Maintenance screen will open:
2. Click the New button.
3. Enter up to 3 characters in the Company field, and then press Enter.
4. In the Name field, enter the company name.
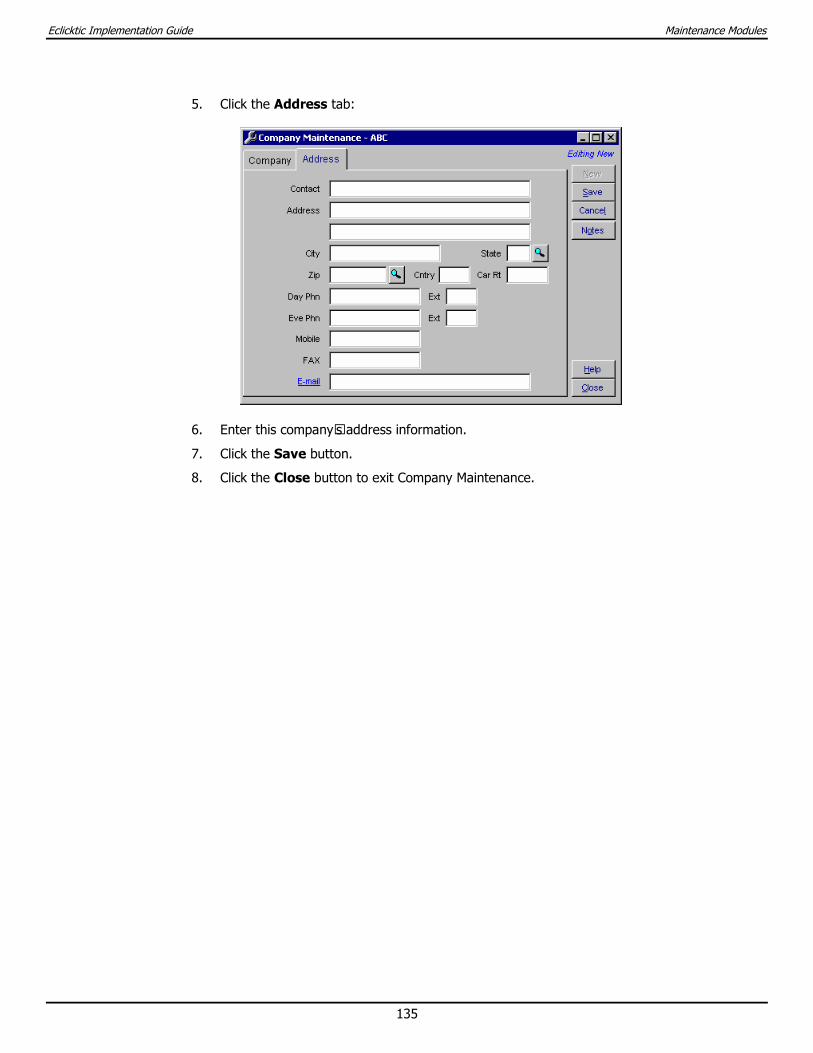
Eclicktic Implementation Guide Maintenance Modules
135
5. Click the Address tab:
6. Enter this company’s address information.
7. Click the Save button.
8. Click the Close button to exit Company Maintenance.

Eclicktic Implementation Guide Maintenance Modules
136
Recurring JE Maintenance Use Recurring JE Maintenance to define "templates" for recurring journal entries such as monthly loan interest reclassifications, depreciation expense allocations, and payroll. Each template contains the G/L account numbers and debit/credit indicators for the journal entry.
Once defined, these recurring templates can then be used in Journal Entry to automate the posting of these types of journals. Debit/credit amounts must still be entered into Journal Entry, but using the template automates entry of the actual G/L account numbers.
To Add a New Recurring Journal Entry:
1. From the G/L menu, select Recurring JE Maintenance.
The Recurring Journal Entry Maintenance screen will open:
2. Click the New button.
3. Enter up to 10 characters in the Recurring JE field.
4. In the Description field, enter a description of the recurring journal entry (for example, Interest Reclassification, Depreciation, Payroll).
5. Click the button to add a new line item.
6. Enter the G/L account number in the Acct field, and the sub-account number in the Sub field, or right-click in the Acct field to select an account from a lookup.
7. In the D/C field, specify if this a recurring journal entry line that requires entry of a debit or credit amount in Journal Entry.
When a valid G/L account number has been entered and debit or credit selected, the account description will display in the Name field.
8. Repeat steps 5 through 7 for each line item desired.
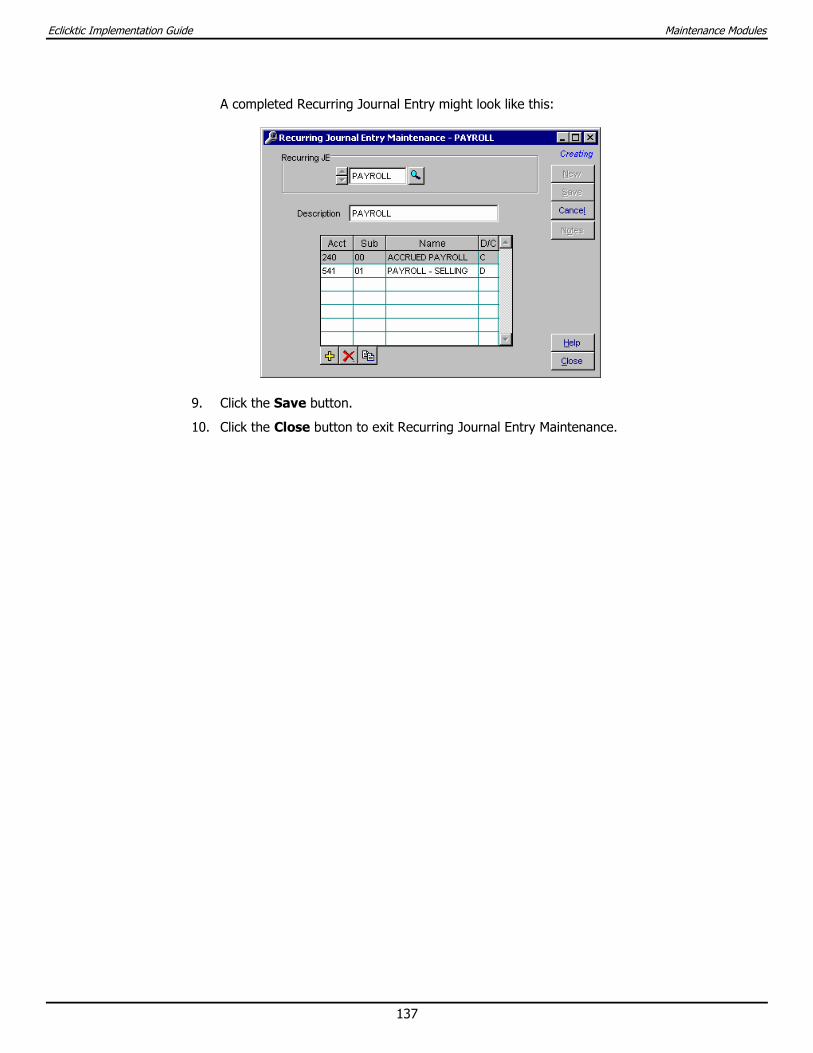
Eclicktic Implementation Guide Maintenance Modules
137
A completed Recurring Journal Entry might look like this:
9. Click the Save button.
10. Click the Close button to exit Recurring Journal Entry Maintenance.
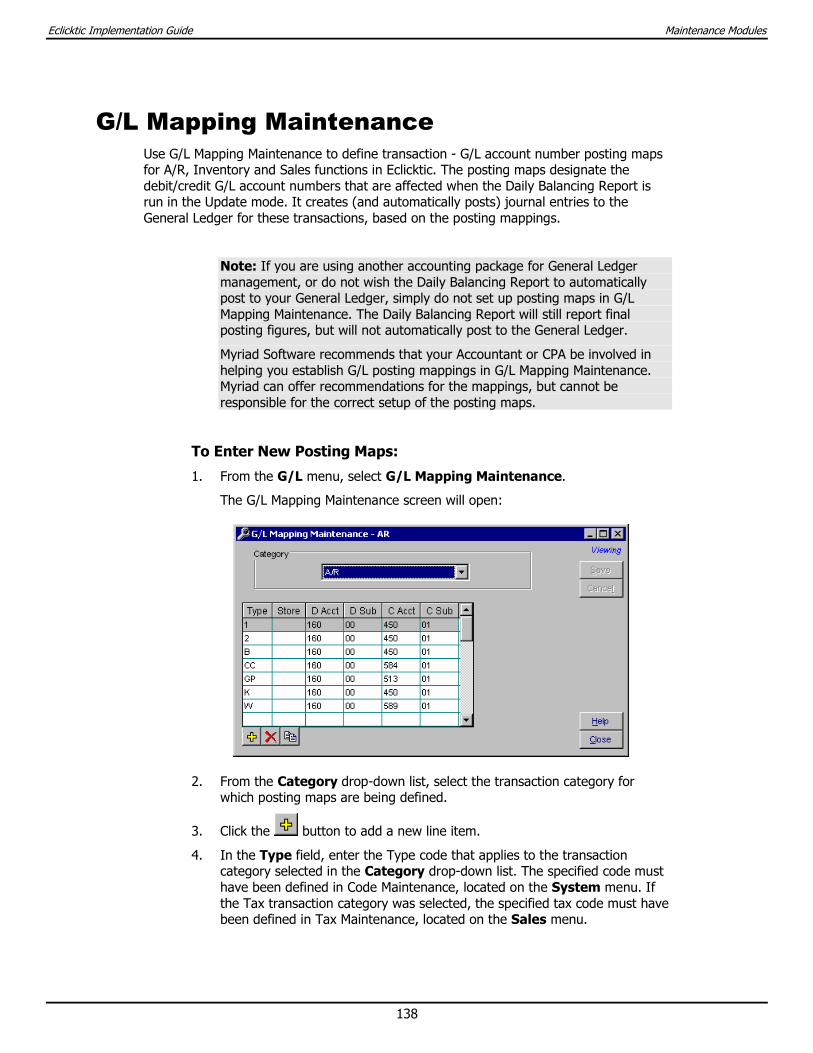
Eclicktic Implementation Guide Maintenance Modules
138
G/L Mapping Maintenance Use G/L Mapping Maintenance to define transaction - G/L account number posting maps for A/R, Inventory and Sales functions in Eclicktic. The posting maps designate the debit/credit G/L account numbers that are affected when the Daily Balancing Report is run in the Update mode. It creates (and automatically posts) journal entries to the General Ledger for these transactions, based on the posting mappings.
Note: If you are using another accounting package for General Ledger management, or do not wish the Daily Balancing Report to automatically post to your General Ledger, simply do not set up posting maps in G/L Mapping Maintenance. The Daily Balancing Report will still report final posting figures, but will not automatically post to the General Ledger.
Myriad Software recommends that your Accountant or CPA be involved in helping you establish G/L posting mappings in G/L Mapping Maintenance. Myriad can offer recommendations for the mappings, but cannot be responsible for the correct setup of the posting maps.
To Enter New Posting Maps:
1. From the G/L menu, select G/L Mapping Maintenance.
The G/L Mapping Maintenance screen will open:
2. From the Category drop-down list, select the transaction category for which posting maps are being defined.
3. Click the button to add a new line item.
4. In the Type field, enter the Type code that applies to the transaction category selected in the Category drop-down list. The specified code must have been defined in Code Maintenance, located on the System menu. If the Tax transaction category was selected, the specified tax code must have been defined in Tax Maintenance, located on the Sales menu.
Eclicktic Implementation Guide Maintenance Modules
139
Press the F2 key to access Code Lookup or Tax Lookup to select a valid Type code for the selected transaction category.
5. If posting the specified transaction by store, enter the Store code for which it is being posted, or press the F2 key to select it from a lookup.
If transactions are being posted by store, a separate Chart of Accounts number would be defined and maintained for each individual store. For example, if your Sales account number is 4000, Chart of Account numbers would be set up as 4000.01 for sales in Store #1, 4000.02 for sales in Store #2, etc.
6. In the D Acct field, enter the debit G/L account number for this transaction, or press the F2 key to select it from the Chart of Accounts Lookup. This lookup will contain a list of account numbers previously defined in Chart of Accounts Maintenance.
Eclicktic Implementation Guide Maintenance Modules
140
Store/Location Maintenance This program is used to designate stores, buildings, or locations that will be used to sell merchandise and/or where inventory will be kept. Typically you will have at least one store/building number for your showroom and warehouse location if they are all in one building. If your warehouse is not attached to your showroom, you will also want to have a unique number for your warehouse. If you have more than one showroom location or warehouse, you will probably want a unique number for each building.
This store/location number will be used to track sales by store, or inventory by store/location.
Eclicktic will also give you the ability to track over 3,000 individual locations within a store/building. Typically this locator logic would be used to identify different areas of a building for ease of knowing where the merchandise physically is or where it was sold.
Usually showrooms are small enough that one store/location number for the warehouse and one location for all showroom inventory is assigned. This should not give you too much trouble when looking for a specific piece of merchandise if it is within a small enough area.
Warehouses may be broken up into several different locations so that merchandise is easily identified as being in the front, back, sides, or mezzanine areas of a warehouse. You may also have merchandise that is stored in a bulk area location. It may be helpful to define each of these areas as a unique alphanumeric location. When an item is shown to be in one of these specific areas of your warehouse, it is easily located without having to wander the entire building.
Since most large warehouses are “racked”, it is important to plan the specific bin location numbers.
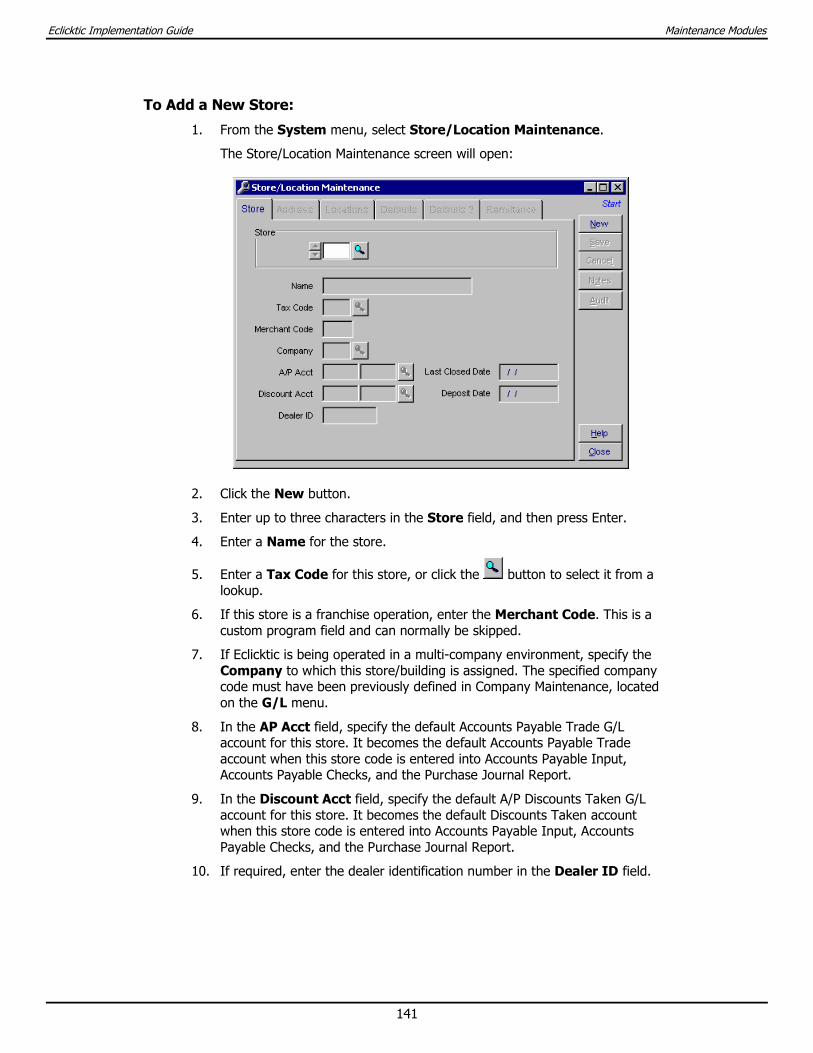
Eclicktic Implementation Guide Maintenance Modules
141
To Add a New Store:
1. From the System menu, select Store/Location Maintenance.
The Store/Location Maintenance screen will open:
2. Click the New button.
3. Enter up to three characters in the Store field, and then press Enter.
4. Enter a Name for the store.
5. Enter a Tax Code for this store, or click the button to select it from a lookup.
6. If this store is a franchise operation, enter the Merchant Code. This is a custom program field and can normally be skipped.
7. If Eclicktic is being operated in a multi-company environment, specify the Company to which this store/building is assigned. The specified company code must have been previously defined in Company Maintenance, located on the G/L menu.
8. In the AP Acct field, specify the default Accounts Payable Trade G/L account for this store. It becomes the default Accounts Payable Trade account when this store code is entered into Accounts Payable Input, Accounts Payable Checks, and the Purchase Journal Report.
9. In the Discount Acct field, specify the default A/P Discounts Taken G/L account for this store. It becomes the default Discounts Taken account when this store code is entered into Accounts Payable Input, Accounts Payable Checks, and the Purchase Journal Report.
10. If required, enter the dealer identification number in the Dealer ID field.
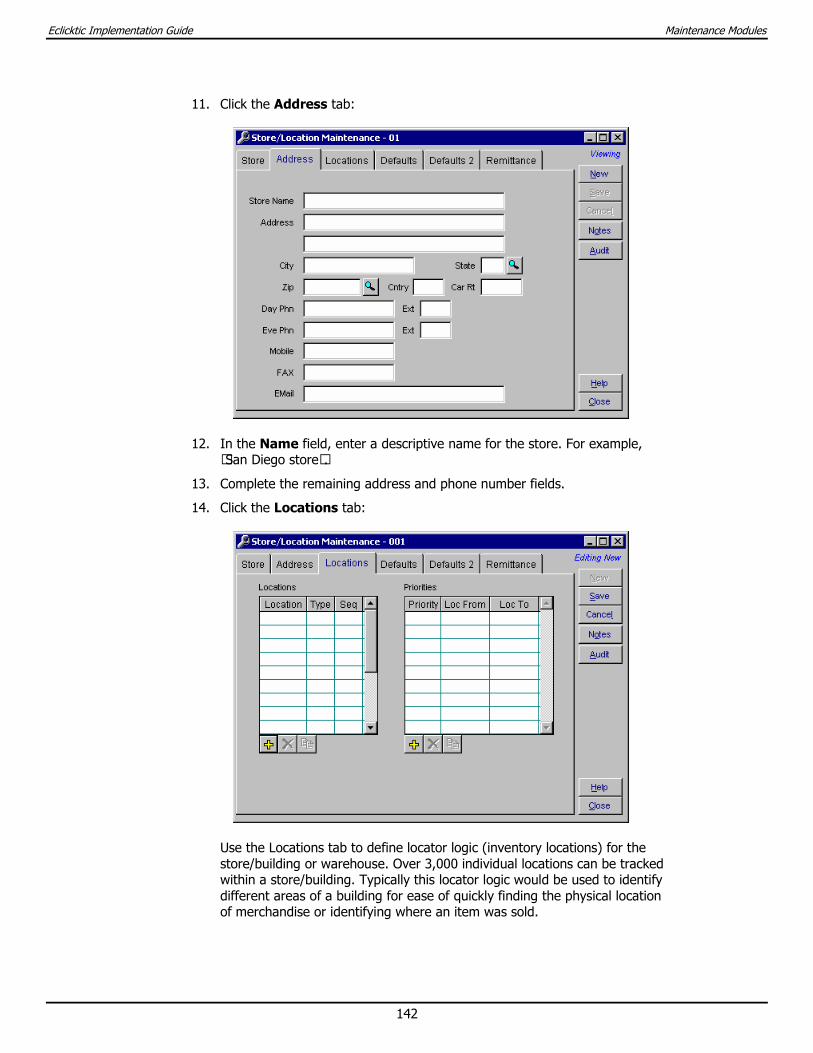
Eclicktic Implementation Guide Maintenance Modules
142
11. Click the Address tab:
12. In the Name field, enter a descriptive name for the store. For example, “San Diego store”.
13. Complete the remaining address and phone number fields.
14. Click the Locations tab:
Use the Locations tab to define locator logic (inventory locations) for the store/building or warehouse. Over 3,000 individual locations can be tracked within a store/building. Typically this locator logic would be used to identify different areas of a building for ease of quickly finding the physical location of merchandise or identifying where an item was sold.
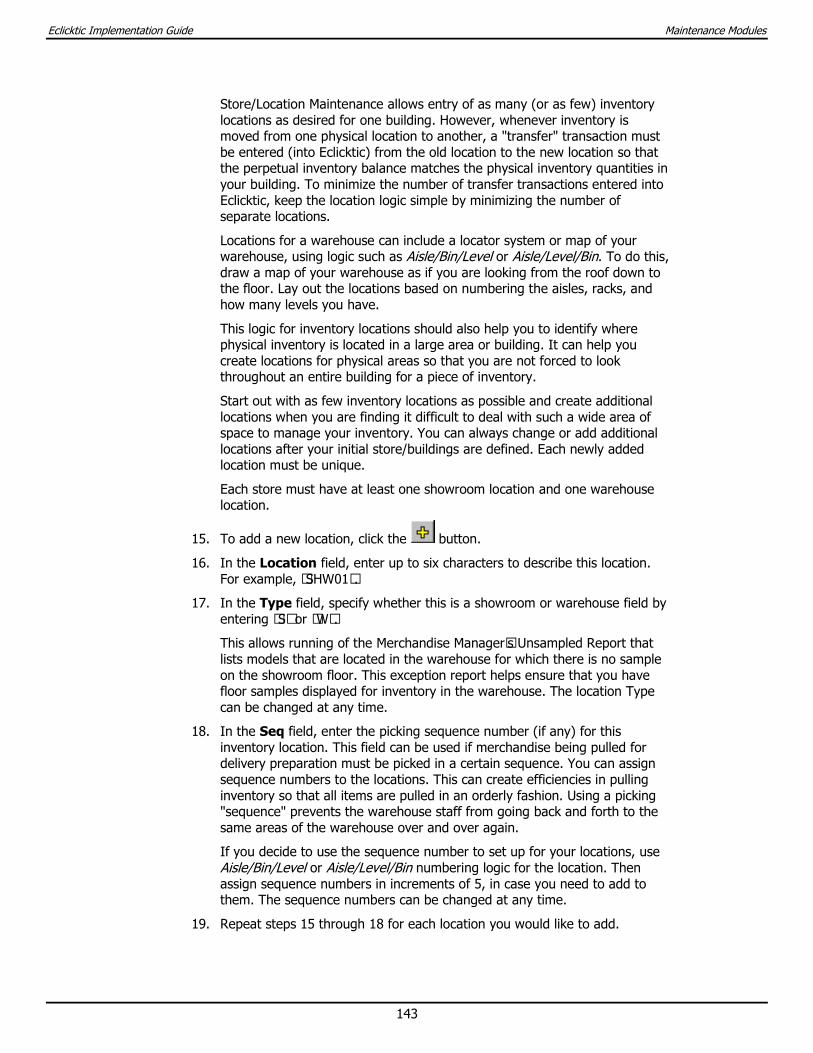
Eclicktic Implementation Guide Maintenance Modules
143
Store/Location Maintenance allows entry of as many (or as few) inventory locations as desired for one building. However, whenever inventory is moved from one physical location to another, a "transfer" transaction must be entered (into Eclicktic) from the old location to the new location so that the perpetual inventory balance matches the physical inventory quantities in your building. To minimize the number of transfer transactions entered into Eclicktic, keep the location logic simple by minimizing the number of separate locations.
Locations for a warehouse can include a locator system or map of your warehouse, using logic such as Aisle/Bin/Level or Aisle/Level/Bin. To do this, draw a map of your warehouse as if you are looking from the roof down to the floor. Lay out the locations based on numbering the aisles, racks, and how many levels you have.
This logic for inventory locations should also help you to identify where physical inventory is located in a large area or building. It can help you create locations for physical areas so that you are not forced to look throughout an entire building for a piece of inventory.
Start out with as few inventory locations as possible and create additional locations when you are finding it difficult to deal with such a wide area of space to manage your inventory. You can always change or add additional locations after your initial store/buildings are defined. Each newly added location must be unique.
Each store must have at least one showroom location and one warehouse location.
15. To add a new location, click the button.
16. In the Location field, enter up to six characters to describe this location. For example, “SHW01”.
17. In the Type field, specify whether this is a showroom or warehouse field by entering “S” or “W”.
This allows running of the Merchandise Manager’s Unsampled Report that lists models that are located in the warehouse for which there is no sample on the showroom floor. This exception report helps ensure that you have floor samples displayed for inventory in the warehouse. The location Type can be changed at any time.
18. In the Seq field, enter the picking sequence number (if any) for this inventory location. This field can be used if merchandise being pulled for delivery preparation must be picked in a certain sequence. You can assign sequence numbers to the locations. This can create efficiencies in pulling inventory so that all items are pulled in an orderly fashion. Using a picking "sequence" prevents the warehouse staff from going back and forth to the same areas of the warehouse over and over again.
If you decide to use the sequence number to set up for your locations, use Aisle/Bin/Level or Aisle/Level/Bin numbering logic for the location. Then assign sequence numbers in increments of 5, in case you need to add to them. The sequence numbers can be changed at any time.
19. Repeat steps 15 through 18 for each location you would like to add.
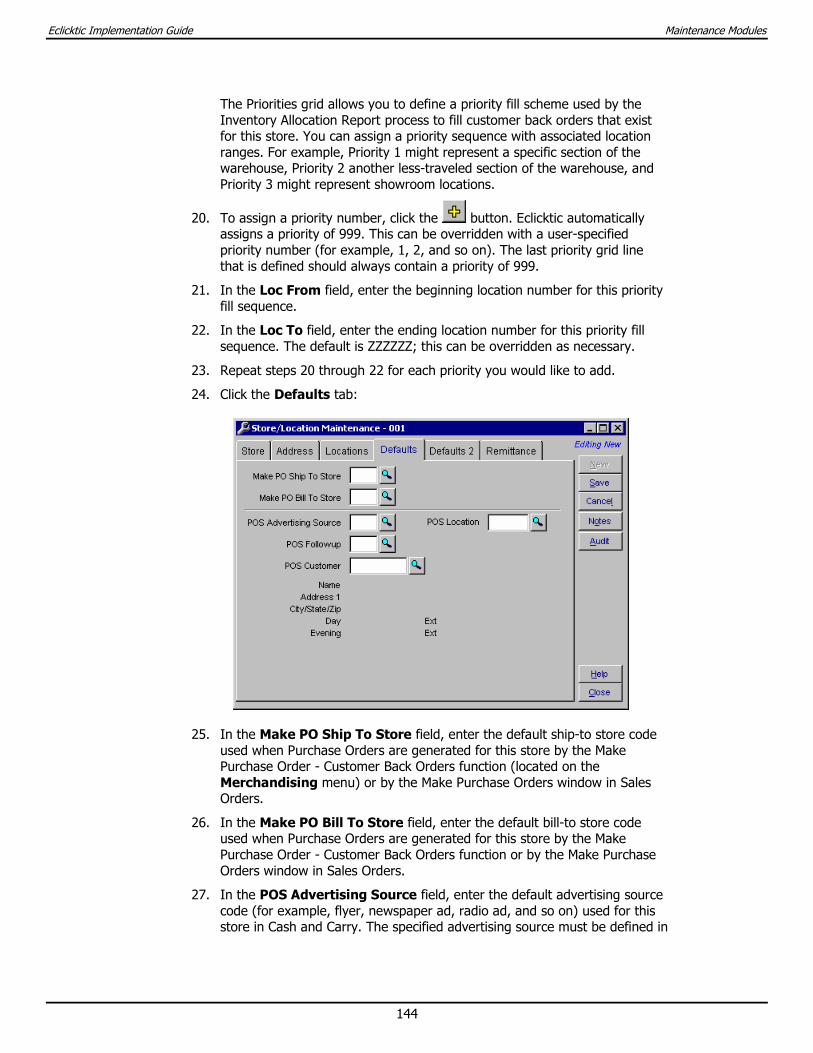
Eclicktic Implementation Guide Maintenance Modules
144
The Priorities grid allows you to define a priority fill scheme used by the Inventory Allocation Report process to fill customer back orders that exist for this store. You can assign a priority sequence with associated location ranges. For example, Priority 1 might represent a specific section of the warehouse, Priority 2 another less-traveled section of the warehouse, and Priority 3 might represent showroom locations.
20. To assign a priority number, click the button. Eclicktic automatically assigns a priority of 999. This can be overridden with a user-specified priority number (for example, 1, 2, and so on). The last priority grid line that is defined should always contain a priority of 999.
21. In the Loc From field, enter the beginning location number for this priority fill sequence.
22. In the Loc To field, enter the ending location number for this priority fill sequence. The default is ZZZZZZ; this can be overridden as necessary.
23. Repeat steps 20 through 22 for each priority you would like to add.
24. Click the Defaults tab:
25. In the Make PO Ship To Store field, enter the default ship-to store code used when Purchase Orders are generated for this store by the Make Purchase Order - Customer Back Orders function (located on the Merchandising menu) or by the Make Purchase Orders window in Sales Orders.
26. In the Make PO Bill To Store field, enter the default bill-to store code used when Purchase Orders are generated for this store by the Make Purchase Order - Customer Back Orders function or by the Make Purchase Orders window in Sales Orders.
27. In the POS Advertising Source field, enter the default advertising source code (for example, flyer, newspaper ad, radio ad, and so on) used for this store in Cash and Carry. The specified advertising source must be defined in
Eclicktic Implementation Guide Maintenance Modules
145
the Advertising Code Category in Code Maintenance, located on the System menu.
28. In the POS Followup field, enter the default followup code used for this store in Cash and Carry. The followup code designates the type of followup action (for example, mailer or phone call) that should be performed on an order. The assigned followup code is used to include (or exclude) customer accounts or sales orders on the Customer Account Report, Customer Mailing Labels, and the Sales Order Report. The specified followup code must be defined in the Follow Up Code Category in Code Maintenance.
29. In the POS Customer field, enter the default bill-to customer code for cash and carry sales transactions entered for this store into Cash and Carry. To create or edit a customer account record, use Customer Account Maintenance, located on the A/R menu.
30. In the POS Location field, enter the default location code that is displayed when a new line item is entered into Cash and Carry in this store. The default location can be overridden for specific Cash and Carry line items.
31. Click the Defaults 2 tab:
32. In the Delivery Location field, enter the default location used when generating pending transfer records to move sales order-reserved merchandise to this store for customer delivery.
Most customer deliveries take place out of a warehouse, but can also occur directly from a store. Therefore, the Delivery Location field would be set up only if the delivery occurs directly from a store and automated pending transfers are being used to move merchandise directly to the store's delivery location. It would typically be set up if there is one specific location to which all goods are automatically transferred in preparation for delivery to customers. For example, if deliveries occur directly from Store 01, the default delivery location might be 01DOCK.
33. In the Pickup Location field, enter the default location used when automatically generating pending transfer records to move sales order-
Eclicktic Implementation Guide Maintenance Modules
146
reserved merchandise to this store for customer pickup. For example, if deliveries occur from Store 01, the default delivery location might be 01PICK.
34. In the Staging Location field, enter the staging location (if any) to which merchandise should be located when automatically generating pending transfer records to temporarily move sales order-reserved merchandise to this store.
A default staging location would be used primarily when merchandise is sold out of one store and must be temporarily moved to an intermediate stop prior to shipment to the actual pickup or delivery store. As a result, the staging location for a given store would typically be in a building outside of the actual store being defined.
35. In the SO Deliver From Store field, enter the default store for the Deliver From Store field on the Details tab of the Sales Order.
36. In the Service Customer field, enter the default Bill To Customer for Service Orders.
37. Click the Remittance tab:
38. In the Remit To field, enter the remit-to name that prints on installment coupons.
39. Complete the remaining address fields.
40. Click the Save button.
41. Click the Close button to exit Store/Location Maintenance.
Eclicktic Implementation Guide Maintenance Modules
147
User Maintenance and Security Each person using Eclicktic must log in with a valid user name and password. Use the User Maintenance window to create new, or modify existing, user profile records that contain valid user names and passwords. These records control access to Eclicktic, set security access for specific windows/actions and store preferences for each user.
Security should be given careful consideration. Users should be granted no more access than is necessary to perform their duties, with additional rights granted when the need arises. Plan ahead, grouping users according to function and responsibilities, and see the Template Users section for instructions on quickly generating similar users.
To Add a New User:
1. From the System menu, select User Maintenance.
The User Maintenance screen will open:
2. Click the New button.
3. In the User field, enter a User ID. This should be a brief, unique name for each user (for example, the user's initials).
4. In the Full Name field, enter the user’s name.
5. In the Password field, enter the user’s password.
Eclicktic Implementation Guide Maintenance Modules
148
6. Click the Security tab:
7. To quickly grant access to all windows in Eclicktic (including User Maintenance), click the All button. You might then selectively uncheck items to remove access to individual windows.
or Check only those items that this user will need to access.
8. For each window or report in Eclicktic, rights privileges can also be granted that identify the type of actions that can be performed by the user in that window. To do so, highlight the window name in the list, then check the appropriate Add, Edit, Delete, Print, Void, or Finalize boxes.
9. In the Count field, enter the number of times this window can be open at one time for this user. For example, if 3 is entered for Sales Orders, this user may then open up to three occurrences of the Sales Orders window at one time. This field is set to 1 for report screens and cannot be changed.
10. Click the Security 2 tab:
11. Use the Security 2 tab to grant or deny access to cost, spiff, commission, sales, and discount information in Eclicktic. For more information on the individual check boxes on this tab, see the User Maintenance topic in the online help.
Eclicktic Implementation Guide Maintenance Modules
149
12. Click the Colors tab:
Myriad Software delivers Eclicktic with a standard default color scheme. Rather than using this or the standard color scheme defined in Windows, the Colors tab can be used to customize the Eclicktic work environment for the currently selected user. This may be done to choose a color scheme that they prefer, or that works better on their particular monitor.
13. To change a color, click on the colored box to the left of the description. The Color dialog box will appear:
14. Click the desired color, and then click the OK button.
15. Repeat steps 13 and 14 for each area of color you want to change.
Eclicktic Implementation Guide Maintenance Modules
150
16. Click the System tab:
17. The Lock Out check box is used if it is necessary to temporarily prevent this user from logging into Eclicktic.
18. From the Access Level drop-down list, select the type of access allowed for this user in Eclicktic. The default comes from the Default User Level field in the Configuration - Administration tab, and can be overridden for this user. Select one of the following:
• No Access - No access is allowed to Eclicktic. This might be used if the user is terminated, to prevent further logging on to Eclicktic.
• User - Allows access to non-administrative functions.
• Administrator - Allows access to all functions. Administrator-only functions include the Eclicktic upgrade program and the Eclicktic Queue.
19. In the Maximum Logins field, enter the number of concurrent times this user may log into Eclicktic. Although only one copy of Eclicktic may run on an individual workstation, the same user may log in at another workstation at the same time if this setting is greater than 1. The default comes from the Default Maximum User Logins field in the Configuration - Administration tab and can be overridden for each user.
20. Tooltips are the small text boxes that appear when the user momentarily pauses with the pointer over a toolbar button, displaying the name or function of that button. Mark the Show Tooltips check box to enable this feature.
Eclicktic Implementation Guide Maintenance Modules
151
21. Each time a user logs on to Eclicktic, a Tip of the Day may be displayed:
Mark the Show Tip of the Day check box to enable this feature.
22. Mark the Turn on Caps Lock check box to automatically enable the Caps Lock key on your keyboard. This may be used to ensure consistent data entry in Eclicktic.
23. The Status Bar appears at the bottom of the Eclicktic screen, and shows helpful hints on the operation of Eclicktic screens currently being displayed. Mark the Show Status Bar check box to enable this feature.
24. The Path for Temporary Files field designates the location in which temporary files for Eclicktic are stored. Leave this field as-is; only use or change this field with the assistance of Myriad Technical Support personnel.
25. Click the Stores tab:
26. In the Default/Home Store field, enter the default store code used in Store fields throughout Eclicktic when this user is logged in. If the Enforce Home Store check box has been selected for this user, entry of a store code is mandatory in the Default Home Store field.
27. In the Default Salesperson field, enter the default salesperson code used in Salesperson fields when this user is logged in to Eclicktic. The specified salesperson code must be defined in Sales/Serviceperson Maintenance.
Eclicktic Implementation Guide Maintenance Modules
152
28. Home Store Logic is designed for use in multi-store environments. With this feature, a salesperson’s access to inventory and merchandising information could be limited to the specific store or group of stores in which the employee normally works. Home Store logic would not usually be set up for managers or supervisors, because these types of positions require more global access to information, regardless of store. Mark the Enforce Home Store Logic check box to enable this feature for this user. For more information on Home Store Logic, see the Eclicktic online help.
29. If Home Store Logic is being enforced for this user, specify the other stores for which the user can view inventory information in the Other Stores grid.
30. Click the Save button.
31. Click the Close button to exit User Maintenance.
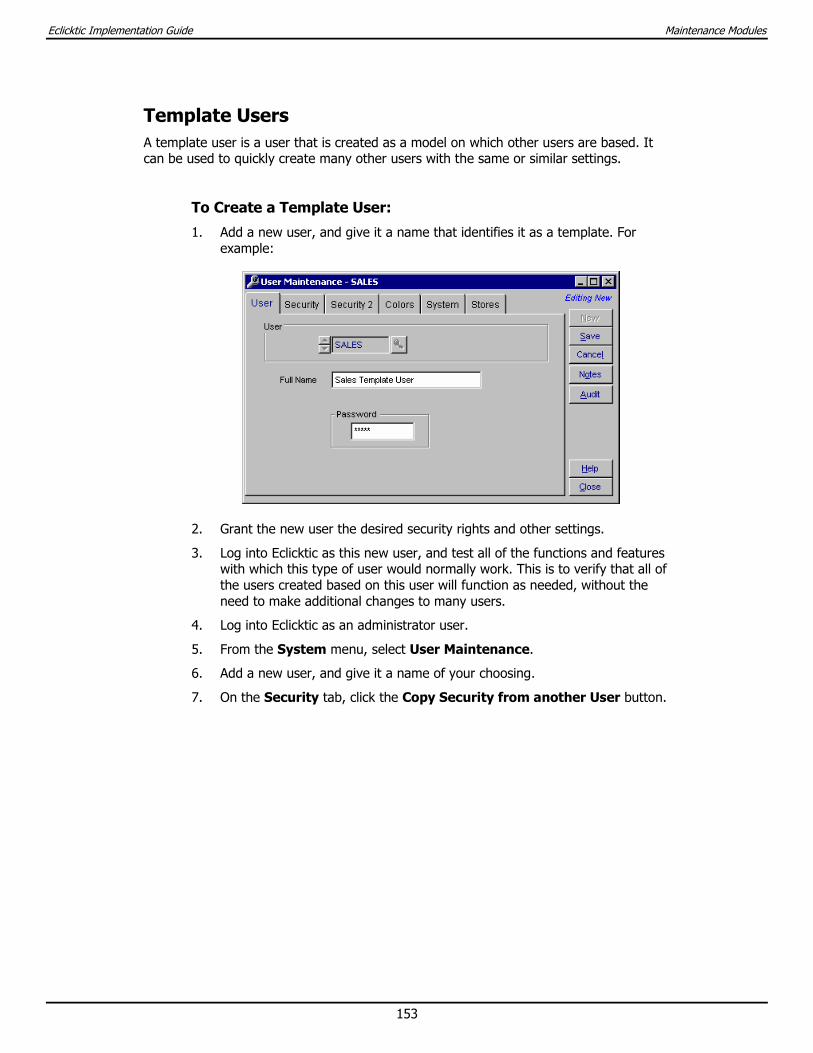
Eclicktic Implementation Guide Maintenance Modules
153
Template Users A template user is a user that is created as a model on which other users are based. It can be used to quickly create many other users with the same or similar settings.
To Create a Template User:
1. Add a new user, and give it a name that identifies it as a template. For example:
2. Grant the new user the desired security rights and other settings.
3. Log into Eclicktic as this new user, and test all of the functions and features with which this type of user would normally work. This is to verify that all of the users created based on this user will function as needed, without the need to make additional changes to many users.
4. Log into Eclicktic as an administrator user.
5. From the System menu, select User Maintenance.
6. Add a new user, and give it a name of your choosing.
7. On the Security tab, click the Copy Security from another User button.
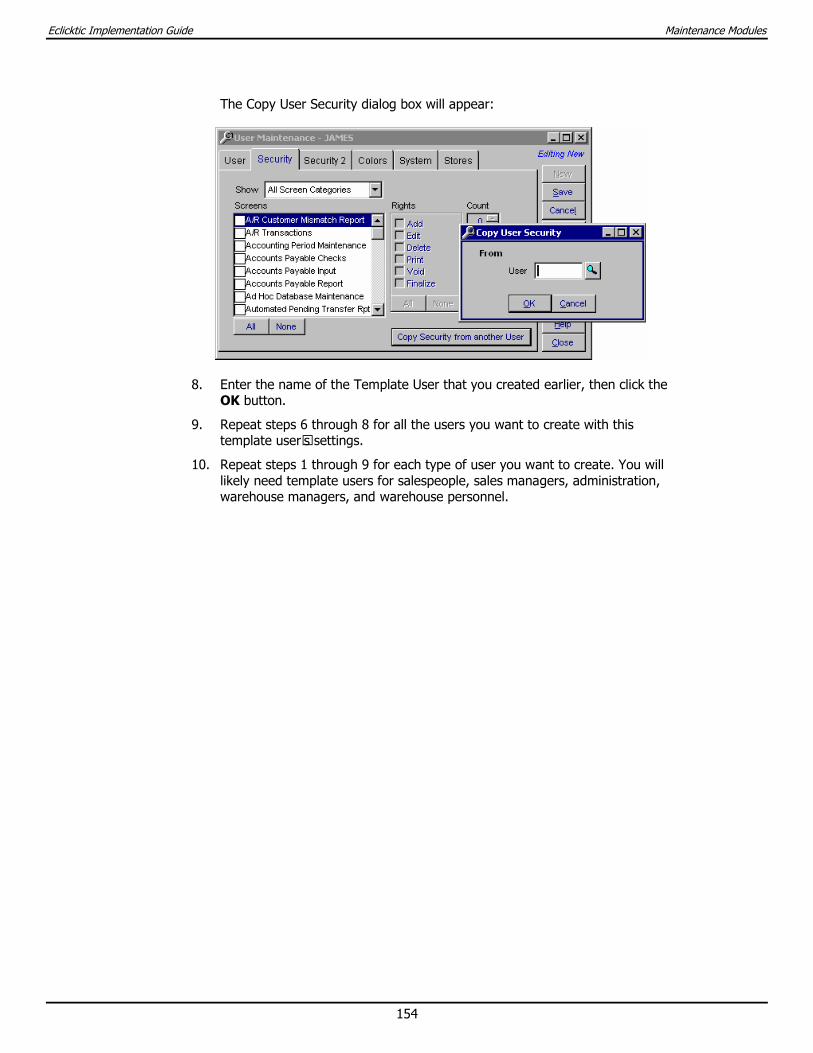
Eclicktic Implementation Guide Maintenance Modules
154
The Copy User Security dialog box will appear:
8. Enter the name of the Template User that you created earlier, then click the OK button.
9. Repeat steps 6 through 8 for all the users you want to create with this template user’s settings.
10. Repeat steps 1 through 9 for each type of user you want to create. You will likely need template users for salespeople, sales managers, administration, warehouse managers, and warehouse personnel.
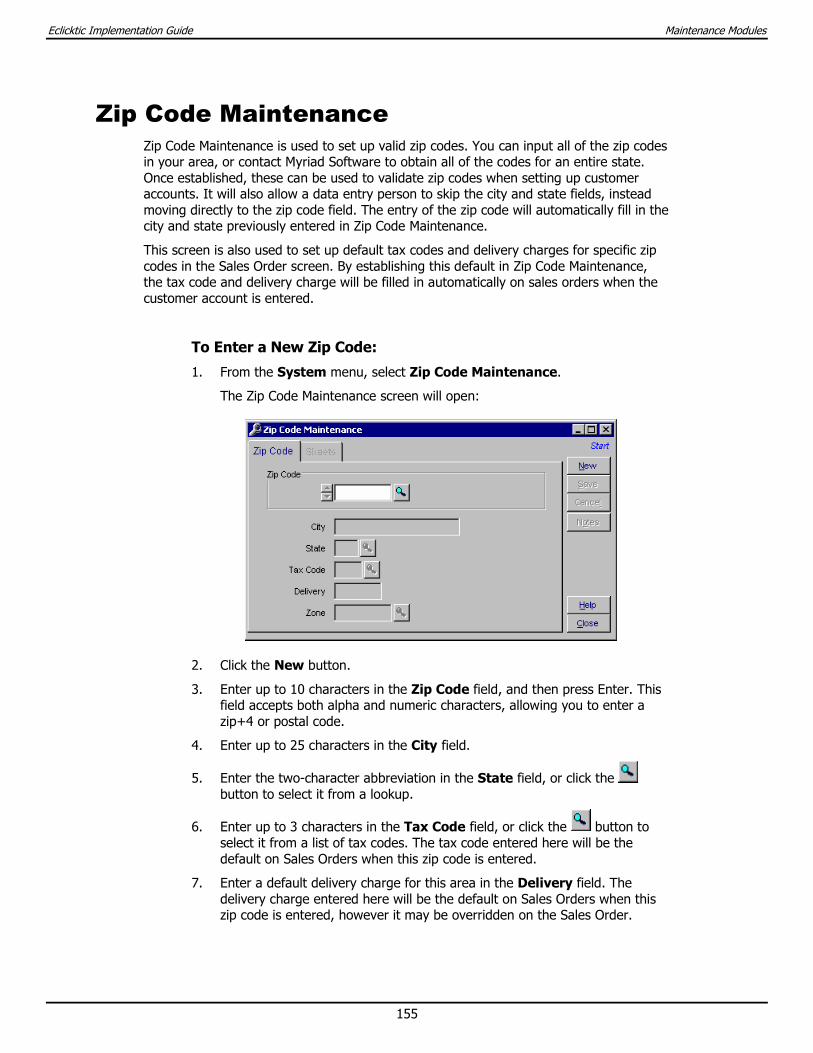
Eclicktic Implementation Guide Maintenance Modules
155
Zip Code Maintenance Zip Code Maintenance is used to set up valid zip codes. You can input all of the zip codes in your area, or contact Myriad Software to obtain all of the codes for an entire state. Once established, these can be used to validate zip codes when setting up customer accounts. It will also allow a data entry person to skip the city and state fields, instead moving directly to the zip code field. The entry of the zip code will automatically fill in the city and state previously entered in Zip Code Maintenance.
This screen is also used to set up default tax codes and delivery charges for specific zip codes in the Sales Order screen. By establishing this default in Zip Code Maintenance, the tax code and delivery charge will be filled in automatically on sales orders when the customer account is entered.
To Enter a New Zip Code:
1. From the System menu, select Zip Code Maintenance.
The Zip Code Maintenance screen will open:
2. Click the New button.
3. Enter up to 10 characters in the Zip Code field, and then press Enter. This field accepts both alpha and numeric characters, allowing you to enter a zip+4 or postal code.
4. Enter up to 25 characters in the City field.
5. Enter the two-character abbreviation in the State field, or click the button to select it from a lookup.
6. Enter up to 3 characters in the Tax Code field, or click the button to select it from a list of tax codes. The tax code entered here will be the default on Sales Orders when this zip code is entered.
7. Enter a default delivery charge for this area in the Delivery field. The delivery charge entered here will be the default on Sales Orders when this zip code is entered, however it may be overridden on the Sales Order.
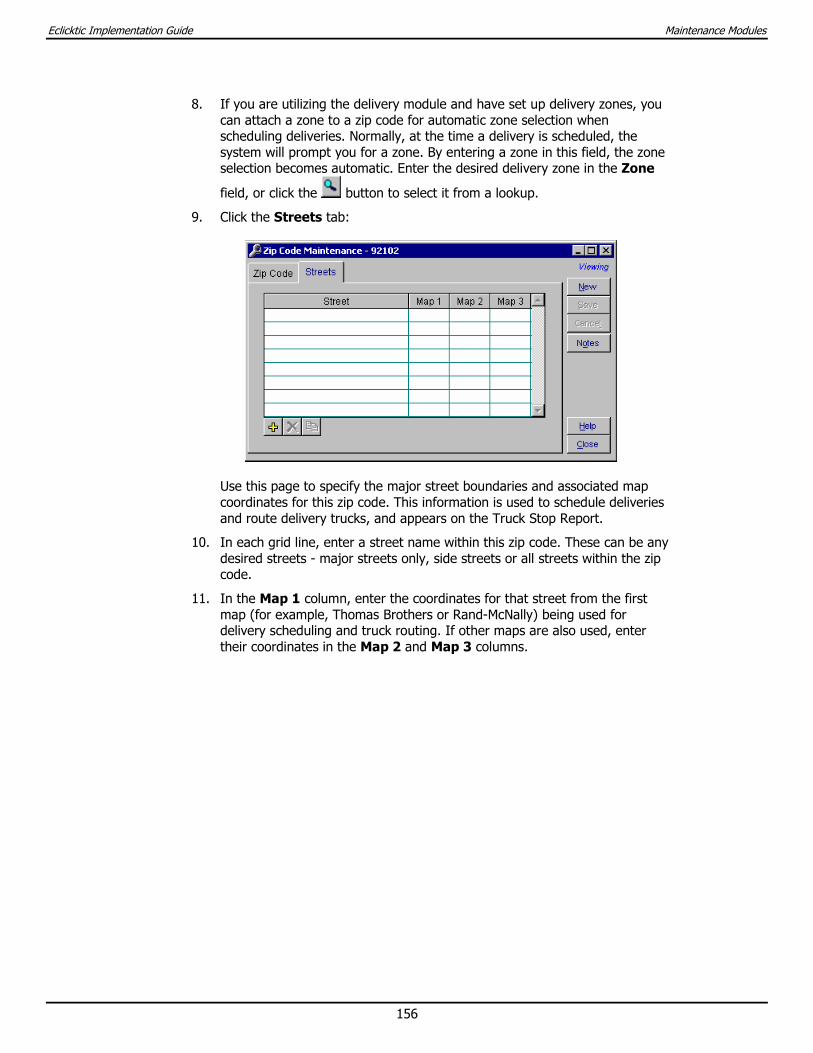
Eclicktic Implementation Guide Maintenance Modules
156
8. If you are utilizing the delivery module and have set up delivery zones, you can attach a zone to a zip code for automatic zone selection when scheduling deliveries. Normally, at the time a delivery is scheduled, the system will prompt you for a zone. By entering a zone in this field, the zone selection becomes automatic. Enter the desired delivery zone in the Zone
field, or click the button to select it from a lookup.
9. Click the Streets tab:
Use this page to specify the major street boundaries and associated map coordinates for this zip code. This information is used to schedule deliveries and route delivery trucks, and appears on the Truck Stop Report.
10. In each grid line, enter a street name within this zip code. These can be any desired streets - major streets only, side streets or all streets within the zip code.
11. In the Map 1 column, enter the coordinates for that street from the first map (for example, Thomas Brothers or Rand-McNally) being used for delivery scheduling and truck routing. If other maps are also used, enter their coordinates in the Map 2 and Map 3 columns.

Index
Eclicktic Implementation Guide Index
158
Index
A/R, 41
Accounting Period Maintenance, 130
Action Buttons, 16
Administration, 32
Administration Lockout, 32
Advertising Codes, 52
Age Late Charges for Installment Contracts, 42
Allow A/R Transactions on Pending Sales, 41
Allow Import of Shopping Carts from Browser, 35
Allow to Sell from Showroom Locations, 36
AS-IS, 60
Bank Account Maintenance, 128
Bonus Based on Date, 44
Bonus Based on Type, 44
Bonus Schedule, 44
Budget Maintenance, 132
Cell, 19
Change Serial Number, 33
Charge Back Codes, 53
Charge Late Charges After End of Contract, 42
Chart of Accounts Maintenance, 48
Check Box, 12
Code Maintenance, 51
Commission Code, 37
Commission Codes, 75
Commission Maintenance, 75
Commissions, 44
Company, 33
Company Maintenance, 134
Configuration, 32
Contract Number, 41
Conversion Default Part Vendor, 46
Convert Parts Button, 46
Customer Account Maintenance, 123
Customer Number, 34
Default Inactivity Logout Minutes, 32
Default Maximum User Logins, 32
Default Part Category, 46
Default Part Department, 46
Default Parts as Inventory Items, 46
Default SO Line Written Date from the Header, 36
Default User Level, 32
Definition of Terms, 12
Delivery Calendar Maintenance, 80, 83
Delivery Zone Maintenance, 80, 83
Department Maintenance, 91
Discontinued Codes, 54
Display Current Users, 33
Display Customer Account Lookup Summary, 36
Display Extra Financing Fields, 35
Drop-down List, 12
Eclicktic interface, 16
EDI, 42
Electronic Data Interchange, 42
Encode, 40
End Prices with, 39
Enhancements, 10
Exclude from Recommended Buying Report, 61
Finance Program Maintenance, 84
Follow Up Codes, 56
Eclicktic Implementation Guide Index
159
Freight Unit Value, 39
G/L Mapping Maintenance, 138
General Ledger Chart of Accounts, 48
Grid, 12, 18
Group Model Maintenance, 95
Hotkeys, 22
IC Verify, 45
Implementation Checklist, 30
Include Pending Sales in CBO Inventory, 37
Include Showroom in Net Inventory, 37
Introduction, 8
Inventory, 37
Inventory Adjustment Codes, 58
Inventory Lookup Defaults, 38
Journal Entry, 136
Labels, 40
Lead Time, 111
Loftware.PAS File Drop Directory, 40
Lookup, 12, 17
Make Purchase Orders - Min/Max, 119
Make Purchase Orders by Customer, 39
Margin Exception, 92, 115
Merchandise Manager's Report, 93, 94
Merchandising, 38
Minimum Amount to Age, 42
Model Lookup Defaults, 37
Model Maintenance, 109
Models, 109
Models created using SO Entry are Special Order, 39
NAS, 60
Not Available for Sale Codes, 60
ODBC DSN, 43
Option Group Maintenance, 97
Optional Modules, 11
Overhead Penalty %, 45
Parts, 46, 109
Payment Hold Codes, 63
Payment Method Maintenance, 125
Pending Sale Hold Days, 34
Photo, 120
Post Date, 44
Print Cents, 40
Print Options and Details, 44
Process by A/R, 45
Promotion Codes, 64
Purchase Order Codes, 66
Purchase Order Number, 38
Radio Button, 13
Reason Code for Barcode Physical Inventory, 37
Receivables Codes, 67
Recurring JE Maintenance, 136
Require Advertising Source, 35
Require Follow Up, 35
Require Reason Code on Returns, 36
Require Service Code on Service Orders, 36
Required Deposit Percentage on Open Orders, 41
Return Reason, 70
Return Reason Codes, 70
Round Up, 39
Sales, 34
Sales Order Number, 34
Sales/Serviceperson Maintenance, 85
Salesperson Type, 78, 85
Salesperson Type Codes, 72
Service Codes, 73
Set Report Copies by User, 43
Show Times on Delivery Calendar Slots, 35
Eclicktic Implementation Guide Index
160
Software Issues, 10
Source for Model Price Calculations, 39
Stock Options, 121
Store/Location Maintenance, 140
Support, 9
System, 43
System Configuration, 32
Tabs, 16
Tax Code, 155
Tax Maintenance, 87
Template Users, 153
Tooltips, 21
Truck Maintenance, 90
Truck Routing, 90
Unit Control Report, 92
Update Models, 40
Upgrades, 10
Use Delivery Calendar, 35
Use Delivery Calendar for Service Orders, 35
Use Factor name when printing A/P Checks, 43
Use Lookup Criteria Go! button, 43
Use Prevue Sales Orders, 35
Use Price #1 (#2 or #3) of Models as the Default Price for Sales Orders, 39
Use Sales Order ID during Make Purchase Orders, 39
User Maintenance and Security, 147
Users’ Conference, 10
Validate Method of Payment, 41
Vendor Maintenance, 100
Visual FoxPro, 8
Warn if Balance Due on Finalize, 35
Warn on Finalize of Zero Cost Items, 36
Zip Code Maintenance, 155