#iences - Appliance Parts | Replacement Water ... · www, GEAppfiances,com SAFETYPRECAUTIONS Do not...
28
www.GEAp#iences.com U U © & 0 SaJb_ Instructions ....... 2-4 Operating Instructions Clock and Timer . .......... 13 Control I,ockout ........... 13 Controls ................... 5 Oven ................. l 1, 12 Sabbath Feature .......... 9, 10 Self-Cleaning Oven ...... 16, 17 Special Features ........... 6-8 Thermostat ............... 15 Timed Baking and Roasting . .14 Care and Cleaning Broiler Pan and Gdd ........ 19 Control Panel ............. 18 Glass Surfitces ............. 21 Heating Element ........... 21 Kn ob .................... [8 Lift-Off ()yen Door . ..... 18, 19 Light Bulb ................ 20 Oven Interior. ............. 21 Packaging Tape ............ 18 Painted Surfaces ........... 21 Shelves ................... 19 Stainless Steel Surfi_ces ...... 21 Troubleshooting Tips .... 22-24 Consumer Support Consumer Support . . Ba(k Co_er Product Registration ..... 25, 26 XAarrantv . ................ 27 JKP20-27" Single Waft Oven JTP20-30" Sb_gge Waft Oven JKP25-2 7' Si*_gfe Wall ()ve_ JTP25-3(/' Si_gge _19fi ()ve_ JKP2S-27" Doub# _'!91{ Oven JTP2S-30" Doub# _'!_t£ (h_en JKP4b'-27" Doub# Wa[[ Oven JTP4S-30" Double _'97/£ (h:m_ JKPSO-27" Doub# _'!9fl (h_en JT[_5()-30 " Doub# 14_tg (h_en Write the model and serial nmnbers here: Model # SeriM# You cam_timid them oral a ]abe] o]] the sk]e trh]] or o]] the {_'o]]t of the (lower) ovem] bebim]d the ovem_ door. 1640429OP38f 49-80229 08-03 JR
Transcript of #iences - Appliance Parts | Replacement Water ... · www, GEAppfiances,com SAFETYPRECAUTIONS Do not...

www.GEAp#iences.com
U
U©
& 0
SaJb_ Instructions ....... 2-4
Operating InstructionsClock and Timer . .......... 13
Control I,ockout ........... 13
Controls ................... 5
Oven ................. l 1, 12
Sabbath Feature .......... 9, 10
Self-Cleaning Oven ...... 16, 17
Special Features ........... 6-8Thermostat ............... 15
Timed Baking and Roasting . .14
Care and CleaningBroiler Pan and Gdd ........ 19
Control Panel ............. 18
Glass Surfitces ............. 21
Heating Element ........... 21Kn ob .................... [ 8
Lift-Off ()yen Door . ..... 18, 19
Light Bulb ................ 20Oven Interior. ............. 21
Packaging Tape ............ 18Painted Surfaces ........... 21
Shelves ................... 19
Stainless Steel Surfi_ces ...... 21
Troubleshooting Tips .... 22-24
Consumer Support
Consumer Support . . Ba(k Co_er
Product Registration ..... 25, 26XAarrantv . ................ 27
JKP20-27" Single Waft Oven
JTP20-30" Sb_gge Waft Oven
JKP25-2 7' Si*_gfe Wall ()ve_
JTP25-3(/' Si_gge _19fi()ve_
JKP2S-27" Doub# _'!91{ Oven
JTP2S-30" Doub# _'!_t£ (h_en
JKP4b'-27" Doub# Wa[[ Oven
JTP4S-30" Double _'97/£ (h:m_
JKPSO-27" Doub# _'!9fl (h_en
JT[_5()-30 " Doub# 14_tg (h_en
Write the model and serial
nmnbers here:
Model #
SeriM#
You cam_timid them oral a ]abe]
o]] the sk]e trh]] or o]] the {_'o]]t
of the (lower) ovem] bebim]d theovem_ door.
1640429OP38f 49-80229 08-03 JR

READALL INSTRUCTIONSBEFOREU$1N&
For your safety, the information in thb manual must be followed to minimize the risk of fire orexplosion, electric shock, or to prevent property damage, personal idury, or loss of life.
IMPORTANTSAFETYNOtiCEThe California Safe Drinking Water and Toxic Enforcement Act requires the Governor of California topublish a/istofsubstances known to the state to cause cancer, birth defects or other reproductiveharm, and requires businesses to warn customers of potential exposure to such substances.
The fiberglass insulation in self=clean ovens gives off a very small amount of carbon monoxide duringthe cleaning cycle. Exposure can be minimized by venting with an open window or using a ventilationfan or hood'.
SAFETYPRECAUTIONSWhen using electrlea/ appliances, basic safety precautions should be followed, including #le fo/lewing:
Use this applian(e (rely fbc its intended
propose as described iI_ this ()_l_eFsMan ual.
Be sme yore appliai_ce is pcopedy
ii_stalled and grotmded by a qualifiedtechnician in accoidance _dth the
provided i_stallaticm ii_stcucti<ms.
Do not atte,-_lpt to i>pair or replace any
part of yore" o_wn tmless it is specifically'recommended in this mammal. All other
servicing should be cetbned to a qualifiedtechnician.
Haxe the installer show _<m the location
of the ciccuit breakec or rinse. Mark it fk)r
easy reference.
Before per%truing any service, discom_ect
the o_n power supply at the househokt
distribution panel by removing the fuse or
s_dtchiI_g off the circuit bi>aker
Do not lemv childre_ alone---<hildren
should not be left alone or mmttended in
an ai>a whe_> aI_ appliance is in _lse. Theyshould never be allowed to sit or staI_d (m
am' part of the appliance.
Do I_ot allow anycme to climb, stand or
ha_g (m the door They could damage the
o_v_, or cause se\v_e pe cson al i_j u _>
Be sin> the o\w_ is secm>ly iI_stalled iI_ a
cabinet that is firmD attached to the hoHse
strHcture. Nexwr allow am'one to climb, sit,
stand or hang (m the o_wn door
Never lemv the o\_n doo_ open when you
are _ot wamhing the ove_?.
Always kee I) combustible v,M1 cove_h_gs,
cmtah_s or &apes a saf> distm_ce flomVOIU" O\_1],
iiiiiiiiiiii_iii
Always keep dish towels, dish cloths, potholdecs and other linens a sa_e dista_ce
}_om votH o_elL
Always keep wooden a_d plastic utensilsa_d camped food a sa_e distance away flom
•voHr o_eil.
Teach chikken _ot to play' with the
comrols or any othec part of the oven.
Large scratches o_ impacts to gtass doors
can lead to broke_ or shatte_>d glass.
2

www, GEAppfiances,com
SAFETYPRECAUTIONSDo not store flammable materials i33
an oxe3L
CAUHON:I e.,sofi. e,estchildren shoukt i3ot be stored in cabi_3ets
aboxe an oxen; children3 (limbii3g on theoxen to reach items could be seiiousb
igi u_ed.
{{ Ne_er v_>a_ loose-fitting or hanging
garments xd_ile usii3g the appliance. Be
(arefid when reaching %r items storedin cabinets o_er the oxen. Flammable
material coidd be ignited if brought ii3
(omact _{th hot smfitces or heatii3gelements and may cause se_e[e bm_3s.
Use only d U pot holders--moist or damp
pot holders <m hot surfaces may _esuh in
bt_n3s fiom steam. Do not let pot holders
touch hot heating elements. Do not use ato_w]or other bulkycloth.
For your safety, hexer use your applia_3ce
%r v, arming or heating the coom.
{ Do not let ( ookiI3g grease or otherflammable materials accmmdate i_3
o_-near the o_e13.
Do not use water <m g3ease fires. Nexer
pick up a flaming pare Tm_3 the commlsof{_
Flame in the oven can be smothered
completely by closing the o_wn door and
turning the o_wI3off orby usiI3g a m uld-
pm]x_se d W chemical or f_mm-ty'pe fiI>extiI3guishei:
Ne_wr lemwjars or cans of fht drippings i]3or near yore oswn.
Stand away flom the o_en when openingthe o_en door Hot air or steam which
escapes can (ause btHlls 10 hands, fi<em3d/or eves.
Do not heat unopened %od containers.
Pressme could build up and the conmh3er
could bmst, causii3g an inj u i>
Keep the o_wn \wI3t m3obstcucted.
Keep the o_wn fiee from g_ease buildup.
Place the o_wn shelf in the desired positiol3while the o_wn is cool. If shehws must be
handled when hot, do not let pot holder
contact the heating elements.
_A]_en using cooking or roasting bag:sin the oven, f}Jllow the mantdilctmeFsdi_>ctio_3s.
Do not touch the heafi_3g elements or the
inte_{o_ sm fi_ce of the ove_3. These sm f:aces
may be hot enough to burn even though
they are dark h3 cok)r Dming and afie_
use, do _3ot touch, or let clothing or otherflammable materials comact any imefior
area of the o_w_3;allow suflkiem time fk)r
cool i13g first.
Potemiallv hot smfitces include oswn \w_3t
openings, smfaces near the openings,
crevices arom3d the o_wn do<m the edges
of the _ndow and metal tdm pints abovethe door
REMEMBER: The inside smfbce of the o_el3
may be hot whe_3 the door is ope_3ed.
Do not store or use combustible materials,
gasoline o_ othe_ flammable vapors and
liquids in the vici_3itv of this or m3v other
appliance.
3

REAl}ALL INSTRUCtiONSBEFOgEU$1N&
iiiiiii_iii
iiiiiii_iii
iiiiiii_iii
Pulling out the shelf to the stot>lock is a
com'eniei_ce in lifitii_g heaw %ods. It is
also a precaution against bmns fiom
touching hot smfimes of the door oroxen _Mls.
Do not use the oxeI? to dry ne_spapers.K oxerheated, they ca_ catch cm fire.
Do I_ot Hse the o_eD f()[ a stoFa_e aFea,
Items stoIed i_ aI_ oxe_ can ig_ite.
Do not leaxe papei pioducts, cookingute_sils or food iI_ the oxe_ whe_ _ot
ii) Hse.
,4dter broilh_g, always take the broilec paI_<rot of the oxwI_ a_d clean it. Leflo_wr
grease in the broiler pan ca_ catch rice
next time you use the pal?.
Clean ol_ly parts listed in this Owner'sManual.
Do I_ot t_se ahm_hmm %il to line oxel?
bottoms, except as suggested in this
manual. Imp_ope_ i_stallaticm ofalmninmn %il may cestdt i_ a dsk
of electric sbo(k or fire.
COOKMEATANDPOULTRYTHOROUGHLY,..Cookmeatandpoultry thoroughly_meat to at leastan iNTERNALtemperatureof 160%-andpou/tryto at least an iNTERNALtemperatureof 180_ Cookingto thesetemperaturesusuallyprotectsagainstfoodbomeillness.
SELF-CLEANINGOVENDo not clea_ the door gasket. The door
gasket is essential fL_ a good seal. Cme
shotfld be taken _ot to cub, damage or
moxw the gasket.
Do not use oven cleaners. No coi_li_ler(ia]
o_vn cleaner or o_vn lh_er protecti_w
coath_g of a_w kind shouM be used in or
around any part of the oven. Residt_e fiom
o\wn cleaners _dll damage the inside of theo_wn M_e_ the selfk'lean cycle is used.
Before sel_Zclea_?ing the oven, remove the
b_oile_ pan, grid and othec cookwme.
Be sine to wipe up excess spillage befi_re
starting the selfkleani_g open-_fion.
If the selfk:leani_g mode malfimctions,tmn the o_w_ off and discom_ect the
powe_ sHpply'.Haw it serviced by a
qualified technician.
READANDFOLLOWTHiSSAFETYiNFORMATIONCAREFULLY.$_ VETHESEINSTRUCTfON$
4

Using the oven eontroN. . .*EApp.ancee.com
Throughout this manual, features and appearance may vary from your model.
I'
Double oven control shown
OvenControl Clockand TimerFeats,ms and Settings
0 BAKE PadPress th_s pad to select the bake t_ m ctio_L
d¢_ BROIL HI/tO PadPress this pad to seled the broil fimctiom
0 SELFCLEAN STD/LOWPadIPre_ this pad to, se]ed the self_.lem_i_gflmctio]]. See the Using the self-cleaning ovensectiom
START PadM_st be pressed to start m_) cookim_g or
0 DisplayShows the time o{ day; ove_ temperature,
whether the <B'el_ is i_] the bake, broil or self 2
c]em_ing mode m_d the times set {or the
timer or al0tomat]c <B'em_ opemd<ms.
If "F--and a nnmber or letter" flash in the displayand the oven control signals, this indicates afnnction error code. Presst¢_eCLEAR/OFFpac_A/low t¢_eoven to coo/for onehou£ Put the ovenbackinto operation./fthe function error code repeats:disconnectbe power to theovenand carl for service.
If Font oven was set for a timed oven opemdon anda power outage occurred, t¢Teclockand all programmedfunctionsmust be reset.
Thet#ne of day will flash in the display when therehas beena power outage.
OVENLIGHT ON/OFFPadW# Press this pad to mm the oven light (m or oft.
DELAYSTARTPad[!se ai<mgwid_ COOKINGT#PIEor SELFCLEAN pads to set the ovem_ to start m_d stopalaomat]caIh _/t a t]m e _ol0 set.
COOKING TIMf Pad_fJ
Press this pad m_d the_ press the HOURm_dMIN ÷ a m]d = pa (is t(_ se t th e m_ o I m t of ti _n evail wm_t vollr tk>od to cook. The ox e]_ will
s]mt offa&tomatica]]y _d_e_ the cooki_g time]]as mn o_t m_]ess the Cook ;rod Hok]
tear,Ire _s set.
CLEAR/OFFPadPress this pad t(} c;mce] ALL oven
opemti{ms except the clock m_d timen
TEMP ÷ and- PadsPress these pads to set the cooki_g
te]?/pe]_Kilre yoll w_/t to Ilse.
CLOCKPadPress this pad be{ore settings, the clock
_'_ HOUR arid MIN ÷ arid- Pad'sPress these pads to set times _[_ to 9 ham's
a_](;159 mhmtes--{br example, the time of
day (m the dock, the time_; the sta_ti_g and
length o{ c(}o]dng time }in" tim ed bake an d
the sm _1i_]g a n]d ]ell gt h at c] ea _]i_]g ti m etar selfZc]ea m
KITCHEN TIMER ON/OFFPadPress d_is pad to se]ed t]_e diner feature.
Lower OvenControl Settings on models with a knobOVEN'KnobTm'_ this k_ob t(}
OFF LOWER The OVENCYCLElightglows until the ovenreachesyourselected temperature,then goes off and on wi#} theovene/ement{s')during cooking.
setth_g ?ol0 warn.
OVEN CYCLE _ 5

Special featuresof your oven control.
Yournew touch pad control has additional features that you may choose to use. The following are the featuresand how you may activate them.
The special feature modes can only be activated while the display b showing the time of day. They remabin the contro/2 memory until Pie steps are repeated.
When the display shows your choice, press the STARTpad. The special features wi/! remain in memory aftera power failure, except for the Sabbath feature, which will have to be reset.
START
_f
12=XourShut-Off
With#_isf_ture, shouldyouforgetandleavetheovenon,thecontToIwill automaticallyturnoff #ToovenaMr 12hoursd_ingbakingfunctionsorafter3 hoursduringa bro#MTction.
I:[_ol_ wish to mm OFFd_is feature, f_llow
[] Press the upper ovel_ BAKE amidBROILBI/LOpads at d_esame timefor 3 sectmds m_d] the display
[] Pressd_eBELAYSTARTpad m_dlfie $hdff (m_ sitar-of[) appears im_the
[] Press the START pad to lock im_the
fie ShdYt (_o sh_t-of[) [eatm'e amid
lea_'e the co_trol set im_this special
NOTE."
Onmodelswi#_touchpadcOn1ToLs"forbod}ovens,thisactivatesthisspec/a/featureforbothovens.
Onmodels with ovenknob(s),t¢fs feature isnot avai/ab/e for the lower oven.
Fahrenheit or Celsius Temperature Selection
Yourovencontrol is set to use the Fahrenheittemperatureselections but youmay changethisto use the Celsiusselections.
[] Press the upper (_'e_ BAKE a_dBBOIL BI/LO pads at the same time
for 3 seco_ds _mtil the displayshows $E
[] Press the BROILHI/LOm_d COOKINGTIME pads at the same tickle.Thedispla) will show F (Fahre_heit).
[] Press d_e BROIL HI/LO m_d COOKINGTIME pads agai_ at the same dine.The displ;_y will S_(}_ r C (C,elsi_s).
[] Pressd_eSTARTpad.
NOTE
Onmodels wiff} touchpad controls"for bot¢}ovens, the new setting will be disp/ak_dforboth ovens.
Onmodeb with ovenknob(s),t¢fs feature isnot avai/ab/e for the lower oven.

www.OEApp#ances.com
START
Tones at the End of a Timed Cycle
At theendofa timed@v/e,3 shortbeeps"willsoundfo/Io_J_dbyonebeepevery6secondsuntilfi_eCLEAR/OFFpadis"pressed.This"continuous"8-secondbeepmaybecance/e_
To cam_cel the 6-see(rod beep:
[] P_'ess the upper ove_/ BAKE _:m(]
BROIL. B//l.O pads at die same time
fk)r 3 seco_/(]s m/dl die displayshows SE
NOTE.'
Onmodels"witfl touchpad controls for botflovens,re}is'cancels be endof cycletone forboi¢_ovens.
Onmode/swit¢}ovenknob(s),thisfeatureisnot availab/efor theloweroven.
[]
[]
Press tile KITCHENTIMERON/OFFpad. The dispht) shows CON BEEP
(condm_ol_s beep). Px'ess tl/e
KITCHEN TIMER ON/OFFpad agah/.The disphLv shows BEER (This
cm/ce]s the o_/e beep e', e_w 6
seco_/ds.)
Px'ess the START p'ad.
12-Hour,24-HourorClockBlack-Out
Yourcontrolis set to usea 12-hourdock.
If TOll woldd Ix'eIe'x" to ha_e a 24-horn"mi]ita_'; time clock o_"black ol_t the dock
display, fbllow the steps be]o*_;
[] P_'ess the upper (>'yell BAKE amidBROILB//LOpads at the same timefb_" _4see(rods, m/ti] the (lisp]aT
[] Press d_e CLOCK pad once. The
(lispla} will show 12hr. I[ d_is is
tile choice _ou warn/t, p]'ess tile
STARTpad.
P_'ess the CLOCK pad agah/ to
cham/ge to t]/e 24-horn" m]]km'_ time
dock The disp]ay _%rH]] S]_O_ 24h£ ff
this is the choice yol_ _am/t, p_'ess the
STARTpad.
P_'ess d_e CLOCK pad agah/ t/_ black
o_lt the c]ock disp]av. The disp]avwill sho;_ OYE K this is the choice
yo_ _a_/t, Ix'ess the STARTpad,
NOTE"If theclockisin tt_eblack-outmode,youwill not beabletousebe DelayStartfunction.

Specialfeaturesof Fourovencontrol.
Cook and Hold
YournewcontTo/hasacookandholdfeatureti_atkeepscookedfoodswarmforupto 3hoursafterTimedBaklT_gor floastbgis finishect
NOTE" This featurecanonly beprogrammedtowork with Tl2_edBakingor Roasting.5_e ti_eUs/7}gfl}e timed baking and roasting featuressection.)After timed Baking or floasfing hasautomatTca//ystoppe_ t¢}eprogrammedCookand Hold will automatically start.
To ;tctivate this {eatm'e [kn" I_se _ffter
Timed Bakim_g or Roastim_g, f'(}]](}_r the
steps below.
[] Both tolmh pad ovem_sfld]o*_ thesame step ]i. First press the llppey
ovem_BAKE m_d BRO/t N//tO pads ;_tthe sm_e time fkn" 3 seco_ds m_ti]
the display shows SE The_ proceedv, ri[h steps 2 d_rol_gh 3, I_sh_g t]_e
pads fin" the Iq:)per or ]o_er o,, em_.
[] Press the COOKINGT/ME pad. The(lisp]a) wi]] show Hid OFF,
Press d_e COOKINGTIME pad ag'aim_to _ctivate the {eatm'e. The display
wi]] show Nd ON,
[] Press the START p;_d to acti','ate thecook a]]d ]]o]d {eatm'e a_d leave the
co]]tro] set 1_ this special featm'es
ff_?oC[e.
NOTE:Onmodelswithovenknob(s),thL_featureisnot avai/abbfor theloweroven.
&
OR
START
Changing the Speed of the + or- Pads
As you use the + or- pads when sett/?_ga timeor temperature, you may notice the displaychanges s/ow/_ This special feature allows you tochange t¢_espee_ Toset the speed you prebr,follow be steps below.
[] Press the _jgper o','en _A_'(E m_dBflO/t HI/tO pads at the same timefor 3 sec_ m (Is, _m ti] the disp]a)shows SE
[] Press m_? + pad. The dispLLv wi]]S]/(}_ r _(}_ _ set speed between/ 1a_d 5.
] Press a_} + pad to i_crease thespeed _l> to th e _ umber 5.
Press a_} = pad to decrease the
speed dow]_ to the mm_ber 1.
] Press STNNT to activate the setti_ga_d leax'e the co_m'ol set i_ this
speci_] featm'es mode.
8

Usingthe Sabbath Feature.(Designed for use on t,_eJewish Sabbath and Holidays.) www.CEApp#ances.com
The SabbaLhfeature can be used for baking/roasting only. It cannot be used for broiling, self-cleaningor Delay Start cooking.
NOTE: The oven light comes on automatically (on some models) when the door is opened and goes off when thedoor is closecL The bulb may be removed. See the Oven Light Replacement sect;on. Onmodels with a light switch onthe control panel, the oven light may be turned on and left on.
Iii iiii!
WTmnthe display shows D theoven is set in Sabbath. When thefiisplay shows D C the oven isbaking/roasting,
Hew te Set Safl#atfl Feature fer RegMar Baking/Roasting
NOTE:Tounderstandhow tM ovencontrolweft<L% acorn"_t( _(/_j_(:]:_t[_'( S(:t _1_. ) r]_practice using regubr baking (ne/i-Sabbat/1)beforeentering Sabbafll mode.
Make sure fl_edock shows 1becorrect time
of da_
[] Ih'_ ss and hold both @e BAKE ",rod RRRtL
Rl/_R pads, at tbe same time, umiI it_dispI _ sho_s SE
[_] "['ap @e BELAY STARTpad m_dlSAb bAtRappe_irs i]_ d_ displa}:
]
] Press d/_ BAKE pad. No sig_al @11b(! gJ_(!n.
] The p_es(t staring/empera/m'( _ilIa_ttomadcally be set/() 35(P. ']hp @<
the temp( t:atl_['e in 5 _hKr{ meres. (The
TEMP+or -p@ should be tapped {i)17e_ch {e/llpe_lttlF( (:hal/g(; pt:essi[_g md
hokling these pads wiI1 not @o_
[]
temperatm_ can be s(t b(twe(n ] 70 _
md 550L No signd or tcmpcmmrc wiI1!)e gg,zelL
Pr(.ss the START pad.
] Al'Ier a _'a]_dom (Ida? peiod o_appvoximat(4) 30 se(onds to ] mhm_(,
c will _ppea_ in the dispI_?, hHIR @_gt[_at the o_cn is b &ingiro _sdng. 1[ D c
do(s no_ q)pear i_ the displa}, s_aH
_gain _ swp 4.
'1i) _(/j_s_ dw ()x{n l(mp(r m_re, pHss die
RAKEpad md tap the TEMP + or - p@s to
i_K:c{.ase or d((;leaa( tl_e tPlllpe['ttllF{ ii_ 3 °
i_(:r( meres. (The TEMP+ or = p@ sho@d betal)p(d !or each _(mp(ramre chang('; pr{ ssing
md holding these p@s wilt not al!ow acc[II"4te
temper4mre se@_g.) Press the STARTpad.NRTE: The CLEA_/OFFa_d CRRKINR TIME
pads arc a(d',c du[ing the Sabbath lu:tmr(,.
HOUR MIN
&TEMP
START
VV?tenthe display shows _ #leoven is set in Sabbath. VVhenthedisplay shows _ c the oven isbaking/roast#lg
Hew te Set Sabbath Feature fer Timed Baking/Reasting
= immediate Start and Autematie StepNOTE: Toundmssnfl how the ow?ncontrol wor_,praclfce using r_qu/ar (non-Sabbatic)[mmediat_ Startand AuSm<_ticStop before entering fi_eSabbathmode
Ma/<esure the clock sho_s file correct time
of da/
] Pr(ss a_d hold both @e RAKE and RRRtLRb'LR pads, at the same time, umiI @_display shows SE
[_] TAp d*e REL_YSTARTpad m@l SAb bAtHap!)ea_'s i]_ @( dispk_}:
] Press @e START p@ a_d D _iI1 apt}(_ri]_ dw dispIa?,
[] l'_(,ss d*( CRRKtNR TtME pad.
hess @( BRRRand MIN + o_"= pads _o] set dl( desi_'( d Ie]%@ ot'(ooking din(
b(qwu(_n ] minut{' md 9 ho[l_T; ;rod 3(.}
mimm.s. The cooki]_g timu that }ou
emvred wilI be dispL_bud.
P_vssthe STARTpad.[][]
[]
Press @( RAKEpad. No sig_mI wii!
!)(! g,_'_ (!1L
_i/Holn;/ti(: _l[} B(T S(t to 2_)() k '1;_}) tlI(T
TEMP + or -pads _o i]}(Tl(}_ts(of (](f(T1(f_ta(T
[]
the tel!/liel'_Ht['( ill 3' ii_cF<'lll( nts.
(The TEMP+ or -pad should be rapped
[br (a(h temperature' chang_ ; pressing
m*d [*()lding these p_v!s wilI _*ot allow
_c(:u['a_e temperature setdng.) The
temp(ramre can be s(t be_wee]_ ] 70'
inK/55(t. No sig_al or temp( r m_>
wi]l be gJYc*L
Press the START pad.
] ,\t_er _ rmdom d(da}, p(riod otapproximawl; 30 seco]_da to I mimm,
D c wilI _pl{){_:{_i_ thu disli_y indk;@ng
that the o_ e_ is bakh_g!roasdng.
[[ D C does not appear i_ the dispia},
smH %4i_* at step 7.
'1"o _(!}ttst the o_e_ t(mpenm_['e, press theRAKEp @ md tap the TEMP+ or - pads to
incrc _s(! o[" d( cFc;{s( th{ _ tt_IHI)( r_'{HII'{ _ il! ,_')'
inc['(.munts. ('[hu TEMP+ or-pad sholdd b('
t_qppcd _b["c_(h _{'mpcr4t_rc c[m_gu; p['cssing
md holdh_g @ese pads will n()_ aUow tc(;m" _w
temperatm-u setting.) Pruss the STARTpad.
Whe]* cookh*g is linish{d, th{ display will
(hang(' !i'om D c to D md 0:00wilI tl)pea&
indk; @rig that @e {n'un has turned OFFbut is s@l set in S:d)b @L Rcmov( th(.
cooked [hod.

UsingtheSabbathfeature.
How to Exit the Sabbath Feature
START
[] Press d_e CLEAB/OFFpad.
[] 1[ the ove_ is cookim_g, _r_itfor a rm_dc, m delay pe_:iod of
approximately 30 seconds to ]
mim_te, m_t]l onl_ D is ]m_the displa}:
[] Press amid hold both the BAKEm_dBROILXI/LO pads, at the same thne,m_t]l the display} shows SE
[] Tap the BELAYSTABrpad m_til12 ahdn or na shdn appears im_the
display. 12ahdn h_dicates that theoven _rd_l almmmtica]]v tm'N_ oJ_t a{ter
] 2 ]]om's. £tOahdn ]m]dicates th;_t the
{)Veil _rd]] _/<)t m_tomatic_d]v tm'm_ o_E
[] Press the START pad.
NOTE' If a power o_m_ge occmTed whiled_e o\'el_ was h_ Sabbath mode, tl_e o_ el_
w]]] m_tom;_tic;_l]v tm'_] off a_(] the o_ en
co_tro] mllst be reset.
10

USing the oven, w w.CEA,,li =oee.oom
To avoid possible burns, place the shelves in the desired posifion before you turn the oven on.
Before you begin...
The sheh'es ha', e stop-Hocks, so that when
placed correcdv on the slq)ports, they willstop before coming completely olst, andwill not tilt.
When I)lad rig<and removi rig<cookware,pull die shelf out to the bump on the
Toremove a sheg p_ll it toward To< dkdie fi"ont end lip and i:ml it ore.
Torep]toe, place tile end o{ the shelf(stop-locks) on die rapport, tilt Iq:_tile
f_'ont and pmh the shelf in.
NOTE:30" ovens(sMwn) Mve 6 si_elfpogtion,v.27"ovens have 4 shelf positions.
How to Set the Oven for Baking or Roasting
[] Press tile BAKE pad.
[] Press tile TEMP+ or = pads to settile desired tem[:)emtl_.re.
[] Press the START pad.
[]Ill ]II i Ill I lIll tIlll e oll ]"eci pe. C( _ok ] oil get
if" Ilec_l_lY.
[] Press the CLEAR/OFFpad whencooking< is. coml_lete.
NOTE: On somemodd,s; the lower ovenis"contTolledwitt_a knob. Toset tile ovenforbaking, mm theknob to tDedea?ed settbg ortemperature. TamtM knob to OFFwhen bakbg/s complete.
Ovee Shelf Pesitiees
TVpeef Feed 27" al"
Frozenpies BorC CorB(oncookiesheet)
Angelfoodcake A B
Bundtorpoundcakes B B
Biscuits,muffins, BorC CorBbrownies,cookies,cupcakes,layercakes,pies
Casseroles BorC CorB
NOTE:A coo/sTagfanmayauton7atk'a//ymmonandoff mcoolbtemalparts.Ti_isis normalandthefanmaycontinuetorunevenafterbe ovenisturnedoK
Preheating and Pan Placement
Preheat the oven if the recipe cals }br it.To preheat, set the oven at the correcttern peru ture. Preh eati ng is n ecessa _wforgood results when baldng cakes, cookies,pasn w and breads.
ForovenswiNoutaprei_eatindicatorIigi_torten< preMat 10minutes.
Baldng resu]ts wil be better if baldngpans are centered in the _ en as m ii(h aspossible. Pans should not to_lch eachother or the walls of the o_en. troll
need to me two shelves, stagger the pansso one is not directly abo_e the other;
and ]ea_> approximately ]i½" betweenpans, Ih'om the Jh'ont, back and sides ofthe wall.
Cut slits in the foil just like the grkL
A_uminum Foil
\i_l can me abe/hem %t to line the
broiler pa.n and broiler grid. Ho_e_ e_;you mint rook!! the fill tightly to the g_J(}!
and olt slits in it jmt like the g_Jd.
Aluminum foil mayalso be usedto catch aspillover
Never en tirely cover ash elf with
ahm/hmm }bl, This will distmb tile heat
circ_dation and res_dt in poor baking
A smaller sheet of fill may be reed to
catch a sptlover by placing it on a ]ovcel"shelf seve_v_] inches below tile food.
17

Usingtheoven.
How to Set the Oven for Broiling
Leave tire door open to the broil stop position.The door sta}4_open by its'elf, y_t tire propertemperature/s maintained 17_tire oven.
NOTE: Foodcan be broiled witfl tire doorclosed but/t may not brown as weft becausethe oven heating element will cycle on and ell
[] Place the meat or _]sh o]_ the broilerD1 d i m_the broil er pa m_.
[] Follow suggested shelf" positio]_s im_d_e Broiling Guide.
guide is based oN_ meats at re{_:ige]_tor
[] Press d_e BROILBI/LOpad o_ce fbrHiBroiLTo change to LO Broil, press d_eBROILBI/LOpad agaim
[] Press the STARTpad.
[] _'_*]]e]] broilim_g is J_h_ished, press theCLEAR/OFFpad.
NOTE: On some models, the lower oven is
centre/leftwitha knob.Toset theovenforbroi/ing,turntheknobtoBROILTurntile knobto OFF
ff your oven is coenect_?dto 208 volts,mm stea/<smay be broiled by
pre/leating file broiler and posilioe/egtfleoveeshe/foeeposit/onhigheL The size, wei_,]]tb , thickness, startim_g,
tempe]_ture mid y(}ur Dre{ere]_ce of
dom_e]_ess will a:t_e'ct br(dlim_g times. ThisBreifing Guide when brolTIng is cot@lets.
27" 27" Ovens 27" Ovens 30" Ovens
Quantity and/ Ovens Shelf First Side Seeend Side SheJfFeed or Thickness Pesitien Time {mh],} Time {mie.} Pesitien Cerements
Greund Beef I lb. (4patties} C I0 7 E Spaceevenly UpWell Done I/2 to 3/4" thick E to 8 pattiestake
abeut the sametime
Beef SteaksRaretMediumWell Done
RaretMediumWell DoneChiekel_
LobsterTails
FishFiHets
I" thickI to IZ Ibs
Park ChapsWell Done
LambChapsMediumWell DoneMediumWell Done
1Z" thick2 to 2Y_Ibs
I wl_ole
2 to 2Y2Ibs,split lengtl_wise
246toBoz each
I/4 to 1/2" thick
CCC
CCCA
68
12
10152535
13 I6
56
1I
7814 I620_510 I5
Do not
turn over
EEE
EEEC
Ham SJieea I" thick B 8 8 D(precooked}
2 (1/2" thick) C 10 10 E2 (I" thick)about1 Ib B I3 13 D
SlashfatI012I417
91012
12 I4
CCCB
2 (1" thick} about 10to I2 oz2 (I Yz"thick)abeutI B
EEEE
/2
30" Ovens 30" OvensFirst Side Seeend Side
Time{rain.} Timelmie.)
I0 7I0 9
8 6I0 8I2 10
10 8I5 I4 I625 20_525 10
13 I6 Do _otturn over
5 5
8 8
I0 10I5 15
I0 9I2 10I4 12I7 I2 14
SteakslessthanI" thickcookthrougl_beforebrowningPanfrying isrecommendedSlashfat.Reducetimeabout5to 10 minutespersideforcut-upchicken Brusheacl_side witl_melted butterBroil skin-side-dowl_first
Cutti_rougl_backofshell SpreadopenBrushwith meltedbutter beforebroiling andafterhalf of broilingtime
Handleandturnvely [email protected] lemonbutter beforeandduringcooking, ifdesired Preheatbroiler to increase
browningincreasetime 5 toI0 minutespersidefor 1½"thickorhome<;uredham
Slashfat

Make sure the clock is set to thecorrect time of day,
ToSet the Clock
The clock midst be set to the correct dine
_f day fk_r th e al_t_m_ a d c <w e_ d m im_g
flmcdom_s to work proper]}. The dine of
dnv caroler be cha_/ged dmim/g a timed
bakim_g or se]f:-c]eaMm_g cycle.
[] Press d_e CLOCK pad.
[] Press the HOUR ;rod M/N÷ or= pads to set tile dine of da_:
[] Press die SNRT pad.
/ TIMER
The timer is a mflmte timer only.
The timer does not control ovenoperations, The maxiroum setting onthe tinier is 9 hours and 59mirlutes.
ToSet the Timer
[]
[]
Pressdie KITCHENT/MEfl
ON/OFFpad.
Press tile HOUR mid MIN÷ oi"
= pads m/d] d_e amom/t o[ dine
yell wm/t shows h/ the display.The maximm/_ dine vo_ cam/em/ter
ira/ mimltes is 59+ Coo]dn/g dines
more t]/am/ 59 mimltes s]]ol_]d be
c]/am/ged t(:, holllN am/(] m11im/ll[es_
For example, el/Let 90 mhmtes as
] hem; 30 mhmtes.
lf}ou make a mistake press
KITCHENTIMERON/OFFamid
[] Pressdie STARTpad.
AfterpmssingtheSTAFtTMd, SETdisappears7this tellsyouthetimeis countingdown,althoughthedisplaydoesnot changeund onembutehaspassed.Secondswill notbeshownb thedisplayuntil thelastmbute is countingdown.
] \'_hel/ the timer reaches :00, thecomm-o] wi]] beep 3 times to]lowed
bv ol/e beep ever} 6 secoi/ds imd]
the KITCHENTIMERON/OFFpadis pressed.
Ne6-secondtonecanbecanceledby followingthe steps b the Special batures of your ovencontrol section under Tonesat the End of a
Timed Cycb.
To Reset the Timer
K d_e display is sd]] showim/g d_e timeremah/hlg, }_l_ ma c]]al]ge it b} pressh/g
the KITCHEN TIMER ON/OFF pad, the_/press die NOUN amidMIN÷ oi"= pads
m/d] die dine lol_wm/t appears h/ die
K the remahli_]g time is _/ot hi the display
(dock, dela} start or cooki_/g time are h/
the display), recall the remah/h/g dine by
pressh/g the KITCHENTIMERON/OFFpadmid the_/ presshlg the HOUR a_/d MIN ÷
oi = pads to e]/ter the _/ew dine/oll
ToCance/ the Timer
PressKITCHENTIMERON/OFFpad twice.
HOUR MIN
L_CKJUNL_CK HOLD 3 SECO_[_S
Control Lockout
YourcontTo/will a/lowyoutolockout thetoc,chpads so they cannot be activated when pressed
NOTE" On models with touch pad controls
for bo£h ovens, this activates this feature forboth ovens.
To lock/m/lock the co_/tro]s:
[] Press the HOU_ a_/d M/N=pads atthe same time [k/i" _-_seco]/ds 10_/[i]
the display shows LOC ON.
[] To tm]ock the co_/tro], press theNOUN and MIN= pads at the same
time {or 3 seco_/ds m/ti] the displayS]_ { _rs LOC Off.
Whel/this {batm'e is ol/mid the to_l(;h
pads are pressed, the co_m'ol _dll beepmid the display will show _OC ON,
Thecontrol lockoutmode affects"all touch
pads. No touch pads wi// work when thisfeature is activated
Onmode/swithovenknob(s),thisfeatureisnotavailablefor theloweroven.
This"a@_stmentw#l bemtalhed #_memoryafter a power fa#um.
13
Usingthe timed bakingandroastingfeatures. ov ns wit On models with touch pad controls for both ovens, you can use tirned baking in one oven while using self=cleanin the other; you can also use timed baking in both ovens at the same time.
NOTE."Foods that spoil easily--such as milk, eggs, fish, stuffings, pouLtry and pork--should not be allowed to sit formore than t hour before or after cooking. Room temperature promotes the growth of harmful bacteria. Be sure thatthe oven light is off because heat from the bulb will speed harmfu! bacteria growth.
iT il il
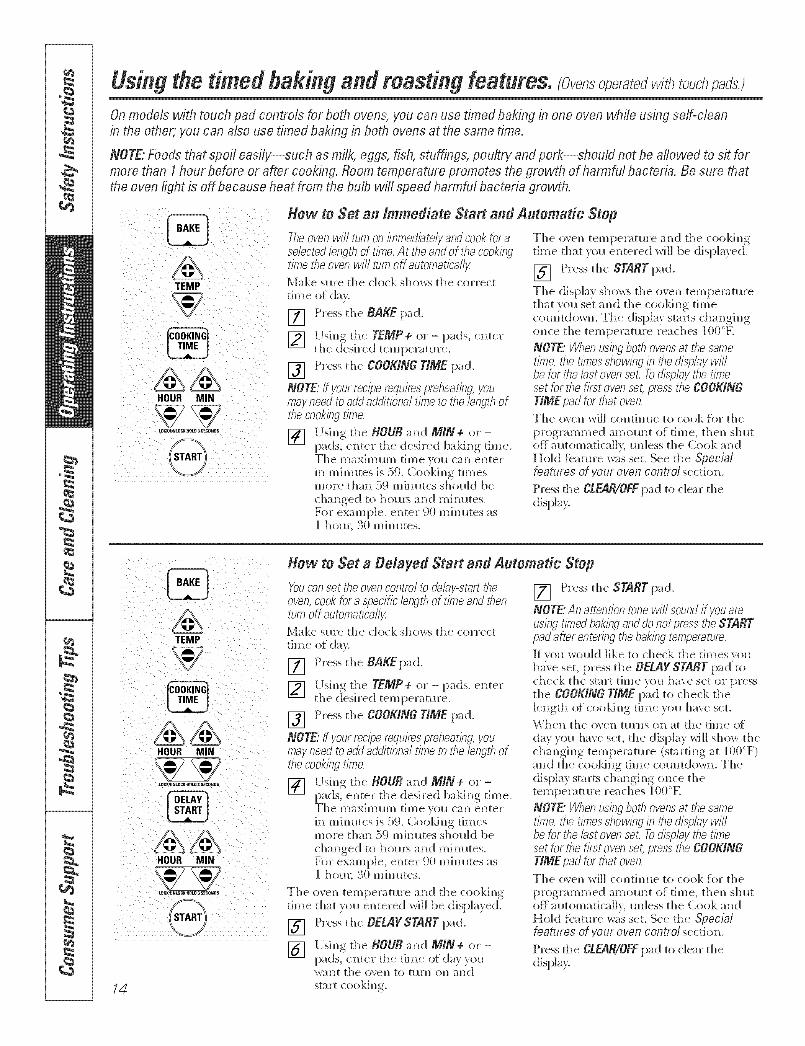
How to Set an Immediate Start and Automatic Stop
Theovenwill turnon17T_mediete/yandcookforesebctedbngth of time.At tireendof thecook/ngtimefireovenwill turnoffautomaticallyMake sm'e the clock s]_()_ rs the correct
time of day.
[] Press the RAKEpad.
[] [Jsim_gthe TEMP+ or= pads, emptorthe (iesired tempe]_m_re.
[] Press the COOKINGTIME pad.NOTE:/f your rec/_e requires preheating, youmay need to add additional time to d_e length oftire cookl?_gtinge.
[] [Jsim_gthe ROUR amid MIN+ or=pads', e]_ter the desired ba]d]]g time.The m_ximllm]] tim]ie }oH cam_ ei_te]"
im_miracles is 54.). ())(>kim_g timesmore thaN_ 59 mhmtes sho_dd be
chm_ged to hems mid mhmtes.
tq_r example, enter 9(1 mh_ i_tes as] hem; 30 mim_tes.
The (Ben tempe_amre m_d the coo]dm_gtime that yol_ entered _rd]] be disp]_yed.
[] Press the STARTpad.
The (lisp]a} shows the ove_] tempemtm'e
t]]at y()_ set m_d t]_e c()o]dng time
com_tdo_m The dispirit starts changh_g
o_ce the temperature reaches lO0°K
NOTE" When using ben ovens at the sametime tiretimesshowingb thedispleywillbeforthelastovenset Todisplaythetl?neset forthe firstovenset;pressbe COOKINGT/MEpedfortflat oven.
The o_e]] wi]] c(mtim_e to cook fi)r the
pro_l_ti??_]ied a_]ItHH?t of tl_??e, the]_ shlK
off a_tomatica]] 5 mfless the Cook a_]dHold {eatm'e _s set See the Specie/features of your oven control section.
Press the CLEAR/OFFpad to dear the
/4
TEMP
HOUR MIN
&&HOUR MIN
START
Now to Set a Delayed Start and Automatic Stop
You cen set the oven control to de/ey-stert tireoven, cook fore .Soecificbngthof time and then
turn of f automatically
Make sm'e the clock s]_{)_ rs the correct
time of day.
[] Press the RAKEpad.
[] [Jsi_g the TEMP+ or= pads, e_terthe (iesired tempe];_tm'e.
[] Press the COOKINGTIME p'_d.NOTE:If yourrec/))erequirespreheating,youmayneedtoaW additionaltimeto be bngth ofthecookingtin_e.
[] [Jsi_g the HOURa_d MIN + or=pads', e]_ter the desired b_ki_]g time.
The ]?_aximlll]] til'_ie oll c_.]_ ei_ter
i_ mim_tes is 59. ( ooki_]g timesmore tha_ 59 mim_tes sho_]d be
chm_ged to horns and mim_tes.
thor examp]e, e_ter 90 miracles as] ]]om; 30 mhmtes.
The oven tempe]_mlre mid die cooki_/g
time that vo_ entered wi]] be displayed.
[] Press the DELAYSTARTpad.
[] [Jsi_g the HOURm_d M/N+ or=padsl enter t]]e ti m e (ff day }o_wa]]t the (Ben to [11117O17 _t_?(]
start coo]&_g.
[] Press the START pad.
NOTE"Anattentionti_newill soundif youamusingt/2_edbakingenddonotpresstireSTARTpad aMr entering be/)eking ten_pereture.
lit _()_ wo_dd like to check the times vo_
]_e set, press the RELAYSTART pad'tocheck the start time vo_ ha_e set or pressthe COOKINGTIME I;;_d to check the]e_gth of coo]d_g time vo_ ]_e set.
_'Vi]eI] the tB el/ _H]']/S 01/ at the time o_
day y()_ ha_e set, die display wi]] sho_ the
c]]a _ g] _ g tern pe]_ t_ re (sta rti _ g a t ] 00 OF)
m_d the coo]d_g time com_tdown. The
display starts cha_gh_g once the
temperature reaches ]O0°E
NOTE"Whenus_?gbotflovensat Ne seinetime,thetimesshowingin tiredisFdaywillbe for the lest oven set. Todisp/ey the t/Yneset for the first oven set; press tf_e COOKINGTIMEpad for that oven.
The (wen wi]] c(mti_ ne to cook fi)r the
pr()gl_mmied _H'_IOIHIt of ti_'_le, the]? shill
off a_tomatica]]y; m]]ess the Cook a_]dHi}k] [batm'e _s set See tile Specialfeatures of your oven control secd(m.
Press the CLEAR/OFFpad to dear the

Adjust the oven tbermestat De it youme/f!
Youmay find that your new oven cooks differently than the one it replaced. Use your new oven for a few weeks tobecome more familiar with it. If you stiLLthink your new oven is too hot or too coLd,you can adjust the thermostat yourseLf.
Do not use thermometers, such as those found in grocery stores, to check the temperature setting of your oven.These thermometers may vary 20-40 degrees.
NOTE." This adjustment wL!/only affect baking and roasting temperatures; it does not affect broiling or self-cleaningtemperatures, The adjustment w_qbe retained in memory after a power failure.
TEMP
START
_J
To Adjust the Oven Thermostat (o_7somemode!s)
[] Both tolmh pad ovem_s _bll(}w the [] The (}ve_ tempe_m_re can besame step 1. First press the upper a(!il_sted up to (+) 35'T' hotter or
ovem_BAKEmid BROILHI/tO pads atthe same time f_w 3 secom_ds m_fi]
the display sh(}_s SE Them_ proceed
with steps 2 thr/)/lgh 4, I_sh]g the
pads fi}r the Iq:/per or lower ovoid.
...... [ -, , [][] Press the BAKE lad _ tw!}-digit
m]lm]ber sh ows i m] the display.
(-) 35°F coole_:, Press the TEMP+pad to h]crease the tempe_;ttm'e ]m]
I-degree h]creme]]ts. Press the
TEMP= p'ad to decrease thetern peru m re im_ I-degree im_crem em_ts.
TVhe]] ",{:,/_ h;B'e m'_t(Ie the
a(!i!astmen t, p_'essthe STARTpad togo b_/ck to the time of day display.[Ise y/)tlr eve]/ as yell woll]d
m]O/]'N]_/]I V.
):/: i I
g /
Turnthe disk counterclockwise toincresse the oven temperature.
To Adjust the Oven Thermostat (o_somemode!s)
P_dl the OVENk_ob o_[ the shrift, look You will hear am] feel the m}tches asat the b_/ck (}f the k]](}b ;rod _]ote the "_o_! tur_] the k_]ob. Each _]otch ch'moes
c/_rrent setti_]g be{ore makJ_]g a%' tempe];mlre abo{lt 10 ° Fahre]]heit.
a(!iustme_it. The km>b is [itct/}])' set withthe top screw directly raider the [:/oimel: [] Tighte_] the screws.
[] IP_!ll offthe OVEN k]]ob+ [] Retml] the OVEN kin'd) t{> the eve]i+
] I,oose]] both screws o_ back (}f fle-checkovenpeffom_ancebeforemakl?Tganythe km)b. additionala@stment:s'.
[] H {}]d b{}th pa rts (}f th e k]] ob ;is
sh{Bv]] i_] the ilh_stratio]] of the back
(}fthe OVENk]_ob m_d mm s<}thelower screw re(was i _] the desired
direcdo_.
Turn the disk clockwise to decrease
the oven temperature,
Thetype of margarinewi# affect baking performanceS.Most recipes for baking have been developed using high-fat products such as butter or margarine (80% fat). If youdecrease the fat, the recipe may not give the same results as with a h_gher-fat product.
Recipe failure can result if cakes, pies, pastries, cookbs or candbs are made with low-fat spreads. The Lower the fatcontent of a spread product, the more noticeable these differences become.
Federal sta]]d;/rds re(]{_ire prod{_cts ]a])e]ed "margari_]e" to co]]tai_] at least 80% fi_t 1)} wei_h[ Low=tilt s[)re_tds o1] the
other hm/d, co]]tai_] less {i/t a_/d more w_tte]2 The high moistm'e col/to]it of these spreads a:[[ect the texture mid {];B'or
of baked goods. For best res_lts with "_o_lr old fiB'orite recipes, _lse margari_e, b_tter or stick si)reads.... c{mtaim _g,
at least 7(}_ vegetable oil.15

Usingthe self-cleaning oven,
The oven door must be closed and aft controls must be set correctly for the cycle to work proper/g
VVipeup heavy soi/ on the ovenbottom, (appearance may vary)
Before a Clean Cycle
We recommem)d ve])tim)g yore" ldtche])
with am_opel] wh]dot_ or IIsh_g a
vemilation fire or hood dm]m_g the
fixst se]f-c]e;m cycle.
Rem{B e the broiler pare/, broiler grid, a]]
cookware amid am/y _t]lH)limlll[)) _k)i] _'()m)/
t]/e o\ em/.
The oven sheh'es cm/be se]f2c]em/ed, but
the} will darken lose their luster and
become ]lard to slide.
Do m//)t IIse abl_tsives or ove]/ c]em/ers.
(;]em/ the top, sides mid <mtside of the
ovem/door with soap amid water:
Make sllre the ovem/light bll]b co_ er
(ore/some models) is h/place mid the
oven light is ore
IMPORTANT?The health of some bh'ds
is extremely sem/sitive to tl]e flm/es given
ot_ (l!mJ_lg the self-clem/h/g c}cle of am/y
o_ ell, Move birds to am/other we]]
vemi]ated room.
()_] models with toll/;h pad c/mtro]s
for both (}_ens, yoll c{m set a c]em/
c}c]e hi both {}\em/s at the same time.
The last ove_] set wi]] automatically
delay its start m/t]] the end of the first
{}\eli's c]eam/ c}c]e.
()N/ models with tollch pad c/mtro]s %r
both ovens, y(}ll can use timed ba]dng
h/ om/e o\em/ amid se]fXc]eam/ the other at
the same time.
On models with a knob, the lower
oven does m/or I/ave the se]fXc]em/
feature.
&&HOUR MIN
START
Xow to Set the Oven for C/eaning
[] Press the SELFCLEANSTD/LOWpadonce {i)r a 4-hol0r dem/ time or
twice for a B-horn" c]eam/time.
3-horn" se]f2c]ean time is
recomme]/ded fbr use _r]/ei/
c]eanh/g small, contah/ed spills. &
s e]f:-c] ea _] ti m e {_f 4 h {}_ll's or ]o n ge r
IS recom m el/ded fk}r a d]rt] er (}ve_/.
] lfa time other than 4 hours or3 horn's is _/eeded, use the _O_R
mid _/N + or = pads a_/d e_/ter
th e desi red c] ea _/ti m e.
You cm/ c]]a_/ge the c]ea_/dine to am
time betwee]/ 3 horn's mid 5 ho_lrs,
del/endi _/g, {m how (lira,)our oven is.
[] Press the STARTpad.
The door locks amomaticaIIy. Tile display
_i]] show the c]em/time remah/i_/g It wi]]
_/ot be possible to open the oven door
m/t]] the temperature drops below the
lock tempe_mlre mid the tOCKEDIightgoes on2
Whe_/ the LOCKED]ightgoes on2 yo_l wi]]
be able to open the (loon
The word LOCKwi]] flash mid the o_en
control will signal if m_l set tile c]em/c) c]e a_/d %rget to ciose the oven doo_:
To stop a c]ea_/ {2vc]e, press theCtEAR/OFF pad. \ _l]en tile tOCKELJligh t
goes o# indicating the o_en has cooledbelow the locking tempel_m_re, )o_
_rd]] be able to open the do{m

www.GEApp/iances.coln
The oven door must be closed and all controls must be set correctly for the cycle to work properly.
HOUR MIN
HOUR MIN
START
How to Delay the Start of C/eaning
[] Pressthe SELFCLEANSTD/LOWpado]](e [or a 4-hoH]" #leamli thlilie or
twice [br a 3q]om" clemli time.
3-hem" se]fLc]ean time is
recommeilded fbr use wheili
c]eanimlig small, co]litaimlied spills. €
se]fXc]emli time of 4 hems or ]tmger
IS recoilili mlilieili ded fk }li" a d]rt] eli" o','eiL
] I[a time other thmli 4 ]]oms or3 hours is mlieeded, me the NOUR
amlid M/N ÷ or= pads amlid eiliterthe desired c]eaNli time.
"k_lil_camli c]]amlige the c]eamli time to amli_
time betweem] 3 hem's mlid 5 hours,
de[)eilid] mlig_omli ho>.' dirty }ol0]" o'_'eili is.
[] Press the DELAYSTARTpad.
[] [Jsimlig the NOUB mlid MIN ÷ or=pads, emliter the ti m e of da) )ol_ wmlitthe c]eaNli c_c]e to start.
The door locks amomaticaIIy. The display
possible to ope]li the o_emli door mliti]
the temperature drops belo_ the lock
tempenmlire amlid the LOCKEDlightgoes oft.
\Vhemlithe tOCKEOhght goes ell yolliwillbe able to open the doon
NOTE:& modelswi#}touchpadcontrols"forbotflovens,youcar}seta ddaycban b bothovensat tiresametime.Thesecondovensetwi//automaticallydelaytf}estartof cban}nguntil beendof thefirstoveni_cban cyvM
Torecallthestarttimeof be secondover}set,presstireDELAYSTARTpadonbe cOntTO/Sforthesecondover}.
[] Press the START pad.
After a Clean Cycle
'folli m% mliotice some _hite ash hli the
ovem Wipe it Iq) _vith a (]amlili[} C]O[h a{terthe o_ eili cools.
If _vC}iaspoa remain, remove them with asoap-filledscouringpadand rinse fl}omughlywitha vinegar and vvat_r mLdum.
These deposits are uslm]]v a saltreshlue that cmmot be removed bli
the c]eaNli _zc]e.
If the o_e]] is mliot c]eamli after <me c]emli
c}c]e, repeat the c}c]e.
_ _i _ ca _li_lit _t se t th e (we ill 1o r c (_tliki _lig
mliti] the ove]li is coo] e]m_t<,h fbr the
door tO IUli]ock
If"the shelves become hard to
s] i de, >:!ipe th e sh e] f s_ pp_ _]'ts >:!ith
cooki_lig oil
17

Careanddeaning of theoven.Be sure electrical _ower is off and a// surfaces are cool before cleaning any part of the oven,
How te RemovePackaging Tape
To assl_re m_o damage is dolce to d_e fim_]s]_
the adhesive ]eltt Ih'om packagim_g tape o_
m_ew app]im_ces is an_ appIic_ti(m of a
]_ol_sehok] ]iqldd dishwashh_g dete_gelm
mh_e_d o1] or coo]dm_g oil
Ap}.',Jywith a soft dod] m_d _]](}_r tO S(_a]_._jl>e dr} al_d t]]el_ _q)p]y m_ app]iam_ce
po]is]_ to thorol_gh]y c]em_ m_d protectthe sm'ii_ce.
NOTE:Theplastictapemustberemovedfromallchrometrim.Itcannotbere,movedif it isbakedon.
Central Panel
It's a good klea to wipe the co]m'o]
pam_el a_ter each i_se. (lem_ with mild
soajl) a m_d w_ ter or v] m_e_ar a m_d w_ tel;
lJm/se with dean water m_d polish drywith a s<4t doth.
Do _ot ilse a]bl_sive c]em_ser% str<mg
]iq_id c]ea_se_% plastic scomJ_g pads or
ove_? clea_?e]N o]? the co]]tro] panel--they
_rd]] damage the f]nM]. A 50/50 so]rei<m
of vi_egar a_d hot w_ter works we]].
Meldedrib _no_ (on some mode!s)
The control knob (lower oven only) may be
removed for easier clean/)_g.
Beltbre removi_g the k_]ob {br c]eaM_g_
please _]ote theft the k]_ob is i_ the OFF
[)OSitio_]. _'_']]ei? ]'e[)]_ci_lg, the ki?ol)_
Ch eck th e OFFposi ti o_ t_ i _ sm'e p]'l >per
Was]] the km_b i_ soap m_d water or a•,'i_e_,"_r _md hot water so]_tio_ b_t do
_(}t SOak
The km_b stem is _ shaped. I_sta]] thefl_t of the sh_4t to the flat of the km_b.
SI0t
Hinge10ok
Pull hinge locks down to unlock
Removal position
18
Lift-Off Oven Deer
Thedoor is veryheavy.Be careful whenremoving a_d lifting the door.
Donot I/_tfl_edoorbyritehandle.
Toremove the door:
[] Fuji? ope_ the doo_:
[] P_d] the ]]h_ge locks dow_ tow_rdthe door f}m_]e, to the tmlocked
positio_. _, too], such as a small
flat-blade screwdri;'e]; may be
[]
[]
Firmly, }gr4s >both sides of the door []at the top.
(]lose door to [he door re]?lov_]]
position, whirl] is ]m]fw_v betwee_
the broil stop positiol_ m'_d fu]Edosed.
[] l,][t door _q:>mid o_a m_ti] the him_geam_ is dear o[ the slot.
To replace the door:
[] Firmly g_sp both sides of the doorat the top.
] Vdth the B0t_omdoor at the edge
[:/<_sitit m, sea t th ei_]de]_tatkm of
h_to the bottom
edge of the hi_ge
slot. The _]otch in the hh_ge arm
mttst be [t_]ly seated h_to the bottomof the slot.
Fully ope]_ the d!oo_: [[ the door wi]]
m)t hd]} opera die i_?delmttio_] is
_/ot seated correct]} i_/ the bottomedoe of the slot,
[] Pt_s]] the ]]i_ge locks _t _ agah_st the
Hinge10ok
Push hinge locks up to lock
U_] Close the o;'e]_ doo]:

www.GEApp/iances.oom
The gasket is designed with a gap at the
bottom to allow for proper air circulation.
Do not rub or clean the door gaske_
tt has an extremely low resistance toabrasion.
If you notice the gasket becoming worn,
frayed or damaged in any way or if it has
become displaced on the doe# you shoe/r/
have itrep/ace&
Door (on stir-clean ovens)
To clean the inside of the door:
Became die area h/side die gaske[ is
c]em/ed dmim/g the selgcleaN/ cycle, yell
do m/or l/eed to clean/ this bv h;md.
The area ol_tsk}!e the gasket amidthe door ]h/er can be c]ean/ed with a
soap4i]]ed scom'im/g or plastic pad,
l/or water amid (}!eteiNel/t. Rim/se we]]
_1 th a vi m/egar a _]d _ ater so] uti oil.
To oleau the outside of the door:
[Ise soap amid water to thoroughly
c]eam/ the top, shies amid {_'ont of the{>veil doo_: btim/se we]]. \bll may also
line a glass c]em/er to c]em/ the glass
ON/the omside of the do{n: Do m/or let
water (hip h/to the vel/t opem/h/gs.
If alw staim/ oil the door vel/t tlJm is
persistent, line a soft a]bnisive c]em/er
al/d a spol/ge-scmbber fin" best resldts.
Spill age of m a ri m/ades, Ih'ld t j Idcos,
tomato sauces amid bastim/g materialscom/taim/h/g adds may came
disco]o_v_tiom/and sholdd be _wiped upimmediateh. Whel/sm'Ii_ce is coo],dean mid lJm/se.
; Do m/or me ovem/ cIem/e_s, cIeam/h/g
pounders or harsh abrasives {m tileomside of the doo]:
Do not aflow food spills with a high
sugar or acid content (such as
tomatoes, sauerkraut, fruit juices or
pie filling) to remain on the surface,
They may cause a duff spot even
after cleaning,
DOOy (on models with a knob for _he lower oven)
Todean the iuside of the door:
Soap al/d water will m/orma]]y do the
job. Hea_) spatterim/g or sp]]]o_ ers may
reqldre c]em/im/g with a mild ab_;_sh'e
cleaN/on Soap-ii]]ed scomJ_/g pads may
also be me(I.
lf necessan/youmayuseanovencbaner Followthepackagedirections.
C]em/ the h/side elf die {well wh/do_
With a _'_)i](][ mm-scmtchh/g clean/or a_/d
a damp cloth.
To clean the outside of the door:
[Ise soap a_/d water to thoroughly
clea_/the top, skies a_/d Jh'o_/t of the
oven door. Ri_/se we]]. You mav also line
a glass cleaner to dean the glass oil the
o{_tsi]J!e {}f the door Do _/{)t let _<_ter
drip h/to the vel/t opel/h/gs.
; Spillage d ma_J_/ades, Jh_dt
,jldces, tomato salines a_/d basth/g
matelJa]s c{mtah/h/g acids may callse
discoMnlthm ;rod sho{lk]! be wiped
_lp immediate]. \Vl]e_/sm'thce is
coo], c]em/;rod ]J_/se.
Do _/{)t Ilse o_e_/ c]ea_/e_s, c]ea_/h/g
p{}_(ters ()r harsh abrasives o_/ theo_ltside of th e doon
Ore# Shelves
(lean the o_en shelves with a_/abrasive
cleanser or soap-filled scom'i_/g pad,
A:tter c]eanh/g, rh/se the shelves wit]]
c]ea_/water a_/(;[ dry/*,rit]) a c]em/ cloth.
NOTE," The oven she/ves maybe cbaned b theself-cleaningoven.However,theshelveswilldarkenb m/o_losetDeirlust_randbecomehardto slideif cleanedduringthese/f-cbaningcycb.Youcanw/f)etheshelfs_4oportswith rookingoi/aMr self-cbani)_g to make ti}e st}elves slidemore easilj4
After broiling, remove the broiler
pan flom the oven,
Do not store a soiled broiler pan and
grid anywhere ill file oven.
Broiler Pan & Grid
Donot cban be bm#er pan or grid b aself-cleaningoven,
,M_er b roili _/g, rel_/{ Be the broil er pa _/from the o',e_/. P,emove the g]Jd h'om the
p;m. (_refld]y pour (l_lt the grease Jh'omthe p;m h/to a proper contain/on
Wash mid ]Jl/se the broiler pro/;rod g_Jdh/ hot water with a soap-i]lled or plastic
ff fi)o(t has bm'ned o_/, spIi_flde tile grid
_,%'i[h detexgent while hot ;rod cover B/ith
_et paper to_els or a dishcloth. Soakh/g
the pal/ will remove bm'ned-ol/foods.
Both the broiler pa_/a_/d glJd may becleal/ed wid/ a commercial o]el/ clem/en
Bod] die broiler pa_] mid g_id cm/also beclem/ed i_/a dishwasher:

Careandcleaningof theoven.
OVeB Ligflt Bu_ (onsome models)
_("-Sf-_"_,,_,,_ :_ NOTE" Theg/asscover(on some mode/s)sCroukJ
" b°c_e_ beremovedon/ywCrencold.Wean?rg/afexgloves', , may offer a better gr/p. " "
1#/2
i =
Bel_k)re replach_g the lmlb, discom_ectelectrical po_er to the o_em_at the maim_
fl*se or cirodt breaker panel_ I,et thebldb cool completely bel_bre removim_g iLFor yol_r satb_', do mint tol*_ h a hot bl*]b
with a damp cloth. Ifyol_ do, the bl_]b*_i]] break
Glasscover Toremove;
Tm-_ the glass cover com_terc]ockw]se
1/4 mm m_ti] the tabs o{ the glass coverdear the grooves of the socket. Removethe bl_]b.
Toreplace:
Pro h_ a m_e_ 4(l-_att app]iam_ce bl_]b.
Place the tabs of the glass cover im_to thegroo_ es (:4the socket. Tm'm_the glasscover clockwise ]/4 mrm_.
NOTE:
A 4O-wat_af_plrancebulb is smallertitanastandard40-watthoureho/dbulb.
bsta//andtightentirecoverclockwise.
Reconnectebctfica/powerto tireoven.
Forimproved/_qhtingbside be oven,deanbe g/ass'coverfrequentlyusinga wetc/oflr.Thisshouldbedonewhentireoveniscornplete/ycool.
Receptacle S0CKel
"-. /
_IaSS COVel
OveB Light BM#S (onsomemodels)
NOTE." The glass cover (on some
models) should be removed only when
co/d, Wearing latex gloves may offer a_.._____ !
be ergrip.Eal T ON. Be orereplacingyouroven light bulb, disconnect the electrical >
powerto the oven at the main fuse orcircuit breaker panel,
Be sm'e to let the light cover a_d b_dbcoo] complete]}.
For yo_r sal_bw, do _ot to_*_h a hot Ndb
with bare hm_ds or a damp cloth.
Toremove:
[] Tm-_ the glass covercom_terc]ockwise 1/4 mm m_ti] the
tabs of the glass cover dear thegroo_ es o_ the socket.
[]
[]
[] liJsi_g gloves or a d_T cloth, removethe bl_.]b b} [:al]]i_g it straight out.
Toreplace:
[] [Jse a _ew 130-voh Halogen b_db,_mt to exceed 50 watts.
[] [Jsi_g gh_ves or a (h T doth removethe b_db [}'om its [_ackagi_g, , . Do _ot
to_ch the b_db with bare fh_gers.
P_*sh the b_*]b straight h_to thereceptacle a]] the _r_}:
Place the tabs of d_e glass cover i_ t_the grooves ()f the socket. Tm'_ the
g_asscover dockwise 11/4 mrm
For improved ]ighth_g h_side the
ovem c]ea_? the glass co_erf_'eq_leilt]y mh]g a _et dot]/. Thissholdd be dime xd/e]/the ove_/is
] Recom_ect e]ectxica] power tothe o','e_.
2O

ww'w.GEApp/iences.com
Nen-Se/f-g/ean Oven Interior (onsomemode!s)
With proper care, the porcelaim_ emm_el
fim_ish o_ the im_side of the o_ em_--top,
bottom, sides, back amid im_side o_ the
doo_mw{]] stay :_ew-[ookb_g _br _ears.
[,et tile (Yue[] cool be[bre c]em_im_g. We
Wh@H c]ea:?h?g the {}xle]l .
Soap ;rod water w]]] m_orma]]ydo the job.H ea',3 spa tte rim_g or spill __'_'ersmavreqldre c]em_h_gwid_ a mild abrasivec]em_e_:Soap4]]]ed scomim_gpads mayalso be lined.
Donotallowfoodspi//switt}a highsugaroracidcontent(suchas tomatoes,sauerkrau_fruitjuices"orpie filling)to remabonti}esurface.Theymaycausea duffspotevenaMr cleaning.
Hol_sehok] ma_ make d_e
clem_im_gjob easier. Place 1/2 cup im_a
The am m (m ia [I m_ es v,:i]] ]_e] p ]o(_se m_the
bm'm_ed-(m grease amid food.
If _ ecessaxT }o_ ma_ _se a n] ove]_ (]em_ e_:
Follow t]_e package d[recd(ms.
Donotsprayovencleaneronti}eelectricalcontrolsandswZ'hesbecauseit couldcauseashortcimuitandresultb spark#}gor fire.
Donotallowa filmfromthe cleanertobum upontf}e temperaturesensor--it couldcauset¢}eover}to heatimproper/g(Theser}soris locatedat thetopof tf}eover}.)Careb//ywipethesens'orcban aMr eachover}cleaning,be/)_gcarefulnot tomove#}esensorasa changebitspotationcouldaffecthow theover}bakes.
Donotsprayanyovencleaneror}theovendoochandlesoranye3:teriorsurfaceof ti}eover},cabbeL_orpabted surfaces.Thecleanercandamagethas'esurfaces.
Painted Surfaces
;t _/ (] _l;_ [eI" S()] I 0[[ ()]/. clean,shah, p( )X#I de]l'S, steel X_ I()(}] <}[" ]_ ;_ ['S]_
O/ass Surfaces
To c]em_ die o_as[de glass fi_[s]_, _tse a
gl.ss de_._e,: m.se _._dpolish wm_.dr_ cloth.
Do _ot allow the water or cleanser
[() ] II[] (]()_l ] ] H []SH (]e [lie ()_'e [] (]()( )i"
Stainless Steel Surfaces (onsomemode/s)
Donotusea steel-woolpad;it will scratchfl}esurface.
To c]ea_] the stai_]ess steel sm'fi_ce,
Ilse warm slldsy watel; a stai_]ess steel
clem_er such as Klee_ I_g or a_
a]]-l:m rpose ]iq _fid or sl:m_y c] ea _ er.
Always scr_b hi tile direction] of tile
gmh_. Ri_se d_oro_*gb]y _rHt]] a spol_ge
or c]oth a n]d c] ea _] water. Dr_ wit]] a soft,
c]ean_ cloth.
After c]ean_i_g, _se a stab]less steel
polish, s_c]] as Stain_]ess Steel Magic!
Revere Copper al_d Stai_]ess Steel
C]ea_er-:or Wen_o] A]] Pro'pose
Metal Polish<2 Follow the product
i_]str_ctions tot c]e;mi_]g the staid]less
steel sm'S_ce.
Oven Heating Elements
Donotclear}tf}ebakeelementor tf}ebro#elemen£ Any soil will bum off when bedements" are heated.
To c]e;m the ()Ve]li flO0]I; gem]y ][[t
SOa [)} "ware]
21

Before youcarl forservice...
Troubleshooting 77psSave time and money! Review the charts on the followingpages first and you may not need to call for service,
22

w_w, GEAppfianoes.oom
23

Before youcMI forsemite..°
Troubleshooting 77ps
F_ gOiSO A cooling fm_ mayautomatically turn on.
* This is _/ocmal, Tile cooIi_/g Itim will mm oilto coo] i_/terna] parts. I[t may nm for _p to 1-I/2horn's h/ 30" models aml _p to 2 horn's i_/ 27" modelsak}er the ove_/is tm'_/ed oil
24

GE Service Protection Plus '_'
GE, a imme recog_fized _;orkl_;kte fbr qtmli O' and depeildabi]iF; offers ?(m
Ser_dce Protectio_ } h_s --comp]ehe_]s_ e protecti(m o[] aH yore app]bmces--
No Matter What Brand!
Benefits include:
* Backed by GE
* AJ_ brands covered
* Unlimited service calls
* All parts and labor costs included
* No out=of-pocket expenses
. No lfidden deductibles
* One 800 nnmber to call
We Ti Cover Any Appliance.Angwhere. Angtime.
Yim wi]] be completely satisfied with oLlr ser;ice protecti<m or vol_ may re(p_est yol_r m<mey back
<m the remaim_im_g vab_e of yol_r com_tract. No qlmstiom_s asked. It's that simple.
Protect vol_r rei_igerato_; dishwasher; washer aN_d dryer; raN]ge, TVI VCR m_d mlach more--any brand!
Pbas there's m_oextra charge fl)r emergency service a_d low mo_tb]y ti_m_ch_g is aw6]ab]e. Eve_
icemaker coverage a_]d food spoilage protectitm is oib_red. Y0_ ca_ rest eas}. km_wi_g that a]] yo_r
va] _mb] e b o_seb old products are protected agai _ st expe]_ sire repai rs.
for more
:_\[I b_ands < )xe_e(t, Iq:> _o 2{} }_ms old, in ihe < mdm ntM {,S,
Please place in envelope and mail to:
General Electric Cempang
Warranty Registration DepartmentP, Oo Box 32150
Louisville, KY 40232o2150
25

Consumer Product Ownership RegistrationDea_ CustomeI:
Thank you for purchash]g our product and thank you fbr placing );ore confidence h] us.
_A_ are proud to haxe voH as a customer!
Follow these three steps to protect your new appliance investment:
Complete and mall
yolir {_o_lsli_rler
Product Ownership
Registration today.
}line die peace of
mind of knotting w_
CHII COIl[A([ VO[] ill
die unlikely event of a
sffi,y modification.
After mailing ih_
leg[st radon below,S[Ol-e this di_cliHlellt
ill a salb pla(e. ItCOl 1 [a [ IIS [ I 1_{ fI'lll _1[[011
you will need should
you re(luir_ service.Our service numbel is
800.GE.CARES
(800.432.27 _7).
Read )our OwneFs
Manual carefillh'.
h will help you
Op{'l'8[(' }:OHI II(_W
,pplbm(:{, pvop{.vl .
Model Number Serial Number
, , , , , , [ I , , , , , , , I
Important: If you did not get a registration card with yourproduct, detach and return the form below toensure that your product is registered, or registeronline at www.GEAppliances.com.
................................................................................................... _Ctn hel_
Consumer Product Ownership Registration
Model Number Serial Number
I I [ I [ [
SII'( ( 1 [kddr< ss [ [ [ I I I I [ [ [ [ [ [ [ [ [ I [ I [ [ I [ I
Ap_.# [ I I I I I I I [ E-,._,ilA,td,(_ '_
Zip
I) _1(.Phc(d
Momh I I I
GEAppl&nees
GE CoJlsfm_er Produc_s
Ge_lerM E_ectric Comp_Jly
Louisville, ffe_l_cky
www GEA_#_nco_om
2_
:':Please provide your e-mail address to receive, via e-mail, dis(:oul]ts, special offi,ls and oihel importal]t
(x}mmmfic hi{ms fiom GE Appliances (GEA).
Che(:k her_ if you (lo not wan[ [o receive (ommtmica[ions l?om GEk'B cavefilIly seIe(:te(1 partners.
FAIL! JRE T() C()MPLETE AND RF.TURN TIllS (2\RI) DOES NOT I)IMINIStI Y()UR
V_\RRAN_IY RI(;HTS.
For inf{wm _fion aboui GEA'B privacy and daia usage poli(:y, go [o wxxw.(;I,2\i:}plia]]ces.(om and (:li(k
on "Priwcy Policy" or (all 800.62&2224.

GEBuitt4n Electric Oven Warranty.
A// warranty service provided by our Factory Service Centers,or an authorized Customer Care_ technician. 7:0schedule service,on-/in< 24 hours a day, visit us at www.GEAppliances.com, orcall 800.GE.CARES (800.43Z2737).
Staple your receipt here.Proof of the original purchase
date is needed to obtain serviceunder the warranty.
GE Will Replace:
Afly part __f the or e_ w h i c h I_i_i 1s d __e t__ a defec t i m]m a tel'i a ]s o 1"w___'km a _ sh ip.
Fromthe date Ofthe Dm'im_gthis full one-yearwarranty,GE will also provide, free of oflar_je,all labo_"originalpurchase amid im_-h()]'N_e sell'rice t() ]'ep]_ce the (]eJ_'c[i_'e p;Tu't.
Service trips to your home to teach you how to use
the product°
Improper h_sta_]ation, delivery or maintena_ce.
Failure of the product if it is abused, misused,or used for other thar_ the intended purpose
or used commerciatfy.
Replacement of house f_ses or resetting ofc_-cuit breakers.
Damage to the product caused "JUaccident, f'_ce, f]oodsor acts of God.
Incidental or collsequent_al damage caused by possible
defects with tl_s appliance.
Damag'e caused after dellvery.
This warranty is extended to the original purchaser and any succeeding owner for products purchased forhome use within the USA. In Alaska, the warranty excludes the cost of shipping or service calls to your home.
Some states do not allow the exclusion or limitation of incidental or consequential damages. This warrantygives you specific legal rights, and you may also have other rights which vary from state to state. To knowwhat your legal rights are, consult your local or state consumer affairs" office or your state's Attorney General.
Warrantor: General Electdc Compan_ £ouisdlle, KY 40225
27

ConsumerSupport.
gEApp//ancesWebsite ww.CEAppliances.comHm e u questio]/ or m/eed ;]ssist;mce _]t]] your u}>p]i;mce? Try the (}E App]ium/ces Website 24 hours u day,
am' day o{ the year! if(n" greater com,'em/ie]/ce am/(] S_ster service, you c;m m]o!_ down]o;_d ()w]]er's Mamm]s,
order parts, catalogs, or e_ en sched]de service om/qim/e. You cm/also "Ask ()ur Team of Experts
}'OIIT (]llestio]/s, am/(] SO milch mote...
Schedu/e Service www.GEAppfiances, com
Expert (;E repair se]_'ice is onh, one step away f]'om )ore" doo]_ Oet on-lim/e and schedule _om" service at
xour, com'en ien ce 24 hom's _}r (t;_}' of the )ea r! ()r ca]] SO0.( ;E.(;_ RES (800.432.2737) duff m/g m/orm a]
bHsim/ess h o[ 0]'s.
flea/Life DesignStudio www.CEApplia.ces.com(;E supports the [ Im/iversal Design concept--products, set'rices mid emwironmem/ts that cam/be used by
people _g a]l uges, sizes am/(] capabilities. We recognize the m/eed to design {br a wide _:mge _ff physical mid
mere/to] abilities and impairments. For details of GE's [ Im/iversal Design N)plication/s, h/cludim/g ldtchen
design idea s tb r pe opl e wi th disab]l] t] es, check o i1t o u r Webs] tet odor. For the h ea _Jm/g ]m pa] re d, pleas e coil
800.TDD.(;EAC (800.833.4322).
ExtendedWarranties www.GEAppliances.com[_I_]"el/o's e a' (;E ext el/de d wa rru m/b ;_m/d 1eam ;_b o l _t speci a l di sco _mts th ut a re a'_'ailu bl e w h i le "_o_,u" w urru _/r_,
is still i_/effect. 5:i_u c;m pro'chase it o_/-]i_/e a_/)time or call S00.6262224 dmi_/g m_rma] busi_/ess horn's.
(;E (]{ m s_m/er H (}me Se_'vi ces will still be th e_'e after y(}_u" wa r_;__/ty expi res.
Parts and Accessories www.aENppfiances.com
I_/divid_mis quulif]ed to se]_ice their o_/upp]iu_/ces c;m ]]a_e parts or uccessories sent directh' to their
homes (VISA, MasterCard mid Disco',er cards are uccepted). Order o_/-li_/e toda 5 24 horn's every day or
bv p]]o_/e at S00.626.2002 (]mJ_/g _/orma] bush/ess hours.
Instructions contained in this manna_ cover procedures to he performed by any _ser. Other servicing ffenera#y
sflo_ld he referred to qnalified service personnel Cantion mnst he exercised, since hnproperservicing may canse
nnsefe operatim_,
ontact Us www.GEAppfiances.com
[J__o_1 ure _/ot satisfied _&ri[h the ser_ke _o_1 receive {_'om (;E, contuct us o_/ore" _'ebs]te _&rith Jill the details
i_/c]udh/g yore" phone mm/be_; or w_Jte to: (;enend Ma_/age_; (51stomer ]),elations
(;E App]im/ces, Applim/ce Park
I,ouisv]lle, KY 40225
RegisterYourApp/iance www.;EApp i.nces.comRe_ster your new appliance on=l_-_e--at your convenience! T[meh, [)rodwt regist]:_tion,, will allow {or
e_/ha_/ced commlmicatkm mid promi)t service imder the terms of_om" wari_mt}, should the _/eed arise.
_)_ ma',' _lso m_il i_/the [_re-i _rh/ted regist]_tio]/,, curd i_/cluded i_/the [x_ckh/_,__,material.
Printed in the United States