IBM Student Mainframe Challenge Part One · IBM Student Mainframe Challenge Part One Time to...
25
IBM Student Mainframe Challenge Part One Time to complete – about an hour The goal of Part One is to learn how to use an IBM System z mainframe without having used one before. Welcome to the Mainframe Challenge! You'll be joining our team of mainframe programmers to learn some skills then prove yourself above the other contestants! Good luck! Welcome to the Mainframe Challenge! You'll be joining our team of mainframe programmers to learn some skills then prove yourself above the other contestants! Good luck! Hi, my name's Gemma. Welcome to the team! I've been here for a few months already, so I'll be able to offer some help and advice about using the mainframe, and about what the contest requires. Hi, my name's Gemma. Welcome to the team! I've been here for a few months already, so I'll be able to offer some help and advice about using the mainframe, and about what the contest requires. I'll set some tasks and questions throughout the contest to see how you're getting on. There will also be prizes for the fastest contestants in each part (if you answer correctly, of course!) I'll set some tasks and questions throughout the contest to see how you're getting on. There will also be prizes for the fastest contestants in each part (if you answer correctly, of course!) Psst! The boss told me earlier what the prizes for each part will be, so listen up! P t d b Psst! The boss told me earlier what the prizes for each part will be, so listen up!
Transcript of IBM Student Mainframe Challenge Part One · IBM Student Mainframe Challenge Part One Time to...

IBM Student Mainframe Challenge
Part OneTime to complete – about an hour
The goal of Part One is to learn how to use an IBM System z mainframe without having
used one before.
Welcome to the Mainframe Challenge!You'll be joining our team of mainframe
programmers to learn some skillsthen prove yourself above the other
contestants! Good luck!
Welcome to the Mainframe Challenge!You'll be joining our team of mainframe
programmers to learn some skillsthen prove yourself above the other
contestants! Good luck!
Hi, my name's Gemma. Welcome to the team!I've been here for a few months already, soI'll be able to offer some help and advice
about using the mainframe,and about what the contest requires.
Hi, my name's Gemma. Welcome to the team!I've been here for a few months already, soI'll be able to offer some help and advice
about using the mainframe,and about what the contest requires.
I'll set some tasks and questions throughout thecontest to see how you're getting on. There willalso be prizes for the fastest contestants in each
part (if you answer correctly, of course!)
I'll set some tasks and questions throughout thecontest to see how you're getting on. There willalso be prizes for the fastest contestants in each
part (if you answer correctly, of course!)
Psst! The boss told me earlier what theprizes for each part will be, so listen up!
Ptdb
Psst! The boss told me earlier what theprizes for each part will be, so listen up!

So, you want to learn the mainframe? Become a whiz with z/OS? Make millions touting your
desperately sought-after skills all over the world?
First things first, let's teach you how to log on to the mainframe. (Everyone has to start somewhere.)
Part One of the Mainframe Challenge covers the following tasks:
1. Logging on to the mainframe
2. Using TSO to:
a) view details of, and allocate a new dataset,
b) copy, read and modify a dataset member (equivalent to Windows folder file),
c) invoke a program from the TSO command entry panel,
d) transmit files to another user on another system.
TSO stands for Time Sharing Option. It provides a single-user logon capability and a basic command
prompt interface to z/OS.
One of the primary objectives of Part One is to teach you how to navigate around the TSO
environment using Ctrl, Enter and TAB to make z/OS respond, move to the next line and move to the
next field respectively.
The software
In order to access the mainframe you'll need some software that will allow you to connect to it, and will
be able to display the z/OS interface. We call it a 3270 terminal emulator (snappy, huh?) - they are
available for multiple platforms.
If you're using Windows...
Go to http://www.tombrennansoftware.com/download.html and download the Vista V1.27.exe
file. Install it by running the .exe file and following the installation instructions.
If you're using a Mac...
Go to http://brown.edu/cis/tn3270/ and install the latest available version.
If you're using Linux...
You'll need to install the following package: x3270 -port1023 (available from
http://x3270.bgp.nu/)
After installation
Everyone got their emulator installed? Then let's begin...
The next step is to start it running. (Predictable, I know.) The default location after a Windows
installation is Start Programs Vista tn3270 Vista Standard session. → → →
You might see this error:
Don't worry about it, just continue. Now we can set up your emulator and connect to the mainframe.

Configuration
➔ Configure your emulator as shown below.
(Windows users: from the menu bar in Vista Session A, select File Reconnect Ask.)→
The Host IP Name is 129.35.161.130 and the IP Port is 993. These values point towards the z/OS
system you'll be accessing.
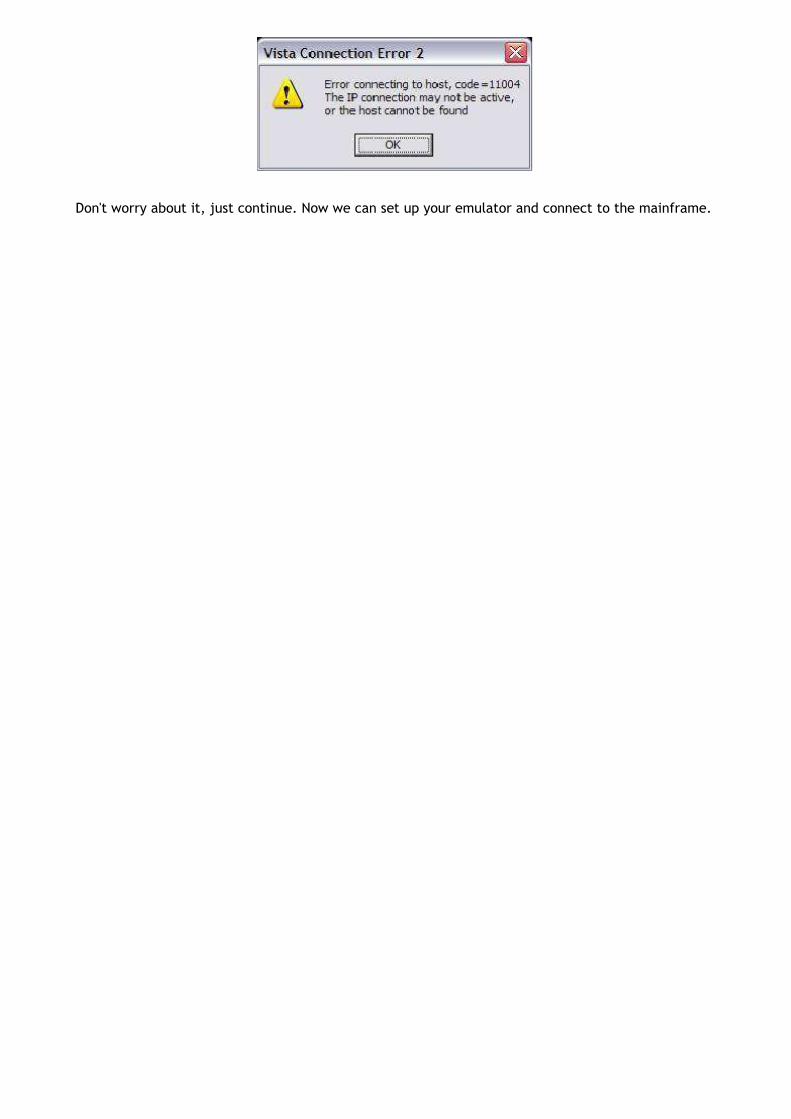
➔ Fill in these two values, and click Connect. If all is well (and you have accepted security
and firewall warnings), you should see this:
Type DIAL ZOS19 at the system command prompt line. This will allow you to access the system we are using for this years challenge!
Congratulations, you have connected to the mainframe! Don't rest on your laurels yet, there's more
to come.
You should now see the following screen....
A z/OS primer
Now's a good time to give you some background information about z/OS, before you dive
into it.
z/OS is an upgrade of what used to be called OS/390. Both of these operating systems are
an evolution of MVS (which stands for Multiple Virtual Storage). General mainframe
literature still contains many references to these terms. When you're connected to the
mainframe, you will find that things are a bit different to what you are used to...
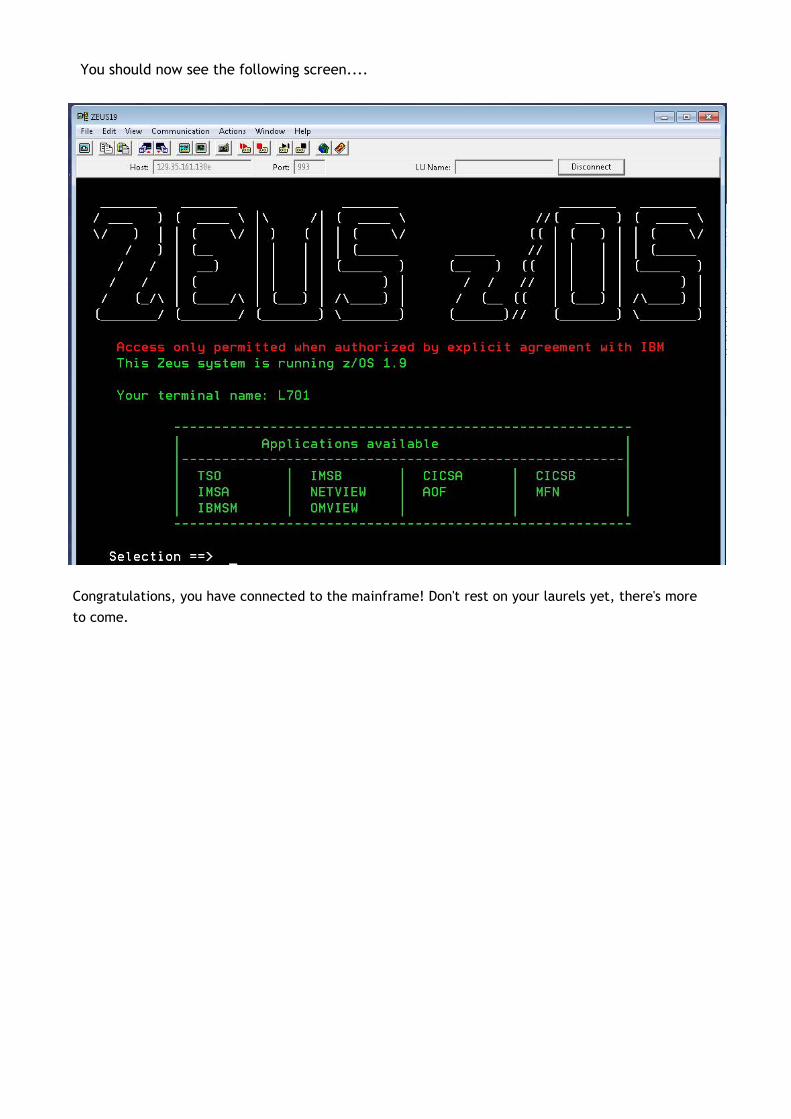
A world where Ctrl == Enter
A number of keys on your keyboard don't have the same function as they would in your
usual operating system. For example, the biggest one to remember is that to enter a
command, you need to press Ctrl, not Enter! (That's the right Ctrl only, not the left
one.)
In the z/OS world, the Enter key is a navigation control, and will move the cursor down to
the next form field on the screen.
Many z/OS emulators allow you to use the Enter key to enter a command, so it won't
matter if you forget – but the warning's there if you need it.
I've summarised the common differences below:
Action Key on mainframe
Key on other O/Ss
Notes
Enter a command Ctrl Enter
Scroll up one page F7 Page Up
Scroll down one page F8 Page Down
Exit current screen F3 Esc Esc is the closest equivalent, and not always used
Scroll left one screen F10(none)
Isn't that great? This is extra functionality only available on z/OS!Scroll right one screen F11
Change to Insert mode Insert Insert You get this one for free
Move cursor to next field Tab Tab This one too
Move cursor to first field on next line
Enter (none) This is what will happen when you forget about Ctrl!
However, ultimately it depends on the emulator you're using. These are the common settings, you should be able to find out the mapping that your emulator uses if it's different.
Now that you know all that, let's put it into action by logging on...
Logging on
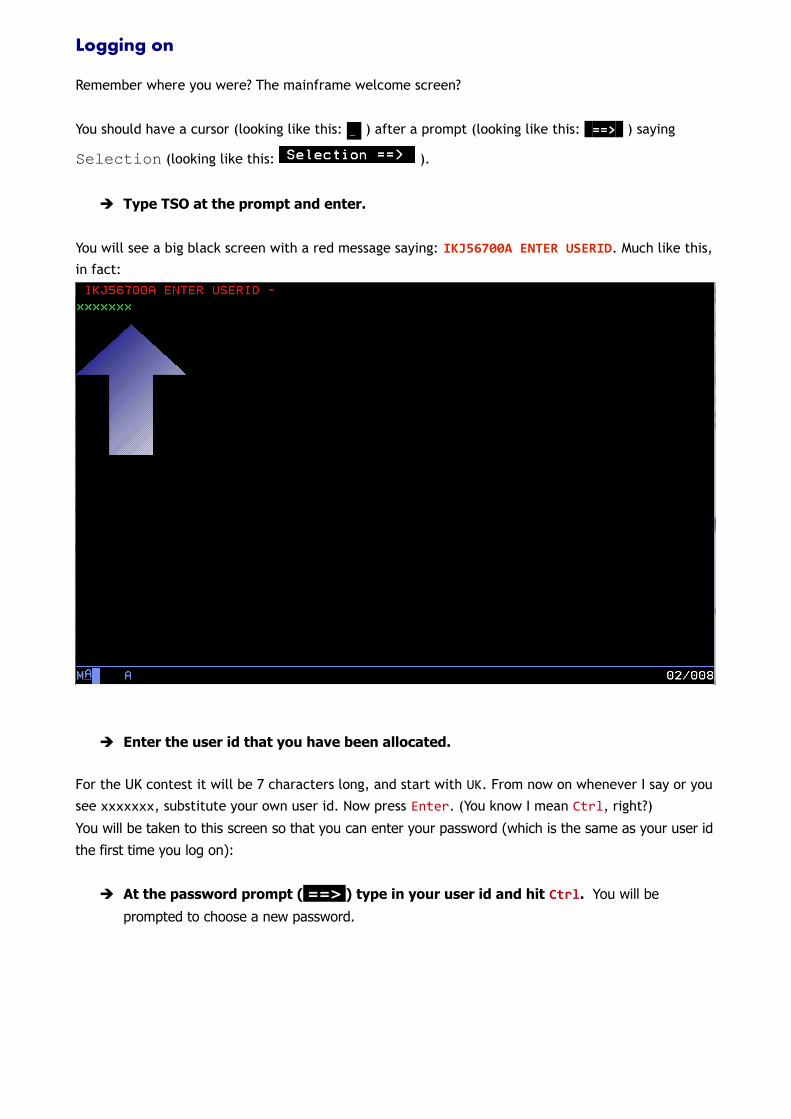
Remember where you were? The mainframe welcome screen?
You should have a cursor (looking like this: _ ) after a prompt (looking like this: ==> ) saying
Selection (looking like this: ).
➔ Type TSO at the prompt and enter.
You will see a big black screen with a red message saying: IKJ56700A ENTER USERID. Much like this,
in fact:
➔ Enter the user id that you have been allocated.
For the UK contest it will be 7 characters long, and start with UK. From now on whenever I say or you
see xxxxxxx, substitute your own user id. Now press Enter. (You know I mean Ctrl, right?)
You will be taken to this screen so that you can enter your password (which is the same as your user id
the first time you log on):
➔ At the password prompt ( ==> ) type in your user id and hit Ctrl. You will be
prompted to choose a new password.
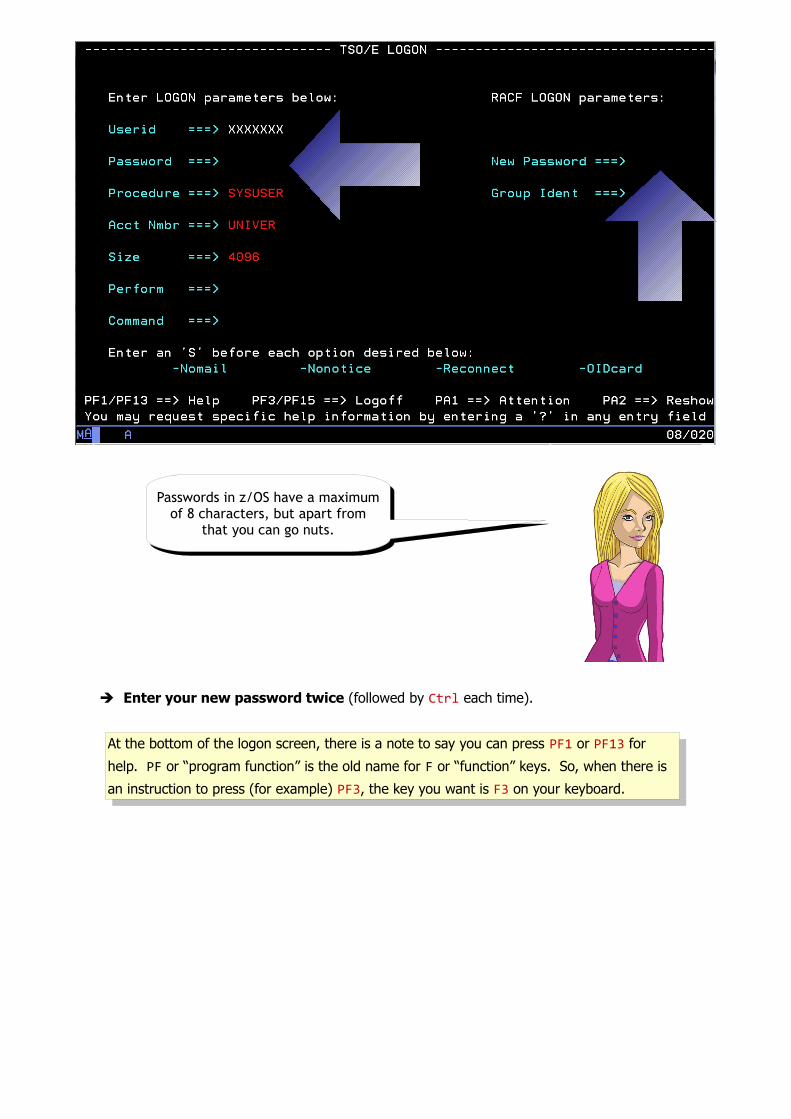
➔ Enter your new password twice (followed by Ctrl each time).
At the bottom of the logon screen, there is a note to say you can press PF1 or PF13 for
help. PF or “program function” is the old name for F or “function” keys. So, when there is
an instruction to press (for example) PF3, the key you want is F3 on your keyboard.
Passwords in z/OS have a maximumof 8 characters, but apart from
that you can go nuts.
Passwords in z/OS have a maximumof 8 characters, but apart from
that you can go nuts.
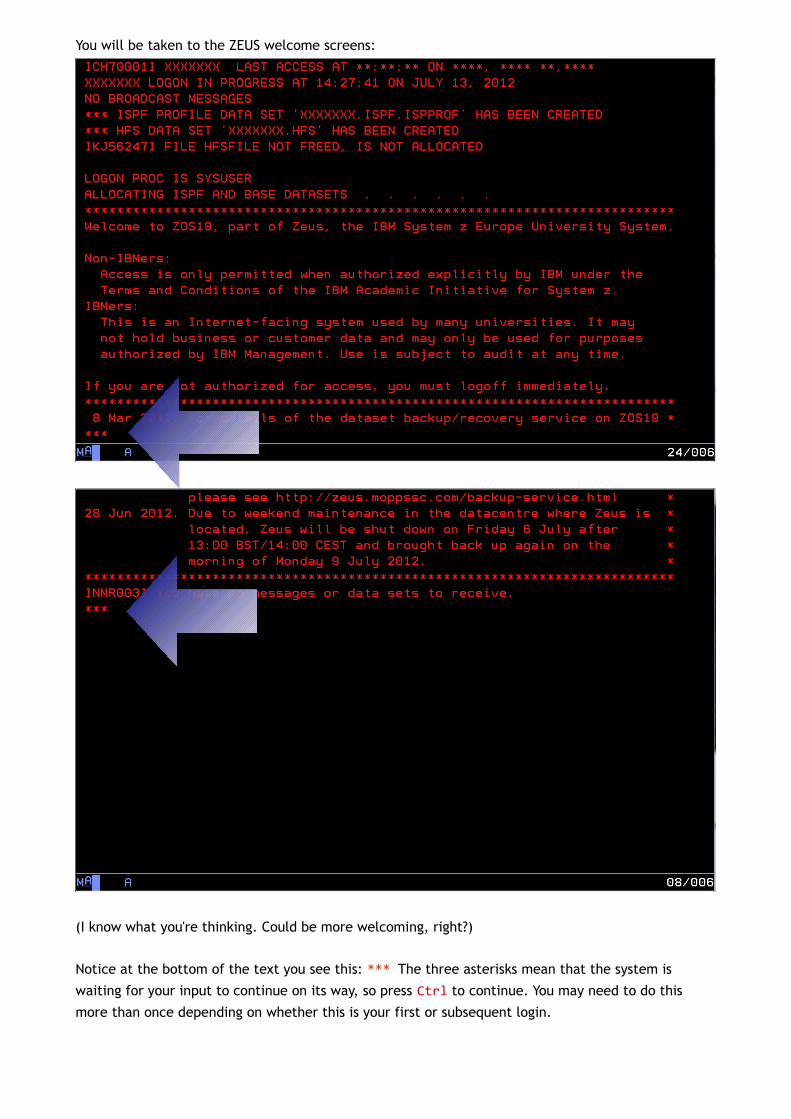
You will be taken to the ZEUS welcome screens:
(I know what you're thinking. Could be more welcoming, right?)
Notice at the bottom of the text you see this: *** The three asterisks mean that the system is
waiting for your input to continue on its way, so press Ctrl to continue. You may need to do this
more than once depending on whether this is your first or subsequent login.

Ahh! This is what we've been waiting for!
This is ISPF. This is where the magic happens. This is your point of control.
ISPF stands for Interactive System Productivity Facility. It is a z/OS application that provides its users
a convenient interface to do tasks on the mainframe.
(While we're on the subject of control, hit Ctrl to clear the copyright message out of the way.)
You are officially logged into a z/OS mainframe,and you've successfully completed the
first three steps of Part One.
Congratulations!
You are officially logged into a z/OS mainframe,and you've successfully completed the
first three steps of Part One.
Congratulations!
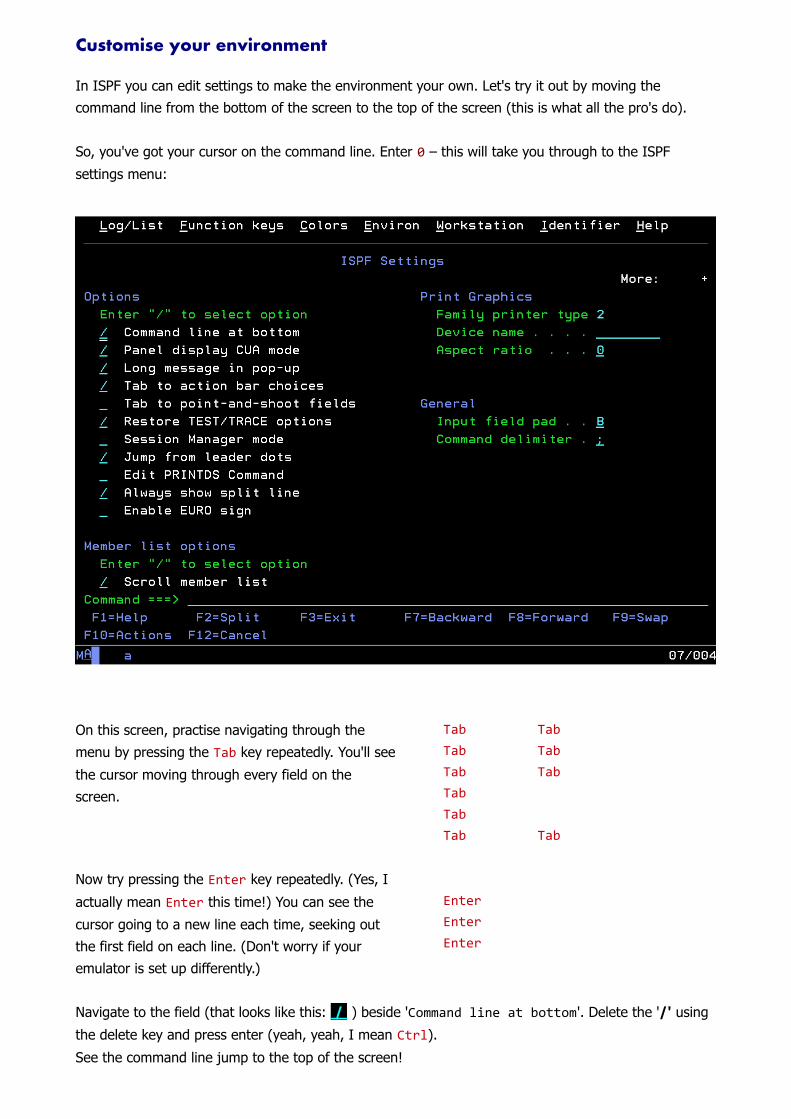
Customise your environment
In ISPF you can edit settings to make the environment your own. Let's try it out by moving the
command line from the bottom of the screen to the top of the screen (this is what all the pro's do).
So, you've got your cursor on the command line. Enter 0 – this will take you through to the ISPF
settings menu:
On this screen, practise navigating through the
menu by pressing the Tab key repeatedly. You'll see
the cursor moving through every field on the
screen.
Tab Tab
Tab Tab
Tab Tab
Tab
Tab
Tab Tab
Now try pressing the Enter key repeatedly. (Yes, I
actually mean Enter this time!) You can see the
cursor going to a new line each time, seeking out
the first field on each line. (Don't worry if your
emulator is set up differently.)
Enter
Enter
Enter
Navigate to the field (that looks like this: / ) beside 'Command line at bottom'. Delete the '/' using
the delete key and press enter (yeah, yeah, I mean Ctrl).
See the command line jump to the top of the screen!

Oh F3, we sing of thee
The F3 key is another useful navigation command because it exits the screen you're in and goes to the
previous screen, sort of like the Back button in an Internet browser. If you hit it twice from here...
...WAIT! Don't do that!
...you'll find yourself at the TSO READY prompt. (If this happens, just enter ISPF again.)
Logging off
In fact, this is what you want to do when you want to log off; F3 back to the TSO READY prompt and
then type logoff.
You should never just close the connectionwindow without logging off properly, else
you may find yourself locked outof your account!
You should never just close the connectionwindow without logging off properly, else
you may find yourself locked outof your account!
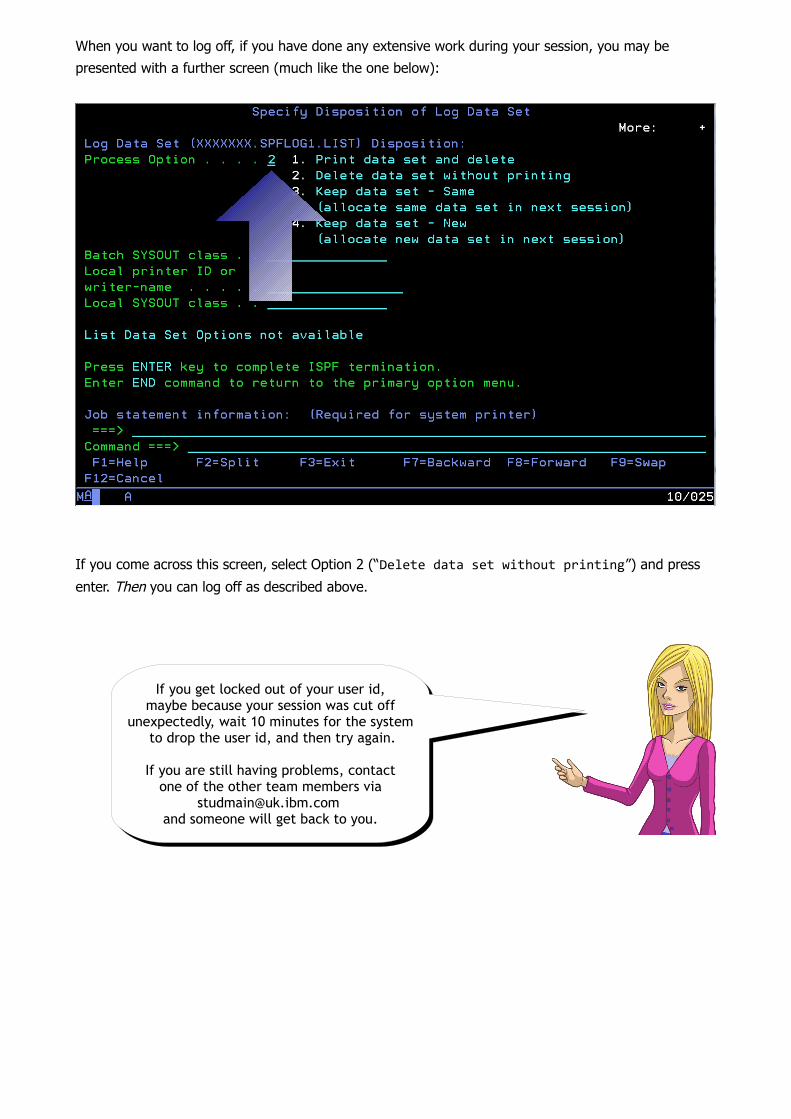
When you want to log off, if you have done any extensive work during your session, you may be
presented with a further screen (much like the one below):
If you come across this screen, select Option 2 (“Delete data set without printing”) and press
enter. Then you can log off as described above.
If you get locked out of your user id,maybe because your session was cut off
unexpectedly, wait 10 minutes for the system to drop the user id, and then try again.
If you are still having problems, contactone of the other team members via
[email protected] and someone will get back to you.
If you get locked out of your user id,maybe because your session was cut off
unexpectedly, wait 10 minutes for the system to drop the user id, and then try again.
If you are still having problems, contactone of the other team members via
[email protected] and someone will get back to you.

CREATING A NEW DATASET
As a logged-on user on the mainframe you have allocated storage, equivalent to Unix quotas, where
you can create datasets (equivalent to Windows folders) to store dataset members (equivalent to
Windows files).
In this part of the Mainframe Challenge you will copy and edit a BUDGET data file then invoke an
analysis program to acquire a specific number of 'fun points'. The target of this part of the challenge is
to purchase gadgets at specific months over a two year period without running out of cash. Each
gadget has an associated initial cost and a specific number of fun points that are accumulated each
month. Some gadgets have an ongoing monthly cost too.
2.1 Allocate a new dataset
You will create a new dataset based upon the characteristics of an existing dataset. Then you will copy
in a template BUDGET dataset member which you will be able to edit.
➔ Go to the main menu within ISPF (use '=.' and press Enter to return there)
Note that you get to the main menu but an 'Invalid option' warning message will appear
in the top right hand corner of the page.
➔ Select option 3 (by typing 3 and pressing Enter) to enter the Utilities Selection
Panel.
Have a look through the options available there and one option that you will see will give you the
option to list datasets. This is option 4.
➔ Select this option by typing 4 and pressing Enter.
You are now in ISPF utility 3.4.
First, we need to know what characteristicsour new dataset will have. One way to achievethis is by locating the dataset that we want to
copy members from and asking forits allocation information.
First, we need to know what characteristicsour new dataset will have. One way to achievethis is by locating the dataset that we want to
copy members from and asking forits allocation information.

➔ In the Dsname Level field type ZOS.CONTEST3.PART1.DATA and then press Enter
A list of one dataset will appear, matching the name specified. In the Command column, ask for the
dataset's allocation information by specifying i in that column, as shown in Illustration 2 and then press
Enter.
Illustration 1: ISPF utility 3.4 - Data Set List Utility
Illustration 2: Data Set List - Obtaining allocation information
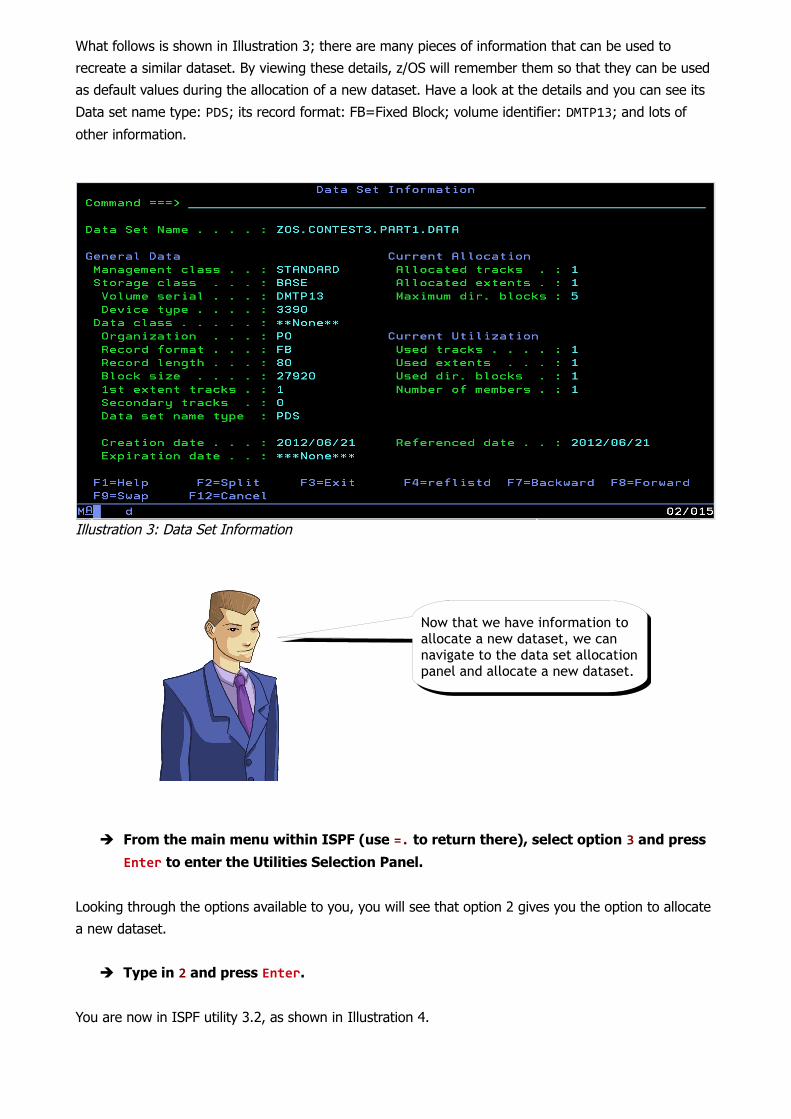
What follows is shown in Illustration 3; there are many pieces of information that can be used to
recreate a similar dataset. By viewing these details, z/OS will remember them so that they can be used
as default values during the allocation of a new dataset. Have a look at the details and you can see its
Data set name type: PDS; its record format: FB=Fixed Block; volume identifier: DMTP13; and lots of
other information.
➔ From the main menu within ISPF (use =. to return there), select option 3 and press
Enter to enter the Utilities Selection Panel.
Looking through the options available to you, you will see that option 2 gives you the option to allocate
a new dataset.
➔ Type in 2 and press Enter.
You are now in ISPF utility 3.2, as shown in Illustration 4.
Illustration 3: Data Set Information
Now that we have information to allocate a new dataset, we cannavigate to the data set allocationpanel and allocate a new dataset.
Now that we have information to allocate a new dataset, we cannavigate to the data set allocationpanel and allocate a new dataset.

In the ISPF Library section the Project, Group and Type fields will specify the new dataset name,
where:
• Project will be the same as your User ID (referred to as <user> later in this section) that you
used to log on to ZEUS,
• Group is a name that you will recognise to aid grouping of files, e.g. CHALLNGE,
• Type is a name that you will recognise to classify the type of files within a dataset, e.g. DATA.
Each field can be up to 8 characters in length.
➔ On the Option line type A and press Enter.
You are now presented, as shown in Illustration 5, with a panel that has allocation information filled in,
based upon the previous dataset that you viewed.
Illustration 4: ISPF utility 3.2 - Data Set Utility

ZOS.CONTEST3.PART1.DATA has been defined as a partitioned data set (PDS). However, best practice
is to define a new data set as extended (PDSE).
To define the new dataset as a PDSE instead of a PDS alter the Data set name type to LIBRARY.
The main advantage of using a PDSE over a PDS is that a PDSE automatically reuses space within the
data set without the need for anyone to periodically run a utility to reorganize it.
More information about PDSEs can be found at
http://publib.boulder.ibm.com/infocenter/zos/basics/index.jsp?
topic=/com.ibm.zos.zconcepts/zconcepts_166.htm
Press Enter again and your dataset will be allocated. The message 'Data set allocated' will be
presented in the top right corner of the page shown in Illustration 4.
2.2 Copying Budget data into your new dataset
To get to the point where we can invoke the financial budgeting calculation program, we need some
input data which we can modify between each invocation of the program.
Illustration 5: Allocate New Data Set - with prefilled details
There is a data set utility which can copydataset members from one dataset intoanother. This utility is option 3.3 from themain ISPF menu panel.
Have a look below at the two main waysto get to that utility!
There is a data set utility which can copydataset members from one dataset intoanother. This utility is option 3.3 from themain ISPF menu panel.
Have a look below at the two main waysto get to that utility!
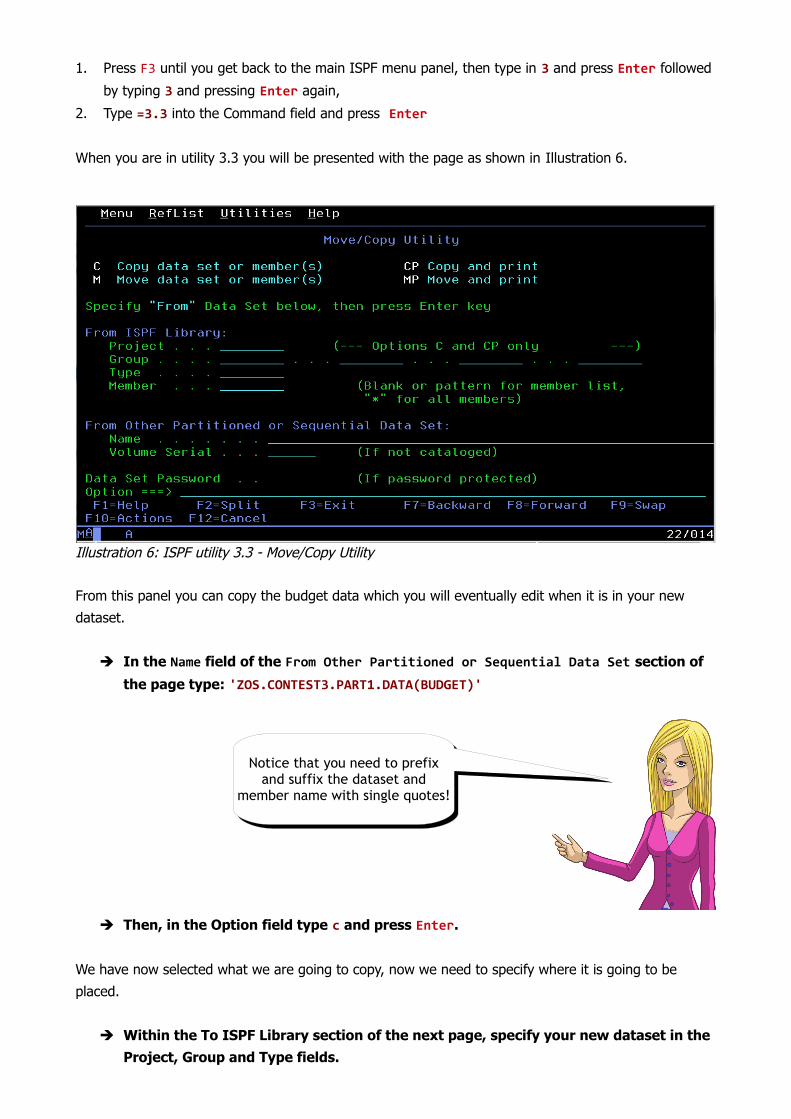
1. Press F3 until you get back to the main ISPF menu panel, then type in 3 and press Enter followed
by typing 3 and pressing Enter again,
2. Type =3.3 into the Command field and press Enter
When you are in utility 3.3 you will be presented with the page as shown in Illustration 6.
From this panel you can copy the budget data which you will eventually edit when it is in your new
dataset.
➔ In the Name field of the From Other Partitioned or Sequential Data Set section of
the page type: 'ZOS.CONTEST3.PART1.DATA(BUDGET)'
➔ Then, in the Option field type c and press Enter.
We have now selected what we are going to copy, now we need to specify where it is going to be
placed.
➔ Within the To ISPF Library section of the next page, specify your new dataset in the
Project, Group and Type fields.
Illustration 6: ISPF utility 3.3 - Move/Copy Utility
Notice that you need to prefixand suffix the dataset and
member name with single quotes!
Notice that you need to prefixand suffix the dataset and
member name with single quotes!
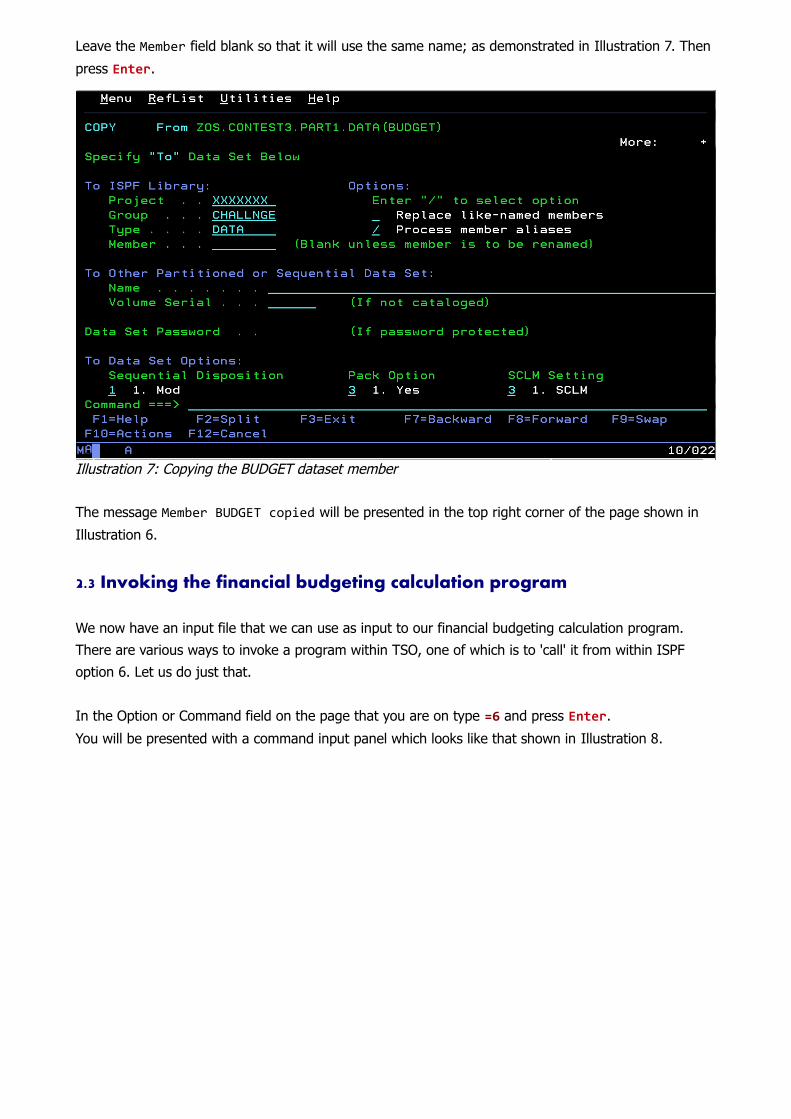
Leave the Member field blank so that it will use the same name; as demonstrated in Illustration 7. Then
press Enter.
The message Member BUDGET copied will be presented in the top right corner of the page shown in
Illustration 6.
2.3 Invoking the financial budgeting calculation program
We now have an input file that we can use as input to our financial budgeting calculation program.
There are various ways to invoke a program within TSO, one of which is to 'call' it from within ISPF
option 6. Let us do just that.
In the Option or Command field on the page that you are on type =6 and press Enter.
You will be presented with a command input panel which looks like that shown in Illustration 8.
Illustration 7: Copying the BUDGET dataset member
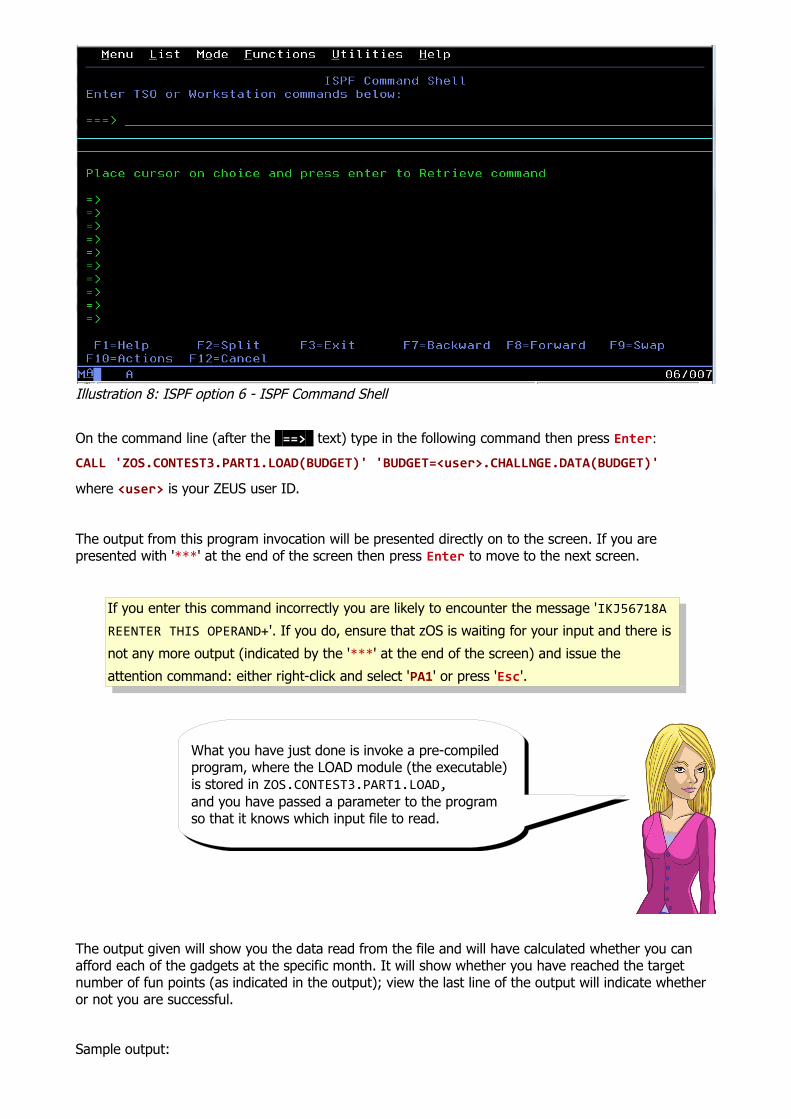
On the command line (after the ==> text) type in the following command then press Enter:
CALL 'ZOS.CONTEST3.PART1.LOAD(BUDGET)' 'BUDGET=<user>.CHALLNGE.DATA(BUDGET)'
where <user> is your ZEUS user ID.
The output from this program invocation will be presented directly on to the screen. If you are presented with '***' at the end of the screen then press Enter to move to the next screen.
If you enter this command incorrectly you are likely to encounter the message 'IKJ56718A
REENTER THIS OPERAND+'. If you do, ensure that zOS is waiting for your input and there is
not any more output (indicated by the '***' at the end of the screen) and issue the
attention command: either right-click and select 'PA1' or press 'Esc'.
The output given will show you the data read from the file and will have calculated whether you can afford each of the gadgets at the specific month. It will show whether you have reached the target number of fun points (as indicated in the output); view the last line of the output will indicate whether or not you are successful.
Sample output:
Illustration 8: ISPF option 6 - ISPF Command Shell
What you have just done is invoke a pre-compiledprogram, where the LOAD module (the executable)is stored in ZOS.CONTEST3.PART1.LOAD,and you have passed a parameter to the programso that it knows which input file to read.
What you have just done is invoke a pre-compiledprogram, where the LOAD module (the executable)is stored in ZOS.CONTEST3.PART1.LOAD,and you have passed a parameter to the programso that it knows which input file to read.

Welcome to the IBM Mainframe Challenge --- Starting current account balance is 50 GBPIncome per month is 100 GBP Modelling for 24 months Target number of fun points is 300 Month 1 set! - Satellite TV (1) - Computer (1) - SLR camera (1) Month 2 set! - Mobile phone (1) Month 10 set! - Smart TV (1) - Weekend away (1) - RC helicopter (1) - Smart phone (1) Month 19 set! - Games console (1) - Digital camera (1) - Tablet (1) - Magazine subscriptions (1) - Theme park (1) - Jetpack (1) Ignoring gadget 'Pay per view' as it is not a known gadget option.- Sports club membership (1) You ran out of cash in month 1. * * * FAILURE * * * ***
Notice that 'Pay per view' was identified in your BUDGET input data set member but not recognised by
the financial budgeting calculation program. This will also be the case if you misspell any of the
gadgets. Note that the text is case-sensitive.
2.4 Editing a dataset member
In order to produce a successful outcome when invoking in the program as described in Step 2.4, you
must modify the input file.
There are various gadgets that you can include and excludein the budget data file. The gadgets and their initial costsare as described in Table 1. Each of these gadgets also hasa monthly cost and a specific number of fun points, neither
of which are exposed to you. The target is to achieve 300 fun points to successfully complete the challenge.

Gadget Initial Cost
Television 300
Smart TV 650
Computer 650
Games console 180
Mobile phone 0
Smart phone 500
SLR camera 500
Digital camera 50
Tablet 250
Satellite TV 0
Weekend away 125
Magazine subscriptions 0
Theme park 60
Jetpack 2000
RC helicopter 100
Sports club membership 300
Table 1: Gadget data
To edit a dataset you must navigate to ISPF utility 3.4.
From the main menu within ISPF (use '=.' to return there), type in 3 and press Enter to enter the
Utilities Selection Panel.
Looking through the options available to you you will see that option 4 will give you the option to list
datasets. Type 4 and press Enter. You are now in ISPF utility 3.4.
In the Dsname Level field type <user>.CHALLNGE.DATA and then press Enter. What will appear is a
list of one dataset matching the name specified.
In the command column ask to edit members in the dataset by specifying e in the Command column,
and then press Enter.
You will now be presented with the list of members available within that dataset. Tab down to the line
which has the BUDGET member on it and edit that member by specifying e to the left of the member as
represented in Illustration 9. Edit the member by pressing Enter.
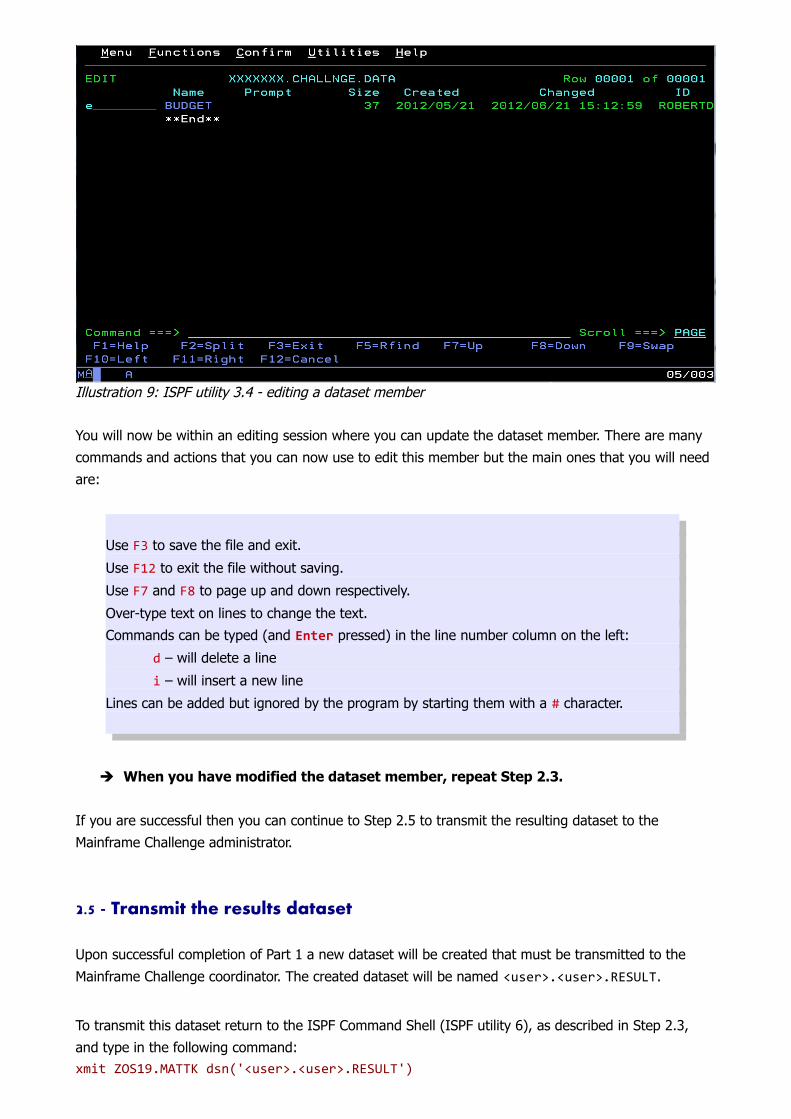
You will now be within an editing session where you can update the dataset member. There are many
commands and actions that you can now use to edit this member but the main ones that you will need
are:
Use F3 to save the file and exit.
Use F12 to exit the file without saving.
Use F7 and F8 to page up and down respectively.
Over-type text on lines to change the text.
Commands can be typed (and Enter pressed) in the line number column on the left:
d – will delete a line
i – will insert a new line
Lines can be added but ignored by the program by starting them with a # character.
➔ When you have modified the dataset member, repeat Step 2.3.
If you are successful then you can continue to Step 2.5 to transmit the resulting dataset to the
Mainframe Challenge administrator.
2.5 - Transmit the results dataset
Upon successful completion of Part 1 a new dataset will be created that must be transmitted to the
Mainframe Challenge coordinator. The created dataset will be named <user>.<user>.RESULT.
To transmit this dataset return to the ISPF Command Shell (ISPF utility 6), as described in Step 2.3,
and type in the following command:xmit ZOS19.MATTK dsn('<user>.<user>.RESULT')
Illustration 9: ISPF utility 3.4 - editing a dataset member

where <user> is your ZEUS user ID.
Congratulations – you have now completed Part 1!
Congratulations – you have now completed Part 1!