
IAT 445 – Lab 8 - SFU
37
IAT 445 – Lab 10 Special Topics in Unity © Lanz Singbeil
Transcript of IAT 445 – Lab 8 - SFU

IAT 445 – Lab 10
Special Topics in Unity
© Lanz Singbeil

Special Topics in Unity We’ll be briefly going over the following concepts. They are covered in more detail in your Watkins textbook:
• Setting up Fog Effects and a Sky Box
• Using Prefabs in useful ways
• Using the Unity Animation Editor
• Using Trigger Volumes
• Using script to switch scenes
• Using script to play sounds
• Using script to control animation
© Lanz Singbeil
Special Topics in Unity Unity refresher:
Start by opening the Unity_Lab10 project.
Setting your Project in Unity is a bit different than in Maya.
If Unity is already running go to File > Open Project.
Or, if you have no project set, then select the project in the little project selection screen.
After setting your project double click the “SmallBayScene” scene file in the project tab.
© Lanz Singbeil

Special Topics in Unity There is a folder called Maya_Exports that contains some FBX objects.
Bring those into your Unity project and place them in a folder called “meshes”
(Put them in the assets folder)
We will use these meshes later.
© Lanz Singbeil

Special Topics in Unity Giving your scene a nicer look: Add Fog and a Skybox
A Skybox is a background material that is rendered before the rest of the scene: http://docs.unity3d.com/Documentation/Components/class-Skybox.html
Fog is a rendering effect that produces a “hazy” appearance for distant objects.
For this tutorial we will use a skybox that Unity has already made. To do that:
Assets > Import Package > Skyboxes
It will open a window where you can choose to import certain files or import all. If you know your scene isn’t going to be at night you could de-select the night-time materials and textures. Otherwise, just press Import.
© Lanz Singbeil

Giving your scene a nicer look: Add Fog and a Skybox
Next, Go to Edit > Render Settings…
In the inspector tab, a set of options will appear. Adjust your settings as you see here:
You can adjust the settings as much as you like or choose a different skybox material.
© Lanz Singbeil

Giving your scene a nicer look: Add Fog and a Skybox
The changes should become immediately visible in your scene
© Lanz Singbeil

Using Prefabs in useful ways A Prefab is a reusable GameObject stored in Project View.
We can use prefabs as a way to quickly build a complex object and to update instances of the same object all at once.
This is similar to using instances or referencing in Maya: We have 1 main object that the others are instances of. If we make changes to the main one, the others will update.
Let’s make an example: Perhaps in our game we want to have “gateways” that take us to different scenes. If each scene has a gateway that looks the same or similar, it makes sense that we only make this asset once.
For now we will just make the prefab of a static gateway but we can later give it code to do the actual teleporting.
© Lanz Singbeil
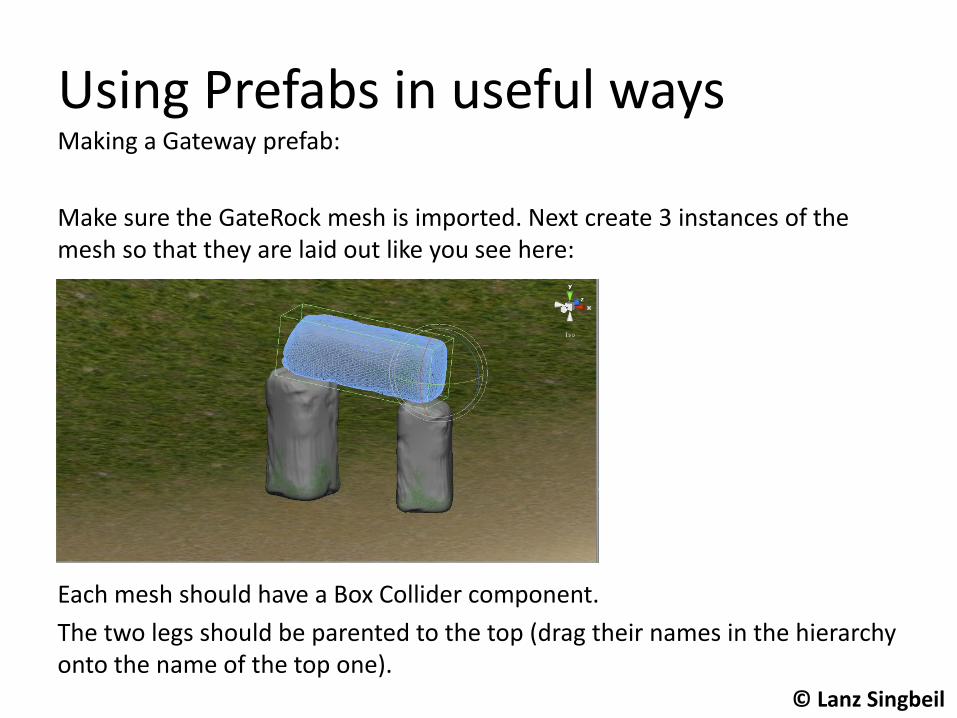
Using Prefabs in useful ways Making a Gateway prefab:
Make sure the GateRock mesh is imported. Next create 3 instances of the mesh so that they are laid out like you see here:
Each mesh should have a Box Collider component.
The two legs should be parented to the top (drag their names in the hierarchy onto the name of the top one).
© Lanz Singbeil

Using Prefabs in useful ways Making a Gateway prefab: In your project view, create a new folder called “prefabs” Then, with that folder selected, create a new prefab and name it “Gateway” Create > Prefab The last step is to drag the gateway object from our scene view onto that prefab. To test the connection, select your prefab and toggle off/on the mesh renderer. The instance in the scene should turn itself off. Make copies of the gateway and see how it still responds to changes from the prefab. Later we’ll add code to it but right now that’s it.
© Lanz Singbeil
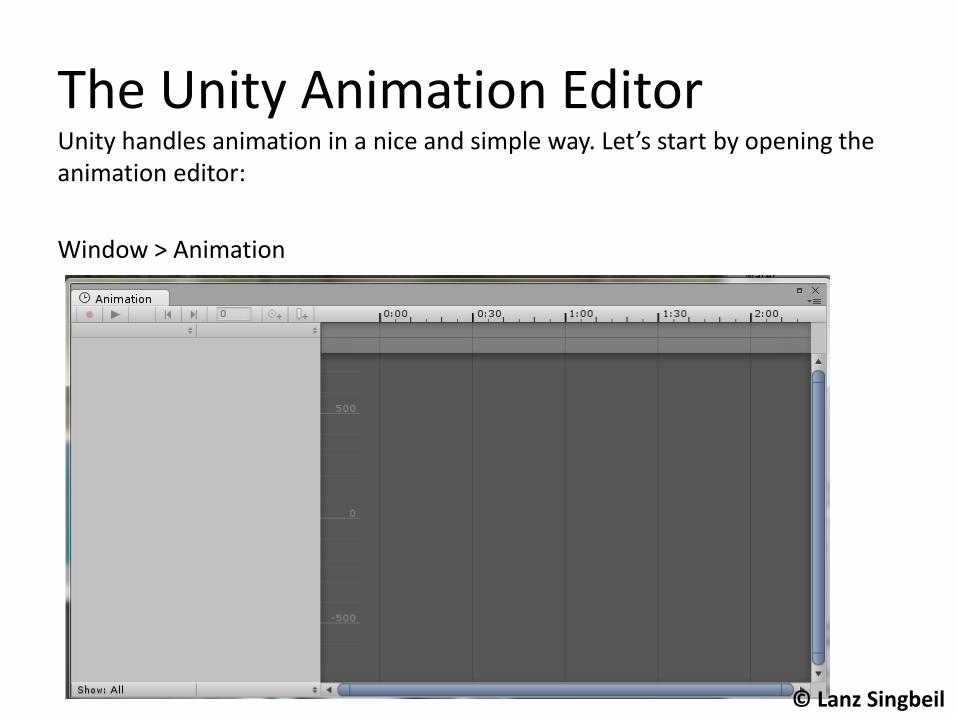
The Unity Animation Editor Unity handles animation in a nice and simple way. Let’s start by opening the animation editor:
Window > Animation
© Lanz Singbeil
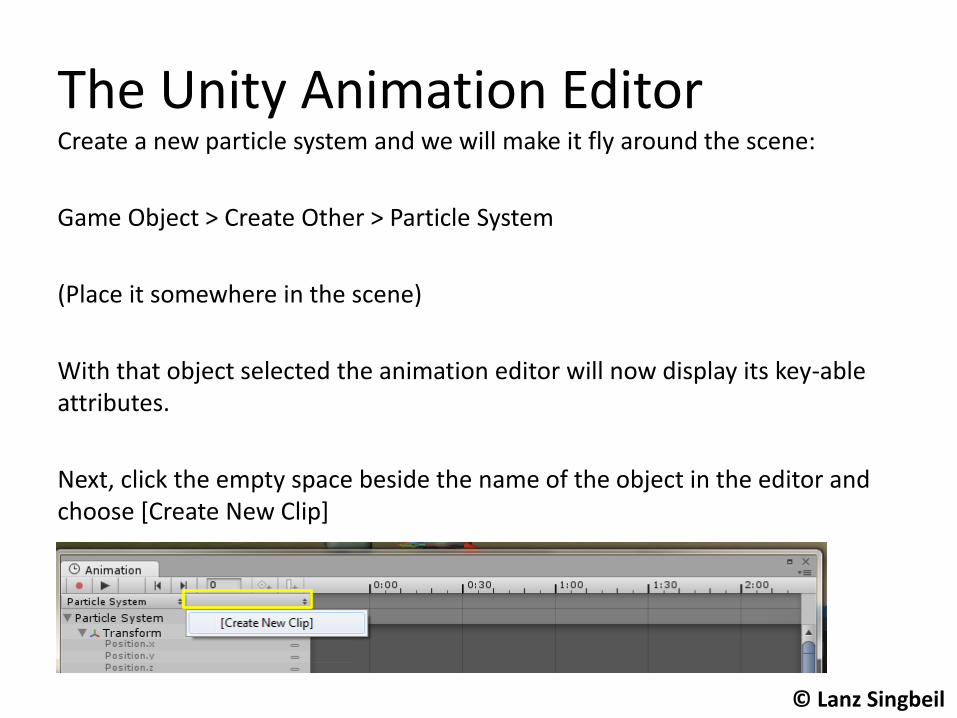
The Unity Animation Editor Create a new particle system and we will make it fly around the scene:
Game Object > Create Other > Particle System
(Place it somewhere in the scene)
With that object selected the animation editor will now display its key-able attributes.
Next, click the empty space beside the name of the object in the editor and choose [Create New Clip]
© Lanz Singbeil

The Unity Animation Editor Save the clip as something like “FlyingParticleAnim”
Before we can add keyframes we need to select the attributes we want to animate. Hold shift and select the X, Y, and Z position. These are all that are necessary to make it move around.
© Lanz Singbeil
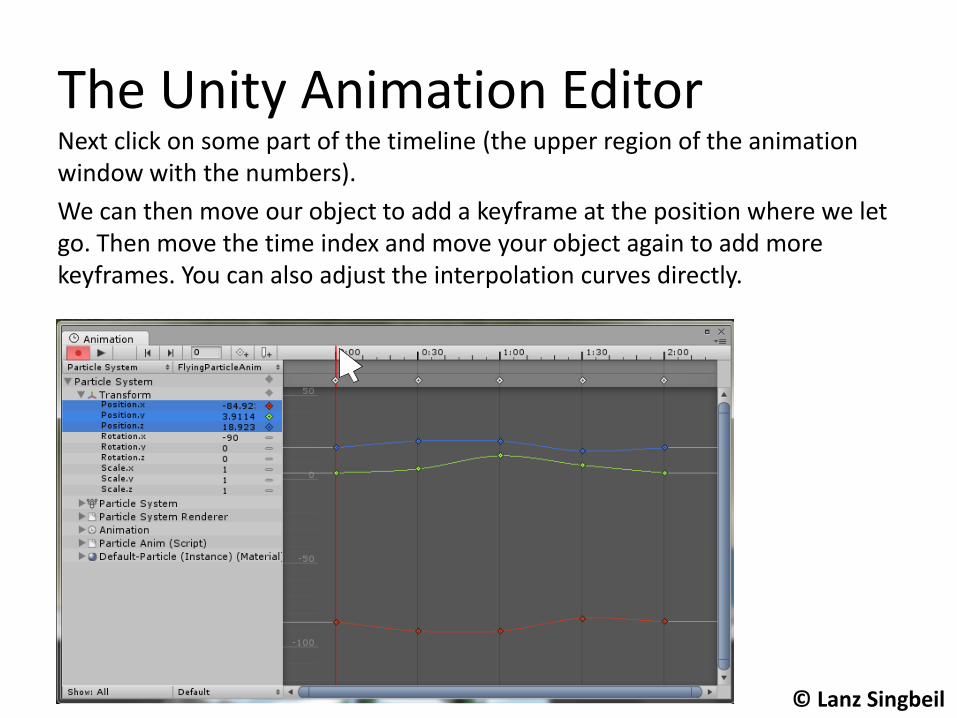
The Unity Animation Editor Next click on some part of the timeline (the upper region of the animation window with the numbers).
We can then move our object to add a keyframe at the position where we let go. Then move the time index and move your object again to add more keyframes. You can also adjust the interpolation curves directly.
clip as something
© Lanz Singbeil

The Unity Animation Editor Making Animation Loop
When you are done animating, press the record button to turn off the animator. Then close the window and press play.
The animation will play! …Once
So we need to make it loop. One approach is to use code. controlling animation with code is a great way to add unique behaviour in your environment.
However, if you want a quick approach you can set it to ALWAYS loop.
© Lanz Singbeil

The Unity Animation Editor Making Animation Loop
Find the animation clip in your project tab and select it.
In the inspector you can change the Wrap Mode setting to Loop or PingPong to have a looping animation.
© Lanz Singbeil
Using Trigger Volumes Suppose we want our character to die if he comes into contact with a certain thing or falls into a pit of doom or maybe we want the scene to transition if they enter a certain area?
First lets make the character die (and have the scene restart):
I created a crazy vine with lots of thorns on it. We will use it to kill our character.
To bring the FBX into unity, copy it from its location in the “Maya Exports” folder and paste it into the “Assets” folder of our Unity Project.
Note: The most important thing when we are doing level design for a game is to make sure things aren’t arbitrary and random. A vine will sort-of work in this scene but for your project you will want something else.
© Lanz Singbeil
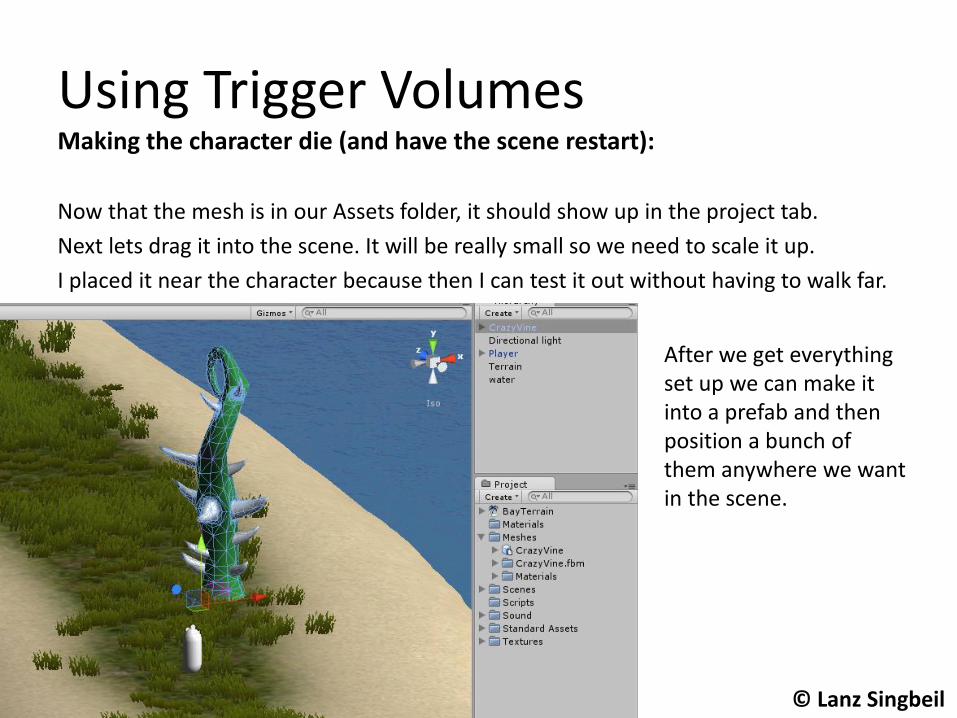
Using Trigger Volumes Making the character die (and have the scene restart):
Now that the mesh is in our Assets folder, it should show up in the project tab.
Next lets drag it into the scene. It will be really small so we need to scale it up.
I placed it near the character because then I can test it out without having to walk far.
After we get everything set up we can make it into a prefab and then position a bunch of them anywhere we want in the scene.
© Lanz Singbeil
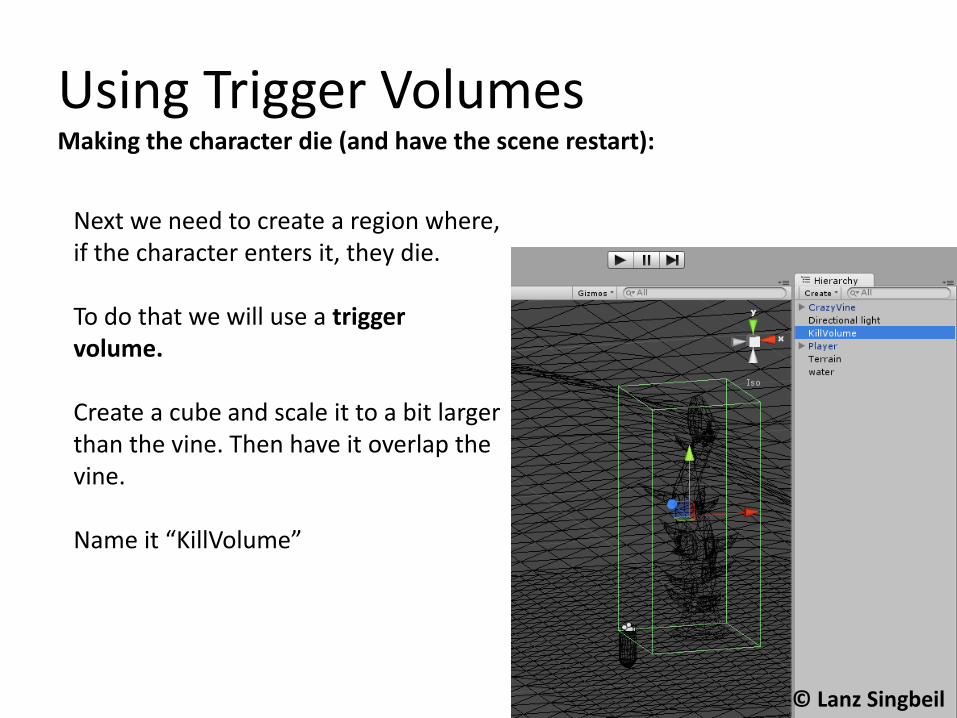
Using Trigger Volumes Making the character die (and have the scene restart):
Next we need to create a region where, if the character enters it, they die. To do that we will use a trigger volume. Create a cube and scale it to a bit larger than the vine. Then have it overlap the vine. Name it “KillVolume”
© Lanz Singbeil

Using Trigger Volumes Making the character die (and have the scene restart):
With the cube selected, look in the inspector and you should see: An “Is Trigger” checkbox. Check this box. (if you can’t see it right away you may need to expand the “box collider” component by clicking on it) There is also a “Mesh Renderer” checkbox. Uncheck this box
© Lanz Singbeil
Using Trigger Volumes Making the character die (and have the scene restart):
What we’ve done is pretty much made the box do nothing. You can’t see it and you can’t bump into it. Aside: if you wanted to make invisible walls, you would only uncheck the Mesh Renderer component and keep the other checkboxes untouched. Now we are ready to add code. About coding in Unity:
Unity uses either C# or Javascript when coding. The textbook uses javascript. Because I am more of a programmer I will be using C# which I find is pretty straightforward and nice to code in.
© Lanz Singbeil

Using Trigger Volumes Making the character die (and have the scene restart):
In the project tab there is an empty folder called “Scripts” Right click the folder and go: Create > C# Script This will add the script to the folder. Name it “KillPlayer” Note about renaming in C#: When you first create the script you have an option to name it. If you choose to rename it later you will need to also give it a matching name in the code or it will produce an error.
© Lanz Singbeil
Using Trigger Volumes Making the character die (and have the scene restart):
How do Scripts Work? Scripts work in Unity by adding them to an object as a new component. This is a very flexible system which allows an object to have a variety of different scripts or many objects to have the same script. For example: If you select the Player object you will see, in the inspector, that it has 3 script components: Mouse Look, Character Motor, and FPSInput Controller.
To add a script as a component to an object, simply drag that script onto the object (or onto the object’s name in the hierarchy tab or into a blank space in the inspector view for that object). Add the KillPlayer script to the KillVolume.
© Lanz Singbeil
Using Trigger Volumes Making the character die (and have the scene restart):
Editing a Script: Double click the KillPlayer script and the default editor will open it: Depending on your settings it will either open Visual Studio, MonoDevelop, or the Unity built-in Editor. I’ll be using MonoDevelop. It is usually installed with Unity. I’ve found it to be fairly easy to use. You can change your default editor by going: Edit > Preferences > External Tools , and then find the “External Script Editor” option
© Lanz Singbeil
Using Trigger Volumes Making the character die (and have the scene restart):
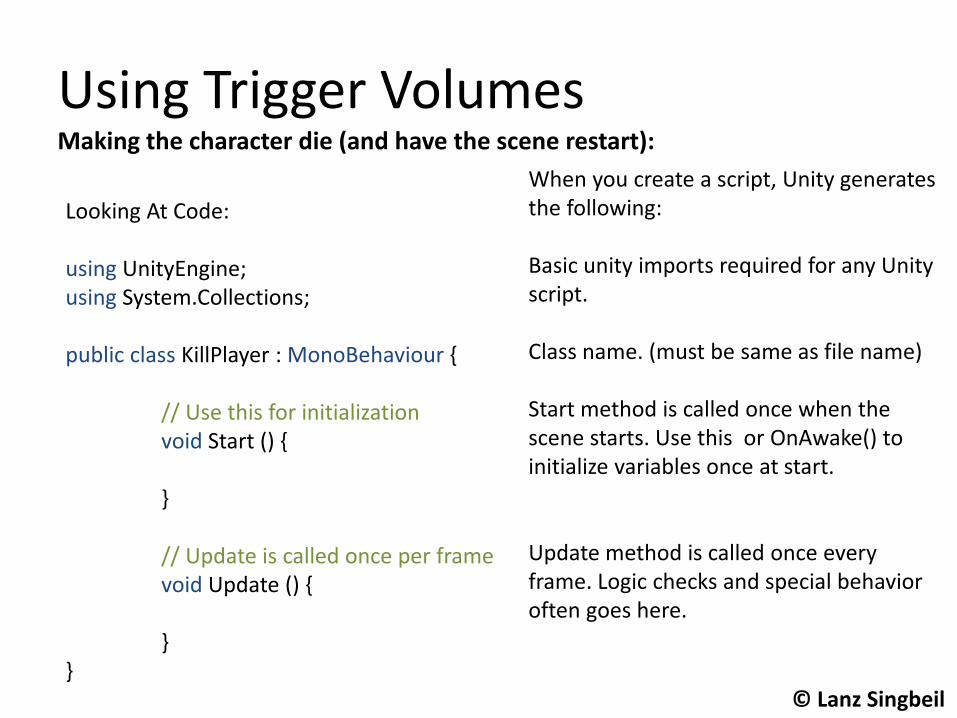
Looking At Code: using UnityEngine; using System.Collections; public class KillPlayer : MonoBehaviour { // Use this for initialization void Start () { } // Update is called once per frame void Update () { } }
When you create a script, Unity generates the following: Basic unity imports required for any Unity script. Class name. (must be same as file name) Start method is called once when the scene starts. Use this or OnAwake() to initialize variables once at start. Update method is called once every frame. Logic checks and special behavior often goes here.
© Lanz Singbeil

Using Trigger Volumes Making the character die (and have the scene restart):
For this particular script, we don’t need to work with the start or update methods. Instead, lets create a new method by adding the following lines of code before the last closing bracket: void OnTriggerEnter(Collider c) { } What this will do is listen for times when something enters the trigger volume. This works because we turned “Is Trigger” on in the Kill Volume’s Box Collider component. Whenever a collideable object enters this trigger volume, it will “trigger” this method. Now all we have to do is put unique functionality in the body of the method.
© Lanz Singbeil

Using Trigger Volumes Making the character die (and have the scene restart):
We want to restart the game. To do that, we tell the game to load the current scene again. The following code allows you to put the restart in any level and it would restart from the beginning of that level rather than the first level of the game. void OnTriggerEnter(Collider c) { Application.LoadLevel(Application.loadedLevel); } Just like in Java, make sure you add a semi-colon at the end of the line. “Application” is a globally accessible class (Static) that contains information about the game in general. We call the LoadLevel method in the Application class and pass the currently loaded level as a parameter.
© Lanz Singbeil

Using Trigger Volumes Making the character die (and have the scene restart):
SAVE YOUR CODE Press the save button. In most scripting applications it is located at the top left. If you don’t save your code, the game will not contain any new functionality. After saving you can go back to Unity and test the game. If there are any syntax Errors Unity will tell you in red at the bottom of the screen. When you run the game, what should happen is that, when you walk close enough to the spikey vine, the scene will restart.
© Lanz Singbeil

Using Trigger Volumes Making the character die (and have the scene restart):
Now parent the KillVolume to the Vine. Then, create a prefab from the vine. If we want to make changes it will change all instances of the prefab. And now we can make a lot of copies of it and scale them/rotate them and not worry about affecting the original!
© Lanz Singbeil
Using script to switch scenes
Remember that we created a gateway object before? Let us use it to teleport to a new level.
First lets make a scene to teleport to: File > New Scene
make a simple scene with a similar set-up to first one. Have a character controller and a simple ground plane.
Make sure to save your new scene.
© Lanz Singbeil
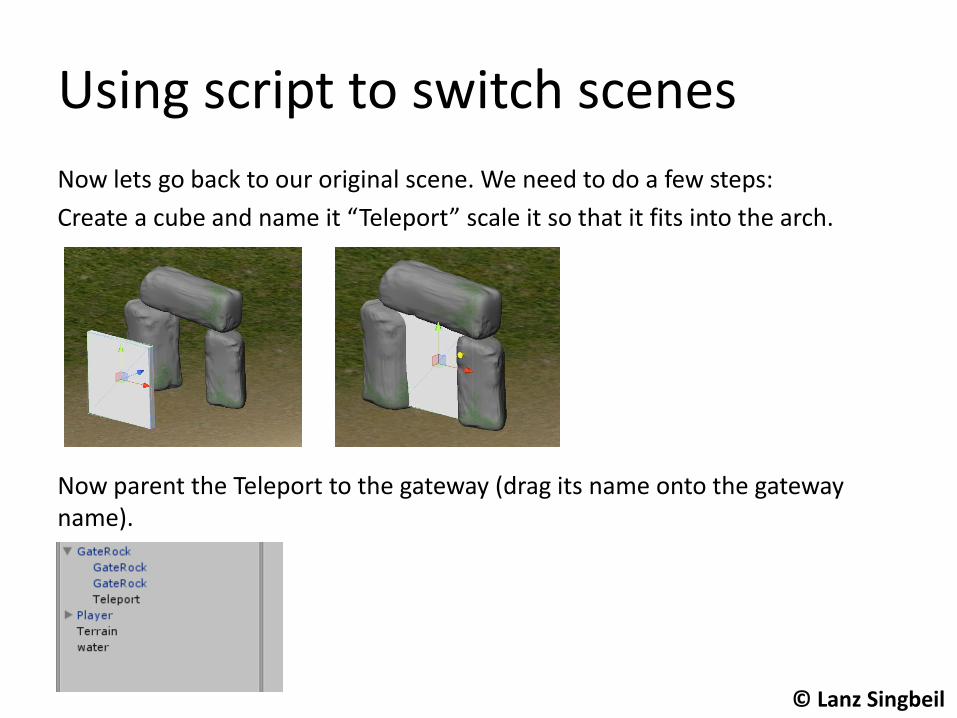
Using script to switch scenes
Now lets go back to our original scene. We need to do a few steps:
Create a cube and name it “Teleport” scale it so that it fits into the arch.
Now parent the Teleport to the gateway (drag its name onto the gateway name).
© Lanz Singbeil

Using script to switch scenes
Lastly, drag this new gateway with the teleporter in it onto the old prefab in the project tab.
This will update the prefab. Any other instances of gateway will now also have this new teleporter.
© Lanz Singbeil

Using script to switch scenes
Now we need to add the logic:
1. Create a new script called “SwitchScenes”
2. Drag that script onto the teleporter object in the prefab.
3. Make sure The teleporter has mesh renderer turned off and “Is Trigger” turned on.
4. In the script, add the following code similar to before:
void OnTriggerEnter(Collider c) {
Application.LoadLevel(“NAME_OF_LEVEL”);
}
© Lanz Singbeil

Using script to switch scenes Test the game!
If you did the steps correctly, Unity should throw an error when you try to teleport:
You may already know how to fix this. We just need to go into our build settings and add all our different scenes. We are going to have to do that anyways if we want to export the game.
File > Build Settings
Then open each scene and press “Add Current”
Test again and it should work.
© Lanz Singbeil
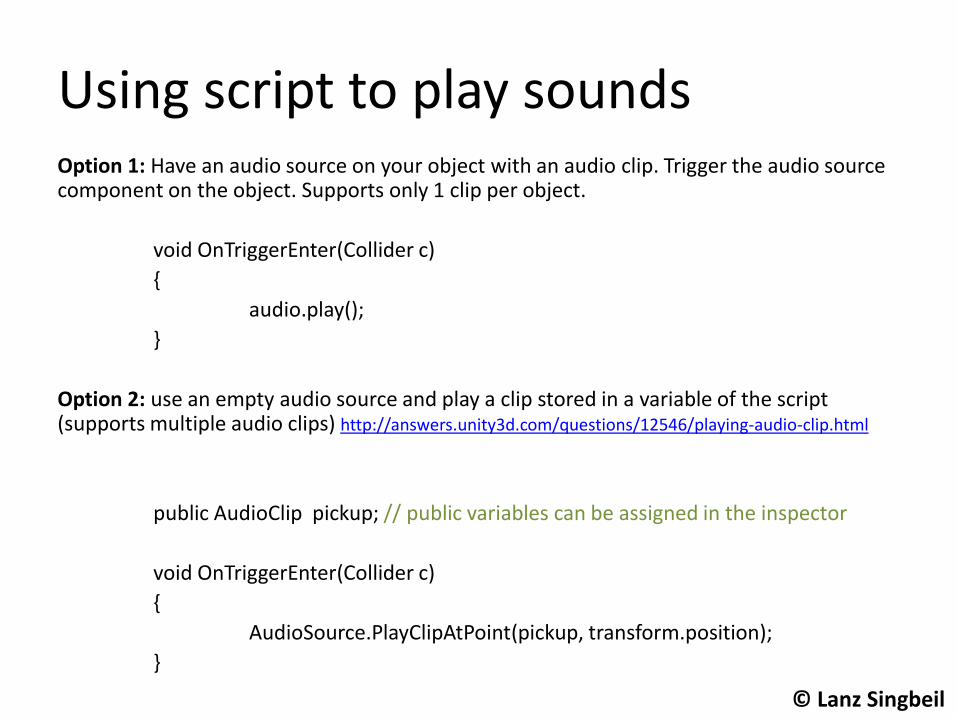
Using script to play sounds
Option 1: Have an audio source on your object with an audio clip. Trigger the audio source component on the object. Supports only 1 clip per object.
void OnTriggerEnter(Collider c)
{
audio.play();
}
Option 2: use an empty audio source and play a clip stored in a variable of the script (supports multiple audio clips) http://answers.unity3d.com/questions/12546/playing-audio-clip.html
public AudioClip pickup; // public variables can be assigned in the inspector
void OnTriggerEnter(Collider c)
{
AudioSource.PlayClipAtPoint(pickup, transform.position);
}
© Lanz Singbeil

Using script to loop animations:
Going back to our particle system, it only plays once.
Maybe we want to be able to trigger an animation at a certain time or to have it always be playing.
For looping an animation, create a new script and add it to your particle system.
In the update method insert the following code:
// Update is called once per frame
void Update () {
if (animation.isPlaying == false)
{
animation.Play();
}
}
© Lanz Singbeil
If time permits:
Questions? Requests?
© Lanz Singbeil