
Hydronic Explorer for Droid User - Slant/Fin bottom of the screen provides links to: Facebook,...
33
Slant/Fin Hydronic Explorer for Android Tablet/Phone User Manual Slant/Fin Corporation 100 Forest Drive Greenvale, NY 11548 (516) 484-2600 www.slantfin.com
-
Upload
duonghuong -
Category
Documents
-
view
214 -
download
1
Transcript of Hydronic Explorer for Droid User - Slant/Fin bottom of the screen provides links to: Facebook,...

Slant/Fin
Hydronic Explorer
for
Android
Tablet/Phone
User Manual
Slant/Fin Corporation 100 Forest Drive
Greenvale, NY 11548 (516) 484-2600
www.slantfin.com


Hydronic Explorer for Android Tablet/Phone User Manual
Slant/Fin Corporation iii
DISCLAIMER
Every effort has been made to assure accuracy of this app as well as all other
Slant/Fin publications. However, neither Slant/Fin nor those responsible for the
preparation of the app make any representations or guarantees, or assume or
accept responsibility or liability with respect thereto.
PROPRIETARY INFORMATION NOTICE
This document contains information proprietary to Slant/Fin Corporation. All
rights are reserved.
No part of this document may be reproduced, transmitted, processed or recorded
by any means or form, electronic, mechanical, photographic or otherwise, nor be
released to any third party without the express written consent of Slant/Fin
Corporation.
Table of Contents
INTRODUCTION..................................................................................................1
USING HYDRONIC EXPLORER ........................................................................................................1
DOWNLOADING HYDRONIC EXPLORER..........................................................................................1
STARTING HYDRONIC EXPLORER ..............................................................3
OPENING HYDRONIC EXPLORER ....................................................................................................3
NAVIGATING HYDRONIC EXPLORER..............................................................................................4
ACCESSING INSTRUCTIONS ............................................................................................................4
HEAT LOSS CALCULATOR..............................................................................5
PURPOSE........................................................................................................................................5
HEAT LOSS CALCULATOR .............................................................................................................5
Adding a New Job ....................................................................................................................5
Adding a Floor .........................................................................................................................6
Adding a Room.........................................................................................................................7
Deleting/Editing Jobs, Floors and Rooms................................................................................8
Heat Loss Calculations ............................................................................................................9
Data Entry..............................................................................................................................10
Cell Descriptions....................................................................................................................10
ROOM HEAT LOSS AND BASEBOARD RECOMMENDATIONS .........................................................14
VIEW SUMMARY FOR THIS JOB ....................................................................................................16
Table of Contents
iv Slant/Fin Corporation
BASEBOARD SELECTOR................................................................................17
PURPOSE ......................................................................................................................................17
HEAT LOSS PER FOOT CALCULATION ..........................................................................................17
SELECTING BASEBOARD ..............................................................................................................17
BOILER SELECTOR .........................................................................................19
SELECTING THE RIGHT BOILER ....................................................................................................19
QUICK ANSWERS .............................................................................................23
PURPOSE ......................................................................................................................................23
How do I create, edit, or delete a job? ...................................................................................23
How do I add, edit, or delete a floor? ....................................................................................23
How do I add, edit, or delete a room?....................................................................................24
One of my entries for heat loss calculations is incorrect. How do I change it? .....................24
How do I save my work? ........................................................................................................24
How do I email a job summary?.............................................................................................24
How do I select the right boiler for a job? .............................................................................24
How do I select baseboard? ...................................................................................................25
OUTDOOR DESIGN TEMPERATURE FOR CITIES ..................................27

Hydronic Explorer for Android Tablet/Phone User Manual
Slant/Fin Corporation 1
Slant/Fin Icon
Introduction
Slant/Fin’s Hydronic Explorer performs fast and accurate heat loss calculations for hot water systems and
helps you select the right boiler and baseboard for each job. It is easy to use, and, whether the job is to
provide heating for a single room or for a multilevel structure, the procedure is always the same: you
simply enter the required data for each room, and Hydronic Explorer does the rest.
Caution: This app is for use with hot water systems only. Do not use to size steam systems.
To further help you in selecting the right equipment, Hydronic Explorer provides links to Slant/Fin’s
website to view additional product information on boilers and baseboard by simply tapping the screen on
your Android tablet or phone.
Note: This manual provides instructions and illustrations as they appear on the Android tablet. The
procedures are the same when using the Android phone, but the illustrations may vary slightly.
Using Hydronic Explorer
Hydronic Explorer requires little computer experience. If you already know how to use your Android
tablet or phone, you are well on your way. If necessary, refer to your Android tablet or phone literature
for operation instructions.
Downloading Hydronic Explorer
Hydronic Explorer is intended for use on an Android tablet, version 3.0 (Honeycomb)
or later and an Android phone, version 2.3 (Gingerbread) or later. To download the
Hydronic Explorer app, use the Google Play Store app on your device and search for
Slant/Fin Hydronic Explorer.
After you have downloaded the app, the Slant/Fin icon will appear on your screen.

Hydronic Explorer for Android Tablet/Phone User Manual
Slant/Fin Corporation 3
Home Screen
Starting Hydronic
Explorer
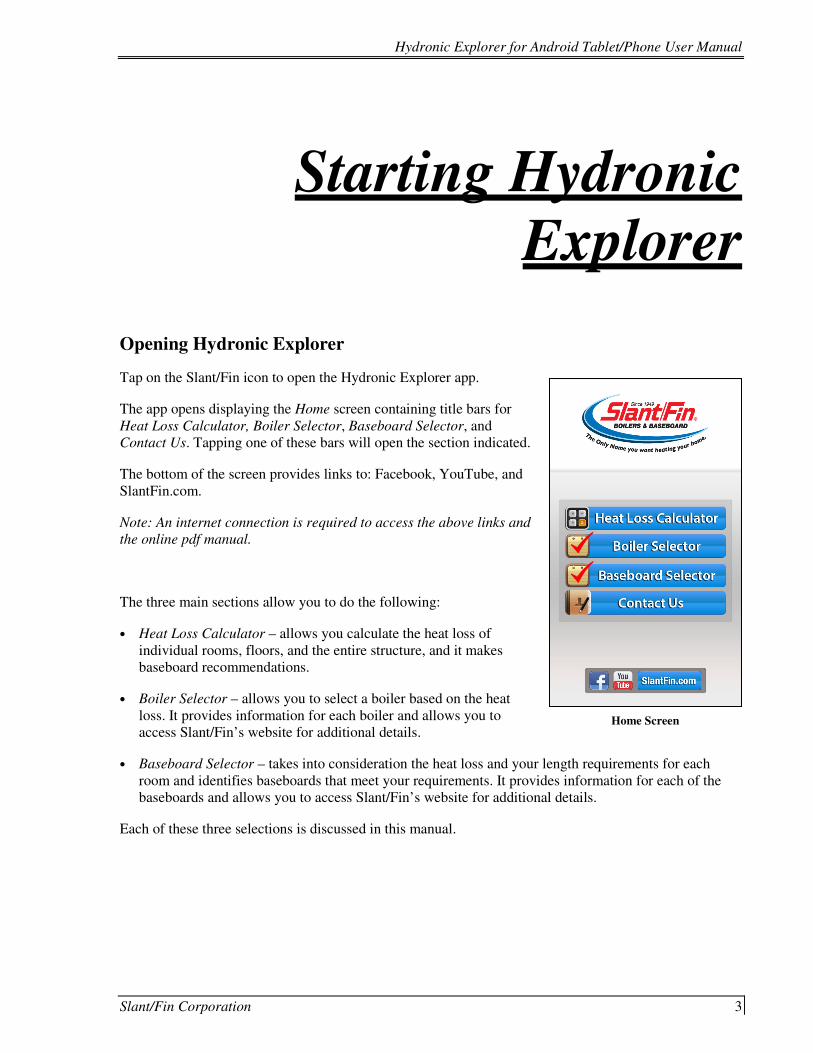
Opening Hydronic Explorer
Tap on the Slant/Fin icon to open the Hydronic Explorer app.
The app opens displaying the Home screen containing title bars for
Heat Loss Calculator, Boiler Selector, Baseboard Selector, and
Contact Us. Tapping one of these bars will open the section indicated.
The bottom of the screen provides links to: Facebook, YouTube, and
SlantFin.com.
Note: An internet connection is required to access the above links and
the online pdf manual.
The three main sections allow you to do the following:
• Heat Loss Calculator – allows you calculate the heat loss of
individual rooms, floors, and the entire structure, and it makes
baseboard recommendations.
• Boiler Selector – allows you to select a boiler based on the heat
loss. It provides information for each boiler and allows you to
access Slant/Fin’s website for additional details.
• Baseboard Selector – takes into consideration the heat loss and your length requirements for each
room and identifies baseboards that meet your requirements. It provides information for each of the
baseboards and allows you to access Slant/Fin’s website for additional details.
Each of these three selections is discussed in this manual.

Starting Hydronic Explorer
4 Slant/Fin Corporation
Back & Home Buttons
Navigating Hydronic Explorer
As indicated above, you can navigate to a desired section by tapping
on one of bars in the Home screen.
At times, the Back button will be displayed allowing you to return to
the previous screen or the Home button allowing you to return to the
Home screen.
Accessing Instructions
When the i button is displayed in one of the upper corners, you can tap
on it do display instructions. The instructions will also display the PDF icon in the upper right corner.
You can tap on the icon to view the online user manual. An internet connection is required.
i (information) Button
Instructions – PDF Icon
PDF Icon

Hydronic Explorer for Android Tablet/Phone User Manual
Slant/Fin Corporation 5
Heat Calculator Screen
Heat Loss Calculator
Purpose
The primary objective of Hydronic Explorer is to help you design a heating system that will provide the
required heating comfort for a specific job. The first step towards this goal is to determine the heat loss
(Btu/hour) using Heat Loss Calculator. Construction, outside temperature, and indoor temperature are
significant factors in this calculation.
Heat Loss Calculator
The Heat Loss Calculator is your main work area where you use the following procedure:
1. Create a job by giving it a name.
2. Identify each floor by giving it a name.
3. Identify the rooms on each floor by naming each of them.
4. Select the rooms, one at a time, and enter the required data in each cell.
Repeat the above procedure if you want to enter more jobs.
Note: It is not necessary to identify all floors and rooms before you start entering data. You may identify
a room, enter its data and then identify another room and so on.
You can use the Hydronic Explorer app to store multiple jobs. All data that you enter is automatically
saved. You can also view and email each job summary. This procedure is discussed in Section View
Summary for this Job in this manual.
Adding a New Job
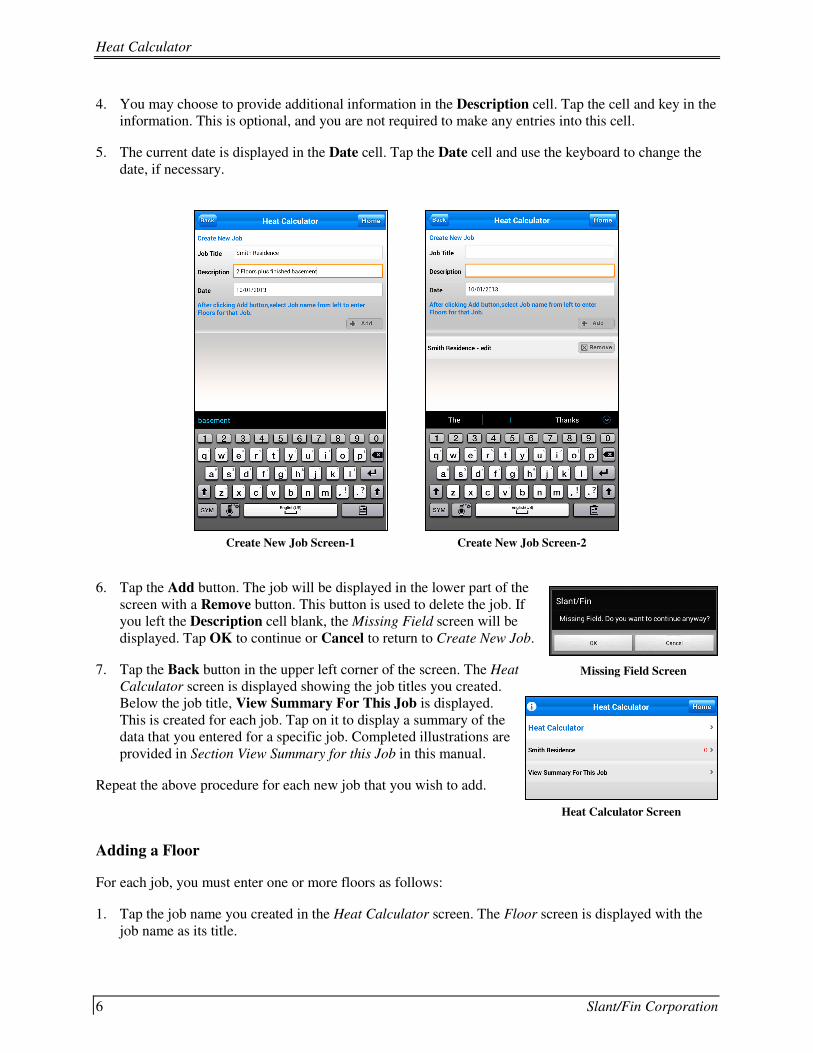
To create a new job, do the following:
1. Tap the Heat Loss Calculator button. The Heat Calculator screen
is displayed with Heat Calculator as its title.
2. Tap the Heat Calculator bar. The Create New Job screen is
displayed with a keyboard at the bottom of the screen.
3. Tap the Job Title and key in the name of the job.
Heat Calculator
6 Slant/Fin Corporation
Missing Field Screen
Heat Calculator Screen
4. You may choose to provide additional information in the Description cell. Tap the cell and key in the
information. This is optional, and you are not required to make any entries into this cell.
5. The current date is displayed in the Date cell. Tap the Date cell and use the keyboard to change the
date, if necessary.
6. Tap the Add button. The job will be displayed in the lower part of the
screen with a Remove button. This button is used to delete the job. If
you left the Description cell blank, the Missing Field screen will be
displayed. Tap OK to continue or Cancel to return to Create New Job.
7. Tap the Back button in the upper left corner of the screen. The Heat
Calculator screen is displayed showing the job titles you created.
Below the job title, View Summary For This Job is displayed.
This is created for each job. Tap on it to display a summary of the
data that you entered for a specific job. Completed illustrations are
provided in Section View Summary for this Job in this manual.
Repeat the above procedure for each new job that you wish to add.
Adding a Floor
For each job, you must enter one or more floors as follows:
1. Tap the job name you created in the Heat Calculator screen. The Floor screen is displayed with the
job name as its title.
Create New Job Screen-2
Create New Job Screen-1

Hydronic Explorer for Android Tablet/Phone User Manual
Slant/Fin Corporation 7
2. Tap the Floor Title cell. Key in the floor name using the displayed keyboard.
3. You may choose to provide additional information in the Description cell. Tap the cell and key in the
information. This is optional, and you are not required to make any entries into this cell.
4. Tap the Add button. The floor will be displayed in the lower part of the screen with a Remove button.
This button is used to delete the floor. If you left the Description cell blank, the Missing Field screen
will be displayed. Tap OK to continue or Cancel to return to Floor screen.
5. Repeat Steps 2 – 4 to add more floors.
6. Tap the Back button in the upper left corner of the screen. The
Heat Calculator screen is displayed showing the job and floor
titles.
Note that you can edit or delete any floor. The procedures are
discussed in Section Deleting/Editing Jobs, Floors and Rooms in this
manual.
Adding a Room
For each floor, you must enter one or more rooms as follows:
1. Tap a floor name in the Heat Calculator screen. The Room screen
is displayed with the floor name as its title.
Name a Floor Multiple Floors
Name a Room

Heat Calculator
8 Slant/Fin Corporation
2. Tap the Room Title cell. Key in the room name using the displayed keyboard.
3. You may choose to provide additional information in the Description cell. Tap the cell and key in the
information. This is optional, and you are not required to make any entries into this cell.
4. Tap the Add button. The room will be displayed in the lower part of the screen with a Remove
button. This button is used to delete the room. If you left the Description cell blank, the Missing
Field screen will be displayed. Tap Ok to continue or Cancel to return to Floor screen.
5. Repeat Steps 2 – 4 to add more rooms to the same floor.
6. Tap the Back button in the upper left corner of the screen. The Heat Calculator screen is displayed
showing the job, floor titles, and room titles. Repeat Steps 1 – 5 to add rooms to another floor.
Deleting/Editing Jobs, Floors and Rooms
You can delete jobs, floors and rooms or edit them such as changing names, correcting typos or adding
information in the Description cell. Starting in the Home screen (tap the Home button in the upper right
corner), tap on the Heat Loss Calculator button. The Heat Calculator screen is displayed.
To delete a job:
1. Tap on the Heat Calculator bar to delete a job. All jobs will be displayed.
2. Tap the Remove button of the job to be deleted.
To delete a floor:
1. Tap on a job name to delete a floor. All floors will be displayed.
More Rooms Multiple Floors & Rooms

Hydronic Explorer for Android Tablet/Phone User Manual
Slant/Fin Corporation 9
2. Tap the Remove button of the floor to be deleted.
To delete a room:
1. Tap on a floor name to delete a room. All rooms on that floor will be displayed.
2. Tap the Remove button of the room to be deleted.
To edit a job:
1. Tap on the Heat Calculator bar to edit a job. All jobs will be displayed.
2. In the lower part of the screen, tap the bar containing the job name and the word edit. The Add button
in the upper part of the screen is replaced with an Update button.
3. Tap the title or description cell and use the keyboard to make changes or enter data.
4. Tap the Update button.
To edit a floor:
1. Tap on a job name to edit a floor. All floors will be displayed.
2. In the lower part of the screen, tap the bar containing the floor
name and the word edit. The Add button is replaced with an
Update button.
3. Tap the title or description cell and use the keyboard to make
changes or enter data.
4. Tap the Update button.
To edit a room:
1. Tap on a floor name to edit a room. All rooms on that floor will be
displayed.
2. In the lower part of the screen, tap the bar containing the room
name and the word edit. The Add button is replaced with an
Update button.
3. Tap the title or description cell and use the keyboard to make
changes or enter data.
4. Tap the Update button.
Heat Loss Calculations
The Hydronic Explorer app calculates heat loss for each room using data that you enter into each cell
within the Heat Loss screen. Tapping on a cell will permit you to enter values using the displayed
numeric keypad, or you may be presented with additional options. The top of the Heat Loss screen
Update a Room

Heat Calculator
10 Slant/Fin Corporation
displays the room’s heat loss in BTU/HR. The bottom of the screen displays recommended baseboards
and required lengths.
As you enter data for additional rooms, the app will update the heat loss for the floor and for the entire
job.
Data Entry
Enter room data as follows:
1. Tap on a room in the Heat Calculator screen. The Heat Loss screen will be displayed where you will
enter values into cells using the displayed numeric keypad. (If the keypad is not displayed, tap on a
cell.) The two figures, below provide examples of entered values for a specific room.
2. Tap on each cell and provide the required values.
3. After making all entries or editing an individual cell, tap the Done button in the upper right corner to
update the heat loss calculation for the room. The Done button will be replaced with the Home
button.
Cell Descriptions
The following describes the cells in the Heat Loss screen.
Room Height, Room Length, and Room Width
Tap each cell and enter the values. All dimensions are in feet.
Heat Loss Screen (Scroll to Top) Heat Loss Screen (Scroll to Bottom)

Hydronic Explorer for Android Tablet/Phone User Manual
Slant/Fin Corporation 11
Doors & Glass (sq ft)
Tap the cell and enter the total area (in square feet) of all of the doors and glass within the room.
Door & Glass Factor
If you know the value, tap the white area in the cell and enter the value
using the keypad. Alternatively, tap the cell. The Door & Glass Factor
screen is displayed. Tap on one of the items. The value is
automatically inserted.
Exposed Wall Length
Determine the length of each wall in the room that is exposed to the outdoors and enter the total (in feet).
Exposed Wall Factor
If you know the value, tap the white area in the cell and enter the value using the keypad. Alternatively,
do the following:
1. Tap on the cell. The Exposed Wall Factor screen is displayed.
2. Tap on the cell that describes the wall’s construction. In our example, we chose Frame. A new screen
representing the selected construction will be displayed.
3. Tap on a cell to select an option, or tap on More options… for more choices. The value will
automatically be inserted.
Door & Glass Factor
Wall Factor - Screen
Wall Factor - More Options Exposed Wall Factor

Heat Calculator
12 Slant/Fin Corporation
Cold Partition Length
Determine the length of each wall in the room that is exposed to adjoining unheated areas of the building
and enter the total (in feet).
Note: This differs from Exposed Wall Length, above where the wall is
exposed to the outside.
Cold Partition Factor
If you know the value, tap the white area in the cell and enter the value
using the keypad. Alternatively, tap the cell then tap on one of the
options in the Cold Partition Factor screen. The proper value is
automatically inserted.
Ceiling Factor
If you know the value, tap the white area in the cell and enter the value using the keypad. Alternatively,
do the following:
1. Tap on the cell. The Ceiling Factor screen is displayed.
2. Tap on a cell that describes the ceiling. In our example we chose Attic Space Above, which
displayed a new screen with insulation options.
3. Tap on one of the options. The proper value is automatically inserted.
Cold Partition Factor
Ceiling Factor
Ceiling Factor – Attic Space Above

Hydronic Explorer for Android Tablet/Phone User Manual
Slant/Fin Corporation 13
Floor Factor
If you know the value, tap the white area in the cell and enter the value using the keypad. Alternatively,
do the following:
1. Tap on the cell. The Floor Factor screen is displayed.
2. Tap on a cell that describes the floor. In our example, we chose Wood Over Enclosed UNHEATED
Space.
3. If you select one of the other options, another screen is displayed. Tap on one of the options. The
proper value is automatically inserted.
Infiltration Factor
If you know the value, tap the white area in the cell and enter the value using the keypad. Alternatively,
do the following:
1. Tap on the cell. The Infiltration Factor screen is displayed.
2. Tap on the cell that best describes the room. In our example we chose Windows and Doors
Weather-stripped OR With Storm Sash. A new screen is displayed.
3. Tap on one of the options. In our example, we chose Rooms with windows or exterior doors, one
side only. The proper value is automatically inserted.
Floor Factor
Floor Factor – Wood Over ENCLOSED

Heat Calculator
14 Slant/Fin Corporation
Indoor Temperature
Tap the white area in the cell and enter the minimum indoor temperature (oF) to be maintained by the
heating system.
Outdoor Temperature
Tap the white area in the cell and enter the outdoor temperature (oF). See Section Outdoor Design
Temperatures for Cities in this manual.
Room Heat Loss and Baseboard Recommendations
At this point you have entered all of the necessary data for a specific room. Scroll to the top of the Heat
Loss screen to read the heat loss in BTU/HR for the room. Scroll to the bottom of the Heat Loss screen to
view recommended baseboard products and required lengths that will meet the room’s heat requirements.
Note: For baseboard lengths, the app suggests actual “finned length” required. Actual output of element
is 4 inches less (finned length) than actual tube length per piece of baseboard. This should be taken into
account when deciding on final requirements of baseboard per room.
If you want to include any of the suggested baseboard products in the job summary, tap the adjacent (+).
To remove them, tap the (–). To view the job summary, return to the Heat Calculator screen (tap the
Back button on top of the screen) and select View Summary for this Job.
Viewing and selecting additional baseboard products and boilers are discussed in the following sections.
Infiltration Factor
Infiltration Factor – Windows and Doors

Hydronic Explorer for Android Tablet/Phone User Manual
Slant/Fin Corporation 15
As you enter data for additional rooms, you can view the heat loss for
each room, floor, and the entire job in the Heat Calculator screen. Tap
the Back button in the upper left corner to return to the Heat
Calculator screen.
Room Heat Loss (BTU/HR) Recommended Baseboard Products
View Heat Loss

Heat Calculator
16 Slant/Fin Corporation
View Summary for this Job
A summary is automatically created for each job and is continuously updated as you enter or modify data.
You can access the summary by tapping View Summary for this Job in the Heat Calculator screen.
Emailing the Summary
The app allows you to email the summary to anyone you choose including to your own computer for
backing up your data. Tap the email icon in the lower right and enter the required information. An internet
connection and email account are required.
Job Summary- Top
Job Summary- Bottom

Hydronic Explorer for Android Tablet/Phone User Manual
Slant/Fin Corporation 17
BaseBoard Selector Screen
Baseboard Selector
Purpose
As you determine the heat loss for each room, you can select baseboard that will provide the necessary
heat for that room. This section will help you make that selection.
Heat Loss per Foot Calculation
For each room, you need to calculate the heat loss per foot (BTU/HR/FT). Do the following:
1. Determine the heat loss for a specific room. You can find this value on top of the Heat Loss screen for
that room or in the Heat Calculator screen.
2. Divide the heat loss by the length of baseboard that you plan to install in that room. This is the heat
loss per foot.
Note: For baseboard lengths, the app suggests actual “finned length” required. Actual output of
element is 4 inches less (finned length) than actual tube length per piece of baseboard. This should be
taken into account when deciding on final requirements of baseboard per room.
Selecting Baseboard
Return to the Home screen and do the following:
1. Tap on Baseboard Selector. The BaseBoard Selector screen is
displayed.
2. Tap on the Heat Loss (BTU/HR/FT) cell. The numeric keypad is
displayed.
3. Enter the heat loss per foot that you calculated in the above
procedure then tap the Done button in the upper right corner. A
list of baseboard products that meet your requirements is
displayed.
4. Tap on a baseboard product. In our example, we selected
Fine/Line 30 FL-30. The Fine/Line 30 screen is displayed. Some
of the information provided includes:
• Application (residential hot water heating)
• Output

Baseboard Selector
18 Slant/Fin Corporation
• Height
• Available Lengths
• Depth
You can also tap the Learn More button to access additional information online. An internet
connection is required.
Baseboard Selections
Fine/Line 30 Baseboard

Hydronic Explorer for Android Tablet/Phone User Manual
Slant/Fin Corporation 19
Boiler Selector
Selecting the Right Boiler
This section will help you select the right boiler for your job. You can use the heat loss in BTU/HR that is
automatically obtained from the Heat Loss Calculator, or, if you already know the heat loss, you can
enter the value manually.
Return to the Home screen and do the following:
1. Tap on Boiler Selector. The Boiler Selector screen is displayed showing the heat loss. If that cell is
empty and you know the heat loss, you can enter it yourself as follows:
a. Tap on the empty cell next to Heat Loss (BTU/HR). The numeric keypad is displayed.
b. Enter the heat loss value then tap the Done button in the upper right corner. To view steam boilers,
enter zero (0). To view all available Slant/Finn Boilers by fuel type, enter 100.
Note: You can tap the i button in the top left corner to display additional instructions.
Calculated Heat Loss
Heat Loss - Manual Entry

Boiler Selector
20 Slant/Fin Corporation
2. Tap on a cell to select the desired fuel type: Gas (Natural or Propane), Oil, or Electric.
Each selection provides a series of screens where you provide additional information by tapping on
the appropriate cells. You will then be provided with a list of boilers that meet your requirements.
3. In our example, we chose Gas, Natural or Propane. The Gas, Natural or Propane screen is
displayed.
4. This selection allows you to enter the operating altitude. You need to enter a value only if the altitude
exceeds 5,000 feet. Tap on the cell. The numeric keypad is displayed. Enter a value (in feet) and tap
the Done button in the upper right corner.
5. Tap on a cell to choose the type of combustion. In our example, we chose Sealed Combustion. The
Sealed Combustion screen is displayed.
6. We are presented with a choice of Boiler or Boiler With Tankless Coil. In our example, we chose
the latter and tapped on Boiler With Tankless Coil. The next screen provides a choice of three
boilers.
Note: Boilers are listed in the order that they fit your BTU requirements. The first boiler shown is the
closest match, but larger boilers are also displayed.
Enter Altitude
Select Boiler Type
Select Boiler

Hydronic Explorer for Android Tablet/Phone User Manual
Slant/Fin Corporation 21
7. Tap on any of the selections to learn about the individual boilers. In our example, we chose Lynx LX-
120 CB (Hot Water). The Lynx LX-120 CB (Hot Water) screen is displayed providing the following
information:
• Fuel type (Gas)
• System: Hot Water
• Combustion type
• Capacity
• Efficiency
You can also tap the Learn More button to access additional
information online.
8. Tap the Back button to return to the previous screen. If you want
to include a boiler in the job summary, tap the adjacent (+). To
remove it, tap (-). To view the job summary, return to the Heat
Calculator screen and tap View Summary for this Job. You may
select up to three boilers to be included in the job summary.
Note: If you exceed this number, the app will randomly include
just three of the selected boilers in the job summary.
Boiler Information


Hydronic Explorer for Android Tablet/Phone User Manual
Slant/Fin Corporation 23
Quick Answers
Purpose
This section serves as handy reference allowing you to find quick answers to specific questions.
How do I create, edit, or delete a job?
Creating a job:
1. Tap the Heat Loss Calculator button. The Heat Calculator screen is displayed.
2. Tap the Heat Calculator bar. The Create New Job screen is displayed.
3. Enter all of the required data in the Create New Job screen and tap Add.
Editing a job:
1. In the Create New Job screen, select the job by tapping the bar with the job name and the word edit.
2. Make changes and tap Update.
Deleting a job:
In the Create New Job screen, tap Remove on the same bar as the job name.
How do I add, edit, or delete a floor?
Adding a floor:
1. Tap the job name in the Heat Calculator screen.
2. Enter all of the required data in the Floor screen and tap Add.
Editing a floor:
1. In the Floor screen, select the floor by tapping the bar with the floor name and the word edit.
2. Make changes and tap Update.

Quick Answers
24 Slant/Fin Corporation
Deleting a floor:
In the Floor screen, tap Remove on the same bar as the floor name.
How do I add, edit, or delete a room?
Adding a room:
1. Tap the floor name in the Heat Calculator screen.
2. Enter all of the required data in the Room screen and tap Add.
Editing a room:
1. In the Room screen, select the room by tapping the bar with the room name and the word edit.
2. Make changes and tap Update.
Deleting a room:
In the Room screen, tap Remove on the same bar as the room name.
One of my entries for heat loss calculations is incorrect. How do I change it?
Tap on the cell, enter the correct data and tap Done.
How do I save my work?
There is no need for you to save your work. The system saves it automatically. However, in the unlikely
event that the app crashes, your data will be lost. For this reason, you should email the job summary to
yourself at another computer; see Section View Summary for this Job in this manual.
How do I email a job summary?
In the Heat Calculator screen, tap on View Summary for this Job below the job. Tap the email icon in
the lower right and enter the required information. An internet connection and email account are required.
How do I select the right boiler for a job?
1. In the Home screen, tap on Boiler Selector.
2. Enter the heat loss (BTU/HR) in the empty cell. This will be entered automatically if you used the app
to calculate the heat loss; otherwise, you can use the numeric keypad to enter it yourself.
3. Tap on the desired fuel type. As additional screens are presented, tap on the appropriate cells. The app
will provide a list of boilers that meet your requirements. The first boiler in the list will most closely
match your BTU requirements. Tap on a boiler to learn more.

Hydronic Explorer for Android Tablet/Phone User Manual
Slant/Fin Corporation 25
Note: To view steam boilers, enter zero (0) in the heat loss cell. To view all available Slant/Finn
Boilers by fuel type, enter 100.
How do I select baseboard?
1. The bottom of the Heat Loss screen will display recommended baseboard products and recommended
lengths for the room. For more information, tap Baseboard Selector in the Home screen.
2. Determine the desired baseboard length and divide that into the room’s heat loss. Enter that value into
the Heat Loss (BTU/HR/FT) cell using the numeric keypad.
3. Tap Done. A list of baseboards meeting your requirements will be displayed. Tap on a baseboard to
learn more.


Hydronic Explorer for Android Tablet/Phone User Manual
Slant/Fin Corporation 27
Outdoor Design
Temperature for Cities
Table 1 Outdoor Design Temperatures for Cities
Hydronics Institute H-21 Manual
Alabama Georgia Michigan
Anniston 19 Atlanta 23 Battle Creek 5
Birmingham 22 Augusta 23 Detroit 8
Mobile 29 Macon 27 Flint 3
Montgomery 26 Savannah 27 Grant Rapids 6
Lansing 6
Alaska Idaho Sault St. Marie -8
Anchorage -20 Boise 10
Fairbanks -50 Coeur D'Alene 7 Minnesota
Juneau -4 Lewiston 12 Duluth -15
Nome -28 Pocatello -2 Minneapolis -10
St. Paul -10
Arizona Illinois
Flagstaff 5 Chicago 0 Mississippi
Phoenix 34 Moline -3 Meridian 24
Tucson 32 Peoria 2 Vicksburg 26
Winslow 13 Springfield 4
Yuma 40 Urbana 4 Missouri
Columbia 6
Arkansas Indiana Kansas City 8
Fort Smith 19 Fort Wayne 5 St. Louis 11
Little Rock 23 Indianapolis 4
Montana
California Iowa Billings -6
Bakersfield 33 Davenport -3 Butte -16
Eureka 35 Des Moines -3 Helena -13
Fresno 31 Dubuque -7 Kalispell -3
Los Angeles 44 Mason City -9 Miles City -15
Oakland 37 Sioux City -6
Sacramento 35 Nebraska
San Diego 44 Kansas Lincoln 0
San Francisco 44 Dodge City 7 North Platte -2
San Jose 36 Topeka 6 Omaha -1
Wichita 9
Colorado Nevada

Outdoor Design Temperature for Cities
28 Slant/Fin Corporation
Table 1 Outdoor Design Temperatures for Cities
Hydronics Institute H-21 Manual
Denver 3 Kentucky Las Vegas 26
Grand Junction 11 Louisville 12 Reno 8
Pueblo -1 Winnemucca 5
Louisiana
Connecticut New Orleans 35 New Hampshire
Hartford 5 Shreveport 26 Concord -7
New Haven 9 Manchester 1
Maine
Delaware Augusta -3 New Jersey
Dover 15 Bangor -4 Atlantic City 18
Wilmington 15 Caribou -14 Newark 15
Portland 0 Trenton 16
District Of Columbia
Washington 19 Maryland New Mexico
Baltimore 15 Albuquerque 17
Florida Roswell 19
Jacksonville 32 Massachusetts
Miami 47 Boston 10 New York
Pensacola 32 Nantucket 0 Albany 0
Tampa 39 Springfield 2 Binghamton 2
Worcester 1 Buffalo 6
Massena -12
New York 15
Rochester 5
Syracuse 2
Canada
North Carolina Tennessee Alberta -25
Asheville 17 Chattanooga 19 Calgary -26
Charlotte 22 Knoxville 17 Edmonton
Greensboro 17 Memphis 21
Raleigh 20 Nashville 16 British Columbia
Wilmington 27 Vancouver 19
Texas Victoria 23
North Dakota Abilene 21
Bismarck -19 Amarillo 12 Manitoba
Fargo -17 Austin 29 Churchill -38
Brownsville 40 Winnipeg -25
Ohio Corpus Christi 36
Akron 6 Dallas 24 New Brunswick
Cincinnati 12 Del Rio 31 Fredericton -10
Cleveland 7 El Paso 25 St. John -7
Columbus 7 Fort Worth 24

Hydronic Explorer for Android Tablet/Phone User Manual
Slant/Fin Corporation 29
Table 1 Outdoor Design Temperatures for Cities
Hydronics Institute H-21 Manual
Dayton 6 Galveston 36 New Foundland
Sandusky 8 Houston 32 St. Johns 6
Toledo 5 Port Arthur 33
San Antonio 30 Nova Scotia
Oklahoma Halifax 4
Oklahoma City 15 Utah Yarmouth 9
Tulsa 16 Vernal -6
Salt Lake City 9 Ontario
Oregon Hamilton 3
Baker 1 Vermont London 3
Eugene 26 Burlington -7 Ottawa -13
Medford 23 Toronto 1
Portland 24 Virginia
Salem 25 Lynchburg 19 Prince Edward Island
Norfolk 23 Charlottetown -3
Pennsylvania Richmond 18
Erie 11 Roanoke 18 Quebec
Harrisburg 13 Montreal -10
Philadelphia 15 Washington Quebec -13
Pittsburgh 11 Seattle 32
Scranton 6 Spokane 4 Saskatchewan
Yakima 10 Prince Albert -35
Rhode Island Saskatoon -30
Providence 10 West Virginia
Elkins 5 Yukon
South Carolina Parkersburg 12 Whitehorse -42
Charleston 27
Columbia 23 Wisconsin
Greenville 23 Green Bay -7
LaCrosse -8
South Dakota Madison -5
Huron -12 Milwaukee -2
Pierre -9
Rapid City -6 Wyoming
Cheyenne -2
Lander -12
Sheridan -7