HP iSCSI Boot for Windows User Guide
26
HP iSCSI Boot for Windows User Guide Part Number 434706-00A September 2007
Transcript of HP iSCSI Boot for Windows User Guide

HP iSCSI Boot for Windows User Guide
Part Number 434706-00A September 2007

© Copyright 2007 Hewlett-Packard Development Company, L.P.
The information contained herein is subject to change without notice. The only warranties for HP products and services are set forth in the express warranty statements accompanying such products and services. Nothing herein should be construed as constituting an additional warranty. HP shall not be liable for technical or editorial errors or omissions contained herein.
Confidential computer software. Valid license from HP required for possession, use or copying. Consistent with FAR 12.211 and 12.212, Commercial Computer Software, Computer Software Documentation, and Technical Data for Commercial Items are licensed to the U.S. Government under vendor’s standard commercial license.
Audience assumptions
This document is for the person who installs, administers, and troubleshoots servers and storage systems. HP assumes you are qualified in the servicing of computer equipment and trained in recognizing hazards in products with hazardous energy levels.

Contents 3
Contents
Overview..................................................................................................................................... 4 iSCSI boot for Windows overview ............................................................................................................... 4 Limitations ................................................................................................................................................ 5 System requirements .................................................................................................................................. 5
Installation and configuration ......................................................................................................... 7 Summary of installation using F6 install ........................................................................................................ 7 Downloading the SoftPaq and extracting...................................................................................................... 7 Installing iSCSI boot .................................................................................................................................. 7
Update the iSCSI boot option ROM ................................................................................................... 7 F6 Installation ............................................................................................................................... 12 Post installation procedures............................................................................................................. 17
Performing an iSCSI boot ......................................................................................................................... 18 Booting from the iSCSI drive ........................................................................................................... 18
Troubleshooting .......................................................................................................................... 19 Known issues .......................................................................................................................................... 19 Using a diagnostic monitor for troubleshooting............................................................................................ 19 Target connection problems...................................................................................................................... 20 Target login problems .............................................................................................................................. 20 LUN access problems .............................................................................................................................. 20 OS problems .......................................................................................................................................... 20
Technical support........................................................................................................................ 22 Before you contact HP.............................................................................................................................. 22 HP contact information............................................................................................................................. 22 Free automated customer support services .................................................................................................. 22
Acronyms and abbreviations........................................................................................................ 24
Index......................................................................................................................................... 26
Overview 4
Overview
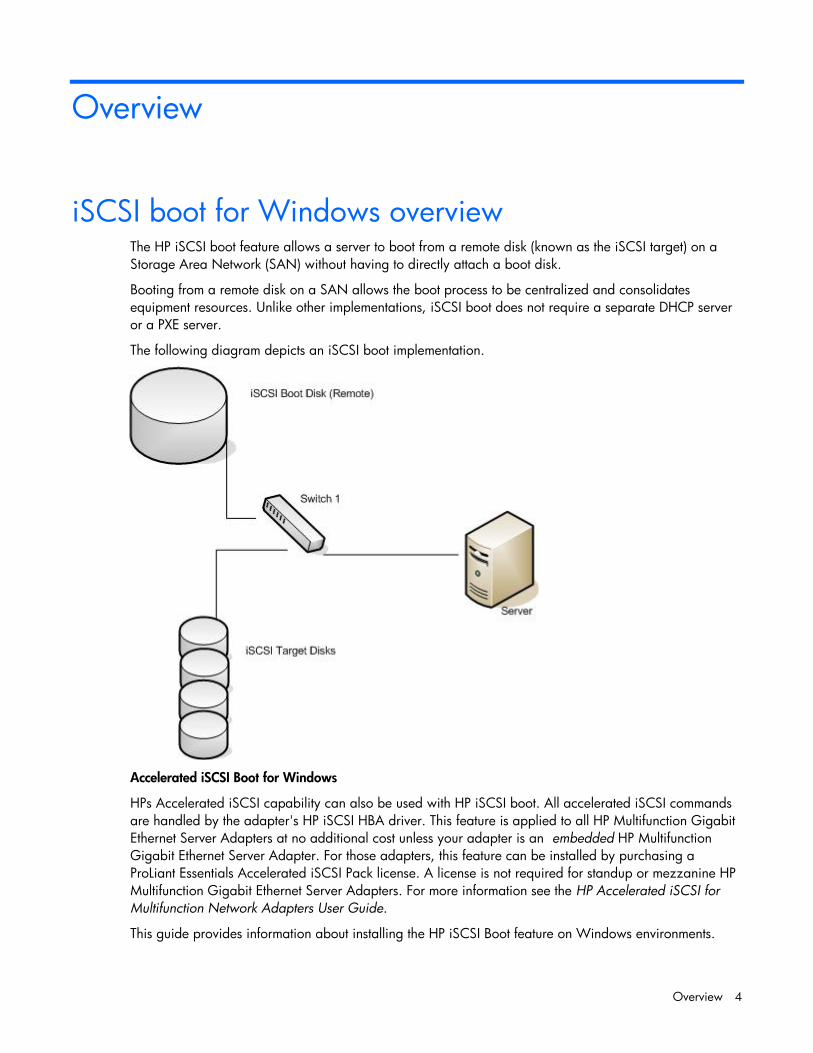
iSCSI boot for Windows overview The HP iSCSI boot feature allows a server to boot from a remote disk (known as the iSCSI target) on a Storage Area Network (SAN) without having to directly attach a boot disk.
Booting from a remote disk on a SAN allows the boot process to be centralized and consolidates equipment resources. Unlike other implementations, iSCSI boot does not require a separate DHCP server or a PXE server.
The following diagram depicts an iSCSI boot implementation.
Accelerated iSCSI Boot for Windows
HPs Accelerated iSCSI capability can also be used with HP iSCSI boot. All accelerated iSCSI commands are handled by the adapter's HP iSCSI HBA driver. This feature is applied to all HP Multifunction Gigabit Ethernet Server Adapters at no additional cost unless your adapter is an embedded HP Multifunction Gigabit Ethernet Server Adapter. For those adapters, this feature can be installed by purchasing a ProLiant Essentials Accelerated iSCSI Pack license. A license is not required for standup or mezzanine HP Multifunction Gigabit Ethernet Server Adapters. For more information see the HP Accelerated iSCSI for Multifunction Network Adapters User Guide.
This guide provides information about installing the HP iSCSI Boot feature on Windows environments.

Overview 5
Limitations The following are iSCSI boot for Windows limitations:
• A system crash may result if you bring down a network interface that iSCSI is using. Windows Server 2003 SP2 prevents disabling iSCSI booted adapters.
• File system access lapses (due to unplugging the cable) for time critical "keep alive" processes (svchost) may cause reboots.
• Network adapter property changes (for example, Link Speed) can cause unrecoverable configuration changes, which may prevent booting.
• Adapter failover during software install or boot phase is not possible.
• Discovery protocols, such as Dynamic Host Configuration Protocol (DHCP), Internet Storage Name Service (iSNS), and Service Location Protocol (SLP) are not supported on iSCSI boot installs or during the boot phase.
System requirements The following system requirements support HP iSCSI boot for Windows.
Supported operating systems
• Windows Server 2003 (SP2 or later)
• Windows Server 2003 x64 (SP2 or later)
Supported hardware
• Servers. ProLiant servers (ML, DL, and BL p-Class or c-Class) that include an iLO (integrated Lights Out) or RILOE (remote insight lights-out edition) management devices with a minimum of 512 MB memory with any of the supported operating systems.
• Adapters. The following Multifunction Gigabit Server Adapters are supported.
o HP NC370T PCI-X Multifunction Gigabit Server Adapter
o HP NC370F PCI-X Multifunction Gigabit Server Adapter
o HP NC373T PCI Express Multifunction Gigabit Server Adapter
o HP NC373F PCI Express Multifunction Gigabit Server Adapter
o HP NC370i PCI-X Multifunction Gigabit Server Adapter
o HP NC371i PCI-X Multifunction Gigabit Server Adapter
o HP NC373i PCI Express Multifunction Gigabit Server Adapter
o HP NC373m PCI Express Dual Port Multifunction Gigabit Server Adapter for c-Class BladeSystem
o HP NC374m PCI Express Dual Port Multifunction Gigabit Server Adapter
o HP NC380T PCI Express Dual Port Multifunction
• Targets. The following targets are supported.
o HP StorageWorks 1510i Modular Smart Array
o HP StorageWorks 1000 Modular Smart Array
o StorageWorks EVA Array iSCSI Connectivity Option (MPX100)
Required software

Overview 6
Unless indicated otherwise, the following files are packaged with the HP iSCSI boot for Windows SoftPaq downloadable from the HP website (http://www.hp.com). See Free automated customer support services (on page 22).
• HP iSCSI Boot Option ROM Upgrade Utility (insiscsi.bat)
• HP Gigabit Server Adapter Firmware Upgrade Utility for c-Class BladeSystem (ccfwupg1.bat)
• HP iSCSI Boot Configuration tool (hpibootconfig) to set EVs and the DOS based EV tool
• HP iSCSI Configuration tool (hpiscsicfg.exe)
• HP iSCSI Crash Dump tool (hpidmpcfg[x|a].sys).
• HP NC-Series Multifunction bxnd52 network driver
The following software must be downloaded or requested from Microsoft:
• Microsoft iSCSI Software Initiator Version 2.05 (http://www.microsoft.com/downloads) or later
• Microsoft QFE that supports crash dump.
Microsoft does not support any servers with iSCSI Boot implementations installed unless an associated crash dump driver is installed. You must contact Microsoft Support (http://support.microsoft.com/default.aspx/kb/939875/en-us) to obtain a copy.

Installation and configuration 7
Installation and configuration
Summary of installation using F6 install The following summarizes the steps involved in an iSCSI boot implementation.
1. Download the SoftPaq and extract the files.
2. Install the iSCSI boot option ROM image.
3. Install a Multifunction Gigabit Server Adapter in a server to which the SAN is connected.
4. Perform an F6 installation for Windows Server 2003 SP2.
5. Install the HP NC-Series Multifunction bxnd network driver.
6. Install Windows SP2.
7. Install Microsoft iSCSI Initiator 2.05 or later
8. Disable the HP NC-Series Multifunction bxiscsi component.
9. Install crash dump driver and its registry.
10. Install the Microsoft QFE that supports crash dump using the HP NC-Series Multifunction bxnd52 network driver.
Downloading the SoftPaq and extracting 1. Go to the HP website (http://www.hp.com).
2. Click Software & Driver Downloads from the left menu bar.
3. Type the product name in the For product box and press Enter. For example, type NC373T.
4. Select an operating system.
5. Click HP ProLiant iSCSI Boot for Windows.
6. Click download and save the HP SoftPaq (sp#####.exe) file to a directory on your hard drive. The SoftPaq file is a self-extracting executable with a file name based on the SoftPaq number.
Installing iSCSI boot
Update the iSCSI boot option ROM Currently there are two utilities that update the iSCSI boot option ROM.
• HP iSCSI Boot Option ROM Upgrade Utility (insiscsi.bat)
• HP Gigabit Server Adapter Firmware Upgrade Utility for c-Class BladeSystem (ccfwupg1.bat)
The HP iSCSI Boot Option ROM Upgrade Utility (insiscsi.bat) installs the iSCSI boot option firmware image on the following adapters in ML and DL systems:

Installation and configuration 8
• HP NC370x Multifunction Gigabit Server Adapter
• HP NC371x Multifunction Gigabit Server Adapter
• HP NC373x Multifunction Gigabit Server Adapter
• HP NC374x Multifunction Gigabit Server Adapter
• HP NC380T Multifunction Gigabit Server Adapter
The HP Gigabit Server Adapter Firmware Upgrade Utility for c-Class BladeSystem (ccfwupg1.bat) installs the iSCSI boot option ROM firmware image on the following adapters in c-Class BladeSystems:
• HP NC370i Multifunction Gigabit Server Adapter
• HP NC373i Multifunction Gigabit Server Adapter
• HP NC373m Multifunction Gigabit Server Adapter
About the iSCSI boot option ROM The HP Multifunction Upgrade Utility modifies an adapter's ROM to support iSCSI boot natively by installing a special iSCSI boot firmware image on HP Multifunction Gigabit Server Adapters (NC37xx and NC380x family). The iSCSI boot option ROM provides disk access to configured iSCSI targets. The iSCSI boot option ROM conforms to the BIOS Boot Specification, which enables a ROM-based PCI component to participate in the IPL boot sequence.
During the iSCSI boot process, the option ROM connects to an iSCSI target to facilitate the loading of the operating system directly from the iSCSI target, which eliminates the need for DHCP and PXE. The option ROM then provides the information that is needed to connect to the iSCSI targets and to locate the root and boot partitions thus allowing the boot sequence to complete.
The HP Multifunction Gigabit Server Adapters support either iSCSI boot or PXE boot but not both. Updating to iSCSI boot capability eliminates PXE as an alternate IPL (initial program load) device. Updating the PXE boot eliminates iSCSI boot capability. This is applicable only to stand up and mezzanine adapters. For embedded adapters, both can be updated and co-exist but at any point of time only one can be used.
The HP iSCSI Boot Option ROM offers the following:
• PCI compatible option ROM header that identifies the ROM code to BIOS
• System BIOS Interrupt 13 Disk Interface that translates BIOS disk I/O to iSCSI
• HP iSCSI Data Mover that performs iSCSI PDU protocol
• Binary image of an UNDI implementation
• Firmware component to perform TCP/IP encapsulation
The HP iSCSI Boot Option ROM supports the following:
• Two iSCSI target IP addresses. If connection to the first IP address fails, the option ROM tries the second IP address.
• CHAP. Supports authentication protocol.
• Option ROM Failover. If two adapters have iSCSI Boot Option ROM installed and the first option ROM fails to connect to a target, then the second option ROM tries to connect.

Installation and configuration 9
Initialize the iSCSI boot path 1. Create a configuration file. The configuration file contains the boot path that the iSCSI Initiator needs
to connect to the iSCSI targets from which it will boot. This information includes the names of the initiator and target, IP addresses, and so on. Create the configuration file by executing the following command on a system running any supported Windows version. Notepad evinput
2. Define iSCSI boot path variables. Enter the following variables and values in the evinput file using this format: "<variable>=<value>". Variable names and values are case sensitive. Comments can be prefixed with a "#" character.
Variable name Description
InitiatorName The name to be used for the iSCSI initiator on the booting system.
TargetName The name of the target from which to boot.
InitiatorNetmask The IP network mask to be used by the iSCSI initiator. This value is in dotted decimal format.
InitiatorRoute The default IP route to be used by the iSCSI initiator. This value is in dotted decimal format.
LAA The Locally Assigned Address (MAC address) to be used by the iSCSI initiator. The value is specified as 12 hex digits. A value of all zeros indicates that the initiator should use the MAC address assigned to the hardware.
LUN The logical unit number for the target. Some targets do not start numbering iSCSI target data LUNs at 0.
ForceBoot This value specifies that the iSCSI initiator should override the IPL boot order for disk controllers and install itself as the boot disk. "True", "TRUE", "true", or "1" indicates that the iSCSI boot option ROM should install itself as the handler for the boot device. Any other value is equivalent to "False". Platforms with updated System ROM versions that support network adapters in the RBSU "Boot controller order" should have Forceboot=False.
AuthMethod The authentication method to use. The initiator and target must agree on a mutually agreeable authentication method or the iSCSI initiator will not be able to log in to the target. The AuthMethod values are “None”, “CHAP”, and “MutualCHAP”. If CHAP is specified, the target may still select “None” as the authentication method. If “CHAP” is specified as the AuthMethod value, CHAPUsername and CHAPSecret must also be specified. If “MutualCHAP” is specified as the AuthMethod value, CHAPUsername, CHAPSecret and CHAPMSecret must also be specified.
CHAPUsername The username for CHAP authentication.
CHAPSecret The secret (password) for CHAP authentication. Specified either as a string or a long hex value (starting with "0x"). This value must be at least 96 bits (12 bytes, 24 hex digits) long.
CHAPMSecret The secret (password) for mutual (reverse) CHAP authentication. Specified either as a string or a long hex value (starting with "0x"). This value must be at least 96 bits (12 byte, 24 hex digits) long.
VLAN The VLAN number that the iSCSI initiator should use for all packets sent and received. This is specified either as the VLAN number or "Disabled" if no VLAN is used.
The following is a sample EV configuration file.

Installation and configuration 10
# Copyright 2006 Hewlett-Packard Development Company, L.P.
# All Rights Reserved
# 06/15/06
#
# Consult the IETF iSP iSCSI for details of these items.
#
##
# Name of the iSCSI Target. Must match what the target offers.
# Hard coded Target IP .. No DNS support
#
TargetName=TargetName=iqn.2003-05.com.hp:storage.fcgw.sr2122-2.ea46a6d61cb4.target01
TargetIP=10.10.10.13
#
# local name the iSCSI client will present to the Target
# and local IP settings. No DNS or DHCP support
#
InitiatorName=iqn.client01
InitiatorIP=10.10.10.02
InitiatorNetmask=255.255.255.0
InitiatorRoute=10.10.10.1
TargetPort=3260
## Locally Admin Address (MAC address) and VLAN (Enabled/Disabled)
#
LAA=000000000000
VLAN=Disabled
## LUN Mapping. This must match what the target LUN offers.
#
LUN=0
## Make this persistent BIOS int 13 IPL routine. Replaces Embedded HD C:\ (if present).
#.
#Exceptions: Platforms with updated System ROM versions that support #network adapters in the RBSU "Boot controller order" should have #ForceBoot=False
#
ForceBoot=True
## Digest (CheckSum) data or Headers. Must match target setting.
#
DataDigest=False
HeaderDigest=False
## Account Login information
# . The AuthMethod values are: None, CHAP, and (TwoWay) MutualCHAP,
#
AuthMethod=None
##
# If AuthMethod is None, These are ignored.

Installation and configuration 11
CHAPUsername=iqn.1991-05.com.microsoft:comfort.txn.cpqcorp.net
CHAPSecret=Some12day123
CHAPMSecret=BetterThanThat
3. Write the boot path to the target server. The boot path configuration file may be written to the target server with the ev DOS utility (bios editor) or written using the hpibootcfg utility.
o To write the boot path using the ev DOS utility, boot to DOS and change directories to the ev DOS utility. The ev DOS utility is packaged with the HP iSCSI boot feature in the \apps\iboot\tools directory.
o Execute the following on the server with the option ROM. ev -c <evinput.txt
o To use the iLO interface to write the iSCSI boot path parameters to the target server, complete the following hpibootcfg.exe -i <input file> -s <iLO IP address|iLO server name> -u <iLO username> -p <iLO password>
All command line arguments are required. The <input file> is the file created in the previous step.
hpibootcfg.exe -i <input file> -s < iLO IP address|iLO server name> -u <iLO username> -p <iLO password>
Argument Description
-i <input file> The name of the boot path input file.
-s <iLO IP address|iLO server name>
The IP address of the HP Integrated Lights Out management port from which to boot the iSCSI target
-u <iLO username> The username of the HP Integrated Lights Out management port from which to boot the iSCSI target.
-p <iLO password> The password for the user name of the HP Integrated Lights Out management port from which to boot the iSCSI target.
Update iSCSI boot Option ROM using insiscsi.bat The insiscsi command upgrades the iSCSI boot option ROM if the iSCSI boot option ROM is already installed and its version is out of date and it installs the iSCSI boot option ROM to replace the PXE option ROM for NC37xx and NC380x adapters.
NOTE: If the integrated SCSI or RAID adapter is not being used, it is highly recommended that you disable it to provide more option ROM space. This is especially necessary in a system with many adapters.
Replacing PXE option ROM
To update the firmware image to the iSCSI boot option ROM image, complete the following:
1. Boot to DOS using a floppy or iLO virtual floppy with a bootable image.
2. Copy all firmware files to a bootable floppy or a disk where the iLO console is located.
3. Type insiscsi and press the Enter key.
4. At the Update iSCSI Boot Option ROM prompt, enter Y. (The available responses are Yes, No, or Quit). The current version of ROM for each installed adapter is compared to the firmware on the diskette and if the installed version is older, you are prompted to accept the upgrade by entering Y

Installation and configuration 12
or to reject the upgrade by entering N. A confirmation message displays when the upgrade is complete.
Command line options
The following are the available options for the insiscsi.bat command and they are not case sensitive. Usage:
insiscsi -S [runs the utility automatically without prompting the user for input]
Replacing iSCSI boot option ROM
To update the firmware image to the PXE option ROM image, complete the following:
1. Boot to DOS using a floppy or iLO virtual floppy with a bootable image.
2. Copy all firmware files to the bootable floppy or a disk where the iLO console is located.
3. Type inspxe and press the Enter key.
4. At the Update PXE Option ROM prompt, enter Y. (The available responses are Yes, No, or Quit). The current version of ROM for each installed adapter is compared to the firmware on the diskette and if the installed version is older, you are prompted to accept the upgrade by entering Y or to reject the upgrade by entering N. A confirmation message displays when the upgrade is complete.
Common installation log file
The upgrade installation activity is written to an installation log file called nic_fw\fwupglog.txt.
Update the iSCSI boot option ROM using ccfwupg1.bat To update the iSCSI boot option ROM on c-Class BladeSystem adapters and the NC370i, use the HP Gigabit Server Adapter Firmware Upgrade Utility for c-Class BladeSystem called ccfwupg1.bat. This utility updates the following adapters for c-Class BladeSystem and the NC370i:
• HP NC373i Multifunction Gigabit Server Adapter
• HP NC373m Multifunction Gigabit Server Adapter
• HP NC370i Multifunction Gigabit Server Adapter
The command will upgrade the Boot Code and iSCSI boot option ROM.
NOTE: If the integrated SCSI or RAID adapter is not being used, it is highly recommended that you disable it to provide more option ROM space. This is especially necessary in a system with many adapters.
Updating boot code and iSCSI boot option ROM
To update the firmware image to the iSCSI boot option ROM image, complete the following:
1. Copy all files and folders to a bootable diskette or USB drive.
2. Boot to DOS using the diskette for your adapter.
3. Type ccfwupg1.bat and press the Enter key. A confirmation message displays when the upgrade is complete. This takes several minutes.
F6 Installation The following describes how to perform an F6 installation of Windows on an iSCSI target.

Installation and configuration 13
Install Windows using F6 The following describes how to perform an F6 installation of Windows on an iSCSI target.
1. To install a Windows operating system directly to an iSCSI target from a Windows CD-ROM, you must create standard DOS-formatted (FAT) diskettes with the files from the CD Install Drivers folder. To create F6 diskettes, navigate to the apps/iboot directory packaged with HP iSCSI boot and copy the contents to the top level folder of a formatted MS-DOS bootable diskette.
a. Create WDF_F6 disk 1. Navigate to the directory for your operating system and copy the contents to the root directory of a diskette.
For Windows 2003: apps/iboot/x86/disk1/*
For Windows 2003 x64: apps/iboot/x64/disk1/*
b. Create VBD_F6 disk 2. Navigate to the directory for your operating system and copy the contents to the root directory of a diskette.
For Windows 2003: apps/iboot/x86/disk2/*
For Windows 2003 x64: apps/iboot/x64/disk2/*
Populate the disk 2 folder with additional Microsoft iSCSI drivers extracted from the MS iSCSI Initiator package and save a copy of this install folder as follows: Mkdir -p <path>
For x64: Use Initiator-2.05-boot-build####-x64fre.exe/extract:<path>
For x86: Use Initiator-2.05-boot-build####-x86fre.exe/extract:<path>
where, #### represents the latest build number.
Copy only the following files from the extracted package <path> to the disk2 folder. iscsiprt.sys
iscsilog.dll
iscsi.inf
msiscsi.sys
c. Create Windows disk3 (bxnd) disk. Navigate to the directory for your operating system and copy the contents to the root directory of a diskette.
For Windows 2003: apps/iboot/x86/l2nd/*
For Windows 2003 x64: apps/iboot/x64/l2nd/*
2. Insert the Windows x86 SP1/SP2 CD and press F6 to select drivers from the Disk1 and Disk2 diskettes when prompted. DO NOT insert the Disk1 diskette into drive A until prompted. When prompted be sure to insert the Disk1 diskette before you insert the Disk2 diskette.
3. The system reboots and the iSCSI Boot Option ROM logon will occur. When the GUI phase of the Windows installation prompts you for the wdfcoinstaller01005.dll, select Cancel and continue.
4. Click Finish to complete the Windows installation. The operating system will load automatically using bxiscsi[x|a].sys. It is possible that a paging file allocation error may appear. If so this error disappears after you disable bxiscsi.sys in a future step below. This error cannot be manually fixed from the Windows configuration setting.
Installation and configuration 14
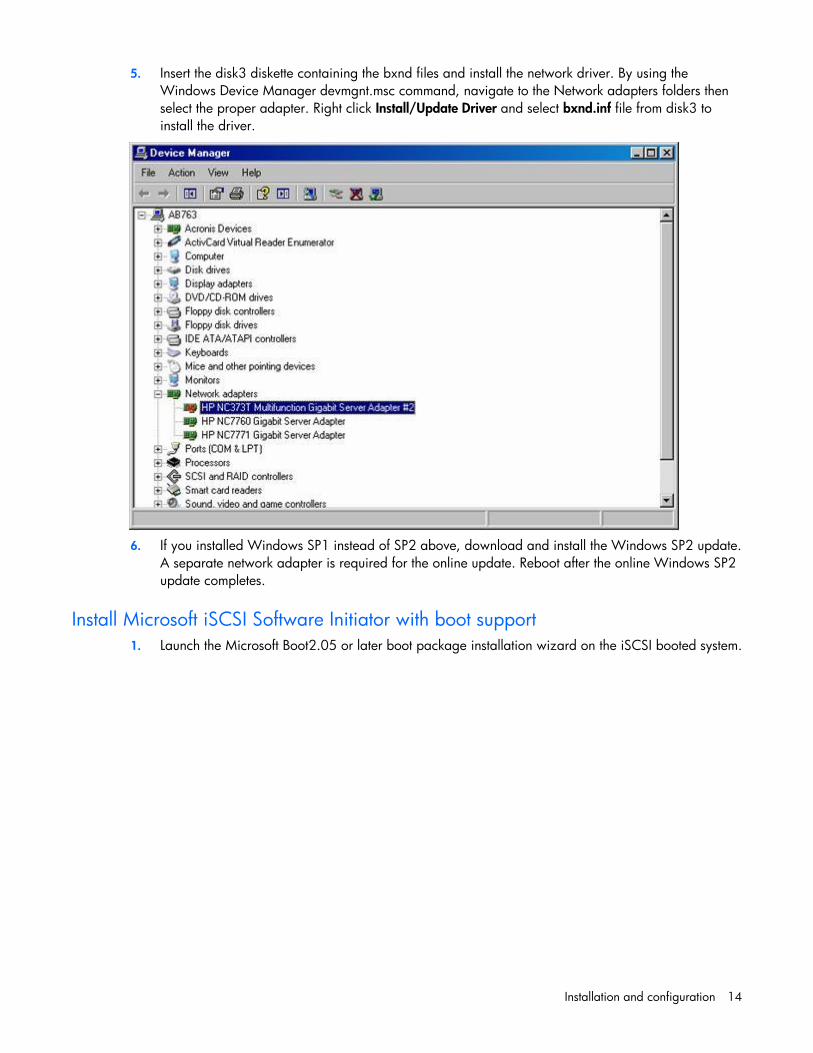
5. Insert the disk3 diskette containing the bxnd files and install the network driver. By using the Windows Device Manager devmgnt.msc command, navigate to the Network adapters folders then select the proper adapter. Right click Install/Update Driver and select bxnd.inf file from disk3 to install the driver.
6. If you installed Windows SP1 instead of SP2 above, download and install the Windows SP2 update.
A separate network adapter is required for the online update. Reboot after the online Windows SP2 update completes.
Install Microsoft iSCSI Software Initiator with boot support 1. Launch the Microsoft Boot2.05 or later boot package installation wizard on the iSCSI booted system.

Installation and configuration 15
2. Select all Installation Options as indicated below and please note that the MPIO option cannot be added to a file system that is being used by an iSCSI Boot client after it has been created during the deployment phase.
3. Select the Configure iSCSI Network Boot Support and Allow Kernel Paging options. On true diskless
systems, all system disk activity is confined to an iSCSI Target.

Installation and configuration 16
4. Select the network interface driver or Service Name for the adapter by highlighting it. The install will continue without a selected Service Name but it will not boot.
5. When the Allow Executive Paging warning displays, click Yes. An inherit characteristic of network
based file systems is down time due to network outages. Implementing an iSCSI MPIO-based environment will greatly reduce system outages.
6. Complete the installation and reboot when prompted.
IMPORTANT: The system MUST be iSCSI booted at least once before disabling bxiscsi.sys[x|a]. Not doing so will cause a Bugcheck 0x7a error once the bxiscsi[x|a].sys is disabled.
7. On the rebooted system, ensure that the MS iSCSI device is active by changing the Windows registry create_pdo_flag entry in the following directory HKLM/SYSTEM/CURRENTCONTROLSET/CONTROL. Change the value from 12 to 4.
8. Reboot the system.
9. On the iSCSI booted system, navigate to Device Manager and select the SCSI and Raid Controllers device to verify that only the MS iSCSI device is active. If this is the only device that is active, the paging file allocation error from an earlier step should disappear. If both MS and the HP NC-Series Multifunction iSCSI are still active, disable the HP NC-Series Multifunction iSCSI client, reboot the system again and the paging file allocation error should now disappear.

Installation and configuration 17
Set up crash dump support The HP iSCSI crash dump driver provides a mechanism for an HP iSCSI Booted system to capture data for analysis when a Windows 2003 OS System Stop Event is encountered (BSOD). System data is generally saved for analysis in a file located at %systemroot%\MEMORY.DMP (for example: C:\windows\Memory.DMP).
1. Run the hpidmpcfg[x|a].exe to add the bxidump[x|a].sys registry entry on the Microsoft iSCSI Initiator instance. A copy of hpidmpcfg[x|a].exe can be found in the l2nd diskette.
2. Run the HP Installer to distribute a copy of the bxidump[x|a].sys to the Windows drivers directory. Alternatively, manually copy the bxidump[x|a].sys to the \windows\system32\drivers directory. A copy of the bxidump[x|a].sys can be found in the l2nd diskette.
3. Apply the OS SP2 QFE for crash dump support.
4. Reboot the system to ensure the modifications are applied.
Post installation procedures After installing iSCSI boot, perform the following:
1. Boot the server over iSCSI from a target boot disk.
2. Add and access data disks over an iSCSI booted server.
3. Install all HP software components for network adapters.
4. Install the HP Network Configuration Utility.
5. Configure HP License components.

Installation and configuration 18
Performing an iSCSI boot
Booting from the iSCSI drive The following sequence describes the iSCSI boot sequence.
At server boot
1. On power up, system BIOS detects the iSCSI boot option ROM.
2. iSCSI boot option ROM obtains iSCSI boot parameters from iLO/RILOE memory using the iSCSI environment variables.
3. iSCSI boot option ROM establishes an iSCSI session with the iSCSI targets defined in the environment variables.
4. Upon session creation, iSCSI boot option ROM establishes the iSCSI target as the local hard disk.
5. Leaves the iSCSI target parameters in the adapter scratch pad memory for the operating system to use.
6. Loads the operating system.
7. System BIOS continues to perform I/O requests that are translated to ISCSI messages by the iSCSI boot option ROM.
When the operating system loads
1. Network driver is loaded and network interface is configured.
2. iSCSI initiator driver is loaded and initialized.
3. iSCSI initiator driver reads target parameters from adapter scratch pad memory.
4. Connects to the iSCSI target.
5. iSCSI session is established and the system boots.

Troubleshooting 19
Troubleshooting
Known issues Known issues for Microsoft iSCSI Initiator installation
• Not selecting an Adapter Service Name (by highlighting it) during initial Microsoft Initiator setup will continue without an error, but it will not select any NDIS driver for booting. The deployed system will BSOD on boot prior to the first splash screen.
Known issues for F6 installation
• The WDF_F6 diskette must not be inserted in the A:\ drive until after F6 prompts for the diskette. Failure to wait for the prompt will cause the F6 installer to fail reading the second diskette.
• During the first reboot of the Windows installation, if the reboot fails with the "Windows could not start because of a computer disk hardware configuration problem" message, perform the following workaround:
Mount the iSCSI target and follow the example below to change the boot.ini file (located at the root of the mounted target drive) from the following: [boot loader]
timeout=10
default=signature(cd4a0)disk(0)rdisk(0)partition(1)\WINDOWS
[operating systems]
signature(cd4a0)disk(0)rdisk(0)partition(1)\WINDOWS="Windows Server 2003, Enterprise" /noexecute=optout /fastdetect
to the following: (change "signature(cd4a0)" to "multi(0)" )
default=multi(0)disk(0)rdisk(0)partition(1)\WINDOWS
[operating systems]
multi(0)disk(0)rdisk(0)partition(1)\WINDOWS="Windows Server 2003, Enterprise" /noexecute=optout /fastdetect
Using a diagnostic monitor for troubleshooting If the client is not able to boot from the target server and the problem is not discernable from the immediately available information, you may need to use a network monitor that is capable of parsing the iSCSI protocol to troubleshoot the information.
If the iSCSI target is software running on a server, you may be able to run a software network monitor such as Ethereal directly on the target system. Otherwise, you may need to configure a network switch with port mirroring and direct the mirrored packets to a port where either a hardware or software network monitor can be attached.

Troubleshooting 20
Target connection problems Symptoms:
The initiator is unable to make a connection to the target.
Possible causes:
• The initiator and target are not connected to the same network
• The initiator and target are not in the same VLAN (if any)
• The IP configurations for the initiator and target are not correct
• The initiator's boot path information is not correct
• The target service is not running on the target server
Target login problems Symptoms:
The iSCSI initiator is able to connect to the target but is unable to log in successfully.
Possible causes:
• The initiator is not configured with the right target name
• The initiator is not configured with the right target IP address
• The initiator is not configured with the right initiator name
• The initiator and target are not configured for the same authentication method
• The initiator and target are using CHAP or Mutual CHAP authentication so they may not be configured with matching user name and secret(s)
• If the target implements some form of Access Control Lists (ACL), the target may not be configured to allow it on the initiator
LUN access problems Symptoms:
The initiator is able to connect to and log in to the target, but the system doesn't see a disk present (it attempts to boot from an internal disk or PXE).
Possible causes:
• The initiator is not configured with the correct LUN from which to boot (Some targets start numbering at 1 instead of 0)
• The target is not configured to allow access to the specified LUN by the initiator
OS problems Symptoms:

Troubleshooting 21
The initiator is able to connect to and log in to the target and the system recognizes the disk but you are unable to install the operating system.
Possible causes:
• There are multiple HP Multifunction Gigabit Server adapters (NC37xx, NC38xx) adapters enabled in the system
• The drivers are not being loaded in the right order during installation
• The target disk provided is not large enough
• The initiator is not configured with the correct LUN from which to boot (some targets start numbering data devices at 1 not 0)
• The target is not configured to allow access to the specified LUN by the initiator
Technical support 22
Technical support
Before you contact HP Be sure to have the following information available before you call HP:
• Technical support registration number (if applicable)
• Product serial number
• Product model name and number
• Product identification number
• Applicable error messages
• Add-on boards or hardware
• Third-party hardware or software
• Operating system type and revision level
HP contact information For the name of the nearest HP authorized reseller:
• In the United States, see the HP US service locator webpage (http://www.hp.com/service_locator).
• In other locations, see the Contact HP worldwide (in English) webpage (http://welcome.hp.com/country/us/en/wwcontact.html).
For HP technical support:
• In the United States, for contact options see the Contact HP United States webpage (http://welcome.hp.com/country/us/en/contact_us.html). To contact HP by phone:
o Call 1-800-HP-INVENT (1-800-474-6836). This service is available 24 hours a day, 7 days a week. For continuous quality improvement, calls may be recorded or monitored.
o If you have purchased a Care Pack (service upgrade), call 1-800-633-3600. For more information about Care Packs, refer to the HP website (http://www.hp.com).
• In other locations, see the Contact HP worldwide (in English) webpage (http://welcome.hp.com/country/us/en/wwcontact.html).
Free automated customer support services The following sites offer troubleshooting information, compatibility notes, and software upgrades (including Softpaqs and drivers).
HP Worldwide Web Server

Technical support 23
• Navigate to a specific product, and then look for support information from the list of support resources at the HP support website (http://h18007.www1.hp.com/support/files/server).
• For downloadable support software for HP Digital Networking Products, Hubs, Integrated Access Devices, Modems and ISDN, Adapters, Remote Access Concentrators/Servers, Software, and Switches, go to the HP software and drivers website (http://h18007.www1.hp.com/support/files/server).
• All SoftPaqs sorted by SoftPaq number can be found at the HP ftp support website (ftp://ftp.compaq.com/pub/softpaq/).
An ASCII version of a SoftPaq can be found by selecting a SoftPaq at the HP ftp support website. (ftp://ftp.compaq.com/pub/softpaq/)
• An index of available software sorted by product can be found at the HP software and drivers website (http://h18007.www1.hp.com/support/files/server).
HP FTP Server
Navigate to a specific product, and then look for support information from the list of support resources at the HP ftp support website (ftp://ftp.compaq.com/pub/softpaq/).

Acronyms and abbreviations 24
Acronyms and abbreviations
BIOS Basic Input/Output System
BSOD blue screen of death
CHAP Challenge Handshake Authentication Protocol
DHCP Dynamic Host Configuration Protocol
EFI extensible firmware interface
HBA host bus adapter
iLO
Integrated Lights-Out
iLO 2 Integrated Lights-Out 2
IP Internet Protocol
IPL initial program load
iSCSI
Internet Small Computer System Interface
LAA locally administered address

Acronyms and abbreviations 25
LUN logical unit number
PDU
protocol data unit
PXE Preboot Execution Environment
RILOE Remote Insight Lights-Out Edition
ROM read-only memory
SAN storage area network
SSL Secure Sockets Layer
TCP Transmission Control Protocol
UNDI Universal Network Driver Interface
VLAN virtual local-area network
XML extensible markup language

Index 26
D diagnostic tools 19
I installation and configuration 7 iSCSI boot 5, 9, 18 iSCSI boot Option ROM 7 iSCSI boot targets 4, 5, 12, 20
O overview 4
S support 22 system requirements 5
T troubleshooting 19
Index