Configuring Windows Server 2012 for iSCSI SAN Boot with EqualLogic...
35
Configuring Windows Server 2012 for iSCSI SAN Boot with EqualLogic Storage A Dell EqualLogic Best Practice Dell Storage Engineering July 2013
Transcript of Configuring Windows Server 2012 for iSCSI SAN Boot with EqualLogic...

Configuring Windows Server 2012 for iSCSI SAN Boot with EqualLogic Storage A Dell EqualLogic Best Practice
Dell Storage Engineering July 2013
2 BP1055 | Configuring Windows Server 2012 for iSCSI SAN Boot with EqualLogic Storage
Revisions
Date Description
July 2013 Initial release
© 2013 Dell Inc. All Rights Reserved. Dell, the Dell logo, and other Dell names and marks are trademarks of Dell Inc. in
the U.S. and worldwide. All other trademarks mentioned herein are the property of their respective owners.
3 BP1055 | Configuring Windows Server 2012 for iSCSI SAN Boot with EqualLogic Storage
Table of contents Revisions ............................................................................................................................................................................................. 2
Acknowledgements .......................................................................................................................................................................... 5
Feedback ............................................................................................................................................................................................ 5
Executive summary .......................................................................................................................................................................... 5
1 Introduction ................................................................................................................................................................................ 6
1.1 Objective........................................................................................................................................................................... 7
1.1.1 Audience ........................................................................................................................................................................... 7
1.1.2 Scope ................................................................................................................................................................................ 7
1.2 Terminology ..................................................................................................................................................................... 8
2 Process overview ....................................................................................................................................................................... 9
2.1 Prerequisites ................................................................................................................................................................... 10
2.2 Restrictions for Broadcom adapter drivers................................................................................................................ 11
3 Extract drivers for a Windows Server 2012 installation ..................................................................................................... 12
3.1 Extract Intel NIC drivers (optional) ............................................................................................................................. 12
3.2 Extract QLogic NIC drivers (optional) ........................................................................................................................ 12
4 Configure the EqualLogic storage system .......................................................................................................................... 13
5 Prepare Intel Network adapters for iSCSI boot .................................................................................................................. 16
6 Configure network adapters for 12G PowerEdge servers ................................................................................................ 19
6.1 Configure QLogic network adapter for iSCSI boot ................................................................................................ 19
6.2 Configure Intel Network Adapters for iSCSI boot ................................................................................................... 22
7 Configure Dell PowerEdge servers for iSCSI boot ............................................................................................................. 23
8 Installing Windows on the iSCSI volume ............................................................................................................................. 25
9 Post Windows Server 2012 OS installation steps ............................................................................................................... 27
9.1 Install hotfixes ................................................................................................................................................................ 27
9.2 Make network adapter the primary boot device. .................................................................................................... 27
9.3 Install the EqualLogic Host Integration Tool (HIT) kit ............................................................................................ 27
9.4 Set Jumbo frames on Network adapters .................................................................................................................. 29
10 Recovery from a degraded network interface ................................................................................................................... 30
11 Conclusion and best practices .............................................................................................................................................. 31
A Configuration worksheet ....................................................................................................................................................... 32
B Network adapter driver and firmware version .................................................................................................................... 33

4 BP1055 | Configuring Windows Server 2012 for iSCSI SAN Boot with EqualLogic Storage
C System details ........................................................................................................................................................................... 33
Additional resources ....................................................................................................................................................................... 34
5 BP1055 | Configuring Windows Server 2012 for iSCSI SAN Boot with EqualLogic Storage
Acknowledgements
This best practice white paper was produced by the following members of the Dell Storage team:
Engineering: Nirav Shah
Technical Marketing: Guy Westbrook
Editing: Camille Daily
Additional contributors: Mike Kosacek and Darren Miller
Feedback
We encourage readers of this publication to provide feedback on the quality and usefulness of this
information by sending an email to [email protected].
Executive summary
This technical paper includes:
• Best Practices for using Dell™ EqualLogic™ storage as the storage device for iSCSI boot from SAN
using Microsoft® Windows Server® 2012.
• Guidelines for configuring volumes on Dell EqualLogic storage, Dell™ PowerEdge™ servers, and
supported network adapters for iSCSI SAN boot from EqualLogic arrays.
• Deployment guide for 1 Gigabit and 10 Gigabit Ethernet iSCSI boot from SAN environments with
EqualLogic storage arrays and supported network adapters.
6 BP1055 | Configuring Windows Server 2012 for iSCSI SAN Boot with EqualLogic Storage
1 Introduction This paper demonstrates Dell best practices for implementing iSCSI boot from SAN with Dell EqualLogic
storage arrays and the 12th generation (12G) PowerEdge servers running Windows Server 2012.
With its unique peer architecture, EqualLogic PS Series storage delivers high performance and availability
in a flexible environment and low total cost of ownership. These storage solutions deliver the benefits of
consolidated networked storage in a self-managing, iSCSI SAN that is affordable and easy to use,
regardless of scale. By eliminating complex tasks and enabling fast and flexible storage provisioning,
EqualLogic solutions dramatically reduce the costs of storage acquisition and ongoing operations.
With the combination of EqualLogic PS Series arrays and network adapters that support boot from SAN, it
is now possible to boot Windows Server 2012 directly from the storage network. While the network boot
operation is similar to the traditional boot process, the cost of hardware is lower.
In most cases, all that’s needed is a supported network adapter on a standard server platform to enable the
boot process over the network. EqualLogic PS Series arrays support several network adapters, as outlined
in this paper.
With the EqualLogic PS Series arrays, iSCSI boot from SAN enhances the reliability and performance of a
Windows server by leveraging the SAN to improve data protection. In addition, it enables centralized
storage management and advanced features such as disk image cloning, snapshots, and disaster
replication.
Now Windows Server 2012 boot images can be managed consistently and efficiently. As a result, servers
can be easily repurposed to improve business continuity. If a server malfunctions, simply boot another
server using the original boot image, to bring the network back into operation immediately. This method
is simple, straight-forward, and efficient for large and small deployments.
Some additional benefits of using iSCSI Boot from SAN in a Windows environment:
Diskless servers: Eliminate the need for each server to boot from its own disks. This allows the
deployment of diskless servers that consume less facility space, power, and budget.
Centralized management: All operating system (OS) images are stored on the EqualLogic PS Series array
and can be centrally managed.
Simplified recovery: Server failures can be quickly recovered by booting a spare server from the SAN.
Rapid disaster recovery: With the boot volumes and production data being replicated to a remote site, the
recovery time objective (RTO) can be reduced by having standby servers that are preconfigured to boot
from SAN.
Rapid deployment: If there is a period of high workloads, then a new server can be imaged from the clone
of the boot image. This allows deployment of more servers to support the increased workload.
7 BP1055 | Configuring Windows Server 2012 for iSCSI SAN Boot with EqualLogic Storage
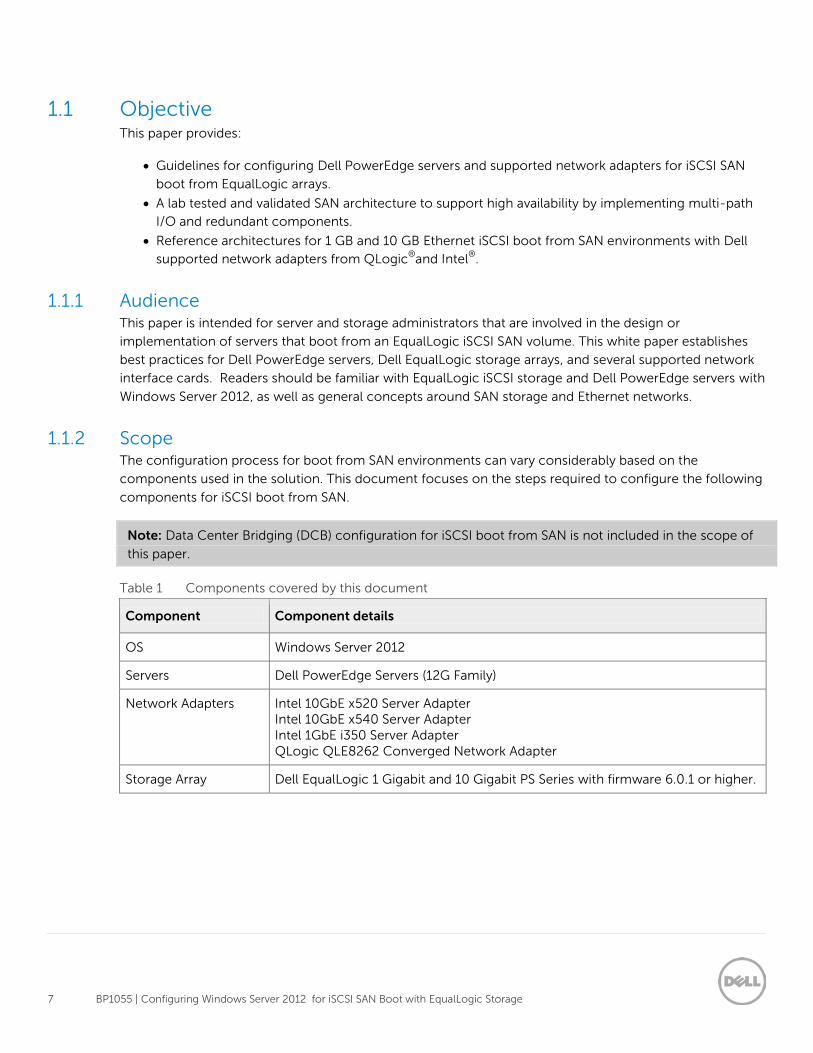
1.1 Objective This paper provides:
• Guidelines for configuring Dell PowerEdge servers and supported network adapters for iSCSI SAN
boot from EqualLogic arrays.
• A lab tested and validated SAN architecture to support high availability by implementing multi-path
I/O and redundant components.
• Reference architectures for 1 GB and 10 GB Ethernet iSCSI boot from SAN environments with Dell
supported network adapters from QLogic®and Intel®.
1.1.1 Audience This paper is intended for server and storage administrators that are involved in the design or
implementation of servers that boot from an EqualLogic iSCSI SAN volume. This white paper establishes
best practices for Dell PowerEdge servers, Dell EqualLogic storage arrays, and several supported network
interface cards. Readers should be familiar with EqualLogic iSCSI storage and Dell PowerEdge servers with
Windows Server 2012, as well as general concepts around SAN storage and Ethernet networks.
1.1.2 Scope The configuration process for boot from SAN environments can vary considerably based on the
components used in the solution. This document focuses on the steps required to configure the following
components for iSCSI boot from SAN.
Note: Data Center Bridging (DCB) configuration for iSCSI boot from SAN is not included in the scope of
this paper.
Table 1 Components covered by this document
Component Component details
OS Windows Server 2012
Servers Dell PowerEdge Servers (12G Family)
Network Adapters Intel 10GbE x520 Server Adapter Intel 10GbE x540 Server Adapter Intel 1GbE i350 Server Adapter QLogic QLE8262 Converged Network Adapter
Storage Array Dell EqualLogic 1 Gigabit and 10 Gigabit PS Series with firmware 6.0.1 or higher.
8 BP1055 | Configuring Windows Server 2012 for iSCSI SAN Boot with EqualLogic Storage
1.2 Terminology 12G PowerEdge Servers or 12G: 12th generation of Dell PowerEdge servers.
Arrays: Refers to iSCSI EqualLogic PS Series storage arrays.
iSCSI Qualified Name (IQN): A naming format used to assign iSCSI names for targets and/or initiators. The
iSCSI Qualified Name is documented in RFC 3720 (http://tools.ietf.org/html/rfc3720) and RFC 3721
(http://tools.ietf.org/html/rfc3721)
Storage Area Network (SAN): The network that interconnects storage devices, including host interfaces (NICs) and arrays. SAN may also refer to the storage, switches, and host interconnects as a single entity.
Slipstream: The process of integrating updates into an original installation media. Some boot from SAN
installations require creating a customized bootable DVD to update the drivers contained on the original
Windows Server 2012 installation media.
9 BP1055 | Configuring Windows Server 2012 for iSCSI SAN Boot with EqualLogic Storage
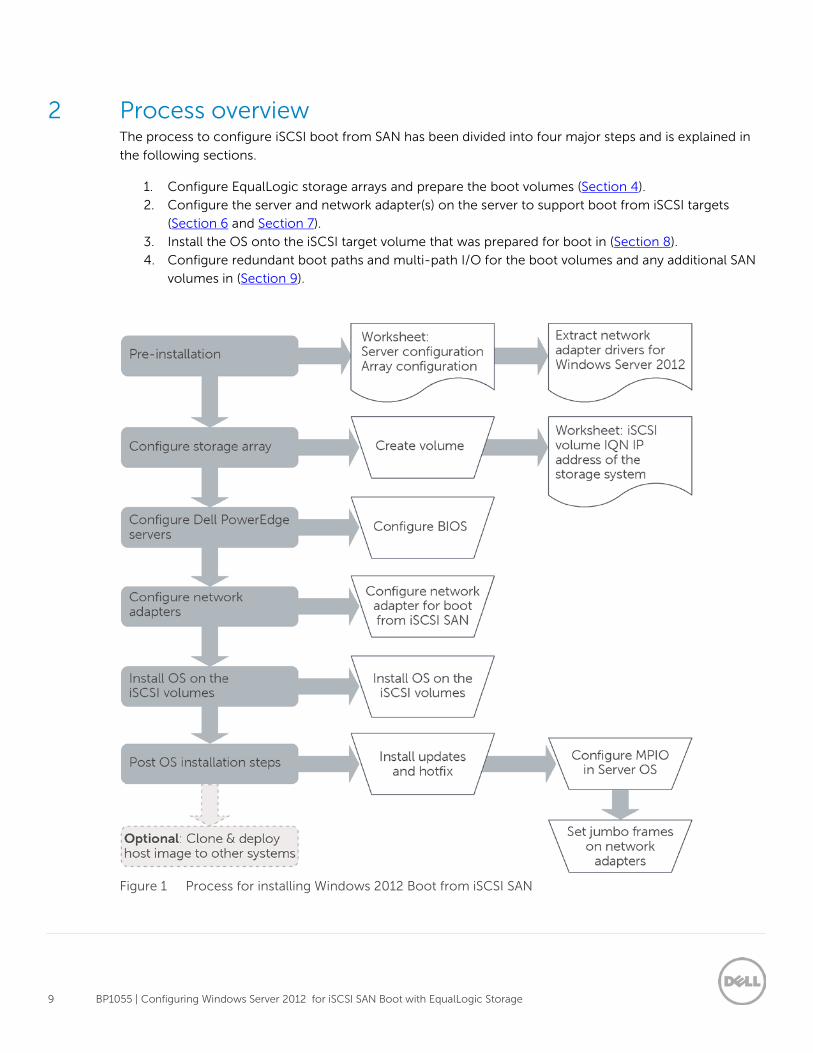
2 Process overview The process to configure iSCSI boot from SAN has been divided into four major steps and is explained in
the following sections.
1. Configure EqualLogic storage arrays and prepare the boot volumes (Section 4).
2. Configure the server and network adapter(s) on the server to support boot from iSCSI targets
(Section 6 and Section 7).
3. Install the OS onto the iSCSI target volume that was prepared for boot in (Section 8).
4. Configure redundant boot paths and multi-path I/O for the boot volumes and any additional SAN
volumes in (Section 9).
Figure 1 Process for installing Windows 2012 Boot from iSCSI SAN
10 BP1055 | Configuring Windows Server 2012 for iSCSI SAN Boot with EqualLogic Storage
2.1 Prerequisites Before you start the configuration process, complete the following steps:
1. Use a configuration tracking worksheet similar to the example provided in Appendix A.
a. Note the IP address, IQN, subnet mask, and other details about the network adapter.
Note: The IQN may also be known as the initiator name in the network adapter configuration. See
Section 6 for more information.
b. Note the EqualLogic group details and volume details as needed.
2. All best practices related to storage, network switches, and servers should be followed. Refer to
the following documents for more information:
a. General guidelines for configuring an EqualLogic SAN network are provided on the Rapid
EqualLogic Configuration Portal at
http://en.community.dell.com/techcenter/storage/w/wiki/3615.rapid-equallogic-
configuration-portal-by-sis.aspx
b. Information for configuring network switches is provided in Switch Configuration Guides at
http://en.community.dell.com/techcenter/storage/w/wiki/4250.switch-configuration-guides-
by-sis.aspx
3. Update Dell EqualLogic Storage arrays with the latest drivers and firmware versions. Details are on
the Dell EqualLogic website at https://eqlsupport.dell.com/support.
In addition, take the following considerations into account:
• NIC teaming is not supported for iSCSI boot.
• iSCSI boot is not supported with IPv6 networks for the network adapters used in this paper.
11 BP1055 | Configuring Windows Server 2012 for iSCSI SAN Boot with EqualLogic Storage
2.2 Restrictions for Broadcom adapter drivers The Broadcom network drivers included on the Windows Server 2012 media do not support booting from
an iSCSI SAN volume for Broadcom. When booting from an iSCSI SAN using Broadcom network adapters,
a slipstreamed image of Windows Server 2012 is required. For more information on creating a
slipstreamed Windows image, see the Microsoft Knowledge Base support article “KB974072” at
http://support.microsoft.com/kb/974072.
Note: Microsoft KB article 97402 currently refers to Windows Server 2008 R2 only, however the same
information applies to Windows Server 2012.
The procedure for an iSCSI boot using Broadcom network adapters is available on the Broadcom support
website in the Broadcom NetXtreme® II Network Adapter User Guide under the section titled, “Using
iSCSI”.
http://www.broadcom.com/docs/support/ethernet_nic/Broadcom_NetXtremeII_Server_T7.6.pdf
(exact link is subject to change as new drivers are released)
Broadcom NICs were not tested as part of this paper.
12 BP1055 | Configuring Windows Server 2012 for iSCSI SAN Boot with EqualLogic Storage
3 Extract drivers for a Windows Server 2012 installation Before you begin the installation steps, download and extract the latest network adapter drivers from
http://support.dell.com. Copy the extracted drivers to a USB flash drive so that they can be easily accessed
during the Windows Server 2012 installation.
Choose the appropriate Intel or QLogic drivers for the configuration. The following steps provide detail on
how to extract the drivers for each specific network adapter.
Note: After extracting the drivers, make note of the directory structure where the files are extracted.
3.1 Extract Intel NIC drivers (optional) 1. Download Intel NIC drivers from http://support.dell.com.
2. Download the latest Network_Driver_*.EXE file and double click it to unpack the driver installation
files.
3. On the Update Package window click Extract without installing…. When prompted, choose a
location to unpack the driver files.
4. Right click the cmd.exe file and select Run as administrator to open the command prompt with
administrator rights.
5. Change the directory in the command prompt to the location of the unpacked driver files.
6. Run this command to extract the drivers: Setup.exe -a
7. Choose a location for the files. If the files are extracted to a USB drive they can be easily mounted
on the system when needed.
8. The installation drivers can be found at \production\W2012-x64\<NIC-Folder>.
3.2 Extract QLogic NIC drivers (optional) 1. Complete the following steps on a compatible system, such as Windows Server 2012.
2. Download the QLogic NIC drivers from http://support.dell.com.
3. Download the latest Network_Driver_*.EXE file, and then double click it to unpack the driver
installation files.
4. On the Update Package window, click Extract without installing… and choose a location to
unpack the driver files.
5. Open the command prompt and change the directory to the location of the unpacked driver files.
6. Choose a location for the driver files. Run this command to extract the drivers: Setup.exe /z“/extractdrivers=\”<location-for-files>””
Example: Setup.exe /z"/extractdrivers=\"C:\temp\””
7. Proceed with the installation, accept the license terms, and choose Drivers only when prompted
to select the feature you want to install. Do not select Install VLAN/TeamingDriver.
8. Unzip the driver package (located at, \production\W2k12-x64\p3p_nic_win2k12_x64.zip).
9. The drivers for installation can be found in the unzipped folder.
13 BP1055 | Configuring Windows Server 2012 for iSCSI SAN Boot with EqualLogic Storage
4 Configure the EqualLogic storage system This section describes the process of configuring the EqualLogic storage arrays to host the iSCSI boot
volumes for a Windows host.
Perform the following steps to create a target volume for booting the Windows host:
1. Log on to the Dell EqualLogic PS Series Group Manager by entering the IP address of the group in
your web browser.
2. Click Storage Pools and select the pool where the volume will be created.
3. In the Activities section click Create Volumes to create a volume on the EqualLogic storage.
4. Give the volume a name (without spaces) and, if desired, enter a description. Select a storage pool
with free pool space and then click Next. 5. Assign the size of the volume to be created. A thin volume can be created by selecting the
checkbox labeled “Thin provisioned volume”. The snapshot reserve defaults to 100% and can be
changed if needed.
Note: Microsoft recommends a system partition size of 84865 MB (80 GB) for Windows Server 2012
installations depending on system RAM, possible power states, and other considerations. A minimum of
32 GB is required according to Microsoft. For more information, see the Microsoft Windows Server
website at http://technet.microsoft.com/en-us/library/jj134246.aspx .
Note: For more information on the default allocation of a snapshot reserve, see the paper titled,
“EqualLogic Snapshots and Clones: Best Practices and Sizing Guidelines” at:
http://en.community.dell.com/dell-groups/dtcmedia/m/mediagallery/20097871/download.aspx
14 BP1055 | Configuring Windows Server 2012 for iSCSI SAN Boot with EqualLogic Storage
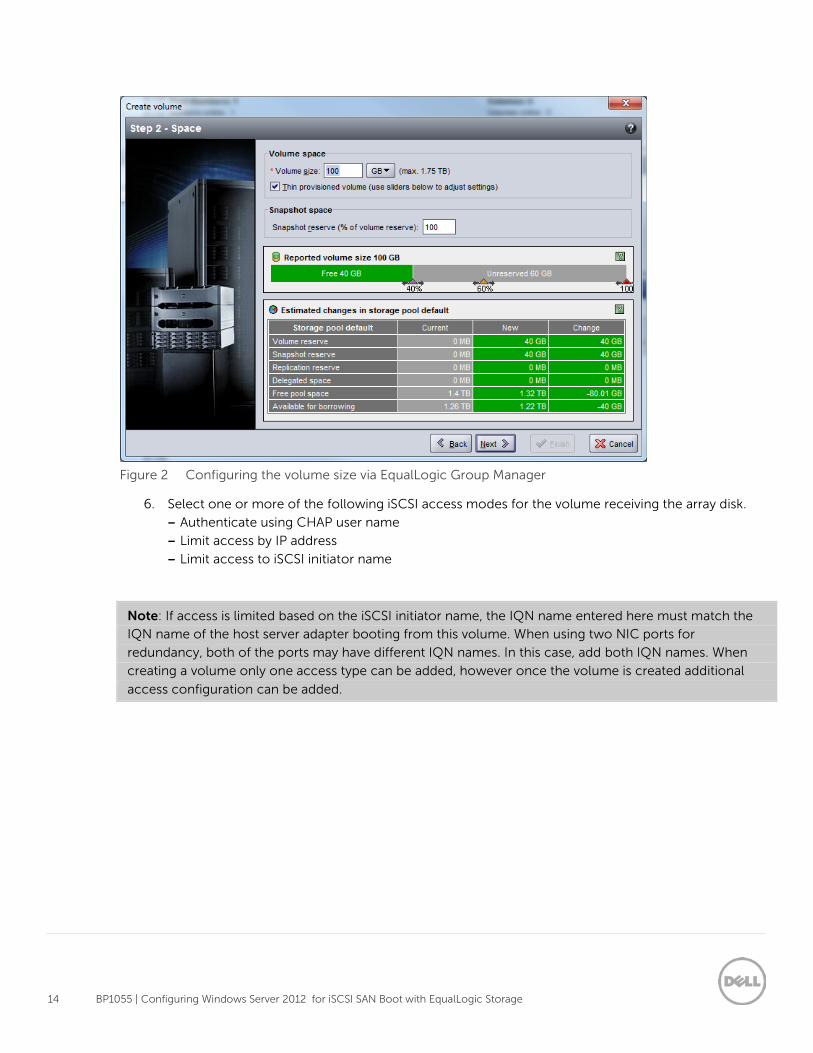
Figure 2 Configuring the volume size via EqualLogic Group Manager
6. Select one or more of the following iSCSI access modes for the volume receiving the array disk.
- Authenticate using CHAP user name
- Limit access by IP address
- Limit access to iSCSI initiator name
Note: If access is limited based on the iSCSI initiator name, the IQN name entered here must match the
IQN name of the host server adapter booting from this volume. When using two NIC ports for
redundancy, both of the ports may have different IQN names. In this case, add both IQN names. When
creating a volume only one access type can be added, however once the volume is created additional
access configuration can be added.
15 BP1055 | Configuring Windows Server 2012 for iSCSI SAN Boot with EqualLogic Storage
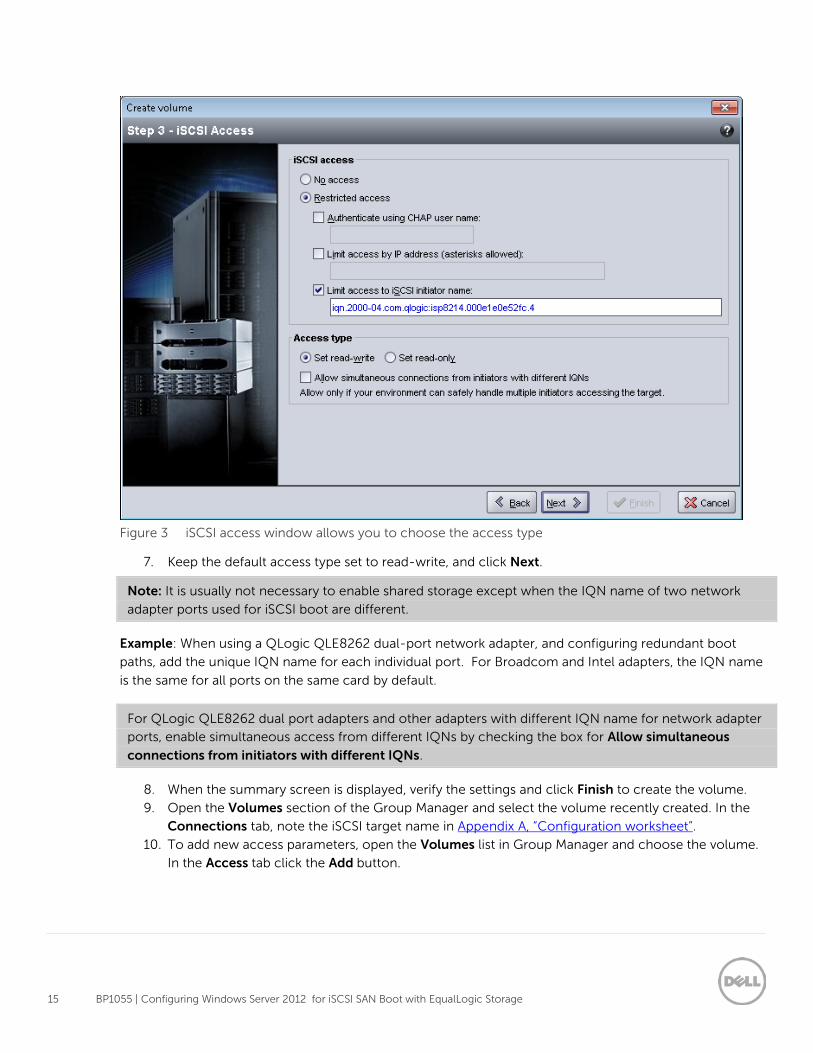
Figure 3 iSCSI access window allows you to choose the access type
7. Keep the default access type set to read-write, and click Next.
Note: It is usually not necessary to enable shared storage except when the IQN name of two network
adapter ports used for iSCSI boot are different.
Example: When using a QLogic QLE8262 dual-port network adapter, and configuring redundant boot
paths, add the unique IQN name for each individual port. For Broadcom and Intel adapters, the IQN name
is the same for all ports on the same card by default.
For QLogic QLE8262 dual port adapters and other adapters with different IQN name for network adapter
ports, enable simultaneous access from different IQNs by checking the box for Allow simultaneous
connections from initiators with different IQNs.
8. When the summary screen is displayed, verify the settings and click Finish to create the volume.
9. Open the Volumes section of the Group Manager and select the volume recently created. In the
Connections tab, note the iSCSI target name in Appendix A, “Configuration worksheet”.
10. To add new access parameters, open the Volumes list in Group Manager and choose the volume.
In the Access tab click the Add button.
16 BP1055 | Configuring Windows Server 2012 for iSCSI SAN Boot with EqualLogic Storage
5 Prepare Intel Network adapters for iSCSI boot
Note: Intel network adapters are not shipped with iSCSI enabled in the Boot ROM. Enable iSCSI so the
Intel network adapters are detected as a boot device and are listed in the boot sequence.
During the system boot, if the [Ctrl+D] option to configure the Intel NIC is not displayed, follow the
following steps in this section to enable iSCSI on the Intel network adapter.
1. Create a DOS bootable USB flash drive.
Note: The open source utility UNetbootin can be used to create a DOS bootable USB flash drive using
FreeDOS. The utility can be downloaded at http://unetbootin.sourceforge.net/.
2. Download the Intel Boot Agent from the Intel support website. The file is named, “Preboot.exe”
Note: The support site for Intel is www.intel.com/support.
3. Extract the Preboot.exe zip file to the bootable USB key created in step 1.
4. With the Intel NIC installed, start the server using the DOS bootable USB key.
5. Once the system starts from the DOS bootable USB key, change to the directory containing the
Boot Agent (\Preboot\Apps\Bootutil\Dos), To enable the capability to run flash firmware on the
selected adapter, run the following command: bootutil.exe –all -fe
6. If this command returns an error, then program the flash using this command: bootutil.exe –up=combo –all –File=<path>/bootimg.flb
See Figure 4 for more detail.
Repeat step 5 to enable flash on the network adapter. (bootimg.flb is located in Preboot\apps\bootutil.)
17 BP1055 | Configuring Windows Server 2012 for iSCSI SAN Boot with EqualLogic Storage
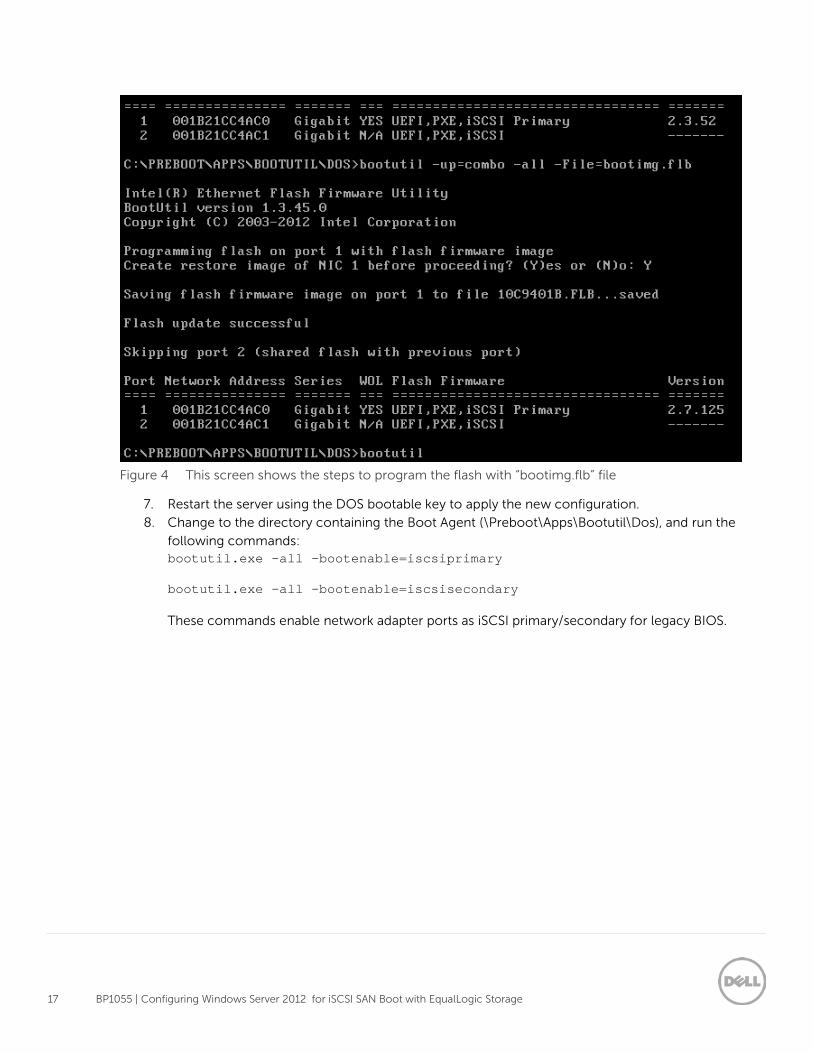
Figure 4 This screen shows the steps to program the flash with “bootimg.flb” file
7. Restart the server using the DOS bootable key to apply the new configuration.
8. Change to the directory containing the Boot Agent (\Preboot\Apps\Bootutil\Dos), and run the
following commands: bootutil.exe –all –bootenable=iscsiprimary
bootutil.exe –all –bootenable=iscsisecondary
These commands enable network adapter ports as iSCSI primary/secondary for legacy BIOS.
18 BP1055 | Configuring Windows Server 2012 for iSCSI SAN Boot with EqualLogic Storage
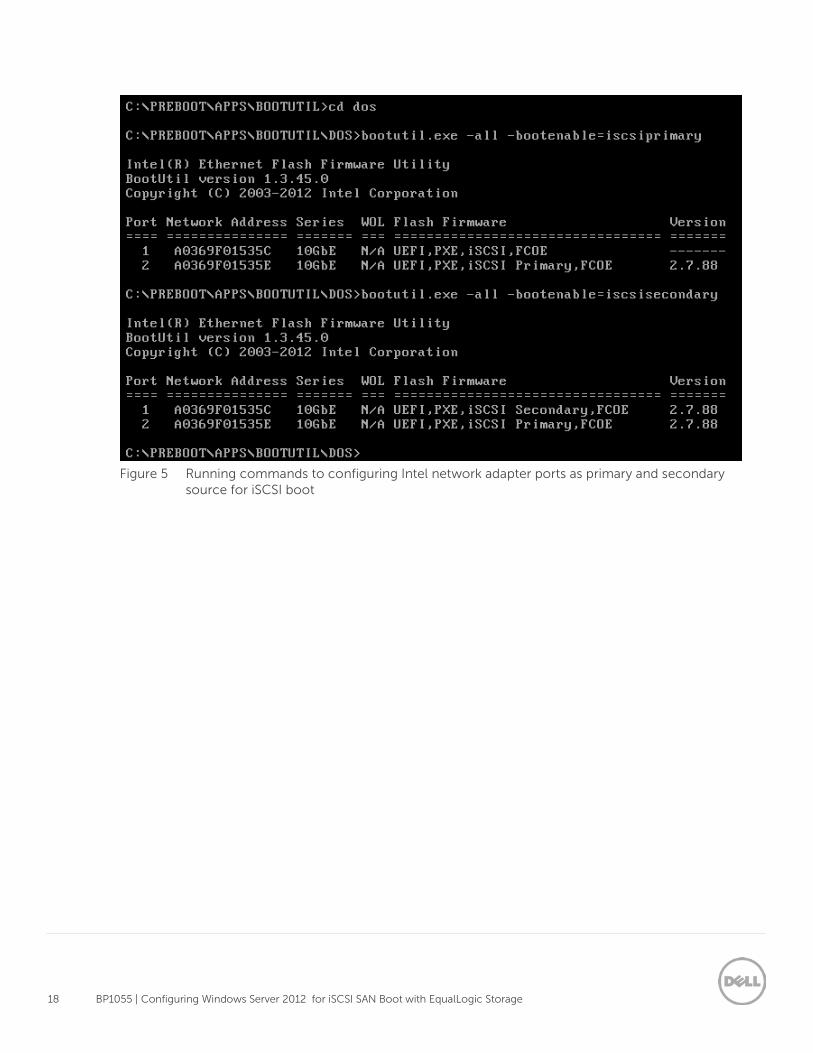
Figure 5 Running commands to configuring Intel network adapter ports as primary and secondary
source for iSCSI boot
19 BP1055 | Configuring Windows Server 2012 for iSCSI SAN Boot with EqualLogic Storage
6 Configure network adapters for 12G PowerEdge servers Configure the network adapter to connect to an iSCSI volume and later boot from the volume. The
following steps describe the procedure for Intel and QLogic network adapters. Use the sections below that
apply to your configuration:
6.1 Configure QLogic Network adapters
6.2 Configure Intel Network adapters
6.1 Configure QLogic network adapter for iSCSI boot
Note: The steps shown below use the iSCSI Boot Firmware Table (iBFT) method for boot from SAN.
For QLogic QLE8262 you can also use FastUTIL to enable the legacy iSCSI HBA mode. Information about
this alternate method is available in Section 4 titled, “Boot Configuration”, of the QLogic Converged Network Adapter User’s Guide at http://i.dell.com/sites/content/shared-content/data-
sheets/en/Documents/Qlogic-QME8242-k-User-Guide.pdf.
Or can be found in the QLogic Manual under Boot Configuration > iSCSI Configuration Using FastUTIL
downloaded from www.support.dell.com.
Use the following steps to configure the QLogic QLE8262 network adapter for iSCSI boot from SAN.
1. During the system boot, press [Ctrl+Q] when prompted to enter the QLogic configuration menu.
2. In the Function Configuration menu, change the protocol type to IBFT for network adapter ports
used for iSCSI boot as shown in Figure 6.
20 BP1055 | Configuring Windows Server 2012 for iSCSI SAN Boot with EqualLogic Storage
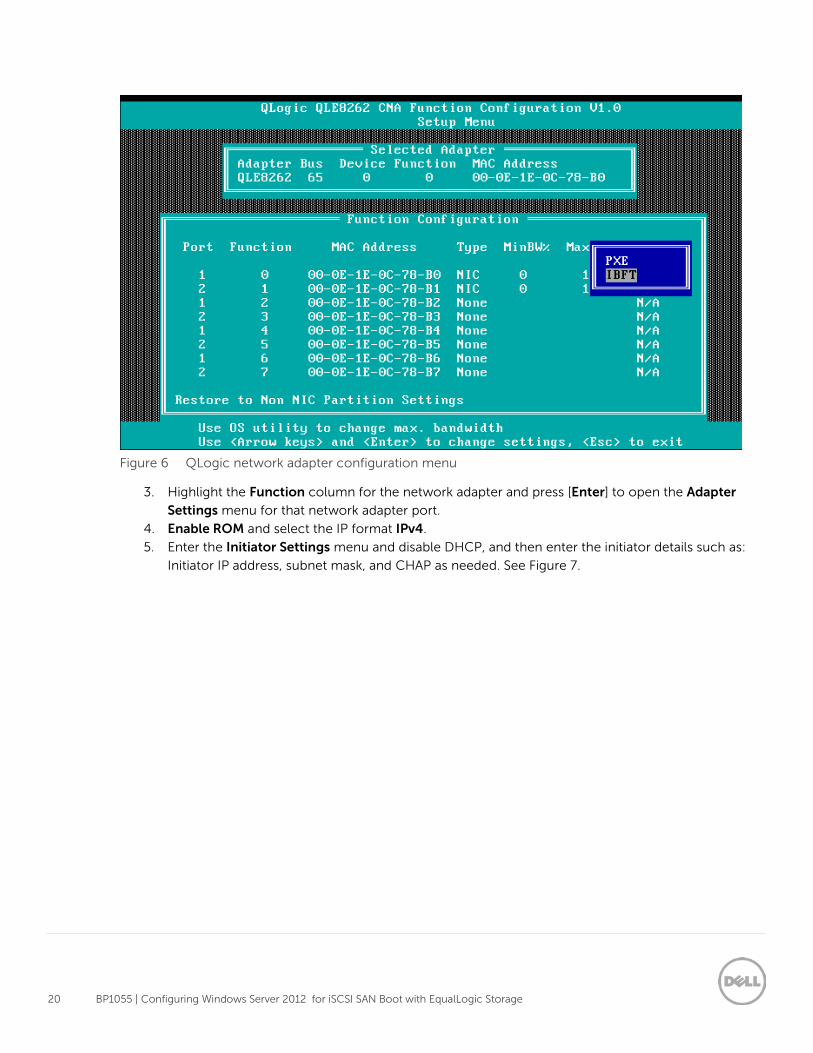
Figure 6 QLogic network adapter configuration menu
3. Highlight the Function column for the network adapter and press [Enter] to open the Adapter Settings menu for that network adapter port.
4. Enable ROM and select the IP format IPv4.
5. Enter the Initiator Settings menu and disable DHCP, and then enter the initiator details such as:
Initiator IP address, subnet mask, and CHAP as needed. See Figure 7.
21 BP1055 | Configuring Windows Server 2012 for iSCSI SAN Boot with EqualLogic Storage
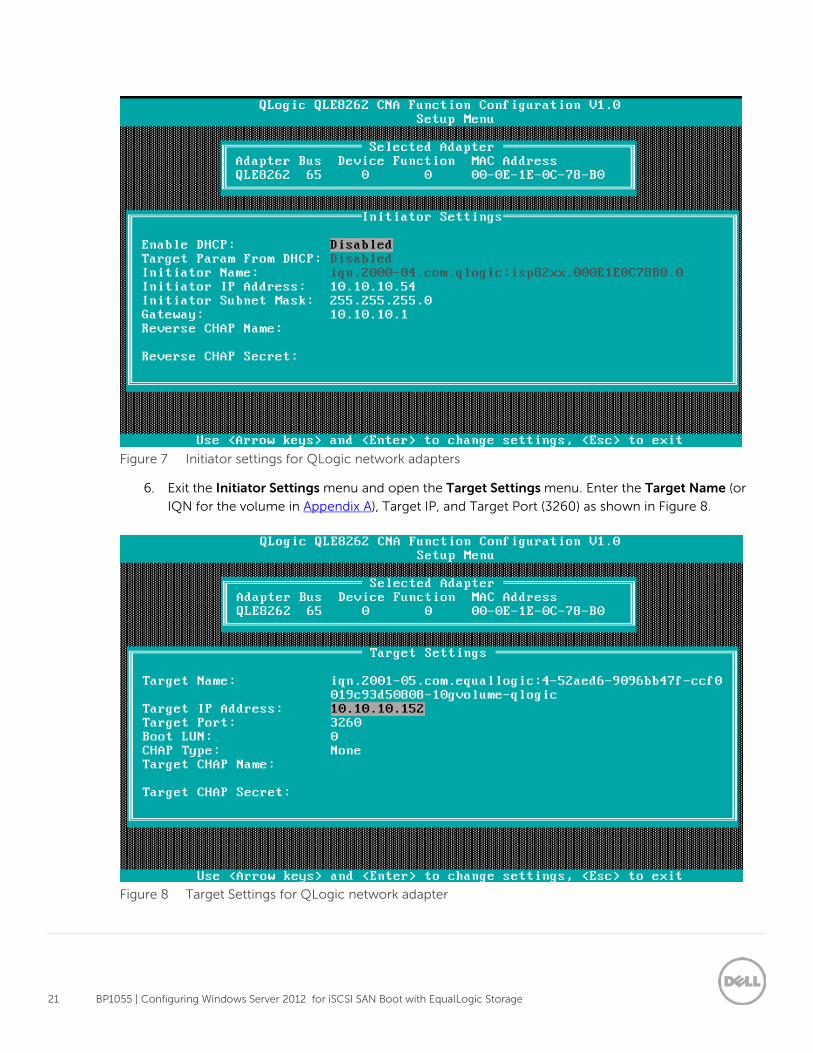
Figure 7 Initiator settings for QLogic network adapters
6. Exit the Initiator Settings menu and open the Target Settings menu. Enter the Target Name (or
IQN for the volume in Appendix A), Target IP, and Target Port (3260) as shown in Figure 8.
Figure 8 Target Settings for QLogic network adapter
22 BP1055 | Configuring Windows Server 2012 for iSCSI SAN Boot with EqualLogic Storage
7. Exit to the Function Configuration menu and enter information for other network adapter ports as
needed.
8. Once complete, press [ESC] and select Save changes. Reboot the system when prompted.
9. Continue to Section 7 to configure a primary boot device.
6.2 Configure Intel Network Adapters for iSCSI boot Intel network adapters are not shipped with the Boot ROM enabled for iSCSI. During the system boot if the
[Ctrl+D] option to configure the Intel NIC is not displayed, see Section 5 to enable iSCSI on an Intel
network adapter.
Use the following steps to configure an Intel network adapter for iSCSI boot from SAN.
1. Start or reboot the system. During the system boot press [F2] to enter system setup, access the
Device Settings.
2. Choose an Intel Network adapter port to be used for the iSCSI boot.
3. Enter the NIC Configuration and change Legacy Boot Protocol to iSCSI Primary or iSCSI Secondary. Click Back to return to the network adapter main configuration page.
4. Enter the iSCSI Configuration and iSCSI General Parameters. Disable TCP/IP parameters DHCP
and enable/disable CHAP authentication as desired.
5. Return to the iSCSI Configuration page.
6. Enter the iSCSI initiator parameter, IP address, Subnet Mask and iSCSI IQN if needed. Return to
the iSCSI configuration page when complete.
Note: The server will auto-generate an IQN for this host. If the target is set to control access based on
the IQN, then add the IQN to the volume access as shown in step 6 of Section 4,
7. Enter the iSCSI Target Parameter, and enter the IP address, TCP port (3260) and iSCSI Name for
the target.
Note: The target IP will be same as the group IP of the EQL group.
8. Return to the Device Settings page, saving the changes as prompted.
9. Configure other Intel network adapter ports for redundancy as shown above in steps 3 through 7
and exit after saving.
10. Click Finish to exit Device Settings and System Setup. This will restart the system.
11. Continue to Section 7 to configure a primary boot device.
23 BP1055 | Configuring Windows Server 2012 for iSCSI SAN Boot with EqualLogic Storage
7 Configure Dell PowerEdge servers for iSCSI boot The following sections describe the process for configuring the server BIOS and NICs to support boot
from iSCSI targets.
1. During the boot, press [F2] to enter the setup mode and access the System BIOS.
2. Select Integrated Devices, disable the Integrated RAID Controller, and click Back.
3. Select Boot settings > BIOS Boot Settings > Boot Sequence. 4. Adjust the boot sequence order to display the DVD/CD or other Windows Server 2012 ROM device
first in the list followed by the Broadcom/Intel/QLogic NIC used for iSCSI boot.
5. If the network adapter used for iSCSI boot is not listed in the Boot Sequence:
a. Make Hard drive C: the top second choice followed by additional desired boot devices. PCIe
add-in network adapter cards are reported in the GUI as Hard Drive C:. b. In the Hard-Disk Drive Sequence, bring the desired network adapter to the top as seen in
Figure 9.
Note: The USB drive and Virtual CD are automatically detected if they are loaded.
24 BP1055 | Configuring Windows Server 2012 for iSCSI SAN Boot with EqualLogic Storage
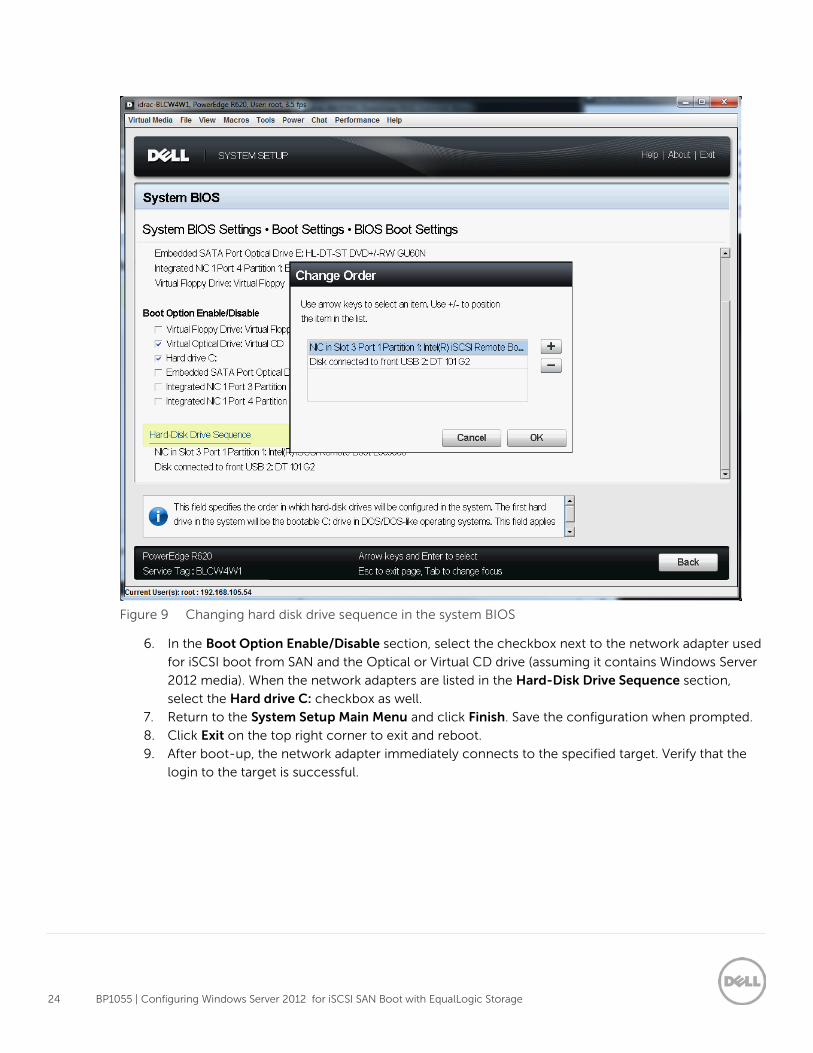
Figure 9 Changing hard disk drive sequence in the system BIOS
6. In the Boot Option Enable/Disable section, select the checkbox next to the network adapter used
for iSCSI boot from SAN and the Optical or Virtual CD drive (assuming it contains Windows Server
2012 media). When the network adapters are listed in the Hard-Disk Drive Sequence section,
select the Hard drive C: checkbox as well.
7. Return to the System Setup Main Menu and click Finish. Save the configuration when prompted.
8. Click Exit on the top right corner to exit and reboot.
9. After boot-up, the network adapter immediately connects to the specified target. Verify that the
login to the target is successful.
25 BP1055 | Configuring Windows Server 2012 for iSCSI SAN Boot with EqualLogic Storage
8 Installing Windows on the iSCSI volume Perform the following steps to install the Windows Server 2012 OS on the iSCSI volume.
1. Insert the Windows Server 2012 media into the system.
2. Turn on or restart the system.
Note: Do not use [F11] with the BIOS Boot Manager. Doing so may prevent Windows Server 2012 from
detecting network boot devices that use the inbox drivers.
3. Press any key as prompted, to boot from the CD/DVD.
4. The Install Windows dialog box appears. Select the appropriate language, time, and keyboard
options. Click Next and then Install Now to continue the installation.
5. Enter the product key if prompt.
6. When the Operating System Selection page appears, select the appropriate Windows Server 2012
installation and click Next to continue.
7. Read the license agreement that is displayed and select I accept the license terms to continue
with the installation. Click Next. 8. Select Custom from the Installation Type page.
9. Determine if the target volume is available in the list of drives. If the target volume is available,
proceed to step 14 below. To install the latest drivers please proceed to the next step.
10. Insert the removable media containing the drivers for the network adapter extracted in Section 3.
11. Click Load Driver to display the dialog box.
12. Click Browse to locate the network device driver and click OK.
13. Click Next to load the drivers.
The available drives list containing the targeted volume appears.
Note: After loading the drives if the iSCSI volume does not appear, click Refresh. It may take a minute
before the list is displayed.
26 BP1055 | Configuring Windows Server 2012 for iSCSI SAN Boot with EqualLogic Storage
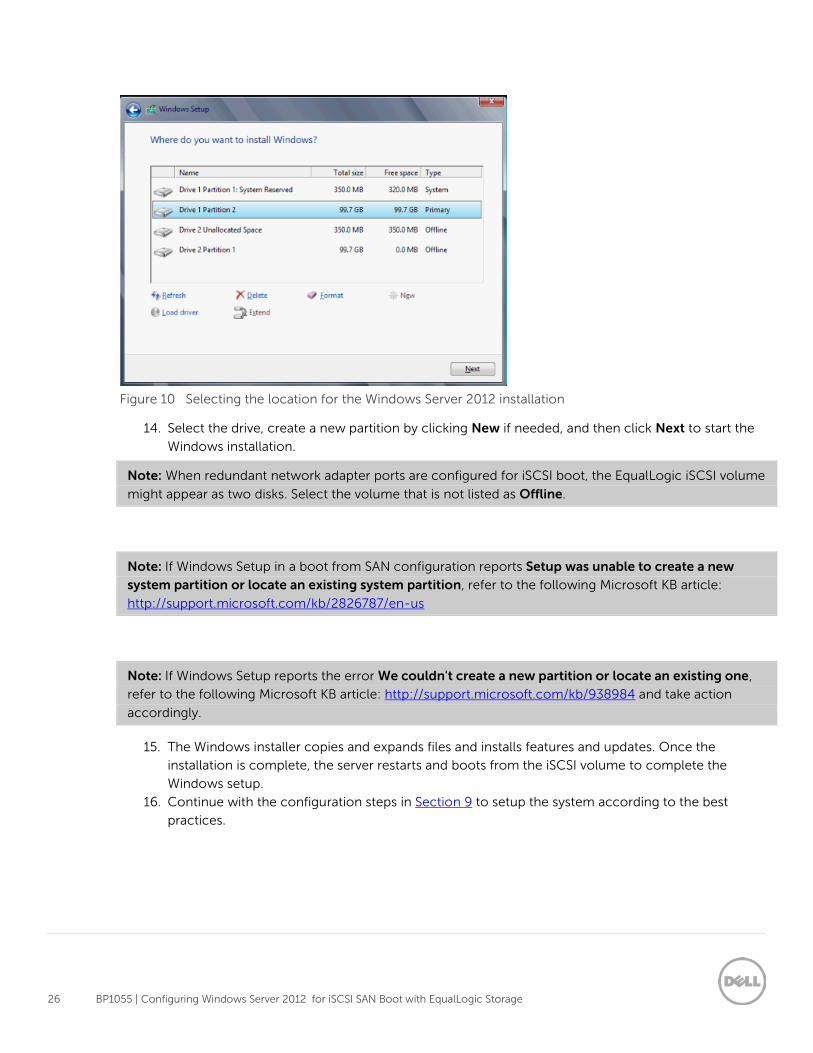
Figure 10 Selecting the location for the Windows Server 2012 installation
14. Select the drive, create a new partition by clicking New if needed, and then click Next to start the
Windows installation.
Note: When redundant network adapter ports are configured for iSCSI boot, the EqualLogic iSCSI volume
might appear as two disks. Select the volume that is not listed as Offline.
Note: If Windows Setup in a boot from SAN configuration reports Setup was unable to create a new system partition or locate an existing system partition, refer to the following Microsoft KB article:
http://support.microsoft.com/kb/2826787/en-us
Note: If Windows Setup reports the error We couldn't create a new partition or locate an existing one,
refer to the following Microsoft KB article: http://support.microsoft.com/kb/938984 and take action
accordingly.
15. The Windows installer copies and expands files and installs features and updates. Once the
installation is complete, the server restarts and boots from the iSCSI volume to complete the
Windows setup.
16. Continue with the configuration steps in Section 9 to setup the system according to the best
practices.
27 BP1055 | Configuring Windows Server 2012 for iSCSI SAN Boot with EqualLogic Storage
9 Post Windows Server 2012 OS installation steps Perform the following steps after Windows Server 2012 is initially installed on the bootable iSCSI volume.
These steps complete the configuration of a bootable iSCSI SAN by configuring multi-path I/O and
redundancy, as well as optimization. As a best practice, install the HIT kit (section 9.3) and configure jumbo
frames (section 9.4).
9.1 Install hotfixes Check for other Microsoft Hotfixes and updates that may be needed for the Windows Server 2012 system
on the Microsoft website.
9.2 Make network adapter the primary boot device. The following section configures the BIOS to use the network adapter used for iSCSI boot as the primary
boot device.
1. Restart the system and press [F2] during the boot to enter the setup mode and access the System BIOS.
2. Select Boot settings > BIOS Boot Settings > Boot Sequence. 3. Adjust the boot sequence order to display Broadcom/Intel/QLogic NIC used for iSCSI boot first in
the list.
4. If the network adapter used for iSCSI boot is not listed in the Boot Sequence:
a. Make Hard drive C: the top choice. PCIe add-in network adapter cards are reported in the GUI
as Hard Drive C:. b. In the Hard-Disk Drive Sequence, bring the desired network adapter to the top as seen in
Figure 9.
9.3 Install the EqualLogic Host Integration Tool (HIT) kit The Host Integration Tool kit, or HIT kit, is a device specific module (DSM) for Dell EqualLogic arrays that is
installed on Windows Server 2012 systems to create redundant connection paths from the host system to
EqualLogic arrays. The HIT kit also installs other utilities and configures the host system according to the
best practices for Dell EqualLogic arrays.
Complete the following steps to install the HIT kit.
1. Go to https://eqlsupport.dell.com to download the HIT kit. An account is required to access the
files.
2. Go to Downloads > HIT kit for Microsoft. Download the latest Host Integration Tools for
Microsoft.
3. Double click Setup64.exe (for x64 bit system) to install HIT kit on the system.
4. Click Next on the Welcome page to proceed.
5. Read and accept the license agreement and click Next to proceed.
28 BP1055 | Configuring Windows Server 2012 for iSCSI SAN Boot with EqualLogic Storage
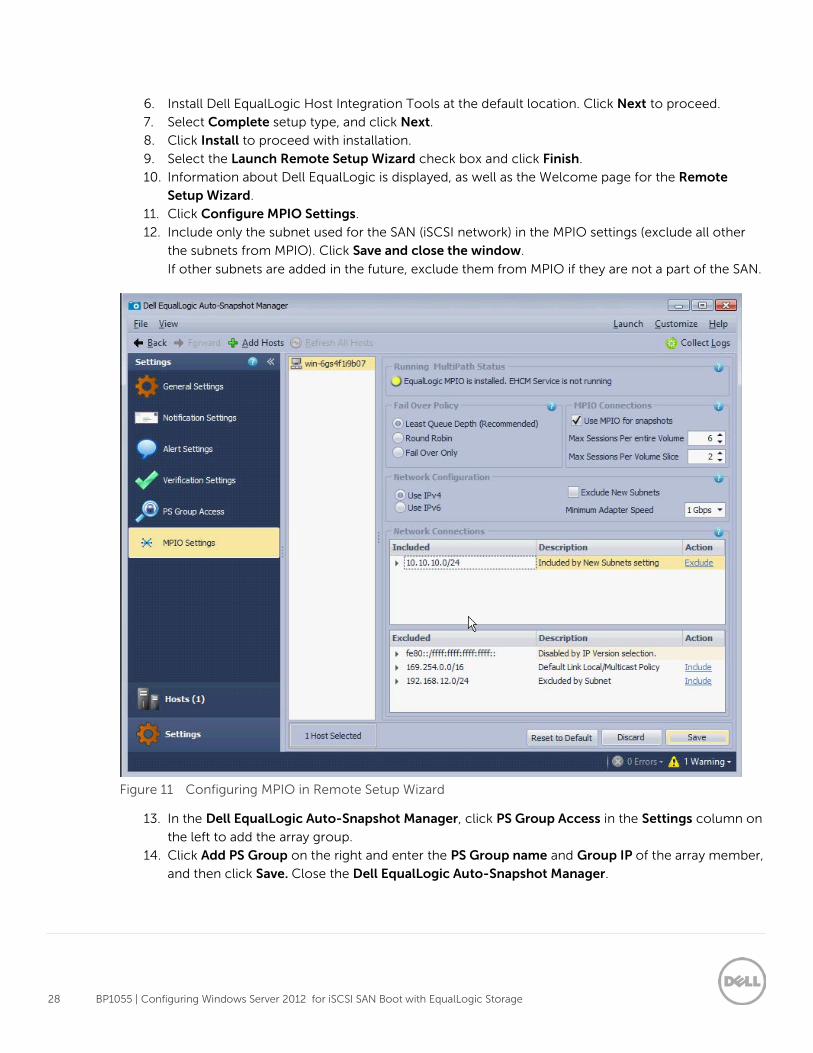
6. Install Dell EqualLogic Host Integration Tools at the default location. Click Next to proceed.
7. Select Complete setup type, and click Next. 8. Click Install to proceed with installation.
9. Select the Launch Remote Setup Wizard check box and click Finish.
10. Information about Dell EqualLogic is displayed, as well as the Welcome page for the Remote Setup Wizard.
11. Click Configure MPIO Settings.
12. Include only the subnet used for the SAN (iSCSI network) in the MPIO settings (exclude all other
the subnets from MPIO). Click Save and close the window.
If other subnets are added in the future, exclude them from MPIO if they are not a part of the SAN.
Figure 11 Configuring MPIO in Remote Setup Wizard
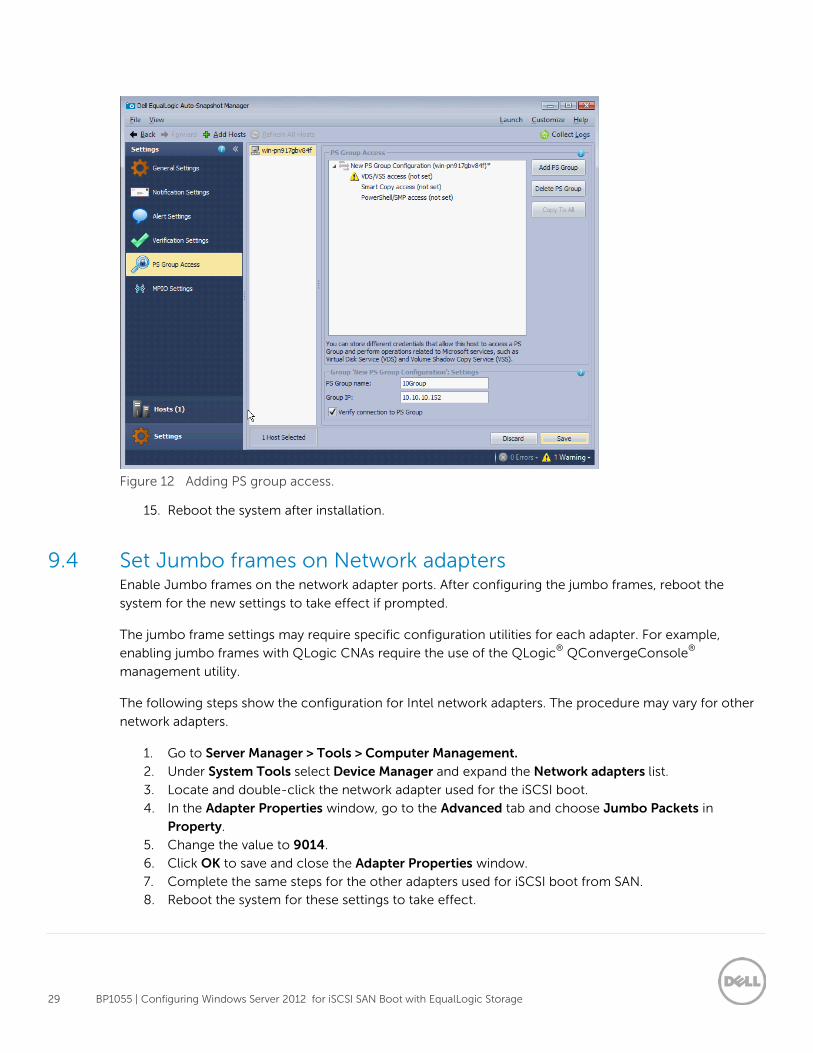
13. In the Dell EqualLogic Auto-Snapshot Manager, click PS Group Access in the Settings column on
the left to add the array group.
14. Click Add PS Group on the right and enter the PS Group name and Group IP of the array member,
and then click Save. Close the Dell EqualLogic Auto-Snapshot Manager.
29 BP1055 | Configuring Windows Server 2012 for iSCSI SAN Boot with EqualLogic Storage
Figure 12 Adding PS group access.
15. Reboot the system after installation.
9.4 Set Jumbo frames on Network adapters Enable Jumbo frames on the network adapter ports. After configuring the jumbo frames, reboot the
system for the new settings to take effect if prompted.
The jumbo frame settings may require specific configuration utilities for each adapter. For example,
enabling jumbo frames with QLogic CNAs require the use of the QLogic® QConvergeConsole®
management utility.
The following steps show the configuration for Intel network adapters. The procedure may vary for other
network adapters.
1. Go to Server Manager > Tools > Computer Management. 2. Under System Tools select Device Manager and expand the Network adapters list.
3. Locate and double-click the network adapter used for the iSCSI boot.
4. In the Adapter Properties window, go to the Advanced tab and choose Jumbo Packets in
Property.
5. Change the value to 9014.
6. Click OK to save and close the Adapter Properties window.
7. Complete the same steps for the other adapters used for iSCSI boot from SAN.
8. Reboot the system for these settings to take effect.
30 BP1055 | Configuring Windows Server 2012 for iSCSI SAN Boot with EqualLogic Storage
10 Recovery from a degraded network interface When the host system is booted with a single active link to the boot volume (degraded boot),
reestablishing the failed connection does not create redundant connections to the boot volume. To regain
the redundant connection you must either reboot the host system or configure the IP address manually in
the OS.
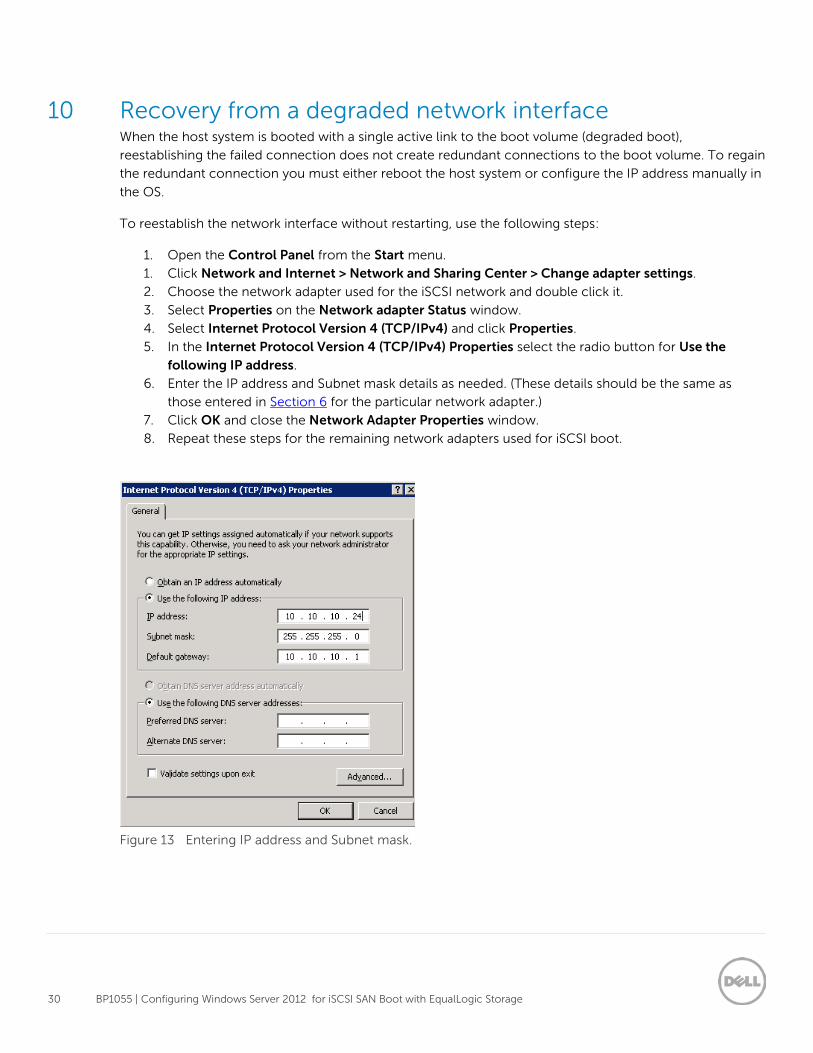
To reestablish the network interface without restarting, use the following steps:
1. Open the Control Panel from the Start menu.
1. Click Network and Internet > Network and Sharing Center > Change adapter settings.
2. Choose the network adapter used for the iSCSI network and double click it.
3. Select Properties on the Network adapter Status window.
4. Select Internet Protocol Version 4 (TCP/IPv4) and click Properties.
5. In the Internet Protocol Version 4 (TCP/IPv4) Properties select the radio button for Use the following IP address.
6. Enter the IP address and Subnet mask details as needed. (These details should be the same as
those entered in Section 6 for the particular network adapter.)
7. Click OK and close the Network Adapter Properties window.
8. Repeat these steps for the remaining network adapters used for iSCSI boot.
Figure 13 Entering IP address and Subnet mask.
31 BP1055 | Configuring Windows Server 2012 for iSCSI SAN Boot with EqualLogic Storage
11 Conclusion and best practices Configuring a Windows Server 2012 to boot from an EqualLogic iSCSI SAN has several advantages for
management of the server and network. It also provides high reliability for the IT environment. Using boot
from SAN is valuable in an IT environment for the following advantages:
• Quick and easy centralized backup
• Faster recovery in event of server failure
• New servers can be replaced, re-purposed, and added quickly and easily
• The operating cost is lowered by eliminating the need for local hard disks on each server
• Simplified management for administrators
Using an external storage device to host server boot images helps with quick and easy centralized backups
for the boot images. Data, including boot information, can be easily replicated minimizing the recovery
time from a server failure. The boot images are securely stored on a storage platform independent of the
servers making it is easy to replace the servers. Simply pointing the new server to a newly replicated or
existing boot image makes adding a new server with a replicated boot image quick and easy.
Boot from iSCSI SAN gives higher reliability in terms of hardware failure, data loss, rapid disaster recovery,
and easier centralized backup. Using iSCSI storage instead of local hard drives provides efficient use of
storage space, because over-provisioning in terms of the internal storage of the server can be eliminated,
resulting in lower operating cost. SAN storage systems are generally more robust and reliable compared to
hard-drives on individual servers.
Boot from iSCSI SAN enables simplified management for the administrator. Operating system patching
and upgrades can be carried out with very little downtime. Upgraded operating system images can be
prepared and cloned on the storage device and individual servers can be pointed to new boot images and
rebooted with very little downtime. Boot images can be cloned and used to test upgrades, service packs,
and other patches without disturbing a production environment.
Boot from iSCSI SAN provides great benefits and offers opportunities to make administrative tasks simpler.
By following the configuration settings outlined in this paper, server and storage administrators can
improve the operational efficiency and productivity in their IT environment.
.
32 BP1055 | Configuring Windows Server 2012 for iSCSI SAN Boot with EqualLogic Storage
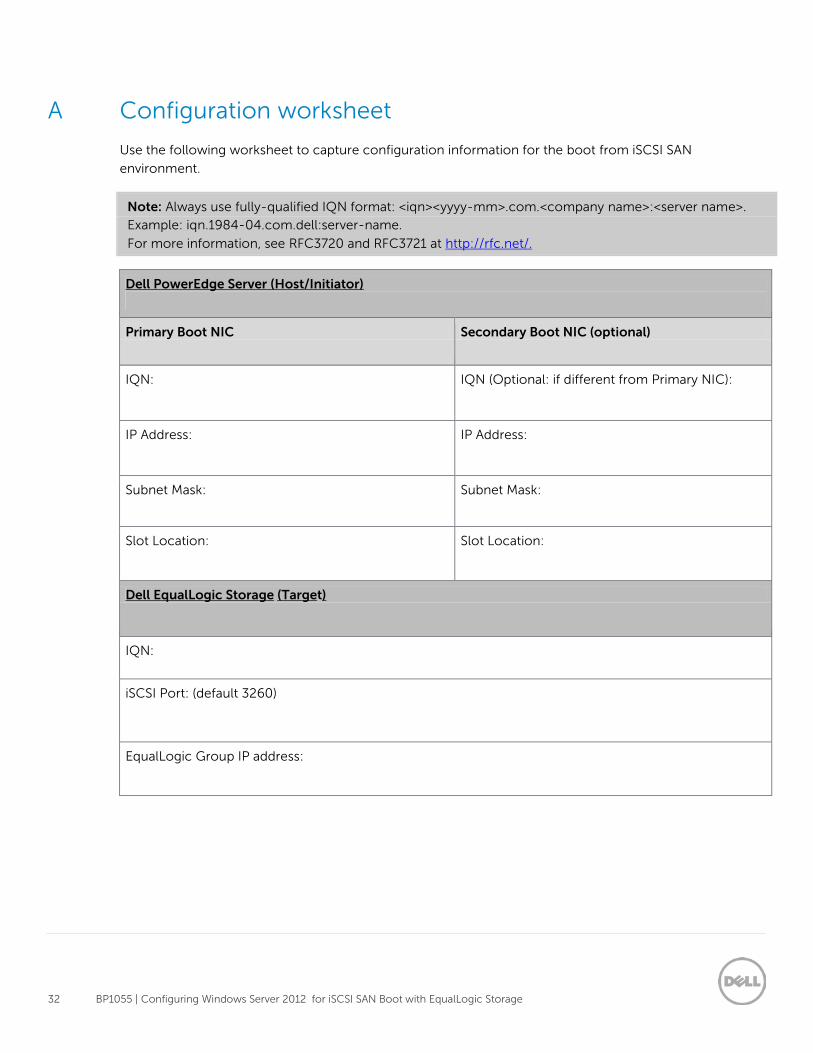
A Configuration worksheet
Use the following worksheet to capture configuration information for the boot from iSCSI SAN
environment.
Note: Always use fully-qualified IQN format: <iqn><yyyy-mm>.com.<company name>:<server name>.
Example: iqn.1984-04.com.dell:server-name.
For more information, see RFC3720 and RFC3721 at http://rfc.net/.
Dell PowerEdge Server (Host/Initiator)
Primary Boot NIC Secondary Boot NIC (optional)
IQN: IQN (Optional: if different from Primary NIC):
IP Address: IP Address:
Subnet Mask: Subnet Mask:
Slot Location: Slot Location:
Dell EqualLogic Storage (Target)
IQN:
iSCSI Port: (default 3260)
EqualLogic Group IP address:
33 BP1055 | Configuring Windows Server 2012 for iSCSI SAN Boot with EqualLogic Storage
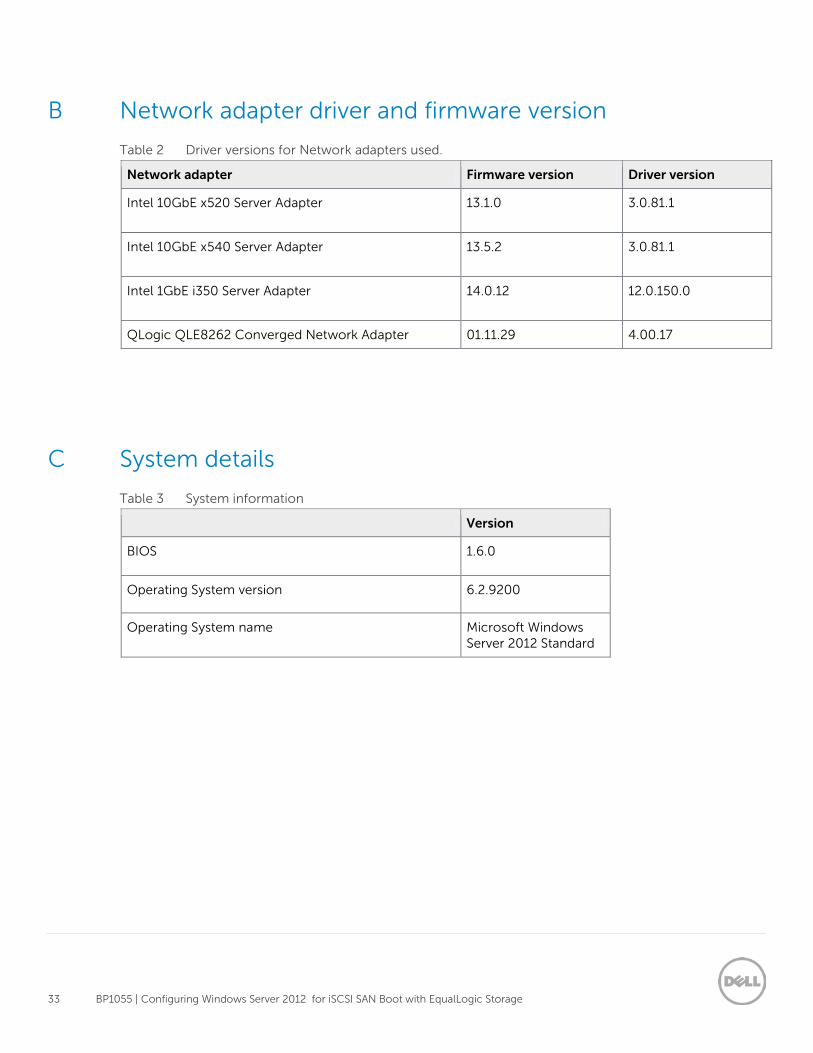
B Network adapter driver and firmware version
Table 2 Driver versions for Network adapters used.
Network adapter Firmware version Driver version
Intel 10GbE x520 Server Adapter
13.1.0 3.0.81.1
Intel 10GbE x540 Server Adapter
13.5.2
3.0.81.1
Intel 1GbE i350 Server Adapter
14.0.12 12.0.150.0
QLogic QLE8262 Converged Network Adapter 01.11.29 4.00.17
C System details
Table 3 System information
Version
BIOS 1.6.0
Operating System version 6.2.9200
Operating System name Microsoft Windows Server 2012 Standard
34 BP1055 | Configuring Windows Server 2012 for iSCSI SAN Boot with EqualLogic Storage
Additional resources
Support.dell.com is focused on meeting your needs with proven services and support.
Dell TechCenter (http://delltechcenter.com) is an IT Community where you can connect with Dell
Customers and Dell employees for the purpose of sharing knowledge, best practices, and information
about Dell products and your installations.
Microsoft articles:
• Windows 2008 R2 “Microsoft iSCSI Boot Step-by-Step Guide” at http://technet.microsoft.com/en-
us/library/ee619733(v=ws.10).aspx
• Information on creating a slipstreamed Windows image is in the Microsoft Knowledge Base support
article “KB974072” at http://support.microsoft.com/kb/974072
• For the Windows Setup in a boot from SAN configuration error message Setup was unable to create a new system partition or locate an existing system partition, refer to the following Microsoft KB
article: http://support.microsoft.com/kb/2826787/en-us
• For the Windows Setup error We couldn't create a new partition or locate an existing one, refer to
the following Microsoft KB article: http://support.microsoft.com/kb/938984
Referenced or recommended Dell publications:
• PS series Deployment: Boot from SAN using QLogic iSCSI Host Buss Adapters at
http://en.community.dell.com/dell-groups/dtcmedia/m/mediagallery/19861476/download.aspx
• Dell EqualLogic Configuration Guide at
http://en.community.dell.com/techcenter/storage/w/wiki/equallogic-configuration-guide.aspx
• Configuring Windows Server 2008 R2 for iSCSI SAN Boot with EqualLogic Storage at
http://en.community.dell.com/dell-groups/dtcmedia/m/mediagallery/20310666/download.aspx
For EqualLogic best practices, reference architectures, and deployment guidelines for enterprise
applications and SANs, refer to Storage Infrastructure and Solutions Team Publications at:
• http://dell.to/sM4hJT

This paper is for informational purposes only. The content is provided as is, without express or implied warranties of
any kind.