How to Guide848a5c47863f10b60520... · 13. Google Analytics i) Navigate to the Data Connector page....
12
s How to Guide Create a Data Connector Version: Release 3.0 Date: 31 st August 2017
Transcript of How to Guide848a5c47863f10b60520... · 13. Google Analytics i) Navigate to the Data Connector page....

s
How to Guide
Create a Data Connector
Version: Release 3.0
Date: 31st August 2017

Copyright © 2017 Big Data BizViz www.bdbizviz.com Page | 2
Contents
1. Document Purpose .......................................................................................................................................................... 3
2. Pre-requisites ................................................................................................................................................................... 3
3. Step-by-Step Process ....................................................................................................................................................... 3
3.1. Accessing the BDB Platform ..................................................................................................................................... 3
3.2. Creating a Data Connector....................................................................................................................................... 4
3.3. Data Connector List................................................................................................................................................ 11
4. Signing Out ..................................................................................................................................................................... 12
Copyright © 2017 Big Data BizViz www.bdbizviz.com Page | 3
1. Document Purpose
The purpose of this document is to guide users on how to create data connectors using the BDB Platform. It is
recommended that users follow the step by step process given below.
2. Pre-requisites
o Browser that supports HTML5
o Operating System: Windows 7
o Basic understanding of the BizViz Server
3. Step-by-Step Process
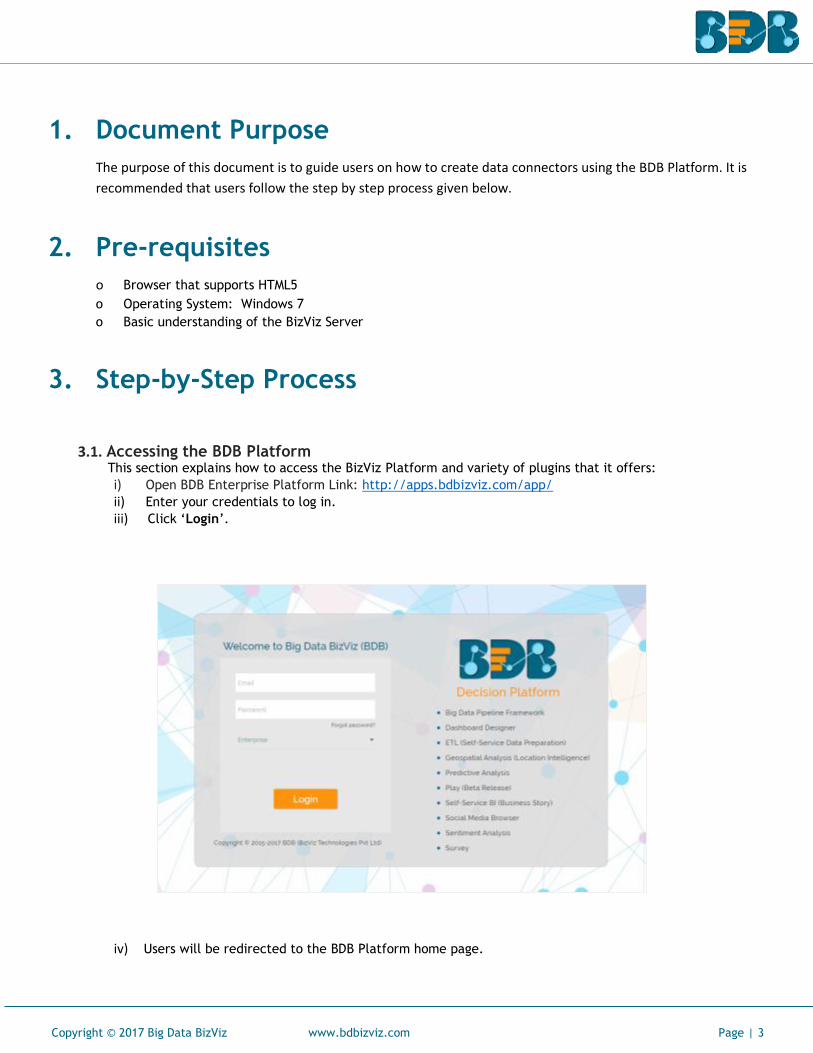
3.1. Accessing the BDB Platform This section explains how to access the BizViz Platform and variety of plugins that it offers:
i) Open BDB Enterprise Platform Link: http://apps.bdbizviz.com/app/
ii) Enter your credentials to log in.
iii) Click ‘Login’.
iv) Users will be redirected to the BDB Platform home page.

Copyright © 2017 Big Data BizViz www.bdbizviz.com Page | 4
3.2. Creating a Data Connector
i) Click the ‘Apps’ icon on the platform menu bar.
ii) All the available plugin applications will be displayed.
iii) Click the ‘Data Center’ option from the apps menu.
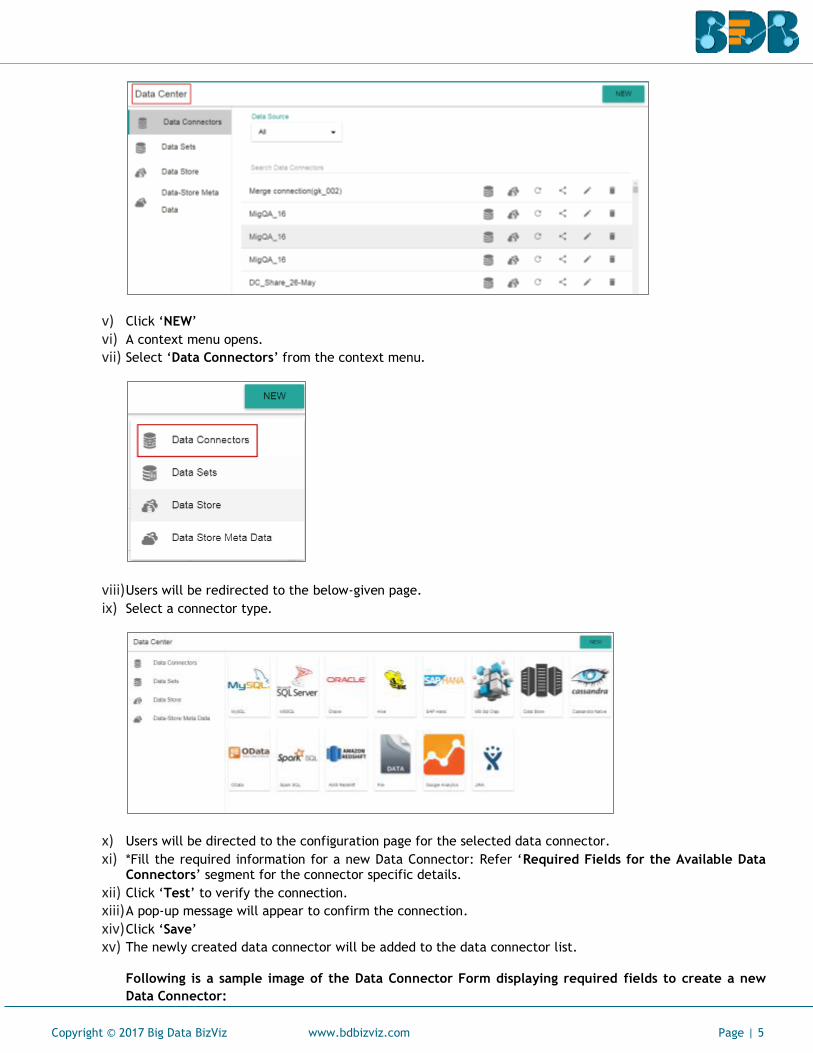
iv) Users will be directed to the Data Center landing page.
Copyright © 2017 Big Data BizViz www.bdbizviz.com Page | 5
v) Click ‘NEW’
vi) A context menu opens.
vii) Select ‘Data Connectors’ from the context menu.
viii) Users will be redirected to the below-given page.
ix) Select a connector type.
x) Users will be directed to the configuration page for the selected data connector.
xi) *Fill the required information for a new Data Connector: Refer ‘Required Fields for the Available Data Connectors’ segment for the connector specific details.
xii) Click ‘Test’ to verify the connection.
xiii) A pop-up message will appear to confirm the connection.
xiv) Click ‘Save’
xv) The newly created data connector will be added to the data connector list.
Following is a sample image of the Data Connector Form displaying required fields to create a new
Data Connector:

Copyright © 2017 Big Data BizViz www.bdbizviz.com Page | 6
*Required Fields for the Available Data Connectors
1. MySQL
i) Data Connector Name: A user defined name to identify the data source
ii) Description: Connection Details
iii) User Name: Enter a User Name (It should be the same as given in the connection server)
iv) Password: Enter the Password (It should be the same as given in the connection server)
v) IP/HOST: Enter database server details (from where the user wants to fetch data)
vi) Port: The server port number
vii) Database Name: Name of the data base where data will be stored
2. MSSQL
i) Data Connector Name: A user defined name to identify the data source
ii) Description: Connection Details
iii) User Name: Enter a User Name (It should be the same as given in the connection server)
iv) Password: Enter the Password (It should be the same as given in the connection server)
v) IP/HOST: Enter database server details (from where the user wants to fetch data)
vi) Port: The server port number
vii) Database Name: Name of the data base where data will be stored
3. Oracle
i) Data Connector Name: A user defined name to identify the data source
ii) Description: Connection Details
iii) User Name: Enter a User Name (It should be the same as given in the connection server)
iv) Password: Enter the Password (It should be the same as given in the connection server)
v) IP/HOST: Enter database server details (from where the user wants to fetch data)
vi) Port: The server port number
vii) SID Service Name: Unique alias used for the database (when connecting)

Copyright © 2017 Big Data BizViz www.bdbizviz.com Page | 7
4. Hive
i) Data Connector Name: A user defined name to identify the data source
ii) Description: Connection Details
iii) User Name: Enter a User Name (It should be the same as given in the connection server)
iv) Password: Enter the Password (It should be the same as given in the connection server)
v) IP/HOST: Enter database server details (from where the user wants to fetch data)
vi) Port: The server port number
5. SAP Hana
i) Data Connector Name: A user defined name to identify the data source
ii) Description: Connection Details
iii) User Name: Enter a User Name (It should be the same as given in the connection server)
iv) Password: Enter the Password (It should be the same as given in the connection server)
v) IP/HOST: Enter database server details (from where the user wants to fetch data)
vi) Port: The server port number
6. MSSQL Olap
i) Data Connector Name: A user defined name to identify the data source
ii) Description: Connection Details
iii) User Name: Enter a User Name (It should be the same as given in the connection server)
iv) Password: Enter the Password (It should be the same as given in the connection server)
v) Address Type (IP/Host): As per the selected Address Type a field will be displayed below. Users
need to enter database server details (from where the user wants to fetch data).
vi) Port: The server port number
vii) Database Name: Name of the data base where data will be stored
7. Data Store
i) Data Connector Name: A user defined name to identify the data source
ii) Data Store Service: Select a data store service from the drop-down list

Copyright © 2017 Big Data BizViz www.bdbizviz.com Page | 8
8. Cassandra Native Data Connector
i) Data Connector Name: A user defined name to identify the data source
ii) Description: Connection Details
iii) User Name: Enter a User Name (It should be the same as given in the connection server)
iv) Password: Enter the Password (It should be the same as given in the connection server)
v) IP/HOST: Enter database server details (from where the user wants to fetch data)
vi) Port: The server port number
vii) Default Key-Space Name: Enter the default key space name
viii) Consistency: Select a consistency option from the drop-down list (One/Two/Three/Quorum)
9. O Data
i) Data Connector Name: A user defined name to identify the data source
ii) Description: Connection Details
iii) Database Type: Database type using the drop-down menu in which the data will be stored (OData
V1-V2/OData V3-V4)
iv) User Name: Enter a User Name (It should be the same as given in the connection server)
v) Password: Enter the Password (It should be the same as given in the connection server)
vi) Base Url: Enter Service Root URL or Base URL
10. Spark SQL
i) Data Connector Name: A user defined name to identify the data source
ii) Description: Connection Details
iii) User Name: Enter a User Name (It should be the same as given in the connection server)
iv) Password: Enter the password (It should be the same as given in the connection server)
v) IP/HOST: Enter database server details (from where the user wants to fetch data)
vi) Port: The server port number
11. AWS Redshift
i) Data Connector Name: A user defined name to identify the data source
ii) Description: Connection Details
iii) User Name: Enter a User Name (It should be the same as given in the connection server)
iv) Password: Enter the password (It should be the same as given in the connection server)
v) IP/HOST: Enter database server details (from where the user wants to fetch data)
vi) Port: The server port number
vii) Database Name: Name of the database where data will be stored
12. File
i) Data Connector Name: A user defined name to identify the data source
ii) Description: Connection details (optional)
iii) Click ‘Save’.
Copyright © 2017 Big Data BizViz www.bdbizviz.com Page | 9
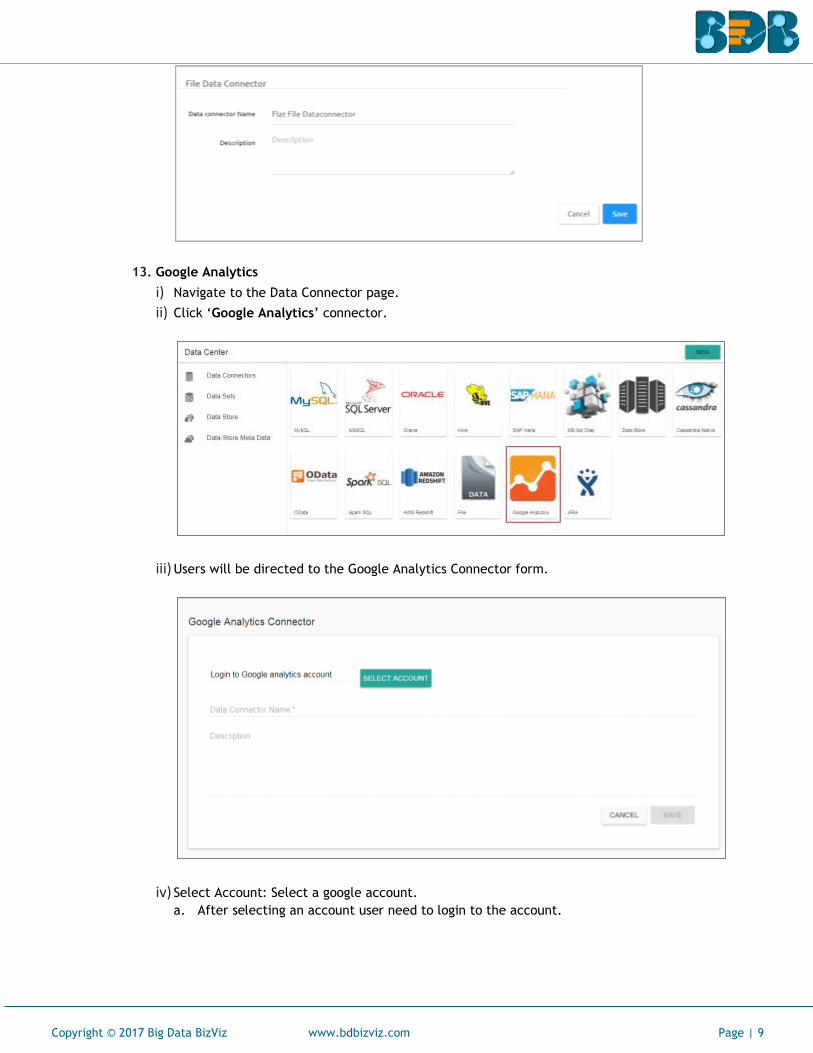
13. Google Analytics
i) Navigate to the Data Connector page.
ii) Click ‘Google Analytics’ connector.
iii) Users will be directed to the Google Analytics Connector form.
iv) Select Account: Select a google account.
a. After selecting an account user need to login to the account.

Copyright © 2017 Big Data BizViz www.bdbizviz.com Page | 10
b. Give access of the analytics data.
c. After getting the access permission, users will be redirected to the data
connector form with an authorization code in the URL.
v) Data Connector Name: Enter a user defined name to identify the data source
vi) Description: Connection details (optional)
vii) Click ‘Save’.
Copyright © 2017 Big Data BizViz www.bdbizviz.com Page | 11
viii) The new Google Analytics Data Connector will be created and added to the existing list of data
connectors.
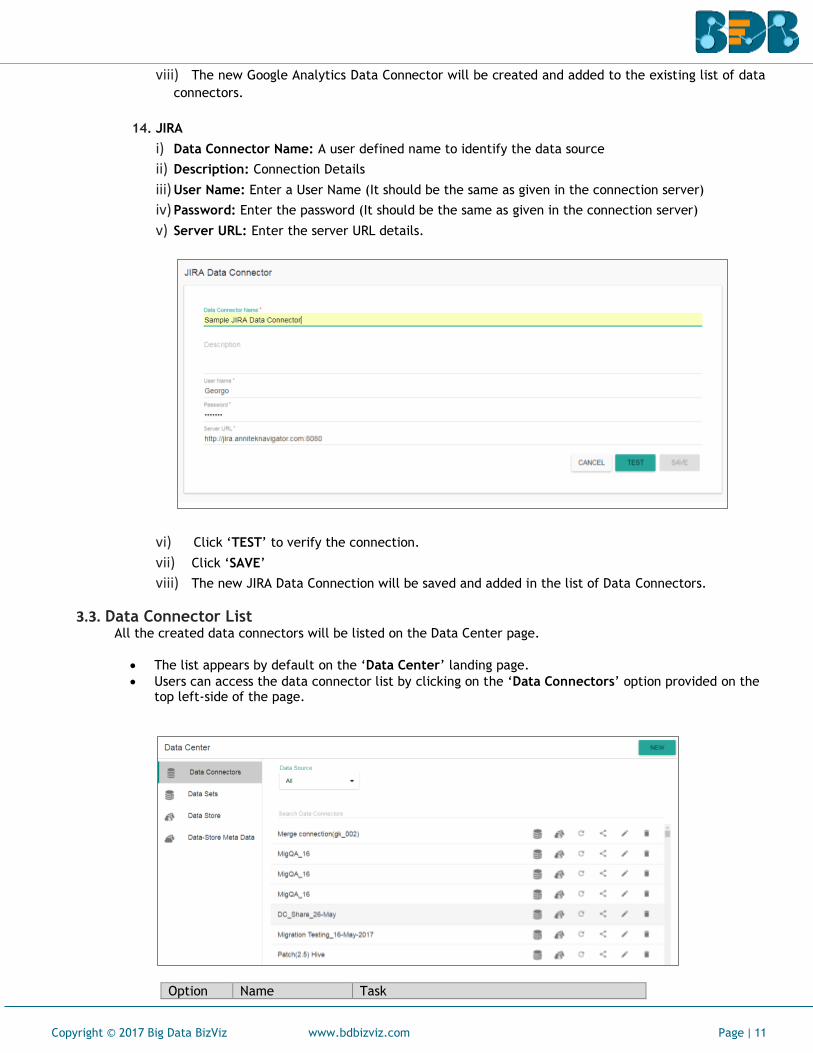
14. JIRA
i) Data Connector Name: A user defined name to identify the data source
ii) Description: Connection Details
iii) User Name: Enter a User Name (It should be the same as given in the connection server)
iv) Password: Enter the password (It should be the same as given in the connection server)
v) Server URL: Enter the server URL details.
vi) Click ‘TEST’ to verify the connection.
vii) Click ‘SAVE’
viii) The new JIRA Data Connection will be saved and added in the list of Data Connectors.
3.3. Data Connector List All the created data connectors will be listed on the Data Center page.
• The list appears by default on the ‘Data Center’ landing page.
• Users can access the data connector list by clicking on the ‘Data Connectors’ option provided on the top left-side of the page.
Option Name Task

Copyright © 2017 Big Data BizViz www.bdbizviz.com Page | 12
New Data Set Redirect user to create a new data set
New Data Store Redirect user to create a new data store
Reconnect Reconnect with the server
Share Share connector with the selected user(s) or group(s)
Edit Edit the connector fields
Remove Remove a connector from the list
4. Signing Out
Follow the below-given steps to log out from the BizViz Platform.
i) Click the ‘User’ icon on the Platform home page. ii) A menu appears with the logged in user details. iii) Click ‘Sign Out’ iv) Users will be successfully logged out from the BizViz Platform.
Note: Clicking on ‘Sign Out’ will redirect the user back to the ‘Login’ page of the BizViz platform.