How to build a 3G/ 4G Solar Relay
14
Version 3 Page 1 1 March 2015 WF’s 850Mhz 3G mobile data Solar Relay – 22 May 2014 WP post My solar relay was commissioned on the 22 May, 2014. The relay is entirely mounted on a single 4m galvanised mast, with brackets to allow coach screw fixing, to an unsuspecting fence post. It consists of a weatherproof equipment box, a 40 watt solar panel, a 10A PWM regulator, a 2nd hand flooded cell 12v 4WD battery (see P.12 for details of a battery upgrade), 12 to 5v regulator, 12v timer (power off midnight to 6am to save a bit on battery/ solar panels capacity), a $20 11dBi 850Mhz yagi and the ‘piece de resistance’, a 150n 703n + 320U with an external antenna modification. This tiny router feeds a 2.4Ghz 19dBi grid pack antenna. This wirelessly bridges 600m to a 150n TPLink 741ND client (19dBi gridpack antenna), also flashed with OpenWRT. The sync rate on the WIFI link is a perfect 150Mbps. See my Whirlpool post on the topic.
-
Upload
mouti-maremma -
Category
Documents
-
view
26 -
download
1
description
This document describes the construction of a remote solar powered relay that receives and transmits 3G or 4G and translates this to a WIFI link suitable for re-transmission over many kilometres.
Transcript of How to build a 3G/ 4G Solar Relay

Version 3 Page 1 1 March 2015
WF’s 850Mhz 3G mobile data Solar Relay – 22 May 2014 WP post
My solar relay was commissioned on the 22 May, 2014.
The relay is entirely mounted on a single 4m galvanised mast, with brackets to allow coach
screw fixing, to an unsuspecting fence post. It consists of a weatherproof equipment box, a
40 watt solar panel, a 10A PWM regulator, a 2nd hand flooded cell 12v 4WD battery (see
P.12 for details of a battery upgrade), 12 to 5v regulator, 12v timer (power off midnight to
6am to save a bit on battery/ solar panels capacity), a $20 11dBi 850Mhz yagi and the ‘piece
de resistance’, a 150n 703n + 320U with an external antenna modification. This tiny router
feeds a 2.4Ghz 19dBi grid pack antenna. This wirelessly bridges 600m to a 150n TPLink
741ND client (19dBi gridpack antenna), also flashed with OpenWRT.
The sync rate on the WIFI link is a perfect 150Mbps. See my Whirlpool post on the topic.

Version 3 Page 2 1 March 2015
Estimated Solar Panel Production
The chart below provides solar energy data calculated by PVWatts for Sydney, NSW, using a
40watt panel inclined for maximum winter efficiency. Your latitude +15 degrees is a quick
and dirty method for a winter panel inclination setting.
From the chart we can see that the ‘worst month’ daily average solar panel DC output is
June with an output of 113Wh/day, and a ‘best month’ of 172Wh/day in October.
Equipment Consumption measurement
The equipment power consumption was measured over 11 days in winter, using a Watts Up
meter temporarily wired to the Solar Controller 12v output leg. The timer is currently set to
‘on’ from 6.00am to midnight 7 days a week ie 18 hours/day of connectivity.
Watts Up results Wh/day Ah/day Avg V V min
old 4WD battery 27.3 2.18 12.52 12.32
The V min (12.32V) over the 11 days operation is lowish (see battery chart P13); but it is
pretty good, considering it is an old battery without sufficient capacity for vehicle use.
Solar panel fit and Battery Autonomy
The 40watt panel production of 113Wh/day for the worst month is ample for this
installation, as the equipment consumes on average 27.3Wh/day or 4 times that required.
Due to the low equipment power consumption of just 2.18Ah per day, a small 12Ah battery,
would support the relay with 3 days autonomy. In due course, I will install a 24Ah deep cycle
battery to replace the old 4WD battery. (see battery upgrade P13). There is an online
battery autonomy calculator here.
Version 3 Page 3 1 March 2015
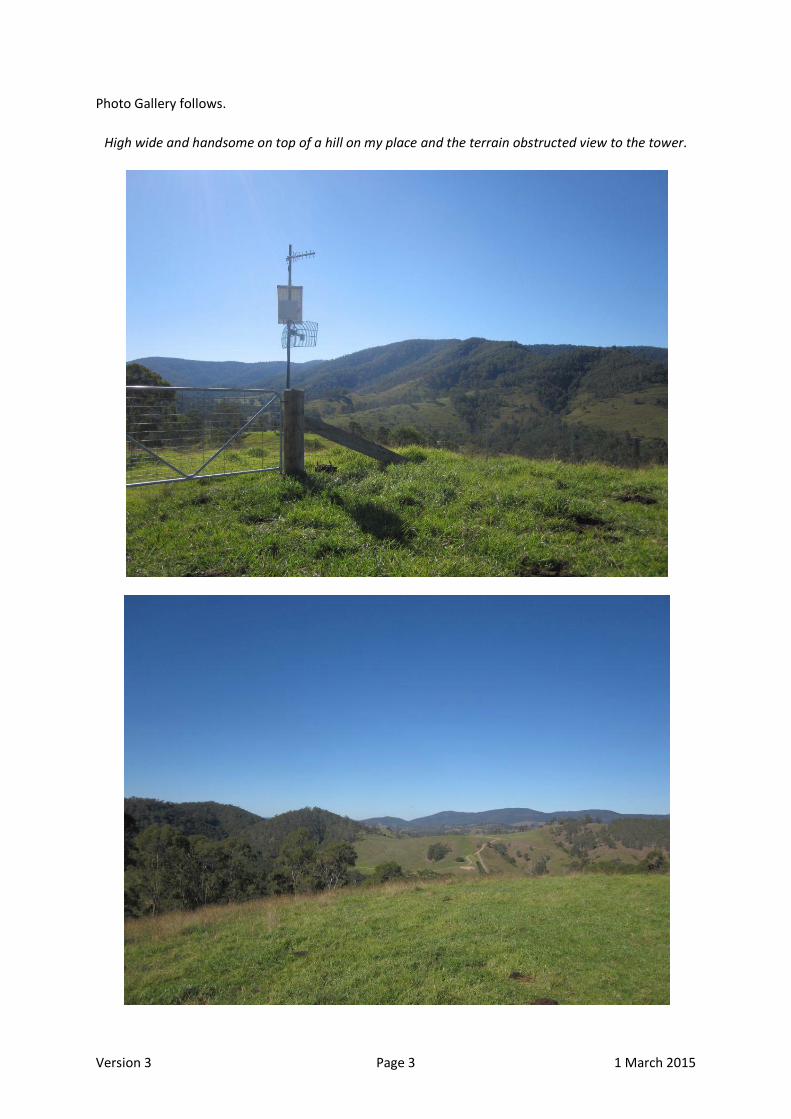
Photo Gallery follows.
High wide and handsome on top of a hill on my place and the terrain obstructed view to the tower.

Version 3 Page 4 1 March 2015
The little 703n with the antenna mod packs a real punch. It is connected to a 19dBi grid pack.

Version 3 Page 5 1 March 2015
On the patio at home, I can readily browse with a laptop and direct WIFI connection to the solar relay; a distance of over 600m.
Here is the connection information using a Netbook (Wireless 72Mbps max) on the patio directly connected to the solar relay, 600m distant.
My i7 connects at 150Mbps.
Speedtests taken at the solar relay site
The Speedtests below were recorded using the Netbook and a LAN connection to the TP-Link 703n, at the relay site. The

Version 3 Page 6 1 March 2015
http://www.speedtest.net/result/3515632764.png
http://www.speedtest.net/result/3515573297.png
http://www.speedtest.net/result/3515626677.png
http://www.speedtest.net/result/3515635833.png
Browsing is sweet and snappy
The WIFI link
The WIFI link is completed by a TP-Link TL-WA741ND (with OpenWRT installed) and a 2nd 19dBi grid pack antenna at home.
The link is rock solid. I reduced the transmit gain from the default +20dBm to +10dBm at both ends, as the WIFI receiver appeared to be overloading with higher levels. This provides a very comfortable receive signal level of -52dBm.

Version 3 Page 7 1 March 2015
The link syncs at 150Mbps, which is full speed for the 40Mhz bandwidth 150n channel. Channel 11 lower is used.
A snap of the router wireless overview screens showing receive levels and sync rates.

Version 3 Page 8 1 March 2015
TP-Link MR3020 Router Radio specifications
Wireless specs for the MR3020 aka 703n
Specs for a TL- WA741ND.
WIFI link throughput tests
For the WIFI throughput test, I used a Lenovo Netbook at the solar relay site via LAN to the 703n and an i7 laptop at home connected via LAN to the TL-WA701ND. I transferred a 214Mb video file from i7 to Netbook and back again measuring with Windows and Networx.
Outgoing from home to relay site
Version 3 Page 9 1 March 2015
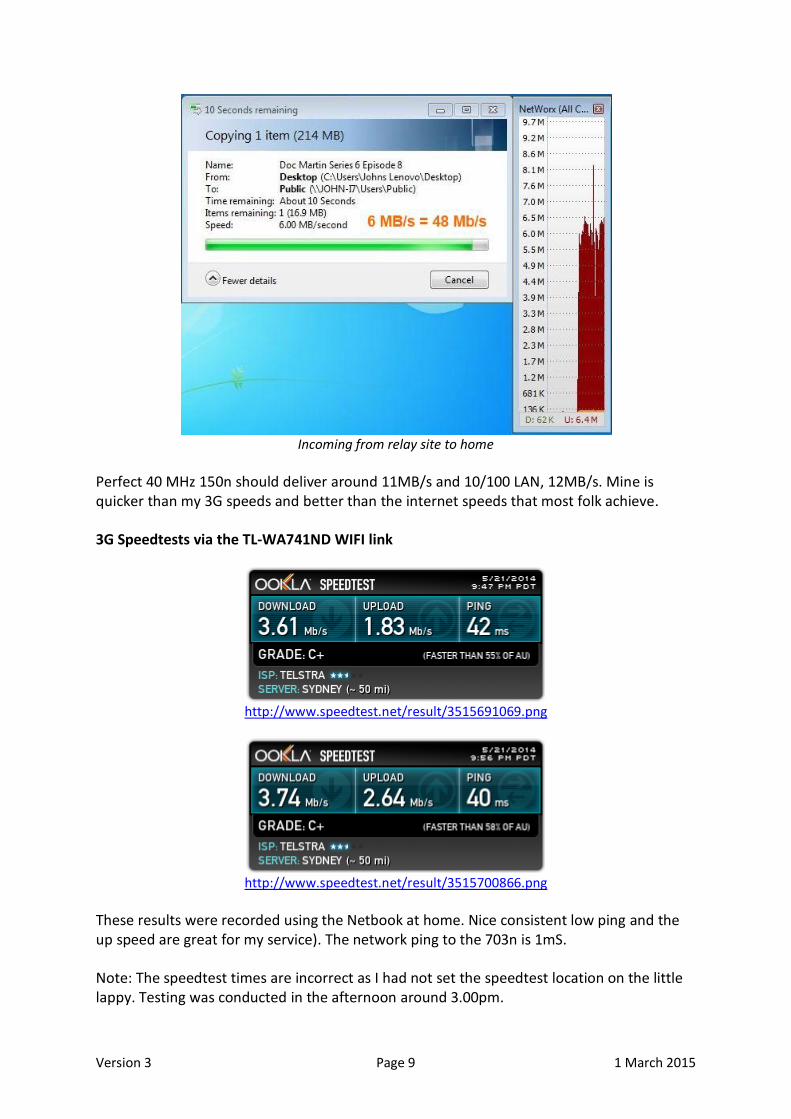
Incoming from relay site to home
Perfect 40 MHz 150n should deliver around 11MB/s and 10/100 LAN, 12MB/s. Mine is quicker than my 3G speeds and better than the internet speeds that most folk achieve.
3G Speedtests via the TL-WA741ND WIFI link
http://www.speedtest.net/result/3515691069.png
http://www.speedtest.net/result/3515700866.png
These results were recorded using the Netbook at home. Nice consistent low ping and the up speed are great for my service). The network ping to the 703n is 1mS.
Note: The speedtest times are incorrect as I had not set the speedtest location on the little lappy. Testing was conducted in the afternoon around 3.00pm.

Version 3 Page 10 1 March 2015
3G Signal info
An RSSI of -82dBm is great, considering the tower is 38.5Km distant
Why does the WIFI work? - Theory and practice and the 600m WIFI path
Some readers may wonder how simple and cheap consumer routers can perform a similar task to that of expensive semi-professional WIFI APs. The reason is simple. The actual WIFI chip is probably the same or similar. Consumer routers generally allow a maximum transmitter power of around +18 dBm. Commercial models may go as high as +28dBm. On the receiver side they are pretty well line ball. However your commercial kit will be more robust with good temperature ratings, a high gain directional antenna, waterproof and ESD protected. Cheap consumer routers are none of these; so reliability may suffer.
Let's calculate the theoretical free space path loss, courtesy of this link. There are plenty of path loss calculators out there. Free space is exactly that ... free space; a vacuum.
Most terrestrial microwave links are compromised by atmosphere and terrain in some way. If you used Ligowave or Splat and actual geographic locations, you may get a more accurate result.
Referring to the earlier photograph of my path, my WIFI link operates at 2462 Mhz (Channel 11 lower), using two passive 19dBi 2.4Ghz antennas. One could compensate for cable loss in the calculator, by reducing the antenna gain at each end, by the actual cable and connector loss.
However we’ll initially make a calculation without losses.

Version 3 Page 11 1 March 2015
Using the chosen WIFI working frequency and 19dBi antennas, it looks like this.
Path loss = 57.8dBm.
So how do we apply this result?
This tells us that assuming a 0dBm transmitter, we'd see -57.8dBm at the receiver 600m away.
With an actual router transmit setting of +10dBm (703n and WA701ND) we see
-57.8 + 10 = -47.8dBm (at the receive site).
The ROOter/ Openwrt actual result is -52dBm, or 4.2dBm lower than the theory calculation, however we have not yet provided for cable/ connector loss or the effects of terrain.
The extremities of the 1st Fresnel zone (the terrain bit) are readily calculated for any path and at any frequency.
Here is a Fresnel zone calculator. There are others.
This is the Fresnel zone result for a 600 m, 2462 MHz Link.
Let us allow 3.0dB for cable/ connector loss (that is the total for both ends) and a bit of terrain, say 1.2dB.
Applying these cable/ connector and terrain losses we have:
-47.8 (theoretically calculated Rx signal) -3.0 (cable/ connectors) -1.2 (terrain) = -52dBm
Note: The 600m link outcome and performance would be identical if 9dB antennas and router transmit level settings of +20dBm were configured.
The 3G path
See my Whirlpool post for details and complications of the 3G wireless path.
Construction materials and cost – Using ingenuity, the cost is surprising low.
Miscellaneous – A few mothballs in the equipment housing will keep insects at bay.

Version 3 Page 12 1 March 2015
January 2015 – A new battery and mount
Back in early October 2014, I upgraded the old 2nd hand battery to a brand new deep cycle AGM 40Ah battery. Not because the old battery let me down, but simply to tidy up the installation and to complete the design as envisaged.
The replacement battery is an'Aldi special', sealed lead acid deep cycle 40AH battery on sale for $99. I bought a couple at that price. No doubt this Aldi battery will be ‘sale recycled’, sometime in the future.
The Vmin is 12.64V, since new battery installation, to date ( 1/03/2015).
Referring to the chart below, the battery has not fallen below 95% full.
A new battery cover and mount was engineered in the workshop, using odd bits of galvanised steel and the bottom of a 20l chemical container.
See pictures of the new battery and method of mounting/ installation over leaf.

Version 3 Page 13 1 March 2015

Version 3 Page 14 1 March 2015
The completed installation