Homestyle Frontload Washers - PWS Laundry
86
www.comlaundry.com FLW1515C Part No. 801728R3 May 2007 Service Homestyle Frontload Washers Refer to Page 2 for Model Numbers
Transcript of Homestyle Frontload Washers - PWS Laundry

www.comlaundry.com
FLW1515C
Part No. 801728R3May 2007
Service
HomestyleFrontload
WashersRefer to Page 2 for Model Numbers


801728 1
© Copyright 2007, Alliance Laundry Systems LLC
All rights reserved. No part of the contents of this book may be reproduced or transmitted in any form or by any means without the expressed written consent of the publisher.
© Copyright, Alliance Laundry Systems LLC – DO NOT COPY or TRANSMIT
Table of ContentsModel Identification ................................................2
Section 1 – Safety InformationLocating an Authorized Servicer ............................4
Section 2 – IntroductionCustomer Service ....................................................5Nameplate Location ................................................5How Your Washer Works .......................................6
Section 3 – Troubleshooting1. Motor Circuit ....................................................92. Troubleshooting Knocking Noise ....................93. Error Code Listing .........................................104. Washer Will Not Start – No LEDs/Lights lit
(No response to start switch) ..........................125. Washer Will Not Start – Door Open Error
(Wash/Rinse LEDs Flashing – Door must be closed and attempting to lock) .......................14
6. Washer Will Not Start – No Door Lock(Door LED Flashing) .....................................16
7. Motor Will Not Run(Door/Final Spin LEDs Flashing) ..................18
8. Washer Will Not Fill – No Communication Error(Wash/Door LEDs Flashing) .........................20
9. Washer Overflows ..........................................2210. Pump Does Not Operate ................................2411. Serial Communication Error
(Final Spin/Rinse LEDs Flashing) .................2612. Washer Will Not Heat – Open/Shorted
Temperature Sensor(Heating LED flashing at end of cycle)(Models equipped with heater) ......................28
13. Washer Will Not Heat (Models equipped with heater) .............................................................30
Section 4 – Grounding14. Wall Receptacle Polarity Check ....................3315. Machine Ground Connections - Front Control
Washers ..........................................................3416. Machine Ground Connections - Front Control
Washers with Suffix 3050 in Model Number ...........................................36
17. Machine Ground Connections - Rear Control Washers ..........................................................38
Section 5 – Service Procedures18. Control Cabinet (Front Control Washers) ......4119. Control Hood Assembly (Rear Control
Washers) ........................................................4320. Cycle Switch ..................................................4521. Temperature Switch .......................................4522. Pressure Switch ..............................................4623. Control ...........................................................4624. Indicator Lights ..............................................4725. Push-to-Start/Rocker Switch ..........................4726. Graphic Panel .................................................4827. Lower Access Panel .......................................4828. Cabinet Top Assembly ...................................4829. Mixing Valve .................................................5230. Junction Box and Line Filter ..........................5431. Inverter Control ..............................................5532. Electric Drain Pump .......................................5633. Belt .................................................................5734. Front Panel .....................................................5935. Loading Door .................................................6136. Door Seal And Hose Assembly .....................6237. Door Switch ...................................................6338. Door Latch Switch .........................................6339. Motor ..............................................................6340. Heating Element (Models equipped
with heater) ....................................................6641. Outer Tub Front Panel ...................................6742. Inner Basket Pulley ........................................6943. Inner Basket Assembly ..................................7044. Bearing Housing ............................................75
Section 6 – Adjustments45. Cabinet Leveling Legs ...................................7946. Loading Door .................................................8047. Door Catch .....................................................8148. Motor Belt Tension ........................................8249. Shipping Braces .............................................83

2 801728© Copyright, Alliance Laundry Systems LLC – DO NOT COPY or TRANSMIT
Model IdentificationInformation in this manual is applicable to these machines:
ATZ90A*N1102
ATZ95A*N1102
FTS90A*N3000
FTS90A*N3050
FTS90A*N3300
FTZ90A*N1102
FTZ91A*N1102
LTK95A*N3050
LTS95A*N3000
LTS95A*N3020
LTZ90A*N1102
* Add Letter To Designate Color. W – White Q – Bisque

801728 3© Copyright, Alliance Laundry Systems LLC – DO NOT COPY or TRANSMIT
Section 1Safety Information
Throughout this manual and on machine decals, you will find precautionary statements (“CAUTION,” “WARNING” and “DANGER”) followed by specific instructions. These precautions are intended for the personal safety of the operator, user, servicer, and those maintaining the machine.
a DANGERDanger indicates an imminently hazardous situation that, if not avoided, will cause severe personal injury or death.
a WARNINGWarning indicates a hazardous situation that, if not avoided, could cause severe personal injury or death.
a CAUTIONCaution indicates a hazardous situation that, if not avoided, may cause minor or moderate personal injury or property damage.
Additional precautionary statements (“IMPORTANT” and “NOTE”) are followed by specific instructions.
IMPORTANT The word “IMPORTANT” is used to inform the reader of specific procedures where minor machine damage will occur if the procedure is not followed.
NOTEThe word “NOTE” is used to communicate installation, operation, maintenance or servicing information that is important but not hazard related.
In the interest of safety, some general precautions relating to the operation of this machine follow.
• Failure to install, maintain and/or operate this product according to the manufacturer’s instructions may result in conditions which can produce serious injury, death and/or property damage.
• Do not repair or replace any part of the product or attempt any servicing unless specifically recommended or published in this Service Manual and unless you understand and have the skills to carry out the servicing.
• Whenever ground wires are removed during servicing, these ground wires must be reconnected to ensure that the product is properly grounded and to reduce the risk of fire, electric shock, serious injury or death.
W006R2
WARNING

4 801728
Section 1 Safety Information
© Copyright, Alliance Laundry Systems LLC – DO NOT COPY or TRANSMIT
NOTE: The WARNINGS and IMPORTANT INSTRUCTIONS appearing in this manual are not meant to cover all possible conditions and situations that may occur. Common sense, caution and care must be exercised when installing, maintaining or operating the washer.
Always contact your dealer, distributor, service agent or the manufacturer about any problems or conditions you do not understand.
Locating an Authorized Servicer
Alliance Laundry Systems is not responsible for personal injury or property damage resulting from improper service. Review all service information before beginning repairs.
Warranty service must be performed by an authorized technician, using authorized factory parts. If service is required after the warranty expires, Alliance Laundry Systems also recommends contacting an authorized technician and using authorized factory parts.
To reduce the risk of electric shock, fire, explosion, serious injury or death:• Disconnect electric power to the washer before servicing.• Never start the washer with any guards/panels removed.• Whenever ground wires are removed during servicing, these ground wires must be
reconnected to ensure that the washer is properly grounded.• Motor not grounded! Disconnect electric power before servicing motor.
W485
WARNING
Repairs that are made to your products by unqualified persons can result in hazards due to improper assembly or adjustments subjecting you or the inexperienced person making such repairs to the risk of serious injury, electrical shock or death.
W007
WARNING
If you or an unqualified person perform service on your product, you must assume the responsibility for any personal injury or property damage which may result. The manufacturer will not be responsible for any injury or property damage arising from improper service and/or service procedures.
W008
WARNING

801728 5© Copyright, Alliance Laundry Systems LLC – DO NOT COPY or TRANSMIT
Section 2Introduction
Customer ServiceIf literature or replacement parts are required, contact the source from whom the machine was purchased or contact Alliance Laundry Systems at (920) 748-3950 for the name and address of the nearest authorized parts distributor.
For technical assistance, call (920) 748-3121.
Nameplate LocationWhen calling or writing about your product, be sure to mention model and serial numbers. Model and serial numbers are located on nameplate(s) as shown.
H129PE1A
NAMEPLATELOCATION

6 801728
Section 2 Introduction
© Copyright, Alliance Laundry Systems LLC – DO NOT COPY or TRANSMIT
How Your Washer Works(Front Control Shown)
FLW1734S
CYCLE SELECTIONOFF
STATUS
STARTSPINONLY
DOOR
WASH
RINSE
FINALSPIN
RINSE& SPIN
DELICATE
PERMANENTPRESS
REGULAR
ON
OFF
EXTRARINSE
TEMPERATURE
HOTCOLD
WARMWARM
WARMCOLD
COLDCOLD
801141
Commercial High Efficiency Washer
Control(Located in control
cabinet)
CycleSelector
StartSwitch
MixingValve
Pressure Switch(Located in control
cabinet)
InnerBasket
OuterTub
ElectricDrainPump
InverterControl
Belt
Motor

801728 7
Section 2 Introduction
© Copyright, Alliance Laundry Systems LLC – DO NOT COPY or TRANSMIT
General
This frontload washer provides some of the same principles of operation as the typical topload washers. It senses water level, it dispenses the desired laundry detergent, agitates the clothes for good cleaning action, pumps the water out of the washer and spins the clothing in preparation for the dryer.
The difference in operation is primarily the rotational washing agitation created for the horizontal basket and drum. This agitation tumbles the clothes in a clockwise, pause, and counter-clockwise direction. This reversing tumbling action provides an efficient washing process and requires less water.
The cycle begins by pressing the start button, which locks the loading door after the vend is satisfied. The type of cycle and water temperature are determined by the temperature selector switch and the cycle select switch.
The inner basket starts agitating during the wash water fill. A column of air is trapped in a pressure bulb and hose. The air pressure continues to increase as the inner basket fills with water until it is great enough to activate the pressure switch which then causes the wash fill to stop.
The regular and perm press agitate cycle tumble the clothing in a clockwise direction for a period of 15 seconds, pauses for nine seconds and then tumbles the clothing in a counterclockwise direction for 15 seconds. This agitation continues until the wash soak cycle. The machine stops agitating and turns on the pump which removes the wash water.
Upon completion of the wash cycle, the machine goes into two rinse cycles. Fresh cold water is brought into the inner basket via the mixing valve until the pressure switch shuts off the water while agitating. The rinse cycle consists of agitation for a predetermined amount of time, then a spin mode with the pump running while the machine goes into a series of 4 short 500 RPM spins.
After all the rinse cycles have been completed, the washer goes into a final high spin cycle to extract as much water as possible from the clothing to prepare them for the dryer. The spin speeds and duration of this final high spin cycle are determined by the type of wash cycle selected (refer to table).
NOTE: Washer may not reach 1000 RPM because of an out-of balance condition. Control may limit speed to 850, 650 or 500 RPM depending on severity of out-of-balance condition.
Technical
The basic operational system of this washer consists of the control, temperature switch, inverter control, pressure switch, water valves, electric pump, A.C. motor and cycle select switch.
The control performs all timing functions like the timer in a topload washer.
The inverter control uses a speed sensor on the motor to measure the drum RPM. Before entering any spin step, the inverter control measures the RPM of motor to sense out-of-balance. The inverter control will try to redistribute the clothes if an out-of-balance condition exists; the inverter control will limit the spin speed to several speeds depending on the severity of the out-of-balance condition. If the out-of-balance condition is severe enough, the inverter control will limit speed to 90 RPM and will not spin.
NOTE: An additional out-of-balance switch is used to detect any out-of-balance condition during spins. If this switch opens during a spin step, the inverter control immediately stops and then restarts the spin.
Regular PermPress Delicate
650 RPM 3minutes
4minutes
4minutes
1000 RPM
3minutes
2minutes
0minutes

8 801728
Section 2 Introduction
© Copyright, Alliance Laundry Systems LLC – DO NOT COPY or TRANSMIT
Notes

801728 9
To reduce the risk of electric shock, fire, explosion, serious injury or death:• Disconnect electric power to the washer before servicing.• Never start the washer with any guards/panels removed.• Whenever ground wires are removed during servicing, these ground wires must be
reconnected to ensure that the washer is properly grounded.• Motor not grounded! Disconnect electric power before servicing motor.
W485
WARNING
© Copyright, Alliance Laundry Systems LLC – DO NOT COPY or TRANSMIT
Section 3Troubleshooting
1. MOTOR CIRCUIT
2. TROUBLESHOOTING KNOCKING NOISEIf a frontload washer produces a noise similar to a knock on a door, it might be due to a flat spot on the belt. The knocking sound is made when the flat spot hits the pulley. The knocking may occur during a pulse spin and fade after reaching a higher RPM.
To correct this condition, replace the belt. Refer to Paragraph 33.
Windings
Tach. Circuit
White
Red
Red
Red
5 4 3 2 1
Resistance Values:Tachometer Circuit: Terminals 4–5Approx. 115 ohms
Windings: Terminals 1–2, 2–3, 1-3Approx. 4.5 ohms
Gray

10 801728
Section 3 Troubleshooting
© Copyright, Alliance Laundry Systems LLC – DO NOT COPY or TRANSMIT
To reduce the risk of electric shock, fire, explosion, serious injury or death:• Disconnect electric power to the washer before servicing.• Never start the washer with any guards/panels removed.• Whenever ground wires are removed during servicing, these ground wires must be
reconnected to ensure that the washer is properly grounded.• Motor not grounded! Disconnect electric power before servicing motor.
W485
WARNING
3. ERROR CODE LISTINGError ConditionsIf any of the following errors occur, the control enters Error Mode. For all fatal errors, the control will terminate the current cycle, turn off all outputs, and flash two LEDs one second on/one second off to indicate the error.
Motor FailureError.
If the control receives the motor failure signal from the motor control, the control will enter Error Mode. The control will turn off all outputs and flash the DOOR and FINAL SPIN LEDs one second on/one second off to indicate a motor failure error. This is a fatal error. The machine must be unpowered to clear this error.
FillError.
If the control receives no full input from the pressure switch indicating the cylinder is full within 30 minutes of starting the fill, the control will enter Error Mode. The control will turn off all outputs and flash the WASH and DOOR LEDs one second on/one second off to indicate a fill error. This is a fatal error. The machine must be unpowered to clear this error.
Door Open Error.
If the control senses the door open during Run Mode, the control will enter Error Mode. The control will turn off all outputs and flash the WASH and RINSE LEDs one second on/one second off to indicate a door open error. This is a fatal error. The machine must be unpowered to clear this error.
Door Lock/Unlock Error.
If the door doesn’t lock in 15 seconds in Door Locking Mode or the door doesn’t unlock in 3 minutes in Door Unlocking Mode, the control will enter Door Lock Error Mode. The control will turn off all outputs and flash the DOOR LED one second on/one second off to indicate a door lock/unlock error.
To clear this error in Door Locked Mode the door must either open or lock. If the door locks, the cycle will start normally. If the door opens, the control will revert back to Start Mode.
To clear this error in Door Unlocking Mode the door must unlock or open. If the door unlocks or opens, the control will enter End of Cycle Mode.
SPI Communications Error.
This error occurs when there is a problem with communications between the front-end control and the motor control. The control will turn off all outputs and flash the FINAL SPIN and RINSE LEDs one second on/one second off to indicate an SPI communications error. This is a fatal error. The machine must be powered down at this point.
Open/Shorted Temperature Sensor Error (Models equipped with heater)
Any time the control senses a temperature less than 32°F (0°C) or greater than 212°F (100°C) while heating, the control will turn off the heater output and not attempt to heat. The control will continue and finish the cycle normally. At the end of the cycle the control will flash the HEATING LED one-second on/one second off to indicate an open/shorted temperature sensor error. This error will be cleared when the door is opened at the end of the cycle.

801728 11
Section 3 Troubleshooting
© Copyright, Alliance Laundry Systems LLC – DO NOT COPY or TRANSMIT
Notes

12 801728
Section 3 Troubleshooting
© Copyright, Alliance Laundry Systems LLC – DO NOT COPY or TRANSMIT
4. WASHER WILL NOT START – NO LEDS/LIGHTS LIT (NO RESPONSE TO START SWITCH)
Is there 220-240 VAC (or 120 Volts)*
to controltransformer?
(2)
(3)
No
Yes
Yes
Is there continuity across
terminals "H9-3" to "H9-7" on the machine control when
the start switch is depressed?
Replace machinecontrol.
*Refer to machine serial platefor correct voltage.
No
Yes
(1)
Is there 24 VACfrom "H1-1" to "H1-3"
on the machine control ?Replace transformer.
Check wiring to transformer.
No
Correct wiringto and/or replacestart switch.
(4)
Is theconfiguration
header pluggedinto "H7"?
No
Yes
Correct wiringon "H7" configuration plug.
FLW1727S

801728 13
Section 3 Troubleshooting
© Copyright, Alliance Laundry Systems LLC – DO NOT COPY or TRANSMIT
WASHER WILL NOT START – NO LEDS/LIGHTS LIT(NO RESPONSE TO START SWITCH)
220-2
40 V
AC
(or
120 V
AC
) 50/6
0H
z (
SE
E M
AC
HIN
E S
ER
IAL P
LA
TE
)
CO
NF
IG.
RE
SIS
TO
R6
.8k O
hm
(Mo
de
ls w
ith
22
0-2
40
VA
C)
3
2
1
4

14 801728
Section 3 Troubleshooting
© Copyright, Alliance Laundry Systems LLC – DO NOT COPY or TRANSMIT
5. WASHER WILL NOT START – DOOR OPEN ERROR(WASH/RINSE LEDS FLASHING – DOOR MUST BE CLOSED AND ATTEMPTING TO LOCK)
Is there 220-240 VAC (or
120 Volts)* across "H4-5" to "H6-5" on
the machinecontrol?
(1)
(2)
Yes
No
Is there 220-240 VAC (or
120 Volts)* from the BLU/BLK wire on door
lock assemblyto neutral?
Replace the secondary door switch.
Replace machinecontrol.
Yes
No
Is there 220-240 VAC (or
120 Volts)* from the BLK wire on the secondary
door switch to neutral?
(3)
Correct wiringto the secondarydoor switch.
Replace doorlock assembly.
Yes
No
FLW1728S
*Refer to machine serial platefor correct voltage.

801728 15
Section 3 Troubleshooting
© Copyright, Alliance Laundry Systems LLC – DO NOT COPY or TRANSMIT
WASHER WILL NOT START – DOOR OPEN ERROR(WASH/RINSE LEDS FLASHING – DOOR MUST BE CLOSED AND ATTEMPTING TO LOCK)
220-2
40 V
AC
(or
120 V
AC
) 50/6
0H
z (
SE
E M
AC
HIN
E S
ER
IAL P
LA
TE
)
CO
NF
IG.
RE
SIS
TO
R6
.8k O
hm
(Mo
de
ls w
ith
22
0-2
40
VA
C)
1
2
3

16 801728
Section 3 Troubleshooting
© Copyright, Alliance Laundry Systems LLC – DO NOT COPY or TRANSMIT
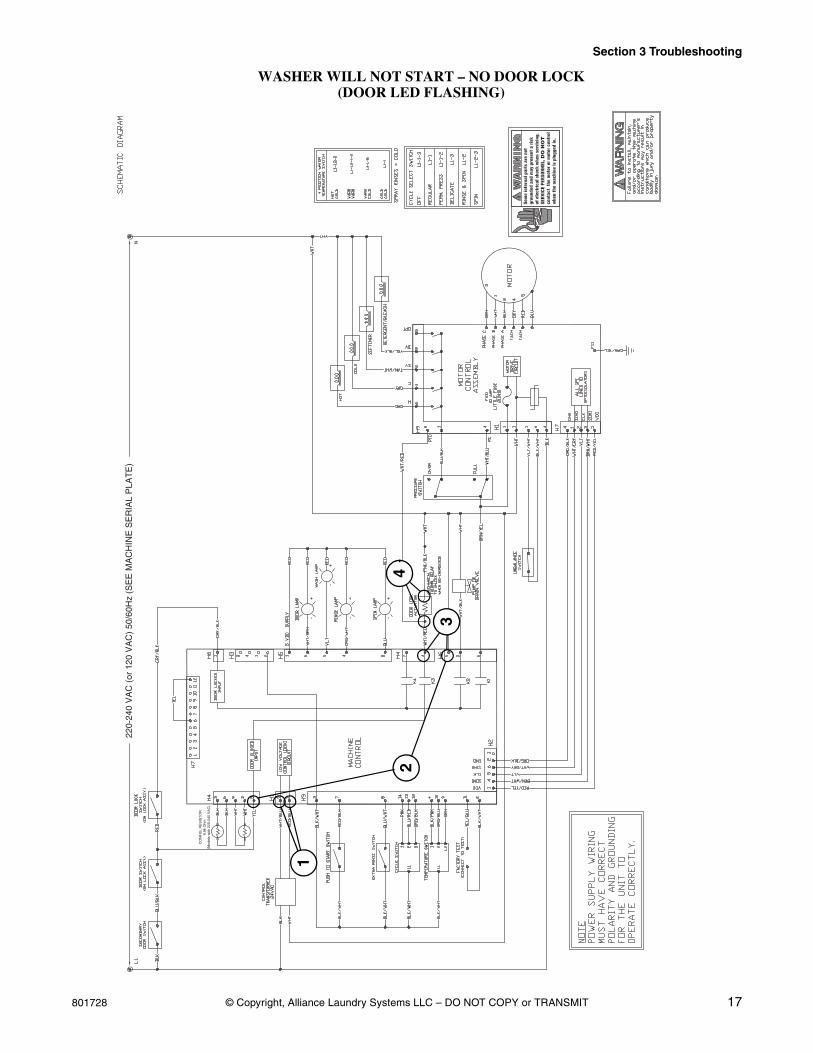
6. WASHER WILL NOT START – NO DOOR LOCK(DOOR LED FLASHING)
Is there 220-240 VAC (or
120 Volts)* at machine control terminals"H4-5" to "H6-5"?
(2)
(1)
(3)
No
Yes
No No
Check secondary door switch, door strike adjustment, and/or wiring.Replace door lock if necessary.
Yes
Is there 220-240 VAC (or
120 Volts)* at machine control terminals "H4-4" to "H6-5"?
Replace machinecontrol.
No
Yes
Is there 220-240 VAC (or
120 Volts)* at the door lock between the WHT/RED
and the PNK/BLKwires?
(4)
Correct wiringbetween machinecontrol and doorlock assembly.
Replace transformer.
Replace doorlock assembly.
No
Yes
FLW1729S
Is the "Wash" light
lit?
Is there 24 VAC from
"H1-1" to "H1-3" on the machine
control?
*Refer to machine serial platefor correct voltage.
801728 17
Section 3 Troubleshooting
© Copyright, Alliance Laundry Systems LLC – DO NOT COPY or TRANSMIT
WASHER WILL NOT START – NO DOOR LOCK(DOOR LED FLASHING)
220-2
40 V
AC
(or
120 V
AC
) 50/6
0H
z (
SE
E M
AC
HIN
E S
ER
IAL P
LA
TE
)
CO
NF
IG.
RE
SIS
TO
R6
.8k O
hm
(Mo
de
ls w
ith
22
0-2
40
VA
C)
2
1
3
4

18 801728
Section 3 Troubleshooting
© Copyright, Alliance Laundry Systems LLC – DO NOT COPY or TRANSMIT
7. MOTOR WILL NOT RUN(DOOR/FINAL SPIN LEDS FLASHING)
(1)
No
Is there continuity between motor terminals?Refer to values
at right.
Yes Replace motor control.
Replace motor.
FLW1712S
Motor Resistance Values:Tach. Circuit: Approx. 115 ohms (Terminals 4-5)Windings: Approx. 4 - 5 ohms (Terminals 1-2, 1-3, 2-3)

801728 19
Section 3 Troubleshooting
© Copyright, Alliance Laundry Systems LLC – DO NOT COPY or TRANSMIT
MOTOR WILL NOT RUN(DOOR/FINAL SPIN LEDS FLASHING)
220-2
40 V
AC
(or
120 V
AC
) 50/6
0H
z (
SE
E M
AC
HIN
E S
ER
IAL P
LA
TE
)
CO
NF
IG.
RE
SIS
TO
R6
.8k O
hm
(Mo
de
ls w
ith
22
0-2
40
VA
C)
1

20 801728
Section 3 Troubleshooting
© Copyright, Alliance Laundry Systems LLC – DO NOT COPY or TRANSMIT
8. WASHER WILL NOT FILL – NO COMMUNICATION ERROR(WASH/DOOR LEDS FLASHING)
Is there220-240 VAC (or
120 Volts)* at terminals "H9-4" and "H1-1" on the
motor controlboard?
Replace pressureswitch.
No No
Is there 220-240 VAC (or
120 Volts)* at terminals "H9-1" to "H1-1" on the
motor control board?
Yes
(1)(2)
(3)
Yes
Replace pressureswitch.
Correct wiring between machinecontrol and pressure switch.
Yes
No
No Replace motor control.
Replace mixing valve.
(4)
Is there 220-240 VAC (or 120 Volts)*
at the mixing valve?
Is there 220-240 VAC (or
120 Volts)* between the BRN/YEL wire on the
pressure switch and "H6-5" on machine
control?
Is the doorlocked?
Refer to section: Washer Will Not Start -
No Door Lock .
No
Yes
Yes
FLW1730S
*Refer to machine serial platefor correct voltage.

801728 21
Section 3 Troubleshooting
© Copyright, Alliance Laundry Systems LLC – DO NOT COPY or TRANSMIT
WASHER WILL NOT FILL – NO COMMUNICATION ERROR(WASH/DOOR LEDS FLASHING)
220-2
40 V
AC
(or
120 V
AC
) 50/6
0H
z (
SE
E M
AC
HIN
E S
ER
IAL P
LA
TE
)
CO
NF
IG.
RE
SIS
TO
R6
.8k O
hm
(Mo
de
ls w
ith
22
0-2
40
VA
C)
2
1
3
44

22 801728
Section 3 Troubleshooting
© Copyright, Alliance Laundry Systems LLC – DO NOT COPY or TRANSMIT
9. WASHER OVERFLOWS
Washer Overflows
Is there 220-240 VAC (or
120 Volts)* at the over level terminal on pressure switch
to "H6-5" on machinecontrol?
Yes
No Replace inoperative
pressure switch.
Is there 220-240 VAC (or
120 Volts)* across the coil of either the hot or cold
water solenoid?
Yes
No
Check for improper wiring
and replace inoperative
pressure switch if necessary.
Replace inoperative
mixing valve.
(1)
(2)
FLW1691S
*Refer to machine serial plate for correct voltage.

801728 23
Section 3 Troubleshooting
© Copyright, Alliance Laundry Systems LLC – DO NOT COPY or TRANSMIT
WASHER OVERFLOWS
220-2
40 V
AC
(or
120 V
AC
) 50/6
0H
z (
SE
E M
AC
HIN
E S
ER
IAL P
LA
TE
)
CO
NF
IG.
RE
SIS
TO
R6
.8k O
hm
(Mo
de
ls w
ith
22
0-2
40
VA
C)
1
22

24 801728
Section 3 Troubleshooting
© Copyright, Alliance Laundry Systems LLC – DO NOT COPY or TRANSMIT
10. PUMP DOES NOT OPERATE
Pump or Drain Valve Does Not Operate
Is there 220-240 VAC (or
120 Volts)* across the WHT/BLK and the WHT wire going
to the pump?
Is there220-240 VAC (or 120 Volts)* from
"H6-2" to "H6-5" on themachine control?
NOTE: Check atbeginning of spin/drain
portion of cycle.
If the pump does not operate
check for obstruction and
replace if necessary.
Correct wiring between pump
andmachine control.
Replacemachine control.
(1)
(2)
No
Yes
No
Yes
FLW1692S
*Refer to machine serial plate for correct voltage.
1
2
NOTE: Check at beginning of spin/drain portion of cycle.

801728 25
Section 3 Troubleshooting
© Copyright, Alliance Laundry Systems LLC – DO NOT COPY or TRANSMIT
PUMP DOES NOT OPERATE
220-2
40 V
AC
(or
120 V
AC
) 50/6
0H
z (
SE
E M
AC
HIN
E S
ER
IAL P
LA
TE
)
CO
NF
IG.
RE
SIS
TO
R6
.8k O
hm
(Mo
de
ls w
ith
22
0-2
40
VA
C)
2
1
26 801728
Section 3 Troubleshooting
© Copyright, Alliance Laundry Systems LLC – DO NOT COPY or TRANSMIT
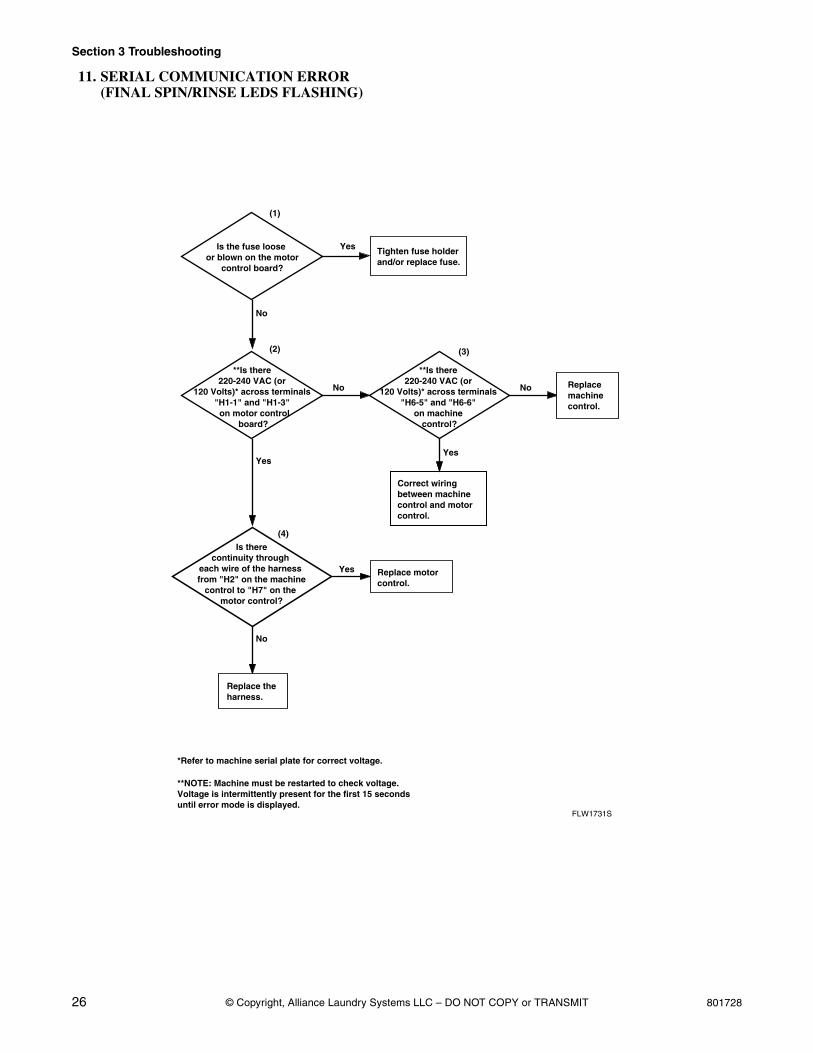
11. SERIAL COMMUNICATION ERROR(FINAL SPIN/RINSE LEDS FLASHING)
**Is there 220-240 VAC (or
120 Volts)* across terminals "H1-1" and "H1-3" on motor control
board?
Replace machine control.
No No
Yes
(3)
(4)
(4)
No
Tighten fuse holder and/or replace fuse.
Correct wiring between machine control and motor control.
Is there continuity through
each wire of the harness from "H2" on the machine
control to "H7" on the motor control?
Yes
Replace the harness.
**NOTE: Machine must be restarted to check voltage. Voltage is intermittently present for the first 15 seconds until error mode is displayed.
**Is there 220-240 VAC (or
120 Volts)* across terminals "H6-5" and "H6-6"
on machine control?
Yes
Yes
(2)
(1)
No
Replace motor control.
FLW1731S
Is the fuse loose or blown on the motor
control board?
*Refer to machine serial plate for correct voltage.
801728 27
Section 3 Troubleshooting
© Copyright, Alliance Laundry Systems LLC – DO NOT COPY or TRANSMIT
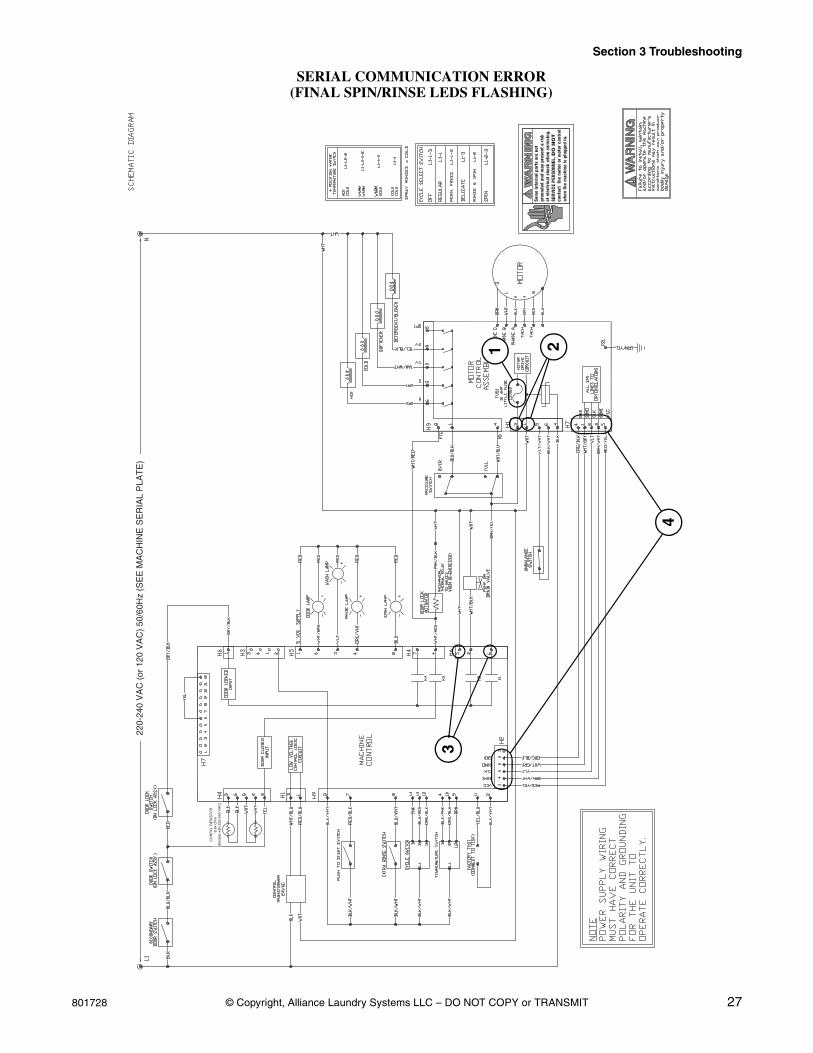
SERIAL COMMUNICATION ERROR(FINAL SPIN/RINSE LEDS FLASHING)
220-2
40 V
AC
(or
120 V
AC
) 50/6
0H
z (
SE
E M
AC
HIN
E S
ER
IAL P
LA
TE
)
CO
NF
IG.
RE
SIS
TO
R6
.8k O
hm
(Mo
de
ls w
ith
22
0-2
40
VA
C)
1 2
3
4

28 801728
Section 3 Troubleshooting
© Copyright, Alliance Laundry Systems LLC – DO NOT COPY or TRANSMIT
12. WASHER WILL NOT HEAT – OPEN/SHORTED TEMPERATURE SENSOR(HEATING LED FLASHING AT END OF CYCLE)(MODELS EQUIPPED WITH HEATER)
No
Yes
Check wiring tothermistor.
Is the pressure switch
satisfied?
The heater will not come on until the pressure switch is satisfied.
No
Yes
(2)
(1)
Replace machine control.
Replace thermistor/heater assembly.
Yes
No
Using an Ohmmeter, is
the resistance value across connector "H3" on
the machine control between 500-35000
Ohms?
Using an Ohmmeter, is
the resistance value at the thermistor
between 500-35000 Ohms?
FLW1723S

801728 29
Section 3 Troubleshooting
© Copyright, Alliance Laundry Systems LLC – DO NOT COPY or TRANSMIT
WASHER WILL NOT HEAT – OPEN/SHORTED TEMPERATURE SENSOR(HEATING LED FLASHING AT END OF CYCLE)
(MODELS EQUIPPED WITH HEATER)22
0-24
0 V
AC
(or
120
VA
C)
50/6
0Hz
(SE
E M
AC
HIN
E S
ER
IAL
PLA
TE
)
CO
NF
IG. R
ES
IST
OR
6.8K
Ohm
(Mod
els
with
220
-240
VA
C)
2
1

30 801728
Section 3 Troubleshooting
© Copyright, Alliance Laundry Systems LLC – DO NOT COPY or TRANSMIT
13. WASHER WILL NOT HEAT (MODELS EQUIPPED WITH HEATER)
Is there 220-240 VAC (or 120 Volts)*
across the heater?
Correct wiring between door lock and terminal 3 on heat relay.
Correct wiring between heat relayand control.
No No
Yes
(3)
(4)
Yes
Replace heater.
Yes
Correct wiring between temperature switch and control or replace temperature select switch.
Is there 220-240 VAC (or
120 Volts)* across terminals 1-2 on the heat relay?
No No Replace machine control.
Is there 220-240 VAC (or
120 Volts)* between terminal 3 on the
heat relay and neutral?
(5)
Yes
Is there 220-240 VAC (or
120 Volts)* between"H4-7" and "H6-5"
on machinecontrol?
Is the pressure switch
satisfied?
The heater will not come on until the pressure switch is satisfied.
No
Yes
Yes
(2)
(1)
Is the "Heating" light
lit?
Is "Boosted Hot" selected on
temperature select switch?
No YesNo
Yes
Is there 5 Volts DC
between terminals "H9-3" and "H9-10", 0 Volts DC between
"H9-4" and "H9-3" and 0 Volts DC between "H9-9"
and "H9-3"?
Replace heat relay.
FLW1732S
*Refer to machine serial platefor correct voltage.

801728 31
Section 3 Troubleshooting
© Copyright, Alliance Laundry Systems LLC – DO NOT COPY or TRANSMIT
WASHER WILL NOT HEAT (MODELS EQUIPPED WITH HEATER)
220-
240
VA
C (
or 1
20 V
AC
) 50
/60H
z (S
EE
MA
CH
INE
SE
RIA
L P
LAT
E)
CO
NF
IG. R
ES
IST
OR
6.8K
Ohm
(Mod
els
with
220
-240
VA
C)
3
1
2
45

32 801728
Section 3 Troubleshooting
© Copyright, Alliance Laundry Systems LLC – DO NOT COPY or TRANSMIT
Notes

801728 33© Copyright, Alliance Laundry Systems LLC – DO NOT COPY or TRANSMIT
To reduce the risk of electric shock, fire, explosion, serious injury or death:• Disconnect electric power to the washer before servicing.• Never start the washer with any guards/panels removed.• Whenever ground wires are removed during servicing, these ground wires must be
reconnected to ensure that the washer is properly grounded.• Motor not grounded! Disconnect electric power before servicing motor.
W485
WARNING
Section 4Grounding
14. WALL RECEPTACLE POLARITY CHECKRefer to Figure 1.
Figure 1
W011GE3A
NeutralSide
RoundGrounding
Prong
L1 NeutralGround
0V.A.C.
115±12V.A.C.
115±12V.A.C.
NOTE: Have a qualified electrician check polarity of wall receptacle. If a voltage reading is measured other than that illustrated, the qualified electrician should correct the problem.
W355SE3B
220-240Volts
50/60 Hz*0 Volts
Power Cord
220-240Volts
50/60 Hz*
NOTE: Have a qualified electrician check polarity of wall receptacle. If a voltage reading is measured other than that illustrated, the qualified electrician should correct the problem.
*Refer to serial plate for correct voltage and hertz.

34 801728
Section 4 Grounding
© Copyright, Alliance Laundry Systems LLC – DO NOT COPY or TRANSMIT
To reduce the risk of electric shock, fire, explosion, serious injury or death:• Disconnect electric power to the washer before servicing.• Never start the washer with any guards/panels removed.• Whenever ground wires are removed during servicing, these ground wires must be
reconnected to ensure that the washer is properly grounded.• Motor not grounded! Disconnect electric power before servicing motor.
W485
WARNING
15. MACHINE GROUND CONNECTIONS - Front Control WashersRefer to Figure 2
Ground to Control Panel Assembly
Ground to Control Cabinet Base
Ground to Electronic Control
Ground Power Cord to Control Cabinet
Grounding Hardware to Control Cabinet
Ground to Electric Drain Pump
Ground to Outer Tub
Ground to Outer Tub Front
Ground to Outer Tub to Cabinet
1
2
3
4
5
6
7
8
9

801728 35
Section 4 Grounding
© Copyright, Alliance Laundry Systems LLC – DO NOT COPY or TRANSMIT
Front Control Washers
Figure 2
FLW1166G
1
2
3 4
5
6
7
8
9

36 801728
Section 4 Grounding
© Copyright, Alliance Laundry Systems LLC – DO NOT COPY or TRANSMIT
To reduce the risk of electric shock, fire, explosion, serious injury or death:• Disconnect electric power to the washer before servicing.• Never start the washer with any guards/panels removed.• Whenever ground wires are removed during servicing, these ground wires must be
reconnected to ensure that the washer is properly grounded.• Motor not grounded! Disconnect electric power before servicing motor.
W485
WARNING
16. MACHINE GROUND CONNECTIONS - Front Control Washers with Suffix 3050 in Model NumberRefer to Figure 3
Ground to Control Panel Assembly
Ground to Control Cabinet Base
Ground to Electronic Control
Ground Power Cord to Control Cabinet
Grounding Hardware to Control Cabinet
Ground to Electric Drain Pump
Ground to Outer Tub
Ground to Outer Tub Front
Ground to Outer Tub to Cabinet
1
2
3
4
5
6
7
8
9

801728 37
Section 4 Grounding
© Copyright, Alliance Laundry Systems LLC – DO NOT COPY or TRANSMIT
Front Control Washers with Suffix 3050 in Model Number
Figure 3
FLW1169G
2 3 4
5
6
78
9
1

38 801728
Section 4 Grounding
© Copyright, Alliance Laundry Systems LLC – DO NOT COPY or TRANSMIT
To reduce the risk of electric shock, fire, explosion, serious injury or death:• Disconnect electric power to the washer before servicing.• Never start the washer with any guards/panels removed.• Whenever ground wires are removed during servicing, these ground wires must be
reconnected to ensure that the washer is properly grounded.• Motor not grounded! Disconnect electric power before servicing motor.
W485
WARNING
17. MACHINE GROUND CONNECTIONS - Rear Control WashersRefer to Figure 4
Ground to Control Panel Assembly
Ground to Cabinet Top
Ground Power Cord to Cabinet Top
Ground to Electric Drain Pump
Ground to Outer Tub
Ground to Outer Tub Front
Ground to Outer Tub to Cabinet
1
2
3
4
5
6
7

801728 39
Section 4 Grounding
© Copyright, Alliance Laundry Systems LLC – DO NOT COPY or TRANSMIT
Rear Control Washers
Figure 4
FLW1167G
2
3
45
6
7
1

40 801728
Section 4 Grounding
© Copyright, Alliance Laundry Systems LLC – DO NOT COPY or TRANSMIT
Notes

801728 41© Copyright, Alliance Laundry Systems LLC – DO NOT COPY or TRANSMIT
To reduce the risk of electric shock, fire, explosion, serious injury or death:• Disconnect electric power to the washer before servicing.• Never start the washer with any guards/panels removed.• Whenever ground wires are removed during servicing, these ground wires must be
reconnected to ensure that the washer is properly grounded.• Motor not grounded! Disconnect electric power before servicing motor.
W485
WARNING
Section 5Service Procedures
IMPORTANT: When reference is made to directions (right or left) in this manual, it is from operator’s position facing front of washer.
18. CONTROL CABINET (Front Control Washers)a. Remove screws holding control panel to
control cabinet. Refer to Figure 6. Remove panel.
b. Remove screws holding cabinet top to control cabinet. Refer to Figure 6.
c. If area or space permits, lift cabinet top to a vertical position.
NOTE: To avoid damage to hinges, be sure to support top with a chain (not included) or equivalent. Refer to Figure 5.
d. Remove cabinet top from washer by removing nuts and carriage bolts holding cabinet top and hinges to control cabinet. Refer to Figure 5.
e. Carefully lift cabinet top off washer and set out of the way to prevent damage.
f. Remove timer knob from cycle switch shaft. Refer to Figure 6.
g. Pull temperature switch knob off shaft.h. Remove screws holding control cabinet base to
control cabinet. Refer to Figure 6.i. Remove screws holding control shield (with
controls attached) to bottom rear flange of control cabinet. Refer to Figure 6.
j. Remove screws holding control to rear of control cabinet. Refer to Figure 6.
k. Remove screws holding control cabinet to top flange of side panels. Refer to Figure 6.
l. Carefully lift control cabinet assembly off washer.
m. Remove screws holding left, right and rear control cabinets together. Refer to Figure 6.
Figure 5
FLW1736S
CHAIN
REARHINGES
CABINETTOP
CARRIAGEBOLT
NUT

42 801728
Section 5 Service Procedures
© Copyright, Alliance Laundry Systems LLC – DO NOT COPY or TRANSMIT
Figure 6
FLW831P
TEMPERATURESWITCH
CABINET TOP
EXPANSIONCLIP
RIGHT CONTROLCABINET
INDICATORLIGHT
PRESSUREHOSECLIP
TIMERKNOB
CONTROLKNOB
PRESSURESWITCH
CONTROL
LEFT CONTROLCABINET
CONTROLSHIELD
CONTROLCABINET
BASE
REARCONTROLCABINET
CONTROLPANEL
CONTROLPANEL
OVERLAY
FRONT CONTROL MODELS
SCREW
BRACKET
BOLT
HINGE
RIVET
SCREW
CYCLE SWITCH
BUSHING
NUT
UNION(SUPPLY
INJECTIONMODELS)
CONNECTOR(SUPPLY
INJECTIONMODELS)PUSH-TO-
START SWITCH
LABEL
SCREW
ROCKERSWITCH

801728 43
Section 5 Service Procedures
© Copyright, Alliance Laundry Systems LLC – DO NOT COPY or TRANSMIT
To reduce the risk of electric shock, fire, explosion, serious injury or death:• Disconnect electric power to the washer before servicing.• Never start the washer with any guards/panels removed.• Whenever ground wires are removed during servicing, these ground wires must be
reconnected to ensure that the washer is properly grounded.• Motor not grounded! Disconnect electric power before servicing motor.
W485
WARNING
19. CONTROL HOOD ASSEMBLY (Rear Control Washers)a. Remove three screws holding rear of hood
assembly to control hood rear panel. Refer to Figure 7.
b. Pivot hood assembly forward on cabinet top. Refer to Figure 7.
c. Carefully remove bottom front of hood from clips on cabinet top.
d. Disconnect wires from components and carefully remove components from hood assembly.
NOTE: Refer to wiring diagram when rewiring component parts.
TO REMOVE CONTROL HOOD END PANELS
Remove two screws holding each end panel to control mounting plate. Refer to Figure 8.
Figure 7
W252IE1A
PivotHood
Forward
W169SE3B
HoodAttachingScrews

44 801728
Section 5 Service Procedures
© Copyright, Alliance Laundry Systems LLC – DO NOT COPY or TRANSMIT
Figure 8
FLW1735S
TOPCOVER SWITCH
BRACKET
TEMPERATURESWITCHEND PANEL
LEFT
CYCLESWITCH
ENDPANELRIGHT
SCREW
GREENINDICATOR
LIGHTS
GRAPHICPANEL
CONTROLMOUNTING
PLATE
TIMERKNOB
CONTROLKNOB
CONTROL
PRESSURESWITCH
PRESSUREHOSE
SCREW
SCREW
LENS
ROCKERSWITCH
REDINDICATOR
LIGHT(Models
with Heat)
MOUNTINGBRACKET
BRACKET
PUSH-TO-START
SWITCH
LOCKING TABS(Press in on tabs and at
same time turn switch 1/4 turn counterclockwise to
remove switch.)
REAR CONTROL MODELS

801728 45
Section 5 Service Procedures
© Copyright, Alliance Laundry Systems LLC – DO NOT COPY or TRANSMIT
To reduce the risk of electric shock, fire, explosion, serious injury or death:• Disconnect electric power to the washer before servicing.• Never start the washer with any guards/panels removed.• Whenever ground wires are removed during servicing, these ground wires must be
reconnected to ensure that the washer is properly grounded.• Motor not grounded! Disconnect electric power before servicing motor.
W485
WARNING
20. CYCLE SWITCHFront Control Washersa. Remove timer knob from cycle switch shaft.
Refer to Figure 6.b. Remove screws holding control panel to
control cabinet. Refer to Figure 6.c. Remove control panel as far as wires permit.d. Disconnect wires from switch terminals.
NOTE: DO NOT pull on wires. Instead, unplug by pulling on disconnect blocks. Use a pliers if necessary.
NOTE: Refer to wiring diagram when rewiring switch.
Rear Control Washersa. Remove timer knob from cycle switch shaft.
Refer to Figure 8.b. Remove three screws holding rear of hood
assembly to control hood rear panel. Refer to Figure 7.
c. Pivot hood assembly forward on cabinet top. Refer to Figure 7.
d. Disconnect wires from switch terminals.
NOTE: DO NOT pull on wires. Instead, unplug by pulling on disconnect blocks. Use a pliers if necessary.
NOTE: Refer to wiring diagram when rewiring switch.
e. Refer to Figure 8 for switch removal.f. Press in on two locking tabs and at the same
time turn switch 1/4 turn counterclockwise to remove switch from switch bracket. Refer to Figure 8.
IMPORTANT: Before removing switch, note switch position in relation to switch bracket so switch can be reinstalled in same position.
NOTE: When installing switch, place switch tabs into cutout in switch bracket and turn switch clockwise to its full limit of travel, within the switch bracket opening, until both locking tabs snap into place.
21. TEMPERATURE SWITCHFront Control Washersa. Remove screws holding control panel to
control cabinet. Refer to Figure 6. Remove panel.
b. Remove screws holding cabinet top to control cabinet. Refer to Figure 6.
c. If area or space permits, lift cabinet top to a vertical position.
NOTE: To avoid damage to hinges, be sure to support top with a chain (not included) or equivalent. Refer to Figure 5.
d. Disconnect wires from switch terminals.
NOTE: DO NOT pull on wires. Instead, unplug by pulling on disconnect blocks. Use a pliers if necessary.
NOTE: Refer to wiring diagram when rewiring switch.
e. Remove screws holding temperature switch to control panel. Refer to Figure 6.
Rear Control Washersa. Remove three screws holding rear of hood
assembly to control hood rear panel. Refer to Figure 7.
b. Pivot hood assembly forward on cabinet top. Refer to Figure 7.
c. Disconnect wires from switch terminals.
NOTE: DO NOT pull on wires. Instead, unplug by pulling on disconnect blocks. Use a pliers if necessary.
NOTE: Refer to wiring diagram when rewiring switch.
46 801728
Section 5 Service Procedures
© Copyright, Alliance Laundry Systems LLC – DO NOT COPY or TRANSMIT
To reduce the risk of electric shock, fire, explosion, serious injury or death:• Disconnect electric power to the washer before servicing.• Never start the washer with any guards/panels removed.• Whenever ground wires are removed during servicing, these ground wires must be
reconnected to ensure that the washer is properly grounded.• Motor not grounded! Disconnect electric power before servicing motor.
W485
WARNING
d. Refer to Figure 8 for switch removal.e. Press in on two locking tabs and at the same
time turn switch 1/4 turn counterclockwise to remove switch from switch bracket. Refer to Figure 8.
IMPORTANT: Before removing switch, note switch position in relation to switch bracket so switch can be reinstalled in same position.
NOTE: When installing switch, place switch tabs into cutout in switch bracket and turn switch clockwise to its full limit of travel, within the switch bracket opening, until both locking tabs snap into place.
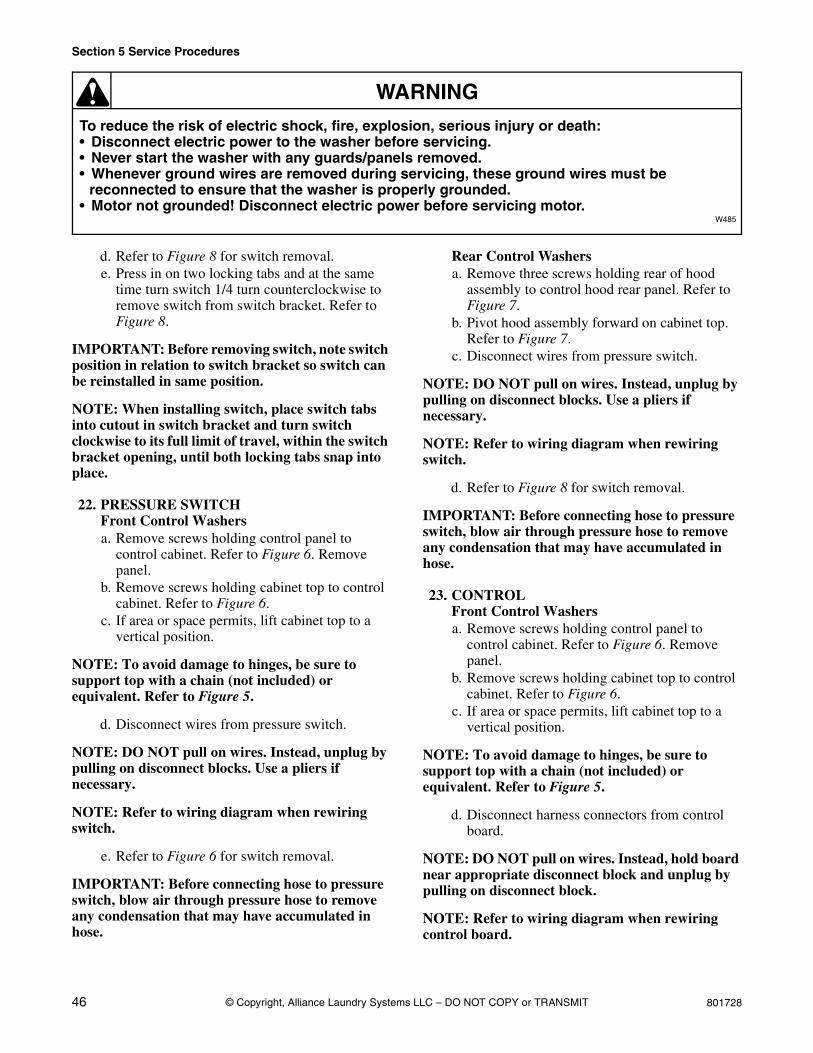
22. PRESSURE SWITCHFront Control Washersa. Remove screws holding control panel to
control cabinet. Refer to Figure 6. Remove panel.
b. Remove screws holding cabinet top to control cabinet. Refer to Figure 6.
c. If area or space permits, lift cabinet top to a vertical position.
NOTE: To avoid damage to hinges, be sure to support top with a chain (not included) or equivalent. Refer to Figure 5.
d. Disconnect wires from pressure switch.
NOTE: DO NOT pull on wires. Instead, unplug by pulling on disconnect blocks. Use a pliers if necessary.
NOTE: Refer to wiring diagram when rewiring switch.
e. Refer to Figure 6 for switch removal.
IMPORTANT: Before connecting hose to pressure switch, blow air through pressure hose to remove any condensation that may have accumulated in hose.
Rear Control Washersa. Remove three screws holding rear of hood
assembly to control hood rear panel. Refer to Figure 7.
b. Pivot hood assembly forward on cabinet top. Refer to Figure 7.
c. Disconnect wires from pressure switch.
NOTE: DO NOT pull on wires. Instead, unplug by pulling on disconnect blocks. Use a pliers if necessary.
NOTE: Refer to wiring diagram when rewiring switch.
d. Refer to Figure 8 for switch removal.
IMPORTANT: Before connecting hose to pressure switch, blow air through pressure hose to remove any condensation that may have accumulated in hose.
23. CONTROLFront Control Washersa. Remove screws holding control panel to
control cabinet. Refer to Figure 6. Remove panel.
b. Remove screws holding cabinet top to control cabinet. Refer to Figure 6.
c. If area or space permits, lift cabinet top to a vertical position.
NOTE: To avoid damage to hinges, be sure to support top with a chain (not included) or equivalent. Refer to Figure 5.
d. Disconnect harness connectors from control board.
NOTE: DO NOT pull on wires. Instead, hold board near appropriate disconnect block and unplug by pulling on disconnect block.
NOTE: Refer to wiring diagram when rewiring control board.

801728 47
Section 5 Service Procedures
© Copyright, Alliance Laundry Systems LLC – DO NOT COPY or TRANSMIT
To reduce the risk of electric shock, fire, explosion, serious injury or death:• Disconnect electric power to the washer before servicing.• Never start the washer with any guards/panels removed.• Whenever ground wires are removed during servicing, these ground wires must be
reconnected to ensure that the washer is properly grounded.• Motor not grounded! Disconnect electric power before servicing motor.
W485
WARNING
IMPORTANT: Remove control board and metal mounting plate as a unit. Handle control board by the back metal plate. Do not contact control board with hands or metal objects. Place assembly in clean, dry area away from work area to avoid damage. Do not attempt field repair of the control. Attempted repair or tampering with the control will void its warranty.
e. Remove four screws holding control to rear control cabinet. Refer to Figure 6.
f. Remove control and place in anti-static shipping material for return to manufacturer.
IMPORTANT: It is important to take care when handling original control. It must be carefully placed in anti-static shipping material which was removed from new control. Warranty credit will not be issued if control is not wrapped properly.
Rear Control Washersa. Remove three screws holding rear of hood
assembly to control hood rear panel. Refer to Figure 7.
b. Pivot hood assembly forward on cabinet top. Refer to Figure 7.
c. Disconnect harness connectors from control board.
NOTE: DO NOT pull on wires. Instead, hold board near appropriate disconnect block and unplug by pulling on disconnect block.
NOTE: Refer to wiring diagram when rewiring control board.
IMPORTANT: Remove control board and metal mounting plate as a unit. Handle control board by the back metal plate. Do not contact control board with hands or metal objects. Place assembly in clean, dry area away from work area to avoid damage. Do not attempt field repair of the control. Attempted repair or tampering with the control will void its warranty.
d. Remove four screws holding control to control hood rear panel. Refer to Figure 8.
e. Remove control and place in anti-static shipping material for return to manufacturer.
IMPORTANT: It is important to take care when handling original control. It must be carefully placed in anti-static shipping material which was removed from new control. Warranty credit will not be issued if control is not wrapped properly.
24. INDICATOR LIGHTSFront Control Washersa. Remove screws holding control panel to
control cabinet. Refer to Figure 6. Remove panel.
b. Disconnect two wires from indicator light.
NOTE: Refer to wiring diagram when rewiring light.
c. Squeeze locking tabs together and pull light out rear of control panel.
Rear Control Washersa. Remove three screws holding rear of hood
assembly to control hood rear panel. Refer to Figure 7.
b. Pivot hood assembly forward on cabinet top. Refer to Figure 7.
c. Carefully remove bottom front of hood from clips on cabinet top.
d. Remove lens from front of graphic panel. Refer to Figure 8.
e. Disconnect two wires from indicator light and remove light. Refer to Figure 8.
NOTE: Refer to wiring diagram when rewiring light.
25. PUSH-TO-START/ROCKER SWITCHFront Control Washersa. Remove screws holding control panel to
control cabinet. Refer to Figure 6. Remove panel.
b. Disconnect wires from switch.

48 801728
Section 5 Service Procedures
© Copyright, Alliance Laundry Systems LLC – DO NOT COPY or TRANSMIT
To reduce the risk of electric shock, fire, explosion, serious injury or death:• Disconnect electric power to the washer before servicing.• Never start the washer with any guards/panels removed.• Whenever ground wires are removed during servicing, these ground wires must be
reconnected to ensure that the washer is properly grounded.• Motor not grounded! Disconnect electric power before servicing motor.
W485
WARNING
c. Remove switch through front of panel. Refer to Figure 6.
Rear Control Washersa. Remove three screws holding rear of hood
assembly to control hood rear panel. Refer to Figure 7.
b. Pivot hood assembly forward on cabinet top. Refer to Figure 7.
c. Carefully remove bottom front of hood from clips on cabinet top.
d. Disconnect wires from switch.e. Remove switch through front of panel. Refer to
Figure 8.
26. GRAPHIC PANELFront Control Washersa. Remove timer knob from cycle switch shaft.
Refer to Figure 6.b. Pull temperature switch knob off shaft.c. Remove four screws holding control panel
overlay to control panel. Refer to Figure 6.
Rear Control Washersa. Remove timer knob from cycle switch shaft.
Refer to Figure 8.b. Pull temperature switch knob off shaft.c. Remove indicator light lenses. Refer to
Figure 8.d. Remove three screws holding rear of hood
assembly to control hood rear panel. Refer to Figure 7.
e. Pivot hood assembly forward on cabinet top. Refer to Figure 7.
f. Carefully remove bottom front of hood from clips on cabinet top.
g. Disconnect wires from components and carefully remove components from control mounting plate.
NOTE: Refer to wiring diagram when rewiring component parts.
h. Remove screws holding both end panels to control hood assembly. Refer to Figure 8.
i. Bend tabs on graphic panel (located inside of control hood) straight out toward rear of hood.
j. Carefully remove graphic panel off front of control mounting plate. Refer to Figure 8.
27. LOWER ACCESS PANELa. While supporting the lower access panel,
remove two screws from bottom edge of lower access panel. Refer to Figure 9.
b. Gently lower the access panel to disengage panel locators from bottom edge of front panel.
28. CABINET TOP ASSEMBLYFront Control Washersa. Remove screws holding control panel to
control cabinet. Refer to Figure 6. Remove panel.
b. Remove screws holding cabinet top to control cabinet. Refer to Figure 6.
c. If area or space permits, lift cabinet top to a vertical position.
NOTE: To avoid damage to hinges, be sure to support top with a chain (not included) or equivalent. Refer to Figure 5.
Figure 9
H202SE1A
ScrewsLower
Access Panel
PanelLocators

801728 49
Section 5 Service Procedures
© Copyright, Alliance Laundry Systems LLC – DO NOT COPY or TRANSMIT
To reduce the risk of electric shock, fire, explosion, serious injury or death:• Disconnect electric power to the washer before servicing.• Never start the washer with any guards/panels removed.• Whenever ground wires are removed during servicing, these ground wires must be
reconnected to ensure that the washer is properly grounded.• Motor not grounded! Disconnect electric power before servicing motor.
W485
WARNING
d. Remove screws holding cabinet top to hinges and remove top.
Rear Control Washersa. While supporting lower access panel, remove
two screws from bottom edge of panel and remove panel. Refer to Figure 9.
b. Using the special tool, No. 318P4, remove dispenser drawer. Refer to Figure 10.
c. Open loading door. Carefully remove wire clamp ring from groove with small flat blade screwdriver. Spring is in 6 o’clock position. Refer to Figure 11.
NOTE: To avoid damage to spring, use screwdriver on wire clamp ring to the right or left of spring.
d. Grasp loading door seal lip. Refer to Figure 12, Step 1.
NOTE: To avoid damage to door seal, DO NOT use pliers or sharp objects to grasp the door seal lip. If lip is damaged, seal will leak.
e. Using a circular motion, pull seal up (Figure 12, Step 1), out (Figure 12, Step 2) and down (Figure 12, Step 3).
f. When seal releases from lip of front panel, pull out and remove the seal from front panel around door opening. Refer to Figure 12, Step 4.
g. Remove bottom two front panel attaching screws. Refer to Figure 14.
h. Remove front panel (with loading door attached) away from washer as far as wires permit.
i. Unplug wire harness from both the door latch switch and from the door switch. Refer to Figure 14. Remove clips holding wire harness and door seal hose along top flange of front panel and remove front panel.
j. Remove two screws holding front of cabinet top to front flange of side panels. Refer to Figure 13.
Figure 10
Figure 11
BL
EA
CH
SO
FT
EN
ERMAX
MAX
BL
EA
CH
SO
FT
EN
ERMAX
MAX
H125SE3B
Remove DrawerFrom Housing
318P4Dispenser Drawer
Tool
Insert Tool
Pull Drawer OutSlightly
H205SE1A
Screw
WireClampRing
Screw
Spring
DoorSeal

50 801728
Section 5 Service Procedures
© Copyright, Alliance Laundry Systems LLC – DO NOT COPY or TRANSMIT
Figure 12
FLW1190B
STEP 1: PULL SEAL UP. STEP 2: PULL SEAL OUT.
STEP 3: PULL SEAL DOWN. STEP 4: PULL SEAL OUT AND REMOVE FROM FRONT PANEL.

801728 51
Section 5 Service Procedures
© Copyright, Alliance Laundry Systems LLC – DO NOT COPY or TRANSMIT
To reduce the risk of electric shock, fire, explosion, serious injury or death:• Disconnect electric power to the washer before servicing.• Never start the washer with any guards/panels removed.• Whenever ground wires are removed during servicing, these ground wires must be
reconnected to ensure that the washer is properly grounded.• Motor not grounded! Disconnect electric power before servicing motor.
W485
WARNING
k. Remove three screws holding hood assembly to control hood rear panel. Refer to Figure 7.
l. Pivot hood assembly forward on cabinet top. Refer to Figure 7.
m. Disconnect hose from pressure switch and push hose down through hole in cabinet top.
n. Disconnect wire harnesses and wires.o. Reinstall control hood assembly.p. Lift front of cabinet top slightly and pull
forward to disengage from rear hold down brackets.
q. Carefully lift cabinet top off washer and set alongside the washer cabinet on protective padding.
Figure 13
FLW1737SCABINET TOPHOLD-DOWN
SCREWS
Figure 14
H204SE3A
BL
EA
CH
SO
FT
EN
ERMAX
MAX
DoorSwitch
DoorLatch
SwitchAttaching
Screws
DoorLatchSwitch
DoorSwitchWires
WireHarness
Front PanelAttaching Screws
DispenserDrawer

52 801728
Section 5 Service Procedures
© Copyright, Alliance Laundry Systems LLC – DO NOT COPY or TRANSMIT
To reduce the risk of electric shock, fire, explosion, serious injury or death:• Disconnect electric power to the washer before servicing.• Never start the washer with any guards/panels removed.• Whenever ground wires are removed during servicing, these ground wires must be
reconnected to ensure that the washer is properly grounded.• Motor not grounded! Disconnect electric power before servicing motor.
W485
WARNING
29. MIXING VALVEa. Front Control Washers
(1) Remove screws holding control panel to control cabinet. Refer to Figure 6. Remove panel.
(2) Remove screws holding cabinet top to control cabinet. Refer to Figure 6.
Rear Control Washers(1) While supporting lower access panel,
remove two screws from bottom edge of panel and remove panel. Refer to Figure 9.
(2) Using the special tool, No. 318P4, remove dispenser drawer. Refer to Figure 10.
(3) Open loading door. Carefully remove wire clamp ring from groove with small flat blade screwdriver. Spring is in 6 o’clock position. Refer to Figure 11.
NOTE: To avoid damage to spring, use screwdriver on wire clamp ring to the right or left of spring.
(4) Grasp loading door seal lip. Refer to Figure 12, Step 1.
NOTE: To avoid damage to door seal, DO NOT use pliers or sharp objects to grasp the door seal lip. If lip is damaged, seal will leak.
(5) Using a circular motion, pull seal up (Figure 12, Step 1), out (Figure 12, Step 2) and down (Figure 12, Step 3).
(6) When seal releases from lip of front panel, pull out and remove the seal from front panel around door opening. Refer to Figure 12, Step 4.
(7) Remove bottom two front panel attaching screws. Refer to Figure 14.
(8) Remove front panel (with loading door attached) away from washer as far as wires permit.
(9) Unplug wire harness from both the door latch switch and from the door switch. Refer to Figure 14. Remove clips holding wire harness and door seal hose along top flange of front panel and remove front panel.
(10) Remove two screws holding front of cabinet top to front flange of side panels. Refer to Figure 13.
b. If area or space permits, lift cabinet top to a vertical position.
NOTE: To avoid damage to hinges, be sure to support top with a chain (not included) or equivalent. Refer to Figure 5.
c. Mixing valve is located on upper back right corner of rear panel. Refer to Figure 15.
d. Shut off external hot and cold water supply and remove two inlet hoses.
e. Loosen hose clamp and remove mixing valve-to-dispenser hose at the mixing valve. Refer to Figure 15.
f. Remove wire harness disconnect blocks from mixing valve solenoid terminals. Refer to Figure 15.
NOTE: Refer to wiring diagram when rewiring solenoids.
g. Go to rear of washer and remove screw holding mixing valve and plate to rear panel, then remove valve and plate out through opening in rear panel. Refer to Figure 15.
h. Remove screws holding valve to mixing valve plate. Refer to Figure 15.

801728 53
Section 5 Service Procedures
© Copyright, Alliance Laundry Systems LLC – DO NOT COPY or TRANSMIT
Figure 15
H077P
HOSECLAMP
MIXING VALVE-TO-DISPENSER HOSE
HOSECLAMP
BACKFLOWPREVENTER
SCREWS
INLETHOSE
MIXINGVALVEPLATE
REARPANEL
MOUNTINGCLIP
WIRE HARNESS
DISCONNECTBLOCKS
MIXINGVALVE

54 801728
Section 5 Service Procedures
© Copyright, Alliance Laundry Systems LLC – DO NOT COPY or TRANSMIT
To reduce the risk of electric shock, fire, explosion, serious injury or death:• Disconnect electric power to the washer before servicing.• Never start the washer with any guards/panels removed.• Whenever ground wires are removed during servicing, these ground wires must be
reconnected to ensure that the washer is properly grounded.• Motor not grounded! Disconnect electric power before servicing motor.
W485
WARNING
30. JUNCTION BOX AND LINE FILTERa. Go to rear of washer and remove two screws
from junction box cover. Refer to Figure 16.b. To remove line filter, disconnect all wires from
filter terminals.
NOTE: Refer to wiring diagram when rewiring filter.
c. Remove screws holding filter to rear panel.d. To remove junction box, remove screws
holding upper and lower portions of box to rear panel. Refer to Figure 16.
Figure 16
FLW850P
JUNCTION BOX COVER
SEAL
LINEFILTER
UPPERJUNCTION
BOX
LOWERJUNCTION
BOX
CONNECTIONBOX
POWERCORD
801728 55
Section 5 Service Procedures
© Copyright, Alliance Laundry Systems LLC – DO NOT COPY or TRANSMIT
To reduce the risk of electric shock, fire, explosion, serious injury or death:• Disconnect electric power to the washer before servicing.• Never start the washer with any guards/panels removed.• Whenever ground wires are removed during servicing, these ground wires must be
reconnected to ensure that the washer is properly grounded.• Motor not grounded! Disconnect electric power before servicing motor.
W485
WARNING
31. INVERTER CONTROL
IMPORTANT: Due to the sensitivity of the inverter control, careful handling is required. As a precautionary measure, we recommend using a ground wrist strap when handling the inverter control. Wrist strap, cord and alligator clip are designed to carry away any electrostatic charge from your body and to direct charge to an available ground. By using this static protection device, potential electrostatic discharge problems associated with handling of inverter control will be minimized. Always handle inverter control by its metal edges. If a wrist strap is not available, touch washer while it is plugged in before handling control to dissipate any charge.
NOTE: New control is supplied in a special anti-static wrapping and protected by anti-static foam. While holding control by its metal edges, remove control from foam and wrapping.
a. While supporting the lower access panel, remove two screws from bottom edge of lower access panel. Refer to Figure 9.
b. Gently lower the access panel to disengage panel locators from bottom edge of front panel.
c. Remove screws holding plastic shield to control.
d. Remove shield.e. Press in on locking tabs and unplug harness
disconnect blocks and all wires from inverter control.
NOTE: DO NOT pull on wires, instead, hold board near appropriate disconnect block and unplug by pulling on disconnect block.
f. Remove screws holding inverter control to base of washer. Refer to Figure 17.
g. Place old control in the anti-static wrapping that new control was supplied in.
IMPORTANT: It is important to take care when handling the original inverter control. It must be carefully placed in the anti-static wrapping and anti-static foam which was removed from new inverter control. If inverter control is not wrapped properly, warranty credit will not be issued.
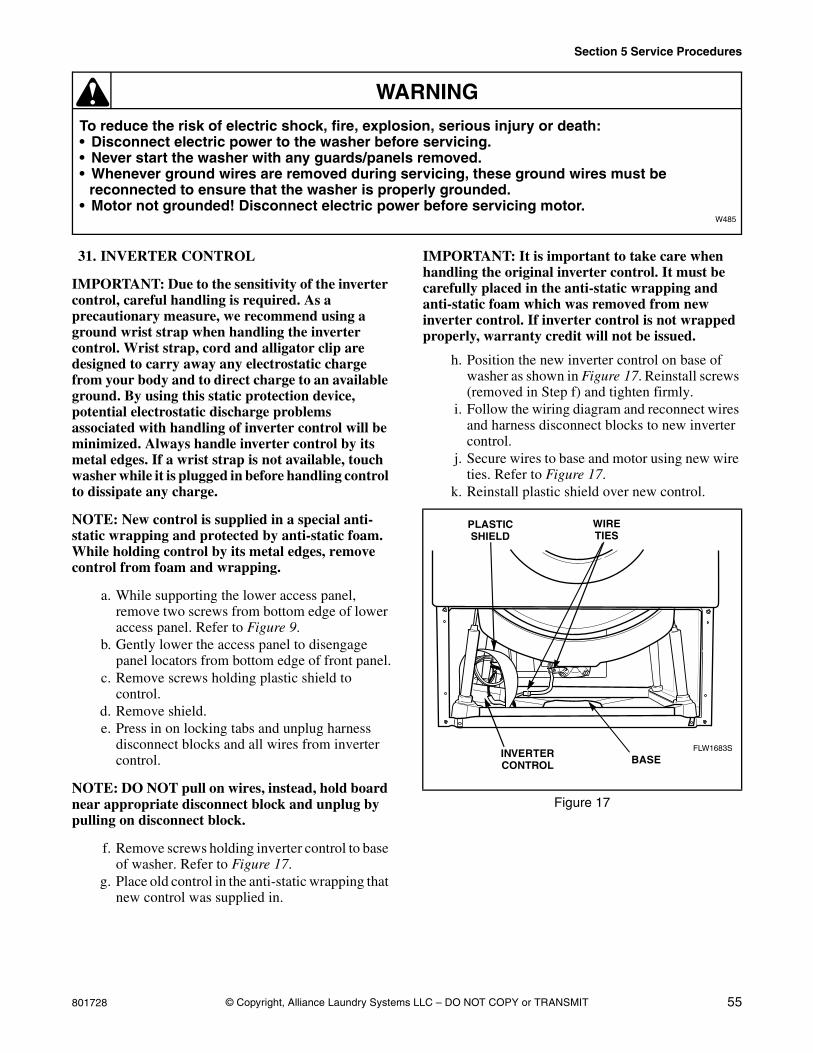
h. Position the new inverter control on base of washer as shown in Figure 17. Reinstall screws (removed in Step f) and tighten firmly.
i. Follow the wiring diagram and reconnect wires and harness disconnect blocks to new inverter control.
j. Secure wires to base and motor using new wire ties. Refer to Figure 17.
k. Reinstall plastic shield over new control.
Figure 17
FLW1683S
PLASTICSHIELD
INVERTERCONTROL
WIRETIES
BASE

56 801728
Section 5 Service Procedures
© Copyright, Alliance Laundry Systems LLC – DO NOT COPY or TRANSMIT
To reduce the risk of electric shock, fire, explosion, serious injury or death:• Disconnect electric power to the washer before servicing.• Never start the washer with any guards/panels removed.• Whenever ground wires are removed during servicing, these ground wires must be
reconnected to ensure that the washer is properly grounded.• Motor not grounded! Disconnect electric power before servicing motor.
W485
WARNING
32. ELECTRIC DRAIN PUMPa. While supporting the lower access panel,
remove two screws from bottom edge of panel and remove panel. Refer to Figure 9.
IMPORTANT: There will always be some water that will remain in the pump and hoses. Therefore, before removing hoses from pump, hoses must be drained to prevent water spillage.
b. Loosen hose clamps and remove three hoses connected to electric drain pump (outer tub-to-pump hose, vent hose and drain hose). Refer to Figure 18.
c. Disconnect wires from drain pump.
NOTE: Refer to wiring diagram when rewiring drain pump.
d. Remove three mounting screws holding pump to base and remove pump out through front of washer. Refer to Figure 18.
Figure 18
FLW1684
OUTERTUB-TO-PUMP
HOSE
MOUNTINGSCREWS
BACKFLOWPREVENTER
DRAINHOSE
MOUNTINGSCREW
ELECTRICDRAIN PUMP

801728 57
Section 5 Service Procedures
© Copyright, Alliance Laundry Systems LLC – DO NOT COPY or TRANSMIT
To reduce the risk of electric shock, fire, explosion, serious injury or death:• Disconnect electric power to the washer before servicing.• Never start the washer with any guards/panels removed.• Whenever ground wires are removed during servicing, these ground wires must be
reconnected to ensure that the washer is properly grounded.• Motor not grounded! Disconnect electric power before servicing motor.
W485
WARNING
33. BELTa. While supporting the lower access panel,
remove two screws from bottom edge of panel and remove panel. Refer to Figure 9.
b. Front Control Washers –(1) Remove screws holding control panel to
control cabinet. Refer to Figure 6. Remove panel.
(2) Remove screws holding cabinet top to control cabinet. Refer to Figure 6.
Rear Control Washers –(1) Using the special tool, No. 318P4, remove
dispenser drawer. Refer to Figure 10.(2) Open loading door. Carefully remove wire
clamp ring from groove with small flat blade screwdriver. Spring is in the 6 o’clock position. Refer to Figure 11.
NOTE: To avoid damage to spring, use screwdriver on wire clamp ring to right or left of spring.
(3) Grasp loading door seal lip. Refer to Figure 12, Step 1.
NOTE: To avoid damage to door seal, DO NOT use pliers or sharp objects to grasp the door seal lip. If lip is damaged, seal will leak.
(4) Using a circular motion, pull seal up (Figure 12, Step 1), out (Figure 12, Step 2), and down (Figure 12, Step 3).
(5) When seal releases from lip of front panel, pull out and remove the seal from front panel around door opening. Refer to Figure 12, Step 4.
(6) While supporting the front panel assembly, remove the two bottom front corner screws. Refer to Figure 14. Remove front panel (with loading door attached) away from washer as far as wire permits.
(7) Unplug wire harness from both the door latch switch and from the door switch. Refer to Figure 14. Remove clips holding wire harness and door seal hose along top flange of front panel and remove front panel.
(8) Remove two screws holding cabinet top to front flange of each side panel. Refer to Figure 13.
c. If area or space permits, lift cabinet top to a vertical position by hinging it on the rear hinges.
NOTE: To avoid damage to hinges, be sure to support cabinet top with a small chain or something similar.
d. Run belt off cylinder pulley while slowly turning pulley. Refer to Figure 19.
e. Remove belt from motor shaft.
NOTE: When installing belt, adjust belt tension as follows:
f. Working through the front access door opening, place a locking pliers on the metal rod and loosen the two adjusting bolts. Repeat procedure to loosen the two pivot bolts. Refer to Figure 19.
g. Pull down on motor to increase belt tension. Use a Burroughs belt gauge to obtain proper tension. Proper belt tension is obtained when belt can be deflected approximately 1/4 inch (6.35 mm) from normal position when moderate pressure 50 to 60 pounds (22.68 to 27.22 Kg) is applied to a point midway between pulleys. Refer to Figure 19.
h. After proper belt tension has been obtained, tighten belt adjusting bolts firmly, then tighten pivot bolts. Refer to Figure 19.

58 801728
Section 5 Service Procedures
© Copyright, Alliance Laundry Systems LLC – DO NOT COPY or TRANSMIT
Figure 19
FLW1706S
MOTORMOUNTINGBRACKET
INNERBASKETPULLEY
PIVOTBOLT
ADJUSTINGBOLT
METALROD
WIREHARNESS
1/4INCH
MOTORSHAFT
BELT
ADJUSTINGBOLT
PIVOTBOLT

801728 59
Section 5 Service Procedures
© Copyright, Alliance Laundry Systems LLC – DO NOT COPY or TRANSMIT
To reduce the risk of electric shock, fire, explosion, serious injury or death:• Disconnect electric power to the washer before servicing.• Never start the washer with any guards/panels removed.• Whenever ground wires are removed during servicing, these ground wires must be
reconnected to ensure that the washer is properly grounded.• Motor not grounded! Disconnect electric power before servicing motor.
W485
WARNING
34. FRONT PANELa. While supporting the lower access panel,
remove two screws from bottom edge of lower access panel. Refer to Figure 9.
b. Gently lower the access panel to disengage panel locators from bottom edge of front panel.
c. Front Control Washers(1) Remove timer knob from cycle switch
shaft. Refer to Figure 6.(2) Pull temperature switch knob off shaft.(3) Remove screws holding control panel to
control cabinet. Refer to Figure 6. Remove panel.
(4) Remove screws holding cabinet top to control cabinet. Refer to Figure 6.
(5) If area or space permits, lift cabinet top to a vertical position.
NOTE: To avoid damage to hinges, be sure to support top with a chain (not included) or equivalent. Refer to Figure 5.
(6) Remove cabinet top from washer by removing nuts and carriage bolts holding cabinet top and hinges to control cabinet. Refer to Figure 5.
(7) Carefully lift cabinet top off washer and set out of the way to prevent damage.
(8) Remove screws holding control cabinet base to control cabinet. Refer to Figure 6.
(9) Remove screws holding control shield (with controls attached) to bottom rear flange of control cabinet. Refer to Figure 6.
(10) Remove screws holding control to rear control cabinet. Refer to Figure 6.
(11) Remove screws holding control cabinet to top flange of side panels.
(12) Carefully lift control cabinet assembly off washer.
d. Using the special tool, No. 318P4, remove dispenser drawer. Refer to Figure 10.
e. Remove bottom two front panel corner screws. Refer to Figure 13.
f. Open loading door. Carefully remove wire clamp ring from groove with small flat blade screwdriver. Spring is in 6 o’clock position. Refer to Figure 11.
NOTE: To avoid damage to spring, use screwdriver on wire clamp ring to right or left of spring.
g. Grasp loading door seal lip. Refer to Figure 12, Step 1.
NOTE: To avoid damage to door seal, DO NOT use pliers or sharp objects to grasp the door seal lip. If lip is damaged, seal will leak.
h. Using a circular motion, pull seal up (Figure 12, Step 1), out (Figure 12, Step 2), and down (Figure 12, Step 3).
i. When seal releases from lip of front panel, pull out and remove the seal from front panel around door opening. Refer to Figure 12, Step 4.
NOTE: The ease of installation of the loading door can be improved using water or soapy solution to work seal around circumference of loading door. Be sure to install seal with the tab in the 12 o’clock position when installing the wire clamp ring to front panel. Be careful not to overstretch tension spring.
j. Remove front panel (with loading door attached) away from washer as far as wires permit.
k. Unplug wire harness from both the door latch switch and from the door switch. Refer to Figure 20. Remove clips holding wire harness and door seal hose along top flange of front panel and remove front panel.
NOTE: Door seal hose and wire harness must be reinstalled in the appropriate clips and holes along top flange of front panel. Refer to Figure 20.

60 801728
Section 5 Service Procedures
© Copyright, Alliance Laundry Systems LLC – DO NOT COPY or TRANSMIT
Figure 20
FLW1738S
WIRE HARNESS
CLIP
DOORSWITCH
DOORSWITCHWIRES
DOORLATCH
SWITCH
WIREHARNESS
LARGECLAMP
DISPENSERHOUSING
When installing door seal, align connecting hose in
vertical position.
DOORSEAL
LARGECLAMP
HOSETIE

801728 61
Section 5 Service Procedures
© Copyright, Alliance Laundry Systems LLC – DO NOT COPY or TRANSMIT
To reduce the risk of electric shock, fire, explosion, serious injury or death:• Disconnect electric power to the washer before servicing.• Never start the washer with any guards/panels removed.• Whenever ground wires are removed during servicing, these ground wires must be
reconnected to ensure that the washer is properly grounded.• Motor not grounded! Disconnect electric power before servicing motor.
W485
WARNING
35. LOADING DOORa. Unlatch and open loading door.b. Remove door bezel by prying inside lip up and
forward with fingers. Refer to Figure 21.c. While supporting loading door, remove screws,
lockwashers and nuts holding loading door to hinge assembly and remove door. Refer to Figure 21.
Figure 21
H212SE1A
Door BezelAttaching
Screw
InnerDoor and
Glass
DoorBezel
HingeAssembly
Nut
Lockwasher
Doorand
GlassScrew

62 801728
Section 5 Service Procedures
© Copyright, Alliance Laundry Systems LLC – DO NOT COPY or TRANSMIT
To reduce the risk of electric shock, fire, explosion, serious injury or death:• Disconnect electric power to the washer before servicing.• Never start the washer with any guards/panels removed.• Whenever ground wires are removed during servicing, these ground wires must be
reconnected to ensure that the washer is properly grounded.• Motor not grounded! Disconnect electric power before servicing motor.
W485
WARNING
36. DOOR SEAL AND HOSE ASSEMBLYa. Front Control Washers
(1) Remove timer knob from cycle switch shaft. Refer to Figure 6.
(2) Pull temperature switch knob off shaft.(3) Remove screws holding control panel to
control cabinet. Refer to Figure 6. Remove panel.
(4) Remove screws holding cabinet top to control cabinet. Refer to Figure 6.
(5) If area or space permits, lift cabinet top to a vertical position.
NOTE: To avoid damage to hinges, be sure to support top with a chain (not included) or equivalent. Refer to Figure 5.
(6) Remove cabinet top from washer by removing nuts and carriage bolts holding cabinet top and hinges to control cabinet. Refer to Figure 5.
(7) Carefully lift cabinet top off washer and set out of the way to prevent damage.
(8) Remove screws holding control cabinet base to control cabinet. Refer to Figure 6.
(9) Remove screws holding control shield (with controls attached) to bottom rear flange of control cabinet. Refer to Figure 6.
(10) Remove screws holding control to rear control cabinet. Refer to Figure 6.
(11) Remove screws holding control cabinet to top flange of side panels. Refer to Figure 6.
(12) Carefully lift control cabinet assembly off washer.
b. While supporting lower front access panel, remove two screws from bottom edge of panel and remove panel. Refer to Figure 9.
c. Using the special tool, No. 318P4, remove dispenser drawer. Refer to Figure 10.
d. Open loading door. Carefully remove wire clamp ring from groove with small flat blade screwdriver. Spring is in 6 o’clock position. Refer to Figure 11.
NOTE: To avoid damage to spring, use screwdriver on wire clamp ring to right or left of spring.
e. Grasp loading door seal lip. Refer to Figure 12, Step 1.
NOTE: To avoid damage to door seal, DO NOT use pliers or sharp objects to grasp the door seal lip. If lip is damaged, seal will leak.
f. Using a circular motion, pull seal up (Figure 12, Step 1), out (Figure 12, Step 2), and down (Figure 12, Step 3).
g. When seal releases from lip of front panel, pull out and remove the seal from front panel around door opening. Refer to Figure 12, Step 4.
h. While supporting the front panel assembly, remove the two bottom front corner screws. Refer to Figure 14. Remove front panel (with loading door attached) away from washer as far as wires permit.
i. Unplug wire harness from both the door latch switch and from the door switch. Refer to Figure 20. Remove clips holding wire harness and door seal hose along top flange of front panel and remove front panel.
NOTE: The large wire clip holds both the wire harnesses and the door seal hose. Refer to Figure 20.
j. Rear Control Washers – Remove two screws holding cabinet top to front flange of side panels. Refer to Figure 13. If area or space permits, lift cabinet top to a vertical position by hinging it on the rear hinges.
NOTE: To avoid damage to hinges, be sure to support cabinet top with a small chain or something similar. Refer to Figure 5.
k. Loosen hose clamp and remove dispenser valve-to-door seal hose connection at the dispenser. Refer to Figure 20.
IMPORTANT: When installing door seal hose, pull hose tie tight to prevent damage. Refer to Figure 20.

801728 63
Section 5 Service Procedures
© Copyright, Alliance Laundry Systems LLC – DO NOT COPY or TRANSMIT
To reduce the risk of electric shock, fire, explosion, serious injury or death:• Disconnect electric power to the washer before servicing.• Never start the washer with any guards/panels removed.• Whenever ground wires are removed during servicing, these ground wires must be
reconnected to ensure that the washer is properly grounded.• Motor not grounded! Disconnect electric power before servicing motor.
W485
WARNING
l. Loosen large clamp holding door seal to front of outer tub. Carefully pull seal off front lip of outer tub front panel and remove door seal and hose. Refer to Figure 20.
NOTE: Door seal installation can be improved using water or soap solution to work seal around circumference of loading door opening. Be sure to install seal with the tab in the 12 o’clock position.
37. DOOR SWITCHa. Open loading door.b. Carefully remove wire clamp ring from groove
with small flat blade screwdriver. Spring is located in the 6 o’clock position. Refer to Figure 11.
NOTE: To avoid damage to spring, use screwdriver on wire clamp ring to right or left of spring.
c. Grasp loading door seal lip. Refer to Figure 12, Step 1.
NOTE: To avoid damage to door seal, DO NOT use pliers or sharp objects to grasp the door seal lip. If lip is damaged, seal will leak.
d. Using a circular motion, pull seal up (Figure 12, Step 1), out (Figure 12, Step 2), and down (Figure 12, Step 3).
e. When seal releases from lip of front panel, pull out and remove the seal from front panel around door opening. Refer to Figure 12, Step 4.
f. Reach up between door seal and front panel. Refer to Figure 20. Press in on switch locking tabs and push switch out through front panel only far enough to allow removal of wires from switch terminals.
IMPORTANT: Refer to wiring diagram when rewiring switch.
38. DOOR LATCH SWITCHa. Open loading door.b. Carefully remove wire clamp ring from groove
with small flat blade screwdriver. Spring is
located in the 6 o’clock position. Refer to Figure 11.
NOTE: To avoid damage to spring, use screwdriver on wire clamp ring to right or left of spring.
c. Grasp loading door seal lip. Refer to Figure 12, Step 1.
NOTE: To avoid damage to door seal, DO NOT use pliers or sharp objects to grasp the door seal lip. If lip is damaged, seal will leak.
d. Using a circular motion, pull seal up (Figure 12, Step 1), out (Figure 12, Step 2), and down (Figure 12, Step 3).
e. When seal releases from lip of front panel, pull out and remove the seal from front panel around door opening. Refer to Figure 12, Step 4.
f. While supporting door lock from the back (through door opening), remove two Phillips head screws holding door latch switch to front panel. Refer to Figure 20.
g. Gently pull door lock out through door opening. Remove door lock only far enough to disconnect harness connector from door lock. Refer to Figure 20.
NOTE: When installing new door lock, be sure to install small lip through mounting hole first and then rotate lock into position.
39. MOTOR
NOTE: Motor is removed out through front of washer, however, as an option, motor can be removed out through lower rear access panel opening.
Motor Removal –a. While supporting lower front access panel,
remove two screws from bottom edge of panel and remove panel. Refer to Figure 9.
b. Front Control Washers –(1) Remove screws holding control panel to
control cabinet. Refer to Figure 6. Remove panel.

64 801728
Section 5 Service Procedures
© Copyright, Alliance Laundry Systems LLC – DO NOT COPY or TRANSMIT
To reduce the risk of electric shock, fire, explosion, serious injury or death:• Disconnect electric power to the washer before servicing.• Never start the washer with any guards/panels removed.• Whenever ground wires are removed during servicing, these ground wires must be
reconnected to ensure that the washer is properly grounded.• Motor not grounded! Disconnect electric power before servicing motor.
W485
WARNING
(2) Remove screws holding cabinet top to control cabinet. Refer to Figure 6.
Rear Control Washers –(1) Using the special tool, No. 318P4, remove
dispenser drawer. Refer to Figure 10.(2) Open loading door. Carefully remove wire
clamp ring from groove with small flat blade screwdriver. Spring is in 6 o’clock position. Refer to Figure 11.
NOTE: To avoid damage to spring, use screwdriver on wire clamp ring to the right or left of spring.
(3) Grasp loading door seal lip. Refer to Figure 12, Step 1.
NOTE: To avoid damage to door seal, DO NOT use pliers or sharp objects to grasp the door seal lip. If lip is damaged, seal will leak.
(4) Using a circular motion, pull seal up (Figure 12, Step 1), out (Figure 12, Step 2) and down (Figure 12, Step 3).
(5) When seal releases from lip of front panel, pull out and remove the seal from front panel around door opening. Refer to Figure 12, Step 4.
(6) While supporting the front panel assembly, remove the two bottom front corner screws. Refer to Figure 14. Remove front panel (with loading door attached) away from washer as far as wires permit.
(7) Unplug wire harness from both the door latch switch and from the door switch. Refer to Figure 20. Remove clips holding wire harness and door seal hose along top flange of front panel and remove front panel.
(8) Remove two screws holding cabinet top to front flange of side panel. Refer to Figure 13.
c. If area or space permits, lift cabinet top to a vertical position by hinging it on the rear hinges. Refer to Figure 5.
NOTE: To avoid damage to hinges, be sure to support cabinet top with a small chain or something similar. Refer to Figure 5.
d. Run belt off inner basket pulley while slowly turning pulley. Refer to Figure 19.
e. Remove belt from motor shaft.f. Cut the wire tie holding small harness
connector to motor, then dis]connect both motor harness connectors from motor.
g. Using a magic marker, outline the washer on the front and rear adjusting bolt holding motor to bracket so the belt can be tightened to the same location.
h. Use a 6 inch piece of 2x4 to support motor. Grasp the metal rod with a locking pliers and remove four bolts and washers holding motor to motor bracket. Refer to Figure 19 and remove motor out through front of washer.
Motor Installation –a. Place new motor into washer and allow motor
to rest on washer base.b. Reconnect harness connector to new motor.
Refer to Figure 19.c. Install new wire tie holding small harness
connector to motor frame. This is necessary to prevent future service calls.
d. Lift motor into position within the motor bracket and install the front pivot bolt and washer. Refer to Figure 19. Then install the rear pivot bolt and washer. Leave bolt snug, do not tighten.
e. Pivot motor up into motor bracket and install the front adjusting bolt and washer. Refer to Figure 19. Then install rear adjusting bolt and washer. Leave bolts snug.
NOTE: Locate the magic marker spot made earlier on the motor bracket. Pivot motor so front adjusting bolt and washer are in this spot and tighten both front and rear adjusting bolts. Then tighten both pivot bolts.

801728 65
Section 5 Service Procedures
© Copyright, Alliance Laundry Systems LLC – DO NOT COPY or TRANSMIT
To reduce the risk of electric shock, fire, explosion, serious injury or death:• Disconnect electric power to the washer before servicing.• Never start the washer with any guards/panels removed.• Whenever ground wires are removed during servicing, these ground wires must be
reconnected to ensure that the washer is properly grounded.• Motor not grounded! Disconnect electric power before servicing motor.
W485
WARNING
f. Place belt on motor pulley, then carefully run belt on inner basket pulley while slowly turning pulley. Refer to Figure 19.
g. Open loading door, reach into inner basket and rotate inner basket several times by hand. Recheck belt alignment.
h. Pull down on motor to increase belt tension. Use a Burroughs belt gauge to obtain proper tension. Proper belt tension is obtained when belt can be deflected approximately 1/4 inch (6.35 mm) from normal position when moderate pressure 50 to 60 pounds (22.68 to 27.22 Kg) is applied to a point midway between pulleys. Refer to Figure 19.
i. After proper belt tension has been obtained, tighten belt adjusting bolts firmly, then tighten pivot bolts. Refer to Figure 19.
j. Reinstall lower front access panel. Refer to Figure 9.
k. Lower cabinet top and install hold-down screws.
l. Front Control Washers – Reinstall control panel.Rear Control Washers – Reinstall front panel, door seal and dispenser drawer.

66 801728
Section 5 Service Procedures
© Copyright, Alliance Laundry Systems LLC – DO NOT COPY or TRANSMIT
To reduce the risk of electric shock, fire, explosion, serious injury or death:• Disconnect electric power to the washer before servicing.• Never start the washer with any guards/panels removed.• Whenever ground wires are removed during servicing, these ground wires must be
reconnected to ensure that the washer is properly grounded.• Motor not grounded! Disconnect electric power before servicing motor.
W485
WARNING
40. HEATING ELEMENT (Models equipped with heater)a. While supporting lower access panel, remove
two screws from bottom edge of panel and remove panel. Refer to Figure 9.
b. Disconnect all wires from heating element.c. Unscrew nut and lockwasher from center
terminal of heating element assembly until nut is at end of threaded stud. Refer to Figure 22.
d. Using a brass or wood rod, tap the threaded stud in toward washer about 1/4 inch to loosen heating element.
e. Grasp heating element assembly by the terminals. Pull assembly and rubber washer through opening in outer tub front panel. Refer to Figure 22.
NOTE: All rubber from old element gasket must be removed prior to installing a new element.
NOTE: When installing new heating element assembly, element must be at the 6 o’clock position.
Figure 22
FLW1743S
OUTERTUB FRONT
PANEL
SEAL
CLAMP RING
HEATINGELEMENT
ASSEMBLY
LOCKWASHERNUT
SCREWWASHERS
NUT
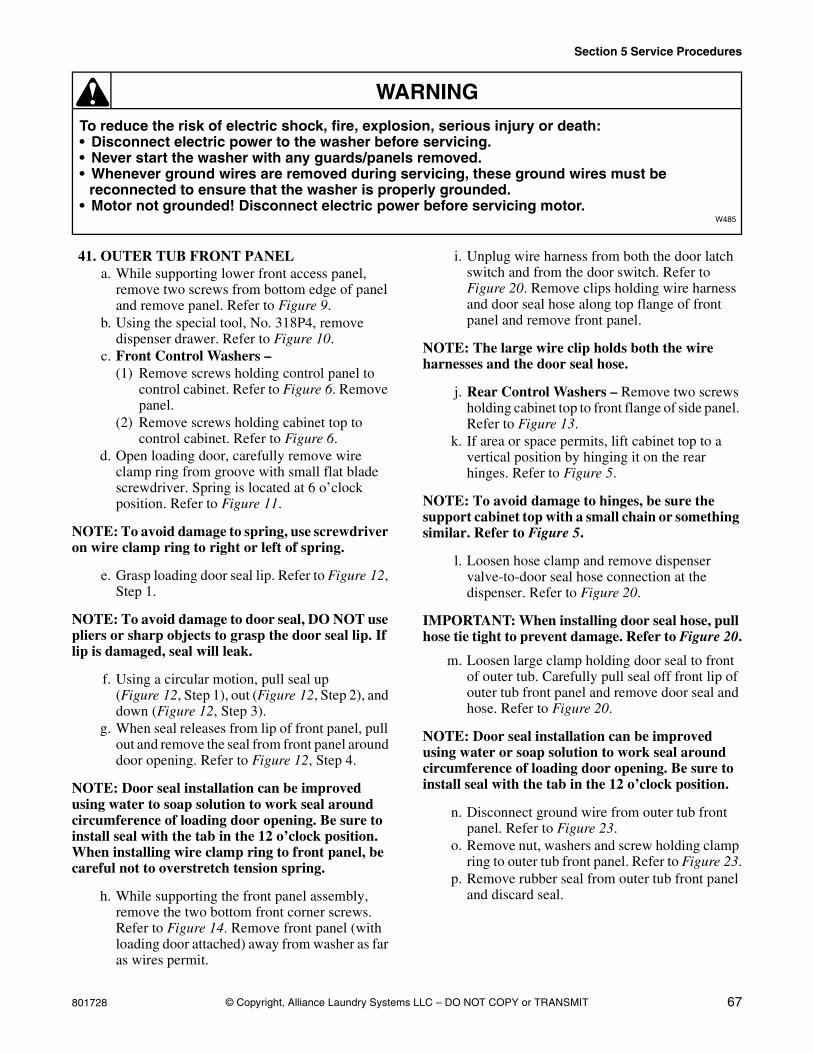
801728 67
Section 5 Service Procedures
© Copyright, Alliance Laundry Systems LLC – DO NOT COPY or TRANSMIT
To reduce the risk of electric shock, fire, explosion, serious injury or death:• Disconnect electric power to the washer before servicing.• Never start the washer with any guards/panels removed.• Whenever ground wires are removed during servicing, these ground wires must be
reconnected to ensure that the washer is properly grounded.• Motor not grounded! Disconnect electric power before servicing motor.
W485
WARNING
41. OUTER TUB FRONT PANELa. While supporting lower front access panel,
remove two screws from bottom edge of panel and remove panel. Refer to Figure 9.
b. Using the special tool, No. 318P4, remove dispenser drawer. Refer to Figure 10.
c. Front Control Washers –(1) Remove screws holding control panel to
control cabinet. Refer to Figure 6. Remove panel.
(2) Remove screws holding cabinet top to control cabinet. Refer to Figure 6.
d. Open loading door, carefully remove wire clamp ring from groove with small flat blade screwdriver. Spring is located at 6 o’clock position. Refer to Figure 11.
NOTE: To avoid damage to spring, use screwdriver on wire clamp ring to right or left of spring.
e. Grasp loading door seal lip. Refer to Figure 12, Step 1.
NOTE: To avoid damage to door seal, DO NOT use pliers or sharp objects to grasp the door seal lip. If lip is damaged, seal will leak.
f. Using a circular motion, pull seal up (Figure 12, Step 1), out (Figure 12, Step 2), and down (Figure 12, Step 3).
g. When seal releases from lip of front panel, pull out and remove the seal from front panel around door opening. Refer to Figure 12, Step 4.
NOTE: Door seal installation can be improved using water to soap solution to work seal around circumference of loading door opening. Be sure to install seal with the tab in the 12 o’clock position. When installing wire clamp ring to front panel, be careful not to overstretch tension spring.
h. While supporting the front panel assembly, remove the two bottom front corner screws. Refer to Figure 14. Remove front panel (with loading door attached) away from washer as far as wires permit.
i. Unplug wire harness from both the door latch switch and from the door switch. Refer to Figure 20. Remove clips holding wire harness and door seal hose along top flange of front panel and remove front panel.
NOTE: The large wire clip holds both the wire harnesses and the door seal hose.
j. Rear Control Washers – Remove two screws holding cabinet top to front flange of side panel. Refer to Figure 13.
k. If area or space permits, lift cabinet top to a vertical position by hinging it on the rear hinges. Refer to Figure 5.
NOTE: To avoid damage to hinges, be sure the support cabinet top with a small chain or something similar. Refer to Figure 5.
l. Loosen hose clamp and remove dispenser valve-to-door seal hose connection at the dispenser. Refer to Figure 20.
IMPORTANT: When installing door seal hose, pull hose tie tight to prevent damage. Refer to Figure 20.
m. Loosen large clamp holding door seal to front of outer tub. Carefully pull seal off front lip of outer tub front panel and remove door seal and hose. Refer to Figure 20.
NOTE: Door seal installation can be improved using water or soap solution to work seal around circumference of loading door opening. Be sure to install seal with the tab in the 12 o’clock position.
n. Disconnect ground wire from outer tub front panel. Refer to Figure 23.
o. Remove nut, washers and screw holding clamp ring to outer tub front panel. Refer to Figure 23.
p. Remove rubber seal from outer tub front panel and discard seal.
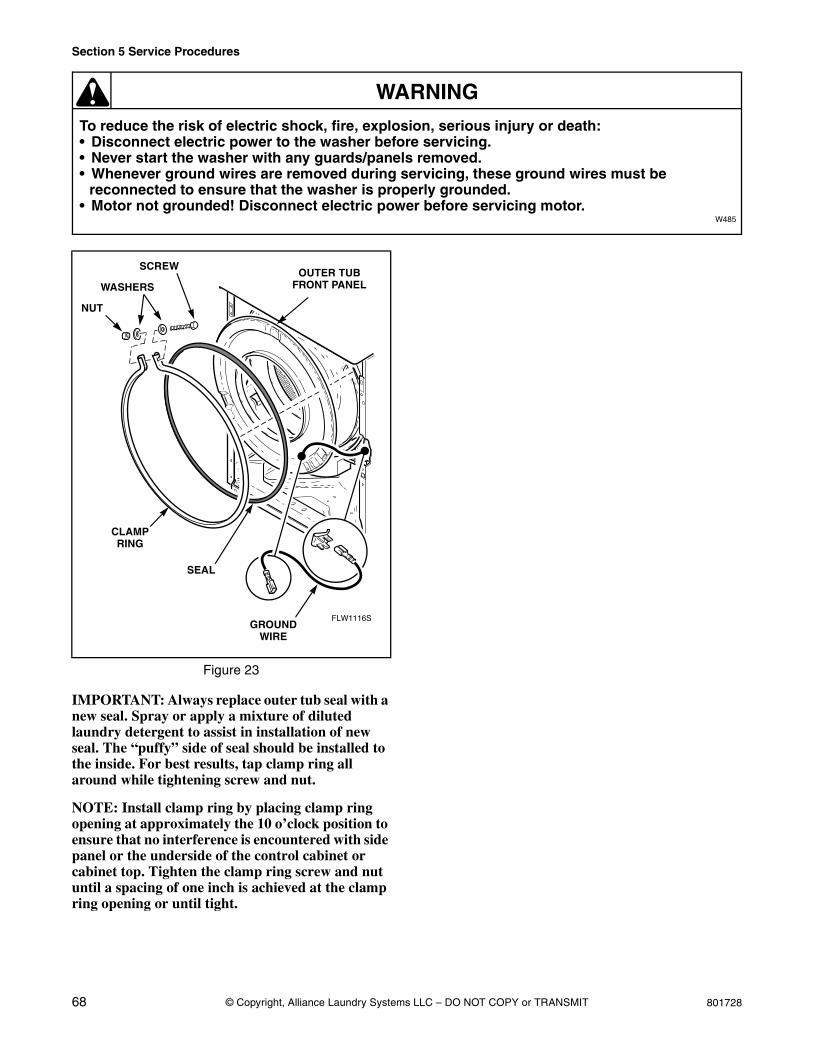
68 801728
Section 5 Service Procedures
© Copyright, Alliance Laundry Systems LLC – DO NOT COPY or TRANSMIT
To reduce the risk of electric shock, fire, explosion, serious injury or death:• Disconnect electric power to the washer before servicing.• Never start the washer with any guards/panels removed.• Whenever ground wires are removed during servicing, these ground wires must be
reconnected to ensure that the washer is properly grounded.• Motor not grounded! Disconnect electric power before servicing motor.
W485
WARNING
IMPORTANT: Always replace outer tub seal with a new seal. Spray or apply a mixture of diluted laundry detergent to assist in installation of new seal. The “puffy” side of seal should be installed to the inside. For best results, tap clamp ring all around while tightening screw and nut.
NOTE: Install clamp ring by placing clamp ring opening at approximately the 10 o’clock position to ensure that no interference is encountered with side panel or the underside of the control cabinet or cabinet top. Tighten the clamp ring screw and nut until a spacing of one inch is achieved at the clamp ring opening or until tight.
Figure 23
FLW1116S GROUND
WIRE
OUTER TUBFRONT PANEL
SCREW
WASHERS
NUT
SEAL
CLAMPRING

801728 69
Section 5 Service Procedures
© Copyright, Alliance Laundry Systems LLC – DO NOT COPY or TRANSMIT
To reduce the risk of electric shock, fire, explosion, serious injury or death:• Disconnect electric power to the washer before servicing.• Never start the washer with any guards/panels removed.• Whenever ground wires are removed during servicing, these ground wires must be
reconnected to ensure that the washer is properly grounded.• Motor not grounded! Disconnect electric power before servicing motor.
W485
WARNING
42. INNER BASKET PULLEYa. While supporting lower front access panel,
remove two screws from bottom edge of panel and remove panel. Refer to Figure 9.
b. Using the special tool, No. 318P4, remove dispenser drawer. Refer to Figure 10.
c. Front Control Washer –(1) Remove screws holding control panel to
control cabinet. Refer to Figure 6. Remove panel.
(2) Remove screws holding cabinet top to control cabinet. Refer to Figure 6.
d. Open loading door, carefully remove wire clamp ring from groove with small flat blade screwdriver. Spring is located at 6 o’clock position. Refer to Figure 11.
NOTE: To avoid damage to spring, use screwdriver on wire clamp ring to right or left of spring.
e. Grasp loading door seal lip. Refer to Figure 12, Step 1.
NOTE: To avoid damage to door seal, DO NOT use pliers or sharp objects to grasp the door seal lip. If lip is damaged, seal will leak.
f. Using a circular motion, pull seal up (Figure 12, Step 1), out (Figure 12, Step 2), and down (Figure 12, Step 3).
g. When seal releases from lip of front panel, pull out and remove the seal from front panel around door opening. Refer to Figure 12, Step 4.
NOTE: Door seal installation can be improved using water to soap solution to work seal around circumference of loading door opening. Be sure to install seal with the tab in the 12 o’clock position. When installing wire clamp ring to front panel, be careful not to overstretch tension spring.
h. While supporting the front panel assembly, remove the two bottom front corner screws. Refer to Figure 14. Remove front panel (with loading door attached) away from washer as far as wires permit.
i. Unplug wire harness from both the door latch switch and from the door switch. Refer to Figure 20. Remove clips holding wire harness and door seal hose along top flange of front panel and remove front panel.
NOTE: The large wire clip holds both the wire harnesses and the door seal hose. Refer to Figure 20.
j. Rear Control Washers – Remove two screws holding cabinet top to front flange of side panels. Refer to Figure 13.
k. If area or space permits, lift cabinet top to a vertical position by hinging it on the rear hinges.
NOTE: To avoid hinge damage, be sure to support cabinet top with a small chain or something similar. Refer to Figure 5.
l. Run belt off pulley while slowly turning pulley. Refer to Figure 19.
m. Remove belt from motor shaft.n. Remove cap screw (left hand thread)
lockwasher and flat washer holding pulley to inner basket shaft. Refer to Figure 27.
NOTE: Cap screw can be accessed through hole in rear panel by removing hole plug. Refer to Figure 27.
o. Remove pulley from shaft.
IMPORTANT: When installing pulley, always use a new cap screw to prevent screw from loosening during operation. Use a thread tap to clean old Loctite out of pulley screw receiving hole before installing new screw. This ensures that inner basket and pulley properly seat.
NOTE: When installing new cap screw, apply a thread locking compound to screw threads and torque new cap screw to 240 minimum to 260 maximum inch pounds (27.5 to 29.7 Nm).

70 801728
Section 5 Service Procedures
© Copyright, Alliance Laundry Systems LLC – DO NOT COPY or TRANSMIT
To reduce the risk of electric shock, fire, explosion, serious injury or death:• Disconnect electric power to the washer before servicing.• Never start the washer with any guards/panels removed.• Whenever ground wires are removed during servicing, these ground wires must be
reconnected to ensure that the washer is properly grounded.• Motor not grounded! Disconnect electric power before servicing motor.
W485
WARNING
p. After installing belt, adjust belt tension as follows:(1) Working through the access door opening,
place a locking pliers on the metal rod and loosen the two adjusting bolts. Refer to Figure 19. Repeat procedure to loosen the two pivot bolts. Refer to Figure 19.
(2) Pull down on motor to increase belt tension. Use a Burroughs belt gauge to obtain proper tension. Proper belt tension is obtained when belt can be deflected approximately 1/4 inch (6.35 mm) from normal position when moderate pressure 50 to 60 pounds (22.68 to 27.22 Kg) is applied to a point midway between pulleys. Refer to Figure 19.
(3) After proper belt tension has been obtained, tighten belt adjusting bolts firmly, then tighten pivot bolts. Refer to Figure 19.
43. INNER BASKET ASSEMBLYInner Basket Removal – a. While supporting lower front access panel,
remove two screws from bottom edge of panel and remove panel. Refer to Figure 9.
b. Using the special tool, No. 318P4, remove dispenser drawer. Refer to Figure 10.
c. Front Control Washers –(1) Remove screws holding control panel to
control cabinet. Refer to Figure 6. Remove panel.
(2) Remove screws holding cabinet top to control cabinet. Refer to Figure 6.
d. Open loading door. Carefully remove wire clamp ring from groove with small flat blade screwdriver. Spring is in 6 o’clock position. Refer to Figure 11.
NOTE: To avoid damage to spring, use screwdriver on wire clamp ring to right or left of spring.
e. Grasp loading door seal lip. Refer to Figure 12, Step 1.
NOTE: To avoid damage to door seal, DO NOT use pliers or sharp objects to grasp the door seal lip. If lip is damaged, seal will leak.
f. Using a circular motion, pull seal up (Figure 12, Step 1), out (Figure 12, Step 2), and down (Figure 12, Step 3).
g. When seal releases from lip of front panel, pull out and remove the seal from front panel around door opening. Refer to Figure 12, Step 4.
h. While supporting the front panel assembly, remove the two bottom front corner screws. Refer to Figure 14. Remove front panel (with loading door attached) away from washer as far as wires permit.
i. Unplug wire harness from both the door latch switch and from the door switch. Refer to Figure 20. Remove clips holding wire harness and door seal hose along top flange of front panel and remove front panel.
NOTE: The large wire clip holds both the wire harnesses and the door seal hose. Refer to Figure 20.
j. Rear Control Washers – Remove two screws holding cabinet top to front flange of side panels. Refer to Figure 13.
k. If area or space permits, lift cabinet top to a vertical position by hinging it on the rear hinges. Refer to Figure 5.
NOTE: To avoid damage to hinges, be sure to support cabinet top with a small chain or something similar. Refer to Figure 5.
l. Loosen hose clamp and remove dispenser valve-to-door seal hose connection at the dispenser. Refer to Figure 20.
IMPORTANT: When installing door seal hose, pull hose tie tight to prevent damage. Refer to Figure 20.
m. Loosen large clamp holding door seal to front of outer tub. Carefully pull seal off front lip of outer tub front panel and remove door seal and hose. Refer to Figure 20.

801728 71
Section 5 Service Procedures
© Copyright, Alliance Laundry Systems LLC – DO NOT COPY or TRANSMIT
To reduce the risk of electric shock, fire, explosion, serious injury or death:• Disconnect electric power to the washer before servicing.• Never start the washer with any guards/panels removed.• Whenever ground wires are removed during servicing, these ground wires must be
reconnected to ensure that the washer is properly grounded.• Motor not grounded! Disconnect electric power before servicing motor.
W485
WARNING
NOTE: Door seal installation can be improved using water or soap solution to work seal around circumference of loading door opening. Be sure to install seal with the tab in the 12 o’clock position.
n. Disconnect ground wire from outer tub front panel. Refer to Figure 23.
o. Remove nut, washers and screw holding clamp ring to outer tub front panel. Refer to Figure 23.
p. Remove rubber seal from outer tub front panel and discard seal.
IMPORTANT: Always replace seal with a new seal. Spray or apply a mixture of diluted laundry detergent to assist in installation of new seal. The “puffy” side of seal should be installed to the inside. For best results, tap clamp ring all around while tightening screw and nut.
NOTE: Install metal clamp ring by placing clamp ring opening at approximately the 10 o’clock position to ensure that no interference is encountered with side panel or the underside of the control cabinet or cabinet top. Tighten the clamp ring screw and nut until a spacing of one inch is achieved at the clamp ring opening or until tight.
q. Run belt off pulley while slowly turning pulley. Refer to Figure 19.
r. Remove belt from motor shaft.s. Remove cap screw (left hand thread),
lockwasher and flat washer holding pulley to inner basket shaft. Refer to Figure 27.
NOTE: Cap screw can be accessed through hole in rear panel by removing hole plug. Refer to Figure 27.
t. Remove pulley front shaft.
IMPORTANT: When installing pulley, always use a new cap screw to prevent screw from loosening during operation. Use a thread tap to clean old Loctite out of pulley screw receiving hole before installing new screw. This ensures that inner basket and pulley properly seat.
NOTE: When installing new cap screw, apply a thread locking compound to screw threads and
torque new cap screw to 240 minimum to 260 maximum inch pounds (27.5 to 29.7 Nm).
u. After installing belt, adjust belt tension per Paragraph 48.
v. Carefully remove inner basket out through front of washer.
Installing 800749P Trunnion Kit or 800198P Inner Basket Kita. Remove nuts, washers and tension rods holding
trunnion to inner basket. Refer to Figure 24.b. If using existing trunnion, clean out old Loctite
from pulley bolt threads using a 3/8-24 UNF Left Hand Tap.
c. Dip threads of three new tension rods into lightweight oil.
d. Insert tension rods into inner basket. Refer to Figure 24. Position each rod so the rounded corner of triangular head faces the center of inner basket. Refer to Figure 25.
e. Position trunnion assembly through rods and onto inner basket.
f. Attach three washers and three new nylon locknuts onto rods. Leave the nuts loose.
IMPORTANT: Always use new nylon locknuts.
Figure 24
FLW10K
TENSIONROD
INNER BASKET
TRUNNION ASSEMBLY
NYLONLOCKNUT
WASHER

72 801728
Section 5 Service Procedures
© Copyright, Alliance Laundry Systems LLC – DO NOT COPY or TRANSMIT
To reduce the risk of electric shock, fire, explosion, serious injury or death:• Disconnect electric power to the washer before servicing.• Never start the washer with any guards/panels removed.• Whenever ground wires are removed during servicing, these ground wires must be
reconnected to ensure that the washer is properly grounded.• Motor not grounded! Disconnect electric power before servicing motor.
W485
WARNING
g. Carefully center trunnion on basket and torque nuts to about 50 inch-pounds.
h. Install inner basket/trunnion assembly into washer. Do not bolt down at this time.
i. Check for concentricity/roundness of assembly. Use a dial indicator to check that concentricity at the inside edge of inner basket lip is a maximum of .05 inch TIR (Total Indicator Runout). Refer to Figure 26. If concentricity is not within .05 inch, remove assembly from washer and adjust location of trunnion. Repeat until concentricity is within .05 inch.
j. Remove inner basket/trunnion assembly from washer and evenly torque three nuts to 200 ± 10 inch-pounds.
k. Recheck that concentricity is still within .05 inch.
Inner Basket Installation – a. Apply No. 27604P Anti-Seize Compound to
the area of the trunnion shaft that will be contacting the front and rear bearings. Refer to Figure 28.
b. Apply a film of grease to area of shaft that will be contacting the bearing housing seal. Refer to Figure 28. Make sure seal lips also are packed with grease. Refer to Figure 28.
c. Install inner basket assembly by pushing all the way into outer tub.
d. Install pulley, flat washer, lockwasher and left hand thread screw. Refer to Figure 27.
IMPORTANT: When installing pulley, always use a new cap screw (included in kit) to prevent screw from loosening during operation. Use a thread tap to clean old Loctite out of pulley screw receiving hole before installing new screw. This ensures that inner basket and pulley properly seat.
Figure 25
FLW11K
TENSION ROD HEAD
INNERBASKET
ROUNDED CORNER
Figure 26
FLW12K
DIAL INDICATOR
INNER BASKET
OUTER TUB
INNER BASKET LIP

801728 73
Section 5 Service Procedures
© Copyright, Alliance Laundry Systems LLC – DO NOT COPY or TRANSMIT
Figure 27
FLW1745S
MOUNTING PLATE AND PRESSURE HOSE
CLIP
PRESSURESWITCH
PUT ALLEXCESS
PRESSURE HOSE SLACK HERE
REARPANEL
REMOVE HOLE PLUG FROM REAR OF MACHINE
TO ACCESSCAP SCREW
NUT
OUTERTUB
INNERBASKET
PRESSUREHOSE
BEARING HOUSING
ASSEMBLY
FRONT CONTROL WASHERILLUSTRATED
MOUNTING PLATEAND PRESSURE
HOSE CLIP
INNERBOLTS
PULLEY
FLATWASHER
TO REMOVECAP SCREW(LEFT HAND
THREAD)
LOCKWASHER
PRESSUREHOSE CLIP
ARMBOLTS
WASHER

74 801728
Section 5 Service Procedures
© Copyright, Alliance Laundry Systems LLC – DO NOT COPY or TRANSMIT
Figure 28
FLW1707S
TRUNNIONSHAFT
INNERBASKET
BEARING HOUSING
ASSEMBLY
APPLY NEW GREASE IN LIPS OF
BEARING HOUSINGSEAL
OUTERTUB
APPLY GREASE TO THIS
AREA
APPLY ANTI-SEIZE
COMPOUND TOTHESE AREAS
Figure 29
FLW25K
Flat Washer
Pulley Bolt Tightening
Fixture
Pulley
Left Hand Thread Screw

801728 75
Section 5 Service Procedures
© Copyright, Alliance Laundry Systems LLC – DO NOT COPY or TRANSMIT
To reduce the risk of electric shock, fire, explosion, serious injury or death:• Disconnect electric power to the washer before servicing.• Never start the washer with any guards/panels removed.• Whenever ground wires are removed during servicing, these ground wires must be
reconnected to ensure that the washer is properly grounded.• Motor not grounded! Disconnect electric power before servicing motor.
W485
WARNING
e. Unscrew left hand thread screw half way.f. Install pulley bolt tightening fixture between
the flat washer and the pulley. Refer to Figure 29.
g. Tighten left hand thread screw until washer is against pulley bolt tightening fixture.
h. Loosen screw about one half turn to free fixture.
i. Remove pulley bolt tightening fixture.j. From front of washer, pull inner basket forward
as far as possible. Flat washer should be against pulley.
k. Push inner basket back into outer tub as far as possible.
l. Tighten left hand thread screw. Be careful not to push the trunnion shaft forward while tightening the screw.
NOTE: Torque new left hand thread screw to 240 minimum to 260 maximum inch pounds (27.5 to 29.7 Nm).
44. BEARING HOUSINGBearing Housing Removal – a. While supporting lower front access panel,
remove two screws from bottom edge of panel and remove panel. Refer to Figure 9.
b. Use special tool, No. 318P4, and remove dispenser drawer.Refer to Figure 10.
c. Front Control Washers –(1) Remove screws holding control panel to
control cabinet. Refer to Figure 6. Remove panel.
(2) Remove screws holding cabinet top to control cabinet. Refer to Figure 6.
d. Open loading door. Carefully remove wire clamp ring from groove with a small flat blade screwdriver. Spring is in 6 o’clock position. Refer to Figure 11.
NOTE: To avoid damage to spring, use screwdriver on wire clamp ring to right or left of spring.
e. Grasp loading door seal lip. Refer to Figure 12, Step 1.
NOTE: To avoid damage to door seal, DO NOT use pliers or sharp objects to grasp the door seal lip. If lip is damaged, seal will leak.
f. Using a circular motion, pull seal up (Figure 12, Step 1), out (Figure 12, Step 2), and down (Figure 12, Step 3).
g. When seal releases from lip of front panel, pull out and remove the seal from front panel around door opening. Refer to Figure 12, Step 4.
h. While supporting the front panel assembly, remove the two bottom front corner screws. Refer to Figure 14. Remove front panel (with loading door attached) away from washer as far as wires permit.
NOTE: Refer to wiring diagram when rewiring door switch.
i. Unplug wire harness from both the door latch switch and from the door switch. Refer to Figure 20. Remove clips holding wire harness and door seal hose along top flange of front panel and remove front panel. Refer to Figure 20.
NOTE: The large wire clip holds both the wire harnesses and the door seal hose. Refer to Figure 20.
j. Rear Control Washers – Remove two screws holding cabinet top to front flange of side panels. Refer to Figure 13.
k. If area or space permits, lift cabinet top to a vertical position by hinging it on the rear hinges.
NOTE: To avoid damage to hinges, be sure to support cabinet top with a small chain or something similar. Refer to Figure 5.
l. Loosen hose clamp and remove dispenser valve-to-door seal hose connection at the dispenser. Refer to Figure 20.
IMPORTANT: When installing door seal hose, pull hose tie tight to prevent damage. Refer to Figure 20.

76 801728
Section 5 Service Procedures
© Copyright, Alliance Laundry Systems LLC – DO NOT COPY or TRANSMIT
To reduce the risk of electric shock, fire, explosion, serious injury or death:• Disconnect electric power to the washer before servicing.• Never start the washer with any guards/panels removed.• Whenever ground wires are removed during servicing, these ground wires must be
reconnected to ensure that the washer is properly grounded.• Motor not grounded! Disconnect electric power before servicing motor.
W485
WARNING
m. Loosen large clamp holding door seal to front of outer tub. Carefully pull seal off front lip of outer tub front panel and remove door seal and hose. Refer to Figure 20.
NOTE: Door seal installation can be improved using water or soap solution to work seal around circumference of loading door opening. Be sure to install seal with the tab in the 12 o’clock position.
n. Disconnect ground wire from outer tub front panel. Refer to Figure 23.
o. Remove nut, washers and screw holding clamp ring to outer tub front panel. Refer to Figure 23.
p. Remove rubber seal from outer tub front panel and discard seal.
IMPORTANT: Always replace seal with a new seal. Spray or apply a mixture of diluted laundry detergent to assist in installation of new seal. The “puffy” side of seal should be installed to the inside. For best results, tap clamp ring all around while tightening screw and nut.
NOTE: Install clamp screw with threads and nut facing downward. Refer to Figure 23. Install clamp screw with threads and nut facing downward. Refer to Figure 23. Install metal clamp ring by placing clamp ring opening at approximately the 10 o’clock position to ensure no interference is encountered with side panel or the underside of the control cabinet or cabinet top. Tighten screw and nut until a spacing of one inch is achieved at the clamp ring opening. Tap clamp ring all around while tightening the screw and nut.
q. Run belt off pulley while slowly turning pulley. Refer to Figure 19.
r. Remove belt from motor shaft.s. Remove cap screw (left hand thread),
lockwasher and flat washer holding pulley to inner basket shaft. Refer to Figure 27.
NOTE: Cap screw can be accessed through hole in rear panel by removing hole plug. Refer to Figure 27.
t. Remove pulley from shaft.
IMPORTANT: When installing pulley, always use a new cap screw to prevent screw from loosening during operation. Use a thread tap to clean old Loctite out of pulley screw receiving hole before installing new screw. This ensures that inner basket and pulley properly seat.
NOTE: When installing new cap screw, apply a thread locking compound to screw threads and torque new cap screw to 240 minimum to 260 maximum inch pounds (27.5 to 29.7 Nm).
u. After installing belt, adjust belt tension per Paragraph 48.
v. Carefully remove inner basket out through front of washer.
w. Remove three screws holding bearing housing arms to outer tub.
IMPORTANT: Prior to disassembly, note the position of the pressure hose, hose clips and mounting plate so parts can be reinstalled in the same position. Refer to Figure 27.
x. While supporting bearing housing, remove three inner screws holding bearing housing to rear of outer tub. Refer to Figure 27.
Bearing Housing Installation –
NOTE: When installing the bearing housing, be sure to route the pressure hose under the right arm and attach hose and pressure hose clip to mounting plate. Refer to Figure 27. Then route pressure hose up to the hose mounting plate on the top arm. Refer to Figure 27. Make sure there is no slack between these two points. All excess pressure hose slack must be collected between the top hose mounting plate on the bearing housing arm and the pressure hose clip. Refer to Figure 27.
IMPORTANT: The three arm bolts should always be tightened first and torqued to 275 inch pounds (31.46 Nm). Then tighten the three inner bolts and torque to 150 inch pounds (17.16 Nm).

801728 77
Section 5 Service Procedures
© Copyright, Alliance Laundry Systems LLC – DO NOT COPY or TRANSMIT
To reduce the risk of electric shock, fire, explosion, serious injury or death:• Disconnect electric power to the washer before servicing.• Never start the washer with any guards/panels removed.• Whenever ground wires are removed during servicing, these ground wires must be
reconnected to ensure that the washer is properly grounded.• Motor not grounded! Disconnect electric power before servicing motor.
W485
WARNING
NOTE: If a bearing failure should occur, a new bearing housing assembly should always be used. The bearings and seal are not serviceable parts. Make sure the new bearing housing seal is packed with lubrication in all grooves before installation. If not, lubricate seal.
a. Apply No. 27604P Anti-Seize Compound to the area of the trunnion shaft that will be contacting the front and rear bearings. Refer to Figure 28.
b. Apply a film of grease to area of shaft that will be contacting the bearing housing seal. Refer to Figure 28. Make sure seal lips also are packed with grease. Refer to Figure 28.
IMPORTANT: When installing inner basket, the following steps must be taken to ensure that the seal is properly orientated:
c. Install inner basket assembly by pushing all the way into outer tub.
d. Install pulley, flat washer, lockwasher and left hand thread screw. Refer to Figure 27.
IMPORTANT: When installing pulley, always use a new cap screw (included in kit) to prevent screw from loosening during operation. Use a thread tap to clean old Loctite out of pulley screw receiving hole before installing new screw. This ensures that inner basket and pulley properly seat.
e. Unscrew left hand thread screw half way.f. Install pulley bolt tightening fixture between
the flat washer and the pulley. Refer to Figure 29.
g. Tighten left hand thread screw until washer is against pulley bolt tightening fixture.
h. Loosen screw about one half turn to free fixture.
i. Remove pulley bolt tightening fixture.j. From front of washer, pull inner basket forward
as far as possible. Flat washer should be against pulley.
k. Push inner basket back into outer tub as far as possible.
l. Tighten left hand thread screw. Be careful not to push the trunnion shaft forward while tightening the screw.
NOTE: Torque new left hand thread screw to 240 minimum to 260 maximum inch pounds (27.5 to 29.7 Nm).

78 801728
Section 5 Service Procedures
© Copyright, Alliance Laundry Systems LLC – DO NOT COPY or TRANSMIT
Notes

801728 79© Copyright, Alliance Laundry Systems LLC – DO NOT COPY or TRANSMIT
To reduce the risk of electric shock, fire, explosion, serious injury or death:• Disconnect electric power to the washer before servicing.• Never start the washer with any guards/panels removed.• Whenever ground wires are removed during servicing, these ground wires must be
reconnected to ensure that the washer is properly grounded.• Motor not grounded! Disconnect electric power before servicing motor.
W485
WARNING
Section 6Adjustments
IMPORTANT: When reference is made to directions (right or left) in this manual, it is from operator’s position facing front of washer.
45. CABINET LEVELING LEGSa. Place washer in position on a clean, firm and
reasonably level floor. Installing the washer on any type of carpeting is not recommended.
b. Loosen locknuts and adjust the leveling legs until the washer does not rock. Refer to Figure 30.
NOTE: Level must rest on raised portion of top panel. Refer to Figure 30.
c. Tighten the locknuts securely against the washer base. If the locknuts are not tight, washer will move out of position during operation.
d. Place rubber feet on all four leveling legs. Refer to Figure 30.
DO NOT slide washer across floor if the leveling legs have been extended, as legs and base could become damaged.
W248
CAUTION
Use of the dispenser drawer or washer door as a handle in the transportation of the washer may cause damage to the dispenser or door.
W185
CAUTION
Figure 30
FLW1944N
FRONT CONTROL WASHERS
REAR CONTROL WASHERS
WASHERBASE
LOCKNUTLEVEL
LEVELINGLEG RUBBER
FOOT
LEVELINGLEG
RUBBERFOOT
LOCKNUTWASHER
BASE
LEVEL

80 801728
Section 6 Adjustments
© Copyright, Alliance Laundry Systems LLC – DO NOT COPY or TRANSMIT
To reduce the risk of electric shock, fire, explosion, serious injury or death:• Disconnect electric power to the washer before servicing.• Never start the washer with any guards/panels removed.• Whenever ground wires are removed during servicing, these ground wires must be
reconnected to ensure that the washer is properly grounded.• Motor not grounded! Disconnect electric power before servicing motor.
W485
WARNING
46. LOADING DOORa. Open loading door.b. Remove door bezel to gain access to nuts. Refer
to Figure 31.c. The loading door can be adjusted up or down
somewhat by loosening screws holding door to hinge, then raise or lower door before retightening screws. Refer to Figure 31.
Figure 31
Door Bezel Attaching Screw
DoorBezel
Inner Doorand Glass
H212SE1B
LoadingDoor
AttachingScrew
NutLockwasher
InnerDoorand
Glass
HingeAssembly
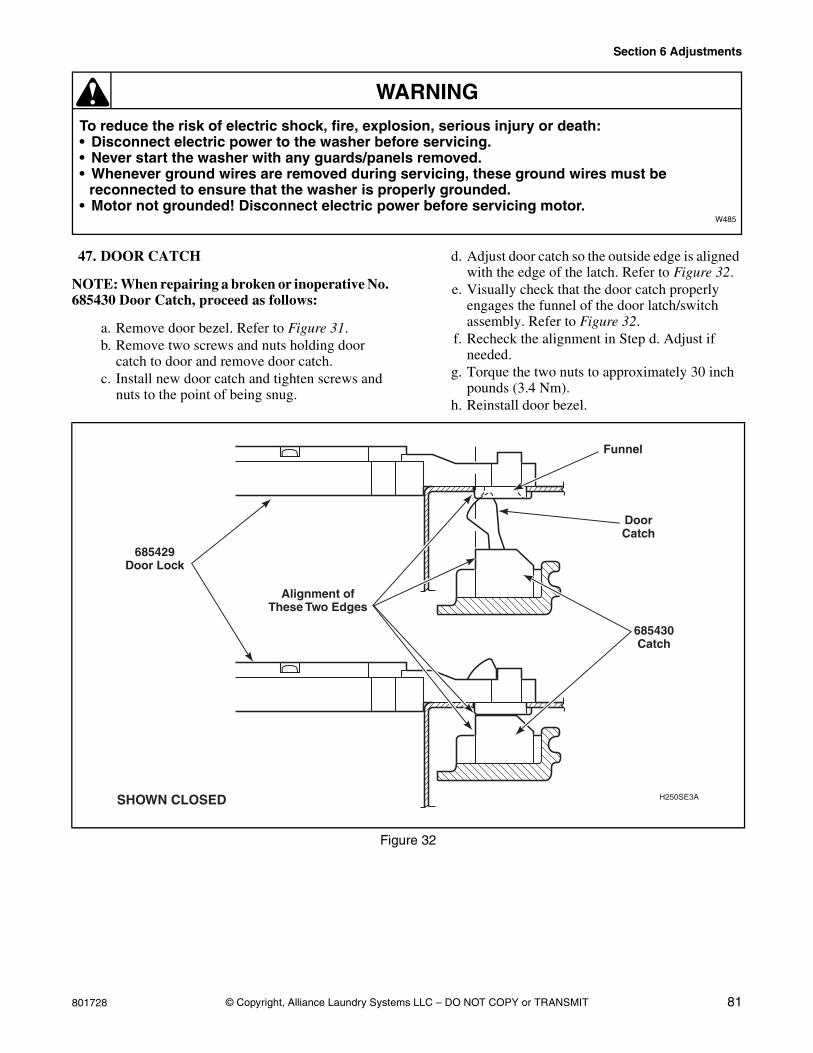
801728 81
Section 6 Adjustments
© Copyright, Alliance Laundry Systems LLC – DO NOT COPY or TRANSMIT
To reduce the risk of electric shock, fire, explosion, serious injury or death:• Disconnect electric power to the washer before servicing.• Never start the washer with any guards/panels removed.• Whenever ground wires are removed during servicing, these ground wires must be
reconnected to ensure that the washer is properly grounded.• Motor not grounded! Disconnect electric power before servicing motor.
W485
WARNING
47. DOOR CATCH
NOTE: When repairing a broken or inoperative No. 685430 Door Catch, proceed as follows:
a. Remove door bezel. Refer to Figure 31.b. Remove two screws and nuts holding door
catch to door and remove door catch.c. Install new door catch and tighten screws and
nuts to the point of being snug.
d. Adjust door catch so the outside edge is aligned with the edge of the latch. Refer to Figure 32.
e. Visually check that the door catch properly engages the funnel of the door latch/switch assembly. Refer to Figure 32.
f. Recheck the alignment in Step d. Adjust if needed.
g. Torque the two nuts to approximately 30 inch pounds (3.4 Nm).
h. Reinstall door bezel.
Figure 32
H250SE3A
685429Door Lock
Funnel
DoorCatch
685430Catch
SHOWN CLOSED
Alignment ofThese Two Edges

82 801728
Section 6 Adjustments
© Copyright, Alliance Laundry Systems LLC – DO NOT COPY or TRANSMIT
To reduce the risk of electric shock, fire, explosion, serious injury or death:• Disconnect electric power to the washer before servicing.• Never start the washer with any guards/panels removed.• Whenever ground wires are removed during servicing, these ground wires must be
reconnected to ensure that the washer is properly grounded.• Motor not grounded! Disconnect electric power before servicing motor.
W485
WARNING
48. MOTOR BELT TENSION
NOTE: Belt adjustment procedures are done through front of washer, however, as an option, washer can be moved from its location and belt adjustment can be done through lower access panel opening at rear of washer.
a. While supporting lower front access panel, remove two screws from bottom edge of access panel and remove panel. Refer to Figure 9.
b. Working through the lower front access door opening, place a locking pliers on the metal rod and loosen the two adjusting bolts. Refer to Figure 33. Repeat procedure to loosen the two pivot bolts. Refer to Figure 33.
c. Pull down on motor to increase belt tension. Use a Burroughs belt gauge to obtain proper tension. Proper belt tension is obtained when belt can be deflected approximately 1/4 inch (6.35 mm) from normal position when moderate pressure 50 to 60 pounds (22.68 to 27.22 Kg) is applied to a point midway between pulleys. Refer to Figure 33.
d. After proper belt tension has been obtained, tighten belt adjusting bolts firmly, then tighten pivot bolts. Refer to Figure 33.
Figure 33
FLW1706S
MOTORMOUNTINGBRACKET
INNER BASKETPULLEY
PIVOTBOLT
ADJUSTINGBOLT
METALROD
WIREHARNESS
1/4INCH
MOTORSHAFT
BELT
ADJUSTINGBOLT
PIVOTBOLT

801728 83
Section 6 Adjustments
© Copyright, Alliance Laundry Systems LLC – DO NOT COPY or TRANSMIT
To reduce the risk of electric shock, fire, explosion, serious injury or death:• Disconnect electric power to the washer before servicing.• Never start the washer with any guards/panels removed.• Whenever ground wires are removed during servicing, these ground wires must be
reconnected to ensure that the washer is properly grounded.• Motor not grounded! Disconnect electric power before servicing motor.
W485
WARNING
49. SHIPPING BRACESAll frontload washers, when shipped from the factory are equipped with two factory installed shipping supports. DO NOT remove this shipping material until after washer is placed in its final installed position. Refer to Figure 34.
IMPORTANT: DO NOT tip or move washer once these supports have been removed. Removal of supports prior to final installation may cause
damage to the shock absorbers and will VOID the product warranty.
NOTE: Shipping supports MUST be kept for future re-positioning or moving of the washer.
Figure 34
FLW821S
SHOCK ABSORBER SHIPPING SUPPORT
SHOCK ABSORBER SHIPPING SUPPORT
SHIPPING BRACKET

84 801728
Section 6 Adjustments
© Copyright, Alliance Laundry Systems LLC – DO NOT COPY or TRANSMIT
Notes