Home Lab 5 Refraction of Light - University of...
21
Home Lab 5 ‐ Refraction of Light Name____________________________________ Date_______________ 1 Home Lab 5 Refraction of Light Overview: In previous experiments we learned that when light falls on certain materials some of the light is reflected back. In many materials, such as glass, plastic, or water, the light also goes through the material or body. For example, I can see my face when light is reflected from the surface of water such as a swimming pool, which means that water reflects light. At the same time, I can see the bottom of the swimming pool, which means light is reflected from the bottom of the pool then transmitted through the water and then into the air to my eye. Light travels in straight lines until it encounters another material where it is partially reflected and partially transmitted. We learned that the angle of incidence is equal to the angle of reflection and the angles do not depend on the nature of the material. In refraction we will learn that the angle of the ray when transmitted through the material changes and depends on the speed of light in the two materials. Many phenomena encountered in our daily lives can be simply explained on the basis of refraction and reflection. Some of these are: why do fish look larger in the water, what causes a spoon to appear bent in a glass of water, why does light travel indefinitely in an optical cable, and, of course ,how are rainbows, and mirages formed, etc.
-
Upload
nguyendien -
Category
Documents
-
view
216 -
download
0
Transcript of Home Lab 5 Refraction of Light - University of...

HomeLab5‐RefractionofLightName____________________________________Date_______________
1
Home Lab 5
Refraction of Light
Overview: In previous experiments we learned that when light falls on certain materials some of the light is reflected back. In many materials, such as glass, plastic, or water, the light also goes through the material or body. For example, I can see my face when light is reflected from the surface of water such as a swimming pool, which means that water reflects light. At the same time, I can see the bottom of the swimming pool, which means light is reflected from the bottom of the pool then transmitted through the water and then into the air to my eye. Light travels in straight lines until it encounters another material where it is partially reflected and partially transmitted. We learned that the angle of incidence is equal to the angle of reflection and the angles do not depend on the nature of the material. In refraction we will learn that the angle of the ray when transmitted through the material changes and depends on the speed of light in the two materials. Many phenomena encountered in our daily lives can be simply explained on the basis of refraction and reflection. Some of these are: why do fish look larger in the water, what causes a spoon to appear bent in a glass of water, why does light travel indefinitely in an optical cable, and, of course ,how are rainbows, and mirages formed, etc.

HomeLab5‐RefractionofLightName____________________________________Date_______________
2
Activity 5-1: The Broken Pencil
Objective: You will make simple observations of light refracting through and reflecting from water and glass. Materials: • A clear medium size glass, beaker, or glass jar. • A pencil, pen, or straw.
Procedure: Fill the glass about 2/3 full of water. Take the pencil and immerse it vertically in the water. Move the pencil in a circular motion around the inside of the glass while viewing the motion from the side of the glass (as shown in the side view below and top view ).
side view top view
Write your observations and answer questions for each of the following:
1. Briefly describe your observations of the pencil as it moves in a circle inside the glass.
2. Describe where in the circle the pencil in the water appears most like the pencil out of the water.
3. Describe where in the circle the pencil in the water appears most broken from the pencil in the air. (most separated)
4. Describe where along the length of the pencil the pencil appears to break (in water, air, between the two).
5. Describe where in the circle the pencil in the water appears most magnified.

HomeLab5‐RefractionofLightName____________________________________Date_______________
3
6. Do you think you would get the same effect with other liquids. Try olive oil. – explain your answer?
Now take the pencil out of the water and move the vertical pencil across the back of the outside of the glass while viewing from the side (as above).
side view top view
7. Briefly describe your observations of the pencil as it moves across the backside of the
glass.
8. Now that the pencil is outside the water does it still appear broken? – explain.
9. Describe where the pencil appears most broken (most separated)?
10. Describe where the pencil appears most magnified as you move it behind the beaker?
11. Make an attempt to explain your main observations in terms of your understanding of light rays. What is bending or breaking, where is it taking place, what causes magnification?

HomeLab5‐RefractionofLightName____________________________________Date_______________
4
Activity 5-2: Rules of Refraction
Objective: : To explore the rules that predicts refraction in materials. Materials Included: • A plastic rectangular block. • A pencil or pen, ruler, protractor, and paper sheet provided. Background: When a light ray moves from one material into another material its speed will usually be altered causing the ray of light to change its direction (to bend). In the picture here it can be seen that the Laser light in the air does not continue in a straight line when moving through a plastic block but bends toward a line drawn perpendicular to the surface where the light entered the block (the normal line). Also note the slight reflection from the front of the block.
As the light leaves on the other side of the plastic block it bends away from the normal line. The amount of refractive bending of the light caused by the plastic block is an intrinsic property of the material making up the block itself. That is, the material in which the block is made can be identified by how much it bends the light (the ultimate test to determine the authenticity of a diamond is for the jeweler to measure its refractive index in an instrument known as a refractometer). As light enters a more optically dense material (e.g. from air into water or glass) – it will always slowdown and thus always bend toward the normal line. If light moves into a less dense material – it will always speedup and thus move away from the normal (as we see in the photo above). In this investigation we will determine the amount and direction that light is bent as it moves from one material into another.

HomeLab5‐RefractionofLightName____________________________________Date_______________
5
Procedure:
The picture and diagram above represent the same instructions. On the page 21 of this handout you are given a page with 3 diagonal dark lines pointing toward another dark line (as shown above).
• Print out this page and place your block on the line as indicated.
• Get down, so your eye is at table level and view the diagonal lines through the side of your block (it should look like the picture below).
• Draw lines around the edge of the block so you will know the placement of the block.
• Line up a ruler with where the diagonal lines appear to project when looking through the side of the block – draw 3 lines to where these lines would continue as seen through your side of the block. Label your lines so we know which are yours.
• Remove the block from the paper and you should have a diagram much like the picture below.
HomeLab5‐RefractionofLightName____________________________________Date_______________
6
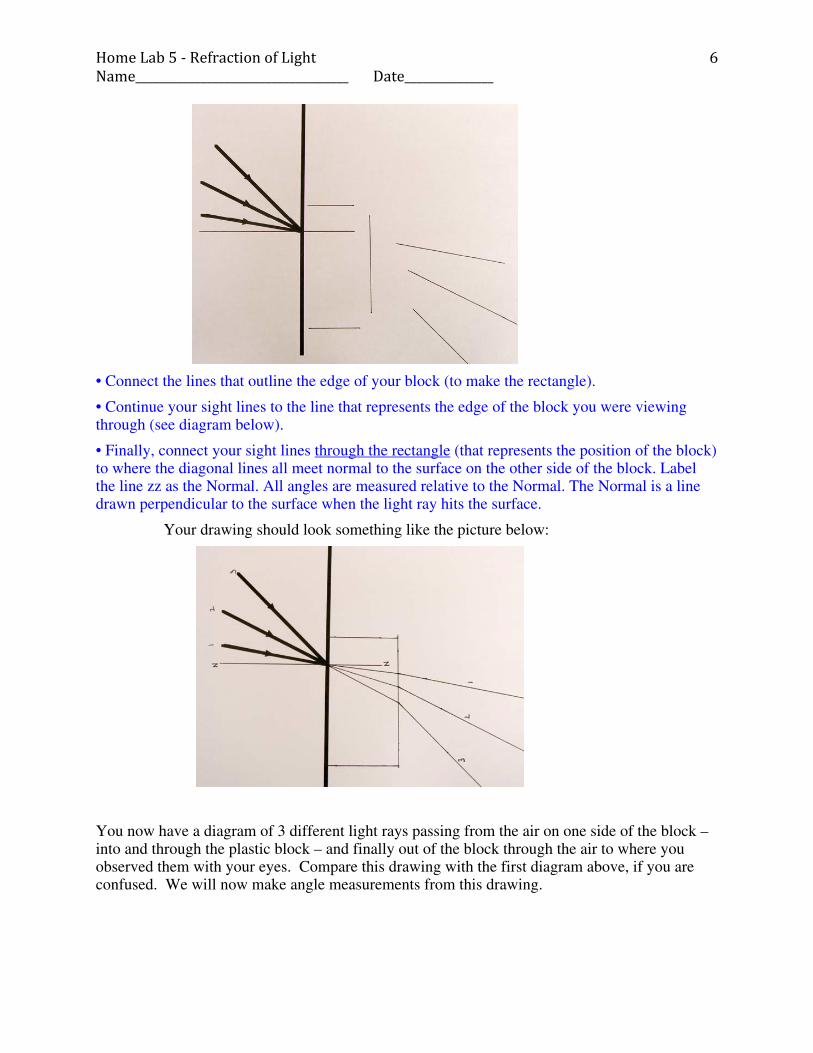
• Connect the lines that outline the edge of your block (to make the rectangle).
• Continue your sight lines to the line that represents the edge of the block you were viewing through (see diagram below).
• Finally, connect your sight lines through the rectangle (that represents the position of the block) to where the diagonal lines all meet normal to the surface on the other side of the block. Label the line zz as the Normal. All angles are measured relative to the Normal. The Normal is a line drawn perpendicular to the surface when the light ray hits the surface.
Your drawing should look something like the picture below:
You now have a diagram of 3 different light rays passing from the air on one side of the block – into and through the plastic block – and finally out of the block through the air to where you observed them with your eyes. Compare this drawing with the first diagram above, if you are confused. We will now make angle measurements from this drawing.

HomeLab5‐RefractionofLightName____________________________________Date_______________
7
Raw Data:
Line i (deg) r (deg)
Change in angle (deg)
( i - r )
1 2 3
Based on your observations during this activity answer the following questions:
1. What direction were the straight light rays bent as they moved from the air (outside the block) into the plastic block:
2. What direction did the straight light rays bend as they moved from inside the plastic block back into the air:
3. Were all the light rays bent by the same amount or did some bend more? – explain.
4. From your observations - conclude a rule about the direction light rays will bend when moving from materials of a lower optical density (for example air) to a higher optical density (e.g. plastic):
5. From your observations - conclude a rule about the direction light rays will bend when moving from materials of a higher optical density to one of a lower optical density.
•Withaprotractor,measuretheincoming,incidentray i andtheangleoftherefractedlightrayr ‐bothmeasuredfromthenormalline(seediagramhereforangles).•Measuretheseanglesfortheotherraysandwriteyourdataforall3lightraysinthetablebelow.

HomeLab5‐RefractionofLightName____________________________________Date_______________
8
(example: plastic to air):
6. As light moves through a material with a high density – describe how does its speed of that light compare to the speed of light in a vacuum.
7. If you need to wear glasses to see properly, light does not come to focus at the right place on your retina. From what you have learned in this activity – explain the function of the plastic in the lenses of your glasses:
8. Briefly describe the process of refraction in terms of the speed of light and the changing direction of light rays:

HomeLab5‐RefractionofLightName____________________________________Date_______________
9
Activity 5-3: Where’s my money
Objective: You will make simple observations of light refracting through and reflecting from water and glass. Materials not Included: • A clear, medium size glass, beaker, or glass jar that will fit inside a larger size clear glass, beaker, etc. • A coin (penny, nickel, dime, etc.)
Procedure A: You will make simple observations of light refracting through and reflecting from different materials. Place a coin in the center of the bottom of the smaller glass. Fill the glass so there is about 3 inches of water in it (it is important that there is enough water in the glass). Set the glass on a table. Move your eye so that it is parallel (even) with the surface of the water in the glass. Now while looking at the surface of the water, slowly change your angle of observation of the surface from parallel to the surface to looking straight above the coin in the glass (see diagram below).
Write your observations and answer questions for each of the following:
1. Briefly describe your observations of the surface of the water as you moved your eye
from the side to straight above the glass:
2. How many coins do you see on the surface when you began looking parallel to the surface?
3. Was there any point where you could see a coin while viewing the surface from an
increasing angle? Describe when this happened. What was the approximate angle of observation from the surface?

HomeLab5‐RefractionofLightName____________________________________Date_______________
10
4. Is there a position where you could see more than one coin while viewing the surface? Describe when this happened. What was the approximate angle of observation from the surface?
5. Briefly describe what the coins look like – is either coin inverted (upside-down)?
6. As you viewed the multiple coins – explain where is reflection occurring? – where is refraction occurring? Is reflection and refraction occurring both for the same image?
Procedure B: Take the larger glass and fill it with a few inches of water. Now while holding your eye in the position where you can see two coins on the surface of the water in the smaller glass – slowly immerse the smaller glass into the larger glass (see diagram). As you lower the smaller glass into the larger glass the water level in the large glass will rise (be careful that it does not overflow onto the table). Lower the small glass so that the level of the water in both glasses is about even. Watch the coin images on the surface of the water of the smaller glass as you lower it into the water of the larger glass.
7. Briefly describe what happens to the images of the two coins as you lower the smaller glass into the water. Hint does one of the images disappear or both disappear?
8. Briefly attempt to explain this effect using your understanding of reflection and refraction (hint: remember that refraction occurs between two different materials).

HomeLab5‐RefractionofLightName____________________________________Date_______________
11
Activity 5-4: Seeing Multiples
Objective: To determine the light ray paths for several images of a penny and stick in a beaker of water. Materials: Same as Activity 5-1 Procedure:
Fig. 5-5-1. In the figure one can see 3 images of a penny. Select the number of one of the four light ray diagrams shown here to answer the questions below.
A.) B.)
In the photograph to the left – one can see 3 separate images of the same penny sitting at the bottom of a cup filled with water. In this exercise – you will select the path of light from the penny to your eye. Below, you will match one light ray diagrams to the image of the penny that it forms.

HomeLab5‐RefractionofLightName____________________________________Date_______________
12
C.) D.) 1.) Write the letter of the diagram that best represents the path of light of the Top Coin: 2.) Write the letter of the diagram that best represents the path of light of the Middle Coin: 3.) Write the letter of the diagram that best represents the path of light of the Bottom Coin: From your understanding of the properties of refraction – explain which of the four diagrams is not possible and why:
HomeLab5‐RefractionofLightName____________________________________Date_______________
13
Activity 5-5: Thick Lenses and Beam Spreaders
Objective: To observe and demonstrate how a beaker of water can act as a thick lens to focus parallel rays of light Background:
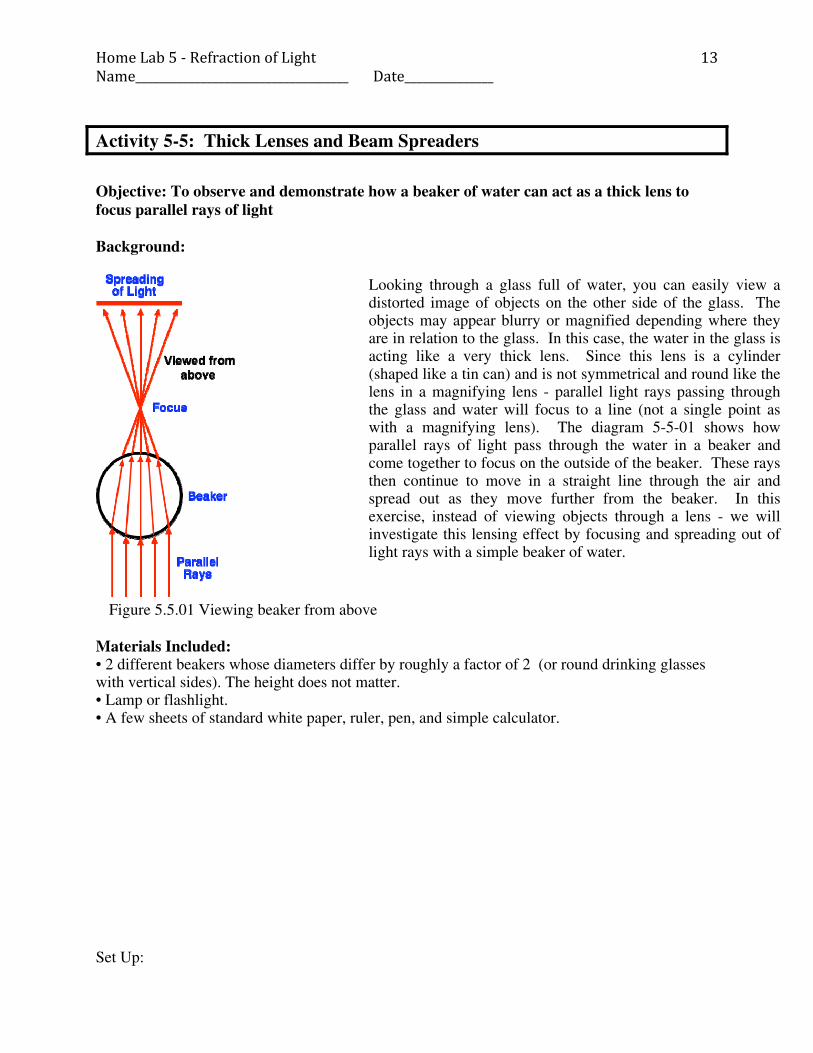
Figure 5.5.01 Viewing beaker from above Materials Included: • 2 different beakers whose diameters differ by roughly a factor of 2 (or round drinking glasses with vertical sides). The height does not matter. • Lamp or flashlight. • A few sheets of standard white paper, ruler, pen, and simple calculator.
Set Up:
Looking through a glass full of water, you can easily view a distorted image of objects on the other side of the glass. The objects may appear blurry or magnified depending where they are in relation to the glass. In this case, the water in the glass is acting like a very thick lens. Since this lens is a cylinder (shaped like a tin can) and is not symmetrical and round like the lens in a magnifying lens - parallel light rays passing through the glass and water will focus to a line (not a single point as with a magnifying lens). The diagram 5-5-01 shows how parallel rays of light pass through the water in a beaker and come together to focus on the outside of the beaker. These rays then continue to move in a straight line through the air and spread out as they move further from the beaker. In this exercise, instead of viewing objects through a lens - we will investigate this lensing effect by focusing and spreading out of light rays with a simple beaker of water.

HomeLab5‐RefractionofLightName____________________________________Date_______________
14
Figure 5.5.02
Procedure:
• Make a “+” in the center of a standard sheet of white 8.5 x 11 paper and center the small beaker (filled with water) on the spot marked “+”.
• Draw a circle around the bottom of your beaker with a pen so you will know its position.
• Direct light from your lamp toward the beaker from at least 2 meters away (at this distance all the rays of light will approach the beaker almost parallel) - darken the room.
• Use a flat sheet of white paper as a focus screen to view the image behind the beaker. You will need to move the paper away from the light source to find the best focused line (see Figure 5.5.02).
• At some specific distance from the back of the beaker a sharp line should come into focus on the paper. Move the paper back and forth until you find the exact spot the line comes into sharp focus (see pictures in Figure 5.5.03).
Figure 5.5.03 • On the paper in which the beaker is sitting (the paper with the “+”) make a mark at the distance where the light comes into focus.

HomeLab5‐RefractionofLightName____________________________________Date_______________
15
• Remove the beaker with water. Using your sheet of paper, measure: i. the diameter of the beaker (the distance across the circle drawn at the bottom of the
beaker and ii. the distance from the center of the beaker at “+” to the mark you made where the line
came into focus (see diagram 5.5.04 below).
Figure 5.5.04
• Write your data in the table below and divide the diameter by the focus distance.
• Do all of above for the other larger beaker.
dist i. dist ii. diameter dist to focus dist i./dist ii. (cm) (cm) (no units) Beaker 1 Beaker 2
Based on your observations during this activity answer the following questions:
1. When we say, “the light comes into focus at one spot” - describe what this means in terms of the path of different light rays.
2. Describe the path of rays that proceed through the center of the beaker to a point of focus behind the beaker – noting any places the light might bend:
HomeLab5‐RefractionofLightName____________________________________Date_______________
16
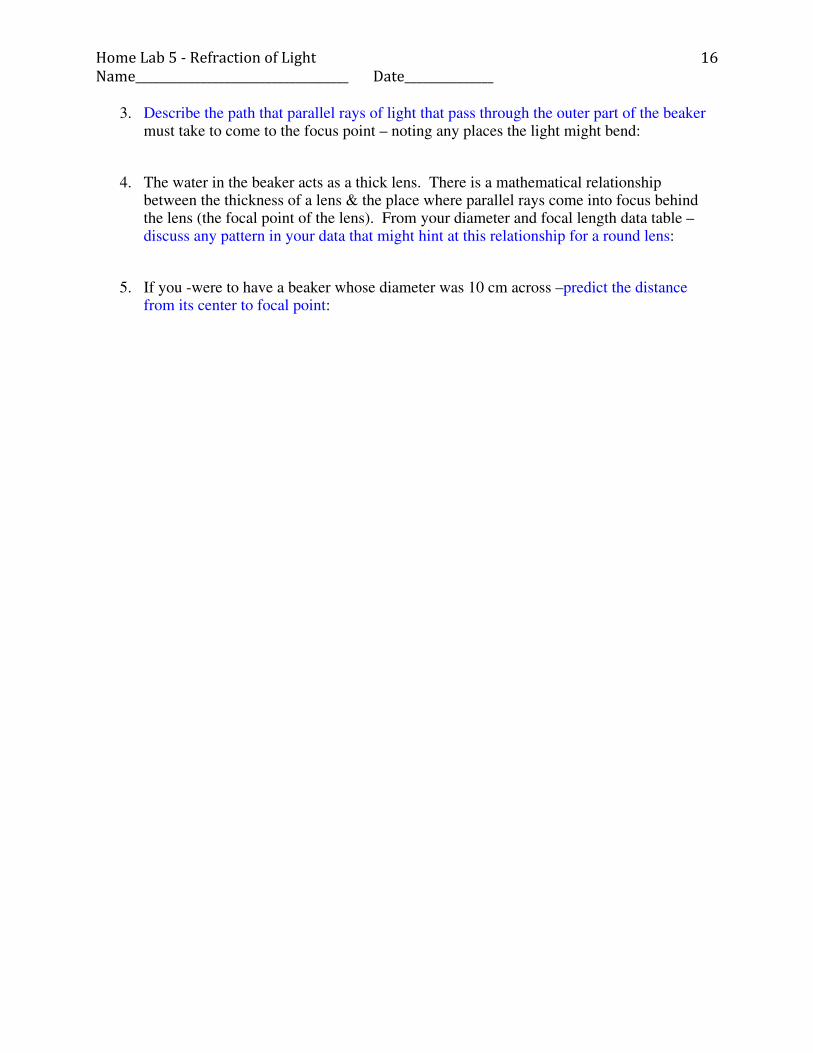
3. Describe the path that parallel rays of light that pass through the outer part of the beaker must take to come to the focus point – noting any places the light might bend:
4. The water in the beaker acts as a thick lens. There is a mathematical relationship between the thickness of a lens & the place where parallel rays come into focus behind the lens (the focal point of the lens). From your diameter and focal length data table – discuss any pattern in your data that might hint at this relationship for a round lens:
5. If you -were to have a beaker whose diameter was 10 cm across –predict the distance from its center to focal point:

HomeLab5‐RefractionofLightName____________________________________Date_______________
17
Activity 5-6: The focusing and spreading out of parallel rays of light
Objective: To observe and demonstrate how a beaker of water can act as a thick lens to focus parallel rays of light from a laser pointer
Figure 5.6.01 Materials Included: • A beaker (or round drinking glasses with vertical sides). • Small amount of milk or milk powder. • Laser-pointer. • Page of paper with lines (provided on the last page of this handout) • Ruler and pen.
Procedure: At the end of this activity you will have made a ray diagram similar to Figure 5.5.01 (the
completed diagram from this activity will need to be scanned or photographed and
electronically submitted with your answers).
• On the page 22 of the handout there is a page with many parallel lines – printout this page. • Place the larger beaker filled water on this page and center it as shown in the diagram 5.5.05 above. Make sure the distance between the wall and the beaker is greater than the diameter of the beaker. • Put a very small amount (less than ½ teaspoon in 200mL of water) of milk in the water - darken the room.
• Place the laser-pointer so that it points directly down the centerline through the beaker and strikes the wall just above where the centerline reaches the wall (see above picture & diagram).

HomeLab5‐RefractionofLightName____________________________________Date_______________
18
• Note that you should be able to see the path of the laser light through the water because of the reflection from the milk particles in solution. If you cannot see the path of the laser through the solution add slightly more milk. If the laser light is too diffuse and does not make a clear spot on the wall dilute the solution by pouring out half the solution and add more water in the beaker.
• On the sheet of paper draw a circle around the bottom of the beaker to clearly identify its position.
Figure 5.5.06 • On the sheet of paper – you need to mark 3 points:
1. the point on the circle where the laser light enters the beaker, 2. the point on the circle where the laser light leaves the beaker, and 3. the point where the laser light is projected to the wall. This first case should be simple
since the light was set up to move in a straight line through the beaker to the wall beyond.
• Now move the laser pointer to the side of the center line, so that it points directly down one of the parallel lines drawn on the paper in the direction of the beaker (as shown in Figure 5.5.06 above).
• Again, mark the 3 points mentioned above on the paper (in this case the laser light should be bent slightly as it enters and leaves the surface of the beaker).
• Repeat this procedure to make 5 lines in total. The centerline and two lines on each side of the center line.
• Once the five light paths have been marked – remove the beaker and connect the marked points to show the each of the 5 paths of the light through the beaker to the wall (much like Figure 5.5.01). Scan or photograph this diagram and embed it as the last page of this document – you will submit it as part of this assignment. Based on your observations during this activity answer the following questions:
HomeLab5‐RefractionofLightName____________________________________Date_______________
19
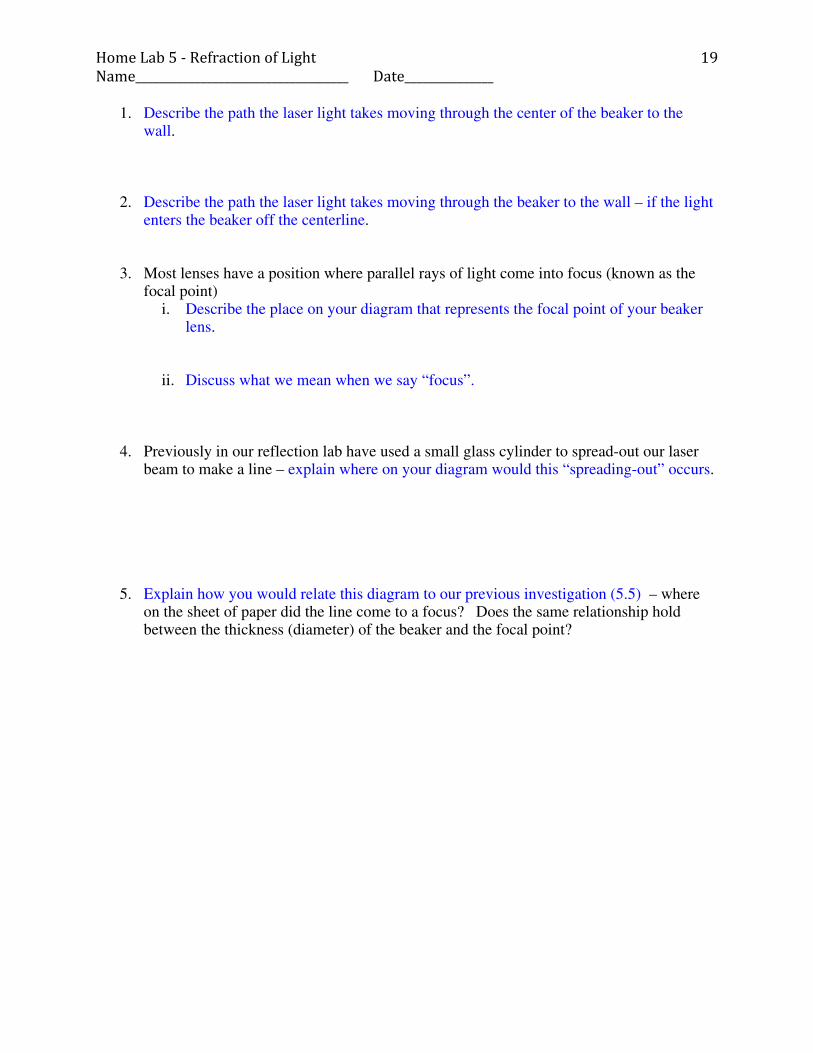
1. Describe the path the laser light takes moving through the center of the beaker to the wall.
2. Describe the path the laser light takes moving through the beaker to the wall – if the light enters the beaker off the centerline.
3. Most lenses have a position where parallel rays of light come into focus (known as the focal point)
i. Describe the place on your diagram that represents the focal point of your beaker lens.
ii. Discuss what we mean when we say “focus”.
4. Previously in our reflection lab have used a small glass cylinder to spread-out our laser beam to make a line – explain where on your diagram would this “spreading-out” occurs.
5. Explain how you would relate this diagram to our previous investigation (5.5) – where on the sheet of paper did the line come to a focus? Does the same relationship hold between the thickness (diameter) of the beaker and the focal point?

HomeLab5‐RefractionofLightName____________________________________Date_______________
20

HomeLab5‐RefractionofLightName____________________________________Date_______________
21


![Online professionaldevelopment[1]](https://static.fdocuments.us/doc/165x107/54656b2caf7959045f8b738f/online-professionaldevelopment1.jpg)