
HIERO and HIEROPLAYER - Amazon Web...
210
HIERO and HIEROPLAYER USER GUIDE VERSION 1.6v1
-
Upload
vuonghuong -
Category
Documents
-
view
219 -
download
2
Transcript of HIERO and HIEROPLAYER - Amazon Web...

HIERO and HIEROPLAYER
USER GUIDE
VERSION 1.6v1

Hiero™ and HieroPlayer™ User Guide. Copyright © 2013 The Foundry Visionmongers Ltd. All Rights Reserved. Use of this User Guide and the Hiero software is subject to an End User Licensing Agreement (the “EULA”), the terms of which are incorporated herein by reference. This User Guide and the Hiero software may be used or copied only in accordance with the terms of the EULA. This User Guide, the Hiero software and all intellectual property rights relating thereto are and shall remain the sole property of The Foundry Visionmongers Ltd. (“The Foundry”) and/or The Foundry's licencors.
The EULA is available in the appendices.
The Foundry assumes no responsibility or liability for any errors or inaccuracies that may appear in this User Guide and this User Guide is subject to change without notice. The content of this User Guide is furnished for informational use only.
Except as permitted by the EULA, no part of this User Guide may be reproduced, stored in a retrieval system or transmitted, in any form or by any means, electronic, mechanical, recording or otherwise, without the prior written permission of The Foundry. To the extent that the EULA authorises the making of copies of this User Guide, such copies shall be reproduced with all copyright, trademark and other proprietary rights notices included herein. The EULA expressly prohibits any action that could adversely affect the property rights of The Foundry and/or The Foundry's licencors, including, but not limited to, the removal of the following (or any other copyright, trademark or other proprietary rights notice included herein):
Hiero™ and HieroPlayer™ shot management and conform software © 2013 The Foundry Visionmongers Ltd. All Rights Reserved.
Hiero™ and HieroPlayer™ are trademarks of The Foundry Visionmongers Ltd.
Mac, Mac OS, Final Cut Pro and QuickTime are trademarks of Apple, Inc., registered in the U.S. and other countries.
Linux ® is a registered trademark of Linus Torvalds.
Windows ® is the registered trademark of Microsoft Corporation.
RED, RED-ONE, R3D, EPIC, HDRx, and RMD are trademarks of Red.com, Inc.
In addition to those names set forth on this page, the names of other actual companies and products mentioned in this User Guide (including, but not limited to, those set forth below) may be the trademarks or service marks, or registered trademarks or service marks, of their respective owners in the United States and/or other countries. No association with any company or product is intended or inferred by the mention of its name in this User Guide.
Adobe ® and After Effects ® are either registered trademarks or trademarks of Adobe Systems Incorporated in the United States and/or other countries.
Avid ®, Avid DNxHD ®, and Media Composer™ are either registered trademarks or trademarks of Avid Technology, Inc. or its subsidiaries in the United States and/or other countries.
Hiero and HieroPlayer software design and engineering: Matt Brealey, Adam Cherbetji, Rick Coles, Jon Creighton, Vincent Delannoy, Paul Dunnill, Martiño Figueroa, Michael Hughes, Jerry Huxtable, David Jennings, Michael Jones, Juan Leni, Zulfiqar Malik, Matt Mauger, Dan Milburn, Antón Morant Fernández, Ant Nascè, Bruno Nicoletti, Matt Plec, Przemek Stys, and Dylan Yudaken.
Product testing: Dan Allum, Nikolas Almpanis, Natasha Sandars, Zachary Scheuren, and Piotr Trzesicki.
Writing and layout design: Joel Byrne.
Proof reading: Eija Närvänen.
The Foundry6th Floor, The Communications Building48 Leicester Square, LondonWC2H 7LTUK
Rev: January 18, 2013
The Foundry Hiero and HieroPlayer 1.6v1
Contents
PREFACE Key Features . . . . . . . . . . . . . . . . . . . . . . . . . . . . . . . . . . . . . . . . . . . . . . . . . 7
About this Guide . . . . . . . . . . . . . . . . . . . . . . . . . . . . . . . . . . . . . . . . . . . . . . 7
Getting Help . . . . . . . . . . . . . . . . . . . . . . . . . . . . . . . . . . . . . . . . . . . . . . . . . 8Online Help . . . . . . . . . . . . . . . . . . . . . . . . . . . . . . . . . . . . . . . . . . . . . . 8Customer Support . . . . . . . . . . . . . . . . . . . . . . . . . . . . . . . . . . . . . . . . . 8
INSTALLATION AND LICENSING
System Requirements . . . . . . . . . . . . . . . . . . . . . . . . . . . . . . . . . . . . . . . . . . 9Operating System . . . . . . . . . . . . . . . . . . . . . . . . . . . . . . . . . . . . . . . . . 9Hardware. . . . . . . . . . . . . . . . . . . . . . . . . . . . . . . . . . . . . . . . . . . . . . . . 9
Installing Hiero or HieroPlayer . . . . . . . . . . . . . . . . . . . . . . . . . . . . . . . . . . 10
Launching Hiero or HieroPlayer . . . . . . . . . . . . . . . . . . . . . . . . . . . . . . . . . 11Startup Options . . . . . . . . . . . . . . . . . . . . . . . . . . . . . . . . . . . . . . . . . 12
Licensing Hiero and HieroPlayer. . . . . . . . . . . . . . . . . . . . . . . . . . . . . . . . . 13Licensing Hiero on a Single Machine . . . . . . . . . . . . . . . . . . . . . . . . . 14Licensing Hiero or HieroPlayer Over a Network . . . . . . . . . . . . . . . . . 15Further Reading . . . . . . . . . . . . . . . . . . . . . . . . . . . . . . . . . . . . . . . . . 17
HIERO AND HIEROPLAYER WORKFLOW
Feature Comparision. . . . . . . . . . . . . . . . . . . . . . . . . . . . . . . . . . . . . . . . . . 18
Preparing a Project in Hiero . . . . . . . . . . . . . . . . . . . . . . . . . . . . . . . . . . . . 19
Loading a Hiero Project in HieroPlayer. . . . . . . . . . . . . . . . . . . . . . . . . . . . 20Opening a Writable Hiero Project . . . . . . . . . . . . . . . . . . . . . . . . . . . . 21
Using Hiero<>Nuke in HieroPlayer . . . . . . . . . . . . . . . . . . . . . . . . . . . . . . 23Open in Nuke. . . . . . . . . . . . . . . . . . . . . . . . . . . . . . . . . . . . . . . . . . . . 23Send to Nuke. . . . . . . . . . . . . . . . . . . . . . . . . . . . . . . . . . . . . . . . . . . . 24
CUSTOMISING YOUR WORKSPACE
Workspace Overview. . . . . . . . . . . . . . . . . . . . . . . . . . . . . . . . . . . . . . . . . . 25Menu Bar Components . . . . . . . . . . . . . . . . . . . . . . . . . . . . . . . . . . . . 27
Creating Your Own Workspace. . . . . . . . . . . . . . . . . . . . . . . . . . . . . . . . . . 28Saving Workspaces . . . . . . . . . . . . . . . . . . . . . . . . . . . . . . . . . . . . . . . 31Loading Workspaces . . . . . . . . . . . . . . . . . . . . . . . . . . . . . . . . . . . . . . 32Deleting Workspaces . . . . . . . . . . . . . . . . . . . . . . . . . . . . . . . . . . . . . 32
Workspace Preferences . . . . . . . . . . . . . . . . . . . . . . . . . . . . . . . . . . . . . . . 33
Optimising Read and Decode Performance . . . . . . . . . . . . . . . . . . . . . . . . 41Using Helper Threads . . . . . . . . . . . . . . . . . . . . . . . . . . . . . . . . . . . . . 42
CONFORMING USING HIERO
Project Settings . . . . . . . . . . . . . . . . . . . . . . . . . . . . . . . . . . . . . . . . . . . . . 43
Importing Sequences. . . . . . . . . . . . . . . . . . . . . . . . . . . . . . . . . . . . . . . . . . 45
Conforming Sequences . . . . . . . . . . . . . . . . . . . . . . . . . . . . . . . . . . . . . . . . 47Conforming Using the Browser . . . . . . . . . . . . . . . . . . . . . . . . . . . . . . 48

CONTENTS 4
Conforming with Pre-ingested Media . . . . . . . . . . . . . . . . . . . . . . . . . 50About the Media Spreadsheet . . . . . . . . . . . . . . . . . . . . . . . . . . . . . . 51Adjusting Timecodes . . . . . . . . . . . . . . . . . . . . . . . . . . . . . . . . . . . . . . 53
Renaming Shots on the Timeline . . . . . . . . . . . . . . . . . . . . . . . . . . . . . . . . 55
Saving and Loading Projects. . . . . . . . . . . . . . . . . . . . . . . . . . . . . . . . . . . . 56Autosaved Projects . . . . . . . . . . . . . . . . . . . . . . . . . . . . . . . . . . . . . . . 58
INGESTING MEDIA About Clips . . . . . . . . . . . . . . . . . . . . . . . . . . . . . . . . . . . . . . . . . . . . . . . . . 59
Ingesting Media . . . . . . . . . . . . . . . . . . . . . . . . . . . . . . . . . . . . . . . . . . . . . 61Using Drag-and-Drop . . . . . . . . . . . . . . . . . . . . . . . . . . . . . . . . . . . . . 62Using the File Browser . . . . . . . . . . . . . . . . . . . . . . . . . . . . . . . . . . . . 63
Caching Media Locally. . . . . . . . . . . . . . . . . . . . . . . . . . . . . . . . . . . . . . . . . 64
Viewing Media . . . . . . . . . . . . . . . . . . . . . . . . . . . . . . . . . . . . . . . . . . . . . . 67Reconnecting and Refreshing Clips. . . . . . . . . . . . . . . . . . . . . . . . . . . 68Viewer Tools . . . . . . . . . . . . . . . . . . . . . . . . . . . . . . . . . . . . . . . . . . . . 69Playback Tools . . . . . . . . . . . . . . . . . . . . . . . . . . . . . . . . . . . . . . . . . . 71Using In and Out Markers. . . . . . . . . . . . . . . . . . . . . . . . . . . . . . . . . . 72Using the Media Tab . . . . . . . . . . . . . . . . . . . . . . . . . . . . . . . . . . . . . . 74Working with Colourspaces . . . . . . . . . . . . . . . . . . . . . . . . . . . . . . . . 75
Previewing on a Broadcast Monitor . . . . . . . . . . . . . . . . . . . . . . . . . . . . . . 77
About Anamorphic Media . . . . . . . . . . . . . . . . . . . . . . . . . . . . . . . . . . . . . . 78
About RED Media . . . . . . . . . . . . . . . . . . . . . . . . . . . . . . . . . . . . . . . . . . . . 79Using RMD Look Files . . . . . . . . . . . . . . . . . . . . . . . . . . . . . . . . . . . . . 80
Using Scopes. . . . . . . . . . . . . . . . . . . . . . . . . . . . . . . . . . . . . . . . . . . . . . . . 80Histogram . . . . . . . . . . . . . . . . . . . . . . . . . . . . . . . . . . . . . . . . . . . . . . 80Waveform . . . . . . . . . . . . . . . . . . . . . . . . . . . . . . . . . . . . . . . . . . . . . . 82Vectorscopes . . . . . . . . . . . . . . . . . . . . . . . . . . . . . . . . . . . . . . . . . . . 83
Using Tags . . . . . . . . . . . . . . . . . . . . . . . . . . . . . . . . . . . . . . . . . . . . . . . . . 83Using Quick Tags . . . . . . . . . . . . . . . . . . . . . . . . . . . . . . . . . . . . . . . . 84Tagging Using the Viewer. . . . . . . . . . . . . . . . . . . . . . . . . . . . . . . . . . 84Tagging Track Items . . . . . . . . . . . . . . . . . . . . . . . . . . . . . . . . . . . . . . 86Adding Notes to Tags . . . . . . . . . . . . . . . . . . . . . . . . . . . . . . . . . . . . . 87Filtering and Flagging Media Using Tags . . . . . . . . . . . . . . . . . . . . . . 87Creating Custom Tags. . . . . . . . . . . . . . . . . . . . . . . . . . . . . . . . . . . . . 88Removing Tags . . . . . . . . . . . . . . . . . . . . . . . . . . . . . . . . . . . . . . . . . . 89
Viewing Metadata. . . . . . . . . . . . . . . . . . . . . . . . . . . . . . . . . . . . . . . . . . . . 90Filtering and Flagging Media Using Metadata . . . . . . . . . . . . . . . . . . 91
MANAGING TIMELINES Adding Tracks to the Timeline . . . . . . . . . . . . . . . . . . . . . . . . . . . . . . . . . . 94
Adding Clips to the Timeline. . . . . . . . . . . . . . . . . . . . . . . . . . . . . . . . . . . . 96
Audio and the Timeline . . . . . . . . . . . . . . . . . . . . . . . . . . . . . . . . . . . . . . . . 98WAV Clip Tracks . . . . . . . . . . . . . . . . . . . . . . . . . . . . . . . . . . . . . . . . . 99
Hiero and HieroPlayer 1.6v1The Foundry

CONTENTS 5
Using Reference Media . . . . . . . . . . . . . . . . . . . . . . . . . . . . . . . . . . . . . . . . 99Comparing Media . . . . . . . . . . . . . . . . . . . . . . . . . . . . . . . . . . . . . . .100
Viewing Multi-Format Timelines. . . . . . . . . . . . . . . . . . . . . . . . . . . . . . . .102
Refreshing and Replacing Track Items . . . . . . . . . . . . . . . . . . . . . . . . . . . 104
Timeline Editing Tools. . . . . . . . . . . . . . . . . . . . . . . . . . . . . . . . . . . . . . . .105Move Tool . . . . . . . . . . . . . . . . . . . . . . . . . . . . . . . . . . . . . . . . . . . . .105Trim Tool . . . . . . . . . . . . . . . . . . . . . . . . . . . . . . . . . . . . . . . . . . . . . .108Slip Tool . . . . . . . . . . . . . . . . . . . . . . . . . . . . . . . . . . . . . . . . . . . . . .110Slide Tool . . . . . . . . . . . . . . . . . . . . . . . . . . . . . . . . . . . . . . . . . . . . .113Roll Tool . . . . . . . . . . . . . . . . . . . . . . . . . . . . . . . . . . . . . . . . . . . . . .115Razor Tool. . . . . . . . . . . . . . . . . . . . . . . . . . . . . . . . . . . . . . . . . . . . .116Setting Soft Trims . . . . . . . . . . . . . . . . . . . . . . . . . . . . . . . . . . . . . . .118Enabling and Disabling Track Items . . . . . . . . . . . . . . . . . . . . . . . . .119
Adding Transitions . . . . . . . . . . . . . . . . . . . . . . . . . . . . . . . . . . . . . . . . . .120Invalid Transitions . . . . . . . . . . . . . . . . . . . . . . . . . . . . . . . . . . . . . .122
Retiming Clips . . . . . . . . . . . . . . . . . . . . . . . . . . . . . . . . . . . . . . . . . . . . . .122Using Freeze Frames. . . . . . . . . . . . . . . . . . . . . . . . . . . . . . . . . . . . .126
VERSIONS AND SNAPSHOTS
Using Versions . . . . . . . . . . . . . . . . . . . . . . . . . . . . . . . . . . . . . . . . . . . . .128Versions in Bins . . . . . . . . . . . . . . . . . . . . . . . . . . . . . . . . . . . . . . . .129Versions in Sequences . . . . . . . . . . . . . . . . . . . . . . . . . . . . . . . . . . .131
Using Snapshots . . . . . . . . . . . . . . . . . . . . . . . . . . . . . . . . . . . . . . . . . . . .131Creating Snapshots. . . . . . . . . . . . . . . . . . . . . . . . . . . . . . . . . . . . . .132Restoring Snapshots. . . . . . . . . . . . . . . . . . . . . . . . . . . . . . . . . . . . .133
ROUND-TRIPPING AND EXPORT MANAGEMENT
Round-Tripping Using the Export Dialog . . . . . . . . . . . . . . . . . . . . . . . . .135Introduction to the Export Dialog . . . . . . . . . . . . . . . . . . . . . . . . . .135Using the Shot Template. . . . . . . . . . . . . . . . . . . . . . . . . . . . . . . . . .137Example Shot Templates. . . . . . . . . . . . . . . . . . . . . . . . . . . . . . . . . .139Adding Additional Nuke Nodes During Export . . . . . . . . . . . . . . . . . 142Exporting to Nuke. . . . . . . . . . . . . . . . . . . . . . . . . . . . . . . . . . . . . . . 143Building VFX Tracks . . . . . . . . . . . . . . . . . . . . . . . . . . . . . . . . . . . . . 149
Round-Tripping Using Hiero<>Nuke . . . . . . . . . . . . . . . . . . . . . . . . . . . .153Connecting Hiero<>Nuke . . . . . . . . . . . . . . . . . . . . . . . . . . . . . . . . .153Open in Nuke . . . . . . . . . . . . . . . . . . . . . . . . . . . . . . . . . . . . . . . . . . 154Send to Nuke. . . . . . . . . . . . . . . . . . . . . . . . . . . . . . . . . . . . . . . . . . .156Send to Hiero . . . . . . . . . . . . . . . . . . . . . . . . . . . . . . . . . . . . . . . . . .156
Advanced Send to Nuke . . . . . . . . . . . . . . . . . . . . . . . . . . . . . . . . . . . . . .157About 3:2 Pulldown . . . . . . . . . . . . . . . . . . . . . . . . . . . . . . . . . . . . .157
Transcoding . . . . . . . . . . . . . . . . . . . . . . . . . . . . . . . . . . . . . . . . . . . . . . .160Transcoding a Sequence or Shots. . . . . . . . . . . . . . . . . . . . . . . . . . .160Transcoding from the Bin View. . . . . . . . . . . . . . . . . . . . . . . . . . . . . 164Transcoding Timeline Selections. . . . . . . . . . . . . . . . . . . . . . . . . . . .165
Hiero and HieroPlayer 1.6v1The Foundry
CONTENTS 6
Ad Hoc Exports . . . . . . . . . . . . . . . . . . . . . . . . . . . . . . . . . . . . . . . . . . . . .165Exporting EDLs and XMLs . . . . . . . . . . . . . . . . . . . . . . . . . . . . . . . . .165Using the Copy Exporter. . . . . . . . . . . . . . . . . . . . . . . . . . . . . . . . . .166
USING THE PYTHON API AND ENVIRONMENT VARIABLES
Using the Script Editor . . . . . . . . . . . . . . . . . . . . . . . . . . . . . . . . . . . . . . .169
Running Python During Startup . . . . . . . . . . . . . . . . . . . . . . . . . . . . . . . .172Startup Projects . . . . . . . . . . . . . . . . . . . . . . . . . . . . . . . . . . . . . . . .173
Environment Variables . . . . . . . . . . . . . . . . . . . . . . . . . . . . . . . . . . . . . . . 174Setting Environment Variables . . . . . . . . . . . . . . . . . . . . . . . . . . . . . 174Sharing Presets . . . . . . . . . . . . . . . . . . . . . . . . . . . . . . . . . . . . . . . . .176Synching to VBlank . . . . . . . . . . . . . . . . . . . . . . . . . . . . . . . . . . . . . .176
APPENDIX A Hiero and HieroPlayer Hotkeys . . . . . . . . . . . . . . . . . . . . . . . . . . . . . . . .178
APPENDIX B Supported Image Formats. . . . . . . . . . . . . . . . . . . . . . . . . . . . . . . . . . . . . 184Optimised Formats and Limitations . . . . . . . . . . . . . . . . . . . . . . . . .185
Supported Audio Formats. . . . . . . . . . . . . . . . . . . . . . . . . . . . . . . . . . . . .186
APPENDIX C Third Party Licences . . . . . . . . . . . . . . . . . . . . . . . . . . . . . . . . . . . . . . . . .187
APPENDIX D End User License Agreement (EULA). . . . . . . . . . . . . . . . . . . . . . . . . . . . . 204
Hiero and HieroPlayer 1.6v1The Foundry

1 PREFACE
Hiero, in conjunction with HieroPlayer, is designed to provide shot management, conform, and playback capabilities for people creating visual effects, especially those using The Foundry’s Nuke Compositor. Hiero combines well with Nuke to deliver visual effects sequences without resorting to other third party applications.
For post-production houses creating visual effects in a collaborative manner, the easy round-tripping of clips and track items to and from Nuke frees expensive “hero” seats that are currently being used as conform, review, and project management stations, allowing for more efficient use of staff and resources in those facilities.
Key Features • Conform multi-track timelines from CMX 3600 Edit Decision Lists (EDLs) and Final Cut Pro XML, including cuts, transitions and retimes.
• Soft import any image sequence type supported by Nuke, meaning the media is not copied multiple times saving disk space. In addition, Hiero and Hieroplayer can also ingest audio and multi-channel images.
• Playback sequences and clips in realtime (dependent on hardware).
• Version and snapshot clips and sequences to record progress and manage your creative options.
• Round-trip through Nuke or export general purpose shots using soft exports in most cases—no bakes are required.
• Use Hiero<>Nuke to set up a connection between the two applications, updating clips on-the-fly.
• Accomplish most tasks through Python scripting that you can with the Hiero and HieroPlayer user interfaces.
About this Guide Throughout this User Guide, we assume you have a basic knowledge of video and audio theory, as well as proficiency with the operating system on which Hiero is installed.
For the most up-to-date information, please see the Hiero product page and the latest Hiero User Guide on our web site at www.thefoundry.co.uk.

PREFACE 8Getting Help
Getting Help If you can’t find what you need in this document, there are other sources of help available to you for all aspects of Hiero and its operation.
Online Help Most controls offer concise instructions in the form of tooltips. To display the tooltips, hover your mouse pointer over an interface control or parameter.
Hiero’s Help menu includes links to the latest Release Notes and Nukepedia, the online knowledge base maintained by experienced Nuke users, containing downloads, tutorials, interviews and more.
There is also a Hiero user forum at forums.thefoundry.co.uk, set up as a hub for users to ask questions and share information about Hiero.
Customer Support Should questions arise that this manual or the online help system fails to address, you can contact Customer Support directly by email at [email protected] or telephone to our London office on +44 (0)20 7968 6828 or to our Los Angeles office on (310) 399 4555 during office hours.
Hiero and HieroPlayer 1.6v1The Foundry

2 INSTALLATION AND LICENSING
Installing and licensing new applications can be a boring task that you just want to be done with as soon as possible. To help you with that, this chapter guides you to the point where you have a default workspace in front of you and are ready to start viewing and editing your media with the minimum of effort.
System Requirements
Before you do anything else, ensure that whichever platform you intend to run the application on meets the following minimum requirements.
Operating System Mac OS X
• Mac OS X Snow Leopard 10.6.8 or newer
Linux
• Linux RHEL 5.4 64-bit
Windows
• Windows 7 64-bit with the latest version of QuickTime installed
Hardware • 4 GB of disk space available for caching and temporary files
• 8 GB of RAM (minimum requirement)
• Intel i3 CPU (or equivalent)
• Workstation-class graphics card with OpenGL 2.1 driver support, such as NVIDIA Quadro series or ATI FireGL series
• RED Rocket cards with at least Rocket Driver 1.4.19.0 and Firmware 1.1.16.5 or later
NOTE: Hiero and HieroPlayer do not support the NVIDIA Quadro 4500 FX and GeForce 7300 GT graphics cards.
NOTE: RED Rocket cards may not work as expected without the latest drivers and firmware.

INSTALLATION AND LICENSING 10Installing Hiero or HieroPlayer
• The following monitor out cards are currently supported in Hiero (not HieroPlayer), though other combinations of cards and drivers may work:
• AJA Kona series PCI cards and Io XT (Mac only, requires Thunderbolt port)
• Blackmagic DeckLink series PCI cards, UltraStudio Express and 3D (Mac only, requires Thunderbolt port)
Installing Hiero or HieroPlayer
Download the required application from www.thefoundry.co.uk/products/ by choosing the required platform from the list. For example, if you intend to install Hiero on Mac OS X, download the Hiero .dmg file.
Follow the on-screen instructions to download the correct installer.
Mac OS X
1. Double-click on the .dmg archive to extract the installation package.
2. Double-click on the .pkg file.
3. Follow the on-screen instructions to install the application. By default, Hiero is installed to /Applications/Hiero1.6v1 and HieroPlayer to /Applications/HieroPlayer1.6v1
Linux
1. Extract the application from the .run archive with the following terminal command:sudo ./Hiero1.6v1-linux-x86-release-64.run
ORsudo ./HieroPlayer1.6v1-linux-x86-release-64.run
The installer displays the End User Licensing Agreement (EULA) and prompts you to accept it.
NOTE: AJA monitor out cards are not currently supported on Linux.
NOTE: On Mac, the AJA Kona 3G is only supported on OS X Lion.
NOTE: Monitor out on Windows machines with AMD graphics cards is not currently supported.
Hiero and HieroPlayer 1.6v1The Foundry

INSTALLATION AND LICENSING 11Launching Hiero or HieroPlayer
2. If you agree with the EULA, enter y and press Enter to accept the EULA. (If you don’t agree with the EULA and press n instead, the installation is cancelled.)
The selected application is installed in an appropriately named folder in the current working directory.
Windows
1. Double-click on the Hiero .exe file.
2. Follow the on-screen instructions to install the required application. By default, Hiero is installed to <drive letter>:/Program Files/Hiero1.6v1 and HieroPlayer to <drive letter>:/Program Files/HieroPlayer1.6v1
Launching Hiero or HieroPlayer
Launch Hiero using one of the following methods, depending on which platform you’re using.
Mac OS X
• Click the dock icon.
• Using the Finder, open the application directory (by default, /Applications/Hiero1.6v1/ or /Applications/HieroPlayer1.6v1/) and double-click the .app icon (or list item).
• Open a terminal and enter the following command:/Applications/Hiero1.6v1/Hiero1.6v1.app/Hiero1.6v1
OR/Applications/HieroPlayer1.6v1/HieroPlayer1.6v1.app/HieroPlayer1.6v1
NOTE: If you leave out sudo from the terminal command, you need to ensure that you have sufficient permissions to install the application under your current working directory.
After the application files have been installed, the installer also runs a post-installation script that creates the following directory:
/usr/local/foundry/RLM
If you don’t have sufficient permissions on the /usr/local folder for this directory to be created, the post-installation script prompts you for your sudo password as necessary.
NOTE: Ensure that the latest version of QuickTime is installed before installing the application. See http://www.apple.com/quicktime/download/ for more information.
Hiero and HieroPlayer 1.6v1The Foundry

INSTALLATION AND LICENSING 12Launching Hiero or HieroPlayer
Linux
• Open the ~/Hiero1.6v1/bin or ~/HieroPlayer1.6v1/bin directory and double-click the icon (or list item).
• Open a terminal, navigate to the ~/Hiero1.6v1/bin or ~/HieroPlayer1.6v1/bin directory and enter ./Hiero1.6v1 or ~/HieroPlayer1.6v1/.
Windows
• Double-click the icon on the Desktop.
• Navigate to Start > All Programs > The Foundry > Hiero1.6v1 or HieroPlayer 1.6v1.
• Using a command prompt, navigate to the application directory (by default, \Program Files\Hiero1.6v1 or \Program Files (x86)\Hiero1.6v1 for Hiero and \Program Files\HieroPlayer1.6v1 or \Program Files (x86)\HieroPlayer1.6v1 for HieroPlayer), and enter Hiero1.6v1 or HieroPlayer1.6v1.
Startup Options If you choose to launch the application from a command line, you can append arguments to the command as follows:
NOTE: The ~/ in the filepath indicates the directory from which the installer was executed.
Argument Result
--help (-h) Displays the available arguments with examples.
--version Displays version and copyright information.
--script Passes all arguments and options after --script into the application. For example:
./Hiero1.6v1 --script myscript.py
If the script resides in a different directory to the application, specify the filepath as well.
--player (Hiero only) Launches Hiero in HieroPlayer mode.
--log-file Sets the location of any logfiles created. For example:
./Hiero1.6v1 --log-file /Desktop/log.txt
See Setting Environment Variables to specify the logfile using an environment variable.
Hiero and HieroPlayer 1.6v1The Foundry

INSTALLATION AND LICENSING 13Licensing Hiero and HieroPlayer
On Windows, you can also use the same arguments on executables (or their shortcuts) by adding them to the program’s Properties. To use a startup argument:
1. Right-click the C:\Program Files\Hiero1.6v1 or HieroPlayer1.6v1 icon or the equivalent icon on the Desktop.
2. Click Properties.
3. Append the required argument to the Target or .exe field.
Licensing Hiero and HieroPlayer
About licences
• Activation Keys—these can be used to easily install and activate node locked (also known as uncounted) licences. Node locked licences allow you to use Hiero or HieroPlayer on a single machine. This licence does not work on different machines and if you need it to, you’ll have to transfer your licence. Node locked licences do not require additional licensing software to be installed. See Licensing Hiero on a Single Machine for more information.
• Floating Licences—also known as counted licences, enable applications to work on any networked client machine. The floating licence is put on the server and is locked to a unique number on that server. Floating licences on a server require additional software to be installed. This
--log-level Sets the level of logging produced during operation. For example:
./Hiero1.6v1 --log-level warning
Log messages are output to screen unless you specify a --log-file. There are four levels of detail, on a sliding scale from minimal to verbose:
• error
• warning (default)
• message
• verbose
Note: Setting the logging level to verbose can produce large log files when --log-file is specified.
See Setting Environment Variables to set the log level using an environment variable.
--quiet (-q) Launch the application without displaying the splash screen or startup dialog.
--single-threaded-playback Launch the application in single-thread mode. This option can solve playback issues on various Linux Fedora flavours.
See Setting Environment Variables to set the playback mode using an environment variable.
Argument Result
Hiero and HieroPlayer 1.6v1The Foundry

INSTALLATION AND LICENSING 14Licensing Hiero and HieroPlayer
software manages those licences on the server, giving licences out to client stations that want them. The software you need to manage these licences is called the Foundry Licensing Tools (FLT) and it can be freely downloaded from our website. Floating licences often declare a port number on the server line and a port number on the vendor line. See Licensing Hiero or HieroPlayer Over a Network for more information.
The instructions below run through both licensing methods and you can find a more detailed description in the Foundry Licensing Tools User Guide available on our website www.thefoundry.co.uk/support/licensing/tools/
Licensing Hiero on a Single Machine
You can purchase activation keys over the Internet by clicking Purchase Licence in the licensing dialog that displays when you launch Hiero or HieroPlayer without a licence, or by contacting The Foundry Sales Department at [email protected].
Installing the licence
You are prompted to enter your activation key when you start the application without a licence. This stepis skipped if you’ve already activated the application.
Select an activation option from the Licensing dialog:
• Purchase Licence—click to open a web browser directly to The Foundry website to purchase an activation key.
• Activate Licence or Use Server—click to enter a previously obtained activation key. When you enter the activation key, the application automatically obtains a licence from the web and installs it on your machine. You’re good to go.
NOTE: If you later want to change your licence (for example, from a node locked licence to a floating licence), you can select Help > Licence in Hiero to display the Hiero Licensing dialog.
Hiero and HieroPlayer 1.6v1The Foundry

INSTALLATION AND LICENSING 15Licensing Hiero and HieroPlayer
Licensing Hiero or HieroPlayer Over a Network
Alternatively, you can purchase a floating licence key from our website. To generate a licence key, we need to know your System ID. The System ID (sometimes called Host ID or rlmhostid) returns a unique number for your computer. We lock our licence keys to the System ID. See Installing floating licences.
To display your System ID, do any of the following:
• On Mac and Windows, you can download the Foundry Licence Utility (FLU) from www.thefoundry.co.uk/licensing and run it. Your System ID is displayed.
• Download the Foundry Licensing Tools (FLT) free of charge from www.thefoundry.co.uk/support/licensing/manage-floating-licences/rlm/ and then:
• On Mac, run /Applications/TheFoundry/LicensingTools7.0/Foundry Licence Utility.app
• On Linux, run the following command in a terminal shell: /usr/local/foundry/LicensingTools7.0/bin/systemid
• On Windows, run C:\Program Files\TheFoundry\LicensingTools7.0\ Foundry Licence Utility.exe
Just so you know what a System ID number looks like, here’s an example: 000ea641d7a1.
Once you have provided us with your System ID number and a licence key has been generated for you, you will receive the licence key in an email or Internet download. The licence key is contained in a text file called foundry.lic. For information on what to do with the foundry.lic file, see
NOTE: If you access the Internet through a proxy server and cannot connect to the activation server, you may get an error dialog prompting you to either:
• Click Use Proxy to enter the proxy server name, port number, user-name, and password. This enables the application to connect to the activation server and obtain a licence. The licence is then installed automatically.
• Click on the web link in the dialog and use the System ID (also known as hostid) provided to manually activate and install a licence. For more information on how to install a licence manually, see the Foundry Licensing Tools (FLT) User Guide available on our website at
www.thefoundry.co.uk/support/licensing/
Hiero and HieroPlayer 1.6v1The Foundry
INSTALLATION AND LICENSING 16Licensing Hiero and HieroPlayer
Installing floating licences below.
Installing floating licences
If you requested a floating licence from The Foundry, you will receive your licence key (foundry.lic) in an email or Internet download. You should also receive the Foundry Licence Utility (FLU) application to help you install the licence key. The instructions below tell you what to do with these.
1. Make sure you have saved both the licence key (foundry.lic) and the Foundry Licence Utility application in the same directory.
2. Run the Foundry Licence Utility application.
The licence key automatically appears in the FLU window if the FLU and foundry.lic are in the same directory. If they are not, you can either copy and paste the contents of the licence key or drag-and-drop the file into the FLU window.
3. Click Install.
This checks the licence file and, provided that the licence is valid, installs it into the correct directory.
In order for the floating licence to work, you will need to install the Foundry Licensing Tools (FLT) on the licence server machine. For more information on how to install floating licences, refer to the FLT User Guide, which you can download from our website: www.thefoundry.co.uk/support/licensing/tools/
4. Once your licence server is up and running, launch the application (if it isn’t already running).
5. Click Activate Licence or Use Server and enter the server address in the field provided. The format for the server name is: <port>@<servername>, for example, 30001@red.
NOTE: The FLU is also available to download from www.thefoundry.co.uk/licensing.
NOTE: You must perform steps 4 and 5 on each client machine that requires a Hiero licence from the server.
TIP: If you later need to display the Licensing dialog again, you can select Help > Licence.
Hiero and HieroPlayer 1.6v1The Foundry
INSTALLATION AND LICENSING 17Licensing Hiero and HieroPlayer
Further Reading For more information on licensing, displaying the System ID number, setting up a floating licence server, adding new licence keys, and managing licence usage across a network, you should read the Foundry Licensing Tools User Guide available on our website:www.thefoundry.co.uk/support/licensing/tools/
Hiero and HieroPlayer 1.6v1The Foundry

3 HIERO AND HIEROPLAYER WORKFLOW
Hiero
In a typical post project worklfow, Hiero sits in between edit and grading, and finishing and delivery, acting as a hub for visual effects. It is used to locate, preview, and then farm media out to shot-based effects applications (such as Nuke), and take their results and re-integrate them into the sequences for review and comment.
HieroPlayer
HieroPlayer sits next to your compositing and other shot creation software, allowing artists to view their work in the context of a timeline. This collaborative workflow allows multiple artists to work on the same timeline, viewing colleague’s work as well as their own.
HieroPlayer can also be used to maintain element libraries. You can filter content using the bin structure, tags, and metadata and view elements on scratch sequences passing clips applications using Hiero<>Nuke.
Feature Comparision
Designed to work hand-in-hand in different scenarios, Hiero and HieroPlayer share a number of features, but as the hub, Hiero has a richer feature set than HieroPlayer.
Feature Hiero HieroPlayer
Review and Playback - Robust playback & review engine for post production
Multi-track timeline viewing and editorial workspace, includ-ing industry standard tools
Nuke equivalent format support including OpenColorIO man-agement
Multi-channel audio import and playback
Extensive review toolset including A/B compare, masks, and colour picker
Realtime image scopes including histogram, waveform, and vectorscope
Media localisation and caching
Broadcast Monitor support

HIERO AND HIEROPLAYER WORKFLOW 19Preparing a Project in Hiero
Preparing a Project in Hiero
The first step in Hiero is to conform the EDL or XML from the editor. The conform process pulls together the required source clips and matches them to events in the EDL or XML. Hiero displays these events in a spreadsheet which is linked to a timeline showing the corresponding track items. See Conforming Using Hiero for more information.
Once the conform is complete, you can view your timeline to confirm that the correct clips are present, check the content using Hiero’s scopes, add reference tracks, and pass on any pertinent information to the next step in production using tags and notes. See Ingesting Media for more information.
The next step is to make any minor edits to the timeline, including transitions and retimes, swap or rename track items, or examine different
Conform - Simple and flexible ingest of cuts from editorial.
Conform multi-track timelines from CMX 3600 Edit Decision Lists (EDLs) and Final Cut Pro XML, including cuts, transitions and retimes
Session-wide spreadsheet containing all sequence events
Shot Management and Export - Manage, distribute and ingest media with ease
Export sequences, timeline shot structures, clip hierarchies, and EDL/XMLs
Transcode, copy, and soft link media
Create template Nuke scripts for easy distribution of work
Automatically update VFX shots in context
Version shots and snapshot timelines for review and editing
Hiero<>Nuke integration - a live link between applications updating on-the-fly as VFX work is completed
Hierarchical project and element library management
Tag of shots, frames, and sequences for easy filtering of con-tent
Open and Scriptable Playback Framework - Flexible enough to fit any pipeline
Extensive Python API to accomplish most tasks through Python scripting that you can with the Hiero and HieroPlayer user interfaces
Integrated Pyside enabling fine-grained customisation of interface tasks
Feature Hiero HieroPlayer
Hiero and HieroPlayer 1.6v1The Foundry
HIERO AND HIEROPLAYER WORKFLOW 20Loading a Hiero Project in HieroPlayer
versions of clips on the timeline. See Managing Timelines and Versions and Snapshots for more information.
The final step before HieroPlayer steps in is to export and save your project. Exporting from Hiero and saving the project creates placemarker track items for VFX work in a read-only Hiero project (.hrox file), preserving the conform work from Hiero. Multiple artists can then work on track items, creating versions which are then automatically updated in HieroPlayer. See Round-Tripping Using the Export Dialog for more information.
Loading a Hiero Project in HieroPlayer
HieroPlayer is most commonly used to open Hiero projects as read-only copies to preserve conform work from Hiero. This way, multiple artists can work on a project without worrying about overwriting a colleagues work.
To open a Hiero project in read-only form:
1. Launch HieroPlayer and navigate to File > Open.
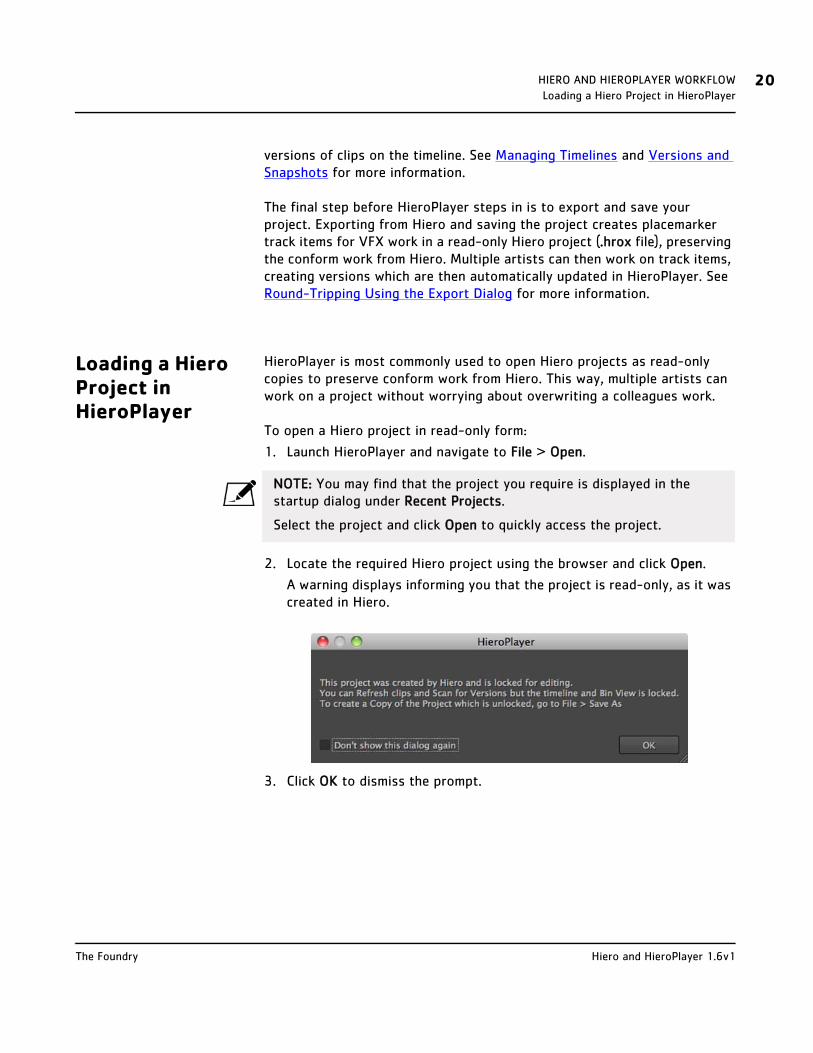
2. Locate the required Hiero project using the browser and click Open.
A warning displays informing you that the project is read-only, as it was created in Hiero.
3. Click OK to dismiss the prompt.
NOTE: You may find that the project you require is displayed in the startup dialog under Recent Projects.
Select the project and click Open to quickly access the project.
Hiero and HieroPlayer 1.6v1The Foundry

HIERO AND HIEROPLAYER WORKFLOW 21Loading a Hiero Project in HieroPlayer
4. Opening a Hiero project in HieroPlayer changes the interface highlight colour to light blue to indicate that the project is read-only.
You can’t delete bins, clips, or track items, or make edits on the timeline when the highlight is light blue.
See Using Hiero<>Nuke in HieroPlayer for information on how to update work between HieroPlayer and Nuke.
Opening a Writable Hiero Project
If you want to open a writable version of a Hiero project, you can open the project and save it as a HieroPlayer project. HieroPlayer projects are always readable in Hiero, so don’t worry about backward compatibility.
To open a Hiero project in writable form:
1. Launch HieroPlayer and navigate to File > Open.
2. Locate the required Hiero project using the browser and click Open.
A warning displays informing you that the project is read-only, as it was created in Hiero.
NOTE: You may find that the project you require is displayed in the startup dialog under Recent Projects.
Select the project and click Open to quickly access the project.
Hiero and HieroPlayer 1.6v1The Foundry

HIERO AND HIEROPLAYER WORKFLOW 22Loading a Hiero Project in HieroPlayer
3. Click OK to dismiss the prompt.
4. Opening a Hiero project in HieroPlayer changes the interface highlight colour to light blue to indicate that the project is read-only.
You can’t delete bins, clips, or track items, or make edits on the timeline when the highlight is light blue.
5. Navigate to File > Save as Player Project and select a save location.
6. The highlight colour changes to orange to indicate that the project is now writable.
Hiero and HieroPlayer 1.6v1The Foundry

HIERO AND HIEROPLAYER WORKFLOW 23Using Hiero<>Nuke in HieroPlayer
Using Hiero<>Nuke in HieroPlayer
Once your project is in HieroPlayer in read-only format, you’re ready to start work on shots in your VFX software. Hiero<>Nuke creates a link between the two applications, updating your work on-the-fly, allowing you to see versions of your work as it progresses in context.
Because the project was exported from Hiero, important information is stored in tags on the individual track items. The tags contain the filepath to the Nuke script for each shot as well as the location of the source files and the path to the VFX clips that don’t exist yet.
For information on connecting Hiero<>Nuke, see Round-Tripping Using Hiero<>Nuke.
Open in Nuke Open in Nuke enables you to open track items using an existing Nuke script stored in a track item tag using Hiero<>Nuke.
To open a track item in Nuke
1. Select the track item(s) in the timeline view.
2. Right-click a highlighted item and select Open in Nuke.
The selected track items are opened in the Nuke application specified in the Preferences > Nuke / Export > Nuke Path field. Each track item is opened in a separate Nuke.
3. Once you’ve completed the VFX work in Nuke, render the clip using the Write node supplied in the script. The new clip is automatically picked up by HieroPlayer, superceding the placeholder clip.
4. You can create multiple versions of the same clip by incrementing the filepath in the Write node’s Properties panel:
• Use the Alt+ hotkeys to increment the version up and down as required.
This selection from HieroPlayer... ...Opened in Nuke
Hiero and HieroPlayer 1.6v1The Foundry

HIERO AND HIEROPLAYER WORKFLOW 24Using Hiero<>Nuke in HieroPlayer
OR
• Manually edit the file name. For example: /renders/BR_SHOT001_FINAL_comp_v02.mov
5. You can create as many versions of a clip as required and cycle through the available files in HieroPlayer to select the latest version. See Using Versions for more information.
Send to Nuke Send to Nuke enables you to add a track item to an existing Nuke script that is connected to HieroPlayer using Hiero<>Nuke. Send to Nuke operates similarly to Open in Nuke, in that track items are opened with additional nodes, but they are added to an existing script.
1. Select the required track item.
2. Right-click the highlighted item and select Send to Nuke.
A list of available scripts is displayed in the submenu.
3. Select the required script to receive the additional track item.
HieroPlayer adds the item to the selected script.
You can create as many versions of a clip as required and cycle through the available files in HieroPlayer to select the latest version. See Using Versions for more information.
This selection from HieroPlayer... ...Sent to Nuke
Hiero and HieroPlayer 1.6v1The Foundry

4 CUSTOMISING YOUR WORKSPACE
Workspace Overview
The Hiero and HieroPlayer interfaces are customisable using floating panes and show/hide functionality, but several default workspaces are supplied for your convenience:
• Hiero’s Conforming workspace is where the bulk of the work you undertake with Hiero is done. The linked spreadsheet and timeline panes are where you’ll really see the power of Hiero.
• The Editing workspace provides the tools you’ll need to fine-tune your media in Hiero.
• The Reviewing workspace is shared by both applications and is used to confirm your media intent is fully realised. You can add tags and notes, mark In and Out points on clips and timelines, and organise your ingested media into bins as required.
• The Flipbooking workspace consists of a Viewer and Project tab and is used primarily as a review tool in HieroPlayer.
• The Timeline workspace is similar to Hiero’s Editing space, but exclusive to HieroPlayer.
When you launch either application, you’re presented with a startup dialog.
NOTE: HieroPlayer doesn’t include any Conform functionality and projects loaded from Hiero can’t be edited unless they’re resaved using File > Save as Player Project.

CUSTOMISING YOUR WORKSPACE 26Workspace Overview
The startup dialog allows you to create a new project, open an existing project, or view the User Guide and website dedicated to Hiero.
Select the required option or click Close to access the appliaction. Take a moment to familiarise yourself with the default workspaces.
Hiero’s default Conforming workspace:
1. Project—manage all aspects of your projects and bins.
2. Menu bar—access Hiero’s dropdown menus.
3. Bin View—displays the contents of any selected project bin.
4. Viewer—display and review your media.
5. Timeline Info—displays the current timeline’s sequence, media, and metadata information.
6. Spreadsheet—displays the contents of the timeline in spreadsheet form.
7. Timeline—displays the current timeline.
NOTE: You can disable this dialog by checking Don’t show this dialog again or by toggling it off in the Workspace Preferences dialog.
Bin View
Timeline Info Timeline
MenuProject Viewer
Spreadsheet
NOTE: The spreadsheet and timeline are linked, mirroring any selections made.
Hiero and HieroPlayer 1.6v1The Foundry

CUSTOMISING YOUR WORKSPACE 27Workspace Overview
HieroPlayer’s default Timeline workspace:
1. Project—manage all aspects of your projects and bins.
2. Menu bar—access Hiero’s dropdown menus.
3. Viewer—display and review your media.
4. Timeline Info—displays the current timeline’s sequence, media, and metadata information.
5. Bin View—displays the contents of any selected project bin.
6. Timeline—displays the current timeline.
Menu Bar Components
The Menu Bar contains various controls, many of which are available through right-click menus, keyboard shortcuts, and toolbars.
For a full list of hotkeys, buttons, and menu functions, refer to Appendix A.
You can switch between workspaces by navigating to Window > Workspace and selecting Conforming, Editing, or Reviewing. Alternatively, you can toggle between the default workspaces using Ctrl/Cmd + 1, Ctrl/Cmd + 2, and Ctrl/Cmd + 3.
Any custom workspaces you create are added to the end of the list. You can access the first custom workspace using Ctrl/Cmd + 4, and so on.
Timeline Info Timeline
MenuProject Viewer
Bin View
Hiero and HieroPlayer 1.6v1The Foundry

CUSTOMISING YOUR WORKSPACE 28Creating Your Own Workspace
Creating Your Own Workspace
Workspace consists of panes, which act like containers, and tabs which describe the individual areas you work with in Hiero and HieroPlayer. During the customisation process, you can:
• Resize your entire workspace or panes independently.
• Split panes to create new work areas, for example two Viewers side-by-side.
• Add and remove panes and tabs as required.
• Float and nest tabs to group similar functions together, for example Histogram, Vectorscope, and Waveform in the same pane.
• Maximise the pane under the mouse cursor by pressing ~ (tilde). Press ~ again to return to the regular interface.
You can create as many workspaces as you require, one for each project you undertake if necessary. In practice though, you may find that two or three custom workspaces will cover your needs.
Resizing your workspace
Resizing the interface, panes, and tabs works in much the same way as other software applications:
• To resize the entire interface, drag the resize handle at the bottom right of the application to the required width and height.
• To resize individual panes, hover the mouse over the edges of the required area until the cursor changes to the resize icon. Click and drag the cursor to resize the pane or tab.
Splitting panes
Splitting panes allows you to organise your workspace into distinct areas delineated by well-defined borders.
• To split panes, right-click the required pane and select Split Vertical or Split Horizontal.
TIP: You can return to the saved version of a workspace by navigating to Window > Workspace > Reset Workspace.
Hiero and HieroPlayer 1.6v1The Foundry

CUSTOMISING YOUR WORKSPACE 29Creating Your Own Workspace
Adding and removing panes and tabs
Adding and removing tabs gives you the freedom to personalise your workspace depending on your current project.
• Add new tabs by:
• Navigating to Window and selecting the required tab. The tab is embedded in its default position or added to the interface as a floating window,
OR
• Right-clicking the pane in which you want the tab to appear and selecting it from the Windows dropdown.
Hiero and HieroPlayer 1.6v1The Foundry

CUSTOMISING YOUR WORKSPACE 30Creating Your Own Workspace
• Close any tab that is not required by:
• Clicking the x on the tab’s right-hand side,
OR
• Right-clicking the tab name and selecting Close Pane or Close Tab.
Floating and nesting
You can move existing panes and tabs to new locations in the interface (to help you organise your project).
• Float a pane or tab by:
• Right-clicking the tab name and selecting Float Pane or Float Tab.
OR
• Dragging the required tab from its current location.
Hiero and HieroPlayer 1.6v1The Foundry

CUSTOMISING YOUR WORKSPACE 31Creating Your Own Workspace
• Nest any floating pane or tab by dragging it to any existing pane.
Saving Workspaces Once you’re happy with the changes you’ve made to the workspace, navigate to Window > Workspace > Save Workspace.
Enter a name for the workspace, then click OK to preserve your workspace as a workspace file (extension .hws).
TIP: Use the orange highlight around the destination pane to help you determine where the tab nests.
Hiero and HieroPlayer 1.6v1The Foundry

CUSTOMISING YOUR WORKSPACE 32Creating Your Own Workspace
Loading Workspaces To use a previously saved workspace, navigate to Window > Workspace and select the custom workspace name you require.
Your pre-saved workspace is loaded.
Deleting Workspaces You may find that after using Hiero or HieroPlayer on a number of projects, some of the workspaces you created earlier have been superceded by more useful entries. Delete Workspace allows you to clear up your saved files, although you can remove the files manually from the save location.
To delete custom workspaces:
1. Navigate to Window > Workspace > Delete Workspace.
2. Select the required workspace from the dropdown menu.
3. Click OK to delete the selected entry.
TIP: If you save a workspace called Conforming, Editing, Reviewing, Flipbooking, or Timeline you can override the defaults supplied with eith application by clicking Save in the dialog box.
Delete the workspace you created to restore the default layout.
TIP: Alternatively, you can use the workspace hotkey Ctrl/Cmd + n (where n is equal to the number of the custom workspace).
TIP: You can return to the saved version of a workspace by navigating to Window > Workspace > Reset Workspace.
Hiero and HieroPlayer 1.6v1The Foundry

CUSTOMISING YOUR WORKSPACE 33Workspace Preferences
Workspace Preferences
The Preferences dialog allows you to make global changes to the way the interface behaves every time you start Hiero or HieroPlayer. Changes you make in the Preferences override any local changes when you restart the application.
To access the Preferences dialog, either:
• Navigate to Hiero (HieroPlayer) > Preferences (OS X) or Edit > Preferences (Linux and Windows), or
• Use the Preferences hotkey Ctrl/Cmd + , (comma).
• General preferences take care of how the applications start up, how often your work is automatically saved, localisation, and cross-platform compatibility.
NOTE: Workspace Preferences are saved in the ~/.hiero/uistate.ini file.
Preference Description
Startup Workspace Sets the default startup workspace.
Show splash screen at startup
Enables or disables the product page during startup.
Reconstruct directories on ingest
When enabled, preserve the original folder/file hierarchy dur-ing ingest.
Show startup dialog Enables or disables the Settings dialog during startup.
Hiero and HieroPlayer 1.6v1The Foundry
CUSTOMISING YOUR WORKSPACE 34Workspace Preferences
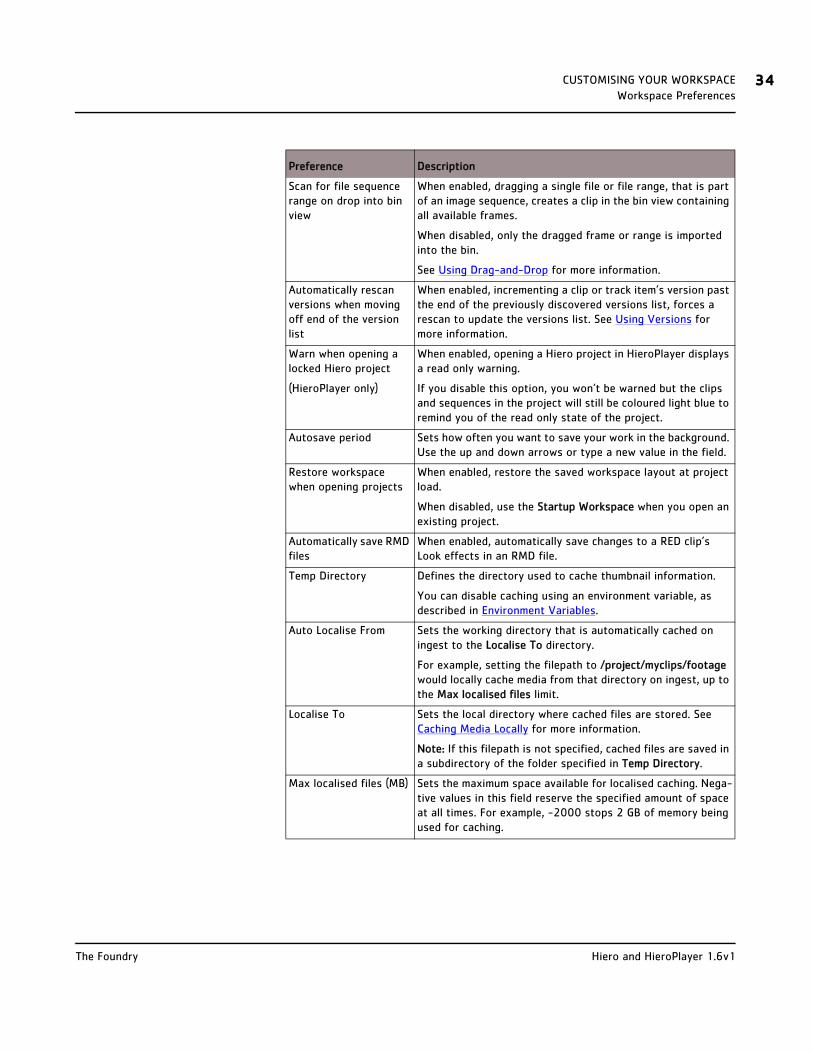
Scan for file sequence range on drop into bin view
When enabled, dragging a single file or file range, that is part of an image sequence, creates a clip in the bin view containing all available frames.
When disabled, only the dragged frame or range is imported into the bin.
See Using Drag-and-Drop for more information.
Automatically rescan versions when moving off end of the version list
When enabled, incrementing a clip or track item’s version past the end of the previously discovered versions list, forces a rescan to update the versions list. See Using Versions for more information.
Warn when opening a locked Hiero project
(HieroPlayer only)
When enabled, opening a Hiero project in HieroPlayer displays a read only warning.
If you disable this option, you won’t be warned but the clips and sequences in the project will still be coloured light blue to remind you of the read only state of the project.
Autosave period Sets how often you want to save your work in the background. Use the up and down arrows or type a new value in the field.
Restore workspace when opening projects
When enabled, restore the saved workspace layout at project load.
When disabled, use the Startup Workspace when you open an existing project.
Automatically save RMD files
When enabled, automatically save changes to a RED clip’s Look effects in an RMD file.
Temp Directory Defines the directory used to cache thumbnail information.
You can disable caching using an environment variable, as described in Environment Variables.
Auto Localise From Sets the working directory that is automatically cached on ingest to the Localise To directory.
For example, setting the filepath to /project/myclips/footage would locally cache media from that directory on ingest, up to the Max localised files limit.
Localise To Sets the local directory where cached files are stored. See Caching Media Locally for more information.
Note: If this filepath is not specified, cached files are saved in a subdirectory of the folder specified in Temp Directory.
Max localised files (MB) Sets the maximum space available for localised caching. Nega-tive values in this field reserve the specified amount of space at all times. For example, -2000 stops 2 GB of memory being used for caching.
Preference Description
Hiero and HieroPlayer 1.6v1The Foundry
CUSTOMISING YOUR WORKSPACE 35Workspace Preferences
• Viewers preferences determine the default settings for the Viewer at startup as well as all new Viewers that you add to the workspace—you can still adjust the settings of individual Viewers.
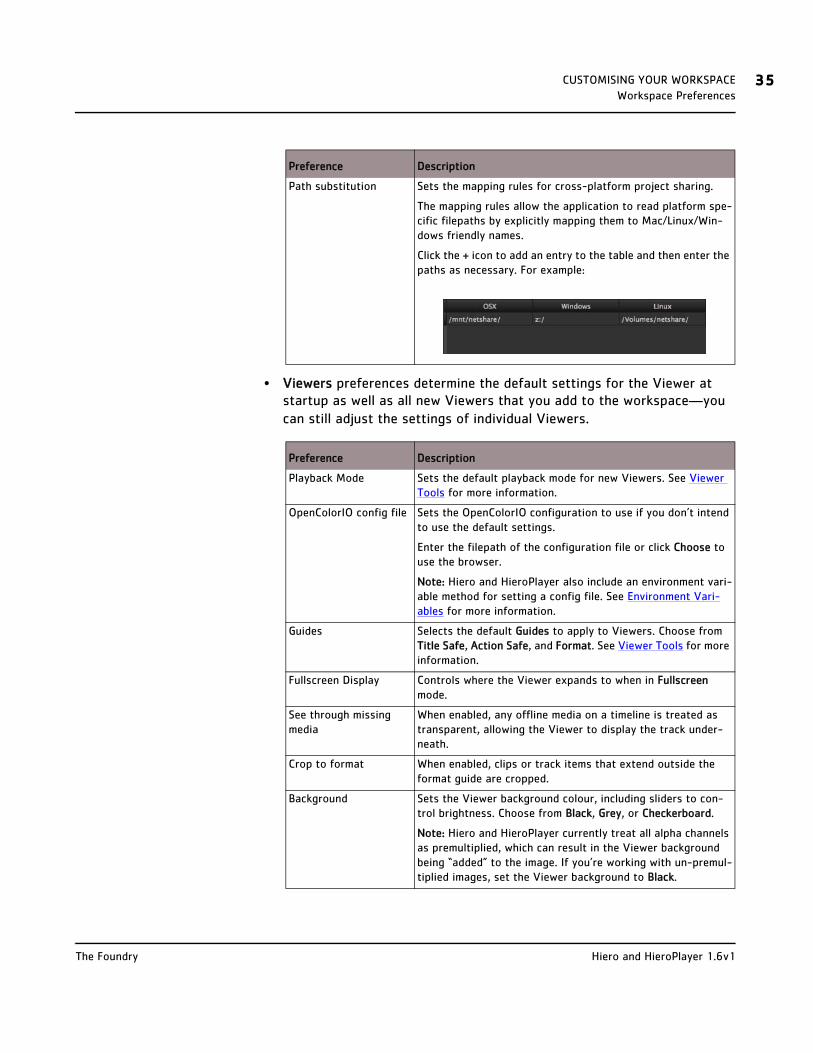
Path substitution Sets the mapping rules for cross-platform project sharing.
The mapping rules allow the application to read platform spe-cific filepaths by explicitly mapping them to Mac/Linux/Win-dows friendly names.
Click the + icon to add an entry to the table and then enter the paths as necessary. For example:
Preference Description
Playback Mode Sets the default playback mode for new Viewers. See Viewer Tools for more information.
OpenColorIO config file Sets the OpenColorIO configuration to use if you don’t intend to use the default settings.
Enter the filepath of the configuration file or click Choose to use the browser.
Note: Hiero and HieroPlayer also include an environment vari-able method for setting a config file. See Environment Vari-ables for more information.
Guides Selects the default Guides to apply to Viewers. Choose from Title Safe, Action Safe, and Format. See Viewer Tools for more information.
Fullscreen Display Controls where the Viewer expands to when in Fullscreen mode.
See through missing media
When enabled, any offline media on a timeline is treated as transparent, allowing the Viewer to display the track under-neath.
Crop to format When enabled, clips or track items that extend outside the format guide are cropped.
Background Sets the Viewer background colour, including sliders to con-trol brightness. Choose from Black, Grey, or Checkerboard.
Note: Hiero and HieroPlayer currently treat all alpha channels as premultiplied, which can result in the Viewer background being “added” to the image. If you’re working with un-premul-tiplied images, set the Viewer background to Black.
Preference Description
Hiero and HieroPlayer 1.6v1The Foundry

CUSTOMISING YOUR WORKSPACE 36Workspace Preferences
• Timecode preferences determine where selected file types derive their timecode.
Preference Description
RED File Timecode Sets the start timecode to use for conformed or ingested R3D files. Select Default From File, Absolute Timecode, or Edge Timecode.
Other Media Timecode Sets where the start timecode for all other media is derived. Select File Header or Frame Number. See Ingesting Media for more information.
Max Valid Timebase Sets the maximum image header timebase above which the value is clamped.
Image files are often created with application specific time-base values in the header description. This can lead to reading in spuriously high framerates and the clamp aims to prevent this from happening.
If your clips do have extremely high framerates, increase this value as necessary to avoid clamping.
EDL-Style Spreadsheet Timecodes
Disabled by default, the srcOut and dstOut values use the film convention, representing the last frame of the cut.
When enabled, the srcOut and dstOut values use the video convention, representing the frame directly after the cut.
• Scopes preferences set the Black and White points for Histogram and Waveform Out of Range warnings individually, in the range 0-1.
Preference Description
Set Black point Sets the black out of range warning level.
Set White point Sets the white out of range warning level.
Luma/chroma encoding Sets how the scopes display luma and chroma information by selecting the rec601 or rec709 standard.
Disable audio When enabled, audio output is muted throughout the applica-tion.
Note: You must restart the application for this option to take effect.
Audio device Sets the audio output device or driver.
Frame Increment Sets the frame increment amount for Skip and Nudge More operations. This control only affects new Viewers.
Preference Description
Hiero and HieroPlayer 1.6v1The Foundry

CUSTOMISING YOUR WORKSPACE 37Workspace Preferences
• RED Rocket preferences enable and disable your RED Rocket.
Preference Description
Use RED Rocket card When enabled, any RED Rocket card present can increase the rendering speed for R3D files significantly, especially at higher resolutions.
• Sequence preferences set the defaults applied to new timelines:
Preference Description
Output Resolution Sets the default resolution for new timelines. Video tracks on new timelines are cropped to the this format.
Frame Rate Sets the default framerate to use when a new timeline is cre-ated.
Start Timecode Sets the timecode starting point for new timelines.
Time Display Sets whether new timelines are measured using Timecode or Frames for display purposes.
Drop Frame Sets whether drop frames are accounted for or not when new timelines are created.
Drop Frame is a timecode display option that leaves out two frames from the 30 fps timecode sequence every minute (except every 10th minute) so that long running NTSC sequences are accurate to a real-time clock (NTSC framerate is 3000/1001, or approximately 0.01% slower than 30fps).
Note: Enabling Drop Frame is a Timecode display feature only—the source media remains a continuous stream of frames.
• Colour Management preferences set the default colourspace applied to various display and file types. For example, setting Viewer to None displays all media in new Viewers with no colourspace applied to them.
Preference Description
Viewer Sets the default LUT applied to new Viewers.
Thumbnails Sets the default LUT applied to thumbnails when ever they are generated in Hiero and HieroPlayer
8-bit Files
Sets the default LUT applied to the specified ingested file type.
16-bit Files
Log Files
Floating Point Files
Hiero and HieroPlayer 1.6v1The Foundry

CUSTOMISING YOUR WORKSPACE 38Workspace Preferences
• Nuke/Export preferences define whether Hiero uses an external Nuke or HieroNuke and how transcoding is handled.
Preference Description
Nuke Path When Use Specified Path For Hiero Renders is enabled, sets the filepath to the external Nuke application you intend to use during round-tripping and Advanced Send to Nuke exports.
Use Specified Path For Hiero Renders
When enabled, the Nuke application specified in Nuke Path is used to render your output.
When disabled, the internal, command line only HieroNuke is used for rendering.
Always Use Interactive Nuke licence
When enabled, renders on external Nukes use an interactive licence (if available).
Launch as NukeX When enabled, the Nuke application specified in Nuke Path is launched as NukeX, if a licence is available.
Note: On Mac, this option is greyed-out. If you need to Launch NukeX, specify the NukeX bundle in the Nuke Path field. For example:
/Applications/Nuke7.0v1/NukeX7.0v1.app
Nuke Limits
Limit Nuke to improve Hiero UI responsiveness
When enabled, the user interface is still responsive during transcodes.
This option causes Nuke to use only 2 threads and 25% of available RAM during transcodes. As a result, transcoding may slow down considerably.
Do Not Limit Nuke When enabled, transcoding uses as much processing power as possible, which may cause the user interface to become unre-sponsive.
Customise Nuke Limits When enabled, use the Threads and Cache Memory fields to manually configure transcode handling:
• Threads—limits the number of threads available to Nuke.
• Cache Memory—limits the amount of total cache memory
available to Nuke.
Hiero and HieroPlayer 1.6v1The Foundry

CUSTOMISING YOUR WORKSPACE 39Workspace Preferences
• Performance preferences allow you to customise Hiero’s performance according to your machine’s capabilities. See Optimising Read and Decode Performance for more information.
NOTE: Hiero supports render farm implementation using Python scripting. Scripts must be located in specific directories, dependent on platform, as listed in Running Python During Startup. If no scripts exist, the dropdown is disabled.
Some example scripts are included in the Hiero package in the following directories:
• On Mac: /Applications/Hiero1.6v1/Hiero1.6v1.app/Contents/Plugins/site-packages/hiero/examples/
• On Linux: /usr/local/Hiero1.6v1/Plugins/site-packages/hiero/exam-ples/
• On Windows: drive letter:\Program Files\The Foundry\Hiero1.6v1\plugins\site-packages\hiero\examples
Preference Description
Default number of threads per reader
Sets the number of threads to use per reader. If your source files are located on high performance local drives, increasing the number threads can significantly improve read times.
CPU intensive operations, such as .jpg decoding, can also be improved by increasing the number of threads per reader.
Overridden number of decode threads per reader
Allows you to override the default number of decode threads used, dependent on file format.
Use the plus button to add an entry and then select the file format using the dropdown menu. Double click the Number of threads column to set the required number of decode threads for that format.
OpenEXR helper threads to use
Sets the number of helper threads to use for OpenEXR only. The default, zero, automatically sets the number of helper threads used.
ARRI helper threads to use
Sets the number of helper threads to use for ARRI only. The default, zero, automatically sets the number of helper threads used.
Note: The OpenEXR and ARRI helper thread preferences are independent of the threads per reader and override table per format settings.
Expand images from 3 to 4 channels per pixels
Enabling this option can improve playback performance for certain combinations of hardware at the expense of the num-ber of frames cached.
Note: Expansion is enabled by default on Mac and Windows.
Hiero and HieroPlayer 1.6v1The Foundry

CUSTOMISING YOUR WORKSPACE 40Workspace Preferences
• Script Editor preferences control the appearance of Hiero’s Script Editor.
Preference Description
Font Sets the font to use for display purposes in the Script Editor.
Font Size Sets the font size to use for display purposes in the Script Editor.
Indent Sets the indent amount, in spaces, to insert when Tab is pressed.
Save and restore script editor history
When enabled, the last entry in the Script Editor is restored at startup.
Once you’ve made your selections in the Preference dialog, click OK to save your changes. Bear in mind that changing some preferences, for example QuickTime decoders, Scopes, and Use RED Rocket card, require you to
Playback cache size Sets the percentage of total memory available for use as cache.
You can't set this to a value higher than 80% of the memory available (rounded down to the nearest half-GB). For example, if you have 6 GB of memory available, the maximum cache size available 4.5 GB.
QuickTime decoders Sets the number of background processes available to handle QuickTime file I/O. You must restart the application for this preference change to take effect.
Note: Using too many decoders can affect performance, depending on the available hardware.
Lock cache into memory
(Mac and Windows only)
When enabled, lock the playback cache in memory so that the operating system doesn’t swap out the memory allocated for the playback cache.
This settings can improve playback performance, but reduces the amount of memory available to run other applications.
Note: Cache locking is enabled by default on Mac OS X and disabled by default on Windows.
Unlock cache when application is in back-ground
(Mac and Windows only)
When Lock cache into memory is active, enabling this control can improve system performance by allowing other applica-tions to use the reserved system RAM when Hiero is running in the background.
Bear in mind that when Hiero becomes active again, there may be playback delays while the cache memory is swapped back in.
Note: Cache release is enabled by default on Mac OS X and disabled by default on Windows.
Preference Description
Hiero and HieroPlayer 1.6v1The Foundry

CUSTOMISING YOUR WORKSPACE 41Optimising Read and Decode Performance
restart Hiero before they’re applied.
Optimising Read and Decode Performance
The Performance preferences enable you to get the best the results from the hardware you’re using by specifying the number of “threads” used for reading and decoding media.
A thread is, at its most basic level, a series of operations (in this case reading and decoding frames) that operates concurrently with other sets of operations. Most media is read intensive, but highly compressed formats like .jpg are decode intensive. Increasing the number of threads can decrease the time it takes to perform an instruction. For example, decoding a .dpx file using 2 threads, instead of 1, decodes 2 frames in parallel.
Hiero and HieroPlayer default to 1 thread per reader to accommodate lower specification hardware, but the following guidelines may improve performance.
You can override the Default number of threads per reader on a format-by-format basis using the override table in the Preferences.
1. Click the icon to add an entry to the table.
2. In the Extension column, click the dropdown to select the file extension to override.
NOTE: Click Restore Defaults to return to the default Preference settings.
Operation Recommended number of threads
Read or I/O
Local HDD 2
Local SSD 3
Network HDD 2
NOTE: As a general rule of thumb, you shouldn’t increase the number of threads above the number of cores in your machine.
Hiero and HieroPlayer 1.6v1The Foundry

CUSTOMISING YOUR WORKSPACE 42Optimising Read and Decode Performance
3. Enter the Number of threads to use for the selected format.
For example, .jpg files rely heavily on decoding so an override setting between 6 and 8 is recommended. Setting the default threads per helper to 6 is not advisable, except on high specification hardware.
4. Click OK to close the Preferences and apply the setting immediately, there is no need to restart the application, so feel free to experiment to achieve the best combination for your setup.
Using Helper Threads
Hiero and HieroPlayer also include two additional helper thread settings dedicated to OpenEXR and ARRI files. These helper threads assist the reader threads to improve performance for .exr and .ari files.
You can change the number of available helpers using the up and down arrows, or by simply entering the number of required helpers in the fields provided.
In general, the default setting 0 should automatically assign helper threads correctly. If, however, your project is .exr/.ari heavy you might consider increasing the number of helper threads.
NOTE: The application must be restarted to apply changes to the ARRI helper setting.
Hiero and HieroPlayer 1.6v1The Foundry
5 CONFORMING USING HIERO
Hiero accepts sequences either from edit decision lists (EDLs) or Final Cut Pro XML files from a specified directory structure containing the source media files. Hiero attempts to conform the media, warning you if there are missing media.
Hiero conforms EDLs into single tracks, and XMLs into multi-track timelines. You can either conform into a brand new timeline, or into an existing timeline by adding new tracks. For example, when conforming multiple EDLs into the same timeline, you would add new tracks for each EDL sequence conformed.
Project Settings A good place to start work is by defining default Project Settings before importing sequences, particularly in the case of EDLs as they may not contain framerate information. Project Settings only apply to the current project and override Preferences settings.
To define Project Settings in Hiero or HieroPlayer:
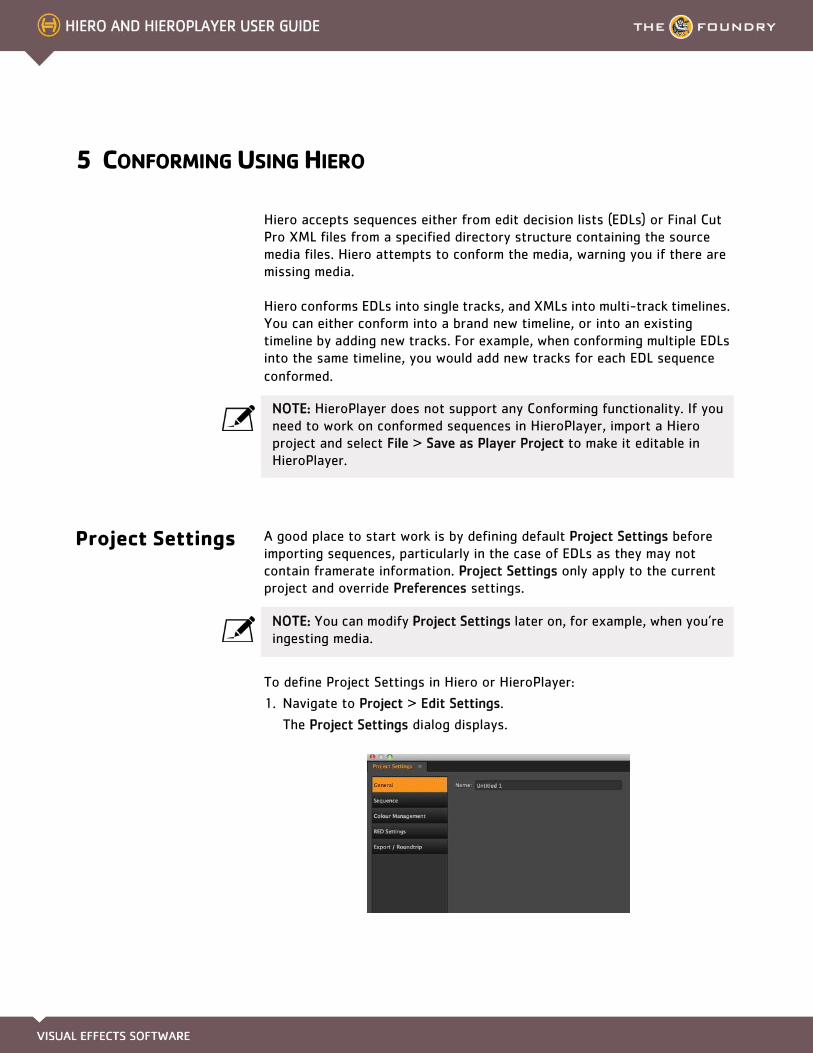
1. Navigate to Project > Edit Settings.
The Project Settings dialog displays.
NOTE: HieroPlayer does not support any Conforming functionality. If you need to work on conformed sequences in HieroPlayer, import a Hiero project and select File > Save as Player Project to make it editable in HieroPlayer.
NOTE: You can modify Project Settings later on, for example, when you’re ingesting media.
CONFORMING USING HIERO 44Project Settings
2. Click the General submenu to set the project Name.
3. Click the Sequence submenu to set the default timeline Output Resolution, Framerate, and Start Timecode.
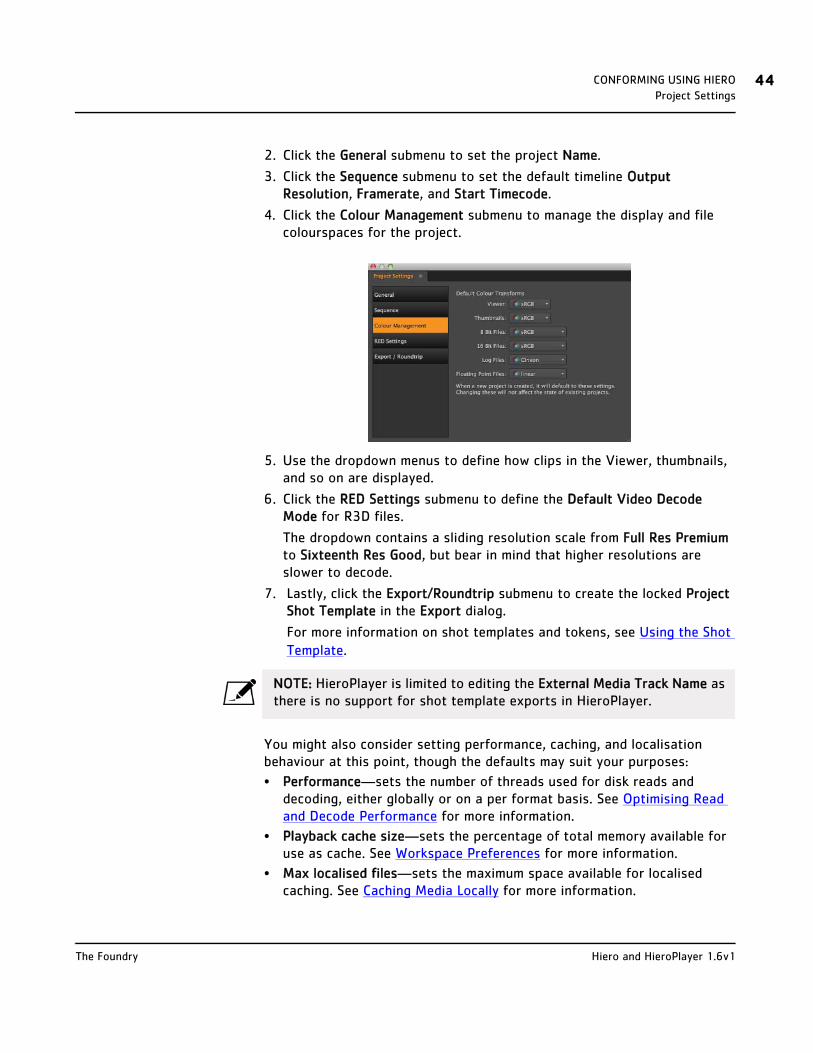
4. Click the Colour Management submenu to manage the display and file colourspaces for the project.
5. Use the dropdown menus to define how clips in the Viewer, thumbnails, and so on are displayed.
6. Click the RED Settings submenu to define the Default Video Decode Mode for R3D files.
The dropdown contains a sliding resolution scale from Full Res Premium to Sixteenth Res Good, but bear in mind that higher resolutions are slower to decode.
7. Lastly, click the Export/Roundtrip submenu to create the locked Project Shot Template in the Export dialog.
For more information on shot templates and tokens, see Using the Shot Template.
You might also consider setting performance, caching, and localisation behaviour at this point, though the defaults may suit your purposes:
• Performance—sets the number of threads used for disk reads and decoding, either globally or on a per format basis. See Optimising Read and Decode Performance for more information.
• Playback cache size—sets the percentage of total memory available for use as cache. See Workspace Preferences for more information.
• Max localised files—sets the maximum space available for localised caching. See Caching Media Locally for more information.
NOTE: HieroPlayer is limited to editing the External Media Track Name as there is no support for shot template exports in HieroPlayer.
Hiero and HieroPlayer 1.6v1The Foundry

CONFORMING USING HIERO 45Importing Sequences
• Localise from and to—sets the working directory that is automatically cached on ingest and the local directory where cached files are stored. See Caching Media Locally for more information.
Importing Sequences
Hiero allows you to import your EDL or XML sequences in one of two ways, depending on your preferences.
If you’re a menu-orientated user:
1. Navigate to File > Import EDL/XML and use the browser to locate the EDL or XML.
2. Select the file and click Open to import the sequence.
If you’re a more hands-on user:Drag-and-drop the EDL or XML files directly from a file browser into Hiero.
NOTE: HieroPlayer does not support importing sequences.
Hiero and HieroPlayer 1.6v1The Foundry

CONFORMING USING HIERO 46Importing Sequences
3. If you’re importing an EDL, bear in mind that there is no guaranteed framerate information included in the file.
When you import EDLs, an Import Options dialog displays.
4. Select the correct frame and use the following check boxes, if required:
• Drop Frame—when enabled, the EDL is assumed to contain drop file information. See Playback Tools for more information.
• Assume differences in source/destination durations indicate a retime—when enabled, any disparity between the source clip (Src) and track item (Dst) duration is treated as a retime.
5. Click OK to import.
After importing the EDL or XML, the Conforming workspace displays and the spreadsheet and timeline are populated with offline clips—media with an unknown location.
Notice that clicking entries in the spreadsheet highlights the corresponding track items on the timeline?
NOTE: The Event column represents the clip’s position on the timeline, not its event number from the EDL.
Hiero and HieroPlayer 1.6v1The Foundry
CONFORMING USING HIERO 47Conforming Sequences
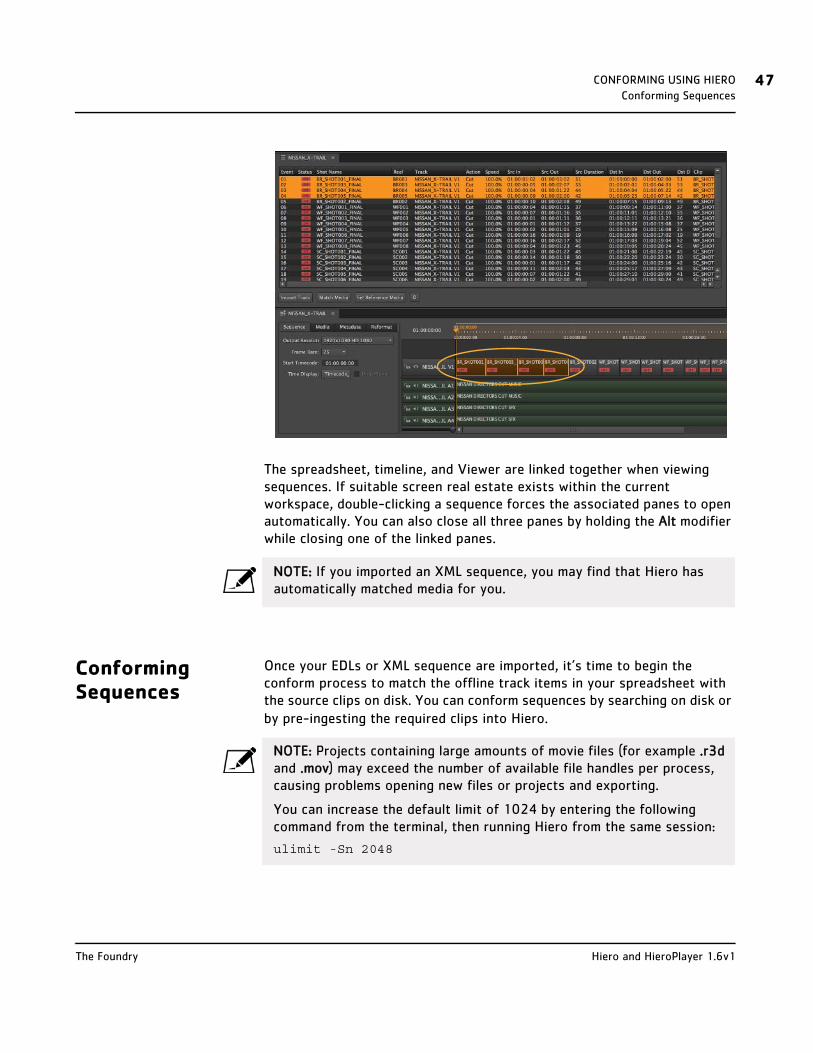
The spreadsheet, timeline, and Viewer are linked together when viewing sequences. If suitable screen real estate exists within the current workspace, double-clicking a sequence forces the associated panes to open automatically. You can also close all three panes by holding the Alt modifier while closing one of the linked panes.
Conforming Sequences
Once your EDLs or XML sequence are imported, it’s time to begin the conform process to match the offline track items in your spreadsheet with the source clips on disk. You can conform sequences by searching on disk or by pre-ingesting the required clips into Hiero.
NOTE: If you imported an XML sequence, you may find that Hiero has automatically matched media for you.
NOTE: Projects containing large amounts of movie files (for example .r3d and .mov) may exceed the number of available file handles per process, causing problems opening new files or projects and exporting.
You can increase the default limit of 1024 by entering the following command from the terminal, then running Hiero from the same session:
ulimit -Sn 2048
Hiero and HieroPlayer 1.6v1The Foundry

CONFORMING USING HIERO 48Conforming Sequences
Conforming Using the Browser
1. After importing a sequence, click Match Media on the spreadsheet and use the browser to locate the source folder containing the correct media.
2. Click Open to display the Conform Options dialog box.
Hiero uses a set of conform Rules and file name Patterns to match candi-date media files on disk to the events, or track items, in a sequence:
• Rules—sets the offline media properties to match to the corresponding spreadsheet entry during conform.
NOTE: HieroPlayer does not support conforming sequences.
Hiero and HieroPlayer 1.6v1The Foundry

CONFORMING USING HIERO 49Conforming Sequences
Rules that rely on information that doesn't exist in the event or candi-date clip are ignored, and some rules compound others to identify a better match.
All rules are enabled by default, but you may occasionally need to disa-ble rules if they cause incorrect matches between a particular edit and set of source clips.
• Patterns—sets the inclusion and exclusion parameters during the con-form, separated by spaces. For example, *mov *dpx would only include or exclude MOV and DPX files.
You could also conform by name, such as BR_Shot*, which would only include or exclude source clip names starting with that string.
3. Enable Accept best timecode match... to use the nearest source timecode match to conform the event, if no rules are matched.
4. When Ignore clips with non-overlapping timecodes is enabled, any potentially matching source clip whose timecode doesn't overlap the track item in question at all is ignored.
Rule Description
Umid Match a RED camera file’s unique media ID (UMID) to the candidate media’s UMID.
RedTapeName Match a RED-style camera reel name from the event to the candidate media name.
RedName Look for a RED-style camera file name in the event that matches the candidate media name.
ReelName Look for the event's reel name in the candidate's media name.
FullPath Match the event's entire filepath to the candidate media’s entire file-path.
FileName Match only the event's file name (no path) to the candidate media’s file name.
FileHead Match the event's file name head (no path, file extension, or padding) to the candidate media’s file name.
PartialName Look for the event's name in the candidate media’s name and vice-versa.
FolderName Look for the event's name in the filepath of the candidate media.
TIP: Use the Select/Deselect All buttons to quickly enable or disable rules.
TIP: It’s always a good idea to be as specific as possible with search locations during conforms, but if the need arises, conform Rules and Patterns can save time.
Hiero and HieroPlayer 1.6v1The Foundry

CONFORMING USING HIERO 50Conforming Sequences
5. Check Conform shots that already have media if you want to update all timeline track items. By default, Hiero doesn’t try to conform events that are not offline.
6. Click OK to begin the conform process.
Hiero attempts to conform the EDL or XML with the selected media.
A dialog box informs you of the success rate once the conform is com-plete.
Successfully matched media is placed in a new Conform bin in the project.
Conforming with Pre-ingested Media
1. If your source media has been ingested into Hiero, you can drag-and-drop media from the bin view onto the Match Media button.
NOTE: You can display the conform Rules matched for each spreadsheet object by hovering the cursor over the required entry.
Hiero and HieroPlayer 1.6v1The Foundry

CONFORMING USING HIERO 51Conforming Sequences
See Ingesting Media for information on getting media into Hiero.
2. Follow the Conform Options instructions on page 48 to complete the conform process.
If you want to conform a single entry in the spreadsheet, drag-and-drop the media from the bin view onto the required entry in the spreadsheet.
Conforming individual, pre-ingested media doesn’t require Conform Options because Hiero already knows the exact location of the media and trusts the decision to replace a track item.
About the Media Spreadsheet
All events in a sequence are displayed in an easy to read format in the spreadsheet including status, the track it resides on, length, and the source file location.
After conforming, you can use the spreadsheet to locate bin clips or replace track items in the timeline, as well as massage timecodes if they are invalid.
Hiero and HieroPlayer 1.6v1The Foundry

CONFORMING USING HIERO 52Conforming Sequences
The media spreadsheet displays each entry’s current media state:
• —the media was successfully conformed and its timecode is correct.
• —the media was successfully conformed, but the timecode is currently incorrect.
• —the media could not be conformed.
See Managing Timelines for more information on importing tracks and reference media.
There are also a number of controls, accessed by clicking the cog icon, that determine the spreadsheet’s appearance and behaviour:
• Select Matching Name—when enabled, selecting an item in the spreadsheet highlights all items with the same name.
• Select Linked—when enabled, selecting an item in the spreadsheet highlights other items linked to it, such as audio tracks ingested with video tracks.
• Display Speed As—sets the unit used in the Speed column of the spreadsheet. Select either fps (frames per second) or% (the percentage of the media framerate).
• Retime method—sets the type of Speed retime applied on the timeline.
• Time Edit Behaviours—sets how source and destination In, Out, and Duration are calculated.
See Retiming Clips for more information on retime methods and Timeline Editing Tools for source/destination calculations.
You can locate, display, reconnect, or rename track items directly from the spreadsheet.
NOTE: Any source or destination field highlighted in yellow indicates that the entry has been rounded down for display purposes.
Hiero and HieroPlayer 1.6v1The Foundry
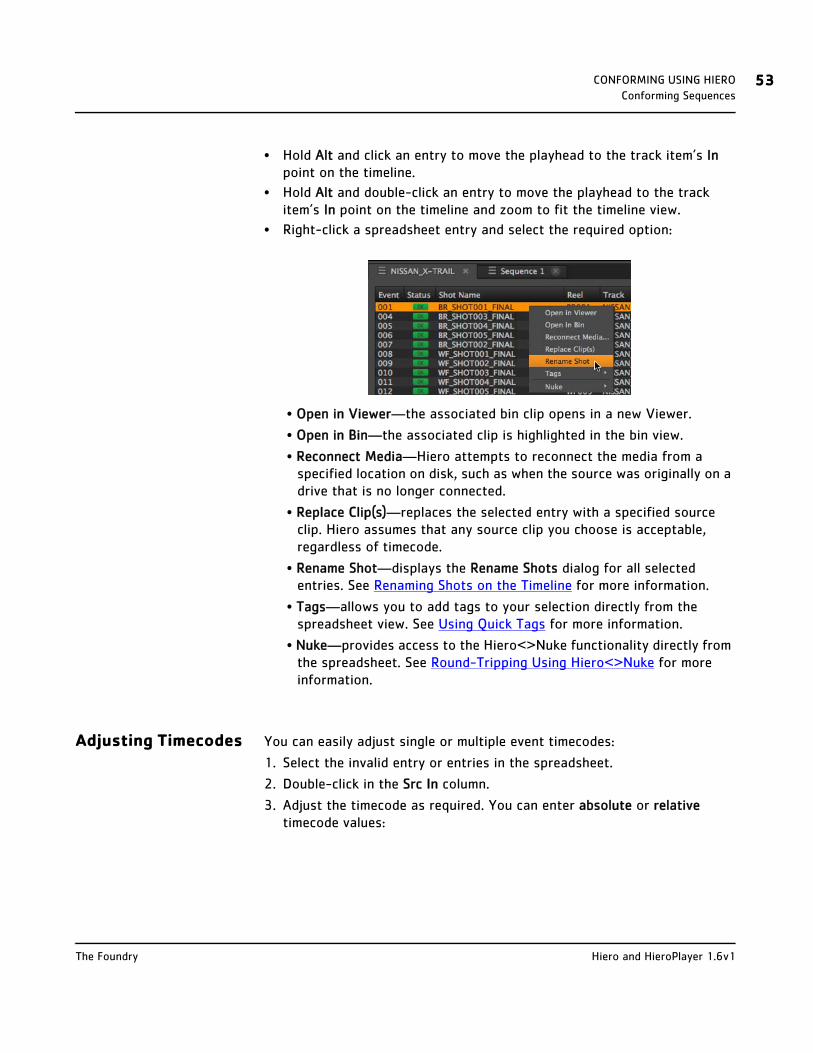
CONFORMING USING HIERO 53Conforming Sequences
• Hold Alt and click an entry to move the playhead to the track item’s In point on the timeline.
• Hold Alt and double-click an entry to move the playhead to the track item’s In point on the timeline and zoom to fit the timeline view.
• Right-click a spreadsheet entry and select the required option:
• Open in Viewer—the associated bin clip opens in a new Viewer.
• Open in Bin—the associated clip is highlighted in the bin view.
• Reconnect Media—Hiero attempts to reconnect the media from a specified location on disk, such as when the source was originally on a drive that is no longer connected.
• Replace Clip(s)—replaces the selected entry with a specified source clip. Hiero assumes that any source clip you choose is acceptable, regardless of timecode.
• Rename Shot—displays the Rename Shots dialog for all selected entries. See Renaming Shots on the Timeline for more information.
• Tags—allows you to add tags to your selection directly from the spreadsheet view. See Using Quick Tags for more information.
• Nuke—provides access to the Hiero<>Nuke functionality directly from the spreadsheet. See Round-Tripping Using Hiero<>Nuke for more information.
Adjusting Timecodes You can easily adjust single or multiple event timecodes:
1. Select the invalid entry or entries in the spreadsheet.
2. Double-click in the Src In column.
3. Adjust the timecode as required. You can enter absolute or relative timecode values:
Hiero and HieroPlayer 1.6v1The Foundry

CONFORMING USING HIERO 54Conforming Sequences
• Absolute—absolute timecodes contain eight digits and specify the new timecode for the event, regardless of the current timecode.
• Relative—uses + and - values to alter the timecode relative to its cur-rent value. You can also use h, m, and s to denote hours, minutes, and seconds.
The media changes state to .
If you’re not sure what the timecode should be, you can:
• Hover the mouse over the target entry in the spreadsheet to view a timecode tooltip.
OR
Example Result
01:05:43:21 Sets the timecode at 1 hour, 05 minutes, 43 seconds, and 21 frames
01054321
Current Position Example Result
01:05:43:21 +1h 02:05:43:21
-110 01:05:42:11
+10000 01:06:43:21
-6m 00:59:43:21
NOTE: Timelines start at 01:00:00:00 by default, but you can change this to any value using the Sequence tab.
Hiero and HieroPlayer 1.6v1The Foundry

CONFORMING USING HIERO 55Renaming Shots on the Timeline
• Examine the bin clip’s metadata and calculate the correct Src In:
1. Right-click the required entry and select Open in Bin.
2. Right click the clip in the bin and select Show Metadata.
The selected clip metadata is displayed in a floating pane.
Renaming Shots on the Timeline
Once you’ve conformed your EDL or XML, you may want to rename track items on the timeline sequentially for clarity.
To rename track items:
1. Select the track items to rename using the timeline or spreadsheet view.
2. Right-click on the timeline or spreadsheet and select Rename Shots.
The Rename Shots dialog displays.
3. Select the rename type from the dropdown:
NOTE: If you need to work on conformed sequences in HieroPlayer, import a Hiero project and select File > Save as Player Project to make it editable in HieroPlayer.
Hiero and HieroPlayer 1.6v1The Foundry
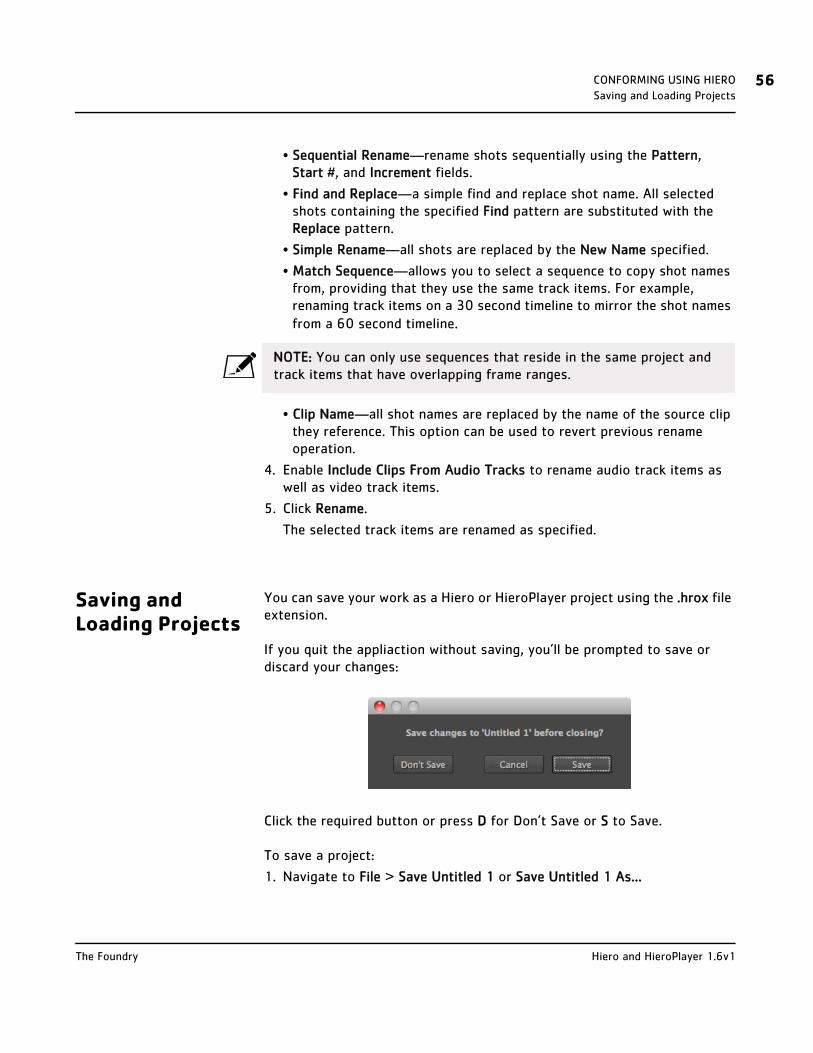
CONFORMING USING HIERO 56Saving and Loading Projects
• Sequential Rename—rename shots sequentially using the Pattern, Start #, and Increment fields.
• Find and Replace—a simple find and replace shot name. All selected shots containing the specified Find pattern are substituted with the Replace pattern.
• Simple Rename—all shots are replaced by the New Name specified.
• Match Sequence—allows you to select a sequence to copy shot names from, providing that they use the same track items. For example, renaming track items on a 30 second timeline to mirror the shot names from a 60 second timeline.
• Clip Name—all shot names are replaced by the name of the source clip they reference. This option can be used to revert previous rename operation.
4. Enable Include Clips From Audio Tracks to rename audio track items as well as video track items.
5. Click Rename.
The selected track items are renamed as specified.
Saving and Loading Projects
You can save your work as a Hiero or HieroPlayer project using the .hrox file extension.
If you quit the appliaction without saving, you’ll be prompted to save or discard your changes:
Click the required button or press D for Don’t Save or S to Save.
To save a project:
1. Navigate to File > Save Untitled 1 or Save Untitled 1 As...
NOTE: You can only use sequences that reside in the same project and track items that have overlapping frame ranges.
Hiero and HieroPlayer 1.6v1The Foundry

CONFORMING USING HIERO 57Saving and Loading Projects
OR
Use the Ctrl/Cmd + S or Shift + Ctrl/Cmd + S hotkeys respectively.
The Save Project dialog box displays.
2. Browse to the save location and enter a name for the project.
3. Click Save.
Hiero saves your project to the location specified and appends the .hrox file extension automatically.
To load a project:
1. Navigate to File > Open.
OR
Use the Ctrl/Cmd + O hotkey.
NOTE: Projects saved in Hiero are read only when loaded into HeiroPlayer. If you want to edit Hiero .hrox files in HieroPlayer, use the File > Save As Player Project function to create a copy.
TIP: If you need to open a project that you worked on recently, you can select Open Recent to quickly locate your work.
Hiero and HieroPlayer 1.6v1The Foundry

CONFORMING USING HIERO 58Saving and Loading Projects
The Open Project dialog box displays.
2. Browse to the file location and click Open.
Hiero opens your project and populates the necessary panes automati-cally.
Autosaved Projects The autosave function creates a temporary save file at 5 minute intervals, but you can adjust the Autosave period in the Preferences dialog. See Workspace Preferences for more information.
At startup, the application scans for autosaved projects and displays a prompt if autosaves exist.
Click Yes to load the autosave or No to ignore and delete it.
Opening a project also uses the autosave functionality. If the autosave is more recent than the saved project file, a prompt displays:
Click Yes to load the autosave file or No to load the original project file.
NOTE: Clicking No does not delete the autosaved project in this case.
Hiero and HieroPlayer 1.6v1The Foundry

6 INGESTING MEDIA
Hiero and HieroPlayer are able to handle the same file formats as Nuke (on the same operating system), including the associated embedded audio and WAV files.
For a full list of supported file formats and playback optimisation, see Appendix B.
About Clips The interface sorts your bin clips into three broad categories: Audio and Video, Audio Only, and Video Only. Clips are displayed differently depending on their content, location, and in the case of the Viewer, the current mode (see Viewer Tools):
Clips in bins
NOTE: Both applications currently treat all alpha channels as premultiplied, which can result in the Viewer background being “added” to the image. If you’re working with un-premultiplied images, set the Viewer background to Black. See Workspace Preferences for more information.
NOTE: Hiero and HieroPlayer don’t not currently support any QuickTime audio on Linux. Support for audio is scheduled for a later release.
Audio and Video Audio Only Video Only
NOTE: The coloured bars under the thumbnail represent the layers available in the clip, in this case colour. Other layers include alpha, depth, and motion, similar to Nuke. See Viewer Tools for more information on displaying layers.

INGESTING MEDIA 60About Clips
Clips in the Viewer
Clips, or track items, on a timeline
See Managing Timelines for more information.
A Clip opened in a timeline
See Using In and Out Markers for more information.
Audio and Video Audio Only Video Only
Audio and Video Audio Only Video Only
(grey background)
(purple background)
Hiero and HieroPlayer 1.6v1The Foundry

INGESTING MEDIA 61Ingesting Media
Clips and track items are highlighted differently in Hiero and HieroPlayer read-only projects:
The blue highlight denotes that the project is read-only. Once you’ve saved the project in HieroPlayer using File > Save as Player Project, the highlight changes to orange.
Ingesting Media Adding media to Hiero, and writable HieroPlayer projects, is as simple as drag-and-drop from a file browser or selecting File > Import Clips or Import Folder. Hiero imports your media into the bin view providing you with a thumbnail of all of your clips and preserving the original folder and file hierarchy.
Both applications soft import the media used in projects, creating symbolic links to locations on disk. See Using the Copy Exporter for information on how to quickly consolidate your media and projects, or Caching Media Locally to help stabilise playback.
Clips with no inherent framerate information are assigned a framerate at ingest as specified in the Preferences.
1. Open the Preferences dialog by pressing Ctrl/Cmd + , (comma).
2. Select Timecode from the submenu on the left.
Clips selected in Hiero... ...and in HieroPlayer
NOTE: Projects containing large amounts of movie files (for example .r3d and .mov) may exceed the number of available file handles per process, causing problems opening new files or projects and exporting.
You can increase the default limit of 1024 by entering the following command from the terminal, then running Hiero from the same session:
ulimit -Sn 2048
Hiero and HieroPlayer 1.6v1The Foundry

INGESTING MEDIA 62Ingesting Media
3. Use the RED File Timecode dropdown to determine R3D clip behaviour:
• Default from File—use the default set by the R3D file in question.
• Absolute Timecode—force the use of the Absolute Timecode as speci-fied in the clip metadata.
• Edge Timecode—force the use of the Edge Timecode as specified in the clip metadata.
4. Use the Other Media Timecode dropdown to determine clip behaviour for all other clips:
• File Header—the file metadata header is used to derive the timecode, if it exists. This option defaults to Frame Number if the header is miss-ing.
• Frame Number—ignores the metadata header, even when present, and derives the timecode from the frames in the clip.
5. Set the Max valid timebase allowed from the image header, above which the value is clamped.
Image files are often created with application specific timebase values in the header description. This can lead to reading in spuriously high fram-erates, and the clamp aims to prevent this from happening.
If your clips do have extremely high framerates, increase this value as necessary to avoid clamping.
6. Enable or disable EDL-Style Spreadsheet Timecodes:
• When disabled, the srcOut and dstOut values use the film convention, representing the last frame of the cut.
• When enabled, the srcOut and dstOut values use the video convention, representing the frame directly after the cut.
7. Click OK to save your settings.
Using Drag-and-Drop Simply locate your media in a file browser and drag the frame range, clip, folder, or folders into the Project tab.
Hiero and HieroPlayer 1.6v1The Foundry

INGESTING MEDIA 63Ingesting Media
Ingest behaviour depends on the target:
• Dragging a folder into the Project tab automatically ingests all the contents of the folder, including other folders and their contents.
• Dragging a movie file, such as a .mov or .r3d, automatically ingests the entire clip.
• Dragging a single file or file range, that is part of an image sequence, is controlled by the Preferences > General > Scan for file sequence range checkbox:
• Enabled—the default setting, dragging a single file or file range, that is part of an image sequence, creates a clip in the bin view containing all available frames.
For example, dragging frames 1-5 and 11-20 ingests the entire frame range.
• Disabled—only the dragged frame or range is imported into the bin.
For example, dragging frames 1-5 and 11-20 ingests two distinct clips, one containing 5 frames and one containing 10 frames.
Using the File Browser
If you prefer to work with menus, you can also import clips using the file browser. You can import individual clip files, ranges, or entire folders, depending on the amount of media you intend to use.
Hiero and HieroPlayer 1.6v1The Foundry

INGESTING MEDIA 64Caching Media Locally
1. Navigate to File > Import Clips or Import Folders.
A browser dialog box displays.
2. Select the type of sequence to display:
• Auto Sequences—displays only sequences containing appropriate file types, such as .dpx and .jpg. For example, myclip.##.dpx.
• No Sequences—displays individual files names with out collapsing them into sequences. For example, myClip.01.dpx, myClip.02.dpx, myClip.03.dpx, and so on.
• All Sequences—displays all possible sequences regardless of file type, including .mov and .r3d.
3. Check split seq to split incomplete sequences into separate clips.
4. Enter text in the Filter field and use the dropdown to show or hide files:
• Select * to display all files except hidden files.
• Select .* * to display all files, including hidden files.
• Select */ to display directory names, but not their contents.
5. Select the file(s) or folder(s) that you require and click Open.
If you import folders, use the Import Options dialog to filter your ingest using inclusion and exclusion parameters, separated by spaces.
6. Hiero automatically sorts through your selection and only imports supported file types.
Caching Media Locally
Hiero and HieroPlayer have the facility to cache files locally, either individually or by setting an automatically localised folder, to help guarantee playback stability. Local caching is controlled initially in the Preferences dialog, then on a clip-by-clip basis.
By default, files are cached to the same location as thumbnail data, though the path varies by platform:
• Mac and Linux - /var/tmp/hiero
• Windows - the system temporary directory, usually C:\temp
To setup your initial caching preferences:
1. Open the Preferences dialog by pressing Ctrl/Cmd + , (comma).
2. Enter a filepath for Auto Localise From, if required.
TIP: You can also use the Ctrl/Cmd + I and Shift + Ctrl/Cmd + I hotkeys.
Hiero and HieroPlayer 1.6v1The Foundry
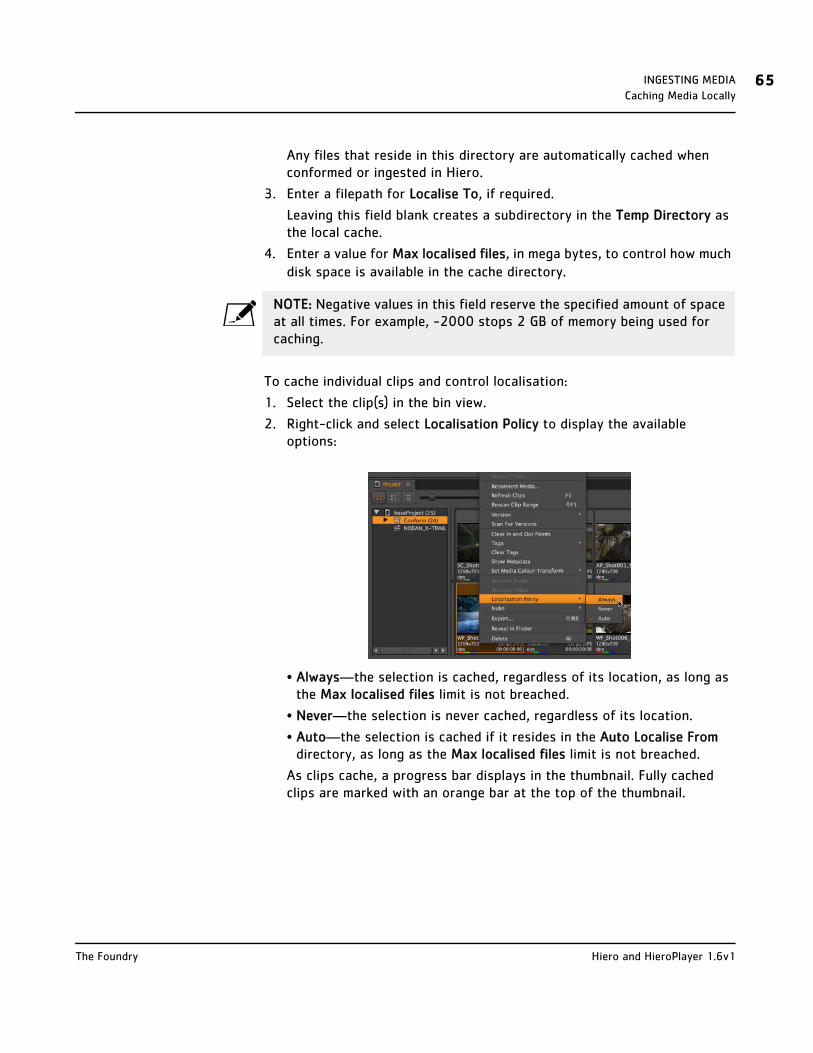
INGESTING MEDIA 65Caching Media Locally
Any files that reside in this directory are automatically cached when conformed or ingested in Hiero.
3. Enter a filepath for Localise To, if required.
Leaving this field blank creates a subdirectory in the Temp Directory as the local cache.
4. Enter a value for Max localised files, in mega bytes, to control how much disk space is available in the cache directory.
To cache individual clips and control localisation:
1. Select the clip(s) in the bin view.
2. Right-click and select Localisation Policy to display the available options:
• Always—the selection is cached, regardless of its location, as long as the Max localised files limit is not breached.
• Never—the selection is never cached, regardless of its location.
• Auto—the selection is cached if it resides in the Auto Localise From directory, as long as the Max localised files limit is not breached.
As clips cache, a progress bar displays in the thumbnail. Fully cached clips are marked with an orange bar at the top of the thumbnail.
NOTE: Negative values in this field reserve the specified amount of space at all times. For example, -2000 stops 2 GB of memory being used for caching.
Hiero and HieroPlayer 1.6v1The Foundry

INGESTING MEDIA 66Caching Media Locally
3. Navigate to Edit > Localisation > Edit Settings to display Localisation Options.
4. The localisation cache defaults to 10000 MB, but you can change its size using the Store size field, if required.
5. You can enable or disable local caching by clicking Enable localisation.
NOTE: This dialog also displays when you reach the Max localised files limit.
NOTE: Negative values in this field reserve the specified amount of space at all times. For example, -2000 stops 2 GB of memory being used for caching.
TIP: You can also toggle local caching on or off using the Edit > Localisation menu.
Hiero and HieroPlayer 1.6v1The Foundry

INGESTING MEDIA 67Viewing Media
6. Click Clear all unused files to purge the localisation cache of all clips not in use in the current session.
7. Check Never notify... to stop this dialog displaying if you run out of localisation cache space.
8. Click Apply to confirm changes without closing the dialog or click OK to close the dialog and accept changes.
Viewing Media To view your media in the Viewer, simply drag-and-drop the clip or sequence from the Project tab on to a Viewer input, or particularly in the case of read-only projects, double-click the clip to send it to the Viewer.
Deleting media
To remove media from the bin view, select the clip(s) or bin and press Backspace or Delete.
NOTE: Hiero and HieroPlayer currently treat all alpha channels as premultiplied, which can result in the Viewer background being “added” to the image. If you’re working with un-premultiplied images, set the Viewer background to Black. See Workspace Preferences for more information.
NOTE: On Linux builds with dual monitors, you may need to set which screen is synchronised for NVIDIA graphics cards. See Synching to VBlank for more information.
Hiero and HieroPlayer 1.6v1The Foundry

INGESTING MEDIA 68Viewing Media
If any of the media is in use in a sequence, the following warning displays:
Click Yes to delete the media from the bin view, but bear in mind that all instances of the deleted media are removed from your current sequences.
Reconnecting and Refreshing Clips
During the post process, media inevitably changes location or form. You can reload or replace your media using the reconnect, refresh, and rescan functions.
Though all three options deal with reloading bin clips, each has a particular use dependent on context:
• Reconnect Media—allows you to redirect the filepath when the source file location changes.
• Refresh Clips (F5)—allows you to reload the clip when the source file location has not changed, such as when work has been done on the clip offline. Selecting refresh only refreshes the clip’s current frame range.
NOTE: You cannot delete clips from HieroPlayer read-only projects.
Hiero and HieroPlayer 1.6v1The Foundry

INGESTING MEDIA 69Viewing Media
• Rescan Clip Range (Shift+F5)—similar to Refresh Clips, above, but rescan also checks for additional frames that may have been added to the source file and adds them to the bin clip’s frame range.
Viewer Tools The Viewer has two sets of tools for manipulating your media: the Viewer tools and the playback tools. The Viewer tools, located at the top of the Viewer, are used to affect the mouse pointer as you move over the Viewer, and to select Viewer preferences:
Icon Function Description
Layers Select the layer to output to the Viewer, for example forward motion vectors or disparityL. Only layers available in the clip are displayed—check the clip’s thumbnail to see at a glance which lay-ers are present:
• red colour layer.
• green colour layer.
• blue colour layer.
• alpha layer.
• depth layer.
• forward motion vector layers.
• backward motion vector layers.
• all other custom layers, such as disparity.
Note: You can scroll through available layers using PgUp or PgDn.
Gain Adjusts the gain applied to the linear input image before viewing, but doesn’t affect your exported image.
Viewer colour transform
Set the colourspace used to display images in the Viewer, for example sRGB and rec709.
Note: If you have specified an OpenColourIO configuration file in the Preferences, you may have more colourspace choices avail-able.
Gamma Adjusts the gamma applied to the image after the viewing trans-form, but doesn’t affect your exported image.
Channels Select the channel(s) to output to the Viewer, for example RGB, single channel, Alpha, or Luma.
Viewer Output
Sets the output for the current input and enables or disables tags.
Hiero and HieroPlayer 1.6v1The Foundry

INGESTING MEDIA 70Viewing Media
ViewerLayout
Select the Viewer configuration, Stack, Horizontal, or Vertical.
SplitWipe When both Viewer inputs contain an image, enable SplitWipe to compare the two images.
Blending Mode Set the type of interaction between images in the Viewer, for example Onion Skin or Difference.
Image Quality Set the Viewer image quality, for example 1:1, 1:4, or 1:16. The default setting, Auto, resizes the image dependent on the Viewer zoom level, which may re-cache the image at a higher resolution.
Note: Image quality, or proxy, for RED clips is dependent on the clip’s Decode Resolution in the Effect tab.
For example, if you're viewing a 4K file and the Decode Resolution is set to Half Premium, a 1:1 proxy value is equal to 2K, 1:2 is equal to 1K, and so on.
Scale Set the scale applied to the clip in the Viewer, for example 25%, 75%, or Fit.
Colour Sample
Enable or disable the RGBA colour information sampler in the Viewer.
Note: The Colour Sample tool displays colour information from the source file, not the colourspace selected in the Viewer colour transform dropdown.
See Working with Colourspaces for more information.
ROI Click and drag to define a Region of Interest (ROI) in the Viewer. The scopes only display information within the ROI, when active.
Guides Enable or disable Viewer overlays:
• Title Safe—any text intended for the audience should reside within this zone.
• Action Safe—any visual elements intended for the audience should reside within this zone.
• Format—adds a red, format-dependent box for the clip or sequence in the Viewer. Sequences support multi-format clips, see Viewing Multi-Format Timelines for more information.
Blanking Enable or disable a range of Viewer masks, for example 16:9 or 1.85:1.
Non RT Play-back
Sets the Viewer playback mode:
• Play All Frames—the default setting, plays all frames in realtime (dependent on hardware).
• Skip Frames—plays frames in realtime skipping where necessary to maintain the framerate.
• Play All Frames, Buffering—plays all frames by buffering and playing frames back as they become available.
Icon Function Description
Hiero and HieroPlayer 1.6v1The Foundry

INGESTING MEDIA 71Viewing Media
Playback Tools The playback tools manipulate the media itself, in much the same way as other editing or playback software.
The playback tools can be summarised as follows:
• In and Out markers—numerical representations of the clip In and Out markers, if they’re set.
• Playhead position—numerical representation of the current position of the playhead.
• Framerate—allows you to force the Viewer to play at a certain speed, within your hardware’s limitations, by entering the required framerate in the field provided.
• Display Mode—select the timing method to display during playback:
See through missing media
When disabled, any offline media on a timeline is treated as a blank clip so the Viewer cannot display the track underneath. This setting also applies to missing frames within a clip.
Note: This control only affects the current Viewer.
Crop to Format
Enable or disable cropping when viewing sequences. When enabled, areas outside the Format guide are cropped automati-cally.
Clipping Enable or disable Hiero’s clipping warning tools:
• No Warnings—all clipping warnings are disabled.
• Exposure—alerts you when the image is under (blue) or over (red) exposed.
• Hot PAL Colours—alerts you when the image chroma is too low (blue) or high (red) for PAL formats.
• Hot NTSC Colours—alerts you when the image chroma is too low (blue) or high (red) for NTSC formats.
View Select the Viewer display mode, for example Audio and Video or Video Only.
n/a Pan On Mac and Windows, hold Alt and drag the image to pan. On Linux, use middle-click and drag to pan.
Icon Function Description
Playhead Position Out Marker Position
In Marker Position
Playback ControlsDisplay Mode
Playback Mode
Framerate Volume
Hiero and HieroPlayer 1.6v1The Foundry
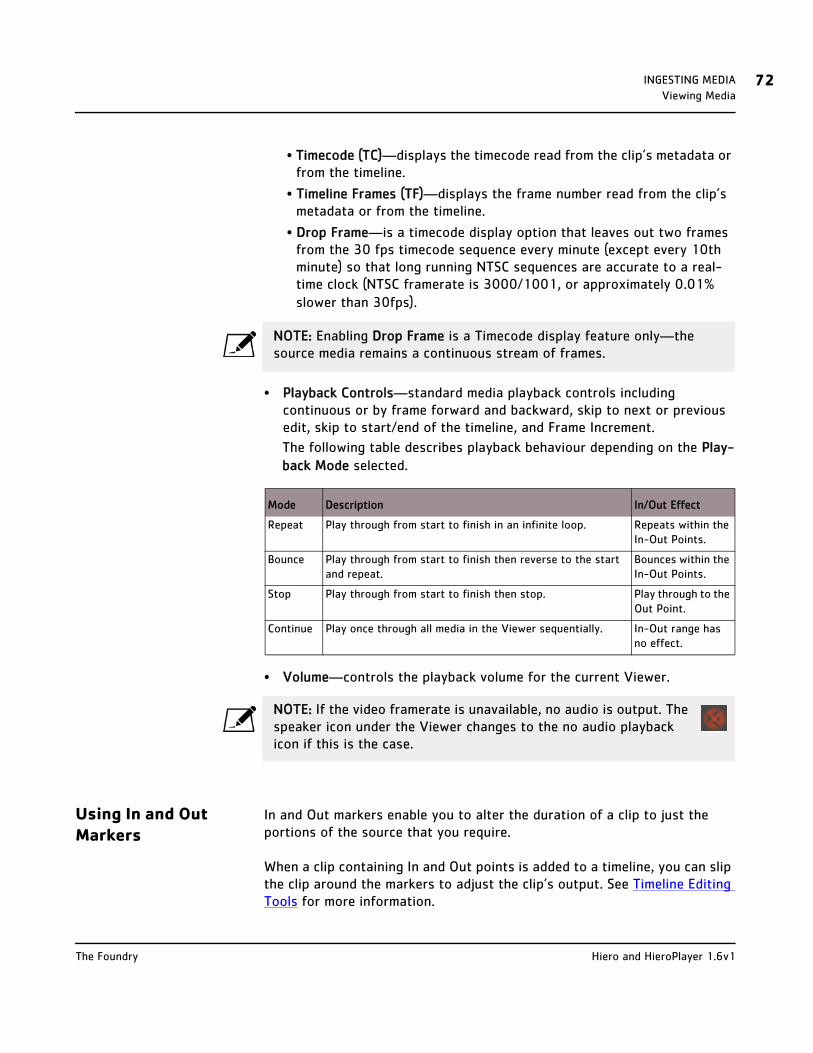
INGESTING MEDIA 72Viewing Media
• Timecode (TC)—displays the timecode read from the clip’s metadata or from the timeline.
• Timeline Frames (TF)—displays the frame number read from the clip’s metadata or from the timeline.
• Drop Frame—is a timecode display option that leaves out two frames from the 30 fps timecode sequence every minute (except every 10th minute) so that long running NTSC sequences are accurate to a real-time clock (NTSC framerate is 3000/1001, or approximately 0.01% slower than 30fps).
• Playback Controls—standard media playback controls including continuous or by frame forward and backward, skip to next or previous edit, skip to start/end of the timeline, and Frame Increment.
The following table describes playback behaviour depending on the Play-back Mode selected.
Mode Description In/Out Effect
Repeat Play through from start to finish in an infinite loop. Repeats within the In-Out Points.
Bounce Play through from start to finish then reverse to the start and repeat.
Bounces within the In-Out Points.
Stop Play through from start to finish then stop. Play through to the Out Point.
Continue Play once through all media in the Viewer sequentially. In-Out range has no effect.
• Volume—controls the playback volume for the current Viewer.
Using In and Out Markers
In and Out markers enable you to alter the duration of a clip to just the portions of the source that you require.
When a clip containing In and Out points is added to a timeline, you can slip the clip around the markers to adjust the clip’s output. See Timeline Editing Tools for more information.
NOTE: Enabling Drop Frame is a Timecode display feature only—the source media remains a continuous stream of frames.
NOTE: If the video framerate is unavailable, no audio is output. The speaker icon under the Viewer changes to the no audio playback icon if this is the case.
Hiero and HieroPlayer 1.6v1The Foundry

INGESTING MEDIA 73Viewing Media
You can also use In and Out points to export certain portions of a clip or sequence. See Transcoding for more information.
To set In and Out markers:
1. Right-click on the required clip or sequence and select Open in Timeline.
Clips opened in a timeline have a purple background on the Sequence tab.
2. Move the playhead to the location of the In Point and press I on your keyboard.
The In Point is marked by the In tab and the time is recorded in the play-back controls.
3. Move the playhead to the location of the Out Point and press O on your keyboard.
The Out Point is marked by the Out tab and the time is recorded in the playback controls.
Click and drag the markers to adjust their position, or hold Ctrl/Cmd to move both markers at once, retaining their relative positions. A Viewer preview shows the current frame for the selected marker(s) and a timecode/frame popup helps to set the new position.
TIP: You can also set markers by navigating to View > Mark In or Mark Out or by using the Timeline menu to Mark Selection or Mark Clip dependent on clip selections on the timeline.
Hiero and HieroPlayer 1.6v1The Foundry

INGESTING MEDIA 74Viewing Media
Clear the markers from your clip by navigating to View > Clear In and Out Points. The markers are removed completely, but you can reapply them by repositioning the playhead and pressing I or O.
When the playhead is positioned near In and Out markers, the top half of the timecode scale controls the playhead and bottom half controls the markers.
Using the Media Tab The Media tab contains format specific controls dependent on the media currently in the Viewer. If the Media tab is not displayed in your workspace, navigate to Window > Media to open it in a floating window.
As an example, .mov files only allow you to control the Colour Curve and Source for the media:
Whereas R3D and ARRIRAW media use their own software development kits (SDKs) to control the extensive settings usually seen on RED and ARRIRAW
Marker Control Area
Playhead Control Area
Hiero and HieroPlayer 1.6v1The Foundry

INGESTING MEDIA 75Viewing Media
Cameras, as well as the Source.
The RED Decode Resolution and ARRIRAW Resolution and Proxy dropdowns control the maximum allowed Viewer resolution, overriding Hiero’s Image Quality setting.
When a clip’s resolution is altered using these controls, the resolution displayed in the Viewer is italicised to indicate that the clip is not displayed at full resolution.
Working with Colourspaces
Colourspace changes are applicable to clips in bins and track items, as well as in the Viewer using the Media tab.
R3D NOTES: The following R3D controls have no effect in Hiero’s default 16-bit half-float decoding mode:
• Version (always set to ColorVersion2)
• Shadow
• Contrast
• CustomPDLogBlackPoint, CustomPDLogWhitePoint and CustomPDLog-Gamma
• RestrictedRange
This list is subject to change depending on the R3D software version in use.
ARRIRAW NOTES:
• ARRIRAW specific controls do not currently work in LogC colourspaces.
• Generally, the Unsqueeze Anamorphic control should not be enabled because the Hiero, HieroPlayer, and Nuke Viewers expand the image automatically.
Hiero and HieroPlayer 1.6v1The Foundry

INGESTING MEDIA 76Viewing Media
To apply colourspace changes to clips in bins:
1. Select the clip or clips in the bin view.
2. Right-click a selected clip and navigate to Set Media Colour Transform.
The current colourspace is highlighted with a tick mark.
3. Select the colourspace to apply to the clip selection.
4. Selecting multiple formats supporting different colourspaces, for example R3Ds and ARRIRAW, breaks the available LUTs into submenus:
To apply colourspace changes to track items:
1. Select the item(s) on the timeline.
2. Right-click a selected item and navigate to Set Media Colour Transform.
3. Select the colourspace to apply to the selection.
NOTE: Only colourspaces applicable to the selection are displayed. For example, REDspace and LogC - CameraNative are only available for R3D and ARRIRAW clips, respectively.
Hiero and HieroPlayer 1.6v1The Foundry

INGESTING MEDIA 77Previewing on a Broadcast Monitor
Previewing on a Broadcast Monitor
Hiero’s monitor out feature allows you to preview Viewer images on an external broadcast video monitor to check the final result, including the correct colourspace and aspect ratio. This option requires additional hardware, such as a monitor output card or a FireWire port.
Hiero’s monitor output architecture currently supports the cards listed below. Some monitor out cards allow you to extend or mirror your desktop so that Hiero’s user interface is visible on the monitor. Please refer to your card’s documentation for more information.
The following monitor out cards are currently supported, though other combinations of cards and drivers may work:
• AJA Kona series PCI cards and Io XT (Mac only, requires Thunderbolt port)
• Blackmagic DeckLink series PCI cards, UltraStudio Express and 3D (Mac only, requires Thunderbolt port)
To preview output on an external broadcast video monitor:
1. Navigate to Window > Monitor Controls.
The Monitor Controls toolbar displays in a floating pane.
2. Select the external device you want to use from the output device dropdown. All available devices are automatically detected and listed in this menu, along with the following default options:
NOTE: HieroPlayer does not support Monitor Out cards.
NOTE: AJA monitor out cards are not currently supported on Linux.
NOTE: On Mac, the AJA Kona 3G is only supported on OS X Lion.
NOTE: Monitor out on Windows machines with AMD graphics cards is not currently supported.
Hiero and HieroPlayer 1.6v1The Foundry

INGESTING MEDIA 78About Anamorphic Media
• None—disables the monitor out feed.
• Floating Window—opens up a pseudo output monitor window, without the need for a monitor device and card. This is intended for full-screen use without displaying any of Hiero’s interface.
3. Select the display format for the device selected in the previous step. The available options depend on the device you are using.
4. Select the Viewer to feed to the output monitor using the source viewer dropdown. Selecting Active Viewer always display the current Viewer.
5. Select the view mode using the A/B selection dropdown. All the usual Hiero A/B controls, such as SplitWipe, are available on the output monitor.
6. Click the filter button to apply the active Viewer’s filtering, gamma, and gain to the monitor output.
7. Click the flip button to flip the output vertically.
8. Click the range button to switch between full-range 0-255 (default) and 16-236 (ITU-R BT.610-4). This button can correct the image output for certain monitor out cards.
9. Click the bit-depth button to toggle between 8- and 10-bit monitor output.
10.Select the colourspace to apply to the image. If you’ve specified an OCIO configuration file in Preferences > Viewers, these custom LUTs are also applicable.
About Anamorphic Media
The Viewer automatically recognises anamorphic clips and displays them with the correct aspect ratio.
If for any reason you want to display an anamorphic clip with a 1:1 aspect ratio, right-click in the Viewer displaying the clip and enable the Ignore Pixel Aspect checkbox.
Hiero and HieroPlayer 1.6v1The Foundry

INGESTING MEDIA 79About RED Media
About RED Media When working with RED clips, using a RED Rocket card can increase the rendering speed significantly, especially at higher resolutions.
The RED Rocket icon has three states:
To modify the RED Rocket options:
1. Click the icon in the Viewer.
The RED Rocket Settings dialog displays.
2. Temporarily disable the RED Rocket card by deselecting Use RED Rocket card. Unlike the option in the Preferences dialog, changing this setting does not affect the application at startup.
3. Click OK to save your settings.
NOTE: The RED Rocket icon is only visible if you have a RED Rocket installed.
Inactive—the RED Rocket card is inactive.
Firmware error—there is a problem with the card firmware. Hover the mouse over the icon for more information.
Active—the RED Rocket card is present and active.
NOTE: You must have Use RED Rocket enabled in the Preferences dialog to access these options. See Workspace Preferences for more information.
NOTE: Projects containing large amounts of movie files (for example .r3d and .mov) may exceed the number of available file handles per process, causing problems opening new files or projects and exporting.
You can increase the default limit of 1024 by entering the following command from the terminal, then running Hiero from the same session:
ulimit -Sn 2048
Hiero and HieroPlayer 1.6v1The Foundry

INGESTING MEDIA 80Using Scopes
Using RMD Look Files RED metadata files, or RMDs, are designed to contain grade information for R3D clips. You can automatically create RMDs for all files, or create RMDs manually for specific clips. RMDs reside in the same folder as the source R3D clip.
Automatic RMDs
The Preferences dialog contains an option to automatically create RMDs for files as you make changes to the RED Look.
To enable Automatic RMDs:
1. Navigate to Hiero (HieroPlayer) > Preferences > General (OS X) or Edit > Preferences > General (Linux and Windows),
OR
Use the Preferences hotkey Ctrl/Cmd + , (comma).
The Preferences dialog box displays.
2. Select Automatically save RMD files and click OK.
Manual RMDs
Sometimes in your workflow, it’s not practical to constantly save RMDs for all your clips. You can create individual RMDs using the Media tab.
1. Modify the RED Look parameters as required.
2. Right-click in the Media tab Effect panel and select Clip Options > Save RMD.
An RMD file is created in the same folder as the source clip.
Using Scopes Hiero and HieroPlayer provide realtime scopes to help you evaluate your media. Realtime scopes provide data as the Viewer plays your clip, but you can also view the scopes frame by frame if you prefer.
Histogram The Histogram provides three colour channel and luma channel information that describes the distribution of red, green, blue, and luma pixels throughout the current frame.
NOTE: When Automatically save RMD files is enabled, all changes you make to RED Look settings are added to the RMD file, overwriting any metadata that was present.
Hiero and HieroPlayer 1.6v1The Foundry
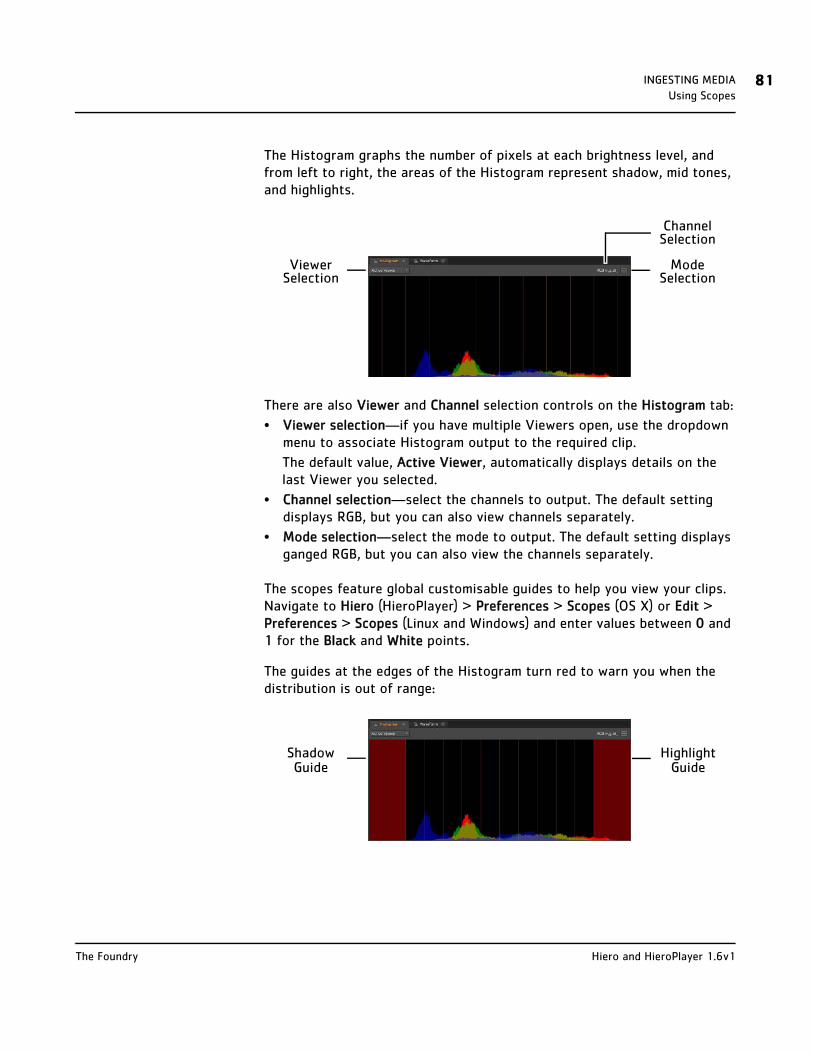
INGESTING MEDIA 81Using Scopes
The Histogram graphs the number of pixels at each brightness level, and from left to right, the areas of the Histogram represent shadow, mid tones, and highlights.
There are also Viewer and Channel selection controls on the Histogram tab:
• Viewer selection—if you have multiple Viewers open, use the dropdown menu to associate Histogram output to the required clip.
The default value, Active Viewer, automatically displays details on the last Viewer you selected.
• Channel selection—select the channels to output. The default setting displays RGB, but you can also view channels separately.
• Mode selection—select the mode to output. The default setting displays ganged RGB, but you can also view the channels separately.
The scopes feature global customisable guides to help you view your clips. Navigate to Hiero (HieroPlayer) > Preferences > Scopes (OS X) or Edit > Preferences > Scopes (Linux and Windows) and enter values between 0 and 1 for the Black and White points.
The guides at the edges of the Histogram turn red to warn you when the distribution is out of range:
Viewer Selection
Mode Selection
Channel Selection
Shadow Guide
Highlight Guide
Hiero and HieroPlayer 1.6v1The Foundry

INGESTING MEDIA 82Using Scopes
Waveform The Waveform scope provides information on clip luminance, or brightness, which you can use to decide whether the clip is over or under exposed. The white traces represent luminance values from 0 - 100% (black through the spectrum to white). The higher the waveform, the brighter the image in the Viewer.
The upper white marker is used to measure when over exposure could be a problem. If your waveform has a lot of traces over the white marker, you should consider reducing the brightness of the clip. The opposite is true of the lower black marker.
There are also Viewer and Mode selection controls on the Waveform tab:
• Viewer selection—if you have multiple Viewers open, use the dropdown menu to associate Waveform output to the required clip.
The default value, Active Viewer, automatically displays details on the last Viewer you selected.
• Channel selection—select the channels to output. The default setting displays RGB, but you can also view channels separately.
• Mode selection—select the mode to output. The default setting displays ganged RGB, but you can also view the channels separately.
The scopes feature global customisable guides to help you view your clips. Navigate to Hiero (HieroPlayer) > Preferences > Scopes (OS X) or Edit > Preferences > Scopes (Linux and Windows) and enter values between 0 and 1 for the Black and White points.
The guides at the top and bottom of the Waveform turn red to warn you when the distribution is out of range:
Viewer Selection
Mode Selection
Channel Selection
Hiero and HieroPlayer 1.6v1The Foundry
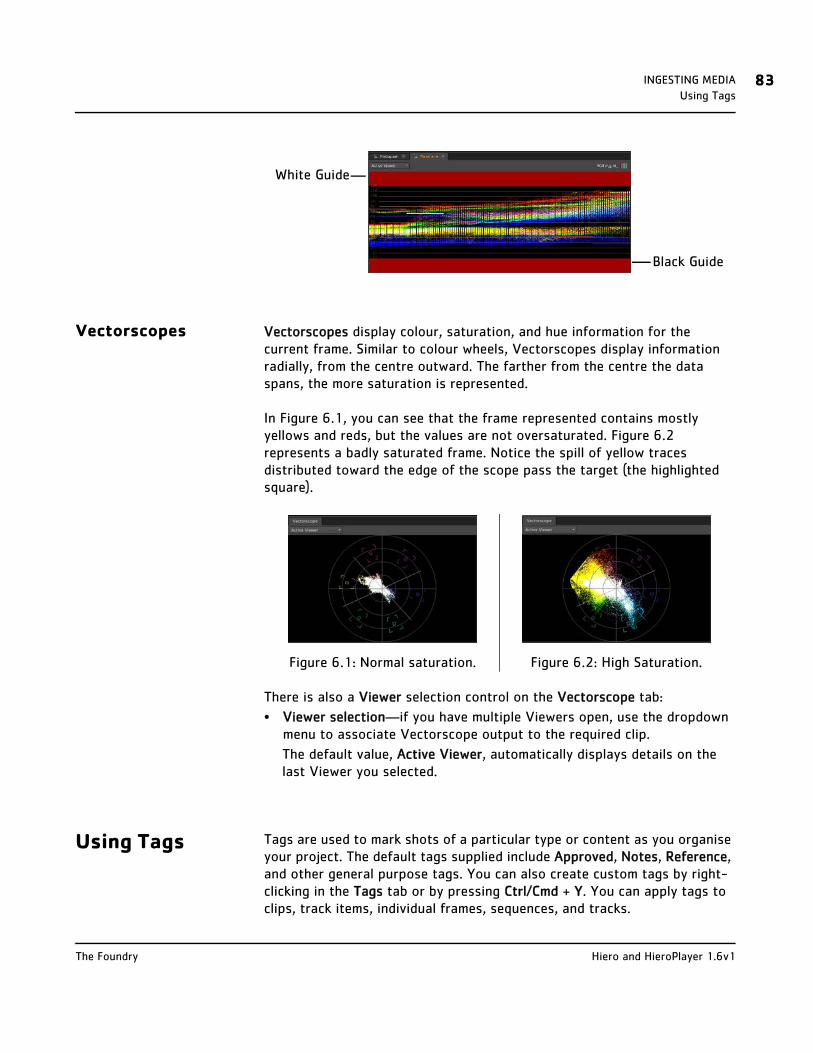
INGESTING MEDIA 83Using Tags
Vectorscopes Vectorscopes display colour, saturation, and hue information for the current frame. Similar to colour wheels, Vectorscopes display information radially, from the centre outward. The farther from the centre the data spans, the more saturation is represented.
Figure 6.1: Normal saturation. Figure 6.2: High Saturation.
In Figure 6.1, you can see that the frame represented contains mostly yellows and reds, but the values are not oversaturated. Figure 6.2 represents a badly saturated frame. Notice the spill of yellow traces distributed toward the edge of the scope pass the target (the highlighted square).
There is also a Viewer selection control on the Vectorscope tab:
• Viewer selection—if you have multiple Viewers open, use the dropdown menu to associate Vectorscope output to the required clip.
The default value, Active Viewer, automatically displays details on the last Viewer you selected.
Using Tags Tags are used to mark shots of a particular type or content as you organise your project. The default tags supplied include Approved, Notes, Reference, and other general purpose tags. You can also create custom tags by right-clicking in the Tags tab or by pressing Ctrl/Cmd + Y. You can apply tags to clips, track items, individual frames, sequences, and tracks.
White Guide
Black Guide
Hiero and HieroPlayer 1.6v1The Foundry

INGESTING MEDIA 84Using Tags
Using Quick Tags Quick tags allow you to add tags, depending on context, by right-clicking a selection and then choosing the type of tag to apply. If you’re tagging a large amount of media, you might find it more convenient to use the drag-and-drop methods described later on.
Quick tags are accessible from bins, spreadsheets, Viewers, and timelines for single or multiple selections.
1. Select the target clips or sequences.
2. Right-click a highlighted selection, go to Tags, and choose the required action, dependent on context.
For example, bin items only allow you to Tag Selection, whereas track items allow you to Tag Shot Selection, Tag Tracks, or Tag this Sequence
Once you’ve selected the tag type, the Add Tag dialog displays.
3. Select the icon to represent the tag using the Icon dropdown.
4. Enter a Name and Note as required.
5. Click Add to mark your selections with the chosen tag.
See Creating Custom Tags and Removing Tags for more information.
Tagging Using the Viewer
To apply a tag using the Viewer:
1. Navigate to Window > Tags.
The Tags tab displays.
Hiero and HieroPlayer 1.6v1The Foundry

INGESTING MEDIA 85Using Tags
2. Drag-and-drop the required tag from the Tags tab to the Viewer.
Depending on whether you’re looking at a clip or sequence, drop the tag on Tag this frame, Tag whole clip, or Tag whole sequence as required.
Tags applied to frames appear above the playback tools in the Viewer timeline.
Tags applied to entire clips or sequences appear above the Viewer, next to the A/B layout dropdown menu.
Tags Playhead
TIP: Use Shift + or to skip to the next or previous tag on the current clip or reposition tags by dragging them along the Viewer timeline.
Tags
Hiero and HieroPlayer 1.6v1The Foundry

INGESTING MEDIA 86Using Tags
Tagging Track Items To apply a tag to a track item on the timeline:
1. Navigate to Window > Tags.
The Tags tab displays.
2. Drag-and-drop the required tag from the Tags tab to the timeline.
Depending on where the tag is dropped, you’ll mark a track item (or items if you make multiple selections) or a track.
Tags applied to track items appear on the right of the selected item(s) on the timeline.
Tags applied to tracks appear in the track header on the left of the timeline.
Hiero and HieroPlayer 1.6v1The Foundry

INGESTING MEDIA 87Using Tags
Adding Notes to Tags
In some cases, a simple tag on a frame or clip may not contain all the information that you wish to pass on to the next stage of production. Adding notes to a tag can provide that extra detail.
1. Add notes to tags by clicking on the required tag and entering text or editing the metadata keys and values.
The example shows a note and metadata key “Artist” added to a clip tag, but you can add notes to frame and timeline tags in the same way.
2. Click outside the dialog to save the note.
Filtering and Flagging Media Using Tags
You can search for clips containing certain tags, for example, if you wanted to find all clips that you tagged as Approved.
There are two types of tag search you can perform: Filter and Flag. Select the desired search type by clicking the magnifier icon in the Project tab.
• Filter—displays all objects that contain the specified tag. This is the default search method.
• Flag—displays all objects and marks the items that don’t match the search tag.
Drag the required tag from the Tags tab into the search box and select the
NOTE: To delete a note, don’t click the - button because this refers to the tag. Instead, simply delete the notes in the window and click outside the note dialog.
Hiero and HieroPlayer 1.6v1The Foundry

INGESTING MEDIA 88Using Tags
bin or bins you want to Filter or Flag.
The following examples show Filtering a bin to display only media with the Approved tag applied and Flagging all media that doesn’t have the Approved tag applied to it.
Creating Custom Tags
You may find that you require a specific tag or suite of tags that are not provided by default. Creating custom tags allows you to really control the organisation of your media, and you can even create your own tag icons.
To create a custom tag:
1. Navigate to Window > Tags to open the Tags tab.
2. Select your project or create a new bin by pressing Ctrl/Cmd + B.
3. Navigate to Project > New Tag, or press Ctrl/Cmd + Y.
The new tag is placed in the selected project or bin.
TIP: If you have more than one search criteria, click the icons in the search box to display a brief description of the icons.
Filters and flags persist until you change the search criteria or click the icon in the search box.
Filtering... ...and Flagging
NOTE: Custom tags can only be created in the Tags tab.
Hiero and HieroPlayer 1.6v1The Foundry

INGESTING MEDIA 89Using Tags
4. Double-click the tag to open the Edit Tag dialog box.
5. Click the Icon dropdown menu to select an icon for the custom tag.
6. Enter a description for the tag in the Name field.
7. Click OK to save your changes.
Removing Tags To remove a tag from a frame or clip, click the tag and then click .
You can remove all tags from a clip or selection of clips by right-clicking your selections in the bin and choosing Clear Tags.
TIP: You can import your own image for the tag by selecting Custom to open the browser.
Hiero and HieroPlayer 1.6v1The Foundry

INGESTING MEDIA 90Viewing Metadata
To remove a tag from a track or track item, click on a tag icon and select the required tag to remove.
Press to remove your selection.
Viewing Metadata
Metadata is information that describes media content, separate from the clip itself, in the form of a table on the Metadata tab. Types of metadata include Duration, File Size, and the Path to the location of the source media.
To view metadata for a bin clip, right-click the clip and select Show Metadata.
Hiero and HieroPlayer 1.6v1The Foundry
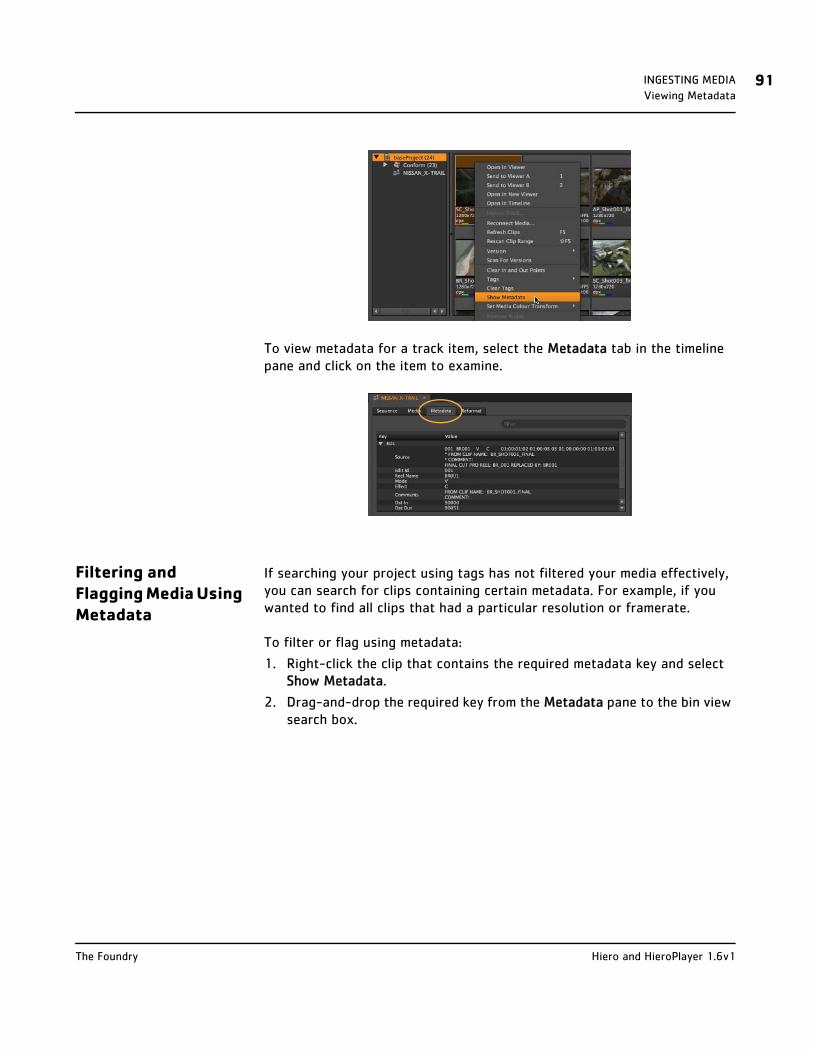
INGESTING MEDIA 91Viewing Metadata
To view metadata for a track item, select the Metadata tab in the timeline pane and click on the item to examine.
Filtering and Flagging Media Using Metadata
If searching your project using tags has not filtered your media effectively, you can search for clips containing certain metadata. For example, if you wanted to find all clips that had a particular resolution or framerate.
To filter or flag using metadata:
1. Right-click the clip that contains the required metadata key and select Show Metadata.
2. Drag-and-drop the required key from the Metadata pane to the bin view search box.
Hiero and HieroPlayer 1.6v1The Foundry

INGESTING MEDIA 92Viewing Metadata
3. Use the metadata key as a filter or flag as described in Filtering and Flagging Media Using Tags.
Hiero and HieroPlayer 1.6v1The Foundry

7 MANAGING TIMELINES
Timelines can contain any number of video sequences and audio tracks with each track containing clips that reference the source clips in your project—making changes to clips in the timeline does not affect the original source clip.
• Video Toggle—quickly turn off and on video tracks during playback.
• Playhead Position—displays the playhead location synchronised with the contents of the Viewer.
• Timecode—displays the timecode or frame number depending on the Time Display mode selected. You can adjust the scale using the Scale Slider or by using the mouse wheel.
• Video Tracks—contain all video sequences for the current timeline.
• Audio Tracks—contain all the audio clips for the current timeline.
NOTE: HieroPlayer does not allow you to edit read-only projects. If you need to edit an imported Hiero project, select File > Save as Player Project to make it editable in HieroPlayer.
NOTE: Conformed EDLs only support one video sequence. If you’ve created multiple EDLs from the same edit, you can add each one into the timeline using the Import Track button under the spreadsheet. See Adding Tracks to the Timeline.
Video TracksAudio TracksTrackLock
Audio Toggle
TimecodeVideo Toggle Playhead Position
Scale Slider

MANAGING TIMELINES 94Adding Tracks to the Timeline
• Scale Slider—adjusts the scale of the timeline. You can fit the contents of the timeline to the screen space available by pressing the F hotkey.
• Audio Toggle—quickly turn off and on audio tracks during playback.
• Track Lock—secure the selected track to disable all editing tools.
Video tracks in multi-track timelines are read from the highest number track downward, for example Video 3, Video 2, Video 1. As a result, if video is present on track 3, video on track 2 in the same time slice is obscured.
In Figure 7.1, although the playhead crosses clips on two video tracks, only the clip in Video 3 is displayed in the Viewer.
Figure 7.1: A typical multi-track timeline.
Audio tracks, on the other hand, can be played back simultaneously—all three audio tracks crossed by the playhead in Figure 7.1 play back together, creating a complete audio backing for the video.
Adding Tracks to the Timeline
You can add empty tracks to existing timelines or import other EDLs or XML edits—effectively others sequence within the timeline.
To import EDL or XML edits:
1. Click Import Track and use the browser to locate the EDL or XML files.
NOTE: HieroPlayer cannot import EDLs or XMLs, but you can add scratch tracks to HieroPlayer projects or imported, read-only Hiero projects if you resave them using File > Save as Player Project.
Hiero and HieroPlayer 1.6v1The Foundry

MANAGING TIMELINES 95Adding Tracks to the Timeline
2. Select the file(s) and click Open to import the sequence.
3. Conform the new track as described in Conforming Sequences.
To add new tracks:
• Drag-and-drop a clip above or below existing tracks as shown,
NOTE: If you’re importing a EDLs, bear in mind that there is no guaranteed framerate information included in the file.
When you import EDLs, an Import Options dialog displays.
Select the correct framerate using the dropdown, then click OK to import.
Hiero and HieroPlayer 1.6v1The Foundry

MANAGING TIMELINES 96Adding Clips to the Timeline
OR
• Right-click in the timeline and select New Video Track or New Audio Track.
Adding Clips to the Timeline
Hiero’s timeline allows you to add clips by simple drag-and-drop from either the Viewer or bins. Using the Viewer restricts you to a single clip, the current clip, but you can drag as many clips as you like from bins.
If the timeline already contains clips, take care not to overwrite existing clips—the most recent clip overlays any existing clip. To avoid this, do one of the following:
NOTE: You can also collapse and expand existing tracks using the right-click menu, and resize the track header to accommodate longer track names.
NOTE: HieroPlayer does not allow you to edit read-only projects. If you need to edit an imported Hiero project, select File > Save as Player Project to make it editable in HieroPlayer.
Hiero and HieroPlayer 1.6v1The Foundry

MANAGING TIMELINES 97Adding Clips to the Timeline
• Use the Move Clip Tool to make space for the new clip and then drag-and-drop it in to the space (see Move Tool for more information),
OR
NOTE: New timelines pick up their framerate from the Preferences > Sequence dialog by default. Dropping a clip with a different framerate to the sequence preferences on a new timeline displays a warning:
The timeline default framerate is set by the first clip added to it.
If the timeline is already populated and the clip you’re adding doesn’t have the same framerate as the timeline, you’re prompted to choose whether the clip’s duration or framerate is retained.
Hiero and HieroPlayer 1.6v1The Foundry

MANAGING TIMELINES 98Audio and the Timeline
• Drag-and-drop the new clip at the end of the sequence. Next, drag the new clip to an existing transition, hold down the Alt modifier, and drop the clip to Ripple all other clips down the timeline.
Audio and the Timeline
Audio tracks on the timeline are handled in much the same way as video tracks. By default, linked audio and video tracks are edited at the same time, but you can lock either track and move them independently or hold Alt to select a single track, if required.
When both Viewer inputs contain clips, the audio output is set by the input marker on the overlays. In the following example, input A is providing the audio output:
The volume slider in the lower right corner of the Viewer controls the
TIP: The cursor changes to when you’re using Ripple mode.
NOTE: Although you can import and edit multi-channel audio, during playback audio is mixed to 48 KHz mono output.
NOTE: Hiero and HieroPlayer do not currently support any QuickTime audio on Linux. Support for audio on Linux is scheduled for a later release.
Hiero and HieroPlayer 1.6v1The Foundry

MANAGING TIMELINES 99Using Reference Media
output level.
The Preferences contain a toggle for audio, allowing you to enable and disable audio playback across the entire interface. See Workspace Preferences for more information.
WAV Clip Tracks Audio can be recorded at the same time as shooting the video or it can be unrelated to the shoot, for example sound effects or music. You can add .wav clips to the timeline in two ways:
• Drag-and-drop—drag your .wav clip to a timeline audio track and drop it in to place.
• Navigate to File > Import Clips or Import Folders.
Use the Timeline Editing Tools to move the clip into place and set its out-put.
Using Reference Media
Importing a lower resolution version of your timeline enables you to compare your current timeline against the reference media to avoid issues with continuity, missed frames, and so on.
To import reference media, click Set Reference Media and use the browser to locate the required file.
NOTE: If the framerate drops too low, audio is automatically muted and the speaker changes to the no audio playback icon.
TIP: You can also use the Ctrl/Cmd + I and Shift + Ctrl/Cmd + I hotkeys.
NOTE: HieroPlayer does not support Set Reference Media, but you can import reference files manually and use A/B compare in the Viewer.
Hiero and HieroPlayer 1.6v1The Foundry

MANAGING TIMELINES 100Using Reference Media
The reference media is automatically imported into Reference tracks, pushing existing tracks outward, and marked with the Reference Media tag.
After importing the reference media, use the show/hide icon to
compare the current timeline against the reference clip.
Comparing Media You can drag media from the bin view to the second Viewer input, and use the SplitWipe tool to compare media.
NOTE: Hiero and HieroPlayer currently treat all alpha channels as premultiplied, which can result in the Viewer background being “added” to the image. If you’re working with un-premultiplied images, set the Viewer background to Black. See Workspace Preferences for more information.
Hiero and HieroPlayer 1.6v1The Foundry

MANAGING TIMELINES 101Using Reference Media
Alternatively, switch the Viewer to Horizontal mode and click the
button to determine the Viewer output using tracks flags and/or tags.
The following controls affect the A/B output:
Icon Description
Clear the associated Viewer input.
Set the associated clip’s thumbnail to the current frame.
Hiero and HieroPlayer 1.6v1The Foundry

MANAGING TIMELINES 102Viewing Multi-Format Timelines
The Viewer overlay displays a description of the contents of the A and B inputs, or No Clip when there is no clip at the playhead, for instance, when there is a gap in a timeline.
The orange triangle in the A/B overlay denotes the clip currently supplying audio and timecode information in the Viewer.
Viewing Multi-Format Timelines
Initially, sequences have an Output Resolution applied across all video tracks on a timeline. You can apply this resolution project-wide through Project > Edit Settings or to individual sequences using the timeline Sequence tab.
In the real world, however, clips are often of different formats so Hiero and HieroPlayer provide clip-by-clip formatting options to help you standardise sequences more easily.
Reformatting applied to clips on a timeline carries over into any export from Hiero. The reformat options in the Export dialog are applied after the transforms applied here. See Round-Tripping and Export Management for more information.
To apply format changes:
1. Select the clip(s) to reformat on the timeline.
Swap the A and B inputs.
Automatically places any tagged Reference media on the timeline in Viewer input B.
Click to toggle A/B time synchronisation.
Icon Description
NOTE: Clips default to Resize Type > Width when you change the format of the sequence.
Hiero and HieroPlayer 1.6v1The Foundry

MANAGING TIMELINES 103Viewing Multi-Format Timelines
2. Click the Reformat tab on the timeline pane to display the reformat options.
3. Select the reformat Type from the dropdown:
• Disabled—no reformatting is applied.
• To Format—enables the Resize Type and orientation controls.
• Scale—enables the Scale controls.
4. To Format controls how a clip is resized and its orientation. The following Resize Types are supported:
• None—no resize is applied.
• Width—scale the original until its width matches the format’s width. Height is then scaled to preserve the original aspect ratio.
• Height—scale the original until its height matches the format’s height. Width is then scaled to preserve the original aspect ratio.
• Fit—scale the original until its smallest side matches the format’s smallest side. The original’s longer side is then scaled to preserve original aspect ratio.
• Fill—scale the original until its longest side matches the format’s lon-gest side. The input’s shorter side is then scaled to preserve original aspect ratio.
• Distort—to scale the original until all its sides match the lengths spec-ified by the format. This option does not preserve the original aspect ratio, so distortions may occur.
You can also change the clip orientation:
TIP: You can enable the Format guide in the Viewer controls to overlay the current format as a red box.
Hiero and HieroPlayer 1.6v1The Foundry

MANAGING TIMELINES 104Refreshing and Replacing Track Items
• Centre—centres the clip within the format dimensions.
• Flip—flips the clip the X axis.
• Flop—flops the clip on the Y axis.
• Turn—rotates the clip 90 degrees anti-clockwise.
5. Scale allows you to directly control the size of the clip without changing its aspect ratio.
Use the slider or enter a value in the field provided to scale the clip.
6. You can crop the clip outside the format by enabling Crop to Format in the Viewer controls.
Refreshing and Replacing Track Items
During the post process, media inevitably changes location or form. Hiero can reload or replace your media using the refresh, rescan, reconnect, and replace functions.
Though all four options deal with reloading track items, each has a particular use dependent on context:
• Refresh Clips (F5)—allows you to reload the track item when the source file location has not changed, such as when work has been done on the clip offline. Selecting refresh only refreshes the clip’s current frame range.
NOTE: HieroPlayer cannot perform the Replace Clip(s) function on read-only projects.
Hiero and HieroPlayer 1.6v1The Foundry

MANAGING TIMELINES 105Timeline Editing Tools
7. Rescan Clip Range (Shift+F5)—similar to Refresh Clips, above, but rescan also checks for additional frames that may have been added to the source file and adds them to the track item’s frame range.
• Reconnect Media—allows you to redirect the filepath when the source file location changes.
• Replace Clip(s)—replaces the selected track item with a specified source clip. Hiero assumes that any source clip you choose is acceptable, regardless of timecode.
Timeline Editing Tools
The timeline Editing Tools allow you to manipulate your track items directly in the timeline instead of the Viewer. Bear in mind that edits you make in the timeline are not carried over to the associated source clips.
Unlike some applications, the timeline tools are automatically enabled depending on the position of your mouse in relation to the track item.
Move Tool Placing the mouse in the centre of a track item activates the Move tool. Click and drag the selected track item to the required position on the timeline. A time count popup, in conjunction with the snap to edit function, helps you to reposition the track item accurately.
NOTE: HieroPlayer does not allow you to edit read-only projects. If you need to edit an imported Hiero project, select File > Save as Player Project to make it editable in HieroPlayer.
Slip Tool
Slide Tool Move Tool
Trim Tool Roll Tool
NOTE: The Move tool defaults to overwrite mode, indicated by the
cursor.
Hiero and HieroPlayer 1.6v1The Foundry

MANAGING TIMELINES 106Timeline Editing Tools
You can also move track items up and down the track hierarchy using drag-and-drop.
Move tool modifiers
Mode Method Indicator Description
Overwrite drag and drop The default move mode. The dragged track item overwrites any items that are present in the move location.
Ripple drag then hold Alt and drop
Drag-and-drop track items on top of other items without overwriting content—items are pushed down the timeline to accommo-date the move.
Duplicate hold Alt and drag then release Alt and drop
Copy the track item, then drag-and-drop on top of other items overwriting existing con-tent—items are not pushed down the time-line to accommodate the move.
Ripple and Duplicate
hold Alt then drag and drop while hold-ing Alt
Copy the track item, then drag-and-drop items on top of others without overwriting content—items are pushed down the time-line to accommodate the move.
Note: On Linux, hold Ctrl + Alt for Duplicate and Ripple Duplicate modifiers.
Time Count
Hiero and HieroPlayer 1.6v1The Foundry

MANAGING TIMELINES 107Timeline Editing Tools
Delete modifiers
Action Hotkeys Description
Delete Backspace Delete the selected track item(s) or gap(s).
Ripple Delete
Shift + Backspace Remove the selected track item(s) and ripple items down stream to close gaps in the timeline.
Note: The ripple effect may not close gaps entirely, because Hiero does not allow linked tracks to become desynchronised during rippling.
If you need to nudge track items by just a frame or two, you can select the items on the timeline and press , or . to nudge by one frame in the chosen direction. Hold Shift and press , or . to nudge by the Frame Increment set under the Viewer.
Moving track items using the spreadsheet view
You can move track items using the Dst columns of the spreadsheet, though the calculation method depends on the Editing Settings applied.
1. Select the required events in the spreadsheet view.
2. Click the cog icon and select the required Editing Settings:
Modify Using Result
Dst In Move Destination
Adjusts the event’s Dst In and Out by the same amount, moving the track item’s position on the timeline by the specified amount, while maintaining Speed.
Before and after a 2 second Dst In increase:
Dst Out Move Destination
Adjusts the event’s Dst Out and In by the same amount, moving the track item’s position on the timeline by the specified amount, while maintaining Speed.
Before and after a 2 second Dst Out increase:
NOTE: You cannot overwrite other track items on the timeline using the nudge keys.
Hiero and HieroPlayer 1.6v1The Foundry

MANAGING TIMELINES 108Timeline Editing Tools
3. Adjust the Dst In or Dst Out to move the track item(s) by the specified amount.
Trim Tool The Trim tool allows you to alter the output of a track item, within its total length, by adding or removing handles.
1. Place the mouse at the left or right of the track item to activate the Trim tool.
2. Drag the edit point to the new position and release the mouse to complete the trim.
The Viewer displays the new In or Out point (depending on whether you’re adjusting the beginning or end of the track item), allowing you to accurately gauge the new output.
Alternatively, click a cut point and nudge the cut using the , and . keys or hold Shift to nudge by the Frame Increment set under the Viewer.
NOTE: You can only increase track item output if the bin clip has handles.
Trim Handles
Trim Amount
NOTE: Trimming multiple track items simultaneously trims each item by the same amount and in the same direction.
Hiero and HieroPlayer 1.6v1The Foundry

MANAGING TIMELINES 109Timeline Editing Tools
By holding Ctrl/Cmd Hiero can add blank frames past the end of the track item’s handles. Blank frames are coloured red on the timeline for clarity:
Trimming using the spreadsheet view
You can trim track item using the Src, Dst, and Duration columns of the spreadsheet:
1. Select the required events in the spreadsheet view.
2. Click the cog icon and select the required Editing Setting depending on whether you’re using the In or Out points or duration:
Modify Using Result
Src In Trim In Trims the event’s Src In, Dst In, and durations while maintaining speed.
Before and after a 2 second Src In increase:
Src Out Trim Out Trims the event’s Src Out, Dst Out, and durations while maintaining speed.
Before and after a 2 second Src Out increase:
Hiero and HieroPlayer 1.6v1The Foundry

MANAGING TIMELINES 110Timeline Editing Tools
3. Adjust the values as required to trim the track item(s) by the specified amount.
Slip Tool The Slip tool allows you to shift a track item In and Out points by the same amount and in the same direction, retaining the original duration but altering the timeline output.
Src Dur Trim Out Trims the event’s Src Dur, Dst Dur, and Src/Dst Out while maintain-ing speed.
Before and after a 50 frame Src Dur increase:
Dst In Trim In Trims the event’s Dst In, Src In, and durations while maintaining speed.
Before and after a 2 second Dst In increase:
Dst Out Trim Out Trims the event’s Dst Out, Src Out, and durations while maintaining speed.
Before and after a 2 second Dst Out increase:
Dst Dur Trim Out Trims the event’s Dst Dur, Src Dur, and Dst/Src Out while maintain-ing speed.
Before and after a 50 frame Dst Dur increase:
Modify Using Result
NOTE: The target track item must have handles to use the Slip tool.
Hiero and HieroPlayer 1.6v1The Foundry

MANAGING TIMELINES 111Timeline Editing Tools
The Slip tool displays different Viewer previews depending on whether the playhead is on the target track item or not, but the basic principals are the same:
1. Place the mouse at the bottom of the track item to activate the Slip tool and display the slip handles.
2. Drag the track item to the new position and release the mouse to complete the slip.
Alternatively, select the slip bar by clicking at the bottom the track item, and nudge the slip using the , and . keys or hold Shift to nudge by the Frame Increment set under the Viewer.
The following Viewer previews are displayed, depending on the playhead position:
Slip Handle
Slip Amount
NOTE: Using the Slip tool does not move the track item on the timeline, only the output is changed.
NOTE: The Viewer background always displays the playhead’s current position.
Hiero and HieroPlayer 1.6v1The Foundry

MANAGING TIMELINES 112Timeline Editing Tools
• When the playhead is not currently on the target track item, the Viewer displays the In frame (1) and Out frame (2), allowing you to accurately gauge the new output.
• When the playhead is on the target track item, the Viewer displays the In frame (1), the current frame (2), and Out frame (3), allowing you to accurately gauge the output of the track item against the current frame.
• When the playhead is on the target track item and A/B compare is active, the Viewer displays the target track item (1) and the reference track item (2), allowing you to synchronise your working track against the reference track.
1 2
1 32
1 2
Hiero and HieroPlayer 1.6v1The Foundry
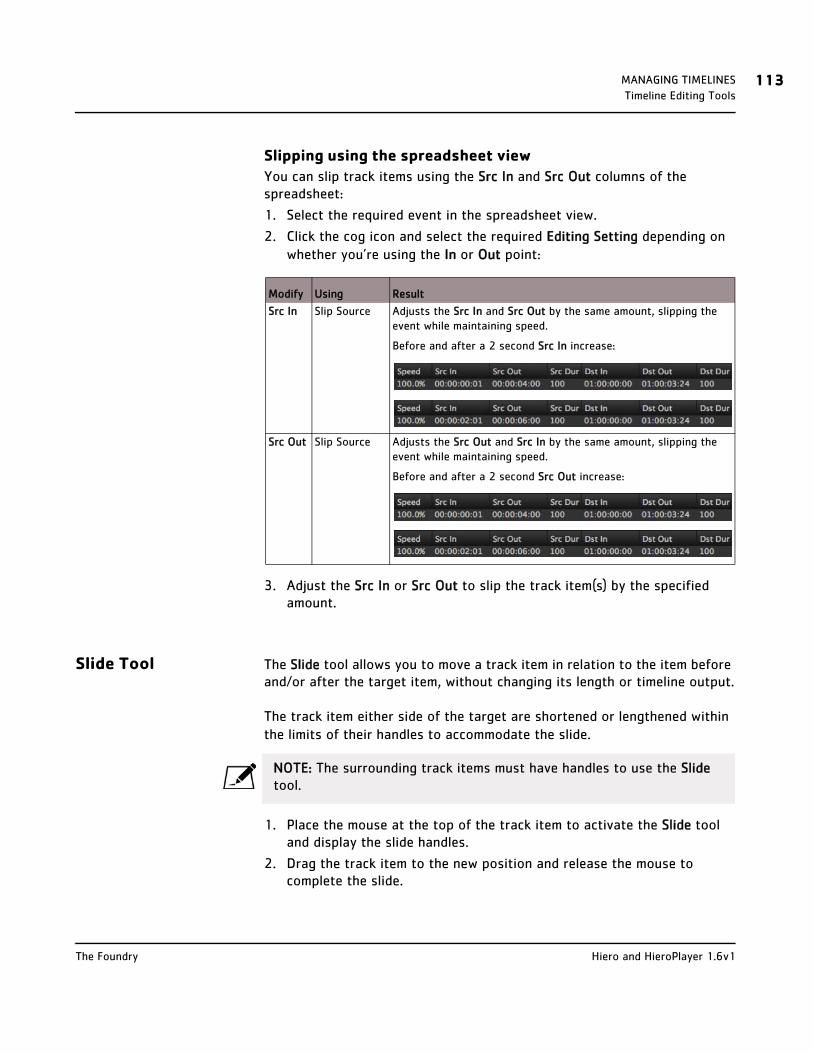
MANAGING TIMELINES 113Timeline Editing Tools
Slipping using the spreadsheet view
You can slip track items using the Src In and Src Out columns of the spreadsheet:
1. Select the required event in the spreadsheet view.
2. Click the cog icon and select the required Editing Setting depending on whether you’re using the In or Out point:
Modify Using Result
Src In Slip Source Adjusts the Src In and Src Out by the same amount, slipping the event while maintaining speed.
Before and after a 2 second Src In increase:
Src Out Slip Source Adjusts the Src Out and Src In by the same amount, slipping the event while maintaining speed.
Before and after a 2 second Src Out increase:
3. Adjust the Src In or Src Out to slip the track item(s) by the specified amount.
Slide Tool The Slide tool allows you to move a track item in relation to the item before and/or after the target item, without changing its length or timeline output.
The track item either side of the target are shortened or lengthened within the limits of their handles to accommodate the slide.
1. Place the mouse at the top of the track item to activate the Slide tool and display the slide handles.
2. Drag the track item to the new position and release the mouse to complete the slide.
NOTE: The surrounding track items must have handles to use the Slide tool.
Hiero and HieroPlayer 1.6v1The Foundry

MANAGING TIMELINES 114Timeline Editing Tools
For example, if you slide the target track item (2) five frames to the right, the preceding item (1) ends five frames later and the next item (3) starts five frames later.
Figure 7.2 shows a timeline containing three track item, and Figure 7.3 shows the same track items with the target (2) sliding to the right.
Figure 7.2: Original clips.
Figure 7.3: Post slide positions.
The Viewer displays the new end point of the previous track item on the left and the new start point of the next track item on the right, allowing you to accurately gauge the slide.
The two centre images (2) represent the start and end frames of the target track item, which don’t change.
1 2 3
1 2 3
1 2 3
Hiero and HieroPlayer 1.6v1The Foundry

MANAGING TIMELINES 115Timeline Editing Tools
Roll Tool The Roll tool enables you to roll a single edit within the available handles, shortening one track item while lengthening the other, but keeping the overall duration the same.
1. Place the mouse on the edit between track items to activate the Roll tool and display the handles.
2. Drag the edit to the new position and release the mouse to complete the roll.
For example, if you roll five frames at the end of one track item (1), the next item (2) starts five frames later. Figure 7.4 shows a timeline con-taining two track items, and Figure 7.5 shows the same items with the cut point “rolled” to the right.
Figure 7.4: Original clips.
Figure 7.5: Rolled clips.
The Viewer displays the pre-edit track item on the left and the post-edit item on the right, allowing you to accurately gauge the new position of the edit.
NOTE: At least one of the target items must have handles to use the Roll tool.
1 2
1 2
Hiero and HieroPlayer 1.6v1The Foundry

MANAGING TIMELINES 116Timeline Editing Tools
Alternatively, click the edit point between the track item and nudge the cut using the , and . keys or hold Shift to nudge by the Frame Increment set under the Viewer.
Razor Tool The Razor tool allows you to cut track items in to separate parts so you can remove sections or rearrange items on the timeline. Unlike the other timeline tools described in this section, Razor is menu driven not mouse position sensitive.
The Razor is applied at the playhead position and can cut through the selected tracks using Window > Razor Selected, or all tracks using Window > Razor All.
1 2
NOTE: You can also use the C and Shift + C hotkeys, or the right-click context menu to perform the respective cuts.
Hiero and HieroPlayer 1.6v1The Foundry

MANAGING TIMELINES 117Timeline Editing Tools
Copying Cuts Between Tracks
The Copy Cuts function allows you to quickly apply cuts from one track to other tracks on the timeline. For example, in the timeline shown in Figure 7.5, you could copy the cuts from the second video track to the Reference audio tracks for synchronisation work.
Figure 7.6: Copying cut between tracks.
To copy cuts:
1. Select the track items containing the cuts to copy. If you intend to copy all the cuts from a track, select any track item.
2. Right-click a highlighted track item and select Copy Cuts.
The Copy Cuts dialog displays.
3. Click the Copy dropdown to select All Cuts or Selected Cuts as required.
4. Click the From dropdown to select the source track.
5. Check all the tracks in the To field to which you want to copy the cuts.
Hiero and HieroPlayer 1.6v1The Foundry

MANAGING TIMELINES 118Timeline Editing Tools
6. Click OK to copy the cuts to the target track(s).
Setting Soft Trims Soft Trims limit the handles on track items to a pre-defined amount, simulating In and Out points on the source clips, allowing you to use other timeline tools on the track items such as Slip and Slide.
To set Soft Trims on a track item:
1. Locate the track item on the timeline.
2. Right-click and select Set Soft Trims.
NOTE: HieroPlayer does not support Soft Trimming.
NOTE: Soft Trims are limited to the source clip’s frame range—a track item’s output plus trims cannot exceed the total frames available.
Hiero and HieroPlayer 1.6v1The Foundry

MANAGING TIMELINES 119Timeline Editing Tools
The Set Soft Trims dialog displays.
3. Set the number of frames to add to the head and tail of the track item:
• Use full available range—sets the handles to the full extent of the source clip’s frame range.
• Use Frames—adds the specified number of frames to the head and tail of the track item.
4. Click OK to add the specified number of handles.
If the handles requested are not within the available frame range, Hiero displays a warning dialog with a suitable correction.
Click Yes to accept, or No to abort the operation.
Enabling and Disabling Track Items
You can temporarily enable or disable tracks and track items on the timeline to selectively view your media without removing track item(s), for example if you wanted to view to lower level video tracks within a timeline.
Source Clip
Track Item
OutIn
Head Tail
NOTE: With track items used in multiple sequences, click Yes to All to accept the correction in all instances.
Hiero and HieroPlayer 1.6v1The Foundry

MANAGING TIMELINES 120Adding Transitions
To enable or disable a track or track item(s):
1. Select the item(s) you want to enable or disable.
2. Right-click on a highlighted item and choose Disable Track or Disable Items to disable the selection.
Disabled items appear black, and are effectively removed from the time-line.
3. Right-click the item and select Enable Clip to re-enable the clip.
Adding Transitions
Hiero supports basic fade transitions as well as dissolves between track items. Transitions come in three flavours:
• Fade in—fades in from black on a single track item.
• Fade out—fades out to black on a single track item.
• Dissolve—fades out from one track item and into the next, by merging frames.
TIP: You can also use the D hotkey to disable or enable your selection.
NOTE: HieroPlayer does not support adding transitions, though you can edit exisiting transitions in HieroPlayer projects.
Hiero and HieroPlayer 1.6v1The Foundry

MANAGING TIMELINES 121Adding Transitions
To add a fade transition:
1. Right-click the target track item and select Fade In or Fade Out to add the fade icon.
2. Adjust the fade by dragging the fade icon, in a similar way to using the Trim tool.
To add a dissolve transition:
1. Hover the mouse pointer over an edit between two track items.
The cursor changes to .
2. Right-click and select Dissolve, or use the Ctrl/Cmd + T hotkey, to add the dissolve icon to the edit.
NOTE: Once a transition is in place, it can be nudged in the same way as an edit using the , and . keys, providing the required handles exist.
NOTE: Dissolves must be between track items on the same track.
Hiero and HieroPlayer 1.6v1The Foundry

MANAGING TIMELINES 122Retiming Clips
3. Adjust either side of the dissolve by dragging the icon, in a similar way to using the Trim tool.
Invalid Transitions Transitions are controlled in a similar way to track items, in that you can drag-and-drop them, but with the following restrictions:
• A fade can not be dragged past the ends of the track item it's attached to, and if the item is deleted, the fade is deleted with it.
• Dissolve ends can not be dragged past the ends of the track items they are attached to, and if both items are deleted, then the dissolve is also deleted.
If only one of the track items linked by the dissolve is deleted, the transi-tion remains so that another item can be placed on the other side.
Invalid transitions are marked with red squares. In most cases, adjusting the length of the transition should be enough to correct the error.
Retiming Clips In addition to transitions, Hiero (and HieroPlayer in writable projects) supports constant retimes on track items. Decreasing the speed of a track
Hiero and HieroPlayer 1.6v1The Foundry

MANAGING TIMELINES 123Retiming Clips
item causes frames to play more than once, whereas increasing the speed skips frames.
To retime track items using the Speed column in the spreadsheet:
1. Select the required event(s) in the spreadsheet view.
2. Click the cog icon and select the required retime method:
• Keep source duration—the track item length is altered on the timeline depending on the retime applied.
For example, retiming a track item to 50% renders frames 1, 1, 2, 2, 3, 3, 4, 4, and so on in the Viewer, and as a result, the item’s length is doubled on the timeline.
Retiming a track item to 200% renders frames 1, 3, 5, 7, and so on in the Viewer, but the item’s length is halved on the timeline.
• Keep timeline duration—the track item length on the timeline is main-tained regardless of the retime applied.
For example, retiming a track item to 50% renders frames 1, 1, 2, 2, 3, 3, 4, 4, and so on in the Viewer, but the item’s length on the timeline remains the same, effectively removing the second half of the item.
Retiming a track item to 200% renders frames 1, 3, 5, 7, and so on in the Viewer, but the item’s length on the timeline remains the same. If no extra frames are available from the source, the item is filled with black frames.
3. Double-click the Speed column and enter the retime value.
The following example shows a track item and the results of 50% and 200% retimes with the Keep source duration and Keep timeline duration methods selected.
Notice that the Keep timeline duration method doesn’t change the length of the track item on the timeline and inserts blank filler frames on the 200% retime?
NOTE: Audio is not currently supported for retimes and is automatically muted to avoid playback problems.
Hiero and HieroPlayer 1.6v1The Foundry

MANAGING TIMELINES 124Retiming Clips
You can also retime track items using the Src, Dst, and Duration columns of the spreadsheet, though the calculation method depends on the Time Edit Behaviours applied.
1. Select the event(s) in the spreadsheet view.
2. Click the cog icon and select the required Time Edit Behaviours:
Original clip
50% Source retime 200% Source retime
50% Destination retime 200% Destination retime
Modify Using Result
Src In Retime Adjusts the event’s Src In and retimes the remaining frames to maintain Dst Duration.
Before and after a 2 second Src In increase:
Hiero and HieroPlayer 1.6v1The Foundry

MANAGING TIMELINES 125Retiming Clips
Src Out Retime Adjusts the event’s Src Out and applies a retime to maintain Dst Duration.
Before and after a 2 second Src Out increase:
Src Dur Retime Adjusts the event’s Src Dur and Src Out, and applies a retime to maintain Dst Duration.
Before and after a 50 frame Src Dur increase:
Dst In Retime Adjusts the event’s Dst In and retimes the remaining frames to maintain the relationship between Dst In and Out.
Before and after a 2 second Dst In increase:
Dst Out Retime Adjusts the event’s Dst Out and retimes the remaining frames to maintain the relationship between Dst Out and In.
Before and after a 2 second Dst Out increase:
Dst Dur Retime Adjusts the event’s Dst Dur and Dst Out, and applies a retime to accommodate the new Dst Duration.
Before and after a 50 frame Dst Dur increase:
Modify Using Result
Hiero and HieroPlayer 1.6v1The Foundry

MANAGING TIMELINES 126Retiming Clips
3. Adjust the values as required to retime the track item(s) by the specified amount.
To retime a track item using the Sequence menu:
1. Select the required track item(s) on the timeline.
2. Navigate to Sequence > Retime.
The Clip Speed dialog displays.
3. Enter the required retime value as a percentage.
4. Select the required retime method using the dropdown:
• Keep timeline duration—the track item length on the timeline is main-tained regardless of the retime applied. When increasing speed, if no extra frames are available from the source, the track item is filled with black frames.
• Keep source duration—the track item length is altered on the timeline depending on the retime applied. For example, a 200% retime halves the length of the item.
• Anchor current frame—the track item length on the timeline and the current frame’s position are maintained after the retime. When increasing speed, if no extra frames are available from the source, the track item is filled with black frames.
5. Click OK to retime the track item(s).
Using Freeze Frames The freeze frame feature enables you to create track items any length using a single frame. To achieve this, the application takes the first frame of the track item and applies a 0% retime, which is reversible by applying a 100% retime.
To freeze frame track items:
1. Select the target item(s) on the timeline.
2. Right-click the item and select Make Freeze Frame,
OR
Navigate to Sequence > Make Freeze Frame.
NOTE: Any source or destination field highlighted in yellow indicates that the entry has been rounded down for display purposes.
Hiero and HieroPlayer 1.6v1The Foundry

MANAGING TIMELINES 127Retiming Clips
3. The selection is retimed to 0% and coloured blue on the timeline for easy identification.
4. Slip the track item to set the freeze frame from the available range.
5. Drag the item’s edit points as required to set the length of the track item. There’s no upper limit for the length of a freeze frame track item.
NOTE: Freeze Frames can also be achieved using the spreadsheet retime modes and modifying Src Dur to 0, or making Src In and Src Out equal. See the table on page 124 for more information.
Hiero and HieroPlayer 1.6v1The Foundry

8 VERSIONS AND SNAPSHOTS
In addition to the regular project save and restore options, Hiero and HieroPlayer can record the different states of your workflow as you progress using versions and snapshots.
• Versions are children of clips. You can have any number of versions per clip as long as they follow the correct naming conventions, as shown in the table below.
Versions can only be applied to bin clips and track items and can be swapped in and out without overwriting existing work.
• Snapshots are time-stamped copies of a sequence, allowing you to save its current state without the inconvenience of saving the entire project.
When you restore a snapshot, a warning displays prior to the restore reminding you that edits since the snapshot was taken are lost.
Using Versions Versions can be added to clips and track items to allow greater flexibility in your workflow. You can have as many versions as required and cycle through them quickly using hotkeys.
The application relies on specific file naming or folder structure conventions to discover versions:
NOTE: You cannot use versions when a clip is opened as a timeline, that is, by using the right-click Open in Timeline option.
Convention Description Example
File name constants
Clip name The file name base must remain the same.
myClip_v1.0001.dpx
myClip_v2.0001.dpx
myClip_v3.0001.dpx
Version prefix The delineation between the file name and version information must be either _ (underscore) or . (full stop) and remain the same for all versions.
myClip_v1.0001.dpx
myClip_v2.0001.dpx
myClip_v3.0001.dpx
File name variables
Version padding
The version number padding in the clip name can be increased or decreased.
myClip_v1.0001.dpx
myClip_v002.0001.dpx
myClip_v03.0001.dpx

VERSIONS AND SNAPSHOTS 129Using Versions
Versions in Bins Versions behave similarly in both bins and sequences, and in both cases, you first have to ingest an existing version.
Ingest and locate the versioned clip, then:
1. Right-click and select Scan for Versions to search for available versions.
A dialog box lets you know how many versions were discovered.
2. Use the right-click Version menu to:
• Go to the next Version Up or Version Down.
• Go to the Minimum or Maximum Versions.
When you reach the end of the discovered versions, incrementing the version automatically scans for new versions that may have become available.
3. Select Version > Open in Versions Bin to display all discovered versions of the target clip.
Frame padding The frame padding in the clip name can be increased or decreased.
myClip_v1.01.dpx
myClip_v1.1.dpx
myClip_v1.0001.dpx
Extension The file format is interchangeable. See Supported Image Formats for more information.
myClip_v1.01.png
myClip_v1.0001.dpx
myClip_v1.mov
Note: If the file extension is a movie format, such as .r3d or .mov, the Frame padding can be omitted.
Folder name constants
Root folder The root folder name must remain the same for all folders containing versions.
~/version/v1/myClip_v1.0001.dpx
~/version/v2/myClip_v2.0001.dpx
~/version/v3/myClip_v3.0001.dpx
Folder name variables
Version padding
The version number padding in the folder name can be increased or decreased.
09_WF_Shot004_v1
09_WF_Shot004_v002
09_WF_Shot004_v03
Convention Description Example
TIP: You can also use the Alt + hotkeys to increment versions.
NOTE: You can turn off the auto scan function by navigating to Preferences > General and disabling Automatically rescan versions...
Hiero and HieroPlayer 1.6v1The Foundry
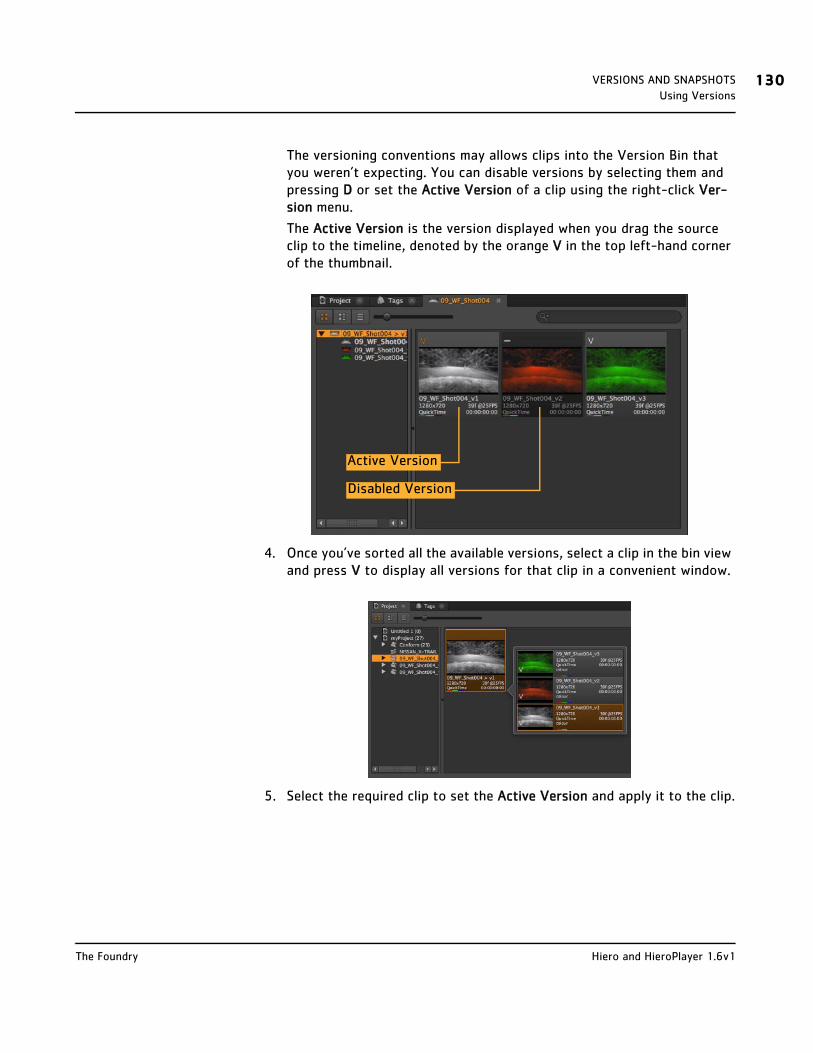
VERSIONS AND SNAPSHOTS 130Using Versions
The versioning conventions may allows clips into the Version Bin that you weren’t expecting. You can disable versions by selecting them and pressing D or set the Active Version of a clip using the right-click Ver-sion menu.
The Active Version is the version displayed when you drag the source clip to the timeline, denoted by the orange V in the top left-hand corner of the thumbnail.
4. Once you’ve sorted all the available versions, select a clip in the bin view and press V to display all versions for that clip in a convenient window.
5. Select the required clip to set the Active Version and apply it to the clip.
Disabled Version
Active Version
Hiero and HieroPlayer 1.6v1The Foundry

VERSIONS AND SNAPSHOTS 131Using Snapshots
Versions in Sequences
As mentioned previously, versions behave similarly in both bins and sequences, but swapping versions in sequences allows you to compare results more easily.
Locate the ingested version clip and drag it to the timeline.
• Version Up or Version Down to increment the version by one.
• Go to the Minimum or Maximum Version.
Once you’ve scanned for versions in the bin view, select a track item on the timeline and press V to display all available versions for that item in a convenient window.
Select the required track item version to set the Active Version.
Using Snapshots Within a project you can save the current state of a sequence as a snapshot, including a comment or tag to describe that snapshot. You can see what snapshots exist for a sequence in the bin view and flip it back to any previously saved state.
As an example workflow, take a look at Figure 8.1.
NOTE: You cannot use versions when a clip is opened as a sequence, that is, using the right-click Open in Timeline option.
TIP: You can also use the Alt + hotkeys to cycle through versions.
NOTE: HieroPlayer does not support creating snapshots, but you can restore snapshots created in Hiero.
Hiero and HieroPlayer 1.6v1The Foundry

VERSIONS AND SNAPSHOTS 132Using Snapshots
Figure 8.1: A typical workflow using snapshots.
1. Two snapshots of the sequence (SQ) are recorded after edits. See Creat-ing Snapshots.
2. Snapshot 1 is then restored. See Restoring Snapshots.
3. Further edits are made, then the sequence is recorded as snapshot 3.
Creating Snapshots To create a snapshot for a sequence:
1. Locate the sequence in the bin view.
2. Right-click the sequence and select Add Snapshot...
The Add new snapshot dialog box displays.
SQ 1 2 3
Time
SQ SQ
Hiero and HieroPlayer 1.6v1The Foundry
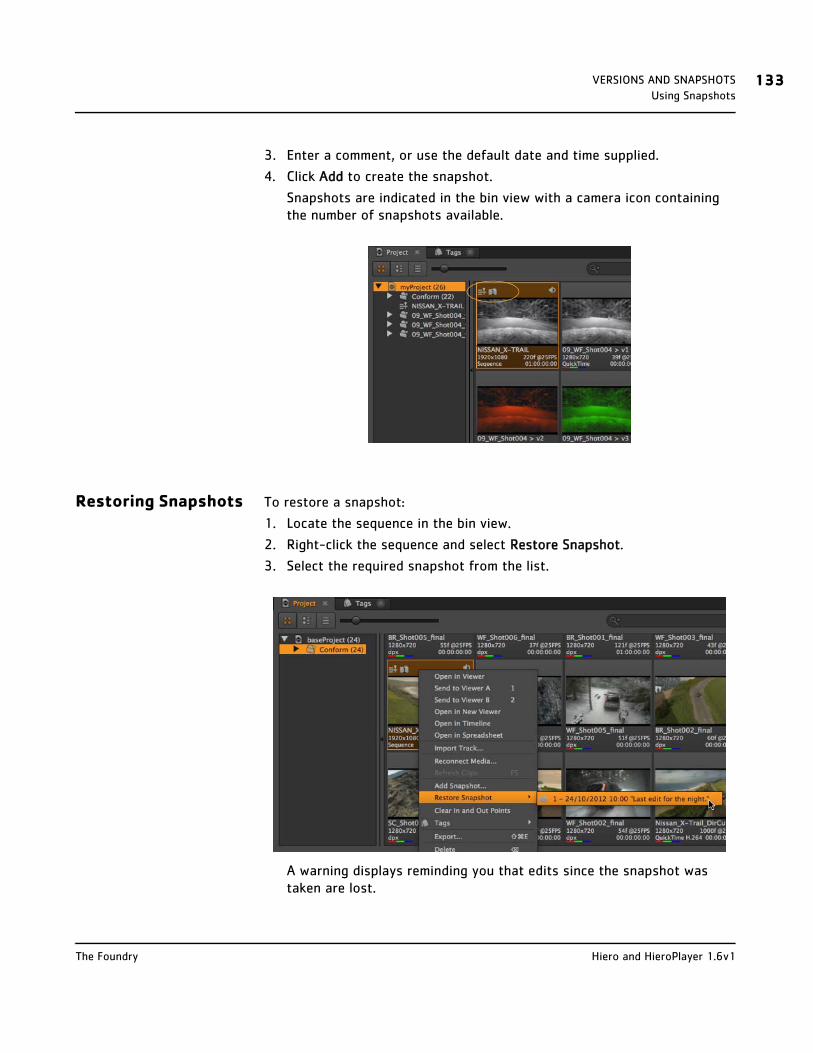
VERSIONS AND SNAPSHOTS 133Using Snapshots
3. Enter a comment, or use the default date and time supplied.
4. Click Add to create the snapshot.
Snapshots are indicated in the bin view with a camera icon containing the number of snapshots available.
Restoring Snapshots To restore a snapshot:
1. Locate the sequence in the bin view.
2. Right-click the sequence and select Restore Snapshot.
3. Select the required snapshot from the list.
A warning displays reminding you that edits since the snapshot was taken are lost.
Hiero and HieroPlayer 1.6v1The Foundry

VERSIONS AND SNAPSHOTS 134Using Snapshots
4. The sequence is restored to the point at which the snap was recorded.
Hiero and HieroPlayer 1.6v1The Foundry

9 ROUND-TRIPPING AND EXPORT MANAGEMENT
Hiero’s export suite can automate round-trips through Nuke, send clips back and forth between Hiero and Nuke using Hiero<>Nuke, transcode, export clip selections from a timeline or bin, write out EDLs and XMLs, or bake out an entire timeline as a single clip in your required delivery format.
With the addition of Python bindings to perform the same functions, this infrastructure provides a massive amount of flexibility, whether your pipeline is GUI or command line orientated.
Hiero ships with several context-sensitive and ad hoc export options:
• Round-Tripping Using the Export Dialog—the process of preparing a project for export and paving the way for VFX work to come back into Hiero.
• Round-Tripping Using Hiero<>Nuke—enables you to open selections in Nuke scripts, from either bin clips or track items, add clips and track items to existing scripts, and send rendered Write nodes from Nuke back to Hiero.
• Advanced Send to Nuke—a single clip or bin export option that doesn’t require the Export dialog or Hiero<>Nuke.
• Ad Hoc Exports—an umbrella covering exports that you might not perform on a per project basis, such as EDL or XML exports.
Round-Tripping Using the Export Dialog
A round-trip describes the process of exporting clips to another application, in this case Nuke, and then paving the way back into Hiero to conform the new VFX clips.
Introduction to the Export Dialog
Hiero uses shot templates and processors to perform some export operations, including round-tripping and EDL/XML creation. The Export
NOTE: HieroPlayer only supports round-tripping using Hiero<>Nuke.
NOTE: Hiero is non-destructive and can slot into your pipeline if you setup your shot template to mirror the existing file structure.

ROUND-TRIPPING AND EXPORT MANAGEMENT 136Round-Tripping Using the Export Dialog
dialog controls what is exported and where, and whether or not to expect versioned clips as part of a round-trip from Nuke.
Two types of Presets are available to construct commonly used export tasks:
• Local Presets—saved in a Task Presets folder using the XML file format. See Running Python During Startup for more information on save locations and the differences between platforms.
• Project Presets—you can drag-and-drop Local Presets into this panel to save the preset within a project .hrox file. This option is designed for collaborative work, allowing you to quickly share your export presets.
Hiero also uses Content Presets in all shot templates, enabling you to create commonly used export conditions, which are then available across all projects. Some presets are only available with certain processors, for example, the EDL Exporter preset cannot be used with Process as Shots.
Processors
Presets
Export Root Shot Template
Export Controls
NOTE: If you select Process as Shots, you’ll notice there is a locked Project Shot Template included in the Project Presets. This preset can only be edited from the main Project > Edit Settings menu. See Using the Shot Template for more information.
Hiero 1.6v1The Foundry

ROUND-TRIPPING AND EXPORT MANAGEMENT 137Round-Tripping Using the Export Dialog
For your convenience, Hiero ships with a number of ready-made presets, but you can edit these as required:
• Transcode Images—defines transcode parameters allowing you to save your most-used file type conversions.
• Nuke Project File—defines the paths used by Nuke Read and Write nodes during a round-trip.
• Nuke Render—defines the render format for Nuke Write nodes. Add multiple Nuke Render presets to create multiple Write nodes in Nuke.
• External Render—defines the export paths used by third party
applications, such as Adobe® After Effects®, during a round-trip.
• EDL Exporter—used to export a sequence to the EDL format.
• SymLink Exporter—creates symlinks to the location of the source files, rather than making copies.
• XML Exporter—used to export a sequence to XML format.
• Copy Exporter—creates copies of the source files to a specified location, rather than symlinking.
• Audio Export—copies any audio tracks to .wav files in a specified location.
Using the Shot Template
The shot template sets up the folder hierarchy and naming conventions for export processors such as Transcode Images. Any folders added to the template are created during export unless they already exist, in which case the export writes to the existing structure.
Hiero ships with default templates for your convenience, but you can quickly create custom templates using folders and “tokens”, which are replaced with the relevant information during export.
Hiero can resolve the following tokens during export:
TIP: A useful auto-expansion feature can save time when creating folder structures in the shot template. Simply type the required folder structure in the first field of the shot template, then press enter to create the specified hierarchy.
Token Resolves to
{binpath} The bin structure to preserve. Including this token recreates your bin structure upto the nearest parent bin.
{clip} The name of the clip used in the shot processed.
{day} The local weekday name, abbreviated to Mon, Tue, and so on.
{DD} The day of the month as a decimal, 01, 02, and so on.
Hiero 1.6v1The Foundry

ROUND-TRIPPING AND EXPORT MANAGEMENT 138Round-Tripping Using the Export Dialog
{event} The timeline event number associated with the track item to pro-cess.
Note: This token does not resolve to the event from the EDL.
{ext} The extension of the file to output, such as .dpx or .mov
{filebase} The base of the clip name to process. For example, the filebase of Shot01_####.dpx is Shot01_####.
{fileext} The format of the clip to process, such as .dpx or .mov
{filename} The source clip name of the media to process.
{fullbinpath} The full bin structure to preserve. Including this token recreates the bin structure upto the project level.
{fullday} The local full weekday name.
{fullmonth} The local full month name.
{MM} The month of the year as a decimal, 01, 02, and so on.
{month} The local month name, abbreviated to Jan, Feb, and so on.
{project} The name of the parent project of the export item.
{projectroot} The root export filepath as specified in the Project Settings.
{sequence} The sequence name to process.
{shot} The name of the track item to process.
{track} The name of the track to process. Exporting EDLs using this token generates a separate EDL for each track.
{user} The current username.
{version} The string v#, defined by the number (#) set in the Version sec-tion of the export dialog
{YY} The year of the century as a decimal, 01, 02, and so on.
{YYYY} The year, including century.
Token Resolves to
TIP: After double-clicking the path column, right-click and choose Select Keyword to display a list of available export tokens, though only valid tokens for the current selection are listed.
Hiero 1.6v1The Foundry

ROUND-TRIPPING AND EXPORT MANAGEMENT 139Round-Tripping Using the Export Dialog
Token substrings are valid if you need to extract a certain part of an evaluated string. For example, if {shot} resolves to NC100, then:
• {shot [0:2] } - resolves to NC
• {shot [-3:] } - resolves to 100
Example Shot Templates
Hiero’s shot template enables you to create as many Nuke Read and Write nodes as required for a project. A typical use case might be creating JPG clips for review and DPX resolution clips for finishing.
Multi-format exports
The following example describes how to build a shot template to export a sequence of MOV clips, create DPX and JPG Write nodes in Nuke, and bring the DPX clips back into Hiero.
1. Set up an export as described in Round-Tripping Using the Export Dia-log.
2. In the Export dialog, select the Basic Nuke Shot preset in the bottom-left pane to auto-complete the shot template with the preset values.
3. Click Duplicate selected preset and give the new preset a name.
4. Rename the renders folder renders_dpx.
5. Select the nuke folder and click to add a new folder. Name the new
folder renders_jpg.
6. Select the renders_jpg folder and click to add a new entry.
7. Replace the {filename} token with {shot}_comp_{version}.####.{ext}, the same as the existing entry under renders_dpx.
TIP: A useful auto-expansion feature can save time when creating folder structures in a template. Simply type the required folder structure in the first field of the template, then press enter to create the specified hierarchy.
NOTE: The #### marks represent frame numbers for image sequences. If you were creating MOV clips, they’d be omitted.
Hiero 1.6v1The Foundry

ROUND-TRIPPING AND EXPORT MANAGEMENT 140Round-Tripping Using the Export Dialog
The shot template should look something like this:
8. Click the Contents column and select Nuke Render.
9. In the Nuke Render settings, use the File Type dropdown to select jpeg.
Notice that the settings available change depending on the File Type selected?
NOTE: When using a third party application to produce the VFX work, select External Render instead of Nuke Render.
Hiero 1.6v1The Foundry

ROUND-TRIPPING AND EXPORT MANAGEMENT 141Round-Tripping Using the Export Dialog
10.Click Nuke Project File in the shot template and check that the correct Read and Write Nodes are enabled.
11.Set up the rest of the export as described previously and click Export.
12.When complete, locate a Nuke Shot Exporter entry in the Export Queue
and click the icon to reveal the Nuke scripts in a browser.
13.Drag the script into Nuke’s Node Graph to display the script.
Once the VFX work is complete, bring the DPX clips back into Hiero:
1. Select the original clips on the Hiero timeline.
2. Click Build External Media Track.
The Build External Media Track dialog displays.
3. Enter a Track Name or use the default VFX.
4. Select the Export Preset used from the dropdown menu. In this case, Dual Render.
5. Enter the filepath of the Export Root directory or click Choose and browse to the location.
Hiero 1.6v1The Foundry

ROUND-TRIPPING AND EXPORT MANAGEMENT 142Round-Tripping Using the Export Dialog
6. Select the Nuke Render (dpx - 10 bit) entry.
7. Click Build to create the VFX track.
Hiero automatically creates the new track containing the DPX clips.
Adding Additional Nuke Nodes During Export
Hiero can include additional Nuke nodes, in any Nuke Project File or Transcode export in the Shot Template, by simply copying and pasting scripts from Nuke.
You can add nodes to shots, tracks, or sequences, or include them as unconnected ad hoc nodes in the script, filtered by tags if necessary.
1. In the Export Controls panel, scroll down to the Additional Nodes con-trol and click Edit.
The Additional Nodes Setup dialog displays.
2. Click to add an entry.
3. Click the Apply To field and select what the current entry applies to:
• Shot—the additional nodes are added to the script for each shot in the export.
Hiero 1.6v1The Foundry

ROUND-TRIPPING AND EXPORT MANAGEMENT 143Round-Tripping Using the Export Dialog
• Track—the additional nodes are added to the script for each track in the export.
• Sequence—the additional nodes are added to the script for the entire sequence.
• Unconnected—the additional nodes are added to the script, but are not connected to the export node tree.
• None—temporarily disables the current entry.
4. Select the Tags that you intend to use to filter which items receive the additional nodes.
If you want to affect only the Reference track, for example, select the Reference tag. All items without that tag are ignored.
5. Copy and paste a node from Nuke into the Script panel.
6. Click OK to accept the additional nodes.
7. Select the Additional Nodes checkbox and complete the export process as described later in this chapter.
Exporting to Nuke 1. Select a sequence in the bin view and navigate to File > Export.
The Export dialog displays.
2. Select Process as Shots from the Processors list.
3. Enter the Export To directory or click Choose... and browse to the location.
The Export To directory is the starting point from which the shot tem-plate builds your shot hierarchy.
NOTE: If you need more than one node, you might consider creating a Group in Nuke and pasting that into the Script panel.
Hiero 1.6v1The Foundry

ROUND-TRIPPING AND EXPORT MANAGEMENT 144Round-Tripping Using the Export Dialog
4. Select the Basic Nuke Shot preset under Local Presets to auto-complete the shot template or select Project Shot Template to use the Project Settings template.
Basic Nuke Shot creates a folder for each clip, or shot, containing a plates folder and a nuke folder containing script and renders folders.
The tokens in the Basic Nuke Shot template break down as follows:
• {filename} simply extracts the source filenames as they appear in the file browser.
• {shot}_comp_{version}.nk extracts the track item name for each clip and the version selected in the Export Controls. For example, Shot01_comp_v03.nk
• {shot}_comp_{version}.####.{ext} appends padding and the specified file extension. For example, Shot01_comp_v03.0001.dpx
5. Click the Nuke Project File preset to display the Read Node and Write Node settings.
NOTE: You can build a custom shot template using Path tokens, the
Contents field, and the buttons. Simply copy an existing
template and edit as required.
NOTE: See the Example Shot Templates for information on how to use the shot template to create multiple format Write nodes in Nuke.
Hiero 1.6v1The Foundry

ROUND-TRIPPING AND EXPORT MANAGEMENT 145Round-Tripping Using the Export Dialog
6. Check which path from the shot template should be used for the Nuke Read and Write nodes. In this case:
• {shot}/plates/{filename} to resolve to the symlinks during export.
• {shot}/nuke/renders/{shot}_comp_{version}.####.{ext} to resolve the render path where Hiero expects to find the Nuke files.
7. Enable Collate Tracks to create additional Nuke Read nodes in the same script for clips that would normally be hidden by clips higher up the track hierarchy or clips on the same track with the same track item name.
For example:
• Items on track 1 that would otherwise be hidden by track 2.
NOTE: There’s is no need to select a Read node when using Collate Tracks.
Exporting these track items from Hiero...
...creates a Nuke script for each track item containing both clips.
Hiero 1.6v1The Foundry

ROUND-TRIPPING AND EXPORT MANAGEMENT 146Round-Tripping Using the Export Dialog
• Two items on the same track with the same name.
8. Click the Nuke Render preset to display the file type settings.
9. Select the file type to render using the dropdown and complete the relevant fields, dependent on the file type selected.
10.Set the following controls common to all file types:
• Colourspace—use the dropdown to set the colourspace to render, such as linear, REDLog, or raw.
• Reformat—select the required reformatting option to enable the Format dropdown.
• Format—sets the format to render out in Nuke, such as 1920x1080 HD 1080.
Select Custom... to create formats that don’t appear in the list of pre-sets.
• Resize—sets the method by which you want to preserve or override the original aspect ratio:
• width—scales the original until its width matches the format’s width. Height is then scaled in such a manner as to preserve the original aspect ratio.
• height—scales the original until its height matches the format’s height. Width is then scaled in such a manner as to preserve the original aspect ratio.
Exporting these track items from Hiero...
...creates this Nuke script.
Hiero 1.6v1The Foundry

ROUND-TRIPPING AND EXPORT MANAGEMENT 147Round-Tripping Using the Export Dialog
• fit—scales the original until its smallest side matches the format’s smallest side. The original’s longer side is then scaled in such a manner as to preserve original aspect ratio.
• fill—scales the original until its longest side matches the format’s lon-gest side. The input’s shorter side is then scaled in such a manner as to preserve original aspect ratio.
• distort—scales the original until all its sides match the lengths speci-fied by the format. This option does not preserve the original aspect ratio, so distortions may occur.
• Channels—set the channels to export using the dropdown. The default, all, exports all channels in the image.
If you want to export a non-standard channel, type the name of the channel into the field manually.
• Write Node Name—if you intend to create more than one Nuke Write node, define the name here. The default, Write_{ext}, appends the individual Write nodes with the file extension being written. You can, however, use any of the tokens Hiero recognises.
• Burn-in Gizmo—when enabled, text burn-in is applied to the media using a Nuke Gizmo. Click Edit to define the information applied during burn-in.
Burn-in fields accept any combination of dropdown tokens and custom text, for example {clip}_myEdit.
The Font field only accepts the full filepath and name of the font file to use. For example, on the Mac any file in /System/Library/Fonts/.
11.Set the Handles, if required:
• Clip Length—exports the full clip length available, as if the clip was opened as a Viewer.
• Cut Length—exports only the cuts included on the timeline.
12.Check Apply Retimes to export any retimes present on the timeline.
13.Set how clip Start Frames are derived using the dropdown menu:
• Source—use the source clip’s start frame.
• Custom—specify a start frame for all clips using the field to the right.
14. Set the Version number and Tracks For Export, if applicable.
NOTE: Selecting Cut Length allows you to add handles to each clip, up to the maximum available source clip length.
NOTE: See Using Versions for more information on how versioning works in Hiero.
Hiero 1.6v1The Foundry

ROUND-TRIPPING AND EXPORT MANAGEMENT 148Round-Tripping Using the Export Dialog
15. If you’re using a render farm, select the renderer from the Render background task dropdown.
Hiero requires a Python script to pass exports to your render farm of choice. Scripts must be located in specific directories, dependent on platform, as listed in Running Python During Startup. If no scripts exist, the dropdown is disabled.
Some example scripts are included in the Hiero package in the following directories:
• On Mac: /Applications/Hiero1.6v1/Hiero1.6v1.app/Contents/Plugins/site-packages/hiero/examples/
• On Linux: /usr/local/Hiero1.6v1/Plugins/site-packages/hiero/exam-ples/
• On Windows: drive letter:\Program Files\The Foundry\Hiero1.6v1\plugins\site-packages\hiero\examples
16.Click Export.
The Export Queue window displays an estimate of how long each com-ponent of the export is expected to take.
Once the export is complete, the file structure specified in the shot tem-plate is created. You can then import the Nuke clips on a separate track when they’re ready.
When clips are exported from Hiero, they are marked with a Nuke tag flagging which clips have an export history. Clips tagged in this way can be used to build VFX tracks quickly as described in building Tracks From Export Tags.
TIP: Click the icon to reveal the exported file in a browser window.
Hiero 1.6v1The Foundry

ROUND-TRIPPING AND EXPORT MANAGEMENT 149Round-Tripping Using the Export Dialog
Building VFX Tracks When the compositing work is complete, the clips are ready to re-ingest. The shot template defines where the Nuke files reside, so all you need to do is instruct Hiero to build Tracks From Export Structure.
Alternatively, if you have a history of rendered VFX clips, different versions and so on, you can also build Tracks From Export Tags to select from a list of available clips.
Tracks From Export Structure
1. Select the required clips on the timeline and right-click to display the context sensitive menu.
TIP: You may find it easier to select clips in the spreadsheet and then right-click on the timeline.
Hiero 1.6v1The Foundry

ROUND-TRIPPING AND EXPORT MANAGEMENT 150Round-Tripping Using the Export Dialog
2. Click Build Track > From Export Structure.
The Build Track From Export Structure dialog displays.
3. Enter a Track Name or use the default VFX.
4. Select an Export Preset using the dropdown menu. In this case, select the same preset used during the export.
5. Enter the filepath of the Export Root directory or click Choose and browse to the location.
6. Select the content you intend to ingest from the shot template. In this case, the Nuke Render.
7. Click Build to create the VFX track.
8. If a clip already exists in any of the target tracks, a dialog displays containing options on how Hiero should behave.
NOTE: The root directory is the location entered in Export To when exporting the project.
NOTE: Hiero warns you if no selection is made in the Contents column.
Hiero 1.6v1The Foundry

ROUND-TRIPPING AND EXPORT MANAGEMENT 151Round-Tripping Using the Export Dialog
9. Select the required option and click OK to proceed.
Hiero automatically creates a new track containing the VFX clips, if they exist, or offline place holders if the clips are a work in progress.
The clips are automatically updated when work is complete as long as they are saved with the expected name and location, as specified in the shot template.
Tracks From Export Tags
1. Select the required clips on the timeline and right-click to display the context sensitive menu.
TIP: You may find it easier to select clips in the spreadsheet and then right-click on the timeline.
Hiero 1.6v1The Foundry

ROUND-TRIPPING AND EXPORT MANAGEMENT 152Round-Tripping Using the Export Dialog
2. Click Build Track > From Export Tag.
The Build Track From Export Tag dialog displays.
3. Enter a Track Name or use the default VFX.
4. Select the required export tag in the left-hand panel to display tag information in the right-hand panel.
5. Click Build to create the VFX track.
6. If a clip already exists in any of the target tracks, a dialog displays containing options on how Hiero should behave.
7. Select the required option and click OK to proceed.
Hiero 1.6v1The Foundry

ROUND-TRIPPING AND EXPORT MANAGEMENT 153Round-Tripping Using Hiero<>Nuke
Hiero automatically creates a new track containing the VFX clips, if they exist, or offline place holders if the clips are a work in progress.
Round-Tripping Using Hiero<>Nuke
Selections in Hiero and HieroPlayer can be opened in Nuke using Hiero<>Nuke, which is an open port between the two applications. When the connection is established, Hiero<>Nuke “listens” for changes applied to clips, in either application, and updates them automatically with the latest version.
Once established, the link operates in three distinct ways:
• Open in Nuke—allows you to open your selections in single or multiple new Nuke scripts, depending on context.
• Send to Nuke—sends your selections to an existing Nuke script. This option is only available when a connection to an open Nuke script has been established.
• Send to Hiero—allows you to send a rendered Write node from Nuke to Hiero, creating a new bin.
Connecting Hiero<>Nuke
To connect Hiero<>Nuke:
1. Navigate to Window > Hiero<>Nuke and then click Start Server to begin “listening” for new Nuke output.
2. Click Install Nuke Scripts and follow the on-screen instructions to edit your init.py file.
The application then installs hiero_tools.py in your .nuke directory.
3. Click OK to dismiss the install dialog and then click Launch Nuke to start the application.
Hiero 1.6v1The Foundry

ROUND-TRIPPING AND EXPORT MANAGEMENT 154Round-Tripping Using Hiero<>Nuke
Once the connection has been verified, enable Start server on startup in Hiero or HieroPlayer and Start connection on startup in Nuke to estab-lish the link automatically in future.
Open in Nuke Open in Nuke operates differently depending on whether you’re opening clips or track items. Clips are opened independently, whereas track items are opened with additional nodes to produce a timeline position relative to a specified master track item.
To open bin clips in Nuke
1. Select the clip(s) in the bin view.
2. Right-click a highlighted clip and select Open in Nuke.
The selected clips are opened in the Nuke application specified in the Preferences > Nuke / Export > Nuke Path field.
To open track items in Nuke
1. Select the track item(s) in the timeline view.
2. Right-click a highlighted item and select Open in Nuke.
The Open in Nuke dialog displays.
NOTE: Hiero<>Nuke is configured to run between applications on the same machine, but if you know the address and port number of a remote machine, click Edit Server Address and enter the appropriate details to connect the applications.
These selections from Hiero... ...Opened in Nuke
Hiero 1.6v1The Foundry

ROUND-TRIPPING AND EXPORT MANAGEMENT 155Round-Tripping Using Hiero<>Nuke
3. Select the track item to use as the master, that is, the item to use to create the relative timeline positions of the other track items.
4. Select the frame range to use from the dropdown menu:
• Timeline—use the frame range occupied by the track item on the time-line.
• Source—use the frame range from the source file.
• Custom—use a custom frame range by entering the required start frame in the field provided.
5. Click OK.
The selected track items are opened in the Nuke application specified in the Preferences > Nuke / Export > Nuke Path field.
NOTE: This dialog is skipped in HieroPlayer and all selections are opened in a separate Nuke.
NOTE: If you haven’t set a valid Project Root, a dialog prompts you for a file path.
These selections from Hiero... ...Opened in Nuke
Hiero 1.6v1The Foundry

ROUND-TRIPPING AND EXPORT MANAGEMENT 156Round-Tripping Using Hiero<>Nuke
Hiero also adds a single offline track item to receive the incoming VFX work.
Send to Nuke Send to Nuke enables you to add clips and track items to existing Nuke scripts that are connected to Hiero or HieroPlayer using Hiero<>Nuke. Send to Nuke operates similarly to Open in Nuke, in that clips are opened independently and track items are opened with additional nodes, but they are added to an existing script.
1. Select the required clip(s) or track item(s).
2. Right-click a highlighted item and select Send to Nuke.
A list of available scripts is displayed in the submenu.
3. Select the required script to receive the additional items.
Hiero adds the items to the selected script.
Send to Hiero Send to Hiero enables you to send rendered Write nodes from Nuke back into Hiero or HieroPlayer using Hiero<>Nuke.
1. Select the required Write node(s) in Nuke’s Node Graph.
2. Right-click a highlighted node and select Send to Hiero.
NOTE: If you selected Open each item in its own Nuke instance, in the example above you’d get three clips, each in a separate Nuke.
Hiero 1.6v1The Foundry

ROUND-TRIPPING AND EXPORT MANAGEMENT 157Advanced Send to Nuke
The selected files are added to Hiero in a new Nuke bin.
Advanced Send to Nuke
Hiero provides a single clip or bin Advanced Send to Nuke option along with its other export functionality.
About 3:2 Pulldown 3:2 pulldown is the process of converting 24 fps film to 29.97 fps interlaced video and vice-versa. Hiero uses Nuke’s Add and Remove 3:2 Pulldown nodes to achieve this, but only offers the option to do so when the selected clip is 24 or 30 fps.
When adding 3:2 pulldown, the film is first slowed down 0.1% to match the speed difference between 29.97 fps and 30 fps. Then, film frames are distributed across video fields in a repeating 3:2 pattern in order to make 24 film frames fill the space of 30 video frames per second:
• The first frame of film is copied to 3 fields of video,
• the second frame of film is copied to 2 fields of video,
• the third frame of film is again copied to 3 fields,
• the fourth frame of film is copied to 2 fields, and so on.
Hiero 1.6v1The Foundry

ROUND-TRIPPING AND EXPORT MANAGEMENT 158Advanced Send to Nuke
The opposite process is used to remove 3:2 pulldown. Hiero allows you to employ 3:2 pulldown from inside the Advanced Send to Nuke dialog, or directly from a bin clip:
To send a clip or bin to Nuke using Advanced send:
1. Locate the required source clip or bin in the bin view.
2. Right-click the clip or bin and select Advanced Send to Nuke.
Hiero 1.6v1The Foundry

ROUND-TRIPPING AND EXPORT MANAGEMENT 159Advanced Send to Nuke
The Advanced Send to Nuke dialog displays.
3. Enter the output script name and location in Nuke Script Path field.
4. If the clips you’re exporting have Soft Trims enabled, check Use Soft Trims to adjust the frame range accordingly.
5. Enter the Nuke output location in the Nuke Write Path field.
6. Select the File Type to transcode to within Nuke. The available transcode options depend on the File Type selected.
7. Set the controls common to all file types as described in Round-Tripping Using the Export Dialog.
8. If you intend to bring the transcoded clips back into Hiero, check Ingest Nuke Output.
9. If your selection requires retiming, choose the retime to apply:
• None—no retimes are applied.
• Add 3:2 Pulldown—converts 24 fps clips to 30 fps clips.
• Remove 3:2 Pulldown—converts 30 fps clips to 24 fps clips.
• To Timebase—enter the retime to apply as frames per second.
• Speed—enter the retime to apply as a percentage.
10.Click Launch Nuke to send the clip to the Nuke specified in Preferences > Nuke / Export > Nuke Path.
Nuke starts up with Read and Write nodes for each clip incorporating the selected File Type settings and Write Path.
NOTE: The 3:2 Pulldown options are only displayed when applicable.
NOTE: The Nuke script is saved in the directory specified as the Write Path.
Hiero 1.6v1The Foundry

ROUND-TRIPPING AND EXPORT MANAGEMENT 160Transcoding
When Ingest Nuke Output is enabled, offline placeholders are added to the bin view. Once the VFX work is complete, right-click a placeholder and select Refresh Clips, or press F5, to ingest the VFX clips.
Transcoding Transcoding in Hiero can use a specified external Nuke application, HieroNuke, or a specified background render process to convert one file format to another.
Transcoding a Sequence or Shots
Transcoding a sequence
1. Select a sequence in the bin view and navigate to File > Export.
The Export dialog displays.
2. Select Process as Sequence and click the Content column to select a format to transcode to using the File Type dropdown.
The controls exposed depend on the transcode you’re applying.
TIP: If you don’t want to use HieroNuke, select the required Nuke application using the Preferences > General tab as described in Workspace Preferences.
Hiero 1.6v1The Foundry

ROUND-TRIPPING AND EXPORT MANAGEMENT 161Transcoding
3. Complete the File Type specific controls. For example, selecting .dpx exposes the datatype, timecode, and edge_code settings.
4. Complete the general controls common to all file types:
• Include Audio—when enabled, any audio tracks are exported alongside the video.
• Colourspace—use the dropdown to set the colourspace to render, such as linear, REDLog, or raw.
• Reformat—select the required reformatting option to enable the Format dropdown.
• Format—sets the format to render out in Nuke, such as 1920x1080 HD 1080.
Select Custom... to create formats that don’t appear in the list of pre-sets.
• Resize—sets the method by which you want to preserve or override the original aspect ratio:
• width—scales the original until its width matches the format’s width. Height is then scaled in such a manner as to preserve the original aspect ratio.
• height—scales the original until its height matches the format’s height. Width is then scaled in such a manner as to preserve the original aspect ratio.
• fit—scales the original until its smallest side matches the format’s smallest side. The original’s longer side is then scaled in such a manner as to preserve original aspect ratio.
• fill—scales the original until its longest side matches the format’s lon-gest side. The input’s shorter side is then scaled in such a manner as to preserve original aspect ratio.
• distort—scales the original until all its sides match the lengths speci-fied by the format. This option does not preserve the original aspect ratio, so distortions may occur.
5. Select the Channels to export from the dropdown. The default, all, exports all channels in the image.
Hiero 1.6v1The Foundry

ROUND-TRIPPING AND EXPORT MANAGEMENT 162Transcoding
If you want to export a non-standard channel, type the name of the channel into the field manually.
6. Check Keep Temporary Nuke Script if you require the .nk files after the transcode operation.
• Burn-in Gizmo—when enabled, text burn-in is applied to the media using a Nuke Gizmo. Click Edit to define the information and font applied during burn-in.
The Font field only accepts the full filepath and name of the font file to use. For example, on the Mac any file in the /System/Library/Fonts/.
7. If you set In and Out points on the sequence, select Range > In/Out Points to export only the specified range.
8. Set the Version number and Tracks For Export, if applicable.
9. If you’re transcoding using a render farm, select the renderer from the Render background task dropdown.
Hiero requires a Python script to pass exports to your render farm of choice. Scripts must be located in specific directories, dependent on platform, as listed in Running Python During Startup. If no scripts exist, the dropdown is disabled.
Some example scripts are included in the Hiero package in the following directories:
• On Mac: /Applications/Hiero1.6v1/Hiero1.6v1.app/Contents/Plugins/site-packages/hiero/examples/
• On Linux: /usr/local/Hiero1.6v1/Plugins/site-packages/hiero/exam-ples/
• On Windows: drive letter:\Program Files\The Foundry\Hiero1.6v1\plugins\site-packages\hiero\examples
10.Click Export.
The Export Queue window displays an estimate of how long each com-ponent of the export is expected to take.
Once the export is complete, the file structure specified in the shot tem-plate is created containing the transcoded files.
NOTE: See Using Versions for more information on how versioning works in Hiero.
TIP: Click the icon to reveal the exported file in a browser window.
Hiero 1.6v1The Foundry

ROUND-TRIPPING AND EXPORT MANAGEMENT 163Transcoding
Transcoding shots
1. Select Process as Shots and use the defaults or build a shot template
using the Path and Contents fields and the buttons.
For example:
Creates a folder for each timeline item {shot}, containing a clip {file-name} with the required file extension {ext}.
2. Enter the Export To directory or click Choose... and browse to the location.
The Export To directory is the starting point from which the shot tem-plate builds your shot hierarchy.
3. Complete the File Type specific and general controls common to all file types as described in Transcoding a sequence.
4. Set the clip Handles:
• Clip Length—exports the full clip length available, as if the clip was opened as a Viewer.
• Cut Length—exports only the cuts included on the timeline.
5. Check Apply Retimes to export any retimes present on the timeline.
6. Set how clip Start Frames are derived using the dropdown menu:
• Source—use the source clip’s start frame.
• Custom—specify a start frame for all clips using the field to the right.
7. Set the Version number and Tracks For Export, if applicable.
8. If you’re transcoding using a render farm, select the renderer from the Render background task dropdown.
Hiero requires a Python script to pass exports to your render farm of choice. Scripts must be located in specific directories, dependent on platform, as listed in Running Python During Startup. If no scripts exist, the dropdown is disabled.
NOTE: Selecting Cut Length allows you to add handles to each clip, up to the maximum available source clip length.
NOTE: See Using Versions for more information on how versioning works in Hiero.
Hiero 1.6v1The Foundry

ROUND-TRIPPING AND EXPORT MANAGEMENT 164Transcoding
Some example scripts are included in the Hiero package in the following directories:
• On Mac: /Applications/Hiero1.6v1/Hiero1.6v1.app/Contents/Plugins/site-packages/hiero/examples/
• On Linux: /usr/local/Hiero1.6v1/Plugins/site-packages/hiero/exam-ples/
On Windows: drive letter:\Program Files\The Foundry\Hiero1.6v1\plugins\site-packages\hiero\examples
9. Click Export.
The Export Queue window displays an estimate of how long each com-ponent of the export is expected to take.
Once the export is complete, the file structure specified in the shot tem-plate is created containing the transcoded files.
Transcoding from the Bin View
To transcode directly from the bin view:
1. Select the bin(s) to export from the bin view.
2. Right-click a highlighted bin and select Export.
The Export dialog displays.
3. Select Process as Clips and modify the shot template, if required.
4. Follow the steps under Transcoding a Sequence or Shots to complete the export.
TIP: Click the icon to reveal the exported file in a browser window.
Hiero 1.6v1The Foundry

ROUND-TRIPPING AND EXPORT MANAGEMENT 165Ad Hoc Exports
Transcoding Timeline Selections
Transcoding an entire timeline can be time consuming, or even unnecessary, if all you’re looking for is a new version of a selection of clips.
To transcode a selection of clips from a timeline:
1. Select the required clips on the timeline.
2. Right-click a highlighted clip and select Export.
The Export dialog displays.
3. Refer to Transcoding a sequence or Transcoding shots as appropriate, to complete the export.
Ad Hoc Exports This section covers exports that you might not perform on a per project basis, such as EDL or XML exports.
Exporting EDLs and XMLs
Hiero supports export to EDL and XML using very similar methods, the main difference being that EDL doesn’t support multiple video tracks in a single file whereas XML does.
To export to EDL or XML:
1. Select a sequence in the bin view and navigate to File > Export.
The Export dialog displays.
2. Select Process as Sequence from the Processors list.
3. Enter the Export To directory or click Choose... and browse to the location.
The Export To directory is the starting point from which the shot tem-plate builds your shot hierarchy.
4. Click the Contents column to display a list of available presets and the associated Export Controls.
Hiero 1.6v1The Foundry

ROUND-TRIPPING AND EXPORT MANAGEMENT 166Ad Hoc Exports
5. Select the EDL Exporter or XML Exporter as required.
6. Set the Version number and Tracks For Export.
7. Click Export.
The Export Queue window displays an estimate of how long the export is expected to take.
Once the export is complete, the file structure specified in the shot tem-plate is created. You can then import the EDL or XML into other applica-tions.
Using the Copy Exporter
Copying media from various locations is very time consuming and can waste disk space. Hiero’s Copy Exporter allows you to consolidate sequences containing only your project media in a named file structure using the shot template.
NOTE: You can build a custom shot template using Path tokens, the
Contents field, and the buttons.
NOTE: When exporting EDLs, check the additional EDL Exporter controls if required:
• Include Absolute Path—adds the full filepath for each clip to the EDL comments field.
• Truncate Reel Name—restricts the Reel name to eight characters.
NOTE: EDLs only support one video track per file. If you have more than one track, include the {track} token in the shot template to write out an EDL for each track preset.
For example, {filename}_{track}.{ext} might produce a separate EDL for each track on your timeline called myTimeline_Video1.edl, myTimeline_Video2.edl, and so on.
TIP: Click the icon to reveal the exported file in a browser window.
Hiero 1.6v1The Foundry

ROUND-TRIPPING AND EXPORT MANAGEMENT 167Ad Hoc Exports
To copy media to a named location:
1. Select a sequence in the bin view and navigate to File > Export.
The Export dialog displays.
2. Select Process as Shots from the Processors list.
3. Enter the Export To directory or click Choose... and browse to the location.
The Export To directory is the starting point from which the shot tem-plate builds your shot hierarchy.
4. Create a new preset by clicking or copy an existing preset.
5. Build a custom shot template using Path tokens, the Contents field, and
the buttons.
An example shot template is shown below:
6. Set the Handles, if required:
• Clip Length—exports the full clip length available, as if the clip was opened from the bin.
• Cut Length—exports only the cuts included on the timeline.
7. Check Apply Retimes, if Cut Length is enabled, to export any retimes present on the timeline.
8. Set how clip Start Frames are derived using the dropdown menu:
• Source—use the source clip’s start frame.
• Custom—specify a start frame for all clips using the field to the right.
9. Set the Version number and the Tracks for Export, if applicable.
10.Click Export.
The Export Queue window displays an estimate of how long the export is expected to take.
NOTE: Selecting Cut Length allows you process retimes and add handles to each clip, up to the maximum available source clip length.
NOTE: See Using Versions for more information on how versioning works in Hiero.
Hiero 1.6v1The Foundry
ROUND-TRIPPING AND EXPORT MANAGEMENT 168Ad Hoc Exports
Once the export is complete, the file structure specified in the shot tem-plate is created.
TIP: Click the icon to reveal the exported file in a browser window.
Hiero 1.6v1The Foundry

10 USING THE PYTHON API AND ENVIRONMENT VARIABLES
Hiero and HieroPlayer ship with a comprehensive Python application programming interface (API) enabling you to perform most user interface actions using Python scripting.
This chapter provides a basic overview and some simple examples to get you started, but more information is available in the dedicated Python API document included in the Hiero package. See Help > Python Dev Guide for more information.
Using the Script Editor
Hiero and HieroPlayer include a Python Script Editor, accessible from the user interface, allowing you to enter Python statements directly.
To access the Script Editor:
1. Navigate to Window > Script Editor.
The Script Editor displays.
2. Enter scripts in the lower half of the editor and press Ctrl/Cmd + Enter to execute the script.
The results are displayed at the top of the editor. A simple example might be:from hiero.core import *bin = projects()[-1].clipsBin()bin.addItem(Bin("Plates"))bin["Plates"].importFolder("/Footage/Hiero/finalshots")
Which imports hiero.core, defines bin in the last project opened, creates a bin called Plates at root level, and imports the specified folder into Plates.

USING THE PYTHON API AND ENVIRONMENT VARIABLES 170Using the Script Editor
Script Editor buttons and commands are described below:
The Script Editor also features auto-completion and help for commands. Classes, attributes and so on are discoverable by:
• Entering the beginning of an object name and pressing the Tab key.
For example, typing Bin and pressing Tab displays a list of objects start-ing with Bin:
Icon Hotkey Description
Ctrl/Cmd + [ Go to the previous script.
Ctrl/Cmd + ] Go to the next script.
n/a Clear the script history.
n/a Load and execute a script.
n/a Load an existing script.
n/a Save a script as a .py file.
Ctrl/Cmd + enter
Run the current script.
n/a Show the input pane only.
n/a Show the output pane only.
n/a Show both the input and output panes.
Ctrl/Cmd + Backspace
Clear the output pane.
Hiero and HieroPlayer 1.6v1The Foundry

USING THE PYTHON API AND ENVIRONMENT VARIABLES 171Using the Script Editor
• Using the help command for a known object.
For example, help(Clip) returns a list of useful information on Clip:
Scroll down in the top pane to see more information relating to Clip.
• Using the dir command for a known object.
For example, dir(Project) returns a concise list of useful information on Project:
For more information on Python scripting, see Help > Python Dev Guide.
NOTE: The last entry in the Script Editor is restored at startup by default, but you can disable this behaviour by navigating to Preferences > General and deselecting Save and restore script editor history.
Hiero and HieroPlayer 1.6v1The Foundry

USING THE PYTHON API AND ENVIRONMENT VARIABLES 172Running Python During Startup
Running Python During Startup
On startup, Hiero and HieroPlayer scan various directories for Python scripts that customise the behaviour of the application. These scripts can be downloaded from online resources and placed in specific locations on disk, depending on the platform you’re using.
If you’re familiar with Python scripting, you can place custom startup scripts in the same locations, though bear in mind that you should take care as mistakes can produce performance issues.
At startup, Hiero and HieroPlayer search <path>/Python/Startup and <path>/Python/StartupUI for any Python .py modules or packages containing __init__.py. Scanning is done in two passes—all the Startup folders are searched and then all the StartupUI folders.
Each package or module discovered is imported and added to the built-in package hiero.plugins.
The <path> varies by platform as follows:
Mac OS X
• /Applications/Hiero1.6v1/Hiero1.6v1.app/Contents/Plugins
• /Applications/HieroPlayer1.6v1/HieroPlayer1.6v1.app/Contents/Plugins
NOTE: Some example scripts are included in the application package in the following directories:
• On Mac:
/Applications/Hiero1.6v1/Hiero1.6v1.app/Contents/Plugins/site-pack-ages/hiero/examples/
/Applications/HieroPlayer1.6v1/HieroPlayer1.6v1.app/Contents/Plugins/site-packages/hiero/examples/
• On Linux:
/usr/local/Hiero1.6v1/Plugins/site-packages/hiero/examples/
/usr/local/HieroPlayer1.6v1/Plugins/site-packages/hiero/examples/
• On Windows:
drive letter:\Program Files\The Foundry\Hiero1.6v1\plugins\site-pack-ages\hiero\examples
drive letter:\Program Files\The Foundry\HieroPlayer1.6v1\plugins\site-packages\hiero\examples
NOTE: Python startup scripts are imported in alphabetical order so you can force ordering if necessary.
Hiero and HieroPlayer 1.6v1The Foundry

USING THE PYTHON API AND ENVIRONMENT VARIABLES 173Running Python During Startup
• /Library/Application Support/TheFoundry/Hiero
• ~/Library/Application Support/TheFoundry/Hiero
• ~/.hiero
Linux
• /usr/local/Hiero1.6v1/Plugins
• /usr/local/HieroPlayer1.6v1/Plugins
• ~/.hiero
Windows
• drive letter:\Program Files\Hiero\plugins\hieroscripts
• drive letter:\Program Files\HieroPlayer\plugins\hieroscripts
• drive letter:\Program Files (x86)\Hiero\plugins\hieroscripts
• drive letter:\Program Files (x86)\HieroPlayer\plugins\hieroscripts
You can specify any number of user-defined paths using the environment variable HIERO_PLUGIN_PATH, separating them with : just like the standard unix PATH environment variable and Nuke's NUKE_PATH. See Setting Environment Variables for more information.
Startup Projects Hiero and HieroPlayer also search <path>/StartupProjects/Hiero and <path>/Templates for preset projects saved as .hrox files. Projects placed in these folders behave differently, depending on which folder they are read from:
• StartupProjects/Hiero—projects in this folder are displayed in the bin view at startup and are read only. An example project, Hiero Presets, is included in the Tags tab.
• Templates—projects in this folder appear in a dropdown menu when you open a new project. Select the template to use for the new project.
To remove a startup project, either:
• Remove it from <path>/StartupProjects/Hiero or <path>/Templates, or
• Rename the file extension so Hiero doesn’t recognise it on startup. For example, myStartup.hrox_hidden.
To modify a startup project:
1. Load the project using File > Open.
NOTE: You may need to create the StartupProjects/Hiero and Templates folders manually in the chosen path.
Hiero and HieroPlayer 1.6v1The Foundry

USING THE PYTHON API AND ENVIRONMENT VARIABLES 174Environment Variables
2. Make any required edits and save over the original in the same location.
The edited project loads at startup.
Environment Variables
Environment variables are used to store values that influence the behaviour of Hiero and HieroPlayer, such as adding additional filepaths to check at startup for plug-in scripts.
Setting Environment Variables
On Mac OS X and Linux
1. The first step is to determine the type of the shell you’re using. Launch a terminal and enter:
echo $SHELL
Your shell type is printed to the screen. For example, /bin/bash indi-cates that your shell is “bash”.
2. Depending on the output of the $SHELL command, do one of the following:
• csh or tcsh—add the following command to the .cshrc or .tcshrc file in your home directory:
setenv VARIABLE value
Replace VARIABLE with the name of the environment variable and value with the value you want to give it, for example:
setenv HIERO_PLUGIN_PATH /SharedDisk/Hiero
• bash or ksh—add the following command to the .bashrc or .kshrc file in your home directory:
export VARIABLE=value
Replace VARIABLE with the name of the environment variable and value with the value you want to give it, for example:
export HIERO_PLUGIN_PATH=/SharedDisk/Hiero
On Windows
1. Right-click on My Computer and select Properties.
2. Click the Advanced tab.
NOTE: The steps above set the environment variable until you manually remove it from the file in your home directory. If you want to set a variable for a single session, you can simply type the variable in the terminal then run Hiero from the same session.
Hiero and HieroPlayer 1.6v1The Foundry

USING THE PYTHON API AND ENVIRONMENT VARIABLES 175Environment Variables
3. Click the Environment Variables button.
The Environment Variables dialog opens.
4. Click the New button under either User variables or System variables, depending on whether you want to set the variable for the current user or all users.
5. In the Variable name field, enter the name of the environment variable you want to set.
6. In the Value field, enter the value for the variable. The value can be a directory path, for example.
7. Click OK to save the variable.
The following table lists the environment variables that Hiero recognises:
NOTE: You must have administrator privileges to set system-wide variables.
Environment Variable Description
__GL_SYNC_DISPLAY_DEVICE On Linux, set this variable to the name of screen device to synchronise in dual screen setups. See Syn-ching to VBlank for more information.
HIERO_DISABLE_THUMBNAIL_CACHE Set this variable to TRUE to stop Hiero caching thumbnails.
Note: This variable does not clear the cache, you must remove cached files manually.
HIERO_PLUGIN_PATH Set this variable to the location of additional scripts to run at startup. You can use .<folder> to point to hidden folders, for example .myPlugins.
For example, you could create a facility-wide location to share presets and use this variable to point multi-ple Hiero’s to it. See Sharing Presets for more infor-mation.
Use the following method to display set paths:
print hiero.core.pluginPath()
HIERO_SINGLE_THREADED_PLAYBACK This variable launches Hiero in single-thread mode, which can solve playback issues on various Linux Fedora flavours.
FOUNDRY_LOG_FILE This variable specifies the location of Hiero’s logfile. If you don’t specify a logfile, all output is to screen.
Hiero and HieroPlayer 1.6v1The Foundry

USING THE PYTHON API AND ENVIRONMENT VARIABLES 176Environment Variables
Sharing Presets Hiero and HieroPlayer support facility-wide preset sharing by pointing multiple seats to a single network location using the HIERO_PLUGIN_PATH. As long as the folder hierarchy mirrors what the application expects, you can place this repository anywhere on your network.
To setup sharing:
1. Create the shared repository directory, for example:
/Volumes/myFacility/Shared/
2. Follow the instructions under Setting Environment Variables to point individual machines to the shared location. For example, if you’re using a bash shell, you could use:
export HIERO_PLUGIN_PATH=/Volumes/myFacility/Shared/
Any file that can be read locally can be placed in the shared path. For example:/Volumes/myFacility/Shared/TaskPresets/Processors/hiero.exporters.FnTimelineProcessor.TimelineProcessor/MyPreset.xml
Synching to VBlank Hiero and HieroPlayer automatically account for tearing that can occur due to NVIDIA and OpenGL issues on Linux, but with dual screen setups, you need to specify which screen to synchronise. The __GL_SYNC_DISPLAY_DEVICE environment variable enables you to specify the synch device by appending the screen device name to the variable.
To determine your screen names:
1. From the console, enter:
FOUNDRY_LOG_LEVEL This variable sets the level of logging Hiero produces during operation. There are four levels of detail, on a sliding scale from minimal to verbose:
• error
• warning
• message
• verbose
Note: Setting the logging level to verbose can pro-duce large log files when FOUNDRY_LOG_FILE is specified.
OCIO Set this variable to the location of your OCIO config-uration file for colour conversion.
Environment Variable Description
Hiero and HieroPlayer 1.6v1The Foundry

USING THE PYTHON API AND ENVIRONMENT VARIABLES 177Environment Variables
nvidia-settings
The NVIDIA X Server Settings dialog box displays.
2. Open up the GPU dropdown to display the screen device names.
3. Make a note of the device names, for example, DFP-0 or CRT-1.
4. Set the __GL_SYNC_DISPLAY_DEVICE environment variable value to the device name as described in Setting Environment Variables.
Hiero and HieroPlayer 1.6v1The Foundry

APPENDIX A
Hiero and HieroPlayer Hotkeys
This appendix lists the hotkeys used by both applications, along with their function.
Hotkey Button Menubar Function
Viewer
Shift + Ctrl/Cmd + 1 n/a View > Zoom to Actual Size Zoom the contents of the Viewer to actual size.
Shift + Ctrl/Cmd + 2 n/a View > Zoom to Half Size Zoom the contents of the Viewer to half size.
H n/a View > Zoom to Fill Fit the current clip to the height of the Viewer.
F n/a View > Zoom to Fit Zoom to fit the clip to the Viewer.
= (equals) n/a View > Zoom In Zoom in to the Viewer.
- (minus) n/a View > Zoom Out Zoom out of the Viewer.
Ctrl/Cmd + F n/a View > Full Screen Toggle Full Screen mode.
Ctrl/Cmd + Shift + F n/a View > Full Quality 1:1 Toggle Full Screen mode at Full Quality 1:1 zoom.
Esc n/a n/a Exit full screen mode.
E View > Clipping Warning Toggle the Level Warning tool on and off.
I View > Mark In Set the In Point at the current frame.
O View > Mark Out Set the Out Point as the current frame.
Alt + I n/a View > Clear In Point Clear the In point for the current clip or timeline.
Alt + O n/a View > Clear Out Point Clear the Out point for the current clip or timeline.
Alt + X n/a View > Clear In and Out Points
Clear the In and Out points for the current clip or timeline.
Home View > Go to Start Go to the start of all clips.
End View > Go to End Go to the end of all clips.
Shift + I n/a View > Go to In Point Go to the In Point in the current clip.
Shift + O n/a View > Go to Out Point Go to the Out Point in the current clip.
(K + J)
View > Frame Backwards Skip one frame backwards.
(K + L)
View > Frame Forwards Skip one frame forwards.

APPENDIX A 179Hiero and HieroPlayer Hotkeys
Shift + View > Skip Backwards Skip backwards by the frame increment value specified in the Viewer tools.
Shift + View > Skip Forwards Skip forwards by the frame increment value specified in the Viewer tools.
View > Previous Edit Go to the previous clip in the Viewer.
View > Next Edit Go to the next clip in the Viewer.
Shift + n/a View > Previous Tag Go to previous frame tag.
Shift + n/a View > Next Tag Go to next frame tag.
space View > Play Play the clip or sequence currently in the Viewer.
J View > Play Backward Play clip or sequence currently in the Viewer backward (click multiple times to increase playback speed).
K View > Pause Pause playback.
L View > Play Forward Play clip or sequence currently in the Viewer forward (click multiple times to increase playback speed).
enter (numeric keypad)
n/a View > Swap Inputs Controls the AB inputs:
• Stack - swaps which input is visible.
• Horizontal - swaps the inputs horizontally.
• Vertical - swaps the inputs vertically.
Alt + left-click + drag
(middle-click and drag on Linux)
n/a n/a Pan the contents of the Viewer.
Scroll wheel
(over Viewer or Viewer timeline)
n/a n/a Zoom the Viewer or Viewer timeline.
Scroll wheel
middle-click + drag
(over Viewer time-line or timeline)
n/a n/a Zoom the Viewer timeline to the indicated frame range.
Scroll wheel
Alt + middle-click + drag
(over Viewer or Viewer timeline)
n/a n/a Zoom the contents of the Viewer or Viewer timeline.
Hotkey Button Menubar Function
Hiero and HieroPlayer 1.6v1The Foundry

APPENDIX A 180Hiero and HieroPlayer Hotkeys
middle-click
(over Viewer time-line or timeline)
n/a n/a Zoom to fit the Viewer timeline to Viewer contents.
Note: If your mouse preferences are not set to Button 3 for the middle mouse button, you may have to use Ctrl/Cmd + middle-click.
PgUp n/a Scroll up and down through available layers in the Viewer.
PgDn n/a
R, G, B, A, Y View > Channels Set the Viewer output channel.
W View > Toggle SplitWipe Toggle the SplitWipe compare mode on and off.
\ (back slash) n/a View > Show Overlays Toggle the HUD overlays.
Alt + close Viewer n/a Close the Viewer and any linked timeline and spreadsheet panes.
Bin
Ctrl/Cmd + B n/a Project > New Bin Create a new bin in the current bin.
Ctrl/Cmd + Y n/a Project > New Tag Create a new tag in the current bin (tags can only be created in the Tags tab).
Ctrl/Cmd + N n/a Project > New Sequence Create a new sequence in the current bin.
Ctrl/Cmd + X n/a Edit > Cut Cut the selected item(s) and place in the buffer.
Ctrl/Cmd + C n/a Edit > Copy Copy the selected item(s) to the buffer.
Ctrl/Cmd + V n/a Edit > Paste Paste item(s) from the buffer.
Backspace / Delete n/a Edit > Delete Delete selected item(s).
Ctrl/Cmd + A n/a Edit > Select All Select all files in the current bin.
Shift + Ctrl/Cmd + A n/a Edit > Clear Selection Deselect all files in the current bin.
Ctrl/Cmd + D n/a Edit > Duplicate Duplicate the selected object(s).
Spreadsheet
Alt + left-click n/a n/a Move the playhead to the selected clip’s In point on the time-line.
Alt + double left-click
n/a n/a Move the playhead to the selected clip’s In point on the time-line and zoom to fit the clip in the timeline view.
Timeline
left-click n/a n/a Select a clip including any linked tracks.
Alt + left-click n/a n/a Select a clip, ignoring linked tracks (for example, audio only).
Shift + drag clip n/a n/a Disable snap to transition when dragging clips.
D n/a n/a Enable or disable the selected clip(s) or track(s).
F n/a View > Zoom to Fit Zoom to fit the clips on the timeline to the available space.
Backspace / Delete n/a n/a Remove the selected clip(s) or razor cut.
Hotkey Button Menubar Function
Hiero and HieroPlayer 1.6v1The Foundry

APPENDIX A 181Hiero and HieroPlayer Hotkeys
Shift + Delete n/a Timeline > Ripple Delete Remove the selected clip(s) and ripple clips down stream to close gaps in the timeline.
Ctrl/Cmd + X n/a Edit > Cut Cut the selected clip(s) and place in the buffer.
Ctrl/Cmd + C n/a Edit > Copy Copy the selected clip(s) to the buffer.
Ctrl/Cmd + V n/a Edit > Paste Paste clip(s) from the buffer to the selected track at the play-head position.
Ctrl/Cmd + A n/a n/a Select all clips on the timeline.
left-click then Shift + left-click
n/a n/a Select all clips between the left-clicks (use Shift + Alt + left-click to ignore linked tracks).
Alt + n/a Clip > Version Up Cycle up through the available clip versions.
Alt + n/a Clip > Version Down Cycle down through the available clip versions.
Shift + A n/a Timeline > Mark Selection Place the In and Out markers around the selected clip or clips on the timeline.
X n/a Timeline > Mark Clip Place the In and Out markers around the upper-most timeline clip under the current playhead position.
C n/a Timeline > Razor Selected Apply the Razor tool to the currently selected track(s) within the selected clip(s).
Shift + C n/a Timeline > Razor All Apply the Razor tool to all tracks within the selected clip(s).
drag then Alt n/a n/a Activate Ripple mode while dragging clips.
Alt then drag n/a n/a Duplicate the dragged clips.
Alt and drag n/a n/a Ripple and duplicate the dragged clips.
Alt and left-click n/a n/a Select a clip, ignoring linked tracks.
Spacebar View > Play/Pause Play through the sequence currently in the Viewer.
Alt + middle-click n/a n/a Fit the Viewer to marked In and Out Points.
, (comma) n/a Timeline > Nudge > Nudge Left
Trim, roll, or nudge a selected transition or clip to the left (within the available handles for trim and roll).
. (full stop) n/a Timeline > Nudge > Nudge Right
Trim, roll, or nudge a selected transition or clip to the right (within the available handles for trim and roll).
Shift + , (comma) n/a Timeline > Nudge > Nudge Left More
Trim, roll, or nudge a selected transition or clip to the left by the frame increment value specified in the Viewer tools (within the available handles for trim and roll).
Shift + . (full stop) n/a Timeline > Nudge > Nudge Right More
Trim, roll, or nudge a selected transition or clip to the right by the frame increment value specified in the Viewer tools (within the available handles for trim and roll).
Ctrl/Cmd + T n/a Timeline > Add Transition > Dissolve
Add a dissolve between two selected track items.
Alt + close timeline n/a Close the timeline and any linked Viewer and spreadsheet panes.
Hotkey Button Menubar Function
Hiero and HieroPlayer 1.6v1The Foundry

APPENDIX A 182Hiero and HieroPlayer Hotkeys
User Interface
Ctrl/Cmd + 1 n/a Window > Workspace > Conforming
Switch to the default Conforming workspace.
Ctrl/Cmd + 2 n/a Window > Workspace > Editing
Switch to the default Editing workspace.
Ctrl/Cmd + 3 n/a Window > Workspace > Reviewing
Switch to the default Reviewing workspace.
Ctrl/Cmd + <num> n/a Windows > Workspace > Custom Workspace Name
Switch to the custom workspace associated with the number selected.
Ctrl/Cmd + , (comma) n/a Hiero1.6v1 > Preferences, HieroPlayer1.6v1 > Prefer-ences,
or
Edit > Preferences
Open the Preferences dialog.
` (backtick) n/a n/a Toggle between full screen and preset pane size for the pane currently under the mouse pointer.
Shift + Ctrl/Cmd + N n/a File > New Project Open a new project.
Ctrl/Cmd + O n/a File > Open Open an existing project.
Ctrl/Cmd + W n/a File > Close Close the current project.
Ctrl/Cmd + S n/a File > Save Save the current project.
Shift + Ctrl/Cmd + S n/a File > Save As... Save the current project with a different name.
Ctrl/Cmd + I n/a File > Import Clips Import a clip or clips.
Shift + Ctrl/Cmd + I n/a File > Import Folder Import a folder or folders.
Shift + Ctrl/Cmd + E n/a File > Export Export the selected sequence.
V n/a n/a Display the available versions of a clip or sequence.
Alt + close Spread-sheet
n/a Close the spreadsheet and any linked timeline and Viewer panes.
Alt + Shift <num> n/a File > Open Recent > Project Name
Open a previously saved project from the list.
Bin View Searchbox
left-click n/a n/a Select a tag search criteria.
Ctrl/Cmd + left-click n/a n/a Toggle select individual tag search criteria.
Shift + left-click n/a n/a Select a range of tag search criteria.
Script Editor
Ctrl/Cmd + [ n/a Go to the previous script.
Ctrl/Cmd + ] n/a Go to the next script.
Hotkey Button Menubar Function
Hiero and HieroPlayer 1.6v1The Foundry

APPENDIX A 183Hiero and HieroPlayer Hotkeys
Ctrl/Cmd + Enter n/a Execute current script.
Ctrl/Cmd + Backspace
n/a Clear the output pane.
Hotkey Button Menubar Function
Hiero and HieroPlayer 1.6v1The Foundry

APPENDIX B
Supported Image Formats
The following table lists supported image formats.
Format Name Bit Depths Read/Write Extension
ARRIRAW 12 read only ari
AVI n/a read only avi
CIN 10 (log) read and write cin
DPX (see the notes below) 8, 10, 12, and 16 read and write dpx
Radiance 16 read only hdr, hdri
JPEG 8 read and write jpg, jpeg
Maya IFF 8 and 16 read only iff
OpenEXR (see the notes below) 16 and 32 read and write exr
PNG 8 and 16 read and write png (8-bit)
png16 (16-bit)
PSD 8 read only psd
QuickTime n/a read and write mov
RAW n/a read only n/a
REDCODE (see the notes below) 16 read only r3d
SGI 8 and 16 read and write sgi, rgb, rgba (8-bit sequences)
sgi16 (for 16-bit sequences)
SoftImage® PIC 8 read and write pic
TIFF 8, 16, and 32 read and write tif, tiff (8-bit sequences)
tif16, tiff16 (16-bit sequences)
ftif, ftiff (32-bit sequences)
Truevision® TARGA 8 read and write tga, targa
Wavefront® RLA 8 read only rla
XPM 8 read only xpm
YUV 8 read only yuv

APPENDIX B 185Supported Image Formats
Optimised Formats and Limitations
Hiero and HieroPlayer play most formats as fast as they can be read from the file system. The frames are cached in RAM up to the cache limit specified in the Preferences dialog. When the cache is full, frames are ejected and must be re-read from disk if needed again.
The playback system supports automatic resolution switching, which enables realtime playback of source clips on typical desktop and graphics card combinations.
Most file formats are read through the same image I/O library used by The Foundry’s Nuke. Formats are optimised for realtime playback based on user feedback about what is most frequently used. The following formats have been optimised, so that the only limiting factor in achieving realtime playback is the rate at which files can be read from the file system:
R3DIn conjunction with a RED Rocket, Hiero and HieroPlayer can take advantage of the lower scale/quality available from the RED SDK based on the current Viewer zoom level.
EXREXR reads have been partially optimised. They currently still load more slowly if any part of the data window lies outside the display window, or if the data window is smaller than the display window and aligned to one of the edges of the display window. This reduction in speed is most noticeable for large data windows.
DPX8-, 10-, 12-, and 16-bit RGB and RGBA reads are optimised, if the channels are all stored in the same element. Reads of other formats may be optimised depending on the number, bit depth and layout (within elements) of the channels. Future releases will handle more formats.
NOTE: OpenEXR 2.0 images containing Deep data are not supported in this release.
Hiero and HieroPlayer 1.6v1The Foundry

APPENDIX B 186Supported Audio Formats
Supported Audio Formats
The following table lists supported audio formats.
Format Name Extension
All platforms
RED Audio n/a
Wave wav
Audio interchange format aiff
Mac
QuickTime Audio n/a
NOTE: Although Hiero and HieroPlayer support the import and editing of multi-channel audio, during playback audio is currently mixed to 48 KHz mono output.
Hiero and HieroPlayer 1.6v1The Foundry

APPENDIX C
Third Party Licences
This appendix lists third party libraries used in Hiero and HieroPlayer, along with their licences.
Library Description Licence
Boost/1.46.0 Source code function / template library
Boost Software License - Version 1.0 - August 17th, 2003
Permission is hereby granted, free of charge, to any person or organisation obtain-ing a copy of the software and accompanying documentation covered by this license (the “Software”) to use, reproduce, display, distribute, execute, and transmit the Software, and to prepare derivative works of the Software, and to permit third-par-ties to whom the Software is furnished to do so, all subject to the following:
The copyright notices in the Software and this entire statement, including the above license grant, this restriction and the following disclaimer, must be included in all copies of the Software, in whole or in part, and all derivative works of the Software, unless such copies or derivative works are solely in the form of machine-executable object code generated by a source language processor.
THE SOFTWARE IS PROVIDED “AS IS”, WITHOUT WARRANTY OF ANY KIND, EXPRESS OR IMPLIED, INCLUDING BUT NOT LIMITED TO THE WARRANTIES OF MERCHANT-ABILITY, FITNESS FOR A PARTICULAR PURPOSE, TITLE AND NON-INFRINGEMENT. IN NO EVENT SHALL THE COPYRIGHT HOLDERS OR ANYONE DISTRIBUTING THE SOFT-WARE BE LIABLE FOR ANY DAMAGES OR OTHER LIABILITY, WHETHER IN CONTRACT, TORT OR OTHERWISE, ARISING FROM, OUT OF OR IN CONNECTION WITH THE SOFTWARE OR THE USE OR OTHER DEALINGS IN THE SOFTWARE.

APPENDIX C 188Third Party Licences
Breakpad/1.0 Multi-platform crash reporting system
Copyright © 2010, Google Inc.
All rights reserved.
Redistribution and use in source and binary forms, with or without modification, are permitted provided that the following conditions are met:
• Redistributions of source code must retain the above copyright notice, this list of conditions and the following disclaimer.
• Redistributions in binary form must reproduce the above copyright notice, this list of conditions and the following disclaimer in the documentation and/or other materials provided with the distribution.
• Neither the name of the organization nor the names of its contributors may be used to endorse or promote products derived from this software without specific prior written permission.
THIS SOFTWARE IS PROVIDED BY THE COPYRIGHT HOLDERS AND CONTRIBUTORS "AS IS" AND ANY EXPRESS OR IMPLIED WARRANTIES, INCLUDING, BUT NOT LIMITED TO, THE IMPLIED WARRANTIES OF MERCHANTABILITY AND FITNESS FOR A PARTIC-ULAR PURPOSE ARE DISCLAIMED. IN NO EVENT SHALL THE COPYRIGHT HOLDER OR CONTRIBUTORS BE LIABLE FOR ANY DIRECT, INDIRECT, INCIDENTAL, SPECIAL, EXEMPLARY, OR CONSEQUENTIAL DAMAGES (INCLUDING, BUT NOT LIMITED TO, PROCUREMENT OF SUBSTITUTE GOODS OR SERVICES; LOSS OF USE, DATA, OR PROFITS; OR BUSINESS INTERRUPTION) HOWEVER CAUSED AND ON ANY THEORY OF LIABILITY, WHETHER IN CONTRACT, STRICT LIABILITY, OR TORT (INCLUDING NEGLIGENCE OR OTHERWISE) ARISING IN ANY WAY OUT OF THE USE OF THIS SOFT-WARE, EVEN IF ADVISED OF THE POSSIBILITY OF SUCH DAMAGE.
bzip2 Data compressor Copyright © 1996-2000 Julian R Seward. All rights reserved.
Redistribution and use in source and binary forms, with or without modification, are permitted provided that the following conditions are met:
1. Redistributions of source code must retain the above copyright notice, this list of conditions and the following disclaimer.
2. The origin of this software must not be misrepresented; you must not claim that you wrote the original software. If you use this software in a product, an acknowledgment in the product documentation would be appreciated but is not required.
3. Altered source versions must be plainly marked as such, and must not be misrepresented as being the original software.
4. The name of the author may not be used to endorse or promote products derived from this software without specific prior written permission.
THIS SOFTWARE IS PROVIDED BY THE AUTHOR ``AS IS'' AND ANY EXPRESS OR IMPLIED WARRANTIES, INCLUDING, BUT NOT LIMITED TO, THE IMPLIED WARRAN-TIES OF MERCHANTABILITY AND FITNESS FOR A PARTICULAR PURPOSE ARE DIS-CLAIMED. IN NO EVENT SHALL THE AUTHOR BE LIABLE FOR ANY DIRECT, INDIRECT, INCIDENTAL, SPECIAL, EXEMPLARY, OR CONSEQUENTIAL DAMAGES (INCLUDING, BUT NOT LIMITED TO, PROCUREMENT OF SUBSTITUTE GOODS OR SERVICES; LOSS OF USE, DATA, OR PROFITS; OR BUSINESS INTERRUPTION) HOWEVER CAUSED AND ON ANY THEORY OF LIABILITY, WHETHER IN CONTRACT, STRICT LIABILITY, OR TORT (INCLUDING NEGLIGENCE OR OTHERWISE) ARISING IN ANY WAY OUT OF THE USE OF THIS SOFTWARE, EVEN IF ADVISED OF THE POSSIBILITY OF SUCH DAMAGE.
Library Description Licence
Hiero and HieroPlayer 1.6v1The Foundry

APPENDIX C 189Third Party Licences
Curl/7.21.1 URL transfer library Copyright © 1996 - 2010, Daniel Stenberg, <[email protected]>.
All rights reserved.
Permission to use, copy, modify, and distribute this software for any purpose with or without fee is hereby granted, provided that the above copyright notice and this permission notice appear in all copies.
THE SOFTWARE IS PROVIDED "AS IS", WITHOUT WARRANTY OF ANY KIND, EXPRESS OR IMPLIED, INCLUDING BUT NOT LIMITED TO THE WARRANTIES OF MERCHANT-ABILITY, FITNESS FOR A PARTICULAR PURPOSE AND NONINFRINGEMENT OF THIRD PARTY RIGHTS. IN NO EVENT SHALL THE AUTHORS OR COPYRIGHT HOLDERS BE LIABLE FOR ANY CLAIM, DAMAGES OR OTHER LIABILITY, WHETHER IN AN ACTION OF CONTRACT, TORT OR OTHERWISE, ARISING FROM, OUT OF OR IN CONNECTION WITH THE SOFTWARE OR THE USE OR OTHER DEALINGS IN THE SOFTWARE.
Except as contained in this notice, the name of a copyright holder shall not be used in advertising or otherwise to promote the sale, use or other dealings in this Soft-ware without prior written authorization of the copyright holder.
EuCon/2.5.5 Software development kit
The EUCON specification and trademark are property of Avid Technology, Inc. Used under license.
Expat/2.0.1 XML parser Copyright © 1998, 1999, 2000 Thai Open Source Software Center Ltd and Clark Cooper
Copyright © 2001, 2002, 2003, 2004, 2005, 2006 Expat maintainers.
Permission is hereby granted, free of charge, to any person obtaining a copy of this software and associated documentation files (the “Software”), to deal in the Soft-ware without restriction, including without limitation the rights to use, copy, modify, merge, publish, distribute, sublicense, and/or sell copies of the Software, and to per-mit persons to whom the Software is furnished to do so, subject to the following conditions:
The above copyright notice and this permission notice shall be included in all copies or substantial portions of the Software.
THE SOFTWARE IS PROVIDED “AS IS”, WITHOUT WARRANTY OF ANY KIND, EXPRESS OR IMPLIED, INCLUDING BUT NOT LIMITED TO THE WARRANTIES OF MERCHANT-ABILITY, FITNESS FOR A PARTICULAR PURPOSE AND NONINFRINGEMENT. IN NO EVENT SHALL THE AUTHORS OR COPYRIGHT HOLDERS BE LIABLE FOR ANY CLAIM, DAMAGES OR OTHER LIABILITY, WHETHER IN AN ACTION OF CONTRACT, TORT OR OTHERWISE, ARISING FROM, OUT OF OR IN CONNECTION WITH THE SOFTWARE OR THE USE OR OTHER DEALINGS IN THE SOFTWARE.
FBX/2010.2 File format support This software contains Autodesk® FBX® code developed by Autodesk, Inc. Copy-right 2008 Autodesk, Inc. All rights, reserved. Such code is provided “as is” and Autodesk, Inc. disclaims any and all warranties, whether express or implied, including without limitation the implied warranties of merchantability, fitness for a particular purpose or non-infringement of third party rights. In no event shall Autodesk, Inc. be liable for any direct, indirect, incidental, special, exemplary, or consequential dam-ages (including, but not limited to, procurement of substitute goods or services; loss of use, data, or profits; or business interruption) however caused and on any theory of liability, whether in contract, strict liability, or tort (including negligence or other-wise) arising in any way out of such code.
Library Description Licence
Hiero and HieroPlayer 1.6v1The Foundry

APPENDIX C 190Third Party Licences
FFmpeg/r15261 File format support Copyright © 2001 Fabrice Bellard
This file is part of FFmpeg.
FFmpeg is free software; you can redistribute it and/or modify it under the terms of the GNU Lesser General Public License as published by the Free Software Foundation; either version 2.1 of the License, or (at your option) any later version.
FFmpeg is distributed in the hope that it will be useful, but WITHOUT ANY WAR-RANTY; without even the implied warranty of MERCHANTABILITY or FITNESS FOR A PARTICULAR PURPOSE. See the GNU Lesser General Public License for more details.
You should have received a copy of the GNU Lesser General Public License along with FFmpeg; if not, write to the Free Software Foundation, Inc., 51 Franklin Street, Fifth Floor, Boston, MA 02110-1301 USA
GLEW/1.5.8 OpenGL support The OpenGL Extension Wrangler Library Copyright © 2002-2008, Milan Ikits <milan [email protected]>
Copyright © 2002-2008, Marcelo E. Magallon <[email protected]>
Copyright © 2002, Lev Povalahev All rights reserved.
Redistribution and use in source and binary forms, with or without modification, are permitted provided that the following conditions are met:
• Redistributions of source code must retain the above copyright notice, this list of conditions and the following disclaimer.
• Redistributions in binary form must reproduce the above copyright notice, this list of conditions and the following disclaimer in the documentation and/or other materials provided with the distribution.
• The name of the author may be used to endorse or promote products derived from this software without specific prior written permission.
THIS SOFTWARE IS PROVIDED BY THE COPYRIGHT HOLDERS AND CONTRIBUTORS “AS IS” AND ANY EXPRESS OR IMPLIED WARRANTIES, INCLUDING, BUT NOT LIMITED TO, THE IMPLIED WARRANTIES OF MERCHANTABILITY AND FITNESS FOR A PARTIC-ULAR PURPOSE ARE DISCLAIMED. IN NO EVENT SHALL THE COPYRIGHT OWNER OR CONTRIBUTORS BE LIABLE FOR ANY DIRECT, INDIRECT, INCIDENTAL, SPECIAL, EXEMPLARY, OR CONSEQUENTIAL DAMAGES (INCLUDING, BUT NOT LIMITED TO, PROCUREMENT OF SUBSTITUTE GOODS OR SERVICES; LOSS OF USE, DATA, OR PROFITS; OR BUSINESS INTERRUPTION) HOWEVER CAUSED AND ON ANY THEORY OF LIABILITY, WHETHER IN CONTRACT, STRICT LIABILITY, OR TORT (INCLUDING NEGLIGENCE OR OTHERWISE) ARISING IN ANY WAY OUT OF THE USE OF THIS SOFT-WARE, EVEN IF ADVISED OF THE POSSIBILITY OF SUCH DAMAGE.
JPEG/6b File format support This software is based in part on the work of the Independent JPEG Group.
Libexif/0.6.20 Metadata parser Author Lutz Mueller [email protected] date 2001-2005
This library is free software; you can redistribute it and/or modify it under the terms of the GNU Lesser General Public License as published by the Free Software Founda-tion; either version 2 of the License, or (at your option) any later version.
This library is distributed in the hope that it will be useful, but WITHOUT ANY WAR-RANTY; without even the implied warranty of MERCHANTABILITY or FITNESS FOR A PARTICULAR PURPOSE. See the GNU Lesser General Public License for more details.
Library Description Licence
Hiero and HieroPlayer 1.6v1The Foundry

APPENDIX C 191Third Party Licences
Libpng/1.2.25 File format support This copy of the libpng notices is provided for your convenience. In case of any dis-crepancy between this copy and the notices in the file png.h that is included in the libpng distribution, the latter shall prevail.
COPYRIGHT NOTICE, DISCLAIMER, and LICENSE:
If you modify libpng you may insert additional notices immediately following this sentence.
libpng versions 1.2.6, August 15, 2004, through 1.2.25, February 18, 2008, are Copyright © 2004, 2006-2008 Glenn Randers-Pehrson, and are distributed accord-ing to the same disclaimer and license as libpng-1.2.5 with the following individual added to the list of Contributing Authors: Cosmin Truta.
libpng versions 1.0.7, July 1, 2000, through 1.2.5 - October 3, 2002, are Copyright © 2000-2002 Glenn Randers-Pehrson, and are distributed according to the same disclaimer and license as libpng-1.0.6 with the following individuals added to the list of Contributing Authors: Simon-Pierre Cadieux, Eric S. Raymond, Gilles Vollant.
Including the following additions to the disclaimer:
There is no warranty against interference with your enjoyment of the library or against infringement. There is no warranty that our efforts or the library will fulfill any of your particular purposes or needs. This library is provided with all faults, and the entire risk of satisfactory quality, performance, accuracy, and effort is with the user.
libpng versions 0.97, January 1998, through 1.0.6, March 20, 2000, are Copyright © 1998, 1999 Glenn Randers-Pehrson, and are distributed according to the same disclaimer and license as libpng-0.96, with the following individuals added to the list of Contributing Authors: Tom Lane, Glenn Randers-Pehrson, Willem van Schaik.
libpng versions 0.89, June 1996, through 0.96, May 1997, are Copyright © 1996, 1997 Andreas Dilger Distributed according to the same disclaimer and license as lib-png-0.88, with the following individuals added to the list of Contributing Authors: John Bowler, Kevin Bracey, Sam Bushell, Magnus Holmgren, Greg Roelofs, Tom Tan-ner
libpng versions 0.5, May 1995, through 0.88, January 1996, are Copyright © 1995, 1996 Guy Eric Schalnat, Group 42, Inc. For the purposes of this copyright and license, "Contributing Authors" is defined as the following set of individuals: Andreas Dilger, Dave Martindale, Guy Eric Schalnat, Paul Schmidt, Tim Wegner
The PNG Reference Library is supplied "AS IS". The Contributing Authors and Group 42, Inc. disclaim all warranties, expressed or implied, including, without limitation, the warranties of merchantability and of fitness for any purpose. The Contributing Authors and Group 42, Inc. assume no liability for direct, indirect, incidental, special, exemplary, or consequential damages, which may result from the use of the PNG Reference Library, even if advised of the possibility of such damage.
Library Description Licence
Hiero and HieroPlayer 1.6v1The Foundry

APPENDIX C 192Third Party Licences
Permission is hereby granted to use, copy, modify, and distribute this source code, or portions hereof, for any purpose, without fee, subject to the following restric-tions:
1. The origin of this source code must not be misrepresented.
2. Altered versions must be plainly marked as such and must not be misrepresented as being the original source.
3. This Copyright notice may not be removed or altered from any source or altered source distribution.
The Contributing Authors and Group 42, Inc. specifically permit, without fee, and encourage the use of this source code as a component to supporting the PNG file format in commercial products. If you use this source code in a product, acknowledg-ment is not required but would be appreciated.
A "png_get_copyright" function is available, for convenient use in "about" boxes and the like:
printf("%s",png_get_copyright(NULL));
Also, the PNG logo (in PNG format, of course) is supplied in the files "pngbar.png" and "pngbar.jpg (88x31) and "pngnow.png" (98x31).
Libpng is OSI Certified Open Source Software. OSI Certified Open Source is a certifi-cation mark of the Open Source Initiative.
Glenn Randers-Pehrson
glennrp at users.sourceforge.net
February 18, 2008
libresample/0.1.3 Realtime resampler All of the files in this package are Copyright 2003 by Dominic Mazzoni <[email protected]>. This library was based heavily on Resample-1.7, Copyright 1994-2002 by Julius O. Smith III <[email protected]>, all rights reserved.
Permission to use and copy is granted subject to the terms of the "GNU Lesser Gen-eral Public License" (LGPL) as published by the Free Software Foundation; either ver-sion 2.1 of the License, or any later version. In addition, Julius O. Smith III requests that a copy of any modified files be sent by email to [email protected] so that he may incorporate them into the CCRMA version.
This library is distributed in the hope that it will be useful, but WITHOUT ANY WAR-RANTY; without even the implied warranty of MERCHANTABILITY or FITNESS FOR A PARTICULAR PURPOSE. See the GNU Lesser General Public License for more details.
Library Description Licence
Hiero and HieroPlayer 1.6v1The Foundry

APPENDIX C 193Third Party Licences
libsndfile/1.0.25 Audio read/write Copyright © 1999-2011 Erik de Castro Lopo <[email protected]>
Copyright © 2005 David Viens <[email protected]>
This program is free software; you can redistribute it and/or modify it under the terms of the GNU Lesser General Public License as published by the Free Software Foundation; either version 2.1 of the License, or (at your option) any later version.
This program is distributed in the hope that it will be useful, but WITHOUT ANY WARRANTY; without even the implied warranty of MERCHANTABILITY or FITNESS FOR A PARTICULAR PURPOSE. See the GNU Lesser General Public License for more details.
You should have received a copy of the GNU Lesser General Public License along with this program; if not, write to the Free Software Foundation, Inc., 59 Temple Place - Suite 330, Boston, MA 02111-1307, USA.
Libtiff/3.9.4 File format support Copyright © 1988-1997 Sam Leffler Copyright © 1991-1997 Silicon Graphics, Inc.
Permission to use, copy, modify, distribute, and sell this software and its documen-tation for any purpose is hereby granted without fee, provided that (i) the above copyright notices and this permission notice appear in all copies of the software and related documentation, and (ii) the names of Sam Leffler and Silicon Graphics may not be used in any advertising or publicity relating to the software without the spe-cific, prior written permission of Sam Leffler and Silicon Graphics.
THE SOFTWARE IS PROVIDED “AS-IS” AND WITHOUT WARRANTY OF ANY KIND, EXPRESS, IMPLIED OR OTHERWISE, INCLUDING WITHOUT LIMITATION, ANY WAR-RANTY OF MERCHANTABILITY OR FITNESS FOR A PARTICULAR PURPOSE.
IN NO EVENT SHALL SAM LEFFLER OR SILICON GRAPHICS BE LIABLE FOR ANY SPE-CIAL, INCIDENTAL, INDIRECT OR CONSEQUENTIAL DAMAGES OF ANY KIND, OR ANY DAMAGES WHATSOEVER RESULTING FROM LOSS OF USE, DATA OR PROFITS, WHETHER OR NOT ADVISED OF THE POSSIBILITY OF DAMAGE, AND ON ANY THE-ORY OF LIABILITY, ARISING OUT OF OR IN CONNECTION WITH THE USE OR PERFOR-MANCE OF THIS SOFTWARE.
Library Description Licence
Hiero and HieroPlayer 1.6v1The Foundry

APPENDIX C 194Third Party Licences
Msinttypes/r20 File format support Copyright © 2006 Alexander Chemeris
Redistribution and use in source and binary forms, with or without modification, are permitted provided that the following conditions are met:
• Redistributions of source code must retain the above copyright notice, this list of conditions and the following disclaimer.
• Redistributions in binary form must reproduce the above copyright notice, this list of conditions and the following disclaimer in the documentation and/or other materials provided with the distribution.
• The name of the author may not be used to endorse or promote products derived from this software without specific prior written permission.
THIS SOFTWARE IS PROVIDED BY THE AUTHOR ``AS IS'' AND ANY EXPRESS OR IMPLIED WARRANTIES, INCLUDING, BUT NOT LIMITED TO, THE IMPLIED WARRAN-TIES OF MERCHANTABILITY AND FITNESS FOR A PARTICULAR PURPOSE ARE DIS-CLAIMED. IN NO EVENT SHALL THE AUTHOR BE LIABLE FOR ANY DIRECT, INDIRECT, INCIDENTAL, SPECIAL, EXEMPLARY, OR CONSEQUENTIAL DAMAGES (INCLUDING, BUT NOT LIMITED TO, PROCUREMENT OF SUBSTITUTE GOODS OR SERVICES; LOSS OF USE, DATA, OR PROFITS; OR BUSINESS INTERRUPTION) HOWEVER CAUSED AND ON ANY THEORY OF LIABILITY, WHETHER IN CONTRACT, STRICT LIABILITY, OR TORT (INCLUDING NEGLIGENCE OR OTHERWISE) ARISING IN ANY WAY OUT OF THE USE OF THIS SOFTWARE, EVEN IF ADVISED OF THE POSSIBILITY OF SUCH DAMAGE.
OpenALSoft/1.13 Cross platform audio library
Copyright © 1999-2007 by authors.
This library is free software; you can redistribute it and/or modify it under the terms of the GNU Library General Public License as published by the Free Software Founda-tion; either version 2 of the License, or (at your option) any later version.
This library is distributed in the hope that it will be useful, but WITHOUT ANY WAR-RANTY; without even the implied warranty of MERCHANTABILITY or FITNESS FOR A PARTICULAR PURPOSE. See the GNU Library General Public License for more details.
You should have received a copy of the GNU Library General Public License along with this library; if not, write to the Free Software Foundation, Inc., 59 Temple Place - Suite 330, Boston, MA 02111-1307, USA.
Or go to www.gnu.org/copyleft/lgpl.html
Library Description Licence
Hiero and HieroPlayer 1.6v1The Foundry

APPENDIX C 195Third Party Licences
OpenColorIO/1.0.0
Color management library
Copyright © 2003-2010 Sony Pictures Imageworks Inc., et al. All Rights Reserved.
Redistribution and use in source and binary forms, with or without modification, are permitted provided that the following conditions are met:
• Redistributions of source code must retain the above copyright notice, this list of conditions and the following disclaimer.
• Redistributions in binary form must reproduce the above copyright notice, this list of conditions and the following disclaimer in the documentation and/or other materials provided with the distribution.
• Neither the name of Sony Pictures Imageworks nor the names of its contributors may be used to endorse or promote products derived from this software without specific prior written permission.
THIS SOFTWARE IS PROVIDED BY THE COPYRIGHT HOLDERS AND CONTRIBUTORS “AS IS” AND ANY EXPRESS OR IMPLIED WARRANTIES, INCLUDING, BUT NOT LIMITED TO, THE IMPLIED WARRANTIES OF MERCHANTABILITY AND FITNESS FOR A PARTIC-ULAR PURPOSE ARE DISCLAIMED. IN NO EVENT SHALL THE COPYRIGHT OWNER OR CONTRIBUTORS BE LIABLE FOR ANY DIRECT, INDIRECT, INCIDENTAL, SPECIAL, EXEMPLARY, OR CONSEQUENTIAL DAMAGES (INCLUDING, BUT NOT LIMITED TO, PROCUREMENT OF SUBSTITUTE GOODS OR SERVICES; LOSS OF USE, DATA, OR PROFITS; OR BUSINESS INTERRUPTION) HOWEVER CAUSED AND ON ANY THEORY OF LIABILITY, WHETHER IN CONTRACT, STRICT LIABILITY, OR TORT (INCLUDING NEGLIGENCE OR OTHERWISE) ARISING IN ANY WAY OUT OF THE USE OF THIS SOFT-WARE, EVEN IF ADVISED OF THE POSSIBILITY OF SUCH DAMAGE.
OpenEXR/cvs-03-03-2008
File format support Copyright © 2002, Industrial Light & Magic, a division of Lucas Digital Ltd. LLC All rights reserved.
Redistribution and use in source and binary forms, with or without modification, are permitted provided that the following conditions are met:
• Redistributions of source code must retain the above copyright notice, this list of conditions and the following disclaimer.
• Redistributions in binary form must reproduce the above copyright notice, this list of conditions and the following disclaimer in the documentation and/or other materials provided with the distribution.
• Neither the name of Industrial Light & Magic nor the names of its contributors may be used to endorse or promote products derived from this software without specific prior written permission.
THIS SOFTWARE IS PROVIDED BY THE COPYRIGHT HOLDERS AND CONTRIBUTORS “AS IS” AND ANY EXPRESS OR IMPLIED WARRANTIES, INCLUDING, BUT NOT LIMITED TO, THE IMPLIED WARRANTIES OF MERCHANTABILITY AND FITNESS FOR A PARTIC-ULAR PURPOSE ARE DISCLAIMED. IN NO EVENT SHALL THE COPYRIGHT OWNER OR CONTRIBUTORS BE LIABLE FOR ANY DIRECT, INDIRECT, INCIDENTAL, SPECIAL, EXEMPLARY, OR CONSEQUENTIAL DAMAGES (INCLUDING, BUT NOT LIMITED TO, PROCUREMENT OF SUBSTITUTE GOODS OR SERVICES; LOSS OF USE, DATA, OR PROFITS; OR BUSINESS INTERRUPTION) HOWEVER CAUSED AND ON ANY THEORY OF LIABILITY, WHETHER IN CONTRACT, STRICT LIABILITY, OR TORT (INCLUDING NEGLIGENCE OR OTHERWISE) ARISING IN ANY WAY OUT OF THE USE OF THIS SOFT-WARE, EVEN IF ADVISED OF THE POSSIBILITY OF SUCH DAMAGE.
Library Description Licence
Hiero and HieroPlayer 1.6v1The Foundry

APPENDIX C 196Third Party Licences
OpenImageIO/r1719
File format support Copyright © 2008 Larry Gritz and the other authors and contributors. All Rights Reserved.
Redistribution and use in source and binary forms, with or without modification, are permitted provided that the following conditions are met:
• Redistributions of source code must retain the above copyright notice, this list of conditions and the following disclaimer.
• Redistributions in binary form must reproduce the above copyright notice, this list of conditions and the following disclaimer in the documentation and/or other materials provided with the distribution.
• Neither the name of the software's owners nor the names of its contributors may be used to endorse or promote products derived from this software without spe-cific prior written permission.
THIS SOFTWARE IS PROVIDED BY THE COPYRIGHT HOLDERS AND CONTRIBUTORS "AS IS" AND ANY EXPRESS OR IMPLIED WARRANTIES, INCLUDING, BUT NOT LIMITED TO, THE IMPLIED WARRANTIES OF MERCHANTABILITY AND FITNESS FOR A PARTIC-ULAR PURPOSE ARE DISCLAIMED. IN NO EVENT SHALL THE COPYRIGHT OWNER OR CONTRIBUTORS BE LIABLE FOR ANY DIRECT, INDIRECT, INCIDENTAL, SPECIAL, EXEMPLARY, OR CONSEQUENTIAL DAMAGES (INCLUDING, BUT NOT LIMITED TO, PROCUREMENT OF SUBSTITUTE GOODS OR SERVICES; LOSS OF USE, DATA, OR PROFITS; OR BUSINESS INTERRUPTION) HOWEVER CAUSED AND ON ANY THEORY OF LIABILITY, WHETHER IN CONTRACT, STRICT LIABILITY, OR TORT (INCLUDING NEGLIGENCE OR OTHERWISE) ARISING IN ANY WAY OUT OF THE USE OF THIS SOFT-WARE, EVEN IF ADVISED OF THE POSSIBILITY OF SUCH DAMAGE.
Library Description Licence
Hiero and HieroPlayer 1.6v1The Foundry

APPENDIX C 197Third Party Licences
OpenSSL/1.0.0a A toolkit implementing the Secure Sockets Layer (SSL v2/v3) and Transport Layer Secu-rity (TLS v1) protocols as well as a full-strength general pur-pose cryptography library
The OpenSSL toolkit stays under a dual license, i.e. both the conditions of the OpenSSL License and the original SSLeay license apply to the toolkit. See below for the actual license texts. Actually both licenses are BSD-style Open Source licenses. In case of any license issues related to OpenSSL please contact:
OpenSSL License
Copyright © 1998-2008 The OpenSSL Project. All rights reserved.
Redistribution and use in source and binary forms, with or without modification, are permitted provided that the following conditions are met:
1. Redistributions of source code must retain the above copyright notice, this list of conditions and the following disclaimer.
2. Redistributions in binary form must reproduce the above copyright notice, this list of conditions and the following disclaimer in the documentation and/or other materi-also provided with the distribution.
3. All advertising materials mentioning features or use of this software must display the following acknowledgment:
"This product includes software developed by the OpenSSL Project for use in the OpenSSL Toolkit. (http://www.openssl.org/)"
4. The names "OpenSSL Toolkit" and "OpenSSL Project" must not be used to endorse or promote products derived from this software without prior written permission. For written permission, please contact [email protected].
5. Products derived from this software may not be called "OpenSSL" nor may "OpenSSL" appear in their names without prior written permission of the OpenSSL Project.
6. Redistributions of any form whatsoever must retain the following acknowledg-ment:
"This product includes software developed by the OpenSSL Project for use in the OpenSSL Toolkit (http://www.openssl.org/)"
THIS SOFTWARE IS PROVIDED BY THE OpenSSL PROJECT ``AS IS'' AND ANY EXPRESSED OR IMPLIED WARRANTIES, INCLUDING, BUT NOT LIMITED TO, THE IMPLIED WARRANTIES OF MERCHANTABILITY AND FITNESS FOR A PARTICULAR PURPOSE ARE DISCLAIMED. IN NO EVENT SHALL THE OpenSSL PROJECT OR ITS CONTRIBUTORS BE LIABLE FOR ANY DIRECT, INDIRECT, INCIDENTAL, SPECIAL, EXEMPLARY, OR CONSEQUENTIAL DAMAGES (INCLUDING, BUT NOT LIMITED TO, PROCUREMENT OF SUBSTITUTE GOODS OR SERVICES; LOSS OF USE, DATA, OR PROFITS; OR BUSINESS INTERRUPTION) HOWEVER CAUSED AND ON ANY THEORY OF LIABILITY, WHETHER IN CONTRACT, STRICT LIABILITY, OR TORT (INCLUDING NEGLIGENCE OR OTHERWISE) ARISING IN ANY WAY OUT OF THE USE OF THIS SOFT-WARE, EVEN IF ADVISED OF THE POSSIBILITY OF SUCH DAMAGE.
This product includes cryptographic software written by Eric Young ([email protected]). This product includes software written by Tim Hudson
Library Description Licence
Hiero and HieroPlayer 1.6v1The Foundry

APPENDIX C 198Third Party Licences
Original SSLeay License
Copyright © 1995-1998 Eric Young ([email protected])
All rights reserved.
This package is an SSL implementation written by Eric Young ([email protected]).
The implementation was written so as to conform with Netscapes SSL.
This library is free for commercial and non-commercial use as long as the following conditions are aheared to. The following conditions apply to all code found in this distribution, be it the RC4, RSA, lhash, DES, etc., code; not just the SSL code. The SSL documentation included with this distribution is covered by the same copyright terms except that the holder is Tim Hudson ([email protected]).
Copyright remains Eric Young's, and as such any Copyright notices in the code are not to be removed.
If this package is used in a product, Eric Young should be given attribution as the author of the parts of the library used.
This can be in the form of a textual message at program startup or in documentation (online or textual) provided with the package.
Redistribution and use in source and binary forms, with or without modification, are permitted provided that the following conditions are met:
1. Redistributions of source code must retain the copyright notice, this list of condi-tions and the following disclaimer.
2. Redistributions in binary form must reproduce the above copyright notice, this list of conditions and the following disclaimer in the documentation and/or other materi-als provided with the distribution.
3. All advertising materials mentioning features or use of this software must display the following acknowledgement:
"This product includes cryptographic software written by Eric Young ([email protected])"
The word 'cryptographic' can be left out if the routines from the library being used are not cryptographic related.
4. If you include any Windows specific code (or a derivative thereof) from the apps directory (application code) you must include an acknowledgement:
"This product includes software written by Tim Hudson ([email protected])"
THIS SOFTWARE IS PROVIDED BY ERIC YOUNG ``AS IS'' AND ANY EXPRESS OR IMPLIED WARRANTIES, INCLUDING, BUT NOT LIMITED TO, THE IMPLIED WARRAN-TIES OF MERCHANTABILITY AND FITNESS FOR A PARTICULAR PURPOSE ARE DIS-CLAIMED. IN NO EVENT SHALL THE AUTHOR OR CONTRIBUTORS BE LIABLE FOR ANY DIRECT, INDIRECT, INCIDENTAL, SPECIAL, EXEMPLARY, OR CONSEQUENTIAL DAM-AGES (INCLUDING, BUT NOT LIMITED TO, PROCUREMENT OF SUBSTITUTE GOODS OR SERVICES; LOSS OF USE, DATA, OR PROFITS; OR BUSINESS INTERRUPTION) HOWEVER CAUSED AND ON ANY THEORY OF LIABILITY, WHETHER IN CONTRACT, STRICT LIABILITY, OR TORT (INCLUDING NEGLIGENCE OR OTHERWISE) ARISING IN ANY WAY OUT OF THE USE OF THIS SOFTWARE, EVEN IF ADVISED OF THE POSSI-BILITY OF SUCH DAMAGE.
Library Description Licence
Hiero and HieroPlayer 1.6v1The Foundry

APPENDIX C 199Third Party Licences
The licence and distribution terms for any publically available version or derivative of this code cannot be changed. i.e. this code cannot simply be copied and put under another distribution licence [including the GNU Public Licence.]
PortAudio Portable Real-Time Audio Library
Copyright © 1999-2011 Ross Bencina and Phil Burk.
Permission is hereby granted, free of charge, to any person obtaining a copy of this software and associated documentation files (the "Software"), to deal in the Soft-ware without restriction, including without limitation the rights to use, copy, modify, merge, publish, distribute, sublicense, and/or sell copies of the Software, and to per-mit persons to whom the Software is furnished to do so, subject to the following conditions:
• The above copyright notice and this permission notice shall be included in all copies or substantial portions of the Software.
THE SOFTWARE IS PROVIDED "AS IS", WITHOUT WARRANTY OF ANY KIND, EXPRESS OR IMPLIED, INCLUDING BUT NOT LIMITED TO THE WARRANTIES OF MERCHANT-ABILITY, FITNESS FOR A PARTICULAR PURPOSE AND NONINFRINGEMENT.
IN NO EVENT SHALL THE AUTHORS OR COPYRIGHT HOLDERS BE LIABLE FOR ANY CLAIM, DAMAGES OR OTHER LIABILITY, WHETHER IN AN ACTION OF CONTRACT, TORT OR OTHERWISE, ARISING FROM, OUT OF OR IN CONNECTION WITH THE SOFTWARE OR THE USE OR OTHER DEALINGS IN THE SOFTWARE.
The text above constitutes the entire PortAudio license; however, the PortAudio community also makes the following non-binding requests:
• Any person wishing to distribute modifications to the Software is requested to send the modifications to the original developer so that they can be incorporated into the canonical version. It is also requested that these non-binding requests be included along with the license above.
PySide 1.0.9 Python bindings for the Qt cross-platform application and UI framework
Copyright © 2009-2010 Nokia Corporation and/or its subsidiary(-ies).
Contact: PySide team <[email protected]>
This library is free software; you can redistribute it and/or modify it under the terms of the GNU Lesser General Public License as published by the Free Software Founda-tion; either version 2.1 of the License, or (at your option) any later version.
This library is distributed in the hope that it will be useful, but WITHOUT ANY WAR-RANTY; without even the implied warranty of MERCHANTABILITY or FITNESS FOR A PARTICULAR PURPOSE. See the GNU Lesser General Public License for more details.
You should have received a copy of the GNU Lesser General Public License along with this library; if not, write to the Free Software Foundation, Inc., 51 Franklin Street, Fifth Floor, Boston, MA 02110-1301 USA
Library Description Licence
Hiero and HieroPlayer 1.6v1The Foundry

APPENDIX C 200Third Party Licences
PyString C++ functions match-ing the interface and behavior of Python's string class methods
Copyright © 2008-2010, Sony Pictures Imageworks Inc
All rights reserved.
Redistribution and use in source and binary forms, with or without modification, are permitted provided that the following conditions are met:
• Redistributions of source code must retain the above copyright notice, this list of conditions and the following disclaimer.
• Redistributions in binary form must reproduce the above copyright notice, this list of conditions and the following disclaimer in the documentation and/or other materials provided with the distribution.
• Neither the name of the organization Sony Pictures Imageworks nor the names of its contributors may be used to endorse or promote products derived from this software without specific prior written permission.
THIS SOFTWARE IS PROVIDED BY THE COPYRIGHT HOLDERS AND CONTRIBUTORS "AS IS" AND ANY EXPRESS OR IMPLIED WARRANTIES, INCLUDING, BUT NOT LIMITED TO, THE IMPLIED WARRANTIES OF MERCHANTABILITY AND FITNESS FOR A PARTIC-ULAR PURPOSE ARE DISCLAIMED. IN NO EVENT SHALL THE COPYRIGHT OWNER OR CONTRIBUTORS BE LIABLE FOR ANY DIRECT, INDIRECT, INCIDENTAL, SPECIAL, EXEMPLARY, OR CONSEQUENTIAL DAMAGES (INCLUDING, BUT NOT LIMITED TO, PROCUREMENT OF SUBSTITUTE GOODS OR SERVICES; LOSS OF USE, DATA, OR PROFITS; OR BUSINESS INTERRUPTION) HOWEVER CAUSED AND ON ANY THEORY OF LIABILITY, WHETHER IN CONTRACT, STRICT LIABILITY, OR TORT (INCLUDING NEGLIGENCE OR OTHERWISE) ARISING IN ANY WAY OUT OF THE USE OF THIS SOFT-WARE, EVEN IF ADVISED OF THE POSSIBILITY OF SUCH DAMAGE.
Python/2.6.5 Source code language Copyright © 2001, 2002, 2003, 2004 Python Software Foundation; All Rights Reserved.
Qt/4.7.2 Application and UI framework
The Qt GUI Toolkit is Copyright © 2010 Nokia Corporation and/or its subsidiary(-ies).
Contact: Nokia Corporation ([email protected])
Qt is available under the GNU Lesser General Public License.
To see the GNU Lesser General Public License, go to www.gnu.org/licenses/.
QuaZip/0.3 Qt ZIP wrapper Copyright © 2005 Sergey A. Tachenov
This program is free software; you can redistribute it and/or modify it under the terms of the GNU General Public License as published by the Free Software Founda-tion; either version 2 of the License, or (at your option) any later version.
This program is distributed in the hope that it will be useful, but WITHOUT ANY WARRANTY; without even the implied warranty of MERCHANTABILITY or FITNESS FOR A PARTICULAR PURPOSE. See the GNU General Public License for more details.
Original ZIP package is copyrighted by Gilles Vollant, see quazip/(un)zip.h files for details.
QuickTime/7.3 QuickTime player Copyright © 1990-2006 by Apple Inc., all rights reserved.
R3D/4.3 Software Development Kit
The R3D SDK and all included materials (including header files, libraries, sample code & documentation) are Copyright © 2008-2011 RED Digital Cinema. All rights reserved. All trademarks are the property of their respective owners.
This software was developed using KAKADU software.
Library Description Licence
Hiero and HieroPlayer 1.6v1The Foundry

APPENDIX C 201Third Party Licences
Skein/1.1 Hashing library Source code author: Doug Whiting, 2008.
This algorithm and source code is released to the public domain.
Copyright © 2003, Dr Brian Gladman, Worcester, UK. All rights reserved.
LICENSE TERMS
The free distribution and use of this software in both source and binary form is allowed (with or without changes) provided that:
1. distributions of this source code include the above copyright notice, this list of conditions and the following disclaimer;
2. distributions in binary form include the above copyright notice, this list of condi-tions and the following disclaimer in the documentation and/or other associated materials;
3. the copyright holder's name is not used to endorse products built using this soft-ware without specific written permission.
ALTERNATIVELY, provided that this notice is retained in full, this product may be distributed under the terms of the GNU General Public License (GPL), in which case the provisions of the GPL apply INSTEAD OF those given above.
DISCLAIMER
This software is provided 'as is' with no explicit or implied warranties in respect of its properties, including, but not limited to, correctness and/or fitness for purpose.
TTB Thread Building Blocks Copyright 2005-2010 Intel Corporation. All Rights Reserved.
This file is part of Threading Building Blocks.
Threading Building Blocks is free software; you can redistribute it and/or modify it under the terms of the GNU General Public License version 2 as published by the Free Software Foundation.
Threading Building Blocks is distributed in the hope that it will be useful, but WITH-OUT ANY WARRANTY; without even the implied warranty of MERCHANTABILITY or FITNESS FOR A PARTICULAR PURPOSE. See the GNU General Public License for more details.
You should have received a copy of the GNU General Public License along with Threading Building Blocks; if not, write to the Free Software Foundation, Inc., 51 Franklin St, Fifth Floor, Boston, MA 02110-1301 USA.
As a special exception, you may use this file as part of a free software library with-out restriction. Specifically, if other files instantiate templates or use macros or inline functions from this file, or you compile this file and link it with other files to produce an executable, this file does not by itself cause the resulting executable to be covered by the GNU General Public License. This exception does not however invalidate any other reasons why the executable file might be covered by the GNU General Public License.
Library Description Licence
Hiero and HieroPlayer 1.6v1The Foundry

APPENDIX C 202Third Party Licences
VXL/1.10.0 Computer vision Copyright © 2000-2003 TargetJr Consortium
GE Corporate Research and Development (GE CRD)
1 Research Circle
Niskayuna, NY 12309
All Rights Reserved
Reproduction rights limited as described below.
Permission to use, copy, modify, distribute, and sell this software and its documen-tation for any purpose is hereby granted without fee, provided that (i) the above copyright notice and this permission notice appear in all copies of the software and related documentation, (ii) the name TargetJr Consortium (represented by GE CRD), may not be used in any advertising or publicity relating to the software without the specific, prior written permission of GE CRD, and (iii) any modifications are clearly marked and summarised in a change history log.
THE SOFTWARE IS PROVIDED “AS IS” AND WITHOUT WARRANTY OF ANY KIND, EXPRESS, IMPLIED OR OTHERWISE, INCLUDING WITHOUT LIMITATION, ANY WAR-RANTY OF MERCHANTABILITY OR FITNESS FOR A PARTICULAR PURPOSE. IN NO EVENT SHALL THE TARGETJR CONSORTIUM BE LIABLE FOR ANY SPECIAL, INCIDEN-TAL, INDIRECT OR CONSEQUENTIAL DAMAGES OF ANY KIND OR ANY DAMAGES WHATSOEVER RESULTING FROM LOSS OF USE, DATA OR PROFITS, WHETHER OR NOT ADVISED OF THE POSSIBILITY OF SUCH DAMAGES, OR ON ANY THEORY OF LIABILITY ARISING OUT OF OR IN CONNECTION WITH THE USE OR PERFORMANCE OF THIS SOFTWARE.
xmlrpcpp/0.7 C++ implementation of the XML-RPC protocol
A full copy of the LGPL license is included in the file COPYING. The source code is Copyright © 2002-2003 by Chris Morley.
This library is free software; you can redistribute it and/or modify it under the terms of the GNU Lesser General Public License as published by the Free Software Founda-tion; either version 2.1 of the License, or (at your option) any later version. This library is distributed in the hope that it will be useful, but WITHOUT ANY WAR-RANTY; without even the implied warranty of MERCHANTABILITY or FITNESS FOR A PARTICULAR PURPOSE. See the GNU Lesser General Public License for more details. You should have received a copy of the GNU Lesser General Public License along with this library; if not, write to the Free Software Foundation, Inc., 59 Temple Place, Suite 330, Boston, MA 02111-1307 USA.
Library Description Licence
Hiero and HieroPlayer 1.6v1The Foundry

APPENDIX C 203Third Party Licences
Zlib/1.2.5 Compression library Copyright © 1995-2010 Jean-loup Gailly and Mark Adler
This software is provided 'as-is', without any express or implied warranty. In no event will the authors be held liable for any damages arising from the use of this software.
Permission is granted to anyone to use this software for any purpose, including commercial applications, and to alter it and redistribute it freely, subject to the fol-lowing restrictions:
1. The origin of this software must not be misrepresented; you must not claim that you wrote the original software. If you use this software in a product, an acknowl-edgment in the product documentation would be appreciated but is not required.
2. Altered source versions must be plainly marked as such, and must not be misrep-resented as being the original software.
3. This notice may not be removed or altered from any source distribution.
Library Description Licence
Hiero and HieroPlayer 1.6v1The Foundry

APPENDIX D
End User License Agreement (EULA)
IMPORTANT: BY INSTALLING THIS SOFTWARE YOU ACKNOWLEDGE THAT YOU HAVE READ THIS AGREEMENT, UNDERSTAND IT AND AGREE TO BE BOUND BY ITS TERMS AND CONDITIONS. IF YOU DO NOT AGREE TO THE TERMS OF THIS AGREEMENT DO NOT INSTALL, COPY OR USE THE SOFTWARE.
This END USER LICENSE AGREEMENT (this "Agreement") is made by and between The Foundry Visionmongers Ltd., a company registered in England and Wales, ("The Foundry"), and you, as either an individual or a single entity ("Licensee").
In consideration of the mutual covenants contained herein and for other good and valuable consideration (the receipt and sufficiency of which is acknowledged by each party hereto) the parties agree as follows:
SECTION 1. GRANT OF LICENSE.
Subject to the limitations of Section 2, The Foundry hereby grants to Licensee a limited, non-transferable and non-exclusive license to install and use a machine readable, object code version of this software program (the "Software") and accompanying user guide and other documentation (collectively, the "Documentation") solely for Licensee's own internal business purposes (collectively, the "License"); provided, however, Licensee's right to install and use the Software and the Documentation is limited to those rights expressly set out in this Agreement.
SECTION 2. RESTRICTIONS ON USE.
Licensee is authorized to use the Software in machine readable, object code form only, and Licensee shall not: (a) assign, sublicense, sell, distribute, transfer, pledge, lease, rent, share or export the Software, the Documentation or Licensee's rights hereunder; (b) alter or circumvent the copy protection mechanisms in the Software or reverse engineer, decompile, disassemble or otherwise attempt to discover the source code of the Software; (c) modify, adapt, translate or create derivative works based on the Software or Documentation; (d) use, or allow the use of, the Software or Documentation on any project other than a project produced by Licensee (an "Authorized Project"); (e) allow or permit anyone (other than Licensee and Licensee's authorized employees to the extent they are working on an Authorized Project) to use or have access to the Software or Documentation; (f) copy or install the Software or Documentation other than as expressly provided for herein; or (g) take any action, or fail to take action, that could adversely affect the trademarks, service marks, patents, trade secrets, copyrights or other intellectual property rights of The Foundry or any third party with intellectual property rights in the Software (each, a "Third Party Licensor"). Furthermore, for purposes of this Section 2, the term "Software" shall include any derivatives of the Software.
Licensee shall install and use only a single copy of the Software on one computer, unless the Software is

APPENDIX D 205End User License Agreement (EULA)
installed in a "floating license" environment, in which case Licensee may install the Software on more than one computer; provided, however, Licensee shall not at any one time use more copies of the Software than the total number of valid Software licenses purchased by Licensee.
Please note that in order to guard against unlicensed use of the Software a licence key is required to access and enable the Software. The issuing of replacement or substituted licence keys if the Software is moved from one computer to another is subject to and strictly in accordance with The Foundry’s Licence Transfer Policy, which is available on The Foundry’s website and which requires a fee to be paid in certain circumstances. The Foundry may from time to time and at its sole discretion vary the terms and conditions of the Licence Transfer Policy.
Furthermore, if the Software can be licensed on an "interactive" or "non-interactive" basis, licensee shall be authorized to use a non-interactive version of the Software for rendering purposes only (i.e., on a CPU, without a user, in a non-interactive capacity) and shall not use such Software on workstations or otherwise in a user-interactive capacity. Licensee shall be authorized to use an interactive version of the Software for both interactive and non-interactive rendering purposes, if available.
If Licensee has purchased the Software on the discount terms offered by The Foundry’s Educational Policy published on its website (“the Educational Policy”), Licensee warrants and represents to The Foundry as a condition of this Agreement that: (a) (if Licensee is an individual) he or she is a part-time or full-time student at the time of purchase and will not use the Software for commercial, professional or for-profit purposes; (b) (if the Licensee is not an individual) it is an organisation that will use it only for the purpose of training and instruction, and for no other purpose (c) Licensee will at all times comply with the Educational Policy (as such policy may be amended from time to time).
Finally, if the Software is a "Personal Learning Edition," (“PLE”) Licensee may use it only for the purpose of personal or internal training and instruction, and for no other purpose. PLE versions of the Software may not be used for commercial, professional or for-profit purposes including, for the avoidance of doubt, the purpose of providing training or instruction to third parties.
SECTION 3. SOURCE CODE.
Notwithstanding that Section 1 defines “Software” as an object code version and that Section 2 provides that Licensee may use the Software in object code form only, The Foundry may also agree to license to Licensee (including by way of upgrades, updates or enhancements) source code or elements of the source code of the Software the intellectual property rights in which belong either to The Foundry or to a Third Party Licensor (“Source Code”). If The Foundry does so Licensee shall be licensed to use the Source Code as Software on the terms of this Agreement and: (a) notwithstanding Section 2 (c) Licensee may use the Source Code at its own risk in any reasonable way for the limited purpose of enhancing its use of the Software solely for its own internal business purposes and in all respects in accordance with this Agreement; (b) Licensee shall in respect of the Source Code comply strictly with all other restrictions applying to its use of the Software under this Agreement as well as any other restriction or instruction that is communicated to it by The Foundry at any time during this Agreement (whether imposed or requested by The Foundry or by any Third Party Licensor); (c) notwithstanding any other term of this Agreement The Foundry gives no warranty whatsoever in respect of the Source Code, which is licensed on
Hiero and HieroPlayer 1.6v1The Foundry

APPENDIX D 206End User License Agreement (EULA)
an “as is” basis, or in respect of any modification of the Source Code made by Licensee (“Modification”); (d) notwithstanding any other term of this Agreement The Foundry shall have no obligation to provide support, maintenance, upgrades or updates of or in respect of the Source Code or of any Modification; and (e) Licensee shall indemnify The Foundry against all liabilities and expenses (including reasonable legal costs) incurred by The Foundry in relation to any claim asserting that any Modification infringes the intellectual property rights of any third party.
SECTION 4. BACK-UP COPY.
Notwithstanding Section 2, Licensee may store one copy of the Software and Documentation off-line and off-site in a secured location owned or leased by Licensee in order to provide a back-up in the event of destruction by fire, flood, acts of war, acts of nature, vandalism or other incident. In no event may Licensee use the back-up copy of the Software or Documentation to circumvent the usage or other limitations set forth in this Agreement.
SECTION 5. OWNERSHIP.
Licensee acknowledges that the Software (including, for the avoidance of doubt, any Source Code that is licensed to Licensee) and Documentation and all intellectual property rights and other proprietary rights relating thereto are and shall remain the sole property of The Foundry and the Third Party Licensors. Licensee shall not remove, or allow the removal of, any copyright or other proprietary rights notice included in and on the Software or Documentation or take any other action that could adversely affect the property rights of The Foundry or any Third Party Licensor. To the extent that Licensee is authorized to make copies of the Software or Documentation under this Agreement, Licensee shall reproduce in and on all such copies any copyright and/or other proprietary rights notices provided in and on the materials supplied by The Foundry hereunder. Nothing in this Agreement shall be deemed to give Licensee any rights in the trademarks, service marks, patents, trade secrets, confidential information, copyrights or other intellectual property rights of The Foundry or any Third Party Licensor, and Licensee shall be strictly prohibited from using the name, trademarks or service marks of The Foundry or any Third Party Licensor in Licensee's promotion or publicity without The Foundry's express written approval.
SECTION 6. LICENSE FEE.
Licensee understands that the benefits granted to Licensee hereunder are contingent upon Licensee's payment in full of the license fee payable in connection herewith (the "License Fee").
SECTION 7. UPGRADES/ENHANCEMENTS.
The Licensee's access to support, upgrades and updates is subject to the terms and conditions of the "Annual Upgrade and Support Programme” available on The Foundry's website. The Foundry may from time to time and at its sole discretion vary the terms and conditions of the Annual Upgrade and Support Programme.
Hiero and HieroPlayer 1.6v1The Foundry

APPENDIX D 207End User License Agreement (EULA)
SECTION 8. TAXES AND DUTIES.
Licensee agrees to pay, and indemnify The Foundry from claims for, any local, state or national tax (exclusive of taxes based on net income), duty, tariff or other impost related to or arising from the transaction contemplated by this Agreement.
SECTION 9. LIMITED WARRANTY.
The Foundry warrants that, for a period of ninety (90) days after delivery of the Software: (a) the machine readable electronic files constituting the Software and Documentation shall be free from errors that may arise from the electronic file transfer from The Foundry and/or its authorized reseller to Licensee; and (b) to the best of The Foundry's knowledge, Licensee's use of the Software in accordance with the Documentation will not, in and of itself, infringe any third party's copyright, patent or other intellectual property rights. Except as warranted, the Software and Documentation is being provided "as is." THE FOREGOING LIMITED WARRANTY IS IN LIEU OF ALL OTHER WARRANTIES OR CONDITIONS, EXPRESS OR IMPLIED, AND The Foundry DISCLAIMS ANY AND ALL IMPLIED WARRANTIES OR CONDITIONS, INCLUDING, WITHOUT LIMITATION, ANY IMPLIED WARRANTY OF TITLE, NON-INFRINGEMENT, MERCHANTABILITY OR FITNESS FOR A PARTICULAR PURPOSE, REGARDLESS OF WHETHER The Foundry KNOWS OR HAS REASON TO KNOW OF LICENSEE'S PARTICULAR NEEDS. The Foundry does not warrant that the Software or Documentation will meet Licensee's requirements or that Licensee's use of the Software will be uninterrupted or error free. No employee or agent of The Foundry is authorized to modify this limited warranty, nor to make additional warranties. No action for any breach of the above limited warranty may be commenced more than one (1) year after Licensee's initial receipt of the Software. To the extent any implied warranties may not be disclaimed under applicable law, then ANY IMPLIED WARRANTIES ARE LIMITED IN DURATION TO NINETY (90) DAYS AFTER DELIVERY OF THE SOFTWARE TO LICENSEE.
SECTION 10. LIMITED REMEDY.
The exclusive remedy available to the Licensee in the event of a breach of the foregoing limited warranty, TO THE EXCLUSION OF ALL OTHER REMEDIES, is for Licensee to destroy all copies of the Software, send The Foundry a written certification of such destruction and, upon The Foundry's receipt of such certification, The Foundry will make a replacement copy of the Software available to Licensee.
SECTION 11. INDEMNIFICATION.
Licensee agrees to indemnify, hold harmless and defend The Foundry, the Third Party Licensors and The Foundry's and each Third Party Licensor’s respective affiliates, officers, directors, shareholders, employees, authorized resellers, agents and other representatives (collectively, the "Released Parties") from all claims, defense costs (including, but not limited to, attorneys' fees), judgments, settlements and other expenses arising from or connected with the operation of Licensee's business or Licensee's possession or use of the Software or Documentation.
SECTION 12. LIMITED LIABILITY.
In no event shall the Released Parties' cumulative liability to Licensee or any other party for any loss or damages resulting from any claims, demands or actions arising out of or relating to this Agreement (or the Software or Documentation contemplated herein) exceed the License Fee paid to The Foundry or its
Hiero and HieroPlayer 1.6v1The Foundry

APPENDIX D 208End User License Agreement (EULA)
authorized reseller for use of the Software. Furthermore, IN NO EVENT SHALL THE RELEASED PARTIES BE LIABLE TO LICENSEE UNDER ANY THEORY FOR ANY INDIRECT, SPECIAL, INCIDENTAL, PUNITIVE, EXEMPLARY OR CONSEQUENTIAL DAMAGES (INCLUDING DAMAGES FOR LOSS OF BUSINESS OR LOSS OF PROFITS) OR THE COST OF PROCUREMENT OF SUBSTITUTE GOODS OR SERVICES, REGARDLESS OF WHETHER THE RELEASED PARTIES KNOW OR HAVE REASON TO KNOW OF THE POSSIBILITY OF SUCH DAMAGES AND REGARDLESS OF WHETHER ANY REMEDY SET FORTH HEREIN FAILS OF ITS ESSENTIAL PURPOSE. No action arising out of or related to this Agreement, regardless of form, may be brought by Licensee more than one (1) year after Licensee's initial receipt of the Software; provided, however, to the extent such one (1) year limit may not be valid under applicable law, then such period shall be limited to the shortest period allowed by law.
SECTION 13. TERM; TERMINATION.
This Agreement is effective upon Licensee's acceptance of the terms hereof and Licensee's payment of the License Fee, and the Agreement will remain in effect until termination. If Licensee breaches this Agreement, The Foundry may terminate the License granted hereunder by notice to Licensee. In the event the License is terminated, Licensee will either return to The Foundry all copies of the Software and Documentation in Licensee's possession or, if The Foundry directs in writing, destroy all such copies. In the later case, if requested by The Foundry, Licensee shall provide The Foundry with a certificate signed by an officer of Licensee confirming that the foregoing destruction has been completed.
SECTION 14. CONFIDENTIALITY.
Licensee agrees that the Software (including, for the avoidance of doubt, any Source Code that is licensed to Licensee) and Documentation are proprietary and confidential information of The Foundry or, as the case may be, the Third Party Licensors, and that all such information and any communications relating thereto (collectively, "Confidential Information") are confidential and a fundamental and important trade secret of The Foundry or the Third Party Licensors. Licensee shall disclose Confidential Information only to Licensee's employees who are working on an Authorized Project and have a "need-to-know" of such Confidential Information, and shall advise any recipients of Confidential Information that it is to be used only as authorized in this Agreement. Licensee shall not disclose Confidential Information or otherwise make any Confidential Information available to any other of the Licensee's employees or to any third parties without the express written consent of The Foundry. Licensee agrees to segregate, to the extent it can be reasonably done, the Confidential Information from the confidential information and materials of others in order to prevent commingling. Licensee shall take reasonable security measures, which such measures shall be at least as great as the measures Licensee uses to keep Licensee's own confidential information secure (but in any case using no less than a reasonable degree of care), to hold the Software, Documentation and any other Confidential Information in strict confidence and safe custody. The Foundry may request, in which case Licensee agrees to comply with, certain reasonable security measures as part of the use of the Software and Documentation. Licensee acknowledges that monetary damages may not be a sufficient remedy for unauthorized disclosure of Confidential Information, and that The Foundry shall be entitled, without waiving any other rights or remedies, to such injunctive or equitable relief as may be deemed proper by a court of competent jurisdiction.
Hiero and HieroPlayer 1.6v1The Foundry

APPENDIX D 209End User License Agreement (EULA)
SECTION 15. INSPECTION.
Licensee shall advise The Foundry on demand of all locations where the Software or Documentation is used or stored. Licensee shall permit The Foundry or its authorized agents to inspect all such locations during normal business hours and on reasonable advance notice.
SECTION 16. NONSOLICITATION.
Licensee agrees not to solicit for employment or retention any of The Foundry's current or future employees who were or are involved in the development and/or creation of the Software.
SECTION 17. U.S. GOVERNMENT LICENSE RIGHTS.
The Software, Documentation and/or data delivered hereunder are subject to the terms of this Agreement and in no event shall the U.S. Government acquire greater than RESTRICTED/LIMITED RIGHTS. At a minimum, use, duplication or disclosure by the U.S. Government is subject to the applicable restrictions of: (i) FAR §52.227-14 ALTS I, II and III (June 1987); (ii) FAR §52.227-19 (June 1987); (iii) FAR §12.211 and 12.212; and/or (iv) DFARS §227.7202-1(a) and DFARS §227.7202-3.
The Software is the subject of the following notices:
• Copyright © 2013 The Foundry Visionmongers, Ltd.. All Rights Reserved.
• Unpublished-rights reserved under the Copyright Laws of the United Kingdom.
SECTION 18. SURVIVAL.
Sections 2, 3, 5, 6, 8, 9, 10, 11, 12, 13, 14, 15, 16, 17, 18, 19 and 20 shall survive any termination or expiration of this Agreement.
SECTION 19. IMPORT/EXPORT CONTROLS.
To the extent that any Software made available hereunder is subject to restrictions upon export and/or reexport from the United States, Licensee agrees to comply with, and not act or fail to act in any way that would violate, the applicable international, national, state, regional and local laws and regulations, including, without limitation, the United States Foreign Corrupt Practices Act, the Export Administration Act and the Export Administration Regulations, as amended or otherwise modified from time to time, and neither The Foundry nor Licensee shall be required under this Agreement to act or fail to act in any way which it believes in good faith will violate any such laws or regulations.
SECTION 20. MISCELLANEOUS.
This Agreement is the exclusive agreement between the parties concerning the subject matter hereof and supersedes any and all prior oral or written agreements, negotiations, or other dealings between the parties concerning such subject. This Agreement may be modified only by a written instrument signed by both parties. If any action is brought by either party to this Agreement against the other party regarding the subject matter hereof, the prevailing party shall be entitled to recover, in addition to any other relief granted, reasonable attorneys' fees and expenses of litigation. Should any term of this Agreement be declared void or unenforceable by any court of competent jurisdiction, such declaration shall have no
Hiero and HieroPlayer 1.6v1The Foundry

APPENDIX D 210End User License Agreement (EULA)
effect on the remaining terms of this Agreement. The failure of either party to enforce any rights granted hereunder or to take action against the other party in the event of any breach hereunder shall not be deemed a waiver by that party as to subsequent enforcement of rights or subsequent actions in the event of future breaches. This Agreement shall be governed by, and construed in accordance with English Law.
The Foundry and Licensee intend that each Third Party Licensor may enforce against Licensee under the Contracts (Rights of Third Parties) Act 1999 ("the Act") any obligation owed by Licensee to The Foundry under this Agreement that is capable of application to any proprietary or other right of that Third Party Licensor in or in relation to the Software. The Foundry and Licensee reserve the right under section 2(3)(a) of the Act to rescind, terminate or vary this Agreement without the consent of any Third Party Licensor.
Copyright © 2013 The Foundry Visionmongers Ltd. All Rights Reserved. Do not duplicate.
Hiero and HieroPlayer 1.6v1The Foundry