Helix Versioning Engine User Guide - 2016 - Perforce … · Helix Versioning Engine User Guide ix...
168
Helix Versioning Engine User Guide 2016.1 May 2016
Transcript of Helix Versioning Engine User Guide - 2016 - Perforce … · Helix Versioning Engine User Guide ix...

Helix Versioning Engine UserGuide
2016.1May 2016

Helix Versioning Engine User Guide2016.1
May 2016
Copyright © 2015-2016 Perforce Software.
All rights reserved.
Perforce software and documentation is available from http://www.perforce.com/. You can download and use Perforce programs, but youcan not sell or redistribute them. You can download, print, copy, edit, and redistribute the documentation, but you can not sell it, or sell anydocumentation derived from it. You can not modify or attempt to reverse engineer the programs.
This product is subject to U.S. export control laws and regulations including, but not limited to, the U.S. Export Administration Regulations,the International Traffic in Arms Regulation requirements, and all applicable end-use, end-user and destination restrictions. Licensee shall notpermit, directly or indirectly, use of any Perforce technology in or by any U.S. embargoed country or otherwise in violation of any U.S. exportcontrol laws and regulations.
Perforce programs and documents are available from our Web site as is. No warranty or support is provided. Warranties and support, alongwith higher capacity servers, are sold by Perforce Software.
Perforce Software assumes no responsibility or liability for any errors or inaccuracies that might appear in this book. By downloading andusing our programs and documents you agree to these terms.
Perforce and Inter-File Branching are trademarks of Perforce Software.
All other brands or product names are trademarks or registered trademarks of their respective companies or organizations.
Any additional software included within Perforce software is listed in License Statements on page 155.

Helix Versioning Engine User Guide iii
Table of Contents
Preface .................................................................................................................................. ix
What’s new in this guide for 2016.1 ..................................................................................... ixHelix documentation ........................................................................................................... ixSyntax conventions .............................................................................................................. xPlease give us feedback ....................................................................................................... xi
Chapter 1 Installation ....................................................................................................... 1
On Unix and OS X ............................................................................................................... 1On Windows ....................................................................................................................... 1
Chapter 2 Overview .......................................................................................................... 3
Introduction ......................................................................................................................... 3File management .................................................................................................................. 3Changelists .......................................................................................................................... 3Parallel development ............................................................................................................ 4
Shared files .................................................................................................................. 4Branching: branches versus streams .............................................................................. 4
Streams: branches with additional intelligence ....................................................... 4Security ............................................................................................................................... 5Organizing your work: jobs and labels .................................................................................. 5Scripting and reporting ........................................................................................................ 5
Chapter 3 Tutorial ............................................................................................................. 7
Read me first ....................................................................................................................... 7Make binaries executable, on UNIX and OS X ....................................................................... 7Create a working directory ................................................................................................... 7Start up the shared server .................................................................................................... 7Start up the command line client .......................................................................................... 8Verify the connection to the server ........................................................................................ 9Create a stream depot ......................................................................................................... 10Create your first stream ...................................................................................................... 11Define a client workspace and bind it to the stream .............................................................. 13Populate a mainline stream ................................................................................................. 15Edit files ............................................................................................................................ 18Delete files ......................................................................................................................... 19Sync files from the depot to your client workspace ............................................................... 21Populate child streams ........................................................................................................ 21
Helix Versioning Engine User Guide
iv Helix Versioning Engine User Guide
Chapter 4 Basic tasks ...................................................................................................... 23
Overview of initial tasks ..................................................................................................... 23Overview of recurring tasks ................................................................................................ 23Initial tasks ........................................................................................................................ 24
Create a working directory ......................................................................................... 24Log in to the shared server ......................................................................................... 25Start up a shared server .............................................................................................. 25Start up the command line client and verify the connection to the server ........................ 26Create a stream depot ................................................................................................. 27Create a mainline stream ............................................................................................ 28Define a workspace and bind it to the stream .............................................................. 29Populate the mainline stream ...................................................................................... 29
Add files ............................................................................................................ 30Branch from other depots ................................................................................... 30
Recurring file-level tasks ..................................................................................................... 31Sync files ................................................................................................................... 32Add files .................................................................................................................... 33Add files outside of Helix and then use p4 reconcile -k ................................................. 34Edit files and check in changes ................................................................................... 34Delete files ................................................................................................................. 35Revert files, to discard changes ................................................................................... 35Rename and move files ............................................................................................... 36Diff files ..................................................................................................................... 36Resolve conflicts ......................................................................................................... 37
Other recurring tasks .......................................................................................................... 37Changelist-related tasks .............................................................................................. 37
Submit a pending changelist ............................................................................... 38Create numbered changelists ............................................................................... 38Submit a numbered changelist ............................................................................ 39Shelve changelists ............................................................................................... 40Display information about changelists ................................................................. 41Move files between changelists ........................................................................... 42Delete changelists ............................................................................................... 42
Configure client behavior ............................................................................................ 42Configure stream behavior .......................................................................................... 43Branch and populate child streams .............................................................................. 43Propagate changes ...................................................................................................... 43
Merge changes from a more stable stream ........................................................... 43Copy changes to a more stable stream ................................................................. 44Compare changes between streams ..................................................................... 44Propagate change across the stream hierarchy ...................................................... 44
Chapter 5 Configure clients ............................................................................................ 45
Configure the client process ................................................................................................ 45Using the command line ............................................................................................. 45

Helix Versioning Engine User Guide
Helix Versioning Engine User Guide v
Using config files ........................................................................................................ 46Using environment variables ....................................................................................... 47Using the Windows registry or OS X system settings .................................................... 48Configure for IPv6 networks ....................................................................................... 48Configure for Unicode ................................................................................................ 48
Setting P4CHARSET on Windows ....................................................................... 49Setting P4CHARSET on UNIX ............................................................................. 49
Configure a client workspace .............................................................................................. 50How Helix manages files in a workspace ..................................................................... 50Define a client workspace ........................................................................................... 50Configure workspace options ...................................................................................... 52Configure submit options ........................................................................................... 53View a stream as of a specific changelist ...................................................................... 53Configure line-ending settings .................................................................................... 54Change the location and/or layout of your workspace .................................................. 55Manage workspaces ................................................................................................... 55Delete a client workspace ........................................................................................... 56
Configure workspace views ................................................................................................ 57Specify mappings ....................................................................................................... 58Use wildcards in workspace views .............................................................................. 58Map part of the depot ................................................................................................ 59Map files to different locations in the workspace .......................................................... 59Map files to different filenames ................................................................................... 59Rearrange parts of filenames ....................................................................................... 60Exclude files and directories ....................................................................................... 60Map a single depot path to multiple locations in a workspace ....................................... 60Restrict access by changelist ........................................................................................ 61Avoid mapping conflicts ............................................................................................. 61Automatically prune empty directories from a workspace ............................................. 62Map different depot locations to the same workspace location ....................................... 62Deal with spaces in filenames and directories .............................................................. 62Map Windows workspaces across multiple drives ........................................................ 63Use the same workspace from different computers ....................................................... 63
Chapter 6 Streams .......................................................................................................... 65
Configure a stream ............................................................................................................. 65More on options ......................................................................................................... 67
Stream types ...................................................................................................................... 68Task streams .............................................................................................................. 69Virtual streams ........................................................................................................... 70
Stream paths ...................................................................................................................... 71Stream paths and inheritance between parents and children .......................................... 72
Update streams .................................................................................................................. 75Make changes to a stream spec and associated files atomically ...................................... 76
Chapter 7 Resolve conflicts ............................................................................................. 77
Helix Versioning Engine User Guide
vi Helix Versioning Engine User Guide
How conflicts occur ............................................................................................................ 77How to resolve conflicts ..................................................................................................... 77Your, theirs, base, and merge files ....................................................................................... 78Options for resolving conflicts ............................................................................................ 78
Accepting yours, theirs, or merge ................................................................................ 79Editing the merge file ................................................................................................. 80Merging to resolve conflicts ........................................................................................ 80
Full list of resolve options ................................................................................................... 80Resolving branched files, deletions, moves and filetype changes ............................................ 82Resolve command-line options ............................................................................................ 84Resolve reporting commands .............................................................................................. 85
Chapter 8 Codeline management ................................................................................... 87
Organizing the depot .......................................................................................................... 87Branching streams .............................................................................................................. 88
A shortcut: p4 populate .............................................................................................. 88Branching streams .............................................................................................................. 89
When to branch .......................................................................................................... 89Branching streams ...................................................................................................... 89
Using branch specifications ................................................................................. 90Merge changes ................................................................................................................... 90
Merging between unrelated files ................................................................................. 91Merging specific file revisions ..................................................................................... 92Re-merging and re-resolving files ................................................................................ 92Reporting branches and merges .................................................................................. 92
Chapter 9 Less common tasks ........................................................................................ 93
Work offline ....................................................................................................................... 93Ignoring groups of files when adding .......................................................................... 93
Reporting ignored files ....................................................................................... 94Locking files ....................................................................................................................... 95
Preventing multiple resolves by locking files ................................................................ 95Preventing multiple checkouts .................................................................................... 95
Chapter 10 Security ......................................................................................................... 97
SSL-encrypted connections .................................................................................................. 97Connecting to services that require plaintext connections .............................................. 98
Passwords .......................................................................................................................... 98Setting passwords ....................................................................................................... 99Using your password ................................................................................................. 99
Connection time limits ........................................................................................................ 99Logging in and logging out ....................................................................................... 100Working on multiple computers ................................................................................ 100
Helix Versioning Engine User Guide
Helix Versioning Engine User Guide vii
Chapter 11 Labels ......................................................................................................... 101
Tagging files with a label .................................................................................................. 101Untagging files ................................................................................................................. 101Previewing tagging results ................................................................................................ 102Listing files tagged by a label ............................................................................................ 102Listing labels that have been applied to files ...................................................................... 102Using a label to specify file revisions ................................................................................. 102Deleting labels .................................................................................................................. 103Creating a label for future use ........................................................................................... 103Restricting files that can be tagged .................................................................................... 104Using static labels to archive workspace configurations ....................................................... 104Using automatic labels as aliases for changelists or other revisions ....................................... 105Preventing inadvertent tagging and untagging of files ........................................................ 106Using labels on edge servers ............................................................................................. 107
Chapter 12 Jobs ............................................................................................................ 109
Creating, editing, and deleting a job .................................................................................. 109Searching jobs ................................................................................................................... 110
Searching job text ..................................................................................................... 110Searching specific fields ............................................................................................ 111Using comparison operators ...................................................................................... 111Searching date fields ................................................................................................. 112
Fixing jobs ........................................................................................................................ 113Linking automatically ............................................................................................... 113Linking manually ..................................................................................................... 113Linking jobs to changelists ........................................................................................ 114
Chapter 13 Scripting and reporting ............................................................................... 115
Common options used in scripting and reporting ............................................................... 115Scripting with Helix forms ................................................................................................ 115File reporting .................................................................................................................... 116
Displaying file status ................................................................................................ 117Displaying file revision history .................................................................................. 118Listing open files ...................................................................................................... 118Displaying file locations ............................................................................................ 119Displaying file contents ............................................................................................. 119Displaying annotations (details about changes to file contents) .................................... 119Monitoring changes to files ....................................................................................... 121
Changelist reporting ......................................................................................................... 121Listing changelists .................................................................................................... 121Listing files and jobs affected by changelists ............................................................... 122
Label reporting ................................................................................................................. 122Branch and integration reporting ....................................................................................... 122

Helix Versioning Engine User Guide
viii Helix Versioning Engine User Guide
Job reporting .................................................................................................................... 123Listing jobs ............................................................................................................... 123Listing jobs fixed by changelists ................................................................................ 123
System configuration reporting .......................................................................................... 124Displaying users ....................................................................................................... 124Displaying workspaces .............................................................................................. 124Listing depots ........................................................................................................... 125
Sample script .................................................................................................................... 125
Glossary ............................................................................................................................. 127
Helix file types .................................................................................................................. 135
File type modifiers ............................................................................................................ 136Specifying how files are stored in Helix ............................................................................. 138Assigning file types for Unicode files ................................................................................. 138
Choosing the file type ............................................................................................... 139Helix file type detection and Unicode ........................................................................ 140
Overriding file types ......................................................................................................... 140Preserving timestamps ...................................................................................................... 140Expanding RCS keywords ................................................................................................. 141
Helix command syntax ...................................................................................................... 143
Command-line syntax ....................................................................................................... 143Specifying filenames on the command line ................................................................. 145Helix wildcards ........................................................................................................ 146Restrictions on filenames and identifiers .................................................................... 147
Spaces in filenames, pathnames, and identifiers .................................................. 147Length limitations ............................................................................................. 147Reserved characters .......................................................................................... 147Filenames containing extended (non-ASCII) characters ........................................ 148
Specifying file revisions ............................................................................................ 149Date and time specifications .............................................................................. 151Revision ranges ................................................................................................ 151
Reporting commands ................................................................................................ 152Using Helix forms ............................................................................................................ 152
License Statements ........................................................................................................... 155
Helix Versioning Engine User Guide ix
PrefaceThis guide tells you how to use the Helix Command Line Client (p4). Unless you’re an experiencedHelix user, we strongly urge you to read the "Basic Concepts" chapter of Introducing Helix beforereading this guide.
Perforce provides many applications that enable you to manage your files, including the commandline client, GUIs — such as P4V — and plug-ins. The command line client enables you to script and toperform administrative tasks that are not supported by Helix GUIs.
Note If you’re new to Helix software, start with the Chapter 3, “Tutorial” on page 7,and then read Chapter 2, “Overview” on page 3.
What’s new in this guide for 2016.1This section provides a list of changes to this guide for the Helix Versioning Engine 2016.1 release.For a list of all new functionality and major bug fixes in Helix Versioning Engine 2016.1, see the HelixVersioning Engine 2016.1 Release Notes.
Command line aliasing nowavailable
See Helix command syntax on page 143.
The ChangeView field inthe client spec may now bespecified in client syntax
See “Restrict access by changelist” on page 61.
Map a single depot path tomultiple locations in a clientworkspace
See “Map a single depot path to multiple locations in aworkspace” on page 60. This feature is currently only availablefor users of classic Helix branches; one-to-many mapping is notavailable for streams.
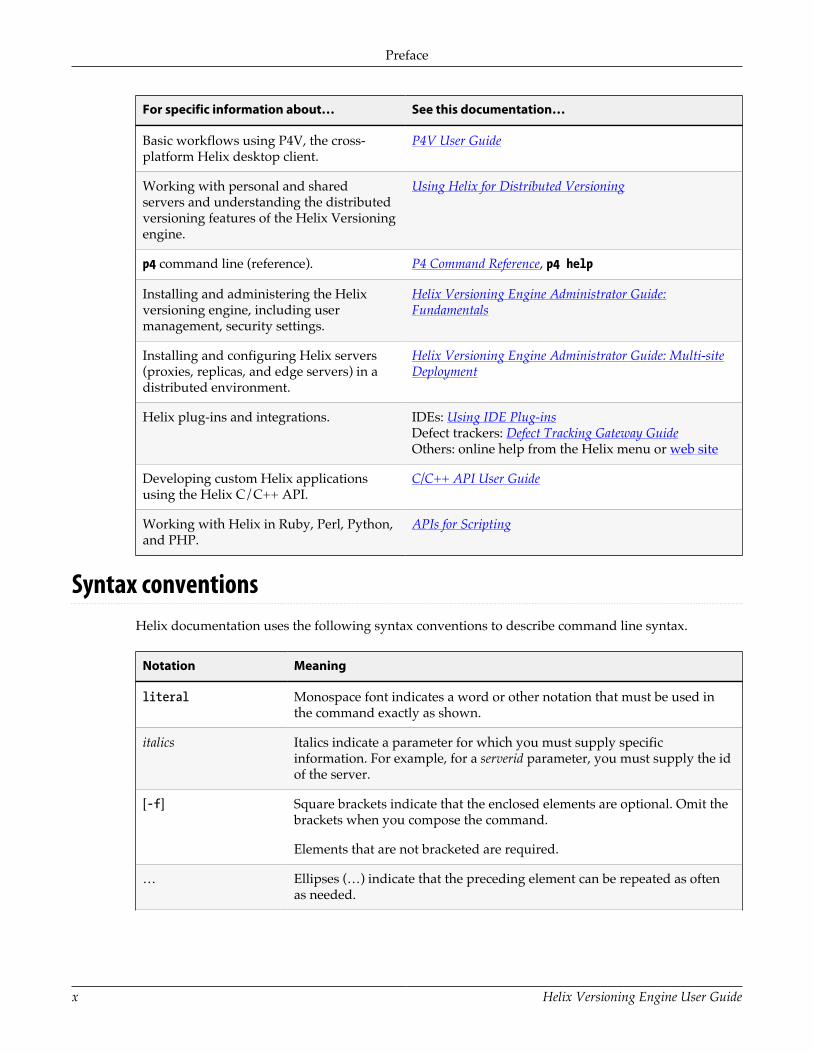
Helix documentationThe following table lists and describes key documents for Helix users, developers, and administrators.For complete information see the following:
http://www.perforce.com/documentation
For specific information about… See this documentation…
Introduction to version control conceptsand workflows; Helix architecture, andrelated products.
Introducing Helix
Using the command-line interface toperform software version managementand codeline management; working withHelix streams; jobs, reporting, scripting,and more.
Helix Versioning Engine User Guide
Preface
x Helix Versioning Engine User Guide
For specific information about… See this documentation…
Basic workflows using P4V, the cross-platform Helix desktop client.
P4V User Guide
Working with personal and sharedservers and understanding the distributedversioning features of the Helix Versioningengine.
Using Helix for Distributed Versioning
p4 command line (reference). P4 Command Reference, p4 help
Installing and administering the Helixversioning engine, including usermanagement, security settings.
Helix Versioning Engine Administrator Guide:Fundamentals
Installing and configuring Helix servers(proxies, replicas, and edge servers) in adistributed environment.
Helix Versioning Engine Administrator Guide: Multi-siteDeployment
Helix plug-ins and integrations. IDEs: Using IDE Plug-insDefect trackers: Defect Tracking Gateway GuideOthers: online help from the Helix menu or web site
Developing custom Helix applicationsusing the Helix C/C++ API.
C/C++ API User Guide
Working with Helix in Ruby, Perl, Python,and PHP.
APIs for Scripting
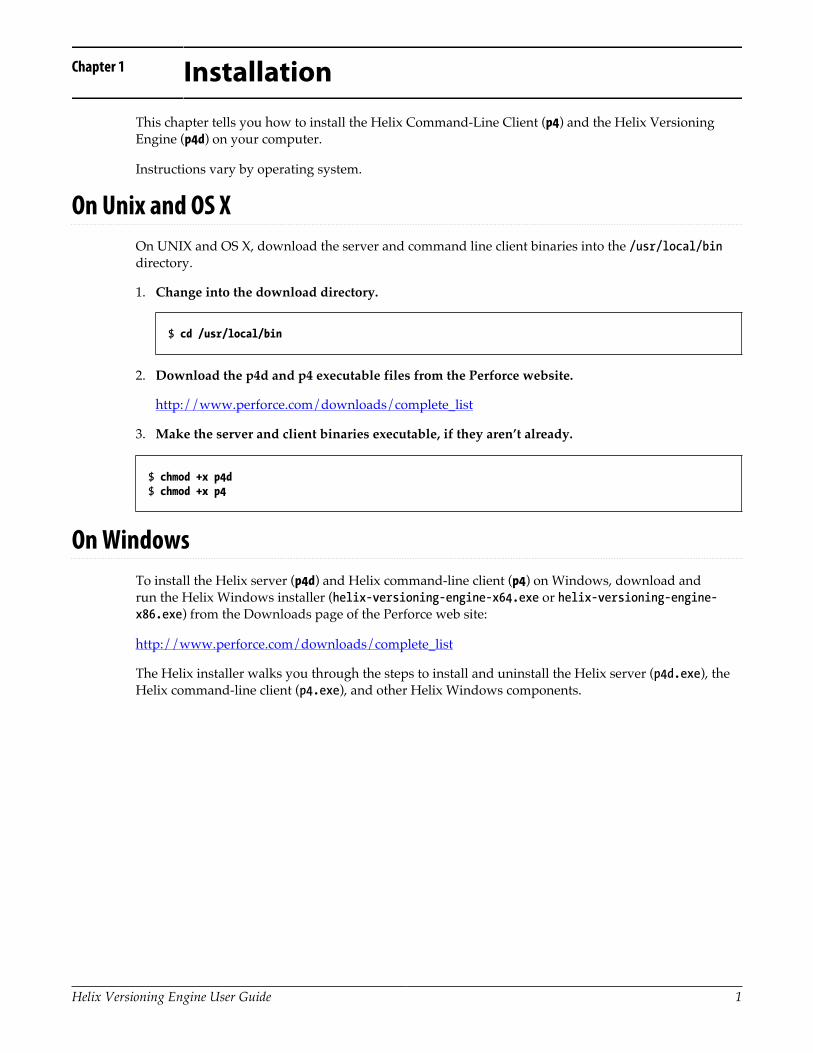
Syntax conventionsHelix documentation uses the following syntax conventions to describe command line syntax.
Notation Meaning
literal Monospace font indicates a word or other notation that must be used inthe command exactly as shown.
italics Italics indicate a parameter for which you must supply specificinformation. For example, for a serverid parameter, you must supply the idof the server.
[-f] Square brackets indicate that the enclosed elements are optional. Omit thebrackets when you compose the command.
Elements that are not bracketed are required.
… Ellipses (…) indicate that the preceding element can be repeated as oftenas needed.

Preface
Helix Versioning Engine User Guide xi
Notation Meaning
element1 | element2 A vertical bar ( | ) indicates that either element1 or element2 is required.
Please give us feedbackWe are interested in receiving opinions on this manual from our users. In particular, we’d like to hearfrom users who have never used Perforce before. Does this guide teach the topic well? Please let usknow what you think; we can be reached at [email protected].
If you need assistance, or wish to provide feedback about any of our products, [email protected].

xii Helix Versioning Engine User Guide
Helix Versioning Engine User Guide 1
Chapter 1 InstallationThis chapter tells you how to install the Helix Command-Line Client (p4) and the Helix VersioningEngine (p4d) on your computer.
Instructions vary by operating system.
On Unix and OS XOn UNIX and OS X, download the server and command line client binaries into the /usr/local/bindirectory.
1. Change into the download directory.
$ cd /usr/local/bin
2. Download the p4d and p4 executable files from the Perforce website.
http://www.perforce.com/downloads/complete_list
3. Make the server and client binaries executable, if they aren’t already.
$ chmod +x p4d$ chmod +x p4
On WindowsTo install the Helix server (p4d) and Helix command-line client (p4) on Windows, download andrun the Helix Windows installer (helix-versioning-engine-x64.exe or helix-versioning-engine-x86.exe) from the Downloads page of the Perforce web site:
http://www.perforce.com/downloads/complete_list
The Helix installer walks you through the steps to install and uninstall the Helix server (p4d.exe), theHelix command-line client (p4.exe), and other Helix Windows components.

2 Helix Versioning Engine User Guide

Helix Versioning Engine User Guide 3
Chapter 2 OverviewThis chapter provides an overview of the Helix version management system.
Important Read the "Basic Concepts" chapter of Introducing Helix before reading this guide.
This guide documents the command-line client only. For documentation on other clients, see the Helixdocumentation website.
Although this guide presents the command line interface, it discusses all the other things you need toknow regardless of interface choice.
IntroductionHelix is an enterprise version management system in which you connect to a shared versioning server;you sync files from a shared repository called the depot, and edit them on your computer in yourworkspace. You manage files with the help of changelists. You have the option of submitting to the depotany changes you make locally to make them available to other users.
The Helix server also known as p4d, manages depots, which contain every revision of every file underversion management. Files are organized into directory trees. The server also maintains a databaseto track data associated with files and client activity: logs, user permissions, metadata, configurationvalues, and so on.
Helix clients provide an interface that allows you to check files in and out of the depot, resolveconflicts, track change requests, and more. Helix includes a number of clients: a command-line client, agraphical user interface client, and various plugins that work with commercial IDEs and productivitysoftware.
Helix also supports a decentralized (“distributed”) workflow. See the "Basic Concepts" chapter ofIntroducing Helix, and Using Helix for Distributed Versioning.
File managementYou use Helix clients to manage a special area of your computer, called a workspace. Directories in thedepot are mapped to directories in your workspace, which contain local copies of managed files. Youalways work on managed files in your workspace:
1. You populate your local workspace by syncing files from the depot.
2. You check the files out of the depot (and into your workspace).
3. You make changes to the files.
4. You check them back into the depot, also known as submitting.
5. If the changes you try to submit conflict with changes that other users, working in parallel withyou, have already submitted, you must resolve conflicts as needed.
ChangelistsThe unit of file submission is the changelist; it is the means by which you check files in and out of thedepot. A changelist must contain at least one file and may contain tens of thousands. A changelist
Chapter 2. Overview
4 Helix Versioning Engine User Guide
is numbered and allows you to track all changes with respect to the contents of the depot: filemodifications, the addition of a file, or the deletion of a file.
A changelist is the simplest way to organize your work. A changelist also represents the atomic unit ofwork in Helix: if a changelist includes several files, changes for all the files are committed to the depotor none of the changes are. For example, if a network connection between the client and the server failsduring changelist submission, the entire submit fails.
Parallel developmentAs with all version management systems, Helix is designed to let multiple users work on the samefiles, codelines, or digital assets in parallel and then reconcile differences later. When conflicts occur,the system resolves them if the user cannot.
Helix permits parallel development at two levels:
• At the file level, with shared files
• At the codeline level, with branching.
Shared filesParallel development also happens when multiple users check the same file(s) out of the depot,work on them in parallel, and check them back into the depot by submitting them. At the time ofsubmission, Helix reports whether there are conflicts with other users' changes to the same file or files,and requires that any conflicts be resolved.
Branching: branches versus streamsIn the course of a collaborative development project, you may find it useful to split off the codeline intomultiple codelines, each having a distinct intended purpose. For example, when a certain milestone isreached in development, you may choose to copy the code — also known as branching it — into a newcodeline for testing, thereby creating a QA branch. After it passes all tests, it is copied up to the Beta testline where it is subjected to real-world use. Later, you may choose to merge one or more of these newbranches back into the main codeline.
Streams: branches with additional intelligence
Streams are like branches, with additional intelligence built in. They provide clues of where and howto do branching and merging. They guide merging and branching actions that support both stabilityand innovation. In addition, using streams eliminates a lot of the work needed to define branches, tocreate workspaces, and to manage merges.
When you create a stream, you specify its type, information about the files it is associated with,its relationship to other streams, and how files are to be treated for branching and merging. Thesystem uses the information you provide to encourage merging best practices and to track paralleldevelopment.
The stream type tells the system how stable the stream is relative to other streams. The stream’s pathinfo tells the system a number of things; including which files to populate the workspace with, which
Chapter 2. Overview
Helix Versioning Engine User Guide 5
files child streams are allowed to branch, and, if necessary, which changelist to lock the files at. Parentlabeling specifies how the stream relates to other streams in the system, helping to determine howchange flows through the system.
Streams are ideal for implementing the mainline branching model, in which less stable streamsmerge changes to keep up to date with their parents, then copy work to the parent when the workis stable enough to promote. In addition, streams enable the system to generate views for associatedworkspaces, eliminating the need for you to update views manually to reflect changes to your streamstructure.
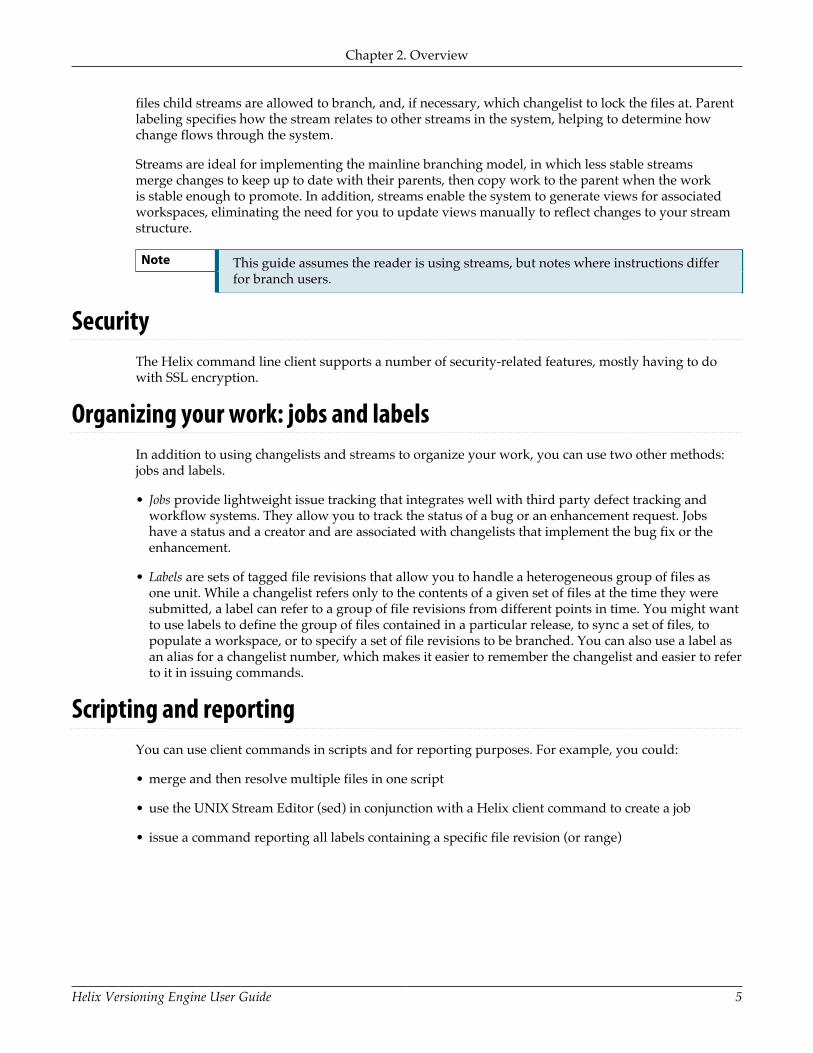
Note This guide assumes the reader is using streams, but notes where instructions differfor branch users.
SecurityThe Helix command line client supports a number of security-related features, mostly having to dowith SSL encryption.
Organizing your work: jobs and labelsIn addition to using changelists and streams to organize your work, you can use two other methods:jobs and labels.
• Jobs provide lightweight issue tracking that integrates well with third party defect tracking andworkflow systems. They allow you to track the status of a bug or an enhancement request. Jobshave a status and a creator and are associated with changelists that implement the bug fix or theenhancement.
• Labels are sets of tagged file revisions that allow you to handle a heterogeneous group of files asone unit. While a changelist refers only to the contents of a given set of files at the time they weresubmitted, a label can refer to a group of file revisions from different points in time. You might wantto use labels to define the group of files contained in a particular release, to sync a set of files, topopulate a workspace, or to specify a set of file revisions to be branched. You can also use a label asan alias for a changelist number, which makes it easier to remember the changelist and easier to referto it in issuing commands.
Scripting and reportingYou can use client commands in scripts and for reporting purposes. For example, you could:
• merge and then resolve multiple files in one script
• use the UNIX Stream Editor (sed) in conjunction with a Helix client command to create a job
• issue a command reporting all labels containing a specific file revision (or range)

6 Helix Versioning Engine User Guide

Helix Versioning Engine User Guide 7
Chapter 3 Tutorial
Read me firstThis tutorial is for users not experienced with the Helix Versioning Engine. After working through thistutorial, you should understand the following:
• the basics of starting up a shared server and command line client
• getting a shared server and client communicating with each other
• adding, editing, deleting, and syncing files on your client computer
• checking those files into the server.
The sections that follow take you — step-by-step — through the tutorial.
Important Before running this tutorial install the shared server and command client binariesonto the same computer. See Chapter 1, “Installation” on page 1 for instructions.
Make binaries executable, on UNIX and OS XOn UNIX and OS X, make the server and client binaries executable, if they aren’t already.
$ cd /usr/local/bin$ chmod +x p4d$ chmod +x p4
Create a working directoryCreate a working directory in which to perform the rest of the steps in this tutorial, and then change tothat directory. In this example, we create a directory called tutorial in the user’s home directory.
On Unix and OS X
$ mkdir /Users/bruno/tutorial$ cd /Users/bruno/tutorial
On Windows
$ mkdir C:\Users\bruno\tutorial$ cd C:\Users\bruno\tutorial
Start up the shared server1. Make a subdirectory in which to start up the server and client.

Chapter 3. Tutorial
8 Helix Versioning Engine User Guide
When started, the server creates a large number of database files; it’s best not to clutter yourworking directory with these files, so we will start up the server and client in a designateddirectory.
On Unix and OS X
$ mkdir /Users/bruno/server
On Windows
$ mkdir C:\Users\bruno\server
2. Start up the shared server.
Start up the shared server, using the -r dir option to specify the directory created in the previousstep and the -p port option to set the hostname:port number to localhost:1666, the requiredsetting for running the shared server and the client on same computer.
On UNIX and OS X
$ p4d -r /Users/bruno/server -p localhost:1666
On Windows
$ p4d -r C:\Users\bruno\server -p localhost:1666
This produces the following output:
Perforce db files in 'server' will be created if missing...Perforce Server starting...
Because the shared server runs in the foreground, you must open a new terminal window inwhich to run subsequent commands.
Start up the command line client1. Change to your working directory.
This is the working directory you created in “Create a working directory” on page 7.
On UNIX and OS X
$ cd /Users/bruno/tutorial
Chapter 3. Tutorial
Helix Versioning Engine User Guide 9
On Windows
$ cd C:\Users\bruno\tutorial
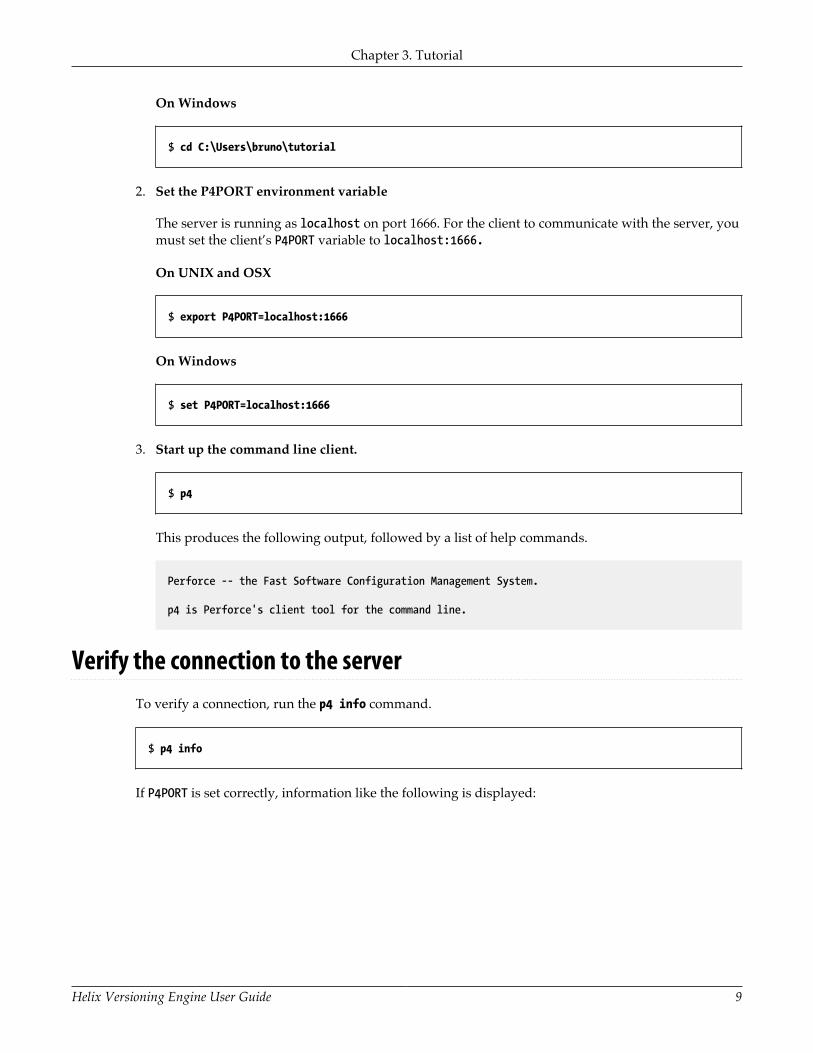
2. Set the P4PORT environment variable
The server is running as localhost on port 1666. For the client to communicate with the server, youmust set the client’s P4PORT variable to localhost:1666.
On UNIX and OSX
$ export P4PORT=localhost:1666
On Windows
$ set P4PORT=localhost:1666
3. Start up the command line client.
$ p4
This produces the following output, followed by a list of help commands.
Perforce -- the Fast Software Configuration Management System.
p4 is Perforce's client tool for the command line.
Verify the connection to the serverTo verify a connection, run the p4 info command.
$ p4 info
If P4PORT is set correctly, information like the following is displayed:

Chapter 3. Tutorial
10 Helix Versioning Engine User Guide
User name: brunoClient name: dhcp-133-n101Client host: dhcp-133-n101.dhcp.perforce.comClient unknown.Current directory: /Users/bruno/tutorialPeer address: 127.0.0.1:49917Client address: 127.0.0.1Server address: localhost:1666Server root: /Users/bruno/serverServer date: 2016/03/01 16:15:38 -0800 PSTServer uptime: 00:03:26Server version: P4D/DARWIN90X86_64/2015.2/1340214 (2016/02/03)Server license: noneCase Handling: insensitive
The Server address: field shows the host to which p4 connected and also displays the host and portnumber on which the Helix server is listening. If P4PORT is set incorrectly, you receive a message likethe following:
Perforce client error: Connect to server failed; check $P4PORT. TCP connect to perforce:1666 failed. perforce: host unknown.
If you get the "host unknown" error, speak to your administrator.
Create a stream depotCreate a stream depot in which the stream you create in the next step will reside. Type the following:
$ p4 depot -t stream JamCode
The -t option specifies the type of depot to create, in this case a stream depot. JamCode is the name ofthe depot you’re creating.
Helix opens the depot specification in an editor:

Chapter 3. Tutorial
Helix Versioning Engine User Guide 11
# A Perforce Depot Specification.## Depot: The name of the depot.# Owner: The user who created this depot.# Date: The date this specification was last modified.# Description: A short description of the depot (optional).# Type: Whether the depot is 'local', 'remote',# 'stream', 'spec', 'archive', 'tangent',# or 'unload'. Default is 'local'.# Address: Connection address (remote depots only).# Suffix: Suffix for all saved specs (spec depot only).# StreamDepth: Depth for streams in this depot (stream depots only).# Map: Path translation information (must have ... in it).# SpecMap: For spec depot, which specs should be recorded (optional).## Use 'p4 help depot' to see more about depot forms.
Depot: JamCode
Owner: bruno
Date: 2016/02/22 13:20:06
Description: Created by bruno.
Type: stream
StreamDepth: //JamCode/1
Map: JamCode/...
Create your first streamA stream is where you store your work. The first stream is always a mainline stream. To learn moreabout streams, see Chapter 6, “Streams” on page 65.
To create the stream:
1. Issue the p4 stream, command, specifying the stream depot name followed by the stream name.
Here, we name the stream main and — with the -t option — specify the stream type as mainline:
$ p4 stream -t mainline //JamCode/main
Helix opens the stream specification (spec) in an editor:

Chapter 3. Tutorial
12 Helix Versioning Engine User Guide
# A Perforce Stream Specification.## Stream: The stream field is unique and specifies the depot path.# Update: The date the specification was last changed.# Access: The date the specification was originally created.# Owner: The user who created this stream.# Name: A short title which may be updated.# Parent: The parent of this stream, or 'none' if Type is mainline.# Type: Type of stream provides clues for commands run# between stream and parent. Five types include 'mainline',# 'release', 'development' (default), 'virtual' and 'task'.# Description: A short description of the stream (optional).# Options: Stream Options:# allsubmit/ownersubmit [un]locked# [no]toparent [no]fromparent mergedown/mergeany# Paths: Identify paths in the stream and how they are to be# generated in resulting clients of this stream.# Path types are share/isolate/import/import+/exclude.# Remapped: Remap a stream path in the resulting client view.# Ignored: Ignore a stream path in the resulting client view.## Use 'p4 help stream' to see more about stream specifications and command.
Stream: //JamCode/main
Owner: bruno
Name: main
Parent: none
Type: mainline
Description: Created by bruno.
Options: allsubmit unlocked notoparent nofromparent mergedown
Paths: share ...
A stream spec defines the stream’s name and location, its type, its parent stream, the files inthe workspace view of workspaces bound to it, and other configurable behaviors. Note that thestream name is composed of the stream depot name followed by the stream name. You edit thestream spec’s fields to configure the stream’s behavior, as explained at length in “Configure astream” on page 65.
2. To verify that your mainline stream has been created, issue the p4 streams command.
For example:

Chapter 3. Tutorial
Helix Versioning Engine User Guide 13
$ p4 streams //JamCode/...
This produces the following output:
Stream //JamCode/main mainline none 'main'
Define a client workspace and bind it to the streamA client workspace is the set of directories on your local computer where you work on the filerevisions that Helix manages. At minimum, you should assign your workspace a name and specify aworkspace root where you want local copies of depot files stored. The client workspace name defaultsto the hostname of the computer on which your client is running. For details, see “Configure a clientworkspace” on page 50.
Before you can work in a stream, you must associate your workspace with the stream. When youassociate a workspace with a stream, Helix generates the workspace view based on the structure ofthe stream. Workspace views are a crucial concept in Helix and are discussed in detail in “Configureworkspace views” on page 57.
To create a workspace and bind it to a stream:
1. Set the P4CLIENT environment variable to desired workspace name.
On UNIX and OS X
$ export P4CLIENT=bruno_ws
On Windows
$ set P4CLIENT=bruno_ws
2. Use the p4 client command to bind your workspace to the stream.
$ p4 client -S //JamCode/main
The -S option specifies the name of the associated stream.
Helix opens the client specification (spec) in an editor:

Chapter 3. Tutorial
14 Helix Versioning Engine User Guide
# A Perforce Client Specification.## Client: The client name.# Update: The date this specification was last modified.# Access: The date this client was last used in any way.# Owner: The Perforce user name of the user who owns the client# workspace. The default is the user who created the# client workspace.# Host: If set, restricts access to the named host.# Description: A short description of the client (optional).# Root: The base directory of the client workspace.# AltRoots: Up to two alternate client workspace roots.# Options: Client options:# [no]allwrite [no]clobber [no]compress# [un]locked [no]modtime [no]rmdir# SubmitOptions:# submitunchanged/submitunchanged+reopen# revertunchanged/revertunchanged+reopen# leaveunchanged/leaveunchanged+reopen# LineEnd: Text file line endings on client: local/unix/mac/win/share.# Type: Type of client: writeable/readonly.# Backup: Client's participation in backup enable/disable. If not# specified backup of a writable client defaults to enabled.# ServerID: If set, restricts access to the named server.# View: Lines to map depot files into the client workspace.# ChangeView: Lines to restrict depot files to specific changelists.# Stream: The stream to which this client's view will be dedicated.# (Files in stream paths can be submitted only by dedicated# stream clients.) When this optional field is set, the# View field will be automatically replaced by a stream# view as the client spec is saved.# StreamAtChange: A changelist number that sets a back-in-time view of a# stream ( Stream field is required ).# Changes cannot be submitted when this field is set.## Use 'p4 help client' to see more about client views and options.
Client: bruno_ws
Owner: bruno
Host: dhcp-133-n101.dhcp.perforce.com
Description: Created by bruno.
Root: /Users/bruno/tutorial
Options: noallwrite noclobber nocompress unlocked nomodtime normdir
SubmitOptions: submitunchanged
LineEnd: local
Stream: //JamCode/main
View: //JamCode/main/... //bruno_ws/...

Chapter 3. Tutorial
Helix Versioning Engine User Guide 15
At this point you have the option to configure the workspace root directory and any other desiredsettings. The workspace root is the highest-level directory of the workspace under which themanaged source files reside. For more information, see “Define a client workspace” on page 50.Once you’ve done this, save any changes and quit the editor.
For information about configuring other settings, see “Configure workspace views” on page 57.
3. Verify that your workspace has been created, with the p4 clients command.
$ p4 clients -S //JamCode/main
This produces the following output:
Client bruno_ws 2016/02/22 root /Users/bruno/tutorial 'Created by bruno.'
Next, populate the mainline stream with files.
Populate a mainline streamNow that you’ve created a stream, you can populate it with files. There are two ways to populate amainline stream:
• Add files from the local filesystem.
• Branch files from another depot.
In this tutorial, we demonstrate populating by adding files. For information on populating bybranching from another depot, see “Branch from other depots” on page 30.
To add files to the mainline stream, copy the files and folders to the workspace root directory and thenmark them for add with the p4 add command.
1. Copy the files and folders to the workspace root directory.
In this example, we add all files residing in a directory named /Users/bruno/repository.
On UNIX and OSX
$ cp /Users/bruno/repository/* /Users/bruno/tutorial
On Windows
$ copy C:\Users\bruno\repository\* C:\Users\bruno\tutorial
2. Change into the client workspace root directory.

Chapter 3. Tutorial
16 Helix Versioning Engine User Guide
On UNIX and OSX
$ cd /Users/bruno/tutorial
On Windows
$ cd C:\User\bruno\tutorial
3. Mark the files for add.
$ p4 add *
This creates a default changelist, which you will use when you submit to the depot the fileyou added to your workspace. For more information on changelists, see “Changelist-relatedtasks” on page 37.
4. Submit the added files.
To populate the stream, submit the default changelist in which the files are open for add.
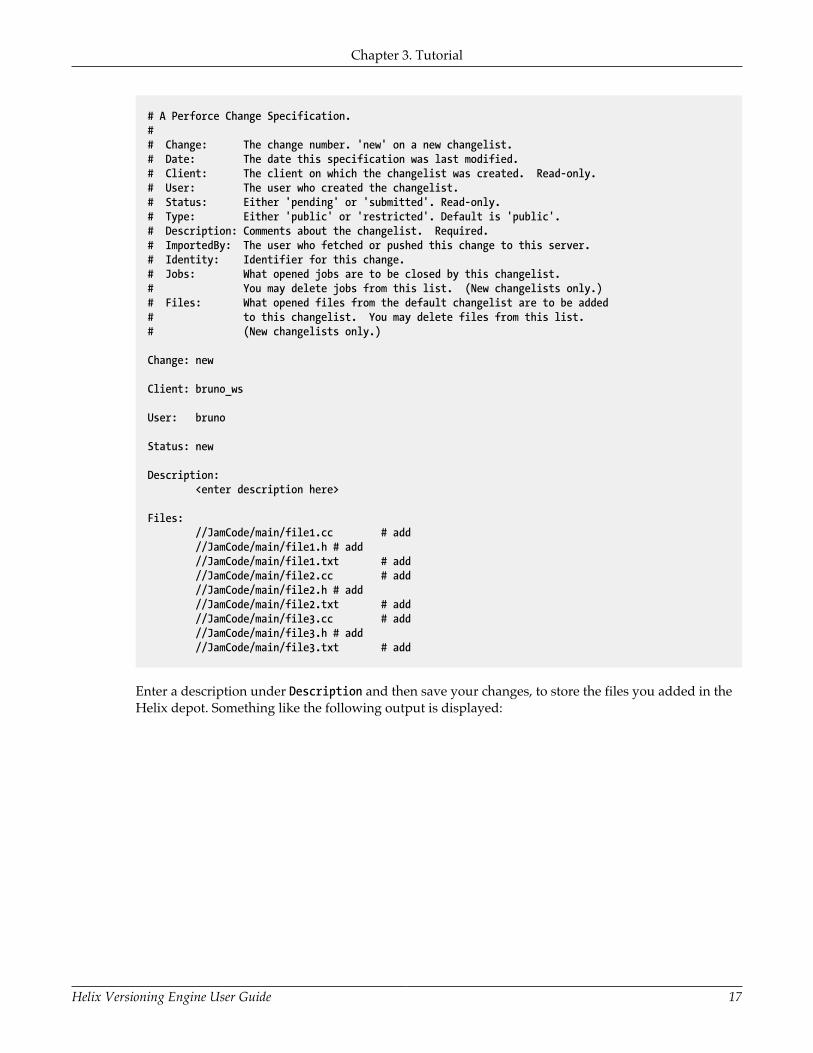
$ p4 submit
Helix opens the change specification in an editor:
Chapter 3. Tutorial
Helix Versioning Engine User Guide 17
# A Perforce Change Specification.## Change: The change number. 'new' on a new changelist.# Date: The date this specification was last modified.# Client: The client on which the changelist was created. Read-only.# User: The user who created the changelist.# Status: Either 'pending' or 'submitted'. Read-only.# Type: Either 'public' or 'restricted'. Default is 'public'.# Description: Comments about the changelist. Required.# ImportedBy: The user who fetched or pushed this change to this server.# Identity: Identifier for this change.# Jobs: What opened jobs are to be closed by this changelist.# You may delete jobs from this list. (New changelists only.)# Files: What opened files from the default changelist are to be added# to this changelist. You may delete files from this list.# (New changelists only.)
Change: new
Client: bruno_ws
User: bruno
Status: new
Description: <enter description here>
Files: //JamCode/main/file1.cc # add //JamCode/main/file1.h # add //JamCode/main/file1.txt # add //JamCode/main/file2.cc # add //JamCode/main/file2.h # add //JamCode/main/file2.txt # add //JamCode/main/file3.cc # add //JamCode/main/file3.h # add //JamCode/main/file3.txt # add
Enter a description under Description and then save your changes, to store the files you added in theHelix depot. Something like the following output is displayed:

Chapter 3. Tutorial
18 Helix Versioning Engine User Guide
Change 1 created with 9 open file(s).Submitting change 1.Locking 9 files ...add //JamCode/main/file1.cc#1add //JamCode/main/file1.h#1add //JamCode/main/file1.txt#1add //JamCode/main/file2.cc#1add //JamCode/main/file2.h#1add //JamCode/main/file2.txt#1add //JamCode/main/file3.cc#1add //JamCode/main/file3.h#1add //JamCode/main/file3.txt#1Change 1 submitted.
The files you added are now stored in the Helix depot.
Edit filesNow that the files are stored in the depot, you or others can check them out of the depot to edit them.To open files for edit, issue the p4 edit command, followed by the names(s) of the files you want toedit:
$ p4 edit file1.txt
This displays output like the following:
//JamCode/main/file1.txt#1 - opened for edit
Now you can edit the file in the editor of your choice and make changes. After you’ve made thedesired changes, you submit the changelist associated with the file(s):
$ p4 submit
This open a change specification in an editor:

Chapter 3. Tutorial
Helix Versioning Engine User Guide 19
## Change: The change number. 'new' on a new changelist.# Date: The date this specification was last modified.# Client: The client on which the changelist was created. Read-only.# User: The user who created the changelist.# Status: Either 'pending' or 'submitted'. Read-only.# Type: Either 'public' or 'restricted'. Default is 'public'.# Description: Comments about the changelist. Required.# ImportedBy: The user who fetched or pushed this change to this server.# Identity: Identifier for this change.# Jobs: What opened jobs are to be closed by this changelist.# You may delete jobs from this list. (New changelists only.)# Files: What opened files from the default changelist are to be added# to this changelist. You may delete files from this list.# (New changelists only.)
Change: new
Client: bruno_ws
User: bruno
Status: new
Description: <enter description here>
Files: //JamCode/main/file1.txt # edit
Enter a description under Description and then save your changes, to store the edits you made in theHelix depot. Something like the following output is displayed:
Change 2 created with 1 open file(s).Submitting change 2.Locking 1 files ...edit //JamCode/main/file1.txt#2Change 2 submitted.
Delete filesDeleting files is more complicated than just deleting them from your filesystem. To mark files fordelete, issue the p4 delete command. In this case, we choose to delete just the header files.
$ p4 delete *.h
Helix displays the following:

Chapter 3. Tutorial
20 Helix Versioning Engine User Guide
//JamCode/main/file1.h#1 - opened for delete//JamCode/main/file2.h#1 - opened for delete//JamCode/main/file3.h#1 - opened for delete
As in “Edit files” on page 18, you issue the p4 submit command to have the deletion affect files inthe depot:
$ p4 submit
Helix opens the change specification in an editor:
# A Perforce Change Specification.## Change: The change number. 'new' on a new changelist.# Date: The date this specification was last modified.# Client: The client on which the changelist was created. Read-only.# User: The user who created the changelist.# Status: Either 'pending' or 'submitted'. Read-only.# Type: Either 'public' or 'restricted'. Default is 'public'.# Description: Comments about the changelist. Required.# ImportedBy: The user who fetched or pushed this change to this server.# Identity: Identifier for this change.# Jobs: What opened jobs are to be closed by this changelist.# You may delete jobs from this list. (New changelists only.)# Files: What opened files from the default changelist are to be added# to this changelist. You may delete files from this list.# (New changelists only.)
Change: new
Client: jschaffer_ws
User: jschaffer
Status: new
Description: <enter description here>
Files: //JamCode/main/file1.h # delete //JamCode/main/file2.h # delete //JamCode/main/file3.h # delete
Enter a description under Description and then save your changes, to store the changes you made inthe Helix depot. Something like the following output is displayed:

Chapter 3. Tutorial
Helix Versioning Engine User Guide 21
Change 3 created with 3 open file(s).Submitting change 3.Locking 3 files ...delete //JamCode/main/file1.h#2delete //JamCode/main/file2.h#2delete //JamCode/main/file3.h#2Change 3 submitted.
Sync files from the depot to your client workspaceSyncing (retrieving files from the depot) — with the p4 sync command — specifies the files anddirectories you want to retrieve from the depot. You do this to obtain the latest changes — be theyedits, adds, or deletes — that have been made by others and then submitted to the depot.
You can only sync files that are mapped in your workspace view. For more information on workspaceviews, see “Configure workspace views” on page 57.
$ p4 sync ...
By passing in …, we request to sync all files in the current directory.
Suppose that another user has made changes to file1.cc and file3.cc. A sync request, would yieldoutput like the following:
//JamCode/main/file1.cc#3 - updating /Users/bruno/workspace/tutorial/file1.cc//JamCode/main/file3.cc#5 - updating /Users/bruno/workspace/tutorial/file3.cc
Populate child streamsAfter populating the mainline, you can branch files for development and for release. For example, tocreate a development stream that is a clone of its mainline parent, issue the following command:
$ p4 stream -t development -P //JamCode/main //JamCode/dev
Helix displays the stream specification with the type set to development. Save the specification. Topopulate the stream with the files from the mainline, issue the following commands:
$ p4 populate -d "From main" -S //JamCode/dev -r$ p4 sync

22 Helix Versioning Engine User Guide

Helix Versioning Engine User Guide 23
Chapter 4 Basic tasksThis chapter describes tasks you commonly perform when setting up and using your version controlsystem. It discusses both tasks you perform just once when getting your system set up, and tasks youmay perform one or more times during the lifetime of your installation.
Overview of initial tasksThis section gives you an overview of the tasks for setting up your command client and shared server.The tasks in this workflow should be performed once, and in the order presented in the followingtable:
Step Task Stream or classic user Link
1 Create a workingdirectory
Both “Create a workingdirectory” on page 24
2 Log in to the sharedserver or start up ashared server
Both “Log in to the sharedserver” on page 25or “Start up a sharedserver” on page 25
3 Start up the commandline client and verifythe connection to theserver
Both “Start up the commandline client and verifythe connection to theserver” on page 26
4 Create a stream depot Stream “Create a streamdepot” on page 27
5 Create a mainlinestream
Stream. Classic users,see “Organizing thedepot” on page 87.
“Create a mainlinestream” on page 28
6 Define a workspace Both “Define a workspaceand bind it to thestream” on page 29
7 Bind the workspace tothe stream
Stream “Define a workspaceand bind it to thestream” on page 29
8 Populate the mainlinestream
Stream. Classic userspopulate a codeline.
“Populate the mainlinestream” on page 29
Overview of recurring tasksThis section gives you an overview of the tasks you perform during the lifetime of your installation,divided between file-level tasks and other tasks. You may perform them one or more times, or never.
The following table summarizes file-level recurring tasks:

Chapter 4. Basic tasks
24 Helix Versioning Engine User Guide
Task Stream or classic user Link
Sync files from the depot Both “Sync files” on page 32
Edit files Both “Edit files and check inchanges” on page 34
Rename and move files Both “Rename and movefiles” on page 36
Diff files Both “Diff files” on page 36
Revert files Both “Revert files, to discardchanges” on page 35
Add files Both “Add files” on page 33
Delete files Both “Delete files” on page 35
Resolve conflicts Both Chapter 7, “Resolveconflicts” on page 77
The following table summarizes other recurring tasks:
Task Stream or classic user Link
Work with changelists Both “Changelist-relatedtasks” on page 37
Configure client behavior Both Chapter 5, “Configureclients” on page 45
Configure stream behavior Stream “Configure astream” on page 65
Branch and populate childstreams
Stream “Branch and populate childstreams” on page 43
Propagate changes betweenstreams
Stream “Propagatechanges” on page 43
Initial tasksYou perform the tasks in this section once, in the order presented.
Create a working directory
Create a working directory and then change to the directory. In this example, we create a workingdirectory called work in the user’s home directory.

Chapter 4. Basic tasks
Helix Versioning Engine User Guide 25
$ mkdir /Users/bruno/work$ cd /Users/bruno/work
Log in to the shared server
Typically, your administrator starts up a shared server for you. If you need to start up your ownshared server, see “Start up a shared server” on page 25.
Your admin provides you with a user id, a password, and the server’s address. You then follow thesesteps:
1. Set the P4PORT environment variable to the server address the admin gave you.
The server is running on as server1 on port 1666. For the client to communicate with the server,you must set the client’s P4PORT variable to server1:1666.
On UNIX and OSX
$ export P4PORT=server1:1666
On Windows
$ set P4PORT=server1:1666
2. Log in to the server with the p4 login command
$ p4 login
Helix displays the following:
Enter password:
Enter the password your admin gave you.
Helix displays the following:
User bruno logged in.
Start up a shared server
Download into your computer’s /usr/local/bin directory the server (p4d) and client (p4) binaries, asdescribed in Chapter 1, “Installation” on page 1. Then, follow these steps:

Chapter 4. Basic tasks
26 Helix Versioning Engine User Guide
1. Make the server and client binaries executable, if they’re not already
$ chmod +x /usr/local/bin/p4d$ chmod +x /usr/local/bin/p4
2. Make a subdirectory in which to start up the server and client.
When started, the server creates a large number of database files; it’s best not to clutter yourworking directory with these files, so we will start up the server and client in a different directory,in this case /Users/bruno/server.
$ mkdir /Users/bruno/server
3. Start up the shared server.
Start up the shared server, using the -r dir option to specify the directory created in the previousstep.
$ p4d -r /Users/bruno/server
This produces the following output:
Perforce db files in 'server' will be created if missing...Perforce Server starting...
Start up the command line client and verify the connection to the server
1. Start up the command line client.
$ p4
To verify a connection, issue the p4 info command. If P4PORT is set correctly, information like thefollowing is displayed:

Chapter 4. Basic tasks
Helix Versioning Engine User Guide 27
User name: brunoClient name: bruno_wsClient host: computer_12Client root: c:\bruno_wsCurrent directory: c:\bruno_wsPeer address; 10.0.102.24:61122Client address: 10.0.0.196Server address: ssl:example.com:1818Server root: /usr/depot/p4dServer date: 2012/03/28 15:03:05 -0700 PDTServer uptime: 752:41:33Server version: P4D/FREEBSD/2012.1/406375 (2012/01/25)ServerID: MasterServer license: P4Admin <p4adm> 20 users (expires 2015/01/01)Server license-ip: 10.0.0.2Case handling: sensitive
The Server address: field shows the host to which p4 connected and also displays the host and portnumber on which the Helix server is listening. If P4PORT is set incorrectly, you receive a message likethe following:
Perforce client error: Connect to server failed; check $P4PORT. TCP connect to perforce:1666 failed. perforce: host unknown.
If the value you see in the third line of the error message is perforce:1666 (as above), P4PORT has notbeen set. Set P4PORT and try to connect again.
If your installation requires SSL, make sure your P4PORT is of the form ssl:hostname:port.
You will be asked to verify the server’s fingerprint the first time you attempt to connect to the server.If the fingerprint is accurate, use the p4 trust command to install the fingerprint into a file (pointedto by the P4TRUST environment variable) that holds a list of known/trusted Helix servers and theirrespective fingerprints. If P4TRUST is unset, this file is .p4trust in the user’s home directory. For moreinformation, see “SSL-encrypted connections” on page 97.
If your installation requires plain text (in order to support older Helix applications), set P4PORT totcp:hostname:port.
Create a stream depotTypically your administrator will create a stream depot for you and provide you with the depot name.
However, if you are creating a stream depot yourself, type the following:
$ p4 depot -t stream depotname
The -t option specifies the type of depot to create, in this case a stream depot.

Chapter 4. Basic tasks
28 Helix Versioning Engine User Guide
Helix opens the depot specification in an editor:
# A Perforce Depot Specification.## Depot: The name of the depot.# Owner: The user who created this depot.# Date: The date this specification was last modified.# Description: A short description of the depot (optional).# Type: Whether the depot is 'local', 'remote',# 'stream', 'spec', 'archive', 'tangent',# or 'unload'. Default is 'local'.# Address: Connection address (remote depots only).# Suffix: Suffix for all saved specs (spec depot only).# StreamDepth: Depth for streams in this depot (stream depots only).# Map: Path translation information (must have ... in it).# SpecMap: For spec depot, which specs should be recorded (optional).## Use 'p4 help depot' to see more about depot forms.
Depot: JamCode
Owner: bruno
Date: 2016/02/22 13:20:06
Description: Created by bruno.
Type: stream
StreamDepth: //JamCode/1
Map: JamCode/...
Adjust the value of other fields as desired and save the specification.
Create a mainline streamTo create a mainline stream:
1. Issue the p4 stream, command, specifying the depot followed by the stream name.
For example:
$ p4 stream -t mainline //JamCode/main
The stream specification form is displayed.
2. Change options in the spec to assign the stream the desired characteristics and save the spec. See“Configure a stream” on page 65 for details on the stream spec.
3. To verify that your mainline stream has been created, issue the p4 streams command.
Chapter 4. Basic tasks
Helix Versioning Engine User Guide 29
For example:
$ p4 streams //projectX/...
Define a workspace and bind it to the streamBefore you can work in a stream, you must define a workspace associated with the stream. When youassociate a workspace with a stream, Helix generates the workspace view based on the structure of thestream. Stream users never need edit the workspace view (and, in fact, cannot manually alter it). If thestructure of the stream changes, Helix updates the views of workspaces associated with the stream onan as-needed basis.
Note Classic Helix users define a workspace by issuing the p4 client command withoutpassing the -S option, and edit the workspace view manually by editing the View:field in the client spec. See “Configure workspace views” on page 57.
Your Helix administrator may already have configured a client workspace for your computer. If so,the Client field in the client spec - displayed when you issue the p4 client command — contains thisname.
If not, to create a workspace for a stream:
1. Issue the p4 client command, using the -S option to specify the name of the associated stream.
For example:
$ p4 client -S //JamCode/main
The workspace specification form is displayed.
2. Configure the workspace root directory and any other desired settings, and save thespecification. See “Define a client workspace” on page 50 for details.
3. Verify that your workspace has been created using p4 clients.
For example:
$ p4 clients -S //JamCode/main
Now you can populate the mainline with files, as described in the next step.
Populate the mainline stream
Note Classic users populate a branch. See Chapter 8, “Codelinemanagement” on page 87.

Chapter 4. Basic tasks
30 Helix Versioning Engine User Guide
There are two ways to populate a mainline stream:
• Add files from the local filesystem. This is the most typical way.
• Branch files from another depot. This way only applies if you have existing "classic" Helix depots.
If you need to preserve file history, branch the source files to the mainline stream. If you have norequirement for preserving file history, simply add them. The sections that follow describe eachapproach.
Add files
If you do not need to preserve file history, simply add the files. To add files to the mainline stream:
1. Create the workspace root directory if it does not exist.
For example:
C:\bruno_ws> cd C:\Users\bruno\p4clientsC:\Users\bruno\p4clients> mkdir bruno_projectX_main
2. Copy the files and folders to the workspace root directory.
3. Change into the client workspace root directory, and use the p4 reconcile command to detectfiles not under Helix control and open them for add.
C:\Users\bruno\p4clients> cd bruno_projectX_mainC:\Users\bruno\p4clients\bruno_projectX_main> p4 add ...
To verify that the files are set up to be added correctly, issue the p4 opened command. To populate thestream, submit the changelist in which the files are open.
For details on working with changelists, see “Changelist-related tasks” on page 37.
Branch from other depots
You can branch files from other stream depots, classic depots, or remote depots into a stream. If youpopulate the mainline by branching, Helix preserves the connection between the revision history of thesource and target files. Your workspace must be set to one associated with the target stream (example:p4 set P4CLIENT=bruno_projectX_main).
To populate the mainline by branching, issue the p4 copy command, specifying source and target.Example:
$ p4 copy -v //mysourcedepot/mainline/... //ProjectX/main/...
In this example the -v option performs the copy on the server without syncing the newly-created filesto the workspace. This can be a significant time-saver if there are many files being copied; you can thensync only the files you intend to work with from the new location.
Chapter 4. Basic tasks
Helix Versioning Engine User Guide 31
p4d displays a series of “import from” messages listing the source and target files, and opens the file(s)in a pending changelist. To preview the results of the operation without opening files, specify the -noption.
To populate the stream with the files from the mainline, issue the following commands:
1. To verify that the files are set up to be added correctly, issue the p4 opened command.
2. To populate the stream, p4 submit the changelist in which the files are open.
If you are populating an empty stream, you can simplify this process by using p4 populate. Forexample:
$ p4 populate //mysourcedepot/mainline/... //ProjectX/main/...
does the same thing as p4 copy -v followed by a p4 submit. If you are unsure of the results of p4populate, use p4 populate -n, which previews the result of the command.
To undo an erroneous copy operation, issue the p4 revert command; for example:
$ p4 revert //ProjectX/main/...
Recurring file-level tasksThis section describes tasks you perform during the lifetime of your installation that occur at the filelevel.
Before we look at the tasks in detail, here’s a table that provides a snapshot of the sequence in whichyou perform the most common file-related tasks.
For details on working with changelists, see “Changelist-related tasks” on page 37.
Here are the basic steps for working with files. In general, to change files in the depot (file repository),you open the files in changelists and submit the changelists with a description of your changes. Helixassigns numbers to changelists and maintains the revision history of your files. This approach enablesyou to group related changes and find out who changed a file and why and when it was changed.
Task Description
Syncing(retrieving filesfrom the depot)
Issue the p4 sync command, specifying the files and directories you want toretrieve from the depot. You can only sync files that are mapped in your clientworkspace view.
Add files to thedepot
1. Create the file in the workspace.
2. Open the file for add in a changelist (p4 add).
3. Submit the changelist (p4 submit).
Edit files andcheck in changes
1. If necessary, sync the desired file revision to your workspace (p4 sync).

Chapter 4. Basic tasks
32 Helix Versioning Engine User Guide
Task Description
2. Open the file for edit in a changelist (p4 edit).
3. Make your changes.
4. Submit the changelist (p4 submit). To discard changes, issue the p4 revertcommand.
Delete files fromthe depot
1. Open the file for delete in a changelist (p4 delete). The file is deleted fromyour workspace.
2. Submit the changelist (p4 submit). The file is deleted from the depot.
Discard changes Revert the files or the changelist in which the files are open. Reverting has thefollowing effects on open files:
Add no effect - the file remains in your workspace.
Edit the revision you opened is resynced from the depot, overwriting anychanges you made to the file in your workspace.
Delete the file is resynced to your workspace.
Files are added to, deleted from, or updated in the depot only when you successfully submit thepending changelist in which the files are open. A changelist can contain a mixture of files open for add,edit and delete.
For details on working with changelists, see “Changelist-related tasks” on page 37.
Sync files
Syncing — with the p4 sync command — adds, updates, or deletes files in the client workspaceto bring the workspace contents into agreement with the depot. If a file exists within a particularsubdirectory in the depot, but that directory does not exist in the client workspace, the directory iscreated in the client workspace when you sync the file. If a file has been deleted from the depot, p4sync deletes it from the client workspace.
Example 4.1. Sync files from the depot to a client workspace.
The command below retrieves the most recent revisions of all files in the client view from the depotinto the workspace. As files are synced, they are listed in the command output.
C:\bruno_ws> p4 sync//Acme/dev/bin/bin.linux24x86/readme.txt#1 - added as c:\bruno_ws\dev\bin\bin.linux24x86\readme.txt//Acme/dev/bin/bin.ntx86/glut32.dll#1 - added as c:\bruno_ws\dev\bin\bin.ntx86\glut32.dll//Acme/dev//bin/bin.ntx86/jamgraph.exe#2 - added as c:\bruno_ws\dev\bin\bin.ntx86\jamgraph.exe[...]
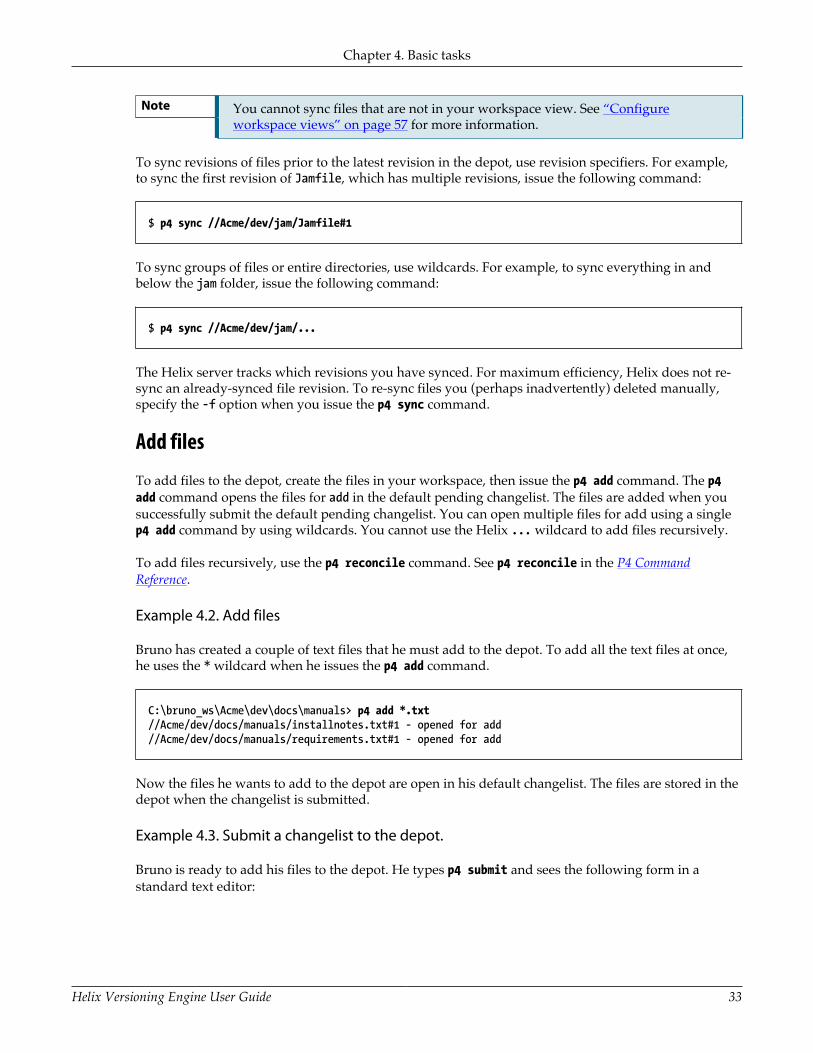
Chapter 4. Basic tasks
Helix Versioning Engine User Guide 33
Note You cannot sync files that are not in your workspace view. See “Configureworkspace views” on page 57 for more information.
To sync revisions of files prior to the latest revision in the depot, use revision specifiers. For example,to sync the first revision of Jamfile, which has multiple revisions, issue the following command:
$ p4 sync //Acme/dev/jam/Jamfile#1
To sync groups of files or entire directories, use wildcards. For example, to sync everything in andbelow the jam folder, issue the following command:
$ p4 sync //Acme/dev/jam/...
The Helix server tracks which revisions you have synced. For maximum efficiency, Helix does not re-sync an already-synced file revision. To re-sync files you (perhaps inadvertently) deleted manually,specify the -f option when you issue the p4 sync command.
Add files
To add files to the depot, create the files in your workspace, then issue the p4 add command. The p4add command opens the files for add in the default pending changelist. The files are added when yousuccessfully submit the default pending changelist. You can open multiple files for add using a singlep4 add command by using wildcards. You cannot use the Helix ... wildcard to add files recursively.
To add files recursively, use the p4 reconcile command. See p4 reconcile in the P4 CommandReference.
Example 4.2. Add files
Bruno has created a couple of text files that he must add to the depot. To add all the text files at once,he uses the * wildcard when he issues the p4 add command.
C:\bruno_ws\Acme\dev\docs\manuals> p4 add *.txt//Acme/dev/docs/manuals/installnotes.txt#1 - opened for add//Acme/dev/docs/manuals/requirements.txt#1 - opened for add
Now the files he wants to add to the depot are open in his default changelist. The files are stored in thedepot when the changelist is submitted.
Example 4.3. Submit a changelist to the depot.
Bruno is ready to add his files to the depot. He types p4 submit and sees the following form in astandard text editor:
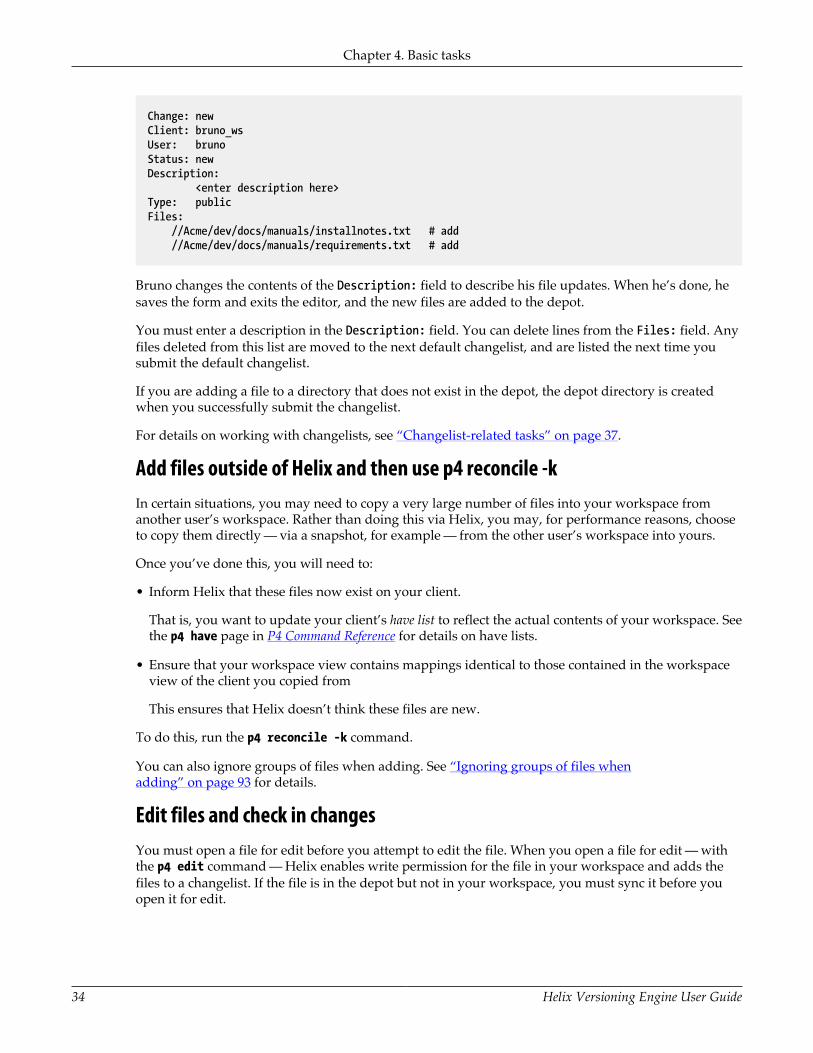
Chapter 4. Basic tasks
34 Helix Versioning Engine User Guide
Change: newClient: bruno_wsUser: brunoStatus: newDescription: <enter description here>Type: publicFiles: //Acme/dev/docs/manuals/installnotes.txt # add //Acme/dev/docs/manuals/requirements.txt # add
Bruno changes the contents of the Description: field to describe his file updates. When he’s done, hesaves the form and exits the editor, and the new files are added to the depot.
You must enter a description in the Description: field. You can delete lines from the Files: field. Anyfiles deleted from this list are moved to the next default changelist, and are listed the next time yousubmit the default changelist.
If you are adding a file to a directory that does not exist in the depot, the depot directory is createdwhen you successfully submit the changelist.
For details on working with changelists, see “Changelist-related tasks” on page 37.
Add files outside of Helix and then use p4 reconcile -kIn certain situations, you may need to copy a very large number of files into your workspace fromanother user’s workspace. Rather than doing this via Helix, you may, for performance reasons, chooseto copy them directly — via a snapshot, for example — from the other user’s workspace into yours.
Once you’ve done this, you will need to:
• Inform Helix that these files now exist on your client.
That is, you want to update your client’s have list to reflect the actual contents of your workspace. Seethe p4 have page in P4 Command Reference for details on have lists.
• Ensure that your workspace view contains mappings identical to those contained in the workspaceview of the client you copied from
This ensures that Helix doesn’t think these files are new.
To do this, run the p4 reconcile -k command.
You can also ignore groups of files when adding. See “Ignoring groups of files whenadding” on page 93 for details.
Edit files and check in changesYou must open a file for edit before you attempt to edit the file. When you open a file for edit — withthe p4 edit command — Helix enables write permission for the file in your workspace and adds thefiles to a changelist. If the file is in the depot but not in your workspace, you must sync it before youopen it for edit.
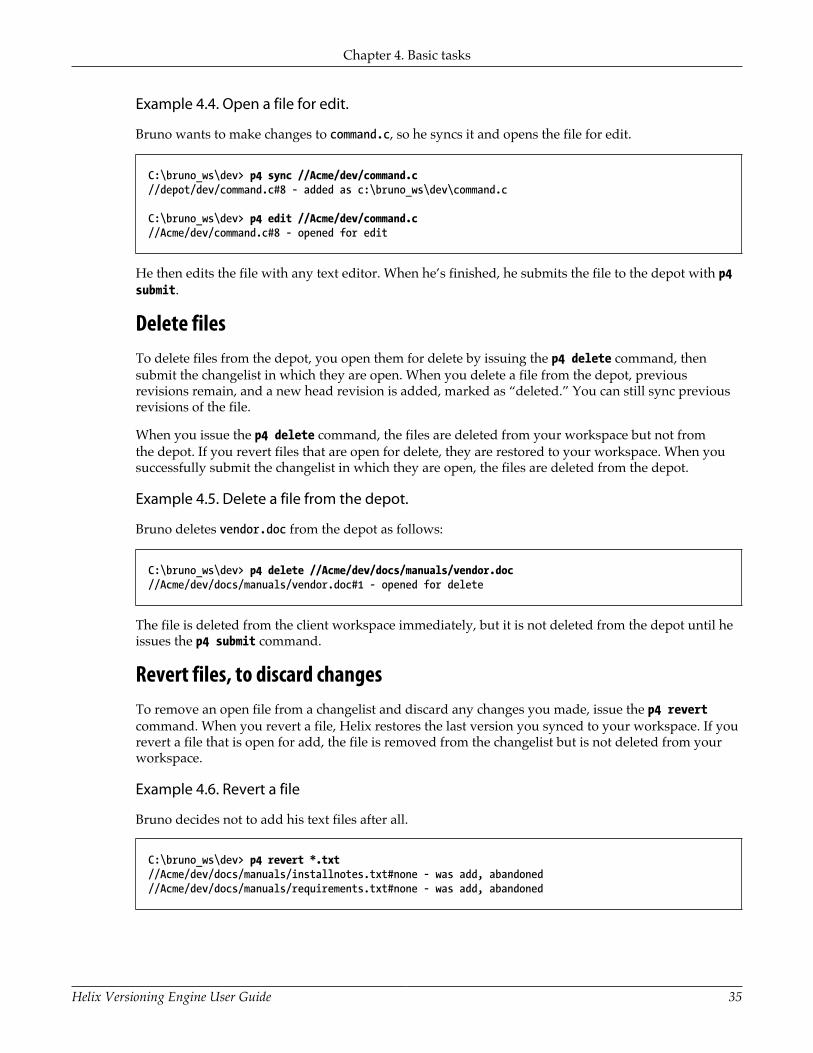
Chapter 4. Basic tasks
Helix Versioning Engine User Guide 35
Example 4.4. Open a file for edit.
Bruno wants to make changes to command.c, so he syncs it and opens the file for edit.
C:\bruno_ws\dev> p4 sync //Acme/dev/command.c//depot/dev/command.c#8 - added as c:\bruno_ws\dev\command.c
C:\bruno_ws\dev> p4 edit //Acme/dev/command.c//Acme/dev/command.c#8 - opened for edit
He then edits the file with any text editor. When he’s finished, he submits the file to the depot with p4submit.
Delete filesTo delete files from the depot, you open them for delete by issuing the p4 delete command, thensubmit the changelist in which they are open. When you delete a file from the depot, previousrevisions remain, and a new head revision is added, marked as “deleted.” You can still sync previousrevisions of the file.
When you issue the p4 delete command, the files are deleted from your workspace but not fromthe depot. If you revert files that are open for delete, they are restored to your workspace. When yousuccessfully submit the changelist in which they are open, the files are deleted from the depot.
Example 4.5. Delete a file from the depot.
Bruno deletes vendor.doc from the depot as follows:
C:\bruno_ws\dev> p4 delete //Acme/dev/docs/manuals/vendor.doc//Acme/dev/docs/manuals/vendor.doc#1 - opened for delete
The file is deleted from the client workspace immediately, but it is not deleted from the depot until heissues the p4 submit command.
Revert files, to discard changesTo remove an open file from a changelist and discard any changes you made, issue the p4 revertcommand. When you revert a file, Helix restores the last version you synced to your workspace. If yourevert a file that is open for add, the file is removed from the changelist but is not deleted from yourworkspace.
Example 4.6. Revert a file
Bruno decides not to add his text files after all.
C:\bruno_ws\dev> p4 revert *.txt//Acme/dev/docs/manuals/installnotes.txt#none - was add, abandoned//Acme/dev/docs/manuals/requirements.txt#none - was add, abandoned

Chapter 4. Basic tasks
36 Helix Versioning Engine User Guide
To preview the results of a revert operation without actually reverting files, specify the -n option whenyou issue the p4 revert command.
Rename and move filesTo rename or move files, you must first open them for add or edit, and then use the p4 move command:
C:\bruno_ws> p4 move source_file target_file
To move groups of files, use matching wildcards in the source_file and target_file specifiers. To movefiles, you must have Helix write permission for the specified files. For information about usingwildcards with Helix files, see “Helix wildcards” on page 146.
For details about Helix permissions, see the Helix Versioning Engine Administrator Guide: Fundamentals.
When you rename or move a file using p4 move, the versioning service creates an integration recordthat links it to its deleted predecessor, preserving the file’s history. Integration is also used to createbranches and to propagate changes.
Diff filesHelix allows you to diff (compare) revisions of text files. By diffing files, you can display:
• Changes that you made after opening the file for edit
• Differences between any two revisions
• Differences between file revisions in different branches
To diff a file that is synced to your workspace with a depot revision, issue the p4 diff filename#revcommand. If you omit the revision specifier, the file in your workspace is compared with the revisionyou last synced, to display changes you made after syncing it.
To diff two revisions that reside in the depot but not in your workspace, use the p4 diff2 command.To diff a set of files, specify wildcards in the filename argument when you issue the p4 diff2command.
The p4 diff command performs the comparison on your computer, but the p4 diff2 commandinstructs the Helix server to perform the diff and to send the results to you.
The following table lists some common uses for diff commands:
To diff Against Use this command
The workspace file The head revision p4 diff file or p4 diff file#head
The workspace file Revision 3 p4 diff file#3
The head revision Revision 134 p4 diff2 file file#134

Chapter 4. Basic tasks
Helix Versioning Engine User Guide 37
To diff Against Use this command
File revision atchangelist 32
File revision atchangelist 177
p4 diff2 file@32 file@177
The workspace file A file shelved inpending changelist123
p4 diff file@=123
All files in release 1 All files in release 2 p4 diff2 //Acme/rel1/... //Acme/rel2/...
By default, the p4 diff command launches Helix’s internal diff application. To use a different diffprogram, set the P4DIFF environment variable to specify the path and executable of the desiredapplication. To specify arguments for the external diff application, use the -d option. For details, referto the P4 Command Reference.
Resolve conflictsWhen you and other users are working on the same set of files, conflicts can occur. Helix enables yourteam to work on the same files simultaneously and resolve any conflicts that arise.
Chapter 7, “Resolve conflicts” on page 77 explains in detail how to resolve file conflicts.
Other recurring tasksThis section describes other basic tasks you perform during the lifetime of your installation.
Changelist-related tasksThis section explains how to work with changelists.
To change files in the depot, you open them in a changelist, make any changes to the files, and thensubmit the changelist. A changelist contains a list of files, their revision numbers, and the operations tobe performed on the files. Unsubmitted changelists are referred to as pending changelists.
The following commands add or remove files from changelists:
p4 addp4 delete
p4 editp4 integrate
p4 reopenp4 revert
p4 shelvep4 unshelvep4 reshelve
Submission of changelists is an all-or-nothing operation; that is, either all of the files in the changelistare updated in the depot, or, if an error occurs, none of them are. This approach guarantees that codealterations that affect multiple files occur simultaneously.
Helix assigns numbers to changelists and also maintains a default changelist, which is numbered whenyou submit it. You can create multiple changelists to organize your work. For example, one changelistmight contain files that are changed to implement a new feature, and another changelist might containa bug fix. When you open a file, it is placed in the default changelist unless you specify an existingchangelist number on the command line using the -c option. For example, to edit a file and submit it in
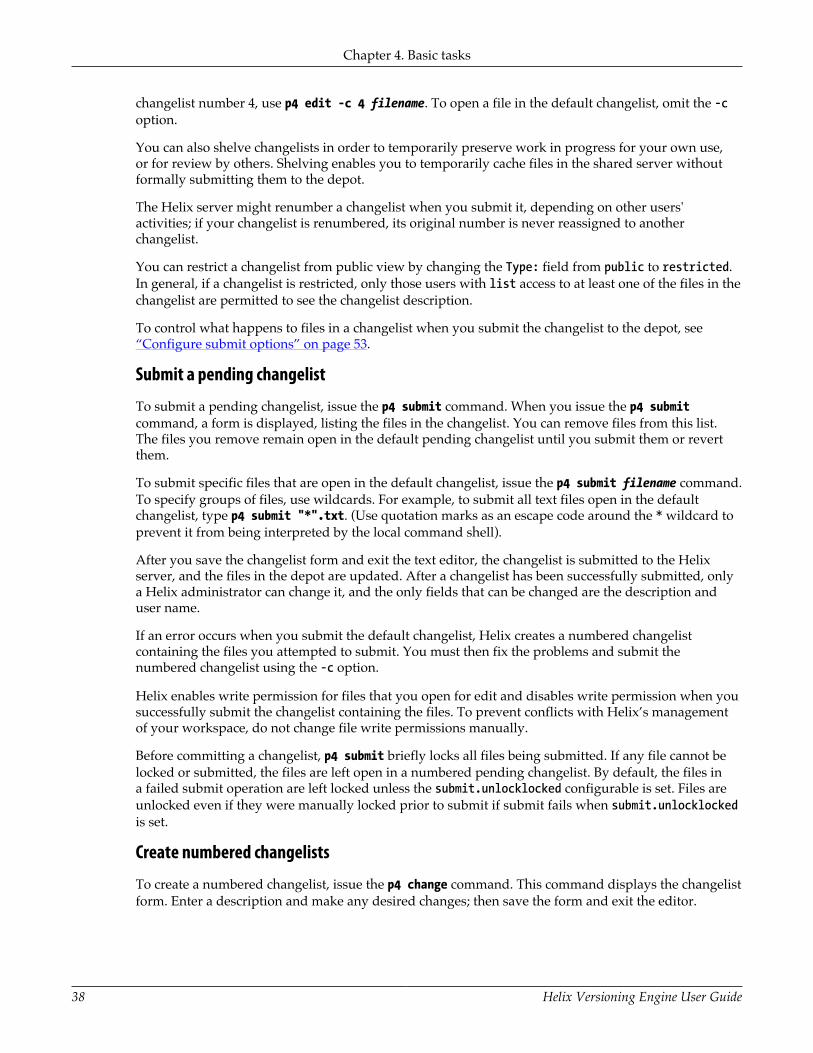
Chapter 4. Basic tasks
38 Helix Versioning Engine User Guide
changelist number 4, use p4 edit -c 4 filename. To open a file in the default changelist, omit the -coption.
You can also shelve changelists in order to temporarily preserve work in progress for your own use,or for review by others. Shelving enables you to temporarily cache files in the shared server withoutformally submitting them to the depot.
The Helix server might renumber a changelist when you submit it, depending on other users'activities; if your changelist is renumbered, its original number is never reassigned to anotherchangelist.
You can restrict a changelist from public view by changing the Type: field from public to restricted.In general, if a changelist is restricted, only those users with list access to at least one of the files in thechangelist are permitted to see the changelist description.
To control what happens to files in a changelist when you submit the changelist to the depot, see“Configure submit options” on page 53.
Submit a pending changelist
To submit a pending changelist, issue the p4 submit command. When you issue the p4 submitcommand, a form is displayed, listing the files in the changelist. You can remove files from this list.The files you remove remain open in the default pending changelist until you submit them or revertthem.
To submit specific files that are open in the default changelist, issue the p4 submit filename command.To specify groups of files, use wildcards. For example, to submit all text files open in the defaultchangelist, type p4 submit "*".txt. (Use quotation marks as an escape code around the * wildcard toprevent it from being interpreted by the local command shell).
After you save the changelist form and exit the text editor, the changelist is submitted to the Helixserver, and the files in the depot are updated. After a changelist has been successfully submitted, onlya Helix administrator can change it, and the only fields that can be changed are the description anduser name.
If an error occurs when you submit the default changelist, Helix creates a numbered changelistcontaining the files you attempted to submit. You must then fix the problems and submit thenumbered changelist using the -c option.
Helix enables write permission for files that you open for edit and disables write permission when yousuccessfully submit the changelist containing the files. To prevent conflicts with Helix’s managementof your workspace, do not change file write permissions manually.
Before committing a changelist, p4 submit briefly locks all files being submitted. If any file cannot belocked or submitted, the files are left open in a numbered pending changelist. By default, the files ina failed submit operation are left locked unless the submit.unlocklocked configurable is set. Files areunlocked even if they were manually locked prior to submit if submit fails when submit.unlocklockedis set.
Create numbered changelists
To create a numbered changelist, issue the p4 change command. This command displays the changelistform. Enter a description and make any desired changes; then save the form and exit the editor.
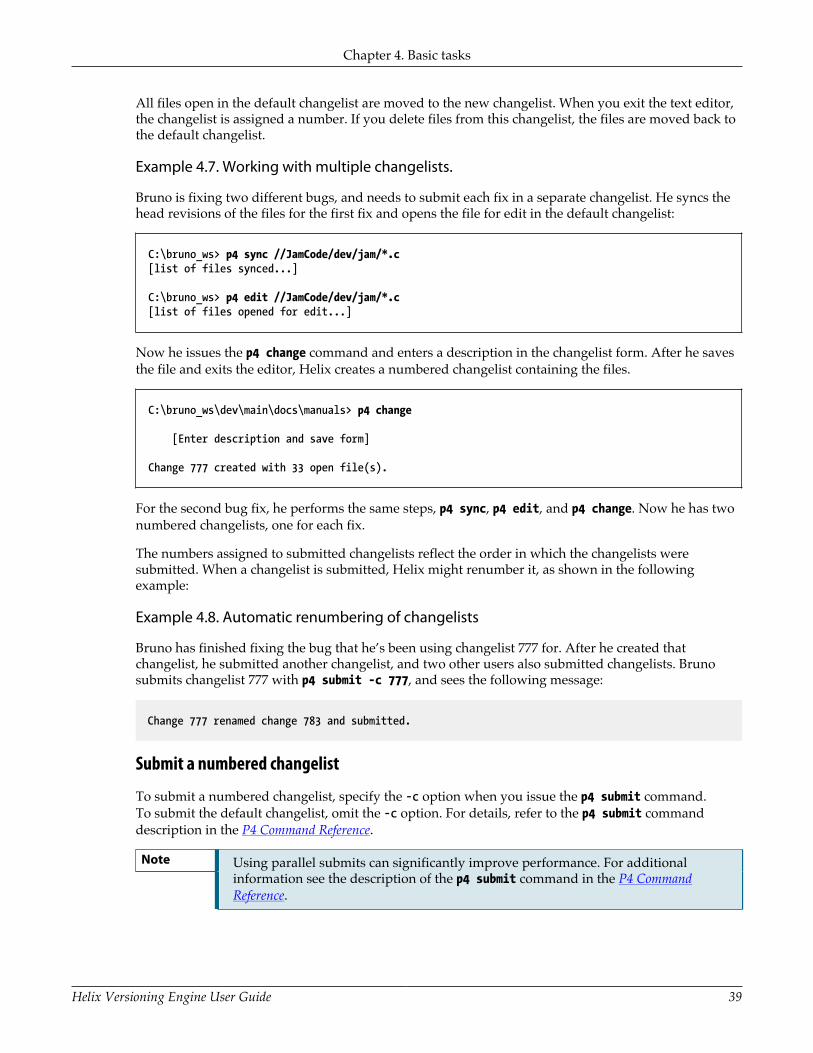
Chapter 4. Basic tasks
Helix Versioning Engine User Guide 39
All files open in the default changelist are moved to the new changelist. When you exit the text editor,the changelist is assigned a number. If you delete files from this changelist, the files are moved back tothe default changelist.
Example 4.7. Working with multiple changelists.
Bruno is fixing two different bugs, and needs to submit each fix in a separate changelist. He syncs thehead revisions of the files for the first fix and opens the file for edit in the default changelist:
C:\bruno_ws> p4 sync //JamCode/dev/jam/*.c[list of files synced...]
C:\bruno_ws> p4 edit //JamCode/dev/jam/*.c[list of files opened for edit...]
Now he issues the p4 change command and enters a description in the changelist form. After he savesthe file and exits the editor, Helix creates a numbered changelist containing the files.
C:\bruno_ws\dev\main\docs\manuals> p4 change
[Enter description and save form]
Change 777 created with 33 open file(s).
For the second bug fix, he performs the same steps, p4 sync, p4 edit, and p4 change. Now he has twonumbered changelists, one for each fix.
The numbers assigned to submitted changelists reflect the order in which the changelists weresubmitted. When a changelist is submitted, Helix might renumber it, as shown in the followingexample:
Example 4.8. Automatic renumbering of changelists
Bruno has finished fixing the bug that he’s been using changelist 777 for. After he created thatchangelist, he submitted another changelist, and two other users also submitted changelists. Brunosubmits changelist 777 with p4 submit -c 777, and sees the following message:
Change 777 renamed change 783 and submitted.
Submit a numbered changelist
To submit a numbered changelist, specify the -c option when you issue the p4 submit command.To submit the default changelist, omit the -c option. For details, refer to the p4 submit commanddescription in the P4 Command Reference.
Note Using parallel submits can significantly improve performance. For additionalinformation see the description of the p4 submit command in the P4 CommandReference.

Chapter 4. Basic tasks
40 Helix Versioning Engine User Guide
Shelve changelists
The Helix shelving feature enables you to temporarily make copies of your files available to other userswithout checking the changelist into the depot.
Shelving is useful for individual developers who are switching between tasks or performing cross-platform testing before checking in their changes. Shelving also enables teams to easily hand offchanges and to perform code reviews.
Example 4.9. Shelving a changelist.
Earl has made changes to command.c on a UNIX platform, and now wants others to be able to view andtest his changes.
$ p4 edit //Acme/dev/command.c//Acme/dev/command.c#9 - opened for edit...
$ p4 shelveChange 123 created with 1 open file(s).Shelving files for change 123.edit //Acme/dev/command.c#9Change 123 files shelved.
A pending changelist is created, and the shelved version of command.c is stored in the server. The filecommand.c remains editable in Earl’s workspace, and Earl can continue to work on the file, or can reverthis changes and work on something else.
Shelved files remain open in the changelist from which they were shelved. (To add a file to an existingshelved changelist, you must first open that file in that specific changelist.) You can continue to workon the files in your workspace without affecting the shelved files. Shelved files can be synced to otherworkspaces, including workspaces owned by other users. For example:
Example 4.10. Unshelving a changelist for code review
Earl has asked for code review and a cross-platform compatibility check on the version of command.cthat he shelved in changelist 123. Bruno, who is using a Windows computer, types:
C:\bruno_ws\dev> p4 unshelve -s 123 //Acme/dev/command.c//Acme/dev/command.c#9 - unshelved, opened for edit
and conducts the test in the Windows environment while Earl continues on with other work.
When you shelve a file, the version on the shelf is unaffected by commands that you perform in yourown workspace, even if you revert the file to work on something else.
Example 4.11. Handing off files to other users.
Earl’s version of command.c works on UNIX, but Bruno’s cross-platform check of command.c hasrevealed a bug. Bruno can take over the work from here, so Earl reverts his workspace and works onsomething else:
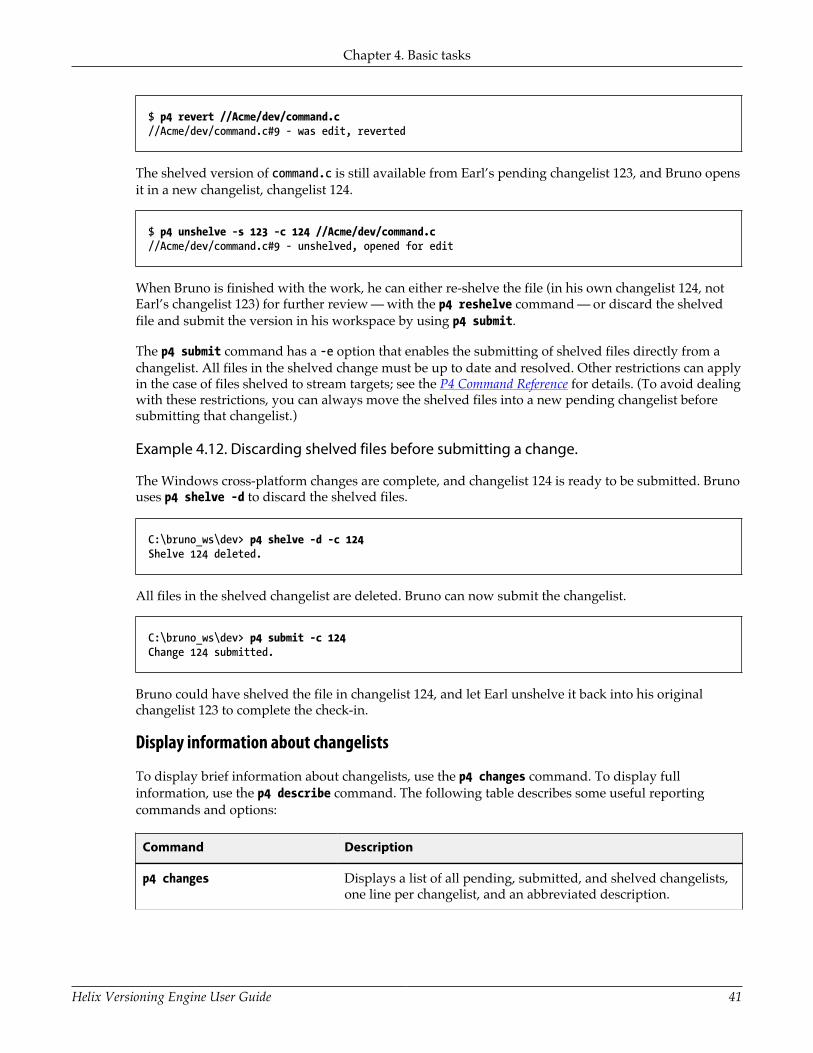
Chapter 4. Basic tasks
Helix Versioning Engine User Guide 41
$ p4 revert //Acme/dev/command.c//Acme/dev/command.c#9 - was edit, reverted
The shelved version of command.c is still available from Earl’s pending changelist 123, and Bruno opensit in a new changelist, changelist 124.
$ p4 unshelve -s 123 -c 124 //Acme/dev/command.c//Acme/dev/command.c#9 - unshelved, opened for edit
When Bruno is finished with the work, he can either re-shelve the file (in his own changelist 124, notEarl’s changelist 123) for further review — with the p4 reshelve command — or discard the shelvedfile and submit the version in his workspace by using p4 submit.
The p4 submit command has a -e option that enables the submitting of shelved files directly from achangelist. All files in the shelved change must be up to date and resolved. Other restrictions can applyin the case of files shelved to stream targets; see the P4 Command Reference for details. (To avoid dealingwith these restrictions, you can always move the shelved files into a new pending changelist beforesubmitting that changelist.)
Example 4.12. Discarding shelved files before submitting a change.
The Windows cross-platform changes are complete, and changelist 124 is ready to be submitted. Brunouses p4 shelve -d to discard the shelved files.
C:\bruno_ws\dev> p4 shelve -d -c 124Shelve 124 deleted.
All files in the shelved changelist are deleted. Bruno can now submit the changelist.
C:\bruno_ws\dev> p4 submit -c 124Change 124 submitted.
Bruno could have shelved the file in changelist 124, and let Earl unshelve it back into his originalchangelist 123 to complete the check-in.
Display information about changelists
To display brief information about changelists, use the p4 changes command. To display fullinformation, use the p4 describe command. The following table describes some useful reportingcommands and options:
Command Description
p4 changes Displays a list of all pending, submitted, and shelved changelists,one line per changelist, and an abbreviated description.

Chapter 4. Basic tasks
42 Helix Versioning Engine User Guide
Command Description
p4 changes -m count Limits the number of changelists reported on to the last specifiednumber of changelists.
p4 changes -s status Limits the list to those changelists with a particular status; forexample, p4 changes -s submitted lists only already submittedchangelists.
p4 changes -u user Limits the list to those changelists submitted by a particular user.
p4 changes -c workspace Limits the list to those changelists submitted from a particularclient workspace.
p4 describe changenum Displays full information about a single changelist. If thechangelist has already been submitted, the report includes a list ofaffected files and the diffs of these files. (You can use the -s optionto exclude the file diffs.)
p4 describe -O changenum If a changelist was renumbered, describe the changelist in termsof its original change number. (For example, the changelistrenumbered in the example on Example 4.8, “Automaticrenumbering of changelists” on page 39 can be retrieved witheither p4 describe 783 or p4 describe -O 777.)
For more information, see “Changelist reporting” on page 121.
Move files between changelists
To move files from one changelist to another, issue the p4 reopen -c changenum filenames command,where changenum specifies the number of the target changelist. If you are moving files to the defaultchangelist, use p4 reopen -c default filenames.
Delete changelists
To delete a pending changelist, you must first remove all files and jobs associated with it and thenissue the p4 change -d changenum command. Related operations include the following:
• To move files to another changelist, issue the p4 reopen -c changenum command.
• To remove files from the changelist and discard any changes, issue the p4 revert -c changenumcommand.
Changelists that have already been submitted can be deleted only by a Helix administrator. See theHelix Versioning Engine Administrator Guide: Fundamentals for more information.
Configure client behaviorYou can configure many aspects of the behavior of both the client workspace and the client binaryrunning on your computer.

Chapter 4. Basic tasks
Helix Versioning Engine User Guide 43
Chapter 5, “Configure clients” on page 45 discusses client configuration in detail.
Configure stream behaviorYou can configure a stream’s characteristics — such as its location, its type, and the files in its view,among other things.
“Configure a stream” on page 65 discusses stream configuration in detail.
Branch and populate child streamsAfter populating the mainline — as described in “Populate the mainline stream” on page 29 — youcan branch files for development and for release. For example, to create a development stream that is aclone of its mainline parent, issue the following command:
$ p4 stream -t development -P //Acme/main //Acme/dev
Helix displays the stream specification with the type set to development. Save the specification. Topopulate the stream with the files from the mainline, issue the following commands:
$ p4 populate -d "From main" -S //Acme/dev -r$ p4 sync
Propagate changesStreams enable you to isolate stable code from work in progress, and to work concurrently on variousprojects without impediment. Best practice is to periodically update less stable streams from streamsthat are more stable (by merging), then promote changes to the more stable stream (by copying).Merging and copying are streamlined forms of integration. In general, propagate change as follows:
• For copying and branching, use p4 copy or p4 populate.
• For merging, use p4 merge.
• For edge cases not addressed by p4 merge or p4 copy, use p4 integrate.
The preceding guidelines apply to classic Helix as well.
Merge changes from a more stable stream
To update a stream with changes from a more stable stream, issue the p4 merge -S source-streamcommand, resolve as required, and submit the resulting changelist. By default, you cannot copychanges to a more stable stream until you have merged any incoming changes from the intendedtarget. This practice ensures that you do not inadvertently overwrite any of the contents of the morestable stream.
Assuming changes have been checked into the mainline after you started working in the developmentstream (and assuming your workspace is set to a development stream), you can incorporate thechanges into the development stream by issuing the following commands:
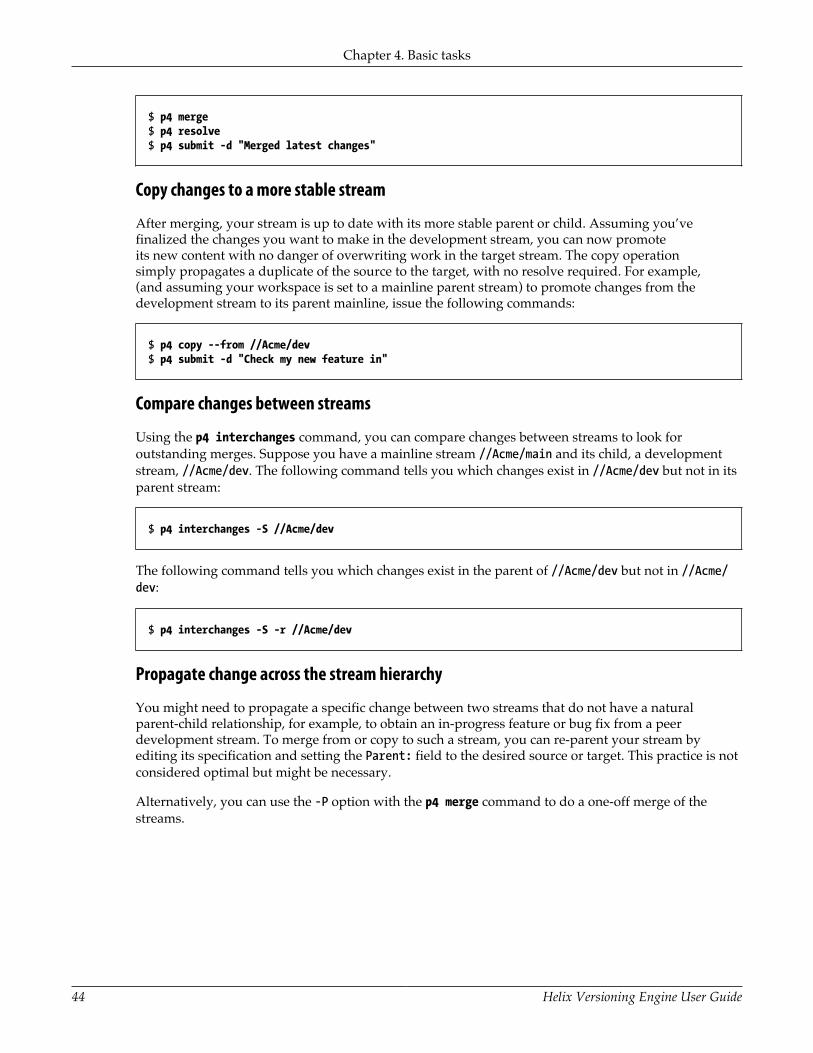
Chapter 4. Basic tasks
44 Helix Versioning Engine User Guide
$ p4 merge$ p4 resolve$ p4 submit -d "Merged latest changes"
Copy changes to a more stable stream
After merging, your stream is up to date with its more stable parent or child. Assuming you’vefinalized the changes you want to make in the development stream, you can now promoteits new content with no danger of overwriting work in the target stream. The copy operationsimply propagates a duplicate of the source to the target, with no resolve required. For example,(and assuming your workspace is set to a mainline parent stream) to promote changes from thedevelopment stream to its parent mainline, issue the following commands:
$ p4 copy --from //Acme/dev$ p4 submit -d "Check my new feature in"
Compare changes between streams
Using the p4 interchanges command, you can compare changes between streams to look foroutstanding merges. Suppose you have a mainline stream //Acme/main and its child, a developmentstream, //Acme/dev. The following command tells you which changes exist in //Acme/dev but not in itsparent stream:
$ p4 interchanges -S //Acme/dev
The following command tells you which changes exist in the parent of //Acme/dev but not in //Acme/dev:
$ p4 interchanges -S -r //Acme/dev
Propagate change across the stream hierarchy
You might need to propagate a specific change between two streams that do not have a naturalparent-child relationship, for example, to obtain an in-progress feature or bug fix from a peerdevelopment stream. To merge from or copy to such a stream, you can re-parent your stream byediting its specification and setting the Parent: field to the desired source or target. This practice is notconsidered optimal but might be necessary.
Alternatively, you can use the -P option with the p4 merge command to do a one-off merge of thestreams.
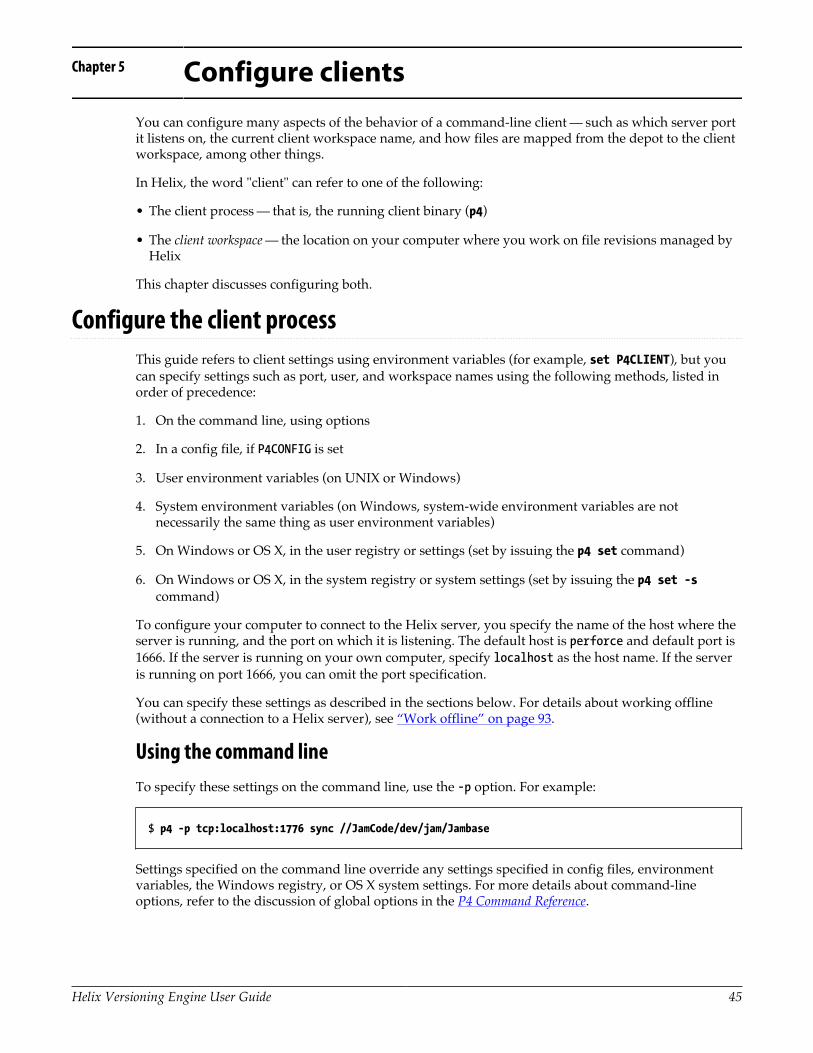
Helix Versioning Engine User Guide 45
Chapter 5 Configure clientsYou can configure many aspects of the behavior of a command-line client — such as which server portit listens on, the current client workspace name, and how files are mapped from the depot to the clientworkspace, among other things.
In Helix, the word "client" can refer to one of the following:
• The client process — that is, the running client binary (p4)
• The client workspace — the location on your computer where you work on file revisions managed byHelix
This chapter discusses configuring both.
Configure the client processThis guide refers to client settings using environment variables (for example, set P4CLIENT), but youcan specify settings such as port, user, and workspace names using the following methods, listed inorder of precedence:
1. On the command line, using options
2. In a config file, if P4CONFIG is set
3. User environment variables (on UNIX or Windows)
4. System environment variables (on Windows, system-wide environment variables are notnecessarily the same thing as user environment variables)
5. On Windows or OS X, in the user registry or settings (set by issuing the p4 set command)
6. On Windows or OS X, in the system registry or system settings (set by issuing the p4 set -scommand)
To configure your computer to connect to the Helix server, you specify the name of the host where theserver is running, and the port on which it is listening. The default host is perforce and default port is1666. If the server is running on your own computer, specify localhost as the host name. If the serveris running on port 1666, you can omit the port specification.
You can specify these settings as described in the sections below. For details about working offline(without a connection to a Helix server), see “Work offline” on page 93.
Using the command lineTo specify these settings on the command line, use the -p option. For example:
$ p4 -p tcp:localhost:1776 sync //JamCode/dev/jam/Jambase
Settings specified on the command line override any settings specified in config files, environmentvariables, the Windows registry, or OS X system settings. For more details about command-lineoptions, refer to the discussion of global options in the P4 Command Reference.

Chapter 5. Configure clients
46 Helix Versioning Engine User Guide
Using config filesConfig files are text files containing settings that are in effect for files in and below the directory wherethe config file resides. Config files are useful if you have multiple client workspaces on the samecomputer. By specifying the settings in config files, you avoid the inconvenience of changing systemsettings every time you want to work with a different workspace.
To use config files, you define the P4CONFIG environment variable, specifying a file name (for example,.p4config). When you issue a command, Helix searches the current working directory and its parentdirectories for the specified file and uses the settings it contains (unless the settings are overridden bycommand-line options).
Each setting in the file must be specified on its own line, using the following format:
setting=value
The following settings can be specified in a config file:
Setting Description
P4CHARSET Character set used for translation of Unicode files.
P4COMMANDCHARSET Non-UTF-16 or UTF-32 character set used by Command-Line Client whenP4CHARSET is set to a UTF-16 or UTF-32 character set.
P4CLIENT Name of the current client workspace.
P4DIFF The name and location of the diff program used by p4 resolve and p4 diff.
P4EDITOR The editor invoked by those Helix commands that use forms.
P4HOST Hostname of the client computer. Only useful if the Host: field of the currentclient workspace has been set in the p4 client form.
P4IGNORE A list of files to ignore when using the p4 add and p4 reconcile commands.
P4LANGUAGE This environment variable is reserved for system integrators.
P4MERGE The name and location of the third-party merge program to be used by p4resolve’s merge option.
P4PASSWD Supplies the current Helix user’s password for any Helix command.
P4PORT The protocol, host and port number of the Helix server (including proxies orbrokers) with which to communicate.
P4TRUST The location of a file of known (trusted) Helix servers. You manage thecontents of this file with the p4 trust command. By default, this file is.p4trust in your home directory.
P4USER Current Helix user name.

Chapter 5. Configure clients
Helix Versioning Engine User Guide 47
For details about these settings, refer to the P4 Command Reference.
Example 5.1. Using config files to handle switching between two workspaces.
Ona switches between two workspaces on the same computer. The first workspace is ona-ash. It hasa client root of /tmp/user/ona and connects to the Helix server using SSL at ssl:ida:1818. The secondworkspace is called ona-agave. Its client root is /home/ona/p4-ona, and it uses a plaintext connection toa Helix server at tcp:warhol:1666.
Ona sets the P4CONFIG environment variable to .p4settings. She creates a file called .p4settings in /tmp/user/ona containing the following text:
P4PORT=ssl:ida:1818P4CLIENT=ona-ash
She creates a second .p4settings file in /home/ona/p4-ona. It contains the following text:
P4PORT=tcp:warhol:1666P4CLIENT=ona-agave
Any work she does on files under /tmp/user/ona is managed by the Helix server at ssl:ida:1818 andwork she does on files under /home/ona/p4-ona is managed by the Helix server at tcp:warhol:1666.
Using environment variablesTo configure connection settings using environment variables, set P4PORT to protocol:host:port, as inthe following examples:
If the server runs on and listens to port supports encryptionprotocol
set P4PORT to
your computer 1666 nothing (plaintext) localhost:1666
perforce 1666 SSL ssl:perforce:1666
houston 3435 nothing (plaintext) tcp:houston:3435
example.com 1818 SSL ssl:example.com:1818
If you do not specify a protocol in your P4PORT setting, tcp: (plaintext communication over TCP/IP) isassumed. If the Helix server has been configured to support SSL, you can encrypt your connection toHelix by using ssl: as the desired protocol.
Other protocols (for example, tcp4: to require a plaintext IPv4 connection, or ssl64: to require anencrypted connection, but to prefer the use of the IPv6 transport instead of IPv4) are available for usein mixed networking environments.
See “Configure for IPv6 networks” on page 48, and the Helix Versioning Engine Administrator Guide:Fundamentals, for details.

Chapter 5. Configure clients
48 Helix Versioning Engine User Guide
Using the Windows registry or OS X system settingsOn Windows and OS X computers, you can store connection settings in the registry (or systemsettings) by using the p4 set command. For example:
$ p4 set P4PORT=ssl:tea.example.com:1667
There are two ways you can configure client settings in the registry:
• p4 set setting=value: for the current local user.
• p4 set -s setting=value: for all users on the local computer. Can be overridden by any registrysettings made for the local user. Requires administrative privileges.
To see which settings are in effect, use the p4 set command without arguments. For details about thep4 set command, see the P4 Command Reference.
Configure for IPv6 networksHelix supports connectivity over IPv6 networks as well as over IPv4 networks.
Depending on the configuration of your LAN or WAN, your system administrator may recommenddifferent port settings. Your administrator may also recommend that you set the net.rfc3484configurable to 1, either from the command line or in a P4CONFIG file:
$ p4 configure set net.rfc3484=1
Doing so ensures RFC3484-compliant behavior if the protocol value is not explicitly specified; thatis, if the client-side configurable net.rfc3484 is set to 1, and P4PORT is set to example.com:1666,or tcp:example.com:1666, or ssl:example.com:1666, the user’s operating system automaticallydetermines, for any given connection, whether to use IPv4 or IPv6 when communicating with theversioning server.
Further information is available in the Helix Versioning Engine Administrator Guide: Fundamentals.
Configure for UnicodeThe Helix server can be run in Unicode mode to activate support for file names or directory namesthat contain Unicode characters, and Helix identifiers (for example, user names) and specifications (forexample, changelist descriptions or jobs) that contain Unicode characters.
In Unicode mode, the Helix server also translates Unicode files and metadata to the character setconfigured on the user’s computer, and verifies that the Unicode files and metadata contain validUTF-8 characters.
Note If you only need to manage textual files that contain Unicode characters, but do notneed the features listed under “Configure for Unicode” on page 48, you do not
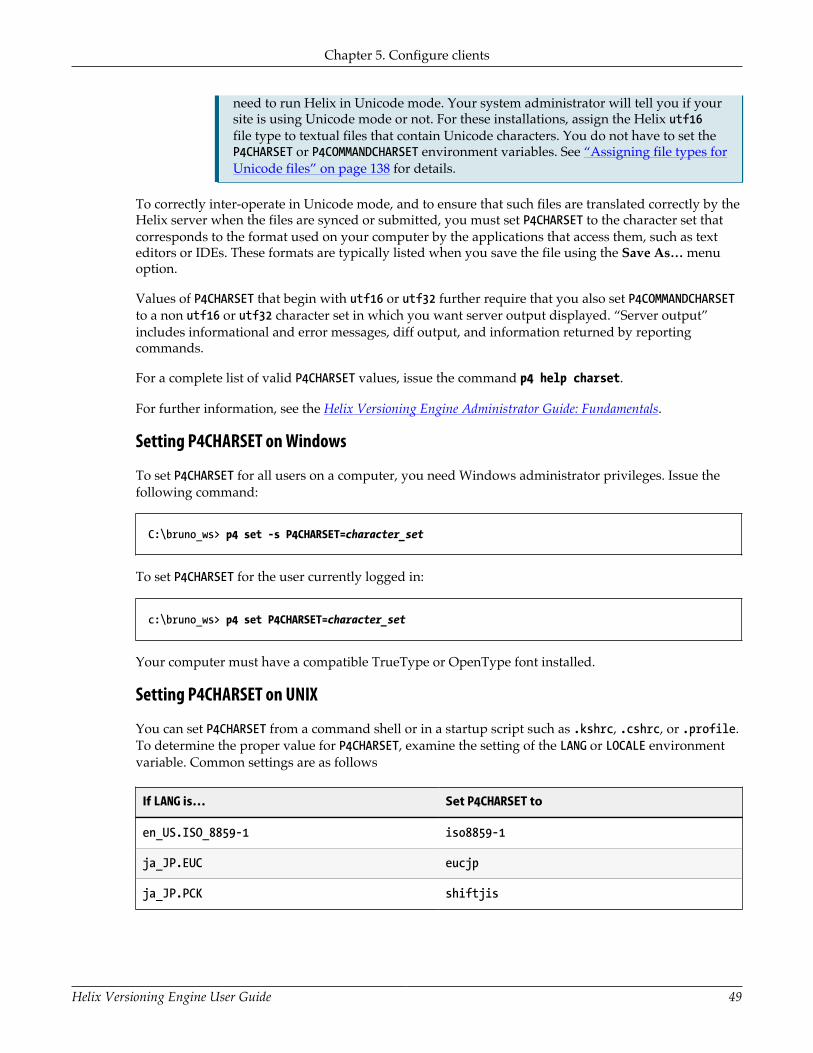
Chapter 5. Configure clients
Helix Versioning Engine User Guide 49
need to run Helix in Unicode mode. Your system administrator will tell you if yoursite is using Unicode mode or not. For these installations, assign the Helix utf16file type to textual files that contain Unicode characters. You do not have to set theP4CHARSET or P4COMMANDCHARSET environment variables. See “Assigning file types forUnicode files” on page 138 for details.
To correctly inter-operate in Unicode mode, and to ensure that such files are translated correctly by theHelix server when the files are synced or submitted, you must set P4CHARSET to the character set thatcorresponds to the format used on your computer by the applications that access them, such as texteditors or IDEs. These formats are typically listed when you save the file using the Save As… menuoption.
Values of P4CHARSET that begin with utf16 or utf32 further require that you also set P4COMMANDCHARSETto a non utf16 or utf32 character set in which you want server output displayed. “Server output”includes informational and error messages, diff output, and information returned by reportingcommands.
For a complete list of valid P4CHARSET values, issue the command p4 help charset.
For further information, see the Helix Versioning Engine Administrator Guide: Fundamentals.
Setting P4CHARSET on Windows
To set P4CHARSET for all users on a computer, you need Windows administrator privileges. Issue thefollowing command:
C:\bruno_ws> p4 set -s P4CHARSET=character_set
To set P4CHARSET for the user currently logged in:
c:\bruno_ws> p4 set P4CHARSET=character_set
Your computer must have a compatible TrueType or OpenType font installed.
Setting P4CHARSET on UNIX
You can set P4CHARSET from a command shell or in a startup script such as .kshrc, .cshrc, or .profile.To determine the proper value for P4CHARSET, examine the setting of the LANG or LOCALE environmentvariable. Common settings are as follows
If LANG is… Set P4CHARSET to
en_US.ISO_8859-1 iso8859-1
ja_JP.EUC eucjp
ja_JP.PCK shiftjis

Chapter 5. Configure clients
50 Helix Versioning Engine User Guide
In general, for a Japanese installation, set P4CHARSET to eucjp, and for a European installation, setP4CHARSET to iso8859-1.
Configure a client workspaceA Helix client workspace is a set of directories on your computer where you work on file revisions thatare managed by Helix. Each workspace is given a name that identifies the client workspace to theHelix server. If no workspace name is specified (by setting the P4CLIENT environment variable) thedefault workspace name is the name of your computer. To specify the effective workspace name, setthe P4CLIENT environment variable. You can have multiple workspaces on your computer.
All files within a Helix client workspace share a root directory, called the client workspace root. Theworkspace root is the highest-level directory of the workspace under which the managed source filesreside.
If you configure multiple workspaces on the same computer, keep workspace locations separate toavoid inadvertently overwriting files. Ensure that client roots are located in different folders and thattheir workspace views do not map depot files to overlapping locations on your computer.
Although Windows-based systems do not have a root directory, Helix supports — via the concept ofa null root — workspaces spread across multiple drives and/or a disjoint folder with only c:\ as theroot.
How Helix manages files in a workspaceHelix manages the files in a client workspace as follows:
• Files in the workspace are created, updated, and deleted as determined by your changes.
• Write permission is enabled when you edit a file, and disabled when you submit your changes.
The state of your workspace is tracked and managed by Helix. To avoid conflicts with the filemanagement performed by Helix applications, do not manually change read-only permissionsettings on files. Helix has commands that help you determine whether or not the state of your clientworkspace corresponds to Helix’s record of that state; see “Work offline” on page 93 for details.
Files in the workspace that you have not put under Helix control are ignored by Helix. For example,compiled objects, libraries, executables, and developers’ temporary files that are created whiledeveloping software but not added to the depot are not affected by Helix commands.
By default, when you create a client workspace, the entire depot is mapped to your workspace. Youcan refine this mapping to view only a portion of the depot and to change the correspondence betweendepot and workspace locations, by refining the workspace view, as described in “Configure workspaceviews” on page 57.
Define a client workspaceTo define a client workspace:
1. Specify the workspace name by setting P4CLIENT; for example, on a UNIX system:
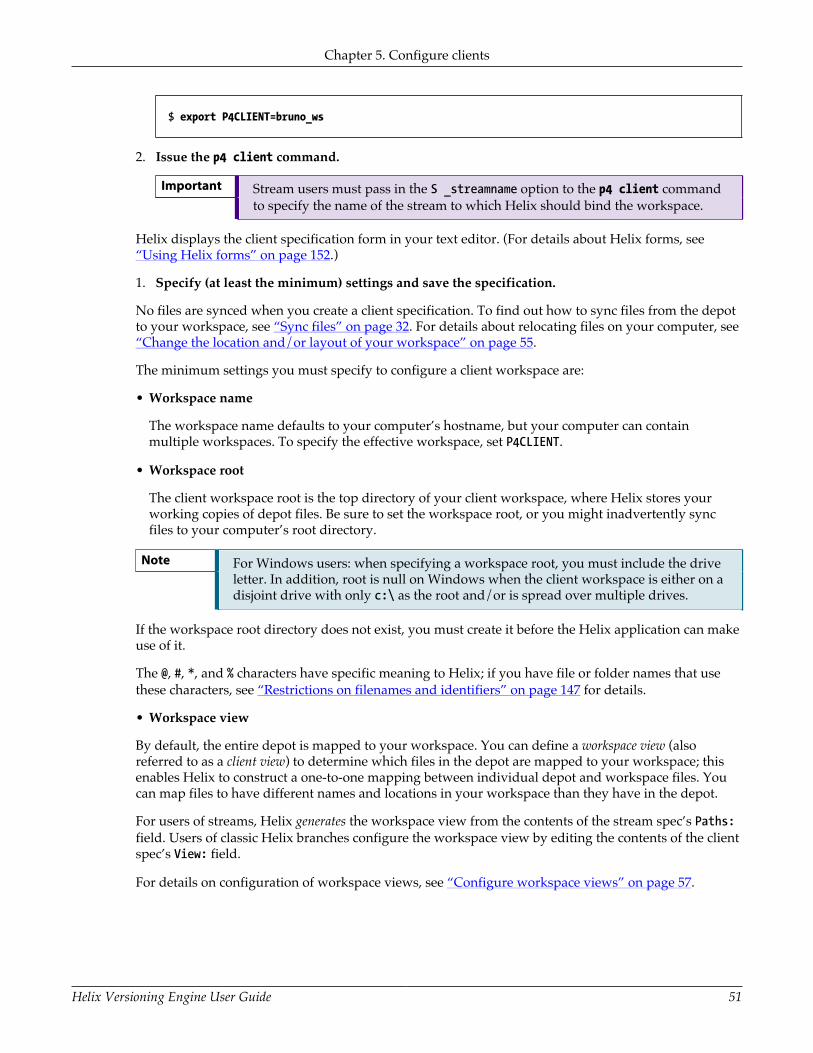
Chapter 5. Configure clients
Helix Versioning Engine User Guide 51
$ export P4CLIENT=bruno_ws
2. Issue the p4 client command.
Important Stream users must pass in the S _streamname option to the p4 client commandto specify the name of the stream to which Helix should bind the workspace.
Helix displays the client specification form in your text editor. (For details about Helix forms, see“Using Helix forms” on page 152.)
1. Specify (at least the minimum) settings and save the specification.
No files are synced when you create a client specification. To find out how to sync files from the depotto your workspace, see “Sync files” on page 32. For details about relocating files on your computer, see“Change the location and/or layout of your workspace” on page 55.
The minimum settings you must specify to configure a client workspace are:
• Workspace name
The workspace name defaults to your computer’s hostname, but your computer can containmultiple workspaces. To specify the effective workspace, set P4CLIENT.
• Workspace root
The client workspace root is the top directory of your client workspace, where Helix stores yourworking copies of depot files. Be sure to set the workspace root, or you might inadvertently syncfiles to your computer’s root directory.
Note For Windows users: when specifying a workspace root, you must include the driveletter. In addition, root is null on Windows when the client workspace is either on adisjoint drive with only c:\ as the root and/or is spread over multiple drives.
If the workspace root directory does not exist, you must create it before the Helix application can makeuse of it.
The @, #, *, and % characters have specific meaning to Helix; if you have file or folder names that usethese characters, see “Restrictions on filenames and identifiers” on page 147 for details.
• Workspace view
By default, the entire depot is mapped to your workspace. You can define a workspace view (alsoreferred to as a client view) to determine which files in the depot are mapped to your workspace; thisenables Helix to construct a one-to-one mapping between individual depot and workspace files. Youcan map files to have different names and locations in your workspace than they have in the depot.
For users of streams, Helix generates the workspace view from the contents of the stream spec’s Paths:field. Users of classic Helix branches configure the workspace view by editing the contents of the clientspec’s View: field.
For details on configuration of workspace views, see “Configure workspace views” on page 57.
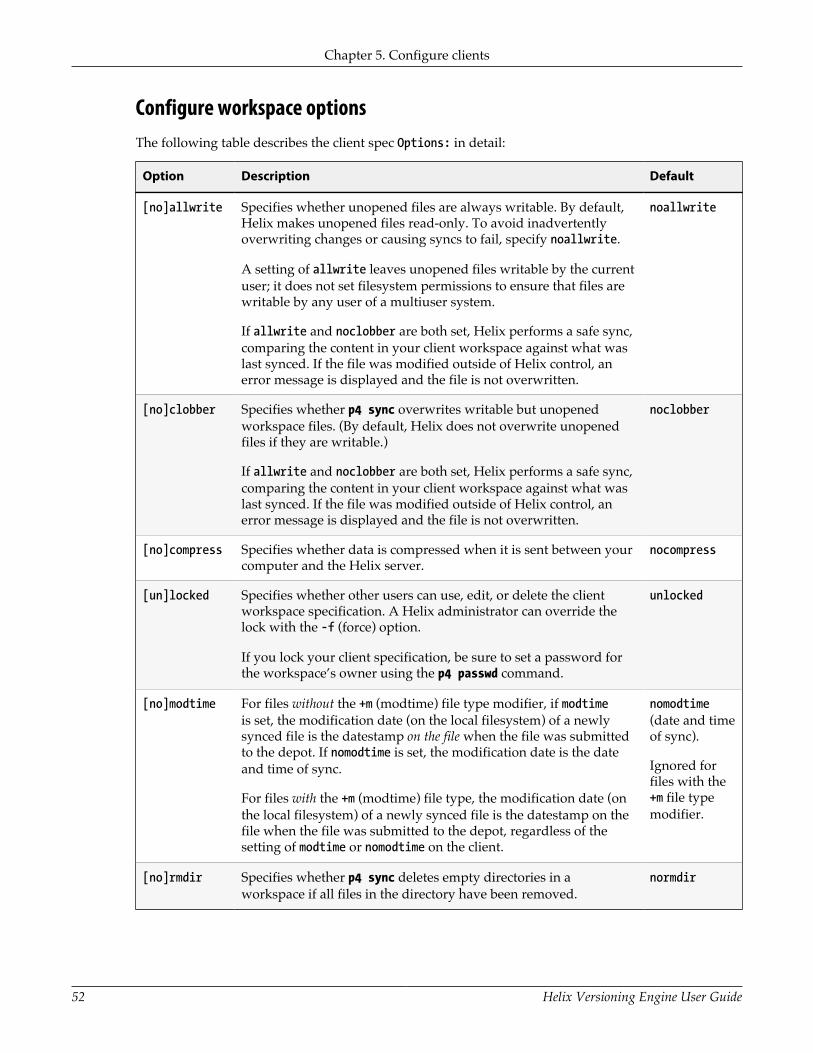
Chapter 5. Configure clients
52 Helix Versioning Engine User Guide
Configure workspace optionsThe following table describes the client spec Options: in detail:
Option Description Default
[no]allwrite Specifies whether unopened files are always writable. By default,Helix makes unopened files read-only. To avoid inadvertentlyoverwriting changes or causing syncs to fail, specify noallwrite.
A setting of allwrite leaves unopened files writable by the currentuser; it does not set filesystem permissions to ensure that files arewritable by any user of a multiuser system.
If allwrite and noclobber are both set, Helix performs a safe sync,comparing the content in your client workspace against what waslast synced. If the file was modified outside of Helix control, anerror message is displayed and the file is not overwritten.
noallwrite
[no]clobber Specifies whether p4 sync overwrites writable but unopenedworkspace files. (By default, Helix does not overwrite unopenedfiles if they are writable.)
If allwrite and noclobber are both set, Helix performs a safe sync,comparing the content in your client workspace against what waslast synced. If the file was modified outside of Helix control, anerror message is displayed and the file is not overwritten.
noclobber
[no]compress Specifies whether data is compressed when it is sent between yourcomputer and the Helix server.
nocompress
[un]locked Specifies whether other users can use, edit, or delete the clientworkspace specification. A Helix administrator can override thelock with the -f (force) option.
If you lock your client specification, be sure to set a password forthe workspace’s owner using the p4 passwd command.
unlocked
[no]modtime For files without the +m (modtime) file type modifier, if modtimeis set, the modification date (on the local filesystem) of a newlysynced file is the datestamp on the file when the file was submittedto the depot. If nomodtime is set, the modification date is the dateand time of sync.
For files with the +m (modtime) file type, the modification date (onthe local filesystem) of a newly synced file is the datestamp on thefile when the file was submitted to the depot, regardless of thesetting of modtime or nomodtime on the client.
nomodtime(date and timeof sync).
Ignored forfiles with the+m file typemodifier.
[no]rmdir Specifies whether p4 sync deletes empty directories in aworkspace if all files in the directory have been removed.
normdir
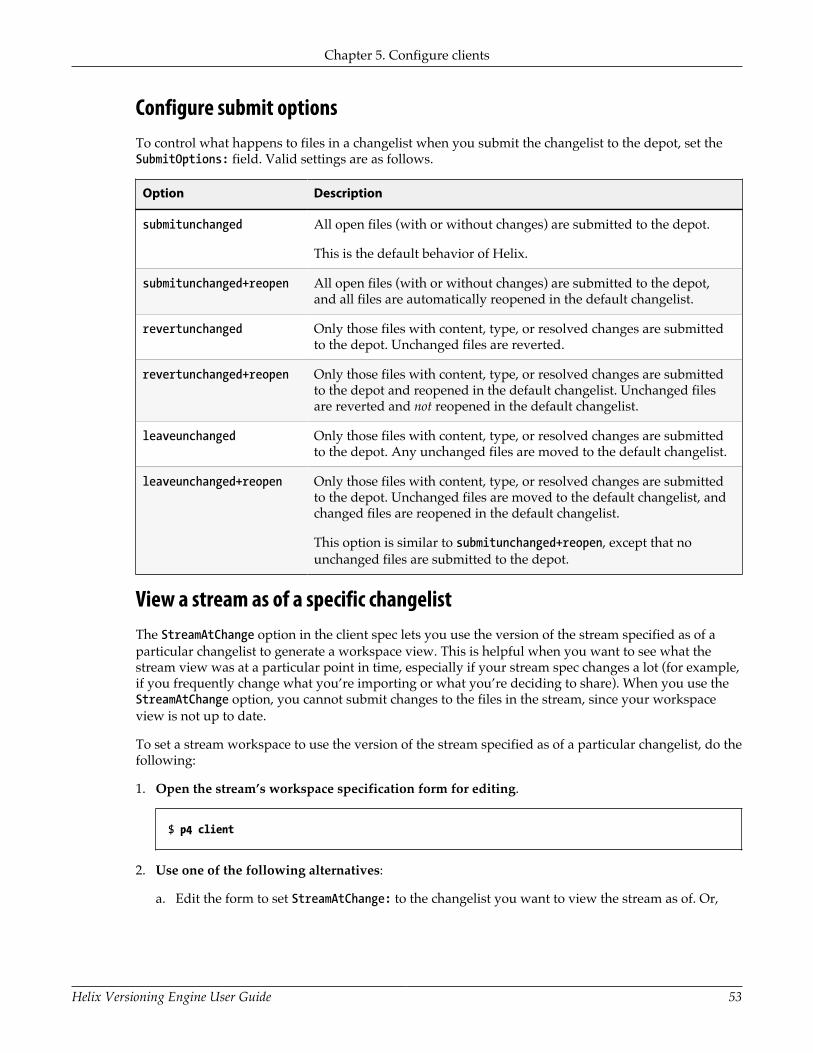
Chapter 5. Configure clients
Helix Versioning Engine User Guide 53
Configure submit optionsTo control what happens to files in a changelist when you submit the changelist to the depot, set theSubmitOptions: field. Valid settings are as follows.
Option Description
submitunchanged All open files (with or without changes) are submitted to the depot.
This is the default behavior of Helix.
submitunchanged+reopen All open files (with or without changes) are submitted to the depot,and all files are automatically reopened in the default changelist.
revertunchanged Only those files with content, type, or resolved changes are submittedto the depot. Unchanged files are reverted.
revertunchanged+reopen Only those files with content, type, or resolved changes are submittedto the depot and reopened in the default changelist. Unchanged filesare reverted and not reopened in the default changelist.
leaveunchanged Only those files with content, type, or resolved changes are submittedto the depot. Any unchanged files are moved to the default changelist.
leaveunchanged+reopen Only those files with content, type, or resolved changes are submittedto the depot. Unchanged files are moved to the default changelist, andchanged files are reopened in the default changelist.
This option is similar to submitunchanged+reopen, except that nounchanged files are submitted to the depot.
View a stream as of a specific changelistThe StreamAtChange option in the client spec lets you use the version of the stream specified as of aparticular changelist to generate a workspace view. This is helpful when you want to see what thestream view was at a particular point in time, especially if your stream spec changes a lot (for example,if you frequently change what you’re importing or what you’re deciding to share). When you use theStreamAtChange option, you cannot submit changes to the files in the stream, since your workspaceview is not up to date.
To set a stream workspace to use the version of the stream specified as of a particular changelist, do thefollowing:
1. Open the stream’s workspace specification form for editing.
$ p4 client
2. Use one of the following alternatives:
a. Edit the form to set StreamAtChange: to the changelist you want to view the stream as of. Or,
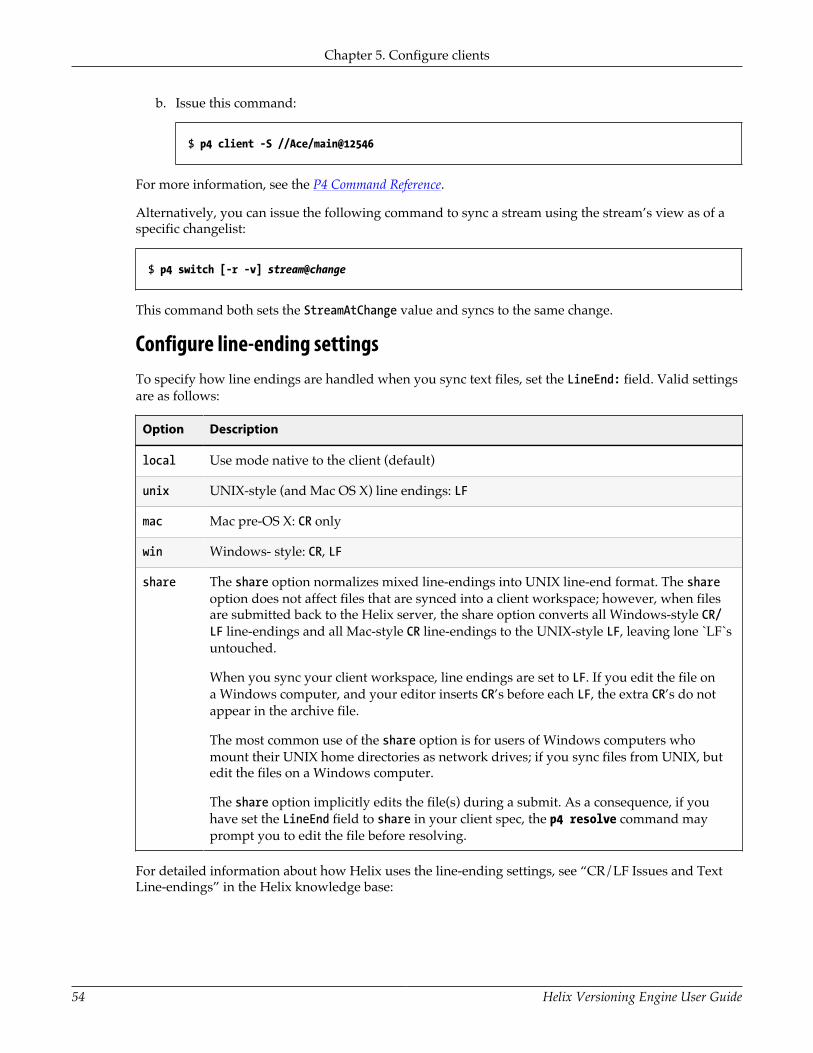
Chapter 5. Configure clients
54 Helix Versioning Engine User Guide
b. Issue this command:
$ p4 client -S //Ace/main@12546
For more information, see the P4 Command Reference.
Alternatively, you can issue the following command to sync a stream using the stream’s view as of aspecific changelist:
$ p4 switch [-r -v] stream@change
This command both sets the StreamAtChange value and syncs to the same change.
Configure line-ending settingsTo specify how line endings are handled when you sync text files, set the LineEnd: field. Valid settingsare as follows:
Option Description
local Use mode native to the client (default)
unix UNIX-style (and Mac OS X) line endings: LF
mac Mac pre-OS X: CR only
win Windows- style: CR, LF
share The share option normalizes mixed line-endings into UNIX line-end format. The shareoption does not affect files that are synced into a client workspace; however, when filesare submitted back to the Helix server, the share option converts all Windows-style CR/LF line-endings and all Mac-style CR line-endings to the UNIX-style LF, leaving lone `LF`suntouched.
When you sync your client workspace, line endings are set to LF. If you edit the file ona Windows computer, and your editor inserts CR’s before each LF, the extra CR’s do notappear in the archive file.
The most common use of the share option is for users of Windows computers whomount their UNIX home directories as network drives; if you sync files from UNIX, butedit the files on a Windows computer.
The share option implicitly edits the file(s) during a submit. As a consequence, if youhave set the LineEnd field to share in your client spec, the p4 resolve command mayprompt you to edit the file before resolving.
For detailed information about how Helix uses the line-ending settings, see “CR/LF Issues and TextLine-endings” in the Helix knowledge base:

Chapter 5. Configure clients
Helix Versioning Engine User Guide 55
http://answers.perforce.com/articles/KB_Article/CR-LF-Issues-and-Text-Line-endings
Change the location and/or layout of your workspaceTo change the location of files in your workspace, issue the p4 client command and change eitheror both of the Root: and View: fields. Before changing these settings, ensure that you have no fileschecked out (by submitting or reverting open files).
If you’re using streams, you must change the Paths: field in the stream spec, rather than the View:field, in the client spec.
If you intend to modify both fields, perform the following steps to ensure that your workspace files arelocated correctly:
1. To remove the files from their old location in the workspace, issue the p4 sync …#none command.
2. Change the Root: field. (The new client workspace root directory must exist on your computerbefore you can retrieve files into it.)
3. To copy the files to their new locations in the workspace, perform a p4 sync. (If you forget toperform the p4 sync …#none before you change the workspace view, you can always remove thefiles from their client workspace locations manually).
4. Users of streams, change the Paths: field in the stream spec. Users of classic Helix branches, changethe View: field in the client spec.
5. Again, perform a p4 sync. This time, syncing changes the layout of the workspace. The files in theclient workspace are synced to their new locations.
Manage workspacesThis section discusses various approaches to managing your stream workspaces.
Using one workspace for multiple streams
When working with multiple streams, you have two choices:
• Switch one workspace between multiple streams; the workspace is appropriately populatedwhenever you switch from one stream to another. While this requires some extra processing, it is theright choice when you don’t need to work on different streams at the same time and you don’t wantto have multiple streams on disk at the same time.
• Establish a distinct workspace for each stream. This is the right choice if you want to move quicklybetween different streams or if you want to have multiple streams on disk at the same time.
Note that distinct workspaces must have distinct workspace roots — that is, distinct local folders.
To change the stream associated with a workspace, issue the following command:
$ p4 switch streamname

Chapter 5. Configure clients
56 Helix Versioning Engine User Guide
To get a workspace view and a set of files as of a specific changelist, issue the following command:
$ p4 switch stream@change
Narrowing the scope of workspaces with virtual streams
For large projects, even consistently-organized streams may not sufficiently restrict workspace views.In large organizations, there are often many groups who are concerned with only a small subset of aproject’s files. In classic Helix, these users would manually restrict their workspace’s view to includeonly the desired subset. Streams offer an analog; use a virtual stream as a filter:
For example, if ongoing development work is occurring in an //Ace/dev stream:
Stream: //Ace/devParent: //Ace/mainType: developmentPaths: share ...
Then a user who is working only with the documentation for the product (rather than all of the assetsassociated with the project) could create a virtual stream that includes only those files under //Ace/dev/docs/..., as follows:
Stream: //Ace/devdocsParent: //Ace/devType: virtualPaths: share docs/...
The user can then can switch his or her workspace to the devdocs virtual stream with the followingcommand:
$ p4 switch //Ace/devdocs
When using the devdocs workspace, the user’s workspace view is automatically updated to includeonly the material in //Ace/dev/docs/... and any changes he or she makes in //Ace/devdocs areautomatically made directly in the original //Ace/dev codeline without the need to manually run p4copy or p4 merge.
For details on virtual streams, see “Virtual streams” on page 70.
Delete a client workspaceTo delete a workspace, issue the p4 client -d clientname command. Deleting a client workspaceremoves Helix’s record of the workspace but does not remove files from the workspace or the depot.
When you delete a workspace specification:

Chapter 5. Configure clients
Helix Versioning Engine User Guide 57
1. Revert (or submit) any pending or shelved changelists associated with the workspace.
2. Delete existing files from a client workspace (p4 sync ...#none). (optional)
3. Delete the client spec.
If you delete the client spec before you delete files in the workspace, you can delete workspace filesusing your operating system’s file deletion command.
Configure workspace viewsBy default, when you create a client workspace, the entire depot is mapped to your workspace. Youcan refine this mapping to view only a portion of the depot and to change the correspondence betweendepot and workspace locations.
Helix generates workspace views automatically, from the stream spec, for all workspaces bound tothat stream. When you bind a workspace to a stream, Helix generates the workspace view based onthe structure of the stream. Specifically, it bases it on the depot mapping entries in the stream spec’sPaths: field. If the structure of the stream changes, Helix updates the views of workspaces associatedwith the stream on an as-needed basis.
For details on all stream spec fields, see “Configure a stream” on page 65.
Note Classic users update the workspace view manually, by editing the View: field in theclient spec (invoked with the p4 client command.)
To modify a workspace view, issue the p4 stream command. Helix displays the stream specificationform, which lists mappings in the Paths: field.
Suppose your stream spec contains the following entries under Paths::
Paths:import ...isolate apps/bin/...share apps/xp/...exclude tests/...
Switching your workspace to this stream gives you this workspace view:
//Acme/XProd/apps/bin/... //bruno_ws/apps/bin/...
//Acme/XProd/apps/xp/... //bruno_ws/apps/xp/...
-//Acme/XProd/tests/... //bruno_ws/tests/...
The sections below provide details about specifying the workspace view. For more information, see thedescription of views in the P4 Command Reference.

Chapter 5. Configure clients
58 Helix Versioning Engine User Guide
Specify mappingsViews consist of multiple mappings. Each mapping has two parts.
• The left-hand side specifies one or more files in the depot and has the form://depotname/file_specification
• The right-hand side specifies one or more files in the client workspace and has the form://clientname/file_specification
The left-hand side of a workspace view mapping is called the depot side, and the right-hand side is theclient side.
To determine the location of any workspace file on your computer, substitute the client workspaceroot for the workspace name on the client side of the mapping. For example, if the workspace root is C:\bruno_ws, the file //JamCode/dev/jam/Jamfile resides in C:\bruno_ws\dev\jam\Jamfile.
Later mappings override earlier ones. In the example below, the second line overrides the first line,mapping the files in //Acme/dev/docs/manuals/ up two levels. When files in //Acme/dev/docs/manuals/ are synced, they reside in c:\bruno_ws\docs\.
View: //Acme/dev/... //bruno_ws/dev/... //Acme/dev/docs/... //bruno_ws/docs/...
Use wildcards in workspace viewsTo map groups of files in workspace views, you use Helix wildcards. Any wildcard used on the depotside of a mapping must be matched with an identical wildcard in the mapping’s client side. You canuse the following wildcards to specify mappings in your client workspace:
Wildcard Description
* Matches anything except slashes. Matches only within a single directory. Casesensitivity depends on your platform.
... Matches anything including slashes. Matches recursively (everything in and belowthe specified directory).
%%1 - %%9 Positional specifiers for substring rearrangement in filenames.
In the following simple workspace view, all files in the depot’s dev stream are mapped to thecorresponding locations in the client workspace:
//JamCode/dev/... //bruno_ws/dev/...
For example, the file //JamCode/dev/jam/Makefile is mapped to the workspace file C:\bruno_ws\dev\jam\Makefile.
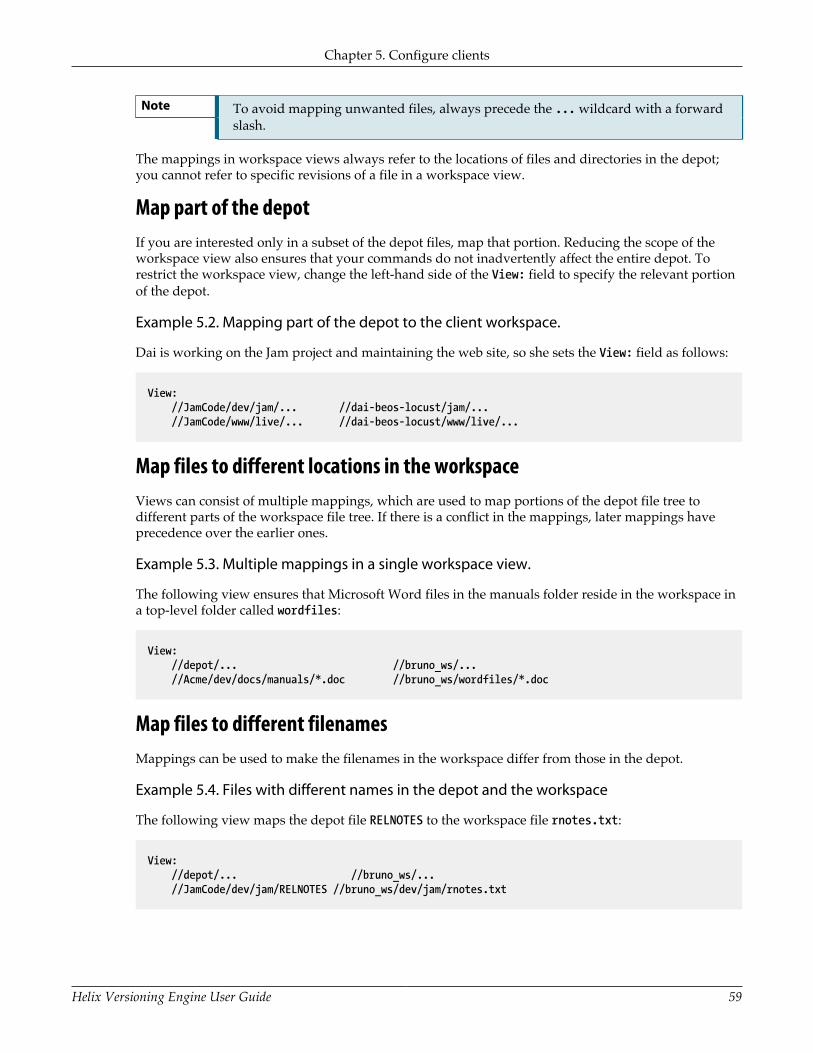
Chapter 5. Configure clients
Helix Versioning Engine User Guide 59
Note To avoid mapping unwanted files, always precede the ... wildcard with a forwardslash.
The mappings in workspace views always refer to the locations of files and directories in the depot;you cannot refer to specific revisions of a file in a workspace view.
Map part of the depotIf you are interested only in a subset of the depot files, map that portion. Reducing the scope of theworkspace view also ensures that your commands do not inadvertently affect the entire depot. Torestrict the workspace view, change the left-hand side of the View: field to specify the relevant portionof the depot.
Example 5.2. Mapping part of the depot to the client workspace.
Dai is working on the Jam project and maintaining the web site, so she sets the View: field as follows:
View: //JamCode/dev/jam/... //dai-beos-locust/jam/... //JamCode/www/live/... //dai-beos-locust/www/live/...
Map files to different locations in the workspaceViews can consist of multiple mappings, which are used to map portions of the depot file tree todifferent parts of the workspace file tree. If there is a conflict in the mappings, later mappings haveprecedence over the earlier ones.
Example 5.3. Multiple mappings in a single workspace view.
The following view ensures that Microsoft Word files in the manuals folder reside in the workspace ina top-level folder called wordfiles:
View: //depot/... //bruno_ws/... //Acme/dev/docs/manuals/*.doc //bruno_ws/wordfiles/*.doc
Map files to different filenamesMappings can be used to make the filenames in the workspace differ from those in the depot.
Example 5.4. Files with different names in the depot and the workspace
The following view maps the depot file RELNOTES to the workspace file rnotes.txt:
View: //depot/... //bruno_ws/... //JamCode/dev/jam/RELNOTES //bruno_ws/dev/jam/rnotes.txt

Chapter 5. Configure clients
60 Helix Versioning Engine User Guide
Rearrange parts of filenamesPositional specifiers %%0 through %%9 can be used to rearrange portions of filenames and directories.
Example 5.5. Using positional specifiers to rearrange filenames and directories.
The following view maps the depot file //depot/allfiles/readme.txt to the workspace filefilesbytype/txt/readme:
View: //depot/allfiles/%%1.%%2 //bruno_ws/filesbytype/%%2/%%1
Exclude files and directoriesExclusionary mappings enable you to explicitly exclude files and directories from a workspace. Toexclude a file or directory, precede the mapping with a minus sign (-). White space is not allowedbetween the minus sign and the mapping.
Example 5.6. Using views to exclude files from a client workspace.
Earl, who is working on the Jam project, does not want any HTML files synced to his workspace. Hisworkspace view looks like this:
View: //JamCode/dev/jam/... //earl-dev-beech/jam/... -//JamCode/dev/jam/....html //earl-dev-beech/jam/....html
Map a single depot path to multiple locations in a workspaceHelix includes a "one-to-many" mapping feature, with which you can map a single depot path tomultiple locations in a client workspace.
Important This feature is currently only available for users of classic Helix branches; one-to-many mapping is not available for streams.
Consider the following scenario: A company has a website whose content is divided into categoriessuch as products, documentation, and technical support. The content for each of these categories ismanaged in its own location in the workspace.
However, all of these websites display the same logo. Consequently, all three of the locations in theworkspace must contain the same image file for the logo.
You might try to map the depot path like this:
View: //Acme/images/logo.png //bruno_ws/products/images/logo.png //Acme/images/logo.png //bruno_ws/documentation/images/logo.png //Acme/images/logo.png //bruno_ws/support/images/logo.png
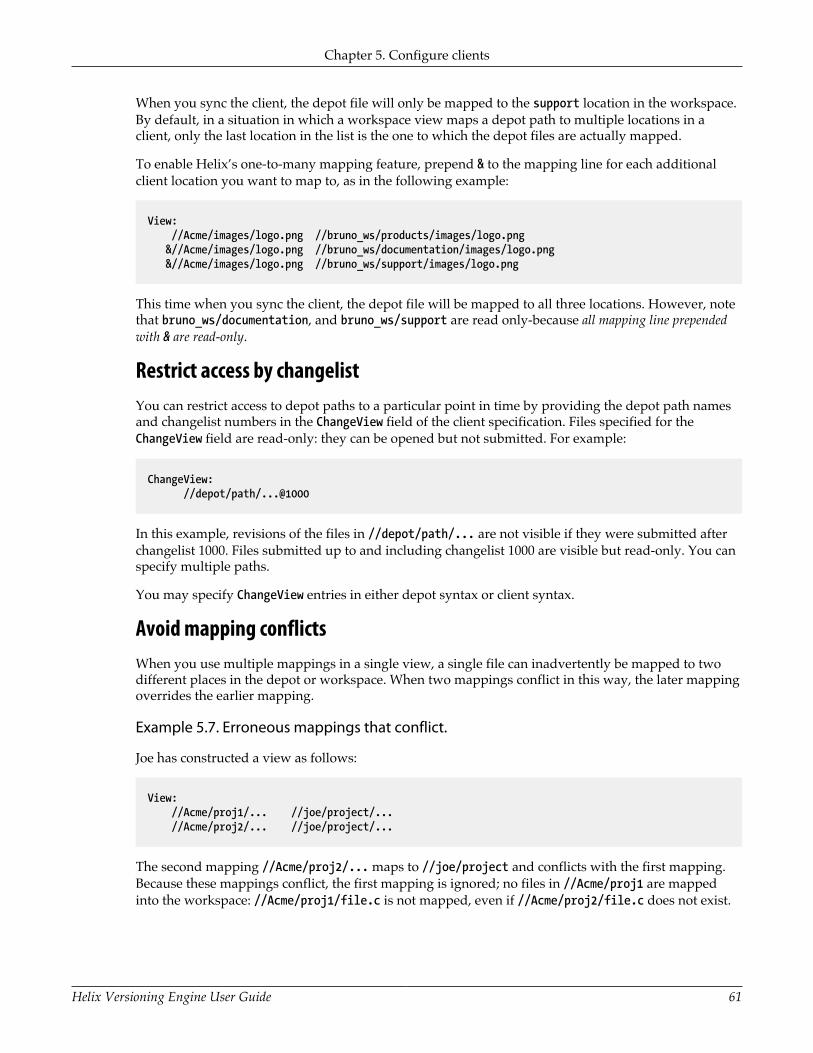
Chapter 5. Configure clients
Helix Versioning Engine User Guide 61
When you sync the client, the depot file will only be mapped to the support location in the workspace.By default, in a situation in which a workspace view maps a depot path to multiple locations in aclient, only the last location in the list is the one to which the depot files are actually mapped.
To enable Helix’s one-to-many mapping feature, prepend & to the mapping line for each additionalclient location you want to map to, as in the following example:
View: //Acme/images/logo.png //bruno_ws/products/images/logo.png &//Acme/images/logo.png //bruno_ws/documentation/images/logo.png &//Acme/images/logo.png //bruno_ws/support/images/logo.png
This time when you sync the client, the depot file will be mapped to all three locations. However, notethat bruno_ws/documentation, and bruno_ws/support are read only-because all mapping line prependedwith & are read-only.
Restrict access by changelistYou can restrict access to depot paths to a particular point in time by providing the depot path namesand changelist numbers in the ChangeView field of the client specification. Files specified for theChangeView field are read-only: they can be opened but not submitted. For example:
ChangeView: //depot/path/...@1000
In this example, revisions of the files in //depot/path/... are not visible if they were submitted afterchangelist 1000. Files submitted up to and including changelist 1000 are visible but read-only. You canspecify multiple paths.
You may specify ChangeView entries in either depot syntax or client syntax.
Avoid mapping conflictsWhen you use multiple mappings in a single view, a single file can inadvertently be mapped to twodifferent places in the depot or workspace. When two mappings conflict in this way, the later mappingoverrides the earlier mapping.
Example 5.7. Erroneous mappings that conflict.
Joe has constructed a view as follows:
View: //Acme/proj1/... //joe/project/... //Acme/proj2/... //joe/project/...
The second mapping //Acme/proj2/... maps to //joe/project and conflicts with the first mapping.Because these mappings conflict, the first mapping is ignored; no files in //Acme/proj1 are mappedinto the workspace: //Acme/proj1/file.c is not mapped, even if //Acme/proj2/file.c does not exist.

Chapter 5. Configure clients
62 Helix Versioning Engine User Guide
Automatically prune empty directories from a workspace
By default, Helix does not remove empty directories from your workspace. To change this behavior,issue the p4 client command and in the Options: field, change the option normdir to rmdir.
For more about changing workspace options, see “Configure workspace options” on page 52.
Map different depot locations to the same workspace location
Overlay mappings enable you to map files from more than one depot directory to the same place in aworkspace. To overlay the contents of a second directory in your workspace, use a plus sign (+) in frontof the mapping.
Example 5.8. Overlaying multiple directories in the same workspace.
Joe wants to combine the files from his projects when they are synced to his workspace, so he hasconstructed a view as follows:
View: //Acme/proj1/... //joe/project/... +//Acme/proj2/... //joe/project/...
The overlay mapping //Acme/proj2/... maps to //joe/project, and overlays the first mapping.Overlay mappings do not conflict. Files (even deleted files) in //Acme/proj2 take precedence over filesin //Acme/proj1. If //Acme/proj2/file.c is missing (as opposed to being present, but deleted), then //Acme/proj1/file.c is mapped into the workspace instead.
Overlay mappings are useful for applying sparse patches in build environments.
Deal with spaces in filenames and directories
Use quotation marks to enclose files or directories that contain spaces.
Example 5.9. Dealing with spaces in filenames and directories.
Joe wants to map files in the depot into his workspace, but some of the paths contain spaces:
View: "//Acme/Release 2.0/..." //joe/current/... "//Acme/Release 1.1/..." "//joe/Patch Release/..." //Acme/webstats/2011/... "//joe/2011 Web Stats/..."
By placing quotation marks around the path components on the server side, client side, or both sides ofthe mappings, Joe can specify file names and/or directory components that contain spaces.
For more information, see “Spaces in filenames, pathnames, and identifiers” on page 147.

Chapter 5. Configure clients
Helix Versioning Engine User Guide 63
Map Windows workspaces across multiple drivesTo specify a workspace that spans multiple Windows drives, use a Root: of null and specify the driveletters (in lowercase) in the workspace view. For example:
Client: bruno_wsUpdate: 2011/11/29 09:46:53Access: 2011/03/02 10:28:40Owner: brunoRoot: nullOptions: noallwrite noclobber nocompress unlocked nomodtime normdirSubmitOptions: submitunchangedLineEnd: localView: //Acme/dev/... "//bruno_ws/c:/Current Release/..." //Acme/release/... "//bruno_ws/d:/Prior Releases/..." //Acme/www/... //bruno_ws/d:/website/...
Use the same workspace from different computersBy default, you can only use a workspace on the computer that is specified by the Host: field. Ifyou want to use the same workspace on multiple computers with different platforms, delete theHost: entry and set the AltRoots: field in the client specification. You can specify a maximum of twoalternate workspace roots. The locations must be visible from all computers that will be using them, forexample through NFS or Samba mounts.
Helix compares the current working directory against the main Root: first, and then against the twoAltRoots: if specified. The first root to match the current working directory is used. If no roots match,the main root is used.
Note If you are using a Windows directory in any of your workspace roots, specify theWindows directory as your main client Root: and specify your other workspaceroot directories in the AltRoots: field.
In the example below, if user bruno’s current working directory is located under /usr/bruno, Helixuses the UNIX path as his workspace root, rather than c:\bruno_ws. This approach allows bruno to usethe same client specification for both UNIX and Windows development.
Client: bruno_wsOwner: brunoDescription: Created by bruno.Root: c:\bruno_wsAltRoots: /usr/bruno/
To find out which client workspace root is in effect, issue the p4 info command and check the Clientroot: field.
Chapter 5. Configure clients
64 Helix Versioning Engine User Guide
If you edit text files in the same workspace from different platforms, ensure that the editors andsettings you use preserve the line endings. For details about line-endings in cross-platform settings, see“Configure line-ending settings” on page 54.
Helix Versioning Engine User Guide 65
Chapter 6 StreamsThis chapter describes how to configure streams, how to propagate changes between them, and how toupdate them.
Note If you are an existing user of Helix branches and would like to use streams instead,see the Streams Migration Guide.
Configure a streamTo configure a stream you edit its associated stream spec. A stream spec names a path in a stream depotto be treated as a stream. A spec defines the stream’s location, its type, its parent stream, the files inits view, and other configurable behaviors. It is created when you create a stream with the p4 streamcommand. You can update the spec’s entries — as described in “Update streams” on page 75 — tochange the stream’s characteristics.
The following is a sample stream spec:

Chapter 6. Streams
66 Helix Versioning Engine User Guide
$ p4 stream -o //Acme/dev# A Perforce Stream Specification.## Use *'p4 help stream'* to see more about stream specifications and command.
Stream: //Acme/dev
Update: 2015/02/06 10:57:04
Access: 2015/02/06 10:57:04
Owner: bruno
Name: //Acme/dev
Parent: //Acme/main
Type: development
Options: allsubmit unlocked toparent fromparent mergeany
Description: Our primary development stream for the project.
Paths: share ... import boost/... //3rd_party/boost/1.53.0/artifacts/original/... import boost/lib/linux26x86_64/... //3rd_party/boost/1.53.0/artifacts/original/lib/linuxx86_64/gcc44libc212/... import boost/lib/linux26x86/... //3rd_party/boost/1.53.0/artifacts/original/lib/linuxx86/gcc44libc212/... import protobuf/... //3rd_party/protobuf/2.4.1/artifacts/patch-1/... import gtest/... //3rd_party/gtest/1.7.0/artifacts/original/... import icu/... //3rd_party/icu/53.1/artifacts/original/... import p4-bin/lib.ntx64/vs11/p4api_vs2012_dyn.zip //builds/p15.1/p4-bin/bin.ntx64/p4api_vs2012_dyn.zip import p4/... //depot/p15.1/p4/... exclude p4/lbr/... exclude p4/server/...
Remapped: p4/doc/... p4/relnotes/...
Ignored: .../~tmp.txt
The following table describes the stream spec in more detail:
Entry Meaning
Stream The Stream field is unique and specifies the depot path where the streamfiles live. All streams in a single stream depot must have the same number offorward slashes in their name; your administrator specifies this number in the
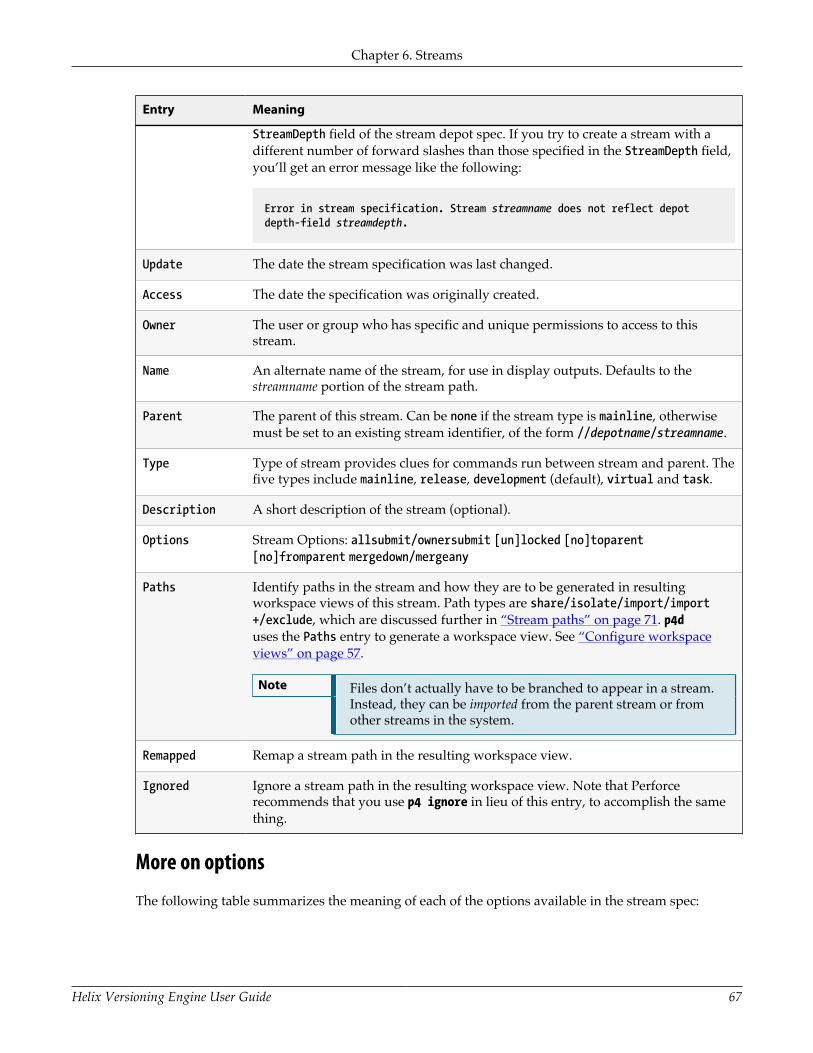
Chapter 6. Streams
Helix Versioning Engine User Guide 67
Entry Meaning
StreamDepth field of the stream depot spec. If you try to create a stream with adifferent number of forward slashes than those specified in the StreamDepth field,you’ll get an error message like the following:
Error in stream specification. Stream streamname does not reflect depotdepth-field streamdepth.
Update The date the stream specification was last changed.
Access The date the specification was originally created.
Owner The user or group who has specific and unique permissions to access to thisstream.
Name An alternate name of the stream, for use in display outputs. Defaults to thestreamname portion of the stream path.
Parent The parent of this stream. Can be none if the stream type is mainline, otherwisemust be set to an existing stream identifier, of the form //depotname/streamname.
Type Type of stream provides clues for commands run between stream and parent. Thefive types include mainline, release, development (default), virtual and task.
Description A short description of the stream (optional).
Options Stream Options: allsubmit/ownersubmit [un]locked [no]toparent[no]fromparent mergedown/mergeany
Paths Identify paths in the stream and how they are to be generated in resultingworkspace views of this stream. Path types are share/isolate/import/import+/exclude, which are discussed further in “Stream paths” on page 71. p4duses the Paths entry to generate a workspace view. See “Configure workspaceviews” on page 57.
Note Files don’t actually have to be branched to appear in a stream.Instead, they can be imported from the parent stream or fromother streams in the system.
Remapped Remap a stream path in the resulting workspace view.
Ignored Ignore a stream path in the resulting workspace view. Note that Perforcerecommends that you use p4 ignore in lieu of this entry, to accomplish the samething.
More on options
The following table summarizes the meaning of each of the options available in the stream spec:
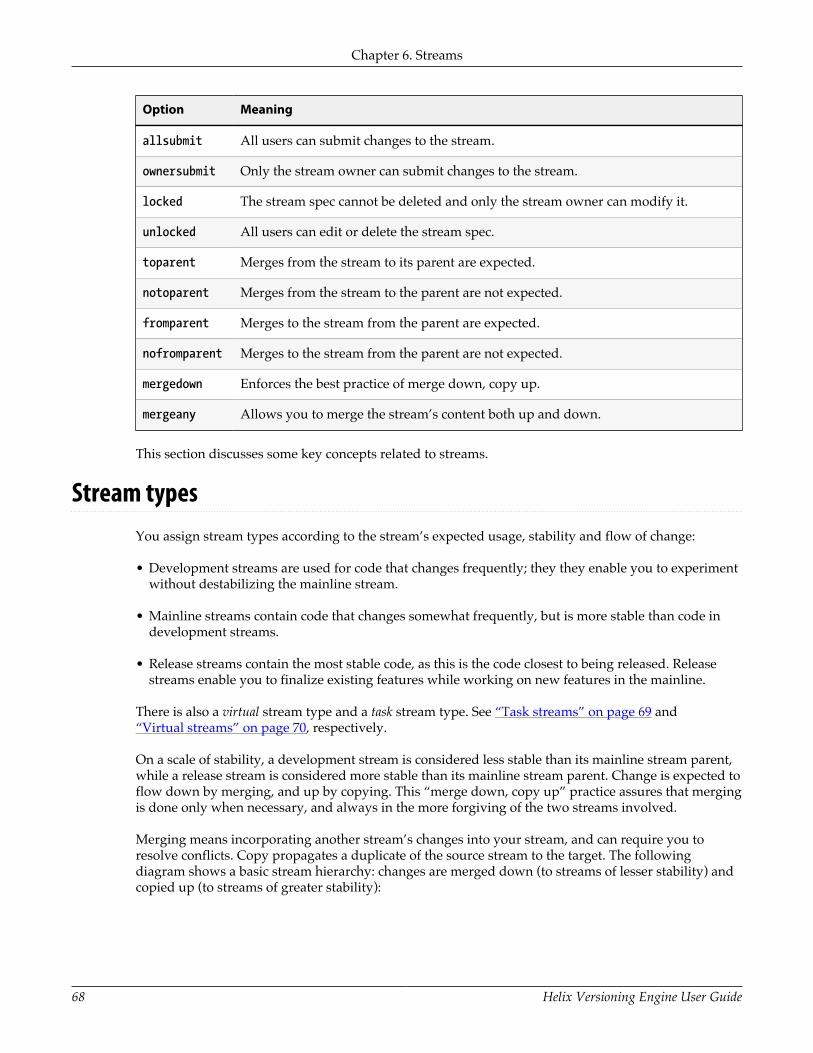
Chapter 6. Streams
68 Helix Versioning Engine User Guide
Option Meaning
allsubmit All users can submit changes to the stream.
ownersubmit Only the stream owner can submit changes to the stream.
locked The stream spec cannot be deleted and only the stream owner can modify it.
unlocked All users can edit or delete the stream spec.
toparent Merges from the stream to its parent are expected.
notoparent Merges from the stream to the parent are not expected.
fromparent Merges to the stream from the parent are expected.
nofromparent Merges to the stream from the parent are not expected.
mergedown Enforces the best practice of merge down, copy up.
mergeany Allows you to merge the stream’s content both up and down.
This section discusses some key concepts related to streams.
Stream typesYou assign stream types according to the stream’s expected usage, stability and flow of change:
• Development streams are used for code that changes frequently; they they enable you to experimentwithout destabilizing the mainline stream.
• Mainline streams contain code that changes somewhat frequently, but is more stable than code indevelopment streams.
• Release streams contain the most stable code, as this is the code closest to being released. Releasestreams enable you to finalize existing features while working on new features in the mainline.
There is also a virtual stream type and a task stream type. See “Task streams” on page 69 and“Virtual streams” on page 70, respectively.
On a scale of stability, a development stream is considered less stable than its mainline stream parent,while a release stream is considered more stable than its mainline stream parent. Change is expected toflow down by merging, and up by copying. This “merge down, copy up” practice assures that mergingis done only when necessary, and always in the more forgiving of the two streams involved.
Merging means incorporating another stream’s changes into your stream, and can require you toresolve conflicts. Copy propagates a duplicate of the source stream to the target. The followingdiagram shows a basic stream hierarchy: changes are merged down (to streams of lesser stability) andcopied up (to streams of greater stability):

Chapter 6. Streams
Helix Versioning Engine User Guide 69
The following table summarizes these qualities of stream types:
Stream Type Stability Merge Copy
mainline Stable per your policy (forexample, all code builds)
from child (from release,or to development)
to child (to release, orfrom development)
virtual N/A; used to filterstreams
N/A N/A
development Unstable from parent to parent
task Unstable from parent to parent
release Highly stable to parent from parent
Task streams
Task streams are lightweight short-lived streams used for bug fixing or new features that only modifya small subset of the stream data. Since branched (copied) files are tracked in a set of shadow tablesthat are later removed, repository metadata is kept to a minimum when using this type of stream andserver performance is optimized.
They are branches that work just like development streams, but task streams remain semi-private untilbranched back to the parent stream. Designed as lightweight branches, they are most effective whenanticipated work in the branch will only affect a small number of files relative to the number of files inthe branch.
Task streams are intended to be deleted or unloaded after use. Because you cannot re-use task streamnames even after the stream has been deleted, most sites adopt a naming convention that is likely to beunique for each task, such as user-date-jobnumber.
Working within task streams is just like working in a development stream:
1. Create the task stream (in this example, as a child of a development stream).

Chapter 6. Streams
70 Helix Versioning Engine User Guide
$ p4 stream -t task -P //projectX/dev //Tasks/mybug123
2. Populate the stream.
$ p4 populate -d "Fix bug 123" -S //Tasks/mybug123 -r
3. Make changes to files in the stream and submit the changes.
4. Merge down any required changes from the parent stream, resolving as necessary.
$ p4 merge
5. Copy up the changes you made into the parent stream.
$ p4 copy --from //Tasks/mybug123
6. Delete or unload the task stream.
$ p4 stream -d //Tasks/mybug123
Alternatively, use p4 unload to unload it:
$ p4 unload -s //Tasks/mybug123
Use unload if you think you might to work on the task stream again.
Only workspaces associated with the task stream can see all the files in the stream; the stream appearsas a sparse branch to other workspaces, which see only those files and revisions that you changedwithin the task stream. Most other metadata for the task stream remains private.
Task streams can quickly accumulate in a depot until they are deleted or unloaded; to keep a projectdepot uncluttered by task streams, your Helix administrator or project lead may choose to establishcertain streams depots as dedicated holding areas for task streams. In this case, create your stream inthe task streams depot as a child of a parent in the project depot.
Task streams are unique in that they can live in different depots from their children or parents.However, the best practice is to have them reside in the same depot as their children or parents.
Virtual streamsVirtual streams can be used to create alternative views of real streams. Virtual streams differ fromother stream types in that a virtual stream is not a separate set of files, but instead a filtered view of itsparent stream. A virtual stream can have child streams, and its child streams inherit its views.

Chapter 6. Streams
Helix Versioning Engine User Guide 71
Stream pathsStream paths control the files and paths that compose a stream and define how those files arepropagated. Except for the mainline, each stream inherits its structure from its parent stream. Tomodify the structure of the child, you specify the paths as follows:
Type Sync? Submit? Integrate to/fromParent?
Remarks
share Y Y Y (Default) For files that are edited and propagatedbetween parent and child streams. All files in ashared path are branched and, in general, sharedpaths are the least restricted.
isolate Y Y N For files that must not be propagated outside thestream but can be edited within it, such as binarybuild results.
import Y N N For files that must be physically present inthe stream but are never changed. Example:third-party libraries. Import paths can referencea specific changelist (or a label that aliases achangelist) to limit the imported files to therevisions at that change or lower. Use the syntax@changelist#, as in: //depot/lib3.0/…@455678.
import+ Y Y N Functions like an import path, in that it canreference an explicitly-defined depot path, butunlike a standard import path, you can submitchanges to the files in an import+ path.
exclude N N N Files in the parent stream that must never be partof the child stream.
In the following example, files in the src path are not submittable (and are imported from the parentstream’s view), files in the lib path are not submittable (and are imported from an explicitly-specifiedlocation in the depot), and files in the db path can be edited and submitted in the stream, but can neverbe copied to the parent:
Paths: share ... import src/... import lib/... //depot/lib3.0/... isolate db/...
The paths are used to generate the mappings for workspaces that are associated with the stream. If thestream structure changes, the workspace views are updated automatically and in fact cannot be alteredmanually. If the stream is locked, only the stream owner (or stream owners, if the Owner: field of thestream is set to a group) can edit the stream specification.

Chapter 6. Streams
72 Helix Versioning Engine User Guide
Stream specification can also remap file locations (so that a file in specified depot location is synced toa different location in the workspace) and screen out files according to file type. For example, to ensurethat object files and executables are not part of the stream, add the following entries to the streamspecification:
Ignored: .o .exe
Stream paths and inheritance between parents and childrenChild streams inherit folder paths and behavioral rules from their parents. When we talk aboutinheritance between parents and children, it helps to think in the following terms:
• Permissiveness: what actions (submit, sync, etcetera) are permitted on a path?
Path types are inherited from parent streams, and you cannot override the effects of the pathtypes assigned by parent streams. In other words, child streams are always as permissive or lesspermissive than their parents, but never more permissive. For example, if a parent stream defines apath as isolate, its child streams cannot redefine the path as share to enable integrations.
• Inclusiveness: what paths are included in the stream?
Since children cannot, by definition, be more inclusive than their parents, you cannot include afolder path in a child that is not also included in its parent. This means, for example, that you cannotadd an isolate path to a child if the folders in that path are not also included in the parent.
In the example in the table below, the incorrectly defined Dev stream, which is a child of Main,contains an isolate path that does not work, because it includes folders that are not included in theparent. In order to isolate the config/ folder in the Dev stream, that folder has to be included as ashare or isolate path in Main:
Incorrect Correct
Stream: //Acme/MainParent: nonePaths: share apps/...Paths: share tests/...
Stream: //Acme/DevParent: //Acme/MainPaths: share apps/... share tests/... isolate config/...
Stream: //Acme/MainParent: nonePaths: share apps/... share tests/... share config/...
Stream: //Acme/DevParent: //Acme/MainPaths: share apps/... share tests/... isolate config/...
Example 6.1. Simple share
Let’s start with a simple case: two streams, //Ace/main and its child //Ace/dev.

Chapter 6. Streams
Helix Versioning Engine User Guide 73
Stream: //Ace/mainParent: nonePaths: share ...
Stream: //Ace/devParent: //Ace/mainPaths: share ...
In this case, the entire stream path is shared. When you switch your workspace to the //Ace/mainstream, the workspace view looks like this:
//Ace/main/... //bruno_ws/...
The workspace view maps the root of the //Ace/main stream to your workspace. When you you switchyour workspace to the //Ace/dev stream, the workspace view is this:
//Ace/dev/... //bruno_ws/...
And the branch view for //Ace/dev/ looks like this:
//Ace/dev/... //Ace/main/...
In other words, the entire dev stream can be synced to workspaces, and the entire stream can bebranched, merged, and copied.
Example 6.2. Share and import
Let’s look at an example where software components are housed in three separate depots: //Acme, //Red, and //Tango.
The Acme mainline is configured like this:
Stream: //Acme/MainParent: nonePaths: share apps/... share tests/... import stuff/... //Red/R6.1/stuff/... import tools/... //Tango/tools/...
If you switch your workspace to the //Acme/Main stream, this would be your workspace view:
//Acme/Main/apps/... //bruno_ws/apps/...//Acme/Main/tests/... //bruno_ws/tests/...//Red/R6.1/stuff/... //bruno_ws/stuff/...//Tango/tools/... //bruno_ws/tools/...
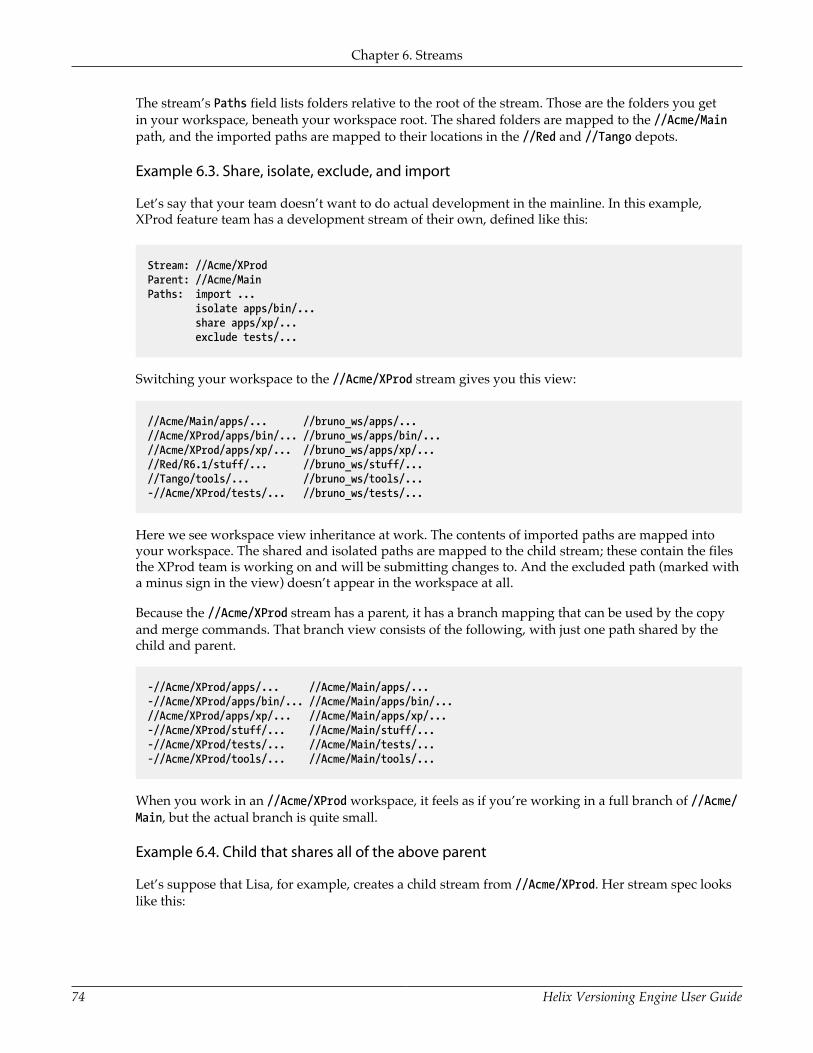
Chapter 6. Streams
74 Helix Versioning Engine User Guide
The stream’s Paths field lists folders relative to the root of the stream. Those are the folders you getin your workspace, beneath your workspace root. The shared folders are mapped to the //Acme/Mainpath, and the imported paths are mapped to their locations in the //Red and //Tango depots.
Example 6.3. Share, isolate, exclude, and import
Let’s say that your team doesn’t want to do actual development in the mainline. In this example,XProd feature team has a development stream of their own, defined like this:
Stream: //Acme/XProdParent: //Acme/MainPaths: import ... isolate apps/bin/... share apps/xp/... exclude tests/...
Switching your workspace to the //Acme/XProd stream gives you this view:
//Acme/Main/apps/... //bruno_ws/apps/...//Acme/XProd/apps/bin/... //bruno_ws/apps/bin/...//Acme/XProd/apps/xp/... //bruno_ws/apps/xp/...//Red/R6.1/stuff/... //bruno_ws/stuff/...//Tango/tools/... //bruno_ws/tools/...-//Acme/XProd/tests/... //bruno_ws/tests/...
Here we see workspace view inheritance at work. The contents of imported paths are mapped intoyour workspace. The shared and isolated paths are mapped to the child stream; these contain the filesthe XProd team is working on and will be submitting changes to. And the excluded path (marked witha minus sign in the view) doesn’t appear in the workspace at all.
Because the //Acme/XProd stream has a parent, it has a branch mapping that can be used by the copyand merge commands. That branch view consists of the following, with just one path shared by thechild and parent.
-//Acme/XProd/apps/... //Acme/Main/apps/...-//Acme/XProd/apps/bin/... //Acme/Main/apps/bin/...//Acme/XProd/apps/xp/... //Acme/Main/apps/xp/...-//Acme/XProd/stuff/... //Acme/Main/stuff/...-//Acme/XProd/tests/... //Acme/Main/tests/...-//Acme/XProd/tools/... //Acme/Main/tools/...
When you work in an //Acme/XProd workspace, it feels as if you’re working in a full branch of //Acme/Main, but the actual branch is quite small.
Example 6.4. Child that shares all of the above parent
Let’s suppose that Lisa, for example, creates a child stream from //Acme/XProd. Her stream spec lookslike this:
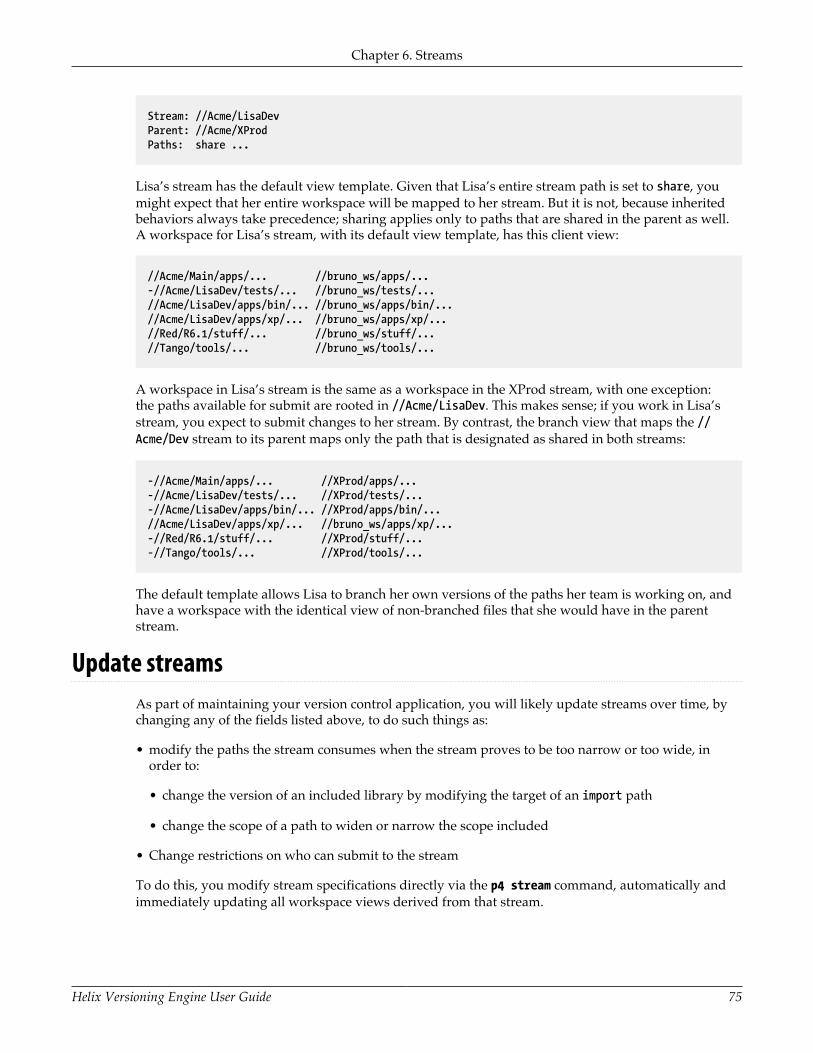
Chapter 6. Streams
Helix Versioning Engine User Guide 75
Stream: //Acme/LisaDevParent: //Acme/XProdPaths: share ...
Lisa’s stream has the default view template. Given that Lisa’s entire stream path is set to share, youmight expect that her entire workspace will be mapped to her stream. But it is not, because inheritedbehaviors always take precedence; sharing applies only to paths that are shared in the parent as well.A workspace for Lisa’s stream, with its default view template, has this client view:
//Acme/Main/apps/... //bruno_ws/apps/...-//Acme/LisaDev/tests/... //bruno_ws/tests/...//Acme/LisaDev/apps/bin/... //bruno_ws/apps/bin/...//Acme/LisaDev/apps/xp/... //bruno_ws/apps/xp/...//Red/R6.1/stuff/... //bruno_ws/stuff/...//Tango/tools/... //bruno_ws/tools/...
A workspace in Lisa’s stream is the same as a workspace in the XProd stream, with one exception:the paths available for submit are rooted in //Acme/LisaDev. This makes sense; if you work in Lisa’sstream, you expect to submit changes to her stream. By contrast, the branch view that maps the //Acme/Dev stream to its parent maps only the path that is designated as shared in both streams:
-//Acme/Main/apps/... //XProd/apps/...-//Acme/LisaDev/tests/... //XProd/tests/...-//Acme/LisaDev/apps/bin/... //XProd/apps/bin/...//Acme/LisaDev/apps/xp/... //bruno_ws/apps/xp/...-//Red/R6.1/stuff/... //XProd/stuff/...-//Tango/tools/... //XProd/tools/...
The default template allows Lisa to branch her own versions of the paths her team is working on, andhave a workspace with the identical view of non-branched files that she would have in the parentstream.
Update streamsAs part of maintaining your version control application, you will likely update streams over time, bychanging any of the fields listed above, to do such things as:
• modify the paths the stream consumes when the stream proves to be too narrow or too wide, inorder to:
• change the version of an included library by modifying the target of an import path
• change the scope of a path to widen or narrow the scope included
• Change restrictions on who can submit to the stream
To do this, you modify stream specifications directly via the p4 stream command, automatically andimmediately updating all workspace views derived from that stream.
Chapter 6. Streams
76 Helix Versioning Engine User Guide
Make changes to a stream spec and associated files atomicallyAlternatively, you can isolate edits to the stream spec to the editing client prior to making themavailable to other clients as part of an atomic changelist submission. This works just as edits to files do:they are made locally on a single client and then submitted to make them available to other clients.
This functionality has a couple of important benefits:
• You can stage a stream spec in your workspace and test it before submitting it.
• You can submit the spec atomically in a changelist along with a set of files. Since the streamstructure dictates the workspace view, this means that when users sync, they obtain the new viewand the new files together.
You open and submit changes to the stream spec using the following three commands:
• p4 stream edit puts the client’s current stream spec into the opened state, isolating any editsmade to fields that affect view generation. While the spec is open, those fields are marked with thecomment #open to indicate that they are open and isolated to your client. Changes made to thesefields affect your workspace view normally, but other clients are not affected.
• p4 stream resolve resolves changes that have been submitted to the stream spec by other userssince you opened it. You may not submit changes to the stream spec until newer changes have beenresolved.
• p4 stream revert reverts any pending changes made to the open spec, returning your client to thelatest submitted version of the stream.
For details on all three of these commands, see the p4 stream page in the P4 Command Reference.
By default, the open stream spec is included along with files that are shelved or submitted in achangelist. Conversely, when unshelving a change that contains an open stream spec, the currentstream is opened and the shelved version becomes the opened version. If the stream is already openwhen attempting to unshelve, a warning is generated and the unshelve operation aborts. The streammay be omitted from any of these operations by using the -Af flag to specify that only files should beacted upon.
See the p4 submit, p4 shelve, and p4 unshelve commands in the P4 Command Reference for details.

Helix Versioning Engine User Guide 77
Chapter 7 Resolve conflictsIn settings where multiple users are working on the same set of files, conflicts can occur. Helix enablesyour team to work on the same files simultaneously and resolve any conflicts that arise. For example,conflicts occur if two users change the same file (the primary concern in team settings) or you edit aprevious revision of a file rather than the head revision.
When you attempt to submit a file that conflicts with the head revision in the depot, Helix requires youto resolve the conflict.
Merging changes from a development stream to a release stream is another typical task that requiresyou to resolve files.
To prevent conflicts, Helix enables you to lock files when they are edited. However, locking can restrictteam development. Your team needs to choose the strategy that maximizes file availability whileminimizing conflicts. For details, see “Locking files” on page 95.
How conflicts occurConflicts can occur in a number of ways, for example:
1. Bruno opens //JamCode/dev/jam/command.c#8 for edit.
2. Gale subsequently opens the same file for edit in her own client workspace.
3. Bruno and Gale both edit //Jamcode/dev/jam/command.c#8.
4. Bruno submits a changelist containing //JamCode/dev/jam/command.c, and the submit succeeds.
5. Gale submits a changelist with her version of //Acme/dev/jam/command.c. Her submit fails.
If Helix accepts Gale’s version into the depot, her changes will overwrite Bruno’s changes. To preventBruno’s changes from being lost, Helix rejects the changelist and schedules the conflicting file to beresolved. If you know of file conflicts in advance and want to schedule a file for resolution, sync it.Helix detects the conflicts and schedules the file for resolution.
How to resolve conflictsTo resolve a file conflict, you determine the contents of the files you intend to submit by issuing thep4 resolve command and choosing the desired method of resolution for each file. After you resolveconflicts, you submit the changelist containing the files.
Note If you open a file for edit, then sync a subsequently submitted revision from thedepot, Helix requires you to resolve to prevent your own changes from beingoverwritten by the depot file.
By default, Helix uses its diff program to detect conflicts. You can configure a third-party diff program.For details, see “Diff files” on page 36.
To resolve conflicts and submit your changes, perform the following steps:

Chapter 7. Resolve conflicts
78 Helix Versioning Engine User Guide
1. Sync the files (for example p4 sync //Acme/dev/jam/...). Helix detects any conflicts and schedulesthe conflicting files for resolve.
2. Issue the p4 resolve command and resolve any conflicts. See “Options for resolvingconflicts” on page 78 for details about resolve options.
3. Test the resulting files (for example, compile code and verify that it runs).
4. Submit the changelist containing the files.
Note If any of the three file revisions participating in the merge are binary instead of text,a three-way merge is not possible. Instead, p4 resolve performs a two-way merge:the two conflicting file versions are presented, and you can choose between them oredit the one in your workspace before submitting the changelist.
Your, theirs, base, and merge filesThe p4 resolve command uses the following terms during the merge process:
File revision Description
yours The revision of the file in your client workspace, containing changes you made.
theirs The revision in the depot, edited by another user, that yours conflicts with. (Usuallythe head revision, but you can schedule a resolve with another revision using p4sync.)
base The file revision in the depot that yours and theirs were edited from (the closestcommon ancestor file).
merge The file generated by Helix from theirs, yours, and base.
result The final file resulting from the resolve process.
Options for resolving conflictsTo specify how a conflict is to be resolved, you issue the p4 resolve command, which displays adialog for each file scheduled for resolve. The dialog describes the differences between the file youchanged and the conflicting revision. For example:
C:\bruno_ws> p4 resolve //Acme/dev/jam/command.cc:\bruno_ws\dev\main\jam\command.c - merging //Acme/dev/jam/command.c#9
Diff chunks: 4 yours + 2 theirs + 1 both + 1 conflictingAccept(a) Edit(e) Diff(d) Merge (m) Skip(s) Help(?) e:
The differences between each pair of files are summarized by p4 resolve. Groups of lines (chunks) inthe yours, theirs, and base files can differ in various ways. Chunks can be:
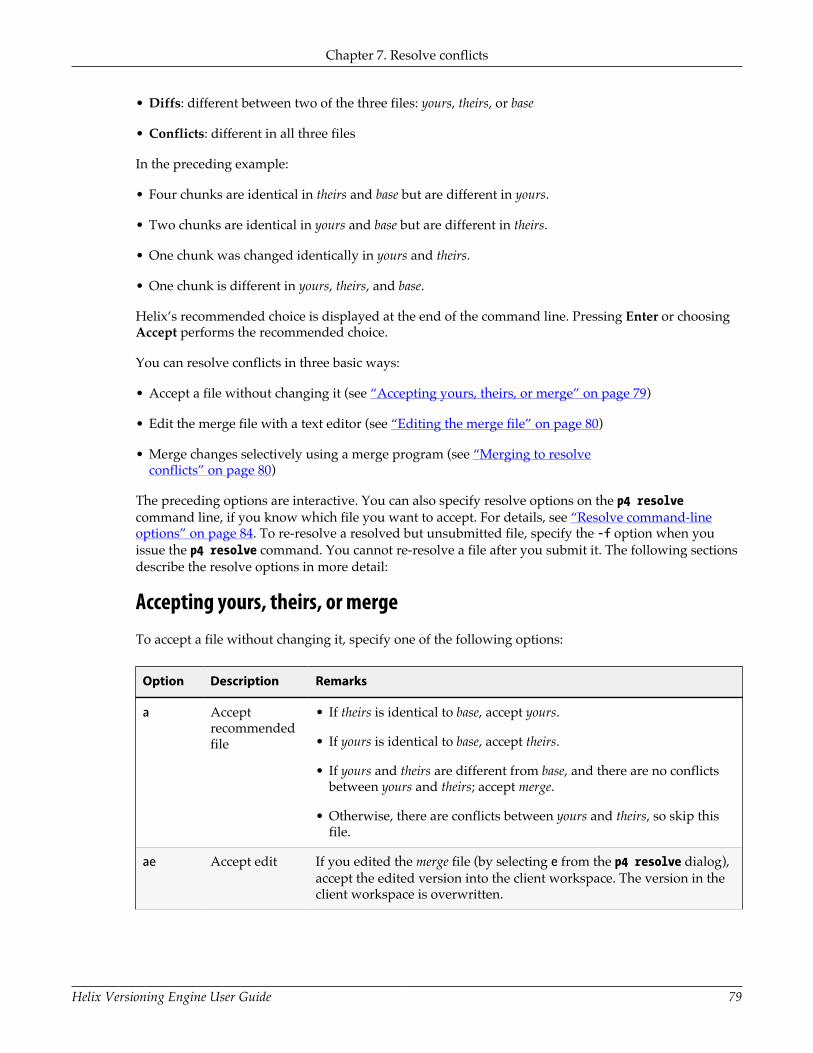
Chapter 7. Resolve conflicts
Helix Versioning Engine User Guide 79
• Diffs: different between two of the three files: yours, theirs, or base
• Conflicts: different in all three files
In the preceding example:
• Four chunks are identical in theirs and base but are different in yours.
• Two chunks are identical in yours and base but are different in theirs.
• One chunk was changed identically in yours and theirs.
• One chunk is different in yours, theirs, and base.
Helix’s recommended choice is displayed at the end of the command line. Pressing Enter or choosingAccept performs the recommended choice.
You can resolve conflicts in three basic ways:
• Accept a file without changing it (see “Accepting yours, theirs, or merge” on page 79)
• Edit the merge file with a text editor (see “Editing the merge file” on page 80)
• Merge changes selectively using a merge program (see “Merging to resolveconflicts” on page 80)
The preceding options are interactive. You can also specify resolve options on the p4 resolvecommand line, if you know which file you want to accept. For details, see “Resolve command-lineoptions” on page 84. To re-resolve a resolved but unsubmitted file, specify the -f option when youissue the p4 resolve command. You cannot re-resolve a file after you submit it. The following sectionsdescribe the resolve options in more detail:
Accepting yours, theirs, or mergeTo accept a file without changing it, specify one of the following options:
Option Description Remarks
a Acceptrecommendedfile
• If theirs is identical to base, accept yours.
• If yours is identical to base, accept theirs.
• If yours and theirs are different from base, and there are no conflictsbetween yours and theirs; accept merge.
• Otherwise, there are conflicts between yours and theirs, so skip thisfile.
ae Accept edit If you edited the merge file (by selecting e from the p4 resolve dialog),accept the edited version into the client workspace. The version in theclient workspace is overwritten.

Chapter 7. Resolve conflicts
80 Helix Versioning Engine User Guide
Option Description Remarks
am Accept merge Accept merge into the client workspace as the resolved revision. Theversion in the client workspace is overwritten.
at Accept theirs Accept theirs into the client workspace as the resolved revision. Theversion in the client workspace is overwritten.
ay Accept yours Accept yours into the client workspace as the resolved revision,ignoring changes that might have been made in theirs.
Accepting yours, theirs, edit, or merge overwrites changes, and the generated merge file might not beprecisely what you want to submit to the depot. The most precise way to ensure that you submit onlythe desired changes is to use a merge program or edit the merge file.
Editing the merge fileTo resolve files by editing the merge file, choose the e option. Helix launches your default text editor,displaying the merge file. In the merge file, diffs and conflicts appear in the following format:
>>>> ORIGINAL file#n(text from the original version)==== THEIR file#m(text from their file)==== YOURS file(text from your file)<<<<
To locate conflicts and differences, look for the difference marker >>>> and edit that portion of the text.Examine the changes made to theirs to make sure that they are compatible with your changes. Makesure you remove all conflict markers before saving. After you make the desired changes, save the file.At the p4 resolve prompt, choose ae.
By default, only the conflicts between the yours and theirs files are marked. To generate differencemarkers for all differences, specify the -v option when you issue the p4 resolve command.
Merging to resolve conflictsA merge program displays the differences between yours, theirs, and the base file, and enables you toselect and edit changes to produce the desired result file. To configure a merge program, set P4MERGEto the desired program. To use the merge program during a resolve, choose the m option. For detailsabout using a specific merge program, consult its online help.
After you merge, save your results and exit the merge program. At the p4 resolve prompt, choose am.
Full list of resolve optionsThe p4 resolve command offers the following options:

Chapter 7. Resolve conflicts
Helix Versioning Engine User Guide 81
Option Action Remarks
? Help Display help for p4 resolve.
a Acceptautomatically
Accept the auto-selected file:
• If theirs is identical to base, accept yours.
• If yours is identical to base, accept theirs.
• If yours and theirs are different from base, and there are no conflictsbetween yours and theirs; accept merge.
• Otherwise, there are conflicts between yours and theirs, so skip thisfile.
ae Accept edit If you edited the merge file (by selecting e from the p4 resolve dialog),accept the edited version into the client workspace. The version in theclient workspace is overwritten.
am Accept merge Accept merge into the client workspace as the resolved revision. Theversion in the client workspace is overwritten.
at Accept theirs Accept theirs into the client workspace as the resolved revision. Theversion in the client workspace is overwritten.
ay Accept yours Accept yours into the client workspace as the resolved revision,ignoring changes that might have been made in theirs.
d Diff Show diffs between merge and yours.
dm Diff merge Show diffs between merge and base.
dt Diff theirs Show diffs between theirs and base.
dy Diff yours Show diffs between yours and base.
e Edit merged Edit the preliminary merge file generated by Helix.
et Edit theirs Edit the revision in the depot that the client revision conflicts with(usually the head revision). This edit is read-only.
ey Edit yours Edit the revision of the file currently in the workspace.
m Merge Invoke the command P4MERGE base theirs yours merge. To use this option,you must set P4MERGE to the name of a third-party program that mergesthe first three files and writes the fourth as a result.
s Skip Skip this file and leave it scheduled for resolve.
Note The merge file is generated by the Helix server, but the differences displayed by dy,dt, dm, and d are generated by your computer’s diff program. To configure another

Chapter 7. Resolve conflicts
82 Helix Versioning Engine User Guide
diff program to be launched when you choose a d option during a resolve, setP4DIFF. For more details, see “Diff files” on page 36.
Example 7.1. Resolving file conflicts
To resolve conflicts between his work on a Jam README file and Gale’s work on the same file, Brunotypes p4 resolve //Acme/dev/jam/README and sees the following:
Diff chunks: 0 yours + 0 theirs + 0 both + 1 conflictingAccept(a) Edit(e) Diff(d) Merge (m) Skip(s) Help(?) e: e
Bruno sees that he and Gale have made a conflicting change to the file. He types e to edit the merge fileand searches for the difference marker >>>>. The following text is displayed:
Jam/MR (formerly "jam - make(1) redux")/+\>>>> ORIGINAL README#26 +\ Copyright 1993, 1997 Christopher Seiwald.==== THEIRS README#27 +\ Copyright 1993, 1997, 2004 Christopher Seiwald.==== YOURS README +\ Copyright 1993, 1997, 2005 Christopher Seiwald.<<<< \+/
Bruno and Gale have updated the copyright date differently. Bruno edits the merge file so that theheader is correct, exits from the editor and types am. The edited merge file is written to the clientworkspace, and he proceeds to resolve the next file.
When a version of the file is accepted during a resolve, the file in the workspace is overwritten, and thenew client file must still be submitted to the depot. New conflicts can occur if new versions of a file aresubmitted after you resolve but before you submit the resolved files. This problem can be prevented bylocking the file before you perform the resolve. For details, see “Locking files” on page 95.
Resolving branched files, deletions, moves and filetype changesBeyond reconciling changes to the contents of related files after integration, you can also determinehow other kinds of changes are handled. Consider this example:
• You edit header.cc in the mainline while a coworker deletes it in the release branch (or vice versa).You integrate fixes in the release branch back to main. During resolve, you can decide whetherheader.cc is deleted from the mainline or the action in the release branch is ignored, preservingheader.cc in the mainline.
• A developer implements RCS keywords in source files in a development branch, and changestheir Helix filetype from text to text+k. The release manager wants to integrate new features fromthe development branch to the mainline, but does not want to enable keyword expansion in themainline. During resolve, the release manager can choose to ignore the filetype change.

Chapter 7. Resolve conflicts
Helix Versioning Engine User Guide 83
• The file header.cc is branched from main to rel. Subsequently, it’s renamed to headerx.cc in main,and moved in the release branch to the headers subfolder.
Following are simple cases describing how you can resolve non-content changes to related files. Aftera source file is branched to a target file, changes are made as describe below, then you integrate thesource to the target. To choose the outcome, you specify the resolve options at (“Accept Theirs”) or ay(“Accept Yours”) as follows:
• The source is edited and target is deleted: the at option re-adds the source in the target branch. Theay option causes the file to remain deleted in the target branch.
• The source is deleted and the target is edited: the at option causes the file to be deleted in the targetbranch. The ay option retains the edited content in the target branch.
• The target file was moved after being branched: the at option moves the target file to the sourcefile name and location. The ay option retains the target file name and location.
• The filetype of the source file was changed after it was branched: the at option propagates thechange to the target. The ay option leaves the filetype of the target unchanged. If the differingfiletypes do not conflict, you have the option of combining them.
• Files have been moved or renamed in conflicting ways: you are prompted to choose a path andfilename. Example:
Resolving move to //Acme/rel/headerx.ccFilename resolve:at: //Acme/rel/headerx.ccay: //Acme/rel/headers/header.ccam: //Acme/rel/headers/headerx.cc
By default, the p4 resolve command resolves all types of change, content and non-content. Toconstrain the type of actions that you want to resolve, specify the -A option as follows:
Option What is Resolved
-Aa Resolve attributes set by p4 attribute.
-Ab Integrations where the source is edited and the target is deleted.
-Ac Resolve file content changes as well as actions.
-Ad Integrations where the source is deleted and target is edited.
-Am Renames and moves.
-At Filetype changes.
-AQ Charset changes.
To perform more than one type of resolve, combine the options (for example: -Abd). By default,resolving is performed file by file, interactively. To specify the same outcome for a particular action
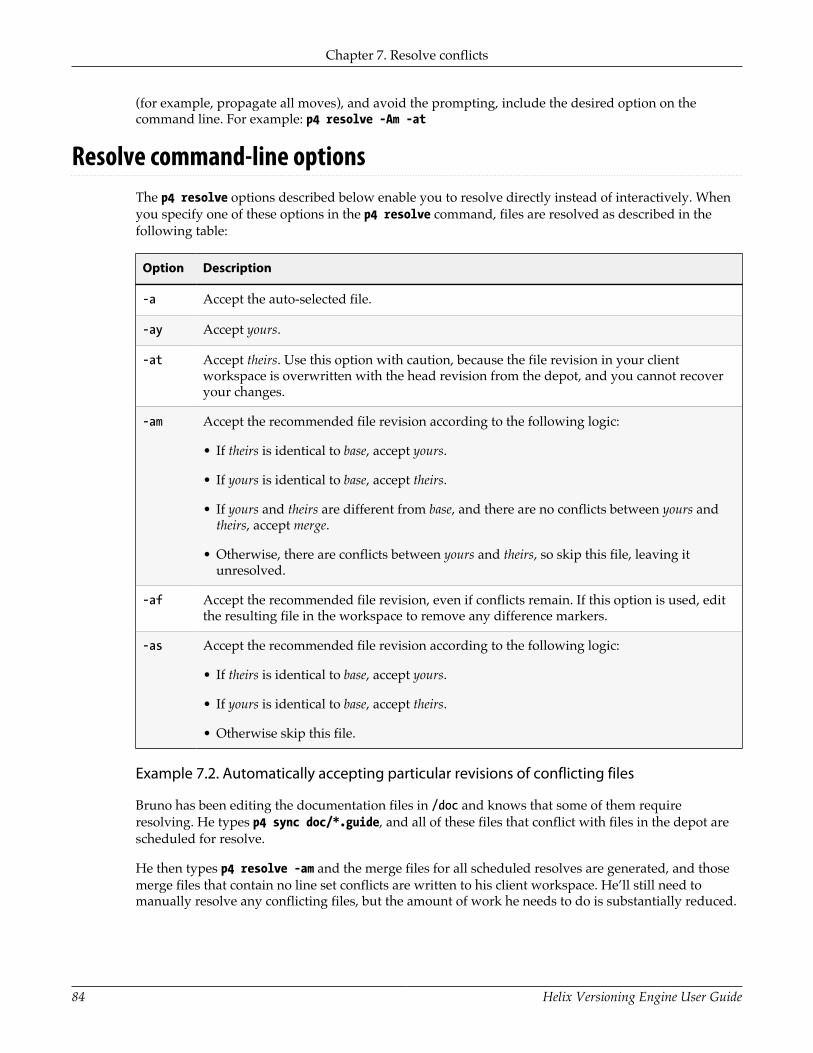
Chapter 7. Resolve conflicts
84 Helix Versioning Engine User Guide
(for example, propagate all moves), and avoid the prompting, include the desired option on thecommand line. For example: p4 resolve -Am -at
Resolve command-line optionsThe p4 resolve options described below enable you to resolve directly instead of interactively. Whenyou specify one of these options in the p4 resolve command, files are resolved as described in thefollowing table:
Option Description
-a Accept the auto-selected file.
-ay Accept yours.
-at Accept theirs. Use this option with caution, because the file revision in your clientworkspace is overwritten with the head revision from the depot, and you cannot recoveryour changes.
-am Accept the recommended file revision according to the following logic:
• If theirs is identical to base, accept yours.
• If yours is identical to base, accept theirs.
• If yours and theirs are different from base, and there are no conflicts between yours andtheirs, accept merge.
• Otherwise, there are conflicts between yours and theirs, so skip this file, leaving itunresolved.
-af Accept the recommended file revision, even if conflicts remain. If this option is used, editthe resulting file in the workspace to remove any difference markers.
-as Accept the recommended file revision according to the following logic:
• If theirs is identical to base, accept yours.
• If yours is identical to base, accept theirs.
• Otherwise skip this file.
Example 7.2. Automatically accepting particular revisions of conflicting files
Bruno has been editing the documentation files in /doc and knows that some of them requireresolving. He types p4 sync doc/*.guide, and all of these files that conflict with files in the depot arescheduled for resolve.
He then types p4 resolve -am and the merge files for all scheduled resolves are generated, and thosemerge files that contain no line set conflicts are written to his client workspace. He’ll still need tomanually resolve any conflicting files, but the amount of work he needs to do is substantially reduced.

Chapter 7. Resolve conflicts
Helix Versioning Engine User Guide 85
Resolve reporting commandsThe following reporting commands are helpful when you are resolving file conflicts:
Command Meaning
p4 diff [filenames] Diffs the file revision in the workspace with the last revision yousynced, to display changes you have made.
p4 diff2 file1 file2 Diffs two depot files. The specified files can be any two file revisionsand different files.
When you diff depot files, Helix server uses its own diff program, notthe diff program configured by setting P4DIFF.
p4 sync -n [filenames\] Previews the specified sync, listing which files have conflicts and needto be resolved.
p4 resolved Reports files that have been resolved but not yet submitted.

86 Helix Versioning Engine User Guide

Helix Versioning Engine User Guide 87
Chapter 8 Codeline managementThis chapter describes the tasks required to maintain groups of files in your depot. The followingspecific issues are addressed:
• Depot directory structure and how to best organize your repository
• Moving files and file changes among stream and project directories
• Identifying specific sets of files using either labels or changelists
This chapter focuses on maintaining a software codebase, but many of the tasks are relevant tomanaging other groups of files, such as a web site. For advice about best practices, see the white paperson the Perforce web site.
Organizing the depotYou can think of a depot as a top-level directory. Consider the following factors as you decide how toorganize your depot:
• Type of content: create depots or mainline streams according to the nature of your projects andtheir relationships (for example, applications with multiple components developed on separateschedules).
• Release requirements: within a project, create streams for each release and merge changes betweenbranches to control the introduction of features and bug fixes.
• Build management: use labels and changelists to control the file revisions that are built; use clientspecifications and views to ensure clean build areas.
A basic and logical way to organize the depot is to create one subdirectory (stream) for each project.For example, if your company is working on Jam, you might devote one stream to the release presentlyin development, another to already-released software, and perhaps one to your corporate web site.Your developers can modify their workspace views to map the files in their project, excluding otherprojects that are not of interest. For example, if Earl maintains the web site, his workspace view mightlook like this:
//JamCode/www/dev/... //earl-web-catalpa/www/development/...//JamCode/www/review/... //earl-web-catalpa/www/review/...//JamCode/www/live/... //earl-web-catalpa/www/live/...
And Gale, who’s working on Jam, sets up her workspace view as:
//Jamcode/dev/jam/... //gale-jam-oak/jam/...
You can organize according to projects or according to the purpose of a stream. For example, toorganize the depot according to projects, you can use a structure like the following:
//Acme/project1/main///Acme/project1/release 1.0///Acme/project1/release 1.1/

Chapter 8. Codeline management
88 Helix Versioning Engine User Guide
Or, to organize the depot according to the purpose of each stream, you can use a structure like thefollowing:
//Acme/main/project1///Acme/main/project2///Acme/release1.0/project1///Acme/release1.0/project2///Acme/release2.0/project1///Acme/release2.0/project2/
Another approach is to create one depot for each project. Choose a structure that makes branching andmerging as simple as possible, so that the history of your activities makes sense to you.
Branching streamsIf you are branching from a stream that has no history, use the p4 add command to add files to it, thenuse p4 copy to create the branched streams. For example, to create the mainline structure shown in theprevious section, perform the following steps:
1. Create a local folder your workspace for the mainline files; for example:
$ mkdir c:\p4clients\myworkspace\depot\main\
2. Copy the files for Project1 and Project2 to the newly created folder.
3. Add the files to the depot:
$ p4 add //Acme/main/project1/...$ p4 add //Acme/main/project2/...$ p4 submit
4. Create release streams:
$ p4 copy //Acme/main/project1/... //Acme/release1.0/project1/...$ p4 copy //Acme/main/project2/... //Acme/release1.0/project2/...$ p4 submit
Now you can use the p4 copy and p4 merge commands to propagate changes between main andrelease streams. (You can also seed a stream from another stream using the p4 integrate command, ifthere is a historical relationship between the source and target that you need to preserve.)
A shortcut: p4 populateIf a target stream is completely empty (no files present, not even deleted files), Helix offers a commandthat automates the process of copying the files from an existing source stream submitting theassociated changelist.
Chapter 8. Codeline management
Helix Versioning Engine User Guide 89
For example, instead of populating a release1.0 branch with the following two commands:
$ p4 copy //Acme/main/project1/... //Acme/release1.0/project1/...$ p4 submit
you can use the p4 populate command to populate the stream:
$ p4 populate //Acme/main/project1/... //Acme/release1.0/project1/...
Branching streamsBranching is a method of maintaining the relationship between sets of related files. Branches canevolve separately from their ancestors and descendants, and you can propagate (merge) changes fromone branch to another as desired.
To create a stream, use the p4 merge command. The p4 merge command is also used to propagatechanges between existing sets of files. For details about merging changes, refer to “Mergechanges” on page 90.
When to branchCreate a branch when two sets of files have different submission policies or need to evolve separately.For example:
• Problem : the development group wants to submit code to the depot whenever their code changes,regardless of whether it compiles, but the release engineers don’t want code to be submitted until it’sbeen debugged, verified, and approved.
Solution: create a release branch by branching the development codeline. When the developmentcodeline is ready, it is merged into the release codeline. Patches and bug fixes are made in the releasecode and merged back into the development code.
• Problem: a company is writing a driver for a new multi-platform printer. The UNIX device driver isdone and they are beginning work on an OS X driver, using the UNIX code as their starting point.
Solution: create an OS X branch from the existing UNIX code. These two codelines can evolveseparately. If bugs are found in one codeline, fixes can be merged to the other.
One basic strategy is to develop code in a mainline stream and create streams for releases. Makerelease-specific bug fixes in the release streams and, if required, merge them back into the mainlinestream.
Branching streamsTo branch a stream, use the p4 branch command. When you branch a stream, Helix records therelationships between the branched files and their ancestors.
You can create branches using file specifications or branch specifications. For simple branches, use filespecifications. For branches that are based on complex sets of files or to ensure that you have a record

Chapter 8. Codeline management
90 Helix Versioning Engine User Guide
of the way you defined the branch, use branch specifications. Branch specifications can also be used insubsequent integrations. Branch specifications also can serve as a record of codeline policy.
Using branch specifications
To map a set of files from source to target, you can create a branch mapping and use it as an argumentwhen you issue the p4 integrate command. To create a branch mapping, issue the p4 branchbranchname command and specify the desired mapping in the View: field, with source files on theleft and target files on the right. Make sure that the target files and directories are in your client view.Creating or altering a branch mapping has no effect on any files in the depot or client workspace. Thebranch mapping merely maps source files to target files.
To use the branch mapping to create a branch, issue the p4 integrate -b branchname command; thenuse p4 submit to submit the target files to the depot.
Branch specifications can contain multiple mappings and exclusionary mappings, just as client viewscan. For example, the following branch mapping branches the Jam 1.0 source code, excluding testscripts, from the main codeline:
Branch: jamgraph-1.0-dev2release
View: //depot/dev/main/jamgraph/... //depot/release/jamgraph/1.0/... -//depot/dev/main/jamgraph/test/... //depot/release/jamgraph/1.0/test/... //depot/dev/main/bin/glut32.dll //depot/release/jamgraph/1.0/bin/glut32.dll
To create a branch using the preceding branch mapping, issue the following command:
$ p4 integrate -b jamgraph-1.0-dev2release
and use p4 submit to submit the changes.
To delete a branch mapping, issue the p4 branch -d branchname command. Deleting a branchmapping has no effect on existing files or branches.
As with workspace views, if a filename or path in a branch view contains spaces, make sure to quotethe path:
//depot/dev/main/jamgraph/... "//depot/release/Jamgraph 1.0/..."
Merge changesAfter you create branches, you might need to propagate changes between them. For example, if you fixa bug in a release branch, you probably want to incorporate the fix back into your main codeline. Topropagate selected changes between branched files, you use the p4 merge and p4 resolve commands,as follows:

Chapter 8. Codeline management
Helix Versioning Engine User Guide 91
1. Issue the p4 merge command to schedule the files for resolve.
2. Issue the p4 resolve command to propagate changes from the source files to the target files.
To propagate individual changes, edit the merge file or use a merge program. The changes aremade to the target files in the client workspace.
3. Submit the changelist containing the resolved files.
Example 8.1. Propagating changes between branched files
Bruno has fixed a bug in the release 2.2 branch of the Jam project and needs to integrate it back to themain codeline. From his home directory, Bruno types the following:
$ p4 merge //JamCode/release/jam/2.2/src/Jambase //JamCode/dev/jam/Jambase
He sees the following message:
//JamCode/dev/jam/Jambase#134 - merge from ////JamCode/release/jam/2.2/src/Jambase#9
The file has been scheduled for resolve. He types p4 resolve, and the standard merge dialog appearson his screen.
//JamCode/dev/jam/Jambase - merging depot/release/jam/2.2/src/Jambase#9Diff chunks: 0 yours + 1 theirs + 0 both + 0 conflictingAccept(a) Edit(e) Diff(d) Merge (m) Skip(s) Help(?) [at]:
He resolves the conflict. When he’s done, the result file overwrites the file in his workspace. Thechangelist containing the file must be submitted to the depot.
To run the p4 merge or p4 copy commands, you must have Helix write permission on the target files,and read access on the source files. (See the Helix Versioning Engine Administrator Guide: Fundamentalsfor information on Helix permissions.)
By default, a file that has been newly created in a client workspace by p4 merge cannot be edited beforebeing submitted. To edit a newly merged file before submission, resolve it, then issue the p4 editcommand.
If the range of revisions being merged includes deleted revisions (for example, a file was deleted fromthe depot, then re-added), you can specify how deleted revisions are merged using the -Di option. Fordetails, refer to the P4 Command Reference.
Merging between unrelated filesIf the target file was not branched from the source, there is no base (common ancestor) revision, andHelix uses the first (most recently added) revision of the source file as its base revision. This operationis referred to as a baseless merge.

Chapter 8. Codeline management
92 Helix Versioning Engine User Guide
Merging specific file revisionsBy default, the p4 merge command merges all the revisions following the last-merged source revisioninto the target. To avoid having to manually delete unwanted revisions from the merge file whileediting, you can specify a range of revisions to be merged. The base file is the revision with the mostedits in common.
Example 8.2. Merging specific file revisions
Bruno has made two bug fixes to //JamCode/dev/jam/scan.c in the development stream, and Earlwants to merge the change into the release 1.0 branch. Although scan.c has gone through severalrevisions since the fixes were submitted, Earl knows that the bug fixes he wants were made to the 30threvision of scan.c. He types:
$ p4 integrate -b jamgraph-1.0-dev2release depot/release/jam/1.0/scan.c#30,30
The target file (//depot/release/jam/1.0/scan.c) is given as an argument, but the file revisions areapplied to the source. When Earl runs p4 resolve, only the 30th revision of Bruno’s file is scheduledfor resolve. That is, Earl sees only the changes that Bruno made to scan.c at revision 30.
Re-merging and re-resolving filesAfter a revision of a source file has been merged into a target, that revision is skipped in subsequentmerges to the same target. To force the merging of already-merged files, specify the -f option whenyou issue the p4 merge command.
A target that has been resolved but not submitted can be resolved again by specifying the -f option top4 resolve. When you re-resolve a file, yours is the new client file, the result of the original resolve.
Reporting branches and mergesThe reporting commands below provide useful information about the status of files being branchedand merged. Note the use of the preview option (-n) for reporting purposes.
To display this information Use this command
Preview of the results of an integration p4 integrate -n [filepatterns]
Files that are scheduled for resolve p4 resolve -n [filepatterns]
Files that have been resolved but not yet submitted. p4 resolved
List of branch specifications p4 branches
The integration history of the specified files. p4 integrated filepatterns
The revision histories of the specified files, including theintegration histories of files from which the specified fileswere branched.
p4 filelog -i [filepatterns]

Helix Versioning Engine User Guide 93
Chapter 9 Less common tasksThis chapter discusses less common tasks.
Work offlineThe preferred method of working offline (without access to the Helix server) is to use DVCS(distributed versioning) features. For details, refer to Using Helix for Distributed Versioning.
If you work offline, you must manually reconcile your work with the Helix service when you regainaccess to it. The following method for working detached assumes that you work on files in yourworkspace or update the workspace with your additions, changes, and deletions before you update thedepot:
To work offline:
1. Work on files without issuing p4 commands. Instead, use operating system commands to changethe permissions on files.
2. After the network connection is re-established, use p4 status or p4 reconcile to find all files inyour workspace that have changed.
3. Submit the resulting changelist(s).
To detect changed files, issue the p4 status or p4 reconcile commands. The commands performessentially the same function, but differ in their default behavior and output format.
Command Description
p4 reconcile When called without arguments, p4 reconcile opens the files in a changelist.To preview an operation, you must either use the -n option with p4 reconcile,or use the p4 status command.
p4 status When called without arguments, p4 status only previews the results ofthe workspace reconciliation. You must use either p4 status -A (or somecombination of the -e, -a, or -d options) to actually open the files in achangelist.
Ignoring groups of files when addingSometimes development processes result in the creation of extraneous content that should not besubmitted to the depot. Compilers produce object files and executables during development, texteditors and word processors produce backup files, and you may have your own personal conventionsfor notes on work in progress.
To ignore files (or groups of files) when adding, create a file with a list of file specifications you wish toignore, and set the P4IGNORE environment variable to point to this file.
When you add files, the full local path and parent directories of any file to be added are searched forP4IGNORE files. If any P4IGNORE files exist, their rules are added to a list, with greater precedence givento P4IGNORE rules closest to the file being added.
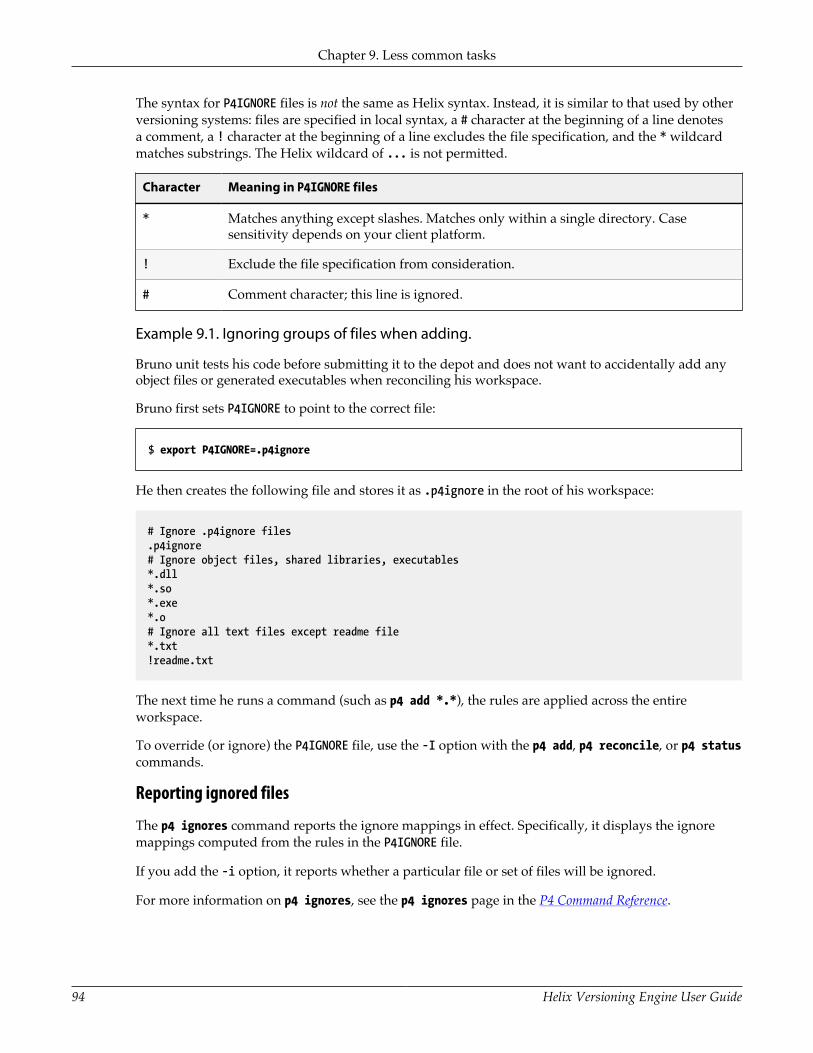
Chapter 9. Less common tasks
94 Helix Versioning Engine User Guide
The syntax for P4IGNORE files is not the same as Helix syntax. Instead, it is similar to that used by otherversioning systems: files are specified in local syntax, a # character at the beginning of a line denotesa comment, a ! character at the beginning of a line excludes the file specification, and the * wildcardmatches substrings. The Helix wildcard of ... is not permitted.
Character Meaning in P4IGNORE files
* Matches anything except slashes. Matches only within a single directory. Casesensitivity depends on your client platform.
! Exclude the file specification from consideration.
# Comment character; this line is ignored.
Example 9.1. Ignoring groups of files when adding.
Bruno unit tests his code before submitting it to the depot and does not want to accidentally add anyobject files or generated executables when reconciling his workspace.
Bruno first sets P4IGNORE to point to the correct file:
$ export P4IGNORE=.p4ignore
He then creates the following file and stores it as .p4ignore in the root of his workspace:
# Ignore .p4ignore files.p4ignore# Ignore object files, shared libraries, executables*.dll*.so*.exe*.o# Ignore all text files except readme file*.txt!readme.txt
The next time he runs a command (such as p4 add *.*), the rules are applied across the entireworkspace.
To override (or ignore) the P4IGNORE file, use the -I option with the p4 add, p4 reconcile, or p4 statuscommands.
Reporting ignored files
The p4 ignores command reports the ignore mappings in effect. Specifically, it displays the ignoremappings computed from the rules in the P4IGNORE file.
If you add the -i option, it reports whether a particular file or set of files will be ignored.
For more information on p4 ignores, see the p4 ignores page in the P4 Command Reference.

Chapter 9. Less common tasks
Helix Versioning Engine User Guide 95
Locking filesAfter you open a file, you can lock it to prevent other users from submitting it before you do. Thebenefit of locking a file is that conflicts are prevented, but when you lock a file, you might preventother team members from proceeding with their work on that file.
Preventing multiple resolves by locking filesWithout file locking, there is no guarantee that the resolve process ever ends. The following scenariodemonstrates the problem:
1. Bruno opens file for edit.
2. Gale opens the same file in her client for edit.
3. Bruno and Gale both edit their client workspace versions of the file.
4. Bruno submits a changelist containing that file, and his submit succeeds.
5. Gale submits a changelist with her version of the file; her submit fails because of file conflicts withthe new depot’s file.
6. Gale starts a resolve.
7. Bruno edits and submits a new version of the same file.
8. Gale finishes the resolve and attempts to submit; the submit fails and must now be merged withBruno’s latest file.
…and so on.
To prevent such problems, you can lock files, as follows.
1. Before scheduling a resolve, lock the file.
2. Sync the file (to schedule a resolve).
3. Resolve the file.
4. Submit the file.
5. Helix automatically unlocks the file after successful changelist submission.
To list open locked files on UNIX, issue the following command:
$ p4 opened | grep "*locked*"
Preventing multiple checkoutsTo ensure that only one user at a time can work on the file, use the +l (exclusive-open) file typemodifier. For example:
Chapter 9. Less common tasks
96 Helix Versioning Engine User Guide
$ p4 reopen -t binary+l file
Although exclusive locking prevents concurrent development, for some file types (binary files),merging and resolving are not meaningful, so you can prevent conflicts by preventing multiple usersfrom working on the file simultaneously.
Your Helix administrator can use the p4 typemap command to ensure that all files of a specified type(for instance, //depot/.../*.gif for all .gif files) can only be opened by one user at a time. See the P4Command Reference.
The difference between p4 lock and +l is that p4 lock allows anyone to open a file for edit, but onlythe person who locked the file can submit it. By contrast, a file of type +l prevents more than one userfrom opening the file.
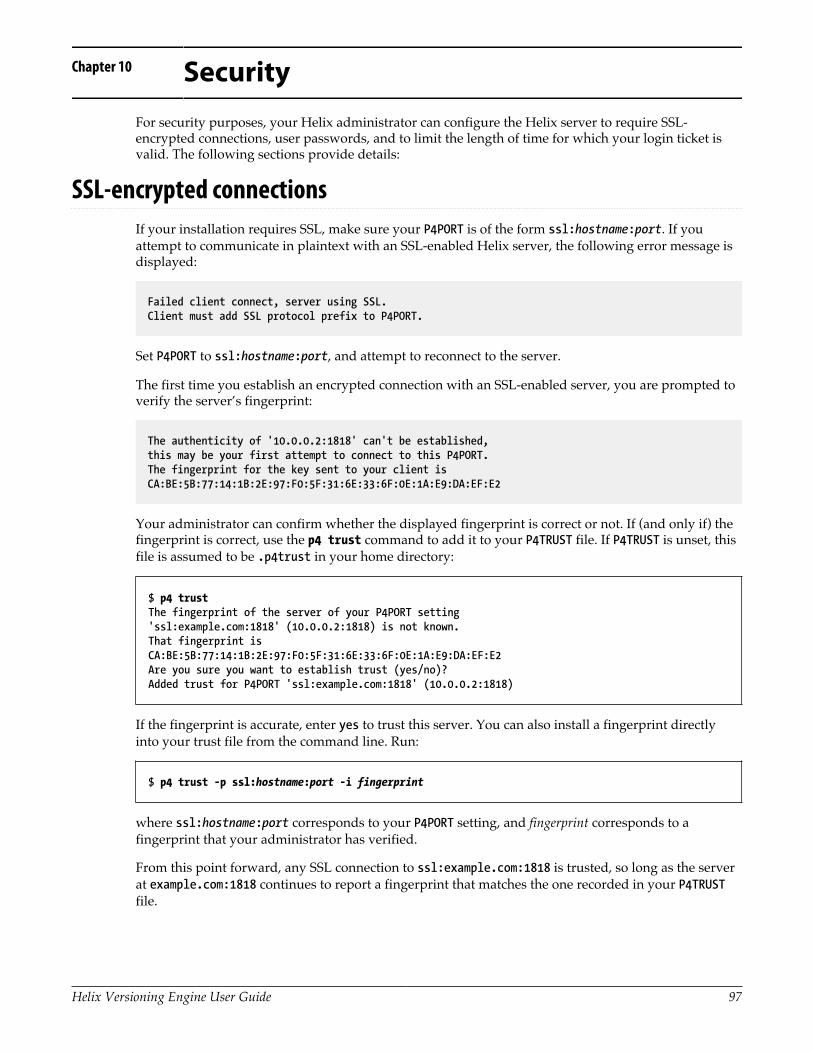
Helix Versioning Engine User Guide 97
Chapter 10 SecurityFor security purposes, your Helix administrator can configure the Helix server to require SSL-encrypted connections, user passwords, and to limit the length of time for which your login ticket isvalid. The following sections provide details:
SSL-encrypted connectionsIf your installation requires SSL, make sure your P4PORT is of the form ssl:hostname:port. If youattempt to communicate in plaintext with an SSL-enabled Helix server, the following error message isdisplayed:
Failed client connect, server using SSL.Client must add SSL protocol prefix to P4PORT.
Set P4PORT to ssl:hostname:port, and attempt to reconnect to the server.
The first time you establish an encrypted connection with an SSL-enabled server, you are prompted toverify the server’s fingerprint:
The authenticity of '10.0.0.2:1818' can't be established,this may be your first attempt to connect to this P4PORT.The fingerprint for the key sent to your client isCA:BE:5B:77:14:1B:2E:97:F0:5F:31:6E:33:6F:0E:1A:E9:DA:EF:E2
Your administrator can confirm whether the displayed fingerprint is correct or not. If (and only if) thefingerprint is correct, use the p4 trust command to add it to your P4TRUST file. If P4TRUST is unset, thisfile is assumed to be .p4trust in your home directory:
$ p4 trustThe fingerprint of the server of your P4PORT setting'ssl:example.com:1818' (10.0.0.2:1818) is not known.That fingerprint isCA:BE:5B:77:14:1B:2E:97:F0:5F:31:6E:33:6F:0E:1A:E9:DA:EF:E2Are you sure you want to establish trust (yes/no)?Added trust for P4PORT 'ssl:example.com:1818' (10.0.0.2:1818)
If the fingerprint is accurate, enter yes to trust this server. You can also install a fingerprint directlyinto your trust file from the command line. Run:
$ p4 trust -p ssl:hostname:port -i fingerprint
where ssl:hostname:port corresponds to your P4PORT setting, and fingerprint corresponds to afingerprint that your administrator has verified.
From this point forward, any SSL connection to ssl:example.com:1818 is trusted, so long as the serverat example.com:1818 continues to report a fingerprint that matches the one recorded in your P4TRUSTfile.

Chapter 10. Security
98 Helix Versioning Engine User Guide
If the Helix server ever reports a different fingerprint than the one that you have trusted, the followingerror message is displayed:
******* WARNING P4PORT IDENTIFICATION HAS CHANGED! *******It is possible that someone is intercepting your connectionto the Perforce P4PORT '10.0.50.39:1667'If this is not a scheduled key change, then you should contactyour Perforce administrator.The fingerprint for the mismatched key sent to your client is18:FC:4F:C3:2E:FA:7A:AE:BC:74:58:2F:FC:F5:87:7C:BE:C0:2D:B5To allow connection use the 'p4 trust' command.
This error message indicates that the server’s fingerprint has changed from one that you stored in yourP4TRUST file and indicates that the server’s SSL credentials have changed.
Although the change to the fingerprint may be legitimate (for example, your administrator controls thelength of time for which your server’s SSL credentials remain valid, and your server’s credentials mayhave expired), it can also indicate the presence of a security risk.
Warning If you see this error message, and your Helix administrator has not notified youof a change to your server’s key and certificate pair, it is imperative that youindependently verify the accuracy of the reported fingerprint.
Unless you can independently confirm the veracity of the new fingerprint (by someout-of-band means ranging from the company’s intranet site, or by personallycontacting your administrator), do not trust the changed fingerprint.
Connecting to services that require plaintext connections
If your Helix installation requires plaintext (in order to support older Helix applications), set P4PORTto tcp:hostname:port. If you attempt to use SSL to connect to a service that expects plaintextconnections, the following error message is displayed:
Perforce client error: SSL connect to ssl:_host_:_port_ failed (Connection reset by peer). Remove SSL protocol prefix from P4PORT.
Set P4PORT to tcp:hostname:port (or, if you are using applications at release 2011.1 or earlier, setP4PORT to hostname:port), and attempt to reconnect to the service.
PasswordsDepending on the security level at which your Helix installation is running, you might need to log into Helix before you can run Helix commands. Without passwords, any user can assume the identity ofany other Helix user by setting P4USER to a different user name or specifying the -u option when youissue a p4 command. To improve security, use passwords.

Chapter 10. Security
Helix Versioning Engine User Guide 99
Setting passwords
To create a password for your Helix user, issue the p4 passwd command.
Passwords may be up to 1,024 characters in length. Your system administrator can configure Helixto require “strong” passwords, the minimum length of a password, and if you have been assigned adefault password, your administrator can further require that you change your password before youfirst use Helix.
By default, the Helix server defines a password as strong if it is at least eight characters long andcontains at least two of the following:
• Uppercase letters
• Lowercase letters
• Non-alphabetic characters
In an environment with a minimum password length of eight characters, for example, a1b2c3d4,A1B2C3D4, aBcDeFgH would be considered strong passwords.
To reset or remove a password (without knowing the password), Helix superuser privilege is required.If you need to have your password reset, contact your Helix administrator. See the Helix VersioningEngine Administrator Guide: Fundamentals for details.
Using your password
If your Helix user has a password set, you must use it when you issue p4 commands. To use thepassword, you can:
• Log into Helix by issuing the p4 login command, before issuing other commands.
• Set P4PASSWD to your password, either in the environment or in a config file.
• Specify the -P password option when you issue p4 commands (for instance, p4 -P mypasswordsubmit).
• Windows or OS X: store your password by using the p4 set -s command. Not advised for siteswhere security is high. Helix administrators can disable this feature.
Connection time limitsYour Helix administrator can configure the Helix server to enforce time limits for users. Helix usesticket-based authentication to enforce time limits. Because ticket-based authentication does notrely on environment variables or command-line options, it is more secure than password-basedauthentication.
Tickets are stored in a file in your home directory. After you have logged in, your ticket is valid for alimited period of time (by default, 12 hours).
Chapter 10. Security
100 Helix Versioning Engine User Guide
Logging in and logging outIf time limits are in effect at your site, you must issue the p4 login command to obtain a ticket. Enteryour password when prompted. If you log in successfully, a ticket is created for you in the ticket file inyour home directory, and you are not prompted to log in again until either your ticket expires or youlog out by issuing the p4 logout command.
To see how much time remains before your login expires, issue the following command:
$ p4 login -s
If your ticket is valid, the length of time remaining is displayed. To extend a ticket’s lifespan, use p4login while already logged in. Your ticket’s lifespan is extended by 1/3 of its initial timeout setting,subject to a maximum of your ticket’s initial timeout setting.
To log out of Helix, issue the following command:
$ p4 logout
Working on multiple computersBy default, your ticket is valid only for the IP address of the computer from which you loggedin. If you use Helix from multiple computers that share a home directory (typical in many UNIXenvironments), log in with:
$ p4 login -a
Using p4 login -a creates a ticket in your home directory that is valid from all IP addresses, enablingyou to remain logged into Helix from more than one computer.
To log out from all computers simultaneously, issue the following command:
$ p4 logout -a
For more information about the p4 login and p4 logout commands, see the P4 Command Reference.

Helix Versioning Engine User Guide 101
Chapter 11 LabelsA Helix label is a set of tagged file revisions. For example, you might want to tag the file revisions thatcompose a particular release with the label release2.0.1. In general, you can use labels to:
• Keep track of all the file revisions contained in a particular release of software.
• Distribute a particular set of file revisions to other users (for example, a standard configuration).
• Populate a clean build workspace.
• Specify a set of file revisions to be branched for development purposes.
• Sync the revisions as a group to a client workspace.
Labels and changelist numbers both refer to particular sets of file revisions but differ as follows:
• A label can refer to any set of file revisions. A changelist number refers to the contents of all the filesin the depot at the time the changelist was submitted. If you need to refer to a group of file revisionsfrom different points in time, use a label. If there is a point in time at which the files are consistentfor your purposes, use a changelist number.
• You can change the contents of a label. You cannot change the contents of a submitted changelist.
• You can assign your own names to labels. Changelist numbers are assigned by Helix.
Changelists are suitable for many applications that traditionally use labels. Unlike labels, changelistsrepresent the state of a set of files at a specific time. Before you assume that a label is required, considerwhether simply referring to a changelist number might fulfill your requirements.
Tagging files with a labelTo tag a set of file revisions (in addition to any revisions that have already been tagged), use p4 tag,specifying a label name and the desired file revisions.
For example, to tag the head revisions of files that reside under //JamCode/release/jam/2.1/src/ withthe label jam-2.1.0, issue the following command:
$ p4 tag -l jam-2.1.0 //JamCode/release/jam/2.1/src/...
To tag revisions other than the head revision, specify a changelist number in the file pattern:
$ p4 tag -l jam-2.1.0 //JamCode/release/jam/2.1/src/...@1234
Only one revision of a given file can be tagged with a given label, but the same file revision can betagged by multiple labels.
Untagging filesYou can untag revisions with:
Chapter 11. Labels
102 Helix Versioning Engine User Guide
$ p4 tag -d -l labelname filepattern
This command removes the association between the specified label and the file revisions tagged byit. For example, if you have tagged all revisions under //JamCode/release/jam/2.1/src/... withjam-2.1.0, you can untag only the header files with:
$ p4 tag -d -l jam-2.1.0 //JamCode/release/jam/2.1/src/*.h
Previewing tagging resultsYou can preview the results of p4 tag with p4 tag -n. This command lists the revisions that would betagged, untagged, or re-tagged without actually performing the operation.
Listing files tagged by a labelTo list the revisions tagged with labelname, use p4 files, specifying the label name as follows:
$ p4 files @labelname
All revisions tagged with labelname are listed, with their file type, change action, and changelistnumber. (This command is equivalent to p4 files //...@labelname).
Listing labels that have been applied to filesTo list all labels that have been applied to files, use the command:
p4 labels filepattern
Using a label to specify file revisionsYou can use a label name anywhere you can refer to files by revision (#1, #head), changelist number(@7381), or date (@2011/07/01).
If you omit file arguments when you issue the p4 sync @labelname command, all files in theworkspace view that are tagged by the label are synced to the revision specified in the label. All filesin the workspace that do not have revisions tagged by the label are deleted from the workspace.Open files or files not under Helix control are unaffected. This command is equivalent to p4sync //...@labelname.
If you specify file arguments when you issue the p4 sync command (p4 sync files@labelname), filesthat are in your workspace and tagged by the label are synced to the tagged revision.

Chapter 11. Labels
Helix Versioning Engine User Guide 103
Example 11.1. Retrieving files tagged by a label into a client workspace
To retrieve the files tagged by Earl’s jam-2.1.0 label into his client workspace, Bruno issues thefollowing command:
$ p4 sync @ jam-2.1.0
and sees:
//JamCode/dev/jam/Build.com#5 - updating c:\bruno_ws\dev\jam\Build.com//JamCode/dev/jam/command.c#5 - updating c:\bruno_ws\dev\jam\command.c//JamCode/dev/jam/command.h#3 - added as c:\bruno_ws\dev\jam\command.h//JamCode/dev/jam/compile.c#12 - updating c:\bruno_ws\dev\jam\compile.c//JamCode/dev/jam/compile.h#2 - updating c:\bruno_ws\dev\jam\compile.h...
Deleting labelsTo delete a label, use the following command:
$ p4 label -d labelname
Deleting a label has no effect on the tagged file revisions (though, of course, the revisions are no longertagged).
Creating a label for future useTo create a label without tagging any file revisions, issue the p4 label labelname command. Thiscommand displays a form in which you describe and specify the label. After you have created a label,you can use p4 tag or p4 labelsync to apply the label to file revisions.
Label names cannot be the same as client workspace, branch, or depot names.
For example, to create jam-2.1.0, issue the following command:
$ p4 label jam-2.1.0
The following form is displayed:
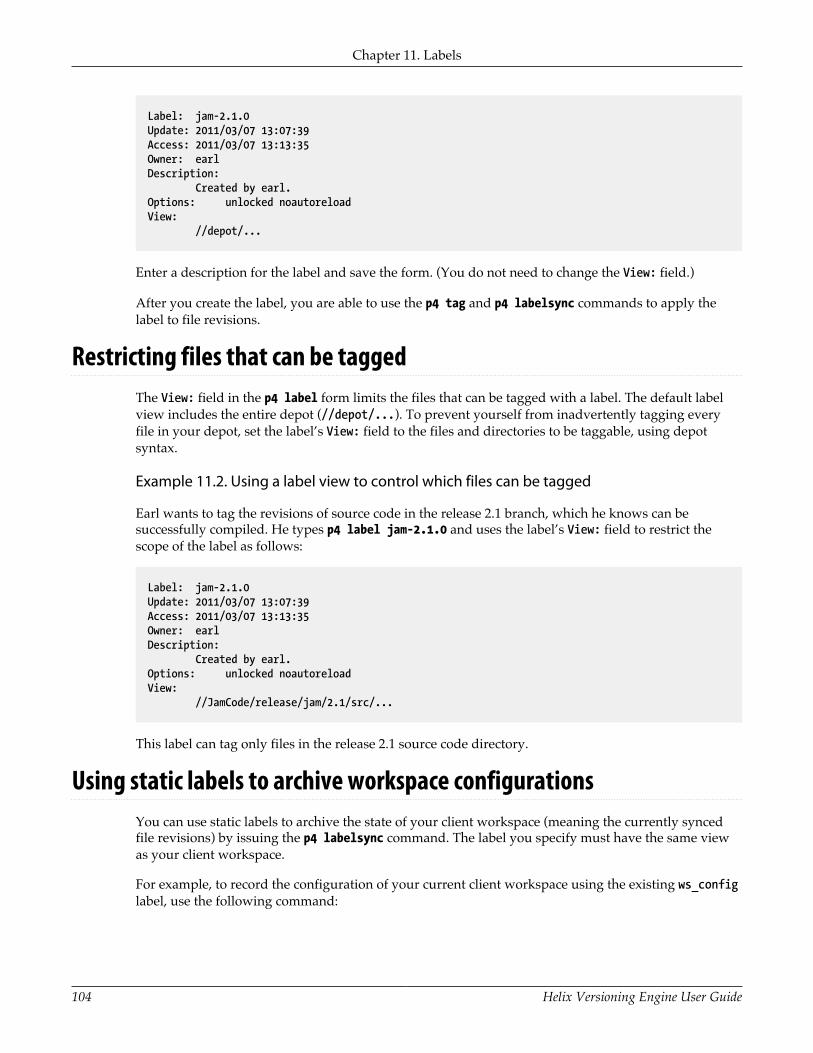
Chapter 11. Labels
104 Helix Versioning Engine User Guide
Label: jam-2.1.0Update: 2011/03/07 13:07:39Access: 2011/03/07 13:13:35Owner: earlDescription: Created by earl.Options: unlocked noautoreloadView: //depot/...
Enter a description for the label and save the form. (You do not need to change the View: field.)
After you create the label, you are able to use the p4 tag and p4 labelsync commands to apply thelabel to file revisions.
Restricting files that can be taggedThe View: field in the p4 label form limits the files that can be tagged with a label. The default labelview includes the entire depot (//depot/...). To prevent yourself from inadvertently tagging everyfile in your depot, set the label’s View: field to the files and directories to be taggable, using depotsyntax.
Example 11.2. Using a label view to control which files can be tagged
Earl wants to tag the revisions of source code in the release 2.1 branch, which he knows can besuccessfully compiled. He types p4 label jam-2.1.0 and uses the label’s View: field to restrict thescope of the label as follows:
Label: jam-2.1.0Update: 2011/03/07 13:07:39Access: 2011/03/07 13:13:35Owner: earlDescription: Created by earl.Options: unlocked noautoreloadView: //JamCode/release/jam/2.1/src/...
This label can tag only files in the release 2.1 source code directory.
Using static labels to archive workspace configurationsYou can use static labels to archive the state of your client workspace (meaning the currently syncedfile revisions) by issuing the p4 labelsync command. The label you specify must have the same viewas your client workspace.
For example, to record the configuration of your current client workspace using the existing ws_configlabel, use the following command:

Chapter 11. Labels
Helix Versioning Engine User Guide 105
$ p4 labelsync -l ws_config
All file revisions that are synced to your current workspace and visible through both the workspaceview and the label view (if any) are tagged with the ws_config label. Files that were previously taggedwith ws_config, then subsequently removed from your workspace (p4 sync #none), are untagged.
To sync the files tagged by the ws_config label (thereby recreating the workspace configuration), issuethe following command:
$ p4 sync @ws_config
Note You can control how static labels are stored using the autoreload or noautoreloadoptions:
• autoreload stores the labels in the unload depot. This storage option can improveperformance on sites that make heavy use of labels.
• noautoreload stores the labels in the db.label table.
These storage options do not affect automatic labels.
Using automatic labels as aliases for changelists or other revisionsYou can use automatic labels to specify files at certain revisions without having to issue the p4labelsync command.
To create an automatic label, fill in the Revision: field of the p4 label form with a revision specifier.When you sync a workspace to an automatic label, the contents of the Revision: field are applied toevery file in the View: field.
Example 11.3. Using an automatic label as an alias for a changelist number.
Earl is running a nightly build process, and has successfully built a product as of changelist 1234.Rather than having to remember the specific changelist for every night’s build, he types p4 labelnightly20111201 and uses the label’s Revision: field to automatically tag all files as of changelist 1234with the nightly20111201 label:
Label: nightly20111201Owner: earlDescription: Nightly build process.Options: unlocked noautoreloadView: //depot/...Revision: @1234
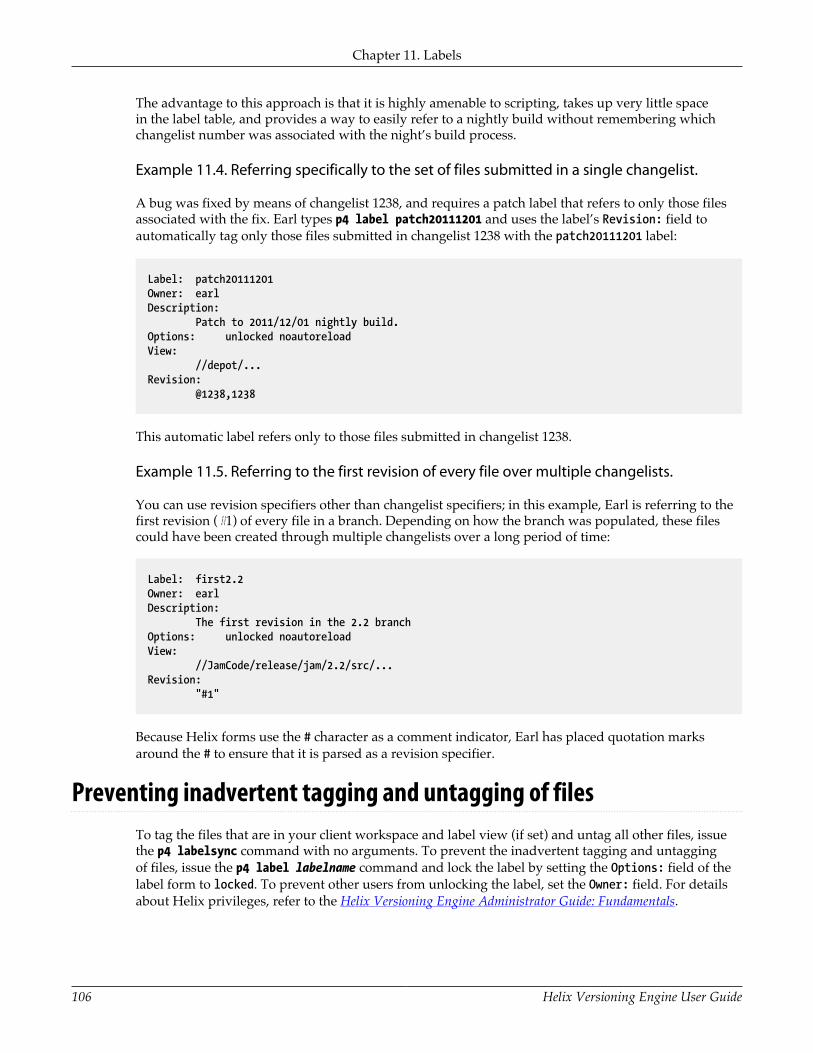
Chapter 11. Labels
106 Helix Versioning Engine User Guide
The advantage to this approach is that it is highly amenable to scripting, takes up very little spacein the label table, and provides a way to easily refer to a nightly build without remembering whichchangelist number was associated with the night’s build process.
Example 11.4. Referring specifically to the set of files submitted in a single changelist.
A bug was fixed by means of changelist 1238, and requires a patch label that refers to only those filesassociated with the fix. Earl types p4 label patch20111201 and uses the label’s Revision: field toautomatically tag only those files submitted in changelist 1238 with the patch20111201 label:
Label: patch20111201Owner: earlDescription: Patch to 2011/12/01 nightly build.Options: unlocked noautoreloadView: //depot/...Revision: @1238,1238
This automatic label refers only to those files submitted in changelist 1238.
Example 11.5. Referring to the first revision of every file over multiple changelists.
You can use revision specifiers other than changelist specifiers; in this example, Earl is referring to thefirst revision (#1) of every file in a branch. Depending on how the branch was populated, these filescould have been created through multiple changelists over a long period of time:
Label: first2.2Owner: earlDescription: The first revision in the 2.2 branchOptions: unlocked noautoreloadView: //JamCode/release/jam/2.2/src/...Revision: "#1"
Because Helix forms use the # character as a comment indicator, Earl has placed quotation marksaround the # to ensure that it is parsed as a revision specifier.
Preventing inadvertent tagging and untagging of filesTo tag the files that are in your client workspace and label view (if set) and untag all other files, issuethe p4 labelsync command with no arguments. To prevent the inadvertent tagging and untaggingof files, issue the p4 label labelname command and lock the label by setting the Options: field of thelabel form to locked. To prevent other users from unlocking the label, set the Owner: field. For detailsabout Helix privileges, refer to the Helix Versioning Engine Administrator Guide: Fundamentals.

Chapter 11. Labels
Helix Versioning Engine User Guide 107
Using labels on edge serversYou can user the Helix Versioning Engine in a distributed, multi-site environment using central andedge servers. With a distributed Helix server architecture, users typically connect to an edge serverand execute commands just as they would with a classic Helix server. For more information, refer toHelix Versioning Engine Administrator Guide: Multi-site Deployment.
When connected to an edge server, the commands p4 label, p4 labelsync, and p4 tag operate onlabels local to the edge server. Global labels can be manipulated by using the -g option. For details,refer to the P4 Command Reference.
Note Using the -g option with p4 labelsync only works with a global client. Tomanipulate a global label, use p4 tag.

108 Helix Versioning Engine User Guide

Helix Versioning Engine User Guide 109
Chapter 12 JobsA job is a numbered (or named) work request managed by Helix. Helix jobs enable you to track thestatus of bugs and enhancement requests and associate them with changelists that implement fixes andenhancements. You can search for jobs based on the contents of fields, the date the job was entered orlast modified, and many other criteria.
Your Helix administrator can customize the job specification for your site’s requirements. For detailson modifying the job specification, see the Helix Versioning Engine Administrator Guide: Fundamentals.
To integrate Helix with your in-house defect tracking system, or to develop an integration with athird-party defect tracking system, use P4DTG, the Perforce Defect Tracking Gateway. P4DTG is anintegrated platform that includes both a graphical configuration editor and a replication engine. Formore information, see:
http://www.perforce.com/product/components/defect_tracking_gateway
Creating, editing, and deleting a jobTo create a job using Helix’s default job-naming scheme, issue the p4 job command. To assign a nameto a new job (or edit an existing job), issue the p4 job jobname command.
Example 12.1. Creating a job
Gale discovers a problem with Jam, so she creates a job by issuing the p4 job command and describesit as follows:
Job: job000006
Status: open
User: gale
Date: 2011/11/14 17:12:21
Description: MAXLINE can't account for expanded cmd buffer size.
The following table describes the fields in the default job specification:
Field Name Description Default
Job The name of the job (white space is not allowed). Bydefault, Helix assigns job names using a numberingscheme (jobnnnnnn).
Last job number + 1
Status • open: job has not yet been fixed.
• closed: job has been completed.
open
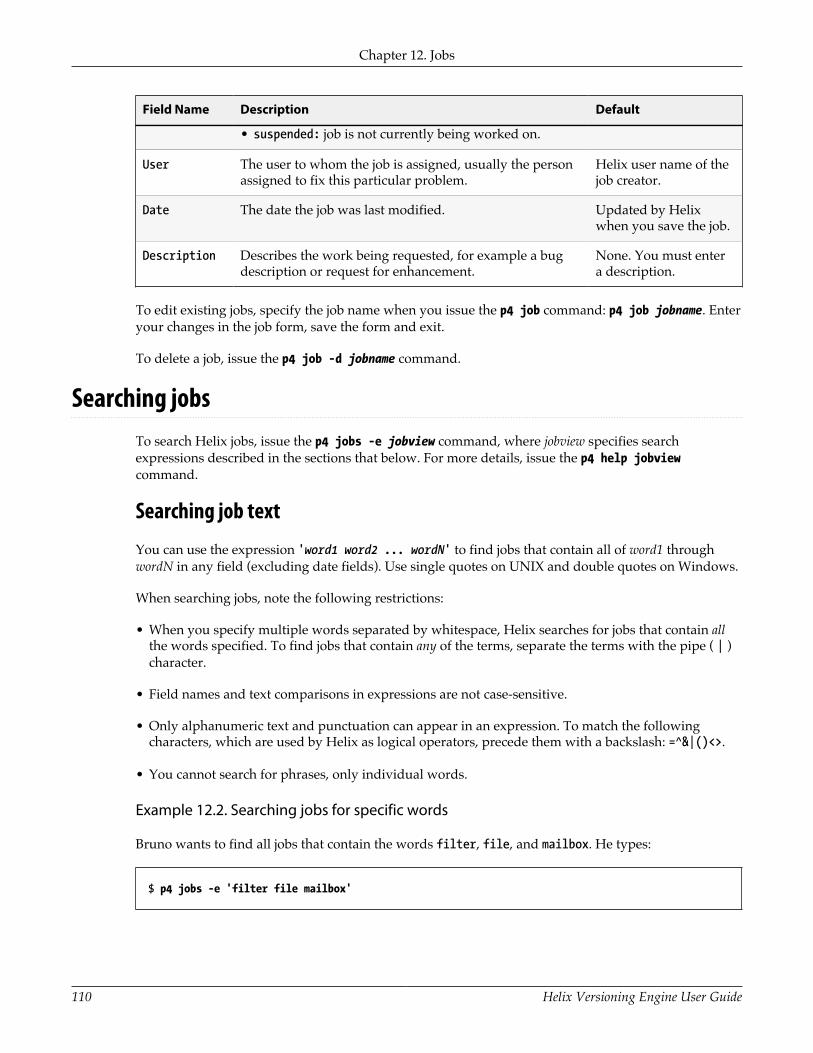
Chapter 12. Jobs
110 Helix Versioning Engine User Guide
Field Name Description Default
• suspended: job is not currently being worked on.
User The user to whom the job is assigned, usually the personassigned to fix this particular problem.
Helix user name of thejob creator.
Date The date the job was last modified. Updated by Helixwhen you save the job.
Description Describes the work being requested, for example a bugdescription or request for enhancement.
None. You must entera description.
To edit existing jobs, specify the job name when you issue the p4 job command: p4 job jobname. Enteryour changes in the job form, save the form and exit.
To delete a job, issue the p4 job -d jobname command.
Searching jobsTo search Helix jobs, issue the p4 jobs -e jobview command, where jobview specifies searchexpressions described in the sections that below. For more details, issue the p4 help jobviewcommand.
Searching job text
You can use the expression 'word1 word2 ... wordN' to find jobs that contain all of word1 throughwordN in any field (excluding date fields). Use single quotes on UNIX and double quotes on Windows.
When searching jobs, note the following restrictions:
• When you specify multiple words separated by whitespace, Helix searches for jobs that contain allthe words specified. To find jobs that contain any of the terms, separate the terms with the pipe ( | )character.
• Field names and text comparisons in expressions are not case-sensitive.
• Only alphanumeric text and punctuation can appear in an expression. To match the followingcharacters, which are used by Helix as logical operators, precede them with a backslash: =^&|()<>.
• You cannot search for phrases, only individual words.
Example 12.2. Searching jobs for specific words
Bruno wants to find all jobs that contain the words filter, file, and mailbox. He types:
$ p4 jobs -e 'filter file mailbox'
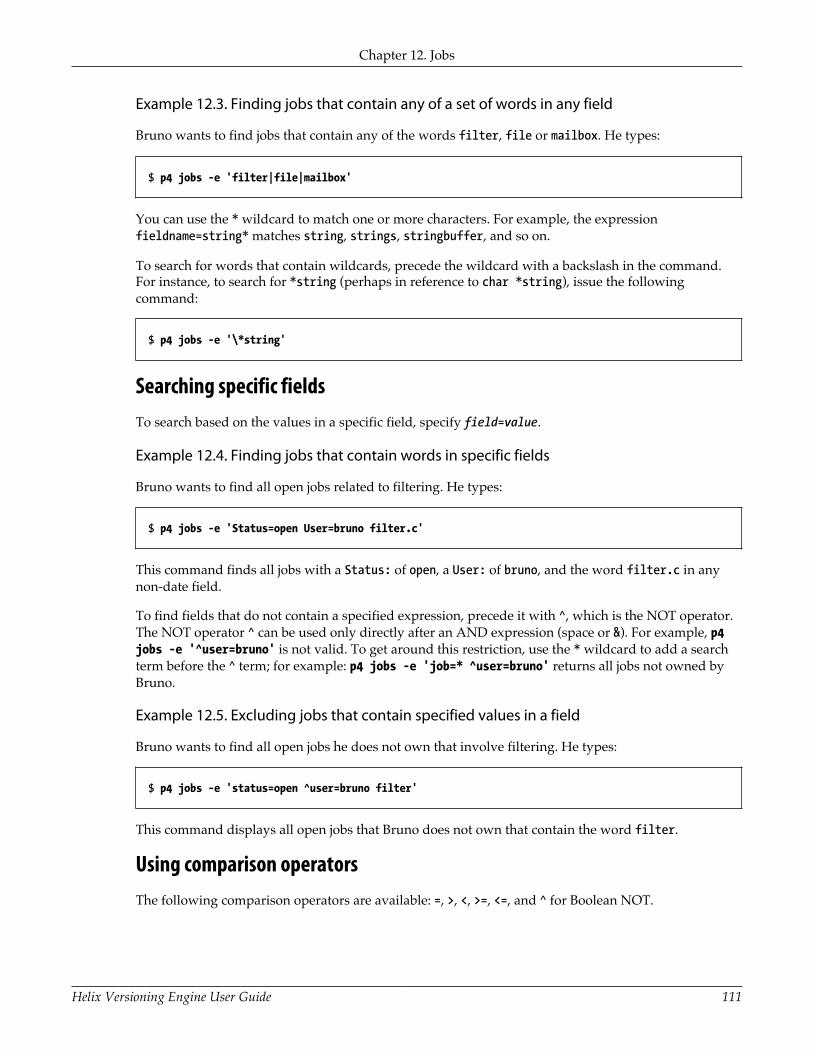
Chapter 12. Jobs
Helix Versioning Engine User Guide 111
Example 12.3. Finding jobs that contain any of a set of words in any field
Bruno wants to find jobs that contain any of the words filter, file or mailbox. He types:
$ p4 jobs -e 'filter|file|mailbox'
You can use the * wildcard to match one or more characters. For example, the expressionfieldname=string* matches string, strings, stringbuffer, and so on.
To search for words that contain wildcards, precede the wildcard with a backslash in the command.For instance, to search for *string (perhaps in reference to char *string), issue the followingcommand:
$ p4 jobs -e '\*string'
Searching specific fieldsTo search based on the values in a specific field, specify field=value.
Example 12.4. Finding jobs that contain words in specific fields
Bruno wants to find all open jobs related to filtering. He types:
$ p4 jobs -e 'Status=open User=bruno filter.c'
This command finds all jobs with a Status: of open, a User: of bruno, and the word filter.c in anynon-date field.
To find fields that do not contain a specified expression, precede it with ^, which is the NOT operator.The NOT operator ^ can be used only directly after an AND expression (space or &). For example, p4jobs -e '^user=bruno' is not valid. To get around this restriction, use the * wildcard to add a searchterm before the ^ term; for example: p4 jobs -e 'job=* ^user=bruno' returns all jobs not owned byBruno.
Example 12.5. Excluding jobs that contain specified values in a field
Bruno wants to find all open jobs he does not own that involve filtering. He types:
$ p4 jobs -e 'status=open ^user=bruno filter'
This command displays all open jobs that Bruno does not own that contain the word filter.
Using comparison operatorsThe following comparison operators are available: =, >, <, >=, <=, and ^ for Boolean NOT.
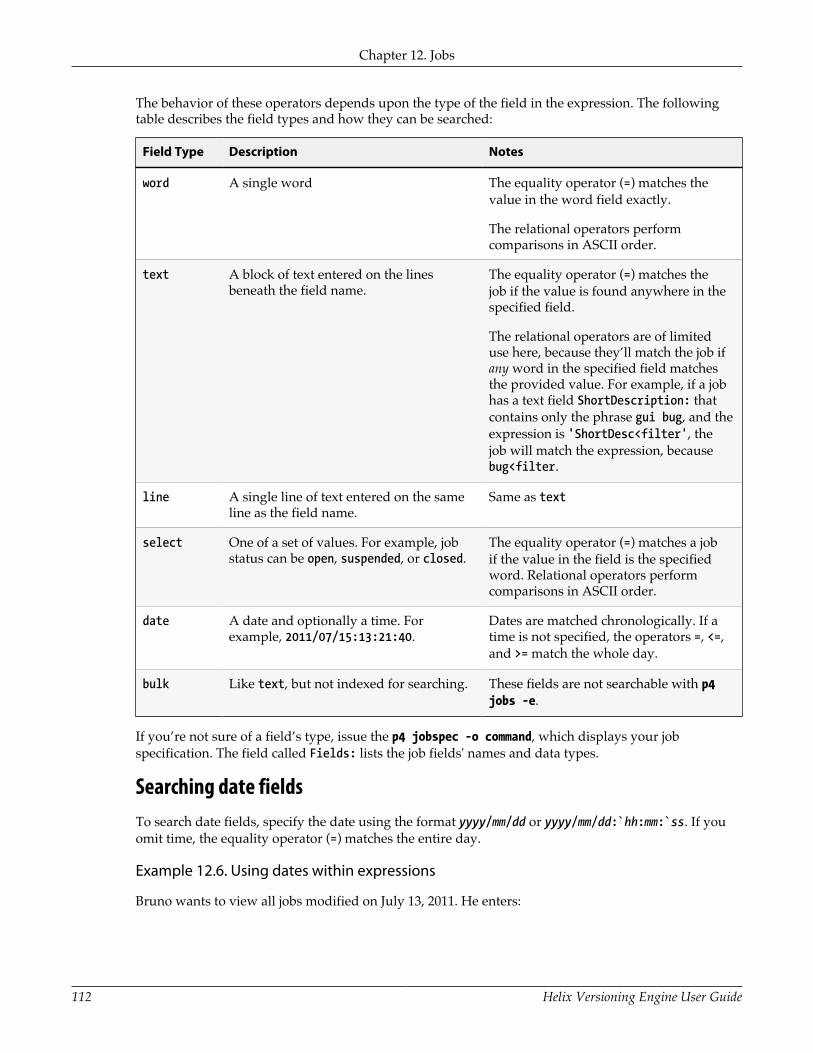
Chapter 12. Jobs
112 Helix Versioning Engine User Guide
The behavior of these operators depends upon the type of the field in the expression. The followingtable describes the field types and how they can be searched:
Field Type Description Notes
word A single word The equality operator (=) matches thevalue in the word field exactly.
The relational operators performcomparisons in ASCII order.
text A block of text entered on the linesbeneath the field name.
The equality operator (=) matches thejob if the value is found anywhere in thespecified field.
The relational operators are of limiteduse here, because they’ll match the job ifany word in the specified field matchesthe provided value. For example, if a jobhas a text field ShortDescription: thatcontains only the phrase gui bug, and theexpression is 'ShortDesc<filter', thejob will match the expression, becausebug<filter.
line A single line of text entered on the sameline as the field name.
Same as text
select One of a set of values. For example, jobstatus can be open, suspended, or closed.
The equality operator (=) matches a jobif the value in the field is the specifiedword. Relational operators performcomparisons in ASCII order.
date A date and optionally a time. Forexample, 2011/07/15:13:21:40.
Dates are matched chronologically. If atime is not specified, the operators =, <=,and >= match the whole day.
bulk Like text, but not indexed for searching. These fields are not searchable with p4jobs -e.
If you’re not sure of a field’s type, issue the p4 jobspec -o command, which displays your jobspecification. The field called Fields: lists the job fields' names and data types.
Searching date fieldsTo search date fields, specify the date using the format yyyy/mm/dd or yyyy/mm/dd:`hh:mm:`ss. If youomit time, the equality operator (=) matches the entire day.
Example 12.6. Using dates within expressions
Bruno wants to view all jobs modified on July 13, 2011. He enters:

Chapter 12. Jobs
Helix Versioning Engine User Guide 113
$ p4 jobs -e 'ModifiedDate=2011/07/13'
Fixing jobsTo fix a job, you link it to a changelist and submit the changelist. Helix automatically changes the valueof a job’s status field to closed when the changelist is submitted.
Jobs can be linked to changelists in one of three ways:
• By setting the JobView: field in the p4 user form to an expression that matches the job.
• With the p4 fix command.
• By editing the p4 submit form.
You can modify job status directly by editing the job, but if you close a job manually, there’s noassociation with the changelist that fixed the job. If you have altered your site’s job specification bydeleting the Status: field, jobs can still be linked to changelists, but status cannot be changed whenthe changelist is submitted. (In most cases, this is not a desired form of operation.) See the chapter onediting job specifications in the Helix Versioning Engine Administrator Guide: Fundamentals for moredetails.
To remove jobs from a changelist, issue the p4 fix -d command.
Linking automaticallyYou can modify your Helix user specification to automatically attach open jobs to any changelists youcreate. To set up automatic inclusion, issue the p4 user command and set the JobView: field value to avalid expression that locates the jobs you want attached.
Example 12.7. Automatically linking jobs to changelists
Bruno wants to see all open jobs that he owns in all changelists he creates. He types p4 user and addsthe JobView: field:
User: brunoUpdate: 2011/06/02 13:11:57Access: 2011/06/03 20:11:07JobView: user=bruno&status=open
All of Bruno’s open jobs now are automatically attached to his default changelist. When he submitschangelists, he must be sure to delete jobs that aren’t fixed by the changelist he is submitting.
Linking manuallyTo link a job to a changelist manually, issue the p4 fix -c changenum jobname command. If thechangelist has already been submitted, the value of the job’s Status: field is changed to closed.Otherwise, the status is not changed.

Chapter 12. Jobs
114 Helix Versioning Engine User Guide
Example 12.8. Manually linking jobs to changelists
You can use p4 fix to link a changelist to a job owned by another user.
Sarah has just submitted a job called options-bug to Bruno, but the bug has already been fixed inBruno’s previously submitted changelist 18. Bruno links the job to the changelist by typing:
$ p4 fix -c 18 options-bug
Because changelist 18 has already been submitted, the job’s status is changed to closed.
Linking jobs to changelistsTo link jobs to changelists when submitting or editing the changelist, enter the job names in the Jobs:field of the changelist specification. When you submit the changelist, the job is (by default) closed.
To unlink a job from a pending changelist, edit the changelist and delete its name from the Jobs: field.To unlink a job from a submitted changelist, issue the p4 fix -d -c changenum jobname command.

Helix Versioning Engine User Guide 115
Chapter 13 Scripting and reportingThis chapter provides details about using p4 commands in scripts and for reporting purposes. For afull description of any particular command, consult the P4 Command Reference, or issue the p4 helpcommand.
Common options used in scripting and reportingThe command-line options described below enable you to specify settings on the command line and inscripts. For full details, refer to the description of global options in the P4 Command Reference.
Option Description
-b batchsize Specify a batch size (number of arguments) to use when processing acommand from -x argfile. By default, 128 arguments are read at atime.
-c client_workspace Specifies the client workspace name.
-G Causes all output (and batch input for form commands with -i) to beformatted as marshaled Python dictionary objects.
-p protocol:host:port Specifies the host and port number of the Helix server, as well as theprotocol used to connect.
-P password Specifies the user password if any. If you prefer your script to log inbefore running commands (instead of specifying the password everytime a command is issued), use the p4 login command. For example:
$ echo 'mypassword' | p4 login
-s Prepends a descriptive field (for example, text:, info:, error:, exit:)to each line of output produced by a Helix command.
-u user Specifies the Helix user name.
-x argfile Reads arguments, one per line, from the specified file. If argfile is asingle hyphen (-), then standard input is read.
Scripting with Helix formsIf your scripts issue p4 commands that require the user to fill in a form, such as the p4 client and p4submit commands, use the -o option to write the form to standard output and the -i option to read theedited form from standard input.
For example, to create a job using a script on UNIX:
1. Write a blank job specification into a text file.

Chapter 13. Scripting and reporting
116 Helix Versioning Engine User Guide
$ p4 job -o > temp1
2. Make the necessary changes to the job.
For example:
$ sed 's/<enter description here>/Crashes on exit./' temp1 > temp2
3. Save the job.
$ p4 job -i < temp2
To accomplish the preceding without a temporary file, issue the following command:
$ p4 job -o | sed 's/<enter description here>/Crashes on exit./' | p4 job -i
The commands that display forms are:
• p4 branch
• p4 change
• p4 client
• p4 job
• p4 label
• p4 submit (use p4 change -o to create changelist, or p4 submit -d "A changelist description" tosupply a description to the default changelist during changelist submission.)
• p4 stream
• p4 user
File reportingThe sections below describe commands that provide information about file status and location. Thefollowing table lists a few basic and highly-useful reporting commands:
To display this information Use this command
File status, including file type, latest revision number, and otherinformation
p4 files
File revisions from most recent to earliest p4 filelog
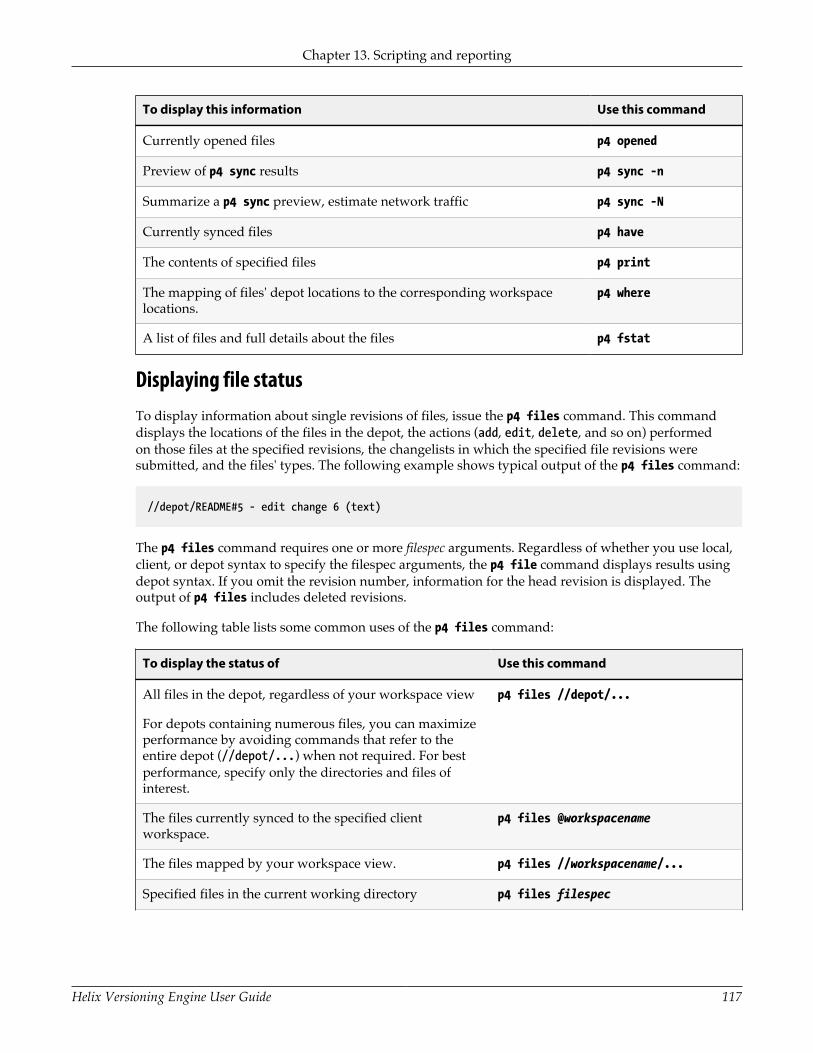
Chapter 13. Scripting and reporting
Helix Versioning Engine User Guide 117
To display this information Use this command
Currently opened files p4 opened
Preview of p4 sync results p4 sync -n
Summarize a p4 sync preview, estimate network traffic p4 sync -N
Currently synced files p4 have
The contents of specified files p4 print
The mapping of files' depot locations to the corresponding workspacelocations.
p4 where
A list of files and full details about the files p4 fstat
Displaying file statusTo display information about single revisions of files, issue the p4 files command. This commanddisplays the locations of the files in the depot, the actions (add, edit, delete, and so on) performedon those files at the specified revisions, the changelists in which the specified file revisions weresubmitted, and the files' types. The following example shows typical output of the p4 files command:
//depot/README#5 - edit change 6 (text)
The p4 files command requires one or more filespec arguments. Regardless of whether you use local,client, or depot syntax to specify the filespec arguments, the p4 file command displays results usingdepot syntax. If you omit the revision number, information for the head revision is displayed. Theoutput of p4 files includes deleted revisions.
The following table lists some common uses of the p4 files command:
To display the status of Use this command
All files in the depot, regardless of your workspace view
For depots containing numerous files, you can maximizeperformance by avoiding commands that refer to theentire depot (//depot/...) when not required. For bestperformance, specify only the directories and files ofinterest.
p4 files //depot/...
The files currently synced to the specified clientworkspace.
p4 files @workspacename
The files mapped by your workspace view. p4 files //workspacename/...
Specified files in the current working directory p4 files filespec

Chapter 13. Scripting and reporting
118 Helix Versioning Engine User Guide
To display the status of Use this command
A specified file revision p4 files filespec#rev
Specified files at the time a changelist was submitted,regardless of whether the files were submitted in thechangelist
p4 files filespec@changenum
Files tagged with a specified label p4 files filespec@labelname
Displaying file revision historyTo display the revision history of a file, issue the p4 filelog filespec command. The followingexample shows how p4 filelog displays revision history:
$ p4 filelog //JamCode/dev/jam/jam.c//JamCode/dev/jam/jam.c... #35 change 627 edit on 2011/11/13 by earl@earl-dev-yew (text)'Handle platform variants better'... #34 change 598 edit on 2011/10/24 by raj@raj-althea (text)'Reverse previous attempt at fix'... ... branch into //JamCode/release/jam/2.2/src/jam.c#1... #33 change 581 edit on 2011/10/03 by gale@gale-jam-oak (text)'Version strings & release notes'
To display the entire description of each changelist, specify the -l option.
Listing open filesTo list the files that are currently opened in a client workspace, issue the p4 opened filespeccommand. The following line is an example of the output displayed by the p4 opened command:
//JamCode/dev/jam/fileos2.c- edit default change (text)
The following table lists some common uses of the p4 opened command:
To list Use this command
Opened files in the current workspace p4 opened
Opened files in all client workspaces p4 opened -asp4 opened -a
Files in a numbered pending changelist p4 opened -c changelist
Files in the default changelist p4 opened -c default
Whether a specific file is opened by you p4 opened filespec

Chapter 13. Scripting and reporting
Helix Versioning Engine User Guide 119
To list Use this command
Whether a specific file is opened by anyone p4 opened -a filespec
Displaying file locationsTo display information about the locations of files, use the p4 where, p4 have, and p4 sync -ncommands:
• To display the location of a file in depot, client, and local syntax, issue the p4 where command.
• To list the location and revisions of files that you last synced to your client workspace, issue the p4have command.
• To see where files will be synced in your workspace, preview the sync by issuing the p4 sync -ncommand.
You can use these commands with or without filespec arguments.
The following table lists some useful location reporting commands:
To display Use this command
The revision number of a file that you synced to yourworkspace
p4 have filespec
How a particular file in the depot maps to yourworkspace
p4 where //depot/filespec
Displaying file contentsTo display the contents of a file in the depot, issue the p4 print filespec command. This commandprints the contents of the file to standard output or to a specified output file, with a one-line bannerthat describes the file. To suppress the banner, specify the -q option. By default, the head revision isdisplayed, but you can specify a file revision.
To display the contents of files Use this command
At the head revision p4 print filespec
Without the banner p4 print -q filespec
At a specified changelist number p4 print filespec@changenum
Displaying annotations (details about changes to file contents)To find out which file revisions or changelists affected lines in a text file, issue the p4 annotatecommand.
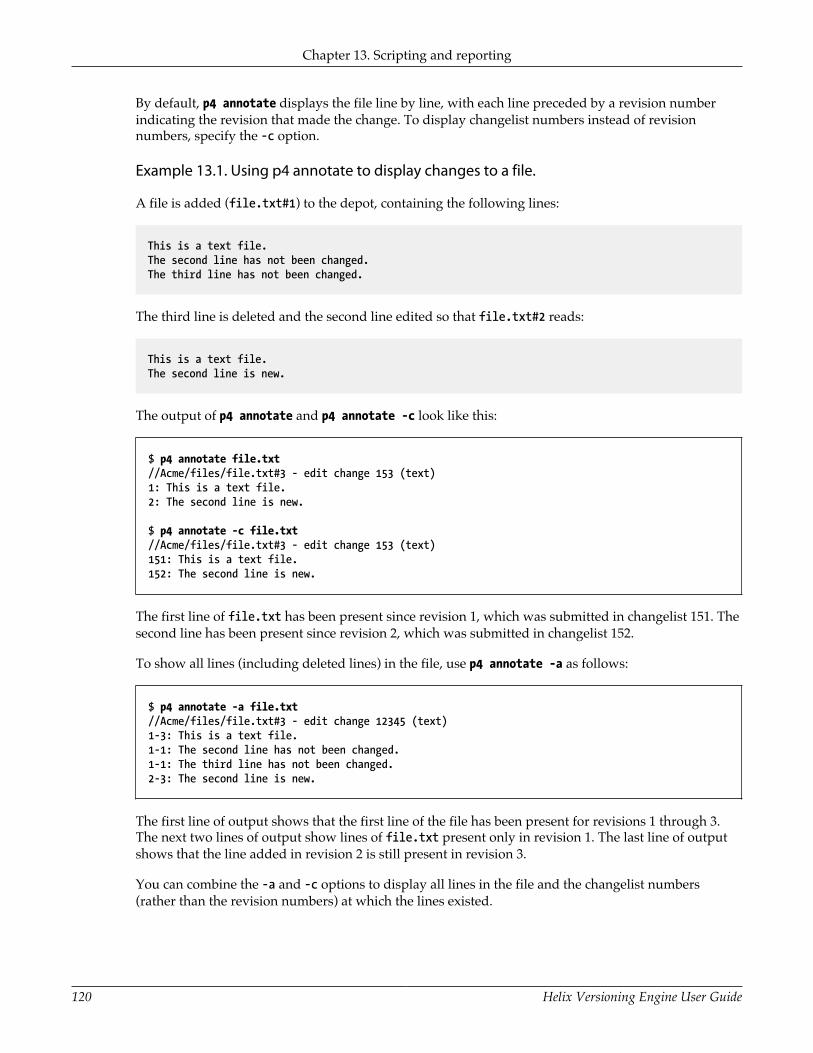
Chapter 13. Scripting and reporting
120 Helix Versioning Engine User Guide
By default, p4 annotate displays the file line by line, with each line preceded by a revision numberindicating the revision that made the change. To display changelist numbers instead of revisionnumbers, specify the -c option.
Example 13.1. Using p4 annotate to display changes to a file.
A file is added (file.txt#1) to the depot, containing the following lines:
This is a text file.The second line has not been changed.The third line has not been changed.
The third line is deleted and the second line edited so that file.txt#2 reads:
This is a text file.The second line is new.
The output of p4 annotate and p4 annotate -c look like this:
$ p4 annotate file.txt//Acme/files/file.txt#3 - edit change 153 (text)1: This is a text file.2: The second line is new.
$ p4 annotate -c file.txt//Acme/files/file.txt#3 - edit change 153 (text)151: This is a text file.152: The second line is new.
The first line of file.txt has been present since revision 1, which was submitted in changelist 151. Thesecond line has been present since revision 2, which was submitted in changelist 152.
To show all lines (including deleted lines) in the file, use p4 annotate -a as follows:
$ p4 annotate -a file.txt//Acme/files/file.txt#3 - edit change 12345 (text)1-3: This is a text file.1-1: The second line has not been changed.1-1: The third line has not been changed.2-3: The second line is new.
The first line of output shows that the first line of the file has been present for revisions 1 through 3.The next two lines of output show lines of file.txt present only in revision 1. The last line of outputshows that the line added in revision 2 is still present in revision 3.
You can combine the -a and -c options to display all lines in the file and the changelist numbers(rather than the revision numbers) at which the lines existed.

Chapter 13. Scripting and reporting
Helix Versioning Engine User Guide 121
Monitoring changes to filesThe following table lists commands that display information about the status of files, changelists, andusers:
To list Use this command
The users who review specified files p4 reviews filespec
The users who review files in a specified changelist p4 reviews -c changenum
A specified user’s email address p4 users username
Changelist reportingThe p4 changes command lists changelists that meet search criteria, and the p4 describe commandlists the files and jobs associated with a specified changelist. These commands are described below.
Listing changelistsTo list changelists, issue the p4 changes command. By default, p4 changes displays one line for everypublic changelist known to the system, as well as for any restricted changelists to which you haveaccess. The following table lists command-line options that you can use to filter the list.
To list changelists Use this command
With the first 31 characters of the changelist descriptions p4 changes
With full descriptions p4 changes -l
The last n changelists p4 changes -m n
With a specified status p4 changes -s pendingp4 changes -s submittedp4 changes -s shelved
From a specified user p4 changes -u user
From a specified workspace p4 changes -c workspace
That affect specified files p4 changes filespec
That affect specified files, including changelists that affectfiles that were later integrated with the named files
p4 changes -i filespec
That affect specified files, including only those changelistsbetween revisions m and n of these files
p4 changes filespec`#m,#n`
That affect specified files at each revision between therevisions specified in labels label1 and label2
p4 changes filespec@label1,@label2
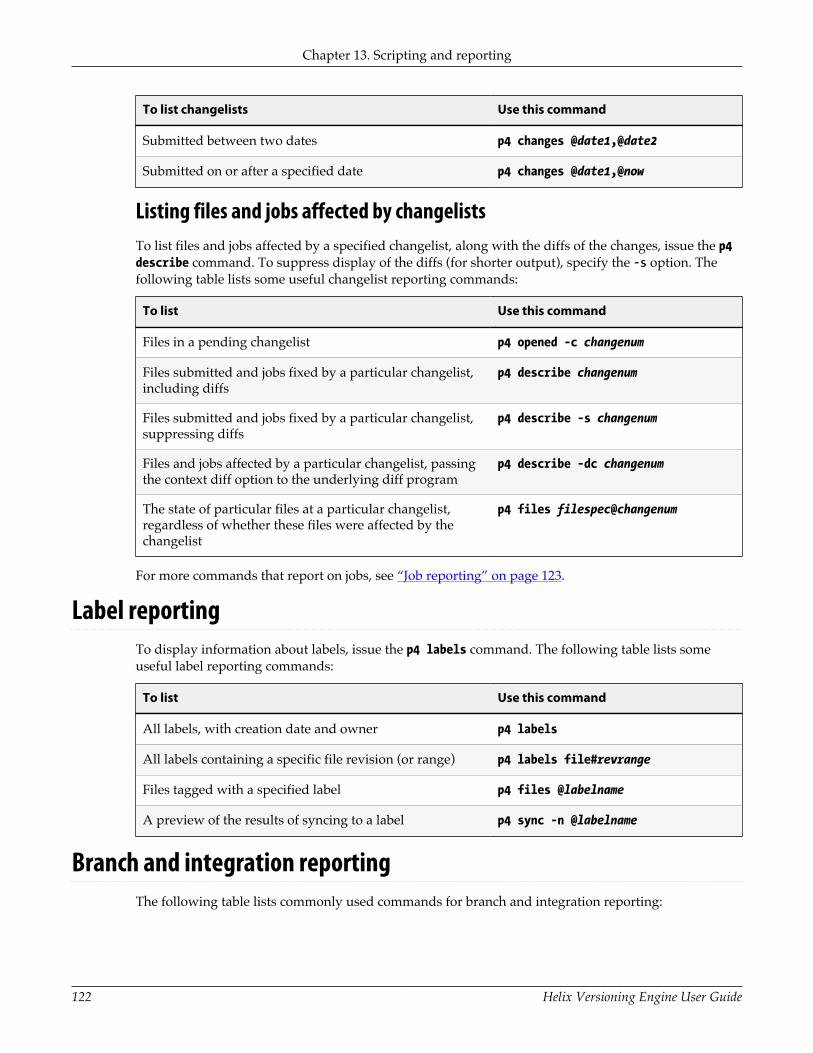
Chapter 13. Scripting and reporting
122 Helix Versioning Engine User Guide
To list changelists Use this command
Submitted between two dates p4 changes @date1,@date2
Submitted on or after a specified date p4 changes @date1,@now
Listing files and jobs affected by changelistsTo list files and jobs affected by a specified changelist, along with the diffs of the changes, issue the p4describe command. To suppress display of the diffs (for shorter output), specify the -s option. Thefollowing table lists some useful changelist reporting commands:
To list Use this command
Files in a pending changelist p4 opened -c changenum
Files submitted and jobs fixed by a particular changelist,including diffs
p4 describe changenum
Files submitted and jobs fixed by a particular changelist,suppressing diffs
p4 describe -s changenum
Files and jobs affected by a particular changelist, passingthe context diff option to the underlying diff program
p4 describe -dc changenum
The state of particular files at a particular changelist,regardless of whether these files were affected by thechangelist
p4 files filespec@changenum
For more commands that report on jobs, see “Job reporting” on page 123.
Label reportingTo display information about labels, issue the p4 labels command. The following table lists someuseful label reporting commands:
To list Use this command
All labels, with creation date and owner p4 labels
All labels containing a specific file revision (or range) p4 labels file#revrange
Files tagged with a specified label p4 files @labelname
A preview of the results of syncing to a label p4 sync -n @labelname
Branch and integration reportingThe following table lists commonly used commands for branch and integration reporting:
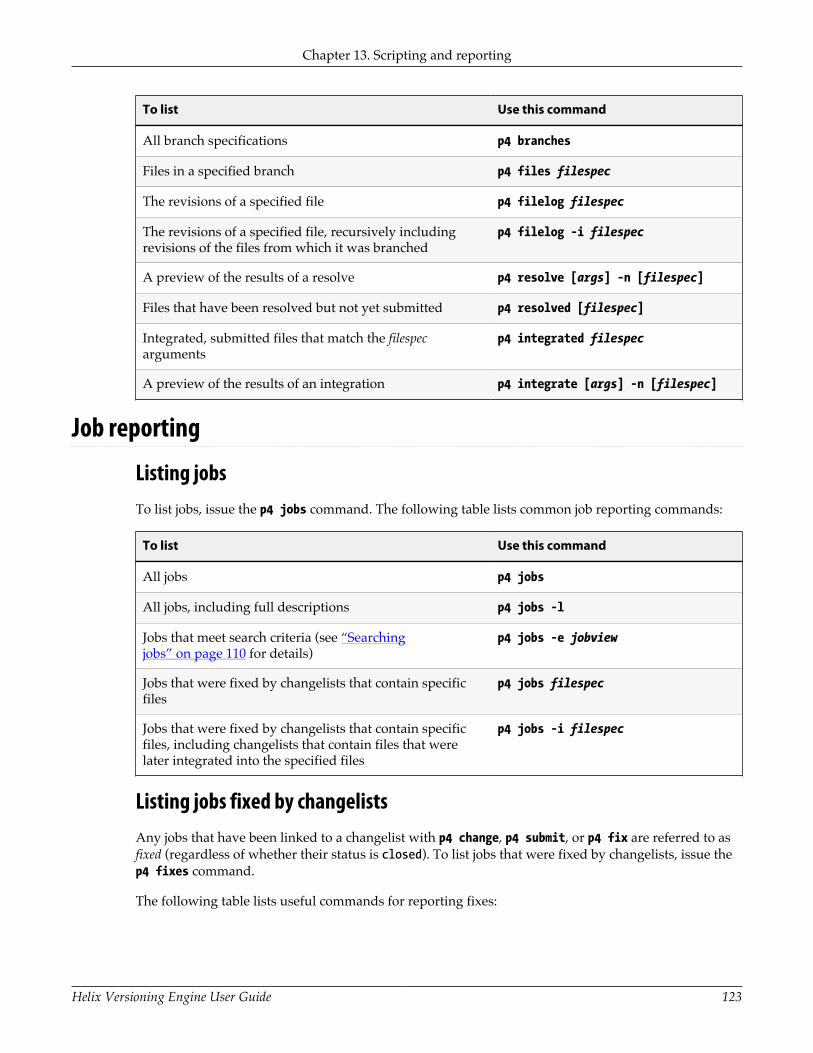
Chapter 13. Scripting and reporting
Helix Versioning Engine User Guide 123
To list Use this command
All branch specifications p4 branches
Files in a specified branch p4 files filespec
The revisions of a specified file p4 filelog filespec
The revisions of a specified file, recursively includingrevisions of the files from which it was branched
p4 filelog -i filespec
A preview of the results of a resolve p4 resolve [args] -n [filespec]
Files that have been resolved but not yet submitted p4 resolved [filespec]
Integrated, submitted files that match the filespecarguments
p4 integrated filespec
A preview of the results of an integration p4 integrate [args] -n [filespec]
Job reporting
Listing jobsTo list jobs, issue the p4 jobs command. The following table lists common job reporting commands:
To list Use this command
All jobs p4 jobs
All jobs, including full descriptions p4 jobs -l
Jobs that meet search criteria (see “Searchingjobs” on page 110 for details)
p4 jobs -e jobview
Jobs that were fixed by changelists that contain specificfiles
p4 jobs filespec
Jobs that were fixed by changelists that contain specificfiles, including changelists that contain files that werelater integrated into the specified files
p4 jobs -i filespec
Listing jobs fixed by changelistsAny jobs that have been linked to a changelist with p4 change, p4 submit, or p4 fix are referred to asfixed (regardless of whether their status is closed). To list jobs that were fixed by changelists, issue thep4 fixes command.
The following table lists useful commands for reporting fixes:
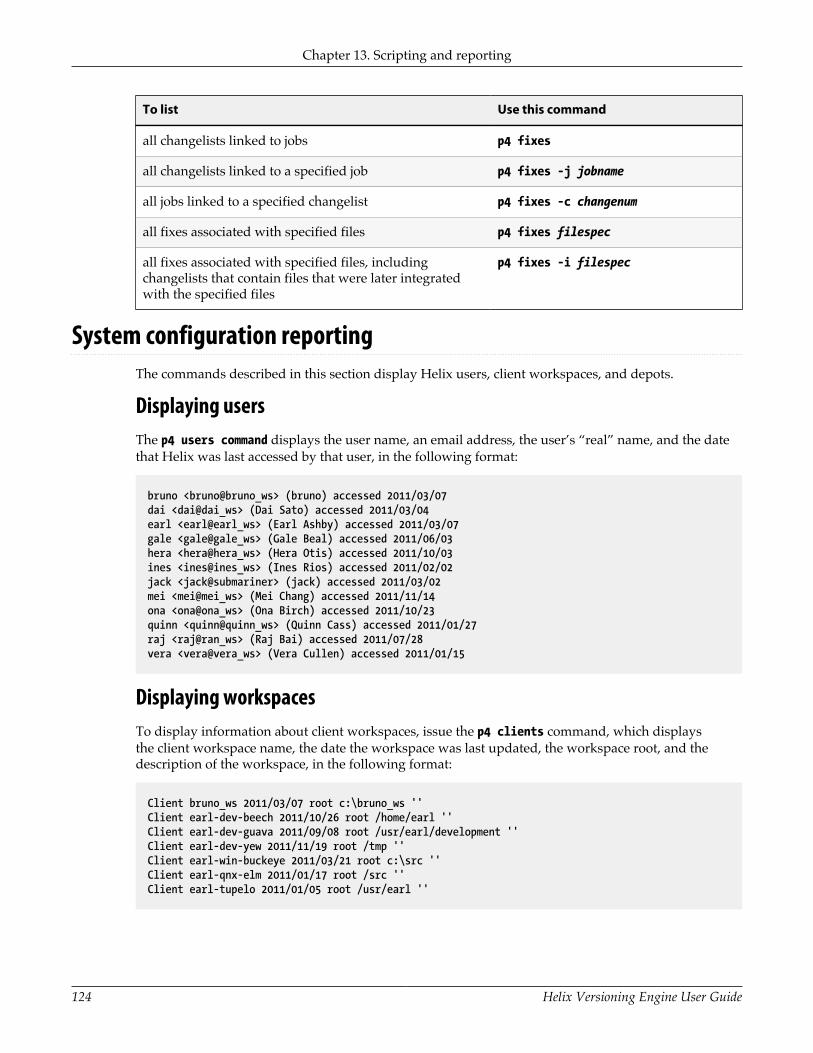
Chapter 13. Scripting and reporting
124 Helix Versioning Engine User Guide
To list Use this command
all changelists linked to jobs p4 fixes
all changelists linked to a specified job p4 fixes -j jobname
all jobs linked to a specified changelist p4 fixes -c changenum
all fixes associated with specified files p4 fixes filespec
all fixes associated with specified files, includingchangelists that contain files that were later integratedwith the specified files
p4 fixes -i filespec
System configuration reportingThe commands described in this section display Helix users, client workspaces, and depots.
Displaying usersThe p4 users command displays the user name, an email address, the user’s “real” name, and the datethat Helix was last accessed by that user, in the following format:
bruno <bruno@bruno_ws> (bruno) accessed 2011/03/07dai <dai@dai_ws> (Dai Sato) accessed 2011/03/04earl <earl@earl_ws> (Earl Ashby) accessed 2011/03/07gale <gale@gale_ws> (Gale Beal) accessed 2011/06/03hera <hera@hera_ws> (Hera Otis) accessed 2011/10/03ines <ines@ines_ws> (Ines Rios) accessed 2011/02/02jack <jack@submariner> (jack) accessed 2011/03/02mei <mei@mei_ws> (Mei Chang) accessed 2011/11/14ona <ona@ona_ws> (Ona Birch) accessed 2011/10/23quinn <quinn@quinn_ws> (Quinn Cass) accessed 2011/01/27raj <raj@ran_ws> (Raj Bai) accessed 2011/07/28vera <vera@vera_ws> (Vera Cullen) accessed 2011/01/15
Displaying workspacesTo display information about client workspaces, issue the p4 clients command, which displaysthe client workspace name, the date the workspace was last updated, the workspace root, and thedescription of the workspace, in the following format:
Client bruno_ws 2011/03/07 root c:\bruno_ws ''Client earl-dev-beech 2011/10/26 root /home/earl ''Client earl-dev-guava 2011/09/08 root /usr/earl/development ''Client earl-dev-yew 2011/11/19 root /tmp ''Client earl-win-buckeye 2011/03/21 root c:\src ''Client earl-qnx-elm 2011/01/17 root /src ''Client earl-tupelo 2011/01/05 root /usr/earl ''
Chapter 13. Scripting and reporting
Helix Versioning Engine User Guide 125
Listing depots
To list depots, issue the p4 depots command. This command lists the depot’s name, its creation date,its type (local, remote, archive, spec, or stream), its host name or IP address (if remote), the mappingto the local depot, and the system administrator’s description of the depot.
For details about defining multiple depots on a single Helix installation, see the Helix Versioning EngineAdministrator Guide: Fundamentals.
Sample scriptThe following sample script parses the output of the p4 fstat command to report files that are openedwhere the head revision is not in the client workspace (a potential problem):
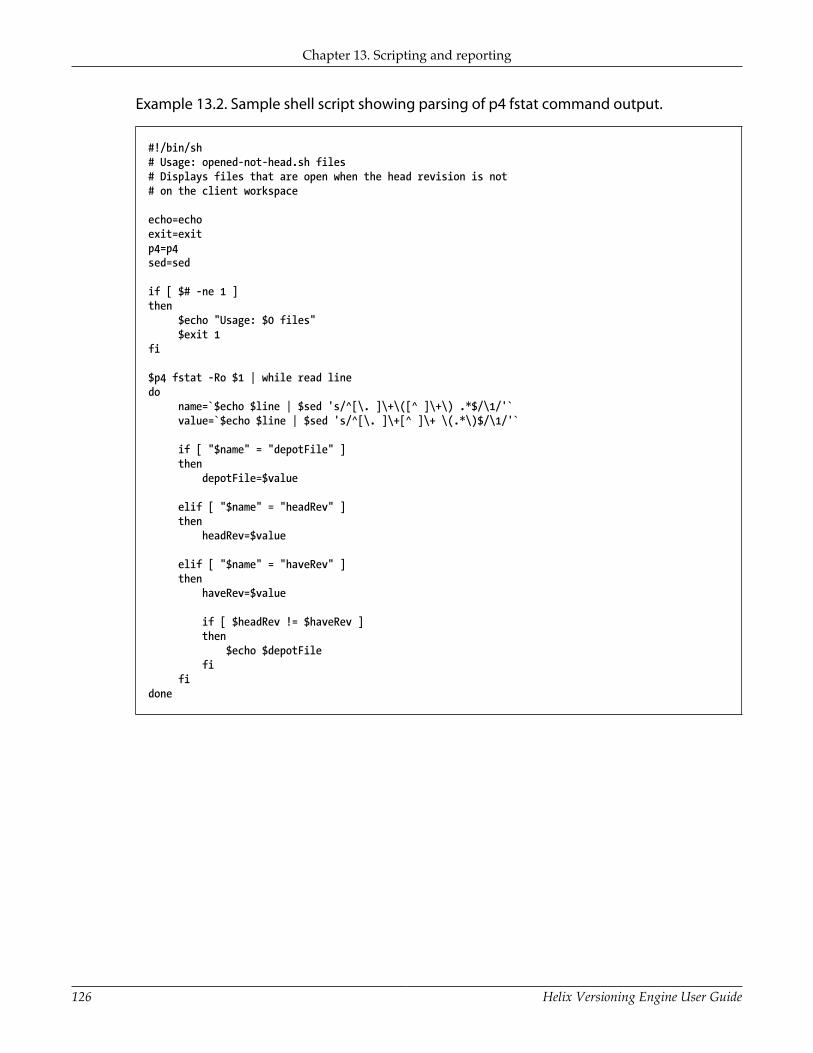
Chapter 13. Scripting and reporting
126 Helix Versioning Engine User Guide
Example 13.2. Sample shell script showing parsing of p4 fstat command output.
#!/bin/sh# Usage: opened-not-head.sh files# Displays files that are open when the head revision is not# on the client workspace
echo=echoexit=exitp4=p4sed=sed
if [ $# -ne 1 ]then $echo "Usage: $0 files" $exit 1fi
$p4 fstat -Ro $1 | while read linedo name=`$echo $line | $sed 's/^[\. ]\+\([^ ]\+\) .*$/\1/'` value=`$echo $line | $sed 's/^[\. ]\+[^ ]\+ \(.*\)$/\1/'`
if [ "$name" = "depotFile" ] then depotFile=$value
elif [ "$name" = "headRev" ] then headRev=$value
elif [ "$name" = "haveRev" ] then haveRev=$value
if [ $headRev != $haveRev ] then $echo $depotFile fi fidone

Helix Versioning Engine User Guide 127
Appendix Glossary
Term Definition
access level A permission assigned to a user to control which Helix commands the user canexecute. See protections.
admin access An access level that gives the user permission to run Helix commands thatoverride metadata but do not affect the state of the service.
apple file type Helix file type assigned to files that are stored using AppleSingle format,permitting the data fork and resource fork to be stored as a single file.
atomic changetransaction
Grouping operations affecting a number of files in a single transaction. If alloperations in the transaction succeed, all the files are updated. If any operationin the transaction fails, none of the files are updated.
base The file revision on which two newer, conflicting file revisions are based.
binary file type Helix file type assigned to a non-text file. By default, the contents of eachrevision are stored in full, and the file is stored in compressed format.
branch (noun) A set of related files created by copying files, as opposed to adding files.A group of related files is often referred to as a codeline.
(verb) To create a stream by copying another stream with p4 copy or p4populate.
branch form The Helix form you use to modify a branch.
branch mapping Specifies how a branch is to be created by defining the location of the originalcodeline and the branch. The branch mapping is used by the integrationprocess to create and update branches. Client workspaces, labels, and branchspecifications cannot share the same name.
branch view A specification of the branching relationship between two codelines in thedepot. Each branch view has a unique name and defines how files are mappedfrom the originating codeline to the target codeline. See branch.
changelist An atomic change transaction in Helix. The changes specified in the changelistare not stored in the depot until the changelist is submitted to the depot.
changelist form The Helix form you use to modify a changelist.
changelistnumber
The unique numeric identifier of a changelist.
change review The process of sending email to users who have registered their interest inchanges made to specified files in the depot.
checkpoint A copy of the underlying metadata at a particular moment in time. See metadata.
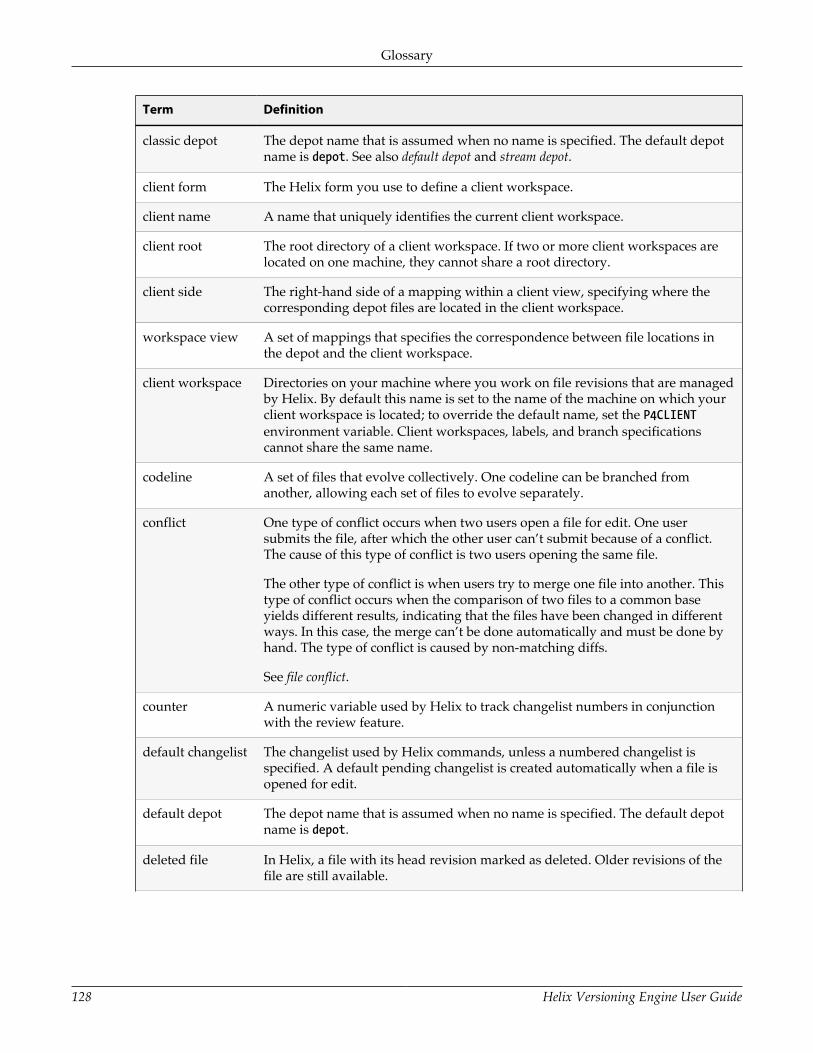
Glossary
128 Helix Versioning Engine User Guide
Term Definition
classic depot The depot name that is assumed when no name is specified. The default depotname is depot. See also default depot and stream depot.
client form The Helix form you use to define a client workspace.
client name A name that uniquely identifies the current client workspace.
client root The root directory of a client workspace. If two or more client workspaces arelocated on one machine, they cannot share a root directory.
client side The right-hand side of a mapping within a client view, specifying where thecorresponding depot files are located in the client workspace.
workspace view A set of mappings that specifies the correspondence between file locations inthe depot and the client workspace.
client workspace Directories on your machine where you work on file revisions that are managedby Helix. By default this name is set to the name of the machine on which yourclient workspace is located; to override the default name, set the P4CLIENTenvironment variable. Client workspaces, labels, and branch specificationscannot share the same name.
codeline A set of files that evolve collectively. One codeline can be branched fromanother, allowing each set of files to evolve separately.
conflict One type of conflict occurs when two users open a file for edit. One usersubmits the file, after which the other user can’t submit because of a conflict.The cause of this type of conflict is two users opening the same file.
The other type of conflict is when users try to merge one file into another. Thistype of conflict occurs when the comparison of two files to a common baseyields different results, indicating that the files have been changed in differentways. In this case, the merge can’t be done automatically and must be done byhand. The type of conflict is caused by non-matching diffs.
See file conflict.
counter A numeric variable used by Helix to track changelist numbers in conjunctionwith the review feature.
default changelist The changelist used by Helix commands, unless a numbered changelist isspecified. A default pending changelist is created automatically when a file isopened for edit.
default depot The depot name that is assumed when no name is specified. The default depotname is depot.
deleted file In Helix, a file with its head revision marked as deleted. Older revisions of thefile are still available.
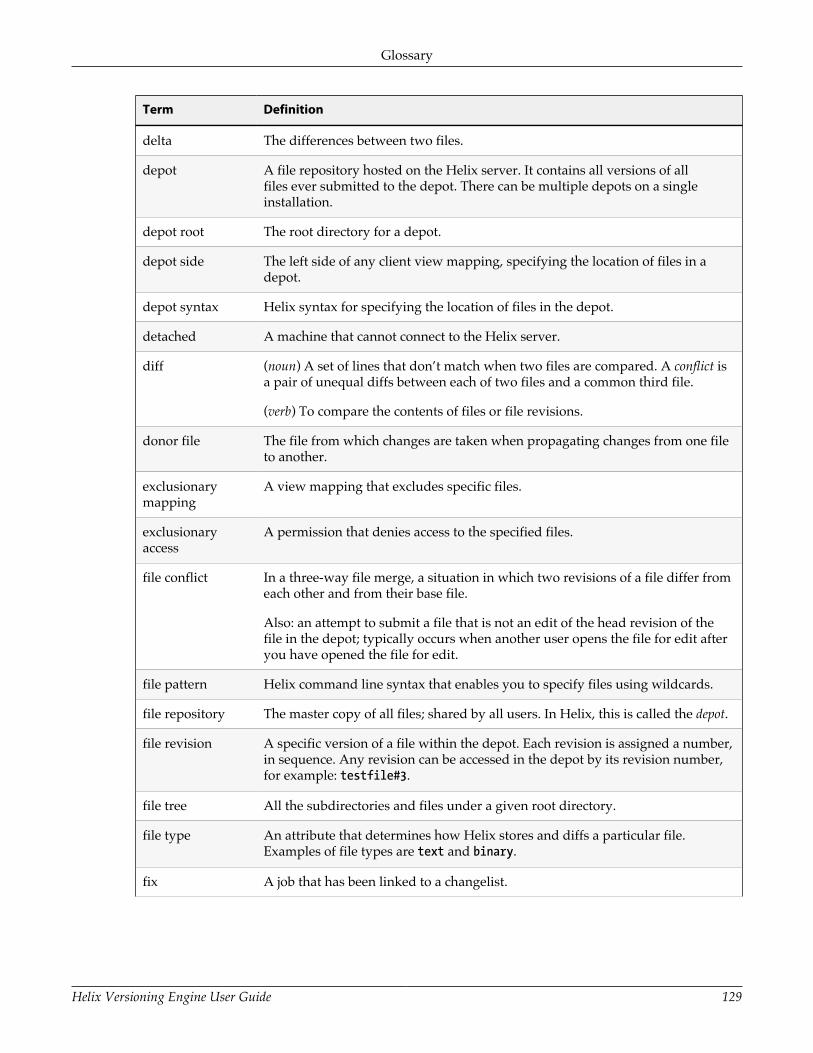
Glossary
Helix Versioning Engine User Guide 129
Term Definition
delta The differences between two files.
depot A file repository hosted on the Helix server. It contains all versions of allfiles ever submitted to the depot. There can be multiple depots on a singleinstallation.
depot root The root directory for a depot.
depot side The left side of any client view mapping, specifying the location of files in adepot.
depot syntax Helix syntax for specifying the location of files in the depot.
detached A machine that cannot connect to the Helix server.
diff (noun) A set of lines that don’t match when two files are compared. A conflict isa pair of unequal diffs between each of two files and a common third file.
(verb) To compare the contents of files or file revisions.
donor file The file from which changes are taken when propagating changes from one fileto another.
exclusionarymapping
A view mapping that excludes specific files.
exclusionaryaccess
A permission that denies access to the specified files.
file conflict In a three-way file merge, a situation in which two revisions of a file differ fromeach other and from their base file.
Also: an attempt to submit a file that is not an edit of the head revision of thefile in the depot; typically occurs when another user opens the file for edit afteryou have opened the file for edit.
file pattern Helix command line syntax that enables you to specify files using wildcards.
file repository The master copy of all files; shared by all users. In Helix, this is called the depot.
file revision A specific version of a file within the depot. Each revision is assigned a number,in sequence. Any revision can be accessed in the depot by its revision number,for example: testfile#3.
file tree All the subdirectories and files under a given root directory.
file type An attribute that determines how Helix stores and diffs a particular file.Examples of file types are text and binary.
fix A job that has been linked to a changelist.

Glossary
130 Helix Versioning Engine User Guide
Term Definition
form Screens displayed by certain Helix commands. For example, you use the Helixchange form to enter comments about a particular changelist and to verify theaffected files.
full-file storage The method by which Helix stores revisions of binary files in the depot: everyfile revision is stored in full. Contrast this with reverse delta storage, which Helixuses for text files.
get An obsolete Helix term: replaced by sync.
group A list of Helix users.
have list The list of file revisions currently in the client workspace.
head revision The most recent revision of a file within the depot. Because file revisions arenumbered sequentially, this revision is the highest-numbered revision of thatfile.
integrate To compare two sets of files (for example, two codeline branches) and:
• Determine which changes in one set apply to the other.
• Determine if the changes have already been propagated.
• Propagate any outstanding changes.
Inter-FileBranching
Helix’s branching mechanism.
job A user-defined unit of work tracked by Helix. The job template determineswhat information is tracked. The template can be modified by the Helix systemadministrator.
job specification A specification containing the fields and valid values stored for a Helix job.
job view A syntax used for searching Helix jobs.
journal A file containing a record of every change made to the Helix server’s metadatasince the time of the last checkpoint.
journaling The process of recording changes made to the Helix server’s metadata.
label A named list of user-specified file revisions.
label view The view that specifies which filenames in the depot can be stored in aparticular label.
lazy copy A method used by Helix to make internal copies of files without duplicating filecontent in the depot. Lazy copies minimize the consumption of disk space bystoring references to the original file instead of copies of the file.

Glossary
Helix Versioning Engine User Guide 131
Term Definition
license file Ensures that the number of Helix users on your site does not exceed the numberfor which you have paid.
list access A protection level that enables you to run reporting commands but preventsaccess to the contents of files.
local depot Any depot located on the currently-specified Helix server.
local syntax The operating-system-specific syntax for specifying a filename.
lock A Helix file lock prevents other clients from submitting the locked file. Filesare unlocked with the p4 unlock command or submitting the changelist thatcontains the locked file.
log Error output from the Helix server. By default, error output is written tostandard error. To specify a log file, set the P4LOG environment variable or usethe p4d -L flag when starting the service.
mapping A single line in a view, consisting of a left side and a right side that specify thecorrespondences between files in the depot and files in a client, label, or branch.The left side specifies the depot files, and the right side specifies the client files.
(See also workspace view, branch view, label view).
MD5 checksum The method used by Helix to verify the integrity of archived files.
merge To create new files from existing files, preserving their ancestry (branching),or to propagate changes from one set of files to another. Also, the processof combining the contents of two conflicting file revisions into a single file,typically using a merge tool like P4Merge.
merge file A file generated by Helix from two conflicting file revisions.
metadata The data stored by the Helix server that describes the files in the depot, thecurrent state of client workspaces, protections, users, labels, and branches.Metadata includes all the data stored in the service except for the actualcontents of the files.
modification time The time a file was last changed.
nonexistentrevision
A completely empty revision of any file. Syncing to a nonexistent revision of afile removes it from your workspace. An empty file revision created by deletinga file and the #none revision specifier are examples of nonexistent file revisions.
numberedchangelist
A pending changelist to which Helix has assigned a number.
open file A file that you are changing in your client workspace.
owner The Helix user who created a particular client, branch, or label.

Glossary
132 Helix Versioning Engine User Guide
Term Definition
p4 The Helix Command Line program, and the command you issue to executeHelix commands from the operating system command line.
p4d The program that runs the Helix server; p4d manages depot files and metadata.
P4Diff A Helix application that displays the differences between two files. P4Diff is thedefault application used to compare files during the file resolution process.
pendingchangelist
A changelist that has not been submitted.
Helix server The Helix depot and metadata; also, the program that manages the depot andmetadata.
protections The permissions stored in the Helix server’s protections table.
RCS format Revision Control System format. Used for storing revisions of text files. RCSformat uses reverse delta encoding for file storage. Helix uses RCS format tostore text files. See also reverse delta storage.
read access A protection level that enables you to read the contents of files managed byHelix.
remote depot A depot located on on a host other than that hosting the currently-specifiedHelix server.
reresolve The process of resolving a file after the file is resolved and before it issubmitted.
resolve The process you use to reconcile the differences between two revisions of afile. You can choose to resolve conflicts by selecting a file to be submitted or bymerging the contents of conflicting files.
resource fork One fork of a Mac file. (These files are composed of a resource fork and a datafork.) You can store resource forks in Helix depots as part of an AppleSingle fileby using Helix’s apple file type.
reverse deltastorage
The method that Helix uses to store revisions of text files. Helix stores thechanges between each revision and its previous revision, plus the full text of thehead revision.
revert To discard the changes you have made to a file in the client workspace.
review access A special protections level that includes read and list accesses and grantspermission to run the p4 review command.
review daemon Any daemon process that uses the p4 review command. See also change review.
revision number A number indicating which revision of the file is being referred to.

Glossary
Helix Versioning Engine User Guide 133
Term Definition
revision range A range of revision numbers for a specified file, specified as the low and highend of the range. For example, myfile#5,7 specifies revisions 5 through 7 ofmyfile.
revisionspecification
A suffix to a filename that specifies a particular revision of that file. Revisionspecifiers can be revision numbers, change numbers, label names, date/timespecifications, or client names.
service In Helix, the shared versioning service that responds to requests from Helixapplications. The Helix server (p4d) maintains depot files and metadatadescribing the files and also tracks the state of client workspaces.
server root The directory in which p4d stores its metadata and all the shared files. Tospecify the server root, set the P4ROOT environment variable.
shelving The process of temporarily storing files in the Helix server without checking ina changelist.
status For a changelist, a value that indicates whether the changelist is new, pending,or submitted. For a job, a value that indicates whether the job is open, closed, orsuspended. You can customize job statuses.
stream A stream is a branch, but with additional intelligence that determines whatchanges can be made and in what order they must be made.
submit To send a pending changelist and changed files to the Helix server forprocessing.
subscribe To register to receive email whenever changelists that affect particular files aresubmitted.
super access An access level that gives the user permission to run every Helix command,including commands that set protections, install triggers, or shut down theservice for maintenance.
symlink file type A Helix file type assigned to symbolic links. On platforms that do not supportsymbolic links, symlink files appear as small text files.
sync To copy a file revision (or set of file revisions) from the depot to a clientworkspace.
target file The file that receives the changes from the donor file when you are integratingchanges between a branched codeline and the original codeline.
text file type Helix file type assigned to a file that contains only ASCII text. See also binary filetype.
theirs The revision in the depot with which the client file is merged when you resolvea file conflict. When you are working with branched files, theirs is the donor file.
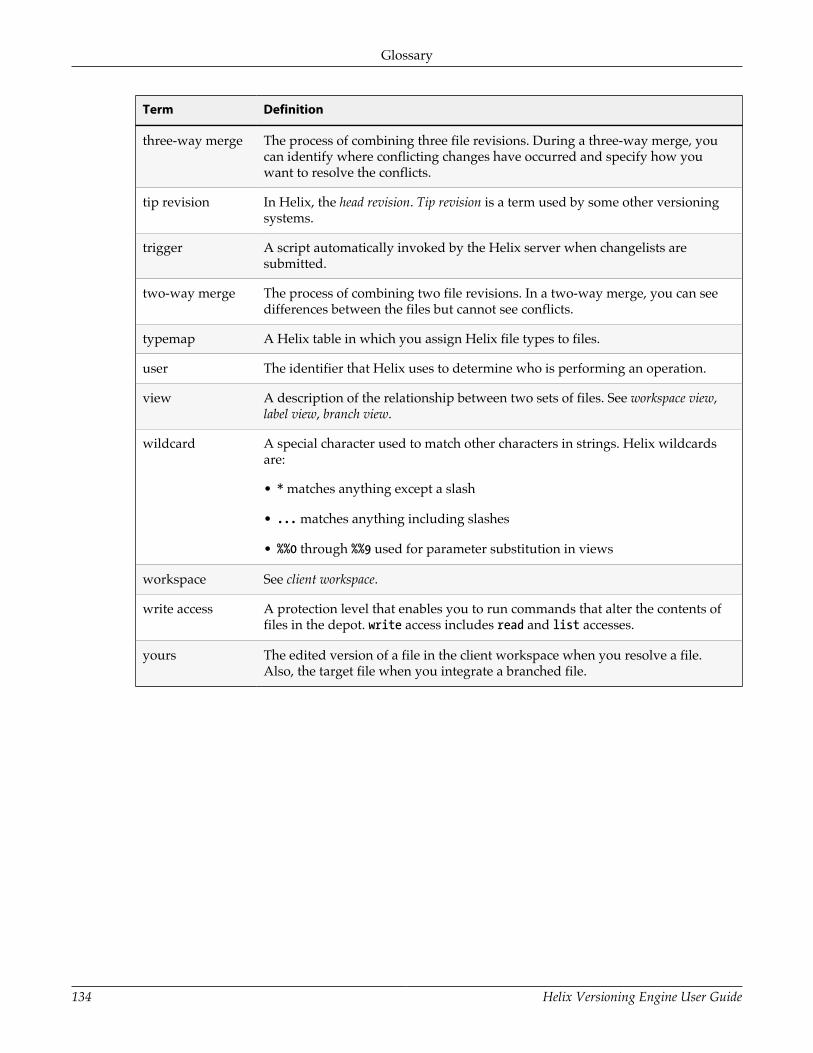
Glossary
134 Helix Versioning Engine User Guide
Term Definition
three-way merge The process of combining three file revisions. During a three-way merge, youcan identify where conflicting changes have occurred and specify how youwant to resolve the conflicts.
tip revision In Helix, the head revision. Tip revision is a term used by some other versioningsystems.
trigger A script automatically invoked by the Helix server when changelists aresubmitted.
two-way merge The process of combining two file revisions. In a two-way merge, you can seedifferences between the files but cannot see conflicts.
typemap A Helix table in which you assign Helix file types to files.
user The identifier that Helix uses to determine who is performing an operation.
view A description of the relationship between two sets of files. See workspace view,label view, branch view.
wildcard A special character used to match other characters in strings. Helix wildcardsare:
• * matches anything except a slash
• ... matches anything including slashes
• %%0 through %%9 used for parameter substitution in views
workspace See client workspace.
write access A protection level that enables you to run commands that alter the contents offiles in the depot. write access includes read and list accesses.
yours The edited version of a file in the client workspace when you resolve a file.Also, the target file when you integrate a branched file.
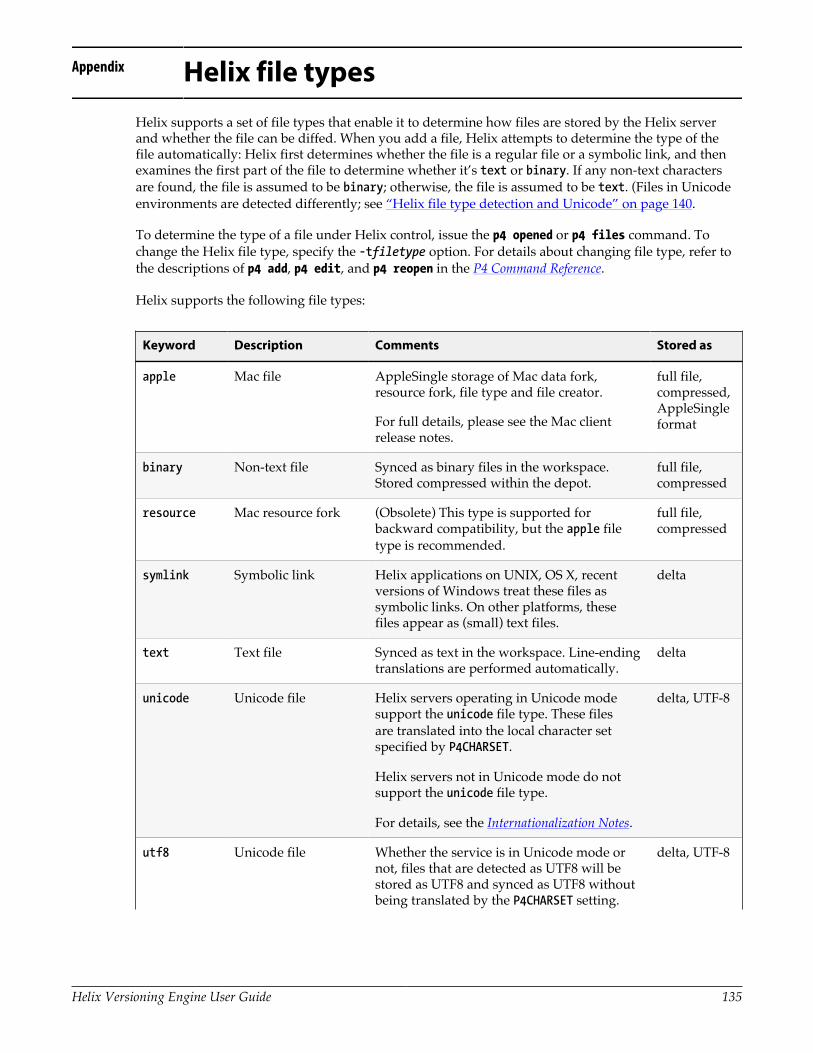
Helix Versioning Engine User Guide 135
Appendix Helix file typesHelix supports a set of file types that enable it to determine how files are stored by the Helix serverand whether the file can be diffed. When you add a file, Helix attempts to determine the type of thefile automatically: Helix first determines whether the file is a regular file or a symbolic link, and thenexamines the first part of the file to determine whether it’s text or binary. If any non-text charactersare found, the file is assumed to be binary; otherwise, the file is assumed to be text. (Files in Unicodeenvironments are detected differently; see “Helix file type detection and Unicode” on page 140.
To determine the type of a file under Helix control, issue the p4 opened or p4 files command. Tochange the Helix file type, specify the -tfiletype option. For details about changing file type, refer tothe descriptions of p4 add, p4 edit, and p4 reopen in the P4 Command Reference.
Helix supports the following file types:
Keyword Description Comments Stored as
apple Mac file AppleSingle storage of Mac data fork,resource fork, file type and file creator.
For full details, please see the Mac clientrelease notes.
full file,compressed,AppleSingleformat
binary Non-text file Synced as binary files in the workspace.Stored compressed within the depot.
full file,compressed
resource Mac resource fork (Obsolete) This type is supported forbackward compatibility, but the apple filetype is recommended.
full file,compressed
symlink Symbolic link Helix applications on UNIX, OS X, recentversions of Windows treat these files assymbolic links. On other platforms, thesefiles appear as (small) text files.
delta
text Text file Synced as text in the workspace. Line-endingtranslations are performed automatically.
delta
unicode Unicode file Helix servers operating in Unicode modesupport the unicode file type. These filesare translated into the local character setspecified by P4CHARSET.
Helix servers not in Unicode mode do notsupport the unicode file type.
For details, see the Internationalization Notes.
delta, UTF-8
utf8 Unicode file Whether the service is in Unicode mode ornot, files that are detected as UTF8 will bestored as UTF8 and synced as UTF8 withoutbeing translated by the P4CHARSET setting.
delta, UTF-8

Helix file types
136 Helix Versioning Engine User Guide
Keyword Description Comments Stored as
For details, see the Internationalization Notes.
utf16 Unicode file Whether the service is in Unicode modeor not, files are transferred as UTF-8, andtranslated to UTF-16 (with byte order mark,in the byte order appropriate for the user’scomputer) in the client workspace.
For details, see the Internationalization Notes.
delta, UTF-8
File type modifiersYou can apply file type modifiers to the base types of specific files to preserve timestamps, expand RCSkeywords, specify how files are stored in the service, and more. For details about applying modifiers tofile types, see “Specifying how files are stored in Helix” on page 138.
The following table lists the file type modifiers:
Modifier Description Comments
+C Helix stores the full compressed versionof each file revision
Default storage mechanism for binaryfiles and newly-added text, unicode, orutf16 files larger than 10MB.
+D Helix stores deltas in RCS format Default storage mechanism for text files.
+F Helix stores full file per revision For large ASCII files that aren’t treatedas text, such as PostScript files, wherestoring the deltas is not useful orefficient.
+k RCS (Revision Control System) keywordexpansion
Supported keywords are as follows:
$Id$
$Header$
$Date$ Date of submission
$DateUTC$ Date of submission inUTC time zone
$DateTime$ Date and time ofsubmission
$DateTimeUTC$ Date and time ofsubmission in UTCtime zone.
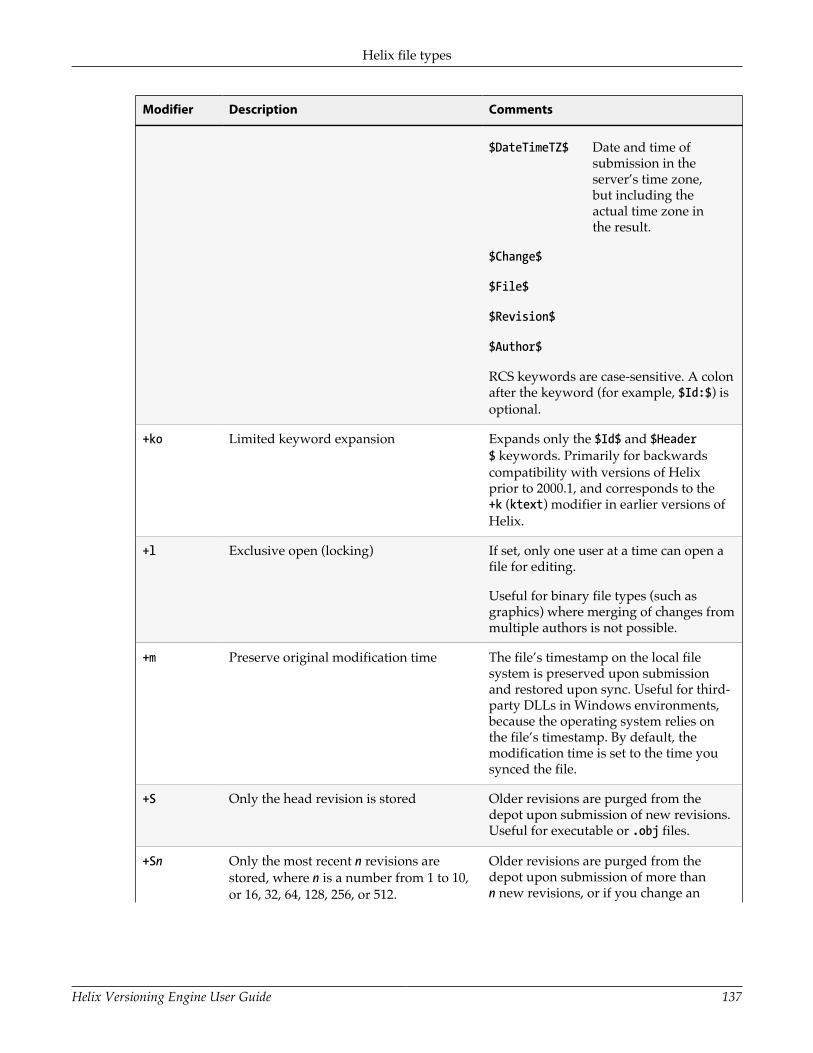
Helix file types
Helix Versioning Engine User Guide 137
Modifier Description Comments
$DateTimeTZ$ Date and time ofsubmission in theserver’s time zone,but including theactual time zone inthe result.
$Change$
$File$
$Revision$
$Author$
RCS keywords are case-sensitive. A colonafter the keyword (for example, $Id:$) isoptional.
+ko Limited keyword expansion Expands only the $Id$ and $Header$ keywords. Primarily for backwardscompatibility with versions of Helixprior to 2000.1, and corresponds to the+k (ktext) modifier in earlier versions ofHelix.
+l Exclusive open (locking) If set, only one user at a time can open afile for editing.
Useful for binary file types (such asgraphics) where merging of changes frommultiple authors is not possible.
+m Preserve original modification time The file’s timestamp on the local filesystem is preserved upon submissionand restored upon sync. Useful for third-party DLLs in Windows environments,because the operating system relies onthe file’s timestamp. By default, themodification time is set to the time yousynced the file.
+S Only the head revision is stored Older revisions are purged from thedepot upon submission of new revisions.Useful for executable or .obj files.
+Sn Only the most recent n revisions arestored, where n is a number from 1 to 10,or 16, 32, 64, 128, 256, or 512.
Older revisions are purged from thedepot upon submission of more thann new revisions, or if you change an

Helix file types
138 Helix Versioning Engine User Guide
Modifier Description Comments
existing +Sn file’s n to a number less thanits current value. For details, see the P4Command Reference.
Using an +Sn file modifier results inspecial behavior when you delete andreadd a file: no file reversions are deletedthat were submitted before the add ordelete. For example, if a file of type +S2is marked as deleted in revision 5, andthen re-added with the same file typeand modifier, revisions 3 and 4 are notpurged.
+w File is always writable on client Not recommended, because Helixmanages the read-write settings on filesunder its control.
+x Execute bit set on client Used for executable files.
+X Archive trigger required The Helix server runs an archive triggerto access the file. See the Helix VersioningEngine Administrator Guide: Fundamentalsfor details.
Specifying how files are stored in HelixFile revisions of binary files are normally stored in full within the depot, but only changes made to textfiles since the previous revision are normally stored. This approach is called delta storage, and Helixuses RCS format to store its deltas. The file’s type determines whether full file or delta storage is used.
Some file types are compressed to gzip format when stored in the depot. The compression occurswhen you submit the file, and decompression happens when you sync (copy the file from the depot toyour workspace). The client workspace always contains the file as it was submitted.
Warning To avoid inadvertent file truncation, do not store binary files as text. If you storea binary file as text from a Windows computer and the file contains the Windowsend-of-file character ^Z, only the part of the file up to the ^Z is stored in the depot.
Assigning file types for Unicode filesThe Helix server can be run in Unicode mode to activate support for filenames and Helix metadatathat contain Unicode characters, or in non-Unicode mode, where filenames and metadata must beASCII, but textual files containing Unicode content are still supported.
If you need to manage textual files that contain Unicode characters, but do not need Unicodecharacters in Helix metadata, you do not need to run Helix in Unicode mode. Assign the Helix utf16file type to textual files that contain Unicode characters.

Helix file types
Helix Versioning Engine User Guide 139
Your system administrator will be able to tell you which mode the service is using.
In either mode, Helix supports a set of file types that enable it to determine how a file is stored andwhether the file can be diffed. The following sections describe the considerations for managing textualfiles in Unicode environments:
To assign file type when adding a file to the depot, specify the -t option. For example:
$ p4 add -t utf16 newfile.txt
To change the file type of files in the depot, open the file for edit, specifying the -t option. Forexample:
$ p4 edit -t utf16 myfile.txt
Choosing the file type
When assigning file types to textual files that contain Unicode, consider the following:
• Do you need to edit and diff the files?
Many IDEs create configuration files that you never edit manually or diff. To ensure they are nevertranslated, assign such files the binary file type.
• Is your site managing files that use different character sets?
If so, consider storing them using a utf16 file type, to ensure they are not translated but still can bediffed.
Unicode mode services translate the contents of Unicode files into the character set specified byP4CHARSET. The following table provides more details about how Unicode-mode services manage thevarious types of text files:
Text file type Stored by Helix as(Unicode mode)
Validated? Translated perP4CHARSET?
Translated perclient platform
text Extended ASCII No No No
unicode UTF-8 Yes (as UTF-16and P4CHARSET)
Yes No
utf16 UTF-8 Yes (as UTF-16) No No
Non-Unicode-mode services do not translate or verify the contents of unicode files. Instead, the UTF-8data is converted to UTF-16 using the byte order appropriate to the client platform. To ensure that suchfiles are not corrupted when you edit them, save them as UTF-8 or UTF-16 from within your editingsoftware.

Helix file types
140 Helix Versioning Engine User Guide
Text file type Stored by Helix as(Unicode mode)
Validated? Translated perP4CHARSET?
Translated perclient platform
text Extended ASCII No No No
unicode UTF-8 Yes (as UTF-16and P4CHARSET)
No No
utf16 UTF-8 Yes (as UTF-16) No Yes
Helix file type detection and UnicodeIn both Unicode mode and non-Unicode mode, if you do not assign a file type when you add a fileto the depot, Helix (by default) attempts to detect file type by scanning the first 65536 characters ofthe file. If non-printable characters are detected, the file is assigned the binary file type. (In Unicodemode, a further check is performed: if there are no non-printable characters, and there are high-ASCIIcharacters that are translatable using the character set specified by P4CHARSET, the file is assigned theunicode file type.)
Finally (for services running in Unicode mode or non-Unicode mode), if a UTF-16 BOM is present, thefile is assigned the utf16 file type. Otherwise, the file is assigned the text file type. (In Unicode mode,a further check is performed: files with high-ASCII characters that are undefined in the character setspecified by P4CHARSET are assigned the binary file type.)
In most cases, there is no need to override Helix’s default file type detection. If you must overrideHelix’s default file type detection, you can assign Helix file types according to a file’s extension,by issuing the p4 typemap command. For more about using the typemap feature, refer to the HelixVersioning Engine Administrator Guide: Fundamentals, and the P4 Command Reference.
Overriding file typesSome file formats (for example, Adobe PDF files, and Rich Text Format files) are actually binary files,but they can be mistakenly detected by Helix as being text. To prevent this problem, your systemadministrator can use the p4 typemap command to specify how such file types are stored. You canalways override the file type specified in the typemap table by specifying the -t filetype option.
Preserving timestampsNormally, Helix updates the timestamp when a file is synced. The modification time (+m) modifier isintended for developers who need to preserve a file’s original timestamp. This modifier enables you toensure that the timestamp of a file synced to your client workspace is the time on your computer whenthe file was submitted.
Windows uses timestamps on third-party DLLs for versioning information (both within thedevelopment environment and also by the operating system), and the +m modifier enables you topreserve the original timestamps to prevent spurious version mismatches. The +m modifier overridesthe client workspace [no]modtime setting (for the files to which it is applied). For details about thissetting, refer to “File type modifiers” on page 136.
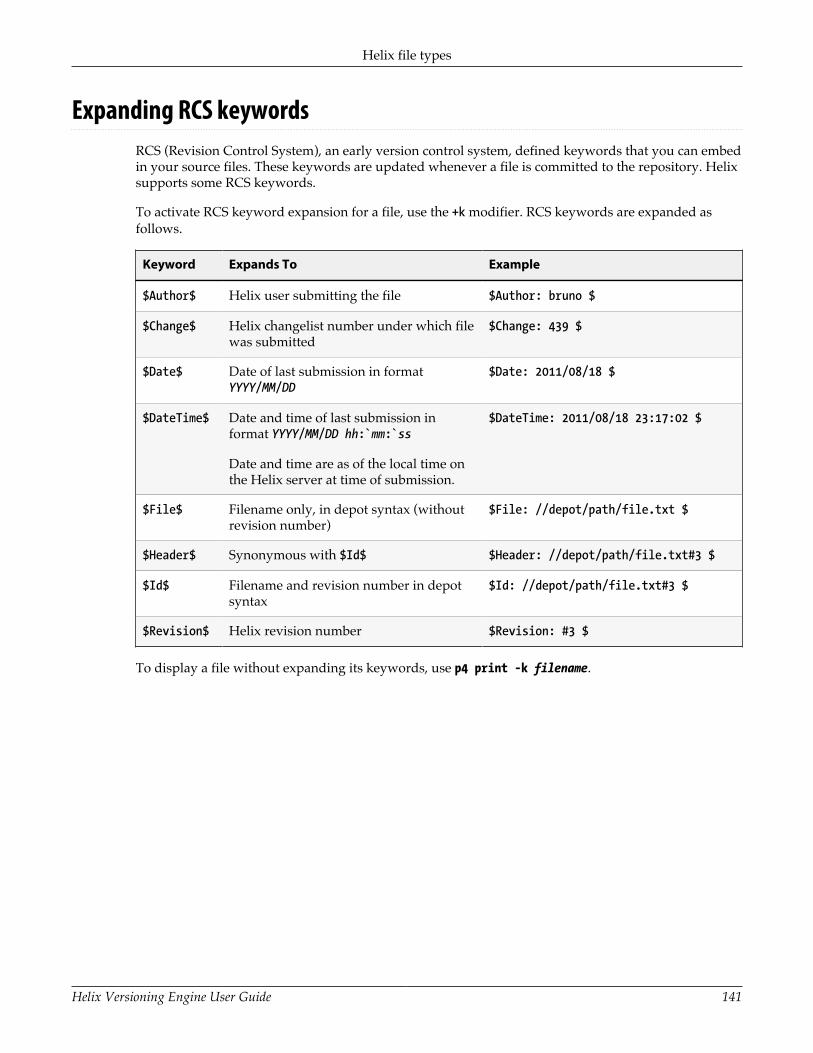
Helix file types
Helix Versioning Engine User Guide 141
Expanding RCS keywordsRCS (Revision Control System), an early version control system, defined keywords that you can embedin your source files. These keywords are updated whenever a file is committed to the repository. Helixsupports some RCS keywords.
To activate RCS keyword expansion for a file, use the +k modifier. RCS keywords are expanded asfollows.
Keyword Expands To Example
$Author$ Helix user submitting the file $Author: bruno $
$Change$ Helix changelist number under which filewas submitted
$Change: 439 $
$Date$ Date of last submission in formatYYYY/MM/DD
$Date: 2011/08/18 $
$DateTime$ Date and time of last submission informat YYYY/MM/DD hh:`mm:`ss
Date and time are as of the local time onthe Helix server at time of submission.
$DateTime: 2011/08/18 23:17:02 $
$File$ Filename only, in depot syntax (withoutrevision number)
$File: //depot/path/file.txt $
$Header$ Synonymous with $Id$ $Header: //depot/path/file.txt#3 $
$Id$ Filename and revision number in depotsyntax
$Id: //depot/path/file.txt#3 $
$Revision$ Helix revision number $Revision: #3 $
To display a file without expanding its keywords, use p4 print -k filename.

142 Helix Versioning Engine User Guide

Helix Versioning Engine User Guide 143
Appendix Helix command syntaxThis appendix provides basic information about p4 commands, including command-line syntax,arguments, and options. For full details about command syntax, refer to the P4 Command Reference.
Certain commands require administrator or superuser permission. For details, consult the HelixVersioning Engine Administrator Guide: Fundamentals.
You have the option of applying aliases to personal server commands, to do such things as:
• abbreviation
• creating more complex commands
• automating simple multi-command sequences
• providing alternate syntax for difficult-to-remember commands
For more information, see the " Introduction" chapter of P4 Command Reference.
Command-line syntaxThe basic syntax for commands is as follows:
p4 [global options] command [command-specific options] [command arguments]
The following options can be used with all p4 commands:
Global options Description and Example
-c clientname Specifies the client workspace associated with the command. OverridesP4CLIENT.
$ p4 -c bruno_ws edit //JamCode/dev/jam/Jambase
-C charset Specifies the client workspace’s character set. Overrides P4CHARSET.
$ p4 -C utf8 sync
-d directory Specifies the current directory, overriding the environment variable PWD.
C:\bruno_ws> p4 -d c:\bruno_ws\dev\main\jam\Jambase Jamfile
-G Format all output as marshaled Python dictionary objects (for scripting withPython).
$ p4 -G info
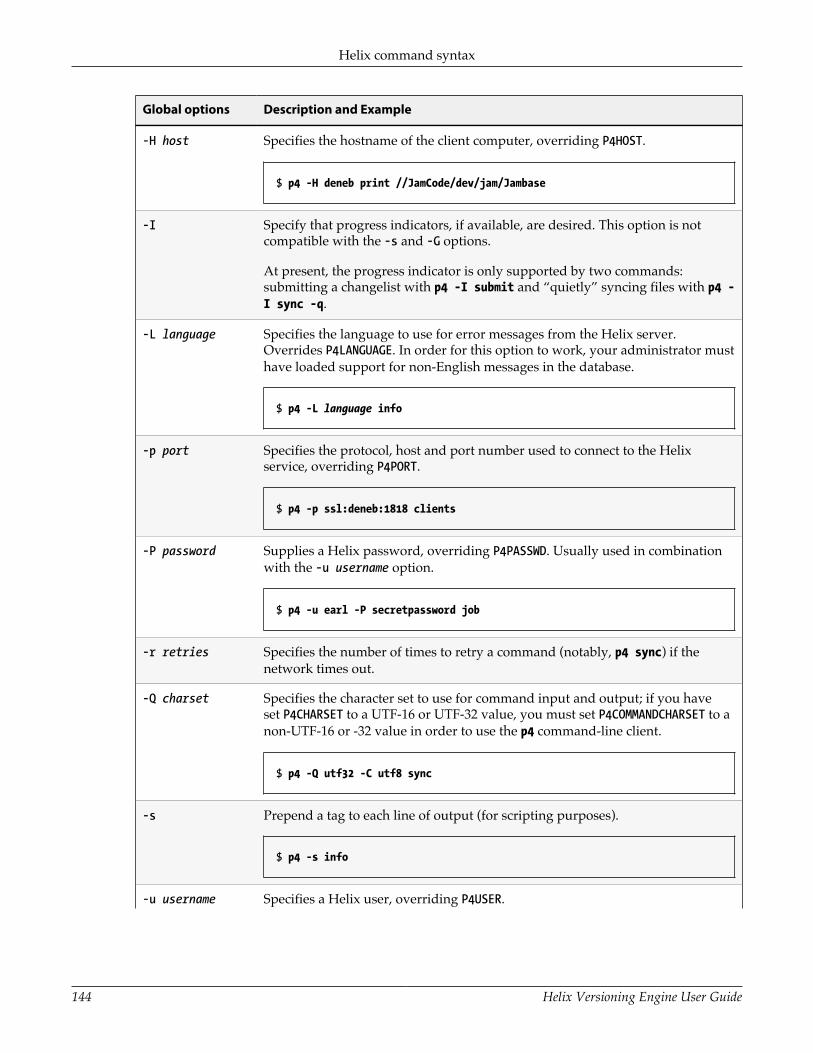
Helix command syntax
144 Helix Versioning Engine User Guide
Global options Description and Example
-H host Specifies the hostname of the client computer, overriding P4HOST.
$ p4 -H deneb print //JamCode/dev/jam/Jambase
-I Specify that progress indicators, if available, are desired. This option is notcompatible with the -s and -G options.
At present, the progress indicator is only supported by two commands:submitting a changelist with p4 -I submit and “quietly” syncing files with p4 -I sync -q.
-L language Specifies the language to use for error messages from the Helix server.Overrides P4LANGUAGE. In order for this option to work, your administrator musthave loaded support for non-English messages in the database.
$ p4 -L language info
-p port Specifies the protocol, host and port number used to connect to the Helixservice, overriding P4PORT.
$ p4 -p ssl:deneb:1818 clients
-P password Supplies a Helix password, overriding P4PASSWD. Usually used in combinationwith the -u username option.
$ p4 -u earl -P secretpassword job
-r retries Specifies the number of times to retry a command (notably, p4 sync) if thenetwork times out.
-Q charset Specifies the character set to use for command input and output; if you haveset P4CHARSET to a UTF-16 or UTF-32 value, you must set P4COMMANDCHARSET to anon-UTF-16 or -32 value in order to use the p4 command-line client.
$ p4 -Q utf32 -C utf8 sync
-s Prepend a tag to each line of output (for scripting purposes).
$ p4 -s info
-u username Specifies a Helix user, overriding P4USER.

Helix command syntax
Helix Versioning Engine User Guide 145
Global options Description and Example
$ p4 -u bill user
-x filename Read arguments, one per line, from the specified file. To read arguments fromstandard input, specify -x -.
$ p4 -x myargs.txt
-z tag To facilitate scripting, displays the output of reporting commands in the formatas that generated by p4 fstat.
$ p4 -z tag info
-q Quiet mode; suppress all informational message and report only warnings orerrors.
-V Displays the version of the p4 executable.
To display the options for a specific command, issue the p4 help command. For example:
$ p4 help add
add -- Open a new file to add it to the depot
p4 add [ -c changelist# ] [ -d -f -I -n ] [ -t filetype ] file ...
Open a file for adding to the depot. If the file exists on the client, it is read to determine if it is text or binary. If it does not exist, it is assumed to be text. To be added, the file must not already reside in the depot, or it must be deleted at the current head revision. Files can be deleted and re-added.[...]
For the full list of global options, commands, and command-specific options, see the P4 CommandReference.
Specifying filenames on the command lineMuch of your everyday use of Helix consists of managing files. You can specify filenames in p4commands as follows:
• Local syntax: the file’s name as specified in your local shell or operating system.
Filenames can be specified using an absolute path (for example, c:\bruno_ws\dev\main\jam\fileos2.c) or a path that is relative to the current directory (for example, .\jam\fileos2.c).

Helix command syntax
146 Helix Versioning Engine User Guide
Relative components (. or ..) cannot be specified following fixed components. For example, mysub/mydir/./here/file.c is invalid, because the dot (.) follows the fixed mysub/mydir components.
• Depot syntax: use the following format: //depotname/file_path, specifying the pathname of the filerelative to the depot root directory. Separate the components of the path using forward slashes. Forexample: //JamCode/dev/jam/Jambase.
• Client syntax: use the following format: //workspacename/file_path, specifying the pathname of thefile relative to the client root directory. Separate the components of the path using forward slashes.For example: //ona-agave/dev/main/jam/Jambase.
Example 46. Using different syntaxes to refer to the same file
Local syntax:
C:\bruno_ws> p4 delete c:\bruno_ws\dev\main\jam\Jambase
Depot syntax:
C:\bruno_ws> p4 delete //JamCode/dev/jam/Jambase
Client syntax:
C:\bruno_ws> p4 delete //bruno_ws/dev/main/jam/Jambase
Helix wildcardsFor commands that operate on sets of files, Helix supports two wildcards.
Wildcard Description
* Matches anything except slashes. Matches only within a single directory. Casesensitivity depends on your platform.
... Matches anything including slashes. Matches recursively (everything in andbelow the specified directory).
Helix wildcards can be used with local or Helix syntax, as in the following examples:
Expression Matches
J* Files in the current directory starting with J.
*/help All files called help in current subdirectories.
./... All files under the current directory and its subdirectories.
./....c All files under the current directory and its subdirectories, that end in .c.
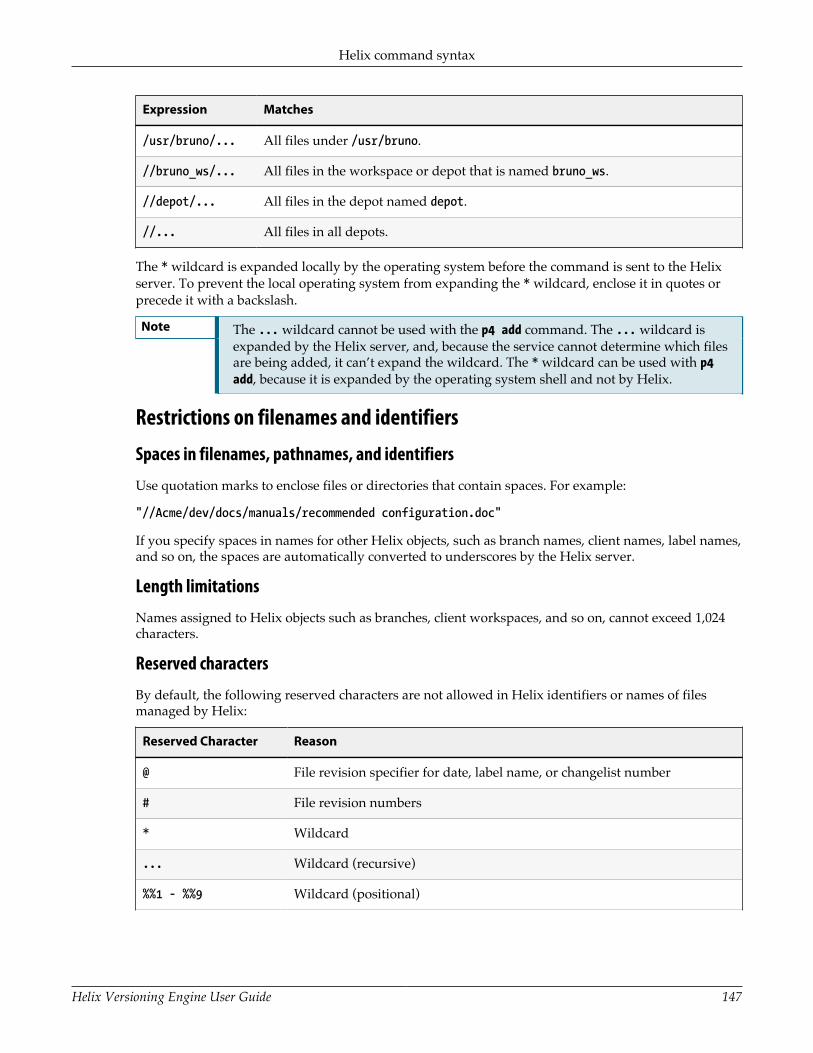
Helix command syntax
Helix Versioning Engine User Guide 147
Expression Matches
/usr/bruno/... All files under /usr/bruno.
//bruno_ws/... All files in the workspace or depot that is named bruno_ws.
//depot/... All files in the depot named depot.
//... All files in all depots.
The * wildcard is expanded locally by the operating system before the command is sent to the Helixserver. To prevent the local operating system from expanding the * wildcard, enclose it in quotes orprecede it with a backslash.
Note The ... wildcard cannot be used with the p4 add command. The ... wildcard isexpanded by the Helix server, and, because the service cannot determine which filesare being added, it can’t expand the wildcard. The * wildcard can be used with p4add, because it is expanded by the operating system shell and not by Helix.
Restrictions on filenames and identifiers
Spaces in filenames, pathnames, and identifiers
Use quotation marks to enclose files or directories that contain spaces. For example:
"//Acme/dev/docs/manuals/recommended configuration.doc"
If you specify spaces in names for other Helix objects, such as branch names, client names, label names,and so on, the spaces are automatically converted to underscores by the Helix server.
Length limitations
Names assigned to Helix objects such as branches, client workspaces, and so on, cannot exceed 1,024characters.
Reserved characters
By default, the following reserved characters are not allowed in Helix identifiers or names of filesmanaged by Helix:
Reserved Character Reason
@ File revision specifier for date, label name, or changelist number
# File revision numbers
* Wildcard
... Wildcard (recursive)
%%1 - %%9 Wildcard (positional)
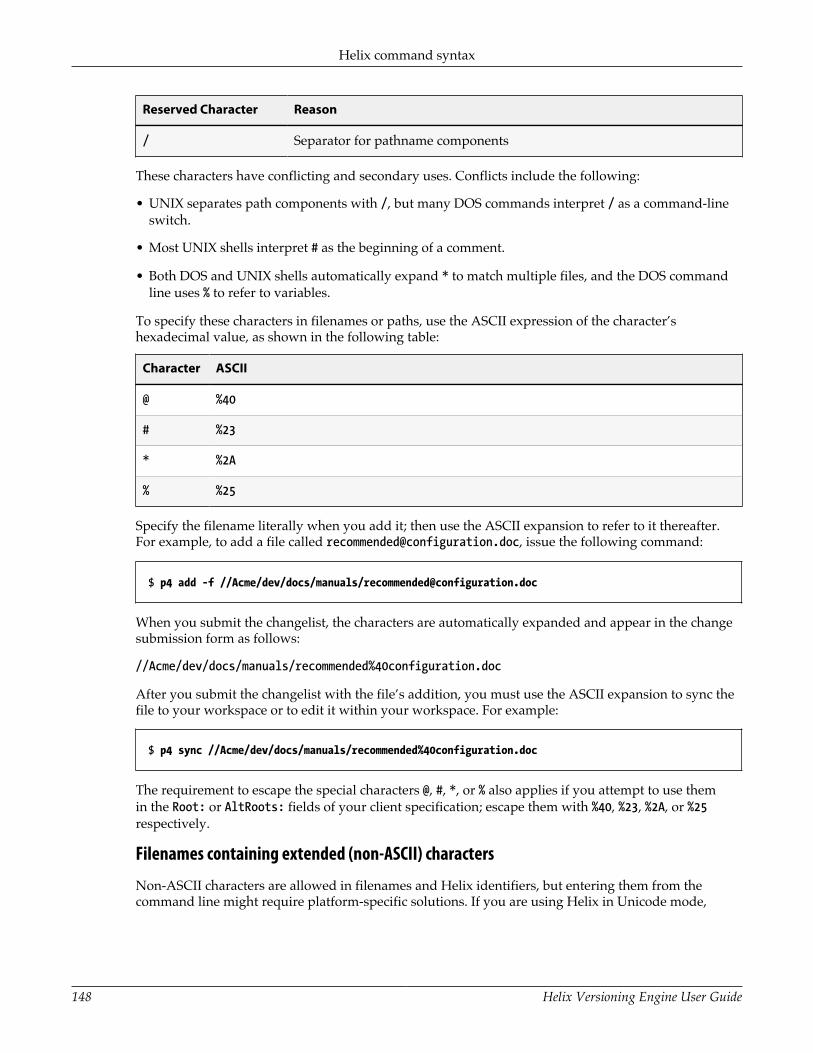
Helix command syntax
148 Helix Versioning Engine User Guide
Reserved Character Reason
/ Separator for pathname components
These characters have conflicting and secondary uses. Conflicts include the following:
• UNIX separates path components with /, but many DOS commands interpret / as a command-lineswitch.
• Most UNIX shells interpret # as the beginning of a comment.
• Both DOS and UNIX shells automatically expand * to match multiple files, and the DOS commandline uses % to refer to variables.
To specify these characters in filenames or paths, use the ASCII expression of the character’shexadecimal value, as shown in the following table:
Character ASCII
@ %40
# %23
* %2A
% %25
Specify the filename literally when you add it; then use the ASCII expansion to refer to it thereafter.For example, to add a file called [email protected], issue the following command:
$ p4 add -f //Acme/dev/docs/manuals/[email protected]
When you submit the changelist, the characters are automatically expanded and appear in the changesubmission form as follows:
//Acme/dev/docs/manuals/recommended%40configuration.doc
After you submit the changelist with the file’s addition, you must use the ASCII expansion to sync thefile to your workspace or to edit it within your workspace. For example:
$ p4 sync //Acme/dev/docs/manuals/recommended%40configuration.doc
The requirement to escape the special characters @, #, *, or % also applies if you attempt to use themin the Root: or AltRoots: fields of your client specification; escape them with %40, %23, %2A, or %25respectively.
Filenames containing extended (non-ASCII) characters
Non-ASCII characters are allowed in filenames and Helix identifiers, but entering them from thecommand line might require platform-specific solutions. If you are using Helix in Unicode mode,

Helix command syntax
Helix Versioning Engine User Guide 149
all users must have P4CHARSET set properly. For details about setting P4CHARSET, see the P4 CommandReference and the Internationalization Notes.
In international environments, use a common code page or locale setting to ensure that all filenamesare displayed consistently across all computers in your organization. To set the code page or locale:
• Windows: use the Regional Settings applet in the Control Panel
• UNIX: set the LOCALE environment variable
Specifying file revisionsEach time you submit a file to the depot, its revision number is incremented. To specify revisionsprior to the most recent, use the # revision specifier to specify a revision number, or @ to specify a date,changelist, client workspace, or label corresponding to the version of the file you are working on.Revision specifications can be used to limit the effect of a command to specified file revisions.
Warning Some operating system shells treat the Helix revision character # as a commentcharacter if it starts a word. If your shell is one of these, escape the # when you useit in p4 commands.
The following table describes the various ways you can specify file revisions:
Revision needed Syntax and example
Revision number file#n
$ p4 sync //JamCode/dev/jam/Jambase#3
Refers to revision 3 of file Jambase
The revision submitted asof a specified changelist
file@changelist_number
$ p4 sync //JamCode/dev/jam/Jambase@126
Refers to the version of Jambase when changelist 126 was submitted,even if it was not part of the change.
$ p4 sync //JamCode/dev/...@126
Refers to the state of the entire depot at changelist 126(numbered changelists are explained in “Submit a numberedchangelist” on page 39.
The revision in a specifiedlabel
file@label_name
$ p4 sync //JamCode/dev/jam/Jambase@beta
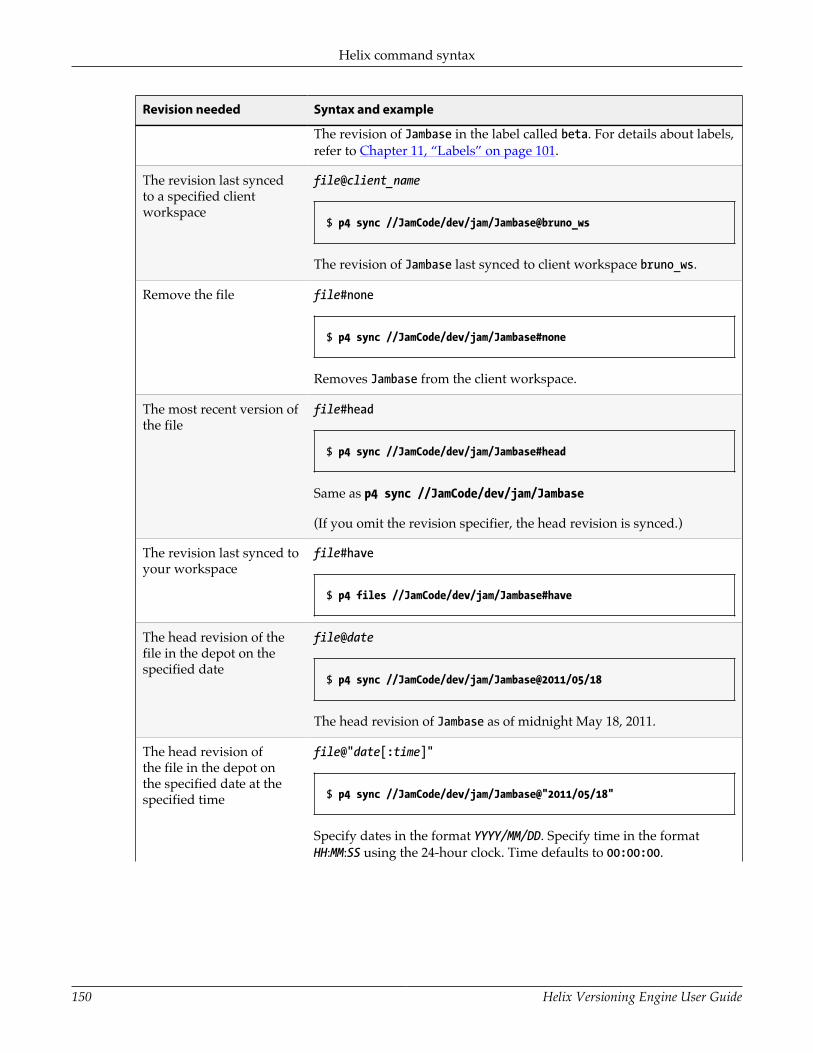
Helix command syntax
150 Helix Versioning Engine User Guide
Revision needed Syntax and example
The revision of Jambase in the label called beta. For details about labels,refer to Chapter 11, “Labels” on page 101.
The revision last syncedto a specified clientworkspace
file@client_name
$ p4 sync //JamCode/dev/jam/Jambase@bruno_ws
The revision of Jambase last synced to client workspace bruno_ws.
Remove the file file#none
$ p4 sync //JamCode/dev/jam/Jambase#none
Removes Jambase from the client workspace.
The most recent version ofthe file
file#head
$ p4 sync //JamCode/dev/jam/Jambase#head
Same as p4 sync //JamCode/dev/jam/Jambase
(If you omit the revision specifier, the head revision is synced.)
The revision last synced toyour workspace
file#have
$ p4 files //JamCode/dev/jam/Jambase#have
The head revision of thefile in the depot on thespecified date
file@date
$ p4 sync //JamCode/dev/jam/Jambase@2011/05/18
The head revision of Jambase as of midnight May 18, 2011.
The head revision ofthe file in the depot onthe specified date at thespecified time
file@"date[:time]"
$ p4 sync //JamCode/dev/jam/Jambase@"2011/05/18"
Specify dates in the format YYYY/MM/DD. Specify time in the formatHH:MM:SS using the 24-hour clock. Time defaults to 00:00:00.

Helix command syntax
Helix Versioning Engine User Guide 151
Revision needed Syntax and example
Separate the date and the time by a single space or a colon. (If you usea space to separate the date and time, you must also enclose the entiredate-time specification in double quotes.)
Example 47. Retrieving files using revision specifiers
Bruno wants to retrieve all revisions that existed at changelist number 30. He types:
$ p4 sync //JamCode/dev/jam/Jambase@30
Another user can sync their workspace so that it contains the same file revisions Bruno has synced byspecifying Bruno’s workspace, as follows:
$ p4 sync @bruno_ws
Example 48. Removing all files from the client workspace
$ p4 sync ...#none
The files are removed from the workspace but not from the depot.
Date and time specifications
Date and time specifications are obtained from the time zone of the computer that hosts the Helixserver. To display the date, time, offset from GMT, and time zone in effect, issue the p4 infocommand. The versioning service stores times as the number of seconds since 00:00:00 GMT Jan. 1,1970), so if you move across time zones, the times stored in the service are correctly reported in thenew time zone.
Revision ranges
Some commands can operate on a range of file revisions. To specify a revision range, specify the startand end revisions separated by a comma, for example, #3,4.
The commands that accept revision range specifications are:
p4 annotatep4 changesp4 dirsp4 filelog
p4 filesp4 fixesp4 grepp4 integrate
p4 interchangesp4 jobsp4 labelsp4 labelsync
p4 listp4 mergep4 printp4 sizes
p4 syncp4 tag
For the preceding commands:
• If you specify a single revision, the command operates on revision #1 through the revision youspecify (except for p4 sync, p4 print, and p4 files, which operate on the highest revision in therange).
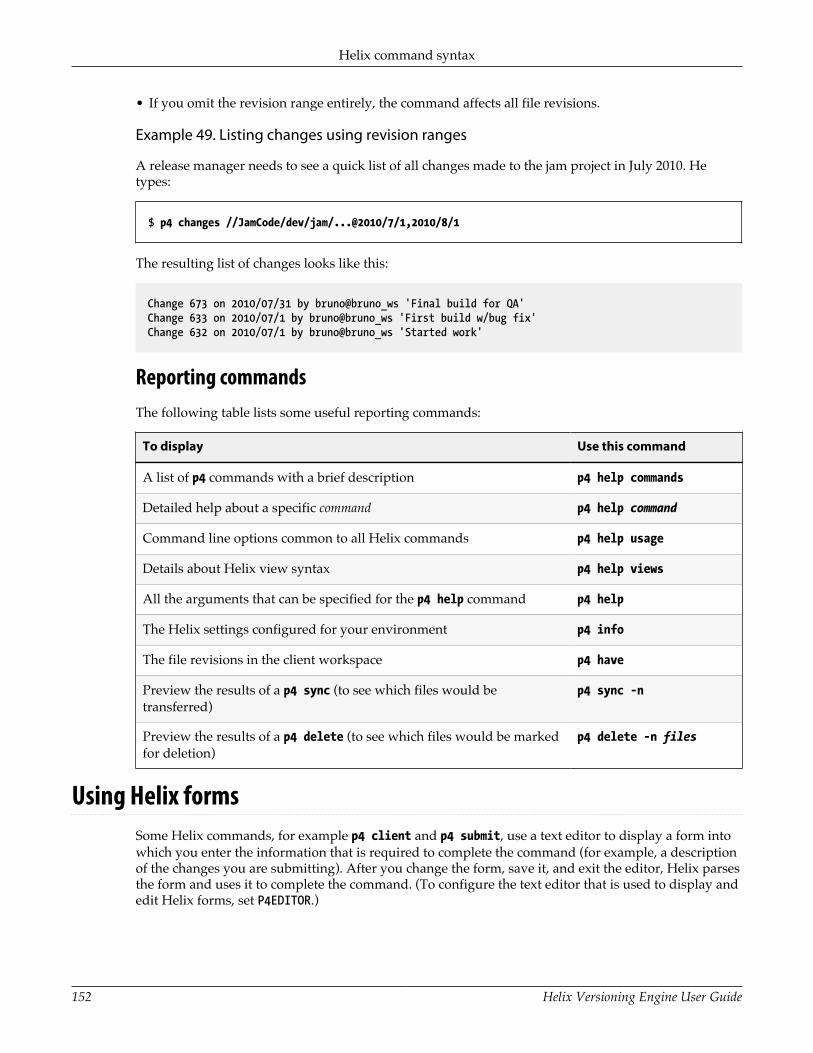
Helix command syntax
152 Helix Versioning Engine User Guide
• If you omit the revision range entirely, the command affects all file revisions.
Example 49. Listing changes using revision ranges
A release manager needs to see a quick list of all changes made to the jam project in July 2010. Hetypes:
$ p4 changes //JamCode/dev/jam/...@2010/7/1,2010/8/1
The resulting list of changes looks like this:
Change 673 on 2010/07/31 by bruno@bruno_ws 'Final build for QA'Change 633 on 2010/07/1 by bruno@bruno_ws 'First build w/bug fix'Change 632 on 2010/07/1 by bruno@bruno_ws 'Started work'
Reporting commandsThe following table lists some useful reporting commands:
To display Use this command
A list of p4 commands with a brief description p4 help commands
Detailed help about a specific command p4 help command
Command line options common to all Helix commands p4 help usage
Details about Helix view syntax p4 help views
All the arguments that can be specified for the p4 help command p4 help
The Helix settings configured for your environment p4 info
The file revisions in the client workspace p4 have
Preview the results of a p4 sync (to see which files would betransferred)
p4 sync -n
Preview the results of a p4 delete (to see which files would be markedfor deletion)
p4 delete -n files
Using Helix formsSome Helix commands, for example p4 client and p4 submit, use a text editor to display a form intowhich you enter the information that is required to complete the command (for example, a descriptionof the changes you are submitting). After you change the form, save it, and exit the editor, Helix parsesthe form and uses it to complete the command. (To configure the text editor that is used to display andedit Helix forms, set P4EDITOR.)

Helix command syntax
Helix Versioning Engine User Guide 153
When you enter information into a Helix form, observe the following rules:
• Field names (for example, View:) must be flush left (not indented) and must end with a colon.
• Values (your entries) must be on the same line as the field name, or indented with tabs on the linesbeneath the field name.
Some field names, such as the Client: field in the p4 client form, require a single value; other fields,such as Description:, take a block of text; and others, like View:, take a list of lines.
Certain values, like Client: in the client workspace form, cannot be changed. Other fields, likeDescription: in p4 submit, must be changed. If you don’t change a field that needs to be changed, orvice versa, Helix displays an error. For details about which fields can be modified, see the P4 CommandReference or use p4 help command.

154 Helix Versioning Engine User Guide
Helix Versioning Engine User Guide 155
Appendix License StatementsPerforce software includes software developed by the University of California, Berkeley and itscontributors. This product includes software developed by the OpenSSL Project for use in the OpenSSLToolkit (http://www.openssl.org/).
Perforce software includes software from the Apache ZooKeeper project, developed by the ApacheSoftware Foundation and its contributors. (http://zookeeper.apache.org/)
Perforce software includes software developed by the OpenLDAP Foundation (http://www.openldap.org/).
Perforce software includes software developed Computing Services at Carnegie Mellon University:Cyrus SASL (http://www.cmu.edu/computing/).

156 Helix Versioning Engine User Guide