HARRISON’S - Woodland Scenics - Model Layouts, Scenery ...€¦ · HARRISON’S HARDWARE PF5891...
8
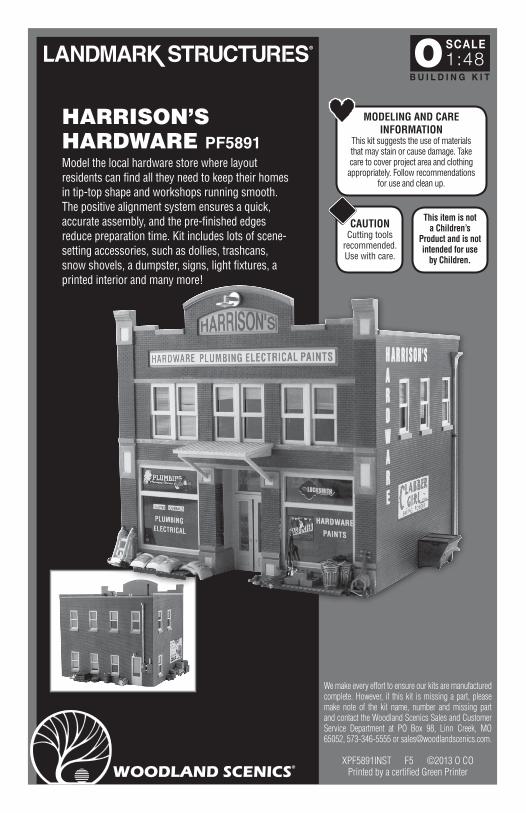
® HARRISON’S HARDWARE PF5891 Model the local hardware store where layout residents can find all they need to keep their homes in tip-top shape and workshops running smooth. The positive alignment system ensures a quick, accurate assembly, and the pre-finished edges reduce preparation time. Kit includes lots of scene- setting accessories, such as dollies, trashcans, snow shovels, a dumpster, signs, light fixtures, a printed interior and many more! 1:48 BUILDING KIT WOODLAND SCENICS ® MODELING AND CARE INFORMATION This kit suggests the use of materials that may stain or cause damage. Take care to cover project area and clothing appropriately. Follow recommendations for use and clean up. This item is not a Children’s Product and is not intended for use by Children. CAUTION Cutting tools recommended. Use with care. We make every effort to ensure our kits are manufactured complete. However, if this kit is missing a part, please make note of the kit name, number and missing part and contact the Woodland Scenics Sales and Customer Service Department at PO Box 98, Linn Creek, MO 65052, 573-346-5555 or [email protected]. XPF5891INST F5 ©2013 O CO Printed by a certified Green Printer
Transcript of HARRISON’S - Woodland Scenics - Model Layouts, Scenery ...€¦ · HARRISON’S HARDWARE PF5891...
®
®
®
HARRISON’S HARDWARE PF5891Model the local hardware store where layout residents can find all they need to keep their homes in tip-top shape and workshops running smooth. The positive alignment system ensures a quick, accurate assembly, and the pre-finished edges reduce preparation time. Kit includes lots of scene-setting accessories, such as dollies, trashcans, snow shovels, a dumpster, signs, light fixtures, a printed interior and many more!
1:48B U I L D I N G K I T
WOODLAND SCENICS®
MODELING AND CARE INFORMATION
This kit suggests the use of materials that may stain or cause damage. Take care to cover project area and clothing appropriately. Follow recommendations
for use and clean up.
This item is not a Children’s
Product and is not intended for use
by Children.
CAUTIONCutting tools
recommended. Use with care.
We make every effort to ensure our kits are manufactured complete. However, if this kit is missing a part, please make note of the kit name, number and missing part and contact the Woodland Scenics Sales and Customer Service Department at PO Box 98, Linn Creek, MO 65052, 573-346-5555 or [email protected].
XPF5891INST F5 ©2013 O CO Printed by a certified Green Printer

®
®
®
HARRISON’S HARDWARE
❑ Wall and Roof Sections❑ Sprues with Details❑ Printed Window Material❑ Clear Window Material❑ Dry Transfer Decals❑ Printed Interior❑ Blackout Paper
Building Kit Contents
1
1:48BUILDING KIT
4
1
5
3
2

2
Additional Needed Supplies❑ Model Glue or Solvent-Based Plastic Cement*❑ Paints (acrylic and/or enamel)*❑ Primer*❑ Painting Tools❑ Hobby Knife / Flush Cutting Shears❑ Cyanoacrylate Adhesive (CA glue / super glue)
TIP! To assist in assembly, refer to exploded-view illustration on back of box.
❑ Fine-grade Sandpaper❑ Clear Tape❑ Tweezers❑ Scissors❑ Ruler❑ Newspaper
Read through instructions.•Collect additional supplies. •
Check kit contents and verify Details.•Cover project area with newspaper.•
Before You Begin
4833
18 17
30
46
12
14 13 24 23 39
51
50
35
36
34
15
31
38 44 43
45 19
21 21 21
40
37 4920
57
55
41
52 26 2553
324754
54
56
7
6
29 28
27
10
8 9 9 11
22
22
28
16
42
NOTE: Allow glue to set before moving to the next step. Plastic cement works by dissolving the surface of plastic and welding parts together. Avoid contact with detail on parts.
*Contact your local hobby shop for recommendations.
(extra part)
(extra part)
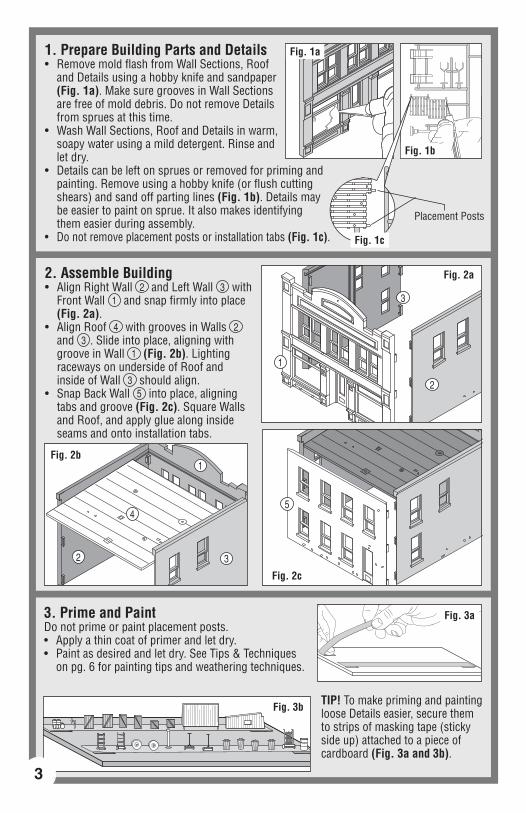
2. Assemble BuildingAlign Right Wall • 2 and Left Wall 3 with Front Wall 1 and snap firmly into place (Fig. 2a). Align Roof • 4 with grooves in Walls 2 and 3 . Slide into place, aligning with groove in Wall 1 (Fig. 2b). Lighting raceways on underside of Roof and inside of Wall 3 should align. Snap Back Wall • 5 into place, aligning tabs and groove (Fig. 2c). Square Walls and Roof, and apply glue along inside seams and onto installation tabs.
Fig. 1a
Placement Posts
3. Prime and PaintDo not prime or paint placement posts.
Apply a thin coat of primer and let dry.•Paint as desired and let dry. See Tips & Techniques •on pg. 6 for painting tips and weathering techniques.
TIP! To make priming and painting loose Details easier, secure them to strips of masking tape (sticky side up) attached to a piece of cardboard (Fig. 3a and 3b).
Fig. 3a
Fig. 2a
Fig. 2b
Fig. 2c
Fig. 3b
1. Prepare Building Parts and DetailsRemove mold flash from Wall Sections, Roof •and Details using a hobby knife and sandpaper (Fig. 1a). Make sure grooves in Wall Sections are free of mold debris. Do not remove Details from sprues at this time.Wash Wall Sections, Roof and Details in warm, •soapy water using a mild detergent. Rinse and let dry. Details can be left on sprues or removed for priming and •painting. Remove using a hobby knife (or flush cutting shears) and sand off parting lines (Fig. 1b). Details may be easier to paint on sprue. It also makes identifying them easier during assembly.Do not remove placement posts or installation tabs • (Fig. 1c).
3
Fig. 1b
Fig. 1c
1
1
5
3
3
4
2
2

5. Apply Dry Transfer DecalsDry Transfer Decals are included for Sacks 12,13,14,15 , Dumpster Front 25 , Large Box 34 , Small Box 36 and Square Box 35 . Before applying, test fit to confirm proper placement.
Cut out desired Decal. Position in desired location and avoid handling the back. Rub over •entire Decal with a burnisher or dull pencil.Lift away carrier sheet carefully. If Decal did not transfer completely, let carrier sheet fall •back in place and burnish again.Place backing paper over Decal and burnish again for maximum adhesion.•If applying onto textured surface, press Decal into texture with a pencil eraser. •
4. Install Window MaterialPosition Printed Window Material on inside of Building. Remove protective film before installation. If clear windows are preferred, use Clear Window Material.
Align Window Material over corresponding windows •on inside of Building. Dab a small amount of glue carefully around edges (Fig. 4a). Repeat for each set of window openings.• Fig. 4a
4
6. PreassemblyAwning
Glue Awning Bracket • 6 to Awning 7 (Fig. 6a).Large Pallet
Glue Tool Set • 17 , Watering Can 18 , Hose 19 , Cinder Blocks 20 , Trash Cans x3 21 to Large Pallet 16 (Fig. 6b).
Double PalletGlue Sacks • 12 , 13 , 14 and 15 to Double Pallet 11 (Fig. 6c).
Handcart GroupingGlue Wheels x6 • 10 onto Handcart 8 and Handcarts x2 9 . Glue Handcart Assemblies x2 9,10 onto Handcart
Assembly 8,10 (Fig. 6d).Dumpster
Glue Dumpster Front • 25 to Dumpster Frame 26 (Fig. 6e).
Push Mower GroupingGlue Push Mower Frames 2x • 22 to Wheels/Blades 23 and Wheels/Blades 24 . Glue Mower Assembly 22,23 behind Mower Assembly22,24 (Fig. 6f).
Fig. 6b
IMPORTANT Assemble and install Details using Cyanoacrylate Adhesive (CA glue / super glue). If Details were left on sprue while painting, remove using a hobby knife (or flush cutting shears). Sand parting lines and touch-up with paint. Details have unique placement posts for predetermined locations. Test fit Details before gluing. Fig. 6a
Fig. 6e
6
17
19
18
Fig. 6c
11
121314
15
1620
21
21
21
7
26
25
89
1010
108,10
Fig. 6d 9,10
Fig. 6f
22
23 24
22
22,24
22,23
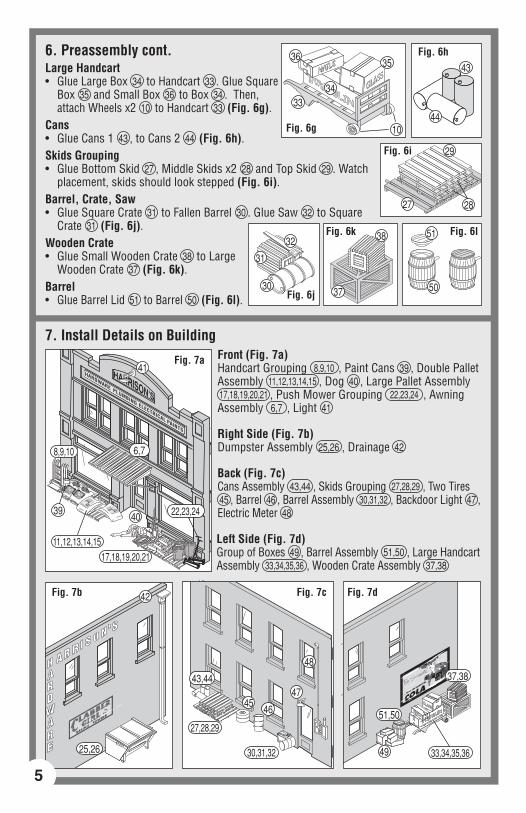
6. Preassembly cont.Large Handcart
Glue Large Box • 34 to Handcart 33 . Glue Square Box 35 and Small Box 36 to Box 34 . Then, attach Wheels x2 10 to Handcart 33 (Fig. 6g).
CansGlue Cans 1 • 43 , to Cans 2 44 (Fig. 6h).
Skids GroupingGlue Bottom Skid • 27 , Middle Skids x2 28 and Top Skid 29 . Watch placement, skids should look stepped (Fig. 6i).
Barrel, Crate, SawGlue Square Crate • 31 to Fallen Barrel 30 . Glue Saw 32 to Square Crate 31 (Fig. 6j).
Wooden CrateGlue Small Wooden Crate • 38 to Large Wooden Crate 37 (Fig. 6k).
BarrelGlue Barrel Lid • 51 to Barrel 50 (Fig. 6l).
7. Install Details on BuildingFront (Fig. 7a)Handcart Grouping 8,9,10 , Paint Cans 39 , Double Pallet Assembly 11,12,13,14,15 , Dog 40 , Large Pallet Assembly 17,18,19,20,21 , Push Mower Grouping 22,23,24 , Awning Assembly 6,7 , Light 41
Back (Fig. 7c)Cans Assembly 43,44 , Skids Grouping 27,28,29 , Two Tires 45 , Barrel 46 , Barrel Assembly 30,31,32 , Backdoor Light 47 , Electric Meter 48
Left Side (Fig. 7d)Group of Boxes 49 , Barrel Assembly 51,50 , Large Handcart Assembly 33,34,35,36 , Wooden Crate Assembly 37,38
Right Side (Fig. 7b)Dumpster Assembly 25,26 , Drainage 42
Fig. 7a
Fig. 7b Fig. 7c Fig. 7d
41
4039
48
42
49
4745
46
33,34,35,36
8,9,10
22,23,24
11,12,13,14,1517,18,19,20,21
27,28,29
30,31,32
6,7
43,44
25,26
51,50
37,38
5
Fig. 6h
43
44
Fig. 6j
31
30
32Fig. 6l51Fig. 6k 38
37 50
Fig. 6i
27
29
28
Fig. 6g
3635
33
10
34
Tips and TechniquesLightingHarrison’s Hardware has a lighting raceway and generic light socket. To reduce glare, paint interior walls and underside of roof a flat, earth-tone shade. Painting
Airbrush or Hand-brush Use enamel (solvent-based) or acrylic (water-soluble) flat finish paint. Aerosol Use flat finish spray paint.
Weathering TechniquesMortar Wash Create the look of brick mortar or add a weathered look (formula follows). Lay building flat so wash spreads evenly. Using a paintbrush, dab on small amounts of Mortar Wash until desired look is achieved. Sponge off excess.
Formula: Mix 1-part acrylic paint (color suggestion: concrete or aged concrete), 12-parts rubbing alcohol, 8-parts water and 1 drop liquid dish soap.
Airbrush Spray thinned flat black paint lightly onto select areas (color suggestion: grimy black). Add more where discoloration occurs naturally (near windows, roof details, etc.).Chalk Rub a dark color of pastel chalk on sandpaper to create chalk dust (color suggestion: gray, black, brown, etc.). Using a paintbrush, dab chalk dust where discoloration can occur.Decals Age Decals by scoring and chipping with a hobby knife.
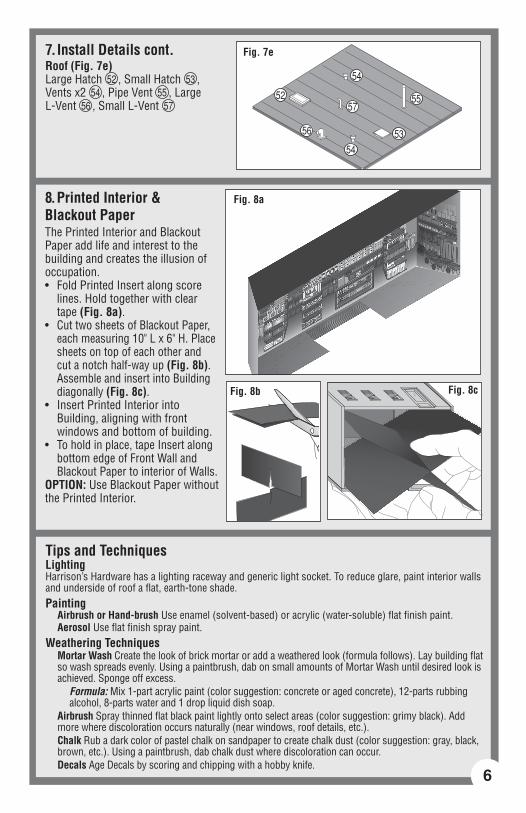
8. Printed Interior & Blackout PaperThe Printed Interior and Blackout Paper add life and interest to the building and creates the illusion of occupation.
Fold Printed Insert along score •lines. Hold together with clear tape (Fig. 8a). Cut two sheets of Blackout Paper, •each measuring 10" L x 6" H. Place sheets on top of each other and cut a notch half-way up (Fig. 8b). Assemble and insert into Building diagonally (Fig. 8c).Insert Printed Interior into •Building, aligning with front windows and bottom of building. To hold in place, tape Insert along •bottom edge of Front Wall and Blackout Paper to interior of Walls.
OPTION: Use Blackout Paper without the Printed Interior.
Roof (Fig. 7e)Large Hatch 52 , Small Hatch 53 , Vents x2 54 , Pipe Vent 55 , Large L-Vent 56 , Small L-Vent 57
7. Install Details cont. Fig. 7e
6
Fig. 8c
Fig. 8a
Fig. 8b
52
54
54
56
57
53
55
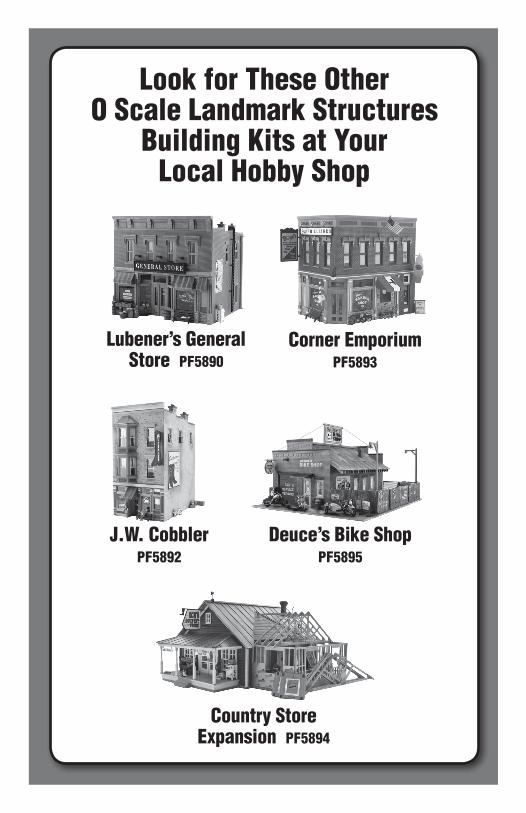
Look for These Other O Scale Landmark Structures
Building Kits at Your Local Hobby Shop
Lubener’s General Store PF5890
Corner Emporium PF5893
Deuce’s Bike Shop PF5895
J.W. Cobbler PF5892
Country Store Expansion PF5894